SheerAIRE AC-2136 Manual de usuario
- Categoría
- Purificadores de aire
- Tipo
- Manual de usuario
Este manual también es adecuado para

Models: AC-2136, AC-2137
Customer Assistance / 1-866-658-0467
www.sheeraire.us
AIR PURIFIER
USE & CARE GUIDE

2
Preparing to Use Your New Air Purifier.................................................................................2
Important Safety Instructions..............................................................................................2-3
Parts and Features......................................................................................................................4
Operating Instructions...........................................................................................................5-6
Care and Maintenance...........................................................................................................6-9
Technical Specifications.............................................................................................................9
Troubleshooting..........................................................................................................................9
Warranty....................................................................................................................Back Cover
Please read this guide. It will help you to operate your new SheerAIRE®
Air Purifier in the safest and most effective way. Keep this book and your receipt
in a safe place for future reference.
Read all instructions in this guide before using your Air Purifier. This product is
intended for indoor residential use only, not for industrial or other commercial
applications. Use only with electrical wiring that is in good working order and
that meets applicable codes and ordinances. If you have questions regarding your
wiring, consult a qualified electrician.
While using your Air Purifier, you should follow the IMPORTANT SAFETY
INSTRUCTIONS listed below. As part of these instructions, we have used the
word “WARNING” to indicate the level of hazard: WARNING: indicates a
hazard which, if not avoided, could result in injury or death.
IMPORTANT INSTRUCTIONS
When using electrical appliances, basic precautions should always be followed
to reduce the risk of fire, electric shock, and injury to persons, including the
following:
1. Read all instructions before using this Air Purifier.
2. Use this Air Purifier only as described in this manual. Any other use not
recommended by the manufacturer may cause electric shock, fire, or
injury to persons.
3. Do not operate the Air Purifier with a damaged power cord or after the
Air Purifier malfunctions or has been dropped in any manner.
4. This appliance is not intended for use by persons (including children) with
reduced physical, sensory or mental capabilities, or lack of experience
and knowledge, unless they have been given supervision or instruction
concerning the use of the appliance by a person responsible for their
safety.
5. Do not place the Air Purifier on a small, unlevel or uneven surface, or any
surface which might allow the Air Purifier to tip, fall, or get knocked over.
6. For proper operation, the Air Purifier should be placed on a smooth, non-
combustible surface.
7. The Air Purifier requires a level surface at least 6” (15.2 cm) from heat
sources such as ranges or heaters.
8. Do not sit, stand or place heavy objects on the Air Purifier.
TABLE OF CONTENTS
PREPARING TO USE YOUR NEW AIR PURIFIER
IMPORTANT SAFETY INSTRUCTIONS

3
9. Always unplug the Air Purifier when not in use, and before servicing.
10. Do not operate the Air Purifier with any safety devices removed.
11. Keep the power cord away from heated surfaces.
12. Do not run power cord under carpeting. Do not cover cord with throw
rugs, runners, or the like. Arrange cord away from traffic area where it
will not be tripped over.
13. Avoid the use of extension cords due to risk of fire. If an extension cord
must be used, the cord must be a minimum 14AWG and rated not less
than 1875 watts.
14. Do not insert or allow any object to enter any openings on the Air
Purifier. Doing so may cause electric shock and/or fire hazard.
15. Do not block air openings or place Air Purifier on a soft surface such
as a bed or sofa.
16. Do not use the Air Purifier where combustible gases or vapors
are present.
17. This product is intended for indoor residential use only, not for
industrial or other commercial applications. Do not operate outdoors.
This warranty is void if the product is ever used for other than private
household purposes.
18. The Air Purifier should be connected to a 120 V, 60 Hz outlet.
19. The Air Purifier has a polarized plug (one blade is wider than the
other). To reduce the risk of shock, this plug is intended to fit in a
polarized outlet only one way. If the plug does not fit fully in the outlet,
reverse the plug. If it still does not fit, contact qualified personnel to
install the proper outlet. DO NOT try to alter the plug in any way.
20. A loose fit between the plug and the AC outlet (receptacle) may cause
overheating and distortion of the plug. Contact a qualified electrician
to relapse loose or worn outlets.
21. The use of a time-delay fuse or time-delay circuit breaker is
recommended.
IMPORTANT SAFETY INSTRUCTIONS
WARNING: SHOCK HAZARD
Use your Air Purifier only in dry environments. This Air Purifier is not intended
for use in a bathroom, laundry area, or similar locations near sinks, washing
machines, swimming pools, or other sources of water. Never locate the Air
Purifier where it may fall into a bathtub or other water receptacle. Do not use in
damp environments such as flooded basements.
WARNING: FIRE HAZARD
Air Purifiers have arcing or sparking parts inside. Do not use near combustible
materials or flammable gases or sources of heat. DO NOT USE in areas where
gasoline, paint or flammable materials are used or stored. To prevent a possible
fire, do not block air intakes or exhaust in any manner. Do not insert or allow
foreign objects to enter any intakes or exhaust openings as this may cause an
electric shock, fire, or damage to the fan.
WARNING: HOT SURFACES
Do not touch the Air Purifier motor when in use. This motor is hot when in use.
To avoid burns, do not let bare skin touch hot surfaces.
READ AND SAVE THESE INSTRUCTIONS

4
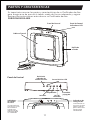
Pre-Filter
VOC/HEPA
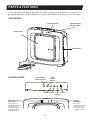
It is important to know your Air Purifier’s parts and features to ensure its
proper and safe use. Review these instructions before using your Air Purifier.
AIR PURIFIER
CONTROL PANEL
Control Panel
Control Panel
LED Indicators
Front Cover
PARTS & FEATURES
Intake Grill
Filter Change
Indicator Reset
LED
Display
Control
Timer
Power
Fan
Speed
Ionizer
Filter Change
Indicators
Red LEDs will
illuminate through
the front cover
to indicate when
each filter needs
to be changed.
Setting
Indicators
LEDs will
illuminate through
the front cover
to indicate each
selected setting.
P
re
-
F
il
t
er
VOC/HE
P
A
POWERFANTIMERIONLEDRESET

5
1. Check the Air Purifier filters. Before turning unit on, be sure all filters
are correctly in place, and that any plastic packaging has been removed
from filters.
2. Place the Air Purifier on a hard surface such as the floor, table, or desk.
Be sure the grills are not blocked by other objects and that there are
no candles or flames near the unit. The Air Purifier can be positioned
upright or on its back in a horizontal position for operation.
3. Plug into the nearest standard electrical outlet.
4. Press the POWER button to turn the Air Purifier on.
Press the POWER button again to turn the Air Purifier off.
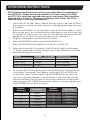
5. When the air purifier is turned on, the LED near the fan icon displays
“1”, which is equivalent to low. To adjust, press the FAN button until the
desired FAN speed is reached.
6. To activate the 1-9 hour timer, press the TIMER button. Once the timer
is activated, the number 1 will appear to the right of the TIMER icon
on the front cover. Continue pressing the TIMER button to select up
to 8 hours of timed operation. Once the time is selected, the unit will
operate and then turn off once its time limit is reached. To deactivate
the timer, press the TIMER button until numbers no longer appear next
to the TIMER icon on the front cover.
NOTE: Before operating the air purifier, record the date of installation on
the HEPA filter. Under normal use conditions (12 hours a day), the HEPA
and VOC filter should be replaced once a year, and the pre-filter should be
replaced every 3 months. To remove and replace either filter, see “Filter
Replacement” in “Care and Maintenance.”
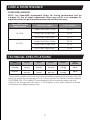
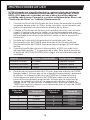
Control Number = Fan Speed Cleaning Level
Press Once 2=Medium Normal Cleaning
Press Twice 3=High Fast Cleaning
Press Three Times 1=Low Quiet Cleaning
Number
Selection
Run Time
Number
Selection
Run Time
1 1 Hour 6 6 Hours
2 2 Hours 7 7 Hours
3 3 Hours 8 8 Hours
4 4 Hours 9 9 Hours
5 5 Hours
OPERATING INSTRUCTIONS

6
OPERATING INSTRUCTIONS
7. Use the FILTER CHANGE INDICATOR RESET button to reset the HEPA
Filter & VOC Filter or Pre-Filter Change Indicators. Each Indicator will
illuminate when each of the filters may need to be replaced. To reset,
press and hold the FILTER CHANGE INDICATOR RESET button until the
Change Indicator Light no longer appears on the front cover. If both
Lights are on at the same time, and only one of the filters is changed,
pressing the FILTER CHANGE INDICATOR RESET button will turn off
and reset both Indicator Lights.
NOTE: When both Indicators illuminate, replace the HEPA Filter
& VOC Filter and Pre-Filter at the same time.
8. Choose to activate or deactivate the Ionizer. The Ionizer provides
additional air freshness through the release of negative ions. To
activate, press the IONIZER button. To deactivate, press the
IONIZER button again and the light no longer appears.
9. To adjust the brightness of the LED indicators, press the LED DISPLAY
button. This activates dimming mode, which reduces the illumination
of the FAN speed, TIMER, IONIZER and LED DISPLAY indicators to 50%
brightness.
NOTE: During dimming mode, pressing the FAN Speed, TIMER or
IONIZER button will automatically reset the LED indicators to full
brightness. LED DISPLAY indicator on front cover appears on AC-2136
only.
10. Press the button again and the FAN speed, TIMER, and IONIZER LED
indicators shut off while the LED DISPLAY indicator remains at 50%
brightness. Press the button a third time and the FAN speed, TIMER,
and IONIZER LED indicators return to full brightness while the LED
DISPLAY indicator shuts off.
NOTE: LED DISPLAY indicator on front cover appears on AC-2136 only.
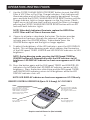
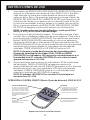
REMOTE CONTROL OPERATION (Up to 15 ft Away), AC-2137 ONLY
Requires two AAA Batteries (Not included)
Timer
Press to activate, then press
again to select 1-9 Hours.
To Deactivate, press button
until numbers no longer
appear next to the TIMER
icon on front cover.
Ionizer
Press to activate; LED will
illuminate next to IONIZER
icon on front cover.
Press again to deactivate.
Power
Press to turn Air Purifier
ON and OFF.
Fan Speed
Press to adjust from
Low to High Speed.

7
FILTER REPLACEMENT
NOTE: The Change Filter Indicator Lights will illuminate on the front cover
when it is time to replace the HEPA & VOC Filter or Pre-Filter. Under conditions
of normal use (12 hours a day), this will occur approximately every 3 months
for the Pre-Filter and once a year for the HEPA filter. The
filters may need
to be changed more often with continuous operation or use in smoky, dusty
environments or harsh air quality environments. See Filter Replacement Table.
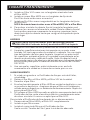
WARNING: To avoid serious injury from electrical shock, ALWAYS turn the Air
Purifier OFF and unplug BEFORE performing filter replacement procedure.
CARE & MAINTENANCE
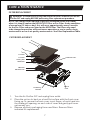
1. Turn the Air Purifier OFF and unplug from outlet.
2. Place the unit on its back on a hard flat surface with the front cover
facing up. To remove the front cover, insert fingers of each hand into
the intake grill openings on each side of cover and gently pull cover
up towards you.
3. Remove all plastic packaging from new filters. Remove filters
indicated for replacement.
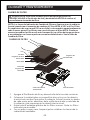
FILTER REPLACEMENT
Fan Housing
Chamber
Control
Panel
VOC Filter Tabs
VOC Filter Tabs
Pre-Filter
Locking Tabs
Pre-Filter
HEPA Filter
VOC Filter

8
CARE & MAINTENANCE
STORAGE
1. If you store your Air Purifier for more than 30 days, you should:
2. Remove the pre-filter, HEPA filter and VOC filter from the unit.
3. Discard the pre-filter.
4. Wrap the HEPA filter in an air-tight plastic bag or plastic wrap.
Be sure that the filter is totally sealed to protect it from its storage
environment. Repeat steps for VOC filter.
5. DO NOT put the plastic-wrapped HEPA filter back into the Air Purifier;
remove plastic wrap completely before re-installing.
Same applies for VOC filter.
To set up the Air Purifier after storage:
1. Unwrap the HEPA filter and VOC filter completely.
2. Install a new pre-filter.
3. Install filter assembly in the Air Purifier.
See “Filter Replacement” section for proper installation.
WARNING: To avoid serious injury from electrical shock, ALWAYS turn the Air
Purifier OFF and unplug BEFORE cleaning.
1. Turn the Air Purifier OFF and unplug from power outlet.
2. Clean exterior surfaces with a damp soft cloth only. DO NOT pour or
splash water on the unit. Do not use any abrasive-type cleaner on it.
Wipe all surfaces free from dust and grime, especially the grill intake
and exhaust openings. Remove front cover to improve access to
cleaning intake openings. See front cover removal instructions in FILTER
REPLACEMENT section.
3. Once all surfaces are completely dry, plug unit back into power outlet
for operation.
CLEANING
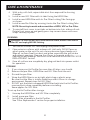
4. With a dry soft cloth, wipe visible dust from exposed fan housing
chamber.
5. Install a new VOC Filter with its tabs facing the HEPA filter.
6. Install a new HEPA filter with its Pre-Filter Locking Tabs facing up
as shown.
7. Install a new Pre-Filter by securing it onto the Pre-Filter Locking Tabs.
NOTE: Do not try to wash and reuse either a HEPA, VOC or Pre-Filter.
8. To reinstall front cover, insert tabs on bottom into slots at base of unit.
Rotate front cover up and gently press top corners down until cover
snaps securely in place.

9
NOTE: Use SheerAIRE replacement filters for lasting performance and for
a proper fit. Use of other replacement filters may result in an improper fit,
negatively affect air purifier performance and void the warranty.
FILTER REPLACEMENT
CARE & MAINTENANCE
SheerAIRE Purifier
Model Number
Filter Description Filter Model #
AC-2136
Carbon Pre-Filter, 2 Pack PF-01
HEPA Filter, Single Pack AC-31
VOC Filter, Single Pack CZ-01
AC-2137
Carbon Pre-Filter, 2 Pack PF-02
HEPA Filter, Single Pack AC-14
VOC Filter, Single Pack CZ-02
TECHNICAL SPECIFICATIONS
MODEL LENGTH WIDTH HEIGHT WEIGHT
INPUT
VOLTAGE
AC-2136
7.4 in
(19 cm))
12.4 in
(31.6 cm)
14.3 in
(36.4 cm)
8.6 lbs
(3.93 kg)
120 volts AC,
60 Hz
AC-2137
7.5 in.
(19.3 cm)
17.3 in
(44 cm)
15.8 in
(40.3 cm)
11.6 lbs
(5.28 kg)
120 volts AC,
60 Hz
This product complies with the maximum allowable concentration of ozone of 0.050
parts per million by volume (ppmv) in a 24-hour period. The Health Canada Guideline
2010 (ISBN 978-1-100-16288-1) recommends that the maximum exposure limit,
based on an average time of 8 hours, is 0.020 ppmv or less when tested in a sealed,
controlled room approximately 30m.

10
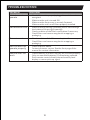
PROBLEM SOLUTION
Unit does not
operate
• Check if the unit is properly plugged in, and the outlet is
energized.
• Make sure the unit is turned ON.
• Make sure the front cover is securely fastened.
• Make sure the unit has all
filters properly installed.
Decreased airflow
• Make sure that nothing is blocking the air flow through
the Intake or Exhaust grill openings.
• Check condition of the
filters and replace if necessary.
• Check
filters and remove any plastic wrapping or
packaging.
Excessive noise
• Check condition of the filters and replace if necessary.
• Check
filters and remove any plastic wrapping or
packaging.
Unit still does not
operate properly
• Check all points above.
• Contact customer service. See the front page of the
manual for contact information.
Remote does not
work
• Check batteries to make sure they are installed properly.
• Only use new AAA batteries (2) when being replaced.
• Point remote control directly toward control panel
display so sensor picks up signal.
TROUBLESHOOTING

11
FOR TWO YEARS from the date of purchase, this air purifier is warranted
against defects in material or workmanship when it is installed, operated
and maintained according to all supplied instructions.
WITH PROOF OF PURCHASE AT A RETAILER IN THE UNITED STATES,
the original purchaser of the air purifier will receive replacement parts or a
replacement air purifier equal in value to the original air purifier as determined
by SheerAIRE®.
This warranty does not cover filters, which are expendable parts that can wear
out from normal use within the warranty period, as well as, use on improper
voltage or current. This warranty is not transferable and only applies to the
original purchaser. This warranty does not include the shipping costs for
replacements.
This warranty is void if the air purifier is ever used for other than private
household purposes or it is determined the air purifier was damaged by repair
not conducted by SheerAIRE® This warranty gives you specific legal rights,
and you may also have other rights which vary from state to state.
To register your product, receive product updates and information on how to
best use your new air purifier, please visit www.sheeraire.us.
If you have any questions about the warranty or need to seek warranty
service, please call 1-866-658-0467.
SheerAire America, LLC Chicago, IL 60642
SheerAIRE® is a registered trademark of SheerAire International Co., Ltd. All Rights Reserved.
SHEERAIRE LIMITED WARRANTY

12

Modelos: AC-2136, AC-2137
Asistencia al Cliente / 1-866-658-0467
www.sheeraire.us
PURIFICADOR DE AIRE
GUÍA DE USO & CUIDADO

14
Preparándose para usar su nuevo Purificador de Aire ............................................... 14
Instrucciones Importantes de Seguridad ................................................................. 14-16
Partes y Características ......................................................................................................... 17
Instrucciones de Uso ........................................................................................................ 18-19
Cuidado y Mantenimiento ............................................................................................. 20-22
Especificaciones Técnicas ...................................................................................................... 22
Solución de Problemas .......................................................................................................... 23
Garantía ..................................................................................................................... Contratapa
Por favor lea esta guía. Lo ayudará a operar su nuevo Purificador de Aire
SheerAIRE
®
de la forma más segura y efectiva. Conserve este libro y su recibo en
un lugar seguro. Puede necesitarlos en el futuro.
Lea todas las instrucciones en esta guía antes de usar su Purificador de Aire.
Este producto ha sido diseñado únicamente para uso interior residencial, no ha
sido diseñado para uso industrial o comercial de otro tipo. Use únicamente con
cableado eléctrico que se encuentra en buen estado de funcionamiento y cumple
con todos los códigos y ordenanzas vigentes. Si usted desea formular preguntas
respecto a su cableado, consulte a un técnico calificado.
Mientras usa su Purificador de Aire, usted debe seguir las INSTRUCCIONES
IMPORTANTES DE SEGURIDAD indicadas a continuación. Como parte de estas
instrucciones, hemos usado la palabra “ADVERTENCIA” para indicar el nivel
de peligro:
ADVERTENCIA: Indica un peligro que si no se evita puede causar
lesiones o fallecimiento.
INSTRUCCIONES IMPORTANTES
Cuando utiliza aparatos eléctricos, se deben tomar precauciones básicas para
reducir el riesgo de incendio, descargas eléctricas y lesiones a las personas,
que incluyen las siguientes:
1. Lea todas las instrucciones antes de usar este Purificador de Aire.
2. Use este Purificador de Aire únicamente en la forma descrita en este
manual. Cualquier otro uso no recomendado por el fabricante puede
causar descargas eléctricas, incendio o lesiones a las personas.
3. No opere al Purificador de Aire si el cable de alimentación está dañado
o después de que el Purificador de Aire funciona mal o se haya caído de
alguna forma.
4. Este aparato no está diseñado para ser utilizado por personas (incluso
niños) con capacidades físicas, sensoriales o mentales reducidas, o falta
de experiencia y conocimiento, salvo bajo la supervisión o instrucciones
de una persona responsable de su seguridad respecto al uso del
artefacto.
ÍNDICE DE CONTENIDO
PREPARÁNDOSE PARA USAR SU NUEVO
PURIFICADOR DE AIRE
INSTRUCCIONES IMPORTANTES DE SEGURIDAD

15
INSTRUCCIONES IMPORTANTES DE SEGURIDAD
5. No coloque e al Purificador de Aire sobre una superficie pequeña,
desnivelada o irregular, ni sobre ninguna superficie permita que el
Purificador de Aire se vuelque, caiga o pueda ser derribado.
6. Para su operación adecuada, el Purificador de Aire debe ser colocado
en una superficie lisa y no combustible.
7. El Purificador de Aire requiere una superficie nivelada que esté al
menos 6" (15.2 cm) de fuentes de calor tal como estufas o radiadores.
8. No se siente, pare ni coloque objetos pesados sobre el Purificador de
Aire.
9. Siempre desconecte el Purificador de Aire cuando no está en uso y
antes de realizar tareas de mantenimiento.
10. No opere al Purificador de Aire si se le ha quitado algún dispositivo de
seguridad.
11. Mantenga al cable de corriente alejado de superficies calientes.
12. No instale el cable de corriente debajo de alfombras. No cubra al cable
de corriente con tapetes, alfombras de pasillo o similares. Coloque al
cable alejado de áreas de circulación donde evitar tropiezos.
13. Evite el uso de cables de extensión debido al riesgo de incendios.
Si debe utilizar un cable de extensión el cable debe ser de al menos
14AWG y calificado no menos de 1875 watts.
14. No inserte ni permita que ningún objeto entre en las aberturas del
Purificador de Aire. Puede provocar descargas eléctricas y/o riesgo d`e
incendio.
15. No bloquee las aberturas de aire ni coloque al Purificador de Aire sobre
superficies suaves tal como una cama o sofá.
16. No use al Purificador de Aire donde hay gases o vapores combustibles.
17. Este producto ha sido diseñado únicamente para uso interior
residencial, no ha sido diseñado para uso industrial o comercial de otro
tipo. No opere en la intemperie. Esta garantía será nula si el producto
es utilizado alguna vez para un fin que no sea doméstico.
18. El Purificador de Aire debe conectarse a una toma de corriente de 120
V 60 Hz.
19. El Purificador de Aire tiene un enchufe polarizado (una clavija es más
ancha que la otra). Para reducir el riesgo de descarga, este enchufe
ha sido diseñado para caber en un toma de corriente polarizado. Si el
enchufe no cabe totalmente en la toma de corriente, gire al enchufe.
Si todavía no calza, póngase en contacto con personal calificado para
instalar la toma de corriente adecuada. NO intente alterar el enchufe
en modo alguno.
20. Un ajuste flojo entre el enchufe y la toma de corriente AC (receptáculo)
puede causar el recalentamiento y distorsión del enchufe. Contacte a
un electricista calificado para que reemplace las tomas de corriente
flojas o gastadas.
21. Se recomienda el uso de un fusible de retardo o interruptor de retardo.
INSTRUCCIONES IMPORTANTES DE SEGURIDAD

16
ADVERTENCIA: PELIGRO DE DESCARGA
Use a su Purificador de Aire únicamente en ambientes secos. Este Purificador de
Aire no ha sido diseñado para ser usado en cuarto de baños, lavaderos o lugares
similares cerca de fregaderos, lavarropas, piscinas u otras fuentes de agua.
Nunca coloque al Purificador de Aire donde se pueda caer dentro de una tina u
otro receptáculo de agua. No lo use en ambientes húmedos tales como sótanos
inundados.
ADVERTENCIA: PELIGRO DE INCENDIO
Los Purificadores de Aire contienen en su interior partes que producen arcos o
chispas. No use cerca de materiales combustibles o gases inflamables o fuentes
de calor. NO USE en áreas donde se utilizan o almacenan gasolina, pintura o
materiales inflamables. Para evitar un posible incendio, no bloquee las entradas
o salidas de aire de ninguna forma. No inserte objetos extraños ni permita que
ingresen objetos extraños en alguna de las aberturas de entrada o salida, dado
que esto puede ocasionar descargas eléctricas, incendio o daños al ventilador.
ADVERTENCIA: PELIGRO DE INCENDIO
No toque el motor del Purificador de Aire cuando está siendo usado. Este motor
está caliente cuando está en uso. Para evitar quemaduras, evite que su piel
desnuda toque las superficies calientes.
LEA Y GUARDE ESTAS INSTRUCCIONES
INSTRUCCIONES IMPORTANTES DE SEGURIDAD

17
Pre-Filter
VOC/HEPA
Es importante conocer las partes y características de su Purificador de Aire
para asegurarse de que está siendo usado de forma adecuada y segura.
Revise estas instrucciones antes de usar su Purificador de Aire.
PURIFICADOR DE AIRE
Panel de Control
Panel de Control
Indicadores LED
PARTES Y CRACTERíSTICAS
Rejilla de
entrada
Reinicio de
Indicador de
Cambio De Filtro
Control de Visor LED
Encendido
y Apagado
Vel. del
Ventilador
Ionizador
Temporizador
Indicadores
de Cambio
de Filtro
Se iluminarán las
LED rojas a través
de la cubierta
frontal para
indicar cuándo
cada filtro debe
ser cambiado.
Indicadores de
Configuración
Se iluminarán las
LED a través de la
cubierta frontal
para indicar cada
configuración
seleccionada
P
re
-
F
il
t
er
VOC/HE
P
A
POWERFANTIMERIONLEDRESET
Panel de Control
Cubierta Frontal
INSTRUCCIONES IMPORTANTES DE SEGURIDAD

18
1. Controle los filtros del Purificador de Aire. Antes de encender la unidad,
asegúrese de que todos los filtros están colocados correctamente y de
que se ha retirado todo el envoltorio plástico de los filtros.
2. Coloque al Purificador de Aire en una superficie dura tal como el suelo
o mesa. Asegúrese de que las rejillas no están bloqueadas por otros
objetos y de que no hay velas o llamas cerca de la unidad. El Purificador
de aire puede estar en posición vertical o sobre su dorso en posición
horizontal.
3. Enchufe en la toma de corriente eléctrica estándar más cerca.
4. Presione el botón de POWER para encender al Purificador de Aire.
Presione el botón de POWER nuevamente para apagar al Purificador
de Aire.
5. Cuando el purificador de aire está encendido, el LED cerca del ícono
del ventilador exhibe “1”, lo que equivale a bajo. Para ajustar, presione
el botón de VENTILADOR (FAN) hasta llegar a la velocidad deseada del
ventilador.
Control Número = Velocidad del Nivel de limpieza
Presione una vez 2=Media Limpieza normal
Presione dos veces 3=Alta Limpieza rápida
Presione tres veces 1=Baja Limpieza silenciosa
6. Para activar el temporizador de 1-9 horas, presione el botón de TIMER
(temporizador). Una vez que se ha activado el temporizador, aparecerá
el número 1 a la derecha del ícono de TIMER en la cubierta frontal.
Continúe presionando al botón de TIMER para seleccionar hasta 8
horas de funcionamiento programado. Una vez que se selecciona el
tiempo, la unidad funcionará y se apagará una vez que se llegue al
tiempo límite. Para desactivar al temporizador, presione al botón de
TIMER hasta que los números ya no aparezcan junto al ícono de TIMER
en la cubierta frontal.
Selección de
Número
Tiempo de
funcionamiento
Selección de
Número
Tiempo de
funcionamiento
1 1 Hora 6 6 Horas
2 2 Horas 7 7 Horas
3 3 Horas 8 8 Horas
4 4 Horas 9 9 Horas
5 5 Horas
NOTA: Antes de usar el purificador de aire, registre la fecha de instalación
en el filtro HEPA. En condiciones de uso normal (12 horas por día), el filtro
HEPA y VOC deben ser sustituidos una vez al año y el pre-filtro debe ser
sustituido cada 3 meses. Para quitar y sustituir cualquiera de los filtros, vea
“Sustitución de Filtros” en “Cuidado y Mantenimiento”.
INSTRUCCIONES DE USO

19
7. Use el botón de REINICIO DEL INDICADOR DE CAMBIO DE FILTRO para
reiniciar los Indicadores de Cambio de Filtro HEPA & VOC o Pre-filtro.
Cada Indicador se iluminará cuando pueda ser necesario cambiar
cada uno de los filtros. Para reiniciar, presione y sostenga el botón de
REINICIO DEL INDICADOR DE CAMBIO DE FILTRO hasta que la Luz de
Indicación de Cambio ya no aparezca en la cubierta frontal. Si las dos
Luces están encendidas al mismo tiempo y se cambió sólo uno de los
filtros, si presiona el botón de REINICIO DEL INDICADOR DE CAMBIO
DE FILTRO se apagarán y reiniciarán ambas Luces de Indicación.
NOTA: Cuando se iluminen los dos Indicadores, sustituya el Filtro
HEPA y & VOC y el Pre-filtro al mismo tiempo.
8. Escoja activar o desactivar el Ionizador. El Ionizador hace que el aire
sea más fresco mediante la liberación de iones negativos. Para activar,
presione el botón IONIZER (IONIZADOR). Para desactivar, presione el
botón IONIZER (IONIZADOR) nuevamente y la luz ya no aparecerá.
9. Para ajustar el brillo de los indicadores LED, presione el botón de LED
DISPLAY (Pantalla LED). Esto activa el modo de reducción de intensidad
que disminuye la luminosidad de los indicadores de velocidad del
ventilador, TIMER, IONIZADOR y LED DISPLAY hasta un 50%
NOTA: Si durante el modo de disminución de intensidad presiona
el botón de Velocidad del Ventilador (FAN), TIMER o IONIZER
(IONIZADOR) los indicadores LED regresarán automáticamente a su
luminosidad total. El indicador LED DISPLAY en la cubierta frontal
aparece únicamente en AC-2136.
10. Presione el botón nuevamente y los indicadores LED de la velocidad
del Ventilador, TIMER e IONIZADOR se apagarán mientras la
luminosidad del indicador de LED DISPLAY permanece a 50%. Presione
el botón por tercera vez y los indicadores LED de la velocidad del
Ventilador, TIMER e IONIZADOR volverán a su luminosidad total
mientras el indicador de LED DISPLAY se apaga.
NOTA: El indicador LED DISPLAY en la cubierta frontal aparece
únicamente en AC-2136.
INSTRUCCIONES DE USO
OPERACIÓN A CONTROL REMOTO (Hasta 15 pies de distancia), SÓLO AC-2137
Requiere dos Baterías AAA (No incluidas)
Timer (Temporizador)
Presione para activar, luego
presione nuevamente para
seleccionar 1-9 horas. Para
desactivar, presione el botón
hasta que los números ya no
aparezcan al lado del ícono
de TIMER en la cubierta
frontal.
Ionizador
Presione para activar; el LED
se iluminará junto al ícono
del IONIZER (IONIZADOR) en
la cubierta frontal. Presione
nuevamente para desactivar.
Power
Presione para ENCENDER y
APAGAR el
Purificador de Aire.
Velocidad del Ventilador
Presione para ajustar de
Baja a Alta Velocidad.

20
CAMBIO DE FILTRO
NOTA: Las Luces de Indicación de Cambio de Filtro se iluminarán en la cubierta
frontal cuando sea el momento de cambiar el Filtro HEPA & VOC o el Pre-Filtro.
En condiciones de uso normal (12 horas al día), esto sucederá aproximadamente
cada 3 meses para el Pre-filtro y una vez al año para el filtro HEPA. Puede ser
necesario cambiar los filtros con más frecuencia si se utiliza de forma continua
o en ambientes con humo o polvo o con mala calidad de aire. Vea la Tabla de
Cambio de Filtro.
ADVERTENCIA: Para evitar lesiones graves por descargas eléctricas
SIEMPRE APAGUE el Purificador de Aire y desenchúfelo ANTES de realizar el
procedimiento de cambio de filtro.
CUIDADO Y MANTENIMIENTO
1. Apague el Purificador de Aire y desenchufe de la toma de corriente.
2. Coloque a la unidad sobre una superficie dura y lisa con la cubierta
trasera hacia arriba. Para quitar la cubierta frontal, inserte los dedos
de cada mano en las aberturas de la rejilla de entrada a cada lado de
la cubierta y jale suavemente la cubierta hacia usted.
3. Quite todo el embalaje plástico de los filtros nuevos. Quite los filtros
indicados para cambio.
4. Con un paño suave y seco, limpie el polvo visible en la cámara de la
cubierta del ventilador.
CAMBIO DE FILTRO
Cámara de cubierta
del Ventilador
Panel de Control
Lengüetas del
Filtro VOC
Lengüetas del
Filtro VOC
Lengüetas de cierre
del Pre-filtro
Pre-filtro
Filtro HEPA
Filtro VOC

21
CUIDADO Y MANTENIMIENTO
5. Instale un Filtro VOC nuevo con su lengüetas orientadas hacia
el filtro HEPA.
6. Instale un nuevo filtro HEPA con sus Lengüetas de Ajuste de
Pre-Filtro hacia arriba como se muestra.
7. Instale un Pre-Filtro nuevo asegurándolo en las Lengüetas de Ajuste
de Pre-Filtro.
NOTA: No intente lavar ni volver a usar el Filtro HEPA, VOC o el Pre-filtro.
8. Para volver a instalar la cubierta frontal, inserte las lengüetas en el
fondo en las ranuras en la base de la unidad. Rote la cubierta frontal
hacia arriba y presione suavemente las esquinas superiores hacia
abajo hasta que la cubierta hasta que se oiga el chasquido de ajuste
en su lugar.
LIMPIEZA
ADVERTENCIA: Para evitar lesiones graves por descargas eléctricas
SIEMPRE APAGUE el Purificador de Aire y desenchúfelo ANTES de limpiarlo.
1. Apague el Purificador de Aire y desenchufe de la toma de corriente.
2. Limpie las superficies exteriores únicamente con un paño suave
húmedo. NO vierta agua sobre la unidad ni la salpique. No use ningún
tipo de limpiador abrasivo para limpiarla. Limpie con un paño todas
las superficies, quitando el polvo y la suciedad, especialmente en las
aberturas de entrada y salida de la rejilla. Quite la cubierta frontal
para acceder mejor a las aberturas de entrada para la limpieza. Vea las
instrucciones para quitar la cubierta frontal en la sección de CAMBIO
DE FILTRO.
3. Una vez que las superficies estén totalmente secas, enchufe
nuevamente a la unidad en la toma de corriente, para su uso.
ALMACENAMIENTO
1. Si usted va a guardar a su Purificador de Aire por más de 30 días,
usted debe:
2. Retirar el Pre-filtro, el filtro HEPA y el filtro VOC de la unidad.
3. Desechar al pre-filtro.
4. Envolver herméticamente al filtro HEPA en una bolsa de plástico o con
un envoltorio de plástico. Asegúrese de que el filtro está totalmente
sellado para protegerlo en su ambiente de almacenamiento. Repita los
pasos para el filtro VOC.
5. NO coloque al filtro HEPA envuelto en plástico nuevamente dentro del
Purificador de Aire; quite el envoltorio plástico completamente antes
de volver a instalar. Lo mismo se aplica para el filtro VOC.
Para instalar el Purificador de Aire después de su almacenamiento:
1. Desenvuelva el filtro HEPA y el filtro VOC completamente.
2. Instale un pre-filtro nuevo.
3. Instale el conjunto de filtro en el Purificador de Aire.
Vea la sección “Cambio de Filtro” para la instalación adecuada.

22
NOTA: Use filtros de repuesto SheerAIRE para un rendimiento duradero y
un ajuste perfecto. Elusode otros filtros de repuesto puede resultar en un
ajuste imperfecto, el rendimiento del purificador de aire puede verse afectado
negativamente y anulará la garantía.
Nº de Modelo de
Purificador SheerAIRE
Descripción de Filtro Nº de Modelo de Filtro
AC-2136
Pre-filtro de Carbono,
Paquete doble
PF-01
Filtro HEPA, Paquete
individual
AC-31
Filtro VOC, Paquete
individual
CZ-01
AC-2137
Pre-filtro de Carbono,
Paquete doble
PF-02
Filtro HEPA, Paquete
individual
AC-14
Filtro VOC, Paquete
individual
CZ-02
CAMBIO DE FILTRO
CUIDADO Y MANTENIMIENTO
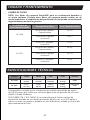
ESPECIFICACIONES TÉCNICAS
MODELO LARGO ANCHO ALTO PESO
VOLTAJE DE
ENTRADA
AC-2136
7.4 in
(19 cm))
12.4 in
(31.6 cm)
14.3 in
(36.4 cm)
8.6 lbs
(3.93 kg)
120 volts AC,
60 Hz
AC-2137
7.5 in.
(19.3 cm)
17.3 in
(44 cm)
15.8 in
(40.3 cm)
11.6 lbs
(5.28 kg)
120 volts AC,
60 Hz
Este producto cumple con la concentración máxima permitida de ozono
de 0.050 partes por millón por volumen (ppmv) en un periodo de 24 horas.
Health Canada Guideline
2010 (ISBN 978-1-100-16288-1) recomienda que el límite máximo de
exposición, basado en un tiempo promedio de 8 horas, es 0.020 ppmv o
menos cuando se somete a pruebas en una habitación sellada y controlada
aproximadamente 30m.

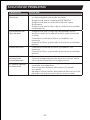
23
PROBLEMA SOLUCIÓN
La unidad no
funciona
• Controle si la unidad está enchufada correctamente
y si hay energía en la toma de corriente.
• Asegúrese de que la unidad esté ENCENDIDA.
• Asegúrese de que la cubierta frontal esté sujeta
firmemente.
• Asegúrese de que los filtros de la unidad está instalados
correctamente.
Disminución del
flujo de aire
• Asegúrese de que no haya algo bloqueando el flujo
de aire a través de las aberturas de la rejilla de entrada
o salida.
• Controle el estado de los filtros y cámbielos si es
necesario.
• Controle los filtros y quite todo el envoltorio o embalaje
plástico.
Ruido excesivo
• Controle el estado de los filtros y cámbielos si es
necesario.
• Controle los filtros y quite todo el envoltorio o embalaje
plástico.
La unidad aún
no funciona
correctamente
• Revise todos los puntos anteriores.
• Contacte al departamento de atención al cliente. Vea la
información de contacto en la página inicial.
El control remoto
no funciona
• Controle las baterías para asegurarse de que están
instaladas correctamente.
• Use únicamente baterías AAA nuevas (2) cuando
las cambie.
• Apunte el control remoto directamente hacia el visor del
panel de control para que el sensor recoja la señal.
SOLUCIÓN DE PROBLEMAS

24
Este purificador de aire cuenta con una garantía POR DOS AÑOS a partir de la
fecha de la compra que cubre defectos del material o mano de obra si ha sido
instalado, operado y mantenido de conformidad con todas las instrucciones
proporcionadas.
CON LA PRUEBA DE COMPRA EN UN VENDEDOR MINORISTA EN LOS
ESTADOS UNIDOS, el comprador original del purificador de aire recibirá las
partes de repuesto o un purificador de aire de reemplazo de valor equivalente
al purificador de aire original según determine SheerAIRE
®
.
Esta garantía no cubre a los filtros, que son partes desechables que se
pueden desgastar con el uso normal dentro del periodo de garantía, así como
tampoco cubre el uso en voltaje o corriente inadecuados. Esta garantía no es
transferible y rige únicamente para el comprador original. Esta garantía no
incluye el costo de envío de los repuestos.
Esta garantía no tendrá validez si el purificador de aire alguna vez se usa
para otros fines que no sean en el hogar particular o si se determina que el
purificador de aire fue dañado por una reparación no realizada por SheerAIRE
®
Esta garantía le otorga a usted derechos legales específicos, y usted también
puede tener otros derechos que varían de un estado a otro.
Para registrar su producto, recibir actualizaciones de producto e información
sobre cómo usar mejor a su nuevo purificador de air, por favor visite www.
sheeraire.us.
Si usted desea formular alguna pregunta sobre la garantía o necesita buscar
servicio de garantía, por favor llame al 1-866-658-0467.
SheerAire America, LLC Chicago, IL 60642
SheerAIRE
®
es una marca registrada de SheerAire International Co., Ltd. Todos los Derechos Reservados.
GARANTÍA LIMITADA DE SHEERAIRE
-
 1
1
-
 2
2
-
 3
3
-
 4
4
-
 5
5
-
 6
6
-
 7
7
-
 8
8
-
 9
9
-
 10
10
-
 11
11
-
 12
12
-
 13
13
-
 14
14
-
 15
15
-
 16
16
-
 17
17
-
 18
18
-
 19
19
-
 20
20
-
 21
21
-
 22
22
-
 23
23
-
 24
24


SheerAIRE AC-2136 Manual de usuario
- Categoría
- Purificadores de aire
- Tipo
- Manual de usuario
- Este manual también es adecuado para
En otros idiomas
- English: SheerAIRE AC-2136 User manual
Documentos relacionados

Otros documentos
-
Kenmore 43783396410 El manual del propietario
-
Whirlpool APR45130L Guía del usuario
-
Honeywell HA106WHDV1 Guía de instalación
-
-
HoMedics AP-T40 El manual del propietario
-
Coway AP-1216L Owners Instrucitons
-
Coway AP-1012GH Manual de usuario
-
Lasko HF25620 Manual de usuario
-