AEG RTB91431AW Manual de usuario
- Categoría
- Frigoríficos-congeladores
- Tipo
- Manual de usuario


CONTENTS
1. SAFETY INFORMATION.............................................................................................3
2. SAFETY INSTRUCTIONS.............................................................................................4
3. OPERATION.................................................................................................................5
4. DAILY USE....................................................................................................................6
5. HINTS AND TIPS..........................................................................................................7
6. CARE AND CLEANING...............................................................................................8
7. TROUBLESHOOTING............................................................................................... 10
8. INSTALLATION..........................................................................................................12
9. TECHNICAL DATA.................................................................................................... 17
FOR PERFECT RESULTS
Thank you for choosing this AEG product. We have created it to give you
impeccable performance for many years, with innovative technologies that help
make life simpler features you might not find on ordinary appliances. Please
spend a few minutes reading to get the very best from it.
Visit our website for:
Get usage advice, brochures, trouble shooter, service information:
www.aeg.com/webselfservice
Register your product for better service:
www.registeraeg.com
Buy Accessories, Consumables and Original spare parts for your appliance:
www.aeg.com/shop
CUSTOMER CARE AND SERVICE
Always use original spare parts.
When contacting our Authorised Service Centre, ensure that you have the
following data available: Model, PNC, Serial Number.
The information can be found on the rating plate.
Warning / Caution-Safety information
General information and tips
Environmental information
Subject to change without notice.
www.aeg.com
2

1. SAFETY INFORMATION
Before the installation and use of the appliance,
carefully read the supplied instructions. The
manufacturer is not responsible for any injuries or
damages that are the result of incorrect installation or
usage. Always keep the instructions in a safe and
accessible location for future reference.
1.1 Children and vulnerable people safety
• This appliance can be used by children aged from 8
years and above and persons with reduced physical,
sensory or mental capabilities or lack of experience
and knowledge if they have been given supervision or
instruction concerning the use of the appliance in a
safe way and understand the hazards involved.
• Do not let children play with the appliance.
• Children shall not carry out cleaning and user
maintenance of the appliance without supervision.
• Keep all packaging away from children and dispose of
it appropriately.
1.2
General Safety
• This appliance is intended to be used in household
and similar applications such as:
– Farm houses; staff kitchen areas in shops, offices
and other working environments
– By clients in hotels, motels, bed and breakfast and
other residential type environments
• Keep ventilation openings, in the appliance enclosure
or in the built-in structure, clear of obstruction.
• Do not use mechanical devices or other means to
accelerate the defrosting process, other than those
recommended by the manufacturer.
• Do not damage the refrigerant circuit.
• Do not use electrical appliances inside the food
storage compartments of the appliance, unless they
are of the type recommended by the manufacturer.
ENGLISH
3

• Do not use water spray and steam to clean the
appliance.
• Clean the appliance with a moist soft cloth. Only use
neutral detergents. Do not use abrasive products,
abrasive cleaning pads, solvents or metal objects.
• Do not store explosive substances such as aerosol
cans with a flammable propellant in this appliance.
• If the supply cord is damaged, it must be replaced by
the manufacturer, its Authorised Service Centre or
similarly qualified persons in order to avoid a hazard.
2. SAFETY INSTRUCTIONS
2.1 Installation
WARNING!
Only a qualified person must
install this appliance.
• Remove all the packaging and the
transit bolts.
• Do not install or use a damaged
appliance.
• Follow the installation instruction
supplied with the appliance.
• Always take care when moving the
appliance as it is heavy. Always use
safety gloves and enclosed footwear.
• Make sure the air can circulate around
the appliance.
• Wait at least 4 hours before
connecting the appliance to the
power supply. This is to allow the oil
to flow back in the compressor.
• Do not install the appliance close to
radiators or cookers, oven or hobs.
• The rear of the appliance must stand
against the wall.
• Do not install the appliance where
there is direct sunlight.
• Do not install this appliance in areas
that are too humid or too colds, such
as the construction appendices,
garages or wine cellars.
• When you move the appliance, lift it
by the front edge to avoid scratching
the floor.
2.2 Electrical connection
WARNING!
Risk of fire and electrical
shock.
• The appliance must be earthed.
• Make sure that the electrical
information on the rating plate agrees
with the power supply. If not, contact
an electrician.
• Always use a correctly installed
shockproof socket.
• Do not use multi-plug adapters and
extension cables.
• Make sure not to cause damage to
the electrical components (e.g. mains
plug, mains cable, compressor).
Contact the Authorised Service
Centre or an electrician to change the
electrical components.
• The mains cable must stay below the
level of the mains plug.
• Connect the mains plug to the mains
socket only at the end of the
installation. Make sure that there is
access to the mains plug after the
installation.
• Do not pull the mains cable to
disconnect the appliance. Always pull
the mains plug.
2.3 Use
WARNING!
Risk of injury, burns,
electrical shock or fire.
www.aeg.com4

• Do not change the specification of
this appliance.
• Do not put electrical appliances (e.g.
ice cream makers) in the appliance
unless they are stated applicable by
the manufacturer.
• Be careful not to cause damage to
the refrigerant circuit. It contains
isobutane (R600a), a natural gas with a
high level of environmental
compatibility. This gas is flammable.
• If damage occurs to the refrigerant
circuit, make sure that there are no
flames and sources of ignition in the
room. Ventilate the room.
• Do not let hot items to touch the
plastic parts of the appliance.
• Do not put soft drinks in the freezer
compartment. This will create
pressure on the drink container.
• Do not store flammable gas and
liquid in the appliance.
• Do not put flammable products or
items that are wet with flammable
products in, near or on the appliance.
• Do not touch the compressor or the
condenser. They are hot.
• Do not remove or touch items from
the freezer compartment if your hands
are wet or damp.
• Do not freeze again food that has
been thawed.
• Obey the storage instructions on the
packaging of frozen food.
2.4 Internal light
• The type of lamp used for this
appliance is not suitable for
household room illumination
2.5 Care and cleaning
WARNING!
Risk of injury or damage to
the appliance.
• Before maintenance, deactivate the
appliance and disconnect the mains
plug from the mains socket.
• This appliance contains hydrocarbons
in the cooling unit. Only a qualified
person must do the maintenance and
the recharging of the unit.
• Regularly examine the drain of the
appliance and if necessary, clean it. If
the drain is blocked, defrosted water
collects in the bottom of the
appliance.
2.6 Disposal
WARNING!
Risk of injury or suffocation.
• Disconnect the appliance from the
mains supply.
• Cut off the mains cable and discard it.
• Remove the door to prevent children
and pets to be closed inside of the
appliance.
• The refrigerant circuit and the
insulation materials of this appliance
are ozone-friendly.
• The insulation foam contains
flammable gas. Contact your
municipal authority for information on
how to discard the appliance
correctly.
• Do not cause damage to the part of
the cooling unit that is near the heat
exchanger.
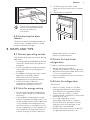
3.
OPERATION
3.1 Switching on
Insert the electrical plug into a wall
socket.
Turn the temperature regulator clockwise
to a medium setting.
3.2 Switching off
To turn off the appliance, turn the
temperature regulator to the "O"
position.
ENGLISH 5

3.3 Temperature regulation
The temperature is automatically
regulated.
To operate the appliance, proceed as
follows:
• turn the Temperature regulator
towards lower settings to obtain the
minimum coldness.
• turn the Temperature regulator
towards higher settings to obtain the
maximum coldness.
A medium setting is
generally the most suitable.
However, the exact setting should be
chosen keeping in mind that the
temperature inside the appliance
depends on:
• room temperature
• how often the door is opened
• the quantity of food stored
• the location of the appliance.
If the ambient temperature
is high or the appliance is
fully loaded, and the
appliance is set to the lowest
temperature, it may run
continuously causing frost to
form on the rear wall. In this
case the dial must be set to
a higher temperature to
allow automatic defrosting
and therefore reduced
energy consumption.
4. DAILY USE
WARNING!
Refer to Safety chapters.
4.1 Freezing fresh food
The freezer compartment is suitable for
freezing fresh food and storing frozen
and deep-frozen food for a long time.
To freeze fresh foods it is not necessary
to change the medium setting.
However, for a faster freezing operation,
turn the temperature regulator toward
higher settings to obtain the maximum
coldness.
CAUTION!
In this condition, the
refrigerator compartment
temperature might drop
below 0°C. If this occurs
reset the temperature
regulator to a warmer
setting.
4.2 Storage of frozen food
When first starting-up or after a period
out of use, before putting the products
in the compartment let the appliance run
at least 2 hours on the higher settings.
In the event of accidental
defrosting, for example due
to a power failure, if the
power has been off for
longer than the value shown
in the technical
characteristics chart under
"rising time", the defrosted
food must be consumed
quickly or cooked
immediately and then re-
frozen (after cooling).
4.3 Thawing
Deep-frozen or frozen food, prior to
being used, can be thawed in the
refrigerator compartment or at room
temperature, depending on the time
available for this operation.
Small pieces may even be cooked still
frozen, directly from the freezer: in this
case, cooking will take longer.
4.4 Movable shelves
The walls of the refrigerator are
equipped with a series of runners so that
the shelves can be positioned as desired.
www.aeg.com
6

Do not move the glass shelf
above the vegetable drawer
to ensure correct air
circulation.
4.5 Positioning the door
shelves
To permit storage of food packages of
various sizes, the door shelves can be
placed at different heights.
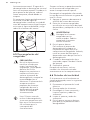
1. Gradually pull the shelf in the
direction of the arrows until it comes
free.
2. Reposition as required.
5. HINTS AND TIPS
5.1 Normal operating sounds
The following sounds are normal during
operation:
• A faint gurgling and bubbling sound
from coils sound when refrigerant is
pumped.
• A whirring and pulsating sound from
the compressor when refrigerant is
pumped.
• A sudden cracking noise from inside
appliance caused by thermic
dilatation (a natural and not
dangerous physical phenomenon).
• A faint click noise from the
temperature regulator when the
compressor switches on or off.
5.2 Hints for energy saving
• Do not open the door frequently or
leave it open longer than absolutely
necessary.
• If the ambient temperature is high
and the Temperature Regulator is set
to low temperature and the appliance
is fully loaded, the compressor may
run continuously, causing frost or ice
on the evaporator. If this happens, set
the Temperature Regulator toward
warmer settings to allow automatic
defrosting and so a saving in
electricity consumption.
5.3 Hints for fresh food
refrigeration
To obtain the best performance:
• do not store warm food or
evaporating liquids in the refrigerator
• do cover or wrap the food, particularly
if it has a strong flavour
• position food so that air can circulate
freely around it
5.4 Hints for refrigeration
Useful hints:
• Meat (all types): wrap in a suitable
packaging and place it on the glass
shelf above the vegetable drawer.
Store meat for at most 1-2 days.
• Cooked foods, cold dishes: cover and
place on any shelf.
• Fruit and vegetables: clean
thoroughly and place in a special
drawer. Bananas, potatoes, onions
and garlic must not be kept in the
refrigerator if not packed.
• Butter and cheese: place in a special
airtight container or wrap in an
ENGLISH
7

aluminium foil or a polythene bag to
exclude as much air as possible.
• Bottles: close with a cap and place on
the door bottle shelf, or (if available)
on the bottle rack.
5.5 Hints for freezing
To help you make the most of the
freezing process, here are some
important hints:
• the maximum quantity of food which
can be frozen in 24 hours is shown on
the rating plate;
• the freezing process takes 24 hours
no further food to be frozen should
be added during this period;
• freeze only top quality, fresh and
thoroughly cleaned, foodstuffs;
• prepare food in small portions to
enable it to be rapidly and completely
frozen and to make it possible
subsequently to thaw only the
quantity required;
• wrap up the food in aluminium foil or
polythene and make sure that the
packages are airtight;
• do not allow fresh, unfrozen food to
touch food which is already frozen,
thus avoiding a rise in temperature of
the latter;
• lean foods store better and longer
than fatty ones; salt reduces the
storage life of food;
• water ices, if consumed immediately
after removal from the freezer
compartment, can possibly cause the
skin to be freeze burnt;
• it is advisable to show the freezing in
date on each individual pack to
enable you to keep tab of the storage
time.
5.6 Hints for storage of frozen
food
To obtain the best performance from this
appliance, you should:
• make sure that the commercially
frozen foodstuffs were adequately
stored by the retailer;
• be sure that frozen foodstuffs are
transferred from the foodstore to the
freezer in the shortest possible time;
• not open the door frequently or leave
it open longer than absolutely
necessary;
• once defrosted, food deteriorates
rapidly and cannot be refrozen;
• do not exceed the storage period
indicated by the food manufacturer.
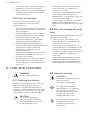
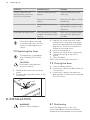
6.
CARE AND CLEANING
WARNING!
Refer to Safety chapters.
6.1 Cleaning the interior
Before using the appliance for the first
time, the interior and all internal
accessories should be washed with
lukewarm water and some neutral soap
to remove the typical smell of a brand-
new product, then dried thoroughly.
CAUTION!
Do not use detergents,
abrasive powders, chlorine
or oil-based cleaners as they
will damage the finish.
6.2 General warnings
CAUTION!
Unplug the appliance before
carrying out any
maintenance operation.
This appliance contains
hydrocarbons in its cooling
unit; maintenance and
recharging must therefore
only be carried out by
authorized technicians.
The accessories and parts of
the appliance are not
suitable for washing in a
dishwasher.
www.aeg.com8

6.3 Periodic cleaning
CAUTION!
Do not pull, move or
damage any pipes and/or
cables inside the cabinet.
CAUTION!
Take care of not to damage
the cooling system.
CAUTION!
When moving the cabinet,
lift it by the front edge to
avoid scratching the floor.
The equipment has to be cleaned
regularly:
1. Clean the inside and accessories with
lukewarm water and some neutral
soap.
2. Regularly check the door seals and
wipe clean to ensure they are clean
and free from debris.
3. Rinse and dry thoroughly.
4. If accessible, clean the condenser
and the compressor at the back of
the appliance with a brush.
This operation will improve the
performance of the appliance and
save electricity consumption.
6.4 Defrosting of the
refrigerator
Frost is automatically eliminated from the
evaporator of the refrigerator
compartment every time the motor
compressor stops, during normal use.
The defrost water drains out through a
trough into a special container at the
back of the appliance, over the motor
compressor, where it evaporates.
It is important to periodically clean the
defrost water drain hole in the middle of
the refrigerator compartment channel to
prevent the water overflowing and
dripping onto the food inside.
6.5 Defrosting the freezer
CAUTION!
Never use sharp metal tools
to scrape off frost from the
evaporator as you could
damage it. Do not use a
mechanical device or any
artificial means to speed up
the thawing process other
than those recommended by
the manufacturer. A
temperature rise of the
frozen food packs, during
defrosting, may shorten their
safe storage life.
About 12 hours prior to
defrosting, set a lower
temperature, in order to
build up sufficient chill
reserve for the interruption
in operation.
A certain amount of frost will always form
on the freezer shelves and around the
top compartment.
Defrost the freezer when the frost layer
reaches a thickness of about 3-5 mm.
1. Switch off the appliance, or pull out
electrical plug from the wall socket.
2. Remove any stored food, wrap it in
several layers of newspaper and put
it in a cool place.
WARNING!
Do not touch frozen
goods with wet hands.
Hands can freeze to the
goods.
3. Leave the door open.
In order to speed up the defrosting
process, place a pot of warm water in
ENGLISH
9

the freezer compartment. In addition,
remove pieces of ice that break away
before defrosting is complete.
4. When defrosting is completed, dry
the interior thoroughly.
5. Switch on the appliance.
After three hours reload the previously
removed food into the freezer
compartment.
6.6 Periods of non-operation
When the appliance is not in use for long
periods, take the following precautions:
1. Disconnect the appliance from
electricity supply.
2. Remove all food.
3. Defrost (if necessary) and clean the
appliance and all accessories.
4. Clean the appliance and all
accessories.
5. Leave the door/doors open to
prevent unpleasant smells.
WARNING!
If you want to keep the
appliance switched on, ask
somebody to check it once
in a while to prevent the
food inside from spoiling in
case of a power failure.
7. TROUBLESHOOTING
WARNING!
Refer to Safety chapters.
7.1 What to do if...
Problem Possible cause Solution
The appliance does not op-
erate.
The appliance is switched
off.
Switch on the appliance.
The mains plug is not con-
nected to the mains socket
correctly.
Connect the mains plug to
the mains socket correctly.
There is no voltage in the
mains socket.
Connect a different electrical
appliance to the mains sock-
et. Contact a qualified elec-
trician.
The appliance is noisy. The appliance is not suppor-
ted properly.
Check if the appliance
stands stable.
The lamp does not work. The lamp is in stand-by. Close and open the door.
The lamp is defective. Refer to "Replacing the
lamp".
The compressor operates
continually.
Temperature is set incorrect-
ly.
Refer to "Operation" chap-
ter.
Many food products to be
frozen were put in at the
same time.
Wait a few hours and then
check the temperature
again.
The room temperature is too
high.
Refer to climate class chart
on the rating plate.
www.aeg.com10

Problem Possible cause Solution
Food products placed in the
appliance were too warm.
Allow food products to cool
to room temperature before
storing.
There is too much frost and
ice.
The door is not closed cor-
rectly or the gasket is de-
formed/dirty.
Refer to "Closing the door".
The water drainage plug is
not correctly positioned.
Position the water drainage
plug in the correct way.
Food products are not wrap-
ped properly.
Wrap the food products bet-
ter.
Temperature is set incorrect-
ly.
Refer to "Operation" chap-
ter.
Water flows on the rear plate
of the refrigerator.
During the automatic de-
frosting process, frost melts
on the rear plate.
This is correct.
Water flows into the refriger-
ator.
The water outlet is clogged. Clean the water outlet.
Food products prevent that
water flows into the water
collector.
Make sure that food prod-
ucts do not touch the rear
plate.
Water flows on the floor. The melting water outlet is
not connected to the evapo-
rative tray above the com-
pressor.
Attach the melting water
outlet to the evaporative
tray.
Door is misaligned or inter-
feres with ventilation grill.
The appliance is not level-
led.
Refer to "Levelling".
The temperature in the ap-
pliance is too low/too high.
The temperature regulator is
not set correctly.
Set a higher/lower tempera-
ture.
The door is not closed cor-
rectly.
Refer to "Closing the door".
The food products' tempera-
ture is too high.
Let the food products tem-
perature decrease to room
temperature before storage.
Many food products are
stored at the same time.
Store less food products at
the same time.
The thickness of the frost is
greater than 4-5 mm.
Defrost the appliance.
The door has been opened
often.
Open the door only if neces-
sary.
ENGLISH 11

Problem Possible cause Solution
There is too much con-
densed water on the rear
wall of the refrigerator.
Door was opened too fre-
quently.
Open the door only when
necessary.
Door was not closed com-
pletely.
Make sure the door is closed
completely.
Stored food was not wrap-
ped.
Wrap food in suitable pack-
aging before storing it in the
appliance.
Door does not open easily. You attempted to re-open
the door immediately after
closing.
Wait a few seconds between
closing and re-opening of
the door.
If the advice does not lead
to the desired result, call the
nearest Authorized Service
Centre.
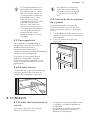
7.2 Replacing the lamp
The appliance is equipped
with a longlife LED interior
light.
CAUTION!
Disconnect the plug from
the mains socket.
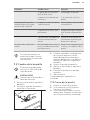
1. Remove the screw from the lamp
cover.
2. Remove the lamp cover (refer to the
illustration).
3. Replace the used lamp with a new
lamp of the same power and shape,
specifically designed for household
appliances. The maximum power is
shown on the lamp cover.
4. Install the lamp cover.
5. Tighten the screw to the lamp cover.
6. Connect the plug to the mains
socket.
7. Open the door.
Make sure that the light comes on.
7.3 Closing the door
1. Clean the door gaskets.
2. If necessary, adjust the door. Refer to
"Installation".
3. If necessary, replace the defective
door gaskets. Contact the Authorised
Service Centre.
8. INSTALLATION
WARNING!
Refer to Safety chapters.
8.1 Positioning
Install the appliance in a dry, well
ventilated indoors where the ambient
temperature corresponds to the climate
www.aeg.com12

class indicated on the rating plate of the
appliance.
Climate
class
Ambient temperature
SN +10°C to + 32°C
N +16°C to + 32°C
ST +16°C to + 38°C
T +16°C to + 43°C
Some functional problems
might occur for some types
of models when operating
outside of that range. The
correct operation can only
be guaranteed within the
specified temperature
range. If you have any
doubts regarding where to
install the appliance, please
turn to the vendor, to our
customer service or to the
nearest Authorised Service
Centre.
8.2 Levelling
When placing the appliance ensure that
it stands level. This can be achieved by
two adjustable feet at the bottom in
front.
8.3 Location
It must be possible to
disconnect the appliance
from the mains power
supply; the plug must
therefore be easily
accessible after installation.
The appliance should be installed well
away from sources of heat such as
radiators, boilers, direct sunlight etc.
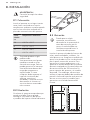
Ensure that air can circulate freely around
the back of the cabinet. To ensure best
performance, if the appliance is
positioned below an overhanging wall
unit, the minimum distance between the
top of the cabinet and the wall unit must
be at least 100 mm . Ideally, however, the
appliance should not be positioned
below overhanging wall units. Accurate
levelling is ensured by one or more
adjustable feet at the base of the
cabinet.
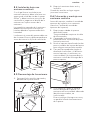
100 mm
15 mm 15 mm
8.4 Installing under a
continuous worktop
If your refrigerator is installed under a
continuous worktop, an air outlet
opening of at least 200cm
2
and a
ventilation grille matching the worktop
design should be installed at the rear of
the worktop.
The cut surfaces of the worktop should
be varnished to avoid swelling due to
penetration of moisture.
The appliance wall distance must be at
least 30 mm and should be checked
before the ventilation grille is inserted.
ENGLISH
13

500/550/600 mm
93-103 mm
105 mm
A
200 cm
2
570 mm
min. 820 mm
550 mm
8.5 Detaching the worktop
1. Unscrew the left and the right screws
at the back.
2
3
1
2. Push the worktop backwards and lift
it up.
Store the screws in a safe place together
with the worktop.
8.6 Fitting and mounting to
continuous worktop
Before fitting, change the door opening
direction if necessary (see: Door
reversibility).
1. Push the appliance carefully into the
niche.
Take care that the mains cable is not
jammed in.
2. Check distance from wall (see:
Installing under a continuous
worktop).
3.
Level the appliance by screwing the
two adjustable feet at the front in or
out, thus ensuring a stable position.
4. With a suitable screws (depending on
the design of the worktop and the
distance between the appliance and
the worktop, not supplied), fix the
appliance under the worktop through
the upper door hinge.
5.
If necessary, equalize the gap
between the door hinge and the
worktop with a suitable washer
(plastic or wood, not supplied).
This will prevent bending of the
hinge and possible failure of door
function.
8.7 Plug socket
CAUTION!
Make sure that the mains
cable can move freely.
The plug socket necessary for
connection of your appliance to the
electricity supply should be positioned
so that it is possible to pull out the
appliance plug.
If your appliance is installed under a
continuous worktop, the plug socket
should be provided as shown.
www.aeg.com
14

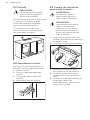
8.8 Rear spacers
You can find the two spacers in the bag
with documentation.
1. Release the screw.
2. Engage the spacer below the screw.
3. Turn the spacer to the right position.
4. Tighten again the screws.
2
4
1
3
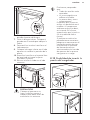
8.9 Door reversibility
WARNING!
Before carrying out any
operations, remove the plug
from the power socket.
CAUTION!
To carry out the following
operations, we suggest that
this be made with another
person that will keep a firm
hold on the doors of the
appliance during the
operations.
1. Tilt back the appliance carefully so
that the compressor cannot touch
the floor.
2. Unscrew both adjustable feet.
3. Unscrew the screws of the door
bottom hinge.
4. Take off the appliance door by
pulling it slightly downwards.
5. Unscrew the top door hinge pin of
the appliance then screw it back on
the other side.
2
1
6. Fit the appliance door on the upper
door hinge pin.
7. Remove the lower hinge. Put over
the pin in the direction of the arrow.
8. Unscrew and install the screw on the
opposite side.
9. Install the lower hinge on the
opposite side leaving the position of
the door unchanged.
10. Screw in the one screw in the place
set free on the other side as well as
the adjustable feet (2 pieces).
11. Remove and install the handle on the
opposite side.
ENGLISH
15

1
2
3
4
CAUTION!
Reposition, level the
appliance, wait for at least
four hours and then connect
it to the power socket.
Do a final check to make
sure that:
• All screws are tightened.
• The magnetic seal
adheres to the cabinet.
• The door opens and
closes correctly.
If the ambient temperature
is cold (i.e. in Winter), the
gasket may not fit perfectly
to the cabinet. In that case,
wait for the natural fitting of
the gasket.
In case you do not want to
carry out the above
mentioned operations,
contact the nearest
Authorised Service Centre.
The Authorised Service
specialist will carry out the
reversibility of the doors at
your cost.
8.10 Reversibility of the
freezer door
www.aeg.com16

180˚
8.11 Electrical connection
• Before plugging in, ensure that the
voltage and frequency shown on the
rating plate correspond to your
domestic power supply.
• The appliance must be earthed. The
power supply cable plug is provided
with a contact for this purpose. If the
domestic power supply socket is not
earthed, connect the appliance to a
separate earth in compliance with
current regulations, consulting a
qualified electrician.
• The manufacturer declines all
responsibility if the above safety
precautions are not observed.
• This appliance complies with the
E.E.C. Directives.
9. TECHNICAL DATA
9.1 Technical data
Height mm 850
Width mm 595
Depth mm 635
Rising time Hours 12
Voltage Volts 230 - 240
Frequency Hz 50
The technical information is situated in
the rating plate, on the external or
internal side of the appliance and in the
energy label.
10. ENVIRONMENTAL CONCERNS
Recycle the materials with the symbol .
Put the packaging in applicable
containers to recycle it. Help protect the
environment and human health and to
recycle waste of electrical and electronic
appliances. Do not dispose appliances
marked with the symbol with the
household waste. Return the product to
your local recycling facility or contact
your municipal office.
ENGLISH 17

CONTENIDO
1. INFORMACIÓN SOBRE SEGURIDAD..................................................................... 19
2. INSTRUCCIONES DE SEGURIDAD..........................................................................20
3. FUNCIONAMIENTO................................................................................................. 22
4. USO DIARIO...............................................................................................................22
5. CONSEJOS................................................................................................................ 23
6. MANTENIMIENTO Y LIMPIEZA............................................................................... 25
7. SOLUCIÓN DE PROBLEMAS................................................................................... 27
8. INSTALACIÓN........................................................................................................... 30
9. DATOS TÉCNICOS................................................................................................... 34
PARA OBTENER RESULTADOS PERFECTOS
Gracias por escoger este producto AEG. Este artículo ha sido creado para ofrecer
un rendimiento impecable durante muchos años, con innovadoras tecnologías
que facilitarán su vida y prestaciones que probablemente no encuentre en
electrodomésticos corrientes. Por favor, dedique algunos minutos a la lectura
para disfrutar de todas sus ventajas.
Consulte en nuestro sitio web:
Obtener consejos, folletos, soluciones a problemas e información de servicio:
www.aeg.com/webselfservice
Registrar su producto para recibir un mejor servicio:
www.registeraeg.com
Adquirir accesorios, artículos de consumo y recambios originales para su
aparato:
www.aeg.com/shop
ATENCIÓN Y SERVICIO AL CLIENTE
Le recomendamos que utilice recambios originales.
Al contactar con nuestro centro autorizado de servicio técnico, cerciórese de
tener la siguiente información a mano: Modelo, PNC, Número de serie.
La información se puede encontrar en la placa de características.
Advertencia / Precaución-Información sobre seguridad
Información general y consejos
Información sobre el medio ambiente
Salvo modificaciones.
www.aeg.com
18

1. INFORMACIÓN SOBRE SEGURIDAD
Antes de instalar y utilizar el aparato, lea atentamente
las instrucciones facilitadas. El fabricante no se hace
responsable de lesiones o daños producidos como
resultado de una instalación o un uso incorrectos:
Conserve siempre estas instrucciones en lugar seguro y
accesible para futuras consultas.
1.1 Seguridad de niños y personas vulnerables
• Este aparato puede ser utilizado por niños de 8 años
en adelante y personas cuyas capacidades físicas,
sensoriales o mentales estén disminuidas o que
carezcan de la experiencia y conocimientos suficientes
para manejarlo, siempre que cuenten con las
instrucciones o la supervisión sobre el uso del
electrodoméstico de forma segura y comprendan los
riesgos.
• No deje que los niños jueguen con el aparato.
• La limpieza y mantenimiento de usuario del aparato
no podrán ser realizados por niños sin supervisión.
• Mantenga todo el material de embalaje fuera del
alcance de los niños y deséchelo de forma adecuada.
1.2
Instrucciones generales de seguridad
• Este aparato está concebido para utilizarse en
aplicaciones domésticas y similares, tales como:
– Granjas; áreas de cocina para el personal en
tiendas, oficinas y otros entornos de trabajo
– Por clientes en hoteles, moteles, pensiones y otros
entornos de tipo residencial
• Mantenga libres de obstrucciones las aberturas de
ventilación del alojamiento del aparato o de la
estructura empotrada.
• No utilice dispositivos mecánicos ni medios artificiales
para acelerar el proceso de descongelación, excepto
los recomendados por el fabricante.
• No dañe el circuito del refrigerante.
ESPAÑOL
19

• No utilice dispositivos eléctricos dentro de los
compartimientos para alimentos del aparato, salvo si
son del tipo recomendado por el fabricante.
• No utilice pulverizadores ni vapor de agua para
limpiar el aparato.
• Limpie el aparato con un paño suave humedecido.
Utilice solo detergentes neutros. No utilice productos
abrasivos, estropajos duros, disolventes ni objetos
metálicos.
• No almacene sustancias explosivas tales como latas
de aerosol con un propulsor inflamable en este
aparato.
• Si el cable eléctrico sufre algún daño, el fabricante, su
servicio técnico autorizado o un profesional
cualificado tendrán que cambiarlo para evitar riesgos.
2. INSTRUCCIONES DE SEGURIDAD
2.1 Instalación
ADVERTENCIA!
Solo un electricista
cualificado puede instalar
este aparato.
• Retire todo el embalaje y los
pasadores de transporte.
• No instale ni utilice un aparato
dañado.
• Siga las instrucciones de instalación
suministradas con el aparato.
• Tenga cuidado al mover el aparato,
porque es pesado. Utilice siempre
guantes de protección y calzado
cerrado.
• Asegúrese de que el aire pueda
circular alrededor del aparato.
• Espere al menos 4 horas antes de
conectar el aparato a la alimentación
eléctrica. Esto es para permitir que el
aceite regrese al compresor.
• No instale el aparato cerca de
radiadores, cocinas, hornos o placas
de cocción.
• La parte posterior del aparato se
debe colocar contra la pared.
• No instale el aparato donde reciba luz
solar directa.
• No coloque este aparato en lugares
demasiado húmedos o fríos, como
anexos a una construcción, garajes o
bodegas.
• Al mover el aparato, levántelo por el
borde frontal para no arañar el suelo.
2.2 Conexión eléctrica
ADVERTENCIA!
Riesgo de incendios y
descargas eléctricas.
• El aparato debe conectarse a tierra.
• Asegúrese de que las
especificaciones eléctricas de la placa
coincidan con las del suministro
eléctrico de su hogar. En caso
contrario, póngase en contacto con
un electricista.
• Utilice siempre una toma con
aislamiento de conexión a tierra
correctamente instalada.
• No utilice adaptadores de enchufes
múltiples ni cables prolongadores.
• Asegúrese de no provocar daños en
los componentes eléctricos (como
enchufe, cable de alimentación,
compresor). Póngase en contacto con
un electricista o con el servicio
www.aeg.com
20

técnico autorizado para cambiar los
componentes eléctricos.
• El cable de alimentación debe estar
por debajo del nivel del enchufe de
alimentación.
• Conecte el enchufe a la toma de
corriente únicamente cuando haya
terminado la instalación. Asegúrese
de tener acceso al enchufe del
suministro de red una vez finalizada la
instalación.
• No desconecte el aparato tirando del
cable de conexión a la red. Tire
siempre del enchufe.
2.3 Uso
ADVERTENCIA!
Existe riesgo de lesiones,
quemaduras, descargas
eléctricas o incendios.
• No cambie las especificaciones de
este aparato.
• El utilice otros aparatos eléctricos
(como máquinas de hacer helados)
dentro de aparatos de refrigeración, a
menos que el fabricante haya
autorizado su utilización
• Tenga cuidado para no dañar el
circuito de refrigerante. Contiene
isobutano (R600a), un gas natural con
alto grado de compatibilidad
medioambiental. Este gas es
inflamable.
• Si se daña el circuito del refrigerante,
evite las llamas y fuentes de ignición
en la habitación. Ventile la habitación.
• No toque con elementos calientes las
piezas de plástico del aparato.
• No coloque bebidas con gas en el
congelador. Se creará presión en el
contenedor de la bebida.
• No almacene gas ni líquido
inflamable en el aparato.
• No coloque productos inflamables ni
objetos mojados con productos
inflamables dentro, cerca o encima
del aparato.
• No toque el compresor ni el
condensador. Están calientes.
• No retire ni toque elementos del
compartimento congelador con las
manos húmedas o mojadas.
• No vuelva a congelar alimentos que
se hayan descongelado.
• Siga las instrucciones del envase de
los alimentos congelados.
2.4 Luz interna
• El tipo de bombilla de este aparato
no es apto para iluminar la casa.
2.5 Mantenimiento y limpieza
ADVERTENCIA!
Podría sufrir lesiones o dañar
el aparato.
• Antes de proceder con el
mantenimiento, apague el aparato y
desconecte el enchufe de la red.
• Este equipo contiene hidrocarburos
en la unidad de refrigeración. Solo
una persona cualificada debe realizar
el mantenimiento y la recarga de la
unidad.
• Examine periódicamente el desagüe
del aparato y límpielo si fuera
necesario. Si el desagüe se bloquea,
el agua descongelada se acumulará
en la base del aparato.
2.6 Desecho
ADVERTENCIA!
Existe riesgo de lesiones o
asfixia.
• Desconecte el aparato de la red.
• Corte el cable de conexión a la red y
deséchelo.
• Retire la puerta para evitar que los
niños y las mascotas queden
encerrados en el aparato.
• El circuito del refrigerante y los
materiales aislantes de este aparato
no dañan la capa de ozono.
• La espuma aislante contiene gas
inflamable. Póngase en contacto con
las autoridades locales para saber
cómo desechar correctamente el
aparato.
• No dañe la parte de la unidad de
refrigeración que está cerca del
intercambiador de calor.
ESPAÑOL
21

3. FUNCIONAMIENTO
3.1 Encendido
Introduzca el enchufe eléctrico en la
toma.
Gire el regulador de temperatura hacia
la derecha, a un ajuste intermedio.
3.2 Apagado
Para apagar el aparato, gire el regulador
de temperatura hasta la posición "O".
3.3 Regulación de la
temperatura
La temperatura se regula
automáticamente.
Para utilizar el aparato, proceda como se
indica:
• Gire el regulador de temperatura
hacia ajustes más bajos para obtener
el frío mínimo.
• Gire el regulador de temperatura
hacia ajustes más altos para obtener
el frío máximo.
Lo más idóneo es ajustar la
temperatura en una posición
intermedia.
Sin embargo, el ajuste exacto debe
elegirse teniendo en cuenta que la
temperatura interior del aparato
depende de:
• temperatura ambiente
• la frecuencia con que se abre la
puerta
• la cantidad de alimentos guardados
• ubicación del aparato.
Si la temperatura ambiente
es elevada o el aparato está
totalmente lleno y se ha
ajustado a las temperaturas
más bajas, puede
mantenerse en marcha de
manera continua
provocando la formación de
escarcha en la pared
posterior. En tal caso, el
mando debe colocarse a
temperatura más elevada
para permitir la
descongelación automática
y reducir así el consumo
energético.
4. USO DIARIO
ADVERTENCIA!
Consulte los capítulos sobre
seguridad.
4.1 Congelación de alimentos
frescos
El compartimento del congelador es
adecuado para congelar alimentos
frescos y conservar a largo plazo los
alimentos congelados y ultracongelados.
Para congelar alimentos frescos no es
necesario cambiar el ajuste intermedio.
Sin embargo, para lograr una
congelación más rápida, gire el
regulador de temperatura a un ajuste
más alto para obtener el frío máximo.
PRECAUCIÓN!
En esa situación, la
temperatura del
compartimento frigorífico
puede descender por
debajo de 0°C. En ese caso,
sitúe el regulador de
temperatura en un ajuste
menos frío.
4.2 Conservación de alimentos
congelados
Al poner en marcha el aparato por
primera vez o después de un periodo sin
uso, déjelo en marcha al menos durante
2 horas con un ajuste alto antes de
colocar los productos en el
compartimento.
www.aeg.com
22

En caso de producirse una
descongelación accidental,
por ejemplo, por un corte
del suministro eléctrico, y si
la interrupción ha sido más
prolongada que el valor
indicado en el campo
"tiempo de elevación" de la
tabla de características
técnicas, será necesario
consumir cuanto antes los
alimentos descongelados o
cocinarlos de inmediato y
congelarlos de nuevo
(después de que se hayan
enfriado).
4.3 Descongelación
Los alimentos ultracongelados o
congelados, antes de utilizarlos, se
pueden descongelar en el
compartimento frigorífico o a
temperatura ambiente, dependiendo del
tiempo de que se disponga.
Es posible incluso cocinar piezas
pequeñas congeladas, tomadas
directamente del congelador: en tal
caso, el tiempo de cocción será más
prolongado.
4.4 Estantes móviles
Las paredes del frigorífico cuentan con
una serie de guías para colocar los
estantes del modo que se prefiera.
No coloque el estante de
vidrio por encima del cajón
de verduras para no impedir
la correcta circulación del
aire.
4.5 Colocación de los estantes
de la puerta
Para poder guardar alimentos de
distintos tamaños, los estantes de la
puerta se pueden colocar a diferentes
alturas.
1. Tire gradualmente del estante en la
dirección de las flechas hasta que se
desenganche.
2. Vuelva a colocarlo según sea
necesario.
5. CONSEJOS
5.1 Sonidos de funcionamiento
normal
Los ruidos siguientes son normales
durante el funcionamiento:
• Un gorgoteo y burbujeo débil desde
el serpentín cuando se bombea el
refrigerante.
• Un zumbido o sonido intermitente
desde el compresor cuando se
bombea el refrigerante.
ESPAÑOL 23

• Un chasquido repentino desde el
interior del aparato debido a la
dilatación térmica (un fenómeno físico
natural no peligroso).
• Un chasquido débil desde el
regulador de temperatura cuando se
activa o desactiva el compresor.
5.2 Consejos para ahorrar
energía
• No abra la puerta con frecuencia ni la
deje abierta más tiempo del
estrictamente necesario.
• Si la temperatura ambiente es alta, se
ha ajustado un valor de temperatura
alto y el aparato está totalmente
lleno, el compresor podría funcionar
sin detenerse y generar escarcha o
hielo en el evaporador. En tal caso,
gire el regulador de temperatura
hasta valores más bajos para facilitar
la descongelación automática y
ahorrar en el consumo eléctrico.
5.3 Consejos para la
refrigeración de alimentos
frescos
Para obtener los mejores resultados:
• no guarde en el frigorífico alimentos
calientes ni líquidos en evaporación
• cubra o envuelva los alimentos, en
especial si tienen sabores fuertes
• coloque los alimentos de modo que
el aire pueda circular libremente entre
ellos
5.4 Consejos para la
refrigeración
Consejos útiles:
• Carne (de todo tipo): guárdela en un
envoltorio adecuado y colóquela en
el estante de vidrio, sobre el cajón de
las verduras. Almacene la carne
durante un máximo de 1-2 días.
• Alimentos cocinados, platos fríos:
cubra y coloque en cualquier instante.
• Frutas y verduras: limpie a fondo y
coloque en un cajón especial. No
guarde en el frigorífico productos
como plátanos, patatas, cebollas y
ajos, a menos que estén
empaquetados.
• Mantequilla y queso: coloque en un
recipiente hermético especial o
envuelva o bolsas de polietileno para
eliminar todo el aire posible.
• Botellas: cierre con un tapón y
colóquelas en el estante para botellas
de la puerta de la puerta o en el
botellero (si dispone de él).
5.5 Consejos sobre la
congelación
Para aprovechar al máximo el proceso de
congelación, tenga en cuenta:
• la cantidad máxima de alimentos que
puede congelarse en 24 horas se
indica en la placa de datos técnicos;
• el proceso de congelación tarda 24
horas, no añada más alimentos para
congelar durante ese tiempo;
• congele sólo alimentos de máxima
calidad, frescos y perfectamente
limpios;
• divida los alimentos en porciones
pequeñas para agilizar el proceso de
congelación y facilitar la
descongelación y uso de las
cantidades necesarias;
• envuelva los alimentos en papel de
aluminio o polietileno y compruebe
que los envoltorios quedan
herméticamente cerrados;
• no permita que alimentos frescos y
sin congelar entren en contacto con
alimentos ya congelados, así evitará
que aumente su temperatura;
• los alimentos magros se congelan
mejor que los grasos; la sal reduce el
tiempo de almacenamiento de los
alimentos;
• el hielo que se consume
inmediatamente después de extraerlo
del congelador puede provocar
quemaduras por congelación en la
piel;
• se recomienda etiquetar cada
paquete con la fecha de congelación
para controlar el tiempo de
almacenamiento.
www.aeg.com
24

5.6 Consejos para el
almacenamiento de alimentos
congelados
Para obtener el máximo rendimiento de
este aparato, deberá:
• comprobar que el comerciante ha
mantenido los productos congelados
correctamente almacenados;
• procurar que los alimentos
congelados pasen de la tienda al
congelador en el menor tiempo
posible;
• evitar la apertura frecuente de la
puerta o dejarla abierta más tiempo
del estrictamente necesario;
• los alimentos descongelados se
deterioran con rapidez y no pueden
congelarse de nuevo;
• no supere el tiempo de
almacenamiento indicado por el
fabricante de los alimentos.
6. MANTENIMIENTO Y LIMPIEZA
ADVERTENCIA!
Consulte los capítulos sobre
seguridad.
6.1 Limpieza del interior
Antes de utilizar el aparato por primera
vez, lave su interior y todos los
accesorios internos con agua templada y
jabón neutro para eliminar el típico olor
de los productos nuevos. A continuación,
seque todo bien.
PRECAUCIÓN!
No utilice detergentes,
polvos abrasivos ni
limpiadores a base de cloro
o aceite, ya que podrían
dañar el acabado.
6.2 Advertencias generales
PRECAUCIÓN!
Antes de realizar tareas de
mantenimiento, desenchufe
el aparato
Este aparato contiene
hidrocarburos en la unidad
de refrigeración por lo que
cualquier tarea de
mantenimiento o recarga
debe ser realizada por
personal técnico
homologado.
Los accesorios y las piezas
del aparato no deben
lavarse en el lavavajillas.
6.3 Limpieza periódica
PRECAUCIÓN!
No mueva, dañe ni tire de
los conductos o cables del
interior del armario.
PRECAUCIÓN!
Tenga cuidado para no
dañar el sistema de
refrigeración.
PRECAUCIÓN!
Al mover el frigorífico,
levántelo por el borde
frontal para no arañar el
suelo.
El equipo debe limpiarse de forma
regular:
1. Limpie el interior y los accesorios con
agua templada y un jabón neutro.
2. Revise y limpie periódicamente las
juntas de la puerta para mantenerlas
limpias y sin restos;
3. Aclare y seque a fondo.
4. Si se puede acceder, limpie el
condensador y el compresor de la
parte posterior del aparato con un
cepillo.
Esa operación mejorará el
rendimiento del aparato y reducirá el
consumo eléctrico.
6.4 Descongelación del
frigorífico
La escarcha se elimina automáticamente
del evaporador del frigorífico cada vez
que se detiene el compresor, durante el
ESPAÑOL
25

funcionamiento normal. El agua de la
descongelación se descarga por un canal
hacia un recipiente especial situado en la
parte posterior del aparato, sobre el
motor compresor, desde donde se
evapora.
Es importante limpiar periódicamente el
orificio de salida del agua de
descongelación situado en la mitad del
canal del compartimento frigorífico para
evitar que el agua se desborde y caiga
sobre los alimentos del interior.
6.5 Descongelación del
congelador
PRECAUCIÓN!
No utilice herramientas
metálicas afiladas para
raspar la escarcha del
evaporador, ya que podría
dañarlo. No utilice
dispositivos mecánicos ni
medios artificiales para
acelerar el proceso de
descongelación, excepto los
recomendados por el
fabricante. El aumento de la
temperatura de los
paquetes de alimentos
congelados durante la
descongelación puede
acortar su tiempo de
almacenamiento.
Unas 12 horas antes de
realizar la descongelación,
ajuste una temperatura más
baja con el fin de acumular
frío suficiente para la
interrupción del
funcionamiento.
Siempre se forma un poco de escarcha
en los estantes del congelador y en
torno al compartimento superior.
Descongele el congelador sólo cuando
la capa de escarcha alcance un grosor de
unos 3 a 5 mm.
1. Apague el aparato o desconecte el
enchufe de la toma de corriente.
2. Retire los alimentos congelados,
envuélvalos en varias hojas de papel
de periódico y colóquelos en un sitio
fresco.
ADVERTENCIA!
No toque los alimentos
congelados con las
manos mojadas. Podrían
congelarse al contacto
con los alimentos.
3. Deje la puerta abierta.
Para acelerar el proceso de
descongelación, coloque un
recipiente con agua tibia en el
compartimento congelador. Además,
retire los trozos de hielo que se
desprendan antes de que finalice la
descongelación.
4. Cuando la descongelación haya
terminado, seque a fondo el interior
del aparato.
5. Encienda el aparato.
Después de tres horas, vuelva a
introducir los alimentos retirados
anteriormente en los compartimentos.
6.6 Periodos de inactividad
Si el aparato no se utiliza durante un
tiempo prolongado, tome las siguientes
precauciones:
1. Desconecte el aparato de la red
eléctrica.
2. Extraiga todos los alimentos.
3. Descongele (si fuera necesario) y
limpie el aparato y todos los
accesorios.
4. Limpie el aparato y todos los
accesorios.
5. Deje la puerta o puertas abiertas
para que no se produzcan olores
desagradables.
www.aeg.com
26

ADVERTENCIA!
Si desea mantener el
aparato encendido, procure
que alguien lo vigile de vez
en cuando para que los
alimentos de su interior no
se estropeen si se
interrumpe el suministro
eléctrico.
7. SOLUCIÓN DE PROBLEMAS
ADVERTENCIA!
Consulte los capítulos sobre
seguridad.
7.1 Qué hacer si...
Problema Posible causa Solución
El aparato no funciona. El aparato está apagado. Encienda el aparato.
El aparato no está correcta-
mente enchufado a la toma
de corriente.
Enchufe el aparato correcta-
mente a la toma de corrien-
te.
No hay tensión en la toma
de corriente.
Enchufe un aparato eléctrico
diferente a la toma de co-
rriente. Llame a un electricis-
ta cualificado.
El aparato hace ruido. El aparato no está bien apo-
yado en el suelo.
Compruebe que los sopor-
tes del aparato descansan
sobre una superficie estable.
La bombilla no funciona. La bombilla está en espera. Cierre y abra la puerta.
La bombilla es defectuosa. Consulte la sección "Cam-
bio de la bombilla".
El compresor funciona conti-
nuamente.
La temperatura está ajustada
incorrectamente.
Consulte el capítulo de fun-
cionamiento.
Se han introducido numero-
sos alimentos para congelar
al mismo tiempo.
Espere unas horas y vuelva a
comprobar la temperatura.
La temperatura ambiente es
demasiado alta.
Consulte la tabla de clase
climática en la placa de ca-
racterísticas.
ESPAÑOL 27

Problema Posible causa Solución
Los alimentos introducidos
en el aparato estaban dema-
siado calientes.
Deje que los alimentos se
enfríen a temperatura am-
biente antes de almacenar-
los.
Hay demasiada escarcha o
hielo.
La puerta no se ha cerrado
correctamente o la junta es-
tá deformada/sucia.
Consulte la sección "Cierre
de la puerta".
El tapón de drenaje del
agua no está bien colocado.
Coloque el tapón de drenaje
en la forma correcta.
Los alimentos no están bien
envueltos.
Envuelva mejor los produc-
tos.
La temperatura está ajustada
incorrectamente.
Consulte el capítulo de fun-
cionamiento.
El agua fluye por la placa
posterior del frigorífico.
Durante el proceso de des-
congelación automática, la
escarcha se derrite en la pla-
ca posterior.
Esto es correcto.
El agua fluye al interior del
frigorífico.
La salida de agua está obs-
truida.
Limpie la salida de agua.
Los productos impiden que
el agua fluya al colector de
agua.
Asegúrese de que los ali-
mentos no entran en contac-
to con la placa posterior.
Hay agua en el suelo. El agua de la descongela-
ción no fluye hacia la bande-
ja de evaporación situada
sobre el compresor.
Fije la salida de agua de
descongelación a la bandeja
de evaporación.
La puerta está mal alineada
o interfiere con la rejilla de
ventilación.
El aparato no está nivelado. Consulte la sección “Nivela-
ción”.
La temperatura del aparato
es demasiado baja/alta.
El regulador de temperatura
no se ha ajustado correcta-
mente.
Seleccione una temperatura
más alta o baja.
La puerta no está bien cerra-
da.
Consulte la sección "Cierre
de la puerta".
La temperatura de los pro-
ductos es demasiado alta.
Deje que la temperatura de
los productos descienda a la
temperatura ambiente antes
de guardarlo.
Se han guardado muchos
alimentos al mismo tiempo.
Guarde menos productos al
mismo tiempo.
www.aeg.com28

Problema Posible causa Solución
El grosor de la escarcha es
de más de 4-5 mm.
Descongele el aparato.
La puerta se ha abierto con
frecuencia.
Si es necesario, cierre la
puerta.
Hay demasiada agua de
condensación en la pared
posterior del frigorífico.
La puerta se abre con dema-
siada frecuencia.
Abra la puerta solo cuando
sea necesario.
La puerta no se cierra com-
pletamente.
Asegúrese de que la puerta
está cerrada completamen-
te.
Los alimentos guardados no
están envueltos correcta-
mente.
Envuelva los alimentos co-
rrectamente antes de guar-
darlos en el aparato.
La puerta no se abre fácil-
mente.
Ha intentado volver a abrir la
puerta inmediatamente des-
pués de cerrarla.
Espere unos segundos entre
el cierre y la reapertura de la
puerta.
Si el consejo anterior no
ofrece resultados, llame al
servicio técnico autorizado
más cercano.
7.2 Cambio de la bombilla
El aparato está equipado
con una luz LED interior de
larga duración.
PRECAUCIÓN!
Desenchufe el aparato de la
toma de corriente.
1. Retire el tornillo de la tapa de la
bombilla.
2. Extraiga la tapa de la bombilla
(consulte la ilustración).
3. Cambie la bombilla usada por otra
de la misma potencia y forma
diseñada específicamente para
aparatos domésticos. La potencia
máxima se indica en la tapa de la
bombilla.
4. Instale la tapa de la bombilla.
5. Apriete el tornillo de la tapa de la
bombilla.
6. Enchufe el aparato a la toma de
corriente.
7. Abra la puerta.
Compruebe que la bombilla se
enciende.
7.3 Cierre de la puerta
1. Limpie las juntas de la puerta.
2. Si es necesario, ajuste la puerta.
Consulte "Instalación".
3. Si es necesario, cambie las juntas
defectuosas. Póngase en contacto
con el servicio técnico autorizado.
ESPAÑOL
29

8. INSTALACIÓN
ADVERTENCIA!
Consulte los capítulos sobre
seguridad.
8.1 Colocación
Instale el aparato en un lugar interior
seco y bien ventilado en el que la
temperatura ambiente se corresponda
con la clase climática indicada en la
placa de características del aparato.
Clase
climáti-
ca
Temperatura ambiente
SN +10°C a + 32°C
N +16°C a + 32°C
ST +16°C a + 38°C
T +16°C a + 43°C
Se puede producir algún
problema de
funcionamiento en algunos
modelos cuando se usan
fuera de ese rango. Solo se
puede garantizar el correcto
funcionamiento dentro del
rango de temperatura
especificado. Si tiene
cualquier duda respecto al
lugar de instalación del
aparato, consulte al
vendedor, a nuestro servicio
de atención al cliente o al
servicio técnico autorizado
más cercano.
8.2 Nivelación
Al colocar el aparato compruebe que
queda nivelado. Esto se puede
conseguir utilizando las dos patas
ajustables de la parte inferior delantera.
8.3 Ubicación
Puede que en algún
momento sea necesario
desenchufar el aparato de la
toma de corriente; por lo
tanto, el enchufe debe ser
fácilmente accesible tras la
instalación del aparato.
Instale el aparato alejado de fuentes de
calor, como radiadores, calderas, luz
solar directa, etc. Asegúrese también de
que el aire puede circular sin obstáculos
por la parte trasera del armario. Para
garantizar el mejor rendimiento, si el
aparato se coloca debajo de un mueble
de cocina colgado en la pared, deje una
distancia mínima de 100 mm entre la
parte superior del aparato y el mueble
de pared . Sin embargo, no conviene
colocar el aparato debajo de muebles de
pared. La base del aparato está provista
de una o varias patas ajustables para
garantizar un nivelado correcto del
mismo.
100 mm
15 mm 15 mm
www.aeg.com
30

8.4 Instalación bajo una
encimera continua
Si su frigorífico se instala bajo una
encimera continua, debe instalarse una
apertura de salida de aire de al menos
200cm
2
y debe instalarse una rejilla de
ventilación a juego con el diseño de la
encimera en la parte trasera de la
encimera.
Las superficies cortadas de la encimera
deben barnizarse para evitar que se
hinchen debido a la penetración de la
humedad.
La distancia al muro del aparato debe ser
de al menos 30 mm y debe comprobarse
antes de insertar la rejilla de ventilación.
500/550/600 mm
93-103 mm
105 mm
A
200 cm
2
570 mm
min. 820 mm
550 mm
8.5 Desmontaje de la encimera
1. Desatornille los tornillos izquierdo y
derecho de la parte trasera.
2
3
1
2. Empuje la encimera hacia atrás y
levántela.
Guarde los tornillos en lugar seguro
junto con la encimera.
8.6 Colocación y montaje con
encimera continua
Antes del montaje, cambie el sentido de
apertura de la puerta si es necesario
(consulte: Cambio del sentido de
apertura de la puerta).
1. Empuje con cuidado el aparato
dentro del hueco.
Tenga cuidado de no pinzar el cable
de alimentación.
2. Compruebe la distancia hasta la
pared (consulte: Instalación bajo una
encimera continua).
3. Nivele el aparato atornillando las dos
patas ajustables de la parte delantera
para asegurar una posición estable.
4. Con tornillos apropiados (según el
diseño de la encimera y la distancia
entre el aparato y la encimera, no
suministrados) fije el aparato bajo la
encimera a través de la bisagra de la
puerta superior.
5. Si es necesario, iguale el espacio
entre la bisagra de la puerta y la
encimera con una arandela adecuada
(de plástico o madera, no
suministrada).
Esto evitará que la bisagra se curve y
un posible fallo de funcionamiento
de la puerta.
ESPAÑOL
31

8.7 Enchufe
PRECAUCIÓN!
Compruebe que el cable de
alimentación de red pueda
moverse con facilidad.
El enchufe necesario para la conexión de
su aparato a la red eléctrica debe
situarse de modo que sea posible
extraer el enchufe del aparato.
Si su aparato se instala bajo una
encimera continua, el enchufe debe
realizarse como se muestra.
8.8 Separadores traseros
Encontrará los dos separadores en la
bolsa que contiene la documentación.
1. Afloje el tornillo.
2. Encaje el separador debajo del
tornillo.
3. Gire el separador a la posición
derecha.
4. Apriete de nuevo los tornillos.
2
4
1
3
8.9 Cambio del sentido de
apertura de la puerta
ADVERTENCIA!
Desenchufe siempre el
aparato antes de llevar a
cabo cualquier operación.
PRECAUCIÓN!
Los procedimientos que se
indican a continuación
requieren la ayuda de otra
persona que sujete bien las
puertas del aparato durante
todo el proceso.
1. Incline el aparato hacia atrás con
cuidado, de modo que el compresor
no toque el suelo.
2. Desatornille las dos patas ajustables.
3. Desatornille los tornillos de la
articulación inferior de la puerta.
4. Desmonte la puerta del aparato
tirando de ella suavemente hacia
abajo.
5. Desatornille el pasador superior de
bisagra de la puerta del
electrodoméstico y atorníllelo de
vuelta en el otro lado.
www.aeg.com
32

2
1
6. Encaje la puerta del aparato en el
pasador superior de bisagra.
7. Quite la bisagra inferior. Coloque el
pasador en el sentido que indique la
flecha.
8. Desatornille e instale el tornillo en el
lado contrario.
9. Coloque la bisagra inferior en el lado
opuesto sin cambiar la posición de la
puerta.
10. Atornille el tornillo en el espacio libre
del otro lado así como las patas
ajustables (2 piezas).
11. Retire e instale el tirador en el lado
contrario.
1
2
3
4
PRECAUCIÓN!
Coloque el aparato en su
lugar, nivélelo y espere al
menos cuatro horas antes de
enchufarlo a la corriente.
Finalmente, compruebe
que:
• Todos los tornillos están
apretados.
• La junta magnética se
adhiere al mueble.
• La puerta abre y cierra
correctamente.
Es posible que la junta no
encaje a la perfección en el
mueble si la temperatura
ambiente es baja (es decir,
en invierno). En tal caso,
espere hasta que la junta se
fije al mueble de forma
natural.
Si prefiere no realizar los
procedimientos anteriores,
póngase en contacto con el
centro de servicio técnico
más próximo. El personal
del centro de servicio
técnico cambiará el sentido
de apertura de las puertas
con gastos a su cargo.
8.10 Posibilidad de invertir la
puerta del congelador
ESPAÑOL 33

180˚
8.11 Conexión eléctrica
• Antes de conectar el aparato,
compruebe que el voltaje y la
frecuencia indicados en la placa de
datos técnicos se corresponden con
el suministro de la vivienda.
• El aparato debe conectarse a tierra. El
enchufe del cable de alimentación se
suministra con un contacto para tal
fin. Si la toma de red de la vivienda
carece de conexión a tierra, conecte
el aparato a una toma de tierra
conforme con la normativa, después
de consultar a un electricista
profesional
• El fabricante declina toda
responsabilidad si no se toman las
precauciones antes indicadas.
• Este aparato cumple las directivas
CEE.
9. DATOS TÉCNICOS
9.1 Datos técnicos
Alto mm 850
Ancho mm 595
Profundidad mm 635
Tiempo de elevación Horas 12
Voltaje Voltios 230 - 240
Frecuencia Hz 50
www.aeg.com34

La información técnica se encuentra en la
placa de datos técnicos situada en el
lado exterior o interior del aparato, y en
la etiqueta de consumo energético.
10. ASPECTOS MEDIOAMBIENTALES
Recicle los materiales con el símbolo .
Coloque el material de embalaje en los
contenedores adecuados para su
reciclaje. Ayude a proteger el medio
ambiente y la salud pública, así como a
reciclar residuos de aparatos eléctricos y
electrónicos. No deseche los aparatos
marcados con el símbolo junto con los
residuos domésticos. Lleve el producto a
su centro de reciclaje local o póngase en
contacto con su oficina municipal.
*
ESPAÑOL
35

www.aeg.com/shop
212001644-A-432016
-
 1
1
-
 2
2
-
 3
3
-
 4
4
-
 5
5
-
 6
6
-
 7
7
-
 8
8
-
 9
9
-
 10
10
-
 11
11
-
 12
12
-
 13
13
-
 14
14
-
 15
15
-
 16
16
-
 17
17
-
 18
18
-
 19
19
-
 20
20
-
 21
21
-
 22
22
-
 23
23
-
 24
24
-
 25
25
-
 26
26
-
 27
27
-
 28
28
-
 29
29
-
 30
30
-
 31
31
-
 32
32
-
 33
33
-
 34
34
-
 35
35
-
 36
36


AEG RTB91431AW Manual de usuario
- Categoría
- Frigoríficos-congeladores
- Tipo
- Manual de usuario
en otros idiomas
- English: AEG RTB91431AW User manual
Artículos relacionados
-
AEG SKB58811AS Manual de usuario
-
-
-
-
AEG RDB428E1AX Manual de usuario
-
AEG RDB428E1AW Manual de usuario
-
AEG SCB51821LS Manual de usuario
-
AEG SFB412F1AS Manual de usuario
-
-
AEG SKS71840S0 Manual de usuario
