
2024640
Rubbermaid Incorporated,
Huntersville, NC U.S.A. 28078-1801
U.S.A. 1-888-895-2110
Canada 1-866-595-0525
www.rubbermaid.com
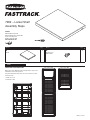
7Z02 – Locker Shelf
Assembly Steps
PKG0000638743
STEP 1
PICK A SHELF POSITION OPTION
NOTE: Lower Locker 7W96 features five mounting locations. Upper Locker
7W95 features three mounting locations.
Using the predetermined shelf positions, choose the location for the shelf
inside of the locker.
1. Round Hole = Front
2. Slotted Hole = Back
Pieces Qty
A
Shelf
1
Pieces Qty
B
Shelf Screws
M5 x 8mm
4
Lower Locker 7W96 Upper Locker 7W95
1
2

2
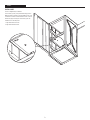
STEP 2
A
A
1
2
INSTALL SHELF
TIP: Use a magnetized tip screwdriver.
Position shelf (A) in any of the provided mounting positions.
NOTE: Slotted hole should be oriented towards the rear of the
unit with the round hole oriented towards the front of the unit.
Attach shelf (A) by inserting four shelf screws (B) into the
molded-in nut on the side panels.
1. Align and install front screws.
2. Align and install back screws.

3
2024640
Rubbermaid Incorporated,
Huntersville, NC, États-Unis 28078 - 1801
U.S.A. 1-888-895-2110
Canada 1-866-595-0525
www.rubbermaid.com
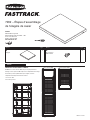
7Z02 – Étapes d’assemblage
de l’étagère de casier
PKG0000638743
ÉTAPE 1
CHOISISSEZ LA POSITION DE L’ÉTAGÈRE
REMARQUE : Le casier inférieur 7W96 comporte cinq emplacements de
montage. Le casier supérieur 7W95 comporte trois emplacements de montage.
En utilisant les positions prédéterminées pour l’étagère, choisissez
l’emplacement de l’étagère à l’intérieur de l’armoire.
1. Trou rond = avant
2. Trou oblong = arrière
Pièces Qté.
A
Étagère
1
Pièces Qté.
B
Vis à étagère
M5 x 8 mm
4
Casier inférieur 7W96 Casier supérieur 7W95
1
2

4
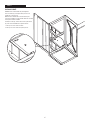
ÉTAPE 2
A
A
1
2
INSTALLER L’ÉTAGÈRE
ASTUCE : Utilisez un tournevis à pointe magnétique.
Placez l’étagère (A) dans l’une des positions de montage
fournies.
REMARQUE : Le trou oblong doit être orienté vers l’arrière de
l’unité avec le trou rond orienté vers l’avant de l’unité.
Fixez l’étagère (A) en insérant quatre vis à étagère (B) dans
l’écrou moulé sur le panneaux latéraux.
1. Alignez et installez les vis avant.
2. Alignez et installez les vis arrières.

5
2024640
Rubbermaid Incorporated,
Huntersville, NC U.S.A. 28078-1801
Estados Unidos 1-888-895-2110
Canadá 1-866-595-0525
www.rubbermaid.com
7Z02 – Pasos para el armado
del estante para armario
PKG0000638743
PASO 1
ELEGIR UNA OPCIÓN PARA LA POSICIÓN DEL ESTANTE
NOTA: El armario inferior 7W96 ofrece cinco posiciones para el armado.
El armario superior 7W95 ofrece tres posiciones para el armado.
Use las posiciones predeterminadas del estante y seleccione la ubicación
para el estante dentro del armario.
1. Orificio redondo = Parte frontal
2. Orificio ranurado = Parte posterior
Piezas Cantidad
A
Estante
1
Piezas Cantidad
B
Tornillos para estantes
M5 x 8mm
4
Armario inferior 7W96 Armario superior 7W95
1
2

6
PASO 2
A
A
1
2
INSTALAR ESTANTE
CONSEJO: Usar un destornillador de punta magnética.
Colocar el estante (A) en cualquiera de las posiciones de
armado que se proporcionan.
NOTA: El orificio ranurado debe orientarse hacia la parte
posterior de la unidad y el orificio redondo debe estar orientado
hacia la parte frontal de la unidad.
Para fijar el estante (A), insertar cuatro tornillos para estantes
(B) en las tuercas moldeadas de los paneles laterales.
1. Alinear y colocar los tornillos frontales.
2. Alinear y colocar los tornillos de la parte posterior.
-
 1
1
-
 2
2
-
 3
3
-
 4
4
-
 5
5
-
 6
6


en otros idiomas
- français: Rubbermaid 2024640 Guide d'installation
- English: Rubbermaid 2024640 Installation guide
Artículos relacionados
-
Rubbermaid 2060984 Guía de instalación
-
-
-
-
-
-
Unbranded 2060312 Guía de instalación
-
-
-