Yamaha Keyboards and Digital - Pianos Manual de usuario
- Categoría
- Instrumentos musicales
- Tipo
- Manual de usuario
Este manual también es adecuado para

IMPORTANT
Check Your Power Supply
Make sure that your local AC mains
voltage matches the voltage speci-
fied on the name plate on the bottom
panel. In some areas a voltage se-
lector may be provided on the rear
panel of the main keyboard unit near
the power cord. Make sure that the
voltage selector is set for the voltage
in your area. The voltage selector is
set at 240V when the unit is initially
shipped. To change the setting use a
“minus” screwdriver to rotate the se-
lector dial so that the correct voltage
appears next to the pointer on the
panel.
YDP-
88
II
Digital Piano
Digital Piano

• Never insert or drop paper or metallic or other objects between the slits of
the key cover and the keyboard. If this happens, immediately turn off the
power and remove the electric plug from the outlet and have the instru-
ment inspected by qualified Yamaha service personnel.
• Do not place the instrument against a wall (allow at least 3 cm/one-inch
from the wall), since this can cause inadequate air circulation, and possibly
result in the instrument overheating.
• Read carefully the attached documentation explaining the assembly pro-
cess. Failure to assemble the instrument in the proper sequence might re-
sult in damage to the instrument or even injury.
• Do not operate the instrument for a long period of time at a high or uncom-
fortable volume level, since this can cause permanent hearing loss. If you
experience any hearing loss or ringing in the ears, consult a physician.
■USING THE BENCH (if included)
• Do not play carelessly with or stand on the bench. Using it as a tool or step-
ladder or for any other purpose might result in accident or injury.
• Only one person should sit on the bench at a time, in order to prevent the
possibility of accident or injury.
• If the bench screws become loose due to extensive long-term use, tighten
them periodically using the included tool.
■SAVING USER DATA
• Save all data to an external device such as the Yamaha DOU-10 Disk Or-
chestra Unit, in order to help prevent the loss of important data due to a
malfunction or user operating error.
Yamaha cannot be held responsible for damage caused by improper use or modifica-
tions to the instrument, or data that is lost or destroyed.
Always turn the power off when the instrument is not in use.
PRECAUTIONS
PLEASE READ CAREFULLY BEFORE PROCEEDING
* Please keep these precautions in a safe place for future reference.
WARNING
Always follow the basic precautions listed below to avoid the possibility of serious injury or even death from electrical shock,
short-circuiting, damages, fire or other hazards. These precautions include, but are not limited to, the following:
• Do not open the instrument or attempt to disassemble the internal parts or
modify them in any way. The instrument contains no user-serviceable parts.
If it should appear to be malfunctioning, discontinue use immediately and
have it inspected by qualified Yamaha service personnel.
• Do not expose the instrument to rain, use it near water or in damp or wet
conditions, or place containers on it containing liquids which might spill into
any openings.
• If the power cord or plug becomes frayed or damaged, or if there is a sud-
den loss of sound during use of the instrument, or if any unusual smells or
smoke should appear to be caused by it, immediately turn off the power
switch, disconnect the electric plug from the outlet, and have the instru-
ment inspected by qualified Yamaha service personnel.
• Only use the voltage specified as correct for the instrument. The required
voltage is printed on the name plate of the instrument.
• Before cleaning the instrument, always remove the electric plug from the
outlet. Never insert or remove an electric plug with wet hands.
• Check the electric plug periodically and remove any dirt or dust which may
have accumulated on it.
CAUTION
Always follow the basic precautions listed below to avoid the possibility of physical injury to you or others, or damage to the
instrument or other property. These precautions include, but are not limited to, the following:
• Do not place the power cord near heat sources such as heaters or radiators,
and do not excessively bend or otherwise damage the cord, place heavy
objects on it, or place it in a position where anyone could walk on, trip over,
or roll anything over it.
• When removing the electric plug from an outlet, always hold the plug itself
and not the cord. Pulling by the cord can damage it.
• Do not connect the instrument to an electrical outlet using a multiple-con-
nector. Doing so can result in lower sound quality, or possibly cause over-
heating in the outlet.
• Remove the electric plug from the outlet when the instrument is not to be
used for extended periods of time, or during electrical storms.
• Before connecting the instrument to other electronic components, turn off
the power for all components. Before turning the power on or off for all
components, set all volume levels to minimum.
• Do not expose the instrument to excessive dust or vibrations, or extreme
cold or heat (such as in direct sunlight, near a heater, or in a car during the
day) to prevent the possibility of panel disfiguration or damage to the in-
ternal components.
• Do not use the instrument near other electrical products such as televi-
sions, radios, or speakers, since this might cause interference which can
affect proper operation of the other products.
• Do not place the instrument in an unstable position where it might acciden-
tally fall over.
• Before moving the instrument, remove all connected cables.
• When cleaning the instrument, use a soft, dry cloth. Do not use paint thinners,
solvents, cleaning fluids, or chemical-impregnated wiping cloths. Also, do
not place vinyl or plastic objects on the instrument, since this might dis-
color the panel or keyboard.
• Do not rest your weight on, or place heavy objects on the instrument, and
do not use excessive force on the buttons, switches or connectors.
• Take care that the key cover does not pinch your fingers, and do not insert
a finger or hand in the key cover gap.
(1)B_EL/CL

The serial number of this product may be found on the bottom of the unit. You
should note this serial number in the space provided below and retain this manual
as a permanent record of your purchase to aid identification in the event of theft.
Model No.
Serial No.
Contents
The Control Panel.........................................................2
Connections .................................................................. 4
Selecting & Playing Voices .......................................... 5
Playing the Demonstration Tunes ............................... 6
The Dual Mode ............................................................. 7
●
Adjusting the Balance Between the Dual-mode
Voices .............................................................. 7
●
Shifting a Dual-Mode Voice Up One Octave .... 7
The Pedals .................................................................... 8
●
Soft (Left) Pedal ............................................... 8
●
Sostenuto (Center) Pedal................................. 8
●
Damper (Right) Pedal....................................... 8
Transposition ................................................................ 8
Pitch Control................................................................. 9
●
Tuning Up ......................................................... 9
●
Tuning Down..................................................... 9
●
To Restore Standard Pitch ............................... 9
The Metronome & Tempo Control ............................. 10
■
The Metronome ................................................. 10
●
Metronome Volume ........................................ 10
●
Metronome Time Signature............................ 10
■
Tempo Control ...................................................10
Using the Recorder .................................................... 11
■
Recording .......................................................... 11
●
Changing the Initial Settings .......................... 12
●
Erasing the recorded data.............................. 12
■
Playback ............................................................12
●
Fast Forward Playback...................................12
MIDI Functions ...........................................................13
●
A Brief Introduction to MIDI ............................ 13
●
MIDI “Messages” Transmitted & Received by
the YDP-88II ....................................................... 13
●
MIDI Transmit & Receive Channel Selection.. 14
●
MIDI Transmit Transpose................................14
■
Other MIDI Functions ....................................... 14
●
Local Control ON/OFF ................................... 15
●
Program Change ON/OFF .............................15
●
Control Change ON/OFF ............................... 15
●
The Multi-Timbre Mode .................................. 16
●
The MIDI Split & Left Local OFF Mode ..........16
●
Bulk Data Dump .............................................16
Troubleshooting ..........................................................17
Options & Expander Modules ...................................17
Keyboard Stand Assembly ........................................18
MIDI Data Format ......................................................24
MIDI Implementation Chart....................................... 25
Specifications.............................................................. 26
Introduction
Thank you for choosing a Yamaha YDP-88II Digital Piano. Your YDP-88II is a fine musical instrument
that employs advanced Yamaha music technology. With the proper care, your YDP-88II will give you many
years of musical pleasure.
● Yamaha’s AWM (Advanced Wave Memory) tone
generator system offers rich, realistic voices.
● Touch-sensitive keys provides extensive expres-
sive control and outstanding playability.
● Dual play mode allows 2 voices to be played
simultaneously.
● Metronome feature with variable tempo facilitates
practice.
● Record and play back anything you play on the
keyboard (up to approximately 1,300 notes).
● MIDI compatibility and a range of MIDI functions
make the YDP-88II useful in a range of advanced
MIDI music systems.
In order to make the most of your YDP-88II’s performance potential and features, we urge you to read
this Owner’s Manual thoroughly, and keep it in a safe place for later reference.

2
The Control Panel
1 [POWER] Switch
Press the [POWER] switch once to turn the power
ON, a second time to turn the power OFF. When the
power is initially turned ON, the [PIANO] voice
selector LED will light.
2 [MASTER VOLUME] Control
The [MASTER VOLUME] control adjusts the
volume (level) of sound produced by the YDP-88II’s
internal stereo sound system. The [MASTER VOL-
UME] control also adjusts headphone volume when a
pair of headphones is plugged into the PHONES jack
(page 5).
3 [MIDI/TRANSPOSE] Button
The [MIDI/TRANSPOSE] button allows access
to the YDP-88II’s TRANSPOSE function (to shift the
pitch of the entire keyboard up or down) and MIDI
functions. For details refer to “TRANSPOSITION”
on page 8, and “MIDI FUNCTIONS” on page 13,
respectively.
4 Voice Selectors
The YDP-88II has five voice selectors. Simply
press any of the voice selectors to select the corre-
sponding voice. The voice selector LED will light to
indicate which voice is currently selected.
The YDP-88II also has a DUAL mode in which
two voices can be played simultaneously across the
full range of the keyboard — see page 7 for details.
NOTE
• The PIANO voice is automatically selected
whenever the [POWER] switch is initially turned
ON.
5 [METRONOME] Button
Turns the metronome sound on and off. The
[TEMPO] control, below, is used to set the tempo of
the metronome sound. More precise tempo settings
can be achieved by using the [METRONOME]
button and the YDP-88II keyboard as described on
page 10.
6 [TEMPO] Control
This control adjusts the tempo of the YDP-88II
metronome function as well as the playback tempo of
the recorder function. The tempo range is from 32 to
280 quarter-note beats per minute.
7 RECORDER [PLAY] and [REC]
Buttons
These buttons control the YDP-88II recorder,
letting you record and play back just about anything
you play on the keyboard — up to a maximum of
about 1,300 notes. See page 11 for details.
POWER
B0A0G0F0E0D0C0B-1A-1
C1 D1 E1 F1 G1 A1 B1 C2 D2 E2 G2 A2 B2 C3 D3 E3 F3 A3 B3 C4 D4 E4 F4 G4F2 G3
1
F2 G3
PHONES Jacks
(Bottom Panel)
Left voice shift up key
(See page 7)
Pitch control keys
(See page 9)
Transpose keys
(See page 8)
Balance keys (See page 7)
ORGANE. PIANO 2
MIN MAX
MASTER VOLUME
PIANO
METRONOME
E. PIANO 1
HARPSI-
CHORD
MIDI/TRANSPOSE
32 280120
TEMPO
PLAY REC
RECORDER
DEMO
234 5 768
PIANO
E. PIANO 2
METRONOME
E. PIANO 1
HARPSI-
CHORD
MIDI/TRANSPOSE
PLAY REC
RECORDER
DEMO
ORGAN
MIN MAX
MASTER VOLUME
32 280120
TEMPO

3
The Control Panel
8 [DEMO] Button
Activates the demo playback mode in which you
can select playback of five pre-programmed demon-
stration sequences. See page 6 for details.
9 Pedals
The soft (left), sostenuto (center) and damper
(right) pedals provide a range of expressive control
capabilities similar to the pedal functions on an
acoustic piano. See page 8 for details.
D6 E6 F6 G6 A6 B6 C7
A4 B4 C5 D5 E5 F5 G5 A5 B5 C6
Right voice shift up key
(See page 6)
DIGITAL PIANO YDP-88II
● Key Cover
• Hold the cover with both hands when moving it, and do not
release it until it is fully opened or closed. Be careful to
avoid catching fingers (yours or others) between the cover
and main unit.
• Do not place objects on top of the key cover. Small objects
placed on the key cover may fall inside the main unit when
the cover is opened and may not be able to be removed.
This could cause electric shock, short circuit, fire or other
serious damage to the instrument.
■ To open the key cover:
ZLift the cover slightly (not too much).
XSlide the cover open.
■ To close the key cover:
ZSlide the cover toward you.
XGently lower the cover over the keys.
Be careful to avoid catching your
fingers when opening or closing
the cover.
If you will be using sheet music with your
YDP-88II, raise the music stand built into its top
panel by lifting the rear edge of the music stand,
then flip down the music stand braces and engage
them with the corresponding recesses.
The music stand can be lowered after slightly
lifting it and folding the two brackets which
support it against the back of the stand.
• Do not try to use the music stand in a half-raised
position. Also, when lowering the stand, make sure to
press it until it is all the way down.
● The Music Stand
Soft pedal
9
Damper pedal
Sostenuto pedal

4
Connections
1 AUX OUT L/L+R and R Jacks
The AUX OUT L/L+R and R jacks deliver the output of the
YDP-88II for connection to an instrument amplifier, mixing console,
PA system, or recording equipment. If you will be connecting the
YDP-88II to a monaural sound system, use only the L/L+R jack.
When a plug is inserted into the L/L+R jack only, the left- and right-
channel signals are combined and delivered via the L/L+R jack so
you don’t lose any of the YDP-88II’s sound.
2 MIDI IN and OUT Connectors
The MIDI IN connector receives MIDI data from an external
MIDI device (such as the DOU-10 Disk Orchestra Unit) which can
be used to control the YDP-88II. The MIDI OUT connector trans-
mits MIDI data generated by the YDP-88II (e.g. note and velocity
data produced by playing the YDP-88II keyboard).
More details on MIDI are given in “MIDI FUNCTIONS” on
page 13.
● PHONES Jacks
(Bottom Panel)
Two pairs of standard pair of stereo headphones can be plugged
in here for private practice or late-night playing. The internal
speaker system is automatically shut off when a pair of headphones
is plugged into either of the PHONES jacks.
MIDI
IN OUT
DOU-10
12
MIDI
IN
OUT
AUX OUT
R L/L+R
130V
110V
240V
220V
VOLTAGE
SELECTOR
AUX OUT
L/L+RR
Stereo System

5
Selecting & Playing Voices
Turn Power On...................................................................................................
After making sure that the YDP-88II’s AC cord is properly plugged
into a convenient AC wall outlet, press the [POWER] switch located to
the left of the keyboard to turn the power ON. In some areas a plug
adaptor may be provided to match the pin configuration of the AC wall
outlets in your area.
When the power is turned ON, the [PIANO] voice selector LED
will light (the PIANO voice is automatically selected whenever the
power is turned ON).
Set the Volume ..................................................................................................
Initially set the [MASTER VOLUME] control about half way
between the “MIN” and “MAX” settings. Then, when you start playing,
re-adjust the [MASTER VOLUME] control for the most comfortable
listening level.
Select a Voice .....................................................................................................
Select the desired voice by pressing one of the voice selectors.
POWER
Play................................................................................................................................
The YDP-88II offers keyboard touch response, so the volume and
timbre of notes played can be controlled according to how “hard” you
play the keys. The amount of variation available depends on the se-
lected voice.
PIANO
E. PIANO 2
E. PIANO 1
HARPSI-
CHORD
ORGAN
MIN MAX
MASTER VOLUME

6
The YDP-88II includes five demo tunes that effectively demonstrate its sound
capabilities. Here’s how you can select and play the demo tunes:
Playing the Demonstration Tunes
Engage the Demo Mode .........................................................................
Select a Demo Tune.....................................................................................
Press one of the flashing voice selectors to start playback of the
corresponding demo tune — featuring the voice normally selected by
that voice selector button. The demo tunes will play in sequence until
stopped, starting with the selected tune. The voice selector indicator
will flash during demo playback.
● The Demo Tunes
• [PIANO] button:..................... Piano Sonata A major K.V. 331 3rd movement
“Turkischer Marsch” by W. A. Mozart
• [E. PIANO 1] button: ............. “Pavane pour une infante défunte” by M. J.
Ravel
• [HARPSICHORD] button: ..... “The Harmonious Blacksmith” by G. F. Händel
• [ORGAN] button:................... Wedding March from “A Midsummer Night
Dream” by J. L. F. Mendelssohn
* The demonstration pieces listed above are short excerpts from the original composi-
tions. The other demo tune is original (© 1997 by YAMAHA CORPORATION).
Press the [DEMO] button to engage the demo mode — the voice
selectors will flash in sequence.
Use the [MASTER VOLUME] control to adjust the volume.
NOTE
• The [TEMPO] control does not affect demo playback.
Play a Different Demo ...............................................................................
You can start playback of any other demo tune during playback by
simply pressing the corresponding voice selector. Playback will stop
and the playback-ready mode described in step 2, above, will be re-
engaged if you press the voice selector of the demo that is currently
playing.
Stop the Demo ..................................................................................................
Press the [DEMO] button when you want to stop demo playback
and return to the normal play mode.
DEMO
DEMO
PIANO
E. PIANO 2
E. PIANO 1
HARPSI-
CHORD
ORGAN
MIN MAX
MASTER VOLUME
Set the Volume ..................................................................................................

7
The Dual Mode
The DUAL mode makes it possible to play two voices simultaneously across
the entire range of the keyboard. To activate the DUAL mode simply press two
voice selectors at the same time (or press one voice selector while holding
another). The voice indicators of both selected voices will light when the DUAL
mode is active. To return to the normal single-voice play mode, press any single
voice selector.
Adjusting the Balance Between the Dual-mode
Voices
.........................................................................................................................
Shifting a Dual-Mode Voice Up One Octave......................
Depending on which voices you combine using the DUAL mode,
the combination may sound better if one of the voices is shifted up an
octave. To shift the right voice, press the C5 key while pressing the two
voice selectors corresponding to the voices to be combined in the
DUAL mode. Press C5 again to shift the voice back to its normal range.
Use the C1 key in the same way to shift the left voice.
All voice combinations are set to the same octave by default.
The volume levels of the two voices combined in the DUAL mode
are normally set automatically to produce a pleasing balance (see
“Default Settings” below). The balance can be adjusted manually by
using the C2 through C4 keys on the keyboard while pressing the two
voice selectors corresponding to the voices to be combined in the
DUAL mode.
The C3 key produces equal (50:50) balance between the two voices,
while keys to the left of C3 increase the volume of the left voice in
relation to the right voice, and keys to the right of C3 increase the
volume of the right voice in relation to the left voice. By “left” and
“right” voice we refer to the relative positions of the voice selectors —
i.e. in a HARPSICHORD/ORGAN combination HARPSICHORD is
the left voice and ORGAN is the right voice.
● Default Settings
Voice Combinations Balance keys
PIANO/ORGAN ....................................... E2
E. PIANO 1/ORGAN................................ F2
E. PIANO 2/ORGAN................................ E2
HARPSICHORD/ORGAN........................ G2
* All other voice combinations are set to C3 (equal balance).
Equal
balance.
Left voice
maximum.
Right voice
maximum.
C
3
C
2
C
4
P
IANO 2
HARPSI-
CHORD
ORGAN
P
IANO 2
HARPSI-
CHORD
ORGAN
Left voice
shift up.
Right voice
shift up.
C
1
C
5

The Pedals
Transposition
Z Press and hold the [MIDI/TRANSPOSE] button.
X Press a key between F#2 and F#3 according to the desired amount
of transposition.*
C Release the [MIDI/TRANSPOSE] button.
* Pressing the C3 key produces normal keyboard pitch. Pressing the
key to the left of C3 (B2) transposes the pitch of the keyboard down
a semitone, the next key to the left (Bb2) transposes down a whole
tone (two semitones), etc., down to the F#2 key which transposes
down 6 semitones. Upward transposition is accomplished in the
same way using the keys to the right of C3, up to F#3 which trans-
poses up 6 semitones.
NOTE
• Notes below and above the A-1 — C7 of the YDP-88
II
sound one octave
higher and lower, respectively.
The [MIDI/TRANSPOSE] button and keys F#2 through F#3 on the keyboard are used for transposition.
The YDP-88II has three foot pedals that produce a range of expressive
effects similar to those produced by the pedals on an acoustic piano.
The YDP-88II’s TRANSPOSE function makes it possible to shift the pitch of
the entire keyboard up or down in semitone intervals up to a maximum of six
semitones. “Transposing” the pitch of the YDP-88II keyboard facilitates playing in
difficult key signatures, and you can easily match the pitch of the keyboard to the
range of a singer or other instrumentalist.
MIDI/TRANSPOSE
C
3
F#
2
Normal
pitch.
Transpose
down.
Transpose
up.
F
#
3
-5 -3 -1 0 +2 +4 +5
-6 -4 -2 +1
+3 +6
Soft pedal
Damper pedal
Sostenuto pedal
Soft (Left) Pedal...............................................................................................
The soft pedal reduces the volume and slightly changes the timbre of
notes played while the pedal is pressed. The soft pedal will not affect
notes which are already playing when it is pressed.
Damper (Right) Pedal ................................................................................
The damper pedal functions in the same way as a damper pedal on
an acoustic piano. When the damper pedal is pressed notes played have
a long sustain. Releasing the pedal immediately stops (damps) any
sustained notes.
Sostenuto (Center) Pedal......................................................................
If you play a note or chord on the keyboard and press the sostenuto
pedal while the note(s) are held, those notes will be sustained as long as
the pedal is held (as if the damper pedal had been pressed) but all
subsequently played notes will not be sustained. This makes it possible
to sustain a chord, for example, while other notes are played “staccato.”
8

Pitch Control
Pitch control makes it possible to tune the YDP-88II over a ±50-cent range
(approximate) in approximately 1.6-cent intervals. A hundred “cents” equals one
semitone, so the tuning range provided allows fine tuning of overall pitch over a
range of approximately a semitone. Pitch control is useful for tuning the YDP-
88II to match other instruments or recorded music.
Tuning Up ...............................................................................................................
Z To tune up (raise pitch), hold the A-1 and B-1 keys simultaneously.
X Press any key between C3 and B3. Each time a key in this range is
pressed the pitch is increased by approximately 1.6 cents, up to a
maximum of 50 cents above standard pitch.
C Release the A-1 and B-1 keys.
Tuning Down.......................................................................................................
Z To tune down (lower pitch), hold the A-1 and A#-1 keys simulta-
neously.
X Press any key between C3 and B3. Each time a key in this range is
pressed the pitch is decreased by approximately 1.6 cents, up to a
maximum of 50 cents below standard pitch.
C Release the A-1 and A#-1 keys.
To Restore Standard Pitch*.................................................................
Z To restore standard pitch (A3 = 440 Hz), hold the A-1, A#-1 and
B-1 keys simultaneously.
X Press any key between C3 and B3.
C Release the A-1, A#-1 and B-1 keys.
* Standard pitch (A3 = 440 Hz) is set when the [POWER] switch is
initially turned ON.
NOTE
• The PITCH CONTROL function has no effect when LOCAL OFF is active
(see “MIDI FUNCTIONS,” page 13).
C
3
B
3
A
-1
B
-1
A
-1
A#
-1
C
3
B
3
A
-1
B
-1
A#
-1
C
3
B
3
9

The Metronome & Tempo Control
The YDP-88II built-in metronome is a convenient feature for practice, and it
can also provide a solid rhythmic guide when recording using the Recorder
feature, described below.
The Metronome
The metronome sound is turned on and off via the [METRO-
NOME] button. Press the [METRONOME] button so that its indicator
lights to turn the metronome on, then again so the indicator goes out to
turn the metronome off.
Metronome Volume ......................................................................................
The volume of the metronome sound can be independently adjusted
by using the [TEMPO] control while holding the [METRONOME]
button. Sliding the control to the right increases the metronome volume.
Metronome Time Signature.................................................................
The time signature of the metronome sound can be set by pressing
the appropriate voice selector button while holding the [METRO-
NOME] button, as follows:
[METRONOME] + [PIANO] No accent (default)
[METRONOME] + [E. PIANO 1] 2 time
[METRONOME] + [E. PIANO 2] 3 time
[METRONOME] + [HARPSICHORD] 4 time
[METRONOME] + [ORGAN] 6 time
Tempo Control
The tempo of the metronome and recorder playback can be con-
trolled in two ways:
■ Use the panel [TEMPO] control to set the required tempo from 32
to 280 quarter-note beats per minute.
■ For more precise tempo settings press the appropriate key on the
keyboard while holding the [METRONOME] button.
A
-1
C
0
C
1
C
2
C
3
C
4
C
5
C
6
32
36
38
34
42
46
48
52
56
60
62
40
44
50
54
58
66
70
72
76
80
84
86
64
68
74
78
82
90
94
96
100
104
108
110
88
92
98
102
106
114
118
120
124
128
132
134
112
116
122
126
130
138
142
144
148
152
156
158
136
140
180
188
196 232
248
264208
216
146
150
154
164
172
176
184
192
200
204
212
220
224
240
256
272
280
160
168
C
7
Tempo
Tempo
Tempo/Key Chart
E. PIANO 2
METRONOME
A
NO 1
HARPSI-
CHORD
ORGAN
METRONOME
METRONOME
32 280120
TEMPO
METRONOME
32 280120
TEMPO
10

The YDP-88II recorder lets you record what you play on the keyboard and
then play it back. This is a useful adjunct to any keyboard study program, since it
lets you hear exactly how you sound from the listener’s perspective. It can also
be just plain fun.
The recorder actually records the following data:
● Notes played ● Voice selection
● Dual mode voices ● Dual balance ● Dual mode octave shift
● Damper pedal ● Soft pedal
● Sostenuto pedal (not recorded as an initial setting)
● Tempo (Initial setting only.)
Using the Recorder
Press either the RECORDER [REC] or [PLAY] button to stop
recording.
Recording
Engage the Record Ready Mode ..................................................
Press the RECORDER [REC] button to engage the record ready
mode (recording does not actually start yet). The [REC] button indica-
tor will light.
Make All Necessary Initial Settings ...........................................
Before actually beginning to record, select the voice you want to
record with (or voices if you will be using the dual mode). You might
also want to set the volume and tempo controls.
Start Recording................................................................................................
Recording will begin automatically as soon as you play a note on the
keyboard or press the [PLAY] button.
NOTE
• If the metronome was on when you started recording, you’ll be able to
keep time with the metronome while recording, but the metronome sound
will not be recorded.
• You can record up to a maximum of about 1,300 notes, depending on
pedal usage and other factors. The [REC] button indicator will begin to
flash when recorder memory is almost full, and recording will stop
automatically.
Stop Recording................................................................................................
PLAY REC
RECORDER
PIANO
E. PIANO 2
E. PIANO 1
HARPSI-
CHORD
ORGAN
PLAY REC
RECORDER
11

Using the Recorder
Changing the Initial Settings.............................................................
The initial voice (including dual mode) and tempo settings made in
step 2 of the recording procedure are actually recorded by the YDP-
88II. These initial settings can be changed after the recording is finished
by pressing the [REC] button to engage the record ready mode, making
the required changes, and then pressing the [REC] button again to exit
from the record ready mode and register the changes. If you do this, be
careful not to press the [PLAY] button or a key on the keyboard, either
of which will start recording and erase all previous recorded data.
Erasing the recorded data....................................................................
The recorded data can be erased by first pressing the [REC] button
to engage the record ready mode, and then pressing the [PLAY] button
twice without recording any data.
Playback
To play back what you’ve recorded, simply press the RECORDER
[PLAY] button. Playback starts from the beginning of the recorded
data, and will stop automatically at the end of the recorded data. You
can also stop playback at any time by pressing the [PLAY] button.
NOTE
• It is possible to play along on the keyboard during playback.
• The playback volume and tempo can be adjusted by using the [MASTER
VOLUME] and [TEMPO] controls, respectively.
• If the metronome is being used during playback, the metronome will stop
when playback is stopped.
• All recorder data will be erased when the YDP-88
II
power is turned off. It
is possible to store recorded data to an external MIDI storage device such
as the Yamaha DOU-10 Disk Orchestra Unit by using the Bulk Dump
function described on page 16.
• The playback data is not transmitted via the MIDI OUT connector.
Fast Forward Playback ............................................................................
When you want to locate a specific point in a recording you can
quickly move forward through the recording while monitoring the
sound by pressing the [REC] button while holding the [MIDI/TRANS-
POSE] button.
PLAY REC
RECORDER
MIDI/TRANSPOSE
PLAY REC
RECORDER
12

MIDI Functions
A Brief Introduction to MIDI...............................................................................................................................................
The MIDI information (messages) transmitted and received by
the YDP-88II are as follows:
● Note and Velocity Data
This information tells the receiving keyboard or tone generator to
play a certain note (specified by the MIDI note number) at a certain
dynamic level (specified by the MIDI velocity value). Note and
velocity data is transmitted by the YDP-88II whenever a key is
pressed, and the YDP-88II’s internal AWM tone generator will “play”
the corresponding note(s) whenever note and velocity data is received
from an external MIDI device.
● Program Change Numbers
The YDP-88II transmits a MIDI program change number between
0 and 4 when one of its voice selectors is pressed. This normally
causes the correspondingly numbered voice to be selected on a
receiving MIDI device. The YDP-88II will respond in the same way,
automatically selecting the appropriate voice when a MIDI program
change number is received. See “Program Change ON/OFF” on page
15 for information on turning program change number reception and
transmission ON or OFF.
MIDI “Messages” Transmitted & Received by the YDP-88II............................................................
● Control Change Numbers
Control Change data representing Damper pedal operation is
transmitted by the YDP-88II whenever one of these pedals is used. If
the receiving device is a tone generator or another keyboard, it will
respond in the same way as the YDP-88II’s internal tone generator
when one of the pedals is used. The YDP-88II also receives and
responds to the appropriate control change data. See “Control Change
ON/OFF” on page 15 for information on turning control change
number reception and transmission ON or OFF.
MIDI, the Musical Instrument Digital Interface, is a world-
standard communication interface that allows MIDI-compatible
musical instruments and equipment to share musical information and
control one another. This makes it possible to create “systems” of
MIDI instruments and equipment that offer far greater versatility and
control than is available with isolated instruments. For example, most
MIDI keyboards (including the YDP-88II, of course) transmit note
and velocity (touch response) information via the MIDI OUT
connector whenever a note is played on the keyboard. If the MIDI
OUT connector is connected to the MIDI IN connector of a second
keyboard (synthesizer, etc.) or a tone generator (essentially a
synthesizer with no keyboard), the second keyboard or tone generator
will respond precisely to notes played on the original transmitting
keyboard. The result is that you can effectively play two instruments
at once, providing thick multi-instrument sounds.
This same type of musical information transfer is used for MIDI
sequence recording. A sequence recorder can be used to “record”
MIDI data received from a YDP-88II, for example. When the
recorded data is played back, the YDP-88II automatically “plays” the
recorded performance in precise detail.
The examples given above really only scratch the surface. MIDI
can do much, much more. The YDP-88II offers a number of MIDI
functions that allows it to be used in fairly sophisticated MIDI
systems.
NOTE
• Always use a high-quality MIDI cable to connect MIDI
OUT to MIDI IN terminals. Never use MIDI cables
longer than about 15 feet, since cables longer than this
can pick up noise which can cause data errors.
DOU-10
MIDI Cable
MIDI INMIDI OUT
YDP-88II
DOU-10
YDP-88II
Data Being Recorded
Playback Data
MIDI IN MIDI INMIDI OUTMIDI OUT
13

MIDI Functions
MIDI Transmit & Receive Channel Selection...................................................................................................
● Setting the YDP-88II MIDI Channels
(Set to receive on MIDI
channel 2)
(Set to receive on MIDI channel 1)
For setting the transmit
channel. (C1 ~ D#2)
For setting the receive
channel. (C4 ~ D#5)
For OMNI mode
ZPress and hold the [MIDI/TRANSPOSE] button.
XPress the key on the keyboard corresponding to the desired MIDI
transmit or receive channel.*
CRelease the [MIDI/TRANSPOSE] button.
* Keys C1 through D#2 on the keyboard are used to set the MIDI
transmit channel, and keys C4 through D#5 are used to turn the
OMNI mode OFF and set the MIDI receive channel as shown in
the illustration to the left. The E5 key sets the OMNI receive
mode and basic receive channel 1.
NOTE
• When the power is initially turned ON, MIDI receive is
set to the OMNI mode and the transmit channel is set
to 1.
The MIDI system allows transmission and reception of MIDI data
on 16 different channels. Multiple channels have been implemented
to allow selective control of certain instruments or devices connected
in series. For example, a single MIDI sequence recorder could be
used to “play” two different instruments or tone generators. One of
the instruments or tone generators could be set to receive only on
channel 1, while the other is set to receive on channel 2. In this
situation the first instrument or tone generator will respond only to
channel-1 information transmitted by the sequence recorder, while the
second instrument or tone generator will respond only to channel-2
information. This allows the sequence recorder to “play” two
completely different parts on the receiving instruments or tone
generators.
In any MIDI control setup, the MIDI channels of the transmitting
and receiving equipment must be matched for proper data transfer. An
“OMNI” receive mode is also available, which allows reception on all
16 MIDI channels. In the OMNI mode it is not necessary to match
the receive channel of the receiving device to the transmit channel of
the transmitting device (except when receiving mode messages).
Other MIDI Functions
The MIDI functions listed to the right are engaged by holding
down the [MIDI/TRANSPOSE] button and pressing the correspond-
ing voice selector. Full details are given in the following pages.
Function YDP-88II Voice Selector
Local Control ON/OFF [PIANO]
Program Change ON/OFF [E. PIANO 1]
Control Change ON/OFF [E. PIANO 2]
Multi-Timbre Mode [HARPSICHORD]
MIDI Split & Left Local OFF [ORGAN]
MIDI FUNCTION CHART
MIDI Transmit Transpose.......................................................................................................................................................
This function allows the MIDI note data transmitted by the YDP-
88II to be transposed up or down in semitone increments by up to
plus or minus 6 semitones. The pitch of the YDP-88II itself is not
affected.
● Setting the MIDI Transpose Function
ZPress and hold the [MIDI/TRANSPOSE] button.
XPress the key on the keyboard corresponding to the desired
amount of transposition.*
CRelease the [MIDI/TRANSPOSE] button.
* Keys F#5 through F#6 on the keyboard are used to set the MIDI
transmit transpose function as shown in the illustration to the left.
NOTE
• When the power is turned ON, MIDI transmit transpose
is set to 0 (no transposition).
Tone Generator
MIDI IN
MIDI IN MIDI THRU
DOU-10
MIDI OUT
YDP-88II
C
1
D#
2
C
4
D#
5
1356810121315
2 4 7 9 11 14 16
1356810121315
2 4 7 9 11 14 16
E
5
MIDI/TRANSPOSE
C
6
F#
5
F#
6
-6 -4 -2 +1 +
3
+
6
+5+4+20-1-3-5
MIDI/TRANSPOSE
14

MIDI Functions
Local Control ON/OFF .............................................................................................................................................................
“Local Control” refers to the fact that, normally, the YDP-88II
keyboard controls its internal tone generator, allowing the internal
voices to be played directly from the keyboard. This situation is
“Local Control ON” since the internal tone generator is controlled
locally by its own keyboard.
Local control can be turned OFF, however, so that the YDP-88II
keyboard does not play the internal voices, but the appropriate MIDI
information is still transmitted via the MIDI OUT connector when
notes are played on the keyboard. At the same time, the internal tone
generator responds to MIDI information received via the MIDI IN
connector.
When using the DOU-10 Disk Orchestra Unit with the YDP-88II,
for example, Local Control should be turned OFF when recording
using the DOU-10 voices only, and ON when recording the YDP-88II
voices while listening to playback of the DOU-10 voices.
= Local Control OFF
= Local Control ON
ZHold down the [MIDI/TRANSPOSE] button.
XPress the [PIANO] voice selector. If the PIANO LED is lit when
the [PIANO] voice selector is pressed, you have turned local
control OFF. If the PIANO LED is not lit when the [PIANO]
voice selector is pressed, you have turned local control ON.
CRelease the [MIDI/TRANSPOSE] button.
Control Change ON/OFF.......................................................................................................................................................
Normally the YDP-88II will respond to MIDI control change data
received from an external MIDI device or keyboard, causing the
selected YDP-88II voice to be affected by pedal and other “control”
settings received from the controlling device. The YDP-88II also
transmits MIDI control change information when one of its pedals are
operated.
This function makes it possible to cancel control change data
reception and transmission if you do not want the YDP-88II voices to
be affected by control change data received from an external device
or vice versa.
= Control Change OFF
= Control Change ON
ZHold down the [MIDI/TRANSPOSE] button.
XPress the [E. PIANO 2] voice selector. If the E. PIANO 2 LED is
lit when the [E. PIANO 2] voice selector is pressed, you have
turned control change reception/transmission OFF. If the E.
PIANO 2 LED is not lit when the [E. PIANO 2] voice selector is
pressed, you have turned control change reception/transmission
ON.
CRelease the [MIDI/TRANSPOSE] button.
Program Change ON/OFF....................................................................................................................................................
Normally the YDP-88II will respond to MIDI program change
numbers received from an external keyboard or other MIDI device,
causing the correspondingly numbered YDP-88II voice to be selected.
The YDP-88II will normally also send a MIDI program change
number whenever one of its voices is selected, causing the corre-
spondingly numbered voice or program to be selected on the external
MIDI device if the device is set up to receive and respond to MIDI
program change numbers.
This function makes it possible to cancel program change number
reception and transmission so that voices can be selected on the YDP-
88II without affecting the external MIDI device, and vice versa.
= Program Change OFF
= Program Change ON
ZHold down the [MIDI/TRANSPOSE] button.
XPress the [E. PIANO 1] voice selector. If the E. PIANO 1 LED is
lit when the [E. PIANO 1] voice selector is pressed, you have
turned program change reception/transmission OFF. If the E.
PIANO 1 LED is not lit when the [E. PIANO 1] voice selector is
pressed, you have turned program change reception/transmission
ON.
CRelease the [MIDI/TRANSPOSE] button.
PIANO E. PI
A
MIDI/TRANSPOSE
PIANO
PIANO
N
O E. PIANO1 E. P
I
MIDI/TRANSPOSE
E. PIANO1
E. PIANO1
N
O1 E. PIANO2
HA
R
CH
O
MIDI/TRANSPOSE
E. PIANO2
E. PIANO2
15

MIDI Functions
The Multi-Timbre Mode...........................................................................................................................................................
The Multi-Timbre mode is a special mode in which the YDP-88II
voices can be independently controlled on different MIDI channel
numbers by an external MIDI device. The Multi-Timbre mode can be
activated as follows:
= Multi-Timbre Mode ON
= Multi-Timbre Mode OFF
ZHold down the [MIDI/TRANSPOSE] button.
XPress the [HARPSICHORD] voice selector. If the HARPSI-
CHORD LED is lit when the [HARPSICHORD] voice selector
is pressed, you have turned the Multi-Timbre mode ON. If the
HARPSICHORD LED is not lit when the [HARPSICHORD]
voice selector is pressed, you have turned the Multi-Timbre mode
OFF.
CRelease the [MIDI/TRANSPOSE] button.
The MIDI Split & Left Local OFF Mode...................................................................................................................
In the MIDI split mode one section of the YDP-88II keyboard is
used to play a YDP-88II voice in the normal way, while the remaining
section is used to play a second MIDI keyboard or tone generator
such as the Yamaha DOU-10 Disk Orchestra Unit. In this mode the
right-hand section of the keyboard is used to play an internal YDP-
88II voice, while the left-hand section of the keyboard plays the
external keyboard or tone generator. Playing the left-hand section of
the keyboard produces no sound from the YDP-88II. The “split
point,” or the key that divides the left- and right-hand sections of the
keyboard can be set at any desired key.
SPLIT POINT
▼
Left-hand section plays
a DOU-10 bass voice.
Right-hand section plays a
YDP-88II piano voice.
ZPress the [ORGAN] voice selector while holding down the
[MIDI/TRANSPOSE] button. The ORGAN LED will flash.
XWhile still holding the [MIDI/TRANSPOSE] button, press the
key on the keyboard at which you want to set the split point. The
ORGAN LED will light continuously. The split-point becomes
the first key of the left-hand section.
CRelease the [MIDI/TRANSPOSE] button.
VTo return to the normal full-keyboard mode, hold the [MIDI/
TRANSPOSE] button and press the [ORGAN] voice selector,
then release both buttons.
NOTE
• When the power is turned ON the default split point key
— F
#
2 — will be automatically selected. If a new split
point is selected it remains active until the power is
turned OFF or a different split point is selected.
Bulk Data Dump .............................................................................................................................................................................
This function is used to transmit all data stored in the Recorder
memory to a MIDI data storage device such as the Yamaha DOU-10
Disk Orchestra Unit, other sequence recorders, or MIDI compatible
computers.
ZHold [MIDI/TRANSPOSE] and press the [PLAY] button.
Transmission will begin.
XRelease the buttons.
NOTE
• Bulk dump will not function when the metronome is on
or when the recorder is in operation.
(Set to receive on MIDI
channel 2)
The MIDI split mode is useful if, for example, you want to play a
piano (YDP-88II) voice with the right hand while playing a synthe-
sizer bass line or string section with the left hand.
When the MIDI split mode is activated, notes played on the left-
hand section are transmitted via the YDP-88II MIDI OUT connector
on MIDI channel 2. Notes played on the right-hand section are
transmitted on the “basic channel” (i.e. the channel set using the
MIDI channel selection function described previously).
O
R
HARPSI-
CHORD
N
O2
MIDI/TRANSPOSE
HARPSI-
CHORD
HARPSI-
CHORD
ORGAN
H
ARPSI-
C
HORD
MIDI/TRANSPOSE
DOU-10
OUT PUT
R
L
AUX IN
L
RMIDI OUT
MIDI
IN
YDP-88II
MIDI/TRANSPOSE
RECORDER
PLAY REC
16

Troubleshooting
If you encounter what appears to be a malfunction, please check the follow-
ing points before assuming that your YDP-88II is faulty.
1.No Sound When the Power is Turned ON
Is the AC plug properly connected to an AC wall outlet? Check the AC connection carefully. Is the
MASTER VOLUME control turned up to a reasonable listening level?
Also make sure that a pair of headphones is not plugged into the PHONES jack, and the Local
Control (page 15) is ON.
2.The Damper Pedal Doesn’t Work
If the damper pedal doesn’t work, or notes are sustained even when the pedal is not pressed, make sure
that the pedal cord is properly plugged into the main unit (page iii).
3.The YDP-88II Reproduces Radio or TV Sound
This can occur if there is a high-power transmitter in your vicinity. Contact your Yamaha dealer.
4.Intermittent Static Noise
This is usually due to turning ON or OFF a household appliance or other electronic equipment which is
fed by the same AC mains line as your YDP-88II.
5.Interference Appears On Radio or TV Sets Located Near the YDP-88II
The YDP-88II contains digital circuitry which can generate radio-frequency noise. The solution is to
move the YDP-88II further away from the affected equipment, or vice versa.
6.Distorted Sound When the YDP-88II is Connected to An External Amplifier/Speaker System
If the YDP-88II is connected to a stereo system or instrument amplifier and the sound is distorted,
reduce the setting of the YDP-88II volume control to a level at which the distortion ceases.
Options & Expander Modules
● Options
BC-8 Bench
A comfortable bench styled to match your Yamaha YDP-88II.
HPE-160 Stereo Headphones
High-performance lightweight dynamic headphones with extra-soft ear pads.
● Expander Modules
DOU-10 Disk Orchestra Unit
A range of MIDI recording and playback functions, plus Yamaha DOC software, Disklavier
PianoSoft™, General MIDI, and Standard MIDI File disk playback capability.
17

Keyboard Stand Assembly
• Be careful not to confuse parts, and be sure to install all parts in the
correct direction. Please assemble in accordance with the se-
quence given below.
• Assembly should be carried out by at least two persons.
• Be sure to use the correct screw size, as indicated above. Use of
incorrect screws can cause damage.
• Be sure to tighten up all screws upon completing assembly of each
unit.
• To disassemble, reverse the assembly sequence given below.
ZOpen the box and remove all the parts.
On opening the box you should find the parts shown in
the illustration above. Check to make sure that all the
required parts are provided.
1
• Bundled pedal cord inside
• 6 x 35 mm round-head screws x 4 1
• 4 x 10 mm round-head screws x 2 2
• 4 x 20 mm tapping screws x 4 3
• 6 x 16 mm flat-head screws x 4 4
A
B
C
D
D
18

3
• 6 x 35 mm round-head screws 1
C
2
R
L
• Use the vinyl tie attached to the bottom of the pedal
box to secure the cord.
• The other vinyl tie will be used later in step N.
19
XUntie the two vinyl ties.
Untie both vinyl ties and straighten out the bundled cord
attached to the bottom of the pedal box. Use the vinyl tie
attached to the bottom of the pedal box to secure the cord.
Don’t discard the other vinyl tie, you’ll need it later in
step N.
CAttach the side panels (D) to the pedal box
(C).
Place the pedal box on top of the wooden blocks attached
to the side panels (D), and while eliminating any gaps
between the pedal box and side panels, attach using the
four 6 x 35 millimeter round-head screws 1 — two
screws on each side. Make sure the pedals extend in the
same direction as the side panel feet.

20
R
L
L
VAttach the rear panel (B).
With the rear panel’s rough surface facing outward and
the panel slightly angled as shown in the illustration,
lower it onto the feet’s protruding edge at the rear of the
pedal box. Then, while eliminating any gaps between the
rear and side panels, secure the top of the rear panel to the
side panel brackets using two 4 x 10 mm round-head
screws 2. Finally, secure the bottom of the rear panel to
the pedal box using four 4 x 20 mm tapping screws 3.
BInstall the main unit (A).
Place the main unit (A) on the side panels (D) with the
screws on its bottom panel (toward the rear of the main
unit) just behind the grooves in the brackets located at the
top of the side panels. Then slide the main unit forward
until it stops. WATCH YOUR FINGERS WHEN DO-
ING THIS!!
• 4 x 20 mm tapping screws 3
54
• 4 x 10 mm round-head screws 2
B
• Be sure to place your
hands at least 15
centimeters from either end of
the main unit when positioning it.
15 cm
D
D
A
• Rough surface
outward.
15 cm

21
• Use the vinyl tie that was removed from the bundled pedal
cord in step X to tie up any slack in the pedal cord.
6
• 6 x 16 mm flat-head screws 4
D
A
A
A
Align the holes on the bottom panel of the main unit with
the holes in the brackets on the side panels (also center
the main unit to produce equal clearance on the left and
right sides, as shown in the illustration), then screw in and
securely tighten the four 6 x 16 millimeter flat-head
screws 4.
• Do not hold the keyboard in any position other than the position
shown in the above illustration.
• Fingers can become pinched between the main unit and the rear or
side panels, be extra careful so as not to drop the main unit.
NConnect the pedal cord.
The pedal cord from the pedal box must be plugged into
the corresponding connector in the main unit. The plug
only goes in one way (the lug on the connector should
face the rear of the main unit, as shown in the illustra-
tion), so don’t try to force it in the wrong way around.

22
MVoltage Selector
Before connecting the AC power cord, check the setting
of the voltage selector which is provided in some areas.
To set the selector for 110V, 130V, 220V or 240V main
voltages, use a “minus” screwdriver to rotate the selector
dial so that the correct voltage for your region appears
next to the pointer on the panel. The voltage selector is set
at 240V when the unit is initially shipped.
After the proper voltage has been selected connect the AC
power cord. A plug adaptor may be also provided in some
areas to match the pin configuration of the AC wall outlets
in your area.
<Set the adjuster.
For stability, an adjuster is provided on the bottom of the
pedal box (C). Rotate the adjuster until it comes in firm
contact with the floor surface. The adjuster ensures stable
pedal operation and facilitates pedal effect control. If the
adjuster is not in firm contact with the floor surface, dis-
torted sound may result.
• A voltage selector is provided in some areas.
7 8
130V
110V
240V
220V
VOLTAGE
SELECTOR
C

23
• When moving the instrument after assembly, always hold the
lower surface of the main unit, NEVER the top portion. Improper
handling can result in damage to the instrument or personal
injury.
■ After completing the assembly, please
check the following.
• Are there any parts left over?
➔ Review the assembly procedure and correct any errors.
• Is the YDP-88II clear of doors and other movable fixtures?
➔ Move the YDP-88II to an appropriate location.
• Does the YDP-88II make a rattling noise when you shake it?
➔ Tighten all screws.
• Does the pedal box rattle or give way when you step on the ped-
als?
➔ Turn the adjuster so that it is set firmly against the floor.
• Is the pedal cord inserted securely into the socket?
➔ Check the connection.
• If the main unit creaks or is otherwise unsteady when you play on
the keyboard, refer to the assembly diagrams and retighten all
screws.

24
1. NOTE ON/OFF
Data format: [9nH] -> [kk] -> [vv]
9nH = Note ON/OFF event (n = channel number)
kk = Note number
Transmit: 15 ~ 114 = D#-1 ~ F#7
Receive: 21 ~ 108 = A-1 ~ C7
vv = Velocity (Key ON = 1 ~ 127. Key OFF = 0)
Data format: [8nH] -> [kk] -> [vv]
8nH = Note OFF event (n = channel number)
kk = Note number
Transmit: 15 ~ 114 = D#-1 ~ F#7
Receive: 21 ~ 108 = A-1 ~ C7
vv = Velocity (Key OFF = 0 ~ 127)
* 8nH (note off) is receive only.
9nH (vvH=00H) used for transmission.
2. CONTROL CHANGE & MODE MESSAGES
Data format: [BnH] -> [cc] -> [vv]
BnH = Control event (n = channel number)
cc = Control number
vv = Control value
cc
CONTROL
VALUE [vv]
07H Volume 00H : -∞
(reception only) 6FH : -3dB
7FH : ±0dB
0AH Panpot 00H ~ 17H : Left 6
(reception only) 18H ~ 1FH : Left 5
20H ~ 27H : Left 4
28H ~ 2FH : Left 3
30H ~ 37H : Left 2
38H ~ 3FH : Left 1
40H ~ 47H : Center
48H ~ 4FH : Scaling pan
50H ~ 57H : Right 1
58H ~ 5FH : Right 2
60H ~ 67H : Right 3
68H ~ 6FH : Right 4
70H ~ 77H : Right 5
78H ~ 7FH : Right 6
0BH Expression 00H : -∞
(reception only) 6FH : -3dB
7FH : ±0dB
40H Damper 00H ~ 3FH : OFF
Pedal 40H ~ 7FH : ON
42H Sostenuto 00H ~ 3FH : OFF
Pedal 40H ~ 7FH : ON
43H Soft Pedal 00H ~ 3FH : OFF
40H ~ 7FH: ON
78H
All Sound OFF (reception only)
00H
79H
Reset All Controller (reception only)
00H
7AH Local Control ON/OFF 00H : OFF
(reception only) 7FH : ON
7BH All Notes OFF (reception only) 00H
7CH Omni OFF/All Notes OFF 00H
(reception only)
7DH Omni ON/All Notes OFF 00H
(reception only)
3. PROGRAM CHANGE
Data format: [CnH] -> [pp]
CnH = program event (n = channel number)
pp = Program number
pp VOICE NAME pp VOICE NAME
00 PIANO 03 HARPSICHORD
01 E. PIANO1 04 ORGAN
02 E. PIANO2
If you’re already very familiar with MIDI, or are using a com-
puter to control your music hardware with computer-generated
MIDI messages, the data provided in this section can help you
to control the YDP-88II.
MIDI Data Format
(2) YDP-88II MIDI Format
Data format: [F0H] -> [43H] -> [73H] -> [38H]
-> [yy] -> [F7H]
43H : Yamaha ID
73H :
] Model ID
38H :
yy : Substatus
yy Information
02H Internal MIDI clock.
03H External MIDI clock.
13H Multi-timbre mode OFF.
15H Multi-timbre mode ON.
61H MIDI FA cancel ON.
62H MIDI FA cancel OFF.
7cH
All notes OFF; receive channel = c+1; omni OFF.
* When yy=2, 3, 13, 15 or 7c, YDP common ID
(01H) is recognized as well as 73H, 38H.
*
All Control Change values are reset when [13H] or
[15H] is received. All voices and other parameters
are also reset when [15H] is received in order to
ensure the same initial settings.
* When [61H] is received, playback will not start
when “start” (FAH) is received. However, “stop”
(FCH) and the “timing clock” (F8H) will not be
affected. Use [62H] to cancel this function.
(3) Special Control
Data format: [F0H] -> [43H] -> [73H] -> [38H]
-> [11H] -> [0nH] -> [cc] -> [vv] -> [F7H]
43H : Yamaha ID
73H :
] Model ID
38H :
11H : Special control
0nH : Control MIDI change + channel number
cc : Control number
vv : Value
cc Control Value [vv]
08H Dual Balance 00H : Left Voice Max.
7FH : Right Voice Max.
1BH Metronome 00H : Off
(reception only)
01H : On
5AH Dual Mode 00H : Dual Off
01H : Dual On (Normal)
02H : Dual On (Left voice 1
octave up)
03H : Dual On (Right voice 1
octave up)
5CH Dual Voice [vv] : Dual Voice
(4) Absolute Tempo
Data format: [F0H] -> [43H] -> [73H] -> [xx]
-> [11H] -> [1nH] -> [cc] -> [dd] -> [F7H]
43H : Yamaha ID
73H :
] Model ID
38H :
11H : Special control
1nH : Control MIDI change
(Transmit: n=control channel number)
(Receive: any channel OK)
ccH : Absolute tempo low byte
ddH : Absolute tempo hight byte
Tempo=dd*128+cc
4. SYSTEM REALTIME MESSAGES
[rrH]
rr= Control
F8H: Timing clock
FAH: Start
FCH: Stop
FEH: Active sensing
Data Transmission Reception
F8H Transmitted every Received as 96-clock
96 clocks tempo timing when
MIDI clock is set to
External
FAH Recorder start Recorder start
FCH Recorder stop Recorder stop
FEH Transmitted every All notes are turned
200 milliseconds off if no data is
received for more than
400 milliseconds
*
Caution: If an overrun framing error occurs the
Damper, Sostenuto, and Soft effects for all channels
are turned off and an All Note Off occurs.
5. SYSTEM EXCLUSIVE MESSAGES
(1) YAMAHA MIDI Format
Data format: [F0H] -> [43H] -> [xnH] -> [ff] ... [F7H]
43H : Yamaha
xn : Substatus + channel number.
ff : Format number.
x ff Information
0 7CH
Panel Data receive.
2 7CH
Panel Data Send occurs when this data received.
2 7DH
Name Data Send occurs when this data received.
* This message is effective only when the channel
number “n” is set to the same as the YDP-88II
receive channel number.
PANEL DATA SEND FORMAT
F0H, 43H, 0nH, 7CH, 00H, 1BH (n: channel number)
53H, 4BH, 20H, 20H (SK)
43H, 4CH, 50H, 27H, 39H, 34H
3xH, 3yH (x, y: version number)
[PANEL DATA]
[CHECK SUM (1byte)] =
0-(53H+4BH+20H+...+Data end)
F7H
• Panel Data Contents
(1) VOICE
(2) DUAL VOICE
(3) DUAL ON/OFF
(4) DUAL BALANCE
(5) 0
(6) 0
(7) 0
(8) 0
(9) 0
(10) 0
(11) 0
(12) SPLIT POINT
(13) 0
(14) Absolute tempo low byte
(15) Absolute tempo high byte
SEQUENCE DATA FORMAT
F0H, 43H, 73H
38H
(Product ID)
06H (Bulk ID)
02H (Bulk number)
03H, 0FH, 0AH, 02H
(Data length= wxyzH 0x1fd1*2 bytes)
[PANEL DATA] (Sequence data)
[CHECK SUM (1byte)] = 0-sum (BULK DATA)
F7H
MODEL ID CODE SEND FORMAT
F0H, 43H, 0nH, 7DH, 00H, 10H (n: channel number)
53H, 4BH, 20H, 20H
] (Model ID)
43H, 4CH, 50H, 27H, 39H, 34H
3xH, 3yH, 20H, 20H, 20H, 20H (x, y: version number)
[CHECK SUM (1byte)] = 0-(53H+4BH+20H+......+20H)
F7H

25
YAMAHA [Digital Piano] Date: 10/03, 1996
Model: YDP-88II MIDI Implementation Chart Version: 1.0
Function Transmitted Recognized Remarks
Basic Default 1 1
Channel Changed 1~16 1~16
Default 3 1
Mode Messages X OMNI on, OMNI off
***************** X
Note 15~114 0~127
Number : True voice ***************** 21~108
Velocity Note on O 9nH, v=1~127 O v=1~127
Note off X 9nH, v=0 X
After key’s XX
Touch Ch’s XX
Pitch Bender XX
Control Change
07 XOVolume
10 XOPan pot
11 XOExpression
64 OODamper
66 OOSostenuto
67 OOSoft pedal
120 XOAll sounds off *1
121 XOReset All Controllers
Program OO
Change : True # *****************
System Exclusive OO
System : Song Position XX
: Song Select XX
Common : Tune XX
System : Clock OO
Real Time: Commands OO
Aux : Local ON/OFF XX
: All Notes Off XO (123~125) *1
Messages: Active Sense OO
: Reset XX
Notes : *1 = recieve if omni off or multi-timbre on
Mode 1: OMNI ON, POLY Mode 2: OMNI ON, MONO O: Yes
Mode 3: OMNI OFF, POLY Mode 4: OMNI OFF, MONO X: No

26
YDP-88II
KEYBOARD 88 KEYS (A-1 ~ C7)
POLYPHONY 28 NOTES MAX.
VOICE SELECTORS PIANO, E. PIANO1, E. PIANO2, HARPSICHORD, ORGAN
RECORDER PLAY, REC
PEDAL CONTROLS SOFT, SOSTENUTO, DAMPER
OTHER CONTROLS MASTER VOLUME, TEMPO, METRONOME, DEMO, MIDI/TRANSPOSE
JACKS/CONNECTORS PHONES x 2, AUX OUT L/L+R & R, MIDI IN/OUT
OUTPUT IMPEDANCE AUX OUT: Output impedance 600 Ω
MAIN AMPLIFIERS 10W x 2
SPEAKERS 16 cm x 2
DIMENTIONS
Music stand
1384 x 468 x 829 mm
(W x D x H) down
(54-1/2" x 18-1/2" x 32-5/8")
Music stand
1384 x 468 x 1001 mm
up
(54-1/2" x 18-1/2" x 39-3/8")
WEIGHT 42 kg (92.6 lbs.)
Specifications
• Specifications and descriptions in this owner’s manual are for information
purposes only. Yamaha Corp. reserves the right to change or modify prod-
ucts or specifications at any time without prior notice. Since specifications,
equipment or options may not be the same in every locale, please check
with your Yamaha dealer.
• This applies only to products distributed by Yamaha-Kemble Music (U.K.) Ltd.
IMPORTANT NOTICE FOR THE UNITED KINGDOM
Connecting the Plug and Cord
IMPORTANT. The wires in this mains lead are coloured in accor-
dance with the following code:
BLUE : NEUTRAL
BROWN : LIVE
As the colours of the wires in the mains lead of this apparatus may
not correspond with the coloured makings identifying the terminals
in your plug proceed as follows:
The wire which is coloured BLUE must be connected to the termi-
nal which is marked with the letter N or coloured BLACK.
The wire which is coloured BROWN must be connected to the
terminal which is marked with the letter L or coloured RED.
Making sure that neither core is connected to the earth terminal of
the three pin plug.

For details of products, please contact your nearest Yamaha or the
authorized distributor listed below.
Pour plus de détails sur les produits, veuillez-vous adresser à Yamaha
ou au distributeur le plus proche de vous figurant dans la liste suivante.
Die Einzelheiten zu Produkten sind bei Ihrer unten aufgeführten Nie-
derlassung und bei Yamaha Vertragshändlern in den jeweiligen
Bestimmungsländern erhältlich.
Para detalles sobre productos, contacte su tienda Yamaha más cercana
o el distribuidor autorizado que se lista debajo.
NORTH AMERICA
CANADA
Yamaha Canada Music Ltd.
135 Milner Avenue, Scarborough, Ontario,
M1S 3R1, Canada
Tel: 416-298-1311
U.S.A.
Yamaha Corporation of America,
Keyboard Division
6600 Orangethorpe Ave., Buena Park, Calif. 90620,
U.S.A.
Tel: 714-522-9011
MIDDLE & SOUTH AMERICA
MEXICO
Yamaha De Mexico S.A. De C.V.,
Departamento de ventas
Javier Rojo Gomez No.1149, Col. Gpe Del
Moral, Deleg. Iztapalapa, 09300 Mexico, D.F.
Tel: 686-00-33
BRASIL
Yamaha Musical Do Brasil LTDA.
Ave. Reboucas 2636, São Paulo, Brasil
Tel: 011-853-1377
PANAMA
Yamaha De Panama S.A.
Edificio Interseco, Calle Elvira Mendez no.10,
Piso 3, Oficina #105, Ciudad de Panama, Panama
Tel: 507-69-5311
OTHER LATIN AMERICAN COUNTRIES
AND CARIBBEAN COUNTRIES
Yamaha Music Latin America Corp.
6101 Blue Lagoon Drive, Miami, Florida 33126,
U.S.A.
Tel: 305-261-4111
EUROPE
THE UNITED KINGDOM
Yamaha-Kemble Music (U.K.) Ltd.
Sherbourne Drive, Tilbrook, Milton Keynes,
MK7 8BL, England
Tel: 01908-366700
IRELAND
Danfay Ltd.
61D, Sallynoggin Road, Dun Laoghaire, Co. Dublin
Tel: 01-2859177
GERMANY/SWITZERLAND
Yamaha Europa GmbH.
Siemensstraße 22-34, 25462 Rellingen,
F.R. of Germany
Tel: 04101-3030
AUSTRIA
Yamaha Music Austria
Schleiergasse 20, A-1100 Wien Austria
Tel: 01-60203900
THE NETHERLANDS
Yamaha Music Nederland
Kanaalweg 18G, 3526KL, Utrecht, The Netherlands
Tel: 030-2828411
BELGIUM
Yamaha Music Belgium
Keiberg Imperiastraat 8, 1930 Zaventem, Belgium
Tel: 02-7258220
FRANCE
Yamaha Musique France,
Division Claviers
BP 70-77312 Marne-la-Vallée Cedex 2, France
Tel: 01-64-61-4000
AFRICA
Yamaha Corporation,
International Marketing Division
Nakazawa-cho 10-1, Hamamatsu, Japan 430
Tel: 053-460-2312
MIDDLE EAST
TURKEY/CYPRUS
Yamaha Europa GmbH.
Siemensstraße 22-34, 25462 Rellingen,
F.R. of Germany
Tel: 04101-3030
OTHER COUNTRIES
Yamaha Corporation,
International Marketing Division
Nakazawa-cho 10-1, Hamamatsu, Japan 430
Tel: 053-460-2312
ASIA
HONG KONG
Tom Lee Music Co., Ltd.
11/F., Silvercord Tower 1, 30 Canton Road,
Tsimshatsui, Kowloon, Hong Kong
Tel: 730-1098
INDONESIA
PT. Yamaha Music Indonesia (Distributor)
PT. Nusantik
Gedung Yamaha Music Center, Jalan Jend. Gatot
Subroto Kav. 4, Jakarta 12930, Indonesia
Tel: 21-520-2577
MALAYSIA
Yamaha Music Malaysia, Sdn., Bhd.
16-28, Jalan SS 2/72, Petaling Jaya, Selangor,
Malaysia
Tel: 3-717-8977
PHILIPPINES
Yupangco Music Corporation
339 Gil J. Puyat Avenue, P.O. Box 885 MCPO,
Makati, Metro Manila, Philippines
Tel: 819-7551
SINGAPORE
Yamaha Music Asia Pte., Ltd.
Blk 17A Toa Payoh #01-190 Lorong 7
Singapore 1231
Tel: 354-0133
TAIWAN
Kung Hsue She Trading Co., Ltd.
No. 322, Section 1, FuHsing S. Road,
Taipei 106, Taiwan. R.O.C.
Tel: 02-709-1266
THAILAND
Siam Music Yamaha Co., Ltd.
865 Phornprapha Building, Rama I Road,
Patumwan, Bangkok 10330, Thailand
Tel: 2-215-3443
THE PEOPLE’S REPUBLIC OF CHINA
AND OTHER ASIAN COUNTRIES
Yamaha Corporation,
International Marketing Division
Nakazawa-cho 10-1, Hamamatsu, Japan 430
Tel: 053-460-2317
OCEANIA
AUSTRALIA
Yamaha Music Australia Pty. Ltd.
17-33 Market Street, South Melbourne, Vic. 3205,
Australia
Tel: 3-699-2388
NEW ZEALAND
Music Houses of N.Z. Ltd.
146/148 Captain Springs Road, Te Papapa,
Auckland, New Zealand
Tel: 9-634-0099
COUNTRIES AND TRUST
TERRITORIES IN PACIFIC OCEAN
Yamaha Corporation,
International Marketing Division
Nakazawa-cho 10-1, Hamamatsu, Japan 430
Tel: 053-460-2317
HEAD OFFICE Yamaha Corporation, Electronic Musical Instrument Division
Nakazawa-cho 10-1, Hamamatsu, Japan 430
Tel: 053-460-3273
[CL] 11
ITALY
Yamaha Musica Italia S.P.A.,
Home Keyboard Division
Viale Italia 88, 20020 Lainate (Milano), Italy
Tel: 02-935-771
SPAIN
Yamaha-Hazen Electronica Musical, S.A.
Jorge Juan 30, 28001, Madrid, Spain
Tel: 91-577-7270
PORTUGAL
Valentim de Carvalho CI SA
Estrada de Porto Salvo, Paço de Arcos 2780 Oeiras,
Portugal
Tel: 01-443-3398/4030/1823
GREECE
Philippe Nakas S.A.
Navarinou Street 13, P.Code 10680, Athens, Greece
Tel: 01-364-7111
SWEDEN
Yamaha Scandinavia AB
J. A. Wettergrens Gata 1
Box 30053
S-400 43 Göteborg, Sweden
Tel: 031 89 34 00
DENMARK
YS Copenhagen Liaison Office
Generatorvej 8B
DK-2730 Herlev, Denmark
Tel: 44 92 49 00
FINLAND
Warner Music Finland OY/Fazer Music
Aleksanterinkatu 11, P.O. Box 260
SF-00101 Helsinki, Finland
Tel: 0435 011
NORWAY
Narud Yamaha AS
Grini Næringspark 17
N-1345 Østerås, Norway
Tel: 67 14 47 90
ICELAND
Skifan HF
Skeifan 17 P.O. Box 8120
IS-128 Reykjavik, Iceland
Tel: 525 5000
OTHER EUROPEAN COUNTRIES
Yamaha Europa GmbH.
Siemensstraße 22-34, 25462 Rellingen, F.R. of
Germany
Tel: 04101-3030

M.D.G., EMI Division © 1997 Yamaha Corporation
VZ40090 706POCP5.2-01A0 Printed in Japan
Transcripción de documentos
Digital Piano YDP-88 II IMPORTANT Check Your Power Supply Make sure that your local AC mains voltage matches the voltage specified on the name plate on the bottom panel. In some areas a voltage selector may be provided on the rear panel of the main keyboard unit near the power cord. Make sure that the voltage selector is set for the voltage in your area. The voltage selector is set at 240V when the unit is initially shipped. To change the setting use a “minus” screwdriver to rotate the selector dial so that the correct voltage appears next to the pointer on the panel. PRECAUTIONS PLEASE READ CAREFULLY BEFORE PROCEEDING * Please keep these precautions in a safe place for future reference. WARNING Always follow the basic precautions listed below to avoid the possibility of serious injury or even death from electrical shock, short-circuiting, damages, fire or other hazards. These precautions include, but are not limited to, the following: • Do not open the instrument or attempt to disassemble the internal parts or modify them in any way. The instrument contains no user-serviceable parts. If it should appear to be malfunctioning, discontinue use immediately and have it inspected by qualified Yamaha service personnel. • Do not expose the instrument to rain, use it near water or in damp or wet conditions, or place containers on it containing liquids which might spill into any openings. • If the power cord or plug becomes frayed or damaged, or if there is a sudden loss of sound during use of the instrument, or if any unusual smells or smoke should appear to be caused by it, immediately turn off the power switch, disconnect the electric plug from the outlet, and have the instrument inspected by qualified Yamaha service personnel. • Only use the voltage specified as correct for the instrument. The required voltage is printed on the name plate of the instrument. • Before cleaning the instrument, always remove the electric plug from the outlet. Never insert or remove an electric plug with wet hands. • Check the electric plug periodically and remove any dirt or dust which may have accumulated on it. CAUTION Always follow the basic precautions listed below to avoid the possibility of physical injury to you or others, or damage to the instrument or other property. These precautions include, but are not limited to, the following: • Do not place the power cord near heat sources such as heaters or radiators, and do not excessively bend or otherwise damage the cord, place heavy objects on it, or place it in a position where anyone could walk on, trip over, or roll anything over it. • Never insert or drop paper or metallic or other objects between the slits of the key cover and the keyboard. If this happens, immediately turn off the power and remove the electric plug from the outlet and have the instrument inspected by qualified Yamaha service personnel. • When removing the electric plug from an outlet, always hold the plug itself and not the cord. Pulling by the cord can damage it. • Do not place the instrument against a wall (allow at least 3 cm/one-inch from the wall), since this can cause inadequate air circulation, and possibly result in the instrument overheating. • Do not connect the instrument to an electrical outlet using a multiple-connector. Doing so can result in lower sound quality, or possibly cause overheating in the outlet. • Remove the electric plug from the outlet when the instrument is not to be used for extended periods of time, or during electrical storms. • Before connecting the instrument to other electronic components, turn off the power for all components. Before turning the power on or off for all components, set all volume levels to minimum. • Do not expose the instrument to excessive dust or vibrations, or extreme cold or heat (such as in direct sunlight, near a heater, or in a car during the day) to prevent the possibility of panel disfiguration or damage to the internal components. • Do not use the instrument near other electrical products such as televisions, radios, or speakers, since this might cause interference which can affect proper operation of the other products. • Do not place the instrument in an unstable position where it might accidentally fall over. • Before moving the instrument, remove all connected cables. • When cleaning the instrument, use a soft, dry cloth. Do not use paint thinners, solvents, cleaning fluids, or chemical-impregnated wiping cloths. Also, do not place vinyl or plastic objects on the instrument, since this might discolor the panel or keyboard. • Do not rest your weight on, or place heavy objects on the instrument, and do not use excessive force on the buttons, switches or connectors. • Take care that the key cover does not pinch your fingers, and do not insert a finger or hand in the key cover gap. (1)B_EL/CL • Read carefully the attached documentation explaining the assembly process. Failure to assemble the instrument in the proper sequence might result in damage to the instrument or even injury. • Do not operate the instrument for a long period of time at a high or uncomfortable volume level, since this can cause permanent hearing loss. If you experience any hearing loss or ringing in the ears, consult a physician. ■USING THE BENCH (if included) • Do not play carelessly with or stand on the bench. Using it as a tool or stepladder or for any other purpose might result in accident or injury. • Only one person should sit on the bench at a time, in order to prevent the possibility of accident or injury. • If the bench screws become loose due to extensive long-term use, tighten them periodically using the included tool. ■SAVING USER DATA • Save all data to an external device such as the Yamaha DOU-10 Disk Orchestra Unit, in order to help prevent the loss of important data due to a malfunction or user operating error. Yamaha cannot be held responsible for damage caused by improper use or modifications to the instrument, or data that is lost or destroyed. Always turn the power off when the instrument is not in use. Introduction Thank you for choosing a Yamaha YDP-88II Digital Piano. Your YDP-88II is a fine musical instrument that employs advanced Yamaha music technology. With the proper care, your YDP-88II will give you many years of musical pleasure. ● Yamaha’s AWM (Advanced Wave Memory) tone generator system offers rich, realistic voices. ● Metronome feature with variable tempo facilitates practice. ● Touch-sensitive keys provides extensive expressive control and outstanding playability. ● Record and play back anything you play on the keyboard (up to approximately 1,300 notes). ● Dual play mode allows 2 voices to be played simultaneously. ● MIDI compatibility and a range of MIDI functions make the YDP-88II useful in a range of advanced MIDI music systems. In order to make the most of your YDP-88II’s performance potential and features, we urge you to read this Owner’s Manual thoroughly, and keep it in a safe place for later reference. Contents The Control Panel ......................................................... 2 Connections .................................................................. 4 Selecting & Playing Voices .......................................... 5 Playing the Demonstration Tunes ............................... 6 The Dual Mode ............................................................. 7 Adjusting the Balance Between the Dual-mode Voices .............................................................. 7 ● Shifting a Dual-Mode Voice Up One Octave .... 7 The Pedals .................................................................... 8 ● Soft (Left) Pedal ............................................... 8 ● Sostenuto (Center) Pedal ................................. 8 ● Damper (Right) Pedal ....................................... 8 Transposition ................................................................ 8 Pitch Control ................................................................. 9 ● Tuning Up ......................................................... 9 ● Tuning Down ..................................................... 9 ● To Restore Standard Pitch ............................... 9 The Metronome & Tempo Control ............................. 10 ■ The Metronome ................................................. 10 ● Metronome Volume ........................................ 10 ● Metronome Time Signature ............................ 10 ■ Tempo Control ................................................... 10 Using the Recorder .................................................... 11 ■ Recording .......................................................... 11 ● Changing the Initial Settings .......................... 12 ● Erasing the recorded data .............................. 12 ● ■ Playback ............................................................ 12 ● Fast Forward Playback ................................... 12 MIDI Functions ........................................................... 13 ● A Brief Introduction to MIDI ............................ 13 ● MIDI “Messages” Transmitted & Received by the YDP-88II ....................................................... 13 ● MIDI Transmit & Receive Channel Selection .. 14 ● MIDI Transmit Transpose ................................ 14 ■ Other MIDI Functions ....................................... 14 ● Local Control ON/OFF ................................... 15 ● Program Change ON/OFF ............................. 15 ● Control Change ON/OFF ............................... 15 ● The Multi-Timbre Mode .................................. 16 ● The MIDI Split & Left Local OFF Mode .......... 16 ● Bulk Data Dump ............................................. 16 Troubleshooting .......................................................... 17 Options & Expander Modules ................................... 17 Keyboard Stand Assembly ........................................ 18 MIDI Data Format ...................................................... 24 MIDI Implementation Chart ....................................... 25 Specifications .............................................................. 26 The serial number of this product may be found on the bottom of the unit. You should note this serial number in the space provided below and retain this manual as a permanent record of your purchase to aid identification in the event of theft. Model No. Serial No. The Control Panel MASTER VOLUME MIN MIDI/TRANSPOSE MAX 2 1 PIANO E. PIANO 1 E. PIANO 2 3 HARPSICHORD METRONOME ORGAN 4 TEMPO 120 32 5 6 MAX MIDI/TRANSPOSE PIANO DEMO 7 MASTER VOLUME MIN RECORDER PLAY REC 280 E. PIANO 1 E. PIANO 2 HARPSICHORD ORGAN METRONOME 32 TEMPO 120 8 RECORDER PLAY REC 280 DEMO POWER A-1 B-1 C0 D0 E0 F0 G0 A0 B0 C1 D1 E1 F1 G1 A1 B1 C2 D2 E2 Pitch control keys (See page 9) PHONES Jacks (Bottom Panel) 2 [MASTER VOLUME] Control The [MASTER VOLUME] control adjusts the volume (level) of sound produced by the YDP-88II’s internal stereo sound system. The [MASTER VOLUME] control also adjusts headphone volume when a pair of headphones is plugged into the PHONES jack (page 5). 3 [MIDI/TRANSPOSE] Button The [MIDI/TRANSPOSE] button allows access to the YDP-88II’s TRANSPOSE function (to shift the pitch of the entire keyboard up or down) and MIDI functions. For details refer to “TRANSPOSITION” on page 8, and “MIDI FUNCTIONS” on page 13, respectively. 4 Voice Selectors The YDP-88II has five voice selectors. Simply press any of the voice selectors to select the corresponding voice. The voice selector LED will light to indicate which voice is currently selected. 2 G2 A2 B2 C3 D3 E3 F3 G3 A3 B3 C4 D4 E4 F4 G4 Transpose keys (See page 8) Balance keys (See page 7) Left voice shift up key (See page 7) 1 [POWER] Switch Press the [POWER] switch once to turn the power ON, a second time to turn the power OFF. When the power is initially turned ON, the [PIANO] voice selector LED will light. F2 The YDP-88II also has a DUAL mode in which two voices can be played simultaneously across the full range of the keyboard — see page 7 for details. NOTE • The PIANO voice is automatically selected whenever the [POWER] switch is initially turned ON. 5 [METRONOME] Button Turns the metronome sound on and off. The [TEMPO] control, below, is used to set the tempo of the metronome sound. More precise tempo settings can be achieved by using the [METRONOME] button and the YDP-88II keyboard as described on page 10. 6 [TEMPO] Control This control adjusts the tempo of the YDP-88II metronome function as well as the playback tempo of the recorder function. The tempo range is from 32 to 280 quarter-note beats per minute. 7 RECORDER [PLAY] and [REC] Buttons These buttons control the YDP-88II recorder, letting you record and play back just about anything you play on the keyboard — up to a maximum of about 1,300 notes. See page 11 for details. ○ ○ ○ ○ ○ ○○○○○○○○○○○○○○○○○○○○○○○○○○○○○○○○○○○○○○○○○○○○○○○○○○○○○○ The Control Panel ● Key Cover Be careful to avoid catching your fingers when opening or closing the cover. DIGITAL PIANO YDP-88II ■ To open the key cover: Z Lift the cover slightly (not too much). X Slide the cover open. A4 B4 C5 D5 E5 F5 G5 A5 B5 C6 D6 E6 F6 G6 A6 B6 C7 ■ To close the key cover: Z Slide the cover toward you. X Gently lower the cover over the keys. Right voice shift up key (See page 6) 8 [DEMO] Button Activates the demo playback mode in which you can select playback of five pre-programmed demonstration sequences. See page 6 for details. 9 Pedals The soft (left), sostenuto (center) and damper (right) pedals provide a range of expressive control capabilities similar to the pedal functions on an acoustic piano. See page 8 for details. • Hold the cover with both hands when moving it, and do not release it until it is fully opened or closed. Be careful to avoid catching fingers (yours or others) between the cover and main unit. • Do not place objects on top of the key cover. Small objects placed on the key cover may fall inside the main unit when the cover is opened and may not be able to be removed. This could cause electric shock, short circuit, fire or other serious damage to the instrument. ● The Music Stand 9 Soft pedal Sostenuto pedal Damper pedal If you will be using sheet music with your YDP-88II, raise the music stand built into its top panel by lifting the rear edge of the music stand, then flip down the music stand braces and engage them with the corresponding recesses. The music stand can be lowered after slightly lifting it and folding the two brackets which support it against the back of the stand. • Do not try to use the music stand in a half-raised position. Also, when lowering the stand, make sure to press it until it is all the way down. ○○○○○○○○○○○○○○○○○○○○○○○○○○○○○○○○○○○○○○○○○○○○○○○○○○○○○○○○○○○○ 3 Connections MIDI 0V 24 R V 220 AUX OUT L/L+R 130V OUT 110V IN VOLTAGE SELECTOR 2 1 R AUX OUT L/L+R Stereo System MIDI IN OUT DOU-10 1 AUX OUT L/L+R and R Jacks The AUX OUT L/L+R and R jacks deliver the output of the YDP-88II for connection to an instrument amplifier, mixing console, PA system, or recording equipment. If you will be connecting the YDP-88II to a monaural sound system, use only the L/L+R jack. When a plug is inserted into the L/L+R jack only, the left- and rightchannel signals are combined and delivered via the L/L+R jack so you don’t lose any of the YDP-88II’s sound. 2 MIDI IN and OUT Connectors The MIDI IN connector receives MIDI data from an external MIDI device (such as the DOU-10 Disk Orchestra Unit) which can be used to control the YDP-88II. The MIDI OUT connector transmits MIDI data generated by the YDP-88II (e.g. note and velocity data produced by playing the YDP-88II keyboard). More details on MIDI are given in “MIDI FUNCTIONS” on page 13. ● PHONES Jacks (Bottom Panel) Two pairs of standard pair of stereo headphones can be plugged in here for private practice or late-night playing. The internal speaker system is automatically shut off when a pair of headphones is plugged into either of the PHONES jacks. 4 ○ ○ ○ ○ ○ ○○○○○○○○○○○○○○○○○○○○○○○○○○○○○○○○○○○○○○○○○○○○○○○○○○○○○○ Selecting & Playing Voices Turn Power On ................................................................................................... After making sure that the YDP-88II’s AC cord is properly plugged into a convenient AC wall outlet, press the [POWER] switch located to the left of the keyboard to turn the power ON. In some areas a plug adaptor may be provided to match the pin configuration of the AC wall outlets in your area. When the power is turned ON, the [PIANO] voice selector LED will light (the PIANO voice is automatically selected whenever the power is turned ON). POWER Set the Volume .................................................................................................. Initially set the [MASTER VOLUME] control about half way between the “MIN” and “MAX” settings. Then, when you start playing, re-adjust the [MASTER VOLUME] control for the most comfortable listening level. MASTER VOLUME MIN MAX Select a Voice ..................................................................................................... PIANO E. PIANO 1 E. PIANO 2 HARPSICHORD ORGAN Select the desired voice by pressing one of the voice selectors. Play ................................................................................................................................ The YDP-88II offers keyboard touch response, so the volume and timbre of notes played can be controlled according to how “hard” you play the keys. The amount of variation available depends on the selected voice. ○○○○○○○○○○○○○○○○○○○○○○○○○○○○○○○○○○○○○○○○○○○○○○○○○○○○○○○○○○○○ 5 Playing the Demonstration Tunes The YDP-88II includes five demo tunes that effectively demonstrate its sound capabilities. Here’s how you can select and play the demo tunes: Engage the Demo Mode ......................................................................... DEMO Press the [DEMO] button to engage the demo mode — the voice selectors will flash in sequence. Select a Demo Tune ..................................................................................... PIANO E. PIANO 1 E. PIANO 2 HARPSICHORD ORGAN Press one of the flashing voice selectors to start playback of the corresponding demo tune — featuring the voice normally selected by that voice selector button. The demo tunes will play in sequence until stopped, starting with the selected tune. The voice selector indicator will flash during demo playback. ● The Demo Tunes • [PIANO] button: ..................... Piano Sonata A major K.V. 331 3rd movement “Turkischer Marsch” by W. A. Mozart • [E. PIANO 1] button: ............. “Pavane pour une infante défunte” by M. J. Ravel • [HARPSICHORD] button: ..... “The Harmonious Blacksmith” by G. F. Händel • [ORGAN] button: ................... Wedding March from “A Midsummer Night Dream” by J. L. F. Mendelssohn * The demonstration pieces listed above are short excerpts from the original compositions. The other demo tune is original (© 1997 by YAMAHA CORPORATION). Set the Volume .................................................................................................. MASTER VOLUME MIN MAX Use the [MASTER VOLUME] control to adjust the volume. NOTE • The [TEMPO] control does not affect demo playback. Play a Different Demo ............................................................................... You can start playback of any other demo tune during playback by simply pressing the corresponding voice selector. Playback will stop and the playback-ready mode described in step 2, above, will be reengaged if you press the voice selector of the demo that is currently playing. DEMO Stop the Demo .................................................................................................. Press the [DEMO] button when you want to stop demo playback and return to the normal play mode. 6 ○ ○ ○ ○ ○ ○○○○○○○○○○○○○○○○○○○○○○○○○○○○○○○○○○○○○○○○○○○○○○○○○○○○○○ The Dual Mode The DUAL mode makes it possible to play two voices simultaneously across the entire range of the keyboard. To activate the DUAL mode simply press two voice selectors at the same time (or press one voice selector while holding another). The voice indicators of both selected voices will light when the DUAL mode is active. To return to the normal single-voice play mode, press any single voice selector. Adjusting the Balance Between the Dual-mode Voices ......................................................................................................................... PIANO 2 HARPSICHORD ORGAN C3 C2 Left voice maximum. C4 Equal balance. Right voice maximum. The volume levels of the two voices combined in the DUAL mode are normally set automatically to produce a pleasing balance (see “Default Settings” below). The balance can be adjusted manually by using the C2 through C4 keys on the keyboard while pressing the two voice selectors corresponding to the voices to be combined in the DUAL mode. The C3 key produces equal (50:50) balance between the two voices, while keys to the left of C3 increase the volume of the left voice in relation to the right voice, and keys to the right of C3 increase the volume of the right voice in relation to the left voice. By “left” and “right” voice we refer to the relative positions of the voice selectors — i.e. in a HARPSICHORD/ORGAN combination HARPSICHORD is the left voice and ORGAN is the right voice. ● Default Settings Voice Combinations Balance keys PIANO/ORGAN ....................................... E2 E. PIANO 1/ORGAN ................................ F2 E. PIANO 2/ORGAN ................................ E2 HARPSICHORD/ORGAN ........................ G2 * All other voice combinations are set to C3 (equal balance). PIANO 2 HARPSICHORD C1 Left voice shift up. ORGAN C5 Shifting a Dual-Mode Voice Up One Octave ...................... Depending on which voices you combine using the DUAL mode, the combination may sound better if one of the voices is shifted up an octave. To shift the right voice, press the C5 key while pressing the two voice selectors corresponding to the voices to be combined in the DUAL mode. Press C5 again to shift the voice back to its normal range. Use the C1 key in the same way to shift the left voice. All voice combinations are set to the same octave by default. Right voice shift up. ○○○○○○○○○○○○○○○○○○○○○○○○○○○○○○○○○○○○○○○○○○○○○○○○○○○○○○○○○○○○ 7 The Pedals The YDP-88II has three foot pedals that produce a range of expressive effects similar to those produced by the pedals on an acoustic piano. Soft (Left) Pedal ............................................................................................... The soft pedal reduces the volume and slightly changes the timbre of notes played while the pedal is pressed. The soft pedal will not affect notes which are already playing when it is pressed. Sostenuto (Center) Pedal ...................................................................... Soft pedal Damper pedal Sostenuto pedal If you play a note or chord on the keyboard and press the sostenuto pedal while the note(s) are held, those notes will be sustained as long as the pedal is held (as if the damper pedal had been pressed) but all subsequently played notes will not be sustained. This makes it possible to sustain a chord, for example, while other notes are played “staccato.” Damper (Right) Pedal ................................................................................ The damper pedal functions in the same way as a damper pedal on an acoustic piano. When the damper pedal is pressed notes played have a long sustain. Releasing the pedal immediately stops (damps) any sustained notes. Transposition The YDP-88II’s TRANSPOSE function makes it possible to shift the pitch of the entire keyboard up or down in semitone intervals up to a maximum of six semitones. “Transposing” the pitch of the YDP-88II keyboard facilitates playing in difficult key signatures, and you can easily match the pitch of the keyboard to the range of a singer or other instrumentalist. The [MIDI/TRANSPOSE] button and keys F#2 through F#3 on the keyboard are used for transposition. F# 2 C3 F# 3 MIDI/TRANSPOSE -6 -4 -2 +1 +3 +6 -5 -3 -1 0 +2 +4 +5 Transpose Transpose down. up. Normal pitch. Z Press and hold the [MIDI/TRANSPOSE] button. X Press a key between F#2 and F#3 according to the desired amount of transposition.* C Release the [MIDI/TRANSPOSE] button. * Pressing the C3 key produces normal keyboard pitch. Pressing the key to the left of C3 (B2) transposes the pitch of the keyboard down a semitone, the next key to the left (Bb2) transposes down a whole tone (two semitones), etc., down to the F#2 key which transposes down 6 semitones. Upward transposition is accomplished in the same way using the keys to the right of C3, up to F#3 which transposes up 6 semitones. NOTE 8 • Notes below and above the A-1 — C7 of the YDP-88II sound one octave higher and lower, respectively. ○ ○ ○ ○ ○ ○ ○ ○ ○ ○ ○ ○ ○ ○ ○ ○ ○ ○ ○ ○ ○ ○ ○ ○ ○ ○ ○ ○ ○ ○ ○ ○ ○ ○ ○ ○ ○ ○ ○ ○ ○ ○ ○ ○ ○ ○ ○ ○ ○ ○ ○ ○ ○ ○ ○ ○ ○ ○○ Pitch Control Pitch control makes it possible to tune the YDP-88II over a ±50-cent range (approximate) in approximately 1.6-cent intervals. A hundred “cents” equals one semitone, so the tuning range provided allows fine tuning of overall pitch over a range of approximately a semitone. Pitch control is useful for tuning the YDP88II to match other instruments or recorded music. Tuning Up ............................................................................................................... Z To tune up (raise pitch), hold the A-1 and B-1 keys simultaneously. A -1 B -1 C3 B3 X Press any key between C3 and B3. Each time a key in this range is pressed the pitch is increased by approximately 1.6 cents, up to a maximum of 50 cents above standard pitch. C Release the A-1 and B-1 keys. Tuning Down ....................................................................................................... A# -1 A -1 Z To tune down (lower pitch), hold the A-1 and A#-1 keys simultaC3 B3 neously. X Press any key between C3 and B3. Each time a key in this range is pressed the pitch is decreased by approximately 1.6 cents, up to a maximum of 50 cents below standard pitch. C Release the A-1 and A#-1 keys. To Restore Standard Pitch* ................................................................. A# -1 A -1 B -1 Z To restore standard pitch (A3 = 440 Hz), hold the A-1, A#-1 and C3 B3 B-1 keys simultaneously. X Press any key between C3 and B3. C Release the A-1, A#-1 and B-1 keys. * Standard pitch (A3 = 440 Hz) is set when the [POWER] switch is initially turned ON. NOTE • The PITCH CONTROL function has no effect when LOCAL OFF is active (see “MIDI FUNCTIONS,” page 13). ○○○○○○○○○○○○○○○○○○○○○○○○○○○○○○○○○○○○○○○○○○○○○○○○○○○○○○○○○○○○ 9 The Metronome & Tempo Control The YDP-88II built-in metronome is a convenient feature for practice, and it can also provide a solid rhythmic guide when recording using the Recorder feature, described below. The Metronome The metronome sound is turned on and off via the [METRONOME] button. Press the [METRONOME] button so that its indicator lights to turn the metronome on, then again so the indicator goes out to turn the metronome off. METRONOME Metronome Volume ...................................................................................... METRONOME TEMPO 120 32 The volume of the metronome sound can be independently adjusted by using the [TEMPO] control while holding the [METRONOME] button. Sliding the control to the right increases the metronome volume. 280 Metronome Time Signature ................................................................. ANO 1 E. PIANO 2 HARPSICHORD The time signature of the metronome sound can be set by pressing the appropriate voice selector button while holding the [METRONOME] button, as follows: METRONOME ORGAN [METRONOME] + [PIANO] [METRONOME] + [E. PIANO 1] [METRONOME] + [E. PIANO 2] [METRONOME] + [HARPSICHORD] [METRONOME] + [ORGAN] No accent (default) 2 time 3 time 4 time 6 time Tempo Control TEMPO 120 32 The tempo of the metronome and recorder playback can be controlled in two ways: 280 ■ Use the panel [TEMPO] control to set the required tempo from 32 to 280 quarter-note beats per minute. METRONOME ■ For more precise tempo settings press the appropriate key on the keyboard while holding the [METRONOME] button. Tempo/Key Chart Tempo 34 A Tempo 10 -1 32 40 44 50 54 58 C 36 0 38 64 68 74 78 82 C C 1 42 46 48 52 56 60 62 88 66 70 72 76 80 84 2 86 92 98 102 106 116 112 C 3 122 126 130 140 136 C 146 150 154 168 160 C 180 188 196 216 208 C 232 248 264 C 4 5 6 7 94 100 108 114 120 128 134 142 148 156 164 176 192 204 220 240 272 90 96 104 110 118 124 132 138 144 152 158 172 184 200 212 224 256 280 ○ ○ ○ ○ ○ ○ ○ ○ ○ ○ ○ ○ ○ ○ ○ ○ ○ ○ ○ ○ ○ ○ ○ ○ ○ ○ ○ ○ ○ ○ ○ ○ ○ ○○ ○ ○ ○ ○ ○ ○ ○ ○ ○ ○ ○ ○ ○ ○ ○ ○ ○ ○ ○ ○ ○ ○ ○○ Using the Recorder The YDP-88II recorder lets you record what you play on the keyboard and then play it back. This is a useful adjunct to any keyboard study program, since it lets you hear exactly how you sound from the listener’s perspective. It can also be just plain fun. The recorder actually records the following data: ● Notes played ● Voice selection ● Dual mode voices ● Dual balance ● Damper pedal ● Soft pedal ● Sostenuto pedal (not recorded as an initial setting) ● Tempo (Initial setting only.) ● Dual mode octave shift Recording Engage the Record Ready Mode .................................................. RECORDER PLAY REC Press the RECORDER [REC] button to engage the record ready mode (recording does not actually start yet). The [REC] button indicator will light. Make All Necessary Initial Settings ........................................... PIANO E. PIANO 1 E. PIANO 2 HARPSICHORD ORGAN Before actually beginning to record, select the voice you want to record with (or voices if you will be using the dual mode). You might also want to set the volume and tempo controls. Start Recording ................................................................................................ Recording will begin automatically as soon as you play a note on the keyboard or press the [PLAY] button. NOTE • If the metronome was on when you started recording, you’ll be able to keep time with the metronome while recording, but the metronome sound will not be recorded. • You can record up to a maximum of about 1,300 notes, depending on pedal usage and other factors. The [REC] button indicator will begin to flash when recorder memory is almost full, and recording will stop automatically. RECORDER PLAY REC Stop Recording ................................................................................................ Press either the RECORDER [REC] or [PLAY] button to stop recording. ○ ○ ○ ○ ○ ○ ○ ○ ○ ○ ○ ○ ○ ○ ○ ○ ○ ○ ○ ○ ○ ○ ○ ○ ○ ○ ○ ○ ○ ○ ○ ○ ○ ○ ○ ○ ○ ○ ○ ○ ○ ○ ○ ○ ○ ○ ○ ○ ○ ○ ○ ○ ○ ○ ○ ○ ○ ○ ○ ○ 11 Using the Recorder Changing the Initial Settings ............................................................. The initial voice (including dual mode) and tempo settings made in step 2 of the recording procedure are actually recorded by the YDP88II. These initial settings can be changed after the recording is finished by pressing the [REC] button to engage the record ready mode, making the required changes, and then pressing the [REC] button again to exit from the record ready mode and register the changes. If you do this, be careful not to press the [PLAY] button or a key on the keyboard, either of which will start recording and erase all previous recorded data. Erasing the recorded data .................................................................... The recorded data can be erased by first pressing the [REC] button to engage the record ready mode, and then pressing the [PLAY] button twice without recording any data. Playback RECORDER PLAY REC To play back what you’ve recorded, simply press the RECORDER [PLAY] button. Playback starts from the beginning of the recorded data, and will stop automatically at the end of the recorded data. You can also stop playback at any time by pressing the [PLAY] button. NOTE • It is possible to play along on the keyboard during playback. • The playback volume and tempo can be adjusted by using the [MASTER VOLUME] and [TEMPO] controls, respectively. • If the metronome is being used during playback, the metronome will stop when playback is stopped. • All recorder data will be erased when the YDP-88II power is turned off. It is possible to store recorded data to an external MIDI storage device such as the Yamaha DOU-10 Disk Orchestra Unit by using the Bulk Dump function described on page 16. • The playback data is not transmitted via the MIDI OUT connector. Fast Forward Playback ............................................................................ MIDI/TRANSPOSE 12 RECORDER PLAY REC When you want to locate a specific point in a recording you can quickly move forward through the recording while monitoring the sound by pressing the [REC] button while holding the [MIDI/TRANSPOSE] button. ○ ○ ○ ○ ○ ○ ○ ○ ○ ○ ○ ○ ○ ○ ○ ○ ○ ○ ○ ○ ○ ○ ○ ○ ○ ○ ○ ○ ○ ○ ○ ○ ○ ○○ ○ ○ ○ ○ ○ ○ ○ ○ ○ ○ ○ ○ ○ ○ ○ ○ ○ ○ ○ ○ ○ ○ ○○ MIDI Functions A Brief Introduction to MIDI ............................................................................................................................................... Data Being Recorded Playback Data MIDI Cable MIDI OUT MIDI OUT MIDI IN MIDI OUT MIDI IN DOU-10 DOU-10 YDP-88II YDP-88II MIDI, the Musical Instrument Digital Interface, is a worldstandard communication interface that allows MIDI-compatible musical instruments and equipment to share musical information and control one another. This makes it possible to create “systems” of MIDI instruments and equipment that offer far greater versatility and control than is available with isolated instruments. For example, most MIDI keyboards (including the YDP-88II, of course) transmit note and velocity (touch response) information via the MIDI OUT connector whenever a note is played on the keyboard. If the MIDI OUT connector is connected to the MIDI IN connector of a second keyboard (synthesizer, etc.) or a tone generator (essentially a synthesizer with no keyboard), the second keyboard or tone generator will respond precisely to notes played on the original transmitting keyboard. The result is that you can effectively play two instruments at once, providing thick multi-instrument sounds. MIDI IN This same type of musical information transfer is used for MIDI sequence recording. A sequence recorder can be used to “record” MIDI data received from a YDP-88II, for example. When the recorded data is played back, the YDP-88II automatically “plays” the recorded performance in precise detail. The examples given above really only scratch the surface. MIDI can do much, much more. The YDP-88II offers a number of MIDI functions that allows it to be used in fairly sophisticated MIDI systems. NOTE • Always use a high-quality MIDI cable to connect MIDI OUT to MIDI IN terminals. Never use MIDI cables longer than about 15 feet, since cables longer than this can pick up noise which can cause data errors. MIDI “Messages” Transmitted & Received by the YDP-88II ............................................................ The MIDI information (messages) transmitted and received by the YDP-88II are as follows: ● Note and Velocity Data This information tells the receiving keyboard or tone generator to play a certain note (specified by the MIDI note number) at a certain dynamic level (specified by the MIDI velocity value). Note and velocity data is transmitted by the YDP-88II whenever a key is pressed, and the YDP-88II’s internal AWM tone generator will “play” the corresponding note(s) whenever note and velocity data is received from an external MIDI device. ● Control Change Numbers Control Change data representing Damper pedal operation is transmitted by the YDP-88II whenever one of these pedals is used. If the receiving device is a tone generator or another keyboard, it will respond in the same way as the YDP-88II’s internal tone generator when one of the pedals is used. The YDP-88II also receives and responds to the appropriate control change data. See “Control Change ON/OFF” on page 15 for information on turning control change number reception and transmission ON or OFF. ● Program Change Numbers The YDP-88II transmits a MIDI program change number between 0 and 4 when one of its voice selectors is pressed. This normally causes the correspondingly numbered voice to be selected on a receiving MIDI device. The YDP-88II will respond in the same way, automatically selecting the appropriate voice when a MIDI program change number is received. See “Program Change ON/OFF” on page 15 for information on turning program change number reception and transmission ON or OFF. ○ ○ ○ ○ ○ ○ ○ ○ ○ ○ ○ ○ ○ ○ ○ ○ ○ ○ ○ ○ ○ ○ ○ ○ ○ ○ ○ ○ ○ ○ ○ ○ ○ ○ ○ ○ ○ ○ ○ ○ ○ ○ ○ ○ ○ ○ ○ ○ ○ ○ ○ ○ ○ ○ ○ ○ ○ ○ ○ ○ 13 MIDI Functions MIDI Transmit & Receive Channel Selection ................................................................................................... ● Setting the YDP-88II MIDI Channels MIDI OUT MIDI IN MIDI IN MIDI THRU C1 Tone Generator DOU-10 E5 D# 5 D# 2 C 4 MIDI/TRANSPOSE 2 4 (Set to receive on MIDI channel 2) YDP-88II (Set to receive on MIDI channel 1) The MIDI system allows transmission and reception of MIDI data on 16 different channels. Multiple channels have been implemented to allow selective control of certain instruments or devices connected in series. For example, a single MIDI sequence recorder could be used to “play” two different instruments or tone generators. One of the instruments or tone generators could be set to receive only on channel 1, while the other is set to receive on channel 2. In this situation the first instrument or tone generator will respond only to channel-1 information transmitted by the sequence recorder, while the second instrument or tone generator will respond only to channel-2 information. This allows the sequence recorder to “play” two completely different parts on the receiving instruments or tone generators. 7 9 11 14 16 2 4 7 9 11 14 16 1 3 5 6 8 10 12 13 15 1 3 5 6 8 10 12 13 15 For setting the transmit channel. (C1 ~ D#2) For setting the receive channel. (C4 ~ D#5) For OMNI mode Z Press and hold the [MIDI/TRANSPOSE] button. X Press the key on the keyboard corresponding to the desired MIDI transmit or receive channel.* C Release the [MIDI/TRANSPOSE] button. * Keys C1 through D#2 on the keyboard are used to set the MIDI transmit channel, and keys C4 through D#5 are used to turn the OMNI mode OFF and set the MIDI receive channel as shown in the illustration to the left. The E5 key sets the OMNI receive mode and basic receive channel 1. NOTE In any MIDI control setup, the MIDI channels of the transmitting and receiving equipment must be matched for proper data transfer. An “OMNI” receive mode is also available, which allows reception on all 16 MIDI channels. In the OMNI mode it is not necessary to match the receive channel of the receiving device to the transmit channel of the transmitting device (except when receiving mode messages). • When the power is initially turned ON, MIDI receive is set to the OMNI mode and the transmit channel is set to 1. MIDI Transmit Transpose ....................................................................................................................................................... This function allows the MIDI note data transmitted by the YDP88II to be transposed up or down in semitone increments by up to plus or minus 6 semitones. The pitch of the YDP-88II itself is not affected. ● Setting the MIDI Transpose Function F# 5 C6 Z Press and hold the [MIDI/TRANSPOSE] button. X Press the key on the keyboard corresponding to the desired amount of transposition.* C Release the [MIDI/TRANSPOSE] button. * F# 6 Keys F#5 through F#6 on the keyboard are used to set the MIDI transmit transpose function as shown in the illustration to the left. MIDI/TRANSPOSE NOTE -6 -4 -2 +1 +3 +6 • When the power is turned ON, MIDI transmit transpose is set to 0 (no transposition). -5 -3 -1 0 +2 +4 +5 Other MIDI Functions The MIDI functions listed to the right are engaged by holding down the [MIDI/TRANSPOSE] button and pressing the corresponding voice selector. Full details are given in the following pages. 14 MIDI FUNCTION CHART Function Local Control ON/OFF Program Change ON/OFF Control Change ON/OFF Multi-Timbre Mode MIDI Split & Left Local OFF YDP-88II Voice Selector [PIANO] [E. PIANO 1] [E. PIANO 2] [HARPSICHORD] [ORGAN] ○ ○ ○ ○ ○ ○ ○ ○ ○ ○ ○ ○ ○ ○ ○ ○ ○ ○ ○ ○ ○ ○ ○ ○ ○ ○ ○ ○ ○ ○ ○ ○ ○ ○○ ○ ○ ○ ○ ○ ○ ○ ○ ○ ○ ○ ○ ○ ○ ○ ○ ○ ○ ○ ○ ○ ○ ○○ MIDI Functions Local Control ON/OFF ............................................................................................................................................................. “Local Control” refers to the fact that, normally, the YDP-88II keyboard controls its internal tone generator, allowing the internal voices to be played directly from the keyboard. This situation is “Local Control ON” since the internal tone generator is controlled locally by its own keyboard. Local control can be turned OFF, however, so that the YDP-88II keyboard does not play the internal voices, but the appropriate MIDI information is still transmitted via the MIDI OUT connector when notes are played on the keyboard. At the same time, the internal tone generator responds to MIDI information received via the MIDI IN connector. When using the DOU-10 Disk Orchestra Unit with the YDP-88II, for example, Local Control should be turned OFF when recording using the DOU-10 voices only, and ON when recording the YDP-88II voices while listening to playback of the DOU-10 voices. PIANO PIANO MIDI/TRANSPOSE = Local Control OFF E. PIA PIANO = Local Control ON Z Hold down the [MIDI/TRANSPOSE] button. X Press the [PIANO] voice selector. If the PIANO LED is lit when the [PIANO] voice selector is pressed, you have turned local control OFF. If the PIANO LED is not lit when the [PIANO] voice selector is pressed, you have turned local control ON. C Release the [MIDI/TRANSPOSE] button. Program Change ON/OFF .................................................................................................................................................... Normally the YDP-88II will respond to MIDI program change numbers received from an external keyboard or other MIDI device, causing the correspondingly numbered YDP-88II voice to be selected. The YDP-88II will normally also send a MIDI program change number whenever one of its voices is selected, causing the correspondingly numbered voice or program to be selected on the external MIDI device if the device is set up to receive and respond to MIDI program change numbers. This function makes it possible to cancel program change number reception and transmission so that voices can be selected on the YDP88II without affecting the external MIDI device, and vice versa. E. PIANO1 MIDI/TRANSPOSE NO E. PIANO1 = Program Change OFF E. PI E. PIANO1 = Program Change ON Z Hold down the [MIDI/TRANSPOSE] button. X Press the [E. PIANO 1] voice selector. If the E. PIANO 1 LED is lit when the [E. PIANO 1] voice selector is pressed, you have turned program change reception/transmission OFF. If the E. PIANO 1 LED is not lit when the [E. PIANO 1] voice selector is pressed, you have turned program change reception/transmission ON. C Release the [MIDI/TRANSPOSE] button. Control Change ON/OFF ....................................................................................................................................................... Normally the YDP-88II will respond to MIDI control change data received from an external MIDI device or keyboard, causing the selected YDP-88II voice to be affected by pedal and other “control” settings received from the controlling device. The YDP-88II also transmits MIDI control change information when one of its pedals are operated. This function makes it possible to cancel control change data reception and transmission if you do not want the YDP-88II voices to be affected by control change data received from an external device or vice versa. MIDI/TRANSPOSE NO1 E. PIANO2 HAR CHO E. PIANO2 = Control Change OFF E. PIANO2 = Control Change ON Z Hold down the [MIDI/TRANSPOSE] button. X Press the [E. PIANO 2] voice selector. If the E. PIANO 2 LED is lit when the [E. PIANO 2] voice selector is pressed, you have turned control change reception/transmission OFF. If the E. PIANO 2 LED is not lit when the [E. PIANO 2] voice selector is pressed, you have turned control change reception/transmission ON. C Release the [MIDI/TRANSPOSE] button. ○ ○ ○ ○ ○ ○ ○ ○ ○ ○ ○ ○ ○ ○ ○ ○ ○ ○ ○ ○ ○ ○ ○ ○ ○ ○ ○ ○ ○ ○ ○ ○ ○ ○ ○ ○ ○ ○ ○ ○ ○ ○ ○ ○ ○ ○ ○ ○ ○ ○ ○ ○ ○ ○ ○ ○ ○ ○ ○ ○ 15 MIDI Functions The Multi-Timbre Mode ........................................................................................................................................................... The Multi-Timbre mode is a special mode in which the YDP-88II voices can be independently controlled on different MIDI channel numbers by an external MIDI device. The Multi-Timbre mode can be activated as follows: MIDI/TRANSPOSE NO2 HARPSICHORD HARPSICHORD = Multi-Timbre Mode ON OR HARPSICHORD = Multi-Timbre Mode OFF Z Hold down the [MIDI/TRANSPOSE] button. X Press the [HARPSICHORD] voice selector. If the HARPSICHORD LED is lit when the [HARPSICHORD] voice selector is pressed, you have turned the Multi-Timbre mode ON. If the HARPSICHORD LED is not lit when the [HARPSICHORD] voice selector is pressed, you have turned the Multi-Timbre mode OFF. C Release the [MIDI/TRANSPOSE] button. The MIDI Split & Left Local OFF Mode ................................................................................................................... In the MIDI split mode one section of the YDP-88II keyboard is used to play a YDP-88II voice in the normal way, while the remaining section is used to play a second MIDI keyboard or tone generator such as the Yamaha DOU-10 Disk Orchestra Unit. In this mode the right-hand section of the keyboard is used to play an internal YDP88II voice, while the left-hand section of the keyboard plays the external keyboard or tone generator. Playing the left-hand section of the keyboard produces no sound from the YDP-88II. The “split point,” or the key that divides the left- and right-hand sections of the keyboard can be set at any desired key. HARPSICHORD ORGAN MIDI/TRANSPOSE SPLIT POINT ▼ Left-hand section plays a DOU-10 bass voice. MIDI OUT AUX IN L R OUT PUT R L MIDI IN DOU-10 YDP-88II (Set to receive on MIDI channel 2) The MIDI split mode is useful if, for example, you want to play a piano (YDP-88II) voice with the right hand while playing a synthesizer bass line or string section with the left hand. When the MIDI split mode is activated, notes played on the lefthand section are transmitted via the YDP-88II MIDI OUT connector on MIDI channel 2. Notes played on the right-hand section are transmitted on the “basic channel” (i.e. the channel set using the MIDI channel selection function described previously). Right-hand section plays a YDP-88II piano voice. Z Press the [ORGAN] voice selector while holding down the [MIDI/TRANSPOSE] button. The ORGAN LED will flash. X While still holding the [MIDI/TRANSPOSE] button, press the key on the keyboard at which you want to set the split point. The ORGAN LED will light continuously. The split-point becomes the first key of the left-hand section. C Release the [MIDI/TRANSPOSE] button. V To return to the normal full-keyboard mode, hold the [MIDI/ TRANSPOSE] button and press the [ORGAN] voice selector, then release both buttons. NOTE • When the power is turned ON the default split point key — F#2 — will be automatically selected. If a new split point is selected it remains active until the power is turned OFF or a different split point is selected. Bulk Data Dump ............................................................................................................................................................................. This function is used to transmit all data stored in the Recorder memory to a MIDI data storage device such as the Yamaha DOU-10 Disk Orchestra Unit, other sequence recorders, or MIDI compatible computers. MIDI/TRANSPOSE RECORDER PLAY REC Z Hold [MIDI/TRANSPOSE] and press the [PLAY] button. Transmission will begin. X Release the buttons. NOTE 16 • Bulk dump will not function when the metronome is on or when the recorder is in operation. ○ ○ ○ ○ ○ ○ ○ ○ ○ ○○○○○○○○○○○○○○○○○○○○○○○○○○○○○○○○○○○○○○○○○○○○○○○○○○ Troubleshooting If you encounter what appears to be a malfunction, please check the following points before assuming that your YDP-88II is faulty. 1. No Sound When the Power is Turned ON Is the AC plug properly connected to an AC wall outlet? Check the AC connection carefully. Is the MASTER VOLUME control turned up to a reasonable listening level? Also make sure that a pair of headphones is not plugged into the PHONES jack, and the Local Control (page 15) is ON. 2. The Damper Pedal Doesn’t Work If the damper pedal doesn’t work, or notes are sustained even when the pedal is not pressed, make sure that the pedal cord is properly plugged into the main unit (page iii). 3. The YDP-88II Reproduces Radio or TV Sound This can occur if there is a high-power transmitter in your vicinity. Contact your Yamaha dealer. 4. Intermittent Static Noise This is usually due to turning ON or OFF a household appliance or other electronic equipment which is fed by the same AC mains line as your YDP-88II. 5. Interference Appears On Radio or TV Sets Located Near the YDP-88II The YDP-88II contains digital circuitry which can generate radio-frequency noise. The solution is to move the YDP-88II further away from the affected equipment, or vice versa. 6. Distorted Sound When the YDP-88II is Connected to An External Amplifier/Speaker System If the YDP-88II is connected to a stereo system or instrument amplifier and the sound is distorted, reduce the setting of the YDP-88II volume control to a level at which the distortion ceases. Options & Expander Modules ● Options BC-8 Bench A comfortable bench styled to match your Yamaha YDP-88II. HPE-160 Stereo Headphones High-performance lightweight dynamic headphones with extra-soft ear pads. ● Expander Modules DOU-10 Disk Orchestra Unit A range of MIDI recording and playback functions, plus Yamaha DOC software, Disklavier PianoSoft™, General MIDI, and Standard MIDI File disk playback capability. ○ ○ ○ ○ ○ ○ ○ ○ ○ ○ ○ ○ ○ ○ ○ ○ ○ ○ ○ ○ ○ ○ ○ ○ ○ ○ ○ ○ ○ ○ ○ ○ ○ ○ ○ ○ ○ ○ ○ ○ ○ ○ ○ ○ ○ ○ ○ ○ ○ ○ ○ ○ ○ ○ ○ ○ ○ ○ ○ 17 1 • 6 x 35 mm round-head screws x4 1 • 4 x 10 mm round-head screws x2 2 • 4 x 20 mm tapping screws x4 3 • 6 x 16 mm flat-head screws x4 4 A D B D C • Bundled pedal cord inside Keyboard Stand Assembly • Be careful not to confuse parts, and be sure to install all parts in the correct direction. Please assemble in accordance with the sequence given below. • Assembly should be carried out by at least two persons. • Be sure to use the correct screw size, as indicated above. Use of incorrect screws can cause damage. • Be sure to tighten up all screws upon completing assembly of each unit. • To disassemble, reverse the assembly sequence given below. Z Open the box and remove all the parts. On opening the box you should find the parts shown in the illustration above. Check to make sure that all the required parts are provided. 18 ○ ○ ○ ○ ○ ○ ○ ○ ○ ○ ○ ○ ○ ○ ○ ○ ○ ○ ○ ○ ○ ○ ○ ○ ○ ○ ○ ○ ○ ○ ○ ○ ○ ○ ○ ○ ○ ○ ○ ○ ○ ○ ○ ○ ○ ○ ○ ○ ○ ○ ○ ○ ○ ○ ○ ○ ○ ○ 2 3 • Use the vinyl tie attached to the bottom of the pedal box to secure the cord. R • 6 x 35 mm round-head screws 1 C • The other vinyl tie will be used later in step N. L X Untie the two vinyl ties. Untie both vinyl ties and straighten out the bundled cord attached to the bottom of the pedal box. Use the vinyl tie attached to the bottom of the pedal box to secure the cord. Don’t discard the other vinyl tie, you’ll need it later in step N. C Attach the side panels (D) to the pedal box (C). Place the pedal box on top of the wooden blocks attached to the side panels (D), and while eliminating any gaps between the pedal box and side panels, attach using the four 6 x 35 millimeter round-head screws 1 — two screws on each side. Make sure the pedals extend in the same direction as the side panel feet. ○ ○ ○ ○ ○ ○ ○ ○ ○ ○ ○ ○ ○ ○ ○ ○ ○ ○ ○ ○ ○ ○ ○ ○ ○ ○ ○ ○ ○ ○ ○ ○ ○ ○ ○ ○ ○ ○ ○ ○ ○ ○ ○ ○ ○ ○ ○ ○ ○ ○ ○ ○ ○ ○ ○ ○ ○ ○ ○ ○ 19 4 5 • 4 x 10 mm round-head screws 2 15 cm D A R 15 cm B D • Be sure to place your hands at least 15 centimeters from either end of the main unit when positioning it. • Rough surface outward. L L • 4 x 20 mm tapping screws 3 V Attach the rear panel (B). With the rear panel’s rough surface facing outward and the panel slightly angled as shown in the illustration, lower it onto the feet’s protruding edge at the rear of the pedal box. Then, while eliminating any gaps between the rear and side panels, secure the top of the rear panel to the side panel brackets using two 4 x 10 mm round-head screws 2. Finally, secure the bottom of the rear panel to the pedal box using four 4 x 20 mm tapping screws 3. B Install the main unit (A). Place the main unit (A) on the side panels (D) with the screws on its bottom panel (toward the rear of the main unit) just behind the grooves in the brackets located at the top of the side panels. Then slide the main unit forward until it stops. WATCH YOUR FINGERS WHEN DOING THIS!! 20 ○ ○ ○ ○ ○ ○○○○○○○○○○○○○○○○○○○○○○○○○○○○○○○○○○○○○○○○○○○○○○○○○○○○○○ 6 A A • 6 x 16 mm flat-head screws 4 • Use the vinyl tie that was removed from the bundled pedal cord in step X to tie up any slack in the pedal cord. A D Align the holes on the bottom panel of the main unit with the holes in the brackets on the side panels (also center the main unit to produce equal clearance on the left and right sides, as shown in the illustration), then screw in and securely tighten the four 6 x 16 millimeter flat-head screws 4. • Do not hold the keyboard in any position other than the position shown in the above illustration. • Fingers can become pinched between the main unit and the rear or side panels, be extra careful so as not to drop the main unit. N Connect the pedal cord. The pedal cord from the pedal box must be plugged into the corresponding connector in the main unit. The plug only goes in one way (the lug on the connector should face the rear of the main unit, as shown in the illustration), so don’t try to force it in the wrong way around. ○ ○ ○ ○ ○ ○ ○ ○ ○ ○ ○ ○ ○ ○ ○ ○ ○ ○ ○ ○ ○ ○ ○ ○ ○ ○ ○ ○ ○ ○ ○ ○ ○ ○ ○ ○ ○ ○ ○ ○ ○ ○ ○ ○ ○ ○ ○ ○ ○ ○ ○ ○ ○ ○ ○ ○ ○ ○ ○ ○ 21 7 8 0V 24 220 V 110V VOLTAGE SELECTOR 130V C • A voltage selector is provided in some areas. M Voltage Selector Before connecting the AC power cord, check the setting of the voltage selector which is provided in some areas. To set the selector for 110V, 130V, 220V or 240V main voltages, use a “minus” screwdriver to rotate the selector dial so that the correct voltage for your region appears next to the pointer on the panel. The voltage selector is set at 240V when the unit is initially shipped. After the proper voltage has been selected connect the AC power cord. A plug adaptor may be also provided in some areas to match the pin configuration of the AC wall outlets in your area. < Set the adjuster. For stability, an adjuster is provided on the bottom of the pedal box (C). Rotate the adjuster until it comes in firm contact with the floor surface. The adjuster ensures stable pedal operation and facilitates pedal effect control. If the adjuster is not in firm contact with the floor surface, distorted sound may result. 22 ○ ○ ○ ○ ○ ○○○○○○○○○○○○○○○○○○○○○○○○○○○○○○○○○○○○○○○○○○○○○○○○○○○○○○ • When moving the instrument after assembly, always hold the lower surface of the main unit, NEVER the top portion. Improper handling can result in damage to the instrument or personal injury. ■ After completing the assembly, please check the following. • Are there any parts left over? ➔ Review the assembly procedure and correct any errors. • Is the YDP-88II clear of doors and other movable fixtures? ➔ Move the YDP-88II to an appropriate location. • Does the YDP-88II make a rattling noise when you shake it? ➔ Tighten all screws. • Does the pedal box rattle or give way when you step on the pedals? ➔ Turn the adjuster so that it is set firmly against the floor. • Is the pedal cord inserted securely into the socket? ➔ Check the connection. • If the main unit creaks or is otherwise unsteady when you play on the keyboard, refer to the assembly diagrams and retighten all screws. ○ ○ ○ ○ ○ ○ ○ ○ ○ ○ ○ ○ ○ ○ ○ ○ ○ ○ ○ ○ ○ ○ ○ ○ ○ ○ ○ ○ ○ ○ ○ ○ ○ ○ ○ ○ ○ ○ ○ ○ ○ ○ ○ ○ ○ ○ ○ ○ ○ ○ ○ ○ ○ ○ ○ ○ ○ ○ ○ ○ 23 MIDI Data Format If you’re already very familiar with MIDI, or are using a computer to control your music hardware with computer-generated MIDI messages, the data provided in this section can help you to control the YDP-88II. 1. NOTE ON/OFF Data format: [9nH] -> [kk] -> [vv] 9nH = Note ON/OFF event (n = channel number) kk = Note number Transmit: 15 ~ 114 = D#-1 ~ F#7 Receive: 21 ~ 108 = A-1 ~ C7 vv = Velocity (Key ON = 1 ~ 127. Key OFF = 0) Data format: [8nH] -> [kk] -> [vv] 8nH = Note OFF event (n = channel number) kk = Note number Transmit: 15 ~ 114 = D#-1 ~ F#7 Receive: 21 ~ 108 = A-1 ~ C7 vv = Velocity (Key OFF = 0 ~ 127) * 8nH (note off) is receive only. 9nH (vvH=00H) used for transmission. 2. CONTROL CHANGE & MODE MESSAGES Data format: [BnH] -> [cc] -> [vv] BnH = Control event (n = channel number) cc = Control number vv = Control value cc CONTROL VALUE [vv] 07H Volume 00H : -∞ (reception only) 6FH : -3dB 7FH : ±0dB 0AH Panpot 00H ~ 17H : Left 6 (reception only) 18H ~ 1FH : Left 5 20H ~ 27H : Left 4 28H ~ 2FH : Left 3 30H ~ 37H : Left 2 38H ~ 3FH : Left 1 40H ~ 47H : Center 48H ~ 4FH : Scaling pan 50H ~ 57H : Right 1 58H ~ 5FH : Right 2 60H ~ 67H : Right 3 68H ~ 6FH : Right 4 70H ~ 77H : Right 5 78H ~ 7FH : Right 6 0BH Expression 00H : -∞ (reception only) 6FH : -3dB 7FH : ±0dB 40H Damper 00H ~ 3FH : OFF Pedal 40H ~ 7FH : ON 42H Sostenuto 00H ~ 3FH : OFF Pedal 40H ~ 7FH : ON 43H Soft Pedal 00H ~ 3FH : OFF 40H ~ 7FH: ON 78H All Sound OFF (reception only) 00H 79H Reset All Controller (reception only) 00H 7AH Local Control ON/OFF 00H : OFF (reception only) 7FH : ON 7BH All Notes OFF (reception only) 00H 7CH Omni OFF/All Notes OFF 00H (reception only) 7DH Omni ON/All Notes OFF 00H (reception only) 3. PROGRAM CHANGE Data format: [CnH] -> [pp] CnH = program event (n = channel number) pp = Program number pp VOICE NAME pp VOICE NAME 00 PIANO 03 HARPSICHORD 01 E. PIANO1 04 ORGAN 02 E. PIANO2 4. SYSTEM REALTIME MESSAGES [rrH] rr= Control F8H: Timing clock FAH: Start FCH: Stop FEH: Active sensing Data Transmission Reception F8H Transmitted every Received as 96-clock 96 clocks tempo timing when MIDI clock is set to External FAH Recorder start Recorder start FCH Recorder stop Recorder stop FEH Transmitted every All notes are turned 200 milliseconds off if no data is received for more than 400 milliseconds * Caution: If an overrun framing error occurs the Damper, Sostenuto, and Soft effects for all channels are turned off and an All Note Off occurs. 5. SYSTEM EXCLUSIVE MESSAGES (1) YAMAHA MIDI Format Data format: [F0H] -> [43H] -> [xnH] -> [ff] ... [F7H] 43H : Yamaha xn : Substatus + channel number. ff : Format number. x ff Information 0 7CH Panel Data receive. 2 7CH Panel Data Send occurs when this data received. 2 7DH Name Data Send occurs when this data received. * This message is effective only when the channel number “n” is set to the same as the YDP-88II receive channel number. PANEL DATA SEND FORMAT F0H, 43H, 0nH, 7CH, 00H, 1BH (n: channel number) 53H, 4BH, 20H, 20H (SK) 43H, 4CH, 50H, 27H, 39H, 34H 3xH, 3yH (x, y: version number) [PANEL DATA] [CHECK SUM (1byte)] = 0-(53H+4BH+20H+...+Data end) F7H • Panel Data Contents (1) VOICE (2) DUAL VOICE (3) DUAL ON/OFF (4) DUAL BALANCE (5) 0 (6) 0 (7) 0 (8) 0 (9) 0 (10) 0 (11) 0 (12) SPLIT POINT (13) 0 (14) Absolute tempo low byte (15) Absolute tempo high byte (2) YDP-88II MIDI Format Data format: [F0H] -> [43H] -> [73H] -> [38H] -> [yy] -> [F7H] 43H : Yamaha ID 73H : ] Model ID 38H : yy : Substatus yy Information 02H Internal MIDI clock. 03H External MIDI clock. 13H Multi-timbre mode OFF. 15H Multi-timbre mode ON. 61H MIDI FA cancel ON. 62H MIDI FA cancel OFF. 7cH All notes OFF; receive channel = c+1; omni OFF. * When yy=2, 3, 13, 15 or 7c, YDP common ID (01H) is recognized as well as 73H, 38H. * All Control Change values are reset when [13H] or [15H] is received. All voices and other parameters are also reset when [15H] is received in order to ensure the same initial settings. * When [61H] is received, playback will not start when “start” (FAH) is received. However, “stop” (FCH) and the “timing clock” (F8H) will not be affected. Use [62H] to cancel this function. (3) Special Control Data format: [F0H] -> [43H] -> [73H] -> [38H] -> [11H] -> [0nH] -> [cc] -> [vv] -> [F7H] 43H : Yamaha ID 73H : ] Model ID 38H : 11H : Special control 0nH : Control MIDI change + channel number cc : Control number vv : Value cc Control Value [vv] 08H Dual Balance 00H : Left Voice Max. 7FH : Right Voice Max. 1BH Metronome 00H : Off (reception only) 01H : On 5AH Dual Mode 00H : Dual Off 01H : Dual On (Normal) 02H : Dual On (Left voice 1 octave up) 03H : Dual On (Right voice 1 octave up) 5CH Dual Voice [vv] : Dual Voice (4) Absolute Tempo Data format: [F0H] -> [43H] -> [73H] -> [xx] -> [11H] -> [1nH] -> [cc] -> [dd] -> [F7H] 43H : Yamaha ID 73H : ] Model ID 38H : 11H : Special control 1nH : Control MIDI change (Transmit: n=control channel number) (Receive: any channel OK) ccH : Absolute tempo low byte ddH : Absolute tempo hight byte Tempo=dd*128+cc SEQUENCE DATA FORMAT F0H, 43H, 73H 38 H (Product ID) 06H (Bulk ID) 02H (Bulk number) 03H, 0FH, 0AH, 02H (Data length= wxyzH 0x1fd1*2 bytes) [PANEL DATA] (Sequence data) [CHECK SUM (1byte)] = 0-sum (BULK DATA) F7H MODEL ID CODE SEND FORMAT F0H, 43H, 0nH, 7DH, 00H, 10H (n: channel number) 53H, 4BH, 20H, 20H ] (Model ID) 43H, 4CH, 50H, 27H, 39H, 34H 3xH, 3yH, 20H, 20H, 20H, 20H (x, y: version number) [CHECK SUM (1byte)] = 0-(53H+4BH+20H+......+20H) F7H 24 ○ ○ ○ ○ ○ ○○○○○○○○○○○○○○○○○○○○○○○○○○○○○○○○○○○○○○○○○○○○○○○○○○○○○○ YAMAHA [Digital Piano] Date: 10/03, 1996 MIDI Implementation Chart Model: YDP-88II Function Transmitted Basic Default Channel Changed Version: 1.0 Recognized 1 1~16 1 1~16 3 X ***************** 1 OMNI on, OMNI off X Remarks Mode Default Messages Note Number : True voice 15~114 ***************** 0~127 21~108 Velocity Note on Note off O 9nH, v=1~127 X 9nH, v=0 O v=1~127 X After Touch key’s Ch’s X X X X X X 07 10 11 X X X O O O Volume Pan pot Expression 64 66 67 O O O O O O Damper Sostenuto Soft pedal 120 121 X X O O All sounds off *1 Reset All Controllers Program Change : True # O ***************** O System Exclusive O O System : Song Position : Song Select Common : Tune X X X X X X System : Clock Real Time : Commands O O O O Aux X X O X X O (123~125) *1 O X Pitch Bender Control Change : Local ON/OFF : All Notes Off Messages : Active Sense : Reset Notes : *1 = recieve if omni off or multi-timbre on Mode 1: OMNI ON, POLY Mode 3: OMNI OFF, POLY Mode 2: OMNI ON, MONO Mode 4: OMNI OFF, MONO O: Yes X: No ○ ○ ○ ○ ○ ○ ○ ○ ○ ○ ○ ○ ○ ○ ○ ○ ○ ○ ○ ○ ○ ○ ○ ○ ○ ○ ○ ○ ○ ○ ○ ○ ○ ○ ○ ○ ○ ○ ○ ○ ○ ○ ○ ○ ○ ○ ○ ○ ○ ○ ○ ○ ○ ○ ○ ○ ○ ○ ○ ○ 25 Specifications YDP-88II KEYBOARD 88 KEYS (A-1 ~ C7) POLYPHONY VOICE SELECTORS RECORDER 28 NOTES MAX. PIANO, E. PIANO1, E. PIANO2, HARPSICHORD, ORGAN PLAY, REC PEDAL CONTROLS SOFT, SOSTENUTO, DAMPER OTHER CONTROLS MASTER VOLUME, TEMPO, METRONOME, DEMO, MIDI/TRANSPOSE JACKS/CONNECTORS PHONES x 2, AUX OUT L/L+R & R, MIDI IN/OUT OUTPUT IMPEDANCE MAIN AMPLIFIERS AUX OUT: Output impedance 600 Ω 10W x 2 16 cm x 2 SPEAKERS DIMENTIONS (W x D x H) WEIGHT Music stand down 1384 x 468 x 829 mm (54-1/2" x 18-1/2" x 32-5/8") Music stand up 1384 x 468 x 1001 mm (54-1/2" x 18-1/2" x 39-3/8") 42 kg (92.6 lbs.) • Specifications and descriptions in this owner’s manual are for information purposes only. Yamaha Corp. reserves the right to change or modify products or specifications at any time without prior notice. Since specifications, equipment or options may not be the same in every locale, please check with your Yamaha dealer. IMPORTANT NOTICE FOR THE UNITED KINGDOM Connecting the Plug and Cord IMPORTANT. The wires in this mains lead are coloured in accordance with the following code: BLUE : NEUTRAL BROWN : LIVE As the colours of the wires in the mains lead of this apparatus may not correspond with the coloured makings identifying the terminals in your plug proceed as follows: The wire which is coloured BLUE must be connected to the terminal which is marked with the letter N or coloured BLACK. The wire which is coloured BROWN must be connected to the terminal which is marked with the letter L or coloured RED. Making sure that neither core is connected to the earth terminal of the three pin plug. • This applies only to products distributed by Yamaha-Kemble Music (U.K.) Ltd. 26 ○ ○ ○ ○ ○ ○○○○○○○○○○○○○○○○○○○○○○○○○○○○○○○○○○○○○○○○○○○○○○○○○○○○○○ For details of products, please contact your nearest Yamaha or the authorized distributor listed below. Pour plus de détails sur les produits, veuillez-vous adresser à Yamaha ou au distributeur le plus proche de vous figurant dans la liste suivante. NORTH AMERICA CANADA Yamaha Canada Music Ltd. 135 Milner Avenue, Scarborough, Ontario, M1S 3R1, Canada Tel: 416-298-1311 U.S.A. Yamaha Corporation of America, Keyboard Division 6600 Orangethorpe Ave., Buena Park, Calif. 90620, U.S.A. Tel: 714-522-9011 MIDDLE & SOUTH AMERICA Die Einzelheiten zu Produkten sind bei Ihrer unten aufgeführten Niederlassung und bei Yamaha Vertragshändlern in den jeweiligen Bestimmungsländern erhältlich. Para detalles sobre productos, contacte su tienda Yamaha más cercana o el distribuidor autorizado que se lista debajo. ITALY ASIA Yamaha Musica Italia S.P.A., Home Keyboard Division Viale Italia 88, 20020 Lainate (Milano), Italy Tel: 02-935-771 SPAIN Yamaha-Hazen Electronica Musical, S.A. Jorge Juan 30, 28001, Madrid, Spain Tel: 91-577-7270 PORTUGAL Valentim de Carvalho CI SA Estrada de Porto Salvo, Paço de Arcos 2780 Oeiras, Portugal Tel: 01-443-3398/4030/1823 GREECE MEXICO Yamaha De Mexico S.A. De C.V., Departamento de ventas Javier Rojo Gomez No.1149, Col. Gpe Del Moral, Deleg. Iztapalapa, 09300 Mexico, D.F. Tel: 686-00-33 BRASIL Yamaha Musical Do Brasil LTDA. Ave. Reboucas 2636, São Paulo, Brasil Tel: 011-853-1377 PANAMA Yamaha De Panama S.A. Edificio Interseco, Calle Elvira Mendez no.10, Piso 3, Oficina #105, Ciudad de Panama, Panama Tel: 507-69-5311 OTHER LATIN AMERICAN COUNTRIES AND CARIBBEAN COUNTRIES Yamaha Music Latin America Corp. 6101 Blue Lagoon Drive, Miami, Florida 33126, U.S.A. Tel: 305-261-4111 EUROPE THE UNITED KINGDOM Yamaha-Kemble Music (U.K.) Ltd. Sherbourne Drive, Tilbrook, Milton Keynes, MK7 8BL, England Tel: 01908-366700 IRELAND Danfay Ltd. 61D, Sallynoggin Road, Dun Laoghaire, Co. Dublin Tel: 01-2859177 GERMANY/SWITZERLAND Yamaha Europa GmbH. Siemensstraße 22-34, 25462 Rellingen, F.R. of Germany Tel: 04101-3030 AUSTRIA Yamaha Music Austria Schleiergasse 20, A-1100 Wien Austria Tel: 01-60203900 Philippe Nakas S.A. Navarinou Street 13, P.Code 10680, Athens, Greece Tel: 01-364-7111 SWEDEN BELGIUM Yamaha Music Belgium Keiberg Imperiastraat 8, 1930 Zaventem, Belgium Tel: 02-7258220 FRANCE Yamaha Musique France, Division Claviers BP 70-77312 Marne-la-Vallée Cedex 2, France Tel: 01-64-61-4000 Tom Lee Music Co., Ltd. 11/F., Silvercord Tower 1, 30 Canton Road, Tsimshatsui, Kowloon, Hong Kong Tel: 730-1098 INDONESIA PT. Yamaha Music Indonesia (Distributor) PT. Nusantik Gedung Yamaha Music Center, Jalan Jend. Gatot Subroto Kav. 4, Jakarta 12930, Indonesia Tel: 21-520-2577 MALAYSIA Yamaha Music Malaysia, Sdn., Bhd. 16-28, Jalan SS 2/72, Petaling Jaya, Selangor, Malaysia Tel: 3-717-8977 PHILIPPINES Yupangco Music Corporation 339 Gil J. Puyat Avenue, P.O. Box 885 MCPO, Makati, Metro Manila, Philippines Tel: 819-7551 Yamaha Scandinavia AB J. A. Wettergrens Gata 1 Box 30053 S-400 43 Göteborg, Sweden Tel: 031 89 34 00 SINGAPORE Yamaha Music Asia Pte., Ltd. Blk 17A Toa Payoh #01-190 Lorong 7 Singapore 1231 Tel: 354-0133 DENMARK YS Copenhagen Liaison Office Generatorvej 8B DK-2730 Herlev, Denmark Tel: 44 92 49 00 TAIWAN FINLAND Warner Music Finland OY/Fazer Music Aleksanterinkatu 11, P.O. Box 260 SF-00101 Helsinki, Finland Tel: 0435 011 Kung Hsue She Trading Co., Ltd. No. 322, Section 1, Fu Hsing S. Road, Taipei 106, Taiwan. R.O.C. Tel: 02-709-1266 THAILAND Siam Music Yamaha Co., Ltd. 865 Phornprapha Building, Rama I Road, Patumwan, Bangkok 10330, Thailand Tel: 2-215-3443 NORWAY Narud Yamaha AS Grini Næringspark 17 N-1345 Østerås, Norway Tel: 67 14 47 90 THE PEOPLE’S REPUBLIC OF CHINA AND OTHER ASIAN COUNTRIES ICELAND Yamaha Corporation, International Marketing Division Nakazawa-cho 10-1, Hamamatsu, Japan 430 Tel: 053-460-2317 Skifan HF Skeifan 17 P.O. Box 8120 IS-128 Reykjavik, Iceland Tel: 525 5000 OTHER EUROPEAN COUNTRIES Yamaha Europa GmbH. Siemensstraße 22-34, 25462 Rellingen, F.R. of Germany Tel: 04101-3030 OCEANIA AUSTRALIA Yamaha Music Australia Pty. Ltd. 17-33 Market Street, South Melbourne, Vic. 3205, Australia Tel: 3-699-2388 AFRICA Yamaha Corporation, International Marketing Division Nakazawa-cho 10-1, Hamamatsu, Japan 430 Tel: 053-460-2312 THE NETHERLANDS Yamaha Music Nederland Kanaalweg 18G, 3526KL, Utrecht, The Netherlands Tel: 030-2828411 HONG KONG NEW ZEALAND Music Houses of N.Z. Ltd. 146/148 Captain Springs Road, Te Papapa, Auckland, New Zealand Tel: 9-634-0099 COUNTRIES AND TRUST TERRITORIES IN PACIFIC OCEAN MIDDLE EAST TURKEY/CYPRUS Yamaha Corporation, International Marketing Division Nakazawa-cho 10-1, Hamamatsu, Japan 430 Tel: 053-460-2317 Yamaha Europa GmbH. Siemensstraße 22-34, 25462 Rellingen, F.R. of Germany Tel: 04101-3030 OTHER COUNTRIES Yamaha Corporation, International Marketing Division Nakazawa-cho 10-1, Hamamatsu, Japan 430 Tel: 053-460-2312 HEAD OFFICE Yamaha Corporation, Electronic Musical Instrument Division [CL] 11 Nakazawa-cho 10-1, Hamamatsu, Japan 430 Tel: 053-460-3273 M.D.G., EMI Division © 1997 Yamaha Corporation VZ40090 706POCP5.2-01A0 Printed in Japan-
 1
1
-
 2
2
-
 3
3
-
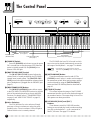 4
4
-
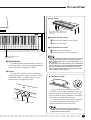 5
5
-
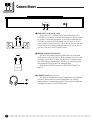 6
6
-
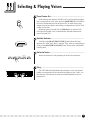 7
7
-
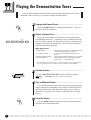 8
8
-
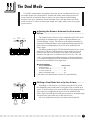 9
9
-
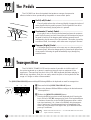 10
10
-
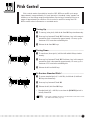 11
11
-
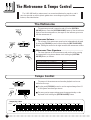 12
12
-
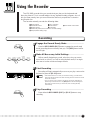 13
13
-
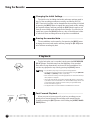 14
14
-
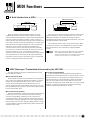 15
15
-
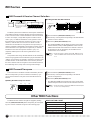 16
16
-
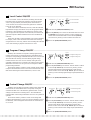 17
17
-
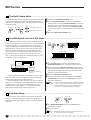 18
18
-
 19
19
-
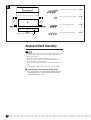 20
20
-
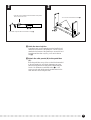 21
21
-
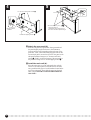 22
22
-
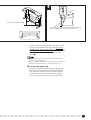 23
23
-
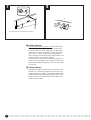 24
24
-
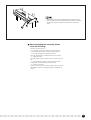 25
25
-
 26
26
-
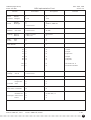 27
27
-
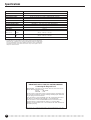 28
28
-
 29
29
-
 30
30


Yamaha Keyboards and Digital - Pianos Manual de usuario
- Categoría
- Instrumentos musicales
- Tipo
- Manual de usuario
- Este manual también es adecuado para
en otros idiomas
- français: Yamaha Keyboards and Digital - Pianos Manuel utilisateur
- italiano: Yamaha Keyboards and Digital - Pianos Manuale utente
- English: Yamaha Keyboards and Digital - Pianos User manual
- Deutsch: Yamaha Keyboards and Digital - Pianos Benutzerhandbuch
- русский: Yamaha Keyboards and Digital - Pianos Руководство пользователя
- Nederlands: Yamaha Keyboards and Digital - Pianos Handleiding
- português: Yamaha Keyboards and Digital - Pianos Manual do usuário
- dansk: Yamaha Keyboards and Digital - Pianos Brugermanual
- polski: Yamaha Keyboards and Digital - Pianos Instrukcja obsługi
- čeština: Yamaha Keyboards and Digital - Pianos Uživatelský manuál
- svenska: Yamaha Keyboards and Digital - Pianos Användarmanual
- Türkçe: Yamaha Keyboards and Digital - Pianos Kullanım kılavuzu
- suomi: Yamaha Keyboards and Digital - Pianos Ohjekirja
- română: Yamaha Keyboards and Digital - Pianos Manual de utilizare
Artículos relacionados
-
Yamaha YDP-88 Manual de usuario
-
-
-
-
-
-
-
-
-