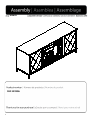
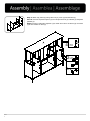
ROOMS TO GO 21612444 Assembly Instructions
- Categoría
- Chimeneas
- Tipo
- Assembly Instructions

1
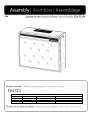
102635
FA1111956

2|
Φ
3/16"

3|

4|
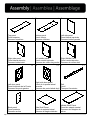
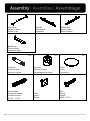
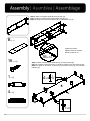
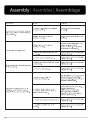
A ×1
Top panel
Panel superior
Panneau supérieur
B ×1
Bottom panel
Panel inferior
Panneau inférieur
C ×1
Left side panel
Panel lateral izquierdo
Panneau latéral gauche
D ×1
Right side panel
Panel lateral derecho
Panneau latéral droit
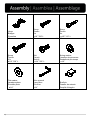
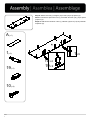
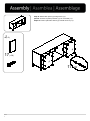
E ×1
Left middle panel
Panel central izquierdo
Panneau du milieu de gauche
F ×1
Right Middle Panel
Panel central derecho
Panneau du milieu droit
G ×1
Left door panel
Panel izquierdo de la Puerta
Panneau de porte gauche
H ×1
Right side door panel
Panel de la puerta lateral
derecha
Panneau de porte latéral droit
I ×1
Rail
Carril
Transport ferroviaire
J ×2
Back panel
Panel posterior
Panneau arrière
K x2
Side Shelf Panel
Panel de estante lateral
Panneau d’étagère latérale
L ×1
Middle Shelf Panel
Panel de estante central
Panneau de l’étagère du
milieu

5|
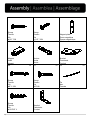
M ×2
Iron frame
Marco de hierro
Cadre en fer
N x2
Side rail
Carril lateral
Rail latéral
O ×1
Middle Rail
Carril central
Râle du Milieu
P x1
Middle leg
Pierna media
Jambe du milieu
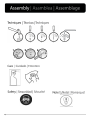
1 x19
Cam bolt
Perno de leva
Boulon à cames
2 x19
Cam lock
Bloqueo de leva
Verrouillage de la came
3 ×19
Cover
Cubrir
Couverture
4 ×18
Wood dowel
Clavija de madera
Cheville en bois
ø5/16” *1-1/4”L
5 ×2
Knob
Perilla
Bouton
6 ×2
Bolt
Cerrojo
Boulon
ø5/32” *3/4” L

6|
7 x4
Hinge
Bisagra
Charnière
8 ×24
Screw
Tornillo
Vis
ø1/8” *5/8” L
9 ×2
Screw
Tornillo
Vis
ø1/8” *1/2” L
10 ×4
Screw
Tornillo
Vis
ø1/8” *5/8” L
11 ×14
Bolt
Cerrojo
Boulon
ø1/4” *5/8” L
12 ×14
Spring washer
Lavadora de primavera
Rondelle de printemps
ø1/4”
13 ×14
Flat washer
Lavadora plana
Rondelle plate
ø1/4”
14 ×1
Allen wrench
Llave Allen
Clé Allen
ø1/4”
15 ×12
Shelf pin
Pasador de estante
Goupille d’étagère

7|
16 ×14
Screw
Tornillo
Vis
ø1/8” *5/8
17 ×28
Screw
Tornillo
Vis
ø 1/8” *1/2L
18 ×2
Magnet plate
Placa magnética
Plaque magnétique
19 ×2
Magnet
Imán
Aimant
20 ×2
Anchor
Ancla
Ancre
21 ×4
Bracket
Paréntesis
Crochet
22 ×2
Screw
Tornillo
Vis
ø8*1-1/2L
23 ×2
Screw
Tornillo
Vis
ø8*3/4L
24 ×2
Tie
Atar
Cravate
25 ×4
Screw
Tornillo
Vis
ø1/8*5/8” L
26 ×2
Bracket
Paréntesis
Crochet

8|
11
(×14)
12(×14)
13(×14)
14 (×1)
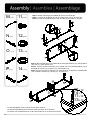
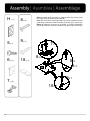
M
(×2)
N(×2)
O (×1
)
P(×1)
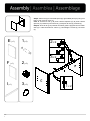
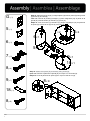
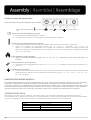
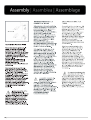
Step 2: Attach middle leg (P) to middle rail (O) using Flat washer (13), spring washer
(12), bolt (11), Allen wrench (14).
Paso 2: Conecte la pata central (P) al riel central (O) con la arandela plana (13), la
arandela de resorte (12), el perno (11), la llave Allen (14).
Étape 2: Fixez la jambe du milieu (P) au rail central (O) à l’aide de la rondelle plate
(13), rondelle à ressort (12), boulon (11), clé Allen (14).
Step 1: Attach side rail (N) and middle rail (O) to Iron frame (M).
Paso 1: Conecte el riel lateral (N) y el riel central (O) al marco de hierro (M).
Étape 1: Fixez le rail latéral (N) et le rail du milieu (O) au cadre en fer (M).
Do not fully tighten screws until all screws are in position.
No apriete completamente los tornillos hasta que estén en su posición.
Ne serrez pas complètement les vis tant que toutes les vis ne sont pas en place.
14×1
11×14
12×14
13×14

9|
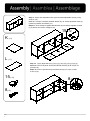
B
(×1)
16 (×14)
1 (×8)
4 (×8)
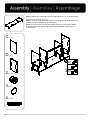
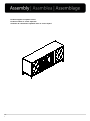
Step 3: Step 2 to bottom panel (B) using screw (16).
Paso 3: Paso 2 al panel inferior (B) usando tornillo (16).
Étape 3: Étape 2 au panneau inférieur (B) en utilisant la vis (16).
Step 4: Attach cam bolt (1) wood dowel (4) to bottom panel (B).
Paso 4: Conecte el perno de leva (1) clavija de madera (4) al panel inferior (B).
Étape 4: Attachez le boulon à cames (1) la cheville en bois (4) au panneau
inférieur (B).
Tighten all screws.
Apretar todos los tornillos.
Serrez toutes les vis.
16×14
4×8
1×8

10
|
A
(×1)
1
(×9)
19(×2)
10(×4)
Step 5: Attach cam bolt (1) magnet (19) screw (10) to top panel (A).
Paso 5: Conecte el perno de leva (1) el tornillo del imán (19) (10) al panel
superior (A).
Étape 5: Attachez le boulon à came (1) l’aimant (19) la vis (10) au panneau
supérieur (A).
10×4
1×9
19×2

11
|
1
(×2)
2 (×2)
3 (×2)
E (×1)
F (×1)
I (×1)
Step 6: Attach rail (I) to Left middle panel (E) right middle panel (F) using cam
bolt (1) cam lock (2) cover (3).
Paso 6: Conecte el riel (I) al panel central izquierdo (E) al panel central
derecho (F) usando el perno de leva (1) bloqueo de leva (2) cubierta (3).
Étape 6: Fixez le rail (I) au panneau du milieu gauche (E) panneau du milieu
droit (F) à l’aide du boulon à cames (1) verrouillage à cames (2) couvercle
(3).
2×2
3×2
1×2

12
|
C
(×1)
D (×1)
2 (×17)
3 (×17)
4 (×10)
3×8
Step 7: Attach step 6 left side panel (C) right side panel(D)to bottom panel
(B) using cam lock (2) cover (3).
Paso 7: Conecte el panel lateral izquierdo (C) del paso 6 al panel inferior (B)
usando la cubierta de bloqueo de leva (2) (3).
Étape 7: Fixez l’étape 6 du panneau latéral gauche (C) du panneau latéral
droit (D) au panneau inférieur (B) à l’aide du verrouillage à cames (2) du
couvercle (3).
2×8

13
|
Step 8: Attach top panel (A) using cam lock (2) cover (3) wood dowel (4).
Paso 8: Conecte el panel superior (A) con bloqueo de leva (2) cubierta (3) clavija de
madera (4).
Étape 8: Fixez le panneau supérieur (A) à l’aide d’un verrou à cames (2) couvercle
(3) d’une cheville en bois (4).
4×10
2
×9
3×9

14
|
J
(×2)
17(×28)
Step 9: Attach back panel (J) using screw (17).
Paso 9: Conecte el panel posterior (J) con el tornillo (17).
Étape 9: Fixez le panneau arrière (J) à l’aide de la vis (17).
17×28

15
|
Step 10: Attach knob (5) hinge (7) magnet plate (18) to door panel
(G) using screw (8) Screw (9) and bolt (6).
Paso 10: Conecte la perilla (5) bisagra (7) placa magnética (18) al
panel de la puerta (G) usando el tornillo (8) Tornillo (9) y el perno (6).
Étape 10: Attachez le bouton (5) charnière (7) plaque magnétique
(18) au panneau de porte (G) à l’aide de vis (8) Vis (9) et boulon (6).
7×2
8×4
6×1
5×1
9×1
18×1
H
(×1)
5(×1)
6 (×1)
7 (×2)
8
(×4)
9(×1)
18 (×1)

16
|
K (×2)
L (×1)
15(×12)
8
(×8)
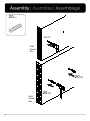
Step 11: Attach side adjustable shelf (K) and middle adjustable shelf (L) using
shelf pin (15).
Paso 11: Coloque el estante ajustable lateral (K) y el estante ajustable medio (L)
usando el pasador del estante (15).
Étape 11: Fixez l’étagère réglable latéralement (K) et l’étagère réglable centrale
(L) à l’aide d’une broche d’étagère (15).
Step 12: Attach Right side door panel (H) to the body using screw (8).
Paso 12: Conecte el panel de la puerta lateral derecha (H) al cuerpo con
el tornillo (8).
Étape 12: Fixez le panneau de porte latéral droit (H) au corps à l’aide
d’une vis (8).
15×12
8×8

17
|
To achieve uniform clearance around the door, you may need to adjust the door by tightening or loosening
the two screws on the hinge itself.
Para lograr un espacio uniforme alrededor de la puerta, es posible que deba ajustar la puerta apretando o
aflojando los dos tornillos de la bisagra.
Pour obtenir un jeu uniforme autour de la porte, vous devrez peut-être ajuster la porte en serrant ou en
desserrant les deux vis de la charnière.

18
|
G
(×1)
5 (×1)
6 (×1)
7 (×2)
8(×4)
9(×1)
18(×1)
8(×8)
Step 13: Attach knob (5) hinge (7) magnet plate (18) to door panel (G) using screw
(8) Screw (9) and bolt (6).
Paso 13: Conecte la perilla (5) bisagra (7) placa magnética (18) al panel de la
puerta (G) usando tornillo (8) Tornillo (9) y perno (6).
Étape 13: Fixer le bouton (5) charnière (7) plaque magnétique (18) au panneau
de porte (G) à l’aide de vis (8) Vis (9) et boulon (6).
Step 14: Attach door panel (G) to the body using screw (8).
Paso 14: Conecte el panel de la puerta (G) al cuerpo con el tornillo (8).
Étape 14: Fixez le panneau de porte (G) au corps à l’aide de vis (8).
7×2
8×4
6×1
5×1
9×1
18×1
8×8

19
|
Step 15
Paso 15
Étape 15
Adjust the bottom nails to keep the door gap consistent.
Ajuste los clavos inferiores para mantener constante el espacio de la puerta.
Ajustez les clous du bas pour maintenir l'écart de la porte cohérent.
To achieve uniform clearance around the door, you may need to adjust the door by tightening or loosening
the two screws on the hinge itself.
Para lograr un espacio uniforme alrededor de la puerta, es posible que deba ajustar la puerta apretando o
aflojando los dos tornillos de la bisagra.
Pour obtenir un jeu uniforme autour de la porte, vous devrez peut-être ajuster la porte en serrant ou en
desserrant les deux vis de la charnière.

20
|
25
(×4)
26 (×2)
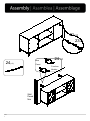
Step 16: Remove the middle shelf panel(K) shelf pin (15).
Paso 16: Retire el panel del estante central (K) pin del estante (15).
Étape 16: Retirez la broche du panneau d’étagère du milieu (K) (15).
Step 17: Attach Firebox to the body. using Bracket (26) screw (25).
Paso 17: Conecte Firebox al cuerpo. utilizando el tornillo Bracket (26) (25).
Étape 17: Fixez Firebox au corps. en utilisant bracket (26) vis (25).
15×4
25×4
26×2

21
|
Firebox shipped in separate carton
Firebox enviado en cartón separado
Chambre de combustion expédiée dans un carton séparé

22
|
Φ3/16”
Wall
Pared
Mur
20
(×2)
Wall
Pared
Mur
20×2
20×2

23
|
21
(×4)
22(×2)
23(×2)
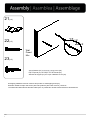
Anti-tipping hardware must be used for this product to avoid tipping and injury.
Se deben utilizar herrajes anti-vuelco para este producto para evitar vuelcos y lesiones.
Le matériel anti-basculement doit être utilisé pour ce produit afin d'éviter le basculement et les blessures.
Wall
Pared
Mur
Attach Bracket (21) to the body. Using screw (23).
Fije el soporte (21) al cuerpo. Uso de tornillo (23).
Attachez le support (21) au corps. Utilisation de vis (23).
21×2
22×2

24
|
Wall
Pared
Mur
24
(×2)
Wall
Pared
Furniture
Mueble
21×2
23×2
24×2

25
|
77.5 lbs<
20 lbs<
20 lbs<
30 lbs<
20 lbs<

26
|
Replacement Parts or Damages
You should examine your merchandise promptly upon receipt. For product concerns, please contact SEI
Furniture customer service at 800-633-5096 Mon-Fri 8:30 am - 5 pm CST. Please have your purchase
information ready when you call.
Requests for missing or damaged parts must be requested within one year of purchase. Damages or missing
parts reported outside of one year will not be honored. SEI Furniture is under no obligation to provide parts or
replacement merchandise. Replacement part requests will not be honored for fully assembled or modified
items.
For merchandise purchased from an online retailer, please contact their customer service for parts or returns.
Merchandise purchased as “like new,” “open box,” or “as is,” or from private parties are exempt from
replacement parts.
One Year Limited Warranty
Product warranty applies to the original purchaser with items in original factory-sealed cartons. Proof of
purchase date, price, and seller must be shown to validate the warranty. This warranty covers defects in
manufacturing. It does not apply to any defects caused by negligence, misuse, accidental damage, or improper
assembly. Glass and mirrors are excluded from this warranty. Warranty does not extend to cosmetic damage,
accidents, misuse, abuse, or neglect. Liability for incidental or consequential damages is excluded to the
maximum extent permitted by law.
After verification of claim, SEI Furniture will repair or replace any defective product or missing part. If the
defective item must be returned in whole or in part, we will send written authorization and a pre-addressed
shipping label for the return of any defective product or part.
No returns will be accepted without prior approval.

27
|
Piezas de Repuesto o Daños
Debe examinar su mercancía inmediatamente después de recibirla. Si tiene inquietudes sobre el producto,
comuníquese con el servicio al cliente de SEI Furniture al 800-633-5096 de lunes a viernes de 8:30 am a 5 pm
CST. Tenga a mano la información de su compra cuando llame.
Las solicitudes de piezas faltantes o dañadas deben solicitarse en el plazo de un año a partir de la compra. Los
daños o piezas faltantes informados fuera de un año no serán aceptados. SEI Furniture no tiene la obligación
de proporcionar piezas o mercadería de reemplazo. No se aceptarán solicitudes de piezas de repuesto para
artículos completamente ensamblados o modificados.
Para mercadería comprada en un minorista en línea, comuníquese con su servicio de atención al cliente para
obtener piezas o devoluciones.
La mercancía comprada como "como nueva", "caja abierta" o "como está" o de particulares están exentas de
piezas de repuesto.
Garantía Limitada de un Año
La garantía del producto se aplica al comprador original con los artículos en cajas de cartón originales selladas
de fábrica. Se debe mostrar el comprobante de la fecha de compra, el precio y el vendedor para validar la
garantía. Esta garantía cubre defectos de fabricación. No se aplica a ningún defecto causado por negligencia,
mal uso, daño accidental o montaje inadecuado. Los vidrios y espejos están excluidos de esta garantía. La
garantía no se extiende a daños cosméticos, accidentes, mal uso, abuso o negligencia. La responsabilidad por
daños incidentales o consecuentes está excluida en la medida máxima permitida por la ley.
Después de la verificación de la reclamación, SEI Furniture reparará o reemplazará cualquier producto
defectuoso o pieza faltante. Si el artículo defectuoso debe devolverse en su totalidad o en parte, le enviaremos
una autorización por escrito y una etiqueta de envío con la dirección predeterminada para la devolución de
cualquier producto o pieza defectuosa.
No se aceptarán devoluciones sin aprobación previa.

28
|
Pièces de Rechange ou Dommages
Vous devez examiner votre marchandise dès sa réception. Pour toute question concernant les produits, veuillez
contacter le service client de SEI Furniture au 800-633-5096 du lundi au vendredi de 8h30 à 17h00 CST.
Veuillez avoir vos informations d'achat prêtes lorsque vous appelez.
Les demandes de pièces manquantes ou endommagées doivent être effectuées dans l'année suivant l'achat. Les
dommages ou pièces manquantes signalés en dehors d'un an ne seront pas honorés. SEI Furniture n'a aucune
obligation de fournir des pièces ou des marchandises de remplacement. Les demandes de pièces de rechange
ne seront pas honorées pour les articles entièrement assemblés ou modifiés.
Pour les marchandises achetées auprès d'un détaillant en ligne, veuillez contacter leur service client pour les
pièces ou les retours.
Les marchandises achetées comme “comme neuves”, “boîte ouverte” ou “en l'état” ou auprès de parties
privées sont exemptées de pièces de rechange.
Garantie Limitée d'un An
La garantie du produit s'applique à l'acheteur d'origine avec des articles dans des cartons d'origine scellés en
usine. La date d'achat, le prix et le vendeur doivent être présentés pour valider la garantie. Cette garantie
couvre les défauts de fabrication. Elle ne s'applique pas aux défauts causés par une négligence, une mauvaise
utilisation, des dommages accidentels ou un assemblage incorrect. Le verre et les miroirs sont exclus de cette
garantie. La garantie ne s'étend pas aux dommages cosmétiques, aux accidents, à la mauvaise utilisation, à
l'abus ou à la négligence. La responsabilité pour les dommages accessoires ou indirects est exclue dans la
mesure maximale permise par la loi.
Après vérification de la réclamation, SEI Furniture réparera ou remplacera tout produit défectueux ou pièce
manquante. Si l'article défectueux doit être retourné en tout ou en partie, nous vous enverrons une autorisation
écrite et une étiquette d'expédition pré-adressée pour le retour de tout produit ou pièce défectueux.
Aucun retour ne sera accepté sans accord préalable.

PO#
ELECTRICAL SPECIFICATIONS | ESPECIFICACIONES ELÉCTRICAS | CARACTÉRISTIQUES ÉLECTRIQUES
Voltage: Tensión: Tension: 120V, 60 Hz
Amps: Amperios: Intensité de courant: 12.5 Amps
Was: Was: Puissance: 1500 Was
Lighng: Iluminación: Éclairage: LED
FA4723

|
2

|
3

|
4

|
5

It's highly recommended to plug the unit to outlet with GFR/GFCI receptacle.
|
6

Se recomienda encarecidamente enchufar la unidad a un tomacorriente con receptáculo GFR/GFCI.
|
7

Il est fortement recommandé de brancher l'appareil sur une prise avec une prise GFR/GFCI.
•
|
8

|
9

|
10

|
11
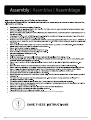
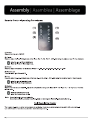
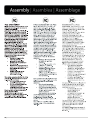
Operating Instructions:
Control Panel on the Front of Unit:
1. Power 2. Heater 3. Flame 4. Log 5. Timer
1. On/Off Main Power Button
a. Press to switch the unit ON/OFF.
b. The unit will turn on to its default factory settings.
2. On/Off Heater Button
a. This allows programming of the thermostat. The fireplace can be used without the heater if desired.
b. Adjust the temperature rating from 62°F - 82°F - ON (17°C - 27°C).
Note: °F is the default unit. To change from Fahrenheit to Celsius: Hold the heater button for approximately
5 seconds, the temperature readout will switch directly from °F to °C and vice versa.
3. Adjustable Flame Brightness
a. Adjust the flame brightness level:F5 - F4 - F3 - F2 - F1 - OFF (F5 being the brightest and F1 the dimmest)
4. Adjustable Log Brightness
a. Adjust the log brightness level: L5 - L4 - L3 - L2 - L1 - OFF (L5 being the brightest and L1 the dimmest)
5. Adjustable Timer
a. This allows you to control the duration of the heater function. Press the timer button until you have reached
the desired duration time. Levels: 30 min - 1H - 2H - 3H - 4H - 5H - 6H - 7H - 8H - 9H – OFF
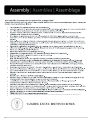
CHILD LOCK FUNCTION:
This unit is equipped with child lock protection. To activate the child lock function, push and hold the power button on the unit
for 6 seconds. After holding the power button, the log light will blink 5 times to confirm that the unit is in child lock mode.
Once the unit is in child lock mode, the buttons on the unit will not function when pushed. To deactivate the child lock
function, push and hold the power button on the unit for 6 seconds.
ELECTRICAL CONNECTION:
A 12.5 AMP, 120 Volts, 60 Hz circuit with a properly grounded outlet is required. It’s recommended that the fireplace be on a
dedicated circuit, as other appliances on the same circuit may cause the circuit breaker to trip or blow the fuse when the
heater is in operation.
ELECTRICAL SPECIFICATIONS
Voltage: 120VAC, 60 Hz
Amps: 12.5Amps
Watts: 1500 Watts
Lighting: LED

|
12
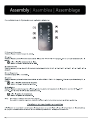
Instrucciones de operación:
Panel de control en la parte delantera de la unidad:
1. Encendido/apagado 2. Calefactor 3. Llama 4. Leños 5. Temporizador
1. Botón de encendido/apagado principal
a. Presiónelo para encender/apagar la unidad.
b. La unidad se encenderá en su configuración predeterminada de fábrica.
2. Botón de encendido/apagado del calefactor
a. Esto permite programar el termostato. Si lo desea, puede usar la chimenea sin el calefactory.
b. Ajuste los grados de temperatura entre 62 °F-- 82 °F-- Encendido (17 °C—27 °C).
Nota: ℉es la unidad predeterminada. Para cambiar de Fahrenheit a Celsius: mantenga presionado el
botón del calefactor por aproximadamente 5 segundos y la lectura de temperatura cambiará de inmediato
de °F a °C y viceversa.
3. Intensidad de la llama ajustable
a. Ajuste el nivel de intensidad de la llama: F5 - F4 - F3 - F2 - F1 - Apagado (F5 es la mayor intensidad y F1,
la menor)
4. Intensidad de los leños ajustable
a. Ajuste el nivel de intensidad de los leños: L5 - L4 - L3 - L2 - L1 - Apagado (L5 es la mayor intensidad y L1,
la menor)
5. Temporizador ajustable
a. T Esto le permite controlar la duración de funcionamiento del calefactor. Presione el botón del temporizador
hasta alcanzar la duración de funcionamiento deseada. Nivel: 30 min - 1 h - 2 h - 3 h - 4 h - 5 h - 6 h - 7 h -
8 h - 9 h – Apagado
FUNCIÓN DE BLOQUEO INFANTIL:
Esta unidad está equipada con protección de bloqueo para niños. Para activar la función de bloqueo para niños, mantenga
presionado el botón de encendido de la unidad durante 6 segundos. Después de mantener presionado el botón de
encendido, la luz de tronco parpadeará 5 veces para confirmar que la unidad está en modo de bloqueo infantil. Una vez que
la unidad está en modo de bloqueo infantil, los botones de la unidad no funcionarán cuando se presionen. Para desactivar
la función de bloqueo para niños, mantenga presionado el botón de encendido de la unidad durante 6 segundos.
CONEXIÓN ELÉCTRICA:
Se requiere un circuito de 12.5 amperios, 120 voltios, 60 Hz, con una salida conectada correctamente a tierra. Es
recomendable que la chimenea se conecte a un circuito dedicado, puesto que otros artefactos en el mismo circuito pueden
causar que el disyuntor del circuito se dispare o el fusible se queme mientras funciona el calefactor.
ESPECIFICACIONES ELÉCTRICAS
Voltaje: 120 VCA, 60 Hz
Amperaje: 12.5 amperios
Vataje: 1500 vatios
Iluminación: LED

|
13
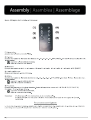
Directives d'utilisation:
Panneau de commande à l'avant de l'unité:
1. Alimentation 2. Fournaise 3. Flamme 4. Bûche 5. Minuterie
1. Bouton marche/arrêt de l'alimentation principale
a. Appuyez pour allumer ou éteindre l'unité.
b. L'unité se mettra en marche avec les paramètres par défaut de l'usine.
2. Bouton marche arrêt de la fournaise
a. Cette commande vous permet de programmer le thermostat. Vous pouvez utiliser le foyer sans la fournaise,
si vous le souhaitez.
b. Ajustez la température entre 62 °F à 82 °F – MARCHE (17 °C à 27 °C).
Remarque: ℉est l'unité par défaut. Pour passer des degrés Fahrenheit aux degrés Celcius: Tenez le
bouton de la fournaise enfoncé pendant environ 5 secondes. L'affichage de la température passera
directement de °F à °C, et vice versa.
3. Luminosité ajustable des flammes
a. Ajustez le niveau de luminosité des flammes : F5 - F4 - F3 - F2 - F1 - OFF (ARRÊT) (F5 étant le niveau le
plus clair et F1, le plus sombre)
4. Luminosité ajustable des bûches
a. Ajustez le niveau de luminosité des bûches : L5 - L4 - L3 - L2 - L1 - OFF (ARRÊT) (L5 étant le niveau le
plus clair et L1, le plus sombre)
5. Minuterie ajustable
a. Cette fonction vous permet de contrôler la durée de fonctionnement de la fournaise. Appuyez sur le bouton
de la minuterie jusqu'à atteindre la durée voulue. Niveau : 30 min - 1 h- 2 h - 3 h - 4 h - 5 h - 6 h - 7 h - 8 h -
9 h - OFF (ARRÊT)
FONCTION DE VERROUILLAGE ENFANT:
Cet appareil est équipé d'une protection de verrouillage pour enfants. Pour activer la fonction de verrouillage parental,
maintenez enfoncé le bouton d'alimentation de l'appareil pendant 6 secondes. Après avoir appuyé sur le bouton
d'alimentation, le voyant du grume clignotera 5 fois pour confirmer que l'appareil est en mode de verrouillage parental. Une
fois que l’appareil est en mode de verrouillage parental, les boutons de l’appareil ne fonctionnent plus lorsque vous appuyez
dessus. Pour désactiver la fonction de verrouillage parental, maintenez enfoncé le bouton d'alimentation de l'appareil
pendant 6 secondes.
RACCORDEMENT ÉLECTRIQUE:
Un circuit de 12,5 A, 120 volts et 60 Hz muni d'une fiche correctement mise à la terre est nécessaire. Nous recommandons
l'utilisation d'un circuit indépendant pour le foyer puisque les autres appareils sur le même circuit peuvent entraîner le
déclenchement du disjoncteur ou griller le fusible lorsque la fournaise est allumée.
CARACTÉRISTIQUES ÉLECTRIQUES
Tension : 120 V c.a., 60 Hz
Intensité de courant : 12,5 A
Puissance : 1500 watts
Éclairage : DEL

|
14

|
15

|
16

|
17

|
18

|
19

|
20

|
21

|
22

|
23

|
24

|
25

Smart Fireplace Setup Guide
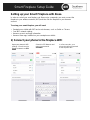
Setting up your Smart Fireplace with Alexa
In order to control your new fireplace via Alexa voice commands, you must connect the
fireplace to your wireless network (WiFi) and then link the fireplace to your Amazon
account.
To set up your smart fireplace, you will need:
• Smartphone or tablet with WiFi and a web browser, such as Safari or Chrome
• Your WiFi network settings
• Amazon account and login information
• Amazon Alexa app, installed on your smartphone or tablet
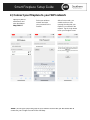
1)
Connect your phone to the fireplace WiFi
Open your phone’s WiFi
settings. You will see the
fireplace network as
SEI-
XXXX
Select this SEI Network and
enter the password:
seiadmin
In a few seconds, your
phone should be connected
to the fireplace WiFi.

Smart Fireplace Setup Guide
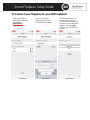
2)
Connect your fireplace to your WiFi network
Open your phone’s
web browser and enter
the address:
http://10.9.8.7
Select your wireless
network and enter your
password for the network.
After a few seconds, you
should see the success
message showing that your
fireplace is connected to the
network. Tap the
Login
button to link your Amazon
account.

Smart Fireplace Setup Guide
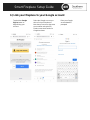
3)
Link your fireplace to your Amazon account
Tap the
Login with
Amazon
button to begin
linking your account.
Tap
Allow
to link your
fireplace to your Amazon
account.
Enter your Amazon account
details when prompted and
tap
Sign-In
when finished.

Smart Fireplace Setup Guide
4)
Name your fireplace and enable the Alexa skill
Choose a name for your
fireplace. This is how you
will identify the device when
using Alexa voice
commands.
Configure the Alexa skill by
tapping the link to launch
the Alexa app.
You will be prompted to
enable the Alexa skill. Tap
Enable to Use.

Smart Fireplace Setup Guide
*Note: To remove a fireplace from your Amazon account, visit http://sei-
smartfireplace.com and login with your account details.
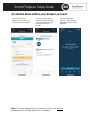
5)
Link the Alexa skill to your Amazon account
Login with the same
Amazon account that you
used to set up the fireplace.
Once you have logged in
with your Amazon account,
close the window to begin
the device discovery
process.
Alexa should find 5
devices – these are the
different functions of your
fireplace.

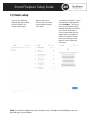
Smart Fireplace Setup Guide
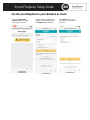
List of Alexa Commands
Use the following phrases to control your fireplace via Alexa. Simply replace
“Fireplace” with the name you chose for your fireplace during setup.
Power
"Alexa, turn Fireplace on"
"Alexa, turn Fireplace off"
Downlight
"Alexa, turn Fireplace downlight on"
"Alexa, turn Fireplace downlight off"
Logs
"Alexa, turn Fireplace log up"
"Alexa, turn Fireplace log down"
Flames
"Alexa, turn Fireplace flame up"
"Alexa, turn Fireplace flame down"
Heat
"Alexa, turn Fireplace heater on"
"Alexa, turn Fireplace heater off"
"Alexa, turn Fireplace heater up"
"Alexa, turn Fireplace heater down"
"Alexa set Fireplace heater to 75"
"Alexa, set Fireplace heater to 70 for two hours"

Smart Fireplace Setup Guide
*Note: To remove a fireplace from your Amazon account, visit http://sei-
smartfireplace.com and login with your account details.
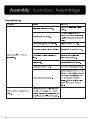
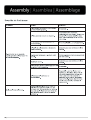
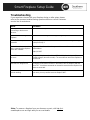
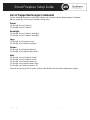
Troubleshooting
If you experience issues with your fireplace during or after setup, please
refer to the common troubleshooting questions below or call our customer
service line for assistance.
Issue
Solution
The fireplace is stuck
connecting to the Amazon
account.
Make sure the fireplace is turned ON for all steps during setup.
Alexa is not connecting to the
fireplace.
Scan for devices using the Alexa app during setup.
The fireplace setup needs to be
restarted.
Delete any fireplace devices or commands from the Alexa app and begin
setup from step 1.
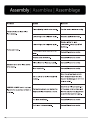
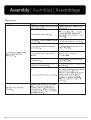
Web address does not work
when connecting the fireplace
to the WiFi network.
Type the full address below into your web browser. Do not abbreviate the
web address.
http://10.9.8.7
The WiFi connection needs to
be reset.
Plug in the fireplace and switch to OFF. Hold the timer button until the
fireplace beeps (about 8 seconds). The reset will not work if the fireplace is
turned ON.
The fireplace has disconnected
after the WiFi dropped out.
Unplug the fireplace, wait 30 seconds, then plug the fireplace back in.
Using the power button located on the firebox, turn the fireplace ON and
then OFF. Use Alexa commands as normal to ensure that the fireplace has
been reconnected.
Alexa commands are enabled
but not working.
Disable the commands, then enable them again. If the commands still do
not work, you may need to reset the fireplace WiFi.

Smart Fireplace Setup Guide
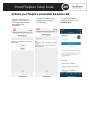
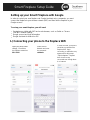
Setting up your Smart Fireplace with Google
In order to control your new fireplace via Google Assistant voice commands, you must
connect the fireplace to your wireless network (WiFi) and then link the fireplace to your
Google account.
To set up your smart fireplace, you will need:
• Smartphone or tablet with WiFi and a web browser, such as Safari or Chrome
• Your WiFi network settings
• Google account and login information
• Google Assistant for Android or IOS
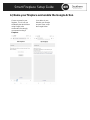
1.) Connecting your phone to the fireplace WiFi
Open your phone’s WiFi
settings. You will see
the fireplace network as
SEI- XXXX
Select this SEI
Network and enter
the password:
seiadmin
In a few seconds, your phone
should be connected to the
fireplace WiFi. Upon
connecting, a notification may
appear which will prompt
“Tap for Options.” Tap and
then choose to stay
connected even though there
is no internet.

Smart Fireplace Setup Guide
*Note: To remove a fireplace from your Amazon account, visit http://sei-
smartfireplace.com and login with your account details.
2.) Connect your fireplace to your WiFi network
Open your phone’s
web browser and
enter the address:
http://10.9.8.7
Select your wireless
network and enter
your password for the
network.
After a few seconds, you
should see the success
message showing that your
fireplace is connected to the
network. Tap the Login button
to link your Google account.
*Note: The success screen may refer to your Amazon account but you will still be able to
connect to your Google Account in the next step.

Smart Fireplace Setup Guide
3.) Link your fireplace to your Google account
Tap the blue Google
Sign in button to
begin linking your
account.
Select the Google account you
wish to link your fireplace to.
Note that you must use the same
account when using the SEI
Firebox smart home action for
Google Assistant.
Enter your Google
account details if
prompted.

Smart Fireplace Setup Guide
*Note: To remove a fireplace from your Amazon account, visit http://sei-
smartfireplace.com and login with your account details.
4.) Name your fireplace and enable the Google Action
Choose a name for your
fireplace. This is how you
will identify the device when
using Google voice
commands. We strongly
recommend naming it
Fireplace.
Your device is now
linked to your Google
account. Next, set up
the Google Action.

Smart Fireplace Setup Guide
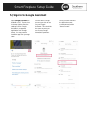
5.) Sign in to Google Assistant
Open Google Assistant on
Android or IOS. Tap the icon
in the top right to enter the
settings screen. Google
Assistant is a separate
application from Google
Home. You may need to
install the app from your app
store.
Choose which Google
account you wish to use
for your Google
Assistant. This should be
the same account you
use for any Google
Home/Nest speakers.
Once you have selected
the desired account,
scroll down and select
“Home Control.”

Smart Fireplace Setup Guide
*Note: To remove a fireplace from your Amazon account, visit http://sei-
smartfireplace.com and login with your account details.
6.) Link the Google Action to your Google account
Locate and select the
S.E.I. Firebox action.
Click the Google
Login Button.
Sign in with the same
Google account you used
to setup your device in
step 3.

Smart Fireplace Setup Guide
7.) Finish setup
If you are not redirected
automatically, please follow
the link to return to the
Google Assistant app.
Now you will see the
devices which have been
successfully discovered.
Click “done.”
Your setup is complete. Try out a
command like “Ok Google, turn
on the Fireplace.” This should
work on any Google Assistant
enabled device which is linked to
your account. Note that the
screen shown below does not
always reflect commands the
Firebox is capable of. Please
refer to the next page of this
guide for a list of supported
commands.
*Note: To remove a fireplace from your Google account, visit www.sei-smartfireplace.com and
login with your account details

Smart Fireplace Setup Guide
*Note: To remove a fireplace from your Amazon account, visit http://sei-
smartfireplace.com and login with your account details.
List of Supported Google Commands
Use the following phrases to control your fireplace via Google Assistant. Simply replace “Fireplace”
with the name you chose for your fireplace during setup.
Power
"Ok Google, turn on Fireplace"
"Ok Google, turn off Fireplace"
Downlight
"Ok Google, turn on Fireplace downlight"
"Ok Google, turn off Fireplace downlight"
Logs
"Ok Google, turn Fireplace log up"
"Ok Google, turn Fireplace log down"
Flames
"Ok Google, turn Fireplace flame up"
"Ok Google, turn Fireplace flame down"
Heat
"Ok Google, turn on Fireplace heater"
"Ok Google, turn off Fireplace heater"
"Ok Google, turn Fireplace heater up"
"Ok Google, turn Fireplace heater down"
"Ok Google, set Fireplace heater to 70"
*Note: When turning on the Fireplace heater, it will default to the maximum temperature setting.
-
 1
1
-
 2
2
-
 3
3
-
 4
4
-
 5
5
-
 6
6
-
 7
7
-
 8
8
-
 9
9
-
 10
10
-
 11
11
-
 12
12
-
 13
13
-
 14
14
-
 15
15
-
 16
16
-
 17
17
-
 18
18
-
 19
19
-
 20
20
-
 21
21
-
 22
22
-
 23
23
-
 24
24
-
 25
25
-
 26
26
-
 27
27
-
 28
28
-
 29
29
-
 30
30
-
 31
31
-
 32
32
-
 33
33
-
 34
34
-
 35
35
-
 36
36
-
 37
37
-
 38
38
-
 39
39
-
 40
40
-
 41
41
-
 42
42
-
 43
43
-
 44
44
-
 45
45
-
 46
46
-
 47
47
-
 48
48
-
 49
49
-
 50
50
-
 51
51
-
 52
52
-
 53
53
-
 54
54
-
 55
55
-
 56
56
-
 57
57
-
 58
58
-
 59
59
-
 60
60
-
 61
61
-
 62
62
-
 63
63
-
 64
64
-
 65
65
-
 66
66
-
 67
67
-
 68
68


ROOMS TO GO 21612444 Assembly Instructions
- Categoría
- Chimeneas
- Tipo
- Assembly Instructions
en otros idiomas
- français: ROOMS TO GO 21612444
- English: ROOMS TO GO 21612444
Artículos relacionados
-
ROOMS TO GO 21810761 Assembly Instructions
-
-
-
-
SEI Furniture FS1217356 Manual de usuario
-
-
-
SEI Furniture 21012149 Manual de usuario
-
-