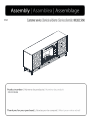
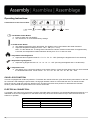
ROOMS TO GO 21612204 Guía de instalación
- Categoría
- Chimeneas
- Tipo
- Guía de instalación
Este manual también es adecuado para

FA1119656

2 |

3 |

4 |
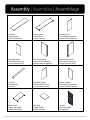
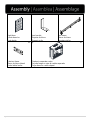
A x1
Top panel
Panel superior
Panneau supérieur
B x1
Bottom panel
Panel inferior
Panneau du bas
C x1
Left side panel
Panel lateral izquierdo
Panneau latéral gauche
D x1
Right side panel
Panel lateral derecho
Panneau latéral droit
E x1
Left vertical panel
Panel vertical izquierdo
Panneau vertical gauche
F x1
Right vertical panel
Panel vertical derecho
Panneau vertical droit
G x1
Front rail
Riel delantero
Rail avant
H x1
Right back panel
Panel trasero derecho
Panneau arrière droit
I x1
Left back panel
Panel trasero izquierdo
Panneau arrière gauche
J x1
Middle shelf
Estante del medio
L'étagère du milieu
K x2
Side shelf
Estante lateral
Tablette latérale
L x1
Left door
Puerta izquierda
Porte gauche

5 |
M x1
Right door
Puerta derecha
Porte droite
N x2
Iron bracket
Soporte de hierro
Support en fer
O x2
Iron frame
Marco de hierro
Armature de fer
P x2
Side iron frame
Marco de hierro lateral
Cadre latéral en fer
Q x1
Firebox in separate carton
Caja de fuego en caja de cartón separada
Foyer dans un carton séparé

6 |
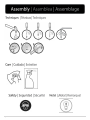
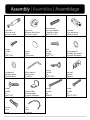
1 x16
Cam bolt
Perno de leva
Boulon à came
2 x16
Cam lock
Bloqueo de la leva
Serrure à came
3 x18
Wood dowel
Taco de madera
Cheville en bois
∅5/16”x1-1/4”L
4 x2
Doorstop
Tope de puerta
Butée de porte
5 x8
Screw
Tornillo
Vis
ø1/8”*5/8”L
6 x16
Cover
Tapa
Couverture
7 x14
Bolt
Tornillo
Boulon
ø1/4”*1/2”
8 x14
Spring washer
Arandela de resorte
Rondelle élastique
9 x14
Flat washer
Arandela plana
Rondelle plate
10 x1
Allen wrench
Lllave allen
Clé Allen
11 x26
Screw
Tornillo
Vis
ø1/8”*5/8”L
12 x4
Bracket
Soporte
Support
13 x8
Screw
Tornillo
Vis
ø1/8”*5/8”L
14 x12
Shelf holder
Estante titular
Support d'étagère
15 x3
Screw
Tornillo
Vis
∅8#x2”L
16 x4
Screw
Tornillo
Vis
ø1/4"*1-3/8"L
17 x4
Anchor
Ancla
Ancre
18 x2
Tie
Lazo
L'attache

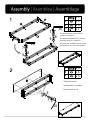
7 |
7
8
9
10
x 8
x 8
x 8
x 1
10
7
8
9
10
7
8
9
7
8
9
x 6
x 6
x 6
10
7
8
9
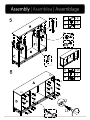
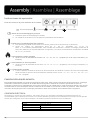
Do not fully tighten screws until all
screws are in position.
No apriete completamente los tornillos
hasta que estén en su posición.
Ne serrez pas complètement les vis tant
que toutes les vis ne sont pas en place.
Tighten all screws.
Apretar todos los tornillos.
Serrez toutes les vis.

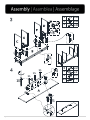
8 |
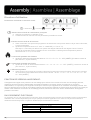
1
2
3
x 8
x 8
x 8
1
3
1
3
1
3
1
3
3x 2
x 2
4
5x 8
3
3
1
3
5
4
5
4
5
4
2
3
2
2
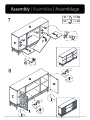
15 x 3
15
15
15
15

9 |
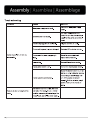
1
2
3
x 8
x 8
x 8
1
3
1
3
1
3
1
3
2
2
1
1
2
3
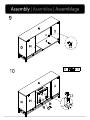
11
12
13
x 26
x 2
x 4
12
13
12
13
11
11
11
11
11
11
11
11
11
11
11
11
13
12
11

10 |
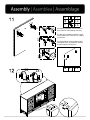
6x 16
14 x 12
14
14
14
14 14
14
6
6
6

11 |
13 x 4
13
13
13
14
14

12 |
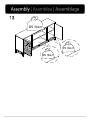
Anti-tipping hardware must be used for
this product to avoid tipping and injury.
El hardware antivuelco debe usarse para
este producto para evitar vuelcos y
lesiones.
Le matériel anti-basculement doit être
utilisé pour ce produit afin d'éviter le
basculement et les blessures.
12
16
17
x 2
x 4
x 4
12
16
17
12
16
17
17
12
18 x 2
18
12
12
18
Anti-tipping hardware must be used for
this product to avoid tipping and injury.
Se debe usar hardware antivuelco para
este producto para evitar que se vuelque
y se lesione.
Une quincaillerie anti-basculement doit
être utilisée pour ce produit afin d'éviter
tout basculement et blessure.

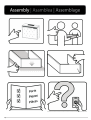
13 |
85 lbs<
15 lbs<
30 lbs<

14 |

PO#
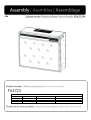
ELECTRICAL SPECIFICATIONS | ESPECIFICACIONES ELÉCTRICAS | CARACTÉRISTIQUES ÉLECTRIQUES
Voltage: Tensión: Tension: 120V, 60 Hz
Amps: Amperios: Intensité de courant: 12.5 Amps
Was: Was: Puissance: 1500 Was
Lighng: Iluminación: Éclairage: LED
FA4723

|
2

|
3

|
4

|
5

It's highly recommended to plug the unit to outlet with GFR/GFCI receptacle.
|
6

Se recomienda encarecidamente enchufar la unidad a un tomacorriente con receptáculo GFR/GFCI.
|
7

Il est fortement recommandé de brancher l'appareil sur une prise avec une prise GFR/GFCI.
•
|
8

|
9

|
10

|
11
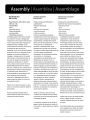
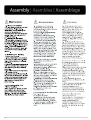
Operating Instructions:
Control Panel on the Front of Unit:
1. Power 2. Heater 3. Flame 4. Log 5. Timer
1. On/Off Main Power Button
a. Press to switch the unit ON/OFF.
b. The unit will turn on to its default factory settings.
2. On/Off Heater Button
a. This allows programming of the thermostat. The fireplace can be used without the heater if desired.
b. Adjust the temperature rating from 62°F - 82°F - ON (17°C - 27°C).
Note: °F is the default unit. To change from Fahrenheit to Celsius: Hold the heater button for approximately
5 seconds, the temperature readout will switch directly from °F to °C and vice versa.
3. Adjustable Flame Brightness
a. Adjust the flame brightness level:F5 - F4 - F3 - F2 - F1 - OFF (F5 being the brightest and F1 the dimmest)
4. Adjustable Log Brightness
a. Adjust the log brightness level: L5 - L4 - L3 - L2 - L1 - OFF (L5 being the brightest and L1 the dimmest)
5. Adjustable Timer
a. This allows you to control the duration of the heater function. Press the timer button until you have reached
the desired duration time. Levels: 30 min - 1H - 2H - 3H - 4H - 5H - 6H - 7H - 8H - 9H – OFF
CHILD LOCK FUNCTION:
This unit is equipped with child lock protection. To activate the child lock function, push and hold the power button on the unit
for 6 seconds. After holding the power button, the log light will blink 5 times to confirm that the unit is in child lock mode.
Once the unit is in child lock mode, the buttons on the unit will not function when pushed. To deactivate the child lock
function, push and hold the power button on the unit for 6 seconds.
ELECTRICAL CONNECTION:
A 12.5 AMP, 120 Volts, 60 Hz circuit with a properly grounded outlet is required. It’s recommended that the fireplace be on a
dedicated circuit, as other appliances on the same circuit may cause the circuit breaker to trip or blow the fuse when the
heater is in operation.
ELECTRICAL SPECIFICATIONS
Voltage: 120VAC, 60 Hz
Amps: 12.5Amps
Watts: 1500 Watts
Lighting: LED

|
12
Instrucciones de operación:
Panel de control en la parte delantera de la unidad:
1. Encendido/apagado 2. Calefactor 3. Llama 4. Leños 5. Temporizador
1. Botón de encendido/apagado principal
a. Presiónelo para encender/apagar la unidad.
b. La unidad se encenderá en su configuración predeterminada de fábrica.
2. Botón de encendido/apagado del calefactor
a. Esto permite programar el termostato. Si lo desea, puede usar la chimenea sin el calefactory.
b. Ajuste los grados de temperatura entre 62 °F-- 82 °F-- Encendido (17 °C—27 °C).
Nota: ℉es la unidad predeterminada. Para cambiar de Fahrenheit a Celsius: mantenga presionado el
botón del calefactor por aproximadamente 5 segundos y la lectura de temperatura cambiará de inmediato
de °F a °C y viceversa.
3. Intensidad de la llama ajustable
a. Ajuste el nivel de intensidad de la llama: F5 - F4 - F3 - F2 - F1 - Apagado (F5 es la mayor intensidad y F1,
la menor)
4. Intensidad de los leños ajustable
a. Ajuste el nivel de intensidad de los leños: L5 - L4 - L3 - L2 - L1 - Apagado (L5 es la mayor intensidad y L1,
la menor)
5. Temporizador ajustable
a. T Esto le permite controlar la duración de funcionamiento del calefactor. Presione el botón del temporizador
hasta alcanzar la duración de funcionamiento deseada. Nivel: 30 min - 1 h - 2 h - 3 h - 4 h - 5 h - 6 h - 7 h -
8 h - 9 h – Apagado
FUNCIÓN DE BLOQUEO INFANTIL:
Esta unidad está equipada con protección de bloqueo para niños. Para activar la función de bloqueo para niños, mantenga
presionado el botón de encendido de la unidad durante 6 segundos. Después de mantener presionado el botón de
encendido, la luz de tronco parpadeará 5 veces para confirmar que la unidad está en modo de bloqueo infantil. Una vez que
la unidad está en modo de bloqueo infantil, los botones de la unidad no funcionarán cuando se presionen. Para desactivar
la función de bloqueo para niños, mantenga presionado el botón de encendido de la unidad durante 6 segundos.
CONEXIÓN ELÉCTRICA:
Se requiere un circuito de 12.5 amperios, 120 voltios, 60 Hz, con una salida conectada correctamente a tierra. Es
recomendable que la chimenea se conecte a un circuito dedicado, puesto que otros artefactos en el mismo circuito pueden
causar que el disyuntor del circuito se dispare o el fusible se queme mientras funciona el calefactor.
ESPECIFICACIONES ELÉCTRICAS
Voltaje: 120 VCA, 60 Hz
Amperaje: 12.5 amperios
Vataje: 1500 vatios
Iluminación: LED

|
13
Directives d'utilisation:
Panneau de commande à l'avant de l'unité:
1. Alimentation 2. Fournaise 3. Flamme 4. Bûche 5. Minuterie
1. Bouton marche/arrêt de l'alimentation principale
a. Appuyez pour allumer ou éteindre l'unité.
b. L'unité se mettra en marche avec les paramètres par défaut de l'usine.
2. Bouton marche arrêt de la fournaise
a. Cette commande vous permet de programmer le thermostat. Vous pouvez utiliser le foyer sans la fournaise,
si vous le souhaitez.
b. Ajustez la température entre 62 °F à 82 °F – MARCHE (17 °C à 27 °C).
Remarque: ℉est l'unité par défaut. Pour passer des degrés Fahrenheit aux degrés Celcius: Tenez le
bouton de la fournaise enfoncé pendant environ 5 secondes. L'affichage de la température passera
directement de °F à °C, et vice versa.
3. Luminosité ajustable des flammes
a. Ajustez le niveau de luminosité des flammes : F5 - F4 - F3 - F2 - F1 - OFF (ARRÊT) (F5 étant le niveau le
plus clair et F1, le plus sombre)
4. Luminosité ajustable des bûches
a. Ajustez le niveau de luminosité des bûches : L5 - L4 - L3 - L2 - L1 - OFF (ARRÊT) (L5 étant le niveau le
plus clair et L1, le plus sombre)
5. Minuterie ajustable
a. Cette fonction vous permet de contrôler la durée de fonctionnement de la fournaise. Appuyez sur le bouton
de la minuterie jusqu'à atteindre la durée voulue. Niveau : 30 min - 1 h- 2 h - 3 h - 4 h - 5 h - 6 h - 7 h - 8 h -
9 h - OFF (ARRÊT)
FONCTION DE VERROUILLAGE ENFANT:
Cet appareil est équipé d'une protection de verrouillage pour enfants. Pour activer la fonction de verrouillage parental,
maintenez enfoncé le bouton d'alimentation de l'appareil pendant 6 secondes. Après avoir appuyé sur le bouton
d'alimentation, le voyant du grume clignotera 5 fois pour confirmer que l'appareil est en mode de verrouillage parental. Une
fois que l’appareil est en mode de verrouillage parental, les boutons de l’appareil ne fonctionnent plus lorsque vous appuyez
dessus. Pour désactiver la fonction de verrouillage parental, maintenez enfoncé le bouton d'alimentation de l'appareil
pendant 6 secondes.
RACCORDEMENT ÉLECTRIQUE:
Un circuit de 12,5 A, 120 volts et 60 Hz muni d'une fiche correctement mise à la terre est nécessaire. Nous recommandons
l'utilisation d'un circuit indépendant pour le foyer puisque les autres appareils sur le même circuit peuvent entraîner le
déclenchement du disjoncteur ou griller le fusible lorsque la fournaise est allumée.
CARACTÉRISTIQUES ÉLECTRIQUES
Tension : 120 V c.a., 60 Hz
Intensité de courant : 12,5 A
Puissance : 1500 watts
Éclairage : DEL

|
14

|
15

|
16

|
17

|
18

|
19

|
20

|
21

|
22

|
23

|
24

|
25

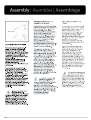
Smart Fireplace Setup Guide
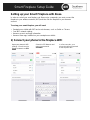
Setting up your Smart Fireplace with Alexa
In order to control your new fireplace via Alexa voice commands, you must connect the
fireplace to your wireless network (WiFi) and then link the fireplace to your Amazon
account.
To set up your smart fireplace, you will need:
• Smartphone or tablet with WiFi and a web browser, such as Safari or Chrome
• Your WiFi network settings
• Amazon account and login information
• Amazon Alexa app, installed on your smartphone or tablet
1)
Connect your phone to the fireplace WiFi
Open your phone’s WiFi
settings. You will see the
fireplace network as
SEI-
XXXX
Select this SEI Network and
enter the password:
seiadmin
In a few seconds, your
phone should be connected
to the fireplace WiFi.

Smart Fireplace Setup Guide
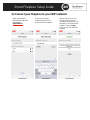
2)
Connect your fireplace to your WiFi network
Open your phone’s
web browser and enter
the address:
http://10.9.8.7
Select your wireless
network and enter your
password for the network.
After a few seconds, you
should see the success
message showing that your
fireplace is connected to the
network. Tap the
Login
button to link your Amazon
account.

Smart Fireplace Setup Guide
3)
Link your fireplace to your Amazon account
Tap the
Login with
Amazon
button to begin
linking your account.
Tap
Allow
to link your
fireplace to your Amazon
account.
Enter your Amazon account
details when prompted and
tap
Sign-In
when finished.

Smart Fireplace Setup Guide
4)
Name your fireplace and enable the Alexa skill
Choose a name for your
fireplace. This is how you
will identify the device when
using Alexa voice
commands.
Configure the Alexa skill by
tapping the link to launch
the Alexa app.
You will be prompted to
enable the Alexa skill. Tap
Enable to Use.

Smart Fireplace Setup Guide
*Note: To remove a fireplace from your Amazon account, visit http://sei-
smartfireplace.com and login with your account details.
5)
Link the Alexa skill to your Amazon account
Login with the same
Amazon account that you
used to set up the fireplace.
Once you have logged in
with your Amazon account,
close the window to begin
the device discovery
process.
Alexa should find 5
devices – these are the
different functions of your
fireplace.

Smart Fireplace Setup Guide
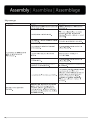
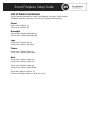
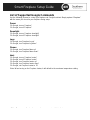
List of Alexa Commands
Use the following phrases to control your fireplace via Alexa. Simply replace
“Fireplace” with the name you chose for your fireplace during setup.
Power
"Alexa, turn Fireplace on"
"Alexa, turn Fireplace off"
Downlight
"Alexa, turn Fireplace downlight on"
"Alexa, turn Fireplace downlight off"
Logs
"Alexa, turn Fireplace log up"
"Alexa, turn Fireplace log down"
Flames
"Alexa, turn Fireplace flame up"
"Alexa, turn Fireplace flame down"
Heat
"Alexa, turn Fireplace heater on"
"Alexa, turn Fireplace heater off"
"Alexa, turn Fireplace heater up"
"Alexa, turn Fireplace heater down"
"Alexa set Fireplace heater to 75"
"Alexa, set Fireplace heater to 70 for two hours"

Smart Fireplace Setup Guide
*Note: To remove a fireplace from your Amazon account, visit http://sei-
smartfireplace.com and login with your account details.
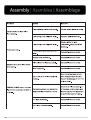
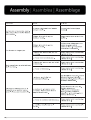
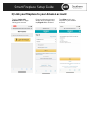
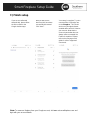
Troubleshooting
If you experience issues with your fireplace during or after setup, please
refer to the common troubleshooting questions below or call our customer
service line for assistance.
Issue
Solution
The fireplace is stuck
connecting to the Amazon
account.
Make sure the fireplace is turned ON for all steps during setup.
Alexa is not connecting to the
fireplace.
Scan for devices using the Alexa app during setup.
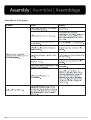
The fireplace setup needs to be
restarted.
Delete any fireplace devices or commands from the Alexa app and begin
setup from step 1.
Web address does not work
when connecting the fireplace
to the WiFi network.
Type the full address below into your web browser. Do not abbreviate the
web address.
http://10.9.8.7
The WiFi connection needs to
be reset.
Plug in the fireplace and switch to OFF. Hold the timer button until the
fireplace beeps (about 8 seconds). The reset will not work if the fireplace is
turned ON.
The fireplace has disconnected
after the WiFi dropped out.
Unplug the fireplace, wait 30 seconds, then plug the fireplace back in.
Using the power button located on the firebox, turn the fireplace ON and
then OFF. Use Alexa commands as normal to ensure that the fireplace has
been reconnected.
Alexa commands are enabled
but not working.
Disable the commands, then enable them again. If the commands still do
not work, you may need to reset the fireplace WiFi.

Smart Fireplace Setup Guide
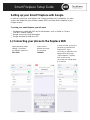
Setting up your Smart Fireplace with Google
In order to control your new fireplace via Google Assistant voice commands, you must
connect the fireplace to your wireless network (WiFi) and then link the fireplace to your
Google account.
To set up your smart fireplace, you will need:
• Smartphone or tablet with WiFi and a web browser, such as Safari or Chrome
• Your WiFi network settings
• Google account and login information
• Google Assistant for Android or IOS
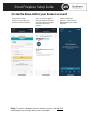
1.) Connecting your phone to the fireplace WiFi
Open your phone’s WiFi
settings. You will see
the fireplace network as
SEI- XXXX
Select this SEI
Network and enter
the password:
seiadmin
In a few seconds, your phone
should be connected to the
fireplace WiFi. Upon
connecting, a notification may
appear which will prompt
“Tap for Options.” Tap and
then choose to stay
connected even though there
is no internet.

Smart Fireplace Setup Guide
*Note: To remove a fireplace from your Amazon account, visit http://sei-
smartfireplace.com and login with your account details.
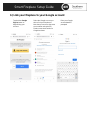
2.) Connect your fireplace to your WiFi network
Open your phone’s
web browser and
enter the address:
http://10.9.8.7
Select your wireless
network and enter
your password for the
network.
After a few seconds, you
should see the success
message showing that your
fireplace is connected to the
network. Tap the Login button
to link your Google account.
*Note: The success screen may refer to your Amazon account but you will still be able to
connect to your Google Account in the next step.

Smart Fireplace Setup Guide
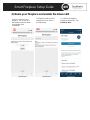
3.) Link your fireplace to your Google account
Tap the blue Google
Sign in button to
begin linking your
account.
Select the Google account you
wish to link your fireplace to.
Note that you must use the same
account when using the SEI
Firebox smart home action for
Google Assistant.
Enter your Google
account details if
prompted.

Smart Fireplace Setup Guide
*Note: To remove a fireplace from your Amazon account, visit http://sei-
smartfireplace.com and login with your account details.
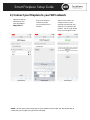
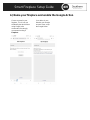
4.) Name your fireplace and enable the Google Action
Choose a name for your
fireplace. This is how you
will identify the device when
using Google voice
commands. We strongly
recommend naming it
Fireplace.
Your device is now
linked to your Google
account. Next, set up
the Google Action.

Smart Fireplace Setup Guide
5.) Sign in to Google Assistant
Open Google Assistant on
Android or IOS. Tap the icon
in the top right to enter the
settings screen. Google
Assistant is a separate
application from Google
Home. You may need to
install the app from your app
store.
Choose which Google
account you wish to use
for your Google
Assistant. This should be
the same account you
use for any Google
Home/Nest speakers.
Once you have selected
the desired account,
scroll down and select
“Home Control.”

Smart Fireplace Setup Guide
*Note: To remove a fireplace from your Amazon account, visit http://sei-
smartfireplace.com and login with your account details.
6.) Link the Google Action to your Google account
Locate and select the
S.E.I. Firebox action.
Click the Google
Login Button.
Sign in with the same
Google account you used
to setup your device in
step 3.

Smart Fireplace Setup Guide
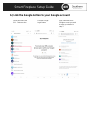
7.) Finish setup
If you are not redirected
automatically, please follow
the link to return to the
Google Assistant app.
Now you will see the
devices which have been
successfully discovered.
Click “done.”
Your setup is complete. Try out a
command like “Ok Google, turn
on the Fireplace.” This should
work on any Google Assistant
enabled device which is linked to
your account. Note that the
screen shown below does not
always reflect commands the
Firebox is capable of. Please
refer to the next page of this
guide for a list of supported
commands.
*Note: To remove a fireplace from your Google account, visit www.sei-smartfireplace.com and
login with your account details

Smart Fireplace Setup Guide
*Note: To remove a fireplace from your Amazon account, visit http://sei-
smartfireplace.com and login with your account details.
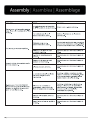
List of Supported Google Commands
Use the following phrases to control your fireplace via Google Assistant. Simply replace “Fireplace”
with the name you chose for your fireplace during setup.
Power
"Ok Google, turn on Fireplace"
"Ok Google, turn off Fireplace"
Downlight
"Ok Google, turn on Fireplace downlight"
"Ok Google, turn off Fireplace downlight"
Logs
"Ok Google, turn Fireplace log up"
"Ok Google, turn Fireplace log down"
Flames
"Ok Google, turn Fireplace flame up"
"Ok Google, turn Fireplace flame down"
Heat
"Ok Google, turn on Fireplace heater"
"Ok Google, turn off Fireplace heater"
"Ok Google, turn Fireplace heater up"
"Ok Google, turn Fireplace heater down"
"Ok Google, set Fireplace heater to 70"
*Note: When turning on the Fireplace heater, it will default to the maximum temperature setting.
-
 1
1
-
 2
2
-
 3
3
-
 4
4
-
 5
5
-
 6
6
-
 7
7
-
 8
8
-
 9
9
-
 10
10
-
 11
11
-
 12
12
-
 13
13
-
 14
14
-
 15
15
-
 16
16
-
 17
17
-
 18
18
-
 19
19
-
 20
20
-
 21
21
-
 22
22
-
 23
23
-
 24
24
-
 25
25
-
 26
26
-
 27
27
-
 28
28
-
 29
29
-
 30
30
-
 31
31
-
 32
32
-
 33
33
-
 34
34
-
 35
35
-
 36
36
-
 37
37
-
 38
38
-
 39
39
-
 40
40
-
 41
41
-
 42
42
-
 43
43
-
 44
44
-
 45
45
-
 46
46
-
 47
47
-
 48
48
-
 49
49
-
 50
50
-
 51
51
-
 52
52
-
 53
53
-
 54
54


ROOMS TO GO 21612204 Guía de instalación
- Categoría
- Chimeneas
- Tipo
- Guía de instalación
- Este manual también es adecuado para
en otros idiomas
- français: ROOMS TO GO 21612204 Guide d'installation
- English: ROOMS TO GO 21612204 Installation guide
Artículos relacionados
-
ROOMS TO GO 21810331 Assembly Instructions
-
-
-
-
Southern Enterprises 21611391 Guía de instalación
-
-
-
-
-