La página se está cargando ...

SAFETY WARNINGS:
• DO NOT install this equipment without first reading and understanding this instruction sheet. If you are unable to understand these
Warnings and Instructions, contact a health care professional, dealer or technical personnel for assistance before attempting to install
this equipment - otherwise, injury may occur.
• After ANY adjustments, repair or service and BEFORE use, make sure that all attaching hardware is tightened securely.
• Grab Bars add security for bath and commode areas if attached as instructed. Location, size, and angle of bars should be determined
by a qualified professional to provide optimum safety and function.
• Use EXTREME caution on wet tub or floor surfaces.
• Users with limited physical capabilities should be supervised or assisted in bath and commode areas, even when using the
Grab Bars.
• This Grab Bar can provide support and increased stability for an individual weighing up to 500 pounds. Grab Bars are NOT designed
to support the total weight of an individual. Use the bar for assistance ONLY.
• Be sure Grab Bars are correctly and securely installed. NEVER use Grab Bars if any looseness is noted.
TOOLS REQUIRED:
• 3/8-inch Power Drill
• 7/64-inch Drill Bit (to drill pilot hole for installation of wood screw into wood wall stud)
• 1/4-inch Carbide Tip Drill Bit (if drilling through ceramic tile)
• #2 Phillips Screwdriver
• Safety Glasses
• Stud Finder
PARTS SUPPLIED:
• Six (6) #10 x 2-1/2 inch wood screws
IMPORTANT:
The recommended mounting method for grab bars is to mount BOTH ends of the bar into WOOD wall studs. For help locating
wood wall studs, please visit our website at www.libertyhardware.com.
BEFORE INSTALLING GRAB BAR:
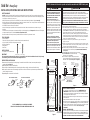
1.Remove the Grab Bar and parts from the package. If concealed mount Grab Bar is used, move cover plates away from
mounting holes (see Figure 1).
2.Determine where you want to install Grab Bar.
3.Place Grab Bar on wall at desired position. If mounting horizontally or vertically, check that the Grab Bar is level.
4.With a pencil, mark the centers of the mounting hole positions on one end. These are the points where you will later drill pilot
holes for putting in the screws.
5.Repeat Step 4 for the other end of the Grab Bar.
Grab Bar • Heavy Duty
INSTALLATION, OPERATING AND CARE INSTRUCTIONS:
1
EXPOSED MOUNT GRAB BAR CONCEALED MOUNT GRAB BAR
Figure 1
COVER
PLATE
MOUNTING
HOLES
MOUNTING
HOLES
COVER
PLATE
FOR RECOMMENDATIONS ON GRAB BAR PLACEMENT,
PLEASE VISIT OUR WEBSITE AT WWW.LIBERTYHARDWARE.COM
PARA INSTALAR EN MONTANTES DE MADERA:
6. Póngase gafas de seguridad antes de empezar.
7. Use el taladro eléctrico de 0,95 cm (3/8") y la broca de 0,28 cm (7/64") para taladrar todos
los agujeros en la pared y en los montantes de madera de la pared en las posiciones
marcadas. NOTA: Si instala la barra de soporte sobre baldosas de cerámica, la broca con
punta de carburo de 0,64 cm (1/4") serán necesarias para taladrar a través de las
baldosas, para prevenir que se dañen. Taladre agujeros guía a través de las baldosas de
cerámica usando una broca con punta de carburo de 0,64 cm (1/4"). Una vez un agujero
ha sido taladrado a través de la baldosa, use la broca de 0,28 cm (7/64") para taladrar un
agujero guía en el propio montante de pared.
8. Coloque la barra de soporte en la pared, alineando los agujeros de montaje con los
agujeros en la pared.
9. Aplique una cuenta de sellador de silicona, diseñado para aplicaciones mojadas, a la parte
posterior de ambas bridas de la barra de soporte. Esto prevendrá que el agua se salga por
los agujeros de montaje pudiendo dañar el tablero
10. Inserte los tornillos para madera provistos dentro de un extremo de la barra de soporte.
Atornille en la pared y en el montante de pared (APRIETE A MANO ÚNICAMENTE)
(vea la Figura 3).
11. Repita el paso 4 para el lado opuesto de la barra de soporte.
12. Apriete firmemente todos los tornillos de montaje
para madera con un destornillador.
13. Si usa la barra de soporte de montaje oculto, mueva las
placas de cubierta sobre los agujeros de montaje y presione
firmemente contra la pared (vea la Figura 1 en la página 5).
USO DE LA BARRA DE SOPORTE:
1. Lea, comprenda y siga la información en la sección de ADVERTENCIAS DE
SEGURIDAD de este folleto de instrucciones. Liberty Hardware Manufacturing
Corporation no será responsable por cualquier daño o lesión causada por la instalación
o uso inapropiado de esta barra de soporte.
2. Agarre la barra de soporte cuando salga de o entre en la bañera, o cuando se siente o
levante del inodoro.
3. Tome precauciones EXTREMAS en tinas o pisos mojados.
4. NO apoye todo su peso en la barra de soporte. La barra de soporte está clasificada para
personas que pesan hasta 500 libras (227 kg) cuando se ha instalado apropiadamente.
5. NO se pare o siente en la barra de soporte. NO use la barra de soporte como una grada
o plataforma para alcanzar el área sobre la tina. Use la barra para apoyo
ÚNICAMENTE.
CUIDADO Y MANTENIMIENTO:
1. El uso de un jabón suave o un limpiador no-abrasivo es recomendado para la limpieza.
2. Periódicamente inspeccione la barra de soporte por daños o aflojamiento. NO la use si
cualquier daño o aflojamiento existe. Contacte a su vendedor autorizado para asistencia.
3. GUARDE ESTAS INSTRUCCIONES PARA FUTURA REFERENCIA.
LA BARRA DE SOPORTE PODRÍA NO
PROVEER LA CANTIDAD DE APOYO PARA
LA QUE ESTÁ DISEÑADA AL MENOS QUE
ESTAS INSTRUCCIONES DE INSTALACIÓN
SEAN SEGUIDAS ESTRICTAMENTE.
Para una instalación apropiada, ambos
extremos de la barra de soporte DEBEN estar
posicionados sobre un montante de pared. Para
un apoyo sólido, por lo menos dos (2) de los tres
(3) tornillos en el extremo de la barra de soporte
DEBEN atravesar el panel o la baldosa y estar
fuertemente sujetos al montante de pared. Dados
los tamaños estándar de los montantes, sólo dos
(2) de los tres (3) tornillos podrán atornillarse en
el montante de pared.
La barra de soporte podrá ser instalada
verticalmente, horizontalmente o en ángulo,
siempre y cuando por lo menos dos (2) de los
tres (3) tornillos de montaje de ambos
extremos de la barra de soporte queden
sujetos a un montante de pared (vea la Figura
2). Ubique los montantes de pared detrás de la
pared antes de iniciar la instalación (un detector
de vigas puede conseguirse en una ferretería).
LOS SIGUIENTES PASOS REQUIEREN TALADRADO EN LA PARED.
Cuando taladre en la pared, tenga el cuidado de evitar cualquier cableado eléctrico o
plomería que pudiera estar ubicada detrás de la pared. Un cableado eléctrico dañado puede
causar choque eléctrico y/o incendio. Ya que las casas más viejas no siempre están
construidas conforme a los códigos y requerimientos para viviendas actuales, averigüe dónde
está localizado el cableado interno para que ningún cable interfiera con su instalación.
LA INSTALACIÓN ADECUADA ES EXTREMADAMENTE IMPORTANTE. EN CASO DE
DUDA, LA INSTALACIÓN DEBIERA SER HECHA POR UN PROFESIONAL CALIFICADO.
AMBOS extremos de la barra de soporte van dentro de montantes de MADERA de la pared
Figure 2
VISTA FRONTAL
MONTAJE VERTICAL
VISTA FRONTAL
MONTAJE EN ÁNGULO
MONTANTE DE
MADERA DE
LA PARED
MONTANTE DE
MADERA DE
LA PARED
NORMALMENTE 40,64 CM
CENTRO A CENTRO
MONTANTE DE
MADERA DE LA
PARED
NORMALMENTE 40,64 CM
CENTRO A CENTRO
Figura 3
VISTA LATERAL
MONTAJE VERTICAL
PANEL
MONTANTE
DE MADERA
DE LA
PARED
TORNILLO PARA
MADERA
LA BARRA
DE
SOPORTE
VISTA SUPERIOR
MONTAJE HORIZONTAL
MONTANTE DE
MADERA
DE LA PARED
TORNILLO PARA
MADERA
SUPERIOR
TORNILLO PARA
MADERA INFERIOR
UBICADO DEBAJO
DEL TORNILLO
PARA MADERA
SUPERIOR EN EL
MONTANTE DE
PARED
MONTANTE DE
MADERA
DE LA PARED
PANEL
LA BARRA
DE SOPORTE
6
VISTA FRONTAL
MONTAJE HORIZONTAL
WOOD SCREW (6)
OR
WOOD SCREW (6)
La página se está cargando ...

ADVERTENCIAS DE SEGURIDAD:
• NO instale este equipo sin antes leer y entender esta hoja de instrucciones. Si usted no logra entender estas advertencias e instrucciones, contacte a
un profesional de la salud, vendedor o personal técnico para asistencia antes de intentar instalar este equipo - de otra forma, podría incurrir en
lesiones.
• Luego de CUALESQUIERA ajustes, reparaciones o servicios y ANTES de usar, asegúrese de que todos los accesorios de acoplamiento estén
apretados firmemente.
• Las barras de soporte aumentan la seguridad en áreas de tinas, duchas e inodoros si se acoplan como se instruye. La ubicación, el tamaño y el
ángulo de las barras deben ser determinados por un profesional calificado para proveer óptima seguridad y funcionalidad.
• Tome precauciones EXTREMAS en tinas o pisos mojados.
• Usuarios con capacidades físicas limitadas deben ser supervisados o ayudados en las áreas de tinas, duchas e inodoros, aun cuando estén usando
barras de soporte.
• Esta barra de soporte puede proveer apoyo y mayor estabilidad para un individuo que pese hasta 500 libras (227 kg). Las barras de soporte NO
están diseñadas para apoyar todo el peso de un individuo. Use la barra para apoyo ÚNICAMENTE.
• Asegúrese de que las barras de soporte estén correcta y firmemente instaladas. NUNCA use las barras de soporte si nota que están flojas.
HERRAMIENTAS REQUERIDAS:
• Taladro eléctrico de 0,95 cm (3/8")
• Broca de 0,28 cm (7/64") (para taladrar el agujero guía para instalar el tornillo para madera en el montante de madera de la pared)
• Broca con punta de carburo de 0,64 cm (1/4") (si taladra a través de baldosa de cerámica)
• Desatornillador en cruz (Phillips) #2
• Gafas de seguridad
• Detector de vigas
PARTE SUMINISTRADA:
• Seis (6) tornillos para madera #10 x 6,35 cm (2-1/2")
IMPORTANTE:
El método de montaje recomendado para las barras de soportes es instalar AMBOS extremos de la barra en los montantes de MADERA de
la pared. Para obtener asistencia para encontrar montantes de pared, por favor visite nuestro sitio Web en www.libertyhardware.com.
ANTES DE INSTALAR LA BARRA DE SOPORTE:
1. Saque la barra de soporte y las piezas del paquete. Si se usa la barra de soporte de montaje oculto, quite las placas de cubierta de los agujeros de
montaje (vea la Figura 1).
2. Determine dónde quiere instalar la barra de soporte.
3. Coloque la barra de soporte en la posición deseada. Si la instala de manera horizontal o vertical, revise que la barra de soporte esté nivelada.
4. Con un lápiz marque los centros de las posiciones de agujeros de montaje de un extremo. Estos son los puntos donde usted taladrará después los
agujeros guía para colocar los tornillos. Si instala sobre baldosas de cerámica, coloque cinta adhesiva de papel en las áreas de montaje antes de
marcar las ubicaciones de los agujeros para evitar que la broca de punta de carburo se deslice a través de la baldosa.
5. Repita el paso 4 para el otro extremo de la barra de soporte.
5
BARRA DE SOPORTE DE MONTAJE EXPUESTO
BARRA DE SOPORTE DE MONTAJE OCULTO
Figura 1
PLACA DE
CUBIERTA
AGUJEROS DE
MONTAJE
AGUJEROS DE
MONTAJE
PLACA DE
CUBIERTA
PARA RECOMENDACIONES EN LA COLOCACIÓN DE BARRAS DE SOPORTE,
POR FAVOR VISITE NUESTRO SITIO WEB EN WWW.LIBERTYHARDWARE.COM
THE FOLLOWING STEPS REQUIRE DRILLING INTO THE WALL.
When drilling into the wall, exercise care to avoid any electrical wiring or
plumbing that may be located behind the wall. Damaged electrical wiring can
cause electrical shock and/or fire. Since older homes do not always fall in line
with current housing codes and requirements, know where internal wall wiring
is located so that no wires will interfere with your installation.
PROPER INSTALLATION IS EXTREMELY IMPORTANT. IF IN DOUBT,
INSTALLATION SHOULD BE DONE BY A QUALIFIED PROFESSIONAL.
TO INSTALL INTO WOOD WALL STUDS:
6. Put on safety glasses before starting.
7. Use the 3/8-inch power drill and 7/64-inch drill bit to drill all holes into the wall and
wood wall studs at the marked positions. NOTE: If installing Grab Bar over ceramic
tiles, the 1/4-inch carbide tip drill bit will be needed for drilling through the tile, in
order to prevent damage to the tiles. Drill pilot holes through the tiles by using a
1/4-inch carbide tip drill bit. Once a hole has been drilled through the ceramic tiles,
use the 7/64-inch drill bit to drill a pilot hole in the wood wall stud itself.
8. Place Grab Bar on wall, aligning mounting holes with the holes in the wall.
9. Apply a bead of silicone sealant designed for wet applications to the back face of
both grab bar mounting flanges. This will prevent water from bleeding through the
mounting holes and potentially damaging the wallboard.
10. Insert the wood screws provided into one end of the Grab
Bar. Screw into wall and wall stud (HAND TIGHTEN
ONLY) (see Figure 3).
11. Repeat Step 4 for opposite end of the Grab Bar.
12. Securely tighten all mounting wood screws with a screwdriver.
13. If concealed mount Grab Bar is used, move cover
plates over mounting holes and firmly press against
the wall (see Figure 1 on page 1).
USING GRAB BAR:
1. Read, understand and follow the information in the SAFETY WARNINGS
section of this instruction booklet. Liberty Hardware Manufacturing
Corporation shall have no liability for any damage or injury caused by improper
installation or use of this Grab Bar.
2. Grasp the Grab Bar when exiting or entering the bathtub or when sitting down
or rising from the commode.
3. Use EXTREME caution on wet tub or floor surfaces.
4. DO NOT put entire weight on Grab Bar. Grab Bar is rated for persons weighing
up to 500 pounds when properly installed.
5. DO NOT stand, sit or step on Grab Bar. DO NOT use Grab Bar as a step or
platform to reach area above the tub. Use the bar for assistance ONLY.
CARE AND MAINTENANCE:
1. Use of mild soap and water or a non-abrasive cleaner is recommended
for cleaning.
2. Periodically inspect the Grab Bar for damage or looseness.
DO NOT use if any damage or looseness exists. Contact your authorized
dealer for assistance.
3. SAVE THESE INSTRUCTIONS FOR FUTURE REFERENCE.
GRAB BAR MAY NOT PROVIDE
DESIGNED AMOUNT OF SUPPORT
UNLESS THESE INSTALLATION
INSTRUCTIONS ARE STRICTLY
FOLLOWED.
For proper installation, both ends of Grab
Bar MUST be positioned over a wall stud.
For solid support, at least two (2) of the
three (3) screws on the end of the Grab Bar
MUST go through the wallboard or tile and
be tightly secured into the wall stud. Given
standard stud sizes, only two (2) of the
three(3) screws may screw into the wall
stud.
Grab Bar may be installed vertically,
horizontally or at an angle, so long as at
least two (2) of the three (3) mounting
screws on both ends of the Grab Bar are
secured into a wall stud (see Figure 2).
Locate the wall studs behind the wall before
beginning installation (a stud finder can be
obtained from a hardware store).
BOTH ends of grab bar into WOOD wall studs
2
Figure 2
FRONT VIEW
VERTICAL MOUNT
FRONT VIEW
ANGLE MOUNT
WOOD
WALL
STUD
WOOD
WALL
STUD
NORMALLY
16" CENTER-TO-CENTER
WOOD
WALL
STUD
NORMALLY
16" CENTER-TO-CENTER
Figure 3
SIDE VIEW
VERTICAL MOUNT
WALLBOARD
WOOD
WALL
STUD
WOOD
SCREW
GRAB
BAR
TOP VIEW
HORIZONTAL MOUNT
WOOD
WALL STUD
TOP
WOOD
SCREW
BOTTOM
WOOD SCREW
LOCATED BELOW
TOP WOOD SCREW
IN WALL STUD
WOOD
WALL STUD
WALLBOARD
GRAB
BAR
FRONT VIEW
HORIZONTAL MOUNT
INSTRUCCIONES DE INSTALACIÓN, OPERACIÓN Y CUIDADO
Barra de soporte • Uso pesado
TORNILLO PARA MADERA (6)
O
TORNILLO PARA MADERA (6)
Transcripción de documentos
Grab Bar • Heavy Duty AMBOS extremos de la barra de soporte van dentro de montantes de MADERA de la pared INSTALLATION, OPERATING AND CARE INSTRUCTIONS: SAFETY WARNINGS: • DO NOT install this equipment without first reading and understanding this instruction sheet. If you are unable to understand these Warnings and Instructions, contact a health care professional, dealer or technical personnel for assistance before attempting to install this equipment - otherwise, injury may occur. • After ANY adjustments, repair or service and BEFORE use, make sure that all attaching hardware is tightened securely. • Grab Bars add security for bath and commode areas if attached as instructed. Location, size, and angle of bars should be determined by a qualified professional to provide optimum safety and function. • Use EXTREME caution on wet tub or floor surfaces. • Users with limited physical capabilities should be supervised or assisted in bath and commode areas, even when using the Grab Bars. • This Grab Bar can provide support and increased stability for an individual weighing up to 500 pounds. Grab Bars are NOT designed to support the total weight of an individual. Use the bar for assistance ONLY. • Be sure Grab Bars are correctly and securely installed. NEVER use Grab Bars if any looseness is noted. 3/8-inch Power Drill 7/64-inch Drill Bit (to drill pilot hole for installation of wood screw into wood wall stud) 1/4-inch Carbide Tip Drill Bit (if drilling through ceramic tile) #2 Phillips Screwdriver Safety Glasses Stud Finder OR PARTS SUPPLIED: Para una instalación apropiada, ambos extremos de la barra de soporte DEBEN estar posicionados sobre un montante de pared. Para un apoyo sólido, por lo menos dos (2) de los tres (3) tornillos en el extremo de la barra de soporte DEBEN atravesar el panel o la baldosa y estar fuertemente sujetos al montante de pared. Dados los tamaños estándar de los montantes, sólo dos (2) de los tres (3) tornillos podrán atornillarse en el montante de pared. PARA INSTALAR EN MONTANTES DE MADERA: 6. Póngase gafas de seguridad antes de empezar. 7. Use el taladro eléctrico de 0,95 cm (3/8") y la broca de 0,28 cm (7/64") para taladrar todos los agujeros en la pared y en los montantes de madera de la pared en las posiciones marcadas. NOTA: Si instala la barra de soporte sobre baldosas de cerámica, la broca con punta de carburo de 0,64 cm (1/4") serán necesarias para taladrar a través de las baldosas, para prevenir que se dañen. Taladre agujeros guía a través de las baldosas de cerámica usando una broca con punta de carburo de 0,64 cm (1/4"). Una vez un agujero ha sido taladrado a través de la baldosa, use la broca de 0,28 cm (7/64") para taladrar un agujero guía en el propio montante de pared. 8. Coloque la barra de soporte en la pared, alineando los agujeros de montaje con los agujeros en la pared. 9. Aplique una cuenta de sellador de silicona, diseñado para aplicaciones mojadas, a la parte posterior de ambas bridas de la barra de soporte. Esto prevendrá que el agua se salga por los agujeros de montaje pudiendo dañar el tablero 10. Inserte los tornillos para madera provistos dentro de un extremo de la barra de soporte. Atornille en la pared y en el montante de pared (APRIETE A MANO ÚNICAMENTE) (vea la Figura 3). 11. Repita el paso 4 para el lado opuesto de la barra de soporte. 12. Apriete firmemente todos los tornillos de montaje TORNILLO PARA MADERA para madera con un destornillador. 13. Si usa la barra de soporte de montaje oculto, mueva las placas de cubierta sobre los agujeros de montaje y presione firmemente contra la pared (vea la Figura 1 en la página 5). La barra de soporte podrá ser instalada verticalmente, horizontalmente o en ángulo, siempre y cuando por lo menos dos (2) de los tres (3) tornillos de montaje de ambos extremos de la barra de soporte queden sujetos a un montante de pared (vea la Figura 2). Ubique los montantes de pared detrás de la pared antes de iniciar la instalación (un detector de vigas puede conseguirse en una ferretería). TOOLS REQUIRED: • • • • • • LOS SIGUIENTES PASOS REQUIEREN TALADRADO EN LA PARED. Cuando taladre en la pared, tenga el cuidado de evitar cualquier cableado eléctrico o plomería que pudiera estar ubicada detrás de la pared. Un cableado eléctrico dañado puede causar choque eléctrico y/o incendio. Ya que las casas más viejas no siempre están construidas conforme a los códigos y requerimientos para viviendas actuales, averigüe dónde está localizado el cableado interno para que ningún cable interfiera con su instalación. LA INSTALACIÓN ADECUADA ES EXTREMADAMENTE IMPORTANTE. EN CASO DE DUDA, LA INSTALACIÓN DEBIERA SER HECHA POR UN PROFESIONAL CALIFICADO. LA BARRA DE SOPORTE PODRÍA NO PROVEER LA CANTIDAD DE APOYO PARA LA QUE ESTÁ DISEÑADA AL MENOS QUE ESTAS INSTRUCCIONES DE INSTALACIÓN SEAN SEGUIDAS ESTRICTAMENTE. • Six (6) #10 x 2-1/2 inch wood screws IMPORTANT: WOOD SCREW (6) WOOD SCREW (6) The recommended mounting method for grab bars is to mount BOTH ends of the bar into WOOD wall studs. For help locating wood wall studs, please visit our website at www.libertyhardware.com. BEFORE INSTALLING GRAB BAR: 1. Remove the Grab Bar and parts from the package. If concealed mount Grab Bar is used, move cover plates away from mounting holes (see Figure 1). 2. Determine where you want to install Grab Bar. 3. Place Grab Bar on wall at desired position. If mounting horizontally or vertically, check that the Grab Bar is level. 4. With a pencil, mark the centers of the mounting hole positions on one end. These are the points where you will later drill pilot holes for putting in the screws. 5. Repeat Step 4 for the other end of the Grab Bar. EXPOSED MOUNT GRAB BAR MONTANTE DE MADERA DE LA PARED MONTANTE DE MADERA DE LA PARED MONTANTE DE MADERA DE LA PARED NORMALMENTE 40,64 CM CENTRO A CENTRO PANEL TORNILLO PARA MADERA SUPERIOR TORNILLO PARA MADERA INFERIOR UBICADO DEBAJO DEL TORNILLO PARA MADERA SUPERIOR EN EL MONTANTE DE PARED VISTA FRONTAL MONTAJE HORIZONTAL LA BARRA DE SOPORTE CONCEALED MOUNT GRAB BAR MOUNTING HOLES Figure 1 LA BARRA DE SOPORTE MOUNTING HOLES COVER PLATE MONTANTE DE MADERA DE LA PARED VISTA SUPERIOR MONTAJE HORIZONTAL PANEL COVER PLATE Figura 3 MONTANTE DE MADERA DE LA PARED USO DE LA BARRA DE SOPORTE: 1. Lea, comprenda y siga la información en la sección de ADVERTENCIAS DE SEGURIDAD de este folleto de instrucciones. Liberty Hardware Manufacturing Corporation no será responsable por cualquier daño o lesión causada por la instalación o uso inapropiado de esta barra de soporte. 2. Agarre la barra de soporte cuando salga de o entre en la bañera, o cuando se siente o levante del inodoro. 3. Tome precauciones EXTREMAS en tinas o pisos mojados. 4. NO apoye todo su peso en la barra de soporte. La barra de soporte está clasificada para personas que pesan hasta 500 libras (227 kg) cuando se ha instalado apropiadamente. 5. NO se pare o siente en la barra de soporte. NO use la barra de soporte como una grada o plataforma para alcanzar el área sobre la tina. Use la barra para apoyo ÚNICAMENTE. MONTANTE DE MADERA DE LA PARED FOR RECOMMENDATIONS ON GRAB BAR PLACEMENT, PLEASE VISIT OUR WEBSITE AT WWW.LIBERTYHARDWARE.COM VISTA LATERAL MONTAJE VERTICAL NORMALMENTE 40,64 CM CENTRO A CENTRO CUIDADO Y MANTENIMIENTO: VISTA FRONTAL MONTAJE EN ÁNGULO 1 Figure 2 VISTA FRONTAL MONTAJE VERTICAL 1. El uso de un jabón suave o un limpiador no-abrasivo es recomendado para la limpieza. 2. Periódicamente inspeccione la barra de soporte por daños o aflojamiento. NO la use si cualquier daño o aflojamiento existe. Contacte a su vendedor autorizado para asistencia. 3. GUARDE ESTAS INSTRUCCIONES PARA FUTURA REFERENCIA. 6 Barra de soporte • Uso pesado BOTH ends of grab bar into WOOD wall studs INSTRUCCIONES DE INSTALACIÓN, OPERACIÓN Y CUIDADO ADVERTENCIAS DE SEGURIDAD: • NO instale este equipo sin antes leer y entender esta hoja de instrucciones. Si usted no logra entender estas advertencias e instrucciones, contacte a un profesional de la salud, vendedor o personal técnico para asistencia antes de intentar instalar este equipo - de otra forma, podría incurrir en lesiones. • Luego de CUALESQUIERA ajustes, reparaciones o servicios y ANTES de usar, asegúrese de que todos los accesorios de acoplamiento estén apretados firmemente. • Las barras de soporte aumentan la seguridad en áreas de tinas, duchas e inodoros si se acoplan como se instruye. La ubicación, el tamaño y el ángulo de las barras deben ser determinados por un profesional calificado para proveer óptima seguridad y funcionalidad. • Tome precauciones EXTREMAS en tinas o pisos mojados. • Usuarios con capacidades físicas limitadas deben ser supervisados o ayudados en las áreas de tinas, duchas e inodoros, aun cuando estén usando barras de soporte. • Esta barra de soporte puede proveer apoyo y mayor estabilidad para un individuo que pese hasta 500 libras (227 kg). Las barras de soporte NO están diseñadas para apoyar todo el peso de un individuo. Use la barra para apoyo ÚNICAMENTE. • Asegúrese de que las barras de soporte estén correcta y firmemente instaladas. NUNCA use las barras de soporte si nota que están flojas. HERRAMIENTAS REQUERIDAS: • Taladro eléctrico de 0,95 cm (3/8") • Broca de 0,28 cm (7/64") (para taladrar el agujero guía para instalar el tornillo para madera en el montante de madera de la pared) • Broca con punta de carburo de 0,64 cm (1/4") (si taladra a través de baldosa de cerámica) • Desatornillador en cruz (Phillips) #2 • Gafas de seguridad • Detector de vigas O PARTE SUMINISTRADA: • Seis (6) tornillos para madera #10 x 6,35 cm (2-1/2") IMPORTANTE: TORNILLO PARA MADERA (6) GRAB BAR MAY NOT PROVIDE DESIGNED AMOUNT OF SUPPORT UNLESS THESE INSTALLATION INSTRUCTIONS ARE STRICTLY FOLLOWED. For proper installation, both ends of Grab Bar MUST be positioned over a wall stud. For solid support, at least two (2) of the three (3) screws on the end of the Grab Bar MUST go through the wallboard or tile and be tightly secured into the wall stud. Given standard stud sizes, only two (2) of the three(3) screws may screw into the wall stud. Grab Bar may be installed vertically, horizontally or at an angle, so long as at least two (2) of the three (3) mounting screws on both ends of the Grab Bar are secured into a wall stud (see Figure 2). Locate the wall studs behind the wall before beginning installation (a stud finder can be obtained from a hardware store). TORNILLO PARA MADERA (6) El método de montaje recomendado para las barras de soportes es instalar AMBOS extremos de la barra en los montantes de MADERA de la pared. Para obtener asistencia para encontrar montantes de pared, por favor visite nuestro sitio Web en www.libertyhardware.com. WOOD WALL STUD ANTES DE INSTALAR LA BARRA DE SOPORTE: 1. Saque la barra de soporte y las piezas del paquete. Si se usa la barra de soporte de montaje oculto, quite las placas de cubierta de los agujeros de montaje (vea la Figura 1). 2. Determine dónde quiere instalar la barra de soporte. 3. Coloque la barra de soporte en la posición deseada. Si la instala de manera horizontal o vertical, revise que la barra de soporte esté nivelada. 4. Con un lápiz marque los centros de las posiciones de agujeros de montaje de un extremo. Estos son los puntos donde usted taladrará después los agujeros guía para colocar los tornillos. Si instala sobre baldosas de cerámica, coloque cinta adhesiva de papel en las áreas de montaje antes de marcar las ubicaciones de los agujeros para evitar que la broca de punta de carburo se deslice a través de la baldosa. 5. Repita el paso 4 para el otro extremo de la barra de soporte. THE FOLLOWING STEPS REQUIRE DRILLING INTO THE WALL. When drilling into the wall, exercise care to avoid any electrical wiring or plumbing that may be located behind the wall. Damaged electrical wiring can cause electrical shock and/or fire. Since older homes do not always fall in line with current housing codes and requirements, know where internal wall wiring is located so that no wires will interfere with your installation. PROPER INSTALLATION IS EXTREMELY IMPORTANT. IF IN DOUBT, INSTALLATION SHOULD BE DONE BY A QUALIFIED PROFESSIONAL. TO INSTALL INTO WOOD WALL STUDS: 6. Put on safety glasses before starting. 7. Use the 3/8-inch power drill and 7/64-inch drill bit to drill all holes into the wall and wood wall studs at the marked positions. NOTE: If installing Grab Bar over ceramic tiles, the 1/4-inch carbide tip drill bit will be needed for drilling through the tile, in order to prevent damage to the tiles. Drill pilot holes through the tiles by using a 1/4-inch carbide tip drill bit. Once a hole has been drilled through the ceramic tiles, use the 7/64-inch drill bit to drill a pilot hole in the wood wall stud itself. 8. Place Grab Bar on wall, aligning mounting holes with the holes in the wall. 9. Apply a bead of silicone sealant designed for wet applications to the back face of both grab bar mounting flanges. This will prevent water from bleeding through the mounting holes and potentially damaging the wallboard. 10. Insert the wood screws provided into one end of the Grab WOOD Bar. Screw into wall and wall stud (HAND TIGHTEN SCREW ONLY) (see Figure 3). 11. Repeat Step 4 for opposite end of the Grab Bar. 12. Securely tighten all mounting wood screws with a screwdriver. 13. If concealed mount Grab Bar is used, move cover plates over mounting holes and firmly press against the wall (see Figure 1 on page 1). WOOD WALL STUD NORMALLY 16" CENTER-TO-CENTER FRONT VIEW HORIZONTAL MOUNT WOOD WALL STUD WOOD WALL STUD WALLBOARD TOP WOOD SCREW BOTTOM WOOD SCREW LOCATED BELOW TOP WOOD SCREW IN WALL STUD GRAB BAR BARRA DE SOPORTE DE MONTAJE EXPUESTO GRAB BAR BARRA DE SOPORTE DE MONTAJE OCULTO AGUJEROS DE MONTAJE AGUJEROS DE MONTAJE PLACA DE CUBIERTA Figura 1 PLACA DE CUBIERTA Figure 3 SIDE VIEW VERTICAL MOUNT 1. Read, understand and follow the information in the SAFETY WARNINGS section of this instruction booklet. Liberty Hardware Manufacturing Corporation shall have no liability for any damage or injury caused by improper installation or use of this Grab Bar. 2. Grasp the Grab Bar when exiting or entering the bathtub or when sitting down or rising from the commode. 3. Use EXTREME caution on wet tub or floor surfaces. 4. DO NOT put entire weight on Grab Bar. Grab Bar is rated for persons weighing up to 500 pounds when properly installed. 5. DO NOT stand, sit or step on Grab Bar. DO NOT use Grab Bar as a step or platform to reach area above the tub. Use the bar for assistance ONLY. NORMALLY 16" CENTER-TO-CENTER PARA RECOMENDACIONES EN LA COLOCACIÓN DE BARRAS DE SOPORTE, POR FAVOR VISITE NUESTRO SITIO WEB EN WWW.LIBERTYHARDWARE.COM WALLBOARD USING GRAB BAR: WOOD WALL STUD WOOD WALL STUD CARE AND MAINTENANCE: FRONT VIEW ANGLE MOUNT Figure 2 5 TOP VIEW HORIZONTAL MOUNT FRONT VIEW VERTICAL MOUNT 1. Use of mild soap and water or a non-abrasive cleaner is recommended for cleaning. 2. Periodically inspect the Grab Bar for damage or looseness. DO NOT use if any damage or looseness exists. Contact your authorized dealer for assistance. 3. SAVE THESE INSTRUCTIONS FOR FUTURE REFERENCE. 2-
 1
1
-
 2
2
-
 3
3
-
 4
4


En otros idiomas
- français: Delta 5618BS Guide d'installation
- English: Delta 5618BS Installation guide