
0099001848-00
MODEL / MODELO:
SA1346
Tire Pressure Monitoring System
Sistema de monitoreo de presión neumática
OWNERS MANUAL
MANUAL DEL USUARIO
SAVE THIS OWNERS MANUAL AND READ BEFORE USE.
CONSERVE ESTE MANUAL DEL USUARIO Y LEALO ANTES DE USO.

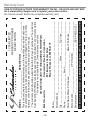
CONTENTS
Contents......................................................................................................3
Digital Display .............................................................................................3
Installing the Sensors..................................................................................4
System Setup..............................................................................................5
Warnings and Alarms ..................................................................................6
Replacing the Batteries ...............................................................................7
Specications ..............................................................................................8
Replacement Parts .....................................................................................8
FCC Information..........................................................................................9
Warranty ...................................................................................................10
Warranty Card ...........................................................................................19
CONTENIDOS
Contenido..................................................................................................11
Pantalla digital...........................................................................................11
Instalación de los sensores.......................................................................12
Conguración del sistema.........................................................................13
Advertencias y alarmas.............................................................................14
Reemplazar las baterías ...........................................................................15
Especicaciones .......................................................................................16
Piezas de repuesto ...................................................................................16
Información de la FCC ..............................................................................17
Garantía Limitada .....................................................................................18
Tarjeta de Garantía ...................................................................................20

• 3 •
SAVE THESE INSTRUCTIONS.
• Read manual before installing
product.
• Save installation kit and store
near unit.
• Check condition of tires regularly.
• If tires are removed for service,
reinstall the sensors on the location
marked on each sensor.
• This system monitors tire pressure
and temperature, but does not
prevent accidents.
• WARNING: This product contains
one or more chemicals known to
the State of California to cause
cancer and birth defects or other
reproductive harm.
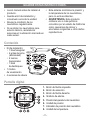
Contents
• Installation kit:
▫ 1 hex wrench
▫ 4 rubber gaskets
(extra)
▫ 4 hex nuts
▫ 1 release key
• 1 Display module
• 4 valve sensors
Digital Display
1. Left arrow button
2. Select button
3. Right arrow button
4. Alarm symbol
5. Tire pressure/temperature
6. Pressure unit
7. Tire position indicator
8. Temperature unit

• 4 •
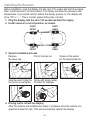
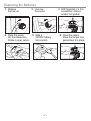
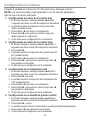
Installing the Sensors
Before installation, plug the display into the car's 12V socket and start the engine.
Next, install sensors in correct position. The display will show tire pressure and
temperature. If you install sensors before the display powers on, the display will
show “00” or “---”. This is normal; please follow step 4 to test.
1. Plug the display into the car's 12V socket and start the engine.
2. Install sensors in correct position, as shown.
RIGHT
FRONT
LEFT
FRONT
RIGHT
REAR
LEFT
REAR
3. Sensor installation process
Remove
the valve cap.
Put on the hex nut. Screw on the sensor
for the appropriate tire.
Using the wrench, tighten the
hex nut. Do not over-tighten.
Spray with soapy water,
to check for leakage.
4. Driving test to refresh the display
After the sensors are installed and setup is complete, drive the vehicle at a
speed of at least 20 mph. This will automatically refresh the display.

• 5 •
System Setup
Plug the display into the car's 12V socket and start the engine.
NOTE: The sensors have been pre-programmed with values
appropriate for most vehicles.
1. High Pressure Value Setting
1. In standby mode, press and hold
■
for 3 seconds to
enter system set up mode.
2. Display shows “43 psi” (default) high pressure setting.
3. Press ◄ button to enter set up.
4. Press ►to adjust the values, then press ◄ to save setting.
5. One beep indicates the setting is updated.
2. Low Pressure Value Setting
1. In standby mode, press and hold ■ for 3 seconds to
enter system set up mode.
2. Press ►button.
3. Display shows “26 psi” (default) low pressure setting.
4. Press ◄ button to enter set up.
5. Press ►to adjust the values, then press ◄ to save setting.
6. One beep indicates the setting is updated.
3. High Temperature Setting
1. In standby mode, press and hold ■ for 3 seconds to
enter system set up mode.
2. Press ►button twice.
3. Display shows “154” (default) high temperature setting.
4. Press ◄ button to enter set up.
5. Press ►to adjust the values, then press ◄ to save setting.
6. One beep indicates the setting is updated.
4. Psi/Bar Pressure Unit Setting
1. In standby mode, press and hold
■
for 3 seconds to
enter system set up mode.
2. Press ►button 3 times.
3. Display shows “Psi/Bar” at the same; default unit is blinking.
4. Press ◄ button to select the other unit.
5. One beep indicates the setting is updated.
5. Temperature Unit Setting
1. In standby mode, press ►button and hold for 3 seconds to enter system set up mode.
2. Choose Fahrenheit or Celsius.
6. To restore default factory settings
1. In standby mode, press ◄ button and hold for 3 seconds.

• 6 •
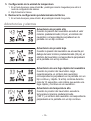
Warnings and Alarms
High pressure warning
When tire pressure exceeds the default high value
(43 Psi), the corresponding tire symbol will ash
on the display, with continuous beeping.
Low pressure warning
When tire pressure falls below default low value
(26 Psi), the corresponding tire symbol will ash
on the display, with continuous beeping.
Fast tire leakage warning
When tire pressure drops suddenly, the
corresponding tire symbol will ash on the display
with fast continuous beeping. If the beeping
continues for more than 10 seconds, it indicates
non-stop tire fast leakage.
High temperature warning
When tire temperature exceeds the default high
temperature (154˚ F), the corresponding tire
symbol will ash on the display, with continuous
beeping.
Low battery warning
When a sensor battery is low, the corresponding
tire symbol will show “Lo” on the display. Replace
the battery as soon as possible.
No sensor signal
If the signal from a battery runs out or a damaged
sensor is not received by the display for 30 minutes,
the corresponding tire symbol will show “---” on
the display.
NOTE: To cancel the warning beep, press any
button; the warning symbol will still ash.

• 7 •
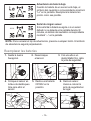
Replacing the Batteries
1. Release
the hex nut.
2. Unscrew
the sensor.
3. With ngernail or a thin
screwdriver, remove
tamper lock gasket.
4. Place the sensor
into the release key.
Rotate to open sensor.
5. Slide a
CR1632 battery
into position.
6. Close the sensor.
Press the tamper lock
gasket back into place.

• 8 •
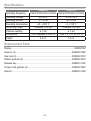
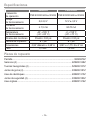
Specications
SENSOR DISPLAY
Operating frequency FSK 433.92 mHz ± 30 kHz FSK 433.92 mHz ± 30 kHz
Operating voltage 2.2-3.0 V 12 V ± 3.0 V
Operating current ≤ 1.5 mA 60-70 mA
Operating temperature -40˚-+185˚ F -4˚-+158˚ F
Monitoring scope Pressure: 0-50 psi Pressure: 0-50 psi
Pressure reading ± 1 psi ± 1 psi
Dimensions 0.93˝ diameter x 0.68˝ H 3.68˝ L x 1.75˝ W x 2˝ H
Weight 0.3 oz. 1.4 oz.
Replacement Parts
Display ...................................................................................................... 93026970Z
Sensors (4) ...........................................................................................2299003148Z
Hex nuts (4) ..........................................................................................5299000107Z
Rubber gaskets (4) ...............................................................................0399000181Z
Release key .......................................................................................... 4999001315Z
Tamper lock gaskets (4) .......................................................................0399000183Z
Wrench .................................................................................................4999001316Z

• 9 •
FCC Information
This product contains transmitter FCC ID 2AMMU-SA1346.
WARNING: Changes or modications to this unit not expressly approved by the party
responsible for compliance could void the user’s authority to operate the equipment.
This equipment has been tested and found to comply with the limits for a Class B
Digital Device, pursuant to Part 15 of the FCC Rules. These limits are designed
to provide reasonable protection against harmful interference in a residential
installation. This equipment generates, uses, and can radiate radio frequency
energy and, if not installed and used in accordance with the instructions,
may cause harmful interference to radio communications. However, there is
no guarantee that interference will not occur in a particular installation. If this
equipment does cause harmful interference to radio or television reception, which
can be determined by turning the equipment off and on, the user is encouraged
to try to correct the interference by one or more of the following measures:
• Reorient or relocate the receiving antenna.
• Increase the separation between the equipment and receiver.
• Connect the equipment into an outlet on a circuit different from that to which
the receiver is connected.
• Consult the dealer or an experienced radio/TV technician for help.
This equipment complies with Part 15 of the FCC Rules. Operation is subject to
the following two conditions:
1. This equipment may not cause harmful interference.
2. This equipment must accept any interference received, including interference
that may cause undesired operation.
This equipment complies with FCC radiation exposure limits set forth for an
uncontrolled environment. This equipment should be installed and operated with
minimum 20cm between the radiator and your body. This transmitter must not
be collocated or operating in conjunction with any other antenna or transmitter
unless authorized to do so by the FCC.
Modications not authorized by the manufacturer may void the user’s authority
to operate this device. This equipment complies with FCC RF radiation
exposure limits set forth for an uncontrolled environment. This transmitter
must not be co-located or operating in conjunction with any other antenna or
transmitter.

• 10 •
Warranty
SCHUMACHER ELECTRIC CORPORATION, 801 E. BUSINESS CENTER DRIVE,
MOUNT PROSPECT, IL 60056-2179, MAKES THIS LIMITED WARRANTY TO THE
ORIGINAL RETAIL PURCHASER OF THIS PRODUCT. THIS LIMITED WARRANTY IS
NOT TRANSFERABLE OR ASSIGNABLE.
Schumacher Electric Corporation (the “Manufacturer”) warrants this Tire Pressure
Monitoring System for one (1) year from the date of purchase at retail against
defective material or workmanship that may occur under normal use and care.
If your unit is not free from defective material or workmanship, Manufacturer’s
obligation under this warranty is solely to repair or replace your product with a new
or reconditioned unit at the option of the Manufacturer. It is the obligation of the
purchaser to forward the unit, along with proof of purchase and mailing charges
prepaid to the Manufacturer or its authorized representatives in order for repair or
replacement to occur.
Manufacturer does not provide any warranty for any accessories used with
this product that are not manufactured by Schumacher Electric Corporation and
approved for use with this product. This Limited Warranty is void if the product is
misused, subjected to careless handling, repaired, or modied by anyone other than
Manufacturer or if this unit is resold through an unauthorized retailer.
Manufacturer makes no other warranties, including, but not limited to, express,
implied or statutory warranties, including without limitation, any implied warranty
of merchantability or implied warranty of tness for a particular purpose. Further,
Manufacturer shall not be liable for any incidental, special or consequential damage
claims incurred by purchasers, users or others associated with this product, including,
but not limited to, lost prots, revenues, anticipated sales, business opportunities,
goodwill, business interruption and any other injury or damage. Any and all such
warranties, other than the limited warranty included herein, are hereby expressly
disclaimed and excluded. Some states do not allow the exclusion or limitation of
incidental or consequential damages or length of implied warranty, so the above
limitations or exclusions may not apply to you. This warranty gives you specic legal
rights and it is possible you may have other rights which vary from this warranty.
THIS LIMITED WARRANTY IS THE ONLY EXPRESS LIMITED WARRANTY AND
THE MANUFACTURER NEITHER ASSUMES OR AUTHORIZES ANYONE
TO ASSUME OR MAKE ANY OTHER OBLIGATION TOWARDS THE PRODUCT
OTHER THAN THIS WARRANTY.
Schumacher
®
and the Schumacher logo are registered
trademarks of Schumacher Electric Corporation.

• 11 •
GUARDE ESTAS INSTRUCCIONES.
• Lea el manual antes de instalar el
producto.
• Guarde el kit de instalación y
consérvelo cerca de la unidad.
• Revise la condición de los
neumáticos regularmente.
• Si se retiran los neumáticos para
servicio técnico, reinstale los
sensores en la ubicación marcada en
cada sensor.
• Este sistema monitorea la presión y
la temperatura de los neumáticos,
pero no evita accidentes.
• ADVERTENCIA: Este producto
contiene uno o más químicos
conocidos por el estado de California
como causantes de cáncer y
anomalías congénitas u otros daños
reproductivos.
Contenido
• Kit de instalación:
▫ 1 llave hexagonal
▫ 4 juntas de goma
(adicionales)
▫ 4 tuercas
hexagonales
▫ 1 llave
de desbloqueo
• 1 módulo
de visualización
• 4 sensores de válvula
Pantalla digital
1. Botón de echa izquierda
2. Botón de selección
3. Botón de echa derecha
4. Símbolo de alarma
5. Presión/temperatura del neumático
6. Unidad de presión
7. Indicador de posición del neumático
8. Unidad de temperatura

• 12 •
Instalación de los sensores
Antes de la instalación, conecte la pantalla en la toma de 12 V del automóvil y
arranque el motor. A continuación, instale los sensores en la posición correcta.
La pantalla mostrará la presión y la temperatura del neumático. Si instala los
sensores antes de que la pantalla se encienda, la pantalla mostrará “00” o “---”.
Esto es normal; continúe con el paso 4 para probar.
1. Conecte la pantalla en la toma de 12 V del automóvil y arranque el motor.
2. Instale los sensores en la posición correcta, tal como se muestra.
FRONTAL
DERECHA
FRONTAL
IZQUIERDA
TRASERA
DERECHA
TRASERA
IZQUIERDA
3. Proceso de instalación del sensor
Retire la tapa
de la válvula.
Coloque la tuerca
hexagonal.
Atornille el sensor del
neumático adecuado.
Ajuste la tuerca hexagonal
con ayuda de la llave.
No la ajuste demasiado.
Rocíe con agua
jabonosa para vericar
si hay fugas.
4. Prueba de conducción para actualizar la pantalla
Después de que los sensores estén instalados y la conguración esté completa,
conduzca el vehículo a una velocidad al menos 20 mph. Esto actualizará la
pantalla automáticamente.

• 13 •
Conguración del sistema
Conecte la pantalla en la toma de 12 V del automóvil y arranque el motor.
NOTA: Los sensores están preprogramados con los valores apropiados
para la mayoría de los vehículos.
1. Conguración del valor de la presión alta
1. En el modo de espera, mantenga pulsado el
■
durante
3 segundos para entrar al modo de conguración del sistema.
2. La pantalla muestra la conguración de la presión alta
“43 psi” (predeterminada).
3. Pulse el botón ◄ para entrar a la conguración.
4. Pulse el botón ► para ajustar los valores, luego pulse
◄ para guardar la conguración.
5. Un bip indica que la conguración se ha actualizado.
2. Conguración del valor de la presión baja
1. En el modo de espera, mantenga pulsado el ■ durante 3
segundos para entrar al modo de conguración del sistema.
2. Pulse el botón ►.
3. La pantalla muestra la conguración de la presión baja “26
psi” (predeterminada).
4. Pulse el botón ◄ para entrar a la conguración.
5. Pulse el botón ► para ajustar los valores, luego pulse ◄
para guardar la conguración.
6. Un bip indica que la conguración se ha actualizado.
3. Conguración de la temperatura alta
1. En el modo de espera, mantenga pulsado el ■ durante 3
segundos para entrar al modo de conguración del sistema.
2. Pulse el botón ► dos veces.
3. La pantalla muestra la conguración de la temperatura alta
“154” (predeterminada).
4. Pulse el botón ◄ para entrar a la conguración.
5. Pulse el botón ► para ajustar los valores, luego pulse ◄
para guardar la conguración.
6. Un bip indica que la conguración se ha actualizado.
4. Conguración de la unidad de presión psi/bar
1. En el modo de espera, mantenga pulsado el ■ durante 3
segundos para entrar al modo de conguración del sistema.
2. Pulse el botón ► 3 veces.
3. La pantalla muestra “psi/bar” al mismo tiempo; la unidad predeterminada parpadea.
4. Pulse el botón ◄ para seleccionar la otra unidad.
5. Un bip indica que la conguración se ha actualizado.

• 14 •
5. Conguración de la unidad de temperatura
1. En el modo de espera, pulse el botón ► y sosténgalo durante 3 segundos para entrar al
modo de conguración del sistema.
2. Elija Fahrenheit o Celsius.
6. Restaurar la conguración predeterminada de fábrica
1. En el modo de espera, pulse el botón ◄ y sosténgalo durante 3 segundos.
Advertencias y alarmas
Advertencia de presión alta
Cuando la presión del neumático exceda el valor
máximo predeterminado (43 psi), el símbolo del
neumático correspondiente parpadeará en la
pantalla con un bip continuo.
Advertencia de presión baja
Cuando la presión del neumático se encuentre por
debajo del valor mínimo predeterminado (26 psi), el
símbolo del neumático correspondiente parpadeará
en la pantalla con un bip continuo.
Advertencia de una fuga rápida del neumático
Cuando la presión del neumático caiga
repentinamente, el símbolo del neumático
correspondiente parpadeará en la pantalla con un
bip continuo y rápido. Si el bip continúa durante
más de 10 segundos, esto indica que existe una
fuga rápida y continua en el neumático.
Advertencia de temperatura alta
Cuando la presión del neumático exceda la
temperatura máxima predeterminada
(154˚ F), el símbolo del neumático correspondiente
parpadeará en la pantalla con un bip continuo.

• 15 •
Advertencia de batería baja
Cuando la batería de un sensor esté baja, el
símbolo del neumático correspondiente mostrará
“Lo” en la pantalla. Reemplace la batería tan
pronto como sea posible.
Señal de ningún sensor
Si la señal de la batería se agota o si un sensor
dañado no se detecta en la pantalla durante 30
minutos, el símbolo del neumático correspondiente
mostrará “---” en la pantalla.
NOTA: Para cancelar el bip de advertencia, presione cualquier botón. El símbolo
de advertencia seguirá parpadeando.
Reemplazar las baterías
1. Suelte la tuerca
hexagonal.
2. Desenrosque
el sensor.
3. Con una uña o un
destornillador no, retire
la junta de seguridad.
4. Coloque el sensor en
la llave de desbloqueo.
Gire para abrir el
sensor.
5. Deslice una batería
CR1632 en la
posición.
6. Cierre el sensor.
Vuelva a colocar la
junta de seguridad en
su lugar.

• 16 •
Especicaciones
SENSOR PANTALLA
Frecuencia
de operación
FSK 433.92 mHz ± 30 kHz FSK 433.92 mHz ± 30 kHz
Voltaje
de funcionamiento
2,2-3,0 V 12 V ± 3,0 V
Corriente
de funcionamiento
≤ 1,5 mA 60-70 mA
Temperatura
de funcionamiento
-40˚-+185˚ F
(-40˚-+85˚ C)
-4˚-+158˚ F
(-20˚-+70˚ C)
Alcance del monitoreo Presión: 0-50 psi Presión: 0-50 psi
Lectura de la presión ± 1 psi ± 1 psi
Dimensiones 0,93˝ diámetro x 0,68˝ A 3,68˝ L x 1,75˝ Al x 2˝ An
Peso 0,3 onz. 1,4 onz.
Piezas de repuesto
Pantalla .....................................................................................................93026970Z
Sensores (4) .........................................................................................2299003148Z
Tuercas hexagonales (4) ......................................................................5299000107Z
Juntas de goma (4) ............................................................................... 0399000181Z
Llave de desbloqueo ............................................................................4999001315Z
Juntas de seguridad (4) ........................................................................ 0399000183Z
Llave inglesa .........................................................................................4999001316Z

• 17 •
Información de la FCC
Este producto contiene un transmisor FCC ID 2AMMU-SA1346.
ADVERTENCIA: Los cambios o modicaciones a esta unidad que no estén
aprobados expresamente por la parte responsable del cumplimiento podrían
anular la autoridad del usuario para operar el equipo.
Este equipo está probado y cumple con los límites para un dispositivo digital de
clase B, de acuerdo con la parte 15 de las reglas de la FCC. Estos límites están
diseñados para proporcionar una protección razonable contra las interferencias
dañinas en una instalación residencial. Este equipo genera, utiliza y puede
irradiar energía de radiofrecuencia y, si no se instala y utiliza de acuerdo con las
instrucciones, podría causar una interferencia perjudicial a las comunicaciones
radiales. Sin embargo, no existe garantía de que no se produzcan interferencias
en una instalación en particular. Si este equipo causa interferencias
perjudiciales a la recepción de radio o televisión, lo que puede determinarse al
apagar y encender el equipo, se recomienda al usuario que intente corregir la
interferencia mediante una o más de las siguientes medidas:
• Reorientar o reubicar la antena receptora.
• Aumentar la separación entre el equipo y el receptor.
• Conectar el equipo a una toma de corriente en un circuito distinto al que está
conectado el receptor.
• Consultar con el distribuidor o con un técnico de radio/TV experimentado
para obtener ayuda.
Este equipo cumple con la parte 15 de las reglas de la FCC. El funcionamiento
está sujeto a las dos condiciones siguientes:
1. Es posible que este equipo no cause interferencias dañinas.
2. Este equipo debe aceptar cualquier interferencia recibida, incluidas las
interferencias que puedan causar un funcionamiento no deseado.
Este equipo cumple con los límites de exposición a la radiación establecidos
por la FCC para un entorno no controlado. Este equipo debe instalarse
y operarse con un mínimo de 20 cm entre el radiador y su cuerpo. Este
transmisor no debe colocarse ni funcionar en conjunto con ninguna otra antena
o transmisor, a menos que la FCC lo autorice.
Las modicaciones no autorizadas por el fabricante pueden anular la
autorización del usuario para utilizar este dispositivo. Este equipo cumple
con los límites de exposición a la radiación RF establecidos por la FCC para
un entorno no controlado. Este transmisor no debe colocarse ni funcionar en
conjunto con ninguna otra antena o transmisor.

• 18 •
Garantía Limitada
SCHUMACHER ELECTRIC CORPORATION, 801 BUSINESS CENTER DRIVE,
MOUNT PROSPECT, IL 60056-2179, REALIZA LA PRESENTE GARANTÍA LIMITADA
AL COMPRADOR MINORISTA ORIGINAL DE ESTE PRODUCTO. LA PRESENTE
GARANTÍA LIMITADA NO PUEDE TRANSFERIRSE NI CEDERSE.
Schumacher Electric Corporation (el “Fabricante”) otorga garantía por este sistema
de monitoreo de presión neumática por un plazo de un (1) año contados a partir de
la fecha de compra por menor por la existencia de cualquier material o de mano de
obra defectuosos que pudieran surgir por su uso y cuidado normal. Si su unidad cuenta
con material defectuoso o defectos de mano de obra, la obligación de los Fabricantes,
conforme a la presente garantía, será simplemente reparar o sustituir el producto por uno
nuevo o por una unidad reparada, a elección del fabricante. Es obligación del comprador
enviar la unidad con comprobante de compra y los gastos de envío prepagos al fabricante
o a sus representantes autorizados para que ésta se pueda reparar o reemplazar.
El Fabricante no presta garantía por lo accesorios utilizados con este producto que no
sean los fabricados por Schumacher Electric Corporation y que no estén aprobados
para su uso con este producto. La presente Garantía Limitada será nula si el producto
se utiliza en forma errónea, se trata de manera inadecuada, es reparado o modicado
por personas que nos sean el Fabricante o si esta unidad es revendida a través de un
vendedor minorista no autorizado.
El Fabricante no realiza ninguna otra garantía, incluidas, a título enunciativo, las
garantías expresas, implícitas o legales, incluidas, a modo de ejemplo, las garantías
implícitas de comerciabilidad o adecuación a un n especíco. Asimismo, el Fabricante
no será responsable ante reclamos por daños accidentales, especiales ni directos en
los que incurran los compradores, usuarios u otras personas asociadas al producto,
incluidas, a título enunciativo, los ingresos y ganancias no percibidos, ventas anticipadas,
oportunidades comerciales, el buen nombre, la interrupción de la actividad comercial
o cualquier otro daño que haya provocado. Todas las garantías, excepto la garantía
limitada incluida en el presente, por medio de la presente, quedan expresamente
anuladas y excluidas. Algunos estados no permiten la exclusión ni la limitación de los
daños accidentales ni directos o el plazo de garantía implícita, por lo que las limitaciones
o exclusiones mencionadas anteriormente podrían no corresponder con su caso. La
presente garantía le otorga derechos legales especícos y es probable que usted cuente
con otros derechos que podrían diferir de los incluidos en la presente garantía.
LA PRESENTE GARANTÍA LIMITADA ES LA ÚNICA GARANTÍA LIMITADA
EXPRESA Y EL FABRICANTE NO ASUME NI AUTORIZA A NADIE A ASUMIR O
A ADQUIRIR NINGUNA OTRA OBLIGACIÓN RESPECTO DEL PRODUCTO QUE
NO SEA LA PRESENTE GARANTÍA.
Schumacher
®
y el logo Schumacher son marcas registradas
de Schumacher Electric Corporation.

• 19 •
1 YEAR LIMITED
WARRANTY PROGRAM
REGISTRATION
MODEL: _____________________DESCRIPTION: ________________________
This is the only express limited warranty, and the manufacturer neither assumes
nor authorizes anyone to assume or make any other obligation. There is no other
warranty, other than what is described in the product owner’s manual.
The warranty card should be submitted within 30 days of purchase. The customer
must keep the ORIGINAL receipt because it will be required for any warranty claims.
This warranty is not transferable. Send warranty card only.
DO NOT SEND UNIT TO THIS ADDRESS FOR REPAIR.
Mail this card to: Schumacher Electric Corporation
801 Business Center Drive
Mount Prospect, IL 60056-2179
Name ______________________________________________________________
Street Address _______________________________________________________
City ________________________________State _________ Zip Code _________
Phone _____________________Email ___________________________________
Store Name Where Purchased ___________________ Date of Purchase _________
Store Location ____________________ UPC Number ________________________
Serial Number ______________________________________ (SEE PRODUCT)
For faster warranty activation, go to www.batterychargers.com to register your product online.
Warranty Card
SAVE ON POSTAGE! ACTIVATE YOUR WARRANTY ONLINE – THE QUICK AND EASY WAY!
Go to www.batterychargers.com to register your product online.
(No internet access? Send in the completed warranty card.)

• 20 •
PROGRAMA DE REGISTRO
DE 1-AÑO DE GARANTÍA
LIMITADA
MODELO: ____________________DESCRIPCIÓN: ________________________
Esta es la única garantía limitada expresa, y el productor no autoriza ni otorga a alguien a
realizar alguna otra obligación. No existe ninguna otra garantía más que la descrita en el manual
del dueño. La tarjeta de garantía debe enviarse durante los primeros 30 días después de la
compra. El cliente debe mantener el recibo de compra ORIGINAL como comprobante, el cual
le otorga todo derecho a cualquier reclamo de garantía. Esta garantía no es transferible. Envie
tarjeta de garantía solamente.
NO ENVÍE LA UNIDAD A ESTA DIRECCIÓN PARA SU REPARACIÓN.
Enviar esta tarjeta a: Schumacher Electric Corporation
801 Business Center Drive
Mount Prospect, IL 60056-2179
Nombre ____________________________________________________________
Dirección ___________________________________________________________
Ciudad __________________________Estado ____________ C.P. _____________
Tel: ________________________ Correo electrónico _________________________
Nombre de la Tienda donde se Compró ____________ Fecha de compra _________
Localización de la Tienda ____________ Numero de Serie ____________________
Código de barras ___________________________ (CONSULTE EL PRODUCTO)
Para una activación más rápida, visite nuestra página de internet en www.batterychargers.com
Tarjeta de Garantía
¡AHORRE EN EL ENVÍO! ¡ACTIVE SU GARANTÍA EN LÍNEA – LA FORMA MAS RÁPIDA Y FÁCIL!
Visite nuestra página en www.batterychargers.com para registrar su producto en línea.
(¿No tiene acceso al internet? Llene la tarjeta de garantía y envíela.)
-
 1
1
-
 2
2
-
 3
3
-
 4
4
-
 5
5
-
 6
6
-
 7
7
-
 8
8
-
 9
9
-
 10
10
-
 11
11
-
 12
12
-
 13
13
-
 14
14
-
 15
15
-
 16
16
-
 17
17
-
 18
18
-
 19
19
-
 20
20


Schumacher Electric SA1346 Wireless Tire Pressure Monitoring System El manual del propietario
- Tipo
- El manual del propietario
- Este manual también es adecuado para
en otros idiomas
Artículos relacionados
-
Schumacher Electric FR01337 El manual del propietario
-
Schumacher Electric SL1317 1000 Peak Amp Lithium Ion Jump Starter/ Power Pack El manual del propietario
-
-
-
-
-