Steren K-705-GRILLO El manual del propietario
- Tipo
- El manual del propietario

K-705
Kit solar
de grillo
Kit solar
de grillo
7

1
Lea cuidadosamente este instructivo para evitar cualquier mal funcionamiento.
La información que se muestra en este manual sirve únicamente como referencia sobre el
producto.
Debido a actualizaciones pueden existir diferencias.
Por favor, consulte nuestra página web www.steren.com para obtener la versión más reciente
de este manual.
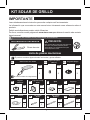
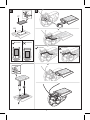
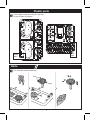
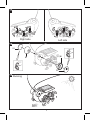
KIT SOLAR DE GRILLO
IMPORTANTE
Pinzas de corte
Herramienta necesaria
PRECAUCIÓN:
Este producto NO es apto para niños menores
de 3 años. Las piezas pequeñas pueden
causar asfixia. Se recomienda el uso para
niños mayores de 7 años.
P2 P3
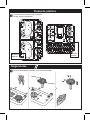
Lista de piezas mecánicas
P1
Panel solar con motor
1 1
1
Engrane (Rojo)
Engrane
(Naranja)
Gear(Orange)
P4
Cant.
2
Engrane de piñón
(Blanco)
No conecte los cables a la energía eléctrica.
El producto contiene algunos bordes funcionales y puntas afiladas.
Cant.Cant. Cant.
P5
Cant.
1
P6
Cant.
2
P7
Cant.
1
Ojos
Esponja
P8
Cant.
1
P9
Cant.
1
P10
Cant.
2
P11
Cant.
1
Antena
Eje redondo
(Largo)
Eje redondo
(Corto)
Eje redondo
(Mediano)
Engrane con eje
(Azul)
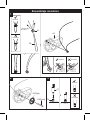
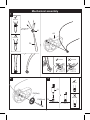
Corte todas las rebabas de las piezas antes de ensamblar.

2
Piezas de plástico
Corte las piezas cuando vaya a utilizarlas.
No las corte por adelantado.
Antes de ensamblar las piezas, corte todas las rebabas.
1 3
4 46 5
12
A
43
1
7
8
7
8
2
5
6
B
rebaba
rebaba
Piezas de
repuesto
Piezas de
repuesto
Sugerencias

3
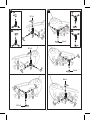
Ensamblaje mecánico
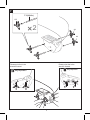
Correcto
Incorrecto
Correcto
Incorrecto
Correcto
Incorrecto
1
2
3
A3
P3(Rojo)
P9(Corto)
P8
A1
P1
P2

4
Correcto Incorrecto
4 5
2
1
P7
B3
Correcto
Incorrecto

5
(Azul)
P5
6
P5(Azul)
B4
B5
Corte las rebabas de
las piezas B4 y B5 antes
de ensamblar.
B2
A2
P4
(Naranja)
P4
(Naranja)
P4
(Naranja)
P3
(Rojo)
P4
(Naranja)
Correcto
Incorrecto
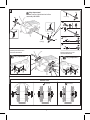
1
PASO
3
PASO
2
PASO
1
PASO
2
PASO
3
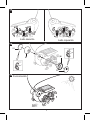
STEPPASO

6
7
A4
A4
A4
2
P10(Mediano)
Muy importante !
Apunte las patas en la dirección correcta,
como se muestra en la ilustración.
Apunte las patas en la dirección correcta,
como se muestra en la ilustración.
Muy importante !

7
8
A5
B6
P11
(Largo)
A6
Antes de ensamblar A5 y A6, asegúrese de que la
dirección de las piezas esten correctas.
Muy importante !
Vista inferior
Apunte los pies en la dirección
que muestra la imagen.
Muy importante !
Muy importante !
Correcto
Incorrecto
Corte todas las rebabas, antes de
ensamblar la pieza B6
B6
P11(Largo)
A6
Correcto
Incorrecto
Apunte los pies en la dirección
que muestra la imagen.

8
10
B7x3
B8x3
B7x3
B7x3
B8x3
B8x3
Correcto
Incorrecto
9
Correcto
Incorrecto

9
11
Lado izquierdo
Lado derecho
Funcionando
12
13
B1
B1
P6
P6

10
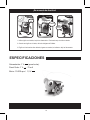
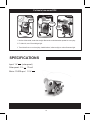
ESPECIFICACIONES
¡Es momento de divertirse!
1. Utilice el grillo en el exterior, bajo la luz directa del sol. Funcionará mejor si el día es soleado.
2. Cuando use el grillo en el interior, utilice luz halógena de 50 Watts.
3. El grillo no funcionará en días nublados, lugares con sombra, luz indirecta o bajo luz fluorescente.
Pruébame
HalógenoHalógeno
50W y más50W y más
Energía
alta
Poca
energía
SOLEADO
EN CASA NUBLADO
Alimentación: 1 V - - - (panel solar)
Panel Solar: 1 V - - - 75 mA
Motor: 10 000 rpm / 1,2 V - - -


1
Read these manual to avoid any damage.
The instructions only are for reference about the product.
There may be differences due to update.
Please check our web site www.steren.com to obtain the latest version of the instruction
manual.
SOLAR CRICKET
IMPORTANT
Diagonal Cutter
Tool you may need
WARNING:
Choking Hazard small partsThis product is NOT
recommended for children under 3 years. Small
parts can cause choking hazard. The use of this
product is recommended for children over 7 years.
P2 P3
Mechanical Parts List
P1
Solar Panel With Motor
1 1
1
Gear(Red)
Gear(Orange)
Gear(Orange)
P4
QTY
2
Pinion Gear
(White)
Don't connect the wires to the mains.
Product contains functional edges and sharp points.
QTYQTY QTY
P5
QTY
1
P6
QTY
2
P7
QTY
1
Eyes
Sponge
P8
QTY
1
P9
QTY
1
P10
QTY
2
P11
QTY
1
Antenna
Round Shaft
(Long)
Round Shaft
(Short)
Round Shaft
(Middle)
Gear With
Shaft(Blue)
Cut all burrs of parts before assembling.

2
Plastic parts
Cut the plastic parts when they are required.
Do not cut them in advance
Cut off the burrs before assembly.
1 3
4 46 5
12
A
43
1
7
8
7
8
2
5
6
B
burr
burr
Spare
parts
Spare
part
Hints

3
Mechanical assembly
Correct
Incorrect
Correct
Incorrect
Correct
Incorrect
1
2
3
A3
P3(Red)
P9(Short)
P8
A1
P1
P2

4
Correct Incorrect
4 5
2
1
P7
B3
Correct
Incorrect

5
(Blue)
P5
6
P5(Blue)
B4
B5
Cut off B4 & B5 burrs
before assembly.
B2
A2
P4
(Orange)
P4
(Orange)
P4
(Orange)
P3
(Red)
P4
(Orange)
Correct
Incorrect
1
STEP
3
STEP
2
STEP
1
STEP
2
STEP
3
STEPSTEP

6
7
A4
A4
A4
2
P10(Middle)
Very Important !
Please point feet in the
direction ilustred.
Please point feet in the
direction ilustred.
Very Important !

7
8
A5
B6
P11
(Long)
A6
Please ensure right direction before
assembly A5 & A6 .
Very Important!
Bottom view
Please point feet in the
direction illustrated.
Very Important !
Very Important !
Correct
Incorrect
Cut off B6 burrs before assembly.
B6
P11(Long)
A6
Correct
Incorrect
Please point feet in the
direction illustrated.

8
10
B7x3
B8x3
B7x3
B7x3
B8x3
B8x3
Correct
Incorrect
9
Correct
Incorrect

9
11
Left side
Right side
Running
12
13
B1
B1
P6
P6

10
SPECIFICATIONS
It´s time to have some FUN!
1. Use the cricket outside, under direct sunlight. Best results are obtained when operated on a sunny day.
2. For indoor fun, use a 50 watt halogen light.
3. The cricket will not run on a cloudy day, shaded locations, indirect sunlight, or under a fluorescent light.
Try
on me
HalogenHalogen
50W & UP50W & UP
Full
energy
Low
power
SUNNY
IN HOUSE CLOUDY
Input: 1 V - - - (solar panel)
Solar panel: 1 V - - - 75 mA
Motor: 10 000 rpm / 1.2 V - - -

www.steren.com
-
 1
1
-
 2
2
-
 3
3
-
 4
4
-
 5
5
-
 6
6
-
 7
7
-
 8
8
-
 9
9
-
 10
10
-
 11
11
-
 12
12
-
 13
13
-
 14
14
-
 15
15
-
 16
16
-
 17
17
-
 18
18
-
 19
19
-
 20
20
-
 21
21
-
 22
22
-
 23
23
-
 24
24


