Hitachi LDU 4 Manual de usuario
- Categoría
- Herramientas eléctricas
- Tipo
- Manual de usuario
Este manual también es adecuado para

Hand Grinder
Amoladora recta
LDU 4
Handling instructions
Instrucciones de manejo
Read through carefully and understand these instructions before use.
Leer cuidadosamente y comprender estas instrucciones antes del uso.

2
12
3
English Español
ﺔﻳﺑﺭﻌﻟﺍ
1
Spindle Husillo
ﻥﺍﺭﻭﺩﻟﺍ ﺩﻭﻣﻋ
2
Collet chuck Boquilla de mordazas
ﻕﻭﻁﻟﺍ ﺽﺑﻘﻣ
3
Tighten Apretar
ﻡﺎﻛﺣﺈﺑ ﺕﻳﺑﺛﺗ
4
Nose bracket Ménsula del nariz
ﺔﻫﻭﻔﻟﺍ ﻝﻣﺎﺣ
5
Tapered portion Parte cónica
ﺔﻗﺩﺗﺳﻣﻟﺍ ﺔﺑﺳﻧﻟﺍ
6
Wear limit Límite de desgaste
ﻝﻛﺂﺗﻟﺍ ﺩﺣ
7
No. of carbon brush
No. de escobilla de carbón
ﺔﻳﻧﻭﺑﺭﻛﻟﺍ ﺵﺭﻔﻟﺍ ﺩﺩﻋ

3
English
GENERAL SAFETY RULES
WARNING!
Read all instructions
Failure to follow all instructions listed below may result in
electric shock, fi re and/or serious injury.
The term “power tool” in all of the warnings listed below
refers to your mains-operated (corded) power tool or
battery-operated (cordless) power tool.
SAVE THESE INSTRUCTIONS
1) Work area
a) Keep work area clean and well lit.
Cluttered and dark areas invite accidents.
b) Do not operate power tools in explosive
atmospheres, such as in the presence of
fl ammable liquids, gases or dust.
Power tools create sparks which may ignite the dust
of fumes.
c) Keep children and bystanders away while
operating a power tool.
Distractions can cause you to lose control.
2) Electrical safety
a) Power tool plugs must match the outlet.
Never modify the plug in any way.
Do not use any adapter plugs with earthed
(grounded) power tools.
Unmodifi ed plugs and matching outlets will reduce
risk of electric shock.
b) Avoid body contact with earthed or grounded
surfaces such as pipes, radiators, ranges and
refrigerators.
There is an increased risk of electric shock if your
body is earthed or grounded.
c) Do not expose power tools to rain or wet
conditions.
Water entering a power tool will increase the risk of
electric shock.
d) Do not abuse the cord. Never use the cord for
carrying, pulling or unplugging the power tool.
Keep cord away from heat, oil, sharp edges or
moving parts.
Damaged or entangled cords increase the risk of
electric shock.
e) When operating a power tool outdoors, use an
extension cord suitable for outdoor use.
Use of a cord suitable for outdoor use reduces the
risk of electric shock.
3) Personal safety
a) Stay alert, watch what you are doing and use
common sense when operating a power tool.
Do not use a power tool while you are tired
or under the infl uence of drugs, alcohol or
medication.
A moment of inattention while operating power tools
may result in serious personal injury.
b) Use safety equipment. Always wear eye
protection.
Safety equipment such as dust mask, non-skid
safety shoes, hard hat, or hearing protection used
for appropriate conditions will reduce personal
injuries.
c) Avoid accidental starting. Ensure the switch is
in the off position before plugging in.
Carrying power tools with your fi nger on the switch
or plugging in power tools that have the switch on
invites accidents.
d) Remove any adjusting key or wrench before
turning the power tool on.
A wrench or a key left attached to a rotating part of
the power tool may result in personal injury.
e) Do not overreach. Keep proper footing and
balance at all times.
This enables better control of the power tool in
unexpected situations.
f) Dress properly. Do not wear looses clothing or
jewellery. Keep your hair, clothing and gloves
away from moving parts.
Loose clothes, jewellery or long hair can be caught
in moving parts.
g) If devices are provided for the connection of
dust extraction and collection facilities, ensure
these are connected and properly used.
Use of these devices can reduce dust related
hazards.
4) Power tool use and care
a) Do not force the power tool. Use the correct
power tool for your application.
The correct power tool will do the job better and
safer at the rate for which it was designed.
b) Do not use the power tool if the switch does not
turn it on and off .
Any power tool that cannot be controlled with the
switch is dangerous and must be repaired.
c) Disconnect the plug from the power source
before making any adjustments, changing
accessories, or storing power tools.
Such preventive safety measures reduce the risk of
starting the power tool accidentally.
d) Store idle power tools out of the reach of
children and do not allow persons unfamiliar
with the power tool or these instructions to
operate the power tool.
Power tools are dangerous in the hands of untrained
users.
e) Maintain power tools. Check for misalignment
or binding of moving parts, breakage of parts
and any other condition that may aff
ect the
power tools operation.
If damaged, have the power tool repaired
before use.
Many accidents are caused by poorly maintained
power tools.
f) Keep cutting tools sharp and clean.
Properly maintained cutting tools with sharp cutting
edges are less likely to bind and are easier to
control.
g) Use the power tool, accessories and tool bits
etc., in accordance with these instructions and
in the manner intended for the particular type
of power tool, taking into account the working
conditions and the work to be performed.
Use of the power tool for operations diff erent from
intended could result in a hazardous situation.

4
English
5) Service
a) Have your power tool serviced by a qualifi ed
repair person using only identical replacement
parts.
This will ensure that the safety of the power tool is
maintained.
PRECAUTION
Keep children and infi rm persons away.
When not in use, tools should be stored out of reach
of children and infi rm persons.
PRECAUTIONS ON USING GRINDER
1. Always use for the right purpose under safe
conditions.
This machine is a portable tool for grinding or fi nishing
work on metal of various types, resin and ceramics. Use
the machine for these purposes only.
2. Always use regulation grinding wheels.
The grinding wheel for this machine should be grinding
wheel with axle which have a maximum diameter of
18 mm and an axle diameter of 3 mm or 6 mm.
3. Always test before using.
Always check the grinding wheel to be used for cracks
or splits. Also, always test-run the machine before using
to check for any abnormalities.
4. Protect the eyes with protective goggles.
Always wear protective goggles during grinding. Also,
when there is a lot of dust produced by grinding, wear a
mask.
5. Always hold the machine securely.
Always hold the machine securely when using. If you do
not hold the machine, the reaction to force can cause it
to spring back.
6. Do not place unreasonable loads on the machine.
Do not place unreasonable loads on the machine by
pressing it so hard against the material that the rotation
speed is drastically reduced. This will reduce work
effi ciency and there is a danger that the grinding wheel
axle will be bent.
7. Never touch revolving parts.
Keep hands and other body parts away from the vicinity
of the grinding wheel while it is spinning to avoid danger
of cuts, abrasions or catching clothes in equipment.
8. Be careful about sparks from grinding.
Grinding particles can become fl ying sparks. Always
keep fl ammable materials and materials which can
easily be damaged in a safe place removed from the
work area. Also, be careful that sparks do not come in
direct contact with hands or feet.
9. Do not put the machine down while it is still
running.
Never run the machine if you are not holding it securely
with both hands. Also, never put the machine on the
table or fl oor while it is still running.
10. Follow the correct order when replacing the
grinding wheel.
When replacing the grinding wheel, carefully follow the
steps outlined in this instruction manual.
11. Use only grinding wheels with a "Safe Speed" at least
as high as the "No-Load RPM" indicated on the power
tool nameplate.
STANDARD ACCESSORIES
(1) Mounted wheels (No. KA-1, 2, 4, 5, 6)..........................5
KA-1 KA-2 KA-4 KA-5 KA-6
(2) Dresser .........................................................................1
(3) Wrench .........................................................................1
(4) Wrench .........................................................................1
(5) Case .............................................................................1
Standard accessories are subject to change without notice.
OPTIONAL ACCESSORIES (sold separately)
○ Mounted wheels with 6 mm shaft
KA-3 KA-7 KA-8 KA-9 KA-10
○ Collet chuck for 3 mm shaft
The 3 mm collet chuck is designed to accept mounted
wheels with a 3 mm diameter shaft for processing small
parts.
Dimensions and handling methods other than the shaft
hole are the same as those for the 6 mm collet chuck.
SPECIFICATIONS
Voltage (by areas)* (110 V, 115 V, 120 V, 127 V, 220 V, 230 V, 240 V)
Input* 240 W
No-load speed* 23000 /min
Mounted Wheel
Maximum 32 mm
Shaft diameter 6 mm
Weight (without cord) 1.9 kg
* Be sure to check the nameplate on product as it is subject to change by areas.

5
English
○ Mounted wheels with 3 mm shaft
All mounted wheels are provided with WA grain, 80
grounding, and P bonding and are suitable for grinding
general and special steel materials.
Purchase and utilize mounted wheels of suitable shape
for processing.
KA-20 KA-21 KA-22 KA-23 KA-24
KC-20 KC-21 KC-22 KC-23 KC-24
○ Universal mount
This universal mount is used when grinding inner
surfaces of workpieces or fi nishing specially shaped
workpieces, by installing the hand grinder on a lathe.
The universal mount is installed on the cross slide after
removing the lathe tool post.
(using universal mount)
(dimensional diagram)
Optional accessories are subject to change without notice.
APPLICATIONS
○ Finishing of dies for press working, die casting and
moulding.
○ Finishing of thread cutting dies, tools and other small
parts.
○ Internal grinding of tools and machine parts.
PRIOR TO OPERATION
1. Power source
Ensure that the power source to be utilized conforms
to the power requirements specifi ed on the product
nameplate.
2. Grounding
This tool should be grounded while in use to protect the
operator from electric shock. The tool is equipped with
a three conductor cord and grounding type plug to fi t the
proper grounding type receptacle. The green (or green
and yellow) conductor in the cord is the grounding wire.
Never connect the green (or green and yellow) wire to a
live terminal.
3. Power switch
Ensure that the power switch is in the OFF position. If
the plug is connected to a receptacle while the power
switch is in the ON position, the power tool will start
operating immediately, which could cause a serious
accident.
4. Extension cord
When the work area is removed from the power source,
use an extension cord of suffi cient thickness and rated
capacity. The extension cord should be kept as short as
practicable.
5. Confi rming condition of the environment
Confi rm that the work site is placed under appropriate
conditions conforming to prescribed precautions.
When grinding a thin steel plate, depending upon the
state of the workbench, a loud noise will be created due
to resounding noise from the steel plate being ground.
To eliminate unwanted noise in this instance, place a
rubber mat beneath the material to be ground.
6. Installing a mounted wheel
● Always use a mounted wheel whose outer diameter
is 32 mm or less. When using a mounted wheel in
excess of this diameter, mounted wheel circumferential
speed will exceed the safety limit, perhaps causing an
accident.
Never use a mounted wheel in excess of 32 mm
diameter.
● Mounted wheels can be simply attached and detached
by using two wrenches. (Refer to Fig. 1).
● Install a mounted wheel so that the mounted wheel
shaft does not protrude more than 15 mm.
NOTE
1. Do not tighten the collet chuck by inserting a shaft
thinner than the regular shaft diameter (6 mm) in
the chuck or in an empty condition. This practice will
damage the collet chuck.
2. When installing a mounted wheel with shaft, tighten the
collet chuck after applying a small quantity of spindle oil
(or sewing machine oil) to the tapered portion indicated
in Fig. 2.

6
English
MOUNTED WHEEL SELECTING METHOD
Mounted wheels attached to this hand grinder are
suitable for grinding press and die cast molds, and
other hard or mild steel parts. (Except stainless plate.)
Types of mounted wheel are varied according to
the materials to be ground. Select a mounted wheel
appropriate for the material to be ground.
● The following table is an outline of mounted wheel and
materials to be ground.
Materials to be ground Grain Grading Bonding degree Structure Bonding agent
Mild steel, hard steel,
forged steel
WA 60 – 80 P m V
Cast iron C 36 M – O m V
Brass, bronze, aluminium
C 36 J – K m V
Ceramic WA 60 – 80 M m V
Synthetic resin C 36 K – M m V
3. Maintenance of the motor
The motor unit winding is the very “heart” of the power
tool.
Exercise due care to ensure the winding does not
become damaged and/or wet with oil or water.
4. Inspecting the carbon brushes (Fig. 3)
The motor employs carbon brushes which are
consumable parts. Since an excessively worn carbon
brush can result in motor trouble, replace the carbon
brushes with new ones having the same carbon brush
No. shown in the fi gure when it becomes worn to or
near the “wear limit”. In addition, always keep carbon
brushes clean and ensure that they slide freely within
the brush holders.
5. Replacing carbon brushes
Disassemble the brush caps with a slotted-head
screwdriver. The carbon brushes can then be easily
removed.
6. Service parts list
CAUTION
Repair, modifi cation and inspection of Hitachi Power
Tools must be carried out by an Hitachi Authorized
Service Center.
This Parts List will be helpful if presented with the tool to
the Hitachi Authorized Service Center when requesting
repair or other maintenance.
In the operation and maintenance of power tools, the
safety regulations and standards prescribed in each
country must be observed.
MODIFICATIONS
Hitachi Power Tools are constantly being improved
and modifi ed to incorporate the latest technological
advancements.
Accordingly, some parts may be changed without prior
notice.
NOTE
Due to HITACHI’s continuing program of research and
development, the specifi cations herein are subject to
change without prior notice.
● Small-scaled mounted wheels with shaft are prepared
for grinding small surfaces. Since mounted wheel shaft
diameter in 3 mm, use the collet chuck for 3 mm shaft
sold separately by your Hitachi dealer as an optional
accessory.
HOW TO USE
1. Switching operation
(1) When throwing the switch lever to the right (ON side),
power is applied; when throwing it to the left (OFF side),
power is switched off .
(2) When fi rst throwing the switch after installing a new
mounted wheel, avoid personal proximity to the
mounted wheel revolving circumference to avoid
danger of a possible imperfection.
2. Precautions on operation
(1) Lightly press the mounted wheel to the material to
be ground
When grinding materials, high-speed revolution
is necessary. Use a hand grinder with high-speed
revolution, minimizing the pressing force.
(2) Dressing the mounted wheel
● After attaching a mounted wheel, correct defl ection of
the mounted wheel center by using a dresser.
If the mounted wheel center is eccentric, not only
precise fi nishing cannot be achieved but also grinder
vibration increases, lowering grinder accuracy and
durability.
● A clogged or worn mounted wheel will soil the fi nishing
surface or lower grinding effi ciency. Occasionally dress
the mounted wheel by applying the dresser.
MAINTENANCE AND INSPECTION
1. Inspecting the mounted wheel
Ensure that the mounted wheel is free of cracks and
surface defects.
2. Inspecting the mounting screws
Regularly inspect all mounting screws and ensure that
they are properly tightened. Should any of the screws
be loose, retighten them immediately. Failure to do so
could result in serious hazard.

7
Español
NORMAS GENERALES DE SEGURIDAD
¡ADVERTENCIA!
Lea todas las instrucciones
Si no se siguen las instrucciones de abajo podría producirse
una descarga eléctrica, un incendio y/o daños graves.
El término “herramienta eléctrica” en todas las advertencias
indicadas a continuación hace referencia a la herramienta
eléctrica que funciona con la red de suministro (con cable) o
a la herramienta eléctrica que funciona con pilas (sin cable).
CONSERVE ESTAS INSTRUCCIONES
1) Área de trabajo
a) Mantenga la zona de trabajo limpia y bien
iluminada.
Las zonas desordenadas y oscuras pueden
provocar accidentes.
b)
No u til ic e las he rr ami ent as elé ctr ica s en entorno s
explosivos como, por ejemplo, en presencia de
líquidos infl amables, gases o polvo.
Las herramientas eléctricas crean chispas que
pueden hacer que el polvo desprenda humo.
c) Mantenga a los niños y transeúntes alejados
cuando utilice una herramienta eléctrica.
Las distracciones pueden hacer que pierda el
control.
2) Seguridad eléctrica
a) Los enchufes de las herramientas eléctricas
tienen que ser adecuados a la toma de
corriente.
No modifi que el enchufe.
No utilice enchufes adaptadores con
herramientas eléctricas conectadas a tierra.
Si no se modifi can los enchufes y se utilizan tomas
de corriente adecuadas se reducirá el riesgo de
descarga eléctrica.
b) Evite el contacto corporal con superfi cies
conectadas a tierra como tuberías, radiadores
y frigorífi cos.
Hay mayor riesgo de descarga eléctrica si su
cuerpo está en contacto con el suelo.
c) No exponga las herramientas eléctricas a la
lluvia o a la humedad.
La entrada de agua en una herramienta eléctrica
aumentará el riesgo de descarga eléctrica.
d) No utilice el cable incorrectamente. No utilice el
cable para transportar, tirar de la herramienta
eléctrica o desenchufarla.
Mantenga el cable alejado del calor, del aceite,
de bordes afi lados o piezas móviles.
Los cables dañados o enredados aumentan el
riesgo de descarga eléctrica.
e) Cuando utilice una herramienta eléctrica al aire
libre, utilice un cable prolongador adecuado
para utilizarse al aire libre.
La utilización de un cable adecuado para usarse al
aire libre reduce el riesgo de descarga eléctrica.
3) Seguridad personal
a) Esté atento, preste atención a lo que hace y
utilice el sentido común cuando utilice una
herramienta eléctrica.
No utilice una herramienta eléctrica cuando
esté cansado o esté bajo la infl uencia de
drogas, alcohol o medicación.
La distracción momentánea cuando utiliza
herramientas eléctricas puede dar lugar a
importantes daños personales.
b) Utilice equipo de seguridad. Utilice siempre
una protección ocular.
El equipo de seguridad como máscara para el
polvo, zapatos de seguridad antideslizantes, casco
o protección para oídos utilizado para condiciones
adecuadas reducirá los daños personales.
c) Evite un inicio accidental. Asegúrese de que el
interruptor está en “off ” antes de enchufarlo.
El transporte de herramientas eléctricas con el
dedo en el interruptor o el enchufe de herramientas
eléctricas con el interruptor encendido puede
provocar accidentes.
d) Retire las llaves de ajuste antes de encender la
herramienta eléctrica.
Si se deja una llave en una pieza giratoria de la
herramienta eléctrica podrían producirse daños
personales.
e) No se extralimite. Mantenga un equilibrio
adecuado en todo momento.
Esto permite un mayor control de la herramienta
eléctrica en situaciones inesperadas.
f) Vístase adecuadamente. No lleve prendas
sueltas o joyas. Mantenga el pelo, la ropa y los
guantes alejados de las piezas móviles.
La ropa suelta, las joyas y el pelo largo pueden
pillarse en las piezas móviles.
g) Si se proporcionan dispositivos para
la conexión de extracción de polvo e
instalaciones de recogida, asegúrese de que
están conectados y se utilizan adecuadamente.
La utilización de estos dispositivos puede reducir
los riesgos relacionados con el polvo.
4) Utilización y mantenimiento de las herramientas
eléctricas
a) No fuerce la herramienta eléctrica. Utilice
la herramienta eléctrica correcta para su
aplicación.
La herramienta eléctrica correcta trabajará mejor y
de forma más segura si se utiliza a la velocidad para
la que fue diseñada.
b) No utilice la herramienta eléctrica si el
interruptor no la enciende y apaga.
Las herramientas eléctricas que no pueden
controlarse con el interruptor son peligrosas y
deben repararse.
c) Desconecte el enchufe de la fuente eléctrica
antes de hacer ajustes, cambiar accesorios o
almacenar herramientas eléctricas.
Estas medidas de seguridad preventivas reducen el
riesgo de que la herramienta eléctrica se ponga en
marcha accidentalmente.
d) Guarde las herramientas eléctricas que no
se utilicen para que no las cojan los niños
y no permita que utilicen las herramientas
eléctricas personas no familiarizadas con las
mismas o con estas instrucciones.
Las herramientas eléctricas son peligrosas si son
utilizadas por usuarios sin formación.
e) Mantenimiento de las herramientas eléctricas.
Compruebe si las piezas móviles están mal
alineadas o unidas, si hay alguna pieza
rota u otra condición que pudiera afectar al
funcionamiento de las herramientas eléctricas.
Si la herramienta eléctrica está dañada, llévela
a reparar antes de utilizarla.

8
Español
Se producen muchos accidentes por no realizar
un mantenimiento correcto de las herramientas
eléctricas.
f) Mantenga las herramientas de corte afi ladas y
limpias.
Las herramientas de corte correctamente
mantenidas con los bordes de corte afi lados son
más fáciles de controlar.
g) Utilice la herramienta eléctrica, los accesorios
y las brocas de la herramienta, etc., de acuerdo
con estas instrucciones y de la manera
adecuada para el tipo de herramienta eléctrica,
teniendo en cuenta las condiciones laborales y
el trabajo que se va a realizar.
La utilización de la herramienta eléctrica para
operaciones diferentes a pretendidas podría dar
lugar a una situación peligrosa.
5) Revisión
a) Lleve su herramienta a que la revise un experto
cualifi cado que utilice sólo piezas de repuesto
idénticas.
Esto garantizará el mantenimiento de la seguridad
de la herramienta eléctrica.
PRECAUCIÓN
Mantenga a los niños y a las personas enfermas
alejadas.
Cuando no se utilicen, las herramientas deben
almacenarse fuera del alcance de los niños y de las
personas enfermas.
PRECAUCIONES AL UTILIZAR LA
AMOLADORA
1. Siempre utilice para la fi nalidad presupuesta de
acuerdo con las condiciones de seguridad.
Esta máquina es una herramienta portátil para el
trabajo de esmerilado y de acabado de piezas de metal
de varios tipos, de resina y de cerámica. Utilice la
máquina solamente para estas fi nalidades.
2. Siempre utilice las muelas abrasiva de regulación.
Utilice muelas abrasivas del tipo con eje para esta
máquina con un diámetro máximo de 18 mm y un
diámetro del eje de 3 mm ó 6 mm.
3. Siempre pruebe antes de utilizar.
Siempre verifi que la muela abrasiva que se utilizará
para ver si no hay fi suras o grietas. Igualmente,
siempre realice un funcionamiento de prueba de la
máquina antes de utilizarla para verifi car la existencia
de cualquier anormalidad.
4. Proteja sus ojos con gafas protectoras.
Siempre utilice gafas protectoras durante el trabajo de
esmerilado. Igualmente, cuando se produzca mucho
polvo por el esmerilado, utilice una máscara.
5. Siempre sostenga la máquina fi rmemente.
Siempre sostenga la máquina fi rmemente durante el
uso. Si no sostiene la máquina fi rmemente, la reacción
de su fuerza puede hacerla saltar para atrás.
6. No coloque cargas excesivas sobre la máquina.
No coloque cargas excesivas sobre la máquina
presionándola con tanta fuerza contra el material que la
velocidad de rotación se reduzca drásticamente. Esto
reducirá la efi ciencia de trabajo y presentará el peligro
de doblar el eje de la muela abrasiva.
7. Nunca toque las piezas rotativas.
Mantenga las manos y otras partes del cuerpo alejadas
de las inmediaciones de la muela abrasiva mientras la
misma esté girando, para evitar el peligro de cortes,
abrasiones o atrapamiento de la ropa en el equipo.
8. Tenga cuidado con las chispas del esmerilado.
Las partículas de esmerilado pueden convertirse
en chispas volantes. Siempre mantenga materiales
infl amables y materiales frágiles en un lugar seguro
alejado del área de trabajo. Igualmente, tenga cuidado
en que las chispas no entren en contacto directo con
las manos y pies.
9. No coloque la máquina aparte mientras la misma
todavía esté funcionando.
Nunca opere la máquina si no la está sosteniendo
fi rmemente con ambas las manos. Igualmente, nunca
coloque la máquina en una mesa o en el piso mientras
la misma todavía esté funcionando.
10. Siga el orden correcto cuando reemplace la muela
abrasiva.
Cuando reemplace la muela abrasiva, siga
cuidadosamente los pasos descritos en este manual
de instrucciones.
11. Utilice solamente muelas abrasivas con una
“Velocidad segura”, al mínimo tan alta cuanto el “RPM
sin carga” indicado en la chapa de identifi cación de la
herramienta.
ESPECIFICACIONES
Voltaje (por áreas)* (110 V, 115 V, 120 V, 127 V, 220 V, 230 V, 240 V)
Acometida* 240 W
Velocidad sin carga* 23000 /min
Muela abrasiva montada
Máximo de 32 mm
Diámetro del eje de 6 mm
Peso (sin cable) 1,9 kg
* Verifi car indefectiblemente los datos de la placa de características de la máquina, pues varían de acuerdo al país de
destino.

9
Español
ACCESSORIOS ESTANDAR
(1) Muelas abrasivas montadas (Nº KA-1, 2, 4, 5, 6) ........5
KA-1 KA-2 KA-4 KA-5 KA-6
(2) Reacondicionadora ......................................................1
(3) Llave .............................................................................1
(4) Llave .............................................................................1
(5) Caja ..............................................................................1
Los accesorios estándar están sujetos a cambio sin previo
aviso.
ACCESORIOS A OPCION (venta por separado)
○ Muelas abrasivas montadas con eje de 6 mm
KA-3 KA-7 KA-8 KA-9 KA-10
○ Boquilla de mordazas para eje de 3 mm
La boquilla de mordazas de 3 mm ha sido diseñada
para aceptar las muelas abrasivas montadas con un eje
de 3 mm den diámetro para procesar piezas pequeñas.
Las dimensiones y métodos de manejo además del
orifi cio del eje son iguales que para la boquilla de
mordazas de 6 mm.
○ Muelas abrasivas montadas con eje de 3 mm
Todas las muelas abrasivas montadas se proveen con
granos WA, dureza 80 y adhesivo P, y son adecuadas
para esmerilar materiales de acero generales y
especiales.
Compre y utilice muelas abrasivas montadas de forma
adecuada para el procesamiento deseado.
KA-20 KA-21 KA-22 KA-23 KA-24
KC-20 KC-21 KC-22 KC-23 KC-24
○ Montaje universal
Se utiliza este montaje universal para amolar las
superfi cies internas de piezas de trabajo o para realizar
el acabado de piezas de trabajo de forma especial,
instalando una amoladora recta en el torno. Se instala el
montaje universal en la corredera transversal después
de retirar el soporte portaherramientas del torno.
(utilizando el montaje universal)
(diagrama dimensional)
Los accesorios a opción están sujetos a cambio sin previo
aviso.
APLICACIONES
○ Acabado de matrices para trabajos de prensas, para
coladas a presión y para moldeo.
○ Acabado de terrajas, herramientas y otras piezas de
pequeño tamaño.
○ Rectifi cado interno de herramientas y piezas de
máquinas.

10
Español
ANTES DE LA PUESTA EN MARCHA
1. Alimentación
Asegurarse de que la alimentación de red que ha de
ser utilizada responda a las exigencias de corriente
especifi cadas en la placa de características del
producto.
2. Puesta a tierra
Se debe conectar la herramienta a tierra durante
el uso para proteger el operador contra choques
eléctricos. La herramienta se equipa con un cable de
tres conductores y una clavija de puesta a tierra para
ajustarse a las tomas con puesta a tierra. El conductor
verde (o verde y amarillo) en el cable es el hilo de
puesta a tierra. Nunca conecte el hilo verde (o verde y
amarillo) a un terminal vivo.
3. Conmutador de alimentación
Asegurarse de que el conmutador de alimentación esté
en la posición OFF (desconectado). Si la clavija está
conectada en la caja del enchufe mientras el conmutador
de alimentación esté en pocisión ON (conectado)
las herramientas eléctricas empezarán a trabajar
inmediatamente, provocando un serio accidente.
4. Cable de prolongación
Cuando está alejada el área de trabajo de la red de
alimentación, usar un cable de prolongación de un
grosor y potencia nominal sufi ciente. El cable de
prolongación debe ser mantenido lo más corto posible.
5. Confi rmación de la condición del ambiente
Compruebe que todos el sitio de trabajo esté en
las condiciones apropiadas de acuerdo con las
precauciones prescritas.
Al amolar una chapa de acero delgada, dependiendo
del estado de la mesa de trabajo, puede que se
produzca un ruido alto debido al ruido resonante de la
amoladura de la chapa de acero. Para eliminar el ruido
indeseable en este caso, coloque una alfombra de
goma por debajo del material que se amolará.
6. Instalación de una muela abrasiva montada
● Siempre utilice una muela abrasiva montada con un
diámetro externo de 32 mm o menos. Cuando utilice
una muela abrasiva montada que exceda de este
diámetro, la velocidad circunferencial excederá el límite
de seguridad, y posiblemente causará un accidente.
Nunca utilice una muela abrasiva montada que exceda
del diámetro de 32 mm.
● Las muelas abrasivas montadas pueden instalarse y
extraerse fácilmente utilizando dos llaves. (Refi érase a
la Fig. 1.)
● Instale una muela abrasiva montada de forma que el eje
de la muela abrasiva no se sobresalga más de 15 mm.
NOTA
1. No apriete la boquilla de mordazas insertando un
eje más delgado de que el eje de diámetro normal
(6 mm) en la boquilla o en una condición vacía. Esto
dañará la boquilla de mordazas.
2. Cuando instale una muela abrasiva montada con eje,
apriete la boquilla de mordazas después de aplicar
una pequeña cantidad de aceite de huso de husillos (o
aceite de máquina de coser) a la parte cónica indicada
en la Fig. 2.
MÉTODO DE SELECCIÓN DE LA MUELA
ABRASIVA
Las muelas abrasivas montadas instaladas en esta
amoladora recta son adecuadas para amolar moldes
de prensa y de fundición, y otras partes de acero duro o
suave. (Excepto chapa inoxidable.)
Los tipos de muelas abrasivas montadas varían
de acuerdo con los materiales que se amolarán.
Seleccione una muela abrasiva montada apropiada al
material que se amolará.
● En la tabla a continuación se provee un resumen de las
muelas abrasivas montadas y materiales que pueden
amolarse.
Materiales a amolar Grano Dureza
Grado del adhesivo
Estructura Agente adhesivo
Acero suave, acero,
suave, acero forjado
WA 60 – 80 P m V
Hierro colado C 36 M – O m V
Latón, bronce, aluminio
C 36 J – K m V
Cerámica WA 60 – 80 M m V
Resina sintética C 36 K – M m V
(2) Cuando se conecta la energía por primera vez después
de instalar una nueva muela abrasiva montada, evite
aproximarse de la circunferencia de rotación de la
muela abrasiva montada para evitar el peligro de una
posible imperfección de instalación.
2. Precauciones durante el funcionamiento
(1) Presione ligeramente la muela abrasiva montada
contra el material que se amolará.
Se requiere una rotación de alta velocidad para amolar
los materiales. Utilice una amoladora recta con rotación
de alta velocidad para minimiza la fuerza de presión.
(2) Reavivación de la muela abrasiva montada
● Después de instalar una muela abrasiva montada,
corrija la defl exión del centro de la muela utilizando un
reavivador de muelas.
● Las muelas abrasivas montadas de escala pequeña
con eje están preparadas para amolar superfi cies
pequeñas. Como el diámetro del eje de la muela
abrasiva montada es de 3 mm, utilice una boquilla
de mordazas para eje de 3 mm, que se vende
separadamente por su distribuidor Hitachi como un
accesorio opcional.
COMO SE USA
1. Operación de conmutación
(1) Se conecta la energía desplazando el interruptor hacia
la derecha (lado ON); y se desconecta la energía
desplazando el interruptor hacia la izquierda (lado
OFF).

11
Español
Si el centro de la muela abrasiva montada está
excéntrico, no sólo será imposible obtener un acabado
preciso pero también se aumentará la vibración de la
amoladora, disminuyendo la precisión y durabilidad de
la amoladora.
● Una muela abrasiva montada incrustada o desgastada
ensuciará la superfi cie de acabado o reducirá la
efi ciencia de amoladura. De vez en cuando, reaviva la
muela abrasiva con el reavivador.
MANTENIMIENTO E INSPECCION
1. Inspección de la muela abrasiva montada
Asegúrese de que la muela abrasiva montada esté libre
de grietas y defectos en su superfi cie.
2. Inspeccionar los tornillos de montaje
Regularmente inspeccionar todos los tornillos de
montaje y asegurarse de que estén apretados
fi rmemente. Si cualquier tornillo estuviera suelto,
volver a apretarlo inmediatamente. El no hacer esto
provocaría un riesgo serio.
3. Mantenimiento de motor
La unidad de bobinado del motor es el verdadero
“corazón” de las herramientas eléctricas.
Prestar el mayor cuidado a asegurarse de que el
bobinado no se dañe y/o se humedezca con aceite o
agua.
4. Inspección de escobillas de carbón (Fig. 3)
El motor emplea carbones de contacto que son
partes consumibles. Como un carbón de contacto
excesivamente desgastado podría dar problemas
al motor, reemplazar el carbón de contacto por uno
nuevo, que tenga el mismo número mostrado en la
fi gura, cuando se haya desgastado o esté cerca del
límite de uso. Adicionalmente, mantener siempre los
carbones de contacto limpios y asegurarse de que
corran libremente dentro de los sujetadores de carbón.
5. Reemplazar el carbón de contacto
Quitar la cápsula de carbón con un destornillador de
cabeza pequeña. El carbón de contacto se deja luego
quitar facilmente.
6. Lista de repuestos
PRECAUCIÓN
La reparación, modifi cación e inspección de las
herramientas eléctricas Hitachi deben ser realizadas
por un Centro de Servicio Autorizado de Hitachi.
Esta lista de repuestos será de utilidad si es presentada
junto con la herramienta al Centro de Servicio
Autorizado de Hitachi, para solicitar la reparación o
cualquier otro tipo de mantenimiento.
En el manejo y el mantenimiento de las herramientas
eléctricas, se deberán observar las normas y
reglamentos vigentes en cada país.
MODIFICACIONES
Hitachi Power Tools introduce constantemente mejoras
y modifi caciones para incorporar los últimos avances
tecnológicos.
Por consiguiente, algunas partes pueden ser
modifi cadas sin previo aviso.
NOTA
Debido al programa continuo de investigación y desarrollo
de HITACHI estas especifi caciones están sujetas a
cambio sin previo aviso.

12

13

14

15

16

17
ﺔﻳﺑﺭﻌﻟﺍ
٤
ﺏﻳﻛﺭﺗﻟﺍ ﺔﻠﺟﻋ ﺩﻳﺩﺣﺗ ﺔﻘﻳﺭﻁ
ﻁﻐﺿ ﻊﻣ ﺍﺫﻫ ﻥﺣﻁﻟﺍ ﺽﺑﻘﻣﺑ ﺔﻁﺑﺗﺭﻣﻟﺍ ﺏﻳﻛﺭﺗﻟﺍ ﺕﻼﺟﻋ ﺏﺳﺎﻧﺗﺗ
.ﺔﺑﻼﺻ ﻝﻗﻷﺍﻭ ﻯﺭﺧﻷﺍ ﺔﺑﻠﺻﻟﺍ ءﺍﺯﺟﻷﺍﻭ ﺩﺍﻭﻣﻟﺍ ﺏﻟﺍﻭﻗﻭ ﻥﺣﻁﻟﺍ
ﻡﺗﻳ ﻲﺗﻟﺍ ﺩﺍﻭﻣﻠﻟ ﺎ
ً
ﻘﻓﻭ ﺏﻳﻛﺭﺗﻟﺍ ﺕﻼﺟﻋ ﻉﺍﻭﻧﺃ ﺩﺩﻌﺗﺗ .(ﺏﻠﺻﻟﺍ ءﺎﻧﺛﺗﺳﺎﺑ)
.ﺎﻬﻧﺣﻁ ﺩﺍﺭﻣﻟﺍ ﺩﺍﻭﻣﻠﻟ ﺔﺑﺳﺎﻧﻣﻟﺍ ﺏﻳﻛﺭﺗﻟﺍ ﺔﻠﺟﻋ ﺩﺩﺣ .ﺎﻬﻧﺣﻁ
.ﺎﻬﻧﺣﻁ ﻡﺗﻳ ﻲﺗﻟﺍ ﺩﺍﻭﻣﻟﺍﻭ ﺏﻳﻛﺭﺗﻟﺍ ﺔﻠﺟﻌﻟ ﺎ
ً
ﻁﻁﺧﻣ ﻲﻟﺎﺗﻟﺍ ﻝﻭﺩﺟﻟﺍ ﻝﺛﻣﻳ ●
ﺎﻬﻧﺣﻁ ﻡﺗﻳ ﻲﺗﻟﺍ ﺩﺍﻭﻣﻟﺍﻥﺣﻁﻟﺍﺔﻳﻭﺳﺗﻟﺍﻁﺎﺑﺗﺭﻻﺍ ﺔﺟﺭﺩﻝﻳﻛﺷﺗﻟﺍﻁﺑﺭﻟﺍ ﻝﻣﺎﻋ
ﺏﻠﺻﻟﺍﻭ ﺔﺑﻼﺻ ﻝﻗﻷﺍ ﺏﻠﺻﻟﺍ
ﻕﻭﺭﻁﻣﻟﺍ ﺏﻠﺻﻟﺍﻭ ﺩﺑﺩﺷﻟﺍ
WA60 – 80PmV
ﺭﻫﺯﻟﺍ ﺩﻳﺩﺣC36M – OmV
ﻡﻭﻳﻧﻣﻭﻟﻷﺍﻭ ﺯﻧﻭﺭﺑﻟﺍﻭ ﺭﻔﺻﻷﺍ ﺱﺎﺣﻧﻟﺍ
C36J – KmV
ﻙﻳﻣﺍﺭﻳﺳﻟﺍWA60 – 80MmV
ﺔﻳﻋﺎﻧﻁﺻﻻﺍ ﻥﺋﺍﺩﻠﻟﺍC36K – MmV
(3 ﻝﻛﺷﻟﺍ) ﺔﻳﻧﻭﺑﺭﻛﻟﺍ ﺓﺎﺷﺭﻔﻟﺍ ﺹﺣﻓ 4
.ﺓﺭﻣﻌﻣﻟﺍ ﺭﻳﻏ ءﺍﺯﺟﻷﺍ ﻥﻣ ﻲﻫﻭ ﺔﻳﻧﻭﺑﺭﻛﻟﺍ ﺓﺎﺷﺭﻔﻟﺍ ﻙﺭﺣﻣﻟﺍ ﻙﻠﻬﺗﺳﻳ
،ﻙﺭﺣﻣﻟﺎﺑ ﻝﻛﺎﺷﻣ ﺩﻭﺟﻭ ﻪﻧﻋ ﺞﺗﻧﻳ ﺩﻗ ﺔﻳﻧﻭﺑﺭﻛﻟﺍ ﺓﺎﺷﺭﻔﻟﺍ ﻝﻛﺂﺗ ﻥﻷ ﺍ
ً
ﺭﻅﻧ
ﺓﺎﺷﺭﻔﻟﺍ ﻡﻗﺭ ﺱﻔﻧ ﺎﻬﻳﺩﻟ ﺓﺩﻳﺩﺟ ﻯﺭﺧﺄﺑ ﺔﻳﻧﻭﺑﺭﻛﻟﺍ ﺓﺎﺷﺭﻔﻟﺍ ﻝﺍﺩﺑﺗﺳﺎﺑ ﻡﻗ
ﺩﺣ" ﻥﻣ ﺎﻬﺑﺍﺭﺗﻗﺍ ﻭﺃ ﺎﻬﻠﻛﺂﺗ ﺩﻧﻋ ﻝﻛﺷﻟﺍ ﻲﻓ ﺢﺿﻭﻣ ﻭﻫ ﺎﻣﻛ ﺔﻳﻧﻭﺑﺭﻛﻟﺍ
ﺭﺍﺭﻣﺗﺳﺎﺑ ﺔﻳﻧﻭﺑﺭﻛﻟﺍ ﺓﺎﺷﺭﻔﻟﺍ ﻑﻳﻅﻧﺗﺑ ﻡﻗ ،ﻙﻟﺫ ﻰﻟﺇ ﺔﻓﺎﺿﻹﺎﺑ ."ﻝﻛﺂﺗﻟﺍ
.ﺓﺎﺷﺭﻔﻟﺍ ﺽﺑﺎﻘﻣ ﻝﺧﺍﺩ ﺔﺳﻼﺳﺑ ﺎﻬﻗﻻﺯﻧﺍ ﻥﻣ ﺩﻛﺄﺗﻟﺍﻭ
ﺔﻳﻧﻭﺑﺭﻛﻟﺍ ﺓﺎﺷﺭﻔﻟﺍ ﻝﺍﺩﺑﺗﺳﺍ 5
ﺩﻌﺑﻭ .ﺕﺎﺣﺗﻓ ﻭﺫ ﺱﺃﺭﺑ ﺭﻳﻐﺻ ﻙﻔﻣ ﻡﺍﺩﺧﺗﺳﺎﺑ ﺓﺎﺷﺭﻔﻟﺍ ﺔﻳﻁﻏﺃ ﻙﻔﺑ ﻡﻗ
.ﺔﻟﻭﻬﺳﺑ ﺔﻳﻧﻭﺑﺭﻛﻟﺍ ﺵﺭﻔﻟﺍ ﻉﺯﻧ ﻥﻛﻣﻳ ﻙﻟﺫ
ﺔﻣﺩﺧﻟﺍ ءﺍﺯﺟﺃ ﺔﻣﺋﺎﻗ 6
ﻪﻳﺑﻧﺗ
ﻥﻣ
Hitachi ﺕﺍﻭﺩﻷ ﺹﺣﻔﻟﺍﻭ ،ﻝﻳﺩﻌﺗﻟﺍﻭ ،ﺡﻼﺻﻹﺍ ﻝﺎﻣﻋﺃ ﺫﻳﻔﻧﺗ ﺏﺟﻳ
.ﺩﻣﺗﻌﻣﻟﺍ ﺔﻣﺩﺧﻟﺍ ﺯﻛﺭﻣ ﻝﺑﻗ
Hitachi ﺔﻣﺩﺧ ﺯﻛﺭﻣﻟ ﺓﺍﺩﻷﺍ ﻊﻣ ﺎﻬﻣﻳﺩﻘﺗ ﺩﻧﻋ ﺓﺩﻳﻔﻣ ﻩﺫﻫ ءﺍﺯﺟﻷﺍ ﺔﻣﺋﺎﻗ
.ﺔﻧﺎﻳﺻﻟﺍ ﻝﺎﻣﻋﺃ ﻥﻣ ﺎﻫﺭﻳﻏ ﻭﺃ ﺡﻼﺻﻹﺍ ﺏﻠﻁ ﺩﻧﻋ ﺩﻣﺗﻌﻣ
ﺕﺎﻣﻳﻠﻌﺗ ﻉﺎﺑﺗﺍ ﺏﺟﻳ ،ﺎﻬﺗﻧﺎﻳﺻ ﻭﺃ ﺔﻳﺋﺎﺑﺭﻬﻛﻟﺍ ﺩﺩﻌﻟﺍ ﻝﻳﻐﺷﺗ ﺔﻟﺎﺣ ﻲﻓ
.ﺔﻟﻭﺩ ﻝﻛﺑ ﺔﺻﺎﺧﻟﺍ ﺭﻳﻳﺎﻌﻣﻟﺍﻭ ﻥﺎﻣﻷﺍ
ﺕﻼﻳﺩﻌﺗﻟﺍ
ﺕﺎﻳﻧﻘﺗﻟﺍ ﺙﺩﺣﻷ ﺎ
ً
ﻌﺑﺗ ﺎﻬﻠﻳﺩﻌﺗﻭ ﺭﺍﺭﻣﺗﺳﺎﺑ
Hitachi ﺕﺍﻭﺩﺃ ﻥﻳﺳﺣﺗ ﻡﺗﻳ
.ﺔﻣﺩﻘﺗﻣﻟﺍ
(ﻡﻳﻣﺻﺗﻟﺍ ﻭﺃ/ﻭ ﺯﻭﻣﺭﻟﺍ ﻡﺎﻗﺭﺃ ﻝﺛﻣ) ءﺍﺯﺟﻷﺍ ﺽﻌﺑ ﺭﻳﻳﻐﺗ ﻡﺗﻳ ﺩﻗ ،ﻙﻟﺫﻟﻭ
.ﻕﺑﺳﻣ ﻡﻼﻋﺇ ﻥﻭﺩ
ﺔﻅﺣﻼﻣ
ﺕﺎﻔﺻﺍﻭﻣﻟﺍ ﺭﻳﻐﺗﺗ ،ﺭﻣﺗﺳﻣﻟﺍ ﺭﻳﻭﻁﺗﻟﺍﻭ ﺙﺣﺑﻠﻟ
HITACHI
ﺞﻣﺎﻧﺭﺑﻟ ﺎ
ً
ﻌﺑﺗ
.ﻕﺑﺳﻣ ﻡﻼﻋﺇ ﻥﻭﺩ ﺎﻧﻫ ﺓﺭﻭﻛﺫﻣﻟﺍ
ﻥﺣﻁﻟ ﺩﻭﻣﻌﻟﺍ ﻊﻣ ﺓﺭﻳﻐﺻﻟﺍ ﺱﻳﻳﺎﻘﻣﻟﺍ ﺕﺍﺫ ﺏﻳﻛﺭﺗﻟﺍ ﺕﻼﺟﻋ ﺯﻳﻬﺟﺗ ﻡﺗﻳ ●
،ﻡﻣ 3 ﻭﻫ ﺏﻳﻛﺭﺗﻟﺍ ﺔﻠﺟﻋ ﺩﻭﻣﻋ ﺭﻁﻗ ﻥﺃ ﺙﻳﺣﻭ .ﺓﺭﻳﻐﺻﻟﺍ ﺢﻁﺳﻷﺍ
ﺔﻁﺳﺍﻭﺑ ﺩﺭﻔﻧﻣ ﻝﻛﺷﺑ ﻉﺎﺑﻳ ﻱﺫﻟﺍﻭ ﻡﻣ 3 ﺩﻭﻣﻌﻠﻟ ﻕﻭﻁﻟﺍ ﺽﺑﻘﻣ ﻡﺩﺧﺗﺳﺍ
.ﻱﺭﺎﻳﺗﺧﺍ ﻕﺣﻠﻣﻛ
Hitachi ﻝﻳﻛﻭ
ﻡﺍﺩﺧﺗﺳﻻﺍ ﺔﻳﻔﻳﻛ
ﻝﻳﻐﺷﺗﻟﺍ ءﺩﺑ 1
ﻝﻳﻐﺷﺗ ﻡﺗﻳ ،(ﻝﻳﻐﺷﺗﻟﺍ ﺏﻧﺎﺟ) ﻥﻳﻣﻳﻟﺍ ﻰﻟﺇ ﺡﺎﺗﻔﻣﻟﺍ ﻉﺍﺭﺫ ﻙﻳﺭﺣﺗ ﺩﻧﻋ (1)
.ﺔﻗﺎﻁﻟﺍ ﻑﺎﻘﻳﺇ ﻡﺗﻳ ،(ﻑﺎﻘﻳﻹﺍ ﺏﻧﺎﺟ) ﺭﺎﺳﻳﻟﺍ ﻰﻟﺇ ﻪﻛﻳﺭﺣﺗ ﺩﻧﻋﻭ ؛ﺔﻗﺎﻁﻟﺍ
،ﺓﺩﻳﺩﺟ ﺏﻳﻛﺭﺗ ﺔﻠﺟﻋ ﺏﻳﻛﺭﺗ ﺩﻌﺑ ﻰﻟﻭﻷﺍ ﺓﺭﻣﻠﻟ ﺡﺎﺗﻔﻣﻟﺍ ﻙﻳﺭﺣﺗ ﺩﻧﻋ (2)
ﺏﻳﻛﺭﺗﻟﺍ ﺔﻠﺟﻋ ﻥﺍﺭﻭﺩﺑ ﺔﻁﻳﺣﻣﻟﺍ ﺔﺋﻳﺑﻠﻟ ﺔﻳﺻﺧﺷﻟﺍ ﺓﺭﻭﺎﺟﻣﻟﺍ ﺏﻧﺟﺗ
.ﻝﻼﺗﺧﻻﺍ ﺭﻁﺧ ﺏﻧﺟﺗﻟ
ﻝﻳﻐﺷﺗﻟﺍ ﻝﻭﺣ ﺕﺎﻁﺎﻳﺗﺣﺍ
2
ﺎﻬﻧﺣﻁ ﺩﺍﺭﻣﻟﺍ ﺩﺍﻭﻣﻠﻟ ﺏﻳﻛﺭﺗﻟﺍ ﺔﻠﺟﻋ ﻰﻠﻋ ﻕﻓﺭﺑ ﻁﻐﺿﺍ (1)
ﺽﺑﻘﻣ ﻡﺩﺧﺗﺳﺍ .ﺔﻠﺋﺎﻫ ﺔﻋﺭﺳ ﺩﻭﺟﻭ ﻙﻟﺫ ﺏﻠﻁﺗﻳ ،ﺩﺍﻭﻣﻟﺍ ﻥﺣﻁ ﺩﻧﻋ
.ﻁﻐﺿﻟﺍ ﺓﻭﻗ ﻥﻣ ﻙﻟﺫ ﻝﻠﻘﻳ ﺎﻣ ،ﺔﻳﻟﺎﻋ ﺔﻋﺭﺳ ﻊﻣ ﺔﻧﻭﺣﺎﻁﻟﺍ
ﺏﻳﻛﺭﺗﻟﺍ ﺔﻠﺟﻋ ﺔﻳﻭﺳﺗ
(2)
ﺏﻳﻛﺭﺗﻟﺍ ﺔﻠﺟﻋ ﺯﻛﺭﻣ ﻝﻳﻣ ﺢﻳﺣﺻﺗﺑ ﻡﻗ ،ﺏﻳﻛﺭﺗﻟﺍ ﺔﻠﺟﻋ ﻁﺑﺭ ﺩﻌﺑ ●
.ﺓﺍﻭﺳﻣ ﻡﺍﺩﺧﺗﺳﺎﺑ
ﻡﺗﻳ ﻥﻠﻓ ،ﻪﻌﺿﻭﻣ ﻲﻓ ﺍ
ً
ﺯﻛﺭﻣﺗﻣ ﻲﻓ ﺱﻳﻟ ﺏﻳﻛﺭﺗﻟﺍ ﺔﻠﺟﻋ ﺯﻛﺭﻣ ﻥﺎﻛ ﺍﺫﺇ
ﺽﺎﻔﺧﻧﺍ ﻰﻟﺇ ﻱﺩﺅﻳ ﺎﻣﻣ ﺔﻧﻭﺣﺎﻁﻟﺍ ﺯﺍﺯﺗﻫﺍ ﺩﺍﺩﺯﻳ ﻑﻭﺳﻭ ﺔﻗﺩﺑ ءﺎﻬﻧﻹﺍ
.ﻝﻣﺣﺗﻟﺍﻭ ﺔﻧﻭﺣﺎﻁﻟﺍ ﺔﻗﺩ
ﺔﻳﻬﺗﻧﻣﻟﺍ ﺢﻁﺳﻷﺍ ﻩﻭﺷﺗ ﻑﻭﺳ ﺔﻠﻛﺂﺗﻣﻟﺍ ﻭﺃ ﺓﺩﻭﺩﺳﻣﻟﺍ ﺏﻳﻛﺭﺗﻟﺍ ﺔﻠﺟﻋ ●
ﺏﻳﻛﺭﺗﻟﺍ ﺔﻠﺟﻋ
ﺔﻳﻭﺳﺗﺑ ﻡﻗ ﺭﺧﻵ ﻥﻳﺣ ﻥﻣ .ﻥﺣﻁﻟﺍ ﺓءﺎﻔﻛ ﺽﻔﺧ ﻭﺃ
.ﺓﺍﻭﺳﻣﻟﺍ ﻡﺍﺩﺧﺗﺳﺎﺑ
ﺹﺣﻔﻟﺍﻭ ﺔﻧﺎﻳﺻﻟﺍ
ﺏﻳﻛﺭﺗﻟﺍ ﺔﻠﺟﻋ ﺹﺣﻓ 1
.ﺔﻳﺣﻁﺳﻟﺍ ﺏﻭﻳﻌﻟﺍﻭ ﻕﻘﺷﺗﻟﺍ ﻥﻣ ﺔﻳﻟﺎﺧ ﺏﻳﻛﺭﺗﻟﺍ ﺔﻠﺟﻋ ﻥﺃ ﻥﻣ ﺩﻛﺄﺗ
ﺕﻳﺑﺛﺗﻟﺍ ﺭﻳﻣﺎﺳﻣ ﺹﺣﻓ 2
ﺎﻬﻁﺑﺭ ﻡﺎﻛﺣﺇ ﻥﻣ ﺩﻛﺄﺗﻟﺍﻭ ﺕﻳﺑﺛﺗﻟﺍ ﺭﻳﻣﺎﺳﻣ ﺔﻓﺎﻛﻟ ﻱﺭﻭﺩﻟﺍ ﺹﺣﻔﻟﺎﺑ ﻡﻗ
.ﺭﻭﻔﻟﺍ ﻰﻠﻋ ﺎﻬﻁﺑﺭ ﻡﺎﻛﺣﺈﺑ ﻡﻗ ،ﺭﻳﻣﺎﺳﻣ ﺔﻳﺃ ﻙﻓ ﺔﻟﺎﺣ ﻲﻓ .ﺢﻳﺣﺻ ﻝﻛﺷﺑ
.ﺭﻁﺎﺧﻣ ﻰﻟﺇ ﻙﻟﺫﺑ ﻡﺎﻳﻘﻟﺍ ﻲﻓ ﻝﺷﻔﻟﺍ ﺽﺭﻌﻳ ﺩﻘﻓ
ﻙﺭﺣﻣﻟﺍ ﺔﻧﺎﻳﺻ 3
.ﺔﻗﺎﻁﻟﺍ
ﺓﺍﺩﺃ ﻥﻣ "ﻁﺳﻭﻷﺍ ءﺯﺟﻟﺍ" ﻭﻫ ﻙﺭﺣﻣﻟﺍ ﺓﺩﺣﻭ ﻑﻠﻣ
.ءﺎﻣﻟﺍ ﻭﺃ ﺕﻳﺯﻟﺍ ﺔﻁﺳﺍﻭﺑ ﻪﻠﻠﺑ ﻭﺃ/ﻭ ﻑﻠﻣﻟﺍ ﻑﻠﺗ ﻡﺩﻋ ﻥﻣ ﺭﺍﺭﻣﺗﺳﺎﺑ ﺩﻛﺄﺗ

18
ﺔﻳﺑﺭﻌﻟﺍ
۳
KA-20 KA-21 KA-22 KA-23 KA-24
KC-20 KC-21 KC-22 KC-23 KC-24
ﻡﺎﻌﻟﺍ ﻝﻣﺎﺣﻟﺍ ○
ﻭﺃ ﻝﻣﻌﻟﺍ ﻊﻁﻘﻟ ﺔﻳﻠﺧﺍﺩﻟﺍ ﺢﻁﺳﻷﺍ ﻥﺣﻁ ﺩﻧﻋ ﻡﺎﻌﻟﺍ ﻝﻣﺎﺣﻟﺍ ﺍﺫﻫ ﻡﺩﺧﺗﺳ
ُ
ﻳ
ﺔﻧﻭﺣﺎﻁﻟﺍ ﺩﻳ ﺏﻳﻛﺭﺗ ﺔﻁﺳﺍﻭﺑ ،ﺹﺎﺧﻟﺍ ﻝﻛﺷﻟﺍ ﺕﺍﺫ ﻝﻣﻌﻟﺍ ﻊﻁﻗ ءﺎﻬﻧﺇ
ﺩﻌﺑ ﻊﻁﺎﻘﺗﻣﻟﺍ ﺝﻻﺯﻣﻟﺍ ﻰﻠﻋ ﻡﺎﻌﻟﺍ ﻝﻣﺎﺣﻟﺍ ﺏﻳﻛﺭﺗ ﻡﺗﻳ .ﺔﻁﺭﺧﻣﻟﺍ ﻰﻠﻋ
.ﺔﻁﺭﺧﻣﻟﺍ ﺓﺍﺩﺃ ﻼﻠﻣﺎﺣ ﺔﻟﺍﺯﺇ
(ﻡﺎﻌﻟﺍ ﻝﻣﺎﺣﻟﺍ ﻡﺍﺩﺧﺗﺳﺍ)
(ﺩﺎﻌﺑﻷﺍ ﻁﻁﺧﻣ)
.ﺭﺎﻁﺧﺇ ﻥﻭﺩ ﺭﻳﻳﻐﺗﻠﻟ ﺔﻳﺭﺎﻳﺗﺧﻻﺍ ﺕﺎﻘﺣﻠﻣﻟﺍ ﻊﺿﺧﺗ
ﺕﺎﻘﻳﺑﻁﺗ
.ﺏﻟﺍﻭﻘﻟﺎﺑ ﻝﻳﻛﺷﺗﻟﺍﻭ ﺏﻟﺎﻘﻟﺍ ﺩﺍﻭﻣﻭ ،ﻝﻣﻌﻟﺍ ﻁﻐﺿﻟ ﺏﻟﺍﻭﻘﻟﺍ ءﺎﻬﻧﺇ ○
.ﻯﺭﺧﻷﺍ ﺓﺭﻳﻐﺻﻟﺍ ءﺍﺯﺟﻷﺍﻭ ﺕﺍﻭﺩﻷﺍﻭ ﺔﻧﻧﺳﻣﻟﺍ ﻊﻁﻘﻟﺍ ﺏﻟﺍﻭﻗ ءﺎﻬﻧﺇ ○
.ﺯﺎﻬﺟﻟﺍ ءﺍﺯﺟﺃﻭ ﺕﺍﻭﺩﻸﻟ ﻲﻠﺧﺍﺩﻟﺍ ﻥﺣﻁﻟﺍ ○
ﻝﻳﻐﺷﺗﻟﺍ ﻝﺑﻗ
ﺔﻗﺎﻁﻟﺍ ﺭﺩﺻﻣ 1
ﺕﺎﺑﻠﻁﺗﻣﻟ ﻕﺑﺎﻁﻣ ﻪﻣﺍﺩﺧﺗﺳﺍ ﻡﺗﻳﺳ ﻱﺫﻟﺍ ﺔﻗﺎﻁﻟﺍ ﺭﺩﺻﻣ ﻥﺃ ﻥﻣ ﺩﻛﺄﺗ
.ﺞﺗﻧﻣﻟﺍ ﻰﻠﻋ ﺓﺩﻭﺟﻭﻣﻟﺍ ﻡﺳﻻﺍ ﺔﺣﻭﻟ ﻰﻠﻋ ﺓﺩﺩﺣﻣﻟﺍ ﺔﻗﺎﻁﻟﺍ
ﺽﻳﺭﺄﺗﻟﺍ
2
ﻥﻣ ﻝﻐﺷﻣﻟﺍ ﺔﻳﺎﻣﺣﻟ ﻡﺍﺩﺧﺗﺳﻻﺍ ﺩﻧﻋ ﺓﺩﺎﻣﻟﺍ ﻩﺫﻫ ﻥﺣﻁ ﻡﺗﻳ ﻥﺃ ﺏﺟﻳ
ﺱﺑﺎﻗﻭ ﻝﻳﺻﻭﺗﻠﻟ ﻙﻼﺳﺃ ﺔﺛﻼﺛﺑ ﺓﺍﺩﻷﺍ ﻩﺫﻫ ﺯﻳﻬﺟﺗ ﻡﺗ .ﺔﻳﺑﺭﻬﻛﻟﺍ ﺔﻣﺩﺻﻟﺍ
ﻝﺻﻭﻣﻟﺍ .ﺢﻳﺣﺻﻟﺍ ﻥﺣﻁﻟﺍ ﻉﻭﻧ ﺱﺑﻘﻣ ﻊﻣ ﻕﻓﺍﻭﺗﻠﻟ ﻥﺣﻁﻟﺍ ﻉﻭﻧ ﺩﻳﺩﺣﺗﻟ
ﻻ .ﻲﺿﺭﻷﺍ ﻙﻠﺳﻟﺍ ﻭﻫ ﻙﻠﺳﻟﺍ ﻲﻓ (ﺭﻔﺻﻷﺍﻭ ﺭﺿﺧﻷﺍ ﻭﺃ) ﺭﺿﺧﻷﺍ
ﻑﺭﻁﺑ (ﺭﻔﺻﻷﺍﻭ ﺭﺿﺧﻷﺍ ﻭﺃ) ﺭﺿﺧﻷﺍ ﻙﻠﺳﻟﺍ ﻝﻳﺻﻭﺗﺑ ﺍ
ً
ﺩﺑﺃ ﻡﻘﺗ
.ﺭﺷﺎﺑﻣ
ﺔﻗﺎﻁﻟﺍ ﺡﺎﺗﻔﻣ
3
ﺱﺑﺎﻘﻟﺍ ﻝﻳﺻﻭﺗ ﺔﻟﺎﺣ ﻲﻓ .ﻑﺎﻘﻳﺇ ﻊﺿﻭﻟﺍ ﻰﻠﻋ ﺔﻗﺎﻁﻟﺍ ﺡﺎﺗﻔﻣ ﻥﺃ ﻥﻣ ﺩﻛﺄﺗ
ﺓﺍﺩﺃ ﻝﻳﻐﺷﺗ ﻡﺗﻳﺳﻓ ،ﻝﻳﻐﺷﺗ ﻊﺿﻭﻟﺍ ﻰﻠﻋ ﺔﻗﺎﻁﻟﺍ ﺡﺎﺗﻔﻣ ﻥﺎﻛﻭ ﺱﺑﻘﻣﻟﺎﺑ
.ﺕﺎﺑﺎﺻﺍ ﻉﻭﻗﻭ ﻰﻟﺇ ﻱﺩﺅﻳ ﺩﻗ ﺎﻣﻣ ،ﺭﻭﻔﻟﺍ ﻰﻠﻋ ﺔﻗﺎﻁﻟﺍ
ﻲﻓﺎﺿﻹﺍ ﻝﻳﺻﻭﺗﻟﺍ ﻙﻠﺳ
4
ﻝﻳﺻﻭﺗ ﻙﻠﺳ ﻡﺩﺧﺗﺳﺍ ،ﺔﻗﺎﻁﻟﺍ ﺭﺩﺻﻣ ﻥﻣ ﻝﻣﻌﻟﺍ ﺔﻘﻁﻧﻣ ﺔﻟﺍﺯﺇ ﺩﻧﻋ
ﻝﻳﺻﻭﺗﻟﺍ ﻙﻠﺳ ﻝﻅﻳ ﻥﺃ ﺏﺟﻳ .ﺔﻧﻧﻘﻣ ﺔﻌﺳﻭ
ٍ
ﻑﺎﻛ ﻙﻣﺳ ﻭﺫ ﻲﻓﺎﺿﺇ
.ﻉﺎﻁﺗﺳﻣﻟﺍ ﺭﺩﻘﺑ ﺍ
ً
ﺭﻳﺻﻗ ﻲﻓﺎﺿﻹﺍ
ﺔﺋﻳﺑﻠﻟ ﺔﻘﺑﺎﻁﻣﻟﺍ ﺔﻟﺎﺣ
5
ﺕﺍءﺍﺭﺟﻺﻟ ﺔﻘﺑﺎﻁﻣﻟﺍ ﺔﻣﺋﻼﻣﻟﺍ ﻑﻭﺭﻅﻟﺎﺑ ﻝﻣﻌﻟﺍ ﻊﻗﻭﻣ ﺔﺋﻳﻬﺗ ﻥﻣ ﺩﻛﺄﺗ
.ﺓﺩﺩﺣﻣﻟﺍ ﺔﻳﺋﺎﻗﻭﻟﺍ
ﺞﻳﺟﺿﻠﻟ ﺍ
ً
ﺭﻅﻧ ﺏﺧﺎﺻ ﺞﻳﺟﺿ ﺙﺩﺣﻳ ،ﻊﻳﻓﺭ ﺏﻠﺻ ﺡﻭﻟ ﺦﻳﻠﺟﺗ ﺩﻧﻋﻭ
ﺔﻟﻭﺎﻁ ﺔﻟﺎﺣ ﻰﻠﻋ
ً
ءﺎﻧﺑ ﻙﻟﺫﻭ ،ﺏﻠﺻﻟﺍ ﺡﻭﻠﻟﺍ ﺦﻳﻠﺟﺗ ﻥﻋ ﺭﺩﺎﺻﻟﺍ ﻱﻭﺩﻣﻟﺍ
ﻊﺿ ،ﺔﻟﺎﺣﻟﺍ ﻩﺫﻫ ﻲﻓ ﺎﻬﻳﻓ ﺏﻭﻏﺭﻣﻟﺍ ﺭﻳﻏ ءﺎﺿﻭﺿﻟﺍ ﻥﻣ ﺩﺣﻠﻟﻭ .ﻝﻣﻌﻟﺍ
.ﺎﻬﺧﻳﻠﺟﺗ ﻡﺗﻳ ﻲﺗﻟﺍ ﺓﺩﺎﻣﻟﺍ ﻝﻔﺳﺃ
ﺔﻳﻁﺎﻁﻣ ﺓﺩﺎﺟﺳ
ﺏﻳﻛﺭﺗﻟﺍ ﺔﻠﺟﻋ ﺏﻳﻛﺭﺗ
6
.ﻝﻗﺃ ﻭﺃ ﻡﻣ 32 ﻲﺟﺭﺎﺧﻟﺍ ﺎﻫﺭﻁﻗ ﻥﻭﻛﻳ ﺙﻳﺣﺑ ﺏﻳﻛﺭﺗ ﺔﻠﺟﻋ ﻡﺩﺧﺗﺳﺍ ●
ﺯﻭﺎﺟﺗﺗ ﻑﻭﺳﻓ ،ﻙﻟﺫ ﻥﻋ ﺩﻳﺯﻳ ﺭﻁﻘﺑ ﺏﻳﻛﺭﺗ ﺔﻠﺟﻋ ﻡﺍﺩﺧﺗﺳﺍ ﺩﻧﻋ
ﻉﻭﻗﻭ ﻲﻓ ﺏﺑﺳﺗﺗ ﺩﻗﻭ ،ﺔﻣﻼﺳﻟﺍ ﺩﺣ ﺏﻳﻛﺭﺗﻟﺍ ﺔﻠﺟﻌﻟ ﺔﻳﻁﻳﺣﻣﻟﺍ ﺔﻋﺭﺳﻟﺍ
.ﺙﺩﺍﻭﺣ
.ﻡﻣ 32 ﻥﻋ ﺩﻳﺯﻳ ﺭﻁﻗ ﻊﻣ ﺏﻳﻛﺭﺗ ﺔﻠﺟﻋ ﻡﺩﺧﺗﺳﺗ ﻻ
.ﻥﻳﺣﺎﺗﻔﻣ ﻡﺍﺩﺧﺗﺳﺎﺑ ﺎﻬﻠﺻﻓﻭ ﺔﻁﺎﺳﺑﺑ ﺏﻳﻛﺭﺗﻟﺍ ﺕﻼﺟﻋ ﻁﺑﺭ ﻥﻛﻣﻳ ●
.(1 ﻝﻛﺷﻟﺍ ﻰﻟﺇ ﻊﺟﺭﺇ)
ﻥﻣ ﺭﺛﻛﺃ ﺏﻳﻛﺭﺗﻟﺍ ﺔﻠﺟﻋ ﺩﻭﻣﻋ ﺯﺭﺑﻳ ﻻ ﻙﻟﺫﻟ ﺏﻳﻛﺭﺗ ﺔﻠﺟﻋ ﺏﻳﻛﺭﺗﺑ ﻡﻗ ●
.ﻡﻣ 15
ﺔﻅﺣﻼﻣ
ﺭﻁﻗ ﻥﻣ ﺭﺛﻛﺃ ﺩﻭﻣﻋ ﻑﻔﺧﻣ ﻝﺎﺧﺩﺈﺑ ﻕﻭﻁﻟﺍ ﺽﺑﻘﻣ ﻁﺑﺭ ﻡﺎﻛﺣﺈﺑ ﻡﻘﺗ ﻻ 1
ﻱﺩﺅﻳ ﻑﻭﺳﻓ .ﺔﻏﺭﺎﻓ ﺔﻟﺎﺣ ﻲﻓ ﻭﺃ ﺽﺑﻘﻣﻟﺍ ﻲﻓ (ﻡﻣ 6) ﻲﻌﻳﺑﻁﻟﺍ ﺩﻭﻣﻌﻟﺍ
ﻕﻭﻁﻟﺍ ﺽﺑﻘﻣ ﻑﻠﺗ ﻰﻟﺇ ﻙﻟﺫﺑ ﻡﺎﻳﻘﻟﺍ
ﺩﻌﺑ ﻕﻭﻁﻟﺍ ﺽﺑﻘﻣ ﻡﺎﻛﺣﺈﺑ ﻡﻗ ،ﺩﻭﻣﻋ ﻊﻣ ﺏﻳﻛﺭﺗ ﺔﻠﺟﻋ ﺏﻳﻛﺭﺗ ﺩﻧﻋ 2
(ﺔﻁﺎﻳﺧﻟﺍ ﺔﻧﻳﻛﺎﻣ ﺕﻳﺯ ﻭﺃ) ﻥﺍﺭﻭﺩﻟﺍ ﺕﻳﺯ ﻥﻣ ﺭﻳﻐﺻﻟﺍ ﺔﻳﻣﻛﻟﺍ ﻡﺍﺩﺧﺗﺳﺍ
.2 ﻝﻛﺷﻟﺍ ﻲﻓ ﺔﺣﺿﻭﻣﻟﺍ ﺔﻗﺩﺗﺳﻣﻟﺍ ﺔﺑﺳﻧﻠﻟ

19
ﺔﻳﺑﺭﻌﻟﺍ
۲
ﺔﻧﻭﺣﺎﻁﻟﺍ ﻡﺍﺩﺧﺗﺳﺍ ﺩﻧﻋ ﺔﻣﺯﻼﻟﺍ ﺕﺎﻁﺎﻳﺗﺣﻻﺍ
.ﺔﻧﻣﺁ ﻑﻭﺭﻅ ﻲﻓ ﺔﺣﻳﺣﺻﻟﺍ ﺽﺍﺭﻏﻸﻟ ﺎ
ً
ﻣﺋﺍﺩ ﺎﻬﻣﺩﺧﺗﺳﺍ
1
ءﺎﻬﻧﺇ ﻭﺃ ﻥﺣﻁﻠﻟ ﻡﺩﺧﺗﺳ
ُ
ﺗ ﻝﻣﺣﻠﻟ ﺔﻠﺑﺎﻗ ﺓﺍﺩﺃ ﻥﻋ ﺓﺭﺎﺑﻋ ﻭﻫ ﺯﺎﻬﺟﻟﺍ ﺍﺫﻫ
ﻡﺩﺧﺗﺳﺍ .ﻙﻳﻣﺍﺭﻳﺳﻟﺍﻭ ﻥﺋﺍﺩﻠﻟﺍﻭ ،ﺓﺩﺩﻌﺗﻣ ﻉﺍﻭﻧﺃ ﻥﻣ ﻥﺩﺎﻌﻣﻟﺍ ﻰﻠﻋ ﻝﻣﻌﻟﺍ
.ﻁﻘﻓ ﻩﺫﻫ ﺽﺍﺭﻏﻸﻟ ﺯﺎﻬﺟﻟﺍ ﺍﺫﻫ
.ﺕﻼﺟﻌﻟﺍ ﻡﺍﺩﺧﺗﺳﺍ ﺕﺎﻣﻳﻠﻌﺗﻟ ﺎ
ً
ﻣﺋﺍﺩ ﻝﺛﺗﻣﺍ
2
ﻪﺑ ﺭﻭﺣﻣ ﺕﺍﺫ ﻥﺣﻁ ﺔﻠﺟﻋ ﺯﺎﻬﺟﻟﺍ ﺍﺫﻬﻟ ﻥﺣﻁﻟﺍ ﺔﻠﺟﻋ ﻥﻭﻛﺗ ﻥﺃ ﺏﺟﻳ
ﻰﻟﺇ ﻝﺻﻳ ﺭﻭﺣﻣ ﺭﻁﻗﻭ ﻡﻣ 18 ﻰﻟﺇ ﻝﺻﻳ ﻱﺫﻟﺍ ﺭﻁﻘﻟﺍ ﻝﻭﻁﻟ ﺩﺣ ﻰﺻﻗﺃ
.ﻡﻣ 6 ﻭﺃ ﻡﻣ 3
.ﻡﺍﺩﺧﺗﺳﻻﺍ ﻝﺑﻗ ﺎ
ً
ﻣﺋﺍﺩ ﺭﺑﺗﺧﺍ 3
.ﻝﺻﺍﻭﻔﻟﺍ ﻭﺃ ﻕﻭﻘﺷﻠﻟ ﺎﻬﻣﺍﺩﺧﺗﺳﺍ ﻡﺗﻳ ﻲﻛ ﻥﺣﻁﻟﺍ ﺔﻠﺟﻋ ﺎ
ً
ﻣﺋﺍﺩ ﺹﺣﻓﺍ
ﻱﺃ ﺩﻭﺟﻭ ﻥﻣ ﻕﻘﺣﺗﻠﻟ ﻡﺍﺩﺧﺗﺳﻻﺍ ﻝﺑﻗ ﺯﺎﻬﺟﻟﺍ ﻝﻳﻐﺷﺗ ﺭﺑﺗﺧﺍ ،ﺎ
ً
ﺿﻳﺃ
.ﺏﻭﻳﻋ
.ﻪﺟﻭﻟﺍ ﺕﺎﻳﻗﺍﻭ ﻡﺍﺩﺧﺗﺳﺎﺑ ﻙﻳﻧﻳﻋ ﺔﻳﺎﻣﺣ ﻡﻗ
4
ﺩﻭﺟﻭ ﻡﺩﻋ ﺔﻟﺎﺣ ﻲﻓ ،ﺎ
ً
ﺿﻳﺃ .ﻥﺣﻁﻟﺍ ءﺎﻧﺛﺃ ﻪﺟﻭﻟﺍ ﺕﺎﻳﻗﺍﻭ ءﺍﺩﺗﺭﺎﺑ ﻡﻗ
.ﻉﺎﻧﻗ ءﺍﺩﺗﺭﺎﺑ ﻡﻗ ،ﻥﺣﻁﻟﺍ ﻥﻋ ﺊﺷﺎﻧ ﺭﺎﺑﻐﻟﺍ ﻥﻣ ﺓﺭﻳﺑﻛ ﺔﻳﻣﻛ
.ﻡﺎﻛﺣﺈﺑ ﺯﺎﻬﺟﻟﺍ ﻙﺎﺳﻣﺈﺑ ﻡﻗ
5
ﻙﺎﺳﻣﺈﺑ ﻡﻘﺗ ﻡﻟ ﺍﺫﺇ .ﻡﺍﺩﺧﺗﺳﻻﺍ ﺩﻧﻋ ﻥﺎﻣﺄﺑ ﺯﺎﻬﺟﻟﺍ ﻡﺍﺩﺧﺗﺳﺎﺑ ﺎ
ً
ﻣﺋﺍﺩ ﻡﻗ
.ﻑﻠﺧﻠﻟ ﻪﺗﺩﻭﻋ ﻰﻟﺇ ﻱﺩﺅﻳ ﻥﺃ ﻥﻛﻣﻣﻟﺍ ﻥﻣ ﺓﻭﻘﻟﺍ ﻝﻌﻓ ﺩﺭ ﻥﺈﻓ ،ﺯﺎﻬﺟﻟﺍ
.ﺯﺎﻬﺟﻟﺍ ﻰﻠﻋ ﺓﺭﻳﺑﻛ ﺕﻻﻭﻣﺣ ﻊﺿﻭﺑ ﻡﻘﺗ ﻻ
6
ﺓﺩﺎﻣ ﻰﻠﻋ ﻁﻐﺿﻟﺍ ﺔﻁﺳﺍﻭﺑ ﺯﺎﻬﺟﻟﺍ ﻰﻠﻋ ﺓﺭﻳﺑﻛ ﺕﻻﻭﻣﺣ ﻊﺿﺗ ﻻ
ﻙﻟﺫ ﻱﺩﺅﻳ .ﺎ
ً
ﻳﺭﺫﺟ ﻥﺍﺭﻭﺩﻟﺍ ﺔﻋﺭﺳ ﺽﺎﻔﺧﻧﺍ ﻰﻟﺇ ﻱﺩﺅﻳ ﺎﻣﻣ ﺓﻭﻘﺑ ﻥﺣﻁﻟﺍ
ﺔﻠﺟﻋ ﺭﻭﺣﻣ ءﺎﻧﺛﻧﺍ ﺔﻳﻟﺎﻣﺗﺣﺍ ﺭﻁﺧ ﺩﻭﺟﻭﻭ ﻝﻣﻌﻟﺍ ﺓءﺎﻔﻛ ﺽﺎﻔﺧﻧﺍ ﻰﻟﺇ
.ﻥﺣﻁﻟﺍ
.ﺓﺭﺍﻭﺩﻟﺍ ءﺍﺯﺟﻷﺍ ﺱﻣﻠﺗ ﻻ
7
ﺏﺟﺗﻟ ﺎﻬﻧﺍﺭﻭﺩ ءﺎﻧﺛﺃ ﻥﺣﻁﻟﺍ ﺔﻠﺟﻋ ﻥﻋ ﻙﻣﺳﺟ ءﺍﺯﺟﺃ ﺔﻳﻘﺑﻭ ﻙﻳﺩﻳ ﺩﻌﺑﺍ
.ﺯﺎﻬﺟﻟﺍ ﻲﻓ ﺱﺑﻼﻣﻟﺍ ﻙﺎﺳﻣﺍ ﻭﺃ ﻙﺣﻟﺍ ﻭﺃ ﺡﻭﺭﺟﻟﺍ ﺭﻁﺎﺧﻣ
.ﻥﺣﻁﻟﺍ ءﺎﻧﺛﺃ ﺕﺍﺭﺍﺭﺷﻟﺍ ﻥﻣ ﺭﺫﺣ ﻥﻛ
8
ﺩﺍﻭﻣﻟﺍ ﺔﻟﺍﺯﺈﺑ ﺎ
ً
ﻣﺋﺍﺩ ﻡﻗ .ﺓﺭﻳﺎﻁﺗﻣ ﺕﺍﺭﺍﺭﺷ ﻥﺣﻁﻟﺍ ﺕﺎﻣﻳﺳﺟ ﺢﺑﺻﺗ ﺩﻗ
ﻥﻣﺁ ﻥﺎﻛﻣ ﻲﻓ ﺎﻬﻌﺿﻭ ﺔﻟﻭﻬﺳﺑ ﻑﻠﺗﺗ ﻥﺍ ﻥﻛﻣﻳ ﻲﺗﻟﺍ ﺩﺍﻭﻣﻟﺍﻭ ﺔﺑﻬﺗﻠﻣﻟﺍ
ﻻ ﺙﻳﺣﺑ ﺕﺍﺭﺍﺭﺷﻟﺍ ﻥﻣ ﺭﺫﺣ ﻥﻛ ،ﺎ
ً
ﺿﻳﺃ .ﻝﻣﻌﻟﺍ ﺔﻘﻁﻧﻣ ﻥﻋ ﺍ
ً
ﺩﻳﻌﺑﻭ
.ﺭﺷﺎﺑﻣ ﻝﻛﺷﺑ ﻙﻳﻣﺩﻗ ﻭﺃ ﻙﻳﺩﻳ ﺱﻣﻼﺗ
.ﻝﻳﻐﺷﺗﻟﺍ ﺩﻳﻗ ﻭﻫﻭ ﺽﺭﻷﺍ ﻰﻠﻋ ﺯﺎﻬﺟﻟﺍ ﻊﺿﺗ ﻻ
9
ﻻ ،ﺎ
ً
ﺿﻳﺃ .ﻙﻳﺩﻳ ﺎﺗﻠﻛﺑ ﻡﺎﻛﺣﺈﺑ ﻪﺑ ﻙﺳﻣﺗ ﻥﻛﺗ ﻡﻟ ﺍﺫﺇ ﺯﺎﻬﺟﻟﺍ ﻝﻳﻐﺷﺗﺑ ﻡﻘﺗ ﻻ
.ﻝﻳﻐﺷﺗﻟﺍ ﺩﻳﻗ ﻝﺍﺯﺎﻣ ﻭﻫﻭ ﺽﺭﻷﺍ ﻭﺃ ﺓﺩﺿﻧﻣﻟﺍ ﻰﻠﻋ ﺯﺎﻬﺟﻟﺍ ﺍ
ً
ﺩﺑﺃ ﻎﻌﺿﺗ
.ﻥﺣﻁﻟﺍ ﺔﻠﺟﻋ ﻝﺍﺩﺑﺗﺳﺍ ﺩﻧﻋ ﺢﻳﺣﺻﻟﺍ ﺏﻳﺗﺭﺗﻟﺍ ﻊﺑﺗﺍ
10
ﻲﻓ ﺎﻫﺩﻳﺩﺣﺗ ﻡﺗ ﻲﺗﻟﺍ ﺔﻳﺎﻧﻌﺑ ﺕﺍﻭﻁﺧﻟﺍ ﻊﺑﺗﺍ ،ﻥﺣﻁﻟﺍ ﺔﻠﺟﻋ ﻝﺍﺩﺑﺗﺳﺍ ﺩﻧﻋ
.ﺍﺫﻫ ﺕﺎﻣﻳﻠﻌﺗﻟﺍ ﻝﻳﻟﺩ
ﺎﻬﺗﻋﺭﺳ ﻝﻗﻷﺍ ﻰﻠﻋ ﻥﻭﻛﺗ "ﺔﻧﻣﺁ ﺔﻋﺭﺳ" ﻊﻣ ﻥﺣﻁﻟﺍ ﺕﻼﺟﻋ ﻡﺩﺧﺗﺳﺗ ﻻ
11
ﻡﺳﺍ ﺔﺣﻭﻟ ﻰﻠﻋ ﺔﻧﻳﺑﻣﻟﺍ "ﻝﻣﺣ ﻥﻭﺩ ﺔﻘﻳﻗﺩﻟﺍ ﻲﻓ ﺕﺍﺭﻭﺩ" ﻝﺛﻣ ﺎ
ً
ﻣﺎﻣﺗ ﺔﻳﻟﺎﻋ
.ﺔﻳﺋﺎﺑﺭﻬﻛﻟﺍ ﺓﺩﻌﻣﻟﺍ
ﻪﻳﺭﺎﻳﻌﻣ ﺕﺎﻘﺣﻠﻣ
5 .................. (KA-1, 2, 4, 5, 6 ﻡﻗﺭ) ﺎﻬﺑﻳﻛﺭﺗ ﻡﺗ ﻲﺗﻟﺍ ﺕﻼﺟﻌﻟﺍ (1)
KA-1 KA-2 KA-4 KA-5 KA-6
1 .................................................................. ﺓﺍﻭﺳﻣﻟﺍ (2)
1
...................................................................ﺡﺎﺗﻔﻣﻟﺍ (3)
1
...................................................................ﺡﺎﺗﻔﻣﻟﺍ (4)
1
..................................................................ﺔﻅﻓﺎﺣﻟﺍ (5)
.ﺭﺎﻁﺧﺇ ﻥﻭﺩ ﺭﻳﻳﻐﺗﻠﻟ ﻪﺿﺭﻋ ﻪﻳﺭﺎﻳﻌﻣﻟﺍ ﺕﺎﻘﻠﺣﻣﻟﺍ
ﺔﻠﺻﻔﻧﻣ ﻉﺎﺑ
ُ
ﺗ ﺔﻳﺭﺎﻳﺗﺧﺍ ﺕﺎﻘﺣﻠﻣ
ﻡﻣ 6 ﺩﻭﻣﻋ ﺕﺍﺫ ﺏﻳﻛﺭﺗﻟﺍ ﺕﻼﺟﻋ ○
KA-3 KA-7 KA-8 KA-9 KA-10
ﻡﻣ 3 ﺩﻭﻣﻌﻟ ﻕﻭﻁﻟﺍ ﺽﺑﻘﻣ ○
ﺩﻭﻣﻋ ﺕﺍﺫ ﺕﻼﺟﻌﻟﺍ ﻊﻣ ﻕﻓﺍﻭﺗﻠﻟ ﻡﻣ
3 ﺩﻭﻣﻌﻟ ﻕﻭﻁﻟﺍ ﺽﺑﻘﻣ ﻡﻳﻣﺻﺗ ﻡﺗ
.ﺎﻬﺗﺟﻟﺎﻌﻣ ﻡﺗﺗ ﻲﺗﻟﺍ ﺓﺭﻳﻐﺻﻟﺍ ءﺍﺯﺟﻸﻟ ﻡﻣ 3 ﺭﻁﻘﺑ
ﺎﻬﺳﻔﻧ ﻲﻫ ﺩﻭﻣﻌﻟﺍ ﺔﺣﺗﻓ ﻥﻋ
ً
ﻼﺿﻓ ﺔﺟﻟﺎﻌﻣﻟﺍ ﻕﺭﻁﻭ ﺩﺎﻌﺑﻷﺍ ﻥﻭﻛﺗ
.ﻡﻣ 6 ﻭﺫ ﻕﻭﻁﻟﺍ ﺽﺑﻘﻣﻟ
ﻡﻣ
3 ﺩﻭﻣﻋ ﺕﺍﺫ ﺏﻳﻛﺭﺗﻟﺍ ﺕﻼﺟﻋ ○
ﻡﻫﻭ P ﻁﺑﺭﻭ 80 ﻥﺣﻁﻭ ،WA ﺱﺎﻳﻘﻣ ﻊﻣ ﺏﻳﻛﺭﺗﻟﺍ ﺕﻼﺟﻋ ﺭﻳﻓﻭﺗ ﻡﺗ
.ﺔﺻﺎﺧﻟﺍ ﺔﺑﻠﺻﻟﺍ ﺩﺍﻭﻣﻟﺍﻭ ﻡﺎﻋ ﻝﻛﺷﺑ ﻥﺣﻁﻠﻟ ﻥﻭﺑﺳﺎﻧﻣ
.ﺔﺟﻟﺎﻌﻣﻠﻟ ﺏﺳﺎﻧﻣﻟﺍ ﻝﻛﺷﻟﺍ ﺕﺍﺫ ﺏﻳﻛﺭﺗﻟﺍ ﺕﻼﺟﻋ ءﺍﺭﺷﺑ ﻡﻗ
ﺕﺎﻔﺻﺍﻭﻣﻟﺍ
*(ﻕﻁﺎﻧﻣﻟﺍ ﺏﺳﺣ) ﻲﺑﺭﻬﻛﻟﺍ ﺩﻬﺟﻟﺍ (ﺕﻟﻭﻓ 240 ،ﺕﻟﻭﻓ 230 ،ﺕﻟﻭﻓ 220 ،ﺕﻟﻭﻓ 127 ،ﺕﻟﻭﻓ 120 ،ﺕﻟﻭﻓ 115 ،ﺕﻟﻭﻓ 110)
*ﻝﺎﺧﺩﻹﺍﺕﺍﻭ 240
*ﻝﻣﺣ ﻥﻭﺩﺑ ﺔﻋﺭﺳﻟﺍﺔﻘﻳﻗﺩ/ 23000
ﺎﻬﺑﻳﻛﺭﺗ ﻡﺗ ﻲﺗﻟﺍ ﺔﻠﺟﻌﻟﺍ
ﻡﻣ
32 ﻰﺻﻗﻷﺍ ﺩﺣﻟﺍ
ﻡﻣ
6 ﺩﻭﻣﻌﻟﺍ ﺭﻁﻗ
ﻙﻠﺳﻟﺍ ﻥﻭﺩﺑ ﻥﺯﻭﻟﺍﻡﺟﻛ 1.9
.ﺔﻘﻁﻧﻣﻟﺍ ﺏﺳﺣ ﺭﻳﻳﻐﺗﻠﻟ ﺔﺿﺭ
ُ
ﻋ ﺎﻬﻧﺃ ﺙﻳﺣ ﺞﺗﻧﻣﻟﺍ ﻰﻠﻋ ﺓﺩﻭﺟﻭﻣﻟﺍ ﻡﺳﻻﺍ ﺔﺣﻭﻟ ﺹﺣﻓ ﻥﻣ ﺩﻛﺄﺗ *

20
ﺔﻳﺑﺭﻌﻟﺍ
۱
ﺔﻣﺎﻌﻟﺍ ﺔﻣﻼﺳﻟﺍ ﺕﺎﻣﻳﻠﻌﺗ
!!! ﺭﻳﺫﺣﺗ
ﺕﺎﻣﻳﻠﻌﺗﻟﺍ ﻊﻳﻣﺟ ﺓءﺍﺭﻗ ﻰﺟﺭﻳ
ﺔﻣﺩﺻ ﺙﻭﺩﺣ ﻰﻟﺇ ﻩﺎﻧﺩﺃ ﺔﺣﺿﻭﻣﻟﺍ ﺕﺎﻣﻳﻠﻌﺗﻟﺍ ﻩﺫﻬﺑ ﻡﺍﺯﺗﻟﻻﺍ ﻡﺩﻋ ﻱﺩﺅﻳ ﺩﻗ
.ﺓﺭﻳﻁﺧ ﺔﺑﺎﺻﺇ ﻭﺃ ﻕﻳﺭﺣ ﺏﻭﺷﻧ ﻭﺃ ﺔﻳﺑﺭﻬﻛ
ﺔﺣﺿﻭﻣﻟﺍ ﺕﺍﺭﻳﺫﺣﺗﻟﺍ ﻊﻳﻣﺟ ﻲﻓ ﺩﺭﺍﻭﻟﺍ "ﺔﻳﺋﺎﺑﺭﻬﻛﻟﺍ ﺓﺩﻌﻟﺍ" ﺢﻠﻁﺻﻣﻟﺍ
ﺓﺩﻌﻟﺍ ﻭﺃ ﻙﺑ ﺔﺻﺎﺧﻟﺍ (ﺔﻳﻛﻠﺳﻟﺍ) ﺔﻳﺳﻳﺋﺭﻟﺍ ﺔﻳﺋﺎﺑﺭﻬﻛﻟﺍ ﺓﺩﻌﻟﺍ ﻰﻟﺇ ﺭﻳﺷﻳ ﻩﺎﻧﺩﺃ
.ﺔﻳﺭﺎﻁﺑﻠﻟ (ﺔﻳﻛﻠﺳﻼﻟﺍ) ﺔﻳﺋﺎﺑﺭﻬﻛﻟﺍ
:ﺔﻳﻟﺎﺗﻟﺍ ﺕﺎﻣﻳﻠﻌﺗﻟﺍ ﻉﺎﺑﺗﺍ ﻰﺟﺭﻳ
ﻝﻣﻌﻟﺍ ﺔﻘﻁﻧﻣ ﻥﺎﻣﺃ
(1
.ﻙﻠﻐﺷ ﻥﺎﻛﻣ ﺓءﺎﺿﺇ ﻥﺳﺣﻭ ﺔﻓﺎﻅﻧ ﻰﻠﻋ ﻅﻓﺎﺣ (ﺃ
ﺏﺑﺳﺗﺗ ﺓءﺎﺿﻣ ﺭﻳﻐﻟﺍ ﻝﻣﻌﻟﺍ ﺕﻻﺎﺟﻣﻭ ﻝﻣﻌﻟﺍ ﻥﺎﻛﻣ ﻲﻓ ﻰﺿﻭﻔﻟﺎﻓ
.ﺙﺩﺍﻭﺣ ﻉﻭﻗﻭ ﻲﻓ
ﺩﻭﺟﻭ ﻲﻓ ﻱﺃ ﺔﻳﺭﺎﺟﻔﻧﺍ ءﺍﻭﺟﺃ ﻲﻓ ﺔﻳﺋﺎﺑﺭﻬﻛﻟﺍ ﺩﺩﻌﻟﺍ ﻝﻳﻐﺷﺗﺑ ﻡﻘﺗ ﻻ (ﺏ
.ﺭﺎﺑﻏ ﻭﺃ ﻝﺎﻌﺗﺷﻼﻟ ﺔﻠﺑﺎﻗ ﺕﺍﺯﺎﻏ ﻭﺃ ﻝﺋﺍﻭﺳ
.ﺔﻧﺧﺩﻷﺍ ﺭﺎﺑﻏ ﻝﺎﻌﺷﺇ ﻰﻠﻋ ﻝﻣﻌﺗ ﺓﺭﺍﺭﺷ ﺔﻳﺋﺎﺑﺭﻬﻛﻟﺍ ﺩﺩﻌﻟﺍ ﺙﺩﺣﺗ
ﻝﺎﻔﻁﻷﺍ ﻝﻭﺎﻧﺗﻣ ﻥﻋ ﺓﺩﻳﻌﺑ ﺔﻳﺋﺎﺑﺭﻬﻛﻟﺍ ﺩﺩﻌﻟﺍ ﻥﻭﻛﺗ ﻥﺃ ﻰﻠﻋ ﻅﻓﺎﺣ (ﺕ
.ﻙﺑ ﻥﻳﻁﻳﺣﻣﻟﺍ ﻭﺃ
ﻙﺩﻘﻓ ﻰﻟﺇ ﻱﺩﺅﺗ ﻥﺃ ﻥﻛﻣﻣﻟﺍ ﻥﻣ ﺕﻳﺗﺷﺗﻟﺍ ﻝﺎﻛﺷﺃ ﻥﻣ ﻝﻛﺷ ﻱﺃ
.ﺓﺭﻁﻳﺳﻟﺍ
ﺔﻳﺑﺭﻬﻛﻟﺍ ﺕﺎﻣﺩﺻﻟﺍ ﻥﻣ ﺔﻳﺎﻗﻭﻟﺍ (2
ﻱﺎﺑ ﺱﺑﺎﻘﻟﺍ ﻝﻳﺩﻌﺗ ﺭﻅﺣﻳ ،ءﺎﺑﺭﻬﻛﻟﺍ ﺫﻔﻧﻣﺑ ﺱﺑﺎﻘﻟﺍ ﻝﻳﺻﻭﺗ ﺏﺟﻳ (ﺃ
.ﺔﻘﻳﺭﻁ
.ﺔﻳﺿﺭﻷﺍ ﺔﻳﺋﺎﺑﺭﻬﻛﻟﺍ ﺩﺩﻌﻟﺍ ﻊﻣ ﺊﻳﺎﻬﻣ ﺱﺑﺎﻗ ﻱﺃ ﻡﺩﺧﺗﺳﺗ ﻻ
ﺭﻁﺧ ﻥﻣ ﺔﻣﺋﻼﻣﻟﺍ ﺱﺑﺎﻘﻣﻟﺍﻭ ﺎﻫﺭﻳﻳﻐﺗ ﻡﺗﻳ ﻡﻟ ﻲﺗﻟﺍ ﺱﺑﺍﻭﻘﻟﺍ ﺽﻔﺧﺗ
. ﺔﻳﺋﺎﺑﺭﻬﻛﻟﺍ ﺕﺎﻣﺩﺻﻟﺍ ﺙﻭﺩﺣ
ﺏﻳﺑﺎﻧﻷﺍ ﻝﺛﻣ ﺔﻳﺿﺭﻷﺍ ﺢﻁﺳﻷﺍ ﻊﻣ ﻱﺩﺳﺟﻟﺍ ﺱﻣﻼﺗﻟﺍ ﺏﻧﺟﺗ (ﺏ
.ﺩﻗﺍﻭﻣﻟﺍﻭ ﺕﺎﺟﻼﺛﻟﺍﻭ ﺔﻳﺭﺍﺭﺣﻟﺍ ﺕﻻﺩﺎﺑﻣﻟﺍﻭ
ﻙﺎﻧﻫ ﺔﻳﺿﺭﻷﺍ ﺢﻁﺳﻷﺍ ﻙﻠﺗ ﻥﻣ ﻱﻷ ﻙﻣﺳﺟ ﺔﺳﻣﻼﻣ ﺔﻟﺎﺣ ﻲﻓ
.ﺔﻳﺑﺭﻬﻛ ﺔﻣﺩﺻﻟ ﻙﺿﺭﻌﺗﻟ ﺓﺭﻭﻁﺧ
.ﺔﺑﻭﻁﺭﻟﺍ ﻭﺃ ﺭﻁﻣﻠﻟ ﺔﻳﺋﺎﺑﺭﻬﻛﻟﺍ ﺩﺩﻌﻟﺍ ﺽﺭﻌﺗ ﻻ (ﺕ
ﺓﺩﻌﻟﺍ ﻝﺧﺍﺩ ﻰﻟﺇ ءﺎﻣﻟﺍ ﺏﺭﺳﺗ ﻥﺇ ﺔﻳﺋﺎﺑﺭﻬﻛﻟﺍ ﺕﺎﻣﺩﺻﻟﺍ ﺭﻁﺧ ﺩﺍﺩﺯﻳ
.ﺔﻳﺋﺎﺑﺭﻬﻛﻟﺍ
ﻭﺃ ﻝﻣﺣﻟ
ً
ﺎﻘﻠﻁﻣ ﻪﻠﻣﻌﺗﺳﺗ ﻻ ،(ﻙﻠﺳﻟﺍ) ﻝﺑﺎﻛﻟﺍ ﻝﺎﻣﻌﺗﺳﺍ ءﻲﺳﺗ ﻻ (ﺙ
.ﺱﺑﻘﻣﻟﺍ ﻥﻣ ﺱﺑﺎﻘﻟﺍ ﺏﺣﺳﻟ ﻭﺃ ﺔﻳﺋﺎﺑﺭﻬﻛﻟﺍ ﺓﺩﻌﻟﺍ ﻊﻓﺩ ﻭﺃ ﺩﺷ
ﻑﺍﻭﺣﻟﺍ ﻭﺃ ﺕﻳﺯﻟﺍ ﻭﺃ ﺓﺭﺍﺭﺣﻟﺍ ﺭﺩﺎﺻﻣ ﻥﻋ
ً
ﺍﺩﻳﻌﺑ ﻪﻳﻠﻋ ﻅﻓﺎﺣﻭ
.ﺔﻛﺭﺣﺗﻣﻟﺍ ﺯﺎﻬﺟﻟﺍ ءﺍﺯﺟﺃ ﻭﺃ ﺓﺩﺎﺣﻟﺍ
ﺕﺎﻣﺩﺻﻟﺍ ﺭﻁﺧ ﻥﻣ ﺔﻛﺑﺎﺷﺗﻣﻟﺍ ﻭﺃ ﺔﻔﻟﺎﺗﻟﺍ (ﻙﻼﺳﻷﺍ) ﺕﻼﺑﺎﻛﻟﺍ ﺩﻳﺯﺗ
.ﺔﻳﺑﺭﻬﻛﻟﺍ
ﻙﻠﺳ ﻡﺍﺩﺧﺗﺳﺎﺑ ﺢﺻﻧﻳ ،ﺝﺭﺎﺧﻟﺎﺑ ﺔﻳﺋﺎﺑﺭﻬﻛﻟﺍ ﺓﺩﻌﻟﺍ ﻝﻳﻐﺷﺗ ﺔﻟﺎﺣ ﻲﻓ (ﺝ
.ﻲﺟﺭﺎﺧﻟﺍ ﻝﺎﻣﻌﺗﺳﻻﺍ ﻊﻣ ﺏﺳﺎﻧﺗﻳ (ﻝﺑﺎﻛ)
ﻥﻣ ﻝﻳﻠﻘﺗﻠﻟ ﻲﺟﺭﺎﺧﻟﺍ ﻝﺎﻣﻌﺗﺳﻻﺍ ﻊﻣ ﺏﺳﺎﻧﻣ ﻙﻠﺳ ﻡﺍﺩﺧﺗﺳﺎﺑ ﻡﻗ
.ﺔﻳﺑﺭﻬﻛ ﺔﻣﺩﺻﻟ ﺽﺭﻌﺗﻟﺍ ﺓﺭﻭﻁﺧ
ﺔﻳﺻﺧﺷﻟﺍ ﺔﻣﻼﺳﻟﺍ (3
ﺓﺩﻌﻟﺍ ﺔﻁﺳﺍﻭﺑ ﻝﻣﻌﻟﺎﺑ ﻡﻗﻭ ﻪﻠﻌﻔﺗ ﺎﻣ ﻰﻟﺇ ﻪﺑﺗﻧﺃﻭ ﺎ
ً
ﻅﻘﻳ ﻥﻛ (ﺃ
ﻙﺭﻭﻌﺷ ﺔﻟﺎﺣ ﻲﻓ ﺔﻳﺋﺎﺑﺭﻬﻛﻟﺍ ﺓﺩﻌﻟﺍ ﻡﺩﺧﺗﺳﺗ ﻻ .ﻝﻘﻌﺗﺑ ﺔﻳﺋﺎﺑﺭﻬﻛﻟﺍ
ﺩﺍﻭﻣ ﻭﺃ ﺔﻳﻭﺩﺃ ﻭﺃ ﺓﺭﺩﺧﻣ ﺩﺍﻭﻣ ﺭﻳﺛﺄﺗ ﺕﺣﺗ ﺕﻧﻛ ﺍﺫﺇ ﻭﺃ ﺏﻌﺗﻟﺎﺑ
.ﺔﻳﻟﻭﺣﻛ
ﻱﺩﺅﻳ ﺩﻗ ﺔﻳﺋﺎﺑﺭﻬﻛﻟﺍ ﺓﺩﻌﻟﺍ ﻡﺍﺩﺧﺗﺳﺇ ﺩﻧﻋ ﺓﺩﺣﺍﻭ ﺔﻅﺣﻠﻟ ﻩﺎﺑﺗﻧﻹﺍ ﻡﺩﻋ
.ﺓﺭﻳﻁﺧ ﺔﺑﺎﺻﺇ ﻰﻟﺇ
.ﻥﻳﻌﻠﻟ ﻲﻗﺍﻭﻟﺍ ﻉﺎﻧﻘﻟﺍ ءﺍﺩﺗﺭﺎﺑ ﺎ
ً
ﻣﺋﺍﺩ ﻡﻗ .ﻥﺎﻣﻷﺍ ﺕﺍﻭﺩﺃ ﻡﺩﺧﺗﺳﺍ (ﺏ
ﺔﻳﺫﺣﺃ ﻭﺃ ﺭﺎﺑﻐﻟﺍ ﻥﻣ ﻲﻗﺍﻭﻟﺍ ﻉﺎﻧﻘﻟﺍ ﻝﺛﻣ ﻥﺎﻣﻷﺍ ﺕﺍﻭﺩﺃ ﻝﻣﻌﺗﺳ
ﻊﻣﺳﻟﺍ ﺔﻳﺎﻣﺣ ﺓﺯﻬﺟﺃ ﻭﺃ ﺔﺑﻠﺻ ﺔﻌﺑﻗ ﻭﺃ ﻕﻻﺯﻧﻼﻟ ﺓﺩﺎﺿﻣﻟﺍ ﻥﺎﻣﻷﺍ
ﺕﻻﺎﻣﺗﺣﺍ ﻝﻳﻠﻘﺗ ﻰﻠﻋ ﺔﻧﻳﻌﻣ ﻑﻭﺭﻅ ﻲﻓ ﺎﻬﻣﺍﺩﺧﺗﺳﺍ ﻡﺗﻳ ﻲﺗﻟﺍﻭ
.ﺔﻳﺻﺧﺷ ﺕﺎﺑﺎﺻﻹ ﺽﺭﻌﺗﻟﺍ
ﻊﺿﻭ ﻲﻓ ﺡﺎﺗﻔﻣﻟﺍ ﻥﺃ ﻥﻣ ﺩﻛﺄﺗ .ﺩﻭﺻﻘﻣﻟﺍ ﺭﻳﻏ ﻝﻳﻐﺷﺗﻟﺍ ﺏﻧﺟﺗ (ﺕ
.ﻝﻳﺻﻭﺗﻟﺍ ﻝﺑﻗ ﻑﺎﻘﻳﻹﺍ
ﻭﺃ ﺡﺎﺗﻔﻣﻟﺍ ﻲﻓ ﻙﻌﺑﺻﺇ ﺩﻭﺟﻭ ﻊﻣ ﺔﻗﺎﻁﻟﺍ ﺕﺍﻭﺩﺃ ﻝﻣﺣ ﻱﺩﺅﻳ
ﻝﻳﻐﺷﺗﻟﺍ ﻊﺿﻭ ﻲﻓ ﺡﺎﺗﻔﻣﻟﺍ ﺎﻬﻳﻓ ﻥﻭﻛﻳ ﻲﺗﻟﺍ ﺔﻗﺎﻁﻟﺍ ﺕﺍﻭﺩﺃ ﻝﻳﺻﻭﺗ
.ﺙﺩﺍﻭﺣ ﻉﻭﻗﻭ ﻝﺎﻣﺗﺣﺍ ﻰﻟﺇ
.ﺔﻳﺋﺎﺑﺭﻬﻛﻟﺍ ﺓﺩﻌﻟﺍ ﻝﻳﻐﺷﺗ ﻝﺑﻗ ﻁﺑﺭﻟﺍ ﺡﺎﺗﻔﻣ ﻭﺃ ﻁﺑﺿﻟﺍ ﺩﺩﻋ ﻉﺯﻧﺍ (ﺙ
ﻥﻣ ﻙﺭﺣﺗﻣﻟﺍ ءﺯﺟﻟﺍ ﺭﺎﺳﻳ ﻰﻠﻋ ﻁﺑﺿ ﺡﺎﺗﻔﻣ ﻭﺃ ﻁﺑﺭ ﺡﺎﺗﻔﻣ ﺩﻭﺟﻭ
.ﺔﻳﺻﺧﺷ ﺔﺑﺎﺻﺇ ﺙﻭﺩﺣ ﻰﻟﺇ ﻱﺩﺅﻳ ﺔﻳﺋﺎﺑﺭﻬﻛﻟﺍ ﺓﺩﻌﻟﺍ
ﻥﻳﺑﻭ ﻙﻧﻳﺑ ﺔﺑﺳﺎﻧﻣ ﺔﻓﺎﺳﻣ ﻙﺭﺗﺍ ،ﺔﻳﺋﺎﺑﺭﻬﻛﻟﺍ ﺓﺩﻌﻟﺍ ﻥﻣ ﺏﺭﺗﻘﺗ ﻻ (ﺝ
.ﺕﺎﻗﻭﻷﺍ ﻊﻳﻣﺟ ﻲﻓ ﻙﻧﺯﺍﻭﺗ ﻰﻠﻋ ﻅﻓﺎﺣﻭ ﺔﻳﺋﺎﺑﺭﻬﻛﻟﺍ ﺓﺩﻌﻟﺍ
ﻲﻓ ﻝﺿﻓﺃ ﻝﻛﺷﺑ ﺯﺎﻬﺟﻟﺍ ﻰﻠﻋ ﺓﺭﻁﻳﺳﻟﺍ ﻥﻣ ﻙﻟﺫ ﻙﻟ ﺢﻣﺳﻳﺳ
.ﺔﻌﻗﻭﺗﻣﻟﺍ ﺭﻳﻏ ﻑﻗﺍﻭﻣﻟﺍ
ﺎﻬﺑ ﻭﺃ ﺔﺿﺎﻔﺿﻓ ﺱﺑﻼﻣ ﻱﺩﺗﺭﺗ ﻻ ،ﺔﺑﺳﺎﻧﻣ ﺱﺑﻼﻣ ءﺍﺩﺗﺭﺎﺑ ﻡﻗ (ﺡ
ﺱﺑﻼﻣﻟﺍﻭ ﻙﺭﻌﺷ ﺩﺎﻌﺑﺇ ﻰﻠﻋ
ً
ﺎﻣﺋﺍﺩ ﻅﻓﺎﺣﻭ ،ﻲﻠﺣ ﻭﺃ ﺔﺑﺋﺎﺳ ﻑﺍﺭﻁﺃ
ﺓﺩﻌﻟﺍ ﻥﻣ ﺔﻛﺭﺣﺗﻣﻟﺍ ءﺍﺯﺟﻷﺍ ﻥﻋ
ً
ﺍﺩﻳﻌﺑ ﺯﺎﻔﻘﻟﺍﻭ ﺎﻬﻳﺩﺗﺭﺗ ﻲﺗﻟﺍ
.ﺔﻳﺋﺎﺑﺭﻬﻛﻟﺍ
ﻲﻠﺣﻟﺍ ﻭﺃ ﻑﺍﺭﻁﺃ ﺎﻬﺑ ﻲﺗﻟﺍ ﻭﺃ ﺔﺿﺎﻔﺿﻔﻟﺍ ﺱﺑﻼﻣﻟﺍ ﻙﺑﺷﺎﺗﺗ ﺩﻗ
.ﺏﺎﻘﺛﻣﻠﻟ ﺔﻛﺭﺣﺗﻣﻟﺍ ءﺍﺯﺟﻷﺎﺑ ﻝﻳﻭﻁﻟﺍ ﺭﻌﺷﻟﺍﻭﺃ
ﻡﺗﻳﻭ ﺔﻠﺻﺗﻣ ﻥﻣ ﺩﻛﺄﺗﻓ .ﺭﺎﺑﻐﻟﺍ ﻊﻳﻣﺟﺗﻭ ﻁﻔﺷ ﺯﺎﻬﺟ ﺏﻳﻛﺭﺗ ﺯﺎﺟ ﻥﺇ (ﺥ
.ﻡﻳﻠﺳ ﻝﻛﺷﺑ ﺎﻬﻣﺍﺩﺧﺗﺳﺍ
ﺭﻁﺎﺧﻣﻟﺍ ﻝﻳﻠﻘﺗ ﻰﻟﺇ ﺓﺯﻬﺟﻷﺍ ﻩﺫﻫ ﻡﺍﺩﺧﺗﺳﺍ ﻱﺩﺅﻳ ﻥﺃ ﻥﻛﻣﻣﻟﺍ ﻥﻣ
.ﺭﺎﺑﻐﻟﺎﺑ ﺔﻘﻠﻌﺗﻣﻟﺍ
ﺎﻬﺑ ﺔﻳﺎﻧﻌﻟﺍﻭ ﺔﻳﺋﺎﺑﺭﻬﻛﻟﺍ ﺓﺩﻌﻟﺍ ﻡﺍﺩﺧﺗﺳﺍ ﺔﻘﻳﺭﻁ (4
ﺔﻳﺋﺎﺑﺭﻬﻛﻟﺍ ﺓﺩﻌﻟﺍ ﻡﺩﺧﺗﺳﺍﻭ ،ﺔﻳﺋﺎﺑﺭﻬﻛﻟﺍ ﺓﺩﻌﻟﺍ ﻡﺍﺩﺧﺗﺳﺍ ﻲﻓ ﻁﺭﻔﺗ ﻻ (ﺃ
.ﻪﺑ ﻡﻭﻘﺗ ﻱﺫﻟﺍ ﻝﻣﻌﻠﻟ ﺔﺑﺳﺎﻧﻣﻟﺍ
ﻙﺩﻋﺎﺳﻳ ﺍﺫﻫ ﻥﺈﻓ ﻙﻟﺫﻟ ﺔﺻﺻﺧﻣﻟﺍ ﺔﻳﺋﺎﺑﺭﻬﻛﻟﺍ ﺓﺩﻌﻟﺍ ﻙﻣﺍﺩﺧﺗﺳﺍ ﺩﻧﻋ
ﻡﺗ ﻲﺗﻟﺍ ﺔﻣﻬﻣﻠﻟ
ً
ﺎﻌﺑﺗ
ً
ﺎﻧﻣﺃ ﺭﺛﻛﺃﻭ ﻝﺿﻓﺃ ﺔﺟﻳﺗﻧ ﻰﻠﻋ ﻝﻭﺻﺣﻟﺍ ﻰﻠﻋ
.ﺎﻬﻟ ﺏﺎﻘﺛﻣﻟﺍ ﻡﻳﻣﺻﺗ
ﺓﺩﻌﻟﺍ ﻡﺩﺧﺗﺳﺗ ﻻ ﻝﻣﻌﻟﺍ ﻥﻋ ﻝﻳﻐﺷﺗﻟﺍ ﺡﺎﺗﻔﻣ ﻝﻁﻌﺗ ﺔﻟﺎﺣ ﻲﻓ (ﺏ
.ﺔﻳﺋﺎﺑﺭﻬﻛﻟﺍ
ﺎﻬﺑ ﺹﺎﺧﻟﺍ ﻝﻳﻐﺷﺗﻟﺍ ﺡﺎﺗﻔﻣ ﻲﻓ ﻡﻛﺣﺗﻟﺍ ﻥﻛﻣﻳ ﻻ ﺔﻳﺋﺎﺑﺭﻬﻛ ﺓﺩﻋ ﻱﺃ
.ﺡﺎﺗﻔﻣﻟﺍ ﺍﺫﻫ ﺡﻼﺻﺇ ﺏﺟﻳﻭ ﺎﻬﻣﺍﺩﺧﺗﺳﺍ ﺩﻧﻋ
ً
ﺍﺭﻁﺧ ﻝﻛﺷﺗ ﺎﻬﻧﺈﻓ
ﻭﺃ ﺕﻼﻳﺩﻌﺗ ﻱﺃ ءﺍﺭﺟﺇ ﻝﺑﻗ ﺔﻗﺎﻁﻟﺍ ﺭﺩﺻﻣ ﻥﻋ ﺱﺑﺎﻘﻟﺍ ﻝﺻﻔﺑ ﻡﻗ (ﺕ
.ﺔﻗﺎﻁﻟﺍ ﺕﺍﻭﺩﺃ ﻥﻳﺯﺧﺗ ﻭﺃ ﺕﺎﻘﺣﻠﻣﻟﺍ ﺭﻳﻳﻐﺗ
ﺭﻳﻏ ﻝﻛﺷﺑ ﺔﻳﺋﺎﺑﺭﻬﻛﻟﺍ ﺓﺩﻌﻟﺍ ﻝﻳﻐﺷﺗ ﻩﺫﻫ ﻁﺎﻳﺗﺣﻻﺍ ﺕﺍءﺍﺭﺟﺇ ﻊﻧﻣﺗ
.ﺩﻭﺻﻘﻣ
ﻝﻭﺎﻧﺗﻣ ﻥﻋ
ً
ﺃﺩﻳﻌﺑ ﺔﻣﺩﺧﺗﺳﻣ ﺭﻳﻐﻟﺍ ﺔﻳﺋﺎﺑﺭﻬﻛﻟﺍ ﺩﺩﻌﻟﺍ ﻥﻳﺯﺧﺗﺑ ﻡﻗ (ﺙ
ﻝﻳﻐﺷﺗ ﻥﻋ ﺓﺭﻛﻓ ﻪﻳﺩﻟ ﺱﻳﻟ ﺹﺧﺷ ﻱﻷ ﺢﻣﺳﺗ ﻻﻭ ﻝﺎﻔﻁﻷﺍ
.ﺎﻬﻠﻳﻐﺷﺗ ﻭﺃ ﺕﺍﻭﺩﻷﺍ ﻩﺫﻫ ﻥﻣ ﺏﺍﺭﺗﻗﻻﺎﺑ ﺏﺎﻘﺛﻣﻟﺍ
ﻥﻳﺑﺭﺩﻣ ﺭﻳﻐﻟﺍ ﺹﺎﺧﺷﻷﺍ ﻱﺩﻳﺃ ﻲﻓ ﺓﺭﻭﻁﺧ ﻝﺛﻣﺗ ﻝﻳﻐﺷﺗﻟﺍ ﺕﺍﻭﺩﺃ
.ﺎﻬﻳﻠﻋ
ﺔﻳﺣﺎﻧ ﻥﻣ
ً
ﺍﺩﻳﺟ ﺎﻬﺻﺣﻔﺑ ﻡﻗ ،ﺔﻳﺋﺎﺑﺭﻬﻛﻟﺍ ﺩﺩﻌﻟﺍ ﺔﻣﻼﺳ ﻥﻣ ﺩﻛﺄﺗ (ﺝ
ءﺯﺟ ﻱﺃ ﻲﻓ ﺭﺳﻛ ﻱﺃ ﺩﻭﺟﻭ ﻭﺃ ﺔﻛﺭﺣﺗﻣﻟﺍ ءﺍﺯﺟﻷﺍ ﻁﺑﺍﺭﺗ ﻯﺩﻣ
.ﺎﻬﻠﻳﻐﺷﺗ ﻰﻠﻋ ﺭﺛﺅﻳ ﺎﻣﺑ ﺎﻬﺋﺍﺯﺟﺃ ﻥﻣ
ﻝﺑﻗ ﺎﻬﺣﻼﺻﺇ ﺏﺟﻳ ﻝﻳﻐﺷﺗﻟﺍ ﺕﺍﻭﺩﺄﺑ ﻑﻠﺗ ﺙﻭﺩﺣ ﺔﻟﺎﺣ ﻲﻓ
.ﻡﺍﺩﺧﺗﺳﻻﺍ
ﺭﻳﻏ ﻝﻛﺷﺑ ﺔﻧﺎﻳﺻﻟﺍ ﺔﻳﻠﻣﻌﺑ ﻡﺎﻳﻘﻟﺍ ﻭﺃ ﻝﻳﻐﺷﺗﻟﺍ ﺕﺍﻭﺩﺃ ﺔﻧﺎﻳﺻ ﻡﺩﻋ
.ﺙﺩﺍﻭﺣﻟﺍ ﻥﻣ ﺭﻳﺛﻛﻟﺍ ﺙﻭﺩﺣ ﻰﻟﺇ ﻱﺩﺅﻳ ﺢﻳﺣﺻ
ﺔﻔﻳﻅﻧﻭ ﺓﺩﺎﺣ ﻊﻳﻁﻘﺗﻟﺍ ﺕﺍﻭﺩﺃ ﻰﻠﻋ ﻅﺎﻔﺣﻟﺍ ﻰﺟﺭﻳ (ﺡ
ﻝﻬﺳﻳ ﺙﻳﺣﺑ ﻑﺍﻭﺣﻟﺍ ﺓﺩﺎﺣ ﻊﻳﻁﻘﺗﻟﺍ ﺕﺍﻭﺩﺃ ﻰﻠﻋ ﻅﺎﻔﺣﻟﺍ ﻰﺟﺭﻳ
.ﺎﻬﻳﻓ ﻡﻛﺣﺗﻟﺍ
ﻕﻓﺍﻭﺗﻳ ﺎﻣﺑ ،ﺦﻟﺇ ﻊﻁﻘﻟﺍ ﻡﻼﻗﺃﻭ ﺕﺎﻘﺣﻠﻣﻟﺍﻭ ،ﺔﻗﺎﻁﻟﺍ ﺓﺍﺩﺃ ﻡﺩﺧﺗﺳﺍ (ﺥ
ﺔﻗﺎﻁﻟﺍ ﺓﺍﺩﺃ ﻉﻭﻧﻟ ﺔﺻﺻﺧﻣﻟﺍ ﺔﻘﻳﺭﻁﻟﺎﺑﻭ ﺕﺎﻣﻳﻠﻌﺗﻟﺍ ﻩﺫﻫ ﻊﻣ
ﺏﻭﻠﻁﻣﻟﺍ ﻝﻣﻌﻟﺍﻭ ﻝﻣﻌﻟﺍ ﻑﻭﺭﻅ ﺭﺎﺑﺗﻋﻻﺍ ﻲﻓ ﻊﺿﻭﻟﺍ ﻊﻣ ،ﺩﺩﺣﻣﻟﺍ
.ﻪﺑ ﻡﺎﻳﻘﻟﺍ
ﻰﻟﺇ ﺎﻬﻟ ﺔﺻﺻﺧﻣﻟﺍ ﺭﻳﻏ ﺽﺍﺭﻏﻸﻟ ﺔﻗﺎﻁﻟﺍ ﺓﺍﺩﺃ ﻡﺩﺧﺗﺳﺍ ﻱﺩﺅﻳ ﺩﻗ
.ﺭﻳﻁﺧ ﻑﻗﻭﻣ ﺩﻭﺟﻭ
ﺔﻣﺩﺧﻟﺍ (
5
ﻁﻘﻓﻭ ﻥﻳﺻﺻﺧﺗﻣﻟﺍ ﻝﺑﻗ ﻥﻣ ﻁﻘﻓ ﺔﻳﺋﺎﺑﺭﻬﻛﻟﺍ ﻙﺗﺩﻋ ﺢﻳﻠﺻﺗﺑ ﺢﻣﺳﺍ (ﺃ
. ﻁﻘﻓ ﺔﻳﻠﺻﻷﺍ ﺭﺎﻳﻐﻟﺍ ﻊﻁﻗ ﻝﺎﻣﻌﺗﺳﺈﺑ
.ﺯﺎﻬﺟﻟﺍ ﻥﺎﻣﺃ ﻰﻠﻋ ﺔﻅﻓﺎﺣﻣﻟﺍ ﻙﻟﺫ ﻥﻣﺅﻳ
ﺕﺎﻁﺎﻳﺗﺣﻻﺍ
.ﻥﺳﻟﺍ ﺭﺎﺑﻛﻭ ﻝﺎﻔﻁﻷﺍ ﻝﻭﺎﻧﺗﻣ ﻥﻋ
ً
ﺍﺩﻳﻌﺑ ﺔﻳﺋﺎﺑﺭﻬﻛﻟﺍ ﺓﺩﻌﻟﺍ ﻊﺿﻭ ﻰﺟﺭﻳ
ﻥﻋ ﺓﺩﻳﻌﺑ ﺔﻳﺋﺎﺑﺭﻬﻛﻟﺍ ﺓﺩﻌﻟﺍ ﻰﻠﻋ ﻅﺎﻔﺣﻟﺍ ﺏﺟﻳ ﻡﺍﺩﺧﺗﺳﻻﺍ ﻡﺩﻋ ﺔﻟﺎﺣ ﻲﻓ
.ﻥﺳﻟﺍ ﺭﺎﺑﻛﻭ ﻝﺎﻔﻁﻷﺍ ﻝﻭﺎﻧﺗﻣ

21
Item
No.
Part Name
1C Housing Ass'y
2 Bearing Lock
3 Stator Ass'y
4A Brush Terminal
5 Machine Screw M4×60
6 Spring Lock Washer
7C Brush Holder
8A Hexagon Socket Hd. Set Screw M4×10
9 Stop Plate
10B Rubber Washer
11 Armature
13 Ball Bearing (626DC2)
14 Bearing Washer
15 Inner Cover
16 Bearing Cover (A)
17 Machine Screw M4×10
18 Ball Bearing (608VVC2)
19 Spring Lock Washer
20 Nose Bracket
21 Ball Bearing (6000VVCM)
22 Wave Washer
23 Bearing Plate
26 Spindle
27 Coupling
28 Ball Bearing (6001VVCMPS2-L)
29 Ring
30 Washer (A)
31 Washer (B)
32 Bearing Lid
33 Hexagon Socket Hd. Set Screw M4×5
34 Machine Screw M4×45
36 Colllet Chuck
37 Brush Cap
38 Name Plate
39 Rivet D2.5×3.8
40 Tail Cover
41 Switch Holder
42 Hexagon Socket Hd. Bolt M4×12
43 Spring Lock Wasfer
44B Switch
45 Cord
46 Cord Armor
47 Cord Crip
Item
No.
Part Name
49 Connector
50B Carbon Brush
51 Wrench 12mm
52 Wrench 17mm
53 Dresser
54 Mounted Wheel KA-1
55 Mounted Wheel KA-2
57 Mounted Wheel KA-4
58 Mounted Wheel KA-5
59 Mounted Wheel KA-6
64B Case
65 Machine Screw M4×6
69 Machine Screw M4×14
70 Spring Loch Washer
71 Rubber Cap
72 Switch Insulator
73 Terminal D4

22

23

509
Code No. C99016134 N
Printed in Japan
Transcripción de documentos
Hand Grinder Amoladora recta 手提帶柄電磨機 LDU 4 Handling instructions Instrucciones de manejo 使用說明書 Read through carefully and understand these instructions before use. Leer cuidadosamente y comprender estas instrucciones antes del uso. 使用前務請詳加閱讀 0000Book̲LDU4.indb 1 2015/03/25 11:32:45 1 2 3 English Español 中國語 ﺍﻟﻌﺭﺑﻳﺔ 1 Spindle Husillo 主軸 ﻋﻣﻭﺩ ﺍﻟﺩﻭﺭﺍﻥ 2 Collet chuck Boquilla de mordazas 套爪夾盤 ﻣﻘﺑﺽ ﺍﻟﻁﻭﻕ 3 Tighten Apretar 擰緊 4 Nose bracket Ménsula del nariz 鼻形支傅架 5 Tapered portion Parte cónica 楔形部分 6 Wear limit Límite de desgaste 磨損極限 7 No. of carbon brush No. de escobilla de carbón 碳刷號 ﺗﺛﺑﻳﺕ ﺑﺈﺣﻛﺎﻡ ﺣﺎﻣﻝ ﺍﻟﻔﻭﻫﺔ ﺍﻟﻧﺳﺑﺔ ﺍﻟﻣﺳﺗﺩﻗﺔ ﺣﺩ ﺍﻟﺗﺂﻛﻝ ﻋﺩﺩ ﺍﻟﻔﺭﺵ ﺍﻟﻛﺭﺑﻭﻧﻳﺔ 2 0000Book̲LDU4.indb 2 2015/03/25 11:32:46 English GENERAL SAFETY RULES WARNING! Read all instructions Failure to follow all instructions listed below may result in electric shock, fire and/or serious injury. The term “power tool” in all of the warnings listed below refers to your mains-operated (corded) power tool or battery-operated (cordless) power tool. SAVE THESE INSTRUCTIONS 1) Work area a) Keep work area clean and well lit. Cluttered and dark areas invite accidents. b) Do not operate power tools in explosive atmospheres, such as in the presence of flammable liquids, gases or dust. Power tools create sparks which may ignite the dust of fumes. c) Keep children and bystanders away while operating a power tool. Distractions can cause you to lose control. 2) Electrical safety a) Power tool plugs must match the outlet. Never modify the plug in any way. Do not use any adapter plugs with earthed (grounded) power tools. Unmodified plugs and matching outlets will reduce risk of electric shock. b) Avoid body contact with earthed or grounded surfaces such as pipes, radiators, ranges and refrigerators. There is an increased risk of electric shock if your body is earthed or grounded. c) Do not expose power tools to rain or wet conditions. Water entering a power tool will increase the risk of electric shock. d) Do not abuse the cord. Never use the cord for carrying, pulling or unplugging the power tool. Keep cord away from heat, oil, sharp edges or moving parts. Damaged or entangled cords increase the risk of electric shock. e) When operating a power tool outdoors, use an extension cord suitable for outdoor use. Use of a cord suitable for outdoor use reduces the risk of electric shock. 3) Personal safety a) Stay alert, watch what you are doing and use common sense when operating a power tool. Do not use a power tool while you are tired or under the influence of drugs, alcohol or medication. A moment of inattention while operating power tools may result in serious personal injury. b) Use safety equipment. Always wear eye protection. Safety equipment such as dust mask, non-skid safety shoes, hard hat, or hearing protection used for appropriate conditions will reduce personal injuries. c) Avoid accidental starting. Ensure the switch is in the off position before plugging in. Carrying power tools with your finger on the switch or plugging in power tools that have the switch on invites accidents. d) Remove any adjusting key or wrench before turning the power tool on. A wrench or a key left attached to a rotating part of the power tool may result in personal injury. e) Do not overreach. Keep proper footing and balance at all times. This enables better control of the power tool in unexpected situations. f) Dress properly. Do not wear looses clothing or jewellery. Keep your hair, clothing and gloves away from moving parts. Loose clothes, jewellery or long hair can be caught in moving parts. g) If devices are provided for the connection of dust extraction and collection facilities, ensure these are connected and properly used. Use of these devices can reduce dust related hazards. 4) Power tool use and care a) Do not force the power tool. Use the correct power tool for your application. The correct power tool will do the job better and safer at the rate for which it was designed. b) Do not use the power tool if the switch does not turn it on and off. Any power tool that cannot be controlled with the switch is dangerous and must be repaired. c) Disconnect the plug from the power source before making any adjustments, changing accessories, or storing power tools. Such preventive safety measures reduce the risk of starting the power tool accidentally. d) Store idle power tools out of the reach of children and do not allow persons unfamiliar with the power tool or these instructions to operate the power tool. Power tools are dangerous in the hands of untrained users. e) Maintain power tools. Check for misalignment or binding of moving parts, breakage of parts and any other condition that may affect the power tools operation. If damaged, have the power tool repaired before use. Many accidents are caused by poorly maintained power tools. f) Keep cutting tools sharp and clean. Properly maintained cutting tools with sharp cutting edges are less likely to bind and are easier to control. g) Use the power tool, accessories and tool bits etc., in accordance with these instructions and in the manner intended for the particular type of power tool, taking into account the working conditions and the work to be performed. Use of the power tool for operations different from intended could result in a hazardous situation. 3 0000Book̲LDU4.indb 3 2015/03/25 11:32:46 English 5) Service a) Have your power tool serviced by a qualified repair person using only identical replacement parts. This will ensure that the safety of the power tool is maintained. PRECAUTION Keep children and infirm persons away. When not in use, tools should be stored out of reach of children and infirm persons. PRECAUTIONS ON USING GRINDER 1. Always use for the right purpose under safe conditions. This machine is a portable tool for grinding or finishing work on metal of various types, resin and ceramics. Use the machine for these purposes only. 2. Always use regulation grinding wheels. The grinding wheel for this machine should be grinding wheel with axle which have a maximum diameter of 18 mm and an axle diameter of 3 mm or 6 mm. 3. Always test before using. Always check the grinding wheel to be used for cracks or splits. Also, always test-run the machine before using to check for any abnormalities. 4. Protect the eyes with protective goggles. Always wear protective goggles during grinding. Also, when there is a lot of dust produced by grinding, wear a mask. 5. Always hold the machine securely. Always hold the machine securely when using. If you do not hold the machine, the reaction to force can cause it to spring back. 6. Do not place unreasonable loads on the machine. Do not place unreasonable loads on the machine by pressing it so hard against the material that the rotation speed is drastically reduced. This will reduce work efficiency and there is a danger that the grinding wheel axle will be bent. 7. Never touch revolving parts. Keep hands and other body parts away from the vicinity of the grinding wheel while it is spinning to avoid danger of cuts, abrasions or catching clothes in equipment. 8. Be careful about sparks from grinding. Grinding particles can become flying sparks. Always keep flammable materials and materials which can easily be damaged in a safe place removed from the work area. Also, be careful that sparks do not come in direct contact with hands or feet. 9. Do not put the machine down while it is still running. Never run the machine if you are not holding it securely with both hands. Also, never put the machine on the table or floor while it is still running. 10. Follow the correct order when replacing the grinding wheel. When replacing the grinding wheel, carefully follow the steps outlined in this instruction manual. 11. Use only grinding wheels with a "Safe Speed" at least as high as the "No-Load RPM" indicated on the power tool nameplate. SPECIFICATIONS Voltage (by areas)* (110 V, 115 V, 120 V, 127 V, 220 V, 230 V, 240 V) Input* No-load speed* Mounted Wheel Weight (without cord) 240 W 23000 /min Maximum 32 mm Shaft diameter 6 mm 1.9 kg * Be sure to check the nameplate on product as it is subject to change by areas. STANDARD ACCESSORIES OPTIONAL ACCESSORIES (sold separately) (1) Mounted wheels (No. KA-1, 2, 4, 5, 6)..........................5 ○ Mounted wheels with 6 mm shaft (2) (3) (4) (5) KA-1 KA-2 KA-4 KA-5 KA-6 Dresser .........................................................................1 Wrench .........................................................................1 Wrench .........................................................................1 Case .............................................................................1 Standard accessories are subject to change without notice. KA-3 KA-7 KA-8 KA-9 KA-10 ○ Collet chuck for 3 mm shaft The 3 mm collet chuck is designed to accept mounted wheels with a 3 mm diameter shaft for processing small parts. Dimensions and handling methods other than the shaft hole are the same as those for the 6 mm collet chuck. 4 0000Book̲LDU4.indb 4 2015/03/25 11:32:46 English ○ Mounted wheels with 3 mm shaft All mounted wheels are provided with WA grain, 80 grounding, and P bonding and are suitable for grinding general and special steel materials. Purchase and utilize mounted wheels of suitable shape for processing. Optional accessories are subject to change without notice. APPLICATIONS ○ Finishing of dies for press working, die casting and moulding. ○ Finishing of thread cutting dies, tools and other small parts. ○ Internal grinding of tools and machine parts. PRIOR TO OPERATION KA-20 KA-21 KA-22 KA-23 KA-24 KC-20 KC-21 KC-22 KC-23 KC-24 ○ Universal mount This universal mount is used when grinding inner surfaces of workpieces or finishing specially shaped workpieces, by installing the hand grinder on a lathe. The universal mount is installed on the cross slide after removing the lathe tool post. (using universal mount) 1. Power source Ensure that the power source to be utilized conforms to the power requirements specified on the product nameplate. 2. Grounding This tool should be grounded while in use to protect the operator from electric shock. The tool is equipped with a three conductor cord and grounding type plug to fit the proper grounding type receptacle. The green (or green and yellow) conductor in the cord is the grounding wire. Never connect the green (or green and yellow) wire to a live terminal. 3. Power switch Ensure that the power switch is in the OFF position. If the plug is connected to a receptacle while the power switch is in the ON position, the power tool will start operating immediately, which could cause a serious accident. 4. Extension cord When the work area is removed from the power source, use an extension cord of sufficient thickness and rated capacity. The extension cord should be kept as short as practicable. 5. Confirming condition of the environment Confirm that the work site is placed under appropriate conditions conforming to prescribed precautions. When grinding a thin steel plate, depending upon the state of the workbench, a loud noise will be created due to resounding noise from the steel plate being ground. To eliminate unwanted noise in this instance, place a rubber mat beneath the material to be ground. 6. Installing a mounted wheel ● Always use a mounted wheel whose outer diameter is 32 mm or less. When using a mounted wheel in excess of this diameter, mounted wheel circumferential speed will exceed the safety limit, perhaps causing an accident. Never use a mounted wheel in excess of 32 mm diameter. ● Mounted wheels can be simply attached and detached by using two wrenches. (Refer to Fig. 1). ● Install a mounted wheel so that the mounted wheel shaft does not protrude more than 15 mm. NOTE 1. Do not tighten the collet chuck by inserting a shaft thinner than the regular shaft diameter (6 mm) in the chuck or in an empty condition. This practice will damage the collet chuck. 2. When installing a mounted wheel with shaft, tighten the collet chuck after applying a small quantity of spindle oil (or sewing machine oil) to the tapered portion indicated in Fig. 2. (dimensional diagram) 5 0000Book̲LDU4.indb 5 2015/03/25 11:32:47 English MOUNTED WHEEL SELECTING METHOD Mounted wheels attached to this hand grinder are suitable for grinding press and die cast molds, and other hard or mild steel parts. (Except stainless plate.) Types of mounted wheel are varied according to the materials to be ground. Select a mounted wheel appropriate for the material to be ground. ● The following table is an outline of mounted wheel and materials to be ground. Materials to be ground Grain Grading Bonding degree Structure Bonding agent Mild steel, hard steel, forged steel WA 60 – 80 P m V Cast iron C 36 M–O m V Brass, bronze, aluminium C 36 J–K m V WA 60 – 80 M m V C 36 K–M m V Ceramic Synthetic resin ● Small-scaled mounted wheels with shaft are prepared for grinding small surfaces. Since mounted wheel shaft diameter in 3 mm, use the collet chuck for 3 mm shaft sold separately by your Hitachi dealer as an optional accessory. HOW TO USE 1. Switching operation (1) When throwing the switch lever to the right (ON side), power is applied; when throwing it to the left (OFF side), power is switched off. (2) When first throwing the switch after installing a new mounted wheel, avoid personal proximity to the mounted wheel revolving circumference to avoid danger of a possible imperfection. 2. Precautions on operation (1) Lightly press the mounted wheel to the material to be ground When grinding materials, high-speed revolution is necessary. Use a hand grinder with high-speed revolution, minimizing the pressing force. (2) Dressing the mounted wheel ● After attaching a mounted wheel, correct deflection of the mounted wheel center by using a dresser. If the mounted wheel center is eccentric, not only precise finishing cannot be achieved but also grinder vibration increases, lowering grinder accuracy and durability. ● A clogged or worn mounted wheel will soil the finishing surface or lower grinding efficiency. Occasionally dress the mounted wheel by applying the dresser. MAINTENANCE AND INSPECTION 1. Inspecting the mounted wheel Ensure that the mounted wheel is free of cracks and surface defects. 2. Inspecting the mounting screws Regularly inspect all mounting screws and ensure that they are properly tightened. Should any of the screws be loose, retighten them immediately. Failure to do so could result in serious hazard. 3. Maintenance of the motor The motor unit winding is the very “heart” of the power tool. Exercise due care to ensure the winding does not become damaged and/or wet with oil or water. 4. Inspecting the carbon brushes (Fig. 3) The motor employs carbon brushes which are consumable parts. Since an excessively worn carbon brush can result in motor trouble, replace the carbon brushes with new ones having the same carbon brush No. shown in the figure when it becomes worn to or near the “wear limit”. In addition, always keep carbon brushes clean and ensure that they slide freely within the brush holders. 5. Replacing carbon brushes Disassemble the brush caps with a slotted-head screwdriver. The carbon brushes can then be easily removed. 6. Service parts list CAUTION Repair, modification and inspection of Hitachi Power Tools must be carried out by an Hitachi Authorized Service Center. This Parts List will be helpful if presented with the tool to the Hitachi Authorized Service Center when requesting repair or other maintenance. In the operation and maintenance of power tools, the safety regulations and standards prescribed in each country must be observed. MODIFICATIONS Hitachi Power Tools are constantly being improved and modified to incorporate the latest technological advancements. Accordingly, some parts may be changed without prior notice. NOTE Due to HITACHI’s continuing program of research and development, the specifications herein are subject to change without prior notice. 6 0000Book̲LDU4.indb 6 2015/03/25 11:32:47 Español NORMAS GENERALES DE SEGURIDAD ¡ADVERTENCIA! Lea todas las instrucciones Si no se siguen las instrucciones de abajo podría producirse una descarga eléctrica, un incendio y/o daños graves. El término “herramienta eléctrica” en todas las advertencias indicadas a continuación hace referencia a la herramienta eléctrica que funciona con la red de suministro (con cable) o a la herramienta eléctrica que funciona con pilas (sin cable). CONSERVE ESTAS INSTRUCCIONES 1) Área de trabajo a) Mantenga la zona de trabajo limpia y bien iluminada. Las zonas desordenadas y oscuras pueden provocar accidentes. b) No utilice las herramientas eléctricas en entornos explosivos como, por ejemplo, en presencia de líquidos inflamables, gases o polvo. Las herramientas eléctricas crean chispas que pueden hacer que el polvo desprenda humo. c) Mantenga a los niños y transeúntes alejados cuando utilice una herramienta eléctrica. Las distracciones pueden hacer que pierda el control. 2) Seguridad eléctrica a) Los enchufes de las herramientas eléctricas tienen que ser adecuados a la toma de corriente. No modifique el enchufe. No utilice enchufes adaptadores con herramientas eléctricas conectadas a tierra. Si no se modifican los enchufes y se utilizan tomas de corriente adecuadas se reducirá el riesgo de descarga eléctrica. b) Evite el contacto corporal con superficies conectadas a tierra como tuberías, radiadores y frigoríficos. Hay mayor riesgo de descarga eléctrica si su cuerpo está en contacto con el suelo. c) No exponga las herramientas eléctricas a la lluvia o a la humedad. La entrada de agua en una herramienta eléctrica aumentará el riesgo de descarga eléctrica. d) No utilice el cable incorrectamente. No utilice el cable para transportar, tirar de la herramienta eléctrica o desenchufarla. Mantenga el cable alejado del calor, del aceite, de bordes afilados o piezas móviles. Los cables dañados o enredados aumentan el riesgo de descarga eléctrica. e) Cuando utilice una herramienta eléctrica al aire libre, utilice un cable prolongador adecuado para utilizarse al aire libre. La utilización de un cable adecuado para usarse al aire libre reduce el riesgo de descarga eléctrica. 3) Seguridad personal a) Esté atento, preste atención a lo que hace y utilice el sentido común cuando utilice una herramienta eléctrica. No utilice una herramienta eléctrica cuando esté cansado o esté bajo la influencia de drogas, alcohol o medicación. La distracción momentánea cuando utiliza herramientas eléctricas puede dar lugar a importantes daños personales. 0000Book̲LDU4.indb 7 b) Utilice equipo de seguridad. Utilice siempre una protección ocular. El equipo de seguridad como máscara para el polvo, zapatos de seguridad antideslizantes, casco o protección para oídos utilizado para condiciones adecuadas reducirá los daños personales. c) Evite un inicio accidental. Asegúrese de que el interruptor está en “off ” antes de enchufarlo. El transporte de herramientas eléctricas con el dedo en el interruptor o el enchufe de herramientas eléctricas con el interruptor encendido puede provocar accidentes. d) Retire las llaves de ajuste antes de encender la herramienta eléctrica. Si se deja una llave en una pieza giratoria de la herramienta eléctrica podrían producirse daños personales. e) No se extralimite. Mantenga un equilibrio adecuado en todo momento. Esto permite un mayor control de la herramienta eléctrica en situaciones inesperadas. f) Vístase adecuadamente. No lleve prendas sueltas o joyas. Mantenga el pelo, la ropa y los guantes alejados de las piezas móviles. La ropa suelta, las joyas y el pelo largo pueden pillarse en las piezas móviles. g) Si se proporcionan dispositivos para la conexión de extracción de polvo e instalaciones de recogida, asegúrese de que están conectados y se utilizan adecuadamente. La utilización de estos dispositivos puede reducir los riesgos relacionados con el polvo. 4) Utilización y mantenimiento de las herramientas eléctricas a) No fuerce la herramienta eléctrica. Utilice la herramienta eléctrica correcta para su aplicación. La herramienta eléctrica correcta trabajará mejor y de forma más segura si se utiliza a la velocidad para la que fue diseñada. b) No utilice la herramienta eléctrica si el interruptor no la enciende y apaga. Las herramientas eléctricas que no pueden controlarse con el interruptor son peligrosas y deben repararse. c) Desconecte el enchufe de la fuente eléctrica antes de hacer ajustes, cambiar accesorios o almacenar herramientas eléctricas. Estas medidas de seguridad preventivas reducen el riesgo de que la herramienta eléctrica se ponga en marcha accidentalmente. d) Guarde las herramientas eléctricas que no se utilicen para que no las cojan los niños y no permita que utilicen las herramientas eléctricas personas no familiarizadas con las mismas o con estas instrucciones. Las herramientas eléctricas son peligrosas si son utilizadas por usuarios sin formación. e) Mantenimiento de las herramientas eléctricas. Compruebe si las piezas móviles están mal alineadas o unidas, si hay alguna pieza rota u otra condición que pudiera afectar al funcionamiento de las herramientas eléctricas. Si la herramienta eléctrica está dañada, llévela a reparar antes de utilizarla. 7 2015/03/25 11:32:47 Español Se producen muchos accidentes por no realizar un mantenimiento correcto de las herramientas eléctricas. f) Mantenga las herramientas de corte afiladas y limpias. Las herramientas de corte correctamente mantenidas con los bordes de corte afilados son más fáciles de controlar. g) Utilice la herramienta eléctrica, los accesorios y las brocas de la herramienta, etc., de acuerdo con estas instrucciones y de la manera adecuada para el tipo de herramienta eléctrica, teniendo en cuenta las condiciones laborales y el trabajo que se va a realizar. La utilización de la herramienta eléctrica para operaciones diferentes a pretendidas podría dar lugar a una situación peligrosa. 5) Revisión a) Lleve su herramienta a que la revise un experto cualificado que utilice sólo piezas de repuesto idénticas. Esto garantizará el mantenimiento de la seguridad de la herramienta eléctrica. PRECAUCIÓN Mantenga a los niños y a las personas enfermas alejadas. Cuando no se utilicen, las herramientas deben almacenarse fuera del alcance de los niños y de las personas enfermas. PRECAUCIONES AL UTILIZAR LA AMOLADORA 1. Siempre utilice para la finalidad presupuesta de acuerdo con las condiciones de seguridad. Esta máquina es una herramienta portátil para el trabajo de esmerilado y de acabado de piezas de metal de varios tipos, de resina y de cerámica. Utilice la máquina solamente para estas finalidades. 2. Siempre utilice las muelas abrasiva de regulación. Utilice muelas abrasivas del tipo con eje para esta máquina con un diámetro máximo de 18 mm y un diámetro del eje de 3 mm ó 6 mm. 3. Siempre pruebe antes de utilizar. Siempre verifique la muela abrasiva que se utilizará para ver si no hay fisuras o grietas. Igualmente, siempre realice un funcionamiento de prueba de la máquina antes de utilizarla para verificar la existencia de cualquier anormalidad. 4. Proteja sus ojos con gafas protectoras. Siempre utilice gafas protectoras durante el trabajo de esmerilado. Igualmente, cuando se produzca mucho polvo por el esmerilado, utilice una máscara. 5. Siempre sostenga la máquina firmemente. Siempre sostenga la máquina firmemente durante el uso. Si no sostiene la máquina firmemente, la reacción de su fuerza puede hacerla saltar para atrás. 6. No coloque cargas excesivas sobre la máquina. No coloque cargas excesivas sobre la máquina presionándola con tanta fuerza contra el material que la velocidad de rotación se reduzca drásticamente. Esto reducirá la eficiencia de trabajo y presentará el peligro de doblar el eje de la muela abrasiva. 7. Nunca toque las piezas rotativas. Mantenga las manos y otras partes del cuerpo alejadas de las inmediaciones de la muela abrasiva mientras la misma esté girando, para evitar el peligro de cortes, abrasiones o atrapamiento de la ropa en el equipo. 8. Tenga cuidado con las chispas del esmerilado. Las partículas de esmerilado pueden convertirse en chispas volantes. Siempre mantenga materiales inflamables y materiales frágiles en un lugar seguro alejado del área de trabajo. Igualmente, tenga cuidado en que las chispas no entren en contacto directo con las manos y pies. 9. No coloque la máquina aparte mientras la misma todavía esté funcionando. Nunca opere la máquina si no la está sosteniendo firmemente con ambas las manos. Igualmente, nunca coloque la máquina en una mesa o en el piso mientras la misma todavía esté funcionando. 10. Siga el orden correcto cuando reemplace la muela abrasiva. Cuando reemplace la muela abrasiva, siga cuidadosamente los pasos descritos en este manual de instrucciones. 11. Utilice solamente muelas abrasivas con una “Velocidad segura”, al mínimo tan alta cuanto el “RPM sin carga” indicado en la chapa de identificación de la herramienta. ESPECIFICACIONES Voltaje (por áreas)* Acometida* Velocidad sin carga* Muela abrasiva montada Peso (sin cable) (110 V, 115 V, 120 V, 127 V, 220 V, 230 V, 240 V) 240 W 23000 /min Máximo de 32 mm Diámetro del eje de 6 mm 1,9 kg * Verificar indefectiblemente los datos de la placa de características de la máquina, pues varían de acuerdo al país de destino. 8 0000Book̲LDU4.indb 8 2015/03/25 11:32:47 Español ACCESSORIOS ESTANDAR (1) Muelas abrasivas montadas (Nº KA-1, 2, 4, 5, 6) ........5 KA-1 (2) (3) (4) (5) KA-2 KA-4 KA-5 KA-6 Reacondicionadora......................................................1 Llave .............................................................................1 Llave .............................................................................1 Caja ..............................................................................1 KC-20 KC-21 KC-22 KC-23 KC-24 ○ Montaje universal Se utiliza este montaje universal para amolar las superficies internas de piezas de trabajo o para realizar el acabado de piezas de trabajo de forma especial, instalando una amoladora recta en el torno. Se instala el montaje universal en la corredera transversal después de retirar el soporte portaherramientas del torno. Los accesorios estándar están sujetos a cambio sin previo aviso. ACCESORIOS A OPCION (venta por separado) ○ Muelas abrasivas montadas con eje de 6 mm KA-3 KA-7 KA-8 KA-9 KA-10 ○ Boquilla de mordazas para eje de 3 mm La boquilla de mordazas de 3 mm ha sido diseñada para aceptar las muelas abrasivas montadas con un eje de 3 mm den diámetro para procesar piezas pequeñas. Las dimensiones y métodos de manejo además del orificio del eje son iguales que para la boquilla de mordazas de 6 mm. ○ Muelas abrasivas montadas con eje de 3 mm Todas las muelas abrasivas montadas se proveen con granos WA, dureza 80 y adhesivo P, y son adecuadas para esmerilar materiales de acero generales y especiales. Compre y utilice muelas abrasivas montadas de forma adecuada para el procesamiento deseado. (utilizando el montaje universal) (diagrama dimensional) Los accesorios a opción están sujetos a cambio sin previo aviso. APLICACIONES KA-20 KA-21 KA-22 KA-23 KA-24 ○ Acabado de matrices para trabajos de prensas, para coladas a presión y para moldeo. ○ Acabado de terrajas, herramientas y otras piezas de pequeño tamaño. ○ Rectificado interno de herramientas y piezas de máquinas. 9 0000Book̲LDU4.indb 9 2015/03/25 11:32:47 Español ANTES DE LA PUESTA EN MARCHA 1. Alimentación Asegurarse de que la alimentación de red que ha de ser utilizada responda a las exigencias de corriente especificadas en la placa de características del producto. 2. Puesta a tierra Se debe conectar la herramienta a tierra durante el uso para proteger el operador contra choques eléctricos. La herramienta se equipa con un cable de tres conductores y una clavija de puesta a tierra para ajustarse a las tomas con puesta a tierra. El conductor verde (o verde y amarillo) en el cable es el hilo de puesta a tierra. Nunca conecte el hilo verde (o verde y amarillo) a un terminal vivo. 3. Conmutador de alimentación Asegurarse de que el conmutador de alimentación esté en la posición OFF (desconectado). Si la clavija está conectada en la caja del enchufe mientras el conmutador de alimentación esté en pocisión ON (conectado) las herramientas eléctricas empezarán a trabajar inmediatamente, provocando un serio accidente. 4. Cable de prolongación Cuando está alejada el área de trabajo de la red de alimentación, usar un cable de prolongación de un grosor y potencia nominal suficiente. El cable de prolongación debe ser mantenido lo más corto posible. 5. Confirmación de la condición del ambiente Compruebe que todos el sitio de trabajo esté en las condiciones apropiadas de acuerdo con las precauciones prescritas. Al amolar una chapa de acero delgada, dependiendo del estado de la mesa de trabajo, puede que se produzca un ruido alto debido al ruido resonante de la amoladura de la chapa de acero. Para eliminar el ruido indeseable en este caso, coloque una alfombra de goma por debajo del material que se amolará. 6. Instalación de una muela abrasiva montada ● Siempre utilice una muela abrasiva montada con un diámetro externo de 32 mm o menos. Cuando utilice una muela abrasiva montada que exceda de este diámetro, la velocidad circunferencial excederá el límite de seguridad, y posiblemente causará un accidente. Nunca utilice una muela abrasiva montada que exceda del diámetro de 32 mm. ● Las muelas abrasivas montadas pueden instalarse y extraerse fácilmente utilizando dos llaves. (Refiérase a la Fig. 1.) ● Instale una muela abrasiva montada de forma que el eje de la muela abrasiva no se sobresalga más de 15 mm. NOTA 1. No apriete la boquilla de mordazas insertando un eje más delgado de que el eje de diámetro normal (6 mm) en la boquilla o en una condición vacía. Esto dañará la boquilla de mordazas. 2. Cuando instale una muela abrasiva montada con eje, apriete la boquilla de mordazas después de aplicar una pequeña cantidad de aceite de huso de husillos (o aceite de máquina de coser) a la parte cónica indicada en la Fig. 2. MÉTODO DE SELECCIÓN DE LA MUELA ABRASIVA Las muelas abrasivas montadas instaladas en esta amoladora recta son adecuadas para amolar moldes de prensa y de fundición, y otras partes de acero duro o suave. (Excepto chapa inoxidable.) Los tipos de muelas abrasivas montadas varían de acuerdo con los materiales que se amolarán. Seleccione una muela abrasiva montada apropiada al material que se amolará. ● En la tabla a continuación se provee un resumen de las muelas abrasivas montadas y materiales que pueden amolarse. Materiales a amolar Grano Dureza Grado del adhesivo Estructura Agente adhesivo Acero suave, acero, suave, acero forjado WA 60 – 80 P m V Hierro colado C 36 M–O m V Latón, bronce, aluminio C 36 J–K m V WA 60 – 80 M m V C 36 K–M m V Cerámica Resina sintética ● Las muelas abrasivas montadas de escala pequeña con eje están preparadas para amolar superficies pequeñas. Como el diámetro del eje de la muela abrasiva montada es de 3 mm, utilice una boquilla de mordazas para eje de 3 mm, que se vende separadamente por su distribuidor Hitachi como un accesorio opcional. COMO SE USA 1. Operación de conmutación (1) Se conecta la energía desplazando el interruptor hacia la derecha (lado ON); y se desconecta la energía desplazando el interruptor hacia la izquierda (lado OFF). (2) Cuando se conecta la energía por primera vez después de instalar una nueva muela abrasiva montada, evite aproximarse de la circunferencia de rotación de la muela abrasiva montada para evitar el peligro de una posible imperfección de instalación. 2. Precauciones durante el funcionamiento (1) Presione ligeramente la muela abrasiva montada contra el material que se amolará. Se requiere una rotación de alta velocidad para amolar los materiales. Utilice una amoladora recta con rotación de alta velocidad para minimiza la fuerza de presión. (2) Reavivación de la muela abrasiva montada ● Después de instalar una muela abrasiva montada, corrija la deflexión del centro de la muela utilizando un reavivador de muelas. 10 0000Book̲LDU4.indb 10 2015/03/25 11:32:47 Español Si el centro de la muela abrasiva montada está excéntrico, no sólo será imposible obtener un acabado preciso pero también se aumentará la vibración de la amoladora, disminuyendo la precisión y durabilidad de la amoladora. ● Una muela abrasiva montada incrustada o desgastada ensuciará la superficie de acabado o reducirá la eficiencia de amoladura. De vez en cuando, reaviva la muela abrasiva con el reavivador. MANTENIMIENTO E INSPECCION 1. Inspección de la muela abrasiva montada Asegúrese de que la muela abrasiva montada esté libre de grietas y defectos en su superficie. 2. Inspeccionar los tornillos de montaje Regularmente inspeccionar todos los tornillos de montaje y asegurarse de que estén apretados firmemente. Si cualquier tornillo estuviera suelto, volver a apretarlo inmediatamente. El no hacer esto provocaría un riesgo serio. 3. Mantenimiento de motor La unidad de bobinado del motor es el verdadero “corazón” de las herramientas eléctricas. Prestar el mayor cuidado a asegurarse de que el bobinado no se dañe y/o se humedezca con aceite o agua. 4. Inspección de escobillas de carbón (Fig. 3) El motor emplea carbones de contacto que son partes consumibles. Como un carbón de contacto excesivamente desgastado podría dar problemas al motor, reemplazar el carbón de contacto por uno nuevo, que tenga el mismo número mostrado en la figura, cuando se haya desgastado o esté cerca del límite de uso. Adicionalmente, mantener siempre los carbones de contacto limpios y asegurarse de que corran libremente dentro de los sujetadores de carbón. 5. Reemplazar el carbón de contacto Quitar la cápsula de carbón con un destornillador de cabeza pequeña. El carbón de contacto se deja luego quitar facilmente. 6. Lista de repuestos PRECAUCIÓN La reparación, modificación e inspección de las herramientas eléctricas Hitachi deben ser realizadas por un Centro de Servicio Autorizado de Hitachi. Esta lista de repuestos será de utilidad si es presentada junto con la herramienta al Centro de Servicio Autorizado de Hitachi, para solicitar la reparación o cualquier otro tipo de mantenimiento. En el manejo y el mantenimiento de las herramientas eléctricas, se deberán observar las normas y reglamentos vigentes en cada país. MODIFICACIONES Hitachi Power Tools introduce constantemente mejoras y modificaciones para incorporar los últimos avances tecnológicos. Por consiguiente, algunas partes pueden ser modificadas sin previo aviso. NOTA Debido al programa continuo de investigación y desarrollo de HITACHI estas especificaciones están sujetas a cambio sin previo aviso. 11 0000Book̲LDU4.indb 11 2015/03/25 11:32:47 中國語 一般安全規則 警告! 閱讀所有說明,未遵守下列之說明可能導致電擊、火 災及/或嚴重傷害。 「電動工具」一詞在下列警告中,關係到電源操作 (有線)之電動工具或電池操作(無線)之電動工 具。 記住這些說明 1) 工作場所 a) 保持工作場所清潔及明亮。 雜亂及昏暗區域易發生意外。 b) 勿在易產生爆炸之環境中操作,譬如有易燃液 體、瓦斯或粉塵存在之處。 電動工具產生火花會引燃粉塵或煙氣。 c) 當操作電動工具時,保持兒童及過往人員遠 離。 分神會讓你失去控制。 2) 電氣安全 a) 電動工具插頭必須與插座配合,絕不可以任何 方法修改插頭,且不得使用任何轉接插頭於有 接地之電動工具。 不修改插頭及所結合之插座可減少電擊。 b) 避免身體接觸到接地面諸如管子、散熱器、爐 灶及冰箱。 如果你的身體接地或搭地,會增加電擊的危 險。 c) 勿讓電動工具淋雨或曝露在潮濕的環境下。 電動工具進水會增加電繫的危險。 d) 勿濫用電源線。絕勿使用電源線去纏繞、拖拉 電動工具或拔插頭,保持電源線遠離熱氣、油 氣、尖角或可動零件。 損壞或纏繞的電源線會增加電繫之危險。 e) 電動工具在室外操作時要使用一適合室外用的 延長線。 使用合適之室外用延長線會減少電擊的危險。 3) 人員安全 a) 保持機警,注意你正在做什麼,並運用普通常 識操作電動工具。 當你感到疲勞或受藥品、酒精或醫療影響時, 勿操作電動工具。 操作中瞬間的不注意可能造成人員嚴重的傷 害。 b) 使用安全裝備,常時佩戴安全眼鏡。 安全裝備有防塵口罩、防滑安全鞋、硬帽,或 在適當情況下使用聽覺防護,可減少人員傷 害。 c) 避 免 意 外 地 啟 動 。 在 插 電 前 確 認 開 關 是 在 “off”的位置。 以手指放在開關握持電動工具,或在電動工具 的開關於“on”的狀況下插上插頭,都會導致 意外發生。 d) 在將電動工具啟動前,先卸下任何調整用鑰匙 或扳手。 扳手或鑰匙遺留在電動工具的轉動部位時,可 能導致人員傷害。 e) 身體勿過度伸張,任何時間要保持站穩及平 衡。 以便在不預期的狀態下,能對電動工具有較好 的控制。 f) 衣著要合宜,別穿太鬆的衣服或戴首飾。保持 你的頭髮、衣服及手套遠離轉動部位。 寬鬆的衣服、手飾及長髮會被捲入轉動部位。 g) 如果裝置要用於粉塵抽取及集塵設施,要確保 其連接及正當使用。 使用此類裝置能減少與粉塵有關之危害。 4) 電動工具之使用及注意事項 a) 勿強力使用電動工具,使用正確之電動工具為 你所需。 正確使用電動工具會依其設計條件使工作做得 更好更安全。 b) 如果開關不能轉至開及關的位置,勿使用電動 工具。 任何電動工具不能被開關所控制是危險的,必 須要修理。 c) 在做任何調整、更換配件或收存電動工具時, 要將插頭與電源分開,且/或將電池從電動工 具中取出。 此種預防安全措施可減少意外開啟電動機之危 險。 d) 收存停用之電動工具,遠離兒童,且不容許不 熟悉電動工具或未瞭解操作電動工具說明書的 人操作電動工具。 在未受過訓練的人手裡,電動工具極為危險。 e) 保養電動工具,檢核是否有可動零件錯誤的結 合或卡住、零件破裂及可能影響電動工具操作 的任何其他情形-電動工具如果損壞,在使用 前要修好。 許多意外皆肇因於不良的保養。 f) 保持切割工具銳利清潔。 適當的保養切割工具,保持銳利之切削鋒口, 可減少卡住並容易控制。 g) 按照說明書使用電動工具、配件及刀具等,使 用特殊型式之電動工具時要考量工作條件及所 執行之工作。 使用電動工具未如預期用途之操作時,會導致 危害。 12 0000Book̲LDU4.indb 12 2015/03/25 11:32:47 中國語 5) 維修 a) 讓你的電動工具由合格修理人員僅使用相同的 維修零件更換。 如此可確保電動工具的安全得以維持。 注意事項: 不可讓孩童和體弱人士靠近工作場所。 應將不使用的工具存放在孩童和體弱人士伸手不及的 地方。 使用手提帶柄電磨機的注意事 項 1. 在安全狀態下用於正當的用途。 本機是用於各種金屬、樹脂及陶瓷的研磨或精加 工的携帶式工具。 2. 使用規定的砂輪。 本機所用砂輪應裝備有最大直徑為18公釐的軸以 及一根3公釐或6公釐的軸。 3. 使用之前應先試運轉。 務請檢查所要用的砂輪有無裂紋或破裂。 而且使用之前應先試運轉,檢查有無異常。 規 4. 帶護目鏡保護眼睛。 研磨作業中,請帶護目鏡。若因研磨而會產生大 量灰塵時,則應戴口罩。 5. 機器應握緊。 使用時,務請握緊機器。否則,會因反作用力而 反衝。 6. 請勿施加過大負荷於機器上。 切勿將機器猛力往工件上壓,使轉速急劇降低, 以免影響工作效率並導致砂輪軸彎曲。 7. 切勿碰到旋轉機件。 砂輪在旋轉時,勿讓雙手及身體的其他部分靠 近,以免被割傷、擦傷或捲入衣服。 8. 注意砂輪飛出火花。 磨粒會變成火花飛出。易燃物與易損物必須放在 遠離工地的安全地區。同時,也要注意不可讓火 花直接碰到手腳。 9. 機器要等停止運轉後才放下。 沒用雙手握緊機器切勿開動。仍在運轉時,請勿 將機器放在桌上或地板上。 10. 裝回砂輪要遵照正確的順序進行。 裝回砂輪時,注意遵照使用說明書所述步驟進 行。 11. 僅使用與動力公主銘牌上標註的“無負荷RPM” 相同大小的速度作為安全速度下限的砂輪。 格 電壓(按地區)* (110 V, 115 V, 120 V, 127 V, 220 V, 230 V, 240 V) 輸入功率* 240 W 額定輸出功率 120 W 無負荷速度* 23000轉/分 安裝磨輪 最大 32 mm 旋轉軸直徑 6 mm 重量(不含線纜) 1.9 kg * 當須改變地區時應檢查產品上的銘牌。 標準附件 (1) 安裝磨輪(KA-1,2,4,5,6) ................................ 1 (2) 修整器 ............................................................... 1 (3) 扳手 .................................................................. 1 (4) 扳手 .................................................................. 1 (5) 箱子 .................................................................. 1 標準附件可能不預先通告而徑予更改。 KA-1 KA-2 KA-4 KA-5 KA-6 13 0000Book̲LDU4.indb 13 2015/03/25 11:32:48 中國語 選購附件(分開銷售) ○ 旋轉軸為6 mm的安裝磨輪 KA-3 KA-7 KA-8 KA-9 KA-10 (用萬能架) ○ 3 mm旋轉軸用的彈簧筒夾頭 3 mm彈簧筒夾頭是為了安裝直徑3 mm旋轉軸的 安裝磨輪而設計的,用來加工細小部件。除了旋 轉軸孔外尺寸及加工方法與6 mm的彈簧筒夾頭相 同。 ○ 3 mm旋轉軸的安裝磨輪 所有的安裝磨輪都備有WA粒度,80拋光和P結 合,適合用於拋光普通及特殊的鋼材。購買並利 用適當形狀的安裝磨輪以便加工。 (尺寸示意圖) 選購附件可能不預先通告而徑予更改。 用 KA-20 KA-21 KA-22 KA-23 途 KA-24 ○ 壓力加工、沖模鑄造及模製用沖模的拋光。 ○ 螺紋切割沖模、工件及其他小型零件的拋光。 ○ 工件及機器零件的內部打磨。 作業之前 KC-20 KC-21 KC-22 KC-23 KC-24 ○ 萬能架 當研磨工件內側表面或加工特殊形狀工件時,使 用萬能架。這時把手提帶柄電磨機裝到車床上。 拆掉車床刀架後把萬能架安到十字導板上。 1. 電源 確認所使用的電源與工具銘牌上標示的規格是否 相符。 2. 接地 這個工具在使用時一定要接地以防操作者受到電 擊。工具是配備有三導線和接地式插銷以適應正 常接地插座。在電纜中的綠色(或綠和黃)導線 是接地線。千萬不要把綠地(綠和黃)線接到火 線上。 3. 電源開關 確認電源開關是否切斷。若電源開關接通,則插 頭插入電源插座時電動工具將出其不意地立刻轉 動,從而招致嚴重事故。 14 0000Book̲LDU4.indb 14 2015/03/25 11:32:48 中國語 4. 延伸線纜 若作業場所移到離開電源的地點,應使用容量足 夠、鎧裝合適的延伸線纜,並且要盡可能地短 些。 5. 確認環境條件 確認工作場地安排在符合規定措施的條件下。當 研磨薄鋼板時,因工作臺的狀態會產生很大的噪 聲,它是因為研磨鋼板引起的。為了消除這種有 害的噪聲可在被研磨的材料下放一塊橡皮墊。 6. 裝上安裝磨輪 ● 常用的安裝磨輪其外外徑等於或小於32 mm。 當使用一個超過該直徑的安裝磨輪時,安裝磨輪 圓周速度將超過安全極限,可能發生意外。絕不 要用外徑超過32 mm的安裝磨輪。 ● 用兩個扳手就可以很簡單地安上或拆下安裝磨輪 (參閱圖1) ● 裝配好的砂輪請安裝得不使其軸突出15mm以上。 被研磨的部件 低碳鋼、高碳鋼、鍛鋼 鑄鋼 黃銅、青銅、鋁 陶瓷 合成樹脂 粒度 WA C C WA C 拋光 60 - 80 36 36 60 - 80 36 ● 帶迴轉軸小尺寸的安裝磨輪是為拋光細小表面準 備的。當安裝磨輪迴轉軸的直徑為3 mm時,要用 3 mm迴轉軸的彈簧筒夾頭,日立販賣商做為任選 附件分別通知。 使用方法 1. 開關的操作 (1) 將手柄向右推(開的一側),電源接通; 將手柄向左推(關的一側),電源切斷。 (2) 安上一個新安裝磨輪後首先開電源,防止人們接 近旋轉的安裝磨輪,以免可能發生機械差錯出現 危險。 2. 操作注意事項 (1) 裝安裝磨輪輕壓到被研磨的部件上 當拋光部件時,需要高轉速。使用高轉速手磨鑽 時使壓小減到最小。 (2) 修整安裝磨輪 ● 安上安裝磨輪後,用修整器校正磨輪中心偏差。 如果安裝磨輪偏心,不僅不能精密地研磨而且增 加手提帶柄電磨機的震動,從而降低磨機的精度 和壽命。 注意: 1. 不要當把一個比規定直徑(6 mm)細的迴轉軸 插入彈簧筒夾頭時擰緊夾頭,也不能在彈簧筒 夾頭空着時擰緊它。 2. 當安裝一個有迴轉軸的安裝磨輪時,在楔形部 分塗少許軸油(或縫紉機油)後再擰緊彈簧筒 夾頭,見圖2。 選用安裝磨輪方法 安在手提帶柄電磨機上的安裝磨輪應適合於研磨 承壓、模具鑄造形狀以及其它高碳鋼或低鋼部件 (除不鏽鋼板外)。 按被研磨的部件安裝磨輪有許多類型。應選用適 合於被研磨部件的安裝磨輪。 ● 下列表格給出了安裝磨輪及被研磨部件的概要: 結合 P M–O J–K M K–M 結構 m m m m m 結合劑 V V V V V ● 一個受到阻塞或被磨損的安裝磨輪將弄污加工表 面或降低拋光效率。 有時用修整器整修安裝磨輪。 維護和檢查 1. 檢修安裝磨輪: 確保安裝磨輪沒有破損及表面的缺陷。 2. 檢查安裝螺釘 要經常檢查安裝螺釘是否緊固妥善。若發現螺釘 鬆了,應立即重新扭緊,否則會導致嚴重的事 故。 3. 電動機的維護 電動機繞線是電動工具的“心臟部”。應仔細檢 查有無損傷,是否被油液或水沾濕。 4. 檢查碳刷(圖3) 馬達使用碳刷,它是消耗部品,因此使用過久的 碳刷將會導致馬達故障,用具有相同碳刷號的新 碳刷去更換舊的,碳刷編號用數字表示碳刷何時 用舊或接近於磨損極限此外,要經常保持碳刷清 潔以及保證它在刷握裡能自由滑動。 5. 更換碳刷 用無頭螺絲刀卸下碳刷蓋、然後可以很容易的取 下碳刷。 15 0000Book̲LDU4.indb 15 2015/03/25 11:32:48 中國語 6. 維修部件目錄 注意: 日立電動工具的修理、維護和檢查必須由日立所 認可的維修中心進行。 當尋求修理或其他維護時,將本部件目錄與工具 一起提交給日立所認可的維修中心會對您有所幫 助。 在操作和維護電動工具中,必須遵守各國的安全 規則和標准規定。 改進: 日立電動工具隨時都在進行改進以適應最新的技術進 步。 因此,有些部件可能未預先通知而進行改進。 註: 為求改進,本手冊所載規格可能不預先通告而徑 予更改。 16 0000Book̲LDU4.indb 16 2015/03/25 11:32:48 ﺍﻟﻌﺭﺑﻳﺔ ﻁﺭﻳﻘﺔ ﺗﺣﺩﻳﺩ ﻋﺟﻠﺔ ﺍﻟﺗﺭﻛﻳﺏ ﺗﺗﻧﺎﺳﺏ ﻋﺟﻼﺕ ﺍﻟﺗﺭﻛﻳﺏ ﺍﻟﻣﺭﺗﺑﻁﺔ ﺑﻣﻘﺑﺽ ﺍﻟﻁﺣﻥ ﻫﺫﺍ ﻣﻊ ﺿﻐﻁ ﺍﻟﻁﺣﻥ ﻭﻗﻭﺍﻟﺏ ﺍﻟﻣﻭﺍﺩ ﻭﺍﻷﺟﺯﺍء ﺍﻟﺻﻠﺑﺔ ﺍﻷﺧﺭﻯ ﻭﺍﻷﻗﻝ ﺻﻼﺑﺔ. )ﺑﺎﺳﺗﺛﻧﺎء ﺍﻟﺻﻠﺏ( .ﺗﺗﻌﺩﺩ ﺃﻧﻭﺍﻉ ﻋﺟﻼﺕ ﺍﻟﺗﺭﻛﻳﺏ ﻭﻓ ًﻘﺎ ﻟﻠﻣﻭﺍﺩ ﺍﻟﺗﻲ ﻳﺗﻡ ﻁﺣﻧﻬﺎ .ﺣﺩﺩ ﻋﺟﻠﺔ ﺍﻟﺗﺭﻛﻳﺏ ﺍﻟﻣﻧﺎﺳﺑﺔ ﻟﻠﻣﻭﺍﺩ ﺍﻟﻣﺭﺍﺩ ﻁﺣﻧﻬﺎ. ً ﻣﺧﻁﻁﺎ ﻟﻌﺟﻠﺔ ﺍﻟﺗﺭﻛﻳﺏ ﻭﺍﻟﻣﻭﺍﺩ ﺍﻟﺗﻲ ﻳﺗﻡ ﻁﺣﻧﻬﺎ. ● ﻳﻣﺛﻝ ﺍﻟﺟﺩﻭﻝ ﺍﻟﺗﺎﻟﻲ ﺍﻟﻣﻭﺍﺩ ﺍﻟﺗﻲ ﻳﺗﻡ ﻁﺣﻧﻬﺎ ﺍﻟﻁﺣﻥ ﺍﻟﺗﺳﻭﻳﺔ ﺩﺭﺟﺔ ﺍﻻﺭﺗﺑﺎﻁ ﺍﻟﺗﺷﻛﻳﻝ ﻋﺎﻣﻝ ﺍﻟﺭﺑﻁ ﺍﻟﺻﻠﺏ ﺍﻷﻗﻝ ﺻﻼﺑﺔ ﻭﺍﻟﺻﻠﺏ ﺍﻟﺷﺩﺑﺩ ﻭﺍﻟﺻﻠﺏ ﺍﻟﻣﻁﺭﻭﻕ WA 60 – 80 P m V ﺣﺩﻳﺩ ﺍﻟﺯﻫﺭ C 36 M–O m V ﺍﻟﻧﺣﺎﺱ ﺍﻷﺻﻔﺭ ﻭﺍﻟﺑﺭﻭﻧﺯ ﻭﺍﻷﻟﻭﻣﻧﻳﻭﻡ C 36 J–K m V WA 60 – 80 M m V C 36 K–M m V ﺍﻟﺳﻳﺭﺍﻣﻳﻙ ﺍﻟﻠﺩﺍﺋﻥ ﺍﻻﺻﻁﻧﺎﻋﻳﺔ 4ﻓﺣﺹ ﺍﻟﻔﺭﺷﺎﺓ ﺍﻟﻛﺭﺑﻭﻧﻳﺔ )ﺍﻟﺷﻛﻝ (3 ﻳﺳﺗﻬﻠﻙ ﺍﻟﻣﺣﺭﻙ ﺍﻟﻔﺭﺷﺎﺓ ﺍﻟﻛﺭﺑﻭﻧﻳﺔ ﻭﻫﻲ ﻣﻥ ﺍﻷﺟﺯﺍء ﻏﻳﺭ ﺍﻟﻣﻌﻣﺭﺓ. ﻧﻅﺭً ﺍ ﻷﻥ ﺗﺂﻛﻝ ﺍﻟﻔﺭﺷﺎﺓ ﺍﻟﻛﺭﺑﻭﻧﻳﺔ ﻗﺩ ﻳﻧﺗﺞ ﻋﻧﻪ ﻭﺟﻭﺩ ﻣﺷﺎﻛﻝ ﺑﺎﻟﻣﺣﺭﻙ، ﻗﻡ ﺑﺎﺳﺗﺑﺩﺍﻝ ﺍﻟﻔﺭﺷﺎﺓ ﺍﻟﻛﺭﺑﻭﻧﻳﺔ ﺑﺄﺧﺭﻯ ﺟﺩﻳﺩﺓ ﻟﺩﻳﻬﺎ ﻧﻔﺱ ﺭﻗﻡ ﺍﻟﻔﺭﺷﺎﺓ ﺍﻟﻛﺭﺑﻭﻧﻳﺔ ﻛﻣﺎ ﻫﻭ ﻣﻭﺿﺢ ﻓﻲ ﺍﻟﺷﻛﻝ ﻋﻧﺩ ﺗﺂﻛﻠﻬﺎ ﺃﻭ ﺍﻗﺗﺭﺍﺑﻬﺎ ﻣﻥ "ﺣﺩ ﺍﻟﺗﺂﻛﻝ" .ﺑﺎﻹﺿﺎﻓﺔ ﺇﻟﻰ ﺫﻟﻙ ،ﻗﻡ ﺑﺗﻧﻅﻳﻑ ﺍﻟﻔﺭﺷﺎﺓ ﺍﻟﻛﺭﺑﻭﻧﻳﺔ ﺑﺎﺳﺗﻣﺭﺍﺭ ﻭﺍﻟﺗﺄﻛﺩ ﻣﻥ ﺍﻧﺯﻻﻗﻬﺎ ﺑﺳﻼﺳﺔ ﺩﺍﺧﻝ ﻣﻘﺎﺑﺽ ﺍﻟﻔﺭﺷﺎﺓ. 5ﺍﺳﺗﺑﺩﺍﻝ ﺍﻟﻔﺭﺷﺎﺓ ﺍﻟﻛﺭﺑﻭﻧﻳﺔ ﻗﻡ ﺑﻔﻙ ﺃﻏﻁﻳﺔ ﺍﻟﻔﺭﺷﺎﺓ ﺑﺎﺳﺗﺧﺩﺍﻡ ﻣﻔﻙ ﺻﻐﻳﺭ ﺑﺭﺃﺱ ﺫﻭ ﻓﺗﺣﺎﺕ .ﻭﺑﻌﺩ ﺫﻟﻙ ﻳﻣﻛﻥ ﻧﺯﻉ ﺍﻟﻔﺭﺵ ﺍﻟﻛﺭﺑﻭﻧﻳﺔ ﺑﺳﻬﻭﻟﺔ. 6ﻗﺎﺋﻣﺔ ﺃﺟﺯﺍء ﺍﻟﺧﺩﻣﺔ ﺗﻧﺑﻳﻪ ﻳﺟﺏ ﺗﻧﻔﻳﺫ ﺃﻋﻣﺎﻝ ﺍﻹﺻﻼﺡ ،ﻭﺍﻟﺗﻌﺩﻳﻝ ،ﻭﺍﻟﻔﺣﺹ ﻷﺩﻭﺍﺕ Hitachiﻣﻥ ﻗﺑﻝ ﻣﺭﻛﺯ ﺍﻟﺧﺩﻣﺔ ﺍﻟﻣﻌﺗﻣﺩ. ﻗﺎﺋﻣﺔ ﺍﻷﺟﺯﺍء ﻫﺫﻩ ﻣﻔﻳﺩﺓ ﻋﻧﺩ ﺗﻘﺩﻳﻣﻬﺎ ﻣﻊ ﺍﻷﺩﺍﺓ ﻟﻣﺭﻛﺯ ﺧﺩﻣﺔ Hitachi ﻣﻌﺗﻣﺩ ﻋﻧﺩ ﻁﻠﺏ ﺍﻹﺻﻼﺡ ﺃﻭ ﻏﻳﺭﻫﺎ ﻣﻥ ﺃﻋﻣﺎﻝ ﺍﻟﺻﻳﺎﻧﺔ. ﻓﻲ ﺣﺎﻟﺔ ﺗﺷﻐﻳﻝ ﺍﻟﻌﺩﺩ ﺍﻟﻛﻬﺭﺑﺎﺋﻳﺔ ﺃﻭ ﺻﻳﺎﻧﺗﻬﺎ ،ﻳﺟﺏ ﺍﺗﺑﺎﻉ ﺗﻌﻠﻳﻣﺎﺕ ﺍﻷﻣﺎﻥ ﻭﺍﻟﻣﻌﺎﻳﻳﺭ ﺍﻟﺧﺎﺻﺔ ﺑﻛﻝ ﺩﻭﻟﺔ. ﺍﻟﺗﻌﺩﻳﻼﺕ ﻳﺗﻡ ﺗﺣﺳﻳﻥ ﺃﺩﻭﺍﺕ Hitachiﺑﺎﺳﺗﻣﺭﺍﺭ ﻭﺗﻌﺩﻳﻠﻬﺎ ﺗﺑﻌًﺎ ﻷﺣﺩﺙ ﺍﻟﺗﻘﻧﻳﺎﺕ ﺍﻟﻣﺗﻘﺩﻣﺔ. ﻭﻟﺫﻟﻙ ،ﻗﺩ ﻳﺗﻡ ﺗﻐﻳﻳﺭ ﺑﻌﺽ ﺍﻷﺟﺯﺍء )ﻣﺛﻝ ﺃﺭﻗﺎﻡ ﺍﻟﺭﻣﻭﺯ ﻭ/ﺃﻭ ﺍﻟﺗﺻﻣﻳﻡ( ﺩﻭﻥ ﺇﻋﻼﻡ ﻣﺳﺑﻕ. ● ﻳﺗﻡ ﺗﺟﻬﻳﺯ ﻋﺟﻼﺕ ﺍﻟﺗﺭﻛﻳﺏ ﺫﺍﺕ ﺍﻟﻣﻘﺎﻳﻳﺱ ﺍﻟﺻﻐﻳﺭﺓ ﻣﻊ ﺍﻟﻌﻣﻭﺩ ﻟﻁﺣﻥ ﺍﻷﺳﻁﺢ ﺍﻟﺻﻐﻳﺭﺓ .ﻭﺣﻳﺙ ﺃﻥ ﻗﻁﺭ ﻋﻣﻭﺩ ﻋﺟﻠﺔ ﺍﻟﺗﺭﻛﻳﺏ ﻫﻭ 3ﻣﻡ، ﺍﺳﺗﺧﺩﻡ ﻣﻘﺑﺽ ﺍﻟﻁﻭﻕ ﻟﻠﻌﻣﻭﺩ 3ﻣﻡ ﻭﺍﻟﺫﻱ ﻳﺑﺎﻉ ﺑﺷﻛﻝ ﻣﻧﻔﺭﺩ ﺑﻭﺍﺳﻁﺔ ﻭﻛﻳﻝ Hitachiﻛﻣﻠﺣﻕ ﺍﺧﺗﻳﺎﺭﻱ. ﻛﻳﻔﻳﺔ ﺍﻻﺳﺗﺧﺩﺍﻡ 1 )(1 )(2 2 )(1 )(2 ● ● ﺑﺩء ﺍﻟﺗﺷﻐﻳﻝ ﻋﻧﺩ ﺗﺣﺭﻳﻙ ﺫﺭﺍﻉ ﺍﻟﻣﻔﺗﺎﺡ ﺇﻟﻰ ﺍﻟﻳﻣﻳﻥ )ﺟﺎﻧﺏ ﺍﻟﺗﺷﻐﻳﻝ( ،ﻳﺗﻡ ﺗﺷﻐﻳﻝ ﺍﻟﻁﺎﻗﺔ؛ ﻭﻋﻧﺩ ﺗﺣﺭﻳﻛﻪ ﺇﻟﻰ ﺍﻟﻳﺳﺎﺭ )ﺟﺎﻧﺏ ﺍﻹﻳﻘﺎﻑ( ،ﻳﺗﻡ ﺇﻳﻘﺎﻑ ﺍﻟﻁﺎﻗﺔ. ﻋﻧﺩ ﺗﺣﺭﻳﻙ ﺍﻟﻣﻔﺗﺎﺡ ﻟﻠﻣﺭﺓ ﺍﻷﻭﻟﻰ ﺑﻌﺩ ﺗﺭﻛﻳﺏ ﻋﺟﻠﺔ ﺗﺭﻛﻳﺏ ﺟﺩﻳﺩﺓ، ﺗﺟﻧﺏ ﺍﻟﻣﺟﺎﻭﺭﺓ ﺍﻟﺷﺧﺻﻳﺔ ﻟﻠﺑﻳﺋﺔ ﺍﻟﻣﺣﻳﻁﺔ ﺑﺩﻭﺭﺍﻥ ﻋﺟﻠﺔ ﺍﻟﺗﺭﻛﻳﺏ ﻟﺗﺟﻧﺏ ﺧﻁﺭ ﺍﻻﺧﺗﻼﻝ. ﺍﺣﺗﻳﺎﻁﺎﺕ ﺣﻭﻝ ﺍﻟﺗﺷﻐﻳﻝ ﺍﺿﻐﻁ ﺑﺭﻓﻕ ﻋﻠﻰ ﻋﺟﻠﺔ ﺍﻟﺗﺭﻛﻳﺏ ﻟﻠﻣﻭﺍﺩ ﺍﻟﻣﺭﺍﺩ ﻁﺣﻧﻬﺎ ﻋﻧﺩ ﻁﺣﻥ ﺍﻟﻣﻭﺍﺩ ،ﻳﺗﻁﻠﺏ ﺫﻟﻙ ﻭﺟﻭﺩ ﺳﺭﻋﺔ ﻫﺎﺋﻠﺔ .ﺍﺳﺗﺧﺩﻡ ﻣﻘﺑﺽ ﺍﻟﻁﺎﺣﻭﻧﺔ ﻣﻊ ﺳﺭﻋﺔ ﻋﺎﻟﻳﺔ ،ﻣﺎ ﻳﻘﻠﻝ ﺫﻟﻙ ﻣﻥ ﻗﻭﺓ ﺍﻟﺿﻐﻁ. ﺗﺳﻭﻳﺔ ﻋﺟﻠﺔ ﺍﻟﺗﺭﻛﻳﺏ ﺑﻌﺩ ﺭﺑﻁ ﻋﺟﻠﺔ ﺍﻟﺗﺭﻛﻳﺏ ،ﻗﻡ ﺑﺗﺻﺣﻳﺢ ﻣﻳﻝ ﻣﺭﻛﺯ ﻋﺟﻠﺔ ﺍﻟﺗﺭﻛﻳﺏ ﺑﺎﺳﺗﺧﺩﺍﻡ ﻣﺳﻭﺍﺓ. ً ﻣﺗﻣﺭﻛﺯﺍ ﻓﻲ ﻣﻭﺿﻌﻪ ،ﻓﻠﻥ ﻳﺗﻡ ﺇﺫﺍ ﻛﺎﻥ ﻣﺭﻛﺯ ﻋﺟﻠﺔ ﺍﻟﺗﺭﻛﻳﺏ ﻟﻳﺱ ﻓﻲ ﺍﻹﻧﻬﺎء ﺑﺩﻗﺔ ﻭﺳﻭﻑ ﻳﺯﺩﺍﺩ ﺍﻫﺗﺯﺍﺯ ﺍﻟﻁﺎﺣﻭﻧﺔ ﻣﻣﺎ ﻳﺅﺩﻱ ﺇﻟﻰ ﺍﻧﺧﻔﺎﺽ ﺩﻗﺔ ﺍﻟﻁﺎﺣﻭﻧﺔ ﻭﺍﻟﺗﺣﻣﻝ. ﻋﺟﻠﺔ ﺍﻟﺗﺭﻛﻳﺏ ﺍﻟﻣﺳﺩﻭﺩﺓ ﺃﻭ ﺍﻟﻣﺗﺂﻛﻠﺔ ﺳﻭﻑ ﺗﺷﻭﻩ ﺍﻷﺳﻁﺢ ﺍﻟﻣﻧﺗﻬﻳﺔ ﺃﻭ ﺧﻔﺽ ﻛﻔﺎءﺓ ﺍﻟﻁﺣﻥ .ﻣﻥ ﺣﻳﻥ ﻵﺧﺭ ﻗﻡ ﺑﺗﺳﻭﻳﺔ ﻋﺟﻠﺔ ﺍﻟﺗﺭﻛﻳﺏ ﺑﺎﺳﺗﺧﺩﺍﻡ ﺍﻟﻣﺳﻭﺍﺓ. ﻣﻼﺣﻅﺔ ﺗﺑﻌًﺎ ﻟﺑﺭﻧﺎﻣﺞ HITACHIﻟﻠﺑﺣﺙ ﻭﺍﻟﺗﻁﻭﻳﺭ ﺍﻟﻣﺳﺗﻣﺭ ،ﺗﺗﻐﻳﺭ ﺍﻟﻣﻭﺍﺻﻔﺎﺕ ﺍﻟﻣﺫﻛﻭﺭﺓ ﻫﻧﺎ ﺩﻭﻥ ﺇﻋﻼﻡ ﻣﺳﺑﻕ. ﺍﻟﺻﻳﺎﻧﺔ ﻭﺍﻟﻔﺣﺹ 1ﻓﺣﺹ ﻋﺟﻠﺔ ﺍﻟﺗﺭﻛﻳﺏ ﺗﺄﻛﺩ ﻣﻥ ﺃﻥ ﻋﺟﻠﺔ ﺍﻟﺗﺭﻛﻳﺏ ﺧﺎﻟﻳﺔ ﻣﻥ ﺍﻟﺗﺷﻘﻕ ﻭﺍﻟﻌﻳﻭﺏ ﺍﻟﺳﻁﺣﻳﺔ. 2ﻓﺣﺹ ﻣﺳﺎﻣﻳﺭ ﺍﻟﺗﺛﺑﻳﺕ ﻗﻡ ﺑﺎﻟﻔﺣﺹ ﺍﻟﺩﻭﺭﻱ ﻟﻛﺎﻓﺔ ﻣﺳﺎﻣﻳﺭ ﺍﻟﺗﺛﺑﻳﺕ ﻭﺍﻟﺗﺄﻛﺩ ﻣﻥ ﺇﺣﻛﺎﻡ ﺭﺑﻁﻬﺎ ﺑﺷﻛﻝ ﺻﺣﻳﺢ .ﻓﻲ ﺣﺎﻟﺔ ﻓﻙ ﺃﻳﺔ ﻣﺳﺎﻣﻳﺭ ،ﻗﻡ ﺑﺈﺣﻛﺎﻡ ﺭﺑﻁﻬﺎ ﻋﻠﻰ ﺍﻟﻔﻭﺭ. ﻓﻘﺩ ﻳﻌﺭﺽ ﺍﻟﻔﺷﻝ ﻓﻲ ﺍﻟﻘﻳﺎﻡ ﺑﺫﻟﻙ ﺇﻟﻰ ﻣﺧﺎﻁﺭ. 3ﺻﻳﺎﻧﺔ ﺍﻟﻣﺣﺭﻙ ﻣﻠﻑ ﻭﺣﺩﺓ ﺍﻟﻣﺣﺭﻙ ﻫﻭ "ﺍﻟﺟﺯء ﺍﻷﻭﺳﻁ" ﻣﻥ ﺃﺩﺍﺓ ﺍﻟﻁﺎﻗﺔ. ﺗﺄﻛﺩ ﺑﺎﺳﺗﻣﺭﺍﺭ ﻣﻥ ﻋﺩﻡ ﺗﻠﻑ ﺍﻟﻣﻠﻑ ﻭ/ﺃﻭ ﺑﻠﻠﻪ ﺑﻭﺍﺳﻁﺔ ﺍﻟﺯﻳﺕ ﺃﻭ ﺍﻟﻣﺎء. 17 2015/03/25 11:32:48 ٤ 0000Book̲LDU4.indb 17 ﺍﻟﻌﺭﺑﻳﺔ ﺗﻁﺑﻳﻘﺎﺕ ○ ﺇﻧﻬﺎء ﺍﻟﻘﻭﺍﻟﺏ ﻟﺿﻐﻁ ﺍﻟﻌﻣﻝ ،ﻭﻣﻭﺍﺩ ﺍﻟﻘﺎﻟﺏ ﻭﺍﻟﺗﺷﻛﻳﻝ ﺑﺎﻟﻘﻭﺍﻟﺏ. ○ ﺇﻧﻬﺎء ﻗﻭﺍﻟﺏ ﺍﻟﻘﻁﻊ ﺍﻟﻣﺳﻧﻧﺔ ﻭﺍﻷﺩﻭﺍﺕ ﻭﺍﻷﺟﺯﺍء ﺍﻟﺻﻐﻳﺭﺓ ﺍﻷﺧﺭﻯ. ○ ﺍﻟﻁﺣﻥ ﺍﻟﺩﺍﺧﻠﻲ ﻟﻸﺩﻭﺍﺕ ﻭﺃﺟﺯﺍء ﺍﻟﺟﻬﺎﺯ. ﻗﺑﻝ ﺍﻟﺗﺷﻐﻳﻝ KA-24 KC-24 KA-23 KC-23 KA-22 KC-22 KA-21 KC-21 1ﻣﺻﺩﺭ ﺍﻟﻁﺎﻗﺔ ﺗﺄﻛﺩ ﻣﻥ ﺃﻥ ﻣﺻﺩﺭ ﺍﻟﻁﺎﻗﺔ ﺍﻟﺫﻱ ﺳﻳﺗﻡ ﺍﺳﺗﺧﺩﺍﻣﻪ ﻣﻁﺎﺑﻕ ﻟﻣﺗﻁﻠﺑﺎﺕ ﺍﻟﻁﺎﻗﺔ ﺍﻟﻣﺣﺩﺩﺓ ﻋﻠﻰ ﻟﻭﺣﺔ ﺍﻻﺳﻡ ﺍﻟﻣﻭﺟﻭﺩﺓ ﻋﻠﻰ ﺍﻟﻣﻧﺗﺞ. 2ﺍﻟﺗﺄﺭﻳﺽ ﻳﺟﺏ ﺃﻥ ﻳﺗﻡ ﻁﺣﻥ ﻫﺫﻩ ﺍﻟﻣﺎﺩﺓ ﻋﻧﺩ ﺍﻻﺳﺗﺧﺩﺍﻡ ﻟﺣﻣﺎﻳﺔ ﺍﻟﻣﺷﻐﻝ ﻣﻥ ﺍﻟﺻﺩﻣﺔ ﺍﻟﻛﻬﺭﺑﻳﺔ .ﺗﻡ ﺗﺟﻬﻳﺯ ﻫﺫﻩ ﺍﻷﺩﺍﺓ ﺑﺛﻼﺛﺔ ﺃﺳﻼﻙ ﻟﻠﺗﻭﺻﻳﻝ ﻭﻗﺎﺑﺱ ﻟﺗﺣﺩﻳﺩ ﻧﻭﻉ ﺍﻟﻁﺣﻥ ﻟﻠﺗﻭﺍﻓﻕ ﻣﻊ ﻣﻘﺑﺱ ﻧﻭﻉ ﺍﻟﻁﺣﻥ ﺍﻟﺻﺣﻳﺢ .ﺍﻟﻣﻭﺻﻝ ﺍﻷﺧﺿﺭ )ﺃﻭ ﺍﻷﺧﺿﺭ ﻭﺍﻷﺻﻔﺭ( ﻓﻲ ﺍﻟﺳﻠﻙ ﻫﻭ ﺍﻟﺳﻠﻙ ﺍﻷﺭﺿﻲ .ﻻ ﺗﻘﻡ ﺃﺑ ًﺩﺍ ﺑﺗﻭﺻﻳﻝ ﺍﻟﺳﻠﻙ ﺍﻷﺧﺿﺭ )ﺃﻭ ﺍﻷﺧﺿﺭ ﻭﺍﻷﺻﻔﺭ( ﺑﻁﺭﻑ ﻣﺑﺎﺷﺭ. 3ﻣﻔﺗﺎﺡ ﺍﻟﻁﺎﻗﺔ ﺗﺄﻛﺩ ﻣﻥ ﺃﻥ ﻣﻔﺗﺎﺡ ﺍﻟﻁﺎﻗﺔ ﻋﻠﻰ ﺍﻟﻭﺿﻊ ﺇﻳﻘﺎﻑ .ﻓﻲ ﺣﺎﻟﺔ ﺗﻭﺻﻳﻝ ﺍﻟﻘﺎﺑﺱ ﺑﺎﻟﻣﻘﺑﺱ ﻭﻛﺎﻥ ﻣﻔﺗﺎﺡ ﺍﻟﻁﺎﻗﺔ ﻋﻠﻰ ﺍﻟﻭﺿﻊ ﺗﺷﻐﻳﻝ ،ﻓﺳﻳﺗﻡ ﺗﺷﻐﻳﻝ ﺃﺩﺍﺓ ﺍﻟﻁﺎﻗﺔ ﻋﻠﻰ ﺍﻟﻔﻭﺭ ،ﻣﻣﺎ ﻗﺩ ﻳﺅﺩﻱ ﺇﻟﻰ ﻭﻗﻭﻉ ﺍﺻﺎﺑﺎﺕ. 4ﺳﻠﻙ ﺍﻟﺗﻭﺻﻳﻝ ﺍﻹﺿﺎﻓﻲ ﻋﻧﺩ ﺇﺯﺍﻟﺔ ﻣﻧﻁﻘﺔ ﺍﻟﻌﻣﻝ ﻣﻥ ﻣﺻﺩﺭ ﺍﻟﻁﺎﻗﺔ ،ﺍﺳﺗﺧﺩﻡ ﺳﻠﻙ ﺗﻭﺻﻳﻝ ﺇﺿﺎﻓﻲ ﺫﻭ ﺳﻣﻙ ﻛﺎ ٍ ﻑ ﻭﺳﻌﺔ ﻣﻘﻧﻧﺔ .ﻳﺟﺏ ﺃﻥ ﻳﻅﻝ ﺳﻠﻙ ﺍﻟﺗﻭﺻﻳﻝ ﺍﻹﺿﺎﻓﻲ ﻗﺻﻳﺭً ﺍ ﺑﻘﺩﺭ ﺍﻟﻣﺳﺗﻁﺎﻉ. 5ﺣﺎﻟﺔ ﺍﻟﻣﻁﺎﺑﻘﺔ ﻟﻠﺑﻳﺋﺔ ﺗﺄﻛﺩ ﻣﻥ ﺗﻬﻳﺋﺔ ﻣﻭﻗﻊ ﺍﻟﻌﻣﻝ ﺑﺎﻟﻅﺭﻭﻑ ﺍﻟﻣﻼﺋﻣﺔ ﺍﻟﻣﻁﺎﺑﻘﺔ ﻟﻺﺟﺭﺍءﺍﺕ ﺍﻟﻭﻗﺎﺋﻳﺔ ﺍﻟﻣﺣﺩﺩﺓ. ﻭﻋﻧﺩ ﺗﺟﻠﻳﺦ ﻟﻭﺡ ﺻﻠﺏ ﺭﻓﻳﻊ ،ﻳﺣﺩﺙ ﺿﺟﻳﺞ ﺻﺎﺧﺏ ﻧﻅﺭً ﺍ ﻟﻠﺿﺟﻳﺞ ﺍﻟﻣﺩﻭﻱ ﺍﻟﺻﺎﺩﺭ ﻋﻥ ﺗﺟﻠﻳﺦ ﺍﻟﻠﻭﺡ ﺍﻟﺻﻠﺏ ،ﻭﺫﻟﻙ ﺑﻧﺎ ًء ﻋﻠﻰ ﺣﺎﻟﺔ ﻁﺎﻭﻟﺔ ﺍﻟﻌﻣﻝ .ﻭﻟﻠﺣﺩ ﻣﻥ ﺍﻟﺿﻭﺿﺎء ﻏﻳﺭ ﺍﻟﻣﺭﻏﻭﺏ ﻓﻳﻬﺎ ﻓﻲ ﻫﺫﻩ ﺍﻟﺣﺎﻟﺔ ،ﺿﻊ ﺳﺟﺎﺩﺓ ﻣﻁﺎﻁﻳﺔ ﺃﺳﻔﻝ ﺍﻟﻣﺎﺩﺓ ﺍﻟﺗﻲ ﻳﺗﻡ ﺗﺟﻠﻳﺧﻬﺎ. 6ﺗﺭﻛﻳﺏ ﻋﺟﻠﺔ ﺍﻟﺗﺭﻛﻳﺏ ● ﺍﺳﺗﺧﺩﻡ ﻋﺟﻠﺔ ﺗﺭﻛﻳﺏ ﺑﺣﻳﺙ ﻳﻛﻭﻥ ﻗﻁﺭﻫﺎ ﺍﻟﺧﺎﺭﺟﻲ 32ﻣﻡ ﺃﻭ ﺃﻗﻝ. ﻋﻧﺩ ﺍﺳﺗﺧﺩﺍﻡ ﻋﺟﻠﺔ ﺗﺭﻛﻳﺏ ﺑﻘﻁﺭ ﻳﺯﻳﺩ ﻋﻥ ﺫﻟﻙ ،ﻓﺳﻭﻑ ﺗﺗﺟﺎﻭﺯ ﺍﻟﺳﺭﻋﺔ ﺍﻟﻣﺣﻳﻁﻳﺔ ﻟﻌﺟﻠﺔ ﺍﻟﺗﺭﻛﻳﺏ ﺣﺩ ﺍﻟﺳﻼﻣﺔ ،ﻭﻗﺩ ﺗﺗﺳﺑﺏ ﻓﻲ ﻭﻗﻭﻉ ﺣﻭﺍﺩﺙ. ﻻ ﺗﺳﺗﺧﺩﻡ ﻋﺟﻠﺔ ﺗﺭﻛﻳﺏ ﻣﻊ ﻗﻁﺭ ﻳﺯﻳﺩ ﻋﻥ 32ﻣﻡ. ● ﻳﻣﻛﻥ ﺭﺑﻁ ﻋﺟﻼﺕ ﺍﻟﺗﺭﻛﻳﺏ ﺑﺑﺳﺎﻁﺔ ﻭﻓﺻﻠﻬﺎ ﺑﺎﺳﺗﺧﺩﺍﻡ ﻣﻔﺗﺎﺣﻳﻥ. )ﺇﺭﺟﻊ ﺇﻟﻰ ﺍﻟﺷﻛﻝ .(1 ● ﻗﻡ ﺑﺗﺭﻛﻳﺏ ﻋﺟﻠﺔ ﺗﺭﻛﻳﺏ ﻟﺫﻟﻙ ﻻ ﻳﺑﺭﺯ ﻋﻣﻭﺩ ﻋﺟﻠﺔ ﺍﻟﺗﺭﻛﻳﺏ ﺃﻛﺛﺭ ﻣﻥ 15ﻣﻡ. ﻣﻼﺣﻅﺔ 1ﻻ ﺗﻘﻡ ﺑﺈﺣﻛﺎﻡ ﺭﺑﻁ ﻣﻘﺑﺽ ﺍﻟﻁﻭﻕ ﺑﺈﺩﺧﺎﻝ ﻣﺧﻔﻑ ﻋﻣﻭﺩ ﺃﻛﺛﺭ ﻣﻥ ﻗﻁﺭ ﺍﻟﻌﻣﻭﺩ ﺍﻟﻁﺑﻳﻌﻲ ) 6ﻣﻡ( ﻓﻲ ﺍﻟﻣﻘﺑﺽ ﺃﻭ ﻓﻲ ﺣﺎﻟﺔ ﻓﺎﺭﻏﺔ .ﻓﺳﻭﻑ ﻳﺅﺩﻱ ﺍﻟﻘﻳﺎﻡ ﺑﺫﻟﻙ ﺇﻟﻰ ﺗﻠﻑ ﻣﻘﺑﺽ ﺍﻟﻁﻭﻕ 2ﻋﻧﺩ ﺗﺭﻛﻳﺏ ﻋﺟﻠﺔ ﺗﺭﻛﻳﺏ ﻣﻊ ﻋﻣﻭﺩ ،ﻗﻡ ﺑﺈﺣﻛﺎﻡ ﻣﻘﺑﺽ ﺍﻟﻁﻭﻕ ﺑﻌﺩ ﺍﺳﺗﺧﺩﺍﻡ ﺍﻟﻛﻣﻳﺔ ﺍﻟﺻﻐﻳﺭ ﻣﻥ ﺯﻳﺕ ﺍﻟﺩﻭﺭﺍﻥ )ﺃﻭ ﺯﻳﺕ ﻣﺎﻛﻳﻧﺔ ﺍﻟﺧﻳﺎﻁﺔ( ﻟﻠﻧﺳﺑﺔ ﺍﻟﻣﺳﺗﺩﻗﺔ ﺍﻟﻣﻭﺿﺣﺔ ﻓﻲ ﺍﻟﺷﻛﻝ .2 KA-20 KC-20 ○ ﺍﻟﺣﺎﻣﻝ ﺍﻟﻌﺎﻡ ﻳُﺳﺗﺧﺩﻡ ﻫﺫﺍ ﺍﻟﺣﺎﻣﻝ ﺍﻟﻌﺎﻡ ﻋﻧﺩ ﻁﺣﻥ ﺍﻷﺳﻁﺢ ﺍﻟﺩﺍﺧﻠﻳﺔ ﻟﻘﻁﻊ ﺍﻟﻌﻣﻝ ﺃﻭ ﺇﻧﻬﺎء ﻗﻁﻊ ﺍﻟﻌﻣﻝ ﺫﺍﺕ ﺍﻟﺷﻛﻝ ﺍﻟﺧﺎﺹ ،ﺑﻭﺍﺳﻁﺔ ﺗﺭﻛﻳﺏ ﻳﺩ ﺍﻟﻁﺎﺣﻭﻧﺔ ﻋﻠﻰ ﺍﻟﻣﺧﺭﻁﺔ .ﻳﺗﻡ ﺗﺭﻛﻳﺏ ﺍﻟﺣﺎﻣﻝ ﺍﻟﻌﺎﻡ ﻋﻠﻰ ﺍﻟﻣﺯﻻﺝ ﺍﻟﻣﺗﻘﺎﻁﻊ ﺑﻌﺩ ﺇﺯﺍﻟﺔ ﺣﺎﻣﻠﻼ ﺃﺩﺍﺓ ﺍﻟﻣﺧﺭﻁﺔ. )ﺍﺳﺗﺧﺩﺍﻡ ﺍﻟﺣﺎﻣﻝ ﺍﻟﻌﺎﻡ( )ﻣﺧﻁﻁ ﺍﻷﺑﻌﺎﺩ( ﺗﺧﺿﻊ ﺍﻟﻣﻠﺣﻘﺎﺕ ﺍﻻﺧﺗﻳﺎﺭﻳﺔ ﻟﻠﺗﻐﻳﻳﺭ ﺩﻭﻥ ﺇﺧﻁﺎﺭ. ۳ 2015/03/25 11:32:49 18 0000Book̲LDU4.indb 18 ﺍﻟﻌﺭﺑﻳﺔ 6 ﺍﻻﺣﺗﻳﺎﻁﺎﺕ ﺍﻟﻼﺯﻣﺔ ﻋﻧﺩ ﺍﺳﺗﺧﺩﺍﻡ ﺍﻟﻁﺎﺣﻭﻧﺔ 1 2 3 4 5 ﺍﺳﺗﺧﺩﻣﻬﺎ ﺩﺍﺋﻣًﺎ ﻟﻸﻏﺭﺍﺽ ﺍﻟﺻﺣﻳﺣﺔ ﻓﻲ ﻅﺭﻭﻑ ﺁﻣﻧﺔ. ﻫﺫﺍ ﺍﻟﺟﻬﺎﺯ ﻫﻭ ﻋﺑﺎﺭﺓ ﻋﻥ ﺃﺩﺍﺓ ﻗﺎﺑﻠﺔ ﻟﻠﺣﻣﻝ ُﺗﺳﺗﺧﺩﻡ ﻟﻠﻁﺣﻥ ﺃﻭ ﺇﻧﻬﺎء ﺍﻟﻌﻣﻝ ﻋﻠﻰ ﺍﻟﻣﻌﺎﺩﻥ ﻣﻥ ﺃﻧﻭﺍﻉ ﻣﺗﻌﺩﺩﺓ ،ﻭﺍﻟﻠﺩﺍﺋﻥ ﻭﺍﻟﺳﻳﺭﺍﻣﻳﻙ .ﺍﺳﺗﺧﺩﻡ ﻫﺫﺍ ﺍﻟﺟﻬﺎﺯ ﻟﻸﻏﺭﺍﺽ ﻫﺫﻩ ﻓﻘﻁ. ﺍﻣﺗﺛﻝ ﺩﺍﺋﻣًﺎ ﻟﺗﻌﻠﻳﻣﺎﺕ ﺍﺳﺗﺧﺩﺍﻡ ﺍﻟﻌﺟﻼﺕ. ﻳﺟﺏ ﺃﻥ ﺗﻛﻭﻥ ﻋﺟﻠﺔ ﺍﻟﻁﺣﻥ ﻟﻬﺫﺍ ﺍﻟﺟﻬﺎﺯ ﻋﺟﻠﺔ ﻁﺣﻥ ﺫﺍﺕ ﻣﺣﻭﺭ ﺑﻪ ﺃﻗﺻﻰ ﺣﺩ ﻟﻁﻭﻝ ﺍﻟﻘﻁﺭ ﺍﻟﺫﻱ ﻳﺻﻝ ﺇﻟﻰ 18ﻣﻡ ﻭﻗﻁﺭ ﻣﺣﻭﺭ ﻳﺻﻝ ﺇﻟﻰ 3ﻣﻡ ﺃﻭ 6ﻣﻡ. ﺍﺧﺗﺑﺭ ﺩﺍﺋﻣًﺎ ﻗﺑﻝ ﺍﻻﺳﺗﺧﺩﺍﻡ. ﺍﻓﺣﺹ ﺩﺍﺋﻣًﺎ ﻋﺟﻠﺔ ﺍﻟﻁﺣﻥ ﻛﻲ ﻳﺗﻡ ﺍﺳﺗﺧﺩﺍﻣﻬﺎ ﻟﻠﺷﻘﻭﻕ ﺃﻭ ﺍﻟﻔﻭﺍﺻﻝ. ﺃﻳﺿًﺎ ،ﺍﺧﺗﺑﺭ ﺗﺷﻐﻳﻝ ﺍﻟﺟﻬﺎﺯ ﻗﺑﻝ ﺍﻻﺳﺗﺧﺩﺍﻡ ﻟﻠﺗﺣﻘﻕ ﻣﻥ ﻭﺟﻭﺩ ﺃﻱ ﻋﻳﻭﺏ. ﻗﻡ ﺣﻣﺎﻳﺔ ﻋﻳﻧﻳﻙ ﺑﺎﺳﺗﺧﺩﺍﻡ ﻭﺍﻗﻳﺎﺕ ﺍﻟﻭﺟﻪ. ﻗﻡ ﺑﺎﺭﺗﺩﺍء ﻭﺍﻗﻳﺎﺕ ﺍﻟﻭﺟﻪ ﺃﺛﻧﺎء ﺍﻟﻁﺣﻥ .ﺃﻳﺿًﺎ ،ﻓﻲ ﺣﺎﻟﺔ ﻋﺩﻡ ﻭﺟﻭﺩ ﻛﻣﻳﺔ ﻛﺑﻳﺭﺓ ﻣﻥ ﺍﻟﻐﺑﺎﺭ ﻧﺎﺷﺊ ﻋﻥ ﺍﻟﻁﺣﻥ ،ﻗﻡ ﺑﺎﺭﺗﺩﺍء ﻗﻧﺎﻉ. ﻗﻡ ﺑﺈﻣﺳﺎﻙ ﺍﻟﺟﻬﺎﺯ ﺑﺈﺣﻛﺎﻡ. ﻗﻡ ﺩﺍﺋﻣًﺎ ﺑﺎﺳﺗﺧﺩﺍﻡ ﺍﻟﺟﻬﺎﺯ ﺑﺄﻣﺎﻥ ﻋﻧﺩ ﺍﻻﺳﺗﺧﺩﺍﻡ .ﺇﺫﺍ ﻟﻡ ﺗﻘﻡ ﺑﺈﻣﺳﺎﻙ ﺍﻟﺟﻬﺎﺯ ،ﻓﺈﻥ ﺭﺩ ﻓﻌﻝ ﺍﻟﻘﻭﺓ ﻣﻥ ﺍﻟﻣﻣﻛﻥ ﺃﻥ ﻳﺅﺩﻱ ﺇﻟﻰ ﻋﻭﺩﺗﻪ ﻟﻠﺧﻠﻑ. 7 8 9 10 11 ﻻ ﺗﻘﻡ ﺑﻭﺿﻊ ﺣﻣﻭﻻﺕ ﻛﺑﻳﺭﺓ ﻋﻠﻰ ﺍﻟﺟﻬﺎﺯ. ﻻ ﺗﺿﻊ ﺣﻣﻭﻻﺕ ﻛﺑﻳﺭﺓ ﻋﻠﻰ ﺍﻟﺟﻬﺎﺯ ﺑﻭﺍﺳﻁﺔ ﺍﻟﺿﻐﻁ ﻋﻠﻰ ﻣﺎﺩﺓ ﺍﻟﻁﺣﻥ ﺑﻘﻭﺓ ﻣﻣﺎ ﻳﺅﺩﻱ ﺇﻟﻰ ﺍﻧﺧﻔﺎﺽ ﺳﺭﻋﺔ ﺍﻟﺩﻭﺭﺍﻥ ﺟﺫﺭﻳًﺎ .ﻳﺅﺩﻱ ﺫﻟﻙ ﺇﻟﻰ ﺍﻧﺧﻔﺎﺽ ﻛﻔﺎءﺓ ﺍﻟﻌﻣﻝ ﻭﻭﺟﻭﺩ ﺧﻁﺭ ﺍﺣﺗﻣﺎﻟﻳﺔ ﺍﻧﺛﻧﺎء ﻣﺣﻭﺭ ﻋﺟﻠﺔ ﺍﻟﻁﺣﻥ. ﻻ ﺗﻠﻣﺱ ﺍﻷﺟﺯﺍء ﺍﻟﺩﻭﺍﺭﺓ. ﺍﺑﻌﺩ ﻳﺩﻳﻙ ﻭﺑﻘﻳﺔ ﺃﺟﺯﺍء ﺟﺳﻣﻙ ﻋﻥ ﻋﺟﻠﺔ ﺍﻟﻁﺣﻥ ﺃﺛﻧﺎء ﺩﻭﺭﺍﻧﻬﺎ ﻟﺗﺟﺏ ﻣﺧﺎﻁﺭ ﺍﻟﺟﺭﻭﺡ ﺃﻭ ﺍﻟﺣﻙ ﺃﻭ ﺍﻣﺳﺎﻙ ﺍﻟﻣﻼﺑﺱ ﻓﻲ ﺍﻟﺟﻬﺎﺯ. ﻛﻥ ﺣﺫﺭ ﻣﻥ ﺍﻟﺷﺭﺍﺭﺍﺕ ﺃﺛﻧﺎء ﺍﻟﻁﺣﻥ. ﻗﺩ ﺗﺻﺑﺢ ﺟﺳﻳﻣﺎﺕ ﺍﻟﻁﺣﻥ ﺷﺭﺍﺭﺍﺕ ﻣﺗﻁﺎﻳﺭﺓ .ﻗﻡ ﺩﺍﺋﻣًﺎ ﺑﺈﺯﺍﻟﺔ ﺍﻟﻣﻭﺍﺩ ﺍﻟﻣﻠﺗﻬﺑﺔ ﻭﺍﻟﻣﻭﺍﺩ ﺍﻟﺗﻲ ﻳﻣﻛﻥ ﺍﻥ ﺗﺗﻠﻑ ﺑﺳﻬﻭﻟﺔ ﻭﺿﻌﻬﺎ ﻓﻲ ﻣﻛﺎﻥ ﺁﻣﻥ ﻭﺑﻌﻳ ًﺩﺍ ﻋﻥ ﻣﻧﻁﻘﺔ ﺍﻟﻌﻣﻝ .ﺃﻳﺿًﺎ ،ﻛﻥ ﺣﺫﺭ ﻣﻥ ﺍﻟﺷﺭﺍﺭﺍﺕ ﺑﺣﻳﺙ ﻻ ﺗﻼﻣﺱ ﻳﺩﻳﻙ ﺃﻭ ﻗﺩﻣﻳﻙ ﺑﺷﻛﻝ ﻣﺑﺎﺷﺭ. ﻻ ﺗﺿﻊ ﺍﻟﺟﻬﺎﺯ ﻋﻠﻰ ﺍﻷﺭﺽ ﻭﻫﻭ ﻗﻳﺩ ﺍﻟﺗﺷﻐﻳﻝ. ﻻ ﺗﻘﻡ ﺑﺗﺷﻐﻳﻝ ﺍﻟﺟﻬﺎﺯ ﺇﺫﺍ ﻟﻡ ﺗﻛﻥ ﺗﻣﺳﻙ ﺑﻪ ﺑﺈﺣﻛﺎﻡ ﺑﻛﻠﺗﺎ ﻳﺩﻳﻙ .ﺃﻳﺿًﺎ ،ﻻ ﺗﺿﻌﻎ ﺃﺑ ًﺩﺍ ﺍﻟﺟﻬﺎﺯ ﻋﻠﻰ ﺍﻟﻣﻧﺿﺩﺓ ﺃﻭ ﺍﻷﺭﺽ ﻭﻫﻭ ﻣﺎﺯﺍﻝ ﻗﻳﺩ ﺍﻟﺗﺷﻐﻳﻝ. ﺍﺗﺑﻊ ﺍﻟﺗﺭﺗﻳﺏ ﺍﻟﺻﺣﻳﺢ ﻋﻧﺩ ﺍﺳﺗﺑﺩﺍﻝ ﻋﺟﻠﺔ ﺍﻟﻁﺣﻥ. ﻋﻧﺩ ﺍﺳﺗﺑﺩﺍﻝ ﻋﺟﻠﺔ ﺍﻟﻁﺣﻥ ،ﺍﺗﺑﻊ ﺍﻟﺧﻁﻭﺍﺕ ﺑﻌﻧﺎﻳﺔ ﺍﻟﺗﻲ ﺗﻡ ﺗﺣﺩﻳﺩﻫﺎ ﻓﻲ ﺩﻟﻳﻝ ﺍﻟﺗﻌﻠﻳﻣﺎﺕ ﻫﺫﺍ. ﻻ ﺗﺳﺗﺧﺩﻡ ﻋﺟﻼﺕ ﺍﻟﻁﺣﻥ ﻣﻊ "ﺳﺭﻋﺔ ﺁﻣﻧﺔ" ﺗﻛﻭﻥ ﻋﻠﻰ ﺍﻷﻗﻝ ﺳﺭﻋﺗﻬﺎ ﻋﺎﻟﻳﺔ ﺗﻣﺎﻣًﺎ ﻣﺛﻝ "ﺩﻭﺭﺍﺕ ﻓﻲ ﺍﻟﺩﻗﻳﻘﺔ ﺩﻭﻥ ﺣﻣﻝ" ﺍﻟﻣﺑﻳﻧﺔ ﻋﻠﻰ ﻟﻭﺣﺔ ﺍﺳﻡ ﺍﻟﻣﻌﺩﺓ ﺍﻟﻛﻬﺭﺑﺎﺋﻳﺔ. ﺍﻟﻣﻭﺍﺻﻔﺎﺕ ) 110ﻓﻭﻟﺕ 115 ،ﻓﻭﻟﺕ 120 ،ﻓﻭﻟﺕ 127 ،ﻓﻭﻟﺕ 220 ،ﻓﻭﻟﺕ 230 ،ﻓﻭﻟﺕ 240 ،ﻓﻭﻟﺕ( ﺍﻟﺟﻬﺩ ﺍﻟﻛﻬﺭﺑﻲ )ﺣﺳﺏ ﺍﻟﻣﻧﺎﻁﻕ(* 240ﻭﺍﺕ ﺍﻹﺩﺧﺎﻝ* / 23000ﺩﻗﻳﻘﺔ ﺍﻟﺳﺭﻋﺔ ﺑﺩﻭﻥ ﺣﻣﻝ* ﺍﻟﺣﺩ ﺍﻷﻗﺻﻰ 32ﻣﻡ ﺍﻟﻌﺟﻠﺔ ﺍﻟﺗﻲ ﺗﻡ ﺗﺭﻛﻳﺑﻬﺎ ﻗﻁﺭ ﺍﻟﻌﻣﻭﺩ 6ﻣﻡ 1.9ﻛﺟﻡ ﺍﻟﻭﺯﻥ ﺑﺩﻭﻥ ﺍﻟﺳﻠﻙ * ﺗﺄﻛﺩ ﻣﻥ ﻓﺣﺹ ﻟﻭﺣﺔ ﺍﻻﺳﻡ ﺍﻟﻣﻭﺟﻭﺩﺓ ﻋﻠﻰ ﺍﻟﻣﻧﺗﺞ ﺣﻳﺙ ﺃﻧﻬﺎ ﻋُﺭﺿﺔ ﻟﻠﺗﻐﻳﻳﺭ ﺣﺳﺏ ﺍﻟﻣﻧﻁﻘﺔ. ﻣﻠﺣﻘﺎﺕ ﻣﻌﻳﺎﺭﻳﻪ ﻣﻠﺣﻘﺎﺕ ﺍﺧﺗﻳﺎﺭﻳﺔ ُﺗﺑﺎﻉ ﻣﻧﻔﺻﻠﺔ ) (1ﺍﻟﻌﺟﻼﺕ ﺍﻟﺗﻲ ﺗﻡ ﺗﺭﻛﻳﺑﻬﺎ )ﺭﻗﻡ 5 .................. (KA-1, 2, 4, 5, 6 ○ ﻋﺟﻼﺕ ﺍﻟﺗﺭﻛﻳﺏ ﺫﺍﺕ ﻋﻣﻭﺩ 6ﻣﻡ )(2 )(3 )(4 )(5 KA-10 KA-1 KA-2 KA-4 KA-5 KA-6 ﺍﻟﻣﺳﻭﺍﺓ 1 .................................................................. ﺍﻟﻣﻔﺗﺎﺡ 1 ................................................................... ﺍﻟﻣﻔﺗﺎﺡ 1 ................................................................... ﺍﻟﺣﺎﻓﻅﺔ 1 .................................................................. ○ ﻣﻘﺑﺽ ﺍﻟﻁﻭﻕ ﻟﻌﻣﻭﺩ 3ﻣﻡ ﺗﻡ ﺗﺻﻣﻳﻡ ﻣﻘﺑﺽ ﺍﻟﻁﻭﻕ ﻟﻌﻣﻭﺩ 3ﻣﻡ ﻟﻠﺗﻭﺍﻓﻕ ﻣﻊ ﺍﻟﻌﺟﻼﺕ ﺫﺍﺕ ﻋﻣﻭﺩ ﺑﻘﻁﺭ 3ﻣﻡ ﻟﻸﺟﺯﺍء ﺍﻟﺻﻐﻳﺭﺓ ﺍﻟﺗﻲ ﺗﺗﻡ ﻣﻌﺎﻟﺟﺗﻬﺎ. ﺗﻛﻭﻥ ﺍﻷﺑﻌﺎﺩ ﻭﻁﺭﻕ ﺍﻟﻣﻌﺎﻟﺟﺔ ﻓﺿﻼً ﻋﻥ ﻓﺗﺣﺔ ﺍﻟﻌﻣﻭﺩ ﻫﻲ ﻧﻔﺳﻬﺎ ﻟﻣﻘﺑﺽ ﺍﻟﻁﻭﻕ ﺫﻭ 6ﻣﻡ. ○ ﻋﺟﻼﺕ ﺍﻟﺗﺭﻛﻳﺏ ﺫﺍﺕ ﻋﻣﻭﺩ 3ﻣﻡ ﺗﻡ ﺗﻭﻓﻳﺭ ﻋﺟﻼﺕ ﺍﻟﺗﺭﻛﻳﺏ ﻣﻊ ﻣﻘﻳﺎﺱ ،WAﻭﻁﺣﻥ 80ﻭﺭﺑﻁ Pﻭﻫﻡ ﻣﻧﺎﺳﺑﻭﻥ ﻟﻠﻁﺣﻥ ﺑﺷﻛﻝ ﻋﺎﻡ ﻭﺍﻟﻣﻭﺍﺩ ﺍﻟﺻﻠﺑﺔ ﺍﻟﺧﺎﺻﺔ. ﻗﻡ ﺑﺷﺭﺍء ﻋﺟﻼﺕ ﺍﻟﺗﺭﻛﻳﺏ ﺫﺍﺕ ﺍﻟﺷﻛﻝ ﺍﻟﻣﻧﺎﺳﺏ ﻟﻠﻣﻌﺎﻟﺟﺔ. ﺍﻟﻣﺣﻠﻘﺎﺕ ﺍﻟﻣﻌﻳﺎﺭﻳﻪ ﻋﺭﺿﻪ ﻟﻠﺗﻐﻳﻳﺭ ﺩﻭﻥ ﺇﺧﻁﺎﺭ. 19 2015/03/25 11:32:49 KA-9 KA-8 KA-7 KA-3 ۲ 0000Book̲LDU4.indb 19 ﺍﻟﻌﺭﺑﻳﺔ ﺙ( ﺍﻧﺯﻉ ﻋﺩﺩ ﺍﻟﺿﺑﻁ ﺃﻭ ﻣﻔﺗﺎﺡ ﺍﻟﺭﺑﻁ ﻗﺑﻝ ﺗﺷﻐﻳﻝ ﺍﻟﻌﺩﺓ ﺍﻟﻛﻬﺭﺑﺎﺋﻳﺔ. ﻭﺟﻭﺩ ﻣﻔﺗﺎﺡ ﺭﺑﻁ ﺃﻭ ﻣﻔﺗﺎﺡ ﺿﺑﻁ ﻋﻠﻰ ﻳﺳﺎﺭ ﺍﻟﺟﺯء ﺍﻟﻣﺗﺣﺭﻙ ﻣﻥ ﺍﻟﻌﺩﺓ ﺍﻟﻛﻬﺭﺑﺎﺋﻳﺔ ﻳﺅﺩﻱ ﺇﻟﻰ ﺣﺩﻭﺙ ﺇﺻﺎﺑﺔ ﺷﺧﺻﻳﺔ. ﺝ( ﻻ ﺗﻘﺗﺭﺏ ﻣﻥ ﺍﻟﻌﺩﺓ ﺍﻟﻛﻬﺭﺑﺎﺋﻳﺔ ،ﺍﺗﺭﻙ ﻣﺳﺎﻓﺔ ﻣﻧﺎﺳﺑﺔ ﺑﻳﻧﻙ ﻭﺑﻳﻥ ﺍﻟﻌﺩﺓ ﺍﻟﻛﻬﺭﺑﺎﺋﻳﺔ ﻭﺣﺎﻓﻅ ﻋﻠﻰ ﺗﻭﺍﺯﻧﻙ ﻓﻲ ﺟﻣﻳﻊ ﺍﻷﻭﻗﺎﺕ. ﺳﻳﺳﻣﺢ ﻟﻙ ﺫﻟﻙ ﻣﻥ ﺍﻟﺳﻳﻁﺭﺓ ﻋﻠﻰ ﺍﻟﺟﻬﺎﺯ ﺑﺷﻛﻝ ﺃﻓﺿﻝ ﻓﻲ ﺍﻟﻣﻭﺍﻗﻑ ﻏﻳﺭ ﺍﻟﻣﺗﻭﻗﻌﺔ. ﺡ( ﻗﻡ ﺑﺎﺭﺗﺩﺍء ﻣﻼﺑﺱ ﻣﻧﺎﺳﺑﺔ ،ﻻ ﺗﺭﺗﺩﻱ ﻣﻼﺑﺱ ﻓﺿﻔﺎﺿﺔ ﺃﻭ ﺑﻬﺎ ﺃﻁﺭﺍﻑ ﺳﺎﺋﺑﺔ ﺃﻭ ﺣﻠﻲ ،ﻭﺣﺎﻓﻅ ﺩﺍﺋﻣﺎ ً ﻋﻠﻰ ﺇﺑﻌﺎﺩ ﺷﻌﺭﻙ ﻭﺍﻟﻣﻼﺑﺱ ﺍﻟﺗﻲ ﺗﺭﺗﺩﻳﻬﺎ ﻭﺍﻟﻘﻔﺎﺯ ﺑﻌﻳﺩﺍً ﻋﻥ ﺍﻷﺟﺯﺍء ﺍﻟﻣﺗﺣﺭﻛﺔ ﻣﻥ ﺍﻟﻌﺩﺓ ﺍﻟﻛﻬﺭﺑﺎﺋﻳﺔ. ﻗﺩ ﺗﺗﺎﺷﺑﻙ ﺍﻟﻣﻼﺑﺱ ﺍﻟﻔﺿﻔﺎﺿﺔ ﺃﻭ ﺍﻟﺗﻲ ﺑﻬﺎ ﺃﻁﺭﺍﻑ ﺃﻭ ﺍﻟﺣﻠﻲ ﺃﻭﺍﻟﺷﻌﺭ ﺍﻟﻁﻭﻳﻝ ﺑﺎﻷﺟﺯﺍء ﺍﻟﻣﺗﺣﺭﻛﺔ ﻟﻠﻣﺛﻘﺎﺏ. ﺥ( ﺇﻥ ﺟﺎﺯ ﺗﺭﻛﻳﺏ ﺟﻬﺎﺯ ﺷﻔﻁ ﻭﺗﺟﻣﻳﻊ ﺍﻟﻐﺑﺎﺭ .ﻓﺗﺄﻛﺩ ﻣﻥ ﻣﺗﺻﻠﺔ ﻭﻳﺗﻡ ﺍﺳﺗﺧﺩﺍﻣﻬﺎ ﺑﺷﻛﻝ ﺳﻠﻳﻡ. ﻣﻥ ﺍﻟﻣﻣﻛﻥ ﺃﻥ ﻳﺅﺩﻱ ﺍﺳﺗﺧﺩﺍﻡ ﻫﺫﻩ ﺍﻷﺟﻬﺯﺓ ﺇﻟﻰ ﺗﻘﻠﻳﻝ ﺍﻟﻣﺧﺎﻁﺭ ﺍﻟﻣﺗﻌﻠﻘﺔ ﺑﺎﻟﻐﺑﺎﺭ. (4ﻁﺭﻳﻘﺔ ﺍﺳﺗﺧﺩﺍﻡ ﺍﻟﻌﺩﺓ ﺍﻟﻛﻬﺭﺑﺎﺋﻳﺔ ﻭﺍﻟﻌﻧﺎﻳﺔ ﺑﻬﺎ ﺃ( ﻻ ﺗﻔﺭﻁ ﻓﻲ ﺍﺳﺗﺧﺩﺍﻡ ﺍﻟﻌﺩﺓ ﺍﻟﻛﻬﺭﺑﺎﺋﻳﺔ ،ﻭﺍﺳﺗﺧﺩﻡ ﺍﻟﻌﺩﺓ ﺍﻟﻛﻬﺭﺑﺎﺋﻳﺔ ﺍﻟﻣﻧﺎﺳﺑﺔ ﻟﻠﻌﻣﻝ ﺍﻟﺫﻱ ﺗﻘﻭﻡ ﺑﻪ. ﻋﻧﺩ ﺍﺳﺗﺧﺩﺍﻣﻙ ﺍﻟﻌﺩﺓ ﺍﻟﻛﻬﺭﺑﺎﺋﻳﺔ ﺍﻟﻣﺧﺻﺻﺔ ﻟﺫﻟﻙ ﻓﺈﻥ ﻫﺫﺍ ﻳﺳﺎﻋﺩﻙ ﻋﻠﻰ ﺍﻟﺣﺻﻭﻝ ﻋﻠﻰ ﻧﺗﻳﺟﺔ ﺃﻓﺿﻝ ﻭﺃﻛﺛﺭ ﺃﻣﻧﺎ ً ﺗﺑﻌﺎ ً ﻟﻠﻣﻬﻣﺔ ﺍﻟﺗﻲ ﺗﻡ ﺗﺻﻣﻳﻡ ﺍﻟﻣﺛﻘﺎﺏ ﻟﻬﺎ. ﺏ( ﻓﻲ ﺣﺎﻟﺔ ﺗﻌﻁﻝ ﻣﻔﺗﺎﺡ ﺍﻟﺗﺷﻐﻳﻝ ﻋﻥ ﺍﻟﻌﻣﻝ ﻻ ﺗﺳﺗﺧﺩﻡ ﺍﻟﻌﺩﺓ ﺍﻟﻛﻬﺭﺑﺎﺋﻳﺔ. ﺃﻱ ﻋﺩﺓ ﻛﻬﺭﺑﺎﺋﻳﺔ ﻻ ﻳﻣﻛﻥ ﺍﻟﺗﺣﻛﻡ ﻓﻲ ﻣﻔﺗﺎﺡ ﺍﻟﺗﺷﻐﻳﻝ ﺍﻟﺧﺎﺹ ﺑﻬﺎ ﻓﺈﻧﻬﺎ ﺗﺷﻛﻝ ﺧﻁﺭﺍً ﻋﻧﺩ ﺍﺳﺗﺧﺩﺍﻣﻬﺎ ﻭﻳﺟﺏ ﺇﺻﻼﺡ ﻫﺫﺍ ﺍﻟﻣﻔﺗﺎﺡ. ﺕ( ﻗﻡ ﺑﻔﺻﻝ ﺍﻟﻘﺎﺑﺱ ﻋﻥ ﻣﺻﺩﺭ ﺍﻟﻁﺎﻗﺔ ﻗﺑﻝ ﺇﺟﺭﺍء ﺃﻱ ﺗﻌﺩﻳﻼﺕ ﺃﻭ ﺗﻐﻳﻳﺭ ﺍﻟﻣﻠﺣﻘﺎﺕ ﺃﻭ ﺗﺧﺯﻳﻥ ﺃﺩﻭﺍﺕ ﺍﻟﻁﺎﻗﺔ. ﺗﻣﻧﻊ ﺇﺟﺭﺍءﺍﺕ ﺍﻻﺣﺗﻳﺎﻁ ﻫﺫﻩ ﺗﺷﻐﻳﻝ ﺍﻟﻌﺩﺓ ﺍﻟﻛﻬﺭﺑﺎﺋﻳﺔ ﺑﺷﻛﻝ ﻏﻳﺭ ﻣﻘﺻﻭﺩ. ﺙ( ﻗﻡ ﺑﺗﺧﺯﻳﻥ ﺍﻟﻌﺩﺩ ﺍﻟﻛﻬﺭﺑﺎﺋﻳﺔ ﺍﻟﻐﻳﺭ ﻣﺳﺗﺧﺩﻣﺔ ﺑﻌﻳﺩﺃً ﻋﻥ ﻣﺗﻧﺎﻭﻝ ﺍﻷﻁﻔﺎﻝ ﻭﻻ ﺗﺳﻣﺢ ﻷﻱ ﺷﺧﺹ ﻟﻳﺱ ﻟﺩﻳﻪ ﻓﻛﺭﺓ ﻋﻥ ﺗﺷﻐﻳﻝ ﺍﻟﻣﺛﻘﺎﺏ ﺑﺎﻻﻗﺗﺭﺍﺏ ﻣﻥ ﻫﺫﻩ ﺍﻷﺩﻭﺍﺕ ﺃﻭ ﺗﺷﻐﻳﻠﻬﺎ. ﺃﺩﻭﺍﺕ ﺍﻟﺗﺷﻐﻳﻝ ﺗﻣﺛﻝ ﺧﻁﻭﺭﺓ ﻓﻲ ﺃﻳﺩﻱ ﺍﻷﺷﺧﺎﺹ ﺍﻟﻐﻳﺭ ﻣﺩﺭﺑﻳﻥ ﻋﻠﻳﻬﺎ. ﺝ( ﺗﺄﻛﺩ ﻣﻥ ﺳﻼﻣﺔ ﺍﻟﻌﺩﺩ ﺍﻟﻛﻬﺭﺑﺎﺋﻳﺔ ،ﻗﻡ ﺑﻔﺣﺻﻬﺎ ﺟﻳﺩﺍً ﻣﻥ ﻧﺎﺣﻳﺔ ﻣﺩﻯ ﺗﺭﺍﺑﻁ ﺍﻷﺟﺯﺍء ﺍﻟﻣﺗﺣﺭﻛﺔ ﺃﻭ ﻭﺟﻭﺩ ﺃﻱ ﻛﺳﺭ ﻓﻲ ﺃﻱ ﺟﺯء ﻣﻥ ﺃﺟﺯﺍﺋﻬﺎ ﺑﻣﺎ ﻳﺅﺛﺭ ﻋﻠﻰ ﺗﺷﻐﻳﻠﻬﺎ. ﻓﻲ ﺣﺎﻟﺔ ﺣﺩﻭﺙ ﺗﻠﻑ ﺑﺄﺩﻭﺍﺕ ﺍﻟﺗﺷﻐﻳﻝ ﻳﺟﺏ ﺇﺻﻼﺣﻬﺎ ﻗﺑﻝ ﺍﻻﺳﺗﺧﺩﺍﻡ. ﻋﺩﻡ ﺻﻳﺎﻧﺔ ﺃﺩﻭﺍﺕ ﺍﻟﺗﺷﻐﻳﻝ ﺃﻭ ﺍﻟﻘﻳﺎﻡ ﺑﻌﻣﻠﻳﺔ ﺍﻟﺻﻳﺎﻧﺔ ﺑﺷﻛﻝ ﻏﻳﺭ ﺻﺣﻳﺢ ﻳﺅﺩﻱ ﺇﻟﻰ ﺣﺩﻭﺙ ﺍﻟﻛﺛﻳﺭ ﻣﻥ ﺍﻟﺣﻭﺍﺩﺙ. ﺡ( ﻳﺭﺟﻰ ﺍﻟﺣﻔﺎﻅ ﻋﻠﻰ ﺃﺩﻭﺍﺕ ﺍﻟﺗﻘﻁﻳﻊ ﺣﺎﺩﺓ ﻭﻧﻅﻳﻔﺔ ﻳﺭﺟﻰ ﺍﻟﺣﻔﺎﻅ ﻋﻠﻰ ﺃﺩﻭﺍﺕ ﺍﻟﺗﻘﻁﻳﻊ ﺣﺎﺩﺓ ﺍﻟﺣﻭﺍﻑ ﺑﺣﻳﺙ ﻳﺳﻬﻝ ﺍﻟﺗﺣﻛﻡ ﻓﻳﻬﺎ. ﺥ( ﺍﺳﺗﺧﺩﻡ ﺃﺩﺍﺓ ﺍﻟﻁﺎﻗﺔ ،ﻭﺍﻟﻣﻠﺣﻘﺎﺕ ﻭﺃﻗﻼﻡ ﺍﻟﻘﻁﻊ ﺇﻟﺦ ،ﺑﻣﺎ ﻳﺗﻭﺍﻓﻕ ﻣﻊ ﻫﺫﻩ ﺍﻟﺗﻌﻠﻳﻣﺎﺕ ﻭﺑﺎﻟﻁﺭﻳﻘﺔ ﺍﻟﻣﺧﺻﺻﺔ ﻟﻧﻭﻉ ﺃﺩﺍﺓ ﺍﻟﻁﺎﻗﺔ ﺍﻟﻣﺣﺩﺩ ،ﻣﻊ ﺍﻟﻭﺿﻊ ﻓﻲ ﺍﻻﻋﺗﺑﺎﺭ ﻅﺭﻭﻑ ﺍﻟﻌﻣﻝ ﻭﺍﻟﻌﻣﻝ ﺍﻟﻣﻁﻠﻭﺏ ﺍﻟﻘﻳﺎﻡ ﺑﻪ. ﻗﺩ ﻳﺅﺩﻱ ﺍﺳﺗﺧﺩﻡ ﺃﺩﺍﺓ ﺍﻟﻁﺎﻗﺔ ﻟﻸﻏﺭﺍﺽ ﻏﻳﺭ ﺍﻟﻣﺧﺻﺻﺔ ﻟﻬﺎ ﺇﻟﻰ ﻭﺟﻭﺩ ﻣﻭﻗﻑ ﺧﻁﻳﺭ. (5ﺍﻟﺧﺩﻣﺔ ﺃ( ﺍﺳﻣﺢ ﺑﺗﺻﻠﻳﺢ ﻋﺩﺗﻙ ﺍﻟﻛﻬﺭﺑﺎﺋﻳﺔ ﻓﻘﻁ ﻣﻥ ﻗﺑﻝ ﺍﻟﻣﺗﺧﺻﺻﻳﻥ ﻭﻓﻘﻁ ﺑﺈﺳﺗﻌﻣﺎﻝ ﻗﻁﻊ ﺍﻟﻐﻳﺎﺭ ﺍﻷﺻﻠﻳﺔ ﻓﻘﻁ . ﻳﺅﻣﻥ ﺫﻟﻙ ﺍﻟﻣﺣﺎﻓﻅﺔ ﻋﻠﻰ ﺃﻣﺎﻥ ﺍﻟﺟﻬﺎﺯ. ﺗﻌﻠﻳﻣﺎﺕ ﺍﻟﺳﻼﻣﺔ ﺍﻟﻌﺎﻣﺔ ﺗﺣﺫﻳﺭ !!! ﻳﺭﺟﻰ ﻗﺭﺍءﺓ ﺟﻣﻳﻊ ﺍﻟﺗﻌﻠﻳﻣﺎﺕ ﻗﺩ ﻳﺅﺩﻱ ﻋﺩﻡ ﺍﻻﻟﺗﺯﺍﻡ ﺑﻬﺫﻩ ﺍﻟﺗﻌﻠﻳﻣﺎﺕ ﺍﻟﻣﻭﺿﺣﺔ ﺃﺩﻧﺎﻩ ﺇﻟﻰ ﺣﺩﻭﺙ ﺻﺩﻣﺔ ﻛﻬﺭﺑﻳﺔ ﺃﻭ ﻧﺷﻭﺏ ﺣﺭﻳﻕ ﺃﻭ ﺇﺻﺎﺑﺔ ﺧﻁﻳﺭﺓ. ﺍﻟﻣﺻﻁﻠﺢ "ﺍﻟﻌﺩﺓ ﺍﻟﻛﻬﺭﺑﺎﺋﻳﺔ" ﺍﻟﻭﺍﺭﺩ ﻓﻲ ﺟﻣﻳﻊ ﺍﻟﺗﺣﺫﻳﺭﺍﺕ ﺍﻟﻣﻭﺿﺣﺔ ﺃﺩﻧﺎﻩ ﻳﺷﻳﺭ ﺇﻟﻰ ﺍﻟﻌﺩﺓ ﺍﻟﻛﻬﺭﺑﺎﺋﻳﺔ ﺍﻟﺭﺋﻳﺳﻳﺔ )ﺍﻟﺳﻠﻛﻳﺔ( ﺍﻟﺧﺎﺻﺔ ﺑﻙ ﺃﻭ ﺍﻟﻌﺩﺓ ﺍﻟﻛﻬﺭﺑﺎﺋﻳﺔ )ﺍﻟﻼﺳﻠﻛﻳﺔ( ﻟﻠﺑﻁﺎﺭﻳﺔ. ﻳﺭﺟﻰ ﺍﺗﺑﺎﻉ ﺍﻟﺗﻌﻠﻳﻣﺎﺕ ﺍﻟﺗﺎﻟﻳﺔ: (1ﺃﻣﺎﻥ ﻣﻧﻁﻘﺔ ﺍﻟﻌﻣﻝ ﺃ( ﺣﺎﻓﻅ ﻋﻠﻰ ﻧﻅﺎﻓﺔ ﻭﺣﺳﻥ ﺇﺿﺎءﺓ ﻣﻛﺎﻥ ﺷﻐﻠﻙ. ﻓﺎﻟﻔﻭﺿﻰ ﻓﻲ ﻣﻛﺎﻥ ﺍﻟﻌﻣﻝ ﻭﻣﺟﺎﻻﺕ ﺍﻟﻌﻣﻝ ﺍﻟﻐﻳﺭ ﻣﺿﺎءﺓ ﺗﺗﺳﺑﺏ ﻓﻲ ﻭﻗﻭﻉ ﺣﻭﺍﺩﺙ. ﺏ( ﻻ ﺗﻘﻡ ﺑﺗﺷﻐﻳﻝ ﺍﻟﻌﺩﺩ ﺍﻟﻛﻬﺭﺑﺎﺋﻳﺔ ﻓﻲ ﺃﺟﻭﺍء ﺍﻧﻔﺟﺎﺭﻳﺔ ﺃﻱ ﻓﻲ ﻭﺟﻭﺩ ﺳﻭﺍﺋﻝ ﺃﻭ ﻏﺎﺯﺍﺕ ﻗﺎﺑﻠﺔ ﻟﻼﺷﺗﻌﺎﻝ ﺃﻭ ﻏﺑﺎﺭ. ﺗﺣﺩﺙ ﺍﻟﻌﺩﺩ ﺍﻟﻛﻬﺭﺑﺎﺋﻳﺔ ﺷﺭﺍﺭﺓ ﺗﻌﻣﻝ ﻋﻠﻰ ﺇﺷﻌﺎﻝ ﻏﺑﺎﺭ ﺍﻷﺩﺧﻧﺔ. ﺕ( ﺣﺎﻓﻅ ﻋﻠﻰ ﺃﻥ ﺗﻛﻭﻥ ﺍﻟﻌﺩﺩ ﺍﻟﻛﻬﺭﺑﺎﺋﻳﺔ ﺑﻌﻳﺩﺓ ﻋﻥ ﻣﺗﻧﺎﻭﻝ ﺍﻷﻁﻔﺎﻝ ﺃﻭ ﺍﻟﻣﺣﻳﻁﻳﻥ ﺑﻙ. ﺃﻱ ﺷﻛﻝ ﻣﻥ ﺃﺷﻛﺎﻝ ﺍﻟﺗﺷﺗﻳﺕ ﻣﻥ ﺍﻟﻣﻣﻛﻥ ﺃﻥ ﺗﺅﺩﻱ ﺇﻟﻰ ﻓﻘﺩﻙ ﺍﻟﺳﻳﻁﺭﺓ. (2ﺍﻟﻭﻗﺎﻳﺔ ﻣﻥ ﺍﻟﺻﺩﻣﺎﺕ ﺍﻟﻛﻬﺭﺑﻳﺔ ﺃ( ﻳﺟﺏ ﺗﻭﺻﻳﻝ ﺍﻟﻘﺎﺑﺱ ﺑﻣﻧﻔﺫ ﺍﻟﻛﻬﺭﺑﺎء ،ﻳﺣﻅﺭ ﺗﻌﺩﻳﻝ ﺍﻟﻘﺎﺑﺱ ﺑﺎﻱ ﻁﺭﻳﻘﺔ. ﻻ ﺗﺳﺗﺧﺩﻡ ﺃﻱ ﻗﺎﺑﺱ ﻣﻬﺎﻳﺊ ﻣﻊ ﺍﻟﻌﺩﺩ ﺍﻟﻛﻬﺭﺑﺎﺋﻳﺔ ﺍﻷﺭﺿﻳﺔ. ﺗﺧﻔﺽ ﺍﻟﻘﻭﺍﺑﺱ ﺍﻟﺗﻲ ﻟﻡ ﻳﺗﻡ ﺗﻐﻳﻳﺭﻫﺎ ﻭﺍﻟﻣﻘﺎﺑﺱ ﺍﻟﻣﻼﺋﻣﺔ ﻣﻥ ﺧﻁﺭ ﺣﺩﻭﺙ ﺍﻟﺻﺩﻣﺎﺕ ﺍﻟﻛﻬﺭﺑﺎﺋﻳﺔ . ﺏ( ﺗﺟﻧﺏ ﺍﻟﺗﻼﻣﺱ ﺍﻟﺟﺳﺩﻱ ﻣﻊ ﺍﻷﺳﻁﺢ ﺍﻷﺭﺿﻳﺔ ﻣﺛﻝ ﺍﻷﻧﺎﺑﻳﺏ ﻭﺍﻟﻣﺑﺎﺩﻻﺕ ﺍﻟﺣﺭﺍﺭﻳﺔ ﻭﺍﻟﺛﻼﺟﺎﺕ ﻭﺍﻟﻣﻭﺍﻗﺩ. ﻓﻲ ﺣﺎﻟﺔ ﻣﻼﻣﺳﺔ ﺟﺳﻣﻙ ﻷﻱ ﻣﻥ ﺗﻠﻙ ﺍﻷﺳﻁﺢ ﺍﻷﺭﺿﻳﺔ ﻫﻧﺎﻙ ﺧﻁﻭﺭﺓ ﻟﺗﻌﺭﺿﻙ ﻟﺻﺩﻣﺔ ﻛﻬﺭﺑﻳﺔ. ﺕ( ﻻ ﺗﻌﺭﺽ ﺍﻟﻌﺩﺩ ﺍﻟﻛﻬﺭﺑﺎﺋﻳﺔ ﻟﻠﻣﻁﺭ ﺃﻭ ﺍﻟﺭﻁﻭﺑﺔ. ﻳﺯﺩﺍﺩ ﺧﻁﺭ ﺍﻟﺻﺩﻣﺎﺕ ﺍﻟﻛﻬﺭﺑﺎﺋﻳﺔ ﺇﻥ ﺗﺳﺭﺏ ﺍﻟﻣﺎء ﺇﻟﻰ ﺩﺍﺧﻝ ﺍﻟﻌﺩﺓ ﺍﻟﻛﻬﺭﺑﺎﺋﻳﺔ. ﺙ( ﻻ ﺗﺳﻲء ﺍﺳﺗﻌﻣﺎﻝ ﺍﻟﻛﺎﺑﻝ )ﺍﻟﺳﻠﻙ( ،ﻻ ﺗﺳﺗﻌﻣﻠﻪ ﻣﻁﻠﻘﺎ ً ﻟﺣﻣﻝ ﺃﻭ ﺷﺩ ﺃﻭ ﺩﻓﻊ ﺍﻟﻌﺩﺓ ﺍﻟﻛﻬﺭﺑﺎﺋﻳﺔ ﺃﻭ ﻟﺳﺣﺏ ﺍﻟﻘﺎﺑﺱ ﻣﻥ ﺍﻟﻣﻘﺑﺱ. ﻭﺣﺎﻓﻅ ﻋﻠﻳﻪ ﺑﻌﻳﺩﺍً ﻋﻥ ﻣﺻﺎﺩﺭ ﺍﻟﺣﺭﺍﺭﺓ ﺃﻭ ﺍﻟﺯﻳﺕ ﺃﻭ ﺍﻟﺣﻭﺍﻑ ﺍﻟﺣﺎﺩﺓ ﺃﻭ ﺃﺟﺯﺍء ﺍﻟﺟﻬﺎﺯ ﺍﻟﻣﺗﺣﺭﻛﺔ. ﺗﺯﻳﺩ ﺍﻟﻛﺎﺑﻼﺕ )ﺍﻷﺳﻼﻙ( ﺍﻟﺗﺎﻟﻔﺔ ﺃﻭ ﺍﻟﻣﺗﺷﺎﺑﻛﺔ ﻣﻥ ﺧﻁﺭ ﺍﻟﺻﺩﻣﺎﺕ ﺍﻟﻛﻬﺭﺑﻳﺔ. ﺝ( ﻓﻲ ﺣﺎﻟﺔ ﺗﺷﻐﻳﻝ ﺍﻟﻌﺩﺓ ﺍﻟﻛﻬﺭﺑﺎﺋﻳﺔ ﺑﺎﻟﺧﺎﺭﺝ ،ﻳﻧﺻﺢ ﺑﺎﺳﺗﺧﺩﺍﻡ ﺳﻠﻙ )ﻛﺎﺑﻝ( ﻳﺗﻧﺎﺳﺏ ﻣﻊ ﺍﻻﺳﺗﻌﻣﺎﻝ ﺍﻟﺧﺎﺭﺟﻲ. ﻗﻡ ﺑﺎﺳﺗﺧﺩﺍﻡ ﺳﻠﻙ ﻣﻧﺎﺳﺏ ﻣﻊ ﺍﻻﺳﺗﻌﻣﺎﻝ ﺍﻟﺧﺎﺭﺟﻲ ﻟﻠﺗﻘﻠﻳﻝ ﻣﻥ ﺧﻁﻭﺭﺓ ﺍﻟﺗﻌﺭﺽ ﻟﺻﺩﻣﺔ ﻛﻬﺭﺑﻳﺔ. (3ﺍﻟﺳﻼﻣﺔ ﺍﻟﺷﺧﺻﻳﺔ ﺃ( ﻛﻥ ﻳﻘ ًﻅﺎ ﻭﺃﻧﺗﺑﻪ ﺇﻟﻰ ﻣﺎ ﺗﻔﻌﻠﻪ ﻭﻗﻡ ﺑﺎﻟﻌﻣﻝ ﺑﻭﺍﺳﻁﺔ ﺍﻟﻌﺩﺓ ﺍﻟﻛﻬﺭﺑﺎﺋﻳﺔ ﺑﺗﻌﻘﻝ .ﻻ ﺗﺳﺗﺧﺩﻡ ﺍﻟﻌﺩﺓ ﺍﻟﻛﻬﺭﺑﺎﺋﻳﺔ ﻓﻲ ﺣﺎﻟﺔ ﺷﻌﻭﺭﻙ ﺑﺎﻟﺗﻌﺏ ﺃﻭ ﺇﺫﺍ ﻛﻧﺕ ﺗﺣﺕ ﺗﺄﺛﻳﺭ ﻣﻭﺍﺩ ﻣﺧﺩﺭﺓ ﺃﻭ ﺃﺩﻭﻳﺔ ﺃﻭ ﻣﻭﺍﺩ ﻛﺣﻭﻟﻳﺔ. ﻋﺩﻡ ﺍﻹﻧﺗﺑﺎﻩ ﻟﻠﺣﻅﺔ ﻭﺍﺣﺩﺓ ﻋﻧﺩ ﺇﺳﺗﺧﺩﺍﻡ ﺍﻟﻌﺩﺓ ﺍﻟﻛﻬﺭﺑﺎﺋﻳﺔ ﻗﺩ ﻳﺅﺩﻱ ﺇﻟﻰ ﺇﺻﺎﺑﺔ ﺧﻁﻳﺭﺓ. ﺏ( ﺍﺳﺗﺧﺩﻡ ﺃﺩﻭﺍﺕ ﺍﻷﻣﺎﻥ .ﻗﻡ ﺩﺍﺋﻣًﺎ ﺑﺎﺭﺗﺩﺍء ﺍﻟﻘﻧﺎﻉ ﺍﻟﻭﺍﻗﻲ ﻟﻠﻌﻳﻥ. ﺳﺗﻌﻣﻝ ﺃﺩﻭﺍﺕ ﺍﻷﻣﺎﻥ ﻣﺛﻝ ﺍﻟﻘﻧﺎﻉ ﺍﻟﻭﺍﻗﻲ ﻣﻥ ﺍﻟﻐﺑﺎﺭ ﺃﻭ ﺃﺣﺫﻳﺔ ﺍﻷﻣﺎﻥ ﺍﻟﻣﺿﺎﺩﺓ ﻟﻼﻧﺯﻻﻕ ﺃﻭ ﻗﺑﻌﺔ ﺻﻠﺑﺔ ﺃﻭ ﺃﺟﻬﺯﺓ ﺣﻣﺎﻳﺔ ﺍﻟﺳﻣﻊ ﻭﺍﻟﺗﻲ ﻳﺗﻡ ﺍﺳﺗﺧﺩﺍﻣﻬﺎ ﻓﻲ ﻅﺭﻭﻑ ﻣﻌﻳﻧﺔ ﻋﻠﻰ ﺗﻘﻠﻳﻝ ﺍﺣﺗﻣﺎﻻﺕ ﺍﻟﺗﻌﺭﺽ ﻹﺻﺎﺑﺎﺕ ﺷﺧﺻﻳﺔ. ﺕ( ﺗﺟﻧﺏ ﺍﻟﺗﺷﻐﻳﻝ ﻏﻳﺭ ﺍﻟﻣﻘﺻﻭﺩ .ﺗﺄﻛﺩ ﻣﻥ ﺃﻥ ﺍﻟﻣﻔﺗﺎﺡ ﻓﻲ ﻭﺿﻊ ﺍﻹﻳﻘﺎﻑ ﻗﺑﻝ ﺍﻟﺗﻭﺻﻳﻝ. ﻳﺅﺩﻱ ﺣﻣﻝ ﺃﺩﻭﺍﺕ ﺍﻟﻁﺎﻗﺔ ﻣﻊ ﻭﺟﻭﺩ ﺇﺻﺑﻌﻙ ﻓﻲ ﺍﻟﻣﻔﺗﺎﺡ ﺃﻭ ﺗﻭﺻﻳﻝ ﺃﺩﻭﺍﺕ ﺍﻟﻁﺎﻗﺔ ﺍﻟﺗﻲ ﻳﻛﻭﻥ ﻓﻳﻬﺎ ﺍﻟﻣﻔﺗﺎﺡ ﻓﻲ ﻭﺿﻊ ﺍﻟﺗﺷﻐﻳﻝ ﺇﻟﻰ ﺍﺣﺗﻣﺎﻝ ﻭﻗﻭﻉ ﺣﻭﺍﺩﺙ. ﺍﻻﺣﺗﻳﺎﻁﺎﺕ ﻳﺭﺟﻰ ﻭﺿﻊ ﺍﻟﻌﺩﺓ ﺍﻟﻛﻬﺭﺑﺎﺋﻳﺔ ﺑﻌﻳﺩﺍً ﻋﻥ ﻣﺗﻧﺎﻭﻝ ﺍﻷﻁﻔﺎﻝ ﻭﻛﺑﺎﺭ ﺍﻟﺳﻥ. ﻓﻲ ﺣﺎﻟﺔ ﻋﺩﻡ ﺍﻻﺳﺗﺧﺩﺍﻡ ﻳﺟﺏ ﺍﻟﺣﻔﺎﻅ ﻋﻠﻰ ﺍﻟﻌﺩﺓ ﺍﻟﻛﻬﺭﺑﺎﺋﻳﺔ ﺑﻌﻳﺩﺓ ﻋﻥ ﻣﺗﻧﺎﻭﻝ ﺍﻷﻁﻔﺎﻝ ﻭﻛﺑﺎﺭ ﺍﻟﺳﻥ. ۱ 2015/03/25 11:32:49 20 0000Book̲LDU4.indb 20 21 0000Book̲LDU4.indb 21 2015/03/25 11:32:49 Item No. 1C 2 3 4A 5 6 7C 8A 9 10B 11 13 14 15 16 17 18 19 20 21 22 23 26 27 28 29 30 31 32 33 34 36 37 38 39 40 41 42 43 44B 45 46 47 Housing Ass'y Bearing Lock Stator Ass'y Brush Terminal Machine Screw M4×60 Spring Lock Washer Brush Holder Hexagon Socket Hd. Set Screw M4×10 Stop Plate Rubber Washer Armature Ball Bearing (626DC2) Bearing Washer Inner Cover Bearing Cover (A) Machine Screw M4×10 Ball Bearing (608VVC2) Spring Lock Washer Nose Bracket Ball Bearing (6000VVCM) Wave Washer Bearing Plate Spindle Coupling Ball Bearing (6001VVCMPS2-L) Ring Washer (A) Washer (B) Bearing Lid Hexagon Socket Hd. Set Screw M4×5 Machine Screw M4×45 Colllet Chuck Brush Cap Name Plate Rivet D2.5×3.8 Tail Cover Switch Holder Hexagon Socket Hd. Bolt M4×12 Spring Lock Wasfer Switch Cord Cord Armor Cord Crip Part Name Item No. 49 50B 51 52 53 54 55 57 58 59 64B 65 69 70 71 72 73 Part Name Connector Carbon Brush Wrench 12mm Wrench 17mm Dresser Mounted Wheel KA-1 Mounted Wheel KA-2 Mounted Wheel KA-4 Mounted Wheel KA-5 Mounted Wheel KA-6 Case Machine Screw M4×6 Machine Screw M4×14 Spring Loch Washer Rubber Cap Switch Insulator Terminal D4 22 0000Book̲LDU4.indb 22 2015/03/25 11:32:50 23 0000Book̲LDU4.indb 23 2015/03/25 11:32:50 509 Code No. C99016134 N Printed in Japan 0000Book̲LDU4.indb 24 2015/03/25 11:32:50-
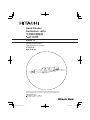 1
1
-
 2
2
-
 3
3
-
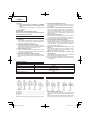 4
4
-
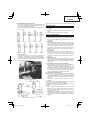 5
5
-
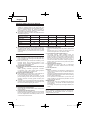 6
6
-
 7
7
-
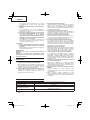 8
8
-
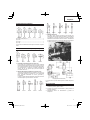 9
9
-
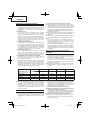 10
10
-
 11
11
-
 12
12
-
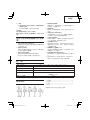 13
13
-
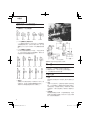 14
14
-
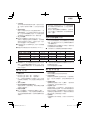 15
15
-
 16
16
-
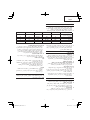 17
17
-
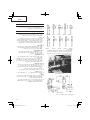 18
18
-
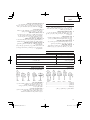 19
19
-
 20
20
-
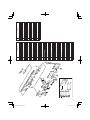 21
21
-
 22
22
-
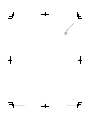 23
23
-
 24
24


Hitachi LDU 4 Manual de usuario
- Categoría
- Herramientas eléctricas
- Tipo
- Manual de usuario
- Este manual también es adecuado para
en otros idiomas
- English: Hitachi LDU 4 User manual
Artículos relacionados
-
Hitachi GP 2S2 Manual de usuario
-
-
Hitachi Koki GP 2S2 Handling Instructions Manual
-
-
Hikoki GP5V Manual de usuario
-
-
-
-
-
Hitachi G 12SA3 Manual de usuario