AEG AHB71821LW Manual de usuario
- Categoría
- Congeladores
- Tipo
- Manual de usuario


CONTENTS
1. SAFETY INFORMATION.............................................................................................3
2. SAFETY INSTRUCTIONS.............................................................................................4
3. OPERATION.................................................................................................................6
4. DAILY USE....................................................................................................................7
5. HINTS AND TIPS..........................................................................................................8
6. CARE AND CLEANING...............................................................................................9
7. TROUBLESHOOTING............................................................................................... 10
8. INSTALLATION..........................................................................................................13
9. TECHNICAL DATA.................................................................................................... 14
FOR PERFECT RESULTS
Thank you for choosing this AEG product. We have created it to give you
impeccable performance for many years, with innovative technologies that help
make life simpler features you might not find on ordinary appliances. Please
spend a few minutes reading to get the very best from it.
Visit our website for:
Get usage advice, brochures, trouble shooter, service information:
www.aeg.com/webselfservice
Register your product for better service:
www.registeraeg.com
Buy Accessories, Consumables and Original spare parts for your appliance:
www.aeg.com/shop
CUSTOMER CARE AND SERVICE
Always use original spare parts.
When contacting our Authorised Service Centre, ensure that you have the
following data available: Model, PNC, Serial Number.
The information can be found on the rating plate.
Warning / Caution-Safety information
General information and tips
Environmental information
Subject to change without notice.
www.aeg.com
2

1. SAFETY INFORMATION
Before the installation and use of the appliance,
carefully read the supplied instructions. The
manufacturer is not responsible for any injuries or
damages that are the result of incorrect installation or
usage. Always keep the instructions in a safe and
accessible location for future reference.
1.1 Children and vulnerable people safety
• This appliance can be used by children aged from 8
years and above and persons with reduced physical,
sensory or mental capabilities or lack of experience
and knowledge if they have been given supervision or
instruction concerning the use of the appliance in a
safe way and understand the hazards involved.
• Do not let children play with the appliance.
• Children shall not carry out cleaning and user
maintenance of the appliance without supervision.
• Keep all packaging away from children and dispose of
it appropriately.
1.2
General Safety
• This appliance is intended to be used in household
and similar applications such as:
– Farm houses; staff kitchen areas in shops, offices
and other working environments
– By clients in hotels, motels, bed and breakfast and
other residential type environments
• Keep ventilation openings, in the appliance enclosure
or in the built-in structure, clear of obstruction.
• Do not use mechanical devices or other means to
accelerate the defrosting process, other than those
recommended by the manufacturer.
• Do not damage the refrigerant circuit.
• Do not use electrical appliances inside the food
storage compartments of the appliance, unless they
are of the type recommended by the manufacturer.
ENGLISH
3

• Do not use water spray and steam to clean the
appliance.
• Clean the appliance with a moist soft cloth. Only use
neutral detergents. Do not use abrasive products,
abrasive cleaning pads, solvents or metal objects.
• Do not store explosive substances such as aerosol
cans with a flammable propellant in this appliance.
• If the supply cord is damaged, it must be replaced by
the manufacturer, its Authorised Service Centre or
similarly qualified persons in order to avoid a hazard.
2. SAFETY INSTRUCTIONS
2.1 Installation
WARNING!
Only a qualified person must
install this appliance.
• Remove all the packaging and the
transit bolts.
• Do not install or use a damaged
appliance.
• Follow the installation instruction
supplied with the appliance.
• Always take care when moving the
appliance as it is heavy. Always use
safety gloves and enclosed footwear.
• Make sure the air can circulate around
the appliance.
• At first installation or after reversing
the door wait at least 4 hours before
connecting the appliance to the
power supply. This is to allow the oil
to flow back in the compressor.
• Before carrying out any operations on
the appliance (e.g. reversing the
door), remove the plug from the
power socket.
• Do not install the appliance close to
radiators or cookers, ovens or hobs.
• Do not install the appliance where
there is direct sunlight.
• Do not install this appliance in areas
that are too humid or too cold, such
as the construction appendices,
garages or wine cellars.
• When you move the appliance, lift it
by the front edge to avoid scratching
the floor.
2.2 Electrical connection
WARNING!
Risk of fire and electrical
shock.
• The appliance must be earthed.
• Make sure that the parameters on the
rating plate are compatible with the
electrical ratings of the mains power
supply.
• Always use a correctly installed
shockproof socket.
• Do not use multi-plug adapters and
extension cables.
• Make sure not to cause damage to
the electrical components (e.g. mains
plug, mains cable, compressor).
Contact the Authorised Service
Centre or an electrician to change the
electrical components.
• The mains cable must stay below the
level of the mains plug.
• Connect the mains plug to the mains
socket only at the end of the
installation. Make sure that there is
access to the mains plug after the
installation.
• Do not pull the mains cable to
disconnect the appliance. Always pull
the mains plug.
2.3 Use
WARNING!
Risk of injury, burns,
electrical shock or fire.
www.aeg.com4

• Do not change the specification of
this appliance.
• Do not put electrical appliances (e.g.
ice cream makers) in the appliance
unless they are stated applicable by
the manufacturer.
• Be careful not to cause damage to
the refrigerant circuit. It contains
isobutane (R600a), a natural gas with a
high level of environmental
compatibility. This gas is flammable.
• If damage occurs to the refrigerant
circuit, make sure that there are no
flames and sources of ignition in the
room. Ventilate the room.
• Do not let hot items to touch the
plastic parts of the appliance.
• Do not put soft drinks in the freezer
compartment. This will create
pressure on the drink container.
• Do not store flammable gas and
liquid in the appliance.
• Do not put flammable products or
items that are wet with flammable
products in, near or on the appliance.
• Do not touch the compressor or the
condenser. They are hot.
• Do not remove or touch items from
the freezer compartment if your hands
are wet or damp.
• Do not freeze again food that has
been thawed.
• Obey the storage instructions on the
packaging of frozen food.
2.4 Internal light
• The type of lamp used for this
appliance is not suitable for
household room illumination
2.5 Care and cleaning
WARNING!
Risk of injury or damage to
the appliance.
• Before maintenance, deactivate the
appliance and disconnect the mains
plug from the mains socket.
• This appliance contains hydrocarbons
in the cooling unit. Only a qualified
person must do the maintenance and
the recharging of the unit.
• Regularly examine the drain of the
appliance and if necessary, clean it. If
the drain is blocked, defrosted water
collects in the bottom of the
appliance.
2.6 Disposal
WARNING!
Risk of injury or suffocation.
• Disconnect the appliance from the
mains supply.
• Cut off the mains cable and discard it.
• Remove the door to prevent children
and pets to be closed inside of the
appliance.
• The refrigerant circuit and the
insulation materials of this appliance
are ozone-friendly.
• The insulation foam contains
flammable gas. Contact your
municipal authority for information on
how to discard the appliance
correctly.
• Do not cause damage to the part of
the cooling unit that is near the heat
exchanger.
ENGLISH
5

3. OPERATION
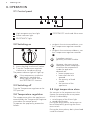
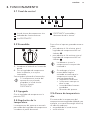
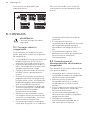
3.1 Control panel
1 2 3 4
1
High temperature alarm light
2
Power indicator light
3
FROSTMATIC light
4
FROSTMATIC switch and Alarm reset
3.2 Switching on
1. Insert the plug into the wall socket.
2. Turn the Temperature regulator
clockwise to a medium setting.
The power indicator light will light up.
If the temperature inside the
appliance is too high the
Alarm light will blink. Active
the FROSTMATIC function.
3.3 Switching off
Turn the Temperature regulator to the
OFF position.
3.4 Temperature regulation
The temperature within the appliance is
controlled by the Temperature Regulator
situated on the control panel.
To operate the appliance, proceed as
follows:
• to obtain the minimum coldness, turn
the Temperature regulator towards
.
• to obtain the maximum coldness, turn
the Temperature regulator towards
.
A medium setting is
generally the most suitable.
However, the exact setting
should be chosen keeping in
mind that the temperature
inside the appliance
depends on:
• room temperature
• how often the lid is
opened
• the quantity of food
stored
• the location of the
appliance.
3.5 High temperature alarm
An increase in the temperature in the
freezer (for example due to an power
failure) is indicated by:
• switching on of the Alarm light
• sounding of buzzer
During the alarm phase, the buzzer can
be switched off by pressing the Alarm
reset switch.
During the alarm phase, don't place food
inside the freezer.
www.aeg.com
6

When normal conditions are restored the
Alarm light will switch off automatically.
3.6 FROSTMATIC function
The freezer compartment is suitable for
long term storage of commercially frozen
and deep-frozen food, and for freezing
fresh food.
Place food in the freezer after a pre-
cooling the appliance for 24 hours.
The freezing process takes 24 hours.
During this period do not put other food
in the freezer. The maximum quantity of
foods to freeze in 24 hours is shown on
the serial number plate.
To activate the FROSTMATIC function,
press the FROSTMATIC switch.
The FROSTMATIC light will light up.
This function stops automatically after 52
hours.
It is possible to deactivate the function at
any time by pressing FROSTMATIC
switch. The FROSTMATIC light will
switch off.
4. DAILY USE
WARNING!
Refer to Safety chapters.
4.1 Freezing fresh food
The freezer compartment is suitable for
freezing fresh food and storing frozen
and deep-frozen food for a long time.
To freeze fresh food activate the
FROSTMATIC function at least 24 hours
before placing the food to be frozen in
the freezer compartment.
The maximum amount of food that can
be frozen in 24 hours is specified on the
rating plate.
1)
The freezing process lasts 24 hours:
during this period do not add other food
to be frozen.
4.2 Storage of frozen food
When first starting-up or after a period
out of use, before putting the products
in the compartment let the appliance run
at least 2 hours on the higher settings.
CAUTION!
In the event of accidental
defrosting, for example due
to a power failure, if the
power has been off for
longer than the value shown
in the technical
characteristics chart under
"rising time", the defrosted
food must be consumed
quickly or cooked
immediately and then re-
frozen (after cooling).
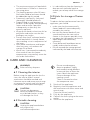
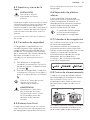
4.3 Opening and closing the
lid
CAUTION!
Never pull the handle with
immense force.
As the lid is equipped with a tightly
closing seal, it is not easy to reopen it
shortly after closing (due to the vacuum
formed inside). Wait for few minutes
before reopening the appliance.
The vacuum valve will help you to open
the lid.
4.4 Security lock
The freezer is equipped with a special
lock in order to avoid accidental locking.
The lock is designed in such manner that
1)
Refer to "Technical data"
ENGLISH 7

you can turn the key and thus close the
lid only if you previously push the key
into the lock.
1. To lock the freezer, push the key into
the lock gently and turn the key
clockwise towards the symbol .
2. To open the freezer, push the key
into the lock gently and turn the key
counter-clockwise towards the
symbol .
Spare keys are available at
the local Service Centre.
WARNING!
Keep the keys well away
from children.
Make sure to remove the key
from the lock before you
discard the old appliance.
4.5 Low frost system
The appliance is equipped with Low frost
system (you can see a valve inside the
freezer in the backside) what reduces ice-
build-up in the chest freezer by up to 80
percent.
4.6 Plastic low divider
With the low divider you can have a
better use of the space above the
compressor. The space formed this way
will allow you to store small food packs
that can be found more easily.
The separator may also be
used as a tray at the time of
defrosting the freezer.
4.7 Freezing Calendar
The symbols show different types of
frozen goods.
The numbers indicate storage times in
months for the appropriate types of
frozen goods. Whether the upper or
lower value of the indicated storage time
is valid depends on the quality of the
foods and treating before freezing.
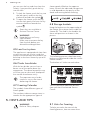
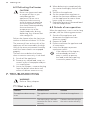
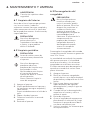
4.8 Storage baskets
Hang the baskets on the upper edge of
the freezer (A) or place them inside the
freezer (B). Turn and fix the handles for
these two positions as shown in the
picture.
A B
The following pictures show how many
baskets can be placed inside the various
freezer models.
The baskets will slide into each other.
230
200
946 1061
1201
1336 1611
You can purchase additional baskets
from your local Authorised Service
Centre.
5.
HINTS AND TIPS
WARNING!
Refer to Safety chapters.
5.1 Hints for freezing
To help you make the most of the
freezing process, here are some hints:
www.aeg.com8

• The maximum quantity of food which
can be frozen in 24 hours is shown on
the rating plate.
• The freezing process takes 24 hours.
No further food to be frozen should
be added during this period.
• Freeze only top quality, fresh and
thoroughly cleaned foodstuffs.
• Prepare food in small portions to
enable it to be rapidly and completely
frozen and to make it possible
subsequently to thaw only the
quantity required.
• Wrap up the food in aluminium foil or
polythene and make sure that the
packages are airtight.
• Do not allow fresh, unfrozen food to
touch food which is already frozen,
thus avoiding a rise in temperature of
the latter.
• Lean foods store better and longer
than fatty ones; salt reduces the
storage life of food.
• Water ices, if consumed immediately
after removal from the freezer
compartment, can possibly cause the
skin to be freeze burnt.
• It is advisable to show the freezing in
date on each individual pack to
enable you to keep tab of the storage
time.
5.2 Hints for storage of frozen
food
To obtain the best performance from this
appliance, you should:
• make sure that the commercially
frozen foodstuffs were adequately
stored by the retailer;
• be sure that frozen foodstuffs are
transferred from the store to the
freezer in the shortest possible time;
• not open the lid frequently or leave it
open longer than absolutely
necessary.
• Once defrosted, food deteriorates
rapidly and cannot be refrozen.
• Do not exceed the storage period
indicated by the food manufacturer.
6. CARE AND CLEANING
WARNING!
Refer to Safety chapters.
6.1 Cleaning the interior
Before using the appliance for the first
time, the interior and all internal
accessories should be washed with
lukewarm water and some neutral soap
to remove the typical smell of a brand-
new product, then dried thoroughly.
CAUTION!
Do not use detergents,
abrasive powders, chlorine
or oil-based cleaners as they
will damage the finish.
6.2 Periodic cleaning
CAUTION!
Unplug the appliance before
carrying out any
maintenance operation.
Do not use detergents,
abrasive products, highly
perfumed cleaning products
or wax polishes to clean the
inner side of the appliance.
Prevent damage to the
cooling system.
There is no need to clean
the compressor area.
1. Switch off the appliance.
2. Regularly clean the appliance and
the accessories with warm water and
neutral soap.
Clean the lid seal carefully.
3. Fully dry the appliance.
4. Connect the mains plug to the mains
socket.
5. Switch on the appliance.
ENGLISH
9

6.3 Defrosting the freezer
CAUTION!
Never use sharp metal tools
to scrape off frost as you
could damage the
appliance. Do not use a
mechanical device or any
artificial means to speed up
the thawing process other
than those recommended by
the manufacturer. A
temperature rise of the
frozen food packs, during
defrosting, may shorten their
safe storage life.
Defrost the freezer when the frost layer
reaches a thickness of about 10-15 mm.
The amount of frost on the walls of the
appliance will be increased by the high
level of the outer environment humidity
and if the frozen food is not wrapped
properly.
The best time to defrost the freezer
when it contains no or only a little food.
1. Switch off the appliance.
2. Remove any stored food, wrap it in
several layers of newspaper and put
it in a cool place.
3. Leave the lid open , remove the plug
from the defrost water drain and
collect all defrost water on a tray.
4. When defrosting is completed, dry
the interior thoroughly and refit the
plug.
5. Switch on the appliance.
6. Set the temperature regulator to
obtain the maximum coldness and
run the appliance for two or three
hours using this setting.
7. Reload the previously removed food
into the compartment.
6.4 Periods of non-operation
When the appliance is not in use for long
periods, take the following precautions:
1. Switch off the appliance and
disconnect the appliance from
electricity supply.
2. Remove all food
3. Defrost and clean the appliance and
all accessories.
4. Leave the lid open to prevent
unpleasant smells.
If the cabinet will be kept on,
ask somebody to check it
once in a while to prevent
the food inside from spoiling
in case of a power failure.
7. TROUBLESHOOTING
WARNING!
Refer to Safety chapters.
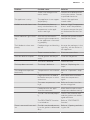
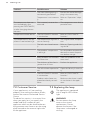
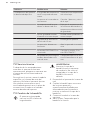
7.1 What to do if...
Problem Possible cause Solution
The appliance does not op-
erate.
The appliance is switched
off.
Switch on the appliance.
The mains plug is not con-
nected to the mains socket
correctly.
Connect the mains plug to
the mains socket correctly.
www.aeg.com10

Problem Possible cause Solution
There is no voltage in the
mains socket.
Connect to a different elec-
trical mains socket. Contact
a qualified electrician.
The appliance is noisy. The appliance is not suppor-
ted properly.
Check if the appliance
stands stable.
Audible or visual alarm is on. The cabinet has been re-
cently switched on or the
temperature in the appli-
ance is too high.
Refer to "High Temperature
Alarm" and if the problem
still occurs contact the near-
est Authorized Service Cen-
tre.
Power indicator light is flash-
ing.
An error has occurred in
measuring the temperature
or the appliance is not work-
ing properly.
Contact the nearest Author-
ized Service Centre.
The lid doesn't close com-
pletely.
Food packages are blocking
the lid.
Arrange the packages in the
right way, see the sticker in
the appliance.
There is excessive frost. Eliminate excess frost.
The lid is difficult to open. The lid gaskets are dirty or
sticky.
Clean the lid gaskets.
The valve is blocked. Check the valve.
The lamp does not work. The lamp is defective. Refer to "Replacing the
lamp".
The compressor operates
continually.
Temperature is set incorrect-
ly.
Refer to "Operation" chap-
ter.
Large quantities of food to
be frozen were put in at the
same time.
Wait some hours and then
check the temperature
again.
The room temperature is too
high.
Refer to climate class chart
on the rating plate.
Food placed in the appli-
ance was too warm.
Allow food to cool to room
temperature before storing.
The lid is not closed proper-
ly.
Check if the lid closes well
and the gaskets are undam-
aged and clean.
The FROSTMATIC function
is switched on.
Refer to "FROSTMATIC
function".
There is too much frost and
ice.
The lid is not closed correct-
ly or the gasket is deformed/
dirty.
Refer to "Opening and clos-
ing the lid".
ENGLISH 11

Problem Possible cause Solution
The water drainage plug is
not correctly positioned.
Position the water drainage
plug in the correct way.
Temperature is set incorrect-
ly.
Refer to "Operation" chap-
ter.
The compressor does not
start immediately after
pressing the FROSTMATIC,
or after changing the tem-
perature.
This is normal, no error has
occurred.
The compressor starts after a
period of time.
Temperature cannot be set. The FROSTMATIC function
is switched on.
Refer to "FROSTMATIC
function".
The temperature in the ap-
pliance is too low/too high.
The temperature regulator is
not set correctly.
Set a higher/lower tempera-
ture.
The lid is not closed correct-
ly.
Refer to "Opening and clos-
ing the lid".
The products' temperature
is too high.
Let the product temperature
decrease to room tempera-
ture before storage.
Many products are stored at
the same time.
Store less products at the
same time.
The thickness of the frost is
greater than 4-5 mm.
Defrost the appliance.
The lid has been opened of-
ten.
Open the lid only if necessa-
ry.
The FROSTMATIC function
is switched on.
Refer to "FROSTMATIC
function".
Products to be frozen are
placed too closely to each
other.
Make sure that there is cold
air circulation in the appli-
ance.
7.2 Customer Service
If your appliance is still not working
properly after making the above checks,
contact the nearest Authorised Service
Centre.
To obtain fast service, it is essential that
when you apply for it you specify the
model and serial number of your
appliance which can be found either on
the guarantee certificate or on the rating
plate located on the external right side
of the appliance.
7.3 Replacing the lamp
The appliance is equipped
with a longlife LED interior
light.
WARNING!
Do not remove the lamp
cover at the time of
replacement. Do not
operate the freezer if the
lamp cover is damaged or
missing.
www.aeg.com12

1. Disconnect the mains plug from the
mains socket.
2. Replace the used lamp with a new
lamp of the same power and
specifically designed for household
appliances (the maximum power is
shown on the lamp cover).
3. Connect the mains plug to the mains
socket.
4. Open the lid. Make sure that the
lamp comes on.
8. INSTALLATION
WARNING!
Refer to Safety chapters.
8.1 Positioning
This appliance can be installed in a dry,
well ventilated indoor where the ambient
temperature corresponds to the climate
class indicated on the rating plate of the
appliance:
Climate
class
Ambient temperature
SN +10°C to + 32°C
N +16°C to + 32°C
ST +16°C to + 38°C
T +16°C to + 43°C
Some functional problems
might occur for some types
of models when operating
outside of that range. The
correct operation can only
be guaranteed within the
specified temperature
range. If you have any
doubts regarding where to
install the appliance, please
turn to the vendor, to our
customer service or to the
nearest Authorised Service
Centre.
The plug should be
accessible after installation.
8.2 Electrical connection
• Before plugging in, ensure that the
voltage and frequency shown on the
rating plate correspond to your
domestic power supply.
• The appliance must be earthed. The
power supply cable plug is provided
with a contact for this purpose. If the
domestic power supply socket is not
earthed, connect the appliance to a
separate earth in compliance with
current regulations, consulting a
qualified electrician.
• The manufacturer declines all
responsibility if the above safety
precautions are not observed.
• This appliance complies with the
E.E.C. Directives.
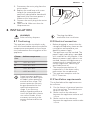
8.3 Ventilation requirements
The airflow behind the appliance must
be sufficient.
1. Put the freezer in horizontal position
on a firm surface. The cabinet must
be on all four feet.
2. Make sure that the clearance
between the appliance and rear wall
is 5 cm.
3. Make sure that the clearance
between the appliance and the sides
is 5 cm.
ENGLISH
13

9. TECHNICAL DATA
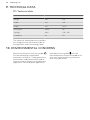
9.1 Technical data
Height mm 876
Width mm 946
Depth mm 667,5
Rising time Hours 46
Voltage Volts 230 - 240
Frequency Hz 50
The technical information are situated in
the rating plate on the external side of
the appliance and in the energy label.
10. ENVIRONMENTAL CONCERNS
Recycle the materials with the symbol .
Put the packaging in applicable
containers to recycle it. Help protect the
environment and human health and to
recycle waste of electrical and electronic
appliances. Do not dispose appliances
marked with the symbol with the
household waste. Return the product to
your local recycling facility or contact
your municipal office.
www.aeg.com14

CONTENIDO
1. INFORMACIÓN SOBRE SEGURIDAD..................................................................... 16
2. INSTRUCCIONES DE SEGURIDAD..........................................................................17
3. FUNCIONAMIENTO................................................................................................. 19
4. USO DIARIO...............................................................................................................20
5. CONSEJOS................................................................................................................ 22
6. MANTENIMIENTO Y LIMPIEZA............................................................................... 23
7. SOLUCIÓN DE PROBLEMAS................................................................................... 24
8. INSTALACIÓN........................................................................................................... 27
9. DATOS TÉCNICOS................................................................................................... 28
PARA OBTENER RESULTADOS PERFECTOS
Gracias por escoger este producto AEG. Este artículo ha sido creado para ofrecer
un rendimiento impecable durante muchos años, con innovadoras tecnologías
que facilitarán su vida y prestaciones que probablemente no encuentre en
electrodomésticos corrientes. Por favor, dedique algunos minutos a la lectura
para disfrutar de todas sus ventajas.
Consulte en nuestro sitio web:
Obtener consejos, folletos, soluciones a problemas e información de servicio:
www.aeg.com/webselfservice
Registrar su producto para recibir un mejor servicio:
www.registeraeg.com
Adquirir accesorios, artículos de consumo y recambios originales para su
aparato:
www.aeg.com/shop
ATENCIÓN Y SERVICIO AL CLIENTE
Le recomendamos que utilice recambios originales.
Al contactar con nuestro centro autorizado de servicio técnico, cerciórese de
tener la siguiente información a mano: Modelo, PNC, Número de serie.
La información se puede encontrar en la placa de características.
Advertencia / Precaución-Información sobre seguridad
Información general y consejos
Información sobre el medio ambiente
Salvo modificaciones.
ESPAÑOL
15

1. INFORMACIÓN SOBRE SEGURIDAD
Antes de instalar y utilizar el aparato, lea atentamente
las instrucciones facilitadas. El fabricante no se hace
responsable de lesiones o daños producidos como
resultado de una instalación o un uso incorrectos:
Conserve siempre estas instrucciones en lugar seguro y
accesible para futuras consultas.
1.1 Seguridad de niños y personas vulnerables
• Este aparato puede ser utilizado por niños de 8 años
en adelante y personas cuyas capacidades físicas,
sensoriales o mentales estén disminuidas o que
carezcan de la experiencia y conocimientos suficientes
para manejarlo, siempre que cuenten con las
instrucciones o la supervisión sobre el uso del
electrodoméstico de forma segura y comprendan los
riesgos.
• No deje que los niños jueguen con el aparato.
• La limpieza y mantenimiento de usuario del aparato
no podrán ser realizados por niños sin supervisión.
• Mantenga todo el material de embalaje fuera del
alcance de los niños y deséchelo de forma adecuada.
1.2
Instrucciones generales de seguridad
• Este aparato está concebido para utilizarse en
aplicaciones domésticas y similares, tales como:
– Granjas; áreas de cocina para el personal en
tiendas, oficinas y otros entornos de trabajo
– Por clientes en hoteles, moteles, pensiones y otros
entornos de tipo residencial
• Mantenga libres de obstrucciones las aberturas de
ventilación del alojamiento del aparato o de la
estructura empotrada.
• No utilice dispositivos mecánicos ni medios artificiales
para acelerar el proceso de descongelación, excepto
los recomendados por el fabricante.
• No dañe el circuito del refrigerante.
www.aeg.com
16

• No utilice dispositivos eléctricos dentro de los
compartimientos para alimentos del aparato, salvo si
son del tipo recomendado por el fabricante.
• No utilice pulverizadores ni vapor de agua para
limpiar el aparato.
• Limpie el aparato con un paño suave humedecido.
Utilice solo detergentes neutros. No utilice productos
abrasivos, estropajos duros, disolventes ni objetos
metálicos.
• No almacene sustancias explosivas tales como latas
de aerosol con un propulsor inflamable en este
aparato.
• Si el cable eléctrico sufre algún daño, el fabricante, su
servicio técnico autorizado o un profesional
cualificado tendrán que cambiarlo para evitar riesgos.
2. INSTRUCCIONES DE SEGURIDAD
2.1 Instalación
ADVERTENCIA!
Solo un electricista
cualificado puede instalar
este aparato.
• Retire todo el embalaje y los
pasadores de transporte.
• No instale ni utilice un aparato
dañado.
• Siga las instrucciones de instalación
suministradas con el aparato.
• Tenga cuidado al mover el aparato,
porque es pesado. Utilice siempre
guantes de protección y calzado
cerrado.
• Asegúrese de que el aire pueda
circular alrededor del aparato.
• En la primera instalación otras invertir
el sentido de apertura de la puerta,
espere al menos 4 horas antes de
conectar el aparato a la alimentación
eléctrica. Esto es para permitir que el
aceite regrese al compresor.
• Desenchufe siempre el aparato antes
de llevar a cabo cualquier operación,
por ejemplo cambiar el sentido de
apertura de la puerta.
• No instale el aparato cerca de
radiadores, cocinas, hornos o placas
de cocción.
• No instale el aparato donde reciba luz
solar directa.
• No coloque este aparato en lugares
demasiado húmedos o fríos, como
anexos a una construcción, garajes o
bodegas.
• Al mover el aparato, levántelo por el
borde frontal para no arañar el suelo.
2.2 Conexión eléctrica
ADVERTENCIA!
Riesgo de incendios y
descargas eléctricas.
• El aparato debe conectarse a tierra.
• Asegúrese de que los parámetros de
la placa de características son
compatibles con los valores eléctricos
del suministro eléctrico.
• Utilice siempre una toma con
aislamiento de conexión a tierra
correctamente instalada.
• No utilice adaptadores de enchufes
múltiples ni cables prolongadores.
• Asegúrese de no provocar daños en
los componentes eléctricos (como
enchufe, cable de alimentación,
ESPAÑOL
17

compresor). Póngase en contacto con
un electricista o con el servicio
técnico autorizado para cambiar los
componentes eléctricos.
• El cable de alimentación debe estar
por debajo del nivel del enchufe de
alimentación.
• Conecte el enchufe a la toma de
corriente únicamente cuando haya
terminado la instalación. Asegúrese
de tener acceso al enchufe del
suministro de red una vez finalizada la
instalación.
• No desconecte el aparato tirando del
cable de conexión a la red. Tire
siempre del enchufe.
2.3 Uso
ADVERTENCIA!
Existe riesgo de lesiones,
quemaduras, descargas
eléctricas o incendios.
• No cambie las especificaciones de
este aparato.
• El utilice otros aparatos eléctricos
(como máquinas de hacer helados)
dentro de aparatos de refrigeración, a
menos que el fabricante haya
autorizado su utilización
• Tenga cuidado para no dañar el
circuito de refrigerante. Contiene
isobutano (R600a), un gas natural con
alto grado de compatibilidad
medioambiental. Este gas es
inflamable.
• Si se daña el circuito del refrigerante,
evite las llamas y fuentes de ignición
en la habitación. Ventile la habitación.
• No toque con elementos calientes las
piezas de plástico del aparato.
• No coloque bebidas con gas en el
congelador. Se creará presión en el
contenedor de la bebida.
• No almacene gas ni líquido
inflamable en el aparato.
• No coloque productos inflamables ni
objetos mojados con productos
inflamables dentro, cerca o encima
del aparato.
• No toque el compresor ni el
condensador. Están calientes.
• No retire ni toque elementos del
compartimento congelador con las
manos húmedas o mojadas.
• No vuelva a congelar alimentos que
se hayan descongelado.
• Siga las instrucciones del envase de
los alimentos congelados.
2.4 Luz interna
• El tipo de bombilla de este aparato
no es apto para iluminar la casa.
2.5 Mantenimiento y limpieza
ADVERTENCIA!
Podría sufrir lesiones o dañar
el aparato.
• Antes de proceder con el
mantenimiento, apague el aparato y
desconecte el enchufe de la red.
• Este equipo contiene hidrocarburos
en la unidad de refrigeración. Solo
una persona cualificada debe realizar
el mantenimiento y la recarga de la
unidad.
• Examine periódicamente el desagüe
del aparato y límpielo si fuera
necesario. Si el desagüe se bloquea,
el agua descongelada se acumulará
en la base del aparato.
2.6 Desecho
ADVERTENCIA!
Existe riesgo de lesiones o
asfixia.
• Desconecte el aparato de la red.
• Corte el cable de conexión a la red y
deséchelo.
• Retire la puerta para evitar que los
niños y las mascotas queden
encerrados en el aparato.
• El circuito del refrigerante y los
materiales aislantes de este aparato
no dañan la capa de ozono.
• La espuma aislante contiene gas
inflamable. Póngase en contacto con
las autoridades locales para saber
cómo desechar correctamente el
aparato.
• No dañe la parte de la unidad de
refrigeración que está cerca del
intercambiador de calor.
www.aeg.com
18

3. FUNCIONAMIENTO
3.1 Panel de control
1 2 3 4
1
Luz de alarma de temperatura alta
2
Indicador de funcionamiento
3
Luz FROSTMATIC
4
FROSTMATIC encendido y
desconexión de la alarma
3.2 Encendido
1. Introduzca el enchufe en la toma de
pared.
2. Gire el regulador de temperatura
hacia la derecha, a un ajuste
intermedio.
Se enciende el piloto de alimentación.
Si la temperatura interior del
aparato es muy elevada,
parpadea la luz de alarma.
Active la función
FROSTMATIC.
3.3 Apagado
Gire el regulador de temperatura a la
posición OFF.
3.4 Regulación de la
temperatura
La temperatura del aparato se controla
por medio del regulador de temperatura
situado en el panel de control.
Para utilizar el aparato, proceda como se
indica:
• para obtener el frío mínimo, gire el
regulador de temperatura hacia el
símbolo .
• para obtener el frío máximo, gire el
regulador de temperatura hacia el
símbolo
.
Lo idóneo es ajustar la
temperatura en una posición
intermedia.
Sin embargo, el ajuste
exacto debe elegirse
teniendo en cuenta que la
temperatura interior del
aparato depende de:
• temperatura ambiente
• la frecuencia con que se
abre la tapa
• la cantidad de alimentos
guardados
• ubicación del aparato.
3.5 Alarma de temperatura
alta
El aumento de la temperatura del
compartimento congelador (debido, por
ejemplo, a un corte de energía eléctrica)
se indicará mediante:
• encendido de la luz de alarma
• señal acústica
ESPAÑOL
19

Para apagar la señal acústica durante la
fase de alarma, pulse el interruptor de
restablecimiento de la alarma.
No coloque alimentos en el congelador
mientras dure la fase de alarma.
Cuando se restablezcan las condiciones
normales, la luz de alarma se apagará de
manera automática.
3.6 Función FROSTMATIC
El compartimento congelador es
apropiado para el almacenamiento
prolongado de los alimentos que se
compran congelados y ultracongelados y
para la congelación doméstica de
alimentos frescos.
Introduzca los alimentos en el
congelador después de un tiempo de
enfriamiento de 24 horas.
El proceso de congelación tarda 24
horas. Durante este periodo, no
introduzca otros alimentos en el
congelador. La cantidad máxima de
alimentos que se pueden congelar en 24
horas se indica en la placa del número
de serie.
Para activar la función FROSTMATIC,
pulse el interruptor FROSTMATIC.
Se iluminará la luz FROSTMATIC.
La función se detiene automáticamente
después de 52 horas.
La función se puede desactivar en
cualquier momento pulsando el
interruptor FROSTMATIC. Se apagará la
luz FROSTMATIC.
4. USO DIARIO
ADVERTENCIA!
Consulte los capítulos sobre
seguridad.
4.1 Congelación de alimentos
frescos
El compartimento del congelador es
adecuado para congelar alimentos
frescos y conservar a largo plazo los
alimentos congelados y ultracongelados.
Para congelar alimentos frescos, active la
función FROSTMATIC al menos 24 horas
antes de introducir los alimentos en el
compartimento congelador.
La cantidad máxima de alimentos que
puede congelarse en 24 horas se indica
en la placa de características.
1)
El proceso de congelación dura 24 horas:
durante ese tiempo no deben añadirse
otros alimentos para congelar.
4.2 Conservación de alimentos
congelados
Al poner en marcha el aparato por
primera vez o después de un periodo sin
uso, déjelo en marcha al menos durante
2 horas con un ajuste alto antes de
colocar los productos en el
compartimento.
PRECAUCIÓN!
En caso de producirse una
descongelación accidental,
por ejemplo, por un corte
del suministro eléctrico, y si
la interrupción ha sido más
prolongada que el valor
indicado en el campo
"tiempo de elevación" de la
tabla de características
técnicas, será necesario
consumir cuanto antes los
alimentos descongelados o
cocinarlos de inmediato y
congelarlos de nuevo
(después de que se hayan
enfriado).
1)
Consulte "Datos técnicos"
www.aeg.com20

4.3 Apertura y cierre de la
tapa
PRECAUCIÓN!
No tire de la manilla
ejerciendo una fuerza
excesiva.
Dado que la tapa va provista de un cierre
sellante hermético, no es fácil abrirla de
nuevo inmediatamente después de
haberla cerrado (a causa del vacío que se
forma en el interior del aparato). Espere
unos minutos antes de volver a abrir el
aparato.
La válvula de vacío facilitará la apertura
de la tapa.
4.4 Cerradura de seguridad
El congelador va equipado con una
cerradura especial que impide que
pueda quedarse bloqueado de forma
accidental. La cerradura está diseñada
de tal modo que sólo funciona después
de haber insertado la llave en la
cerradura y tras girarla para cerrar la
tapa.
1. Para bloquear el congelador,
introduzca suavemente la llave en la
cerradura y gírela a la derecha hacia
el símbolo .
2. Para abrir el congelador, introduzca
suavemente la llave en la cerradura y
gírela a la izquierda hacia el símbolo
.
Solicite al Centro de servicio
técnico las llaves de
repuesto que necesite.
ADVERTENCIA!
Mantenga las llaves fuera
del alcance de los niños.
Asegúrese de retirar la llave
de la cerradura antes de
deshacerse del aparato
antiguo.
4.5 Sistema Low Frost
El aparato está provisto de un sistema
Low Frost (válvula de la parte posterior
del congelador) que reduce en hasta el
80% el hielo que se acumula en el arcón
congelador.
4.6 Separador de plástico
inferior
Con el separador inferior puede
aprovechar mejor el espacio que hay
sobre el compresor. El espacio así
formado permite almacenar paquetes
pequeños de comida que pueden
localizarse con mayor facilidad.
El separador también puede
utilizarse como bandeja al
descongelar el congelador.
4.7 Calendario de congelación
Los símbolos muestran los distintos tipos
de alimentos congelados.
Los números indican los tiempos de
almacenamiento en meses para cada
tipo de alimento congelado. Que el valor
superior o inferior del tiempo de
almacenamiento indicado sea válido
dependerá de la calidad de los
alimentos y del tratamiento aplicado
antes de la congelación.
4.8 Cestos de almacenamiento
Cuelgue los cestos del borde superior
del congelador (A) o colóquelos dentro
del mismo (B). Gire y fije las
empuñaduras para cada una de estas
dos posiciones según se indica en la
figura.
A B
Las figuras siguientes indican la cantidad
de cestos que pueden introducirse en
los distintos modelos de congelador.
ESPAÑOL
21

Los cestos están diseñados para
acoplarse entre sí.
230
200
946 1061
1201
1336 1611
Solicite al Centro de servicio técnico
autorizado los cestos adicionales que
precise.
5. CONSEJOS
ADVERTENCIA!
Consulte los capítulos sobre
seguridad.
5.1 Consejos sobre la
congelación
Estos consejos son importantes para
poder aprovechar al máximo el proceso
de congelación:
• La cantidad máxima de alimentos que
puede congelarse en 24 horas se
indica en la placa de características.
• El proceso de congelación tarda 24
horas. No añada más alimentos para
congelar durante ese tiempo.
• Congele sólo alimentos de máxima
calidad, frescos y perfectamente
limpios.
• Prepare los alimentos en porciones
pequeñas para que se congelen de
manera rápida y total, así como para
poder descongelar posteriormente
solo las cantidades necesarias.
• Envuelva los alimentos en papel de
aluminio o polietileno y compruebe
que los envoltorios quedan
herméticamente cerrados.
• No permita que alimentos frescos y
sin congelar entren en contacto con
alimentos ya congelados, así evitará
que aumente su temperatura.
• Los alimentos magros se congelan
mejor que los grasos; la sal reduce el
tiempo de almacenamiento de los
alimentos.
• El hielo que se consume
inmediatamente después de extraerlo
del congelador puede provocar
quemaduras por congelación en la
piel.
• Se recomienda etiquetar cada
paquete con la fecha de congelación
para controlar el tiempo de
almacenamiento.
5.2 Consejos para el
almacenamiento de alimentos
congelados
Para obtener el máximo rendimiento de
este aparato, deberá:
• comprobar que el comerciante ha
mantenido los productos congelados
correctamente almacenados;
• procurar que los alimentos
congelados pasen de la tienda al
congelador en el menor tiempo
posible;
• evitar la apertura frecuente de la tapa
o dejarla abierta más tiempo del
estrictamente necesario.
• los alimentos descongelados se
deterioran con rapidez y no pueden
congelarse de nuevo.
• No supere el tiempo de
almacenamiento indicado por el
fabricante de los alimentos.
www.aeg.com
22

6. MANTENIMIENTO Y LIMPIEZA
ADVERTENCIA!
Consulte los capítulos sobre
seguridad.
6.1 Limpieza del interior
Antes de utilizar el aparato por primera
vez, lave su interior y todos los
accesorios internos con agua templada y
jabón neutro para eliminar el típico olor
de los productos nuevos. A continuación,
seque todo bien.
PRECAUCIÓN!
No utilice detergentes,
polvos abrasivos ni
limpiadores a base de cloro
o aceite, ya que podrían
dañar el acabado.
6.2 Limpieza periódica
PRECAUCIÓN!
Antes de realizar tareas de
mantenimiento, desenchufe
el aparato.
No utilice detergentes,
productos abrasivos,
productos de limpieza muy
perfumados ni ceras
abrillantadoras para limpiar
el interior del aparato.
Procure no dañar el sistema
de refrigeración.
No es necesario limpiar la
zona del compresor.
1. Apague el aparato.
2. Limpie periódicamente el aparato y
los accesorios con agua templada y
jabón neutro.
Limpie cuidadosamente el sello de la
tapa.
3. Seque a fondo el aparato.
4. Conecte el enchufe a la toma de
corriente.
5. Encienda el aparato.
6.3 Descongelación del
congelador
PRECAUCIÓN!
No utilice herramientas
metálicas afiladas para
retirar la escarcha; podría
dañar el aparato. No utilice
dispositivos mecánicos ni
medios artificiales para
acelerar el proceso de
descongelación, excepto los
recomendados por el
fabricante. El aumento de la
temperatura de los
paquetes de alimentos
congelados durante la
descongelación puede
acortar su tiempo de
almacenamiento.
Descongele el congelador sólo cuando
la capa de escarcha alcance un grosor de
unos 10 a 15 mm.
La cantidad de escarcha de las paredes
del aparato aumenta si la humedad
exterior es elevada y si los alimentos
congelados no están bien envueltos.
El mejor momento para descongelar el
aparato es cuando está vacío o tiene
pocos alimentos.
1. Apague el aparato.
2. Retire los alimentos congelados,
envuélvalos en varias hojas de papel
de periódico y colóquelos en un sitio
fresco.
3. Deje la tapa abierta, extraiga el
tapón de drenaje del agua de
descongelación y recoja el agua en
una bandeja.
4. Cuando finalice la descongelación,
seque bien el interior y vuelva a
colocar el tapón.
5. Encienda el aparato.
6. Ajuste el regulador de temperatura
para obtener el máximo frío y haga
funcionar el aparato durante dos o
tres horas con dicho ajuste.
7. Vuelva a introducir los alimentos que
retiró previamente.
ESPAÑOL
23

6.4 Periodos de inactividad
Si el aparato no se utiliza durante un
tiempo prolongado, tome las siguientes
precauciones:
1. Apague el aparato y desconecte el
aparato de la toma eléctrica.
2. Extraiga todos los alimentos
3. Descongele y limpie el aparato y
todos sus accesorios.
4. Deje abierta la tapa para impedir la
formación de olores desagradables.
Si el armario va a
mantenerse en marcha,
procure que alguien lo vigile
de vez en cuando para que
los alimentos de su interior
no se estropeen si se
interrumpe el suministro
eléctrico.
7. SOLUCIÓN DE PROBLEMAS
ADVERTENCIA!
Consulte los capítulos sobre
seguridad.
7.1 Qué hacer si...
Problema Posible causa Solución
El aparato no funciona. El aparato está apagado. Encienda el aparato.
El aparato no está correcta-
mente enchufado a la toma
de corriente.
Enchufe el aparato correcta-
mente a la toma de corrien-
te.
No hay tensión en la toma
de corriente.
Enchúfelo a otra toma de
corriente. Llame a un electri-
cista cualificado.
El aparato hace ruido. El aparato no está bien apo-
yado en el suelo.
Compruebe que los sopor-
tes del aparato descansan
sobre una superficie estable.
La alarma audible o visual
está activada.
El aparato se ha conectado
recientemente o la tempera-
tura del aparato sigue sien-
do demasiado alta.
Consulte "Alarma de tempe-
ratura alta" y si el problema
se vuelve a producir, pónga-
se en contacto con el servi-
cio técnico más cercano.
La luz indicadora de alimen-
tación parpadea.
Se ha producido un error en
la medición de la temperatu-
ra o el aparato no funciona
correctamente.
Póngase en contacto con el
servicio técnico autorizado
más cercano.
La tapa no cierra totalmente. Hay paquetes de alimentos
que impiden el ajuste de la
tapa.
Coloque los paquetes de ali-
mentos en la forma correcta;
consulte la etiqueta adheri-
da al aparato.
www.aeg.com24

Problema Posible causa Solución
Hay demasiada escarcha. Elimine el exceso de escar-
cha.
Es difícil abrir la tapa. Las juntas de la tapa están
sucias o pegajosas.
Limpie las juntas de la tapa.
La válvula está bloqueada. Compruebe la válvula.
La bombilla no funciona. La bombilla es defectuosa. Consulte la sección "Cam-
bio de la bombilla".
El compresor funciona conti-
nuamente.
La temperatura está ajustada
incorrectamente.
Consulte el capítulo de fun-
cionamiento.
Se han introducido grandes
cantidades de alimentos pa-
ra congelar al mismo tiem-
po.
Espere unas horas y vuelva a
comprobar la temperatura.
La temperatura ambiente es
demasiado alta.
Consulte la tabla de clase
climática en la placa de ca-
racterísticas.
Los alimentos introducidos
en el aparato estaban dema-
siado calientes.
Permita que los alimentos se
enfríen a temperatura am-
biente antes de almacenar-
los.
La tapa no se ha cerrado co-
rrectamente.
Asegúrese de que la puerta
cierra correctamente y de
que la junta esté sin daños y
limpia.
La función FROSTMATIC es-
tá activada.
Consulte la sección “Fun-
ción FROSTMATIC”.
Hay demasiada escarcha o
hielo.
La tapa no se ha cerrado co-
rrectamente o la junta está
deformada/sucia.
Consulte "Apertura y cierre
de la tapa".
El tapón de drenaje del
agua no está bien colocado.
Coloque el tapón de drenaje
en la forma correcta.
La temperatura está ajustada
incorrectamente.
Consulte el capítulo de fun-
cionamiento.
El compresor no se pone en
marcha inmediatamente
después de pulsar FROST-
MATIC o tras cambiar la
temperatura.
Esto es normal y no significa
que exista un error.
El compresor se pone en
marcha después de un cierto
tiempo.
No es posible ajustar la tem-
peratura.
La función FROSTMATIC es-
tá activada.
Consulte la sección “Fun-
ción FROSTMATIC”.
ESPAÑOL 25

Problema Posible causa Solución
La temperatura del aparato
es demasiado baja/alta.
El regulador de temperatura
no se ha ajustado correcta-
mente.
Seleccione una temperatura
más alta o baja.
La tapa no se ha cerrado co-
rrectamente.
Consulte "Apertura y cierre
de la tapa".
La temperatura de los pro-
ductos es demasiado alta.
Deje que la temperatura de
los alimentos descienda a la
temperatura ambiente antes
de guardarlos.
Se han guardado muchos
alimentos al mismo tiempo.
Guarde menos productos al
mismo tiempo.
El grosor de la escarcha es
de más de 4-5 mm.
Descongele el aparato.
La tapa se ha abierto con
frecuencia.
Abra la tapa solo si es nece-
sario.
La función FROSTMATIC es-
tá activada.
Consulte la sección “Fun-
ción FROSTMATIC”.
Los productos para congelar
estaban demasiado cerca
unos de otros.
Compruebe que el aire frío
circula libremente en el apa-
rato.
7.2 Servicio técnico
Si después de las comprobaciones
anteriores el aparato no funciona
correctamente, póngase en contacto con
el centro de servicio autorizado más
cercano.
Para agilizar el servicio, anote el modelo
específico y el número de serie del
aparato y facilítelos al personal técnico.
Los números se encuentran en el
certificado de garantía o en la placa de
características situada en el costado
exterior derecho del aparato.
7.3 Cambio de la bombilla
El aparato está equipado
con una luz LED interior de
larga duración.
ADVERTENCIA!
No retire la tapa de la
bombilla hasta el momento
de cambiarla. No utilice el
congelador si la tapa de la
bombilla falta o está
dañada.
1. Desenchufe el aparato de la toma de
red.
2. Cambie la bombilla por una nueva
de la misma potencia y
específicamente diseñada para
electrodomésticos (la potencia
máxima se indica en la tapa de la
bombilla).
3. Conecte el enchufe a la toma de
corriente.
4. Abra la tapa. Compruebe que la
bombilla se ilumina.
www.aeg.com
26

8. INSTALACIÓN
ADVERTENCIA!
Consulte los capítulos sobre
seguridad.
8.1 Colocación
El aparato se puede instalar en un lugar
interior seco y bien ventilado en el que la
temperatura ambiente se corresponda
con la clase climática indicada en la
placa de características del aparato:
Clase
climáti-
ca
Temperatura ambiente
SN +10°C a + 32°C
N +16°C a + 32°C
ST +16°C a + 38°C
T +16°C a + 43°C
Se puede producir algún
problema de
funcionamiento en algunos
modelos cuando se usan
fuera de ese rango. Solo se
puede garantizar el correcto
funcionamiento dentro del
rango de temperatura
especificado. Si tiene
cualquier duda respecto al
lugar de instalación del
aparato, consulte al
vendedor, a nuestro servicio
de atención al cliente o al
servicio técnico autorizado
más cercano
El enchufe debe ser
accesible después de la
instalación.
8.2 Conexión eléctrica
• Antes de conectar el aparato,
compruebe que el voltaje y la
frecuencia indicados en la placa de
datos técnicos se corresponden con
el suministro de la vivienda.
• El aparato debe conectarse a tierra. El
enchufe del cable de alimentación se
suministra con un contacto para tal
fin. Si la toma de red de la vivienda
carece de conexión a tierra, conecte
el aparato a una toma de tierra
conforme con la normativa, después
de consultar a un electricista
profesional
• El fabricante declina toda
responsabilidad si no se toman las
precauciones antes indicadas.
• Este aparato cumple las directivas
CEE.
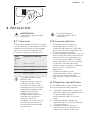
8.3 Requisitos de ventilación
El aire debe poder circular libremente
por la parte posterior del aparato.
1. Coloque el congelador en posición
horizontal sobre una superficie firme.
El aparato debe apoyarse
correctamente sobre sus cuatro
patas.
2. Asegúrese de que queda una
separación de 5 cm entre el aparato
y la pared trasera.
3. Asegúrese también de que la
separación entre el aparato y las
superficies laterales es de 5 cm.
ESPAÑOL
27

9. DATOS TÉCNICOS
9.1 Datos técnicos
Alto mm 876
Ancho mm 946
Fondo mm 667,5
Tiempo de elevación Horas 46
Tensión Voltios 230 - 240
Frecuencia Hz 50
La información técnica se encuentra en la
placa de datos técnicos situada en el
lado exterior del aparato, y en la
etiqueta de consumo energético.
10. ASPECTOS MEDIOAMBIENTALES
Recicle los materiales con el símbolo .
Coloque el material de embalaje en los
contenedores adecuados para su
reciclaje. Ayude a proteger el medio
ambiente y la salud pública, así como a
reciclar residuos de aparatos eléctricos y
electrónicos. No deseche los aparatos
marcados con el símbolo junto con los
residuos domésticos. Lleve el producto a
su centro de reciclaje local o póngase en
contacto con su oficina municipal.
*
www.aeg.com
28

ESPAÑOL 29

www.aeg.com30

ESPAÑOL 31

www.aeg.com/shop
804181614-A-042017
-
 1
1
-
 2
2
-
 3
3
-
 4
4
-
 5
5
-
 6
6
-
 7
7
-
 8
8
-
 9
9
-
 10
10
-
 11
11
-
 12
12
-
 13
13
-
 14
14
-
 15
15
-
 16
16
-
 17
17
-
 18
18
-
 19
19
-
 20
20
-
 21
21
-
 22
22
-
 23
23
-
 24
24
-
 25
25
-
 26
26
-
 27
27
-
 28
28
-
 29
29
-
 30
30
-
 31
31
-
 32
32


AEG AHB71821LW Manual de usuario
- Categoría
- Congeladores
- Tipo
- Manual de usuario
En otros idiomas
- English: AEG AHB71821LW User manual
Documentos relacionados
-
AEG AHB71821LW Manual de usuario
-
AEG ABB68221AF Manual de usuario
-
-
AEG AHB55011LW Manual de usuario
-
-
-
-
AEG SFB412F1AS Manual de usuario
-
AEG SDB414F1AS Manual de usuario
-