Glacier Bay FP4A0032BNV Guía de instalación
- Categoría
- Artículos sanitarios
- Tipo
- Guía de instalación

INSTALLATION AND CARE GUIDE
SKU#
302357334
Model#
FP4A0032BNV
PULL-DOWN KITCHEN FAUCET
Questions, problems, missing parts?
Before returning to the store, call Glacier Bay Customer Service
8 a.m. - 7 p.m., EST, Monday - Friday
9 a.m. - 6 p.m., EST, Saturday
1-855-HD-GLACIER (1-855-434-5224)
HOMEDEPOT.COM/GLACIERBAY
THANK YOU
We appreciate the trust and condence you have placed in Glacier Bay through the purchase of this kitchen
faucet. We strive to continually create quality products designed to enhance your home. Visit us online to see
our full line of products available for your home improvement needs. Thank you for choosing Glacier Bay!
THD 08/2017 REV.01

2
□ Observe all local plumbing and building codes.
□ Cover the drain in your sink to avoid losing parts.
□ Review the care and cleaning section included in this guide.
Important Information
..............................2
Warranty
...................................................2
Pre-installation
.........................................2
Planning Installation
................................2
Tools and Hardware Required
..................2
Package Contents
....................................3
Installation ................................................4
Operation...................................................7
Care and Cleaning ....................................8
Troubleshooting ........................................8
Service Parts .............................................9
Table of Contents
Important Information
Warranty
Pre-installation
Glacier Bay products are manufactured with superior quality standards and workmanship and are backed by our
limited lifetime warranty. Glacier Bay products are warranted to the original consumer purchaser to be free of
defects in materials or workmanship. We will replace FREE OF CHARGE any product or parts that proves defective.
Simply, return the product / part to any of The Home Depot retail locations or call 1-855-HD Glacier (1-855-434-
5224) to receive the replacement item. Proof of purchase (original sales receipt) from the original consumer
purchaser must be made available for all Glacier Bay warranty claims.
This warranty excludes incidental / inconsequential damages and failures due to misuse, abuse or normal wear and
tear. This warranty excludes all industrial, commercial & business usage, whose purchasers are hereby, extended
a ve year limited warranty from the date of purchase, with all other terms of this warranty applying except the
duration of warranty.
Some states and provinces do not allow the exclusion or limitation of incidental or consequential damages, so the
above limitations may not apply to you. This warranty gives you specic legal rights and you may also have other
rights that vary from state to state and province to province. Please see a store or contact 1-855-HD Glacier for
more details.
Before you begin to install this product, ensure that all parts are present. Compare parts with the package
contents list. If any part is missing or damaged, do not attempt to install the product. Contact customer service for
replacement parts.
LIMITED LIFETIME WARRANTY
PLANNING INSTALLATION
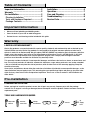
TOOLS AND HARDWARE REQUIRED
SILICONE
Adjustable
Wrench
Phillips
Screwdriver
Channel-
Lock Pliers
Safety
Goggles
Sealant
(2)
Supply
Lines

3
HOMEDEPOT.COM/GLACIERBAY
1-855-HD-GLACIER
Pre-Installation (continued)
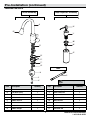
PACKAGE CONTENTS
Faucet Assembly
Soap Dispenser Assembly
B*
A
D*
C*
E*
F*
G*
H
Tools
J*
I*
P
K*
L*
M*
N*
O*
Part Description Quantity
A Faucet 1
B Pull-down spray 1
C Outlet hose 1
D Rubber washer 1
E Rubber washer 1
F Metal washer 1
G Lock nut 1
H Rubber weight 1
Part Description Quantity
I Pull-down spray hose 1
J Quick connector 1
K Pump nozzle 1
L Dispenser holder 1
M Metal washer 1
N Lock nut 1
O Bottle 1
P Extension rod 1
NOTE: *Items come pre-assembled.

4
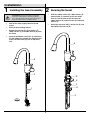
Installation
A
C
I
1
D
A
E
F
P
G
2
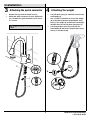
□ Shut off the water supply. Remove the old
faucet.
□ Clean off the mounting surface.
□ Remove the lock nut (G), metal washer (F),
rubber washer (E) and rubber washer (D) from
the faucet.
□ Insert the pull-down spray hose (I), outlet hose
(C) and supply lines through the mounting hole
in the sink until faucet (A) sets on top of the
sink.
□ Slide the rubber washer (D), rubber washer (E),
metal washer (F) and lock nut (G) over outlet
hose (C). Use the lock nut (G) to secure the
rubber washer (D), rubber washer (E) and metal
washer (F).
□ Attach the extension rod (P) to lock nut (G), and
then tighten the lock nut (G).
CAUTION: Always turn off the water supply before
removing an existing faucet or replacing any part of a
faucet. Open the faucet handle to relieve water pressure
and ensure that the water is completely shut off.
1
Installing the faucet assembly
2
Securing the faucet

5
HOMEDEPOT.COM/GLACIERBAY
1-855-HD-GLACIER
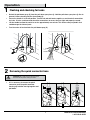
NOTE: For removal, see “Quick Connector Removal.”
3
Attaching the quick connector
4
Attaching the weight
Installation
1
2
C
I
J
A
3
H
I
□ Remove the cap from the outlet hose (C).
□ Attach the quick connector (J) to the outlet hose
(C). Pull down the quick connector (J) to ensure
it is secure.
□ The pull-down spray (B) should be nested in the
faucet body (A).
□ Use a Phillips screwdriver to secure the weight
(H) at the lowest point on the pull-down spray
hose (I). The weight (H) should cover the weight
location decal on the pull-down spray hose (I).
□ Pull the pull-down spray (B) away from the
faucet body (A) and ensure the pull-down spray
hose (I) is not obstructed.

6
Installation (continued)
2
1
K
L
M
N
O
3
5
Making the water supply
connections
□ Remove bottle (O), bottle lock nut (N) and metal
washer (M) from shank of dispenser holder (L).
Remove pump nozzle (K) from dispenser holder
(L).
□ Insert shank of dispenser holder (L) and pump
nozzle (K) through top of sink.
□ Attach metal washer (M) , bottle lock nut (N)
and bottle (O) to dispenser holder (L) and screw
tightly.
6
Installing the soap dispenser
assembly
□ Use 1/2 in. I.P.S. faucet connections (1), or a
3/8 in. O.D. ball-nose riser (2) with supply line
coupling nuts (3) (not included).
□ Use a wrench to tighten the connections. Do not
over tighten or torque the copper supply line.
2
3
1

7
HOMEDEPOT.COM/GLACIERBAY
1-855-HD-GLACIER
B
A A
3
2
1
Operation
1
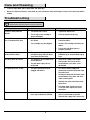
Flushing and checking for leaks
□ Detach the pull-down spray (B) from the pull-down spray hose (I). Hold the pull-down spray hose (I) rm to
prevent it from retracting into the faucet body (A).
□ Ensure the handle is in the off position. Turn the hot and cold water supplies on and check all connections
for leaks. If leaks are discovered, check the connections to ensure they are tight and properly secured.
□ Lift the handle to allow the water to run for approximately one minute. This ushes away any debris that
could damage the internal parts.
□ Turn the water off and reattach the pull-down spray (B).
□ If it is necessary to remove the quick
connector, push the quick connector
housing up, hold the housing together and
pull down.
2
Removing the quick connector hose
CAUTION: Use caution when removing the quick
connector hose to prevent cutting your hands.

8
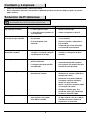
Problem Possible Cause Solution
There are leaks from the
handle.
□ The bonnet nut is loose.
□ The O-ring on the cartridge is
dirty or damaged.
□ Tighten the bonnet nut.
□ Clean or replace the O-ring.
The pull-down spray leaks or
has a reduced water ow.
□ The pull-down spray is dirty or
mis-tted.
□ The cartridge may be clogged.
□ Remove the pull-down spray and
check for debris.
□ Remove the cartridge and check for
debris.
□ Ensure the pull-down spray is
properly installed.
There are leaks from the hose
underneath the deck.
□ The connection between the
pull-down spray and pull-down
spray hose may be loose.
□ Tighten the connection between the
pulldown spray and pull-down spray
hose.
The hose does not retract. □ The weight is not installed in the
correct position.
□ The pull-down spray hose is
obstructed.
□ Reinstall or readjust the weight.
□ Check under the sink to ensure
the pull-down spray hose is not
obstructed.
The water pressure is low. □ The quick connector may be
clogged with debris.
□ Turn off the water supply and
disconnect the quick connector from
the outlet hose.
□ Disconnect the quick connector from
the pull-down spray hose and ush
under running water.
□ Reattach the quick connector to the
outlet hose.
□ Test water ow. If water pressure
is still low then replace the quick
connector.
There is no hot or cold water. □ The hot or cold water supply
lines may be kinked or twisted.
□ Ensure hot and cold water supply
lines are not kinked or twisted.
Reinstall the supply line if necessary.
Care and Cleaning
Troubleshooting
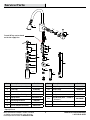
NOTE: Refer to the service parts section in this manual for a
detailed drawing showing the location of the parts listed below.
□ To clean, wipe down with a damp cloth and towel dry.
□ Do not use abrasive cleaners, steel wool, or harsh chemicals when cleaning this faucet, or the warranty will be
voided.

9
HOMEDEPOT.COM/GLACIERBAY
1-855-HD-GLACIER
*Specify Finish
4.
3.
2.
1.
5.
7.
8.
9.
13.
11.
10.
15.
12.
14.
6.
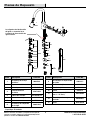
DATE CODE:
HOT
DO NOT REMOVE
1-888-328-2383
Faucet ID Tags can be found
on the hot supply line.
Service Parts
Part Description Part No.
1 Metal Handle Assembly A662598*
2 Trim Cap A103290*
3 Bonnet Nut A104207
4 Ceramic Disc Cartridge A507348N
5 Spray Head A523484N-54*
6 Mounting Hardware A66D507
7 Lock Nut A070419
8 Shank Adaptor Assembly A66G142N
Part Description Part No.
9 Soap Dispenser Assembly A502227*
10 Soap Pump A66D350
11 Soap Bottle A116000
12 Weight A504713
13
Hex Wrench (H2.5 * 19 mm L
* 53 mm L)
A031000NI
14 Spray Hose Assembly A604008N*
15 Wrench A031244ZA
Many replacement cartridges, aerators, and drain
assemblies can be purchased at your local The
Home Depot store or online at HOMEDEPOT.COM

Questions, problems, missing parts?
Before returning to the store, call Glacier Bay Customer Service
8 a.m. - 7 p.m., EST, Monday - Friday
9 a.m. - 6 p.m., EST, Saturday
1-855-HD-GLACIER (1-855-434-5224)
HOMEDEPOT.COM/GLACIERBAY
Retain this manual for future use.

GUÍA DE INSTALACIÓN Y CUIDADO
Núm. de sku
302357334
Núm. de modelo
FP4A0032BNV
¿Tiene preguntas, problemas, o faltan piezas?
Antes de regresar a la tienda, llame a Servicio al Cliente de Glacier Bay
de lunes a viernes de 8 a.m. a 7 p.m., hora local del Este
de lunes a viernes de 9 a.m. a 6 p.m., sábado
1-855-HD-GLACIER (1-855-434-5224)
HOMEDEPOT.COM/GLACIERBAY
GRACIAS
Apreciamos la conanza que ha depositado en Glacier Bay por la compra de este grifo para cocina. Nos esforzamos
por crear continuamente productos de calidad diseñados para mejorar su hogar. Visítenos en internet para ver nuestra
línea completa de productos disponibles para sus necesidades de mejorar su hogar. ¡Gracias por elegir a Glacier Bay!
GRIFO EXTRAÍBLE PARA COCINA

2
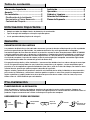
Llave
ajustable
Destornillador
Phillips
Pinzas
ajustables
Gafas de
seguridad
Sellador
(2)
Conductos de
alimentación
SILICONE
□ Cumpla con todos los códigos locales de plomería y de construcción.
□ Tape el desagüe del lavabo para evitar que se pierdan piezas.
□ Lea el apartado cuidado y limpieza de esta guía.
Información Importante
...........................2
Garantía
....................................................2
Pre-instalación
.........................................2
Planicación de la Instalación
.................2
Herramientas y Piezas Necesaria
............2
Contenido del Paquete
.............................3
Instalación ................................................4
Operación ..................................................7
Cuidado y Limpieza ..................................8
Solución de Problemas .............................8
Piezas de Repuesto ..................................9
Tabla de contenido
Información Importante
Garantía
Los productos de Glacier Bay están fabricados con normas y mano de obra de calidad superior y están respaldados
por nuestra garantía de por vida limitada. Los productos de Glacier Bay están garantizados al comprador
consumidor original de estar libres de defectos en materiales o mano de obra. Reemplazaremos LIBRE DE CARGOS
cualquier producto o pieza que se demuestre está defectuosa. Símplemente, devuelva el producto a cualquiera de
las ubicaciones de venta al detalle de The Home Depot o llame al 1-855-HD Glacier (1-855-434-5224) para recibir
el artículo de reemplazo. La prueba de compra (recibo de venta original) del comprador consumidor original debe
estar disponible para todos los reclamos de garantía de Glacier Bay.
Esta garantía excluye daños y fallos incidentales / consecuenciales debido al mal uso, abuso o desgaste normal por
el uso. Esta garantía excluye todos los usos industriales, comerciales y de negocios, a cuyos compradores por la
presente, se les ha ampliado una garantía limitada de cinco años a partir de la fecha de compra, con todos los otros
artículos de esta garantía que aplican excepto la duración de la garantía.
Algunos estados y provincias no permiten la exclusión o la limitación de los daños incidentales o consecuenciales,
por lo tanto, las limitaciones y exclusiones anteriores podrían no aplicar a usted. Esta garantía le otorga derechos
legales especícos y también puede tener otros derechos que varían de un estado a otro. Por favor, vaya a una
tienda o llame al 1-855-HD Glacier para más detalles.
GARANTÍA DE POR VIDA LIMITADA
Pre-instalación
Antes de comenzar a instalar este producto, asegúrese de que todas las partes estén presentes. Compare las
partes con la lista de contenido del paquete. Si hace falta alguna parte o se encuentra dañada, no intente instalar el
producto. Póngase en contacto con servicio al cliente para las partes de reemplazo.
PLANIFICACIÓN DE LA INSTALACIÓN
HERRAMIENTAS Y PIEZAS NECESARIAS

3
HOMEDEPOT.COM/GLACIERBAY
1-855-HD-GLACIER
Pre-instalación (continuación)
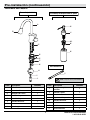
CONTENIDO DEL PAQUETE
Ensamblaje del Grifo
Ensamblaje de dispensador de jabón
B*
A
D*
C*
E*
F*
G*
H
J*
I*
P
K*
L*
M*
N*
O*
Herramientas
NOTA: *Las piezas vienen preensambladas.
Pieza Descripción Cantidad
A Grifo 1
B Bec extensible 1
C Manguera de salida 1
D Arandela de goma 1
E Arandela de goma 1
F Arandela de metal 1
G Contratuerca 1
H Peso de goma 1
Pieza Descripción Cantidad
I
Manguera de grifo
extraíble
1
J Conector rápido 1
K Canuto de la bomba 1
L Soporte del dispensador 1
M Arandela de metal 1
N Contratuerca 1
O Botella 1
P Varilla extensión 1

4
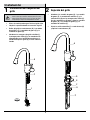
Instalación
CUIDADO: Cierre siempre el suministro de agua antes de
retirar el grifo viejo o sustituir cualquier pieza de un grifo.
Abra la manija del grifo para reducir la presión del agua y
compruebe que el agua está completamente cortada
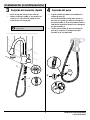
1
Instalación del conjunto del
grifo
2
Sujeción del grifo
A
C
I
1
D
A
E
F
P
G
2
□ Cierre el suministro de agua. Retire el grifo viejo.
□ Limpie la supercie donde va a montar el grifo.
□ Retire del grifo las contratuerca (G), la arandela
de metálica (F), la arandela de goma (E) y la
arandela de goma (D).
□ Introduzca la manguera de grifo extraíble (I),
la manguera de salida (C) y los conductos de
alimentación por el oricio de montaje en el
lavabo hasta que el grifo (A) se sitúe sobre el
lavabo.
□ Introduzca la arandela de goma (D) , la arandela
de goma (E), la arandela de metálica (F) y la
contratuerca (G) por las manguera de salida (C).
Use las contratuerca (G) para sujetar la arandela
de goma (D) , la arandela de goma (E) y la
arandela de metálica (F).
□ Sujete la varilla extensión (P) a contratuerca (G)
y apriete la contratuerca (G).

5
HOMEDEPOT.COM/GLACIERBAY
1-855-HD-GLACIER
Instalación (continuación)
H
I
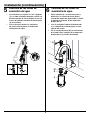
3
Sujeción del conector rápido
4
Sujeción del peso
□ Retira la tapa del manguera de salida (C).
□ Coloca el conector rápido (J) al manguera de
salida (C). Tira del conector rápido (J) para
vericar que esté asegurado.
□ El grifo extraíble (B) debe estar anidado en el
cuerpo del grifo (A).
□ Use un destornillador Phillips para apretar el
peso (H) en el punto más bajo en la manguera
de grifo extraíble (I). El peso (H) debería cubrir la
etiqueta de localización de peso en la manguera
de grifo extraíble (I).
□ Tire de grifo extraíble (B) lejos del cuerpo del
grifo (A) y asegúrese la manguera de grifo
extraíble (I) no esté obstruido.
NOTA: Para retirar, consulte el aparado “Para retirar el
conector rápido”
1
2
C
I
J
A
3

6
Instalación (continuación)
□ Retire la botella (O), los contratuerca de la
botella (N) y la arandela de metal (M) del
vástago del soporte del dispensador (L). Retire
la boquilla de la bomba (K) del soporte del
dispensador (L).
□ Pase el vástago del soporte del dispensador
(L) y la boquilla de la bomba (K) por la parte
superior del lavabo.
□ Fije la arandela de metal (M), los contratuerca
de la botella (N) y la botella (O) al soporte del
dispensador (L) y atornillar rmemente.
2
1
K
L
M
N
O
3
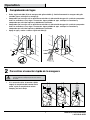
5
Conexión de las líneas de
suministro de agua
6
Conexión de las líneas de
suministro de agua
□ Use conexiones para grifos I.P.S. de ½ pulgada
(1) o un tubo ascendente de punta esférica con
diámetro exterior de 3/8 de pulgada (2) con las
tuercas de unión del conducto de alimentación
(3) (no incluidas).
□ Use un llave para apretar las conexiones.
No apriete excesivamente el conducto de
alimentación de cobre.
2
3
1

7
HOMEDEPOT.COM/GLACIERBAY
1-855-HD-GLACIER
Operation
1
Comprobación de fugas
□ Retire el grifo extraíble (B) de la manguera del grifo extraíble (I). Sostén rmemente la manguera del grifo
extraíble (I) para evitar que se retraiga (A).
□ Compruebe que la manija esté en posición cerrada. Abra la alimentación de agua fría y caliente y ompruebe
todas las conexiones si hay fugas. Si encuentra alguna pérdida de agua, verique las conexiones y
compruebe que estén bien aprietes y debidamente instaladas.
□ Compruebe que la manija esté en posición cerrada. Abra la alimentación de agua fría y caliente y ompruebe
todas las conexiones si hay fugas. Si encuentra alguna pérdida de agua, verique las conexiones y
compruebe que estén bien aprietes y debidamente instaladas.
□ Apaga el agua y vuelva a colocar el grifo extraíble (B).
B
A A
3
2
1
□ Si es necesario retirar el conector rápido,
empuje el receptáculo del conector hacia
arriba, sujete el receptáculo al mismo
tiempo y jale hacia abajo.
2
Para retirar el conector rápido de la manguera
PRECAUCIÓN: Tenga cuidado al retirar el extremo del
conector rápido de la manguera para no sufrir cortes en
las manos.

8
Cuidado y Limpieza
Solución de Problemas
NOTA: Consulte la sección de piezas de repuesto de este manual para ver
dibujos detallados sobre la ubicación de las piezas enumeradas abajo.
□ Limpie con un trapo húmedo y seque con un paño.
□ No use limpiadores abrasivos, lana metálica ni productos químicos fuertes para limpiar el grifo o la garantía
podría anularse.
Problema Posible causa Solución
Hay fugas por la manija. □ La tuerca tapa está oja.
□ La junta tórica del cartucho está
sucia o dañada.
□ Apriete la tuerca tapa.
□ Limpie o reemplace el anillo O.
El bec extensible tiene fugas
o un ujo de agua reducido.
□ El bec extensible está sucio o
mal ajustado.
□ El cartucho puede estar
obstruido.
□ Retire el bec extensible y compruebe
si hay suciedad.
□ Retire el cartucho y compruebe si
hay suciedad.
□ Compruebe que el bec extensible
está instalado correctamente.
Hay fugas de la manguera
debajo del fregadero.
□ La conexión entre el grifo
extraíble y la manguera del grifo
extraíble puede estar oja.
□ Aprieta la conexión entre el grifo
extraíble y la manguera del grifo
extraíble.
La manguera no se retrae. □ El peso no está instalado en la
posición adecuada.
□ La manguera del grifo extraíble
está obstruida.
□ Reinstalar o reajuste el peso.
□ Compruebe debajo del fregadero
para asegurar la manguera del grifo
extraíble no está obstruida.
La presión del agua es baja. □ El conector rápido está
obstruido con residuos.
□ Apague el suministro de agua y
desconecte el conector rápido de la
manguera de salida.
□ Desconecte el conector rápido de
la manguera del grifo extraíble y
limpiar con agua corriente.
□ Vuelva a conectar el conector rápido
a la manguera de salida.
□ Verique el ujo de agua. Si la
presión del agua sigue siendo bajo,
sustituya el conector rápido.
No hay agua caliente o fría. □ Las líneas de suministro de
agua caliente o fría pueden
estar doblen o torcido.
□ Asegúrese las líneas de suministro
de agua caliente y fría no se doblen
o torcido. Reinstale la tubería de
suministro si es necesario.

9
HOMEDEPOT.COM/GLACIERBAY
1-855-HD-GLACIER
*Especifique El Acabado
Muchos cartuchos, aireadores y conjuntos de desagüe de
repuesto se pueden adquirir en la tienda Home Depot más
próxima o en línea en HOMEDEPOT.COM.
4.
3.
2.
1.
5.
7.
8.
9.
13.
11.
10.
15.
12.
14.
6.
DATE CODE:
HOT
DO NOT REMOVE
1-888-328-2383
Las etiquetas de identicación
del grifo se encontrarán en
la tubería de alimentación de
agua caliente.
Piezas de Repuesto
Pieza Descripción Pieza No.
1
Ensamblaje de manija
metálicas
A662598*
2 Tapa ornamental A103290*
3 Tuerca tapa A104207
4
Cartucho de disco
cerámico
A507348N
5 Cabeza del rociador A523484N-54*
6
Piezas de montaje
A66D507
7 Contratuerca A070419
8
Ensamblaje de adaptador
de vástago
A66G142N
Pieza Descripción Pieza No.
9
Ensamblaje de dispensador
de jabón
A502227*
10 Bomba de la jabonera A66D350
11 Botella de jabón A116000
12 Pesas A504713
13
Llave hexagonal (H2.5 * 19
mm L * 53 mm L)
A031000NI
14
Ensamblaje de manguera del
rociador
A604008N*
15 Llave A031244ZA

¿Tiene preguntas, problemas, o faltan piezas?
Antes de regresar a la tienda, llame a Servicio al Cliente de Glacier Bay
de lunes a viernes de 8 a.m. a 7 p.m., hora local del Este
de lunes a viernes de 9 a.m. a 6 p.m., sábado
1-855-HD-GLACIER (1-855-434-5224)
HOMEDEPOT.COM/GLACIERBAY
Conserve este manual para uso futuro.
-
 1
1
-
 2
2
-
 3
3
-
 4
4
-
 5
5
-
 6
6
-
 7
7
-
 8
8
-
 9
9
-
 10
10
-
 11
11
-
 12
12
-
 13
13
-
 14
14
-
 15
15
-
 16
16
-
 17
17
-
 18
18
-
 19
19
-
 20
20


Glacier Bay FP4A0032BNV Guía de instalación
- Categoría
- Artículos sanitarios
- Tipo
- Guía de instalación
en otros idiomas
Artículos relacionados
-
Glacier Bay FP4A0033RBP Guía de instalación
-
-
-
-
-
-
-
-
-