Britax P14832500 Alpine Base Accessory Guía del usuario
- Tipo
- Guía del usuario

AlpineTM Base Accessory
User Guide
Guía del usuario

THIS USER GUIDE CONTAINS A MANDATORY ARBITRATION CLAUSE AND
CLASS ACTION WAIVER (“ARBITRATION AGREEMENT”) THAT AFFECTS YOUR
LEGAL RIGHTS, REQUIRES YOU TO ARBITRATE DISPUTES, AND LIMITS THE
MANNER IN WHICH YOU CAN SEEK RELIEF.
IMPORTANT
WILLOWTM, ALPINETM, CLICKTIGHT®, y BRITAX® son marcas comerciales propiedad de
Britax Child Safety, Inc. Todos los derechos reservados. ©2023 Britax Child Safety, Inc.
Impreso en China. Este producto y sus componentes se encuentran sujetos a cambios
sin previo aviso.
P14832500_A.1:06.23
WILLOWTM, ALPINETM, CLICKTIGHT® and BRITAX® are trademarks owned by Britax. All
rights reserved. ©2023 Britax Child Safety, Inc. This product and its components
are subject to change without notice.
ESTA GUÍA DEL USUARIO CONTIENE UNA CLÁUSULA DE ARBITRAJE
OBLIGATORIO Y RENUNCIA A DEMANDA COLECTIVA (“ACUERDO DE
ARBITRAJE”) QUE AFECTA SUS DERECHOS LEGALES, REQUIERE QUE
ARBITRE LAS DISPUTAS Y LIMITA LA MANERA EN QUE PUEDE SOLICITAR
COMPENSACIÓN.
IMPORTANTE

Table of Contents
Alpine Base Accessory Overview ���������������������������������������������������������������������2
Safety Information ������������������������������������������������������������������������������������������������������3
Important Notes ......................................................................................................................................... 5
Registration ..................................................................................................................................................... 6
ReboundReduceTM Stability Bar ....................................................................................................7
Using the Base Accessory �������������������������������������������������������������������������������������8
Overhang .......................................................................................................................................................... 8
Adjusting the Recline Angle ..........................................................................................................8
ClickTight Indicator .................................................................................................................................10
Lap-Shoulder Belt Installation ...................................................................................................... 11
Lap Belt Installation ................................................................................................................................14
Lower Connector Installation ....................................................................................................... 17
Attaching the Child Restraint (Sold Separately) to the Base ......................21
Removing the Child Restraint (Sold Separately) from the Base .............. 21
Uninstalling the Base ..........................................................................................................................22
Using the Lower Anchors ................................................................................................................ 25
Vehicle Compatibility �������������������������������������������������������������������������������������������� 26
Warranty ������������������������������������������������������������������������������������������������������������������������29
Arbitration Agreement ������������������������������������������������������������������������������������������31

2
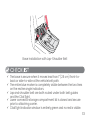
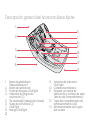
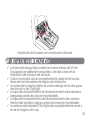
Alpine Base Accessory Overview
1. ReboundReduceTM
Stability Bar
2. Recline Button
3. ClickTight Locking Point
4. Recline Angle Indicator (2)
5. Recline Foot (under base)
6. Belt Guides (2)
7. ClickTight
8. ClickTight Handle
9. ClickTight Indicator Window
10. Lower Connectors
11. Serial Number & Manufacture
Date Label (inside compartment)
12. Lower Connectors Storage
Compartment Lid
13. User Guide Storage
10
4
3
13
11
12
5
8
9
7
6
2
1

3
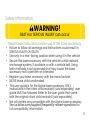
Read these instructions before use of the base accessory.
• Failure to follow all warnings and instructions could result in
SERIOUS INJURY OR DEATH.
• Use only in a rear-facing position when using it in the vehicle.
• Secure this base accessory with the vehicle’s child restraint
anchorage system, if available, or with a vehicle belt. Using
both methods is not approved and may cause the base
accessory not to perform as intended.
• Register your base accessory with the manufacturer.
• NEVER leave child unattended.
• This user guide is for the Alpine base accessory ONLY.
Instructions in the infant child restraint (sold separately) user
guide MUST be followed. Refer to the user guide that came
with the original infant child restraint (sold separately).
• Not all carriers are compatible with the Alpine base accessory.
See us.britax.com/support/frequently-asked-questions for
full compatibility information.
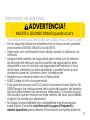
Safety Information
DEATH or SERIOUS INJURY can occur�
WARNING!

4
• This base accessory can only be used in the following classes of
vehicles: multi-purpose passenger vehicles, passenger cars, or
trucks.
• In a vehicle with rear designated seating positions, vehicle owners
should be alerted that, according to accident statistics, children
are safer when properly restrained in the rear seating positions
than in the front seating positions. To ensure your child’s safety,
please study Vehicle Seating Positions on page 26 and consult
your vehicle owner’s manual.
• DO NOT use the base accessory if it is damaged or broken.
• To prevent injury due to deterioration or hidden damage, DO NOT
use this base accessory if it is older than six (6) years or has been
in a moderate or severe crash. See expiration date on the date of
manufacture label located on the base accessory.
• Always make sure the base accessory is secured to the vehicle,
even when unoccupied, since in a crash an unsecured base
accessory may injure occupants.
• Do NOT route belt(s) through ClickTight
handle opening for any installation
method.

5
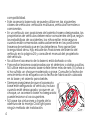
Important Notes
• Do not, except as described in this booklet, attempt to
disassemble any part of the base accessory or change the way
the vehicle’s seat belts are used.
• Do not allow children to play with this base accessory.
• Do not use anything to raise the base accessory off vehicle seat
except as described in these instructions. In a crash, this could
cause the base accessory not to perform as intended.
• Store the base accessory in a safe, dry place when it will not be
used for an extended period of time. Do not place heavy objects
on top of it.
• Third party recommendations are subject to change, so we
recommend you visit their websites for the most up to date
recommendations.

6
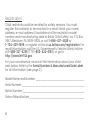
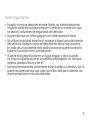
Registration
Child restraints could be recalled for safety reasons. You must
register this restraint to be reached in a recall. Send your name,
address, e-mail address if available and the restraint’s model
number and manufacturing date to Britax Child Safety, Inc. P.O. Box
91167 Allentown, PA 18109-9925, or call 1-888-427-4829 or
1-704-409-1699, or register online at us.britax.com/registration. For
recall information, call the U.S. Government’s Vehicle Safety Hotline
at 1-888-327-4236 (TTY 1-800-424-9153), or go to
http://www.NHTSA.gov.
For your convenience, record all the information about your child
seat below. Refer to the Serial Number & Manufactured Date Label
for all information (see page 2).
Model Name and Number: __________________________________________
Serial Number: ______________________________________________________
Batch Number:______________________________________________________
Date of Manufacture:________________________________________________

7
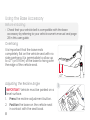
ReboundReduceTM Stability Bar
Attaching the ReboundReduceTM Stability Bar
1. Push the ReboundReduceTM Stability
Bar into the receivers on the base
until a click is heard.
2. Pull up on the ReboundReduceTM
Stability Bar to verify that it is secure.
NOTE: The ReboundReduceTM Stability
Bar cannot be removed once installed.
2
1

8
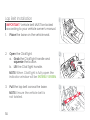
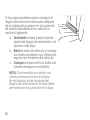
Adjusting the Recline Angle
IMPORTANT: Vehicle must be parked on a
level surface.
1. Press the recline adjustment button.
2. Position the base on the vehicle seat
in contact with the seat back.
Before installing:
‐Check that your vehicle belt is compatible with the base
accessory by referring to your vehicle owner’s manual and page
28 in this user guide.
Using the Base Accessory
Overhang
It is important that the base rests
completely at on the vehicle seat with no
side overhang. It is permissible to allow up
to 4.7” (or 11.9 cm) of the base to hang over
the edge of the vehicle seat.
4.7”
1

9
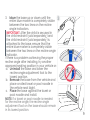
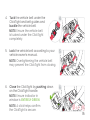
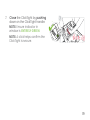
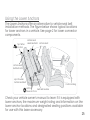
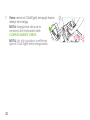
3. Move the base up or down until the
entire blue marker is completely visible
between the two lines on the recline
angle indicators.
IMPORTANT: After the child is secured in
the child restraint (sold separately) and
the child restraint (sold separately) is
attached to the base, ensure that the
entire blue marker is completely visible
between the two lines on the recline angle
indicator.
If there is a problem achieving the proper
recline angle after installing, try another
approved seating position in your vehicle or:
a. Uninstall the base and lower the
recline angle adjustment foot to the
lowest position.
b. Remove the base from the vehicle and
place a rolled towel or pool noodle in
the vehicle seat bight.
c. Place the base against the towel or
pool noodle and install.
NOTE: If a towel or pool noodle is needed
for the recline angle, the recline angle
adjustment foot on the base should remain
in its lowest position.
3

10
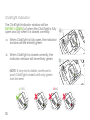
CLICKTIGHT OPEN CLICKTIGHT CLOSED
YES NO
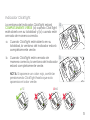
ClickTight Indicator
a
b
The ClickTight indicator window will be
ENTIRELY GREEN (a) when the ClickTight is fully
open and (b) when it is closed correctly.
a. When ClickTight is fully open, the indicator
window will be entirely green.
b. When ClickTight is closed correctly, the
indicator window will be entirely green.
NOTE: If any red is visible, continue to
push ClickTight closed until only green
can be seen.

11
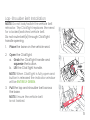
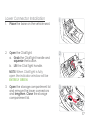
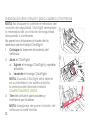
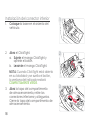
Lap-Shoulder Belt Installation
1. Place the base on the vehicle seat.
2. Open the ClickTight.
a. Grab the ClickTight handle and
squeeze the button.
b. Lift the ClickTight handle.
NOTE: When ClickTight is fully open and
button is released the indicator window
will be ENTIRELY GREEN.
3. Pull the lap and shoulder belt across
the base.
NOTE: Ensure the vehicle belt
is not twisted.
NOTE: Do not lock/switch the vehicle belt
retractor. The ClickTight replaces the need
for a locked/switched vehicle belt.
Do not route belt(s) through ClickTight
handle opening.
1
2
3

12
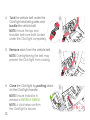
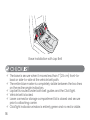
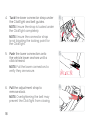
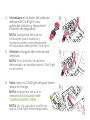
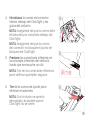
4. Tuck the vehicle belt under the
ClickTight and belt guides and
buckle the vehicle belt.
NOTE: Ensure the lap and
shoulder belts are both tucked
under the ClickTight completely.
5. Remove slack from the vehicle belt.
NOTE: Overtightening the belt may
prevent the ClickTight from closing.
6. Close the ClickTight by pushing down
on the ClickTight handle.
NOTE: Ensure indicator in
window is ENTIRELY GREEN.
NOTE: A click helps conrm
the ClickTight is secure.
4
5
6
CLICKTIGHT OPEN CLICKTIGHT CLOSED
YES NO

13
Base Installation with Lap-Shoulder Belt
9The base is secure when it moves less than 1” (2.5 cm) front-to-
back or side-to-side at the vehicle belt path.
9The entire blue marker is completely visible between the two lines
on the recline angle indicators.
9Lap and shoulder belt are both routed under both belt guides
and the ClickTight.
9Lower connector storage compartment lid is closed and secure
prior to attaching carrier.
9ClickTight indicator window is entirely green and no red is visible.

14
1. Place the base on the vehicle seat.
2. Open the ClickTight.
a. Grab the ClickTight handle and
squeeze the button.
b. Lift the ClickTight handle.
NOTE: When ClickTight is fully open the
indicator window will be ENTIRELY GREEN.
3. Pull the lap belt across the base.
NOTE: Ensure the vehicle belt is
not twisted.
Lap Belt Installation
IMPORTANT: Vehicle belt MUST be locked
according to your vehicle owner’s manual.
1
3
2

15
4. Tuck the vehicle belt under the
ClickTight and belt guides and
buckle the vehicle belt.
NOTE: Ensure the vehicle belt
is tucked under the ClickTight
completely.
5. Lock the vehicle belt according to your
vehicle owner’s manual.
NOTE: Overtightening the vehicle belt
may prevent the ClickTight from closing.
6. Close the ClickTight by pushing down
on the ClickTight handle.
NOTE: Ensure indicator in
window is ENTIRELY GREEN.
NOTE: A click helps conrm
the ClickTight is secure.
4
5
6
CLICKTIGHT OPEN CLICKTIGHT CLOSED
YES NO

16
Base Installation with Lap Belt
9The base is secure when it moves less than 1” (2.5 cm) front-to-
back or side-to-side at the vehicle belt path.
9The entire blue marker is completely visible between the two lines
on the recline angle indicators.
9Lap belt is routed under both belt guides and the ClickTight.
9Vehicle belt is locked.
9Lower connector storage compartment lid is closed and secure
prior to attaching carrier.
9ClickTight indicator window is entirely green and no red is visible.

17
1. Place the base on the vehicle seat.
2. Open the ClickTight.
a. Grab the ClickTight handle and
squeeze the button.
b. Lift the ClickTight handle.
NOTE: When ClickTight is fully
open the indicator window will be
ENTIRELY GREEN.
3. Open the storage compartment lid
and remove the lower connectors
and lengthen. Close the storage
compartment lid.
Lower Connector Installation 1
3
2

18
4. Tuck the lower connector strap under
the ClickTight and belt guides.
NOTE: Ensure the strap is tucked under
the ClickTight completely.
NOTE: Ensure the connector strap
is not blocking the locking point for
the ClickTight.
5. Push the lower connectors onto
the vehicle lower anchors until a
click is heard.
NOTE: Pull the lower connectors to
verify they are secure.
6. Pull the adjustment strap to
remove slack.
NOTE: Overtightening the belt may
prevent the ClickTight from closing.
4
6
5

19
7. Close the ClickTight by pushing
down on the ClickTight handle.
NOTE: Ensure indicator in
window is ENTIRELY GREEN.
NOTE: A click helps conrm the
ClickTight is secure.
7
CLICKTIGHT OPEN CLICKTIGHT CLOSED
YES NO

20
Base Installation with Lower Connectors
9The base is secure when it moves less than 1” (2.5 cm) front-to-
back or side-to-side at the vehicle belt path.
9The entire blue marker is completely visible between the two lines
on the recline angle indicators.
9Lower connector strap is routed under both belt guides and
the ClickTight.
9Lower connector storage compartment lid is closed and secure
prior to attaching carrier.
9ClickTight indicator window is entirely green and no red is visible.

21
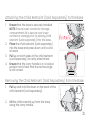
Attaching the Child Restraint (Sold Separately) to the Base
1. Ensure that the base is securely installed.
NOTE: Ensure lower connector storage
compartment lid is secure over lower
connector storage prior to placing child
restraint (sold separately) into the base.
2. Place the child restraint (sold separately)
into the base and press down until a click
is heard.
3. Pull up on both sides of the child restraint
(sold separately) to verify attachment.
4. Ensure that the carry handle is in a locked
position and check that the recline angle
is still correct.
Removing the Child Restraint (Sold Separately) from the Base
1. Pull up and hold the lever on the back of the
child restraint (sold separately).
2. Lift the child restraint up from the base
using the carry handle.

22
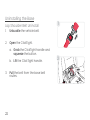
Uninstalling the Base
Lap Shoulder Belt Uninstall
1. Unbuckle the vehicle belt.
2. Open the ClickTight.
a. Grab the ClickTight handle and
squeeze the button.
b. Lift the ClickTight handle.
3. Pull the belt from the base belt
routes.
2
1

23
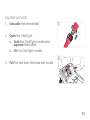
Lap Belt Uninstall
1. Unbuckle the vehicle belt.
2. Open the ClickTight.
a. Grab the ClickTight handle and
squeeze the button.
b. Lift the ClickTight handle.
3. Pull the belt from the base belt routes.
1
2

24
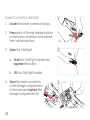
Lower Connector Uninstall
1. Loosen the lower connector straps.
2. Press each of the red release buttons
on the lower connectors and release
from vehicle anchors.
3. Open the ClickTight.
a. Grab the ClickTight handle and
squeeze the button.
b. Lift the ClickTight handle.
4. Store the lower connectors
in the storage compartment
in the base and replace the
storage compartment lid.
1
2
3

25
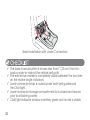
Using the Lower Anchors
The Lower Anchors offer an alternative to vehicle seat belt
installation methods. The gure below shows typical locations
for lower anchors in a vehicle. See page 2 for lower connector
components.
Check your vehicle owner’s manual to learn if it is equipped with
lower anchors, the maximum weight rating and information on the
lower anchor locations and designated seating positions available
for use with this base accessory.
Vehicle Seat
Head Restraint
Vehicle Seat
Belt Retractor
Lap-Shoulder
Vehicle Seat Belt
Seat Belt Buckles
Frontal Air Bag
Vehicle Seat
Top Tether
Anchors
LATCH
Lower Anchors

26
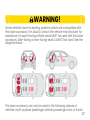
Vehicle Seating Positions
DO NOT place child restraint on front seat with air
bag. DEATH OR SERIOUS INJURY can occur. Owners
of vehicles with front passenger side airbags
should refer to their owner’s manual for child
restraint installation instructions. The back seat is
the safest place for children 12 and under.
Vehicle Compatibility
WARNING!

27
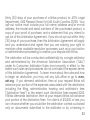
Some vehicles have no seating positions which are compatible with
this base accessory. If in doubt, contact the vehicle manufacturer for
assistance. Forward-facing vehicle seats MUST be used with this base
accessory. Side-facing or rear-facing seats CANNOT be used. See the
diagram below.
This base accessory can only be used in the following classes of
vehicles: multi-purpose passenger vehicles, passenger cars, or trucks.
WARNING!

28
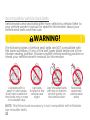
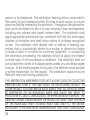
The following types of vehicle seat belts are NOT compatible with
this base accessory. If any of the belt types listed below are in the
chosen seating position, choose another vehicle seating position or
check your vehicle owner’s manual for information.
Motorized,
automatic
vehicle seat
belts.
Lap belts
forward of the
vehicle seat
bight.
Lap-shoulder belts
with top or bottom
anchor points on
the vehicle door.
Lap belts with a
sewn-in latch plate
that have a retractor
that locks only in case
of a sudden stop.
NOTE: This Britax base accessory is not compatible with inatable
lap-shoulder belts.
Incompatible Vehicle Seat Belts
Vehicle seats and seat belts differ from vehicle to vehicle. Refer to
your vehicle owner’s manual for specic information about your
vehicle seat belts and their use.
WARNING!

29
Warranty
This base accessory was manufactured by Britax Child Safety, Inc.
(“Britax”). To the extent allowed by law, Britax warrants this product to
the original retail purchaser as follows:
LIMITED ONE-YEAR WARRANTY
This product is warranted against defective materials or workmanship
for one (1) year from the date of original purchase. Proof of purchase
is required for any warranty claims. Your exclusive remedy for this
warranty is that Britax will, at its option, provide repair or replacement
components to the original purchaser of this product. Britax reserves
the right to discontinue or change fabrics, parts, models or products,
or to make substitutions.
This warranty does not cover damages that arise from negligence,
misuse or use not in accordance with the product instruction.
Additionally, Britax products purchased from unauthorized retailers,
online auction sites, or as second hand items are not covered under
this warranty.
The use of non-Britax covers, inserts, toys, accessories, or tightening
devices is not approved by Britax. Their use could cause this child
restraint to fail safety standards or not perform as intended in a crash.
Their use also may void the Britax warranty.

30
To make a claim under this warranty, you must contact Britax
Consumer Services at 1-888-427-4829 or 1-704-409-1699, or write to
us using the address on the back cover of this User Guide.
DISCLAIMER OF WARRANTIES
The following disclaimer shall apply to you to the maximum extent
permitted by applicable law. THE LIMITED WARRANTY SET FORTH ABOVE
IS THE EXCLUSIVE WARRANTY MADE BY BRITAX� ALL OTHER WARRANTIES,
WHETHER EXPRESS, IMPLIED, OR STATUTORY, INCLUDING WITHOUT
LIMITATION THE IMPLIED WARRANTIES OF MERCHANTABILITY AND FITNESS
FOR A PARTICULAR PURPOSE, ARE DISCLAIMED� Some states do not allow
certain exclusions or limitations on warranties, so the above may not
apply to you. This warranty gives you specic legal rights, and you
may have other rights, which vary from state to state. Neither Britax,
nor the retailer selling this product, authorizes any person to create
for it any other warranty, obligation, or liability in connection with this
product.
LIMITATION OF DAMAGES
The following limitation of damages shall apply to you to the maximum
extent permitted by applicable law. THE REMEDIES CONTAINED IN THE
LIMITED WARRANTY SET FORTH ABOVE ARE THE EXCLUSIVE REMEDIES
PROVIDED BY BRITAX� IN NO EVENT SHALL BRITAX BE LIABLE TO YOU FOR
ANY INCIDENTAL, SPECIAL, PUNITIVE, EXEMPLARY, OR CONSEQUENTIAL
DAMAGES ARISING OUT OF OR RELATING IN ANY WAY TO THE
RELATIONSHIP BETWEEN YOU AND BRITAX (INCLUDING DISPUTES RELATED

31
TO THE MARKETING OR SALE OF BRITAX PRODUCTS), ANY PROVISIONS IN
THIS USER GUIDE, AND/OR YOUR PURCHASE OR USE OF ANY PRODUCTS
DESIGNED, MANUFACTURED, DISTRIBUTED, MARKETED, OR SOLD BY BRITAX�
PLEASE COMPLETE AND MAIL THE OWNER REGISTRATION CARD WITHIN
(30) DAYS OF PURCHASE
You may also register online at us.britax.com/registration.
Arbitration Agreement
MANDATORY ARBITRATION & CLASS ACTION WAIVER (“ARBITRATION
AGREEMENT”)
PLEASE READ THIS SECTION CAREFULLY BECAUSE IT AFFECTS YOUR LEGAL
RIGHTS, REQUIRES YOU TO ARBITRATE DISPUTES, AND LIMITS THE MANNER
IN WHICH YOU CAN SEEK RELIEF�
Arbitration is a process in which persons with a dispute waive their
rights to le a lawsuit and proceed in court and to have a jury trial to
resolve their disputes and, instead, agree to submit their disputes to a
neutral third person (an “arbitrator”) for a decision. Each party to the
dispute has an opportunity to present some evidence to the arbitrator.
Pre-arbitration discovery may be limited. Arbitration proceedings are
private and less formal than court trials. The arbitrator will issue a nal
and binding decision resolving the dispute, which may be enforced
as a court judgment. A court rarely overturns an arbitrator’s decision.

32
YOU AND BRITAX AGREE THAT ANY DISPUTE BETWEEN US, WHETHER
BASED IN CONTRACT, TORT, STATUTE OR OTHERWISE, SHALL BE RESOLVED
IN BINDING INDIVIDUAL ARBITRATION� For purposes of this Arbitration
Agreement, the word “dispute” and “disputes” are given the broadest
possible meaning and include, without limitation, all claims, disputes,
and/or controversies arising out of or relating in any way to the
relationship between you and Britax (including disputes related to the
marketing or sale of Britax products), any provisions in this User Guide
or this Arbitration Agreement (including the interpretation and scope
of this Arbitration Agreement and the arbitrability of any dispute), and/
or your purchase or use of any products designed, manufactured,
distributed, marketed, or sold by Britax. The Federal Arbitration Act
(“FAA”) and federal arbitration law apply to this Arbitration Agreement.
Notwithstanding the foregoing, you and Britax each agree that you and
Britax shall retain the rights to bring an individual suit in small claims
court for disputes within the scope of such court’s jurisdiction and/or to
bring an individual suit in court to enjoin infringement or other misuse
of intellectual property rights. In no way shall the foregoing sentence
allow for an action to be brought on a class or collective basis.
YOU HAVE THE RIGHT TO OPT OUT OF THIS ARBITRATION AGREEMENT,
BUT YOU MUST EXERCISE THIS RIGHT WITHIN THIRTY (30) DAYS OF YOUR
PURCHASE OF A BRITAX PRODUCT� If you do not wish to be bound by this
Arbitration Agreement, you must notify Britax by mailing or e-mailing
a written opt-out notice, postmarked or electronically delivered within

33
thirty (30) days of your purchase of a Britax product, to: ATTN: Legal
Department, 4140 Pleasant Road, Fort Mill, South Carolina 29708. Your
opt-out notice must include your full name, address and/or e-mail
address, the model and serial numbers of the purchased product, a
copy of your proof of purchase, and a statement that you intend to
opt out of this Arbitration Agreement. If you do not opt out within thirty
(30) days of your purchase, then this Arbitration Agreement will apply
and you understand and agree that you are waiving your right to
maintain other available resolution processes, such as a court action
or administrative proceeding, to resolve your dispute with Britax.
The arbitration will be conducted condentially by a single arbitrator
and administered by the American Arbitration Association (“AAA”)
under its Consumer Arbitration Rules most recently in effect to the
extent such rules and procedures do not contradict the express terms
of this Arbitration Agreement. To learn more about the rules and how
to begin an arbitration, you may call any AAA ofce or go to www.
adr.org. If you demand arbitration, then at your request Britax will
advance your portion of the expenses associated with the arbitration,
including the ling, administrative, hearing and arbitrator’s fees
(“Arbitration Fees”) to the extent such Arbitration Fees exceed $200.
If Britax demands arbitration, then at your request Britax will advance
your portion of the Arbitration Fees. For claims of $10,000 or less, you
can choose whether you would like the arbitration carried out based
only on documents submitted to the arbitrator or by a hearing in

34
person or by telephone. The arbitration hearing will be conducted in
the county of your residence, within 30 miles of such county, or in such
place as shall be ordered by the arbitrator. Throughout the arbitration,
each party shall bear his, her or its own attorneys’ fees and expenses,
including any witness and expert witness fees. The arbitrator shall
apply applicable substantive law consistent with the FAA, shall apply
statutes of limitation, and shall honor claims of privilege recognized
at law. The arbitrator shall decide, with or without a hearing, any
motion that is substantially similar to a motion to dismiss for failure
to state a claim or a motion for summary judgment. In conducting
the arbitration proceeding, the arbitrator shall not apply any federal
or state rules of civil procedure or evidence. The arbitrator shall not
consolidate the claims of multiple parties unless you and Britax agree
to do so. At the timely request of any party, the arbitrator shall provide
a written explanation for the award. The arbitrator’s award may be
led with any court having jurisdiction.
THIS ARBITRATION AGREEMENT DOES NOT ALLOW CLASS OR COLLECTIVE
ARBITRATIONS EVEN IF THE AAA RULES OR PROCEDURES WOULD� IN
OTHER WORDS, YOU AND BRITAX EACH AGREE THAT ALL DISPUTES SHALL
BE ARBITRATED ON AN INDIVIDUAL BASIS AND WAIVE ANY RIGHT TO
PROCEED IN A CLASS, CONSOLIDATED, OR REPRESENTATIVE FASHION� THE
ARBITRATOR MAY AWARD MONEY OR INJUNCTIVE RELIEF ONLY IN FAVOR
OF THE INDIVIDUAL PARTY SEEKING RELIEF AND ONLY TO THE EXTENT
NECESSARY TO PROVIDE RELIEF WARRANTED BY THAT PARTY’S INDIVIDUAL

35
CLAIM� NO CLASS, REPRESENTATIVE OR PRIVATE ATTORNEY GENERAL
OR GENERAL INJUNCTIVE RELIEF THEORIES OF LIABILITY OR PRAYERS FOR
RELIEF MAY BE MAINTAINED IN ANY ARBITRATION CONDUCTED PURSUANT
TO THIS ARBITRATION AGREEMENT�
If the foregoing class action waiver and prohibition against class
arbitration is determined to be invalid or unenforceable for any
reason, then this entire Arbitration Agreement shall be void. If any
portion of this Arbitration Agreement other than the class action
waiver and prohibition against class arbitration is deemed to be
invalid or unenforceable for any reason, it shall not invalidate the
remaining portions of this Arbitration Agreement. If for any reason
a dispute proceeds in court rather than in arbitration, you and Britax
each waive any right to a jury trial.

Índice
Descripción general del Accesorio Base Alpine ������������������������������������2
Información de seguridad ������������������������������������������������������������������������������������3
Notas Importantes ...................................................................................................................................5
Registro ...............................................................................................................................................................6
Barra de estabilidad ReboundReduceTM .................................................................................................................................. 7
Usando el Accesorio Base ������������������������������������������������������������������������������������8
Saliente ................................................................................................................................................................8
Ajustando el ángulo de reclinación .......................................................................................9
Indicador ClickTight ................................................................................................................................ 11
Instalación del cinturón para cadera y hombros .................................................. 12
Instalación del cinturón para cadera .................................................................................15
Instalación del conector inferior ..............................................................................................18
Cómo colocar el asiento de seguridad para niños (se vende por
separado) en la base ....................................................................................................................... 22
Cómo retirar el asiento de seguridad para niños (se vende por
separado) de la base ....................................................................................................................... 23
Desinstalación de la base ............................................................................................................ 23
Uso de los anclajes inferiores ....................................................................................................26
Compatibilidad de vehículos ��������������������������������������������������������������������������27
Garantía �������������������������������������������������������������������������������������������������������������������������30
Acuerdo de Arbitraje ���������������������������������������������������������������������������������������������32

2
Descripción general del Accesorio Base Alpine
1. Barra de estabilidad
ReboundReduceTM
2. Botón de reclinación
3. Punto de bloqueo ClickTight
4. Indicador de ángulo de
reclinación (2)
5. Pie reclinable (debajo de la base)
6. Guías de cinturones (2)
7. ClickTight
8. Mango ClickTight
9. Ventana del indicador
ClickTight
10. Conectores inferiores
11. Etiqueta con fecha de
fabricación y número de serie
(dentro del compartimiento)
12. Tapa del compartimento de
almacenamiento LUAS
13. Almacenamiento de la guía
del usuario
10
4
3
13
11
12
5
8
9
7
6
2
1

3
Lea estas instrucciones antes de utilizar el accesorio base
• De no seguirse todas las advertencias e instrucciones, podrían
provocarse LESIONES GRAVES o la MUERTE.
• Úselo solo con orientación hacia atrás cuando lo utilice en un
vehículo.
• Asegure este asiento de seguridad para niños con el sistema
de anclaje del vehículo para el asiento de seguridad si está
disponible o con el cinturón de seguridad del vehículo. El uso
de ambos métodos no está aprobado y puede hacer que el
accesorio base no funcione como corresponde.
• Registre su accesorio base con el fabricante.
• NUNCA deje al niño sin supervisión.
• Esta guía del usuario es SOLO para el accesorio base Alpine. Se
DEBEN seguir las instrucciones de la guía del usuario del asiento
de auto para bebés (se vende por separado). Consulte la guía
del usuario que se incluye con este asiento de auto para bebés
original (se vende por separado).
• No todos los portabebés son compatibles con el accesorio
base Alpine. Consulte us.britax.com/support/frequently-
asked-questions para obtener información completa sobre la
Información de seguridad
MUERTE o LESIONES GRAVES puede ocurrir�
ADVERTENCIA!

4
compatibilidad.
• Este accesorio base solo se puede utilizar en las siguientes
clases de vehículos: vehículos multiusos, vehículos normales o
camionetas.
• En un vehículo con posiciones del asiento trasero designadas, los
propietarios de vehículos deben estar conscientes de que, según
las estadísticas de accidentes, los niños están más seguros
cuando están amarradas adecuadamente en las posiciones
traseras de sentado que en las delanteras. Para garantizar
la seguridad de su hijo, estudie las Posiciones de asiento del
vehículo en la página 26 y consulte el manual del propietario
del vehículo.
• No utilice el accesorio de la base si está dañado o roto.
• Para evitar lesiones ocasionadas por el deterioro o daños ocultos,
NO utilice este accesorio base si este tiene más de seis (6) años o
si ha sufrido un choque moderado o grave. Consulte la fecha de
vencimiento en la etiqueta con la fecha de fabricación ubicada
en la base y el asiento para bebés.
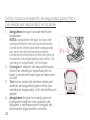
• Siempre asegúrese de que el accesorio
base esté asegurado al vehículo, incluso
cuando esté desocupado, ya que en un
choque, un accesorio base no asegurado
puede lesionar a los ocupantes.
• NO pase los cinturones a través de la
abertura de la manija ClickTight para
ningún método de instalación.

5
• Excepto como se describe en este folleto, no intente desarmar
ninguna parte del accesorio base ni cambiar la manera en que
se usa los cinturones de seguridad del vehículo.
• No permita que los niños jueguen con este accesorio base.
• No utilice nada para levantar el accesorio base fuera del asiento
del vehículo, excepto como se describe en estas instrucciones.
En caso de un accidente, esto podría provocar que el accesorio
base no funcione como corresponde.
• Guarde el accesorio base en un lugar seguro y seco cuando
no vaya a utilizarla durante un período prolongado. No coloque
objetos pesados encima de él.
• Las recomendaciones de terceros están sujetas a cambios, por lo
que le recomendamos que visite sus sitios web para obtener las
recomendaciones más actualizadas.
Notas Importantes

6
Registro
Los asientos de seguridad para niños pueden ser retirados del
mercado por razones de seguridad. Usted debe registrar este
asiento para ser contactado en caso de un retiro del mercado.
Envíe su nombre, dirección, dirección de correo electrónico si
está disponible y el número de modelo del asiento y la fecha
de fabricación a Britax Child Safety, Inc. P.O. Box 91167 Allentown,
PA 18109-9925 o llame al 1-888-427-4829 o 1-704-409-1699, o
regístrese en línea en us.britax.com/registration. Para obtener
información sobre el retiro del mercado, llame a la Línea Directa de
Seguridad Vehicular del Gobierno de los Estados Unidos al 1-888-
327-4236 (TTY 1-800-424-9153), o visite http://www.NHTSA.gov.
Para su conveniencia, anote toda la información sobre el asiento
de seguridad para niños a continuación. Consulte el número de
serie y la etiqueta con la fecha de fabricación para obtener toda la
información (consulte la página 2).
Nombre y número del modelo: ______________________________________
Número de serie: ___________________________________________________
Número de lote: ____________________________________________________
Fecha de fabricación: ______________________________________________

7
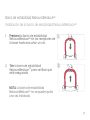
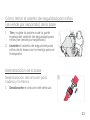
Barra de estabilidad ReboundReduceTM
Instalación de la barra de estabilidad ReboundReduceTM
1. Presione la barra de estabilidad
ReboundReduceTM en los receptores de
la base hasta escuchar un clic.
2. Tire la barra de estabilidad
ReboundReduceTM para vericar que
esté asegurada.
NOTA: La barra de estabilidad
ReboundReduceTM no se puede quitar
una vez instalada.
2
1

8
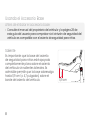
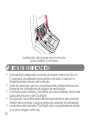
Antes de instalar el accesorio base:
‐Consulte el manual del propietario del vehículo y la página 28 de
esta guía del usuario para comprobar si el cinturón de seguridad del
vehículo es compatible con el asiento de seguridad para niños.
Usando el Accesorio Base
Saliente
Es importante que la base del asiento
de seguridad para niños esté apoyada
completamente plana sobre el asiento
del vehículo sin salientes laterales. Es
admisible permitir que la base sobresalga
hasta 11,9 cm (o 4,7 pulgadas) sobre el
borde del asiento del vehículo. 11,9 cm

9
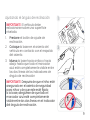
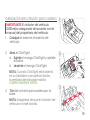
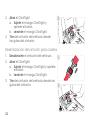
Ajustando el ángulo de reclinación
IMPORTANTE: El vehículo debe
estacionarse sobre una supercie
nivelada.
1. Presione el botón de ajuste de
reclinación.
2. Coloque la base en el asiento del
vehículo en contacto con el respaldo
del asiento.
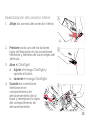
3. Mueva la base hacia arriba o hacia
abajo hasta que todo el marcador
azul esté completamente visible entre
las dos líneas de los indicadores de
ángulo de reclinación
IMPORTANTE: Después de que el niño esté
asegurado en el asiento de seguridad
para niños y de que este esté jado
a la base, asegúrese de que todo el
marcador azul esté completamente
visible entre las dos líneas en el indicador
del ángulo de reclinación.
3
1

10
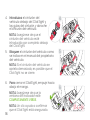
Si hay algún problema para conseguir el
ángulo de reclinación adecuado después
de la instalación, pruebe con otra posición
de asiento aprobada en su vehículo o
realice lo siguiente:
a. Desinstale la base y baje el pie de
ajuste del ángulo de reclinación a la
posición más baja.
b. Retire la base del vehículo y coloque
una toalla enrollada o un cilindro de
espuma en el asiento del vehículo.
c. Coloque la base contra la toalla o el
cilindro de espuma e instálela.
NOTA: Si se necesita una toalla o un
cilindro de espuma para el ángulo
de reclinación, el pie de ajuste del
ángulo de reclinación en la base debe
permanecer en su posición más baja.

11
La ventana del indicador ClickTight estará
COMPLETAMENTE VERDE (a) cuando ClickTight
esté abierto en su totalidad y (b) cuando esté
cerrado de manera correcta.
a. Cuando ClickTight esté abierto en su
totalidad, la ventana del indicador estará
completamente verde.
b. Cuando ClickTight esté cerrado de
manera correcta, la ventana del indicador
estará completamente verde.
NOTA: Si aparece un color rojo, continúe
presionando ClickTight hasta que solo
aparezca el color verde.
CLICKTIGHT OPEN CLICKTIGHT CLOSED
SÍ NO
Indicador ClickTight
a
b

12
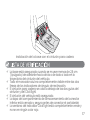
Instalación del cinturón para cadera y hombros
1. Coloque la base en el asiento del
vehículo.
2. Abra el ClickTight.
a. Sujete el mango ClickTight y apriete
el botón.
b. Levante el mango ClickTight.
NOTA: Cuando ClickTight está abierto
en su totalidad y se suelta el botón,
la ventana del indicador estará
COMPLETAMENTE VERDE.
3. Tire del cinturón para cadera y
hombros por la base.
NOTA: Asegúrese de que el cinturón del
vehículo no esté torcido.
NOTA: No bloquee ni cambie el retractor del
cinturón de seguridad. ClickTight reemplaza
la necesidad de un cinturón de seguridad
bloqueado o cambiado.
No pase los cinturones a través de la
abertura de la manija ClickTight.
1
2
3

13
4. Introduzca el cinturón del vehículo
debajo del ClickTight y las
guías del cinturón y abroche el
cinturón de seguridad.
NOTA: Asegúrese de que los
cinturones para caderas y
hombros estén completamente
introducidos debajo del ClickTight.
5. Elimine la holgura del cinturón del
vehículo.
NOTA: Si el cinturón se aprieta
demasiado, es posible que el ClickTight
no se cierre.
6. Para cerrar el ClickTight, empuje hacia
abajo el mango.
NOTA: Asegúrese de que la
ventana del indicador esté
COMPLETAMENTE VERDE.
NOTA: Un clic ayuda a conrmar
que el ClickTight está asegurado.
4
5
6
CLICKTIGHT OPEN CLICKTIGHT CLOSED
YES NO

14
Instalación de la base con el cinturón
para cadera y hombros
9La base está asegurada cuando se mueve menos de 2,5 cm
(1 pulgada) de adelante hacia atrás o de lado a lado en la
trayectoria del cinturón del vehículo.
9Todo el marcador azul es completamente visible entre las dos
líneas de los indicadores de ángulo de reclinación.
9El cinturón para cadera y hombros se coloca debajo de las dos
guías del cinturón y del ClickTight.
9La tapa del compartimiento de almacenamiento del conector
inferior está cerrada y segura antes de conectar el portabebé.
9La ventana del indicador ClickTight está completamente verde
y no se ve ningún color rojo.

15
1. Coloque la base en el asiento del
vehículo.
2. Abra el ClickTight.
a. Sujete el mango ClickTight y apriete
el botón.
b. Levante el mango ClickTight.
NOTA: Cuando ClickTight está abierto
en su totalidad y se suelta el botón,
la ventana del indicador estará
COMPLETAMENTE VERDE.
3. Tire del cinturón para cadera por la
base.
NOTA: Asegúrese de que el cinturón del
vehículo no esté torcido.
Instalación del cinturón para cadera
IMPORTANTE: El cinturón del vehículo
DEBE estar asegurado de acuerdo con el
manual del propietario del vehículo.
1
3
2

16
4. Introduzca el cinturón del
vehículo debajo del ClickTight y
las guías del cinturón y abroche
el cinturón del vehículo.
NOTA: Asegúrese de que el
cinturón del vehículo esté
introducido por completo debajo
del ClickTight.
5. Bloquee el cinturón del vehículo como
se indica en el manual del propietario
del vehículo.
NOTA: Si el cinturón del vehículo se
aprieta demasiado, es posible que el
ClickTight no se cierre.
6. Para cerrar el ClickTight, empuje hacia
abajo el mango.
NOTA: Asegúrese de que la
ventana del indicador esté
COMPLETAMENTE VERDE.
NOTA: Un clic ayuda a conrmar
que el ClickTight está asegurado.
4
5
6
CLICKTIGHT OPEN CLICKTIGHT CLOSED
YES NO

17
Instalación de la base con el cinturón para cadera
9La base está asegurada cuando se mueve menos de 2,5 cm
(1 pulgada) de adelante hacia atrás o de lado a lado en la
trayectoria del cinturón del vehículo.
9Todo el marcador azul es completamente visible entre las dos
líneas de los indicadores de ángulo de reclinación.
9El cinturón para cadera se coloca debajo de las dos guías del
cinturón y del ClickTight.
9El cinturón del vehículo está asegurado.
9La tapa del compartimiento de almacenamiento del conector
inferior está cerrada y segura antes de conectar el portabebé.
9La ventana del indicador ClickTight está completamente verde y
no se ve ningún color rojo.

18
1. Coloque la base en el asiento del
vehículo.
2. Abra el ClickTight.
a. Sujete el mango ClickTight y
apriete el botón.
b. Levante el mango ClickTight.
NOTA: Cuando ClickTight está abierto
en su totalidad y se suelta el botón,
la ventana del indicador estará
COMPLETAMENTE VERDE.
3. Abra la tapa del compartimento
de almacenamiento, retire los
conectores inferiores y alárguelos.
Cierre la tapa del compartimento de
almacenamiento.
Instalación del conector inferior 1
3
2

19
4. Introduzca la correa del conector
inferior debajo del ClickTight y las
guías del cinturón.
NOTA: Asegúrese de que la correa esté
introducida por completo debajo del
ClickTight.
NOTA: Asegúrese de que la correa
del conector no bloquee el punto de
bloqueo del ClickTight.
5. Presione los conectores inferiores en
los anclajes inferiores del vehículo
hasta que se escuche un clic.
NOTA: Tire de los conectores inferiores
para vericar que estén seguros.
6. Tire de la correa de ajuste para
eliminar el sobrante.
NOTA: Si el cinturón se aprieta
demasiado, es posible que el
ClickTight no se cierre.
4
6
5

20
7. Para cerrar el ClickTight, empuje hacia
abajo el mango.
NOTA: Asegúrese de que la
ventana del indicador esté
COMPLETAMENTE VERDE.
NOTA: Un clic ayuda a conrmar
que el ClickTight está asegurado.
7
CLICKTIGHT OPEN CLICKTIGHT CLOSED
YES NO

21
9La base está asegurada cuando se mueve menos de 2,5 cm
(1 pulgada) de adelante hacia atrás o de lado a lado en la
trayectoria del cinturón del vehículo.
9Todo el marcador azul es completamente visible entre las dos
líneas de los indicadores de ángulo de reclinación.
9La correa del conector inferior se coloca debajo de las dos guías
del cinturón y del ClickTight.
9La tapa del compartimento de almacenamiento está cerrada y
asegurada antes de colocar el portabebés.
9La tapa del compartimiento de almacenamiento del conector
inferior está cerrada y segura antes de conectar el portabebé.
9La ventana del indicador ClickTight está completamente verde y
no se ve ningún color rojo.
Instalación de la base con conectores inferiores

22
Cómo colocar el asiento de seguridad para niños
(se vende por separado) en la base
1. Asegúrese de que la base esté bien
instalada.
NOTA: Asegúrese de que la tapa del
compartimento de almacenamiento
conectores inferiores esté asegurada
por encima del almacenamiento
conectores inferiores antes de colocar
el asiento de seguridad para niños (se
vende por separado) en la base.
2. Coloque el asiento de seguridad para
niños (se vende por separado)en la
base y presione hasta que se escuche
un clic.
3. Tire hacia arriba de ambos lados del
asiento de seguridad para niños (se
vende por separado) a n de vericar el
ajuste.
4. Asegúrese de que la manija para el
transporte esté en una posición de
bloqueo y verique que el ángulo de
reclinación siga siendo correcto.

23
Cómo retirar el asiento de seguridad para niños
(se vende por separado) de la base
1. Tire y sujete la palanca de la parte
trasera del asiento de seguridad para
niños (se vende por separado).
2. Levante el asiento de seguridad para
niños de la base con la manija para el
transporte.
Desinstalación de la base
Desinstalación del cinturón para
cadera y hombros
1. Desabroche el cinturón del vehículo.
1

24
2
2. Abra el ClickTight.
a. Sujete el mango ClickTight y
apriete el botón.
b. Levante el mango ClickTight.
3. Tire del cinturón del vehículo desde
las guías del cinturón.
Desinstalación del cinturón para cadera
1. Desabroche el cinturón del vehículo.
2. Abra el ClickTight.
a. Sujete el mango ClickTight y apriete
el botón.
b. Levante el mango ClickTight.
3. Tire del cinturón del vehículo desde las
guías del cinturón.
1
2

25
Desinstalación del conector inferior
1. Aoje las correas del conector inferior.
2. Presione cada uno de los botones
rojos de liberación en los conectores
inferiores y libérelos de los anclajes del
vehículo.
3. Abra el ClickTight.
a. Sujete el mango ClickTight y
apriete el botón.
b. Levante el mango ClickTight.
4. Guarde los conectores
inferiores en el
compartimento de
almacenamiento de la
base y reemplace la tapa
del compartimento de
almacenamiento.
2
1
3

26
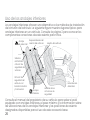
Uso de los anclajes inferiores
Los anclajes inferiores ofrecen una alternativa a los métodos de instalación
del cinturón del vehículo. La siguiente gura muestra lugares típicos para
anclajes inferiores en un vehículo. Consulte la página 2 para conocer los
componentes conectores de este asiento para niños.
Consulte el manual del propietario de su vehículo para saber si está
equipado con anclajes inferiores, el peso máximo y la información sobre
las ubicaciones de los anclajes inferiores y las posiciones de asiento
designadas disponibles para el uso de este accesorio base.
Reposacabezas del
asiento del vehículo
Sistema
retráctil del
cinturón de
seguridad del
vehículo
Cinturón de
seguridad del
vehículo con
banda horizontal
y transversal Hebillas de los
cinturones de
seguridad
Bolsa de aire
delantera
Asiento del vehículo
Anclaje
de retención
Anclajes
inferiores

27
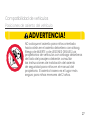
Posiciones de asiento del vehículo
NO coloque el asiento para niños orientado
hacia atrás en el asiento delantero con airbag.
Riesgo de MUERTE o de LESIONES GRAVES. Los
propietarios de vehículos con airbags delanteros
del lado del pasajero deberán consultar
las instrucciones de instalación del asiento
de seguridad para niños en el manual del
propietario. El asiento trasero es el lugar más
seguro para niños menores de 12 años.
Compatibilidad de vehículos
ADVERTENCIA!

28
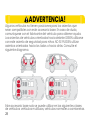
Algunos vehículos no tienen posiciones para los asientos que
sean compatibles con este accesorio base. En caso de duda,
comuníquese con el fabricante del vehículo para obtener ayuda.
Los asientos de vehículos orientados hacia delante DEBEN utilizarse
con este asiento de seguridad para niños. NO SE PUEDEN utilizar
asientos orientados hacia los lados o hacia atrás. Consulte el
siguiente diagrama.
Este accesorio base solo se puede utilizar en las siguientes clases
de vehículos: vehículos multiusos, vehículos normales o camionetas.
ADVERTENCIA!

29
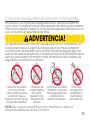
Los siguientes tipos de cinturones de seguridad NO son compatibles con
este accesorio base. Si alguno de los tipos de cinturón que se detallan
a continuación se encuentra en la posición de asiento elegida, elija otra
posición de asiento del vehículo o consulte el manual del propietario de su
vehículo para obtener información sobre la instalación de un asiento de
seguridad para niños en su vehículo.
Cinturones
de seguridad
motorizados y
automáticos
para vehículos.
Cinturones de
cadera delante
de la unión
respaldo-cojín
del asiento del
vehículo.
Cinturones de cadera
y hombros con puntos
de anclaje superiores
o inferiores en la
puerta del vehículo.
Cinturones de cadera
con una placa de
cierre cosida que tiene
un retractor que se
bloquea solo en caso de
una parada repentina.
NOTA: Este accesorio base Britax no es compatible con todos los
cinturones inables de cadera y hombros.
Cinturones de seguridad de vehículos incompatibles
Los asientos y los cinturones de seguridad de los vehículos dieren de
unos a otros. Consulte el manual del propietario del vehículo para obtener
información especíca sobre los cinturones de seguridad del vehículo y su
uso con asientos de seguridad para niños.
ADVERTENCIA!

30
Garantía
Este accesorio base fue fabricado por Britax Child Safety, Inc.
(“Britax”). En la medida en que lo permita la ley, Britax garantiza
este producto al comprador minorista original de la siguiente
manera:
GARANTÍA LIMITADA DE UN AÑO
Este producto tiene garantía contra materiales o fabricación
defectuosos durante un (1) año a partir de la fecha original de
compra. Se requiere un comprobante de compra para ejercer
cualquier reclamo de garantía. Su solución única para esta
garantía es que Britax, a su elección, proporcione componentes de
reparación o reemplazo al comprador original de este producto.
Britax se reserva el derecho a suspender, cambiar o sustituir las
telas, las piezas, los modelos y los productos.
Esta garantía no abarca daños que surjan de la negligencia, el
mal uso o un uso no conforme a las instrucciones del producto.
Además, los productos Britax comprados a minoristas no
autorizados, sitios de subastas en línea o como artículos de
segunda mano no están cubiertos por la garantía.
El uso de fundas, insertos, juguetes, accesorios, o dispositivos de
ajuste no fabricados por Britax no está aprobado por Britax. Su
uso podría hacer que esta retención para niños no cumpla con las

31
normas de seguridad. Su uso también puede anular la garantía de
Britax.
Para hacer un reclamo bajo esta garantía, debe comunicarse con
el Departamento de Servicios al Consumidor de Britax al 1-888-
427-4829 o al 1-704-409-1699 o escribirnos a la dirección que
aparece en la contraportada de esta Guía de usuario.
EXENCIÓN DE GARANTÍAS
El siguiente descargo de responsabilidad se aplicará a usted en la
máxima medida permitida por la ley aplicable. LA GARANTÍA LIMITADA
ESTABLECIDA ANTERIORMENTE ES LA GARANTÍA EXCLUSIVA OFRECIDA
POR BRITAX� SE RENUNCIA A TODAS LAS DEMÁS GARANTÍAS, YA SEAN
EXPRESAS, IMPLÍCITAS O LEGALES, INCLUIDAS LAS GARANTÍAS IMPLÍCITAS
DE COMERCIALIZACIÓN Y ADECUACIÓN PARA UN FIN DETERMINADO,
ENTRE OTRAS� Algunos estados no permiten ciertas exclusiones o
limitaciones en las garantías, por lo que es posible que lo anterior
no se aplique en su caso. Esta garantía le otorga derechos legales
especícos y usted puede tener otros derechos, que varían de un
estado a otro. Ni Britax, ni el minorista que venda este producto,
autoriza a ninguna persona a crear para él cualquier otra garantía,
obligación o responsabilidad en relación con este producto.
LIMITACIÓN DE DAÑOS
La siguiente limitación de daños se aplicará a usted en la máxima

32
medida permitida por la ley aplicable. LOS RECURSOS CONTENIDOS
EN LA GARANTÍA LIMITADA ESTABLECIDA ANTERIORMENTE SON LOS
RECURSOS EXCLUSIVOS PROVISTOS POR BRITAX� EN NINGÚN CASO
BRITAX SERÁ RESPONSABLE ANTE USTED POR DAÑOS INCIDENTALES,
ESPECIALES, PUNITIVOS, EJEMPLARES O CONSECUENTES QUE SURJAN
O ESTÉN RELACIONADOS DE CUALQUIER FORMA CON LA RELACIÓN
ENTRE USTED Y BRITAX (INCLUIDAS DISPUTAS RELACIONADAS CON
LA COMERCIALIZACIÓN O VENTA DE PRODUCTOS BRITAX), LAS
DISPOSICIONES DE ESTA GUÍA DE USUARIO O LA COMPRA O EL USO
DE CUALQUIER PRODUCTO DISEÑADO, FABRICADO, DISTRIBUIDO,
COMERCIALIZADO O VENDIDO POR BRITAX�
COMPLETE Y ENVÍE POR CORREO LA TARJETA DE REGISTRO DE
PROPIETARIO DENTRO DE LOS (30) DÍAS DE LA COMPRA�
También puede registrarla en línea en us.britax.com/registration.
Acuerdo de Arbitraje
ARBITRAJE OBLIGATORIO Y RENUNCIA A DEMANDA COLECTIVA
(“ACUERDO DE ARBITRAJE”)
LEA ESTA SECCIÓN DETENIDAMENTE PORQUE AFECTA SUS DERECHOS
LEGALES, REQUIERE QUE ARBITRE LAS DISPUTAS Y LIMITA LA MANERA EN
QUE PUEDE SOLICITAR COMPENSACIÓN�

33
El arbitraje es un proceso en el que las personas con una disputa
renuncian a sus derechos de presentar una demanda y proceder
ante un tribunal y tener un juicio con jurado para resolver sus disputas
y, en su lugar, aceptan presentar sus disputas a un tercero neutro
(un “árbitro”) para que tome una decisión. Cada parte de la disputa
tiene la oportunidad de presentar evidencia al árbitro. El hallazgo de
arbitraje previo puede ser limitado. Los procedimientos de arbitraje
son privados y menos formales que los procesos judiciales. El árbitro
emitirá una decisión nal y vinculante para resolver la disputa, que
puede imponerse como si fuera una sentencia judicial. Un tribunal
rara vez anula la decisión de un árbitro.
USTED Y BRITAX ACUERDAN QUE CUALQUIER DISPUTA ENTRE LAS PARTES�,
YA SEA QUE SE BASE EN UN CONTRATO, AGRAVIO, ESTATUTO O DE
OTRO TIPO, SE RESOLVERÁ EN ARBITRAJE PERSONALIZADO VINCULANTE�
A los nes de este Acuerdo de arbitraje, las palabras “disputa” y
“disputas” tienen el signicado más amplio posible e incluyen todos
los reclamos, todas las disputas o controversias que surjan de o se
relacionen de alguna manera con la relación entre usted y Britax
(incluidas las disputas relacionadas con la comercialización o venta
de productos Britax), entre otros, cualquier disposición en esta Guía
de usuario o este Acuerdo de arbitraje (incluida la interpretación y el
alcance de este Acuerdo de arbitraje y la arbitrabilidad de cualquier
disputa) o su compra o uso de cualquier producto diseñado,
fabricado, distribuido, comercializado, o vendido por Britax. La Ley

34
Federal de Arbitraje (“FAA”, del inglés Federal Arbitration Act) y la
ley federal de arbitraje se aplican a este Acuerdo de arbitraje. Sin
perjuicio de lo anterior, usted y Britax acuerdan, cada uno, que usted
y Britax retendrán los derechos de iniciar una demanda individual en
un tribunal de reclamos menores por disputas dentro del alcance de
la jurisdicción de dicho tribunal o de iniciar una demanda individual
en un tribunal para prohibir la infracción u otro uso indebido de los
derechos de propiedad intelectual. De ninguna manera la oración
anterior permitirá que se realice una acción de forma colectiva.
USTED TIENE DERECHO A RETIRARSE DE ESTE ACUERDO DE ARBITRAJE,
PERO DEBE EJERCER ESTE DERECHO DENTRO DE LOS TREINTA (30) DÍAS
POSTERIORES A LA COMPRA DE UN PRODUCTO BRITAX� Si no desea
estar obligado por este Acuerdo de arbitraje, debe noticar a Britax
enviando por correo o correo electrónico un aviso de retiro por
escrito, con matasellos o entregado electrónicamente dentro de los
treinta (30) días posteriores a la compra de un producto Britax, a la
siguiente dirección: ATTN: Legal Department, 4140 Pleasant Road, Fort
Mill, South Carolina 29708. Su aviso de retiro debe incluir su nombre
completo, dirección postal o dirección de correo electrónico, el
modelo y los números de serie del producto comprado, una copia
de su comprobante de compra y una declaración acerca de que
pretende retirarse de este Acuerdo de arbitraje. Si no se retira dentro
de los treinta (30) días posteriores a su compra, se aplicará este
Acuerdo de arbitraje y entiende y acepta que renuncia a su derecho

35
a mantener otros procesos de resolución disponibles, como una
acción judicial o un procedimiento administrativo, para resolver su
disputa con Britax.
El arbitraje será dirigido de manera condencial por un solo árbitro
y administrado por la American Arbitration Association (“AAA”)
en virtud de sus Reglas de Arbitraje del Consumidor vigentes
más recientemente, en la medida en que dichas reglas y dichos
procedimientos no contradigan los términos expresos de este
Acuerdo de arbitraje. Para obtener más información sobre las reglas
y cómo comenzar un arbitraje, puede llamar a cualquier ocina de
AAA o visitar la página web www.adr.org. Si usted solicita arbitraje,
entonces Britax adelantará su parte de los gastos asociados con el
arbitraje, incluidos los honorarios de presentación, administración,
audiencia y árbitro (“Honorarios de arbitraje”) en la medida en que
tales Honorarios de arbitraje excedan los 200 $. Si Britax solicita
arbitraje, entonces a su solicitud, Britax adelantará su parte de los
Honorarios de arbitraje. En el caso de reclamos de 10 000 $ o menos,
puede elegir si desea que el arbitraje se lleve a cabo solo en función de
los documentos enviados al árbitro o por una audiencia en persona
o por teléfono. La audiencia de arbitraje se llevará a cabo en el
condado de su residencia, dentro de las 30 millas de dicho condado
o en el lugar que el árbitro ordene. Durante el arbitraje, cada parte
asumirá los honorarios y gastos de sus propios abogados, incluidos
los honorarios de testigos y testigos expertos. El árbitro aplicará la ley

36
sustantiva aplicable de acuerdo con la FAA, aplicará los estatutos de
limitación y honrará los reclamos de privilegio reconocidos por la ley.
El árbitro decidirá, con o sin una audiencia, cualquier moción que
sea sustancialmente similar a una moción que se desestime por no
presentar un reclamo o una moción para juicio sumario. Al realizar
el procedimiento de arbitraje, el árbitro no aplicará el reglamento
federal o los reglamentos estatales de procedimiento civil o de las
pruebas. El árbitro no consolidará los reclamos de varias partes, a
menos que usted y Britax acuerden hacerlo. A solicitud oportuna de
cualquiera de las partes, el árbitro proporcionará una explicación
por escrito para el laudo. El laudo del árbitro puede presentarse
ante cualquier tribunal con jurisdicción.
ESTE ACUERDO DE ARBITRAJE NO PERMITE ARBITRAJES COLECTIVOS,
INCLUSO SI LAS REGLAS O LOS PROCEDIMIENTOS DE LA AAA LO HARÍAN�
EN OTRAS PALABRAS, USTED Y BRITAX ACUERDAN QUE TODAS LAS
DISPUTAS SERÁN ARBITRADAS DE MANERA INDIVIDUAL Y RENUNCIAN
A CUALQUIER DERECHO DE PROCEDER DE FORMA COLECTIVA,
CONSOLIDADA O REPRESENTATIVA� EL ÁRBITRO PUEDE ADJUDICAR
DINERO O MEDIDAS CAUTELARES SOLO A FAVOR DE LA PARTE INDIVIDUAL
QUE SOLICITA COMPENSACIÓN, Y SOLO EN LA MEDIDA EN QUE SEA
NECESARIO PARA PROPORCIONAR COMPENSACIÓN GARANTIZADA POR
EL RECLAMO INDIVIDUAL DE ESA PARTE� NINGÚN ABOGADO COLECTIVO,
REPRESENTANTE O FISCAL GENERAL PRIVADO NI MEDIDAS CAUTELARES
GENERALES DE RESPONSABILIDAD O PEDIDOS DE COMPENSACIÓN

37
PODRÁ MANTENERSE EN NINGÚN ARBITRAJE REALIZADO DE ACUERDO
CON ESTE ACUERDO DE ARBITRAJE�
Si se determina que la renuncia a demanda colectiva y la prohibición
del arbitraje colectivo anterior no son válidas o no son aplicables por
cualquier motivo, entonces todo este Acuerdo de arbitraje será nulo.
Si alguna parte de este Acuerdo de arbitraje que no sea la renuncia
a demanda colectiva y la prohibición del arbitraje colectivo se
considera no válida o inaplicable por cualquier motivo, no invalidará
las partes restantes de este Acuerdo de arbitraje. Si por algún motivo
una disputa procede en un tribunal en lugar de en un arbitraje, usted
y Britax renuncian a cualquier derecho a un juicio con jurado.

Britax Child Safety, Inc.
us.Britax.com
A Britax Childcare company
4140 Pleasant Road
Fort Mill, SC 29708 USA 1-888-427-4829
1-704-409-1699
Britax Child Safety, Inc.
us.Britax.com
A Britax Childcare company
4140 Pleasant Road
Fort Mill, SC 29708 USA 1-888-427-4829
1-704-409-1699
-
 1
1
-
 2
2
-
 3
3
-
 4
4
-
 5
5
-
 6
6
-
 7
7
-
 8
8
-
 9
9
-
 10
10
-
 11
11
-
 12
12
-
 13
13
-
 14
14
-
 15
15
-
 16
16
-
 17
17
-
 18
18
-
 19
19
-
 20
20
-
 21
21
-
 22
22
-
 23
23
-
 24
24
-
 25
25
-
 26
26
-
 27
27
-
 28
28
-
 29
29
-
 30
30
-
 31
31
-
 32
32
-
 33
33
-
 34
34
-
 35
35
-
 36
36
-
 37
37
-
 38
38
-
 39
39
-
 40
40
-
 41
41
-
 42
42
-
 43
43
-
 44
44
-
 45
45
-
 46
46
-
 47
47
-
 48
48
-
 49
49
-
 50
50
-
 51
51
-
 52
52
-
 53
53
-
 54
54
-
 55
55
-
 56
56
-
 57
57
-
 58
58
-
 59
59
-
 60
60
-
 61
61
-
 62
62
-
 63
63
-
 64
64
-
 65
65
-
 66
66
-
 67
67
-
 68
68
-
 69
69
-
 70
70
-
 71
71
-
 72
72
-
 73
73
-
 74
74
-
 75
75


Britax P14832500 Alpine Base Accessory Guía del usuario
- Tipo
- Guía del usuario
en otros idiomas
Artículos relacionados
-
Britax P14715800 Guía del usuario
-
Britax Boulevard ClickTight Guía del usuario
-
-
-
-
-
-
Britax Advocate ClickTight Guía del usuario
-