Baby Trend XCEL-R8 Plus Jogging Stroller Manual de usuario
- Categoría
- Cochecitos
- Tipo
- Manual de usuario

JG94XXXB_2L_050522.1
Read all instructions BEFORE assembly and USE of product.
KEEP INSTRUCTIONS FOR FUTURE USE.
Lea todas las instrucciones ANTES de armar y USAR el
producto. CONSERVE LAS INSTRUCCIONES PARA USO FUTURO.
XCEL-R8™ PLUS Jogger
1-800-328-7363
(8:00 a.m. ~ 4:30 p.m. PST)
www.babytrend.com
Baby Trend, Inc.
13048 Valley Blvd.
Fontana CA 92335
Instruction Manual
Manual de Instrucciones JG94XXXB
Parent Tray
+LED Lights

WARRANTY
DO NOT RETURN YOUR PRODUCT TO THE STORE. PLEASE CONTACT
BABY TREND® FOR REPLACEMENT PARTS, SERVICE AND REPAIR.
The Baby Trend® warranty covers workmanship defects within 1 year of purchase. Any
product which has been subjected to misuse, abuse, abnormal use, excessive wear and
tear, improper assembly, negligence, environmental exposure, alteration or accident,
or has had its serial number altered or removed invalidates all claims against the
manufacturer. Any damage to property during installation is the sole responsibility of
the end user.
Customer Service Department can be contacted at 1 (800) 328-7363 Monday through
Friday between 8:00 a.m. and 4:30 p.m. (PST). Return Authorizations are required
prior to returning product(s) to Baby Trend®. Please visit http://babytrend.com/pages/
limited-warranty for complete warranty details.
GARANTIA
NO DEVUELVA SU PRODUCTO A LA TIENDA. POR FAVOR CONTACTE A
BABY TREND® PARA PIEZAS DE REPUESTO, SERVICIO Y REPARACION.
La garantía de Baby Trend® cubre defectos de fábrica por 1 año después de la
compra. Cualquier producto que haya sido sometido a uso inadecuado, abuso, uso
anormal, desgaste excesivo, montaje incorrecto, negligencia, exposición ambiental,
alteración o accidente, o cuyo número de serie haya sido alterado o removido, anula
todos los reclamos contra el fabricante. Cualquier daño a la propiedad durante la
instalación es la exclusiva responsabilidad del usuario final.
El Departamento de Servicio al Cliente está disponible llamando al 1 (800) 328-7363,
de lunes a viernes de 8:00 a.m. a 4:30 p.m. (PST). Se requiere una Autorización de
Devolución antes de poder devolver el o los productos a Baby Trend®. Visite http://
babytrend.com/pages/limited-warranty para conocer todos los detalles de la garantía.

4
WARNING
Copyright © 2022, Baby Trend Inc., All Rights Reserved. Todos los derechos reservados.
3
PARTS PIEZAS
Copyright © 2022, Baby Trend Inc., All Rights Reserved. Todos los derechos reservados.
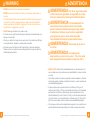
WARNING: Please follow all of these
instructions to ensure the safety of your child. Keep
these instructions for future reference.
WARNING: Failure to follow these instructions
could result in serious injury or death. Avoid serious
injury from falling or sliding out. Always use the safety
harness and insure that the children are properly
positioned according to these instructions.
WARNING: Never leave children unattended
WARNING: Wheel can detach and cause tip
over. Pull on the wheel to assure it is securely attached.
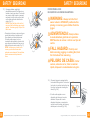
• CAUTION: This single jogger is designed for one child only. Use with
more than one child may cause the unbalance condition which can injure/
harm your child.
• Purses, shopping bags, parcels, diaper bags or accessory items may
change the balance of the stroller and cause hazardous unstable
conditions.
• The maximum weight that can be carried in the basket is 5 lb. (2.26
kg), child tray and parent tray are 3 lb. (1.36 kg) each. If equipped, the
maximum weight can be carried in the side pockets (2) is 3 lb. (1.36 kg),
back pockets (2) is 3 lb. (1.36 kg) and canopy pockets is (2) 1 lb. (0.45
kg). Excessive weight may cause a hazardous unstable condition to exist.
• Be certain the stroller is fully erect and latched in the open position before
allowing children near the stroller.
• Use of the stroller with children weighing more than 50 pounds (22.67 kg)
or over 42 inches (106.7 cm) tall, will cause excessive wear and stress on
the stroller and may cause a hazardous unstable condition to exist.
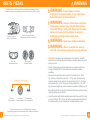
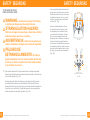
Check that you have all the parts for this model before assembling the stroller.
Verique que tenga todas las piezas para este modelo antes de montar el carrito.
*Parent Tray with LED lights
*Bandeja para padres con luces LED
2-Rear Wheels
2-Ruedas traseras
Front Wheel
Rueda delantera
Stroller and Fender
Carrito y Guardabarros
Child Tray
Bandeja para niños
Axel Nuts
Tuerca del Eje
Retainer plate
Placa de retención
*The light unit requires four size AAA batteries (not included).
*La unidad de luz requiere cuatro baterías AAA de tamaño (no incluidas).
** Joined parts • Piezas unidas
**

6
ADVERTENCIA
Copyright © 2022, Baby Trend Inc., All Rights Reserved. Todos los derechos reservados.
5
WARNING
Copyright © 2022, Baby Trend Inc., All Rights Reserved. Todos los derechos reservados.
ADVERTENCIA: Por favor, siga todas estas
instrucciones para garantizar la seguridad de su hijo.
Conserve estas instrucciones para referencia futura.
ADVERTENCIA: El incumplimiento de
estas instrucciones podría ocasionar una lesión
grave o la muerte. Evite lesiones graves por caídas
o resbalones. Siempre use el arnés de seguridad
y asegúrese de que los niños estén ubicados
correctamente de acuerdo a estas instrucciones.
ADVERTENCIA: Nunca pierda de vista a
los niños.
ADVERTENCIA: La rueda puede
desprenderse y provocar un vuelco. Tire de la rueda
para asegurarse de que esté bien sujeta los niños.
• PRECAUCIÓN: Este carrito está diseñado para un niño solamente. El
uso con más de un niño podría provocar inestabilidad y lesionar o dañar
a su hijo.
• Los bolsos, bolsas de compras, paquetes, bolsas de pañales o artículos
accesorios podrían cambiar el equilibrio del carrito y causar condiciones
de inestabilidad peligrosas.
• El peso máximo que se puede llevar es de 5 libras (2.26 kg) en la
canasta y de 3 libras (1.36 kg) en la bandeja para niños y en la bandeja
para padres. Si incluido, el peso máximo que se puede llevar en los
bolsillos laterales (2) es de 3 libras (1.36 kg), en los bolsillos posteriores
(2) es de 3 libras, y en los bolsillos de la cubierta es de (2) 1 libra (0.45
kg). El exceso de peso podría ocasionar una inestabilidad peligrosa.
• Procure que el carrito esté completamente erguido y con el pestillo en la
posición abierta antes de permitir que los niños se acerquen al carrito.
• NEVER use the stroller on stairways or escalators.
• NEVER use the stroller with roller skates, in-line skates, skateboards or
bicycles.
• We recommend that the child occupant be at least 6 months of age prior
to use of the stroller for jogging. Because children develop at different
rates, please discuss the use of a jogging stroller with your health care
provider prior to jogging with your child.
• NEVER allow your stroller to be used as a toy.
• To clean use only mild household soap or detergent and warm water on a
sponge or clean cloth.
• Check your stroller for loose screws, worn parts, torn material or stitching
on a regular basis. Replace or repair parts as needed.
• Discontinue use of stroller should it malfunction or become damaged.
Please contact our customer service department to arrange for repair or
obtain replacement parts.

8
ASSEMBLY MONTAJE
Copyright © 2022, Baby Trend Inc., All Rights Reserved. Todos los derechos reservados.
7
ADVERTENCIA
Copyright © 2022, Baby Trend Inc., All Rights Reserved. Todos los derechos reservados.
• El uso del carrito con niños que pesan más de 50 libras (22.67 kg) o
miden más de 42 pulgadas (106.7 cm) causará un desgaste y tensión
excesivos en el carrito y podrían provocar una inestabilidad peligrosa.
• NUNCA use el carrito en escaleras mecánicas o comunes.
• NUNCA use el carrito con patines de ruedas, patines en línea,
monopatines o bicicletas.
• Recomendamos que el niño ocupante tenga al menos 6 meses de edad
antes de usar el carrito para trotar. Debido a que los niños se desarrollan
a diferentes ritmos, tenga a bien discutir sobre el uso del carrito para
trotar con su proveedor del cuidado de la salud antes de trotar con su
hijo.
• NUNCA permita el uso de su carrito como un juguete.
• Para limpiarlo, use solamente jabón doméstico o detergente suaves y
agua tibia en una esponja o trapo limpio.
• Verique con frecuencia que su carrito no tenga tornillos sueltos, piezas
gastadas, materiales o costuras rasgados.
• Reemplace o repare las piezas conforme sea necesario.
• Deje de usar el carrito si presenta fallas o daños. Por favor, comuníquese
con nuestro departamento de reparación de piezas para gestionar la
reparación u obtención de piezas de reemplazo.
IMPORTANT! To ensure safe operation of your stroller, please
follow these instructions carefully. Please keep these instructions for future
reference.
IMPORTANT! Before assembly and each use, inspect this product
for damaged hardware, loose joints, missing parts or sharp edges. NEVER
use if any parts are missing or broken.
IMPORTANT! Adult assembly is required.
¡IMPORTANTE! Para asegurar el funcionamiento seguro de su
carrito, siga estas instrucciones cuidadosamente. Por favor, conserve estas
instrucciones para referencia futura.
¡IMPORTANTE! Antes del montaje y de cada uso, inspeccione el
producto para detectar daños en el equipo, uniones sueltas, piezas faltantes
o bordes losos. NUNCA use el carrito con piezas faltantes o rotas.
¡IMPORTANTE! Se requiere el montaje por parte de un adulto.

910
ASSEMBLY MONTAJE ASSEMBLY MONTAJE
Copyright © 2022, Baby Trend Inc., All Rights Reserved. Todos los derechos reservados. Copyright © 2022, Baby Trend Inc., All Rights Reserved. Todos los derechos reservados.
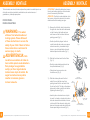
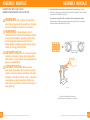
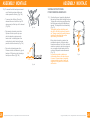
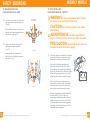
ATTENTION: To attach the front wheel, remove
the nuts and retainer plate from the front wheel
prior to the assembly that follows.
ATENCIÓN: Para jar la rueda delantera, retire
las tuercas y la placa de retención de la rueda
delantera antes del montaje que sigue.
1) • Remove the fold latch, which is located on
the right side. Lean the stroller backwards
so that it rests on the handle and rear
axle frame and the front wheel forks are
pointing upward (Fig. 1).
• Suelte el pestillo de pliegue. Incline el
carrito hacia atrás de modo que se apoye
sobre el manubrio y el armazón del eje
trasero, y que las horquillas de la rueda
delantera apunten hacia arriba (Fig. 1).
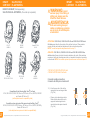
2) • Slide the front wheel onto the front forks
(Fig. 2).
• Deslice la rueda delantera dentro de las
horquillas delanteras (Fig. 2).
• Faites glisser la roue avant sur les
fourches avant (Fig. 2).
3) • Slide the retainer plate onto the front
wheel. Be sure that the raised lip is
pointing toward the fork and insert it into
the slot on the fork. The tab on the retainer
plate must be lined up with the slot before
tightening the wheel (Fig. 3).
• Inserte la placa de retención en el eje de
la rueda. La clavija en la punta de la placa
debe de colocarse hacia adentro, de cara
a la horquilla. Debe alinear la clavija de la
placa con el agujero antes de atornillar las
tuercas para asegurar la rueda (Fig. 3).
FRONT WHEEL
RUEDA DELANTERA
WARNING: This wheel
utilizes a front wheel double nut
locking system. Please follow all
of these instructions to ensure the
safety of your child. Failure to follow
these instructions could result in
serious injury or death.
ADVERTENCIA: Esta
rueda tiene un sistema de traba de
tuerca doble para la rueda delantera.
Para proteger la seguridad de
su hijo, por favor siga todas las
instrucciones al pié de la letra. No
seguir las instrucciones podría
resultar en lesiones graves o
incluso la muerte.
Fig. 1
The front wheel, rear wheels, fender, and parent tray need to be installed prior to use.
Antes del uso se deben instalar la rueda delantera, las ruedas traseras, el
guardabarros y la bandeja para padres.
Fig. 2
Retainer Plate
Placa de Retención
Axel Nut
Tuerca del Eje
Axel and Hub
Eje y Cubo
Fig. 3
Front Fork
Horquilla Delantera
Slot
Ranura

11 12
ASSEMBLY MONTAJE ASSEMBLY MONTAJE
Copyright © 2022, Baby Trend Inc., All Rights Reserved. Todos los derechos reservados. Copyright © 2022, Baby Trend Inc., All Rights Reserved. Todos los derechos reservados.
TESTING FOR PROPER WHEEL INSTALLATION
PARA VERIFICAR LA INSTALACION DE LAS RUEDAS
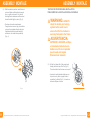
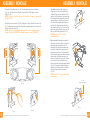
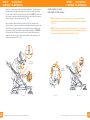
4) • With the wheel in position, install the axel
nuts and tighten with standard crescent,
box, or open end wrench. You should
feel signicant resistance and the wheel
should be held tightly in place (Fig. 4).
• Posicione la rueda correctamente.
Ponga las tuercas en el eje y atorníllelas
con una llave inglesa abierta o de pipa.
Apriételas hasta que sienta bastante
resistencia. La rueda debe quedar ja
(Fig. 4).
Fig. 5Fig. 4
5) • Lift the front wheel off of the ground and
sharply strike the top of the tire (Fig. 5).
The wheel should not be loose or come off.
• Levante la rueda delantera hasta que no
toque el suelo y déle un golpe rme al
neumático (la llanta) (Fig. 5). La rueda no
debe de aojarse o caerse.
WARNING: ALWAYS
check the double nut locking
system before each use to
ensure that the front wheel is
securely fastened to the frame.
ADVERTENCIA:
ANTES DE CADA USO verique
el sistema de traba de tuerca
doble con el n de comprobar
que la rueda esté sujeta
rmemente al armazón.

13 14
ASSEMBLY MONTAJE ASSEMBLY MONTAJE
Copyright © 2022, Baby Trend Inc., All Rights Reserved. Todos los derechos reservados. Copyright © 2022, Baby Trend Inc., All Rights Reserved. Todos los derechos reservados.
FENDER
GUARDABARROS
Refer to step 7 as needed for replacement
purposes.
Consulte el paso 7 según sea necesario para
nes de reemplazo.
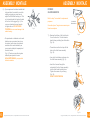
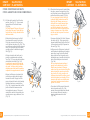
7) • Examine the bottom of the front fender.
You will notice four 1/4 inch diameter
plastic tubes protruding from the bottom
(Fig. 7a).
• These tubes must be lined up with the
holes in the front frame assembly
(Fig. 7b).
• Line up the front fender and press onto
the front frame assembly (Fig. 7c).
• Insert the 4 screws through the
underside of the front frame assembly
into the front fender's plastic tubes.
Tighten the screws only until snug
(Fig. 7d).
DO NOT OVER TIGHTEN.
6) • If you experience front wheel wobble that
is beyond what is normal for use while
walking or jogging you may have to
adjust the front wheel housing nut. This
nut is located under the footrest located
at the -front of the jogger (Fig. 6). You
can use a standard crescent wrench
to tighten the nut. DO NOT OVER
TIGHTEN this can cause damage to the
wheel housing.
• Si experimenta un tambaleo en la rueda
delantera que es anormal para el uso
al caminar, podría tener que ajustar la
arandela de la rueda delantera, que
se encuentra debajo del reposapiés al
frente del carrito
(Fig. 6). Puede usar una llave inglesa
estándar para ajustar la tuerca.
NO AJUSTE DE MÁS. ya que podría
dañar la arandela.
Fig. 6
Fig. 7a
Underside
Parte inferior
Fig. 7b
Fig. 7c
Fig. 7d

15 16
ASSEMBLY MONTAJE ASSEMBLY MONTAJE
Copyright © 2022, Baby Trend Inc., All Rights Reserved. Todos los derechos reservados. Copyright © 2022, Baby Trend Inc., All Rights Reserved. Todos los derechos reservados.
REAR WHEEL
RUEDA TRASERA
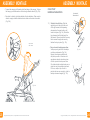
8) • Lean the stroller forward to rest on the front
wheel. To attach the rear wheels, push each
wheel’s axle into the plastic corner tting as
shown in (Fig. 8). Depress the metal lever
on the inside of the corner tting as you
push the axle into corner tting. When the
wheel will not go on any farther, release the
lever. Check that the wheel has locked into
the corner tting by pulling on the wheel. If
not locked, lift upward on the lever, push the
wheel on farther and release lever.
• Ensure that the wheels are rmly locked into place. NEVER use
the stroller if the wheels are not locked into place, contact our
customer service department immediately at 1-800- 328-7363,
between the hours of 8:00am and 4:30pm PST, for assistance.
• Incline el carrito hacia delante de modo que se apoye en la rueda
delantera. Para colocar las ruedas traseras, empuje el eje de
cada rueda dentro del accesorio plástico de la esquina como se
indica en la Fig. 8. Baje la palanca metálica que está dentro del
accesorio de la esquina mientras empuja el eje hacia el interior
del mismo. Cuando no pueda empujar más la rueda, suelte la
palanca. Tire de la rueda para vericar que se haya trabado en
el accesorio de la esquina. Si no se trabó, levante la palanca,
empuje la rueda aún más y suelte la palanca.
• Asegúrese de que las ruedas estén rmemente trabadas. NUNCA
use el carrito si las ruedas no están bien trabadas, y llame a
nuestro departamento de servicio al cliente de inmediato al
1-800- 328-7363 en el horario de 8:00 a.m. a 4:30 p.m., Hora
Estándar del Pacíco para recibir ayuda.
• Examine la parte inferior del
guardabarros delantero. Notará
cuatro tubos plásticos de ¼ pulgada
de diámetro que sobresalen de la
parte inferior (Fig. 7a).
• Estos tubos deben estar alineados
con los agujeros del armazón
delantero (Fig. 7b).
•
Alinee el guardabarros delantero y
presiónelo en el armazón delantero
(Fig. 7c).
• Introduzca los 4 tornillos por debajo
del armazón delantero en los
tubos plásticos del guardabarros
delantero. Ajuste bien los tornillos
sin forzarlos (Fig. 7d).
NO AJUSTE DE MÁS.
Fig. 8

17 18
ASSEMBLY MONTAJE ASSEMBLY MONTAJE
Copyright © 2022, Baby Trend Inc., All Rights Reserved. Todos los derechos reservados. Copyright © 2022, Baby Trend Inc., All Rights Reserved. Todos los derechos reservados.
PARENT TRAY WITH LED LIGHTS
BANDEJA PARA PADRES CON LUCES LED
WARNING: Do not place hot liquids or
more than 3 pounds in the parent tray. Serious
burns or unstable conditions could result.
WARNING: Keep batteries out of
children's reach. Old and new batteries should
not be mixed. Alkaline, standard carbon-zinc,
and rechargeable batteries should not be
mixed. Remove batteries before storing music
center for a long period of time.
ADVERTENCIA: No coloque líquidos
calientes ni más de 3 libras sobre la bandeja
para padres, ya que podría causar quemaduras
graves o inestabilidad.
ADVERTENCIA: Mantenga las
pilas fuera del alcance de los niños. Las pilas
viejas y nuevas no deben mezclarse. Las pilas
alcalinas, estándar de carbón y zinc, y las pilas
recargables no deben mezclarse. Retire las
pilas antes de guardar el centro musical por un
largo período.
9) • Two AAA batteries required on each side of the parent tray: To open
battery slot, unscrew and slide the lid out from the underside. Then, lift the lid
to insert two AAA batteries (Fig. 9a).
• Se requieren dos pilas AAA a cada lado de la bandeja para padres:
Desenrosque y deslice la tapa hacia afuera de la parte inferior. Levante la
tapa para insertar dos pilas AAA (Fig. 9a).
Fig. 9a
*Four size AAA batteries (not included).
*Cuatro baterías AAA de tamaño (no incluidas).
*

19 20
ASSEMBLY MONTAJE ASSEMBLY MONTAJE
Copyright © 2022, Baby Trend Inc., All Rights Reserved. Todos los derechos reservados. Copyright © 2022, Baby Trend Inc., All Rights Reserved. Todos los derechos reservados.
Fig. 9d
Fig. 9c
• Repeat for the other side (Fig. 9b). Secure the lid and screw it closed
(Fig. 9c). Test the on and off button to activate the LED Lights on each
side (Fig. 9d).
NOTE: 1st push - Fast Blink, 2nd push - Slow Blink, 3rd push - Constant ON,
4th push - OFF.
• Repítelo para el otro lado (Fig. 9b). Asegure la tapa y atornille su cierre (Fig.
9c). Compruebe los botones de encendido y apagado para activar las luces
LED en cada lado (Fig. 9d).
NOTA: Oprima 1 vez: parpadeo rápido; oprima 2 veces: parpadeo lento;
oprima 3 veces: ENCENDIDO constante; oprima 4 veces: APAGADO.
Fig. 9b
* *
• To attach the parent tray, align the
ttings on the ends of the parent tray
with the ttings on the outsides of the
handle. Hook the hole in the parent tray.
Pull outward on the opposite end while
pushing down on the tray until locked
onto the stroller handle. Be careful not
to pinch your ngers when installing
the parent tray (Fig. 9e). To remove the
parent tray, pull outward on one end of
the tray while lifting upward (Fig. 9f).
NOTE: Refer to (Fig. 9g) for the
activation button.
• Para colocar la bandeja para padres,
alinee los accesorios de los extremos
de la bandeja para padres con los
accesorios de las partes externas del
manubrio. Enganche el agujero en la
bandeja para padres. Tire hacia fuera
en el extremo opuesto mientras empuja
hacia abajo la bandeja hasta que se
trabe en el manubrio del carrito. Tenga
la precaución de no pellizcarse los
dedos al instalar la bandeja para padres
(Fig. 9e). Para retirar la bandeja para
padres, tire hacia fuera de un extremo
de la bandeja mientras la levanta
(Fig. 9f).
NOTA: Consulte (Fig. 9g) para el botón
de activación.
Fig. 9e
Fig. 9f
Fig. 9g
On - Off
Encendido - Apagado

21 22
ASSEMBLY MONTAJE ASSEMBLY MONTAJE
Copyright © 2022, Baby Trend Inc., All Rights Reserved. Todos los derechos reservados. Copyright © 2022, Baby Trend Inc., All Rights Reserved. Todos los derechos reservados.
Fig.10a
Fig.10b
CANOPY
CUBIERTA
10)
• Insert the canopy into the stroller
frame and ensure both sides click in
(Fig. 10a).
• Inserte la cubierta en el marco del
cochecito y asegúrese de que haga
clic (Fig. 10a).
• NOTE: Check the following steps
(Fig. 10b through Fig. 10c) to ensure
all installations. Adjust only if needed.
Wrap the elastic around the stroller
frame to band and catch. On both
sides of the canopy, attach the hook
and loop (Fig. 10b).
• NOTA: Compruebe los siguientes
pasos (Fig. 10b a Fig. 10c) para
asegurar todas las instalaciones.
Ajuste solo si es necesario. Envuelva
el elástico alrededor del marco del
cochecito para atar y atrapar. A ambos
lados del dosel, conecte el gancho y el
lazo (Fig. 10b).
• Use the buttons to attach the straps to the rear of the seat fabric (Fig. 10c).
• Use los botones para sujetar las correas a la parte trasera de la tela del
asiento (Fig. 10c).
Fig.10c

23 24
ASSEMBLY MONTAJE ASSEMBLY MONTAJE
Copyright © 2022, Baby Trend Inc., All Rights Reserved. Todos los derechos reservados. Copyright © 2022, Baby Trend Inc., All Rights Reserved. Todos los derechos reservados.
Open / Close
Abra / Cierre
• To open the canopy: pull forward on the front edge of the canopy. To close
the canopy: push backwards on the front edge towards handle (Fig. 10d).
• Para abrir la cubierta: jale hacia delante el borde delantero. Para cerrar la
cubierta: empuje el borde delantero hacia atrás en dirección al manubrio
(Fig. 10d).
Fig.10d
CHILD TRAY
BANDEJA PARA NIÑOS
11) • To attach the child tray: Push the
angled tray onto the post at the end
of the right armrest, while pressing
downward on the snap button, until
locked into place (Fig. 11a). Rotate the
tray downward until latched onto the
left armrest. Please check that the snap
button comes through and securely
latches the tray in place (Fig. 11b).
•
Para colocar la bandeja para niños:
Verique que el gancho de la bandeja
se trabe correctamente (Fig. 11a).
Empuje la bandeja angulada dentro
del poste que está en el extremo del
apoyabrazos derecho mientras oprime
el botón a presión hasta que se trabe.
Gire la bandeja hacia abajo hasta que se
sujete bien en el apoyabrazos izquierdo.
Por favor, verique que el botón a
presión atraviese por completo y trabe la
bandeja de manera segura (Fig. 11b).
Fig. 11b
Fig. 11a
“Underside”
“Parte inferior”

25 26
ASSEMBLY MONTAJE ASSEMBLY MONTAJE
Copyright © 2022, Baby Trend Inc., All Rights Reserved. Todos los derechos reservados. Copyright © 2022, Baby Trend Inc., All Rights Reserved. Todos los derechos reservados.
12)• To access the child seat: press inward
on left side tray release button and
rotate upward on the tray (Fig. 12a).
• To remove the child tray: Press the
release button and rotate the tray 180
degrees and pull the tray until it released
(Fig. 12b).
• Para acceder al asiento para niños:
Oprima el botón a presión rojo que
está a la derecha y ejerza presión
hacia arriba. La bandeja para niños
se levantará y girará hacia arriba para
permitir el acceso al asiento (Fig. 12a).
• Para retirar la bandeja para niños:
Presione el botón de liberación y gire la
bandeja á 180 grados y jale la bandeja
hasta que se libere. (Fig. 12b).
Fig. 12a
Fig. 12b
180°
90°
Fig. 13
SEATBACK POSITIONING
POSICIONED DEL RESPALDO
13) • To recline the seat, press the adjustment
tabs and pull down while holding the hoop.
To place the seat into an upright position,
hold the hoop and push the adjustment
upward. The strap will lock automatically
(Fig. 13).
The upright position should be used
only for a child that is at least 6 months
old. Always re-adjust the safety harness,
including the shoulder belts, when
repositioning the seatback.
• Para reclinar el asiento, presione las
pestañas de ajuste y tire hacia abajo
mientras sostiene el aro. Para colocar el
asiento en posición vertical, sostenga el
aro y empuje el ajuste hacia arriba. La
correa se bloqueará automáticamente
(Fig. 13).
La posición erguida se debe usar
únicamente para un niño de al menos
6 meses. Al reposicionar el respaldo,
siempre vuelva a ajustar el arnés de
seguridad, incluyendo los cinturones
del hombro.

27 28
INFANT
CAR SEAT SILLITA PARA
EL AUTOMÓVIL INFANT
CAR SEAT SILLITA PARA
EL AUTOMÓVIL
Copyright © 2022, Baby Trend Inc., All Rights Reserved. Todos los derechos reservados. Copyright © 2022, Baby Trend Inc., All Rights Reserved. Todos los derechos reservados.
INFANT CAR SEAT (Sold separately)
SILLITA PARA EL AUTOMÓVIL (Se vende por separado)
Compatible with the following Baby Trend® Car Seats:
EZ Lift, EZ-Lift PLUS, EZ-Lift PRO, Flex-Loc, EZ Flex-Loc, EZ Loc, INERTIA, SECURE
and Canada: EZ Flex-Loc 32.
(visit babytrend.com for compatibilty chart)
Compatible con las siguientes sillitas para automóviles Baby Trend®:
EZ Lift, EZ-Lift PLUS, EZ-Lift PRO, Flex-Loc, EZ Flex-Loc, EZ Loc, INERTIA, SECURE y
Canada: EZ Flex-Loc 32.
(visite babytrend.com para ver la tabla de compatibilidad)
SECURE
MODELS
EZ- LIFT
MODELS
Canada EZ FLEX-
LOC 32
FEX_LOC,
EZ FLEX-LOC, EZ LOC
EZ FLEX-LOC,
EZ LOC
INERTIA
MODELS
WARNING: Avoid
serious injury from falling or
sliding out, always use the
Infant Car Seat harness.
ADVERTENCIA:
Evite una lesión grave por
caídas o resbalones, siempre
use el arnés de la Sillita para
el automóvil.
Car seats module connection
Conexión de sillita para el automóvil
14) • From the rear side of the stroller
engage both car seat support tabs
(Fig. 14a).
• Primero gire la bandeja pra niños:
Desde la parte trasera del carrito,
enganche ambas lengüetas de
soporte del asiento para automóvil
(Fig. 14a). Fig. 14a
CS01 EZ-Lift, CS02 EZ-Lift PLUS and
CS03 EZ-Lift PRO Infant Car Seats
ATTENTION: CS01 EZ-Lift, CS02 EZ-Lift PLUS and CS03 EZ-Lift PRO Infant
Car Seats must attach to the module of the strollers front seat. These models
require child tray and seat back adjustment to the most reclined position.
NOTE: To make seat position adjustments refer to step 13.
ATENCIÓN: CS01 EZ-Lift, CS02 EZ-Lift PLUS and CS03 EZ-Lift PRO Sillas
de Auto deben fijarse al módulo del asiento delantero del carrito. Estos modelos
requieren el ajuste de la bandeja para niños y el respaldo del asiento a la posición
más reclinada.
NOTA: Para realizar ajustes de posiciones en la sillita lea el paso 13.

29 30
INFANT
CAR SEAT SILLITA PARA
EL AUTOMÓVIL INFANT
CAR SEAT SILLITA PARA
EL AUTOMÓVIL
Copyright © 2022, Baby Trend Inc., All Rights Reserved. Todos los derechos reservados. Copyright © 2022, Baby Trend Inc., All Rights Reserved. Todos los derechos reservados.
• Align the car seat module to the inner frame connectors. Carefully rest the
car seats lower rear against the angle point of the tray. Latch the module
into the stroller frame. Press down rmly for the click. ALWAYS ensure that
the car seat is properly connected and locked onto the stroller before each
use by lifting up on the car seat handle (Fig. 14b).
• Alinee el módulo de la sillita para el automóvil con los conectores del
armazón interno. Apoye con cuidado la parte trasera inferior del asiento del
automóvil contra el punto angular de la bandeja. Enganche el módulo en
el marco del carrito. Presione rmemente hasta que haga clic. SIEMPRE
verique que la sillita para el automóvil esté conectada correctamente y
trabada en el carrito antes de cada uso levantándola del manubrio de la
sillita para el automóvil (Fig. 14b).
.
Fig. 14b
“Click”
“Clic”
Angle point
Punto angular
Removing the car seat:
Retirada de la silla de auto:
• NOTE: Set handle to the carry position (Fig. 14c). Squeeze the release
handle located at the Top-rear of the car seat and lift away from the stroller
(Fig. 14d).
• NOTA: Coloque el manubrio en la posición de traslado (Fig. 14c). Apriete el
manubrio de liberación ubicado en la parte Superior trasera de la sillita para
el automóvil y levántelo para retirarlo del carrito (Fig. 14d).
Fig. 14c Fig. 14d
Press
Prensa

31 32
INFANT
CAR SEAT SILLITA PARA
EL AUTOMÓVIL INFANT
CAR SEAT SILLITA PARA
EL AUTOMÓVIL
Copyright © 2022, Baby Trend Inc., All Rights Reserved. Todos los derechos reservados. Copyright © 2022, Baby Trend Inc., All Rights Reserved. Todos los derechos reservados.
Fig. 15a
OTHER COMPATIBLE CAR SEATS
OTROS ASIENTOS DE COCHE COMPATIBLES
15) • Put the stroller seat in the full recline
position, See (Fig. 13). Turn car seat
support tabs on the stroller frame
(Fig 15a).
Car Seat Support Tabs are Only used
for the infant car seat. Check that the
front child tray is rmly attached to the
stroller armrests.
• Position the infant car seat so that it
faces toward the rear of the stroller.
Push the car seat into the front tray
until it latches into place (Fig. 15b). The
rear of the car seat rests on the support
tabs. Put the stroller seat in the most
upright position for additional support,
See (Fig. 14).
• Coloque el asiento del carrito en la
posición completamente reclinada ,
Vea (Fig. 13). Luego gire las lengüetas
del armazón del carrito (Fig. 15a).
Lengüetas de soporte del asiento de
coche sólo se utilizan para el asiento
de coche. Verique que la bandeja
delantera para niños esté rmemente
sujetada a los apoyabrazos del carrito.
• Ubique la sillita para el automóvil de
modo tal que apunte hacia la parte
trasera del carrito. Empuje la sillita
para el automóvil dentro de la bandeja
delantera hasta que se sujete bien
(Fig. 15b). La parte trasera de la sillita
para el automóvil descansa sobre
las lengüetas de apoyo. Coloque el
asiento del carrito en la posición más
erguida para un apoyo adicional, Vea
(Fig. 14).
Fig. 15b
16) • When the infant car seat is locked rmly
into place, secure the single short clip
over the infant car seat through the belt
path on the infant car seat (Fig.16a).
It is very important that the short clip
is always tightly fastened around the
infant car seat. Always secure your
child with the car seat harness when
using the car seat in the stroller. If
your child is already in the car seat,
check that the child is secured with the
harness. Improper use of the stroller
with the car seat may result in serious
injury or death.
• To remove the Infant Car Seat, Remove
the short clip (Fig. 16a), squeeze the
release handle located at the Foot-End
of the seat and carefully lift upward on
the seat (Fig. 16b).
• Verique que la sillita para el automóvil
esté rmemente trabada en la bandeja
para niños, luego je la sillita infantil
para el altomóvil con el gancho corto
metiéndolos en el recorrido del cinturón
de la sillita infantil para el automóvil
(Fig. 16a).
Es muy importante amarrar bien el
gancho corto alrededor de la sillita
infantil para el automóvil. Siempre
sujete a su hijo con el arnés de la sillita
para el automóvil cuando use la sillita
en el carrito. Si su hijo ya está en la
sillita para el automóvil, verique que el
niño esté sujetado con el arnés. El uso
incorrecto del carrito con la sillita para
el automóvil podría acarrear lesiones
graves o la muerte.
• Para retirar la Sillita para el Automóvil,
retirar el gancho corto (Fig. 16a),
apriete la manija de liberación ubicada
en el extremo inferior del asiento y
levante cuidadosamente la silla
(Fig. 16b).
Fig. 16a
Fig. 16b
Short clip
Gancho corto

34
SAFETY SEGURIDAD
Copyright © 2022, Baby Trend Inc., All Rights Reserved. Todos los derechos reservados.
33
INFANT
CAR SEAT SILLITA PARA
EL AUTOMÓVIL
Copyright © 2022, Baby Trend Inc., All Rights Reserved. Todos los derechos reservados.
•
Applies to all models:
Rotate the
support tabs up when not using
the car seat (Fig. 16c).
•
Se aplica a todos los modelos:
Gire las lengüetas de apoyo hacia
arriba cuando no use la sillita para
el automóvil (Fig. 16c).
Fig. 16c
BRAKES
FRENOS
WARNING: Always
check with your pediatrician for
a recommended starting age /
weight for your baby in an all
terrain stroller.
WARNING: Always set
brakes when the stroller is not
being pushed so that the stroller
will not roll away. NEVER leave
stroller unattended on a hill or
incline as the stroller may slide
down the hill.
ADVERTENCIA:
Siempre verique con su
pediatra la edad o el peso
recomendados para empezar
a llevar a su bebé en un carrito
todo terreno.
ADVERTENCIA:
Siempre aplique los frenos
cuando el carrito no esté
siendo empujado, para
impedir que ruede fuera de su
alcance. Nunca deje el carrito
desatendido en una colina
o pendiente, ya que podría
deslizarse pendiente abajo.

35 36
SAFETY SEGURIDAD SAFETY SEGURIDAD
Copyright © 2022, Baby Trend Inc., All Rights Reserved. Todos los derechos reservados. Copyright © 2022, Baby Trend Inc., All Rights Reserved. Todos los derechos reservados.
17) • To engage brakes, apply light
downward pressure to the brake lever
located on each rear wheel. The stroller
may require slight forward or rearward
movement in order to line up the teeth
on the brake with each wheel brake
cluster (Fig. 17).
NOTE: Check that the stroller will not
move and that both brakes are properly
applied. To release, gently lift up on the
brake lever.
• Para aplicar los frenos, ejerza una ligera
presión hacia abajo a la palanca del
freno situada en cada rueda trasera.
El carrito podría requerir un leve
movimiento hacia delante o hacia atrás
para alinear los dientes del freno con el
piñón del freno de cada rueda (Fig. 17).
NOTA: Verique que el carrito no se
mueva y que ambos frenos estén
aplicados correctamente. Para soltarlos,
levante suavemente la palanca del
freno.
Fig. 17
FRONT WHEEL LOCK
BLOQUEO DE LAS RUEDA DELANTERAS
WARNING: Always lock the front
swivel wheel in STRAIGHT position before
placing or removing your children from the
jogger.
ADVERTENCIA: Siempre trabe
la rueda delantera giratoria en la posición
RECTA antes de colocar o retirar a su hijo del
carrito.
FALL HAZARD: From tip over
before running, jogging, or walking fast, lock
the front wheel from swiveling.
PELIGRO DE CAÍDA: Evitar
vuelcos, antes de correr, trotar o caminar
rápido, bloquear la rueda delantera de girar.
18) • The swivel jogger is equipped with a
front wheel locking device. Front wheel
lock works in a vertical motion from top
to bottom, locking and unlocking the
wheel (Fig. 18b).
• El carrito está equipado con un
dispositivo de traba para la rueda
delantera. Bloqueo de la rueda
delantera trabaja en un movimiento
vertical de arriba a abajo, de bloqueo y
desbloqueo de la rueda (Fig. 18b). Fig. 18a
Lock
Trabe
Unlock
Destrabe

37 38
SAFETY SEGURIDAD SAFETY SEGURIDAD
Copyright © 2022, Baby Trend Inc., All Rights Reserved. Todos los derechos reservados. Copyright © 2022, Baby Trend Inc., All Rights Reserved. Todos los derechos reservados.
TO SECURE THE CHILD
PARA SUJETAR AL NIÑO
WARNING: Avoid serious injury from falling
or sliding out. Always use the safety harness.
STRANGULATION HAZARD:
Child can strangle in loose straps. Never leave child in
seat when straps are loose or undone.
ADVERTENCIA:
Evite lesiones graves por
caídas o resbalones. Siempre use el arnés de seguridad.
PELIGRO DE
ESTRANGULAMIENTO: El niño se
puede estrangular con las correas sueltas. Nunca deje
al niño en el asiento cuando las correas estén sueltas
o sin terminar de colocar.
19) •The shoulder straps of the 5-point harness have 3 attachment positions.
Select the position that places the shoulder strap level with, or below the top
of the child’s shoulder (Fig. 19a).
• Carefully place the child in the stroller seat and bring the safety harness
around the child’s waist and over the shoulders. Place the crotch strap
between the child’s legs. Insert the male end of each shoulder/waist belt into
the buckle on the crotch strap. Tighten the harness to be snug around the
child’s waist and over the child’s shoulders (Fig. 19b).
Fig. 19a
Adjust for a snug t
Regule para lograr un buen ajuste
Fig. 19b
• Las correas del hombro del arnés de 5
puntos tienen 3 posiciones de sujeción.
Escoja la posición que sitúe a la correa
del hombro al mismo nivel o a un nivel
inferior a la parte superior del hombro
del niño (Fig. 19a).
• Coloque cuidadosamente al niño en
el asiento del carrito y pase el arnés
de seguridad por la cintura del niño y
por encima de los hombros. Coloque
la correa de la entrepierna entre las
piernas del niño. Introduzca el extremo
macho del cinturón de cada hombro o
de la cintura en la hebilla de la correa de
la entrepierna. Ajuste el arnés de modo
que esté ceñido alrededor de la cintura
del niño y por encima de sus hombros
(Fig. 19b).

ASSEMBLY MONTAJE
40
Copyright © 2022, Baby Trend Inc., All Rights Reserved. Todos los derechos reservados.
39
SAFETY SEGURIDAD
Copyright © 2022, Baby Trend Inc., All Rights Reserved. Todos los derechos reservados.
Fig. 20
Center Clasp
Presilla central
TO RELEASE THE CHILD
PARA SOLTARLAS AL NIÑO
20) • To release, push button on center clasp,
the two harness buckles will pop free
(Fig. 20).
• Para soltarlas, presione el botón en la
presilla central para destrabar las dos
hebillas del arnés (Fig. 20).
21) • Unhook the shoulder straps only if
adjusting the harness positions
(Fig. 21).
• Desenganchar las correas de los
hombros solo si ajusta las posiciones
del arnés (Fig. 21).
Fig. 21
Fig. 22a
TO FOLD STROLLER
PARA DESPLEGAR EL CARRITO
WARNING: Care must be taken when folding
the stroller to prevent nger entrapment.
CAUTION: Do not allow children near stroller
while folding.
ADVERTENCIA:
Se debe ser prudente al
plegar el carrito para evitar que queden dedos atrapados.
PRECAUCIÓN: No permita que los niños se
acerquen al carrito mientras lo pliega.
22) • Close the canopy as described in the canopy
section. Recline seat by releasing buckle as
described in seatback positioning section.
• The stroller is folded by simultaneously
pulling each trigger fold (Fig. 22a). When
the fold latches are released, the handle will
begin to fall toward the oor. Release the fold
buttons and press downward on the stroller
handle until the stroller is completely folded.
• Cierre la cubierta como se describe en la
sección de la cubierta. Suelte la hebilla para
reclinar el asiento como se describe en la
sección sobre las posiciones del respaldo.
• El carrito se pliega tirando simultáneamente
de cada gatillo (Fig. 22a). Cuando se
sueltan los pestillos para plegar el carrito, el
manubrio comienza a caer al suelo. Suelte
los botones para plegar el carrito y presione
hacia abajo el manubrio hasta que el carrito
esté completamente plegado.

42
SAFETY SEGURIDAD
Copyright © 2022, Baby Trend Inc., All Rights Reserved. Todos los derechos reservados.
ASSEMBLY MONTAJE
41 Copyright © 2022, Baby Trend Inc., All Rights Reserved. Todos los derechos reservados.
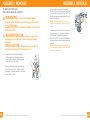
• Secure the stroller in the folded position by
locking the fold latch, located on the right side
of the stroller, over the rivet that protrudes from
the frame (Fig. 22b).
• El carrito se asegura en la posición plegada
por el bloqueo que esta localizado en el lado
derecho del carrito sobre el remache que
sobresale del armazón (Fig. 22b).
JOGGING WITH YOUR STROLLER
TROTAR CON SU CARRITO
WARNING: Never jog or run
with your newborn in the car seat
position. Use for strolling only.
STRANGULATION
HAZARD! Children have
strangled when straps have wrapped
around their neck. When not in use
hook the tether strap onto the stroller
handle. Keep this stroller tether strap
out of the reach of children.
ADVERTENCIA: Nunca
trote ni corra con su recién nacido en
la posición de sillita para el automóvil.
Úsela para pasear solamente.
¡PELIGRO DE
ESTRANGULAMIENTO!
Se han estrangulado niños con las
correas enredadas alrededor de sus
cuellos. Cuando no esté en uso,
enganche la correa de anclaje al
manubrio del carrito. Mantenga esta
correa de anclaje del carrito fuera del
alcance de los niños.
Fig. 22b

43 44
SAFETY SEGURIDAD SAFETY SEGURIDAD
Copyright © 2022, Baby Trend Inc., All Rights Reserved. Todos los derechos reservados. Copyright © 2022, Baby Trend Inc., All Rights Reserved. Todos los derechos reservados.
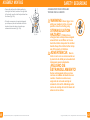
23) When you are jogging with your child, use
the following safety features:
Al trotar con su hijo, use las siguientes
características de seguridad:
• LOCK THE FRONT SWIVEL WHEEL IN
STRAIGHT POSITION
• TRABE LA RUEDA DELANTERA
GIRATORIA EN LA POSICIÓN RECTA
• SAFETY WRIST STRAP: Always connect
the safety strap to either wrist when
jogging. This strap will keep the stroller
from rolling away in the event that you trip
while running (Fig. 23a). The safety strap
must remain connected to the rear lower
frame cross member at all times. This
location is intended to prevent the stroller
being tipped backward in the event that
you do fall to the ground. The safety strap
includes a Velcro attachment for storage,
on the left side of the stroller, when not in
use (Fig. 23b).
• CORREA DE SEGURIDAD PARA LA
MUÑECA: Siempre conecte la correa de
seguridad a cualquiera de las muñecas al
trotar. Esta correa evitará que el cochecito
ruede fuera de su alcance en caso de que
usted se tropiece mientras corre (Fig. 23a).
La correa de seguridad debe permanecer
conectada al travesaño del armazón
inferior trasero en todo momento.
Esta posición tiene como n evitar que el
cochecito se incline hacia atrás en caso de
que usted se caiga al suelo. La correa de
seguridad incluye un accesorio de Velcro
para su almacenaje, a la izquierda del
cochecito, cuando no está en uso
(Fig. 23b).
Fig. 23a
Fig. 23b
TIRES
NEUMÁTICOS
24) •
Check the pressure before using the
stroller. Tires are shipped un-inated.
The tires should be inated on a regular
basis to the P.S.I. specied on each tire.
NOTE: Only use hand pump.
DO NOT USE air compressor to inate
the tire. *Pump not included.
DO NOT INFLATE above the maximum
recommended ination pressure that is
on the side of the tire.
• Controle la presión antes de usar
el carrito. Las llanatas se entregan
desinadas. Las llantas deben inarse
regularmente de acuerdo al P.S.I.
especíco de cada llanta.
NOTA: Sólo use un inador manual.
NO USE un compresor de aire para
inar el neumático. *Bomba no
estaincluida.
NO INFLE por encima de la máxima
presión de inado recomendada, que
se encuentra al costado del neumático.

45 46
ASSEMBLY MONTAJE ASSEMBLY MONTAJE
Copyright © 2022, Baby Trend Inc., All Rights Reserved. Todos los derechos reservados. Copyright © 2022, Baby Trend Inc., All Rights Reserved. Todos los derechos reservados.
TO UNFOLD STROLLER
PARA DESPLEGAR EL CARRITO
WARNING: Care must be taken when
unfolding the stroller to prevent nger entrapment.
CAUTION: Do not allow children near stroller
while unfolding.
ADVERTENCIA: Se debe ser prudente
al desplegar el carrito para evitar que queden dedos
atrapados.
PRECAUCIÓN: No permita que los niños se
acerquen al carrito mientras lo despliega.
Fig. 25a
Fig. 26b
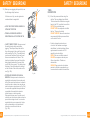
• Lift up on the stroller handle with both
hands until the stroller frame is erected and
locked in the open position (Fig. 25b). The
stroller has spring-loaded latches on both
sides of the frame.
NOTE: Test that both latches are fully
engaged prior to placing your child in the
stroller.
• Levante el manubrio del carrito con ambas
manos hasta que el armazón del carrito
esté erguido y trabado en la posición
abierta (Fig. 25b). El carrito tiene pestillos
accionados por resorte a ambos lados del
armazón.
NOTA: Pruebe que ambos pestillos estén
completamente sujetados antes de colocar
a su hijo en el carrito.
25) • Stand the stroller on the ground with
all three wheels touching the ground.
Remove the fold latch, which is located
on the right side (Fig. 25a).
• Apoye el carrito de modo tal que las tres
ruedas toquen el suelo. Suelte el pestillo
de pliegue, que se encuentra a la derecha
del carrito (Fig. 25a).

MAINTENANCE MANTENIMIENTO MAINTENANCE MANTENIMIENTO
47 48
Copyright © 2022, Baby Trend Inc., All Rights Reserved. Todos los derechos reservados. Copyright © 2022, Baby Trend Inc., All Rights Reserved. Todos los derechos reservados.
MAINTENANCE
MANTENIMIENTO
WHEEL ADJUSTMENT:
• It should be noted that all three wheel vehicles
can be easily inuenced to deviate from
a straight line. In most cases strollers can
have a tendency to pull to the right/left due to
many factors. Including uneven tire pressure,
improper wheel installation, road conditions and
manufacturing tolerances. If you nd your Baby
Trend stroller to signicantly track or pull to the
left or right while use on at terrain, follow the
sequence of the instructions on page 9 to realign
your front wheel.
FLAT TIRE:
• The jogging stroller features bicycle tires to allow
for extended wear and ease of pushing. Just like
a bicycle tire, the jogging stroller can suffer from
at tires. If you have a at tire, you can use a
standard bicycle tire repair kit to repair the tire or
you can take the tire to a bicycle shop for repair.
If you experience numerous at tires, you may
want to purchase thorn proof inner tubes for
the jogging stroller. These can be purchased at
bicycle stores or at many national retail stores.
The correct size to purchase is shown on the
sidewall of the tire.
AJUSTE DE RUEDAS:
• Debe tenerse en cuenta que todos los vehículos de
tres ruedas pueden inuenciarse fácilmente para
el desvío de una línea recta. En la mayoría de los
casos, los carritos pueden tener una tendencia a
desviarse hacia la derecha o izquierda debido a
numerosos factores, incluyendo presión dispareja
en los neumáticos, instalación incorrecta de las
ruedas, condiciones del camino y tolerancias de
fabricación. Si usted descubre que su carrito Baby
Trend se desvía signicativamente hacia la derecha
o izquierda al usarlo en un terreno plano, siga la
secuencia de las instrucciones en la página 9 para
realinear su rueda delantera.
NEUMÁTICO DESINFLADO:
• El carrito para trotar lleva neumáticos de bicicleta
para permitir un uso prolongado y facilidad de
empuje. Al igual que un neumático de bicicleta,
al carrito para trotar se le pueden desinar los
neumáticos. Si se le desina un neumático, puede
usar un equipo de reparación de neumáticos de
bicicleta estándar para repararlo, o bien puede
llevar el neumático a una tienda de bicicletas para
que lo reparen. Si el hecho se repite en numerosas
oportunidades, le sugerimos que compre cámaras
internas a prueba de espinas para el carrito para
trotar. Se pueden comprar en tiendas para bicicletas
o en muchas tiendas nacionales minoristas. El
tamaño correcto se exhibe en la pared lateral del
neumático.

49 50
OTHER OTROOTHER OTRO
Copyright © 2022, Baby Trend Inc., All Rights Reserved. Todos los derechos reservados. Copyright © 2022, Baby Trend Inc., All Rights Reserved. Todos los derechos reservados.
FCC Statement
This device complies with Part 15 of the FCC rules. Operation is subject to the following two
conditions:
1 this device may not cause harmful interference, and
2 this device must accept any interference received, including interference that may cause
undesired operation.
WARNING: Changes or modications to this unit not
expressly approved by the party responsible for compliance could
void the user’s authority to operate the equipment.
NOTE: This equipment has been tested and found to comply with the limits for a Class B
digital device, pursuant to Part 15 of the FCC Rules. These limits are designed to provide
reasonable protection against harmful interference in a residential installation. This equipment
generates, uses and can radiate radio frequency energy and, if not installed and used in
accordance with the instructions, may cause harmful interference to radio communications.
However, there is no guarantee that interference will not occur in a particular installation. If
this equipment does cause harmful interference to radio or television reception, which can
be determined by turning the equipment off and on, the user is encouraged to try to correct
the interference by one or more of the following measures:
• Reorient or relocate the receiving antenna.
• Increase the separation between the equipment and receiver.
• Connect the equipment into an outlet on a circuit different from that to which the receiver
is connected.
• Consult the dealer or an experienced radio/TV technician for help.
Declaración de la FCC
Este dispositivo cumple con las normas de la Parte 15 de la Comisión Federal de Comuni-
caciones (FCC). El funcionamiento está sujeto a las siguientes dos condiciones:
1 este dispositivo no puede producir interferencias perjudiciales y
2 este dispositivo debe aceptar cualquier interferencia que reciba, incluyendo las que pu-
edan provocar un funcionamiento no deseado.
ADVERTENCIA: Los cambios o modi caciones
realizados a esta unidad, sin la aprobación expresa de la parte
responsable del cumplimiento, podrían invalidar la autorización
del usuario para operar el equipo.
NOTA: este equipo ha sido probado y se ha encontrado que cumple con los límites de
dispositivos digitales de Clase B, de conformidad con las Normas de la Parte 15 de la FCC.
Estos límites han sido establecidos para brindar una protección razonable contra interferencias
perjudiciales en una instalación residencial. Este equipo genera, utiliza y puede irradiar
frecuencias de radio y, de no instalarse y utilizarse de conformidad con las instrucciones,
podría causar interferencias perjudiciales en las comunicaciones de radio.
Sin embargo, no es posible garantizar que en una determinada instalación no se producirán
interferencias. Si este dispositivo provoca interferencias dañinas a la recepción de radio
o televisión, cuestión que puede determinarse encendiendo y apagando el dispositivo, se
insta al usuario a que intente corregir la interferencia realizando uno o más de los proced-
imientos siguientes:
• Vuelva a orientar o colocar la antena de recepción.
• Aumente la separación entre el dispositivo y el receptor.
• Conecte el dispositivo a una toma de corriente diferente a la que se encuentra conecta-
do el receptor.
• Consulte al distribuidor o a un técnico de radio o TV experimentado para pedirle ayuda.

51 52
Copyright © 2022, Baby Trend Inc., All Rights Reserved. Todos los derechos reservados.
Copyright © 2022, Baby Trend Inc., All Rights Reserved. Todos los derechos reservados.
BABY TREND® CUSTOMER SERVICE
The Customer Service Department can be contacted
at 1 (800) 328-7363 Monday through Friday between
8:00 a.m. and 4:30 p.m. (PST). Return Authorizations are
required prior to returning product(s) to Baby Trend®.
BABY TREND® SERVICIO AL CLIENTE
El Departamento de Servicio al Cliente puede
ser contactado a 1 (800) 328-7363 Lunes a
viernes entre 8:00 a.m. y 4:30 p.m. (PST).Un
numero de autorizacion es requerido antes de la
devolución de los producto(s) a Baby Trend®.

53 54
Copyright © 2022, Baby Trend Inc., All Rights Reserved. Todos los derechos reservados. Copyright © 2022, Baby Trend Inc., All Rights Reserved. Todos los derechos reservados.
-
 1
1
-
 2
2
-
 3
3
-
 4
4
-
 5
5
-
 6
6
-
 7
7
-
 8
8
-
 9
9
-
 10
10
-
 11
11
-
 12
12
-
 13
13
-
 14
14
-
 15
15
-
 16
16
-
 17
17
-
 18
18
-
 19
19
-
 20
20
-
 21
21
-
 22
22
-
 23
23
-
 24
24
-
 25
25
-
 26
26
-
 27
27
-
 28
28


Baby Trend XCEL-R8 Plus Jogging Stroller Manual de usuario
- Categoría
- Cochecitos
- Tipo
- Manual de usuario