Klarstein 10032865 Aromatica II Duo Coffee Maker Machine Manual de usuario
- Categoría
- Cafeteras
- Tipo
- Manual de usuario

www.klarstein.com
AROMATICA II
DUO
Kaeemaschine
Coee Maker
Cafetière
Cafetera
Caettiera
Kávovar
Koezetapparaat
10032865 10032866 10032874


3
DE
Sicherheitshinweise 4
Geräteübersicht 6
Bedienfeld, Tasten und Anzeigen 8
Inbetriebnahme und Bedienung 9
Reinigung und Wartung 17
Fehlersuche und Fehlerbehebung 20
Hinweise zur Entsorgung 20
TECHNISCHE DATEN
Artikelnummer 10032865, 10032866, 10032874
Stromversorgung 220-240 V ~ 50/60 Hz
Leistung 1000 W
Maximale Füllmenge (Tank) 1,25 L
HERSTELLER & IMPORTEUR (UK)
Hersteller:
Chal-Tec GmbH, Wallstraße 16, 10179 Berlin, Deutschland.
Importeur für Großbritannien:
Chal-Tec UK limited
Unit 6 Riverside Business Centre
Brighton Road
Shoreham-by-Sea
BN43 6RE
United Kingdom
English 21
Français 39
Español 57
Italiano 75
Česky 93
Nederlands 111
Sehr geehrter Kunde,
wir gratulieren Ihnen zum Erwerb Ihres Gerätes. Lesen Sie
die folgenden Hinweise sorgfältig durch und befolgen Sie
diese, um möglichen Schäden vorzubeugen. Für Schäden,
die durch Missachtung der Hinweise und unsachgemäßen
Gebrauch entstehen, übernehmen wir keine Haftung.
Scannen Sie den folgenden QR-Code, um Zugri auf die
aktuellste Bedienungsanleitung und weitere Informationen
rund um das Produkt zu erhalten.
INHALTSVERZEICHNIS

4
DE
SICHERHEITSHINWEISE
Allgemeine Sicherheitshinweise
• Lesen Sie alle Hinweise vor Gebrauch sorgfältig durch und bewahren Sie die
Anleitung zum Nachschlagen auf.
• Verwenden Sie das Gerät und das Zubehör nur für den vorgesehenen Zweck
und nicht für andere Zwecke als in der Bedienungsanleitung beschrieben
werden.
• Benutzen Sie das Gerät nicht, wenn Teile oder Zubehör beschädigt oder
defekt sind. Wenn ein Teil oder Zubehör beschädigt oder defekt ist, muss es
durch den Hersteller oder einen autorisierten Fachbetrieb ersetzt werden.
• Kinder sollten beaufsichtigt werden, um sicherzustellen, dass sie nicht mit
dem Gerät spielen.
• Die Benutzung des Geräts durch Kinder oder Personen mit einer körperlichen,
sensorischen, geistigen oder motorischen Einschränkung oder mangelnder
Erfahrung und Kenntnis kann zu Gefahren führen. Personen, die für deren
Sicherheit verantwortlich sind, sollten ihnen ausdrückliche Anweisungen
geben oder die Bedienung des Gerätes beaufsichtigen.
• Verwenden Sie das Gerät nicht in der Nähe von Badewannen, Duschen,
Waschbecken oder anderen mit Wasser gefüllten Behältern.
• Tauchen Sie das Gerät nicht in Wasser oder andere Flüssigkeiten.
• Wenn das Gerät in Wasser oder andere Flüssigkeiten eingetaucht wird, holen
Sie es nicht mit ihren Händen heraus. Ziehen Sie sofort den Netzstecker aus
der Steckdose. Das Gerät darf nicht mehr verwendet werden, nachdem es in
Wasser oder andere Flüssigkeiten eingetaucht wurde.
• Das Gerät ist für den Gebrauch im Haushalt oder für haushaltsähnliche
Anwendungen vorgesehen, wie in Mitarbeiter-Küchen in Geschäften, Büros
oder anderen Arbeitsumgebungen, auf Bauernhöfen, von Kunden in Hotels,
Motels oder anderen Übernachtungsmöglichkeiten sowie in Unterkünften mit
Übernachtung und Frühstück.
Elektrische Sicherheit
• Überprüfen Sie vor jedem Gebrauch, ob die Netzspannung mit der Spannung
auf dem Typenschild des Geräts übereinstimmt.
• Das Gerät ist nicht für die Bedienung über eine externe Zeitschaltuhr oder ein
seperates Fernbedienungssystem vorgesehen.
• Schließen Sie das Gerät an eine geerdete Steckdose an. Verwenden Sie bei
Bedarf ein geerdetes Verlängerungskabel mit geeignetem Durchmesser
(mindestens 3 x 1 mm²).
• Stellen Sie sicher, dass kein Wasser in die Kontaktstecker des Netzkabels und
des Verlängerungskabels eindringen kann.
• Wickeln Sie das Netzkabel und das Verlängerungskabel immer vollständig ab.
• Stellen Sie sicher, dass das Netzkabel nicht über den Rand einer Arbeitsplatte
hängt und nicht versehentlich eingeklemmt oder darüber gestolpert werden
kann.
• Halten Sie das Netzkabel von Hitze, Öl und scharfen Kanten fern.

5
DE
• Verwenden Sie das Gerät nicht, wenn das Netzkabel oder der Netzstecker
beschädigt oder defekt sind.
• Wenn das Netzkabel oder der Netzstecker beschädigt oder defekt sind,
müssen sie durch den Hersteller, einen autorisierten Fachbetrieb oder einer
ähnlich quali zierten Person ersetzt werden.
• Ziehen Sie nicht am Netzkabel, um den Netzstecker aus der Steckdose zu
ziehen.
• Ziehen Sie den Netzstecker aus der Steckdose, wenn das Gerät nicht in Betrieb
ist, vor der Montage oder Demontage und vor der Reinigung und Wartung.
Sicherheitshinweise für Ka eemaschinen
• Verwenden Sie das Gerät nicht im Freien.
• Verwenden Sie das Gerät nicht in feuchter Umgebung.
• Verwenden Sie das Gerät, wenn es mit Wasser gefüllt ist, nur in frostfreier
Umgebung.
• Stellen Sie das Gerät auf eine stabile und ebene Fläche.
• Stellen Sie das Gerät auf eine hitzebeständigen und spritzwassergeschützte
Ober äche.
• Stellen Sie das Gerät nicht auf ein Kochfeld.
• Stellen Sie das Gerät nicht auf eine heiße Ober äche oder in die Nähe o ener
Flammen.
• Stellen Sie sicher, dass das Gerät nicht mit brennbaren Materialien in Kontakt
kommt.
• Halten Sie das Gerät von Wärmequellen fern.
• Seien Sie vorsichtig mit heißem Wasser und Dampf, um Verbrennungen zu
vermeiden.
• Wenn das Gerät nicht in Gebrauch ist, lagern Sie es an einem trockenen Ort.
Stellen Sie sicher, dass Kinder keinen Zugang zu verstauten Geräten haben.
• Die Ka eemaschine ist für die Zubereitung von Ka ee mit Ka eebohnen
oder gemahlenem Ka ee konzipiert. Das Gerät ist nur für den Innenbereich
geeignet. Das Produkt ist nur für den Hausgebrauch bestimmt.
Verpackungsentsorgung
WARNUNG
Erstickungsgefahr! Entsorgen Sie Plastikverpackungen umgehend,
damit sich Kinder nicht daran verletzen.

6
DE
GERÄTEÜBERSICHT

7
DE
1 Ein/Aus-Taste A Ka eemengen-Anzeige
2 Mahlwerk-Taste B Ka eestärken-Anzeige
3Ka eemengen-Wähler C Timer-Anzeige
4Ka eestärken-Wähler D Entkalkungsanzeige
5 Timer-Taste E Warmhalteanzeige
6 Stunden-Taste
7 Minuten-Taste
8 Display
9 Mahl-Feinheitsgrad-Wähler
10 Permanent lter
11 Filterhalterung
12 Entriegelungsknopf (Filterhalterung)
13 Ka eebohnenfach
14 Wasserbehälter
15 Wasserstandsanzeige
16 Ka eekanne
17 Ka eestandsanzeige
18 Heizplatte
19 Mahlkammer
20 Kohle lterhalter
21 Bürste/Schraubenzieher
22 Wasserdampfö nung
23 Entkalkungstaste (Taste 3+4)
24 Wassertankdeckel
25 Kohle lterbefestigung
26 Kohle lter
27 Abdeckung Bohnenbehälter
28 Abdeckung Reinigungsö nung

8
DE
BEDIENFELD, TASTEN UND ANZEIGEN

9
DE
INBETRIEBNAHME UND BEDIENUNG
Vor dem ersten Betrieb
• Reinigen Sie das Gerät. Siehe dazu den Abschnitt „Reinigung und Wartung“.
• Reinigen Sie das Zubehör. Siehe dazu den Abschnitt: „Reinigung und
Wartung“.
Uhr einstellen (Abb. B & C)
Wenn Sie den Netzstecker in die Steckdose stecken, leuchtet das Display (8) auf,
um anzuzeigen, dass die Uhr eingestellt werden kann. Sie können die Uhr auch zu
einem späteren Zeitpunkt einstellen.
1. Drücken Sie mehrmals auf die Stunden-Taste (6), um die Stunden einzustellen.
2. Drücken Sie mehrmals auf die Minuten-Taste (7), um die Minuten einzustellen.
3. Die Uhrzeit wird auf dem Display (8) angezeigt.
Bedienung
VORSICHT
Verbrühungsgefahr! Halten Sie Hände, Gesicht und andere
Körperteile von der Dampfö nung fern. Der Dampf aus dem Gerät
wird während des Gebrauchs sehr heiß. Decken Sie die
Dampfö nung nicht zu.
• Das Gerät kann für die Zubereitung von Ka ee mit Ka eebohnen oder
gemahlenem Ka ee verwendet werden.
• Vor dem ersten Gebrauch wird das Gerät auf die Zubereitung von Ka ee mit
Ka eebohnen eingestellt.
• Nach jedem Gebrauch speichert das Gerät die zuletzt verwendete Einstellung
für den nächsten Gebrauch: Ka ee mit Ka eebohnen oder Ka ee mit
gemahlenem Ka ee zubereiten.
Hinweis: Das Gerät kann nur verwendet werden, wenn das Display aktiviert ist.
Wenn das Display nicht aktiviert ist, drücken Sie eine beliebige Taste, um es zu
aktivieren. Das Gerät ist nun betriebsbereit.
Ka eemenge einstellen (Abb. B & C)
• Der Ka eemengen-Wähler (3) dient zur Einstellung der gewünschten
Ka eemenge. Er kann auf 2, 4, 6, 8 oder 10 Tassen eingestellt werden.
• Drücken Sie mehrmals den Ka eemengen-Wähler (3), um die gewünschte
Ka eemenge einzustellen. Die Anzahl der Tassen (A) wird im Display (8)
angezeigt.
• AROMA-Funktion: Drücken Sie lange auf den Ka eemengen-Wähler (3), um
die„AROMA“-Stufe aufzurufen, das Symbol leuchtet auf und das Heizelement
wird in Abständen aufgeheizt.

10
DE

11
DE
Kaeestärke einstellen (Abb. B & C)
• Der Kaeestärken-Wähler (4) wird verwendet für die Einstellung der
gewünschten Kaeestärke. Er kann auf milden Kaee (MILD), mittelstarken
Kaee (MEDIUM) und starken Kaee (STRONG) eingestellt werden.
• Drücken Sie mehrmals den Kaeestärken-Wähler (4), um die gewünschte
Kaeestärke einzustellen. Die gewählte Kaeestärke (B) wird im Display (8)
angezeigt.
Startvorwahl-Funktion (Abb. B & C)
Das Gerät verfügt über eine Startvorwahlfunktion, die es ermöglicht, die Zeit für
den Start des Kaee-Zubereitungsprozesses zu programmieren. Die Startvorwahl
kann über die Timer-Taste (5) ausgewählt werden.
1. Stellen Sie die Uhr ein. Prüfen Sie, ob die Uhr bereits eingestellt ist. Wenn sie
noch nicht eingestellt wurde, siehe Abschnitt „Uhr einstellen“.
2. Halten Sie die Timer-Taste (5) gedrückt, bis die Uhr im Display blinkt.
3. Drücken Sie mehrmals die Stunden-Taste (6), um die Stunden einzustellen.
4. Drücken Sie mehrmals die Minuten-Taste (7), um die Minuten einzustellen.
5. Stellen Sie die Kaeemenge ein. Siehe dazu den Abschnitt „Kaeemenge
einstellen“.
6. Stellen Sie die Kaeestärke ein. Siehe dazu den Abschnitt „Kaeestärke
einstellen“.
7. Wenn Sie Kaee mit gemahlenem Kaee zubereiten möchten, schalten Sie die
Mahlfunktion aus, bevor Sie die Startvorwahlfunktion verwenden.
8. Drücken Sie die Timer-Taste (5), um die Einstellungen zu speichern. Die Timer-
Anzeige (C) leuchtet kontinuierlich.
9. Um den Vorgang zu unterbrechen, drücken Sie erneut die Timer-Taste (5). Die
Timer-Anzeige (C) erlischt.
Wasserbehälter befüllen (Abb. D)
• Schalten Sie vor dem Befüllen des Wasserbehälters das Gerät bitte aus und
ziehen Sie den Netzstecker aus der Steckdose.
• Füllen Sie nicht mehr Wasser in den Wasserbehälter als für die Zubereitung
des Kaees erforderlich ist. Verwenden Sie nur die für die Zubereitung des
Kaees benötigte Wassermenge. Das Gerät stoppt automatisch, wenn der
Wasserbehälter leer ist.
• Verwenden Sie das Gerät nicht, ohne dass sich Wasser im Wasserbehälter
bendet.
• Überschreiten Sie nicht die Markierung für die maximale Füllmenge (10
Tassen), wenn Sie den Wasserbehälter befüllen. Stellen Sie sicher, dass der
Wasserstand während des Gebrauchs immer über der Mindestmarke (2
Tassen) liegt.
• Füllen Sie nur kaltes Wasser in den Wasserbehälter.
• Verwenden Sie kein kohlensäurehaltiges Wasser oder andere Flüssigkeiten
zum Befüllen des Wasserbehälters.
• Gießen Sie kein Wasser in das Kaeebohnenfach.

12
DE

13
DE
So befüllen Sie den Wasserbehälter:
1. Önen Sie den Deckel (24).
2. Befüllen Sie den Wasserbehälter (14) bis zur gewünschten Markierung an der
Wasserstandsanzeige (15) mit Wasser.
3. Füllen Sie nicht mehr Wasser in den Wasserbehälter, als für die Zubereitung
des Kaees erforderlich ist. Verwenden Sie nur die für die Zubereitung des
Kaees benötigte Wassermenge. Das Gerät stoppt automatisch, wenn der
Wasserbehälter leer ist.
4. Schließen Sie den Deckel (24).
Mahlkaee-Feinheitsgrad einstellen (Abb. E)
• Die Mahl-Feinheitsgrad-Wahl (9) dient zur Einstellung der gewünschten
Feinheit des Kaeepulvers bei Verwendung von Kaeebohnen. Er kann auf
verschiedene Positionen eingestellt werden, von fein gemahlenem Kaee bis
zu grob gemahlenem Kaee.
• Drehen Sie den Mahl-Feinheitsgrad-Wähler (9) in die gewünschte Position, um
die Feinheit des Mahlkaees einzustellen.
Wechsel von Glaskanne zu Thermokanne
• Drücken Sie lange auf die Mahlwerk-Taste (2), um zwischen der Funktion
Glaskanne/Thermokanne zu wechseln.
• Wenn die Warmhalteanzeige (E) aueuchtet, kann die Glaskanne verwendet
werden.
Hinweis: Verwenden Sie auf keinen Fall die Warmhalteplatte, wenn Sie die
Thermokanne nutzen, da sich sonst ein Hitzestau bilden kann.
Deckel der Glaskanne abnehmen und anbringen
Einige Geräte sind mit einer zusätzlichen Kaeekanne aus Glas ausgestattet. Der
Deckel der Glaskanne lässt sich wie folgt lösen:
123
Önen Sie den Deckel
in Pfeilrichtung.
Drehen Sie den Deckel
in Pfeilrichtung und
drücken Sie mit der
linken Hand gleichzeitig
auf den Pin an der
Deckelhalterung. Lösen
Sie den Deckel.
Schieben Sie zuerst
den Pin wieder in
die Deckelhalterung
und drehen Sie
den Deckel dann
in Pfeilrichtung.
Schließen Sie den
Deckel anschließend.

14
DE

15
DE
Deckel der Thermokanne abnehmen und anbringen
• Abnehmen: Drehen Sie den Deckel entgegen dem Uhrzeigersinn.
• Anbringen: Setzen Sie den Deckel auf die Kanne, so dass der Auslasshebel
nach rechts zeigt. Drehen Sie den Deckel im Uhrzeigersinn bis zum Anschlag.
Der Deckel ist nun geschlossen.
• Eingießen: Den Auslasshebel heruntergedrückt halten und gießen.
Hinweis: Es ist zu empfehlen, die Thermokanne vor der Benutzung mit heißem
Wasser vorzuwärmen.
Kaee kochen mit Kaeebohnen (Abb. A - H)
Hinweis: Verwenden Sie nur Kaeebohnen und Korbltertüten der Größe
80/200 mm.
1. Wenn die Mahlfunktion nicht aktiviert ist, drücken Sie die Mahlwerk-Taste (2),
um die Mahlfunktion zu aktivieren. Die Kaeemenge und die Kaeestärke
werden auf dem Display angezeigt.
2. Füllen Sie die erforderliche Wassermenge in den Wasserbehälter (14). Befüllen
Sie den Wasserbehälter nicht mit mehr Wasser als für die Zubereitung des
Kaees erforderlich ist. Verwenden Sie nur die für die Zubereitung des
Kaees benötigte Wassermenge. Das Gerät stoppt automatisch, wenn der
Wasserbehälter leer ist.
3. Önen Sie den Deckel des Kaeebohnen-Behälters (27).
4. Füllen Sie das Kaeebohnenfach (13) vollständig mit Kaeebohnen.
5. Schließen Sie den Deckel (27).
6. Stellen Sie die Feinheit des gemahlenen Kaees ein. Siehe dazu den Abschnitt
„Mahlkaee-Feinheitsgrad einstellen”.
7. Drücken Sie den Entriegelungsknopf (12), um die Filterhalterung (11) zu
önen.
8. Setzen Sie einen geeigneten Kaeelter in den Kaeelterhalter (10) ein.
9. Schließen Sie die Filterhalterung (11), bis der Entriegelungsknopf (12)
einrastet.
10. Stellen Sie die gewünschte Kaeemenge ein. Siehe dazu Abschnitt
„Kaeemenge einstellen“.
11. Stellen Sie die gewünschte Kaeestärke ein. Siehe dazu Abschnitt
„Kaeestärke einstellen“.
12. Stellen Sie die Kaeekanne (16) auf die Heizplatte (18).
13. Schalten Sie das Gerät durch Drücken der Ein/Aus-Taste (1) ein. Das
Kaeetassen-Symbol (E) erscheint. Nach einigen Sekunden beginnt das Gerät
die Kaeebohnen zu mahlen und den Kaee zuzubereiten.
14. Um den Vorgang zu unterbrechen, drücken Sie die Ein/Aus-Taste (1).
15. Wenn der Vorgang abgeschlossen ist, piept das Gerät und schaltet in den
Warmhalte-Modus. Das Kaeetassen-Symbol (E) beginnt zu blinken. Das
Gerät kann durch Drücken der Ein/Aus-Taste (1) ausgeschaltet werden oder es
schaltet sich nach 40 Minuten automatisch ab.
16. Lassen Sie das Gerät vollständig abkühlen.

16
DE

17
DE
Kaee kochen mit gemahlenem Kaee (Abb. A, B, C, D, F & G)
Hinweis: Verwenden Sie nur gemahlenen Kaee und Korbltertüten der Größe
80/200 mm.
1. Wenn die Mahl-Funktion aktiviert ist, drücken Sie die Mahlwerk-Taste (2), um
die Mahl-Funktion zu deaktivieren. Die Kaeemenge und die Kaeestärke
werden nicht im Display angezeigt.
2. Füllen Sie den Wasserbehälter (14) mit der erforderlichen Wassermenge.
Befüllen Sie den Wasserbehälter nicht mit mehr Wasser als für die Zubereitung
des Kaees erforderlich ist. Verwenden Sie nur die für die Zubereitung des
Kaees benötigte Wassermenge. Das Gerät stoppt automatisch, wenn der
Wasserbehälter leer ist.
3. Drücken Sie den Entriegelungsknopf (12), um die Filterhalterung (11) zu önen.
4. Setzen Sie einen geeigneten Kaeelter in den Kaeelterhalter (10) ein.
5. Geben Sie die gewünschte Kaeemenge in den Kaeelter.
6. Schließen Sie die Filterhalterung (11), bis der Entriegelungsknopf (12) einrastet.
7. Stellen Sie die Kaeekanne (16) auf die Heizplatte (18).
8. Schalten Sie das Gerät durch Drücken der Ein/Aus-Taste (1) ein. Das
Kaeetassen-Symbol (E) erscheint. Das Gerät beginnt mit der Zubereitung des
Kaees.
9. Um den Vorgang zu unterbrechen, drücken Sie die Ein/Aus-Taste (1).
10. Wenn der Vorgang abgeschlossen ist, piept das Gerät und schaltet in den
Warmhalte-Modus. Das Kaeetassen-Symbol (E) beginnt zu blinken. Das
Gerät kann durch Drücken der Ein/Aus-Taste (1) ausgeschaltet werden oder es
schaltet sich nach 40 Minuten automatisch ab.
11. Lassen Sie das Gerät vollständig abkühlen.
REINIGUNG UND WARTUNG
• Schalten Sie das Gerät vor der Reinigung oder Wartung immer aus, ziehen Sie
den Netzstecker aus der Steckdose und warten Sie, bis das Gerät abgekühlt ist.
• Tauchen Sie das Gerät nicht in Wasser oder andere Flüssigkeiten.
• Verwenden Sie zur Reinigung des Gerätes keine aggressiven oder scheuernden
Reinigungsmittel
• Reinigen Sie das Gerät nicht mit scharfen Gegenständen.
• Überprüfen Sie das Gerät regelmäßig auf mögliche Schäden.
• Reinigen Sie das Zubehör:
- Reinigen Sie die Kaeekanne mit Seifenwasser.
- Reinigen Sie den Kaeelterhalter mit Seifenwasser.
- Reinigen Sie den Deckel des Kaeebohnenfachs mit Seifenwasser.
- Trocknen Sie das Zubehör gründlich ab.

18
DE
• Reinigen Sie die Außenseite des Gerätes mit einem feuchten Tuch und
trocknen Sie die Außenseite des Gerätes mit einem sauberen, trockenen Tuch
ab.
• Bewahren Sie das Gerät und das Zubehör in der Originalverpackung auf.
• Lagern Sie das Gerät an einem trockenen und frostfreien Ort, außerhalb der
Reichweite von Kindern.
Das Mahlfach reinigen (Abb. C & I)
Hinweis: Beim Mahlen von Kaeebohnen kann Kaeepulver das Mahlwerk
verstopfen. Um das Verstopfen des Mahlwerks zu verhindern, können Sie alle
2 Wochen das Mahlfach (19) reinigen.
Vor der Reinigung des Mahlfachs sind folgende Schritte erforderlich:
1. Schalten Sie das Gerät aus.
2. Ziehen Sie den Netzstecker aus der Steckdose.
3. Entfernen Sie die Kaeekanne von der Heizplatte.
4. Leeren Sie den Kaeelterhalter. Legen Sie einen geeigneten Kaeelter ein.
Schließen Sie die Filterhalterung.
5. Lösen Sie die Arretierung der Abdeckung (28), indem Sie den kleinen Knopf
eindrücken.
6. Nehmen Sie die Abdeckung (28) ab.
7. Reinigen Sie das Mahlwerk (19) mit der Bürste (21).
8. Setzen Sie die Abdeckung wieder auf (28).
Das Gerät entkalken (Abb. A - D)
• Das Gerät muss nach 70 Brühvorgängen entkalkt werden. Wenn Sie den
Netzstecker in der Steckdose stecken lassen, zählt das Gerät die Anzahl der
Brühvorgänge.
• Die Anzeige (D) blinkt im Display, wenn das Gerät entkalkt werden muss.
• Nutzen Sie ein geeignetes Entkalkungsmittel für das Entkalken der Maschine.
Spezielle Enkalkungsmittel nden Sie im lokalen Fachhandel.
• Bevor Sie das Gerät entkalken, ziehen Sie den Netzstecker aus der Steckdose
und warten Sie, bis das Gerät abgekühlt ist.
• Tauchen Sie das Gerät nicht in Wasser oder andere Flüssigkeiten.
• Stellen Sie sicher, dass die Mahlfunktion beim Entkalken des Gerätes nicht
aktiviert ist.
So starten Sie den Entkalkungsvorgang:
1. Önen Sie den Deckel (24).
2. Falls nötig, leeren sie den Wasserbehälter (14).
3. Entfernen Sie den Kohlelterhalter (20) aus dem Wasserbehälter (14).
4. Fülllen Sie einen geeigneten Entkalker in den Wasserbehälter (14).
5. Stellen Sie die Kaeekanne (16) auf die Heizplatte (18).
6. Stecken Sie den Netzstecker in die Steckdose.

19
DE
7. Schalten Sie das Gerät durch Drücken der Ein/Aus-Taste (1) ein.
8. Lassen Sie das Gerät laufen, bis sich 1⁄3 des Entkalkers in der Kaekanne (16)
bendet.
9. Schalten Sie das Gerät durch Drücken der Ein/Aus-Taste (1) aus.
10. Lassen Sie den Entkalker für etwa 30 Minuten einwirken.
11. Schalten Sie das Gerät durch Drücken der Ein/Aus-Taste (1) ein.
12. Lassen Sie das Gerät laufen, bis sich der verbliebene Entkalker in der
Kaeekanne (16) bendet. Das Gerät stoppt automatisch, wenn der
Wasserbehälter (14) leer ist.
Spülen Sie das Gerät zweimal nach folgendem Verfahren:
1. Füllen Sie sauberes Wasser in den Wasserbehälter (14) bis zur maximalen
Markierung an der Wasserstandsanzeige (15).
2. Stellen Sie die leere Kaeekanne (16) auf die Heizplatte (18).
3. Schalten Sie das Gerät durch Drücken der Ein/Aus-Taste (1) ein.
4. Lassen Sie das Wasser vollständig durch das Gerät laufen. Das Gerät stoppt
automatisch, wenn der Wasserbehälter (14) leer ist.
Nach dem Entkalken:
1. Setzen Sie den Kohlelterhalter (20) in den Wasserbehälter (14) ein.
2. Schließen Sie den Deckel (24).
3. Schalten Sie das Gerät durch Drücken der Ein/Aus-Taste (1) aus.
4. Halten Sie den Kaeemengen-Wähler (3) und den Kaeestärken-Wähler (4)
gedrückt, bis die Anzeige (D) vom Display (8) verschwindet (Abb. C).
5. Reinigen Sie die Außenseite des Gerätes mit einem feuchten Tuch und
trocknen Sie diese mit einem sauberen, trockenen Tuch ab.
6. Das Gerät ist nun einsatzbereit.
Kohlelter austauschen
1. Önen Sie den Deckel (24).
2. Falls nötig, leeren sie den Wasserbehälter (14).
3. Entfernen Sie den Kohlelterhalter (20) aus dem Wasserbehälter (14).
4. Önen Sie die Abdeckung (25).
5. Entfernen Sie den alten Kohlelter (26).
6. Setzen Sie den neuen Kohlelter ein (26).
7. Schließen Sie die Abdeckung (25).
Hinweis: Der Kohlelterhalter darf nicht in den Wasserbehälter eingesetzt
werden, bevor das Gerät entkalkt wurde. Dies gilt nicht, wenn Sie das Gerät das
erste Mal in Betrieb nehmen.

20
DE
FEHLERSUCHE UND FEHLERBEHEBUNG
Problem Mögliche Ursache Lösungsansatz
Keine Symbole
im Display.
Gerät nicht angeschlossen. Stecken Sie den Stecker ein.
Kein Strom. Überprüfen Sie die
Sicherung.
Display kaputt. Wenden Sie sich an den
Kundendienst.
Die Sicherung
springt raus.
Zu viele Geräte an
derselben Steckdose.
Stecken Sie das Gerät an
eine eigene Steckdose.
Gerät kaputt. Wenden Sie sich an den
Kundendienst.
Wasser läuft aus. Zu viel Wasser im Tank. Überfüllen Sie den Tank
nicht.
HINWEISE ZUR ENTSORGUNG
Wenn es in Ihrem Land eine gesetzliche Regelung
zur Entsorgung von elektrischen und elektronischen
Geräten gibt, weist dieses Symbol auf dem Produkt oder
auf der Verpackung darauf hin, dass dieses Produkt
nicht im Hausmüll entsorgt werden darf. Stattdessen
muss es zu einer Sammelstelle für das Recycling von
elektrischen und elektronischen Geräten gebracht
werden. Durch regelkonforme Entsorgung schützen
Sie die Umwelt und die Gesundheit Ihrer Mitmenschen
vor negativen Konsequenzen. Informationen zum
Recycling und zur Entsorgung dieses Produkts,
erhalten Sie von Ihrer örtlichen Verwaltung oder Ihrem
Hausmüllentsorgungsdienst.

21
EN
Dear Customer,
Congratulations on purchasing this device. Please read the
following instructions carefully and follow them to prevent
possible damages. We assume no liability for damage
caused by disregard of the instructions and improper use.
Scan the QR code to get access to the latest user manual and
more product information.
CONTENTS
Safety Instructions 22
Product Description 24
Control Panel, Buttons and Indicators 26
Start and Operation 27
Cleaning and Maintenance 35
Troubleshooting 38
Disposal Considerations 38
TECHNICAL DATA
Item number 10032865, 10032866, 10032874
Power supply 220-240 V ~ 50/60 Hz
Power consumption 1000 W
Max. capacity (water tank) 1.25 l
MANUFACTURER & IMPORTER (UK)
Manufacturer:
Chal-Tec GmbH, Wallstrasse 16, 10179 Berlin, Germany.
Importer for Great Britain:
Chal-Tec UK limited
Unit 6 Riverside Business Centre
Brighton Road
Shoreham-by-Sea
BN43 6RE
United Kingdom

22
EN
SAFETY INSTRUCTIONS
General safety
• Read the manual carefully before use and keep the manual for future
reference.
• Only use the appliance and the accessories for their intended purposes
and do not use the appliance and the accessories for other purposes than
described in the manual.
• Do not use the appliance if any part or any accessory is damaged or defective.
If a part or an accessory is damaged or defective, it must be replaced by the
manufacturer or an authorised repair agent.
• Children should be supervised to ensure that they do not play with the
appliance.
• The use of this appliance by children or persons with a physical, sensory,
mental or motorial disability, or lack of experience and knowledge can give
cause to hazards. Persons responsible for their safety should give explicit
instructions or supervise the use of the appliance.
• Do not use the appliance near bathtubs, showers, basins or other vessels
containing water.
• Do not immerse the appliance in water or other liquids.
• If the appliance is immersed in water or other liquids, do not remove the
appliance with your hands. Immediately remove the mains plug from the wall
socket. If the appliance is immersed in water or other liquids, do not use the
appliance again.
• This appliance is intended to be used in domestic and similar applications
such as sta kitchen areas in shops, oces and other working environments;
farm houses; by clients in hotels, motels and other residential type
environments; bed-and- breakfast type environments.
Electrical safety
• Before use, always check that the mains voltage is the same as the voltage on
the rating plate of the appliance.
• The appliance is not intended to be operated by means of an external timer or
separate remote-control system.
• Connect the appliance to an earthed wall socket. If necessary, use an earthed
extension cable of a suitable diameter (at least 3 x 1 mm²).
• Make sure that water cannot enter the contact plugs of the mains cable and
the extension cable.
• Always fully unwind the mains cable and the extension cable.
• Make sure that the mains cable does not hang over the edge of a worktop and
cannot be caught accidentally or tripped over.
• Keep the mains cable away from heat, oil and sharp edges.
• Do not use the appliance if the mains cable or the mains plug is damaged
or defective. If the mains cable or the mains plug is damaged or defective,
it must be replaced by the manufacturer, an authorised repair agent or by a
qualied person.

23
EN
• Do not pull the mains cable to disconnect the mains plug from the mains.
• Disconnect the mains plug from the mains when the appliance is not in use,
before assembly or disassembly and before cleaning and maintenance.
Safety instructions for co ee makers
• Do not use the appliance outdoors.
• Do not use the appliance in damp environments.
• Only use the appliance in frost-free environments if the appliance is lled with
water.
• Place the appliance on a stable and at surface.
• Place the appliance on a heat-resistant and splash-proof surface.
• Do not place the appliance on a hob.
• Do not place the appliance on hot surfaces or near open ames.
• Make sure that the appliance does not come into contact with ammable
material.
• Keep the appliance away from heat sources.
• Be careful with hot water and steam to avoid burns.
• Store the appliance in a dry place when not in use. Make sure that children do
not have access to stored appliances.
• The co ee maker has been designed for making co ee with co ee beans or
ground co ee. The appliance is suitable for indoor use only. The appliance is
suitable for domestic use only.
Disposal of packaging
WARNING
Danger of su ocation! Dispose of plastic packaging immediately so
that children do not injure themselves.

24
EN
PRODUCT DESCRIPTION

25
EN
1On/o button ACo ee quantity indicator
2 Grinding button B Co ee strength indicator
3Co ee quantity selector C Timer indicator
4Co ee strength selector D Descaling indicator
5 Timer button E Keep-warm indicator
6 Hour button
7 Minute button
8 Display
9Ground co ee neness selector
10 Permanent lter
11 Filter holder assembly
12 Release button ( lter holder assembly)
13 Co ee bean compartment
14 Water reservoir
15 Water level indicator
16 Co ee pot
17 Co ee level indicator
18 Heating plate
19 Grinding compartment
20 Carbon lter holder
21 Brush/screwdriver
22 Steam hole
23 Descale button (button 3+4)
24 Water tank cover
25 Carbon lter mounting
26 Carbon lter
27 Co ee bean compartment cover
28 Cleaning opening cover

26
EN
CONTROL PANEL, BUTTONS AND INDICATORS

27
EN
START AND OPERATION
Before initial use
• Clean the appliance. Refer to the section "Cleaning and maintenance".
• Clean the accessories. Refer to the section "Cleaning and maintenance".
Setting the clock ( g. B & C)
If the mains plug is inserted into the wall socket, the display (8) will light to
indicate that the clock can be set. The clock can be adjusted at any time later on.
1. Repeatedly press the hour button (6) to set the hours.
2. Repeatedly press the minute button (7) to set the minutes.
3. The time is shown on the display (8).
Use
CAUTION
Risk of scalding! Keep your hands, face and other body parts away
from the steam hole. The steam from the appliance becomes very
hot during use. Do not cover the steam hole.
• The appliance can be used for making co ee with co ee beans or ground
co ee.
• Before rst use, the appliance is set to make co ee with co ee beans.
• After each use, the appliance will memorise the last used setting for the next
use: making co ee with co ee beans or making co ee with ground co ee.
Note: The appliance can only be used when the display is activated. If the
display is not activated, press any button to activate the display. The appliance
is ready for use.
Setting the co ee quantity ( g. B & C)
• The co ee quantity selector (3) is used for setting the required co ee quantity.
It can be set to 2, 4, 6, 8 or 10 cups.
• Repeatedly press the co ee quantity selector (3) to set the co ee quantity.
The number of cups (A) is shown on the display (8).
• Aroma function: Long press the co ee quantity selector (3) to enter the
"AROMA" stage, the icon lights up and the heating tube is heated up at
intervals.

28
EN

29
EN
Setting the coee strength (g. B & C)
• The coee strength selector (4) is used for setting the required coee
strength. It can be set to mild coee (MILD), medium coee (MEDIUM) and
strong coee (STRONG).
• Repeatedly press the coee strength selector (4) to set the coee strength.
The coee strength (B) is shown on the display (8).
Delay start function (g. B & C)
The appliance has a delay start function which makes it possible to program the
time for starting the coee-making process. The delay start can be selected via the
timer button (5).
1. Set the clock. Check whether the clock has already been set. If the clock has
not been set, refer to the section "Setting the clock".
2. Keep the timer button (5) pressed until the clock on the display ashes.
3. Repeatedly press the hour button (6) to set the hours.
4. Repeatedly press the minute button (7) to set the minutes.
5. Set the coee quantity. Refer to the section "Setting the coee quantity".
6. Set the coee strength. Refer to the section "Setting the coee strength".
7. If you want to make coee with ground coee, switch o the grinding
function before using the delay start function.
8. Press the timer button (5) to save the settings. The timer indicator (C) lights
continuously.
9. To interrupt the process, press the timer button (5) again. The timer indicator
(C) goes o.
Filling the water reservoir (g. D)
• Before lling the water reservoir, switch o the appliance and remove the
mains plug from the wall socket.
• Do not ll the water reservoir with more water than required for making the
coee. Only use the amount of water required for making the coee. The
appliance automatically stops when the water reservoir is empty.
• Do not use the appliance without water in the water reservoir.
• Do not exceed the maximum mark (10 cups) when you ll the water reservoir.
Make sure that the water level is always above the minimum mark (2 cups)
during use.
• Only use cold water to ll the water reservoir.
• Do not use carbonated water or other liquids to ll the water reservoir.
• Do not pour water in the coee bean compartment.

30
EN

31
EN
To ll the water reservoir:
1. Open the cover (24).
2. Fill the water reservoir (14) with water up to the required mark on the water
level indicator (15).
3. Do not ll the water reservoir with more water than required for making the
coee. Only use the amount of water required for making the coee. The
appliance automatically stops when the water reservoir is empty.
4. Close the cover (24).
Setting the ground coee neness (g. E)
• The ground coee neness selector (9) is used for setting the required
neness of the ground coee when using coee beans. It can be set to
dierent positions from ne coee grounds to coarse coee grounds.
• Turn the ground coee neness selector (9) to the required position to set the
neness of the ground coee.
Change from glass jug to thermo jug
• Press and hold the grinding button (2) to switch the glass jug/thermo jug
function.
• When the keep-warm indicator (E) lights up, the glass jug can be used.
Note: Never use the hot plate when using the thermo jug, as heat may
accumulate.
Removing and tting the lid of the glass jug
Some appliances are equipped with a glass jug. To remove the lid, proceed as
follows:
123
Open the lid in
direction of the arrow.
Turn the lid in the
direction of the arrow
to release the left-hand
pin of the lid from the
holder. The lid can now
be removed.
First insert the right-
hand pin into the
holder, then turn the
lid in the direction
of the arrow so that
the left-hand pin
engages. Close the
lid.

32
EN

33
EN
Removing/replacing the lid of the thermo jug
• Remove the lid: Turn the lid anticlockwise. The lid can now be removed.
• Fit the lid: Place the lid onto the jug so that the release lever is pointing to the
right. Turn the lid clockwise until it stops. The lid is now closed.
• Pour coee: Press and hold down the release lever in order to pour out the
contents of the thermo jug.
Note: We recommend preheating the thermo jug with hot water before use.
Making coee with coee beans (g. A - H)
Note: Use only coee beans and basket lter bags of size 80/200 mm.
1. If the grinding function is not activated, press the grinding button (2) to
activate the grinding function. The coee quantity and the coee strength are
shown on the display.
2. Fill the water reservoir (14) with the required amount of water. Do not ll
the water reservoir with more water than required for making the coee.
Only use the amount of water required for making the coee. The appliance
automatically stops when the water reservoir is empty.
3. Open the cover of the coee bean compartment (27).
4. Fill the coee bean compartment (13) completely with coee beans.
5. Close the cover (27).
6. Set the ground coee neness. Refer to the section "Setting the ground coee
neness".
7. Press the release button (12) to open the lter holder assembly (11).
8. Place a suitable coee lter in the coee lter holder (10).
9. Close the lter holder assembly (11) until the release button (12) clicks into
place.
10. Set the coee quantity. Refer to the section "Setting the coee quantity".
11. Set the coee strength. Refer to the section "Setting the coee strength".
12. Place the coee pot (16) on the heating plate (18).
13. Switch on the appliance by pressing the on/o button (1). The cup-of-coee
symbol (E) appears. After a few seconds, the appliance starts grinding the
coee beans and making the coee.
14. To interrupt the process, press the on/o button (1).
15. If the process is completed, the appliance will beep and switch to keep-warm
mode. The cup-of-coee symbol (E) starts ashing. The appliance can be
switched o by pressing the on/o button (1) or the appliance switches o
automatically after 40 minutes.
16. Allow the appliance to cool down completely.

34
EN

35
EN
Making coee with ground coee (g. A, B, C, D, F & G)
Note: Use only ground coee and basket lter bags of size 80/200 mm.
1. If the grinding function is activated, press the grinding button (2) to deactivate
the grinding function. The coee quantity and the coee strength are not
shown on the display.
2. Fill the water reservoir (14) with the required amount of water. Do not ll
the water reservoir with more water than required for making the coee.
Only use the amount of water required for making the coee. The appliance
automatically stops when the water reservoir is empty.
3. Press the release button (12) to open the lter holder assembly (11).
4. Place a suitable coee lter in the coee lter holder (10).
5. Put the required amount of coee in the coee lter.
6. Close the lter holder assembly (11) until the release button (12) clicks into
place.
7. Place the coee pot (16) on the heating plate (18).
8. Switch on the appliance by pressing the on/o button (1). The cup-of-coee
symbol (E) appears. The appliance starts making the coee.
9. To interrupt the process, press the on/o button (1).
10. If the process is completed, the appliance will beep and switch to keep-warm
mode. The cup-of-coee symbol (E) starts ashing. The appliance can be
switched o by pressing the on/o button (1) or the appliance switches o
automatically after 40 minutes.
11. Allow the appliance to cool down completely.
CLEANING AND MAINTENANCE
• Before cleaning or maintenance, always switch o the appliance, remove the
mains plug from the wall socket and wait until the appliance has cooled down.
• Do not immerse the appliance in water or any other liquids.
• Do not use aggressive or abrasive cleaning agents to clean the appliance.
• Do not use sharp objects to clean the appliance.
• Regularly check the appliance for possible damage.
• Clean the accessories:
- Clean the coee pot in soapy water.
- Clean the coee lter holder in soapy water.
- Clean the lid of the coee bean compartment in soapy water.
- Thoroughly dry the accessories.
• Clean the outside of the appliance with a damp cloth. Dry the outside of the
appliance with a clean, dry cloth.
• Put the appliance and the accessories in the original packaging
• Store the appliance in a dry and frost-free place, out of the reach of children.

36
EN
Cleaning the grinding compartment (g. C & I)
Note: When grinding coee beans, coee powder can clog the grinding
mechanism. The grinding compartment (19) can be cleaned every 2 weeks to
prevent the grinding mechanism from being clogged.
Before cleaning the grinding compartment the following steps are required:
1. Switch o the appliance.
2. Remove the mains plug from the wall socket.
3. Remove the coee pot from the heating plate.
4. Empty the coee lter holder. Place a suitable coee lter. Close the lter
holder assembly.
5. Release the lock on the cover (28) by pressing the small button.
6. Remove the cover (28).
7. Clean the grinding compartment (19) using the brush (21).
8. Mount the cover (28).
Descaling the appliance (g. A - D)
• The appliance must be descaled after each 70 brewing cycles. If you leave the
mains plug in the wall socket, the appliance will keep track of the number of
brewing cycles.
• The indicator (D) will ash on the display to indicate that the appliance must
be descaled.
• If the appliance must be descaled, use a suitable descaling agent. Special
descaling agents are available from local specialist shops.
• Before descaling the appliance, remove the mains plug from the wall socket
and wait until the appliance has cooled down.
• Do not immerse the appliance in water or any other liquids.
• Make sure that the grinding function is not activated when descaling the
appliance.
To start the descaling process:
1. Open the cover (24).
2. If necessary, empty the water reservoir (14).
3. Remove the carbon lter holder (20) from the water reservoir (14).
4. Fill the water reservoir (14) with a suitable descaling agent.
5. Place the coee pot (16) on the heating plate (18).
6. Insert the mains plug into the wall socket.
7. Switch on the appliance by pressing the on/o button (1).
8. Let the appliance run until 1⁄3 of the descaling agent is in the coee pot (16).
9. Switch o the appliance by pressing the on/o button (1).
10. Let the descaling agent work for approximately 30 minutes.
11. Switch on the appliance by pressing the on/o button (1).
12. Let the appliance run until the remaining descaling agent is in the coee pot
(16). The appliance stops automatically when the water reservoir (14) is empty.

37
EN
Rinse the appliance twice according to the below procedure:
1. Fill the water reservoir (14) with clean water up to the maximum mark on the
water level indicator (15).
2. Place the empty coee pot (16) on the heating plate (18).
3. Switch on the appliance by pressing the on/o button (1).
4. Let all water run through the appliance. The appliance stops automatically
when the water reservoir (14) is empty.
After descaling:
1. Place the carbon lter holder (20) in the water reservoir (14).
2. Close the cover (24).
3. Switch o the appliance by pressing the on/o button (1).
4. Keep the coee quantity selector (3) and the coee strength selector (4)
pressed until the indicator (D) disappears from the display (8) (g. C).
5. Clean the outside of the appliance with a damp cloth. Dry the outside of the
appliance with a clean, dry cloth.
6. The appliance is ready for use.
Replacing the carbon lter
1. Open the cover (24).
2. If necessary, empty the water reservoir (14).
3. Remove the carbon lter holder (20) from the water reservoir (14).
4. Open the cover (25).
5. Remove the old carbon lter (26).
6. Place the new carbon lter (26).
7. Close the cover (25).
Note: The carbon lter holder must not be placed in the water reservoir before
the appliance has been descaled. This does not apply the rst time you put the
appliance into operation.

38
EN
TROUBLESHOOTING
Problem Possible cause Suggested solution
No symbol in the
display.
Not plugged in. Insert the plug.
No mains power. Check the fuse/socket.
Display is defective. Contact customer service.
The automatic
circuit breaker in
the fuse box trips
Too many appliances
connected to the same
power circuit.
Plug the device into its own
power socket.
Appliance defective. Contact customer service.
Water runs out of
the appliance
Too much water in the
water tank.
Do not overll the water
tank
DISPOSAL CONSIDERATIONS
If there is a legal regulation for the disposal of electrical
and electronic devices in your country, this symbol on the
product or on the packaging indicates that this product
must not be disposed of with household waste. Instead,
it must be taken to a collection point for the recycling
of electrical and electronic equipment. By disposing of
it in accordance with the rules, you are protecting the
environment and the health of your fellow human beings
from negative consequences. For information about the
recycling and disposal of this product, please contact your
local authority or your household waste disposal service.

39
FR
FICHE TECHNIQUE
Numéro d‘article 10032865, 10032866, 10032874
Alimentation 220-240 V ~ 50/60 Hz
Puissance 1000 W
Contenance maximale (réservoir) 1,25 L
FABRICANT ET IMPORTATEUR (UK)
Fabricant :
Chal-Tec GmbH, Wallstraße 16, 10179 Berlin, Allemagne.
Importateur pour la Grande Bretagne :
Chal-Tec UK limited
Unit 6 Riverside Business Centre
Brighton Road
Shoreham-by-Sea
BN43 6RE
United Kingdom
Chère cliente, cher client,
Toutes nos félicitations pour l’acquisition de ce nouvel
appareil. Veuillez lire attentivement et respecter les
instructions de ce mode d’emploi an d’éviter d’éventuels
dommages. Nous ne saurions être tenus pour responsables
des dommages dus au non-respect des consignes et à
la mauvaise utilisation de l’appareil. Scannez le QR-Code
pour obtenir la dernière version du mode d‘emploi et des
informations supplémentaires concernant le produit.
SOMMAIRE
Consignes de sécurité 40
Aperçu de l‘appareil 42
Panneau de commande, touches et achages 44
Mise en marche et utilisation 45
Nettoyage et maintenance 53
De identication et résolution des problèmes 56
Informations sur le recyclage 56

40
FR
CONSIGNES DE SÉCURITÉ
Consignes générales de sécurité
• Lisez attentivement toutes les instructions avant utilisation de l’appareil et
conservez-les pur vous y référer ultérieurement.
• Utilisez l’appareil et ses accessoires uniquement aux ns prévues et non à
d’autres ns que celles décrites dans le mode d’emploi.
• N’utilisez pas l’appareil si des pièces ou des accessoires sont endommagés ou
défectueux. Si une pièce ou un accessoire est endommagé ou défectueux, il
doit être remplacé par le fabricant ou un spécialiste agréé.
• Les enfants doivent être surveillés pour s’assurer qu’ils ne jouent pas avec
l’appareil.
• L’utilisation de l’appareil par des enfants ou des personnes ayant une
décience physique, sensorielle, mentale ou motrice, ou dénués d’expérience
et de connaissances, peut être dangereuse. Les personnes responsables
de leur sécurité doivent fournir des instructions explicites ou superviser le
fonctionnement de l’appareil.
• N’utilisez pas l’appareil près d’une baignoire, d’une douche, d’un lavabo ou
d’autres récipients remplis d’eau.
• N’immergez pas l’appareil dans de l’eau ni d’autres liquides.
• Si l’appareil est immergé dans de l’eau ou d’autres liquides, ne l’en sortez pas
avec vos mains. Débranchez immédiatement la che d’alimentation de la
prise. L’appareil ne doit pas être utilisé après immersion dans l’eau ou d’autres
liquides.
• L’appareil est destiné à un usage domestique ou similaire, par exemple
pour les cuisines du personnel dans les magasins, les bureaux et autres
environnements de travail, pour les fermes, les clients des hôtels, motels et
autres établissements d’hébergement seul ou avec petit déjeuner.
Sécurité électrique
• Avant chaque utilisation, vériez que la tension du secteur correspond à la
tension indiquée sur la plaque signalétique de l’appareil.
• L’appareil ne doit pas être utilisé avec une minuterie externe ou un système de
télécommande séparé.
• Branchez l’appareil sur une prise de courant avec mise à la terre. Si nécessaire,
utilisez une rallonge d’un diamètre approprié (au moins 3 x 1 mm²).
• Assurez-vous que l’eau ne puisse jamais pénétrer dans les ches de contact du
câble d’alimentation et du câble rallonge.
• Déroulez toujours entièrement le câble d’alimentation et le câble rallonge.
• Assurez-vous que le câble d’alimentation ne pende pas au bord du plan
de travail et ne puisse pas être accidentellement pincé ou faire trébucher
quelqu’un.
• Tenez le câble d’alimentation à l’écart de la chaleur, de l’huile et des rebords
coupants.
• N’utilisez pas l’appareil si le câble d’alimentation ou la che sont endommagés
ou défectueux.

41
FR
• Si le câble d’alimentation ou la che sont endommagés ou défectueux, faites-
les remplacer par le fabricant, un spécialiste agréé ou une personne quali ée.
• Ne tirez pas sur le câble d’alimentation pour le débrancher de la prise.
• Débranchez la che secteur de la prise lorsque l’appareil n’est plus en
marche, ainsi qu’avant l’assemblage ou le démontage et avant le nettoyage et
l’entretien.
Consignes de sécurité concernant les cafetières
• N’utilisez pas l’appareil à l’extérieur.
• N’utilisez pas l’appareil dans un environnement humide.
• N’utilisez l’appareil que dans un environnement hors gel lorsqu’il est rempli
d’eau.
• Placez l’appareil sur une surface stable et horizontale.
• Placez l’appareil sur une surface résistante à la chaleur et protégée contre les
éclaboussures d’eau.
• N’installez pas l’appareil sur une table de cuisson.
• N’installez pas l’appareil sur une surface chaude ou à proximité de ammes
libres.
• Assurez-vous que l’appareil n’entre pas en contact avec des matériaux
in ammables.
• Tenez l’appareil à l’écart des sources de chaleur.
• Soyez prudent avec l’eau chaude et la vapeur pour éviter les brûlures.
• Lorsque l’appareil n’est pas en service, conservez-le dans un endroit sec.
Assurez-vous que les enfants ne puissent pas accéder à l’appareil rangé.
• La cafetière est conçue pour la préparation de café à partir de café en grains
ou de café en poudre. L’appareil n’est adapté que pour un usage intérieur.
L’appareil n’est conçu que pour une utilisation domestique.
Recyclage de l’emballage
MISE EN GARDE
Risque d‘étou ement ! Recyclez les emballages en plastique
immédiatement pur que les enfants ne se blessent pas avec.

42
FR
APERÇU DE L‘APPAREIL

43
FR
1 Touche de marche/arrêt A Indicateur de quantité de café
2 Touche du broyeur B Indicateur de force du café
3 Sélecteur de quantité de café C A chage de la minuterie
4 Sélecteur de l‘intensité du café D Témoin de détartrage
5 Touche de la minuterie E Témoin de maintien au chaud
6 Touche des heures
7 Touche des minutes
8 Écran
9Sélecteur de nesse du broyeur
10 Filtre permanent
11 Support de ltre
12 Bouton de déverrouillage (support de ltre)
13 Compartiment à café en grains
14 Réservoir d‘eau
15 Indicateur de niveau d‘eau
16 Carafe
17 Indicateur de niveau de café
18 Plaque chau ante
19 Broyeur
20 Support de ltre à charbon
21 Brosse / tournevis
22 Sortie de vapeur d‘eau
23 Touche de détartrage (touches 3+4)
24 Couvercle du réservoir d‘eau
25 Fixation du ltre à charbon
26 Filtre à charbon
27 Couvercle du conteneur de café en grains
28 Couvercle de l‘ouverture pour le nettoyage

44
FR
PANNEAU DE COMMANDE, TOUCHES ET
AFFICHAGES

45
FR
MISE EN MARCHE ET UTILISATION
Avant la première utilisation
• Nettoyez l‘appareil. Pour cela, consultez la section „Nettoyage et
maintenance“.
• Nettoyez les accessoires. Consultez pour cela la section „Nettoyage et
maintenance“.
Réglage de l‘heure (illustrations B & C)
Lorsque vous branchez le câble d‘alimentation dans la prise, l‘écran (8) s‘allume
pour indiquer que vous pouvez régler l‘horloge. Vous pouvez également régler
l‘horloge ultérieurement.
1. Appuyez plusieurs fois sur la touche des heures (6) pour régler les heures.
2. Appuyez plusieurs fois sur la touche des minutes (7) pour régler les minutes.
3. L‘heure s‘a che à l‘écran (8).
Utilisation
ATTENTION
Risque de brûlures ! Gardez les mains, le visage et autres parties
du corps éloignés de la sortie de vapeur. La vapeur de l‘appareil est
très chaude. Ne pas recouvrir la sortie de vapeur.
• L‘appareil peut être utilisé pour préparer du café à partir de café en grains ou
en poudre.
• Avant la première utilisation, l‘appareil est réglé par défaut pour préparer du
café en grains.
• Après chaque utilisation, l‘appareil mémorise vos derniers réglages :
préparation avec du café en grains ou moulu.
Remarque : l‘appareil ne peut être utilisé que lorsque l‘écran est activé. Si l‘écran
n‘est pas activé, appuyez sur une touche de votre choix pour l‘activer. L‘appareil
est désormais prêt à fonctionner.
Réglage de la quantité de café (illustrations B & C)
• Le sélecteur de quantité de café (3) sert au réglage de la quantité de café
souhaitée. Vous pouvez le régler sur 2, 4, 6, 8 ou 10 tasses.
• Appuyez plusieurs fois sur le sélecteur de quantité de café (3) pour régler la
quantité souhaitée. Le nombre de tasses (A) s‘a che sur l‘écran (8).
• Fonction AROMA : appuyez longuement sur le sélecteur de quantité de café
(3) pour choisir le niveau „AROMA“, l‘icône s‘allume et l‘élément chau ant
chau e par intermittence.

46
FR

47
FR
Réglage de l‘intensité du café (illustrations B & C)
• Le sélecteur de force du café (4) sert à choisir l‘intensité du café. Vous pouvez
le régler sur café doux (MILD), café moyen (MEDIUM) et café fort (STRONG).
• Appuyez plusieurs fois sur le sélecteur de force du café (4) pour régler la
force désirée. La force de café choisie (B) s‘ache à l‘écran (8).
Fonction démarrage diéré (illustrations B & C)
L‘appareil dispose d‘une fonction démarrage diéré qui vous permet de
programmer l‘horaire de préparation du café. Vous pouvez programmer le
démarrage diéré de la cafetière à l‘aide de la touche de la minuterie (5).
1. Réglez l‘heure. Vériez que l‘heure est bien réglée. Si vous ne l‘avez pas fait
auparavant, consultez la section „Réglage de l‘heure“.
2. Maintenez la touche minuterie (5) jusqu‘à ce que l‘heure clignote à l‘écran.
3. Appuyez plusieurs fois sur la touche des heures (6) pour régler les heures.
4. Appuyez plusieurs fois sur la touche des minutes (7) pour régler les minutes.
5. Réglez la quantité de café. Consultez pour cela la section „Réglage de la
quantité de café“.
6. Réglez l‘intensité du café. Consultez pour cela la section „Réglage de l‘intensité
du café“.
7. Si vous souhaitez préparer du café à partir de café moulu, désactivez la
fonction de broyeur avant d‘utiliser le démarrage diéré.
8. Appuyez sur la touche de la minuterie (5) pour mémoriser les paramètres.
L‘achage de la minuterie (C) s‘allume en xe.
9. Pour interrompre le processus, appuyez à nouveau sur la touche de la
minuterie(5). L‘achage de la minuterie (C) s‘éteint.
Remplissage du réservoir d‘eau (illustration D)
• Avant de remplir le réservoir d‘eau, veuillez éteindre l‘appareil et débrancher la
che de la prise.
• Ne versez pas plus d‘eau dans le réservoir que nécessaire pour la quantité de
café souhaitée. N‘utilisez que la quantité d‘eau nécessaire pour la préparation
de votre café. L‘appareil s‘arrête automatiquement lorsque le réservoir d‘eau
est vide.
• N‘utilisez pas l‘appareil si le réservoir d‘eau est vide.
• Ne dépassez pas le marquage de niveau d‘eau maximum (10 tasses) lorsque
vous remplissez le réservoir. Assurez-vous que le niveau d‘eau se trouve
toujours au-dessus de la marque de niveau minimum (2 tasses) pendant le
fonctionnement.
• Versez toujours de l‘eau fraîche uniquement dans le réservoir.
• N‘utilisez pas d‘eau ou d‘autres liquides gazeux pour remplir le réservoir d‘eau.
• Ne versez pas d‘eau dans le compartiment de café en grains.

48
FR

49
FR
Remplissage du réservoir d‘eau :
1. Ouvrez le couvercle (24).
2. Remplissez le réservoir avec de l‘eau (14) jusqu‘au marquage souhaité de
l‘indicateur (15).
3. Ne versez pas plus d‘eau dans le réservoir d‘eau que nécessaire pour faire
le café. N‘utilisez que la quantité d‘eau nécessaire pour préparer le café.
L‘appareil s‘arrête automatiquement lorsque le réservoir d‘eau est vide.
4. Refermez le couvercle (24).
Réglage de la nesse du café à moudre (illustration E)
• Le sélecteur de nesse de mouture du café (9) sert à régler la nesse
souhaitée du café à moudre lorsque vous utilisez des grains. Vous pouvez
choisir diérentes positions allant du café nement moulu jusqu‘aux grains
moulus grossièrement.
• Tournez le sélecteur de nesse de mouture du café (9) jusqu‘à la position
souhaitée pour régler la nesse de la mouture du café.
Passer de la carafe en verre à la carafe thermos
• Appuyez longuement sur la touche du broyeur (2) pour basculer entre les
fonctions carafe en verre / carafe thermos.
• Lorsque le témoin de maintien au chaud (E) est allumé, vous pouvez utiliser la
carafe en verre.
Remarque : n‘utilisez en aucun cas la plaque de maintien au chaud avec la
carafe thermos, car cela peut provoquer une accumulation de chaleur.
Retirer et remettre en place le couvercle de la carafe en verre
Certains appareils sont équipés d‘une verseuse supplémentaire en verre. Le
couvercle de la verseuse en verre peut être retiré comme suit :
123
Ouvrez le couvercle
dans le sens de la
èche.
Tournez le couvercle
dans le sens de la
èche et appuyez en
même temps avec la
main gauche sur la
goupille du support du
couvercle. Desserrez le
couvercle.
Repoussez d‘abord
la goupille dans le
support de couvercle
puis tournez le
couvercle dans le
sens de la èche.
Refermez ensuite le
couvercle.

50
FR

51
FR
Retirer et remettre en place le couvercle de la carafe thermos
• Démontage : tournez le couvercle en sens antihoraire.
• Installation : mettez le couvercle sur la carafe de telle sorte que le levier pour
verser le café soit tourné vers la droite. Tourne le couvercle en sens horaire
jusqu’au bout. Le couvercle est maintenant verrouillé.
• Service : maintenez le levier d’ouverture de la verseuse et servez.
Remarque : il est recommandé de préchauer la carafe thermos avec de l‘eau
chaude avant utilisation.
Préparation du café avec du café en grains (illustrations A-H)
Remarque : n‘utilisez que des grains de café et les sacs ltrants à panier de
taille 80/200 mm.
1. Si la fonction de broyeur n‘est pas activée, appuyez sur la touche du broyeur
(2) pour l‘activer. La quantité de café et l‘intensité du café sont achées à
l‘écran.
2. Remplissez la quantité d‘eau nécessaire dans le réservoir d‘eau (14). Ne versez
pas plus d‘eau que nécessaire pour la préparation du café dans le réservoir.
N‘utilisez que la quantité d‘eau nécessaire pour préparer le café. L‘appareil
s‘arrête automatiquement lorsque le réservoir d‘eau est vide.
3. Ouvrez le couvercle du compartiment de café en grains (27).
4. Remplissez entièrement le compartiment (13) avec du café en grains.
5. Fermez le couvercle (27).
6. Réglez la nesse de la mouture de café. Consultez la section „Régler le degré
de nesse de mouture du café“.
7. Appuyez sur la touche de déverrouillage (12) pour ouvrir le porte-ltre (11).
8. Insérez un ltre à café adapté dans le porte-ltre à café (10).
9. Fermez le porte-ltre (11) jusqu‘à ce que le bouton de déverrouillage (12)
s‘enclenche.
10. Dénissez la quantité de café souhaitée. Voir section „Réglage de la quantité
de café“.
11. Réglez l‘intensité souhaitée de votre café. Voir section „Réglage de l‘intensité
du café“.
12. Placez la verseuse (16) sur la plaque chauante (18).
13. Allumez l‘appareil en appuyant sur la touche marche / arrêt (1). Le symbole
de la tasse à café (E) apparaît. Au bout de quelques secondes, l‘appareil
commence à broyer les grains et à préparer le café.
14. Pour interrompre le processus, appuyez sur la touche marche / arrêt (1).
15. Lorsque le processus est terminé, l‘appareil émet un bip et passe en mode de
maintien au chaud. L‘icône de tasse à café (E) se met à clignoter. Vous pouvez
éteindre l‘appareil en appuyant sur la touche marche / arrêt (1), ou le laisser
s‘éteindre automatiquement au bout de 40 minutes.
16. Laissez l‘appareil refroidir complètement.

52
FR

53
FR
Préparation de café à partir de café moulu (illustrations A, B,
C, D, F & G)
Remarque : n‘utilisez que du café moulu et les sacs ltrants à panier de taille
80/200 mm.
1. Si la fonction de broyeur est activée, appuyez sur la touche du broyeur (2) pour
la désactiver. La quantité de café et l‘intensité du café ne sont pas achées à
l‘écran.
2. Remplissez le réservoir d‘eau (14) avec la quantité requise. Ne versez plus
d‘eau que nécessaire dans le réservoir pour la préparation du café. N‘utilisez
que la quantité d‘eau nécessaire pour préparer le café. L‘appareil s‘arrête
automatiquement lorsque le réservoir d‘eau est vide.
3. Appuyez sur la touche de déverrouillage (12) pour ouvrir le porte-ltre (11).
4. Insérez un ltre à café approprié dans le porte-ltre à café (10).
5. Versez la quantité de café souhaitée dans le ltre à café.
6. Fermez le porte-ltre (11) jusqu‘à ce que la touche de déverrouillage (12)
s‘enclenche.
7. Placez la verseuse (16) sur la plaque chauante (18).
8. Allumez l‘appareil en appuyant sur la touche marche / arrêt (1). Le symbole de
la tasse à café (E) apparaît. L‘appareil commence la préparation du café.
9. Pour interrompre la préparation, appuyez sur la touche marche / arrêt (1).
10. Lorsque le processus est terminé, l‘appareil émet un bip et passe en mode de
maintien au chaud. L‘icône de tasse à café (E) se met à clignoter. Vous pouvez
éteindre l‘appareil en appuyant sur la touche marche / arrêt (1), ou le laisser
s‘éteindre automatiquement au bout de 40 minutes.
11. Laissez l‘appareil refroidir complètement.
NETTOYAGE ET MAINTENANCE
• Éteignez toujours l‘appareil avant de le nettoyer ou de l‘entretenir. Débranchez
la che de la prise et attendez que l‘appareil soit refroidi.
• Ne plongez pas l‘appareil dans de l‘eau ou d‘autres liquides.
• N‘utilisez pas de produits agressifs ou abrasifs pour nettoyer l‘appareil.
• Ne nettoyez pas l‘appareil avec des objets pointus.
• Vériez régulièrement l’appareil pour détecter d‘éventuels dommages.
• Nettoyez les accessoires :
- Nettoyez la verseuse avec de l‘eau savonneuse.
- Nettoyez le porte-ltre à café avec de l‘eau savonneuse.
- Nettoyez le couvercle du compartiment à grains de café avec de l‘eau
savonneuse.
- Séchez soigneusement les accessoires.
• Nettoyez l’extérieur de l’appareil avec un chion propre et sec.
• Rangez l‘appareil et les accessoires dans leur emballage d‘origine.
• Conservez l’appareil dans un endroit sec et à l‘abri du gel, hors de portée des
enfants.

54
FR
Nettoyage du broyeur (illustrations C & I)
Remarque : lorsque vous broyez des grains de café, de la poudre peut obstruer
le broyeur. Pour éviter que le broyeur ne se bouche, vous pouvez nettoyer le
broyeur toutes les 2 semaines (19).
Avant de nettoyer le broyeur, les étapes suivantes sont indispensables :
1. Eteignez l‘appareil.
2. Débranchez la che de la prise.
3. Retirez la carafe de la plaque chauante.
4. Videz le porte-ltre à café. Insérer un ltre à café adapté. Fermez le porte-
ltre.
5. Desserrez le verrou du couvercle (28) en appuyant sur le petit bouton.
6. Retirez le couvercle (28).
7. Nettoyez le broyeur (19) avec la brosse (21).
8. Remettez le couvercle (28).
Détartrage de l‘appareil (illustrations A - D)
• L‘appareil doit être détartré toutes les 70 percolations. Si vous laissez la che
branchée dans la prise, l‘appareil compte le nombre de percolations.
• Le témoin (D) clignote à l‘écran lorsqu‘il est temps de détartrer l‘appareil.
• Utilisez un détartrant adapté pour la machine. Des produits détartrants
spéciaux sont disponibles chez votre détaillant local.
• Avant de détartrer l‘appareil, débranchez la che de la prise et laissez l‘appareil
refroidir complètement.
• Ne plongez jamais l‘appareil dans l‘eau ni dans un autre liquide.
• Vériez que la fonction de broyeur n‘est pas activée lorsque vous détartrez
l‘appareil.
Démarrage du processus de détartrage :
1. Ouvrez le couvercle (24).
2. Si besoin, videz le réservoir d‘eau (14).
3. Retirez le support de ltre à charbon (20) du réservoir d‘eau (14).
4. Versez un détartrant adapté dans le réservoir d‘eau (14).
5. Placez la carafe de café (16) sur la plaque chauante (18).
6. Branchez la che dans la prise.
7. Allumez l‘appareil en appuyant sur la touche de marche/arrêt (1).
8. Faites fonctionner l‘appareil jusqu‘à ce qu‘ 1⁄3 du détartrant soit passé dans la
carafe(16).
9. Éteignez l‘appareil en appuyant sur la touche de marche/arrêt (1).
10. Laissez agir le détartrant pendant environ 30 minutes.
11. Allumez l‘appareil en appuyant sur la touche de marche/arrêt (1).
12. Faites fonctionner l‘appareil jusqu‘à ce que le reste du détartrant soit passé
dans la carafe (16). L‘appareil s‘arrête automatiquement lorsque le réservoir
d‘eau (14) est vide.

55
FR
Rincez l‘appareil deux fois selon la procédure suivante :
1. Versez de l‘eau propre dans le réservoir (14) jusqu‘au niveau maximum de
l‘indicateur d‘eau (15).
2. Placez la carafe de café (16) sur la plaque chauante (18).
3. Allumez l‘appareil en appuyant sur la touche de marche/arrêt (1).
4. Faites passer la totalité de l‘eau à travers l‘appareil. L‘appareil s‘arrête
automatiquement lorsque le réservoir d‘eau (14) est vide.
Après le détartrage :
1. Placez le support de ltre à charbon (20) dans le réservoir d‘eau (14).
2. Fermez le couvercle (24).
3. Éteignez l‘appareil en appuyant sur la touche de marche/arrêt (1).
4. Maintenez le sélecteur de quantité de café (3) et le sélecteur de force de café
(4) jusqu‘à ce que le témoin (D) disparaisse de l‘écran (8) (illustration C).
5. Nettoyez l‘extérieur de l‘appareil avec un chion humide puis séchez-le avec
un chion propre et sec.
6. L‘appareil est de nouveau prêt à l‘emploi.
Remplacement du ltre à charbon
1. Ouvrez le couvercle (24).
2. Si besoin, videz le réservoir d‘eau (14).
3. Retirez le support de ltre à charbon (20) du réservoir d‘eau (14).
4. Ouvrez le couvercle (25).
5. Retirez l‘ancien ltre à charbon (26).
6. Installez le nouveau ltre à charbon (26).
7. Fermez le couvercle (25).
Remarque : Ne pas installer le porte-ltre à charbon dans le réservoir d‘eau
avant le détartrage de l‘appareil. Ceci ne s‘applique pas si vous utilisez l‘appareil
pour la première fois.

56
FR
DE IDENTIFICATION ET RÉSOLUTION DES
PROBLÈMES
Problème Cause possible Solution
Pas d‘icône à
l‘écran.
L‘appareil n‘est pas
branché.
Banchez la che dans la
prise.
Pas d‘alimentation. Contrôlez le fusible.
Ecran défectueux. Adressez-vous à notre
service client.
Le fusible saute.
Trop d‘appareils branchés
sur la même prise.
Branchez l‘appareil sur une
autre prise.
Appareil défectueux. Adressez-vous à notre
service client.
Il y a une fuite
d‘eau.
Trop d‘eau dans le
réservoir.
Ne versez pas trop d‘eau
dans le réservoir.
INFORMATIONS SUR LE RECYCLAGE
S‘il existe une réglementation pour l‘élimination ou le
recyclage des appareils électriques et électroniques dans
votre pays, ce symbole sur le produit ou sur l‘emballage
indique que cet appareil ne doit pas être jeté avec les
ordures ménagères. Vous devez le déposer dans un point
de collecte pour le recyclage des équipements électriques
et électroniques. La mise au rebut conforme aux règles
protège l‘environnement et la santé de vos semblables
des conséquences négatives. Pour plus d‘informations
sur le recyclage et l‘élimination de ce produit, veuillez
contacter votre autorité locale ou votre service de
recyclage des déchets ménagers.

57
ES
Estimado cliente:
Le felicitamos por la adquisición de este producto. Lea
atentamente las siguientes instrucciones y sígalas para evitar
posibles daños. No asumimos ninguna responsabilidad
por los daños causados por el incumplimiento de las
instrucciones y el uso inadecuado. Escanee el siguiente
código QR para obtener acceso a la última guía del usuario y
más información sobre el producto.
ÍNDICE
Indicaciones de seguridad 58
Visión general del aparato 60
Panel de control, botones e indicadores 62
Puesta en marcha y uso 63
Limpieza y mantenimiento 71
Detección y resolución de problemas 74
Indicaciones sobre la retirada del aparato 74
DATOS TÉCNICOS
Número de artículo 10032865, 10032866, 10032874
Suministro eléctrico 220-240 V ~ 50/60 Hz
Potencia 1000 W
Capacidad máxima (depósito) 1,25 L
FABRICANTE E IMPORTADOR (REINO UNIDO)
Fabricante:
Chal-Tec GmbH, Wallstraße 16, 10179 Berlín, Alemania.
Importador para Gran Bretaña:
Chal-Tec UK limited
Unit 6 Riverside Business Centre
Brighton Road
Shoreham-by-Sea
BN43 6RE
United Kingdom

58
ES
INDICACIONES DE SEGURIDAD
Advertencias generales de seguridad
• Lea atentamente todas las indicaciones y conserve este manual para consultas
posteriores.
• Utilice el aparato y los accesorios solamente para el n previsto y no para
otros nes descritos en el manual de instrucciones.
• No utilice el aparato si hay piezas o accesorios dañados o defectuosos. Si
hay una pieza o accesorio dañado o defectuoso, debe ser sustituido por el
fabricante o un técnico autorizado.
• Los niños deberán estar vigilados para evitar que jueguen con el aparato.
• El uso del aparato por parte de niños o personas con discapacidades físicas,
sensoriales, psíquicas o motrices o con falta de experiencia y conocimiento
puede conllevar riesgos. Las personas responsables de su seguridad deben
dar instrucciones expresas o supervisar el uso del aparato.
• No utilice el aparato cerca de bañeras, duchas, lavabos u otros recipientes
llenos de agua.
• No sumerja el aparato en agua ni en ningún otro líquido.
• Si el aparato se ha sumergido en agua u otro líquido, no lo saque con las
manos. Desconecte inmediatamente el enchufe de la toma de corriente. Si
el aparato se ha sumergido en agua u otro líquido, no podrá ser utilizado de
nuevo.
• Este aparato está confeccionado para su utilización en el hogar o entornos
similares, como: cocinas de personal en comercios, ocinas y otros entornos
laborales; en granjas, en los hoteles por parte de los clientes, moteles y otros
alojamientos hoteleros; en establecimientos con media pensión.
Seguridad eléctrica
• Asegúrese siempre antes de su uso de que la tensión de red coincida con la
que aparece en la placa técnica del aparato.
• Este aparato no es apto para el uso con un temporizador externo o un sistema
por control remoto.
• Conecte el aparato a una toma de corriente con toma de tierra. En caso
necesario, utilice un cable alargador con un diámetro adecuado (mínimo 3 x
1 mm2).
• Asegúrese de que no se ltre agua en el enchufe del cable de alimentación ni
del cable alargador.
• Desenrolle el cable de alimentación y el cable alargador completamente.
• Asegúrese de que el cable de alimentación no quede colgando del borde de
una supercie de trabajo y no se atrape accidentalmente o alguien tropiece
con él.
• Mantenga el cable de alimentación lejos del calor, el aceite y los cantos
alados.
• Nunca ponga en marcha el aparato si el cable de alimentación o el enchufe
presentan daños.

59
ES
• Si el cable de alimentación o el enchufe están dañados, deberán ser
sustituidos por el fabricante, un servicio técnico autorizado o una persona
igualmente cuali cada.
• No tire del cable para desconectar el enchufe de la toma de corriente.
• Desconecte el enchufe de la toma de corriente cuando el aparato no esté
en marcha, antes de montarlo o desmontarlo y antes de limpiarlo y realizar
labores de mantenimiento.
Indicaciones de seguridad para cafeteras
• No utilice el aparato al aire libre.
• No utilice el aparato en entornos húmedos.
• Cuando el aparato esté lleno de agua, utilícelo solamente en entornos libres
de escarcha.
• Coloque el aparato en una super cie estable y plana.
• Coloque el aparato en una super cie resistente el calor y protegida de las
salpicaduras.
• No coloque el aparato sobre super cies de cocción.
• No coloque el aparato sobre una super cie caliente ni cerca de llamas
abiertas.
• Asegúrese de que el aparato no entre en contacto con materiales in amables.
• Mantenga el aparato alejado de fuentes de calor.
• Tenga cuidado con el agua caliente y el vapor para evitar quemaduras.
• Si no utiliza el aparato, guárdelo en un lugar seco. Asegúrese de que los niños
no tengan acceso al aparato guardado.
• La cafetera está concebida para preparar café con granos de café o café
molido. El aparato solamente es apto para un uso en interiores. El aparato
solamente es apto para un uso doméstico
Retirada de embalajes
ADVERTENCIA
¡Riesgo de as xia! Deseche inmediatamente los embalajes de
plástico para que los niños no se lesionen.

60
ES
VISIÓN GENERAL DEL APARATO

61
ES
1Botón on/o A Indicador cantidad café
2 Botón del molinillo B Indicador intensidad café
3 Selector cantidad café C Indicador temporizador
4 Selector intensidad café D Indicador de descalci cación
5 Botón del temporizador E Mantenimiento de calor
6 Botón de horas
7 Botón de los minutos
8 Display
9 Regulador del grado de molienda
10 Filtro permanente
11 Estructura del soporte del ltro
12 Botón de desbloqueo (estructura del
soporte del ltro)
13 Compartimento granos de café
14 Recipiente para el agua
15 Indicador del nivel de agua
16 Jarra para el café
17 Indicador del nivel de café
18 Placa calefactora
19 Cámara de molienda
20 Soporte para el ltro de carbón
21 Cepillo/ destornillador
22 Ori cio para el vapor de agua
23 Botón para descalci car (Botón 3+4)
24 Tapa del depósito de agua
25 Fijación del ltro de carbón
26 Filtro de carbón
27 Tapa del recipiente granos de café
28 Tapa de la abertura de limpieza

62
ES
PANEL DE CONTROL, BOTONES E INDICADORES

63
ES
PUESTA EN MARCHA Y USO
Antes del primer uso
• Limpie el aparato. Para ello, consulte la sección „Limpieza y mantenimiento“.
• Limpie el accesorio. Para ello, consulte la sección: „Limpieza y mantenimiento“.
Con gurar la hora (ilustraciones B y C)
Si conecta el enchufe a la toma de corriente, el display (8) se ilumina para indicar
que se puede con gurar la hora. También puede con gurar la hora en otro
momento.
1. Pulse varias veces el botón de las horas (6) para con gurar las horas.
2. Pulse varias veces el botón de los minutos (7) para con gurar los minutos.
3. Aparece la hora en el display (8).
Utilización
ATENCIÓN
¡Existe riesgo de quemaduras! Mantenga alejadas las manos, el
rostro y otras partes del cuerpo de los ori cios para el vapor. El
vapor que sale del aparato alcanza temperaturas muy elevadas
durante el funcionamiento. No cubra los ori cios para el vapor.
• Antes del primer uso, el aparato está con gurado para preparar café a partir
de granos de café.
• Después de cada uso, el aparato guarda la última con guración empleada
para el próximo uso: Preparar café con granos de café o con café molido
Nota: El aparato solo puede utilizarse cuando el display está activado. Si el
display no está activado, pulse cualquier botón para activarlo. El aparato está
listo para su uso.
Con gurar la cantidad de café (ilustraciones B y C)
• El selector de cantidad de café (3) se emplea para regular la cantidad deseada
de café. Pueden elegirse 2, 4, 6, 8 o 10 tazas de café.
• Pulse varias veces el selector de la cantidad de café (3) para elegir la cantidad
deseada. El número de tazas (A) aparece en el display (8).
• Función AROMA: Mantenga pulsado el selector de la cantidad de café (3) para
acceder al nivel „AROMA“, el símbolo de ilumina y la resistencia se calienta por
etapas.

64
ES

65
ES
Congurar la intensidad del café (ilustraciones B y C)
• El selector de la intensidad del café (4) se emplea para regular la intensidad
deseada del café. Puede seleccionarse un café suave (MILD), un café medio
(MEDIUM) y un café fuerte (STRONG).
• Pulse varias veces el selector de la intensidad de café (4) para elegir la
intensidad deseada. La intensidad deseada del café (A) aparece en el display
(8).
Función de inicio programado (ilustraciones B y C)
El aparato dispone de una función de inicio programado que permite programar la
hora del inicio del proceso de preparación del café. El inicio programado se puede
seleccionar mediante el botón del temporizador (5).
1. Congure la hora. Compruebe si la hora ya está congurada. Si todavía no lo
ha congurado, consulte la sección „congurar hora“.
2. Mantenga pulsado el botón TIMER (5) hasta que la hora parpadee en el
display.
3. Pulse varias veces el botón de las horas (6) para congurar la hora.
4. Pulse varias veces el botón de los minutos (7) para congurar los minutos.
5. Escoja la cantidad de café. Para ello, consulte la sección: „Seleccionar cantidad
de café“.
6. Escoja la intensidad del café. Para ello, consulte la sección: „Seleccionar
intensidad del café“.
7. Si desea preparar café con café molido, desactive la función de molienda
antes de utilizar la función de inicio programado.
8. Pulse el botón del temporizador (5) para guardar los ajustes. El indicador del
temporizador (C) se ilumina de manera continuada.
9. Para interrumpir el proceso, pulse de nuevo el botón del temporizador (5). El
indicador del temporizador (C) se apaga.
Llenar el depósito de agua (ilustración D)
• Apague el aparato y desconecte el enchufe de la toma de corriente antes de
llenar el depósito de agua.
• No llene más agua en el depósito de la necesaria para preparar el café. Utilice
solamente la cantidad de agua necesaria para preparar el café. El aparato se
detiene automáticamente si el recipiente de agua está vacío.
• No utilice el aparato sin agua en su depósito.
• No sobrepase la cantidad máxima indicada por la marca (10 tazas) cuando
rellene el depósito. Asegúrese de que el nivel del agua siempre se sitúe por
encima de la marca mínima (2 tazas) durante el uso de la cafetera.
• Llene el compartimento solo con agua fría.
• No utilice agua con gas ni ningún otro líquido para rellenar el depósito.
• No vierta agua en el compartimento para los granos de café.

66
ES

67
ES
Cómo llenar el depósito de agua:
1. Abra la tapa (24).
2. Rellene el depósito de agua (14) hasta la marca deseada en el indicador del
nivel del agua (15).
3. No llene más agua en el depósito de la necesaria para preparar el café. Utilice
solamente la cantidad de agua necesaria para preparar el café. El aparato se
detiene automáticamente si el recipiente de agua está vacío.
4. Cierre la tapa (24).
Regular el grado de molienda del café molido (ilustración E)
• El selector de grado de molienda (9) se emplea para regular el grosor deseado
del café molido cuando utilice granos de café. Se puede congurar en
distintas posiciones, desde un café muy molido a uno menos molido.
• Gire el selector del grado de molienda (9) hasta la posición deseada para
regular el grosor del café molido.
Cambiar la jarra de cristal por la jarra térmica
• Mantenga pulsado el botón de molinillo (2) para cambiar entre la función Jarra
de cristal/Jarra térmica.
• Cuando se ilumine el indicador de mantenimiento de calor (E), se puede
utilizar la jarra de cristal.
Nota: No utilice la placa calentadora con la jarra térmica, ya que puede
provocar una acumulación de calor.
Montar y desmontar la tapa de la jarra de cristal
Algunas cafeteras incluyen una jarra de cristal adicional. La tapa de la jarra de
cristal se extrae de la siguiente manera:
123
Abra la tapa en
dirección de la echa.
Gire la tapa en
dirección de la echa
presionando al mismo
tiempo con la mano
izquierda el botón
ubicado en el soporte
de la tapa. Retire la
tapa.
Encaje primero el
soporte de la tapa en
el botón y luego gire
la tapa en dirección
de la echa. A
continuación, cierre
la tapa.

68
ES

69
ES
Montar y desmontar la tapa de la jarra térmica
• Desmontar: gire la tapa en el sentido contrario a las agujas del reloj.
• Montar: coloque la tapa sobre la jarra con la palanca de salida orientada hacia
la derecha. Gire la tapa en el sentido de las agujas del reloj hasta el nal. La
tapa ya está cerrada.
• Verter: presione la palanca de salida para servir.
Nota: Se recomienda precalentar la jarra térmica con agua caliente antes de
utilizarla.
Preparar café con granos de café (ilustración A-H)
Nota: Utilice solamente granos de café y ltros para cafetera tipo cesta de
tamaño 80/200 mm.
1. Si no está activada la función de molienda, presione el botón del molinillo (2)
para activarla. La cantidad de café y su intensidad se mostrarán en el display.
2. Rellene la cantidad necesaria de agua en el depósito (14). No llene más
agua en el depósito de la necesaria para preparar el café. Utilice solamente
la cantidad de agua necesaria para preparar el café. El aparato se detiene
automáticamente si el recipiente de agua está vacío.
3. Abra la tapa del recipiente para los granos de café (27).
4. Rellene el compartimento para los granos de café (13) con granos de café.
5. Cierre la tapa (27).
6. Escoja el grado de molienda del café. Para ello, consulte la sección „Regular el
grado de molienda del café“.
7. Presione el botón de desbloqueo (12) para abrir la estructura de soporte del
ltro (11).
8. Coloque un ltro de café adecuado en el soporte para el ltro (10).
9. Cierre la estructura de soporte del ltro (11) hasta que encaje el botón de
desbloqueo (12).
10. Escoja la cantidad de café deseada. Para ello, consulte la sección „Seleccionar
cantidad de café“.
11. Seleccione la intensidad del café deseada. Para ello, consulte la sección:
„Seleccionar intensidad del café“.
12. Coloque la jarra de café (16) sobre la placa calefactora (18).
13. Encienda el aparato pulsando el interruptor on/o (1). Aparece el símbolo de
la taza de café (E). Tras algunos segundos, el aparato comienza a moler los
granos de café y a preparar el café.
14. Para interrumpir el proceso, pulse de nuevo el botón del on/o (1).
15. Cuando haya nalizado el proceso, el aparato pita y se activa el modo
de mantenimiento de calor. El símbolo de la taza de café (E) comienza a
parpadear. El aparato se apaga presionando el botón on/o (1) o se apaga
automáticamente transcurridas 40 minutos.
16. Deje que el aparato se enfríe por completo.

70
ES

71
ES
Preparar café con café molido (ilustraciones A, B, C, D, F y G)
Nota: Utilice sólo café molido y ltros para cafetera tipo cesta de tamaño
80/200 mm.
1. Si está activada la función de molienda, presione el botón del molinillo (2) para
desactivarla. La cantidad de café y su intensidad no se mostrarán en el display.
2. Rellene la cantidad necesaria de agua en el depósito (14). No llene más
agua en el depósito de la necesaria para preparar el café. Utilice solamente
la cantidad de agua necesaria para preparar el café. El aparato se detiene
automáticamente si el recipiente de agua está vacío.
3. Presione el botón de desbloqueo (12) para abrir la estructura de soporte del
ltro (11).
4. Coloque un ltro de café adecuado en el soporte para el ltro (10).
5. Introduzca la cantidad deseada de café en el ltro.
6. Cierre la estructura de soporte del ltro (11) hasta que encaje el botón de
desbloqueo (12).
7. Coloque la jarra de café (16) sobre la placa calefactora (18).
8. Encienda el aparato pulsando el interruptor on/o (1). El símbolo de las tazas
de café (E) se ilumina. El aparato comienza con la preparación del café.
9. Para interrumpir el proceso, pulse de nuevo el botón on/o (1).
10. Cuando haya nalizado el proceso, el aparato pita y se activa el modo
de mantenimiento de calor. El símbolo de la taza de café (E) comienza a
parpadear. El aparato se apaga presionando el botón on/o (1) o se apaga
automáticamente transcurridas 40 minutos.
11. Deje que el aparato se enfríe por completo.
LIMPIEZA Y MANTENIMIENTO
• Apague el aparato y desconecte el enchufe de la toma de corriente antes
de limpiarlo o de realizar labores de mantenimiento. Espere a que se haya
enfriado completamente.
• No sumerja el aparato en agua ni en ningún otro líquido.
• No utilice productos de limpieza agresivos ni abrasivos para limpiar el aparato.
• No limpie el aparato con objetos punzantes.
• Compruebe regularmente el aparato para detectar posibles averías.
• Limpie los accesorios:
- Lave la jarra de café con agua y jabón.
- Lave la estructura de soporte del ltro con agua y jabón.
- Lave la tapa del compartimento de los granos de café con agua y jabón.
- Seque bien todos los accesorios.
• Limpie la parte exterior con un paño húmedo y a continuación séquela con un
paño limpio y seco.
• Conserve el aparato y sus accesorios en su embalaje original.
• Guarde el aparato en un lugar seco sin escarcha y fuera del alcance de los
niños.

72
ES
Limpiar el compartimento de molienda (ilustraciones C y I)
Nota: A la hora de moler granos de café, se puede atascar el café molido en
el molinillo. Para evitar esa obstrucción del molinillo, puede limpiar cada dos
semanas el compartimento de molienda (19).
Antes de limpiar el compartimento de molienda, siga estos pasos:
1. Apague el aparato.
2. Desconecte el enchufe de la toma de corriente.
3. Retire la jarra de café de la placa calefactora.
4. Vacíe el soporte del ltro de café. Introduzca un ltro de café adecuado. Cierre
el soporte del ltro.
5. Pulse el botón pequeño para desbloquear el mecanismo de bloqueo de la
tapa (28).
6. Retire la tapa (28).
7. Limpie el molinillo (1) con el cepillo (21).
8. Vuelva a colocar la tapa (28).
Descalcicar el aparato (Ilustraciones A - D)
• El aparato debe descalcicarse cada 70 ciclos de preparación. Si deja el
enchufe conectado a la toma de corriente, el aparato cuenta el número de
ciclos.
• El indicador (D) parpadea en el display cuando deba descalcicar el aparato.
• Utilice un descalcicante adecuado para descalcicar el aparato. Encontrará
productos especiales para descalcicar en comercios locales.
• Apague el aparato y desconecte el enchufe de la toma de corriente antes de
descalcicarlo. Espere a que se haya enfriado completamente.
• No sumerja el aparato en agua ni en ningún otro líquido.
• Asegúrese de la función de molienda no esté activada cuando descalcique el
aparato.
Cómo iniciar el proceso de descalcicación:
1. Abra la tapa (24).
2. Si es necesario, vacíe el depósito de agua (14).
3. Retire el ltro de carbón (20) del depósito de agua (14).
4. Rellene la cantidad necesaria de líquido descalcicante en el depósito (14).
5. Coloque la jarra de café (16) sobre la placa calefactora (18).
6. Conecte el enchufe en la toma de corriente.
7. Encienda el aparato pulsando el interruptor on/o (1).
8. Deje el aparato en marcha hasta que haya 1⁄3 del descalcicante en la jarra de
café (16).
9. Apague el aparato pulsando el interruptor on/o (1).
10. Deje que la solución actúe durante 30 minutos.
11. Encienda el aparato pulsando el interruptor on/o (1).

73
ES
12. Deje el aparato en marcha hasta que el resto del descalcicante acabe en la
jarra de café (16). El aparato se detiene automáticamente si el recipiente de
agua (14) está vacío.
Enjuague dos veces el aparato del siguiente modo:
1. Rellene agua limpia en el depósito de agua (14) hasta la marca máxima del
indicador del nivel del agua (15).
2. Coloque la jarra de café (16) sobre la placa calefactora (18).
3. Encienda el aparato pulsando el interruptor on/o (1).
4. Deje que el agua pase por todo el aparato. El aparato se detiene
automáticamente si el recipiente de agua (14) está vacío.
Después de la descalcicación:
1. Coloque el ltro de carbón (20) en el depósito de agua (14).
2. Cierre la tapa (24).
3. Apague el aparato pulsando el interruptor on/o (1).
4. Mantenga pulsados el selector de cantidad de café (3) y el de intensidad del
café (4) hasta que desaparezca el indicador (D) del display (8) (ilustración C).
5. Limpie la parte exterior con un paño húmedo y a continuación séquela con un
paño limpio y seco.
6. El aparato está listo para su uso.
Sustituir ltro de carbón
1. Abra la tapa (24).
2. Si es necesario, vacíe el depósito de agua (14).
3. Retire el ltro de carbón (20) del depósito de agua (14).
4. Abra la tapa (25).
5. Retire el ltro antiguo de carbón (26).
6. Coloque el nuevo ltro de carbón (26).
7. Cierre la tapa (25).
Nota: El ltro de carbón activo no debe colocarse en el depósito de agua antes
de descalcicar el aparato. Esta condición no se aplica si utiliza el aparato por
primera vez.

74
ES
DETECCIÓN Y RESOLUCIÓN DE PROBLEMAS
Problema Posible causa Solución propuesta
No hay símbolos
en el display.
El aparato no está
conectado.
Conecte el enchufe.
No hay electricidad. Compruebe el fusible.
El display está averiado. Contacte con el servicio de
atención al cliente.
El fusible salta.
Hay demasiados aparatos
conectados a una toma de
corriente.
Conecte el aparato a una
toma de corriente propia.
El aparato está averiado. Contacte con el servicio de
atención al cliente.
El agua rebosa. Demasiada agua en el
depósito.
No llene en exceso el
depósito.
INDICACIONES SOBRE LA RETIRADA DEL APARATO
Si en su país existe una disposición legal relativa a la
eliminación de aparatos eléctricos y electrónicos, este
símbolo estampado en el producto o en el embalaje
advierte que no debe eliminarse como residuo doméstico.
En lugar de ello, debe depositarse en un punto de
recogida de reciclaje de aparatos eléctricos y electrónicos.
Una gestión adecuada de estos residuos previene
consecuencias potencialmente negativas para el medio
ambiente y la salud de las personas. Puede consultar más
información sobre el reciclaje y la eliminación de este
producto contactando con su administración local o con
su servicio de recogida de residuos.

75
IT
Avvertenze di sicurezza 76
Descrizione del prodotto 78
Pannello di controllo, tasti e spie 80
Messa in funzione e utilizzo 81
Pulizia e manutenzione 89
Ricerca e correzione degli errori 92
Avviso di smaltimento 92
DATI TECNICI
Numero articolo 10032865, 10032866, 10032874
Alimentazione 220-240 V ~ 50/60 Hz
Potenza 1000 W
Quantità di riempimento massima
(serbatoio) 1,25 L
PRODUTTORE E IMPORTATORE (UK)
Produttore:
Chal-Tec GmbH, Wallstraße 16, 10179 Berlino, Germania.
Importatore per la Gran Bretagna:
Chal-Tec UK limited
Unit 6 Riverside Business Centre
Brighton Road
Shoreham-by-Sea
BN43 6RE
United Kingdom
Gentile cliente,
La ringraziamo per aver acquistato il dispositivo. La
preghiamo di leggere attentamente le seguenti istruzioni
per l’uso e di seguirle per evitare possibili danni. Non ci
assumiamo alcuna responsabilità per danni scaturiti da una
mancata osservazione delle avvertenze di sicurezza e da
un uso improprio del dispositivo. Scansionare il codice QR
seguente, per accedere al manuale d’uso più attuale e per
ricevere informazioni sul prodotto.
INDICE

76
IT
AVVERTENZE DI SICUREZZA
Avvertenze di sicurezza generiche
• Leggere attentamente tutte le avvertenze prima dell’utilizzo e conservare il
manuale per future consultazioni.
• Utilizzare dispositivo e accessori solo per gli scopi previsti e secondo le
modalità descritte nel manuale.
• Non utilizzare il dispositivo se componenti o accessori sono danneggiati o
guasti. Se componenti o accessori dovessero essere danneggiati o guasti,
devono essere sostituiti dal produttore o da un’azienda tecnica autorizzata.
• Tenere sotto controllo i bambini per assicurarsi che non giochino con il
dispositivo.
• L’utilizzo del dispositivo da parte di bambini, persone con limitate capacità
siche, psichiche o motorie e persone con esperienza insuciente può
comportare pericoli. Chiunque sia responsabile del controllo di queste
persone deve fornire chiare istruzioni o essere presente durante l’utilizzo del
dispositivo.
• Non utilizzare il dispositivo vicino a vasche, docce, lavandini o altri contenitori
pieni d’acqua.
• Non immergere il dispositivo in acqua o altri liquidi.
• Se il dispositivo è stato immerso in acqua o altri liquidi, non tirarlo fuori con
le mani. Staccare immediatamente la spina. Il dispositivo non può essere più
utilizzato dopo che è stato immerso in acqua o altri liquidi.
• Il dispositivo è adatto al solo utilizzo casalingo e in ambienti similari, come
nella cucina dei dipendenti presso aziende, uci o altri ambienti lavorativi,
in agriturismi, per clienti di hotel, motel o altre tipologie di strutture per
pernottamento e bed & breakfast.
Sicurezza elettrica
• Controllare prima di ogni utilizzo che la tensione della rete elettrica
corrisponda a quella indicata sulla targhetta del dispositivo.
• Il dispositivo non è adatto all’utilizzo con timer esterni o con un sistema di
comando a distanza separato.
• Collegare il dispositivo a una presa elettrica con messa a terra. Se necessario,
utilizzare una prolunga con messa a terra e di diametro adeguato (almeno 3 x
1 mm2).
• Assicurarsi che non possa penetrare acqua nella spina di contatto del cavo di
alimentazione e della prolunga.
• Srotolare sempre completamente cavo di alimentazione e prolunga.
• Assicurarsi che il cavo non penzoli dal bordo di piani di lavoro, che non resti
impigliato e che non si corra il rischio di inciamparvi.
• Tenere il cavo lontano da calore, olio e bordi taglienti.
• Non utilizzare il dispositivo se cavo o spina sono danneggiati o guasti.
• Se cavo o spina sono danneggiati o guasti, devono essere sostituiti dal
produttore, da un’azienda tecnica autorizzata o da una persona con qualica
equivalente.

77
IT
• Non staccare la spina tirando dal cavo, ma impugnando saldamente la spina
stessa.
• Staccare la spina quando il dispositivo non è in utilizzo, prima di montaggio e
smontaggio e prima di pulizia e manutenzione.
Avvertenze di sicurezza per macchine del ca è
• Non utilizzare il dispositivo all’aperto.
• Non utilizzare il dispositivo in ambienti umidi.
• Se il dispositivo è pieno d’acqua, utilizzarlo solo in ambienti in cui non gela.
• Posizionare il dispositivo su una super cie piana e stabile.
• Posizionare il dispositivo su una super cie termoresistente e protetta dagli
spruzzi d’acqua.
• Non posizionare il dispositivo su un piano cottura.
• Non posizionare il dispositivo su super ci bollenti o vicino a amme libere.
• Assicurarsi che il dispositivo non entri in contatto con materiali in ammabili.
• Tenere il dispositivo lontano da fonti di calore.
• Fare attenzione a vapore e acqua bollente per evitare di ustionarsi.
• Quando il dispositivo non viene utilizzato, conservarlo in un luogo asciutto.
Assicurarsi che il dispositivo sia conservato fuori dalla portata dei bambini.
• La macchina del ca è è progettata per preparare ca è partendo da chicchi
interi o polvere. Il dispositivo è adatto solo per ambienti interni. Il prodotto è
adatto solo ad uso casalingo.
Smaltimento dell’imballaggio
AVVERTENZA
Pericolo di so ocamento! Smaltire immediatamente gli imballaggi
in plastica, in modo che i bambini non si facciano male.

78
IT
DESCRIZIONE DEL PRODOTTO

79
IT
1Tasto on/o ASpia quantità ca è
2 Tasto macina B Spia intensità ca è
3Selezionare quantità ca è C Spia timer
4Selezionare intensità ca è DSpia decalci cazione
5 Timer E Mantenimento calore
6 Tasto ore
7 Tasto minuti
8 Display
9Selezionare grado di nezza macina
10 Filtro permanente
11 Supporto del ltro
12 Tasto di sblocco (supporto del ltro)
13 Vano per chicchi ca è
14 Contenitore dell’acqua
15 Indicazione livello dell’acqua
16 Brocca del ca è
17 Indicazione livello ca è
18 Piastra riscaldante
19 Vano di macinatura
20 Supporto per ltro ai carboni
21 Spazzola/cacciavite
22 Apertura vapore
23 Tasto decalci cazione (tasti 3+4)
24 Coperchio serbatoio dell’acqua
25 Fissaggio ltro ai carboni
26 Filtro ai carboni
27 Coperchio contenitore chicchi di ca è
28 Copertura apertura di pulizia

80
IT
PANNELLO DI CONTROLLO, TASTI E SPIE

81
IT
MESSA IN FUNZIONE E UTILIZZO
Prima di procedere all’utilizzo
• Pulire il dispositivo. Fare riferimento al paragrafo “Pulizia e manutenzione”.
• Pulire gli accessori. Fare riferimento al paragrafo “Pulizia e manutenzione”.
Impostare l’orologio (immagini B & C)
Quando si collega la spina, il display (8) si accende per indicare che è possibile
impostare l’orologio. L’orologio può essere impostato anche successivamente.
1. Premere più volte il tasto delle ore (6) per impostare le ore.
2. Premere più volte il tasto dei minuti (7) per impostare i minuti.
3. L’orario viene mostrato sul display (8).
Utilizzo
ATTENZIONE
Pericolo di ustioni! Tenere mani, viso e altre parti del corpo lontano
dall’apertura del vapore. Il vapore che esce dal dispositivo è
bollente. Non coprire l’apertura del vapore.
• Prima del primo utilizzo il dispositivo viene impostato per la preparazione con
ca è in chicchi.
• Dopo ogni utilizzo il dispositivo salva le ultime impostazioni utilizzate:
preparazione con ca è in chicchi o in polvere.
Nota: il dispositivo può essere utilizzato solo se il display è attivato. Se il display
non è attivato, premere un tasto qualunque per attivarlo. Il dispositivo è ora
pronto all’uso.
Impostare la quantità di ca è (immagini B & C)
• Il tasto per selezionare la quantità di ca è (3) serve a impostare la quantità di
ca è desiderata. Può essere regolato su 2, 4, 6, 8 o 10 tazze.
• Premere più volte il tasto (3) per impostare la quantità di ca è desiderata. Il
numero di tazze (A) viene mostrato sul display (8).
• Funzione AROMA: premere a lungo sul tasto per selezionare la quantità
di ca è (3) per aprire il livello “AROMA”. Il simbolo si illumina e l’elemento
riscaldante si riscalda a intervalli.

82
IT

83
IT
Impostare l’intensità del caè (immagini B & C)
• Il tasto per selezionare l’intensità del caè (4) viene utilizzato per impostare
l’intensità desiderata. Può essere impostato su leggero (MILD), media intensità
(MEDIUM) e caè forte (STRONG).
• Premere più volte il tasto (4) per impostare l’intensità desiderata. L’intensità
selezionata (B) viene mostrata sul display (8).
Funzione di avvio programmato (immagini B & C)
Il dispositivo è dotato di una funzione di avvio programmato, che permette di
programmare l’inizio della preparazione del caè. Questa funzione può essere
selezionata tramite il tasto timer (5).
1. Impostare l’orologio. Controllare se è già stato impostato. Se non è così, fare
riferimento al paragrafo “Impostare l’orologio”.
2. Tenere premuto il tasto timer (5), no a quando l’orologio sul display
lampeggia.
3. Premere più volte il tasto delle ore (6) per impostare le ore.
4. Premere più volte il tasto dei minuti (7) per impostare i minuti.
5. Impostare la quantità di caè. Fare riferimento al paragrafo “Impostare la
quantità di caè”.
6. Impostare l’intensità del caè. Fare riferimento al paragrafo “Impostare
l’intensità del caè”.
7. Se si procede alla preparazione con caè in polvere, spegnere la funzione di
macinatura prima di utilizzare l’avvio programmato.
8. Premere il tasto timer (5) per salvare le impostazioni. L’indicazione timer (C)
rimane costantemente accesa.
9. Per interrompere la procedura, premere di nuovo il tasto timer (5).
L’indicazione timer (C) scompare.
Riempire il contenitore dell’acqua (immagine D)
• Spegnere il dispositivo e staccare la spina prima di riempire il contenitore
dell’acqua.
• Non aggiungere quantità d’acqua superiore a quella necessaria per la
preparazione del caè. Il dispositivo si arresta automaticamente quando il
contenitore dell’acqua è vuoto.
• Non utilizzare il dispositivo se il contenitore dell’acqua è vuoto.
• Quando si riempie il contenitore, non superare il segno che indica il
riempimento massimo (10 tazze). Durante l’utilizzo, assicurarsi sempre che il
livello dell’acqua sia sopra il livello minimo (2 tazze).
• Aggiungere solo acqua fredda nel contenitore.
• Non utilizzare acqua frizzante o altri liquidi per riempire il contenitore.
• Non versare acqua nel vano per i chicchi di caè.

84
IT

85
IT
Come riempire il contenitore dell’acqua:
1. Aprire il coperchio (24).
2. Riempire il contenitore dell’acqua (14) no al livello desiderato sulla scala di
riempimento (15).
3. Non aggiungere quantità d’acqua superiore a quella necessaria per la
preparazione del caè. Il dispositivo si arresta automaticamente quando il
contenitore dell’acqua è vuoto.
4. Chiudere il coperchio (24).
Impostare il grado di nezza della macinatura (immagine E)
• La manopola per selezionare il grado di nezza della macinatura (9) viene
utilizzata con il caè in chicchi. Può essere regolata su diverse posizioni, per
avere caè in polvere ne o grossolana.
• Ruotare la manopola (9) sulla posizione desiderata per impostare il grado di
nezza della macinatura.
Passare dalla caraa in vetro alla caraa termica
• Premere a lungo sul tasto della macina (2) per passare tra funzione caraa in
vetro/caraa termica.
• Quando si accende l’indicazione di mantenimento calore (E), è possibile
utilizzare la caraa in vetro.
Nota: non utilizzare in nessun caso la piastra riscaldante con la caraa termica,
in quanto può formarsi un accumulo di calore.
Togliere e mettere il coperchio della caraa in vetro
Alcuni dispositivi sono dotati di un’ulteriore caraa in vetro. Il coperchio della
caraa in vetro può essere staccato come indicato di seguito:
123
Aprire il coperchio in
direzione della freccia
Ruotare il coperchio
in direzione della
freccia e premere
contemporaneamente
con la mano sinistra
il pin sul manico della
caraa. Staccare il
coperchio
Spingere il pin di
nuovo nel manico
della caraa e
ruotare il coperchio
in direzione della
freccia. Procedere a
chiudere il coperchio.

86
IT

87
IT
Togliere e mettere il coperchio della caraa termica
• Togliere: ruotare il coperchio in senso antiorario.
• Mettere: mettere il coperchio sulla caraa, in modo che la leva di rilascio
sia rivolta a destra. Ruotare il coperchio in senso orario no al bloccaggio. Il
coperchio è chiuso.
• Versare: tenere premuta la leva di rilascio e versare.
Nota: si consiglia di riscaldare la caraa termica con acqua bollente prima
dell’utilizzo.
Preparazione con caè in chicchi (immagini A-H)
Nota: utilizzare solo caè in grani e sacchetti per ltro a cestello da 80/200 mm.
1. Se la funzione di macinatura non è attivata, premere il tasto macina (2). La
quantità e l’intensità del caè vengono mostrate sul display.
2. Aggiungere la quantità d’acqua necessaria nel contenitore (14). Non
aggiungere quantità d’acqua superiore a quella necessaria per la preparazione
del caè. Il dispositivo si arresta automaticamente quando il contenitore
dell’acqua è vuoto.
3. Aprire il coperchio del contenitore per i chicchi di caè (27).
4. Riempire completamente il vano per chicchi di caè (13).
5. Chiudere il coperchio (27).
6. Impostare il grado di nezza per la macinatura. Fare riferimento al paragrafo
“Impostare il grado di nezza della macinatura”.
7. Premere il tasto di sblocco (12) per aprire il supporto del ltro (11).
8. Inserire un ltro appropriato nel portaltro (10).
9. Chiudere il supporto del ltro (11) no a quando il tasto di sblocco (12) si
innesta.
10. Impostare la quantità di caè desiderata. Fare riferimento al paragrafo
“Impostare la quantità di caè”.
11. Impostare l’intensità del caè desiderata. Fare riferimento al paragrafo
“Impostare l’intensità del caè”.
12. Posizionare il bricco (16) sulla piastra riscaldante (18).
13. Accendere il dispositivo con il tasto On/O (1). Il simbolo delle tazze di caè
(E) compare sul display. Dopo pochi secondi, il dispositivo inizia a macinare i
chicchi e a preparare il caè.
14. Per interrompere la procedura, premere il tasto On/O (1).
15. A preparazione terminata, il dispositivo emette un segnale acustico e passa
alla modalità di mantenimento calore. Il simbolo delle tazze di caè (E)
comincia a lampeggiare. Il dispositivo può essere spento premendo il tasto
On/O (1) o si spegne da solo dopo 40 minuti.
16. Lasciare rareddare completamente il dispositivo.

88
IT

89
IT
Preparazione con caè macinato (immagini A, B, C, D, F & G)
Nota: utilizzare solo caè macinato e sacchetti per ltro a cestello da 80/200
mm.
1. Se la funzione di macinatura è attivata, premere il tasto macina (2) per
disattivarla. La quantità e l’intensità del caè non vengono mostrate sul
display.
2. Aggiungere la quantità d’acqua necessaria nel contenitore (14). Non
aggiungere quantità d’acqua superiore a quella necessaria per la preparazione
del caè. Il dispositivo si arresta automaticamente quando il contenitore
dell’acqua è vuoto.
3. Premere il tasto di sblocco (12) per aprire il supporto del ltro (11).
4. Inserire un ltro appropriato nel portaltro (10).
5. Mettere la quantità di caè desiderata nel ltro.
6. Chiudere il supporto del ltro (11) no a quando il tasto di sblocco (12) si
innesta.
7. Posizionare il bricco (16) sulla piastra riscaldante (18).
8. Accendere il dispositivo con il tasto On/O (1). Il simbolo delle tazze di caè
(E) compare sul display. Dopo pochi secondi, il dispositivo inizia a preparare il
caè.
9. Per interrompere la procedura, premere il tasto On/O (1).
10. A preparazione terminata, il dispositivo emette un segnale acustico e passa
alla modalità di mantenimento calore. Il simbolo delle tazze di caè (E)
comincia a lampeggiare. Il dispositivo può essere spento premendo il tasto
On/O (1) o si spegne da solo dopo 40 minuti.
11. Lasciare rareddare completamente il dispositivo.
PULIZIA E MANUTENZIONE
• Prima di pulizia e manutenzione, spegnere il dispositivo, staccare la spina e
attendere che si sia completamente rareddato.
• Non immergere il dispositivo in acqua o altri liquidi.
• Non utilizzare detergenti aggressivi o corrosivi per pulire il dispositivo.
• Non pulire il dispositivo con oggetti alati.
• Controllare regolarmente il dispositivo per eventuali danni.
• Pulire gli accessori:
- Pulire il bricco con acqua e sapone.
- Pulire il supporto del ltro con acqua e sapone.
- Pulire il coperchio del vano per i chicchi di caè con acqua e sapone.
- Asciugare con cura gli accessori.
• Pulire l’esterno del dispositivo con un panno umido e asciugarlo con un panno
asciutto e pulito.
• Conservare il dispositivo e gli accessori nell’imballaggio originale.
• Conservare il dispositivo in un luogo asciutto, senza gelo e fuori dalla portata
dei bambini.

90
IT
Pulire il vano di macinatura (immagini C & I)
Nota: durante la macinatura di chicchi, la polvere di caè può otturare la
macina. Per evitare che ciò accada, pulire il vano di macinatura (19) ogni 2
settimane.
Prima di pulire il vano di macinatura è necessario realizzare questi passaggi:
1. Spegnere il dispositivo
2. Staccare la spina.
3. Rimuovere la brocca dalla piastra riscaldante.
4. Svuotare il supporto del ltro. Inserire un ltro per caè adatto. Chiudere il
supporto.
5. Sganciare il blocco della copertura (28) premendo il tasto piccolo.
6. Rimuovere la copertura (28).
7. Pulire la macina (19) con la spazzola (21).
8. Riposizionare la copertura (28).
Decalcicare il dispositivo (immagini A-D)
• Il dispositivo deve essere decalcicato ogni 70 preparazioni. Lasciando inserita
la spina, il dispositivo tiene conto del numero di preparazioni.
• L’indicazione (D) lampeggia sul display, quando è necessario decalcicare il
dispositivo.
• Utilizzare un prodotto per decalcicare adatto. Prodotti appositi possono
essere acquistati presso rivenditori specializzati.
• Prima di procedere alla decalcicazione, staccare la spina e attendere che il
dispositivo si sia rareddato.
• Non immergere il dispositivo in acqua o altri liquidi.
• Assicurarsi che la funzione di macinatura non sia attiva mentre si decalcica il
dispositivo.
Come iniziare la decalcicazione:
1. Aprire il coperchio (24).
2. Se necessario, svuotare il contenitore dell’acqua (14).
3. Rimuovere il supporto del ltro ai carboni (20) dal contenitore dell’acqua (14).
4. Mettere un prodotto decalcicante adatto nel contenitore dell’acqua (14).
5. Posizionare la brocca (16) sulla piastra riscaldante (18).
6. Inserire la spina nella presa elettrica.
7. Accendere il dispositivo con il tasto On/O (1).
8. Far andare il dispositivo, no a quando 1⁄3 del decalcicante si trova nella
brocca (16).
9. Spegnere il dispositivo con il tasto On/O (1).
10. Lasciare agire il decalcicante per circa 30 minuti.
11. Accendere il dispositivo con il tasto On/O (1).

91
IT
12. Lasciare in funzione il dispositivo, no a quando il decalcicante restante si
trova nella brocca (16). Il dispositivo si arresta automaticamente quando il
contenitore dell’acqua (14) è vuoto.
Risciacquare il dispositivo 2 volte seguendo questa procedura:
1. Riempire il contenitore dell’acqua (14) con acqua pulita no al segno che indica
il livello massimo (15).
2. Posizionare il bricco vuoto (16) sulla piastra riscaldante (18).
3. Accendere il dispositivo con il tasto On/O (1).
4. Far scorrere tutta l’acqua attraverso il dispositivo. Il dispositivo si arresta
automaticamente quando il contenitore dell’acqua (14) è vuoto.
Dopo la procedura di decalcicazione:
1. Posizionare il supporto del ltro ai carboni (20) nel contenitore dell’acqua (14).
2. Chiudere il coperchio (24).
3. Spegnere il dispositivo con il tasto On/O (1).
4. Tenere premuti i tasti per la quantità (3) e per l’intensità del caè (4), no a
quando l’indicazione (D) scompare dal display (8) (immagine C).
5. Pulire l’esterno del dispositivo con un panno umido e asciugarlo con un panno
pulito e asciutto.
6. Il dispositivo è pronto all’uso.
Sostituire il ltro ai carboni
1. Aprire il coperchio (24).
2. Se necessario, svuotare il contenitore dell’acqua (14).
3. Rimuovere il supporto del ltro ai carboni (20) dal contenitore dell’acqua (14).
4. Aprire la copertura (25).
5. Rimuovere il vecchio ltro ai carboni (26).
6. Inserire il nuovo ltro ai carboni (26).
7. Chiudere la copertura (25).
Nota: il supporto del ltro ai carboni non deve essere rimesso nel contenitore
dell’acqua prima della decalcicazione del dispositivo. Questo non vale se il
dispositivo viene messo in funzione per la prima volta.

92
IT
RICERCA E CORREZIONE DEGLI ERRORI
Problema Possibile causa Soluzioni
Nessun simbolo
sul display
Il dispositivo non è
collegato alla rete elettrica.
Collegare la spina.
Non c’è corrente. Controllare il fusibile.
Il display è guasto. Rivolgersi al servizio clienti.
Il fusibile salta.
Troppi dispositivi collegati
alla stessa presa elettrica.
Collegare il dispositivo a
un’altra presa elettrica.
Il dispositivo è guasto. Rivolgersi al servizio clienti.
Fuoriuscita
d’acqua.
Troppa acqua nel serbatoio. Non riempire
eccessivamente il serbatoio.
AVVISO DI SMALTIMENTO
Se nel proprio paese si applicano le regolamentazioni
inerenti lo smaltimento di dispositivi elettrici ed
elettronici, questo simbolo sul prodotto o sulla confezione
segnala che questi prodotti non possono essere
smaltiti con i riuti normali e devono essere portati a
un punto di raccolta di dispositivi elettrici ed elettronici.
Grazie al corretto smaltimento dei vecchi dispositivi si
tutela il pianeta e la salute delle persone da possibili
conseguenze negative. Informazioni riguardanti il riciclo
e lo smaltimento di questi prodotti si ottengono presso
l’amministrazione locale oppure il servizio di gestione dei
riuti domestici.

93
CZ
Vážený zákazníku,
Gratulujeme Vám k zakoupení produktu Prosím, důkladně
si přečtete manuál a dbejte na následující pokyny, aby se
zabránilo škodám na zařízení. Jakékoliv selhání způsobené
ignorováním uvedených instrukcí a upozornění uvedených v
návodu k použití se nevztahuje na naši záruku a jakoukoliv
odpovědnost. Naskenujte QR kód, abyste získali přístup k
nejnovějšímu uživatelskému manuálu a dalším informacím.
OBSAH
Bezpečnostní pokyny 94
Popis produktu 96
Ovládací panel, tlačítka a indikátory 98
Použití a provoz 99
Čištění a údržba 107
Řešení problémů 110
Opatření při likvidaci zboží 110
TECHNICKÁ DATA
Kód produktu 10032865, 10032866, 10032874
Napájení 220-240 V ~ 50/60 Hz
Spotřeba energie 1000 W
Maximální kapacita (nádrž na vodu) 1,25 L
VÝROBCE & DOVOZCE (UK)
Výrobce:
Chal-Tec GmbH, Wallstraße 16, 10179 Berlín, Německo.
Dovozce pro Velkou Británii:
Chal-Tec UK limited
Unit 6 Riverside Business Centre
Brighton Road
Shoreham-by-Sea
BN43 6RE
Velká Británie

94
CZ
BEZPEČNOSTNÍ POKYNY
Všeobecní bezpečnost
• Před použitím si pečlivě přečtěte tuto příručku a uschovejte ji pro budoucí
použití.
• Spotřebič a příslušenství používejte pouze na určené účely a příslušenství
nepoužívejte jinak, než je uvedeno v návodu.
• Nepoužívejte spotřebič, pokud je poškozen nebo pokud je poškozena některá
část nebo veškeré příslušenství. Pokud je část spotřebiče nebo příslušenství
poškozeno, musí být vyměněny výrobcem nebo autorizovaným servisním
technikem.
• Děti musí být pod dozorem, aby se zajistilo, že se se zařízením nebudou hrát.
• Používání tohoto zařízení dětmi nebo osobami s fyzickým, smyslovým,
mentálním nebo motorickým postižením nebo nedostatkem zkušeností a
znalostí může vést k nebezpečí. Osoby odpovědné za jejich bezpečnost by
měly poskytnout pokyny k používání, nebo dohlížet na bezpečné používání
spotřebiče.
• Nepoužívejte spotřebič v blízkosti van, sprch, umyvadel nebo jiných nádob
obsahujících vodu.
• Zařízení neponořujte do vody nebo do jiné tekutiny.
• Pokud je spotřebič ponořen do vody nebo jiné kapaliny a stále je zapojen
do elektrické sítě, nevyjímejte ho rukama. Ihned odpojte síťovou zástrčku ze
zásuvky. Pokud byl spotřebič ponořen do vody nebo jiné kapaliny tak ho více
nepoužívejte.
• Tento spotřebič je určen pro použití v domácnostech a podobných místech,
jako například kuchyňské prostory pro zaměstnance v obchodech, kancelářích
a jiných pracovních prostředích; pro klienty v hotelech, motelech a jiném
prostředí rezidenčního typu.
Bezpečnost při používání elektrického zařízení
• Před použitím zkontrolujte, zda je použito napětí stejné, jako napětí uvedené
na přístroji na informačním štítku.
• Zařízení nejsou určeny k provozu pomocí externího časovače nebo
samostatného dálkového ovládání.
• Spotřebič připojte k uzemněné zásuvce. V případě potřeby použijte uzemněný
prodlužovací kabel s vhodným průměrem (nejméně 3 x 1 mm²).
• Ujistěte se, že voda nemůže vniknout do kolíků na zástrčce síťového kabelu
nebo do prodlužovacího kabelu.
• Síťový kabel nebo prodlužovací kabel nesmí být zapleten.
• Ujistěte se, že síťový kabel nevisí z okraje kuchyňské linky a nedá se náhodně
zachytit nebo se o něj nedá klopýtnout.
• Síťový kabel udržujte mimo dosah tepla, oleje a ostrých hran.
• Nepoužívejte spotřebič, pokud je poškozen napájecí kabel nebo zástrčka.
• Pokud je síťový kabel nebo zástrčka poškozena, opravu musí provést výrobce,
autorizovaný servisní technik nebo kvalikovaná osoba.

95
CZ
• Netahejte síťový kabel, abyste odpojili síťovou zástrčku od elektrické sítě.
• Před montáží nebo demontáží a před čištěním a údržbou odpojte síťovou
zástrčku, když se spotřebič nepoužívá.
Bezpečnostní pokyny pro kávovary
• Spotřebič nepoužívejte venku.
• Spotřebič nepoužívejte v prostředí, kde se nachází pára.
• Pokud je v nádrži voda, okolní teplota nesmí klesnout pod bod mrazu.
• Spotřebič umístěte na plochý a stabilní povrch.
• Umístěte spotřebič na tepelně odolný povrch.
• Neumisťujte spotřebič na varnou desku.
• Spotřebič neumísťujte na horké povrchy nebo do blízkosti otevřeného ohně.
• Ujistěte se, že zařízení není v kontaktu s hořlavým materiálem.
• Udržujte spotřebič mimo zdrojů tepla.
• Buďte opatrní s horkou vodou a párou, abyste předešli popáleninám.
• Když spotřebič nepoužíváte, skladujte jej na suchém místě. Ujistěte se, že děti
nemají přístup k uloženému zařízení.
• Kávovar je pro přípravu kávy s kávových zrn nebo mleté kávy. Přístroj je
vhodný pouze pro vnitřní použití. Produkt je určen pouze pro použití v
domácnosti.
Obaly zlikvidujte
VAROVÁNÍ
Nebezpečí udušení se obaly! Plastové obaly okamžitě zlikvidujte,
aby si děti neublížili.

96
CZ
POPIS PRODUKTU

97
CZ
1Tlačítko zapnutí / vypnutí AIndikátor množství kávy
2Tlačítko mlýnku na kávu B Indikátor síly kávy
3Tlačítko na volení množství kávy CIndikátor časovače
4Tlačítko pro výběr síly kávy DIndikátor na odstranění vodního kamene
5Tlačítko časovače EIndikátor udržování teploty
6Tlačítko hodin
7Tlačítko minut
8 Displej
9 Selektor jemnosti kávy
10 Trvalý ltr
11 Sestava držáku ltru
12 Uvolňovací tlačítko
(sestava držáku ltru)
13 Nádoba na kávová zrna
14 Vodní nádrž
15 Indikátor úrovně vody
16 Nádoba na kávu
17 Indikátor úrovně kávy
18 Ohřívací deska
19 Prostor mlýnku na kávu
20 Držák uhlíkového ltru
21 Štětec
22 Vývod páry
23 Tlačítko na odstranění vodního kamene (3 + 4)
24 Kryt nádrže na vodu
25 Držák uhlíkového ltru
26 Prostor uhlíkového ltru
27 Kryt nádoby na kávová zrna
28 Kryt pro čištění prostoru mlýnku

98
CZ
OVLÁDACÍ PANEL, TLAČÍTKA A INDIKÁTORY

99
CZ
POUŽITÍ A PROVOZ
Před prvním použitím
• Vyčistěte zařízení. Viz „Čištění a údržba“.
• Vyčistěte příslušenství. Viz „Čištění a údržba“.
Nastavení hodin (obr. B a C)
Pokud je síťová zástrčka zasunuta do zásuvky, rozsvítí se displej indikátor (8), který
indikuje, že hodiny mohou být nastaveny. Hodiny lze kdykoliv později upravit.
1. Opakovaným stiskem tlačítka hodin (6) nastavte hodiny.
2. Opakovaným stiskem tlačítka minut (7) nastavte minuty.
3. Na displeji (8) se zobrazí čas.
Použití
UPOZORNĚNÍ
Riziko opaření! Ruce, obličej a další části těla udržujte mimo otvoru
pro páru. Během používání se pára z přístroje zahřeje na vysokou
teplotu. Nezakrývejte otvor pro vypouštění páry.
• Zařízení je možné použít na výrobu kávy z kávových zrn nebo mleté kávy.
• Před prvním použitím je spotřebič nastaven na výrobu kávy z kávových zrn.
• Po každém použití si spotřebič zapamatuje poslední použité nastavení pro
další použití: Výroba kávy z kávových zrn nebo mleté kávy.
Poznámka: Spotřebič lze použít pouze tehdy, když je aktivován displej. Pokud
displej není aktivován a pokud chcete aktivovat zobrazení, stiskněte libovolné
tlačítko. Zařízení bude připraveno k použití.
Nastavení množství kávy (obr. B a C)
• Pro nastavení požadovaného množství kávy se používá volič množství kávy (3).
Můžete jej nastavit na 2, 4, 6, 8 nebo 10 šálků.
• Opakovaně stiskněte tlačítko na zvolení množství kávy (3) pro nastavení
množství kávy. Na displeji (8) se zobrazí počet šálků (A).
• Funkce aroma: Dlouhým stiskem tlačítka na zvolení množství kávy (3)
vstoupíte do fáze „AROMA“, rozsvítí se ikona a topná trubice se v určitých
intervalech zahřívá.

100
CZ

101
CZ
Nastavení síly kávy (obr. B a C)
• Tlačítko pro nastavení síly kávy (4) se používá k nastavení požadované síly
kávy. Může být nastavena na mírně silnou kávu (MILD), středně silnou kávu
(MEDIUM) a silnou kávu (STRONG).
• Opakovaně stiskněte tlačítko na zvolení síly kávy (4) pro nastavení síly kávy.
Síla kávy (B) se zobrazuje na displeji (8).
Funkce zpožděného startu (obr. B a C)
Zařízení má funkci zpožděného startu, která umožňuje naprogramovat čas
spuštění vaření kávy. Spuštění zpožděného startu lze zvolit pomocí tlačítka
časovače (5).
1. Nastavte hodiny. Zkontrolujte, zda již byly nastaveny hodiny. Pokud hodiny
nejsou nastaveny, viz „Nastavení hodin“.
2. Držte tlačítko časovače (5) stisknuté, dokud hodiny na displeji bliknou.
3. Opakovaným stiskem tlačítka hodin (6) nastavte hodiny.
4. Opakovaným stiskem tlačítka minut (7) nastavte minuty.
5. Nastavte množství šálků kávy. Viz „Nastavení množství kávy“.
6. Nastavte sílu kávy. Viz „Nastavení síly kávy“.
7. Pokud chcete připravit kávu s mletou kávou, vypněte funkci mletí před
použitím funkce zpožděný start.
8. Stisknutím tlačítka časovače (5) uložte nastavení. Indikátor časovače (C) bude
svítit nepřetržitě.
9. Chcete-li proces přerušit, stiskněte znovu tlačítko časovače (5). Indikátor
časovače (C) se vypne.
Naplnění zásobníku na vodu (obr. D)
• Před údržbou vypněte spotřebič a odpojte síťovou zástrčku od síťové zásuvky.
• Nelijte do nádrže na vodu více vody, než je potřebné pro přípravu kávy.
Používejte pouze množství vody potřebné pro přípravu kávy. Zařízení se
automaticky zastaví, když je zásobník vody prázdný.
• Nepoužívejte spotřebič s prázdnou nádrží na vodu.
• Při plnění zásobníku vody nepřekračujte maximální značku (10 šálků). Ujistěte
se, že během používání je hladina vody vždy nad minimální značkou (2 šálky).
• K plnění zásobníku vody používejte pouze studenou vodu.
• Na naplnění zásobníku vody nepoužívejte sycenou vodu ani jiné kapaliny.
• Nelijte vodu do prostoru na kávová zrna.

102
CZ

103
CZ
Naplnění nádrže na vodu:
1. Otevřete kryt (24).
2. Naplňte nádrž na vodu (14) jen do požadované úrovně, nebo do značky max.
3. Nelijte do nádrže na vodu více vody, než je potřebné pro přípravu kávy.
Používejte pouze množství vody potřebné pro přípravu kávy. Zařízení se
automaticky zastaví, když je zásobník vody prázdný.
4. Zavřete kryt (24).
Nastavení jemnosti kávy (obrázek E)
• Tlačítko pro nastavení jemnosti kávy (9) se používá k nastavení požadované
jemnosti mleté kávy při použití kávových zrn. Mohou být nastaveny na různé
úrovně, od jemně pomleté kávy až po kávová zrna namleté na hrubo.
• Pro nastavení jemnosti mleté kávy otočte tlačítko pro nastavení jemnosti kávy
(9) do požadované polohy.
Změna skleněné nádoby na termosku
• Stiskněte a podržte tlačítko na mletí kávy (2), čímž můžete volit mezi skleněnou
nádobou a termoskou.
• Když se rozsvítí indikátor udržování teploty (E), je možné použít skleněnou
nádobu.
Poznámka: Na ohřátí tekutiny v termosce nepoužívejte ohřev, protože teplo se
může akumulovat uvnitř.
Odstranění a namontování víka skleněné nádoby
Některá zařízení jsou vybavena skleněnou nádobou. Chcete-li odstranit víko,
postupujte následovně:
123
Otevřete víko ve
směru, jak naznačuje
šipka.
Otočte víko ve směru
šipky a uvolněte levý
čep
víka z držáku. Nyní je
možné víko odstranit.
Nejdříve vložte pravý
kolík do držáku a pak
otočte víko ve směru
šipky tak, aby byl
levý čep zablokován.
Zavřete víko.

104
CZ

105
CZ
Odstranění a namontování víka termosky
• Odstraňte víko: Otočte víko proti směru hodinových ručiček. Nyní je možné
víko odstranit.
• Namontujte víko: Umístěte víko na džbán tak, aby uvolňovací páčka směřovala
doprava. Otáčejte víko ve směru hodinových ručiček, dokud se nezastaví. Víko
je nyní zavřené.
• Nalévání kávy: Podržte uvolňovací páčku, abyste nalili kávu.
Poznámka: Před použitím doporučujeme předehřátí termosky pomocí horké
vody.
Příprava kávy s kávovými zrny (obrázky A - H)
Poznámka: Používejte pouze kávové zrna a košíčkové ltrové sáčky o velikosti
80/200 mm.
1. Pokud není funkce mletí aktivována, stiskněte tlačítko na mletí kávy (2), čímž
aktivujete funkci mletí. Množství kávy a síla kávy se zobrazují na displeji.
2. Naplňte nádrž na vodu (14) potřebným množstvím vody. Nelijte do nádrže na
vodu více vody, než je potřebné pro přípravu kávy. Používejte pouze množství
vody potřebné pro přípravu kávy. Zařízení se automaticky zastaví, když je
zásobník vody prázdný.
3. Otevřete kryt přihrádky na kávová zrna (27).
4. Zásobník na kávová zrna (13) naplňte kávovými zrny.
5. Zavřete kryt (27).
6. Nastavte jemnost kávy. Viz „Nastavení jemnosti kávy“.
7. Stisknutím tlačítka (12) otevřete sestavu držáku ltru (11).
8. Do držáku na kávový ltr (10) vložte vhodný kávový ltr.
9. Zavřete sestavu držáku ltru (11), dokud nezapadne uvolňovací tlačítko (12) na
své místo.
10. Nastavte množství šálků kávy. Viz „Nastavení množství kávy“.
11. Nastavte sílu kávy. Viz „Nastavení síly kávy“.
12. Umístěte nádobu na kávu (16) na topnou desku (18).
13. Zapněte spotřebič stisknutím tlačítka zapnutí / vypnutí (1). Zobrazí se symbol
šálku kávy (E). Po několika sekundách spotřebič začne mlít kávová zrna a
připravovat kávu.
14. Chcete-li proces přerušit, stiskněte tlačítko zapnutí / vypnutí (1).
15. Pokud je proces dokončen, spotřebič zapípá a přepne se do režimu udržování
teploty. Symbol šálku kávy (E) začne blikat. Zařízení lze vypnout stisknutím
tlačítka zapnutí / vypnutí (1) nebo se zařízení po 40 minut automaticky vypne.
16. Nechte spotřebič zcela vychladnout.

106
CZ

107
CZ
Příprava kávy s mletou kávou (obrázky A, B, C, D, F & G)
Poznámka: Používejte pouze mleté kávové a košové ltrační sáčky velikosti
80/200 mm.
1. Pokud není funkce mletí aktivována, stiskněte tlačítko na mletí kávy (2), čímž
aktivujete funkci mletí. Množství kávy a síla kávy se zobrazují na displeji.
2. Naplňte nádrž na vodu (14) potřebným množstvím vody. Nelijte do nádrže na
vodu více vody, než je potřebné pro přípravu kávy. Používejte pouze množství
vody potřebné pro přípravu kávy. Zařízení se automaticky zastaví, když je
zásobník vody prázdný.
3. Stisknutím tlačítka (12) otevřete sestavu držáku ltru (11).
4. Do držáku na kávový ltr (10) vložte vhodný kávový ltr.
5. Vložte požadované množství kávy do kávového ltru.
6. Zavřete sestavu držáku ltru (11), dokud nezapadne uvolňovací tlačítko (12) na
své místo.
7. Umístěte nádobu na kávu (16) na topnou desku (18).
8. Zapněte spotřebič stisknutím tlačítka zapnutí / vypnutí (1). Zobrazí se symbol
šálku kávy (E). Zařízení začne připravovat kávu.
9. Chcete-li proces přerušit, stiskněte tlačítko zapnutí / vypnutí (1).
10. Pokud je proces dokončen, spotřebič zapípá a přepne se do režimu udržování
teploty. Symbol šálku kávy (E) začne blikat. Zařízení lze vypnout stisknutím
tlačítka zapnutí / vypnutí (1) nebo se zařízení po 40 minut automaticky vypne.
11. Nechte spotřebič zcela vychladnout.
ČIŠTĚNÍ A ÚDRŽBA
• Před čištěním nebo údržbou vždy vypněte spotřebič, odpojte síťovou zástrčku
ze zásuvky a počkejte, dokud se spotřebič nevychladne.
• Přístroj neponořujte do vody ani do jiných kapalin.
• K čištění spotřebiče nepoužívejte agresivní nebo abrazivní čisticí prostředky.
• K čištění spotřebiče nepoužívejte ostré předměty.
• Pravidelně zkontrolujte, zda nedošlo k poškození spotřebiče.
• Vyčistěte příslušenství.
- Čištění příslušenství:
- Vyčistěte držák kávového ltru v mýdlové vodě.
- Vyčistěte víko prostoru na kávové zrno v mýdlové vodě.
- Příslušenství důkladně vysušte.
• Vyčistěte vnější části spotřebiče vlhkým hadříkem. Osušte vnější části
spotřebiče čistým suchým hadříkem.
• Přístroj a příslušenství odložte do původního obalu.
• Přístroj skladujte na suchém místě mimo dosah dětí.

108
CZ
Čištění prostoru mlýnku na kávu (obr. C & I)
Poznámka: Při mletí kávových zrn může kávový prach ucpat mlecí
mechanismus. Prostor mlýnku na kávu (19) je doporučeno čistit každé 2 týdny,
aby se zabránilo ucpávání mlýnku.
Před čištěním mlýnku na kávu je třeba provést následující kroky:
1. Vypněte spotřebič.
2. Ihned odpojte síťovou zástrčku ze zásuvky.
3. Odstraňte nádobu na kávu z topné desky.
4. Vyprázdněte držák kávového ltru. Vložte vhodný ltr na kávu. Zavřete sestavu
držáku ltru.
5. Uvolněte zámek na krytu (28) stlačením malého tlačítka.
6. Odstraňte kryt (28).
7. Mlýnek na kávu (19) očistěte pomocí kartáče (21).
8. Vraťte kryt na své místo (28).
Odstranění vodního kamene (obr. A až D)
• Vodní kámen ze spotřebiče musí být odstraněn po každých 70 cyklech přípravy
kávy. Pokud necháte síťovou zástrčku v elektrické zásuvce, spotřebič bude
sledovat počet cyklů vaření.
• Indikátor (D) bude blikat na displeji, což naznačuje, že ze spotřebiče musí být
odstraněn vodní kámen.
• Pokud je třeba odstranit vodní kámen ze zařízení, použijte vhodný prostředek
na odstraňování vodního kamene. Speciální prostředky na odstraňování
vodního kamene jsou k dispozici ve specializovaných prodejnách.
• Před odstraněním vodního kamene ze spotřebiče odpojte síťovou zástrčku ze
zásuvky a počkejte, dokud spotřebič nevychladne.
• Přístroj neponořujte do vody ani do jiných kapalin.
• Ujistěte se, že při odstranění vodního kamene ze spotřebiče není aktivována
funkce mletí kávy.
Chcete-li spustit proces odstranění vodního kamene:
1. Otevřete kryt (24).
2. Pokud je to nutné, vyprázdněte nádrž na vodu (14).
3. Vyjměte držák uhlíkového ltru (20) z nádrže na vodu (14).
4. Naplňte nádrž na vodu (14) vhodným prostředkem k odstranění vodního
kamene.
5. Umístěte nádobu na kávu (16) na topnou desku (18).
6. Zasuňte síťovou zástrčku do síťové zásuvky.
7. Zapněte spotřebič stisknutím tlačítka zapnutí / vypnutí (1).
8. Nechte spotřebič běžet, dokud 1⁄3 prostředku na odstranění vodního kamene
není v kávovaru (16).
9. Vypněte spotřebič stisknutím tlačítka zapnutí / vypnutí (1).

109
CZ
10. Nechte prostředek na odstranění vodního kamene pracovat přibližně 30
minut.
11. Zapněte spotřebič stisknutím tlačítka zapnutí / vypnutí (1).
12. Nechte spotřebič běžet, dokud se nádrž na vodu s prostředkem na odstranění
vodního kamene nevyprázdní. Zařízení se automaticky zastaví, když je
zásobník vody (14) prázdný.
Vypláchněte zařízení dvakrát podle následujícího postupu:
1. Naplňte vodní nádržku (14) čistou vodou, až po značku maxima na indikátoru
(15).
2. Umístěte nádobu na kávu (16) na topnou desku (18).
3. Zapněte spotřebič stisknutím tlačítka zapnutí / vypnutí (1).
4. Nechte všechnu vodu projít přes spotřebič. Zařízení se automaticky zastaví,
když je zásobník vody (14) prázdný.
Pro odstranění vodního kamene:
1. Umístěte držák uhlíkového ltru (20) do nádrže na vodu (14).
2. Zavřete kryt (24).
3. Vypněte spotřebič stisknutím tlačítka zapnutí / vypnutí (1).
4. Stiskněte tlačítko na výběr množství kávy (3) a tlačítko pro výběr síly kávy (4)
stisknuté, dokud indikátor (D) nezmizí z displeje (8) (obrázek C).
5. Vyčistěte vnější části spotřebiče vlhkým hadříkem. Osušte vnější části
spotřebiče čistým suchým hadříkem.
6. Zařízení bude připraveno k použití.
Výměna uhlíkového ltru
1. Otevřete kryt (24).
2. Pokud je to nutné, vyprázdněte nádrž na vodu (14).
3. Vyjměte držák uhlíkového ltru (20) z nádrže na vodu (14).
4. Otevřete kryt (25).
5. Vyberte starý uhlíkový ltr (26).
6. Vložte nový uhlíkový ltr (26).
7. Zavřete kryt (25).
Poznámka: Držák uhlíkového ltru nesmí být umístěn do nádrže vodu před
odstraněním vodního kamene ze spotřebiče. Toto se netýká prvního uvedení
spotřebiče do provozu.

110
CZ
ŘEŠENÍ PROBLÉMŮ
Problém Možná příčina Navrhované řešení
Na displeji není
žádný symbol.
Kávovar není připojen do
elektrické sítě.
Zastrčte hlavní zástrčku.
Žádné síťové napájení. Zkontrolujte pojistku /
zásuvku.
Displej je porouchaný. Obraťte se na zákaznický
servis.
Jistič v pojistkové
skříni se vypnul.
Příliš mnoho přístrojů je
připojeno ke stejnému
okruhu napájení.
Zapojte zařízení do vlastní
elektrické zásuvky.
Zařízení je zkažené. Obraťte se na zákaznický
servis.
Voda vytéká ze
spotřebiče.
V nádrži na vodu je příliš
mnoho vody.
Do nádrže na vodu
nedávejte více vody než je
značka maximum.
OPATŘENÍ PŘI LIKVIDACI ZBOŽÍ
Pokud ve Vaší zemi existuje předpis k likvidaci elektrických
a elektronických zařízení, tento symbol na produktu
nebo na obalu upozorňuje na to, že se nesmí likvidovat
v běžném domácím odpadu. Namísto toho se musí
přinést na sběrné místo pro recyklaci elektrických a
elektronických zařízení. Díky likvidaci podle předpisů
chráníte životní prostředí a zdraví Vašich blízkých před
negativními následky. Informace o recyklaci a k likvidaci
tohoto produktu, obdržíte na Vaší místní správě nebo
společnosti, která má na starost likvidaci odpadu.

111
NL
Geachte klant,
hartelijk gefeliciteerd met de aanschaf van dit apparaat.
Lees de hierna volgende handleiding aandachtig door
en volg de instructies op om schade te voorkomen. Voor
schade veroorzaakt door het niet in acht nemen van
de instructies of door onjuist gebruik nemen wij geen
verantwoordelijkheid. Scan de QR code om toegang tot de
meest actuele gebruikershandleiding te verkrijgen evenals
meer informatie rondom het artikel.
INHOUDSOPGAVE
Veiligheidsinstructies 112
Overzicht apparaat 114
Bedieningspaneel, functietoetsen & display 116
Ingebruikname en bediening 117
Reiniging en onderhoud 125
Foutmeldingen en oplossingen 128
Instructies voor afvoer 128
TECHNISCHE GEGEVENS
Artikelnummer 10032865, 10032866, 10032874
Stroomvoorziening 220-240 V ~ 50/60 Hz
Vermogen 1000 W
Maximaal inhoudelijk vermogen (tank) 1,25 L
FABRIKANT & IMPORTEUR (UK)
Fabrikant:
Chal-Tec GmbH, Wallstraße 16, 10179 Berlijn, Duitsland.
Importeur voor Groot-Brittannië:
Chal-Tec UK limited
Unit 6 Riverside Business Centre
Brighton Road
Shoreham-by-Sea
BN43 6RE
United Kingdom

112
NL
VEILIGHEIDSINSTRUCTIES
Algemene veiligheidsinstructies
• Lees voor gebruik alle informatie zorgvuldig door en bewaar de handleiding
als referentie.
• Gebruik het apparaat en de bijbehorende accessoires uitsluitend voor het
voorbestemde doeleinde en niet voor andere doeleinden dan die, die in de
gebruikershandleiding worden beschreven.
• Gebruik het apparaat niet wanneer onderdelen of accessoires beschadigd of
defect zijn. Wanneer een onderdeel of accessoire beschadigd of defect is dient
dit door de fabrikant of een geautoriseerd vakbedrijf te worden vervangen.
• Kinderen dienen ten allen tijde onder toezicht te blijven om er zeker van te zijn
dat ze het apparaat niet als speelgoed gebruiken.
• Het gebruik van het apparaat door kinderen of personen met een fysieke,
sensorische, mentale of motorische beperking of ontbrekende ervaring en
kennis kan tot gevaarlijke situaties leiden. Personen die voor hun veiligheid
verantwoordelijk zijn dienen nadrukkelijke aanwijzigingen te geven of toezicht
te houden op het gebruik van het apparaat.
• Gebruik het apparaat niet nabij een badkuip, douche, wasbak of andere met
water gevulde recipiënten.
• Dompel het apparaat niet onder in water of andere vloeistoen.
• Wanneer het apparaat per vergissing toch in water of vloeistof terechtkomt
haal het er dan niet met uw handen uit. Trek direct de stekker uit het
stopcontact. Het apparaat mag niet meer gebruikt worden nadat het in water
of een andere vloeistof ondergedompeld is geweest.
• Het apparaat is bestemd voor gebruik in een huishouden of een
soorgelijke toepassing, zoals een kantine in winkels, kantoren of andere
werkomgevingen, op boerderijen, door klanten in een hotel, motel of andere
overnachtingsmogelijkheid evenals in onderkomens met overnachting en
ontbijt.
Elektrische veiligheid
• Controleer voor gebruik of de netspanning overeenkomt met de spanning op
het etiket.
• Het apparaat is niet bestemd voor bediening middels een externe
tijdschakelaar of een afzonderlijk systeem voor bediening op afstand.
• Sluit het apparaat aan op een geaard stopcontact. Gebruik, indien nodig, een
geaard verlengsnoer met geschikte doorsnede (min. 3 x 1 mm2).
• Let erop dat er geen water in de stekker of in het verlengsnoer kan dringen.
• Rol de kabel en het verlengsnoer altijd volledig af.
• Zorg ervoor dat de stroomkabel niet over de rand van een werkblad hangt
en niet per vergissing kan worden ingeklemd of dat iemand erover kan
struikelen.
• Houdt de stroomkabel ver van hitte, olie en scherpe randjes.

113
NL
• Gebruik het apparaat niet wanneer de stroomkabel of de stekker beschadigd
of defect is.
• Wanneer de stroomkabel of de stekker beschadigd is dient deze door de
fabrikant, een geautoriseerd vakbedrijf of een gelijkwaardig gekwali ceerd
persoon te worden vervangen.
• Trek niet aan de stroomkabel om de stekker uit het stopcontact te halen.
• Neem de stekker uit het stopcontact wanneer het apparaat niet in gebruik
is, voor de montage of demontage en voordat u overgaat tot reiniging of
onderhoud.
Veiligheidsinstructies voor ko ezetapparaten
• Gebruik het apparaat niet in de vrije natuur.
• Gebruik het apparaat niet in een vochtige omgeving.
• Gebruik het apparaat, wanneer het met water is gevuld, uitsluitend in een
vorstvrije omgeving.
• Plaats het apparaat op een stabiel en plat oppervlak.
• Plaats het apparaat op een hittebestendig en spatwaterdicht oppervlak.
• Plaats het apparaat niet op een kookveld.
• Plaats het apparaat niet op een heet oppervlak of in de nabijheid van open
vuur.
• Zorg ervoor dat het apparaat niet in contact komt met brandbare materialen.
• Houdt het apparaat ver van warmtebronnen.
• Wees voorzichtig met heet water en damp om verbranding te voorkomen.
• Wanneer u het apparaat niet gebruikt plaatst u het op een droge plaats. Zorg
ervoor dat kinderen geen toegang tot opgeborgen apparaten hebben.
• Het ko ezetapparaat is bestemd voor het bereiden van ko e met
ko ebonen of met gemalen ko e. Het apparaat is geschikt voor gebruik
binnenshuis. Het artikel is bestemd voor huiselijk gebruik.
Afvoer van verpakkingsmateriaal
WAARSCHUWING
Verstikkingsgevaar! Verwijder de plastic verpakkingen per
omgaande om te voorkomen dat kinderen zich verwonden.

114
NL
OVERZICHT APPARAAT

115
NL
1 Aan / Uit toets A Weergave ko ekwantiteit
2 Maalwerk B Weergave ko ekwaliteit
3Hoeveelheid ko e C Weergave timer
4Intensiteit ko e D Weergave ontkalking
5 Timer E Weergave warmhoudstatus
6 Uur
7 Minuten
8 Display
9 Maalgradatie
10 Permanent lter
11 Filterhouder
12 Ontregelingsknop ( lterhouder)
13 Ko ebonenreservoir
14 Watertank
15 Waterstandindicator
16 Ko ekan
17 Ko estandweergave
18 Warmteplaat
19 Maalkamer
20 Kool lterhouder
21 Borstel/schroevendraaier
22 Waterdampsleuf
23 Ontkalkingstoets (toets 3+4)
24 Deksel watertank
25 Kool lterbevestiging
26 Kool lter
27 Afdekking bonenreservoir
28 Afdekking reiningsopening

116
NL
BEDIENINGSPANEEL, FUNCTIETOETSEN & DISPLAY

117
NL
INGEBRUIKNAME EN BEDIENING
Voor het eerste gebruik
• Reinig het apparaat. Zie hiervoor de sectie “Reiniging en onderhoud”.
• Reinig de accessoires. Zie hiervoor de sectie “Reiniging en onderhoud”.
De tijd instellen (afb. B en C)
Wanneer u de stekker in het stopcontact steekt licht het display (8) op en geeft aan
dat de tijd kan worden ingesteld. U kunt de klok ook op een later tijdstip instellen.
1. Druk meerdere malen op de urentoets (6) om het uur in te stellen.
2. Druk meerdere malen op de minutentoets (7) om de minuten in te stellen.
3. De juiste tijd wordt nu op het display (8) weergegeven.
Bediening
WAARSCHUWING
Verbrandingsgevaar! Houdt uw handen, gezicht en andere
lichaamsdelen op afstand van de dampsleuf. De waterdamp uit het
apparaat wordt tijdens het gebruik zeer heet. Dek de dampsleuf
niet af.
• Het apparaat kan worden gebruikt voor het bereiden van ko e met
ko ebonen of gemalen ko e.
• Voor het eerste gebruik is het apparaat op bereiding met ko ebonen
ingesteld.
• Na elk gebruik slaat het apparaat de laatst gebruikte instelling op voor
het volgende gebruik: ko e met ko ebonen of ko e met gemalen ko e
bereiden.
Opmerking: Het apparaat kan allen worden gebruikt wanneer het display
geactiveerd is. Wanneer het display niet actief is drukt u op een willekeurige
toets om het te activeren. Het apparaat is nu klaar voor gebruik.
De hoeveelheid ko e instellen (afb. B en C)
• De hoeveelheid ko e toets (3) dient voor het instellen van de gewenste
hoeveelheid ko e. U kunt 2, 4, 6, 8 of 10 kopjes instellen.
• Druk meerdere malen op de hoeveelheid ko e toets (3) om de gewenste
hoeveelheid te selecteren. Het aantal kopjes (A) wordt op het display (8)
weergegeven.
• AROMA-functie: druk gedurende langere tijd op de hoeveelheid ko e
toets (3) om de “Aroma”-functie op te roepen. Het symbool licht op en het
verwarmingselement wordt met intervallen verwarmd.

118
NL

119
NL
De koe-intensiteit instellen (afb. B en C)
• De koe-intensiteit toets (4) dient voor het instellen van de gewenste koe-
intensiteit. U kunt kiezen uit milde koe (MILD), middelmatig sterke koe
(MEDIUM) en sterke koe (STRONG).
• Druk meerdere malen op de koe-intensiteit toets (4) om de gewenste
intensiteit te selecteren. De geselecteerde intensiteit (B) wordt op het display
(8) aangegeven.
Startvoorkeursfunctie (afb. B en C)
Het apparaat beschikt over een startvoorkeursfunctie die het mogelijk maakt
het tijdstip te programmeren voor het begin van het koebereidingsproces. De
voorkeurstijd kan via de timer toets worden ingesteld (5).
1. Stel de tijd in. Controleer of de tijd al is ingesteld. Wanneer de tijd nog niet is
ingesteld gaat u eerst naar de sectie “De tijd instellen”.
2. Houdt de timer toets (5) ingedrukt tot de klok in het display knippert.
3. Druk meerdere malen de uren toets (6) in om de uren in te stellen.
4. Druk meerdere malen de minuten toets (7) in om de minuten in te stellen.
5. Stel de gewenste hoeveelheid koe in. Zie daarvoor de sectie “De hoeveelheid
koe instellen”.
6. Stel de koe-intensiteit in. Zie daarvoor de sectie “De koe-intensiteit
instellen”.
7. Wanneer u koe met gemalen koe wil laten bereiden schakelt u de
maalfunctie uit voordat u de startvoorkeursfunctie gebruikt.
8. Druk op de timer toets (5) om de instellingen op te slaan. De timer weergave
(C) brand continue.
9. Om de voortgang te onderbreken drukt u opnieuw op de timer toets (5). De
timer weergave (C) dooft.
De watertank vullen (afb. D)
• Schakel het apparaat voor het vullen van de watertank uit en neem de stekker
uit het stopcontact.
• Vul niet meer water in het reservoir dan voor de toebereiding van de koe
nodig is. Gebruik alleen de voor de toebereiding van de koe benodigde
hoeveelheid water. Het apparaat stopt automatisch wanneer de tank leeg is.
• Gebruik het apparaat niet wanneer er geen water in de tank aanwezig is.
• Overschrijdt de maximale vulhoeveelheid (10 kopjes) niet wanneer u de
watertank vult. Zorg ervoor dat de waterstand tijdens het gebruik altijd boven
de minimale markering (2 kopjes) ligt.
• Vul uitsluitend koud water in de watertank.
• Gebruik geen koolzuurhoudend water of andere vloeistoen om de watertank
te vullen.
• Giet geen water in het koebonenvak.

120
NL

121
NL
Zo vult u de watertank:
1. Open het deksel (24).
2. Vul de watertank (14) tot aan de gewenste markering van de
waterstandsindicator (15) met water.
3. Vul niet meer water dan voor de toebereiding van de koe noodzakelijk is.
Gebruik uitsluitend de voor de toebereiding benodigde hoeveelheid water.
Het apparaat stopt automatisch wanneer de watertank leeg is.
4. Sluit het deksel (24).
Maalgradatie voor gemalen koe instellen (afb. E)
• De maalgradatie (9) dient voor het instellen van de gewenste jnheid van
de gemalen koe bij gebruik van koebonen. Het kan op verschillende
gradaties worden ingesteld, van jn gemalen koe tot grof gemalen koe.
• Draai de maalgradatie (9) in de gewenste positie om de gradatie van de
gemalen koe in te stellen.
Wisselen van glazen kan naar thermoskan
• Druk lang op de maalwerk toets (2) om te wisselen tussen glazen kan en
thermoskan.
• Wanneer de warmhoudweergave (E) oplicht kan de glazen kan worden
gebruikt.
Opmerking: Het is aan te bevelen de thermoskan voor gebruik met warm water
voor te verwarmen.
Deksel van de glazen kan afnemen en plaatsen
Sommige apparaten zijn aanvullend voorzien van een glazen koekan. De deksel
van de glazen kan laat zich als volgt verwijderen:
123
Open het deksel in de
richting van de pijl.
Draai het deksel in
de richting van de pijl
en druk met de linker
hand tegelijkertijd
op de pin aan de
dekselhouder.
Verwijder het deksel.
Schuif eerst de
pin weer in de
dekselhouder en
draai de deksel dan
in de richting van de
pijl. Sluit vervolgens
het deksel.

122
NL

123
NL
Deksel van de thermoskan afnemen en plaatsen
• Afnemen: draai de deksel tegen de klok in.
• Plaatsen: plaats de deksel op de kan, zodat de ontkoppeling naar rechts wijst.
Draai de deksel met de klok mee tot aan de aanslag. De deksel is nu gesloten.
• Inschenken: de koppeling ingedrukt houden en schenken.
Opmerking: Het is aan te bevelen de thermoskan voor gebruik met warm water
voor te verwarmen.
Koe zetten met koebonen (afb. A – H)
Opmerking: Gebruik alleen koebonen en korlterzakken van 80/200 mm.
1. Wanneer de maalfunctie niet geactiveerd is drukt u eerst de maalwerk
toets (2) in om de maalfunctie te activeren. De hoeveelheid koe en koe-
intensiteit worden op het display weergegeven.
2. Doe de noodzakelijke hoeveelheid water in de watertank (14). Doe niet meer
water in het reservoir dan voor de toebereiding van de koe nodig is. Gebruik
alleen de voor de toebereiding van de koe benodigde hoeveelheid water.
Het apparaat stopt automatisch wanneer de tank leeg is.
3. Open de deksel van het koebonenreservoir (27).
4. Vul het koebonenreservoir (13) volledig met koebonen.
5. Sluit het deksel (27).
6. Stel de maalgradatie van de gemalen koe in. Zie hiervoor de sectie
“Maalgradatie gemalen koe instellen”.
7. Druk op de ontregelingsknop (12) om de lterhouder (11) te openen.
8. Plaats een geschikt koelter in de koelterhouder (10).
9. Sluit de lterhouder (11) totdat de ontregelingsknop (12) vergrendelt.
10. Stel de gewenste hoeveelheid koe in. Zie hiervoor de sectie “De hoeveelheid
koe instellen”.
11. Stel de koe-intensiteit in. Zie hiervoor de sectie “De koe-intensiteit
instellen”.
12. Plaats de koekan (16) op de verwarmingsplaat (18).
13. Zet het apparaat aan door op de Aan / Uit toets (1) te drukken. Het
koekopjessymbool (E) verschijnt. Na enkele seconden begint het apparaat
met het malen van de koebonen en de bereiding van de koe.
14. Om het proces te onderbreken drukt u op de Aan / Uit toets (1).
15. Wanneer het proces afgesloten is piept het apparaat en schakelt de
warmhoudmodus in. Het koekopjessymbool (E) begint te knipperen. Het
apparaat kan door het drukken op de Aan / Uit toets (1) worden uitgeschakeld
en anders schakelt het zichzelf na 40 minuten automatisch uit.
16. Laat het apparaat volledig afkoelen.

124
NL

125
NL
Koe zetten met gemalen koe (afb. A, B, C, D, F en G)
Opmerking: Gebruik alleen gemalen koe en 80/200 mm korlterzakken.
1. Wanneer de maalfunctie geactiveerd is drukt u eerst de maalwerk toets (2) in
om de maalfunctie te deactiveren. De hoeveelheid koe en koe-intensiteit
worden niet op het display weergegeven.
2. Doe de noodzakelijke hoeveelheid water in de watertank (14). Doe niet meer
water in het reservoir dan voor de toebereiding van de koe nodig is. Gebruik
alleen de voor de toebereiding van de koe benodigde hoeveelheid water.
Het apparaat stopt automatisch wanneer de tank leeg is.
3. Druk op de ontregelingsknop (12) om de lterhouder (11) te openen.
4. Plaats een geschikt koelter in de koelterhouder (10).
5. Schep de benodigde hoeveelheid koe in het koelter.
6. Sluit de lterhouder (11) totdat de ontregelingsknop (12) vergrendelt.
7. Plaats de koekan (16) op de verwarmingsplaat (18).
8. Zet het apparaat aan door op de Aan / Uit toets (1) te drukken. Het
koekopjessymbool (E) verschijnt. Het apparaat begint met het bereiden van
de koe.
9. Om het proces te onderbreken drukt u op de Aan / Uit toets (1).
10. Wanneer het proces afgesloten is piept het apparaat en schakelt de
warmhoudmodus in. Het koekopjessymbool (E) begint te knipperen. Het
apparaat kan door het drukken op de Aan / Uit toets (1) worden uitgeschakeld
en anders schakelt het zichzelf na 40 minuten automatisch uit.
11. Laat het apparaat volledig afkoelen.
REINIGING EN ONDERHOUD
• Schakel het apparaat voor de reiniging of het onderhoud uit. Neem de stekker
uit het stopcontact en wacht tot het apparaat is afgekoeld.
• Dompel het apparaat niet onder in water of andere vloeistoen.
• Gebruik voor de reiniging van het apparaat geen agressieve of schurende
middelen.
• Reinig het apparaat niet met scherpe voorwerpen.
• Controleer het apparaat regelmatig op eventueel opgelopen schade.
• Reinig de accessoires:
- Reinig de koekan met water en afwasmiddel.
- Reinig de koelterhouder met water en afwasmiddel.
- Reinig de deksel van het koebonenreservoir met water en afwasmiddel.
- Droog de accessoires grondig af.
• Reinig het exterieur van het apparaat met een vochtige doek en droog het
met een schone, droge doek af.
• Bewaar het apparaat en de accessoires in de originele verpakking.
• Bewaar het apparaat op een droge, vorstvrije plaats, buiten het bereik van
kinderen.

126
NL
Het maalvak reinigen (afb. C en I)
Opmerking: Bij het malen van koe kan door koepoeder het maalwerk
verstopt raken. Om het verstopt raken van het maalwerk te voorkomen dient u
het maalvak om de twee weken te reinigen.
Voor het reinigen van het maalvak zijn de volgende stappen noodzakelijk:
1. Schakel het apparaat uit.
2. Neem de stekker uit het stopcontact.
3. Verwijder de koekan van de verwarmingsplaat.
4. Leeg de koelterhouder. Plaats een geschikt koelter. Sluit de lterhouder.
5. Maak de vergrendeling van het deksel (28) los door op het kleine knopje te
drukken.
6. Neem de deksel (28) weg.
7. Reinig het molenwerk (19) met de borstel (21).
8. Plaats de deksel weer terug (28).
Het apparaat ontkalken (afb. A – D)
• Het apparaat moet na 70 brouwprocessen ontkalkt worden. Wanneer u de
stekker in het stopcontact laat telt het apparaat het aantal brouwprocessen.
• De melding (D) knippert in het display wanneer het apparaat moet worden
ontkalkt.
• Gebruik een geschikt ontkalkingsmiddel voor het ontkalken van het apparaat.
U vindt speciale ontkalkingsmiddelen bij uw lokale vakhandel.
• Voordat u het apparaat ontkalkt neemt u de stekker uit het stopcontact en
wacht u tot het apparaat is afgekoeld.
• Dompel het apparaat niet onder in water of andere vloeistoen.
• Zorg ervoor dat de maalfunctie bij het ontkalken van het apparaat niet is
geactiveerd.
Zo start u het ontkalkingsproces:
1. Open de deksel (24).
2. Indien nodig leegt u de watertank (14).
3. Verwijder de koollterhouder (20) uit de watertank (14).
4. Vul de watertank (14) met een geschikte ontkalker.
5. Plaats de koekan (16) op de verwarmingsplaat (18).
6. Steek de stekker in het stopcontact.
7. Zet het apparaat aan door op de Aan / Uit toets (1) te drukken.
8. Laat het apparaat gaan totdat 1⁄3 van de ontkalker zich in de koekan (16)
bevindt.
9. Schakel het apparaat uit door de Aan / Uit toets (1) in te drukken.
10. Laat de ontkalker circa 30 minuten inwerken.
11. Zet het apparaat weer aan door op de Aan / Uit toets (1) te drukken.
12. Laat het apparaat gaan totdat alle overgebleven ontkalker zich in de koekan
(16) bevindt. Het apparaat stopt automatisch wanneer de watertank (14) leeg
is.

127
NL
Spoel het apparaat tweemaal na volgens onderstaande procedure:
1. Vul de watertank (14) met schoon water tot aan de maximale
waterstandsindicatie (15).
2. Plaats de lege koekan (16) op de verwarmingsplaat (18).
3. Zet het apparaat aan door op de Aan / Uit toets (1) te drukken.
4. Laat het water volledig door het apparaat lopen. Het apparaat stopt
automatisch wanneer de watertank (14) leeg is.
Na het ontkalken:
1. Plaats de koollterhouder (20) in de watertank (14).
2. Sluit het deksel (24).
3. Schakel het apparaat uit door op de Aan / Uit toets (1) te drukken.
4. Houd de hoeveelheid koe toets (3) en de koe-intensiteit toets (4) ingedrukt
tot de weergave (D) van het display (8) verdwijnt (afb. C).
5. Reinig het exterieur van het apparaat met een vochtige doek en droog haar
met een schone, droge doek weer af.
6. Het apparaat is nu weer klaar voor gebruik.
Het koollter vervangen
1. Open het deksel (24).
2. Leeg, indien nodig, de watertank (14).
3. Verwijder de koollterhouder (20) uit de watertank (14).
4. Open het deksel (25)
5. Verwijder het oude koollter (26).
6. Plaats het nieuwe koollter (26).
7. Sluit het deksel (25).
Opmerking: De koollterhouder mag niet in de watertank worden ingezet
voordat het apparaat is ontkalkt. Dit geldt niet wanneer het apparaat voor de
eerste keer wordt gebruikt.

128
NL
FOUTMELDINGEN EN OPLOSSINGEN
Probleem Mogelijke oorzaak Oplossing
Het display toont
geen symbolen.
Apparaat niet aangesloten. Steek de stekker in het
stopcontact.
Geen stroom. Controleer de zekering.
Display stuk. Neem contact op met de
klantenservice.
De zekering
springt eruit.
Teveel apparaten in
hetzelfde stopcontact.
Steek de stekker van het
apparaat in een eigen
stopcontact.
Apparaat stuk. Neem contact op met de
klantenservice.
Water lekt. Teveel water in de tank. Doe niet teveel water in de
tank.
INSTRUCTIES VOOR AFVOER
Wanneer in uw land een wettelijke regeling geldt voor
het afvoeren van elektrische en elektronische apparaten,
wijst het hiernaast afgebeelde symbool, op het product
zelf of op de verpakking, erop dat het betreende product
niet met het huisvuil afgevoerd mag worden. In plaats
daarvan dient het naar een centraal depot voor het
recyclen van elektrische en elektronische apparaten te
worden gebracht. Door het afval volgens de voorschriften
af te voeren beschermt u het milieu en de gezondheid
van uw medemensen tegen de negatieve consequenties.
Informatie over recycling en de afvoer van dit product
ontvangt u van uw gemeente of van uw plaatselijke
grondstoen- en afvaldienst.


-
 1
1
-
 2
2
-
 3
3
-
 4
4
-
 5
5
-
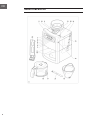 6
6
-
 7
7
-
 8
8
-
 9
9
-
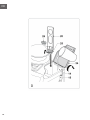 10
10
-
 11
11
-
 12
12
-
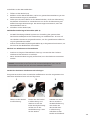 13
13
-
 14
14
-
 15
15
-
 16
16
-
 17
17
-
 18
18
-
 19
19
-
 20
20
-
 21
21
-
 22
22
-
 23
23
-
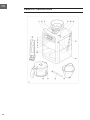 24
24
-
 25
25
-
 26
26
-
 27
27
-
 28
28
-
 29
29
-
 30
30
-
 31
31
-
 32
32
-
 33
33
-
 34
34
-
 35
35
-
 36
36
-
 37
37
-
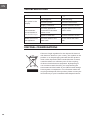 38
38
-
 39
39
-
 40
40
-
 41
41
-
 42
42
-
 43
43
-
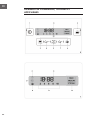 44
44
-
 45
45
-
 46
46
-
 47
47
-
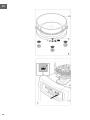 48
48
-
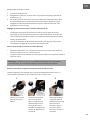 49
49
-
 50
50
-
 51
51
-
 52
52
-
 53
53
-
 54
54
-
 55
55
-
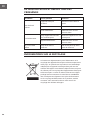 56
56
-
 57
57
-
 58
58
-
 59
59
-
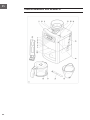 60
60
-
 61
61
-
 62
62
-
 63
63
-
 64
64
-
 65
65
-
 66
66
-
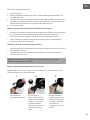 67
67
-
 68
68
-
 69
69
-
 70
70
-
 71
71
-
 72
72
-
 73
73
-
 74
74
-
 75
75
-
 76
76
-
 77
77
-
 78
78
-
 79
79
-
 80
80
-
 81
81
-
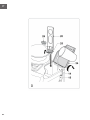 82
82
-
 83
83
-
 84
84
-
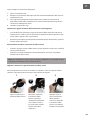 85
85
-
 86
86
-
 87
87
-
 88
88
-
 89
89
-
 90
90
-
 91
91
-
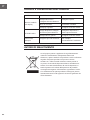 92
92
-
 93
93
-
 94
94
-
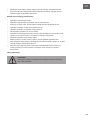 95
95
-
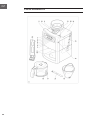 96
96
-
 97
97
-
 98
98
-
 99
99
-
 100
100
-
 101
101
-
 102
102
-
 103
103
-
 104
104
-
 105
105
-
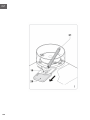 106
106
-
 107
107
-
 108
108
-
 109
109
-
 110
110
-
 111
111
-
 112
112
-
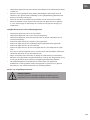 113
113
-
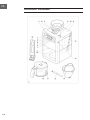 114
114
-
 115
115
-
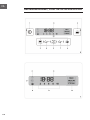 116
116
-
 117
117
-
 118
118
-
 119
119
-
 120
120
-
 121
121
-
 122
122
-
 123
123
-
 124
124
-
 125
125
-
 126
126
-
 127
127
-
 128
128
-
 129
129
-
 130
130
-
 131
131
-
 132
132


Klarstein 10032865 Aromatica II Duo Coffee Maker Machine Manual de usuario
- Categoría
- Cafeteras
- Tipo
- Manual de usuario
en otros idiomas
- français: Klarstein 10032865 Aromatica II Duo Coffee Maker Machine Manuel utilisateur
- italiano: Klarstein 10032865 Aromatica II Duo Coffee Maker Machine Manuale utente
- English: Klarstein 10032865 Aromatica II Duo Coffee Maker Machine User manual
- Deutsch: Klarstein 10032865 Aromatica II Duo Coffee Maker Machine Benutzerhandbuch
- Nederlands: Klarstein 10032865 Aromatica II Duo Coffee Maker Machine Handleiding
- čeština: Klarstein 10032865 Aromatica II Duo Coffee Maker Machine Uživatelský manuál