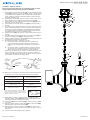
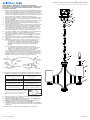
Kichler Lighting 44071DBK Manual de usuario
- Tipo
- Manual de usuario

Date Issued: 09/28/17 IS-44071-US
We’re here to help 866-558-5706
Hrs: M-F 9am to 5pm EST
CAUTION – RISK OF SHOCK –
Disconnect Power at the main circuit breaker panel or main
fusebox before starting and during the installation.
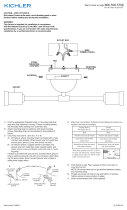
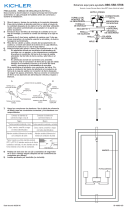
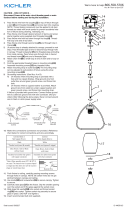
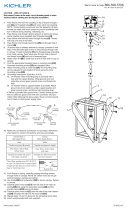
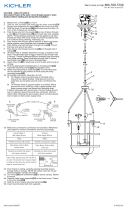
1) Passxturewirefromthecoupling[1]ontopofxturethrough
astem[2]andscrewstemintocoupling.NOTE:Threadlocking
compoundmustbeappliedtoallstemthreadsasnotedwith
arrowsymboltopreventaccidentalrotationofxtureduring
cleaning,relamping,etc.
2) Passxturewirethroughdesiredamountofstemsandscrew
stemstogetherusingsuppliedshortthreadedtubes[3].
3) Passxturewirefromlaststemthroughrstloop[4].Thread-
rstloopontoendoflaststem.
4) Passxturewirethroughsecondloop[5]andthroughholein
canopy.
5) (Ifsecondloopisalreadyattachedtocanopy,proceedtonext
step).Passthreadedpipeatendofsecondloopthroughhole
incanopy.Threadlockwasherontothreadedpipeprotruding
frominsidecanopy.Passxturewirethroughholeinhexnut
andthreadhexnutontoendofthreadedpipe.
6) Attachchainlink[6]tosmallloopatendofstemandtoloopon
canopy.
7) Findtheappropriatethreadedholesonmountingstrap[7].As-
semblemountingscrews[8]intothreadedholes.
8) Attachmountingstraptooutletbox[9].Themountingstrapcan
beadjustedtosuitpositionofxture.
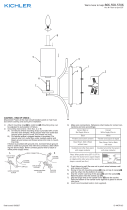
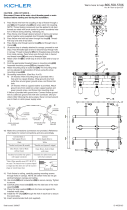
9) Groundinginstructions:(SeeIllus.AorB).
A) Onxtureswheremountingstrapisprovidedwitha
holeandtworaiseddimples.Wrapgroundwirefrom
outletboxaroundgreengroundscrew,andthreadinto
hole.
B) Onxtureswhereacuppedwasherisprovided.Attach
groundwirefromoutletboxundercuppedwasherand
greengroundscrew,andthreadintomountingstrap.
Ifxtureisprovidedwithgroundwire.Connectxtureground
wiretooutletboxgroundwirewithwireconnector.(Notpro-
vided.)Afterfollowingtheabovesteps.Neverconnectground
wiretoblackorwhitepowersupplywires.
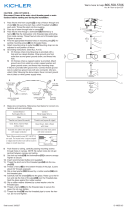
10)Makewireconnections(connectorsnotprovided.)Reference
chartbelowforcorrectconnectionsandwireaccordingly.
11)Pushxturetoceiling,carefullypassingmountingscrews
throughholesincanopy[10].NOTE:Becertainwiresdonot
getpinchedbetweencanopyandceiling.
12) Useknobs[11]andlockwashers[12]tosecurecanopy.Tighten
tosecure.
13) Slipthesmalleropeningoftheglass[13]overthesocket[14].
Resttheglassontothesocketcup[15].
14) Slipthelargerendofthecandlecover[16]ontothesocket.
Restthebottomofthecandlecoveragainsttoglasstosecure
intoplace.
15) Insertrecommendedbulb(s)(notsupplied).
GREEN GROUND
SCREW
CUPPED
WASHER
OUTLET BOX
GROUND
FIXTURE
GROUND
DIMPLES
WIRE CONNECTOR
OUTLET BOX
GROUND
GREEN GROUND
SCREW
FIXTURE
GROUND
A
B
Connect Black or
Red Supply Wire to:
Connect
White Supply Wire to:
Black White
*Parallel cord (round & smooth) *Parallel cord (square & ridged)
Clear, Brown, Gold or Black
without tracer
Clear, Brown, Gold or Black
with tracer
Insulated wire (other than green)
with copper conductor
Insulated wire (other than green)
with silver conductor
*Note: When parallel wires (SPT I & SPT II)
are used. The neutral wire is square shaped
or ridged and the other wire will be round in
shape or smooth (see illus.)
Neutral Wire
16
3
2
1
►
►
►
►
4
5
6
8
7
9
10
11
12
13
14
15

Date Issued: 09/28/17 IS-44071-US
Estamos aquí para ayudarle 866-558-5706
Horario: Lunes-Viernes 9am a 5pm EST (hora ocial del este)
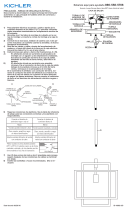
1) Paseelcabledejacióndesdeelacoplamiento[1]enlaparte
superiordelaparatoatravésdeunvástago[2]yelvástagodel
tornilloenelacoplamiento.NOTA:Elcompuestodebloqueo
deroscadebeaplicarseatodosloshilosdelvástagocomose
indicaconelsímbolodeechaparaevitarlarotaciónacciden-
taldeldispositivodurantelalimpieza,relamping,etc.
2) Paseelcabledelaccesorioatravésdelacantidaddeseada
detallos yeltornilloseunenutilizandotubosroscadoscortos
suministrados[3].
3) Paseelcabledejacióndelúltimovástagoatravésdelprimer
bucle[4].Hiloprimerlazoenelextremodelúltimotallo.
4) Paseelcabledejaciónatravésdelsegundobucle[5] y el
oriciopasanteencanopy.
5) (Sielsegundobucleyaestáconectadoaldosel,continúecon
elsiguientepaso).Paseeltuboroscadoalnaldelsegundo
pasodelbucleenpabellón.Enrosqueellatiguilloeneltubo
roscadoquesobresaledesdeelinteriordeldosel.Paseel
cabledejaciónatravésdeloricioenhexagonalyenrosque
latuercahexagonalenelextremodeltuboroscado.
6) Conecteeleslabóndelacadena[6]aunlazopequeñoenel
extremodelvástagoyallazoencendidopabellón.
7) Encuentrelosoriciosroscadosadecuadosenlacorreade
montaje[7].Montarlostornillosdemontaje[8]enlosoricios
roscados.
8) Fijelacorreademontajealacajadesalida[9].Lacorrea
demontajepuedeajustadoparaadaptarsealaposicióndel
aparato.
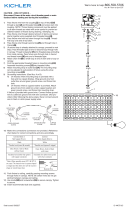
9) Instruccionesparaponeratierra:(VerIlustracionesAoB).
A) Enartefactosdondesesuministralaabrazaderade
montajeconunagujeroydosdepresionesonduladas.
Envuelvaelconductordetierradelacajadesalida
alrededordeltornillodetierraverdeyatornilleenel
agujero.
B) Enartefactosdondesesuministraunaarandela
cóncava.Fijeelconductordetierradelacajadesalida
debajodelaarandelacóncavayeltornillodetierra
verdeyenrosqueenlaabrazaderademontaje.
Sisesuministraelartefactoconconductordetierra.Conecte
elconductordetierradelartefactoalconductordetierrade
lacajadesalidaconconectordetierradespuésdeseguirlos
pasosanteriores.Nuncaconecteelconductordetierraalos
alambresdealimentacióneléctricanegrosoblancos.
10)Hagalasconexionesdelosalambres.Reérasealatablade
abajopararealizarlasconexionescorrectasdeloscables.
11)Empujeelaccesorioaltecho,concuidadopasartornillosa
travésdeoriciosenelpabellón.
12)Utilicelasperillas[10]ylasarandelasdeseguridad[11]para
asegurareldosel.Aprieteparaasegurar.
13) Deslicelaaberturamáspequeñadelvidrio[13]sobreelzó-
calo[14].Apoyarelvasoenelreceptáculo[15].
14) Coloqueelextremomásgrandedelatapadelavela[16]enel
zócalo.Coloqueelfondodelatapadelavelacontraelcristal
paralugar.
15) Inserteel(los)bulbo(s)recomendado(s)(noincluido).
PRECAUCIÓN – RIESGO DE DESCARGA ELÉCTRICA –
Desconecte la electricidad en el panel principal del interruptor
automático o caja principal de fusibles antes de comenzar y
durante la instalación.
ARANDELA
CONCAVA
TIERRA DE LA
CAJA DE SALIDA
TORNILLO DE TIERRA,
VERDE
DEPRESIONES
TIERRA
ARTEFACTO
CONECTOR DE ALAMBRE
TIERRA DE LA
CAJA DE SALIDA
TORNILLO DE TIERRA,
VERDE
TIERRA
ARTEFACTO
A
B
Conectar el alambre de
suministro negro o rojo al
Conectar el alambre de
suministro blanco al
Negro Blanco
*Cordon paralelo (redondo y liso)
*Cordon paralelo (cuadrado y estriado)
Claro, marrón, amarillio o negro
sin hebra identificadora
Claro, marrón, amarillio o negro
con hebra identificadora
Alambre aislado (diferente del verde)
con conductor de cobre
Alambre aislado (diferente del
verde) con conductor de plata
*Nota: Cuando se utiliza alambre paralelo
(SPT I y SPT II). El alambre neutro es de forma
cuadrada o estriada y el otro alambre será de
forma redonda o lisa. (Vea la ilustracíón).
Hilo Neutral
16
3
2
1
►
►
►
►
4
5
6
8
7
9
10
11
12
13
14
15
-
 1
1
-
 2
2


Kichler Lighting 44071DBK Manual de usuario
- Tipo
- Manual de usuario
en otros idiomas
Artículos relacionados
-
 Kichler Lighting 43195NBR Manual de usuario
-
 Kichler Lighting 43692NI Manual de usuario
-
 Kichler Lighting 43983BK Manual de usuario
-
 Kichler Lighting 44070NI Manual de usuario
-
 Kichler Lighting 43982BK Manual de usuario
-
 Kichler Lighting 44075BK Manual de usuario
-
 Kichler Lighting 44058OZ Manual de usuario
-
 Kichler Lighting 44228AVI Manual de usuario
-
 Kichler Lighting 44223BK Manual de usuario
-
 Kichler Lighting 44115PN Manual de usuario


