Simply Conserve N2935BN Guía de instalación
- Tipo
- Guía de instalación

HANDHELD SHOWERHEAD INSTALLATION
INSTRUCTIONS
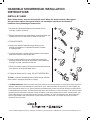
INSTALL BY HAND
Note: Some shower arms are formed with a ball where the head connects. We suggest
that you either replace this type of arm or use an adapter, which can be found at a
hardware store, plumbing or home center.
1. Remove the old showerhead from the shower arm by
turning it counter-clockwise.
2. Before installing the new showerhead, clean the shower arm
threads, then turn on the water to wash out the pipe.
3. TURN OFF WATER.
4. Apply a few layers of plumber’s tape directly to the
shower arm threads in a clockwise direction to create
a watertight seal.
5. Check that there is a screen washer seated in the bracket.
Attach the bracket to the shower arm.
6. Place a rubber washer into one of the ends of the hose
and then connect the hose to the bottom of the bracket by
turning it by hand, clockwise to the arm.
7. Place one rubber washer into the other end of the hose and
then attach it to the showerhead wand.
8. Tighten all ttings until it is snug. DO NOT OVERTIGHTEN.
To clean – unscrew showerhead and remove foreign particles.
Soak nozzle in hydrogen peroxide or vinegar.
** 10 YEAR WARRANTY: AM Conservation Group warranties to the original purchaser of this product that it is free from
defects in material and workmanship for a period of ten years. AM Conservation Group will at our choice replace any
part of the product which is in our opinion defective provided that the product has not been abused, misused, altered,
or damaged after its purchase. This includes damage due to the use of tools or harsh chemicals. In the event a product
has been discontinued, AM Conservation Group will replace it with what we determine to be the closest product. AM
Conservation Group is not responsible for labor charges, installation, or other consequential cost. AM Conservation
Group’s responsibility shall not exceed the original cost of the product. Save your receipt as proof of purchase is
required for warranty action.
2301 Charleston Regional Parkway | Charleston, SC 29492 | Customer Service: 1.888.866.1624 | www.amconservationgroup.com
5
6
7
1
2
3
4
8

INSTRUCCIONES PARA LA INSTALACIÓN DEL
CABEZAL DE DUCHA MANUAL
INSTALAR CON LA MANO
Nota: Algunos brazos de ducha tienen una esfera en donde se conecta el cabezal. Sugerimos que
reemplaces este tipo de brazo o uses un adaptador, que puedes encontrar en una ferretería o en
una tienda de artículos de plomería o del hogar.
1. Retire el viejo cabezal del brazo de la ducha dándole vueltas
en sentido contrario a las manecillas del reloj.
2. Antes de instalar el nuevo cabezal, limpie las roscas del
brazo de la ducha y luego abra la llave del agua para lavar
el tubo.
3. CIERRE LA LLAVE DEL AGUA.
4. Coloque varias capas de cinta de plomería directamente
sobre la rosca del brazo de la ducha en el sentido de las
manecillas del reloj para un sellado a prueba de agua.
5. Verique que haya una arandela de ltro en el soporte para
cabezal. Acople el soporte al brazo de la ducha.
6. Coloque una arandela de goma en uno de los extremos de la
manguera y luego conecte la manguera al fondo del soporte
dándole vueltas con la mano en el sentido de las manecillas
del reloj hacia el brazo.
7. Coloque una arandela de goma en el otro extremo de la
manguera y luego acóplela con la varilla del cabezal de l
a ducha.
8. Apriete todos los acoples hasta ajustarlos bien. NO APRIETE
DEMASIADO.
Para limpiar, desenrosca el cabezal de ducha y remueve la
suciedad. Remoja la boquilla en peróxido de hidrógeno o
vinagre.
**10 AÑOS DE GARANTÍA: AM Conservation Group garantiza al comprador original de este producto que el mismo está libre de
defectos materiales y de mano de obra durante el 10 años. AM Conservation Group reemplazará a nuestra discreción, cualquier
pieza del producto que, en nuestra opinión, esté defectuosa, siempre que el producto no haya sido objeto de abuso, uso indebido,
alteraciones o daños después de haber sido comprado. Esto incluye daños por el uso de herramientas o químicos abrasivos. En
caso de que el producto se haya discontinuado, AM Conservation Group lo reemplazará con el producto que, en nuestra opinión,
más se aproxime al original. AM Conservation Group no se responsabiliza por los cargos de mano de obra, instalación o gastos
secundarios. La responsabilidad de AM Conservation Group no excederá el costo original del producto. Guarde el recibo como
comprobante de compra ya que lo necesitará para cualquier reclamación de garantía.
2301 Charleston Regional Parkway | Charleston, SC 29492 | Customer Service: 1.888.866.1624 | www.amconservationgroup.com
5
6
7
1
2
3
4
8
-
 1
1
-
 2
2


Simply Conserve N2935BN Guía de instalación
- Tipo
- Guía de instalación
en otros idiomas
Otros documentos
-
Niagara Conservation N2515CH-1PK Guía de instalación
-
Niagara Conservation N3115P-FC Guía de instalación
-
-
-
Glacier Bay 8474700H Guía de instalación
-
-
Culligan WSH-C125 Instrucciones de operación
-
-
 Waterpik Technologies Cascadia CF-200 Manual de usuario
