Schumacher SL3 series El manual del propietario
- Categoría
- Bancos de energía
- Tipo
- El manual del propietario
Este manual también es adecuado para

SL5
SL3
Models / Modelos / Modèles :
SL3 series, SL4 series, SL5 series
Lithium Ion Fuel Packs
Packs de energía de iones de litio
Blocs d’alimentation lithium-ion
OWNER’S MANUAL
MANUAL DEL USUARIO
GUIDE D’UTILISATION
SAVE THIS MANUAL AND READ BEFORE USE.
This manual explains how to use your Fuel Pack
safely and effectively. Read and follow these
instructions and precautions.
CONSERVE ESTE MANUAL Y LEALO ANTES DE
CADA USO. En este manual le explica cómo utilizar
el pack de energia de manera segura y conable. Lea
y siga las siguientes instrucciones y precauciones.
GARDER LE MANUEL D’INSTRUCTIONS ET LE
LIRE AVANT UTILISATION. Ce manuel explique
comment utiliser l’unité d’une façon sûre et efcace.
Lisez et suivez ces instructions et précautions.
0099001557-01
SL4

• 2 •
1. IMPORTANT SAFETY INSTRUCTIONS
1.1 SAVE THESE INSTRUCTIONS –
This manual contains important safety and operating
instructions.
1.2 Keep out of reach of children.
1.3 Do not expose the unit to extreme heat, rain or snow.
1.4 Do not disassemble the Fuel Pack; this may result in
re or explosion.
1.5 Do not charge the Fuel Pack at temperatures below
32°F (0°C).
1.6 Ideal operating temperature is 41°-113°F (5°-45°C).
Prolonged exposure to high temperatures will reduce
the life of the battery.
1.7 WARNING: This product contains one or more
chemicals known to the State of California to cause
cancer and birth defects or other reproductive harm.

• 3 •
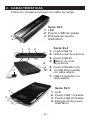
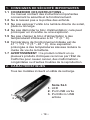
2. FEATURES
All models include a charging cable.
3
1
2
SL3 series
1. LED
2. Output USB port
3. Input Micro USB port
SL4 series
1. 1A USB port
2. Power level LEDs
3. 2A USB port
4.
Power Level button
5. 2A Micro USB port
6. 1A Micro USB (output)
with attached cable
7. 2A USB (input)
with attached cable
3
4 5
6
7
21
1
2
3
4
SL5 series
1. LCD
2. Output 1A USB port
3. Output 2A USB port
4. Input 2A
Micro USB port

• 4 •
3. LED INDICATORS AND LCD DISPLAY
LED INDICATORS
SL3 series:
Recharge: RED LED is ON during recharge; changes
to BLUE when unit is fully charged.
SL4 series:
Charge: 4 BLUE LEDs ON during charging; OFF
when charging is complete.
Recharge: 4 BLUE LEDs turn on, then one or more
blink, indicating the charge level:
100% charged
75% charged
50% charged
25% charged
When charging is complete, all 4 BLUE LEDs turn solid
and stay on until unit is disconnected.
LCD DISPLAY (SL5 series only):
Charge: The LCD display turns on and stays on
throughout the charging process. When the device is
fully charged or the Fuel Pack is fully discharged, the
LCD display will shut off.
Recharge: When connected, the LCD display will turn
on (with the blue backlight on for 10 seconds), showing
% of charge and blinking IN. Once the charging process
is complete, the LCD will show 100% charged, and stay
on until disconnected. To check the capacity (%) available
on the Fuel Pack, shake the Fuel Pack once. The LCD
display will turn on and show the % of charge.
NOTE: The unit’s display screen is covered with
a removable screen protector. If this becomes
scratched, simply peel off and discard.

• 5 •
4. CHARGING YOUR ELECTRONIC DEVICE
Charging times will vary.
The Fuel Pack is pre-charged at 50-60% capacity, and
should be ready to use upon purchase. Charging to
full capacity is recommended before rst use.
NOTE: When charging iDevices, use the charging cable
included with your iDevice. If the lightning connector
end is unplugged during charging and the fuel pack
shuts off, you must disconnect and reconnect both ends
of the charging cable, to resume charging.
Battery Reset
If the battery needs to be reset for any reason, simply
reconnect the fuel pack to your laptop or computer.
SL3 series
1. iDevices: Plug the iDevice charging cable’s end
into your iDevice’s input port.
Other devices: Plug the Micro USB end of the
(provided) charging cable into your device’s input port.
2. Plug the USB end of the charging cable into the
Fuel Pack’s “OUT” USB port.
3. The device should show the charging icon.
SL4 series
iDevices
1. Plug the iDevice charging cable’s end into your
iDevice input port.
2. Plug the USB end of the charging cable into either
the Fuel Pack’s “5V/1A” or “5V/2A” port.
(“5V/2A” is recommended for iPad.)
3. Push the
Power Level
button on the side of the
Fuel Pack (near “5V/2A” port) to check the capacity
level of the Fuel Pack.

• 6 •
4. The LEDs turn on and stay on throughout the
charging process.
5. Your iDevice should show the charging icon.
6. When the device is fully charged or the Fuel Pack is
fully discharged, the LEDs will shut off.
Other Devices
1. Option 1: Plug the provided (detached) charging
cable’s Micro USB end into your device’s input
port. Next, plug the USB end of the charging cable
into either the “5V/1A” or “5V/2A” USB port of the
Fuel Pack. Refer to your device’s owner manual for
recommendation of either 1A or 2A input current.
Option 2 (using attached charging cable):
Plug the attached cable’s Micro USB end into your
device’s input port.
2. The LEDs turn on and stay on throughout the
charging process.
3. Your device should show the charging icon.
4. When the device is fully charged or the Fuel Pack is
fully discharged, the LEDs will shut off.
SL5 series
1. iDevices: Plug the iDevice charging cable’s end
into your iDevice input port.
Other Devices: Plug the provided charging cable’s
Micro USB end into your device’s input port.
2. Plug the USB end of the charging cable into either
“Output 1” or “Output 2” USB port of the Fuel Pack.
(“Output 2” is recommended for iPad.)
3. The LCD display turns on and stays on throughout
the charging process.
4. Your device should show the charging icon.
5. When the device is fully charged or the Fuel Pack is
fully discharged, the LCD display will shut off.

• 7 •
5. RECHARGING THE FUEL PACK
SL3 series
Recharging will take up to 4 hours.
1. Plug the provided charging cable’s Micro USB end
into the Fuel Pack’s Micro USB “IN” port, and then
plug the USB end into your computer or laptop.
2. The LED indicator will turn on, RED.
3. When charging is complete, the LED will turn BLUE
and stay on until the unit is disconnected.
SL4 series
Recharging will take approximately 4 hours
(use a 2A adaptor to charge the fuel pack).
1. Option 1: Plug the provided (detached) charging
cable’s Micro USB end into the Fuel Pack’s Micro
USB “Input” port, and then plug the USB end into
your computer or laptop.
Option 2 (using attached charging cable):
Plug the attached cable’s USB end into your
computer or laptop.
2. Blue LEDs blink, indicating the level of charge.
3. When charging is complete, all 4 LEDs will turn
solid and stay on until the unit is disconnected.
SL5 series
Recharging will take approximately 7.5 hours
(use a 2A adaptor to charge the fuel pack).
1. Plug the provided charging cable’s Micro USB end
into the Fuel Pack’s Micro USB “IN” port, and plug
the USB end into your computer or laptop.
2. When connected, the LCD display will turn on (with
the blue backlight on for 10 seconds), showing % of
charge and blinking IN.

• 8 •
3.
When charging is complete, the LCD will show 100%
charged, and stay on until the unit is disconnected.
To check the capacity (%) available on the Fuel Pack,
shake the Fuel Pack once. The LCD display will turn
on and show the % of charge.
6. MAINTENANCE AND CARE
• Recharge the Fuel Pack every 3 months, if it has
not been used.
• Occasionally clean the case of the Fuel Pack with
a soft dry cloth.
• Store in a cool, dry place.
7. SPECIFICATIONS
SL3 series
Capacity .................................................... 2600 mAh
Input ...............................................Micro USB 5V/1A
Output ......................................................USB 5V/1A
SL4 series
Capacity .................................................... 4200 mAh
Input ...........................Micro USB 5V/2A, USB 5V/2A
Output ............Micro USB 5V/1A, USB 5V/1A, 5V/2A
SL5 series
Capacity .................................................. 10000 mAh
Input ...............................................Micro USB 5V/2A
Output ..........................................USB 5V/1A, 5V/2A

• 9 •
8. LIMITED WARRANTY
Schumacher Electric Corporation (the “Manufacturer”)
warrants this Fuel Pack to the original purchaser for
one (1) year from the date of purchase at retail against
defective material or workmanship that may occur
under normal use and care. If your unit is not free from
defective material or workmanship, Manufacturer’s
obligation under this warranty is solely to repair or
replace your product with a new or reconditioned unit
at the option of the Manufacturer. It is the obligation
of the purchaser to forward the unit, along with proof
of purchase and mailing charges prepaid to the
manufacturer or its authorized representatives in order
for repair or replacement to occur.
Manufacturer expressly disclaims and excludes
any warranties other than this limited warranty.
Manufacturer shall not be liable for any incidental,
special or consequential damage claims incurred
by purchasers, users or others associated with this
product. This warranty gives you specic legal rights
and it is possible you may have other rights which vary
from this warranty.
Schumacher Electric Corporation
801 Business Center Drive
Mount Prospect, IL, 60056-2179
For customer service:
www.batterychargers.com
or call 1-800-621-5485,
Monday-Friday 7:00am to 5:00pm CST
Go to www.batterychargers.com
to register your product online.
Schumacher
®
is a registered trademark
of Schumacher Electric Corporation.

• 10 •
1. INSTRUCCIONES IMPORTANTES DE SEGURIDAD
1.1 GUARDE ESTAS INSTRUCCIONES –
Este manual contiene instrucciones operativas
y de seguridad de importancia.
1.2 Manténgase alejado de los niños.
1.3 No exponga la unidad al calor extremo, la lluvia o
a la nieve.
1.4 No desarme el pack de energía; esto puede
provocar un incendio o una explosión.
1.5 No cargue el pack de energía a temperaturas
inferiores a 32 ° F (0 ° C).
1.6 Temperatura de operación ideal es de 41 °- 113 ° F
(5 °- 45 ° C). La exposición prolongada a altas
temperaturas reducirá la vida útil de la batería.
1.7 ADVERTENCIA: Este producto contiene una o más
sustancias químicas conocidas en el Estado de
California como causantes de cáncer y defectos de
nacimiento u otros daños reproductivos.

• 11 •
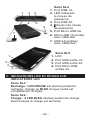
2. CARACTERÍSTICAS
Todos los modelos incluyen un cable de carga.
3
1
2
Serie SL3
1. LED
2. Puerto USB de salida
3. Entrada de puerto
USB Micro
Serie SL4
1.
Puerto USB 1A
2.
LED de nivel de potencia
3.
Puerto USB 2A
4.
Botón de nivel
de potencia
5.
Puerto USB Micro 2A
6.
1A USB Micro (salida)
con cable adjunto
7.
USB 2A (entrada) con
cable adjunto
3
4 5
6
7
21
1
2
3
4
Serie SL5
1.
LCD
2.
Puerto USB 1A Salida
3.
Puerto USB 2A Salida
4.
Entrada 2A de puerto
USB Micro

• 12 •
3. INDICADORES LED Y PANTALLA LCD
INDICADORES LED
Serie SL3:
Recarga: LED ROJO está encendido durante la
recarga; cambios a azul cuando la unidad está
completamente cargada.
Serie SL4:
Carga: 4 LEDS AZULES durante la carga; OFF
cuando la carga ha nalizado.
Recarga: 4 LEDS AZULES se encienden, a continuación,
uno o más de parpadeo, lo que indica el nivel de carga:
100% de la carga
75% de la carga
50% de la carga
25% de la carga
Cuando se completa la carga, los 4 LEDs AZULES se
vuelven sólidos y permanecen encendidos hasta que la
unidad se desconecta.
PANTALLA LCD (Serie SL5 sólo):
Carga: La pantalla LCD se enciende y permanece así
durante todo el proceso de carga. Cuando el dispositivo
está completamente cargada o el pack de energía está
completamente descargada, la pantalla LCD se apagará.
Recarga: Cuando está conectado, la pantalla LCD se
encenderá (con la luz de fondo azul por 10 segundos),
muestra el% de carga y parpadea IN. Una vez que el
proceso de carga se haya completado, la pantalla LCD
mostrará el 100% de la carga, y estar al tanto hasta
que se desconecte. Para comprobar la capacidad (%)
disponibles en el pack de energía, agite bien el pack
de energía una vez. La pantalla LCD se encenderá y
mostrará el% de carga.
NOTA: la pantalla LCD de la unidad está cubierta
con un protector de pantalla extraíble. Si se raya,
simplemente pelar y desechar.

• 13 •
4. CARGA SU DISPOSITIVO ELECTRÓNICO
Tiempos de carga variará.
El pack de energia está pre-cargado en el 50-60% de
la capacidad, y debería estar listo para su uso cuando
se compran. Se recomienda carga a plena capacidad
antes del primer uso.
NOTA: Cuando cargue iDispositivos, utilice el cable
de carga incluido con su iDispositivo. Si el extremo del
conector del relámpago está desenchufado durante
la carga y el pack de energía se apaga, se debe
desconectar y volver a conectar los ambos extremos
del cable de carga, para reanudar la carga.
Restablecer la batería
Si la batería necesita ser reiniciado por cualquier
razón, simplemente vuelva a conectar el pack de
energía a su computadora portátil o computadora.
Serie SL3
1. iDispositivos: Conecte el extremo del cable
de carga del iDispositivo al puerto de entrada de
tu iDispositivo.
Otros dispositivos: Conecte el extremo USB
Micro del (suministrado) cable de carga en el
puerto de entrada del dispositivo.
2. Enchufe el extremo USB del cable de carga que en
el “OUT” puerto USB del pack de energía.
3. El dispositivo debería mostrar el icono de carga.

• 14 •
Serie SL4
iDispositivos
1. Conecte el extremo del cable de carga del
iDispositivo al puerto de entrada de tu iDispositivo.
2. Conecte el extremo USB del cable de carga al
ya sea en “5V/1A” o “5V/2A” puerto del pack de
energía. (“5V/2A” se recomienda para el iPad.)
3. Pulse el botón
nivel de potencia
en el lado del
pack de energía (cercano a “5V/2A” puerto) para
comprobar el nivel de capacidad del pack de
energía.
4. Los LED se encienden y permanecen encendidos
durante todo el proceso de carga.
5. El iDispositivo debería mostrar el icono de carga.
6. Cuando el dispositivo está completamente cargada o
el pack de energía está completamente descargada,
los LEDs se apagan.
Otros dispositivos
1. Opción 1: Conecte el de carga Micro USB del
extremo del cable suministrado (desapegado), en
el puerto de entrada del dispositivo. A continuación,
conecte el extremo USB del cable de carga en
cualquiera de la “5V/1A” o “5V/2A” puerto USB del
pack de energía. Consulte el manual de usuario de
su dispositivo para la recomendación de cualquiera
1A o 2A corriente de entrada.
Opción 2 (utilizando el cable de carga adjunto):
Enchufe el extremo USB Micro del cable adjunto al
puerto de entrada de su dispositivo.
2. Los LED se encienden y permanecen encendidos
durante todo el proceso de carga.

• 15 •
3. El dispositivo debería mostrar el icono de carga.
4. Cuando el dispositivo está completamente cargada o
el pack de energía está completamente descargada,
el LED se apaga.
Serie SL5
1. iDispositivos: Conecte el extremo del cable de carga
del iDispositivo al puerto de entrada de tu iDispositivo.
Otros dispositivos: Conecte el extremo USB
Micro del (suministrado) cable de carga en el
puerto de entrada del dispositivo.
2. Conecte el extremo USB del cable de carga al ya
sea en “Output 1” o “Output 2” puerto del pack de
energía. (“Output 2” se recomienda para el iPad.)
3. La pantalla LCD se enciende y permanece así
durante todo el proceso de carga.
4. El dispositivo debería mostrar el icono de carga.
5. Cuando el dispositivo está completamente cargada o
el pack de energía está completamente descargada,
la pantalla LCD se apagará.
5. RECARGA DEL PACK DE ENERGÍA
Serie SL3
Recarga puede tardar hasta 4 horas.
1. Conecte el extremo de USB Micro del (suminis-
trado) cable de carga en el puerto “IN” de USB
Micro de pack de energia y luego conecte el
extremo USB en su ordenador o portátil.
2. El indicador LED se enciende, ROJO.
3. Cuando se completa la carga, el LED se vuelve de
color AZUL y permanezca encendida hasta que la
unidad esté desconectada.

• 16 •
Serie SL4
El tiempo de recarga es aproximadamente 4 horas
(utilice un adaptador de 2 A para cargar el pack
de energía).
1. Opción 1: Enchufe el extremo del Micro USB del
cable de carga suministrado (desapegado) en el
puerto de USB Micro “IN” del pack de energia, y
luego conecte el extremo USB en su ordenador
o portátil.
Opción 2 (utilizando el cable de carga adjunto):
Conecte el apegado extremo USB en su ordenador
o portátil.
2. LEDs azules parpadean, lo que indica el nivel
de carga.
3. Cuando se completa la carga, los 4 LEDs se
vuelven sólidos y permanecen encendidos hasta
que la unidad esté desconectada.
Serie SL5
El tiempo de recarga es aproximadamente 7,5 horas
(utilice un adaptador de 2 A para cargar el pack
de energía).
1. Enchufe el extremo del Micro USB del cable de
carga (suministrado) en el puerto de USB Micro
“IN” del pack de energia y conecte el extremo USB
en su ordenador o portátil.
2. Cuando está conectado, la pantalla LCD se
encenderá (con la luz de fondo azul por 10
segundos), muestra el% de carga y parpadea IN.
3. Cuando la carga esté completa, la pantalla LCD
mostrará 100% de carga, y permanecer hasta que la
unidad esté desconectada.
Para comprobar la capacidad (%) disponibles en el
pack de energía, agite bien el pack de energía una
vez. La pantalla LCD se encenderá y mostrará el%
de carga.

• 17 •
6. MANTENIMIENTO Y CUIDADO
• Recargar el pack de energía cada 3 meses, si no
se ha utilizado.
• Ocasionalmente limpie el caso del pack de energía
con un paño suave y seco.
• Almacene en un lugar fresco y seco.
7. ESPECIFICACIONES
Serie SL3
Capacidad ................................................. 2600 mAh
Entrada ...........................................Micro USB 5V/1A
Salida .......................................................USB 5V/1A
Serie SL4
Capacidad ................................................. 4200 mAh
Entrada .......................Micro USB 5V/2A, USB 5V/2A
Salida .............Micro USB 5V/1A, USB 5V/1A, 5V/2A
Serie SL5
Capacidad ............................................... 10000 mAh
Entrada ...........................................Micro USB 5V/2A
Salida ...........................................USB 5V/1A, 5V/2A

• 18 •
8. GARANTÍA LIMITADA
Schumacher Electric Corporation (el “Fabricante”)
garantiza el pack de energía al comprador original por
un año desde la fecha de compra al menudeo contra
defectos de material o mano de obra que puede ocurrir
bajo condiciones normales de uso y cuidado. Si la unidad
por alguna razón está defectuosa de su material o mano
de obra, la obligación del fabricante bajo esta garantía
es exclusivamente para reparar o reemplazar el producto
con una unidad nueva o en buen estado a la opción del
fabricante. Es la obligación del comprador enviar la unidad,
junto con el comprobante de compra y gastos de envío pre-
pagado para el fabricante o sus representantes autorizados
para la reparación o reemplazo según el caso.
El fabricante expresamente rechaza y excluye cualquier
garantía, diferente a la presente garantía limitada. El
fabricante no se hace responsable de cualquier daño
incidental, especial o consecuentes reclamos efectuados
por los compradores, usuarios o terceros relacionados con
este producto. Esta garantía le otorga derechos legales
especícos y es posible que usted pueda tener otros
derechos que varían de esta garantía.
Schumacher Electric Corporation
801 Business Center Drive
Mount Prospect, IL, 60056-2179
Para servicio al cliente:
www.batterychargers.com
o llame 1-800-621-5485
Lunes-viernes 7:00am to 5:00pm CST
Visite www.batterychargers.com
para registrar su producto en línea.
Schumacher
®
es una marca registrada
de Schumacher Electric Corporation.

• 19 •
1. CONSIGNES DE SÉCURITÉ IMPORTANTES
1.1 CONSERVER CES INSTRUCTIONS –
Ce manuel contient des instructions importantes
concernant la sécurité et le fonctionnement.
1.2 Ne le laissez pas a la portée des enfants.
1.3 Ne pas exposer l’unité à la lumière directe du soleil,
pluie ou la neige.
1.4 Ne pas démonter le bloc d’alimentation; cela peut
provoquer un incendie ou une explosion.
1.5 Ne pas charger le bloc d’alimentation à des
températures inférieures à 32 ° F (0 ° C).
1.6 Température de fonctionnement idéale est de
41 °- 113 ° F (5 °- 45 ° C). Une exposition
prolongée à des températures élevées réduira la
durée de vie de la batterie.
1.7 AVERTISSEMENT : Ce produit contient un ou
plusieurs produits chimiques reconnus par l’État de
Californie pour causer cancer, des malformations
congénitales ou d’autres troubles de la reproduction.
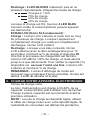
2. CARACTÉRISTIQUES
Tous les modèles incluent un câble de recharge.
3
1
2
S
é
rie SL3
1. LED
2. Port USB sortie
3. Port Micro USB
entrée

• 20 •
S
é
rie SL4
1. Port USB 1A
2. LED indiquant
le niveau de
puissance
3. Port USB 2A
4.
B
outon de niveau
de puissance
5. Port Micro USB 2A
6. Micro USB 1A (sortie)
avec câble xé
7. USB 2A (entrée)
avec câble xé
3
4 5
6
7
21
1
2
3
4
S
é
rie SL5
1. LCD
2. Port USB sortie 1A
3. Port USB sortie 2A
4. Port Micro USB
entrée 2A
3. INDICATEURS LED ET ÉCRAN LCD
INDICATEURS LED
Série SL3 :
Recharge : LED ROUGE est allumé pendant la
recharge; change au BLEU lorsque l’unité est
complètement chargée.
Série SL4 :
Charge : 4 LED BLEU allumés pendant la charge;
éteint lorsque la charge est terminée.

• 21 •
Recharge : 4 LED BLEUES s’allument, puis un ou
plusieurs clignotements, indiquant le niveau de charge :
Chargée à 100%
75% de charge
50% de charge
25% de charge
Lorsque la charge est ni, tous les 4 LED BLEU
tournent solide et restent allumés jusqu’à appareil
est débranché.
ECRAN LCD (Série SL5 uniquement) :
Charge : L’écran LCD s’allume et reste tout au long
du processus de charge. Lorsque l’appareil est
complètement chargé ou l’unité est complètement
déchargée, l’écran LCD s’éteint.
Recharge : Lorsque vous êtes connecté, l’écran
LCD s’allume (avec le rétro-éclairage bleu pour 10
secondes), montrant le % de charge et clignotes IN.
Une fois le processus de chargement est terminé,
l’écran LCD afche 100% de charge, et reste allumé
jusqu’à ce que déconnecté. Pour vérier la capacité (%)
disponible sur secouer l’unité une fois. L’écran LCD
s’allume et montre le % de charge.
REMARQUE : L’écran d’afchage de l’unité est
recouvert avec protecteur d’écran amovible. Si cela est
abimé, il suft de décoller et le jeter.
4. CHARGE VOTRE APPAREIL ÉLECTRONIQUE
Temps de charge varie.
Le bloc d’alimentation est chargé à 50-60% de sa
capacité, et devrait être prêt à utiliser lors de l’achat.
Charge à pleine capacité est recommandé avant la
première utilisation.
NOTE : Lors de la charge les dipositifs Apple, utilisez
le câble de charge inclus avec votre dipositif Apple. Si
l’extrémité du connecteur est débranché pendant le

• 22 •
chargement et l’unité s’éteint, vous devez déconnecter
et reconnecter les deux extrémités du câble de
chargement pour reprendre la charge.
Réinitialisation de la batterie
Si la batterie doit être réinitialisé pour n’importe
quel raison, rebranchez simplement l’unité à votre
ordinateur portable ou un ordinateur.
Série SL3
1. Dispositifs Apple : Branchez le câble de charge
de dispositif Apple dans le port d’entrée de votre
dispositif Apple.
Autres dispositifs : Branchez l’extrémité micro
USB de câble de recharge sur le port d’entrée de
votre appareil.
2. Branchez l’extrémité USB du câble de recharge sur
le port USB «OUT» de l’unité.
3. L’appareil doit afcher l’indicateur de charge.
Série SL4
Dispositifs Apple
1. Branchez le câble de charge de dispositif Apple
dans le port d’entrée de votre dispositif Apple.
2. Branchez l’extrémité USB du câble de charge en
« 5V/1A » ou le port « 5V/2A » de l’unité. (« 5V/2A »
est recommandé pour iPad.)
3. Appuyez sur le bouton de niveau de puissance
sur le côté de l’unité (près du port « 5V/2A ») pour
vérier le niveau de capacité de l’unité.
4. Les voyants s’allument et restent allumés pendant
tout le processus de charge.
5. Votre dispositif Apple devrait afcher l’indicateur
de charge.
6. Lorsque l’appareil est complètement chargé ou l’unité
est complètement déchargée, la LED s’éteindra.

• 23 •
Autres dispositifs
1. Option 1 : Branchez le câble fourni (micro USB)
dans le port d’entrée de votre appareil. Ensuite,
branchez l’extrémité USB du câble de charge soit
dans le « 5V/1A » ou port USB « 5V/2A » de l’unité.
Reportez-vous au manuel d’instructions pour
recommandation de 1A ou de 2A
Option 2 (en utilisant le câble de chargement
ci-joint) : Branchez la n micro USB du câble
attaché au port d’entrée de votre appareil.
2. Les voyants s’allument et restent allumés pendant
tout le processus de charge.
3. Votre appareil doit afcher l’indicateur de charge.
4. Lorsque l’appareil est complètement chargé
ou l’unité est complètement déchargée, la LED
s’éteindra.
Série SL5
1. Dispositifs Apple : Branchez le câble de charge
de dispositif Apple dans le port d’entrée de votre
dispositif Apple.
Autres dispositifs : Branchez le chargement
prévu n Micro USB de câble dans le port d’entrée
de votre appareil.
2. Branchez l’extrémité USB du câble de charge
en soit « Output 1 » ou « Output 2 » port USB de
l’unité. (« Output 2 » est recommandé pour i Pad.)
3. L’écran LCD s’allume et reste tout au long du
processus de charge.
4. Votre appareil doit afcher l’indicateur de charge.
5. Lorsque l’appareil est complètement chargé ou l’unite
est complètement déchargée, l’écran LCD s’éteint.

• 24 •
5. RECHARGER L’UNITÉ
Série SL3
La recharge peut prendre jusqu’à 4 heures.
1. Branchez la charge prévue n Micro USB de câble
dans le port USB de Micro Pack carburant port
« IN », puis branchez l’autre extrémité USB dans
votre ordinateur de bureau ou portable.
2. L’indicateur LED s’allume, ROUGE.
3. Lorsque la charge est terminée, le voyant devient
BLEU et reste jusqu’à ce que l’appareil est débranché.
Série SL4
La recharge prend environ 4 heures (utilisez l’adaptateur
2A pour charger le bloc d’alimentation).
1. Option 1 : Branchez le câble fourni a la n
Micro USB de dans « Input » le port du bloc
d’alimentation, puis branchez l’autre extrémité USB
dans votre ordinateur de bureau ou portable.
Option 2 (en utilisant le câble de chargement
ci-joint) : Branchez la n USB du câble attaché à
votre ordinateur de bureau ou portable.
2. LED bleues clignotent, indiquant le niveau de charge.
3. Lorsque la charge est terminée, tous les 4 LED
s’allumeront solide et restent allumés jusqu’à
l’appareil est débranché.
Série SL5
La recharge prend environ 7,5 heures (utilisez
l’adaptateur 2A pour charger le bloc d’alimentation).
1. Branchez la charge prévue n Micro USB de câble
dans le port USB de Micro cloc d’alimentation port
« IN », et branchez l’autre extrémité USB dans
votre ordinateur de bureau ou portable.
2. Une fois connecté, l’écran LCD s’allume (avec le
rétro-éclairage bleu pour 10 secondes), montrant%
de charge et clignote IN.

• 25 •
3.
Lorsque la charge est terminée, l’écran LCD afche
100 % de charge, et de rester jusqu’à ce que l’appareil
est débranché.
Pour vérier la capacité (%) disponible sur l’unité,
secouer le pack une fois. L’écran LCD s’allume et
montrer le% de charge.
6. ENTRETIEN
• Rechargez le bloc d’alimentation tous les
3 mois, si elle n’a pas été utilisée.
• Nettoyer de temps en temps avec un chiffon
doux et sec.
• Conserver dans un endroit frais et sec.
7. SPÉCIFICATIONS
Série SL3
Capacité .................................................... 2600 mAh
Entrée ...........................................Micro USB 5V / 1A
Sortie ......................................................USB 5V / 1A
Série SL4
Capacité .................................................... 4200 mAh
Entrée .....................Micro USB 5V / 2A, USB 5V / 2A
Sortie .......Micro USB 5V / 1A, USB 5V / 1A , 5V / 2A
Série SL5
Capacité .................................................. 10000 mAh
Entrée ...........................................Micro USB 5V / 2A
Sortie ........................................ USB 5V / 1A, 5V / 2A

• 26 •
8. GARANTIE LIMITÉE
Schumacher Electric Corporation (le « Fabricant »)
garantit l’unité pour un (1) an à compter de la date
d’achat au détail contre les défauts de matériaux ou de
fabrication qui peut survenir en cas d’utilisation et un
entretien normal. Si votre appareil n’est pas exempt de
défauts de matériaux ou de fabrication, l’obligation du
fabricant sous cette garantie est uniquement à réparer
ou remplacer votre produit par un appareil neuf ou remis à
neuf au choix du fabricant. C’est l’obligation de l’acheteur
de renvoyer l’appareil, avec une preuve d’achat et les
frais d’envoi prépayés au fabricant ou ses représentants
autorisés pour la réparation ou le remplacement de se
produire.
Fabricant décline expressément et exclut toute autre
garantie que cette garantie restreinte. Fabricant ne
peut être tenu responsable des dommages demandes
incidentes, spéciaux ou consécutifs encourus par les
acheteurs, utilisateurs ou autres personnes associées à
ce produit. Cette garantie vous donne des droits légaux
spéciques et il est possible que vous pouvez avoir
d’autres droits qui varient de cette garantie.
Schumacher Electric Corporation
801 Business Center Drive
Mount Prospect, IL, 60056-2179
Pour le service client :
www.batterychargers.com
ou composez le 1-800-621-5485,
Du lundi au vendredi 07h00-17h00 CST
Aller sur www.batterychargers.com
pour enregistrer votre produit en ligne.
Schumacher
®
est une marque déposée
de Schumacher Electric Corporation.
-
 1
1
-
 2
2
-
 3
3
-
 4
4
-
 5
5
-
 6
6
-
 7
7
-
 8
8
-
 9
9
-
 10
10
-
 11
11
-
 12
12
-
 13
13
-
 14
14
-
 15
15
-
 16
16
-
 17
17
-
 18
18
-
 19
19
-
 20
20
-
 21
21
-
 22
22
-
 23
23
-
 24
24
-
 25
25
-
 26
26


Schumacher SL3 series El manual del propietario
- Categoría
- Bancos de energía
- Tipo
- El manual del propietario
- Este manual también es adecuado para
en otros idiomas
Artículos relacionados
-
Schumacher Electric SL015 SL1317 SL1431 El manual del propietario
-
Schumacher Electric SL08 SL1314 SL1429 El manual del propietario
-
Schumacher Electric SL010 SL1315 SL1327 SL1396 SL1430 El manual del propietario
-
Schumacher Electric SL1314 600 Peak Amp Lithium Ion Jump Starter/ Power Pack El manual del propietario
-
-
-
Schumacher SL1465 Jump Starter/Power Pack El manual del propietario
-
-

