
THANK YOU
We appreciate the trust and confidence you have placed in Husky through the purchase of this chest/cabinet. We strive to continually
create quality products designed to enhance your home. Visit us online to see our full line of products available for your home
improvement needs. Thank you for choosing Husky!
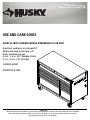
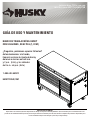
Model #HOTC5209B11M
SKU # 100x xxx xxx
USE AND CARE GUIDE
HUSKY 52 INCH 9 DRAWER MOBILE WORKBENCH 24.5 IN DEEP
Questions, problems, missing parts?
Before returning to the store, call
Husky Customer Service
8 a.m. - 7 p.m., EST, Monday-Friday
9 a.m.- 6 p.m., EST, Saturday
1 888 HD-HUSKY
HUSKYTOOLS.COM

2
Safety Information
DANGER: Do not stand on this product. You
may fall or cause the product to tip.
DANGER: Do not move the product prior to
closing and locking all the drawers. The
drawers could come open and make the
product unstable and tip.
DANGER: Do not mount this product on a
truck bed or any other moving object.
WARNING: Keep the product on a level
surface. The product may become unstable and
tip if stored or moved on an uneven surface.
CAUTION: Do not lift this product directly
with a forklift or tow with any mechanical
devices.
CAUTION: Do not exceed the maximum
product weight, including contents. Do not
exceed the maximum weight for each drawer.
See Specifications on page 4.
CAUTION: Only transport this product when
empty. Properly secure when transporting.
1. Do not open more than one drawer at a time.
2. Do not let children approach the product.
3. To help prevent the product from tipping, load the product
starting with the bottom drawers.
4. Keep locking the casters’ brake set unless you are moving
the cabinet. This will help to prevent the product from rolling.
5. Lock all drawers before moving the product.
6. Make sure all drawers close tightly before locking/unlocking.
7. Do not step in any drawer/drawers.
8. When moving this product, push it rather than pull it.
9. Do not alter this product in any manner.
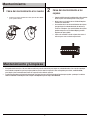
Plug and Outlet Safety
WARNING: Chest/cabinet plugs must match the outlet. Never
modify the plug in any way. Do not use any adapter plugs with earth
(grounded) chest/cabinet power strips. Unmodified plugs and
matching outlets will reduce risk of electric shock.
WARNING: Avoid body contact with earthed or grounded surfaces
such as pipes, radiators, ranges and refrigerators. There is increased risk
of electric shock if your body is earthed or grounded.
WARNING: Chests/cabinets marked “Grounding Required” have a
power strip with a three wire cord and three prong grounding plug. The
plug must be connected to a properly grounded outlet (See Figure).
If the power strip should electrically malfunction or break down,
grounding provides a low resistance path to carry electricity away
from the user, reducing the risk of electric shock. The grounding
prong in the plug is connected through the green wire inside the
cord to the grounding system in the power strip. The green wire in
the cord must be the only wire connected to the
power strip's grounding system and must
never be attached to an electrically “live”
terminal. Your power strip must be plugged into
an appropriate outlet, properly installed and
grounded in accordance with all codes and ordinances.
Table of Contents
Assembly ...............................................................
Operation ................................................................
Maintenance ..........................................................
Care and Clearning
...................................................
Service Parts
....................................................................
Table of Contents .............................. 2
Safety Information .............................. 2-3
Warranty .............................. 3
Pre-Assembly .............................. 4
.............................. 4Tools Required
............................... 4Hardware Included
.............................. 4Specifications
.............................. 5Package Contents
6
7
8
8
9

Warranty
HUSKYTOOLS.COM
Please contact 1-888-HD-HUSKY for further assistance.
The manufacturer warrants the product to be free from defects in materials and workmanship for a period of years from date of purchase. three (3)
This warranty applies only to the original consumer and only to products used in normal use and service. If this product is found to be defective, the
manufacturer’s only obligation, and your exclusive remedy, is the repair or replacement of the product at the manufacturer’s discretion, provided
that the product has not been damaged through misuse, abuse, accident, modifications, alteration neglect or mishandling. This warranty shall not
apply to any product that is found to have been improperly installed, set-up, or used in any way not in accordance with the instructions supplied
with the product. This warranty shall not apply to a failure of the product as a result of an accident, misuse, abuse, negligence, alteration, faulty
installation, or any other failure not relating to faulty material or workmanship. This warranty shall not apply to the finish on any portion of the
products such as surface and/or weathering, as this is considered normal wear and tear.
The manufacturer does not warrant and specifically disclaims any warranty, whether express or implied, of fitness for a particular purpose, other
than the warranty contained herein. The manufacturer specifically disclaims any liability and shall not be liable for any consequential or incidental
loss or damage, including but not limited to any labor/expense costs involved in the replacement or repair of said product.
Contact the Customer Service Team at 1-888-HD-HUSKY or visit www.huskytools.com.
Safety Information (continued)
This device complies with Part 15 of the FCC Rules.
Operation is subject to the following two conditions: (1) This
device may not cause harmful interference, and (2) This
device must accept any interference received, including
interference that may cause undesired operation.
NOTE: This equipment has been tested and found to
comply with the limits for a Class B digital device, pursuant
to Part 15 of the FCC Rules. These limits are designed to
provide reasonable protection against harmful interference
in a residential installation. This equipment generates,
uses and can radiate radio frequency energy and, if not
installed and used in accordance with the instructions, may
cause harmful interference to radio communications.
However, there is no guarantee that interference will not
occur in a particular installation. If this equipment does
cause harmful interference to radio or television reception,
which can be determined by turning the equipment off and
on, the user is encouraged to try to correct the interference
by one or more of the following measures:
– Reorient or relocate the receiving antenna.
– Increase the separation between the equipment and
receiver.
– Connect the equipment into an outlet on a circuit different
from that to which the receiver is connected.
– Consult the dealer or an experienced radio/TV technician
for help.
WARNING: Changes or modifications to this unit not
expressly approved by the party responsible for compliance
could void the user's authority to operate the equipment.
The Responsible party information:
Clearwater Metal Vn JSC
Lot CN2, Mai Trung IZ, An Tay Village, Ben Cat Town, Binh
Duong Province, Vietnam. Tel: +84.274.3581.773
Product name: Power strip 6 outlets with 2 USB ports
Model# K2415014K2415009 /
3

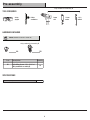
Pre-assembly
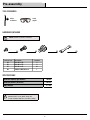
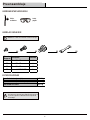
TOOLS REQUIRED
HARDWARE INCLUDED
NOTE: Hardware not shown to actual size.
SPECIFICATIONS
NOTE: Begin product assembly close to the final
intended location of your cabinet. This product
is heavy and may be difficult to move after assembly.
Service Part Description Quantity
AA
BB
Bolt M4 x 10L
4
CC
Bolt M8 x 15L
4
16
AA BB CC
DD
10MM/13MM Wrench
1
DD
Maximum capacity (per drawer) 100 lbs
Maximum product (total unit) 1,200 lbs
Empty weight 211 lbs
Phillips
screwdriver
Safety
goggles
Bolt M6 x 15L
4

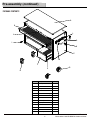
Pre-assembly (continued)
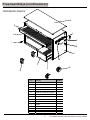
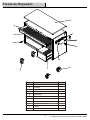
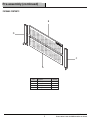
PACKAGE CONTENTS
A
B
D
E
F
G
H
K
I
J
C
Part Description Quantity
A Wood top 1
B Side handle 1
C Rolling cabinet 1
D Swivel caster with brake 2
E Drawer slide 100 lbs (pair) 11
F Drawer 9
G Rigid caster 2
H Power strip bracket 2
I Key (set) 1
J Lock 1
K Drawer liner 9
L Grommet 1
M Power strip 1
HUSKYTOOLS.COM
Please contact 1-888-HD-HUSKY for further assistance.
L
M
5

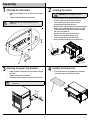
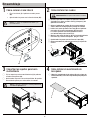
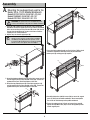
Assembly
1
Attaching the side handle
2
Installing the casters
NOTE: The holes in the cabinet are tapped and do not
require nuts.
□
Ensure all drawers are securely locked into place using
□ Lay the rolling cabinet (C) on its back. Use the
packaging material to protect the finish.
□ Mount the two swivel casters with brake (D) to the rolling
cabinet (C) using four bolts (BB) per caster. The swivel
casters with brake (D) should be installed on the same
□ Mount the two rigid casters (G) to the rolling
cabinet (C) using four bolts (CC) per caster.
□ Tighten all bolts with a 13 mm wrench (DD).
□
Return the rolling cabinet (C) to its upright position.
CAUTION: Do not over tighten the screws.
□
the key (I) and lock (J) on the rolling cabinet (C).
side as the side handle (B).
□ Attach the side handle (B) to the cabinet using four bolts
(AA).
Tighten all bolts with the 10mm wrench (DD).□
BB
G
C
D
3
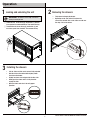
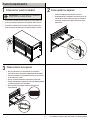
4
Installing the drawer liner
□
Place the drawer liners in appropriately sized drawers
and the chest lid area to protect the surface.
AA
Attaching the power strip brackets
□
Attach the power strip brackets (H) to the cabinet using four
bolts (AA).
Tighten all bolts using a screwdriver.
□
Do not over tighten the bolts to avoid damage to the finish.
NOTE: The holes in the cabinet are tapped and do not
require nuts.
□
H
AA
K
6

Operation
Installing the drawers
□ Pull the slides and slide carrier out until fully extended.
□ Hold the slide on the cabinet while aligning it with
the slide on the drawer.
□
□ Slowly push the drawer until it is fully closed to
engage the slide.
□ Open the drawer and close it to verify proper
operation.
Slightly insert one side and repeat for the other side.
3
2
Removing the drawers
□ Fully extend and empty the drawer.
□ Depending on the slide, either lift or lower the
release lever on both sides so the slides can ride over
the stops. Pull out to remove.
1
Locking and unlocking the unit
IMPORTANT : The drawers must be fully closed before
locking / unlocking the unit.
HUSKYTOOLS.COM
Please contact 1-888-HD-HUSKY for further assistance.
I
□
To lock the unit, insert the key (I) into the lock (J) and turn
□
To unlock the unit, insert the key (I) into the lock (J) and
it one quarter turn counterclockwise. Then remove the key.
turn it one quarter turn clockwise. Then remove the key.
7

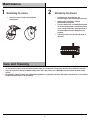
Maintenance
Maintaining the casters
Maintaining the drawers
□ Grease the casters annually using high quality
bearing grease.
□ Periodically clean the drawer trim, and
inside the drawers with a mild detergent and water.
□ Remove grease and oil with a standard,
nonflammable cleaning fluid.
□ The use of drawer liners is recommended to protect
the finish inside the drawers and make the drawers
easier to clean. Drawer liners can be purchased at
The Home Depot and can be cleaned with soap .
□ Lubricate the slides semi-annually with grease or
equivalent.
□
This steel product has been coated with industrial powder coating for a durable finish. To help protect this finish, do not allow harsh chemicals
Care and Cleaning
such as oil or grease to remain on the powder coating surface. Use a glass cleaner, such as Windex to clean and maintain all powder coated
surfaces.
and water.
□
The wood top is made of Parawood (also called Rubberwood) which has a polyurethane coating to help protect it from moisture. It can be cleaned
with most household cleaners, such as Windex .
R
R
21
8

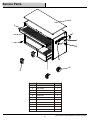
Service Parts
HUSKYTOOLS.COM
Please contact 1-888-HD-HUSKY for further assistance.
Part
Description
Quantity
A
Wood top
1
B
Side handle
1
D
Swivel caster with brake
2
E
Drawer slide 100 lbs (pair)
11
G
Rigid caster
2
H
Power strip bracket
2
I
Key (set)
1
J
Lock
1
K
Drawer liner
9
L
Grommet
1
M
Power strip
1
A
B
D
E
G
H
K
I
J
L
M
9

Questions, problems, missing parts? Before returning to the store,
call Husky Customer Service
8 a.m.-7 p.m., EST, Monday-Friday, 9 a.m. - 6 p.m. EST Saturday
1-888-HD-HUSKY
HUSKYTOOLS.COM
Retain this manual for future use.

GRACIAS POR TU COMPRA
Apreciamos la confianza que has depositado en Husky al comprar este baúl/gabinete. Nos esforzamos para continuamente crear
productos de calidad diseñados para mejorar tu hogar. Visítanos en Internet para ver nuestra línea completa de productos disponibles para
las necesidades de mejoras de tu hogar. ¡Gracias por elegir Husky!
MODELO Núm.HOTC5209B11M
Artículo Núm. 100x xxx xxx
BANCO DE TRABAJO MÓVIL HUSKY
CON 9 CAJONES, DE 52 PLG (1,32 M)
¿Preguntas, problemas o piezas faltantes?
Antes de devolver a la tienda,
llama al servicio al cliente de Husky
de lunes a viernes entre 8 a.m.
1-888-HD-HUSKY
HUSKYTOOLS.COM
de 9 a.m. a 6 p.m. (Este)
y 7 p.m. (Este), y los sábados
GUÍA DE USO Y MANTENIMIENTO

2
Tabla de Contenido
Tabla de Contenido ...................................................
Información de Seguridad
.......................................
Garantía .........................................................................
Preensamblaje
..................................................
Ensamblaje ........................................................... 6
Funcionamiento ..................................................... 7
Mantenimiento ......................................................8
Cuidado y Mantenimiento
........................................8
Piezas de Repuesto
....................................................9
Herramientas Necesarias ...........................................
Herrajes Incluidos
.......................................................
Especificaciones ........................................................
Contenido del Paquete
........................................
2
2 - 3
3
4
4
4
5
4
Información de seguridad
1. No abras más de un cajón a la vez.
2. Mantén a los niños lejos del producto.
3. Para evitar que el producto se caiga, comienza
por los cajones inferiores a cargarlo con artículos.
4. Mantén bloqueados los frenos de las ruedas, excepto si vas a
mover el gabinete. Esto ayudará a evitar que el producto ruede.
5. Cierra con seguro todos los cajones antes de mover el producto.
6. Asegúrate de que todos los cajones cierren bien antes de cerrar/abrir.
7. No te pares sobre ningún cajón o cajones.
8. de h Cuando vayas a mover este producto, empújalo en lugar alarlo.
9. No modifiques este producto de ninguna manera
Seguridad con enchufes y tomacorrientes
ADVERTENCIA: Evita el contacto físico con las superficies
conectadas a tierra como tuberías, radiadores, estufas y
refrigeradores. Existe mayor riesgo de descarga eléctrica si tu
cuerpo hace tierra.
ADVERTENCIA: Las cajas para herramientas/gabinetes
etiquetadas con “Grounding Required” (requiere conexión a
tierra) tienen una barra multicontacto con un cordón de tres
cables y un enchufe de conexión a tierra de tres espigas. El
enchufe debe conectarse a un tomacorrientes con conexión a
tierra (ver figura). Si la barra multicontacto tiene un problema
eléctrico o se daña, la conexión a tierra proporciona un camino
de baja resistencia para alejar la electricidad del usuario,
reduciendo el riesgo de descarga eléctrica. La espiga de
conexión a tierra está conectada al sistema de conexión a
tierra a través del cable verde dentro del cordón de la barra
multicontacto. El cable verde en el cordón tiene
que ser el único conectado al sistema de
conexión a tierra de la barra multicontacto
y nunca jamás conectarse a un terminal
con corriente eléctrica. Tu barra multicontacto
debe ser conectada en un tomacorriente apropiado,
que esté idamente instalado y conectado a tierra de acuerdo
con las leyes y regulaciones.
ADVERTENCIA: Los enchufes de la caja para
herramientas/gabinete tienen que coincidir con el
tomacorriente. No intentes modificar el enchufe de ninguna
forma. No usar ningún enchufe adaptador con barras
multicontacto de cajas para herramientas/gabinetes que
tengan conexión a tierra. Enchufes sin modificaciones y
tomacorrientes adecuados reducen el riesgo de descarga
eléctrica.
PELIGRO: No te pares sobre este producto.
Puedes caerte o provocar que el producto se vuelque.
PRECAUCIÓN: No levantes este producto
directamente con un montacargas o lo remolques con
ningún dispositivo mecánico.
PELIGRO: No montes este producto en la cama de un
camión o sobre cualquier otro objeto en movimiento.
ADVERTENCIA: Mantén el producto sobre una
superficie nivelada. El producto puede volverse
inestable y volcarse si se almacena o mueve sobre una
superficie desnivelada.
PRECAUCIÓN: No sobrepases el peso máximo
permitido para el producto, incluyendo el contenido. No
sobrepases el peso máximo para cada cajón. Consulta
las especificaciones en la página 4.
PRECAUCIÓN: Transporta este producto sólo cuando
esté vacío. Asegúralo debidamente cuando vayas a
transportarlo.
PELIGRO: No muevas el producto antes de cerrar y
asegurar todos los cajones. Los cajones pueden abrirse
y provocar que el producto quede inestable y se
vuelque.

HUSKYTOOLS.COM
Garantía
El fabricante garantiza que este producto no presentará defectos materiales ni de fabricación durante (3) años a partir de la fecha tres
original de compra. Esta garantía es válida solo para el consumidor original y cubre solo productos en uso y servicio normales.
Si se detecta algún defecto en este producto, la única obligación y solución exclusiva del fabricante, a su entera discreción,
será reparar o reponer el producto, siempre y cuando el producto no haya sido dañado por mal uso, abuso, accidente, modificaciones,
alteraciones, negligencia o manejo indebido. Esta garantía no cubre ningún producto instalado, configurado o usado sin seguir las
instrucciones adjuntas. Esta garantía no cubre fallas del producto como consecuencia de un accidente, mal uso, abuso, negligencia,
modificaciones o instalaciones defectuosas, ni cualquier otra falla no relacionada con defectos materiales o de fabricación. Esta
garantía no se aplica al acabado de ninguna parte del producto, como la superficie, ni al deterioro por condiciones ambientales,
El fabricante no garantiza y rechaza específicamente cualquier garantía, explícita o implícita, de la idoneidad del producto para
un propósito en particular, que no sea la garantía establecida por este medio. El fabricante rechaza específicamente cualquier
obligación y no será responsable por ningún daño o pérdida, directos o indirectos, incluyendo, pero sin limitarse a, cualquier
Comuníquese con el equipo de servicio al cliente por el 1-888-HD-HUSKY o visite www.huskytools.com.
ya que se considera desgaste normal.
costo de mano de obra/gastos relacionados con la reposición o reparación de dicho producto.
Para obtener asistencia, llama al 1-888-HD-HUSKY.
Información de seguridad(continuación)
Este dispositivo cumple con la Parte 15 de las Regulaciones
de la FCC. Su operación está sujeta a las dos condiciones
siguientes: (1) Este dispositivo no debe causar interferencia
dañina, y (2) tiene que aceptar cualquier interferencia
recibida, incluyendo aquella que pudiera afectar su
funcionamiento.
NOTA: Este equipo fue sometido a prueba y se determinó
que cumple con los límites establecidos para un dispositivo
digital Clase B según la Parte 15 de las Normas FCC. Estos
límites fueron establecidos para dar protección razonable
contra la interferencia dañina en uso residencial. Este equipo
genera, consume y puede irradiar energía de radiofrecuencia;
si no se instala y usa de acuerdo con las instrucciones, puede
causar interferencia dañina a comunicaciones radiales. Sin
embargo, no hay garantía de que no ocurrirá interferencia en
una instalación particular. Si este equipo causa interferencia
perjudicial a la recepción de radio o televisión, que puede
determinarse encendiendo y apagando el equipo, se
recomienda al usuario tratar de corregir la interferencia con
una o más de las siguientes medidas:
– Reorientar o reubicar la antena receptora.
– Incrementar la distancia entre los equipos y el receptor.
– Conectar el equipo a un tomacorriente en un circuito
distinto al que el receptor está conectado.
– Consultar al distribuidor o algún técnico de radio/TV con
experiencia.
ADVERTENCIA: Los cambios o modificaciones a esta
unidad sin aprobación expresa de la parte responsable del
cumplimiento de las normas aplicables podrían anular el
derecho del usuario a operar el equipo.
La información de la parte responsable:
Clearwater Metal Vn JSC
Lot CN2, Mai Trung IZ, An Tay Village, Ben Cat Town, Binh
Duong Province, Vietnam. Tel: +84.274.3581.773
Nombre del producto: Barra multicontacto con 6
tomacorrientes y 2 puertos USB
Modelo # K2415009 / K2415014
3

Preensamblaje
4
HERRAMIENTAS NECESARIAS
HERRAJES INCLUIDOS
NOTA: No se muestra el tamaño real de los herrajes.
ESPECIFICACIONES
NOTA: Comienza el ensamblaje del producto cerca
de la ubicación deseada de tu gabinete. Este producto
es pesado y puede ser difícil de mover después del
ensamblaje.
Pieza de
Repuesto
Descripción Cantidad
AA Perno M4x 10L 4
BB Perno M6x 15L 4
CC Perno M8x 15L 16
DD Llave de 10MM/13MM 1
Capacidad máxima (por cajón) 45.4 kg
Capacidad máxima (unidad completa) 544.2 kg
Peso cuando está vacío 95.7 kg
Phillips
screwdriver
Safety
goggles
AA BB CC DD

Preensamblaje (continuación)
CONTENIDO DEL PAQUETE
5
HUSKYTOOLS.COM
Para obtener asistencia, por favor llama al 1-888-43-HUSKY.
Pieza Descripción Cantidad
A Cubierta de madera 1
B Asa lateral 1
C Gabinete con ruedas 1
D Rueda giratoria con freno 2
E Corredera de cajón para 45 kg (el par) 11
F Cajón 9
G Rueda rígida 2
H Soporte para barra multicontacto 2
I Llave (juego) 1
J Cerradura 1
K Revestimiento de cajones 9
L Remache 1
M Barra multicontacto 1
A
B
D
E
F
G
H
K
I
J
C
L
M

Ensamblaje
1
Cómo colocar el asa lateral
2
Cómo instalar las ruedas
NOTA : Los orificios en el gabinete están rellenos y no
necesitan tuercas.
□
PRECAUCIÓN: No aprietes demasiado los tornillos.
6
□ Fija el asa lateral (B) al gabinete usando 4 pernos
(AA).
Aprieta todos los pernos con la llave de 10 mm (DD).□
4
Cómo instalar el revestimiento de
□
Coloca los revestimientos de los cajones (K) en los cajones de
tamaño adecuado y el área de la tapa del baúl para proteger la
los cajones
superficie.
Garantiza que todos los cajones del gabinete estén bien
□ Coloca el gabinete con ruedas (C) con su parte posterior
sobre el material de empaque para proteger el acabado.
□ Instala las 2 ruedas giratorias con freno (D) en el gabinete
con ruedas (C) usando cuatro pernos (BB) por rueda.
Las ruedas giratorias con freno (D) deben instalarse
□ Monta las dos ruedas giratorias (G) en el centro del gabinete
□ Aprieta todos los pernos con una llave de 13 mm (DD).
□
Coloca nuevamente el gabinete con ruedas (C) en posición
□
ajustados en su lugar, usando la llave (I) y bloqueo (J) del
en el mismo lado que el asa lateral (B).
gabinete con ruedas (C).
vertical.
con ruedas (C) usando cuatro pernos (CC) por rueda.
3
NOTA: Este paso es opcional. El usuario puede decidir
si instala los soportes o n o.
□
Cómo fijar los soportes para barra
multicontacto
□ Fija los soportes para barra multicontacto (H) al gabinete
usando cuatro pernos (AA).
□ Aprieta todos los pernos con un destornillador. No aprietes
demasiado los pernos para evitar daños al acabado.
AA
BB
G
C
D
H
AA
K

Funcionamiento
Cómo instalar los cajones
□ Hala las correderas y el sujetador de las correderas
hacia afuera hasta que quede completamente extendido.
□ Sostén la corredera en el gabinete mientras la alineas con
la corredera en el cajón.
□
□ Empuja lentamente el cajón hasta que esté completamente
cerrado y enganche en la corredera.
□ Abre el cajón y ciérralo para verificar que funcione
correctamente.
Inserta un lado ligeramente y repite para el otro lado.
3
2
Cómo quitar los cajones
□ Extiende completamente el cajón y vacíalo.
□ Dependiendo de la corredera, levanta o baja las de
liberación en ambos lados para que las correderas
pasen por encima de los topes. Hala hacia afuera
para retirar.
1
Cómo cerrar y abrir la unidad
IMPORTANTE : Los cajones deben estar completamente
cerrados antes de cerrar/abrir la unidad.
7
HUSKYTOOLS.COM
Para obtener asistencia, por favor llama al 1-888-43-HUSKY.
□
Para cerrar la unidad, inserta la llave (I) en la cerradura (J) y
□
Para abrir la unidad, inserta la llave (I) en la cerradura (J) y
gírala un cuarto de vuelta hacia la izquierda. Retira la llave.
gírala un cuarto de vuelta hacia la derecha. Retira la llave.
I

Mantenimiento
Cómo dar mantenimiento a las ruedas
Cómo dar mantenimiento a los
cajones
□ Engrasa las ruedas anualmente usando grasa de alta calidad
para cojinetes de bola.
8
□ Limpia periódicamente la moldura del cajón y dentro
de los cajones con un detergente suave y agua.
□ Quita la grasa y el aceite con un fluido de limpieza
estándar no inflamable.
□ Se recomienda el uso de revestimientos de cajones
para proteger el acabado dentro de los mismos y
facilitar su limpieza. Los revestimientos de cajones
pueden comprarse en The Home Depot y pueden
□ Lubrica las correderas de los cajones dos veces al
año con grasa o un sustancia equivalente.
□
Este producto de acero ha sido revestido con cubierta granular industrial para lograr un acabado duradero. Para ayudar a proteger
Mantenimiento y Limpieza
este acabado, no permitas que haya caigan químicos fuertes sobre la superficie. Usa un limpiador para vidrio, como Windex® ,
para limpiar y dar mantenimiento a todas las superficies de cubierta granular.
limpiarse con agua y jabón.
□
La cubierta de madera está hecha de Caucho de Pará que tiene un revestimiento de poliuretano para ayudar a proteger la cubierta
contra la humedad. Puede limpiarse con la mayoría de limpiadores para el hogar, como Windex®.
21

Piezas de Repuesto
9
HUSKYTOOLS.COM
Para obtener asistencia, por favor llama al 1-888-43-HUSKY.
Pieza
Descripción
Cantidad
A
Cubierta de madera
1
B
Asa lateral
1
D
Rueda giratoria con freno
2
E
Corredera de cajón para 45 kg (el par)
11
G
Rueda rígida
2
H
Soporte para barra multicontacto
2
I
Llave (juego)
1
J
Cerradura
1
K
Revestimiento de cajones
9
L
Remache
1
M
Barra multicontacto
1
A
B
D
E
G
H
K
I
J
L
M

¿Preguntas, problemas o piezas faltantes? Antes de devolver a la tienda, llama al
Servicio al cliente de Husky,
1-888-HD-HUSKY
HUSKYTOOLS.COM
Conserva este manual para uso futuro.
de lunes a viernes, entre 8:00 a.m. y 7:00 p.m. (hora estándar del Este),
y los sábados de 9:00 a.m. a 6:00 p.m. (hora estándar del Este).

THANK YOU
USE AND CARE GUIDE
Questions, problems, missing parts?
Before returning to the store, call
Husky Customer Service
8 a.m. - 7 p.m., EST, Monday-Friday, 9 a.m. - 6 p.m., EST, Saturday
1-888-43-HUSKY
HUSKYTOOLS.COM
We appreciate the trust and confidence you have placed in Husky through the purchase of this pegboard. We strive to continually
create quality products designed to enhance your home. Visit us online to see our full line of products available for your home
improvement needs. Thank you for choosing Husky!
Model # D6TC09002
HUSKY 52 IN. PEGBOARD BACK WALL
Sku # 1001-288-349

Table of Contents
Table of Contents ......................................................
2
Safety Information
........................................................
2
Warranty ........................................................................
3
Pre-Assembly
.......................................................
4
Assembly ................................................................
Operation .....................................................................
Safety Information
Do not alter this product in any manner.
DANGER: Do not stand on this product. You
may fall or cause the product to tip.
WARNING: When assembled to a workbench, keep
the unit on a level surface. The unit may become unstable
and tip if stored or moved on an uneven surface.
CAUTION: Do not exceed the maximum
weight loading capacity. See Specifications on page 4.
CAUTION: Only transport this product when
empty. Properly secure when transporting.
This pegboard has three different assembly methods. It can be
Care and Cleaning
.......................................................
Service Parts
....................................................................
Tools Required ..............................................................
4
Hardware Included
.......................................................
Specifications ................................................................
4
Package Contents
................................................
5
6-9
9
10
1.
2.
2
4
9
Do not let children approach the product.
3.
installed directly on a wall (Assembly Method C) or on a variety
of Husky 52” Mobile Workbenches. Be sure to match
your model number to the Assembly Method A or B.

Warranty
The manufacturer warrants the product to be free from defects in materials and workmanship for a period of three ( ) years from date of3
purchase. This warranty applies only to the original consumer and only to products used in normal use and service. If this product is
found to be defective, the manufacturer’s only obligation, and your exclusive remedy, is the repair or replacement of the product at the
manufacturer’s discretion, provided that the product has not been damaged through misuse, abuse, accident, modifications, alteration
neglect or mishandling. This warranty shall not apply to any product that is found to have been improperly installed, set-up, or used in
any way not in accordance with the instructions supplied with the product. This warranty shall not apply to a failure of the product
as a result of an accident, misuse, abuse, negligence, alteration, faulty installation, or any other failure not relating to faulty material or
workmanship. This such as surface and/or weathering, as this is warranty shall not apply to the finish on any portion of the products
considered normal wear and tear.
The manufacturer does not warrant and specifically disclaims any warranty, whether express or implied, of fitness for a particular purpose,
other disclaims any liability and shall not be liable for any consequential than the warranty contained herein. The manufacturer specifically
or costs involved in the replacement or repair of said product.incidental loss or damage, including but not limited to any labor/expense
Contact the Customer Service Team at 1-888-43-HUSKY or visit www.huskytools.com.
HUSKYTOOLS.COM
Please contact HUSKY for further assistance. 1-888-43-
3

Pre-assembly
TOOLS REQUIRED
Safety
goggles
HARDWARE INCLUDED
SPECIFICATIONS
AA
BB
Screw M6 x 12L
19
Self-drilling Screws 1/4 in. X 3/4 in. L
16
AA
BB
Maximum capacity 100 lbs
4
NOTE: Hardware not shown to actual size.
Part Description Quantity
Phillips
screwdriver
10 mm.
socket
1/8 in.
drill bit
Power
drill
Only needed for Assembly B
(Only needed for assembly B)
Only needed for Assembly B

Pre-assembly continued) (
HUSKYTOOLS.COM
PACKAGE CONTENTS
Please contact HUSKY for further assistance. 1-888-43-
Part Description Quantity
A Bottom Pegboard Panel 1
B Top Pegboard Panel 1
C Right Support Post 1
D Left Support Post 1
5
B
D
C
A

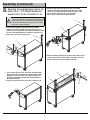
Assembly
M ounting the pegboard back wall to the
1.
Place the right support post (C) on the back side of the mobile
holes and secure the post using the four M6 screws (AA). Secure
6
A.
M odel SKU#1001-075-943 #HOTC5210B1AD,
WARNING: Use special care to not over-tighten any of the
H usky 52 in. 10-Dr Mobile Workbench
screws to avoid damage to the pegboard or mobile workbench.
workbench. Ensure the support post lines up with the four bottom
the post, but do not tighten the screws at this time so that the
support post has some movement.
C
AA
D
M odel SKU#1001-081-787 #75809AHR,
M odel SKU#1001-257-215 #HTBX105F,
Repeat step 1 for the left support post (D).
2.
NOTE: If the workbench comes with pre-installed
threads on each corner, it is not necessary to install the
self drilling screws (BB) into the four top holes of each
post. If the mobile workbench does not have pre-installed
threads on each corner, please refer to Assembly B.
Attach the bottom pegboard panel (A) to the right support post (C)
pegboard to the posts, but do not tighten at this time.
Attach the top pegboard panel (B) to the right support post (C)
pegboard to the posts, but do not tighten at this time.
5.
and left support post (D) using four M6 screws (AA). Secure the
6.
and left support post (D) using four M6 screws (AA). Secure the
A
C
D
B
C
D
AA
Ensure the front pegboard panels are flush. Using a Phillips-head
Carefully, tighten the eight M6 screws (AA) to secure the support
the screws to avoid damage to the mobile workbench.
Ensure the pegboard panel is flush and square, then carefully
to both support posts.
7.
screwdriver, tighten the three M6 screws (AA) to connect the
8.
9.
posts (C) and (D) to the mobile workbench. Do not over-tighten
tighten the eight M6 screws (AA) to secure the pegboard panels
AA
A
B
bottom panel (A) and top panel (B) together.
AA

Assembly (continued)
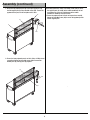
M ounting the pegboard back wall to the
1.
Place the right support post (C) on the back of the mobile
marker to mark the eight holes in the bottom plate which connect
Using a power drill and 1/8 in. drill bit, drill the eight marked
B.
7
Model#HOTC5211B1QBD, SKU#1000-031-149
WARNING: Use special care to not over-tighten any of the
Attaching this product to your mobile workbench requires drilling
the wood top or mobile workbench.
workbench. Ensure you drill on a level plane and only 3/4 in.
Repeat step 3 to drill the holes for the other support post (D).
Attach the right support post (C) to the back of the mobile
socket. Secure the post, but do not tighten the screws at this
Repeat step 5 to attach the left support post (D).
H usky 52 in. 11-Dr Mobile Workbench
screws to avoid damage to the pegboard or mobile workbench.
holes into the mobile workbench. Use special care not to damage
workbench. Use a Ensure the support post is flush and level.
the post to the mobile workbench. Remove the support post (C).
3.
holes into the sides of the wood top and metal corners of the
deep into the wood top and metal sides to avoid damage to
4.
5.
workbench using eight self-drilling screws (BB) and a 10 mm
time so that the support post has some movement.
6.
C
D
C
BB
D
BB
Repeat step 1 for the left support post (D).
2.
the mobile workbench.
Attach the bottom pegboard panel (A) to the right support post (C)
pegboard to the post, but do not tighten at this time.
7.
and left support post (D) using four M6 screws (AA). Secure the
A
C
D
AA

Assembly ( )continued
8
Attach the top pegboard panel (B) to the right support post (C)
pegboard to the post, but do not tighten at this time.
Ensure the front pegboard panels are flush. Using a Phillips-head
Carefully, tighten the sixteen self-drilling screws (BB) to secure
over-tighten the screws to avoid damage to the mobile
Ensure the pegboard panel is flush and square, then carefully
to both support posts.
8.
and left support post (D) using four M6 screws (AA). Secure the
9.
screwdriver, tighten the three M6 screws (AA) to connect the
10.
11.
the support posts (C) and (D) to the mobile workbench. Do not
workbench's wood top and steel corners.
tighten the eight M6 screws (AA) to secure the pegboard panels
B
C
D
AA
AA
A
B
bottom panel (A) and top panel (B) together.

Assembly (continued)
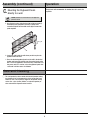
M ounting the Pegboard Panels
1.
On a flat level surface, align the long sides of the top panel (B)
screwdriver, to connect thetighten the three M6 screws (AA)
Locate the studs inside the wall where you wish to place the
9
C.
Place the attached pegboard panels on the wall in the desired
directly to a wall
and bottom panel (A) together and using a Phillips-head
panels together.
2.
pegboard and mark them.
3.
B
A
location and locate the peg holes over the marked studs on the
wall. Ensure the pegboard is level, then using a minimum 2.5 in.
long screw and 1/2 in. washer, secure the pegboard panels into
wall studs in all four corners at minimum.
NOTE: Hardware is not included to secure pegboard
AA
□
This steel product has been coated with industrial powder coating
Care and Cleaning
®
surface. Use a glass cleaner ( Windex or equivalent product) to
for a durable finish. To help protect this finish, do not allow harsh
chemicals such as oil or grease to remain on the powder coating
clean and maintain all powder coated surfaces.
panels to a wall.
Operation
The peg holes will accommodate all standard size 1/8 in. and 1/4 in.
peg hooks.

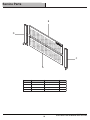
Service Parts
HUSKYTOOLS.COM
Please contact 1-888-43-HUSKY for further assistance.
Part Part# Description Quantity
A B4B080TC52E3735A Bottom Pegboard Panel 1
B B4B080TC52E3736A Top Pegboard Panel 1
C B4C150TC46E3733A Right Support Post 1
D B4C150TC46E3732A Left Support Post 1
10
B
D
C
A

Questions, problems, missing parts? Before returning to the store, call
Husky Customer Service
8 a.m.-7 p.m., EST, Monday-Friday, 9 a.m. - 6 p.m. EST Saturday
1-888-43-HUSKY
HUSKYTOOLS.COM
Retain this manual for future use.
-
 1
1
-
 2
2
-
 3
3
-
 4
4
-
 5
5
-
 6
6
-
 7
7
-
 8
8
-
 9
9
-
 10
10
-
 11
11
-
 12
12
-
 13
13
-
 14
14
-
 15
15
-
 16
16
-
 17
17
-
 18
18
-
 19
19
-
 20
20
-
 21
21
-
 22
22
-
 23
23
-
 24
24
-
 25
25
-
 26
26
-
 27
27
-
 28
28
-
 29
29
-
 30
30
-
 31
31


Husky HOTC5209B12M D6TC09002 Instrucciones de operación
- Tipo
- Instrucciones de operación
- Este manual también es adecuado para
en otros idiomas
Artículos relacionados
-
Husky HOTC5209B31M Instrucciones de operación
-
-
-
-
-
-
Husky HOTC6205BB1M Instrucciones de operación
-
-
-