Intellinet 561952 Quick Instruction Guide
- Tipo
- Quick Instruction Guide


2
This guide presents the basic steps
to set up and operate this device.
For specifications, visit support.intellinet-
network.com/barcode/561952.
Register your product at register.
intellinet-network.com/r/561952 or
scan the QR code on the cover.
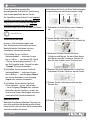
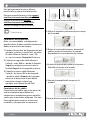
Connections
Device Connections
Note: Your needs and setup may vary. Both
Extender units must be used together.
1 Plug a Cat5e/6 Ethernet cable — up
to 100 m long — from your powered
source device (for example, a PoE
injector or switch) into the Output
connector on one extender.
2 Plug a second Cat5e/6 Ethernet
cable — up to 800 m long — from
the Input on the first extender to
the Input the second extender.
3 Plug a third Cat5e/6 Ethernet cable —
up to 100 m long — from the Output
on the second extender to the device
you want to transmit power and data
to (e.g., a PoE network camera).
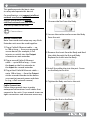
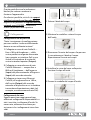
Cable Connections
Follow these general steps to make
waterproof connections on all cables that
connect to the units. Use a wrench to ensure
tight connections and whenever necessary.
1 Unscrew the Nut from the Body.
2 Loosen the washer and unscrew the Body
from the unit.
3 Remove the Insert from the Body and feed
the cable through the Nut and Body.
Replace the Insert into the Body .
4 Install the cable plug into the port. Screw
on the Body to the unit.
5 Tighten the Body washer to the unit.
6 Tighten the Nut to the Body.
Nut Body
with
washer
Insert
English
Instructions

3
Instructions
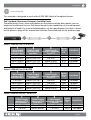
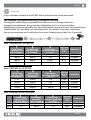
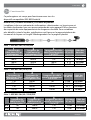
Functionality
This extender is designed to work with all IEEE 802.3bt/at/af-compliant devices.
PoE Standard | Maximum Distance | Available Power
The table below shows select information on the power and the data speeds you can
expect to be delivered to your PoE device based on the capabilities of your equipment
and lengths of cable. For a more detailed table, visit the specifications link that is shown
on the previous page of this manual and click the Downloads tab on the product page.
Series 1: IEEE 802.3af (15.4 W) PSE
1
Cable length
between PSE
and extender 1
2
Cable length
between PoE
extenders
3
Cable length
between extender
2 and PD
Power
(W) at
PD
Data Rate
1 m (3 ft.) 400 m (1,312 ft.) 1 m (3 ft.) 10.27 100 Mbps
100 m (328 ft.) 800 m (2,624 ft.) 1 m (3 ft.) 5.21 10 Mbps
100 m (328 ft.) 400 m (1,312 ft.) 100 m (328 ft.) 8.73 100 Mbps
100 m (328 ft.) 800 m (2,624 ft.) 100 m (328 ft.) 4.78 10 Mbps
Series 2: IEEE 802.3at (30 W) PSE
1
Cable length
between PSE
and extender 1
2
Cable length
between PoE
extenders
3
Cable length
between extender
2 and PD
Power
(W) at
PD
Data Rate
1 m (3 ft.) 400 m (1,312 ft.) 1 m (3 ft.) 23.98 100 Mbps
100 m (328 ft.) 800 m (2,624 ft.) 1 m (3 ft.) 13.41 10 Mbps
1 m (3 ft.) 400 m (1,312 ft.) 100 m (328 ft.) 22.1 100 Mbps
100 m (328 ft.) 800 m (2,624 ft.) 100 m (328 ft.) 12.19 10 Mbps
Series 3: IEEE 802.3bt (60 / 90 W) PSE
1
Cable length
between PSE
and extender 1
2
Cable length
between PoE
extenders
3
Cable length
between extender
2 and PD
Power
(W) at
PD
Data Rate
60 W 1 m (3 ft.) 100 m (328 ft.) 1 m (3 ft.) 43.83 100 Mbps
90 W 1 m (3 ft.) 200 m (656 ft.) 1 m (3 ft.) 76.61 100 Mbps
1 2 3
English

4
Diese Kurzanleitung zeigt die
grundlegenden Schritte zur Einrichtung
und Inbetriebnahme dieses Geräts.
Die Spezifikationen finden Sie auf support.
intellinet-network.com/barcode/561952.
Registrieren Sie Ihr Produkt auf register.
intellinet-network.com/r/561952 oder
scannen Sie den QR-Code auf dem Deckblatt.
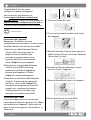
Anschlüsse
Geräteverbindungen
Hinweis: Ihre Anforderungen und
Ihre Konfiguration könnten variieren.
Beide Extender-Einheiten müssen
zusammen verwendet werden.
1 Schließen Sie ein Cat5e/6-
Netzwerkkabel — mit einer Länge
bis zu 100 m — von Ihrem PSE-Gerät
(“Power Sourcing Equipment”, z. B.
ein PoE-injektor oder -Switch) an den
“Output”-Port des Extenders.
2 Schließen Sie ein zweites Cat5e/6-
Netzwerkkabel — mit einer Länge
bis zu 800 m — vom Eingang (Input)
des ersten Extenders zum Eingang
(Input) des zweiten Extenders.
3 Schließen Sie ein drittes Cat5e/6-
Ethernetkabel – bis zu 100 m lang
– vom Ausgang (Output) des zweiten
Extenders an das Gerät an, an das Sie
Strom und Daten übertragen möchten
(etwa eine PoE-Netzwerkkamera).
Kabelanschlüsse
Befolgen Sie diese einfachen Schritte, um
eine wasserdichte Verbindung aller Kabel
herzustellen, die mit dem Gerät verbunden
sind. Verwenden Sie einen
Schraubenschlüssel, um feste Verbindungen
zu gewährleisten und wann immer nötig.
1 Schrauben Sie die Mutter vom Gehäuse
ab.
2 Lösen Sie die Unterlegscheibe und
schrauben Sie das Gehäuse vom Gerät ab.
3 Entfernen Sie den Einsatz aus dem
Gehäuse und führen Sie das Kabel durch
die Mutter und das Gehäuse. Setzen Sie
den Einsatz wieder in das Gehäuse ein .
4 Stecken Sie den Kabelstecker in den Port.
Schrauben Sie das Gehäuse an das Gerät.
5 Ziehen Sie die Unterlegscheibe an der
Einheit fest.
6 Ziehen Sie die Mutter am Gehäuse fest.
Nut Body
with
washer
Insert
Deutsch
Anleitung

5Deutsch
Anleitung
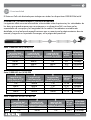
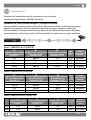
Funktion
Dieser Extender wurde für alle IEEE 802.3bt/at/af-konformen Geräte entwickelt.
PoE-Standard | Maximale Entfernung | Verfügbare Leistung
Die folgende Tabelle zeigt ausgewählte Informationen zur Leistung und zu den
Datengeschwindigkeiten, die je nach den Fähigkeiten Ihrer Ausrüstung und den
Kabellängen erwartungsgemäß an Ihr PoE-Gerät geliefert werden können. Eine detailliertere
Tabelle finden Sie unter dem Link „Spezifikationen“, der auf der vorherigen Seite dieser
Anweisung angezeigt wird, und klicken Sie auf der Produktseite auf den Tab „Downloads“.
Serie 1: IEEE 802.3af (15,4 W) PSE
1
Kabellänge
zwischen PSE
und Extender 1
2
Kabellänge
zwischen PoE-
Extendern
3
Kabellänge
zwischen Extender
2 und PD
Leistung
(W) an
PD
Datenrate
1 m 400 m 1 m 10.27 100 Mbps
100 m 800 m 1 m 5.21 10 Mbps
100 m 400 m 100 m 8.73 100 Mbps
100 m 800 m 100 m 4.78 10 Mbps
Serie 2: IEEE 802.3at (30 W) PSE
1
Kabellänge
zwischen PSE
und Extender 1
2
Kabellänge
zwischen PoE-
Extendern
3
Kabellänge
zwischen Extender
2 und PD
Leistung
(W) an
PD
Datenrate
1 m 400 m 1 m 23.98 100 Mbps
100 m 800 m 1 m 13.41 10 Mbps
1 m 400 m 100 m 22.1 100 Mbps
100 m 800 m 100 m 12.19 10 Mbps
Serie 3: IEEE 802.3bt (60/90 W) PSE
1
Kabellänge
zwischen PSE
und Extender 1
2
Kabellänge
zwischen
PoE-Extendern
3
Kabellänge
zwischen Extender
2 und PD
Leistung
(W) an
PD
Datenrate
60 W 1 m 100 m 1 m 43.83 100 Mbps
90 W 1 m 200 m 1 m 76.61 100 Mbps
1 2 3

6Español
Esta guía presenta los pasos básicos
para instalar y operar este dispositivo.
Para mas especificaciones, visita support.
intellinet-network.com/barcode/561952.
Registre el producto en register.
intellinet-network.com/r/561952 o
escanee el código QR en la cubierta.
Conexiónes
Conexiones del dispositivo
Nota: sus necesidades y configuración
pueden variar. Ambas unidades extensoras
deben usarse al mismo tiempo.
1 Desde el dispositivo de alimentación (por
ejemplo: inyector o switch PoE), conecte
el cable Ethernet Cat5e/6 - máx. 100
m - en el conector Output del Extensor.
2 Conecte un segundo cable ethernet
Cat5e/6 - máx. 800 m - desde la Entrada
(Input) en el primer extensor hasta la
Entrada (Input) en el segundo extensor.
3 Conecte un tercer cable Ethernet
Cat5e/6 - de hasta 100 m de longitud
- desde la salida (Output) del segundo
extensor al dispositivo al que desea
transmitir energía y datos (por
ejemplo, una cámara de red PoE).
Conexiones de los cables
Conexiones por cable: siga estos pasos de
manera completa para realizar las
conexiones a prueba de agua en aquellos
cables que se enchufan al equipo. Use una
llave inglesa para asegurar conexiones
estrechas y siempre que sea necesario.
1 Desenrosque la tuerca del cuerpo.
2 Afloje la arandela y desenrosque el cuerpo
de la unidad.
3 Retire el inserto del cuerpo y alimente el
cable a través de la tuerca y el cuerpo.
Reemplace el inserto dentro del cuerpo. .
4 Instale el enchufe del cable en el puerto.
Atornille el cuerpo a la unidad.
5 Apriete la arandela del cuerpo en la
unidad.
6 Ajuste bien la tuerca al orificio roscado.
Nut Body
with
washer
Insert
Instrucciones

7
Español
Instrucciones
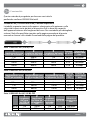
Funcionalidad
El Extensor PoE está diseñado para trabajar con todos los dispositivos IEEE 802.3bt/at/af.
Estándar PoE | Distancia máxima | Corriente disponible
La siguiente tabla muestra información seleccionada sobre la potencia y las velocidades de
los datos que puede esperar que se entreguen a su dispositivo PoE, con base en las
capacidades de su equipo y las longitudes de los cables. Para obtener una tabla más
detallada, visite el enlace de especificaciones que se muestra en la página anterior de este
manual y haga clic en la pestaña Descargas, en la página del producto.
Serie 1: IEEE 802.3af (15.4 W) PSE
1
Longitud del
cable entre el PSE
y el extensor 1
2
Longitud del
cable entre los
extensores del PoE
3
Longitud del
cable entre el
extensor 2 y el PD
Potencia
(W) en
el PD
Velocidad
de los datos
1 m 400 m 1 m 10.27 100 Mbps
100 m 800 m 1 m 5.21 10 Mbps
100 m 400 m 100 m 8.73 100 Mbps
100 m 800 m 100 m 4.78 10 Mbps
Serie 2: IEEE 802.3at (30 W) PSE
1
Longitud del
cable entre el PSE
y el extensor 1
2
Longitud del
cable entre los
extensores del PoE
3
Longitud del
cable entre el
extensor 2 y el PD
Potencia
(W) en
el PD
Velocidad
de los datos
1 m 400 m 1 m 23.98 100 Mbps
100 m 800 m 1 m 13.41 10 Mbps
1 m 400 m 100 m 22.1 100 Mbps
100 m 800 m 100 m 12.19 10 Mbps
Serie 3: IEEE 802.3bt (60 / 90 W) PSE
1
Longitud del
cable entre el PSE
y el extensor 1
2
Longitud del
cable entre los
extensores del PoE
3
Longitud del
cable entre el
extensor 2 y el PD
Potencia
(W) en
el PD
Velocidad
de los datos
60 W 1 m 100 m 1 m 43.83 100 Mbps
90 W 1 m 200 m 1 m 76.61 100 Mbps
1 2 3

8
Ce guide décrit les bases pour
configurer et opérer cet appareil.
Vous trouvez les spécifications sur,
visitez support.intellinet-network.com/
barcode/561952. Enregistrez votre produit sur
register.intellinet-network.com/r/561952 ou
scannez le code QR figurant sur la couverture.
Connexions
Connexions de l’appareil
Remarque : Vos besoins et votre
configuration peuvent varier. Les deux unités
Extender doivent être utilisées ensemble.
1 Branchez un câble Ethernet Cat5e/6
(jusqu’à 100 m de long) entre le
dispositif source alimenté (par
exemple, un commutateur ou un
injecteur PoE) et le connecteur de
sortie (Output) du prolongateur.
2 Branchez un second câble Ethernet
Cat5e/6 (jusqu’à 800 m de long
également) de l’Entrée (Input) du
premier prolongateur à l’Entrée
(Input) du second prolongateur.
3 Branchez un troisième câble Ethernet
Cat5e/6 - d’une longueur maximale
de 100 m - de la sortie (Output) du
deuxième prolongateur au dispositif
auquel vous souhaitez transmettre
l’alimentation et les données (par
exemple, une caméra réseau PoE).
Connexions des câble
Suivez ces étapes pour vous assurer de
raccordements étanches pour tous les câbles
qui conduisent à l’appareil. Utilisez une clé
pour assurer le serrage des connexions et si
nécessaire.
1 Dévissez l’Ecrou du Corps.
2 Desserrez la rondelle et dévissez le Corps
de l’appareil.
3 Retirez l’Insert du Corps et faites passer le
câble à travers l’Ecrou et le Corps. Replacez
l’insert dans le Corps.
4 Installez la fiche du câble dans le port.
Vissez le Corps à l’appareil.
5 Serrez la Rondelle de corps sur l’appareil..
6 Serrez bien l’écrou au corps fileté.
Nut Body
with
washer
Insert
Français
Instructions

9
Français
Instructions
Fonctionnalité
Ce prolongateur est conçu pour fonctionner avec tous les
dispositifs compatibles IEEE 802.3bt/at/af.
Norme PoE | Distance maximale | Puissance disponible
Le tableau ci-dessous présente des informations sélectionnées sur la puissance et
les débits de données que vous pouvez attendre de votre appareil PoE en fonction
des capacités de votre équipement et des longueurs de câble. Pour un tableau
plus détaillé, visitez le lien des spécifications qui figure sur la page précédente de
ce manuel et cliquez sur l’onglet Téléchargements sur la page du produit.
Série 1 : IEEE 802.3af (15,4 W) PSE
1
Longueur du
câble entre PSE et
prolongateur 1
2
Longueur du
câble entre les
prolongateurs PoE
3
Longueur du câble
entre le prolongateur
2 et le PD
Puissance
(W) au PD
Débit des
données
1 m 400 m 1 m 10.27 100 Mbps
100 m 800 m 1 m 5.21 10 Mbps
100 m 400 m 100 m 8.73 100 Mbps
100 m 800 m 100 m 4.78 10 Mbps
Série 2 : IEEE 802.3at (30 W) PSE
1
Longueur du
câble entre PSE et
prolongateur 1
2
Longueur du
câble entre les
prolongateurs PoE
3
Longueur du câble
entre le prolongateur
2 et le PD
Puissance
(W) au PD
Débit des
données
1 m 400 m 1 m 23.98 100 Mbps
100 m 800 m 1 m 13.41 10 Mbps
1 m 400 m 100 m 22.1 100 Mbps
100 m 800 m 100 m 12.19 10 Mbps
Série 3 : IEEE 802.3bt (60 / 90 W) PSE
1
Longueur du
câble entre PSE
et prolongateur 1
2
Longueur du
câble entre les
prolongateurs PoE
3
Longueur du câble
entre le prolongateur
2 et le PD
Puissance
(W) au PD
Débit des
données
60 W 1 m 100 m 1 m 43.83 100 Mbps
90 W 1 m 200 m 1 m 76.61 100 Mbps
1 2 3

10 Polski
Instrukcje
Ta instrukcja prezentuje podstawowe
kroki podłączenia i instalacji urządzenia.
Pełną specyfikację produktu znajdziecie
Państwo na stronie support.intellinet-
network.com/barcode/561952.
Zarejestruj produkt na register.intellinet-
network.com/r/561952 lub zeskanuj
znajdujący się na pokrywie kod QR.
Połączenia
Podłączenie urządzenia
Uwaga: Twoje potrzeby i konfiguracja
mogą się różnić. Obydwa przedłużacze
Extender muszą być używane razem.
1 Połącz kablem sieciowym Cat5e/6
– długość do 100 m – zasilone
urządzenie sieciowe (adapter PoE lub
przełącznik) z portem wyjściowym
(Output) Regeneratora/Extendera.
2 Połącz drugim kablem sieciowym
Cat5e/6 – długość do 800 m –
od portu wejściowego (Input)
pierwszego ekstendera do portu
wejściowego (Input) drugiego.
3 Podłącz trzeci kabel Ethernet
Cat5e/6 — o długości do 100 m — z
portu wyjścia (Output) na drugim
przedłużaczu Extender do urządzenia,
do którego chcesz przesyłać zasilanie
i dane (np. kamera sieciowa PoE).
Podłączenie kabli
Postępuj zgodnie z poniższymi ogólnymi
krokami, aby wykonać wodoszczelne
połączenia wszystkich kabli podłączanych
do urządzenia. Użyj klucza, aby zapewnić
szczelność połączenia i w razie konieczności.
1 Odkręć nakrętkę modułu.
2 Poluzuj podkładkę i odkręć moduł
urządzenia.
3 Wyjmij wkład z modułu i przeprowadź
kabel przez nakrętkę i moduł. Umieść
wkład w module.
4 Zainstaluj wtyczkę kabla w porcie.
Przykręć moduł do urządzenia.
5 Dokręć podkładkę modułu do urządzenia.
6 Dokręć nakrętkę do korpusu.
Nut Body
with
washer
Insert

11Polski
Instrukcje
Funkcjonalność
Extender jest zaprojektowany do współpracy ze wszystkimi
urządzeniami zgodnymi z IEEE 802.3bt/at/af.
Standard PoE | Maksymalna odległość | Dostępne zasilanie
Poniższa tabela zawiera wybrane informacje dotyczące zasilania i szybkości przesyłania
danych do urządzenia PoE, na podstawie możliwości sprzętu i długości kabla. Aby
uzyskać bardziej szczegółowe informacje, odwiedź link danych technicznych dostępny
na poprzedniej stronie tej instrukcji i kliknij kartę Pliki do pobrania na stronie produktu.
Series 1: IEEE 802.3af (15.4 W) PSE
1
Długość kabla między
PSE a przedłużaczem
Extender 1
2
Długość kabla pomiędzy
przedłużaczami
Extender PoE
3
Długość kabla między
przedłużaczem
Extender 2 a PD
Moc
(W) w
PD
Szybkość
przesyłania
danych
1 m 400 m 1 m 10.27 100 Mbps
100 m 800 m 1 m 5.21 10 Mbps
100 m 400 m 100 m 8.73 100 Mbps
100 m 800 m 100 m 4.78 10 Mbps
Series 2: IEEE 802.3at (30 W) PSE
1
Długość kabla między
PSE a przedłużaczem
Extender 1
2
Długość kabla pomiędzy
przedłużaczami
Extender PoE
3
Długość kabla między
przedłużaczem
Extender 2 a PD
Moc
(W)
w PD
Szybkość
przesyłania
danych
1 m 400 m 1 m 23.98 100 Mbps
100 m 800 m 1 m 13.41 10 Mbps
1 m 400 m 100 m 22.1 100 Mbps
100 m 800 m 100 m 12.19 10 Mbps
Series 3: IEEE 802.3bt (60 / 90 W) PSE
1
Długość kabla między
PSE a przedłużaczem
Extender 1
2
Długość kabla pomiędzy
przedłużaczami
Extender PoE
3
Długość kabla między
przedłużaczem
Extender 2 a PD
Moc (W)
w PD
Szybkość
przesyłania
danych
60 W 1 m 100 m 1 m 43.83 100 Mbps
90 W 1 m 200 m 1 m 76.61 100 Mbps
1 2 3

12
Questa guida fornisce le indicazioni
basilari per settare e mettere in
funzione l’apparecchio.
Per ulteriori specifiche, visita il sito support.
intellinet-network.com/barcode/561952.
Registra il tuo prodotto su register.intellinet-
network.com/r/561952 o scansiona il
codice QR presente sulla copertina.
Collegamenti
Collegamenti del dispositivo
“Nota: Le esigenze e la configurazione
possono variare. Le due unità Extender
devono essere utilizzate insieme.”
1 Collegate un cavo di rete Cat5e/6 —
fino a 100 m di lunghezza — dalla
vostra periferica sorgente alimentata
(per esempio, un iniettore PoE o uno
switch) al connettore di uscita del
vostro extender/repeater (Output).
2 Collegate un secondo cavo di rete
Cat5e/6 Ethernet — sempre fino a
800 m di lunghezza — dall’ingresso
(Input) del primo extender all’ingresso
(Input) del secondo extender.
3 Collegare un terzo cavo Ethernet
Cat5e/6, di lunghezza fino a 100 m,
dall’uscita (Output) del secondo
extender al dispositivo a cui si desidera
trasmettere alimentazione e dati (ad
esempio, una telecamera di rete PoE).
Collegamenti dei cavi
Seguire questi passaggi generali per
effettuare collegamenti impermeabili su
tutti i cavi che si collegano all’unità. Se
necessario, utilizzare una chiave per
assicurarsi che i collegamenti siano ben
saldi.
1 Svitare il dado dal corpo.
2 Allentare la rondella e svitare il corpo
dall’unità.
3 Rimuovere l’inserto dal corpo e far passare
il cavo attraverso il dado e il corpo.
Riposizionare l’inserto nel corpo.
4 Installare la spina del cavo nella porta.
Avvitare il corpo all’unità.
5 Serrare la rondella del corpo all’unità.
6 Serrare il dado al corpo.
Nut Body
with
washer
Insert
Italiano
Istruzioni

13
Italiano
Istruzioni
Funzionalità
Questo extender è progettato per lavorare con tutte le
periferiche conformi IEEE 802.3bt/at/af.
Standard PoE | Distanza massima | Potenza disponibile
La tabella seguente riporta informazioni selezionate sulla potenza e sulla
velocità di trasmissione dei dati al dispositivo PoE in base alle capacità
dell’apparecchiatura e alla lunghezza del cavo. Per una tabella più dettagliata,
visitare il link alle specifiche riportato nella pagina precedente di questo
manuale e cliccare sulla scheda Download della pagina del prodotto.
Serie 1: IEEE 802.3af (15.4 W) PSE
1
Lunghezza del cavo
tra PSE ed extender 1
2
Lunghezza del cavo
tra gli extender PoE
3
Lunghezza del cavo
tra l’extender 2 e il PD
Potenza
(W) al PD
Velocità di
trasmissione
dati
1 m 400 m 1 m 10.27 100 Mbps
100 m 800 m 1 m 5.21 10 Mbps
100 m 400 m 100 m 8.73 100 Mbps
100 m 800 m 100 m 4.78 10 Mbps
Serie 2: IEEE 802.3at (30 W) PSE
1
Lunghezza del cavo
tra PSE ed extender 1
2
Lunghezza del cavo
tra gli extender PoE
3
Lunghezza del cavo
tra l’extender 2 e il PD
Potenza
(W) al
PD
Velocità di
trasmissione
dati
1 m 400 m 1 m 23.98 100 Mbps
100 m 800 m 1 m 13.41 10 Mbps
1 m 400 m 100 m 22.1 100 Mbps
100 m 800 m 100 m 12.19 10 Mbps
Serie 3: IEEE 802.3bt (60 / 90 W) PSE
1
Lunghezza
del cavo
tra PSE ed
extender 1
2
Lunghezza
del cavo tra
gli extender
PoE
3
Lunghezza
del cavo tra
l’extender
2 e il PD
Potenza
(W) al PD
Velocità di
trasmissione
dati
60 W 1 m 100 m 1 m 43.83 100 Mbps
90 W 1 m 200 m 1 m 76.61 100 Mbps
1 2 3

14
WASTE ELECTRICAL & ELECTRONIC EQUIPMENT
DISPOSAL OF ELECTRIC AND ELECTRONIC EQUIPMENT
(Applicable In The European Union And Other European Countries With Separate Collection Systems)
ENGLISH: This symbol on the product or its packaging means
that this product must not be treated as unsorted
household waste. In accordance with EU Directive
2012/19/EU on Waste Electrical and Electronic
Equipment (WEEE), this electrical product must be disposed
of in accordance with the user’s local regulations for electrical
or electronic waste. Please dispose of this product by
returning it to your local point of sale or recycling pickup
point in your municipality.
DEUTSCH: Dieses auf dem Produkt oder der Verpackung
angebrachte Symbol zeigt an, dass dieses Produkt nicht mit
dem Hausmüll entsorgtwerden darf. In Übereinstimmung
mit der Richtlinie 2012/19/EU des Europäischen Parlaments
und des Rates über Elektro- und Elektronik-Altgeräte (WEEE)
darf dieses Elektrogerät nicht im normalen Hausmüll oder
dem Gelben Sack entsorgt werden. Wenn Sie dieses Produkt
entsorgen möchten, bringen Sie es bitte zur Verkaufsstelle
zurück oder zum Recycling-Sammelpunkt Ihrer Gemeinde.
ESPAÑOL: Este símbolo en el producto o su embalaje
indica que el producto no debe tratarse como residuo
doméstico. De conformidad con la Directiva 2012/19/EU de
la UE sobre residuos de aparatos eléctricos y electrónicos
(RAEE), este producto eléctrico no puede desecharse se
con el resto de residuos no clasificados. Deshágase de
este producto devolviéndolo a su punto de venta o a
un punto de recolección municipal para su reciclaje.
FRANÇAIS: Ce symbole sur Ie produit ou son emballage
signifie que ce produit ne doit pas être traité comme un
déchet ménager. Conformément à la Directive 2012/19/EU
sur les déchets d’équipements électriques et électroniques
(DEEE), ce produit électrique ne doit en aucun cas être
mis au rebut sous forme de déchet municipal non trié.
Veuillez vous débarrasser de ce produit en Ie renvoyant
à son point de vente ou au point de ramassage local
dans votre municipalité, à des fins de recyclage.
ITALIANO: Questo simbolo sui prodotto o sulla relativa
confezione indica che il prodotto non va trattato come
un rifiuto domestico. In ottemperanza alla Direttiva UE
2012/19/EU sui rifiuti di apparecchiature elettriche ed
elettroniche (RAEE), questa prodotto elettrico non deve
essere smaltito come rifiuto municipale misto. Si prega di
smaltire il prodotto riportandolo al punto vendita o al punto
di raccolta municipale locale per un opportuno riciclaggio.
POLSKI: Jeśli na produkcie lub jego opakowaniu
umieszczono ten symbol, wówczas w czasie utylizacji
nie wolno wyrzucać tego produktu wraz z odpadami
komunalnymi. Zgodnie z Dyrektywą Nr 2012/19/EU w
sprawie zużytego sprzętu elektrycznego i elektronicznego
(WEEE), niniejszego produktu elektrycznego nie wolno
usuwać jako nie posortowanego odpadu komunalnego.
Prosimy o usuniecie niniejszego produktu poprzez jego zwrot
do punktu zakupu lub oddanie do miejscowego komunalnego
punktu zbiórki odpadów przeznaczonych do recyklingu.
WARRANTY AT: | GARANTIE AUF: | GARANTÍA EN: | GARANTIE À : | GWARANCJA NA: | GARANZIA A:
intellinet-network.com
EN MÉXICO: Póliza de Garantía Intellinet Network Solutions — Datos del importador y responsable
ante el consumidor • IC Intracom México, S.A.P.I. de C.V. • Av. Interceptor Poniente # 73, Col. Parque
Industrial La Joya, Cuautitlán Izcalli, Estado de México, C.P. 54730, México. • Tel. (55)1500-4500
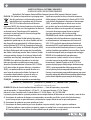
La presente garantía cubre los siguientes productos contra cualquier defecto de fabricación en sus materiales y mano de obra.
A Garantizamos los productos de limpieza, aire comprimido y consumibles, por 60 dias a partir de la fecha de entrega,
o por el tiempo en que se agote totalmente su contenido por su propia función de uso, lo que suceda primero.
B Garantizamos los productos con partes móviles por 3 años.
C Garantizamos los demás productos por 5 años (productos sin partes móviles), bajo las siguientes condiciones:
1 Todos los productos a que se refiere esta garantía, ampara su cambio físico, sin ningún cargo para el consumidor.
2 El comercializador no tiene talleres de servicio, debido a que los productos que se garantizan

North America
IC Intracom America
550 Commerce Blvd.
Oldsmar, FL 34677 USA
Asia & Africa
IC Intracom Asia
4-F, No. 77, Sec. 1, Xintai 5th Rd.
Xizhi Dist., New Taipei City 221, Taiwan
Europe
IC Intracom Europe
Löhbacher Str. 7, D-58553
Halver, Germany
15
no cuentan con reparaciones, ni refacciones, ya que su garantía es de cambio físico.
3 La garantía cubre exclusivamente aquellas partes, equipos o sub-ensambles que hayan
sido instaladas de fábrica y no incluye en ningún caso el equipo adicional o cualesquiera
que hayan sido adicionados al mismo por el usuario o distribuidor.
Para hacer efectiva esta garantía bastará con presentar el producto al distribuidor en el domicilio donde fue adquirido o
en el domicilio de IC Intracom México, S.A.P.I. de C.V., junto con los accesorios contenidos en su empaque, acompañado
de su póliza debidamente llenada y sellada por la casa vendedora (indispensable el sello y fecha de compra) donde
lo adquirió, o bien, la factura o ticket de compra original donde se mencione claramente el modelo, número de serie
(cuando aplique) y fecha de adquisición. Esta garantía no es válida en los siguientes casos: Si el producto se hubiese
utilizado en condiciones distintas a las normales; si el producto no ha sido operado conforme a los instructivos
de uso; o si el producto ha sido alterado o tratado de ser reparado por el consumidor o terceras personas.
REGULATORY STATEMENTS
FCC Class A
This equipment has been tested and found to comply with the limits for a Class A digital device, pursuant to Part 15
of the Federal Communications Commission (FCC) Rules. These limits are designed to provide reasonable protection
against harmful interference when the equipment is operated in a commercial environment. This equipment generates,
uses and can radiate radio frequency energy, and if not installed and used in accordance with the instruction manual
may cause harmful interference to radio communications. Operation of this equipment in a residential area is likely to
cause harmful interference, in which case the user will be required to correct the interference at his own expense. Any
changes or modifications made to this equipment without the approval of the manuafacturer could result in the product
not meeting the Class A limits, in which case the FCC could void the user’s authority to operate the equipment.
CE/UKCA
ENGLISH : This device complies with the requirements of CE 2014/30/EU (UKCA Electromagnetic
Compatibility Regulations 2016) and / or 2014/35/EU (UKCA Electrical Equipment
[Safety] Regulations 2016). The Declaration of Conformity for is available at:
DEUTSCH : Dieses Gerät enspricht der CE 2014/30/EU und / oder 2014/35/EU. Die
Konformitätserklärung für dieses Produkt finden Sie unter:
ESPAÑOL : Este dispositivo cumple con los requerimientos de CE 2014/30/EU y / o 2014/35/
EU. La declaración de conformidad esta disponible en:
FRANÇAIS : Cet appareil satisfait aux exigences de CE 2014/30/EU et / ou 2014/35/
EU. La Déclaration de Conformité est disponible à:
POLSKI : Urządzenie spełnia wymagania CE 2014/30/EU I / lub 2014/35/EU. Deklaracja
zgodności dostępna jest na stronie internetowej producenta:
ITALIANO : Questo dispositivo è conforme alla CE 2014/30/EU e / o 2014/35/EU.
La dichiarazione di conformità è disponibile al:
support.intellinet-network.com/barcode/561952

-
 1
1
-
 2
2
-
 3
3
-
 4
4
-
 5
5
-
 6
6
-
 7
7
-
 8
8
-
 9
9
-
 10
10
-
 11
11
-
 12
12
-
 13
13
-
 14
14
-
 15
15
-
 16
16


Intellinet 561952 Quick Instruction Guide
- Tipo
- Quick Instruction Guide
en otros idiomas
- français: Intellinet 561952
- italiano: Intellinet 561952
- English: Intellinet 561952
- Deutsch: Intellinet 561952
- polski: Intellinet 561952
Artículos relacionados
-
Intellinet 561693 Quick Instruction Guide
-
Intellinet 508957 Quick Instruction Guide
-
-
Intellinet 561211 Quick Instruction Guide
-
-
Intellinet 509107 Quick Instruction Guide
-
-
Intellinet 561204 Quick Instruction Guide