
www.auna-multimedia.com
Rockstar Plus
Karaokeanlage
Karaoke System
Système karaoké
Sistema de karaoke
Impianto di karaoke
10035746


3
DE
English 21
Français 35
Español 51
Italiano 67
Sehr geehrter Kunde,
wir gratulieren Ihnen zum Erwerb Ihres Gerätes.
Lesen Sie die folgenden Hinweise sorgfältig durch
und befolgen Sie diese, um möglichen Schäden
vorzubeugen. Für Schäden, die durch Missachtung der
Hinweise und unsachgemäßen Gebrauch entstehen,
übernehmen wir keine Haftung. Scannen Sie den
folgenden QR-Code, um Zugri auf die aktuellste
Bedienungsanleitung und weitere Informationen rund
um das Produkt zu erhalten:
TECHNISCHE DATEN
Artikelnummer 10035746
Stromversorgung 100-240 V ~ 50/60 Hz (DC: 12 V, 1,2 A)
Ausgangsleistung 12 W 10% THD
Betriebstemperatur 0-40°C
Eektive BT-Reichweite 10 m (Luftlinie)
BT Frequenz 2402–2480 MHz
BT Sendeleistung (max.) -1,62 dBm
INHALT
Sicherheitshinweise 4
Lieferumfang 5
Geräteübersicht 6
Anschlüsse 8
Bedienung 9
Reinigung und Pege 14
Fehlersuche und Fehlerbehebung 14
Spezielle Entsorgungshinweise für Verbraucher in Deutschland 17
Hinweise zur Entsorgung 19
Konformitätserklärung 19

4
DE
SICHERHEITSHINWEISE
Allgemeine Hinweise
• Blitzschlag - Wenn Sie das Gerät länger nicht benutzen oder es
gewittert, ziehen Sie den Stecker aus der Steckdose oder trennen
Sie das Gerät vom Antennenanschluss. Dadurch werden Schäden am
Produkt durch Blitzschlag und Überspannung vermieden.
• Überlastung - Überlasten Sie keine Steckdosen, Verlängerungskabel
oder integrierten Steckdosen, da dies zu einem Brand oder Stromschlag
führen kann.
• Fremdkörper und Flüssigkeitseintritt - Schieben Sie niemals
Gegenstände jeglicher Art durch Önungen in das Gerät, da sie
gefährliche Spannungspunkte berühren oder Teile kurzschließen
können, die zu einem Brand oder einem elektrischen Schlag führen
könnten. Verschütten Sie niemals Flüssigkeiten jeglicher Art auf dem
Gerät.
• Reparatur und Wartung - Versuchen Sie nicht, dieses Produkt selbst zu
warten, da Sie sich durch das Önen oder Entfernen von Abdeckungen
gefährlichen Spannungen oder anderen Gefahren aussetzen.
Überlassen Sie alle Wartungsarbeiten qualiziertem Servicepersonal.
• Schäden, die einen Service erfordern - Ziehen Sie den Netzstecker aus
der Steckdose und wenden Sie sich an einen qualizierten Fachbetrieb
wenn eine der folgenden Situationen eintritt:
a) Wenn das Netzkabel oder der Stecker beschädigt ist.
b) Wenn Flüssigkeit verschüttet wurde oder Gegenstände auf das
Produkt gefallen sind.
c) Wenn das Produkt Regen oder Wasser ausgesetzt war.
d) Wenn das Produkt heruntergefallen oder beschädigt ist.
e) Wenn das Produkt eine deutliche verringerte Leistung aufweist.
• Ersatzteile - Wenn Ersatzteile benötigt werden, stellen Sie sicher, dass
der Fachbetrieb, der die Teile ersetzt, nur Ersatzteile verwendet, die
vom Hersteller zugelassen sind oder dieselben Eigenschaften wie das
Originalteil haben. Unbefugter Austausch kann zu Feuer, Stromschlag
oder anderen Gefahren führen.
• Wärme - Stellen Sie das Gerät nicht in der Nähe von Wärmequellen
wie Heizkörpern, Heizregistern, Öfen oder anderen Produkten
(einschließlich Verstärkern) auf.
Hinweis: Kinder ab 8 Jahren, psychisch, sensorisch und körperlich
eingeschränkte Menschen dürfen das Gerät nur benutzen, wenn sie
vorher von einer für sie verantwortlichen Aufsichtsperson ausführlich
mit den Funktionen und den Sicherheitsvorkehrungen vertraut gemacht
wurden und die damit verbundenen Risiken verstehen.

5
DE
LIEFERUMFANG
• Karaokeanlage (1x)
• Netzteiladapter (1x)
• RCA-Kabel (1x)
• Mikrofon mit Kabel (1x)
• Bedienungsanleitung (1x)

6
DE
GERÄTEÜBERSICHT
Vorderseite
1Bildschirm 11 Lautstärkeregler Mikrofon 21 Hauptlautstärkeregler
2CD-Fach 12 Aufnahmeanzeige 22 AUX-IN-Anschluss
3Leistungsanzeige 13 Aufnahmetaste (REC) 23 USB-Anschluss
4Ein-/Ausschalten/Modus 14 Speichern/Wiederholen 24 Anschluss Mikrofon 1
5Monitor ein/aus 15 Überspringen - (SKIP -) 25 Anschluss Mikrofon 2
6AVC ein/aus 16 Überspringen + (SKIP +) 26 LED-Dekorationsleuchte
7Echo + 17 Stopptaste 27 Metallgitter
8Echo - 18 BT-Anzeige
9LED-Dekorationsleuchte 19 Koppeln/Wiedergabe/
Pause
10 Lichtmodus 20 Balanceregler

7
DE
Rückseite
1Gri 3Video-Ausgang 5Audio-Ausgang (L)
2Mikrofonhalter 4Audio-Ausgang (R) 6Netzteil-Anschluss

8
DE
ANSCHLÜSSE
Mikrofon anschließen
Sie können das Mikrofon sowohl mit dem Anschluss MIC 1 (24) als auch mit
dem Anschluss MIC 2 (25) verbinden.
Hinweis: Lassen Sie das Mikrofon nicht herunterfallen, da dies zu
Schäden am Mikrofon oder am Lautsprecher führen kann. Verdrehen
oder knicken Sie das Mikrofonkabel nicht, da es dadurch beschädigt
werden könnte.
Das Gerät mit einem Fernseher verbinden
Um Video, Liedtexte und Audio über Ihren Fernseher abspielen zu können,
müssen Sie die folgenden Schritte durchführen:
1. Verbinden Sie den Anschluss des RCA-Videokabels (gelb) mit dem
Video-Ausgang (1) und die Audiokabel (weiß und rot) mit dem Audio-
Ausgang (4 und 5) an der Rückseite des Geräts.
2. Verbinden Sie das andere Ende des RCA-Kabels (gelb) mit dem Video-
Eingang und die Audiokabel (weiß und rot) mit dem Audio-Eingang
Ihres Fernsehers.
HINWEISE:
• Dieses Gerät kann sowohl mit als auch ohne Fernseher verwendet
werden. Es wird jedoch empfohlen, dass Gerät in Verbindung mit einem
Fernseher zu verwenden, damit alle Funktionen genutzt werden können.
• Lesen Sie sich in Bezug auf die Verwendung des Fernsehers dessen
Bedienungsanleitung durch.
• Damit die Liedtexte auf dem Bildschirm angezeigt werden können,
muss eine CD+G oder MP3+G-Dateien genutzt werden.
Stromanschluss
Stecken Sie den Netzstecker in eine Steckdose mit 240V~ 50 Hz.
Hinweis: Stecken Sie den Netzstecker erst dann in die Steckdose,
nachdem alle Verbindungen hergestellt wurden.

9
DE
BEDIENUNG
Line-IN-Anschluss
1. Drücken Sie die EIN/AUS-Taste (4), um das Gerät einzuschalten.
2. Stecken Sie den Anschluss des 3,5-mm-Audiokabels (nicht im
Lieferumfang enthalten) in den AUX-IN-Anschluss (19) des Geräts.
3. Drücken Sie die MODE-Taste (4) auf der Vorderseite des Geräts, um in
den AUX-IN-Modus zu wechseln.
4. Bedienen Sie das Gerät über das verbundene externe Audiogerät.
Disco-Lichter
Es stehen 3 verschiedene Lichtmodi zur Verfügung:
• Lichtmodus 1: Wenn Sie in das Mikrofon sprechen oder singen,
synchronisiert das Gerät das Licht passend dazu.
• Lichtmodus 2: Das Gerät leuchtet in zufälligen Farben und Mustern auf.
• Lichtmodus 3: Die Lichteekte werden deaktiviert.
HINWEIS: Wenn das Gerät eingeschaltet wird, ist automatisch Lichtmodus
1 aktiviert. Drücken Sie die LIGHT MODE-Taste (10) einmal, um in den
Lichtmodus2 zu wechseln. Wenn Sie die Taste erneut drücken, werden die
Lichteekte deaktiviert.
CD-Wiedergabe
1. Drücken Sie zum Einschalten des Geräts die EIN/AUS-Taste (4).
2. Önen Sie das CD-Fach und legen Sie eine CD (mit Standarddateien
oder MP3+G-Datei) oder eine CD+G ein, und drücken Sie diese sanft auf
die Mittelspindel. Schließen Sie anschließend das CD-Fach.
Was ist eine CD+G?
Bei einer CD+G (CD+Graphics) handelt
es sich um das Standardformat für die
meisten Karaoke-CDs, bei denen die
Wörter auf dem Bildschirm angezeigt
werden.
Was ist eine MP3+G-Datei?
Bei MP3+G-Datei handelt es sich um das
neueste Format für Karaokemusik, bei
welchem die kleine Größe der MP3-
Dateien genutzt wird. Die Worte werden
auf dem Bildschirm angezeigt.

10
DE
3. Drücken Sie mehrfach die MODE-Taste (4), um den CDF/CD-Modus
auszuwählen. Auf dem Bildschirm wird dann „CD“ angezeigt. Während
des Einlesens blinkt „CD Reading“ auf dem Bildschirm auf. Sobald die
CD gelesen wurde wird die Gesamtzahl der auf der CD bendlichen
Titel auf dem Bildschirm angezeigt.
4. Drücken Sie zum Starten der Wiedergabe die Taste Wiedergabe/Pause
(19). Wenn Sie eine CD+G-Datei eingelegt haben, werden das Bild
und die Liedtexte auf dem Fernsehbildschirm angezeigt (falls an den
Fernseher angeschlossen).
5. Passen Sie die Lautstärke am Hauptlautstärkeregler (21) an.
6. Verbinden Sie ein (oder zwei) Mikrofon(e) mit dem Mikrofonanschluss
(24 oder 25). Schieben Sie die Ein-/Ausschalttaste am Mikrofon in die
Position „Ein“.
7. Stellen Sie die gewünschte Mikrofonlautstärke am Mikrofon-
Lautstärkeregler (11) ein. Dies wirkt sich auf die Lautstärke aller
verwendeten Mikrofone aus.
8. Drücken Sie die Tasten Echo +/- (7 oder 8), um Ihrer Stimme einen
Halleekt zu verleihen (von Stufe 00 bis Stufe 08).
9. Drehen Sie am Balanceregler (20), um die Toneekte anzupassen.
Diese Funktion kann nur auf Lieder angewendet werden, bei denen der
Gesang getrennt aufgenommen wurde.
10. Wenn Sie die Taste A.V.C. (6) drücken, wird die Hauptstimme leiser
gestellt und von Ihrer eigenen Stimme überdeckt, wenn Sie ein Lied
in das Mikrofon hinein singen. Diese Funktion kann nur auf Lieder
angewendet werden, bei denen der Gesang getrennt aufgenommen
wurde.
11. Wiederholungsfunktion
• Drücken Sie die Wiederholungstaste (14) einmal, wird das ausgewählte
Lied in Dauerschleife wiederholt. Auf dem Bildschirm wird das Symbol
angezeigt.
• Drücken Sie die Wiederholungstaste (14) zweimal, werden alle auf der
CD bendlichen Lieder wiederholt. Auf dem Bildschirm wird das Symbol
angezeigt.
• Drücken Sie die Wiederholungstaste (14) dreimal, wird die
Wiederholungsfunktion abgebrochen. Auf dem Bildschirm wird das
Symbol angezeigt.
HINWEISE:
• Legen Sie ausschließlich CDs in das CD-Fach ein, da dieses durch
Fremdkörper beschädigt werden kann.
• Wenn keine CD eingelegt wurde, wird auf dem Bildschirm „no“
angezeigt.
• Wenn das Gerät an einen Fernseher oder an eine andere Audioquelle
angeschlossen wurde, passen Sie die Lautstärke am Fernseher bzw. an
der jeweiligen Audioquelle an.

11
DE
USB-Wiedergabe
1. Drücken Sie zum Einschalten des Geräts die EIN/AUS-Taste (4) .
2. Stecken Sie einen USB-Stick in den USB-Anschluss (23) des Geräts.
3. Drücken Sie mehrfach die MODE-Taste (4), um in den USB-Modus zu
gelangen. Auf dem Bildschirm wird „USB“ angezeigt. Solange der USB-
Stick eingelesen wird, blinkt auf dem Bildschirm „USB READING“ auf.
Anschließend wird auf dem Bildschirm die Gesamtanzahl der auf dem
USB-Stick bendlichen Titel angezeigt.
4. Drücken Sie zum Starten der Wiedergabe die Taste Wiedergabe/
Pause (19). Wenn Sie eine MP3+G-Datei hören, werden das Bild und
die Lyrics auf dem Fernsehbildschirm angezeigt (falls an den Fernseher
angeschlossen).
HINWEISE:
• Die Titel und Ordner werden auf dem Bildschirm angezeigt. Drücken Sie
zur Auswahl des Titels, welchen Sie wiedergeben möchten, die Taste
SKIP +/- (15 oder 16).
5. Stellen Sie die Lautstärke mit dem MASTER VOL-Regler (21) ein.
HINWEIS: Wenn das Gerät an einen Fernseher oder an eine andere
Audioquelle angeschlossen wurde, passen Sie die Lautstärke am Fernseher
bzw. an der jeweiligen Audioquelle an.
6. Schließen Sie die Mikrofone an und schieben Sie den ON/OFF-Schalter
(Ein/Aus) am Mikrofon in die Position „ON“ (Ein).
7. Stellen Sie die gewünschte Mikrofonlautstärke mit dem MIC VOL-Regler
ein. Dies wirkt sich auf die Lautstärke beider Mikrofone aus.
8. Drücken Sie die Tasten ECHO -/+ , um Ihrer Stimme einen Halleekt zu
verleihen (von Stufe 00 bis Stufe 08).
9. WIEDERHOLEN (REPEAT):
• Drücken Sie die Wiederholungstaste einmal, wird das ausgewählte
Lied in Dauerschleife wiederholt. Auf dem Bildschirm wird das
Symbol angezeigt.
• Drücken Sie die Wiederholungstaste zweimal, wird der
ausgewählte Ordner wiederholt. Auf dem Bildschirm wird das
Symbol angezeigt.
• Drücken Sie die Wiederholungstaste dreimal, werden alle auf der
CD bendlichen Lieder wiederholt. Auf dem Bildschirm wird das
Symbol angezeigt.
• Drücken Sie die Wiederholungstaste viermal, wird die
Wiederholungsfunktion abgebrochen. Auf dem Bildschirm wird das
Symbol angezeigt.

12
DE
10. PAUSE:
• Drücken Sie zum Pausieren während der Wiedergabe die PLAY/
PAUSE-Taste (19). Die PLAY/PAUSE-Anzeige blinkt während des
Pausierens auf.
• Drücken Sie die PLAY/PAUSE-Taste (19) erneut, um die Wiedergabe
fortzusetzen.
11. Drücken Sie zum Stoppen der Wiedergabe die STOP-Taste (17).
12. Drücken Sie zum Ausschalten des Geräts die EIN/AUS-Taste (4).
BT-Funktion
Gehen Sie zum Koppeln eines externen BT-Geräts folgendermaßen vor:
1. Drücken Sie zum Einschalten des Geräts die EIN/AUS-Taste (4).
2. Drücken Sie zur Auswahl des BT-Modus mehrfach die MODE-Taste (4).
Auf dem Bildschirm wird „BLUETOOTH“ angezeigt. Das Gerät sucht
automatisch nach bereits zuvor verbundenen BT-Geräten (falls vorher
externe BT-Geräte gekoppelt wurden). Fahren Sie, falls keine zuvor
verbundenen Geräte vorhanden sind, mit dem nächsten Schritt fort.
HINWEIS: Wenn Sie die PAIR-Taste (16) lange drücken, werden alle
verbundenen Geräte getrennt, so dass ein neues Gerät gekoppelt werden
kann.
3. Aktivieren Sie die BT-Funktion Ihres externen Geräts. Önen Sie die
Geräteliste und wählen Sie „Rockstar Plus“ aus.
HINWEIS: Weitere Hinweise zur Verwendung der BT-Funktion des externen
Geräts benden sich in dessen Bedienungsanleitung.
4. Die BT-Anzeige leuchtet permanent auf und ein Signal ertönt.
HINWEISE:
• Wenn Sie beim Herstellen der BT-Verbindung zur Eingabe eines
Passworts aufgefordert werden, geben Sie zur Verbindungsherstellung
„0000“ ein.
• Bei manchen BT-Geräten, muss nach der erfolgreichen Koppelung
zusätzlich noch „als Audiogerät verwenden“ oder Ähnliches ausgewählt
werden.
• Wenn die BT-Verbindung nach der Koppelung getrennt wird, verringern
Sie den Abstand zwischen den beiden Geräten. Der Abstand zwischen
BT-Gerät und Karaokeanlage darf nicht mehr als 10 Meter betragen.

13
DE
5. Starten Sie die Wiedergabe auf dem BT-Gerät. Drücken Sie während
der Wiedergabe die PLAY/PAUSE-Taste (16), um die Wiedergabe zu
pausieren.
6. Drücken Sie zur Auswahl des nächsten oder vorherigen Titels die Tasten
SKIP -/+ (17).
Aufnahme-Funktion
1. Drücken Sie zum Aufnehmen Ihres Gesangs sowie der Musik die REC-
Taste (13). Die Aufnahme beginnt und die REC-Anzeige (12) leuchtet
währenddessen permanent auf.
2. Drücken Sie, sobald Sie die Aufnahme beenden möchten, erneut die
REC-Taste (13). Die REC-Anzeige (12) erlischt.
3. Die aufgenommenen Dateien werden auf USB gespeichert.
4. Wählen Sie zum Anhören der aufgenommenen Dateien mit der MODE-
Taste (4) den USB-Modus aus. Wählen Sie die aufgenommene Datei, die
Sie wiedergeben möchten, mit den Tasten SKIP+/- (15 oder 16) aus.
5. Drücken Sie zur Wiedergabe des ausgewählten Titels die PLAY/PAUSE-
Taste.
HINWEIS: Die Aufnahmefunktion ist in den folgenden Modi verfügbar: BT,
AUX und CD. Im CD-Modus können ausschließlich Titel im Format CD, CD-R,
CD-RW und CD+G aufgenommen werden. Das MP3-Format ist für den CD-
Modus nicht verfügbar.
Speicherfunktion (PROGRAM)
1. Drücken Sie im Stoppmodus die Taste Speichern/Wiederholen (14).
„P01“ wird auf dem Bildschirm angezeigt. Der erste Titel kann nun
gespeichert werden.
2. Wählen Sie mit den Tasten Überspringen +/- (15 oder 16) den ersten
Titel aus.
3. Drücken Sie zum Bestätigen erneut die Taste Speichern/Wiederholen
(14).
4. Die oben genannten Schritte können für bis zu 20 Titel wiederholt
werden. Drücken Sie zum Beginnen der Wiedergabe die Taste
Wiedergabe/Pause (19).

14
DE
REINIGUNG UND PFLEGE
• Schalten Sie das Gerät vor der Reinigung aus und ziehen Sie den
Netzstecker aus der Steckdose.
• Wenn das Gerät staubig ist, wischen Sie es mit einem weichen und
trockenen Staubtuch ab.
• Reinigen Sie das Gerät mit einem weichen Tuch.
• Verwenden Sie zur Reinigung kein Wachs, Poliersprays oder aggressive
Reinigungsmittel.
VORSICHT
Stromschlaggefahr! Achten Sie während der Reinigung
darauf, dass kein Wasser oder andere Flüssigkeiten in das
Geräteinnere gelangen.
FEHLERSUCHE UND FEHLERBEHEBUNG
Überprüfen Sie, bevor Sie sich an den Kundendienst wenden, die in der
Tabelle genannten Hinweise zur Problemlösung.
Problem Mögliche Ursache Lösungsmöglichkeit
Gerät ist aus Das Gerät ist
ausgeschaltet.
Schalten Sie das Gerät
mit der EIN/AUS-Taste
(4) ein.
Das Netzkabel ist nicht
richtig angeschlossen.
Vergewissern Sie sich,
dass das Netzkabel richtig
an der Rückseite des
Geräts angeschlossen ist.
Die Steckdose ist kaputt. Nehmen Sie eine andere
Steckdose.
Kein Ton Der Lautstärkeregler
bendet sich in der
Minimaleinstellung.
Stellen Sie die Lautstärke
mit dem MASTER VOL-
Regler ein.
Die falsche Funktion ist
ausgewählt.
Wählen Sie mit der
MODE-Taste die richtige
Funktion aus.
Ein externes Gerät wird
verwendet.
Erhöhen Sie die
Lautstärke am externen
Gerät.

15
DE
Problem Mögliche Ursache Lösungsmöglichkeit
Kein Ton, wenn
an Fernseher
angeschlossen.
Der Ton am Fernseher ist
stummgeschaltet oder zu
leise eingestellt.
Stellen Sie die Lautstärke
am Fernseher ein.
Es wurde nicht die richtige
Quelle am Fernseher
ausgewählt.
Wählen Sie die
richtige Quelle aus (für
gewöhnlich AV).
Die Liedtexte
werden nicht auf
dem Fernseh-
bildschirm
angezeigt
Der Videostecker wurde
nicht richtig eingesteckt.
Stecken Sie den
Videostecker richtig ein.
Am Fernseher wurde
die falsche Quelle
ausgewählt.
Wählen Sie die
richtige Quelle aus (für
gewöhnlich AV).
Die wiedergegebene
Datei/der Titel enthält
keine Liedtexte.
Nur bei Dateien, die
Liedtexte enthalten,
werden diese auf dem
Fernseher angezeigt.
AUX-IN oder BT-Funktion
wird verwendet.
Im AUX IN- oder BT-
Modus wird nichts auf
dem Fernsehbildschirm
angezeigt. Verwenden
Sie einen anderen
Modus zum Anzeigen der
Liedtexte.
Mikrofon hat
keinen Ton.
Das Mikrofon ist nicht
richtig an einen der
Mikrofonanschlüsse
angeschlossen.
Stellen Sie sicher, dass
das Mikrofon richtig an
den Anschluss MIC 1 oder
MIC 2 angeschlossen ist.
Das Mikrofon ist
ausgeschaltet.
Schieben Sie den ON/
OFF-Schalter (Ein/Aus)
am Mikrofon in die
Position „ON“ (Ein).
Die Mikrofonlautstärke ist
zu leise eingestellt.
Stellen Sie die Mikrofon-
Lautstärke mit dem MIC
VOL-Regler ein.
Die Master-Lautstärke ist
zu leise eingestellt.
Stellen Sie die Lautstärke
mit dem MASTER VOL-
Regler ein.

16
DE
Problem Mögliche Ursache Lösungsmöglichkeit
USB-Dateien
werden nicht
wiedergegeben.
Die USB-Dateien sind
beschädigt.
Ersetzen Sie die Dateien.
Das Dateiformat
kann nicht vom Gerät
wiedergegeben werden.
Nutzen Sie Dateien eines
kompatiblen Formats.
Der USB-Stick wird nicht
vom Gerät unterstützt.
Nutzen Sie einen anderen
USB-Stick.
Externes BT-
Gerät kann
nicht mit dem
Gerät gekoppelt
werden
Die BT-Funktion Ihres
externen Geräts ist
deaktiviert.
Aktivieren Sie die BT-
Funktion Ihres externen
Geräts (siehe dessen
Bedienungsanleitung).
Das Gerät bendet
sich nicht im
Kopplungsmodus.
Drücken Sie die PAIR-
Taste, damit das Gerät
für externe BT-Geräte
sichtbar wird.
Nach
erfolgreichem
Herstellen der
BT-Verbindung
ist die Musik
nicht verfügbar.
Das BT-Gerät unterstützt
das A2DP-BT-Prol nicht.
Verwenden Sie ein
BT-Gerät, das A2DP
unterstützt.
Die Lautstärke des
externen BT-Geräts ist zu
niedrig eingestellt.
Stellen Sie die Lautstärke
am externen BT-Gerät ein.


18
DE
• Bei einem Vertrieb unter Verwendung von Fernkommunikationsmitteln
ist die unentgeltliche Abholung am Ort der Abgabe auf Elektro- und
Elektronikgeräte der Kategorien 1, 2 und 4 gemäß § 2 Abs. 1 ElektroG,
nämlich „Wärmeüberträger“, „Bildschirmgeräte“ (Oberäche von mehr
als 100 cm²) oder „Großgeräte“ (letztere mit mindestens einer äußeren
Abmessung über 50 Zentimeter) beschränkt. Für andere Elektro- und
Elektronikgeräte (Kategorien 3, 5, 6) ist eine Rückgabemöglichkeit in
zumutbarer Entfernung zum jeweiligen Endnutzer zu gewährleisten.
• Altgeräte dürfen kostenlos auf dem lokalen Wertstohof oder in
folgenden Sammelstellen in Ihrer Nähe abgegeben werden: www.take-
e-back.de
• Für Elektro- und Elektronikgeräte der Kategorien 1, 2 und 4 bieten
wir auch die Möglichkeit einer unentgeltlichen Abholung am Ort der
Abgabe. Beim Kauf eines Neugeräts haben Sie die Möglichkeit, eine
Altgerätabholung über die Webseite auszuwählen.
• Batterien können überall dort kostenfrei zurückgegeben werden, wo sie
verkauft werden (z. B. Super-, Bau-, Drogeriemarkt). Auch Wertsto- und
Recyclinghöfe nehmen Batterien zurück. Sie können Batterien auch per
Post an uns zurücksenden. Altbatterien in haushaltsüblichen Mengen
können Sie direkt bei uns von Montag bis Freitag zwischen 08:00 und
16:00 Uhr unter der folgenden Adresse unentgeltlich zurückgeben:
Chal-Tec Fulllment GmbH
Norddeutschlandstr. 3
47475 Kamp-Lintfort
• Wichtig zu beachten ist, dass Lithiumbatterien aus Sicherheitsgründen
vor der Rückgabe gegen Kurzschluss gesichert werden müssen (z. B.
durch Abkleben der Pole).
• Finden sich unter der durchgestrichenen Mülltonne auf der Batterie
zusätzlich die Zeichen Cd, Hg oder Pb ist das ein Hinweis darauf, dass
die Batterie gefährliche Schadstoe enthält. (»Cd« steht für Cadmium,
»Pb« für Blei und »Hg« für Quecksilber).
Hinweis zur Abfallvermeidung
Indem Sie die Lebensdauer Ihrer Altgeräte verlängern, tragen Sie dazu
bei, Ressourcen eizient zu nutzen und zusätzlichen Müll zu vermeiden.
Die Lebensdauer Ihrer Altgeräte können Sie verlängern, indem Sie defekte
Altgeräte reparieren lassen. Wenn sich Ihr Altgerät in gutem Zustand
bendet, könnten Sie es spenden, verschenken oder verkaufen.

19
DE
HINWEISE ZUR ENTSORGUNG
Wenn es in Ihrem Land eine gesetzliche Regelung
zur Entsorgung von elektrischen und elektronischen
Geräten gibt, weist dieses Symbol auf dem Produkt
oder auf der Verpackung darauf hin, dass dieses
Produkt nicht im Hausmüll entsorgt werden darf.
Stattdessen muss es zu einer Sammelstelle für
das Recycling von elektrischen und elektronischen
Geräten gebracht werden. Durch regelkonforme
Entsorgung schützen Sie die Umwelt und die
Gesundheit Ihrer Mitmenschen vor negativen
Konsequenzen. Informationen zum Recycling
und zur Entsorgung dieses Produkts, erhalten
Sie von Ihrer örtlichen Verwaltung oder Ihrem
Hausmüllentsorgungsdienst.
KONFORMITÄTSERKLÄRUNG
Hersteller:
Chal-Tec GmbH, Wallstraße 16, 10179 Berlin,
Deutschland.
Importeur für Großbritannien:
Berlin Brands Group UK Limited
PO Box 42
272 Kensington High Street
London, W8 6ND
United Kingdom
Hiermit erklärt Chal-Tec GmbH, dass der
Funkanlagentyp Rockstar Plus der Richtlinie
2014/53/EU entspricht. Der vollständige Text der
EU-Konformitätserklärung ist unter der folgenden
Internetadresse verfügbar: use.berlin/10035746


21
EN
Dear Customer,
Congratulations on purchasing this device. Please read
the following instructions carefully and follow them to
prevent possible damages. We assume no liability for
damage caused by disregard of the instructions and
improper use. Scan the QR code to get access to the
latest user manual and more product information.
TECHNICAL DATA
Item number 10035746
Power supply 100-240 V ~ 50/60 Hz (DC: 12 V, 1.2 A)
Output power 12 W 10% THD
Operation temperature 0-40 °C
BT eective distance 10 m (open air)
BT frequency 2402–2480 MHz
BT radio-frequency power (max.) -1.62 dBm
Technical Data 21
Safety Instructions 22
Scope of Delivery 23
Device Overview 24
Connections 26
Operation 27
Cleaning and Care 31
Troubleshooting 32
Disposal Considerations 34
Declaration of Conformity 34
CONTENTS

22
EN
SAFETY INSTRUCTIONS
General information
• This product is not intended for commercial use. Household use only.
• Lightning - If you are not going to use the device for a long time or
if there is a storm, disconnect the plug from the electrical outlet and
disconnect the device from the antenna connector. This will avoid
damage to the product that may be caused by lightning or overvoltage.
• Overload - Do not overload power outlets, extension cords, or built-in
power outlets, as this may result in a re or electric shock.
• Foreign objects and liquid - Never push objects of any kind through
openings in the device as they may touch dangerous voltage points or
short out parts, which could result in a re or electric shock. Never spill
liquids of any kind on the device.
• Repairs and maintenance - Do not attempt to service this product
yourself, as opening or removing covers will expose you to dangerous
voltages or other hazards. Leave all maintenance to qualied service
personnel.
• Damage requiring service - Disconnect the power plug from the outlet
and consult a qualied specialist if any of the following conditions
occur:
a) If the power cord or plug is damaged.
b) If liquid has been spilled or objects have fallen onto the product.
c) If the product has been exposed to rain or water.
d) If the product has been dropped or damaged.
e) If the product has a markedly reduced performance.
• Replacement parts - When replacement parts are required, make
sure that the service professional who replaces the parts only uses
replacement parts that have been approved by the manufacturer or
that have the same characteristics as the original part. Unauthorized
replacement may result in re, electric shock or other hazards.
• Heat - Do not place the unit near heat sources such as radiators,
heaters, stoves or other products (including ampliers).
Note: This device may be only used by children 8 years old or older and
persons with limited physical, sensory and mental capabilities and/or
lack of experience and knowledge, provided that they have been
instructed in use of the device by a responsible person who understands
the associated risks.

23
EN
SCOPE OF DELIVERY
• Karaoke system (1x)
• AC adapter (1x)
• RCA cable (1x)
• Wired microphone (1x)
• Instruction manual (1x)

24
EN
DEVICE OVERVIEW
Front
1LED SCREEN 11 MIC VOL Knob 21 MASTER VOL Knob
2CD Compartment 12 REC Indicator 22 AUX IN Jack
3Power Indicator 13 REC Button 23 USB Jack
4POWER/MODE Button 14 REPEAT/PROG Button 24 MIC 1 Jack
5Monitor on/o Button 15 SKIP- Button 25 MIC 2 Jack
6A.V.C on/o Button 16 SKIP+ Button 26 LED Decoration Light
7ECHO + Button 17 STOP Button 27 Metal Grill
8ECHO - Button 18 BT indicator
9LED Decoration Light 19 PAIR/PLAY/PAUSE Button
10 LIGHT MODE Button 20 BALANCE Knob

25
EN
Back
1Handle 3VIDEO OUT Jack 5AUDIO OUT (L) Jack
2Microphone Holder 4AUDIO OUT (R) Jack 6DC IN Jack

26
EN
CONNECTIONS
Connecting the microphone
Connect the microphone into MIC 1 jack (24) as well as MIC 2 jack (25) when
desired.
Notes: Do not drop or tap the microphone as damage to the microphone
or speaker may occur. Do not twirl the microphone by cord as it will
cause damage to the encased wiring.
Connecting the unit to a TV
To output the video, lyrics and audio to your TV, perform the following steps:
1. Connect the RCA video cable (Yellow) to the VIDEO OUT jack (3) and the
audio cables (White and Red) to the AUDIO OUT jacks (4 and 5) located
on the back of the karaoke machine.
2. Connect the opposite end of the RCA video cable (Yellow) to the VIDEO
IN jack and the audio cables (White and Red) to the AUDIO IN on your
TV.
NOTES:
• This unit can be used with or without a TV, but it is highly recommended
to use a TV in order to utilize all the features.
• Also please refer to the TV’s User Guide.
• To see the lyrics on the screen, you must use a CD+G disc or MP3+G
les.
Connecting power source
Insert the AC power cord into a conveniently located AC outlet having
240V~ 50Hz.
Note: Make all connections before connecting to AC power.

27
EN
OPERATION
Connecting to Line-in jack
1. Press the POWER button (4) to turn the unit on.
2. Insert the 3.5 mm audio cable (not included) into the AUX IN jack (22) of
the unit.
3. Press the MODE button (4) on the front panel to switch to AUX IN mode.
4. Use the controls on the connected device to begin playing audio routed
through the unit.
Disco Lights
There are three light modes as follows:
• Light Mode 1: The unit will synchronize to the music being played or
with the sound when you speak or sing into the microphone.
• Light Mode 2: The unit will light up with random colours and patterns.
• Light Mode 3: The light eects will be turned o.
NOTE: When the unit is turned on, the Light mode 1 is automatically
activated. Press Light mode button (10) to switch to Light mode 2, and press
again to turn o the light.
Playing a CD
1. Press the POWER button (4) to turn the unit on.
2. Lift open the CD door and insert a CD (with standard or MP3+G les) or
a CD+G by gently pressing it on the center spindle. Then close the CD
door.
What is a CD+G?
A CD+G (CD+Graphics) is the standard format for
most karaoke discs that will display the words
on the screen.
What is an MP3+G?
MP3+G is the newest format for karaoke music
utilizing the MP3’s small le size. It will display
the words on the screen.
3. Repeatedly press the MODE button (4) to select the CDG/CD mode;
“CD READING” will appear on the screen when searching the disc and
then the total number of tracks will appear.

28
EN
4. Press the PLAY/PAUSE button (19) to start playback. If listening to a
CD+G le, the image and lyrics will appear on the screen:
5. Adjust the volume to a comfortable level using the MASTER VOL knob
(21).
6. Connect microphones and slide the ON/OFF switch on the microphone
to the ON position.
7. Rotate the MIC VOL knob (11) to increase or decrease the microphone
volume as you desired, which will aect both microphones.
8. Press the ECHO -/+ button (7 and 8) to add an echo eect (From level
00 to Level 08) to your voice.
9. Rotate the Balance Knob (20) to adjust the sound eect of the song.
This function is only applicable to the songs recorded with separated
vocals that is downloaded.
10. Press A.V.C button (6), the lead vocal will be decreased and covered by
your voice when you’re singing a song with microphone. This function
is only applicable to the songs recorded with separated vocals that is
downloaded
11. REPEAT
• During playback, press the REPEAT/PROG button (14) once to
repeatedly play the selected song, the LED screen will show a small
icon ;
• Press it again to repleatedly play all the songs in the disc, the LED
screen will show a small icon ;
• Press it again to cancel the repeat function, the LED screen will show a
small icon .
NOTES:
• Never place anything other than a CD in the compartment, as foreign
objects can damage the unit.
• If no disc is inserted, “NO DISC” will appear on the display.
• If connected to a TV or other audio source, adjust the volume of the TV
using its own volume control.
Playing songs from the USB
1. Press the POWER button (4) to turn the unit on.
2. Insert a USB ash drive into the USB slot (23) on the unit.
3. Repeatedly press the MODE button (4) to select the USB mode. “USB
READING” will appear when searching the drive and then the total
number of les will appear.
4. Press the PLAY/PAUSE button (19) to start playback. If listening to an
MP3+G le, the image and lyrics will appear on the screen.

29
EN
NOTE: If connected to a TV or other audio source, adjust the volume of the
TV using its own volume control.
5. Adjust the volume to a comfortable level using the MASTER VOL knob
(21).
NOTE: If connected to a TV or other audio source, adjust the volume of the
TV using its own volume control.
6. Connect microphones and slide the ON/OFF switch on the microphone
to the ON position.
7. Rotate the MIC VOL knob (11) to increase or decrease the microphone
volume as you desired, which will aect both microphones.
8. Press the ECHO -/+ buttons (7 and 8) to add an echo eect (from level
00 to level08) to your voice.
9. REPEAT:
• During playback, press the REPEAT/PROG button (14) once to
repeatedly play the selected song, the LED screen will show a small
icon ;
• Press it again to repeatedly play the selected folder; the LED screen will
show a small icon ;
• Press it again to repeatedly play all the folders, the LED screen will
show a small icon ;
• Press it again to cancel the repeat function, the LED screen will show a
small icon .
10. PAUSE:
• During playback, if you wish to pause the music momentarily, press
the PLAY/PAUSE button (19).
• Press the PLAY/PAUSE button(19) again to resume normal playback.
11. Press the STOP button (17) to stop playback.
12. Long press the POWER button (4) to turn the unit o.
Using a BT device
To pair an external BT device, perform the following procedure:
1. Press the POWER button (4) to turn the unit on.
2. Repeatedly press the MODE button (4) to select the BT, “BLUETOOTH”
will appear on the screen. The unit automatically searches for and pairs
a previously paired BT device (if previously paired). If no previously
paired devices are present, connect as shown in the next step.

30
EN
NOTE: You can also long press the PAIR button (19) to disconnect any paired
devices in order to pair another device.
3. Turn on your device’s BT option in settings to search for a discoverable
device with a BT signal. Select “Rockstar Plus“ from the device results
on the BT menu.
NOTE: Also refer to the user manual of your BT device for detailed
instructions.
4. The BT indicator will light solid and a chime will sound.
NOTES:
• If your BT prompts you for a pass code during the pairing process,
please enter “0000” to connect.
• On some BT devices, once pairing is complete, select your BT device as
“Use as Audio Device” or similar.
• If connection is lost after successful pairing, check to make sure the
distance between speaker and BT enabled device does not exceed
30feet/10 meters.
5. Start playback of your BT device. Press the PLAY/PAUSE button (19)
during playback to pause the song.
6. SKIP: Advance or go back one track by pressing the Skip -/+ buttons (15
and 16).
Using recording function
1. To record your singing as well as the music, press the REC button (13).
Recording will begin and REC indicator (12) will light solid.
2. When done recording, press the REC button (13) again, the REC
indicator (12) will turn o.
3. The recorded audio le will be recorded onto the USB drive.
4. To listen to the recorded song, press MODE button (4) to switch to USB
Mode, you can nd the recorded song in the REC le and press the SKIP
-/+ buttons (15 and 16) to choose the song that you want to play.
5. Press the PLAY/PAUSE button (19) to play the selected song.
NOTE: The recording MODE is available in BT, AUX, and CD mode. While in
CD mode, it can only record the songs with CD, CD-R, CD-RW, and CD+G
format, not available for MP3 format.

31
EN
Using programming MODE
1. While in the STOP mode, press the REPEAT/PROG button (8). ”PROG
SET 01” will appear on the display indicating the rst program is ready
to program.
2. Select the rst track by using the SKIP -/+ buttons (15 and 16).
3. Press the REPEAT/PROG button (14) again to conrm the entry.
4. Repeat to set up to 20 tracks into memory. When done, press the PLAY/
PAUSE button (19) to start playback.
NOTES:
• Press the STOP button (17) twice to stop and clear the program.
• You can program up to 20 tracks for playback in any desired order.
If more than 20 tracks are attempted to be programmed, “FULL” will
appear in the display.
• The programming MODE is available in CD and USB mode.
CLEANING AND CARE
• Disconnect the unit from the power source when cleaning.
• If the unit becomes dusty, wipe it with a soft and dry duster.
• Use a soft cloth to clean this unit.
• Do not use any wax, polish sprays, or abrasive cleaners on the unit.
CAUTION
Risk of electric shock! Never allow any water or other liquids
to get inside the unit while cleaning.

32
EN
TROUBLESHOOTING
Before contacting costumer service, check the troubleshooting information
listed in the table.
Problem Possible Cause Possible Solution
No Power. The unit is turned o. Press the POWER button
to turn on the unit.
The power cord is not
connected correctly.
Make sure that the
power cord is properly
connected to the rear of
the unit.
The power outlet is
broken.
Connect the unit to a
dierent outlet.
No Sound –
General.
MASTER VOLUME is set
to minimum.
Adjust the volume with
the MASTER VOL control.
Correct MODE was not
selected.
Select the correct MODE
with the MODE button.
An external device is
used.
Increase the volume on
the external device.
No Sound –
If connected to
a TV.
Volume on the TV is
muted or too low.
Adjust the volume on the
TV set.
The correct source was
not selected on the TV’s
menu.
Select the correct source
(usually AV).
Lyrics do not
appear on the
TV screen.
Video plug is not
connected properly.
Insert the video plug
correctly.
The wrong source was
selected on the TV set.
Select the correct source
on TV (usually AV).
The le/track being
played is not a track
recording with lyrics.
Only les containing
lyrics will be displayed on
the TV.
AUX-IN or BT MODE is
used.
In AUX IN or BT mode,
nothing is displayed on
the TV screen. Use a
dierent mode to display
lyrics on the TV.

33
EN
Problem Possible Cause Possible Solution
No sound from
the microphone.
The microphone is not
properly connected to
one of the microphone
jacks.
Make sure that the
microphone is correctly
connected to the MIC 1 or
MIC 2 jack.
The microphone is turned
o.
Slide the microphone
ON/OFF switch to the
“ON“ position.
The microphone volume
is set too low.
Adjust the microphone
volume with the MIC VOL
control.
The master volume is set
too low.
Adjust the volume with
the MASTER VOL control.
USB les are not
played back.
The USB les are
corrupted.
Replace the les.
The le format cannot be
played back from the unit.
Use les of a compatible
format.
The connected USB
device is not supported
by the unit.
Use a dierent USB
device.
External BT
device cannot
be paired with
the unit.
The BT MODE of your
external device is
disabled.
Activate the BT MODE of
your external device (refer
to its user manual).
The unit is not in pairing
mode.
Press the PAIR button to
make the unit visible to
external BT devices.
After
successfully
establishing the
BT connection,
the music is not
available.
The BT device does not
support the A2DP-BT
prole.
Use a BT-device that
supports A2DP.
The volume of the
external BT device is set
too low.
Adjust the volume on the
external BT device.

34
EN
DISPOSAL CONSIDERATIONS
If there is a legal regulation for the disposal of
electrical and electronic devices in your country,
this symbol on the product or on the packaging
indicates that this product must not be disposed
of with household waste. Instead, it must be taken
to a collection point for the recycling of electrical
and electronic equipment. By disposing of it in
accordance with the rules, you are protecting the
environment and the health of your fellow human
beings from negative consequences. For information
about the recycling and disposal of this product,
please contact your local authority or your household
waste disposal service.
DECLARATION OF CONFORMITY
Manufacturer:
Chal-Tec GmbH, Wallstrasse 16, 10179 Berlin,
Germany.
Importer for Great Britain:
Berlin Brands Group UK Limited
PO Box 42
272 Kensington High Street
London, W8 6ND
United Kingdom
Hereby, Chal-Tec GmbH declares that the radio
equipment type Rockstar Plus is in compliance with
Directive 2014/53/EU. The full text of the EU declaration
of conformity is available at the following internet
address: use.berlin/10035746
For Great Britain: Hereby, Chal-Tec GmbH declares that
the radio equipment type Rockstar Plus is in compliance
with the relevant statutory requirements. The full text of
the declaration of conformity is available at the following
internet address: use.berlin/10035746

35
FR
Chère cliente, cher client,
Toutes nos félicitations pour l’acquisition de ce nouvel
appareil. Veuillez lire attentivement et respecter
les instructions de ce mode d’emploi an d’éviter
d’éventuels dommages. Le fabricant ne saurait être tenu
pour responsable des dommages dus au non-respect
des consignes de sécurité et à la mauvaise utilisation
de l’appareil. Scannez le QR-Code pour accéder à
la dernière version du mode d‘emploi et à d‘autres
informations concernant le produit :
FICHE TECHNIQUE
Numéro d'article 10035746
Alimentation 100-240 V ~ 50/60 Hz (DC: 12 V, 1,2 A)
Puissance de sortie 12 W 10% THD
Température de fonctionnement 0-40°C
Portée BT eective 10 m (en ligne droite)
BT fréquence 2402–2480 MHz
BT puissance de radiofréquence
(max.) -1,62 dBm
SOMMAIRE
Fiche technique 35
Consignes de sécurité 36
Contenu de l‘emballage 37
Aperçu de l‘appareil 38
Connexions 40
Utilisation 41
Nettoyage et entretien 46
Identication et résolution des problèmes 46
Informations sur le recyclage 49
Déclaration de conformité 49

36
FR
CONSIGNES DE SÉCURITÉ
Consignes générales
• Foudre - Si vous n‘utilisez pas l‘appareil pendant une longue période
ou s‘il y a de l‘orage, débranchez la che de la prise et débranchez
l‘antenne de l‘appareil. Cela évite d‘endommager le produit à cause de
la foudre et des surtensions.
• Surcharge - Ne surchargez pas les prises de courant, les rallonges ou
les prises de courant, car cela pourrait provoquer un incendie ou une
électrocution.
• Corps étranger et insertion de liquides - Ne glissez jamais d‘objets
d‘aucune sorte à travers les ouvertures de l‘appareil, car ils pourraient
toucher des points de tension dangereux ou court-circuiter des
éléments, ce qui pourrait provoquer un incendie ou une électrocution.
Ne renversez jamais de liquides d‘aucune sorte sur l‘appareil.
• Réparation et maintenance - Ne tentez pas de réparer ce produit
vous-même en vous exposant à des tensions dangereuses ou à d‘autres
risques en ouvrant ou en retirant les couvercles. Conez toute la
maintenance à un personnel qualié.
• Dégâts nécessitant une intervention de professionnel - Débranchez
la che de la prise et consultez un spécialiste qualié si l‘une des
situations suivantes se produit :
a) Lorsque le câble secteur ou la che sont endommagés.
b) Lorsque des liquides ont été renversés ou que des objets sont
tombés sur l‘appareil.
c) Lorsque le produit a été exposé à la pluie ou à l‘eau.
d) Lorsque le produit a fait une chute ou a été endommagé.
e) Lorsque le produit a des performances sensiblement réduites.
• Pièces de rechange - Si des pièces de rechange sont nécessaires,
assurez-vous que l‘entreprise spécialisée qui remplace les pièces
n‘utilise que des pièces de rechange approuvées par le fabricant ou qui
ont les mêmes caractéristiques que la pièce d‘origine. Le remplacement
non autorisé peut entraîner un incendie, un choc électrique ou vous
exposer à d‘autres dangers.
• Chaleur - Ne placez pas l‘appareil à proximité de sources de chaleur
telles que des radiateurs, des grilles de chauage, des poêles ou
d‘autres produits (y compris les amplicateurs).
Note: Cet appareil peut être utilisé par des enfants de 8 ans ou plus et
des personnes ayant des capacités physiques, sensorielles et mentales
limitées et / ou dénuées d‘expérience et de connaissances, à condition
d‘avoir été instruits au fonctionnement de l‘appareil par une personne
responsable et d‘en comprendre les risques associés.

37
FR
CONTENU DE L‘EMBALLAGE
• Chaîne karaoké (1x)
• Adaptateur secteur (1x)
• Câble RCA (1x)
• Micro laire (1x)
• Mode d‘emploi (1x)

38
FR
APERÇU DE L‘APPAREIL
Face avant
1Écran 11 Réglage volume du micro 21 Réglage volume
principal
2Compartiment CD 12 Témoin d'enregistrement 22 Prise AUX-IN
3Aichage de la puissance 13 Touche d'enregistrement
(REC)
23 Port USB
4Marche/arrêt/mode 14 Mémorisation /répétition 24 Prise de micro 1
5Moniteur marche/arrêt 15 Saut de titre - (SKIP -) 25 Prise de micro 2
6AVC marche/arrêt 16 Saut de titre + (SKIP +) 26 Lumières LED
décoratives
7Écho + 17 Stop 27 Grille métallique
8Écho -
9Lumières LED décoratives 19 Appairer / Lecture / Pause
10 Mode lumineux 20 Réglage de la balance

39
FR
Dos de l‘appareil
1Poignée 3Sortie Vidéo 5Sortie audio (L)
2Support de micro 4Sortie audio (R) 6Prise de l’adaptateur
secteur

40
FR
CONNEXIONS
Branchement du micro
Vous pouvez connecter le micro à la prise MIC 1 (24) et à la prise MIC 2 (25).
Remarque : Ne faites pas tomber le micro car cela pourrait endommager
celui-ci ou l‘enceinte. Ne tordez pas et ne pliez pas le câble du micro, car
cela pourrait l‘endommager.
Pour connecter l‘appareil à un téléviseur
Pour lire la vidéo, les paroles et l‘audio sur votre téléviseur, vous devez
suivre les étapes ci-dessous :
1. Connectez le connecteur du câble vidéo RCA (jaune) à la sortie vidéo (1)
et les câbles audio (blanc et rouge) à la sortie audio (2 et 3) à l‘arrière de
l‘appareil.
2. Connectez l‘autre extrémité du câble RCA (jaune) à l‘entrée vidéo et les
câbles audio (blanc et rouge) à l‘entrée audio de votre téléviseur.
REMARQUES :
• Cet appareil peut être utilisé avec ou sans téléviseur. Cependant, il est
recommandé d‘utiliser l‘appareil avec un téléviseur pour que toutes les
fonctions soient disponibles.
• Pour plus d‘informations sur l‘utilisation du téléviseur, lisez son mode
d‘emploi.
• Vous devez utiliser un chier CD +G ou MP3 +G pour que les paroles
puissent s‘aicher à l‘écran.
Branchement sur le secteur
Insérez la che d‘alimentation dans une prise de 240 V ~ 50 Hz.
Remarque : Insérez la che d‘alimentation dans la prise uniquement
après avoir eectué toutes les connexions.

41
FR
UTILISATION
Prise Line-IN
1. Appuyez sur le bouton ON / OFF (4) pour allumer l‘appareil.
2. Branchez la che du câble audio 3,5 mm (non fourni) dans la prise AUX-
IN (19) de l‘appareil.
3. Appuyez sur MODE (4) à l‘avant de l‘appareil pour passer en mode
AUX-IN.
4. Contrôlez l‘appareil depuis l‘appareil externe connecté.
Lumières Disco
3 modes de lumière sont disponibles :
• Mode lumière 1: Lorsque vous parlez ou chantez dans le micro,
l‘appareil synchronise la lumière en conséquence.
• Mode lumière 2: L‘appareil s‘allume dans des couleurs et des motifs
aléatoires.
• Mode lumière 3: les eets de lumière sont désactivés.
REMARQUE : Lorsque l‘appareil est allumé, le mode lumière 1 est
automatiquement activé. Appuyez une fois sur LIGHT MODE (10) pour
passer en mode lumière 2. Appuyez à nouveau sur la touche pour désactiver
les eets de lumière.
Lecture de CD
1. Pour allumer l‘appareil, appuyez sur la touche MARCHE / ARRÊT (6).
2. Ouvrez le compartiment CD et insérez un CD (avec des chiers standard
ou MP3 + G) ou CD + G et appuyez doucement dessus sur l‘axe central.
Puis fermez le compartiment CD.
Qu'est-ce qu'un CD+G ?
Un CD + G (CD + Graphics) est le format
standard de la plupart des CD de
karaoké, avec les paroles aichées à
l'écran.
Qu'est-ce qu'un chier
MP3+G ?
Le chier MP3 + G est le dernier format
de musique karaoké qui utilise la taille
réduite des chiers MP3. Les paroles
s'aichent à l'écran.

42
FR
3. Appuyez plusieurs fois sur MODE (4) pour sélectionner le mode CDG /
CD. L‘écran aiche „CD“. Pendant que l‘appareil parcourt le CD, l‘écran
aiche „CD Reading“ en clignotant. Dès que le CD est lu, le nombre
total de titres se trouvant sur le CD s‘aiche à l‘écran.
4. Pour démarrer la lecture, appuyez sur Lecture / Pause (19). Si vous avez
inséré un chier CD + G, l‘image et les paroles s‘aichent sur l‘écran du
téléviseur (si l‘appareil est connecté au téléviseur).
5. Réglez le volume sur la commande de volume principale (21).
6. Connectez un (ou deux) micro (s) à la prise de micro (24 ou 25). Glissez
le bouton d‘alimentation du micro en position „marche“.
7. Réglez le volume du micro sur la commande de volume du micro (11).
Cela modie le volume de tous les micros utilisés.
8. Appuyez sur Echo +/- (7 ou 8) pour donner à votre voix un eet de
réverbération (du niveau 00 au niveau 08).
9. Tournez la commande de balance (20) pour régler les eets audio. Cette
fonction ne peut s‘appliquer qu‘aux morceaux avec les voix enregistrées
séparément.
10. Appuyez sur la touche A.V.C. (6) pour baisser le volume de la voix
principale et la couvrir avec votre propre voix en chantant dans le
micro. Cette fonction ne peut s‘appliquer qu‘aux morceaux avec les voix
enregistrées séparément.
11. Fonction répétition
• Appuyez une fois sur la touche de répétition (14) pour répéter le
morceau sélectionné en boucle. L‘icône apparaît à l‘écran.
• Appuyez deux fois sur la touche de répétition (14) pour répéter toutes
les chansons du CD. L‘icône apparaît à l‘écran.
• Appuyez trois fois sur la touche de répétition (14) pour annuler la
fonction de répétition. L‘icône [X] apparaît sur l‘écran.
REMARQUES :
• N‘insérez que des CD dans le compartiment CD, car les corps étrangers
peuvent l‘endommager.
• Si aucun CD n‘est inséré, l‘écran aiche „no“.
• Si l‘appareil est connecté à un téléviseur ou à une autre source audio,
réglez le volume sur le téléviseur ou la source audio correspondante.

43
FR
Lecture par USB
1. Pour allumer l‘appareil, appuyez sur MARCHE / ARRÊT (4).
2. Insérez une clé USB dans le port USB (23) de l‘appareil.
3. Appuyez plusieurs fois sur la touche MODE (4) pour accéder au mode
USB. L‘écran aiche „USB“. Tant que la clé USB est en cours de lecture,
l‘écran aiche „USB READING“ en clignotant. Le nombre total de pistes
de la clé USB s‘aiche ensuite à l‘écran.
4. Appuyez sur PLAY / PAUSE (19) pour démarrer la lecture. Lorsque vous
écoutez un chier MP3+G, l‘image et les paroles s‘aichent à l‘écran
(sous réserve que l‘écran soit connecté).
REMARQUES:
• Le titre et le dossier s‘aichent à l‘écran. Pour choisir le titre que vous
souhaitez lire, appuyez sur les touches SKIP +/- (15 ou 16).
5. Réglez le volume avec la touche MASTER VOL (21).
REMARQUE : Si l‘appareil est connecté à un téléviseur ou à une autre source
audio, réglez le volume sur le téléviseur ou la source audio correspondante.
6. Branchez les micros et glissez l‘interrupteur MARCHE/ARRÊT du micro
sur la position „ON“.
7. Réglez le volume du micro avec la commande MIC VOL. Cela modie le
volume des deux micros.
8. Appuyez sur les touches ECHO -/+ pour donner à votre voix un eet de
réverbération (du niveau 00 au niveau 08).
9. RÉPÉTITION (REPEAT) :
• Appuyez une fois sur la touche de répétition pour lire en boucle le
morceau sélectionné. L‘icône apparaît à l‘écran.
• Appuyez deux fois sur répétition pour répéter le dossier
sélectionné. L‘icône apparaît à l‘écran.
• Appuyez trois fois sur répétition pour répéter toutes les chansons
du CD. L‘icône apparaît à l‘écran.
• Appuyez quatre fois sur répétition pour quitter la fonction de
répétition annulée. L‘icône apparaît sur l‘écran.
10. PAUSE:
• Pour mettre en pause la lecture, appuyez sur PLAY/PAUSE (19). Le
témoin PLAY/PAUSE clignote pendant la pause.
• Appuyez à nouveau sur PLAY/PAUSE (19) pour reprendre la lecture.
11. Pour arrêter la lecture, appuyez sur la touche STOP (17).
12. Pour éteindre l‘appareil, appuyez sur MARCHE/ARRÊT (4).

44
FR
Fonction BT
Suivez les étapes ci-dessous pour coupler un appareil BT externe :
1. Allumez l‘appareil en appuyant sur la touche MARCHE / ARRÊT (4).
2. Pour choisir le mode BT, appuyez plusieurs fois sur la touche MODE (4).
L‘écran aiche „BLUETOOTH“. L‘appareil recherche automatiquement
les appareils précédemment connectés en BT (si d‘autres appareils
externes BT ont déjà été appairés). Si aucun appareil n‘a encore été
connecté, passez à l‘étape suivante.
REMARQUE : Appuyez longuement sur la touche PAIR (16) pour déconnecter
tous les appareils et appairer un nouvel appareil.
3. Activez la fonction BT de votre appareil externe. Ouvrez la liste des
appareils et choisissez „Rockstar Plus“.
REMARQUE : Vous trouverez de plus amples informations sur l‘utilisation de
la fonction BT de l‘appareil externe dans son mode d‘emploi.
4. Le témoin BT s‘allume en permanence et un signal retentit.
REMARQUES :
• Si vous êtes invité à saisir un mot de passe lors de l‘établissement de la
connexion BT, saisissez „0000“.
• Avec certains appareils BT, vous devrez aussi sélectionner „Utiliser
comme appareil audio“ ou quelque chose de similaire une fois le
couplage réussi.
• Si la connexion BT est perdue après le couplage, réduisez la distance
entre les deux appareils. La distance entre l‘appareil BT et le système
de karaoké ne doit pas dépasser 10 mètres.

45
FR
5. Démarrez la lecture sur l‘appareil BT. Pendant la lecture, appuyez sur
PLAY/PAUSE (16) pour interrompre la lecture.
6. Pour sélectionner la piste suivante ou précédente, appuyez sur les
touches SKIP -/+ (17).
Fonction enregistrement
1. Appuyez sur la touche REC (13) pour enregistrer votre chant et votre
musique. L‘enregistrement démarre et le témoin REC (12) s‘allume en
continu.
2. Pour terminer l‘enregistrement, appuyez à nouveau sur REC (13). Le
témoin REC (12) s‘éteint.
3. Les chiers enregistrés sont sauvegardés sur USB.
4. Pour écouter les chiers enregistrés, sélectionnez le mode USB avec
MODE (4). Utilisez les touches SKIP +/- (15 ou 16) pour sélectionner le
chier enregistré que vous souhaitez lire.
5. Appuyez sur PLAY/PAUSE pour lire la piste sélectionnée.
REMARQUE : La fonction d‘enregistrement est disponible dans les modes
suivants: BT, AUX et CD. Seuls les titres au format CD, CD-R, CD-RW et
CD + G peuvent être enregistrées en mode CD. Le format MP3 n‘est pas
disponible pour le mode CD.
Fonction mémorisation (PROGRAM)
1. En mode d‘arrêt, appuyez sur la touche Enregistrer/Répéter (14). L‘écran
aiche „P01“. Le premier titre peut maintenant être enregistré.
2. Utilisez les touches Skip +/- (15 ou 16) pour sélectionner la première
piste.
3. Appuyez à nouveau sur Enregistrer / Répéter (14) pour conrmer.
4. Vous pouvez répéter les étapes ci-dessus pour un maximum de 20
pistes. Pour démarrer la lecture, appuyez sur Lecture / Pause (19).

46
FR
NETTOYAGE ET ENTRETIEN
• Avant de nettoyer l‘appareil, éteignez-le et débranchez la che de la
prise.
• Si l‘appareil est poussiéreux, essuyez-le avec un chion doux et sec.
• Nettoyez l‘appareil avec un chion doux.
• N‘utilisez pas de cire, de sprays de polissage ou de produits de
nettoyage agressifs pour le nettoyage.
ATTENTION
Risque de choc électrique ! Pendant le nettoyage, assurez-
vous qu‘aucune eau ou autre liquide ne pénètre à l‘intérieur
de l‘appareil.
IDENTIFICATION ET RÉSOLUTION DES
PROBLÈMES
Avant de contacter le service client, consultez les conseils de dépannage du
tableau.
Problème Cause possible Possibilité de solution
L'appareil ne
fonctionne pas
L'appareil est éteint. Allumez l'appareil avec le
bouton ON / OFF.
Le câble secteur est mal
branché.
Assurez-vous que le
cordon d'alimentation est
correctement connecté à
l'arrière du produit.
La prise est hors service. Utilisez une autre prise.
Pas de son Le volume est réglé au
minimum.
Réglez le volume avec la
commande MASTER VOL.
Vous avez sélectionné
une mauvaise fonction.
Utilisez le bouton MODE
pour sélectionner la
fonction correcte.
Vous utilisez un appareil
externe.
Augmentez le volume sur
le périphérique externe.

47
FR
Problème Cause possible Possibilité de solution
Pas de son
lorsque
l'appareil est
branché au
téléviseur.
Le son du téléviseur est
coupé ou réglé trop bas.
Réglez le volume sur le
téléviseur.
La source correcte n'a pas
été sélectionnée sur le
téléviseur.
Sélectionnez la bonne
source (généralement
AV).
Les paroles ne
s'aichent pas à
l'écran.
La che vidéo n'est pas
insérée correctement.
Insérez correctement la
che vidéo.
La mauvaise source a
été sélectionnée sur le
téléviseur.
Sélectionnez la bonne
source (généralement
AV).
Le chier / la piste en
cours de lecture ne
contient pas de paroles.
Seuls les chiers
contenant des paroles
peuvent en aicher sur le
téléviseur.
La fonction AUX-IN ou BT
est utilisée.
Rien ne s'aiche sur
l'écran du téléviseur en
mode AUX IN ou BT.
Utilisez un autre mode
pour aicher les paroles.
Pas de son au
micro.
Le micro n'est pas
correctement branché à
l'un des ports de micro.
Assurez-vous que le micro
est correctement branché
à la prise MIC 1 ou MIC 2.
Le micro est éteint. Faites glisser
l'interrupteur MARCHE /
ARRÊT du microphone sur
la position MARCHE).
Le volume du micro est
trop bas.
Réglez le volume du
micro avec la commande
MIC VOL.
Le volume Master est trop
bas.
Réglez le volume avec la
commande MASTER VOL.
Les chiers USB
ne sont pas lus.
Le chier USB est
endommagé.
Remplacez le chier.
Le format de chier ne
peut pas être lu par
l'appareil.
Utilisez des chiers aux
formats compatibles.
La clé USB n'est pas prise
en charge par l'appareil.
Utilisez une autre clé USB.

48
FR
Problème Cause possible Possibilité de solution
Impossible
d'appairer
un appareil
externe.
La fonction BT de votre
appareil externe est
désactivée.
Activez la fonction BT de
votre appareil externe
(voir son mode d'emploi).
L'appareil n'est pas en
mode de couplage.
Appuyez sur le bouton
PAIR pour rendre
l'appareil visible aux
appareils BT externes.
La musique
n'est pas
disponible après
établissement
de la connexion
BT.
L'appareil BT ne prend
pas en charge le prol
A2DP-BT.
Utilisez un appareil BT
prenant en charge A2DP.
Le volume de l'appareil
BT externe est réglé trop
bas.
Réglez le volume sur
l'appareil BT externe.

49
FR
INFORMATIONS SUR LE RECYCLAGE
S‘il existe une réglementation pour l‘élimination ou le
recyclage des appareils électriques et électroniques
dans votre pays, ce symbole sur le produit ou sur
l‘emballage indique que cet appareil ne doit pas
être jeté avec les ordures ménagères. Vous devez le
déposer dans un point de collecte pour le recyclage
des équipements électriques et électroniques.
La mise au rebut conforme aux règles protège
l‘environnement et la santé de vos semblables des
conséquences négatives. Pour plus d‘informations
sur le recyclage et l‘élimination de ce produit, veuillez
contacter votre autorité locale ou votre service de
recyclage des déchets ménagers.
DÉCLARATION DE CONFORMITÉ
Fabricant :
Chal-Tec GmbH, Wallstraße 16, 10179 Berlin,
Allemagne.
Importateur pour la Grande Bretagne :
Berlin Brands Group UK Limited
PO Box 42
272 Kensington High Street
London, W8 6ND
United Kingdom
Le soussigné, Chal-Tec GmbH, déclare que
l’équipement radioélectrique du type Rockstar Plus est
conforme à la directive 2014/53/UE. Le texte complet
de la déclaration UE de conformité est disponible à
l’adresse internet suivante : use.berlin/10035746


51
ES
Estimado cliente:
Le felicitamos por la adquisición de este producto.
Lea atentamente el siguiente manual y siga
cuidadosamente las instrucciones de uso con el n de
evitar posibles daños. La empresa no se responsabiliza
de los daños ocasionados por un uso indebido del
producto o por haber desatendido las indicaciones de
seguridad. Escanee el código QR para obtener acceso
al manual de usuario más reciente y otra información
sobre el producto:
DATOS TÉCNICOS
Número de artículo 10035746
Fuente de alimentación 100-240 V ~ 50/60 Hz (DC: 12 V, 1,2 A)
Potencia de salida 12 W 10% THD
Temperatura de funcionamiento 0-40°C
Alcance del BT 10 m (linea)
BT frecuencia 2402–2480 MHz
BT potencia de radiofrecuencia
(max.) -1,62 dBm
ÍNDICE
Datos técnicos 51
Indicaciones de seguridad 52
Contenido del envío 53
Descripción del aparato 54
Conexiones 56
Funcionamiento 57
Limpieza y cuidado 62
Solución de problemas y corrección de errores 62
Indicaciones sobre la retirada del aparato 65
Declaración de conformidad 65

52
ES
INDICACIONES DE SEGURIDAD
Indicaciones generales
• Relámpago - Si no va a utilizar el aparato durante un periodo largo
de tiempo o si hay una tormenta eléctrica, desenchufe el aparato de la
toma de corriente y desconecte el conector de antena. De este modo,
protegerá el aparato de los daños que pueden ocasionar relámpagos y
la sobretensión.
• Sobrecarga - No sobrecargue las tomas de corriente, cables
alargadores o tomas de corriente integradas para evitar el riesgo de un
incendio o de descarga eléctrica.
• Objetos extraños y entrada de líquido - No introduzca objetos de
ningún tipo en las ranuras del aparato, ya que podría tocar elementos
con voltajes peligrosos o piezas salientes que podrían causar un
incendio o una descarga eléctrica. No derrame líquido de ningún tipo
sobre el aparato.
• Reparación y mantenimiento - No intente reparar el aparato usted
mismo, ya que si abre o retira las cubiertas, podría provocar una tensión
peligrosa u otro riesgo. Contacte con un servicio técnico para su
reparación.
• Daños que requieren una reparación - Desconecte el enchufe de
la toma de corriente y póngase en contacto con un servicio técnico
cualicado si:
a) El cable de alimentación o el enchufe está dañado.
b) Se ha derramado líquido o se ha caído un objeto en el interior del
aparato.
c) El producto ha estado expuesto a la lluvia o agua.
d) Se ha dejado caer el producto o está dañado.
e) El rendimiento del producto ha disminuido considerablemente.
• Piezas de repuesto - Si necesita piezas de repuesto, asegúrese de
que el técnico que cambiará las piezas utiliza solamente las piezas
de recambio originales del fabricante o piezas con las mismas
características que las piezas originales. Las piezas no autorizadas
pueden provocar incendios, descargas eléctricas y otros riesgos.
• Calor - No instale el aparato cerca de las fuentes de calor como
radiadores, calentadores, hornos u otros aparatos similares (incluidos
amplicadores).
Nota: Este aparato puede ser utilizado por niños mayores de 8 años y
personas con discapacidades físicas, sensoriales y mentales y/o con
falta de experiencia y conocimientos, siempre y cuando hayan sido
instruidos sobre el uso del aparato y comprendan los peligros y riesgos
asociados.

53
ES
CONTENIDO DEL ENVÍO
• Equipo de karaoke (1x)
• Adaptador de alimentación (1x)
• Cable RCA (1x)
• Micrófono con cable (1x)
• Manual de instrucciones (1x)

54
ES
DESCRIPCIÓN DEL APARATO
Parte delantera
1Pantalla 11 Control volumen micrófono 21 Control volumen
principal
2Compartimento del CD 12 Indicador de grabación 22 Conector AUX-IN
3Indicador de potencia 13 Botón de grabación (REC) 23 Conector USB
4On/O/Modo 14 Guardar/Repetición 24 Conector micrófono 1
5Monitor on/o 15 Saltar - (SKIP -) 25 Conector micrófono 2
6AVC on/o 16 Saltar + (SKIP +) 26 Luz de decoración LED
7Eco + 17 Botón de parada 27 Rejilla de metal
8Eco - 18 Indicador de BT
9Luces LED de decoración 19 Emparejamiento/
Reproducción/Pausa
10 Modo de luz 20 Control del balance

55
ES
Parte trasera
1Asa 3Salida de Video 5Salida de audio (Izda.)
2Soporte del micrófono 4Salida de audio (Dcha.) 6Conexión a fuente de
alimentación

56
ES
CONEXIONES
Conectando el micrófono
Puede conectar el micrófono a los conectores MIC 1 (20) y MIC 2 (21).
Nota: No deje caer el micrófono ya que esto puede dañar el micrófono
o el altavoz. No tuerza ni doble el cable del micrófono, ya que puede
dañarlo.
Conectando la unidad a un televisor
Para reproducir video, letras y audio en tu TV, debes seguir los siguientes
pasos:
1. Conecte el cable de vídeo RCA (amarillo) al terminal de salida de vídeo
(1) y los cables de audio (blanco y rojo) al terminal de salida de audio (4
y 5) en la parte posterior de la unidad.
2. Conecte el otro extremo del cable RCA (amarillo) a la entrada de
vídeo y los cables de audio (blanco y rojo) a la entrada de audio de su
televisor.
NOTAS :
• Este dispositivo puede ser usado con o sin un televisor. Sin embargo, se
recomienda que el dispositivo se utilice junto con una TV para que todas
las funciones puedan ser utilizadas.
• Con respecto al uso de la televisión, lea las instrucciones de
funcionamiento.
• Para que la letra se muestre en la pantalla se puede utilizar un CD+G o
un MP3+G.
Conexión de la alimentación
Inserte el enchufe en una toma de corriente de 240 V~ 50 Hz.
Nota: No conecte el enchufe en la toma de corriente hasta que se hayan
realizado todas las conexiones.

57
ES
FUNCIONAMIENTO
Conector AUX-IN
1. Presione el botón ON/OFF (4) para encender la unidad.
2. Enchufe el conector del cable de audio de 3,5 mm (no incluido) en el
conector AUX-IN (19) de la unidad.
3. Presione el botón MODE (4) en el frente de la unidad para cambiar al
modo AUX-IN.
4. Opere la unidad desde el dispositivo de audio externo conectado.
Luces de discoteca
Hay 3 modos de luz diferentes disponibles:
• Modo de luz 1: Cuando hablas o cantas en el micrófono, el dispositivo
sincroniza la luz para que coincida.
• Modo de luz 2: El dispositivo se ilumina en colores y patrones
aleatorios.
• Modo de luz 3: Los efectos de luz están desactivados.
NOTA: Cuando se enciende la unidad, el modo de luz 1 se activa
automáticamente. Pulse el botón LIGHT MODE (10) una vez para cambiar
al modo de luz 2. Si presiona el botón de nuevo, los efectos de la luz se
desactivan.
Reproducción de CD
1. Presione el botón ON/OFF (6) para encender el dispositivo.
2. Abra la bandeja de CD e inserte un CD (con archivos estándar o archivo
MP3+G) o un CD+G y presiónelo suavemente en el eje central. Entonces
cierre la bandeja de CD.
¿Qué es un CD+G?
Un CD+G (CD+Grácos) es el formato
estándar para la mayoría de los CDs de
karaoke donde las palabras aparecen en
la pantalla.
¿Qué es un archivo
MP3+G?
El archivo MP3+G es el último formato
de música de karaoke, que utiliza el
pequeño tamaño de los archivos MP3.
Las palabras se muestran en la pantalla.

58
ES
3. Presione el botón MODE (4) varias veces para seleccionar el modo
CDG/CD La pantalla mostrará „Cd“. Durante la lectura „---“ parpadea en
la pantalla. Una vez que se ha leído el CD, el número total de pistas del
CD se muestra en la pantalla.
4. Presione el botón PLAY/PAUSE para iniciar la reproducción (19). Si ha
insertado un CD+G, la imagen y la letra se muestran en la pantalla del
televisor (si está conectado al televisor). Cuando se inserta un CD+G, el
indicador de CDG se ilumina en la pantalla.
5. Ajuste el volumen con el control MASTER VOL (21)
6. Conecte uno o dos micrófonos al MIC 1 (24) o MIC 2 (25) y deslice el
interruptor de encendido y apagado en el el micrófono a la posición
„ON“.
7. Ajuste el volumen del micrófono deseado con el control MIC VOL (11).
Esto afecta al volumen de ambos micrófonos.
8. Presione el botón ECHO -/+ (7 U 8) para añadir un efecto de
reverberación a su voz (del nivel 00 al nivel 08).
9. Gire el control de balance (20) para ajustar los efectos de sonido. Esta
función sólo se puede utilizar en canciones en las que las voces están
grabadas por separado.
10. Cuando presione el botón A.V.C. (6), la voz principal se vuelve más
suave y es superpuesta por tu propia voz cuando cantas una canción
con el micrófono. Esta función sólo se puede utilizar con las canciones
en las que las voces se han grabado y descargado por separado.
11. Función de repetición
• Si se pulsa una vez el botón de repetición (14), la canción seleccionada
se repite en un bucle continuo. El símbolo aparece en la pantalla.
• Si presionas el botón de repetición (14) dos veces, se repetirán todas las
canciones del CD. El símbolo aparece en la pantalla.
• Presione el botón de repetición (14) tres veces para cancelar la función
de repetición.
• La función de repetición se cancela. El símbolo aparece en la
pantalla.
NOTAS :
• Sólo inserte los CD en la bandeja de CD, ya que cuerpos extraños
pueden dañarla.
• Si no se inserta un CD, la pantalla muestra „no“.
• Cuando la unidad está conectada a un televisor u otra fuente de audio,
ajuste el volumen del televisor o de la fuente de audio.

59
ES
Reproducción USB
1. Presione el botón ON/OFF (4) para encender el dispositivo.
2. Inserte una memoria USB en el puerto USB (23) del aparato.
3. Presione el botón MODE (4) varias veces para entrar en el modo USB.
En la pantalla aparece „USB“. Mientras se lea la memoria USB, “USB
READING“ parpadeará en la pantalla. Entonces la pantalla mostrará el
número total de pistas en la memoria USB.
4. Presione el botón PLAY/PAUSE (19) para iniciar la reproducción. Cuando
se reproduce un archivo MP3+G, la imagen y la letra se muestran en la
pantalla del televisor (si está conectado al televisor).
NOTAS:
• En la pantalla se muestran las pistas y carpetas. Para seleccionar el
título que desea reproducir, pulse el botón SKIP-/+ (15 o 16).
5. Ajuste el volumen con el control MASTER VOL (21).
NOTA: Si la unidad está conectada a un televisor o a otra fuente de audio,
ajuste el volumen del televisor o de la fuente de audio.
6. Conecte los micrófonos al conector y deslice el interruptor ON/OFF del
micrófono a la posición “ON“.
7. Ajuste el volumen del micrófono deseado con el control MIC VOL. Esto
afectará al volumen de ambos micrófonos.
8. Presione los botones ECHO -/+ para añadir un efecto de reverberación
a su voz (de nivel 00 a nivel 08)
9. REPETIR (REPEAT):
• Si presiona el botón REPEAT una vez durante la reproducción, la
canción seleccionada se repetirá en un bucle continuo. El indicador
aparece en la pantalla.
• Si presiona el botón REPEAT dos veces durante la reproducción, la
carpeta seleccionada se repetirá en un bucle continuo. El indicador
aparece en la pantalla.
• Si presiona el botón REPEAT tres veces durante la reproducción,
se repetirá en un bucle continuo todas las canciones del CD. El
indicador aparece en la pantalla.
• Si presiona el botón REPEAT cuatro veces durante la reproducción,
se interrumpe el modo de repetición. El indicador aparece en la
pantalla.

60
ES
10. PAUSE:
• Presione el botón PLAY/PAUSE (19) para hacer una pausa durante la
reproducción. El indicador de REPRODUCCIÓN/PAUSA parpadeará
durante la pausa.
• Presione el botón PLAY/PAUSE (19) de nuevo para reanudar la
reproducción.
11. Presione el botón STOP (17) para detener la reproducción.
12. Presione el botón ON/OFF (4) para apagar la unidad.
La función de BT
Para emparejar un dispositivo BT externo, proceda de la siguiente manera:
1. Presione el botón ON/OFF (4) para encender el dispositivo.
2. Para seleccionar el modo BT, presione la FUNCIÓN-(4). “BLUETOOTH“
aparece en la pantalla. El dispositivo busca automáticamente los
dispositivos de BT previamente conectados (si los dispositivos de BT
externos fueron emparejados previamente). Si no hay dispositivos
conectados previamente, continúe con el siguiente paso.
NOTA: Si presiona el botón PAIR (16) durante mucho tiempo, todos los
dispositivos conectados se desconectarán para poder emparejar un nuevo
dispositivo.
3. Active la función BT de su dispositivo externo. Abra la lista de
dispositivos y seleccione „Rockstar Plus”.
NOTA : Para más instrucciones sobre cómo utilizar la función BT del
dispositivo externo, consulte su manual de usuario.
4. El indicador de BT se ilumina permanentemente y suena una señal.
NOTAS:
• Si está usando la conexión BT y le solicitan contraseña, introduzca lo
siguiente para establecer una conexión“0000“.
• Con algunos dispositivos BT, después de un emparejamiento exitoso se
requiere aceptar su „uso como dispositivo de audio“ o similar.
• Si la conexión BT se desconecta después del emparejamiento, reduzca
la distancia entre los dos dispositivos. La distancia entre el dispositivo
BT y el sistema de karaoke no debe exceder los 10 metros.

61
ES
5. Inicie la reproducción en el dispositivo BT. Durante la reproducción,
presione el botón PLAY/PAUSE (16) para detener la reproducción.
6. Presione los botones SKIP -/+ (17) para seleccionar la pista siguiente o
anterior.
Función de grabación
1. Presione el botón REC (13) para grabar sus voces y música La grabación
comienza y el indicador REC (12) se enciende continuamente.
2. Cuando quiera detener la grabación, pulse de nuevo el botón REC (13).
El indicador REC (12) se apaga.
3. Los archivos grabados se almacenan en el USB.
4. Para escuchar los archivos grabados, seleccione el archivo deseado con
el botón MODE (4) para seleccionar el modo USB. Seleccione el archivo
grabado que desea reproducir con los botones SKIP +/- (15 o 16).
5. Presione el botón PLAY/PAUSE para reproducir la pista seleccionada.
NOTA: La función de grabación está disponible en los siguientes modos: BT,
AUX y CD. Sólo las pistas en formato CD, CD-R, CD-RW y CD+G pueden ser
grabadas en el modo CD. El formato MP3 no está disponible para el modo
CD.
Función de memoria (PROGRAM)
1. En el modo reposo, presione el botón Guardar/repetir (14) En la pantalla
aparecerá „P01“. La primera pista puede ser almacenada ahora.
2. Seleccione el primer título con las teclas SKIP -/+ (15 o 16).
3. Presione el botón REPEAT/PROG (14) de nuevo para conrmar
4. Los pasos anteriores pueden repetirse hasta en 20 pistas. Presione el
botón PLAY/PAUSE (19) para iniciar la reproducción.

62
ES
LIMPIEZA Y CUIDADO
• Antes de limpiar, apague la unidad y desenchufe el cable de
alimentación de la toma de corriente.
• Si la unidad está polvorienta, límpiela con un paño suave y seco.
• Limpie la unidad con un paño suave.
• No use cera, aerosoles para pulir o agentes de limpieza agresivos.
ATENCIÓN
¡Riesgo de descarga eléctrica! Durante la limpieza,
asegúrese de que no entre agua u otros líquidos en el
interior del dispositivo.
SOLUCIÓN DE PROBLEMAS Y CORRECCIÓN DE
ERRORES
Antes de ponerse en contacto con el servicio de atención al cliente,
compruebe los consejos para la resolución de problemas que guran en la
tabla.
Problema Posible causa Posible solución
El dispositivo no
funciona
El dispositivo está
apagado.
Encienda el dispositivo
con el botón ON/OFF.
El cable de alimentación
no está conectado
correctamente.
Asegúrese de que el cable
de alimentación esté
bien conectado a la parte
posterior de la unidad.
El enchufe está roto Utilice otro enchufe
No hay sonido El control de volumen
está en el ajuste mínimo.
Ajuste el volumen con el
control MASTER VOL-.
Se selecciona la función
incorrecta.
Presione el botón
FUNCTION para
seleccionar la función
correcta.
Se está utilizando un
dispositivo externo.
Aumente el volumen del
dispositivo externo.

63
ES
Problema Posible causa Posible solución
No hay sonido
cuando se
conecta a la TV.
El sonido de la televisión
está silenciado o
demasiado bajo.
Ajusta el volumen del
televisor.
La fuente correcta no
se selecciona en la
televisión.
Seleccione la fuente
correcta (generalmente
AV).
La letra no
aparece en la
pantalla del
televisor.
El conector de vídeo
no está conectado
correctamente.
Inserte el enchufe del
video correctamente.
Se selecciona la fuente
equivocada en la
televisión.
Seleccione la fuente
correcta (generalmente
AV).
El archivo/pista que se
está reproduciendo no
contiene letras.
Sólo los archivos
que contengan letras
de canciones serán
mostrados en la TV.
Se utiliza la función AUX
IN o BT.
En el modo AUX IN o BT,
no se muestra nada en
la pantalla del televisor.
Utilice otro modo para
mostrar la letra.
El micrófono no
suena
El micrófono no está
conectado correctamente
al conector.
Asegúrese de que
el micrófono esté
correctamente conectado
al conector MIC 1 o MIC 2.
El micrófono está
apagado.
Deslice el interruptor de
encendido y apagado del
micrófono a la posición
"ON".
El volumen del micrófono
está demasiado bajo.
Ajuste el volumen del
micrófono con el control
MIC VOL.
El volumen maestro está
demasiado bajo.
Ajuste el volumen con el
botón MASTER VOL.

64
ES
Problema Posible causa Posible solución
Los archivos
USB no se
reproducen.
Los archivos USB están
dañados.
Reemplace los archivos.
El formato del archivo no
puede ser reproducido
por el dispositivo.
Use archivos de un
formato compatible.
La memoria USB no
es compatible con el
dispositivo.
Use una unidad ash USB
diferente.
El dispositivo
externo de BT
no puede ser
emparejado con
la unidad
La función BT de su
dispositivo externo está
desactivada.
Active la función BT de
su dispositivo externo
(consulte su manual de
instrucciones).
El dispositivo no
está en modo de
emparejamiento.
Presione el botón PAIR
para que la unidad
sea visible para los
dispositivos externos de
BT.
Después de
establecer
con éxito la
conexión BT, la
música no está
disponible.
El dispositivo BT no
soporta el perl A2DP BT.
Utiliza un dispositivo de
BT que soporte A2DP.
El volumen del dispositivo
BT externo está ajustado
demasiado bajo.
Ajuste el volumen en el
dispositivo BT externo.

65
ES
INDICACIONES SOBRE LA RETIRADA DEL
APARATO
Si en su país existe una disposición legal relativa a
la eliminación de aparatos eléctricos y electrónicos,
este símbolo estampado en el producto o en
el embalaje advierte que no debe eliminarse
como residuo doméstico. En lugar de ello, debe
depositarse en un punto de recogida de reciclaje
de aparatos eléctricos y electrónicos. Una gestión
adecuada de estos residuos previene consecuencias
potencialmente negativas para el medio ambiente
y la salud de las personas. Puede consultar más
información sobre el reciclaje y la eliminación de este
producto contactando con su administración local o
con su servicio de recogida de residuos.
DECLARACIÓN DE CONFORMIDAD
Fabricante:
Chal-Tec GmbH, Wallstraße 16, 10179 Berlín, Alemania.
Importador para Gran Bretaña:
Berlin Brands Group UK Limited
PO Box 42
272 Kensington High Street
London, W8 6ND
United Kingdom
Por la presente, Chal-Tec GmbH declara que el tipo
de equipo radioeléctrico Rockstar Plus es conforme
con la Directiva 2014/53/UE. El texto completo de la
declaración UE de conformidad está disponible en la
dirección Internet siguiente: use.berlin/10035746


67
IT
Gentile cliente,
La ringraziamo per aver acquistato il dispositivo.
La preghiamo di leggere attentamente le seguenti
istruzioni per l’uso e di seguirle per evitare possibili
danni tecnici. Non ci assumiamo alcuna responsabilità
per danni scaturiti da una mancata osservazione delle
avvertenze di sicurezza e da un uso improprio del
dispositivo. Scansionare il codice QR seguente, per
accedere al manuale d’uso più attuale e per ricevere
informazioni sul prodotto.
DATI TECNICI
Codice articolo 10035746
Alimentazione 100-240 V ~ 50/60 Hz (DC: 12 V, 1,2 A)
Potenza d’uscita 12 W 10% THD
Potenza operativa 0-40°C
Eicace raggio d’azione BT 10 m (in linea d’aria)
BT frequenza 2402–2480 MHz
BT potenza a radiofrequenza
(max.) -1,62 dBm
INDICE
Dati tecnici 67
Avvertenze di sicurezza 68
Volume di consegna 69
Descrizione del prodotto 70
Collegamenti 72
Funzionamento 73
Pulizia e manutenzione 78
Ricerca e correzione degli errori 78
Avviso di smaltimento 81
Dichiarazione di conformità 81

68
IT
AVVERTENZE DI SICUREZZA
Avvertenze generali
• Colpo di fulmine – Se il dispositivo non viene utilizzato o c’è un
temporale, staccare la spina dalla presa di corrente e scollegare il
dispositivo dalla connessione dell’antenna. In questo modo si evitano
danni al dispositivo dovuti a colpi di fulmine o sovratensione.
• Sovraccarico – Non sovraccaricare prese elettriche, prolunga o
prese di corrente integrate, in quanto ciò potrebbe causare incendi o
folgorazioni.
• Corpi estranei e liquidi – Non inlare nessun tipo di oggetto nelle
aperture del dispositivo, in quanto si potrebbe entrare in contatto
con pericolosi punti di tensione o causare il cortocircuito di alcune
componenti. Questo potrebbe causare incendi o folgorazioni. Non
rovesciare liquidi sul dispositivo.
• Riparazione e manutenzione – Non cercare di eettuare opere di
manutenzione in modo autonomo, dato che rimuovendo o aprendo
le coperture potrebbero liberarsi tensioni pericolose o insorgere
altri rischi. Lasciare che le opere di manutenzione siano eettuate da
personale tecnico qualicato.
• Danni che necessitano manutenzione – Staccare la spina dalla
presa elettrica e rivolgersi a un’azienda specializzata se si vericano le
seguenti situazioni:
a) Se cavo di alimentazione o spina sono danneggiati.
b) Se sono stati rovesciati liquidi o sono caduti oggetti sopra al
dispositivo.
c) Se il prodotto è stato esposto a pioggia o acqua.
d) Se il prodotto è caduto o è danneggiato.
e) Se il prodotto presenta prestazioni sensibilmente al di sotto della
norma.
• Parti di ricambio – Se sono necessarie parti di ricambio, assicurarsi
che l’azienda specializzata che si occupa della sostituzione utilizzi solo
parti autorizzate dal produttore o con caratteristiche equivalenti alle
parti originali. Una sostituzione non adeguata può causare incendi,
folgorazioni o altri rischi.
• Calore – Non posizionare il dispositivo nei pressi di fonti di calore,
come termosifoni, radiatori convettivi, forni o altri prodotti (inclusi
amplicatori).
Nota: Questo dispositivo può essere utilizzato da bambini a partire
da 8 anni e da persone con limitate capacità siche e psichiche o con
conoscenza ed esperienza limitate, solo se sono stati istruiti sulle
modalità d’uso e comprendono i rischi e i pericoli connessi.

69
IT
VOLUME DI CONSEGNA
• Impianto di karaoke (1x)
• Adattatore di rete (1x)
• Cavo RCA (1x)
• Microfono con cavo (1x)
• Manuale di istruzioni (1x)

70
IT
DESCRIZIONE DEL PRODOTTO
Lato frontale
1Display 11 Volume microfono 21 Manopola volume
principale
2Vano CD 12 Spia registrazione 22 Presa AUX-IN
3Spia potenza 13 Tasto registrazione (REC) 23 Presa USB
4Modalità On/O 14 Salvare/Ripetere 24 Presa microfono 1
5Monitor on/o 15 Saltare - (SKIP -) 25 Presa microfono 2
6AVC on/o 16 Saltare+ (SKIP +) 26 Luce a LED decorativa
7Eco + 17 Tasto Stop 27 Griglia di metallo
8Eco - 18 Spia BT
9Luce a LED decorativa 19 Accoppiamento/Play/
Pausa
10 Modalità luce 20 Manopola balance

71
IT
Vista posteriore
1Maniaco 3Uscita video 5Uscita audio (S)
2Portamicrofono 4Uscita audio (D) 6Collegamento cavo di
rete

72
IT
COLLEGAMENTI
Come collegare il microfono
È possibile collegare il microfono sia alla presa MIC1 (24) che MIC2 (25).
Nota: non lasciar cadere il microfono per terra perché ciò potrebbe
causare danni all’altoparlante e al microfono stesso. Non torcere o
piegare il cavo del microfono perché potrebbe danneggiarsi.
Come collegare il dispositivo a un televisore
Per poter riprodurre video, testi di canzoni e audio tramite il televisore,
eseguire i seguenti passaggi:
1. Inserire il cavo video RCA (giallo) nell’uscita video (1) e il cavo audio
(bianco e rosso) nell’uscita audio (4 e 5) sul retro del dispositivo.
2. Inserire l’altra estremità del cavo RCA (giallo) nell’ingresso video e il
cavo audio (bianco e rosso) nell’ingresso audio del televisore.
NOTE :
• Si può utilizzare il dispositivo con o senza televisione. Si consiglia
tuttavia di usarlo con una televisione, in modo tale da poter sfruttare
tutte le funzioni.
• Leggere le istruzioni inerenti l’uso con la televisione.
• Per fare in modo che i tasti delle canzoni appaiano sullo schermo,
bisogna usare un CD+G o un le MP3+G.
Allacciamento alla rete elettrica
Inserire la spina in una presa da 240 V~ 50 Hz.
Nota: inserire la spina nella presa solo dopo aver instaurato tutti i
collegamenti.

73
IT
FUNZIONAMENTO
Connettore AUX-IN
1. Premere il tasto ON/OFF (4) per accendere il dispositivo.
2. Inserire il cavo audio da 3,5 mm (non incluso nel volume di consegna)
nell’ingresso AUX (19) del dispositivo.
3. Premere il tasto MODE (4) sul lato frontale del dispositivo per accedere
alla modalità AUX-IN.
4. Gestire il dispositivo tramite il dispositivo audio esterno collegato.
Luci da discoteca
Sono disponibili tre diverse modalità di illuminazione:
• Modalità di illuminazione 1: quando si parla o si canta con il microfono,
il dispositivo sincronizza la luce adatta.
• Modalità di illuminazione 2: il dispositivo lampeggia con colori e
motivi casuali.
• Modalità di illuminazione 3: gli eetti luminosi vengono disattivati.
NOTA: quando si accende il dispositivo, la modalità di illuminazione 1 si
attiva automaticamente. Premere una volta il tasto LIGHT MODE (10) per
accedere alla modalità di illuminazione 2. Premendo il tasto un’altra volta,
gli eetti luminosi si disattivano.
Riproduzione CD
1. Premere il tasto ON/OFF (4) per accendere il dispositivo.
2. Aprire il vano CD e inserire un CD (con le standard o MP3+G) oppure
un CD+G e premerlo dolcemente sul mandrino centrale. Chiudere inne
il vano.
Che cos’è un CD+G?
Con CD+G (CD+Graphics) si intende
un formato standard per la grande
maggioranza dei CD di karaoke che
fanno apparire le parole sullo schermo.
Che cos’è un le MP3+G?
Con le MP3+G si intende l’ultimo
formato di musica karaoke con il quale
si usa la dimensione piccola dei le MP3.
Le parole appaiono sullo schermo.

74
IT
3. Premere ripetutamente il tasto MODE (4) per selezionare la modalità
CDF/CD. Sullo schermo appare “CD”. Durante l’acquisizione lampeggia
“CD Reading” sullo schermo. Non appena il CD è stato letto, sullo
schermo appare la quantità dei brani che si trovano sul CD.
4. Premere il tasto Play/Pause (19) per avviare la riproduzione. Dopo aver
inserito un le CD+G, sullo schermo della televisione appaiono la gura
e i testi delle canzoni (se collegato alla TV).
5. Regolare il volume con la manopola principale (21).
6. Inserire un (o due) microfono (i) nella presa relativa (24 o 25). Mettere il
tasto on/o sul microfono in posizione “On”.
7. Regolare il volume del microfono con la manopola relativa (11). Ciò ha
eetto sul volume di tutti i microfoni utilizzati.
8. Premere i tasti Eco +/- (7 oppure 8) per conferire alla propria voce un
eetto eco (da livello 00 a 08).
9. Ruotare la manopola balance (20) per regolare gli eetti sonori. Si può
utilizzare questa funzione solo con canzoni la cui voce è stata registrata
separatamente.
10. Quando si preme il tasto A.V.C. (6) la voce principale viene abbassata e
coperta dalla propria quando si canta una canzone al microfono. Si può
utilizzare questa funzione solo con canzoni la cui voce è stata registrata
separatamente.
11. Funzione di ripetizione
• Se si preme una volta il pulsante di ripetizione (14), il brano selezionato
viene ripetuto continuamente. Il simbolo appare sullo schermo.
• Se si preme il pulsante di ripetizione (14) due volte, tutti i brani del CD
saranno ripetuti. Il simbolo appare sullo schermo.
• Se si preme il pulsante di ripetizione (14) tre volte, la funzione di
ripetizione viene annullata. Il simbolo appare sullo schermo.
NOTE :
• Inserire nel vano CD solo dischi, perché corpi estranei possono
danneggiarlo.
• Se non si inserisce un CD, sullo schermo appare “no”.
• Se il dispositivo è stato collegato a una televisione oppure a una fonte
audio, regolare il volume sulla TV o sulla rispettiva fonte audio.

75
IT
Riproduzione USB
1. Premere il tasto on/o (4) per accendere il dispositivo.
2. Inserire una penna USB nella presa USB (23) del dispositivo.
3. Premere più volte il tasto MODE (4) per accedere alla modalità USB.
Sullo schermo appare “USB”. Finché il dispositivo continua a leggere la
penna USB, sullo schermo lampeggia “USB READING” e poi appaiono la
quantità dei brani che si trovano sulla penna.
4. Per iniziare la riproduzione premere il tasto play/pause (19). Quando si
ascolta un le MP3+G, sullo schermo della TV appaiono le gure e i testi
(se collegato alla TV).
NOTE:
• Sullo schermo appaiono i brani e le cartelle. Premere il tasto SKIP +/- (15
o 16) per selezionare il brano da riprodurre.
5. Regolare il volume con la manopola MASTER VOL (21).
NOTA: se il dispositivo è stato collegato a una televisione o a un’altra fonte
audio, regolare il volume sulla TV o sulla rispettiva fonte audio.
6. Collegare i microfoni e mettere l’interruttore ON/OFF in posizione
“ON”.
7. Regolare il volume dei microfoni con la manopola MIC VOL. Ciò ha
eetto sul volume di entrambi i microfoni.
8. Premere i tasti ECO +/- per conferire alla propria voce un eetto eco (da
livello 00 a 08).
9. RIPETIZIONE (REPEAT):
• Se si preme il tasto ripetizione una volta, la canzone selezionata
viene continuamente ripetuta. Sullo schermo appare il simbolo .
• Se si preme il tasto ripetizione due volte, viene ripetuta la cartella
selezionata. Sullo schermo appare il simbolo .
• Se si preme il tasto ripetizione tre volte, vengono ripetute tutte le
canzoni che si trovano sul CD. Sullo schermo appare il simbolo .
• Se si preme il tasto ripetizione quattro volte, la funzione di
ripetizione viene interrotta. Sullo schermo appare il simbolo .
10. PAUSE:
• Premere il tasto PLAY/PAUSE (19) per mettere in pausa durante la
riproduzione. La spia PLAY/PAUSE lampeggia durante la messa in
pausa.
• Premere nuovamente il tasto PLAY/PAUSE (19) per proseguire la

76
IT
riproduzione.
11. Premere il tasto STOP (17) per fermare la riproduzione.
12. Premere il tasto ON/OFF (4) per spegnere il dispositivo.
Funzione BT
Per accoppiare un dispositivo BT esterno proseguire nel modo seguente:
1. Premere il tasto ON/OFF (4) per accendere il dispositivo.
2. Premere più volte il tasto MODE (4) per selezionare la modalità BT.
Sullo schermo appare “BLUETOOTH”. Il dispositivo va automaticamente
alla ricerca dei dispositivi BT precedentemente collegati (in caso siano
stati accoppiati precedentemente dei dispositivi BT). Proseguire con il
prossimo punto se non risultano esserci dispositivi precedentemente
collegati.
NOTA: se si preme a lungo il tasto PAIR (16), tutti i dispositivi collegati si
staccano, in modo tale da poter accoppiare un nuovo dispositivo.
3. Attivare la funzione BT del proprio dispositivo esterno. Aprire la lista dei
dispositivi e selezionare “Rockstar Plus”.
NOTA : ulteriori istruzioni riguardanti l’utilizzo della funzione BT del
dispositivo esterno si trovano nel suo manuale.
4. La spia BT lampeggia di continuo e viene emesso un segnale acustico.
NOTE:
• Se durante l’instaurazione del collegamento BT viene richiesta una
password, digitare “0000”.
• Su alcuni dispositivi BT bisogna selezionare “utilizzare come dispositivo
audio” o qualcosa di simile dopo l’avvenuto l’accoppiamento.
• Se il collegamento BT viene interrotto dopo l’accoppiamento, diminuire
la distanza tra i due dispositivi. La distanza tra il dispositivo BT e
l’impianto di karaoke deve essere minore di 10 m.

77
IT
5. Avviare la riproduzione sul dispositivo BT. Premere il tasto PLAY/PAUSE
(16) durante la riproduzione per mettere in pausa.
6. Premere i tasti SKIP +/- (17) per selezionare il brano precedente o
successivo.
Funzione di registrazione
1. Premere il tasto REC (13) per registrare il canto e la musica. La
registrazione inizia e la spia REC (12) lampeggia in continuazione.
2. Quando si vuole concludere la registrazione premere nuovamente il
tasto REC (13). La spia REC (12) sparisce.
3. I le registrati vengono salvati sulla penna USB.
4. Con il tasto MODE (4) selezionare la modalità USB per ascoltare i le
registrati. Selezionare con i tasti SKIP +/- (15 o 16) i le registrati da
riprodurre.
5. Premere il tasto PLAY/PAUSE per riprodurre il brano selezionato.
NOTA: la funzione di registrazione è disponibile nelle seguenti modalità: BT,
AUX e CD. Nella modalità CD si possono selezionare solo brani in formato
CD, CD-R, CD-RW e CD+G. Il formato MP3 non è disponibile nella modalità
CD.
Funzione di memorizzazione (PROGRAM)
1. Premere il tasto Salva/Ripeti (14) in modalità Stop. Sullo schermo
appare “P01”. Ora è possibile salvare il primo brano.
2. Selezionare con i tasti Salta +/- (15 o 16) il primo brano.
3. Premere nuovamente il tasto Salva/Ripeti (14) per confermare.
4. Si possono ripetere i punti sovramenzionati per 20 brani. Per avviare la
riproduzione premere il tasto Play/Pause (19).

78
IT
PULIZIA E MANUTENZIONE
• Spegnere il dispositivo prima di eseguire lavori di pulizia e togliere la
spina dalla presa elettrica.
• Se il dispositivo è impolverato pulirlo con un panno morbido e asciutto.
• Pulire il dispositivo con un panno morbido.
• Non utilizzare cera, spray lucidanti o detergenti aggressivi.
ATTENZIONE
Pericolo di scosse elettriche! Assicurarsi durante la pulizia
che acqua o altri liquidi non penetrino all’interno del
dispositivo.
RICERCA E CORREZIONE DEGLI ERRORI
Prima di rivolgersi al servizio d’assistenza clienti vericare le istruzioni
indicate nella tabella per risolvere eventuali problemi.
Problema Causa possibile Soluzione
Il dispositivo è
su o.
Il dispositivo è spento. Accendere il dispositivo
mediante il tasto ON/
OFF (4).
Il cavo d’alimentazione
non è collegato
correttamente.
Assicurarsi che il cavo
d’alimentazione sia
collegato correttamente
sul retro del dispositivo.
La presa è rotta. Utilizzare un’altra presa.
Non viene
emesso alcun
suono.
La manopola del volume
è impostata sul minimo.
Regolare il volume con la
manopola MASTER VOL.
È stata selezionata la
funzione sbagliata.
Selezionare con il tasto
MODE la funzione
corretta.
Viene utilizzato un
dispositivo esterno.
Alzare il volume sul
dispositivo esterno.
Non viene
emesso alcun
suono quando
è collegato alla
TV.
Il suono sulla TV è
impostato su muto
oppure è troppo basso.
Impostare il volume sulla
TV.
Non è stata selezionata la
fonte corretta sulla TV.
Selezionare la fonte
corretta (solitamente AV).

79
IT
Problema Causa possibile Soluzione
Sullo schermo
della TV non
appaiono i testi
delle canzoni.
La spina video non è stata
inserita correttamente.
Inserire correttamente la
spina video.
Sulla TV è stata scelta la
fonte sbagliata.
Selezionare la fonte
corretta (solitamente AV).
Il le/brano riprodotto
non contiene testi di
canzoni.
Solo i le che contengono
testi di canzoni appaiono
in TV.
Viene utilizzato AUX-IN o
la funzione BT.
In modalità AUX-IN o BT
non appare nulla sulla TV.
Usare un’altra modalità
per mostrare i testi delle
canzoni.
Il microfono non
emette alcun
suono.
Il microfono non è
correttamente collegato a
una presa microfono.
Assicurarsi che il
microfono sia inserito
correttamente nella spina
MIC1 o MIC2.
Il microfono è spento. Portare l’interruttore ON/
OFF sul microfono in
posizione “ON”.
Il volume del microfono è
regolato troppo basso.
Regolare il volume
del microfono con la
manopola MIC VOL.
Il volume Master è
regolato troppo basso.
Regolare il volume con la
manopola MASTER VOL.
I le USB
non vengono
riprodotti.
I le USB sono
danneggiati.
Sostituire i le.
Il formato del le non
può essere riprodotto dal
dispositivo.
Usare i le di un formato
compatibile.
La penna USB non
è supportata dal
dispositivo.
Usare un’altra penna USB.

80
IT
Problema Causa possibile Soluzione
Non si può
accoppiare
il dispositivo
esterno BT con
l’impianto di
karaoke.
La funzione BT del proprio
dispositivo esterno è
disattivata.
Attivare la funzione BT
del proprio dispositivo
esterno (vedi il suo
manuale di istruzioni).
Il dispositivo non si
trova in modalità di
accoppiamento.
Premere il tasto PAIR
per rendere l’impianto
di karaoke visibile per i
dispositivi esterni BT.
Dopo aver
instaurato il
collegamento
BT, la musica
non è
disponibile.
Il dispositivo BT non
supporta il prolo BT
A2DP.
Usare un dispositivo BT
che supporti A2DP.
Il volume del dispositivo
esterno BT è troppo
basso.
Regolare il volume sul
dispositivo esterno BT.

81
IT
AVVISO DI SMALTIMENTO
Se nel proprio paese si applicano le
regolamentazioni inerenti lo smaltimento di
dispositivi elettrici ed elettronici, questo simbolo
sul prodotto o sulla confezione segnala che questi
prodotti non possono essere smaltiti con i riuti
normali e devono essere portati a un punto di
raccolta di dispositivi elettrici ed elettronici. Grazie
al corretto smaltimento dei vecchi dispositivi si
tutela il pianeta e la salute delle persone da possibili
conseguenze negative. Informazioni riguardanti
il riciclo e lo smaltimento di questi prodotti si
ottengono presso l’amministrazione locale oppure il
servizio di gestione dei riuti domestici.
DICHIARAZIONE DI CONFORMITÀ
Produttore:
Chal-Tec GmbH, Wallstraße 16, 10179 Berlino,
Germania.
Importatore per la Gran Bretagna:
Berlin Brands Group UK Limited
PO Box 42
272 Kensington High Street
London, W8 6ND
United Kingdom
Il fabbricante, Chal-Tec GmbH, dichiara che il tipo
di apparecchiatura radio Rockstar Plus è conforme
alla direttiva 2014/53/UE. Il testo completo della
dichiarazione di conformità UE è disponibile al
seguente indirizzo Internet: use.berlin/10035746


-
 1
1
-
 2
2
-
 3
3
-
 4
4
-
 5
5
-
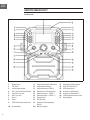 6
6
-
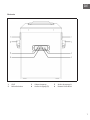 7
7
-
 8
8
-
 9
9
-
 10
10
-
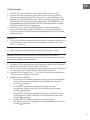 11
11
-
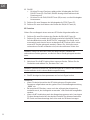 12
12
-
 13
13
-
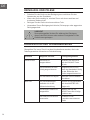 14
14
-
 15
15
-
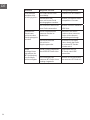 16
16
-
 17
17
-
 18
18
-
 19
19
-
 20
20
-
 21
21
-
 22
22
-
 23
23
-
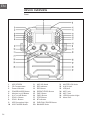 24
24
-
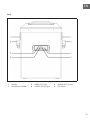 25
25
-
 26
26
-
 27
27
-
 28
28
-
 29
29
-
 30
30
-
 31
31
-
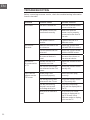 32
32
-
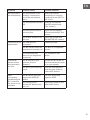 33
33
-
 34
34
-
 35
35
-
 36
36
-
 37
37
-
 38
38
-
 39
39
-
 40
40
-
 41
41
-
 42
42
-
 43
43
-
 44
44
-
 45
45
-
 46
46
-
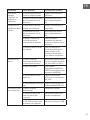 47
47
-
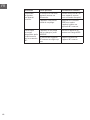 48
48
-
 49
49
-
 50
50
-
 51
51
-
 52
52
-
 53
53
-
 54
54
-
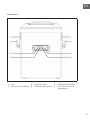 55
55
-
 56
56
-
 57
57
-
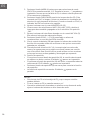 58
58
-
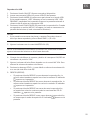 59
59
-
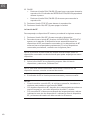 60
60
-
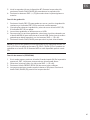 61
61
-
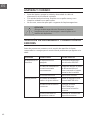 62
62
-
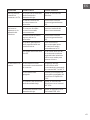 63
63
-
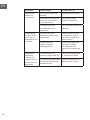 64
64
-
 65
65
-
 66
66
-
 67
67
-
 68
68
-
 69
69
-
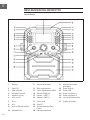 70
70
-
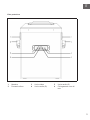 71
71
-
 72
72
-
 73
73
-
 74
74
-
 75
75
-
 76
76
-
 77
77
-
 78
78
-
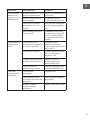 79
79
-
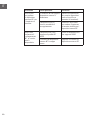 80
80
-
 81
81
-
 82
82
-
 83
83
-
 84
84


En otros idiomas
- français: Auna 10035746 Le manuel du propriétaire
- italiano: Auna 10035746 Manuale del proprietario
- English: Auna 10035746 Owner's manual
- Deutsch: Auna 10035746 Bedienungsanleitung