Truper FUG-254 El manual del propietario
- Categoría
- Potentes sistemas de pulverización fina
- Tipo
- El manual del propietario

Manual
Gas sprayer
Backpack
FUG-254
ModelCode
FUG-254
Applies for:
101569
6.6 gal
Read the user’s manual thoroughly
before operating this tool.
CAUTION
ENGLISH
ESPAÑOL

2ENGLISH
Contents
CAUTION
Keep this manual for future references.
The illustrations in this manual are for reference
only. They might be different from the real tool.
To gain the best performance of
the tool, prolong the duty life,
make the Warranty valid if
necessary, and to avoid hazards
of fatal injuries please read and
understand this Manual before
using the tool.
Fuel Specifications
General safety warnings for motor tools
Safety Warnings for Using Sprayers
Parts
Assembly
Fuel Supply
Ignition
Tank filling
Operation
Maintenance
Troubleshooting
Authorized Service Centers
Warranty Policy
3
4
5
6
7
8
9
9
10
10
11
13
14

3
Code
Description
Net Weight
Motor
Rated Motor Power
Fuel Tank
Maximum liquid flow
Work Cycle
Type of Fuel
FUG-254
101569
10 kg
Gas sprayer backpack
6.6 Gal
1 Hp
8 l/min
30 minutes’ rest per tank consumed. Maximum 6 hours daily
Unleaded Gasoline
Type of starter Retractable
4 strokes | 31 cc
Technical data
Fuel Specifications
• The sprayer has a 4-stroke air-cooled engine that uses pure unleaded gasoline.
• Do not mix oil with the fuel for any reason.
• For any reason, do not use fuels mixed with ethyl alcohol (gasohol), ethanol or methane for any reason, as
they can attract moisture, which causes separation and acid formation during storage. Acidity can damage the engine's fuel
system when in storage.
• To avoid engine problems, the fuel system should be drained before storing the sprayer for periods of 30 days or longer.
Empty the fuel tank, start the engine and let it run until the fuel lines and carburetor are empty. Next season, use fresh
gasoline.
• Never use engine or carburetor cleaners inside the gas tank as permanent damage may result.
ENGLISH
WARNING

4
General safety warnings
for motor tools
Keep your work area tidy and with good lighting.
Cluttered and dark areas can cause injuries.
Never use the mixer in explosive environments or
where there are flammable liquids present.
Set the mixer 30 ft. away from the fuel filling up area
before starting the motor.
Keep children and passersby at a safe distance while
the mixer is operating.
Distractions can make you loose control and
cause accidents.
Avoid making contact with power lines and circuits.
Find and avoid all power lines and circuits, especially
hidden wiring. Also keep away from grounded objects.
Stay always alert, be prudent and use common sense.
Even tough you are familiar with the use of the mixer do
not get distracted while operating the machine. It can
cause accidents.
Do not operate the mixer when tired or under the
influence of drugs, alcohol or medication.
A moment of distraction while operating the mixer can
cause severe personal injury.
Use the mixer with the guards and protector installed
and in good repair.
Failure to comply with this warning leads to severe personal
injury.
Never force the concrete mixer.
Working within the range designed assures a belter job
and is safer.
Store the mixer is a safe place away from the reach of
children.
Motor concrete mixers are dangerous near inexperienced
hands.
Wear the right clothes.
Loose clothing, jewelry or long hair can get
tangled in the moving parts.
Keep your hands away from the rotating or moving
parts.
Failure to comply with this warning leads to
severe personal injury.
Do not use the mixer in enclosed areas.
To prevent accumulation of carbon monoxide, an
odorless toxic gas potentially deadly.
Use the right personal protection equipment.
Using eye protection, anti-dust masks, non-skid safety
shoes, helmet, hearing protection and safety gloves
considerably reduce the risk of injury.
Turn off the mixer before adjusting, changing
accessories or storing.
Double-check the mixer motor switch is in the OFF position.
Never run the mixer if the switch is not working or is
not duly assembled.
The operator is exposed to severe injury. Take it to repair
immediately to a Authorized Service
Center.
Do not overreach.
Good footing and balance give better control of the mixer in
unexpected situations.
Prevent unintentional starting.
Double-check the mixer motor is OFF before
leaving or servicing.
Remove any vise fixed in the mixer before starting it.
Additional tools or wrenches fixed in a rotating part in
the mixer can cause severe personal injury.
Service the mixer and double-check it is in the best
conditions before starting it.
Check carefully the moving parts. See alignment and
assembly. Do it periodically. Look for damaged elements
or part that is not functioning correctly. Repair
immediately in a Authorized Service
Center.
Accessories.
Use only accessories or spare parts indicated in this
Manual o certified by .
Never leave the concrete mixer running and
unattended.
To prevent severe accidents turn off the mixer after
operating and before setting it in a safe place.
Never smoke near fuel.
Do not smoke near the area where fuel is being supplied
or when operating the mixer.
CAUTION CAUTION
WARNING
DANGER
DANGER
CAUTION
DANGER
DANGER
CAUTION
CAUTION
CAUTION
CAUTION
DANGER
DANGER
DANGER
WARNING
WARNING
WARNING
WARNING
WARNING
WARNING
WARNING
ENGLISH

• Keep the sprayer and chemicals
out of the reach of children. Store in a safe place.
• Do not store chemicals in the sprayer tank.
• After preparing the compound it should
be applied immediately.
• Be sure to read and understand the
instructions and precautions for the chemicals to be used
with the equipment before use.
• Be sure to use the specific chemical in
amounts appropriate for the job to be done. Wrong
chemicals and quantities can damage the sprayer, spoil the
sprayed product, cause hazardous situations and serious
ecological damage.
• Even if the chemical is stored in a
plastic container, it may damage some of the equipment
parts. Make sure that the chemical is compatible with high
density polypropylene sprayers.
• Many of the chemicals commonly
used with the sprayer are hazardous if handled or used
incorrectly.
• In case of poisoning, seek medical
advice immediately and show the doctor the label of the
chemical used.
• If the chemical splashes in the mouth or
eyes, wash them out with clean water and then see a
doctor.
• If the operator has a headache or
dizziness, stop work immediately and see a doctor
immediately..
• Always empty and clean the sprayer
after each use.
• Clothes used during application should
be washed daily, separately from everyday clothes.
• Equip yourself with adequate protection:
protective clothing, goggles and respirators with suitable
cartridges so as not to inhale the sprayed chemicals.
• Familiarize yourself with the first aid
procedures described on the chemical container prior to
application.
• For operator safety, spraying must be
carried out strictly in accordance with the chemical
instructions. Spraying extremely poisonous chemicals is
strictly prohibited.
5
Safety Warnings for
Using Sprayers
• The sprayer is designed for agricultural use.
• Do not attempt to spray hot solutions or solutions that
can become hot with the sprayer.
• Do not attempt to spray gasoline,
flammable liquids, caustic alkalis or corrosive acids
with the sprayer.
Chemicals
Before operating the sprayer
After using the sprayer
• Never leave the sprayer unattended.
• Take care of the sprayer from knocks and falls, especially
when it is pressurized.
• Do not exceed the level indicated on the tank when filling
the sprayer.
• Do not spray while the wind is blowing
or in any other condition that may expose you or others to
the sprayed chemical.
• Do not remove any parts or attempt to make repairs
while the sprayer is pressurized.
• Never carry the sprayer by the hose.
• Do not eat, drink, or smoke while
using the sprayer.
During the use of the sprayer
• Never smoke near the fuel, in the area where the
gasoline is dispensed, or where you prepare the mixture
with the oil, or when operating the sprayer.
• To reduce the risk of fire or burns, handle fuel
carefully, it is highly flammable.
• Do not let gasoline or oil touch your skin.
• Protect your eyes from gasoline and oil splashes. In case
of accidental contact, wash immediately with clean water.
If irritation persists, consult a doctor.
• Mix and store fuel in a container designed for this
purpose.
• Mix fuel outdoors away from any
sparks or flames.
• Before refueling the sprayer turn off the engine, place it
on clear ground and wait for the engine to cool down.
• Clean up any fuel that may have fallen
into the sprayer before operating it.
• Check for fuel leaks and correct them
before using the sprayer to prevent fire or burn injury.
• Move the sprayer at least 30 feet (9 meters) away from
the fueling site before starting the engine.
• Under no circumstances burn spilled fuel for disposal.
• Do not use any type of fuel other than that specified for
the sprayer in these instructions.
Fuel handling
ENGLISH
DANGER
CAUTION
CAUTION
CAUTION
CAUTION
CAUTION
CAUTION
CAUTION
CAUTION
CAUTION
CAUTION
CAUTION
WARNING
WARNING
WARNING
WARNING
WARNING
WARNING
WARNING
WARNING
WARNING

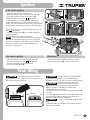
Parts
6
25 L
Tank
Drain cap
Hose
connection
Frame
Muffler
Easy carrying
handles
Drain
cap
Spark
plug
Starter
Shoulder
straps
Pressure
regulator
Air filter
Allen Key
Spark plug
wrench
Wrench
2 hoses
“Y” connector
Handles
with valve
Long-range pistol
Lances
Cone spray nozzles
Back
padded
support
Double fan spray nozzles
Exhaust
Jack-line
Tank
filling cap
Fuel
tank cap
Choke
lever
Fuel tank
Oil deposit
drain cap
Throttle
lever
Pump
Stop
button
Fuel tank
ENGLISH

A1
B
F
D
E
Rubber
washer
Assembly
7
• Before starting to operate the equipment, its parts
and accessories must be properly assembled and in
the correct position.
• Connect the end (A1) of the hose to the pump.
• The long reach gun (F) can be connected to the
end (A2) of the hose.
• To use the nozzles (E) connect the end (A2) of the
hose to the valve handle (B).
• Connect the spear (D) to the valve.
• One of the included nozzles (E) can be attached to
the lance.
For a larger spray area connect the “Y”
adapter to the pump outlet and assemble both
hoses together.
• Check that all connections are tight and have their
respective rubber washer.
Pump
A2
ENGLISH
NOTE
Hose, valve and spears

F
G
8
Assembly
Fuel Supply
• Wait for the engine to cool completely before refueling
or oiling.
• Install the equipment on a flat surface.
• Clean around the fuel and oil tank caps to avoid
contamination.
• Slowly loosen the fuel tank cap.
• Being careful to avoid spills pour the fuel into the tank (F).
• Before capping the fuel tank check and clean the
gaskets. Immediately install the fuel tank cap and tighten it
by hand.
• Wipe up any spilled fuel.
• Slowly loosen the oil tank cap.
• Fill the tank with SAE-10W/30 4-stroke gasoline engine
oil (G). The oil should reach the top of the oil filler neck.
• Install the oil tank cap and tighten it by hand.
• Always check the oil level before operating the machine.
ENGLISH
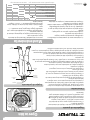
To mount the straps to the equipment:
1. Insert the ends of each strap (A) ) behind
the mounting bolt (B).
2. Pass the end of the straps through its
respective buckle (C) as shown in the image.
3. Place the metal hooks of each strap (D) in
the plastic supports (E) on the bottom of the
tank.
Harness assembly
E
C
D
B
A
C
D
E
B

x10
9
Ignition
A
• When adding the liquid, the engine
does not have to stop, but it must be at low speed (i.e., in
the minimum throttle position).
• BEFORE USING THE SPRAYER WITH
CHEMICALS, YOU MUST TEST THE TANK UNDER
RUNNING WATER. If you find any leaks or malfunctioning
parts, repair or replace before using any chemicals.
• Determine the proper amounts of
chemical concentrate and water to prepare the spray
mixture. The ratio is indicated on the label of the
concentrated chemical container.
• Remove the tank lid and make sure the particle filter (A)
is in place.
• Pour the appropriate amount of mixture into the tank, after
pouring hold the container down for a minimum of 30
seconds to allow it to empty completely.
• Do not exceed the limit marked on the
tank.
• Close the tank by screwing the cap clockwise until the
tank is perfectly sealed.
C
• Install the unit on a firm, level surface.
• Move the throttle lever to one third of the scale (A).
• Press and release the choke bulb 10 times (B).
• Move the choke lever to the “ ” (1) position.
• Pull the starter 3 to 5 times (C) to get fuel into the
engine, then pull the starter fast and hard to start the
engine. Once the engine starts do not let go of the starter,
carefully return it to its initial position to avoid damaging
it.
• Once the engine starts slowly install the choke lever in
the “ ” (2) position.
• Adjust the throttle lever (A) to a position suitable for
spraying operation.
• The machine is now ready for operation.
• The new machine should not be operated in
the fully open position for the first 4 hours. The speed
should be controlled at 4 000 RPM - 5 000 RPM, thus
allowing the motor to have a good adaptation and
perform a reliable work.
Cold motor ignition
• Move the throttle lever (A) to its lowest position.
• Press the stop button (D), until the motor stops.
Shutdown
• Move the fuel lever to one third of the scale (A).
• Move the choke lever to the “ ” (2) position.
• Pull the starter (C) until the engine starts.
• Adjust the throttle lever (A).
Hot motor ignition
A
D
B
1 2
NOTE
Tank filling
ENGLISH
CAUTION CAUTION
CAUTION
CAUTION

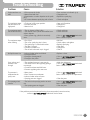
Protective
goggles
Full
coverall
Long
sleeve
Nitrile
gloves
Rubber
boots
Mask or
breathing
system
Hood
Operation
Maintenance
10
• The pressure at which the liquid comes out of the pump
is regulated at the factory.
• If adjustment is necessary, wait until the motor speed is
5 000 RPM - 6 000 RPM and make adjustments by means
of the pressure adjustment knob (A).
• Release the knob lock and turn clockwise to increase
pressure and counterclockwise to decrease pressure.
Pressure regulation
• Chemical spraying should be done in cool weather with
little wind. For example, in the early morning or late
afternoon. This reduces evaporation and drift of the
chemicals as well as improves product application.
• Wear all personal protective equipment before carrying the
equipment on your shoulders.
• Set the equipment on a table that will support its weight, so that the
shoulder straps are off the edge of the table.
• Put your shoulders through the straps and secure the equipment behind
your back.
• Adjust the throttle lever to operate the motor.
• Open the handle valve to start spraying.
• After opening the valve keep the handle moving so that the spray is not
concentrated in one spot. Failure to do so may result in chemical damage.
• Remember that the operator must face into the wind.
• The lance or gun should form a level angle of about 15°
• During spraying, the spray tube should oscillate continuously between left and right
to increase the spraying range. The advanced steps should match the oscillation
speed.
Spraying
Protective equipment
Increase
pressure Decrease
pressure
• The following maintenance tasks should be carried out
whenever you finish operating the equipment.
• Clean all surfaces.
• Clean the chemical tank with clean water and dry it.
• Check all connections for water or fuel leaks. In case of a
leak, repair it immediately.
• Check all bolts for looseness or looseness. Tighten firmly
or replace them.
• After maintenance, the machine should be left to dry in a
ventilated place. It must be far from any source of light and
avoid sunlight.
• If the equipment is to be stored for a long time, in addition
to the above points:
• Completely discharge the fuel from the tank and
carburetor. Turn off the choke, pull the starter 3 - 5 times.
• Remove the spark plug and pour some oil into the
cylinder. Then pull the starter lightly 2 - 3 times. Then install
the spark plug.
A
ENGLISH
Periodic maintenance Each use Every 25 h
of use Every 50 h
of use Every 150 h
of use Every 250 h
of use
*Trained user or Truper Authorized Service Center **Truper Authorized Service Center
General cleaning
Air filter cleaning
Check-fill oil level in the pump
Carburetor cleaning*
Spark plug inspection and adjustment*
Fuel tank cleaning**
Fuel filter change**
Fuel Hose Replacement**
Exhaust and muffler cleaning**

Equipment does not
start.
The equipment starts,
but does not run at
high speed.
The equipment works,
but has low efficiency.
The equipment stops
when running.
No liquid comes out.
Spray volume and
pressure is not
enough.
The pressure is
adequate but the
spray is not.
The spraying mist is
uneven.
• Did not press the choke.
• Water mixed with fuel.
• Deterioration or carbon deposits on the spark
plug.
• No contact between spark plug and coil wire.
• Choke not in fully open position.
• Incorrect fuel ratio.
• Water in fuel.
• The air cleaner or filter is dirty.
• The outside of the cylinder and muffler have
carbon deposits.
• Piston, piston ring, cylinder is excessively
worn.
• Out of fuel.
• The coil or spark plug wire is loose.
• The spark plug is covered with carbon.
• The filter is clogged.
• Gasoline has water in it.
• The air hole in the tank cap is clogged.
• Inlet and outlet valves are blocked.
• Damaged washer.
• Damage to bearing 6004Z.
• Damage to the piston.
• The regulated pressure is not enough.
• The elastic force of the regulating spring is
not enough.
• Corrosion-resistant steel ball worn.
• Pressure regulating valve seat worn.
• Worn piston.
• Piston clearance not adequate.
• Inlet and outlet valves are worn.
• Spraying parts are clogged.
• The holes in the spraying nozzle are worn
out.
• The spraying parts are clogged.
• Press 10 times as indicated. (p. 8)
• Change the fuel.
• Replace the spark plug.
• Check and adjust.
• Open to full position.
• Change fuel.
• Change fuel.
• Check and clean.
• Check and clean.
• Go to a Authorized
Service Center to replace.
• Add fuel.
• Check, replace and tighten.
• Replace spark plug.
• Clean filter.
• Change fuel.
• Clean it.
• Replace o clean.
• Go to a Authorized
Service Center to replace.
• Make the adjustment.
• Go to a Authorized
Service Center to replace.
• Go to a Authorized
Service Center or repairs or replacement.
• Clean the parts.
• Go to a Authorized
Service Center to replace.
• Clean the parts.
Problem Cause Solution
If the problems persist despite performing the recommended corrective actions,
contact a Authorized Service Center.
11
ENGLISH
Troubleshooting

Notes
12 ENGLISH

13
ENGLISH
Authorized Service Centers
In the event of any problem contacting a Truper Authorized Service Center, please see our webpage www.truper.com
to get an updated list, or call our toll-free numbers 800 690-6990 or 800 0187-873 to get information about the
nearest Service Center.
AGUASCALIENTES
BAJA
CALIFORNIA
BAJA
CALIFORNIA SUR
CAMPECHE
CHIAPAS
CHIHUAHUA
CIUDAD DE
MÉXICO
COAHUILA
COLIMA
DURANGO
ESTADO DE
MÉXICO
GUANAJUATO
GUERRERO
HIDALGO
JALISCO
MICHOACÁN
MORELOS
NAYARIT
NUEVO LEÓN
OAXACA
PUEBLA
QUERÉTARO
QUINTANA ROO
SAN LUIS
POTOSÍ
SINALOA
SONORA
TABASCO
TAMAULIPAS
TLAXCALA
VERACRUZ
YUCATÁN
DE TODO PARA LA CONSTRUCCIÓN
GRAL. BARRAGÁN #1201, COL. GREMIAL, C.P. 20030,
AGUASCALIENTES, AGS. TEL.: 449 994 0537
SUCURSAL TIJUANA
AV. LA ENCANTADA, LOTE #5, PARQUE INDUSTRIAL EL
FLORIDO II, C.P 22244, TIJUANA, B.C.
TEL.: 664 969 5100
FIX FERRETERÍAS
FELIPE ÁNGELES ESQ. RUIZ CORTÍNEZ S/N, COL. PUEBLO
NUEVO, C.P. 23670, CD. CONSTITUCIÓN, B.C.S.
TEL.: 613 132 1115
TORNILLERÍA Y FERRETERÍA AAA
AV. ÁLVARO OBREGÓN #324, COL. ESPERANZA
C.P. 24080 CAMPECHE, CAMP. TEL.: 981 815 2808
FIX FERRETERÍAS
AV. CENTRAL SUR #27, COL. CENTRO, C.P. 30700,
TAPACHULA, CHIS. TEL.: 962 118 4083
SUCURSAL CHIHUAHUA
AV. SILVESTRE TERRAZAS #128-11, PARQUE INDUSTRIAL
BAFAR, CARRETERA MÉXICO CUAUHTÉMOC, C.P. 31415,
CHIHUAHUA, CHIH. TEL. 614 434 0052
FIX FERRETERÍAS
EL MONSTRUO DE CORREGIDORA, CORREGIDORA # 22,
COL. CENTRO, C.P. 06060, CUAUHTÉMOC, CDMX.
TEL: 55 5522 5031 / 5522 4861
SUCURSAL TORREÓN
CALLE METAL MECÁNICA #280, PARQUE INDUSTRIAL
ORIENTE, C.P. 27278, TORREÓN, COAH.
TEL.: 871 209 68 23
BOMBAS Y MOTORES BYMTESA DE MANZANILLO
BLVD. MIGUEL DE LA MADRID #190, COL. 16 DE
SEPTIEMBRE, C.P. 28239, MANZANILLO, COL.
TEL.: 314 332 1986 / 332 8013
TORNILLOS ÁGUILA, S.A. DE C.V.
MAZURIO #200, COL. LUIS ECHEVERRÍA, DURANGO,
DGO.TEL.: 618 817 1946 / 618 818 2844
SUCURSAL CENTRO JILOTEPEC
PARQUE INDUSTRIAL # 1, COL. PARQUE INDUSTRIAL
JILOTEPEC, JILOTEPEC, EDO. DE MÉX. C.P. 54257
TEL: 761 782 9101 EXT. 5728 Y 5102
CÍA. FERRETERA NUEVO MUNDO S.A. DE C.V.
AV. MÉXICO - JAPÓN #225, CD. INDUSTRIAL, C.P. 38010,
CELAYA, GTO. TEL.: 461 617 7578 / 79 / 80 / 88
CENTRO DE SERVICIO ECLIPSE
CALLE PRINCIPAL MZ.1 LT. 1, COL. SANTA FE, C.P. 39010,
CHILPANCINGO, GRO. TEL.: 747 478 5793
FERREPRECIOS S.A. DE C.V.
LIBERTAD ORIENTE #304 LOCAL 30, INTERIOR DE PASAJE
ROBLEDO, COL. CENTRO, C.P. 43600, TULANCINGO,
HGO. TEL.: 775 753 6615 / 775 753 6616
SUCURSAL GUADALAJARA
AV. ADOLFO B. HORN # 6800, COL: SANTA CRUZ DEL
VALLE, C.P.: 45655, TLAJOMULCO DE ZUÑIGA, JAL.
TEL.: 33 3606 5285 AL 90
FIX FERRETERÍAS
AV. PASEO DE LA REPÚBLICA #3140-A, COL.
EX-HACIENDA DE LA HUERTA, C.P. 58050, MORELIA,
MICH. TEL.: 443 334 6858
FIX FERRETERÍAS
CAPITÁN ANZURES #95, ESQ. JOSÉ PERDIZ, COL.
CENTRO, C.P. 62740, CUAUTLA, MOR.
TEL.: 735 352 8931
HERRAMIENTAS DE TEPIC
MAZATLAN #117, COL. CENTRO, C.P. 63000, TEPIC, NAY.
TEL.: 311 258 0540
SUCURSAL MONTERREY
CARRETERA LAREDO #300, 1B MONTERREY PARKS,
COLONIA PUERTA DE ANÁHUAC, C.P. 66052, ESCOBEDO,
NUEVO LEÓN, TEL.: 81 8352 8791 / 81 8352 8790
FIX FERRETERÍAS
AV. 20 DE NOVIEMBRE #910, COL. CENTRO, C.P. 68300,
TUXTEPEC, OAX. TEL.: 287 106 3092
SUCURSAL PUEBLA
AV PERIFÉRICO #2-A, SAN LORENZO ALMECATLA,
C.P. 72710, CUAUTLACINGO, PUE.
TEL.: 222 282 8282 / 84 / 85 / 86
ARU HERRAMIENTAS S.A DE C.V.
AV. PUERTO DE VERACRUZ #110, COL. RANCHO DE
ENMEDIO, C.P. 76842, SAN JUAN DEL RÍO, QRO.
TEL.: 427 268 4544
FIX FERRETERÍAS
CARRETERA FEDERAL MZ. 46 LT. 3 LOCAL 2, COL EJIDAL,
C.P. 77710 PLAYA DEL CARMEN, Q.R.
TEL.: 984 267 3140
FIX FERRETERÍAS
AV. UNIVERSIDAD #1850, COL. EL PASEO, C.P. 78320,
SAN LUIS POTOSÍ, S.L.P. TEL.: 444 822 4341
SUCURSAL CULIACÁN
AV. JESÚS KUMATE SUR #4301, COL. HACIENDA DE LA
MORA, C.P. 80143, CULIACÁN, SIN.
TEL.: 667 173 9139 / 173 8400
FIX FERRETERÍAS
CALLE 5 DE FEBRERO #517, SUR LT. 25 MZ. 10, COL.
CENTRO, C.P. 85000, CD. OBREGÓN, SON.
TEL.: 644 413 2392
SUCURSAL VILLAHERMOSA
CALLE HELIO LOTES 1, 2 Y 3 MZ. #1, COL. INDUSTRIAL,
2A ETAPA, C.P. 86010, VILLAHERMOSA, TAB.
TEL.: 993 353 7244
VM ORINGS Y REFACCIONES
CALLE ROSITA #527 ENTRE 20 DE NOVIEMBRE Y GRAL.
RODRÍGUEZ, FRACC. REYNOSA, C.P. 88780, REYNOSA,
TAMS. TEL.: 899 926 7552
SERVICIOS Y HERRAMIENTAS INDUSTRIALES
PABLO SIDAR #132, COL . BARRIO DE SAN BARTOLOMÉ,
C.P. 90970, SAN PABLO DEL MONTE, TLAX.
TEL.: 222 271 7502
LA CASA DISTRIBUIDORA TRUPER
BLVD. PRIMAVERA. ESQ. HORTENSIA S/N, COL.
PRIMAVERA C.P. 93308, POZA RICA, VER.
TEL.: 782 823 8100 / 826 8484
SUCURSAL MÉRIDA
CALLE 33 #600 Y 602, LOCALIDAD ITZINCAB Y MULSAY,
MPIO. UMÁN, C.P. 97390, MÉRIDA, YUC.
TEL.: 999 912 2451

14
FUG-254101569
1
YEAR
www.truper.com
12-2022
ENGLISH
Warranty
policy
Code Model Brand
Stamp of the business. Delivery date:
Warranty. Duration: 1 year. Coverage: parts, components and workmanship against manufacturing or operating
defects, except if used under conditions other than normal; when it was not operated in accordance with the
instructive; was altered or repaired by personnel not authorized by Truper®. To make the warranty valid, present
the product, stamped policy or invoice or receipt or voucher, in the establishment where you bought it or in
Corregidora 35, Centro, Cuauhtémoc, CDMX, 06060, where you can also purchase parts, components,
consumables and accessories. It includes the costs of transportation of the product that derive from its fulfillment
of its service network. . Phone number 800-018-7873. Made in China. Imported by Truper, S.A. de C.V. Parque
Industrial 1, Parque Industrial Jilotepec, Jilotepec, Edo. de Méx. C.P. 54257, Phone number 761 782 9100.

14 ESPAÑOL
FUG-254101569
1
AÑO
Póliza de
Garantía
www.truper.com
12-2022
Código Modelo Marca
Sello del establecimiento comercial. Fecha de entrega:
Garantía. Duración: 1 año. Cobertura: piezas, componentes y mano de obra contra defectos de fabricación o
funcionamiento, excepto si se usó en condiciones distintas a las normales; cuando no fue operado conforme
instructivo; fue alterado o reparado por personal no autorizado por Truper®. Para hacer efectiva la garantía
presente el producto, póliza sellada o factura o recibo o comprobante, en el establecimiento donde lo compró
o en Corregidora 35, Centro, Cuauhtémoc, CDMX, 06060, donde también podrá adquirir partes, componentes,
consumibles y accesorios. Incluye los gastos de transportación del producto que deriven de su cumplimiento de
su red de servicio. Tel. 800-018-7873. Made in/Hecho en China. Importador Truper, S.A. de C.V. Parque
Industrial 1, Parque Industrial Jilotepec, Jilotepec, Edo. de Méx. C.P. 54257, Tel. 761 782 9100.

Centros de Servicio Autorizados
13
ESPAÑOL
En caso de tener algún problema para contactar un Centro de Servicio Autorizado Truper
®
consulte nuestra página
www.truper.com donde obtendrá un listado actualizado, o llame al: 800 690-6990 ó 800 0187-873 donde le
informarán cuál es el Centro de Servicio más cercano.
AGUASCALIENTES
BAJA
CALIFORNIA
BAJA
CALIFORNIA SUR
CAMPECHE
CHIAPAS
CHIHUAHUA
CIUDAD DE
MÉXICO
COAHUILA
COLIMA
DURANGO
ESTADO DE
MÉXICO
GUANAJUATO
GUERRERO
HIDALGO
JALISCO
MICHOACÁN
MORELOS
NAYARIT
NUEVO LEÓN
OAXACA
PUEBLA
QUERÉTARO
QUINTANA ROO
SAN LUIS
POTOSÍ
SINALOA
SONORA
TABASCO
TAMAULIPAS
TLAXCALA
VERACRUZ
YUCATÁN
DE TODO PARA LA CONSTRUCCIÓN
GRAL. BARRAGÁN #1201, COL. GREMIAL, C.P. 20030,
AGUASCALIENTES, AGS. TEL.: 449 994 0537
SUCURSAL TIJUANA
AV. LA ENCANTADA, LOTE #5, PARQUE INDUSTRIAL EL
FLORIDO II, C.P 22244, TIJUANA, B.C.
TEL.: 664 969 5100
FIX FERRETERÍAS
FELIPE ÁNGELES ESQ. RUIZ CORTÍNEZ S/N, COL. PUEBLO
NUEVO, C.P. 23670, CD. CONSTITUCIÓN, B.C.S.
TEL.: 613 132 1115
TORNILLERÍA Y FERRETERÍA AAA
AV. ÁLVARO OBREGÓN #324, COL. ESPERANZA
C.P. 24080 CAMPECHE, CAMP. TEL.: 981 815 2808
FIX FERRETERÍAS
AV. CENTRAL SUR #27, COL. CENTRO, C.P. 30700,
TAPACHULA, CHIS. TEL.: 962 118 4083
SUCURSAL CHIHUAHUA
AV. SILVESTRE TERRAZAS #128-11, PARQUE INDUSTRIAL
BAFAR, CARRETERA MÉXICO CUAUHTÉMOC, C.P. 31415,
CHIHUAHUA, CHIH. TEL. 614 434 0052
FIX FERRETERÍAS
EL MONSTRUO DE CORREGIDORA, CORREGIDORA # 22,
COL. CENTRO, C.P. 06060, CUAUHTÉMOC, CDMX.
TEL: 55 5522 5031 / 5522 4861
SUCURSAL TORREÓN
CALLE METAL MECÁNICA #280, PARQUE INDUSTRIAL
ORIENTE, C.P. 27278, TORREÓN, COAH.
TEL.: 871 209 68 23
BOMBAS Y MOTORES BYMTESA DE MANZANILLO
BLVD. MIGUEL DE LA MADRID #190, COL. 16 DE
SEPTIEMBRE, C.P. 28239, MANZANILLO, COL.
TEL.: 314 332 1986 / 332 8013
TORNILLOS ÁGUILA, S.A. DE C.V.
MAZURIO #200, COL. LUIS ECHEVERRÍA, DURANGO,
DGO.TEL.: 618 817 1946 / 618 818 2844
SUCURSAL CENTRO JILOTEPEC
PARQUE INDUSTRIAL # 1, COL. PARQUE INDUSTRIAL
JILOTEPEC, JILOTEPEC, EDO. DE MÉX. C.P. 54257
TEL: 761 782 9101 EXT. 5728 Y 5102
CÍA. FERRETERA NUEVO MUNDO S.A. DE C.V.
AV. MÉXICO - JAPÓN #225, CD. INDUSTRIAL, C.P. 38010,
CELAYA, GTO. TEL.: 461 617 7578 / 79 / 80 / 88
CENTRO DE SERVICIO ECLIPSE
CALLE PRINCIPAL MZ.1 LT. 1, COL. SANTA FE, C.P. 39010,
CHILPANCINGO, GRO. TEL.: 747 478 5793
FERREPRECIOS S.A. DE C.V.
LIBERTAD ORIENTE #304 LOCAL 30, INTERIOR DE PASAJE
ROBLEDO, COL. CENTRO, C.P. 43600, TULANCINGO,
HGO. TEL.: 775 753 6615 / 775 753 6616
SUCURSAL GUADALAJARA
AV. ADOLFO B. HORN # 6800, COL: SANTA CRUZ DEL
VALLE, C.P.: 45655, TLAJOMULCO DE ZUÑIGA, JAL.
TEL.: 33 3606 5285 AL 90
FIX FERRETERÍAS
AV. PASEO DE LA REPÚBLICA #3140-A, COL.
EX-HACIENDA DE LA HUERTA, C.P. 58050, MORELIA,
MICH. TEL.: 443 334 6858
FIX FERRETERÍAS
CAPITÁN ANZURES #95, ESQ. JOSÉ PERDIZ, COL.
CENTRO, C.P. 62740, CUAUTLA, MOR.
TEL.: 735 352 8931
HERRAMIENTAS DE TEPIC
MAZATLAN #117, COL. CENTRO, C.P. 63000, TEPIC, NAY.
TEL.: 311 258 0540
SUCURSAL MONTERREY
CARRETERA LAREDO #300, 1B MONTERREY PARKS,
COLONIA PUERTA DE ANÁHUAC, C.P. 66052, ESCOBEDO,
NUEVO LEÓN, TEL.: 81 8352 8791 / 81 8352 8790
FIX FERRETERÍAS
AV. 20 DE NOVIEMBRE #910, COL. CENTRO, C.P. 68300,
TUXTEPEC, OAX. TEL.: 287 106 3092
SUCURSAL PUEBLA
AV PERIFÉRICO #2-A, SAN LORENZO ALMECATLA,
C.P. 72710, CUAUTLACINGO, PUE.
TEL.: 222 282 8282 / 84 / 85 / 86
ARU HERRAMIENTAS S.A DE C.V.
AV. PUERTO DE VERACRUZ #110, COL. RANCHO DE
ENMEDIO, C.P. 76842, SAN JUAN DEL RÍO, QRO.
TEL.: 427 268 4544
FIX FERRETERÍAS
CARRETERA FEDERAL MZ. 46 LT. 3 LOCAL 2, COL EJIDAL,
C.P. 77710 PLAYA DEL CARMEN, Q.R.
TEL.: 984 267 3140
FIX FERRETERÍAS
AV. UNIVERSIDAD #1850, COL. EL PASEO, C.P. 78320,
SAN LUIS POTOSÍ, S.L.P. TEL.: 444 822 4341
SUCURSAL CULIACÁN
AV. JESÚS KUMATE SUR #4301, COL. HACIENDA DE LA
MORA, C.P. 80143, CULIACÁN, SIN.
TEL.: 667 173 9139 / 173 8400
FIX FERRETERÍAS
CALLE 5 DE FEBRERO #517, SUR LT. 25 MZ. 10, COL.
CENTRO, C.P. 85000, CD. OBREGÓN, SON.
TEL.: 644 413 2392
SUCURSAL VILLAHERMOSA
CALLE HELIO LOTES 1, 2 Y 3 MZ. #1, COL. INDUSTRIAL,
2A ETAPA, C.P. 86010, VILLAHERMOSA, TAB.
TEL.: 993 353 7244
VM ORINGS Y REFACCIONES
CALLE ROSITA #527 ENTRE 20 DE NOVIEMBRE Y GRAL.
RODRÍGUEZ, FRACC. REYNOSA, C.P. 88780, REYNOSA,
TAMS. TEL.: 899 926 7552
SERVICIOS Y HERRAMIENTAS INDUSTRIALES
PABLO SIDAR #132, COL . BARRIO DE SAN BARTOLOMÉ,
C.P. 90970, SAN PABLO DEL MONTE, TLAX.
TEL.: 222 271 7502
LA CASA DISTRIBUIDORA TRUPER
BLVD. PRIMAVERA. ESQ. HORTENSIA S/N, COL.
PRIMAVERA C.P. 93308, POZA RICA, VER.
TEL.: 782 823 8100 / 826 8484
SUCURSAL MÉRIDA
CALLE 33 #600 Y 602, LOCALIDAD ITZINCAB Y MULSAY,
MPIO. UMÁN, C.P. 97390, MÉRIDA, YUC.
TEL.: 999 912 2451

Notas
12 ESPAÑOL

El equipo no arranca.
El equipo arranca,
pero no funciona a
alta velocidad.
El equipo funciona,
pero tiene poca
eficiencia.
El equipo se detiene al
estar funcionando.
No sale líquido.
El volumen y la
presión de
pulverización no es
suficiente.
La presión es
suficiente pero el
rociado no lo es.
El rocío de la
pulverización no es
parejo.
• No presionó el bulbo cebador.
• Se mezcló agua con el combustible.
• Deterioro o depósitos de carbón en la bujía.
• No hay contacto entre la bujía y el cable de la
bobina.
• El ahogador no está en posición
completamente abierto.
• Proporción de combustible incorrecta.
• Hay agua en el combustible.
• El filtro o limpiador del aire está sucio.
• La parte exterior del cilindro y el silenciador
tienen depósitos de carbón.
• El pistón, el anillo del pistón, el cilindro, están
demasiado desgastados.
• Se acabó el combustible.
• El cable de la bobina o la bujía está flojo.
• La bujía está cubierta de carbón.
• El filtro está tapado.
• La gasolina tiene agua.
• El orificio de aire en la tapa del tanque está
tapado.
• Las válvulas de entrada y de salida están
bloqueadas.
• Arandela dañada.
• Daños en el rodamiento 6004Z.
• Daños en el pistón.
• La presión regulada no es suficiente.
• La fuerza elástica del resorte de regulación
no es suficiente.
• Bola de acero resistente a la corrosión
desgastada.
• Asiento de la válvula reguladora de presión
desgastado.
• Pistón desgastado.
• La distancia del pistón no es suficiente.
• Las válvulas de entrada y salida estás
desgastadas.
• Las piezas de pulverización están tapadas.
• Los orificios de la hoja de pulverización están
gastados.
• Las piezas de pulverización están tapadas.
• Presione 10 veces como se indica. (p. 8)
• Cambie el combustible.
• Cambie la bujía.
• Revise y ajuste.
• Abra a la posición completa.
• Cambie el combustible.
• Cambie el combustible.
• Revise y limpie.
• Revise y limpie.
• Acuda a un Centro de Servicio Autorizado
para su reemplazo.
• Agregue combustible.
• Revise, cambie y apriete.
• Cambie la bujía.
• Limpie el filtro.
• Cambie el combustible.
• Límpielo.
• Cambie o límpielas.
• Acuda a un Centro de Servicio Autorizado
para su reemplazo.
• Realice el ajuste.
• Acuda a un Centro de Servicio Autorizado
para su reemplazo.
• Acuda a un Centro de Servicio Autorizado
para su reparación o
reemplazo.
• Límpielas.
• Acuda a un Centro de Servicio Autorizado
para su reemplazo.
• Límpielas.
Problema Causa Solución
Si los problemas persisten a pesar de realizar las acciones correctivas recomendadas,
contacte a un Centro de Servicio Autorizado .
11
ESPAÑOL
Solución de problemas

Gafas
protectoras
Traje
completo
Manga
larga
Guantes
de nitrilo
Botas de
hule
Mascarilla o
sistema de
respiración
Capucha
Operación
Mantenimiento
10
• La presión con la que sale el líquido de la bomba está
regulada de fábrica.
• Si es necesario regular, espere a que la velocidad del
motor sea de 5 000 r/min – 6 000 r/min y haga los
ajustes por medio de la perilla de ajuste de presión (A).
• Libere el seguro de la perilla y gire en sentido horario
para aumentar la presión y en sentido antihorario para
disminuirla.
Regulación de presión
• La pulverización de químicos debe realizarse con clima
fresco y poco viento. Por ejemplo, a primera hora de la
mañana o a última de la tarde. Esto reduce las evaporaciones
y la deriva de los productos químicos así como mejorar la
aplicación del producto.
• Colóquese todo el equipo de protección personal antes de
cargar el equipo en sus hombros.
• Coloque el equipo en una mesa que sostenga su peso, de
manera que las correas para los hombros queden fuera del
borde de la mesa.
• Haga pasar sus hombros por las correas y asegure el
equipo a su espalda.
• Regule la palanca de aceleración para que el motor funcione.
• Abra la válvula del mango para comenzar a pulverizar.
• Después de abrir la válvula mantenga el mango en movimiento para que el
rocío no se concentre en un solo punto. De lo contrario podría provocar un daño
por químicos.
• Recuerde que el operador debe orientarse hacia el viento.
• La lanza o pistola debe formar un ángulo nivelado de unos 15°
• Durante la pulverización, el tubo de pulverización debe oscilar continuamente
entre la izquierda y la derecha para aumentar el rango de pulverización. Los pasos
avanzados deben coincidir con la velocidad de oscilación.
Pulverización
Equipo de protección
Aumento
de presión Disminución
de presión
• Las siguientes tareas de mantenimiento se deben llevar a
cabo siempre que termine de operar el equipo.
• Limpie todas sus superficies.
• Limpie el tanque para químicos con agua limpia y
séquelo.
• Revise todas las conexiones para ubicar fugas de agua o
combustible. En caso de fuga, repárela inmediatamente.
• Revise todos los tornillos para ver si están sueltos o faltan.
Apriete con firmeza o cámbielos.
• Después del mantenimiento, la máquina se debe dejar
secar en un sitio ventilado. Debe estar lejos de fuente de
fuego y evitar la luz solar.
• Si va a almacenar el equipo por largo tiempo, además de
los puntos anteriores:
• Descargue por completo el combustible del tanque y del
carburador. Apague el ahogador, jale el arrancador 3 - 5
veces.
• Retire la bujía y vierta algo de aceite en el cilindro. Luego,
jale el arrancador ligeramente de 2 – 3 veces. Después
coloque la bujía.
A
ESPAÑOL
Mantenimiento periódico Cada uso Cada 25 h
de uso Cada 50 h
de uso Cada 150 h
de uso Cada 250 h
de uso
*Usuario capacitado o Centro de Servicio Autorizado Truper **Centro de Servicio Autorizado Truper
Limpieza general
Limpieza filtro de aire
Revisar-rellenar nivel de aceite en la bomba
Limpieza carburador*
Insepección y ajuste de bujía*
Limpieza de tanque de combustible**
Cambio de filtro de combustible**
Reemplazo de manguera de combustible**
Limpieza del escape y silinciador**

x10
9
ESPAÑOL
Encendido
A
• Cuando se añade el líquido, el motor
no tiene que parar, pero debe estar a baja velocidad (es
decir, en la posición de mínima aceleración).
• ANTES DE USAR EL FUMIGADOR
CON QUÍMICOS, DEBE PROBAR EL TANQUE CON AGUA
CORRIENTE. Si encuentra alguna fuga o parte que no
funcione correctamente, repare o reemplace antes de
utilizar cualquier químico.
• Determine las cantidades adecuadas de
químico concentrado y agua para preparar la mezcla del
producto a rociar. La proporción está indicada en la etiqueta
del contenedor del químico concentrado.
• Retire la tapa del tanque y asegúrese de que el filtro de
partículas (A) esté en su lugar.
• Vierta la cantidad adecuada de mezcla en el tanque,
después de verter mantenga el envase hacia abajo durante
un mínimo de 30 segundos para que se vacíe por completo.
• No rebase el límite marcado en el
tanque.
• Cierre el tanque atornillando la tapa en el sentido de las
manecillas del reloj hasta que el tanque quede
perfectamente sellado.
ATENCIÓN
ATENCIÓN ATENCIÓN
ATENCIÓN
C
• Coloque el equipo en una superficie firme y nivelada.
• Mueva la palanca de aceleración a un tercio de la escala
(A).
• Oprima y suelte el bulbo cebador 10 veces (B).
• Mueva la palanca del ahogador a la posición “ ” (1).
• Jale el arrancador de 3 a 5 veces (C) para que el
combustible entre al motor, después jale rápido y con
fuerza el arrancador para arrancar el motor. Una vez que
el motor arranque no suelte el arrancador, regréselo con
cuidado a su posición inicial para evitar dañarlo.
• Una vez que el motor arranque coloque lentamente la
palanca del ahogador en la posición “ ” (2).
• Regule la palanca de aceleración (A) a una posición
adecuada para realizar la operación de pulverización.
• El equipo ya está listo para operar.
• La máquina nueva no debe trabajar en la
posición de aceleración máxima durante las primeras 4
horas.
La velocidad debe ser controlada a dos tercios de la
escala de aceleración,
permitiendo así que el motor tenga
una buena adaptación y realice un trabajo confiable.
Arranque del motor en frío
• Mueva la palanca de aceleración (A) a su posición más
baja.
• Presione el botón de paro (D), hasta que se detenga el
motor.
Apagado
• Mueva la palanca de aceleración a un tercio de la escala
(A).
• Mueva la palanca del ahogador a la posición “ ” (2).
• Tire del arrancador (C) hasta que el motor arranque.
• Regule la palanca de aceleración (A).
Arranque del motor en caliente
A
D
B
1 2
NOTA
Llenado del tanque

F
G
8
Ensamblado
Abastecimiento de combustible
ESPAÑOL
• Espere a que el motor se enfríe por completo antes de
abastecer combustible o aceite.
• Coloque el equipo sobre una superficie plana.
• Limpie alrededor de las tapas del tanque de combustible y
aceite para evitar su contaminación.
• Afloje lentamente la tapa del tanque de combustible.
• Teniendo cuidado de evitar derrames vierta el combustible en el
tanque (F).
• Antes de tapar el tanque de combustible revise y limpie las
juntas. Coloque de inmediato la tapa del tanque de combustible y
apriételo con la mano.
• Limpie todo derrame de combustible.
• Afloje lentamente la tapa del tanque de aceite.
• Llene el tanque con aceite (G) para motor a gasolina a 4
tiempos SAE-10W/30. El aceite debe alcanzar la parte superior del
cuello de llenado de aceite.
• Coloque la tapa del tanque de aceite y apriételo con la mano.
• Siempre verifique el nivel de aceite antes de operar la máquina.
A
C
E
C
D
D
E
B
B
Para montar las correas al equipo:
1. Inserte los extremos de cada correa (A) por
atrás del perno de montaje (B).
2. Haga pasar el extremo de las correas por su
respectiva hebilla (C) como se muestra en la
imagen.
3. Coloque los ganchos metálicos de cada
correa (D) en los soportes plásticos (E) en la
parte inferior del tanque.
Ensamble del arnés

A1
NOTA
B
D
E
Arandela
de goma
Ensamblado
7
ESPAÑOL
• Antes de comenzar a operar el equipo, sus piezas
y accesorios deben de estar debidamente
ensambladas y estar en la posición correcta.
• Conecte el extremo (A1) de la manguera a la
bomba.
• La pistola de largo alcance (F) puede ser
conectada al extremo (A2) de la manguera.
• Para utilizar las boquillas (E) conecte el extremo
(A2) de la manguera al mango con valvula (B).
• Conecte la lanza (D) a la valvula.
• A la lanza se puede conectar alguna de las
boquillas incluidas (E).
Para una mayor área de pulverizado
conecte el adaptador "Y" a la salida de la bomba y
ensamble ambas mangueras.
• Compruebe que todas las conexiones estén firmes
y cuenten con su respectiva arandela de goma.
Bomba
A2
F
Manguera, válvula y lanzas

Partes
6ESPAÑOL
Tanque
de 25 L
Tapón de
drenado
Conexión
de manguera
Bastidor
Silenciador
Manijas
para sostener
el tanque
Tapón de
drenado
Bujía
Piola
Correas
para hombros
Regulador
de presión
Filtro
de aire
Llaves allen
Llave para
bujía
Llave
2 Mangueras
Adaptador "Y"
Mangos con
válvula
Pistola de largo alcance
Lanzas
Boquillas
pulverizadoras
de cono
Soporte
acojinado
para espalda
Boquillas pulverizadoras
de abanico doble
Escape
Piola
Tapa de
llenado del
tanque
Tapa del
tanque de
combustible
Palanca del
ahogador
Tanque de
combustible
Tapón del
depósito de aceite
Palanca de
aceleración
Bomba
Botón
de paro
Tanque de
combustible

• Mantenga el fumigador y los
químicos fuera del alcance de los niños. Guárdelos
en un lugar seguro.
• No almacene químicos en el tanque del fumigador.
• Después de preparar el compuesto
debe de ser aplicado inmediatamente.
• Asegúrese de leer y entender las
instrucciones y precauciones de los químicos que va a
utilizar con el equipo antes de usarlo.
• Asegúrese de usar el químico
específico en cantidades adecuadas para el trabajo a
realizar. Los químicos y cantidades equivocadas pueden
dañar el fumigador, estropear el producto rociado,
provocar situaciones de riesgo y daños ecológicos graves.
• A pesar de que el químico esté
almacenado en un recipiente de plástico, podría dañar
alguna de las partes del equipo. Asegúrese que el químico
sea compatible con fumigadores de Polipropileno de alta
densidad.
• Muchos de los químicos
comúnmente usados con el fumigador son peligrosos si se
manejan o usan de forma incorrecta.
• En caso de intoxicación, busque
inmediatamente un médico y muéstrele la etiqueta del
producto químico utilizado.
• Si el producto químico salpica la boca
o los ojos, lávelos con agua limpia y luego vaya a ver al
médico.
• Si el operario tiene dolor de cabeza o
mareos, debe dejar de trabajar inmediatamente y acudir al
médico de inmediato.
• Siempre vacíe y limpie el fumigador
después de cada uso.
• La ropa usada durante la aplicación
debe ser lavada diariamente, separada de la ropa de uso
cotidiano.
• Equípese con protección adecuada:
ropa protectora, gafas protectoras y respiradores con
cartuchos adecuados para no inhalar los químicos
rociados.
• Familiarícese con los
procedimientos de primeros auxilios descritos en el
recipiente del químico antes de su aplicación.
• Para la seguridad del operador, la
pulverización debe llevarse a cabo estrictamente de
acuerdo con las instrucciones de los productos químicos.
Está estrictamente prohibido pulverizar productos químicos
extremadamente venenosos.
5
ESPAÑOL
Advertencias de Seguridad
para uso de fumigadores agrícolas
• El fumigador está diseñado para uso agrícola.
• No intente rociar soluciones calientes o que puedan
calentarse con el fumigador.
• No intente rociar gasolina, líquidos
inflamables, alcalinos cáusticos o ácidos corrosivos con
el fumigador.
Químicos
ADVERTENCIA
ADVERTENCIA
ADVERTENCIA
ADVERTENCIA
ADVERTENCIA
ADVERTENCIA
Antes de operar el fumigador
Después de operar el fumigador
PELIGRO
ATENCIÓN
• Jamás deje el fumigador sin atender.
• Cuide el fumigador de golpes y caídas, especialmente
cuando esté presurizado.
• No sobrepase el nivel indicado en el tanque cuando llene
el fumigador.
• No realice trabajos de rociado
mientras sopla el viento o en cualquier otra condición que
pueda exponerlo a usted o los demás al químico rociado.
• No remueva ninguna pieza o trate de hacer reparaciones
mientras el fumigador se encuentre presurizado.
• Nunca cargue el fumigador por la manguera.
• No coma, beba, ni fume mientras
use el fumigador.
Durante el uso del fumigador
ADVERTENCIA
ADVERTENCIA
ATENCIÓN
ATENCIÓN
ATENCIÓN
ATENCIÓN
ATENCIÓN
ATENCIÓN
ATENCIÓN
ATENCIÓN
• Nunca fume cerca del combustible, ni de la zona en
donde se abastezca de la gasolina, ni donde prepare la
mezcla con el aceite, ni al operar el fumigador.
• Para reducir el riesgo de incendio o quemaduras
maneje el combustible con cuidado, es muy inflamable.
• No deje que gasolina o aceite toquen la piel.
• Protéjase los ojos para evitar salpicaduras de gasolina y
aceite. En caso de contacto accidental lávelos inmediata-
mente con agua limpia. Si persiste la irritación acuda a un
médico.
• Mezcle y almacene el combustible en un recipiente
diseñado para tal fin.
• Mezcle el combustible al aire
libre lejos de cualquier chispa o llama.
• Antes de reabastecer el fumigador de combustible
apague el motor, colóquela en suelo despejado y espere
a que el motor se enfríe.
• Limpie todo el combustible que
pueda haber caído en el fumigador antes de operarla.
• Revise si hay fugas de combustible,
de ser así corríjalas antes de usar el fumigador, para evitar
incendios o lesiones por quemadura.
• Aleje el fumigador por lo menos 9 metros (30 pies) del
lugar de carga de combustible antes de arrancar el motor.
• Bajo ninguna circunstancia queme el combustible
derramado para eliminarlo.
• Por ningún motivo utilice cualquier otro tipo de
combustible que el especificado para el fumigador en
este instructivo.
Manejo de combustible
ADVERTENCIA
ATENCIÓN
ATENCIÓN

4ESPAÑOL
Advertencias Generales de Seguridad
para uso de herramientas motorizadas
Mantenga su área de trabajo limpia, ordenada y bien
iluminada.
Áreas desordenadas y obscuras pueden provocar
accidentes.
Nunca utilice el equipo en ambientes explosivos, o en
presencia de líquidos inflamables.
Aleje el equipo al menos 9 metros (30 pies) del lugar
de recarga de combustible antes de arrancar el motor.
Mantenga a los niños y a otras personas a una distancia
segura mientras utiliza el equipo.
Las distracciones pueden hacerle perder el
control y provocar accidentes.
Evite hacer contacto con líneas y circuitos eléctricos.
Ubique y evite todas las líneas y circuitos
eléctricos, especialmente el cableado oculto.
Así como cualquier objeto conectado a tierra.
Esté siempre alerta, sea prudente y utilice el sentido común.
No deje que la familiaridad con el uso del
equipo lo distraiga mientras lo utiliza.
Esto puede provocar accidentes.
No utilice el equipo si está cansado, o bajo la influencia
de drogas, alcohol o medicamentos.
Un momento de distracción mientras utiliza el
equipo puede provocar lesiones personales
graves.
Utilice el equipo con sus guardas y protectores en su
lugar y en buen estado.
De no hacerlo se expone a lesiones personales graves.
Nunca fuerce el equipo.
Trabajar dentro del rango para el que fue diseñado
asegura un mejor trabajo y es más seguro.
Guarde el equipo en un lugar seguro fuera del alcance
de los niños.
Los equipos motorizados son peligrosas en
manos inexpertas.
Utilice la indumentaria adecuada.
La ropa suelta, joyas o cabello largo pueden
ser atrapados por las piezas móviles.
Mantenga las manos alejadas de las partes giratorias
y/o móviles.
De no hacerlo se expone a lesiones personales graves.
No utilice el equipo en espacios encerrados.
Para evitar respirar la acumulación de monóxido
de carbono, gas inodoro tóxico y potencialmente
mortal.
Utilice equipo adecuado de protección personal.
Usar protección para los ojos, mascarillas antipolvo,
zapatos de seguridad antideslizantes, casco, protección
para los oídos y guantes de seguridad, reduce
considerablemente el riesgo de lesiones.
Apague el equipo antes de hacer ajustes, cambiar sus
accesorios o guardarlo.
Asegúrese de que el interruptor del equipo esté en posición
de apagado.
Nunca utilice el equipo si el interruptor no funciona o
no está debidamente ensamblado.
De hacerlo se expone a lesiones personales
graves, repárelo inmediatamente en un
Centro de Servicio Autorizado .
No sobre extienda su campo de acción.
Un buen apoyo y equilibrio permiten un mejor control
del equipo en situaciones inesperadas.
Evite encendidos accidentales.
Asegúrese de que el motor del equipo
esté apagado antes de dejarlo o darle
mantenimiento.
Retire cualquier llave de ajuste antes de encender el
equipo.
Herramientas adicionales o llaves colocadas
en una pieza giratoria del equipo
puede provocar lesiones personales graves.
Déle mantenimiento al equipo y cerciórese que se
encuentra en condiciones óptimas antes de utilizarlo.
Revise cuidadosamente sus partes móviles, su
alineación y montaje. Hágalo periódicamente.
Busque cualquier elemento dañado o pieza que no
funcione adecuadamente para su inmediata reparación
en un Centro de Servicio Autorizado .
Accesorios.
Utilice sólo los accesorios o refacciones
indicados en este instructivo o
certificados por .
Nunca deje el equipo en marcha sin supervisión.
Apague el equipo después de operarlo y antes de
colocarlo en un lugar seguro para evitar accidentes
graves.
Nunca fume cerca del combustible.
No fume cerca de la zona en donde se abastezca de
combustible, ni al operar el equipo.
ATENCIÓN
ATENCIÓN
PELIGRO
ADVERTENCIA
PELIGRO
ATENCIÓN
PELIGRO
PELIGRO
ADVERTENCIA
ADVERTENCIA
ADVERTENCIA
ADVERTENCIA
ATENCIÓN
ATENCIÓN
ATENCIÓN
ATENCIÓN
ADVERTENCIA
ADVERTENCIA
ADVERTENCIA
PELIGRO
PELIGRO
PELIGRO

3
ESPAÑOL
Código
Descripción
Peso neto
Motor
Potencia nominal del motor
Tanque de líquido
Flujo máximo de líquido
Ciclo de trabajo
Tipo de combustible
FUG-254
101569
10 kg
Fumigador a gasolina tipo mochila
25 L (6.6 Gal)
746 W (1 Hp)
8 l/min
30 min de descanso por tanque consumido. Máximo diario 6 horas.
Gasolina sin plomo
Tipo de arranque Retractil
4 tiempos | 31 cm3 (cc)
Especificaciones técnicas
Especificaciones de combustible
• El fumigador tiene un motor de 4 tiempos enfriado por aire que utiliza gasolina pura sin plomo.
• Por ningún motivo mezcle aceite con el combustible.
• Por ningún motivo utilice combustibles mezclados con alcohol etílico (gasohol), etanol o metano, ya
que pueden atraer humedad, la cual provoca la separación y la formación de ácidos durante el almacenaje. La acidez puede
dañar el sistema de combustible del motor cuando se encuentre almacenado.
• Para no tener problemas con el motor se debe vaciar el sistema de combustible antes de almacenar el fumigador por
periodos de 30 días o más tiempo. Vacíe el tanque de gasolina, arranque el motor y déjelo funcionar hasta que las líneas de
combustible y el carburador se vacíen. La siguiente temporada, use gasolina fresca.
• Nunca use dentro del tanque de gasolina, productos para limpiar motores o carburadores ya que puede ocasionar daño permanente.
ADVERTENCIA

Í
ndice
2
Guarde este Instructivo para futuras referencias.
Los gráficos de este Instructivo son para
referencia, pueden variar del aspecto real de la
herramienta.
FUG-254
Para poder sacar el máximo
provecho de la herramienta,
alargar su vida útil, hacer válida
la garantía en caso de ser
necesario y evitar riesgos o
lesiones graves, es fundamental
leer este Instructivo por
completo antes de usar la
herramienta.
ATENCIÓN
ESPAÑOL
Especificaciones técnicas
Advertencias de Seguridad para
uso de herramientas motorizadas
Advertencias de Seguridad para
uso de fumigadores agrícolas
Partes
Ensamble
Abastecimiento de combustible
Encendido
Llenado del tanque
Operación
Mantenimiento
Solución de problemas
Centros de Servicio Autorizados
Póliza de Garantía
3
4
5
6
7
8
9
9
10
10
11
13
14

Instructivo de
Lea este Instructivo por completo
antes de usar la herramienta.
Fumigador a gasolina
tipo mochila
FUG-254
ModeloCódigo
FUG-254
Este Instructivo es para:
101569
6.6 gal
25 L
ATENCIÓN
ESPAÑOL
ENGLISH
-
 1
1
-
 2
2
-
 3
3
-
 4
4
-
 5
5
-
 6
6
-
 7
7
-
 8
8
-
 9
9
-
 10
10
-
 11
11
-
 12
12
-
 13
13
-
 14
14
-
 15
15
-
 16
16
-
 17
17
-
 18
18
-
 19
19
-
 20
20
-
 21
21
-
 22
22
-
 23
23
-
 24
24
-
 25
25
-
 26
26
-
 27
27
-
 28
28


Truper FUG-254 El manual del propietario
- Categoría
- Potentes sistemas de pulverización fina
- Tipo
- El manual del propietario
En otros idiomas
- English: Truper FUG-254 Owner's manual