
User Guide & Warranty
DANGER
READ AND UNDERSTAND ALL SAFETY INFORMATION BEFORE USING THIS PRODUCT. Failure
to follow these safety instructions may result in ELECTRICAL SHOCK, EXPLOSION, FIRE,
which may result in a SERIOUS INJURY, DEATH, or PROPERTY DAMAGE.
Electrical Shock. Product is an electrical device that can shock and cause serious injury. Do not cut
power cords. Do not submerge in water or get wet.
Explosion. Unmonitored, incompatible, or damaged batteries can explode if used with product. Do
not leave product unattended while in use. Do not attempt to charge a damaged or frozen battery. Use
product only with batteries of recommended voltage. Operate product in well ventilated areas.
Fire. Product is an electrical device that emits heat and is capable of causing burns. Do not cover
product. Do not smoke or use any source of electrical spark or fire when operating product. Keep
product away from combustible materials.
Eye Injury. Wear eye protection when operating product. Batteries can explode and cause flying
debris. Battery acid can cause eye and skin irritation. In the case of contamination of eyes or skin,
flush aected area with running clean water and contact poison control immediately.
Explosive Gases. Working in the vicinity of a lead-acid is dangerous. Batteries generate explosive
gases during normal battery operation. To reduce risk of battery explosion, follow all safety
information instructions and those published by the battery manufacturer and manufacturer of
any equipment intended to be used in the vicinity of battery. Review cautionary markings on these
products and on engine.
For more information
and support visit:
GENIUS10AU

About GENIUS10. The NOCO GENIUS10 represents some of the most innovative and advanced technology on the market, making each charge simple and easy. It is
quite possibly the safest and most ecient charger you will ever use. The GENIUS10 is designed for charging all types of 6V & 12V lead-acid batteries, including Lithium
(LiFePO4), Wet (Flooded), Gel, MF (Maintenance-Free), CA (Calcium), EFB (Enhanced Flooded Battery), and AGM (Absorption Glass Mat) batteries. It is suitable for
charging battery capacities up to 230 Amp-Hours and maintaining all battery sizes. Getting Started. Before using the charger, carefully read the battery manufacture’s
specific precautions and recommended rates of charge for the battery. Make sure to determine the voltage and chemistry of the battery by referring to your battery
owner’s manual prior to charging. Mounting. It is important to keep in mind the distance to the battery. The DC cable length from the charger, with either the
battery clamp or eyelet terminal connectors, is approximately 77.7 inches (1973.6mm). Allow for 12-inches (304mm) of slack between connections. Proposition 65.
WARNING: This product can expose you to chemicals including lead and exhaust fumes, which are known to the State of California to cause cancer and birth defects or
other reproductive harm. For more information go to www.P65Warnings.ca.gov. Personal Precaution. Only use product as intended. Someone should be within range
of your voice or close enough to come to your aid in case of emergency. Have a supply of clean water and soap nearby in the case of battery acid contamination. Wear
complete eye protection and protective clothing while working near a battery. Always wash hands after handling batteries and related materials. Do not handle or wear
any metal objects when working with batteries including; tools, watches or jewelry. If metal is dropped onto battery, it may spark or create a short circuit resulting in
electrical shock, fire, explosion which may result in injury, death or property damage. Minors. If the product is intended by “Purchaser” to be used by a minor, purchasing
adult agrees to provide detailed instructions and warnings to any minor prior to use. Failure to do so is the sole responsibility of the “Purchaser,” who agrees to indemnify
NOCO for any unintended use or misuse by a minor. Choking Hazard. Accessories may present a choking hazard to children. Do not leave children unattended with
product or any accessory. The product is not a toy. Handling. Handle product with care. The product can become damaged if impacted. Do not use a damaged product,
including, but not limited to, cracks to the casing or damaged cables. Do not use product with a damaged power cord. Humidity and liquids may damage product. Do not
handle product or any electrical components near any liquid. Store and operate product in dry locations. Do not operate product if it becomes wet. If product is already
operating and becomes wet, disconnect it from the battery and discontinue use immediately. Do not disconnect the product by pulling on the cables. Modifications.
Do not attempt to alter, modify or repair any part of the product. Disassembling product may cause injury, death or damage to property. If product becomes damaged,
malfunctions or comes in contact with any liquid, discontinue use, and contact NOCO. Any modifications to the product will void your warranty. Accessories. This
product is only approved for use with NOCO accessories. NOCO is not responsible for user safety or damage when using accessories not approved by NOCO. Location.
Prevent battery acid from coming in contact with the product. Do not operate the product in a closed-in area or an area with restricted ventilation. Do not set a battery
on top of product. Position cable leads to avoid accidental damage by moving vehicle parts (including hoods and doors), moving engine parts (including fan blades,
belts, and pulleys), or what could become a hazard that may cause injury or death. Operating Temperature. This product is designed to work in ambient temperatures
between -4° F and 104° F (-20° C and 40° C). Do not operate outside of temperature ranges. Do not charge a frozen battery. Discontinue use of product immediately
if the battery becomes excessively warm. Storage. Do not use or store your product in areas with high concentrations of dust or airborne materials. Store your product
on flat; secure surfaces so it’s not prone to falling. Store your product in a dry location. The storage temperature is -20° to 25°C (average under-hood temperature).
Never exceed 80ºC under any condition. Compatibility. The product is only compatible with 6V & 12-volt Lead-Acid, AGM, and Lithium batteries. Do not attempt to
Important Safety Warnings

EN
use product with any other type of battery. Charging other battery chemistries may result in injury, death or property damage. Contact the battery manufacturer prior to
attempting to charge the battery. Medical Devices. Do not charge pacemakers or other medical devices. Product may emit electromagnetic fields. Product contains
magnetic components which may interfere with pacemakers, defibrillators, or other medical devises. These electromagnetic fields may interfere with pacemakers or
other medical devices. Consult with your physician prior to use if you have any medical device including pacemakers. If you suspect the product is interfering with a
medical device, stop using the product immediately and consult your physician. Cleaning. Power o the product before attempting any maintenance or cleaning. Clean
and dry product immediately if it comes in contact with liquid or any type of contaminant. Use a soft, lint-free (microfiber) cloth. Avoid getting moisture in openings.
Explosive Atmospheres. Obey all signs and instructions. Do not operate product in any area with a potentially explosive atmosphere, including fueling areas or areas
which contain chemicals or particles such as grain, dust or metal powders. High-Consequence Activities. This product is not intended for use where the failure of
the product could lead to injury, death or severe environmental damage. Radio Frequency Interference. Product is designed, tested, and manufactured to comply
with regulations governing radio frequency emissions. Such emissions from the product can negatively aect the operation of other electronic equipment, causing them
to malfunction. Model Number: GENIUS10 This device complies with Part 15 of the FCC Rules. Operation is subject to the following two conditions: (1) this device
may not cause harmful interference, and (2) this device must accept any interference received, including interference that may cause undesired operation. NOTE: This
equipment has been tested and found to comply with the limits for a Class A digital device, pursuant to Part 15 of the FCC Rules. These limits are designed to provide
reasonable protection against harmful interference when the equipment is operated in a commercial environment. This equipment generates, uses, and can radiate
radio frequency energy and, if not installed and used in accordance with the instruction manual, may cause harmful interference to radio communications. Operation
of this equipment in a residential area is likely to cause harmful interference in which case the user will be required to correct the interference at his/her own expense.
How To Use
Charging Modes.
The GENIUS10 has nine (9) modes: Standby, 12V, 12V AGM, 12V LITHIUM, 6V, 6V AGM, REPAIR, SUPPLY and Force. Some charge modes must be pressed and held
for three (3) to five (5) seconds to enter the mode. These “Press and Hold” modes are advanced charging modes that require your full attention before selecting. It is
important to understand the dierences and purpose of each charge mode. Do not operate the charger until you confirm the appropriate charge mode for your battery.
Below is a brief description:

Mode Explanation
Standby
Press & Hold (3
Seconds)
No Power
14.5V | 10A | Up To 230AH Batteries
In Standby mode, the charger is not charging or providing any power to the battery. Energy Save is activated during this mode, drawing microscopic
power from the electrical outlet. Canbus is enabled in Standby mode. When in Standby, the orange Standby LED will illuminate.
For charging 12-volt Wet Cell, Gel Cell, Enhanced Flooded, Maintenance-Free and Calcium batteries. When selected, the 12V white LED will illuminate.
For charging 6-volt Wet Cell, Gel Cell, Enhanced Flooded, Maintenance-Free and Calcium batteries. When selected, the 6V white LED will illuminate.
7.25V | 10A | Up To 230AH Batteries
14.8V | 10A | Up To 230AH Batteries
For charging 12-volt AGM batteries. When selected, the 12V AGM white LED will illuminate.
14.6V | 10A | Up To 230AH Batteries
For charging 12-volt lithium-ion batteries, including lithium iron phosphate. When selected, the 12V Lithium blue LED will illuminate. For use on batteries
with Battery Management Systems (BMS) only.
Force Mode For charging batteries with a voltage lower than 1V. Press and Hold for five (5) seconds to enter Force Mode. The selected charge mode will then operate
under Force Mode for five (5) minutes before returning to standard charging in the selected mode.
10A | Up To 230AH Batteries
Press & Hold
(5 Seconds)
An advanced battery recovery mode for repairing and restoring, old, idle, damaged, stratified or sulfated batteries. When selected, a red LED will
illuminate and flash.
16.5V | 10A | Any Capacity
For charging 6-volt advanced AGM batteries, which requires a higher than normal charging voltage. When selected, a white LED will illuminate.
7.40V | 10A | Up To 230AH Batteries
Converts to a DC power supply for powering any 12VDC device, like a tire inflator, oil changer, or as a memory retainer when replacing a battery. When
selected, a red LED will illuminate.
13.6V @ 25°C | 10A | Max 12A [Press and Hold 3 Seconds With Clamps Not Connected]
(Peak Voltage Measured At 25°C, Amperage Rating Is Bulk Amperage When Above 0°C)
[From Standby Press and Hold 3 Seconds With Clamps Connected to the Battery]
Press & Hold (3
Seconds)

EN
Using 6V. [Press & Hold for 3 seconds]
6V charge mode is designed for 6-volt lead-acid batteries only, like Wet Cell, Gel Cell, Enhanced Flooded, Maintenance-Free and Calcium batteries. Press and hold for three (3) seconds
to enter 6V Charge Mode. Consult the battery manufacturer before using this mode.
Using 12V Lithium.
12V Lithium charge mode is designed for 12-volt lithium-ion batteries only, including lithium iron phosphate.
CAUTION. USE THIS MODE WITH EXTREME CARE. THIS MODE SHOULD ONLY BE USED WITH 12-VOLT LITHIUM BATTERIES THAT HAVE A BUILT-IN BATTERY MANAGEMENT
SYSTEM (BMS). LITHIUM-ION BATTERIES ARE MADE AND CONSTRUCTED IN DIFFERENT WAYS AND SOME MAY OR MAY NOT CONTAIN A BATTERY MANAGEMENT SYSTEM
(BMS). CONSULT THE LITHIUM BATTERY MANUFACTURER BEFORE CHARGING AND ASK FOR RECOMMENDED CHARGING RATES AND VOLTAGES. SOME LITHIUM-ION BATTERIES
MAY BE UNSTABLE AND UNSUITABLE FOR CHARGING.
Using 13.6V Supply.[Press and Hold 3 Seconds With Clamps Not Connected]
13.6V Supply converts the charger to a constant current, constant voltage DC power supply. It can be used to power 12VDC devices, tire inflators, seat heaters and more. As a power supply, it can
also be used to retain a vehicle’s on-board computer settings during battery repair or replacement. 13.6V Supply provides 13.6-volts at 10A with overload protection at 12A (Max).
CAUTION. USE THIS MODE WITH EXTREME CARE. SUPPLY MODE DISABLES SAFETY FEATURES AND LIVE POWER IS PRESENT AT THE CONNECTORS. DO NOT TOUCH CONNECTIONS
TOGETHER. RISK OF SPARKS, FIRE, EXPLOSION, PROPERTY DAMAGE, INJURY, AND DEATH.
Using 12V Repair. [Press & Hold][From Standby Press and Hold 3 Seconds With Clamps Connected to the Battery]
12V Repair is an advanced battery recovery mode for repairing and storing, old, idle, damaged, stratified or sulfated batteries. Not all batteries can be recovered. Batteries tend to become damaged
if kept at a low charge and/or never given the opportunity to receive a full charge. The most common battery problems are battery sulfation and stratification. Both battery sulfation and stratification
will artificially raise the open circuit voltage of the battery, causing the battery to appear fully charged, while providing low capacity. Use 12V Repair in attempt to reverse these problems. For optimal
results, take the 12-volt battery through a full charge cycle, bringing the battery to full charge, before using this mode. 12V Repair can take up to four (4) hours to complete the recovery process
and will return to Standby when completed.
CAUTION. USE THIS MODE WITH CARE. THIS MODE IS FOR 12-VOLT LEAD-ACID BATTERIES ONLY. THIS MODE USES A HIGH CHARGING VOLTAGE AND MAY CAUSE SOME WATER LOSS IN WET
(FLOODED) CELL BATTERIES. BE ADVISED, SOME BATTERIES AND ELECTRONICS MAY BE SENSITIVE TO HIGH CHARGING VOLTAGES. TO MINIMIZE RISKS TO ELECTRONICS, DISCONNECT THE
BATTERY BEFORE USING THIS MODE.
Force Mode. [Press & Hold for 5 seconds]
Force mode allow the charger to manually begin charging when the connected battery’s voltage is too low to be detected. If battery voltage is too low for the charger to detect,
press and hold the mode button for 5 seconds to activate Force Mode, then select the appropriate mode. All available modes will flash. Once a charge mode is selected, the
Charge Mode LED and Charge LED will alternate between each other, indicating Force Mode is active. After five (5) minutes the charger will return to the normal charge operation
and low voltage detection will be reactivated.

CAUTION.USE THIS MODE WITH EXTREME CARE. FORCE MODE DISABLES SAFETY FEATURES AND LIVE POWER IS PRESENT AT THE CONNECTORS. ENSURE ALL
CONNECTIONS ARE MADE PRIOR TO ENTERING FORCE MODE, AND DO NOT TOUCH CONNECTIONS TOGETHER. RISK OF SPARKS, FIRE, EXPLOSION, PROPERTY
DAMAGE, INJURY, AND DEATH.
Connecting to the Battery.
Do not connect the AC power plug until all other connections are made. Identify the correct polarity of the battery terminals on the battery. Do not make any connections
to the carburetor, fuel lines, or thin, sheet metal parts. The below instructions are for a negative ground system (most common). If your vehicle is a positive ground system
(very uncommon), follow the below instructions in reverse order.
1.)Connect the positive (red) eyelet terminal connector to the positive (POS,P,+) battery terminal.
2.)Connect the negative (black) eyelet terminal connector to the negative (NEG,N,-) battery terminal.
3.)Connect the battery charger into a suitable electrical outlet. Do not face the battery when making this connection.
4.)When disconnecting, disconnect in the reverse sequence, removing the negative first (or positive first for positive ground systems).
Begin Charging.
1.)Verify the voltage and chemistry of the battery.
2.)Confirm that you have connected the battery clamps or eyelet terminal connectors properly and the AC power plug is plugged into an electrical outlet.
3.)[First time use]The charger will begin in Standby mode, indicated by an orange LED. In Standby, the charger is not providing any power.
4.)Press the mode button to toggle to the appropriate charge mode (press and hold for three seconds to enter an advanced charge mode) for the voltage and
chemistry of your battery.
5.)The mode LED will illuminate the selected charge mode and the Charge LEDs will illuminate (depending on the health of the battery) indicating the charging
process has started.
6.)The charger can now be left connected to the battery at all times to provide maintenance charging.
Auto-Memory: The charger has built in auto-memory and will return to the last charge mode when connected. To change modes after the first use, press the mode
button.

EN
Charging Times.
The estimated time to charge a battery is shown below. The size of the
battery (Ah) and its depth of discharge (DOD) greatly affect its charging
time. The charge time is based on an average depth of discharge to a
fully charged battery and is for reference purposes only. Actual data may
differ due to battery conditions. The time to charge a normally discharged
battery is based on a 50% DOD. Temperature will also impact charging
times. The GENIUS10 features thermal compensation that automatically
adjusts charging profiles to maximize charging performance.
Charging Times.
Battery Size Approximate Time to Charge In Hours
6V 12V
Ah (Amp hour)
20
40
80
100
230
1.5
3.0
6.0
7.0
17.3
1.5
3.0
6.0
7.0
17.3

Understanding Error LEDs.
Error Conditions will be indicated by the following LEDs.
LED Reason/Solution
Possible battery short / Battery will not hold a charge. Have battery checked by a professional.
Battery voltage is too high for the selected charge mode. Check the battery and charge mode.
Reverse polarity. Reverse the battery connections.
Charger is in Standby mode or Battery voltage is too low for charger to detect.
Charger internal temperature too high / Charger will resume function once the Charger internal temperature drops.
Charger ambient temperature too cold / Charger will resume function once the Charger ambient temperature rises.
Solid
Solid
Solid
Solid
Flashing
Explanation
The 25% Charge LED will slowly pulse “on” and “o”, when the battery is less than 25% fully charged. When the battery is 25%
charged, the red Charge LED will be solid.
The 75% Charge LED will slowly pulse “on” and “o”, when the battery is less than 75% fully charged. When the battery is 75%
charged, the orange Charge LED will be solid.
The 50% Charge LED will slowly pulse “on” and “o”, when the battery is less than 50% fully charged. When the battery is 50%
charged, the red Charge LED will be solid.
Pulsing Green LED - Bulk charge complete, optimizing battery for extended life.
Solid Green LED - When the battery is 100% charged, the Charge LED will be solid green.
After the battery is fully charged, the charger will continue monitoring the battery, and provide ongoing maintenance and
optimization. The 100% Charge LED will pulse “on” and “o” slowly during these cycles. The charger can be left connected to the
battery indefinitely.
Understanding Charge LEDs.
LED
25%
Red LED
75%
Orange LED
100%
Green LED
50%
Red LED
Maintenance
Green LED

EN
6.) Charge LED indicates the connected battery(s) state-of-charge.
7.) Mode LED Indicates the Charge Mode the charger is currently in. Push
the MODE button to cycle through charge Modes.
8.) «Press and Hold» Mode LED Mode button must be pressed and held for
3 seconds to enter the mode.
9.) Supply Mode LED Illuminates solid Red when Supply mode is selected.
10.) Repair Mode LED Illuminates solid Red when Repair mode is selected.
6
5
7
1
8
3
2
4
10
2
2
9
1.) Mode Button Push to cycle through charging Modes.
2.) Overvoltage Error LED Illuminates solid Red; Battery Voltage is above
Protect voltage.
3.) Bad Battery Error LED Illuminates solid Red when connected battery will
not hold a charge.
4.) Reverse Polarity Error LED Illuminates solid Red when reverse polarity
is detected.
5.) Standby LED Illuminates when the charger is in Standby Mode, the charger
is not charging or providing any power to the battery.

3 Year Hassle-Free Warranty
Technical Specifications
NOCO warrants that this product (the “Product”) will be free from defects in material and workmanship for a period of Three (3) years from the date of purchase (the “Warranty
Period”). For defects reported during the Warranty Period, NOCO will, at its discretion, and subject to NOCO’s technical support analysis, either repair or replace defective
products. Replacement parts and products will be new or serviceably used, comparable in function and performance to the original part and warranted for the remainder of the
original Warranty Period.
NOCO’S LIABILITY HEREUNDER IS EXPRESSLY LIMITED TO REPLACEMENT OR REPAIR. TO THE MAXIMUM EXTENT PERMITTED BY LAW, NOCO SHALL NOT BE LIABLE TO
ANY PURCHASER OF THE PRODUCT OR ANY THIRD PARTY FOR ANY SPECIAL, INDIRECT, CONSEQUENTIAL OR EXEMPLARY DAMAGES, INCLUDING, BUT NOT LIMITED
TO, LOST PROFITS, PROPERTY DAMAGE OR PERSONAL INJURY, RELATED IN ANY WAY TO THE PRODUCT, HOWSOEVER CAUSED, EVEN IF NOCO HAD KNOWLEDGE OF
THE POSSIBILITY OF SUCH DAMAGES. THE WARRANTIES SET FORTH HEREIN ARE IN LIEU OF ALL OTHER WARRANTIES, EXPRESS, IMPLIED, STATUTORY OR OTHERWISE,
120-240 VAC, 50-60Hz
120-240 VAC, 50-60Hz
150 W Max
Various
10A (12V), 10A (6V))
1V (12V), 1V (6V)
<0.5mA
-20°C to +40°C
6V, 12V
Wet, Gel, MF, CA, EFB, AGM, Calcium, Lithium
Up to 230Ah, Maintains All Battery Sizes
IP65
Natural Convection
7.1 x 3.6 x 2.3 Inches
3.33 Pounds
Input Voltage AC:
Working Voltage AC:
Output Power:
Charging Voltage:
Charging Current:
Low-Voltage Detection:
Back Current Drain:
Ambient Temperature:
Type of Batteries:
Battery Chemistries:
Battery Capacity:
Housing Protection:
Cooling:
Dimensions (L x W x H):
Weight:

EN
INCLUDING, WITHOUT LIMITATION, THE IMPLIED WARRANTIES OF MERCHANTABILITY AND FITNESS FOR A PARTICULAR PURPOSE, AND THOSE ARISING FROM COURSE OF
DEALING, USAGE OR TRADE PRACTICE. IN THE EVENT THAT ANY APPLICABLE LAWS IMPOSE WARRANTIES, CONDITIONS OR OBLIGATIONS THAT CANNOT BE EXCLUDED OR
MODIFIED, THIS PARAGRAPH SHALL APPLY TO THE GREATEST EXTENT ALLOWED BY SUCH LAWS.
This Warranty is made solely for the benefit of the original purchaser of the Product from NOCO or from a NOCO approved reseller or distributor and is not assignable or
transferable. To assert a warranty claim, the purchaser must: (1) request and obtain a return merchandise authorization (“RMA”) number and return location information (the
“Return Location”) from NOCO Support by emailing [email protected] or by calling 1.800.456.6626; and (2) send the Product, including RMA number, and receipt to the Return
Location. DO NOT SEND IN PRODUCT WITHOUT FIRST OBTAINING AN RMA FROM NOCO SUPPORT.
The original purchaser is responsible (and must prepay) all packaging and transportation costs to ship products for warranty service.
NOTWITHSTANDING THE ABOVE, THIS HASSLE-FREE WARRANTY IS VOID AND DOES NOT APPLY TO PRODUCTS THAT: (a) are misused, mishandled, subjected to abuse or
careless handling, accident, improperly stored, or operated under conditions of extreme voltage, temperature, shock, or vibration beyond NOCO’s recommendations for safe
and eective use; (b) improperly installed, operated or maintained; (c) are/were modified without the express written consent of NOCO; (d) have been disassembled, altered or
repaired by anyone other than NOCO; (e) the defects of which were reported after the Warranty Period.
THIS HASSLE-FREE WARRANTY DOES NOT COVER: (1) normal wear and tear; (2) cosmetic damage that does not aect functionality; or (3) Products where the NOCO serial
number is missing, altered, or defaced.
HASSLE-FREE WARRANTY CONDITIONS
These conditions apply only to Product during the Warranty Period. The Hassle-Free Warranty is void either by elapsed time from date of purchase (elapsed time from serial
number date, if no proof of purchase) or from the conditions listed earlier in this document. Return Product with the appropriate documentation.
With Receipt:
0-3 Years: NO Charge. With proof of purchase, The warranty period begins on date of purchase.
With NO Receipt:
0-3 Years: NO Charge. With NO proof of purchase, The warranty period begins on the serial number date.
We recommend registering your NOCO product in order to upload proof of purchase and extend your eective warranty dates. You may register your NOCO product online
at: no.co/register. If you have any questions regarding your warranty or product, contact NOCO Support (email and phone number above) or write to: The NOCO Company, at
30339 Diamond Parkway, #102, Glenwillow, OH 44139 USA.

Guía de usuario y garantía
PELIGRO
ASEGÚRESE DE QUE LEE Y ENTIENDE TODA LA INFORMACIÓN DE SEGURIDAD ANTES DE USAR ESTE
PRODUCTO. El incumplimiento de estas instrucciones de seguridad podría resultar en DESCARGA
ELÉCTRICA, EXPLOSIÓN o INCENDIO, que podrían causar LESIONES GRAVES, MUERTE o DAÑOS MATERIALES.
Descarga eléctrica. Este producto es un dispositivo eléctrico que puede producir descarga y causar lesiones graves.
No corte los cables de alimentación. No lo sumerja en agua ni deje que se moje.
Explosión. Baterías sin supervisar, incompatibles o dañadas pueden explotar si se utilizan con este producto. No lo deje
desatendido mientras está en uso. No intente cargar una batería dañada o congelada. Utilice este producto solo con
baterías del voltaje recomendado. Úselo solo en áreas bien ventiladas.
Incendio. Este producto es un dispositivo eléctrico que emite calor y puede causar quemaduras. No cubra este
producto. No fume ni utilice nada que pueda causar chispas o fuego mientras usa este producto. Manténgalo alejado
de materiales combustibles.
Lesión ocular. Use protección ocular cuando utilice este producto. Las baterías pueden explotar y hacer que salgan
disparadas pequeñas partículas. El ácido de la batería puede causar irritación en los ojos y la piel. En el caso de
contaminación de los ojos o la piel, aclare el área afectada con abundante agua corriente y póngase en contacto
inmediatamente con el servicio de control de intoxicación y envenenamiento.
Gases explosivos. Es peligroso trabajar cerca de baterías de ácido-plomo. Las baterías generan gases explosivos
durante su funcionamiento normal. Para reducir el riesgo de explosión de la batería, siga todas las instrucciones de
seguridad publicadas por el fabricante de la batería y el fabricante de cualquier equipo destinado a ser utilizado cerca
de esta. Revise las señales de precaución en estos productos y en el motor.
Para obtener más información y
asistencia técnica consulte:
Español
GENIUS10AU

ES
Acerca de GENIUS10. El NOCO GENIUS10 representa algunas de las tecnologías más innovadoras y avanzadas del mercado, lo que hace que cada carga sea simple y fácil.
Es posiblemente el cargador más seguro y eficiente que jamás utilizará. El GENIUS10 está diseñado para cargar todo tipo de baterías de plomo-ácido de 6 V y 12 V, incluyendo
litio (LiFePO4), húmeda (inundada), gel, MF (sin mantenimiento), CA (calcio), EFB (batería inundada mejorada), y baterías AGM (alfombrilla de absorción de vidrio). Es adecuado
para cargar capacidades de batería de hasta 230 amperios-hora y mantener todos los tamaños de batería. Empezando. Antes de usar el cargador, lea detenidamente las
precauciones específicas del fabricante de la batería y las tasas de carga recomendadas para la batería. Asegúrese de determinar el voltaje y la química de la batería
consultando el manual del propietario de la batería antes de cargarla. Montaje. Es importante tener en cuenta la distancia a la batería. La longitud del cable de CC desde el
cargador, ya sea con la abrazadera de la batería o los conectores del terminal de ojal, es de aproximadamente 77.7 pulgadas (1973,6 mm). Deje una holgura de 12 pulgadas
(304 mm) entre las conexiones. Proposición 65. ADVERTENCIA: Este producto puede exponerle a químicos incluyendo plomo y gases de escape, que son conocido s por el
Estado de California como causante (s) de cáncer y defectos de nacimiento u otros daños reproductivos. Para mayor información, visite www.P65Warnings.ca.gov.
Precaución. Utilice este producto solo para el propósito para el que fue diseñado. Debería haber una persona lo suficientemente cerca como para oír su voz o acudir en su
ayuda en caso de emergencia. Ponga agua limpia y jabón a su alcance por si tuviera que usarlos en caso de contaminación con el ácido de la batería. Use protección ocular
completa y ropa protectora cuando trabaje cerca de una batería. Lávese siempre las manos después de manipular baterías y materiales relacionados. No use objetos metálicos
cuando trabaje con baterías, incluidas herramientas, relojes o joyas. Si cae metal sobre la batería, pueden saltar chispas o producirse un cortocircuito que podría provocar
descarga eléctrica, incendio, explosión y causar lesiones, muerte o daños materiales. Menores de edad. Si el Comprador ha adquirido este producto para que lo use un
menor de edad, el adulto que lo ha comprado se compromete a proporcionar instrucciones y advertencias detalladas al menor de edad antes de que este lo use. De no
hacerlo, la responsabilidad recaerá únicamente sobre el Comprador, que se compromete a indemnizar a NOCO por el uso no intencionado o mal uso por parte de un menor de
edad. Peligro de asfixia. Los accesorios pueden suponer riesgo de asfixia para niños pequeños. No deje que un niño utilice este producto o cualquier otro accesorio sin la
supervisión de un adulto. Este producto no es un juguete. Manipulación. Manipule este producto con cuidado. Este producto puede dañarse si recibe golpes. No utilice un
producto dañado. Posibles daños incluyen, pero no se limitan a, grietas en el revestimiento o cables dañados. No utilice un producto que tenga un cable de alimentación
dañado. La humedad y los líquidos pueden dañar este producto. No utilice este producto ni ningún componente eléctrico cerca de líquidos. Guarde y utilice este producto en un
lugar seco. No lo utilice si se moja. Si este producto se moja estando en funcionamiento, desconéctelo de la batería y deje de usarlo inmediatamente. No desconecte este
producto de la corriente tirando del cable de alimentación. Modificaciones. No intente alterar, modificar ni reparar ninguna de las partes de este producto. Desarmar este
producto puede provocar lesiones, muerte o daños materiales. Si este producto se daña, funciona incorrectamente o entra en contacto con líquidos, deje de usarlo y contacte
con NOCO. Cualquier modificación a este producto anulará su garantía. Accesorios. Este producto solo está aprobado para ser utilizado con accesorios de NOCO. NOCO no se
responsabiliza de la seguridad del usuario u otros daños que pudieran producirse al utilizar accesorios no aprobados por NOCO. Ubicación. Evite que el ácido de la batería
entre en contacto con este producto. No opere este producto en un área cerrada o con escasa ventilación. No coloque una batería encima de este producto. Coloque los cables
de manera que se eviten daños accidentales al mover partes del vehículo (incluidos capós y puertas), piezas del motor (incluidas aspas de ventiladores, correas y poleas) o
cualquier cosa que pudiera provocar tropiezos y causar lesiones o muerte. Temperatura de funcionamiento. Este producto está diseñado para trabajar a temperaturas
ambientes de entre -4 °F y 104 °F (-20 °C y 40 °C). No lo opere fuera de estos rangos de temperatura. No cargue una batería congelada. Deje de utilizar el producto
inmediatamente si la batería se calienta en exceso. Almacenamiento. No utilice ni guarde su producto en áreas con altas concentraciones de polvo o materiales en suspensión.
Guarde su producto sobre superficies planas y seguras para que no se caiga. Guarde su producto en un lugar seco. La temperatura de almacenamiento es de -20 a 25 ºC
Advertencias importantes de seguridad

(temperatura media bajo el capó). Nunca sobrepasar los 80 ºC bajo ninguna condición. Compatibilidad. El producto solo es compatible con baterías de ácido-plomo, AGM y
litio de 6 V y de 12 V. No intente utilizar el producto con ningún otro tipo de batería. La carga de otras sustancias químicas de la batería puede provocar lesiones, la muerte o
daños a la propiedad. Póngase en contacto con el fabricante de la batería antes de intentar cargar la batería. No cargue una batería si no está seguro de la química o voltaje
específico de la batería. Dispositivos médicos. Este producto puede emitir campos electromagnéticos. Contiene componentes magnéticos que pueden interferir con
marcapasos, desfibriladores u otros dispositivos médicos. Estos campos electromagnéticos pueden interferir con marcapasos u otros dispositivos médicos. Consulte con su
médico antes de usar este producto si tiene un dispositivo médico, incluidos marcapasos. Si sospecha que este producto está interfiriendo con un dispositivo médico, deje de
usarlo inmediatamente y consulte con su médico. Limpieza. Apague y desconecte este producto de la corriente antes de limpiarlo o llevar a cabo mantenimiento. Limpie y
seque este producto inmediatamente si entra en contacto con líquidos o cualquier otro tipo de contaminante. Utilice un trapo suave sin pelusa (microfibra). Evite que los puertos
o aberturas se mojen. Atmósferas explosivas. Obedezca todas las señales e instrucciones. No cargue ni utilice este producto en áreas con una atmósfera potencialmente
explosiva, incluidas áreas de repostar o áreas en las que el aire contiene sustancias químicas o partículas como grano, polvo o polvo metálico. Actividades de alto riesgo.
Este producto no está destinado para ser utilizado en casos en los que su mal funcionamiento pudiera causar la muerte, lesiones o daños medioambientales graves.
Interferencia de radiofrecuencia. Este producto ha sido diseñado, probado y fabricado para cumplir con las normas que regulan las emisiones de radiofrecuencia. Tales
emisiones del producto pueden afectar al funcionamiento de otros aparatos electrónicos y hacer que funcionen incorrectamente. Modelos: GENIUS10. Este dispositivo
cumple con el artículo 15 de las normas de la Comisión Federal de Comunicaciones (FCC). La operación está sujeta a las dos condiciones siguientes: (1) Este dispositivo puede
que no cause interferencias dañinas y (2) este dispositivo debe aceptar cualquier interferencia recibida, incluidas aquellas que puedan causar un funcionamiento no deseado.
NOTA: Este equipo ha sido probado y se ha demostrado que cumple con los límites para un dispositivo digital de clase A, conforme al artículo 15 de las normas de la FCC.
Estos límites están diseñados para proporcionar protección razonable contra interferencias dañinas en una instalación comercial. Este equipo genera, utiliza y puede irradiar
energía de radiofrecuencia y, si no se instala o utiliza de acuerdo con las instrucciones, puede causar interferencias perjudiciales a las comunicaciones por radio. Puede que
este equipo cause interferencias perjudiciales en un área residencial, en cuyo caso es posible que el usuario tenga que corregir la interferencia por su propia cuenta y riesgo.
Instrucciones de Uso
Modos de carga.
El GENIUS10 dispone de nueve (9) modos: modo de espera, 12 V, 12 V AGM, 12 V LITIO, 6 V, 6 V AGM, REPARACIÓN, SUMINISTRO y POTENCIA. Para algunos modos
de carga se debe presionar y mantener durante tres (3) a cinco (5) segundos para acceder al modo. Estos modos de “presionar y mantener presionado” son modos
de carga avanzados que requieren toda su atención antes de seleccionarlos. Es importante comprender las diferencias y el propósito de cada modo de carga. No
opere el cargador hasta que confirme el modo de carga adecuado para su batería. A continuación, se muestra una breve descripción:

ES
Modo Explicación
Standby
Mantener presionado
(3 segundos)
Sin energía
14,5 V | 10 A | Baterías de hasta 230 Ah
En el modo de espera, el cargador no se carga ni proporciona energía a la batería. Durante este modo se activa el ahorro de energía, extrayendo energía
microscópica de la toma eléctrica. En el modo de espera se encuentra habilitado el Canbus. Cuando se encuentre en modo de espera, se encenderá el
LED naranja de modo de espera.
Para cargar baterías de celdas húmedas, celdas de gel, electrolito líquido avanzado, sin mantenimiento y de calcio de 12 voltios, cuando se selecciona, el
LED blanco de 12 V se iluminará.
Para cargar baterías de celdas húmedas, celdas de gel, electrolito líquido avanzado, sin mantenimiento y de calcio de 6 voltios, Cuando se selecciona, el
LED blanco de 6 V se iluminará.
7,25 V | 10 A | Baterías de hasta 230 Ah
14,8 V | 10 A | Baterías de hasta 230 Ah
Para cargar baterías AGM de 12 voltios. Cuando se selecciona, el LED blanco de 12 V AGM se iluminará.
14,6 V | 10 A | Baterías de hasta 230 Ah
Para cargar baterías de iones de litio de 12 voltios, incluidas las de fosfato de hierro y litio. Cuando se selecciona, el LED azul de litio de 12 V se
encenderá. Para uso en baterías con sistemas de administración de baterías (BMS) únicamente.
Modo de potencia Para cargar baterías con una tensión inferior a 1 V. Mantenga presionado durante cinco (5) segundos para ingresar al modo de fuerza. El modo de carga
seleccionado operará bajo el modo de fuerza durante cinco (5) minutos antes de volver a la carga estándar en el modo seleccionado.
10 A | Baterías de hasta 230 Ah
Un modo avanzado de recuperación de la batería para reparar y almacenar baterías viejas, inactivas, dañadas, estratificadas o sulfatadas. Cuando se
seleccione, se iluminará y parpadeará un LED rojo.
16,5 V | 10 A | cualquier capacidad
Para cargar las baterías AGM avanzadas de 6 voltios, lo que requiere un voltaje de carga superior al normal, cuando las seleccione, se iluminará un LED
de color blanco.
7,40 V | 10 A | baterías de hasta 230 Ah
Se convierte en una fuente de alimentación de CC para alimentar cualquier dispositivo de 12 V en CC, como un inflador de neumáticos, un cambiador de
aceite o un dispositivo de retención de memoria al reemplazar una batería. Cuando se seleccione, se iluminará un LED rojo.
13,6 V | 10 A | máximo de 12 A [Presione y mantenga presionado 3 segundos sin que las abrazaderas estén conectadas]
(Voltaje máximo calculado en 25 °C, el índice de amperaje es el volumen de amperaje cuando está por encima de 0 °C)
[Desde el modo de suspensión, mantenga presionado 3 segundos teniendo las abrazaderas conectadas a la batería]
Mantener presionado
(5 segundos)
Mantener presionado
(3 segundos)

Uso de 6 V [Mantener presionado durante 3 segundos]
El modo de carga de 6 V está diseñado solo para baterías de ácido-plomo de 6 voltios, como las baterías de celda húmeda, de celda de gel, electrolito líquido avanzado,
sin mantenimiento y de calcio. Presionar y mantener presionado durante tres (3) segundos para acceder al modo de carga de 6 V. Consultar con el fabricante de la
batería antes de usar este modo.
Uso de litio de 12 V.
El modo de carga de litio de 12 V está diseñado solamente para baterías de iones de litio de 12 voltios, incluidas las de fosfato de hierro y litio.
PRECAUCIÓN. UTILICE ESTE MODO CON CUIDADO EXTREMO. EL MODO DE FUERZA DESACTIVA LAS FUNCIONES DE SEGURIDAD Y LA CORRIENTE ACTIVA ESTÁ
PRESENTE EN LOS CONECTORES. ASEGÚRESE DE QUE TODAS LAS CONEXIONES SE HAGAN ANTES DE ENTRAR EN EL MODO DE FUERZA, Y NO JUNTE LAS
CONEXIONES. RIESGO DE CHISPAS, INCENDIO, EXPLOSIÓN, DAÑO A LA PROPIEDAD, LESIONES Y MUERTE.
Uso de fuente de 13,6 V[Presione y mantenga presionado 3 segundos sin que las abrazaderas estén conectadas]
La fuente de 13,6 V convierte el cargador en una fuente de alimentación de CC de voltaje constante y corriente constante. Se puede utilizar para alimentar dispositivos de 12
V de CC, incluidos infladores de neumáticos, cambiadores de aceite, cafeteras, calentadores de asientos y más. Como fuente de alimentación, también se puede utilizar para
conservar la configuración del ordenador de a bordo del vehículo durante la reparación o la sustitución de la batería. El suministro de 13,6 V proporciona 13,6 voltios a 10 A con
protección contra sobrecarga a 12 A (máximo).
PRECAUCIÓN. UTILICE ESTE MODO CON MUCHO CUIDADO. EL MODO DE SUMINISTRO DESACTIVA LAS FUNCIONES DE SEGURIDAD Y LA ELECTRICIDAD ESTÁ PRESENTE EN
LOS CONECTORES. NO TOQUE LAS CONEXIONES QUE ESTÉN JUNTAS. EXISTE RIESGO DE QUE SE PRODUZCAN CHISPAS, DE QUE SE INICIE UN INCENDIO, DE QUE HAYA UNA
EXPLOSIÓN, DE QUE SE PRODUZCAN DAÑOS EN LA PROPIEDAD, LESIONES E INCLUSO LA MUERTE.
Uso de la reparación de 12 V (presionar y mantener presionado)[Desde el modo de suspensión, mantenga presionado 3 segundos teniendo las abrazaderas
conectadas a la batería]
La reparación de 12 V es un modo avanzado de recuperación de la batería para reparar y almacenar baterías viejas, inactivas, dañadas, estratificadas o sulfatadas. No todas
las baterías se pueden recuperar. Las baterías tienden a dañarse si se mantienen con poca carga o nunca se les da la posibilidad de recibir una carga completa. Los problemas
más comunes de la batería son la sulfatación y la estratificación de la misma. Tanto la sulfatación como la estratificación de la batería aumentan de manera artificial el voltaje del
circuito abierto de la batería, lo que hace que la batería parezca estar completamente cargada, al mismo tiempo que proporcionan una capacidad baja. Utilice la reparación de
12 V en un intento de revertir estos problemas. Para obtener resultados óptimos, lleve la batería de 12 voltios por un ciclo de carga completo, llevando la batería a plena carga,
antes de usar este modo. La reparación de 12 V puede tardar hasta cuatro (4) horas en completar el proceso de recuperación, y volverá al modo de espera una vez completado.
PRECAUCIÓN. UTILICE ESTE MODO CON CUIDADO. ESTE MODO ES SOLO PARA BATERÍAS DE ÁCIDO-PLOMO DE 12 VOLTIOS. ESTE MODO UTILIZA UN VOLTAJE DE CARGA
ALTO Y PUEDE CAUSAR ALGUNA PÉRDIDA DE AGUA EN LAS CÉLULAS DE LAS BATERÍAS HÚMEDAS (LÍQUIDAS). TENGA EN CUENTA QUE ALGUNAS BATERÍAS Y COMPONENTES
ELECTRÓNICOS PUEDEN SER SENSIBLES A ALTOS VOLTAJES DE CARGA. PARA MINIMIZAR LOS RIESGOS DE LOS COMPONENTES ELECTRÓNICOS, DESCONECTE LA BATERÍA
ANTES DE USAR ESTE MODO.
Modo de potencia [Mantener presionado durante 5 segundos]

ES
El modo de fuerza permite que el cargador comience a cargarse manualmente cuando el voltaje de la batería conectada es demasiado bajo para ser detectado. Si el voltaje de
la batería es demasiado bajo para que el cargador lo detecte, mantenga presionado el botón de modo durante 5 segundos para activar el modo de fuerza, luego seleccione el
modo apropiado. Todos los modos disponibles parpadearán. Una vez que se selecciona un modo de carga, el LED de modo de carga y el LED de carga se alternarán entre sí, lo
que indica que el modo de fuerza está activo. Después de cinco (5) minutos, el cargador regresará a la operación de carga normal y la detección de bajo voltaje se reactivará.
PRECAUCIÓN.UTILICE ESTE MODO CON CUIDADO EXTREMO. EL MODO DE FUERZA DESACTIVA LAS FUNCIONES DE SEGURIDAD Y LA CORRIENTE ACTIVA ESTÁ
PRESENTE EN LOS CONECTORES. ASEGÚRESE DE QUE TODAS LAS CONEXIONES SE HAGAN ANTES DE ENTRAR EN EL MODO DE FUERZA, Y NO JUNTE LAS
CONEXIONES. RIESGO DE CHISPAS, INCENDIO, EXPLOSIÓN, DAÑO A LA PROPIEDAD, LESIONES Y MUERTE.
Conectar la batería
No conecte el cable de alimentación de corriente alterna hasta que haya hecho el resto de las conexiones. Averigüe la polaridad correcta de los terminales en la batería.
No establezca ninguna conexión con el carburador, las mangueras de combustible o placas delgadas de metal. Las siguientes instrucciones son para un sistema de tierra
negativo (el más común). Si su vehículo es un sistema de tierra positivo (muy infrecuente), siga las instrucciones en orden inverso.
1.)Conecte el conector positivo del terminal (rojo) al terminal positivo de la batería (POS, P, +).
2.)Conecte el conector negativo del terminal (negro) al terminal negativo de la batería (NEG, N, -).
3.)Conecte el cargador de la batería a una toma de corriente adecuada. No mire hacia la batería en el momento de realizar esta conexión.
4.)Al desconectar, hágalo en orden inverso, quitando primero el polo negativo (o el positivo primero en los sistemas de tierra positivos).

Inicio de la carga.
1.)Verifique el voltaje y la química de la batería.
2.)Asegúrese de que ha conectado los cables de arranque o conectores de terminal redondo correctamente y de que el cable de alimentación de corriente alterna
está enchufado a la toma de corriente.
3.)[Primer uso]El cargador comenzará en modo Standby, indicado por un led naranja. En Standby el cargador no suministra energía.
4.)Pulse el botón de modos para activar el modo de carga apropiado (pulse continuamente durante tres segundos para activar un modo avanzado de carga) para el
voltaje y la composición química de su batería.
5.)El led de modo iluminará el modo de carga seleccionado y los ledes de carga LED se iluminarán (dependiendo del estado de la batería) indicando que el proceso
de carga ha comenzado.
6.)Ahora el cargador se puede dejar conectado a la batería en todo momento para proporcionar carga de mantenimiento.
Memoria automática: El cargador tiene memoria automática incorporada y regresará al último modo de carga cuando se conecte. Para cambiar los modos
después del primer uso, presione el botón de modo.
Tiempos de carga.
El tiempo estimado para cargar una batería se muestra a continuación.
El tamaño de la batería (Ah) y su profundidad de descarga (DOD) afectan
considerablemente a su tiempo de carga. El tiempo de carga está medido
desde una profundidad promedio de descarga hasta una carga completa
de la batería, y tiene una finalidad de referencia únicamente. Los datos
reales pueden diferir debido a las condiciones de la batería. El tiempo
para cargar una batería descargada con normalidad está basado en
una DOD del 50 %. La temperatura también afectará a los tiempos
de carga. El GENIUS10 cuenta con compensación térmica que ajusta
automáticamente los perfiles de carga para maximizar el rendimiento
de carga.
Tiempos de carga.
Tamaño de la Batería Aproximado Tiempo de carga en Horas
6V 12V
Ah (amp hora)
20
40
80
100
230
1.5
3.0
6.0
7.0
17.3
1.5
3.0
6.0
7.0
17.3

ES
Entendiendo los LED de error.
Las condiciones de error serán indicadas por los siguientes LED.
LED Razón / Solución
Posible cortocircuito de la batería/la batería no mantendrá la carga. Lleve la batería a un profesional para su revisión.
El voltaje de la batería es demasiado alto para el modo de carga seleccionado. Compruebe la batería y el modo de carga.
Polaridad inversa. Invierta las conexiones de la batería.
El cargador se encuentra en modo de espera o el voltaje de la batería es demasiado bajo para que el cargador lo detecte.
La temperatura interna del cargador es demasiado alta / El cargador reanudará la función una vez que la temperatura interna del cargador baje.
La temperatura ambiente del cargador es demasiado fría / El cargador reanudará la función una vez que la temperatura ambiente del cargador
aumente.
LED Explicación
25 % LED
rojo
El LED de carga del 25 % parpadeará lentamente entre “on” (encendido) y “off” (apagado), cuando la batería esté cargada por
debajo del 25 %. Cuando la batería esté cargada al 25 %, el LED rojo de carga permanecerá fijo.
75 % LED
naranja
El LED de carga del 75 % parpadeará lentamente entre “on” (encendido) y “off” (apagado), cuando la batería esté cargada por
debajo del 75 %. Cuando la batería esté cargada al 75 %, el LED naranja de carga permanecerá fijo.
El LED de carga del 50 % parpadeará lentamente entre “on” (encendido) y “off” (apagado), cuando la batería esté cargada por
debajo del 50 %. Cuando la batería esté cargada al 50 %, el LED rojo de carga permanecerá fijo.
100 % LED
verde
LED verde parpadeante - Carga masiva completa, optimizando la batería para una vida más larga.
LED verde constante - Cuando la batería esté cargada al 100 %, el LED de carga permanecerá de color verde fijo.
50 % LED
rojo
Mantenimiento
LED verde
Una vez que la batería esté completamente cargada, el cargador continuará supervisando la batería y proporcionará un
mantenimiento y una optimización continuos. El LED de carga del 100 % pulsará “activar” y “desactivar” lentamente durante estos
ciclos. El cargador se puede dejar conectado a la batería de forma indefinida.
Significado de los ledes de carga.
Constante
Constante
Constante
Constante
Parpadeante

6.) LED de carga Indica el estado de carga de la batería conectada.
7.) LED de modo Indica el modo de carga en el que se encuentra actualmente el
cargador. Presionar el botón de MODO para recorrer los modos de carga.
8.) LED de modo “presionar y mantener presionado” El botón de modo se
debe mantener presionado durante 3 segundos para acceder al modo.
9.) LED de modo de suministro Se ilumina en rojo constante cuando se
selecciona el modo de suministro.
10.) LED de modo de reparación Se ilumina en rojo constante cuando se
selecciona el modo de reparación.
6
5
7
1
8
3
2
4
10
2
2
9
1.) Botón de modo Presionar para recorrer los modos de carga.
2.) LED de error de sobretensión Se ilumina en rojo constante; el voltaje de
la batería se encuentra por encima del voltaje de protección.
3.) LED de batería en malas condiciones Se ilumina en rojo constante
cuando la batería conectada no retiene la carga.
4.) LED de polaridad inversa Se ilumina en rojo constante cuando se detecta
una polaridad inversa.
5.) LED de espera Se ilumina cuando el cargador se encuentra en modo de
espera, el cargador no se está cargando ni proporciona energía a la batería.

ES
3 años sin complicaciones
The NOCO Company (“NOCO”) garantiza que este producto (el “Producto”) está libre de defectos de materiales y mano de obra por un periodo de Tres (3) años desde la fecha
de compra (el “Periodo de garantía”). En el caso de los defectos que se comuniquen durante el Periodo de garantía, NOCO, según su criterio y en función del análisis del
departamento de soporte técnico de NOCO, reparará o sustituirá los Productos defectuosos. Las piezas y los productos de recambio serán nuevos o reacondicionados, y su
función y rendimiento serán comparable a los de la pieza original y estarán garantizados durante el resto del Periodo de garantía original.
LA RESPONSABILIDAD DE NOCO BAJO ESTA GARANTÍA LIMITADA SE CIRCUNSCRIBE EXPRESAMENTE A REEMPLAZO O REPARACIÓN. HASTA DONDE LO PERMITA LA
LEY, NOCO NO SE RESPONSABILIZARÁ, NI ANTE CUALQUIER COMPRADOR DEL PRODUCTO NI ANTE TERCERAS PARTES, DE GASTOS, DAÑOS O PÉRDIDAS DE NINGUNA
CLASE, YA SEAN ESTOS IMPREVISTOS, INDIRECTOS O ESPECIALES, INCLUYENDO, SIN LIMITACIÓN, LA PÉRDIDA DE BENEFICIOS, DAÑOS A LA PROPIEDAD O LESIONES
PERSONALES, COMOQUIERA QUE HAYAN SIDO CAUSADOS, INCLUSO SI NOCO TUVIERA CONOCIMIENTO DE LA POSIBILIDAD DE DICHOS DAÑOS. LA GARANTÍA LIMITADA
120-240 VAC, 50-60Hz
120-240 VAC, 50-60Hz
150 W Max
Vario
10A (12V), 10A (6V))
1V (12V), 1V (6V)
<0.5mA
-20°C to +40°C
6V, 12V
Wet, Gel, MF, CA, EFB, AGM, Calcio, Litio
Hasta 230Ah (12V), Mantiene todos los tamaños de baterías
IP65
Convección natural
7.1 x 3.6 x 2.3 Pulgadas (18 x 9.1 x 5.8 cm)
3.33lb
Technical Specifications.
Voltaje de entrada CA:
Voltaje normal de trabajo CA:
Potencia de salida:
Voltaje de carga:
Corriente de carga:
Detección de bajo voltaje:
Corriente de carga:
Temperatura ambiente:
Tipo de baterías:
Química de la batería:
Capacidad de la batería:
Protección de la cubierta:
Enfriamiento:
Dimensiones (largo x ancho x alto):
Peso:
Especificaciones técnicas

AQUÍ ESTABLECIDA SUSTITUYE Y EXCLUYE AL RESTO DE GARANTÍAS QUE NO SE MENCIONEN EN ESTE DOCUMENTO, YA SEA DE FORMA EXPRESA O IMPLÍCITA POR LEY O
POR OTROS MEDIOS, INCLUYENDO CUALQUIER GARANTÍA IMPLÍCITA DE COMERCIABILIDAD O IDONEIDAD PARA UN PROPÓSITO PARTICULAR PERO SIN LIMITARSE A ELLA,
Y AQUELLAS QUE SURJAN DE LAS ACTIVIDADES DE VENTA, USO O COMERCIO. EN EL CASO DE QUE CUALQUIER LEY APLICABLE IMPONGA GARANTÍAS, CONDICIONES U
OBLIGACIONES QUE NO PUEDEN SER EXCLUIDAS O MODIFICADAS, ESTE PÁRRAFO SE APLICARÁ HASTA DONDE LO PERMITA LA LEY.
Esta garantía está constituida únicamente para el beneficio del comprador original del producto en NOCO o en un proveedor o distribuidor aprobado por NOCO, y no es
atribuible ni transferible. Para reclamar un artículo en garantía, el comprador debe: (1) solicitar y obtener un número de autorización de devolución de mercancía (“RMA”) y la
información del lugar de devolución (“Return Location”) del servicio de asistencia de NOCO, enviando un correo electrónico a [email protected] o llamando al 1.800.456.6626; y
(2) enviar el producto, incluyendo el número de “RMA” y el recibo del lugar de devolución. NO ENVÍE NINGÚN PRODUCTO SIN ANTES HABER OBTENIDO UN NÚMERO DE RMA
DEL SERVICIO DE ASISTENCIA DE NOCO.
El comprador se responsabiliza (y debe abonar por adelantado) todos los gastos de embalaje y transporte para hacer uso del servicio de garantía.
NO OBSTANTE LO ANTERIOR, ESTA GARANTÍA SIN COMPLICACIONES ES NULA Y NO SE APLICA A PRODUCTOS QUE: (a) se utilicen incorrectamente, se manipulen
incorrectamente, estén sujetos a abusos o a manipulación imprudente, accidentes, guardados inadecuadamente u operados bajo condiciones de voltaje, temperatura, choque
o vibración excesivos más allá de las recomendaciones de NOCO para un uso seguro y efectivo; (b) se instalen, operen o mantengan de forma inapropiada; (c) sean/fueran
modificados sin el consentimiento expreso por escrito de NOCO; (d) hayan sido desmontados, alterados o reparados por alguien distinto a NOCO; (e) tengan defectos que
hayan sido comunicados después del Periodo de Garantía.
ESTA GARANTÍA SIN COMPLICACIONES NO CUBRE: (1) el uso y desgaste normal; (2) los daños estéticos que no afecten a su funcionalidad; o (3) a Productos a los que les
falte, haya sido alterado o se haya desfigurado el número de serie de NOCO.
CONDICIONES DE LA GARANTÍA SIN COMPLICACIONES
Estas condiciones solamente se aplican a los Productos bajo el Periodo de Garantía. La garantía sin complicaciones es nula por el tiempo transcurrido desde la fecha de
compra (tiempo transcurrido desde la fecha del número de serie, si no hay prueba de compra) o por las condiciones enumeradas anteriormente en este documento. Devuelva
el Producto con la documentación apropiada.
Con recibo:
0-3 años: SIN cargo. Con el comprobante de compra, el período de garantía comienza en la fecha de compra.
SIN recibo:
0-3 años: SIN cargo. SIN el comprobante de compra, el período de garantía comienza en la fecha del número de serie.
Le recomendamos registrar su producto de NOCO para cargar el comprobante de compra y extender la fecha de vigencia de la garantía. Puede registrar su producto de NOCO
en línea en: no.co/register. Si tiene alguna pregunta con respecto a su garantía o producto, póngase en contacto con el servicio de asistencia de NOCO (correo electrónico y
número de teléfono arriba) o escriba a: The NOCO Company, en 30339 Diamond Parkway, #102, Glenwillow, OH 44139 EE. UU.

用户指南及产品保证
危险
使用本产品前请详阅所有安全守则。请遵守安全守则,否则可能酿成以下后果:触电、
爆炸、火灾,因而严重人身伤害、死亡、或财物损失。
触电。 本产品乃电器用品,如使用不当,可能引起触电而造成严重人身伤害。切勿割
断电源线。切勿弄湿或把本产品浸泡水中。
爆炸。 本产品用在未经监管、不兼容、损坏的电池上可能会引起爆炸。使用本产品时
必须有人在旁。切勿尝试发动已经损毁或已经冻结的电池。本产品只可用在推荐电压的
电池上。请在空气流通之处使用本产品。
火灾。 本产品乃可产生高热的电器,可能会导致烫伤。请勿用异物掩盖本产品。使
用本产品时,请勿吸烟或接近任何电火花或火焰源头。切勿把本产品安置在任何易燃
物附近。
眼睛受伤。 操作本产品时,请佩戴护目镜。电池一旦爆炸,碎片可能四处飞溅。电池
酸液可刺激眼睛及皮肤。假如不慎让电池酸液接触到眼睛或皮肤,请马上用清洁流水冲
洗接触部位并且通知毒物控制中心。
爆炸性气体。 在铅酸液体附近作业十分危险。即使电池运作正常,亦会产生爆炸性气
体。为降低电池爆炸的危险性,请严格遵守所有本产品的安全指引、电池生产商以及其
他阁下准备在电池附近使用的所有装置的生产商所印发的安全指引。请留心细看发动机
上以及这些装置上印有的注意图示。
详细资料以及客户服务请浏览:
中文
GENIUS10AU

关于GENIUS10 NOCO GENIUS10代表着市场上一些最具创新性和最先进的技术,让每次充电变得更简单。它很可能是您使用过的
最安全有效的充电器。GENIUS10可以为所有类型的6V和12V铅酸电池充电,包括锂电池(LiFePO4)、湿电池(富液式)、胶体电
池、MF(免维护)、CA(钙)、EFB(增强型富液式)和AGM(吸附式玻璃纤维隔板)电池。可充电的电池容量高达230安培小时,
并且支持所有电池尺寸。 开始使用 在使用这个充电器之前,仔细阅读电池制造商的具体预防措施和电池的建议充电率。在进行充电前
务必参考电池使用说明书,确定电池的电压和化学性质。 安装。 记住与电池的距离很重要。充电器的直流电缆长度(使用电池夹或孔
眼终端连接器)约为77.7英寸(1973.6毫米)。在连接之间留出12英寸(304毫米)的间隙。 【加州65号提案】 电池极柱、端子、以
及有关配件均含有化学物质,包括铅。加州政府认定以上物品能导致癌症、先天性缺陷以及其他生殖系统损害。 个人使用注意事项。
本产品只能在拟定用途上使用。为预防紧急情况,请在他人能听见使用者呼救或在能马上营救使用者的邻近地点使用本产品。预防电
池酸液溅伤,请在作业现场预先准备清洁水源及肥皂。在电池附近作业时请佩戴完备的护目镜及防护服。处理电池及有关物质后必须
洗净双手。进行有关电池的工作时切勿处理或佩戴包括工具、手表、饰物在内的任何金属物件。万一金属物件跌落电池上,可能会激
发火花或引起短路,导致能造成人身伤害、死亡或财物损失的触电、火灾、爆炸。 未成年使用者。 如“购买者”打算让未成年人使用本
产品,购买本产品的成年人必须同意在让任何未成年人使用本产品之前,向该当未成年人提供详细指引及警告。如“购买者”未能遵守
此一条款,“购买者”必须负上全责,并且同意如该当未成年使用者误用或滥用本产品,将保障NOCO不会因而蒙受损失。 窒息危险。
本产品配件有潜在儿童窒息危险。切勿在没有成年人监管的情况下让儿童接触本产品及任何配件。本产品并非玩具。 处理。请小心
处理本产品。碰撞可能损毁本产品。切勿使用包括外壳有裂痕或电线损毁等损毁的产品。切勿把有损毁的电源线与本产品一起使用。
潮湿和液体可能会损毁本产品。切勿在任何液体附近处理本产品或任何电气部件。请在干燥环境下操作及储存本产品。如本产品被沾
湿,切勿操作本产品。如本产品在操作中被沾湿,请马上切断与汽车电池的连接及停止使用。切断连接时切勿拉扯电线。 改装。 切勿
尝试更改、改装或修理本产品任何部分。分解本产品可以导致人身伤害、死亡或财物损失。如本产品已经损毁、发生故障、或接触过
任何液体,请停止使用并通知NOCO。任何对本产品的改动将令保证失效。 配件。 本产品只认可与NOCO原厂配件一起使用。如与非
NOCO认可配件一起使用,NOCO对使用者的安全或损伤概不负责。 使用地点。 避免让电池酸液接触本产品。切勿在密室内或空气不
流通的地方操作本产品。切勿把电池放在本产品上。安放电缆在不会意外被可活动的汽车零件(包括发动机罩及车门)、发动机零件
(包括风扇叶、皮带、和皮带轮)损毁、以及能避开其他可能导致人身伤害或死亡的潜在危险物的位置。 操作温度 此产品是要在介乎
摄氏零下4华氏度和104华氏度(零下20摄氏度和40摄氏度)环境温度下使用。切勿在这个温度范围以外操作。切勿对冰冻的电池进行
充电。如果电池变得过暖,立即停止使用此产品。 存放 切勿在有高浓度的灰尘或空气中物质的地方使用或保存此产品。把产品存放在
平坦安全的表面,使它不容易掉下来。把它存放在干燥位置。存储温度介乎摄氏-20度至25度(罩下温度平均值)。在任何情况下都
不得超过80ºC。 兼容性 本产品只与6V和12V铅酸、AGM和锂电池兼容。不要尝试把它用于任何其他类型的电池。对其他化学性质的
电池进行充电,可能导致受伤、死亡或财产损坏。在尝试对这些电池进行充电前,先联系电池制造商。 医疗设备 切勿对起搏器或其他
医疗设备进行充电。此产品可能会发出电磁场。此产品包含可能干扰起搏器、除颤器或其他医疗设备的磁性元件。这些电磁场可能干
重要安全警告

ZH
扰起搏器或其他医疗设备。如果你有包括起搏器等任何医疗设备,在使用此产品前先咨询医生。你若怀疑此产品正在干扰医疗设备,
立即停用并咨询你的医生。 清洁。 进行任何保养或清洁工作前,请先切断本产品的电源。如本产品曾接触液体或其他污染物,请马
上清洁及抹干本产品。请使用不起毛(超细纤维)软布。请勿让开口处接触水分。 易爆气体环境。 请遵守所有标示及指引。切勿在
潜在易爆气体环境下操作本产品,包括加油区或带有化学物或谷物、尘埃、或金属粉末等的地点。 高度危险性活动。 请勿在如产品故
障有可能导致人身伤害、死亡、或严重破坏环境的地点使用本产品。无线电频率干扰。 本产品根据无线电频率条例设计、测试、和制
造。本产品发出的无线电频率有可能对其他电子装置的操作造成负面影响及使其发生故障。 型号:GENIUS10。 本装置符合FCC Part
15条例。操作本装置必须符合以下两个条件:(1)本装置不可造成有害干扰,(2)本装置必须能承受任何干扰,包括有可导致不良
操作的干扰。注:本装置经过测试,证明符合FCC Part 15条例对A类数码装置所规定的限制。此项限制的设计是为了保护在商业环境
中操作的装置尽量不受有害干扰。本装置产生、使用、并且能发出无线电频率能量。安装及使用本装置时,请务必遵守说明书,否则
可能对无线电通讯造成有害干扰。在住宅区操作本装置很可能会造成有害干扰,使用者需要自费修正所造成的干扰。
使用方法:
充电模式
GENIUS10有九(9)种模式:待机,12V,12V AGM,12V锂电池,6V,6V AGM +,修复模式,供电模式和FORCE。 必须按一些充
电模式三(3)到五(5)秒才能进入此模式。 这些“长按”模式是高级充电模式,需要您在选择前充分注意。 了解每种充电模式的特
性和用途非常重要。 在确认电池的正确充电模式之前,请勿操作充电器。 以下是简短说明:

模式 说明
Standby
按下并保持
(3秒)
没有电力
14.5V | 10A | 高达230Ah电池
在待机模式下,充电器没有充电或为电池提供任何电源。在这种模式下,节能会被激活,从电源插座中获取极少的电
力。Canbus总线在待机模式下启用。当处于待机状态时,橙色待机LED将亮起。
用于为12V湿电池、胶体电池、增强型富液式电池、免维护电池和钙电池充电。当选择时,12V白色LED将亮起。
用于为6V湿电池、胶体电池、增强型富液式电池、免维护电池和钙电池充电。当选择时,6V白色LED将亮起。
7.25V | 10A | 高达230Ah电池
14.8V | 10A | 高达230Ah电池
用于为12V AGM电池充电。当选择时,12V白色LED将亮起。
14.6V | 10A | 高达230Ah电池
用于为12V锂离子电池充电,包括磷酸铁锂。当选择时,12V Lithium蓝色LED将亮起。只用于包含电池管理系统(BMS)
的电池。
Force模式 用于为电压低于1V的电池充电。按下并保持5秒进入Force模式。所选充电模式将在Force模式下运行5分钟,然后回
到标准充电模式。
10A Bulk | 高达230Ah电池
按下并保持
(5秒)
一种先进的电池回收模式,用于修复和储存旧的、闲置的、损坏的、分层的或硫酸化的电池。当选择时,红色LED将亮
起并闪烁。
16.5V | 10A | 任何容量
用于给6V高级AGM电池充电,需要高于正常水平的充电电压。当选择时,白色的LED将亮起。
7.40V | 10A | 高达230Ah电池
转换为直流电源,为任何12VDC设备供电,如轮胎充气机、换油器或在更换电池时作为记忆保持器。当选择时,红色
的LED将亮起。
13.6V | 10A | 最高12A [请在没有连接夹子的情况下按住 3 秒钟]
(在25°C测量的峰值电压,电流额定值为高于0°C的大电流)
[在夹子连接电池后,请在待机状态下按住 3 秒钟]
按下并保持
(3秒)

ZH
使用6V。 [按下并保持3秒]
6V充电模式专为6V铅酸电池而设计,比如湿电池、胶体电池、增强型富液式、免维护电池和钙电池。按下并保持3秒进入6V充电模
式。使用此模式前,请咨询电池制造商。
使用12V Lithium。
12V Lithium充电模式专为12V锂离子电池而设计,包括磷酸铁锂。
警告。 使用此模式时请格外小心。此模式仅适用于拥有内置电池管理系统(BMS)的12V锂电池。锂离子电池以不同的方式制造和构
造,有些可能包含或不包含电池管理系统(BMS)。充电前请咨询锂电池制造商,并询问建议的充电速度和电压。一些锂离子电池可能
不稳定,不适合充电。
使用13.6V电源。[请在没有连接夹子的情况下按住 3 秒钟]
13.6V电源将充电器转换为恒流、恒压直流电源。可用于为12VDC设备供电,包括轮胎充气机、换油器、咖啡壶、座椅加热器等。作
为电源,它还可以用于在电池维修或更换期间保留车辆的车载电脑设置。13.6V电源在10A时提供13.6V电压,12A(最大)时提供过载
保护。
警告。 使用此模式请极端小心。供电模式会禁用安全功能,连接器上存在活跃电流。请勿让连接器相互接触。否则存在打火、火灾、
爆炸、财产损失、受伤和死亡的风险。
使用12V修复。 [在夹子连接电池后,请在待机状态下按住 3 秒钟]
12V修复一种先进的电池回收模式,用于修复和储存旧的、闲置的、损坏的、分层的或硫酸化的电池。并不是所有电池都能回收。如
果保持低电量和/或从未给予充满电的机会,电池往往会损坏。最常见的电池问题是电池硫酸化和分层。电池硫酸化和分层都会人为
地提高电池的开路电压,在提供低容量的同时,使电池看起来像是已充满电。使用12V修复来解决这些问题。为了获得最佳效果,请
在使用此模式之前,让12V电池经历一个完整的充电循环,使蓄电池充满电。12V修复可能需要4小时才能完成恢复过程,完成后将返
回待机状态。
警告。使用此模式时请小心。此模式仅适用于12V铅酸电池。此模式使用高充电电压,并可能导致湿(富液式)电池中的水分流失。请
注意,一些电池和电子产品可能对高充电电压敏感。为尽量降低对电子产品造成的风险,在使用此模式前请断开电池。
Force模式 [按下并保持5秒]
Force模式使充电器能够在连接电池电压过低而无法检测到时手动开始充电。如果电池电压过低,充电器无法检测到,按下模式按钮并
保持5秒钟,以激活Force模式,然后再选择适当的模式。所有可用模式都将闪烁。一旦选择了充电模式,充电模式LED和充电LED将
交替显示,表明Force模式已激活。5分钟后,充电器将恢复正常充电操作,低电压检测将重新激活。

警告。 使用此模式时请格外小心。Force模式禁用安全功能,连接器上存在带电电源。确保在进入Force模式之前完成了所有连接,切
勿触摸连接。存在火花、火灾、爆炸、财产损坏、伤害和死亡的风险。
连接到电池
在其他所有连接都完成之前,切勿把AC电源插头连接。确定电池上电池终端的极性正确。切勿对化油器、燃料管路,或者薄金属板件
作出任何连接。以下的说明是关于负极接地系统(最普遍)。如果你的车辆采用正极接地系统(罕见),按照和以下说明相反的步骤
进行连接。
1.) 将孔式接头插接器的正极(红色)连接到电池正极端(POS,P,+)。
2.) 将孔式接头插接器的负极(黑色)连接到电池负极端(NEG,N,-)。
3.) 将电池充电器连接到合适的电源插座。连接时不要面对电池。
4.) 切断连接时,请按照相反顺序解除连接,先解开负极端子(如汽车采用正极接地线系统,请先解开正极端子)。
开始进行充电
1.) 检查电池的电压和化学性质
2.) 确认已正确连接电池夹或孔眼端子连接器,并且交流电源插头已插入电源插座。
3.) [第一次使用] 充电器将以橙色 LED 指示的待机模式启动。在待机状态下,充电器不会提供任何电源。
4.) 请按模式按钮切换至适合您电池电压和化学成分的充电模式(按住三秒钟以进入高级充电模式)。
5.) 所选充电模式的模式 LED 将会点亮,同时指示充电过程已开始的充电 LED 将会点亮(取决于电池健康状况)。
6.) 充电器现在可以一直保持和电池连接的状态,进行维护充电。
自动记忆: 充电器内置自动记忆功能,连接后将返回到上次的充电模式。首次使用后如需更改模式,请按模式按钮。

ZH
充电时间。
电池充电的估计时间如下所示。电池的尺寸(Ah)和放电深
度(DOD)对其充电时间有很大影响。充电时间基于对充满
电的电池的平均放电深度,仅供参考。实际数据可能因
电池状况而有所不同。给正常放电的电池充电的时间基
于50%的DOD。温度也将影响充电时间。GENIUS10具有
热补偿功能,可自动调整充电模式,以最大限度地提高
充电性能。
充电时间。
电池大小 以小时为单位的大约充电时间
6V 12V安时(安培小时)
20
40
80
100
230
1.5
3.0
6.0
7.0
17.3
1.5
3.0
6.0
7.0
17.3

了解错误LED。
错误情况将由以下LED指示。
LED灯 原因/解决方
可能电池短路/电池无法充电。请专业人员检查电池。
电池电压对于选择的充电模式而言过高。检查电池和充电模式。
极性颠倒。颠倒电池连接。
充电器处于待机模式或电池电压过低,充电器无法检测到。
充电器内部温度过高/一旦充电器内部温度下降,充电器将恢复运行。
充电器环境温度过低/一旦充电器环境温度升高,充电器将恢复运行。
LED灯 说明
25% 红色
LED
当电池电量低于25%时,25%充电LED将缓慢地跳动“开”和“关”。当电池电量达到25%时,红色的充电
LED将变成稳定状态。
75% 橙色
LED
当电池电量低于75%时,75%充电LED将缓慢地跳动“开”和“关”。当电池电量达到75%时,橙色的充电
LED将变成稳定状态。
当电池电量低于50%时,50%充电LED将缓慢地跳动“开”和“关”。当电池电量达到50%时,红色的充电
LED将变成稳定状态。
100% 绿
色LED
跳动的绿色LED - 大电流充电完成,优化电池,延长使用寿命。
稳定的绿色LED - 当电池电量达到100%时,充电LED将变成稳定的绿色。
50% 红色
LED
维护 绿色
LED
电池充满电后,充电器将继续监测电池,并提供持续的维护和优化。在这些周期中,100%充电LED将缓慢
地跳动“开”和“关”。充电器可以无限期地与电池保持连接。
了解充电LED灯
稳定
稳定
稳定
稳定
闪烁

ZH
6.) 充电LED 指示已连接电池的充电状态。
7.) 模式LED 指示充电器当前所处的充电模式。按“模式”按钮
可循环切换充电模式。
8.) [ 按下并保持 ] 模式LED 模式按钮必须按下并保持3秒才
能进入模式。
9.)电源模式LED 当选择电源模式时,亮起稳定的红色。
10.) 修复模式LED 当选择修复模式时,亮起稳定的红色。
6
5
7
1
8
3
2
4
10
2
2
9
1.) 模式按钮 按下可循环切换充电模式。
2.) 过电压错误LED 亮起稳定的红色;电池电压高于保护电
压。
3.) 电池故障LED 当连接的电池不充电时,亮起稳定的红色。
4.) 极性颠倒LED 当检测到极性颠倒时,亮起稳定的红色。
5.) 待机LED 当充电器处于待机模式、充电器未充电或向电池
提供任何电源时亮起。

AC输入电压:
AC工作电压:
输出功率:
充电电压
充电电流:
低电压检测:
电流损耗:
环境温度:
电池类型:
电池性质:
电池容量:
外壳防护:
冷却:
尺寸(长x宽x高)
重量:
120-240 VAC, 50-60Hz
120-240 VAC, 50-60Hz
150 W(最大)
多样
10A (12V), 10A (6V)
1V (12V), 1V (6V)
<0.5mA
零下20摄氏度至40摄氏度
6V, 12V
湿型、胶体、免维护、CA、增强型注水式、AGM型、钙、Lithium
高达230安时,支持所有大小的电池
IP65
自然对流
4.6 x 2.9 x 1.9 英寸
3.33磅
技术规格

ZH
3 年无忧保修
NOCO 保证此产品(“产品”)将于购买日期起计三 (3)年(“保修期”)内不会有任何材料和工艺上的缺陷。在保修期内报告的
缺陷,NOCO将有权决定修理或更换有缺陷的产品,决定视乎NOCO的技术支持分析而定。替代部件和产品将是新而合用的,
在功能和性能上和原件相若,并在原先保修期的剩余时间内得到保证。
NOCO的法律责任明确地限于交换或修理。在法律允许的最大程度内,本产品的购买者或第三者就任何特殊、间接、相应或惩
戒性损害,包括但不限于,与产品有任何关连的损失利润、财物损失、或人身伤害,无论其发生原因为何,即使NOCO认知上
述损失发生的可能性,NOCO毋须对此赔偿负责。此保证代替并排除所有其他明示、隐含、法定或其他保证,包括但不限于隐
含的可销售性及特殊用途合适性保证,及因交易过程、按惯例或业界常规而伴随的保证。如任何适用法例施加不能排除或更
改的保证、条件或义务,本段内容将适用至该当法例可容许的最大范围内。
这项保证仅为了向NOCO或者经NOCO核准的经销商或分销商获得此产品的最初购买者的利益作出,不可转授或转让。如要
提出保修申索,购买者必须:(1)发电邮到[email protected]或致电1.800.456.6626,向NOCO Support要求并取得一个退货授
权(“RMA”)号码和退货地点信息(退货地点);并且(2)把产品连同RMA号码和收据寄送到退货地点。切勿在没有先向NOCO
SUPPORT取得号码的情况下将产品送回。
原购买者必须负责(同时预付)把产品送出接受保证服务的所有包装及运送费用。
尽管有上述情况,无忧保修对下列产品无效和不适用:(a)使用不当、处理不当;遭到滥用或不小心的处理、意外;储存不
当;或者在极端电压、温度、震动或振动(超越NOCO对安全和有效使用所建议的程度)等情况下操作;(b)安装、操作或维
护不当;(c)在没有NOCO的明确书面同意下被改动;(d)曾经被NOCO以外的何人拆开、更改或修理;(e)其缺陷是在保修期过
后报告。
这项无忧保修并不适用于:(1)正常损耗;(2)没有影响功能性的表面损害;或者(3)其NOCO序列号丢失、被更改或损坏的产
品。
无忧保修条件
这些条件仅于保修期间适用于产品。这项无忧保修因为超过从购买日期起计的时限(如无购买证明,时限从序列号日期起
计),或者本文件先前列出的情况而无效。将产品连同适当文件返还
有收据:

0至3年:免费。有购买证明。保修期从购买日期起计。
无收据:
0至3 年:免费。没有购买证明。保修期从序列号日期起计。
我们建议你为NOCO产品登记,以便上载购买证明和延长你的有效保修期。你可以在no.co/register为NOCO产品进行在线
登记。若有任何关于保修或产品的问题,联系NOCO Support(电邮地址和电话号码见于上面)或者寄信到:The NOCO
Company, at 30339 Diamond Parkway, #102, Glenwillow, OH 44139 USA.

用戶指南及產品保證
危險
使用本產品前請詳閱所有安全守則。請遵守安全守則,否則可能釀成以下後果: 觸
電、爆炸、火災,因而嚴重人身傷害、死亡、或財物損失。
觸電。 本產品乃電器用品,如使用不當,可能引起觸電而造成嚴重人身傷害。切勿割
斷電源線。切勿弄濕或把本產品浸泡水中。
爆炸。 本產品用在未經監管、不兼容、損壞的電池上可能會引起爆炸。使用本產品時
必須有人在旁。切勿嘗試發動已經損毀或已經凍結的電池。本產品只可用在推薦電壓的
電池上。請在空氣流通之處使用本產品。
火災。 本產品乃可產生高熱的電器,可能會導致燙傷。請勿用異物掩蓋本產品。使
用本產品時,請勿吸煙或接近任何電火花或火焰源頭。切勿把本產品安置在任何易燃
物附近。
眼睛受傷。 操作本產品時,請佩戴護目鏡。電池一旦爆炸,碎片可能四處飛濺。電池
酸液可刺激眼睛及皮膚。假如不慎讓電池酸液接觸到眼睛或皮膚,請馬上用清潔流水沖
洗接觸部位並且通知毒物控制中心。
爆炸性氣體。 在鉛酸液體附近作業十分危險。即使電池運作正常,亦會產生爆炸性氣
體。為降低電池爆炸的危險性,請嚴格遵守所有本產品的安全指引、電池生產商以及其
他閣下準備在電池附近使用的所有裝置的生產商所印發的安全指引。請留心細看引擎上
以及這些裝置上印有的注意圖示。
詳細資料以及客戶服務請瀏覽:
漢語
GENIUS10AU

關於GENIUS10。 NOCO GENIUS10代表了市場上最進階,最具創意的技術,我們讓充電從此變得方便簡單。 它可能是您用過的最安
全,最高效的充電器。GENIUS10可為各種類型的6V和12V鉛酸電池充電,包括鋰鐵電池 (LiFePO4),濕式電池(富液),膠體電池,
免維護電池,鉛鈣電池,增強型富液蓄電池和吸收式玻璃纖維網蓄電池充電。它適合為容量高達230安時的電池充電,適合維護各種
規格的電池。 準備。 在使用本充電器之前,請仔細閱讀電池製造商的具體注意事項和建議的電池充電率。在充電之前,請務必根據
電池使用者手冊確定電池的電壓和化學成分。 安裝。 安裝。務必要留心充電器與電池的距離。充電器的直流電纜長度約為77.7英吋
(1973.6 毫米),配備有電池夾或孔式端子連接器。允許連接處之間有12英吋(30 毫米)的空隙。 【加州65號提案】 電池極柱、端子、
以及有關配件均含有化學物質,包括鉛。加州政府認定以上物品能導致癌症、先天性缺陷以及其他生殖系統損害。 個人使用注意事項
本產品只能在擬定用途上使用。為預防緊急情況,請在他人能聽見使用者呼救或在能馬上營救使用者的鄰近地點使用本產品。預防電
池酸液濺傷,請在作業現場預先準備清潔水源及肥皂。在電池附近作業時請佩戴完備的護目鏡及防護服。處理電池及有關物質後必須
洗淨雙手。進行有關電池的工作時切勿處理或佩戴包括工具、手錶、飾物在內的任何金屬物件。萬一金屬物件跌落電池上,可能會激
發火花或引起短路,導致能造成人身傷害、死亡或財物損失的觸電、火災、爆炸。 未成年使用者。 如「購買者」打算讓未成年人士使
用本產品,購買本產品的成年人必須同意在讓任何未成年人士使用本產品之前,向該當未成年人士提供詳細指引及警告。如「購買者」
未能遵守此一條款,「購買者」必須負上全責,並且同意如該當未成年使用者誤用或濫用本產品,將保障NOCO不會因而蒙受損失。
窒息危險。 本產品配件有潛在兒童窒息危險。切勿在沒有成年人監管的情況下讓兒童接觸本產品及任何配件。本產品並非玩具。 處
理。請小心處理本產品。碰撞可能損毀本產品。切勿使用包括外殼有裂痕或電線損毀等損毀的產品。切勿把有損毀的電源線與本產品
一起使用。潮濕和液體可能會損毀本產品。切勿在任何液體附近處理本產品或任何電氣部件。請在乾燥環境下操作及儲存本產品。如
本產品被沾濕,切勿操作本產品。如本產品在操作中被沾濕,請馬上切斷與 汽車電池的連接及停止使用。切斷連接時切勿拉扯電線。
改裝。 切勿嘗試更改、改裝或修理本產品任何部分。分解本產品可以導致人身傷害、死亡或財物損失。如本產品已經損毀、發生故
障、或接觸過任何液體,請停止使用並通知NOCO。任何對本產品的改動將令保證失效。 配件。 本產品只認可與NOCO原廠配件一起
使用。如與非NOCO認可配件一起使用,NOCO對使用者的安全或損傷概不負責。 使用地點。 避免讓電池酸液接觸本產品。切勿在密
室內或空氣不流通的地方操作本產品。切勿把電池放在本產品上。安放電纜在不會意外被可活動的汽車零件(包括車頭蓋及車門)、
引擎零件(包括扇片、皮帶、和滑輪)損毀、以及能避開其他可能導致人身傷害或死亡的潛在危險物的位置。 工作溫度。 本產品的
設計工作環境溫度在-4°F 至 104°F (-20°C 至 40°C)之間,操作時請勿超過該溫度範圍。請勿給結凍的電池充電。如果電池過熱,請
立即停止使用本產品。 存儲。 請勿在灰塵或其他空氣傳播物質密度較大的區域使用或存放本產品。請將本產品存放在平坦安全的表
面,以免跌落。請將本產品存放在乾燥的地方。存儲溫度為-20°C至25°C(引擎罩下的平均溫度)。在任何情況下都不得超過80ºC。
相容性。 本產品僅適用于6V和12V的鉛酸、AGM及鋰電池。請勿嘗試將本產品用於任何其他類型的電池。為其他化學電池充電可能會
造成人身傷害、死亡或財產損失。在嘗試為電池充電之前,請與電池製造商聯絡。 醫療設備。 不要給心臟起搏器或其他醫療設備充
電。本產品可能會產生電磁場。本產品的磁性元件可能會干擾心臟起搏器、除顫器或其他醫療設備。這些電磁場可能會干擾心臟起搏
重要安全警告

ZH
器或其他醫療設備。如果您有任何醫療設備(包括心臟起搏器),請在使用前諮詢您的醫生。如果您懷疑本產品干擾了醫療設備,請
立即停止使用本產品並諮詢您的醫生。 清潔。 進行任何保養或清潔工作前,請先切斷本產品的電源。如本產品曾接觸液體或其他污
染物,請馬上清潔及抹乾本產品。請使用不起毛(超細纖維)軟布。請勿讓開口處接觸水分。 易爆氣體環境。 請遵守所有標示及指
引。切勿在潛在易爆氣體環境下操作本產品,包括加油區或帶有化學物或穀物、塵埃、或金屬粉末等的地點。 高度危險性活動。 請勿
在如產品故障有可能導致人身傷害、死亡、或嚴重破壞環境的地點使用本產品。無線電頻率干擾。 本產品根據無線電頻率條例設計、
測試、和製造。本產品發出的無線電頻率有可能對其他電子裝置的操作造成負面影響及使其發生故障。 型號:GENIUS10。 本裝置符
合FCC Part 15條例。操作本裝置必須符合以下兩個條件:(一)本裝置不可造成有害干擾,(二)本裝置必須能承受任何干擾,包
括有可導致不良操作的干擾。注:本裝置經過測試,證明符合FCC Part 15條例對A類數碼裝置所規定的限制。此項限制的設計是為了
保護在商業環境中操作的裝置盡量不受有害干擾。本裝置產生、使用、並且能發出無線電頻率能量。安裝及使用本裝置時,請務必遵
守說明書,否則可能對無線電通訊造成有害干擾。在住宅區操作本裝置很可能會造成有害干擾,使用者需要自費修正所造成的干擾。
使用方法:
充電模式。
GENIUS10有九(9)種模式:待機,12V,12V AGM,12V鋰電池,6V,6V AGM +,修復模式,供電模式和FORCE。必須按一些充
電模式三(3)到五(5)秒才能進入此模式。這些“長按”模式是高級充電模式,需要您在選擇前充分注意。了解每種充電模式的特性
和用途非常重要。在確認電池的正確充電模式之前,請勿操作充電器。以下是簡短說明:

在待機模式下,充電器沒有為電池充電或提供任何電力。在此模式下,節能功能會啟動,充電器從電源插座吸收微量電
力。在待機模式下Canbus被啟用。處於待機狀態時,橙色待機LED燈會亮起。
模式 說明
Standby
按住(3秒)
無電
14.5V | 10A | 容量不超過230安培小時的電池
用於給12伏濕電池、膠體電池、增大滿槽電池、免維護電池及鈣電池充電。選擇後,白色的12V LED燈會亮起。
用於給6伏濕電池、膠體電池、增大滿槽電池、免維護電池及鈣電池充電。選擇後,白色的6V LED燈會亮起。
7.25V | 1A | 容量不超過30安培小時的電池
14.8V | 10A | 容量不超過230安培小時的電池
用於給12伏AGM電池充電。選擇後,白色的12V AGM LED燈會亮起。
14.6V | 10A | 容量不超過230安培小時的電池
為12V鋰離子電池(包括鋰鐵電池)充電。選擇後,藍色的12V LED燈會亮起。僅限配有電池管理系統的電池使用。
強制模式 為電壓低於1V的電池充電。按住5秒,進入強行充電模式。選中的充電模式會在強行充電模式下運作5分鐘,然後返回選中
模式中的標準充電模式。
1A | 容量不超過230安培小時的電池
按住(5秒)
用於復原和儲存舊電池、閒置電池、損壞電池、分層電池或硫化電池的先進電池回收模式。選擇此選項後,一個紅色LED
燈會亮起並閃爍
16.5V | 1A | 任何容量的電池
用於給6伏高級AGM電池充電,這需要電壓高於正常充電電壓。選擇此選項後,一個白色LED燈會亮起。
7.40V | 10A | 不超過230安培小時的電池
此模式將充電器轉換為直流供電,用於為任何12V直流裝置供電,如輪胎充氣機、換油器,或在更換電池時用作記憶體保持
器。選擇此選項後,一個紅色指示燈會亮起。
13.6V | 10A | 不超過12安培 [請在沒有連接夾子的情況下按住 3 秒鐘]
(25°C時測量的峰值電壓,安培值是0 °C以上時的總安培)
[在夾子連接電池後,請在待機狀態下按住 3 秒鐘]
按住(3秒)

ZH
使用6V模式。 [按住3秒]
6V充電模式僅適用于6伏的鉛酸電池,如濕電池、膠體電池、增大滿槽電池、免維護電池和鈣電池。長按三(3)秒即可進入6V充電模
式。使用此模式之前,請諮詢電池製造商。
使用12V鋰電池充電模式。
12V鋰電池充電模式僅適用于12伏鋰電池,包括磷酸鐵鋰電池。
警告: 請謹慎使用此模式。此模式僅限配有內建電池管理系統的12V鋰電池使用。鋰離子電池的製造和生產方式各有不同,有的可能
沒有電池管理系統。充電前,請諮詢電池廠商,詢問推薦的充電速率與電壓。某些鋰離子電池可能不穩定,不適合充電。
使用13.6V供電。 [請在沒有連接夾子的情況下按住 3 秒鐘]
13.6V供電模式將充電器轉換為直流電源,用於給任何12V直流裝置供電,如輪胎充氣機、換油器、咖啡壺或座椅加熱器。作為電源,
它還可用於在電池維修或更換過程中保留車輛的車載電腦設定。13.6伏供電在10安培時提供13.6伏電壓,在12A(最高)時提供過載保
護。
警告: 使用此模式請極端小心。供電模式會禁用安全功能,連接器上存在活躍電流。請勿讓連接器相互接觸。否則存在打火、火災、
爆炸、財產損失、受傷和死亡的風險。
使用12V復原。 [在夾子連接電池後,請在待機狀態下按住 3 秒鐘]
12V復原是一種先進的電池復原模式,用於復原和存儲舊的、閒置的、損壞的、階層的或硫化的電池。並非所有電池都可以復原。倘
電池在較低的電量下存放並/或從未獲得完全充電,電池往往會損壞。最常見的電池問題是電池硫化和分層。電池硫化和分層都會人為
地提高電池的開路電壓,引致電池在提供較低容量的情況下顯現完全充電。不妨使用12V復原,嘗試解決這些問題。為了獲得最佳效
果,請在使用此模式之前,使12伏電池經歷一個完整的充電週期。12V復原可能需要多達四(4)個小時才能完成復原過程,在完成復原
後,會返回待機狀態。
警告:務必謹慎地使用此模式。此模式僅適用于12伏鉛酸電池。該模式採用了高充電電壓,可能引致濕(滿槽)電池出現一定的水損失。
請注意,一些電池和電子裝置可能對高充電電壓很敏感。在使用此模式之前,請切斷與電池的連接,以盡量減小對電子裝置造成的風
險。
強制模式 [按住5秒]
在連接的電池電壓過低,無法偵測到時,強行充電模式允許充電器手動開始充電。若電池電壓過低,無法偵測到,請按住模式按鈕

5秒,開啟強行充電模式,然後選擇合適的模式。所有可用的模式會閃爍。選好充電模式後,充電模式LED燈和充電LED燈會交替亮
起,表示正在使用強行充電模式。5分鐘後,充電器會回到正常充電工況,低電壓偵測將重新開啟。
警告: 請謹慎使用此模式。強行充電模式會停用安全功能,接頭處有電。進入強行充電模式前,請確保已連好所有的電線,不要觸碰
接頭。存在產生火花,火災,爆炸,財產損失,人身傷亡的風險。
連接電池。
在完成所有其他連接之前,請勿連接交流電源插頭。確定電池端子的極性正確。請勿與化油器、燃油管路或薄金屬板部件連接。以下
說明適用於負極接地系統(最常見)。如果您的車輛是正極接地系統(非常罕見),請按照以下說明以相反的順序操作。
1.) 將正極(紅色)環形接線端子連接到電池的正極(POS、P、+)端子。
2.) 將負極(黑色)環形接線端子連接到電池的負極(NEG、N、-)端子。
3.) 將電池充電器連接到適合的電源插座。進行此連接時,請不要面對著電池。
4.) 切斷連接時,請按照相反順序解除連接,先解開負極端子(如汽車採用正極接地線系統,請先解開正極端子)。
開始充電。
1.) 核對電池的電壓和化學成分。
2.) 確認已正確連接電池夾或孔眼端子連接器,並且交流電源插頭已插入電源插座。
3.) [首次使用] 充電器將以橙色 LED 指示的待機模式啟動。在待機狀態下,充電器不會提供任何電源。
4.) 請按模式按鈕切換至適合您電池電壓和化學成分的充電模式(按住三秒鐘以進入高階充電模式)。
5.) 所選充電模式的模式 LED 將會點亮,同時指示充電過程已開始的充電 LED 將會點亮(取決於電池健康狀況)。
6.) 現在可以讓充電器一直與電池連接,以提供維護充電。
自動記憶: 充電器配有內建的自動記憶體,連接後,充電器會返回最近一次的充電模式。首次使用後,若要變更充電模式,請按模
式按鈕。

ZH
充電時間。
電池充電的估計時間如下所示。電池的容量和放電深度極
大地影響電池的充電時間。充電時間是以完全充電的電池
之平均放電深度為基礎的,僅供參考。實際資料可能因電
池而異。給正常放電的電池充電的時間是以50%放電深度
為基礎的。溫度也會影響充電時間。GENIUS10具有溫度補
償功能,會自動調整充電設定,使充電性能最大化。
充電時間。
電池容量 大致充電時間(小時)
6V 12V
Ah(安培小時)
20
40
80
100
230
1.5
3.0
6.0
7.0
17.3
1.5
3.0
6.0
7.0
17.3

了解錯誤指示燈。
錯誤條件將由以下LED指示。
LED燈 原因/解決辦法
可能缺少電池/電池無法保持充電。請專業人員檢查電池。
對於所選的充電模式,電池電壓過高。檢查電池和充電模式。
極性接反。反轉電池的極性連接。
充電器處於待機模式,或者電池電壓太低,充電器無法檢測到電池。
充電器內部溫度過高/ 內部溫度下降後,充電器會重新開啟。
充電器環境溫度過低 / 環境溫度上升後,充電器會重新開啟。
LED燈 說明
25%紅色
LED燈
當電池充電低於25%時,25%充電LED燈會緩慢脈衝閃爍。當電池充電25%時,紅色充電LED燈會
穩定地亮著。
75% 橙色
LED燈
當電池充電低於75%時,75%充電LED燈會緩慢脈衝閃爍。當電池充電75%時,橙色充電LED燈會
穩定地亮著。
當電池充電低於50%時,50%充電LED燈會緩慢脈衝閃爍。當電池充電50%時,紅色充電LED燈會
穩定地亮著。
100% 綠
色 LED燈
脈衝閃爍的綠色LED燈 - 總體充電結束後,最佳化電池以延長電池壽命。
穩定亮著的綠色LED 燈 - 當電池100%充飽時,充電LED燈顯示平穩亮著的綠色。
50% 紅色
LED燈
維護 綠色
LED燈
電池充滿後,充電器會持續監控電池,並持續進行維護和最佳化調整。在此期間,100%充電LED燈
會緩慢地「亮起」和「熄滅」 。充電器可以一直連接電池。
瞭解充電LED指示燈。
穩定亮著
穩定亮著
穩定亮著
穩定亮著
閃爍

ZH
6.) 充电LED 指示已连接电池的充电状态。
7.) 模式LED 指示充电器当前所处的充电模式。按“模式”按钮
可循环切换充电模式。
8.) [ 按下并保持 ] 模式LED 模式按钮必须按下并保持3秒才
能进入模式。
9.) 电源模式LED 当选择电源模式时,亮起稳定的红色。
10.) 修复模式LED 当选择修复模式时,亮起稳定的红色。
6
5
7
1
8
3
2
4
10
2
2
9
1.) 模式按钮 按下可循环切换充电模式。
2.) 过电压错误LED 亮起稳定的红色;电池电压高于保护电
压。
3.) 电池故障LED 当连接的电池不充电时,亮起稳定的红色。
4.) 极性颠倒LED 当检测到极性颠倒时,亮起稳定的红色。
5.) 待机LED 当充电器处于待机模式、充电器未充电或向电池
提供任何电源时亮起。

交流輸入電壓:
交流工作電壓:
輸出功率:
充電電壓:
充電電流:
低壓檢測:
反向電流:
環境溫度:
電池類型:
電池化學成分:
電池容量:
外殼保護等級:
冷卻:
尺寸(長X寬X高)
重量:
120-240V,50-60Hz
120-240V,50-60Hz
最大150W
各不相同
10A (12V), 10A (6V)
1V (12V), 1V (6V)
<0.5mA
-20°C至+40°C
6V, 12V
濕電池、膠體電池、MF電池、CA電池、EFB電池、AGM電池、鈣電池、Lithium
230Ah以下,可為所有容量電池提供維護充電
IP65
自然對流
4.6 x 2.9 x 1.9 英寸
3.33磅
技術規格

ZH
0三年無憂保修
NOCO保證本產品自購買之日起三(3)年(“保修期”)內不會出現材料和工藝方面的缺陷。對於保修期內報告的缺
陷,NOCO將根據NOCO的技術支援分析自行決定對有缺陷的產品進行修理或更換。更換部件和產品將是新的或可使用的,在
功能和性能上與原部件相當,保修期為原始保修期的剩餘時間。
NOCO的法律責任明確地限於交換或修理。在法律允許的最大程度內,本產品的購買者或第三者就任何特殊、間接、相應或懲
戒性損害,包括但不限於,與產品有任何關連的損失利潤、財物損失、或人身傷害,無論其發生原因為何,即使NOCO認知上
述損失發生的可能性,NOCO毋須對此賠償負責。此保證代替并排除所有其他明示、隱含、法定或其他保證,包括但不限於隱
含的可銷售性及特殊用途合適性保證,及因交易過程、按慣例或業界常規而伴隨的保證。如任何適用法例施加不能排除或更
改的保證、條件或義務,本段內容將適用至該當法例可容許的最大範圍內。
本保修僅為NOCO產品的原始購買者或NOCO批准的經銷商或分銷商提供,不可轉讓。要提起保修索賠,購買者必須:(1)
發送電子郵件至[email protected]或致電1.800.456.6626,向NOCO支持部門索取並獲得退貨商品授權(“RMA”)號碼和退貨
地點資訊(“退貨地點”);(2)將產品及RMA號碼和收據發送到退貨地點。請勿在沒有從NOCO支援部門獲得RMA的情況
下發送產品。
原購買者必須負責(同時預付)把產品送出接受保證服務的所有包裝及運送費用。
上述無憂保修不適用於以下情況:(a)誤用、誤操作、濫用或疏忽操作、發生事故、不當存放或在超出NOCO安全有效使用
建議的極端電壓、溫度、衝擊或振動條件下操作本產品;(b)安裝、操作或維護不當;(c)未經NOCO明確書面同意而修
改;(d)由NOCO以外的任何人拆卸、更改或修理;(e)保修期後報告的缺陷。
無憂保修不包括以下情況:(1)正常磨損;(2)不影響功能的外觀損傷;或(3)NOCO序號缺失、被更改或汙損的產品。
無憂保修條件
這些條件僅適用於保修期內的產品。無憂保修期從購買之日(如無購買憑證,則從序號日期),或從前文列出的情況算起。
退貨需包括適當文檔。
有收據:
0-3年:免費。有購買憑證,保修期自購買之日開始。

無收據:
0-3年:免費。無購買憑證,保修期自序號日期開始。
我們建議您對您的NOCO產品進行註冊,以便上傳購買憑證並延長有效保修期。您可以線上註冊您的NOCO產品,網址:no.
co/register。如果您對保修或產品有任何疑問,請聯絡NOCO支援部門(電郵地址和電話號碼見上文),信件郵寄地址:The
NOCO Company, at 30339 Diamond Parkway, #102, Glenwillow, OH 44139 USA.


GENIUS10AU.10102022B
-
 1
1
-
 2
2
-
 3
3
-
 4
4
-
 5
5
-
 6
6
-
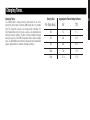 7
7
-
 8
8
-
 9
9
-
 10
10
-
 11
11
-
 12
12
-
 13
13
-
 14
14
-
 15
15
-
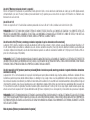 16
16
-
 17
17
-
 18
18
-
 19
19
-
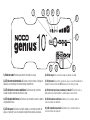 20
20
-
 21
21
-
 22
22
-
 23
23
-
 24
24
-
 25
25
-
 26
26
-
 27
27
-
 28
28
-
 29
29
-
 30
30
-
 31
31
-
 32
32
-
 33
33
-
 34
34
-
 35
35
-
 36
36
-
 37
37
-
 38
38
-
 39
39
-
 40
40
-
 41
41
-
 42
42
-
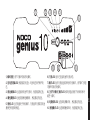 43
43
-
 44
44
-
 45
45
-
 46
46
-
 47
47
-
 48
48


