Samsung HG43NE593SF Guía de inicio rápido
- Categoría
- Televisores LCD
- Tipo
- Guía de inicio rápido

To register this product please visit
www.samsung.com/register.
Quick Setup Guide
Guía rápida de conguración
List of Parts / Lista de componentes
➣ The provided accessories may vary depending on the model. / Los colores y las formas pueden variar según el modelo.
English Español
Power Cord Cable de alimentación
• Safety Guide
• Quick Setup Guide
• Regulatary Guide
• Guía de seguridad
• Guía de conguración rápida
• Guía de información legal
BRACKET-NUT WALL TUERCA SOPORTE DE PARED
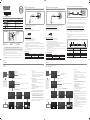
Viewing the Connection Panel / Affi chage du panneau de branchement
1
2
3
4
VIDEO
2
5
6
7
8
9
! 0
1 USB (5V 0.5A), (HDD 1.0A /
CLONING)
2 HDMI IN 1, 2, 3 (DVI)
3 LAN
4 ANT IN (AIR/CABLE)
5 DIGITAL AUDIO OUT (OPTICAL)
6 AUDIO OUT
7 EX-LINK
8 COMPONENT / AV IN 1
9 PILLOW OUT
0 DATA
! DVI AUDIO IN
The Channel menu items in the Menu OSD, except for Channel List, are deactivated. If you need to
change the channel line up, use the Channel Setup item in the Hotel option menu.
Notice
Los elementos del menú Canal del menú OSD, excepto Lista de canales, se desactivan. Si necesita cambiar
el número del canal, utilice el elemento Conguración de canales del menú de opciones de Hotel.
Aviso
English
– When using Widget Solution through Virtual Standby mode gets set to be On.
– If power cable is reconnected after being plugged out, it may take up to 2 minutes for booting time.
Español
– Cuando utilice Solución de Widget mediante el modo Modo espera virtual se configura como Encendido.
– Si se vuelve a conectar el cable de alimentación después de haber sido desenchufado, el arranque puede
demorarse 2 minutos.
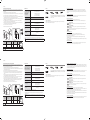
[ English ]
Hotel Plug & Play
The Hotel Plug & Play function, which automatically performs the Hotel mode selection, Country Setup, Clock Setup, and Picture mode Setup once, when power is rst turned ON. Setup also runs automatically after you have executed a
Service Reset.
♦ UI Scenario
♦ LocalSet
– Initially highlighted: US
– If you press the Enter key after selecting Change, you can change the
country.
– If the country is changed, the TV automatically turns off and on.
– If you select the incorrect country, execute TV Reset again after
entering the System section of the Hotel Menu.
♦ Menu Language OSD
– If you select TV Basic Setup from the “TV Installation Type” OSD, the
“Menu Language” OSD appears.
– Initially highlighted: English
– If you press the Enter key, the “Picture Mode” OSD appears
♦ Picture Mode OSD
– Initially highlighted: Standard.
– The TV displays the Picture Mode OSD where you can choose the
Dynamic or a Standard Picture mode.
♦ Auto Program OSD
– If you press the Enter key, the TV automatically searches for channels.
♦ Set Clock Mode, DST(Daylight saving time), and Time Zone OSD
– Initially highlighted: Clock Mode: Auto, DST: Off, Time Zone: Eastern
– If the TV will be tuned to digital broadcast channels, and these
channels transmit date and time information, set the Clock Mode to
Auto. The TV will set the date and time automatically.
– If the TV will not be tuned to digital broadcast channels, set the Clock
Mode to Manual, and then set the date and time on the TV manually.
– Set DST On or Off to apply or not apply daylight saving time to the TV.
– Select your time zone on the map that appears.
E
+
P
E
E
EE
E
E
E
E
After Searching channels.
Select Clock Mode, DST, and your
Time Zone
Select the channel
band to use for Auto
Program
Select Picture modeSelect your language
If you select Factory
Reset, the TV resets all
values to their factory
defaults and then
displays the Hospital
Plug & Play menu. Go to
the rst Hospital Plug &
Play screen below.
E
E
E
E
Press Power OFF to
exit.
Self Diagnosis for TV
Self Diagnosis for HTV
SW Update
Service Pattern OFF
ATV Cable AGC Gain Default
DTV OpenCable AGC Gain Default
Sound Bar Out OFF
Contact Samsung
Standby LED ON
TV Reset
If you change the
country of the
Current Location
The TV is automatically turned off and on.
If you
select
TV Basic
Setup
Your TV is now ready to use.
Setup Complete!
Done
Auto Program is finding channels for you...
Auto Program
40%
DTV Air 4
DTV Air
Air
DTV Cable
Cable
05
Hotel Option Menu
appears.
If you don't change the country of the Current Location
If you select Cloning Mode
Copy the system settings from the USB or server to the TV.
If you select Factory Menu
End setup and go to Factory Menu directly.
♦ Conguración local
– Resaltado inicialmente: EE.UU.
– Si pulsa la tecla Enter después de seleccionar Cambiar, puede cambiar
el país.
– Si se cambia el país, el televisor se apaga y se enciende
automáticamente.
– Si selecciona el país incorrecto, ejecute el restablecimiento del
televisor nuevamente después de ingresar a la sección Sistema del
menú hotel.
♦ OSD de Idioma del menú
– Si selecciona la configuración básica del televisor desde la OSD “Tipo
de instalación de TV”, aparece la OSD “Idioma del menú”.
– Resaltado inicialmente: Inglés
– Si pulsa la tecla Enter, aparece la OSD “Modo de Imagen”.
♦ OSD de Modo de Imagen
– Resaltado inicialmente: Estándar
– El televisor muestra la OSD de modo de imagen donde usted puede
elegir el modo de imagen Dinámico o Normal.
♦ OSD de programación automática
– Si pulsa la tecla Enter, el televisor busca canales automáticamente.
♦ Conguración de la OSD de Modo Reloj, DST (horario de verano) y zona
horaria
– Resaltado inicialmente: Modo Reloj: Automático, Horario de Verano:
apagado; Zona horaria: Este
– Si el televisor será sintonizado con canales de transmisión digital y
estos canales transmiten información de fecha y hora, configure el
Modo Reloj en Automático. El televisor configurará la fecha y la hora
automáticamente.
– Si el televisor no será sintonizado con canales de transmisión digital,
configure el Modo Reloj en Manual y luego configure manualmente la
fecha y la hora en el televisor.
– Active o desactive Horario de Verano para aplicar o no aplicar el
horario de verano al televisor.
– Seleccione su zona horaria en el mapa que aparece.
E
+
P
E
E
EE
E
E
E
Después de buscar los
canales.
Seleccione Modo Reloj, Horario de
Verano y su Zona horaria
Seleccione la banda
de canales a utilizar
para programación
automática
Seleccione el Modo
de imagen
Seleccione su
idioma.
Si selecciona los valores
predeterminados, el
televisor restablece
los valores de fábrica
predeterminados
y muestra el menú
Hospital Plug & Play.
Vaya a la primera
pantalla de Hospital Plug
& Play siguiente.
E
E
E
E
E
Pulse apagar para
salir.
Self Diagnosis for TV
Self Diagnosis for HTV
SW Update
Service Pattern OFF
ATV Cable AGC Gain Default
DTV OpenCable AGC Gain Default
Sound Bar Out OFF
Contact Samsung
Standby LED ON
TV Reset
Si cambia el país
de la ubicación
actual
El televisor se apaga y enciende
automáticamente.
Si selecciona la
conguración
básica del
televisor
Your TV is now ready to use.
Setup Complete!
Done
Auto Program is finding channels for you...
Auto Program
40%
DTV Air 4
DTV Air
Air
DTV Cable
Cable
05
Aparece el menú de
opciones de Hotel.
Si no cambia el país de la ubicación actual
Si selecciona el modo de
clonación
Copie los ajustes del sistema desde el USB o el servidor al
televisor.
Si selecciona el menú de
fábrica
Finalice la conguración y vaya
directamente al menú Fábrica.
-03
Connecting a Pillow Speaker (NE593 Models only)
➣ You can connect a pillow speaker to the TV in the hospital using a jumper cable. The speaker functions as a remote control and
speaker.
VIDEO
VIDEO
V
I
D
E
O
TV Rear Panel
Jumper Cable
Pillow Speaker
1. Connect the pillow speaker jumper cable (cable sold separately) from the television’s PILLOW SPEAKER Port
to the pillow speaker jack on the wall behind the television.
Pillow Speaker Jack Specications
y
Output jack: RCA type
y
Input jumper pin: 1/8” 3-conductor stereo phone pin.
y
Signal specications: Tip-Audio, Ring-Data/Channel change, Sleeve-Common
Tip
Ring Sleeve
VOL +
VOL
-
1
2
3
How to Use the Pillow Speaker
y
Analog type speaker: The pillow speaker has one key.
– Power On: press the key when the TV is in standby mode.
– Channel Up: press the key when the speaker is on.
– Power Off: press and hold the key for more than 3 seconds when the speaker is on.
– An Analog type speaker always works regardless of the Pillow Speaker Type value set in the Hospital
mode setup menu.
y
Digital type speaker: The TV supports the Samsung, Philips, or Zenith code.
– This speaker is only compatible with a specified IR code. You can change the code in the Hospital mode
setup menu.
– The TV gives priority to the Samsung remote control over the pillow speaker’s wired remote control.
– Option : Channel Menu Display.
Pillow Sound Control
Speaker Selection Menu TV Speaker Pillow Speaker
TV Speaker Sound Sound
External Speaker No Sound Sound
Conexión de un altavoz de almohada (sólo modelos NE593)
➣ Puede conectar un altavoz de almohada al televisor en el hospital usando un cable de puente. El altavoz funciona como control
remoto y altavoz.
VIDEO
VIDEO
V
I
D
E
O
Panel posterior del TV
Cable de puente
Altavoz de almohada
1. Conecte el cable de puente (se vende por separado) del altavoz de almohada entre el puerto PILLOW
SPEAKER del televisor y el conector del altavoz de almohada en la pared detrás del televisor.
Especicaciones del conector del altavoz de almohada
y
Conector de salida: tipo RCA
y
Pin puente de entrada: pin de teléfono estéreo con 3 conductores de 1/8”
y
Especicaciones de señal: Punta=audio, anillo=cambiar datos/canal, masa=común
Punta
Anillo Masa
VOL +
VOL
-
1
2
3
Cómo utilizar el altavoz de almohada
y
Altavoz tipo analógico: El altavoz de almohada tiene una tecla.
– Encender: pulse la tecla con el televisor en modo de espera.
– Subir canal: pulse la tecla cuando el altavoz esté encendido.
– Apagar: mantenga pulsada la tecla más de 3 segundos cuando el altavoz esté encendido.
– Un altavoz de tipo analógico funciona siempre independientemente del tipo de altavoz de almohada
que esté configurado en el menú de configuración del modo Hospital.
y
Altavoz tipo digital: El televisor admite los códigos Samsung, Philips o Zenith.
– Este altavoz solo es compatible con un código IR específico. Puede cambiar el código en el menú de
configuración del modo Hospital.
– El televisor da prioridad al control remoto Samsung sobre el control remoto por cable del altavoz de
almohada.
– Opciones : Visualización menú de canales.
Control de sonido de la almohada
Menú de selección de altavoz Altavoz del televisor Altavoz de almohada
Altavoz del televisor Sonido Sonido
Altavoz externo Sin sonido Sonido
[ English ] [ Español ]
Connecting the TV to an SBB or STB / Conexión del televisor a un SBB o STB
ETH MODEM
TV Rear Panel / Panel posterior del TV
Data Cable / Cable de datos
English
1. Connect the DATA jack of the TV to the ETH MODEM jack of the STB (SBB) with the Data cable.
✎ The “ETH MODEM” jack name that you connect the Data Cable to may differ depending on the SBB or STB type.
Español
1. Conecte la entrada DATA del televisor a la entrada ETH MODEM del STB (SBB) con el cable de datos.
✎
El nombre del conector “ETH MODEM” al que conecta el cable de datos puede variar según el tipo de SBB o STB.
List of Hospitality SI Vendors and Compatible Data Cables Supplied with the TV / Lista de
proveedores SI de hotel y cables de datos compatibles suministrados con el televisor
English
y
Conrm you are using the correct data cable for your SI vendor. Refer to the code label on the data cables.
y
Contact your nearest dealer or your SI Vendor to buy the data cable not included in the TV.
Español
y
Conrme que está utilizando el cable de datos correcto para su proveedor SI. Consulte la etiqueta de código
en los cables de datos.
y
Comuníquese con su distribuidor más cercano o su proveedor SI para adquirir el cable de datos no incluido
con el televisor.
Conrm the code on the Code Label /
Compruebe el código en la etiqueta del código
Note the labeled end. /
Tenga en cuenta el extremo etiquetado.
Note the labeled end. /
Tenga en cuenta el extremo etiquetado.
SI Vendor /
Proveedor SI
Cable code /
Código del cable
Remark /
Observación
Samsung
OCC
Enseo
Guest-Tek
BN39-00865B Provided
NXTV BN39-01011B
nStreams BN39-01110A
Soni BN39-01011E Provided
✎ Operation Specification of Data Cable(RJ12) : TTL /
Especificación de funcionamiento del cable de datos (RJ12): TTL
[ Español ]
Plug & Play Hotel
La función Plug & Play Hotel realiza automáticamente la selección del modo de hotel, la conguración del país, del reloj y del modo de imagen una vez, después del primer encendido. La conguración también se ejecuta
automáticamente después de un restablecimiento del servicio.
♦ Escenario de interfaz de usuario

Specifications
Environmental Considerations
Operating Temperature
Operating Humidity
Storage Temperature
Storage Humidity
50°F to 104°F (10°C to 40°C)
10% to 80%, non-condensing
-4°F to 113°F (-20°C to 45°C)
5% to 95%, non-condensing
Model Name HG43NE593
Display Resolution 1920 x 1080
Screen Size
(Diagonal)
43” Class
(42.5” measured diagonally)
Sound (Output) 20W (L:10W, R:10W)
Dimensions (W x H x D)
Body
38.8 x 22.6 x 2.8 inches
(985.5 x 573.7 x 72.2 mm)
Weight
Without Stand
17.0 lbs (7.7 kg)
➣ Design and specications are subject to change without prior notice.
➣ This device is a Class B digital apparatus.
➣ For information about power supply and power consumption, refer to the label attached to the product.
WARNING: This product contains chemicals known to the State of California to cause cancer and reproductive
toxicity.
Especificaciones
Consideraciones ambientales
Temperatura de funcionamiento
Humedad de funcionamiento
Temperatura de almacenamiento
Humedad de almacenamiento
10 °C a 40 °C (50° F a 104 °F)
10% a 80%, sin condensación
-20 ℃ a 45 ℃ (-4 °F a 113 °F)
5% a 95%, sin condensación
Nombre del modelo HG43NE593
Resolución de pantalla 1920 x 1080
Tamaño de la pantalla
(diagonal)
43” Class
(42,5” measured diagonally)
Sonido (salida) 20W (L:10W, R:10W)
Dimensiones (An x Al x Pr)
Cuerpo principal
38,8 x 22,6 x 2,8 pulgadas
(985,5 x 573,7 x 72,2 mm)
Peso
Sin el soporte
17,0 lbs (7,7 kg)
➣ El diseño y las especicaciones pueden cambiar sin previo aviso.
➣ Este dispositivo es un aparato digital Clase B.
➣ Para obtener información sobre la fuente de alimentación y el consumo de energía, consulte la etiqueta
adherida al producto.
ADVERTENCIA: Este producto contiene sustancias químicas que, según el Estado de California, provocan
cáncer y toxicidad reproductiva.
[ English ]
[ Español ]
Licence
The terms HDMI and HDMI High-Denition Multimedia Interface, and the HDMI Logo
are trademarks or registered trademarks of HDMI Licensing LLC in the United States
and other countries.
Open Source License Notice
Open Source used in this product can be found on the following webpage. (http://opensource.samsung.com)
Open Source License Notice is written only English.
Wall Mount Kit Specifications (VESA)
Install your wall mount on a solid wall, perpendicular to the oor. When attaching to other building materials,
please contact your nearest dealer. If installing on a ceiling or slanted wall, TV may fall and result in severe
personal injury.
➣ Standard dimensions for wall mount kits are shown in the table below.
➣ Samsung wall mount kits contain a detailed installation manual. All parts necessary for assembly are provided.
➣ Do not use screws that do not comply with VESA standard screw specications.
➣ Do not use screws that are longer than the standard dimension or do not comply with the VESA standard screw
specications. Screws that are too long may cause damage to the inside of the TV.
➣ For wall mounts that do not comply with the VESA standard screw specications, the length of the screws may
differ depending on the wall mount specications.
➣ Do not fasten the screws too rmly. This may damage the product or cause the product to fall, leading to
personal injury. Samsung is not liable for these kinds of accidents.
➣ Samsung is not liable for product damage or personal injury when a non-VESA or non-specied wall mount is
used or the consumer fails to follow the product installation instructions.
➣ Do not mount the TV at more than a 15 degree tilt.
➣ Always have two people mount the TV on a wall.
TV
Wall mount
bracket
C
TV size in
inches
VESA screw hole specs (A *
B) in millimeters
C (mm)
Standard Screw
(Length*
Pitch in mm)
Quantity
43 200 x 200 22 M8 4
Do not install your Wall Mount Kit while your TV is turned on.It may result in personal injury
due to electric shock.
Especificaciones del kit de montaje de pared (VESA)
Instale el soporte de pared en una pared sólida, perpendicular al suelo. Cuando instale el televisor en otros
materiales de construcción, comuníquese con su distribuidor más cercano. If installing on a ceiling or slanted
wall, TV may fall and result in severe personal injury.
➣ Las dimensiones estándar de los soportes de pared se muestran en la tabla que sigue.
➣ Los kits de montaje de pared Samsung contienen un manual de instalaciones detallado. Se proveen todas las
piezas necesarias para el montaje.
➣ No use tornillos que no cumplan las especicaciones de tornillos estándar VESA.
➣ No use tornillos con una longitud superior a la medida estándar o que no cumplan con las especicaciones
de tornillos estándar VESA. Los tornillos que son demasiado largos pueden causar daños en el interior del
televisor.
➣ Para soportes de pared que no cumplen las especicaciones de tornillos estándar VESA, la longitud de estos
puede variar dependiendo de las especicaciones del soporte de pared.
➣ No apriete excesivamente los tornillos. Podría dañar el producto o provocar su caída con riesgo de causar
lesiones personales. Samsung no se hace responsable de este tipo de accidentes.
➣ Samsung no se hace responsable de daños o lesiones personales cuando se usa un soporte de pared que no
cumple las especicaciones VESA o si el cliente no sigue las instrucciones de instalación del producto.
➣ No instale el televisor con una inclinación de más de 15 grados.
➣ Siempre son necesarias dos personas para instalar el televisor en la pared.
TV
Soporte del
montaje de pared
C
Tamaño del
televisor en
pulgadas
Especicaciones oricios
tornillos VESA (A * B) en
milímetros
C (mm)
Tornillo estándar
(Longitud*Separación
en mm)
Cantidad
43 200 x 200 22 M8 4
No instale el soporte de pared con el televisor encendido. Se podría producir una descarga
eléctrica con riesgo de causar lesiones personales.
NOTE TO CABLE TV INSTALLER
This reminder is provided to call the cable TV system installer's attention to Article 820–40 of the National
Electric Code (U.S.A.). The code provides guidelines for proper grounding and, in particular, species that the
cable ground shall be connected to the grounding system of the building, as close to the point of the cable entry
as practical.
MAINTENANCE AND SERVICING
Never remove the back cover of the TV; this can expose you to high voltage and other hazards. If the TV does not
operate properly, unplug it and call an authorized service center.
CLEANING AND DISINFECTING
Clean the exterior of this television by removing dust with a lint-free cloth.
CAUTION: To avoid damage to the surface of the television, do not use abrasive or chemical cleaning agents.
RAIN AND MOISTURE
WARNING: To avoid the hazards of re or electrical shock, DO NOT expose this television to rain or
moisture.
OXYGEN ENVIRONMENT
WARNING: Do not use in any oxygen tent or oxygen chamber. Such use may cause a re hazard.
WET LOCATION
Apparatus shall not be exposed to dripping or splashing and no objects lled with liquids, such as
vases, shall be placed on the apparatus.
SERVICE INSTRUCTIONS
CAUTION: These servicing instructions are for use by qualied service personnel only.
To reduce the risk of electric shock, do not perform any servicing other than contained in the operating
instructions unless you are qualied to do so.
For 120 volt applications, use only a UL-Listed detachable power cord with NEMA conguration 5–15P type
(parallel blades) plug cap.
For 240 volt applications, use only a UL-Listed detachable power supply cord with NEMA conguration 6–15P type
(tandem blades) plug cap.
Warning - Wall Mounting
The product should be mounted to a wall only as recommended by the manufacturer. The product may slide or
fall, causing serious injury to a child or adult, and serious damage to the product.
NOTA PARA EL INSTALADOR DEL TV POR CABLE
Se publica este recordatorio para llamar la atención del instalador del sistema de televisión por cable sobre el
artículo 820–40 del National Electric Code (EE.UU.). Este código proporciona instrucciones sobre la conexión a
tierra, y en especial especica que el cable se debe conectar al sistema de conexión a tierra del edicio, lo más
cerca posible del puerto de entrada del cable.
MANTENIMIENTO Y SERVICIO
No retire nunca la cubierta posterior del televisor para evitar exponerse a un alto voltaje y otros riesgos. Si el
televisor no funciona adecuadamente, desenchúfelo y comuníquese con un centro de servicio autorizado.
LIMPIEZA Y DESINFECCIÓN
Limpie el polvo de la supercie exterior del televisor con un paño sin pelusa.
PRECAUCIÓN: Para evitar dañar la supercie el televisor, no use productos de limpieza abrasivos ni químicos.
LLUVIA Y HUMEDAD
ADVERTENCIA: Para evitar el riesgo de incendio o descarga eléctrica, NO exponga este televisor a
la lluvia o la humedad.
ENTORNO DE OXÍGENO
ADVERTENCIA: No usar en una cámara de oxígeno. Podría provocar un incendio.
UBICACIÓN HÚMEDA
Se debe evitar que un líquido gotee o salpique el aparato; no coloque objetos que contengan
líquidos, como jarrones, sobre el aparato.
INSTRUCCIONES DE SERVICIO
PRECAUCIÓN: Estas instrucciones de servicio son sólo para el personal de servicio cualicado.
Para reducir el riesgo de una descarga eléctrica, no realice ninguna tarea de servicio que no esté incluida en las
instrucciones de funcionamiento a menos que usted esté cualicado para hacerlo.
En las aplicaciones de 120 voltios, use sólo un cable de alimentación desconectable UL con un enchufe (clavijas
paralelas) del tipo 5-15P de conguración NEMA.
En las aplicaciones de 240 voltios, use sólo un cable de alimentación desconectable UL con un enchufe (clavijas en
tándem) del tipo 6-15P de conguración NEMA.
Advertencia - Montaje de pared
Se debe instalar el producto en una pared sólo según la recomendación del fabricante. El producto puede
deslizarse o caerse, y provocar lesiones graves a niños o adultos, y daños importantes en el producto.
-
 1
1
-
 2
2


Samsung HG43NE593SF Guía de inicio rápido
- Categoría
- Televisores LCD
- Tipo
- Guía de inicio rápido