Sony DSX-A416BT El manual del propietario
- Categoría
- Sistemas de video del coche
- Tipo
- El manual del propietario

DSX-A416BT
4-739-631-13(1)
FM/MW/LW
Bluetooth® Car Audio
FM/MW/LW Bluetooth®
Автомобильное Аудио
Operating Instructions
GB
Bedienungsanleitung
DE
Mode d’emploi
FR
Istruzioni per l’uso
IT
Manual de instrucciones
ES
Инструкция по
эксплуатации
RU
To cancel the demonstration (DEMO) display, see
page 18.
For the connection/installation, see page 30.
Zum Deaktivieren der Demo-Anzeige (DEMO)
schlagen Sie bitte auf Seite 22 nach.
Informationen zum Anschluss und zur Installation
finden Sie auf Seite 36.
Pour annuler la démonstration (DEMO), reportez-
vous à la page 20.
Pour le raccordement/l’installation, reportez-vous à
la page 34.
Per annullare la dimostrazione (DEMO), vedere
pagina 20.
Per l’installazione e i collegamenti, consultare
pagina 34.
Para cancelar la pantalla de demostración (DEMO),
consulte la página 19.
Para la conexión/instalación, consulte la página 34.
Для отмены демонстрации на дисплее (режим
DEMO) см. стр. 21.
Инструкции по установке/подключению см. на
стр. 36.

2GB
Made in Thailand
The nameplate indicating operating voltage,
etc., is located on the bottom of the chassis.
The validity of the CE marking is restricted to
only those countries where it is legally
enforced, mainly in the countries EEA
(European Economic Area).
Hereby, Sony Corporation declares that this
equipment is in compliance with Directive
2014/53/EU.
The full text of the EU declaration of
conformity is available at the following
internet address:
http://www.compliance.sony.de/
Notice for customers: the following
information is only applicable to
equipment sold in countries applying
EU Directives
This product has been manufactured by or
on behalf of Sony Corporation.
EU Importer: Sony Europe B.V.
Inquiries to the EU Importer or related to
product compliance in Europe should be
sent to the manufacturer’s authorized
representative, Sony Belgium, bijkantoor
van Sony Europe B.V., Da Vincilaan 7-D1, 1930
Zaventem, Belgium.
Disposal of waste batteries
and electrical and electronic
equipment (applicable in
the European Union and
other countries with
separate collection systems)
This symbol on the product, the battery or
on the packaging indicates that the product
and the battery shall not be treated as
household waste. On certain batteries this
symbol might be used in combination with a
chemical symbol. The chemical symbol for
lead (Pb) is added if the battery contains
more than 0.004% lead. By ensuring that
these products and batteries are disposed of
correctly, you will help to prevent potentially
negative consequences for the environment
and human health which could be caused by
inappropriate waste handling. The recycling
of the materials will help to conserve natural
resources. In case of products that for safety,
performance or data integrity reasons
require a permanent connection with an
incorporated battery, this battery should be
replaced by qualified service staff only. To
ensure that the battery and the electrical
and electronic equipment will be treated
properly, hand over these products at end-
of-life to the appropriate collection point for
the recycling of electrical and electronic
equipment. For all other batteries, please
view the section on how to remove the
battery from the product safely. Hand the
battery over to the appropriate collection
point for the recycling of waste batteries. For
more detailed information about recycling of
this product or battery, please contact your
local Civic Office, your household waste
disposal service or the shop where you
purchased the product or battery.
For safety, be sure to install this unit in the
dashboard of the car as the rear side of
the unit becomes hot during use.
For details, see “Connection/Installation”
(page 30).

3GB
CAUTION
The following frequency 65 – 74 MHz range
is not allocated to sound broadcasting in the
European Common Allocations table and
cannot be used in Europe.
Disclaimer regarding services offered
by third parties
Services offered by third parties may be
changed, suspended, or terminated without
prior notice. Sony does not bear any
responsibility in these sorts of situations.
Caution
IN NO EVENT SHALL SONY BE LIABLE FOR
ANY INCIDENTAL, INDIRECT OR
CONSEQUENTIAL DAMAGES OR OTHER
DAMAGES INCLUDING, WITHOUT
LIMITATION, LOSS OF PROFITS, LOSS OF
REVENUE, LOSS OF DATA, LOSS OF USE OF
THE PRODUCT OR ANY ASSOCIATED
EQUIPMENT, DOWNTIME, AND PURCHASER’S
TIME RELATED TO OR ARISING OUT OF THE
USE OF THIS PRODUCT, ITS HARDWARE
AND/OR ITS SOFTWARE.
Dear customer, this product includes a radio
transmitter.
According to UNECE Regulation no. 10, a
vehicle manufacturers may impose specific
conditions for installation of radio
transmitters into vehicles.
Please check your vehicle operation manual
or contact the manufacturer of your vehicle
or your vehicle dealer, before you install this
product into your vehicle.
Emergency calls
This BLUETOOTH car handsfree and the
electronic device connected to the
handsfree operate using radio signals,
cellular, and landline networks as well as
user-programmed function, which cannot
guarantee connection under all conditions.
Therefore do not rely solely upon any
electronic device for essential
communications (such as medical
emergencies).
On BLUETOOTH communication
Microwaves emitting from a BLUETOOTH
device may affect the operation of
electronic medical devices. Turn off this
unit and other BLUETOOTH devices in the
following locations, as it may cause an
accident.
– where inflammable gas is present, in a
hospital, train, airplane, or petrol station
– near automatic doors or a fire alarm
This unit supports security capabilities that
comply with the BLUETOOTH standard to
provide a secure connection when the
BLUETOOTH wireless technology is used,
but security may not be enough
depending on the setting. Be careful when
communicating using BLUETOOTH wireless
technology.
We do not take any responsibility for the
leakage of information during BLUETOOTH
communication.
If you have any questions or problems
concerning your unit that are not covered in
this manual, consult your nearest Sony
dealer.
Warning if your car’s ignition has no
ACC position
Be sure to set the AUTO OFF function
(page 18). The unit will shut off completely
and automatically in the set time after the
unit is turned off and the clock is
displayed (i.e. press and hold OFF for 1
second), which prevents battery drain. If
you do not set the AUTO OFF function,
press and hold OFF until the display
disappears each time you turn the
ignition off.
Important notice

4GB
Table of Contents
Guide to Parts and Controls. . . . . . . . . . . . . 5
Getting Started
Detaching the Front Panel . . . . . . . . . . . . . . 6
Resetting the Unit. . . . . . . . . . . . . . . . . . . . . 7
Setting the Clock. . . . . . . . . . . . . . . . . . . . . . 7
Preparing a BLUETOOTH Device . . . . . . . . . 7
Connecting a USB Device. . . . . . . . . . . . . . . 9
Connecting Other Portable Audio
Device . . . . . . . . . . . . . . . . . . . . . . . . . . 10
Listening to the Radio
Listening to the Radio . . . . . . . . . . . . . . . . 10
Using Radio Data System (RDS). . . . . . . . . . 11
Playback
Playing a USB Device . . . . . . . . . . . . . . . . . 12
Playing a BLUETOOTH Device . . . . . . . . . . 12
Searching and Playing Tracks . . . . . . . . . . 13
Handsfree Calling (via
BLUETOOTH only)
Receiving a Call. . . . . . . . . . . . . . . . . . . . . . 14
Making a Call. . . . . . . . . . . . . . . . . . . . . . . . 14
Available Operations During Call . . . . . . . 15
Useful Functions
Sony | Music Center with iPhone/
Android™ Smartphone . . . . . . . . . . . . 16
Using Voice Recognition (Android
Smartphone only). . . . . . . . . . . . . . . . . 17
Using Siri Eyes Free. . . . . . . . . . . . . . . . . . . 17
Settings
Canceling the DEMO Mode . . . . . . . . . . . . 18
Basic Setting Operation . . . . . . . . . . . . . . . 18
General Setup (GENERAL) . . . . . . . . . . . . . 18
Sound Setup (SOUND) . . . . . . . . . . . . . . . . 19
Display Setup (DISPLAY). . . . . . . . . . . . . . . 20
BLUETOOTH Setup (BLUETOOTH) . . . . . . . 21
Sony | Music Center Setup
(SONY APP) . . . . . . . . . . . . . . . . . . . . . . 21
Additional Information
Updating the Firmware . . . . . . . . . . . . . . . 22
Precautions. . . . . . . . . . . . . . . . . . . . . . . . . 22
Maintenance. . . . . . . . . . . . . . . . . . . . . . . . 23
Specifications . . . . . . . . . . . . . . . . . . . . . . . 23
Troubleshooting . . . . . . . . . . . . . . . . . . . . . 25
Messages . . . . . . . . . . . . . . . . . . . . . . . . . . 28
Connection/Installation
Cautions . . . . . . . . . . . . . . . . . . . . . . . . . . . 30
Parts List for Installation . . . . . . . . . . . . . . 30
Connection . . . . . . . . . . . . . . . . . . . . . . . . . . 31
Installation . . . . . . . . . . . . . . . . . . . . . . . . . 34

5GB
Guide to Parts and Controls
Front panel release button
SRC (source)
Turn on the power.
Change the source.
OFF
Press and hold for 1 second to turn the
source off and display the clock.
Press and hold for more than 2 seconds
to turn off the power and the display.
Control dial
Rotate to adjust the volume.
PUSH ENTER
Enter the selected item.
Press SRC, rotate then press to change
the source (timeout in 2 seconds).
MENU
Open the setup menu.
VOICE (page 15, 17)
Press and hold for more than 2 seconds
to activate voice dial, voice recognition
(Android smartphone only), or the Siri
function (iPhone only).
N-Mark
Touch the control dial with Android
smartphone to make BLUETOOTH
connection.
Display window
/ (SEEK –/+)
Tune in radio stations automatically.
Press and hold to tune manually.
/ (prev/next)
/ (fast-reverse/fast-forward)
PTY (program type)
Select PTY in RDS.
(browse) (page 13)
Enter the browse mode during playback.
(Not available when a USB device in
Android mode or iPod is connected.)
CALL
Enter the call menu. Receive/end a call.
Press and hold for more than 2 seconds
to switch the BLUETOOTH signal.
(back)
Return to the previous display.
MODE (page 7, 10, 15)
Receptor for the remote commander
Number buttons (1 to 6)
Receive stored radio stations. Press and
hold to store stations.
Main unit

6GB
ALBUM /
Skip an album for audio device. Press and
hold to skip albums continuously.
(Not available when a USB device in
Android mode or iPod is connected.)
(repeat)
(Not available when a USB device in
Android mode is connected.)
(shuffle)
(Not available when a USB device in
Android mode is connected.)
MIC (page 15)
(play/pause)
EXTRA BASS
Reinforce bass sound in synchronization
with the volume level. Press to change
the EXTRA BASS setting: [1], [2], [OFF].
AUX input jack
DSPL (display)
Press to change display items.
SCRL (scroll)
Press and hold to scroll a display item.
USB port
Detaching the Front Panel
You can detach the front panel of this unit to
prevent theft.
1 Press and hold OFF until the unit
turns off, press the front panel
release button , then pull the panel
towards you to remove.
Caution alarm
If you turn the ignition switch to the OFF
position without detaching the front panel,
the caution alarm will sound for a few
seconds. The alarm will only sound if the
built-in amplifier is used.
Serial numbers
Make sure the serial numbers on the bottom
of the unit and the back of the front panel
are matched correctly. Otherwise you cannot
make BLUETOOTH pairing, connection and
disconnection by NFC.
Getting Started
Attaching the front panel

7GB
Resetting the Unit
Before operating the unit for the first time,
after replacing the car battery, or changing
the connections, you must reset the unit.
1 Press DSPL and (back)/MODE for
more than 2 seconds.
Note
Resetting the unit will erase the clock setting and
some stored contents.
Setting the area/region
After resetting the unit, the area/region
setting display appears.
1 Press ENTER while [SET AREA] is
displayed.
The area/region currently set appears.
2 Rotate the control dial to select
[EUROPE] or [RUSSIA], then press it.
3 Rotate the control dial to select [YES]
or [NO], then press it.
If the setting area/region is changed, the
unit is reset, then the clock is displayed.
This setting can be configured in the general
setup menu (page 18).
Setting the Clock
1 Press MENU, rotate the control dial to
select [GENERAL], then press it.
2 Rotate the control dial to select [SET
CLOCK-ADJ], then press it.
The hour indication flashes.
3 Rotate the control dial to set the hour
and minute.
To move the digital indication, press
/ (SEEK –/+).
4 After setting the minute, press MENU.
The setup is complete and the clock
starts.
To display the clock
Press DSPL.
Preparing a BLUETOOTH
Device
You can enjoy music, or perform handsfree
calling depending on the BLUETOOTH
compatible device such as a smartphone,
cellular phone and audio device (hereafter
“BLUETOOTH device” if not otherwise
specified). For details on connecting, refer to
the operating instructions supplied with the
device.
Before connecting the device, turn down the
volume of this unit; otherwise, loud sound
may result.
By touching the control dial on the unit with
an NFC* compatible smartphone, the unit is
paired and connected with the smartphone
automatically.
* NFC (Near Field Communication) is a technology
enabling short-range wireless communication
between various devices, such as mobile phones
and IC tags. Thanks to the NFC function, data
communication can be achieved easily just by
touching the relevant symbol or designated
location on NFC compatible devices.
For a smartphone with Android OS 4.0 or
lower installed, downloading the app “NFC
Easy Connect” available on Google Play is
required. The app may not be downloadable
in some countries/regions.
1 Activate the NFC function on the
smartphone.
For details, refer to the operating
instructions supplied with the
smartphone.
2 Touch the N-Mark part of the unit
with the N-Mark part of the
smartphone.
Connecting with a Smartphone
using One-touch connection (NFC)

8GB
Make sure that lights up on the display
of the unit.
To disconnect using NFC
Touch the N-Mark part of the unit with the
N-Mark part of the smartphone again.
Notes
• When making the connection, handle the
smartphone carefully to prevent scratches.
• One-touch connection is not possible when the
unit is already connected to two NFC compatible
devices. In this case, disconnect either device, and
make connection with the smartphone again.
When connecting a BLUETOOTH device for
the first time, mutual registration (called
“pairing”) is required. Pairing enables this
unit and other devices to recognize each
other. This unit can connect two BLUETOOTH
devices (two cellular phones, or a cellular
phone and an audio device).
1 Place the BLUETOOTH device within
1 m (3 ft) of this unit.
2 Press MENU, rotate the control dial to
select [BLUETOOTH], then press it.
3 Rotate the control dial to select [SET
PAIRING], then press it.
4 Rotate the control dial to select [SET
DEVICE 1]* or [SET DEVICE 2]*, then
press it.
flashes while the unit is in pairing
standby mode.
* [SET DEVICE 1] or [SET DEVICE 2] will be
changed to the paired device name after
pairing is complete.
5 Perform pairing on the BLUETOOTH
device so it detects this unit.
6 Select [DSX-A416BT] shown in the
display of the BLUETOOTH device.
If your model name does not appear,
repeat from step 2.
7 If passkey* input is required on the
BLUETOOTH device, input [0000].
* Passkey may be called “Passcode,” “PIN code,”
“PIN number” or “Password,” etc., depending
on the device.
When pairing is made, stays lit.
8 Select this unit on the BLUETOOTH
device to establish the BLUETOOTH
connection.
or lights up when the connection is
made.
Note
While connecting to a BLUETOOTH device, this unit
cannot be detected from another device. To enable
detection, enter the pairing mode and search for
this unit from another device.
To start playback
For details, see “Playing a BLUETOOTH
Device” (page 12).
To disconnect the paired device
Perform steps 2 to 4 to disconnect after this
unit and the BLUETOOTH device are paired.
To use a paired device, connection with this
unit is required. Some paired devices will
connect automatically.
1 Press MENU, rotate the control dial to
select [BLUETOOTH], then press it.
Pairing and connecting with a
BLUETOOTH device
Connecting with a paired
BLUETOOTH device
[0000]
Input passkey

9GB
2 Rotate the control dial to select [SET
BT SIGNL], then press it.
Make sure that lights up.
3 Activate the BLUETOOTH function on
the BLUETOOTH device.
4 Operate the BLUETOOTH device to
connect to this unit.
or lights up.
Icons in the display:
To connect the last-connected device
from this unit
Activate the BLUETOOTH function on the
BLUETOOTH device.
To connect with the audio device, press SRC
to select [BT AUDIO] and press (play/
pause).
To connect with the cellular phone, press
CALL.
Note
While streaming BLUETOOTH audio, you cannot
connect from this unit to the cellular phone.
Connect from the cellular phone to this unit instead.
Tip
With BLUETOOTH signal on: when the ignition is
turned to on, this unit reconnects automatically to
the last-connected cellular phone.
To install the microphone
For details, see “Installing the microphone”
(page 33).
When an iPhone/iPod with iOS5 or later
installed is connected to the USB port, the
unit is paired and connected with the
iPhone/iPod automatically.
To enable BLUETOOTH Auto Pairing, make
sure [SET AUTOPAIR] in [BLUETOOTH] is set
to [ON] (page 21).
1 Activate the BLUETOOTH function on
the iPhone/iPod.
2 Connect an iPhone/iPod to the USB
port.
Make sure that lights up on the display
of the unit.
Notes
• BLUETOOTH Auto Pairing is not possible if the unit
is already connected to two BLUETOOTH devices.
In this case, disconnect either device, then
connect the iPhone/iPod again.
• If BLUETOOTH Auto Pairing is not established, see
“Preparing a BLUETOOTH Device” (page 7).
Connecting a USB Device
1 Turn down the volume on the unit.
2 Connect the USB device to the unit.
To connect an iPod/iPhone, use the USB
connection cable for iPod (not supplied).
Lights up when handsfree calling is
available by enabling the HFP
(Handsfree Profile).
Lights up when the audio device is
playable by enabling the A2DP
(Advanced Audio Distribution
Profile).
Connecting with an iPhone/iPod
(BLUETOOTH Auto Pairing)

10GB
Connecting Other Portable
Audio Device
1 Turn off the portable audio device.
2 Turn down the volume on the unit.
3 Connect the portable audio device to
the AUX input jack (stereo mini jack)
on the unit with a connecting cord
(not supplied)*.
* Be sure to use a straight type plug.
4 Press SRC to select [AUX].
To match the volume level of the
connected device to other sources
Start playback of the portable audio device
at a moderate volume, and set your usual
listening volume on the unit.
Press MENU, then select [SOUND] [SET AUX
VOL] (page 20).
Listening to the Radio
To listen to the radio, press SRC to select
[TUNER].
1 Press MODE to change the band (FM1,
FM2, FM3, MW or LW).
2 Press MENU, rotate the control dial to
select [GENERAL], then press it.
3 Rotate the control dial to select [SET
BTM], then press it.
The unit stores stations in order of
frequency on the number buttons.
1 Press MODE to change the band (FM1,
FM2, FM3, MW or LW).
2 Perform tuning.
To tune manually
Press and hold / (SEEK –/+) to
locate the approximate frequency, then
press / (SEEK –/+) repeatedly to
fine adjust to the desired frequency.
To tune automatically
Press / (SEEK –/+).
Scanning stops when the unit receives a
station.
1 While receiving the station that you
want to store, press and hold a
number button (1 to 6) until [MEM]
appears.
1 Select the band, then press a number
button (1 to 6).
Listening to the Radio
Storing automatically (BTM)
Tuning
Storing manually
Receiving the stored stations

11GB
Using Radio Data System
(RDS)
AF continuously retunes the station to the
strongest signal in a network, and TA
provides current traffic information or traffic
programs (TP) if received.
1 Press MENU, rotate the control dial to
select [GENERAL], then press it.
2 Rotate the control dial to select [SET
AF/TA], then press it.
3 Rotate the control dial to select [SET
AF-ON], [SET TA-ON], [SET AF/TA-ON]
or [SET AF/TA-OFF], then press it.
To store RDS stations with the AF and
TA setting
You can preset RDS stations along with an
AF/TA setting. Set AF/TA, then store the
station with BTM or manually. If you preset
manually, you can also preset non-RDS
stations.
To receive emergency announcements
With AF or TA on, emergency
announcements will automatically interrupt
the currently selected source.
To adjust the volume level during a
traffic announcement
Level will be stored into memory for
subsequent traffic announcements,
independently from the regular volume
level.
To stay with one regional program
(REGIONAL)
When the AF and REGIONAL functions are
on, you will not be switched to another
regional station with a stronger frequency. If
you leave this regional program’s reception
area, set [SET REGIONAL] in [GENERAL] to
[SET REG-OFF] during FM reception
(page 19).
This function does not work in the UK and
some other areas.
Local Link function (UK only)
This function enables you to select other
local stations in the area, even if they are not
stored on your number buttons.
During FM reception, press a number button
(1 to 6) on which a local station is stored.
Within 5 seconds, press again a number
button of the local station. Repeat this
procedure until the local station is received.
1 Press PTY during FM reception.
2 Rotate the control dial until the
desired program type appears, then
press it.
The unit starts to search for a station
broadcasting the selected program type.
Type of programs
The CT data from the RDS transmission sets
the clock.
1 Set [SET CT-ON] in [GENERAL]
(page 19).
Setting alternative frequencies
(AF) and traffic announcement
(TA)
Selecting program types (PTY)
NEWS (News), AFFAIRS (Current Affairs), INFO
(Information), SPORT (Sports), EDUCATE
(Education), DRAMA (Drama), CULTURE
(Culture), SCIENCE (Science), VARIED (Varied),
POP M (Pop Music), ROCK M (Rock Music),
EASY M (M.O.R. Music), LIGHT M (Light
classical), CLASSICS (Serious classical), OTHER
M (Other Music), WEATHER (Weather), FINANCE
(Finance), CHILDREN (Children’s program),
SOCIAL (Social Affairs), RELIGION (Religion),
PHONE IN (Phone In), TRAVEL (Travel), LEISURE
(Leisure), JAZZ (Jazz Music), COUNTRY (Country
Music), NATION M (National Music), OLDIES
(Oldies Music), FOLK M (Folk Music),
DOCUMENT (Documentary)
Setting clock time (CT)

12GB
Playing a USB Device
In these Operating Instructions, “iPod” is
used as a general reference for the iPod
functions on an iPod and iPhone, unless
otherwise specified by the text or
illustrations.
For details on the compatibility of your iPod,
see “About iPod” (page 22) or visit the
support site on the back cover.
AOA (Android Open Accessory) 2.0, MSC
(Mass Storage Class) and MTP (Media
Transfer Protocol) type USB devices*
compliant with the USB standard can be
used. Depending on the USB device, the
Android mode or MSC/MTP mode can be
selected on the unit.
Some digital media players or Android
smartphones may require setting to MTP
mode.
* e.g., a USB flash drive, digital media player,
Android smartphone
Notes
• For details on the compatibility of your USB device,
visit the support site on the back cover.
• Smartphones with Android OS 4.1 or higher
installed support Android Open Accessory 2.0
(AOA 2.0). However, some smartphones may not
fully support AOA 2.0 even if Android OS 4.1 or
higher is installed.
For details on the compatibility of your Android
smartphone, visit the support site on the back
cover.
• Playback of the following files is not supported.
MP3/WMA/FLAC:
–copyright-protected files
– DRM (Digital Rights Management) files
– Multi-channel audio files
MP3/WMA:
– lossless compression files
Before making a connection, select the USB
mode (Android mode or MSC/MTP mode)
depending on the USB device (page 19).
1 Connect a USB device to the USB port
(page 9).
Playback starts.
If a device is already connected, to start
playback, press SRC to select [USB] ([IPD]
appears in the display when the iPod is
recognized).
2 Adjust the volume on this unit.
To stop playback
Press and hold OFF for 1 second.
To remove the device
Stop playback, then remove the device.
Caution for iPhone
When you connect an iPhone via USB,
phone call volume is controlled by the
iPhone, not the unit. Do not inadvertently
increase the volume on the unit during a
call, as a sudden loud sound may result
when the call ends.
Playing a BLUETOOTH Device
You can play contents on a connected
device that supports BLUETOOTH A2DP
(Advanced Audio Distribution Profile).
1 Make BLUETOOTH connection with
the audio device (page 7).
To select the audio device, press MENU,
then select [BLUETOOTH] [SET
AUDIODEV] (page 21).
2 Press SRC to select [BT AUDIO].
3 Operate the audio device to start
playback.
4 Adjust the volume on this unit.
Notes
• Depending on the audio device, information such
as title, track number/time and playback status
may not be displayed on this unit.
• Even if the source is changed on this unit,
playback of the audio device does not stop.
• [BT AUDIO] does not appear in the display while
running the “Sony | Music Center” application via
the BLUETOOTH function.
Playback

13GB
To match the volume level of the
BLUETOOTH device to other sources
Start playback of the BLUETOOTH audio
device at a moderate volume, and set your
usual listening volume on the unit.
Press MENU, then select [SOUND] [SET BTA
VOL] (page 20).
Searching and Playing
Tracks
Not available when a USB device in Android
mode is connected.
1 During playback, press (repeat) or
(shuffle) repeatedly to select the
desired play mode.
Playback in the selected play mode may
take time to start.
Available play modes differ depending on
the selected sound source.
Not available when a USB device in Android
mode or iPod is connected.
1 During USB playback, press
(browse)* to display the list of search
categories.
When the track list appears, press
(back) repeatedly to display the desired
search category.
* During USB playback, press (browse) for
more than 2 seconds to directly return to the
beginning of the category list.
2 Rotate the control dial to select the
desired search category, then press it
to confirm.
3 Repeat step 2 to search the desired
track.
Playback starts.
To exit the Quick-BrowZer mode
Press (browse).
Not available when a USB device in Android
mode or iPod is connected.
1 During USB playback, press
(browse).
2 Press (SEEK +).
3 Rotate the control dial to select the
item.
The list is jumped in steps of 10% of the
total number of items.
4 Press ENTER to return to the Quick-
BrowZer mode.
The selected item appears.
5 Rotate the control dial to select the
desired item, then press it.
Playback starts.
Repeat play and shuffle play
Searching a track by name (Quick-
BrowZer™)
Searching by skipping items
(Jump mode)

14GB
To use a cellular phone, connect it with this
unit. You can connect two cellular phones to
the unit. For details, see “Preparing a
BLUETOOTH Device” (page 7).
Receiving a Call
1 Press CALL when a call is received
with a ringtone.
The phone call starts.
Note
The ringtone and talker’s voice are output only from
the front speakers.
To reject the call
Press and hold OFF for 1 second.
To end the call
Press CALL again.
Making a Call
You can make a call from the phonebook or
call history when a cellular phone
supporting PBAP (Phone Book Access
Profile) is connected.
When two cellular phones are connected to
the unit, select either phone.
1 Press CALL.
When two cellular phones are connected
to the unit, rotate the control dial to
select either phone, then press it.
2 Rotate the control dial to select
[PHONE BOOK], then press it.
3 Rotate the control dial to select an
initial from the initial list, then press
it.
4 Rotate the control dial to select a
name from the name list, then press
it.
5 Rotate the control dial to select a
number from the number list, then
press it.
The phone call starts.
1 Press CALL.
When two cellular phones are connected
to the unit, rotate the control dial to
select either phone, then press it.
2 Rotate the control dial to select
[RECENT CALL], then press it.
A list of the call history appears.
3 Rotate the control dial to select a
name or phone number from the call
history, then press it.
The phone call starts.
1 Press CALL.
When two cellular phones are connected
to the unit, rotate the control dial to
select either phone, then press it.
2 Rotate the control dial to select [DIAL
NUMBER], then press it.
3 Rotate the control dial to enter the
phone number, and lastly select [ ]
(space), then press ENTER*.
The phone call starts.
* To move the digital indication, press /
(SEEK –/+).
Note
[_] appears instead of [#] on the display.
1 Press CALL.
When two cellular phones are connected
to the unit, rotate the control dial to
select either phone, then press it.
2 Rotate the control dial to select
[REDIAL], then press it.
The phone call starts.
Handsfree Calling (via
BLUETOOTH only)
From the phonebook
From the call history
By phone number input
By redial

15GB
You can make a call by saying the voice tag
stored in a connected cellular phone that
has a voice dialing function.
1 Press CALL.
When two cellular phones are connected
to the unit, rotate the control dial to
select either phone, then press it.
2 Rotate the control dial to select
[VOICE DIAL], then press it.
Alternatively, press and hold VOICE for
more than 2 seconds.
3 Say the voice tag stored on the
cellular phone.
Your voice is recognized, and the call is
made.
To cancel voice dialing
Press VOICE.
Available Operations During
Call
To adjust the ringtone volume
Rotate the control dial while receiving a call.
To adjust the talker’s voice volume
Rotate the control dial during a call.
To adjust the volume for the other party
(Mic gain adjustment)
Press MIC.
Adjustable volume levels: [MIC-LOW], [MIC-
MID], [MIC-HI].
To reduce echo and noise (Echo
Canceler/Noise Canceler Mode)
Press and hold MIC.
Settable mode: [EC/NC-1], [EC/NC-2].
To switch between handsfree mode
and handheld mode
During a call, press MODE to switch the
phone call audio between the unit and
cellular phone.
Note
Depending on the cellular phone, this operation
may not be available.
By voice tags

16GB
Sony | Music Center with
iPhone/Android™
Smartphone
Downloading the latest version of
“Sony | Music Center” application is required
from the App Store for iPhone or from
available on Google Play for Android
smartphone.
Notes
• For your safety, follow your local traffic laws and
regulations, and do not operate the application
while driving.
• “Sony | Music Center” is an app for controlling
Sony audio devices which are compatible with
“Sony | Music Center”, by your iPhone/Android
smartphone.
• What you can control with “Sony | Music Center”
varies depending on the connected device.
• To make use of “Sony | Music Center” features, see
the details on your iPhone/Android smartphone.
• For further details on “Sony | Music Center,” visit
the following URL: http://www.sony.net/smcqa/
• Visit the website below and check the compatible
iPhone/Android smartphone models.
For iPhone: visit the App Store
For Android smartphone: visit Google Play
1 Make the BLUETOOTH connection
with iPhone/Android smartphone
(page 7).
To select the audio device, press MENU,
then select [BLUETOOTH] [SET
AUDIODEV] (page 21).
2 Launch the “Sony | Music Center”
application.
3 Press MENU, rotate the control dial to
select [SONY APP], then press it.
4 Rotate the control dial to select
[CONNECT], then press it.
Connection to iPhone/Android
smartphone starts.
For details on the operations on iPhone/
Android smartphone, see the help of the
application.
If the device number appears
Make sure that the number is displayed
(e.g., 123456), then select [Yes] on the
iPhone/Android smartphone.
To terminate connection
1
Press MENU, rotate the control dial to select
[SONY APP], then press it.
2 Rotate the control dial to select [CONNECT],
then press it.
Selecting the source or application
You can operate to select the desired source
or application on iPhone/Android
smartphone.
To select the source
Press SRC repeatedly. Alternatively, press
SRC, rotate the control dial to select the
desired source, then press ENTER.
To display the source list
Press SRC.
Announcement of SMS by voice
guide (Android smartphone only)
Messages of SMS are automatically read out
through the car speakers when they are
received.
For details on settings, refer to the help of
the application.
Replying a message of SMS
(Android smartphone only)
You can reply a message by touching the
reply icon.
1 Activate the “Sony | Music Center”
application, then touch the [Reply] (reply)
icon.
The message input display appears on the
“Sony | Music Center” application.
2 Input a reply message by voice recognition.
The list of message candidates appears on the
“Sony | Music Center” application.
3 Rotate the control dial to select the desired
message, then press it.
The message is sent out.
Useful Functions
Establishing the Sony | Music
Center connection

17GB
Making sound and display settings
You can adjust the settings relating to sound
and display via iPhone/Android
smartphone.
For details on settings, refer to the help of
the application.
Using Voice Recognition
(Android Smartphone only)
1 Press and hold VOICE to activate
voice recognition.
2 Say the desired voice command into
the microphone.
To deactivate voice recognition
Press VOICE.
Notes
• Voice recognition may not be available in some
cases.
• Voice recognition may not work properly
depending on the performance of the connected
Android smartphone.
• Operate under conditions where noise such as
engine sound is minimized during voice
recognition.
Using Siri Eyes Free
Siri Eyes Free allows you to use an iPhone
handsfree by simply speaking into the
microphone. This function requires you to
connect an iPhone to the unit via
BLUETOOTH. Availability is limited to iPhone
4s or later. Make sure that your iPhone is
running the latest iOS version.
You must complete BLUETOOTH registration
and connection configurations for the
iPhone with the unit in advance. For details,
see “Preparing a BLUETOOTH Device”
(page 7). To select the iPhone, press MENU,
then select [BLUETOOTH] [SET AUDIODEV]
(page 21).
1 Activate the Siri function on the
iPhone.
For details, refer to the operating
instructions supplied with the iPhone.
2 Press and hold VOICE for more than
2 seconds.
The voice command display appears.
3 After the iPhone beeps, speak into
the microphone.
The iPhone beeps again, then Siri starts
responding.
To deactivate Siri Eyes Free
Press VOICE.
Notes
• The iPhone may not recognize your voice
depending on usage conditions. (For example, if
you are in a moving car.)
• Siri Eyes Free may not function properly, or the
response time may lag in locations where iPhone
signals are difficult to receive.
• Depending on the iPhone’s operating condition,
Siri Eyes Free may not function properly, or may
quit.
• If you play a track with an iPhone using the
BLUETOOTH audio connection, when the track
starts playback via BLUETOOTH, Siri Eyes Free
automatically quits and the unit switches to the
BLUETOOTH audio source.
• When Siri Eyes Free is activated during audio
playback, the unit may switch to the BLUETOOTH
audio source even if you do not specify a track to
play.
• When connecting the iPhone to the USB port, Siri
Eyes Free may not function properly, or may quit.
• When connecting the iPhone to the unit via USB,
do not activate Siri with the iPhone. Siri Eyes Free
may not function properly, or may quit.
• There is no audio sound while Siri Eyes Free is
activated.

18GB
Canceling the DEMO Mode
You can cancel the demonstration display
which appears when the source is off and
the clock is displayed.
1 Press MENU, rotate the control dial to
select [GENERAL], then press it.
2 Rotate the control dial to select [SET
DEMO], then press it.
3 Rotate the control dial to select [SET
DEMO-OFF], then press it.
The setting is complete.
4 Press (back) twice.
The display returns to normal reception/
play mode.
Basic Setting Operation
You can set items in the following setup
categories:
General setup (GENERAL), Sound setup
(SOUND), Display setup (DISPLAY),
BLUETOOTH setup (BLUETOOTH), Sony |
Music Center setup (SONY APP)
1 Press MENU.
2 Rotate the control dial to select the
setup category, then press it.
The items that can be set differ
depending on the source and settings.
3 Rotate the control dial to select the
options, then press it.
To return to the previous display
Press (back).
General Setup (GENERAL)
AREA (area)
Specifies the area/region to use this unit:
[EUROPE], [RUSSIA].
If the area/region currently set is
changed, this unit is reset, then the clock
is displayed.
(Available only while the source is off and
the clock is displayed.)
DEMO (demonstration)
Activates the demonstration: [ON], [OFF].
CLOCK-ADJ (clock adjust) (page 7)
CAUT ALM (caution alarm)
Activates the caution alarm: [ON], [OFF]
(page 6).
(Available only while the source is off and
the clock is displayed.)
BEEP (beep)
Activates the beep sound: [ON], [OFF].
AUTO OFF (auto off)
Shuts off automatically after a certain
time when the unit is turned off and the
clock is displayed (i.e. press and hold OFF
for 1 second): [ON] (30 minutes), [OFF].
STEERING (steering)
Registers/resets the setting of the
steering wheel remote control.
(Available only while the source is off and
the clock is displayed.)
STR CONTROL (steering control)
Selects the input mode of the connected
remote control. To prevent a malfunction,
be sure to match the input mode with the
connected remote control before use.
CUSTOM (custom)
Input mode for the steering wheel
remote control
PRESET (preset)
Input mode for the wired remote
control excluding the steering wheel
remote control (Automatically selected
when [RESET CUSTOM] is performed.)
Settings

19GB
EDIT CUSTOM (edit custom)
Registers the functions (SOURCE, ATT,
VOL +/–, SEEK +/–, VOICE, ON HOOK, OFF
HOOK) to the steering wheel remote
control:
Rotate the control dial to select the
function you want to assign to the
steering wheel remote control, then
press it.
While [REGISTER] is blinking, press and
hold the button on the steering wheel
remote control you want to assign the
function to. When registration is
complete, [REGISTERED] is displayed.
To register other functions, repeat
steps and .
(Available only when [STR CONTROL] is
set to [CUSTOM].)
RESET CUSTOM (reset custom)
Resets the setting of the steering wheel
remote control: [YES], [NO].
(Available only when [STR CONTROL] is
set to [CUSTOM].)
Notes
• While making settings, only button operation
on the unit is available. For safety, park your car
before making this setting.
• If an error occurs while registering, all the
previously-registered information remains.
Restart registration from the function where
the error occurred.
• This function may not be available on some
vehicles. For details on the compatibility of
your vehicle, visit the support site on the back
cover.
USB MODE (USB mode)
Changes the USB mode: [ANDROID],
[MSC/MTP].
(Available only when the USB source is
selected.)
CT (clock time)
Activates the CT function: [ON], [OFF].
AF/TA (alternative frequencies/traffic
announcement)
Selects the alternative frequencies (AF)
and traffic announcement (TA) setting:
[AF-ON], [TA-ON], [AF/TA-ON],
[AF/TA-OFF].
REGIONAL (regional)
Restricts reception to a specific region:
[ON], [OFF].
(Available only when FM is received.)
BTM (best tuning memory) (page 10)
(Available only when the tuner is
selected.)
FIRMWARE (firmware)
(Available only while the source is off and
the clock is displayed.)
Checks/updates the firmware version. For
details, visit the support site on the back
cover.
FW VERSION (firmware version)
Displays current firmware version.
FW UPDATE (firmware update)
Enters firmware update process: [YES],
[NO].
Updating the firmware takes a few
minutes to complete. During the update,
do not turn the ignition to the OFF
position, nor remove the USB device.
Sound Setup (SOUND)
This setup menu is not available when the
source is off and the clock is displayed.
EQ10 PRESET (EQ10 preset)
Selects an equalizer curve from 10
equalizer curves or off:
[OFF], [R&B], [ROCK], [POP], [HIP-HOP],
[EDM], [JAZZ], [SOUL], [COUNTRY],
[KARAOKE]*, [CUSTOM].
The equalizer curve setting can be
memorized for each source.
* [KARAOKE] reduces the vocal sound but
cannot fully remove it during playback. Also,
using a microphone is not supported.
EQ10 CUSTOM (EQ10 custom)
Sets [CUSTOM] of EQ10.
Setting the equalizer curve: [BAND1] –
[BAND10] (32 Hz, 63 Hz, 125 Hz, 250 Hz,
500 Hz, 1 kHz, 2 kHz, 4 kHz, 8 kHz, 16 kHz).
The volume level is adjustable in 1 dB
steps, from -6 dB to +6 dB.
BALANCE (balance)
Adjusts the sound balance: [RIGHT-15] –
[CENTER] – [LEFT-15].

20GB
FADER (fader)
Adjusts the relative level: [FRONT-15] –
[CENTER] – [REAR-15].
S.WOOFER (subwoofer)
SW LEVEL (subwoofer level)
Adjusts the subwoofer volume level:
[+6 dB] – [0 dB] – [-6 dB].
([ATT] is displayed at the lowest setting.)
SW PHASE (subwoofer phase)
Selects the subwoofer phase: [SUB
NORM], [SUB REV].
LPF FREQ (low pass filter frequency)
Selects the subwoofer cut-off frequency:
[80Hz], [100Hz], [120Hz].
HPF FREQ (high pass filter frequency)
Selects the front/rear speaker cut-off
frequency: [OFF], [80Hz], [100Hz], [120Hz].
AUX VOL (AUX volume level)
Adjusts the volume level for each
connected auxiliary device: [+18 dB] –
[0 dB] – [-8 dB].
This setting negates the need to adjust
the volume level between sources.
(Available only when the AUX is selected.)
BTA VOL (BLUETOOTH audio volume level)
Adjusts the volume level for each
connected BLUETOOTH device: [+6 dB] –
[0 dB] – [-6 dB].
This setting negates the need to adjust
the volume level between sources.
(Available only when the BT audio or
application is selected.)
Display Setup (DISPLAY)
DIMMER (dimmer)
Changes the display brightness:
[OFF], [ON], [AT] (auto), [CLK] (clock).
([AT] is available only when the
illumination control lead is connected,
and the head light is turned on.)
To set this function to be active only
during a fixed period, select [CLK], then
set the start and end times.
– To set the brightness when the dimmer
function is activated:
Set [DIMMER] to [ON], then adjust
[BRIGHTNESS].
– To set the brightness when the dimmer
function is deactivated:
Set [DIMMER] to [OFF], then adjust
[BRIGHTNESS].
The brightness setting is stored and
applied when the dimmer function is
activated or deactivated.
BRIGHTNESS (brightness)
Adjusts the display brightness. The
brightness level is adjustable: [1] – [10].
BUTTON-C (button color)
Sets a preset color or customized color for
the buttons.
COLOR (color)
Selects from 15 presets colors, 1
customized color.
CUSTOM-C (custom color)
Registers a customized color for the
buttons.
RGB RED, RGB GRN, RGB BLUE
Adjustable color range: [0] – [32] ([0]
cannot be set for all color ranges).
DSPL-C (display color)
Sets a preset color or customized color for
the display.
COLOR (color)
Selects from 15 presets colors, 1
customized color.
CUSTOM-C (custom color)
Registers a customized color for the
display.
RGB RED, RGB GRN, RGB BLUE
Adjustable color range: [0] – [32] ([0]
cannot be set for all color ranges).
SND SYNC (sound synchronization)
Activates the synchronization of the
illumination with the sound: [ON], [OFF].
AUTO SCR (auto scroll)
Scrolls long items automatically: [ON],
[OFF].
(Not available when the AUX or tuner is
selected.)

21GB
BLUETOOTH Setup
(BLUETOOTH)
PAIRING (pairing) (page 8)
Connects up to two BLUETOOTH devices:
[DEVICE 1], [DEVICE 2].
[DEVICE 1] or [DEVICE 2] will be changed to
the paired device name after pairing is
complete.
AUDIODEV (audio device)
Selects the audio device.
[*] appears on the device paired with
[DEVICE 1] or the current A2DP compatible
audio device.
RINGTONE (ringtone)
Selects whether this unit or the connected
cellular phone outputs the ringtone: [1]
(this unit), [2] (cellular phone).
AUTO ANS (auto answer)
Sets this unit to answer an incoming call
automatically: [OFF], [1] (about 3
seconds), [2] (about 10 seconds).
AUTOPAIR (auto pairing)
Starts BLUETOOTH pairing automatically
when iOS device version 5.0 or later is
connected via USB: [ON], [OFF].
BT SIGNL (BLUETOOTH signal) (page 8)
Activates/deactivates the BLUETOOTH
function.
BT INIT (BLUETOOTH initialize)
Initializes all the BLUETOOTH related
settings (pairing information, device
information, etc.): [YES], [NO].
When disposing the unit, initialize all the
settings.
(Available only while the source is off and
the clock is displayed.)
Sony | Music Center Setup
(SONY APP)
AUTO LAUNCH (auto launch)
Activates the “Sony | Music Center” auto
launch: [ON], [OFF].
When [ON] is selected, “Sony | Music
Center” will automatically connect after
the BLUETOOTH connection is complete.
CONNECT (connect)
Establish and terminate “Sony | Music
Center” function (connection).

22GB
Updating the Firmware
To update the firmware, visit the support site
on the back cover, then follow the online
instructions.
Note
During the update, do not remove the USB device.
Precautions
• Do not leave the front panel or audio
devices on the dashboard.
• When the unit is turned on, the power
antenna (aerial) extends automatically.
• Do not splash liquid onto the unit.
•You can connect to the following iPod
models. Update your iPod devices to the
latest software before use.
Compatible iPhone/iPod models
•Use of the Made for Apple badge means
that an accessory has been designed to
connect specifically to the Apple product(s)
identified in the badge, and has been
certified by the developer to meet Apple
performance standards. Apple is not
responsible for the operation of this device
or its compliance with safety and
regulatory standards.
Please note that the use of this accessory
with an Apple product may affect wireless
performance.
If you have any questions or problems
concerning your unit that are not covered in
this manual, consult your nearest Sony
dealer.
Additional Information
Playback order of audio files
Folder (album)
Audio file (track)
About iPod
Compatible
Model
Bluetooth® USB
iPhone X
iPhone 8
iPhone 8 Plus
iPhone 7
iPhone 7 Plus
iPhone SE
iPhone 6s
iPhone 6s Plus
iPhone 6
iPhone 6 Plus
iPhone 5s
iPhone 5c
iPhone 5
iPhone 4s
iPod touch
(6th generation)
iPod touch
(5th generation)
iPod nano
(7th generation)

23GB
Maintenance
Cleaning the connectors
Avoid touching the connectors directly. The
unit may not function properly if the
connectors between the unit and the front
panel are not clean. In order to prevent this,
detach the front panel (page 6) and clean
the connectors with a cotton swab. Do not
apply too much force. Otherwise, the
connectors may be damaged.
Note
For safety, do not remove the front panel while
driving.
Specifications
Tuner section
FM
Tuning range:
When [AREA] is set to [EUROPE]:
87.5 MHz – 108.0 MHz
When [AREA] is set to [RUSSIA]:
FM1/FM2: 87.5 MHz – 108.0 MHz
(at 50 kHz step)
FM3: 65 MHz – 74 MHz (at 30 kHz step)
Usable sensitivity: 8 dBf
Signal-to-noise ratio: 73 dB
Separation: 50 dB at 1 kHz
MW/LW
Tuning range:
MW: 531 kHz – 1,602 kHz
LW: 153 kHz – 279 kHz
Sensitivity: MW: 26 V, LW: 50 V
USB Player section
Interface: USB (Full-speed)
Maximum current: 1 A
Maximum number of recognizable folders
and files:
Folders (albums): 256
Files (tracks) per folder: 256
Compatible Android Open Accessory
protocol (AOA): 2.0
Corresponding codec:
MP3 (.mp3)
Bit rate: 8 kbps – 320 kbps (Supports
VBR (Variable Bit Rate))
Sampling rate: 16 kHz – 48 kHz
WMA (.wma)
Bit rate: 32 kbps – 192 kbps (Supports
VBR (Variable Bit Rate))
Sampling rate: 32 kHz, 44.1 kHz,
48 kHz
FLAC (.flac)
Bit depth: 16 bit, 24 bit
Sampling rate: 44.1 kHz, 48 kHz
Supported file system: FAT16, FAT32
Wireless Communication
Communication System:
BLUETOOTH Standard version 3.0
Output:
BLUETOOTH Standard Power Class 2
(Max. Conducted +1 dBm)

24GB
Maximum communication range:
Line of sight approx. 10 m (33 ft)*
1
Frequency band:
2.4 GHz band
(2.4000 GHz – 2.4835 GHz)
Modulation method: FHSS
Compatible BLUETOOTH Profiles*
2
:
A2DP (Advanced Audio Distribution
Profile) 1.3
AVRCP (Audio Video Remote Control
Profile) 1.3
HFP (Handsfree Profile) 1.6
PBAP (Phone Book Access Profile)
SPP (Serial Port Profile)
Corresponding codec:
SBC (.sbc), AAC (.m4a)
*1 The actual range will vary depending on factors
such as obstacles between devices, magnetic
fields around a microwave oven, static electricity,
reception sensitivity, antenna (aerial)’s
performance, operating system, software
application, etc.
*2 BLUETOOTH standard profiles indicate the
purpose of BLUETOOTH communication between
devices.
NFC Communication
Frequency band: 13.56 MHz
Power amplifier section
Output: Speaker outputs
Speaker impedance: 4 – 8
Maximum power output: 55 W × 4 (at 4 )
General
Power requirements: 12 V DC car battery
(negative ground (earth))
Rated current consumption: 10 A
Dimensions:
Approx. 178 mm × 50 mm × 177 mm
(7
1
/8 in × 2 in × 7 in) (w/h/d)
Mounting dimensions:
Approx. 182 mm × 53 mm × 160 mm
(7
1
/4 in × 2
1
/8 in × 6
5
/16 in) (w/h/d)
Mass: Approx. 0.8 kg (1 lb 13 oz)
Package contents:
Main unit (1)
Microphone (1)
Parts for installation and connections
(1 set)
Ask the dealer for detailed information.
Design and specifications are subject to
change without notice.
The Bluetooth® word mark and logos are registered
trademarks owned by the Bluetooth SIG, Inc. and
any use of such marks by Sony Corporation is under
license. Other trademarks and trade names are
those of their respective owners.
The N-Mark is a trademark or registered trademark
of NFC Forum, Inc. in the United States and in other
countries.
Windows Media is either a registered trademark or
trademark of Microsoft Corporation in the United
States and/or other countries.
This product is protected by certain intellectual
property rights of Microsoft Corporation. Use or
distribution of such technology outside of this
product is prohibited without a license from
Microsoft or an authorized Microsoft subsidiary.
Apple, iPhone, iPod, iPod nano, iPod touch, and Siri
are trademarks of Apple Inc., registered in the U.S.
and other countries. App Store is a service mark of
Apple Inc.
IOS is a trademark or registered trademark of Cisco
in the U.S. and other countries and is used under
license.
Google, Google Play and Android are trademarks of
Google LLC.
libFLAC
Copyright (C) 2000-2009 Josh Coalson
Copyright (C) 2011-2013 Xiph.Org Foundation
Redistribution and use in source and binary forms,
with or without modification, are permitted
provided that the following conditions are met:
– Redistributions of source code must retain the
above copyright notice, this list of conditions and
the following disclaimer.
– Redistributions in binary form must reproduce the
above copyright notice, this list of conditions and
the following disclaimer in the documentation
and/or other materials provided with the
distribution.
– Neither the name of the Xiph.org Foundation nor
the names of its contributors may be used to
endorse or promote products derived from this
software without specific prior written
permission.
THIS SOFTWARE IS PROVIDED BY THE COPYRIGHT
HOLDERS AND CONTRIBUTORS “AS IS” AND ANY
EXPRESS OR IMPLIED WARRANTIES, INCLUDING, BUT
NOT LIMITED TO, THE IMPLIED WARRANTIES OF
MERCHANTABILITY AND FITNESS FOR A PARTICULAR
PURPOSE ARE DISCLAIMED. IN NO EVENT SHALL THE
Copyrights

25GB
FOUNDATION OR CONTRIBUTORS BE LIABLE FOR
ANY DIRECT, INDIRECT, INCIDENTAL, SPECIAL,
EXEMPLARY, OR CONSEQUENTIAL DAMAGES
(INCLUDING, BUT NOT LIMITED TO, PROCUREMENT
OF SUBSTITUTE GOODS OR SERVICES; LOSS OF USE,
DATA, OR PROFITS; OR BUSINESS INTERRUPTION)
HOWEVER CAUSED AND ON ANY THEORY OF
LIABILITY, WHETHER IN CONTRACT, STRICT
LIABILITY, OR TORT (INCLUDING NEGLIGENCE OR
OTHERWISE) ARISING IN ANY WAY OUT OF THE USE
OF THIS SOFTWARE, EVEN IF ADVISED OF THE
POSSIBILITY OF SUCH DAMAGE.
Troubleshooting
The following checklist will help you remedy
problems you may encounter with your unit.
Before going through the checklist below,
check the connection and operating
procedures.
For details on using the fuse and removing
the unit from the dashboard, see
“Connection/Installation” (page 30).
If the problem is not solved, visit the support
site on the back cover.
General
No sound or the sound is very low.
The position of the fader control [FADER]
is not set for a 2-speaker system.
The volume of the unit and/or connected
device is very low.
– Increase the volume of the unit and
connected device.
No beep sound.
An optional power amplifier is connected
and you are not using the built-in
amplifier.
Stored stations and correct time are
erased.
The fuse has blown.
Makes a noise when the position of the
ignition is switched.
The leads are not matched correctly with
the car’s accessory power connector.
During playback or reception, the
demonstration mode starts.
If no operation is performed for 5 minutes
with [DEMO-ON] set, the demonstration
mode starts.
– Set [DEMO-OFF] (page 18).
The display disappears from/does not
appear in the display window.
The connectors are dirty (page 23).
The display/illumination flashes.
The power supply is not sufficient.
– Check that the car battery supplies
enough power to the unit. (The power
requirement is 12 V DC.)
The operation buttons do not function.
Press DSPL and (back)/MODE for more
than 2 seconds to reset the unit.
The contents stored in memory are
erased.
Radio reception
The radio reception is poor.
Static noise occurs.
Connect the antenna (aerial) firmly.
65 MHz to 74 MHz in FM3 cannot be tuned
in.
[AREA] is set to [EUROPE].
– Set [AREA] to [RUSSIA] (page 18).
RDS
RDS services cannot be received (when
[AREA] is set to [RUSSIA]).
FM3 is selected.
– Select FM1 or FM2.
RDS services are unavailable in the current
region.
The SEEK starts after a few seconds of
listening.
The station is non-TP or has weak signal.
– Deactivate TA (page 11).
No traffic announcements.
Activate TA (page 11).
The station does not broadcast any traffic
announcements despite being TP.
– Tune in another station.
PTY displays [- - - - - - - -].
The current station is not an RDS station,
or the radio reception is poor.

26GB
Program service name flashes.
There is no alternative frequency for the
current station.
– Press (SEEK –/+) while the
program service name is flashing. [PI
SEEK] appears and the unit starts
searching for another frequency with
the same PI (program identification)
data.
USB device playback
A USB device takes longer to play.
The USB device contains files with a
complicated tree structure.
The audio file cannot be played.
For details on supported formats, see
“Specifications” (page 23).
If the audio file still cannot be played, refer
to the operating instructions supplied with
the USB device, or contact the
manufacturer of the USB device.
Operations for skipping an album,
skipping items (Jump mode), and
searching a track by name (Quick-
BrowZer) cannot be performed.
Set [USB MODE] to [MSC/MTP] (page 19).
The sound cannot be output during
playback in Android mode.
Check the status of the audio playback
application on the Android smartphone.
NFC function
One-touch connection (NFC) is not
possible.
If the smartphone does not respond to the
touching.
– Check that the NFC function of the
smartphone is turned on.
– Move the N-Mark part of the
smartphone closer to the N-Mark part
on this unit.
– If the smartphone is in a case, remove it.
NFC receiving sensitivity depends on the
device.
If One-touch connection with the
smartphone fails several times, make
BLUETOOTH connection manually.
BLUETOOTH function
The connecting device cannot detect this
unit.
Before the pairing is made, set this unit to
pairing standby mode.
While connected to two BLUETOOTH
devices, this unit cannot be detected from
another device.
– Disconnect either connection and search
for this unit from another device.
When the device pairing is made, set the
BLUETOOTH signal output to on (page 8).
Connection is not possible.
The connection is controlled from one side
(this unit or BLUETOOTH device), but not
both.
– Connect to this unit from a BLUETOOTH
device or vice versa.
The name of the detected device does not
appear.
Depending on the status of the other
device, it may not be possible to obtain
the name.
No ringtone.
Adjust the volume by rotating the control
dial while receiving a call.
Depending on the connecting device, the
ringtone may not be sent properly.
– Set [RINGTONE] to [1] (page 21).
The front speakers are not connected to
the unit.
– Connect the front speakers to the unit.
The ringtone is output only from the
front speakers.
The talker’s voice cannot be heard.
The front speakers are not connected to
the unit.
– Connect the front speakers to the unit.
The talker’s voice is output only from the
front speakers.
A call partner says that the volume is too
low or high.
Adjust the volume accordingly using Mic
gain adjustment (page 15).

27GB
Echo or noise occurs in phone call
conversations.
Lower the volume.
Set EC/NC Mode to [EC/NC-1] or [EC/NC-2]
(page 15).
If the ambient noise other than the phone
call sound is loud, try reducing this noise.
E.g.: If a window is open and road noise,
etc., is loud, shut the window. If an air
conditioner is loud, lower the air
conditioner.
The phone is not connected.
When BLUETOOTH audio is played, the
phone is not connected even if you press
CALL.
– Connect from the phone.
The phone sound quality is poor.
Phone sound quality depends on
reception conditions of cellular phone.
– Move your car to a place where you can
enhance the cellular phone’s signal if
the reception is poor.
The volume of the connected audio device
is low (high).
Volume level will differ depending on the
audio device.
– Adjust the volume of the connected
audio device or this unit (page 20).
The sound skips during playback of a
BLUETOOTH audio device.
Reduce the distance between the unit and
the BLUETOOTH audio device.
If the BLUETOOTH audio device is stored in
a case which interrupts the signal, remove
the audio device from the case during use.
Several BLUETOOTH devices or other
devices which emit radio waves are in use
nearby.
– Turn off the other devices.
– Increase the distance from the other
devices.
The playback sound stops momentarily
when the connection between this unit
and the cellular phone is being made. This
is not a malfunction.
The connected BLUETOOTH audio device
cannot be controlled.
Check that the connected BLUETOOTH
audio device supports AVRCP.
Some functions do not work.
Check if the connecting device supports
the functions in question.
A call is answered unintentionally.
The connecting phone is set to answer a
call automatically.
Pairing failed due to a timeout.
Depending on the connecting device, the
time limit for pairing may be short.
– Try completing the pairing within the
time.
BLUETOOTH function cannot operate.
Turn off the unit by pressing OFF for more
than 2 seconds, then turn the unit on
again.
No sound is output from the car speakers
during handsfree call.
If the sound is output from the cellular
phone, set the cellular phone to output
the sound from the car speakers.
Siri Eyes Free is not activated.
Perform the handsfree registration for an
iPhone that supports Siri Eyes Free.
Set the Siri function on the iPhone to on.
Cancel the BLUETOOTH connection with
the iPhone and the unit, and reconnect.
Sony | Music Center operation
Application name is mismatched with the
actual application in “Sony | Music
Center”.
Launch the application again from the
“Sony | Music Center” application.
While running the “Sony | Music Center”
application via BLUETOOTH, the display
automatically switches to [BT AUDIO].
The “Sony | Music Center” application or
BLUETOOTH function has failed.
Run the application again.

28GB
The “Sony | Music Center” application is
automatically disconnected when the
display switches to [IPD].
The “Sony | Music Center” application on
iPhone/iPod does not support iPod
playback.
– Change the source of the unit to other
than [IPD], then establish the “Sony |
Music Center” connection (page 16).
The “Sony | Music Center” connection is
automatically disconnected when the USB
mode of the unit is changed to
[ANDROID].
The Android smartphone is not
supporting playback in Android mode.
– Set the USB mode of the unit to [MSC/
MTP], then establish the “Sony | Music
Center” connection (page 16).
Messages
The following messages may appear or flash
during operation.
INVALID
The selected operation could be invalid.
[USB MODE] cannot be changed during
iPod playback.
READ
Wait until reading is complete and
playback starts automatically. This may
take some time depending on the file
organization.
(underscore): The character cannot be
displayed.
For USB device playback:
HUB NO SUPRT: USB hubs are not
supported.
IPD STOP: iPod playback has finished.
Operate your iPod/iPhone to start
playback.
NOT SUPPORT - ANDROID MODE
A USB device not supporting AOA
(Android Open Accessory) 2.0 is
connected to the unit while [USB MODE] is
set to [ANDROID].
– Set [USB MODE] to [MSC/MTP] (page 19).
USB ERROR
Connect the USB device again.
USB NO DEV
Make sure the USB device or USB cable is
securely connected.
USB NO MUSIC
Connect a USB device containing playable
files (page 23).
USB NO SUPRT
For details on the compatibility of your
USB device, visit the support site on the
back cover.
OVERLOAD: The USB device is overloaded.
Disconnect the USB device, then press SRC
to select another source.
The USB device has a fault, or an
unsupported device is connected.
For RDS operation:
NO AF: No alternative frequencies.
Press (SEEK –/+) while the
program service name is flashing. The unit
starts searching for another frequency
with the same PI (program identification)
data ([PI SEEK] appears).
NO PI: No program identification. The
selected station has no PI (program
identification) data.
Select another station.
NO TP: No traffic programs.
The unit will continue searching for
available TP stations.

29GB
For BLUETOOTH function:
BTA NO DEV: The BLUETOOTH device is not
connected or recognized.
Make sure the BLUETOOTH device is
securely connected, or the BLUETOOTH
connection is established with the
BLUETOOTH device.
ERROR: The selected operation could not be
performed.
Wait for a while, then try again.
UNKNOWN: A name or phone number
cannot be displayed.
WITHHELD: The phone number is hidden by
the caller.
For Sony | Music Center operation:
APP ––––––––: A connection with the
application is not established.
Make the “Sony | Music Center”
connection again (page 16).
APP DISCNCT: The application is
disconnected.
Make the “Sony | Music Center”
connection (page 16).
APP DISPLAY: A screen setting display of
the application is open.
Exit the screen setting display of the
application to enable button operation.
APP LIST: The contents list of the USB is
open.
Exit the list of the application to enable
button operation.
APP MENU: A setting display of the
application is open.
Exit the setting display of the application
to enable button operation.
APP NO DEV: The device with the
application installed is not connected or
recognized.
Make the BLUETOOTH connection and
establish the “Sony | Music Center”
connection again (page 16).
APP SOUND: A sound setting display of the
application is open.
Exit the sound setting display of the
application to enable button operation.
OPEN APP: The “Sony | Music Center”
application is not running.
Launch the application.
For steering wheel remote control
operation:
ERROR
Register again from the function where
the error occurred (page 19).
TIMEOUT
Try completing the registration while
[REGISTER] is blinking (about 6 seconds)
(page 19).
For firmware update operation:
FILE ERROR: The updater is not stored in the
USB device.
Store the updater in the USB device, then
try again (page 22).
UPDATE ERROR PRESS ENTER: Firmware
update is not completed properly.
Press ENTER to clear the message, then try
again.
During the update, do not turn the
ignition to the OFF position, nor remove
the USB device (page 22).
If these solutions do not help improve the
situation, consult your nearest Sony dealer.
If you take the unit to be repaired because of
device playback trouble, bring the device
that was used at the time the problem
began.

30GB
Cautions
• Run all ground (earth) leads to a
common ground (earth) point.
• Do not get the leads trapped under a
screw, or caught in moving parts (e.g., seat
railing).
• Before making connections, turn the car
ignition off to avoid short circuits.
• Connect the power supply lead to the
unit and speakers before connecting it to
the auxiliary power connector.
• Be sure to insulate any loose unconnected
leads with electrical tape for safety.
• Choose the installation location carefully so
that the unit will not interfere with normal
driving operations.
• Avoid installing the unit in areas subject to
dust, dirt, excessive vibration, or high
temperature, such as in direct sunlight or
near heater ducts.
• Use only the supplied mounting hardware
for a safe and secure installation.
Note on the power supply lead (yellow)
When connecting this unit in combination with
other stereo components, the amperage rating of
the car circuit to which the unit is connected must
be higher than the sum of each component’s fuse
amperage rating.
Mounting angle adjustment
Adjust the mounting angle to less than 30°.
Parts List for Installation
•This parts list does not include all the
package contents.
•The bracket and the protection collar
are attached to the unit before shipping.
Before mounting the unit, use the release
keys to remove the bracket from the
unit. For details, see “Removing the
protection collar and the bracket”
(page 34).
•Keep the release keys for future use as
they are also necessary if you remove the
unit from your car.
Connection/Installation
Precautions
× 2

31GB
Connection
*1 Not supplied
*2 Speaker impedance: 4 – 8 × 4
*3 RCA pin cord (not supplied)
*4 Depending on the type of car, use an adaptor for
a wired remote control (not supplied). For details
on using the wired remote control, see “Using
the wired remote control” (page 33).
*5 Whether in use or not, route the microphone
input cord such that it does not interfere with
driving operations. Secure the cord with a clamp,
etc., if it is installed around your feet.
*6 For details on installing the microphone, see
“Installing the microphone” (page 33).
*7 Depending on the type of car, use an adaptor
(not supplied) if the antenna (aerial) connector
does not fit.
from a wired remote control
(not supplied)*
4
from a car antenna (aerial)*
7
*
3
*
3
Subwoofer*
1
For details, see “Making
connections” (page 32).
Power amplifier*
1
See “Power connection diagram” (page 32)
for details.
*
2
*
3
*
5
*
6

32GB
If you have a power antenna (aerial) without
a relay box, connecting this unit with the
supplied power supply lead may damage
the antenna (aerial).
To the car’s speaker connector
To the car’s power connector
Subwoofer Easy Connection
You can use a subwoofer without a power
amplifier when it is connected to a rear
speaker cord.
Notes
• Preparation of the rear speaker cords is required.
• Use a subwoofer with an impedance of 4 to 8 ,
and with adequate power handling capacities to
avoid damage.
Memory hold connection
When the yellow power supply lead is
connected, power will always be supplied to
the memory circuit even when the ignition
switch is turned off.
Speaker connection
•Before connecting the speakers, turn the
unit off.
• Use speakers with an impedance of 4 to
8 , and with adequate power handling
capacities to avoid damage.
Check your car’s auxiliary power connector,
and match the connections of cords
correctly depending on the car.
Making connections
1
Rear speaker
(right)
Purple
2
Purple/black
striped
3
Front speaker
(right)
Gray
4
Gray/black
striped
5
Front speaker
(left)
White
6
White/black
striped
7
Rear speaker
(left)
Green
8
Green/black
striped
12
continuous power
supply
Yellow
13
power antenna (aerial)
/power amplifier
control (REM OUT)
Blue/white
striped
14
switched illumination
power supply
Orange/
white striped
15
switched power
supply
Red
16 ground (earth) Black
Power connection diagram
Front speaker
Subwoofer
Auxiliary power connector

33GB
Common connection
When the positions of the red and
yellow leads are inverted
When the car without ACC position
After matching the connections and
switching power supply leads correctly,
connect the unit to the car’s power supply. If
you have any questions and problems
connecting your unit that are not covered in
this manual, consult the car dealer.
To capture your voice during handsfree
calling, you need to install the microphone
.
Cautions
•It is extremely dangerous if the cord
becomes wound around the steering
column or gearstick. Be sure to keep it and
other parts from interfering with your
driving operations.
• If airbags or any other shock-absorbing
equipment is in your car, contact the store
where you purchased this unit, or the car
dealer, before installation.
Note
Before attaching the double-sided tape , clean
the surface of the dashboard with a dry cloth.
1 To enable the wired remote control,
set [STR CONTROL] in [SET STEERING]
to [PRESET] (page 18).
12
continuous power
supply
Yellow
15 switched power supply Red
12 switched power supply Yellow
15
continuous power
supply
Red
Red Red
Yellow Yellow
Red Red
Yellow Yellow
Red
Red
Ye l l ow
Yellow
Installing the microphone
Using the wired remote control
Clip (not supplied)

34GB
Installation
Before installing the unit, remove the
protection collar and the bracket from
the unit.
1 Pinch both edges of the protection
collar , then pull it out.
2 Insert both release keys until they
click, and pull down the bracket ,
then pull up the unit to separate.
Before installing, make sure the catches on
both sides of the bracket are bent
inwards 2 mm (
3
/32 in).
1 Position the bracket inside the
dashboard, then bend the claws
outward for a tight fit.
2 Mount the unit onto the bracket ,
then attach the protection collar .
Notes
• If the catches are straight or bent outwards, the
unit will not be installed securely and may spring
out.
• Make sure the 4 catches on the protection collar
are properly engaged in the slots of the unit.
For details, see “Detaching the Front Panel”
(page 6).
For details, see “Resetting the Unit” (page 7).
Removing the protection collar
and the bracket
Face the hook inwards.
Mounting the unit in the
dashboard
Detaching and attaching the front
panel
Resetting the unit
182 mm (7
1
/4 in)
53 mm (2
1
/8 in)
Catch

35GB
When replacing the fuse,
be sure to use one
matching the amperage
rating stated on the
original fuse. If the fuse
blows, check the power
connection and replace the
fuse. If the fuse blows again after
replacement, there may be an internal
malfunction. In such a case, consult your
nearest Sony dealer.
Fuse replacement
Fuse (10 A)

2DE
Für mögliche spätere Service-Anfragen,
notieren Sie sich bitte vor der Installation
Ihres Gerätes hier die Seriennummer:
S/N: ___________________________
Hinweis: Die 7-stellige Seriennummer finden
Sie oben auf der Verpackung des Gerätes
oder unten auf dem Gerät selber.
Hergestellt in Thailand
Das Typenschild mit Betriebsspannung usw.
befindet sich an der Geräteunterseite.
Die Gültigkeit des CE-Zeichens beschränkt
sich auf Länder, in denen es gesetzlich
vorgeschrieben ist, hauptsächlich in Ländern
des Europäischen Wirtschaftsraums (EWR).
Hiermit erklärt Sony Corporation, dass diese
Funkanlage der Richtlinie 2014/53/EU
entspricht.
Der vollständige Text der EU-
Konformitätserklärung ist unter der
folgenden Internetadresse verfügbar:
http://www.compliance.sony.de/
Hinweis für Kunden: Die folgenden
Informationen gelten nur für Geräte,
die in Ländern verkauft werden, in
denen EU-Richtlinien gelten
Dieses Produkt wurde von oder für die Sony
Corporation hergestellt.
EU Importeur: Sony Europe B.V.
Anfragen an den Importeur oder zur
Produktkonformität auf Grundlage der
Gesetzgebung in Europa senden Sie bitte an
den Bevollmächtigten Sony Belgium,
bijkantoor van Sony Europe B.V., Da
Vincilaan 7-D1, 1930 Zaventem, Belgien.
Entsorgung von
gebrauchten Batterien und
Akkus und gebrauchten
elektrischen und
elektronischen Geräten
(anzuwenden in den Ländern der
Europäischen Union und anderen
Ländern mit einem separaten
Sammelsystem für diese Produkte)
Das Symbol auf dem Produkt, der Batterie/
dem Akku oder der Verpackung weist darauf
hin, dass das Produkt oder die Batterie/der
Akku nicht als normaler Haushaltsabfall zu
behandeln sind. Ein zusätzliches chemisches
Symbol Pb (Blei) unter der
durchgestrichenen Mülltonne bedeutet,
dass die Batterie/der Akku einen Anteil von
mehr als 0,004 % Blei enthält. Durch Ihren
Beitrag zum korrekten Entsorgen des
Produktes und der Batterie/des Akkus
schützen Sie die Umwelt und die Gesundheit
Ihrer Mitmenschen. Umwelt und Gesundheit
werden durch falsches Entsorgen gefährdet.
Materialrecycling hilft, den Verbrauch von
Rohstoffen zu verringern. Bei Produkten, die
auf Grund ihrer Sicherheit, der Funktionalität
oder als Sicherung vor Datenverlust eine
ständige Verbindung zur eingebauten
Batterie/zum eingebauten Akku benötigen,
sollte die Batterie/der Akku nur durch
qualifiziertes Servicepersonal ausgetauscht
werden. Um sicherzustellen, dass das
Produkt und die Batterie/der Akku korrekt
entsorgt werden, geben Sie das Produkt
zwecks Entsorgung an einer geeigneten
Annahmestelle für das Recycling von
elektrischen und elektronischen Geräten ab.
Für alle anderen Batterien/Akkus
entnehmen Sie die Batterie/den Akku bitte
entsprechend dem Kapitel über die sichere
Entfernung der Batterie/des Akkus. Geben
Sie die Batterie/den Akku an einer
geeigneten Annahmestelle für das Recycling
von Batterien/Akkus ab. Weitere
Informationen über das Recycling dieses
Produkts oder der Batterie/des Akkus
erhalten Sie von Ihrer Gemeinde, den
kommunalen Entsorgungsbetrieben oder
dem Geschäft, in dem Sie das Produkt
gekauft haben. Hinweis für
Lithiumbatterien: Bitte geben Sie nur
entladene Batterien an den Sammelstellen
ab. Wegen Kurzschlussgefahr überkleben
Installieren Sie das Gerät aus
Sicherheitsgründen unbedingt im
Armaturenbrett des Fahrzeugs, denn die
Rückseite des Geräts erwärmt sich bei
Betrieb.
Erläuterungen dazu finden Sie unter
„Anschluss/Installation“ (Seite 36).

3DE
Sie bitte die Pole der Batterie mit
Klebestreifen. Sie erkennen Lithiumbatterien
an den Abkürzungen Li oder CR.
ACHTUNG
Der Frequenzbereich 65 – 74 MHz ist in der
europäischen
Frequenzbereichszuordnungstabelle keinem
Hörfunk zugewiesen und kann in Europa
nicht verwendet werden.
Haftungsausschluss für von Dritten
angebotene Dienste
Von Dritten angebotene Dienste können
ohne vorherige Ankündigung geändert,
ausgesetzt oder eingestellt werden. Sony
übernimmt in diesen Fällen keine Haftung.
Vorsicht
UNTER KEINEN UMSTÄNDEN ÜBERNIMMT
SONY DIE HAFTUNG FÜR INDIREKTE, NEBEN-,
FOLGE- ODER SONSTIGE SCHÄDEN. DIESER
HAFTUNGSAUSSCHLUSS GILT OHNE JEDE
EINSCHRÄNKUNG FÜR ENTGANGENEN
GEWINN, ENTGANGENES EINKOMMEN,
DATENVERLUST, NUTZUNGSAUSFALL DES
PRODUKTS ODER ZUGEHÖRIGER GERÄTE,
AUSFALLZEITEN UND ZEITAUFWAND DES
KÄUFERS, DIE AUF DIE VERWENDUNG DIESES
PRODUKTS, DER HARDWARE UND/ODER
SEINER SOFTWARE ZURÜCKGEHEN ODER IN
VERBINDUNG DAMIT AUFTRETEN.
Hinweis für den Kunden: Diese Produkt
umfasst einen Funksender.
Gemäß UNECE Regelung 10 kann ein
Fahrzeughersteller bestimmte Bedingungen
für die Installation von Funksendern in
Fahrzeugen festlegen.
Bitte schlagen Sie in der Betriebsanleitung
zum Fahrzeug nach oder wenden Sie sich an
den Fahrzeughersteller, bevor Sie dieses
Produkt im Fahrzeug installieren.
Notrufe
Diese BLUETOOTH-Freisprecheinrichtung für
das Auto und das elektronische Gerät, das
mit der Freisprecheinrichtung verbunden ist,
arbeiten mit Funksignalen, Mobilfunk- und
Festnetzen sowie benutzerprogrammierten
Funktionen, bei denen nicht unter allen
Umständen eine Verbindung garantiert
werden kann.
Verlassen Sie sich daher bei wichtigen
Mitteilungen (wie z. B. medizinischen
Notfällen) nicht ausschließlich auf
elektronische Geräte.
Warnhinweis, wenn die Zündung
Ihres Fahrzeugs nicht über eine
Zubehörposition (ACC oder I) verfügt
Aktivieren Sie unbedingt die
Abschaltautomatik (AUTO OFF) (Seite 22).
Das Gerät schaltet sich nach dem
Ausschalten und dem Anzeigen der
Uhrzeit (d. h. halten Sie OFF 1 Sekunde
lang gedrückt) innerhalb einer bestimmte
Zeit automatisch vollständig aus, um die
Autobatterie zu schonen. Wenn Sie die
Abschaltautomatik (AUTO OFF) nicht
aktivieren, müssen Sie jedes Mal, wenn
Sie die Zündung ausschalten, OFF
gedrückt halten, bis die Anzeige
ausgeblendet wird.
Wichtiger Hinweis

4DE
BLUETOOTH-Kommunikation
Von einem BLUETOOTH-Gerät ausgehende
Mikrowellen können den Betrieb von
elektronischen medizinischen Geräten
beeinflussen. Schalten Sie dieses Gerät
und andere BLUETOOTH-Geräte an
folgenden Orten aus. Andernfalls besteht
Unfallgefahr.
– An Orten mit entzündlichen Gasen, in
einem Krankenhaus, Zug, Flugzeug oder
an einer Tankstelle
– In der Nähe von automatischen Türen
oder Feuermeldern
Dieses Gerät unterstützt dem BLUETOOTH-
Standard entsprechende
Sicherheitsfunktionen, um die
Verbindungssicherheit bei BLUETOOTH-
Funkverbindungen zu gewährleisten. Je
nach Einstellung bieten diese jedoch
möglicherweise keinen ausreichenden
Schutz. Seien Sie bei der Kommunikation
mit BLUETOOTH-Funktechnologie also
vorsichtig.
Für Sicherheitslücken bei der Übertragung
von Informationen während der
BLUETOOTH-Kommunikation kann keine
Haftung übernommen werden.
Sollten an Ihrem Gerät Probleme auftreten
oder sollten Sie Fragen haben, auf die in
dieser Anleitung nicht eingegangen wird,
wenden Sie sich bitte an Ihren Sony-Händler.

5DE
Inhalt
Lage und Funktion der Teile und
Bedienelemente . . . . . . . . . . . . . . . . . . . 6
Vorbereitungen
Abnehmen der Frontplatte . . . . . . . . . . . . . 7
Zurücksetzen des Geräts . . . . . . . . . . . . . . . 8
Einstellen der Uhr . . . . . . . . . . . . . . . . . . . . . 8
Vorbereiten eines BLUETOOTH-Geräts . . . . 8
Anschließen eines USB-Geräts . . . . . . . . . . 11
Anschließen eines anderen tragbaren
Audiogeräts. . . . . . . . . . . . . . . . . . . . . . 12
Radioempfang
Radioempfang . . . . . . . . . . . . . . . . . . . . . . 12
Das Radiodatensystem (RDS) . . . . . . . . . . 13
Wiedergabe
Wiedergabe mit einem USB-Gerät . . . . . . 14
Wiedergabe mit einem BLUETOOTH-
Gerät . . . . . . . . . . . . . . . . . . . . . . . . . . . 15
Suchen und Wiedergeben von Titeln . . . . 15
Freisprechanrufe (nur über
BLUETOOTH)
Entgegennehmen eines Anrufs . . . . . . . . 17
Tätigen eines Anrufs. . . . . . . . . . . . . . . . . . 17
Während eines Anrufs verfügbare
Funktionen . . . . . . . . . . . . . . . . . . . . . . 18
Weitere nützliche Funktionen
Sony | Music Center mit iPhone/
Android™-Smartphone . . . . . . . . . . . . 19
Verwenden der Spracherkennung (nur
Android-Smartphone) . . . . . . . . . . . . . 20
Verwenden von Siri Eyes Free . . . . . . . . . . 21
Einstellungen
Beenden des DEMO-Modus . . . . . . . . . . . 22
Grundlegende Einstellschritte . . . . . . . . . 22
Allgemeine Einstellungen (GENERAL) . . . 22
Klangeinstellungen (SOUND) . . . . . . . . . . 24
Anzeigeeinstellungen (DISPLAY) . . . . . . . 25
BLUETOOTH-Einstellungen
(BLUETOOTH) . . . . . . . . . . . . . . . . . . . . 25
Sony | Music Center-Einstellungen
(SONY APP) . . . . . . . . . . . . . . . . . . . . . . 26
Weitere Informationen
Aktualisieren der Firmware . . . . . . . . . . . . 26
Sicherheitsmaßnahmen . . . . . . . . . . . . . . 26
Wartung . . . . . . . . . . . . . . . . . . . . . . . . . . . 27
Technische Daten. . . . . . . . . . . . . . . . . . . . 28
Störungsbehebung . . . . . . . . . . . . . . . . . . 29
Meldungen . . . . . . . . . . . . . . . . . . . . . . . . . 33
Anschluss/Installation
Vorsichtsmaßnahmen . . . . . . . . . . . . . . . . 36
Teileliste für die Installation . . . . . . . . . . . 36
Anschluss . . . . . . . . . . . . . . . . . . . . . . . . . . 37
Installation . . . . . . . . . . . . . . . . . . . . . . . . . 40

6DE
Lage und Funktion der Teile und Bedienelemente
Taste zum Lösen der Frontplatte
SRC (Tonquelle)
Einschalten des Geräts.
Wechseln der Tonquelle.
OFF
Wenn Sie die Taste 1 Sekunde lang
gedrückt halten, wird die Tonquelle
ausgeschaltet und die Uhrzeit angezeigt.
Wenn Sie die Taste mehr als 2 Sekunden
lang gedrückt halten, schalten sich das
Gerät und das Display aus.
Steuerregler
Drehen Sie den Regler, um die Lautstärke
einzustellen.
PUSH ENTER
Bestätigen der ausgewählten Option.
Drücken Sie SRC, drehen Sie den Regler
und drücken Sie dann darauf, um die
Tonquelle zu wechseln
(Zeitüberschreitung nach 2 Sekunden).
MENU
Aufrufen des Setup-Menüs.
VOICE (Seite 18, 20, 21)
Halten Sie den Regler länger als
2 Sekunden gedrückt, um die
Sprachwahlfunktion, die
Spracherkennung (nur Android-
Smartphone) oder die Siri-Funktion (nur
iPhone) zu aktivieren.
N-Zeichen
Halten Sie das Android-Smartphone an
den Steuerregler, um eine BLUETOOTH-
Verbindung herzustellen.
Display
/ (SEEK –/+)
Automatisches Einstellen von
Radiosendern. Zum manuellen Einstellen
halten Sie diese Taste gedrückt.
/ (Zurück/Weiter)
/ (Schnelles Rückwärts-/
Vorwärtssuchen)
PTY (Programmtyp)
Auswählen von PTY bei einem RDS-
Sender.
(Suchen) (Seite 16)
Wechseln in den Suchmodus während
der Wiedergabe.
(Nicht verfügbar, wenn ein USB-Gerät im
Android-Modus oder iPod angeschlossen
ist.)
CALL
Aufrufen des Anrufmenüs.
Entgegennehmen/Beenden eines
Anrufs.
Zum Umschalten des BLUETOOTH-Signals
halten Sie diese Taste länger als
2 Sekunden gedrückt.
Hauptgerät

7DE
(Zurück)
Zurückschalten zur vorherigen Anzeige.
MODE (Seite 8, 12, 19)
Empfänger für die Fernbedienung
Zahlentasten (Stationstasten) (1 bis 6)
Einstellen gespeicherter Radiosender.
Zum Speichern von Sendern halten Sie
die Taste gedrückt.
ALBUM /
Überspringen eines Albums auf einem
Audiogerät. Zum Überspringen mehrerer
Alben halten Sie die Taste gedrückt.
(Nicht verfügbar, wenn ein USB-Gerät im
Android-Modus oder iPod angeschlossen
ist.)
(Wiederholung)
(Nicht verfügbar, wenn ein USB-Gerät im
Android-Modus angeschlossen ist.)
(Zufall)
(Nicht verfügbar, wenn ein USB-Gerät im
Android-Modus angeschlossen ist.)
MIC (Seite 18)
(Wiedergabe/Pause)
EXTRA BASS
Verstärken von Bässen synchron mit dem
Lautstärkepegel. Ändern Sie mit dieser
Taste die EXTRA BASS-Einstellung: [1], [2],
[OFF].
AUX-Eingangsbuchse
DSPL (Anzeige)
Wechseln der Informationen im Display.
SCRL (Bildlauf)
Zum Durchlaufenlassen der
Informationen im Display halten Sie die
Taste gedrückt.
USB-Anschluss
Abnehmen der Frontplatte
Um zu verhindern, dass das Gerät gestohlen
wird, können Sie die Frontplatte abnehmen.
1 Halten Sie OFF gedrückt, bis sich
das Gerät ausschaltet, drücken Sie die
Taste zum Lösen der Frontplatte
und ziehen Sie die Frontplatte auf
sich zu und heraus.
Warnton
Wenn Sie den Zündschlüssel in die Position
OFF stellen, ohne die Frontplatte
abzunehmen, ertönt einige Sekunden lang
ein Warnton. Der Warnton wird nur
ausgegeben, wenn der integrierte
Verstärker verwendet wird.
Seriennummern
Stellen Sie sicher, dass die Seriennummern
an der Unterseite dieses Geräts und der
Rückseite der Frontplatte genau
übereinstimmen. Andernfalls sind das
BLUETOOTH-Pairing sowie das Herstellen
und Trennen einer Verbindung über NFC
nicht möglich.
Vorbereitungen
Anbringen der Frontplatte

8DE
Zurücksetzen des Geräts
Bevor Sie das Gerät zum ersten Mal
benutzen oder wenn Sie die Autobatterie
ausgetauscht oder die Verbindungen
gewechselt haben, müssen Sie das Gerät
zurücksetzen.
1 Drücken Sie DSPL und (Zurück)/
MODE länger als 2 Sekunden.
Hinweis
Wenn Sie das Gerät zurücksetzen, werden die
eingestellte Uhrzeit und einige weitere
gespeicherte Einstellungen gelöscht.
Einstellen des Landes bzw. der
Region
Nach dem Zurücksetzen des Geräts
erscheint die Anzeige zum Einstellen des
Landes bzw. der Region.
1 Drücken Sie ENTER, solange [SET
AREA] angezeigt wird.
Das zurzeit eingestellte Land bzw. die
Region erscheint.
2 Drehen Sie den Steuerregler, um
[EUROPE] oder [RUSSIA]
auszuwählen, und drücken Sie
anschließend den Steuerregler.
3 Drehen Sie den Steuerregler, um
[YES] oder [NO] auszuwählen, und
drücken Sie anschließend den
Steuerregler.
Wenn die Einstellung für das Land bzw.
die Region geändert wird, wird das Gerät
zurückgesetzt und dann wird die Uhrzeit
angezeigt.
Diese Einstellung kann im Menü mit den
allgemeinen Einstellungen konfiguriert
werden (Seite 22).
Einstellen der Uhr
1 Drücken Sie MENU, drehen Sie den
Steuerregler, um [GENERAL]
auszuwählen, und drücken Sie
anschließend den Steuerregler.
2 Drehen Sie den Steuerregler, um [SET
CLOCK-ADJ] auszuwählen, und
drücken Sie anschließend den
Steuerregler.
Die Stundenanzeige blinkt.
3 Drehen Sie den Steuerregler, um die
Stunden und Minuten einzustellen.
Drücken Sie / (SEEK –/+), um zur
jeweils nächsten Ziffer in der
Digitalanzeige zu wechseln.
4 Drücken Sie MENU, nachdem Sie die
Minuten eingestellt haben.
Der Einstellvorgang ist damit
abgeschlossen und die Uhr beginnt zu
laufen.
So lassen Sie die Uhrzeit anzeigen
Drücken Sie DSPL.
Vorbereiten eines
BLUETOOTH-Geräts
Je nach dem BLUETOOTH-kompatiblen
Gerät, also z. B. Smartphone, Mobiltelefon
oder Audiogerät (im Folgenden als
„BLUETOOTH-Gerät“ bezeichnet, sofern
nicht anders angegeben), können Sie Musik
wiedergeben oder Freisprechanrufe tätigen.
Einzelheiten zum Herstellen der Verbindung
schlagen Sie bitte in der
Bedienungsanleitung zu dem anderen Gerät
nach.
Drehen Sie vor dem Herstellen der
Verbindung die Lautstärke dieses Geräts
herunter. Andernfalls wird u. U. der Ton mit
hoher Lautstärke ausgegeben.

9DE
Wenn Sie ein NFC*-kompatibles Smartphone
an den Steuerregler dieses Geräts halten,
wird ein Pairing durchgeführt und dieses
Gerät wird automatisch mit dem
Smartphone verbunden.
* NFC (Near Field Communication) ist eine
Technologie zur drahtlosen Kommunikation über
kurze Strecken zwischen verschiedenen Geräten,
z. B. Mobiltelefonen und IC-Tags. Dank der NFC-
Funktion lässt sich die Datenkommunikation
starten, indem einfach ein NFC-Gerät nahe an die
entsprechende Markierung oder eine festgelegte
Stelle an einem anderen NFC-kompatiblen Gerät
gehalten wird.
Bei einem Smartphone, auf dem das
Android-Betriebssystem 4.0 oder niedriger
installiert ist, muss die App „NFC Easy
Connect“, die auf Google Play erhältlich ist,
heruntergeladen werden. Die App ist
möglicherweise nicht in allen Ländern/
Regionen herunterladbar.
1 Aktivieren Sie die NFC-Funktion am
Smartphone.
Näheres dazu schlagen Sie bitte in der
mit dem Smartphone gelieferten
Bedienungsanleitung nach.
2 Halten Sie den Bereich mit dem N-
Zeichen des Smartphones an den
Bereich mit dem N-Zeichen an
diesem Gerät.
Vergewissern Sie sich, dass im Display
dieses Geräts aufleuchtet.
So trennen Sie die Verbindung mit NFC
Halten Sie den Bereich mit dem N-Zeichen
des Smartphones erneut an den Bereich mit
dem N-Zeichen an diesem Gerät.
Hinweise
• Gehen Sie beim Herstellen der Verbindung
vorsichtig mit dem Smartphone um, um Kratzer zu
vermeiden.
• Die Sofortverbindung ist nicht möglich, wenn
dieses Gerät bereits mit zwei NFC-kompatiblen
Geräten verbunden ist. Trennen Sie in diesem Fall
die Verbindung zu einem der Geräte und stellen
Sie erneut die Verbindung zum Smartphone her.
Wenn Sie zum ersten Mal eine Verbindung
zu einem BLUETOOTH-Gerät herstellen
wollen, ist eine gegenseitige Registrierung
(das so genannte „Pairing“) erforderlich.
Durch das Pairing können dieses und andere
Geräte einander erkennen. Sie können
dieses Gerät mit zwei BLUETOOTH-Geräten
verbinden (zwei Mobiltelefone oder ein
Mobiltelefon und ein Audiogerät).
1 Platzieren Sie das BLUETOOTH-Gerät
maximal 1 m von diesem Gerät
entfernt.
2 Drücken Sie MENU, drehen Sie den
Steuerregler, um [BLUETOOTH]
auszuwählen, und drücken Sie
anschließend den Steuerregler.
3 Drehen Sie den Steuerregler, um [SET
PAIRING] auszuwählen, und drücken
Sie anschließend den Steuerregler.
4 Drehen Sie den Steuerregler, um [SET
DEVICE 1]* oder [SET DEVICE 2]*
auszuwählen, und drücken Sie
anschließend den Steuerregler.
blinkt, wenn sich dieses Gerät im
Bereitschaftsmodus für das Pairing
befindet.
* Nachdem das Pairing abgeschlossen ist, wird
statt [SET DEVICE 1] oder [SET DEVICE 2] der
Name des Geräts, mit dem ein Pairing
ausgeführt wurde, angezeigt.
Sofortverbindung mit einem
Smartphone (NFC)
Pairing und Herstellen einer
Verbindung mit einem
BLUETOOTH-Gerät

10DE
5 Führen Sie das Pairing am
BLUETOOTH-Gerät durch, so dass es
dieses Gerät erkennt.
6 Wählen Sie [DSX-A416BT] im Display
des BLUETOOTH-Geräts aus.
Wird die Bezeichnung Ihres Modells nicht
angezeigt, fangen Sie nochmals mit
Schritt 2 an.
7 Wenn am BLUETOOTH-Gerät ein
Passwort* eingegeben werden muss,
geben Sie [0000] ein.
* Das Passwort wird bei manchen Geräten auch
„Kennwort“, „PIN-Code“, „PIN-Nummer“ oder
„Passcode“ usw. genannt.
Nach erfolgreichem Pairing leuchtet
stetig.
8 Wählen Sie dieses Gerät an dem
BLUETOOTH-Gerät, zu dem eine
BLUETOOTH-Verbindung hergestellt
werden soll, aus.
oder leuchtet auf, wenn die
Verbindung hergestellt wurde.
Hinweis
Während eine Verbindung zu einem BLUETOOTH-
Gerät besteht, kann dieses Gerät von keinem
anderen Gerät erkannt werden. Damit dieses Gerät
erkannt werden kann, schalten Sie es in den
Pairing-Modus und lassen Sie dann vom anderen
Gerät aus nach diesem Gerät suchen.
So starten Sie die Wiedergabe
Erläuterungen dazu finden Sie unter
„Wiedergabe mit einem BLUETOOTH-Gerät“
(Seite 15).
So trennen Sie die Verbindung zu
einem Gerät, mit dem bereits ein
Pairing ausgeführt wurde
Gehen Sie zum Trennen der Verbindung wie
in Schritt 2 bis 4 erläutert vor, nachdem
zwischen diesem Gerät und dem
BLUETOOTH-Gerät das Pairing ausgeführt
wurde.
Sie müssen zu dem Gerät, mit dem ein
Pairing ausgeführt wurde, eine Verbindung
herstellen, um es nutzen zu können. Bei
einigen Geräten wird die Verbindung nach
dem Pairing automatisch hergestellt.
1 Drücken Sie MENU, drehen Sie den
Steuerregler, um [BLUETOOTH]
auszuwählen, und drücken Sie
anschließend den Steuerregler.
2 Drehen Sie den Steuerregler, um [SET
BT SIGNL] auszuwählen, und drücken
Sie anschließend den Steuerregler.
Vergewissern Sie sich, dass
aufleuchtet.
3 Aktivieren Sie die BLUETOOTH-
Funktion am BLUETOOTH-Gerät.
4 Stellen Sie am BLUETOOTH-Gerät die
Verbindung mit diesem Gerät her.
oder leuchtet auf.
Symbole im Display:
[0000]
Passwort eingeben
Herstellen einer Verbindung zu
einem BLUETOOTH-Gerät, mit dem
ein Pairing ausgeführt wurde
Leuchtet, wenn Freisprechanrufe
über HFP (Handsfree Profile)
möglich sind.
Leuchtet, wenn durch Aktivieren des
A2DP (Advanced Audio Distribution
Profile) die Wiedergabe mit dem
Audiogerät möglich ist.

11DE
So stellen Sie eine Verbindung zu dem
zuletzt verbundenen Gerät von diesem
Gerät aus her
Aktivieren Sie die BLUETOOTH-Funktion am
BLUETOOTH-Gerät.
Zum Herstellen der Verbindung mit dem
Audiogerät drücken Sie SRC, um [BT AUDIO]
auszuwählen, und drücken dann
(Wiedergabe/Pause).
Zum Herstellen der Verbindung mit dem
Mobiltelefon drücken Sie CALL.
Hinweis
Beim Streaming von BLUETOOTH-Audiodaten
können Sie von diesem Gerät aus keine Verbindung
zum Mobiltelefon herstellen. Stellen Sie die
Verbindung zu diesem Gerät stattdessen vom
Mobiltelefon aus her.
Tipp
Bei eingeschaltetem BLUETOOTH-Signal: Wenn die
Zündung eingeschaltet wird, versucht dieses Gerät
automatisch, eine Verbindung zu dem Mobiltelefon
herzustellen, mit dem es zuletzt verbunden war.
So installieren Sie das Mikrofon
Erläuterungen dazu finden Sie unter
„Installieren des Mikrofons“ (Seite 39).
Wenn ein iPhone/iPod mit installiertem iOS5
oder höher an den USB-Anschluss
angeschlossen wird, wird automatisch ein
Pairing mit diesem Gerät ausgeführt und die
Verbindung zum iPhone/iPod wird
hergestellt.
Zum Aktivieren der BLUETOOTH-
Pairingautomatik stellen Sie sicher, dass [SET
AUTOPAIR] unter [BLUETOOTH] auf [ON]
gesetzt ist (Seite 26).
1 Aktivieren Sie die BLUETOOTH-
Funktion am iPhone/iPod.
2 Schließen Sie ein iPhone bzw. einen
iPod an den USB-Anschluss an.
Vergewissern Sie sich, dass im Display
dieses Geräts aufleuchtet.
Hinweise
• Die BLUETOOTH-Pairingautomatik ist nicht
möglich, wenn dieses Gerät bereits mit zwei
anderen BLUETOOTH-Geräten verbunden ist.
Trennen Sie in diesem Fall die Verbindung zu
einem der anderen Geräte und stellen Sie erneut
die Verbindung zum iPhone/iPod her.
• Wenn die BLUETOOTH-Pairingautomatik nicht zur
Verfügung steht, gehen Sie wie in „Vorbereiten
eines BLUETOOTH-Geräts“ (Seite 8) erläutert vor.
Anschließen eines USB-
Geräts
1 Drehen Sie die Lautstärke an diesem
Gerät herunter.
2 Schließen Sie das USB-Gerät an
dieses Gerät an.
Zum Anschließen eines iPod/iPhone
verwenden Sie das USB-
Verbindungskabel für iPod (nicht
mitgeliefert).
Herstellen der Verbindung mit
einem iPhone/iPod (BLUETOOTH-
Pairingautomatik)

12DE
Anschließen eines anderen
tragbaren Audiogeräts
1 Schalten Sie das tragbare Audiogerät
aus.
2 Drehen Sie die Lautstärke an diesem
Gerät herunter.
3 Schließen Sie das tragbare
Audiogerät mit einem
Verbindungskabel (nicht
mitgeliefert)* an die AUX-
Eingangsbuchse (Stereominibuchse)
am Gerät an.
* Verwenden Sie unbedingt einen geraden
Stecker.
4 Drücken Sie SRC und wählen Sie
[AUX] aus.
So gleichen Sie den Lautstärkepegel
des angeschlossenen Geräts an andere
Tonquellen an
Starten Sie die Wiedergabe am tragbaren
Audiogerät mit gemäßigter Lautstärke und
stellen Sie die gewohnte Hörlautstärke an
diesem Gerät ein.
Drücken Sie MENU und wählen Sie dann
[SOUND] [SET AUX VOL] (Seite 24).
Radioempfang
Wenn Sie Radio hören wollen, drücken Sie
SRC, um [TUNER] auszuwählen.
1 Drücken Sie MODE, um den
Frequenzbereich zu wechseln (FM1,
FM2, FM3, MW oder LW).
2 Drücken Sie MENU, drehen Sie den
Steuerregler, um [GENERAL]
auszuwählen, und drücken Sie
anschließend den Steuerregler.
3 Drehen Sie den Steuerregler, um [SET
BTM] auszuwählen, und drücken Sie
anschließend den Steuerregler.
Das Gerät speichert die Sender in der
Reihenfolge der Frequenzen auf den
Zahlentasten (Stationstasten).
1 Drücken Sie MODE, um den
Frequenzbereich zu wechseln (FM1,
FM2, FM3, MW oder LW).
2 Stellen Sie Sender ein.
Manuelle Sendersuche
Halten Sie / (SEEK –/+) gedrückt,
bis die Frequenz in etwa erreicht ist, und
drücken Sie / (SEEK –/+) dann so
oft, bis die gewünschte Frequenz genau
eingestellt ist.
Automatische Sendersuche
Drücken Sie / (SEEK –/+).
Der Suchlauf stoppt, wenn ein Sender
empfangen wird.
1 Während des Empfangs des zu
speichernden Senders halten Sie eine
Stationstaste (1 bis 6) so lange
gedrückt, bis [MEM] angezeigt wird.
Radioempfang
Automatisches Speichern von
Sendern (BTM)
Sendereinstellung
Manuelles Speichern von Sendern

13DE
1 Wählen Sie den Frequenzbereich aus
und drücken Sie eine Stationstaste (1
bis 6).
Das Radiodatensystem
(RDS)
Mit AF wird der Sender mit den stärksten
Signalen in einem Netzwerk ständig neu
eingestellt, während mit TA gegebenenfalls
aktuelle Verkehrsinformationen bzw.
Verkehrsfunksender (TP) empfangen
werden.
1 Drücken Sie MENU, drehen Sie den
Steuerregler, um [GENERAL]
auszuwählen, und drücken Sie
anschließend den Steuerregler.
2 Drehen Sie den Steuerregler, um [SET
AF/TA] auszuwählen, und drücken Sie
anschließend den Steuerregler.
3 Drehen Sie den Steuerregler, um [SET
AF-ON], [SET TA-ON], [SET AF/TA-ON]
oder [SET AF/TA-OFF] auszuwählen,
und drücken Sie anschließend den
Steuerregler.
So speichern Sie RDS-Sender
zusammen mit der AF- und TA-
Einstellung
Sie können zusammen mit den RDS-Sendern
eine AF/TA-Einstellung speichern. Stellen Sie
AF/TA ein und speichern Sie die Sender
dann mit BTM oder manuell ab. Beim
manuellen Speichern können Sie auch Nicht-
RDS-Sender speichern.
So empfangen Sie
Katastrophenwarnungen
Wenn AF oder TA aktiviert ist, unterbrechen
Katastrophenwarnungen automatisch die
ausgewählte Tonquelle.
So stellen Sie während einer
Verkehrsdurchsage die Lautstärke ein
Der eingestellte Pegel wird für spätere
Verkehrsdurchsagen gespeichert, und zwar
unabhängig von der sonst eingestellten
Lautstärke.
Unveränderter Empfang eines
Regionalsenders (REGIONAL)
Wenn die AF- und die REGIONAL-Funktion
aktiviert sind, wird nicht zu einem anderen
Regionalsender mit einer stärkeren
Frequenz gewechselt. Wenn Sie den
Empfangsbereich des betreffenden
Regionalsenders verlassen, setzen Sie
während des Empfangs eines FM-Senders
(UKW) [SET REGIONAL] unter [GENERAL] auf
[SET REG-OFF] (Seite 23).
Diese Funktion steht in Großbritannien und
einigen anderen Regionen nicht zur
Verfügung.
Lokalsenderfunktion (nur
Großbritannien)
Mithilfe dieser Funktion können Sie andere
Lokalsender auswählen, auch wenn diese
zuvor nicht unter einer Stationstaste
gespeichert wurden.
Drücken Sie während des UKW-Empfangs
(FM) eine Stationstaste (1 bis 6), unter der ein
Lokalsender gespeichert ist. Drücken Sie
innerhalb von 5 Sekunden erneut die
Stationstaste des Lokalsenders.
Wiederholen Sie diesen Vorgang, bis das
Gerät den gewünschten Lokalsender
empfängt.
1 Drücken Sie PTY während des
Empfangs eines UKW-Senders (FM).
2 Drehen Sie den Steuerregler, bis der
gewünschte Programmtyp angezeigt
wird, und drücken Sie anschließend
den Steuerregler.
Das Gerät beginnt, nach einem Sender zu
suchen, der den ausgewählten
Programmtyp ausstrahlt.
Einstellen gespeicherter Sender
Einstellen von
Alternativfrequenzen (AF) und
Verkehrsdurchsagen (TA)
Auswählen des Programmtyps
(PTY)

14DE
Programmtypen
Mit den CT-Daten (Uhrzeitdaten), die von
RDS-Sendern ausgestrahlt werden, lässt sich
die Uhr einstellen.
1 Stellen Sie [SET CT-ON] unter
[GENERAL] ein (Seite 23).
Wiedergabe mit einem USB-
Gerät
In dieser Bedienungsanleitung wird „iPod“
als allgemeiner Begriff für die iPod-
Funktionen bei einem iPod und iPhone
verwendet, sofern nicht im Text oder in
Abbildungen anders angegeben.
Erläuterungen zur Kompatibilität des iPod
finden Sie unter „Der iPod“ (Seite 27) oder
auf der Support-Website, die auf der
hinteren Umschlagseite angegeben ist.
Sie können USB-Geräte* des Typs AOA
(Android Open Accessory) 2.0, MSC
(Massenspeicherklasse) und MTP
(Medientransferprotokoll) verwenden, die
dem USB-Standard entsprechen. Je nach
dem USB-Gerät kann der Android- oder der
MSC/MTP-Modus am Gerät ausgewählt
werden.
Bei manchen digitalen Medienplayern oder
Android-Smartphones muss der MTP-Modus
eingestellt werden.
* Beispielsweise ein USB-Flash-Laufwerk, ein
digitaler Medienplayer, ein Android-Smartphone
Hinweise
• Einzelheiten zur Kompatibilität Ihres USB-Geräts
finden Sie auf der Support-Website, die auf der
hinteren Umschlagseite angegeben ist.
• Smartphones, auf denen das Android-
Betriebssystem 4.1 oder höher installiert ist,
unterstützen Android Open Accessory 2.0 (AOA
2.0). Jedoch unterstützen manche Smartphones
AOA 2.0 möglicherweise nicht vollständig, auch
wenn das Android-Betriebssystem 4.1 oder höher
installiert ist.
Einzelheiten zur Kompatibilität Ihres Android-
Smartphones finden Sie auf der Support-Website,
die auf der hinteren Umschlagseite angegeben ist.
• Die Wiedergabe der folgenden Dateien wird nicht
unterstützt.
MP3/WMA/FLAC:
– Kopiergeschützte Dateien
– DRM-Dateien (digitale Rechteverwaltung)
– Mehrkanalaudiodateien
MP3/WMA:
– Dateien mit verlustfreier Komprimierung
NEWS (Nachrichten), AFFAIRS (Aktuelles
Zeitgeschehen), INFO (Informationen), SPORT
(Sport), EDUCATE (Erziehung und Bildung),
DRAMA (Hörspiele), CULTURE (Kultur), SCIENCE
(Wissenschaft), VARIED (Verschiedenes), POP
M (Pop-Musik), ROCK M (Rock-Musik), EASY M
(Unterhaltungsmusik), LIGHT M (Leichte
Klassik), CLASSICS (Klassik), OTHER M (Sonstige
Musik), WEATHER (Wetter), FINANCE
(Finanzberichte), CHILDREN
(Kinderprogramme), SOCIAL
(Magazinsendungen), RELIGION (Religion),
PHONE IN (Hörertelefon), TRAVEL
(Reiseinformationen), LEISURE
(Freizeitprogramm), JAZZ (Jazz), COUNTRY
(Country-Musik), NATION M (Volksmusik),
OLDIES (Oldies), FOLK M (Folk-Musik),
DOCUMENT (Dokumentarbeiträge)
Einstellen der Uhrzeit (CT)
Wiedergabe

15DE
Wählen Sie vor dem Herstellen einer
Verbindung je nach dem USB-Gerät den
USB-Modus (Android-Modus oder MSC/
MTP-Modus) aus (Seite 23).
1 Schließen Sie ein USB-Gerät an den
USB-Anschluss an (Seite 11).
Die Wiedergabe beginnt.
Wenn bereits ein Gerät angeschlossen
ist, drücken Sie zum Starten der
Wiedergabe SRC, um [USB] auszuwählen
([IPD] erscheint im Display, wenn der iPod
erkannt wird).
2 Stellen Sie die Lautstärke an diesem
Gerät ein.
So stoppen Sie die Wiedergabe
Halten Sie OFF 1 Sekunde lang gedrückt.
So trennen Sie die Verbindung zum
Gerät
Stoppen Sie die Wiedergabe und trennen Sie
dann das Gerät von diesem Gerät.
Vorsicht beim iPhone
Wenn Sie ein iPhone über USB anschließen,
wird die Lautstärke beim Telefonieren über
das iPhone, nicht das Gerät gesteuert.
Erhöhen Sie während eines Telefonats nicht
versehentlich die Lautstärke am Gerät.
Andernfalls erfolgt die Tonausgabe nach
Beendigung des Telefonats unvermittelt mit
hoher Lautstärke.
Wiedergabe mit einem
BLUETOOTH-Gerät
Sie können die Inhalte auf einem
verbundenen Gerät wiedergeben, das
BLUETOOTH A2DP (Advanced Audio
Distribution Profile) unterstützt.
1 Stellen Sie eine BLUETOOTH-
Verbindung zu dem Audiogerät her
(Seite 8).
Zum Auswählen des Audiogeräts drücken
Sie MENU und wählen dann [BLUETOOTH]
[SET AUDIODEV] (Seite 25).
2 Drücken Sie SRC, um [BT AUDIO]
auszuwählen.
3 Starten Sie am Audiogerät die
Wiedergabe.
4 Stellen Sie die Lautstärke an diesem
Gerät ein.
Hinweise
• Bei manchen Audiogeräten werden Informationen
wie Titel, Titelnummer, verstrichene Spieldauer
und Wiedergabestatus möglicherweise nicht an
diesem Gerät angezeigt.
• Auch wenn die Tonquelle an diesem Gerät
gewechselt wird, stoppt die Wiedergabe am
Audiogerät nicht.
• [BT AUDIO] erscheint nicht im Display, solange die
Anwendung „Sony | Music Center“ über die
BLUETOOTH-Funktion ausgeführt wird.
So gleichen Sie den Lautstärkepegel
des BLUETOOTH-Geräts an andere
Tonquellen an
Starten Sie die Wiedergabe am BLUETOOTH-
Audiogerät mit gemäßigter Lautstärke und
stellen Sie die gewohnte Hörlautstärke an
diesem Gerät ein.
Drücken Sie MENU und wählen Sie dann
[SOUND] [SET BTA VOL] (Seite 24).
Suchen und Wiedergeben
von Titeln
Nicht verfügbar, wenn ein USB-Gerät im
Android-Modus angeschlossen ist.
1 Drücken Sie während der Wiedergabe
so oft (Wiederholung) oder
(Zufall), bis der gewünschte
Wiedergabemodus ausgewählt ist.
Es kann eine Weile dauern, bis die
Wiedergabe im ausgewählten
Wiedergabemodus beginnt.
Je nach ausgewählter Tonquelle stehen
unterschiedliche Wiedergabemodi zur
Verfügung.
Wiedergabewiederholung und
Zufallswiedergabe

16DE
Nicht verfügbar, wenn ein USB-Gerät im
Android-Modus oder ein iPod
angeschlossen ist.
1 Drücken Sie während der USB-
Wiedergabe (Suchen)*, um die
Liste der Suchkategorien anzuzeigen.
Wenn die Titelliste erscheint, drücken Sie
mehrmals (Zurück), bis die
gewünschte Suchkategorie angezeigt
wird.
* Während der USB-Wiedergabe drücken Sie
(Suchen) länger als 2 Sekunden, um direkt
zum Anfang der Kategorieliste zu wechseln.
2 Wählen Sie durch Drehen des
Steuerreglers die gewünschte
Kategorie für die Suche aus und
drücken Sie zum Bestätigen den
Steuerregler.
3 Gehen Sie zum Suchen des
gewünschten Titels wie in Schritt 2
erläutert vor.
Die Wiedergabe beginnt.
So deaktivieren Sie den Quick-BrowZer-
Modus
Drücken Sie (Suchen).
Nicht verfügbar, wenn ein USB-Gerät im
Android-Modus oder ein iPod
angeschlossen ist.
1 Drücken Sie während der USB-
Wiedergabe (Suchen).
2 Drücken Sie (SEEK +).
3 Drehen Sie den Steuerregler, um das
Element auszuwählen.
Die Liste wird in Schritten von 10 % der
Gesamtzahl an Elementen
übersprungen.
4 Drücken Sie ENTER, um wieder in den
Quick-BrowZer-Modus zu schalten.
Das ausgewählte Element erscheint.
5 Drehen Sie den Steuerregler, um das
gewünschte Element auszuwählen,
und drücken Sie den Steuerregler.
Die Wiedergabe beginnt.
Suchen nach einem Titel anhand
seines Namens (Quick-BrowZer™)
Suchen mit Überspringen von
Elementen (Sprung-Modus)

17DE
Wenn Sie ein Mobiltelefon zusammen mit
diesem Gerät nutzen wollen, verbinden Sie
es mit diesem Gerät. Sie können zwei
Mobiltelefone an dieses Gerät anschließen.
Erläuterungen dazu finden Sie unter
„Vorbereiten eines BLUETOOTH-Geräts“
(Seite 8).
Entgegennehmen eines
Anrufs
1 Drücken Sie CALL, wenn das
Rufzeichen für einen eingehenden
Anruf ertönt.
Das Telefongespräch beginnt.
Hinweis
Das Rufzeichen und die Stimme des
Gesprächsteilnehmers werden nur über die
Frontlautsprecher ausgegeben.
So weisen Sie einen Anruf zurück
Halten Sie OFF 1 Sekunde lang gedrückt.
So beenden Sie den Anruf
Drücken Sie CALL erneut.
Tätigen eines Anrufs
Sie können einen Anruf über das
Telefonbuch oder die Rufliste tätigen, wenn
eine Verbindung zu einem Mobiltelefon
besteht, das PBAP (Phone Book Access
Profile) unterstützt.
Wenn zwei Mobiltelefone mit diesem Gerät
verbunden sind, wählen Sie eines davon
aus.
1 Drücken Sie CALL.
Wenn zwei Mobiltelefone mit diesem
Gerät verbunden sind, drehen Sie zum
Auswählen des gewünschten
Mobiltelefons den Steuerregler und
drücken ihn dann.
2 Drehen Sie den Steuerregler, um
[PHONE BOOK] auszuwählen, und
drücken Sie anschließend den
Steuerregler.
3 Drehen Sie den Steuerregler, um
einen Anfangsbuchstaben aus der
Liste der Anfangsbuchstaben
auszuwählen, und drücken Sie
anschließend den Steuerregler.
4 Drehen Sie den Steuerregler, um
einen Namen aus der Liste der
Namen auszuwählen, und drücken
Sie anschließend den Steuerregler.
5 Drehen Sie den Steuerregler, um eine
Nummer aus der Liste der Nummern
auszuwählen, und drücken Sie
anschließend den Steuerregler.
Das Telefongespräch beginnt.
1 Drücken Sie CALL.
Wenn zwei Mobiltelefone mit diesem
Gerät verbunden sind, drehen Sie zum
Auswählen des gewünschten
Mobiltelefons den Steuerregler und
drücken ihn dann.
2 Drehen Sie den Steuerregler, um
[RECENT CALL] auszuwählen, und
drücken Sie anschließend den
Steuerregler.
Eine Rufliste erscheint.
3 Drehen Sie den Steuerregler, um
einen Namen oder eine
Telefonnummer aus der Rufliste
auszuwählen, und drücken Sie
anschließend den Steuerregler.
Das Telefongespräch beginnt.
Freisprechanrufe (nur über
BLUETOOTH)
Über das Telefonbuch
Über die Rufliste

18DE
1 Drücken Sie CALL.
Wenn zwei Mobiltelefone mit diesem
Gerät verbunden sind, drehen Sie zum
Auswählen des gewünschten
Mobiltelefons den Steuerregler und
drücken ihn dann.
2 Drehen Sie den Steuerregler, um
[DIAL NUMBER] auszuwählen, und
drücken Sie anschließend den
Steuerregler.
3 Drehen Sie zum Eingeben der
Telefonnummer den Steuerregler,
wählen Sie schließlich [ ]
(Leerzeichen) und drücken Sie
anschließend ENTER*.
Das Telefongespräch beginnt.
* Drücken Sie / (SEEK –/+), um zur
jeweils nächsten Ziffer in der Digitalanzeige zu
wechseln.
Hinweis
Im Display erscheint [_] anstelle von [#].
1 Drücken Sie CALL.
Wenn zwei Mobiltelefone mit diesem
Gerät verbunden sind, drehen Sie zum
Auswählen des gewünschten
Mobiltelefons den Steuerregler und
drücken ihn dann.
2 Drehen Sie den Steuerregler, um
[REDIAL] auszuwählen, und drücken
Sie anschließend den Steuerregler.
Das Telefongespräch beginnt.
Wenn das verbundene Mobiltelefon über die
Sprachwahlfunktion verfügt, können Sie
einen Anruf tätigen, indem Sie den im
Mobiltelefon gespeicherten Namen laut
aussprechen.
1 Drücken Sie CALL.
Wenn zwei Mobiltelefone mit diesem
Gerät verbunden sind, drehen Sie zum
Auswählen des gewünschten
Mobiltelefons den Steuerregler und
drücken ihn dann.
2 Drehen Sie den Steuerregler, um
[VOICE DIAL] auszuwählen, und
drücken Sie anschließend den
Steuerregler.
Oder halten Sie VOICE mehr als
2 Sekunden lang gedrückt.
3 Sprechen Sie den Namen des
gewünschten Gesprächsteilnehmers
laut aus, und zwar genauso, wie Sie
ihn im Mobiltelefon gespeichert
haben.
Wenn Ihre Stimme erkannt wird, wird der
Anruf getätigt.
So brechen Sie die Sprachwahl ab
Drücken Sie VOICE.
Während eines Anrufs
verfügbare Funktionen
So stellen Sie die Lautstärke für das
Rufzeichen ein
Drehen Sie den Steuerregler, während ein
Anruf eingeht.
So stellen Sie die Lautstärke der
Anruferstimme ein
Drehen Sie den Steuerregler während eines
Anrufs.
So stellen Sie die Lautstärke für den
anderen Gesprächsteilnehmer ein
(Einstellen der Mikrofonverstärkung)
Drücken Sie MIC.
Einstellbare Lautstärkepegel: [MIC-LOW],
[MIC-MID], [MIC-HI].
So verringern Sie Echo und Rauschen
beim Telefonieren (Echo-/
Rauschunterdrückungsmodus)
Halten Sie MIC gedrückt.
Einstellbare Modi: [EC/NC-1], [EC/NC-2].
Durch Eingabe der
Telefonnummer
Über die Wahlwiederholung
Mithilfe der Sprachwahl

19DE
So wechseln Sie zwischen
Freisprechmodus und normalem
Telefonmodus
Drücken Sie während eines Anrufs MODE,
um zwischen dem Telefonieren über dieses
Gerät und über das Mobiltelefon zu
wechseln.
Hinweis
Diese Funktion ist je nach Mobiltelefon
möglicherweise nicht verfügbar.
Sony | Music Center mit
iPhone/Android™-
Smartphone
Für ein iPhone müssen Sie die neueste
Version der Anwendung „Sony | Music
Center“ vom App Store herunterladen, für
ein Android-Smartphone von auf Google
Play.
Hinweise
• Befolgen Sie zu Ihrer eigenen Sicherheit die vor
Ort geltende Straßenverkehrsordnung und die
Verkehrsvorschriften und bedienen Sie die
Anwendung nicht beim Fahren.
• Mit der App „Sony | Music Center“ können Sie
Sony-Audiogeräte, die mit „Sony | Music Center“
kompatibel sind, über Ihr iPhone/Android-
Smartphone bedienen.
• Welche Funktionen Sie mit „Sony | Music Center“
steuern können, hängt vom verbundenen Gerät
ab.
• Näheres zur Verwendung der Funktionen von
„Sony | Music Center“ finden Sie in den
Erläuterungen zum iPhone/Android-Smartphone.
• Einzelheiten zu „Sony | Music Center“ finden Sie
unter folgender URL:
http://www.sony.net/smcqa/
• Auf der unten angegebenen Website finden Sie
Informationen zu kompatiblen iPhone-/Android-
Smartphone-Modellen.
Bei einem iPhone: Besuchen Sie den App Store
Bei einem Android-Smartphone: Besuchen Sie
Google Play
1 Stellen Sie eine BLUETOOTH-
Verbindung mit dem iPhone/
Android-Smartphone her (Seite 8).
Zum Auswählen des Audiogeräts drücken
Sie MENU und wählen dann [BLUETOOTH]
[SET AUDIODEV] (Seite 25).
2 Starten Sie die Anwendung
„Sony | Music Center“.
3 Drücken Sie MENU, drehen Sie den
Steuerregler, um [SONY APP]
auszuwählen, und drücken Sie
anschließend den Steuerregler.
Weitere nützliche Funktionen
Herstellen der Verbindung zu
Sony | Music Center

20DE
4 Drehen Sie den Steuerregler, um
[CONNECT] auszuwählen, und
drücken Sie anschließend den
Steuerregler.
Die Verbindung zum iPhone/Android-
Smartphone wird hergestellt.
Einzelheiten zu den Funktionen am
iPhone/Android-Smartphone finden Sie
in der Hilfe zur Anwendung.
Wenn die Gerätenummer angezeigt
wird
Vergewissern Sie sich, dass die Nummer
angezeigt wird (z. B. 123456), und wählen
Sie dann [Ja] am iPhone/Android-
Smartphone.
So trennen Sie die Verbindung
1
Drücken Sie MENU, drehen Sie den
Steuerregler, um [SONY APP] auszuwählen,
und drücken Sie anschließend den
Steuerregler.
2 Drehen Sie den Steuerregler, um [CONNECT]
auszuwählen, und drücken Sie anschließend
den Steuerregler.
Auswählen der Tonquelle oder
Anwendung
Sie können über dieses Gerät die
gewünschte Tonquelle oder Anwendung am
iPhone/Android-Smartphone auswählen.
So wählen Sie die Tonquelle aus
Drücken Sie mehrmals SRC. Oder drücken
Sie SRC, drehen Sie den Steuerregler, um die
gewünschte Tonquelle auszuwählen, und
drücken Sie ENTER.
So rufen Sie die Tonquellenliste auf
Drücken Sie SRC.
Sprachausgabe einer SMS (nur
Android-Smartphone)
SMS-Nachrichten werden, wenn sie
eingehen, automatisch über die
Autolautsprecher vorgelesen.
Nähere Informationen zu den Einstellungen
finden Sie in der Hilfe zur Anwendung.
Beantworten einer SMS-Nachricht
(nur Android-Smartphone)
Sie können eine Nachricht beantworten,
indem Sie das Antwortsymbol berühren.
1 Aktivieren Sie die Anwendung „Sony | Music
Center“ und berühren Sie dann das Symbol
[Reply] (Antworten).
Die Anzeige zum Eingeben einer Nachricht
erscheint in der Anwendung „Sony | Music
Center“.
2 Geben Sie mithilfe der Spracherkennung
eine Antwortnachricht ein.
Eine Liste auswählbarer Nachrichten erscheint in
der Anwendung „Sony | Music Center“.
3 Drehen Sie den Steuerregler, um die
gewünschte Nachricht auszuwählen, und
drücken Sie den Steuerregler.
Die Nachricht wird gesendet.
Vornehmen von Klang- und
Anzeigeeinstellungen
Sie können Klang- und
Anzeigeeinstellungen über ein iPhone/
Android-Smartphone vornehmen.
Nähere Informationen zu den Einstellungen
finden Sie in der Hilfe zur Anwendung.
Verwenden der
Spracherkennung (nur
Android-Smartphone)
1 Halten Sie VOICE gedrückt, um die
Spracherkennung zu aktivieren.
2 Sprechen Sie den gewünschten
Sprachbefehl in das Mikrofon.
So deaktivieren Sie die
Spracherkennung
Drücken Sie VOICE.
Hinweise
• Die Spracherkennung steht unter Umständen
nicht in allen Fällen zur Verfügung.
• Die Spracherkennung funktioniert je nach den
Funktionen des verbundenen Android-
Smartphones möglicherweise nicht einwandfrei.
• Achten Sie darauf, dass Umgebungsgeräusche
wie Motorengeräusche bei Verwendung der
Spracherkennung möglichst leise sind.

21DE
Verwenden von Siri Eyes
Free
Mit Siri Eyes Free können Sie ein iPhone
freihändig nutzen, indem Sie einfach in das
Mikrofon sprechen. Für diese Funktion
müssen Sie ein iPhone über BLUETOOTH mit
diesem Gerät verbinden. Die Funktion steht
nur bei einem iPhone 4s oder höher zur
Verfügung. Stellen Sie sicher, dass auf Ihrem
iPhone die neueste iOS-Version läuft.
Sie müssen vorab die BLUETOOTH-
Registrierung und die Konfiguration der
Verbindung zwischen dem iPhone und
diesem Gerät abgeschlossen haben.
Erläuterungen dazu finden Sie unter
„Vorbereiten eines BLUETOOTH-Geräts“
(Seite 8). Zum Auswählen des iPhone
drücken Sie MENU und wählen dann
[BLUETOOTH] [SET AUDIODEV] (Seite 25).
1 Aktivieren Sie die Siri-Funktion am
iPhone.
Näheres dazu schlagen Sie bitte in der
mit dem iPhone gelieferten
Bedienungsanleitung nach.
2 Halten Sie VOICE mehr als
2 Sekunden lang gedrückt.
Die Sprachbefehlsanzeige erscheint.
3 Nachdem das iPhone einen Signalton
ausgegeben hat, sprechen Sie in das
Mikrofon.
Das iPhone gibt erneut einen Signalton
aus, dann beginnt Siri zu reagieren.
So deaktivieren Sie Siri Eyes Free
Drücken Sie VOICE.
Hinweise
• Je nach den Nutzungsbedingungen erkennt das
iPhone Ihre Stimme eventuell nicht. (Wenn Sie sich
beispielsweise in einem fahrenden Auto
befinden.)
• An Orten mit schlechtem iPhone-Signalempfang
kann es vorkommen, dass Siri Eyes Free nicht
richtig funktioniert oder die Reaktionszeit recht
lang ist.
• Je nach den Betriebsbedingungen des iPhone
funktioniert Siri Eyes Free möglicherweise nicht
einwandfrei oder wird beendet.
• Wenn Sie einen Titel mit einem iPhone und einer
BLUETOOTH-Audioverbindung wiedergeben
wollen und die Wiedergabe des Titels über
BLUETOOTH startet, wird Siri Eyes Free
automatisch beendet und dieses Gerät wechselt
zur BLUETOOTH-Tonquelle.
• Wenn Siri Eyes Free während der
Audiowiedergabe aktiviert wird, wechselt dieses
Gerät möglicherweise zur BLUETOOTH-Tonquelle,
auch wenn Sie keinen Titel für die Wiedergabe
angegeben haben.
• Wenn Sie das iPhone an den USB-Anschluss
anschließen, funktioniert Siri Eyes Free
möglicherweise nicht einwandfrei oder wird
beendet.
• Wenn Sie das iPhone über USB an dieses Gerät
anschließen, aktivieren Sie Siri nicht mit dem
iPhone. Siri Eyes Free funktioniert möglicherweise
nicht einwandfrei oder wird beendet.
• Solange Siri Eyes Free aktiviert ist, ist der Ton von
Tonquellen nicht zu hören.

22DE
Beenden des DEMO-Modus
Sie können die Demo, die bei
ausgeschalteter Tonquelle und
eingeblendeter Uhrzeit angezeigt wird,
abbrechen.
1 Drücken Sie MENU, drehen Sie den
Steuerregler, um [GENERAL]
auszuwählen, und drücken Sie
anschließend den Steuerregler.
2 Drehen Sie den Steuerregler, um [SET
DEMO] auszuwählen, und drücken
Sie anschließend den Steuerregler.
3 Drehen Sie den Steuerregler, um [SET
DEMO-OFF] auszuwählen, und
drücken Sie anschließend den
Steuerregler.
Die Einstellung ist damit abgeschlossen.
4 Drücken Sie (Zurück) zweimal.
Die Anzeige wechselt wieder in den
normalen Empfangsmodus bzw.
Wiedergabemodus.
Grundlegende
Einstellschritte
Sie können Optionen in den folgenden
Konfigurationskategorien einstellen:
Allgemeine Einstellungen (GENERAL),
Klangeinstellungen (SOUND),
Anzeigeeinstellungen (DISPLAY),
BLUETOOTH-Einstellungen (BLUETOOTH),
Sony | Music Center-Einstellungen (SONY
APP)
1 Drücken Sie MENU.
2 Drehen Sie den Steuerregler, um die
Konfigurationskategorie
auszuwählen, und drücken Sie den
Steuerregler.
Welche Optionen eingestellt werden
können, hängt von der Tonquelle und
den Einstellungen ab.
3 Drehen Sie den Steuerregler, um die
Optionen auszuwählen, und drücken
Sie anschließend den Steuerregler.
So schalten Sie zur vorherigen Anzeige
zurück
Drücken Sie (Zurück).
Allgemeine Einstellungen
(GENERAL)
AREA (Gebiet)
Zum Festlegen des Landes bzw. der
Region, wo dieses Gerät verwendet wird:
[EUROPE], [RUSSIA].
Wenn die aktuelle Einstellung für das
Land bzw. die Region geändert wird, wird
dieses Gerät zurückgesetzt und dann wird
die Uhrzeit angezeigt.
(Nur verfügbar, wenn die Tonquelle
ausgeschaltet ist und die Uhrzeit
angezeigt wird.)
DEMO (Demo-Modus)
Zum Einstellen des Demo-Modus: [ON],
[OFF].
CLOCK-ADJ (Uhr einstellen) (Seite 8)
CAUT ALM (Warnton)
Zum Einstellen des Warntons: [ON], [OFF]
(Seite 7).
(Nur verfügbar, wenn die Tonquelle
ausgeschaltet ist und die Uhrzeit
angezeigt wird.)
BEEP (Signalton)
Zum Einstellen des Signaltons: [ON],
[OFF].
AUTO OFF (Abschaltautomatik)
Zum automatischen vollständigen
Abschalten des Geräts eine bestimmte
Zeit nach dem Ausschalten und dem
Anzeigen der Uhrzeit (d. h. halten Sie OFF
1 Sekunde lang gedrückt): [ON]
(30 Minuten), [OFF].
Einstellungen

23DE
STEERING (Lenkrad)
Zum Registrieren/Zurücksetzen der
Einstellungen für die
Lenkradfernbedienung.
(Nur verfügbar, wenn die Tonquelle
ausgeschaltet ist und die Uhrzeit
angezeigt wird.)
STR CONTROL (Lenkradfernbedienung)
Zum Auswählen des Eingangsmodus für
die angeschlossene Fernbedienung. Um
eine Fehlfunktion zu vermeiden, achten
Sie vor dem Gebrauch darauf, dass der
Eingangsmodus mit der angeschlossenen
Fernbedienung übereinstimmt.
CUSTOM (Benutzerdefiniert)
Eingangsmodus für die
Lenkradfernbedienung
PRESET (Voreingestellt)
Eingangsmodus für die
Kabelfernbedienung, ausgenommen
die Lenkradfernbedienung (wird
automatisch ausgewählt, wenn [RESET
CUSTOM] ausgeführt wird).
EDIT CUSTOM (Benutzerdefinierte
Einstellung bearbeiten)
Zum Registrieren der Funktionen
(SOURCE, ATT, VOL +/–, SEEK +/–, VOICE,
ON HOOK, OFF HOOK) für die
Lenkradfernbedienung:
Wählen Sie durch Drehen des
Steuerreglers eine Funktion aus, die
der Lenkradfernbedienung
zugewiesen werden soll, und drücken
Sie dann den Steuerregler.
Wenn [REGISTER] blinkt, halten Sie die
Taste der Lenkradfernbedienung
gedrückt, der Sie die Funktion
zuweisen möchten. Nach Abschluss
der Registrierung wird [REGISTERED]
angezeigt.
Registrieren Sie wie in Schritt und
erläutert weitere Funktionen.
(Nur verfügbar, wenn [STR CONTROL] auf
[CUSTOM] gesetzt ist.)
RESET CUSTOM (Benutzerdefinierte
Einstellung zurücksetzen)
Zum Zurücksetzen der Einstellungen für
die Lenkradfernbedienung: [YES], [NO].
(Nur verfügbar, wenn [STR CONTROL] auf
[CUSTOM] gesetzt ist.)
Hinweise
• Beim Vornehmen der Einstellungen können nur
die Tasten an diesem Gerät verwendet werden.
Stellen Sie aus Sicherheitsgründen das
Fahrzeug ab, bevor Sie diese Einstellungen
vornehmen.
• Wenn beim Registrieren ein Fehler auftritt,
bleiben alle zuvor registrierten Informationen
erhalten. Starten Sie die Registrierung ab der
Funktion neu, bei der der Fehler auftrat.
• Diese Funktion steht unter Umständen nicht
bei allen Fahrzeugen zur Verfügung.
Einzelheiten zur Kompatibilität Ihres Fahrzeugs
finden Sie auf der Support-Website, die auf der
hinteren Umschlagseite angegeben ist.
USB MODE (USB-Modus)
Zum Ändern des USB-Modus: [ANDROID],
[MSC/MTP].
(Nur verfügbar, wenn die USB-
Signalquelle ausgewählt ist.)
CT (Uhrzeit)
Zum Einstellen der CT-Funktion: [ON],
[OFF].
AF/TA (Alternativfrequenzen/
Verkehrsdurchsagen)
Zum Einstellen von Alternativfrequenzen
(AF) und Verkehrsdurchsagen (TA):
[AF-ON], [TA-ON], [AF/TA-ON], [AF/TA-
OFF].
REGIONAL (Regional)
Zum Beschränken des Empfangs auf eine
bestimmte Region: [ON], [OFF].
(Nur bei UKW-Empfang (FM) verfügbar.)
BTM (Speicherbelegungsautomatik)
(Seite 12)
(Nur verfügbar, wenn der Tuner
ausgewählt ist.)
FIRMWARE (Firmware)
(Nur verfügbar, wenn die Tonquelle
ausgeschaltet ist und die Uhrzeit
angezeigt wird.)
Zum Anzeigen/Aktualisieren der
Firmwareversion. Einzelheiten dazu
finden Sie auf der Support-Website, die
auf der hinteren Umschlagseite
angegeben ist.
FW VERSION (Firmwareversion)
Die aktuelle Firmwareversion wird
angezeigt.

24DE
FW UPDATE (Firmwareaktualisierung)
Zum Starten der Firmwareaktualisierung:
[YES], [NO].
Es dauert einige Minuten, bis die
Firmwareaktualisierung abgeschlossen
ist. Stellen Sie den Zündschlüssel
während der Aktualisierung nicht in die
Position OFF und entfernen Sie auch nicht
das USB-Gerät.
Klangeinstellungen
(SOUND)
Dieses Konfigurationsmenü ist nicht
verfügbar, wenn die Tonquelle
ausgeschaltet ist und die Uhrzeit angezeigt
wird.
EQ10 PRESET (EQ10-Voreinstellung)
Zum Auswählen aus 10 Equalizer-Kurven
oder Ausschalten der Equalizer-Kurve:
[OFF], [R&B], [ROCK], [POP], [HIP-HOP],
[EDM], [JAZZ], [SOUL], [COUNTRY],
[KARAOKE]*, [CUSTOM].
Die Einstellung für die Equalizer-Kurve
kann für jede Tonquelle gespeichert
werden.
* Der Gesang wird mit [KARAOKE] zwar
reduziert, kann aber bei der Wiedergabe nicht
vollständig ausgeblendet werden. Außerdem
wird die Verwendung eines Mikrofons nicht
unterstützt.
EQ10 CUSTOM (EQ10 benutzerdefiniert)
Zum Einstellen von [CUSTOM] unter EQ10.
Zum Einstellen der Equalizer-Kurve:
[BAND1] – [BAND10] (32 Hz, 63 Hz, 125 Hz,
250 Hz, 500 Hz, 1 kHz, 2 kHz, 4 kHz, 8 kHz,
16 kHz).
Die Lautstärke lässt sich in Schritten von
1 dB auf einen Wert zwischen -6 dB und
+6 dB einstellen.
BALANCE (Balance)
Zum Einstellen der Balance: [RIGHT-15] –
[CENTER] – [LEFT-15].
FADER (Fader)
Zum Einstellen des relativen Pegels:
[FRONT-15] – [CENTER] – [REAR-15].
S.WOOFER (Tiefsttonlautsprecher)
SW LEVEL (Pegel des
Tiefsttonlautsprechers)
Zum Einstellen der Lautstärke des
Tiefsttonlautsprechers:
[+6 dB] – [0 dB] – [-6 dB].
([ATT] wird bei der niedrigsten Einstellung
angezeigt.)
SW PHASE (Phase des
Tiefsttonlautsprechers)
Zum Auswählen der Phase des
Tiefsttonlautsprechers: [SUB NORM], [SUB
REV].
LPF FREQ (Frequenz des
Niedrigpassfilters)
Zum Auswählen der Grenzfrequenz des
Tiefsttonlautsprechers: [80Hz], [100Hz],
[120Hz].
HPF FREQ (Frequenz des Hochpassfilters)
Zum Auswählen der Grenzfrequenz der
Front-/Hecklautsprecher: [OFF], [80Hz],
[100Hz], [120Hz].
AUX VOL (AUX-Lautstärkepegel)
Zum Einstellen der Lautstärke der
einzelnen angeschlossenen Zusatzgeräte:
[+18 dB] – [0 dB] – [-8 dB].
Wenn Sie die Einstellung hier vornehmen,
brauchen Sie die Lautstärke der einzelnen
Tonquellen nicht mehr anzugleichen.
(Nur verfügbar, wenn AUX ausgewählt
ist.)
BTA VOL (BLUETOOTH-Audio-
Lautstärkepegel)
Zum Einstellen der Lautstärke der
einzelnen angeschlossenen BLUETOOTH-
Geräte: [+6 dB] – [0 dB] – [-6 dB].
Wenn Sie die Einstellung hier vornehmen,
brauchen Sie die Lautstärke der einzelnen
Tonquellen nicht mehr anzugleichen.
(Nur verfügbar, wenn BT-Audio oder eine
Anwendung ausgewählt ist.)

25DE
Anzeigeeinstellungen
(DISPLAY)
DIMMER (Dimmer)
Zum Wechseln der Helligkeit im Display:
[OFF], [ON], [AT] (Automatik), [CLK]
(Uhrzeit).
([AT] steht nur zur Verfügung, wenn die
Steuerleitung für die Beleuchtung
angeschlossen ist und die Scheinwerfer
eingeschaltet sind.)
Um die Funktion so einzustellen, dass sie
nur während der festgelegten Zeit aktiv
ist, wählen Sie [CLK] und stellen dann die
Anfangs- und die Endezeit ein.
– Einstellen der Helligkeit bei aktiviertem
Dimmer:
Setzen Sie [DIMMER] auf [ON] und
stellen Sie [BRIGHTNESS] ein.
– Einstellen der Helligkeit bei
deaktiviertem Dimmer:
Setzen Sie [DIMMER] auf [OFF] und
stellen Sie [BRIGHTNESS] ein.
Die Helligkeitseinstellung wird
gespeichert und bei Aktivierung bzw.
Deaktivierung des Dimmers angewendet.
BRIGHTNESS (Helligkeit)
Zum Einstellen der Helligkeit im Display.
Die Helligkeit lässt sich einstellen: [1] –
[10].
BUTTON-C (Tastenfarbe)
Zum Einstellen einer voreingestellten
oder benutzerdefinierten Farbe für die
Tasten.
COLOR (Farben)
Sie können aus 15 voreingestellten und
1 benutzerdefinierten Farbe auswählen.
CUSTOM-C (Benutzerdefinierte Farbe)
Zum Speichern einer benutzerdefinierten
Farbe für die Tasten.
RGB RED, RGB GRN, RGB BLUE
Einstellbarer Farbbereich: [0] – [32] ([0]
lässt sich nicht für alle Farbbereiche
einstellen).
DSPL-C (Displayfarbe)
Zum Einstellen einer voreingestellten
oder benutzerdefinierten Farbe für das
Display.
COLOR (Farben)
Sie können aus 15 voreingestellten und
1 benutzerdefinierten Farbe auswählen.
CUSTOM-C (Benutzerdefinierte Farbe)
Zum Speichern einer benutzerdefinierten
Farbe für das Display.
RGB RED, RGB GRN, RGB BLUE
Einstellbarer Farbbereich: [0] – [32] ([0]
lässt sich nicht für alle Farbbereiche
einstellen).
SND SYNC (Sound-Synchronisation)
Zum Aktivieren der Synchronisierung der
Beleuchtung mit dem Ton: [ON], [OFF].
AUTO SCR (Automatischer Bildlauf)
Zum Einstellen des automatischen
Bildlaufs für lange Informationen: [ON],
[OFF].
(Nicht verfügbar, wenn AUX oder der
Tuner ausgewählt ist.)
BLUETOOTH-Einstellungen
(BLUETOOTH)
PAIRING (Pairing) (Seite 9)
Zum Herstellen einer Verbindung mit bis
zu zwei BLUETOOTH-Geräten: [DEVICE 1],
[DEVICE 2].
Nachdem das Pairing abgeschlossen ist,
wird statt [DEVICE 1] oder [DEVICE 2] der
Name des Geräts angezeigt, mit dem ein
Pairing ausgeführt wurde.
AUDIODEV (Audiogerät)
Zum Auswählen des Audiogeräts.
[*] erscheint bei dem Gerät, mit dem ein
Pairing als [DEVICE 1] ausgeführt wurde,
oder dem aktuellen, A2DP-kompatiblen
Audiogerät.
RINGTONE (Rufzeichen)
Zum Auswählen, ob das Rufzeichen
dieses Geräts oder des verbundenen
Mobiltelefons ertönen soll: [1] (dieses
Gerät), [2] (Mobiltelefon).

26DE
AUTO ANS (Automatische
Anrufentgegennahme)
Zum Einstellen dieses Geräts auf das
automatische Entgegennehmen eines
eingehenden Anrufs: [OFF], [1] (etwa
3 Sekunden), [2] (etwa 10 Sekunden).
AUTOPAIR (Pairingautomatik)
Zum automatischen Starten des
BLUETOOTH-Pairing, wenn ein Gerät mit
iOS Version 5.0 oder höher über USB
angeschlossen wird: [ON], [OFF].
BT SIGNL (BLUETOOTH-Signal) (Seite 10)
Zum Aktivieren/Deaktivieren der
BLUETOOTH-Funktion.
BT INIT (BLUETOOTH-Initialisierung)
Zum Initialisieren aller BLUETOOTH-
Einstellungen (Pairing-Informationen,
Geräteinformationen usw.): [YES], [NO].
Wenn Sie das Gerät entsorgen wollen,
initialisieren Sie alle Einstellungen.
(Nur verfügbar, wenn die Tonquelle
ausgeschaltet ist und die Uhrzeit
angezeigt wird.)
Sony | Music Center-
Einstellungen (SONY APP)
AUTO LAUNCH (Startautomatik)
Zum Aktivieren des automatischen Starts
von „Sony | Music Center“: [ON], [OFF].
Bei Auswahl von [ON] wird „Sony | Music
Center“ nach Herstellung der
BLUETOOTH-Verbindung automatisch
verbunden.
CONNECT (Verbinden)
Zum Aktivieren und Deaktivieren der
„Sony | Music Center“-Funktion
(Verbindung).
Aktualisieren der Firmware
Zum Aktualisieren der Firmware rufen Sie die
Support-Website auf, die auf der hinteren
Umschlagseite angegeben ist, und gehen
nach den online angezeigten Anweisungen
vor.
Hinweis
Trennen Sie während der Aktualisierung nicht das
USB-Gerät vom Gerät.
Sicherheitsmaßnahmen
•Lassen Sie die Frontplatte oder
Audiogeräte nicht auf dem Armaturenbrett
liegen.
• Wenn das Gerät eingeschaltet wird, wird
die Motorantenne automatisch
ausgefahren.
• Achten Sie darauf, dass keine Flüssigkeiten
auf das Gerät gelangen.
Weitere Informationen
Wiedergabereihenfolge von
Audiodateien
Ordner (Album)
Audiodatei (Titel)

27DE
• Folgende iPod-Modelle können
angeschlossen werden. Aktualisieren Sie
Ihr iPod-Modell vor dem Gebrauch anhand
der neuesten Software.
Kompatible iPhone-/iPod-Modelle
• Die Verwendung des „Made for Apple“-
Markenemblems bedeutet, dass ein
Zubehör speziell für den Anschluss an
das(die) Apple-Produkt(e) entwickelt
wurde, die im Markenemblem bezeichnet
sind, und vom Entwickler für die Erfüllung
der Apple-Leistungsstandards zertifiziert
wurde. Apple übernimmt keine
Verantwortung für den Betrieb dieses
Geräts oder dessen Einhaltung von
Sicherheits- und gesetzlichen Standards.
Bitte beachten, dass die Verwendung
dieses Zubehörs mit einem Apple-Produkt
die drahtlose Leistungsfähigkeit
beeinträchtigen kann.
Sollten an Ihrem Gerät Probleme auftreten
oder sollten Sie Fragen haben, auf die in
dieser Anleitung nicht eingegangen wird,
wenden Sie sich bitte an Ihren Sony-Händler.
Wartung
Reinigen der Anschlüsse
Berühren Sie die Anschlüsse möglichst nicht
direkt. Das Gerät funktioniert
möglicherweise nicht ordnungsgemäß,
wenn die Anschlüsse zwischen dem Gerät
und der Frontplatte verschmutzt sind. Um
dies zu vermeiden, nehmen Sie die
Frontplatte ab (Seite 7) und reinigen Sie die
Anschlüsse mit einem Wattestäbchen.
Drücken Sie dabei nicht zu fest auf die
Anschlüsse. Andernfalls können sie
beschädigt werden.
Hinweis
Entfernen Sie die Frontplatte aus
Sicherheitsgründen nicht beim Fahren.
Der iPod
Kompatibles
Modell
Bluetooth® USB
iPhone X
iPhone 8
iPhone 8 Plus
iPhone 7
iPhone 7 Plus
iPhone SE
iPhone 6s
iPhone 6s Plus
iPhone 6
iPhone 6 Plus
iPhone 5s
iPhone 5c
iPhone 5
iPhone 4s
iPod touch
(6. Generation)
iPod touch
(5. Generation)
iPod nano
(7. Generation)

28DE
Technische Daten
Tuner
FM (UKW)
Empfangsbereich:
Wenn [AREA] auf [EUROPE] gesetzt ist:
87,5 MHz – 108,0 MHz
Wenn [AREA] auf [RUSSIA] gesetzt ist:
FM1/FM2: 87,5 MHz – 108,0 MHz
(in Schritten von 50 kHz)
FM3: 65 MHz – 74 MHz (in Schritten von
30 kHz)
Nutzbare Empfindlichkeit: 8 dBf
Signal-Rauschabstand: 73 dB
Kanaltrennung: 50 dB bei 1 kHz
MW/LW
Empfangsbereich:
MW: 531 kHz – 1.602 kHz
LW: 153 kHz – 279 kHz
Empfindlichkeit: MW: 26 µV, LW: 50 µV
USB-Player
Schnittstelle: USB (Full-Speed)
Maximale Stromstärke: 1 A
Höchstzahl an erkennbaren Ordnern und
Dateien:
Ordner (Alben): 256
Dateien (Titel) pro Ordner: 256
Kompatibles Android Open Accessory-
Protokoll (AOA): 2.0
Entsprechender Codec:
MP3 (.mp3)
Bitrate: 8 Kbps – 320 Kbps (Unterstützt
VBR (variable Bitrate))
Abtastrate: 16 kHz – 48 kHz
WMA (.wma)
Bitrate: 32 Kbps – 192 Kbps
(Unterstützt VBR (variable Bitrate))
Abtastrate: 32 kHz, 44,1 kHz,
48 kHz
FLAC (.flac)
Bittiefe: 16 Bit, 24 Bit
Abtastrate: 44,1 kHz, 48 kHz
Unterstütztes Dateisystem: FAT16, FAT32
Drahtlose Kommunikation
Kommunikationssystem:
BLUETOOTH-Standard Version 3.0
Sendeleistung:
BLUETOOTH-Standard Leistungsklasse 2
(max. +1 dBm leitungsgebunden)
Maximale Kommunikationsreichweite:
Sichtlinie ca. 10 m*
1
Frequenzbereich:
2,4-GHz-Frequenzbereich
(2,4000 GHz – 2,4835 GHz)
Modulationsverfahren: FHSS
Kompatible BLUETOOTH-Profile*
2
:
A2DP (Advanced Audio Distribution
Profile) 1.3
AVRCP (Audio Video Remote Control
Profile) 1.3
HFP (Handsfree Profile) 1.6
PBAP (Phone Book Access Profile)
SPP (Serial Port Profile)
Entsprechender Codec:
SBC (.sbc), AAC (.m4a)
*1 Die tatsächliche Reichweite hängt von
verschiedenen Faktoren ab, wie z. B.
Hindernissen zwischen Geräten, Magnetfeldern
um einen Mikrowellenherd, statischer
Elektrizität, Empfangsempfindlichkeit, Leistung
der Antenne, Betriebssystem,
Softwareanwendung usw.
*2 BLUETOOTH-Standardprofile geben den Zweck
der BLUETOOTH-Kommunikation zwischen den
Geräten an.
NFC-Datenübertragung
Frequenzbereich: 13,56 MHz
Endverstärker
Ausgänge: Lautsprecherausgänge
Lautsprecherimpedanz: 4 – 8
Maximale Ausgangsleistung: 55 W × 4
(an 4 )
Allgemeines
Betriebsspannung: 12 V Gleichstrom,
Autobatterie (negative Erdung)
Nennstromaufnahme: 10 A
Abmessungen:
ca. 178 mm × 50 mm × 177 mm
(B/H/T)
Einbaumaße:
ca. 182 mm × 53 mm × 160 mm
(B/H/T)
Gewicht: ca. 0,8 kg
Lieferumfang:
Hauptgerät (1)
Mikrofon (1)

29DE
Montageteile und Anschlusszubehör
(1 Satz)
Nähere Informationen dazu erhalten Sie
beim Händler.
Änderungen, die dem technischen
Fortschritt dienen, bleiben vorbehalten.
Der Bluetooth®-Schriftzug und die Bluetooth-Logos
sind eingetragene Markenzeichen und Eigentum
der Bluetooth SIG, Inc., und ihre Verwendung durch
die Sony Corporation erfolgt in Lizenz. Andere
Markenzeichen und Produktnamen sind Eigentum
der jeweiligen Rechteinhaber.
Das N-Zeichen ist ein Markenzeichen oder
eingetragenes Markenzeichen von NFC Forum, Inc.
in den Vereinigten Staaten und anderen Ländern.
Windows Media ist ein eingetragenes
Markenzeichen oder Markenzeichen der Microsoft
Corporation in den USA und/oder anderen Ländern.
Dieses Produkt ist durch bestimmte gewerbliche
Schutz- und Urheberrechte der Microsoft
Corporation geschützt. Die Verwendung oder der
Vertrieb derartiger Technologie außerhalb dieses
Produkts ohne eine Lizenz von Microsoft oder einer
autorisierten Microsoft-Niederlassung ist untersagt.
Apple, iPhone, iPod, iPod nano, iPod touch und Siri
sind Markenzeichen der Apple Inc., die in den USA
und anderen Ländern eingetragen sind. App Store
ist eine Dienstleistungsmarke von Apple Inc.
IOS ist ein Markenzeichen oder ein eingetragenes
Markenzeichen von Cisco in den USA und anderen
Ländern und wird in Lizenz verwendet.
Google, Google Play und Android sind Marken von
Google LCC.
libFLAC
Copyright (C) 2000-2009 Josh Coalson
Copyright (C) 2011-2013 Xiph.Org Foundation
Die Redistribution und Nutzung im Quell- und
Binärformat mit oder ohne Modifikationen ist unter
folgenden Voraussetzungen zulässig:
– Redistributionen des Quellcodes müssen den
oben genannten Urheberrechtsvermerk, diese
Liste der Voraussetzungen sowie den folgenden
Haftungsausschluss enthalten.
– Bei Redistributionen im Binärformat müssen der
oben genannte Urheberrechtsvermerk, diese
Liste der Voraussetzungen sowie der folgende
Haftungsausschluss in der Dokumentation und/
oder in sonstigen mit der Redistribution
verbreiteten Materialien enthalten sein.
– Der Name der Xiph.org Foundation und die
Namen deren Partner dürfen nicht ohne vorherige
schriftliche Genehmigung verwendet werden, um
für Produkte zu werben oder Produkte zu
befürworten, die aus dieser Software abgeleitet
sind.
DIESE SOFTWARE WIRD VON DEN
URHEBERRECHTSINHABERN UND DEREN PARTNERN
OHNE GEWÄHR ZUR VERFÜGUNG GESTELLT UND
JEDWEDE AUSDRÜCKLICHE ODER IMPLIZITE
HAFTUNG WIE DIE HAFTUNG FÜR HANDELSÜBLICHE
QUALITÄT UND DIE EIGNUNG FÜR EINEN
BESTIMMTEN ZWECK WERDEN AUSGESCHLOSSEN.
UNTER KEINEN UMSTÄNDEN HAFTEN DIE
FOUNDATION ODER DEREN PARTNER FÜR DIREKTE,
INDIREKTE, SPEZIELLE, EXEMPLARISCHE, NEBEN-
ODER FOLGESCHÄDEN IRGENDWELCHER ART (U. A.
BESCHAFFUNG VON ERSATZARTIKELN ODER
-SERVICES, NUTZUNGSAUSFALL, DATENVERLUST,
ENTGANGENEN GEWINN ODER UNTERBRECHUNG
DER GESCHÄFTSTÄTIGKEIT), UNABHÄNGIG VON
DEREN URSACHE UND VON JEDER
HAFTUNGSTHEORIE, OB AUF EINEM VERTRAG ODER
GEFÄHRDUNGSHAFTUNG ODER EINER
UNERLAUBTEN HANDLUNG (U. A. FAHRLÄSSIGKEIT)
BERUHEND, DIE IN IRGENDEINER WEISE AUS DER
VERWENDUNG DIESER SOFTWARE ENTSTEHEN,
AUCH WENN SIE VON DER MÖGLICHKEIT SOLCHER
SCHÄDEN IN KENNTNIS GESETZT WURDEN.
Störungsbehebung
Anhand der folgenden Checkliste können
Sie die meisten Probleme, die
möglicherweise an Ihrem Gerät auftreten,
selbst beheben.
Bevor Sie die folgende Checkliste
durchgehen, überprüfen Sie bitte zunächst,
ob Sie das Gerät richtig angeschlossen und
bedient haben.
Einzelheiten zum Gebrauch der Sicherung
und zum Ausbauen des Geräts aus dem
Armaturenbrett finden Sie unter „Anschluss/
Installation“ (Seite 36).
Wenn das Problem sich nicht beheben lässt,
besuchen Sie die Support-Website, die auf
der hinteren Umschlagseite angegeben ist.
Urheberrechte

30DE
Allgemeines
Es ist gar kein Ton zu hören oder der Ton
ist zu leise.
Der Fader-Regler [FADER] ist nicht für ein
2-Lautsprecher-System eingestellt.
Die Lautstärke dieses Geräts und/oder
des verbundenen Geräts ist sehr niedrig.
– Erhöhen Sie die Lautstärke dieses Geräts
und des verbundenen Geräts.
Kein Signalton ertönt.
Ein gesondert erhältlicher Endverstärker
ist angeschlossen und Sie verwenden
nicht den integrierten Verstärker.
Gespeicherte Sender und die korrekte
Uhrzeit werden gelöscht.
Die Sicherung ist durchgebrannt.
Störgeräusche sind zu hören, wenn der
Zündschlüssel gedreht wird.
Die Leitungen sind nicht korrekt an den
Stromanschluss für Zubehörgeräte am
Fahrzeug angeschlossen.
Das Gerät wechselt während der
Wiedergabe bzw. des Radioempfangs in
den Demo-Modus.
Wenn [DEMO-ON] eingestellt ist und
5 Minuten lang keine Funktion ausgeführt
wird, wechselt das Gerät in den Demo-
Modus.
– Stellen Sie [DEMO-OFF] ein (Seite 22).
Die Anzeige wird ausgeblendet bzw.
erscheint nicht im Display.
Die Anschlüsse sind verschmutzt
(Seite 27).
Das Display bzw. die Beleuchtung blinkt.
Das Gerät wird nicht ausreichend mit
Strom versorgt.
– Überprüfen Sie, ob die Autobatterie das
Gerät mit ausreichend Strom versorgt.
(Die Betriebsspannung beträgt 12 V
Gleichstrom.)
Die Funktionstasten funktionieren nicht.
Drücken Sie DSPL und (Zurück)/MODE
länger als 2 Sekunden, um das Gerät
zurückzusetzen.
Der Speicherinhalt wird gelöscht.
Radioempfang
Der Radioempfang ist schlecht.
Störgeräusche sind zu hören.
Schließen Sie die Antenne fest an.
In FM3 kann zwischen 65 MHz und 74 MHz
kein Sender eingestellt werden.
[AREA] ist auf [EUROPE] gesetzt.
– Setzen Sie [AREA] auf [RUSSIA] (Seite 22).
RDS
RDS-Dienste können nicht empfangen
werden (wenn [AREA] auf [RUSSIA]
gesetzt ist).
FM3 ist ausgewählt.
– Wählen Sie FM1 oder FM2 aus.
RDS-Dienste stehen in der aktuellen
Region nicht zur Verfügung.
Der Sendersuchlauf (SEEK) startet nach ein
paar Sekunden Radioempfang.
Der Sender ist kein Verkehrsfunksender
(TP) oder die Sendesignale sind zu
schwach.
– Deaktivieren Sie TA (Seite 13).
Es sind keine Verkehrsdurchsagen zu
hören.
Aktivieren Sie TA (Seite 13).
Der Sender sendet keine
Verkehrsdurchsagen, obwohl es sich um
einen Verkehrsfunksender (TP) handelt.
– Stellen Sie einen anderen Sender ein.
Bei der PTY-Funktion wird [- - - - - - - -]
angezeigt.
Der aktuelle Sender ist kein RDS-Sender
oder der Radioempfang ist schlecht.
Der Programmdienstname blinkt.
Für den aktuellen Sender gibt es keine
Alternativfrequenz.
– Drücken Sie (SEEK –/+),
solange der Programmdienstname
blinkt. [PI SEEK] wird angezeigt und das
Gerät beginnt dann mit der Suche nach
einer Frequenz mit denselben PI-Daten
(Programmkennung).

31DE
Wiedergabe mit einem USB-Gerät
Es dauert länger, bis an einem USB-Gerät
die Wiedergabe beginnt.
Die Dateien auf dem USB-Gerät befinden
sich in einer komplizierten Datei-/
Ordnerstruktur.
Die Audiodatei kann nicht wiedergegeben
werden.
Erläuterungen zu den unterstützten
Dateiformaten finden Sie unter
„Technische Daten“ (Seite 28).
Wenn die Audiodatei dennoch nicht
wiedergegeben werden kann, schlagen
Sie in der mit dem USB-Gerät gelieferten
Bedienungsanleitung nach oder wenden
Sie sich an den Hersteller des USB-Geräts.
Funktionen zum Überspringen eines
Albums bzw. von Elementen (Sprung-
Modus) und Suchen nach einem Titel
anhand seines Namens (Quick-BrowZer)
können nicht ausgeführt werden.
Setzen Sie [USB MODE] auf [MSC/MTP]
(Seite 23).
Während der Wiedergabe im Android-
Modus kann kein Ton ausgegeben
werden.
Überprüfen Sie den Status der
Anwendung für die Audiowiedergabe auf
dem Android-Smartphone.
NFC-Funktion
Die Sofortverbindung (NFC) ist nicht
möglich.
Das Smartphone reagiert nicht, wenn die
Geräte aneinandergehalten werden.
– Vergewissern Sie sich, dass die NFC-
Funktion am Smartphone eingeschaltet
ist.
– Halten Sie den Bereich mit dem N-
Zeichen des Smartphones näher an den
Bereich mit dem N-Zeichen an diesem
Gerät.
– Wenn sich das Smartphone in einem
Etui befindet, nehmen Sie es heraus.
Die NFC-Empfangsempfindlichkeit hängt
vom Gerät ab.
Wenn die Sofortverbindung mit dem
Smartphone mehrere Male fehlschlägt,
stellen Sie die BLUETOOTH-Verbindung
manuell her.
BLUETOOTH-Funktion
Das zu verbindende Gerät kann dieses
Gerät nicht erkennen.
Schalten Sie dieses Gerät in den
Bereitschaftsmodus für das Pairing, bevor
Sie das Pairing vornehmen.
Während eine Verbindung zu zwei
BLUETOOTH-Geräten besteht, kann dieses
Gerät von keinem weiteren Gerät erkannt
werden.
– Trennen Sie eine der Verbindungen und
lassen Sie dann vom anderen Gerät aus
nach diesem Gerät suchen.
Schalten Sie die BLUETOOTH-
Signalausgabe ein, wenn das Pairing
bereits erfolgt ist (Seite 10).
Es kann keine Verbindung hergestellt
werden.
Die Verbindungsherstellung kann nur von
einem Gerät aus gesteuert werden
(diesem Gerät oder dem BLUETOOTH-
Gerät), aber nicht von beiden Geräten aus.
– Stellen Sie von einem BLUETOOTH-Gerät
aus eine Verbindung zu diesem Gerät
her oder umgekehrt.
Der Name des erkannten Geräts wird nicht
angezeigt.
Je nach dem Status des anderen Geräts
wird der Name möglicherweise nicht
angezeigt.
Es ist kein Rufzeichen zu hören.
Stellen Sie, wenn ein Anruf eingeht, die
Lautstärke durch Drehen des
Steuerreglers ein.
Je nach dem verbundenen Gerät wird das
Rufzeichen möglicherweise nicht richtig
übertragen.
– Setzen Sie [RINGTONE] auf [1] (Seite 25).
Die Frontlautsprecher sind nicht an dieses
Gerät angeschlossen.
– Schließen Sie die Frontlautsprecher an
dieses Gerät an. Das Rufzeichen wird nur
über die Frontlautsprecher ausgegeben.

32DE
Die Stimme des Gesprächsteilnehmers ist
nicht zu hören.
Die Frontlautsprecher sind nicht an dieses
Gerät angeschlossen.
– Schließen Sie die Frontlautsprecher an
dieses Gerät an. Die Stimme des
Gesprächsteilnehmers wird nur über die
Frontlautsprecher ausgegeben.
Ihr Gesprächspartner teilt Ihnen mit, dass
die Lautstärke zu hoch oder zu niedrig ist.
Verringern oder erhöhen Sie die
Lautstärke, indem Sie die
Mikrofonverstärkung einstellen (Seite 18).
Bei Telefongesprächen ist ein Echo oder
Rauschen zu hören.
Verringern Sie die Lautstärke.
Setzen Sie den EC/NC-Modus auf
[EC/NC-1] oder [EC/NC-2] (Seite 18).
Wenn Umgebungsgeräusche das
Telefongespräch überlagern, versuchen
Sie, diese Geräusche zu reduzieren.
Beispiel: Wenn das Fenster geöffnet ist
und Straßenlärm usw. hereindringt,
schließen Sie das Fenster. Wenn eine
Klimaanlage laut ist, drehen Sie diese
herunter.
Es besteht keine Verbindung zum Telefon.
Während der BLUETOOTH-
Audiowiedergabe lässt sich auch durch
Drücken von CALL keine Verbindung zum
Mobiltelefon herstellen.
– Stellen Sie die Verbindung vom
Mobiltelefon aus her.
Die Tonqualität beim Telefonieren ist nicht
gut.
Die Tonqualität beim Telefonieren hängt
von den Empfangsbedingungen des
Mobiltelefons ab.
– Fahren Sie bei schlechtem Empfang mit
dem Auto an eine Stelle, an der der
Empfang für das Mobiltelefon besser ist.
Die Lautstärke des verbundenen
Audiogeräts ist zu niedrig (hoch).
Der Lautstärkepegel variiert je nach
Audiogerät.
– Stellen Sie am verbundenen Audiogerät
oder an diesem Gerät die Lautstärke ein
(Seite 24).
Der Ton setzt während der Wiedergabe
mit einem BLUETOOTH-Audiogerät aus.
Verringern Sie den Abstand zwischen
diesem Gerät und dem BLUETOOTH-
Audiogerät.
Wenn sich das BLUETOOTH-Audiogerät in
einem Etui befindet, das die
Signalübertragung stört, nehmen Sie das
Audiogerät während des Betriebs aus
dem Etui.
In der Nähe werden einige BLUETOOTH-
oder andere Geräte verwendet, die
Funkwellen ausstrahlen.
– Schalten Sie die anderen Geräte aus.
– Erhöhen Sie den Abstand zu den
anderen Geräten.
Der Wiedergabeton setzt kurz aus, wenn
die Verbindung zwischen diesem Gerät
und dem Mobiltelefon hergestellt wird.
Dies ist keine Fehlfunktion.
Das verbundene BLUETOOTH-Audiogerät
lässt sich nicht steuern.
Überprüfen Sie, ob das verbundene
BLUETOOTH-Audiogerät das Profil AVRCP
unterstützt.
Einige Funktionen stehen nicht zur
Verfügung.
Vergewissern Sie sich, dass das
verbundene Gerät die betreffenden
Funktionen unterstützt.
Ein Anruf wird unbeabsichtigt
entgegengenommen.
Das verbundene Telefon ist so eingestellt,
dass Anrufe automatisch
entgegengenommen werden.
Das Pairing ist aufgrund einer
Zeitüberschreitung fehlgeschlagen.
Je nach dem verbundenen Gerät ist das
Zeitlimit für das Pairing sehr kurz.
– Versuchen Sie, das Pairing in der
vorgegebenen Zeit abzuschließen.
Die BLUETOOTH-Funktion lässt sich nicht
verwenden.
Schalten Sie das Gerät aus, indem Sie OFF
mehr als 2 Sekunden lang drücken, und
schalten Sie das Gerät dann wieder ein.

33DE
Bei einem Anruf über die
Freisprecheinrichtung wird über die
Lautsprecher des Fahrzeugs kein Ton
ausgegeben.
Wenn der Ton über das Mobiltelefon
ausgegeben wird, stellen Sie dieses so
ein, dass der Ton über die Lautsprecher
des Fahrzeugs ausgegeben wird.
Siri Eyes Free ist nicht aktiviert.
Registrieren Sie ein iPhone, das Siri Eyes
Free unterstützt, zur freihändigen
Verwendung.
Aktivieren Sie die Siri-Funktion am iPhone.
Trennen Sie die BLUETOOTH-Verbindung
zwischen dem iPhone und diesem Gerät
und stellen Sie sie wieder her.
Sony | Music Center-Bedienung
Der Name der Anwendung entspricht
nicht der tatsächlichen Anwendung in
„Sony | Music Center“.
Starten Sie die Anwendung von der
Anwendung „Sony | Music Center“ aus
erneut.
Beim Ausführen der Anwendung
„Sony | Music Center“ über BLUETOOTH
wechselt das Display automatisch zu [BT
AUDIO].
Die Anwendung „Sony | Music Center“
oder die BLUETOOTH-Funktion ist
fehlgeschlagen.
Führen Sie die Anwendung erneut aus.
Die Verbindung zur Anwendung
„Sony | Music Center“ wird automatisch
getrennt, wenn das Display zu [IPD]
wechselt.
Die Anwendung „Sony | Music Center“ auf
dem iPhone/iPod unterstützt die iPod-
Wiedergabe nicht.
– Wechseln Sie am Gerät zu einer anderen
Tonquelle als [IPD] und stellen Sie die
Verbindung zu „Sony | Music Center“ her
(Seite 19).
Die Verbindung zu „Sony | Music Center“
wird automatisch getrennt, wenn der USB-
Modus des Geräts in [ANDROID] geändert
wird.
Das Android-Smartphone unterstützt die
Wiedergabe im Android-Modus nicht.
– Setzen Sie den USB-Modus des Geräts
auf [MSC/MTP] und stellen Sie die
Verbindung zu „Sony | Music Center“ her
(Seite 19).
Meldungen
Eine der folgenden Meldungen erscheint
oder blinkt möglicherweise während des
Betriebs.
INVALID
Die ausgewählte Funktion ist
möglicherweise nicht zulässig.
[USB MODE] kann während der iPod-
Wiedergabe nicht geändert werden.
READ
Bitte warten Sie, bis das Einlesen
abgeschlossen ist. Die Wiedergabe
beginnt danach automatisch. Dieser
Vorgang kann je nach Dateistruktur einige
Zeit in Anspruch nehmen.
(Unterstrich): Das Zeichen lässt sich nicht
anzeigen.
Bei der Wiedergabe mit einem USB-
Gerät:
HUB NO SUPRT: USB-Hubs werden nicht
unterstützt.
IPD STOP: Die iPod-Wiedergabe ist am Ende
angelangt.
Starten Sie am iPod/iPhone die
Wiedergabe.
NOT SUPPORT - ANDROID MODE
[USB MODE] ist auf [ANDROID] gesetzt
und ein an dieses Gerät angeschlossenes
USB-Gerät unterstützt AOA (Android Open
Accessory) 2.0 nicht.
– Setzen Sie [USB MODE] auf [MSC/MTP]
(Seite 23).

34DE
USB ERROR
Schließen Sie das USB-Gerät erneut an.
USB NO DEV
Vergewissern Sie sich, dass das USB-Gerät
bzw. das USB-Kabel fest angeschlossen
ist.
USB NO MUSIC
Schließen Sie ein USB-Gerät an, auf dem
sich abspielbare Dateien befinden
(Seite 28).
USB NO SUPRT
Einzelheiten zur Kompatibilität Ihres USB-
Geräts finden Sie auf der Support-
Website, die auf der hinteren
Umschlagseite angegeben ist.
OVERLOAD: Das USB-Gerät ist überlastet.
Trennen Sie das USB-Gerät von diesem
Gerät und wählen Sie mit SRC eine andere
Tonquelle aus.
Am USB-Gerät liegt ein Fehler vor oder ein
nicht unterstütztes Gerät ist
angeschlossen.
Beim RDS-Betrieb:
NO AF: Es gibt keine Alternativfrequenzen.
Drücken Sie (SEEK –/+), solange
der Programmdienstname blinkt. Das
Gerät beginnt dann mit der Suche nach
einer Frequenz mit denselben PI-Daten
(Programmkennung). [PI SEEK] wird
angezeigt.
NO PI: Keine Programmkennung. Der
ausgewählte Sender verfügt nicht über PI-
Daten (Programmkennung).
Wählen Sie einen anderen Sender aus.
NO TP: Es gibt keine Verkehrsfunksender.
Das Gerät sucht weiter nach verfügbaren
Verkehrsfunksendern (TP).
BLUETOOTH-Funktion:
BTA NO DEV: Es ist kein BLUETOOTH-Gerät
angeschlossen bzw. es wird nicht erkannt.
Stellen Sie sicher, dass das BLUETOOTH-
Gerät richtig verbunden ist oder die
BLUETOOTH-Verbindung mit dem
BLUETOOTH-Gerät hergestellt wird.
ERROR: Die ausgewählte Funktion konnte
nicht ausgeführt werden.
Warten Sie eine Weile und versuchen Sie
es dann erneut.
UNKNOWN: Ein Name oder eine
Telefonnummer kann nicht angezeigt
werden.
WITHHELD: Die Telefonnummer wird vom
Anrufer unterdrückt.
Sony | Music Center-Bedienung:
APP ––––––––: Eine Verbindung mit der
Anwendung wurde nicht hergestellt.
Stellen Sie die „Sony | Music Center“-
Verbindung erneut her (Seite 19).
APP DISCNCT: Es besteht keine Verbindung
zur Anwendung.
Stellen Sie die „Sony | Music Center“-
Verbindung her (Seite 19).
APP DISPLAY: In der Anwendung ist eine
Bildschirmeinstellanzeige geöffnet.
Schließen Sie die
Bildschirmeinstellanzeige der
Anwendung, um die Tastenfunktion zu
aktivieren.
APP LIST: Die Inhaltsliste des USB-Geräts ist
geöffnet.
Schließen Sie die Liste, um die
Tastenfunktion zu aktivieren.
APP MENU: In der Anwendung ist eine
Einstellanzeige geöffnet.
Schließen Sie die Einstellanzeige der
Anwendung, um die Tastenfunktion zu
aktivieren.

35DE
APP NO DEV: Es wurde keine Verbindung
zum Gerät mit der installierten Anwendung
hergestellt bzw. das Gerät wird nicht
erkannt.
Stellen Sie eine BLUETOOTH-Verbindung
her und stellen Sie erneut die Verbindung
zu „Sony | Music Center“ her (Seite 19).
APP SOUND: In der Anwendung ist eine
Klangeinstellanzeige geöffnet.
Schließen Sie die Klangeinstellanzeige der
Anwendung, um die Tastenfunktion zu
aktivieren.
OPEN APP: Die Anwendung „Sony | Music
Center“ wird nicht ausgeführt.
Starten Sie die Anwendung.
Beim Verwenden der
Lenkradfernbedienung:
ERROR
Starten Sie die Registrierung ab der
Funktion neu, bei der der Fehler auftrat
(Seite 23).
TIMEOUT
Versuchen Sie, die Registrierung
abzuschließen, solange [REGISTER] blinkt
(etwa 6 Sekunden) (Seite 23).
Beim Aktualisieren der Firmware:
FILE ERROR: Die Aktualisierungsdatei ist
nicht auf dem USB-Gerät gespeichert.
Speichern Sie die Aktualisierungsdatei auf
dem USB-Gerät und versuchen Sie es
erneut (Seite 26).
UPDATE ERROR PRESS ENTER: Die
Firmware-Aktualisierung wurde nicht
ordnungsgemäß abgeschlossen.
Drücken Sie ENTER, um die Meldung
auszublenden, und versuchen Sie es dann
erneut.
Stellen Sie den Zündschlüssel während
der Aktualisierung nicht in die Position
OFF und entfernen Sie auch nicht das
USB-Gerät (Seite 26).
Wenn sich das Problem mit diesen
Abhilfemaßnahmen nicht beheben lässt,
wenden Sie sich an einen Sony-Händler.
Wenn Sie dieses Gerät aufgrund einer
Störung bei der Wiedergabe mit einem
anderen Gerät zur Reparatur bringen,
bringen Sie bitte auch das Gerät mit, das
verwendet wurde, als das Problem zum
ersten Mal auftrat.

36DE
Vorsichtsmaßnahmen
• Schließen Sie alle Masseleitungen an
einen gemeinsamen Massepunkt an.
• Achten Sie darauf, dass die Leitungen nicht
unter einer Schraube oder zwischen
beweglichen Teilen, wie z. B. in einer
Sitzschiene, eingeklemmt werden.
• Schalten Sie, bevor Sie irgendwelche
Anschlüsse vornehmen, die Zündung des
Fahrzeugs aus, um Kurzschlüsse zu
vermeiden.
• Schließen Sie die Stromversorgungsleitung
an dieses Gerät und die Lautsprecher
an, bevor Sie sie an den
Hilfsstromanschluss anschließen.
• Aus Sicherheitsgründen müssen alle losen,
nicht angeschlossenen Leitungen mit
Isolierband abgeklebt werden.
• Wählen Sie den Einbauort sorgfältig so aus,
dass das Gerät beim Fahren nicht
hinderlich ist.
• Installieren Sie das Gerät nicht an einer
Stelle, an der es Staub, Schmutz,
übermäßigen Erschütterungen oder hohen
Temperaturen ausgesetzt ist, wie z. B. in
direktem Sonnenlicht oder in der Nähe der
Heizung.
• Verwenden Sie ausschließlich die
mitgelieferten Montageteile. Nur mit
diesen Teilen lässt sich das Gerät sicher
montieren.
Hinweis zur Stromversorgungsleitung (gelb)
Wenn Sie dieses Gerät zusammen mit anderen
Stereokomponenten anschließen, muss der
Autostromkreis, an den die Geräte angeschlossen
sind, einen höheren Ampere-Wert aufweisen als die
Summe der Ampere-Werte der Sicherungen an den
einzelnen Komponenten.
Einstellen des Montagewinkels
Achten Sie darauf, dass der Montagewinkel
geringer ist als 30°.
Teileliste für die Installation
•In dieser Teileliste ist nicht der gesamte
Inhalt der Packung aufgeführt.
•Die Halterung und die
Schutzumrandung werden vor der
Auslieferung am Gerät angebracht. Vor
dem Montieren des Geräts entfernen Sie
mit den Löseschlüsseln die Halterung
vom Gerät. Erläuterungen dazu finden Sie
unter „Abnehmen der Schutzumrandung
und der Halterung“ (Seite 40).
•Bewahren Sie die Löseschlüssel zur
späteren Verwendung auf. Sie benötigen
sie auch, wenn Sie das Gerät aus dem
Fahrzeug ausbauen wollen.
Anschluss/Installation
Sicherheitsmaßnahmen
× 2

37DE
Anschluss
*1 Nicht mitgeliefert
*2 Lautsprecherimpedanz: 4 – 8 × 4
*3 Cinchkabel (nicht mitgeliefert)
*4 Verwenden Sie je nach Fahrzeugtyp einen
Adapter für eine per Kabel angeschlossene
Fernbedienung (nicht mitgeliefert). Einzelheiten
zum Verwenden der Kabelfernbedienung finden
Sie unter „Verwenden der Kabelfernbedienung“
(Seite 39).
*5 Führen Sie das Mikrofoneingangskabel so, dass
es beim Fahren nicht hinderlich ist, unabhängig
davon, ob es gerade in Gebrauch ist oder nicht.
Sichern Sie das Kabel mit einer Kabelklemme
usw., falls es durch den Fußraum geführt werden
muss.
*6 Einzelheiten zum Installieren des Mikrofons
finden Sie unter „Installieren des Mikrofons“
(Seite 39).
*7 Verwenden Sie je nach Fahrzeugtyp einen
Adapter (nicht mitgeliefert), wenn der
Antennenanschluss nicht passt.
von einer per Kabel angeschlossenen
Fernbedienung (nicht mitgeliefert)*
4
von einer Autoantenne*
7
*
3
*
3
Tiefsttonlautsprecher*
1
Erläuterungen dazu finden Sie
unter „Vornehmen der
Anschlüsse“ (Seite 38).
Endverstärker*
1
Näheres finden Sie unter
„Stromanschlussdiagramm“ (Seite 38).
*
2
*
3
*
5
*
6

38DE
Wenn Sie eine Motorantenne ohne
Relaiskästchen verwenden und dieses Gerät
mit der mitgelieferten
Stromversorgungsleitung anschließen,
kann die Antenne beschädigt werden.
An den Lautsprecheranschluss des
Fahrzeugs
An den Stromanschluss des Fahrzeugs
Einfaches Anschließen eines
Tiefsttonlautsprechers
Sie können einen Tiefsttonlautsprecher
ohne Endverstärker installieren, indem Sie
ihn einfach an das Hecklautsprecherkabel
anschließen.
Hinweise
• Die Hecklautsprecherkabel müssen vorbereitet
werden.
• Verwenden Sie einen Tiefsttonlautsprecher mit
einer Impedanz zwischen 4 und 8 und mit
ausreichender Belastbarkeit, um Schäden zu
vermeiden.
Anschluss für Stromversorgung des
Speichers
Wenn die gelbe Stromversorgungsleitung
angeschlossen ist, wird der Speicher stets
(auch bei ausgeschalteter Zündung) mit
Strom versorgt.
Lautsprecheranschluss
•Schalten Sie das Gerät vor dem
Anschließen der Lautsprecher aus.
•Verwenden Sie Lautsprecher mit einer
Impedanz zwischen 4 und 8 und mit
ausreichender Belastbarkeit, um Schäden
zu vermeiden.
Stellen Sie die Position des
Hilfsstromanschlusses bei Ihrem Fahrzeug
fest und nehmen Sie die Anschlüsse
entsprechend dem Fahrzeug richtig vor.
Vornehmen der Anschlüsse
1
Hecklautsprecher
(rechts)
Violett
2
Violettschwarz
gestreift
3
Frontlautsprecher
(rechts)
Grau
4
Grauschwarz
gestreift
5
Frontlautsprecher
(links)
Weiß
6
Weißschwarz
gestreift
7
Hecklautsprecher
(links)
Grün
8
Grünschwarz
gestreift
12
Kontinuierliche
Stromversorgung
Gelb
13
Steuerung für
Motorantenne/
Endverstärker (REM
OUT)
Blauweiß
gestreift
14
Geschaltete
Stromversorgung für
die Beleuchtung
Orange-weiß
gestreift
15
Geschaltete
Stromversorgung
Rot
16 Masse Schwarz
Stromanschlussdiagramm
Frontlaut-
sprecher
Tiefsttonlaut-
sprecher
Hilfsstromanschluss

39DE
Normaler Anschluss
Wenn die Position der roten und
gelben Leitung vertauscht ist
Bei einem Fahrzeug mit Zündschloss
ohne Zubehörposition ACC oder I
Stellen Sie die Anschlüsse her, schließen Sie
die geschalteten
Stromversorgungsleitungen richtig an und
verbinden Sie dann das Gerät mit der
Stromversorgung des Fahrzeugs. Sollten
beim Anschließen des Geräts Probleme
auftreten oder sollten Sie Fragen haben, auf
die in dieser Anleitung nicht eingegangen
wird, wenden Sie sich bitte an den
Fahrzeughändler.
Damit bei Freisprechanrufen Ihre Stimme
übertragen werden kann, müssen Sie das
Mikrofon installieren.
Vorsichtsmaßnahmen
• Es ist sehr gefährlich, wenn sich das Kabel
um die Lenksäule oder den Schalthebel
wickelt. Achten Sie unbedingt darauf, dass
das Kabel und andere Teile beim Fahren
nicht hinderlich sind.
•Wenn Ihr Auto mit Airbags oder anderen
Aufprallschutzsystemen ausgestattet ist,
wenden Sie sich vor der Installation an den
Händler, bei dem Sie dieses Gerät
erworben haben, oder an den
Autohändler.
Hinweis
Reinigen Sie die Oberfläche des Armaturenbretts
mit einem trockenen Tuch, bevor Sie das
doppelseitige Klebeband anbringen.
1 Zum Aktivieren der
Kabelfernbedienung setzen Sie [STR
CONTROL] unter [SET STEERING] auf
[PRESET] (Seite 23).
12
Kontinuierliche
Stromversorgung
Gelb
15
Geschaltete
Stromversorgung
Rot
12
Geschaltete
Stromversorgung
Gelb
15
Kontinuierliche
Stromversorgung
Rot
Rot Rot
Gelb Gelb
Rot Rot
Gelb Gelb
Rot
Rot
Gelb
Gelb
Installieren des Mikrofons
Verwenden der
Kabelfernbedienung
Clip (nicht mitgeliefert)

40DE
Installation
Nehmen Sie vor dem Installieren des Geräts
die Schutzumrandung und die Halterung
vom Gerät ab.
1 Fassen Sie die Schutzumrandung
mit den Fingern an den Seitenkanten
und ziehen Sie sie heraus.
2 Führen Sie die beiden Löseschlüssel
ein, bis sie mit einem Klicken
einrasten. Ziehen Sie die Halterung
nach unten und das Gerät zum
Herausziehen nach oben.
Vergewissern Sie sich vor der Montage, dass
die Verriegelungen an beiden Seiten der
Halterung um 2 mm nach innen gebogen
sind.
1 Platzieren Sie die Halterung im
Armaturenbrett und biegen Sie dann
die Klammern nach außen, um einen
sicheren Halt zu gewährleisten.
2 Montieren Sie das Gerät an der
Halterung und bringen Sie dann
die Schutzumrandung an.
Hinweise
• Wenn die Verriegelungen gerade oder nach
außen gebogen sind, ist das Gerät nicht sicher
installiert und kann herausrutschen.
• Achten Sie darauf, dass die 4 Verriegelungen an
der Schutzumrandung fest in den Kerben am
Gerät sitzen.
Erläuterungen dazu finden Sie unter
„Abnehmen der Frontplatte“ (Seite 7).
Abnehmen der Schutzumrandung
und der Halterung
Der Haken muss nach innen weisen.
Montieren des Geräts im
Armaturenbrett
Abnehmen und Anbringen der
Frontplatte
182 mm
53 mm
Verriegelung

41DE
Erläuterungen dazu finden Sie unter
„Zurücksetzen des Geräts“ (Seite 8).
Wenn Sie eine Sicherung
austauschen, achten Sie
darauf, eine
Ersatzsicherung mit dem
gleichen Ampere-Wert wie
die Originalsicherung zu
verwenden. Dieser ist auf
der Originalsicherung angegeben. Wenn die
Sicherung durchbrennt, überprüfen Sie den
Stromanschluss und tauschen die Sicherung
aus. Brennt die neue Sicherung ebenfalls
durch, kann eine interne Fehlfunktion
vorliegen. Wenden Sie sich in einem solchen
Fall an Ihren Sony-Händler.
Zurücksetzen des Geräts
Austauschen der Sicherung
Sicherung (10 A)

2FR
Fabriqué en Thaïlande
La plaque signalétique reprenant la tension
d’alimentation, etc. se trouve sur le dessous
du châssis.
La validité du libellé CE se limite uniquement
aux pays où la loi l’impose, principalement
les pays de l’EEE (Espace économique
européen).
Le soussigné, Sony Corporation, déclare que
cet équipement est conforme à la Directive
2014/53/UE.
Le texte complet de la déclaration UE de
conformité est disponible à l’adresse
internet suivante :
http://www.compliance.sony.de/
Avis à l’attention des clients : les
informations suivantes s’appliquent
uniquement aux appareils vendus dans
des pays qui appliquent les directives
de l’Union Européenne
Ce produit a été fabriqué par ou pour le
compte de Sony Corporation.
Importateur dans l’UE : Sony Europe B.V.
Les questions basées sur la législation
européenne pour l’importateur ou relatives
à la conformité des produits doivent être
adressées au mandataire : Sony Belgium,
bijkantoor van Sony Europe B.V., Da
Vincilaan 7-D1, 1930 Zaventem, Belgique.
Elimination des piles et
accumulateurs et des
équipements électriques et
électroniques usagés
(applicable dans les pays de
l’Union Européenne et dans les autres
pays disposant de systèmes de collecte
sélective)
Ce symbole apposé sur le produit, la pile ou
l’accumulateur, ou sur l’emballage, indique
que le produit et les piles et accumulateurs
fournis avec ce produit ne doivent pas être
traités comme de simples déchets
ménagers. Sur certains types de piles, ce
symbole apparaît parfois combiné avec un
symbole chimique. Le symbole pour le
plomb (Pb) est rajouté lorsque ces piles
contiennent plus de 0,004 % de plomb. En
vous assurant que les produits, piles et
accumulateurs sont mis au rebut de façon
appropriée, vous participez activement à la
prévention des conséquences négatives que
leur mauvais traitement pourrait provoquer
sur l’environnement et sur la santé humaine.
Le recyclage des matériaux contribue par
ailleurs à la préservation des ressources
naturelles. Pour les produits qui, pour des
raisons de sécurité, de performance ou
d’intégrité des données, nécessitent une
connexion permanente à une pile ou à un
accumulateur intégré(e), il conviendra de
vous rapprocher d’un Service Technique
qualifié pour effectuer son remplacement.
En rapportant votre appareil électrique, les
piles et accumulateurs en fin de vie à un
point de collecte approprié vous vous
assurez que le produit, la pile ou
l’accumulateur intégré sera traité
correctement. Pour tous les autres cas de
figure et afin d’enlever les piles ou
accumulateurs en toute sécurité de votre
appareil, reportez-vous au manuel
d’utilisation. Rapportez les piles et
accumulateurs, et les équipements
électriques et électroniques usagés au point
de collecte approprié pour le recyclage. Pour
toute information complémentaire au sujet
du recyclage de ce produit ou des piles et
accumulateurs, vous pouvez contacter votre
municipalité, votre déchetterie locale ou le
point de vente où vous avez acheté ce
produit.
Pour votre sécurité, veuillez installer cet
appareil dans le tableau de bord de la
voiture en tenant compte du fait que
l’arrière de l’appareil chauffe en cours
d’utilisation.
Pour de plus amples détails, reportez-
vous à la section « Raccordement/
Installation » (page 34).

3FR
ATTENTION
La plage de fréquences suivante 65 – 74 MHz
n’est pas affectée à la diffusion du son dans
la table des affectations communes
européennes et ne peut pas être utilisée en
Europe.
Avis d’exclusion de responsabilité
relatif aux services proposés par des
tiers
Les services proposés par des tiers peuvent
être modifiés, suspendus ou clôturés sans
avis préalable. Sony n’assume aucune
responsabilité dans ce genre de situation.
Attention
SONY NE PEUT ÊTRE, EN AUCUN CAS, TENU
POUR RESPONSABLE D’UN QUELCONQUE
DOMMAGE ACCIDENTEL, INDIRECT OU
ACCESSOIRE, OU DE TOUT AUTRE
DOMMAGE, Y COMPRIS, MAIS SANS S’Y
LIMITER, LA PERTE DE BÉNÉFICES, DE
REVENUS, DE DONNÉES, DE JOUISSANCE DU
PRODUIT OU DE TOUT ÉQUIPEMENT
ASSOCIÉ, SON INDISPONIBILITÉ, ET LE TEMPS
PERDU PAR L’ACHETEUR, LIÉ À OU
RÉSULTANT DE L’UTILISATION DE CE
PRODUIT, DE SES COMPOSANTS MATÉRIELS
ET/OU LOGICIELS.
Cher client, ce produit contient un émetteur
radio.
Conformément au règlement UNECE n° 10,
un fabricant automobile peut imposer
certaines conditions particulières pour
l’installation d’émetteurs radio dans ses
véhicules.
Veuillez vérifier le manuel d’utilisation de
votre véhicule ou contactez le constructeur
de votre véhicule ou votre concessionnaire,
avant d’installer ce produit dans votre
véhicule.
Appels d’urgence
Le système BLUETOOTH mains libres
embarqué et le dispositif électronique qui y
est connecté fonctionnent grâce aux
signaux radio, aux réseaux cellulaires et aux
lignes terrestres, tout comme la fonction de
programmation par l’utilisateur. La
connexion n’est donc pas garantie en toutes
circonstances.
Par conséquent, ne vous reposez pas
uniquement sur un dispositif électronique
pour vos communications importantes (tels
que les appels médicaux d’urgence).
Avertissement au cas où le contact
de votre voiture ne dispose pas
d’une position ACC
Veillez à activer la fonction AUTO OFF
(page 21). L’appareil se met hors tension
complètement et automatiquement à
l’heure définie une fois qu’il est éteint et
que l’horloge est affichée (c’est-àdire en
maintenant OFF enfoncé pendant 1
seconde), ce qui évite de décharger la
batterie. Si vous ne réglez pas la fonction
AUTO OFF, appuyez sur OFF et maintenez
enfoncé jusqu’à ce que l’affichage
disparaisse chaque fois que vous coupez
le contact.
Remarque importante

4FR
Communication par BLUETOOTH
Les micro-ondes émises par un dispositif
BLUETOOTH peuvent perturber le
fonctionnement des dispositifs médicaux
électroniques. Dans les circonstances qui
suivent, mettez cet appareil, ainsi que les
autres dispositifs BLUETOOTH présents,
hors tension, car ils peuvent provoquer un
accident.
– En présence d’un gaz inflammable, dans
un hôpital, un train, un avion ou une
station-service
– À proximité de portes automatiques ou
d’un système de détection d’incendie
Cet appareil prend en charge les
fonctionnalités conformes à la norme
BLUETOOTH afin de fournir une connexion
sécurisée lorsque la technologie sans fil
BLUETOOTH est utilisée. Mais, en fonction
de l’environnement, la sécurité peut ne
pas être suffisante. Soyez donc prudent
lorsque vous communiquez en utilisant la
technologie sans fil BLUETOOTH.
Nous n’assumons aucune responsabilité
en cas de fuite d’informations au cours
d’une communication BLUETOOTH.
Si vous avez des questions concernant cet
appareil ou si vous rencontrez des
problèmes qui ne sont pas abordés dans ce
mode d’emploi, contactez votre revendeur
Sony le plus proche.

5FR
Table des matières
Emplacement des commandes. . . . . . . . . . 6
Préparation
Retrait de la façade avant . . . . . . . . . . . . . . 7
Réinitialisation de l’appareil . . . . . . . . . . . . 8
Réglage de l’horloge . . . . . . . . . . . . . . . . . . 8
Préparation d’un périphérique
BLUETOOTH. . . . . . . . . . . . . . . . . . . . . . . 8
Connexion d’un périphérique USB . . . . . . . 11
Connexion d’un autre périphérique audio
portatif. . . . . . . . . . . . . . . . . . . . . . . . . . . 11
Utilisation de la radio
Utilisation de la radio . . . . . . . . . . . . . . . . . 12
Utilisation du système RDS (Système de
radiocommunication de données) . . . 12
Lecture
Lecture d’un périphérique USB . . . . . . . . . 14
Lecture d’un périphérique
BLUETOOTH. . . . . . . . . . . . . . . . . . . . . . 14
Recherche et lecture de plages. . . . . . . . . 15
Appel mains libres (via
BLUETOOTH uniquement)
Recevoir un appel. . . . . . . . . . . . . . . . . . . . 16
Passer un appel . . . . . . . . . . . . . . . . . . . . . 16
Opérations disponibles en cours
d’appel. . . . . . . . . . . . . . . . . . . . . . . . . . 17
Fonctions utiles
Sony | Music Center avec smartphone
iPhone/Android™. . . . . . . . . . . . . . . . . 18
Utilisation de la reconnaissance vocale
(smartphone Android
uniquement) . . . . . . . . . . . . . . . . . . . . . 19
Utilisation de Siri Eyes Free . . . . . . . . . . . . 19
Réglages
Désactivation du mode DEMO . . . . . . . . . 20
Réglages de base. . . . . . . . . . . . . . . . . . . . 20
Configuration générale (GENERAL). . . . . . . 21
Configuration du son (SOUND) . . . . . . . . . 22
Configuration de l’affichage
(DISPLAY) . . . . . . . . . . . . . . . . . . . . . . . 23
Configuration de BLUETOOTH
(BLUETOOTH) . . . . . . . . . . . . . . . . . . . . 24
Configuration de Sony | Music Center
(SONY APP) . . . . . . . . . . . . . . . . . . . . . . 24
Informations complémentaires
Mise à jour du firmware. . . . . . . . . . . . . . . 25
Précautions. . . . . . . . . . . . . . . . . . . . . . . . . 25
Entretien . . . . . . . . . . . . . . . . . . . . . . . . . . . 26
Spécifications . . . . . . . . . . . . . . . . . . . . . . . 26
Dépannage . . . . . . . . . . . . . . . . . . . . . . . . . 28
Messages . . . . . . . . . . . . . . . . . . . . . . . . . . 32
Raccordement/Installation
Attention. . . . . . . . . . . . . . . . . . . . . . . . . . . 34
Liste des pièces pour installation . . . . . . . 34
Raccordement . . . . . . . . . . . . . . . . . . . . . . 35
Installation . . . . . . . . . . . . . . . . . . . . . . . . . 38

6FR
Emplacement des commandes
Touche de déverrouillage de la façade
avant
SRC (source)
Permet de mettre l’appareil sous tension.
Permet aussi de changer de source.
OFF
Maintenez enfoncé pendant 1 seconde
pour désactiver la source et afficher
l’horloge.
Maintenez enfoncé pendant plus de
2 secondes pour mettre l’appareil hors
tension et pour faire disparaître
l’affichage.
Molette de réglage
Tournez cette commande pour régler le
volume.
PUSH ENTER
Permet d’accéder à l’élément
sélectionné.
Appuyez sur SRC, tournez puis appuyez
pour modifier la source (délai de
2secondes).
MENU
Permet d’ouvrir le menu de
configuration.
VOICE (page 17, 19)
Maintenez enfoncé pendant plus de
2 secondes pour activer la numérotation
vocale, la reconnaissance vocale
(smartphone Android uniquement) ou la
fonction Siri (iPhone uniquement).
Repère en forme de lettre N
Touchez la molette de réglage avec le
smartphone Android pour établir une
connexion BLUETOOTH.
Fenêtre d’affichage
/ (SEEK –/+)
Permettent de régler des stations
automatiquement. Maintenez enfoncé
pour rechercher une station
manuellement.
/ (Précédent/Suivant)
/ (Recul rapide/Avance rapide)
PTY (Type d’émission)
Sélectionnez PTY dans RDS.
(Rechercher) (page 15)
Permet d’accéder au mode de recherche
pendant la lecture.
(Non disponible quand un périphérique
USB en mode Android ou un iPod est
connecté.)
Appareil principal

7FR
CALL
Permet d’accéder au menu des appels.
Recevoir/mettre fin à un appel.
Maintenez enfoncé pendant plus de
2 secondes pour sélectionner le signal
BLUETOOTH.
(Retour)
Permet de revenir à l’affichage
précédent.
MODE (page 8, 12, 17)
Récepteur de la télécommande
Touches numériques (1 à 6)
Permettent de recevoir les stations radio
mémorisées. Maintenez enfoncé pour
mémoriser une station.
ALBUM /
Permettent de sauter un album pour le
périphérique audio. Maintenez enfoncé
pour sauter des albums en continu.
(Non disponible quand un périphérique
USB en mode Android ou un iPod est
connecté.)
(Répéter)
(Non disponible quand un périphérique
USB en mode Android est connecté.)
(Aléatoire)
(Non disponible quand un périphérique
USB en mode Android est connecté.)
MIC (page 17)
(Lecture/pause)
EXTRA BASS
Permet de renforcer les sons graves en
synchronisation avec le niveau de
volume. Appuyez pour modifier le
réglage EXTRA BASS : [1], [2], [OFF].
Prise d’entrée AUX
DSPL (Affichage)
Appuyez pour changer les éléments
d’affichage.
SCRL (Défilement)
Maintenez enfoncé pour faire défiler un
élément d’affichage.
Port USB
Retrait de la façade avant
Vous pouvez retirer la façade avant de cet
appareil pour le protéger du vol.
1 Appuyez sur OFF et maintenez
enfoncé jusqu’à ce que l’appareil se
mette hors tension, appuyez sur la
touche de déverrouillage de la façade
avant , puis tirez la façade avant
vers vous pour la retirer.
Alarme d’avertissement
Si vous mettez la clé de contact en position
OFF sans retirer la façade avant, l’alarme
d’avertissement retentit pendant quelques
secondes. L’alarme retentit uniquement
lorsque l’amplificateur intégré est utilisé.
Numéros de série
Assurez-vous que les numéros de série
figurant sur la base de l’appareil et au dos de
la façade avant correspondent parfaitement.
Dans le cas contraire, vous ne pouvez pas
effectuer l’appairage, la connexion et la
déconnexion BLUETOOTH à l’aide de la
fonction NFC.
Préparation
Installation de la façade avant

8FR
Réinitialisation de l’appareil
Avant la première mise en service de
l’appareil, après avoir remplacé la batterie
du véhicule ou modifié les raccordements,
vous devez réinitialiser l’appareil.
1 Appuyez sur DSPL et (Retour)/
MODE pendant plus de 2 secondes.
Remarque
La réinitialisation de l’appareil remet l’heure à zéro
et efface certaines informations mémorisées.
Réglage de la zone/région
Après réinitialisation de l’appareil,
l’affichage du paramétrage de la zone/
région apparaît.
1 Appuyez sur ENTER pendant que [SET
AREA] est affiché.
La zone/région actuellement
sélectionnée s’affiche.
2 Tournez la molette de réglage pour
sélectionner [EUROPE] ou [RUSSIA],
puis appuyez dessus.
3 Tournez la molette de réglage pour
sélectionner [YES] ou [NO], puis
appuyez dessus.
Si le réglage de la zone/région est
modifié, l’appareil est réinitialisé, puis
l’horloge s’affiche.
Ce réglage peut être configuré dans le menu
de configuration générale (page 21).
Réglage de l’horloge
1 Appuyez sur MENU, tournez la
molette de réglage pour sélectionner
[GENERAL], puis appuyez dessus.
2 Tournez la molette de réglage pour
sélectionner [SET CLOCK-ADJ], puis
appuyez dessus.
L’indication des heures clignote.
3 Tournez la molette de réglage pour
régler l’heure et les minutes.
Appuyez sur / (SEEK –/+) pour
modifier l’indication numérique.
4 Une fois les minutes réglées, appuyez
sur MENU.
La configuration est terminée et l’horloge
démarre.
Pour afficher l’horloge
Appuyez sur DSPL.
Préparation d’un
périphérique BLUETOOTH
Selon le périphérique compatible
BLUETOOTH utilisé, smartphone, téléphone
portable et périphérique audio, vous pouvez
écouter de la musique ou passer un appel
en mode mains libres (le terme
« périphérique BLUETOOTH » sera utilisé ci-
après sauf mention contraire). Pour plus de
détails concernant les connexions, reportez-
vous au mode d’emploi fourni avec le
périphérique.
Avant de connecter le périphérique, baissez
le niveau sonore de cet appareil, faute de
quoi le volume risque d’être trop élevé.
Lorsque vous établissez un contact entre la
molette de réglage de l’appareil et un
smartphone compatible NFC*, l’appareil est
appairé et connecté au smartphone
automatiquement.
* La technologie NFC (Near Field Communication -
Communication en champ proche) permet
d’établir une communication sans fil à courte
portée entre différents périphériques tels que des
téléphones portables et des étiquettes IC. Grâce à
la fonction NFC, la communication des données
peut être effectuée facilement par simple contact
avec le symbole correspondant ou la zone
spécifiée sur les périphériques compatibles NFC.
Pour un smartphone exécutant Android OS
4.0 ou une version antérieure, le
téléchargement de l’application « NFC Easy
Connect » disponible sur Google Play est
nécessaire. Cette application peut ne pas
être téléchargeable dans certains pays/
certaines régions.
Connexion avec un smartphone
par One Touch (NFC)

9FR
1 Activez la fonction NFC sur le
smartphone.
Pour plus de détails, reportez-vous au
mode d’emploi fourni avec le
smartphone.
2 Touchez le repère en forme de lettre
N de l’appareil avec le repère en
forme de lettre N du smartphone.
Assurez-vous que s’allume sur
l’affichage de l’appareil.
Déconnexion via NFC
Touchez de nouveau le repère en forme de
lettre N de l’appareil avec le repère en forme
de lettre N du smartphone.
Remarques
• Lorsque vous établissez la connexion, manipulez
le smartphone avec précaution pour éviter les
rayures.
• Il n’est pas possible d’établir la connexion One
Touch lorsque l’appareil est déjà connecté à deux
autres périphériques compatibles NFC. Si tel est le
cas, déconnectez l’un ou l’autre périphérique, puis
établissez à nouveau la connexion avec le
smartphone.
Lorsque vous établissez une connexion avec
un périphérique BLUETOOTH pour la
première fois, un enregistrement mutuel
(appelé « appairage ») est nécessaire.
L’appairage permet à cet appareil et aux
autres périphériques de se reconnaître
mutuellement. Cet appareil peut se
connecter à deux périphériques BLUETOOTH
(deux téléphones portables, ou un
téléphone portable et un périphérique
audio).
1 Placez le périphérique BLUETOOTH à
une distance inférieure à 1 m de cet
appareil.
2 Appuyez sur MENU, tournez la
molette de réglage pour sélectionner
[BLUETOOTH], puis appuyez dessus.
3 Tournez la molette de réglage pour
sélectionner [SET PAIRING], puis
appuyez dessus.
4 Tournez la molette de réglage pour
sélectionner [SET DEVICE 1]* ou [SET
DEVICE 2]*, puis appuyez dessus.
clignote lorsque l’appareil est en
mode de veille d’appairage.
* [SET DEVICE 1] ou [SET DEVICE 2] prendra le
nom du périphérique appairé une fois
l’appairage terminé.
5 Procédez à l’appairage sur le
périphérique BLUETOOTH afin qu’il
détecte cet appareil.
6 Sélectionnez [DSX-A416BT] sur
l’affichage du périphérique
BLUETOOTH.
Si le nom de votre modèle n’apparaît pas,
répétez la procédure à partir de l’étape 2.
7 Si la saisie d’une clé d’accès* sur le
périphérique BLUETOOTH est
nécessaire, saisissez [0000].
* La clé d’accès peut être appelée « code
d’accès », « code PIN », « nombre PIN » ou
« mot de passe », etc., en fonction du
périphérique.
Lorsque l’appairage est effectué, reste
allumé.
Appairage et connexion avec un
périphérique BLUETOOTH
[0000]
Saisissez la clé d’accès

10FR
8 Sélectionnez cet appareil sur le
périphérique BLUETOOTH pour établir
la connexion BLUETOOTH.
ou s’allume lorsque la connexion
est établie.
Remarque
Lorsque la connexion est en cours avec un
périphérique BLUETOOTH, cet appareil ne peut pas
être détecté à partir d’un autre périphérique. Pour
permettre sa détection, accédez au mode
d’appairage et recherchez cet appareil à partir de
l’autre périphérique.
Pour démarrer la lecture
Pour de plus amples détails, reportez-vous à
la section « Lecture d’un périphérique
BLUETOOTH » (page 14).
Pour déconnecter le périphérique
appairé
Exécutez les étapes 2 à 4 pour procéder à la
déconnexion une fois que cet appareil et le
périphérique BLUETOOTH ont été appairés.
Pour utiliser un périphérique appairé, il est
nécessaire d’établir une connexion avec cet
appareil. Certains périphériques appairés se
connectent automatiquement.
1 Appuyez sur MENU, tournez la
molette de réglage pour sélectionner
[BLUETOOTH], puis appuyez dessus.
2 Tournez la molette de réglage pour
sélectionner [SET BT SIGNL], puis
appuyez dessus.
Assurez-vous que s’allume.
3 Activez la fonction BLUETOOTH sur le
périphérique BLUETOOTH.
4 Utilisez le périphérique BLUETOOTH
pour le connecter à cet appareil.
ou s’allume.
Icônes apparaissant sur l’affichage :
Pour connecter le dernier périphérique
connecté à partir de cet appareil
Activez la fonction BLUETOOTH sur le
périphérique BLUETOOTH.
Pour connecter un périphérique audio,
appuyez sur SRC pour sélectionner [BT
AUDIO] et appuyez sur (Lecture/pause).
Pour connecter un téléphone portable,
appuyez sur CALL.
Remarque
Pendant la transmission BLUETOOTH audio en
continu, vous ne pouvez pas établir la connexion au
téléphone portable à partir de cet appareil.
Établissez plutôt la connexion à cet appareil à partir
du téléphone portable.
Conseil
Avec le signal BLUETOOTH activé : lorsque le
contact est mis, cet appareil se reconnecte
automatiquement au dernier téléphone portable
connecté.
Installation du micro
Pour de plus amples détails, reportez-vous à
la section « Installation du microphone »
(page 37).
Lorsqu’un iPhone/iPod exécutant iOS5 ou
une version ultérieure est raccordé au port
USB, l’appareil est appairé et connecté à
l’iPhone/iPod automatiquement.
Pour activer l’appairage automatique
BLUETOOTH, assurez-vous que [SET
AUTOPAIR] dans [BLUETOOTH] est réglé sur
[ON] (page 24).
1 Activez la fonction BLUETOOTH sur
l’iPhone/iPod.
Connexion avec un périphérique
BLUETOOTH appairé
S’allume lorsque la fonction appel
en mode mains libres est disponible
grâce à l’activation du profil HFP
(Profil mains libres).
S’allume lorsque le périphérique
audio peut être lu grâce à
l’activation du profil A2DP (Profil de
distribution audio avancée).
Connexion d’un iPhone/iPod
(appairage BLUETOOTH
automatique)

11FR
2 Raccordez un iPhone/iPod au port
USB.
Assurez-vous que s’allume sur
l’affichage de l’appareil.
Remarques
• L’appairage BLUETOOTH automatique n’est pas
possible lorsque l’appareil est déjà connecté à
deux autres périphériques BLUETOOTH. Dans ce
cas, déconnectez l’un ou l’autre périphérique, puis
reconnectez l’iPhone/iPod.
• Si l’appairage BLUETOOTH automatique n’est pas
effectué, reportez-vous à la section « Préparation
d’un périphérique BLUETOOTH » (page 8).
Connexion d’un
périphérique USB
1 Baissez le volume sur l’appareil.
2 Raccordez le périphérique USB à
l’appareil.
Pour raccorder un iPod/iPhone, utilisez le
câble de connexion USB pour iPod (non
fourni).
Connexion d’un autre
périphérique audio portatif
1 Mettez le périphérique audio portatif
hors tension.
2 Baissez le volume sur l’appareil.
3 Raccordez le périphérique audio
portatif à la prise d’entrée AUX (mini-
prise stéréo) de l’appareil à l’aide
d’un cordon de raccordement (non
fourni)*.
* Veillez à utiliser une fiche de type droit.
4 Appuyez sur SRC pour sélectionner
[AUX].
Adaptation du niveau de volume du
périphérique connecté aux autres
sources
Démarrez la lecture sur le périphérique
audio portatif à un niveau de volume
modéré et réglez l’appareil sur votre volume
d’écoute habituel.
Appuyez sur MENU, puis sélectionnez
[SOUND] [SET AUX VOL] (page 23).

12FR
Utilisation de la radio
Pour écouter la radio, appuyez sur SRC afin
de sélectionner [TUNER].
1 Appuyez sur MODE pour changer de
bande (FM1, FM2, FM3, MW (PO) ou
LW (GO)).
2 Appuyez sur MENU, tournez la
molette de réglage pour sélectionner
[GENERAL], puis appuyez dessus.
3 Tournez la molette de réglage pour
sélectionner [SET BTM], puis appuyez
dessus.
L’appareil mémorise les stations sur les
touches numériques dans l’ordre des
fréquences.
1 Appuyez sur MODE pour changer de
bande (FM1, FM2, FM3, MW (PO) ou
LW (GO)).
2 Procédez à la syntonisation.
Pour effectuer la syntonisation
manuellement
Appuyez sur / (SEEK –/+) et
maintenez enfoncé pour localiser la
fréquence approximativement, puis
appuyez plusieurs fois sur /
(SEEK –/+) pour régler la fréquence
souhaitée avec précision.
Pour effectuer la syntonisation
automatique
Appuyez sur / (SEEK –/+).
Le balayage s’interrompt lorsque
l’appareil capte une station.
1 Lorsque vous recevez la station que
vous souhaitez mémoriser, appuyez
sur une touche numérique (1 à 6) et
maintenez-la enfoncée jusqu’à ce
que [MEM] apparaisse.
1 Sélectionnez la bande, puis appuyez
sur une touche numérique (1 à 6).
Utilisation du système RDS
(Système de
radiocommunication de
données)
AF règle en permanence la station sur le
signal le plus fort du réseau et TA propose
les messages et les programmes de
radioguidage (TP) disponibles.
1 Appuyez sur MENU, tournez la
molette de réglage pour sélectionner
[GENERAL], puis appuyez dessus.
2 Tournez la molette de réglage pour
sélectionner [SET AF/TA], puis
appuyez dessus.
3 Tournez la molette de réglage pour
sélectionner [SET AF-ON], [SET TA-
ON], [SET AF/TA-ON] ou [SET AF/TA-
OFF], puis appuyez dessus.
Utilisation de la radio
Mémorisation automatique (BTM)
Syntonisation
Mémorisation manuelle
Réception des stations
mémorisées
Réglage des fonctions AF
(Fréquences alternatives) et TA
(Messages de radioguidage)

13FR
Mémorisation des stations RDS avec les
réglages AF et TA
Vous pouvez présélectionner les stations
RDS avec un réglage AF/TA. Réglez AF/TA,
puis mémorisez la station à l’aide de la
fonction BTM ou manuellement. Si vous
effectuez une présélection manuelle, vous
pouvez également présélectionner des
stations non-RDS.
Réception de messages d’urgence
Lorsque la fonction AF ou TA est activée, les
messages d’urgence interrompent
automatiquement la source sélectionnée en
cours de diffusion.
Réglage du niveau de volume pendant
la diffusion d’un message de
radioguidage
Le niveau sera enregistré dans la mémoire
pour les messages de radioguidage
suivants, indépendamment du niveau de
volume normal.
Écoute continue d’une émission
régionale (REGIONAL)
Lorsque les fonctions AF et REGIONAL sont
activées, vous ne basculez pas sur une autre
station régionale ayant une fréquence plus
puissante. Si vous quittez la zone de
réception de cette émission régionale,
réglez [SET REGIONAL] dans [GENERAL] sur
[SET REG-OFF] en cours de réception FM
(page 22).
Cette fonction est inopérante au Royaume-
Uni et dans certaines autres régions.
Fonction de liaison locale (Royaume-
Uni uniquement)
Cette fonction vous permet de sélectionner
d’autres stations locales de la région, même
si elles ne sont pas associées à vos touches
numériques.
En cours de réception FM, appuyez sur une
touche numérique (1 à 6) sur laquelle une
station locale est mémorisée. Dans les
5 secondes qui suivent, appuyez de
nouveau sur la touche numérique de la
station locale. Répétez cette procédure
jusqu’à ce que vous captiez la station locale
souhaitée.
1 En cours de réception FM, appuyez
sur PTY.
2 Tournez la molette de réglage jusqu’à
ce que le type d’émission souhaité
apparaisse, puis appuyez dessus.
L’appareil commence à rechercher une
station diffusant le type d’émission
sélectionné.
Types d’émissions
Les données CT accompagnant la
transmission RDS assurent le réglage de
l’horloge.
1 Réglez [SET CT-ON] dans [GENERAL]
(page 22).
Sélection de types d’émission
(PTY)
NEWS (Dernières nouvelles), AFFAIRS
(Questions d’actualités), INFO (Informations),
SPORT (Sport), EDUCATE (Éducation), DRAMA
(Théâtre), CULTURE (Culture), SCIENCE
(Sciences), VARIED (Divers), POP M (Variétés),
ROCK M (Rock), EASY M (Musique d’ambiance),
LIGHT M (Musique classique pour non
spécialistes), CLASSICS (Musique classique pour
public averti), OTHER M (Autres musiques),
WEATHER (Météo), FINANCE (Informations
financières), CHILDREN (Programme pour
enfants), SOCIAL (Affaires sociales), RELIGION
(Religion), PHONE IN (Entrée téléphone),
TRAVEL (Voyages), LEISURE (Loisirs), JAZZ
(Musique jazz), COUNTRY (Musique country),
NATION M (Musiques du monde), OLDIES
(Musique rétro), FOLK M (Musique folk),
DOCUMENT (Documentaires)
Réglage de l’heure (CT)

14FR
Lecture d’un périphérique
USB
Dans ce mode d’emploi, « iPod » est utilisé
pour faire référence, de manière générale,
aux fonctions iPod d’un iPod ou d’un
iPhone, sauf mention contraire figurant dans
le texte ou les illustrations.
Pour plus de détails sur la compatibilité de
votre iPod, reportez-vous à la section « À
propos de l’iPod » (page 25) ou visitez le site
d’assistance indiqué sur la couverture
arrière.
Des périphériques USB* de type AOA
(Android Open Accessory) 2.0, MSC (Mass
Storage Class) et MTP (Media Transfer
Protocol) compatibles avec la norme USB
peuvent être utilisés. Selon le périphérique
USB, le mode Android ou le mode MSC/MTP
peut être sélectionné sur l’appareil.
La sélection du mode MTP peut être
obligatoire avec certains lecteurs
multimédia numériques ou smartphones
Android.
* tels qu’un lecteur Flash USB, un lecteur
multimédia numérique ou un smartphone
Android
Remarques
• Pour plus de détails sur la compatibilité de votre
périphérique USB, visitez le site d’assistance
indiqué sur la quatrième de couverture de ce
mode d’emploi.
• Les smartphones exécutant Android OS 4.1 ou
ultérieur prennent en charge Android Open
Accessory 2.0 (AOA 2.0). Toutefois, certains
smartphones peuvent ne pas prendre
complètement en charge AOA 2.0 même s’ils
exécutent Android OS 4.1 ou ultérieur.
Pour plus de détails sur la compatibilité de votre
smartphone Android, visitez le site d’assistance
indiqué sur la quatrième de couverture de ce
mode d’emploi.
• La lecture des fichiers suivants n’est pas prise en
charge.
MP3/WMA/FLAC :
– fichiers contenant une protection des droits
d’auteur
– fichiers DRM (Gestion des droits numériques)
– fichiers audio multicanaux
MP3/WMA :
– fichiers comprimés sans perte
Avant d’établir une connexion, sélectionnez
le mode USB (mode Android ou mode MSC/
MTP) en fonction du périphérique USB
(page 22).
1 Raccordez un périphérique USB au
port USB (page 11).
La lecture commence.
Si un périphérique est déjà raccordé,
pour démarrer la lecture, appuyez sur
SRC pour sélectionner [USB] ([IPD]
apparaît sur l’affichage lorsque l’iPod est
reconnu).
2 Réglez le volume sur cet appareil.
Pour arrêter la lecture
Appuyez sur OFF et maintenez enfoncé
pendant 1 seconde.
Pour retirer le périphérique
Arrêtez la lecture, puis retirez le
périphérique.
Avertissement concernant l’iPhone
Lorsque vous connectez un iPhone par USB,
le volume des appels téléphoniques est
contrôlé par l’iPhone et non par l’appareil.
Évitez d’augmenter le volume par
inadvertance en cours d’appel, le niveau
sonore pouvant être brusquement élevé
lorsqu’il est mis fin à l’appel.
Lecture d’un périphérique
BLUETOOTH
Vous pouvez lire du contenu sur un
périphérique connecté prenant en charge le
profil BLUETOOTH A2DP (Profil de
distribution audio avancée).
1 Établissez une connexion BLUETOOTH
avec le périphérique audio connecté
(page 8).
Pour sélectionner le périphérique audio,
appuyez sur MENU, puis sélectionnez
[BLUETOOTH] [SET AUDIODEV]
(page 24).
Lecture

15FR
2 Appuyez sur SRC pour sélectionner
[BT AUDIO].
3 Utilisez le périphérique audio pour
commencer la lecture.
4 Réglez le volume sur cet appareil.
Remarques
• Selon le périphérique audio utilisé, des
informations telles que le titre, le numéro/la durée
de la plage et l’état de la lecture peuvent ne pas
être affichées sur cet appareil.
• Même si la source est modifiée sur cet appareil, la
lecture du périphérique audio ne s’interrompt pas.
• [BT AUDIO] n’apparaît pas sur l’affichage de
l’appareil lorsque l’application « Sony | Music
Center » est en cours d’utilisation via la fonction
BLUETOOTH.
Adaptation du niveau de volume du
périphérique BLUETOOTH aux autres
sources
Démarrez la lecture sur le périphérique
audio BLUETOOTH à un niveau de volume
modéré et réglez l’appareil sur votre volume
d’écoute habituel.
Appuyez sur MENU, puis sélectionnez
[SOUND] [SET BTA VOL] (page 23).
Recherche et lecture de
plages
Non disponible quand un périphérique USB
en mode Android est connecté.
1 En cours de lecture, appuyez
plusieurs fois sur (Répéter) ou
(Aléatoire) pour sélectionner le
mode de lecture souhaité.
Le démarrage de la lecture dans le mode
sélectionné peut prendre un certain
temps.
Les modes de lecture disponibles diffèrent
selon la source audio sélectionnée.
Non disponible quand un périphérique USB
en mode Android ou un iPod est connecté.
1 Pendant la lecture USB, appuyez sur
(Rechercher)* pour afficher la liste
des catégories de recherche.
Lorsque la liste des plages s’affiche,
appuyez plusieurs fois sur (Retour)
jusqu’à ce que la catégorie de recherche
souhaitée apparaisse.
* Pendant la lecture USB, appuyez sur
(Rechercher) pendant plus de 2 secondes
pour revenir directement au début de la liste
de catégories.
2 Tournez la molette de réglage pour
sélectionner la catégorie de
recherche de votre choix, puis
appuyez pour valider.
3 Répétez l’étape 2 pour chercher la
plage souhaitée.
La lecture commence.
Pour quitter le mode Quick-BrowZer
Appuyez sur (Rechercher).
Non disponible quand un périphérique USB
en mode Android ou un iPod est connecté.
1 Pendant la lecture USB, appuyez sur
(Rechercher).
2 Appuyez sur (SEEK +).
3 Tournez la molette de réglage pour
sélectionner l’élément.
L’appareil effectue des sauts dans la liste
par pas de 10 % du nombre total
d’éléments.
4 Appuyez sur ENTER pour revenir au
mode Quick-BrowZer.
L’élément sélectionné apparaît.
5 Tournez la molette de réglage pour
sélectionner l’élément souhaité, puis
appuyez dessus.
La lecture commence.
Lecture répétée et aléatoire
Recherche d’une plage par son
nom (Quick-BrowZer™)
Recherche d’éléments par saut
(Mode Saut)

16FR
Pour utiliser un téléphone portable,
connectez-le à cet appareil. Vous pouvez
connecter deux téléphones portables à cet
appareil. Pour de plus amples détails,
reportez-vous à la section « Préparation
d’un périphérique BLUETOOTH » (page 8).
Recevoir un appel
1 Appuyez sur CALL lorsqu’un appel est
reçu accompagné d’une sonnerie.
L’appel téléphonique commence.
Remarque
La sonnerie et la voix du correspondant sont
reproduites par les haut-parleurs avant
uniquement.
Pour rejeter l’appel
Appuyez sur OFF et maintenez enfoncé
pendant 1 seconde.
Pour mettre fin à l’appel
Appuyez à nouveau sur CALL.
Passer un appel
Vous pouvez passer un appel à partir du
répertoire téléphonique ou de l’historique
des appels lorsqu’un téléphone portable
prenant en charge le profil PBAP (profil
d’accès au répertoire téléphonique) est
connecté.
Lorsque deux téléphones portables sont
connectés à l’appareil, sélectionnez l’un ou
l’autre des téléphones.
1 Appuyez sur CALL.
Lorsque deux téléphones portables sont
connectés à l’appareil, tournez la molette
de réglage pour sélectionner l’un des
téléphones, puis appuyez dessus.
2 Tournez la molette de réglage pour
sélectionner [PHONE BOOK], puis
appuyez dessus.
3 Tournez la molette de réglage pour
sélectionner une initiale dans la liste
des initiales, puis appuyez dessus.
4 Tournez la molette de réglage pour
sélectionner un nom dans la liste des
noms, puis appuyez dessus.
5 Tournez la molette de réglage pour
sélectionner un numéro dans la liste
des numéros, puis appuyez dessus.
L’appel téléphonique commence.
1 Appuyez sur CALL.
Lorsque deux téléphones portables sont
connectés à l’appareil, tournez la molette
de réglage pour sélectionner l’un des
téléphones, puis appuyez dessus.
2 Tournez la molette de réglage pour
sélectionner [RECENT CALL], puis
appuyez dessus.
L’historique des appels apparaît.
3 Tournez la molette de réglage pour
sélectionner un nom ou un numéro
dans le répertoire des appels, puis
appuyez dessus.
L’appel téléphonique commence.
1 Appuyez sur CALL.
Lorsque deux téléphones portables sont
connectés à l’appareil, tournez la molette
de réglage pour sélectionner l’un des
téléphones, puis appuyez dessus.
Appel mains libres (via
BLUETOOTH uniquement)
À partir du répertoire
téléphonique
À partir de l’historique des appels
Par saisie du numéro de
téléphone

17FR
2 Tournez la molette de réglage pour
sélectionner [DIAL NUMBER], puis
appuyez dessus.
3 Tournez la molette de réglage pour
saisir le numéro de téléphone, et en
dernier lieu sélectionnez [ ] (espace),
puis appuyez sur ENTER*.
L’appel téléphonique commence.
* Appuyez sur / (SEEK –/+) pour
modifier l’indication numérique.
Remarque
[_] apparaît au lieu de [#] sur l’affichage.
1 Appuyez sur CALL.
Lorsque deux téléphones portables sont
connectés à l’appareil, tournez la molette
de réglage pour sélectionner l’un des
téléphones, puis appuyez dessus.
2 Tournez la molette de réglage pour
sélectionner [REDIAL], puis appuyez
dessus.
L’appel téléphonique commence.
Vous pouvez passer un appel en prononçant
le repère vocal mémorisé sur un téléphone
portable connecté qui dispose d’une
fonction de numérotation vocale.
1 Appuyez sur CALL.
Lorsque deux téléphones portables sont
connectés à l’appareil, tournez la molette
de réglage pour sélectionner l’un des
téléphones, puis appuyez dessus.
2 Tournez la molette de réglage pour
sélectionner [VOICE DIAL], puis
appuyez dessus.
À défaut, appuyez sur VOICE et
maintenez enfoncé pendant plus de
2secondes.
3 Prononcez le repère vocal stocké sur
le téléphone portable.
Votre voix est reconnue, et l’appel est
passé.
Pour annuler la numérotation vocale
Appuyez sur VOICE.
Opérations disponibles en
cours d’appel
Réglage du volume de la sonnerie
Tournez la molette de réglage lorsque vous
recevez un appel.
Réglage du volume de la voix du
correspondant
Tournez la molette de réglage lorsque
l’appel est en cours.
Réglage du volume pour l’autre partie
(réglage du gain du micro)
Appuyez sur MIC.
Niveaux de volume réglables : [MIC-LOW],
[MIC-MID], [MIC-HI].
Réduction de l’écho et des bruits (Mode
correcteur d’écho/correcteur de bruits)
Appuyez sur MIC et maintenez enfoncé.
Modes réglables : [EC/NC-1], [EC/NC-2].
Basculement du mode mains libres au
mode manuel
En cours d’appel, appuyez sur MODE pour
basculer le son de l’appel téléphonique
entre l’appareil et le téléphone portable.
Remarque
Cette opération peut ne pas être disponible, selon
le téléphone portable utilisé.
Par recomposition
À l’aide de repères vocaux

18FR
Sony | Music Center avec
smartphone iPhone/
Android™
Il est nécessaire de télécharger la toute
dernière version de l’application
« Sony | Music Center » à partir de l’App
Store pour un iPhone ou de Google Play
pour un smartphone Android.
Remarques
• Pour votre sécurité, respectez la réglementation
routière locale et n’utilisez pas l’application en
conduisant.
• « Sony | Music Center » est une application qui
permet de commander les périphériques audio
Sony compatibles avec « Sony | Music Center »,
grâce à votre iPhone/smartphone Android.
• Les fonctionnalités dont vous pouvez disposer par
l’intermédiaire de « Sony | Music Center » varient
en fonction du périphérique connecté.
• Pour utiliser les fonctionnalités « Sony | Music
Center », consultez les informations détaillées
disponibles sur votre iPhone/smartphone
Android.
• Pour plus d’informations sur « Sony | Music
Center », visitez le site à l’adresse URL suivante :
http://www.sony.net/smcqa/
• Visitez le site web ci-dessous et vérifiez quels sont
les modèles d’iPhone ou de smartphones Android
compatibles.
Pour un iPhone : visitez l’App Store
Pour les smartphones Android : visitez Google
Play
1 Permet d’établir une connexion
BLUETOOTH avec un iPhone ou un
smartphone Android (page 8).
Pour sélectionner le périphérique audio,
appuyez sur MENU, puis sélectionnez
[BLUETOOTH] [SET AUDIODEV]
(page 24).
2 Démarrez l’application « Sony | Music
Center ».
3 Appuyez sur MENU, tournez la
molette de réglage pour sélectionner
[SONY APP], puis appuyez dessus.
4 Tournez la molette de réglage pour
sélectionner [CONNECT], puis
appuyez dessus.
La connexion à l’iPhone/au smartphone
Android commence.
Pour de plus amples détails sur le
manière de procéder sur un iPhone/
smartphone Android, consultez l’aide de
l’application.
Si le numéro du périphérique apparaît
Assurez-vous que le numéro est affiché (par
ex. 123456), puis sélectionnez [Oui] sur
l’iPhone/le smartphone Android.
Pour mettre fin à la connexion
1
Appuyez sur MENU, tournez la molette de
réglage pour sélectionner [SONY APP], puis
appuyez dessus.
2 Tournez la molette de réglage pour
sélectionner [CONNECT], puis appuyez
dessus.
Sélection de la source ou de
l’application
Vous pouvez sélectionnez la source ou
l’application de votre choix sur l’iPhone/le
smartphone Android.
Sélection de la source
Appuyez sur SRC à plusieurs reprises. À
défaut, appuyez sur SRC, tournez la molette
de réglage pour sélectionner l’élément
souhaité, puis appuyez sur ENTER.
Affichage de la liste des sources
Appuyez sur SRC.
Annonce de la réception de SMS
par le guide vocal (smartphone
Android uniquement)
Lorsque des SMS sont reçus, ils sont
automatiquement lus par l’intermédiaire des
haut-parleurs de la voiture.
Pour plus de détails concernant les réglages,
consultez l’aide de l’application.
Réponse à un message SMS
(smartphone Android uniquement)
Vous pouvez répondre à un message en
appuyant sur l’icône Répondre.
Fonctions utiles
Établissement de la connexion
Sony | Music Center

19FR
1 Activez l’application « Sony | Music Center »,
puis appuyez sur l’icône [Reply] (Répondre).
L’affichage d’entrée de message apparaît dans
l’application « Sony | Music Center ».
2 Entrez un message de réponse par
reconnaissance vocale.
La liste des messages candidats apparaît dans
l’application « Sony | Music Center ».
3 Tournez la molette de réglage pour
sélectionner le message de votre choix, puis
appuyez dessus.
Le message est envoyé.
Réglage du son et de l’affichage
Vous pouvez effectuer les réglages du son et
de l’affichage par l’intermédiaire d’un
iPhone/smartphone Android.
Pour plus de détails concernant les réglages,
consultez l’aide de l’application.
Utilisation de la
reconnaissance vocale
(smartphone Android
uniquement)
1 Appuyez sur VOICE et maintenez
enfoncé pour activer la
reconnaissance vocale.
2 Prononcez la commande vocale de
votre choix dans le micro.
Désactivation de la reconnaissance
vocale
Appuyez sur VOICE.
Remarques
• Il est possible que la reconnaissance vocale ne soit
pas disponible dans certains cas.
• La reconnaissance vocale peut ne pas fonctionner
correctement en fonction des performances du
smartphone Android connecté.
• Utilisez la reconnaissance vocale lorsque les
bruits, tels que celui du moteur, sont réduits au
minimum.
Utilisation de Siri Eyes Free
Siri Eyes Free vous permet d’utiliser un
iPhone en mode mains libres, en parlant
simplement dans le micro. Cette fonction
nécessite que vous connectiez un iPhone à
l’appareil via BLUETOOTH. Cette
fonctionnalité est disponible pour l’iPhone
4s et les versions ultérieures. Assurez-vous
que votre iPhone utilise la dernière version
d’iOS.
Vous devez préalablement effectuer
l’enregistrement et la configuration de la
connexion BLUETOOTH de l’iPhone avec
l’appareil. Pour de plus amples détails,
reportez-vous à la section « Préparation
d’un périphérique BLUETOOTH » (page 8).
Pour sélectionner l’iPhone, appuyez sur
MENU, puis sélectionnez [BLUETOOTH]
[SET AUDIODEV] (page 24).
1 Activez la fonction Siri sur l’iPhone.
Pour plus d’informations, reportez-vous
au mode d’emploi fourni avec l’iPhone.
2 Appuyez sur VOICE et maintenez
pendant plus de 2 secondes.
L’écran de commande vocale apparaît.
3 Après le bip émis par l’iPhone, parlez
dans le micro.
L’iPhone émet à nouveau un bip, et Siri
commence à répondre.
Désactivation de Siri Eyes Free
Appuyez sur VOICE.
Remarques
• Il est possible que l’iPhone ne reconnaisse pas
votre voix, en fonction des conditions dans
lesquelles vous l’utilisez. (Par exemple, si votre
véhicule est en mouvement).
• Siri Eyes Free peut ne pas fonctionner
correctement, ou le temps de réponse peut être
long, dans des zones où la réception des signaux
de l’iPhone est difficile.
• En fonction des conditions dans lesquelles
l’iPhone est utilisé, Siri Eyes Free peut ne pas
fonctionner correctement, voire même s’arrêter.
• Si vous effectuez la lecture d’une plage avec un
iPhone qui utilise la connexion audio BLUETOOTH,
lorsque la lecture commence via BLUETOOTH, Siri
Eyes Free se ferme automatiquement et l’appareil
bascule sur la source audio BLUETOOTH.
• Lorsque Siri Eyes Free est activé en cours de
lecture audio, l’appareil est susceptible de
basculer sur la source audio BLUETOOTH, même si
vous ne spécifiez aucune plage pour la lecture.

20FR
• Lors du raccordement de l’iPhone à un port USB,
Siri Eyes Free peut ne pas fonctionner
correctement, voire même s’arrêter.
• Lorsque vous raccordez l’iPhone à l’appareil par
USB, n’activez pas Siri avec l’iPhone. Siri Eyes Free
peut ne pas fonctionner correctement, voire
même s’arrêter.
• Aucun son audio n’est diffusé lorsque Siri Eyes
Free est activé.
Désactivation du mode
DEMO
Vous pouvez désactiver l’écran de
démonstration qui s’affiche lorsque la
source est désactivée et que l’horloge est
affichée.
1 Appuyez sur MENU, tournez la
molette de réglage pour sélectionner
[GENERAL], puis appuyez dessus.
2 Tournez la molette de réglage pour
sélectionner [SET DEMO], puis
appuyez dessus.
3 Tournez la molette de réglage pour
sélectionner [SET DEMO-OFF], puis
appuyez dessus.
Le réglage est terminé.
4 Appuyez deux fois sur (Retour).
L’affichage revient au mode de
réception/lecture normal.
Réglages de base
Vous pouvez régler des paramètres dans les
catégories de configuration suivantes :
Configuration générale (GENERAL),
Configuration du son (SOUND),
Configuration de l’affichage (DISPLAY),
Configuration de BLUETOOTH (BLUETOOTH),
Configuration de Sony | Music Center (SONY
APP)
1 Appuyez sur MENU.
2 Tournez la molette de réglage pour
sélectionner la catégorie de
configuration, puis appuyez dessus.
Les paramètres qui peuvent être définis
varient selon la source et les réglages.
3 Tournez la molette de réglage pour
sélectionner les options, puis
appuyez dessus.
Pour revenir à l’affichage précédent
Appuyez sur (Retour).
Réglages

21FR
Configuration générale
(GENERAL)
AREA (région)
Spécifie la région dans laquelle cet
appareil peut être utilisé : [EUROPE],
[RUSSIA].
Si le réglage actuel de la zone/région est
modifié, l’appareil est réinitialisé, puis
l’horloge s’affiche.
(Disponible uniquement lorsque la source
est désactivée et que l’horloge est
affichée.)
DEMO (démonstration)
Permet d’activer la démonstration : [ON],
[OFF].
CLOCK-ADJ (réglage de l’horloge) (page 8)
CAUT ALM (alarme d’avertissement)
Permet d’activer la fonction d’alarme
d’avertissement : [ON], [OFF] (page 7).
(Disponible uniquement lorsque la source
est désactivée et que l’horloge est
affichée.)
BEEP (bip)
Permet d’activer le bip sonore : [ON],
[OFF].
AUTO OFF (extinction auto)
Permet d’éteindre l’appareil
automatiquement après un certain laps
de temps lorsque l’appareil est mis hors
tension et d’afficher l’horloge (c’est-à-dire
quand vous appuyez sur OFF et
maintenez enfoncé pendant 1 seconde) :
[ON] (30 minutes), [OFF].
STEERING (volant)
Permet d’enregistrer/réinitialiser les
paramètres de la télécommande au
volant.
(Disponible uniquement lorsque la source
est désactivée et que l’horloge est
affichée.)
STR CONTROL (commande au volant)
Permet de sélectionner le mode d’entrée
de la télécommande connectée. Pour
éviter toute erreur de fonctionnement,
vérifiez avant utilisation si le mode
d’entrée correspond à la télécommande
connectée.
CUSTOM (personnalisé)
Mode d’entrée de la télécommande au
volant
PRESET (présélection)
Mode d’entrée de la télécommande
filaire, excepté la télécommande au
volant (qui est sélectionnée
automatiquement à l’exécution de
[RESET CUSTOM].)
EDIT CUSTOM (modifier personnalisation)
Permet d’enregistrer les fonctions
(SOURCE, ATT, VOL +/–, SEEK +/–, VOICE,
ON HOOK, OFF HOOK) dans la
télécommande au volant :
Tournez la molette de réglage pour
sélectionner la fonction que vous
voulez attribuer à la télécommande au
volant, puis appuyez dessus.
Lorsque [REGISTER] clignote, appuyez
sur le bouton de la télécommande au
volant auquel vous souhaitez attribuer
une fonction et maintenez-le enfoncé.
Lorsque l’enregistrement est terminé,
[REGISTERED] s’affiche.
Pour enregistrer d’autres fonctions,
répétez les étapes et .
(Disponible uniquement lorsque [STR
CONTROL] est réglé sur [CUSTOM].)
RESET CUSTOM (réinitialiser
personnalisation)
Permet de réinitialiser les paramètres de
la télécommande au volant : [YES], [NO].
(Disponible uniquement lorsque [STR
CONTROL] est réglé sur [CUSTOM].)
Remarques
• Lorsque vous réglez ces paramètres, seules les
commandes par touches sur l’appareil sont
disponibles. Pour des raisons de sécurité, garez
votre voiture avant de régler ce paramètre.
• Si une erreur se produit lors de
l’enregistrement, toutes les données
enregistrées sont préservées. Recommencez
l’enregistrement à partir de la fonction qui est à
l’origine de l’erreur.
• Il est possible que cette fonction ne soit pas
disponible sur certains véhicules. Pour plus de
détails sur la compatibilité de votre véhicule,
visitez le site d’assistance indiqué sur la
quatrième de couverture de ce mode d’emploi.

22FR
USB MODE (mode USB)
Permet de modifier le mode USB :
[ANDROID], [MSC/MTP].
(Disponible uniquement lorsque la source
USB est sélectionnée.)
CT (heure)
Permet d’activer la fonction CT : [ON],
[OFF].
AF/TA (fréquences alternatives/messages
de radioguidage)
Permet de sélectionner le réglage des
fréquences alternatives (AF) et des
messages de radioguidage (TA) : [AF-ON],
[TA-ON], [AF/TA-ON], [AF/TA-OFF].
REGIONAL (régional)
Permet de restreindre la réception à une
région spécifique : [ON], [OFF].
(Disponible uniquement pendant la
réception FM.)
BTM (mémorisation des meilleurs réglages)
(page 12)
(Disponible uniquement lorsque le
syntoniseur est sélectionné.)
FIRMWARE (micrologiciel)
(Disponible uniquement lorsque la source
est désactivée et que l’horloge est
affichée.)
Permet de vérifier/mettre à jour la version
du firmware. Pour plus d’informations,
visitez le site d’assistance à l’adresse
mentionnée sur la quatrième de
couverture de ce mode d’emploi.
FW VERSION (version du firmware)
Affiche la version actuelle du firmware.
FW UPDATE (mise à jour du firmware)
Lance le processus de mise à jour du
firmware : [YES], [NO].
La mise à jour du firmware dure quelques
minutes. Pendant la mise à jour, ne
tournez pas la clé de contact sur la
position OFF et ne retirez pas le
périphérique USB.
Configuration du son
(SOUND)
Ce menu de configuration n’est pas
disponible lorsque la source est hors tension
et que l’horloge est affichée.
EQ10 PRESET (préréglage EQ10)
Sélectionnez une courbe d’égaliseur
parmi les 10 courbes disponibles ou
désactivez la fonction :
[OFF], [R&B], [ROCK], [POP], [HIP-HOP],
[EDM], [JAZZ], [SOUL], [COUNTRY],
[KARAOKE]*, [CUSTOM].
Il est possible de mémoriser le réglage de
la courbe de l’égaliseur pour chaque
source.
* Le réglage [KARAOKE] réduit le son vocal, mais
ne le supprime pas complètement pendant la
lecture. En outre, il n’est pas possible d’utiliser
un micro.
EQ10 CUSTOM (EQ10 personnalisé)
Permet de régler [CUSTOM] pour EQ10.
Réglage de la courbe d’égaliseur :
[BAND1] – [BAND10] (32 Hz, 63 Hz, 125 Hz,
250 Hz, 500 Hz, 1 kHz, 2 kHz, 4 kHz, 8 kHz,
16 kHz).
Le niveau de volume peut être réglé par
incréments de 1 dB, de -6 dB à +6 dB.
BALANCE (balance)
Permet de régler la balance du son :
[RIGHT-15] – [CENTER] – [LEFT-15].
FADER (fader)
Permet de régler le niveau relatif :
[FRONT-15] – [CENTER] – [REAR-15].
S.WOOFER (caisson de graves)
SW LEVEL (niveau du caisson de graves)
Permet de régler le volume du caisson de
graves : [+6 dB] – [0 dB] – [-6 dB].
([ATT] est affiché au réglage inférieur.)
SW PHASE (phase du caisson de graves)
Permet de sélectionner la phase du
caisson de graves : [SUB NORM], [SUB
REV].
LPF FREQ (fréquence du filtre passe-bas)
Permet de sélectionner la fréquence de
coupure du caisson de graves : [80Hz],
[100Hz], [120Hz].

23FR
HPF FREQ (fréquence du filtre passe-haut)
Permet de sélectionner la fréquence de
coupure du haut-parleur avant/arrière :
[OFF], [80Hz], [100Hz], [120Hz].
AUX VOL (niveau de volume AUX)
Permet de régler le niveau de volume de
chaque périphérique auxiliaire raccordé :
[+18 dB] – [0 dB] – [-8 dB].
Ce réglage évite d’ajuster le niveau de
volume entre les sources.
(Disponible uniquement lorsque AUX est
sélectionné.)
BTA VOL (niveau de volume audio
BLUETOOTH)
Permet de régler le niveau de volume de
chaque périphérique BLUETOOTH
connecté : [+6 dB] – [0 dB] – [-6 dB].
Ce réglage évite d’ajuster le niveau de
volume entre les sources.
(Disponible uniquement lorsque l’audio
ou une application BT est sélectionné.)
Configuration de l’affichage
(DISPLAY)
DIMMER (gradateur)
Permet de modifier la luminosité de
l’affichage :
[OFF], [ON], [AT] (auto), [CLK] (horloge).
([AT] est disponible uniquement lorsque
le câble de commande de l’illumination
est connecté et que les phares sont
allumés).
Pour activer cette fonction uniquement
pendant une durée définie, sélectionnez
[CLK], puis définissez l’heure de début et
l’heure de fin.
– Pour définir la luminosité quand la
fonction du régulateur de luminosité est
activée :
réglez [DIMMER] sur [ON], puis ajustez
[BRIGHTNESS].
– Pour définir la luminosité quand la
fonction du régulateur de luminosité est
désactivée :
réglez [DIMMER] sur [OFF], puis ajustez
[BRIGHTNESS].
Le réglage de luminosité est mémorisé et
appliqué lorsque la fonction du
régulateur de luminosité est activée ou
désactivée.
BRIGHTNESS (luminosité)
Permet de régler la luminosité de
l’affichage. Le niveau de luminosité est
réglable entre : [1] – [10].
BUTTON-C (couleur des touches)
Permet de sélectionner une couleur
prédéfinie ou personnalisée pour les
touches.
COLOR (couleur)
Permet de choisir parmi 15 couleurs
prédéfinies, 1 couleur personnalisée.
CUSTOM-C (couleur personnalisée)
Permet d’enregistrer une couleur
personnalisée pour les touches.
RGB RED, RGB GRN, RGB BLUE
Gamme de couleurs réglables : [0] –
[32] ([0] ne peut pas être défini dans
toutes les gammes de couleurs).
DSPL-C (couleur d’affichage)
Permet de sélectionner une couleur
prédéfinie ou personnalisée pour
l’affichage.
COLOR (couleur)
Permet de choisir parmi 15 couleurs
prédéfinies, 1 couleur personnalisée.
CUSTOM-C (couleur personnalisée)
Permet d’enregistrer une couleur
personnalisée pour l’affichage.
RGB RED, RGB GRN, RGB BLUE
Gamme de couleurs réglables : [0] –
[32] ([0] ne peut pas être défini dans
toutes les gammes de couleurs).
SND SYNC (synchronisation du son)
Active la synchronisation de l’illumination
avec le son : [ON], [OFF].
AUTO SCR (défilement automatique)
Permet de faire défiler automatiquement
les rubriques longues : [ON], [OFF].
(Non disponible lorsque AUX ou le
syntoniseur est sélectionné.)

24FR
Configuration de
BLUETOOTH (BLUETOOTH)
PAIRING (appairage) (page 9)
Permet de connecter jusqu’à deux
périphériques BLUETOOTH : [DEVICE 1],
[DEVICE 2].
[DEVICE 1] ou [DEVICE 2] prendra le nom
du périphérique appairé une fois
l’appairage terminé.
AUDIODEV (périphérique audio)
Permet de sélectionner le périphérique
audio.
[*] apparaît sur le périphérique appairé
avec le [DEVICE 1] ou le périphérique
audio compatible A2DP actuel.
RINGTONE (sonnerie)
Permet de choisir si la sonnerie sera
émise par cet appareil ou par le
téléphone portable connecté : [1] (cet
appareil), [2] (téléphone portable).
AUTO ANS (réponse automatique)
Permet de régler cet appareil pour qu’il
réponde automatiquement à un appel
entrant : [OFF], [1] (après 3 secondes
environ), [2] (après 10 secondes environ).
AUTOPAIR (appairage automatique)
Permet de démarrer l’appairage
BLUETOOTH automatiquement lorsque le
périphérique iOS version 5.0 ou ultérieure
est connecté par USB : [ON], [OFF].
BT SIGNL (signal BLUETOOTH) (page 10)
Permet d’activer/de désactiver la fonction
BLUETOOTH.
BT INIT (initialisation du BLUETOOTH)
Permet d’initialiser tous les réglages
BLUETOOTH (informations d’appairage,
informations relatives aux périphériques,
etc.) : [YES], [NO].
Lorsque vous mettez cet appareil au
rebut, initialisez tous les réglages.
(Disponible uniquement lorsque la source
est désactivée et que l’horloge est
affichée.)
Configuration de
Sony | Music Center (SONY
APP)
AUTO LAUNCH (lancement automatique)
Permet d’activer le lancement
automatique de « Sony | Music Center » :
[ON], [OFF].
Lorsque [ON] est sélectionné,
« Sony | Music Center » est connecté
automatiquement une fois que la
connexion BLUETOOTH est établie.
CONNECT (connexion)
Permet d’établir et de mettre fin à la
connexion avec la fonction « Sony | Music
Center » (connexion).

25FR
Mise à jour du firmware
Pour mettre à jour le firmware, consultez le
site d’assistance à l’adresse mentionnée sur
la quatrième de couverture de ce mode
d’emploi, puis suivez les instructions en
ligne.
Remarque
Ne retirez pas le périphérique USB pendant la mise
à jour.
Précautions
• Ne laissez pas la façade avant ou des
périphériques audio sur le tableau de bord.
• À la mise sous tension de l’appareil,
l’antenne électrique se déploie
automatiquement.
• Ne renversez pas de liquide sur l’appareil.
•Vous pouvez connecter les modèles d’iPod
suivants. Effectuez la mise à jour du logiciel
de vos périphériques iPod avant de les
utiliser.
Modèles iPhone/iPod compatibles
•L’utilisation du badge Made for Apple
signifie qu’un accessoire a été conçu pour
être raccordé spécifiquement au produit ou
aux produits Apple identifiés dans le
badge, et a été certifié par le constructeur
pour satisfaire les normes de performance
d’Apple. Apple n’est pas responsable du
fonctionnement de cet appareil ni de sa
conformité avec les consignes et normes
de sécurité.
Veuillez noter que l’utilisation de cet
accessoire avec un produit Apple peut
avoir un effet adverse sur les performances
sans fil.
Informations complémentaires
Ordre de lecture des fichiers
audio
Dossier (album)
Fichier audio (plage)
À propos de l’iPod
Modèle
compatible
Bluetooth® USB
iPhone X
iPhone 8
iPhone 8 Plus
iPhone 7
iPhone 7 Plus
iPhone SE
iPhone 6s
iPhone 6s Plus
iPhone 6
iPhone 6 Plus
iPhone 5s
iPhone 5c
iPhone 5
iPhone 4s
iPod touch
(6ème génération)
iPod touch
(5ème génération)
iPod nano
(7ème génération)

26FR
Si vous avez des questions ou des
problèmes concernant cet appareil qui ne
sont pas abordés dans ce mode d’emploi,
contactez votre revendeur Sony.
Entretien
Nettoyage des connecteurs
Évitez de toucher directement les
connecteurs. L’appareil peut ne pas
fonctionner correctement si les connecteurs
entre l’appareil et la façade avant sont
souillés. Pour éviter cette situation, retirez la
façade avant (page 7) et nettoyez les
connecteurs à l’aide d’un coton-tige.
N’exercez pas une pression trop forte. Vous
risqueriez d’endommager les connecteurs.
Remarque
Pour votre sécurité, ne retirez pas la façade avant
pendant que vous conduisez.
Spécifications
Radio
FM
Plage de syntonisation :
Quand [AREA] est réglé sur [EUROPE] :
87,5 MHz – 108,0 MHz
Quand [AREA] est réglé sur [RUSSIA] :
FM1/FM2 : 87,5 MHz – 108,0 MHz
(par pas de 50 kHz)
FM3 : 65 MHz – 74 MHz
(par pas de 30 kHz)
Sensibilité utile : 8 dBf
Rapport signal/bruit : 73 dB
Séparation : 50 dB à 1 kHz
MW (PO)/LW (GO)
Plage de syntonisation :
MW (PO) : 531 kHz – 1 602 kHz
LW (GO) : 153 kHz – 279 kHz
Sensibilité : MW (PO) : 26 µV,
LW (GO) : 50 µV
Lecteur USB
Interface : USB (pleine vitesse)
Courant maximal : 1 A
Nombre maximum de dossiers et fichiers
susceptibles d’être reconnus :
Dossiers (albums) : 256
Fichiers (plages) par dossier : 256
Protocole AOA (Android Open Accessory)
compatible : 2.0
Codec correspondant :
MP3 (.mp3)
Débit binaire : 8 kbits/s – 320 kbits/s
(prise en charge de VBR (Variable
Bit Rate))
Taux d’échantillonnage : 16 kHz –
48 kHz
WMA (.wma)
Débit binaire : 32 kbits/s – 192 kbits/s
(prise en charge de VBR (Variable
Bit Rate))
Taux d’échantillonnage : 32 kHz,
44,1 kHz, 48 kHz
FLAC (.flac)
Profondeur de bit : 16 bits, 24 bits
Taux d’échantillonnage : 44,1 kHz,
48 kHz
Système de fichiers pris en charge : FAT16,
FAT32

27FR
Communication sans fil
Système de communication :
Norme BLUETOOTH version 3.0
Sortie :
Norme BLUETOOTH Classe de puissance 2
(Max. +1 dBm rayonnée)
Portée de communication maximale :
Ligne de visée, 10 m environ*
1
Bande de fréquence :
Bande de 2,4 GHz
(2,4000 GHz - 2,4835 GHz)
Méthode de modulation : FHSS
Profils BLUETOOTH compatibles*
2
:
A2DP (Profil de distribution audio
avancée) 1.3
AVRCP (Profil de commande à distance
audio/vidéo) 1.3
HFP (Profil mains libres) 1.6
PBAP (Profil d’accès au répertoire
téléphonique)
SPP (Profil de port série)
Codec correspondant :
SBC (.sbc), AAC (.m4a)
*1 La portée réelle varie en fonction de nombreux
facteurs, tels que la présence d’obstacles entre
les périphériques, les champs magnétiques
autour des fours à micro-ondes, l’électricité
statique, la sensibilité de la réception, les
performances de l’antenne, le système
d’exploitation, les applications logicielles, etc.
*2 Les profils de la norme BLUETOOTH précisent
l’objet de la communication BLUETOOTH entre
les périphériques.
Communication NFC
Bande de fréquence : 13,56 MHz
Amplificateur de puissance
Sortie : sorties haut-parleurs
Impédance des haut-parleurs : 4 – 8
Puissance de sortie maximale : 55 W × 4
(sous 4 )
Généralités
Alimentation requise : batterie de véhicule
12 V CC (masse négative)
Consommation nominale : 10 A
Dimensions :
environ 178 mm × 50 mm × 177 mm
(l/h/p)
Dimensions du support :
environ 182 mm × 53 mm × 160 mm
(l/h/p)
Poids : environ 0,8 kg
Contenu de l’emballage :
Appareil principal (1)
Microphone (1)
Composants destinés à l’installation et au
raccordement (1 jeu)
Veuillez vous adresser au concessionnaire
pour tout renseignement complémentaire.
La conception et les spécifications sont
sujettes à modification sans préavis.
Les logos et la marque verbale Bluetooth® sont des
marques déposées qui appartiennent à Bluetooth
SIG, Inc. et qui sont utilisées par Sony Corporation
sous licence uniquement. Les autres marques
commerciales et noms commerciaux appartiennent
à leurs propriétaires respectifs.
Le repère en forme de lettreN est une marque
commerciale ou une marque déposée de NFC
Forum, Inc. aux États-Unis et dans d’autres pays.
Windows Media est une marque ou une marque
déposée de Microsoft Corporation aux Etats-Unis
et/ou dans d’autres pays.
Ce produit est protégé par des droits de propriété
intellectuelle de Microsoft Corporation. Toute
utilisation ou diffusion de la technologie décrite
sortant du cadre de l’utilisation de ce produit est
interdite sans licence accordée par Microsoft ou une
filiale autorisée de Microsoft.
Apple, iPhone, iPod, iPod nano, iPod touch et Siri
sont des marques de Apple Inc., déposées aux
Etats-Unis et dans d’autres pays/régions. App Store
est une marque de service d’Apple Inc.
IOS est une marque commerciale ou une marque
déposée de Cisco aux États-Unis et dans d’autres
pays et qui est utilisée sous licence.
Google, Google Play et Android sont des marques
de Google LCC.
libFLAC
Copyright (C) 2000-2009 Josh Coalson
Copyright (C) 2011-2013 Xiph.Org Foundation
La redistribution et l’utilisation en formes source et
binaire, avec ou sans modification, sont permises
pourvu que les conditions suivantes soient
respectées :
– Toute redistribution de code source doit être
accompagnée de la mention du copyright
correspondant, de la liste de conditions et de la
clause de non-responsabilité ci-dessous.
Copyrights

28FR
– Les redistributions en forme binaire doivent
reproduire l’avis de droits d’auteur ci-dessus,
cette liste de conditions et la clause de non-
responsabilité ci-dessous dans la documentation
et/ou tout autre matériel fourni avec la
distribution.
– Ni le nom de Xiph.org Foundation, ni celui de ses
contributeurs ne peut être utilisé pour soutenir ou
promouvoir des produits dérivés de ce logiciel
sans autorisation spécifique écrite préalable.
CE LOGICIEL EST FOURNI PAR LES DETENTEURS DU
COPYRIGHT ET SES CONTRIBUTEURS « EN L’ETAT »
SANS QUELQUE GARANTIE QUE CE SOIT, EXPRESSE
OU IMPLICITE, INCLUANT MAIS SANS S’Y LIMITER,
LES GARANTIES IMPLICITES DE QUALITE
MARCHANDE ET DE CONVENANCE A UNE FIN
PARTICULIERE. EN AUCUN CAS LA FONDATION OU
SES CONTRIBUTEURS NE PEUVENT ETRE TENUS
POUR RESPONSABLES D’UN QUELCONQUE
DOMMAGE DIRECT, INDIRECT, ACCESSOIRE,
PARTICULIER, EXEMPLAIRE OU CONSECUTIF (Y
COMPRIS, MAIS SANS S’Y LIMITER, L’ACQUISITION DE
PRODUITS OU SERVICES DE SUBSTITUTION ; LA
PERTE DE JOUISSANCE, DE DONNEES OU DE
BENEFICES ; OU LES PERTES D’EXPLOITATION)
QUELLES QU’EN SOIENT LES CAUSES ET QUEL QUE
SOIT LE TYPE DE RESPONSABILITE, CONTRACTUELLE,
SANS FAUTE OU FONDEE SUR UN DELIT CIVIL (Y
COMPRIS PAR NEGLIGENCE OU POUR UNE AUTRE
CAUSE) RESULTANT D’UNE MANIERE OU D’UNE
AUTRE DE L’UTILISATION DE CE LOGICIEL, MEME SI
MENTION A ETE FAITE DE LA POSSIBILITE DE TELS
DOMMAGES.
Dépannage
La liste de contrôles suivante vous aidera à
remédier aux problèmes que vous pourriez
rencontrer avec cet appareil.
Avant de passer en revue la liste de
contrôles ci-dessous, vérifiez les procédures
de raccordement et d’utilisation.
Pour plus de détails sur l’utilisation du
fusible et le retrait de l’appareil du tableau
de bord, reportez-vous à la section
« Raccordement/Installation » (page 34).
Si le problème n’est pas résolu, visitez le site
d’assistance indiqué sur la quatrième de
couverture de ce mode d’emploi.
Généralités
Absence de son ou son très faible.
La position de la commande d’équilibre
avant-arrière [FADER] n’est pas réglée
pour un système à 2 haut-parleurs.
Le volume de l’appareil et/ou du
périphérique connecté est très faible.
– Augmentez le volume de l’appareil et du
périphérique connecté.
Aucun bip n’est émis.
Un amplificateur de puissance en option
est raccordé et vous n’utilisez pas
l’amplificateur intégré.
Les stations mémorisées et l’heure sont
effacées.
Le fusible a sauté.
Émission de bruit lorsque la position de la
clé de contact est modifiée.
Les câbles ne sont pas raccordés
correctement au connecteur
d’alimentation destiné aux accessoires du
véhicule.
En cours de lecture ou de réception, le
mode de démonstration démarre.
Si aucune opération n’est effectuée
pendant 5 minutes avec [DEMO-ON]
activé, le mode de démonstration
démarre.
– Réglez [DEMO-OFF] (page 21).
L’affichage disparaît de la fenêtre
d’affichage ou il ne s’affiche pas.
Les connecteurs sont sales (page 26).
L’affichage/illumination clignote.
L’alimentation est insuffisante.
– Vérifiez que la batterie du véhicule
fournit une alimentation suffisante à
l’appareil. (L’alimentation requise est de
12 V CC.)
Les touches de commande sont
inopérantes.
Appuyez sur DSPL et (Retour)/MODE
pendant plus de 2 secondes pour
réinitialiser l’appareil.
Le contenu stocké en mémoire est effacé.

29FR
Réception radio
La réception radio est mauvaise.
Des interférences statiques sont
présentes.
Raccordez fermement l’antenne.
Il est impossible de syntoniser les
fréquences comprises entre 65 MHz et
74 MHz en FM3.
[AREA] est réglé sur [EUROPE].
– Réglez [AREA] sur [RUSSIA] (page 21).
RDS
Réception impossible des services RDS
(quand [AREA] est réglé sur [RUSSIA]).
FM3 est sélectionné.
– Sélectionnez FM1 ou FM2.
Les services RDS ne sont pas disponibles
dans la région actuelle.
Une recherche (SEEK) commence après
quelques secondes d’écoute.
La station ne diffuse pas de programmes
de radioguidage (fonction TP désactivée)
ou le signal capté est faible.
–Désactivez TA (page12).
Aucun message de radioguidage.
Activez TA (page 12).
La station n’émet pas de messages de
radioguidage, malgré l’indication TP.
– Réglez la fréquence pour capter une
autre station.
PTY affiche [- - - - - - - -].
La station actuellement captée n’est pas
une station RDS ou la réception radio est
mauvaise.
Le nom du service de l’émission clignote.
Il n’existe aucune fréquence alternative
pour la station actuelle.
– Appuyez sur (SEEK –/+)
pendant que le nom du service de
l’émission clignote. [PI SEEK] apparaît et
l’appareil commence à chercher une
autre fréquence avec les mêmes
données PI (identification de
programme).
Lecture de périphériques USB
La lecture sur un périphérique USB exige
un délai de démarrage plus long.
Le périphérique USB contient des fichiers
comportant une hiérarchie de dossiers
complexe.
Impossible de lire le fichier audio.
Pour plus d’informations sur les formats
pris en charge, reportez-vous à la section
«Spécifications» (page26).
Si le fichier audio est toujours impossible à
lire, consultez le mode d’emploi fourni
avec le périphérique USB ou contactez le
fabricant du périphérique USB.
Les opérations de saut d’album, saut
d’éléments (Mode Saut) et de recherche
de plage par nom (Quick-BrowZer) sont
impossibles à exécuter.
Réglez [USB MODE] sur [MSC/MTP]
(page 22).
Le son ne peut pas être reproduit pendant
la lecture en mode Android.
Vérifiez l’état de l’application de lecture
audio sur le smartphone Android.
Fonction NFC
La connexion par One Touch (NFC) n’est
pas possible.
Si le smartphone ne répond pas au
contact.
– Vérifiez que la fonction NFC du
smartphone est activée.
– Rapprochez le repère en forme de lettre
N du smartphone du repère en forme de
lettre N de cet appareil.
– Si le smartphone se trouve dans un étui,
retirez-le.
La sensibilité de réception NFC dépend du
périphérique.
Si une connexion One Touch avec le
smartphone échoue à plusieurs reprises,
établissez la connexion BLUETOOTH
manuellement.

30FR
Fonction BLUETOOTH
Le périphérique connecté ne détecte pas
cet appareil.
Avant de procéder à l’appairage, réglez cet
appareil sur le mode de veille d’appairage.
Lorsque qu’il est connecté à deux
périphériques BLUETOOTH, cet appareil ne
peut pas être détecté par un autre
périphérique.
– Interrompez l’une de ces deux
connexions et recherchez cet appareil à
partir de cet autre périphérique.
Lorsque l’appairage avec ce périphérique
est effectué, activez la transmission du
signal BLUETOOTH (page 10).
Impossible d’établir la connexion.
La connexion est contrôlée par l’un des
périphériques (cet appareil ou le
périphérique BLUETOOTH), mais non par
les deux.
– Établissez la connexion de cet appareil à
partir du périphérique BLUETOOTH ou
vice versa.
Le nom du périphérique détecté ne
s’affiche pas.
Selon l’état de l’autre périphérique, il peut
être impossible d’en obtenir le nom.
Aucune sonnerie.
Adaptez le volume en tournant la molette
de réglage lorsque vous recevez un appel.
Selon le périphérique connecté, la
sonnerie peut ne pas être transférée
correctement.
– Réglez [RINGTONE] sur [1] (page 24).
Les haut-parleurs avant ne sont pas
raccordés à l’appareil.
– Raccordez les haut-parleurs avant à
l’appareil. La sonnerie est reproduite par
les haut-parleurs avant uniquement.
La voix du correspondant est inaudible.
Les haut-parleurs avant ne sont pas
raccordés à l’appareil.
– Raccordez les haut-parleurs avant à
l’appareil. La voix du correspondant est
reproduite par les haut-parleurs avant
uniquement.
Un correspondant signale que le volume
est trop faible ou trop élevé.
Réglez le volume en conséquence en
utilisant le réglage du gain du micro
(page 17).
Les conversations téléphoniques sont
parasitées par un écho ou par du bruit.
Baissez le volume.
Réglez le mode EC/NC sur [EC/NC-1] ou
[EC/NC-2] (page 17).
Si les bruit environnants autres que ceux
associés à l’appel téléphonique sont
importants, essayez de les réduire.
Par ex : si une fenêtre est ouverte et que le
bruit de la circulation est important, etc.,
fermez la fenêtre. Si la climatisation
produit beaucoup de bruit, réduisez son
intensité.
Le téléphone n’est pas connecté.
Pendant la lecture d’un périphérique
audio BLUETOOTH, le téléphone n’est pas
connecté, même si vous appuyez sur
CALL.
– Établissez la connexion à partir du
téléphone.
La qualité du son du téléphone est
mauvaise.
La qualité du son du téléphone dépend
des conditions de réception du téléphone
portable.
– Si la réception est mauvaise, déplacez
votre véhicule dans un endroit
permettant d’améliorer la réception du
signal.
Le volume du périphérique audio
connecté est faible (élevé).
Le niveau de volume diffère selon le
périphérique audio utilisé.
– Réglez le volume du périphérique audio
connecté ou de cet appareil (page 23).
Le son est saccadé pendant la lecture d’un
périphérique audio BLUETOOTH.
Réduisez la distance entre l’appareil et le
périphérique audio BLUETOOTH.
Si le périphérique audio BLUETOOTH est
rangé dans un étui qui interrompt le
signal, sortez-le pendant la durée de son
utilisation.

31FR
Plusieurs périphériques BLUETOOTH ou
autres, émettant des ondes radio, sont
utilisés à proximité.
– Mettez ces périphériques hors tension.
– Augmentez la distance qui sépare le
périphérique lu de ces autres
périphériques.
Le son s’interrompt momentanément en
cours de lecture lorsque la connexion
entre cet appareil et le téléphone portable
est établie. Il ne s’agit pas d’un problème
de fonctionnement.
Le périphérique audio BLUETOOTH
connecté ne peut pas être commandé.
Vérifiez que le périphérique audio
BLUETOOTH connecté prend en charge le
profil AVRCP.
Certaines fonctions ne sont pas utilisables.
Vérifiez si le périphérique connecté prend
en charge les fonctions en question.
Suite à un appel, le téléphone est
décroché involontairement.
Le téléphone connecté est configuré pour
répondre automatiquement à un appel.
L’appairage a échoué, le temps alloué
ayant été dépassé.
Selon le périphérique connecté, le temps
alloué pour l’appairage peut être court.
– Efforcez-vous de terminer l’appairage
dans le temps alloué.
La fonction BLUETOOTH n’est pas
utilisable.
Mettez l’appareil hors tension en
appuyant sur OFF pendant plus de
2 secondes, puis remettez l’appareil sous
tension.
Aucun son n’est reproduit par les haut-
parleurs pendant un appel en mode mains
libres.
Si le son est reproduit par le téléphone
portable, configurez-le pour que le son
soit reproduit par les haut-parleurs du
véhicule.
Siri Eyes Free n’est pas activé.
Effectuez l’enregistrement du mode mains
libres pour un iPhone prenant en charge
Siri Eyes Free.
Activez la fonction Siri sur l’iPhone.
Mettez fin à la connexion BLUETOOTH
avec l’iPhone et l’appareil, et rétablissez la
connexion.
Fonctionnement de Sony | Music
Center
Le nom de l’application ne correspond pas
à l’application originale dans
« Sony | Music Center ».
Relancez l’application à partir de
l’application « Sony | Music Center ».
Lorsque l’application « Sony | Music
Center » est utilisée via BLUETOOTH,
l’affichage passe automatiquement sur
[BT AUDIO].
L’application « Sony | Music Center » ou la
fonction BLUETOOTH n’a pas fonctionné
correctement.
Relancez l’application.
L’application « Sony | Music Center » est
automatiquement déconnectée lorsque
l’affichage passe sur [IPD].
L’application « Sony | Music Center »
installée sur l’iPhone/iPod ne prend pas
en charge la lecture d’un iPod.
– Modifiez la source de l’appareil en
choisissant une option autre que [IPD],
puis établissez la connexion
«Sony | Music Center » (page18).
La connexion « Sony | Music Center » est
automatiquement déconnectée quand le
mode USB de l’appareil est réglé sur
[ANDROID].
Le smartphone Android ne prend pas en
charge la lecture en mode Android.
– Réglez le mode USB de l’appareil sur
[MSC/MTP], puis établissez la connexion
« Sony | Music Center » (page 18).

32FR
Messages
Les messages suivants peuvent s’afficher ou
clignoter pendant le fonctionnement.
INVALID
L’opération sélectionnée n’est peut-être
pas valide.
[USB MODE] ne peut pas être modifié
lorsque la lecture d’un iPod est en cours.
READ
Attendez que la lecture des informations
soit terminée et que la lecture commence
automatiquement. Cela peut prendre un
certain temps, en fonction de
l’organisation des fichiers.
(trait de soulignement) : impossible
d’afficher le caractère.
Pour la lecture de périphériques
USB :
HUB NO SUPRT : les concentrateurs USB ne
sont pas pris en charge.
IPD STOP : la lecture de l’iPod est terminée.
Utilisez votre iPod/iPhone pour
commencer la lecture.
NOT SUPPORT - ANDROID MODE
Un périphérique USB ne prenant pas en
charge AOA (Android Open Accessory) 2.0
est connecté à l’appareil quand [USB
MODE] est réglé sur [ANDROID].
– Réglez [USB MODE] sur [MSC/MTP]
(page 22).
USB ERROR
Connectez à nouveau le périphérique USB.
USB NO DEV
Assurez-vous que le périphérique USB ou
le câble USB est correctement raccordé.
USB NO MUSIC
Connectez un périphérique USB contenant
des fichiers susceptibles d’être lus
(page 26).
USB NO SUPRT
Pour plus de détails sur la compatibilité de
votre périphérique USB, visitez le site
d’assistance indiqué sur la quatrième de
couverture de ce mode d’emploi.
OVERLOAD : le périphérique USB est
surchargé.
Débranchez le périphérique USB, puis
appuyez sur SRC pour sélectionner une
autre source.
Le périphérique USB est défectueux ou un
périphérique non pris en charge est
connecté.
Pour le fonctionnement RDS :
NO AF : aucune fréquence alternative.
Appuyez sur (SEEK –/+) pendant
que le nom du service de l’émission
clignote. L’appareil commence à
rechercher une autre fréquence avec les
mêmes données d’identification de
programme (PI) (l’indication [PI SEEK]
apparaît).
NO PI : pas d’identification de programme.
La station sélectionnée ne possède pas de
données PI (identification de programme).
Sélectionnez une autre station.
NO TP : aucun programme de radioguidage.
L’appareil continue à rechercher les
stations TP.
Pour la fonction BLUETOOTH :
BTA NO DEV : le périphérique BLUETOOTH
n’est pas connecté ou reconnu.
Assurez-vous que le périphérique
BLUETOOTH est correctement connecté,
ou que la connexion BLUETOOTH est
établie avec le périphérique BLUETOOTH.
ERROR : l’opération choisie n’a pas pu être
exécutée.
Attendez quelques instants, puis
réessayez.

33FR
UNKNOWN : un nom ou un numéro de
téléphone ne peut pas être affiché.
WITHHELD : le numéro de téléphone est
masqué par l’appelant.
Pour le fonctionnement de Sony |
Music Center :
APP –––––––– : aucune connexion n’est
établie avec l’application.
Établissez à nouveau la connexion à
«Sony | Music Center » (page18).
APP DISCNCT : l’application est
déconnectée.
Établissez la connexion à « Sony | Music
Center » (page 18).
APP DISPLAY : un affichage permettant de
configurer l’écran de l’application apparaît.
Quittez l’affichage de configuration de
l’écran de l’application pour permettre le
fonctionnement des touches.
APP LIST : la liste des contenus du
périphérique USB apparaît.
Quittez l’affichage de la liste de
l’application pour permettre le
fonctionnement des touches.
APP MENU : un affichage permettant de
configurer l’application apparaît.
Quittez l’affichage de configuration de
l’application pour permettre le
fonctionnement des touches.
APP NO DEV : le périphérique sur lequel est
installé l’application n’est pas connecté ou
reconnu.
Établissez la connexion BLUETOOTH et
établissez à nouveau la connexion
« Sony | Music Center » (page 18).
APP SOUND : un affichage permettant de
configurer le son de l’application apparaît.
Quittez l’affichage de configuration du
son de l’application pour permettre le
fonctionnement des touches.
OPEN APP : l’application « Sony | Music
Center » ne fonctionne pas actuellement.
Lancez l’application.
Pour utiliser la télécommande au
volant :
ERROR
Recommencez l’enregistrement à partir de
la fonction qui est à l’origine de l’erreur
(page 21).
TIMEOUT
Essayez de procéder à l’enregistrement
pendant que [REGISTER] clignote
(pendant 6 secondes environ) (page 21).
Pour le fonctionnement de la mise à
jour du firmware :
FILE ERROR : le programme de mise à jour
n’est pas stocké sur le périphérique USB.
Stockez le programme de mise à jour sur
le périphérique USB, puis réessayez
(page 25).
UPDATE ERROR PRESS ENTER : la mise à
jour du firmware ne s’est pas terminée
correctement.
Appuyez sur ENTER pour effacer le
message, puis réessayez.
Pendant la mise à jour, ne tournez pas la
clé de contact sur la position OFF et ne
retirez pas le périphérique USB (page 25).
Si ces solutions ne permettent pas
d’améliorer la situation, contactez votre
revendeur Sony le plus proche.
Si vous portez l’appareil à réparer en raison
d’un problème de lecture de périphérique,
apportez le périphérique utilisé au moment
où le problème s’est produit.

34FR
Attention
• Acheminez tous les fils de masse jusqu’à
un point de masse commun.
• Veillez à ce qu’aucun fil ne soit coincé sous
une vis ou happé par des pièces mobiles
(par exemple, une glissière de siège).
• Avant d’effectuer les raccordements,
coupez le contact du véhicule pour éviter
les courts-circuits.
• Raccordez le câble d’alimentation à
l’appareil et aux haut-parleurs avant de le
brancher sur le connecteur d’alimentation
auxiliaire.
• Pour des raisons de sécurité, veillez à isoler
avec du ruban isolant les extrémités libres
des fils non raccordés.
• Choisissez soigneusement l’emplacement
d’installation afin que l’appareil n’entrave
pas la conduite normale.
• Évitez d’installer l’appareil dans des
endroits soumis à la poussière, à la saleté,
à des vibrations excessives ou à des
températures élevées, notamment sous les
rayons directs du soleil ou à proximité des
conduites de chauffage.
• Utilisez exclusivement le matériel de
fixation fourni afin de garantir une
installation sûre.
Remarque sur le câble d’alimentation (jaune)
Lorsque vous raccordez cet appareil conjointement
avec d’autres équipements stéréo, l’intensité du
circuit du véhicule auquel l’appareil est raccordé
doit être supérieure à la somme de l’intensité des
fusibles de chaque composant.
Réglage de l’angle de fixation
Réglez l’angle de fixation afin qu’il soit
inférieur à 30°.
Liste des pièces pour
installation
•Cette liste des pièces ne comprend pas
tout le contenu de l’emballage.
•Le support et le tour de protection
sont fixés à l’appareil en usine. Avant de
monter l’appareil, utilisez les clés de
déblocage pour retirer le support de
l’appareil. Pour de plus amples détails,
reportez-vous à la section « Retrait du tour
de protection et du support » (page 38).
•Conservez les clés de déblocage , car
vous en aurez besoin à l’avenir si vous
décidez de retirer l’appareil de votre
véhicule.
Raccordement/Installation
Précautions
× 2

35FR
Raccordement
*1 Non fourni
*2 Impédance des haut-parleurs : 4 – 8 × 4
*3 Cordon à broches RCA (non fourni)
*4 Selon le type de véhicule, utilisez un adaptateur
pour la télécommande filaire (non fournie). Pour
plus d’informations sur l’utilisation de la
télécommande filaire, voir « Utilisation de la
télécommande filaire » (page 38).
*5 Qu’il soit ou non utilisé, guidez le cordon
d’entrée du micro de manière à ce qu’il n’entrave
pas la conduite du véhicule. Fixez-le à l’aide d’un
serre-câbles, s’il se trouve au niveau de vos
pieds.
*6 Pour plus de détails concernant l’installation du
micro, reportez-vous à la section « Installation
du microphone » (page 37).
*7 Selon le type de véhicule, utilisez un adaptateur
(non fourni) si vous ne parvenez pas à brancher
le connecteur d’antenne.
d’une télécommande filaire
(non fournie)*
4
de l’antenne du véhicule*
7
*
3
*
3
Caisson de graves*
1
Pour de plus amples détails,
reportez-vous à la section
« Raccordements » (page 36).
Amplificateur de
puissance*
1
Voir «Schéma de raccordement électrique»
(page 37) pour plus de détails.
*
2
*
3
*
5
*
6

36FR
Si vous disposez d’une antenne électrique
dépourvue de relais, vous risquez de
l’endommager si vous raccordez cet appareil
à l’aide du câble d’alimentation fourni .
Vers le connecteur haut-parleurs du
véhicule
Vers le connecteur d’alimentation du
véhicule
Raccordement aisé d’un caisson de
graves
Vous pouvez utiliser un caisson de graves
sans amplificateur de puissance pour autant
qu’il soit raccordé à un cordon de haut-
parleur arrière.
Remarques
• La préparation des cordons de haut-parleurs
arrière est requise.
• Utilisez un caisson de graves dont l’impédance est
comprise entre 4 et 8 et dont la puissance
admissible est appropriée pour éviter qu’il soit
endommagé.
Raccordement de protection de la
mémoire
Lorsque le câble d’alimentation jaune est
raccordé, le circuit mémoire est toujours
alimenté, même lorsque le contact est
coupé.
Raccordement des haut-parleurs
•Avant de raccorder les haut-parleurs,
mettez l’appareil hors tension.
•Utilisez des haut-parleurs dont
l’impédance est comprise entre 4 et 8
et dont la puissance admissible est
appropriée pour éviter qu’ils soient
endommagés.
Raccordements
1
Haut-parleur
arrière (droit)
Violet
2 Rayé violet/noir
3
Haut-parleur
avant (droit)
Gris
4 Rayé gris/noir
5
Haut-parleur
avant (gauche)
Blanc
6 Rayé blanc/noir
7
Haut-parleur
arrière (gauche)
Vert
8 Rayé vert/noir
12
alimentation
permanente
Jaune
13
antenne électrique/
amplificateur de
puissance (REM OUT)
Rayé bleu/
blanc
14
alimentation de
l’illumination
commutée
Rayé orange/
blanc
15
alimentation
commutée
Rouge
16 masse Noir
Haut-parleur
avant
Caisson de
graves

37FR
Vérifiez le connecteur d’alimentation
auxiliaire de votre véhicule et faites
correspondre correctement les
raccordements en fonction du véhicule.
Raccordement ordinaire
Quand les positions des câbles rouge et
jaune sont inversées
Quand le véhicule est dépourvu de
position ACC
Après avoir fait correspondre correctement
les raccordements et les câbles
d’alimentation commutée, raccordez
l’appareil à l’alimentation du véhicule. Si
vous avez des questions et des problèmes
de raccordement de cet appareil, qui ne sont
pas abordés dans ce mode d’emploi,
contactez votre concessionnaire automobile.
Pour pouvoir capter votre voix lors d’un
appel en mode mains libres, vous devez
installer le micro .
Schéma de raccordement
électrique
12
alimentation
permanente
Jaune
15 alimentation commutée Rouge
12 alimentation commutée Jaune
15
alimentation
permanente
Rouge
Connecteur
d’alimentation auxiliaire
Rouge Rouge
Jaune Jaune
Rouge Rouge
Jaune Jaune
Installation du microphone
Rouge
Rouge
Jaune
Jaune
Clip (non fourni)

38FR
Attention
• Il est extrêmement dangereux de laisser le
cordon s’enrouler autour de la colonne de
direction ou du levier de vitesses. Assurez-
vous de placer le cordon et les autres
pièces de manière à ce qu’ils ne gênent
pas la conduite.
• Si des airbags ou d’autres équipements
destinés à absorber les chocs sont installés
dans votre véhicule, contactez le magasin
où vous avez acheté cet appareil ou le
concessionnaire automobile avant de
procéder à l’installation.
Remarque
Avant de fixer l’adhésif double face , nettoyez la
surface du tableau de bord avec un chiffon sec.
1 Pour activer la télécommande filaire,
réglez [STR CONTROL] sous [SET
STEERING] sur [PRESET] (page 21).
Installation
Avant d’installer l’appareil, retirez son tour
de protection et son support .
1 Pincez les deux bords du tour de
protection , puis retirez-le.
2 Insérez les deux clés de déblocage
jusqu’à ce qu’elles émettent un
déclic, enfoncez le support , puis
dégagez l’appareil en le tirant vers le
haut.
Avant de procéder à l’installation, assurez-
vous que les languettes des deux côtés du
support sont inclinées de 2 mm vers
l’intérieur.
1 Positionnez le support à l’intérieur
du tableau de bord, puis pliez les
griffes vers l’extérieur pour un
ajustement serré.
2 Montez l’appareil sur le support ,
puis fixez le tour de protection .
Utilisation de la télécommande
filaire
Retrait du tour de protection et du
support
Montage de l’appareil dans le
tableau de bord
Dirigez le crochet vers l’intérieur.
182 mm
53 mm
Languette

39FR
Remarques
• Si les languettes sont droites ou si elles sont
inclinées vers l’extérieur, l’appareil ne peut pas
être installé correctement et il risque d’être
expulsé.
• Assurez-vous que les 4 languettes du tour de
protection sont bien insérées dans les fentes de
l’appareil.
Pour de plus amples détails, reportez-vous à
la section « Retrait de la façade avant »
(page 7).
Pour de plus amples détails, reportez-vous à
la section « Réinitialisation de l’appareil »
(page 8).
Lorsque vous remplacez le
fusible, veillez à utiliser un
fusible dont l’intensité, en
ampères, correspond à la
valeur indiquée sur le
fusible usagé. Si le fusible
saute, vérifiez le
branchement de l’alimentation et
remplacez-le. Si le nouveau fusible saute
également, il est possible que l’appareil soit
défectueux. Dans ce cas, consultez votre
revendeur Sony le plus proche.
Retrait et fixation de la façade
avant
Réinitialisation de l’appareil
Remplacement du fusible
Fusible (10 A)

2IT
Fabbricato in Thailandia
La targhetta indicante la tensione operativa
e informazioni simili è situata nella parte
inferiore del rivestimento.
La marcatura CE è valida esclusivamente nei
paesi in cui è prevista per legge,
principalmente nei paesi inclusi nello Spazio
economico europeo (EEA, European
Economic Area).
Con la presente, Sony Corporation dichiara
che questo apparecchio è conforme alla
Direttiva 2014/53/UE.
Il testo completo della dichiarazione di
conformità UE è disponibile al seguente
indirizzo Internet:
http://www.compliance.sony.de/
Avviso per i clienti: le seguenti
informazioni riguardano
esclusivamente gli apparecchi venduti
in paesi in cui sono applicate le
direttive UE
Questo prodotto è stato fabbricato da o per
conto di Sony Corporation.
Importatore UE: Sony Europe B.V.
Richieste all’importatore UE o relative alla
conformità di prodotto in Europa devono
essere indirizzate al rappresentante
autorizzato del costruttore, Sony Belgium,
bijkantoor van Sony Europe B.V., Da
Vincilaan 7-D1, 1930 Zaventem, in Belgio.
Smaltimento delle batterie
(pile e accumulatori) esauste
e delle apparecchiature
elettriche ed elettroniche a
fine vita (applicabile in tutti i
Paesi dell’Unione Europea e negli altri
Paesi con sistema di raccolta
differenziata)
Questo simbolo sul prodotto, batteria o
imballo indica che il prodotto non deve
essere considerato come un normale rifiuto
domestico. Su talune batterie questo
simbolo può essere utilizzato in
combinazione con un simbolo chimico. Il
simbolo chimico del piombo (Pb) è aggiunto
se la batteria contiene più dello 0,004% di
piombo. Assicurandovi che questi prodotti e
le batterie siano smaltiti correttamente,
contribuirete a prevenire potenziali
conseguenze negative per l’ambiente e per
la salute che potrebbero essere causate dal
trattamento inappropriato dei medesimi
prodotti o batterie. Il riciclo dei materiali
aiuterà a preservare le risorse naturali. Nel
caso di prodotti che per ragioni di sicurezza,
prestazioni o integrità dei dati richiedano
una connessione permanente con una
batteria in essi incorporata, la stessa dovrà
essere sostituita esclusivamente da
personale qualificato. Per assicurarsi che la
batteria sia trattata correttamente, si prega
di consegnare i prodotti a fine vita in un
centro di raccolta idoneo per il riciclo di
apparecchiature elettriche ed elettroniche.
Per tutte le altre batterie, si prega di
consultare la sezione relativa alla rimozione
sicura della batteria dal prodotto. Si prega di
consegnare le batterie in un centro di
raccolta idoneo per il riciclo delle batterie
esauste. Per informazioni più dettagliate sul
riciclo di questi prodotti o batterie, si prega
di contattare il vostro Comune, il servizio di
smaltimento rifiuti ovvero il punto vendita
presso il quale è stato acquistato il prodotto
o la batteria. In caso di smaltimento abusivo
di batterie o di apparecchiature elettriche ed
elettroniche potrebbero essere applicate le
sanzioni previste dalla normativa vigente
(valido solo per l’Italia).
Per motivi di sicurezza, accertarsi di
installare questo apparecchio sul
cruscotto dell’auto perché la parte
posteriore dell’apparecchio si scalda
durante l’utilizzo.
Per ulteriori informazioni, consultare
“Collegamenti e installazione”
(pagina 34).

3IT
ATTENZIONE
Il seguente intervallo di frequenza 65 –
74 MHz non è assegnato alla trasmissione
audio secondo la tabella delle allocazioni
comuni europee (ECA Table) e non può
essere utilizzato in Europa.
Dichiarazione di non responsabilità
relativa a servizi offerti da terze parti
I servizi offerti da terze parti possono essere
cambiati, sospesi o interrotti senza
preavviso. Sony declina ogni responsabilità
in questo genere di situazioni.
Attenzione
IN NESSUN CASO SONY SI ASSUMERÀ
ALCUNA RESPONSABILITÀ PER EVENTUALI
DANNI INCIDENTALI, INDIRETTI O
CONSEQUENZIALI O DANNI DI ALTRO TIPO,
COMPRESI MA NON LIMITATI A PERDITA DI
PROFITTO, PERDITA DI RICAVI, PERDITA DI
DATI, PERDITA DELL’USO DEL PRODOTTO O
DI QUALSIASI APPARECCHIATURA
ASSOCIATA, TEMPI DI FERMO E TEMPO
DELL’ACQUIRENTE IN RELAZIONE A O
CAUSATI DALL’USO DEL PRESENTE
PRODOTTO O DEI SUOI COMPONENTI
HARDWARE E/O SOFTWARE.
Gentile cliente, il presente prodotto
comprende un trasmettitore radio.
In conformità alla norma UNECE n. 10, i
produttori di veicoli possono imporre
specifiche condizioni per l’installazione di
trasmettitori radio sui veicoli.
Prima di installare questo prodotto sul
veicolo, consultare il manuale di istruzioni
del veicolo in uso o contattare il produttore o
il concessionario del veicolo.
Chiamate di emergenza
Questo impianto vivavoce BLUETOOTH per
automobile e il dispositivo elettronico
connesso all’impianto vivavoce funzionano
utilizzando segnali radio, la rete cellulare e la
rete di telefonia fissa, nonché funzioni
programmate dall’utente, che non possono
garantire la connessione in tutte le
condizioni.
Si invita pertanto a non affidarsi
esclusivamente a un dispositivo elettronico
per le comunicazioni essenziali (per esempio
emergenze di carattere medico).
Informazioni sulle comunicazioni
BLUETOOTH
Le microonde emesse dai dispositivi
BLUETOOTH possono influire sul
funzionamento di dispositivi medici
elettronici. Spegnere questo apparecchio e
gli altri dispositivi BLUETOOTH nei seguenti
luoghi per prevenire il rischio di incidenti.
– In presenza di gas infiammabili, in
ospedale, su treni e aeroplani, nelle
stazioni di servizio
– Nelle vicinanze di porte automatiche o di
allarmi antincendio
Questo apparecchio supporta le funzioni
di sicurezza conformi allo standard
BLUETOOTH per fornire una connessione
sicura durante l’utilizzo della tecnologia
wireless BLUETOOTH, ma a seconda degli
ambienti tale sicurezza potrebbe rivelarsi
non sufficiente. Prestare attenzione
durante le comunicazioni tramite la
tecnologia wireless BLUETOOTH.
Non ci assumeremo alcuna responsabilità
per l’eventuale divulgazione accidentale di
informazioni durante le comunicazioni
tramite BLUETOOTH.
Per eventuali domande o problemi
riguardanti l’apparecchio non trattati nel
presente manuale, rivolgersi al più vicino
rivenditore Sony.
Avvertenza relativa all’installazione
su un’auto sprovvista della posizione
ACC (accessoria) sul blocchetto di
accensione
Assicurarsi di impostare la funzione AUTO
OFF (pagina 21). L’apparecchio si spegne
completamente e in modo automatico
dopo l’intervallo di tempo impostato dal
relativo spegnimento (o tenendo premuto
OFF per 1 secondo), per evitare lo
scaricamento della batteria. Se non viene
impostata la funzione AUTO OFF, tenere
premuto OFF fino alla disattivazione del
display ogni volta che si spegne il motore.
Avviso importante

4IT
Indice
Guida alle parti e ai comandi. . . . . . . . . . . . 5
Operazioni preliminari
Rimozione del pannello anteriore. . . . . . . . 6
Azzeramento dell’apparecchio . . . . . . . . . . 7
Impostazione dell’orologio . . . . . . . . . . . . . 7
Preparazione di un dispositivo
BLUETOOTH. . . . . . . . . . . . . . . . . . . . . . . 7
Collegamento di un dispositivo USB. . . . . 10
Collegamento di un altro dispositivo audio
portatile. . . . . . . . . . . . . . . . . . . . . . . . . 10
Ascolto della radio
Ascolto della radio . . . . . . . . . . . . . . . . . . . . 11
Utilizzo del sistema RDS (sistema dati
radio) . . . . . . . . . . . . . . . . . . . . . . . . . . . 12
Riproduzione
Riproduzione di un dispositivo USB . . . . . 13
Riproduzione di un dispositivo
BLUETOOTH. . . . . . . . . . . . . . . . . . . . . . 14
Ricerca e riproduzione dei brani . . . . . . . . 15
Chiamate in vivavoce
(esclusivamente tramite
BLUETOOTH)
Ricevere una chiamata. . . . . . . . . . . . . . . . 16
Inviare una chiamata . . . . . . . . . . . . . . . . . 16
Operazioni disponibili durante una
chiamata . . . . . . . . . . . . . . . . . . . . . . . . 17
Funzioni utili
Sony | Music Center con iPhone/
smartphone Android™ . . . . . . . . . . . . 18
Utilizzo del riconoscimento vocale (solo
smartphone Android). . . . . . . . . . . . . . 19
Utilizzo di Siri Eyes Free . . . . . . . . . . . . . . . 19
Impostazioni
Disattivazione del modo DEMO . . . . . . . . 20
Operazioni di base delle impostazioni. . . 20
Impostazioni generali (GENERAL). . . . . . . . 21
Impostazioni audio (SOUND) . . . . . . . . . . 22
Impostazioni di visualizzazione
(DISPLAY) . . . . . . . . . . . . . . . . . . . . . . . 23
Impostazioni BLUETOOTH
(BLUETOOTH) . . . . . . . . . . . . . . . . . . . . 24
Impostazioni di Sony | Music Center
(SONY APP) . . . . . . . . . . . . . . . . . . . . . . 24
Informazioni aggiuntive
Aggiornamento del firmware . . . . . . . . . . 25
Precauzioni . . . . . . . . . . . . . . . . . . . . . . . . . 25
Manutenzione . . . . . . . . . . . . . . . . . . . . . . 26
Caratteristiche tecniche. . . . . . . . . . . . . . . 26
Guida alla soluzione dei problemi . . . . . . 28
Messaggi. . . . . . . . . . . . . . . . . . . . . . . . . . . 32
Collegamenti e installazione
Attenzione . . . . . . . . . . . . . . . . . . . . . . . . . 34
Elenco dei componenti per
l’installazione . . . . . . . . . . . . . . . . . . . . 34
Connessioni . . . . . . . . . . . . . . . . . . . . . . . . 35
Installazione . . . . . . . . . . . . . . . . . . . . . . . . 38

5IT
Guida alle parti e ai comandi
Tasto rilascio pannello anteriore
SRC (sorgente)
Per accendere l’apparecchio.
Per cambiare la sorgente.
OFF
Tenere premuto per 1 secondo per
disattivare la sorgente e visualizzare
l’orologio.
Tenere premuto per più di 2 secondi per
spegnere l’apparecchio e disattivare il
display.
Manopola di controllo
Ruotare per regolare il volume.
PUSH ENTER
Per impostare la voce selezionata.
Premere SRC, ruotare e quindi premere
per cambiare la sorgente (timeout dopo 2
secondi).
MENU
Per aprire il menu di impostazione.
VOICE (pagina 17, 19)
Tenere premuto per più di 2 secondi per
attivare i comandi vocali, il
riconoscimento vocale (solo smartphone
Android) o la funzione Siri (solo iPhone).
Contrassegno N
Toccare la manopola di controllo con uno
smartphone Android per stabilire una
connessione BLUETOOTH.
Finestra del display
/ (SEEK –/+)
Per sintonizzare automaticamente le
stazioni radio. Tenere premuto per
sintonizzarle manualmente.
/ (prec/succ)
/ (indietro/avanti rapido)
PTY (tipo di programma)
Per selezionare PTY in RDS.
(sfoglia) (pagina 15)
Per impostare il modo sfoglia durante la
riproduzione.
(Non disponibile quando è collegato un
dispositivo USB in modalità Android o un
iPod.)
CALL
Per accedere al menu delle chiamate. Per
ricevere/terminare una chiamata.
Tenere premuto per più di 2 secondi per
commutare il segnale BLUETOOTH.
(indietro)
Per tornare al display precedente.
MODE (pagina 7, 11, 17)
Ricettore del telecomando
Tasti numerici (da 1 a 6)
Per ricevere le stazioni radio
memorizzate. Tenere premuto per
memorizzare le stazioni.
Unità principale

6IT
ALBUM /
Per saltare un album per un apparecchio
audio. Tenere premuto per saltare gli
album in modo continuo.
(Non disponibile quando è collegato un
dispositivo USB in modalità Android o un
iPod.)
(ripeti)
(Non disponibile quando è collegato un
dispositivo USB in modalità Android.)
(ordine casuale)
(Non disponibile quando è collegato un
dispositivo USB in modalità Android.)
MIC (pagina 17)
(riproduzione/pausa)
EXTRA BASS
Per rafforzare il suono dei bassi in
sincronizzazione con il livello del volume.
Premere per cambiare l’impostazione
EXTRA BASS: [1], [2], [OFF].
Presa di ingresso AUX
DSPL (display)
Premere per cambiare le voci sul display.
SCRL (scorrimento)
Tenere premuto per scorrere le voci del
display.
Porta USB
Rimozione del pannello
anteriore
Per evitare il furto dell’apparecchio, è
possibile rimuoverne il pannello anteriore.
1 Tenere premuto OFF fino allo
spegnimento dell’apparecchio,
quindi premere il tasto rilascio
pannello anteriore , infine tirare il
pannello verso di sé per estrarlo.
Segnale di avvertimento
Se la chiave di accensione viene impostata
sulla posizione OFF senza che il pannello
anteriore sia stato rimosso, viene emesso
per alcuni secondi un segnale acustico di
avvertimento. Tale segnale viene emesso
solo se è in uso l’amplificatore incorporato.
Numeri di serie
Verificare che i numeri di serie sulla parte
inferiore dell’apparecchio e sul retro del
pannello corrispondano in modo corretto.
Altrimenti non sarà possibile eseguire
l’associazione BLUETOOTH, la connessione e
la disconnessione tramite NFC.
Operazioni preliminari
Installazione del pannello
anteriore

7IT
Azzeramento
dell’apparecchio
Prima di utilizzare l’apparecchio per la prima
volta, dopo la sostituzione della batteria
dell’auto o dopo avere effettuato modifiche
ai collegamenti, è necessario azzerare
l’apparecchio.
1 Premere DSPL e (indietro)/MODE
per più di 2 secondi.
Nota
In seguito all’azzeramento dell’apparecchio
verranno cancellate le impostazioni dell’orologio e
alcune funzioni memorizzate.
Impostazione dell’area/regione
Dopo l’azzeramento dell’apparecchio, viene
visualizzato il display di impostazione
dell’area/regione.
1 Premere ENTER mentre è visualizzato
[SET AREA].
Viene visualizzata l’area/regione
impostata attualmente.
2 Ruotare la manopola di controllo per
selezionare [EUROPE] o [RUSSIA],
quindi premere la manopola.
3 Ruotare la manopola di controllo per
selezionare [YES] o [NO], quindi
premere la manopola.
Se viene modificata l’impostazione area/
regione, l’apparecchio si azzera e quindi
viene visualizzato l’orologio.
Questa impostazione può essere
configurata nel menu di impostazione
generale (pagina 21).
Impostazione dell’orologio
1 Premere MENU, ruotare la manopola
di controllo per selezionare
[GENERAL], quindi premere la
manopola.
2 Ruotare la manopola di controllo per
selezionare [SET CLOCK-ADJ], quindi
premere la manopola.
L’indicazione dell’ora lampeggia.
3 Ruotare la manopola di controllo per
impostare l’ora e i minuti.
Per passare da una cifra all’altra
dell’indicazione digitale, premere /
(SEEK –/+).
4 Dopo aver impostato i minuti,
premere MENU.
L’impostazione è completata e l’orologio
viene attivato.
Per visualizzare l’orologio
Premere DSPL.
Preparazione di un
dispositivo BLUETOOTH
È possibile ascoltare musica o eseguire
chiamate in vivavoce, a seconda del
dispositivo compatibile con BLUETOOTH in
uso, per esempio uno smartphone, un
telefono cellulare o un dispositivo audio (di
seguito indicato come “dispositivo
BLUETOOTH”, se non altrimenti specificato).
Per informazioni dettagliate sulla
connessione, consultare le istruzioni per
l’uso fornite con il dispositivo.
Prima di collegare il dispositivo, abbassare il
volume dell’apparecchio per evitare il rischio
di suoni troppo forti.

8IT
Toccando la manopola di controllo
dell’apparecchio con uno smartphone
compatibile con NFC*, l’apparecchio viene
associato e connesso allo smartphone
automaticamente.
* La tecnologia NFC (Near Field Communication)
permette la comunicazione wireless a breve
raggio tra vari dispositivi, per esempio telefoni
cellulari e tag IC. Grazie alla funzione NFC, è
possibile comunicare dati con facilità
semplicemente toccando il relativo simbolo o il
punto designato su dispositivi compatibili con
NFC.
Per gli smartphone con il sistema operativo
Android 4.0 o precedente, è necessario
scaricare l’app “NFC Easy Connect”
disponibile su Google Play. In certi paesi/
regioni l’app potrebbe non essere
disponibile per il download.
1 Attivare la funzione NFC sullo
smartphone.
Per informazioni dettagliate consultare le
istruzioni per l’uso fornite con lo
smartphone.
2 Toccare l’area con il contrassegno N
sull’apparecchio con l’area del
contrassegno N dello smartphone.
Verificare che il simbolo si illumini sul
display dell’apparecchio.
Per disconnettersi utilizzando NFC
Toccare nuovamente l’area con il
contrassegno N sull’apparecchio con l’area
del contrassegno N dello smartphone.
Note
• Quando si esegue la connessione, maneggiare lo
smartphone con attenzione per evitare graffi.
• Non è possibile eseguire la connessione One
touch se l’apparecchio è già connesso a due
dispositivi compatibili con NFC. In tal caso,
disconnettere uno degli altri due dispositivi ed
eseguire nuovamente la connessione con lo
smartphone.
Quando si esegue la connessione a un
dispositivo BLUETOOTH per la prima volta è
richiesta una registrazione reciproca
(denominata “associazione”). L’associazione
consente all’apparecchio e agli altri
dispositivi di riconoscersi a vicenda.
L’apparecchio è in grado di connettersi a due
dispositivi BLUETOOTH (due telefoni
cellulari, o un telefono cellulare e un
dispositivo audio).
1 Posizionare il dispositivo BLUETOOTH
entro 1 m di distanza
dall’apparecchio.
2 Premere MENU, ruotare la manopola
di controllo per selezionare
[BLUETOOTH], quindi premere la
manopola.
3 Ruotare la manopola di controllo per
selezionare [SET PAIRING], quindi
premere la manopola.
4 Ruotare la manopola di controllo per
selezionare [SET DEVICE 1]* o [SET
DEVICE 2]*, quindi premere la
manopola.
lampeggia quando l’apparecchio è in
modalità attesa di associazione.
* Una volta completata l’associazione, [SET
DEVICE 1] o [SET DEVICE 2] viene sostituito dal
nome del dispositivo associato.
5 Eseguire l’associazione sul
dispositivo BLUETOOTH affinché rilevi
l’apparecchio.
Collegamento di uno smartphone
tramite la connessione One touch
(NFC)
Associazione e connessione con
un dispositivo BLUETOOTH

9IT
6 Selezionare [DSX-A416BT]
visualizzato sul display del
dispositivo BLUETOOTH.
Se il nome del modello in uso non è
visualizzato, ripetere la procedura dal
punto 2.
7 Se sul dispositivo BLUETOOTH viene
richiesta l’immissione di un codice
passkey*, immettere [0000].
* Il codice passkey può essere definito
“Passcode”, “codice PIN”, “numero PIN” o
“Password” e così via, a seconda del
dispositivo.
Una volta completata l’associazione, il
simbolo rimane illuminato.
8 Selezionare l’apparecchio sul
dispositivo BLUETOOTH per stabilire
una connessione BLUETOOTH.
o si illumina quando la
connessione è stata completata.
Nota
Durante la connessione a un dispositivo
BLUETOOTH l’apparecchio non può essere rilevato
da un altro dispositivo. Per attivare il rilevamento,
accedere alla modalità di associazione e cercare
l’apparecchio da un altro dispositivo.
Per avviare la riproduzione
Per ulteriori informazioni, consultare
“Riproduzione di un dispositivo
BLUETOOTH” (pagina 14).
Per disconnettere il dispositivo
associato
Eseguire i punti da 2 a 4 per disconnettere il
dispositivo BLUETOOTH dopo che è stato
associato all’apparecchio.
Per utilizzare un dispositivo associato è
richiesta la connessione all’apparecchio.
Alcuni dispositivi associati stabiliranno la
connessione automaticamente.
1 Premere MENU, ruotare la manopola
di controllo per selezionare
[BLUETOOTH], quindi premere la
manopola.
2 Ruotare la manopola di controllo per
selezionare [SET BT SIGNL], quindi
premere la manopola.
Verificare che il simbolo si illumini.
3 Attivare la funzione BLUETOOTH sul
dispositivo BLUETOOTH.
4 Utilizzare il dispositivo BLUETOOTH
per connetterlo all’apparecchio.
o si illuminano.
Icone sul display:
Per connettere l’ultimo dispositivo che
è stato connesso all’apparecchio
Attivare la funzione BLUETOOTH sul
dispositivo BLUETOOTH.
Per stabilire la connessione con un
dispositivo audio, premere SRC per
selezionare [BT AUDIO], quindi premere
(riproduzione/pausa).
Per stabilire la connessione con un telefono
cellulare, premere CALL.
[0000]
Immettere il codice passkey
Connessione a un dispositivo
BLUETOOTH associato
Si illumina quando sono disponibili
le chiamate in vivavoce tramite
l’attivazione di HFP (Handsfree
Profile).
Si illumina quando è possibile
riprodurre il dispositivo audio
tramite l’attivazione di A2DP
(Advanced Audio Distribution
Profile).

10IT
Nota
Durante la trasmissione di dati audio tramite
BLUETOOTH non è possibile stabilire una
connessione dall’apparecchio al telefono cellulare.
Stabilire la connessione dal telefono cellulare
all’apparecchio.
Suggerimento
Con segnale BLUETOOTH attivo: quando la
chiavetta di accensione viene attivata, l’apparecchio
si riconnette automaticamente all’ultimo telefono
cellulare che è stato connesso.
Per installare il microfono
Per ulteriori informazioni, consultare
“Installazione del microfono” (pagina 37).
Quando un iPhone/iPod con iOS5 o
successivo viene collegato alla porta USB,
l’apparecchio viene associato e connesso
all’iPhone/iPod automaticamente.
Per attivare l’associazione BLUETOOTH
automatica, verificare che [SET AUTOPAIR] in
[BLUETOOTH] sia impostato su [ON]
(pagina 24).
1 Attivare la funzione BLUETOOTH
sull’iPhone/iPod.
2 Collegare l’iPhone/iPod alla porta
USB.
Verificare che il simbolo si illumini sul
display dell’apparecchio.
Note
• Non è possibile eseguire l’associazione
BLUETOOTH automatica se l’apparecchio è già
connesso a due dispositivi BLUETOOTH. In tal
caso, disconnettere uno degli altri due dispositivi
ed eseguire nuovamente la connessione con
l’iPhone/iPod.
• Se l’associazione BLUETOOTH automatica non si
attiva, consultare “Preparazione di un dispositivo
BLUETOOTH” (pagina 7).
Collegamento di un
dispositivo USB
1 Abbassare il volume sull’apparecchio.
2 Collegare il dispositivo USB
all’apparecchio.
Per collegare un iPod/iPhone, utilizzare il
cavo di collegamento USB per iPod (non
in dotazione).
Collegamento di un altro
dispositivo audio portatile
1 Spegnere il dispositivo audio
portatile.
2 Abbassare il volume sull’apparecchio.
3 Collegare il dispositivo audio portatile
alla presa di ingresso AUX (minipresa
stereo) sull’apparecchio con un cavo
di collegamento (non in dotazione)*.
* Assicurarsi di utilizzare una spina diritta.
4 Premere SRC per selezionare [AUX].
Connessione con un iPhone/iPod
(associazione BLUETOOTH
automatica)

11IT
Per adeguare il livello del volume del
dispositivo collegato ad altre sorgenti
Avviare la riproduzione del dispositivo audio
portatile collegato selezionando un volume
moderato e impostare il consueto volume di
ascolto sull’apparecchio.
Premere MENU, quindi selezionare [SOUND]
[SET AUX VOL] (pagina 23).
Ascolto della radio
Per ascoltare la radio, premere SRC per
selezionare [TUNER].
1 Premere MODE per cambiare banda
(FM1, FM2, FM3, MW o LW).
2 Premere MENU, ruotare la manopola
di controllo per selezionare
[GENERAL], quindi premere la
manopola.
3 Ruotare la manopola di controllo per
selezionare [SET BTM], quindi
premere la manopola.
L’apparecchio memorizza le stazioni in
corrispondenza dei tasti numerici in base
all’ordine delle frequenze.
1 Premere MODE per cambiare banda
(FM1, FM2, FM3, MW o LW).
2 Eseguire la sintonizzazione.
Sintonizzazione manuale
Tenere premuto / (SEEK –/+) per
individuare la frequenza approssimativa,
quindi premere più volte /
(SEEK –/+) per sintonizzarsi con
precisione sulla frequenza desiderata.
Sintonizzazione automatica
Premere / (SEEK –/+).
La ricerca si arresta non appena
l’apparecchio riceve una stazione.
1 Durante la ricezione della stazione
che si desidera memorizzare, tenere
premuto un tasto numerico (da 1 a 6)
fino a visualizzare [MEM].
Ascolto della radio
Memorizzazione automatica
(BTM)
Sintonizzazione
Memorizzazione manuale

12IT
1 Selezionare la banda, quindi premere
un tasto numerico (da 1 a 6).
Utilizzo del sistema RDS
(sistema dati radio)
AF sintonizza continuamente la stazione con
il segnale più potente, mentre TA fornisce
informazioni o trasmette programmi correnti
relativi al traffico (TP), se disponibili.
1 Premere MENU, ruotare la manopola
di controllo per selezionare
[GENERAL], quindi premere la
manopola.
2 Ruotare la manopola di controllo per
selezionare [SET AF/TA], quindi
premere la manopola.
3 Ruotare la manopola di controllo per
selezionare [SET AF-ON], [SET TA-ON],
[SET AF/TA-ON] o [SET AF/TA-OFF],
quindi premere la manopola.
Memorizzazione di stazioni RDS con
impostazione AF e TA
È possibile preselezionare le stazioni RDS
insieme all’impostazione AF/TA. Impostare
AF/TA, quindi memorizzare la stazione
mediante la funzione BTM o manualmente.
Se si utilizza il modo di preselezione
manuale, è possibile preselezionare anche le
stazioni non RDS.
Ricezione dei notiziari di emergenza
Se è attivato il modo AF o TA, gli annunci di
emergenza interrompono automaticamente
la riproduzione della sorgente selezionata.
Regolazione del livello del volume
durante la ricezione di un notiziario sul
traffico
Il livello del volume viene memorizzato
anche per i notiziari sul traffico successivi,
indipendentemente dal normale livello del
volume.
Mantenimento del programma
regionale (REGIONAL)
Quando sono attivate le funzioni AF e
REGIONAL, la stazione sintonizzata non
verrà sostituita da un’altra stazione
regionale con segnale più potente. Se si
intende lasciare tale area di ricezione del
programma regionale, impostare [SET
REGIONAL] in [GENERAL] su [SET REG-OFF]
durante la ricezione FM (pagina 22).
Questa funzione non è disponibile nel
Regno Unito e in altre aree.
Funzione Local Link (solo per il Regno
Unito)
Questa funzione consente di selezionare
altre stazioni locali della stessa area, anche
se non sono memorizzate in corrispondenza
dei tasti numerici.
Durante la ricezione FM, premere un tasto
numerico (da 1 a 6) in corrispondenza del
quale è memorizzata una stazione locale.
Entro 5 secondi, premere nuovamente il
tasto numerico della stazione locale.
Ripetere questa procedura fino alla ricezione
della stazione locale.
1 Premere PTY durante la ricezione FM.
2 Ruotare la manopola di controllo fino
a visualizzare il tipo di programma
desiderato, quindi premere la
manopola.
L’apparecchio avvia la ricerca di una
stazione che trasmette il tipo di
programma selezionato.
Ricezione delle stazioni
memorizzate
Impostazione delle funzioni AF
(frequenze alternative) e TA
(notiziari sul traffico)
Selezione del modo PTY (tipo di
programma)

13IT
Tipi di programmi
L’orologio viene regolato mediante i dati CT
della trasmissione RDS.
1 Impostare [SET CT-ON] in [GENERAL]
(pagina 22).
Riproduzione di un
dispositivo USB
Nelle presenti Istruzioni per l’uso il termine
“iPod” viene utilizzato come denominazione
generica per le funzioni iPod su iPod e
iPhone, salvo quando diversamente
specificato dal testo o dalle figure.
Per ulteriori informazioni sulla compatibilità
dell’iPod in uso, consultare “Informazioni su
iPod” (pagina 25) o visitare il sito Web di
assistenza indicato sulla retrocopertina.
È possibile utilizzare dispositivi USB di tipo
AOA (Android Open Accessory) 2.0, MSC
(memorizzazione di massa) e MTP
(protocollo di trasferimento dei file
multimediali)* compatibili con lo standard
USB. A seconda del dispositivo USB,
sull’apparecchio è possibile selezionare la
modalità Android o MSC/MTP.
Alcuni lettori di file multimediali digitali o
smartphone Android potrebbero richiedere
l’impostazione della modalità MTP.
* Per es. una chiavetta USB, un lettore di supporti
digitali, uno smartphone Android
Note
• Per ulteriori informazioni sulla compatibilità del
dispositivo USB in uso, visitare il sito di assistenza
riportato sulla retrocopertina.
• Gli smartphone con Android 4.1 o versioni
successive supportano Android Open Accessory
2.0 (AOA 2.0). Ciononostante, alcuni smartphone
potrebbero non supportare completamente AOA
2.0 pur avendo installato Android 4.1 o versioni
successive.
Per ulteriori informazioni sulla compatibilità dello
smartphone Android in uso, visitare il sito di
assistenza riportato sulla retrocopertina.
• Non è supportata la riproduzione dei file riportati
di seguito.
MP3/WMA/FLAC:
– file protetti da copyright
– file DRM (gestione dei diritti digitali)
– file audio multicanale
MP3/WMA:
– file con compressione senza perdita di dati
NEWS (notizie), AFFAIRS (attualità), INFO
(informazione), SPORT (programmi sportivi),
EDUCATE (programmi educativi), DRAMA
(teatro), CULTURE (programmi culturali),
SCIENCE (programmi scientifici), VARIED (varie),
POP M (musica pop), ROCK M (musica rock),
EASY M (musica d’ascolto), LIGHT M (musica
classica leggera), CLASSICS (musica classica
impegnata), OTHER M (altro tipo di musica),
WEATHER (meteo), FINANCE (finanza),
CHILDREN (programmi per bambini), SOCIAL
(società), RELIGION (religione), PHONE IN
(telefonate in diretta), TRAVEL (viaggi), LEISURE
(tempo libero), JAZZ (musica jazz), COUNTRY
(musica country), NATION M (musica
nazionale), OLDIES (musica evergreen), FOLK M
(musica folk), DOCUMENT (documentari)
Impostazione dell’orologio (CT)
Riproduzione

14IT
Prima di eseguire una connessione,
selezionare la modalità USB (modalità
Android o modalità MSC/MTP) a seconda del
dispositivo USB (pagina 22).
1 Collegare un dispositivo USB alla
porta USB (pagina 10).
La riproduzione si avvia
automaticamente.
Se un dispositivo è già collegato, per
avviare la riproduzione premere SRC per
selezionare [USB] (sul display viene
visualizzata la dicitura [IPD] quando l’iPod
è stato riconosciuto).
2 Regolare il volume sul presente
apparecchio.
Per interrompere la riproduzione
Tenere premuto OFF per 1 secondo.
Per rimuovere il dispositivo
Interrompere la riproduzione, quindi
rimuovere il dispositivo.
Precauzione per iPhone
Quando si connette un iPhone tramite USB,
il volume delle chiamate telefoniche è
controllato dall’iPhone, non
dall’apparecchio. Non aumentare
accidentalmente il volume sull’apparecchio
durante una chiamata in quanto alla fine
della chiamata il suono potrebbe essere
troppo forte.
Riproduzione di un
dispositivo BLUETOOTH
È possibile riprodurre contenuti da un
dispositivo connesso compatibile con
BLUETOOTH A2DP (Advanced Audio
Distribution Profile).
1 Eseguire la connessione BLUETOOTH
con il dispositivo audio (pagina 7).
Per selezionare il dispositivo audio,
premere MENU, quindi selezionare
[BLUETOOTH] [SET AUDIODEV]
(pagina 24).
2 Premere SRC per selezionare [BT
AUDIO].
3 Avviare la riproduzione dal
dispositivo audio.
4 Regolare il volume sul presente
apparecchio.
Note
• A seconda del dispositivo audio in uso, è possibile
che informazioni quali titolo, numero/durata della
traccia e stato di riproduzione non siano
visualizzate sull’apparecchio.
• Anche se la sorgente viene modificata
sull’apparecchio, la riproduzione del dispositivo
audio non si interrompe.
• [BT AUDIO] non viene visualizzato sul display
mentre l’applicazione “Sony | Music Center” è in
esecuzione tramite la funzione BLUETOOTH.
Per adeguare il livello del volume del
dispositivo BLUETOOTH ad altre
sorgenti
Avviare la riproduzione del dispositivo audio
BLUETOOTH selezionando un volume
moderato e impostare il consueto volume di
ascolto sull’apparecchio.
Premere MENU, quindi selezionare [SOUND]
[SET BTA VOL] (pagina 23).

15IT
Ricerca e riproduzione dei
brani
Non disponibile quando è collegato un
dispositivo USB in modalità Android.
1 Durante la riproduzione, premere più
volte (ripeti) o (ordine casuale)
per selezionare il modo di
riproduzione desiderato.
La riproduzione nel modo di riproduzione
selezionato potrebbe impiegare qualche
tempo ad avviarsi.
I modi di riproduzione disponibili variano a
seconda della sorgente audio selezionata.
Non disponibile quando è collegato un
dispositivo USB in modalità Android o un
iPod.
1 Durante la riproduzione di un
dispositivo USB, premere (sfoglia)*
per visualizzare l’elenco delle
categorie di ricerca.
Quando viene visualizzato l’elenco dei
brani, premere più volte (indietro) per
visualizzare la categoria di ricerca
desiderata.
* Durante la riproduzione USB, premere
(sfoglia) per più di 2 secondi per tornare
direttamente all’inizio dell’elenco delle
categorie.
2 Ruotare la manopola di controllo per
selezionare la categoria di ricerca
desiderata, quindi premerla per
confermare.
3 Ripetere il punto 2 per cercare il brano
desiderato.
La riproduzione si avvia
automaticamente.
Per annullare il modo Quick-BrowZer
Premere (sfoglia).
Non disponibile quando è collegato un
dispositivo USB in modalità Android o un
iPod.
1 Durante la riproduzione di un
dispositivo USB, premere (sfoglia).
2 Premere (SEEK +).
3 Ruotare la manopola di controllo per
selezionare la voce.
L’elenco viene saltato in incrementi pari al
10% del numero totale di voci.
4 Premere ENTER per tornare al modo
Quick-BrowZer.
Viene visualizzata la voce selezionata.
5 Ruotare la manopola di controllo per
selezionare la voce desiderata, quindi
premere la manopola.
La riproduzione si avvia
automaticamente.
Riproduzione ripetuta e in ordine
casuale
Ricerca di un brano in base al
nome (Quick-BrowZer™)
Ricerca mediante la modalità
salto delle voci (Modo Jump)

16IT
Per utilizzare un telefono cellulare,
connetterlo all’apparecchio. All’apparecchio
possono essere connessi due telefoni
cellulari. Per ulteriori informazioni,
consultare “Preparazione di un dispositivo
BLUETOOTH” (pagina 7).
Ricevere una chiamata
1 Premere CALL quando si riceve una
chiamata e la suoneria squilla.
La chiamata telefonica ha inizio.
Nota
La suoneria e la voce del chiamante vengono
emesse solo dai diffusori anteriori.
Per rifiutare una chiamata
Tenere premuto OFF per 1 secondo.
Per terminare una chiamata
Premere CALL di nuovo.
Inviare una chiamata
Quando è connesso un telefono cellulare
che supporta PBAP (Phone Book Access
Profile), è possibile inviare una chiamata
dalla rubrica o dal registro delle chiamate.
Se all’apparecchio sono collegati due
telefoni cellulari, selezionare uno dei
telefoni.
1 Premere CALL.
Quando all’apparecchio sono collegati
due telefoni cellulari, ruotare la
manopola di controllo per selezionare
uno dei telefoni, quindi premere la
manopola.
2 Ruotare la manopola di controllo per
selezionare [PHONE BOOK], quindi
premere la manopola.
3 Ruotare la manopola di controllo per
selezionare un’iniziale dall’elenco
delle iniziali, quindi premere la
manopola.
4 Ruotare la manopola di controllo per
selezionare un nome nell’elenco dei
nomi, quindi premere la manopola.
5 Ruotare la manopola di controllo per
selezionare un numero nell’elenco
dei numeri, quindi premere la
manopola.
La chiamata telefonica ha inizio.
1 Premere CALL.
Quando all’apparecchio sono collegati
due telefoni cellulari, ruotare la
manopola di controllo per selezionare
uno dei telefoni, quindi premere la
manopola.
2 Ruotare la manopola di controllo per
selezionare [RECENT CALL], quindi
premere la manopola.
Viene visualizzato il registro delle
chiamate.
3 Ruotare la manopola di controllo per
selezionare un nome o numero
telefonico nel registro delle chiamate,
quindi premere la manopola.
La chiamata telefonica ha inizio.
Chiamate in vivavoce
(esclusivamente tramite
BLUETOOTH)
Dalla rubrica
Dal registro delle chiamate

17IT
1 Premere CALL.
Quando all’apparecchio sono collegati
due telefoni cellulari, ruotare la
manopola di controllo per selezionare
uno dei telefoni, quindi premere la
manopola.
2 Ruotare la manopola di controllo per
selezionare [DIAL NUMBER], quindi
premere la manopola.
3 Ruotare la manopola di controllo per
immettere il numero telefonico,
quindi selezionare [ ] (spazio) e
premere ENTER*.
La chiamata telefonica ha inizio.
* Per passare da una cifra all’altra
dell’indicazione digitale, premere /
(SEEK –/+).
Nota
Sul display viene visualizzato [_] anziché [#].
1 Premere CALL.
Quando all’apparecchio sono collegati
due telefoni cellulari, ruotare la
manopola di controllo per selezionare
uno dei telefoni, quindi premere la
manopola.
2 Ruotare la manopola di controllo per
selezionare [REDIAL], quindi premere
la manopola.
La chiamata telefonica ha inizio.
È possibile inviare una chiamata
pronunciando il comando vocale
memorizzato in un telefono cellulare
connesso compatibile con la funzione di
composizione vocale.
1 Premere CALL.
Quando all’apparecchio sono collegati
due telefoni cellulari, ruotare la
manopola di controllo per selezionare
uno dei telefoni, quindi premere la
manopola.
2 Ruotare la manopola di controllo per
selezionare [VOICE DIAL], quindi
premere la manopola.
In alternativa, tenere premuto VOICE per
più di 2 secondi.
3 Pronunciare il comando vocale
memorizzato sul telefono cellulare.
La voce viene riconosciuta e la chiamata
viene inviata.
Per annullare la composizione vocale
Premere VOICE.
Operazioni disponibili
durante una chiamata
Per regolare il volume della suoneria
Ruotare la manopola di controllo mentre si
riceve una chiamata.
Per regolare il volume della voce del
chiamante
Ruotare la manopola di controllo durante la
chiamata.
Per regolare il volume per il chiamante
(regolazione del guadagno del
microfono)
Premere MIC.
Livelli di volume impostabili: [MIC-LOW],
[MIC-MID], [MIC-HI].
Per ridurre l’eco e il rumore (modo
annullamento eco/annullamento
rumore)
Tenere premuto MIC.
Modi impostabili: [EC/NC-1], [EC/NC-2].
Per passare dalla modalità vivavoce
alla modalità telefono
Per trasferire l’audio di una chiamata
dall’apparecchio al telefono cellulare e
viceversa, premere MODE durante la
chiamata.
Nota
A seconda del telefono cellulare in uso, questa
operazione potrebbe non essere disponibile.
Tramite composizione del numero
Tramite ricomposizione
Tramite comando vocale

18IT
Sony | Music Center con
iPhone/smartphone
Android™
È necessario scaricare la versione più
recente dell’applicazione “Sony | Music
Center” dall’App Store per iPhone o su
Google Play per uno smartphone Android.
Note
• Per motivi di sicurezza, rispettare le normative
locali e il codice della strada e non utilizzare
l’applicazione durante la guida.
• L’app “Sony | Music Center” consente di
controllare dispositivi audio Sony compatibili con
“Sony | Music Center” tramite l’iPhone/
smartphone Android.
• Ciò che può essere controllato tramite
“Sony | Music Center” varia a seconda del
dispositivo connesso.
• Per utilizzare le funzionalità “Sony | Music Center”,
fare riferimento alle informazioni dettagliate
disponibili sull’iPhone/smartphone Android.
• Per ulteriori informazioni su “Sony | Music Center”,
visitare l’URL seguente:
http://www.sony.net/smcqa/
• Visitare il sito Web indicato di seguito per
verificare i modelli di iPhone/smartphone Android
compatibili.
Per iPhone: accedere ad App Store
Per smartphone Android: accedere a Google Play
1 Stabilire una connessione
BLUETOOTH con l’iPhone/
smartphone Android (pagina 7).
Per selezionare il dispositivo audio,
premere MENU, quindi selezionare
[BLUETOOTH] [SET AUDIODEV]
(pagina 24).
2 Avviare l’applicazione “Sony | Music
Center”.
3 Premere MENU, ruotare la manopola
di controllo per selezionare [SONY
APP], quindi premere la manopola.
4 Ruotare la manopola di controllo per
selezionare [CONNECT], quindi
premere la manopola.
La connessione all’iPhone/smartphone
Android viene stabilita.
Per informazioni dettagliate sulle
operazioni sull’iPhone/smartphone
Android, consultare la guida
dell’applicazione.
Se viene visualizzato il numero di
dispositivo
Verificare che il numero sia visualizzato (per
es. 123456), quindi selezionare [Sì]
sull’iPhone/smartphone Android.
Per terminare la connessione
1
Premere MENU, ruotare la manopola di
controllo per selezionare [SONY APP], quindi
premere la manopola.
2 Ruotare la manopola di controllo per
selezionare [CONNECT], quindi premere la
manopola.
Selezione della sorgente o
applicazione
È possibile selezionare la sorgente o
applicazione di interesse sull’iPhone/
smartphone Android.
Per selezionare la sorgente
Premere SRC più volte. In alternativa,
premere SRC, ruotare la manopola di
controllo per selezionare la sorgente
desiderata, quindi premere ENTER.
Per visualizzare l’elenco di sorgenti
Premere SRC.
Annuncio di SMS tramite guida
vocale (solo smartphone Android)
I messaggi SMS sono letti automaticamente
tramite i diffusori dell’auto quando sono
ricevuti.
Per informazioni dettagliate sulle
impostazioni, consultare la guida
dell’applicazione.
Funzioni utili
Stabilire una connessione con
Sony | Music Center

19IT
Risposta a messaggi SMS (solo
smartphone Android)
È possibile rispondere a un messaggio
toccando l’icona di risposta.
1 Attivare l’applicazione “Sony | Music
Center”, quindi toccare l’icona [Reply]
(rispondi).
Nell’applicazione “Sony | Music Center” viene
visualizzata la schermata di immissione di
messaggi.
2 Immettere un messaggio di risposta per
mezzo del riconoscimento vocale.
Nell’applicazione “Sony | Music Center” viene
visualizzato un elenco di possibili messaggi di
risposta.
3 Ruotare la manopola di controllo per
selezionare il messaggio di interesse, quindi
premere la manopola.
Il messaggio viene inviato.
Impostazioni di audio e
visualizzazione
È possibile regolare le impostazioni relative
ad audio e visualizzazione tramite l’iPhone/
smartphone Android.
Per informazioni dettagliate sulle
impostazioni, consultare la guida
dell’applicazione.
Utilizzo del riconoscimento
vocale (solo smartphone
Android)
1 Tenere premuto VOICE per attivare il
riconoscimento vocale.
2 Pronunciare il comando vocale di
interesse in direzione del microfono.
Per disattivare il riconoscimento vocale
Premere VOICE.
Note
• In alcuni casi il riconoscimento vocale potrebbe
non essere disponibile.
• A seconda delle prestazioni dello smartphone
Android connesso, il riconoscimento vocale
potrebbe non funzionare correttamente.
• Utilizzare il riconoscimento vocale in situazioni in
cui disturbi come il rumore del motore sono ridotti
al minimo.
Utilizzo di Siri Eyes Free
Siri Eyes Free consente di utilizzare un
iPhone senza usare le mani, semplicemente
parlando nel microfono. La funzione
richiede che l’iPhone sia connesso
all’apparecchio tramite BLUETOOTH. La
disponibilità è limitata agli iPhone 4s e
modelli successivi. Verificare che sull’iPhone
in uso sia installata la versione di iOS più
recente.
Prima di utilizzare questa funzione è
necessario completare la registrazione
BLUETOOTH e le configurazioni della
connessione per l’iPhone. Per ulteriori
informazioni, consultare “Preparazione di un
dispositivo BLUETOOTH” (pagina 7). Per
selezionare l’iPhone, premere MENU, quindi
selezionare [BLUETOOTH] [SET AUDIODEV]
(pagina 24).
1 Attivare la funzione Siri sull’iPhone.
Per informazioni dettagliate consultare le
istruzioni per l’uso fornite con l’iPhone.
2 Tenere premuto VOICE per più di
2 secondi.
Viene visualizzata la schermata dei
comandi vocali.
3 Dopo che l’iPhone ha emesso un
segnale acustico, parlare in direzione
del microfono.
L’iPhone emette un altro segnale
acustico, quindi Siri inizia a rispondere.
Per disattivare Siri Eyes Free
Premere VOICE.
Note
• A seconda delle condizioni in cui viene utilizzato, è
possibile che l’iPhone non riconosca la voce. (per
esempio se viene utilizzato in un’automobile in
movimento).
• È possibile che Siri Eyes Free non funzioni
correttamente o che si verifichino ritardi nella
risposta in aree in cui il segnale dell’iPhone è
scarso.
• A seconda delle condizioni operative dell’iPhone,
è possibile che Siri Eyes Free non funzioni
correttamente o si chiuda all’improvviso.
• Se si riproduce una traccia tramite un iPhone
utilizzando la connessione audio BLUETOOTH,
quando la riproduzione della traccia tramite
BLUETOOTH ha inizio, Siri Eyes Free si chiude
automaticamente e l’apparecchio viene
automaticamente impostato sulla sorgente audio
BLUETOOTH.

20IT
• Quando Siri Eyes Free viene attivata durante la
riproduzione audio, è possibile che l’apparecchio
venga impostato automaticamente sulla sorgente
audio BLUETOOTH anche se non è stata specificata
la traccia da riprodurre.
• Quando l’iPhone viene collegato alla porta USB, è
possibile che Siri Eyes Free non funzioni
correttamente o si chiuda all’improvviso.
• Quando l’iPhone viene collegato all’apparecchio
tramite USB, non attivare Siri sull’iPhone. È
possibile che Siri Eyes Free non funzioni
correttamente o si chiuda all’improvviso.
• Mentre Siri Eyes Free è attiva, i suoni audio non
vengono emessi.
Disattivazione del modo
DEMO
È possibile disattivare il display di
dimostrazione che viene visualizzato
quando la sorgente è disattivata ed è
visualizzato l’orologio.
1 Premere MENU, ruotare la manopola
di controllo per selezionare
[GENERAL], quindi premere la
manopola.
2 Ruotare la manopola di controllo per
selezionare [SET DEMO], quindi
premere la manopola.
3 Ruotare la manopola di controllo per
selezionare [SET DEMO-OFF], quindi
premere la manopola.
L’impostazione è completata.
4 Premere due volte (indietro).
Il display torna al modo di ricezione/
riproduzione normale.
Operazioni di base delle
impostazioni
È possibile impostare voci nelle seguenti
categorie di impostazioni:
Impostazioni generali (GENERAL),
impostazioni audio (SOUND), impostazioni
di visualizzazione (DISPLAY), impostazioni
BLUETOOTH (BLUETOOTH), impostazioni di
Sony | Music Center (SONY APP)
1 Premere MENU.
2 Ruotare la manopola di controllo per
selezionare la categoria di
impostazione, quindi premere la
manopola.
Le voci che possono essere impostate
sono diverse a seconda della sorgente e
delle impostazioni.
Impostazioni

21IT
3 Ruotare la manopola di controllo per
selezionare le opzioni, quindi
premere la manopola.
Per tornare al display precedente
Premere (indietro).
Impostazioni generali
(GENERAL)
AREA (area)
Consente di specificare l’area/la regione
in cui utilizzare questo apparecchio:
[EUROPE], [RUSSIA].
Se viene modificata l’area/la regione
impostata, l’apparecchio si azzera e
quindi viene visualizzato l’orologio.
(Disponibile solo quando la sorgente è
disattivata ed è visualizzato l’orologio.)
DEMO (dimostrazione)
Consente di attivare/disattivare la
dimostrazione: [ON], [OFF].
CLOCK-ADJ (regolazione dell’orologio)
(pagina 7)
CAUT ALM (segnale di avvertimento)
Consente di attivare/disattivare il segnale
di avvertimento: [ON], [OFF] (pagina 6).
(Disponibile solo quando la sorgente è
disattivata ed è visualizzato l’orologio.)
BEEP (segnale acustico)
Consente di attivare/disattivare il segnale
acustico: [ON], [OFF].
AUTO OFF (spegnimento automatico)
Consente di spegnere automaticamente
l’apparecchio dopo un intervallo di tempo
prestabilito dalla disattivazione e mentre
è visualizzato l’orologio (ovvero tenere
premuto OFF per 1 secondo): [ON] (30
minuti), [OFF].
STEERING (telecomando da volante)
Consente di registrare/azzerare le
impostazioni del telecomando da volante.
(Disponibile solo quando la sorgente è
disattivata ed è visualizzato l’orologio.)
STR CONTROL (controllo dallo sterzo)
Consente di selezionare il modo di
immissione del telecomando collegato.
Per prevenire problemi di funzionamento,
prima dell’uso accertarsi di fare
corrispondere il modo di immissione con
il telecomando collegato.
CUSTOM (personalizzato)
Modo di immissione per il
telecomando da volante
PRESET (preselezione)
Modo di immissione per il
telecomando cablato escluso il
telecomando da volante (Selezionato
automaticamente quando viene
eseguito [RESET CUSTOM].)
EDIT CUSTOM (modifica
personalizzazioni)
Consente di registrare le funzioni
(SOURCE, ATT, VOL +/–, SEEK +/–, VOICE,
ON HOOK, OFF HOOK) sul telecomando
da volante:
Ruotare la manopola di controllo per
selezionare la funzione che si desidera
assegnare al telecomando da volante,
quindi premere la manopola.
Mentre [REGISTER] lampeggia, tenere
premuto il tasto sul telecomando da
volante che si desidera assegnare alla
funzione. Una volta completata la
registrazione, viene visualizzato
[REGISTERED].
Per registrare altre funzioni, ripetere i
passi e .
(Disponibile solo se [STR CONTROL] è
impostato su [CUSTOM].)
RESET CUSTOM (azzeramento
personalizzazioni)
Consente di azzerare le impostazioni del
telecomando da volante: [YES], [NO].
(Disponibile solo se [STR CONTROL] è
impostato su [CUSTOM].)
Note
• Durante la definizione delle impostazioni, sono
disponibili soltanto i tasti sull’apparecchio. Per
ragioni di sicurezza, parcheggiare l’auto prima
di definire queste impostazioni.
• Se si verifica un errore durante la registrazione,
tutte le informazioni registrate in precedenza
rimangono memorizzate. Riavviare la
registrazione dalla funzione con cui si è
verificato l’errore.
• Questa funzione potrebbe non essere
disponibile su alcuni veicoli. Per ulteriori
informazioni sulla compatibilità del veicolo in
uso, visitare il sito Web relativo all’assistenza
riportato sulla retrocopertina.

22IT
USB MODE (modo USB)
Consente di modificare la modalità USB:
[ANDROID], [MSC/MTP].
(Disponibile solo se è selezionata la
sorgente USB.)
CT (ora)
Consente di attivare/disattivare la
funzione CT: [ON], [OFF].
AF/TA (frequenze alternative/notiziari sul
traffico)
Consente di selezionare l’impostazione
frequenze alternative (AF) e notiziari sul
traffico (TA): [AF-ON], [TA-ON],
[AF/TA-ON], [AF/TA-OFF].
REGIONAL (regionale)
Consente di limitare la ricezione a una
regione specifica: [ON], [OFF].
(Disponibile solo durante la ricezione FM.)
BTM (memorizzazione automatica delle
emittenti con sintonia migliore) (pagina 11)
(Disponibile solo se è selezionato il
sintonizzatore.)
FIRMWARE (firmware)
(Disponibile solo quando la sorgente è
disattivata ed è visualizzato l’orologio.)
Consente di controllare/aggiornare la
versione del firmware. Per ulteriori
informazioni, visitare il sito di assistenza
riportato sulla retrocopertina.
FW VERSION (versione del firmware)
Visualizza la versione del firmware
corrente.
FW UPDATE (aggiornamento del
firmware)
Avvia la procedura di aggiornamento del
firmware: [YES], [NO].
L’aggiornamento del firmware necessita
di alcuni minuti per essere completato.
Durante l’aggiornamento, non impostare
la chiave di accensione sulla posizione
OFF e non rimuovere il dispositivo USB.
Impostazioni audio (SOUND)
Questo menu di impostazioni non è
disponibile quando la sorgente è disattivata
ed è visualizzato l’orologio.
EQ10 PRESET (EQ10 preselezionato)
Consente di selezionare una curva
dell’equalizzatore scegliendo tra 10 curve
dell’equalizzatore oppure di disattivare la
curva:
[OFF], [R&B], [ROCK], [POP], [HIP-HOP],
[EDM], [JAZZ], [SOUL], [COUNTRY],
[KARAOKE]*, [CUSTOM].
È possibile memorizzare l’impostazione
della curva dell’equalizzatore per
ciascuna sorgente.
* [KARAOKE] riduce l’audio vocale, ma non è in
grado di rimuoverlo completamente durante la
riproduzione. Inoltre, l’uso di un microfono
non è supportato.
EQ10 CUSTOM (EQ10 personalizzato)
Consente di impostare [CUSTOM] di EQ10.
Impostazioni della curva
dell’equalizzatore: [BAND1] – [BAND10]
(32 Hz, 63 Hz, 125 Hz, 250 Hz, 500 Hz,
1 kHz, 2 kHz, 4 kHz, 8 kHz, 16 kHz).
Il livello del volume può essere regolato in
incrementi di 1 dB, da -6 dB a +6 dB.
BALANCE (bilanciamento)
Consente di regolare il bilanciamento
dell’audio: [RIGHT-15] – [CENTER] –
[LEFT-15].
FADER (attenuatore)
Consente di regolare il livello relativo:
[FRONT-15] – [CENTER] – [REAR-15].

23IT
S.WOOFER (subwoofer)
SW LEVEL (livello subwoofer)
Consente di regolare il volume del
subwoofer:
[+6 dB] – [0 dB] – [-6 dB].
([ATT] viene visualizzato con il valore
minimo.)
SW PHASE (fase del subwoofer)
Consente di selezionare la fase del
subwoofer: [SUB NORM], [SUB REV].
LPF FREQ (frequenza filtro passa basso)
Consente di selezionare la frequenza di
taglio del subwoofer: [80Hz], [100Hz],
[120Hz].
HPF FREQ (frequenza filtro passa alto)
Consente di selezionare la frequenza di
taglio del diffusore anteriore/posteriore:
[OFF], [80Hz], [100Hz], [120Hz].
AUX VOL (livello volume AUX)
Consente di regolare il livello del volume
di ciascun apparecchio ausiliario
collegato: [+18 dB] – [0 dB] – [-8 dB].
Questa impostazione elimina la necessità
di regolare il livello del volume tra
sorgenti diverse.
(Disponibile solo se è selezionato AUX.)
BTA VOL (livello del volume dell’audio
BLUETOOTH)
Consente di regolare il livello del volume
di ciascun dispositivo BLUETOOTH
connesso: [+6 dB] – [0 dB] – [-6 dB].
Questa impostazione elimina la necessità
di regolare il livello del volume tra
sorgenti diverse.
(Disponibile solo quando è selezionato
l’audio BT o un’applicazione.)
Impostazioni di
visualizzazione (DISPLAY)
DIMMER (attenuatore di luminosità)
Consente di modificare la luminosità del
display:
[OFF], [ON], [AT] (automatico), [CLK]
(orologio).
([AT] è disponibile solo quando il
conduttore di controllo dell’illuminazione
è collegato e la luce dell’abitacolo è
accesa.)
Per impostare questa funzione in modo
che sia attiva solo durante il periodo di
tempo impostato, selezionare [CLK],
quindi impostare l’ora di inizio e di fine.
– Per impostare la luminosità quando la
funzione di attenuazione di luminosità è
attivata:
Impostare [DIMMER] su [ON], quindi
regolare [BRIGHTNESS].
– Per impostare la luminosità quando la
funzione di attenuazione di luminosità è
disattivata:
Impostare [DIMMER] su [OFF], quindi
regolare [BRIGHTNESS].
L’impostazione della luminosità regolata
è salvata e viene applicata quando la
funzione di attenuazione della luminosità
viene attivata o disattivata.
BRIGHTNESS (luminosità)
Consente di regolare la luminosità del
display. Il livello di luminosità è
regolabile: [1] – [10].
BUTTON-C (colore pulsanti)
Consente di impostare un colore
predefinito o personalizzato per i
pulsanti.
COLOR (colore)
Consente di selezionare uno dei 15 colori
preimpostati o 1 colore personalizzato.
CUSTOM-C (colore personalizzato)
Consente di registrare un colore
personalizzato per i pulsanti.
RGB RED, RGB GRN, RGB BLUE
Gamma di regolazione dei colori:
[0] – [32] ([0] non può essere impostato
per tutte le gamme di colore).

24IT
DSPL-C (colore display)
Consente di impostare un colore
predefinito o personalizzato per il display.
COLOR (colore)
Consente di selezionare uno dei 15 colori
preimpostati o 1 colore personalizzato.
CUSTOM-C (colore personalizzato)
Consente di registrare un colore
personalizzato per il display.
RGB RED, RGB GRN, RGB BLUE
Gamma di regolazione dei colori:
[0] – [32] ([0] non può essere impostato
per tutte le gamme di colore).
SND SYNC (sincronizzazione audio)
Consente di attivare la sincronizzazione
dell’illuminazione con l’audio: [ON], [OFF].
AUTO SCR (scorrimento automatico)
Consente di fare scorrere
automaticamente le voci composte da
molti caratteri: [ON], [OFF].
(Non disponibile quando è selezionato
AUX o il sintonizzatore.)
Impostazioni BLUETOOTH
(BLUETOOTH)
PAIRING (associazione) (pagina 8)
Consente di connettere fino a due
dispositivi BLUETOOTH: [DEVICE 1],
[DEVICE 2].
Una volta completata l’associazione,
[DEVICE 1] o [DEVICE 2] viene sostituito dal
nome del dispositivo associato.
AUDIODEV (dispositivo audio)
Consente di selezionare il dispositivo
audio.
[*] viene visualizzato sul dispositivo
associato con [DEVICE 1] o sull’attuale
dispositivo audio compatibile con A2DP.
RINGTONE (suoneria)
Consente di impostare lo squillo della
suoneria sull’apparecchio o sul telefono
cellulare connesso: [1] (apparecchio), [2]
(telefono cellulare).
AUTO ANS (risposta automatica)
Consente di impostare la risposta
automatica a una chiamata in arrivo da
parte dell’apparecchio: [OFF], [1] (circa 3
secondi), [2] (circa 10 secondi).
AUTOPAIR (associazione automatica)
Consente di avviare l’associazione
BLUETOOTH automatica quando un
dispositivo con iOS 5.0 o versione
successiva viene collegato tramite USB:
[ON], [OFF].
BT SIGNL (segnale BLUETOOTH) (pagina 9)
Consente di attivare/disattivare la
funzione BLUETOOTH.
BT INIT (inizializzazione di BLUETOOTH)
Consente di inizializzare tutte le
impostazioni relative alla funzione
BLUETOOTH (informazioni di
associazione, informazioni sul dispositivo,
ecc.): [YES], [NO].
Inizializzare tutte le impostazioni prima di
gettare via l’apparecchio.
(Disponibile solo quando la sorgente è
disattivata ed è visualizzato l’orologio.)
Impostazioni di
Sony | Music Center (SONY
APP)
AUTO LAUNCH (avvio automatico)
Consente di attivare l’avvio automatico di
“Sony | Music Center”: [ON], [OFF].
Quando è selezionato [ON], “Sony | Music
Center” si connette automaticamente una
volta completata la connessione
BLUETOOTH.
CONNECT (connessione)
Consente di attivare e terminare la
funzione “Sony | Music Center”
(connessione).

25IT
Aggiornamento del
firmware
Per aggiornare il firmware, visitare il sito
dedicato all’assistenza riportato sulla
retrocopertina e seguire le istruzioni online.
Nota
Durante l’aggiornamento, non rimuovere il
dispositivo USB.
Precauzioni
• Non lasciare il pannello anteriore o
dispositivi audio sul cruscotto.
• Quando l’apparecchio è acceso, l’antenna
elettrica si estende automaticamente.
• Non bagnare l’apparecchio.
•È possibile collegare i seguenti modelli di
iPod. Aggiornare il software dei dispositivi
iPod all’ultima versione prima di utilizzarli.
Modelli di iPhone/iPod compatibili
• L’uso dell’adesivo Made for Apple indica
che un accessorio è stato progettato per
essere collegato specificatamente al
prodotto Apple indicato ed è stato
certificato dallo sviluppatore per soddisfare
gli standard di prestazioni di Apple. Apple
non si assume alcuna responsabilità in
merito al funzionamento del dispositivo o
alla conformità con gli standard normativi e
di sicurezza.
Nota: l’uso dell’accessorio con un prodotto
Apple può influire sulle prestazioni
wireless.
Informazioni aggiuntive
Ordine di riproduzione dei file
audio
Cartella (album)
File audio (brano)
Informazioni su iPod
Modello
compatibile
Bluetooth® USB
iPhone X
iPhone 8
iPhone 8 Plus
iPhone 7
iPhone 7 Plus
iPhone SE
iPhone 6s
iPhone 6s Plus
iPhone 6
iPhone 6 Plus
iPhone 5s
iPhone 5c
iPhone 5
iPhone 4s
iPod touch
(6
a
generazione)
iPod touch
(5
a
generazione)
iPod nano
(7
a
generazione)

26IT
Per eventuali domande o problemi
riguardanti l’apparecchio non trattati nel
presente manuale, rivolgersi al più vicino
rivenditore Sony.
Manutenzione
Pulizia dei connettori
Evitare di toccare i connettori direttamente.
Se i connettori tra l’apparecchio e il pannello
anteriore sono sporchi, l’apparecchio
potrebbe non funzionare correttamente. Per
evitare questo problema, rimuovere il
pannello anteriore (pagina 6), quindi pulire i
connettori con un cotton fioc. Non esercitare
forza eccessiva. Diversamente, i connettori
potrebbero venire danneggiati.
Nota
Per motivi di sicurezza, non rimuovere il pannello
anteriore durante la guida.
Caratteristiche tecniche
Sintonizzatore
FM
Gamma di frequenze:
Quando [AREA] è impostato su [EUROPE]:
87,5 MHz – 108,0 MHz
Quando [AREA] è impostato su [RUSSIA]:
FM1/FM2: 87,5 MHz – 108,0 MHz
(incrementi di 50 kHz)
FM3: 65 MHz – 74 MHz
(incrementi di 30 kHz)
Sensibilità utilizzabile: 8 dBf
Rapporto segnale-rumore: 73 dB
Separazione: 50 dB a 1 kHz
MW/LW
Gamma di frequenze:
MW: 531 kHz – 1.602 kHz
LW: 153 kHz – 279 kHz
Sensibilità: MW: 26 V, LW: 50 V
Lettore USB
Interfaccia: USB (Full speed)
Corrente massima: 1 A
Numero massimo di cartelle e file
riconoscibili:
Cartelle (album): 256
File (brani) per cartella: 256
Protocollo compatibile Android Open
Accessory (AOA): 2.0
Codec corrispondenti:
MP3 (.mp3)
Velocità di trasmissione:
8 kbps – 320 kbps (Supporta VBR
(Variable Bit Rate, velocità di
trasmissione variabile))
Frequenza di campionamento:
16 kHz – 48 kHz
WMA (.wma)
Velocità di trasmissione:
32 kbps – 192 kbps (Supporta VBR
(Variable Bit Rate, velocità di
trasmissione variabile))
Frequenza di campionamento:
32 kHz, 44,1 kHz, 48 kHz
FLAC (.flac)
Profondità in bit: 16 bit, 24 bit
Frequenza di campionamento:
44,1 kHz, 48 kHz
File system supportati: FAT16, FAT32

27IT
Comunicazione wireless
Sistema di comunicazione:
standard BLUETOOTH versione 3.0
Uscita:
standard BLUETOOTH classe di potenza 2
(condotta max. +1 dBm)
Portata massima di comunicazione:
circa 10 m senza ostacoli alla vista*
1
Banda di frequenza:
2,4 GHz
(2,4000 GHz – 2,4835 GHz)
Metodo di modulazione: FHSS
Profili BLUETOOTH compatibili*
2
:
A2DP (Advanced Audio Distribution
Profile) 1.3
AVRCP (Audio Video Remote Control
Profile) 1.3
HFP (Handsfree Profile) 1.6
PBAP (Phone Book Access Profile)
SPP (Serial Port Profile)
Codec corrispondenti:
SBC (.sbc), AAC (.m4a)
*1 La portata effettiva varia in base a fattori quali
ostacoli tra i dispositivi, campi magnetici in
prossimità di un forno a microonde, elettricità
statica, sensibilità di ricezione, prestazioni
dell’antenna, sistema operativo, applicazioni
software e così via.
*2 I profili dello standard BLUETOOTH indicano lo
scopo della comunicazione BLUETOOTH tra
dispositivi.
Comunicazione NFC
Banda di frequenza: 13,56 MHz
Amplificatore di potenza
Uscita: uscite diffusori
Impedenza diffusori: 4 – 8
Potenza di uscita massima: 55 W × 4 (a 4 )
Generali
Requisiti di alimentazione: batteria auto da
12 V CC (massa negativa)
Consumo di corrente nominale: 10 A
Dimensioni:
circa 178 mm × 50 mm × 177 mm (l/a/p)
Dimensioni di montaggio:
circa 182 mm × 53 mm × 160 mm (l/a/p)
Peso: circa 0,8 kg
Contenuto della confezione:
Unità principale (1)
Microfono (1)
Elementi per l’installazione e i
collegamenti (1 set)
Per ulteriori informazioni, rivolgersi al
rivenditore.
Il design e le caratteristiche tecniche sono
soggetti a modifiche senza preavviso.
Bluetooth® e i relativi loghi sono marchi di fabbrica
registrati di proprietà di Bluetooth SIG, Inc. L’uso di
tali marchi è concesso in licenza a Sony Corporation.
Tutti gli altri marchi di fabbrica o marchi di fabbrica
registrati sono di proprietà delle rispettive aziende.
Il contrassegno N è un marchio di fabbrica o un
marchio di fabbrica registrato di NFC Forum, Inc.
negli Stati Uniti e in altre nazioni.
Windows Media è un marchio di fabbrica registrato
o marchio di fabbrica di Microsoft Corporation negli
Stati Uniti e/o in altri paesi.
Questo prodotto è tutelato da specifici diritti di
proprietà intellettuale di Microsoft Corporation.
L’uso o la distribuzione della tecnologia in
questione al di fuori del presente prodotto sono
vietati senza apposita licenza concessa da Microsoft
o da una filiale Microsoft autorizzata.
Apple, iPhone, iPod, iPod nano, iPod touch e Siri
sono marchi di Apple Inc., registrati negli U.S.A. e in
altri paesi. App Store è un marchio di servizio di
Apple Inc.
IOS è un marchio di fabbrica o un marchio di
fabbrica registrato di Cisco negli Stati Uniti e in altri
paesi ed è utilizzato su licenza.
Google, Google Play e Android sono marchi di
Google LLC.
libFLAC
Copyright (C) 2000-2009 Josh Coalson
Copyright (C) 2011-2013 Xiph.Org Foundation
Sono permessi la ridistribuzione e l’utilizzo in forma
sorgente o binaria, con o senza modifiche, solo se
vengono rispettate le seguenti condizioni:
– Le ridistribuzioni del codice sorgente devono
mantenere la nota sul copyright riportata qui
sopra, l’elenco delle condizioni e la dichiarazione
di responsabilità limitata che segue.
– Le ridistribuzioni in forma binaria devono
riprodurre la nota sul copyright riportata qui
sopra, l’elenco delle condizioni e la dichiarazione
di responsabilità limitata che segue nella
documentazione e/o nell’altro materiale fornito
con la distribuzione.
Informazioni su copyright

28IT
– Il nome della Fondazione Xiph.org e i nomi dei
relativi collaboratori non potranno essere utilizzati
per sostenere o promuovere prodotti derivati da
questo software, senza previa autorizzazione
scritta.
IL SOFTWARE È FORNITO DAI DETENTORI DEL
COPYRIGHT E DAI COLLABORATORI “COSÌ COM’È” E
NON SI RICONOSCE ALCUNA ALTRA GARANZIA
ESPRESSA O IMPLICITA, INCLUSE, A TITOLO
ESEMPLIFICATIVO, GARANZIE IMPLICITE DI
COMMERCIABILITÀ E IDONEITÀ PER UN FINE
PARTICOLARE. IN NESSUN CASO LA FONDAZIONE O I
RELATIVI COLLABORATORI POTRANNO ESSERE
RITENUTI RESPONSABILI PER DANNI DIRETTI,
INDIRETTI, INCIDENTALI, SPECIALI, PUNITIVI O
CONSEQUENZIALI (INCLUSI, A TITOLO
ESEMPLIFICATIVO, DANNI DERIVANTI DALLA
NECESSITÀ DI SOSTITUIRE BENI E SERVIZI, DANNI
PER MANCATO UTILIZZO, PERDITA DI DATI O
MANCATO GUADAGNO, INTERRUZIONE
DELL’ATTIVITÀ), IMPUTABILI A QUALUNQUE CAUSA E
INDIPENDENTEMENTE DALLA TEORIA DELLA
RESPONSABILITÀ, SIA NELLE CONDIZIONI PREVISTE
DAL CONTRATTO CHE IN CASO DI “STRICT LIABILITY”,
ERRORI (INCLUSI NEGLIGENZA O ALTRO), DERIVANTI
O COMUNQUE CORRELATI ALL’UTILIZZO DEL
SOFTWARE, ANCHE QUALORA SIANO STATI
INFORMATI DELLA POSSIBILITÀ DEL VERIFICARSI DI
TALI DANNI.
Guida alla soluzione dei
problemi
Fare riferimento alla seguente lista di verifica
per risolvere la maggior parte dei problemi
che si potrebbero verificare durante l’uso di
questo apparecchio.
Prima di esaminare l’elenco che segue,
verificare le procedure di collegamento e
d’uso dell’apparecchio.
Per informazioni sull’utilizzo del fusibile e
sulla rimozione dell’apparecchio dal
cruscotto, consultare “Collegamenti e
installazione” (pagina 34).
Se il problema persiste, visitare il sito di
assistenza riportato sulla retrocopertina.
Generali
Non viene emesso alcun suono o il
volume dell’audio è molto basso.
La posizione dell’attenuatore [FADER] non
è appropriata per un sistema a 2 diffusori.
Il volume dell’apparecchio e/o del
dispositivo collegato è molto basso.
– Aumentare il volume dell’apparecchio e
del dispositivo collegato.
Non viene emesso alcun segnale acustico.
Un amplificatore di potenza opzionale è
collegato e l’amplificatore incorporato non
viene utilizzato.
Le stazioni memorizzate e l’ora esatta
sono cancellate.
Si è bruciato il fusibile.
Quando si cambia la posizione della
chiave di accensione, viene emesso un
disturbo.
I cavi non sono collegati correttamente al
connettore di alimentazione accessoria
dell’auto.
Durante la riproduzione o la ricezione,
viene attivato il modo di dimostrazione.
Se non viene eseguita alcuna operazione
per 5 minuti quando è impostata la
funzione [DEMO-ON], viene attivato il
modo di dimostrazione.
– Impostare [DEMO-OFF] (pagina 21).
Il display viene disattivato/non viene
visualizzato nella finestra del display.
I connettori sono sporchi (pagina 26).
Il display/l’illuminazione lampeggia.
L’alimentazione non è sufficiente.
– Verificare che la batteria dell’auto
fornisca sufficiente alimentazione
all’apparecchio. (L’alimentazione
richiesta è 12 V CC.)
I tasti per le operazioni non funzionano.
Premere DSPL e (indietro)/MODE per
più di 2 secondi per azzerare
l’apparecchio.
Tutti i dati memorizzati saranno cancellati.

29IT
Ricezione radiofonica
La ricezione radiofonica è bassa.
Sono presenti scariche statiche.
Collegare saldamente l’antenna.
Non è possibile sintonizzare da 65 MHz a
74 MHz in FM3.
[AREA] è impostato su [EUROPE].
– Impostare [AREA] su [RUSSIA]
(pagina 21).
RDS
Impossibile ricevere i servizi RDS (quando
[AREA] è impostato su [RUSSIA]).
È selezionato FM3.
–Selezionare FM1 o FM2.
I servizi RDS non sono disponibili nella
regione corrente.
Dopo alcuni secondi di ascolto, viene
avviata la funzione SEEK.
La stazione non è TP oppure il segnale è
debole.
– Disattivare il modo TA (pagina 12).
Non viene trasmesso alcun notiziario sul
traffico.
Attivare il modo TA (pagina 12).
La stazione non trasmette notiziari sul
traffico pur essendo una stazione TP.
– Sintonizzarsi su un’altra stazione.
Il modo PTY visualizza [- - - - - - - -].
La stazione attuale non è una stazione
RDS oppure la ricezione radiofonica è
bassa.
Il nome del servizio programmi
lampeggia.
Non esiste alcuna frequenza alternativa
per la stazione corrente.
– Premere (SEEK –/+) durante il
lampeggiamento del nome del servizio
programmi. Viene visualizzato [PI SEEK]
e l’apparecchio avvia la ricerca di un’altra
frequenza con gli stessi dati PI
(identificativo programma).
Riproduzione mediante un
dispositivo USB
Un dispositivo USB necessita di un tempo
maggiore per avviare la riproduzione.
Il dispositivo USB contiene file con una
struttura ad albero complessa.
Non è possibile riprodurre un file audio.
Per informazioni sui formati supportati,
consultare “Caratteristiche tecniche”
(pagina 26).
Se continua a risultare impossibile
riprodurre il file audio, consultare le
istruzioni per l’uso in dotazione con il
dispositivo USB oppure contattare il
produttore del dispositivo USB.
Impossibile eseguire le operazioni per
saltare un album, saltare voci (Modo
Jump) e cercare un brano in base al nome
(Quick-BrowZer).
Impostare [USB MODE] su [MSC/MTP]
(pagina 22).
L’audio non viene emesso durante la
riproduzione in modalità Android.
Controllare lo stato dell’applicazione per la
riproduzione audio sullo smartphone
Android.
Funzione NFC
Non è possibile stabilire la connessione
One touch (NFC).
Se lo smartphone non risponde al tocco.
– Verificare che la funzione NFC sullo
smartphone sia stata attivata.
– Avvicinare l’area con il contrassegno N
dello smartphone all’area con il
contrassegno N sull’apparecchio.
– Se lo smartphone è dotato di custodia,
rimuoverla.
La sensibilità di ricezione NFC dipende dal
dispositivo.
Se più tentativi di stabilire una
connessione One touch con lo
smartphone non vanno a buon fine,
stabilire la connessione BLUETOOTH
manualmente.

30IT
Funzione BLUETOOTH
Il dispositivo da connettere non rileva
l’apparecchio.
Impostare l’apparecchio in modalità
attesa di associazione prima di eseguire
l’associazione.
Mentre è connesso a due dispositivi
BLUETOOTH l’apparecchio non può essere
rilevato da un altro dispositivo.
– Terminare una delle due connessioni ed
eseguire la ricerca dell’apparecchio da
un altro dispositivo.
Una volta che l’associazione al dispositivo
è stata completata, attivare l’uscita del
segnale BLUETOOTH (pagina 9).
Non è possibile stabilire una connessione.
La connessione è controllata da un lato
(l’apparecchio o il dispositivo
BLUETOOTH), non da entrambi.
– Stabilire la connessione all’apparecchio
da un dispositivo BLUETOOTH o
viceversa.
Il nome del dispositivo rilevato non viene
visualizzato.
A seconda dello stato dell’altro
dispositivo, può non essere possibile
ottenerne il nome.
La suoneria non viene emessa.
Regolare il volume ruotando la manopola
di controllo mentre si riceve una chiamata.
A seconda del dispositivo connesso, è
possibile che la suoneria non venga
inviata correttamente.
– Impostare [RINGTONE] su [1] (pagina 24).
I diffusori anteriori non sono collegati
all’apparecchio.
– Collegare i diffusori anteriori
all’apparecchio. La suoneria viene
emessa solo dai diffusori anteriori.
La voce del chiamante non si sente.
I diffusori anteriori non sono collegati
all’apparecchio.
– Collegare i diffusori anteriori
all’apparecchio. La voce del chiamante
viene emessa solo dai diffusori anteriori.
Il chiamante sostiene che il volume è
troppo basso o alto.
Regolare il volume secondo necessità
utilizzando la regolazione del guadagno
del microfono (pagina 17).
Durante le conversazioni telefoniche si
verificano fenomeni di eco o disturbi.
Abbassare il volume.
Impostare il modo EC/NC su [EC/NC-1] o
[EC/NC-2] (pagina 17).
Se il livello di rumore ambientale diverso
dal suono della chiamata è alto, tentare di
ridurre tale rumore.
Per esempio, chiudere il finestrino se è
aperto e i rumori della strada sono troppo
alti. Se il condizionatore d’aria è rumoroso,
abbassare il condizionatore.
Il telefono non è connesso.
Quando viene riprodotto audio tramite
BLUETOOTH, il telefono non viene
connesso, neanche se si preme CALL.
– Stabilire una connessione dal telefono.
La qualità dell’audio del telefono è bassa.
La qualità dell’audio del telefono dipende
dalle condizioni di ricezione del telefono
cellulare.
– Se la ricezione è bassa, portare
l’automobile dove il segnale del telefono
cellulare è migliore.
Il volume del dispositivo audio connesso è
basso (alto).
Il livello del volume sarà diverso a seconda
del dispositivo audio.
– Regolare il volume del dispositivo audio
connesso o dell’apparecchio (pagina 23).
L’audio “salta” durante la riproduzione di
un dispositivo audio BLUETOOTH.
Ridurre la distanza tra l’apparecchio e il
dispositivo audio BLUETOOTH.
Se il dispositivo audio BLUETOOTH è
contenuto in una custodia che ostacola il
segnale, rimuovere il dispositivo dalla
custodia durante l’uso.
Nelle vicinanze sono in uso più dispositivi
BLUETOOTH o altri dispositivi che
emettono onde radio.
– Spegnere gli altri dispositivi.

31IT
– Aumentare la distanza dagli altri
dispositivi.
La riproduzione dell’audio si interrompe
brevemente quando viene stabilita la
connessione tra l’apparecchio e il telefono
cellulare. Non si tratta di un
malfunzionamento.
Non è possibile controllare il dispositivo
audio BLUETOOTH connesso.
Verificare che il dispositivo audio
BLUETOOTH connesso sia compatibile con
AVRCP.
Alcune funzioni non rispondono.
Verificare che il dispositivo connesso
supporti la funzione in questione.
Una chiamata viene risposta
accidentalmente.
Il telefono connesso è impostato per
rispondere alle chiamate
automaticamente.
L’associazione ha richiesto troppo tempo e
non è stata completata.
A seconda del dispositivo da connettere, il
limite di tempo per l’associazione può
essere breve.
– Tentare di completare l’associazione
entro il tempo previsto.
Non è possibile utilizzare la funzione
BLUETOOTH.
Spegnere l’apparecchio premendo OFF
per più di 2 secondi, quindi riaccenderlo.
Durante le chiamate in vivavoce i diffusori
dell’automobile non emettono alcun
suono.
Se l’audio è impostato per essere emesso
dal telefono cellulare, impostare il
telefono per l’invio dell’audio ai diffusori
dell’automobile.
Siri Eyes Free non è attivata.
Eseguire la registrazione della funzione
vivavoce per un iPhone compatibile con
Siri Eyes Free.
Attivare la funzione Siri sull’iPhone.
Annullare la connessione BLUETOOTH tra
l’iPhone e l’apparecchio e stabilire una
nuova connessione.
Funzionamento di Sony | Music
Center
Il nome dell’applicazione non corrisponde
con l’applicazione inclusa in “Sony | Music
Center”.
Avviare nuovamente l’applicazione
dall’applicazione “Sony | Music Center”.
Quando l’applicazione “Sony | Music
Center” è in esecuzione tramite
BLUETOOTH, il display passa
automaticamente a [BT AUDIO].
L’applicazione “Sony | Music Center” o la
funzione BLUETOOTH si sono bloccate.
Avviare nuovamente l’applicazione.
La connessione dell’applicazione
“Sony | Music Center” si interrompe
automaticamente quando il display passa
a [IPD].
L’applicazione “Sony | Music Center”
sull’iPhone/iPod non supporta la
riproduzione dell’iPod.
– Impostare l’apparecchio su una sorgente
diversa da [IPD], quindi stabilire la
connessione con “Sony | Music Center”
(pagina 18).
La connessione “Sony | Music Center” si
interrompe automaticamente quando la
modalità USB dell’apparecchio passa a
[ANDROID].
Lo smartphone Android non supporta la
riproduzione in modalità Android.
– Impostare la modalità USB
dell’apparecchio su [MSC/MTP], quindi
stabilire la connessione con
“Sony | Music Center” (pagina 18).

32IT
Messaggi
Durante il funzionamento, i seguenti
messaggi possono apparire o lampeggiare.
INVALID
L’operazione selezionata potrebbe non
essere valida.
[USB MODE] non può essere modificato
durante la riproduzione di un iPod.
READ
Una volta terminata l’operazione di
lettura, la riproduzione si avvia
automaticamente. Potrebbe essere
necessario attendere un po’ di tempo a
seconda dell’organizzazione dei file.
(carattere di sottolineatura): non è
possibile visualizzare il carattere.
Riproduzione mediante un
dispositivo USB:
HUB NO SUPRT: gli hub USB non sono
supportati.
IPD STOP: la riproduzione di un iPod è finita.
Avviare la riproduzione dall’iPod/iPhone.
NOT SUPPORT - ANDROID MODE
Un dispositivo USB che non supporta AOA
(Android Open Accessory) 2.0 è collegato
all’apparecchio mentre [USB MODE] è
impostato su [ANDROID].
– Impostare [USB MODE] su [MSC/MTP]
(pagina 22).
USB ERROR
Collegare nuovamente il dispositivo USB.
USB NO DEV
Accertarsi che il dispositivo USB o il cavo
USB siano collegati saldamente.
USB NO MUSIC
Collegare un dispositivo USB contenente
file riproducibili (pagina 26).
USB NO SUPRT
Per ulteriori informazioni sulla
compatibilità del dispositivo USB in uso,
visitare il sito di assistenza riportato sulla
retrocopertina.
OVERLOAD: il dispositivo USB è
sovraccaricato.
Scollegare il dispositivo USB, quindi
premere SRC per selezionare un’altra
sorgente.
Il dispositivo USB è difettoso oppure è
stato collegato un dispositivo non
supportato.
Funzionamento RDS:
NO AF: nessuna frequenza alternativa.
Premere (SEEK –/+) durante il
lampeggiamento del nome del servizio
programmi. Viene visualizzato [PI SEEK] e
l’apparecchio avvia la ricerca di un’altra
frequenza con gli stessi dati PI
(identificativo programma).
NO PI: nessun identificativo programma. La
stazione selezionata non dispone di dati PI
(identificativo programma).
Selezionare un’altra stazione.
NO TP: nessun programma sul traffico.
L’apparecchio continua la ricerca di
stazioni TP disponibili.
Funzione BLUETOOTH:
BTA NO DEV: il dispositivo BLUETOOTH non
è connesso o non viene riconosciuto.
Verificare che il dispositivo BLUETOOTH sia
correttamente connesso, o che la
connessione BLUETOOTH sia stata stabilita
con il dispositivo BLUETOOTH.
ERROR: l’operazione selezionata non può
essere eseguita.
Attendere qualche minuto, quindi
riprovare.

33IT
UNKNOWN: non è possibile visualizzare un
nome o un numero di telefono.
WITHHELD: il numero di telefono è stato
nascosto dal chiamante.
Funzionamento di Sony | Music
Center:
APP ––––––––: non è stata stabilita la
connessione con l’applicazione.
Stabilire nuovamente una connessione
con “Sony | Music Center” (pagina 18).
APP DISCNCT: l’applicazione è disconnessa.
Stabilire una connessione con
Sony | Music Center (pagina 18).
APP DISPLAY: una schermata di
impostazioni dello schermo
dell’applicazione è aperta.
Uscire dalla schermata di impostazioni
dello schermo dell’applicazione per
attivare i pulsanti.
APP LIST: l’elenco dei contenuti del
dispositivo USB è aperto.
Uscire dall’elenco dell’applicazione per
attivare i pulsanti.
APP MENU: una schermata di impostazioni
dell’applicazione è aperta.
Uscire dalla schermata di impostazioni
dell’applicazione per attivare i pulsanti.
APP NO DEV: il dispositivo su cui è installata
l’applicazione non è connesso o non viene
riconosciuto.
Eseguire la connessione BLUETOOTH e
stabilire nuovamente la connessione con
“Sony | Music Center” (pagina 18).
APP SOUND: una schermata di impostazioni
audio dell’applicazione è aperta.
Uscire dalla schermata di impostazioni
audio dell’applicazione per attivare i
pulsanti.
OPEN APP: l’applicazione “Sony | Music
Center” non è in esecuzione.
Avviare l’applicazione.
Funzionamento del telecomando da
volante:
ERROR
Riavviare la registrazione dalla funzione
con cui si è verificato l’errore (pagina 21).
TIMEOUT
Tentare di completare la registrazione
mentre [REGISTER] lampeggia (circa 6
secondi) (pagina 21).
Aggiornamento firmware:
FILE ERROR: l’aggiornatore non è contenuto
nel dispositivo USB.
Salvare l’aggiornatore nel dispositivo USB,
quindi riprovare (pagina 25).
UPDATE ERROR PRESS ENTER:
l’aggiornamento del firmware non è stato
completato correttamente.
Premere ENTER per eliminare il
messaggio, quindi riprovare.
Durante l’aggiornamento, non impostare
la chiave di accensione sulla posizione
OFF e non rimuovere il dispositivo USB
(pagina 25).
Se le soluzioni riportate non risolvono il
problema, rivolgersi al più vicino rivenditore
Sony.
Se l’apparecchio viene portato in un centro
di assistenza a causa di un problema relativo
alla riproduzione di un dispositivo,
assicurarsi di portare il dispositivo utilizzato
al momento in cui si è verificato il problema.

34IT
Attenzione
• Portare tutti i cavi di messa a terra a un
punto di massa comune.
• Evitare che i cavi rimangano bloccati da
una vite o incastrati nelle parti mobili (ad
esempio nelle guide scorrevoli dei sedili).
• Prima di effettuare i collegamenti,
spegnere il motore dell’automobile per
evitare cortocircuiti.
• Collegare il cavo di alimentazione
all’apparecchio e ai diffusori prima di
collegarlo al connettore di alimentazione
ausiliaria.
• Per motivi di sicurezza, accertarsi di isolare
qualsiasi cavo non collegato utilizzando del
nastro adesivo.
• Scegliere con attenzione la posizione per
l’installazione in modo che l’apparecchio
non interferisca con le operazioni di guida
del conducente.
• Evitare di installare l’apparecchio dove sia
soggetto ad alte temperature, come alla
luce solare diretta o al getto di aria calda
dell’impianto di riscaldamento, o dove
possa essere soggetto a polvere, sporco e
vibrazioni eccessive.
• Usare solo il materiale di montaggio in
dotazione per un’installazione stabile e
sicura.
Nota sul cavo di alimentazione (giallo)
Se questo apparecchio viene collegato in
combinazione con altri componenti stereo, la
potenza nominale del circuito dell’automobile deve
essere superiore alla somma della potenza
nominale dei fusibili dei vari componenti.
Regolazione dell’angolo di montaggio
Regolare l’angolo di montaggio in modo che
sia inferiore a 30°.
Elenco dei componenti per
l’installazione
•Questo elenco dei componenti non
comprende tutto il contenuto della
confezione.
• La staffa e la cornice protettiva
vengono applicate all’apparecchio in
fabbrica. Prima di installare l’apparecchio,
utilizzare le chiavi di rilascio per
rimuovere la staffa dall’apparecchio. Per
ulteriori informazioni, consultare
“Rimozione della staffa e della cornice
protettiva” (pagina 38).
•Conservare le chiavi di rilascio per un
uso futuro in quanto sono necessarie per
rimuovere l’apparecchio dall’auto.
Collegamenti e installazione
Precauzioni
× 2

35IT
Connessioni
*1 Non in dotazione
*2 Impedenza diffusori: 4 – 8 × 4
*3 Cavo a piedini RCA (non in dotazione)
*4 A seconda del tipo di auto, utilizzare un
adattatore per il telecomando cablato (non in
dotazione). Per ulteriori informazioni sull’uso del
telecomando cablato, consultare “Uso del
telecomando cablato” (pagina 37).
*5 A prescindere che venga utilizzato o meno,
disporre il cavo di ingresso del microfono in
modo che non interferisca con le operazioni di
guida. Fissare il cavo con una fascetta o simili se
è installato in prossimità dei piedi del guidatore.
*6 Per informazioni dettagliate sull’installazione del
microfono, fare riferimento a “Installazione del
microfono” (pagina 37).
*7 A seconda del tipo di auto, utilizzare un
adattatore (non in dotazione) se il connettore
dell’antenna non può essere inserito.
da un telecomando cablato
(non in dotazione)*
4
dall’antenna dell’automobile*
7
*
3
*
3
Subwoofer*
1
Per ulteriori informazioni,
consultare “Collegamenti”
(pagina 36).
Amplificatore di
potenza*
1
Consultare “Diagramma dei collegamenti di
alimentazione” (pagina 36) per ulteriori
informazioni.
*
2
*
3
*
5
*
6

36IT
Quando si collega l’apparecchio con il cavo
di alimentazione in dotazione si potrebbe
danneggiare l’antenna elettrica, se questa
non dispone di scatola a relè.
Al connettore del diffusore dell’auto
Al connettore di alimentazione
dell’auto
Collegamento semplice del
subwoofer
È possibile utilizzare un subwoofer senza un
amplificatore di potenza quando è collegato
a un cavo del diffusore posteriore.
Note
• È necessario preparare i cavi del diffusore
posteriore.
• Usare un subwoofer con impedenza compresa tra
4 e 8 e con capacità di potenza adeguata,
altrimenti il subwoofer potrebbe essere
danneggiato.
Collegamento per la conservazione
della memoria
Quando il cavo di ingresso alimentazione
giallo è collegato, viene sempre fornita
alimentazione al circuito di memoria anche
quando l’interruttore di accensione è
spento.
Collegamento dei diffusori
•Prima di collegare i diffusori spegnere
l’apparecchio.
•Usare diffusori con impedenza compresa
tra 4 e 8 e con capacità di potenza
adeguata, altrimenti i diffusori potrebbero
essere danneggiati.
Controllare il connettore di alimentazione
ausiliaria dell’automobile e far corrispondere
correttamente i collegamenti dei cavi a
seconda dell’automobile.
Collegamenti
1
Diffusore
posteriore
(destro)
Viola
2
A strisce viola/
nero
3
Diffusore
anteriore
(destro)
Grigio
4
A strisce grigio/
nero
5
Diffusore
anteriore
(sinistro)
Bianco
6
A strisce bianco/
nero
7
Diffusore
posteriore
(sinistro)
Verde
8
A strisce verde/
nero
12
alimentazione
continua
Giallo
13
antenna elettrica/
controllo
dell’amplificatore di
potenza (REM OUT)
A strisce blu/
bianco
14
alimentazione
commutata
dell’illuminazione
A strisce
arancione/
bianco
15
alimentazione
commutata
Rosso
16 terra Nero
Diagramma dei collegamenti di
alimentazione
Diffusore
anteriore
Subwoofer
Connettore di
alimentazione ausiliaria

37IT
Collegamento normale
Se le posizioni dei cavi rosso e giallo
sono invertite
Se l’auto non è dotata di posizione ACC
(accessoria)
Dopo aver fatto corrispondere i collegamenti
ai cavi di alimentazione commutata,
collegare l’apparecchio all’alimentazione
dell’automobile. Per eventuali domande o
problemi riguardanti l’apparecchio non
trattati nel presente manuale, rivolgersi
all’autoconcessionario.
Per acquisire la voce durante le chiamate in
vivavoce è necessario installare il microfono
.
Attenzione
•Può essere estremamente pericoloso se il
cavo si avvolge attorno al piantone dello
sterzo o alla leva del cambio. Accertarsi che
il cavo e gli altri componenti non
interferiscano con le operazioni di guida.
• Se l’automobile è dotata di airbag o altre
attrezzature di ammortizzazione degli urti,
richiedere assistenza al negozio in cui è
stato acquistato questo apparecchio o al
concessionario dell’automobile prima
dell’installazione.
Nota
Prima di applicare il nastro biadesivo , pulire la
superficie del cruscotto con un panno asciutto.
1 Per abilitare il telecomando cablato,
impostare [STR CONTROL] in [SET
STEERING] su [PRESET] (pagina 21).
12 alimentazione continua Giallo
15
alimentazione
commutata
Rosso
12
alimentazione
commutata
Giallo
15 alimentazione continua Rosso
Rosso Rosso
Giallo Giallo
Rosso Rosso
Giallo Giallo
Rosso
Rosso
Giallo
Giallo
Installazione del microfono
Uso del telecomando cablato
Morsetto (non in dotazione)

38IT
Installazione
Prima di installare l’apparecchio, rimuovere
la cornice protettiva e la staffa
dall’apparecchio.
1 Afferrare entrambe le estremità della
cornice protettiva , quindi estrarla.
2 Inserire entrambe le chiavi di rilascio
finché non scattano in posizione,
quindi abbassare la staffa , infine
sollevare l’apparecchio per estrarlo.
Prima di installare l’apparecchio, accertarsi
di ripiegare i fermi presenti su entrambi i lati
della staffa verso l’interno di 2 mm.
1 Inserire la staffa nel cruscotto,
quindi piegare verso l’esterno i
morsetti per un’installazione sicura.
2 Montare l’apparecchio sulla staffa ,
quindi fissare la cornice protettiva .
Note
• Se i fermi sono diritti o ripiegati verso l’esterno,
l’apparecchio non verrà installato in modo sicuro e
potrebbe fuoriuscire.
• Assicurarsi che i 4 fermi sulla cornice protettiva
siano correttamente inseriti negli alloggiamenti
dell’apparecchio.
Per ulteriori informazioni, consultare
“Rimozione del pannello anteriore”
(pagina 6).
Rimozione della staffa e della
cornice protettiva
Con il gancio rivolto verso l’interno.
Montaggio dell’apparecchio sul
cruscotto
Rimozione e installazione del
pannello anteriore
182 mm
53 mm
Fermo

39IT
Per ulteriori informazioni, consultare
“Azzeramento dell’apparecchio” (pagina 7).
Per la sostituzione del
fusibile, assicurarsi di
utilizzare un fusibile dello
stesso amperaggio di
quello indicato
sull’originale. Se il fusibile
si brucia, controllare i
collegamenti dell’alimentazione e sostituire
il fusibile. Se dopo la sostituzione il fusibile si
brucia di nuovo, è possibile che si tratti di un
problema interno. In tal caso, rivolgersi al
più vicino rivenditore Sony.
Azzeramento dell’apparecchio
Sostituzione del fusibile
Fusibile (10 A)

2ES
Fabricado en Tailandia
La placa de características que indica el
voltaje de funcionamiento, etc., está situada
en la parte inferior del chasis.
La validez de la marca CE está limitada a
aquellos países en los que la legislación la
impone, principalmente los países del EEE
(Espacio económico europeo).
Por la presente, Sony Corporation declara
que este equipo es conforme con la
Directiva 2014/53/UE.
El texto completo de la declaración UE de
conformidad está disponible en la dirección
Internet siguiente:
http://www.compliance.sony.de/
Aviso para los clientes: la información
siguiente resulta de aplicación solo a
los equipos comercializados en países
afectados por las directivas de la UE
Este producto ha sido fabricado por, o en
nombre de Sony Corporation.
Importador UE: Sony Europe B.V.
Las consultas relacionadas con el
Importador a la UE o con la conformidad del
producto en Europa deben dirigirse al
representante autorizado por el fabricante,
Sony Belgium, bijkantoor van Sony Europe
B.V., Da Vincilaan 7-D1, 1930 Zaventem,
Bélgica.
Tratamiento de las baterías
y equipos eléctricos y
electrónicos al final de su
vida útil (aplicable en la
Unión Europea y otros
países con sistemas de tratamiento
selectivo de residuos)
Este símbolo en el producto, la batería o el
embalaje indica que el producto y la batería
no pueden tratarse como un residuo
doméstico normal. En algunas baterías este
símbolo puede utilizarse en combinación
con un símbolo químico. Se añadirá el
símbolo químico del plomo (Pb) si la batería
contiene más del 0,004 % de plomo. Al
asegurarse de que estos productos y
baterías se desechan correctamente,
ayudará a prevenir las posibles
consecuencias negativas para la salud y el
medio ambiente que podrían derivarse de
su incorrecta manipulación. El reciclaje de
los materiales ayuda a preservar los recursos
naturales. En el caso de productos, que por
razones de seguridad, rendimiento o
mantenimiento de datos, requieran una
conexión permanente con la batería
incorporada, esta batería deberá
reemplazarse únicamente por personal
técnico cualificado para ello. Para
asegurarse de que la batería se desecha
correctamente, entregue estos productos al
final de su vida útil en un punto de recogida
adecuado para el reciclado de aparatos
eléctricos y electrónicos. Para el resto de
baterías, consulte la sección donde se indica
cómo extraer la batería del producto de
forma segura. Deposite la batería en el
correspondiente punto de recogida para el
reciclado de baterías. Si desea obtener
información detallada sobre el reciclaje de
este producto o de la batería, póngase en
contacto con el ayuntamiento, el punto de
recogida más cercano o el establecimiento
donde ha adquirido el producto o la batería.
PRECAUCIÓN
El intervalo de frecuencias siguiente de 65 –
74 MHz no está destinado a la retransmisión
de sonido según el cuadro de atribución de
frecuencias común europeo y no puede
utilizarse en Europa.
Por motivos de seguridad, asegúrese de
instalar esta unidad en el salpicadero del
automóvil, ya que la parte posterior de la
misma se calienta durante su uso.
Para obtener más información, consulte
“Conexión/Instalación” (página 34).

3ES
Nota legal acerca de los servicios
prestados por otros proveedores
Los servicios prestados por otros
proveedores están sujetos a cambios,
anulaciones o interrupciones sin previo
aviso. Sony no asume responsabilidad
alguna en estas situaciones.
Precaución
SONY NO SE HACE RESPONSABLE EN
NINGÚN CASO DE DAÑOS ACCIDENTALES,
INDIRECTOS, COLATERALES O DE OTRO TIPO,
LO QUE INCLUYE, A TÍTULO MERAMENTE
ENUNCIATIVO, LA PÉRDIDA DE BENEFICIOS,
LA PÉRDIDA DE INGRESOS, LA PÉRDIDA DE
DATOS, LA IMPOSIBILIDAD DE UTILIZAR EL
PRODUCTO O EQUIPOS ASOCIADOS, EL
TIEMPO DE INACTIVIDAD O EL TIEMPO DEL
COMPRADOR EN RELACIÓN CON LA
UTILIZACIÓN DE ESTE PRODUCTO, SU
HARDWARE Y/O SU SOFTWARE.
Tenga en cuenta que este producto incluye
un transmisor de radio.
Según la norma 10 de UNECE, un fabricante
de un vehículo puede imponer condiciones
específicas para la instalación de
transmisores de radio en los vehículos.
Consulte el manual de instrucciones de su
vehículo o póngase en contacto con el
concesionario de su vehículo antes de
instalar este producto en su vehículo.
Llamadas de emergencia
Este sistema manos libres para vehículo
BLUETOOTH y el dispositivo electrónico
conectado al mismo funcionan mediante
señales de radio, redes de telefonía móvil y
redes terrestres, así como a través de
funciones programadas por el usuario, por
lo que la conexión no está garantizada en
todas las condiciones.
Por tanto, no confíe exclusivamente en un
solo dispositivo electrónico para las
comunicaciones importantes (como las
emergencias médicas).
Acerca de la comunicación BLUETOOTH
Las microondas generadas por un
dispositivo BLUETOOTH pueden afectar al
funcionamiento de los dispositivos
médicos electrónicos. Apague la unidad y
otros dispositivos BLUETOOTH en los
siguientes lugares, ya que podría sufrir un
accidente.
– en lugares con presencia de gases
inflamables, un hospital, un tren, un
avión o una gasolinera
– cerca de puertas automáticas o de una
alarma de incendios
Esta unidad es compatible con
prestaciones de seguridad conformes con
la norma BLUETOOTH para proporcionar
una conexión segura cuando se utiliza la
conexión inalámbrica BLUETOOTH, pero es
posible que la seguridad no sea suficiente
en función del entorno. Extreme las
precauciones al comunicarse mediante la
tecnología inalámbrica BLUETOOTH.
No asumimos responsabilidad alguna por
la divulgación de información durante la
comunicación BLUETOOTH.
Si desea realizar alguna consulta o
solucionar algún problema relativo a la
unidad que no se trate en este manual,
póngase en contacto con su distribuidor
Sony más cercano.
Advertencia: si el encendido del
automóvil no dispone de una
posición ACC
Asegúrese de seleccionar la función AUTO
OFF (página 20). La unidad se apagará
totalmente y de forma automática en el
tiempo definido después de apagar la
unidad y una vez que aparezca el reloj
(mantenga pulsado OFF durante 1
segundo), para evitar que se agote la
batería. Si no utiliza la función AUTO OFF,
mantenga pulsado OFF hasta que
desaparezca la imagen cada vez que
apague el contacto.
Aviso importante

4ES
Tabla de contenidos
Guía de elementos y controles . . . . . . . . . . 5
Procedimientos iniciales
Extracción del panel frontal . . . . . . . . . . . . . 6
Reinicio de la unidad . . . . . . . . . . . . . . . . . . 7
Ajuste del reloj . . . . . . . . . . . . . . . . . . . . . . . 7
Preparación de un dispositivo
BLUETOOTH. . . . . . . . . . . . . . . . . . . . . . . 7
Conexión de un dispositivo USB . . . . . . . . 10
Conexión de otros dispositivos de audio
portátiles . . . . . . . . . . . . . . . . . . . . . . . . 10
Escuchar la radio
Escuchar la radio. . . . . . . . . . . . . . . . . . . . . . 11
Utilización del sistema de datos de radio
(RDS) . . . . . . . . . . . . . . . . . . . . . . . . . . . . 11
Reproducción
Reproducción de un dispositivo USB . . . . 13
Reproducción de un dispositivo
BLUETOOTH. . . . . . . . . . . . . . . . . . . . . . 13
Búsqueda y reproducción de pistas . . . . . 14
Llamadas manos libres (solo
mediante BLUETOOTH)
Recibir una llamada . . . . . . . . . . . . . . . . . . 15
Realizar una llamada . . . . . . . . . . . . . . . . . 15
Operaciones disponibles durante una
llamada . . . . . . . . . . . . . . . . . . . . . . . . . 16
Funciones útiles
Sony | Music Center con iPhone/
smartphone Android™ . . . . . . . . . . . . 17
Uso del reconocimiento de voz (solo
disponible en un smartphone con
sistema Android) . . . . . . . . . . . . . . . . . 18
Utilización de Siri Eyes Free . . . . . . . . . . . . 18
Ajustes
Cancelación del modo DEMO . . . . . . . . . . 19
Funcionamiento de los ajustes
básicos . . . . . . . . . . . . . . . . . . . . . . . . . 19
Ajustes generales (GENERAL) . . . . . . . . . . 20
Ajustes de sonido (SOUND). . . . . . . . . . . . . 21
Ajustes de pantalla (DISPLAY). . . . . . . . . . 22
Ajustes de BLUETOOTH (BLUETOOTH) . . . 23
Configuración de Sony | Music Center
(SONY APP) . . . . . . . . . . . . . . . . . . . . . . 23
Información adicional
Actualización del firmware . . . . . . . . . . . . 24
Precauciones . . . . . . . . . . . . . . . . . . . . . . . 24
Mantenimiento. . . . . . . . . . . . . . . . . . . . . . 25
Especificaciones. . . . . . . . . . . . . . . . . . . . . 25
Solución de problemas . . . . . . . . . . . . . . . 27
Mensajes. . . . . . . . . . . . . . . . . . . . . . . . . . . . 31
Conexión/Instalación
Precauciones . . . . . . . . . . . . . . . . . . . . . . . 34
Lista de piezas para la instalación . . . . . . 34
Conexión. . . . . . . . . . . . . . . . . . . . . . . . . . . 35
Instalación . . . . . . . . . . . . . . . . . . . . . . . . . 38

5ES
Guía de elementos y controles
Botón de desbloqueo del panel frontal
SRC (fuente)
Encienda la unidad.
Cambie de fuente.
OFF
Mantenga el botón pulsado durante 1
segundo para desactivar la fuente y
mostrar el reloj.
Mantenga el botón pulsado durante más
de 2 segundos para apagar la unidad y la
pantalla.
Dial de control
Gire el dial para ajustar el volumen.
PUSH ENTER
Acceda a la opción seleccionada.
Pulse SRC, gírelo y púlselo para cambiar
de fuente (en un máximo de 2 segundos).
MENU
Abra el menú de configuración.
VOICE (página 16, 18)
Manténgalo presionado durante más de
2 segundos para activar la marcación por
voz, el reconocimiento de voz (solo en
smartphones Android) o la función Siri
(solo en iPhone).
Marca N
Toque el dial de control con el
smartphone Android para establecer la
conexión BLUETOOTH.
Visor
/ (SEEK –/+)
Sintonice emisoras de radio de forma
automática. Manténgalo pulsado para
sintonizarlas de forma manual.
/ (anterior/siguiente)
/ (retroceso/avance rápido)
PTY (tipo de programa)
Seleccione PTY en RDS.
(buscar) (página 14)
Acceda al modo de búsqueda durante la
reproducción.
(No disponible si hay conectado un
dispositivo USB en modo Android o un
iPod.)
CALL
Acceda al menú de llamada. Reciba o
finalice una llamada.
Mantenga el botón pulsado durante más
de 2 segundos para cambiar la señal
BLUETOOTH.
(atrás)
Vuelva a la pantalla anterior.
MODE (página 7, 11, 16)
Receptor del mando a distancia
Unidad principal

6ES
Botones numéricos (de 1 a 6)
Reciba emisoras de radio almacenadas.
Manténgalo pulsado para almacenar
emisoras.
ALBUM /
Salte un álbum de un dispositivo de
audio. Manténgalo pulsado para saltar
álbumes de forma continua.
(No disponible si hay conectado un
dispositivo USB en modo Android o un
iPod.)
(repetición)
(No disponible si hay conectado un
dispositivo USB en modo Android.)
(aleatorio)
(No disponible si hay conectado un
dispositivo USB en modo Android.)
MIC (página 16)
(reproducción/pausa)
EXTRA BASS
Refuerza el sonido de graves de forma
sincronizada con el nivel de volumen.
Pulse este botón para cambiar el ajuste
de EXTRA BASS: [1], [2], [OFF].
Toma de entrada AUX
DSPL (pantalla)
Pulse este botón para cambiar las
opciones mostradas.
SCRL (desplazamiento)
Mantenga pulsado este botón para
desplazarse por una opción mostrada.
Puerto USB
Extracción del panel frontal
Puede desmontar el panel frontal de esta
unidad para evitar robos.
1 Mantenga pulsado OFF hasta que
se apague la unidad y pulse el botón
de desbloqueo del panel frontal y,
a continuación, tire del panel hacia su
posición para extraerlo.
Alarma de precaución
Si sitúa el contacto en la posición OFF sin
extraer el panel frontal, sonará la alarma de
precaución durante unos segundos. La
alarma solo suena si se utiliza el
amplificador integrado.
Números de serie
Compruebe que los números de serie de la
parte inferior de la unidad y la parte
posterior del panel frontal coincidan
exactamente. De lo contrario, no podrá
realizar emparejamientos BLUETOOTH ni
conectar o desconectar mediante NFC.
Procedimientos iniciales
Montaje del panel frontal

7ES
Reinicio de la unidad
Debe reiniciar la unidad antes de utilizarla
por primera vez o después de sustituir la
batería del vehículo o cambiar las
conexiones.
1 Pulse DSPL y (atrás)/MODE
durante más de 2 segundos.
Nota
Si pulsa el botón de reinicio, se borrará el ajuste del
reloj y algunos contenidos almacenados.
Ajuste de la región
Después de reiniciar la unidad, aparece la
pantalla de ajuste de la región.
1 Pulse ENTER mientras aparece [SET
AREA].
Aparece la región seleccionada
actualmente.
2 Gire el dial de control para
seleccionar [EUROPE] o [RUSSIA] y
púlselo.
3 Gire el dial de control para
seleccionar [YES] o [NO] y púlselo.
Si se modifica la región, la unidad se
reinicia y aparece el reloj.
Este ajuste puede configurarse en el menú
de configuración general (página 20).
Ajuste del reloj
1 Pulse MENU, gire el dial de control
para seleccionar [GENERAL] y, a
continuación, púlselo.
2 Gire el dial de control para
seleccionar [SET CLOCK-ADJ] y
púlselo.
La indicación de la hora parpadea.
3 Gire el dial de control para ajustar la
hora y el minuto.
Para modificar la indicación digital, pulse
/ (SEEK –/+).
4 Después de ajustar los minutos,
pulse MENU.
El ajuste ha finalizado y se inicia el reloj.
Para mostrar el reloj
Pulse DSPL.
Preparación de un
dispositivo BLUETOOTH
Puede escuchar música o realizar llamadas
manos libres, en función del dispositivo
BLUETOOTH compatible, como un
smartphone, un teléfono móvil o un
dispositivo de audio (de ahora en adelante,
“dispositivo BLUETOOTH”, si no se indica otra
denominación). Para obtener más
información sobre cómo establecer la
conexión, consulte el manual de
instrucciones suministrado con el
dispositivo.
Antes de conectar el dispositivo, baje el
volumen de la unidad; de lo contrario,
puede emitir un sonido muy fuerte.
Al tocar el dial de control en la unidad con
un smartphone compatible con NFC*, la
unidad se emparejará y conectará con el
smartphone de forma automática.
* NFC (comunicación de campo cercano) es una
tecnología que permite la comunicación
inalámbrica de corto alcance entre diferentes
dispositivos, como teléfonos móviles y etiquetas
IC. Gracias a la función NFC, es posible enviar
datos de forma sencilla con solo tocar el símbolo
determinado o la ubicación designada en los
dispositivos compatibles con NFC.
En los smartphones que tengan instalado el
sistema operativo Android 4.0 o inferior,
debe descargarse la aplicación “NFC Easy
Connect” disponible en Google Play. Es
posible que la aplicación no esté disponible
en algunos países o regiones.
1 Active la función NFC en el
smartphone.
Para obtener más información, consulte
el manual de instrucciones suministrado
con el smartphone.
Conexión con un smartphone con
un solo toque (NFC)

8ES
2 Junte la parte con la marca N de la
unidad con la parte de la marca N del
smartphone.
Asegúrese de que se encienda en la
pantalla de la unidad.
Desconexión con NFC
Junte de nuevo la parte con la marca N de la
unidad con la parte de la marca N del
smartphone.
Notas
• Al establecer la conexión, extreme las
precauciones con el smartphone para evitar
arañazos.
• No será posible llevar a cabo la conexión con un
solo toque si la unidad ya se encuentra conectada
a dos dispositivos compatibles con NFC. Si este es
el caso, desconecte el dispositivo y establezca la
conexión con el smartphone nuevamente.
Al conectar un dispositivo BLUETOOTH por
primera vez, debe realizar un registro
compartido (llamado “emparejamiento”). El
emparejamiento permite que esta unidad y
otros dispositivos se reconozcan
mutuamente. Esta unidad puede conectar
dos dispositivos BLUETOOTH (dos teléfonos
móviles, o un móvil y un dispositivo de
audio).
1 Coloque el dispositivo BLUETOOTH a
1 m de esta unidad.
2 Pulse MENU, gire el dial de control
para seleccionar [BLUETOOTH] y, a
continuación, púlselo.
3 Gire el dial de control para
seleccionar [SET PAIRING] y púlselo.
4 Gire el dial de control para
seleccionar [SET DEVICE 1]* o [SET
DEVICE 2]* y púlselo.
parpadea mientras la unidad está en
modo de espera de emparejamiento.
* El nombre [SET DEVICE 1] o [SET DEVICE 2]
cambiará al del dispositivo emparejado una
vez que el emparejamiento se haya
completado.
5 Realice el emparejamiento en el
dispositivo BLUETOOTH para que
detecte esta unidad.
6 Seleccione [DSX-A416BT], que
aparece en la pantalla del dispositivo
BLUETOOTH.
Si el nombre de su modelo no aparece,
vuelva al paso 2.
7 Si el dispositivo BLUETOOTH requiere
una clave de acceso*, introduzca
[0000].
* La clave de acceso puede denominarse
también “código de acceso”, “código PIN”,
“número PIN”, “contraseña”, etc., en función
del dispositivo.
Cuando se realiza el emparejamiento,
permanece encendido.
8 Seleccione esta unidad en el
dispositivo BLUETOOTH para
establecer la conexión BLUETOOTH.
o se encenderá cuando se
establezca la conexión.
Nota
Al conectarse a un dispositivo BLUETOOTH, ningún
otro dispositivo podrá detectar la unidad. Para
habilitar la detección, acceda al modo de
emparejamiento y busque esta unidad desde otro
dispositivo.
Emparejar y conectar con un
dispositivo BLUETOOTH
[0000]
Introducción de clave de acceso

9ES
Para iniciar la reproducción
Para obtener más información, consulte
“Reproducción de un dispositivo
BLUETOOTH” (página 13).
Para desconectar el dispositivo
emparejado
Siga los pasos de 2 a 4 para desconectarlo
una vez que esta unidad y el dispositivo
BLUETOOTH estén emparejados.
Para utilizar un dispositivo emparejado,
debe establecerse una conexión con esta
unidad. Algunos dispositivos emparejados
se conectan automáticamente.
1 Pulse MENU, gire el dial de control
para seleccionar [BLUETOOTH] y, a
continuación, púlselo.
2 Gire el dial de control para
seleccionar [SET BT SIGNL] y púlselo.
Asegúrese de que se enciende.
3 Active la función BLUETOOTH en el
dispositivo BLUETOOTH.
4 Accione el dispositivo BLUETOOTH
para conectar con esta unidad.
o se enciende.
Iconos que aparecen en la pantalla:
Para conectar el último dispositivo
conectado desde la unidad
Active la función BLUETOOTH en el
dispositivo BLUETOOTH.
Para conectarse con el dispositivo de audio,
pulse SRC para seleccionar [BT AUDIO] y
pulse (reproducción/pausa).
Para conectarse con el teléfono móvil,
presione CALL.
Nota
Al transmitir el sonido por BLUETOOTH, no se podrá
conectar desde la unidad al teléfono móvil. En su
lugar, conéctese desde el teléfono móvil a esta
unidad.
Consejo
Mientras la señal BLUETOOTH está encendida:
cuando encienda el contacto, la unidad se volverá a
conectar automáticamente al último teléfono móvil
conectado.
Para instalar el micrófono
Para obtener más información, consulte
“Instalación del micrófono” (página 37).
Cuando un iPhone/iPod con iOS5 o superior
está conectado al puerto USB, la unidad se
emparejará y conectará con el iPhone/iPod
de forma automática.
Para habilitar el emparejamiento automático
mediante BLUETOOTH asegúrese de que
[SET AUTOPAIR] en [BLUETOOTH] esté
configurado en [ON] (página 23).
1 Active la función BLUETOOTH en el
iPhone/iPod.
2 Conecte un iPhone/iPod al puerto
USB.
Asegúrese de que se encienda en la
pantalla de la unidad.
Conexión con un dispositivo
BLUETOOTH emparejado
Se ilumina cuando se pueden
realizar llamadas con manos libres al
habilitar el HFP (Perfil de manos
libres).
Se ilumina cuando se permite la
reproducción en el dispositivo de
audio al habilitar el A2DP (Perfil de
distribución de audio avanzado).
Conexión con un iPhone/iPod
(emparejamiento automático
mediante BLUETOOTH)

10ES
Notas
• El emparejamiento automático mediante
BLUETOOTH no será posible si la unidad ya se
encuentra conectada a dos dispositivos
BLUETOOTH. En este caso, desconecte el otro
dispositivo y después conecte el iPhone/iPod de
nuevo.
• Si no se establece el emparejamiento automático
BLUETOOTH, consulte “Preparación de un
dispositivo BLUETOOTH” (página 7).
Conexión de un dispositivo
USB
1 Baje el volumen de la unidad.
2 Conecte el dispositivo USB a la
unidad.
Para conectar un iPod/iPhone, use el
cable de conexión USB para iPod (no
suministrado).
Conexión de otros
dispositivos de audio
portátiles
1 Apague el dispositivo de audio
portátil.
2 Baje el volumen de la unidad.
3 Conecte el dispositivo de audio
portátil al conector para entrada AUX
(minitoma estéreo) de la unidad con
un cable de conexión (no
suministrado)*.
* Asegúrese de usar un conector de tipo recto.
4 Pulse SRC para seleccionar [AUX].
Cómo ajustar el nivel de volumen del
dispositivo conectado al de otras
fuentes
Inicie la reproducción en el dispositivo de
audio portátil con un nivel de volumen
moderado y ajuste el volumen de la unidad
al nivel que suele emplear.
Pulse MENU y seleccione [SOUND]
[SET AUX VOL] (página 21).

11ES
Escuchar la radio
Para escuchar la radio, pulse SRC y, a
continuación, toque [TUNER].
1 Pulse MODE para cambiar de banda
(FM1, FM2, FM3, MW o LW).
2 Pulse MENU, gire el dial de control
para seleccionar [GENERAL] y, a
continuación, púlselo.
3 Gire el dial de control para
seleccionar [SET BTM] y púlselo.
La unidad almacena las emisoras en el
orden de frecuencia en los botones
numéricos.
1 Pulse MODE para cambiar de banda
(FM1, FM2, FM3, MW o LW).
2 Efectúe la sintonización.
Para sintonizar manualmente
Mantenga pulsadas / (SEEK –/+)
para buscar la frecuencia aproximada y, a
continuación, toque / (SEEK –/+)
varias veces para sintonizar la frecuencia
deseada.
Para sintonizar automáticamente
Pulse / (SEEK –/+).
La búsqueda se detiene cuando la
unidad recibe una emisora.
1 Mientras recibe la emisora que desea
almacenar, mantenga pulsado un
botón numérico (1 a 6) hasta que
aparezca [MEM].
1 Seleccione la banda y, a continuación,
toque el número de presintonía
deseado (1 a 6).
Utilización del sistema de
datos de radio (RDS)
AF resintoniza continuamente la emisora
para recibir la señal más intensa de la red y
TA proporciona información actualizada
sobre el tráfico o programas de tráfico (TP) si
la recibe.
1 Pulse MENU, gire el dial de control
para seleccionar [GENERAL] y, a
continuación, púlselo.
2 Gire el dial de control para
seleccionar [SET AF/TA] y púlselo.
3 Gire el dial de control para
seleccionar [SET AF-ON], [SET TA-ON],
[SET AF/TA-ON] o [SET AF/TA-OFF] y, a
continuación, púlselo.
Para almacenar emisoras de RDS con
ajuste de AF y TA
Es posible presintonizar emisoras RDS junto
con un ajuste AF/TA. Ajuste AF/TA y, a
continuación, almacene la emisora con BTM
o de forma manual. Si las presintoniza
manualmente, también puede presintonizar
emisoras que no sean RDS.
Para recibir anuncios de emergencia
Con las funciones AF o TA activadas, los
anuncios de emergencia interrumpirán
automáticamente la fuente seleccionada en
ese momento.
Escuchar la radio
Almacenamiento automático
(BTM)
Sintonización
Almacenamiento manual
Recepción de emisoras
almacenadas
Ajuste de frecuencias alternativas
(AF) y anuncios de tráfico (TA)

12ES
Para ajustar el nivel de volumen
durante un anuncio de tráfico
El nivel se almacenará en la memoria para
futuros anuncios de tráfico,
independientemente del nivel de volumen
regular.
Para continuar recibiendo un programa
regional (REGIONAL)
Si las funciones AF y REGIONAL están
activadas, no se cambiará a otra emisora
regional con una frecuencia más intensa. Si
abandona la zona de recepción de dicho
programa regional, ajuste [SET REGIONAL]
de [GENERAL] en [SET REG-OFF] durante la
recepción de FM (página 21).
Esta función no está disponible en el Reino
Unido ni en algunas otras zonas.
Función Local Link (solo Reino Unido)
Esta función permite seleccionar otras
emisoras locales de la zona, aunque no
estén almacenadas en sus botones
numéricos.
Durante la recepción FM, pulse un botón
numérico (1 a 6) en el que haya una emisora
local almacenada. Antes de que transcurran
5 segundos, vuelva a pulsar un botón
numérico de una emisora local. Repita este
procedimiento hasta que reciba la emisora
local.
1 Durante la recepción de FM, pulse
PTY.
2 Gire el dial de control hasta que
aparezca el tipo de programa que
desee y, a continuación, púlselo.
La unidad busca emisoras que ofrezcan
el tipo de programa seleccionado.
Tipos de programas
Los datos CT de la transmisión RDS ajustan
la hora del reloj.
1 Ajuste [SET CT-ON] en [GENERAL]
(página 20).
Selección de tipos de programa
(PTY)
NEWS (noticias), AFFAIRS (temas de
actualidad), INFO (información), SPORT
(deportes), EDUCATE (educación), DRAMA
(drama), CULTURE (cultura), SCIENCE (ciencia),
VARIED (variados), POP M (música pop), ROCK
M (música rock), EASY M (grandes éxitos),
LIGHT M (música clásica ligera), CLASSICS
(música clásica), OTHER M (otra música),
WEATHER (tiempo), FINANCE (finanzas),
CHILDREN (programa infantil), SOCIAL (temas
de sociedad), RELIGION (religión), PHONE IN
(entrada de teléfono), TRAVEL (viajes), LEISURE
(ocio), JAZZ (música jazz), COUNTRY (música
country), NATION M (música nacional), OLDIES
(música de décadas anteriores), FOLK M
(música folk), DOCUMENT (documentales)
Ajuste de la hora del reloj (CT)

13ES
Reproducción de un
dispositivo USB
En este Manual de instrucciones, “iPod” se
utiliza como referencia general para las
funciones de iPod en el iPod y el iPhone, a
menos que se indique lo contrario en el
texto o las ilustraciones.
Para obtener más información sobre la
compatibilidad de su iPod, consulte “Acerca
del iPod” (página 24) o visite el sitio web de
asistencia de la contraportada.
Se pueden utilizar dispositivos USB* de tipo
AOA (Android Open Accessory) 2.0, MSC
(Mass Storage Class) y MTP (Media Transfer
Protocol) que cumplan con la norma USB. En
función del dispositivo USB, es posible
seleccionar el modo Android o MSC/MTP en
la unidad.
En función del reproductor multimedia
digital o el smartphone Android, es
necesario ajustar el modo MTP.
* Por ejemplo, una unidad de memoria USB, un
reproductor multimedia digital o un smartphone
Android.
Notas
• Para obtener más información sobre la
compatibilidad del dispositivo USB, visite el sitio
web de asistencia de la contraportada.
• Los smartphones con Android OS 4.1 o una versión
superior instalada son compatibles con Android
Open Accessory 2.0 (AOA 2.0). Sin embargo, es
posible que algunos smartphones no sean
totalmente compatibles con AOA 2.0, aunque
tengan instalado Android OS 4.1 o una versión
superior.
Para obtener más información sobre la
compatibilidad del smartphone Android, visite el
sitio web de asistencia de la contraportada.
• No es posible reproducir los siguientes tipos de
archivo.
MP3/WMA/FLAC:
– archivos protegidos por derechos de propiedad
intelectual
– archivos DRM (gestión de derechos digitales)
– archivos de audio multicanal
MP3/WMA:
– archivos de compresión sin pérdida
Antes de establecer una conexión,
seleccione el modo USB (modo Android o
modo MSC/MTP) en función del dispositivo
USB (página 20).
1 Conecte el dispositivo USB al puerto
USB (página 10).
Se inicia la reproducción.
Si ya hay un dispositivo conectado, pulse
SRC para seleccionar [USB] (aparece [IPD]
en la pantalla cuando se reconoce el
iPod).
2 Ajuste el volumen en esta unidad.
Para detener la reproducción
Mantenga pulsado OFF durante 1 segundo.
Para expulsar el dispositivo
Detenga la reproducción y, a continuación,
desconecte el dispositivo.
Advertencia para iPhone
Al conectar un iPhone a través de USB, el
volumen de las llamadas del teléfono se
controla a través del propio iPhone, no con
la unidad. No aumente el volumen de la
unidad durante las llamadas telefónicas
para evitar sonidos altos e inesperados
después de una llamada.
Reproducción de un
dispositivo BLUETOOTH
Puede reproducir contenidos en un
dispositivo conectado que sea compatible
con BLUETOOTH A2DP (Perfil de distribución
de audio avanzado).
1 Establezca la conexión BLUETOOTH
con el dispositivo de audio (página 7).
Para seleccionar el dispositivo de audio,
presione MENU y seleccione
[BLUETOOTH] [SET AUDIODEV]
(página 23).
2 Pulse SRC para seleccionar
[BT AUDIO].
Reproducción

14ES
3 Inicie la reproducción desde el
dispositivo de audio.
4 Ajuste el volumen en esta unidad.
Notas
• Según el dispositivo de audio, es posible que
información como el título, el número o tiempo de
la pista y el estado de la reproducción no se
visualicen en la unidad.
• Incluso si cambia la fuente de la unidad, la
reproducción del dispositivo de audio no se
detendrá.
• [BT AUDIO] no aparecerá en la pantalla mientras
se reproduce la aplicación “Sony | Music Center” a
través de la función BLUETOOTH.
Para ajustar el nivel de volumen del
dispositivo BLUETOOTH al de otras
fuentes
Inicie la reproducción en el dispositivo de
audio BLUETOOTH con un nivel de volumen
moderado y ajuste el volumen de la unidad
al nivel que suele emplear.
Pulse MENU y seleccione [SOUND]
[SET BTA VOL] (página 22).
Búsqueda y reproducción de
pistas
No disponible si hay conectado un
dispositivo USB en modo Android.
1 Durante la reproducción, pulse varias
veces (repetición) o (aleatorio)
para seleccionar el modo de
reproducción que desee.
Puede que tarde en iniciarse la
reproducción en el modo de
reproducción seleccionado.
Los modos de reproducción disponibles
varían en función de la fuente de sonido
seleccionada.
No disponible si hay conectado un
dispositivo USB en modo Android o un iPod.
1 Durante la reproducción USB, pulse
(buscar)* para ver la lista de
categorías de búsqueda.
Cuando aparezca la lista de pistas, pulse
(atrás) varias veces para ver la lista de
búsqueda que desee.
* Durante la reproducción USB, pulse
(buscar) durante más de 2 segundos para
volver directamente al principio de la lista de
categorías.
2 Gire el dial de control para
seleccionar la categoría que desee y
púlselo para confirmar.
3 Repita el paso 2 para seleccionar la
pista que desee.
Se inicia la reproducción.
Para salir del modo Quick-BrowZer
Pulse (buscar).
No disponible si hay conectado un
dispositivo USB en modo Android o un iPod.
1 Durante la reproducción USB, pulse
(buscar).
2 Pulse (SEEK +).
3 Gire el dial de control para
seleccionar la opción.
Saltará la lista en pasos del 10% respecto
al número total de elementos.
4 Pulse ENTER para volver al modo
Quick-BrowZer.
Aparece el elemento seleccionado.
5 Gire el dial de control para
seleccionar el elemento que desee y
púlselo.
Se inicia la reproducción.
Reproducción aleatoria y
repetición
Búsqueda de pista por nombre
(Quick-BrowZer™)
Búsqueda omitiendo elementos
(modo salto)

15ES
Para utilizar un teléfono móvil, conéctelo a la
unidad. Puede conectar dos teléfonos
móviles a la unidad. Para obtener más
información, consulte “Preparación de un
dispositivo BLUETOOTH” (página 7).
Recibir una llamada
1 Presione CALL al recibir una llamada
con un tono de timbre.
La llamada telefónica comenzará.
Nota
El tono de timbre y la voz de la persona que habla
se emiten solo en los altavoces frontales.
Para rechazar la llamada
Mantenga pulsado OFF durante 1 segundo.
Para finalizar la llamada
Presione CALL de nuevo.
Realizar una llamada
Puede realizar una llamada desde la agenda
telefónica o del historial de llamadas cuando
un teléfono móvil compatible con PBAP
(Perfil de acceso a agenda telefónica) está
conectado.
Cuando dos teléfonos móviles estén
conectados a la unidad, seleccione
cualquiera de los dos.
1 Pulse CALL.
Cuando dos teléfonos móviles estén
conectados a la unidad, gire el dial de
control para seleccionar uno y luego
púlselo.
2 Gire el dial de control para
seleccionar [PHONE BOOK] y púlselo.
3 Gire el dial de control para
seleccionar una inicial de la lista de
iniciales y púlselo.
4 Gire el dial de control para
seleccionar un nombre de la lista de
nombres y púlselo.
5 Gire el dial de control para
seleccionar un número de la lista de
números y púlselo.
La llamada telefónica comenzará.
1 Pulse CALL.
Cuando dos teléfonos móviles estén
conectados a la unidad, gire el dial de
control para seleccionar uno y luego
púlselo.
2 Gire el dial de control para
seleccionar [RECENT CALL] y púlselo.
Aparecerá una lista con el historial de
llamadas.
3 Gire el dial de control para
seleccionar un nombre o un número
de teléfono del historial de llamadas
y púlselo.
La llamada telefónica comenzará.
1 Pulse CALL.
Cuando dos teléfonos móviles estén
conectados a la unidad, gire el dial de
control para seleccionar uno y luego
púlselo.
2 Gire el dial de control para
seleccionar [DIAL NUMBER] y púlselo.
3 Gire el dial de control para introducir
el número de teléfono y, por último,
seleccione [ ] (espacio) y pulse
ENTER*.
La llamada telefónica comenzará.
* Para modificar la indicación digital, pulse
/ (SEEK –/+).
Llamadas manos libres (solo
mediante BLUETOOTH)
Desde la agenda telefónica
Desde el historial de llamadas
Mediante la introducción del
número de teléfono

16ES
Nota
[_] aparece en lugar de [#] en la pantalla.
1 Pulse CALL.
Cuando dos teléfonos móviles estén
conectados a la unidad, gire el dial de
control para seleccionar uno y luego
púlselo.
2 Gire el dial de control para
seleccionar [REDIAL] y púlselo.
La llamada telefónica comenzará.
Puede hacer una llamada mencionando la
etiqueta de voz almacenada en un teléfono
móvil conectado que cuente con la función
de marcación por voz.
1 Pulse CALL.
Cuando dos teléfonos móviles estén
conectados a la unidad, gire el dial de
control para seleccionar uno y luego
púlselo.
2 Gire el dial de control para
seleccionar [VOICE DIAL] y púlselo.
Como alternativa, mantenga pulsada la
tecla VOICE durante más de 2 segundos.
3 Mencione la etiqueta de voz
almacenada en el teléfono móvil.
Su voz se reconocerá, y se realizará la
llamada.
Para cancelar la marcación por voz
Pulse VOICE.
Operaciones disponibles
durante una llamada
Para ajustar el volumen del tono de
timbre
Gire el dial de control al recibir una llamada.
Para ajustar el volumen de la voz de la
persona que habla
Gire el dial de control durante una llamada.
Para ajustar el volumen del interlocutor
(ajuste de ganancia del micrófono)
Pulse MIC.
Niveles de volumen ajustables: [MIC-LOW],
[MIC-MID], [MIC-HI].
Para reducir el eco y el ruido (modo de
cancelación de eco/cancelación de
ruido)
Mantenga presionado MIC.
Modo configurable: [EC/NC-1], [EC/NC-2].
Para alternar entre el modo de manos
libres y el modo manual
Durante una llamada, presione MODE para
cambiar el audio de la llamada entre la
unidad y el teléfono móvil.
Nota
Según el teléfono móvil, puede que esta operación
no se encuentre disponible.
Mediante rellamada
Mediante etiquetas de voz

17ES
Sony | Music Center con
iPhone/smartphone
Android™
Debe descargar la última versión de la
aplicación “Sony | Music Center” desde la
App Store en el caso del iPhone o en Google
Play en el caso de un smartphone con
sistema Android.
Notas
• Para su seguridad, respete las leyes y normas de
circulación, y no utilice la aplicación mientras
conduce.
• “Sony | Music Center” es una aplicación para
controlar los dispositivos de audio de Sony
compatibles con “Sony | Music Center” a través de
su iPhone o smartphone con sistema Android.
• Lo que se puede controlar con “Sony | Music
Center” varía en función del dispositivo
conectado.
• Para hacer uso de las funciones de “Sony | Music
Center” puede consultar la información
correspondiente en su iPhone o smartphone con
sistema Android.
• Para obtener más información sobre “Sony | Music
Center” visite la siguiente URL:
http://www.sony.net/smcqa/
• Visite el sitio web a continuación para verificar los
modelos compatibles de iPhone y smartphone
con sistema Android.
Para iPhone: visite la App Store.
Para smartphone con sistema Android: visite
Google Play.
1 Realice la conexión BLUETOOTH con
un iPhone o smartphone con sistema
Android (página 7).
Para seleccionar el dispositivo de audio,
presione MENU y seleccione
[BLUETOOTH] [SET AUDIODEV]
(página 23).
2 Inicie la aplicación “Sony | Music
Center”.
3 Pulse MENU, gire el dial de control
para seleccionar [SONY APP] y, a
continuación, púlselo.
4 Gire el dial de control para
seleccionar [CONNECT] y púlselo.
Se iniciará la conexión con el iPhone o
smartphone con sistema Android.
Para más información sobre las
operaciones en un iPhone o smartphone
con sistema Android, consulte la sección
de ayuda de la aplicación.
Si aparece el número de dispositivo
Asegúrese de que aparezca el número (por
ejemplo, 123456) y, luego, seleccione [Sí] en
el iPhone o smartphone con sistema
Android.
Para finalizar la conexión
1
Pulse MENU, gire el dial de control para
seleccionar [SONY APP] y, a continuación,
púlselo.
2 Gire el dial de control para seleccionar
[CONNECT] y púlselo.
Selección de la fuente o aplicación
Puede seleccionar la fuente o la aplicación
deseada en el iPhone o smartphone con
sistema Android.
Para seleccionar la fuente
Pulse SRC varias veces. Otra opción es pulsar
SRC, girar el dial de control para seleccionar
la fuente deseada y pulsar ENTER.
Para visualizar la lista de fuentes
Pulse SRC.
Anuncio de SMS mediante la guía
de voz (solo disponible en un
smartphone con sistema Android)
Los mensajes SMS recibidos se leen
automáticamente a través de los altavoces
del vehículo.
Para obtener más información sobre los
ajustes, consulte la sección de ayuda de la
aplicación.
Funciones útiles
Establecimiento de la conexión
con Sony | Music Center

18ES
Responder un mensaje SMS (solo
disponible en un smartphone con
sistema Android)
Para responder a un mensaje, puede tocar el
icono de respuesta.
1 Active la aplicación “Sony | Music Center” y
toque el icono [Reply] (respuesta).
Aparecerá la pantalla de entrada de mensajes en
la aplicación “Sony | Music Center”.
2 Responda al mensaje a través del
reconocimiento de voz.
Aparecerá una lista con los posibles mensajes en
la aplicación “Sony | Music Center”.
3 Gire el dial de control para seleccionar el
mensaje que desee y púlselo.
Se enviará el mensaje.
Configuración de ajustes de sonido
y pantalla
Puede configurar los ajustes relacionados
con el sonido y la pantalla a través del
iPhone o smartphone con sistema Android.
Para obtener más información sobre los
ajustes, consulte la sección de ayuda de la
aplicación.
Uso del reconocimiento de
voz (solo disponible en un
smartphone con sistema
Android)
1 Mantenga pulsado VOICE para activar
el reconocimiento de voz.
2 Diga la orden que desee al
micrófono.
Para desactivar el reconocimiento de
voz
Pulse VOICE.
Notas
• Es posible que el reconocimiento de voz no esté
disponible en algunos casos.
• Puede que el reconocimiento de voz no funcione
correctamente según el smartphone con sistema
Android conectado.
• Utilice el reconocimiento de voz en condiciones de
poco ruido, por ejemplo procedente del motor.
Utilización de Siri Eyes Free
Siri Eyes Free permite utilizar el iPhone en
modo manos libres simplemente hablando
al micrófono. Para utilizar esta función debe
conectar un iPhone a la unidad mediante
BLUETOOTH. El servicio solo está disponible
con un iPhone 4s o superior. Asegúrese de
que su iPhone tenga instalada la última
versión de iOS.
Antes, debe completar el registro y la
configuración de conexión BLUETOOTH para
el iPhone. Para obtener más información,
consulte “Preparación de un dispositivo
BLUETOOTH” (página 7). Para seleccionar el
iPhone, presione MENU y seleccione
[BLUETOOTH] [SET AUDIODEV] (página 23).
1 Active la función Siri en el iPhone.
Para obtener más información, consulte
el manual de instrucciones suministrado
con el iPhone.
2 Mantenga pulsada la tecla VOICE
durante más de 2 segundos.
Aparece la pantalla de control por voz.
3 Después del pitido del iPhone, hable
al micrófono.
El iPhone hará otro pitido y, a
continuación, Siri comenzará a
responder.
Para desactivar Siri Eyes Free
Pulse VOICE.
Notas
• Puede que el iPhone no reconozca su voz según
las condiciones de uso. (Por ejemplo, si se
encuentra en un automóvil en movimiento.)
• Es posible que Siri Eyes Free no funcione
correctamente, o que el tiempo de respuesta se
retrase en lugares donde la recepción del iPhone
no sea buena.
• Según las condiciones de utilización del iPhone,
puede que Siri Eyes Free no funcione
correctamente o se cierre.
• Si reproduce una pista con un iPhone a través de
la conexión de audio BLUETOOTH, Siri Eyes Free se
cerrará automáticamente al iniciar la reproducción
de la pista mediante BLUETOOTH, y la unidad
reproducirá la fuente de audio BLUETOOTH.
• Cuando Siri Eyes Free se activa durante la
reproducción de audio, la unidad puede
reproducir la fuente de audio BLUETOOTH, a pesar
de que no haya especificado una pista para
reproducir.

19ES
• Al conectar el iPhone al puerto USB, puede que
Siri Eyes Free no funcione correctamente o se
cierre.
• Cuando conecte el iPhone a la unidad mediante
USB, no active Siri con el iPhone. Es posible que
Siri Eyes Free no funcione correctamente o se
cierre.
• No se emitirá ningún sonido de audio mientras Siri
Eyes Free esté activado.
Cancelación del modo DEMO
Puede cancelar la pantalla de demostración
que aparece cuando la fuente está
desactivada y aparece el reloj.
1 Pulse MENU, gire el dial de control
para seleccionar [GENERAL] y, a
continuación, púlselo.
2 Gire el dial de control para
seleccionar [SET DEMO] y púlselo.
3 Gire el dial de control para
seleccionar [SET DEMO-OFF] y
púlselo.
El ajuste habrá finalizado.
4 Pulse (atrás) dos veces.
La pantalla vuelve al modo de recepción/
reproducción normal.
Funcionamiento de los
ajustes básicos
Puede establecer las opciones de las
siguientes categorías de configuración:
Ajustes generales (GENERAL),
Ajustes de sonido (SOUND),
Ajustes de pantalla (DISPLAY),
Ajustes de BLUETOOTH (BLUETOOTH),
Configuración de Sony | Music Center (SONY
APP)
1 Pulse MENU.
2 Gire el dial de control para
seleccionar la categoría de ajustes
que desee y púlselo.
Las opciones que puede ajustar
dependen de la fuente y de la
configuración.
3 Gire el dial de control para
seleccionar las opciones y púlselo.
Para volver a la pantalla anterior
Pulse (atrás).
Ajustes

20ES
Ajustes generales
(GENERAL)
AREA (área)
Especifica la región en la que va a
utilizarse esta unidad: [EUROPE],
[RUSSIA].
Si se modifica la región seleccionada, la
unidad se reinicia y aparece el reloj.
(Disponible solo cuando la fuente está
desactivada y aparece el reloj.)
DEMO (demostración)
Activa la demostración: [ON], [OFF].
CLOCK-ADJ (ajuste del reloj) (página 7)
CAUT ALM (alarma de precaución)
Activa la alarma de precaución: [ON],
[OFF] (página 6).
(Disponible solo cuando la fuente está
desactivada y aparece el reloj.)
BEEP (pitido)
Activa el sonido de pitido: [ON], [OFF].
AUTO OFF (apagado automático)
Se apaga automáticamente después de
un tiempo determinado cuando se apaga
la unidad y aparece el reloj (al mantener
pulsado OFF durante 1 segundo):
[ON] (30 minutos), [OFF].
STEERING (volante)
Registra/reinicia el ajuste del mando a
distancia en el volante.
(Disponible solo cuando la fuente está
desactivada y aparece el reloj.)
STR CONTROL (control en el volante)
Selecciona el modo de entrada del
mando a distancia conectado. Para evitar
errores, asegúrese de que el modo de
entrada coincide con el mando a
distancia conectado antes de usarlo.
CUSTOM (personalizado)
Modo de entrada del mando a
distancia en el volante
PRESET (predeterminado)
Modo de entrada del mando a
distancia con cable, sin tener en cuenta
el mando a distancia en el volante
(seleccionado automáticamente al
realizar [RESET CUSTOM].)
EDIT CUSTOM (editar personalización)
Registra las funciones (SOURCE, ATT,
VOL +/–, SEEK +/–, VOICE, ON HOOK, OFF
HOOK) en el mando a distancia en el
volante:
Gire el dial de control para seleccionar
la función que desea asignar al mando
a distancia del volante y, a
continuación, púlselo.
Mientras [REGISTER] parpadea,
mantenga pulsado el botón del
mando a distancia en el volante al que
desea asignar la función. Una vez
finalizado el registro, aparece
[REGISTERED].
Para registrar otras funciones, repita
los pasos y .
(Disponible solo cuando [STR CONTROL]
está ajustado en [CUSTOM].)
RESET CUSTOM (reiniciar personalización)
Reinicia el ajuste del mando a distancia
en el volante: [YES], [NO].
(Disponible solo cuando [STR CONTROL]
está ajustado en [CUSTOM].)
Notas
• Al realizar ajustes, solo puede utilizarse la
unidad con los botones. Por motivos de
seguridad, estacione el vehículo antes de
realizar este ajuste.
• Si se produce un error durante el registro, la
información registrada anteriormente no se
elimina. Vuelva a empezar el registro a partir
de la función en la que se produjo el error.
• Es posible que esta función no esté disponible
en algunos vehículos. Para obtener más
información sobre la compatibilidad de su
vehículo, visite el sitio web de asistencia de la
contraportada.
USB MODE (modo USB)
Cambia el modo USB: [ANDROID],
[MSC/MTP].
(Disponible solo cuando se selecciona la
fuente USB.)
CT (hora del reloj)
Activa la función CT: [ON], [OFF].
AF/TA (frecuencias alternativas/anuncio de
tráfico)
Selecciona el ajuste de las frecuencias
alternativas (AF) y los anuncios de tráfico
(TA): [AF-ON], [TA-ON], [AF/TA-ON],
[AF/TA-OFF].

21ES
REGIONAL (regional)
Limita la recepción a una región
específica: [ON], [OFF].
(Disponible solo si hay recepción FM.)
BTM (memoria de mejor sintonización)
(página 11)
(Disponible solo cuando se selecciona el
sintonizador.)
FIRMWARE (firmware)
(Disponible solo cuando la fuente está
desactivada y aparece el reloj.)
Comprueba/actualiza la versión del
firmware. Para obtener más información,
visite el sitio web de asistencia de la
contraportada.
FW VERSION (versión del firmware)
Muestra la versión del firmware actual.
FW UPDATE (actualización del firmware)
Accede al proceso de actualización del
firmware: [YES], [NO].
La actualización del firmware lleva unos
minutos. Durante la actualización, no
sitúe el contacto en la posición OFF ni
desconecte el dispositivo USB.
Ajustes de sonido (SOUND)
Este menú de configuración no está
disponible si la fuente está desactivada y
aparece el reloj.
EQ10 PRESET (preajuste EQ10)
Selecciona una curva de ecualizador entre
10 curvas diferentes o la desactiva:
[OFF], [R&B], [ROCK], [POP], [HIP-HOP],
[EDM], [JAZZ], [SOUL], [COUNTRY],
[KARAOKE]*, [CUSTOM].
Es posible memorizar el ajuste de la curva
de ecualizador de cada fuente.
* [KARAOKE] reduce el sonido vocal, aunque no
puede eliminarlo del todo durante la
reproducción. Asimismo, tampoco está
permitido utilizar un micrófono.
EQ10 CUSTOM (EQ10 personalizado)
Ajusta [CUSTOM] en EQ10.
Ajuste de la curva de ecualizador:
[BAND1] – [BAND10] (32 Hz, 63 Hz, 125 Hz,
250 Hz, 500 Hz, 1 kHz, 2 kHz, 4 kHz, 8 kHz,
16 kHz).
El nivel de volumen puede ajustarse en
pasos de 1 dB, de -6 dB a +6 dB.
BALANCE (balance)
Ajusta el balance del sonido: [RIGHT-15] –
[CENTER] – [LEFT-15].
FADER (atenuador)
Ajusta el nivel relativo: [FRONT-15] –
[CENTER] – [REAR-15].
S.WOOFER (altavoz potenciador de graves)
SW LEVEL (nivel del altavoz potenciador
de graves)
Ajusta el nivel de volumen del altavoz
potenciador de graves:
[+6 dB] – [0 dB] – [-6 dB].
(Aparece [ATT] en el ajuste más bajo.)
SW PHASE (fase del altavoz potenciador
de graves)
Selecciona la fase del altavoz potenciador
de graves: [SUB NORM], [SUB REV].
LPF FREQ (frecuencia de filtro de paso
bajo)
Selecciona la frecuencia de corte del
altavoz potenciador de graves:
[80Hz], [100Hz], [120Hz].
HPF FREQ (frecuencia de filtro de paso alto)
Selecciona la frecuencia de corte del
altavoz frontal/posterior: [OFF], [80Hz],
[100Hz], [120Hz].
AUX VOL (nivel de volumen AUX)
Ajusta el nivel de volumen de cada
dispositivo auxiliar conectado:
[+18 dB] – [0 dB] – [-8 dB].
Este ajuste evita tener que ajustar el nivel
de volumen en diferentes fuentes.
(Disponible solo cuando se selecciona
AUX.)

22ES
BTA VOL (nivel de volumen de audio
BLUETOOTH)
Ajusta el nivel de volumen de cada
dispositivo BLUETOOTH conectado:
[+6 dB] – [0 dB] – [-6 dB].
Este ajuste evita tener que ajustar el nivel
de volumen en diferentes fuentes.
(Disponible solo cuando se selecciona
una aplicación o audio BT.)
Ajustes de pantalla
(DISPLAY)
DIMMER (atenuador)
Modifica el brillo de la pantalla:
[OFF], [ON], [AT] (automático), [CLK]
(reloj).
([AT] solo está disponible cuando el cable
de control de la iluminación está
conectado y los faros delanteros están
encendidos.)
Para que esta función solo esté activa
durante un período determinado,
seleccione [CLK] y defina las horas de
inicio y finalización.
– Para ajustar el brillo cuando la función
de atenuación está activada:
Ajuste [DIMMER] en [ON] y, a
continuación, ajuste [BRIGHTNESS].
– Para ajustar el brillo cuando la función
de atenuación está desactivada:
Ajuste [DIMMER] en [OFF] y, a
continuación, ajuste [BRIGHTNESS].
El ajuste de brillo se almacena y se aplica
cuando la función de atenuación se activa
o desactiva.
BRIGHTNESS (brillo)
Ajusta el brillo de la pantalla. El nivel de
brillo es ajustable: [1] – [10].
BUTTON-C (color del botón)
Establece un color predeterminado o
personalizado para los botones.
COLOR (color)
Selecciona 1 color personalizado de entre
15 colores predeterminados.
CUSTOM-C (color personalizado)
Registra un color personalizado para los
botones.
RGB RED, RGB GRN, RGB BLUE
Gama de color ajustable: [0] – [32] (no
se puede establecer [0] para todas las
gamas de colores).
DSPL-C (color de la pantalla)
Establece un color predeterminado o
personalizado para la pantalla.
COLOR (color)
Selecciona 1 color personalizado de entre
15 colores predeterminados.
CUSTOM-C (color personalizado)
Registra un color personalizado para la
pantalla.
RGB RED, RGB GRN, RGB BLUE
Gama de color ajustable: [0] – [32] (no
se puede establecer [0] para todas las
gamas de colores).
SND SYNC (sincronización del sonido)
Activa la sincronización de la iluminación
con el sonido: [ON], [OFF].
AUTO SCR (desplazamiento automático)
Desplaza automáticamente los
elementos más largos: [ON], [OFF].
(No disponible cuando se selecciona AUX
o el sintonizador.)

23ES
Ajustes de BLUETOOTH
(BLUETOOTH)
PAIRING (emparejamiento) (página 8)
Conecta hasta dos dispositivos
BLUETOOTH: [DEVICE 1], [DEVICE 2].
El nombre [DEVICE 1] o [DEVICE 2]
cambiará al del dispositivo emparejado
una vez que el emparejamiento se haya
completado.
AUDIODEV (dispositivo de audio)
Selecciona el dispositivo de audio.
[*] aparece en el dispositivo emparejado
con [DEVICE 1] o el dispositivo de audio
compatible con el A2DP actual.
RINGTONE (tono de llamada)
Selecciona si esta unidad o el teléfono
móvil conectado emite el tono de timbre:
[1] (esta unidad), [2] (teléfono móvil).
AUTO ANS (respuesta automática)
Configura esta unidad para que responda
a las llamadas entrantes de forma
automática: [OFF], [1] (aproximadamente
3 segundos), [2] (aproximadamente 10
segundos).
AUTOPAIR (emparejamiento automático)
Inicia el emparejamiento de BLUETOOTH
automáticamente cuando un dispositivo
iOS con la versión 5.0 o posterior se
conecta mediante USB: [ON], [OFF].
BT SIGNL (señal BLUETOOTH) (página 9)
Activa/desactiva la función BLUETOOTH.
BT INIT (inicializar BLUETOOTH)
Inicializa todos los ajustes relacionados
con BLUETOOTH (información de
emparejamiento, información del
dispositivo, etc.): [YES], [NO].
Al desechar la unidad, inicialice todos los
ajustes.
(Disponible solo cuando la fuente está
desactivada y aparece el reloj.)
Configuración de
Sony | Music Center (SONY
APP)
AUTO LAUNCH (inicio automático)
Activa el inicio automático de
“Sony | Music Center”: [ON], [OFF].
Si [ON] está seleccionado, “Sony | Music
Center” se conectará automáticamente
una vez completada la conexión
BLUETOOTH.
CONNECT (conexión)
Permite establecer y finalizar una
conexión con la función “Sony | Music
Center”.

24ES
Actualización del firmware
Para actualizar el firmware, visite el sitio web
de asistencia de la contraportada y siga las
instrucciones.
Nota
Durante la actualización, no desconecte el
dispositivo USB.
Precauciones
• No deje nunca el panel frontal ni otros
dispositivos de audio en el salpicadero.
• Cuando se enciende la unidad, la antena se
despliega automáticamente.
• No derrame líquidos sobre la unidad.
• Puede conectarse a los siguientes modelos
de iPod. Actualice sus dispositivos iPod a la
última versión de software antes de
utilizarlos.
Modelos de iPhone/iPod compatibles
•El uso de la insignia Made for Apple
significa que un accesorio ha sido diseñado
para conectarse específicamente al
producto o a los productos Apple
identificados en la insignia, y ha sido
certificado por el fabricante de que cumple
las normas de rendimiento de Apple. Apple
no se hace responsable por el
funcionamiento de este dispositivo o su
cumplimiento con normas de seguridad y
regulatorias.
Tenga en cuenta que el uso de este
accesorio con un producto Apple puede
afectar el rendimiento inalámbrico.
Información adicional
Orden de reproducción de
archivos de audio
Carpeta (álbum)
Archivo de audio
(pista)
Acerca del iPod
Modelo
compatible
Bluetooth® USB
iPhone X
iPhone 8
iPhone 8 Plus
iPhone 7
iPhone 7 Plus
iPhone SE
iPhone 6s
iPhone 6s Plus
iPhone 6
iPhone 6 Plus
iPhone 5s
iPhone 5c
iPhone 5
iPhone 4s
iPod touch
(6.ª generación)
iPod touch
(5.ª generación)
iPod nano
(7.ª generación)

25ES
Si desea realizar alguna consulta o
solucionar algún problema relativo a la
unidad que no se trate en este manual,
póngase en contacto con su distribuidor
Sony más cercano.
Mantenimiento
Limpieza de los conectores
Evite tocar directamente los conectores. Es
posible que la unidad no funcione
correctamente si los conectores entre la
unidad y el panel frontal están sucios. Para
evitarlo, retire el panel frontal (página 6) y
limpie los conectores con un bastón de
algodón. No aplique una fuerza excesiva. De
lo contrario, podría dañar los conectores.
Nota
Por motivos de seguridad, no desmonte el panel
frontal mientras conduzca.
Especificaciones
Sección del sintonizador
FM
Rango de sintonización:
Si [AREA] está ajustado en [EUROPE]:
87,5 MHz – 108,0 MHz
Si [AREA] está ajustado en [RUSSIA]:
FM1/FM2: 87,5 MHz – 108,0 MHz
(en pasos de 50 kHz)
FM3: 65 MHz – 74 MHz
(en pasos de 30 kHz)
Sensibilidad: 8 dBf
Relación señal-ruido: 73 dB
Separación: 50 dB a 1 kHz
MW/LW
Rango de sintonización:
MW: 531 kHz – 1.602 kHz
LW: 153 kHz – 279 kHz
Sensibilidad: MW: 26 V, LW: 50 V
Sección del reproductor USB
Interfaz: USB (máxima velocidad)
Corriente máxima: 1 A
Número máximo de carpetas y archivos
reconocibles:
Carpetas (álbumes): 256
Archivos (pistas) por carpeta: 256
Protocolo Android Open Accessory (AOA)
compatible: 2.0
Códec correspondiente:
MP3 (.mp3)
Velocidad de bits: 8 kbps – 320 kbps
(compatible con VBR (velocidad de
bits variable))
Frecuencia de muestreo:
16 kHz – 48 kHz
WMA (.wma)
Velocidad de bits: 32 kbps – 192 kbps
(compatible con VBR (velocidad de
bits variable))
Frecuencia de muestreo: 32 kHz,
44,1 kHz, 48 kHz
FLAC (.flac)
Profundidad de bits: 16 bits, 24 bits
Frecuencia de muestreo: 44,1 kHz,
48 kHz
Sistemas de archivos compatibles: FAT16,
FAT32

26ES
Comunicación inalámbrica
Sistema de comunicación:
Norma BLUETOOTH versión 3.0
Salida:
Norma BLUETOOTH, clase de potencia 2
(Conducción máx. +1 dBm)
Rango máximo de comunicación:
Línea de visión aprox. 10 m*
1
Banda de frecuencia:
Banda de 2,4 GHz
(2,4000 GHz – 2,4835 GHz)
Método de modulación: FHSS
Perfiles BLUETOOTH compatibles*
2
:
A2DP (Perfil avanzado de distribución de
audio) 1.3
AVRCP (Perfil de control remoto de
audio/vídeo) 1.3
HFP (Perfil de manos libres) 1.6
PBAP (Perfil de acceso a agenda
telefónica)
SPP (Perfil de puerto de serie)
Códec correspondiente:
SBC (.sbc), AAC (.m4a)
*1 La cobertura real variará en función de factores
como los obstáculos entre dispositivos, los
campos magnéticos alrededor de un horno
microondas, la electricidad estática, la
sensibilidad de la recepción, el rendimiento de la
antena, el sistema operativo, la aplicación del
software, etc.
*2 Los perfiles estándar de BLUETOOTH indican la
finalidad de la comunicación BLUETOOTH entre
dispositivos.
Comunicación NFC
Banda de frecuencia: 13,56 MHz
Sección del amplificador de potencia
Salidas: salidas de altavoz
Impedancia de altavoz: 4 – 8
Salida de potencia máxima: 55 W × 4 (a 4 )
General
Requisitos de alimentación: batería para
vehículo de 12 V CC (masa negativa)
Consumo de corriente nominal: 10 A
Dimensiones:
Aprox. 178 mm × 50 mm × 177 mm
(an./al./pr.)
Dimensiones de montaje:
Aprox. 182 mm × 53 mm × 160 mm
(an./al./pr.)
Peso: aprox. 0,8 kg
Contenidos del paquete:
Unidad principal (1)
Micrófono (1)
Componentes de instalación y
conexiones (1 juego)
Para obtener más información, consulte al
distribuidor.
El diseño y las especificaciones pueden
variar sin previo aviso.
La marca y los logotipos Bluetooth® son marcas
comerciales registradas propiedad de Bluetooth
SIG, Inc. y Sony Corporation dispone de la licencia
correspondiente para utilizar dichas marcas. Las
otras marcas comerciales y nombres de marcas
pertenecen a sus respectivos propietarios.
La marca N es una marca comercial o marca
comercial registrada de NFC Forum, Inc. en los
EE.UU. y en otros países.
Windows Media es una marca comercial o marca
comercial registrada de Microsoft Corporation en
los Estados Unidos y en otros países.
Este producto está protegido por determinados
derechos de propiedad intelectual de Microsoft
Corporation. Queda prohibido el uso o distribución
de esta tecnología fuera de este producto sin las
licencias correspondientes de Microsoft o una filial
autorizada de Microsoft.
Apple, iPhone, iPod, iPod nano, iPod touch y Siri son
marcas comerciales de Apple Inc., registradas en
Estados Unidos y otros países. App Store es una
marca de servicio de Apple Inc.
IOS es una marca comercial o marca comercial
registrada de Cisco en los EE. UU. y en otros países y
se utiliza con licencia.
Google, Google Play y Android son marcas
comerciales de Google LLC.
Derechos de autor

27ES
libFLAC
Copyright (C) 2000-2009 Josh Coalson
Copyright (C) 2011-2013 Fundación Xiph.Org
Se permite su redistribución y uso en formatos de
fuente y binario, con o sin modificaciones, siempre
y cuando se cumplan las siguientes condiciones:
– Las redistribuciones del código fuente deben
respetar el aviso de protección de derechos de
autor indicado anteriormente, esta lista de
condiciones y la siguiente nota legal.
– Las redistribuciones en formato binario deben
reproducir el aviso de protección de derechos de
autor indicado anteriormente, esta lista de
condiciones y la siguiente nota legal en la
documentación u otros materiales
proporcionados con la distribución.
– No se puede usar el nombre de la Fundación
Xiph.org ni los nombres de sus colaboradores
para apoyar o promocionar productos derivados
de este software sin obtener un permiso previo
específico por escrito.
ESTE SOFTWARE HA SIDO PROPORCIONADO POR
LOS TITULARES DE LOS DERECHOS DE AUTOR Y SUS
COLABORADORES “TAL CUAL” Y SE RENUNCIA A
CUALQUIER GARANTÍA EXPRESA O IMPLÍCITA,
INCLUYENDO, ENTRE OTRAS, LAS GARANTÍAS
IMPLÍCITAS DE COMERCIABILIDAD E IDONEIDAD
PARA UN FIN EN PARTICULAR. LA FUNDACIÓN O SUS
COLABORADORES NO SERÁN RESPONSABLES EN
NINGÚN CASO DE NINGÚN DAÑO INDIRECTO,
DIRECTO, ACCIDENTAL, ESPECIAL, EJEMPLAR O
DERIVADO (INCLUYENDO, ENTRE OTROS, LA
ADQUISICIÓN DE PRODUCTOS O SERVICIOS DE
SUSTITUCIÓN; IMPOSIBILIDAD DE USO, PÉRDIDA DE
DATOS O BENEFICIOS; O INTERRUPCIÓN DEL
NEGOCIO) SEA CUAL SEA SU CAUSA, Y PARTIENDO
DE CUALQUIER TEORÍA DE RESPONSABILIDAD QUE
SE APLIQUE, YA SE TRATE DE RESPONSABILIDAD
CONTRACTUAL, RESPONSABILIDAD OBJETIVA U
OTRO AGRAVIO (INCLUIDA LA NEGLIGENCIA O
CUALQUIER OTRA) DERIVADA DEL USO DE ESTE
SOFTWARE, AUNQUE SE ADVIERTA DE LA
POSIBILIDAD DE QUE SE PRODUZCAN DICHOS
DAÑOS.
Solución de problemas
La siguiente lista de comprobación pretende
facilitar la solución de los problemas que
surjan con la unidad.
Antes de consultar la siguiente lista de
comprobación, verifique los procedimientos
de conexión y de funcionamiento.
Para obtener más información sobre la
utilización del fusible y la extracción de la
unidad del salpicadero, consulte “Conexión/
Instalación” (página 34).
Si el problema no se resuelve, consulte el
sitio de asistencia de la contraportada.
General
No se escucha ningún sonido o el sonido
es muy bajo.
La posición del control del fader [FADER]
no está configurada para un sistema de 2
altavoces.
El volumen de la unidad y/o el dispositivo
conectado es muy bajo.
– Suba el volumen de la unidad y el
dispositivo conectado.
La unidad no emite el sonido de pitido.
Hay conectado un amplificador de
potencia opcional y no está usando el
amplificador integrado.
Las emisoras almacenadas y la hora
correcta se borraron.
El fusible se fundió.
La unidad hace un ruido al cambiar la
posición del contacto.
Los cables no están bien conectados con
el conector de alimentación auxiliar del
vehículo.
Durante la reproducción o la recepción se
inicia el modo de demostración.
Si no se realiza ninguna operación durante
5 minutos y [DEMO-ON] está
seleccionado, se inicia el modo de
demostración.
– Ajuste [DEMO-OFF] (página 20).
Las indicaciones desaparecen o no
aparecen en el monitor.
Los conectores están sucios (página 25).

28ES
La pantalla/iluminación parpadea.
La alimentación no es suficiente.
– Compruebe que la batería del vehículo
proporcione suficiente potencia a la
unidad. (La potencia necesaria es de
12 V CC.)
Los botones de las operaciones no
funcionan.
Pulse DSPL y (atrás)/MODE durante
más de 2 segundos para reiniciar la
unidad.
El contenido almacenado en la memoria
se borra.
Recepción de radio
La recepción de radio falla.
Se produce ruido estático.
Conecte correctamente la antena.
No es posible sintonizar de 65 MHz a
74 MHz en FM3.
[AREA] está ajustado en [EUROPE].
– Ajuste [AREA] en [RUSSIA] (página 20).
RDS
No es posible recibir los servicios RDS (si
[AREA] está ajustado en [RUSSIA]).
FM3 está seleccionado.
– Seleccione FM1 o FM2.
Los servicios RDS no están disponibles en
la región actual.
La operación SEEK empieza después de
unos segundos de escucha.
La emisora no es TP o tiene una señal
débil.
–Desactive TA (página11).
No se reciben anuncios de tráfico.
Active TA (página 11).
La emisora no emite ninguna notificación
de tráfico a pesar de ser TP.
– Sintonice otra emisora.
PTY muestra [- - - - - - - -].
La emisora actual no es RDS o la recepción
de radio es mala.
El nombre del servicio del programa
parpadea.
No hay frecuencia alternativa para la
emisora actual.
–Pulse (SEEK –/+) mientras el
nombre del servicio del programa
parpadea. Aparece [PI SEEK] y la unidad
empieza a buscar otra frecuencia con los
mismos datos de PI (identificación del
programa).
Reproducción de dispositivo USB
Un dispositivo USB tarda más en
reproducirse.
El dispositivo USB contiene archivos con
una estructura de árbol complicada.
No puede reproducirse el archivo de
audio.
Para obtener información detallada sobre
los formatos compatibles, consulte
“Especificaciones” (página 25).
Si el archivo de audio sigue sin poder
reproducirse, consulte el manual de
instrucciones del dispositivo USB o
póngase en contacto con el fabricante del
dispositivo USB.
No es posible realizar operaciones como
saltar un álbum, saltar contenidos (modo
salto) o buscar una pista por nombre
(Quick-BrowZer).
Ajuste [USB MODE] en [MSC/MTP]
(página 20).
No se emite sonido durante la
reproducción en el modo Android.
Compruebe el estado de la aplicación de
reproducción de audio en el smartphone
Android.

29ES
Función NFC
La conexión con un solo toque (NFC) no es
posible.
Si el smartphone no responde al tacto.
– Compruebe que la función NFC del
smartphone esté activada.
– Coloque la parte con la marca N del
smartphone más cerca de la parte con la
marca N de la unidad.
– Si el smartphone tiene una carcasa,
quítela.
La sensibilidad de recepción de NFC
depende del dispositivo.
Si la conexión al smartphone con un solo
toque falla en repetidas ocasiones, realice
la conexión BLUETOOTH de forma manual.
Función BLUETOOTH
El dispositivo de conexión no puede
detectar la unidad.
Antes de realizar el emparejamiento,
configure esta unidad en el modo de
espera de emparejamiento.
Al conectarse a dos dispositivos
BLUETOOTH, ningún otro dispositivo
podrá detectar la unidad.
– Desconecte una de las conexiones y
busque esta unidad desde otro
dispositivo.
Cuando se realiza el emparejamiento del
dispositivo, ajuste la salida de la señal
BLUETOOTH en ON (página 9).
No es posible establecer la conexión.
La conexión se controla desde uno de los
lados (desde esta unidad o desde el
dispositivo BLUETOOTH), pero no desde
ambos.
– Conéctese a esta unidad desde un
dispositivo BLUETOOTH o viceversa.
El nombre del dispositivo detectado no
aparece.
Según el estado del otro dispositivo,
puede que no sea posible obtener el
nombre.
No se escucha el tono de timbre.
Ajuste el volumen girando el dial de
control al recibir una llamada.
Según el dispositivo de conexión, es
posible que el tono de timbre no se haya
enviado correctamente.
– Ajuste [RINGTONE] en [1] (página 23).
Los altavoces frontales no están
conectados a la unidad.
– Conecte los altavoces frontales a la
unidad. El tono de timbre se emite solo
en los altavoces frontales.
No se puede escuchar la voz de la persona
que habla.
Los altavoces frontales no están
conectados a la unidad.
– Conecte los altavoces frontales a la
unidad. La voz de la persona que habla
se emite solo en los altavoces frontales.
Un interlocutor dice que el volumen está
demasiado bajo o alto.
Ajuste el volumen de forma correcta
mediante el ajuste de ganancia del
micrófono (página 16).
Hay eco o ruidos en las conversaciones
telefónicas.
Baje el volumen.
Ajuste el modo EC/NC en [EC/NC-1] o
[EC/NC-2] (página 16).
Si el ruido ambiente (que no sea el del
sonido de la llamada) es muy alto, intente
reducirlo.
Por ejemplo, si hay una ventanilla abierta
y el ruido del tráfico, etc., es muy alto,
cierre la ventanilla. Si el aire
acondicionado hace mucho ruido, baje su
nivel.
El teléfono no está conectado.
Al reproducir audio por BLUETOOTH, el
teléfono no se conecta por más que
presione CALL.
– Conéctese desde el teléfono.

30ES
La calidad de sonido del teléfono es mala.
La calidad de sonido del teléfono
depende de las condiciones de recepción
de teléfono móvil.
– Si la recepción es mala, mueva su
automóvil a un lugar donde la señal del
teléfono sea mejor.
El volumen del dispositivo de audio
conectado es bajo (alto).
El nivel de volumen será diferente en
función del dispositivo de audio.
– Ajuste el volumen del dispositivo de
audio conectado o el de la unidad
(página 22).
El sonido es intermitente durante la
reproducción de un dispositivo de audio
BLUETOOTH.
Reduzca la distancia entre la unidad y el
dispositivo de audio BLUETOOTH.
Si el dispositivo de audio BLUETOOTH se
encuentra en una carcasa que interrumpe
la señal, retire el dispositivo de audio de la
carcasa durante su uso.
Hay varios dispositivos BLUETOOTH u
otros dispositivos que se están utilizando
cerca y emiten ondas de radio.
– Apague los otros dispositivos.
– Aumente la distancia con los otros
dispositivos.
El sonido de reproducción se detiene de
forma momentánea al conectar esta
unidad con el teléfono móvil. No se trata
de ningún problema de funcionamiento.
El dispositivo de audio BLUETOOTH
conectado no se puede controlar.
Compruebe que el dispositivo de audio
BLUETOOTH conectado sea compatible
con AVRCP.
Algunas funciones no se ejecutan.
Compruebe que el dispositivo de
conexión sea compatible con las
funciones en cuestión.
Una llamada es contestada
involuntariamente.
El teléfono conectado está configurado
para responder llamadas
automáticamente.
El emparejamiento falló porque se agotó
el tiempo de espera.
Según el dispositivo de conexión, es
posible que el límite de tiempo para
realizar el emparejamiento sea breve.
– Intente completar el emparejamiento
dentro del tiempo establecido.
La función BLUETOOTH no funciona.
Apague la unidad pulsando OFF durante
más de 2 segundos y a continuación
encienda la unidad de nuevo.
Los altavoces del automóvil no emiten
sonido alguno durante una llamada con
manos libres.
Si el sonido se emite desde el teléfono
móvil, configúrelo para que emita el
sonido desde los altavoces del automóvil.
Siri Eyes Free no está activado.
Realice el registro manos libres en el caso
de un iPhone compatible con Siri Eyes
Free.
Active la función Siri en el iPhone.
Cancele la conexión BLUETOOTH con el
iPhone y la unidad, y vuelva a conectarlo.
Funcionamiento de Sony | Music
Center
El nombre de la aplicación no coincide con
la aplicación que figura en “Sony | Music
Center”.
Inicie la aplicación de nuevo desde la
aplicación “Sony | Music Center”.
Mientras se ejecuta la aplicación
“Sony | Music Center” a través de
BLUETOOTH, la pantalla cambia
automáticamente a [BT AUDIO].
La aplicación “Sony | Music Center” o la
función BLUETOOTH ha fallado.
Ejecute de nuevo la aplicación.

31ES
La aplicación “Sony | Music Center” se
desconecta automáticamente cuando la
pantalla cambia a [IPD].
La aplicación “Sony | Music Center” en el
iPhone o iPod no es compatible con la
reproducción a través de iPod.
– Cambie la fuente de la unidad a otra que
no sea [IPD] y luego establezca la
conexión “Sony | Music Center”
(página 17).
La conexión “Sony | Music Center” se
desconecta de manera automática cuando
el modo USB de la unidad cambia a
[ANDROID].
El smartphone con Android no es
compatible con la reproducción en modo
Android.
– Configure el modo USB de la unidad
como [MSC/MTP] y, a continuación,
establezca la conexión “Sony | Music
Center” (página 17).
Mensajes
Es posible que aparezcan o parpadeen los
siguientes mensajes durante la utilización
de la unidad.
INVALID
La operación seleccionada tal vez no sea
válida.
[USB MODE] no puede modificarse
durante la reproducción de un iPod.
READ
Espere hasta que finalice la lectura y la
reproducción empiece automáticamente.
El proceso puede tardar un tiempo, en
función de la organización de los archivos.
(guión bajo): el carácter no puede
mostrarse.
Reproducción de dispositivo USB:
HUB NO SUPRT: concentradores USB no
compatibles.
IPD STOP: la reproducción del iPod ha
finalizado.
Inicie la reproducción desde su iPod/
iPhone.
NOT SUPPORT - ANDROID MODE
Se ha conectado a la unidad un
dispositivo USB no compatible con AOA
(Android Open Accessory) 2.0 mientras
[USB MODE] está ajustado en [ANDROID].
– Ajuste [USB MODE] en [MSC/MTP]
(página 20).
USB ERROR
Conecte de nuevo el dispositivo USB.
USB NO DEV
Asegúrese de que el dispositivo USB o el
cable USB esté correctamente conectado.
USB NO MUSIC
Conecte un dispositivo USB con archivos
reproducibles (página 25).
USB NO SUPRT
Para obtener más información sobre la
compatibilidad del dispositivo USB, visite
el sitio web de asistencia de la
contraportada.
OVERLOAD: el dispositivo USB está
sobrecargado.
Desconecte el dispositivo USB y pulse SRC
para seleccionar otra fuente.
El dispositivo USB presenta un fallo o se
ha conectado un dispositivo no
compatible.

32ES
Funcionamiento de RDS:
NO AF: no hay frecuencias alternativas.
Pulse (SEEK –/+) mientras el
nombre del servicio del programa
parpadea. La unidad empieza a buscar
otra frecuencia con los mismos datos de
PI (identificación del programa) (aparece
[PI SEEK]).
NO PI: sin identificación de programas. La
emisora seleccionada no tiene datos de PI
(identificación de programas).
Seleccione otra emisora.
NO TP: no hay programas de tráfico.
La unidad continuará buscando emisoras
de TP disponibles.
Función BLUETOOTH:
BTA NO DEV: el dispositivo BLUETOOTH no
está conectado o no se reconoce.
Asegúrese de que el dispositivo
BLUETOOTH esté correctamente
conectado o de que se establezca la
conexión BLUETOOTH con el dispositivo
BLUETOOTH.
ERROR: no puede realizarse la operación
seleccionada.
Espere unos instantes y vuelva a
intentarlo.
UNKNOWN: no se puede visualizar un
nombre o número de teléfono.
WITHHELD: la persona que llama oculta su
número de teléfono.
Para el funcionamiento de
Sony | Music Center:
APP ––––––––: no hay una conexión
establecida con la aplicación.
Establezca de nuevo la conexión con
“Sony | Music Center” (página 17).
APP DISCNCT: la aplicación está
desconectada.
Establezca la conexión con “Sony | Music
Center” (página 17).
APP DISPLAY: hay una pantalla de
configuración de visualización de la
aplicación abierta.
Salga de la pantalla de configuración de
visualización de la aplicación para poder
utilizar el botón.
APP LIST: la lista de contenidos del
dispositivo USB está abierta.
Salga de la lista de la aplicación para
poder utilizar el botón.
APP MENU: hay una ventana de
configuración de la aplicación abierta.
Salga de la pantalla de configuración de la
aplicación para poder utilizar el botón.
APP NO DEV: no se reconoce el dispositivo
con la aplicación instalada o no está
conectado.
Establezca la conexión BLUETOOTH y la
conexión “Sony | Music Center” de nuevo
(página 17).
APP SOUND: hay una pantalla de
configuración de sonido de la aplicación
abierta.
Salga de la pantalla de configuración del
sonido de la aplicación para poder utilizar
el botón.
OPEN APP: la aplicación “Sony | Music
Center” no funciona.
Inicie la aplicación.

33ES
Para la utilización del mando a
distancia en el volante:
ERROR
Vuelva a empezar el registro a partir de la
función en la que se produjo el error
(página 20).
TIMEOUT
Trate de completar el registro mientras
[REGISTER] está parpadeando
(aproximadamente 6 segundos)
(página 20).
Operación de actualización del
firmware:
FILE ERROR: el programa de actualización
no está almacenado en el dispositivo USB.
Guarde el programa de actualización en el
dispositivo USB y vuelva a intentarlo
(página 24).
UPDATE ERROR PRESS ENTER: la
actualización del firmware no se ha
realizado correctamente.
Pulse ENTER para borrar el mensaje y
vuelva a intentarlo.
Durante la actualización, no sitúe el
contacto en la posición OFF ni desconecte
el dispositivo USB (página 24).
Si estas soluciones no mejoran la situación,
póngase en contacto con su distribuidor
Sony más cercano.
Si lleva la unidad a reparar a causa de
problemas en la reproducción del
dispositivo, lleve el dispositivo que se utilizó
cuando se produjo el problema.

34ES
Precauciones
• Dirija todos los cables de masa a un
punto de masa común.
• Evite que los cables queden atrapados bajo
un tornillo o en piezas móviles (p. ej., rieles
de asientos).
• Antes de establecer conexiones, apague el
motor del automóvil para evitar
cortocircuitos.
• Conecte el cable de alimentación a la
unidad y los altavoces antes de conectarlo
al conector de alimentación auxiliar.
• Asegúrese de aislar los cables no
conectados sueltos con cinta aislante para
mayor seguridad.
• Elija cuidadosamente el lugar de
instalación para que la unidad no interfiera
con las operaciones de conducción
normales.
• Evite instalar la unidad en zonas expuestas
a polvo, suciedad, vibración excesiva o
temperaturas elevadas, como la luz solar
directa o cerca de conductos de
calefacción.
• Use solo el equipo de montaje
suministrado para realizar una instalación
segura.
Nota sobre el cable de alimentación (amarillo)
Al conectar esta unidad junto con otros
componentes estéreo, el valor del amperaje del
circuito del vehículo al que está conectada la
unidad debe ser superior a la suma del valor del
amperaje del fusible de cada componente.
Ajuste del ángulo de montaje
Ajuste el ángulo de montaje a menos de
30°.
Lista de piezas para la
instalación
•Esta lista de piezas no incluye todo el
contenido del paquete.
•El soporte y la abrazadera de protección
están fijados a la unidad al salir de
fábrica. Antes de montar la unidad, utilice
las llaves de desbloqueo para
desmontar el soporte de la unidad. Para
obtener más información, consulte
“Desmontaje de la abrazadera de
protección y el soporte” (página 38).
•Guarde las llaves de desbloqueo para
utilizarlas más adelante, ya que también
son necesarias para desmontar la unidad
del vehículo.
Conexión/Instalación
Precauciones
× 2

35ES
Conexión
*1 No suministrado
*2 Impedancia de altavoz: 4 – 8 × 4
*3 Cable con clavija RCA (no suministrado)
*4 En función del tipo de vehículo, use un
adaptador para un control remoto con cable (no
suministrado). Para obtener información
detallada sobre el uso del control remoto con
cable, consulte “Uso del control remoto con
cable” (página 37).
*5 Tanto si se utiliza como si no, procure que el
recorrido del cable de entrada del micrófono no
interfiera con las operaciones de conducción.
Fije el cable con una abrazadera, etc., si lo instala
alrededor de los pies.
*6 Para obtener más información sobre la
instalación del micrófono, consulte “Instalación
del micrófono” (página 37).
*7 En función del tipo de vehículo, use un
adaptador (no suministrado) si el conector de la
antena no encaja.
desde un control remoto con
cable (no suministrado)*
4
desde la antena de un vehículo*
7
*
3
*
3
Altavoz potenciador de graves*
1
Para obtener más información,
consulte “Establecimiento de
conexiones” (página 36).
Amplificador de potencia*
1
Consulte “Diagrama de conexión de la
alimentación” (página 36) para obtener
información más detallada.
*
2
*
3
*
5
*
6

36ES
Si tiene una antena motorizada sin caja de
relés, la conexión de esta unidad con el
cable de conexión de alimentación
suministrado puede dañar la antena.
Al conector del altavoz del vehículo
Al conector de alimentación del
vehículo
Conexión fácil de altavoz
potenciador de graves
Puede utilizar un altavoz potenciador de
graves sin un amplificador de potencia si
está conectado a un cable de altavoz
trasero.
Notas
• Es necesario preparar los cables de altavoz
traseros.
• Utilice un altavoz potenciador de graves con una
impedancia de 4 a 8 y con una capacidad de
administración de la potencia suficiente para
evitar daños.
Conexión del soporte de la
memoria
Si el cable de alimentación amarillo está
conectado, siempre se suministrará
alimentación eléctrica al circuito de
memoria aunque esté apagado el
interruptor de la llave de encendido.
Conexión del altavoz
• Antes de conectar los altavoces, apague la
unidad.
•Utilice unos altavoces con una impedancia
de 4 a 8 y con una capacidad de
administración de la potencia suficiente
para evitar daños.
Compruebe el conector de alimentación
auxiliar de su vehículo y conecte los cables
correctamente en función del vehículo.
Establecimiento de conexiones
1
Altavoz trasero
(derecho)
Lila
2
A rayas
moradas/negras
3
Altavoz
delantero
(derecho)
Gris
4
A rayas grises/
negras
5
Altavoz
delantero
(izquierdo)
Blanco
6
A rayas blancas/
negras
7
Altavoz trasero
(izquierdo)
Verde
8
A rayas verdes/
negras
12
Fuente de
alimentación continua
Amarillo
13
Control de la antena
motorizada/
amplificador de
potencia (REM OUT)
A rayas
azules/
blancas
14
Fuente de
alimentación de
iluminación
conmutada
A rayas
naranja/
blancas
15
Fuente de
alimentación
conmutada
Rojo
16 Masa Negro
Diagrama de conexión de la
alimentación
Altavoz
delantero
Altavoz
potenciador
de graves
Conector de alimentación
auxiliar

37ES
Conexión común
Posiciones de los cables rojo y amarillo
invertidas
Para los vehículos sin posición ACC
Después de establecer las conexiones y
cambiar los cables de alimentación
correctamente, conecte la unidad a la fuente
de alimentación del vehículo. Si desea
realizar alguna consulta o solucionar algún
problema relativo a la unidad que no se trate
en este manual, póngase en contacto con el
concesionario del vehículo.
Para capturar su voz durante llamadas
manos libres, debe instalar el micrófono .
Precauciones
•Es extremadamente peligroso que el cable
se enrolle alrededor de la columna de
dirección o la palanca de cambios.
Asegúrese de que ni este ni otros
elementos no interfieran en sus
operaciones de conducción del vehículo.
•Si su automóvil cuenta con airbags o
cualquier otro equipo de amortiguación de
impactos, póngase en contacto con la
tienda en la que adquirió esta unidad o con
el concesionario del automóvil antes de
realizar la instalación.
Nota
Antes de fijar la cinta de doble cara , limpie la
superficie del salpicadero con un paño seco.
1 Para activar el control remoto con
cable, ajuste [STR CONTROL] de [SET
STEERING] en [PRESET] (página 20).
12
Fuente de alimentación
continua
Amarillo
15
Fuente de alimentación
conmutada
Rojo
12
Fuente de alimentación
conmutada
Amarillo
15
Fuente de alimentación
continua
Rojo
Rojo Rojo
Amarillo Amarillo
Rojo Rojo
Amarillo Amarillo
Rojo
Rojo
Amarillo
Amarillo
Instalación del micrófono
Uso del control remoto con cable
Gancho (no suministrado)

38ES
Instalación
Antes de instalar la unidad, desmonte la
abrazadera de protección y el soporte
de la unidad.
1 Sujete la abrazadera de protección
por los dos extremos y extráigala.
2 Introduzca las dos llaves de
desbloqueo hasta que encajen,
baje el soporte y tire de la unidad
hacia arriba para separarla.
Antes de la instalación, asegúrese de que
los pasadores situados a ambos lados del
soporte estén doblados hacia dentro
2mm.
1 Coloque el soporte dentro del
salpicadero y, a continuación, doble
los ganchos hacia fuera para que
queden bien ajustados.
2 Monte la unidad en el soporte y
fije la abrazadera de protección .
Notas
• Si los pasadores están rectos o doblados hacia
fuera, la unidad no se instalará con seguridad y
puede salirse hacia fuera.
• Asegúrese de que los 4 pasadores de la
abrazadera de protección estén correctamente
introducidos en las ranuras de la unidad.
Para obtener más información, consulte
“Extracción del panel frontal” (página 6).
Desmontaje de la abrazadera de
protección y el soporte
Gancho mirando hacia dentro.
Montaje de la unidad en el
salpicadero
Montaje y desmontaje del panel
frontal
182 mm
53 mm
Pasador

39ES
Para obtener más información, consulte
“Reinicio de la unidad” (página 7).
Cuando sustituya el fusible,
asegúrese de usar uno que
coincida con el valor del
amperaje indicado en el
fusible original. Si se funde
el fusible, compruebe la
conexión de la
alimentación y sustituya el fusible. Si se
vuelve a fundir el fusible después de
sustituirlo, puede que haya una avería
interna. En ese caso, consulte al distribuidor
Sony más cercano.
Reinicio de la unidad
Sustitución de fusibles
Fusible (10 A)

2RU
FM/MW/LW
Bluetooth®
Автомобильное
Аудио
: , 1-7-1
- , 108-0075
.
CE
,
.
(
).
,
:
MM.YYYY, MM – YYYY –
.
Bluetooth NFC
, , ,
,
.
: -20 +60 °C.
< 80 %,
.
: 0 40 °C.
:
40–60 %.
.
Утилизация
использованных
элементов питания и
отслужившего
электрического и
электронного оборудования
(Директива применима в странах
Евросоюза и других странах, где
действуют системы раздельного
сбора отходов)
Отказ от ответственности в
отношении услуг, предоставляемых
сторонними поставщиками
,
, ,
.
Sony
.
“
”, , 123103, ,
, 6
,
“
”
, 050010,
, . , . , 117/
7
,
.
. “/
” (. 36).
Предупреждение для случаев,
когда в замке зажигания нет
положения ACC
,
AUTO OFF (. 21).
,
(,
OFF 1
).
. AUTO OFF
,
OFF,
.

3RU
Қазақстан жеріндегі тұтынушылардың
шағым-талаптарын қабылдауға уəкілетті
ұйым «Сони Электроникс» АҚ
Қазақстандағы Өкілдігі, 050010, Қазақстан
Республикасы, Алматы қ., Достық даңғылы,
117 /7 үй
Внимание!
SONY
, ,
,
, ,
,
, ,
,
,
,
.
.
(UNECE) 10
.
,
.
Вызовы экстренных служб
BLUETOOTH
, ,
.
(,
)
.
Примечания касательно
использования технологии
BLUETOOTH
,
BLUETOOTH,
.
,
BLUETOOTH,
.
– ,
, ,
,
.
–
.
,
BLUETOOTH
BLUETOOTH,
.
BLUETOOTH
.
Sony
,
BLUETOOTH.
,
,
,
Sony.
Важное примечание

4RU
Содержание
. . . . . . . . . . . . . . . . . . . . . . 5
Начало работы
. . . . . . . . . . . . . 6
. . . . . . . . . . . . . 7
. . . . . . . . . . . . . . . . . . . . . 7
BLUETOOTH. . . . . 7
USB . . . . . . . . 10
. . . . . . . . . . . . . . . . . . 11
Прослушивание радио
. . . . . . . . . . . . . . . 11
(RDS) . . . . . . . . . 12
Воспроизведение
USB. . . . . 13
BLUETOOTH. . . . . . . . . . . . . . . . . . . . . . 14
. . . . . . . . . . . . . . . . . . . . . 15
Совершение телефонного
звонка в режиме
беспроводной гарнитуры
(только через BLUETOOTH)
. . . . . . . . . . . . 16
. . . . . . . . . . . . . . . . . 16
,
. . . . . . . . . . . . . . . . . . . . . . . . . . 17
Полезные функции
Sony | Music
Center iPhone
Android™ . . . . . . . . . . . . . . . . . . . . 18
(
Android). . . . . . . . . . . . . . . . . . . . . . 20
Siri Eyes
Free . . . . . . . . . . . . . . . . . . . . . . . . . . . . 20
Параметры
DEMO . . . . . . . . . . . . . . . 21
. . . . . . . . . . . . . . . . . . . . . . 21
(GENERAL). . . . . . . . . . . . . . . . . . . . . . . . 21
(SOUND) . . . . . . . . . . . . 23
(DISPLAY). . . . . . . . . 24
BLUETOOTH (BLUETOOTH). . . 25
Sony | Music
Center (SONY APP). . . . . . . . . . . . . . . . 25
Дополнительная информация
. . . . . . . 26
. . . . . . . . . . . . 26
. . . . . . . . . . . . . . . . 27
. . . . . . . . . 27
. . . . . . . . . . . . . . . . . 29
. . . . . . . . . . . . . . . . . . . . . . . . 33
Установка/подключение
! . . . . . . . . . . . . . . . . . . . . . . . . . 36
. . . . . 36
. . . . . . . . . . . . . . . . . . . . . . 37
. . . . . . . . . . . . . . . . . . . . . . . . . . 40

5RU
Справочник по деталям и органам управления
Кнопка снятия передней панели
SRC (источник)
.
.
OFF
1
.
2
.
Дисковый регулятор
.
PUSH ENTER
.
, SRC,
,
( —
2).
MENU
.
VOICE (стр. 17, 20)
2 ,
,
(
Android)
Siri ( iPhone).
Знак N
BLUETOOTH,
Android.
Окошко дисплея
/ (SEEK –/+)
.
.
/ (предыдущая/следующая)
/ (ускоренная перемотка
назад/ускоренная перемотка
вперед)
PTY (тип программы)
(PTY) RDS.
(обзор) (стр. 15)
.
(,
USB Android
iPod.)
Основное устройство

6RU
CALL
.
.
2 ,
BLUETOOTH.
(назад)
.
MODE (стр. 7, 11, 18)
Приемник сигналов с пульта
дистанционного управления
Номерные кнопки (1–6)
.
.
ALBUM /
.
.
(,
USB Android
iPod.)
(повтор)
(,
USB Android.)
(случайная последовательность)
(,
USB Android.)
MIC (стр. 17)
(воспроизведение/пауза)
EXTRA BASS
.
,
EXTRA BASS: [1], [2], [OFF].
Входное гнездо AUX
DSPL (дисплей)
,
.
SCRL (прокрутка)
.
Порт USB
Снятие передней панели
.
1 Нажмите и удерживайте кнопку
OFF до тех пор, пока устройство
не отключится. Нажмите кнопку
снятия передней панели , а
затем потяните панель на себя и
снимите ее.
Предупредительный звуковой
сигнал
OFF
,
.
,
.
Заводские номера
,
.
,
BLUETOOTH,
NFC.
Начало работы
Установка передней панели

7RU
Перезагрузка устройства
,
.
1 Нажмите кнопки DSPL и (назад)/
MODE и удерживайте их нажатыми
более 2 секунд.
Примечание
.
Установка страны/региона
/.
1 При отображении [SET AREA]
нажмите кнопку ENTER.
.
2 Поворачивая дисковый регулятор,
выберите [EUROPE] или [RUSSIA], а
затем нажмите дисковый
регулятор.
3 Поворачивая дисковый регулятор,
выберите [YES] или [NO], а затем
нажмите дисковый регулятор.
,
.
(. 21).
Установка часов
1 Нажмите кнопку MENU, поверните
дисковый регулятор для выбора
[GENERAL], затем нажмите
дисковый регулятор.
2 Поворачивая дисковый регулятор,
выберите [SET CLOCK-ADJ], затем
нажмите дисковый регулятор.
.
3 Поворачивайте дисковый
регулятор для установки значения
часов и минут.
/
(SEEK –/+).
4 После установки минут нажмите
кнопку MENU.
,
.
Для отображения часов
DSPL.
Подготовка устройства
BLUETOOTH
, ,
BLUETOOTH, :
,
(
“ BLUETOOTH”,
). ,
, . ,
.
,
.
.
,
NFC*,
.
* NFC — ,
,
.
NFC
,
, NFC.
Подключение к смартфону
одним касанием (с помощью
технологии NFC)

8RU
Android 4.0 ,
“NFC
Easy Connect” Google Play.
.
1 Активируйте функцию NFC на
смартфоне.
.
,
.
2 Коснитесь области со знаком N на
аппарате областью со знаком N на
смартфоне.
,
.
Отсоединение устройства с
помощью NFC
N
N
.
Примечания
•
,
.
•
,
,
NFC.
.
BLUETOOTH
(“”).
.
BLUETOOTH (
).
1 Разместите устройство BLUETOOTH
на расстоянии не более 1 м от
данного аппарата.
2 Нажмите кнопку MENU.
Поворачивая дисковый регулятор,
выберите [BLUETOOTH], затем
нажмите дисковый регулятор.
3 Поворачивая дисковый регулятор,
выберите [SET PAIRING], а затем
нажмите дисковый регулятор.
4 Поворачивая дисковый регулятор,
выберите [SET DEVICE 1]* или
[SET DEVICE 2]*, а затем нажмите
дисковый регулятор.
,
.
*
[SET DEVICE 1] [SET DEVICE 2]
.
5 Выполните сопряжение на
устройстве BLUETOOTH, чтобы оно
обнаружило аппарат.
Сопряжение с устройством
BLUETOOTH и подключение к
нему

9RU
6 Выберите пункт [DSX-A416BT],
отображаемый на дисплее
устройства BLUETOOTH.
,
, 2.
7 Если на устройстве BLUETOOTH
необходимо ввести ключ доступа*,
введите [0000].
*
“
”, “-”, “ ”, “”
. .
.
8 Выберите данный аппарат на
устройстве BLUETOOTH, чтобы
создать подключение BLUETOOTH.
,
.
Примечание
BLUETOOTH
.
,
.
Включение функции
воспроизведения
.
“
BLUETOOTH” (. 14).
Отключение сопряженного
устройства
BLUETOOTH
,
2–4.
,
.
.
1 Нажмите кнопку MENU.
Поворачивая дисковый регулятор,
выберите [BLUETOOTH], затем
нажмите дисковый регулятор.
2 Поворачивая дисковый регулятор,
выберите [SET BT SIGNL], а затем
нажмите дисковый регулятор.
, .
3 Активируйте функцию BLUETOOTH
на устройстве BLUETOOTH.
4 Выполните необходимые действия
на устройстве BLUETOOTH, чтобы
подключить его к данному
аппарату.
.
[0000]
Введите ключ доступа
Подключение к сопряженному
устройству BLUETOOTH
,
,
HFP (Handsfree
Profile).
,
,
A2DP (Advanced Audio
Distribution Profile).

10RU
Подключение к устройству, которое
было подключено к аппарату в
прошлый раз
BLUETOOTH
BLUETOOTH.
, SRC,
[BT AUDIO],
(/).
, CALL.
Примечание
BLUETOOTH
.
.
Совет
BLUETOOTH,
,
.
Установка микрофона
.
“ ” (. 39).
iPhone
iPod iOS5
USB
iPhone iPod.
BLUETOOTH, [BLUETOOTH]
[SET AUTOPAIR]
[ON] (. 25).
1 Активируйте функцию BLUETOOTH
на iPhone или iPod.
2 Подключите iPhone или iPod к
порту USB.
,
.
Примечания
•
BLUETOOTH,
BLUETOOTH.
iPhone
iPod.
•
BLUETOOTH,
, “
BLUETOOTH” (. 7).
Подключение устройства
USB
1 Уменьшите громкость на аппарате.
2 Подключите устройство USB к
аппарату.
iPhone iPod
USB iPod (
).
Подключение к iPhone или iPod
(автоматическое сопряжение
по каналу BLUETOOTH)

11RU
Подключение другого
переносного
аудиоустройства
1 Выключите переносное
аудиоустройство.
2 Уменьшите громкость на аппарате.
3 Подключите переносное
аудиоустройство ко входному
гнезду AUX (мини-стереоразъему)
на аппарате при помощи
соединительного кабеля (не
входит в комплект поставки)*.
*
.
4 Нажимая кнопку SRC, выберите
[AUX].
Выравнивание уровня громкости
подключенного устройства по
отношению к другим источникам
сигналов
.
MENU,
[SOUND] [SET AUX VOL] (. 23).
Прослушивание радио
SRC [TUNER].
1 Нажимая кнопку MODE, измените
диапазон (FM1, FM2, FM3, MW или
LW).
2 Нажмите кнопку MENU, поверните
дисковый регулятор для выбора
[GENERAL], затем нажмите
дисковый регулятор.
3 Поворачивая дисковый регулятор,
выберите [SET BTM], затем нажмите
дисковый регулятор.
.
1 Нажимая кнопку MODE, измените
диапазон (FM1, FM2, FM3, MW или
LW).
2 Выполните настройку.
Для настройки вручную
/ (SEEK –/+),
,
/ (SEEK –/+)
.
Для автоматической настройки
/
(SEEK –/+).
,
.
Прослушивание радио
Автоматическое сохранение
(BTM)
Настройка

12RU
1 Во время приема радиостанции,
которую необходимо сохранить,
нажмите и удерживайте номерную
кнопку (1–6), пока не появится
индикация [MEM].
1 Выберите диапазон, затем
нажмите номерную кнопку (1–6).
Системы радиоданных
(RDS)
AF
,
,
TA
(TP)
, .
1 Нажмите кнопку MENU, поверните
дисковый регулятор для выбора
[GENERAL], затем нажмите
дисковый регулятор.
2 Поворачивая дисковый регулятор,
выберите [SET AF/TA], затем
нажмите дисковый регулятор.
3 Поворачивая дисковый регулятор,
выберите [SET AF-ON], [SET TA-ON],
[SET AF/TA-ON] или [SET AF/TA-OFF],
затем нажмите дисковый
регулятор.
Для сохранения станций RDS с
параметрами AF и TA
RDS
AF/TA. AF/TA,
BTM .
RDS.
Для приема экстренных сообщений
AF TA
.
Для настройки громкости во время
приема сообщения о текущей
ситуации на дорогах
,
.
Для прослушивания одной
региональной программы
(REGIONAL)
AF REGIONAL ,
.
[SET REGIONAL] [SET
REG-OFF] [GENERAL]
FM- (. 22).
.
Функция местной привязки (только
для Великобритании)
,
.
FM
(1–6),
. 5
. ,
.
Сохранение вручную
Прием радиостанций,
сохраненных в памяти
Установка альтернативных
частот (AF) и сообщений о
текущей ситуации на дорогах
(TA)

13RU
1 Нажмите PTY во время приема в
диапазоне FM.
2 Поворачивайте дисковый
регулятор, пока не отобразится
требуемый тип программы, затем
нажмите дисковый регулятор.
,
.
Тип программ
CT,
RDS,
.
1 Установите [SET CT-ON] в
положение [GENERAL] (стр. 22).
Воспроизведение
устройства USB
“iPod”
iPod iPod
iPhone,
.
iPod . “
iPod” (. 26) -
,
.
USB*
AOA (Android Open Accessory) 2.0,
MSC (
) MTP (
),
USB.
USB
Android
MSC/MTP.
Android
MTP.
* , - USB,
, Android.
Примечания
•
USB -
,
.
• Android 4.1
Android
Open Accessory 2.0 (AOA 2.0).
AOA 2.0, Android 4.1
.
Android
- ,
.
•
.
MP3/WMA/FLAC:
– , ;
– DRM (
);
– .
Выбор типов программ (PTY)
NEWS (), AFFAIRS ( ),
INFO (), SPORT (), EDUCATE
(), DRAMA (
), CULTURE (), SCIENCE
(), VARIED ( ), POP M (-
), ROCK M (-), EASY M
( ), LIGHT M (
), CLASSICS (
), OTHER M (
), WEATHER (), FINANCE
(), CHILDREN (
), SOCIAL ( ),
RELIGION (), PHONE IN (
),
TRAVEL (), LEISURE (), JAZZ
( ), COUNTRY (
“”), NATION M (
), OLDIES ( ), FOLK M
(-), DOCUMENT (
).
Установка часов (CT)
Воспроизведение

14RU
MP3/WMA:
– , .
USB ( Android MSC/MTP)
USB (. 22).
1 Подключите устройство USB к
порту USB (стр. 10).
.
,
,
SRC [USB] (
iPod
,
[IPD]).
2 Отрегулируйте громкость на
данном устройстве.
Для остановки воспроизведения
OFF
1 .
Для удаления устройства
,
.
Предупреждение касательно iPhone
iPhone
USB
iPhone,
.
,
.
Воспроизведение с
устройства BLUETOOTH
,
BLUETOOTH
A2DP (Advanced Audio Distribution Profile).
1 Создайте подключение BLUETOOTH
к аудиоустройству (стр. 7).
,
MENU, [BLUETOOTH]
[SET AUDIODEV] (. 25).
2 Нажимая кнопку SRC, выберите [BT
AUDIO].
3 На аудиоустройстве включите
функцию воспроизведения.
4 Отрегулируйте громкость на
данном устройстве.
Примечания
•
,
,
,
.
• ,
.
• “Sony | Music Center”
BLUETOOTH
[BT AUDIO].
Выравнивание уровня громкости
устройства BLUETOOTH по
отношению к другим источникам
сигналов
BLUETOOTH
,
.
MENU,
[SOUND] [SET BTA VOL] (. 24).

15RU
Поиск и воспроизведение
композиций
,
USB Android.
1 Чтобы выбрать нужный режим
воспроизведения, во время
воспроизведения нажмите кнопку
(повтор) или (случайная
последовательность) несколько
раз.
.
.
,
USB Android
iPod.
1 В режиме воспроизведения USB
нажмите (обзор)*, чтобы
отобразить список категорий
поиска.
,
(),
.
*
USB
() 2 ,
.
2 Поворачивая дисковый регулятор,
выберите требуемую категорию
поиска, затем нажмите дисковый
регулятор для подтверждения.
3 Повторите шаг 2 для поиска
требуемой композиции.
.
Для выхода из режима Quick-
BrowZer
().
,
USB Android
iPod.
1 В режиме воспроизведения USB
нажмите (обзор).
2 Нажмите кнопку (SEEK +).
3 Поверните дисковый регулятор,
чтобы выбрать элемент.
10 %
.
4 Нажмите кнопку ENTER для
возврата в режим Quick-BrowZer.
.
5 Поворачивая дисковый регулятор,
выберите требуемый элемент, а
затем нажмите дисковый
регулятор.
.
Повторное воспроизведение и
воспроизведение в случайной
последовательности
Поиск композиции по названию
(Quick-BrowZer™)
Поиск с пропуском элементов
(режим перехода)

16RU
,
.
.
. “
BLUETOOTH” (. 7).
Прием входящего вызова
1 При входящем звонке с мелодией
вызова нажмите кнопку CALL.
.
Примечание
.
Отклонение вызова
OFF
1 .
Завершение вызова
CALL .
Совершение вызова
PBAP
(Phone Book Access Profile,
),
.
,
.
1 Нажмите кнопку CALL.
,
,
,
.
2 Поворачивая дисковый регулятор,
выберите [PHONE BOOK], а затем
нажмите дисковый регулятор.
3 Поворачивая дисковый регулятор,
выберите инициал в списке, а
затем нажмите дисковый
регулятор.
4 Поворачивая дисковый регулятор,
выберите имя в списке, а затем
нажмите дисковый регулятор.
5 Поворачивая дисковый регулятор,
выберите номер в списке, а затем
нажмите дисковый регулятор.
.
1 Нажмите кнопку CALL.
,
,
,
.
2 Поворачивая дисковый регулятор,
выберите [RECENT CALL], а затем
нажмите дисковый регулятор.
.
3 Поворачивая дисковый регулятор,
выберите имя или номер телефона
в журнале вызовов, а затем
нажмите дисковый регулятор.
.
Совершение телефонного
звонка в режиме
беспроводной гарнитуры
(только через BLUETOOTH)
Совершение вызова из
телефонной книги
Совершение вызова из журнала
вызовов

17RU
1 Нажмите кнопку CALL.
,
,
,
.
2 Поворачивая дисковый регулятор,
выберите [DIAL NUMBER], а затем
нажмите дисковый регулятор.
3 Поверните дисковый регулятор,
введите номер телефона, потом
выберите [ ] (пробел), а затем
нажмите ENTER*.
.
*
/ (SEEK –/+).
Примечание
[#]
[_].
1 Нажмите кнопку CALL.
,
,
,
.
2 Поворачивая дисковый регулятор,
выберите [REDIAL], а затем
нажмите дисковый регулятор.
.
,
,
,
.
1 Нажмите кнопку CALL.
,
,
,
.
2 Поворачивая дисковый регулятор,
выберите [VOICE DIAL], а затем
нажмите дисковый регулятор.
,
VOICE
2.
3 Произнесите голосовую метку,
хранящуюся в мобильном
телефоне.
,
.
Отмена голосового набора номера
VOICE.
Операции, доступные во
время вызова
Настройка громкости мелодии
вызова
.
Настройка громкости голоса
собеседника
.
Настройка громкости для
собеседника (настройка усиления
сигнала с микрофона)
MIC.
:
[MIC-LOW], [MIC-MID] [MIC-HI].
Совершение вызова путем
ввода номера телефона
Совершение вызова путем
повторного набора номера
Совершение вызова с помощью
голосовых меток

18RU
Уменьшение уровня эхо и шума
(режим Echo Canceler/Noise Canceler)
MIC
.
:
[EC/NC-1] [EC/NC-2].
Переключение между режимом
беспроводной гарнитуры и обычным
режимом телефона
MODE
.
Примечание
.
Использование
приложения Sony | Music
Center с iPhone или
смартфоном с
ОС Android™
“Sony | Music Center”
App Store ( iPhone) Google
Play ( Android).
Примечания
•
.
• “Sony | Music Center” —
Sony iPhone
Android.
• ,
“Sony | Music Center”,
.
• ,
“Sony | Music Center”, . iPhone
Android.
•
“Sony | Music Center” . URL-
: http://www.sony.net/smcqa/
• -
iPhone
Android.
iPhone: App Store.
Android:
Google Play.
1 Создайте подключение BLUETOOTH
к iPhone или смартфону с
ОС Android (стр. 7).
,
MENU, [BLUETOOTH]
[SET AUDIODEV] (. 25).
2 Запустите приложение
“Sony | Music Center”.
Полезные функции
Подключение к приложению
Sony | Music Center

19RU
3 Нажмите кнопку MENU, поверните
дисковый регулятор для выбора
[SONY APP], затем нажмите
дисковый регулятор.
4 Повернув дисковый регулятор,
выберите [CONNECT], а затем
нажмите дисковый регулятор.
iPhone Android.
iPhone
Android .
“” .
Если отображается номер устройства
,
(, 123456),
[] iPhone
Android.
Завершение подключения
1
Нажмите кнопку MENU, поверните
дисковый регулятор для выбора [SONY
APP], затем нажмите дисковый
регулятор.
2 Повернув дисковый регулятор, выберите
[CONNECT], а затем нажмите дисковый
регулятор.
Выбор источника сигнала или
приложения
iPhone Android.
Выбор источника сигнала
SRC .
, SRC,
,
,
ENTER.
Отображение списка источников
сигналов
SRC.
Объявление SMS с помощью
функции воспроизведения речи
(только для смартфонов с
ОС Android)
SMS
.
. “” .
Ответ на SMS (только для
смартфонов с ОС Android)
,
.
1 Активируйте приложение “Sony | Music
Center”, а затем нажмите значок [Reply]
(ответ).
“Sony | Music Center”
.
2 Произнесите ответ на сообщение,
используя функцию распознавания речи.
“Sony | Music Center”
.
3 Поворачивая дисковый регулятор,
выберите необходимое сообщение, а
затем нажмите дисковый регулятор.
.
Настройка параметров звука и
дисплея
iPhone
Android
,
.
. “” .

20RU
Использование функции
распознавания речи
(только для смартфонов с
ОС Android)
1 Чтобы активировать функцию
распознавания речи, нажмите и
удерживайте кнопку VOICE.
2 Произнесите необходимую
голосовую команду в микрофон.
Выключение функции
распознавания речи
VOICE.
Примечания
•
.
•
.
Android.
•
(, ).
Использование функции
Siri Eyes Free
Siri Eyes Free
iPhone
,
.
,
iPhone
BLUETOOTH.
iPhone 4s iPhone.
, iPhone
iOS.
,
BLUETOOTH
iPhone
. .
“
BLUETOOTH” (. 7).
iPhone,
MENU,
[BLUETOOTH] [SET AUDIODEV] (. 25).
1 Активируйте функцию Siri на
устройстве iPhone.
.
, iPhone.
2 Нажмите кнопку VOICE и
удерживайте ее нажатой более
2секунд.
.
3 После того как iPhone издаст
сигнал, произнесите команду в
микрофон.
iPhone , Siri
.
Выключение функции Siri Eyes Free
VOICE.
Примечания
• iPhone
,
,
. (,
.)
•
iPhone Siri Eyes Free
.
•
iPhone Siri Eyes Free
.
•
iPhone,
BLUETOOTH,
BLUETOOTH, Siri Eyes Free
,
BLUETOOTH.
• Siri Eyes Free
,
BLUETOOTH, ,
.
• iPhone USB
Siri Eyes Free
.
• iPhone
USB Siri iPhone.
Siri Eyes Free
.
• Siri Eyes Free ,
.

21RU
Отмена режима DEMO
,
,
.
1 Нажмите кнопку MENU, поверните
дисковый регулятор для выбора
[GENERAL], затем нажмите
дисковый регулятор.
2 Поворачивая дисковый регулятор,
выберите [SET DEMO], затем
нажмите дисковый регулятор.
3 Поворачивая дисковый регулятор,
выберите [SET DEMO-OFF], а затем
нажмите дисковый регулятор.
.
4 Дважды нажмите кнопку
(назад).
/.
Основные операции
настройки параметров
:
(GENERAL),
(SOUND),
(DISPLAY), BLUETOOTH
(BLUETOOTH),
Sony | Music Center (SONY APP).
1 Нажмите кнопку MENU.
2 Поворачивая дисковый регулятор,
выберите категорию настройки, а
затем нажмите дисковый
регулятор.
.
3 Поворачивая дисковый регулятор,
выберите параметры, а затем
нажмите дисковый регулятор.
Для возврата к предыдущему
дисплею
().
Настройка общих
параметров (GENERAL)
AREA ()
/,
: [EUROPE],
[RUSSIA].
,
.
(
, .)
DEMO ()
:
[ON], [OFF].
CLOCK-ADJ ( ) (. 7)
CAUT ALM (
)
: [ON], [OFF] (. 6).
(
, .)
BEEP ( )
: [ON],
[OFF].
AUTO OFF ( )
,
( OFF
1 ): [ON] (30 ),
[OFF].
Параметры

22RU
STEERING ( )
/
.
(
, .)
STR CONTROL (
)
.
.
CUSTOM ()
.
PRESET ()
(
[RESET CUSTOM]).
EDIT CUSTOM (
)
(SOURCE, ATT,
VOL +/–, SEEK +/–, VOICE, ON HOOK OFF
HOOK)
:
,
,
,
.
[REGISTER]
,
.
[REGISTERED].
.
(,
[STR CONTROL]
[CUSTOM].)
RESET CUSTOM (
)
:
[YES], [NO].
(,
[STR CONTROL]
[CUSTOM].)
Примечания
•
.
.
•
,
.
,
, .
•
.
- ,
.
USB MODE ( USB)
USB: [ANDROID],
[MSC/MTP].
(,
USB.)
CT ( )
CT: [ON], [OFF].
AF/TA ( /
)
/
(AF)
(TA): [AF-ON], [TA-ON],
[AF/TA-ON], [AF/TA-OFF].
REGIONAL ( )
: [ON], [OFF].
( FM.)
BTM ( )
(. 11)
(,
.)

23RU
FIRMWARE ()
(
, .)
/
.
-,
.
FW VERSION ( )
.
FW UPDATE (
)
:
[YES], [NO].
.
OFF
USB.
Настройка звука (SOUND)
,
.
EQ10 PRESET (
EQ10)
10
:
[OFF], [R&B], [ROCK], [POP], [HIP-HOP],
[EDM], [JAZZ], [SOUL], [COUNTRY],
[KARAOKE]*, [CUSTOM].
.
* [KARAOKE]
,
.
.
EQ10 CUSTOM (
EQ10)
[CUSTOM] EQ10.
:
[BAND1] – [BAND10] (32 , 63 , 125 ,
250 , 500 , 1 , 2 , 4 , 8 ,
16 ).
–6 +6
1.
BALANCE ()
:
[RIGHT-15] – [CENTER] – [LEFT-15].
FADER ( )
:
[FRONT-15] – [CENTER] – [REAR-15].
S.WOOFER ()
SW LEVEL ( )
:
[+6 dB] – [0 dB] – [-6 dB].
([ATT] ,
.)
SW PHASE ( )
: [SUB NORM],
[SUB REV].
LPF FREQ (
)
:
[80Hz], [100Hz], [120Hz].
HPF FREQ (
)
/ :
[OFF], [80Hz], [100Hz], [120Hz].
AUX VOL ( AUX)
: [+18 dB] – [0 dB] – [-8 dB].
.
(,
AUX.)

24RU
BTA VOL (
BLUETOOTH)
BLUETOOTH: [+6 dB] – [0 dB] – [-6 dB].
.
(,
BT .)
Настройка дисплея
(DISPLAY)
DIMMER ( )
:
[OFF], [ON], [AT] (), [CLK]
().
( [AT] ,
, ,
.)
, [CLK],
.
–
:
[DIMMER]
[ON] [BRIGHTNESS].
–
:
[DIMMER]
[OFF] [BRIGHTNESS].
.
BRIGHTNESS ()
.
: [1] – [10].
BUTTON-C ( )
.
COLOR ()
15
1 .
CUSTOM-C ( )
.
RGB RED, RGB GRN, RGB BLUE
:
[0] – [32] ( [0]
).
DSPL-C ( )
.
COLOR ()
15
1 .
CUSTOM-C ( )
.
RGB RED, RGB GRN, RGB BLUE
:
[0] – [32] ( [0]
).
SND SYNC ( )
: [ON], [OFF].
AUTO SCR ( )
: [ON], [OFF].
(,
AUX .)

25RU
Настройка BLUETOOTH
(BLUETOOTH)
PAIRING () (. 8)
BLUETOOTH: [DEVICE 1], [DEVICE 2].
[DEVICE 1] [DEVICE 2]
.
AUDIODEV ()
.
,
[DEVICE 1]
,
A2DP,
[*].
RINGTONE ( )
,
(
):
[1] — , [2] —
.
AUTO ANS ( )
: [OFF], [1] —
3 , [2] —
10 .
AUTOPAIR ( )
BLUETOOTH
iOS 5.0
USB: [ON], [OFF].
BT SIGNL ( BLUETOOTH) (. 9)
BLUETOOTH.
BT INIT ( BLUETOOTH)
,
BLUETOOTH (
,
. .): [YES], [NO].
.
(
, .)
Настройка приложения
Sony | Music Center (SONY
APP)
AUTO LAUNCH ( )
“Sony | Music Center”: [ON],
[OFF].
[ON],
“Sony | Music Center”
BLUETOOTH.
CONNECT ()
“Sony | Music Center”.

26RU
Обновление
микропрограммы
,
-
,
,
.
Примечание
USB.
Меры предосторожности
•
.
•
.
• .
•
iPod.
iPod
.
iPhone iPod
• “
Apple” ,
Apple,
,
Apple. Apple
.
,
Apple
.
Дополнительная информация
Порядок воспроизведения
аудиофайлов
Папка (альбом)
Аудиофайл
(композиция)
Сведения об устройстве iPod
Bluetooth® USB
iPhone X
iPhone 8
iPhone 8 Plus
iPhone 7
iPhone 7 Plus
iPhone SE
iPhone 6s
iPhone 6s Plus
iPhone 6
iPhone 6 Plus
iPhone 5s
iPhone 5c
iPhone 5
iPhone 4s
iPod touch
(6- )
iPod touch
(5- )
iPod nano
(7- )

27RU
,
,
,
Sony.
Уход за устройством
Чистка контактов
.
,
-
,
.
(. 6)
.
.
.
Примечание
.
Технические
характеристики
Тюнер
FM
:
[AREA]
[EUROPE]:
87,5 – 108,0
[AREA]
[RUSSIA]:
FM1/FM2: 87,5 – 108,0
( 50 )
FM3: 65 – 74 ( 30 )
: 8
“-”: 73
: 50 1
MW/LW
:
MW: 531 – 1602
LW: 153 – 279
: MW: 26 , LW: 50
Проигрыватель USB
: USB ()
: 1 A
:
(): 256
(): 256
Android
Open Accessory (AOA): 2.0
:
MP3 (.mp3)
:
8 / – 320 / (
VBR (
))
: 16 –
48
WMA (.wma)
:
32 / – 192 /
( VBR (
))
: 32 ,
44,1 , 48

28RU
FLAC (.flac)
: 16 , 24
: 44,1 ,
48
:
FAT16, FAT32
Беспроводная связь
:
BLUETOOTH 3.0
:
BLUETOOTH,
2 (. +1 )
:
:
. 10 *
1
:
2,4
( 2,4000 2,4835 )
: FHSS
BLUETOOTH*
2
:
A2DP (Advanced Audio Distribution
Profile) 1.3
AVRCP (Audio Video Remote Control
Profile) 1.3
HFP (Handsfree Profile) 1.6
PBAP (Phone Book Access Profile)
SPP (Serial Port Profile)
:
SBC (.sbc), AAC (.m4a)
*1
,
,
,
,
,
, ,
. .
*2 BLUETOOTH
BLUETOOTH .
Подключение по NFC
: 13,56
Усилитель мощности
:
: 4 – 8
:
55 × 4 ( 4 )
Общая информация
:
12
(
)
: 10 A
:
. 178 × 50 × 177
(//)
:
. 182 × 53 × 160
(//)
: . 0,8
:
(1)
(1)
(1 )
.
.
,
, , ,
.
.
.
–
SONY
.
Bluetooth®
Bluetooth SIG, Inc.
Sony Corporation .
.
N
NFC
Forum, Inc. .
Авторские права

29RU
Windows Media
Microsoft Corporation /
.
Microsoft Corporation.
,
,
Microsoft
Microsoft
.
Apple, iPhone, iPod, iPod nano, iPod touch Siri
Apple Inc.,
.
App Store
Apple Inc.
IOS
Cisco ,
.
Google, Google Play Android
Google LLC.
libFLAC
(C) 2000–2009 .
(C) 2011-2013 . Xiph.Org
Foundation
:
–
,
.
–
,
/
,
.
– Xiph.org Foundation
,
.
“ ”.
,
,
.
, , ,
,
(
, ,
, ),
,
, ,
( .
.),
,
.
Поиск и устранение
неисправностей
,
.
.
,
. “/
” (. 36).
,
- ,
.
Общая информация
Звук отсутствует или очень тихий.
[FADER]
2
.
/
.
–
.
Не слышен звуковой сигнал.
,
.

30RU
Из памяти удалены
запрограммированные радиостанции и
установка времени.
Перегорел предохранитель.
Слышен шум при переключении
положения ключа зажигания.
.
Во время воспроизведения или приема
начинается демонстрация.
[DEMO-ON]
5
,
.
– [DEMO-OFF]
(. 21).
Пропала/не отображается индикация в
окошке дисплея.
(. 27).
Дисплей/подсветка мигает.
.
– ,
.
( : 12
.)
Не работают кнопки управления.
DSPL
()/MODE 2 ,
.
.
Прием радиостанций
Слабый радиосигнал.
Статический шум.
.
В диапазоне FM3 не удастся настроить
частоты 65 МГц – 74 МГц.
[AREA] [EUROPE].
– [AREA]
[RUSSIA] (. 21).
RDS
Не удается принять услуги RDS (когда
для параметра [AREA] задано значение
[RUSSIA]).
FM3.
– FM1 FM2.
RDS
.
После нескольких секунд
прослушивания включается функция
SEEK.
TP
.
– TA (. 12).
Дорожные сообщения не передаются.
TA (. 12).
, TP.
– .
При включении функции PTY
отображается индикация [- - - - - - - -].
RDS, .
Название программной услуги мигает.
.
– (SEEK –/+),
. [PI SEEK],
PI
( ).
Воспроизведение с устройства
USB
Устройство USB требует больше
времени для воспроизведения.
USB
.

31RU
Не удается воспроизвести аудиофайл.
. “
” (. 27).
-
, .
USB
.
Не удается выполнить операции
пропуска альбома, пропуска элементов
(режим перехода) и поиска
композиции по названию (Quick-
BrowZer).
[USB MODE]
[MSC/MTP] (. 22).
В режиме Android звук с аппарата не
воспроизводится.
Android.
Функция NFC
Не удается выполнить подключение
одним касанием (с использованием
функции NFC).
,
.
– , NFC
.
–
N
N .
– ,
.
NFC
.
,
BLUETOOTH .
Функция BLUETOOTH
Подключаемому устройству не удается
обнаружить данный аппарат.
,
.
BLUETOOTH,
.
–
.
BLUETOOTH (. 9).
Не удается создать подключение.
(
BLUETOOTH), .
–
BLUETOOTH .
Не отображается имя обнаруженного
устройства.
, ,
.
Отсутствует мелодия вызова.
,
.
.
– [RINGTONE]
[1] (. 25).
.
–
.
.
Не слышно собеседника.
.
–
.
.

32RU
Собеседник говорит, что вас слышно
очень тихо или очень громко.
(. 17).
Во время телефонных разговоров
слышно эхо или шум.
.
EC/NC
[EC/NC-1] [EC/NC-2] (. 18).
,
.
,
, .
,
.
Телефон не подключен.
BLUETOOTH
,
CALL.
– .
Плохое качество звука в телефоне.
.
–
, ,
, .
Громкость подключенного
аудиоустройства слишком низкая или
слишком высокая.
.
–
(. 24).
Во время воспроизведения с
аудиоустройства BLUETOOTH
прерывается звук.
BLUETOOTH.
BLUETOOTH
,
, .
BLUETOOTH
, .
– .
–
.
.
.
Не удается управлять подключенным
аудиоустройством BLUETOOTH.
,
BLUETOOTH
AVRCP.
Не работают некоторые функции.
,
.
Происходит автоматический ответ на
входящий вызов.
,
.
Не удалось выполнить сопряжение из-
за превышения времени ожидания.
, ,
.
–
.
Не удается управлять функцией
BLUETOOTH.
, OFF
2 , .
Во время телефонного разговора в
режиме беспроводной гарнитуры нет
звука из динамиков автомобиля.
, ,
.

33RU
Функция Siri Eyes Free не включена.
iPhone
Siri Eyes Free
.
Siri
iPhone.
BLUETOOTH
iPhone
, .
Использование приложения
Sony | Music Center
Название приложения не соответствует
фактическому приложению в
“Sony | Music Center”.
“Sony | Music Center”.
При запуске приложения “Sony | Music
Center” через BLUETOOTH дисплей
автоматически переключается в режим
[BT AUDIO].
“Sony | Music Center”
BLUETOOTH.
.
Когда дисплей переключается в режим
[IPD], приложение “Sony | Music Center”
автоматически отключается.
“Sony | Music Center”
iPhone iPod
iPod.
–
, [IPD],
“Sony | Music
Center” (. 18).
Когда для режима USB на аппарате
задано значение [ANDROID],
приложение “Sony | Music Center”
автоматически отключается.
Android
“Android”.
– USB
[MSC/MTP],
“Sony | Music Center”
(. 18).
Сообщения
.
INVALID
.
iPod
[USB MODE]
.
READ
.
.
.
(знак подчеркивания):
.
При воспроизведении с устройства
USB:
HUB NO SUPRT:
USB.
IPD STOP:
iPod .
iPod iPhone
.
NOT SUPPORT - ANDROID MODE
USB,
AOA
(Android Open Accessory) 2.0,
[USB MODE]
[ANDROID].
– [USB MODE]
[MSC/MTP]
(. 22).
USB ERROR
USB.
USB NO DEV
, USB
USB .

34RU
USB NO MUSIC
USB
(. 27).
USB NO SUPRT
USB
- ,
.
OVERLOAD: USB .
USB,
SRC
.
USB ,
.
При приеме станций RDS:
NO AF:
.
(SEEK –/+),
.
PI
( )
( [PI SEEK]).
NO PI: .
PI (
).
.
NO TP:
.
,
TP.
Примечания по работе с функцией
BLUETOOTH:
BTA NO DEV: BLUETOOTH
.
, BLUETOOTH
BLUETOOTH.
ERROR:
.
,
.
UNKNOWN:
.
WITHHELD:
.
При использовании приложения
Sony | Music Center:
APP ––––––––:
.
“Sony | Music Center” (. 18).
APP DISCNCT: .
“Sony | Music Center” (. 18).
APP DISPLAY:
.
,
.
APP LIST:
USB.
,
.
APP MENU:
.
,
.

35RU
APP NO DEV:
.
BLUETOOTH,
“Sony | Music Center”
(. 18).
APP SOUND:
.
,
.
OPEN APP: “Sony | Music
Center” .
.
Примечания по работе пульта
дистанционного управления на
руле:
ERROR
,
,
(. 22).
TIMEOUT
, [REGISTER]
( 6 ) (. 22).
При обновлении
микропрограммы:
FILE ERROR:
USB.
USB
(. 26).
UPDATE ERROR PRESS ENTER:
.
ENTER,
, .
OFF
USB (. 26).
,
Sony.
,
USB,
.

36RU
Внимание!
• Подведите все заземляющие провода
к общей точке заземления.
•
(,
).
•
.
•
,
—
.
•
.
•
,
.
• ,
,
,
,
,
,
.
•
.
Примечание относительно провода
питания (желтый)
cepeea
,
.
Регулировка угла установки
,
30°.
Перечень деталей для
установки
•
.
•
.
,
. .
“
” (. 40).
•
,
.
Установка/подключение
Меры предосторожности
× 2

37RU
Подключение
*1 .
*2 :
4 – 8 × 4
*3 RCA (
).
*4 ,
,
(
).
.
“
” (. 40).
*5 ,
,
,
. , ,
,
.
*6 .
“ ” (. 39).
*7
(
), .
от проводного пульта
дистанционного управления
(не входит в комплект поставки)*
4
от автомобильной антенны*
7
*
3
*
3
Сабвуфер*
1
Подробные сведения см. в
разделе “Установка
соединений” (стр. 38).
Усилитель мощности*
1
Подробные сведения см. в разделе
“Схема подключения питания” (стр. 39).
*
2
*
3
*
5
*
6

38RU
,
.
К разъему громкоговорителя
автомобиля
К разъему электропитания
автомобиля
Простое подключение сабвуфера
,
.
Примечания
•
.
•
4 – 8
.
Подсоединение для поддержки
памяти
,
,
.
Подключение
громкоговорителей
•
.
•
4 – 8
.
Установка соединений
1
-
()
2
/
3
-
()
4
/
5
-
()
6
/
7
-
()
8
/
12
13
/
(REM OUT)
/
14
/
15
16
Передний
громкоговоритель
Сабвуфер

39RU
(
).
Общая схема подключения
Если красный и желтый провода
переставлены местами
Если в автомобиле нет положения
ACC
.
- ,
,
,
.
,
.
Схема подключения питания
12
15
12
15
Разъем подключения вспомогательного питания
Красный Красный
Желтый Желтый
Красный Красный
Желтый Желтый
Установка микрофона
Красный
Красный
Желтый
Желтый
Зажим (не входит в
комплект поставки)

40RU
Внимание!
•
.
. ,
,
.
•
,
,
,
.
Примечание
.
1 Чтобы активировать проводной
пульт дистанционного управления,
установите для [STR CONTROL] в
[SET STEERING] значение [PRESET]
(стр. 22).
Установка
.
1 Захватите оба края защитной
манжеты , а затем вытащите ее.
2 Вставьте оба ключа для демонтажа
до щелчка, потяните кронштейн
вниз, а затем потяните
устройство вверх, чтобы
отсоединить его.
,
2 .
1 Установите кронштейн в
приборную панель, затем выгните
выступы наружу, чтобы обеспечить
плотную фиксацию.
2 Прикрепите устройство к
кронштейну , затем вставьте
защитную манжету .
Использование проводного
пульта дистанционного
управления
Отсоединение защитной
манжеты и кронштейна
Установка устройства в
приборной панели
Направьте крючок внутрь.
182 мм
53 мм
Фиксатор

41RU
Примечания
•
,
.
• , 4
, .
.
“ ” (. 6).
.
“ ” (. 7).
,
,
.
,
.
,
.
Sony.
Снятие и установка передней
панели
Перезагрузка устройства
Замена предохранителя
Предохранитель
(10 A)

, Sony Corporation ,
2014/53/EU.
:
http://www.compliance.sony.de/
Sony Corporation ovime izjavljuje da je ova
oprema u skladu s Direktivom 2014/53/EU.
Cjeloviti tekst EU izjave o sukladnosti dostupan
je na sljedećoj internetskoj adresi:
http://www.compliance.sony.de/
Sony Corporation tímto prohlašuje, že toto
zařízení je v souladu se směrnicí 2014/53/EU.
Úplné znění EU prohlášení o shodě je k dispozici
na této internetové adrese:
http://www.compliance.sony.de/
Herved erklærer Sony Corporation, at dette
udstyr er i overensstemmelse med direktiv
2014/53/EU.
Den fulde ordlyd af EU-
overensstemmelseserklæringen er tilgængelig
på følgende internetadresse:
http://www.compliance.sony.de/
Hierbij verklaart Sony Corporation dat deze
radioapparatuur conform is met Richtlijn 2014/
53/EU.
De volledige tekst van de EU-
conformiteitsverklaring kan worden
geraadpleegd op het volgende internetadres:
http://www.compliance.sony.de/
Hereby, Sony Corporation declares that this
equipment is in compliance with Directive 2014/
53/EU.
The full text of the EU declaration of conformity
is available at the following internet address:
http://www.compliance.sony.de/
Käesolevaga deklareerib Sony Corporation, et
käesolev seade vastab direktiivi 2014/53/EL
nõuetele.
ELi vastavusdeklaratsiooni täielik tekst on
kättesaadav järgmisel internetiaadressil:
http://www.compliance.sony.de/
Sony Corporation vakuuttaa, että tämä laite on
direktiivin 2014/53/EU mukainen.
EU-vaatimustenmukaisuusvakuutuksen
täysimittainen teksti on saatavilla seuraavassa
internetosoitteessa:
http://www.compliance.sony.de/
Le soussigné, Sony Corporation, déclare que cet
équipement est conforme à la Directive 2014/
53/UE.
Le texte complet de la déclaration UE de
conformité est disponible à l’adresse internet
suivante :
http://www.compliance.sony.de/
Hiermit erklärt Sony Corporation, dass diese
Funkanlage der Richtlinie 2014/53/EU
entspricht.
Der vollständige Text der EU-Konformitätserklärung
ist unter der folgenden Internetadresse verfügbar:
http://www.compliance.sony.de/
Με την παρούσα Sony Corporation δηλώνει
ότι, αυτή η συσκευή πληροί τους όρους της
οδηγίας 2014/53/EU.
Το πλήρες κείενο της δήλωσης
συόρφωσης ΕΕ διατίθεται στην ακόλουθη
ιστοσελίδα στο διαδίκτυο:
http://www.compliance.sony.de/
A Sony Corporation igazolja, hogy ez a készülék
megfelel a 2014/53/EU irányelvnek.
Az EU-megfelelőségi nyilatkozat teljes szövege
elérhető a következő internetes címen:
http://www.compliance.sony.de/
Con la presente, Sony Corporation dichiara che
questo apparecchio è conforme alla Direttiva
2014/53/UE.
Il testo completo della dichiarazione di
conformità UE è disponibile al seguente
indirizzo Internet:
http://www.compliance.sony.de/
Български
Hrvatski
Česky
Dansk
Nederlands
English
Eesti keel
Suomi
Français
Deutsch
Ελληνικά
Magyar
Italiano

Ar šo Sony Corporation deklarē, ka šī iekārta
atbilst direktīvai 2014/53/ES.
Pilns ES atbilstības deklarācijas teksts ir
pieejams šādā interneta vietnē:
http://www.compliance.sony.de/
Mes, Sony Corporation, patvirtiname, kad šis
įrenginys atitinka direktyvą 2014/53/ES.
Visas ES atitikties deklaracijos tekstas
pasiekiamas šiuo internetiniu adresu:
http://www.compliance.sony.de/
Herved erklærer Sony Corporation at
utstyrstypen er i samsvar med direktiv 2014/53/
EU.
EU-erklæring fulltekst finner du på Internett
under:
http://www.compliance.sony.de/
Sony Corporation niniejszym oświadcza, że to
urządzenie jest zgodne z dyrektywą 2014/53/
UE.
Pełny tekst deklaracji zgodności UE jest
dostępny pod następującym adresem
internetowym:
http://www.compliance.sony.de/
O(a) abaixo assinado(a) Sony Corporation
declara que o presente equipamento está em
conformidade com a Diretiva 2014/53/UE.
O texto integral da declaração de conformidade
está disponível no seguinte endereço de
Internet:
http://www.compliance.sony.de/
Prin prezenta, Sony Corporation declară că acest
echipament este în conformitate cu Directiva
2014/53/UE.
Textul integral al declaraiei UE de conformitate
este disponibil la următoarea adresă internet:
http://www.compliance.sony.de/
Sony Corporation potrjuje, da je ta oprema
skladna z Direktivo 2014/53/EU.
Celotno besedilo izjave EU o skladnosti je na
voljo na naslednjem spletnem naslovu:
http://www.compliance.sony.de/
Sony Corporation týmto vyhlasuje, že zariadenie
je v súlade so smernicou 2014/53/EÚ.
Úplné vyhlásenie EÚ o zhode je k dispozícii na
tejto internetovej adrese:
http://www.compliance.sony.de/
Por la presente, Sony Corporation declara que
este equipo es conforme con la Directiva 2014/
53/UE.
El texto completo de la declaración UE de
conformidad está disponible en la dirección
Internet siguiente:
http://www.compliance.sony.de/
Härmed försäkrar Sony Corporation att denna
utrustning överensstämmer med direktiv 2014/
53/EU.
Den fullständiga texten till EU-försäkran om
överensstämmelse finns på följande
webbadress:
http://www.compliance.sony.de/
Sony Corporation bu ekipmanın 2014/53/AB
Direktifine uygun olduğunu işbu belge ile beyan
eder.
AB uygunluk beyanının tam metni aşağıdaki
internet adresinden edinilebilir:
http://www.compliance.sony.de/
Me anë të këtij dokumenti, Sony Corporation
deklaron se kjo pajisje është në pajtueshmëri
me Direktivën 2014/53/BE.
Teksti i plotë i deklaratës së pajtueshmërisë së
BE-së disponohet në adresën e mëposhtme të
të internetit:
http://www.compliance.sony.de/
ј , Sony Corporation ј
2014/53/.
ј
:
http://www.compliance.sony.de/
Sony Corporation ovim izjavljuje da je ova
oprema u skladu sa direktivom 2014/53/EU.
Kompletan tekst EU izjave o usklađenosti je
dostupan na sledećoj internet adresi:
http://www.compliance.sony.de/
Latviešu
Lietuvių kalba
Norsk
Polski
Português
Română
Slovensky
Slovenščina
Español
Svenska
Türkçe
Shqip
Македонски
Srpski

App. de smartphone
Support by Sony app - Trouvez des infos et recevez des
notifications au sujet de votre produit :
App per smartphone
App Support by Sony - Trovate informazioni e ricevete
notifiche sul vostro prodotto:
Smartphone app
Support by Sony app - Find information and get
notification about your product:
Smartphone App
Support by Sony App - Finden Sie Informationen und
erhalten Sie Benachrichtigungen über Ihr Produkt:
Aplicación para Smartphone
Aplicación Support by Sony - Busque información y
obtenga notificaciones acerca de su producto:
√
News & Alerts / Nachrichten u. Alerts / Actus & Alertes / Novità e avvisi /
Noticias y Alertas / Новости и сообщения
√
Software updates / Software-Updates / Mises à jour / Aggiornamenti software /
Actualizaciones de software / Обновления программного обеспечения
√
Tutorials / Anleitungen / Didacticiels / Tutorial / Tutoriales / Руководства
√
Tips & Tricks / Tipps u. Tricks / Conseils & Astuces / Consigli e suggerimenti /
Consejos y Trucos / Советы и рекомендации
https://sony.net/SBS
Приложение для смартфонов
Приложение Support by Sony — подробная
информация и новости о продукте:
©2018 Sony Corporation Printed in Thailand http://www.sony.net/
http://www.sony.eu/support
Site d’assistance
Si vous avez des questions ou si vous souhaitez
consulter les toutes dernières informations techniques
sur ce produit, rendez-vous sur le site Web suivant :
Sito di assistenza clienti
In caso di domande o per le informazioni più aggiornate
sul presente prodotto, visitare il seguente sito Web:
Support site
If you have any questions or for the latest support
information on this product, please visit
the web site below:
Support-Website
Wenn Sie Fragen haben oder die neuesten
Support-Informationen zu diesem Produkt abrufen
möchten, rufen Sie bitte folgende Website auf:
Sitio Web de soporte técnico en línea
Para resolver cualquier duda u obtener la información
más reciente sobre el soporte técnico de este producto,
visite el siguiente sitio Web:
Сайт для получения поддержки
В случае возникновения вопросов и для получения
самых последних сведений о данном продукте
посетите следующий веб-сайт:
http://www.sony.eu/mysony
Register your product online now at:
Merci d’enregister votre produit en ligne sur:
Registre su producto online en:
Registrieren Sie Ihr Produkt jetzt bei:
Registra online il tuo prodotto su:
:
Transcripción de documentos
4-739-631-13(1) FM/MW/LW Bluetooth® Car Audio FM/MW/LW Bluetooth® Автомобильное Аудио Operating Instructions GB Bedienungsanleitung DE Mode d’emploi FR Istruzioni per l’uso IT Manual de instrucciones ES Инструкция по эксплуатации To cancel the demonstration (DEMO) display, see page 18. For the connection/installation, see page 30. Zum Deaktivieren der Demo-Anzeige (DEMO) schlagen Sie bitte auf Seite 22 nach. Informationen zum Anschluss und zur Installation finden Sie auf Seite 36. Pour annuler la démonstration (DEMO), reportezvous à la page 20. Pour le raccordement/l’installation, reportez-vous à la page 34. Per annullare la dimostrazione (DEMO), vedere pagina 20. Per l’installazione e i collegamenti, consultare pagina 34. Para cancelar la pantalla de demostración (DEMO), consulte la página 19. Para la conexión/instalación, consulte la página 34. Для отмены демонстрации на дисплее (режим DEMO) см. стр. 21. Инструкции по установке/подключению см. на стр. 36. DSX-A416BT RU For safety, be sure to install this unit in the dashboard of the car as the rear side of the unit becomes hot during use. For details, see “Connection/Installation” (page 30). Made in Thailand The nameplate indicating operating voltage, etc., is located on the bottom of the chassis. The validity of the CE marking is restricted to only those countries where it is legally enforced, mainly in the countries EEA (European Economic Area). Hereby, Sony Corporation declares that this equipment is in compliance with Directive 2014/53/EU. The full text of the EU declaration of conformity is available at the following internet address: http://www.compliance.sony.de/ Notice for customers: the following information is only applicable to equipment sold in countries applying EU Directives This product has been manufactured by or on behalf of Sony Corporation. EU Importer: Sony Europe B.V. Inquiries to the EU Importer or related to product compliance in Europe should be sent to the manufacturer’s authorized representative, Sony Belgium, bijkantoor van Sony Europe B.V., Da Vincilaan 7-D1, 1930 Zaventem, Belgium. 2GB Disposal of waste batteries and electrical and electronic equipment (applicable in the European Union and other countries with separate collection systems) This symbol on the product, the battery or on the packaging indicates that the product and the battery shall not be treated as household waste. On certain batteries this symbol might be used in combination with a chemical symbol. The chemical symbol for lead (Pb) is added if the battery contains more than 0.004% lead. By ensuring that these products and batteries are disposed of correctly, you will help to prevent potentially negative consequences for the environment and human health which could be caused by inappropriate waste handling. The recycling of the materials will help to conserve natural resources. In case of products that for safety, performance or data integrity reasons require a permanent connection with an incorporated battery, this battery should be replaced by qualified service staff only. To ensure that the battery and the electrical and electronic equipment will be treated properly, hand over these products at endof-life to the appropriate collection point for the recycling of electrical and electronic equipment. For all other batteries, please view the section on how to remove the battery from the product safely. Hand the battery over to the appropriate collection point for the recycling of waste batteries. For more detailed information about recycling of this product or battery, please contact your local Civic Office, your household waste disposal service or the shop where you purchased the product or battery. CAUTION Emergency calls The following frequency 65 – 74 MHz range is not allocated to sound broadcasting in the European Common Allocations table and cannot be used in Europe. This BLUETOOTH car handsfree and the electronic device connected to the handsfree operate using radio signals, cellular, and landline networks as well as user-programmed function, which cannot guarantee connection under all conditions. Therefore do not rely solely upon any electronic device for essential communications (such as medical emergencies). Warning if your car’s ignition has no ACC position Be sure to set the AUTO OFF function (page 18). The unit will shut off completely and automatically in the set time after the unit is turned off and the clock is displayed (i.e. press and hold OFF for 1 second), which prevents battery drain. If you do not set the AUTO OFF function, press and hold OFF until the display disappears each time you turn the ignition off. Disclaimer regarding services offered by third parties Services offered by third parties may be changed, suspended, or terminated without prior notice. Sony does not bear any responsibility in these sorts of situations. Important notice Caution IN NO EVENT SHALL SONY BE LIABLE FOR ANY INCIDENTAL, INDIRECT OR CONSEQUENTIAL DAMAGES OR OTHER DAMAGES INCLUDING, WITHOUT LIMITATION, LOSS OF PROFITS, LOSS OF REVENUE, LOSS OF DATA, LOSS OF USE OF THE PRODUCT OR ANY ASSOCIATED EQUIPMENT, DOWNTIME, AND PURCHASER’S TIME RELATED TO OR ARISING OUT OF THE USE OF THIS PRODUCT, ITS HARDWARE AND/OR ITS SOFTWARE. On BLUETOOTH communication Microwaves emitting from a BLUETOOTH device may affect the operation of electronic medical devices. Turn off this unit and other BLUETOOTH devices in the following locations, as it may cause an accident. – where inflammable gas is present, in a hospital, train, airplane, or petrol station – near automatic doors or a fire alarm This unit supports security capabilities that comply with the BLUETOOTH standard to provide a secure connection when the BLUETOOTH wireless technology is used, but security may not be enough depending on the setting. Be careful when communicating using BLUETOOTH wireless technology. We do not take any responsibility for the leakage of information during BLUETOOTH communication. If you have any questions or problems concerning your unit that are not covered in this manual, consult your nearest Sony dealer. Dear customer, this product includes a radio transmitter. According to UNECE Regulation no. 10, a vehicle manufacturers may impose specific conditions for installation of radio transmitters into vehicles. Please check your vehicle operation manual or contact the manufacturer of your vehicle or your vehicle dealer, before you install this product into your vehicle. 3GB Additional Information Table of Contents Guide to Parts and Controls. . . . . . . . . . . . . 5 Getting Started Detaching the Front Panel . . . . . . . . . . . . . . 6 Resetting the Unit. . . . . . . . . . . . . . . . . . . . . 7 Setting the Clock. . . . . . . . . . . . . . . . . . . . . . 7 Preparing a BLUETOOTH Device . . . . . . . . . 7 Connecting a USB Device. . . . . . . . . . . . . . . 9 Connecting Other Portable Audio Device . . . . . . . . . . . . . . . . . . . . . . . . . . 10 Listening to the Radio Listening to the Radio . . . . . . . . . . . . . . . . 10 Using Radio Data System (RDS). . . . . . . . . . 11 Playback Playing a USB Device . . . . . . . . . . . . . . . . . 12 Playing a BLUETOOTH Device . . . . . . . . . . 12 Searching and Playing Tracks . . . . . . . . . . 13 Handsfree Calling (via BLUETOOTH only) Receiving a Call. . . . . . . . . . . . . . . . . . . . . . 14 Making a Call. . . . . . . . . . . . . . . . . . . . . . . . 14 Available Operations During Call . . . . . . . 15 Useful Functions Sony | Music Center with iPhone/ Android™ Smartphone . . . . . . . . . . . . 16 Using Voice Recognition (Android Smartphone only). . . . . . . . . . . . . . . . . 17 Using Siri Eyes Free . . . . . . . . . . . . . . . . . . . 17 Settings Canceling the DEMO Mode . . . . . . . . . . . . Basic Setting Operation . . . . . . . . . . . . . . . General Setup (GENERAL) . . . . . . . . . . . . . Sound Setup (SOUND) . . . . . . . . . . . . . . . . Display Setup (DISPLAY). . . . . . . . . . . . . . . BLUETOOTH Setup (BLUETOOTH) . . . . . . . Sony | Music Center Setup (SONY APP) . . . . . . . . . . . . . . . . . . . . . . 4GB 18 18 18 19 20 21 21 Updating the Firmware . . . . . . . . . . . . . . . Precautions . . . . . . . . . . . . . . . . . . . . . . . . . Maintenance. . . . . . . . . . . . . . . . . . . . . . . . Specifications . . . . . . . . . . . . . . . . . . . . . . . Troubleshooting . . . . . . . . . . . . . . . . . . . . . Messages . . . . . . . . . . . . . . . . . . . . . . . . . . 22 22 23 23 25 28 Connection/Installation Cautions . . . . . . . . . . . . . . . . . . . . . . . . . . . 30 Parts List for Installation . . . . . . . . . . . . . . 30 Connection . . . . . . . . . . . . . . . . . . . . . . . . . . 31 Installation . . . . . . . . . . . . . . . . . . . . . . . . . 34 Guide to Parts and Controls Main unit Front panel release button SRC (source) Turn on the power. Change the source. OFF Press and hold for 1 second to turn the source off and display the clock. Press and hold for more than 2 seconds to turn off the power and the display. Control dial Rotate to adjust the volume. PUSH ENTER Enter the selected item. Press SRC, rotate then press to change the source (timeout in 2 seconds). MENU Open the setup menu. VOICE (page 15, 17) Press and hold for more than 2 seconds to activate voice dial, voice recognition (Android smartphone only), or the Siri function (iPhone only). N-Mark Touch the control dial with Android smartphone to make BLUETOOTH connection. / (SEEK –/+) Tune in radio stations automatically. Press and hold to tune manually. / (prev/next) / (fast-reverse/fast-forward) PTY (program type) Select PTY in RDS. (browse) (page 13) Enter the browse mode during playback. (Not available when a USB device in Android mode or iPod is connected.) CALL Enter the call menu. Receive/end a call. Press and hold for more than 2 seconds to switch the BLUETOOTH signal. (back) Return to the previous display. MODE (page 7, 10, 15) Receptor for the remote commander Number buttons (1 to 6) Receive stored radio stations. Press and hold to store stations. Display window 5GB ALBUM / Skip an album for audio device. Press and hold to skip albums continuously. (Not available when a USB device in Android mode or iPod is connected.) (repeat) (Not available when a USB device in Android mode is connected.) (shuffle) (Not available when a USB device in Android mode is connected.) MIC (page 15) (play/pause) Getting Started Detaching the Front Panel You can detach the front panel of this unit to prevent theft. 1 Press and hold OFF until the unit turns off, press the front panel release button , then pull the panel towards you to remove. EXTRA BASS Reinforce bass sound in synchronization with the volume level. Press to change the EXTRA BASS setting: [1], [2], [OFF]. AUX input jack DSPL (display) Press to change display items. SCRL (scroll) Press and hold to scroll a display item. USB port Caution alarm If you turn the ignition switch to the OFF position without detaching the front panel, the caution alarm will sound for a few seconds. The alarm will only sound if the built-in amplifier is used. Serial numbers Make sure the serial numbers on the bottom of the unit and the back of the front panel are matched correctly. Otherwise you cannot make BLUETOOTH pairing, connection and disconnection by NFC. Attaching the front panel 6GB Resetting the Unit Before operating the unit for the first time, after replacing the car battery, or changing the connections, you must reset the unit. 1 Press DSPL and (back)/MODE for more than 2 seconds. Note Resetting the unit will erase the clock setting and some stored contents. Setting the area/region After resetting the unit, the area/region setting display appears. 1 Press ENTER while [SET AREA] is displayed. The area/region currently set appears. 2 Rotate the control dial to select [EUROPE] or [RUSSIA], then press it. 3 Rotate the control dial to select [YES] or [NO], then press it. If the setting area/region is changed, the unit is reset, then the clock is displayed. This setting can be configured in the general setup menu (page 18). Setting the Clock 1 Press MENU, rotate the control dial to select [GENERAL], then press it. 2 Rotate the control dial to select [SET CLOCK-ADJ], then press it. Preparing a BLUETOOTH Device You can enjoy music, or perform handsfree calling depending on the BLUETOOTH compatible device such as a smartphone, cellular phone and audio device (hereafter “BLUETOOTH device” if not otherwise specified). For details on connecting, refer to the operating instructions supplied with the device. Before connecting the device, turn down the volume of this unit; otherwise, loud sound may result. Connecting with a Smartphone using One-touch connection (NFC) By touching the control dial on the unit with an NFC* compatible smartphone, the unit is paired and connected with the smartphone automatically. * NFC (Near Field Communication) is a technology enabling short-range wireless communication between various devices, such as mobile phones and IC tags. Thanks to the NFC function, data communication can be achieved easily just by touching the relevant symbol or designated location on NFC compatible devices. For a smartphone with Android OS 4.0 or lower installed, downloading the app “NFC Easy Connect” available on Google Play is required. The app may not be downloadable in some countries/regions. 1 The hour indication flashes. 3 4 For details, refer to the operating instructions supplied with the smartphone. Rotate the control dial to set the hour and minute. To move the digital indication, press / (SEEK –/+). After setting the minute, press MENU. The setup is complete and the clock starts. Activate the NFC function on the smartphone. 2 Touch the N-Mark part of the unit with the N-Mark part of the smartphone. To display the clock Press DSPL. 7GB Make sure that of the unit. lights up on the display To disconnect using NFC Touch the N-Mark part of the unit with the N-Mark part of the smartphone again. Notes • When making the connection, handle the smartphone carefully to prevent scratches. • One-touch connection is not possible when the unit is already connected to two NFC compatible devices. In this case, disconnect either device, and make connection with the smartphone again. 7 If passkey* input is required on the BLUETOOTH device, input [0000]. * Passkey may be called “Passcode,” “PIN code,” “PIN number” or “Password,” etc., depending on the device. Pairing and connecting with a BLUETOOTH device When connecting a BLUETOOTH device for the first time, mutual registration (called “pairing”) is required. Pairing enables this unit and other devices to recognize each other. This unit can connect two BLUETOOTH devices (two cellular phones, or a cellular phone and an audio device). Input passkey [0000] When pairing is made, 8 stays lit. Select this unit on the BLUETOOTH device to establish the BLUETOOTH connection. or made. lights up when the connection is Note 1 Place the BLUETOOTH device within 1 m (3 ft) of this unit. 2 Press MENU, rotate the control dial to select [BLUETOOTH], then press it. 3 Rotate the control dial to select [SET PAIRING], then press it. 4 Rotate the control dial to select [SET DEVICE 1]* or [SET DEVICE 2]*, then press it. flashes while the unit is in pairing standby mode. * [SET DEVICE 1] or [SET DEVICE 2] will be changed to the paired device name after pairing is complete. 5 Perform pairing on the BLUETOOTH device so it detects this unit. 6 Select [DSX-A416BT] shown in the display of the BLUETOOTH device. If your model name does not appear, repeat from step 2. 8GB While connecting to a BLUETOOTH device, this unit cannot be detected from another device. To enable detection, enter the pairing mode and search for this unit from another device. To start playback For details, see “Playing a BLUETOOTH Device” (page 12). To disconnect the paired device Perform steps 2 to 4 to disconnect after this unit and the BLUETOOTH device are paired. Connecting with a paired BLUETOOTH device To use a paired device, connection with this unit is required. Some paired devices will connect automatically. 1 Press MENU, rotate the control dial to select [BLUETOOTH], then press it. 2 Rotate the control dial to select [SET BT SIGNL], then press it. Make sure that lights up. 3 Activate the BLUETOOTH function on the BLUETOOTH device. 4 Operate the BLUETOOTH device to connect to this unit. or lights up. Icons in the display: Lights up when handsfree calling is available by enabling the HFP (Handsfree Profile). Connecting with an iPhone/iPod (BLUETOOTH Auto Pairing) When an iPhone/iPod with iOS5 or later installed is connected to the USB port, the unit is paired and connected with the iPhone/iPod automatically. To enable BLUETOOTH Auto Pairing, make sure [SET AUTOPAIR] in [BLUETOOTH] is set to [ON] (page 21). 1 Activate the BLUETOOTH function on the iPhone/iPod. 2 Connect an iPhone/iPod to the USB port. Lights up when the audio device is playable by enabling the A2DP (Advanced Audio Distribution Profile). To connect the last-connected device from this unit Activate the BLUETOOTH function on the BLUETOOTH device. To connect with the audio device, press SRC to select [BT AUDIO] and press (play/ pause). To connect with the cellular phone, press CALL. Note While streaming BLUETOOTH audio, you cannot connect from this unit to the cellular phone. Connect from the cellular phone to this unit instead. Make sure that of the unit. lights up on the display Notes • BLUETOOTH Auto Pairing is not possible if the unit is already connected to two BLUETOOTH devices. In this case, disconnect either device, then connect the iPhone/iPod again. • If BLUETOOTH Auto Pairing is not established, see “Preparing a BLUETOOTH Device” (page 7). Tip With BLUETOOTH signal on: when the ignition is turned to on, this unit reconnects automatically to the last-connected cellular phone. To install the microphone For details, see “Installing the microphone” (page 33). Connecting a USB Device 1 2 Turn down the volume on the unit. Connect the USB device to the unit. To connect an iPod/iPhone, use the USB connection cable for iPod (not supplied). 9GB Connecting Other Portable Audio Device 1 2 3 Listening to the Radio Turn off the portable audio device. Listening to the Radio Turn down the volume on the unit. To listen to the radio, press SRC to select [TUNER]. Connect the portable audio device to the AUX input jack (stereo mini jack) on the unit with a connecting cord (not supplied)*. * Be sure to use a straight type plug. Storing automatically (BTM) 1 Press MODE to change the band (FM1, FM2, FM3, MW or LW). 2 Press MENU, rotate the control dial to select [GENERAL], then press it. 3 Rotate the control dial to select [SET BTM], then press it. The unit stores stations in order of frequency on the number buttons. 4 Press SRC to select [AUX]. To match the volume level of the connected device to other sources Start playback of the portable audio device at a moderate volume, and set your usual listening volume on the unit. Press MENU, then select [SOUND] [SET AUX VOL] (page 20). Tuning 1 Press MODE to change the band (FM1, FM2, FM3, MW or LW). 2 Perform tuning. To tune manually Press and hold / (SEEK –/+) to locate the approximate frequency, then press / (SEEK –/+) repeatedly to fine adjust to the desired frequency. To tune automatically Press / (SEEK –/+). Scanning stops when the unit receives a station. Storing manually 1 While receiving the station that you want to store, press and hold a number button (1 to 6) until [MEM] appears. Receiving the stored stations 1 10GB Select the band, then press a number button (1 to 6). Using Radio Data System (RDS) Setting alternative frequencies (AF) and traffic announcement (TA) AF continuously retunes the station to the strongest signal in a network, and TA provides current traffic information or traffic programs (TP) if received. 1 Press MENU, rotate the control dial to select [GENERAL], then press it. 2 Rotate the control dial to select [SET AF/TA], then press it. 3 Rotate the control dial to select [SET AF-ON], [SET TA-ON], [SET AF/TA-ON] or [SET AF/TA-OFF], then press it. To store RDS stations with the AF and TA setting You can preset RDS stations along with an AF/TA setting. Set AF/TA, then store the station with BTM or manually. If you preset manually, you can also preset non-RDS stations. To receive emergency announcements With AF or TA on, emergency announcements will automatically interrupt the currently selected source. To adjust the volume level during a traffic announcement Level will be stored into memory for subsequent traffic announcements, independently from the regular volume level. This function does not work in the UK and some other areas. Local Link function (UK only) This function enables you to select other local stations in the area, even if they are not stored on your number buttons. During FM reception, press a number button (1 to 6) on which a local station is stored. Within 5 seconds, press again a number button of the local station. Repeat this procedure until the local station is received. Selecting program types (PTY) 1 2 Press PTY during FM reception. Rotate the control dial until the desired program type appears, then press it. The unit starts to search for a station broadcasting the selected program type. Type of programs NEWS (News), AFFAIRS (Current Affairs), INFO (Information), SPORT (Sports), EDUCATE (Education), DRAMA (Drama), CULTURE (Culture), SCIENCE (Science), VARIED (Varied), POP M (Pop Music), ROCK M (Rock Music), EASY M (M.O.R. Music), LIGHT M (Light classical), CLASSICS (Serious classical), OTHER M (Other Music), WEATHER (Weather), FINANCE (Finance), CHILDREN (Children’s program), SOCIAL (Social Affairs), RELIGION (Religion), PHONE IN (Phone In), TRAVEL (Travel), LEISURE (Leisure), JAZZ (Jazz Music), COUNTRY (Country Music), NATION M (National Music), OLDIES (Oldies Music), FOLK M (Folk Music), DOCUMENT (Documentary) Setting clock time (CT) To stay with one regional program (REGIONAL) The CT data from the RDS transmission sets the clock. When the AF and REGIONAL functions are on, you will not be switched to another regional station with a stronger frequency. If you leave this regional program’s reception area, set [SET REGIONAL] in [GENERAL] to [SET REG-OFF] during FM reception (page 19). 1 Set [SET CT-ON] in [GENERAL] (page 19). 11GB 1 Playback Playback starts. If a device is already connected, to start playback, press SRC to select [USB] ([IPD] appears in the display when the iPod is recognized). Playing a USB Device In these Operating Instructions, “iPod” is used as a general reference for the iPod functions on an iPod and iPhone, unless otherwise specified by the text or illustrations. Connect a USB device to the USB port (page 9). 2 Adjust the volume on this unit. To stop playback Press and hold OFF for 1 second. For details on the compatibility of your iPod, see “About iPod” (page 22) or visit the support site on the back cover. To remove the device AOA (Android Open Accessory) 2.0, MSC (Mass Storage Class) and MTP (Media Transfer Protocol) type USB devices* compliant with the USB standard can be used. Depending on the USB device, the Android mode or MSC/MTP mode can be selected on the unit. Some digital media players or Android smartphones may require setting to MTP mode. When you connect an iPhone via USB, phone call volume is controlled by the iPhone, not the unit. Do not inadvertently increase the volume on the unit during a call, as a sudden loud sound may result when the call ends. * e.g., a USB flash drive, digital media player, Android smartphone Notes • For details on the compatibility of your USB device, visit the support site on the back cover. • Smartphones with Android OS 4.1 or higher installed support Android Open Accessory 2.0 (AOA 2.0). However, some smartphones may not fully support AOA 2.0 even if Android OS 4.1 or higher is installed. For details on the compatibility of your Android smartphone, visit the support site on the back cover. • Playback of the following files is not supported. MP3/WMA/FLAC: – copyright-protected files – DRM (Digital Rights Management) files – Multi-channel audio files MP3/WMA: – lossless compression files Before making a connection, select the USB mode (Android mode or MSC/MTP mode) depending on the USB device (page 19). 12GB Stop playback, then remove the device. Caution for iPhone Playing a BLUETOOTH Device You can play contents on a connected device that supports BLUETOOTH A2DP (Advanced Audio Distribution Profile). 1 Make BLUETOOTH connection with the audio device (page 7). To select the audio device, press MENU, then select [BLUETOOTH] [SET AUDIODEV] (page 21). 2 3 Press SRC to select [BT AUDIO]. 4 Adjust the volume on this unit. Operate the audio device to start playback. Notes • Depending on the audio device, information such as title, track number/time and playback status may not be displayed on this unit. • Even if the source is changed on this unit, playback of the audio device does not stop. • [BT AUDIO] does not appear in the display while running the “Sony | Music Center” application via the BLUETOOTH function. To match the volume level of the BLUETOOTH device to other sources Start playback of the BLUETOOTH audio device at a moderate volume, and set your usual listening volume on the unit. Press MENU, then select [SOUND] [SET BTA VOL] (page 20). Searching and Playing Tracks Searching by skipping items (Jump mode) Not available when a USB device in Android mode or iPod is connected. 1 During USB playback, press (browse). 2 3 Press (SEEK +). Rotate the control dial to select the item. The list is jumped in steps of 10% of the total number of items. Repeat play and shuffle play 4 Not available when a USB device in Android mode is connected. 1 During playback, press (repeat) or (shuffle) repeatedly to select the desired play mode. Press ENTER to return to the QuickBrowZer mode. The selected item appears. 5 Rotate the control dial to select the desired item, then press it. Playback starts. Playback in the selected play mode may take time to start. Available play modes differ depending on the selected sound source. Searching a track by name (QuickBrowZer™) Not available when a USB device in Android mode or iPod is connected. 1 During USB playback, press (browse)* to display the list of search categories. When the track list appears, press (back) repeatedly to display the desired search category. * During USB playback, press (browse) for more than 2 seconds to directly return to the beginning of the category list. 2 Rotate the control dial to select the desired search category, then press it to confirm. 3 Repeat step 2 to search the desired track. Playback starts. To exit the Quick-BrowZer mode Press (browse). 13GB Handsfree Calling (via BLUETOOTH only) To use a cellular phone, connect it with this unit. You can connect two cellular phones to the unit. For details, see “Preparing a BLUETOOTH Device” (page 7). 4 Rotate the control dial to select a name from the name list, then press it. 5 Rotate the control dial to select a number from the number list, then press it. The phone call starts. From the call history 1 Press CALL. When two cellular phones are connected to the unit, rotate the control dial to select either phone, then press it. Receiving a Call 1 Press CALL when a call is received with a ringtone. 2 A list of the call history appears. 3 The phone call starts. Note Press and hold OFF for 1 second. To end the call By phone number input 1 You can make a call from the phonebook or call history when a cellular phone supporting PBAP (Phone Book Access Profile) is connected. When two cellular phones are connected to the unit, select either phone. Press CALL. When two cellular phones are connected to the unit, rotate the control dial to select either phone, then press it. Press CALL again. Making a Call Rotate the control dial to select a name or phone number from the call history, then press it. The phone call starts. The ringtone and talker’s voice are output only from the front speakers. To reject the call Rotate the control dial to select [RECENT CALL], then press it. 2 Rotate the control dial to select [DIAL NUMBER], then press it. 3 Rotate the control dial to enter the phone number, and lastly select [ ] (space), then press ENTER*. The phone call starts. * To move the digital indication, press / (SEEK –/+). Note From the phonebook 1 Press CALL. When two cellular phones are connected to the unit, rotate the control dial to select either phone, then press it. 2 Rotate the control dial to select [PHONE BOOK], then press it. 3 Rotate the control dial to select an initial from the initial list, then press it. 14GB [_] appears instead of [#] on the display. By redial 1 Press CALL. When two cellular phones are connected to the unit, rotate the control dial to select either phone, then press it. 2 Rotate the control dial to select [REDIAL], then press it. The phone call starts. By voice tags You can make a call by saying the voice tag stored in a connected cellular phone that has a voice dialing function. 1 Press CALL. When two cellular phones are connected to the unit, rotate the control dial to select either phone, then press it. 2 To switch between handsfree mode and handheld mode During a call, press MODE to switch the phone call audio between the unit and cellular phone. Note Depending on the cellular phone, this operation may not be available. Rotate the control dial to select [VOICE DIAL], then press it. Alternatively, press and hold VOICE for more than 2 seconds. 3 Say the voice tag stored on the cellular phone. Your voice is recognized, and the call is made. To cancel voice dialing Press VOICE. Available Operations During Call To adjust the ringtone volume Rotate the control dial while receiving a call. To adjust the talker’s voice volume Rotate the control dial during a call. To adjust the volume for the other party (Mic gain adjustment) Press MIC. Adjustable volume levels: [MIC-LOW], [MICMID], [MIC-HI]. To reduce echo and noise (Echo Canceler/Noise Canceler Mode) Press and hold MIC. Settable mode: [EC/NC-1], [EC/NC-2]. 15GB If the device number appears Useful Functions Sony | Music Center with iPhone/Android™ Smartphone Downloading the latest version of “Sony | Music Center” application is required from the App Store for iPhone or from available on Google Play for Android smartphone. Make sure that the number is displayed (e.g., 123456), then select [Yes] on the iPhone/Android smartphone. To terminate connection 1 Press MENU, rotate the control dial to select [SONY APP], then press it. 2 Rotate the control dial to select [CONNECT], then press it. Selecting the source or application You can operate to select the desired source or application on iPhone/Android smartphone. Notes • For your safety, follow your local traffic laws and regulations, and do not operate the application while driving. • “Sony | Music Center” is an app for controlling Sony audio devices which are compatible with “Sony | Music Center”, by your iPhone/Android smartphone. • What you can control with “Sony | Music Center” varies depending on the connected device. • To make use of “Sony | Music Center” features, see the details on your iPhone/Android smartphone. • For further details on “Sony | Music Center,” visit the following URL: http://www.sony.net/smcqa/ • Visit the website below and check the compatible iPhone/Android smartphone models. For iPhone: visit the App Store For Android smartphone: visit Google Play Establishing the Sony | Music Center connection 1 Make the BLUETOOTH connection with iPhone/Android smartphone (page 7). To select the audio device, press MENU, then select [BLUETOOTH] [SET AUDIODEV] (page 21). 2 Launch the “Sony | Music Center” application. 3 Press MENU, rotate the control dial to select [SONY APP], then press it. 4 Rotate the control dial to select [CONNECT], then press it. Connection to iPhone/Android smartphone starts. For details on the operations on iPhone/ Android smartphone, see the help of the application. 16GB To select the source Press SRC repeatedly. Alternatively, press SRC, rotate the control dial to select the desired source, then press ENTER. To display the source list Press SRC. Announcement of SMS by voice guide (Android smartphone only) Messages of SMS are automatically read out through the car speakers when they are received. For details on settings, refer to the help of the application. Replying a message of SMS (Android smartphone only) You can reply a message by touching the reply icon. 1 Activate the “Sony | Music Center” application, then touch the [Reply] (reply) icon. The message input display appears on the “Sony | Music Center” application. 2 Input a reply message by voice recognition. The list of message candidates appears on the “Sony | Music Center” application. 3 Rotate the control dial to select the desired message, then press it. The message is sent out. Making sound and display settings 1 You can adjust the settings relating to sound and display via iPhone/Android smartphone. For details on settings, refer to the help of the application. For details, refer to the operating instructions supplied with the iPhone. 2 1 Press and hold VOICE to activate voice recognition. 2 Say the desired voice command into the microphone. To deactivate voice recognition Press VOICE. Notes • Voice recognition may not be available in some cases. • Voice recognition may not work properly depending on the performance of the connected Android smartphone. • Operate under conditions where noise such as engine sound is minimized during voice recognition. Using Siri Eyes Free Siri Eyes Free allows you to use an iPhone handsfree by simply speaking into the microphone. This function requires you to connect an iPhone to the unit via BLUETOOTH. Availability is limited to iPhone 4s or later. Make sure that your iPhone is running the latest iOS version. You must complete BLUETOOTH registration and connection configurations for the iPhone with the unit in advance. For details, see “Preparing a BLUETOOTH Device” (page 7). To select the iPhone, press MENU, then select [BLUETOOTH] [SET AUDIODEV] (page 21). Press and hold VOICE for more than 2 seconds. The voice command display appears. 3 Using Voice Recognition (Android Smartphone only) Activate the Siri function on the iPhone. After the iPhone beeps, speak into the microphone. The iPhone beeps again, then Siri starts responding. To deactivate Siri Eyes Free Press VOICE. Notes • The iPhone may not recognize your voice depending on usage conditions. (For example, if you are in a moving car.) • Siri Eyes Free may not function properly, or the response time may lag in locations where iPhone signals are difficult to receive. • Depending on the iPhone’s operating condition, Siri Eyes Free may not function properly, or may quit. • If you play a track with an iPhone using the BLUETOOTH audio connection, when the track starts playback via BLUETOOTH, Siri Eyes Free automatically quits and the unit switches to the BLUETOOTH audio source. • When Siri Eyes Free is activated during audio playback, the unit may switch to the BLUETOOTH audio source even if you do not specify a track to play. • When connecting the iPhone to the USB port, Siri Eyes Free may not function properly, or may quit. • When connecting the iPhone to the unit via USB, do not activate Siri with the iPhone. Siri Eyes Free may not function properly, or may quit. • There is no audio sound while Siri Eyes Free is activated. 17GB General Setup (GENERAL) Settings Canceling the DEMO Mode You can cancel the demonstration display which appears when the source is off and the clock is displayed. AREA (area) Specifies the area/region to use this unit: [EUROPE], [RUSSIA]. If the area/region currently set is changed, this unit is reset, then the clock is displayed. (Available only while the source is off and the clock is displayed.) 1 Press MENU, rotate the control dial to select [GENERAL], then press it. 2 Rotate the control dial to select [SET DEMO], then press it. DEMO (demonstration) Activates the demonstration: [ON], [OFF]. 3 Rotate the control dial to select [SET DEMO-OFF], then press it. CLOCK-ADJ (clock adjust) (page 7) The setting is complete. 4 Press (back) twice. The display returns to normal reception/ play mode. Basic Setting Operation You can set items in the following setup categories: General setup (GENERAL), Sound setup (SOUND), Display setup (DISPLAY), BLUETOOTH setup (BLUETOOTH), Sony | Music Center setup (SONY APP) 1 2 Press MENU. Rotate the control dial to select the setup category, then press it. The items that can be set differ depending on the source and settings. 3 Rotate the control dial to select the options, then press it. To return to the previous display Press 18GB (back). CAUT ALM (caution alarm) Activates the caution alarm: [ON], [OFF] (page 6). (Available only while the source is off and the clock is displayed.) BEEP (beep) Activates the beep sound: [ON], [OFF]. AUTO OFF (auto off) Shuts off automatically after a certain time when the unit is turned off and the clock is displayed (i.e. press and hold OFF for 1 second): [ON] (30 minutes), [OFF]. STEERING (steering) Registers/resets the setting of the steering wheel remote control. (Available only while the source is off and the clock is displayed.) STR CONTROL (steering control) Selects the input mode of the connected remote control. To prevent a malfunction, be sure to match the input mode with the connected remote control before use. CUSTOM (custom) Input mode for the steering wheel remote control PRESET (preset) Input mode for the wired remote control excluding the steering wheel remote control (Automatically selected when [RESET CUSTOM] is performed.) EDIT CUSTOM (edit custom) Registers the functions (SOURCE, ATT, VOL +/–, SEEK +/–, VOICE, ON HOOK, OFF HOOK) to the steering wheel remote control: Rotate the control dial to select the function you want to assign to the steering wheel remote control, then press it. While [REGISTER] is blinking, press and hold the button on the steering wheel remote control you want to assign the function to. When registration is complete, [REGISTERED] is displayed. To register other functions, repeat steps and . (Available only when [STR CONTROL] is set to [CUSTOM].) RESET CUSTOM (reset custom) Resets the setting of the steering wheel remote control: [YES], [NO]. (Available only when [STR CONTROL] is set to [CUSTOM].) Notes • While making settings, only button operation on the unit is available. For safety, park your car before making this setting. • If an error occurs while registering, all the previously-registered information remains. Restart registration from the function where the error occurred. • This function may not be available on some vehicles. For details on the compatibility of your vehicle, visit the support site on the back cover. USB MODE (USB mode) Changes the USB mode: [ANDROID], [MSC/MTP]. (Available only when the USB source is selected.) CT (clock time) Activates the CT function: [ON], [OFF]. AF/TA (alternative frequencies/traffic announcement) Selects the alternative frequencies (AF) and traffic announcement (TA) setting: [AF-ON], [TA-ON], [AF/TA-ON], [AF/TA-OFF]. BTM (best tuning memory) (page 10) (Available only when the tuner is selected.) FIRMWARE (firmware) (Available only while the source is off and the clock is displayed.) Checks/updates the firmware version. For details, visit the support site on the back cover. FW VERSION (firmware version) Displays current firmware version. FW UPDATE (firmware update) Enters firmware update process: [YES], [NO]. Updating the firmware takes a few minutes to complete. During the update, do not turn the ignition to the OFF position, nor remove the USB device. Sound Setup (SOUND) This setup menu is not available when the source is off and the clock is displayed. EQ10 PRESET (EQ10 preset) Selects an equalizer curve from 10 equalizer curves or off: [OFF], [R&B], [ROCK], [POP], [HIP-HOP], [EDM], [JAZZ], [SOUL], [COUNTRY], [KARAOKE]*, [CUSTOM]. The equalizer curve setting can be memorized for each source. * [KARAOKE] reduces the vocal sound but cannot fully remove it during playback. Also, using a microphone is not supported. EQ10 CUSTOM (EQ10 custom) Sets [CUSTOM] of EQ10. Setting the equalizer curve: [BAND1] – [BAND10] (32 Hz, 63 Hz, 125 Hz, 250 Hz, 500 Hz, 1 kHz, 2 kHz, 4 kHz, 8 kHz, 16 kHz). The volume level is adjustable in 1 dB steps, from -6 dB to +6 dB. BALANCE (balance) Adjusts the sound balance: [RIGHT-15] – [CENTER] – [LEFT-15]. REGIONAL (regional) Restricts reception to a specific region: [ON], [OFF]. (Available only when FM is received.) 19GB FADER (fader) Adjusts the relative level: [FRONT-15] – [CENTER] – [REAR-15]. S.WOOFER (subwoofer) SW LEVEL (subwoofer level) Adjusts the subwoofer volume level: [+6 dB] – [0 dB] – [-6 dB]. ([ATT] is displayed at the lowest setting.) SW PHASE (subwoofer phase) Selects the subwoofer phase: [SUB NORM], [SUB REV]. LPF FREQ (low pass filter frequency) Selects the subwoofer cut-off frequency: [80Hz], [100Hz], [120Hz]. HPF FREQ (high pass filter frequency) Selects the front/rear speaker cut-off frequency: [OFF], [80Hz], [100Hz], [120Hz]. AUX VOL (AUX volume level) Adjusts the volume level for each connected auxiliary device: [+18 dB] – [0 dB] – [-8 dB]. This setting negates the need to adjust the volume level between sources. (Available only when the AUX is selected.) BTA VOL (BLUETOOTH audio volume level) Adjusts the volume level for each connected BLUETOOTH device: [+6 dB] – [0 dB] – [-6 dB]. This setting negates the need to adjust the volume level between sources. (Available only when the BT audio or application is selected.) Display Setup (DISPLAY) DIMMER (dimmer) Changes the display brightness: [OFF], [ON], [AT] (auto), [CLK] (clock). ([AT] is available only when the illumination control lead is connected, and the head light is turned on.) To set this function to be active only during a fixed period, select [CLK], then set the start and end times. 20GB – To set the brightness when the dimmer function is activated: Set [DIMMER] to [ON], then adjust [BRIGHTNESS]. – To set the brightness when the dimmer function is deactivated: Set [DIMMER] to [OFF], then adjust [BRIGHTNESS]. The brightness setting is stored and applied when the dimmer function is activated or deactivated. BRIGHTNESS (brightness) Adjusts the display brightness. The brightness level is adjustable: [1] – [10]. BUTTON-C (button color) Sets a preset color or customized color for the buttons. COLOR (color) Selects from 15 presets colors, 1 customized color. CUSTOM-C (custom color) Registers a customized color for the buttons. RGB RED, RGB GRN, RGB BLUE Adjustable color range: [0] – [32] ([0] cannot be set for all color ranges). DSPL-C (display color) Sets a preset color or customized color for the display. COLOR (color) Selects from 15 presets colors, 1 customized color. CUSTOM-C (custom color) Registers a customized color for the display. RGB RED, RGB GRN, RGB BLUE Adjustable color range: [0] – [32] ([0] cannot be set for all color ranges). SND SYNC (sound synchronization) Activates the synchronization of the illumination with the sound: [ON], [OFF]. AUTO SCR (auto scroll) Scrolls long items automatically: [ON], [OFF]. (Not available when the AUX or tuner is selected.) BLUETOOTH Setup (BLUETOOTH) Sony | Music Center Setup (SONY APP) PAIRING (pairing) (page 8) Connects up to two BLUETOOTH devices: [DEVICE 1], [DEVICE 2]. [DEVICE 1] or [DEVICE 2] will be changed to the paired device name after pairing is complete. AUTO LAUNCH (auto launch) Activates the “Sony | Music Center” auto launch: [ON], [OFF]. When [ON] is selected, “Sony | Music Center” will automatically connect after the BLUETOOTH connection is complete. AUDIODEV (audio device) Selects the audio device. [*] appears on the device paired with [DEVICE 1] or the current A2DP compatible audio device. CONNECT (connect) Establish and terminate “Sony | Music Center” function (connection). RINGTONE (ringtone) Selects whether this unit or the connected cellular phone outputs the ringtone: [1] (this unit), [2] (cellular phone). AUTO ANS (auto answer) Sets this unit to answer an incoming call automatically: [OFF], [1] (about 3 seconds), [2] (about 10 seconds). AUTOPAIR (auto pairing) Starts BLUETOOTH pairing automatically when iOS device version 5.0 or later is connected via USB: [ON], [OFF]. BT SIGNL (BLUETOOTH signal) (page 8) Activates/deactivates the BLUETOOTH function. BT INIT (BLUETOOTH initialize) Initializes all the BLUETOOTH related settings (pairing information, device information, etc.): [YES], [NO]. When disposing the unit, initialize all the settings. (Available only while the source is off and the clock is displayed.) 21GB About iPod Additional Information Updating the Firmware To update the firmware, visit the support site on the back cover, then follow the online instructions. • You can connect to the following iPod models. Update your iPod devices to the latest software before use. Compatible iPhone/iPod models Compatible Model Bluetooth® USB iPhone X iPhone 8 iPhone 8 Plus Precautions iPhone 7 • Do not leave the front panel or audio devices on the dashboard. • When the unit is turned on, the power antenna (aerial) extends automatically. • Do not splash liquid onto the unit. iPhone 7 Plus iPhone SE iPhone 6s iPhone 6s Plus iPhone 6 iPhone 6 Plus iPhone 5s iPhone 5c iPhone 5 iPhone 4s iPod touch (6th generation) iPod touch (5th generation) Note During the update, do not remove the USB device. Playback order of audio files Folder (album) Audio file (track) iPod nano (7th generation) • Use of the Made for Apple badge means that an accessory has been designed to connect specifically to the Apple product(s) identified in the badge, and has been certified by the developer to meet Apple performance standards. Apple is not responsible for the operation of this device or its compliance with safety and regulatory standards. Please note that the use of this accessory with an Apple product may affect wireless performance. If you have any questions or problems concerning your unit that are not covered in this manual, consult your nearest Sony dealer. 22GB Maintenance Specifications Cleaning the connectors Tuner section Avoid touching the connectors directly. The unit may not function properly if the connectors between the unit and the front panel are not clean. In order to prevent this, detach the front panel (page 6) and clean the connectors with a cotton swab. Do not apply too much force. Otherwise, the connectors may be damaged. Note For safety, do not remove the front panel while driving. FM Tuning range: When [AREA] is set to [EUROPE]: 87.5 MHz – 108.0 MHz When [AREA] is set to [RUSSIA]: FM1/FM2: 87.5 MHz – 108.0 MHz (at 50 kHz step) FM3: 65 MHz – 74 MHz (at 30 kHz step) Usable sensitivity: 8 dBf Signal-to-noise ratio: 73 dB Separation: 50 dB at 1 kHz MW/LW Tuning range: MW: 531 kHz – 1,602 kHz LW: 153 kHz – 279 kHz Sensitivity: MW: 26 μV, LW: 50 μV USB Player section Interface: USB (Full-speed) Maximum current: 1 A Maximum number of recognizable folders and files: Folders (albums): 256 Files (tracks) per folder: 256 Compatible Android Open Accessory protocol (AOA): 2.0 Corresponding codec: MP3 (.mp3) Bit rate: 8 kbps – 320 kbps (Supports VBR (Variable Bit Rate)) Sampling rate: 16 kHz – 48 kHz WMA (.wma) Bit rate: 32 kbps – 192 kbps (Supports VBR (Variable Bit Rate)) Sampling rate: 32 kHz, 44.1 kHz, 48 kHz FLAC (.flac) Bit depth: 16 bit, 24 bit Sampling rate: 44.1 kHz, 48 kHz Supported file system: FAT16, FAT32 Wireless Communication Communication System: BLUETOOTH Standard version 3.0 Output: BLUETOOTH Standard Power Class 2 (Max. Conducted +1 dBm) 23GB Maximum communication range: Line of sight approx. 10 m (33 ft)*1 Frequency band: 2.4 GHz band (2.4000 GHz – 2.4835 GHz) Modulation method: FHSS Compatible BLUETOOTH Profiles*2: A2DP (Advanced Audio Distribution Profile) 1.3 AVRCP (Audio Video Remote Control Profile) 1.3 HFP (Handsfree Profile) 1.6 PBAP (Phone Book Access Profile) SPP (Serial Port Profile) Corresponding codec: SBC (.sbc), AAC (.m4a) Design and specifications are subject to change without notice. *1 The actual range will vary depending on factors such as obstacles between devices, magnetic fields around a microwave oven, static electricity, reception sensitivity, antenna (aerial)’s performance, operating system, software application, etc. *2 BLUETOOTH standard profiles indicate the purpose of BLUETOOTH communication between devices. This product is protected by certain intellectual property rights of Microsoft Corporation. Use or distribution of such technology outside of this product is prohibited without a license from Microsoft or an authorized Microsoft subsidiary. NFC Communication Frequency band: 13.56 MHz Power amplifier section Output: Speaker outputs Speaker impedance: 4 Ω – 8 Ω Maximum power output: 55 W × 4 (at 4 Ω) General Power requirements: 12 V DC car battery (negative ground (earth)) Rated current consumption: 10 A Dimensions: Approx. 178 mm × 50 mm × 177 mm (7 1/8 in × 2 in × 7 in) (w/h/d) Mounting dimensions: Approx. 182 mm × 53 mm × 160 mm (7 1/4 in × 2 1/8 in × 6 5/16 in) (w/h/d) Mass: Approx. 0.8 kg (1 lb 13 oz) Package contents: Main unit (1) Microphone (1) Parts for installation and connections (1 set) Ask the dealer for detailed information. 24GB Copyrights The Bluetooth® word mark and logos are registered trademarks owned by the Bluetooth SIG, Inc. and any use of such marks by Sony Corporation is under license. Other trademarks and trade names are those of their respective owners. The N-Mark is a trademark or registered trademark of NFC Forum, Inc. in the United States and in other countries. Windows Media is either a registered trademark or trademark of Microsoft Corporation in the United States and/or other countries. Apple, iPhone, iPod, iPod nano, iPod touch, and Siri are trademarks of Apple Inc., registered in the U.S. and other countries. App Store is a service mark of Apple Inc. IOS is a trademark or registered trademark of Cisco in the U.S. and other countries and is used under license. Google, Google Play and Android are trademarks of Google LLC. libFLAC Copyright (C) 2000-2009 Josh Coalson Copyright (C) 2011-2013 Xiph.Org Foundation Redistribution and use in source and binary forms, with or without modification, are permitted provided that the following conditions are met: – Redistributions of source code must retain the above copyright notice, this list of conditions and the following disclaimer. – Redistributions in binary form must reproduce the above copyright notice, this list of conditions and the following disclaimer in the documentation and/or other materials provided with the distribution. – Neither the name of the Xiph.org Foundation nor the names of its contributors may be used to endorse or promote products derived from this software without specific prior written permission. THIS SOFTWARE IS PROVIDED BY THE COPYRIGHT HOLDERS AND CONTRIBUTORS “AS IS” AND ANY EXPRESS OR IMPLIED WARRANTIES, INCLUDING, BUT NOT LIMITED TO, THE IMPLIED WARRANTIES OF MERCHANTABILITY AND FITNESS FOR A PARTICULAR PURPOSE ARE DISCLAIMED. IN NO EVENT SHALL THE FOUNDATION OR CONTRIBUTORS BE LIABLE FOR ANY DIRECT, INDIRECT, INCIDENTAL, SPECIAL, EXEMPLARY, OR CONSEQUENTIAL DAMAGES (INCLUDING, BUT NOT LIMITED TO, PROCUREMENT OF SUBSTITUTE GOODS OR SERVICES; LOSS OF USE, DATA, OR PROFITS; OR BUSINESS INTERRUPTION) HOWEVER CAUSED AND ON ANY THEORY OF LIABILITY, WHETHER IN CONTRACT, STRICT LIABILITY, OR TORT (INCLUDING NEGLIGENCE OR OTHERWISE) ARISING IN ANY WAY OUT OF THE USE OF THIS SOFTWARE, EVEN IF ADVISED OF THE POSSIBILITY OF SUCH DAMAGE. Troubleshooting The following checklist will help you remedy problems you may encounter with your unit. Before going through the checklist below, check the connection and operating procedures. For details on using the fuse and removing the unit from the dashboard, see “Connection/Installation” (page 30). If the problem is not solved, visit the support site on the back cover. General No sound or the sound is very low. The position of the fader control [FADER] is not set for a 2-speaker system. The volume of the unit and/or connected device is very low. – Increase the volume of the unit and connected device. No beep sound. An optional power amplifier is connected and you are not using the built-in amplifier. Stored stations and correct time are erased. The fuse has blown. Makes a noise when the position of the ignition is switched. The leads are not matched correctly with the car’s accessory power connector. During playback or reception, the demonstration mode starts. If no operation is performed for 5 minutes with [DEMO-ON] set, the demonstration mode starts. – Set [DEMO-OFF] (page 18). The display disappears from/does not appear in the display window. The connectors are dirty (page 23). The display/illumination flashes. The power supply is not sufficient. – Check that the car battery supplies enough power to the unit. (The power requirement is 12 V DC.) The operation buttons do not function. Press DSPL and (back)/MODE for more than 2 seconds to reset the unit. The contents stored in memory are erased. Radio reception The radio reception is poor. Static noise occurs. Connect the antenna (aerial) firmly. 65 MHz to 74 MHz in FM3 cannot be tuned in. [AREA] is set to [EUROPE]. – Set [AREA] to [RUSSIA] (page 18). RDS RDS services cannot be received (when [AREA] is set to [RUSSIA]). FM3 is selected. – Select FM1 or FM2. RDS services are unavailable in the current region. The SEEK starts after a few seconds of listening. The station is non-TP or has weak signal. – Deactivate TA (page 11). No traffic announcements. Activate TA (page 11). The station does not broadcast any traffic announcements despite being TP. – Tune in another station. PTY displays [- - - - - - - -]. The current station is not an RDS station, or the radio reception is poor. 25GB Program service name flashes. There is no alternative frequency for the current station. – Press (SEEK –/+) while the program service name is flashing. [PI SEEK] appears and the unit starts searching for another frequency with the same PI (program identification) data. USB device playback A USB device takes longer to play. The USB device contains files with a complicated tree structure. The audio file cannot be played. For details on supported formats, see “Specifications” (page 23). If the audio file still cannot be played, refer to the operating instructions supplied with the USB device, or contact the manufacturer of the USB device. Operations for skipping an album, skipping items (Jump mode), and searching a track by name (QuickBrowZer) cannot be performed. Set [USB MODE] to [MSC/MTP] (page 19). The sound cannot be output during playback in Android mode. Check the status of the audio playback application on the Android smartphone. NFC function One-touch connection (NFC) is not possible. If the smartphone does not respond to the touching. – Check that the NFC function of the smartphone is turned on. – Move the N-Mark part of the smartphone closer to the N-Mark part on this unit. – If the smartphone is in a case, remove it. NFC receiving sensitivity depends on the device. If One-touch connection with the smartphone fails several times, make BLUETOOTH connection manually. 26GB BLUETOOTH function The connecting device cannot detect this unit. Before the pairing is made, set this unit to pairing standby mode. While connected to two BLUETOOTH devices, this unit cannot be detected from another device. – Disconnect either connection and search for this unit from another device. When the device pairing is made, set the BLUETOOTH signal output to on (page 8). Connection is not possible. The connection is controlled from one side (this unit or BLUETOOTH device), but not both. – Connect to this unit from a BLUETOOTH device or vice versa. The name of the detected device does not appear. Depending on the status of the other device, it may not be possible to obtain the name. No ringtone. Adjust the volume by rotating the control dial while receiving a call. Depending on the connecting device, the ringtone may not be sent properly. – Set [RINGTONE] to [1] (page 21). The front speakers are not connected to the unit. – Connect the front speakers to the unit. The ringtone is output only from the front speakers. The talker’s voice cannot be heard. The front speakers are not connected to the unit. – Connect the front speakers to the unit. The talker’s voice is output only from the front speakers. A call partner says that the volume is too low or high. Adjust the volume accordingly using Mic gain adjustment (page 15). Echo or noise occurs in phone call conversations. Lower the volume. Set EC/NC Mode to [EC/NC-1] or [EC/NC-2] (page 15). If the ambient noise other than the phone call sound is loud, try reducing this noise. E.g.: If a window is open and road noise, etc., is loud, shut the window. If an air conditioner is loud, lower the air conditioner. The phone is not connected. When BLUETOOTH audio is played, the phone is not connected even if you press CALL. – Connect from the phone. The phone sound quality is poor. Phone sound quality depends on reception conditions of cellular phone. – Move your car to a place where you can enhance the cellular phone’s signal if the reception is poor. The volume of the connected audio device is low (high). Volume level will differ depending on the audio device. – Adjust the volume of the connected audio device or this unit (page 20). The sound skips during playback of a BLUETOOTH audio device. Reduce the distance between the unit and the BLUETOOTH audio device. If the BLUETOOTH audio device is stored in a case which interrupts the signal, remove the audio device from the case during use. Several BLUETOOTH devices or other devices which emit radio waves are in use nearby. – Turn off the other devices. – Increase the distance from the other devices. The playback sound stops momentarily when the connection between this unit and the cellular phone is being made. This is not a malfunction. The connected BLUETOOTH audio device cannot be controlled. Check that the connected BLUETOOTH audio device supports AVRCP. Some functions do not work. Check if the connecting device supports the functions in question. A call is answered unintentionally. The connecting phone is set to answer a call automatically. Pairing failed due to a timeout. Depending on the connecting device, the time limit for pairing may be short. – Try completing the pairing within the time. BLUETOOTH function cannot operate. Turn off the unit by pressing OFF for more than 2 seconds, then turn the unit on again. No sound is output from the car speakers during handsfree call. If the sound is output from the cellular phone, set the cellular phone to output the sound from the car speakers. Siri Eyes Free is not activated. Perform the handsfree registration for an iPhone that supports Siri Eyes Free. Set the Siri function on the iPhone to on. Cancel the BLUETOOTH connection with the iPhone and the unit, and reconnect. Sony | Music Center operation Application name is mismatched with the actual application in “Sony | Music Center”. Launch the application again from the “Sony | Music Center” application. While running the “Sony | Music Center” application via BLUETOOTH, the display automatically switches to [BT AUDIO]. The “Sony | Music Center” application or BLUETOOTH function has failed. Run the application again. 27GB The “Sony | Music Center” application is automatically disconnected when the display switches to [IPD]. The “Sony | Music Center” application on iPhone/iPod does not support iPod playback. – Change the source of the unit to other than [IPD], then establish the “Sony | Music Center” connection (page 16). NOT SUPPORT - ANDROID MODE A USB device not supporting AOA (Android Open Accessory) 2.0 is connected to the unit while [USB MODE] is set to [ANDROID]. – Set [USB MODE] to [MSC/MTP] (page 19). The “Sony | Music Center” connection is automatically disconnected when the USB mode of the unit is changed to [ANDROID]. The Android smartphone is not supporting playback in Android mode. – Set the USB mode of the unit to [MSC/ MTP], then establish the “Sony | Music Center” connection (page 16). USB NO DEV Make sure the USB device or USB cable is securely connected. Messages The following messages may appear or flash during operation. INVALID The selected operation could be invalid. [USB MODE] cannot be changed during iPod playback. READ Wait until reading is complete and playback starts automatically. This may take some time depending on the file organization. (underscore): The character cannot be displayed. For USB device playback: HUB NO SUPRT: USB hubs are not supported. IPD STOP: iPod playback has finished. Operate your iPod/iPhone to start playback. 28GB USB ERROR Connect the USB device again. USB NO MUSIC Connect a USB device containing playable files (page 23). USB NO SUPRT For details on the compatibility of your USB device, visit the support site on the back cover. OVERLOAD: The USB device is overloaded. Disconnect the USB device, then press SRC to select another source. The USB device has a fault, or an unsupported device is connected. For RDS operation: NO AF: No alternative frequencies. Press (SEEK –/+) while the program service name is flashing. The unit starts searching for another frequency with the same PI (program identification) data ([PI SEEK] appears). NO PI: No program identification. The selected station has no PI (program identification) data. Select another station. NO TP: No traffic programs. The unit will continue searching for available TP stations. For BLUETOOTH function: BTA NO DEV: The BLUETOOTH device is not connected or recognized. Make sure the BLUETOOTH device is securely connected, or the BLUETOOTH connection is established with the BLUETOOTH device. ERROR: The selected operation could not be performed. Wait for a while, then try again. UNKNOWN: A name or phone number cannot be displayed. WITHHELD: The phone number is hidden by the caller. For Sony | Music Center operation: APP ––––––––: A connection with the application is not established. Make the “Sony | Music Center” connection again (page 16). APP DISCNCT: The application is disconnected. Make the “Sony | Music Center” connection (page 16). APP DISPLAY: A screen setting display of the application is open. Exit the screen setting display of the application to enable button operation. APP LIST: The contents list of the USB is open. Exit the list of the application to enable button operation. APP MENU: A setting display of the application is open. Exit the setting display of the application to enable button operation. APP SOUND: A sound setting display of the application is open. Exit the sound setting display of the application to enable button operation. OPEN APP: The “Sony | Music Center” application is not running. Launch the application. For steering wheel remote control operation: ERROR Register again from the function where the error occurred (page 19). TIMEOUT Try completing the registration while [REGISTER] is blinking (about 6 seconds) (page 19). For firmware update operation: FILE ERROR: The updater is not stored in the USB device. Store the updater in the USB device, then try again (page 22). UPDATE ERROR PRESS ENTER: Firmware update is not completed properly. Press ENTER to clear the message, then try again. During the update, do not turn the ignition to the OFF position, nor remove the USB device (page 22). If these solutions do not help improve the situation, consult your nearest Sony dealer. If you take the unit to be repaired because of device playback trouble, bring the device that was used at the time the problem began. APP NO DEV: The device with the application installed is not connected or recognized. Make the BLUETOOTH connection and establish the “Sony | Music Center” connection again (page 16). 29GB Connection/Installation Parts List for Installation Cautions • Run all ground (earth) leads to a common ground (earth) point. • Do not get the leads trapped under a screw, or caught in moving parts (e.g., seat railing). • Before making connections, turn the car ignition off to avoid short circuits. • Connect the power supply lead to the unit and speakers before connecting it to the auxiliary power connector. • Be sure to insulate any loose unconnected leads with electrical tape for safety. ×2 Precautions • Choose the installation location carefully so that the unit will not interfere with normal driving operations. • Avoid installing the unit in areas subject to dust, dirt, excessive vibration, or high temperature, such as in direct sunlight or near heater ducts. • Use only the supplied mounting hardware for a safe and secure installation. Note on the power supply lead (yellow) When connecting this unit in combination with other stereo components, the amperage rating of the car circuit to which the unit is connected must be higher than the sum of each component’s fuse amperage rating. Mounting angle adjustment Adjust the mounting angle to less than 30°. 30GB • This parts list does not include all the package contents. • The bracket and the protection collar are attached to the unit before shipping. Before mounting the unit, use the release keys to remove the bracket from the unit. For details, see “Removing the protection collar and the bracket” (page 34). • Keep the release keys for future use as they are also necessary if you remove the unit from your car. Connection Subwoofer*1 *3 *3 *3 Power amplifier*1 *2 For details, see “Making connections” (page 32). See “Power connection diagram” (page 32) for details. from a wired remote control (not supplied)*4 *5*6 from a car antenna (aerial)*7 *1 *2 *3 *4 Not supplied Speaker impedance: 4 Ω – 8 Ω × 4 RCA pin cord (not supplied) Depending on the type of car, use an adaptor for a wired remote control (not supplied). For details on using the wired remote control, see “Using the wired remote control” (page 33). *5 Whether in use or not, route the microphone input cord such that it does not interfere with driving operations. Secure the cord with a clamp, etc., if it is installed around your feet. *6 For details on installing the microphone, see “Installing the microphone” (page 33). *7 Depending on the type of car, use an adaptor (not supplied) if the antenna (aerial) connector does not fit. 31GB Subwoofer Easy Connection Making connections If you have a power antenna (aerial) without a relay box, connecting this unit with the supplied power supply lead may damage the antenna (aerial). You can use a subwoofer without a power amplifier when it is connected to a rear speaker cord. Front speaker To the car’s speaker connector Subwoofer Notes 1 Rear speaker 2 (right) Purple Purple/black striped 3 Front speaker 4 (right) Gray 5 White Front speaker 6 (left) 7 Rear speaker 8 (left) Gray/black striped White/black striped • Preparation of the rear speaker cords is required. • Use a subwoofer with an impedance of 4 Ω to 8 Ω, and with adequate power handling capacities to avoid damage. Memory hold connection When the yellow power supply lead is connected, power will always be supplied to the memory circuit even when the ignition switch is turned off. Green Speaker connection Green/black striped • Before connecting the speakers, turn the unit off. • Use speakers with an impedance of 4 Ω to 8 Ω, and with adequate power handling capacities to avoid damage. To the car’s power connector Power connection diagram 12 continuous power supply Yellow power antenna (aerial) Blue/white 13 /power amplifier striped control (REM OUT) 14 switched illumination power supply Orange/ white striped 15 switched power supply Red 16 ground (earth) 32GB Black Check your car’s auxiliary power connector, and match the connections of cords correctly depending on the car. Auxiliary power connector Common connection Red Installing the microphone Red To capture your voice during handsfree calling, you need to install the microphone . Yellow Yellow continuous power 12 supply Yellow 15 switched power supply Red When the positions of the red and yellow leads are inverted Red Red Yellow Yellow 12 switched power supply 15 continuous power supply Clip (not supplied) Yellow Red When the car without ACC position Red Red Yellow Yellow After matching the connections and switching power supply leads correctly, connect the unit to the car’s power supply. If you have any questions and problems connecting your unit that are not covered in this manual, consult the car dealer. Cautions • It is extremely dangerous if the cord becomes wound around the steering column or gearstick. Be sure to keep it and other parts from interfering with your driving operations. • If airbags or any other shock-absorbing equipment is in your car, contact the store where you purchased this unit, or the car dealer, before installation. Note Before attaching the double-sided tape , clean the surface of the dashboard with a dry cloth. Using the wired remote control 1 To enable the wired remote control, set [STR CONTROL] in [SET STEERING] to [PRESET] (page 18). 33GB Mounting the unit in the dashboard Installation Removing the protection collar and the bracket Before installing the unit, remove the protection collar and the bracket from the unit. 1 Before installing, make sure the catches on both sides of the bracket are bent inwards 2 mm (3/32 in). 1 Position the bracket inside the dashboard, then bend the claws outward for a tight fit. 182 mm (7 1/4 in) Pinch both edges of the protection collar , then pull it out. 53 mm (2 1/8 in) 2 2 Insert both release keys until they click, and pull down the bracket , then pull up the unit to separate. Catch Mount the unit onto the bracket , then attach the protection collar . Face the hook inwards. Notes • If the catches are straight or bent outwards, the unit will not be installed securely and may spring out. • Make sure the 4 catches on the protection collar are properly engaged in the slots of the unit. Detaching and attaching the front panel For details, see “Detaching the Front Panel” (page 6). Resetting the unit For details, see “Resetting the Unit” (page 7). 34GB Fuse replacement When replacing the fuse, Fuse (10 A) be sure to use one matching the amperage rating stated on the original fuse. If the fuse blows, check the power connection and replace the fuse. If the fuse blows again after replacement, there may be an internal malfunction. In such a case, consult your nearest Sony dealer. 35GB Für mögliche spätere Service-Anfragen, notieren Sie sich bitte vor der Installation Ihres Gerätes hier die Seriennummer: S/N: ___________________________ Hinweis: Die 7-stellige Seriennummer finden Sie oben auf der Verpackung des Gerätes oder unten auf dem Gerät selber. Installieren Sie das Gerät aus Sicherheitsgründen unbedingt im Armaturenbrett des Fahrzeugs, denn die Rückseite des Geräts erwärmt sich bei Betrieb. Erläuterungen dazu finden Sie unter „Anschluss/Installation“ (Seite 36). Hergestellt in Thailand Das Typenschild mit Betriebsspannung usw. befindet sich an der Geräteunterseite. Die Gültigkeit des CE-Zeichens beschränkt sich auf Länder, in denen es gesetzlich vorgeschrieben ist, hauptsächlich in Ländern des Europäischen Wirtschaftsraums (EWR). Hiermit erklärt Sony Corporation, dass diese Funkanlage der Richtlinie 2014/53/EU entspricht. Der vollständige Text der EUKonformitätserklärung ist unter der folgenden Internetadresse verfügbar: http://www.compliance.sony.de/ Hinweis für Kunden: Die folgenden Informationen gelten nur für Geräte, die in Ländern verkauft werden, in denen EU-Richtlinien gelten Dieses Produkt wurde von oder für die Sony Corporation hergestellt. EU Importeur: Sony Europe B.V. Anfragen an den Importeur oder zur Produktkonformität auf Grundlage der Gesetzgebung in Europa senden Sie bitte an den Bevollmächtigten Sony Belgium, bijkantoor van Sony Europe B.V., Da Vincilaan 7-D1, 1930 Zaventem, Belgien. 2DE Entsorgung von gebrauchten Batterien und Akkus und gebrauchten elektrischen und elektronischen Geräten (anzuwenden in den Ländern der Europäischen Union und anderen Ländern mit einem separaten Sammelsystem für diese Produkte) Das Symbol auf dem Produkt, der Batterie/ dem Akku oder der Verpackung weist darauf hin, dass das Produkt oder die Batterie/der Akku nicht als normaler Haushaltsabfall zu behandeln sind. Ein zusätzliches chemisches Symbol Pb (Blei) unter der durchgestrichenen Mülltonne bedeutet, dass die Batterie/der Akku einen Anteil von mehr als 0,004 % Blei enthält. Durch Ihren Beitrag zum korrekten Entsorgen des Produktes und der Batterie/des Akkus schützen Sie die Umwelt und die Gesundheit Ihrer Mitmenschen. Umwelt und Gesundheit werden durch falsches Entsorgen gefährdet. Materialrecycling hilft, den Verbrauch von Rohstoffen zu verringern. Bei Produkten, die auf Grund ihrer Sicherheit, der Funktionalität oder als Sicherung vor Datenverlust eine ständige Verbindung zur eingebauten Batterie/zum eingebauten Akku benötigen, sollte die Batterie/der Akku nur durch qualifiziertes Servicepersonal ausgetauscht werden. Um sicherzustellen, dass das Produkt und die Batterie/der Akku korrekt entsorgt werden, geben Sie das Produkt zwecks Entsorgung an einer geeigneten Annahmestelle für das Recycling von elektrischen und elektronischen Geräten ab. Für alle anderen Batterien/Akkus entnehmen Sie die Batterie/den Akku bitte entsprechend dem Kapitel über die sichere Entfernung der Batterie/des Akkus. Geben Sie die Batterie/den Akku an einer geeigneten Annahmestelle für das Recycling von Batterien/Akkus ab. Weitere Informationen über das Recycling dieses Produkts oder der Batterie/des Akkus erhalten Sie von Ihrer Gemeinde, den kommunalen Entsorgungsbetrieben oder dem Geschäft, in dem Sie das Produkt gekauft haben. Hinweis für Lithiumbatterien: Bitte geben Sie nur entladene Batterien an den Sammelstellen ab. Wegen Kurzschlussgefahr überkleben Sie bitte die Pole der Batterie mit Klebestreifen. Sie erkennen Lithiumbatterien an den Abkürzungen Li oder CR. ACHTUNG Der Frequenzbereich 65 – 74 MHz ist in der europäischen Frequenzbereichszuordnungstabelle keinem Hörfunk zugewiesen und kann in Europa nicht verwendet werden. Warnhinweis, wenn die Zündung Ihres Fahrzeugs nicht über eine Zubehörposition (ACC oder I) verfügt Aktivieren Sie unbedingt die Abschaltautomatik (AUTO OFF) (Seite 22). Das Gerät schaltet sich nach dem Ausschalten und dem Anzeigen der Uhrzeit (d. h. halten Sie OFF 1 Sekunde lang gedrückt) innerhalb einer bestimmte Zeit automatisch vollständig aus, um die Autobatterie zu schonen. Wenn Sie die Abschaltautomatik (AUTO OFF) nicht aktivieren, müssen Sie jedes Mal, wenn Sie die Zündung ausschalten, OFF gedrückt halten, bis die Anzeige ausgeblendet wird. Haftungsausschluss für von Dritten angebotene Dienste Von Dritten angebotene Dienste können ohne vorherige Ankündigung geändert, ausgesetzt oder eingestellt werden. Sony übernimmt in diesen Fällen keine Haftung. Wichtiger Hinweis Vorsicht UNTER KEINEN UMSTÄNDEN ÜBERNIMMT SONY DIE HAFTUNG FÜR INDIREKTE, NEBEN-, FOLGE- ODER SONSTIGE SCHÄDEN. DIESER HAFTUNGSAUSSCHLUSS GILT OHNE JEDE EINSCHRÄNKUNG FÜR ENTGANGENEN GEWINN, ENTGANGENES EINKOMMEN, DATENVERLUST, NUTZUNGSAUSFALL DES PRODUKTS ODER ZUGEHÖRIGER GERÄTE, AUSFALLZEITEN UND ZEITAUFWAND DES KÄUFERS, DIE AUF DIE VERWENDUNG DIESES PRODUKTS, DER HARDWARE UND/ODER SEINER SOFTWARE ZURÜCKGEHEN ODER IN VERBINDUNG DAMIT AUFTRETEN. Hinweis für den Kunden: Diese Produkt umfasst einen Funksender. Gemäß UNECE Regelung 10 kann ein Fahrzeughersteller bestimmte Bedingungen für die Installation von Funksendern in Fahrzeugen festlegen. Bitte schlagen Sie in der Betriebsanleitung zum Fahrzeug nach oder wenden Sie sich an den Fahrzeughersteller, bevor Sie dieses Produkt im Fahrzeug installieren. Notrufe Diese BLUETOOTH-Freisprecheinrichtung für das Auto und das elektronische Gerät, das mit der Freisprecheinrichtung verbunden ist, arbeiten mit Funksignalen, Mobilfunk- und Festnetzen sowie benutzerprogrammierten Funktionen, bei denen nicht unter allen Umständen eine Verbindung garantiert werden kann. Verlassen Sie sich daher bei wichtigen Mitteilungen (wie z. B. medizinischen Notfällen) nicht ausschließlich auf elektronische Geräte. 3DE BLUETOOTH-Kommunikation Von einem BLUETOOTH-Gerät ausgehende Mikrowellen können den Betrieb von elektronischen medizinischen Geräten beeinflussen. Schalten Sie dieses Gerät und andere BLUETOOTH-Geräte an folgenden Orten aus. Andernfalls besteht Unfallgefahr. – An Orten mit entzündlichen Gasen, in einem Krankenhaus, Zug, Flugzeug oder an einer Tankstelle – In der Nähe von automatischen Türen oder Feuermeldern Dieses Gerät unterstützt dem BLUETOOTHStandard entsprechende Sicherheitsfunktionen, um die Verbindungssicherheit bei BLUETOOTHFunkverbindungen zu gewährleisten. Je nach Einstellung bieten diese jedoch möglicherweise keinen ausreichenden Schutz. Seien Sie bei der Kommunikation mit BLUETOOTH-Funktechnologie also vorsichtig. Für Sicherheitslücken bei der Übertragung von Informationen während der BLUETOOTH-Kommunikation kann keine Haftung übernommen werden. Sollten an Ihrem Gerät Probleme auftreten oder sollten Sie Fragen haben, auf die in dieser Anleitung nicht eingegangen wird, wenden Sie sich bitte an Ihren Sony-Händler. 4DE Inhalt Lage und Funktion der Teile und Bedienelemente . . . . . . . . . . . . . . . . . . . 6 Vorbereitungen Abnehmen der Frontplatte . . . . . . . . . . . . . 7 Zurücksetzen des Geräts . . . . . . . . . . . . . . . 8 Einstellen der Uhr . . . . . . . . . . . . . . . . . . . . . 8 Vorbereiten eines BLUETOOTH-Geräts . . . . 8 Anschließen eines USB-Geräts . . . . . . . . . . 11 Anschließen eines anderen tragbaren Audiogeräts. . . . . . . . . . . . . . . . . . . . . . 12 Radioempfang Radioempfang . . . . . . . . . . . . . . . . . . . . . . 12 Das Radiodatensystem (RDS) . . . . . . . . . . 13 Wiedergabe Wiedergabe mit einem USB-Gerät . . . . . . 14 Wiedergabe mit einem BLUETOOTHGerät . . . . . . . . . . . . . . . . . . . . . . . . . . . 15 Suchen und Wiedergeben von Titeln . . . . 15 Einstellungen Beenden des DEMO-Modus . . . . . . . . . . . Grundlegende Einstellschritte . . . . . . . . . Allgemeine Einstellungen (GENERAL) . . . Klangeinstellungen (SOUND) . . . . . . . . . . Anzeigeeinstellungen (DISPLAY) . . . . . . . BLUETOOTH-Einstellungen (BLUETOOTH) . . . . . . . . . . . . . . . . . . . . Sony | Music Center-Einstellungen (SONY APP) . . . . . . . . . . . . . . . . . . . . . . 22 22 22 24 25 25 26 Weitere Informationen Aktualisieren der Firmware . . . . . . . . . . . . Sicherheitsmaßnahmen . . . . . . . . . . . . . . Wartung . . . . . . . . . . . . . . . . . . . . . . . . . . . Technische Daten. . . . . . . . . . . . . . . . . . . . Störungsbehebung . . . . . . . . . . . . . . . . . . Meldungen . . . . . . . . . . . . . . . . . . . . . . . . . 26 26 27 28 29 33 Anschluss/Installation Vorsichtsmaßnahmen . . . . . . . . . . . . . . . . Teileliste für die Installation . . . . . . . . . . . Anschluss . . . . . . . . . . . . . . . . . . . . . . . . . . Installation . . . . . . . . . . . . . . . . . . . . . . . . . 36 36 37 40 Freisprechanrufe (nur über BLUETOOTH) Entgegennehmen eines Anrufs . . . . . . . . 17 Tätigen eines Anrufs. . . . . . . . . . . . . . . . . . 17 Während eines Anrufs verfügbare Funktionen . . . . . . . . . . . . . . . . . . . . . . 18 Weitere nützliche Funktionen Sony | Music Center mit iPhone/ Android™-Smartphone . . . . . . . . . . . . 19 Verwenden der Spracherkennung (nur Android-Smartphone) . . . . . . . . . . . . . 20 Verwenden von Siri Eyes Free . . . . . . . . . . 21 5DE Lage und Funktion der Teile und Bedienelemente Hauptgerät Taste zum Lösen der Frontplatte SRC (Tonquelle) Einschalten des Geräts. Wechseln der Tonquelle. OFF Wenn Sie die Taste 1 Sekunde lang gedrückt halten, wird die Tonquelle ausgeschaltet und die Uhrzeit angezeigt. Wenn Sie die Taste mehr als 2 Sekunden lang gedrückt halten, schalten sich das Gerät und das Display aus. Steuerregler Drehen Sie den Regler, um die Lautstärke einzustellen. PUSH ENTER Bestätigen der ausgewählten Option. Drücken Sie SRC, drehen Sie den Regler und drücken Sie dann darauf, um die Tonquelle zu wechseln (Zeitüberschreitung nach 2 Sekunden). MENU Aufrufen des Setup-Menüs. VOICE (Seite 18, 20, 21) Halten Sie den Regler länger als 2 Sekunden gedrückt, um die Sprachwahlfunktion, die Spracherkennung (nur AndroidSmartphone) oder die Siri-Funktion (nur iPhone) zu aktivieren. 6DE N-Zeichen Halten Sie das Android-Smartphone an den Steuerregler, um eine BLUETOOTHVerbindung herzustellen. Display / (SEEK –/+) Automatisches Einstellen von Radiosendern. Zum manuellen Einstellen halten Sie diese Taste gedrückt. / (Zurück/Weiter) / (Schnelles Rückwärts-/ Vorwärtssuchen) PTY (Programmtyp) Auswählen von PTY bei einem RDSSender. (Suchen) (Seite 16) Wechseln in den Suchmodus während der Wiedergabe. (Nicht verfügbar, wenn ein USB-Gerät im Android-Modus oder iPod angeschlossen ist.) CALL Aufrufen des Anrufmenüs. Entgegennehmen/Beenden eines Anrufs. Zum Umschalten des BLUETOOTH-Signals halten Sie diese Taste länger als 2 Sekunden gedrückt. (Zurück) Zurückschalten zur vorherigen Anzeige. MODE (Seite 8, 12, 19) Empfänger für die Fernbedienung Zahlentasten (Stationstasten) (1 bis 6) Einstellen gespeicherter Radiosender. Zum Speichern von Sendern halten Sie die Taste gedrückt. ALBUM / Überspringen eines Albums auf einem Audiogerät. Zum Überspringen mehrerer Alben halten Sie die Taste gedrückt. (Nicht verfügbar, wenn ein USB-Gerät im Android-Modus oder iPod angeschlossen ist.) (Wiederholung) (Nicht verfügbar, wenn ein USB-Gerät im Android-Modus angeschlossen ist.) Vorbereitungen Abnehmen der Frontplatte Um zu verhindern, dass das Gerät gestohlen wird, können Sie die Frontplatte abnehmen. 1 Halten Sie OFF gedrückt, bis sich das Gerät ausschaltet, drücken Sie die Taste zum Lösen der Frontplatte und ziehen Sie die Frontplatte auf sich zu und heraus. (Zufall) (Nicht verfügbar, wenn ein USB-Gerät im Android-Modus angeschlossen ist.) MIC (Seite 18) (Wiedergabe/Pause) EXTRA BASS Verstärken von Bässen synchron mit dem Lautstärkepegel. Ändern Sie mit dieser Taste die EXTRA BASS-Einstellung: [1], [2], [OFF]. AUX-Eingangsbuchse DSPL (Anzeige) Wechseln der Informationen im Display. SCRL (Bildlauf) Zum Durchlaufenlassen der Informationen im Display halten Sie die Taste gedrückt. USB-Anschluss Warnton Wenn Sie den Zündschlüssel in die Position OFF stellen, ohne die Frontplatte abzunehmen, ertönt einige Sekunden lang ein Warnton. Der Warnton wird nur ausgegeben, wenn der integrierte Verstärker verwendet wird. Seriennummern Stellen Sie sicher, dass die Seriennummern an der Unterseite dieses Geräts und der Rückseite der Frontplatte genau übereinstimmen. Andernfalls sind das BLUETOOTH-Pairing sowie das Herstellen und Trennen einer Verbindung über NFC nicht möglich. Anbringen der Frontplatte 7DE Zurücksetzen des Geräts Einstellen der Uhr Bevor Sie das Gerät zum ersten Mal benutzen oder wenn Sie die Autobatterie ausgetauscht oder die Verbindungen gewechselt haben, müssen Sie das Gerät zurücksetzen. 1 Drücken Sie MENU, drehen Sie den Steuerregler, um [GENERAL] auszuwählen, und drücken Sie anschließend den Steuerregler. 2 Drehen Sie den Steuerregler, um [SET CLOCK-ADJ] auszuwählen, und drücken Sie anschließend den Steuerregler. 1 Drücken Sie DSPL und (Zurück)/ MODE länger als 2 Sekunden. Hinweis Wenn Sie das Gerät zurücksetzen, werden die eingestellte Uhrzeit und einige weitere gespeicherte Einstellungen gelöscht. Die Stundenanzeige blinkt. 3 Einstellen des Landes bzw. der Region Nach dem Zurücksetzen des Geräts erscheint die Anzeige zum Einstellen des Landes bzw. der Region. 1 Drücken Sie ENTER, solange [SET AREA] angezeigt wird. Das zurzeit eingestellte Land bzw. die Region erscheint. 2 Drehen Sie den Steuerregler, um [EUROPE] oder [RUSSIA] auszuwählen, und drücken Sie anschließend den Steuerregler. 3 Drehen Sie den Steuerregler, um [YES] oder [NO] auszuwählen, und drücken Sie anschließend den Steuerregler. Wenn die Einstellung für das Land bzw. die Region geändert wird, wird das Gerät zurückgesetzt und dann wird die Uhrzeit angezeigt. Diese Einstellung kann im Menü mit den allgemeinen Einstellungen konfiguriert werden (Seite 22). 8DE Drehen Sie den Steuerregler, um die Stunden und Minuten einzustellen. Drücken Sie / (SEEK –/+), um zur jeweils nächsten Ziffer in der Digitalanzeige zu wechseln. 4 Drücken Sie MENU, nachdem Sie die Minuten eingestellt haben. Der Einstellvorgang ist damit abgeschlossen und die Uhr beginnt zu laufen. So lassen Sie die Uhrzeit anzeigen Drücken Sie DSPL. Vorbereiten eines BLUETOOTH-Geräts Je nach dem BLUETOOTH-kompatiblen Gerät, also z. B. Smartphone, Mobiltelefon oder Audiogerät (im Folgenden als „BLUETOOTH-Gerät“ bezeichnet, sofern nicht anders angegeben), können Sie Musik wiedergeben oder Freisprechanrufe tätigen. Einzelheiten zum Herstellen der Verbindung schlagen Sie bitte in der Bedienungsanleitung zu dem anderen Gerät nach. Drehen Sie vor dem Herstellen der Verbindung die Lautstärke dieses Geräts herunter. Andernfalls wird u. U. der Ton mit hoher Lautstärke ausgegeben. Sofortverbindung mit einem Smartphone (NFC) Wenn Sie ein NFC*-kompatibles Smartphone an den Steuerregler dieses Geräts halten, wird ein Pairing durchgeführt und dieses Gerät wird automatisch mit dem Smartphone verbunden. * NFC (Near Field Communication) ist eine Technologie zur drahtlosen Kommunikation über kurze Strecken zwischen verschiedenen Geräten, z. B. Mobiltelefonen und IC-Tags. Dank der NFCFunktion lässt sich die Datenkommunikation starten, indem einfach ein NFC-Gerät nahe an die entsprechende Markierung oder eine festgelegte Stelle an einem anderen NFC-kompatiblen Gerät gehalten wird. Bei einem Smartphone, auf dem das Android-Betriebssystem 4.0 oder niedriger installiert ist, muss die App „NFC Easy Connect“, die auf Google Play erhältlich ist, heruntergeladen werden. Die App ist möglicherweise nicht in allen Ländern/ Regionen herunterladbar. 1 • Gehen Sie beim Herstellen der Verbindung vorsichtig mit dem Smartphone um, um Kratzer zu vermeiden. • Die Sofortverbindung ist nicht möglich, wenn dieses Gerät bereits mit zwei NFC-kompatiblen Geräten verbunden ist. Trennen Sie in diesem Fall die Verbindung zu einem der Geräte und stellen Sie erneut die Verbindung zum Smartphone her. Pairing und Herstellen einer Verbindung mit einem BLUETOOTH-Gerät Wenn Sie zum ersten Mal eine Verbindung zu einem BLUETOOTH-Gerät herstellen wollen, ist eine gegenseitige Registrierung (das so genannte „Pairing“) erforderlich. Durch das Pairing können dieses und andere Geräte einander erkennen. Sie können dieses Gerät mit zwei BLUETOOTH-Geräten verbinden (zwei Mobiltelefone oder ein Mobiltelefon und ein Audiogerät). Aktivieren Sie die NFC-Funktion am Smartphone. Näheres dazu schlagen Sie bitte in der mit dem Smartphone gelieferten Bedienungsanleitung nach. 2 Hinweise Halten Sie den Bereich mit dem NZeichen des Smartphones an den Bereich mit dem N-Zeichen an diesem Gerät. Vergewissern Sie sich, dass dieses Geräts aufleuchtet. im Display So trennen Sie die Verbindung mit NFC Halten Sie den Bereich mit dem N-Zeichen des Smartphones erneut an den Bereich mit dem N-Zeichen an diesem Gerät. 1 Platzieren Sie das BLUETOOTH-Gerät maximal 1 m von diesem Gerät entfernt. 2 Drücken Sie MENU, drehen Sie den Steuerregler, um [BLUETOOTH] auszuwählen, und drücken Sie anschließend den Steuerregler. 3 Drehen Sie den Steuerregler, um [SET PAIRING] auszuwählen, und drücken Sie anschließend den Steuerregler. 4 Drehen Sie den Steuerregler, um [SET DEVICE 1]* oder [SET DEVICE 2]* auszuwählen, und drücken Sie anschließend den Steuerregler. blinkt, wenn sich dieses Gerät im Bereitschaftsmodus für das Pairing befindet. * Nachdem das Pairing abgeschlossen ist, wird statt [SET DEVICE 1] oder [SET DEVICE 2] der Name des Geräts, mit dem ein Pairing ausgeführt wurde, angezeigt. 9DE 5 Führen Sie das Pairing am BLUETOOTH-Gerät durch, so dass es dieses Gerät erkennt. So trennen Sie die Verbindung zu einem Gerät, mit dem bereits ein Pairing ausgeführt wurde 6 Wählen Sie [DSX-A416BT] im Display des BLUETOOTH-Geräts aus. Gehen Sie zum Trennen der Verbindung wie in Schritt 2 bis 4 erläutert vor, nachdem zwischen diesem Gerät und dem BLUETOOTH-Gerät das Pairing ausgeführt wurde. Wird die Bezeichnung Ihres Modells nicht angezeigt, fangen Sie nochmals mit Schritt 2 an. Herstellen einer Verbindung zu einem BLUETOOTH-Gerät, mit dem ein Pairing ausgeführt wurde 7 Wenn am BLUETOOTH-Gerät ein Passwort* eingegeben werden muss, geben Sie [0000] ein. Sie müssen zu dem Gerät, mit dem ein Pairing ausgeführt wurde, eine Verbindung herstellen, um es nutzen zu können. Bei einigen Geräten wird die Verbindung nach dem Pairing automatisch hergestellt. * Das Passwort wird bei manchen Geräten auch „Kennwort“, „PIN-Code“, „PIN-Nummer“ oder „Passcode“ usw. genannt. 1 Drücken Sie MENU, drehen Sie den Steuerregler, um [BLUETOOTH] auszuwählen, und drücken Sie anschließend den Steuerregler. 2 Drehen Sie den Steuerregler, um [SET BT SIGNL] auszuwählen, und drücken Sie anschließend den Steuerregler. Passwort eingeben [0000] Nach erfolgreichem Pairing leuchtet stetig. 8 Wählen Sie dieses Gerät an dem BLUETOOTH-Gerät, zu dem eine BLUETOOTH-Verbindung hergestellt werden soll, aus. oder leuchtet auf, wenn die Verbindung hergestellt wurde. Hinweis Während eine Verbindung zu einem BLUETOOTHGerät besteht, kann dieses Gerät von keinem anderen Gerät erkannt werden. Damit dieses Gerät erkannt werden kann, schalten Sie es in den Pairing-Modus und lassen Sie dann vom anderen Gerät aus nach diesem Gerät suchen. So starten Sie die Wiedergabe Erläuterungen dazu finden Sie unter „Wiedergabe mit einem BLUETOOTH-Gerät“ (Seite 15). 10DE Vergewissern Sie sich, dass aufleuchtet. 3 Aktivieren Sie die BLUETOOTHFunktion am BLUETOOTH-Gerät. 4 Stellen Sie am BLUETOOTH-Gerät die Verbindung mit diesem Gerät her. oder leuchtet auf. Symbole im Display: Leuchtet, wenn Freisprechanrufe über HFP (Handsfree Profile) möglich sind. Leuchtet, wenn durch Aktivieren des A2DP (Advanced Audio Distribution Profile) die Wiedergabe mit dem Audiogerät möglich ist. So stellen Sie eine Verbindung zu dem zuletzt verbundenen Gerät von diesem Gerät aus her 2 Aktivieren Sie die BLUETOOTH-Funktion am BLUETOOTH-Gerät. Zum Herstellen der Verbindung mit dem Audiogerät drücken Sie SRC, um [BT AUDIO] auszuwählen, und drücken dann (Wiedergabe/Pause). Zum Herstellen der Verbindung mit dem Mobiltelefon drücken Sie CALL. Vergewissern Sie sich, dass dieses Geräts aufleuchtet. Hinweis Beim Streaming von BLUETOOTH-Audiodaten können Sie von diesem Gerät aus keine Verbindung zum Mobiltelefon herstellen. Stellen Sie die Verbindung zu diesem Gerät stattdessen vom Mobiltelefon aus her. Tipp Bei eingeschaltetem BLUETOOTH-Signal: Wenn die Zündung eingeschaltet wird, versucht dieses Gerät automatisch, eine Verbindung zu dem Mobiltelefon herzustellen, mit dem es zuletzt verbunden war. Schließen Sie ein iPhone bzw. einen iPod an den USB-Anschluss an. im Display Hinweise • Die BLUETOOTH-Pairingautomatik ist nicht möglich, wenn dieses Gerät bereits mit zwei anderen BLUETOOTH-Geräten verbunden ist. Trennen Sie in diesem Fall die Verbindung zu einem der anderen Geräte und stellen Sie erneut die Verbindung zum iPhone/iPod her. • Wenn die BLUETOOTH-Pairingautomatik nicht zur Verfügung steht, gehen Sie wie in „Vorbereiten eines BLUETOOTH-Geräts“ (Seite 8) erläutert vor. So installieren Sie das Mikrofon Erläuterungen dazu finden Sie unter „Installieren des Mikrofons“ (Seite 39). Herstellen der Verbindung mit einem iPhone/iPod (BLUETOOTHPairingautomatik) Wenn ein iPhone/iPod mit installiertem iOS5 oder höher an den USB-Anschluss angeschlossen wird, wird automatisch ein Pairing mit diesem Gerät ausgeführt und die Verbindung zum iPhone/iPod wird hergestellt. Zum Aktivieren der BLUETOOTHPairingautomatik stellen Sie sicher, dass [SET AUTOPAIR] unter [BLUETOOTH] auf [ON] gesetzt ist (Seite 26). 1 Anschließen eines USBGeräts 1 Drehen Sie die Lautstärke an diesem Gerät herunter. 2 Schließen Sie das USB-Gerät an dieses Gerät an. Zum Anschließen eines iPod/iPhone verwenden Sie das USBVerbindungskabel für iPod (nicht mitgeliefert). Aktivieren Sie die BLUETOOTHFunktion am iPhone/iPod. 11DE Anschließen eines anderen tragbaren Audiogeräts 1 Schalten Sie das tragbare Audiogerät aus. 2 Drehen Sie die Lautstärke an diesem Gerät herunter. 3 Schließen Sie das tragbare Audiogerät mit einem Verbindungskabel (nicht mitgeliefert)* an die AUXEingangsbuchse (Stereominibuchse) am Gerät an. * Verwenden Sie unbedingt einen geraden Stecker. 4 Radioempfang Radioempfang Wenn Sie Radio hören wollen, drücken Sie SRC, um [TUNER] auszuwählen. Automatisches Speichern von Sendern (BTM) 1 Drücken Sie MODE, um den Frequenzbereich zu wechseln (FM1, FM2, FM3, MW oder LW). 2 Drücken Sie MENU, drehen Sie den Steuerregler, um [GENERAL] auszuwählen, und drücken Sie anschließend den Steuerregler. 3 Drehen Sie den Steuerregler, um [SET BTM] auszuwählen, und drücken Sie anschließend den Steuerregler. Das Gerät speichert die Sender in der Reihenfolge der Frequenzen auf den Zahlentasten (Stationstasten). Drücken Sie SRC und wählen Sie [AUX] aus. So gleichen Sie den Lautstärkepegel des angeschlossenen Geräts an andere Tonquellen an Starten Sie die Wiedergabe am tragbaren Audiogerät mit gemäßigter Lautstärke und stellen Sie die gewohnte Hörlautstärke an diesem Gerät ein. Drücken Sie MENU und wählen Sie dann [SOUND] [SET AUX VOL] (Seite 24). Sendereinstellung 1 Drücken Sie MODE, um den Frequenzbereich zu wechseln (FM1, FM2, FM3, MW oder LW). 2 Stellen Sie Sender ein. Manuelle Sendersuche Halten Sie / (SEEK –/+) gedrückt, bis die Frequenz in etwa erreicht ist, und drücken Sie / (SEEK –/+) dann so oft, bis die gewünschte Frequenz genau eingestellt ist. Automatische Sendersuche Drücken Sie / (SEEK –/+). Der Suchlauf stoppt, wenn ein Sender empfangen wird. Manuelles Speichern von Sendern 1 12DE Während des Empfangs des zu speichernden Senders halten Sie eine Stationstaste (1 bis 6) so lange gedrückt, bis [MEM] angezeigt wird. Einstellen gespeicherter Sender 1 Wählen Sie den Frequenzbereich aus und drücken Sie eine Stationstaste (1 bis 6). Das Radiodatensystem (RDS) Einstellen von Alternativfrequenzen (AF) und Verkehrsdurchsagen (TA) Mit AF wird der Sender mit den stärksten Signalen in einem Netzwerk ständig neu eingestellt, während mit TA gegebenenfalls aktuelle Verkehrsinformationen bzw. Verkehrsfunksender (TP) empfangen werden. 1 Drücken Sie MENU, drehen Sie den Steuerregler, um [GENERAL] auszuwählen, und drücken Sie anschließend den Steuerregler. 2 Drehen Sie den Steuerregler, um [SET AF/TA] auszuwählen, und drücken Sie anschließend den Steuerregler. 3 Drehen Sie den Steuerregler, um [SET AF-ON], [SET TA-ON], [SET AF/TA-ON] oder [SET AF/TA-OFF] auszuwählen, und drücken Sie anschließend den Steuerregler. So speichern Sie RDS-Sender zusammen mit der AF- und TAEinstellung Sie können zusammen mit den RDS-Sendern eine AF/TA-Einstellung speichern. Stellen Sie AF/TA ein und speichern Sie die Sender dann mit BTM oder manuell ab. Beim manuellen Speichern können Sie auch NichtRDS-Sender speichern. So empfangen Sie Katastrophenwarnungen Wenn AF oder TA aktiviert ist, unterbrechen Katastrophenwarnungen automatisch die ausgewählte Tonquelle. So stellen Sie während einer Verkehrsdurchsage die Lautstärke ein Der eingestellte Pegel wird für spätere Verkehrsdurchsagen gespeichert, und zwar unabhängig von der sonst eingestellten Lautstärke. Unveränderter Empfang eines Regionalsenders (REGIONAL) Wenn die AF- und die REGIONAL-Funktion aktiviert sind, wird nicht zu einem anderen Regionalsender mit einer stärkeren Frequenz gewechselt. Wenn Sie den Empfangsbereich des betreffenden Regionalsenders verlassen, setzen Sie während des Empfangs eines FM-Senders (UKW) [SET REGIONAL] unter [GENERAL] auf [SET REG-OFF] (Seite 23). Diese Funktion steht in Großbritannien und einigen anderen Regionen nicht zur Verfügung. Lokalsenderfunktion (nur Großbritannien) Mithilfe dieser Funktion können Sie andere Lokalsender auswählen, auch wenn diese zuvor nicht unter einer Stationstaste gespeichert wurden. Drücken Sie während des UKW-Empfangs (FM) eine Stationstaste (1 bis 6), unter der ein Lokalsender gespeichert ist. Drücken Sie innerhalb von 5 Sekunden erneut die Stationstaste des Lokalsenders. Wiederholen Sie diesen Vorgang, bis das Gerät den gewünschten Lokalsender empfängt. Auswählen des Programmtyps (PTY) 1 Drücken Sie PTY während des Empfangs eines UKW-Senders (FM). 2 Drehen Sie den Steuerregler, bis der gewünschte Programmtyp angezeigt wird, und drücken Sie anschließend den Steuerregler. Das Gerät beginnt, nach einem Sender zu suchen, der den ausgewählten Programmtyp ausstrahlt. 13DE Programmtypen NEWS (Nachrichten), AFFAIRS (Aktuelles Zeitgeschehen), INFO (Informationen), SPORT (Sport), EDUCATE (Erziehung und Bildung), DRAMA (Hörspiele), CULTURE (Kultur), SCIENCE (Wissenschaft), VARIED (Verschiedenes), POP M (Pop-Musik), ROCK M (Rock-Musik), EASY M (Unterhaltungsmusik), LIGHT M (Leichte Klassik), CLASSICS (Klassik), OTHER M (Sonstige Musik), WEATHER (Wetter), FINANCE (Finanzberichte), CHILDREN (Kinderprogramme), SOCIAL (Magazinsendungen), RELIGION (Religion), PHONE IN (Hörertelefon), TRAVEL (Reiseinformationen), LEISURE (Freizeitprogramm), JAZZ (Jazz), COUNTRY (Country-Musik), NATION M (Volksmusik), OLDIES (Oldies), FOLK M (Folk-Musik), DOCUMENT (Dokumentarbeiträge) Einstellen der Uhrzeit (CT) Mit den CT-Daten (Uhrzeitdaten), die von RDS-Sendern ausgestrahlt werden, lässt sich die Uhr einstellen. 1 Stellen Sie [SET CT-ON] unter [GENERAL] ein (Seite 23). Wiedergabe Wiedergabe mit einem USBGerät In dieser Bedienungsanleitung wird „iPod“ als allgemeiner Begriff für die iPodFunktionen bei einem iPod und iPhone verwendet, sofern nicht im Text oder in Abbildungen anders angegeben. Erläuterungen zur Kompatibilität des iPod finden Sie unter „Der iPod“ (Seite 27) oder auf der Support-Website, die auf der hinteren Umschlagseite angegeben ist. Sie können USB-Geräte* des Typs AOA (Android Open Accessory) 2.0, MSC (Massenspeicherklasse) und MTP (Medientransferprotokoll) verwenden, die dem USB-Standard entsprechen. Je nach dem USB-Gerät kann der Android- oder der MSC/MTP-Modus am Gerät ausgewählt werden. Bei manchen digitalen Medienplayern oder Android-Smartphones muss der MTP-Modus eingestellt werden. * Beispielsweise ein USB-Flash-Laufwerk, ein digitaler Medienplayer, ein Android-Smartphone Hinweise • Einzelheiten zur Kompatibilität Ihres USB-Geräts finden Sie auf der Support-Website, die auf der hinteren Umschlagseite angegeben ist. • Smartphones, auf denen das AndroidBetriebssystem 4.1 oder höher installiert ist, unterstützen Android Open Accessory 2.0 (AOA 2.0). Jedoch unterstützen manche Smartphones AOA 2.0 möglicherweise nicht vollständig, auch wenn das Android-Betriebssystem 4.1 oder höher installiert ist. Einzelheiten zur Kompatibilität Ihres AndroidSmartphones finden Sie auf der Support-Website, die auf der hinteren Umschlagseite angegeben ist. • Die Wiedergabe der folgenden Dateien wird nicht unterstützt. MP3/WMA/FLAC: – Kopiergeschützte Dateien – DRM-Dateien (digitale Rechteverwaltung) – Mehrkanalaudiodateien MP3/WMA: – Dateien mit verlustfreier Komprimierung 14DE Wählen Sie vor dem Herstellen einer Verbindung je nach dem USB-Gerät den USB-Modus (Android-Modus oder MSC/ MTP-Modus) aus (Seite 23). 1 Schließen Sie ein USB-Gerät an den USB-Anschluss an (Seite 11). Die Wiedergabe beginnt. Wenn bereits ein Gerät angeschlossen ist, drücken Sie zum Starten der Wiedergabe SRC, um [USB] auszuwählen ([IPD] erscheint im Display, wenn der iPod erkannt wird). 2 Stellen Sie die Lautstärke an diesem Gerät ein. So stoppen Sie die Wiedergabe Halten Sie OFF 1 Sekunde lang gedrückt. So trennen Sie die Verbindung zum Gerät Stoppen Sie die Wiedergabe und trennen Sie dann das Gerät von diesem Gerät. Vorsicht beim iPhone Wenn Sie ein iPhone über USB anschließen, wird die Lautstärke beim Telefonieren über das iPhone, nicht das Gerät gesteuert. Erhöhen Sie während eines Telefonats nicht versehentlich die Lautstärke am Gerät. Andernfalls erfolgt die Tonausgabe nach Beendigung des Telefonats unvermittelt mit hoher Lautstärke. Wiedergabe mit einem BLUETOOTH-Gerät Sie können die Inhalte auf einem verbundenen Gerät wiedergeben, das BLUETOOTH A2DP (Advanced Audio Distribution Profile) unterstützt. 2 Drücken Sie SRC, um [BT AUDIO] auszuwählen. 3 Starten Sie am Audiogerät die Wiedergabe. 4 Stellen Sie die Lautstärke an diesem Gerät ein. Hinweise • Bei manchen Audiogeräten werden Informationen wie Titel, Titelnummer, verstrichene Spieldauer und Wiedergabestatus möglicherweise nicht an diesem Gerät angezeigt. • Auch wenn die Tonquelle an diesem Gerät gewechselt wird, stoppt die Wiedergabe am Audiogerät nicht. • [BT AUDIO] erscheint nicht im Display, solange die Anwendung „Sony | Music Center“ über die BLUETOOTH-Funktion ausgeführt wird. So gleichen Sie den Lautstärkepegel des BLUETOOTH-Geräts an andere Tonquellen an Starten Sie die Wiedergabe am BLUETOOTHAudiogerät mit gemäßigter Lautstärke und stellen Sie die gewohnte Hörlautstärke an diesem Gerät ein. Drücken Sie MENU und wählen Sie dann [SOUND] [SET BTA VOL] (Seite 24). Suchen und Wiedergeben von Titeln Wiedergabewiederholung und Zufallswiedergabe Nicht verfügbar, wenn ein USB-Gerät im Android-Modus angeschlossen ist. 1 Drücken Sie während der Wiedergabe so oft (Wiederholung) oder (Zufall), bis der gewünschte Wiedergabemodus ausgewählt ist. Es kann eine Weile dauern, bis die Wiedergabe im ausgewählten Wiedergabemodus beginnt. 1 Stellen Sie eine BLUETOOTHVerbindung zu dem Audiogerät her (Seite 8). Je nach ausgewählter Tonquelle stehen unterschiedliche Wiedergabemodi zur Verfügung. Zum Auswählen des Audiogeräts drücken Sie MENU und wählen dann [BLUETOOTH] [SET AUDIODEV] (Seite 25). 15DE Suchen nach einem Titel anhand seines Namens (Quick-BrowZer™) 5 Drehen Sie den Steuerregler, um das gewünschte Element auszuwählen, und drücken Sie den Steuerregler. Die Wiedergabe beginnt. Nicht verfügbar, wenn ein USB-Gerät im Android-Modus oder ein iPod angeschlossen ist. 1 Drücken Sie während der USBWiedergabe (Suchen)*, um die Liste der Suchkategorien anzuzeigen. Wenn die Titelliste erscheint, drücken Sie mehrmals (Zurück), bis die gewünschte Suchkategorie angezeigt wird. * Während der USB-Wiedergabe drücken Sie (Suchen) länger als 2 Sekunden, um direkt zum Anfang der Kategorieliste zu wechseln. 2 Wählen Sie durch Drehen des Steuerreglers die gewünschte Kategorie für die Suche aus und drücken Sie zum Bestätigen den Steuerregler. 3 Gehen Sie zum Suchen des gewünschten Titels wie in Schritt 2 erläutert vor. Die Wiedergabe beginnt. So deaktivieren Sie den Quick-BrowZerModus Drücken Sie (Suchen). Suchen mit Überspringen von Elementen (Sprung-Modus) Nicht verfügbar, wenn ein USB-Gerät im Android-Modus oder ein iPod angeschlossen ist. 1 Drücken Sie während der USBWiedergabe (Suchen). 2 3 Drücken Sie (SEEK +). Drehen Sie den Steuerregler, um das Element auszuwählen. Die Liste wird in Schritten von 10 % der Gesamtzahl an Elementen übersprungen. 4 Drücken Sie ENTER, um wieder in den Quick-BrowZer-Modus zu schalten. Das ausgewählte Element erscheint. 16DE Über das Telefonbuch Freisprechanrufe (nur über BLUETOOTH) Wenn Sie ein Mobiltelefon zusammen mit diesem Gerät nutzen wollen, verbinden Sie es mit diesem Gerät. Sie können zwei Mobiltelefone an dieses Gerät anschließen. Erläuterungen dazu finden Sie unter „Vorbereiten eines BLUETOOTH-Geräts“ (Seite 8). 1 Drücken Sie CALL. Wenn zwei Mobiltelefone mit diesem Gerät verbunden sind, drehen Sie zum Auswählen des gewünschten Mobiltelefons den Steuerregler und drücken ihn dann. 2 Drehen Sie den Steuerregler, um [PHONE BOOK] auszuwählen, und drücken Sie anschließend den Steuerregler. 3 Drehen Sie den Steuerregler, um einen Anfangsbuchstaben aus der Liste der Anfangsbuchstaben auszuwählen, und drücken Sie anschließend den Steuerregler. Entgegennehmen eines Anrufs 4 1 Drehen Sie den Steuerregler, um einen Namen aus der Liste der Namen auszuwählen, und drücken Sie anschließend den Steuerregler. 5 Drehen Sie den Steuerregler, um eine Nummer aus der Liste der Nummern auszuwählen, und drücken Sie anschließend den Steuerregler. Drücken Sie CALL, wenn das Rufzeichen für einen eingehenden Anruf ertönt. Das Telefongespräch beginnt. Das Telefongespräch beginnt. Hinweis Das Rufzeichen und die Stimme des Gesprächsteilnehmers werden nur über die Frontlautsprecher ausgegeben. So weisen Sie einen Anruf zurück Halten Sie OFF 1 Sekunde lang gedrückt. Über die Rufliste 1 Drücken Sie CALL. Wenn zwei Mobiltelefone mit diesem Gerät verbunden sind, drehen Sie zum Auswählen des gewünschten Mobiltelefons den Steuerregler und drücken ihn dann. So beenden Sie den Anruf Drücken Sie CALL erneut. Tätigen eines Anrufs 2 Sie können einen Anruf über das Telefonbuch oder die Rufliste tätigen, wenn eine Verbindung zu einem Mobiltelefon besteht, das PBAP (Phone Book Access Profile) unterstützt. Wenn zwei Mobiltelefone mit diesem Gerät verbunden sind, wählen Sie eines davon aus. 3 Drehen Sie den Steuerregler, um [RECENT CALL] auszuwählen, und drücken Sie anschließend den Steuerregler. Eine Rufliste erscheint. Drehen Sie den Steuerregler, um einen Namen oder eine Telefonnummer aus der Rufliste auszuwählen, und drücken Sie anschließend den Steuerregler. Das Telefongespräch beginnt. 17DE Durch Eingabe der Telefonnummer 1 3 Drehen Sie den Steuerregler, um [DIAL NUMBER] auszuwählen, und drücken Sie anschließend den Steuerregler. Drehen Sie zum Eingeben der Telefonnummer den Steuerregler, wählen Sie schließlich [ ] (Leerzeichen) und drücken Sie anschließend ENTER*. Drücken Sie CALL. Wenn zwei Mobiltelefone mit diesem Gerät verbunden sind, drehen Sie zum Auswählen des gewünschten Mobiltelefons den Steuerregler und drücken ihn dann. Drücken Sie CALL. Wenn zwei Mobiltelefone mit diesem Gerät verbunden sind, drehen Sie zum Auswählen des gewünschten Mobiltelefons den Steuerregler und drücken ihn dann. 2 1 2 Drehen Sie den Steuerregler, um [VOICE DIAL] auszuwählen, und drücken Sie anschließend den Steuerregler. Oder halten Sie VOICE mehr als 2 Sekunden lang gedrückt. 3 Sprechen Sie den Namen des gewünschten Gesprächsteilnehmers laut aus, und zwar genauso, wie Sie ihn im Mobiltelefon gespeichert haben. Wenn Ihre Stimme erkannt wird, wird der Anruf getätigt. Das Telefongespräch beginnt. * Drücken Sie / (SEEK –/+), um zur jeweils nächsten Ziffer in der Digitalanzeige zu wechseln. So brechen Sie die Sprachwahl ab Drücken Sie VOICE. Hinweis Im Display erscheint [_] anstelle von [#]. Über die Wahlwiederholung 1 Drücken Sie CALL. Wenn zwei Mobiltelefone mit diesem Gerät verbunden sind, drehen Sie zum Auswählen des gewünschten Mobiltelefons den Steuerregler und drücken ihn dann. 2 Drehen Sie den Steuerregler, um [REDIAL] auszuwählen, und drücken Sie anschließend den Steuerregler. Das Telefongespräch beginnt. Mithilfe der Sprachwahl Wenn das verbundene Mobiltelefon über die Sprachwahlfunktion verfügt, können Sie einen Anruf tätigen, indem Sie den im Mobiltelefon gespeicherten Namen laut aussprechen. Während eines Anrufs verfügbare Funktionen So stellen Sie die Lautstärke für das Rufzeichen ein Drehen Sie den Steuerregler, während ein Anruf eingeht. So stellen Sie die Lautstärke der Anruferstimme ein Drehen Sie den Steuerregler während eines Anrufs. So stellen Sie die Lautstärke für den anderen Gesprächsteilnehmer ein (Einstellen der Mikrofonverstärkung) Drücken Sie MIC. Einstellbare Lautstärkepegel: [MIC-LOW], [MIC-MID], [MIC-HI]. So verringern Sie Echo und Rauschen beim Telefonieren (Echo-/ Rauschunterdrückungsmodus) Halten Sie MIC gedrückt. Einstellbare Modi: [EC/NC-1], [EC/NC-2]. 18DE So wechseln Sie zwischen Freisprechmodus und normalem Telefonmodus Drücken Sie während eines Anrufs MODE, um zwischen dem Telefonieren über dieses Gerät und über das Mobiltelefon zu wechseln. Hinweis Diese Funktion ist je nach Mobiltelefon möglicherweise nicht verfügbar. Weitere nützliche Funktionen Sony | Music Center mit iPhone/Android™Smartphone Für ein iPhone müssen Sie die neueste Version der Anwendung „Sony | Music Center“ vom App Store herunterladen, für ein Android-Smartphone von auf Google Play. Hinweise • Befolgen Sie zu Ihrer eigenen Sicherheit die vor Ort geltende Straßenverkehrsordnung und die Verkehrsvorschriften und bedienen Sie die Anwendung nicht beim Fahren. • Mit der App „Sony | Music Center“ können Sie Sony-Audiogeräte, die mit „Sony | Music Center“ kompatibel sind, über Ihr iPhone/AndroidSmartphone bedienen. • Welche Funktionen Sie mit „Sony | Music Center“ steuern können, hängt vom verbundenen Gerät ab. • Näheres zur Verwendung der Funktionen von „Sony | Music Center“ finden Sie in den Erläuterungen zum iPhone/Android-Smartphone. • Einzelheiten zu „Sony | Music Center“ finden Sie unter folgender URL: http://www.sony.net/smcqa/ • Auf der unten angegebenen Website finden Sie Informationen zu kompatiblen iPhone-/AndroidSmartphone-Modellen. Bei einem iPhone: Besuchen Sie den App Store Bei einem Android-Smartphone: Besuchen Sie Google Play Herstellen der Verbindung zu Sony | Music Center 1 Stellen Sie eine BLUETOOTHVerbindung mit dem iPhone/ Android-Smartphone her (Seite 8). Zum Auswählen des Audiogeräts drücken Sie MENU und wählen dann [BLUETOOTH] [SET AUDIODEV] (Seite 25). 2 Starten Sie die Anwendung „Sony | Music Center“. 3 Drücken Sie MENU, drehen Sie den Steuerregler, um [SONY APP] auszuwählen, und drücken Sie anschließend den Steuerregler. 19DE 4 Drehen Sie den Steuerregler, um [CONNECT] auszuwählen, und drücken Sie anschließend den Steuerregler. Die Verbindung zum iPhone/AndroidSmartphone wird hergestellt. Einzelheiten zu den Funktionen am iPhone/Android-Smartphone finden Sie in der Hilfe zur Anwendung. Wenn die Gerätenummer angezeigt wird Vergewissern Sie sich, dass die Nummer angezeigt wird (z. B. 123456), und wählen Sie dann [Ja] am iPhone/AndroidSmartphone. Beantworten einer SMS-Nachricht (nur Android-Smartphone) Sie können eine Nachricht beantworten, indem Sie das Antwortsymbol berühren. 1 Aktivieren Sie die Anwendung „Sony | Music Center“ und berühren Sie dann das Symbol [Reply] (Antworten). Die Anzeige zum Eingeben einer Nachricht erscheint in der Anwendung „Sony | Music Center“. 2 Geben Sie mithilfe der Spracherkennung eine Antwortnachricht ein. Eine Liste auswählbarer Nachrichten erscheint in der Anwendung „Sony | Music Center“. 3 Drehen Sie den Steuerregler, um die gewünschte Nachricht auszuwählen, und drücken Sie den Steuerregler. So trennen Sie die Verbindung 1 Drücken Sie MENU, drehen Sie den Steuerregler, um [SONY APP] auszuwählen, und drücken Sie anschließend den Steuerregler. 2 Drehen Sie den Steuerregler, um [CONNECT] auszuwählen, und drücken Sie anschließend den Steuerregler. Auswählen der Tonquelle oder Anwendung Sie können über dieses Gerät die gewünschte Tonquelle oder Anwendung am iPhone/Android-Smartphone auswählen. So wählen Sie die Tonquelle aus Drücken Sie mehrmals SRC. Oder drücken Sie SRC, drehen Sie den Steuerregler, um die gewünschte Tonquelle auszuwählen, und drücken Sie ENTER. So rufen Sie die Tonquellenliste auf Drücken Sie SRC. Die Nachricht wird gesendet. Vornehmen von Klang- und Anzeigeeinstellungen Sie können Klang- und Anzeigeeinstellungen über ein iPhone/ Android-Smartphone vornehmen. Nähere Informationen zu den Einstellungen finden Sie in der Hilfe zur Anwendung. Verwenden der Spracherkennung (nur Android-Smartphone) 1 Halten Sie VOICE gedrückt, um die Spracherkennung zu aktivieren. 2 Sprechen Sie den gewünschten Sprachbefehl in das Mikrofon. Sprachausgabe einer SMS (nur Android-Smartphone) So deaktivieren Sie die Spracherkennung SMS-Nachrichten werden, wenn sie eingehen, automatisch über die Autolautsprecher vorgelesen. Hinweise Nähere Informationen zu den Einstellungen finden Sie in der Hilfe zur Anwendung. 20DE Drücken Sie VOICE. • Die Spracherkennung steht unter Umständen nicht in allen Fällen zur Verfügung. • Die Spracherkennung funktioniert je nach den Funktionen des verbundenen AndroidSmartphones möglicherweise nicht einwandfrei. • Achten Sie darauf, dass Umgebungsgeräusche wie Motorengeräusche bei Verwendung der Spracherkennung möglichst leise sind. Verwenden von Siri Eyes Free Mit Siri Eyes Free können Sie ein iPhone freihändig nutzen, indem Sie einfach in das Mikrofon sprechen. Für diese Funktion müssen Sie ein iPhone über BLUETOOTH mit diesem Gerät verbinden. Die Funktion steht nur bei einem iPhone 4s oder höher zur Verfügung. Stellen Sie sicher, dass auf Ihrem iPhone die neueste iOS-Version läuft. Sie müssen vorab die BLUETOOTHRegistrierung und die Konfiguration der Verbindung zwischen dem iPhone und diesem Gerät abgeschlossen haben. Erläuterungen dazu finden Sie unter „Vorbereiten eines BLUETOOTH-Geräts“ (Seite 8). Zum Auswählen des iPhone drücken Sie MENU und wählen dann [BLUETOOTH] [SET AUDIODEV] (Seite 25). 1 • Wenn Sie einen Titel mit einem iPhone und einer BLUETOOTH-Audioverbindung wiedergeben wollen und die Wiedergabe des Titels über BLUETOOTH startet, wird Siri Eyes Free automatisch beendet und dieses Gerät wechselt zur BLUETOOTH-Tonquelle. • Wenn Siri Eyes Free während der Audiowiedergabe aktiviert wird, wechselt dieses Gerät möglicherweise zur BLUETOOTH-Tonquelle, auch wenn Sie keinen Titel für die Wiedergabe angegeben haben. • Wenn Sie das iPhone an den USB-Anschluss anschließen, funktioniert Siri Eyes Free möglicherweise nicht einwandfrei oder wird beendet. • Wenn Sie das iPhone über USB an dieses Gerät anschließen, aktivieren Sie Siri nicht mit dem iPhone. Siri Eyes Free funktioniert möglicherweise nicht einwandfrei oder wird beendet. • Solange Siri Eyes Free aktiviert ist, ist der Ton von Tonquellen nicht zu hören. Aktivieren Sie die Siri-Funktion am iPhone. Näheres dazu schlagen Sie bitte in der mit dem iPhone gelieferten Bedienungsanleitung nach. 2 Halten Sie VOICE mehr als 2 Sekunden lang gedrückt. Die Sprachbefehlsanzeige erscheint. 3 Nachdem das iPhone einen Signalton ausgegeben hat, sprechen Sie in das Mikrofon. Das iPhone gibt erneut einen Signalton aus, dann beginnt Siri zu reagieren. So deaktivieren Sie Siri Eyes Free Drücken Sie VOICE. Hinweise • Je nach den Nutzungsbedingungen erkennt das iPhone Ihre Stimme eventuell nicht. (Wenn Sie sich beispielsweise in einem fahrenden Auto befinden.) • An Orten mit schlechtem iPhone-Signalempfang kann es vorkommen, dass Siri Eyes Free nicht richtig funktioniert oder die Reaktionszeit recht lang ist. • Je nach den Betriebsbedingungen des iPhone funktioniert Siri Eyes Free möglicherweise nicht einwandfrei oder wird beendet. 21DE 3 Einstellungen Beenden des DEMO-Modus Sie können die Demo, die bei ausgeschalteter Tonquelle und eingeblendeter Uhrzeit angezeigt wird, abbrechen. 1 Drücken Sie MENU, drehen Sie den Steuerregler, um [GENERAL] auszuwählen, und drücken Sie anschließend den Steuerregler. 2 Drehen Sie den Steuerregler, um [SET DEMO] auszuwählen, und drücken Sie anschließend den Steuerregler. 3 Drehen Sie den Steuerregler, um [SET DEMO-OFF] auszuwählen, und drücken Sie anschließend den Steuerregler. Die Einstellung ist damit abgeschlossen. 4 Drücken Sie (Zurück) zweimal. Die Anzeige wechselt wieder in den normalen Empfangsmodus bzw. Wiedergabemodus. Drehen Sie den Steuerregler, um die Optionen auszuwählen, und drücken Sie anschließend den Steuerregler. So schalten Sie zur vorherigen Anzeige zurück Drücken Sie (Zurück). Allgemeine Einstellungen (GENERAL) AREA (Gebiet) Zum Festlegen des Landes bzw. der Region, wo dieses Gerät verwendet wird: [EUROPE], [RUSSIA]. Wenn die aktuelle Einstellung für das Land bzw. die Region geändert wird, wird dieses Gerät zurückgesetzt und dann wird die Uhrzeit angezeigt. (Nur verfügbar, wenn die Tonquelle ausgeschaltet ist und die Uhrzeit angezeigt wird.) DEMO (Demo-Modus) Zum Einstellen des Demo-Modus: [ON], [OFF]. CLOCK-ADJ (Uhr einstellen) (Seite 8) Grundlegende Einstellschritte Sie können Optionen in den folgenden Konfigurationskategorien einstellen: Allgemeine Einstellungen (GENERAL), Klangeinstellungen (SOUND), Anzeigeeinstellungen (DISPLAY), BLUETOOTH-Einstellungen (BLUETOOTH), Sony | Music Center-Einstellungen (SONY APP) 1 2 Drücken Sie MENU. Drehen Sie den Steuerregler, um die Konfigurationskategorie auszuwählen, und drücken Sie den Steuerregler. Welche Optionen eingestellt werden können, hängt von der Tonquelle und den Einstellungen ab. 22DE CAUT ALM (Warnton) Zum Einstellen des Warntons: [ON], [OFF] (Seite 7). (Nur verfügbar, wenn die Tonquelle ausgeschaltet ist und die Uhrzeit angezeigt wird.) BEEP (Signalton) Zum Einstellen des Signaltons: [ON], [OFF]. AUTO OFF (Abschaltautomatik) Zum automatischen vollständigen Abschalten des Geräts eine bestimmte Zeit nach dem Ausschalten und dem Anzeigen der Uhrzeit (d. h. halten Sie OFF 1 Sekunde lang gedrückt): [ON] (30 Minuten), [OFF]. STEERING (Lenkrad) Zum Registrieren/Zurücksetzen der Einstellungen für die Lenkradfernbedienung. (Nur verfügbar, wenn die Tonquelle ausgeschaltet ist und die Uhrzeit angezeigt wird.) STR CONTROL (Lenkradfernbedienung) Zum Auswählen des Eingangsmodus für die angeschlossene Fernbedienung. Um eine Fehlfunktion zu vermeiden, achten Sie vor dem Gebrauch darauf, dass der Eingangsmodus mit der angeschlossenen Fernbedienung übereinstimmt. CUSTOM (Benutzerdefiniert) Eingangsmodus für die Lenkradfernbedienung PRESET (Voreingestellt) Eingangsmodus für die Kabelfernbedienung, ausgenommen die Lenkradfernbedienung (wird automatisch ausgewählt, wenn [RESET CUSTOM] ausgeführt wird). EDIT CUSTOM (Benutzerdefinierte Einstellung bearbeiten) Zum Registrieren der Funktionen (SOURCE, ATT, VOL +/–, SEEK +/–, VOICE, ON HOOK, OFF HOOK) für die Lenkradfernbedienung: Wählen Sie durch Drehen des Steuerreglers eine Funktion aus, die der Lenkradfernbedienung zugewiesen werden soll, und drücken Sie dann den Steuerregler. Wenn [REGISTER] blinkt, halten Sie die Taste der Lenkradfernbedienung gedrückt, der Sie die Funktion zuweisen möchten. Nach Abschluss der Registrierung wird [REGISTERED] angezeigt. Registrieren Sie wie in Schritt und erläutert weitere Funktionen. (Nur verfügbar, wenn [STR CONTROL] auf [CUSTOM] gesetzt ist.) RESET CUSTOM (Benutzerdefinierte Einstellung zurücksetzen) Zum Zurücksetzen der Einstellungen für die Lenkradfernbedienung: [YES], [NO]. (Nur verfügbar, wenn [STR CONTROL] auf [CUSTOM] gesetzt ist.) Hinweise • Beim Vornehmen der Einstellungen können nur die Tasten an diesem Gerät verwendet werden. Stellen Sie aus Sicherheitsgründen das Fahrzeug ab, bevor Sie diese Einstellungen vornehmen. • Wenn beim Registrieren ein Fehler auftritt, bleiben alle zuvor registrierten Informationen erhalten. Starten Sie die Registrierung ab der Funktion neu, bei der der Fehler auftrat. • Diese Funktion steht unter Umständen nicht bei allen Fahrzeugen zur Verfügung. Einzelheiten zur Kompatibilität Ihres Fahrzeugs finden Sie auf der Support-Website, die auf der hinteren Umschlagseite angegeben ist. USB MODE (USB-Modus) Zum Ändern des USB-Modus: [ANDROID], [MSC/MTP]. (Nur verfügbar, wenn die USBSignalquelle ausgewählt ist.) CT (Uhrzeit) Zum Einstellen der CT-Funktion: [ON], [OFF]. AF/TA (Alternativfrequenzen/ Verkehrsdurchsagen) Zum Einstellen von Alternativfrequenzen (AF) und Verkehrsdurchsagen (TA): [AF-ON], [TA-ON], [AF/TA-ON], [AF/TAOFF]. REGIONAL (Regional) Zum Beschränken des Empfangs auf eine bestimmte Region: [ON], [OFF]. (Nur bei UKW-Empfang (FM) verfügbar.) BTM (Speicherbelegungsautomatik) (Seite 12) (Nur verfügbar, wenn der Tuner ausgewählt ist.) FIRMWARE (Firmware) (Nur verfügbar, wenn die Tonquelle ausgeschaltet ist und die Uhrzeit angezeigt wird.) Zum Anzeigen/Aktualisieren der Firmwareversion. Einzelheiten dazu finden Sie auf der Support-Website, die auf der hinteren Umschlagseite angegeben ist. FW VERSION (Firmwareversion) Die aktuelle Firmwareversion wird angezeigt. 23DE FW UPDATE (Firmwareaktualisierung) Zum Starten der Firmwareaktualisierung: [YES], [NO]. Es dauert einige Minuten, bis die Firmwareaktualisierung abgeschlossen ist. Stellen Sie den Zündschlüssel während der Aktualisierung nicht in die Position OFF und entfernen Sie auch nicht das USB-Gerät. Klangeinstellungen (SOUND) Dieses Konfigurationsmenü ist nicht verfügbar, wenn die Tonquelle ausgeschaltet ist und die Uhrzeit angezeigt wird. EQ10 PRESET (EQ10-Voreinstellung) Zum Auswählen aus 10 Equalizer-Kurven oder Ausschalten der Equalizer-Kurve: [OFF], [R&B], [ROCK], [POP], [HIP-HOP], [EDM], [JAZZ], [SOUL], [COUNTRY], [KARAOKE]*, [CUSTOM]. Die Einstellung für die Equalizer-Kurve kann für jede Tonquelle gespeichert werden. * Der Gesang wird mit [KARAOKE] zwar reduziert, kann aber bei der Wiedergabe nicht vollständig ausgeblendet werden. Außerdem wird die Verwendung eines Mikrofons nicht unterstützt. EQ10 CUSTOM (EQ10 benutzerdefiniert) Zum Einstellen von [CUSTOM] unter EQ10. Zum Einstellen der Equalizer-Kurve: [BAND1] – [BAND10] (32 Hz, 63 Hz, 125 Hz, 250 Hz, 500 Hz, 1 kHz, 2 kHz, 4 kHz, 8 kHz, 16 kHz). Die Lautstärke lässt sich in Schritten von 1 dB auf einen Wert zwischen -6 dB und +6 dB einstellen. BALANCE (Balance) Zum Einstellen der Balance: [RIGHT-15] – [CENTER] – [LEFT-15]. FADER (Fader) Zum Einstellen des relativen Pegels: [FRONT-15] – [CENTER] – [REAR-15]. 24DE S.WOOFER (Tiefsttonlautsprecher) SW LEVEL (Pegel des Tiefsttonlautsprechers) Zum Einstellen der Lautstärke des Tiefsttonlautsprechers: [+6 dB] – [0 dB] – [-6 dB]. ([ATT] wird bei der niedrigsten Einstellung angezeigt.) SW PHASE (Phase des Tiefsttonlautsprechers) Zum Auswählen der Phase des Tiefsttonlautsprechers: [SUB NORM], [SUB REV]. LPF FREQ (Frequenz des Niedrigpassfilters) Zum Auswählen der Grenzfrequenz des Tiefsttonlautsprechers: [80Hz], [100Hz], [120Hz]. HPF FREQ (Frequenz des Hochpassfilters) Zum Auswählen der Grenzfrequenz der Front-/Hecklautsprecher: [OFF], [80Hz], [100Hz], [120Hz]. AUX VOL (AUX-Lautstärkepegel) Zum Einstellen der Lautstärke der einzelnen angeschlossenen Zusatzgeräte: [+18 dB] – [0 dB] – [-8 dB]. Wenn Sie die Einstellung hier vornehmen, brauchen Sie die Lautstärke der einzelnen Tonquellen nicht mehr anzugleichen. (Nur verfügbar, wenn AUX ausgewählt ist.) BTA VOL (BLUETOOTH-AudioLautstärkepegel) Zum Einstellen der Lautstärke der einzelnen angeschlossenen BLUETOOTHGeräte: [+6 dB] – [0 dB] – [-6 dB]. Wenn Sie die Einstellung hier vornehmen, brauchen Sie die Lautstärke der einzelnen Tonquellen nicht mehr anzugleichen. (Nur verfügbar, wenn BT-Audio oder eine Anwendung ausgewählt ist.) Anzeigeeinstellungen (DISPLAY) DIMMER (Dimmer) Zum Wechseln der Helligkeit im Display: [OFF], [ON], [AT] (Automatik), [CLK] (Uhrzeit). ([AT] steht nur zur Verfügung, wenn die Steuerleitung für die Beleuchtung angeschlossen ist und die Scheinwerfer eingeschaltet sind.) Um die Funktion so einzustellen, dass sie nur während der festgelegten Zeit aktiv ist, wählen Sie [CLK] und stellen dann die Anfangs- und die Endezeit ein. – Einstellen der Helligkeit bei aktiviertem Dimmer: Setzen Sie [DIMMER] auf [ON] und stellen Sie [BRIGHTNESS] ein. – Einstellen der Helligkeit bei deaktiviertem Dimmer: Setzen Sie [DIMMER] auf [OFF] und stellen Sie [BRIGHTNESS] ein. Die Helligkeitseinstellung wird gespeichert und bei Aktivierung bzw. Deaktivierung des Dimmers angewendet. BRIGHTNESS (Helligkeit) Zum Einstellen der Helligkeit im Display. Die Helligkeit lässt sich einstellen: [1] – [10]. BUTTON-C (Tastenfarbe) Zum Einstellen einer voreingestellten oder benutzerdefinierten Farbe für die Tasten. COLOR (Farben) Sie können aus 15 voreingestellten und 1 benutzerdefinierten Farbe auswählen. CUSTOM-C (Benutzerdefinierte Farbe) Zum Speichern einer benutzerdefinierten Farbe für die Tasten. RGB RED, RGB GRN, RGB BLUE Einstellbarer Farbbereich: [0] – [32] ([0] lässt sich nicht für alle Farbbereiche einstellen). DSPL-C (Displayfarbe) Zum Einstellen einer voreingestellten oder benutzerdefinierten Farbe für das Display. COLOR (Farben) Sie können aus 15 voreingestellten und 1 benutzerdefinierten Farbe auswählen. CUSTOM-C (Benutzerdefinierte Farbe) Zum Speichern einer benutzerdefinierten Farbe für das Display. RGB RED, RGB GRN, RGB BLUE Einstellbarer Farbbereich: [0] – [32] ([0] lässt sich nicht für alle Farbbereiche einstellen). SND SYNC (Sound-Synchronisation) Zum Aktivieren der Synchronisierung der Beleuchtung mit dem Ton: [ON], [OFF]. AUTO SCR (Automatischer Bildlauf) Zum Einstellen des automatischen Bildlaufs für lange Informationen: [ON], [OFF]. (Nicht verfügbar, wenn AUX oder der Tuner ausgewählt ist.) BLUETOOTH-Einstellungen (BLUETOOTH) PAIRING (Pairing) (Seite 9) Zum Herstellen einer Verbindung mit bis zu zwei BLUETOOTH-Geräten: [DEVICE 1], [DEVICE 2]. Nachdem das Pairing abgeschlossen ist, wird statt [DEVICE 1] oder [DEVICE 2] der Name des Geräts angezeigt, mit dem ein Pairing ausgeführt wurde. AUDIODEV (Audiogerät) Zum Auswählen des Audiogeräts. [*] erscheint bei dem Gerät, mit dem ein Pairing als [DEVICE 1] ausgeführt wurde, oder dem aktuellen, A2DP-kompatiblen Audiogerät. RINGTONE (Rufzeichen) Zum Auswählen, ob das Rufzeichen dieses Geräts oder des verbundenen Mobiltelefons ertönen soll: [1] (dieses Gerät), [2] (Mobiltelefon). 25DE AUTO ANS (Automatische Anrufentgegennahme) Zum Einstellen dieses Geräts auf das automatische Entgegennehmen eines eingehenden Anrufs: [OFF], [1] (etwa 3 Sekunden), [2] (etwa 10 Sekunden). AUTOPAIR (Pairingautomatik) Zum automatischen Starten des BLUETOOTH-Pairing, wenn ein Gerät mit iOS Version 5.0 oder höher über USB angeschlossen wird: [ON], [OFF]. Weitere Informationen Aktualisieren der Firmware Zum Aktualisieren der Firmware rufen Sie die Support-Website auf, die auf der hinteren Umschlagseite angegeben ist, und gehen nach den online angezeigten Anweisungen vor. Hinweis BT SIGNL (BLUETOOTH-Signal) (Seite 10) Zum Aktivieren/Deaktivieren der BLUETOOTH-Funktion. Trennen Sie während der Aktualisierung nicht das USB-Gerät vom Gerät. BT INIT (BLUETOOTH-Initialisierung) Zum Initialisieren aller BLUETOOTHEinstellungen (Pairing-Informationen, Geräteinformationen usw.): [YES], [NO]. Wenn Sie das Gerät entsorgen wollen, initialisieren Sie alle Einstellungen. (Nur verfügbar, wenn die Tonquelle ausgeschaltet ist und die Uhrzeit angezeigt wird.) Sicherheitsmaßnahmen Sony | Music CenterEinstellungen (SONY APP) AUTO LAUNCH (Startautomatik) Zum Aktivieren des automatischen Starts von „Sony | Music Center“: [ON], [OFF]. Bei Auswahl von [ON] wird „Sony | Music Center“ nach Herstellung der BLUETOOTH-Verbindung automatisch verbunden. CONNECT (Verbinden) Zum Aktivieren und Deaktivieren der „Sony | Music Center“-Funktion (Verbindung). 26DE • Lassen Sie die Frontplatte oder Audiogeräte nicht auf dem Armaturenbrett liegen. • Wenn das Gerät eingeschaltet wird, wird die Motorantenne automatisch ausgefahren. • Achten Sie darauf, dass keine Flüssigkeiten auf das Gerät gelangen. Wiedergabereihenfolge von Audiodateien Ordner (Album) Audiodatei (Titel) Der iPod • Folgende iPod-Modelle können angeschlossen werden. Aktualisieren Sie Ihr iPod-Modell vor dem Gebrauch anhand der neuesten Software. Kompatible iPhone-/iPod-Modelle Kompatibles Modell Bluetooth® USB iPhone X iPhone 8 iPhone 8 Plus iPhone 7 iPhone 7 Plus iPhone SE iPhone 6s iPhone 6s Plus iPhone 6 iPhone 6 Plus iPhone 5s iPhone 5c iPhone 5 iPhone 4s iPod touch (6. Generation) iPod touch (5. Generation) iPod nano (7. Generation) Sollten an Ihrem Gerät Probleme auftreten oder sollten Sie Fragen haben, auf die in dieser Anleitung nicht eingegangen wird, wenden Sie sich bitte an Ihren Sony-Händler. Wartung Reinigen der Anschlüsse Berühren Sie die Anschlüsse möglichst nicht direkt. Das Gerät funktioniert möglicherweise nicht ordnungsgemäß, wenn die Anschlüsse zwischen dem Gerät und der Frontplatte verschmutzt sind. Um dies zu vermeiden, nehmen Sie die Frontplatte ab (Seite 7) und reinigen Sie die Anschlüsse mit einem Wattestäbchen. Drücken Sie dabei nicht zu fest auf die Anschlüsse. Andernfalls können sie beschädigt werden. Hinweis Entfernen Sie die Frontplatte aus Sicherheitsgründen nicht beim Fahren. • Die Verwendung des „Made for Apple“Markenemblems bedeutet, dass ein Zubehör speziell für den Anschluss an das(die) Apple-Produkt(e) entwickelt wurde, die im Markenemblem bezeichnet sind, und vom Entwickler für die Erfüllung der Apple-Leistungsstandards zertifiziert wurde. Apple übernimmt keine Verantwortung für den Betrieb dieses Geräts oder dessen Einhaltung von Sicherheits- und gesetzlichen Standards. Bitte beachten, dass die Verwendung dieses Zubehörs mit einem Apple-Produkt die drahtlose Leistungsfähigkeit beeinträchtigen kann. 27DE Technische Daten Tuner FM (UKW) Empfangsbereich: Wenn [AREA] auf [EUROPE] gesetzt ist: 87,5 MHz – 108,0 MHz Wenn [AREA] auf [RUSSIA] gesetzt ist: FM1/FM2: 87,5 MHz – 108,0 MHz (in Schritten von 50 kHz) FM3: 65 MHz – 74 MHz (in Schritten von 30 kHz) Nutzbare Empfindlichkeit: 8 dBf Signal-Rauschabstand: 73 dB Kanaltrennung: 50 dB bei 1 kHz MW/LW Empfangsbereich: MW: 531 kHz – 1.602 kHz LW: 153 kHz – 279 kHz Empfindlichkeit: MW: 26 μV, LW: 50 μV USB-Player Schnittstelle: USB (Full-Speed) Maximale Stromstärke: 1 A Höchstzahl an erkennbaren Ordnern und Dateien: Ordner (Alben): 256 Dateien (Titel) pro Ordner: 256 Kompatibles Android Open AccessoryProtokoll (AOA): 2.0 Entsprechender Codec: MP3 (.mp3) Bitrate: 8 Kbps – 320 Kbps (Unterstützt VBR (variable Bitrate)) Abtastrate: 16 kHz – 48 kHz WMA (.wma) Bitrate: 32 Kbps – 192 Kbps (Unterstützt VBR (variable Bitrate)) Abtastrate: 32 kHz, 44,1 kHz, 48 kHz FLAC (.flac) Bittiefe: 16 Bit, 24 Bit Abtastrate: 44,1 kHz, 48 kHz Unterstütztes Dateisystem: FAT16, FAT32 Drahtlose Kommunikation Kommunikationssystem: BLUETOOTH-Standard Version 3.0 28DE Sendeleistung: BLUETOOTH-Standard Leistungsklasse 2 (max. +1 dBm leitungsgebunden) Maximale Kommunikationsreichweite: Sichtlinie ca. 10 m*1 Frequenzbereich: 2,4-GHz-Frequenzbereich (2,4000 GHz – 2,4835 GHz) Modulationsverfahren: FHSS Kompatible BLUETOOTH-Profile*2: A2DP (Advanced Audio Distribution Profile) 1.3 AVRCP (Audio Video Remote Control Profile) 1.3 HFP (Handsfree Profile) 1.6 PBAP (Phone Book Access Profile) SPP (Serial Port Profile) Entsprechender Codec: SBC (.sbc), AAC (.m4a) *1 Die tatsächliche Reichweite hängt von verschiedenen Faktoren ab, wie z. B. Hindernissen zwischen Geräten, Magnetfeldern um einen Mikrowellenherd, statischer Elektrizität, Empfangsempfindlichkeit, Leistung der Antenne, Betriebssystem, Softwareanwendung usw. *2 BLUETOOTH-Standardprofile geben den Zweck der BLUETOOTH-Kommunikation zwischen den Geräten an. NFC-Datenübertragung Frequenzbereich: 13,56 MHz Endverstärker Ausgänge: Lautsprecherausgänge Lautsprecherimpedanz: 4 Ω – 8 Ω Maximale Ausgangsleistung: 55 W × 4 (an 4 Ω) Allgemeines Betriebsspannung: 12 V Gleichstrom, Autobatterie (negative Erdung) Nennstromaufnahme: 10 A Abmessungen: ca. 178 mm × 50 mm × 177 mm (B/H/T) Einbaumaße: ca. 182 mm × 53 mm × 160 mm (B/H/T) Gewicht: ca. 0,8 kg Lieferumfang: Hauptgerät (1) Mikrofon (1) Montageteile und Anschlusszubehör (1 Satz) Nähere Informationen dazu erhalten Sie beim Händler. Änderungen, die dem technischen Fortschritt dienen, bleiben vorbehalten. Urheberrechte Der Bluetooth®-Schriftzug und die Bluetooth-Logos sind eingetragene Markenzeichen und Eigentum der Bluetooth SIG, Inc., und ihre Verwendung durch die Sony Corporation erfolgt in Lizenz. Andere Markenzeichen und Produktnamen sind Eigentum der jeweiligen Rechteinhaber. Das N-Zeichen ist ein Markenzeichen oder eingetragenes Markenzeichen von NFC Forum, Inc. in den Vereinigten Staaten und anderen Ländern. Windows Media ist ein eingetragenes Markenzeichen oder Markenzeichen der Microsoft Corporation in den USA und/oder anderen Ländern. Dieses Produkt ist durch bestimmte gewerbliche Schutz- und Urheberrechte der Microsoft Corporation geschützt. Die Verwendung oder der Vertrieb derartiger Technologie außerhalb dieses Produkts ohne eine Lizenz von Microsoft oder einer autorisierten Microsoft-Niederlassung ist untersagt. Apple, iPhone, iPod, iPod nano, iPod touch und Siri sind Markenzeichen der Apple Inc., die in den USA und anderen Ländern eingetragen sind. App Store ist eine Dienstleistungsmarke von Apple Inc. IOS ist ein Markenzeichen oder ein eingetragenes Markenzeichen von Cisco in den USA und anderen Ländern und wird in Lizenz verwendet. Google, Google Play und Android sind Marken von Google LCC. libFLAC Copyright (C) 2000-2009 Josh Coalson Copyright (C) 2011-2013 Xiph.Org Foundation Die Redistribution und Nutzung im Quell- und Binärformat mit oder ohne Modifikationen ist unter folgenden Voraussetzungen zulässig: – Der Name der Xiph.org Foundation und die Namen deren Partner dürfen nicht ohne vorherige schriftliche Genehmigung verwendet werden, um für Produkte zu werben oder Produkte zu befürworten, die aus dieser Software abgeleitet sind. DIESE SOFTWARE WIRD VON DEN URHEBERRECHTSINHABERN UND DEREN PARTNERN OHNE GEWÄHR ZUR VERFÜGUNG GESTELLT UND JEDWEDE AUSDRÜCKLICHE ODER IMPLIZITE HAFTUNG WIE DIE HAFTUNG FÜR HANDELSÜBLICHE QUALITÄT UND DIE EIGNUNG FÜR EINEN BESTIMMTEN ZWECK WERDEN AUSGESCHLOSSEN. UNTER KEINEN UMSTÄNDEN HAFTEN DIE FOUNDATION ODER DEREN PARTNER FÜR DIREKTE, INDIREKTE, SPEZIELLE, EXEMPLARISCHE, NEBENODER FOLGESCHÄDEN IRGENDWELCHER ART (U. A. BESCHAFFUNG VON ERSATZARTIKELN ODER -SERVICES, NUTZUNGSAUSFALL, DATENVERLUST, ENTGANGENEN GEWINN ODER UNTERBRECHUNG DER GESCHÄFTSTÄTIGKEIT), UNABHÄNGIG VON DEREN URSACHE UND VON JEDER HAFTUNGSTHEORIE, OB AUF EINEM VERTRAG ODER GEFÄHRDUNGSHAFTUNG ODER EINER UNERLAUBTEN HANDLUNG (U. A. FAHRLÄSSIGKEIT) BERUHEND, DIE IN IRGENDEINER WEISE AUS DER VERWENDUNG DIESER SOFTWARE ENTSTEHEN, AUCH WENN SIE VON DER MÖGLICHKEIT SOLCHER SCHÄDEN IN KENNTNIS GESETZT WURDEN. Störungsbehebung Anhand der folgenden Checkliste können Sie die meisten Probleme, die möglicherweise an Ihrem Gerät auftreten, selbst beheben. Bevor Sie die folgende Checkliste durchgehen, überprüfen Sie bitte zunächst, ob Sie das Gerät richtig angeschlossen und bedient haben. Einzelheiten zum Gebrauch der Sicherung und zum Ausbauen des Geräts aus dem Armaturenbrett finden Sie unter „Anschluss/ Installation“ (Seite 36). Wenn das Problem sich nicht beheben lässt, besuchen Sie die Support-Website, die auf der hinteren Umschlagseite angegeben ist. – Redistributionen des Quellcodes müssen den oben genannten Urheberrechtsvermerk, diese Liste der Voraussetzungen sowie den folgenden Haftungsausschluss enthalten. – Bei Redistributionen im Binärformat müssen der oben genannte Urheberrechtsvermerk, diese Liste der Voraussetzungen sowie der folgende Haftungsausschluss in der Dokumentation und/ oder in sonstigen mit der Redistribution verbreiteten Materialien enthalten sein. 29DE Allgemeines Es ist gar kein Ton zu hören oder der Ton ist zu leise. Der Fader-Regler [FADER] ist nicht für ein 2-Lautsprecher-System eingestellt. Die Lautstärke dieses Geräts und/oder des verbundenen Geräts ist sehr niedrig. – Erhöhen Sie die Lautstärke dieses Geräts und des verbundenen Geräts. Kein Signalton ertönt. Ein gesondert erhältlicher Endverstärker ist angeschlossen und Sie verwenden nicht den integrierten Verstärker. Gespeicherte Sender und die korrekte Uhrzeit werden gelöscht. Die Sicherung ist durchgebrannt. Störgeräusche sind zu hören, wenn der Zündschlüssel gedreht wird. Die Leitungen sind nicht korrekt an den Stromanschluss für Zubehörgeräte am Fahrzeug angeschlossen. Das Gerät wechselt während der Wiedergabe bzw. des Radioempfangs in den Demo-Modus. Wenn [DEMO-ON] eingestellt ist und 5 Minuten lang keine Funktion ausgeführt wird, wechselt das Gerät in den DemoModus. – Stellen Sie [DEMO-OFF] ein (Seite 22). Die Anzeige wird ausgeblendet bzw. erscheint nicht im Display. Die Anschlüsse sind verschmutzt (Seite 27). Das Display bzw. die Beleuchtung blinkt. Das Gerät wird nicht ausreichend mit Strom versorgt. – Überprüfen Sie, ob die Autobatterie das Gerät mit ausreichend Strom versorgt. (Die Betriebsspannung beträgt 12 V Gleichstrom.) Die Funktionstasten funktionieren nicht. Drücken Sie DSPL und (Zurück)/MODE länger als 2 Sekunden, um das Gerät zurückzusetzen. Der Speicherinhalt wird gelöscht. 30DE Radioempfang Der Radioempfang ist schlecht. Störgeräusche sind zu hören. Schließen Sie die Antenne fest an. In FM3 kann zwischen 65 MHz und 74 MHz kein Sender eingestellt werden. [AREA] ist auf [EUROPE] gesetzt. – Setzen Sie [AREA] auf [RUSSIA] (Seite 22). RDS RDS-Dienste können nicht empfangen werden (wenn [AREA] auf [RUSSIA] gesetzt ist). FM3 ist ausgewählt. – Wählen Sie FM1 oder FM2 aus. RDS-Dienste stehen in der aktuellen Region nicht zur Verfügung. Der Sendersuchlauf (SEEK) startet nach ein paar Sekunden Radioempfang. Der Sender ist kein Verkehrsfunksender (TP) oder die Sendesignale sind zu schwach. – Deaktivieren Sie TA (Seite 13). Es sind keine Verkehrsdurchsagen zu hören. Aktivieren Sie TA (Seite 13). Der Sender sendet keine Verkehrsdurchsagen, obwohl es sich um einen Verkehrsfunksender (TP) handelt. – Stellen Sie einen anderen Sender ein. Bei der PTY-Funktion wird [- - - - - - - -] angezeigt. Der aktuelle Sender ist kein RDS-Sender oder der Radioempfang ist schlecht. Der Programmdienstname blinkt. Für den aktuellen Sender gibt es keine Alternativfrequenz. – Drücken Sie (SEEK –/+), solange der Programmdienstname blinkt. [PI SEEK] wird angezeigt und das Gerät beginnt dann mit der Suche nach einer Frequenz mit denselben PI-Daten (Programmkennung). Wiedergabe mit einem USB-Gerät Es dauert länger, bis an einem USB-Gerät die Wiedergabe beginnt. Die Dateien auf dem USB-Gerät befinden sich in einer komplizierten Datei-/ Ordnerstruktur. Die Audiodatei kann nicht wiedergegeben werden. Erläuterungen zu den unterstützten Dateiformaten finden Sie unter „Technische Daten“ (Seite 28). Wenn die Audiodatei dennoch nicht wiedergegeben werden kann, schlagen Sie in der mit dem USB-Gerät gelieferten Bedienungsanleitung nach oder wenden Sie sich an den Hersteller des USB-Geräts. Funktionen zum Überspringen eines Albums bzw. von Elementen (SprungModus) und Suchen nach einem Titel anhand seines Namens (Quick-BrowZer) können nicht ausgeführt werden. Setzen Sie [USB MODE] auf [MSC/MTP] (Seite 23). Während der Wiedergabe im AndroidModus kann kein Ton ausgegeben werden. Überprüfen Sie den Status der Anwendung für die Audiowiedergabe auf dem Android-Smartphone. NFC-Funktion Die Sofortverbindung (NFC) ist nicht möglich. Das Smartphone reagiert nicht, wenn die Geräte aneinandergehalten werden. – Vergewissern Sie sich, dass die NFCFunktion am Smartphone eingeschaltet ist. – Halten Sie den Bereich mit dem NZeichen des Smartphones näher an den Bereich mit dem N-Zeichen an diesem Gerät. – Wenn sich das Smartphone in einem Etui befindet, nehmen Sie es heraus. Die NFC-Empfangsempfindlichkeit hängt vom Gerät ab. Wenn die Sofortverbindung mit dem Smartphone mehrere Male fehlschlägt, stellen Sie die BLUETOOTH-Verbindung manuell her. BLUETOOTH-Funktion Das zu verbindende Gerät kann dieses Gerät nicht erkennen. Schalten Sie dieses Gerät in den Bereitschaftsmodus für das Pairing, bevor Sie das Pairing vornehmen. Während eine Verbindung zu zwei BLUETOOTH-Geräten besteht, kann dieses Gerät von keinem weiteren Gerät erkannt werden. – Trennen Sie eine der Verbindungen und lassen Sie dann vom anderen Gerät aus nach diesem Gerät suchen. Schalten Sie die BLUETOOTHSignalausgabe ein, wenn das Pairing bereits erfolgt ist (Seite 10). Es kann keine Verbindung hergestellt werden. Die Verbindungsherstellung kann nur von einem Gerät aus gesteuert werden (diesem Gerät oder dem BLUETOOTHGerät), aber nicht von beiden Geräten aus. – Stellen Sie von einem BLUETOOTH-Gerät aus eine Verbindung zu diesem Gerät her oder umgekehrt. Der Name des erkannten Geräts wird nicht angezeigt. Je nach dem Status des anderen Geräts wird der Name möglicherweise nicht angezeigt. Es ist kein Rufzeichen zu hören. Stellen Sie, wenn ein Anruf eingeht, die Lautstärke durch Drehen des Steuerreglers ein. Je nach dem verbundenen Gerät wird das Rufzeichen möglicherweise nicht richtig übertragen. – Setzen Sie [RINGTONE] auf [1] (Seite 25). Die Frontlautsprecher sind nicht an dieses Gerät angeschlossen. – Schließen Sie die Frontlautsprecher an dieses Gerät an. Das Rufzeichen wird nur über die Frontlautsprecher ausgegeben. 31DE Die Stimme des Gesprächsteilnehmers ist nicht zu hören. Die Frontlautsprecher sind nicht an dieses Gerät angeschlossen. – Schließen Sie die Frontlautsprecher an dieses Gerät an. Die Stimme des Gesprächsteilnehmers wird nur über die Frontlautsprecher ausgegeben. Ihr Gesprächspartner teilt Ihnen mit, dass die Lautstärke zu hoch oder zu niedrig ist. Verringern oder erhöhen Sie die Lautstärke, indem Sie die Mikrofonverstärkung einstellen (Seite 18). Bei Telefongesprächen ist ein Echo oder Rauschen zu hören. Verringern Sie die Lautstärke. Setzen Sie den EC/NC-Modus auf [EC/NC-1] oder [EC/NC-2] (Seite 18). Wenn Umgebungsgeräusche das Telefongespräch überlagern, versuchen Sie, diese Geräusche zu reduzieren. Beispiel: Wenn das Fenster geöffnet ist und Straßenlärm usw. hereindringt, schließen Sie das Fenster. Wenn eine Klimaanlage laut ist, drehen Sie diese herunter. Es besteht keine Verbindung zum Telefon. Während der BLUETOOTHAudiowiedergabe lässt sich auch durch Drücken von CALL keine Verbindung zum Mobiltelefon herstellen. – Stellen Sie die Verbindung vom Mobiltelefon aus her. Die Tonqualität beim Telefonieren ist nicht gut. Die Tonqualität beim Telefonieren hängt von den Empfangsbedingungen des Mobiltelefons ab. – Fahren Sie bei schlechtem Empfang mit dem Auto an eine Stelle, an der der Empfang für das Mobiltelefon besser ist. Die Lautstärke des verbundenen Audiogeräts ist zu niedrig (hoch). Der Lautstärkepegel variiert je nach Audiogerät. – Stellen Sie am verbundenen Audiogerät oder an diesem Gerät die Lautstärke ein (Seite 24). 32DE Der Ton setzt während der Wiedergabe mit einem BLUETOOTH-Audiogerät aus. Verringern Sie den Abstand zwischen diesem Gerät und dem BLUETOOTHAudiogerät. Wenn sich das BLUETOOTH-Audiogerät in einem Etui befindet, das die Signalübertragung stört, nehmen Sie das Audiogerät während des Betriebs aus dem Etui. In der Nähe werden einige BLUETOOTHoder andere Geräte verwendet, die Funkwellen ausstrahlen. – Schalten Sie die anderen Geräte aus. – Erhöhen Sie den Abstand zu den anderen Geräten. Der Wiedergabeton setzt kurz aus, wenn die Verbindung zwischen diesem Gerät und dem Mobiltelefon hergestellt wird. Dies ist keine Fehlfunktion. Das verbundene BLUETOOTH-Audiogerät lässt sich nicht steuern. Überprüfen Sie, ob das verbundene BLUETOOTH-Audiogerät das Profil AVRCP unterstützt. Einige Funktionen stehen nicht zur Verfügung. Vergewissern Sie sich, dass das verbundene Gerät die betreffenden Funktionen unterstützt. Ein Anruf wird unbeabsichtigt entgegengenommen. Das verbundene Telefon ist so eingestellt, dass Anrufe automatisch entgegengenommen werden. Das Pairing ist aufgrund einer Zeitüberschreitung fehlgeschlagen. Je nach dem verbundenen Gerät ist das Zeitlimit für das Pairing sehr kurz. – Versuchen Sie, das Pairing in der vorgegebenen Zeit abzuschließen. Die BLUETOOTH-Funktion lässt sich nicht verwenden. Schalten Sie das Gerät aus, indem Sie OFF mehr als 2 Sekunden lang drücken, und schalten Sie das Gerät dann wieder ein. Bei einem Anruf über die Freisprecheinrichtung wird über die Lautsprecher des Fahrzeugs kein Ton ausgegeben. Wenn der Ton über das Mobiltelefon ausgegeben wird, stellen Sie dieses so ein, dass der Ton über die Lautsprecher des Fahrzeugs ausgegeben wird. Siri Eyes Free ist nicht aktiviert. Registrieren Sie ein iPhone, das Siri Eyes Free unterstützt, zur freihändigen Verwendung. Aktivieren Sie die Siri-Funktion am iPhone. Trennen Sie die BLUETOOTH-Verbindung zwischen dem iPhone und diesem Gerät und stellen Sie sie wieder her. Sony | Music Center-Bedienung Der Name der Anwendung entspricht nicht der tatsächlichen Anwendung in „Sony | Music Center“. Starten Sie die Anwendung von der Anwendung „Sony | Music Center“ aus erneut. Beim Ausführen der Anwendung „Sony | Music Center“ über BLUETOOTH wechselt das Display automatisch zu [BT AUDIO]. Die Anwendung „Sony | Music Center“ oder die BLUETOOTH-Funktion ist fehlgeschlagen. Führen Sie die Anwendung erneut aus. Die Verbindung zur Anwendung „Sony | Music Center“ wird automatisch getrennt, wenn das Display zu [IPD] wechselt. Die Anwendung „Sony | Music Center“ auf dem iPhone/iPod unterstützt die iPodWiedergabe nicht. – Wechseln Sie am Gerät zu einer anderen Tonquelle als [IPD] und stellen Sie die Verbindung zu „Sony | Music Center“ her (Seite 19). Die Verbindung zu „Sony | Music Center“ wird automatisch getrennt, wenn der USBModus des Geräts in [ANDROID] geändert wird. Das Android-Smartphone unterstützt die Wiedergabe im Android-Modus nicht. – Setzen Sie den USB-Modus des Geräts auf [MSC/MTP] und stellen Sie die Verbindung zu „Sony | Music Center“ her (Seite 19). Meldungen Eine der folgenden Meldungen erscheint oder blinkt möglicherweise während des Betriebs. INVALID Die ausgewählte Funktion ist möglicherweise nicht zulässig. [USB MODE] kann während der iPodWiedergabe nicht geändert werden. READ Bitte warten Sie, bis das Einlesen abgeschlossen ist. Die Wiedergabe beginnt danach automatisch. Dieser Vorgang kann je nach Dateistruktur einige Zeit in Anspruch nehmen. (Unterstrich): Das Zeichen lässt sich nicht anzeigen. Bei der Wiedergabe mit einem USBGerät: HUB NO SUPRT: USB-Hubs werden nicht unterstützt. IPD STOP: Die iPod-Wiedergabe ist am Ende angelangt. Starten Sie am iPod/iPhone die Wiedergabe. NOT SUPPORT - ANDROID MODE [USB MODE] ist auf [ANDROID] gesetzt und ein an dieses Gerät angeschlossenes USB-Gerät unterstützt AOA (Android Open Accessory) 2.0 nicht. – Setzen Sie [USB MODE] auf [MSC/MTP] (Seite 23). 33DE USB ERROR Schließen Sie das USB-Gerät erneut an. USB NO DEV Vergewissern Sie sich, dass das USB-Gerät bzw. das USB-Kabel fest angeschlossen ist. USB NO MUSIC Schließen Sie ein USB-Gerät an, auf dem sich abspielbare Dateien befinden (Seite 28). USB NO SUPRT Einzelheiten zur Kompatibilität Ihres USBGeräts finden Sie auf der SupportWebsite, die auf der hinteren Umschlagseite angegeben ist. OVERLOAD: Das USB-Gerät ist überlastet. Trennen Sie das USB-Gerät von diesem Gerät und wählen Sie mit SRC eine andere Tonquelle aus. Am USB-Gerät liegt ein Fehler vor oder ein nicht unterstütztes Gerät ist angeschlossen. Beim RDS-Betrieb: NO AF: Es gibt keine Alternativfrequenzen. Drücken Sie (SEEK –/+), solange der Programmdienstname blinkt. Das Gerät beginnt dann mit der Suche nach einer Frequenz mit denselben PI-Daten (Programmkennung). [PI SEEK] wird angezeigt. NO PI: Keine Programmkennung. Der ausgewählte Sender verfügt nicht über PIDaten (Programmkennung). Wählen Sie einen anderen Sender aus. NO TP: Es gibt keine Verkehrsfunksender. Das Gerät sucht weiter nach verfügbaren Verkehrsfunksendern (TP). 34DE BLUETOOTH-Funktion: BTA NO DEV: Es ist kein BLUETOOTH-Gerät angeschlossen bzw. es wird nicht erkannt. Stellen Sie sicher, dass das BLUETOOTHGerät richtig verbunden ist oder die BLUETOOTH-Verbindung mit dem BLUETOOTH-Gerät hergestellt wird. ERROR: Die ausgewählte Funktion konnte nicht ausgeführt werden. Warten Sie eine Weile und versuchen Sie es dann erneut. UNKNOWN: Ein Name oder eine Telefonnummer kann nicht angezeigt werden. WITHHELD: Die Telefonnummer wird vom Anrufer unterdrückt. Sony | Music Center-Bedienung: APP ––––––––: Eine Verbindung mit der Anwendung wurde nicht hergestellt. Stellen Sie die „Sony | Music Center“Verbindung erneut her (Seite 19). APP DISCNCT: Es besteht keine Verbindung zur Anwendung. Stellen Sie die „Sony | Music Center“Verbindung her (Seite 19). APP DISPLAY: In der Anwendung ist eine Bildschirmeinstellanzeige geöffnet. Schließen Sie die Bildschirmeinstellanzeige der Anwendung, um die Tastenfunktion zu aktivieren. APP LIST: Die Inhaltsliste des USB-Geräts ist geöffnet. Schließen Sie die Liste, um die Tastenfunktion zu aktivieren. APP MENU: In der Anwendung ist eine Einstellanzeige geöffnet. Schließen Sie die Einstellanzeige der Anwendung, um die Tastenfunktion zu aktivieren. APP NO DEV: Es wurde keine Verbindung zum Gerät mit der installierten Anwendung hergestellt bzw. das Gerät wird nicht erkannt. Stellen Sie eine BLUETOOTH-Verbindung her und stellen Sie erneut die Verbindung zu „Sony | Music Center“ her (Seite 19). APP SOUND: In der Anwendung ist eine Klangeinstellanzeige geöffnet. Schließen Sie die Klangeinstellanzeige der Anwendung, um die Tastenfunktion zu aktivieren. OPEN APP: Die Anwendung „Sony | Music Center“ wird nicht ausgeführt. Starten Sie die Anwendung. Beim Verwenden der Lenkradfernbedienung: ERROR Starten Sie die Registrierung ab der Funktion neu, bei der der Fehler auftrat (Seite 23). TIMEOUT Versuchen Sie, die Registrierung abzuschließen, solange [REGISTER] blinkt (etwa 6 Sekunden) (Seite 23). Beim Aktualisieren der Firmware: FILE ERROR: Die Aktualisierungsdatei ist nicht auf dem USB-Gerät gespeichert. Speichern Sie die Aktualisierungsdatei auf dem USB-Gerät und versuchen Sie es erneut (Seite 26). UPDATE ERROR PRESS ENTER: Die Firmware-Aktualisierung wurde nicht ordnungsgemäß abgeschlossen. Drücken Sie ENTER, um die Meldung auszublenden, und versuchen Sie es dann erneut. Stellen Sie den Zündschlüssel während der Aktualisierung nicht in die Position OFF und entfernen Sie auch nicht das USB-Gerät (Seite 26). Wenn sich das Problem mit diesen Abhilfemaßnahmen nicht beheben lässt, wenden Sie sich an einen Sony-Händler. Wenn Sie dieses Gerät aufgrund einer Störung bei der Wiedergabe mit einem anderen Gerät zur Reparatur bringen, bringen Sie bitte auch das Gerät mit, das verwendet wurde, als das Problem zum ersten Mal auftrat. 35DE Anschluss/Installation Teileliste für die Installation Vorsichtsmaßnahmen • Schließen Sie alle Masseleitungen an einen gemeinsamen Massepunkt an. • Achten Sie darauf, dass die Leitungen nicht unter einer Schraube oder zwischen beweglichen Teilen, wie z. B. in einer Sitzschiene, eingeklemmt werden. • Schalten Sie, bevor Sie irgendwelche Anschlüsse vornehmen, die Zündung des Fahrzeugs aus, um Kurzschlüsse zu vermeiden. • Schließen Sie die Stromversorgungsleitung an dieses Gerät und die Lautsprecher an, bevor Sie sie an den Hilfsstromanschluss anschließen. • Aus Sicherheitsgründen müssen alle losen, nicht angeschlossenen Leitungen mit Isolierband abgeklebt werden. ×2 Sicherheitsmaßnahmen • Wählen Sie den Einbauort sorgfältig so aus, dass das Gerät beim Fahren nicht hinderlich ist. • Installieren Sie das Gerät nicht an einer Stelle, an der es Staub, Schmutz, übermäßigen Erschütterungen oder hohen Temperaturen ausgesetzt ist, wie z. B. in direktem Sonnenlicht oder in der Nähe der Heizung. • Verwenden Sie ausschließlich die mitgelieferten Montageteile. Nur mit diesen Teilen lässt sich das Gerät sicher montieren. Hinweis zur Stromversorgungsleitung (gelb) Wenn Sie dieses Gerät zusammen mit anderen Stereokomponenten anschließen, muss der Autostromkreis, an den die Geräte angeschlossen sind, einen höheren Ampere-Wert aufweisen als die Summe der Ampere-Werte der Sicherungen an den einzelnen Komponenten. Einstellen des Montagewinkels Achten Sie darauf, dass der Montagewinkel geringer ist als 30°. 36DE • In dieser Teileliste ist nicht der gesamte Inhalt der Packung aufgeführt. • Die Halterung und die Schutzumrandung werden vor der Auslieferung am Gerät angebracht. Vor dem Montieren des Geräts entfernen Sie mit den Löseschlüsseln die Halterung vom Gerät. Erläuterungen dazu finden Sie unter „Abnehmen der Schutzumrandung und der Halterung“ (Seite 40). • Bewahren Sie die Löseschlüssel zur späteren Verwendung auf. Sie benötigen sie auch, wenn Sie das Gerät aus dem Fahrzeug ausbauen wollen. Anschluss Tiefsttonlautsprecher*1 *3 *3 *3 Endverstärker*1 *2 Erläuterungen dazu finden Sie unter „Vornehmen der Anschlüsse“ (Seite 38). Näheres finden Sie unter „Stromanschlussdiagramm“ (Seite 38). von einer per Kabel angeschlossenen Fernbedienung (nicht mitgeliefert)*4 *5*6 von einer Autoantenne*7 *1 *2 *3 *4 Nicht mitgeliefert Lautsprecherimpedanz: 4 Ω – 8 Ω × 4 Cinchkabel (nicht mitgeliefert) Verwenden Sie je nach Fahrzeugtyp einen Adapter für eine per Kabel angeschlossene Fernbedienung (nicht mitgeliefert). Einzelheiten zum Verwenden der Kabelfernbedienung finden Sie unter „Verwenden der Kabelfernbedienung“ (Seite 39). *5 Führen Sie das Mikrofoneingangskabel so, dass es beim Fahren nicht hinderlich ist, unabhängig davon, ob es gerade in Gebrauch ist oder nicht. Sichern Sie das Kabel mit einer Kabelklemme usw., falls es durch den Fußraum geführt werden muss. *6 Einzelheiten zum Installieren des Mikrofons finden Sie unter „Installieren des Mikrofons“ (Seite 39). *7 Verwenden Sie je nach Fahrzeugtyp einen Adapter (nicht mitgeliefert), wenn der Antennenanschluss nicht passt. 37DE Vornehmen der Anschlüsse Wenn Sie eine Motorantenne ohne Relaiskästchen verwenden und dieses Gerät mit der mitgelieferten Stromversorgungsleitung anschließen, kann die Antenne beschädigt werden. Einfaches Anschließen eines Tiefsttonlautsprechers Sie können einen Tiefsttonlautsprecher ohne Endverstärker installieren, indem Sie ihn einfach an das Hecklautsprecherkabel anschließen. Frontlautsprecher An den Lautsprecheranschluss des Fahrzeugs Tiefsttonlautsprecher Hinweise Violett 1 Hecklautsprecher Violettschwarz 2 (rechts) gestreift Grau Frontlautsprecher Grauschwarz (rechts) 4 gestreift 3 Weiß 5 Frontlautsprecher Weißschwarz 6 (links) gestreift 7 Grün Hecklautsprecher Grünschwarz 8 (links) gestreift An den Stromanschluss des Fahrzeugs 12 Kontinuierliche Stromversorgung Steuerung für Motorantenne/ 13 Endverstärker (REM OUT) Blauweiß gestreift Geschaltete 14 Stromversorgung für die Beleuchtung Orange-weiß gestreift 15 Geschaltete Stromversorgung 16 Masse 38DE Gelb Rot Schwarz • Die Hecklautsprecherkabel müssen vorbereitet werden. • Verwenden Sie einen Tiefsttonlautsprecher mit einer Impedanz zwischen 4 Ω und 8 Ω und mit ausreichender Belastbarkeit, um Schäden zu vermeiden. Anschluss für Stromversorgung des Speichers Wenn die gelbe Stromversorgungsleitung angeschlossen ist, wird der Speicher stets (auch bei ausgeschalteter Zündung) mit Strom versorgt. Lautsprecheranschluss • Schalten Sie das Gerät vor dem Anschließen der Lautsprecher aus. • Verwenden Sie Lautsprecher mit einer Impedanz zwischen 4 Ω und 8 Ω und mit ausreichender Belastbarkeit, um Schäden zu vermeiden. Stromanschlussdiagramm Stellen Sie die Position des Hilfsstromanschlusses bei Ihrem Fahrzeug fest und nehmen Sie die Anschlüsse entsprechend dem Fahrzeug richtig vor. Hilfsstromanschluss Normaler Anschluss Rot Installieren des Mikrofons Rot Damit bei Freisprechanrufen Ihre Stimme übertragen werden kann, müssen Sie das Mikrofon installieren. Gelb Gelb Kontinuierliche 12 Stromversorgung 15 Gelb Geschaltete Stromversorgung Rot Wenn die Position der roten und gelben Leitung vertauscht ist Rot Clip (nicht mitgeliefert) Rot Gelb Gelb 12 Geschaltete Stromversorgung Gelb 15 Kontinuierliche Stromversorgung Rot Vorsichtsmaßnahmen Bei einem Fahrzeug mit Zündschloss ohne Zubehörposition ACC oder I Rot Rot Gelb Gelb Stellen Sie die Anschlüsse her, schließen Sie die geschalteten Stromversorgungsleitungen richtig an und verbinden Sie dann das Gerät mit der Stromversorgung des Fahrzeugs. Sollten beim Anschließen des Geräts Probleme auftreten oder sollten Sie Fragen haben, auf die in dieser Anleitung nicht eingegangen wird, wenden Sie sich bitte an den Fahrzeughändler. • Es ist sehr gefährlich, wenn sich das Kabel um die Lenksäule oder den Schalthebel wickelt. Achten Sie unbedingt darauf, dass das Kabel und andere Teile beim Fahren nicht hinderlich sind. • Wenn Ihr Auto mit Airbags oder anderen Aufprallschutzsystemen ausgestattet ist, wenden Sie sich vor der Installation an den Händler, bei dem Sie dieses Gerät erworben haben, oder an den Autohändler. Hinweis Reinigen Sie die Oberfläche des Armaturenbretts mit einem trockenen Tuch, bevor Sie das doppelseitige Klebeband anbringen. Verwenden der Kabelfernbedienung 1 Zum Aktivieren der Kabelfernbedienung setzen Sie [STR CONTROL] unter [SET STEERING] auf [PRESET] (Seite 23). 39DE Montieren des Geräts im Armaturenbrett Installation Abnehmen der Schutzumrandung und der Halterung Nehmen Sie vor dem Installieren des Geräts die Schutzumrandung und die Halterung vom Gerät ab. 1 Vergewissern Sie sich vor der Montage, dass die Verriegelungen an beiden Seiten der Halterung um 2 mm nach innen gebogen sind. 1 Fassen Sie die Schutzumrandung mit den Fingern an den Seitenkanten und ziehen Sie sie heraus. Platzieren Sie die Halterung im Armaturenbrett und biegen Sie dann die Klammern nach außen, um einen sicheren Halt zu gewährleisten. 182 mm 53 mm 2 Führen Sie die beiden Löseschlüssel ein, bis sie mit einem Klicken einrasten. Ziehen Sie die Halterung nach unten und das Gerät zum Herausziehen nach oben. 2 Verriegelung Montieren Sie das Gerät an der Halterung und bringen Sie dann die Schutzumrandung an. Der Haken muss nach innen weisen. Hinweise • Wenn die Verriegelungen gerade oder nach außen gebogen sind, ist das Gerät nicht sicher installiert und kann herausrutschen. • Achten Sie darauf, dass die 4 Verriegelungen an der Schutzumrandung fest in den Kerben am Gerät sitzen. Abnehmen und Anbringen der Frontplatte Erläuterungen dazu finden Sie unter „Abnehmen der Frontplatte“ (Seite 7). 40DE Zurücksetzen des Geräts Erläuterungen dazu finden Sie unter „Zurücksetzen des Geräts“ (Seite 8). Austauschen der Sicherung Wenn Sie eine Sicherung Sicherung (10 A) austauschen, achten Sie darauf, eine Ersatzsicherung mit dem gleichen Ampere-Wert wie die Originalsicherung zu verwenden. Dieser ist auf der Originalsicherung angegeben. Wenn die Sicherung durchbrennt, überprüfen Sie den Stromanschluss und tauschen die Sicherung aus. Brennt die neue Sicherung ebenfalls durch, kann eine interne Fehlfunktion vorliegen. Wenden Sie sich in einem solchen Fall an Ihren Sony-Händler. 41DE Pour votre sécurité, veuillez installer cet appareil dans le tableau de bord de la voiture en tenant compte du fait que l’arrière de l’appareil chauffe en cours d’utilisation. Pour de plus amples détails, reportezvous à la section « Raccordement/ Installation » (page 34). Fabriqué en Thaïlande La plaque signalétique reprenant la tension d’alimentation, etc. se trouve sur le dessous du châssis. La validité du libellé CE se limite uniquement aux pays où la loi l’impose, principalement les pays de l’EEE (Espace économique européen). Le soussigné, Sony Corporation, déclare que cet équipement est conforme à la Directive 2014/53/UE. Le texte complet de la déclaration UE de conformité est disponible à l’adresse internet suivante : http://www.compliance.sony.de/ Avis à l’attention des clients : les informations suivantes s’appliquent uniquement aux appareils vendus dans des pays qui appliquent les directives de l’Union Européenne Ce produit a été fabriqué par ou pour le compte de Sony Corporation. Importateur dans l’UE : Sony Europe B.V. Les questions basées sur la législation européenne pour l’importateur ou relatives à la conformité des produits doivent être adressées au mandataire : Sony Belgium, bijkantoor van Sony Europe B.V., Da Vincilaan 7-D1, 1930 Zaventem, Belgique. 2FR Elimination des piles et accumulateurs et des équipements électriques et électroniques usagés (applicable dans les pays de l’Union Européenne et dans les autres pays disposant de systèmes de collecte sélective) Ce symbole apposé sur le produit, la pile ou l’accumulateur, ou sur l’emballage, indique que le produit et les piles et accumulateurs fournis avec ce produit ne doivent pas être traités comme de simples déchets ménagers. Sur certains types de piles, ce symbole apparaît parfois combiné avec un symbole chimique. Le symbole pour le plomb (Pb) est rajouté lorsque ces piles contiennent plus de 0,004 % de plomb. En vous assurant que les produits, piles et accumulateurs sont mis au rebut de façon appropriée, vous participez activement à la prévention des conséquences négatives que leur mauvais traitement pourrait provoquer sur l’environnement et sur la santé humaine. Le recyclage des matériaux contribue par ailleurs à la préservation des ressources naturelles. Pour les produits qui, pour des raisons de sécurité, de performance ou d’intégrité des données, nécessitent une connexion permanente à une pile ou à un accumulateur intégré(e), il conviendra de vous rapprocher d’un Service Technique qualifié pour effectuer son remplacement. En rapportant votre appareil électrique, les piles et accumulateurs en fin de vie à un point de collecte approprié vous vous assurez que le produit, la pile ou l’accumulateur intégré sera traité correctement. Pour tous les autres cas de figure et afin d’enlever les piles ou accumulateurs en toute sécurité de votre appareil, reportez-vous au manuel d’utilisation. Rapportez les piles et accumulateurs, et les équipements électriques et électroniques usagés au point de collecte approprié pour le recyclage. Pour toute information complémentaire au sujet du recyclage de ce produit ou des piles et accumulateurs, vous pouvez contacter votre municipalité, votre déchetterie locale ou le point de vente où vous avez acheté ce produit. ATTENTION La plage de fréquences suivante 65 – 74 MHz n’est pas affectée à la diffusion du son dans la table des affectations communes européennes et ne peut pas être utilisée en Europe. Avertissement au cas où le contact de votre voiture ne dispose pas d’une position ACC Veillez à activer la fonction AUTO OFF (page 21). L’appareil se met hors tension complètement et automatiquement à l’heure définie une fois qu’il est éteint et que l’horloge est affichée (c’est-àdire en maintenant OFF enfoncé pendant 1 seconde), ce qui évite de décharger la batterie. Si vous ne réglez pas la fonction AUTO OFF, appuyez sur OFF et maintenez enfoncé jusqu’à ce que l’affichage disparaisse chaque fois que vous coupez le contact. Avis d’exclusion de responsabilité relatif aux services proposés par des tiers Les services proposés par des tiers peuvent être modifiés, suspendus ou clôturés sans avis préalable. Sony n’assume aucune responsabilité dans ce genre de situation. Remarque importante Attention SONY NE PEUT ÊTRE, EN AUCUN CAS, TENU POUR RESPONSABLE D’UN QUELCONQUE DOMMAGE ACCIDENTEL, INDIRECT OU ACCESSOIRE, OU DE TOUT AUTRE DOMMAGE, Y COMPRIS, MAIS SANS S’Y LIMITER, LA PERTE DE BÉNÉFICES, DE REVENUS, DE DONNÉES, DE JOUISSANCE DU PRODUIT OU DE TOUT ÉQUIPEMENT ASSOCIÉ, SON INDISPONIBILITÉ, ET LE TEMPS PERDU PAR L’ACHETEUR, LIÉ À OU RÉSULTANT DE L’UTILISATION DE CE PRODUIT, DE SES COMPOSANTS MATÉRIELS ET/OU LOGICIELS. Cher client, ce produit contient un émetteur radio. Conformément au règlement UNECE n° 10, un fabricant automobile peut imposer certaines conditions particulières pour l’installation d’émetteurs radio dans ses véhicules. Veuillez vérifier le manuel d’utilisation de votre véhicule ou contactez le constructeur de votre véhicule ou votre concessionnaire, avant d’installer ce produit dans votre véhicule. Appels d’urgence Le système BLUETOOTH mains libres embarqué et le dispositif électronique qui y est connecté fonctionnent grâce aux signaux radio, aux réseaux cellulaires et aux lignes terrestres, tout comme la fonction de programmation par l’utilisateur. La connexion n’est donc pas garantie en toutes circonstances. Par conséquent, ne vous reposez pas uniquement sur un dispositif électronique pour vos communications importantes (tels que les appels médicaux d’urgence). 3FR Communication par BLUETOOTH Les micro-ondes émises par un dispositif BLUETOOTH peuvent perturber le fonctionnement des dispositifs médicaux électroniques. Dans les circonstances qui suivent, mettez cet appareil, ainsi que les autres dispositifs BLUETOOTH présents, hors tension, car ils peuvent provoquer un accident. – En présence d’un gaz inflammable, dans un hôpital, un train, un avion ou une station-service – À proximité de portes automatiques ou d’un système de détection d’incendie Cet appareil prend en charge les fonctionnalités conformes à la norme BLUETOOTH afin de fournir une connexion sécurisée lorsque la technologie sans fil BLUETOOTH est utilisée. Mais, en fonction de l’environnement, la sécurité peut ne pas être suffisante. Soyez donc prudent lorsque vous communiquez en utilisant la technologie sans fil BLUETOOTH. Nous n’assumons aucune responsabilité en cas de fuite d’informations au cours d’une communication BLUETOOTH. Si vous avez des questions concernant cet appareil ou si vous rencontrez des problèmes qui ne sont pas abordés dans ce mode d’emploi, contactez votre revendeur Sony le plus proche. 4FR Table des matières Emplacement des commandes. . . . . . . . . . 6 Préparation Retrait de la façade avant . . . . . . . . . . . . . . 7 Réinitialisation de l’appareil . . . . . . . . . . . . 8 Réglage de l’horloge . . . . . . . . . . . . . . . . . . 8 Préparation d’un périphérique BLUETOOTH. . . . . . . . . . . . . . . . . . . . . . . 8 Connexion d’un périphérique USB . . . . . . . 11 Connexion d’un autre périphérique audio portatif. . . . . . . . . . . . . . . . . . . . . . . . . . . 11 Utilisation de la radio Utilisation de la radio . . . . . . . . . . . . . . . . . 12 Utilisation du système RDS (Système de radiocommunication de données) . . . 12 Réglages Désactivation du mode DEMO . . . . . . . . . 20 Réglages de base. . . . . . . . . . . . . . . . . . . . 20 Configuration générale (GENERAL). . . . . . . 21 Configuration du son (SOUND) . . . . . . . . . 22 Configuration de l’affichage (DISPLAY) . . . . . . . . . . . . . . . . . . . . . . . 23 Configuration de BLUETOOTH (BLUETOOTH) . . . . . . . . . . . . . . . . . . . . 24 Configuration de Sony | Music Center (SONY APP) . . . . . . . . . . . . . . . . . . . . . . 24 Informations complémentaires Mise à jour du firmware. . . . . . . . . . . . . . . Précautions . . . . . . . . . . . . . . . . . . . . . . . . . Entretien . . . . . . . . . . . . . . . . . . . . . . . . . . . Spécifications . . . . . . . . . . . . . . . . . . . . . . . Dépannage . . . . . . . . . . . . . . . . . . . . . . . . . Messages . . . . . . . . . . . . . . . . . . . . . . . . . . 25 25 26 26 28 32 Lecture Lecture d’un périphérique USB . . . . . . . . . 14 Lecture d’un périphérique BLUETOOTH. . . . . . . . . . . . . . . . . . . . . . 14 Recherche et lecture de plages. . . . . . . . . 15 Raccordement/Installation Attention. . . . . . . . . . . . . . . . . . . . . . . . . . . Liste des pièces pour installation . . . . . . . Raccordement . . . . . . . . . . . . . . . . . . . . . . Installation . . . . . . . . . . . . . . . . . . . . . . . . . 34 34 35 38 Appel mains libres (via BLUETOOTH uniquement) Recevoir un appel. . . . . . . . . . . . . . . . . . . . 16 Passer un appel . . . . . . . . . . . . . . . . . . . . . 16 Opérations disponibles en cours d’appel. . . . . . . . . . . . . . . . . . . . . . . . . . 17 Fonctions utiles Sony | Music Center avec smartphone iPhone/Android™. . . . . . . . . . . . . . . . . 18 Utilisation de la reconnaissance vocale (smartphone Android uniquement) . . . . . . . . . . . . . . . . . . . . . 19 Utilisation de Siri Eyes Free . . . . . . . . . . . . 19 5FR Emplacement des commandes Appareil principal Touche de déverrouillage de la façade avant VOICE (page 17, 19) Maintenez enfoncé pendant plus de 2 secondes pour activer la numérotation vocale, la reconnaissance vocale (smartphone Android uniquement) ou la fonction Siri (iPhone uniquement). Repère en forme de lettre N Touchez la molette de réglage avec le smartphone Android pour établir une connexion BLUETOOTH. SRC (source) Permet de mettre l’appareil sous tension. Permet aussi de changer de source. OFF Maintenez enfoncé pendant 1 seconde pour désactiver la source et afficher l’horloge. Maintenez enfoncé pendant plus de 2 secondes pour mettre l’appareil hors tension et pour faire disparaître l’affichage. Molette de réglage Tournez cette commande pour régler le volume. PUSH ENTER Permet d’accéder à l’élément sélectionné. Appuyez sur SRC, tournez puis appuyez pour modifier la source (délai de 2 secondes). MENU Permet d’ouvrir le menu de configuration. 6FR Fenêtre d’affichage / (SEEK –/+) Permettent de régler des stations automatiquement. Maintenez enfoncé pour rechercher une station manuellement. / (Précédent/Suivant) / (Recul rapide/Avance rapide) PTY (Type d’émission) Sélectionnez PTY dans RDS. (Rechercher) (page 15) Permet d’accéder au mode de recherche pendant la lecture. (Non disponible quand un périphérique USB en mode Android ou un iPod est connecté.) CALL Permet d’accéder au menu des appels. Recevoir/mettre fin à un appel. Maintenez enfoncé pendant plus de 2 secondes pour sélectionner le signal BLUETOOTH. (Retour) Permet de revenir à l’affichage précédent. MODE (page 8, 12, 17) Récepteur de la télécommande Touches numériques (1 à 6) Permettent de recevoir les stations radio mémorisées. Maintenez enfoncé pour mémoriser une station. ALBUM / Permettent de sauter un album pour le périphérique audio. Maintenez enfoncé pour sauter des albums en continu. (Non disponible quand un périphérique USB en mode Android ou un iPod est connecté.) (Répéter) (Non disponible quand un périphérique USB en mode Android est connecté.) (Aléatoire) (Non disponible quand un périphérique USB en mode Android est connecté.) MIC (page 17) (Lecture/pause) EXTRA BASS Permet de renforcer les sons graves en synchronisation avec le niveau de volume. Appuyez pour modifier le réglage EXTRA BASS : [1], [2], [OFF]. Préparation Retrait de la façade avant Vous pouvez retirer la façade avant de cet appareil pour le protéger du vol. 1 Appuyez sur OFF et maintenez enfoncé jusqu’à ce que l’appareil se mette hors tension, appuyez sur la touche de déverrouillage de la façade avant , puis tirez la façade avant vers vous pour la retirer. Alarme d’avertissement Si vous mettez la clé de contact en position OFF sans retirer la façade avant, l’alarme d’avertissement retentit pendant quelques secondes. L’alarme retentit uniquement lorsque l’amplificateur intégré est utilisé. Numéros de série Assurez-vous que les numéros de série figurant sur la base de l’appareil et au dos de la façade avant correspondent parfaitement. Dans le cas contraire, vous ne pouvez pas effectuer l’appairage, la connexion et la déconnexion BLUETOOTH à l’aide de la fonction NFC. Prise d’entrée AUX DSPL (Affichage) Appuyez pour changer les éléments d’affichage. SCRL (Défilement) Maintenez enfoncé pour faire défiler un élément d’affichage. Installation de la façade avant Port USB 7FR Réinitialisation de l’appareil Avant la première mise en service de l’appareil, après avoir remplacé la batterie du véhicule ou modifié les raccordements, vous devez réinitialiser l’appareil. 1 La réinitialisation de l’appareil remet l’heure à zéro et efface certaines informations mémorisées. Réglage de la zone/région Après réinitialisation de l’appareil, l’affichage du paramétrage de la zone/ région apparaît. Appuyez sur ENTER pendant que [SET AREA] est affiché. La zone/région actuellement sélectionnée s’affiche. 2 Tournez la molette de réglage pour sélectionner [EUROPE] ou [RUSSIA], puis appuyez dessus. 3 Tournez la molette de réglage pour sélectionner [YES] ou [NO], puis appuyez dessus. Si le réglage de la zone/région est modifié, l’appareil est réinitialisé, puis l’horloge s’affiche. Ce réglage peut être configuré dans le menu de configuration générale (page 21). Réglage de l’horloge 1 Appuyez sur MENU, tournez la molette de réglage pour sélectionner [GENERAL], puis appuyez dessus. 2 Tournez la molette de réglage pour sélectionner [SET CLOCK-ADJ], puis appuyez dessus. L’indication des heures clignote. 3 Une fois les minutes réglées, appuyez sur MENU. La configuration est terminée et l’horloge démarre. Pour afficher l’horloge Appuyez sur DSPL. Appuyez sur DSPL et (Retour)/ MODE pendant plus de 2 secondes. Remarque 1 4 Tournez la molette de réglage pour régler l’heure et les minutes. Appuyez sur / (SEEK –/+) pour modifier l’indication numérique. 8FR Préparation d’un périphérique BLUETOOTH Selon le périphérique compatible BLUETOOTH utilisé, smartphone, téléphone portable et périphérique audio, vous pouvez écouter de la musique ou passer un appel en mode mains libres (le terme « périphérique BLUETOOTH » sera utilisé ciaprès sauf mention contraire). Pour plus de détails concernant les connexions, reportezvous au mode d’emploi fourni avec le périphérique. Avant de connecter le périphérique, baissez le niveau sonore de cet appareil, faute de quoi le volume risque d’être trop élevé. Connexion avec un smartphone par One Touch (NFC) Lorsque vous établissez un contact entre la molette de réglage de l’appareil et un smartphone compatible NFC*, l’appareil est appairé et connecté au smartphone automatiquement. * La technologie NFC (Near Field Communication Communication en champ proche) permet d’établir une communication sans fil à courte portée entre différents périphériques tels que des téléphones portables et des étiquettes IC. Grâce à la fonction NFC, la communication des données peut être effectuée facilement par simple contact avec le symbole correspondant ou la zone spécifiée sur les périphériques compatibles NFC. Pour un smartphone exécutant Android OS 4.0 ou une version antérieure, le téléchargement de l’application « NFC Easy Connect » disponible sur Google Play est nécessaire. Cette application peut ne pas être téléchargeable dans certains pays/ certaines régions. 1 2 1 Pour plus de détails, reportez-vous au mode d’emploi fourni avec le smartphone. Placez le périphérique BLUETOOTH à une distance inférieure à 1 m de cet appareil. 2 Touchez le repère en forme de lettre N de l’appareil avec le repère en forme de lettre N du smartphone. Appuyez sur MENU, tournez la molette de réglage pour sélectionner [BLUETOOTH], puis appuyez dessus. 3 Tournez la molette de réglage pour sélectionner [SET PAIRING], puis appuyez dessus. 4 Tournez la molette de réglage pour sélectionner [SET DEVICE 1]* ou [SET DEVICE 2]*, puis appuyez dessus. Activez la fonction NFC sur le smartphone. clignote lorsque l’appareil est en mode de veille d’appairage. * [SET DEVICE 1] ou [SET DEVICE 2] prendra le nom du périphérique appairé une fois l’appairage terminé. Assurez-vous que s’allume sur l’affichage de l’appareil. Déconnexion via NFC Touchez de nouveau le repère en forme de lettre N de l’appareil avec le repère en forme de lettre N du smartphone. 5 Procédez à l’appairage sur le périphérique BLUETOOTH afin qu’il détecte cet appareil. 6 Sélectionnez [DSX-A416BT] sur l’affichage du périphérique BLUETOOTH. Remarques • Lorsque vous établissez la connexion, manipulez le smartphone avec précaution pour éviter les rayures. • Il n’est pas possible d’établir la connexion One Touch lorsque l’appareil est déjà connecté à deux autres périphériques compatibles NFC. Si tel est le cas, déconnectez l’un ou l’autre périphérique, puis établissez à nouveau la connexion avec le smartphone. Appairage et connexion avec un périphérique BLUETOOTH Lorsque vous établissez une connexion avec un périphérique BLUETOOTH pour la première fois, un enregistrement mutuel (appelé « appairage ») est nécessaire. L’appairage permet à cet appareil et aux autres périphériques de se reconnaître mutuellement. Cet appareil peut se connecter à deux périphériques BLUETOOTH (deux téléphones portables, ou un téléphone portable et un périphérique audio). Si le nom de votre modèle n’apparaît pas, répétez la procédure à partir de l’étape 2. 7 Si la saisie d’une clé d’accès* sur le périphérique BLUETOOTH est nécessaire, saisissez [0000]. * La clé d’accès peut être appelée « code d’accès », « code PIN », « nombre PIN » ou « mot de passe », etc., en fonction du périphérique. Saisissez la clé d’accès [0000] Lorsque l’appairage est effectué, allumé. reste 9FR 8 Sélectionnez cet appareil sur le périphérique BLUETOOTH pour établir la connexion BLUETOOTH. Icônes apparaissant sur l’affichage : S’allume lorsque la fonction appel en mode mains libres est disponible grâce à l’activation du profil HFP (Profil mains libres). ou s’allume lorsque la connexion est établie. Remarque Lorsque la connexion est en cours avec un périphérique BLUETOOTH, cet appareil ne peut pas être détecté à partir d’un autre périphérique. Pour permettre sa détection, accédez au mode d’appairage et recherchez cet appareil à partir de l’autre périphérique. Pour démarrer la lecture Pour de plus amples détails, reportez-vous à la section « Lecture d’un périphérique BLUETOOTH » (page 14). Pour déconnecter le périphérique appairé Exécutez les étapes 2 à 4 pour procéder à la déconnexion une fois que cet appareil et le périphérique BLUETOOTH ont été appairés. Connexion avec un périphérique BLUETOOTH appairé S’allume lorsque le périphérique audio peut être lu grâce à l’activation du profil A2DP (Profil de distribution audio avancée). Pour connecter le dernier périphérique connecté à partir de cet appareil Activez la fonction BLUETOOTH sur le périphérique BLUETOOTH. Pour connecter un périphérique audio, appuyez sur SRC pour sélectionner [BT AUDIO] et appuyez sur (Lecture/pause). Pour connecter un téléphone portable, appuyez sur CALL. Remarque Pendant la transmission BLUETOOTH audio en continu, vous ne pouvez pas établir la connexion au téléphone portable à partir de cet appareil. Établissez plutôt la connexion à cet appareil à partir du téléphone portable. Conseil Pour utiliser un périphérique appairé, il est nécessaire d’établir une connexion avec cet appareil. Certains périphériques appairés se connectent automatiquement. Avec le signal BLUETOOTH activé : lorsque le contact est mis, cet appareil se reconnecte automatiquement au dernier téléphone portable connecté. Installation du micro Pour de plus amples détails, reportez-vous à la section « Installation du microphone » (page 37). 1 2 Appuyez sur MENU, tournez la molette de réglage pour sélectionner [BLUETOOTH], puis appuyez dessus. Tournez la molette de réglage pour sélectionner [SET BT SIGNL], puis appuyez dessus. Assurez-vous que s’allume. 3 Activez la fonction BLUETOOTH sur le périphérique BLUETOOTH. 4 Utilisez le périphérique BLUETOOTH pour le connecter à cet appareil. ou s’allume. Connexion d’un iPhone/iPod (appairage BLUETOOTH automatique) Lorsqu’un iPhone/iPod exécutant iOS5 ou une version ultérieure est raccordé au port USB, l’appareil est appairé et connecté à l’iPhone/iPod automatiquement. Pour activer l’appairage automatique BLUETOOTH, assurez-vous que [SET AUTOPAIR] dans [BLUETOOTH] est réglé sur [ON] (page 24). 1 10FR Activez la fonction BLUETOOTH sur l’iPhone/iPod. 2 Raccordez un iPhone/iPod au port USB. Connexion d’un autre périphérique audio portatif 1 Mettez le périphérique audio portatif hors tension. 2 3 Baissez le volume sur l’appareil. Assurez-vous que s’allume sur l’affichage de l’appareil. Remarques • L’appairage BLUETOOTH automatique n’est pas possible lorsque l’appareil est déjà connecté à deux autres périphériques BLUETOOTH. Dans ce cas, déconnectez l’un ou l’autre périphérique, puis reconnectez l’iPhone/iPod. • Si l’appairage BLUETOOTH automatique n’est pas effectué, reportez-vous à la section « Préparation d’un périphérique BLUETOOTH » (page 8). Connexion d’un périphérique USB 1 2 Baissez le volume sur l’appareil. Raccordez le périphérique USB à l’appareil. Pour raccorder un iPod/iPhone, utilisez le câble de connexion USB pour iPod (non fourni). Raccordez le périphérique audio portatif à la prise d’entrée AUX (miniprise stéréo) de l’appareil à l’aide d’un cordon de raccordement (non fourni)*. * Veillez à utiliser une fiche de type droit. 4 Appuyez sur SRC pour sélectionner [AUX]. Adaptation du niveau de volume du périphérique connecté aux autres sources Démarrez la lecture sur le périphérique audio portatif à un niveau de volume modéré et réglez l’appareil sur votre volume d’écoute habituel. Appuyez sur MENU, puis sélectionnez [SOUND] [SET AUX VOL] (page 23). 11FR Mémorisation manuelle Utilisation de la radio 1 Utilisation de la radio Pour écouter la radio, appuyez sur SRC afin de sélectionner [TUNER]. Mémorisation automatique (BTM) 1 Appuyez sur MODE pour changer de bande (FM1, FM2, FM3, MW (PO) ou LW (GO)). 2 Appuyez sur MENU, tournez la molette de réglage pour sélectionner [GENERAL], puis appuyez dessus. 3 Tournez la molette de réglage pour sélectionner [SET BTM], puis appuyez dessus. L’appareil mémorise les stations sur les touches numériques dans l’ordre des fréquences. Syntonisation 1 2 Appuyez sur MODE pour changer de bande (FM1, FM2, FM3, MW (PO) ou LW (GO)). Procédez à la syntonisation. Pour effectuer la syntonisation manuellement Appuyez sur / (SEEK –/+) et maintenez enfoncé pour localiser la fréquence approximativement, puis appuyez plusieurs fois sur / (SEEK –/+) pour régler la fréquence souhaitée avec précision. Pour effectuer la syntonisation automatique Appuyez sur / (SEEK –/+). Le balayage s’interrompt lorsque l’appareil capte une station. 12FR Lorsque vous recevez la station que vous souhaitez mémoriser, appuyez sur une touche numérique (1 à 6) et maintenez-la enfoncée jusqu’à ce que [MEM] apparaisse. Réception des stations mémorisées 1 Sélectionnez la bande, puis appuyez sur une touche numérique (1 à 6). Utilisation du système RDS (Système de radiocommunication de données) Réglage des fonctions AF (Fréquences alternatives) et TA (Messages de radioguidage) AF règle en permanence la station sur le signal le plus fort du réseau et TA propose les messages et les programmes de radioguidage (TP) disponibles. 1 Appuyez sur MENU, tournez la molette de réglage pour sélectionner [GENERAL], puis appuyez dessus. 2 Tournez la molette de réglage pour sélectionner [SET AF/TA], puis appuyez dessus. 3 Tournez la molette de réglage pour sélectionner [SET AF-ON], [SET TAON], [SET AF/TA-ON] ou [SET AF/TAOFF], puis appuyez dessus. Mémorisation des stations RDS avec les réglages AF et TA Vous pouvez présélectionner les stations RDS avec un réglage AF/TA. Réglez AF/TA, puis mémorisez la station à l’aide de la fonction BTM ou manuellement. Si vous effectuez une présélection manuelle, vous pouvez également présélectionner des stations non-RDS. Sélection de types d’émission (PTY) 1 En cours de réception FM, appuyez sur PTY. 2 Tournez la molette de réglage jusqu’à ce que le type d’émission souhaité apparaisse, puis appuyez dessus. L’appareil commence à rechercher une station diffusant le type d’émission sélectionné. Réception de messages d’urgence Lorsque la fonction AF ou TA est activée, les messages d’urgence interrompent automatiquement la source sélectionnée en cours de diffusion. Réglage du niveau de volume pendant la diffusion d’un message de radioguidage Le niveau sera enregistré dans la mémoire pour les messages de radioguidage suivants, indépendamment du niveau de volume normal. Écoute continue d’une émission régionale (REGIONAL) Lorsque les fonctions AF et REGIONAL sont activées, vous ne basculez pas sur une autre station régionale ayant une fréquence plus puissante. Si vous quittez la zone de réception de cette émission régionale, réglez [SET REGIONAL] dans [GENERAL] sur [SET REG-OFF] en cours de réception FM (page 22). Cette fonction est inopérante au RoyaumeUni et dans certaines autres régions. Fonction de liaison locale (RoyaumeUni uniquement) Cette fonction vous permet de sélectionner d’autres stations locales de la région, même si elles ne sont pas associées à vos touches numériques. En cours de réception FM, appuyez sur une touche numérique (1 à 6) sur laquelle une station locale est mémorisée. Dans les 5 secondes qui suivent, appuyez de nouveau sur la touche numérique de la station locale. Répétez cette procédure jusqu’à ce que vous captiez la station locale souhaitée. Types d’émissions NEWS (Dernières nouvelles), AFFAIRS (Questions d’actualités), INFO (Informations), SPORT (Sport), EDUCATE (Éducation), DRAMA (Théâtre), CULTURE (Culture), SCIENCE (Sciences), VARIED (Divers), POP M (Variétés), ROCK M (Rock), EASY M (Musique d’ambiance), LIGHT M (Musique classique pour non spécialistes), CLASSICS (Musique classique pour public averti), OTHER M (Autres musiques), WEATHER (Météo), FINANCE (Informations financières), CHILDREN (Programme pour enfants), SOCIAL (Affaires sociales), RELIGION (Religion), PHONE IN (Entrée téléphone), TRAVEL (Voyages), LEISURE (Loisirs), JAZZ (Musique jazz), COUNTRY (Musique country), NATION M (Musiques du monde), OLDIES (Musique rétro), FOLK M (Musique folk), DOCUMENT (Documentaires) Réglage de l’heure (CT) Les données CT accompagnant la transmission RDS assurent le réglage de l’horloge. 1 Réglez [SET CT-ON] dans [GENERAL] (page 22). 13FR Lecture Lecture d’un périphérique USB Dans ce mode d’emploi, « iPod » est utilisé pour faire référence, de manière générale, aux fonctions iPod d’un iPod ou d’un iPhone, sauf mention contraire figurant dans le texte ou les illustrations. Pour plus de détails sur la compatibilité de votre iPod, reportez-vous à la section « À propos de l’iPod » (page 25) ou visitez le site d’assistance indiqué sur la couverture arrière. Des périphériques USB* de type AOA (Android Open Accessory) 2.0, MSC (Mass Storage Class) et MTP (Media Transfer Protocol) compatibles avec la norme USB peuvent être utilisés. Selon le périphérique USB, le mode Android ou le mode MSC/MTP peut être sélectionné sur l’appareil. La sélection du mode MTP peut être obligatoire avec certains lecteurs multimédia numériques ou smartphones Android. * tels qu’un lecteur Flash USB, un lecteur multimédia numérique ou un smartphone Android Remarques • Pour plus de détails sur la compatibilité de votre périphérique USB, visitez le site d’assistance indiqué sur la quatrième de couverture de ce mode d’emploi. • Les smartphones exécutant Android OS 4.1 ou ultérieur prennent en charge Android Open Accessory 2.0 (AOA 2.0). Toutefois, certains smartphones peuvent ne pas prendre complètement en charge AOA 2.0 même s’ils exécutent Android OS 4.1 ou ultérieur. Pour plus de détails sur la compatibilité de votre smartphone Android, visitez le site d’assistance indiqué sur la quatrième de couverture de ce mode d’emploi. • La lecture des fichiers suivants n’est pas prise en charge. MP3/WMA/FLAC : – fichiers contenant une protection des droits d’auteur – fichiers DRM (Gestion des droits numériques) – fichiers audio multicanaux MP3/WMA : – fichiers comprimés sans perte 14FR Avant d’établir une connexion, sélectionnez le mode USB (mode Android ou mode MSC/ MTP) en fonction du périphérique USB (page 22). 1 Raccordez un périphérique USB au port USB (page 11). La lecture commence. Si un périphérique est déjà raccordé, pour démarrer la lecture, appuyez sur SRC pour sélectionner [USB] ([IPD] apparaît sur l’affichage lorsque l’iPod est reconnu). 2 Réglez le volume sur cet appareil. Pour arrêter la lecture Appuyez sur OFF et maintenez enfoncé pendant 1 seconde. Pour retirer le périphérique Arrêtez la lecture, puis retirez le périphérique. Avertissement concernant l’iPhone Lorsque vous connectez un iPhone par USB, le volume des appels téléphoniques est contrôlé par l’iPhone et non par l’appareil. Évitez d’augmenter le volume par inadvertance en cours d’appel, le niveau sonore pouvant être brusquement élevé lorsqu’il est mis fin à l’appel. Lecture d’un périphérique BLUETOOTH Vous pouvez lire du contenu sur un périphérique connecté prenant en charge le profil BLUETOOTH A2DP (Profil de distribution audio avancée). 1 Établissez une connexion BLUETOOTH avec le périphérique audio connecté (page 8). Pour sélectionner le périphérique audio, appuyez sur MENU, puis sélectionnez [BLUETOOTH] [SET AUDIODEV] (page 24). 2 Appuyez sur SRC pour sélectionner [BT AUDIO]. 3 Utilisez le périphérique audio pour commencer la lecture. 4 Réglez le volume sur cet appareil. Remarques Recherche d’une plage par son nom (Quick-BrowZer™) Non disponible quand un périphérique USB en mode Android ou un iPod est connecté. 1 • Selon le périphérique audio utilisé, des informations telles que le titre, le numéro/la durée de la plage et l’état de la lecture peuvent ne pas être affichées sur cet appareil. • Même si la source est modifiée sur cet appareil, la lecture du périphérique audio ne s’interrompt pas. • [BT AUDIO] n’apparaît pas sur l’affichage de l’appareil lorsque l’application « Sony | Music Center » est en cours d’utilisation via la fonction BLUETOOTH. Pendant la lecture USB, appuyez sur (Rechercher)* pour afficher la liste des catégories de recherche. Lorsque la liste des plages s’affiche, appuyez plusieurs fois sur (Retour) jusqu’à ce que la catégorie de recherche souhaitée apparaisse. * Pendant la lecture USB, appuyez sur (Rechercher) pendant plus de 2 secondes pour revenir directement au début de la liste de catégories. Adaptation du niveau de volume du périphérique BLUETOOTH aux autres sources 2 Démarrez la lecture sur le périphérique audio BLUETOOTH à un niveau de volume modéré et réglez l’appareil sur votre volume d’écoute habituel. Appuyez sur MENU, puis sélectionnez [SOUND] [SET BTA VOL] (page 23). Tournez la molette de réglage pour sélectionner la catégorie de recherche de votre choix, puis appuyez pour valider. 3 Répétez l’étape 2 pour chercher la plage souhaitée. La lecture commence. Pour quitter le mode Quick-BrowZer Recherche et lecture de plages Lecture répétée et aléatoire Non disponible quand un périphérique USB en mode Android est connecté. 1 En cours de lecture, appuyez plusieurs fois sur (Répéter) ou (Aléatoire) pour sélectionner le mode de lecture souhaité. Appuyez sur Recherche d’éléments par saut (Mode Saut) Non disponible quand un périphérique USB en mode Android ou un iPod est connecté. 1 Pendant la lecture USB, appuyez sur (Rechercher). 2 3 Appuyez sur (SEEK +). Le démarrage de la lecture dans le mode sélectionné peut prendre un certain temps. Les modes de lecture disponibles diffèrent selon la source audio sélectionnée. (Rechercher). Tournez la molette de réglage pour sélectionner l’élément. L’appareil effectue des sauts dans la liste par pas de 10 % du nombre total d’éléments. 4 Appuyez sur ENTER pour revenir au mode Quick-BrowZer. L’élément sélectionné apparaît. 5 Tournez la molette de réglage pour sélectionner l’élément souhaité, puis appuyez dessus. La lecture commence. 15FR Appel mains libres (via BLUETOOTH uniquement) Pour utiliser un téléphone portable, connectez-le à cet appareil. Vous pouvez connecter deux téléphones portables à cet appareil. Pour de plus amples détails, reportez-vous à la section « Préparation d’un périphérique BLUETOOTH » (page 8). À partir du répertoire téléphonique 1 Lorsque deux téléphones portables sont connectés à l’appareil, tournez la molette de réglage pour sélectionner l’un des téléphones, puis appuyez dessus. 2 Tournez la molette de réglage pour sélectionner [PHONE BOOK], puis appuyez dessus. 3 Tournez la molette de réglage pour sélectionner une initiale dans la liste des initiales, puis appuyez dessus. 4 Tournez la molette de réglage pour sélectionner un nom dans la liste des noms, puis appuyez dessus. 5 Tournez la molette de réglage pour sélectionner un numéro dans la liste des numéros, puis appuyez dessus. Recevoir un appel 1 Appuyez sur CALL lorsqu’un appel est reçu accompagné d’une sonnerie. Appuyez sur CALL. L’appel téléphonique commence. L’appel téléphonique commence. Remarque La sonnerie et la voix du correspondant sont reproduites par les haut-parleurs avant uniquement. Pour rejeter l’appel À partir de l’historique des appels 1 Pour mettre fin à l’appel Appuyez à nouveau sur CALL. 2 Passer un appel Vous pouvez passer un appel à partir du répertoire téléphonique ou de l’historique des appels lorsqu’un téléphone portable prenant en charge le profil PBAP (profil d’accès au répertoire téléphonique) est connecté. Lorsque deux téléphones portables sont connectés à l’appareil, sélectionnez l’un ou l’autre des téléphones. Appuyez sur CALL. Lorsque deux téléphones portables sont connectés à l’appareil, tournez la molette de réglage pour sélectionner l’un des téléphones, puis appuyez dessus. Appuyez sur OFF et maintenez enfoncé pendant 1 seconde. Tournez la molette de réglage pour sélectionner [RECENT CALL], puis appuyez dessus. L’historique des appels apparaît. 3 Tournez la molette de réglage pour sélectionner un nom ou un numéro dans le répertoire des appels, puis appuyez dessus. L’appel téléphonique commence. Par saisie du numéro de téléphone 1 Appuyez sur CALL. Lorsque deux téléphones portables sont connectés à l’appareil, tournez la molette de réglage pour sélectionner l’un des téléphones, puis appuyez dessus. 16FR 2 Tournez la molette de réglage pour sélectionner [DIAL NUMBER], puis appuyez dessus. 3 Tournez la molette de réglage pour saisir le numéro de téléphone, et en dernier lieu sélectionnez [ ] (espace), puis appuyez sur ENTER*. L’appel téléphonique commence. * Appuyez sur / (SEEK –/+) pour modifier l’indication numérique. Remarque [_] apparaît au lieu de [#] sur l’affichage. Par recomposition 1 Appuyez sur CALL. Lorsque deux téléphones portables sont connectés à l’appareil, tournez la molette de réglage pour sélectionner l’un des téléphones, puis appuyez dessus. 2 Tournez la molette de réglage pour sélectionner [REDIAL], puis appuyez dessus. L’appel téléphonique commence. À l’aide de repères vocaux Vous pouvez passer un appel en prononçant le repère vocal mémorisé sur un téléphone portable connecté qui dispose d’une fonction de numérotation vocale. 1 Opérations disponibles en cours d’appel Réglage du volume de la sonnerie Tournez la molette de réglage lorsque vous recevez un appel. Réglage du volume de la voix du correspondant Tournez la molette de réglage lorsque l’appel est en cours. Réglage du volume pour l’autre partie (réglage du gain du micro) Appuyez sur MIC. Niveaux de volume réglables : [MIC-LOW], [MIC-MID], [MIC-HI]. Réduction de l’écho et des bruits (Mode correcteur d’écho/correcteur de bruits) Appuyez sur MIC et maintenez enfoncé. Modes réglables : [EC/NC-1], [EC/NC-2]. Basculement du mode mains libres au mode manuel En cours d’appel, appuyez sur MODE pour basculer le son de l’appel téléphonique entre l’appareil et le téléphone portable. Remarque Cette opération peut ne pas être disponible, selon le téléphone portable utilisé. Appuyez sur CALL. Lorsque deux téléphones portables sont connectés à l’appareil, tournez la molette de réglage pour sélectionner l’un des téléphones, puis appuyez dessus. 2 Tournez la molette de réglage pour sélectionner [VOICE DIAL], puis appuyez dessus. À défaut, appuyez sur VOICE et maintenez enfoncé pendant plus de 2 secondes. 3 Prononcez le repère vocal stocké sur le téléphone portable. Votre voix est reconnue, et l’appel est passé. Pour annuler la numérotation vocale Appuyez sur VOICE. 17FR 4 Fonctions utiles Sony | Music Center avec smartphone iPhone/ Android™ Il est nécessaire de télécharger la toute dernière version de l’application « Sony | Music Center » à partir de l’App Store pour un iPhone ou de Google Play pour un smartphone Android. Remarques • Pour votre sécurité, respectez la réglementation routière locale et n’utilisez pas l’application en conduisant. • « Sony | Music Center » est une application qui permet de commander les périphériques audio Sony compatibles avec « Sony | Music Center », grâce à votre iPhone/smartphone Android. • Les fonctionnalités dont vous pouvez disposer par l’intermédiaire de « Sony | Music Center » varient en fonction du périphérique connecté. • Pour utiliser les fonctionnalités « Sony | Music Center », consultez les informations détaillées disponibles sur votre iPhone/smartphone Android. • Pour plus d’informations sur « Sony | Music Center », visitez le site à l’adresse URL suivante : http://www.sony.net/smcqa/ • Visitez le site web ci-dessous et vérifiez quels sont les modèles d’iPhone ou de smartphones Android compatibles. Pour un iPhone : visitez l’App Store Pour les smartphones Android : visitez Google Play Tournez la molette de réglage pour sélectionner [CONNECT], puis appuyez dessus. La connexion à l’iPhone/au smartphone Android commence. Pour de plus amples détails sur le manière de procéder sur un iPhone/ smartphone Android, consultez l’aide de l’application. Si le numéro du périphérique apparaît Assurez-vous que le numéro est affiché (par ex. 123456), puis sélectionnez [Oui] sur l’iPhone/le smartphone Android. Pour mettre fin à la connexion 1 Appuyez sur MENU, tournez la molette de réglage pour sélectionner [SONY APP], puis appuyez dessus. 2 Tournez la molette de réglage pour sélectionner [CONNECT], puis appuyez dessus. Sélection de la source ou de l’application Vous pouvez sélectionnez la source ou l’application de votre choix sur l’iPhone/le smartphone Android. Sélection de la source Appuyez sur SRC à plusieurs reprises. À défaut, appuyez sur SRC, tournez la molette de réglage pour sélectionner l’élément souhaité, puis appuyez sur ENTER. Affichage de la liste des sources Établissement de la connexion Sony | Music Center 1 Permet d’établir une connexion BLUETOOTH avec un iPhone ou un smartphone Android (page 8). Pour sélectionner le périphérique audio, appuyez sur MENU, puis sélectionnez [BLUETOOTH] [SET AUDIODEV] (page 24). 2 Démarrez l’application « Sony | Music Center ». 3 Appuyez sur MENU, tournez la molette de réglage pour sélectionner [SONY APP], puis appuyez dessus. 18FR Appuyez sur SRC. Annonce de la réception de SMS par le guide vocal (smartphone Android uniquement) Lorsque des SMS sont reçus, ils sont automatiquement lus par l’intermédiaire des haut-parleurs de la voiture. Pour plus de détails concernant les réglages, consultez l’aide de l’application. Réponse à un message SMS (smartphone Android uniquement) Vous pouvez répondre à un message en appuyant sur l’icône Répondre. 1 Activez l’application « Sony | Music Center », puis appuyez sur l’icône [Reply] (Répondre). L’affichage d’entrée de message apparaît dans l’application « Sony | Music Center ». 2 Entrez un message de réponse par reconnaissance vocale. La liste des messages candidats apparaît dans l’application « Sony | Music Center ». 3 Tournez la molette de réglage pour sélectionner le message de votre choix, puis appuyez dessus. Le message est envoyé. Réglage du son et de l’affichage Vous pouvez effectuer les réglages du son et de l’affichage par l’intermédiaire d’un iPhone/smartphone Android. Pour plus de détails concernant les réglages, consultez l’aide de l’application. Utilisation de la reconnaissance vocale (smartphone Android uniquement) 1 2 Appuyez sur VOICE et maintenez enfoncé pour activer la reconnaissance vocale. Prononcez la commande vocale de votre choix dans le micro. Utilisation de Siri Eyes Free Siri Eyes Free vous permet d’utiliser un iPhone en mode mains libres, en parlant simplement dans le micro. Cette fonction nécessite que vous connectiez un iPhone à l’appareil via BLUETOOTH. Cette fonctionnalité est disponible pour l’iPhone 4s et les versions ultérieures. Assurez-vous que votre iPhone utilise la dernière version d’iOS. Vous devez préalablement effectuer l’enregistrement et la configuration de la connexion BLUETOOTH de l’iPhone avec l’appareil. Pour de plus amples détails, reportez-vous à la section « Préparation d’un périphérique BLUETOOTH » (page 8). Pour sélectionner l’iPhone, appuyez sur MENU, puis sélectionnez [BLUETOOTH] [SET AUDIODEV] (page 24). 1 Activez la fonction Siri sur l’iPhone. Pour plus d’informations, reportez-vous au mode d’emploi fourni avec l’iPhone. 2 Appuyez sur VOICE et maintenez pendant plus de 2 secondes. L’écran de commande vocale apparaît. 3 Après le bip émis par l’iPhone, parlez dans le micro. L’iPhone émet à nouveau un bip, et Siri commence à répondre. Désactivation de Siri Eyes Free Appuyez sur VOICE. Désactivation de la reconnaissance vocale Appuyez sur VOICE. Remarques • Il est possible que la reconnaissance vocale ne soit pas disponible dans certains cas. • La reconnaissance vocale peut ne pas fonctionner correctement en fonction des performances du smartphone Android connecté. • Utilisez la reconnaissance vocale lorsque les bruits, tels que celui du moteur, sont réduits au minimum. Remarques • Il est possible que l’iPhone ne reconnaisse pas votre voix, en fonction des conditions dans lesquelles vous l’utilisez. (Par exemple, si votre véhicule est en mouvement). • Siri Eyes Free peut ne pas fonctionner correctement, ou le temps de réponse peut être long, dans des zones où la réception des signaux de l’iPhone est difficile. • En fonction des conditions dans lesquelles l’iPhone est utilisé, Siri Eyes Free peut ne pas fonctionner correctement, voire même s’arrêter. • Si vous effectuez la lecture d’une plage avec un iPhone qui utilise la connexion audio BLUETOOTH, lorsque la lecture commence via BLUETOOTH, Siri Eyes Free se ferme automatiquement et l’appareil bascule sur la source audio BLUETOOTH. • Lorsque Siri Eyes Free est activé en cours de lecture audio, l’appareil est susceptible de basculer sur la source audio BLUETOOTH, même si vous ne spécifiez aucune plage pour la lecture. 19FR • Lors du raccordement de l’iPhone à un port USB, Siri Eyes Free peut ne pas fonctionner correctement, voire même s’arrêter. • Lorsque vous raccordez l’iPhone à l’appareil par USB, n’activez pas Siri avec l’iPhone. Siri Eyes Free peut ne pas fonctionner correctement, voire même s’arrêter. • Aucun son audio n’est diffusé lorsque Siri Eyes Free est activé. Réglages Désactivation du mode DEMO Vous pouvez désactiver l’écran de démonstration qui s’affiche lorsque la source est désactivée et que l’horloge est affichée. 1 Appuyez sur MENU, tournez la molette de réglage pour sélectionner [GENERAL], puis appuyez dessus. 2 Tournez la molette de réglage pour sélectionner [SET DEMO], puis appuyez dessus. 3 Tournez la molette de réglage pour sélectionner [SET DEMO-OFF], puis appuyez dessus. Le réglage est terminé. 4 Appuyez deux fois sur (Retour). L’affichage revient au mode de réception/lecture normal. Réglages de base Vous pouvez régler des paramètres dans les catégories de configuration suivantes : Configuration générale (GENERAL), Configuration du son (SOUND), Configuration de l’affichage (DISPLAY), Configuration de BLUETOOTH (BLUETOOTH), Configuration de Sony | Music Center (SONY APP) 1 2 Appuyez sur MENU. Tournez la molette de réglage pour sélectionner la catégorie de configuration, puis appuyez dessus. Les paramètres qui peuvent être définis varient selon la source et les réglages. 3 Tournez la molette de réglage pour sélectionner les options, puis appuyez dessus. Pour revenir à l’affichage précédent Appuyez sur 20FR (Retour). Configuration générale (GENERAL) AREA (région) Spécifie la région dans laquelle cet appareil peut être utilisé : [EUROPE], [RUSSIA]. Si le réglage actuel de la zone/région est modifié, l’appareil est réinitialisé, puis l’horloge s’affiche. (Disponible uniquement lorsque la source est désactivée et que l’horloge est affichée.) DEMO (démonstration) Permet d’activer la démonstration : [ON], [OFF]. CLOCK-ADJ (réglage de l’horloge) (page 8) CAUT ALM (alarme d’avertissement) Permet d’activer la fonction d’alarme d’avertissement : [ON], [OFF] (page 7). (Disponible uniquement lorsque la source est désactivée et que l’horloge est affichée.) BEEP (bip) Permet d’activer le bip sonore : [ON], [OFF]. AUTO OFF (extinction auto) Permet d’éteindre l’appareil automatiquement après un certain laps de temps lorsque l’appareil est mis hors tension et d’afficher l’horloge (c’est-à-dire quand vous appuyez sur OFF et maintenez enfoncé pendant 1 seconde) : [ON] (30 minutes), [OFF]. STEERING (volant) Permet d’enregistrer/réinitialiser les paramètres de la télécommande au volant. (Disponible uniquement lorsque la source est désactivée et que l’horloge est affichée.) STR CONTROL (commande au volant) Permet de sélectionner le mode d’entrée de la télécommande connectée. Pour éviter toute erreur de fonctionnement, vérifiez avant utilisation si le mode d’entrée correspond à la télécommande connectée. CUSTOM (personnalisé) Mode d’entrée de la télécommande au volant PRESET (présélection) Mode d’entrée de la télécommande filaire, excepté la télécommande au volant (qui est sélectionnée automatiquement à l’exécution de [RESET CUSTOM].) EDIT CUSTOM (modifier personnalisation) Permet d’enregistrer les fonctions (SOURCE, ATT, VOL +/–, SEEK +/–, VOICE, ON HOOK, OFF HOOK) dans la télécommande au volant : Tournez la molette de réglage pour sélectionner la fonction que vous voulez attribuer à la télécommande au volant, puis appuyez dessus. Lorsque [REGISTER] clignote, appuyez sur le bouton de la télécommande au volant auquel vous souhaitez attribuer une fonction et maintenez-le enfoncé. Lorsque l’enregistrement est terminé, [REGISTERED] s’affiche. Pour enregistrer d’autres fonctions, répétez les étapes et . (Disponible uniquement lorsque [STR CONTROL] est réglé sur [CUSTOM].) RESET CUSTOM (réinitialiser personnalisation) Permet de réinitialiser les paramètres de la télécommande au volant : [YES], [NO]. (Disponible uniquement lorsque [STR CONTROL] est réglé sur [CUSTOM].) Remarques • Lorsque vous réglez ces paramètres, seules les commandes par touches sur l’appareil sont disponibles. Pour des raisons de sécurité, garez votre voiture avant de régler ce paramètre. • Si une erreur se produit lors de l’enregistrement, toutes les données enregistrées sont préservées. Recommencez l’enregistrement à partir de la fonction qui est à l’origine de l’erreur. • Il est possible que cette fonction ne soit pas disponible sur certains véhicules. Pour plus de détails sur la compatibilité de votre véhicule, visitez le site d’assistance indiqué sur la quatrième de couverture de ce mode d’emploi. 21FR USB MODE (mode USB) Permet de modifier le mode USB : [ANDROID], [MSC/MTP]. (Disponible uniquement lorsque la source USB est sélectionnée.) CT (heure) Permet d’activer la fonction CT : [ON], [OFF]. AF/TA (fréquences alternatives/messages de radioguidage) Permet de sélectionner le réglage des fréquences alternatives (AF) et des messages de radioguidage (TA) : [AF-ON], [TA-ON], [AF/TA-ON], [AF/TA-OFF]. REGIONAL (régional) Permet de restreindre la réception à une région spécifique : [ON], [OFF]. (Disponible uniquement pendant la réception FM.) BTM (mémorisation des meilleurs réglages) (page 12) (Disponible uniquement lorsque le syntoniseur est sélectionné.) FIRMWARE (micrologiciel) (Disponible uniquement lorsque la source est désactivée et que l’horloge est affichée.) Permet de vérifier/mettre à jour la version du firmware. Pour plus d’informations, visitez le site d’assistance à l’adresse mentionnée sur la quatrième de couverture de ce mode d’emploi. FW VERSION (version du firmware) Affiche la version actuelle du firmware. FW UPDATE (mise à jour du firmware) Lance le processus de mise à jour du firmware : [YES], [NO]. La mise à jour du firmware dure quelques minutes. Pendant la mise à jour, ne tournez pas la clé de contact sur la position OFF et ne retirez pas le périphérique USB. 22FR Configuration du son (SOUND) Ce menu de configuration n’est pas disponible lorsque la source est hors tension et que l’horloge est affichée. EQ10 PRESET (préréglage EQ10) Sélectionnez une courbe d’égaliseur parmi les 10 courbes disponibles ou désactivez la fonction : [OFF], [R&B], [ROCK], [POP], [HIP-HOP], [EDM], [JAZZ], [SOUL], [COUNTRY], [KARAOKE]*, [CUSTOM]. Il est possible de mémoriser le réglage de la courbe de l’égaliseur pour chaque source. * Le réglage [KARAOKE] réduit le son vocal, mais ne le supprime pas complètement pendant la lecture. En outre, il n’est pas possible d’utiliser un micro. EQ10 CUSTOM (EQ10 personnalisé) Permet de régler [CUSTOM] pour EQ10. Réglage de la courbe d’égaliseur : [BAND1] – [BAND10] (32 Hz, 63 Hz, 125 Hz, 250 Hz, 500 Hz, 1 kHz, 2 kHz, 4 kHz, 8 kHz, 16 kHz). Le niveau de volume peut être réglé par incréments de 1 dB, de -6 dB à +6 dB. BALANCE (balance) Permet de régler la balance du son : [RIGHT-15] – [CENTER] – [LEFT-15]. FADER (fader) Permet de régler le niveau relatif : [FRONT-15] – [CENTER] – [REAR-15]. S.WOOFER (caisson de graves) SW LEVEL (niveau du caisson de graves) Permet de régler le volume du caisson de graves : [+6 dB] – [0 dB] – [-6 dB]. ([ATT] est affiché au réglage inférieur.) SW PHASE (phase du caisson de graves) Permet de sélectionner la phase du caisson de graves : [SUB NORM], [SUB REV]. LPF FREQ (fréquence du filtre passe-bas) Permet de sélectionner la fréquence de coupure du caisson de graves : [80Hz], [100Hz], [120Hz]. HPF FREQ (fréquence du filtre passe-haut) Permet de sélectionner la fréquence de coupure du haut-parleur avant/arrière : [OFF], [80Hz], [100Hz], [120Hz]. AUX VOL (niveau de volume AUX) Permet de régler le niveau de volume de chaque périphérique auxiliaire raccordé : [+18 dB] – [0 dB] – [-8 dB]. Ce réglage évite d’ajuster le niveau de volume entre les sources. (Disponible uniquement lorsque AUX est sélectionné.) BTA VOL (niveau de volume audio BLUETOOTH) Permet de régler le niveau de volume de chaque périphérique BLUETOOTH connecté : [+6 dB] – [0 dB] – [-6 dB]. Ce réglage évite d’ajuster le niveau de volume entre les sources. (Disponible uniquement lorsque l’audio ou une application BT est sélectionné.) Configuration de l’affichage (DISPLAY) DIMMER (gradateur) Permet de modifier la luminosité de l’affichage : [OFF], [ON], [AT] (auto), [CLK] (horloge). ([AT] est disponible uniquement lorsque le câble de commande de l’illumination est connecté et que les phares sont allumés). Pour activer cette fonction uniquement pendant une durée définie, sélectionnez [CLK], puis définissez l’heure de début et l’heure de fin. – Pour définir la luminosité quand la fonction du régulateur de luminosité est activée : réglez [DIMMER] sur [ON], puis ajustez [BRIGHTNESS]. – Pour définir la luminosité quand la fonction du régulateur de luminosité est désactivée : réglez [DIMMER] sur [OFF], puis ajustez [BRIGHTNESS]. Le réglage de luminosité est mémorisé et appliqué lorsque la fonction du régulateur de luminosité est activée ou désactivée. BRIGHTNESS (luminosité) Permet de régler la luminosité de l’affichage. Le niveau de luminosité est réglable entre : [1] – [10]. BUTTON-C (couleur des touches) Permet de sélectionner une couleur prédéfinie ou personnalisée pour les touches. COLOR (couleur) Permet de choisir parmi 15 couleurs prédéfinies, 1 couleur personnalisée. CUSTOM-C (couleur personnalisée) Permet d’enregistrer une couleur personnalisée pour les touches. RGB RED, RGB GRN, RGB BLUE Gamme de couleurs réglables : [0] – [32] ([0] ne peut pas être défini dans toutes les gammes de couleurs). DSPL-C (couleur d’affichage) Permet de sélectionner une couleur prédéfinie ou personnalisée pour l’affichage. COLOR (couleur) Permet de choisir parmi 15 couleurs prédéfinies, 1 couleur personnalisée. CUSTOM-C (couleur personnalisée) Permet d’enregistrer une couleur personnalisée pour l’affichage. RGB RED, RGB GRN, RGB BLUE Gamme de couleurs réglables : [0] – [32] ([0] ne peut pas être défini dans toutes les gammes de couleurs). SND SYNC (synchronisation du son) Active la synchronisation de l’illumination avec le son : [ON], [OFF]. AUTO SCR (défilement automatique) Permet de faire défiler automatiquement les rubriques longues : [ON], [OFF]. (Non disponible lorsque AUX ou le syntoniseur est sélectionné.) 23FR Configuration de BLUETOOTH (BLUETOOTH) PAIRING (appairage) (page 9) Permet de connecter jusqu’à deux périphériques BLUETOOTH : [DEVICE 1], [DEVICE 2]. [DEVICE 1] ou [DEVICE 2] prendra le nom du périphérique appairé une fois l’appairage terminé. AUDIODEV (périphérique audio) Permet de sélectionner le périphérique audio. [*] apparaît sur le périphérique appairé avec le [DEVICE 1] ou le périphérique audio compatible A2DP actuel. RINGTONE (sonnerie) Permet de choisir si la sonnerie sera émise par cet appareil ou par le téléphone portable connecté : [1] (cet appareil), [2] (téléphone portable). AUTO ANS (réponse automatique) Permet de régler cet appareil pour qu’il réponde automatiquement à un appel entrant : [OFF], [1] (après 3 secondes environ), [2] (après 10 secondes environ). AUTOPAIR (appairage automatique) Permet de démarrer l’appairage BLUETOOTH automatiquement lorsque le périphérique iOS version 5.0 ou ultérieure est connecté par USB : [ON], [OFF]. BT SIGNL (signal BLUETOOTH) (page 10) Permet d’activer/de désactiver la fonction BLUETOOTH. BT INIT (initialisation du BLUETOOTH) Permet d’initialiser tous les réglages BLUETOOTH (informations d’appairage, informations relatives aux périphériques, etc.) : [YES], [NO]. Lorsque vous mettez cet appareil au rebut, initialisez tous les réglages. (Disponible uniquement lorsque la source est désactivée et que l’horloge est affichée.) 24FR Configuration de Sony | Music Center (SONY APP) AUTO LAUNCH (lancement automatique) Permet d’activer le lancement automatique de « Sony | Music Center » : [ON], [OFF]. Lorsque [ON] est sélectionné, « Sony | Music Center » est connecté automatiquement une fois que la connexion BLUETOOTH est établie. CONNECT (connexion) Permet d’établir et de mettre fin à la connexion avec la fonction « Sony | Music Center » (connexion). À propos de l’iPod Informations complémentaires Mise à jour du firmware Pour mettre à jour le firmware, consultez le site d’assistance à l’adresse mentionnée sur la quatrième de couverture de ce mode d’emploi, puis suivez les instructions en ligne. Remarque Ne retirez pas le périphérique USB pendant la mise à jour. Précautions • Ne laissez pas la façade avant ou des périphériques audio sur le tableau de bord. • À la mise sous tension de l’appareil, l’antenne électrique se déploie automatiquement. • Ne renversez pas de liquide sur l’appareil. Ordre de lecture des fichiers audio Dossier (album) Fichier audio (plage) • Vous pouvez connecter les modèles d’iPod suivants. Effectuez la mise à jour du logiciel de vos périphériques iPod avant de les utiliser. Modèles iPhone/iPod compatibles Modèle compatible Bluetooth® USB iPhone X iPhone 8 iPhone 8 Plus iPhone 7 iPhone 7 Plus iPhone SE iPhone 6s iPhone 6s Plus iPhone 6 iPhone 6 Plus iPhone 5s iPhone 5c iPhone 5 iPhone 4s iPod touch (6ème génération) iPod touch (5ème génération) iPod nano (7ème génération) • L’utilisation du badge Made for Apple signifie qu’un accessoire a été conçu pour être raccordé spécifiquement au produit ou aux produits Apple identifiés dans le badge, et a été certifié par le constructeur pour satisfaire les normes de performance d’Apple. Apple n’est pas responsable du fonctionnement de cet appareil ni de sa conformité avec les consignes et normes de sécurité. Veuillez noter que l’utilisation de cet accessoire avec un produit Apple peut avoir un effet adverse sur les performances sans fil. 25FR Si vous avez des questions ou des problèmes concernant cet appareil qui ne sont pas abordés dans ce mode d’emploi, contactez votre revendeur Sony. Entretien Nettoyage des connecteurs Évitez de toucher directement les connecteurs. L’appareil peut ne pas fonctionner correctement si les connecteurs entre l’appareil et la façade avant sont souillés. Pour éviter cette situation, retirez la façade avant (page 7) et nettoyez les connecteurs à l’aide d’un coton-tige. N’exercez pas une pression trop forte. Vous risqueriez d’endommager les connecteurs. Remarque Pour votre sécurité, ne retirez pas la façade avant pendant que vous conduisez. 26FR Spécifications Radio FM Plage de syntonisation : Quand [AREA] est réglé sur [EUROPE] : 87,5 MHz – 108,0 MHz Quand [AREA] est réglé sur [RUSSIA] : FM1/FM2 : 87,5 MHz – 108,0 MHz (par pas de 50 kHz) FM3 : 65 MHz – 74 MHz (par pas de 30 kHz) Sensibilité utile : 8 dBf Rapport signal/bruit : 73 dB Séparation : 50 dB à 1 kHz MW (PO)/LW (GO) Plage de syntonisation : MW (PO) : 531 kHz – 1 602 kHz LW (GO) : 153 kHz – 279 kHz Sensibilité : MW (PO) : 26 μV, LW (GO) : 50 μV Lecteur USB Interface : USB (pleine vitesse) Courant maximal : 1 A Nombre maximum de dossiers et fichiers susceptibles d’être reconnus : Dossiers (albums) : 256 Fichiers (plages) par dossier : 256 Protocole AOA (Android Open Accessory) compatible : 2.0 Codec correspondant : MP3 (.mp3) Débit binaire : 8 kbits/s – 320 kbits/s (prise en charge de VBR (Variable Bit Rate)) Taux d’échantillonnage : 16 kHz – 48 kHz WMA (.wma) Débit binaire : 32 kbits/s – 192 kbits/s (prise en charge de VBR (Variable Bit Rate)) Taux d’échantillonnage : 32 kHz, 44,1 kHz, 48 kHz FLAC (.flac) Profondeur de bit : 16 bits, 24 bits Taux d’échantillonnage : 44,1 kHz, 48 kHz Système de fichiers pris en charge : FAT16, FAT32 Communication sans fil Système de communication : Norme BLUETOOTH version 3.0 Sortie : Norme BLUETOOTH Classe de puissance 2 (Max. +1 dBm rayonnée) Portée de communication maximale : Ligne de visée, 10 m environ*1 Bande de fréquence : Bande de 2,4 GHz (2,4000 GHz - 2,4835 GHz) Méthode de modulation : FHSS Profils BLUETOOTH compatibles*2 : A2DP (Profil de distribution audio avancée) 1.3 AVRCP (Profil de commande à distance audio/vidéo) 1.3 HFP (Profil mains libres) 1.6 PBAP (Profil d’accès au répertoire téléphonique) SPP (Profil de port série) Codec correspondant : SBC (.sbc), AAC (.m4a) Poids : environ 0,8 kg Contenu de l’emballage : Appareil principal (1) Microphone (1) Composants destinés à l’installation et au raccordement (1 jeu) Veuillez vous adresser au concessionnaire pour tout renseignement complémentaire. La conception et les spécifications sont sujettes à modification sans préavis. Copyrights Les logos et la marque verbale Bluetooth® sont des marques déposées qui appartiennent à Bluetooth SIG, Inc. et qui sont utilisées par Sony Corporation sous licence uniquement. Les autres marques commerciales et noms commerciaux appartiennent à leurs propriétaires respectifs. Le repère en forme de lettre N est une marque commerciale ou une marque déposée de NFC Forum, Inc. aux États-Unis et dans d’autres pays. *1 La portée réelle varie en fonction de nombreux facteurs, tels que la présence d’obstacles entre les périphériques, les champs magnétiques autour des fours à micro-ondes, l’électricité statique, la sensibilité de la réception, les performances de l’antenne, le système d’exploitation, les applications logicielles, etc. *2 Les profils de la norme BLUETOOTH précisent l’objet de la communication BLUETOOTH entre les périphériques. Windows Media est une marque ou une marque déposée de Microsoft Corporation aux Etats-Unis et/ou dans d’autres pays. Communication NFC Apple, iPhone, iPod, iPod nano, iPod touch et Siri sont des marques de Apple Inc., déposées aux Etats-Unis et dans d’autres pays/régions. App Store est une marque de service d’Apple Inc. Bande de fréquence : 13,56 MHz Amplificateur de puissance Sortie : sorties haut-parleurs Impédance des haut-parleurs : 4 Ω – 8 Ω Puissance de sortie maximale : 55 W × 4 (sous 4 Ω) Généralités Alimentation requise : batterie de véhicule 12 V CC (masse négative) Consommation nominale : 10 A Dimensions : environ 178 mm × 50 mm × 177 mm (l/h/p) Dimensions du support : environ 182 mm × 53 mm × 160 mm (l/h/p) Ce produit est protégé par des droits de propriété intellectuelle de Microsoft Corporation. Toute utilisation ou diffusion de la technologie décrite sortant du cadre de l’utilisation de ce produit est interdite sans licence accordée par Microsoft ou une filiale autorisée de Microsoft. IOS est une marque commerciale ou une marque déposée de Cisco aux États-Unis et dans d’autres pays et qui est utilisée sous licence. Google, Google Play et Android sont des marques de Google LCC. libFLAC Copyright (C) 2000-2009 Josh Coalson Copyright (C) 2011-2013 Xiph.Org Foundation La redistribution et l’utilisation en formes source et binaire, avec ou sans modification, sont permises pourvu que les conditions suivantes soient respectées : – Toute redistribution de code source doit être accompagnée de la mention du copyright correspondant, de la liste de conditions et de la clause de non-responsabilité ci-dessous. 27FR – Les redistributions en forme binaire doivent reproduire l’avis de droits d’auteur ci-dessus, cette liste de conditions et la clause de nonresponsabilité ci-dessous dans la documentation et/ou tout autre matériel fourni avec la distribution. – Ni le nom de Xiph.org Foundation, ni celui de ses contributeurs ne peut être utilisé pour soutenir ou promouvoir des produits dérivés de ce logiciel sans autorisation spécifique écrite préalable. CE LOGICIEL EST FOURNI PAR LES DETENTEURS DU COPYRIGHT ET SES CONTRIBUTEURS « EN L’ETAT » SANS QUELQUE GARANTIE QUE CE SOIT, EXPRESSE OU IMPLICITE, INCLUANT MAIS SANS S’Y LIMITER, LES GARANTIES IMPLICITES DE QUALITE MARCHANDE ET DE CONVENANCE A UNE FIN PARTICULIERE. EN AUCUN CAS LA FONDATION OU SES CONTRIBUTEURS NE PEUVENT ETRE TENUS POUR RESPONSABLES D’UN QUELCONQUE DOMMAGE DIRECT, INDIRECT, ACCESSOIRE, PARTICULIER, EXEMPLAIRE OU CONSECUTIF (Y COMPRIS, MAIS SANS S’Y LIMITER, L’ACQUISITION DE PRODUITS OU SERVICES DE SUBSTITUTION ; LA PERTE DE JOUISSANCE, DE DONNEES OU DE BENEFICES ; OU LES PERTES D’EXPLOITATION) QUELLES QU’EN SOIENT LES CAUSES ET QUEL QUE SOIT LE TYPE DE RESPONSABILITE, CONTRACTUELLE, SANS FAUTE OU FONDEE SUR UN DELIT CIVIL (Y COMPRIS PAR NEGLIGENCE OU POUR UNE AUTRE CAUSE) RESULTANT D’UNE MANIERE OU D’UNE AUTRE DE L’UTILISATION DE CE LOGICIEL, MEME SI MENTION A ETE FAITE DE LA POSSIBILITE DE TELS DOMMAGES. Dépannage La liste de contrôles suivante vous aidera à remédier aux problèmes que vous pourriez rencontrer avec cet appareil. Avant de passer en revue la liste de contrôles ci-dessous, vérifiez les procédures de raccordement et d’utilisation. Pour plus de détails sur l’utilisation du fusible et le retrait de l’appareil du tableau de bord, reportez-vous à la section « Raccordement/Installation » (page 34). Si le problème n’est pas résolu, visitez le site d’assistance indiqué sur la quatrième de couverture de ce mode d’emploi. Généralités Absence de son ou son très faible. La position de la commande d’équilibre avant-arrière [FADER] n’est pas réglée pour un système à 2 haut-parleurs. Le volume de l’appareil et/ou du périphérique connecté est très faible. – Augmentez le volume de l’appareil et du périphérique connecté. Aucun bip n’est émis. Un amplificateur de puissance en option est raccordé et vous n’utilisez pas l’amplificateur intégré. Les stations mémorisées et l’heure sont effacées. Le fusible a sauté. Émission de bruit lorsque la position de la clé de contact est modifiée. Les câbles ne sont pas raccordés correctement au connecteur d’alimentation destiné aux accessoires du véhicule. En cours de lecture ou de réception, le mode de démonstration démarre. Si aucune opération n’est effectuée pendant 5 minutes avec [DEMO-ON] activé, le mode de démonstration démarre. – Réglez [DEMO-OFF] (page 21). L’affichage disparaît de la fenêtre d’affichage ou il ne s’affiche pas. Les connecteurs sont sales (page 26). L’affichage/illumination clignote. L’alimentation est insuffisante. – Vérifiez que la batterie du véhicule fournit une alimentation suffisante à l’appareil. (L’alimentation requise est de 12 V CC.) Les touches de commande sont inopérantes. Appuyez sur DSPL et (Retour)/MODE pendant plus de 2 secondes pour réinitialiser l’appareil. Le contenu stocké en mémoire est effacé. 28FR Réception radio La réception radio est mauvaise. Des interférences statiques sont présentes. Raccordez fermement l’antenne. Il est impossible de syntoniser les fréquences comprises entre 65 MHz et 74 MHz en FM3. [AREA] est réglé sur [EUROPE]. – Réglez [AREA] sur [RUSSIA] (page 21). RDS Réception impossible des services RDS (quand [AREA] est réglé sur [RUSSIA]). FM3 est sélectionné. – Sélectionnez FM1 ou FM2. Les services RDS ne sont pas disponibles dans la région actuelle. Une recherche (SEEK) commence après quelques secondes d’écoute. La station ne diffuse pas de programmes de radioguidage (fonction TP désactivée) ou le signal capté est faible. – Désactivez TA (page 12). Aucun message de radioguidage. Activez TA (page 12). La station n’émet pas de messages de radioguidage, malgré l’indication TP. – Réglez la fréquence pour capter une autre station. PTY affiche [- - - - - - - -]. La station actuellement captée n’est pas une station RDS ou la réception radio est mauvaise. Le nom du service de l’émission clignote. Il n’existe aucune fréquence alternative pour la station actuelle. – Appuyez sur (SEEK –/+) pendant que le nom du service de l’émission clignote. [PI SEEK] apparaît et l’appareil commence à chercher une autre fréquence avec les mêmes données PI (identification de programme). Lecture de périphériques USB La lecture sur un périphérique USB exige un délai de démarrage plus long. Le périphérique USB contient des fichiers comportant une hiérarchie de dossiers complexe. Impossible de lire le fichier audio. Pour plus d’informations sur les formats pris en charge, reportez-vous à la section « Spécifications » (page 26). Si le fichier audio est toujours impossible à lire, consultez le mode d’emploi fourni avec le périphérique USB ou contactez le fabricant du périphérique USB. Les opérations de saut d’album, saut d’éléments (Mode Saut) et de recherche de plage par nom (Quick-BrowZer) sont impossibles à exécuter. Réglez [USB MODE] sur [MSC/MTP] (page 22). Le son ne peut pas être reproduit pendant la lecture en mode Android. Vérifiez l’état de l’application de lecture audio sur le smartphone Android. Fonction NFC La connexion par One Touch (NFC) n’est pas possible. Si le smartphone ne répond pas au contact. – Vérifiez que la fonction NFC du smartphone est activée. – Rapprochez le repère en forme de lettre N du smartphone du repère en forme de lettre N de cet appareil. – Si le smartphone se trouve dans un étui, retirez-le. La sensibilité de réception NFC dépend du périphérique. Si une connexion One Touch avec le smartphone échoue à plusieurs reprises, établissez la connexion BLUETOOTH manuellement. 29FR Fonction BLUETOOTH Le périphérique connecté ne détecte pas cet appareil. Avant de procéder à l’appairage, réglez cet appareil sur le mode de veille d’appairage. Lorsque qu’il est connecté à deux périphériques BLUETOOTH, cet appareil ne peut pas être détecté par un autre périphérique. – Interrompez l’une de ces deux connexions et recherchez cet appareil à partir de cet autre périphérique. Lorsque l’appairage avec ce périphérique est effectué, activez la transmission du signal BLUETOOTH (page 10). Impossible d’établir la connexion. La connexion est contrôlée par l’un des périphériques (cet appareil ou le périphérique BLUETOOTH), mais non par les deux. – Établissez la connexion de cet appareil à partir du périphérique BLUETOOTH ou vice versa. Le nom du périphérique détecté ne s’affiche pas. Selon l’état de l’autre périphérique, il peut être impossible d’en obtenir le nom. Aucune sonnerie. Adaptez le volume en tournant la molette de réglage lorsque vous recevez un appel. Selon le périphérique connecté, la sonnerie peut ne pas être transférée correctement. – Réglez [RINGTONE] sur [1] (page 24). Les haut-parleurs avant ne sont pas raccordés à l’appareil. – Raccordez les haut-parleurs avant à l’appareil. La sonnerie est reproduite par les haut-parleurs avant uniquement. La voix du correspondant est inaudible. Les haut-parleurs avant ne sont pas raccordés à l’appareil. – Raccordez les haut-parleurs avant à l’appareil. La voix du correspondant est reproduite par les haut-parleurs avant uniquement. 30FR Un correspondant signale que le volume est trop faible ou trop élevé. Réglez le volume en conséquence en utilisant le réglage du gain du micro (page 17). Les conversations téléphoniques sont parasitées par un écho ou par du bruit. Baissez le volume. Réglez le mode EC/NC sur [EC/NC-1] ou [EC/NC-2] (page 17). Si les bruit environnants autres que ceux associés à l’appel téléphonique sont importants, essayez de les réduire. Par ex : si une fenêtre est ouverte et que le bruit de la circulation est important, etc., fermez la fenêtre. Si la climatisation produit beaucoup de bruit, réduisez son intensité. Le téléphone n’est pas connecté. Pendant la lecture d’un périphérique audio BLUETOOTH, le téléphone n’est pas connecté, même si vous appuyez sur CALL. – Établissez la connexion à partir du téléphone. La qualité du son du téléphone est mauvaise. La qualité du son du téléphone dépend des conditions de réception du téléphone portable. – Si la réception est mauvaise, déplacez votre véhicule dans un endroit permettant d’améliorer la réception du signal. Le volume du périphérique audio connecté est faible (élevé). Le niveau de volume diffère selon le périphérique audio utilisé. – Réglez le volume du périphérique audio connecté ou de cet appareil (page 23). Le son est saccadé pendant la lecture d’un périphérique audio BLUETOOTH. Réduisez la distance entre l’appareil et le périphérique audio BLUETOOTH. Si le périphérique audio BLUETOOTH est rangé dans un étui qui interrompt le signal, sortez-le pendant la durée de son utilisation. Plusieurs périphériques BLUETOOTH ou autres, émettant des ondes radio, sont utilisés à proximité. – Mettez ces périphériques hors tension. – Augmentez la distance qui sépare le périphérique lu de ces autres périphériques. Le son s’interrompt momentanément en cours de lecture lorsque la connexion entre cet appareil et le téléphone portable est établie. Il ne s’agit pas d’un problème de fonctionnement. Le périphérique audio BLUETOOTH connecté ne peut pas être commandé. Vérifiez que le périphérique audio BLUETOOTH connecté prend en charge le profil AVRCP. Certaines fonctions ne sont pas utilisables. Vérifiez si le périphérique connecté prend en charge les fonctions en question. Suite à un appel, le téléphone est décroché involontairement. Le téléphone connecté est configuré pour répondre automatiquement à un appel. L’appairage a échoué, le temps alloué ayant été dépassé. Selon le périphérique connecté, le temps alloué pour l’appairage peut être court. – Efforcez-vous de terminer l’appairage dans le temps alloué. La fonction BLUETOOTH n’est pas utilisable. Mettez l’appareil hors tension en appuyant sur OFF pendant plus de 2 secondes, puis remettez l’appareil sous tension. Aucun son n’est reproduit par les hautparleurs pendant un appel en mode mains libres. Si le son est reproduit par le téléphone portable, configurez-le pour que le son soit reproduit par les haut-parleurs du véhicule. Siri Eyes Free n’est pas activé. Effectuez l’enregistrement du mode mains libres pour un iPhone prenant en charge Siri Eyes Free. Activez la fonction Siri sur l’iPhone. Mettez fin à la connexion BLUETOOTH avec l’iPhone et l’appareil, et rétablissez la connexion. Fonctionnement de Sony | Music Center Le nom de l’application ne correspond pas à l’application originale dans « Sony | Music Center ». Relancez l’application à partir de l’application « Sony | Music Center ». Lorsque l’application « Sony | Music Center » est utilisée via BLUETOOTH, l’affichage passe automatiquement sur [BT AUDIO]. L’application « Sony | Music Center » ou la fonction BLUETOOTH n’a pas fonctionné correctement. Relancez l’application. L’application « Sony | Music Center » est automatiquement déconnectée lorsque l’affichage passe sur [IPD]. L’application « Sony | Music Center » installée sur l’iPhone/iPod ne prend pas en charge la lecture d’un iPod. – Modifiez la source de l’appareil en choisissant une option autre que [IPD], puis établissez la connexion « Sony | Music Center » (page 18). La connexion « Sony | Music Center » est automatiquement déconnectée quand le mode USB de l’appareil est réglé sur [ANDROID]. Le smartphone Android ne prend pas en charge la lecture en mode Android. – Réglez le mode USB de l’appareil sur [MSC/MTP], puis établissez la connexion « Sony | Music Center » (page 18). 31FR Messages Les messages suivants peuvent s’afficher ou clignoter pendant le fonctionnement. INVALID L’opération sélectionnée n’est peut-être pas valide. [USB MODE] ne peut pas être modifié lorsque la lecture d’un iPod est en cours. READ Attendez que la lecture des informations soit terminée et que la lecture commence automatiquement. Cela peut prendre un certain temps, en fonction de l’organisation des fichiers. (trait de soulignement) : impossible d’afficher le caractère. Pour la lecture de périphériques USB : HUB NO SUPRT : les concentrateurs USB ne sont pas pris en charge. IPD STOP : la lecture de l’iPod est terminée. Utilisez votre iPod/iPhone pour commencer la lecture. NOT SUPPORT - ANDROID MODE Un périphérique USB ne prenant pas en charge AOA (Android Open Accessory) 2.0 est connecté à l’appareil quand [USB MODE] est réglé sur [ANDROID]. – Réglez [USB MODE] sur [MSC/MTP] (page 22). USB ERROR Connectez à nouveau le périphérique USB. USB NO DEV Assurez-vous que le périphérique USB ou le câble USB est correctement raccordé. USB NO MUSIC Connectez un périphérique USB contenant des fichiers susceptibles d’être lus (page 26). 32FR USB NO SUPRT Pour plus de détails sur la compatibilité de votre périphérique USB, visitez le site d’assistance indiqué sur la quatrième de couverture de ce mode d’emploi. OVERLOAD : le périphérique USB est surchargé. Débranchez le périphérique USB, puis appuyez sur SRC pour sélectionner une autre source. Le périphérique USB est défectueux ou un périphérique non pris en charge est connecté. Pour le fonctionnement RDS : NO AF : aucune fréquence alternative. Appuyez sur (SEEK –/+) pendant que le nom du service de l’émission clignote. L’appareil commence à rechercher une autre fréquence avec les mêmes données d’identification de programme (PI) (l’indication [PI SEEK] apparaît). NO PI : pas d’identification de programme. La station sélectionnée ne possède pas de données PI (identification de programme). Sélectionnez une autre station. NO TP : aucun programme de radioguidage. L’appareil continue à rechercher les stations TP. Pour la fonction BLUETOOTH : BTA NO DEV : le périphérique BLUETOOTH n’est pas connecté ou reconnu. Assurez-vous que le périphérique BLUETOOTH est correctement connecté, ou que la connexion BLUETOOTH est établie avec le périphérique BLUETOOTH. ERROR : l’opération choisie n’a pas pu être exécutée. Attendez quelques instants, puis réessayez. UNKNOWN : un nom ou un numéro de téléphone ne peut pas être affiché. OPEN APP : l’application « Sony | Music Center » ne fonctionne pas actuellement. Lancez l’application. WITHHELD : le numéro de téléphone est masqué par l’appelant. Pour le fonctionnement de Sony | Music Center : APP –––––––– : aucune connexion n’est établie avec l’application. Établissez à nouveau la connexion à « Sony | Music Center » (page 18). APP DISCNCT : l’application est déconnectée. Établissez la connexion à « Sony | Music Center » (page 18). APP DISPLAY : un affichage permettant de configurer l’écran de l’application apparaît. Quittez l’affichage de configuration de l’écran de l’application pour permettre le fonctionnement des touches. APP LIST : la liste des contenus du périphérique USB apparaît. Quittez l’affichage de la liste de l’application pour permettre le fonctionnement des touches. APP MENU : un affichage permettant de configurer l’application apparaît. Quittez l’affichage de configuration de l’application pour permettre le fonctionnement des touches. APP NO DEV : le périphérique sur lequel est installé l’application n’est pas connecté ou reconnu. Établissez la connexion BLUETOOTH et établissez à nouveau la connexion « Sony | Music Center » (page 18). Pour utiliser la télécommande au volant : ERROR Recommencez l’enregistrement à partir de la fonction qui est à l’origine de l’erreur (page 21). TIMEOUT Essayez de procéder à l’enregistrement pendant que [REGISTER] clignote (pendant 6 secondes environ) (page 21). Pour le fonctionnement de la mise à jour du firmware : FILE ERROR : le programme de mise à jour n’est pas stocké sur le périphérique USB. Stockez le programme de mise à jour sur le périphérique USB, puis réessayez (page 25). UPDATE ERROR PRESS ENTER : la mise à jour du firmware ne s’est pas terminée correctement. Appuyez sur ENTER pour effacer le message, puis réessayez. Pendant la mise à jour, ne tournez pas la clé de contact sur la position OFF et ne retirez pas le périphérique USB (page 25). Si ces solutions ne permettent pas d’améliorer la situation, contactez votre revendeur Sony le plus proche. Si vous portez l’appareil à réparer en raison d’un problème de lecture de périphérique, apportez le périphérique utilisé au moment où le problème s’est produit. APP SOUND : un affichage permettant de configurer le son de l’application apparaît. Quittez l’affichage de configuration du son de l’application pour permettre le fonctionnement des touches. 33FR Raccordement/Installation Attention • Acheminez tous les fils de masse jusqu’à un point de masse commun. • Veillez à ce qu’aucun fil ne soit coincé sous une vis ou happé par des pièces mobiles (par exemple, une glissière de siège). • Avant d’effectuer les raccordements, coupez le contact du véhicule pour éviter les courts-circuits. • Raccordez le câble d’alimentation à l’appareil et aux haut-parleurs avant de le brancher sur le connecteur d’alimentation auxiliaire. • Pour des raisons de sécurité, veillez à isoler avec du ruban isolant les extrémités libres des fils non raccordés. Liste des pièces pour installation ×2 Précautions • Choisissez soigneusement l’emplacement d’installation afin que l’appareil n’entrave pas la conduite normale. • Évitez d’installer l’appareil dans des endroits soumis à la poussière, à la saleté, à des vibrations excessives ou à des températures élevées, notamment sous les rayons directs du soleil ou à proximité des conduites de chauffage. • Utilisez exclusivement le matériel de fixation fourni afin de garantir une installation sûre. Remarque sur le câble d’alimentation (jaune) Lorsque vous raccordez cet appareil conjointement avec d’autres équipements stéréo, l’intensité du circuit du véhicule auquel l’appareil est raccordé doit être supérieure à la somme de l’intensité des fusibles de chaque composant. Réglage de l’angle de fixation Réglez l’angle de fixation afin qu’il soit inférieur à 30°. 34FR • Cette liste des pièces ne comprend pas tout le contenu de l’emballage. • Le support et le tour de protection sont fixés à l’appareil en usine. Avant de monter l’appareil, utilisez les clés de déblocage pour retirer le support de l’appareil. Pour de plus amples détails, reportez-vous à la section « Retrait du tour de protection et du support » (page 38). • Conservez les clés de déblocage , car vous en aurez besoin à l’avenir si vous décidez de retirer l’appareil de votre véhicule. Raccordement Caisson de graves*1 *3 *3 *3 Amplificateur de puissance*1 *2 Pour de plus amples détails, reportez-vous à la section « Raccordements » (page 36). Voir «Schéma de raccordement électrique» (page 37) pour plus de détails. d’une télécommande filaire (non fournie)*4 *5*6 de l’antenne du véhicule*7 *1 *2 *3 *4 Non fourni Impédance des haut-parleurs : 4 Ω – 8 Ω × 4 Cordon à broches RCA (non fourni) Selon le type de véhicule, utilisez un adaptateur pour la télécommande filaire (non fournie). Pour plus d’informations sur l’utilisation de la télécommande filaire, voir « Utilisation de la télécommande filaire » (page 38). *5 Qu’il soit ou non utilisé, guidez le cordon d’entrée du micro de manière à ce qu’il n’entrave pas la conduite du véhicule. Fixez-le à l’aide d’un serre-câbles, s’il se trouve au niveau de vos pieds. *6 Pour plus de détails concernant l’installation du micro, reportez-vous à la section « Installation du microphone » (page 37). *7 Selon le type de véhicule, utilisez un adaptateur (non fourni) si vous ne parvenez pas à brancher le connecteur d’antenne. 35FR Raccordement aisé d’un caisson de graves Raccordements Si vous disposez d’une antenne électrique dépourvue de relais, vous risquez de l’endommager si vous raccordez cet appareil à l’aide du câble d’alimentation fourni . Vous pouvez utiliser un caisson de graves sans amplificateur de puissance pour autant qu’il soit raccordé à un cordon de hautparleur arrière. Vers le connecteur haut-parleurs du véhicule Haut-parleur avant Caisson de graves 1 Haut-parleur 2 arrière (droit) Violet 3 Haut-parleur 4 avant (droit) Gris 5 Haut-parleur 6 avant (gauche) Blanc 7 Haut-parleur 8 arrière (gauche) Vert Rayé violet/noir Rayé gris/noir Rayé blanc/noir Rayé vert/noir Vers le connecteur d’alimentation du véhicule Remarques • La préparation des cordons de haut-parleurs arrière est requise. • Utilisez un caisson de graves dont l’impédance est comprise entre 4 Ω et 8 Ω et dont la puissance admissible est appropriée pour éviter qu’il soit endommagé. Raccordement de protection de la mémoire Lorsque le câble d’alimentation jaune est raccordé, le circuit mémoire est toujours alimenté, même lorsque le contact est coupé. Raccordement des haut-parleurs 12 alimentation permanente antenne électrique/ 13 amplificateur de puissance (REM OUT) Rayé bleu/ blanc alimentation de 14 l’illumination commutée Rayé orange/ blanc 15 alimentation commutée 16 masse 36FR Jaune Rouge Noir • Avant de raccorder les haut-parleurs, mettez l’appareil hors tension. • Utilisez des haut-parleurs dont l’impédance est comprise entre 4 Ω et 8 Ω et dont la puissance admissible est appropriée pour éviter qu’ils soient endommagés. Schéma de raccordement électrique Quand le véhicule est dépourvu de position ACC Rouge Rouge Jaune Jaune Vérifiez le connecteur d’alimentation auxiliaire de votre véhicule et faites correspondre correctement les raccordements en fonction du véhicule. Connecteur d’alimentation auxiliaire Après avoir fait correspondre correctement les raccordements et les câbles d’alimentation commutée, raccordez l’appareil à l’alimentation du véhicule. Si vous avez des questions et des problèmes de raccordement de cet appareil, qui ne sont pas abordés dans ce mode d’emploi, contactez votre concessionnaire automobile. Raccordement ordinaire Rouge Rouge Installation du microphone Jaune 12 alimentation permanente Jaune Jaune Pour pouvoir capter votre voix lors d’un appel en mode mains libres, vous devez installer le micro . 15 alimentation commutée Rouge Quand les positions des câbles rouge et jaune sont inversées Rouge Rouge Clip (non fourni) Jaune Jaune 12 alimentation commutée Jaune 15 alimentation permanente Rouge 37FR 2 Attention • Il est extrêmement dangereux de laisser le cordon s’enrouler autour de la colonne de direction ou du levier de vitesses. Assurezvous de placer le cordon et les autres pièces de manière à ce qu’ils ne gênent pas la conduite. • Si des airbags ou d’autres équipements destinés à absorber les chocs sont installés dans votre véhicule, contactez le magasin où vous avez acheté cet appareil ou le concessionnaire automobile avant de procéder à l’installation. Insérez les deux clés de déblocage jusqu’à ce qu’elles émettent un déclic, enfoncez le support , puis dégagez l’appareil en le tirant vers le haut. Dirigez le crochet vers l’intérieur. Remarque Avant de fixer l’adhésif double face , nettoyez la surface du tableau de bord avec un chiffon sec. Utilisation de la télécommande filaire 1 Pour activer la télécommande filaire, réglez [STR CONTROL] sous [SET STEERING] sur [PRESET] (page 21). Montage de l’appareil dans le tableau de bord Avant de procéder à l’installation, assurezvous que les languettes des deux côtés du support sont inclinées de 2 mm vers l’intérieur. 1 Installation Positionnez le support à l’intérieur du tableau de bord, puis pliez les griffes vers l’extérieur pour un ajustement serré. 182 mm 53 mm Retrait du tour de protection et du support Avant d’installer l’appareil, retirez son tour de protection et son support . 1 Pincez les deux bords du tour de protection , puis retirez-le. 2 Languette Montez l’appareil sur le support , puis fixez le tour de protection . 38FR Remarques • Si les languettes sont droites ou si elles sont inclinées vers l’extérieur, l’appareil ne peut pas être installé correctement et il risque d’être expulsé. • Assurez-vous que les 4 languettes du tour de protection sont bien insérées dans les fentes de l’appareil. Retrait et fixation de la façade avant Pour de plus amples détails, reportez-vous à la section « Retrait de la façade avant » (page 7). Réinitialisation de l’appareil Pour de plus amples détails, reportez-vous à la section « Réinitialisation de l’appareil » (page 8). Remplacement du fusible Lorsque vous remplacez le Fusible (10 A) fusible, veillez à utiliser un fusible dont l’intensité, en ampères, correspond à la valeur indiquée sur le fusible usagé. Si le fusible saute, vérifiez le branchement de l’alimentation et remplacez-le. Si le nouveau fusible saute également, il est possible que l’appareil soit défectueux. Dans ce cas, consultez votre revendeur Sony le plus proche. 39FR Per motivi di sicurezza, accertarsi di installare questo apparecchio sul cruscotto dell’auto perché la parte posteriore dell’apparecchio si scalda durante l’utilizzo. Per ulteriori informazioni, consultare “Collegamenti e installazione” (pagina 34). Fabbricato in Thailandia La targhetta indicante la tensione operativa e informazioni simili è situata nella parte inferiore del rivestimento. La marcatura CE è valida esclusivamente nei paesi in cui è prevista per legge, principalmente nei paesi inclusi nello Spazio economico europeo (EEA, European Economic Area). Con la presente, Sony Corporation dichiara che questo apparecchio è conforme alla Direttiva 2014/53/UE. Il testo completo della dichiarazione di conformità UE è disponibile al seguente indirizzo Internet: http://www.compliance.sony.de/ Avviso per i clienti: le seguenti informazioni riguardano esclusivamente gli apparecchi venduti in paesi in cui sono applicate le direttive UE Questo prodotto è stato fabbricato da o per conto di Sony Corporation. Importatore UE: Sony Europe B.V. Richieste all’importatore UE o relative alla conformità di prodotto in Europa devono essere indirizzate al rappresentante autorizzato del costruttore, Sony Belgium, bijkantoor van Sony Europe B.V., Da Vincilaan 7-D1, 1930 Zaventem, in Belgio. 2IT Smaltimento delle batterie (pile e accumulatori) esauste e delle apparecchiature elettriche ed elettroniche a fine vita (applicabile in tutti i Paesi dell’Unione Europea e negli altri Paesi con sistema di raccolta differenziata) Questo simbolo sul prodotto, batteria o imballo indica che il prodotto non deve essere considerato come un normale rifiuto domestico. Su talune batterie questo simbolo può essere utilizzato in combinazione con un simbolo chimico. Il simbolo chimico del piombo (Pb) è aggiunto se la batteria contiene più dello 0,004% di piombo. Assicurandovi che questi prodotti e le batterie siano smaltiti correttamente, contribuirete a prevenire potenziali conseguenze negative per l’ambiente e per la salute che potrebbero essere causate dal trattamento inappropriato dei medesimi prodotti o batterie. Il riciclo dei materiali aiuterà a preservare le risorse naturali. Nel caso di prodotti che per ragioni di sicurezza, prestazioni o integrità dei dati richiedano una connessione permanente con una batteria in essi incorporata, la stessa dovrà essere sostituita esclusivamente da personale qualificato. Per assicurarsi che la batteria sia trattata correttamente, si prega di consegnare i prodotti a fine vita in un centro di raccolta idoneo per il riciclo di apparecchiature elettriche ed elettroniche. Per tutte le altre batterie, si prega di consultare la sezione relativa alla rimozione sicura della batteria dal prodotto. Si prega di consegnare le batterie in un centro di raccolta idoneo per il riciclo delle batterie esauste. Per informazioni più dettagliate sul riciclo di questi prodotti o batterie, si prega di contattare il vostro Comune, il servizio di smaltimento rifiuti ovvero il punto vendita presso il quale è stato acquistato il prodotto o la batteria. In caso di smaltimento abusivo di batterie o di apparecchiature elettriche ed elettroniche potrebbero essere applicate le sanzioni previste dalla normativa vigente (valido solo per l’Italia). ATTENZIONE Il seguente intervallo di frequenza 65 – 74 MHz non è assegnato alla trasmissione audio secondo la tabella delle allocazioni comuni europee (ECA Table) e non può essere utilizzato in Europa. Avvertenza relativa all’installazione su un’auto sprovvista della posizione ACC (accessoria) sul blocchetto di accensione Assicurarsi di impostare la funzione AUTO OFF (pagina 21). L’apparecchio si spegne completamente e in modo automatico dopo l’intervallo di tempo impostato dal relativo spegnimento (o tenendo premuto OFF per 1 secondo), per evitare lo scaricamento della batteria. Se non viene impostata la funzione AUTO OFF, tenere premuto OFF fino alla disattivazione del display ogni volta che si spegne il motore. Dichiarazione di non responsabilità relativa a servizi offerti da terze parti I servizi offerti da terze parti possono essere cambiati, sospesi o interrotti senza preavviso. Sony declina ogni responsabilità in questo genere di situazioni. Avviso importante Attenzione IN NESSUN CASO SONY SI ASSUMERÀ ALCUNA RESPONSABILITÀ PER EVENTUALI DANNI INCIDENTALI, INDIRETTI O CONSEQUENZIALI O DANNI DI ALTRO TIPO, COMPRESI MA NON LIMITATI A PERDITA DI PROFITTO, PERDITA DI RICAVI, PERDITA DI DATI, PERDITA DELL’USO DEL PRODOTTO O DI QUALSIASI APPARECCHIATURA ASSOCIATA, TEMPI DI FERMO E TEMPO DELL’ACQUIRENTE IN RELAZIONE A O CAUSATI DALL’USO DEL PRESENTE PRODOTTO O DEI SUOI COMPONENTI HARDWARE E/O SOFTWARE. Gentile cliente, il presente prodotto comprende un trasmettitore radio. In conformità alla norma UNECE n. 10, i produttori di veicoli possono imporre specifiche condizioni per l’installazione di trasmettitori radio sui veicoli. Prima di installare questo prodotto sul veicolo, consultare il manuale di istruzioni del veicolo in uso o contattare il produttore o il concessionario del veicolo. Chiamate di emergenza Questo impianto vivavoce BLUETOOTH per automobile e il dispositivo elettronico connesso all’impianto vivavoce funzionano utilizzando segnali radio, la rete cellulare e la rete di telefonia fissa, nonché funzioni programmate dall’utente, che non possono garantire la connessione in tutte le condizioni. Si invita pertanto a non affidarsi esclusivamente a un dispositivo elettronico per le comunicazioni essenziali (per esempio emergenze di carattere medico). Informazioni sulle comunicazioni BLUETOOTH Le microonde emesse dai dispositivi BLUETOOTH possono influire sul funzionamento di dispositivi medici elettronici. Spegnere questo apparecchio e gli altri dispositivi BLUETOOTH nei seguenti luoghi per prevenire il rischio di incidenti. – In presenza di gas infiammabili, in ospedale, su treni e aeroplani, nelle stazioni di servizio – Nelle vicinanze di porte automatiche o di allarmi antincendio Questo apparecchio supporta le funzioni di sicurezza conformi allo standard BLUETOOTH per fornire una connessione sicura durante l’utilizzo della tecnologia wireless BLUETOOTH, ma a seconda degli ambienti tale sicurezza potrebbe rivelarsi non sufficiente. Prestare attenzione durante le comunicazioni tramite la tecnologia wireless BLUETOOTH. Non ci assumeremo alcuna responsabilità per l’eventuale divulgazione accidentale di informazioni durante le comunicazioni tramite BLUETOOTH. Per eventuali domande o problemi riguardanti l’apparecchio non trattati nel presente manuale, rivolgersi al più vicino rivenditore Sony. 3IT Indice Guida alle parti e ai comandi. . . . . . . . . . . . 5 Operazioni preliminari Rimozione del pannello anteriore. . . . . . . . 6 Azzeramento dell’apparecchio . . . . . . . . . . 7 Impostazione dell’orologio . . . . . . . . . . . . . 7 Preparazione di un dispositivo BLUETOOTH. . . . . . . . . . . . . . . . . . . . . . . 7 Collegamento di un dispositivo USB. . . . . 10 Collegamento di un altro dispositivo audio portatile . . . . . . . . . . . . . . . . . . . . . . . . . 10 Ascolto della radio Ascolto della radio . . . . . . . . . . . . . . . . . . . . 11 Utilizzo del sistema RDS (sistema dati radio) . . . . . . . . . . . . . . . . . . . . . . . . . . . 12 Impostazioni Disattivazione del modo DEMO . . . . . . . . 20 Operazioni di base delle impostazioni. . . 20 Impostazioni generali (GENERAL). . . . . . . . 21 Impostazioni audio (SOUND) . . . . . . . . . . 22 Impostazioni di visualizzazione (DISPLAY) . . . . . . . . . . . . . . . . . . . . . . . 23 Impostazioni BLUETOOTH (BLUETOOTH) . . . . . . . . . . . . . . . . . . . . 24 Impostazioni di Sony | Music Center (SONY APP) . . . . . . . . . . . . . . . . . . . . . . 24 Informazioni aggiuntive Aggiornamento del firmware . . . . . . . . . . Precauzioni . . . . . . . . . . . . . . . . . . . . . . . . . Manutenzione . . . . . . . . . . . . . . . . . . . . . . Caratteristiche tecniche. . . . . . . . . . . . . . . Guida alla soluzione dei problemi . . . . . . Messaggi. . . . . . . . . . . . . . . . . . . . . . . . . . . 25 25 26 26 28 32 Riproduzione Riproduzione di un dispositivo USB . . . . . 13 Riproduzione di un dispositivo BLUETOOTH. . . . . . . . . . . . . . . . . . . . . . 14 Ricerca e riproduzione dei brani . . . . . . . . 15 Chiamate in vivavoce (esclusivamente tramite BLUETOOTH) Ricevere una chiamata . . . . . . . . . . . . . . . . 16 Inviare una chiamata . . . . . . . . . . . . . . . . . 16 Operazioni disponibili durante una chiamata . . . . . . . . . . . . . . . . . . . . . . . . 17 Funzioni utili Sony | Music Center con iPhone/ smartphone Android™ . . . . . . . . . . . . 18 Utilizzo del riconoscimento vocale (solo smartphone Android). . . . . . . . . . . . . . 19 Utilizzo di Siri Eyes Free . . . . . . . . . . . . . . . 19 4IT Collegamenti e installazione Attenzione . . . . . . . . . . . . . . . . . . . . . . . . . Elenco dei componenti per l’installazione . . . . . . . . . . . . . . . . . . . . Connessioni . . . . . . . . . . . . . . . . . . . . . . . . Installazione . . . . . . . . . . . . . . . . . . . . . . . . 34 34 35 38 Guida alle parti e ai comandi Unità principale Tasto rilascio pannello anteriore Finestra del display SRC (sorgente) Per accendere l’apparecchio. Per cambiare la sorgente. OFF Tenere premuto per 1 secondo per disattivare la sorgente e visualizzare l’orologio. Tenere premuto per più di 2 secondi per spegnere l’apparecchio e disattivare il display. / (prec/succ) / (indietro/avanti rapido) PTY (tipo di programma) Per selezionare PTY in RDS. (sfoglia) (pagina 15) Per impostare il modo sfoglia durante la riproduzione. (Non disponibile quando è collegato un dispositivo USB in modalità Android o un iPod.) Manopola di controllo Ruotare per regolare il volume. PUSH ENTER Per impostare la voce selezionata. Premere SRC, ruotare e quindi premere per cambiare la sorgente (timeout dopo 2 secondi). CALL Per accedere al menu delle chiamate. Per ricevere/terminare una chiamata. Tenere premuto per più di 2 secondi per commutare il segnale BLUETOOTH. (indietro) Per tornare al display precedente. MENU Per aprire il menu di impostazione. VOICE (pagina 17, 19) Tenere premuto per più di 2 secondi per attivare i comandi vocali, il riconoscimento vocale (solo smartphone Android) o la funzione Siri (solo iPhone). Contrassegno N Toccare la manopola di controllo con uno smartphone Android per stabilire una connessione BLUETOOTH. / (SEEK –/+) Per sintonizzare automaticamente le stazioni radio. Tenere premuto per sintonizzarle manualmente. MODE (pagina 7, 11, 17) Ricettore del telecomando Tasti numerici (da 1 a 6) Per ricevere le stazioni radio memorizzate. Tenere premuto per memorizzare le stazioni. 5IT ALBUM / Per saltare un album per un apparecchio audio. Tenere premuto per saltare gli album in modo continuo. (Non disponibile quando è collegato un dispositivo USB in modalità Android o un iPod.) (ripeti) (Non disponibile quando è collegato un dispositivo USB in modalità Android.) (ordine casuale) (Non disponibile quando è collegato un dispositivo USB in modalità Android.) MIC (pagina 17) (riproduzione/pausa) Operazioni preliminari Rimozione del pannello anteriore Per evitare il furto dell’apparecchio, è possibile rimuoverne il pannello anteriore. 1 Tenere premuto OFF fino allo spegnimento dell’apparecchio, quindi premere il tasto rilascio pannello anteriore , infine tirare il pannello verso di sé per estrarlo. EXTRA BASS Per rafforzare il suono dei bassi in sincronizzazione con il livello del volume. Premere per cambiare l’impostazione EXTRA BASS: [1], [2], [OFF]. Presa di ingresso AUX DSPL (display) Premere per cambiare le voci sul display. SCRL (scorrimento) Tenere premuto per scorrere le voci del display. Porta USB Segnale di avvertimento Se la chiave di accensione viene impostata sulla posizione OFF senza che il pannello anteriore sia stato rimosso, viene emesso per alcuni secondi un segnale acustico di avvertimento. Tale segnale viene emesso solo se è in uso l’amplificatore incorporato. Numeri di serie Verificare che i numeri di serie sulla parte inferiore dell’apparecchio e sul retro del pannello corrispondano in modo corretto. Altrimenti non sarà possibile eseguire l’associazione BLUETOOTH, la connessione e la disconnessione tramite NFC. Installazione del pannello anteriore 6IT Azzeramento dell’apparecchio Prima di utilizzare l’apparecchio per la prima volta, dopo la sostituzione della batteria dell’auto o dopo avere effettuato modifiche ai collegamenti, è necessario azzerare l’apparecchio. 1 Impostazione dell’orologio 1 Premere MENU, ruotare la manopola di controllo per selezionare [GENERAL], quindi premere la manopola. 2 Ruotare la manopola di controllo per selezionare [SET CLOCK-ADJ], quindi premere la manopola. Premere DSPL e (indietro)/MODE per più di 2 secondi. Nota L’indicazione dell’ora lampeggia. 3 In seguito all’azzeramento dell’apparecchio verranno cancellate le impostazioni dell’orologio e alcune funzioni memorizzate. Impostazione dell’area/regione Dopo l’azzeramento dell’apparecchio, viene visualizzato il display di impostazione dell’area/regione. 1 Premere ENTER mentre è visualizzato [SET AREA]. Viene visualizzata l’area/regione impostata attualmente. 2 Ruotare la manopola di controllo per selezionare [EUROPE] o [RUSSIA], quindi premere la manopola. 3 Ruotare la manopola di controllo per selezionare [YES] o [NO], quindi premere la manopola. Se viene modificata l’impostazione area/ regione, l’apparecchio si azzera e quindi viene visualizzato l’orologio. Questa impostazione può essere configurata nel menu di impostazione generale (pagina 21). Ruotare la manopola di controllo per impostare l’ora e i minuti. Per passare da una cifra all’altra dell’indicazione digitale, premere / (SEEK –/+). 4 Dopo aver impostato i minuti, premere MENU. L’impostazione è completata e l’orologio viene attivato. Per visualizzare l’orologio Premere DSPL. Preparazione di un dispositivo BLUETOOTH È possibile ascoltare musica o eseguire chiamate in vivavoce, a seconda del dispositivo compatibile con BLUETOOTH in uso, per esempio uno smartphone, un telefono cellulare o un dispositivo audio (di seguito indicato come “dispositivo BLUETOOTH”, se non altrimenti specificato). Per informazioni dettagliate sulla connessione, consultare le istruzioni per l’uso fornite con il dispositivo. Prima di collegare il dispositivo, abbassare il volume dell’apparecchio per evitare il rischio di suoni troppo forti. 7IT Collegamento di uno smartphone tramite la connessione One touch (NFC) Toccando la manopola di controllo dell’apparecchio con uno smartphone compatibile con NFC*, l’apparecchio viene associato e connesso allo smartphone automaticamente. * La tecnologia NFC (Near Field Communication) permette la comunicazione wireless a breve raggio tra vari dispositivi, per esempio telefoni cellulari e tag IC. Grazie alla funzione NFC, è possibile comunicare dati con facilità semplicemente toccando il relativo simbolo o il punto designato su dispositivi compatibili con NFC. Per gli smartphone con il sistema operativo Android 4.0 o precedente, è necessario scaricare l’app “NFC Easy Connect” disponibile su Google Play. In certi paesi/ regioni l’app potrebbe non essere disponibile per il download. 1 2 Note • Quando si esegue la connessione, maneggiare lo smartphone con attenzione per evitare graffi. • Non è possibile eseguire la connessione One touch se l’apparecchio è già connesso a due dispositivi compatibili con NFC. In tal caso, disconnettere uno degli altri due dispositivi ed eseguire nuovamente la connessione con lo smartphone. Associazione e connessione con un dispositivo BLUETOOTH Quando si esegue la connessione a un dispositivo BLUETOOTH per la prima volta è richiesta una registrazione reciproca (denominata “associazione”). L’associazione consente all’apparecchio e agli altri dispositivi di riconoscersi a vicenda. L’apparecchio è in grado di connettersi a due dispositivi BLUETOOTH (due telefoni cellulari, o un telefono cellulare e un dispositivo audio). Attivare la funzione NFC sullo smartphone. Per informazioni dettagliate consultare le istruzioni per l’uso fornite con lo smartphone. 1 Toccare l’area con il contrassegno N sull’apparecchio con l’area del contrassegno N dello smartphone. Posizionare il dispositivo BLUETOOTH entro 1 m di distanza dall’apparecchio. 2 Premere MENU, ruotare la manopola di controllo per selezionare [BLUETOOTH], quindi premere la manopola. 3 Ruotare la manopola di controllo per selezionare [SET PAIRING], quindi premere la manopola. 4 Ruotare la manopola di controllo per selezionare [SET DEVICE 1]* o [SET DEVICE 2]*, quindi premere la manopola. Verificare che il simbolo display dell’apparecchio. si illumini sul Per disconnettersi utilizzando NFC lampeggia quando l’apparecchio è in modalità attesa di associazione. Toccare nuovamente l’area con il contrassegno N sull’apparecchio con l’area del contrassegno N dello smartphone. * Una volta completata l’associazione, [SET DEVICE 1] o [SET DEVICE 2] viene sostituito dal nome del dispositivo associato. 5 8IT Eseguire l’associazione sul dispositivo BLUETOOTH affinché rilevi l’apparecchio. 6 Selezionare [DSX-A416BT] visualizzato sul display del dispositivo BLUETOOTH. Se il nome del modello in uso non è visualizzato, ripetere la procedura dal punto 2. 7 Se sul dispositivo BLUETOOTH viene richiesta l’immissione di un codice passkey*, immettere [0000]. * Il codice passkey può essere definito “Passcode”, “codice PIN”, “numero PIN” o “Password” e così via, a seconda del dispositivo. Immettere il codice passkey [0000] Connessione a un dispositivo BLUETOOTH associato Per utilizzare un dispositivo associato è richiesta la connessione all’apparecchio. Alcuni dispositivi associati stabiliranno la connessione automaticamente. 1 Premere MENU, ruotare la manopola di controllo per selezionare [BLUETOOTH], quindi premere la manopola. 2 Ruotare la manopola di controllo per selezionare [SET BT SIGNL], quindi premere la manopola. Verificare che il simbolo Attivare la funzione BLUETOOTH sul dispositivo BLUETOOTH. 4 Utilizzare il dispositivo BLUETOOTH per connetterlo all’apparecchio. o Una volta completata l’associazione, il simbolo rimane illuminato. 8 Selezionare l’apparecchio sul dispositivo BLUETOOTH per stabilire una connessione BLUETOOTH. o si illumina quando la connessione è stata completata. Nota Durante la connessione a un dispositivo BLUETOOTH l’apparecchio non può essere rilevato da un altro dispositivo. Per attivare il rilevamento, accedere alla modalità di associazione e cercare l’apparecchio da un altro dispositivo. Per avviare la riproduzione Per ulteriori informazioni, consultare “Riproduzione di un dispositivo BLUETOOTH” (pagina 14). Per disconnettere il dispositivo associato Eseguire i punti da 2 a 4 per disconnettere il dispositivo BLUETOOTH dopo che è stato associato all’apparecchio. si illumini. 3 si illuminano. Icone sul display: Si illumina quando sono disponibili le chiamate in vivavoce tramite l’attivazione di HFP (Handsfree Profile). Si illumina quando è possibile riprodurre il dispositivo audio tramite l’attivazione di A2DP (Advanced Audio Distribution Profile). Per connettere l’ultimo dispositivo che è stato connesso all’apparecchio Attivare la funzione BLUETOOTH sul dispositivo BLUETOOTH. Per stabilire la connessione con un dispositivo audio, premere SRC per selezionare [BT AUDIO], quindi premere (riproduzione/pausa). Per stabilire la connessione con un telefono cellulare, premere CALL. 9IT Nota Durante la trasmissione di dati audio tramite BLUETOOTH non è possibile stabilire una connessione dall’apparecchio al telefono cellulare. Stabilire la connessione dal telefono cellulare all’apparecchio. Suggerimento Con segnale BLUETOOTH attivo: quando la chiavetta di accensione viene attivata, l’apparecchio si riconnette automaticamente all’ultimo telefono cellulare che è stato connesso. Collegamento di un dispositivo USB 1 2 Abbassare il volume sull’apparecchio. Collegare il dispositivo USB all’apparecchio. Per collegare un iPod/iPhone, utilizzare il cavo di collegamento USB per iPod (non in dotazione). Per installare il microfono Per ulteriori informazioni, consultare “Installazione del microfono” (pagina 37). Connessione con un iPhone/iPod (associazione BLUETOOTH automatica) Quando un iPhone/iPod con iOS5 o successivo viene collegato alla porta USB, l’apparecchio viene associato e connesso all’iPhone/iPod automaticamente. Per attivare l’associazione BLUETOOTH automatica, verificare che [SET AUTOPAIR] in [BLUETOOTH] sia impostato su [ON] (pagina 24). 1 Attivare la funzione BLUETOOTH sull’iPhone/iPod. 2 Collegare l’iPhone/iPod alla porta USB. Collegamento di un altro dispositivo audio portatile 1 Spegnere il dispositivo audio portatile. 2 3 Abbassare il volume sull’apparecchio. Collegare il dispositivo audio portatile alla presa di ingresso AUX (minipresa stereo) sull’apparecchio con un cavo di collegamento (non in dotazione)*. * Assicurarsi di utilizzare una spina diritta. Verificare che il simbolo display dell’apparecchio. si illumini sul Note • Non è possibile eseguire l’associazione BLUETOOTH automatica se l’apparecchio è già connesso a due dispositivi BLUETOOTH. In tal caso, disconnettere uno degli altri due dispositivi ed eseguire nuovamente la connessione con l’iPhone/iPod. • Se l’associazione BLUETOOTH automatica non si attiva, consultare “Preparazione di un dispositivo BLUETOOTH” (pagina 7). 10IT 4 Premere SRC per selezionare [AUX]. Per adeguare il livello del volume del dispositivo collegato ad altre sorgenti Avviare la riproduzione del dispositivo audio portatile collegato selezionando un volume moderato e impostare il consueto volume di ascolto sull’apparecchio. Premere MENU, quindi selezionare [SOUND] [SET AUX VOL] (pagina 23). Ascolto della radio Ascolto della radio Per ascoltare la radio, premere SRC per selezionare [TUNER]. Memorizzazione automatica (BTM) 1 Premere MODE per cambiare banda (FM1, FM2, FM3, MW o LW). 2 Premere MENU, ruotare la manopola di controllo per selezionare [GENERAL], quindi premere la manopola. 3 Ruotare la manopola di controllo per selezionare [SET BTM], quindi premere la manopola. L’apparecchio memorizza le stazioni in corrispondenza dei tasti numerici in base all’ordine delle frequenze. Sintonizzazione 1 Premere MODE per cambiare banda (FM1, FM2, FM3, MW o LW). 2 Eseguire la sintonizzazione. Sintonizzazione manuale Tenere premuto / (SEEK –/+) per individuare la frequenza approssimativa, quindi premere più volte / (SEEK –/+) per sintonizzarsi con precisione sulla frequenza desiderata. Sintonizzazione automatica Premere / (SEEK –/+). La ricerca si arresta non appena l’apparecchio riceve una stazione. Memorizzazione manuale 1 Durante la ricezione della stazione che si desidera memorizzare, tenere premuto un tasto numerico (da 1 a 6) fino a visualizzare [MEM]. 11IT Ricezione delle stazioni memorizzate 1 Selezionare la banda, quindi premere un tasto numerico (da 1 a 6). Utilizzo del sistema RDS (sistema dati radio) Impostazione delle funzioni AF (frequenze alternative) e TA (notiziari sul traffico) AF sintonizza continuamente la stazione con il segnale più potente, mentre TA fornisce informazioni o trasmette programmi correnti relativi al traffico (TP), se disponibili. 1 Premere MENU, ruotare la manopola di controllo per selezionare [GENERAL], quindi premere la manopola. 2 Ruotare la manopola di controllo per selezionare [SET AF/TA], quindi premere la manopola. 3 Ruotare la manopola di controllo per selezionare [SET AF-ON], [SET TA-ON], [SET AF/TA-ON] o [SET AF/TA-OFF], quindi premere la manopola. Memorizzazione di stazioni RDS con impostazione AF e TA È possibile preselezionare le stazioni RDS insieme all’impostazione AF/TA. Impostare AF/TA, quindi memorizzare la stazione mediante la funzione BTM o manualmente. Se si utilizza il modo di preselezione manuale, è possibile preselezionare anche le stazioni non RDS. Ricezione dei notiziari di emergenza Se è attivato il modo AF o TA, gli annunci di emergenza interrompono automaticamente la riproduzione della sorgente selezionata. 12IT Regolazione del livello del volume durante la ricezione di un notiziario sul traffico Il livello del volume viene memorizzato anche per i notiziari sul traffico successivi, indipendentemente dal normale livello del volume. Mantenimento del programma regionale (REGIONAL) Quando sono attivate le funzioni AF e REGIONAL, la stazione sintonizzata non verrà sostituita da un’altra stazione regionale con segnale più potente. Se si intende lasciare tale area di ricezione del programma regionale, impostare [SET REGIONAL] in [GENERAL] su [SET REG-OFF] durante la ricezione FM (pagina 22). Questa funzione non è disponibile nel Regno Unito e in altre aree. Funzione Local Link (solo per il Regno Unito) Questa funzione consente di selezionare altre stazioni locali della stessa area, anche se non sono memorizzate in corrispondenza dei tasti numerici. Durante la ricezione FM, premere un tasto numerico (da 1 a 6) in corrispondenza del quale è memorizzata una stazione locale. Entro 5 secondi, premere nuovamente il tasto numerico della stazione locale. Ripetere questa procedura fino alla ricezione della stazione locale. Selezione del modo PTY (tipo di programma) 1 2 Premere PTY durante la ricezione FM. Ruotare la manopola di controllo fino a visualizzare il tipo di programma desiderato, quindi premere la manopola. L’apparecchio avvia la ricerca di una stazione che trasmette il tipo di programma selezionato. Tipi di programmi NEWS (notizie), AFFAIRS (attualità), INFO (informazione), SPORT (programmi sportivi), EDUCATE (programmi educativi), DRAMA (teatro), CULTURE (programmi culturali), SCIENCE (programmi scientifici), VARIED (varie), POP M (musica pop), ROCK M (musica rock), EASY M (musica d’ascolto), LIGHT M (musica classica leggera), CLASSICS (musica classica impegnata), OTHER M (altro tipo di musica), WEATHER (meteo), FINANCE (finanza), CHILDREN (programmi per bambini), SOCIAL (società), RELIGION (religione), PHONE IN (telefonate in diretta), TRAVEL (viaggi), LEISURE (tempo libero), JAZZ (musica jazz), COUNTRY (musica country), NATION M (musica nazionale), OLDIES (musica evergreen), FOLK M (musica folk), DOCUMENT (documentari) Impostazione dell’orologio (CT) L’orologio viene regolato mediante i dati CT della trasmissione RDS. 1 Impostare [SET CT-ON] in [GENERAL] (pagina 22). Riproduzione Riproduzione di un dispositivo USB Nelle presenti Istruzioni per l’uso il termine “iPod” viene utilizzato come denominazione generica per le funzioni iPod su iPod e iPhone, salvo quando diversamente specificato dal testo o dalle figure. Per ulteriori informazioni sulla compatibilità dell’iPod in uso, consultare “Informazioni su iPod” (pagina 25) o visitare il sito Web di assistenza indicato sulla retrocopertina. È possibile utilizzare dispositivi USB di tipo AOA (Android Open Accessory) 2.0, MSC (memorizzazione di massa) e MTP (protocollo di trasferimento dei file multimediali)* compatibili con lo standard USB. A seconda del dispositivo USB, sull’apparecchio è possibile selezionare la modalità Android o MSC/MTP. Alcuni lettori di file multimediali digitali o smartphone Android potrebbero richiedere l’impostazione della modalità MTP. * Per es. una chiavetta USB, un lettore di supporti digitali, uno smartphone Android Note • Per ulteriori informazioni sulla compatibilità del dispositivo USB in uso, visitare il sito di assistenza riportato sulla retrocopertina. • Gli smartphone con Android 4.1 o versioni successive supportano Android Open Accessory 2.0 (AOA 2.0). Ciononostante, alcuni smartphone potrebbero non supportare completamente AOA 2.0 pur avendo installato Android 4.1 o versioni successive. Per ulteriori informazioni sulla compatibilità dello smartphone Android in uso, visitare il sito di assistenza riportato sulla retrocopertina. • Non è supportata la riproduzione dei file riportati di seguito. MP3/WMA/FLAC: – file protetti da copyright – file DRM (gestione dei diritti digitali) – file audio multicanale MP3/WMA: – file con compressione senza perdita di dati 13IT Prima di eseguire una connessione, selezionare la modalità USB (modalità Android o modalità MSC/MTP) a seconda del dispositivo USB (pagina 22). 1 Collegare un dispositivo USB alla porta USB (pagina 10). La riproduzione si avvia automaticamente. Se un dispositivo è già collegato, per avviare la riproduzione premere SRC per selezionare [USB] (sul display viene visualizzata la dicitura [IPD] quando l’iPod è stato riconosciuto). 2 Regolare il volume sul presente apparecchio. Riproduzione di un dispositivo BLUETOOTH È possibile riprodurre contenuti da un dispositivo connesso compatibile con BLUETOOTH A2DP (Advanced Audio Distribution Profile). 1 Per selezionare il dispositivo audio, premere MENU, quindi selezionare [BLUETOOTH] [SET AUDIODEV] (pagina 24). Per interrompere la riproduzione Tenere premuto OFF per 1 secondo. Per rimuovere il dispositivo Interrompere la riproduzione, quindi rimuovere il dispositivo. Precauzione per iPhone Quando si connette un iPhone tramite USB, il volume delle chiamate telefoniche è controllato dall’iPhone, non dall’apparecchio. Non aumentare accidentalmente il volume sull’apparecchio durante una chiamata in quanto alla fine della chiamata il suono potrebbe essere troppo forte. Eseguire la connessione BLUETOOTH con il dispositivo audio (pagina 7). 2 Premere SRC per selezionare [BT AUDIO]. 3 Avviare la riproduzione dal dispositivo audio. 4 Regolare il volume sul presente apparecchio. Note • A seconda del dispositivo audio in uso, è possibile che informazioni quali titolo, numero/durata della traccia e stato di riproduzione non siano visualizzate sull’apparecchio. • Anche se la sorgente viene modificata sull’apparecchio, la riproduzione del dispositivo audio non si interrompe. • [BT AUDIO] non viene visualizzato sul display mentre l’applicazione “Sony | Music Center” è in esecuzione tramite la funzione BLUETOOTH. Per adeguare il livello del volume del dispositivo BLUETOOTH ad altre sorgenti Avviare la riproduzione del dispositivo audio BLUETOOTH selezionando un volume moderato e impostare il consueto volume di ascolto sull’apparecchio. Premere MENU, quindi selezionare [SOUND] [SET BTA VOL] (pagina 23). 14IT Ricerca e riproduzione dei brani Riproduzione ripetuta e in ordine casuale Non disponibile quando è collegato un dispositivo USB in modalità Android. 1 Durante la riproduzione, premere più volte (ripeti) o (ordine casuale) per selezionare il modo di riproduzione desiderato. La riproduzione nel modo di riproduzione selezionato potrebbe impiegare qualche tempo ad avviarsi. I modi di riproduzione disponibili variano a seconda della sorgente audio selezionata. Ricerca di un brano in base al nome (Quick-BrowZer™) Ricerca mediante la modalità salto delle voci (Modo Jump) Non disponibile quando è collegato un dispositivo USB in modalità Android o un iPod. 1 Durante la riproduzione di un dispositivo USB, premere (sfoglia). 2 3 Premere (SEEK +). Ruotare la manopola di controllo per selezionare la voce. L’elenco viene saltato in incrementi pari al 10% del numero totale di voci. 4 Premere ENTER per tornare al modo Quick-BrowZer. Viene visualizzata la voce selezionata. 5 Ruotare la manopola di controllo per selezionare la voce desiderata, quindi premere la manopola. La riproduzione si avvia automaticamente. Non disponibile quando è collegato un dispositivo USB in modalità Android o un iPod. 1 Durante la riproduzione di un dispositivo USB, premere (sfoglia)* per visualizzare l’elenco delle categorie di ricerca. Quando viene visualizzato l’elenco dei brani, premere più volte (indietro) per visualizzare la categoria di ricerca desiderata. * Durante la riproduzione USB, premere (sfoglia) per più di 2 secondi per tornare direttamente all’inizio dell’elenco delle categorie. 2 Ruotare la manopola di controllo per selezionare la categoria di ricerca desiderata, quindi premerla per confermare. 3 Ripetere il punto 2 per cercare il brano desiderato. La riproduzione si avvia automaticamente. Per annullare il modo Quick-BrowZer Premere (sfoglia). 15IT Dalla rubrica Chiamate in vivavoce (esclusivamente tramite BLUETOOTH) Per utilizzare un telefono cellulare, connetterlo all’apparecchio. All’apparecchio possono essere connessi due telefoni cellulari. Per ulteriori informazioni, consultare “Preparazione di un dispositivo BLUETOOTH” (pagina 7). Ricevere una chiamata 1 1 Quando all’apparecchio sono collegati due telefoni cellulari, ruotare la manopola di controllo per selezionare uno dei telefoni, quindi premere la manopola. 2 Ruotare la manopola di controllo per selezionare [PHONE BOOK], quindi premere la manopola. 3 Ruotare la manopola di controllo per selezionare un’iniziale dall’elenco delle iniziali, quindi premere la manopola. 4 Ruotare la manopola di controllo per selezionare un nome nell’elenco dei nomi, quindi premere la manopola. 5 Ruotare la manopola di controllo per selezionare un numero nell’elenco dei numeri, quindi premere la manopola. Premere CALL quando si riceve una chiamata e la suoneria squilla. La chiamata telefonica ha inizio. La chiamata telefonica ha inizio. Nota La suoneria e la voce del chiamante vengono emesse solo dai diffusori anteriori. Per rifiutare una chiamata Tenere premuto OFF per 1 secondo. Dal registro delle chiamate 1 Premere CALL di nuovo. Quando è connesso un telefono cellulare che supporta PBAP (Phone Book Access Profile), è possibile inviare una chiamata dalla rubrica o dal registro delle chiamate. Se all’apparecchio sono collegati due telefoni cellulari, selezionare uno dei telefoni. Premere CALL. Quando all’apparecchio sono collegati due telefoni cellulari, ruotare la manopola di controllo per selezionare uno dei telefoni, quindi premere la manopola. Per terminare una chiamata Inviare una chiamata Premere CALL. 2 Ruotare la manopola di controllo per selezionare [RECENT CALL], quindi premere la manopola. Viene visualizzato il registro delle chiamate. 3 Ruotare la manopola di controllo per selezionare un nome o numero telefonico nel registro delle chiamate, quindi premere la manopola. La chiamata telefonica ha inizio. 16IT Tramite composizione del numero 1 2 3 2 Premere CALL. Ruotare la manopola di controllo per selezionare [VOICE DIAL], quindi premere la manopola. In alternativa, tenere premuto VOICE per più di 2 secondi. Quando all’apparecchio sono collegati due telefoni cellulari, ruotare la manopola di controllo per selezionare uno dei telefoni, quindi premere la manopola. 3 Ruotare la manopola di controllo per selezionare [DIAL NUMBER], quindi premere la manopola. Per annullare la composizione vocale Ruotare la manopola di controllo per immettere il numero telefonico, quindi selezionare [ ] (spazio) e premere ENTER*. La chiamata telefonica ha inizio. * Per passare da una cifra all’altra dell’indicazione digitale, premere / (SEEK –/+). Nota Pronunciare il comando vocale memorizzato sul telefono cellulare. La voce viene riconosciuta e la chiamata viene inviata. Premere VOICE. Operazioni disponibili durante una chiamata Per regolare il volume della suoneria Ruotare la manopola di controllo mentre si riceve una chiamata. Sul display viene visualizzato [_] anziché [#]. Tramite ricomposizione 1 Premere CALL. Quando all’apparecchio sono collegati due telefoni cellulari, ruotare la manopola di controllo per selezionare uno dei telefoni, quindi premere la manopola. 2 Ruotare la manopola di controllo per selezionare [REDIAL], quindi premere la manopola. La chiamata telefonica ha inizio. Tramite comando vocale È possibile inviare una chiamata pronunciando il comando vocale memorizzato in un telefono cellulare connesso compatibile con la funzione di composizione vocale. 1 Premere CALL. Quando all’apparecchio sono collegati due telefoni cellulari, ruotare la manopola di controllo per selezionare uno dei telefoni, quindi premere la manopola. Per regolare il volume della voce del chiamante Ruotare la manopola di controllo durante la chiamata. Per regolare il volume per il chiamante (regolazione del guadagno del microfono) Premere MIC. Livelli di volume impostabili: [MIC-LOW], [MIC-MID], [MIC-HI]. Per ridurre l’eco e il rumore (modo annullamento eco/annullamento rumore) Tenere premuto MIC. Modi impostabili: [EC/NC-1], [EC/NC-2]. Per passare dalla modalità vivavoce alla modalità telefono Per trasferire l’audio di una chiamata dall’apparecchio al telefono cellulare e viceversa, premere MODE durante la chiamata. Nota A seconda del telefono cellulare in uso, questa operazione potrebbe non essere disponibile. 17IT 4 Funzioni utili Sony | Music Center con iPhone/smartphone Android™ È necessario scaricare la versione più recente dell’applicazione “Sony | Music Center” dall’App Store per iPhone o su Google Play per uno smartphone Android. Note • Per motivi di sicurezza, rispettare le normative locali e il codice della strada e non utilizzare l’applicazione durante la guida. • L’app “Sony | Music Center” consente di controllare dispositivi audio Sony compatibili con “Sony | Music Center” tramite l’iPhone/ smartphone Android. • Ciò che può essere controllato tramite “Sony | Music Center” varia a seconda del dispositivo connesso. • Per utilizzare le funzionalità “Sony | Music Center”, fare riferimento alle informazioni dettagliate disponibili sull’iPhone/smartphone Android. • Per ulteriori informazioni su “Sony | Music Center”, visitare l’URL seguente: http://www.sony.net/smcqa/ • Visitare il sito Web indicato di seguito per verificare i modelli di iPhone/smartphone Android compatibili. Per iPhone: accedere ad App Store Per smartphone Android: accedere a Google Play Stabilire una connessione con Sony | Music Center 1 Stabilire una connessione BLUETOOTH con l’iPhone/ smartphone Android (pagina 7). Per selezionare il dispositivo audio, premere MENU, quindi selezionare [BLUETOOTH] [SET AUDIODEV] (pagina 24). 2 Avviare l’applicazione “Sony | Music Center”. 3 Premere MENU, ruotare la manopola di controllo per selezionare [SONY APP], quindi premere la manopola. 18IT Ruotare la manopola di controllo per selezionare [CONNECT], quindi premere la manopola. La connessione all’iPhone/smartphone Android viene stabilita. Per informazioni dettagliate sulle operazioni sull’iPhone/smartphone Android, consultare la guida dell’applicazione. Se viene visualizzato il numero di dispositivo Verificare che il numero sia visualizzato (per es. 123456), quindi selezionare [Sì] sull’iPhone/smartphone Android. Per terminare la connessione 1 Premere MENU, ruotare la manopola di controllo per selezionare [SONY APP], quindi premere la manopola. 2 Ruotare la manopola di controllo per selezionare [CONNECT], quindi premere la manopola. Selezione della sorgente o applicazione È possibile selezionare la sorgente o applicazione di interesse sull’iPhone/ smartphone Android. Per selezionare la sorgente Premere SRC più volte. In alternativa, premere SRC, ruotare la manopola di controllo per selezionare la sorgente desiderata, quindi premere ENTER. Per visualizzare l’elenco di sorgenti Premere SRC. Annuncio di SMS tramite guida vocale (solo smartphone Android) I messaggi SMS sono letti automaticamente tramite i diffusori dell’auto quando sono ricevuti. Per informazioni dettagliate sulle impostazioni, consultare la guida dell’applicazione. Risposta a messaggi SMS (solo smartphone Android) È possibile rispondere a un messaggio toccando l’icona di risposta. 1 Attivare l’applicazione “Sony | Music Center”, quindi toccare l’icona [Reply] (rispondi). Nell’applicazione “Sony | Music Center” viene visualizzata la schermata di immissione di messaggi. 2 Immettere un messaggio di risposta per mezzo del riconoscimento vocale. Nell’applicazione “Sony | Music Center” viene visualizzato un elenco di possibili messaggi di risposta. 3 Ruotare la manopola di controllo per selezionare il messaggio di interesse, quindi premere la manopola. Il messaggio viene inviato. Impostazioni di audio e visualizzazione È possibile regolare le impostazioni relative ad audio e visualizzazione tramite l’iPhone/ smartphone Android. Per informazioni dettagliate sulle impostazioni, consultare la guida dell’applicazione. Utilizzo del riconoscimento vocale (solo smartphone Android) 1 Tenere premuto VOICE per attivare il riconoscimento vocale. 2 Pronunciare il comando vocale di interesse in direzione del microfono. Per disattivare il riconoscimento vocale Premere VOICE. Note • In alcuni casi il riconoscimento vocale potrebbe non essere disponibile. • A seconda delle prestazioni dello smartphone Android connesso, il riconoscimento vocale potrebbe non funzionare correttamente. • Utilizzare il riconoscimento vocale in situazioni in cui disturbi come il rumore del motore sono ridotti al minimo. Utilizzo di Siri Eyes Free Siri Eyes Free consente di utilizzare un iPhone senza usare le mani, semplicemente parlando nel microfono. La funzione richiede che l’iPhone sia connesso all’apparecchio tramite BLUETOOTH. La disponibilità è limitata agli iPhone 4s e modelli successivi. Verificare che sull’iPhone in uso sia installata la versione di iOS più recente. Prima di utilizzare questa funzione è necessario completare la registrazione BLUETOOTH e le configurazioni della connessione per l’iPhone. Per ulteriori informazioni, consultare “Preparazione di un dispositivo BLUETOOTH” (pagina 7). Per selezionare l’iPhone, premere MENU, quindi selezionare [BLUETOOTH] [SET AUDIODEV] (pagina 24). 1 Attivare la funzione Siri sull’iPhone. Per informazioni dettagliate consultare le istruzioni per l’uso fornite con l’iPhone. 2 Tenere premuto VOICE per più di 2 secondi. Viene visualizzata la schermata dei comandi vocali. 3 Dopo che l’iPhone ha emesso un segnale acustico, parlare in direzione del microfono. L’iPhone emette un altro segnale acustico, quindi Siri inizia a rispondere. Per disattivare Siri Eyes Free Premere VOICE. Note • A seconda delle condizioni in cui viene utilizzato, è possibile che l’iPhone non riconosca la voce. (per esempio se viene utilizzato in un’automobile in movimento). • È possibile che Siri Eyes Free non funzioni correttamente o che si verifichino ritardi nella risposta in aree in cui il segnale dell’iPhone è scarso. • A seconda delle condizioni operative dell’iPhone, è possibile che Siri Eyes Free non funzioni correttamente o si chiuda all’improvviso. • Se si riproduce una traccia tramite un iPhone utilizzando la connessione audio BLUETOOTH, quando la riproduzione della traccia tramite BLUETOOTH ha inizio, Siri Eyes Free si chiude automaticamente e l’apparecchio viene automaticamente impostato sulla sorgente audio BLUETOOTH. 19IT • Quando Siri Eyes Free viene attivata durante la riproduzione audio, è possibile che l’apparecchio venga impostato automaticamente sulla sorgente audio BLUETOOTH anche se non è stata specificata la traccia da riprodurre. • Quando l’iPhone viene collegato alla porta USB, è possibile che Siri Eyes Free non funzioni correttamente o si chiuda all’improvviso. • Quando l’iPhone viene collegato all’apparecchio tramite USB, non attivare Siri sull’iPhone. È possibile che Siri Eyes Free non funzioni correttamente o si chiuda all’improvviso. • Mentre Siri Eyes Free è attiva, i suoni audio non vengono emessi. Impostazioni Disattivazione del modo DEMO È possibile disattivare il display di dimostrazione che viene visualizzato quando la sorgente è disattivata ed è visualizzato l’orologio. 1 Premere MENU, ruotare la manopola di controllo per selezionare [GENERAL], quindi premere la manopola. 2 Ruotare la manopola di controllo per selezionare [SET DEMO], quindi premere la manopola. 3 Ruotare la manopola di controllo per selezionare [SET DEMO-OFF], quindi premere la manopola. L’impostazione è completata. 4 Premere due volte (indietro). Il display torna al modo di ricezione/ riproduzione normale. Operazioni di base delle impostazioni È possibile impostare voci nelle seguenti categorie di impostazioni: Impostazioni generali (GENERAL), impostazioni audio (SOUND), impostazioni di visualizzazione (DISPLAY), impostazioni BLUETOOTH (BLUETOOTH), impostazioni di Sony | Music Center (SONY APP) 1 2 Premere MENU. Ruotare la manopola di controllo per selezionare la categoria di impostazione, quindi premere la manopola. Le voci che possono essere impostate sono diverse a seconda della sorgente e delle impostazioni. 20IT 3 Ruotare la manopola di controllo per selezionare le opzioni, quindi premere la manopola. Per tornare al display precedente Premere (indietro). Impostazioni generali (GENERAL) AREA (area) Consente di specificare l’area/la regione in cui utilizzare questo apparecchio: [EUROPE], [RUSSIA]. Se viene modificata l’area/la regione impostata, l’apparecchio si azzera e quindi viene visualizzato l’orologio. (Disponibile solo quando la sorgente è disattivata ed è visualizzato l’orologio.) DEMO (dimostrazione) Consente di attivare/disattivare la dimostrazione: [ON], [OFF]. CLOCK-ADJ (regolazione dell’orologio) (pagina 7) CAUT ALM (segnale di avvertimento) Consente di attivare/disattivare il segnale di avvertimento: [ON], [OFF] (pagina 6). (Disponibile solo quando la sorgente è disattivata ed è visualizzato l’orologio.) BEEP (segnale acustico) Consente di attivare/disattivare il segnale acustico: [ON], [OFF]. AUTO OFF (spegnimento automatico) Consente di spegnere automaticamente l’apparecchio dopo un intervallo di tempo prestabilito dalla disattivazione e mentre è visualizzato l’orologio (ovvero tenere premuto OFF per 1 secondo): [ON] (30 minuti), [OFF]. STEERING (telecomando da volante) Consente di registrare/azzerare le impostazioni del telecomando da volante. (Disponibile solo quando la sorgente è disattivata ed è visualizzato l’orologio.) STR CONTROL (controllo dallo sterzo) Consente di selezionare il modo di immissione del telecomando collegato. Per prevenire problemi di funzionamento, prima dell’uso accertarsi di fare corrispondere il modo di immissione con il telecomando collegato. CUSTOM (personalizzato) Modo di immissione per il telecomando da volante PRESET (preselezione) Modo di immissione per il telecomando cablato escluso il telecomando da volante (Selezionato automaticamente quando viene eseguito [RESET CUSTOM].) EDIT CUSTOM (modifica personalizzazioni) Consente di registrare le funzioni (SOURCE, ATT, VOL +/–, SEEK +/–, VOICE, ON HOOK, OFF HOOK) sul telecomando da volante: Ruotare la manopola di controllo per selezionare la funzione che si desidera assegnare al telecomando da volante, quindi premere la manopola. Mentre [REGISTER] lampeggia, tenere premuto il tasto sul telecomando da volante che si desidera assegnare alla funzione. Una volta completata la registrazione, viene visualizzato [REGISTERED]. Per registrare altre funzioni, ripetere i passi e . (Disponibile solo se [STR CONTROL] è impostato su [CUSTOM].) RESET CUSTOM (azzeramento personalizzazioni) Consente di azzerare le impostazioni del telecomando da volante: [YES], [NO]. (Disponibile solo se [STR CONTROL] è impostato su [CUSTOM].) Note • Durante la definizione delle impostazioni, sono disponibili soltanto i tasti sull’apparecchio. Per ragioni di sicurezza, parcheggiare l’auto prima di definire queste impostazioni. • Se si verifica un errore durante la registrazione, tutte le informazioni registrate in precedenza rimangono memorizzate. Riavviare la registrazione dalla funzione con cui si è verificato l’errore. • Questa funzione potrebbe non essere disponibile su alcuni veicoli. Per ulteriori informazioni sulla compatibilità del veicolo in uso, visitare il sito Web relativo all’assistenza riportato sulla retrocopertina. 21IT USB MODE (modo USB) Consente di modificare la modalità USB: [ANDROID], [MSC/MTP]. (Disponibile solo se è selezionata la sorgente USB.) Impostazioni audio (SOUND) CT (ora) Consente di attivare/disattivare la funzione CT: [ON], [OFF]. EQ10 PRESET (EQ10 preselezionato) Consente di selezionare una curva dell’equalizzatore scegliendo tra 10 curve dell’equalizzatore oppure di disattivare la curva: [OFF], [R&B], [ROCK], [POP], [HIP-HOP], [EDM], [JAZZ], [SOUL], [COUNTRY], [KARAOKE]*, [CUSTOM]. È possibile memorizzare l’impostazione della curva dell’equalizzatore per ciascuna sorgente. AF/TA (frequenze alternative/notiziari sul traffico) Consente di selezionare l’impostazione frequenze alternative (AF) e notiziari sul traffico (TA): [AF-ON], [TA-ON], [AF/TA-ON], [AF/TA-OFF]. REGIONAL (regionale) Consente di limitare la ricezione a una regione specifica: [ON], [OFF]. (Disponibile solo durante la ricezione FM.) BTM (memorizzazione automatica delle emittenti con sintonia migliore) (pagina 11) (Disponibile solo se è selezionato il sintonizzatore.) FIRMWARE (firmware) (Disponibile solo quando la sorgente è disattivata ed è visualizzato l’orologio.) Consente di controllare/aggiornare la versione del firmware. Per ulteriori informazioni, visitare il sito di assistenza riportato sulla retrocopertina. FW VERSION (versione del firmware) Visualizza la versione del firmware corrente. FW UPDATE (aggiornamento del firmware) Avvia la procedura di aggiornamento del firmware: [YES], [NO]. L’aggiornamento del firmware necessita di alcuni minuti per essere completato. Durante l’aggiornamento, non impostare la chiave di accensione sulla posizione OFF e non rimuovere il dispositivo USB. 22IT Questo menu di impostazioni non è disponibile quando la sorgente è disattivata ed è visualizzato l’orologio. * [KARAOKE] riduce l’audio vocale, ma non è in grado di rimuoverlo completamente durante la riproduzione. Inoltre, l’uso di un microfono non è supportato. EQ10 CUSTOM (EQ10 personalizzato) Consente di impostare [CUSTOM] di EQ10. Impostazioni della curva dell’equalizzatore: [BAND1] – [BAND10] (32 Hz, 63 Hz, 125 Hz, 250 Hz, 500 Hz, 1 kHz, 2 kHz, 4 kHz, 8 kHz, 16 kHz). Il livello del volume può essere regolato in incrementi di 1 dB, da -6 dB a +6 dB. BALANCE (bilanciamento) Consente di regolare il bilanciamento dell’audio: [RIGHT-15] – [CENTER] – [LEFT-15]. FADER (attenuatore) Consente di regolare il livello relativo: [FRONT-15] – [CENTER] – [REAR-15]. S.WOOFER (subwoofer) SW LEVEL (livello subwoofer) Consente di regolare il volume del subwoofer: [+6 dB] – [0 dB] – [-6 dB]. ([ATT] viene visualizzato con il valore minimo.) SW PHASE (fase del subwoofer) Consente di selezionare la fase del subwoofer: [SUB NORM], [SUB REV]. LPF FREQ (frequenza filtro passa basso) Consente di selezionare la frequenza di taglio del subwoofer: [80Hz], [100Hz], [120Hz]. HPF FREQ (frequenza filtro passa alto) Consente di selezionare la frequenza di taglio del diffusore anteriore/posteriore: [OFF], [80Hz], [100Hz], [120Hz]. AUX VOL (livello volume AUX) Consente di regolare il livello del volume di ciascun apparecchio ausiliario collegato: [+18 dB] – [0 dB] – [-8 dB]. Questa impostazione elimina la necessità di regolare il livello del volume tra sorgenti diverse. (Disponibile solo se è selezionato AUX.) BTA VOL (livello del volume dell’audio BLUETOOTH) Consente di regolare il livello del volume di ciascun dispositivo BLUETOOTH connesso: [+6 dB] – [0 dB] – [-6 dB]. Questa impostazione elimina la necessità di regolare il livello del volume tra sorgenti diverse. (Disponibile solo quando è selezionato l’audio BT o un’applicazione.) Impostazioni di visualizzazione (DISPLAY) DIMMER (attenuatore di luminosità) Consente di modificare la luminosità del display: [OFF], [ON], [AT] (automatico), [CLK] (orologio). ([AT] è disponibile solo quando il conduttore di controllo dell’illuminazione è collegato e la luce dell’abitacolo è accesa.) Per impostare questa funzione in modo che sia attiva solo durante il periodo di tempo impostato, selezionare [CLK], quindi impostare l’ora di inizio e di fine. – Per impostare la luminosità quando la funzione di attenuazione di luminosità è attivata: Impostare [DIMMER] su [ON], quindi regolare [BRIGHTNESS]. – Per impostare la luminosità quando la funzione di attenuazione di luminosità è disattivata: Impostare [DIMMER] su [OFF], quindi regolare [BRIGHTNESS]. L’impostazione della luminosità regolata è salvata e viene applicata quando la funzione di attenuazione della luminosità viene attivata o disattivata. BRIGHTNESS (luminosità) Consente di regolare la luminosità del display. Il livello di luminosità è regolabile: [1] – [10]. BUTTON-C (colore pulsanti) Consente di impostare un colore predefinito o personalizzato per i pulsanti. COLOR (colore) Consente di selezionare uno dei 15 colori preimpostati o 1 colore personalizzato. CUSTOM-C (colore personalizzato) Consente di registrare un colore personalizzato per i pulsanti. RGB RED, RGB GRN, RGB BLUE Gamma di regolazione dei colori: [0] – [32] ([0] non può essere impostato per tutte le gamme di colore). 23IT DSPL-C (colore display) Consente di impostare un colore predefinito o personalizzato per il display. COLOR (colore) Consente di selezionare uno dei 15 colori preimpostati o 1 colore personalizzato. CUSTOM-C (colore personalizzato) Consente di registrare un colore personalizzato per il display. RGB RED, RGB GRN, RGB BLUE Gamma di regolazione dei colori: [0] – [32] ([0] non può essere impostato per tutte le gamme di colore). SND SYNC (sincronizzazione audio) Consente di attivare la sincronizzazione dell’illuminazione con l’audio: [ON], [OFF]. AUTO SCR (scorrimento automatico) Consente di fare scorrere automaticamente le voci composte da molti caratteri: [ON], [OFF]. (Non disponibile quando è selezionato AUX o il sintonizzatore.) Impostazioni BLUETOOTH (BLUETOOTH) PAIRING (associazione) (pagina 8) Consente di connettere fino a due dispositivi BLUETOOTH: [DEVICE 1], [DEVICE 2]. Una volta completata l’associazione, [DEVICE 1] o [DEVICE 2] viene sostituito dal nome del dispositivo associato. AUDIODEV (dispositivo audio) Consente di selezionare il dispositivo audio. [*] viene visualizzato sul dispositivo associato con [DEVICE 1] o sull’attuale dispositivo audio compatibile con A2DP. RINGTONE (suoneria) Consente di impostare lo squillo della suoneria sull’apparecchio o sul telefono cellulare connesso: [1] (apparecchio), [2] (telefono cellulare). 24IT AUTO ANS (risposta automatica) Consente di impostare la risposta automatica a una chiamata in arrivo da parte dell’apparecchio: [OFF], [1] (circa 3 secondi), [2] (circa 10 secondi). AUTOPAIR (associazione automatica) Consente di avviare l’associazione BLUETOOTH automatica quando un dispositivo con iOS 5.0 o versione successiva viene collegato tramite USB: [ON], [OFF]. BT SIGNL (segnale BLUETOOTH) (pagina 9) Consente di attivare/disattivare la funzione BLUETOOTH. BT INIT (inizializzazione di BLUETOOTH) Consente di inizializzare tutte le impostazioni relative alla funzione BLUETOOTH (informazioni di associazione, informazioni sul dispositivo, ecc.): [YES], [NO]. Inizializzare tutte le impostazioni prima di gettare via l’apparecchio. (Disponibile solo quando la sorgente è disattivata ed è visualizzato l’orologio.) Impostazioni di Sony | Music Center (SONY APP) AUTO LAUNCH (avvio automatico) Consente di attivare l’avvio automatico di “Sony | Music Center”: [ON], [OFF]. Quando è selezionato [ON], “Sony | Music Center” si connette automaticamente una volta completata la connessione BLUETOOTH. CONNECT (connessione) Consente di attivare e terminare la funzione “Sony | Music Center” (connessione). Informazioni su iPod Informazioni aggiuntive Aggiornamento del firmware • È possibile collegare i seguenti modelli di iPod. Aggiornare il software dei dispositivi iPod all’ultima versione prima di utilizzarli. Modelli di iPhone/iPod compatibili Per aggiornare il firmware, visitare il sito dedicato all’assistenza riportato sulla retrocopertina e seguire le istruzioni online. Modello compatibile Bluetooth® USB iPhone X Nota iPhone 8 Durante l’aggiornamento, non rimuovere il dispositivo USB. iPhone 8 Plus iPhone 7 iPhone 7 Plus iPhone SE iPhone 6s iPhone 6s Plus iPhone 6 iPhone 6 Plus iPhone 5s iPhone 5c iPhone 5 iPhone 4s iPod touch (6a generazione) iPod touch (5a generazione) Precauzioni • Non lasciare il pannello anteriore o dispositivi audio sul cruscotto. • Quando l’apparecchio è acceso, l’antenna elettrica si estende automaticamente. • Non bagnare l’apparecchio. Ordine di riproduzione dei file audio Cartella (album) File audio (brano) iPod nano (7a generazione) • L’uso dell’adesivo Made for Apple indica che un accessorio è stato progettato per essere collegato specificatamente al prodotto Apple indicato ed è stato certificato dallo sviluppatore per soddisfare gli standard di prestazioni di Apple. Apple non si assume alcuna responsabilità in merito al funzionamento del dispositivo o alla conformità con gli standard normativi e di sicurezza. Nota: l’uso dell’accessorio con un prodotto Apple può influire sulle prestazioni wireless. 25IT Per eventuali domande o problemi riguardanti l’apparecchio non trattati nel presente manuale, rivolgersi al più vicino rivenditore Sony. Manutenzione Pulizia dei connettori Evitare di toccare i connettori direttamente. Se i connettori tra l’apparecchio e il pannello anteriore sono sporchi, l’apparecchio potrebbe non funzionare correttamente. Per evitare questo problema, rimuovere il pannello anteriore (pagina 6), quindi pulire i connettori con un cotton fioc. Non esercitare forza eccessiva. Diversamente, i connettori potrebbero venire danneggiati. Caratteristiche tecniche Sintonizzatore FM Gamma di frequenze: Quando [AREA] è impostato su [EUROPE]: 87,5 MHz – 108,0 MHz Quando [AREA] è impostato su [RUSSIA]: FM1/FM2: 87,5 MHz – 108,0 MHz (incrementi di 50 kHz) FM3: 65 MHz – 74 MHz (incrementi di 30 kHz) Sensibilità utilizzabile: 8 dBf Rapporto segnale-rumore: 73 dB Separazione: 50 dB a 1 kHz MW/LW Gamma di frequenze: MW: 531 kHz – 1.602 kHz LW: 153 kHz – 279 kHz Sensibilità: MW: 26 μV, LW: 50 μV Lettore USB Nota Per motivi di sicurezza, non rimuovere il pannello anteriore durante la guida. 26IT Interfaccia: USB (Full speed) Corrente massima: 1 A Numero massimo di cartelle e file riconoscibili: Cartelle (album): 256 File (brani) per cartella: 256 Protocollo compatibile Android Open Accessory (AOA): 2.0 Codec corrispondenti: MP3 (.mp3) Velocità di trasmissione: 8 kbps – 320 kbps (Supporta VBR (Variable Bit Rate, velocità di trasmissione variabile)) Frequenza di campionamento: 16 kHz – 48 kHz WMA (.wma) Velocità di trasmissione: 32 kbps – 192 kbps (Supporta VBR (Variable Bit Rate, velocità di trasmissione variabile)) Frequenza di campionamento: 32 kHz, 44,1 kHz, 48 kHz FLAC (.flac) Profondità in bit: 16 bit, 24 bit Frequenza di campionamento: 44,1 kHz, 48 kHz File system supportati: FAT16, FAT32 Comunicazione wireless Sistema di comunicazione: standard BLUETOOTH versione 3.0 Uscita: standard BLUETOOTH classe di potenza 2 (condotta max. +1 dBm) Portata massima di comunicazione: circa 10 m senza ostacoli alla vista*1 Banda di frequenza: 2,4 GHz (2,4000 GHz – 2,4835 GHz) Metodo di modulazione: FHSS Profili BLUETOOTH compatibili*2: A2DP (Advanced Audio Distribution Profile) 1.3 AVRCP (Audio Video Remote Control Profile) 1.3 HFP (Handsfree Profile) 1.6 PBAP (Phone Book Access Profile) SPP (Serial Port Profile) Codec corrispondenti: SBC (.sbc), AAC (.m4a) *1 La portata effettiva varia in base a fattori quali ostacoli tra i dispositivi, campi magnetici in prossimità di un forno a microonde, elettricità statica, sensibilità di ricezione, prestazioni dell’antenna, sistema operativo, applicazioni software e così via. *2 I profili dello standard BLUETOOTH indicano lo scopo della comunicazione BLUETOOTH tra dispositivi. Comunicazione NFC Banda di frequenza: 13,56 MHz Amplificatore di potenza Uscita: uscite diffusori Impedenza diffusori: 4 Ω – 8 Ω Potenza di uscita massima: 55 W × 4 (a 4 Ω) Generali Requisiti di alimentazione: batteria auto da 12 V CC (massa negativa) Consumo di corrente nominale: 10 A Dimensioni: circa 178 mm × 50 mm × 177 mm (l/a/p) Dimensioni di montaggio: circa 182 mm × 53 mm × 160 mm (l/a/p) Peso: circa 0,8 kg Contenuto della confezione: Unità principale (1) Microfono (1) Elementi per l’installazione e i collegamenti (1 set) Per ulteriori informazioni, rivolgersi al rivenditore. Il design e le caratteristiche tecniche sono soggetti a modifiche senza preavviso. Informazioni su copyright Bluetooth® e i relativi loghi sono marchi di fabbrica registrati di proprietà di Bluetooth SIG, Inc. L’uso di tali marchi è concesso in licenza a Sony Corporation. Tutti gli altri marchi di fabbrica o marchi di fabbrica registrati sono di proprietà delle rispettive aziende. Il contrassegno N è un marchio di fabbrica o un marchio di fabbrica registrato di NFC Forum, Inc. negli Stati Uniti e in altre nazioni. Windows Media è un marchio di fabbrica registrato o marchio di fabbrica di Microsoft Corporation negli Stati Uniti e/o in altri paesi. Questo prodotto è tutelato da specifici diritti di proprietà intellettuale di Microsoft Corporation. L’uso o la distribuzione della tecnologia in questione al di fuori del presente prodotto sono vietati senza apposita licenza concessa da Microsoft o da una filiale Microsoft autorizzata. Apple, iPhone, iPod, iPod nano, iPod touch e Siri sono marchi di Apple Inc., registrati negli U.S.A. e in altri paesi. App Store è un marchio di servizio di Apple Inc. IOS è un marchio di fabbrica o un marchio di fabbrica registrato di Cisco negli Stati Uniti e in altri paesi ed è utilizzato su licenza. Google, Google Play e Android sono marchi di Google LLC. libFLAC Copyright (C) 2000-2009 Josh Coalson Copyright (C) 2011-2013 Xiph.Org Foundation Sono permessi la ridistribuzione e l’utilizzo in forma sorgente o binaria, con o senza modifiche, solo se vengono rispettate le seguenti condizioni: – Le ridistribuzioni del codice sorgente devono mantenere la nota sul copyright riportata qui sopra, l’elenco delle condizioni e la dichiarazione di responsabilità limitata che segue. – Le ridistribuzioni in forma binaria devono riprodurre la nota sul copyright riportata qui sopra, l’elenco delle condizioni e la dichiarazione di responsabilità limitata che segue nella documentazione e/o nell’altro materiale fornito con la distribuzione. 27IT – Il nome della Fondazione Xiph.org e i nomi dei relativi collaboratori non potranno essere utilizzati per sostenere o promuovere prodotti derivati da questo software, senza previa autorizzazione scritta. IL SOFTWARE È FORNITO DAI DETENTORI DEL COPYRIGHT E DAI COLLABORATORI “COSÌ COM’È” E NON SI RICONOSCE ALCUNA ALTRA GARANZIA ESPRESSA O IMPLICITA, INCLUSE, A TITOLO ESEMPLIFICATIVO, GARANZIE IMPLICITE DI COMMERCIABILITÀ E IDONEITÀ PER UN FINE PARTICOLARE. IN NESSUN CASO LA FONDAZIONE O I RELATIVI COLLABORATORI POTRANNO ESSERE RITENUTI RESPONSABILI PER DANNI DIRETTI, INDIRETTI, INCIDENTALI, SPECIALI, PUNITIVI O CONSEQUENZIALI (INCLUSI, A TITOLO ESEMPLIFICATIVO, DANNI DERIVANTI DALLA NECESSITÀ DI SOSTITUIRE BENI E SERVIZI, DANNI PER MANCATO UTILIZZO, PERDITA DI DATI O MANCATO GUADAGNO, INTERRUZIONE DELL’ATTIVITÀ), IMPUTABILI A QUALUNQUE CAUSA E INDIPENDENTEMENTE DALLA TEORIA DELLA RESPONSABILITÀ, SIA NELLE CONDIZIONI PREVISTE DAL CONTRATTO CHE IN CASO DI “STRICT LIABILITY”, ERRORI (INCLUSI NEGLIGENZA O ALTRO), DERIVANTI O COMUNQUE CORRELATI ALL’UTILIZZO DEL SOFTWARE, ANCHE QUALORA SIANO STATI INFORMATI DELLA POSSIBILITÀ DEL VERIFICARSI DI TALI DANNI. Guida alla soluzione dei problemi Fare riferimento alla seguente lista di verifica per risolvere la maggior parte dei problemi che si potrebbero verificare durante l’uso di questo apparecchio. Prima di esaminare l’elenco che segue, verificare le procedure di collegamento e d’uso dell’apparecchio. Per informazioni sull’utilizzo del fusibile e sulla rimozione dell’apparecchio dal cruscotto, consultare “Collegamenti e installazione” (pagina 34). Se il problema persiste, visitare il sito di assistenza riportato sulla retrocopertina. Generali Non viene emesso alcun suono o il volume dell’audio è molto basso. La posizione dell’attenuatore [FADER] non è appropriata per un sistema a 2 diffusori. Il volume dell’apparecchio e/o del dispositivo collegato è molto basso. – Aumentare il volume dell’apparecchio e del dispositivo collegato. Non viene emesso alcun segnale acustico. Un amplificatore di potenza opzionale è collegato e l’amplificatore incorporato non viene utilizzato. Le stazioni memorizzate e l’ora esatta sono cancellate. Si è bruciato il fusibile. Quando si cambia la posizione della chiave di accensione, viene emesso un disturbo. I cavi non sono collegati correttamente al connettore di alimentazione accessoria dell’auto. Durante la riproduzione o la ricezione, viene attivato il modo di dimostrazione. Se non viene eseguita alcuna operazione per 5 minuti quando è impostata la funzione [DEMO-ON], viene attivato il modo di dimostrazione. – Impostare [DEMO-OFF] (pagina 21). Il display viene disattivato/non viene visualizzato nella finestra del display. I connettori sono sporchi (pagina 26). Il display/l’illuminazione lampeggia. L’alimentazione non è sufficiente. – Verificare che la batteria dell’auto fornisca sufficiente alimentazione all’apparecchio. (L’alimentazione richiesta è 12 V CC.) I tasti per le operazioni non funzionano. Premere DSPL e (indietro)/MODE per più di 2 secondi per azzerare l’apparecchio. Tutti i dati memorizzati saranno cancellati. 28IT Ricezione radiofonica La ricezione radiofonica è bassa. Sono presenti scariche statiche. Collegare saldamente l’antenna. Non è possibile sintonizzare da 65 MHz a 74 MHz in FM3. [AREA] è impostato su [EUROPE]. – Impostare [AREA] su [RUSSIA] (pagina 21). RDS Impossibile ricevere i servizi RDS (quando [AREA] è impostato su [RUSSIA]). È selezionato FM3. – Selezionare FM1 o FM2. I servizi RDS non sono disponibili nella regione corrente. Dopo alcuni secondi di ascolto, viene avviata la funzione SEEK. La stazione non è TP oppure il segnale è debole. – Disattivare il modo TA (pagina 12). Non viene trasmesso alcun notiziario sul traffico. Attivare il modo TA (pagina 12). La stazione non trasmette notiziari sul traffico pur essendo una stazione TP. – Sintonizzarsi su un’altra stazione. Il modo PTY visualizza [- - - - - - - -]. La stazione attuale non è una stazione RDS oppure la ricezione radiofonica è bassa. Il nome del servizio programmi lampeggia. Non esiste alcuna frequenza alternativa per la stazione corrente. – Premere (SEEK –/+) durante il lampeggiamento del nome del servizio programmi. Viene visualizzato [PI SEEK] e l’apparecchio avvia la ricerca di un’altra frequenza con gli stessi dati PI (identificativo programma). Riproduzione mediante un dispositivo USB Un dispositivo USB necessita di un tempo maggiore per avviare la riproduzione. Il dispositivo USB contiene file con una struttura ad albero complessa. Non è possibile riprodurre un file audio. Per informazioni sui formati supportati, consultare “Caratteristiche tecniche” (pagina 26). Se continua a risultare impossibile riprodurre il file audio, consultare le istruzioni per l’uso in dotazione con il dispositivo USB oppure contattare il produttore del dispositivo USB. Impossibile eseguire le operazioni per saltare un album, saltare voci (Modo Jump) e cercare un brano in base al nome (Quick-BrowZer). Impostare [USB MODE] su [MSC/MTP] (pagina 22). L’audio non viene emesso durante la riproduzione in modalità Android. Controllare lo stato dell’applicazione per la riproduzione audio sullo smartphone Android. Funzione NFC Non è possibile stabilire la connessione One touch (NFC). Se lo smartphone non risponde al tocco. – Verificare che la funzione NFC sullo smartphone sia stata attivata. – Avvicinare l’area con il contrassegno N dello smartphone all’area con il contrassegno N sull’apparecchio. – Se lo smartphone è dotato di custodia, rimuoverla. La sensibilità di ricezione NFC dipende dal dispositivo. Se più tentativi di stabilire una connessione One touch con lo smartphone non vanno a buon fine, stabilire la connessione BLUETOOTH manualmente. 29IT Funzione BLUETOOTH Il dispositivo da connettere non rileva l’apparecchio. Impostare l’apparecchio in modalità attesa di associazione prima di eseguire l’associazione. Mentre è connesso a due dispositivi BLUETOOTH l’apparecchio non può essere rilevato da un altro dispositivo. – Terminare una delle due connessioni ed eseguire la ricerca dell’apparecchio da un altro dispositivo. Una volta che l’associazione al dispositivo è stata completata, attivare l’uscita del segnale BLUETOOTH (pagina 9). Non è possibile stabilire una connessione. La connessione è controllata da un lato (l’apparecchio o il dispositivo BLUETOOTH), non da entrambi. – Stabilire la connessione all’apparecchio da un dispositivo BLUETOOTH o viceversa. Il nome del dispositivo rilevato non viene visualizzato. A seconda dello stato dell’altro dispositivo, può non essere possibile ottenerne il nome. La suoneria non viene emessa. Regolare il volume ruotando la manopola di controllo mentre si riceve una chiamata. A seconda del dispositivo connesso, è possibile che la suoneria non venga inviata correttamente. – Impostare [RINGTONE] su [1] (pagina 24). I diffusori anteriori non sono collegati all’apparecchio. – Collegare i diffusori anteriori all’apparecchio. La suoneria viene emessa solo dai diffusori anteriori. La voce del chiamante non si sente. I diffusori anteriori non sono collegati all’apparecchio. – Collegare i diffusori anteriori all’apparecchio. La voce del chiamante viene emessa solo dai diffusori anteriori. 30IT Il chiamante sostiene che il volume è troppo basso o alto. Regolare il volume secondo necessità utilizzando la regolazione del guadagno del microfono (pagina 17). Durante le conversazioni telefoniche si verificano fenomeni di eco o disturbi. Abbassare il volume. Impostare il modo EC/NC su [EC/NC-1] o [EC/NC-2] (pagina 17). Se il livello di rumore ambientale diverso dal suono della chiamata è alto, tentare di ridurre tale rumore. Per esempio, chiudere il finestrino se è aperto e i rumori della strada sono troppo alti. Se il condizionatore d’aria è rumoroso, abbassare il condizionatore. Il telefono non è connesso. Quando viene riprodotto audio tramite BLUETOOTH, il telefono non viene connesso, neanche se si preme CALL. – Stabilire una connessione dal telefono. La qualità dell’audio del telefono è bassa. La qualità dell’audio del telefono dipende dalle condizioni di ricezione del telefono cellulare. – Se la ricezione è bassa, portare l’automobile dove il segnale del telefono cellulare è migliore. Il volume del dispositivo audio connesso è basso (alto). Il livello del volume sarà diverso a seconda del dispositivo audio. – Regolare il volume del dispositivo audio connesso o dell’apparecchio (pagina 23). L’audio “salta” durante la riproduzione di un dispositivo audio BLUETOOTH. Ridurre la distanza tra l’apparecchio e il dispositivo audio BLUETOOTH. Se il dispositivo audio BLUETOOTH è contenuto in una custodia che ostacola il segnale, rimuovere il dispositivo dalla custodia durante l’uso. Nelle vicinanze sono in uso più dispositivi BLUETOOTH o altri dispositivi che emettono onde radio. – Spegnere gli altri dispositivi. – Aumentare la distanza dagli altri dispositivi. La riproduzione dell’audio si interrompe brevemente quando viene stabilita la connessione tra l’apparecchio e il telefono cellulare. Non si tratta di un malfunzionamento. Non è possibile controllare il dispositivo audio BLUETOOTH connesso. Verificare che il dispositivo audio BLUETOOTH connesso sia compatibile con AVRCP. Alcune funzioni non rispondono. Verificare che il dispositivo connesso supporti la funzione in questione. Una chiamata viene risposta accidentalmente. Il telefono connesso è impostato per rispondere alle chiamate automaticamente. L’associazione ha richiesto troppo tempo e non è stata completata. A seconda del dispositivo da connettere, il limite di tempo per l’associazione può essere breve. – Tentare di completare l’associazione entro il tempo previsto. Non è possibile utilizzare la funzione BLUETOOTH. Spegnere l’apparecchio premendo OFF per più di 2 secondi, quindi riaccenderlo. Durante le chiamate in vivavoce i diffusori dell’automobile non emettono alcun suono. Se l’audio è impostato per essere emesso dal telefono cellulare, impostare il telefono per l’invio dell’audio ai diffusori dell’automobile. Funzionamento di Sony | Music Center Il nome dell’applicazione non corrisponde con l’applicazione inclusa in “Sony | Music Center”. Avviare nuovamente l’applicazione dall’applicazione “Sony | Music Center”. Quando l’applicazione “Sony | Music Center” è in esecuzione tramite BLUETOOTH, il display passa automaticamente a [BT AUDIO]. L’applicazione “Sony | Music Center” o la funzione BLUETOOTH si sono bloccate. Avviare nuovamente l’applicazione. La connessione dell’applicazione “Sony | Music Center” si interrompe automaticamente quando il display passa a [IPD]. L’applicazione “Sony | Music Center” sull’iPhone/iPod non supporta la riproduzione dell’iPod. – Impostare l’apparecchio su una sorgente diversa da [IPD], quindi stabilire la connessione con “Sony | Music Center” (pagina 18). La connessione “Sony | Music Center” si interrompe automaticamente quando la modalità USB dell’apparecchio passa a [ANDROID]. Lo smartphone Android non supporta la riproduzione in modalità Android. – Impostare la modalità USB dell’apparecchio su [MSC/MTP], quindi stabilire la connessione con “Sony | Music Center” (pagina 18). Siri Eyes Free non è attivata. Eseguire la registrazione della funzione vivavoce per un iPhone compatibile con Siri Eyes Free. Attivare la funzione Siri sull’iPhone. Annullare la connessione BLUETOOTH tra l’iPhone e l’apparecchio e stabilire una nuova connessione. 31IT Messaggi Durante il funzionamento, i seguenti messaggi possono apparire o lampeggiare. INVALID L’operazione selezionata potrebbe non essere valida. [USB MODE] non può essere modificato durante la riproduzione di un iPod. READ Una volta terminata l’operazione di lettura, la riproduzione si avvia automaticamente. Potrebbe essere necessario attendere un po’ di tempo a seconda dell’organizzazione dei file. (carattere di sottolineatura): non è possibile visualizzare il carattere. Riproduzione mediante un dispositivo USB: HUB NO SUPRT: gli hub USB non sono supportati. IPD STOP: la riproduzione di un iPod è finita. Avviare la riproduzione dall’iPod/iPhone. NOT SUPPORT - ANDROID MODE Un dispositivo USB che non supporta AOA (Android Open Accessory) 2.0 è collegato all’apparecchio mentre [USB MODE] è impostato su [ANDROID]. – Impostare [USB MODE] su [MSC/MTP] (pagina 22). USB ERROR Collegare nuovamente il dispositivo USB. USB NO DEV Accertarsi che il dispositivo USB o il cavo USB siano collegati saldamente. USB NO MUSIC Collegare un dispositivo USB contenente file riproducibili (pagina 26). 32IT USB NO SUPRT Per ulteriori informazioni sulla compatibilità del dispositivo USB in uso, visitare il sito di assistenza riportato sulla retrocopertina. OVERLOAD: il dispositivo USB è sovraccaricato. Scollegare il dispositivo USB, quindi premere SRC per selezionare un’altra sorgente. Il dispositivo USB è difettoso oppure è stato collegato un dispositivo non supportato. Funzionamento RDS: NO AF: nessuna frequenza alternativa. Premere (SEEK –/+) durante il lampeggiamento del nome del servizio programmi. Viene visualizzato [PI SEEK] e l’apparecchio avvia la ricerca di un’altra frequenza con gli stessi dati PI (identificativo programma). NO PI: nessun identificativo programma. La stazione selezionata non dispone di dati PI (identificativo programma). Selezionare un’altra stazione. NO TP: nessun programma sul traffico. L’apparecchio continua la ricerca di stazioni TP disponibili. Funzione BLUETOOTH: BTA NO DEV: il dispositivo BLUETOOTH non è connesso o non viene riconosciuto. Verificare che il dispositivo BLUETOOTH sia correttamente connesso, o che la connessione BLUETOOTH sia stata stabilita con il dispositivo BLUETOOTH. ERROR: l’operazione selezionata non può essere eseguita. Attendere qualche minuto, quindi riprovare. UNKNOWN: non è possibile visualizzare un nome o un numero di telefono. WITHHELD: il numero di telefono è stato nascosto dal chiamante. Funzionamento di Sony | Music Center: APP ––––––––: non è stata stabilita la connessione con l’applicazione. Stabilire nuovamente una connessione con “Sony | Music Center” (pagina 18). APP DISCNCT: l’applicazione è disconnessa. Stabilire una connessione con Sony | Music Center (pagina 18). APP DISPLAY: una schermata di impostazioni dello schermo dell’applicazione è aperta. Uscire dalla schermata di impostazioni dello schermo dell’applicazione per attivare i pulsanti. APP LIST: l’elenco dei contenuti del dispositivo USB è aperto. Uscire dall’elenco dell’applicazione per attivare i pulsanti. APP MENU: una schermata di impostazioni dell’applicazione è aperta. Uscire dalla schermata di impostazioni dell’applicazione per attivare i pulsanti. APP NO DEV: il dispositivo su cui è installata l’applicazione non è connesso o non viene riconosciuto. Eseguire la connessione BLUETOOTH e stabilire nuovamente la connessione con “Sony | Music Center” (pagina 18). Funzionamento del telecomando da volante: ERROR Riavviare la registrazione dalla funzione con cui si è verificato l’errore (pagina 21). TIMEOUT Tentare di completare la registrazione mentre [REGISTER] lampeggia (circa 6 secondi) (pagina 21). Aggiornamento firmware: FILE ERROR: l’aggiornatore non è contenuto nel dispositivo USB. Salvare l’aggiornatore nel dispositivo USB, quindi riprovare (pagina 25). UPDATE ERROR PRESS ENTER: l’aggiornamento del firmware non è stato completato correttamente. Premere ENTER per eliminare il messaggio, quindi riprovare. Durante l’aggiornamento, non impostare la chiave di accensione sulla posizione OFF e non rimuovere il dispositivo USB (pagina 25). Se le soluzioni riportate non risolvono il problema, rivolgersi al più vicino rivenditore Sony. Se l’apparecchio viene portato in un centro di assistenza a causa di un problema relativo alla riproduzione di un dispositivo, assicurarsi di portare il dispositivo utilizzato al momento in cui si è verificato il problema. APP SOUND: una schermata di impostazioni audio dell’applicazione è aperta. Uscire dalla schermata di impostazioni audio dell’applicazione per attivare i pulsanti. OPEN APP: l’applicazione “Sony | Music Center” non è in esecuzione. Avviare l’applicazione. 33IT Collegamenti e installazione Attenzione • Portare tutti i cavi di messa a terra a un punto di massa comune. • Evitare che i cavi rimangano bloccati da una vite o incastrati nelle parti mobili (ad esempio nelle guide scorrevoli dei sedili). • Prima di effettuare i collegamenti, spegnere il motore dell’automobile per evitare cortocircuiti. • Collegare il cavo di alimentazione all’apparecchio e ai diffusori prima di collegarlo al connettore di alimentazione ausiliaria. • Per motivi di sicurezza, accertarsi di isolare qualsiasi cavo non collegato utilizzando del nastro adesivo. Elenco dei componenti per l’installazione ×2 Precauzioni • Scegliere con attenzione la posizione per l’installazione in modo che l’apparecchio non interferisca con le operazioni di guida del conducente. • Evitare di installare l’apparecchio dove sia soggetto ad alte temperature, come alla luce solare diretta o al getto di aria calda dell’impianto di riscaldamento, o dove possa essere soggetto a polvere, sporco e vibrazioni eccessive. • Usare solo il materiale di montaggio in dotazione per un’installazione stabile e sicura. Nota sul cavo di alimentazione (giallo) Se questo apparecchio viene collegato in combinazione con altri componenti stereo, la potenza nominale del circuito dell’automobile deve essere superiore alla somma della potenza nominale dei fusibili dei vari componenti. Regolazione dell’angolo di montaggio Regolare l’angolo di montaggio in modo che sia inferiore a 30°. 34IT • Questo elenco dei componenti non comprende tutto il contenuto della confezione. • La staffa e la cornice protettiva vengono applicate all’apparecchio in fabbrica. Prima di installare l’apparecchio, utilizzare le chiavi di rilascio per rimuovere la staffa dall’apparecchio. Per ulteriori informazioni, consultare “Rimozione della staffa e della cornice protettiva” (pagina 38). • Conservare le chiavi di rilascio per un uso futuro in quanto sono necessarie per rimuovere l’apparecchio dall’auto. Connessioni Subwoofer*1 *3 *3 *3 Amplificatore di potenza*1 *2 Per ulteriori informazioni, consultare “Collegamenti” (pagina 36). Consultare “Diagramma dei collegamenti di alimentazione” (pagina 36) per ulteriori informazioni. da un telecomando cablato (non in dotazione)*4 *5*6 dall’antenna dell’automobile*7 *1 *2 *3 *4 Non in dotazione Impedenza diffusori: 4 Ω – 8 Ω × 4 Cavo a piedini RCA (non in dotazione) A seconda del tipo di auto, utilizzare un adattatore per il telecomando cablato (non in dotazione). Per ulteriori informazioni sull’uso del telecomando cablato, consultare “Uso del telecomando cablato” (pagina 37). *5 A prescindere che venga utilizzato o meno, disporre il cavo di ingresso del microfono in modo che non interferisca con le operazioni di guida. Fissare il cavo con una fascetta o simili se è installato in prossimità dei piedi del guidatore. *6 Per informazioni dettagliate sull’installazione del microfono, fare riferimento a “Installazione del microfono” (pagina 37). *7 A seconda del tipo di auto, utilizzare un adattatore (non in dotazione) se il connettore dell’antenna non può essere inserito. 35IT Collegamento semplice del subwoofer Collegamenti Quando si collega l’apparecchio con il cavo di alimentazione in dotazione si potrebbe danneggiare l’antenna elettrica, se questa non dispone di scatola a relè. È possibile utilizzare un subwoofer senza un amplificatore di potenza quando è collegato a un cavo del diffusore posteriore. Diffusore anteriore Al connettore del diffusore dell’auto Subwoofer 1 Diffusore posteriore 2 (destro) Viola 3 Diffusore anteriore 4 (destro) Grigio 5 Diffusore anteriore 6 (sinistro) Bianco 7 Diffusore posteriore 8 (sinistro) Verde A strisce viola/ nero A strisce grigio/ nero A strisce bianco/ nero A strisce verde/ nero Al connettore di alimentazione dell’auto Note • È necessario preparare i cavi del diffusore posteriore. • Usare un subwoofer con impedenza compresa tra 4 Ω e 8 Ω e con capacità di potenza adeguata, altrimenti il subwoofer potrebbe essere danneggiato. Collegamento per la conservazione della memoria Quando il cavo di ingresso alimentazione giallo è collegato, viene sempre fornita alimentazione al circuito di memoria anche quando l’interruttore di accensione è spento. Collegamento dei diffusori • Prima di collegare i diffusori spegnere l’apparecchio. • Usare diffusori con impedenza compresa tra 4 Ω e 8 Ω e con capacità di potenza adeguata, altrimenti i diffusori potrebbero essere danneggiati. 12 alimentazione continua antenna elettrica/ controllo 13 dell’amplificatore di potenza (REM OUT) A strisce blu/ bianco alimentazione 14 commutata dell’illuminazione A strisce arancione/ bianco 15 alimentazione commutata 16 terra 36IT Giallo Rosso Nero Diagramma dei collegamenti di alimentazione Controllare il connettore di alimentazione ausiliaria dell’automobile e far corrispondere correttamente i collegamenti dei cavi a seconda dell’automobile. Connettore di alimentazione ausiliaria Collegamento normale Rosso Rosso Installazione del microfono Per acquisire la voce durante le chiamate in vivavoce è necessario installare il microfono . Giallo Giallo 12 alimentazione continua 15 alimentazione commutata Giallo Rosso Se le posizioni dei cavi rosso e giallo sono invertite 12 Rosso Rosso Giallo Giallo alimentazione commutata Morsetto (non in dotazione) Giallo 15 alimentazione continua Rosso Se l’auto non è dotata di posizione ACC (accessoria) Rosso Rosso Giallo Giallo Dopo aver fatto corrispondere i collegamenti ai cavi di alimentazione commutata, collegare l’apparecchio all’alimentazione dell’automobile. Per eventuali domande o problemi riguardanti l’apparecchio non trattati nel presente manuale, rivolgersi all’autoconcessionario. Attenzione • Può essere estremamente pericoloso se il cavo si avvolge attorno al piantone dello sterzo o alla leva del cambio. Accertarsi che il cavo e gli altri componenti non interferiscano con le operazioni di guida. • Se l’automobile è dotata di airbag o altre attrezzature di ammortizzazione degli urti, richiedere assistenza al negozio in cui è stato acquistato questo apparecchio o al concessionario dell’automobile prima dell’installazione. Nota Prima di applicare il nastro biadesivo , pulire la superficie del cruscotto con un panno asciutto. Uso del telecomando cablato 1 Per abilitare il telecomando cablato, impostare [STR CONTROL] in [SET STEERING] su [PRESET] (pagina 21). 37IT Montaggio dell’apparecchio sul cruscotto Installazione Rimozione della staffa e della cornice protettiva Prima di installare l’apparecchio, rimuovere la cornice protettiva e la staffa dall’apparecchio. 1 Prima di installare l’apparecchio, accertarsi di ripiegare i fermi presenti su entrambi i lati della staffa verso l’interno di 2 mm. 1 Inserire la staffa nel cruscotto, quindi piegare verso l’esterno i morsetti per un’installazione sicura. 182 mm Afferrare entrambe le estremità della cornice protettiva , quindi estrarla. 53 mm 2 2 Inserire entrambe le chiavi di rilascio finché non scattano in posizione, quindi abbassare la staffa , infine sollevare l’apparecchio per estrarlo. Fermo Montare l’apparecchio sulla staffa , quindi fissare la cornice protettiva . Con il gancio rivolto verso l’interno. Note • Se i fermi sono diritti o ripiegati verso l’esterno, l’apparecchio non verrà installato in modo sicuro e potrebbe fuoriuscire. • Assicurarsi che i 4 fermi sulla cornice protettiva siano correttamente inseriti negli alloggiamenti dell’apparecchio. Rimozione e installazione del pannello anteriore Per ulteriori informazioni, consultare “Rimozione del pannello anteriore” (pagina 6). 38IT Azzeramento dell’apparecchio Per ulteriori informazioni, consultare “Azzeramento dell’apparecchio” (pagina 7). Sostituzione del fusibile Per la sostituzione del Fusibile (10 A) fusibile, assicurarsi di utilizzare un fusibile dello stesso amperaggio di quello indicato sull’originale. Se il fusibile si brucia, controllare i collegamenti dell’alimentazione e sostituire il fusibile. Se dopo la sostituzione il fusibile si brucia di nuovo, è possibile che si tratti di un problema interno. In tal caso, rivolgersi al più vicino rivenditore Sony. 39IT Por motivos de seguridad, asegúrese de instalar esta unidad en el salpicadero del automóvil, ya que la parte posterior de la misma se calienta durante su uso. Para obtener más información, consulte “Conexión/Instalación” (página 34). Fabricado en Tailandia La placa de características que indica el voltaje de funcionamiento, etc., está situada en la parte inferior del chasis. La validez de la marca CE está limitada a aquellos países en los que la legislación la impone, principalmente los países del EEE (Espacio económico europeo). Por la presente, Sony Corporation declara que este equipo es conforme con la Directiva 2014/53/UE. El texto completo de la declaración UE de conformidad está disponible en la dirección Internet siguiente: http://www.compliance.sony.de/ Aviso para los clientes: la información siguiente resulta de aplicación solo a los equipos comercializados en países afectados por las directivas de la UE Este producto ha sido fabricado por, o en nombre de Sony Corporation. Importador UE: Sony Europe B.V. Las consultas relacionadas con el Importador a la UE o con la conformidad del producto en Europa deben dirigirse al representante autorizado por el fabricante, Sony Belgium, bijkantoor van Sony Europe B.V., Da Vincilaan 7-D1, 1930 Zaventem, Bélgica. Tratamiento de las baterías y equipos eléctricos y electrónicos al final de su vida útil (aplicable en la Unión Europea y otros países con sistemas de tratamiento selectivo de residuos) Este símbolo en el producto, la batería o el embalaje indica que el producto y la batería no pueden tratarse como un residuo doméstico normal. En algunas baterías este símbolo puede utilizarse en combinación con un símbolo químico. Se añadirá el símbolo químico del plomo (Pb) si la batería contiene más del 0,004 % de plomo. Al asegurarse de que estos productos y baterías se desechan correctamente, ayudará a prevenir las posibles consecuencias negativas para la salud y el medio ambiente que podrían derivarse de su incorrecta manipulación. El reciclaje de los materiales ayuda a preservar los recursos naturales. En el caso de productos, que por razones de seguridad, rendimiento o mantenimiento de datos, requieran una conexión permanente con la batería incorporada, esta batería deberá reemplazarse únicamente por personal técnico cualificado para ello. Para asegurarse de que la batería se desecha correctamente, entregue estos productos al final de su vida útil en un punto de recogida adecuado para el reciclado de aparatos eléctricos y electrónicos. Para el resto de baterías, consulte la sección donde se indica cómo extraer la batería del producto de forma segura. Deposite la batería en el correspondiente punto de recogida para el reciclado de baterías. Si desea obtener información detallada sobre el reciclaje de este producto o de la batería, póngase en contacto con el ayuntamiento, el punto de recogida más cercano o el establecimiento donde ha adquirido el producto o la batería. PRECAUCIÓN El intervalo de frecuencias siguiente de 65 – 74 MHz no está destinado a la retransmisión de sonido según el cuadro de atribución de frecuencias común europeo y no puede utilizarse en Europa. 2ES Advertencia: si el encendido del automóvil no dispone de una posición ACC Asegúrese de seleccionar la función AUTO OFF (página 20). La unidad se apagará totalmente y de forma automática en el tiempo definido después de apagar la unidad y una vez que aparezca el reloj (mantenga pulsado OFF durante 1 segundo), para evitar que se agote la batería. Si no utiliza la función AUTO OFF, mantenga pulsado OFF hasta que desaparezca la imagen cada vez que apague el contacto. Nota legal acerca de los servicios prestados por otros proveedores Los servicios prestados por otros proveedores están sujetos a cambios, anulaciones o interrupciones sin previo aviso. Sony no asume responsabilidad alguna en estas situaciones. Aviso importante Precaución SONY NO SE HACE RESPONSABLE EN NINGÚN CASO DE DAÑOS ACCIDENTALES, INDIRECTOS, COLATERALES O DE OTRO TIPO, LO QUE INCLUYE, A TÍTULO MERAMENTE ENUNCIATIVO, LA PÉRDIDA DE BENEFICIOS, LA PÉRDIDA DE INGRESOS, LA PÉRDIDA DE DATOS, LA IMPOSIBILIDAD DE UTILIZAR EL PRODUCTO O EQUIPOS ASOCIADOS, EL TIEMPO DE INACTIVIDAD O EL TIEMPO DEL COMPRADOR EN RELACIÓN CON LA UTILIZACIÓN DE ESTE PRODUCTO, SU HARDWARE Y/O SU SOFTWARE. Tenga en cuenta que este producto incluye un transmisor de radio. Según la norma 10 de UNECE, un fabricante de un vehículo puede imponer condiciones específicas para la instalación de transmisores de radio en los vehículos. Consulte el manual de instrucciones de su vehículo o póngase en contacto con el concesionario de su vehículo antes de instalar este producto en su vehículo. Llamadas de emergencia Este sistema manos libres para vehículo BLUETOOTH y el dispositivo electrónico conectado al mismo funcionan mediante señales de radio, redes de telefonía móvil y redes terrestres, así como a través de funciones programadas por el usuario, por lo que la conexión no está garantizada en todas las condiciones. Por tanto, no confíe exclusivamente en un solo dispositivo electrónico para las comunicaciones importantes (como las emergencias médicas). Acerca de la comunicación BLUETOOTH Las microondas generadas por un dispositivo BLUETOOTH pueden afectar al funcionamiento de los dispositivos médicos electrónicos. Apague la unidad y otros dispositivos BLUETOOTH en los siguientes lugares, ya que podría sufrir un accidente. – en lugares con presencia de gases inflamables, un hospital, un tren, un avión o una gasolinera – cerca de puertas automáticas o de una alarma de incendios Esta unidad es compatible con prestaciones de seguridad conformes con la norma BLUETOOTH para proporcionar una conexión segura cuando se utiliza la conexión inalámbrica BLUETOOTH, pero es posible que la seguridad no sea suficiente en función del entorno. Extreme las precauciones al comunicarse mediante la tecnología inalámbrica BLUETOOTH. No asumimos responsabilidad alguna por la divulgación de información durante la comunicación BLUETOOTH. Si desea realizar alguna consulta o solucionar algún problema relativo a la unidad que no se trate en este manual, póngase en contacto con su distribuidor Sony más cercano. 3ES Tabla de contenidos Guía de elementos y controles . . . . . . . . . . 5 Procedimientos iniciales Extracción del panel frontal . . . . . . . . . . . . . 6 Reinicio de la unidad . . . . . . . . . . . . . . . . . . 7 Ajuste del reloj . . . . . . . . . . . . . . . . . . . . . . . 7 Preparación de un dispositivo BLUETOOTH. . . . . . . . . . . . . . . . . . . . . . . 7 Conexión de un dispositivo USB . . . . . . . . 10 Conexión de otros dispositivos de audio portátiles . . . . . . . . . . . . . . . . . . . . . . . . 10 Ajustes Cancelación del modo DEMO . . . . . . . . . . 19 Funcionamiento de los ajustes básicos . . . . . . . . . . . . . . . . . . . . . . . . . 19 Ajustes generales (GENERAL) . . . . . . . . . . 20 Ajustes de sonido (SOUND). . . . . . . . . . . . . 21 Ajustes de pantalla (DISPLAY) . . . . . . . . . . 22 Ajustes de BLUETOOTH (BLUETOOTH) . . . 23 Configuración de Sony | Music Center (SONY APP) . . . . . . . . . . . . . . . . . . . . . . 23 Información adicional Escuchar la radio. . . . . . . . . . . . . . . . . . . . . . 11 Utilización del sistema de datos de radio (RDS) . . . . . . . . . . . . . . . . . . . . . . . . . . . . 11 Actualización del firmware . . . . . . . . . . . . 24 Precauciones . . . . . . . . . . . . . . . . . . . . . . . 24 Mantenimiento. . . . . . . . . . . . . . . . . . . . . . 25 Especificaciones . . . . . . . . . . . . . . . . . . . . . 25 Solución de problemas . . . . . . . . . . . . . . . 27 Mensajes. . . . . . . . . . . . . . . . . . . . . . . . . . . . 31 Reproducción Conexión/Instalación Reproducción de un dispositivo USB . . . . 13 Reproducción de un dispositivo BLUETOOTH. . . . . . . . . . . . . . . . . . . . . . 13 Búsqueda y reproducción de pistas . . . . . 14 Precauciones . . . . . . . . . . . . . . . . . . . . . . . Lista de piezas para la instalación . . . . . . Conexión . . . . . . . . . . . . . . . . . . . . . . . . . . . Instalación . . . . . . . . . . . . . . . . . . . . . . . . . Escuchar la radio Llamadas manos libres (solo mediante BLUETOOTH) Recibir una llamada . . . . . . . . . . . . . . . . . . 15 Realizar una llamada . . . . . . . . . . . . . . . . . 15 Operaciones disponibles durante una llamada . . . . . . . . . . . . . . . . . . . . . . . . . 16 Funciones útiles Sony | Music Center con iPhone/ smartphone Android™ . . . . . . . . . . . . 17 Uso del reconocimiento de voz (solo disponible en un smartphone con sistema Android) . . . . . . . . . . . . . . . . . 18 Utilización de Siri Eyes Free . . . . . . . . . . . . 18 4ES 34 34 35 38 Guía de elementos y controles Unidad principal Botón de desbloqueo del panel frontal Visor SRC (fuente) Encienda la unidad. Cambie de fuente. OFF Mantenga el botón pulsado durante 1 segundo para desactivar la fuente y mostrar el reloj. Mantenga el botón pulsado durante más de 2 segundos para apagar la unidad y la pantalla. / (anterior/siguiente) / (retroceso/avance rápido) PTY (tipo de programa) Seleccione PTY en RDS. (buscar) (página 14) Acceda al modo de búsqueda durante la reproducción. (No disponible si hay conectado un dispositivo USB en modo Android o un iPod.) Dial de control Gire el dial para ajustar el volumen. PUSH ENTER Acceda a la opción seleccionada. Pulse SRC, gírelo y púlselo para cambiar de fuente (en un máximo de 2 segundos). MENU Abra el menú de configuración. VOICE (página 16, 18) Manténgalo presionado durante más de 2 segundos para activar la marcación por voz, el reconocimiento de voz (solo en smartphones Android) o la función Siri (solo en iPhone). Marca N Toque el dial de control con el smartphone Android para establecer la conexión BLUETOOTH. / (SEEK –/+) Sintonice emisoras de radio de forma automática. Manténgalo pulsado para sintonizarlas de forma manual. CALL Acceda al menú de llamada. Reciba o finalice una llamada. Mantenga el botón pulsado durante más de 2 segundos para cambiar la señal BLUETOOTH. (atrás) Vuelva a la pantalla anterior. MODE (página 7, 11, 16) Receptor del mando a distancia 5ES Botones numéricos (de 1 a 6) Reciba emisoras de radio almacenadas. Manténgalo pulsado para almacenar emisoras. ALBUM / Salte un álbum de un dispositivo de audio. Manténgalo pulsado para saltar álbumes de forma continua. (No disponible si hay conectado un dispositivo USB en modo Android o un iPod.) (repetición) (No disponible si hay conectado un dispositivo USB en modo Android.) Procedimientos iniciales Extracción del panel frontal Puede desmontar el panel frontal de esta unidad para evitar robos. 1 Mantenga pulsado OFF hasta que se apague la unidad y pulse el botón de desbloqueo del panel frontal y, a continuación, tire del panel hacia su posición para extraerlo. (aleatorio) (No disponible si hay conectado un dispositivo USB en modo Android.) MIC (página 16) (reproducción/pausa) EXTRA BASS Refuerza el sonido de graves de forma sincronizada con el nivel de volumen. Pulse este botón para cambiar el ajuste de EXTRA BASS: [1], [2], [OFF]. Toma de entrada AUX DSPL (pantalla) Pulse este botón para cambiar las opciones mostradas. SCRL (desplazamiento) Mantenga pulsado este botón para desplazarse por una opción mostrada. Puerto USB Alarma de precaución Si sitúa el contacto en la posición OFF sin extraer el panel frontal, sonará la alarma de precaución durante unos segundos. La alarma solo suena si se utiliza el amplificador integrado. Números de serie Compruebe que los números de serie de la parte inferior de la unidad y la parte posterior del panel frontal coincidan exactamente. De lo contrario, no podrá realizar emparejamientos BLUETOOTH ni conectar o desconectar mediante NFC. Montaje del panel frontal 6ES Reinicio de la unidad Debe reiniciar la unidad antes de utilizarla por primera vez o después de sustituir la batería del vehículo o cambiar las conexiones. 1 Pulse DSPL y (atrás)/MODE durante más de 2 segundos. Nota Si pulsa el botón de reinicio, se borrará el ajuste del reloj y algunos contenidos almacenados. Ajuste de la región Después de reiniciar la unidad, aparece la pantalla de ajuste de la región. 1 Pulse ENTER mientras aparece [SET AREA]. Aparece la región seleccionada actualmente. 2 3 Gire el dial de control para seleccionar [EUROPE] o [RUSSIA] y púlselo. Gire el dial de control para seleccionar [YES] o [NO] y púlselo. Si se modifica la región, la unidad se reinicia y aparece el reloj. Este ajuste puede configurarse en el menú de configuración general (página 20). Ajuste del reloj 1 Pulse MENU, gire el dial de control para seleccionar [GENERAL] y, a continuación, púlselo. 2 Gire el dial de control para seleccionar [SET CLOCK-ADJ] y púlselo. La indicación de la hora parpadea. 3 Gire el dial de control para ajustar la hora y el minuto. Para modificar la indicación digital, pulse / (SEEK –/+). 4 Después de ajustar los minutos, pulse MENU. Para mostrar el reloj Pulse DSPL. Preparación de un dispositivo BLUETOOTH Puede escuchar música o realizar llamadas manos libres, en función del dispositivo BLUETOOTH compatible, como un smartphone, un teléfono móvil o un dispositivo de audio (de ahora en adelante, “dispositivo BLUETOOTH”, si no se indica otra denominación). Para obtener más información sobre cómo establecer la conexión, consulte el manual de instrucciones suministrado con el dispositivo. Antes de conectar el dispositivo, baje el volumen de la unidad; de lo contrario, puede emitir un sonido muy fuerte. Conexión con un smartphone con un solo toque (NFC) Al tocar el dial de control en la unidad con un smartphone compatible con NFC*, la unidad se emparejará y conectará con el smartphone de forma automática. * NFC (comunicación de campo cercano) es una tecnología que permite la comunicación inalámbrica de corto alcance entre diferentes dispositivos, como teléfonos móviles y etiquetas IC. Gracias a la función NFC, es posible enviar datos de forma sencilla con solo tocar el símbolo determinado o la ubicación designada en los dispositivos compatibles con NFC. En los smartphones que tengan instalado el sistema operativo Android 4.0 o inferior, debe descargarse la aplicación “NFC Easy Connect” disponible en Google Play. Es posible que la aplicación no esté disponible en algunos países o regiones. 1 Active la función NFC en el smartphone. Para obtener más información, consulte el manual de instrucciones suministrado con el smartphone. El ajuste ha finalizado y se inicia el reloj. 7ES 2 Junte la parte con la marca N de la unidad con la parte de la marca N del smartphone. 4 Gire el dial de control para seleccionar [SET DEVICE 1]* o [SET DEVICE 2]* y púlselo. parpadea mientras la unidad está en modo de espera de emparejamiento. * El nombre [SET DEVICE 1] o [SET DEVICE 2] cambiará al del dispositivo emparejado una vez que el emparejamiento se haya completado. Asegúrese de que se encienda en la pantalla de la unidad. 5 Realice el emparejamiento en el dispositivo BLUETOOTH para que detecte esta unidad. 6 Seleccione [DSX-A416BT], que aparece en la pantalla del dispositivo BLUETOOTH. Desconexión con NFC Junte de nuevo la parte con la marca N de la unidad con la parte de la marca N del smartphone. Si el nombre de su modelo no aparece, vuelva al paso 2. Notas • Al establecer la conexión, extreme las precauciones con el smartphone para evitar arañazos. • No será posible llevar a cabo la conexión con un solo toque si la unidad ya se encuentra conectada a dos dispositivos compatibles con NFC. Si este es el caso, desconecte el dispositivo y establezca la conexión con el smartphone nuevamente. 7 Emparejar y conectar con un dispositivo BLUETOOTH Si el dispositivo BLUETOOTH requiere una clave de acceso*, introduzca [0000]. * La clave de acceso puede denominarse también “código de acceso”, “código PIN”, “número PIN”, “contraseña”, etc., en función del dispositivo. Al conectar un dispositivo BLUETOOTH por primera vez, debe realizar un registro compartido (llamado “emparejamiento”). El emparejamiento permite que esta unidad y otros dispositivos se reconozcan mutuamente. Esta unidad puede conectar dos dispositivos BLUETOOTH (dos teléfonos móviles, o un móvil y un dispositivo de audio). Introducción de clave de acceso [0000] Cuando se realiza el emparejamiento, permanece encendido. 8 1 Coloque el dispositivo BLUETOOTH a 1 m de esta unidad. 2 Pulse MENU, gire el dial de control para seleccionar [BLUETOOTH] y, a continuación, púlselo. 3 Gire el dial de control para seleccionar [SET PAIRING] y púlselo. 8ES Seleccione esta unidad en el dispositivo BLUETOOTH para establecer la conexión BLUETOOTH. o se encenderá cuando se establezca la conexión. Nota Al conectarse a un dispositivo BLUETOOTH, ningún otro dispositivo podrá detectar la unidad. Para habilitar la detección, acceda al modo de emparejamiento y busque esta unidad desde otro dispositivo. Para iniciar la reproducción Para obtener más información, consulte “Reproducción de un dispositivo BLUETOOTH” (página 13). Para desconectar el dispositivo emparejado Siga los pasos de 2 a 4 para desconectarlo una vez que esta unidad y el dispositivo BLUETOOTH estén emparejados. Conexión con un dispositivo BLUETOOTH emparejado Para conectar el último dispositivo conectado desde la unidad Active la función BLUETOOTH en el dispositivo BLUETOOTH. Para conectarse con el dispositivo de audio, pulse SRC para seleccionar [BT AUDIO] y pulse (reproducción/pausa). Para conectarse con el teléfono móvil, presione CALL. Nota Al transmitir el sonido por BLUETOOTH, no se podrá conectar desde la unidad al teléfono móvil. En su lugar, conéctese desde el teléfono móvil a esta unidad. Consejo Para utilizar un dispositivo emparejado, debe establecerse una conexión con esta unidad. Algunos dispositivos emparejados se conectan automáticamente. Mientras la señal BLUETOOTH está encendida: cuando encienda el contacto, la unidad se volverá a conectar automáticamente al último teléfono móvil conectado. Para instalar el micrófono Para obtener más información, consulte “Instalación del micrófono” (página 37). 1 Pulse MENU, gire el dial de control para seleccionar [BLUETOOTH] y, a continuación, púlselo. 2 Gire el dial de control para seleccionar [SET BT SIGNL] y púlselo. Asegúrese de que se enciende. 3 Active la función BLUETOOTH en el dispositivo BLUETOOTH. 4 Accione el dispositivo BLUETOOTH para conectar con esta unidad. o se enciende. Iconos que aparecen en la pantalla: Se ilumina cuando se pueden realizar llamadas con manos libres al habilitar el HFP (Perfil de manos libres). Conexión con un iPhone/iPod (emparejamiento automático mediante BLUETOOTH) Cuando un iPhone/iPod con iOS5 o superior está conectado al puerto USB, la unidad se emparejará y conectará con el iPhone/iPod de forma automática. Para habilitar el emparejamiento automático mediante BLUETOOTH asegúrese de que [SET AUTOPAIR] en [BLUETOOTH] esté configurado en [ON] (página 23). 1 Active la función BLUETOOTH en el iPhone/iPod. 2 Conecte un iPhone/iPod al puerto USB. Se ilumina cuando se permite la reproducción en el dispositivo de audio al habilitar el A2DP (Perfil de distribución de audio avanzado). Asegúrese de que se encienda en la pantalla de la unidad. 9ES Notas • El emparejamiento automático mediante BLUETOOTH no será posible si la unidad ya se encuentra conectada a dos dispositivos BLUETOOTH. En este caso, desconecte el otro dispositivo y después conecte el iPhone/iPod de nuevo. • Si no se establece el emparejamiento automático BLUETOOTH, consulte “Preparación de un dispositivo BLUETOOTH” (página 7). Conexión de un dispositivo USB 1 2 Conexión de otros dispositivos de audio portátiles 1 Apague el dispositivo de audio portátil. 2 3 Baje el volumen de la unidad. Baje el volumen de la unidad. Conecte el dispositivo de audio portátil al conector para entrada AUX (minitoma estéreo) de la unidad con un cable de conexión (no suministrado)*. * Asegúrese de usar un conector de tipo recto. Conecte el dispositivo USB a la unidad. Para conectar un iPod/iPhone, use el cable de conexión USB para iPod (no suministrado). 4 Pulse SRC para seleccionar [AUX]. Cómo ajustar el nivel de volumen del dispositivo conectado al de otras fuentes Inicie la reproducción en el dispositivo de audio portátil con un nivel de volumen moderado y ajuste el volumen de la unidad al nivel que suele emplear. Pulse MENU y seleccione [SOUND] [SET AUX VOL] (página 21). 10ES Escuchar la radio Escuchar la radio Recepción de emisoras almacenadas 1 Para escuchar la radio, pulse SRC y, a continuación, toque [TUNER]. Almacenamiento automático (BTM) 1 Pulse MODE para cambiar de banda (FM1, FM2, FM3, MW o LW). 2 Pulse MENU, gire el dial de control para seleccionar [GENERAL] y, a continuación, púlselo. 3 Gire el dial de control para seleccionar [SET BTM] y púlselo. La unidad almacena las emisoras en el orden de frecuencia en los botones numéricos. Sintonización 1 Pulse MODE para cambiar de banda (FM1, FM2, FM3, MW o LW). 2 Efectúe la sintonización. Para sintonizar manualmente Mantenga pulsadas / (SEEK –/+) para buscar la frecuencia aproximada y, a continuación, toque / (SEEK –/+) varias veces para sintonizar la frecuencia deseada. Para sintonizar automáticamente Pulse / (SEEK –/+). La búsqueda se detiene cuando la unidad recibe una emisora. Seleccione la banda y, a continuación, toque el número de presintonía deseado (1 a 6). Utilización del sistema de datos de radio (RDS) Ajuste de frecuencias alternativas (AF) y anuncios de tráfico (TA) AF resintoniza continuamente la emisora para recibir la señal más intensa de la red y TA proporciona información actualizada sobre el tráfico o programas de tráfico (TP) si la recibe. 1 Pulse MENU, gire el dial de control para seleccionar [GENERAL] y, a continuación, púlselo. 2 Gire el dial de control para seleccionar [SET AF/TA] y púlselo. 3 Gire el dial de control para seleccionar [SET AF-ON], [SET TA-ON], [SET AF/TA-ON] o [SET AF/TA-OFF] y, a continuación, púlselo. Para almacenar emisoras de RDS con ajuste de AF y TA Es posible presintonizar emisoras RDS junto con un ajuste AF/TA. Ajuste AF/TA y, a continuación, almacene la emisora con BTM o de forma manual. Si las presintoniza manualmente, también puede presintonizar emisoras que no sean RDS. Para recibir anuncios de emergencia Almacenamiento manual 1 Mientras recibe la emisora que desea almacenar, mantenga pulsado un botón numérico (1 a 6) hasta que aparezca [MEM]. Con las funciones AF o TA activadas, los anuncios de emergencia interrumpirán automáticamente la fuente seleccionada en ese momento. 11ES Para ajustar el nivel de volumen durante un anuncio de tráfico El nivel se almacenará en la memoria para futuros anuncios de tráfico, independientemente del nivel de volumen regular. Para continuar recibiendo un programa regional (REGIONAL) Si las funciones AF y REGIONAL están activadas, no se cambiará a otra emisora regional con una frecuencia más intensa. Si abandona la zona de recepción de dicho programa regional, ajuste [SET REGIONAL] de [GENERAL] en [SET REG-OFF] durante la recepción de FM (página 21). Esta función no está disponible en el Reino Unido ni en algunas otras zonas. Función Local Link (solo Reino Unido) Esta función permite seleccionar otras emisoras locales de la zona, aunque no estén almacenadas en sus botones numéricos. Durante la recepción FM, pulse un botón numérico (1 a 6) en el que haya una emisora local almacenada. Antes de que transcurran 5 segundos, vuelva a pulsar un botón numérico de una emisora local. Repita este procedimiento hasta que reciba la emisora local. Selección de tipos de programa (PTY) 1 Durante la recepción de FM, pulse PTY. 2 Gire el dial de control hasta que aparezca el tipo de programa que desee y, a continuación, púlselo. La unidad busca emisoras que ofrezcan el tipo de programa seleccionado. Tipos de programas NEWS (noticias), AFFAIRS (temas de actualidad), INFO (información), SPORT (deportes), EDUCATE (educación), DRAMA (drama), CULTURE (cultura), SCIENCE (ciencia), VARIED (variados), POP M (música pop), ROCK M (música rock), EASY M (grandes éxitos), LIGHT M (música clásica ligera), CLASSICS (música clásica), OTHER M (otra música), WEATHER (tiempo), FINANCE (finanzas), CHILDREN (programa infantil), SOCIAL (temas de sociedad), RELIGION (religión), PHONE IN (entrada de teléfono), TRAVEL (viajes), LEISURE (ocio), JAZZ (música jazz), COUNTRY (música country), NATION M (música nacional), OLDIES (música de décadas anteriores), FOLK M (música folk), DOCUMENT (documentales) Ajuste de la hora del reloj (CT) Los datos CT de la transmisión RDS ajustan la hora del reloj. 1 12ES Ajuste [SET CT-ON] en [GENERAL] (página 20). Reproducción Reproducción de un dispositivo USB En este Manual de instrucciones, “iPod” se utiliza como referencia general para las funciones de iPod en el iPod y el iPhone, a menos que se indique lo contrario en el texto o las ilustraciones. Para obtener más información sobre la compatibilidad de su iPod, consulte “Acerca del iPod” (página 24) o visite el sitio web de asistencia de la contraportada. Se pueden utilizar dispositivos USB* de tipo AOA (Android Open Accessory) 2.0, MSC (Mass Storage Class) y MTP (Media Transfer Protocol) que cumplan con la norma USB. En función del dispositivo USB, es posible seleccionar el modo Android o MSC/MTP en la unidad. En función del reproductor multimedia digital o el smartphone Android, es necesario ajustar el modo MTP. * Por ejemplo, una unidad de memoria USB, un reproductor multimedia digital o un smartphone Android. Notas • Para obtener más información sobre la compatibilidad del dispositivo USB, visite el sitio web de asistencia de la contraportada. • Los smartphones con Android OS 4.1 o una versión superior instalada son compatibles con Android Open Accessory 2.0 (AOA 2.0). Sin embargo, es posible que algunos smartphones no sean totalmente compatibles con AOA 2.0, aunque tengan instalado Android OS 4.1 o una versión superior. Para obtener más información sobre la compatibilidad del smartphone Android, visite el sitio web de asistencia de la contraportada. • No es posible reproducir los siguientes tipos de archivo. MP3/WMA/FLAC: – archivos protegidos por derechos de propiedad intelectual – archivos DRM (gestión de derechos digitales) – archivos de audio multicanal MP3/WMA: – archivos de compresión sin pérdida Antes de establecer una conexión, seleccione el modo USB (modo Android o modo MSC/MTP) en función del dispositivo USB (página 20). 1 Conecte el dispositivo USB al puerto USB (página 10). Se inicia la reproducción. Si ya hay un dispositivo conectado, pulse SRC para seleccionar [USB] (aparece [IPD] en la pantalla cuando se reconoce el iPod). 2 Ajuste el volumen en esta unidad. Para detener la reproducción Mantenga pulsado OFF durante 1 segundo. Para expulsar el dispositivo Detenga la reproducción y, a continuación, desconecte el dispositivo. Advertencia para iPhone Al conectar un iPhone a través de USB, el volumen de las llamadas del teléfono se controla a través del propio iPhone, no con la unidad. No aumente el volumen de la unidad durante las llamadas telefónicas para evitar sonidos altos e inesperados después de una llamada. Reproducción de un dispositivo BLUETOOTH Puede reproducir contenidos en un dispositivo conectado que sea compatible con BLUETOOTH A2DP (Perfil de distribución de audio avanzado). 1 Establezca la conexión BLUETOOTH con el dispositivo de audio (página 7). Para seleccionar el dispositivo de audio, presione MENU y seleccione [BLUETOOTH] [SET AUDIODEV] (página 23). 2 Pulse SRC para seleccionar [BT AUDIO]. 13ES 3 Inicie la reproducción desde el dispositivo de audio. 4 Ajuste el volumen en esta unidad. Notas • Según el dispositivo de audio, es posible que información como el título, el número o tiempo de la pista y el estado de la reproducción no se visualicen en la unidad. • Incluso si cambia la fuente de la unidad, la reproducción del dispositivo de audio no se detendrá. • [BT AUDIO] no aparecerá en la pantalla mientras se reproduce la aplicación “Sony | Music Center” a través de la función BLUETOOTH. Para ajustar el nivel de volumen del dispositivo BLUETOOTH al de otras fuentes Inicie la reproducción en el dispositivo de audio BLUETOOTH con un nivel de volumen moderado y ajuste el volumen de la unidad al nivel que suele emplear. Pulse MENU y seleccione [SOUND] [SET BTA VOL] (página 22). Búsqueda de pista por nombre (Quick-BrowZer™) No disponible si hay conectado un dispositivo USB en modo Android o un iPod. 1 Durante la reproducción USB, pulse (buscar)* para ver la lista de categorías de búsqueda. Cuando aparezca la lista de pistas, pulse (atrás) varias veces para ver la lista de búsqueda que desee. * Durante la reproducción USB, pulse (buscar) durante más de 2 segundos para volver directamente al principio de la lista de categorías. 2 Gire el dial de control para seleccionar la categoría que desee y púlselo para confirmar. 3 Repita el paso 2 para seleccionar la pista que desee. Se inicia la reproducción. Para salir del modo Quick-BrowZer Búsqueda y reproducción de pistas Reproducción aleatoria y repetición No disponible si hay conectado un dispositivo USB en modo Android. 1 Durante la reproducción, pulse varias veces (repetición) o (aleatorio) para seleccionar el modo de reproducción que desee. Puede que tarde en iniciarse la reproducción en el modo de reproducción seleccionado. Los modos de reproducción disponibles varían en función de la fuente de sonido seleccionada. Pulse (buscar). Búsqueda omitiendo elementos (modo salto) No disponible si hay conectado un dispositivo USB en modo Android o un iPod. 1 Durante la reproducción USB, pulse (buscar). 2 3 Pulse (SEEK +). Gire el dial de control para seleccionar la opción. Saltará la lista en pasos del 10% respecto al número total de elementos. 4 Pulse ENTER para volver al modo Quick-BrowZer. Aparece el elemento seleccionado. 5 Gire el dial de control para seleccionar el elemento que desee y púlselo. Se inicia la reproducción. 14ES Llamadas manos libres (solo mediante BLUETOOTH) Para utilizar un teléfono móvil, conéctelo a la unidad. Puede conectar dos teléfonos móviles a la unidad. Para obtener más información, consulte “Preparación de un dispositivo BLUETOOTH” (página 7). 2 Gire el dial de control para seleccionar [PHONE BOOK] y púlselo. 3 Gire el dial de control para seleccionar una inicial de la lista de iniciales y púlselo. 4 Gire el dial de control para seleccionar un nombre de la lista de nombres y púlselo. 5 Gire el dial de control para seleccionar un número de la lista de números y púlselo. La llamada telefónica comenzará. Desde el historial de llamadas Recibir una llamada 1 1 Cuando dos teléfonos móviles estén conectados a la unidad, gire el dial de control para seleccionar uno y luego púlselo. Presione CALL al recibir una llamada con un tono de timbre. La llamada telefónica comenzará. Nota 2 El tono de timbre y la voz de la persona que habla se emiten solo en los altavoces frontales. Gire el dial de control para seleccionar [RECENT CALL] y púlselo. Aparecerá una lista con el historial de llamadas. Para rechazar la llamada Mantenga pulsado OFF durante 1 segundo. Pulse CALL. 3 Para finalizar la llamada Presione CALL de nuevo. Gire el dial de control para seleccionar un nombre o un número de teléfono del historial de llamadas y púlselo. La llamada telefónica comenzará. Realizar una llamada Puede realizar una llamada desde la agenda telefónica o del historial de llamadas cuando un teléfono móvil compatible con PBAP (Perfil de acceso a agenda telefónica) está conectado. Cuando dos teléfonos móviles estén conectados a la unidad, seleccione cualquiera de los dos. Desde la agenda telefónica 1 Pulse CALL. Cuando dos teléfonos móviles estén conectados a la unidad, gire el dial de control para seleccionar uno y luego púlselo. Mediante la introducción del número de teléfono 1 Pulse CALL. Cuando dos teléfonos móviles estén conectados a la unidad, gire el dial de control para seleccionar uno y luego púlselo. 2 Gire el dial de control para seleccionar [DIAL NUMBER] y púlselo. 3 Gire el dial de control para introducir el número de teléfono y, por último, seleccione [ ] (espacio) y pulse ENTER*. La llamada telefónica comenzará. * Para modificar la indicación digital, pulse / (SEEK –/+). 15ES Nota [_] aparece en lugar de [#] en la pantalla. Mediante rellamada 1 Pulse CALL. Cuando dos teléfonos móviles estén conectados a la unidad, gire el dial de control para seleccionar uno y luego púlselo. 2 Gire el dial de control para seleccionar [REDIAL] y púlselo. La llamada telefónica comenzará. Mediante etiquetas de voz Operaciones disponibles durante una llamada Para ajustar el volumen del tono de timbre Gire el dial de control al recibir una llamada. Para ajustar el volumen de la voz de la persona que habla Gire el dial de control durante una llamada. Para ajustar el volumen del interlocutor (ajuste de ganancia del micrófono) Pulse MIC. Niveles de volumen ajustables: [MIC-LOW], [MIC-MID], [MIC-HI]. Puede hacer una llamada mencionando la etiqueta de voz almacenada en un teléfono móvil conectado que cuente con la función de marcación por voz. Para reducir el eco y el ruido (modo de cancelación de eco/cancelación de ruido) 1 Pulse CALL. Mantenga presionado MIC. Modo configurable: [EC/NC-1], [EC/NC-2]. Cuando dos teléfonos móviles estén conectados a la unidad, gire el dial de control para seleccionar uno y luego púlselo. Para alternar entre el modo de manos libres y el modo manual 2 Gire el dial de control para seleccionar [VOICE DIAL] y púlselo. Como alternativa, mantenga pulsada la tecla VOICE durante más de 2 segundos. 3 Mencione la etiqueta de voz almacenada en el teléfono móvil. Su voz se reconocerá, y se realizará la llamada. Para cancelar la marcación por voz Pulse VOICE. 16ES Durante una llamada, presione MODE para cambiar el audio de la llamada entre la unidad y el teléfono móvil. Nota Según el teléfono móvil, puede que esta operación no se encuentre disponible. 4 Funciones útiles Sony | Music Center con iPhone/smartphone Android™ Debe descargar la última versión de la aplicación “Sony | Music Center” desde la App Store en el caso del iPhone o en Google Play en el caso de un smartphone con sistema Android. Notas • Para su seguridad, respete las leyes y normas de circulación, y no utilice la aplicación mientras conduce. • “Sony | Music Center” es una aplicación para controlar los dispositivos de audio de Sony compatibles con “Sony | Music Center” a través de su iPhone o smartphone con sistema Android. • Lo que se puede controlar con “Sony | Music Center” varía en función del dispositivo conectado. • Para hacer uso de las funciones de “Sony | Music Center” puede consultar la información correspondiente en su iPhone o smartphone con sistema Android. • Para obtener más información sobre “Sony | Music Center” visite la siguiente URL: http://www.sony.net/smcqa/ • Visite el sitio web a continuación para verificar los modelos compatibles de iPhone y smartphone con sistema Android. Para iPhone: visite la App Store. Para smartphone con sistema Android: visite Google Play. Establecimiento de la conexión con Sony | Music Center 1 Realice la conexión BLUETOOTH con un iPhone o smartphone con sistema Android (página 7). Para seleccionar el dispositivo de audio, presione MENU y seleccione [BLUETOOTH] [SET AUDIODEV] (página 23). 2 Inicie la aplicación “Sony | Music Center”. 3 Pulse MENU, gire el dial de control para seleccionar [SONY APP] y, a continuación, púlselo. Gire el dial de control para seleccionar [CONNECT] y púlselo. Se iniciará la conexión con el iPhone o smartphone con sistema Android. Para más información sobre las operaciones en un iPhone o smartphone con sistema Android, consulte la sección de ayuda de la aplicación. Si aparece el número de dispositivo Asegúrese de que aparezca el número (por ejemplo, 123456) y, luego, seleccione [Sí] en el iPhone o smartphone con sistema Android. Para finalizar la conexión 1 Pulse MENU, gire el dial de control para seleccionar [SONY APP] y, a continuación, púlselo. 2 Gire el dial de control para seleccionar [CONNECT] y púlselo. Selección de la fuente o aplicación Puede seleccionar la fuente o la aplicación deseada en el iPhone o smartphone con sistema Android. Para seleccionar la fuente Pulse SRC varias veces. Otra opción es pulsar SRC, girar el dial de control para seleccionar la fuente deseada y pulsar ENTER. Para visualizar la lista de fuentes Pulse SRC. Anuncio de SMS mediante la guía de voz (solo disponible en un smartphone con sistema Android) Los mensajes SMS recibidos se leen automáticamente a través de los altavoces del vehículo. Para obtener más información sobre los ajustes, consulte la sección de ayuda de la aplicación. 17ES Responder un mensaje SMS (solo disponible en un smartphone con sistema Android) Para responder a un mensaje, puede tocar el icono de respuesta. 1 Active la aplicación “Sony | Music Center” y toque el icono [Reply] (respuesta). Aparecerá la pantalla de entrada de mensajes en la aplicación “Sony | Music Center”. 2 Responda al mensaje a través del reconocimiento de voz. Aparecerá una lista con los posibles mensajes en la aplicación “Sony | Music Center”. 3 Gire el dial de control para seleccionar el mensaje que desee y púlselo. Se enviará el mensaje. Configuración de ajustes de sonido y pantalla Utilización de Siri Eyes Free Siri Eyes Free permite utilizar el iPhone en modo manos libres simplemente hablando al micrófono. Para utilizar esta función debe conectar un iPhone a la unidad mediante BLUETOOTH. El servicio solo está disponible con un iPhone 4s o superior. Asegúrese de que su iPhone tenga instalada la última versión de iOS. Antes, debe completar el registro y la configuración de conexión BLUETOOTH para el iPhone. Para obtener más información, consulte “Preparación de un dispositivo BLUETOOTH” (página 7). Para seleccionar el iPhone, presione MENU y seleccione [BLUETOOTH] [SET AUDIODEV] (página 23). 1 Para obtener más información, consulte el manual de instrucciones suministrado con el iPhone. Puede configurar los ajustes relacionados con el sonido y la pantalla a través del iPhone o smartphone con sistema Android. 2 Para obtener más información sobre los ajustes, consulte la sección de ayuda de la aplicación. 3 Uso del reconocimiento de voz (solo disponible en un smartphone con sistema Android) 1 Mantenga pulsado VOICE para activar el reconocimiento de voz. 2 Diga la orden que desee al micrófono. Para desactivar el reconocimiento de voz Pulse VOICE. Notas • Es posible que el reconocimiento de voz no esté disponible en algunos casos. • Puede que el reconocimiento de voz no funcione correctamente según el smartphone con sistema Android conectado. • Utilice el reconocimiento de voz en condiciones de poco ruido, por ejemplo procedente del motor. 18ES Active la función Siri en el iPhone. Mantenga pulsada la tecla VOICE durante más de 2 segundos. Aparece la pantalla de control por voz. Después del pitido del iPhone, hable al micrófono. El iPhone hará otro pitido y, a continuación, Siri comenzará a responder. Para desactivar Siri Eyes Free Pulse VOICE. Notas • Puede que el iPhone no reconozca su voz según las condiciones de uso. (Por ejemplo, si se encuentra en un automóvil en movimiento.) • Es posible que Siri Eyes Free no funcione correctamente, o que el tiempo de respuesta se retrase en lugares donde la recepción del iPhone no sea buena. • Según las condiciones de utilización del iPhone, puede que Siri Eyes Free no funcione correctamente o se cierre. • Si reproduce una pista con un iPhone a través de la conexión de audio BLUETOOTH, Siri Eyes Free se cerrará automáticamente al iniciar la reproducción de la pista mediante BLUETOOTH, y la unidad reproducirá la fuente de audio BLUETOOTH. • Cuando Siri Eyes Free se activa durante la reproducción de audio, la unidad puede reproducir la fuente de audio BLUETOOTH, a pesar de que no haya especificado una pista para reproducir. • Al conectar el iPhone al puerto USB, puede que Siri Eyes Free no funcione correctamente o se cierre. • Cuando conecte el iPhone a la unidad mediante USB, no active Siri con el iPhone. Es posible que Siri Eyes Free no funcione correctamente o se cierre. • No se emitirá ningún sonido de audio mientras Siri Eyes Free esté activado. Ajustes Cancelación del modo DEMO Puede cancelar la pantalla de demostración que aparece cuando la fuente está desactivada y aparece el reloj. 1 Pulse MENU, gire el dial de control para seleccionar [GENERAL] y, a continuación, púlselo. 2 Gire el dial de control para seleccionar [SET DEMO] y púlselo. 3 Gire el dial de control para seleccionar [SET DEMO-OFF] y púlselo. El ajuste habrá finalizado. 4 Pulse (atrás) dos veces. La pantalla vuelve al modo de recepción/ reproducción normal. Funcionamiento de los ajustes básicos Puede establecer las opciones de las siguientes categorías de configuración: Ajustes generales (GENERAL), Ajustes de sonido (SOUND), Ajustes de pantalla (DISPLAY), Ajustes de BLUETOOTH (BLUETOOTH), Configuración de Sony | Music Center (SONY APP) 1 2 Pulse MENU. Gire el dial de control para seleccionar la categoría de ajustes que desee y púlselo. Las opciones que puede ajustar dependen de la fuente y de la configuración. 3 Gire el dial de control para seleccionar las opciones y púlselo. Para volver a la pantalla anterior Pulse (atrás). 19ES Ajustes generales (GENERAL) AREA (área) Especifica la región en la que va a utilizarse esta unidad: [EUROPE], [RUSSIA]. Si se modifica la región seleccionada, la unidad se reinicia y aparece el reloj. (Disponible solo cuando la fuente está desactivada y aparece el reloj.) DEMO (demostración) Activa la demostración: [ON], [OFF]. CLOCK-ADJ (ajuste del reloj) (página 7) CAUT ALM (alarma de precaución) Activa la alarma de precaución: [ON], [OFF] (página 6). (Disponible solo cuando la fuente está desactivada y aparece el reloj.) BEEP (pitido) Activa el sonido de pitido: [ON], [OFF]. AUTO OFF (apagado automático) Se apaga automáticamente después de un tiempo determinado cuando se apaga la unidad y aparece el reloj (al mantener pulsado OFF durante 1 segundo): [ON] (30 minutos), [OFF]. STEERING (volante) Registra/reinicia el ajuste del mando a distancia en el volante. (Disponible solo cuando la fuente está desactivada y aparece el reloj.) STR CONTROL (control en el volante) Selecciona el modo de entrada del mando a distancia conectado. Para evitar errores, asegúrese de que el modo de entrada coincide con el mando a distancia conectado antes de usarlo. CUSTOM (personalizado) Modo de entrada del mando a distancia en el volante PRESET (predeterminado) Modo de entrada del mando a distancia con cable, sin tener en cuenta el mando a distancia en el volante (seleccionado automáticamente al realizar [RESET CUSTOM].) 20ES EDIT CUSTOM (editar personalización) Registra las funciones (SOURCE, ATT, VOL +/–, SEEK +/–, VOICE, ON HOOK, OFF HOOK) en el mando a distancia en el volante: Gire el dial de control para seleccionar la función que desea asignar al mando a distancia del volante y, a continuación, púlselo. Mientras [REGISTER] parpadea, mantenga pulsado el botón del mando a distancia en el volante al que desea asignar la función. Una vez finalizado el registro, aparece [REGISTERED]. Para registrar otras funciones, repita los pasos y . (Disponible solo cuando [STR CONTROL] está ajustado en [CUSTOM].) RESET CUSTOM (reiniciar personalización) Reinicia el ajuste del mando a distancia en el volante: [YES], [NO]. (Disponible solo cuando [STR CONTROL] está ajustado en [CUSTOM].) Notas • Al realizar ajustes, solo puede utilizarse la unidad con los botones. Por motivos de seguridad, estacione el vehículo antes de realizar este ajuste. • Si se produce un error durante el registro, la información registrada anteriormente no se elimina. Vuelva a empezar el registro a partir de la función en la que se produjo el error. • Es posible que esta función no esté disponible en algunos vehículos. Para obtener más información sobre la compatibilidad de su vehículo, visite el sitio web de asistencia de la contraportada. USB MODE (modo USB) Cambia el modo USB: [ANDROID], [MSC/MTP]. (Disponible solo cuando se selecciona la fuente USB.) CT (hora del reloj) Activa la función CT: [ON], [OFF]. AF/TA (frecuencias alternativas/anuncio de tráfico) Selecciona el ajuste de las frecuencias alternativas (AF) y los anuncios de tráfico (TA): [AF-ON], [TA-ON], [AF/TA-ON], [AF/TA-OFF]. REGIONAL (regional) Limita la recepción a una región específica: [ON], [OFF]. (Disponible solo si hay recepción FM.) BTM (memoria de mejor sintonización) (página 11) (Disponible solo cuando se selecciona el sintonizador.) FIRMWARE (firmware) (Disponible solo cuando la fuente está desactivada y aparece el reloj.) Comprueba/actualiza la versión del firmware. Para obtener más información, visite el sitio web de asistencia de la contraportada. FW VERSION (versión del firmware) Muestra la versión del firmware actual. FW UPDATE (actualización del firmware) Accede al proceso de actualización del firmware: [YES], [NO]. La actualización del firmware lleva unos minutos. Durante la actualización, no sitúe el contacto en la posición OFF ni desconecte el dispositivo USB. Ajustes de sonido (SOUND) Este menú de configuración no está disponible si la fuente está desactivada y aparece el reloj. EQ10 PRESET (preajuste EQ10) Selecciona una curva de ecualizador entre 10 curvas diferentes o la desactiva: [OFF], [R&B], [ROCK], [POP], [HIP-HOP], [EDM], [JAZZ], [SOUL], [COUNTRY], [KARAOKE]*, [CUSTOM]. Es posible memorizar el ajuste de la curva de ecualizador de cada fuente. * [KARAOKE] reduce el sonido vocal, aunque no puede eliminarlo del todo durante la reproducción. Asimismo, tampoco está permitido utilizar un micrófono. EQ10 CUSTOM (EQ10 personalizado) Ajusta [CUSTOM] en EQ10. Ajuste de la curva de ecualizador: [BAND1] – [BAND10] (32 Hz, 63 Hz, 125 Hz, 250 Hz, 500 Hz, 1 kHz, 2 kHz, 4 kHz, 8 kHz, 16 kHz). El nivel de volumen puede ajustarse en pasos de 1 dB, de -6 dB a +6 dB. BALANCE (balance) Ajusta el balance del sonido: [RIGHT-15] – [CENTER] – [LEFT-15]. FADER (atenuador) Ajusta el nivel relativo: [FRONT-15] – [CENTER] – [REAR-15]. S.WOOFER (altavoz potenciador de graves) SW LEVEL (nivel del altavoz potenciador de graves) Ajusta el nivel de volumen del altavoz potenciador de graves: [+6 dB] – [0 dB] – [-6 dB]. (Aparece [ATT] en el ajuste más bajo.) SW PHASE (fase del altavoz potenciador de graves) Selecciona la fase del altavoz potenciador de graves: [SUB NORM], [SUB REV]. LPF FREQ (frecuencia de filtro de paso bajo) Selecciona la frecuencia de corte del altavoz potenciador de graves: [80Hz], [100Hz], [120Hz]. HPF FREQ (frecuencia de filtro de paso alto) Selecciona la frecuencia de corte del altavoz frontal/posterior: [OFF], [80Hz], [100Hz], [120Hz]. AUX VOL (nivel de volumen AUX) Ajusta el nivel de volumen de cada dispositivo auxiliar conectado: [+18 dB] – [0 dB] – [-8 dB]. Este ajuste evita tener que ajustar el nivel de volumen en diferentes fuentes. (Disponible solo cuando se selecciona AUX.) 21ES BTA VOL (nivel de volumen de audio BLUETOOTH) Ajusta el nivel de volumen de cada dispositivo BLUETOOTH conectado: [+6 dB] – [0 dB] – [-6 dB]. Este ajuste evita tener que ajustar el nivel de volumen en diferentes fuentes. (Disponible solo cuando se selecciona una aplicación o audio BT.) Ajustes de pantalla (DISPLAY) DIMMER (atenuador) Modifica el brillo de la pantalla: [OFF], [ON], [AT] (automático), [CLK] (reloj). ([AT] solo está disponible cuando el cable de control de la iluminación está conectado y los faros delanteros están encendidos.) Para que esta función solo esté activa durante un período determinado, seleccione [CLK] y defina las horas de inicio y finalización. – Para ajustar el brillo cuando la función de atenuación está activada: Ajuste [DIMMER] en [ON] y, a continuación, ajuste [BRIGHTNESS]. – Para ajustar el brillo cuando la función de atenuación está desactivada: Ajuste [DIMMER] en [OFF] y, a continuación, ajuste [BRIGHTNESS]. El ajuste de brillo se almacena y se aplica cuando la función de atenuación se activa o desactiva. BRIGHTNESS (brillo) Ajusta el brillo de la pantalla. El nivel de brillo es ajustable: [1] – [10]. 22ES BUTTON-C (color del botón) Establece un color predeterminado o personalizado para los botones. COLOR (color) Selecciona 1 color personalizado de entre 15 colores predeterminados. CUSTOM-C (color personalizado) Registra un color personalizado para los botones. RGB RED, RGB GRN, RGB BLUE Gama de color ajustable: [0] – [32] (no se puede establecer [0] para todas las gamas de colores). DSPL-C (color de la pantalla) Establece un color predeterminado o personalizado para la pantalla. COLOR (color) Selecciona 1 color personalizado de entre 15 colores predeterminados. CUSTOM-C (color personalizado) Registra un color personalizado para la pantalla. RGB RED, RGB GRN, RGB BLUE Gama de color ajustable: [0] – [32] (no se puede establecer [0] para todas las gamas de colores). SND SYNC (sincronización del sonido) Activa la sincronización de la iluminación con el sonido: [ON], [OFF]. AUTO SCR (desplazamiento automático) Desplaza automáticamente los elementos más largos: [ON], [OFF]. (No disponible cuando se selecciona AUX o el sintonizador.) Ajustes de BLUETOOTH (BLUETOOTH) PAIRING (emparejamiento) (página 8) Conecta hasta dos dispositivos BLUETOOTH: [DEVICE 1], [DEVICE 2]. El nombre [DEVICE 1] o [DEVICE 2] cambiará al del dispositivo emparejado una vez que el emparejamiento se haya completado. AUDIODEV (dispositivo de audio) Selecciona el dispositivo de audio. [*] aparece en el dispositivo emparejado con [DEVICE 1] o el dispositivo de audio compatible con el A2DP actual. Configuración de Sony | Music Center (SONY APP) AUTO LAUNCH (inicio automático) Activa el inicio automático de “Sony | Music Center”: [ON], [OFF]. Si [ON] está seleccionado, “Sony | Music Center” se conectará automáticamente una vez completada la conexión BLUETOOTH. CONNECT (conexión) Permite establecer y finalizar una conexión con la función “Sony | Music Center”. RINGTONE (tono de llamada) Selecciona si esta unidad o el teléfono móvil conectado emite el tono de timbre: [1] (esta unidad), [2] (teléfono móvil). AUTO ANS (respuesta automática) Configura esta unidad para que responda a las llamadas entrantes de forma automática: [OFF], [1] (aproximadamente 3 segundos), [2] (aproximadamente 10 segundos). AUTOPAIR (emparejamiento automático) Inicia el emparejamiento de BLUETOOTH automáticamente cuando un dispositivo iOS con la versión 5.0 o posterior se conecta mediante USB: [ON], [OFF]. BT SIGNL (señal BLUETOOTH) (página 9) Activa/desactiva la función BLUETOOTH. BT INIT (inicializar BLUETOOTH) Inicializa todos los ajustes relacionados con BLUETOOTH (información de emparejamiento, información del dispositivo, etc.): [YES], [NO]. Al desechar la unidad, inicialice todos los ajustes. (Disponible solo cuando la fuente está desactivada y aparece el reloj.) 23ES Acerca del iPod Información adicional Actualización del firmware Para actualizar el firmware, visite el sitio web de asistencia de la contraportada y siga las instrucciones. Nota Durante la actualización, no desconecte el dispositivo USB. Precauciones • No deje nunca el panel frontal ni otros dispositivos de audio en el salpicadero. • Cuando se enciende la unidad, la antena se despliega automáticamente. • No derrame líquidos sobre la unidad. Orden de reproducción de archivos de audio Carpeta (álbum) Archivo de audio (pista) • Puede conectarse a los siguientes modelos de iPod. Actualice sus dispositivos iPod a la última versión de software antes de utilizarlos. Modelos de iPhone/iPod compatibles Modelo compatible Bluetooth® USB iPhone X iPhone 8 iPhone 8 Plus iPhone 7 iPhone 7 Plus iPhone SE iPhone 6s iPhone 6s Plus iPhone 6 iPhone 6 Plus iPhone 5s iPhone 5c iPhone 5 iPhone 4s iPod touch (6.ª generación) iPod touch (5.ª generación) iPod nano (7.ª generación) • El uso de la insignia Made for Apple significa que un accesorio ha sido diseñado para conectarse específicamente al producto o a los productos Apple identificados en la insignia, y ha sido certificado por el fabricante de que cumple las normas de rendimiento de Apple. Apple no se hace responsable por el funcionamiento de este dispositivo o su cumplimiento con normas de seguridad y regulatorias. Tenga en cuenta que el uso de este accesorio con un producto Apple puede afectar el rendimiento inalámbrico. 24ES Si desea realizar alguna consulta o solucionar algún problema relativo a la unidad que no se trate en este manual, póngase en contacto con su distribuidor Sony más cercano. Mantenimiento Limpieza de los conectores Evite tocar directamente los conectores. Es posible que la unidad no funcione correctamente si los conectores entre la unidad y el panel frontal están sucios. Para evitarlo, retire el panel frontal (página 6) y limpie los conectores con un bastón de algodón. No aplique una fuerza excesiva. De lo contrario, podría dañar los conectores. Especificaciones Sección del sintonizador FM Rango de sintonización: Si [AREA] está ajustado en [EUROPE]: 87,5 MHz – 108,0 MHz Si [AREA] está ajustado en [RUSSIA]: FM1/FM2: 87,5 MHz – 108,0 MHz (en pasos de 50 kHz) FM3: 65 MHz – 74 MHz (en pasos de 30 kHz) Sensibilidad: 8 dBf Relación señal-ruido: 73 dB Separación: 50 dB a 1 kHz MW/LW Rango de sintonización: MW: 531 kHz – 1.602 kHz LW: 153 kHz – 279 kHz Sensibilidad: MW: 26 μV, LW: 50 μV Sección del reproductor USB Nota Por motivos de seguridad, no desmonte el panel frontal mientras conduzca. Interfaz: USB (máxima velocidad) Corriente máxima: 1 A Número máximo de carpetas y archivos reconocibles: Carpetas (álbumes): 256 Archivos (pistas) por carpeta: 256 Protocolo Android Open Accessory (AOA) compatible: 2.0 Códec correspondiente: MP3 (.mp3) Velocidad de bits: 8 kbps – 320 kbps (compatible con VBR (velocidad de bits variable)) Frecuencia de muestreo: 16 kHz – 48 kHz WMA (.wma) Velocidad de bits: 32 kbps – 192 kbps (compatible con VBR (velocidad de bits variable)) Frecuencia de muestreo: 32 kHz, 44,1 kHz, 48 kHz FLAC (.flac) Profundidad de bits: 16 bits, 24 bits Frecuencia de muestreo: 44,1 kHz, 48 kHz Sistemas de archivos compatibles: FAT16, FAT32 25ES Comunicación inalámbrica Sistema de comunicación: Norma BLUETOOTH versión 3.0 Salida: Norma BLUETOOTH, clase de potencia 2 (Conducción máx. +1 dBm) Rango máximo de comunicación: Línea de visión aprox. 10 m*1 Banda de frecuencia: Banda de 2,4 GHz (2,4000 GHz – 2,4835 GHz) Método de modulación: FHSS Perfiles BLUETOOTH compatibles*2: A2DP (Perfil avanzado de distribución de audio) 1.3 AVRCP (Perfil de control remoto de audio/vídeo) 1.3 HFP (Perfil de manos libres) 1.6 PBAP (Perfil de acceso a agenda telefónica) SPP (Perfil de puerto de serie) Códec correspondiente: SBC (.sbc), AAC (.m4a) *1 La cobertura real variará en función de factores como los obstáculos entre dispositivos, los campos magnéticos alrededor de un horno microondas, la electricidad estática, la sensibilidad de la recepción, el rendimiento de la antena, el sistema operativo, la aplicación del software, etc. *2 Los perfiles estándar de BLUETOOTH indican la finalidad de la comunicación BLUETOOTH entre dispositivos. Comunicación NFC Banda de frecuencia: 13,56 MHz Sección del amplificador de potencia Salidas: salidas de altavoz Impedancia de altavoz: 4 Ω – 8 Ω Salida de potencia máxima: 55 W × 4 (a 4 Ω) General Requisitos de alimentación: batería para vehículo de 12 V CC (masa negativa) Consumo de corriente nominal: 10 A Dimensiones: Aprox. 178 mm × 50 mm × 177 mm (an./al./pr.) Dimensiones de montaje: Aprox. 182 mm × 53 mm × 160 mm (an./al./pr.) Peso: aprox. 0,8 kg 26ES Contenidos del paquete: Unidad principal (1) Micrófono (1) Componentes de instalación y conexiones (1 juego) Para obtener más información, consulte al distribuidor. El diseño y las especificaciones pueden variar sin previo aviso. Derechos de autor La marca y los logotipos Bluetooth® son marcas comerciales registradas propiedad de Bluetooth SIG, Inc. y Sony Corporation dispone de la licencia correspondiente para utilizar dichas marcas. Las otras marcas comerciales y nombres de marcas pertenecen a sus respectivos propietarios. La marca N es una marca comercial o marca comercial registrada de NFC Forum, Inc. en los EE.UU. y en otros países. Windows Media es una marca comercial o marca comercial registrada de Microsoft Corporation en los Estados Unidos y en otros países. Este producto está protegido por determinados derechos de propiedad intelectual de Microsoft Corporation. Queda prohibido el uso o distribución de esta tecnología fuera de este producto sin las licencias correspondientes de Microsoft o una filial autorizada de Microsoft. Apple, iPhone, iPod, iPod nano, iPod touch y Siri son marcas comerciales de Apple Inc., registradas en Estados Unidos y otros países. App Store es una marca de servicio de Apple Inc. IOS es una marca comercial o marca comercial registrada de Cisco en los EE. UU. y en otros países y se utiliza con licencia. Google, Google Play y Android son marcas comerciales de Google LLC. libFLAC Copyright (C) 2000-2009 Josh Coalson Copyright (C) 2011-2013 Fundación Xiph.Org Se permite su redistribución y uso en formatos de fuente y binario, con o sin modificaciones, siempre y cuando se cumplan las siguientes condiciones: – Las redistribuciones del código fuente deben respetar el aviso de protección de derechos de autor indicado anteriormente, esta lista de condiciones y la siguiente nota legal. – Las redistribuciones en formato binario deben reproducir el aviso de protección de derechos de autor indicado anteriormente, esta lista de condiciones y la siguiente nota legal en la documentación u otros materiales proporcionados con la distribución. – No se puede usar el nombre de la Fundación Xiph.org ni los nombres de sus colaboradores para apoyar o promocionar productos derivados de este software sin obtener un permiso previo específico por escrito. ESTE SOFTWARE HA SIDO PROPORCIONADO POR LOS TITULARES DE LOS DERECHOS DE AUTOR Y SUS COLABORADORES “TAL CUAL” Y SE RENUNCIA A CUALQUIER GARANTÍA EXPRESA O IMPLÍCITA, INCLUYENDO, ENTRE OTRAS, LAS GARANTÍAS IMPLÍCITAS DE COMERCIABILIDAD E IDONEIDAD PARA UN FIN EN PARTICULAR. LA FUNDACIÓN O SUS COLABORADORES NO SERÁN RESPONSABLES EN NINGÚN CASO DE NINGÚN DAÑO INDIRECTO, DIRECTO, ACCIDENTAL, ESPECIAL, EJEMPLAR O DERIVADO (INCLUYENDO, ENTRE OTROS, LA ADQUISICIÓN DE PRODUCTOS O SERVICIOS DE SUSTITUCIÓN; IMPOSIBILIDAD DE USO, PÉRDIDA DE DATOS O BENEFICIOS; O INTERRUPCIÓN DEL NEGOCIO) SEA CUAL SEA SU CAUSA, Y PARTIENDO DE CUALQUIER TEORÍA DE RESPONSABILIDAD QUE SE APLIQUE, YA SE TRATE DE RESPONSABILIDAD CONTRACTUAL, RESPONSABILIDAD OBJETIVA U OTRO AGRAVIO (INCLUIDA LA NEGLIGENCIA O CUALQUIER OTRA) DERIVADA DEL USO DE ESTE SOFTWARE, AUNQUE SE ADVIERTA DE LA POSIBILIDAD DE QUE SE PRODUZCAN DICHOS DAÑOS. Solución de problemas La siguiente lista de comprobación pretende facilitar la solución de los problemas que surjan con la unidad. Antes de consultar la siguiente lista de comprobación, verifique los procedimientos de conexión y de funcionamiento. Para obtener más información sobre la utilización del fusible y la extracción de la unidad del salpicadero, consulte “Conexión/ Instalación” (página 34). Si el problema no se resuelve, consulte el sitio de asistencia de la contraportada. General No se escucha ningún sonido o el sonido es muy bajo. La posición del control del fader [FADER] no está configurada para un sistema de 2 altavoces. El volumen de la unidad y/o el dispositivo conectado es muy bajo. – Suba el volumen de la unidad y el dispositivo conectado. La unidad no emite el sonido de pitido. Hay conectado un amplificador de potencia opcional y no está usando el amplificador integrado. Las emisoras almacenadas y la hora correcta se borraron. El fusible se fundió. La unidad hace un ruido al cambiar la posición del contacto. Los cables no están bien conectados con el conector de alimentación auxiliar del vehículo. Durante la reproducción o la recepción se inicia el modo de demostración. Si no se realiza ninguna operación durante 5 minutos y [DEMO-ON] está seleccionado, se inicia el modo de demostración. – Ajuste [DEMO-OFF] (página 20). Las indicaciones desaparecen o no aparecen en el monitor. Los conectores están sucios (página 25). 27ES La pantalla/iluminación parpadea. La alimentación no es suficiente. – Compruebe que la batería del vehículo proporcione suficiente potencia a la unidad. (La potencia necesaria es de 12 V CC.) Los botones de las operaciones no funcionan. Pulse DSPL y (atrás)/MODE durante más de 2 segundos para reiniciar la unidad. El contenido almacenado en la memoria se borra. Recepción de radio La recepción de radio falla. Se produce ruido estático. Conecte correctamente la antena. No es posible sintonizar de 65 MHz a 74 MHz en FM3. [AREA] está ajustado en [EUROPE]. – Ajuste [AREA] en [RUSSIA] (página 20). RDS No es posible recibir los servicios RDS (si [AREA] está ajustado en [RUSSIA]). FM3 está seleccionado. – Seleccione FM1 o FM2. Los servicios RDS no están disponibles en la región actual. La operación SEEK empieza después de unos segundos de escucha. La emisora no es TP o tiene una señal débil. – Desactive TA (página 11). No se reciben anuncios de tráfico. Active TA (página 11). La emisora no emite ninguna notificación de tráfico a pesar de ser TP. – Sintonice otra emisora. PTY muestra [- - - - - - - -]. La emisora actual no es RDS o la recepción de radio es mala. 28ES El nombre del servicio del programa parpadea. No hay frecuencia alternativa para la emisora actual. – Pulse (SEEK –/+) mientras el nombre del servicio del programa parpadea. Aparece [PI SEEK] y la unidad empieza a buscar otra frecuencia con los mismos datos de PI (identificación del programa). Reproducción de dispositivo USB Un dispositivo USB tarda más en reproducirse. El dispositivo USB contiene archivos con una estructura de árbol complicada. No puede reproducirse el archivo de audio. Para obtener información detallada sobre los formatos compatibles, consulte “Especificaciones” (página 25). Si el archivo de audio sigue sin poder reproducirse, consulte el manual de instrucciones del dispositivo USB o póngase en contacto con el fabricante del dispositivo USB. No es posible realizar operaciones como saltar un álbum, saltar contenidos (modo salto) o buscar una pista por nombre (Quick-BrowZer). Ajuste [USB MODE] en [MSC/MTP] (página 20). No se emite sonido durante la reproducción en el modo Android. Compruebe el estado de la aplicación de reproducción de audio en el smartphone Android. Función NFC La conexión con un solo toque (NFC) no es posible. Si el smartphone no responde al tacto. – Compruebe que la función NFC del smartphone esté activada. – Coloque la parte con la marca N del smartphone más cerca de la parte con la marca N de la unidad. – Si el smartphone tiene una carcasa, quítela. La sensibilidad de recepción de NFC depende del dispositivo. Si la conexión al smartphone con un solo toque falla en repetidas ocasiones, realice la conexión BLUETOOTH de forma manual. Función BLUETOOTH El dispositivo de conexión no puede detectar la unidad. Antes de realizar el emparejamiento, configure esta unidad en el modo de espera de emparejamiento. Al conectarse a dos dispositivos BLUETOOTH, ningún otro dispositivo podrá detectar la unidad. – Desconecte una de las conexiones y busque esta unidad desde otro dispositivo. Cuando se realiza el emparejamiento del dispositivo, ajuste la salida de la señal BLUETOOTH en ON (página 9). No es posible establecer la conexión. La conexión se controla desde uno de los lados (desde esta unidad o desde el dispositivo BLUETOOTH), pero no desde ambos. – Conéctese a esta unidad desde un dispositivo BLUETOOTH o viceversa. El nombre del dispositivo detectado no aparece. Según el estado del otro dispositivo, puede que no sea posible obtener el nombre. No se escucha el tono de timbre. Ajuste el volumen girando el dial de control al recibir una llamada. Según el dispositivo de conexión, es posible que el tono de timbre no se haya enviado correctamente. – Ajuste [RINGTONE] en [1] (página 23). Los altavoces frontales no están conectados a la unidad. – Conecte los altavoces frontales a la unidad. El tono de timbre se emite solo en los altavoces frontales. No se puede escuchar la voz de la persona que habla. Los altavoces frontales no están conectados a la unidad. – Conecte los altavoces frontales a la unidad. La voz de la persona que habla se emite solo en los altavoces frontales. Un interlocutor dice que el volumen está demasiado bajo o alto. Ajuste el volumen de forma correcta mediante el ajuste de ganancia del micrófono (página 16). Hay eco o ruidos en las conversaciones telefónicas. Baje el volumen. Ajuste el modo EC/NC en [EC/NC-1] o [EC/NC-2] (página 16). Si el ruido ambiente (que no sea el del sonido de la llamada) es muy alto, intente reducirlo. Por ejemplo, si hay una ventanilla abierta y el ruido del tráfico, etc., es muy alto, cierre la ventanilla. Si el aire acondicionado hace mucho ruido, baje su nivel. El teléfono no está conectado. Al reproducir audio por BLUETOOTH, el teléfono no se conecta por más que presione CALL. – Conéctese desde el teléfono. 29ES La calidad de sonido del teléfono es mala. La calidad de sonido del teléfono depende de las condiciones de recepción de teléfono móvil. – Si la recepción es mala, mueva su automóvil a un lugar donde la señal del teléfono sea mejor. El emparejamiento falló porque se agotó el tiempo de espera. Según el dispositivo de conexión, es posible que el límite de tiempo para realizar el emparejamiento sea breve. – Intente completar el emparejamiento dentro del tiempo establecido. El volumen del dispositivo de audio conectado es bajo (alto). El nivel de volumen será diferente en función del dispositivo de audio. – Ajuste el volumen del dispositivo de audio conectado o el de la unidad (página 22). La función BLUETOOTH no funciona. Apague la unidad pulsando OFF durante más de 2 segundos y a continuación encienda la unidad de nuevo. El sonido es intermitente durante la reproducción de un dispositivo de audio BLUETOOTH. Reduzca la distancia entre la unidad y el dispositivo de audio BLUETOOTH. Si el dispositivo de audio BLUETOOTH se encuentra en una carcasa que interrumpe la señal, retire el dispositivo de audio de la carcasa durante su uso. Hay varios dispositivos BLUETOOTH u otros dispositivos que se están utilizando cerca y emiten ondas de radio. – Apague los otros dispositivos. – Aumente la distancia con los otros dispositivos. El sonido de reproducción se detiene de forma momentánea al conectar esta unidad con el teléfono móvil. No se trata de ningún problema de funcionamiento. El dispositivo de audio BLUETOOTH conectado no se puede controlar. Compruebe que el dispositivo de audio BLUETOOTH conectado sea compatible con AVRCP. Algunas funciones no se ejecutan. Compruebe que el dispositivo de conexión sea compatible con las funciones en cuestión. Una llamada es contestada involuntariamente. El teléfono conectado está configurado para responder llamadas automáticamente. 30ES Los altavoces del automóvil no emiten sonido alguno durante una llamada con manos libres. Si el sonido se emite desde el teléfono móvil, configúrelo para que emita el sonido desde los altavoces del automóvil. Siri Eyes Free no está activado. Realice el registro manos libres en el caso de un iPhone compatible con Siri Eyes Free. Active la función Siri en el iPhone. Cancele la conexión BLUETOOTH con el iPhone y la unidad, y vuelva a conectarlo. Funcionamiento de Sony | Music Center El nombre de la aplicación no coincide con la aplicación que figura en “Sony | Music Center”. Inicie la aplicación de nuevo desde la aplicación “Sony | Music Center”. Mientras se ejecuta la aplicación “Sony | Music Center” a través de BLUETOOTH, la pantalla cambia automáticamente a [BT AUDIO]. La aplicación “Sony | Music Center” o la función BLUETOOTH ha fallado. Ejecute de nuevo la aplicación. La aplicación “Sony | Music Center” se desconecta automáticamente cuando la pantalla cambia a [IPD]. La aplicación “Sony | Music Center” en el iPhone o iPod no es compatible con la reproducción a través de iPod. – Cambie la fuente de la unidad a otra que no sea [IPD] y luego establezca la conexión “Sony | Music Center” (página 17). La conexión “Sony | Music Center” se desconecta de manera automática cuando el modo USB de la unidad cambia a [ANDROID]. El smartphone con Android no es compatible con la reproducción en modo Android. – Configure el modo USB de la unidad como [MSC/MTP] y, a continuación, establezca la conexión “Sony | Music Center” (página 17). Mensajes Es posible que aparezcan o parpadeen los siguientes mensajes durante la utilización de la unidad. INVALID La operación seleccionada tal vez no sea válida. [USB MODE] no puede modificarse durante la reproducción de un iPod. READ Espere hasta que finalice la lectura y la reproducción empiece automáticamente. El proceso puede tardar un tiempo, en función de la organización de los archivos. Reproducción de dispositivo USB: HUB NO SUPRT: concentradores USB no compatibles. IPD STOP: la reproducción del iPod ha finalizado. Inicie la reproducción desde su iPod/ iPhone. NOT SUPPORT - ANDROID MODE Se ha conectado a la unidad un dispositivo USB no compatible con AOA (Android Open Accessory) 2.0 mientras [USB MODE] está ajustado en [ANDROID]. – Ajuste [USB MODE] en [MSC/MTP] (página 20). USB ERROR Conecte de nuevo el dispositivo USB. USB NO DEV Asegúrese de que el dispositivo USB o el cable USB esté correctamente conectado. USB NO MUSIC Conecte un dispositivo USB con archivos reproducibles (página 25). USB NO SUPRT Para obtener más información sobre la compatibilidad del dispositivo USB, visite el sitio web de asistencia de la contraportada. OVERLOAD: el dispositivo USB está sobrecargado. Desconecte el dispositivo USB y pulse SRC para seleccionar otra fuente. El dispositivo USB presenta un fallo o se ha conectado un dispositivo no compatible. (guión bajo): el carácter no puede mostrarse. 31ES Funcionamiento de RDS: NO AF: no hay frecuencias alternativas. Pulse (SEEK –/+) mientras el nombre del servicio del programa parpadea. La unidad empieza a buscar otra frecuencia con los mismos datos de PI (identificación del programa) (aparece [PI SEEK]). NO PI: sin identificación de programas. La emisora seleccionada no tiene datos de PI (identificación de programas). Seleccione otra emisora. NO TP: no hay programas de tráfico. La unidad continuará buscando emisoras de TP disponibles. Función BLUETOOTH: BTA NO DEV: el dispositivo BLUETOOTH no está conectado o no se reconoce. Asegúrese de que el dispositivo BLUETOOTH esté correctamente conectado o de que se establezca la conexión BLUETOOTH con el dispositivo BLUETOOTH. ERROR: no puede realizarse la operación seleccionada. Espere unos instantes y vuelva a intentarlo. UNKNOWN: no se puede visualizar un nombre o número de teléfono. WITHHELD: la persona que llama oculta su número de teléfono. Para el funcionamiento de Sony | Music Center: APP ––––––––: no hay una conexión establecida con la aplicación. Establezca de nuevo la conexión con “Sony | Music Center” (página 17). APP DISCNCT: la aplicación está desconectada. Establezca la conexión con “Sony | Music Center” (página 17). APP DISPLAY: hay una pantalla de configuración de visualización de la aplicación abierta. Salga de la pantalla de configuración de visualización de la aplicación para poder utilizar el botón. APP LIST: la lista de contenidos del dispositivo USB está abierta. Salga de la lista de la aplicación para poder utilizar el botón. APP MENU: hay una ventana de configuración de la aplicación abierta. Salga de la pantalla de configuración de la aplicación para poder utilizar el botón. APP NO DEV: no se reconoce el dispositivo con la aplicación instalada o no está conectado. Establezca la conexión BLUETOOTH y la conexión “Sony | Music Center” de nuevo (página 17). APP SOUND: hay una pantalla de configuración de sonido de la aplicación abierta. Salga de la pantalla de configuración del sonido de la aplicación para poder utilizar el botón. OPEN APP: la aplicación “Sony | Music Center” no funciona. Inicie la aplicación. 32ES Para la utilización del mando a distancia en el volante: ERROR Vuelva a empezar el registro a partir de la función en la que se produjo el error (página 20). TIMEOUT Trate de completar el registro mientras [REGISTER] está parpadeando (aproximadamente 6 segundos) (página 20). Operación de actualización del firmware: FILE ERROR: el programa de actualización no está almacenado en el dispositivo USB. Guarde el programa de actualización en el dispositivo USB y vuelva a intentarlo (página 24). UPDATE ERROR PRESS ENTER: la actualización del firmware no se ha realizado correctamente. Pulse ENTER para borrar el mensaje y vuelva a intentarlo. Durante la actualización, no sitúe el contacto en la posición OFF ni desconecte el dispositivo USB (página 24). Si estas soluciones no mejoran la situación, póngase en contacto con su distribuidor Sony más cercano. Si lleva la unidad a reparar a causa de problemas en la reproducción del dispositivo, lleve el dispositivo que se utilizó cuando se produjo el problema. 33ES Conexión/Instalación Precauciones • Dirija todos los cables de masa a un punto de masa común. • Evite que los cables queden atrapados bajo un tornillo o en piezas móviles (p. ej., rieles de asientos). • Antes de establecer conexiones, apague el motor del automóvil para evitar cortocircuitos. • Conecte el cable de alimentación a la unidad y los altavoces antes de conectarlo al conector de alimentación auxiliar. • Asegúrese de aislar los cables no conectados sueltos con cinta aislante para mayor seguridad. Lista de piezas para la instalación ×2 Precauciones • Elija cuidadosamente el lugar de instalación para que la unidad no interfiera con las operaciones de conducción normales. • Evite instalar la unidad en zonas expuestas a polvo, suciedad, vibración excesiva o temperaturas elevadas, como la luz solar directa o cerca de conductos de calefacción. • Use solo el equipo de montaje suministrado para realizar una instalación segura. Nota sobre el cable de alimentación (amarillo) Al conectar esta unidad junto con otros componentes estéreo, el valor del amperaje del circuito del vehículo al que está conectada la unidad debe ser superior a la suma del valor del amperaje del fusible de cada componente. Ajuste del ángulo de montaje Ajuste el ángulo de montaje a menos de 30°. 34ES • Esta lista de piezas no incluye todo el contenido del paquete. • El soporte y la abrazadera de protección están fijados a la unidad al salir de fábrica. Antes de montar la unidad, utilice las llaves de desbloqueo para desmontar el soporte de la unidad. Para obtener más información, consulte “Desmontaje de la abrazadera de protección y el soporte” (página 38). • Guarde las llaves de desbloqueo para utilizarlas más adelante, ya que también son necesarias para desmontar la unidad del vehículo. Conexión Altavoz potenciador de graves*1 *3 *3 *3 Amplificador de potencia*1 *2 Para obtener más información, consulte “Establecimiento de conexiones” (página 36). Consulte “Diagrama de conexión de la alimentación” (página 36) para obtener información más detallada. desde un control remoto con cable (no suministrado)*4 *5*6 desde la antena de un vehículo*7 *1 *2 *3 *4 No suministrado Impedancia de altavoz: 4 Ω – 8 Ω × 4 Cable con clavija RCA (no suministrado) En función del tipo de vehículo, use un adaptador para un control remoto con cable (no suministrado). Para obtener información detallada sobre el uso del control remoto con cable, consulte “Uso del control remoto con cable” (página 37). *5 Tanto si se utiliza como si no, procure que el recorrido del cable de entrada del micrófono no interfiera con las operaciones de conducción. Fije el cable con una abrazadera, etc., si lo instala alrededor de los pies. *6 Para obtener más información sobre la instalación del micrófono, consulte “Instalación del micrófono” (página 37). *7 En función del tipo de vehículo, use un adaptador (no suministrado) si el conector de la antena no encaja. 35ES Establecimiento de conexiones Si tiene una antena motorizada sin caja de relés, la conexión de esta unidad con el cable de conexión de alimentación suministrado puede dañar la antena. Conexión fácil de altavoz potenciador de graves Puede utilizar un altavoz potenciador de graves sin un amplificador de potencia si está conectado a un cable de altavoz trasero. Al conector del altavoz del vehículo Altavoz delantero Altavoz potenciador de graves 1 Altavoz trasero 2 (derecho) Lila 3 Altavoz delantero 4 (derecho) Gris 5 Altavoz delantero 6 (izquierdo) Blanco 7 Verde Altavoz trasero 8 (izquierdo) A rayas moradas/negras A rayas grises/ negras A rayas blancas/ negras A rayas verdes/ negras Al conector de alimentación del vehículo Notas • Es necesario preparar los cables de altavoz traseros. • Utilice un altavoz potenciador de graves con una impedancia de 4 Ω a 8 Ω y con una capacidad de administración de la potencia suficiente para evitar daños. Conexión del soporte de la memoria Si el cable de alimentación amarillo está conectado, siempre se suministrará alimentación eléctrica al circuito de memoria aunque esté apagado el interruptor de la llave de encendido. Conexión del altavoz 36ES 12 Fuente de Amarillo alimentación continua 13 Control de la antena motorizada/ amplificador de potencia (REM OUT) A rayas azules/ blancas 14 Fuente de alimentación de iluminación conmutada A rayas naranja/ blancas • Antes de conectar los altavoces, apague la unidad. • Utilice unos altavoces con una impedancia de 4 Ω a 8 Ω y con una capacidad de administración de la potencia suficiente para evitar daños. Diagrama de conexión de la alimentación Compruebe el conector de alimentación auxiliar de su vehículo y conecte los cables correctamente en función del vehículo. Conector de alimentación auxiliar Fuente de 15 alimentación conmutada Rojo 16 Masa Negro Conexión común Rojo Rojo Instalación del micrófono Para capturar su voz durante llamadas manos libres, debe instalar el micrófono . Amarillo Amarillo 12 Fuente de alimentación continua Amarillo 15 Fuente de alimentación conmutada Rojo Posiciones de los cables rojo y amarillo invertidas Rojo Gancho (no suministrado) Rojo Amarillo Amarillo Fuente de alimentación 12 conmutada Amarillo Fuente de alimentación 15 continua Rojo Para los vehículos sin posición ACC Rojo Rojo Amarillo Amarillo Después de establecer las conexiones y cambiar los cables de alimentación correctamente, conecte la unidad a la fuente de alimentación del vehículo. Si desea realizar alguna consulta o solucionar algún problema relativo a la unidad que no se trate en este manual, póngase en contacto con el concesionario del vehículo. Precauciones • Es extremadamente peligroso que el cable se enrolle alrededor de la columna de dirección o la palanca de cambios. Asegúrese de que ni este ni otros elementos no interfieran en sus operaciones de conducción del vehículo. • Si su automóvil cuenta con airbags o cualquier otro equipo de amortiguación de impactos, póngase en contacto con la tienda en la que adquirió esta unidad o con el concesionario del automóvil antes de realizar la instalación. Nota Antes de fijar la cinta de doble cara , limpie la superficie del salpicadero con un paño seco. Uso del control remoto con cable 1 Para activar el control remoto con cable, ajuste [STR CONTROL] de [SET STEERING] en [PRESET] (página 20). 37ES Montaje de la unidad en el salpicadero Instalación Desmontaje de la abrazadera de protección y el soporte Antes de instalar la unidad, desmonte la abrazadera de protección y el soporte de la unidad. 1 Antes de la instalación, asegúrese de que los pasadores situados a ambos lados del soporte estén doblados hacia dentro 2 mm. 1 Sujete la abrazadera de protección por los dos extremos y extráigala. Coloque el soporte dentro del salpicadero y, a continuación, doble los ganchos hacia fuera para que queden bien ajustados. 182 mm 53 mm 2 Introduzca las dos llaves de desbloqueo hasta que encajen, baje el soporte y tire de la unidad hacia arriba para separarla. 2 Pasador Monte la unidad en el soporte y fije la abrazadera de protección . Gancho mirando hacia dentro. Notas • Si los pasadores están rectos o doblados hacia fuera, la unidad no se instalará con seguridad y puede salirse hacia fuera. • Asegúrese de que los 4 pasadores de la abrazadera de protección estén correctamente introducidos en las ranuras de la unidad. Montaje y desmontaje del panel frontal Para obtener más información, consulte “Extracción del panel frontal” (página 6). 38ES Reinicio de la unidad Para obtener más información, consulte “Reinicio de la unidad” (página 7). Sustitución de fusibles Cuando sustituya el fusible, Fusible (10 A) asegúrese de usar uno que coincida con el valor del amperaje indicado en el fusible original. Si se funde el fusible, compruebe la conexión de la alimentación y sustituya el fusible. Si se vuelve a fundir el fusible después de sustituirlo, puede que haya una avería interna. En ese caso, consulte al distribuidor Sony más cercano. 39ES FM/MW/LW Bluetooth® Автомобильное Аудио Сделано в Таиланде Производитель: Сони Корпорейшн, 1-7-1 Конан Минато-ку Токио, 108-0075 Япония В целях безопасности обязательно устанавливайте это устройство на приборной панели автомобиля, так как его задняя часть нагревается во время работы. Подробнее см. “Установка/ подключение” (стр. 36). Табличка с указанием рабочего напряжения и других характеристик находится на нижней панели корпуса. Маркировка CE действительна лишь в тех странах, в которых принята на законодательном уровне. В основном это страны ЕЭЗ (Европейской экономической зоны). Дата изготовления указана на товаре, а также на упаковке в следующем формате: MM.YYYY, где MM – месяц и YYYY – год изготовления. Автомагнитола с Bluetooth и NFC в одно касание Условия хранения Товары сохраняют в упакованном виде в темных, сухих, чистых, хорошо вентилируемых помещениях, изолированных от мест хранения кислот и щелочей. Температура хранения: от -20 до +60 °C. Относительная влажность хранения не более < 80 %, без образования конденсата. Рабочая температура: от 0 до 40 °C. Рабочая относительная влажность: 40–60 %. Срок хранения не установлен. 2RU Утилизация использованных элементов питания и отслужившего электрического и электронного оборудования (Директива применима в странах Евросоюза и других странах, где действуют системы раздельного сбора отходов) Предупреждение для случаев, когда в замке зажигания нет положения ACC Убедитесь, что настроена функция AUTO OFF (стр. 21). Устройство полностью отключится автоматически по истечении заданного времени, когда устройство выключится и отобразятся часы (например, при нажатии кнопки OFF и удержании ее в течение 1 секунды). Это предотвращает разрядку аккумулятора. Если функция AUTO OFF не настроена, при каждом отключении зажигания нажмите и удерживайте OFF, пока экран не потухнет. Отказ от ответственности в отношении услуг, предоставляемых сторонними поставщиками Службы, предоставляемые сторонними поставщиками, могут быть изменены, приостановлены или отменены без предварительного уведомления. Компания Sony не несет ответственности за ситуации подобного рода. Импортер на территории стран Таможенного союза АО “Сони Электроникс”, Россия, 123103, Москва, Карамышевский проезд, 6 Организация, уполномоченная принимать претензии от потребителей на территории Казахстана АО “Сони Электроникс” Представительство в Казахстане, 050010, Республика Казахстан, г. Алматы, пр. Достык, дом 117/ 7 Қазақстан жеріндегі тұтынушылардың шағым-талаптарын қабылдауға уəкілетті ұйым «Сони Электроникс» АҚ Қазақстандағы Өкілдігі, 050010, Қазақстан Республикасы, Алматы қ., Достық даңғылы, 117/7 үй Важное примечание Внимание! КОМПАНИЯ SONY НИ ПРИ КАКИХ УСЛОВИЯХ НЕ НЕСЕТ ОТВЕТСТВЕННОСТИ ЗА ЛЮБОЙ СЛУЧАЙНЫЙ, КОСВЕННЫЙ, ПОБОЧНЫЙ ИЛИ ДРУГИЕ ВИДЫ УЩЕРБА, ВКЛЮЧАЯ, ПОМИМО ПРОЧЕГО, УПУЩЕННЫЕ ДОХОДЫ, УПУЩЕННУЮ ВЫРУЧКУ, ПОТЕРЮ ДАННЫХ, НЕВОЗМОЖНОСТЬ ИСПОЛЬЗОВАНИЯ ПРОДУКТА ИЛИ ЛЮБОГО СВЯЗАННОГО С НИМ ОБОРУДОВАНИЯ, ПРОСТОИ И ПОТЕРЮ ВРЕМЕНИ ПОКУПАТЕЛЕМ В СВЯЗИ С ИСПОЛЬЗОВАНИЕМ ДАННОГО ПРОДУКТА, А ТАКЖЕ ОБОРУДОВАНИЯ ИЛИ ПРОГРАММНОГО ОБЕСПЕЧЕНИЯ, ВХОДЯЩЕГО В СОСТАВ ПРОДУКТА. В составе данного продукта имеется радиопередающее устройство. Согласно нормативному акту Экономической комиссии для стран Европы (UNECE) № 10 производители транспортных средств могут оговаривать определенные условия установки радиопередающих устройств в транспортные средства. Прежде чем устанавливать данный продукт в свой автомобиль, изучите руководство по эксплуатации автомобиля либо проконсультируйтесь с его производителем или продавцом. Вызовы экстренных служб Данная автомобильная гарнитура BLUETOOTH и подключенное к ней электронное устройство используют радиосигналы, сотовые и наземные сети, а также запрограммированные пользователем функции и не гарантируют стабильное подключение при любых условиях. Поэтому при необходимости совершить важный вызов (например, запросить экстренную медицинскую помощь) никогда не полагайтесь только на одно электронное устройство. Примечания касательно использования технологии BLUETOOTH Микроволны, излучаемые устройством BLUETOOTH, могут помешать работе медицинских электронных устройств. Находясь в указанных ниже местах, выключайте данный аппарат и другие устройства BLUETOOTH, так как использование таких устройств может привести к несчастным случаям. – Места, в которых присутствуют легко воспламеняющиеся газы, больницы, поезда, самолеты или автозаправочные станции. – Места рядом с автоматическими дверями или системами пожарной сигнализации. Данный аппарат поддерживает функции обеспечения безопасности, соответствующие стандарту BLUETOOTH и служащие для безопасного подключения с использованием технологии BLUETOOTH, причем уровень безопасности зависит от используемых настроек и может быть недостаточно высоким. При передаче информации с использованием беспроводной технологии BLUETOOTH соблюдайте осторожность. Компания Sony не несет ответственности за утечку информации, передаваемой с использованием технологии BLUETOOTH. В случае возникновения вопросов или проблем, касающихся данного устройства, которые не описаны в этом руководстве, обратитесь к ближайшему дилеру Sony. 3RU Содержание Справочник по деталям и органам управления . . . . . . . . . . . . . . . . . . . . . . 5 Начало работы Снятие передней панели . . . . . . . . . . . . . 6 Перезагрузка устройства . . . . . . . . . . . . . 7 Установка часов . . . . . . . . . . . . . . . . . . . . . 7 Подготовка устройства BLUETOOTH. . . . . 7 Подключение устройства USB . . . . . . . . 10 Подключение другого переносного аудиоустройства . . . . . . . . . . . . . . . . . . 11 Прослушивание радио Прослушивание радио . . . . . . . . . . . . . . . 11 Системы радиоданных (RDS) . . . . . . . . . 12 Воспроизведение Воспроизведение устройства USB. . . . . 13 Воспроизведение с устройства BLUETOOTH. . . . . . . . . . . . . . . . . . . . . . 14 Поиск и воспроизведение композиций . . . . . . . . . . . . . . . . . . . . . 15 Совершение телефонного звонка в режиме беспроводной гарнитуры (только через BLUETOOTH) Прием входящего вызова . . . . . . . . . . . . 16 Совершение вызова. . . . . . . . . . . . . . . . . 16 Операции, доступные во время вызова. . . . . . . . . . . . . . . . . . . . . . . . . . 17 Полезные функции Использование приложения Sony | Music Center с iPhone или смартфоном с ОС Android™ . . . . . . . . . . . . . . . . . . . . 18 Использование функции распознавания речи (только для смартфонов с ОС Android). . . . . . . . . . . . . . . . . . . . . . 20 Использование функции Siri Eyes Free . . . . . . . . . . . . . . . . . . . . . . . . . . . . 20 4RU Параметры Отмена режима DEMO . . . . . . . . . . . . . . . 21 Основные операции настройки параметров . . . . . . . . . . . . . . . . . . . . . . 21 Настройка общих параметров (GENERAL). . . . . . . . . . . . . . . . . . . . . . . . 21 Настройка звука (SOUND) . . . . . . . . . . . . 23 Настройка дисплея (DISPLAY). . . . . . . . . 24 Настройка BLUETOOTH (BLUETOOTH). . . 25 Настройка приложения Sony | Music Center (SONY APP) . . . . . . . . . . . . . . . . 25 Дополнительная информация Обновление микропрограммы . . . . . . . Меры предосторожности . . . . . . . . . . . . Уход за устройством . . . . . . . . . . . . . . . . Технические характеристики. . . . . . . . . Поиск и устранение неисправностей . . . . . . . . . . . . . . . . . Сообщения . . . . . . . . . . . . . . . . . . . . . . . . 26 26 27 27 29 33 Установка/подключение Внимание! . . . . . . . . . . . . . . . . . . . . . . . . . Перечень деталей для установки . . . . . Подключение . . . . . . . . . . . . . . . . . . . . . . Установка. . . . . . . . . . . . . . . . . . . . . . . . . . 36 36 37 40 Справочник по деталям и органам управления Основное устройство Кнопка снятия передней панели VOICE (стр. 17, 20) Нажмите дисковый регулятор и удерживайте его нажатым более 2 секунд, чтобы активировать функцию голосового набора номера, функцию распознавания речи (только для смартфонов с ОС Android) или функцию Siri (только для iPhone). SRC (источник) Включение питания. Смена источника сигнала. OFF Нажмите и удерживайте в течение 1 секунды для выключения источника и отображения часов. Нажмите и удерживайте более 2 секунд для выключения питания и дисплея. Дисковый регулятор Поворачивайте для регулирования уровня громкости. PUSH ENTER Открытие выбранного пункта меню. Чтобы выбрать другой источник сигнала, нажмите кнопку SRC, поверните дисковый регулятор, а затем нажмите его (время ожидания — 2 секунды). MENU Вход в меню настройки. Знак N Чтобы установить подключение по BLUETOOTH, коснитесь дискового регулятора смартфоном с ОС Android. Окошко дисплея / (SEEK –/+) Автоматическая настройка на радиостанции. Нажмите и удерживайте для настройки вручную. / (предыдущая/следующая) / (ускоренная перемотка назад/ускоренная перемотка вперед) PTY (тип программы) Выбор типа программы (PTY) в RDS. (обзор) (стр. 15) Переход в режим обзора при воспроизведении. (Недоступно, если подключено устройство USB в режиме Android или устройство iPod.) 5RU CALL Вход в меню вызовов. Прием и завершение вызова. Нажмите кнопку и удерживайте ее нажатой более 2 секунд, чтобы переключить сигнал BLUETOOTH. Снятие передней панели (назад) Возврат к предыдущему экрану. Во избежание кражи устройства можно снять с него переднюю панель. MODE (стр. 7, 11, 18) 1 Приемник сигналов с пульта дистанционного управления Номерные кнопки (1–6) Прием сохраненных в памяти радиостанций. Нажмите и удерживайте для сохранения станций. ALBUM / Пропуск альбома для аудиоустройства. Нажмите и удерживайте для непрерывного пропуска альбомов. (Недоступно, если подключено устройство USB в режиме Android или устройство iPod.) (повтор) (Недоступно, если подключено устройство USB в режиме Android.) (случайная последовательность) (Недоступно, если подключено устройство USB в режиме Android.) MIC (стр. 17) (воспроизведение/пауза) EXTRA BASS Усиление звучания басового звука пропорционально уровню громкости. Нажмите, чтобы изменить настройку EXTRA BASS: [1], [2], [OFF]. Входное гнездо AUX DSPL (дисплей) Нажмите, чтобы изменить отображаемые элементы. SCRL (прокрутка) Нажмите и удерживайте для прокрутки индикации. Порт USB 6RU Начало работы Нажмите и удерживайте кнопку OFF до тех пор, пока устройство не отключится. Нажмите кнопку снятия передней панели , а затем потяните панель на себя и снимите ее. Предупредительный звуковой сигнал Если до поворота выключателя зажигания в положение OFF с устройства не была снята передняя панель, то в течение нескольких секунд будет слышен предупредительный звуковой сигнал. Звуковой сигнал будет слышен, только если используется встроенный усилитель. Заводские номера Убедитесь, что заводские номера в нижней части аппарата и на задней части передней панели совпадают. Если они не совпадают, вам не удастся выполнять сопряжение по каналу BLUETOOTH, создавать и закрывать подключения с помощью технологии NFC. Установка передней панели Перезагрузка устройства Перед первым использованием устройства, после замены автомобильного аккумулятора или повторного подсоединения кабелей необходимо перезагрузить устройство. 1 Нажмите кнопки DSPL и (назад)/ MODE и удерживайте их нажатыми более 2 секунд. 3 Поворачивайте дисковый регулятор для установки значения часов и минут. Для выбора настраиваемого разряда используйте кнопки / (SEEK –/+). 4 После установки минут нажмите кнопку MENU. Установка завершена, после чего часы начнут отсчет времени. Примечание Для отображения часов Перезагрузка устройства приведет к удалению настроек часов и некоторых сохраненных элементов содержимого. нажмите кнопку DSPL. Установка страны/региона Подготовка устройства BLUETOOTH После перезагрузки устройства откроется меню настройки страны/региона. 1 При отображении [SET AREA] нажмите кнопку ENTER. Отобразится текущая страна или регион. 2 Поворачивая дисковый регулятор, выберите [EUROPE] или [RUSSIA], а затем нажмите дисковый регулятор. 3 Поворачивая дисковый регулятор, выберите [YES] или [NO], а затем нажмите дисковый регулятор. При изменении региона или страны устройство перезагрузится, после чего на дисплее отобразятся часы. Этот параметр можно настроить в меню общих параметров (стр. 21). Установка часов 1 Нажмите кнопку MENU, поверните дисковый регулятор для выбора [GENERAL], затем нажмите дисковый регулятор. 2 Поворачивая дисковый регулятор, выберите [SET CLOCK-ADJ], затем нажмите дисковый регулятор. Начнет мигать индикация часа. Вы можете слушать музыку или совершать телефонные звонки в режиме беспроводной гарнитуры в зависимости от того, какое устройство, совместимое с технологией BLUETOOTH, вы используете: смартфон, мобильный телефон или аудиоустройство (далее называемые “устройство BLUETOOTH”, если не указано иное). Сведения о том, как подключать устройства, см. в руководствах, поставляемых с этими устройствами. Прежде чем подключать устройство, уменьшите громкость на аппарате. В противном случае может раздаться громкий звук. Подключение к смартфону одним касанием (с помощью технологии NFC) Если вы коснетесь дискового регулятора смартфоном, совместимым с технологией NFC*, аппарат будет автоматически сопряжен со смартфоном и подключен к нему. * NFC — это технология, позволяющая использовать беспроводную связь на небольших расстояниях между различными устройствами, например мобильными телефонами и радиометками. Благодаря функции NFC можно легко обмениваться данными, просто касаясь соответствующего символа или специального места на устройстве, совместимом с технологией NFC. 7RU Если на смартфоне установлена ОС Android 4.0 или более ранней версии, необходимо загрузить приложение “NFC Easy Connect” из Google Play. В некоторых странах или регионах это приложение может быть недоступно. 1 Активируйте функцию NFC на смартфоне. Дополнительные сведения см. в руководствах, поставляемых со смартфонами. 2 Коснитесь области со знаком N на аппарате областью со знаком N на смартфоне. Убедитесь, что на дисплее аппарата включился индикатор . Отсоединение устройства с помощью NFC Еще раз коснитесь области со знаком N на аппарате областью со знаком N на смартфоне. Сопряжение с устройством BLUETOOTH и подключение к нему При первом подключении устройства BLUETOOTH необходимо выполнить взаимную регистрацию устройств (“сопряжение”). После сопряжения данный аппарат и другие устройства смогут распознавать друг друга. К аппарату можно подключить два устройства BLUETOOTH (два мобильных телефона или мобильный телефон и аудиоустройство). 1 Разместите устройство BLUETOOTH на расстоянии не более 1 м от данного аппарата. 2 Нажмите кнопку MENU. Поворачивая дисковый регулятор, выберите [BLUETOOTH], затем нажмите дисковый регулятор. 3 Поворачивая дисковый регулятор, выберите [SET PAIRING], а затем нажмите дисковый регулятор. 4 Поворачивая дисковый регулятор, выберите [SET DEVICE 1]* или [SET DEVICE 2]*, а затем нажмите дисковый регулятор. Примечания • При создании подключения обращайтесь со смартфоном аккуратно, чтобы не поцарапать его. • Вам не удастся создать подключение одним касанием, если аппарат уже подключен к двум устройствам, поддерживающим технологию NFC. В этом случае отключите каждое устройство и еще раз попытайтесь создать подключение к смартфону. мигает, когда аппарат находится в режиме ожидания сопряжения. * По завершении сопряжения вместо надписи [SET DEVICE 1] или [SET DEVICE 2] будет отображаться имя сопряженного устройства. 5 8RU Выполните сопряжение на устройстве BLUETOOTH, чтобы оно обнаружило аппарат. 6 Выберите пункт [DSX-A416BT], отображаемый на дисплее устройства BLUETOOTH. Если название модели вашего аппарата не отображается, повторите все операции, начиная с действия 2. Отключение сопряженного устройства Чтобы после сопряжения данного аппарата и устройства BLUETOOTH отключить их друг от друга, выполните действия 2–4. Подключение к сопряженному устройству BLUETOOTH 7 Если на устройстве BLUETOOTH необходимо ввести ключ доступа*, введите [0000]. * В зависимости от используемого устройства ключ доступа может называться “секретный код”, “ПИН-код”, “номер ПИН”, “пароль” и т. д. Чтобы использовать сопряженное устройство, необходимо создать подключение к аппарату. Некоторые сопряженные устройства подключаются автоматически. 1 Нажмите кнопку MENU. Поворачивая дисковый регулятор, выберите [BLUETOOTH], затем нажмите дисковый регулятор. 2 Поворачивая дисковый регулятор, выберите [SET BT SIGNL], а затем нажмите дисковый регулятор. Введите ключ доступа [0000] После удачного сопряжения будет отображаться значок . 8 Выберите данный аппарат на устройстве BLUETOOTH, чтобы создать подключение BLUETOOTH. или отображаются, если подключение создано. Примечание Во время подключения к устройству BLUETOOTH другому устройству не удастся обнаружить данный аппарат. Чтобы устройство смогло обнаружить аппарат, включите режим сопряжения и выполните поиск данного аппарата на другом устройстве. Включение функции воспроизведения Подробные сведения см. в разделе “Воспроизведение с устройства BLUETOOTH” (стр. 14). Убедитесь, что включен индикатор . 3 Активируйте функцию BLUETOOTH на устройстве BLUETOOTH. 4 Выполните необходимые действия на устройстве BLUETOOTH, чтобы подключить его к данному аппарату. или будет светиться. Значки на дисплее Отображается, когда можно совершить вызов в режиме беспроводной гарнитуры, включив профиль HFP (Handsfree Profile). Отображается, когда можно воспроизвести звук с аудиоустройства, включив профиль A2DP (Advanced Audio Distribution Profile). 9RU Подключение к устройству, которое было подключено к аппарату в прошлый раз 2 Активируйте функцию BLUETOOTH на устройстве BLUETOOTH. Чтобы подключить аппарат к аудиоустройству, нажмите кнопку SRC, выберите [BT AUDIO], а затем нажмите (воспроизведение/пауза). Чтобы подключить аппарат к мобильному телефону, нажмите CALL. Убедитесь, что на дисплее аппарата включился индикатор . Примечание При передаче потокового аудио по каналу BLUETOOTH вам не удастся подключиться с данного аппарата к мобильному телефону. Вместо этого подключитесь с мобильного телефона к аппарату. Совет Если на аппарате включен сигнал BLUETOOTH, то при включении зажигания аппарат автоматически подключится к мобильному телефону, к которому он был подключен в последний раз. Установка микрофона Подключите iPhone или iPod к порту USB. Примечания • Вам не удастся использовать функцию автоматического сопряжения по каналу BLUETOOTH, если аппарат уже подключен к двум устройствам BLUETOOTH. В этом случае отключите каждое устройство и еще раз попытайтесь создать подключение к iPhone или iPod. • Если не удается выполнить сопряжение с помощью функции автоматического сопряжения по каналу BLUETOOTH, выполните действия, указанные в разделе “Подготовка устройства BLUETOOTH” (стр. 7). Подробные сведения см. в разделе “Установка микрофона” (стр. 39). Подключение к iPhone или iPod (автоматическое сопряжение по каналу BLUETOOTH) При подключении устройства iPhone или iPod с iOS5 или более поздней версии к порту USB данный аппарат автоматически выполнит сопряжение с устройством iPhone или iPod. Чтобы включить функцию автоматического сопряжения по каналу BLUETOOTH, в разделе [BLUETOOTH] задайте для параметра [SET AUTOPAIR] значение [ON] (стр. 25). 1 Активируйте функцию BLUETOOTH на iPhone или iPod. 10RU Подключение устройства USB 1 2 Уменьшите громкость на аппарате. Подключите устройство USB к аппарату. Для подключения iPhone или iPod используйте кабель USB для iPod (не входит в комплект поставки). Подключение другого переносного аудиоустройства 1 Выключите переносное аудиоустройство. 2 3 Уменьшите громкость на аппарате. Подключите переносное аудиоустройство ко входному гнезду AUX (мини-стереоразъему) на аппарате при помощи соединительного кабеля (не входит в комплект поставки)*. * Обязательно используйте разъем прямого типа. 4 Прослушивание радио Прослушивание радио Для прослушивания радио нажмите кнопку SRC и выберите [TUNER]. Автоматическое сохранение (BTM) 1 Нажимая кнопку MODE, измените диапазон (FM1, FM2, FM3, MW или LW). 2 Нажмите кнопку MENU, поверните дисковый регулятор для выбора [GENERAL], затем нажмите дисковый регулятор. 3 Поворачивая дисковый регулятор, выберите [SET BTM], затем нажмите дисковый регулятор. Радиостанции закрепляются за номерными кнопками и сохраняются в памяти устройства в порядке частот. Нажимая кнопку SRC, выберите [AUX]. Выравнивание уровня громкости подключенного устройства по отношению к другим источникам сигналов Запустите воспроизведение на переносном аудиоустройстве с умеренной громкостью и установите на аппарате обычную громкость прослушивания. Нажмите кнопку MENU, затем выберите [SOUND] [SET AUX VOL] (стр. 23). Настройка 1 Нажимая кнопку MODE, измените диапазон (FM1, FM2, FM3, MW или LW). 2 Выполните настройку. Для настройки вручную Нажимая и удерживая кнопки / (SEEK –/+), задайте приблизительную частоту, затем кратковременными нажатиями кнопок / (SEEK –/+) точно настройте нужную частоту. Для автоматической настройки Используйте кнопки / (SEEK –/+). Поиск остановится, когда устройство найдет радиостанцию. 11RU Сохранение вручную 1 Во время приема радиостанции, которую необходимо сохранить, нажмите и удерживайте номерную кнопку (1–6), пока не появится индикация [MEM]. Прием радиостанций, сохраненных в памяти 1 Выберите диапазон, затем нажмите номерную кнопку (1–6). Системы радиоданных (RDS) Установка альтернативных частот (AF) и сообщений о текущей ситуации на дорогах (TA) Функция AF выполняет постоянную перенастройку радиостанций, имеющих самый сильный сигнал в сети, а функция TA обеспечивает прием сообщений или программ (TP) о текущей ситуации на дорогах, если их прием возможен. 1 Нажмите кнопку MENU, поверните дисковый регулятор для выбора [GENERAL], затем нажмите дисковый регулятор. 2 Поворачивая дисковый регулятор, выберите [SET AF/TA], затем нажмите дисковый регулятор. 3 Поворачивая дисковый регулятор, выберите [SET AF-ON], [SET TA-ON], [SET AF/TA-ON] или [SET AF/TA-OFF], затем нажмите дисковый регулятор. 12RU Для сохранения станций RDS с параметрами AF и TA Можно выполнить предварительную настройку станций RDS с параметрами AF/TA. Задайте AF/TA, затем сохраните станцию с помощью BTM или вручную. При выполнении предварительной настройки вручную можно также сохранить станции без RDS. Для приема экстренных сообщений При включении AF или TA экстренные сообщения будут автоматически прерывать текущее вещание. Для настройки громкости во время приема сообщения о текущей ситуации на дорогах Уровень громкости будет сохранен в памяти для последующего приема таких сообщений, независимо от обычного уровня громкости. Для прослушивания одной региональной программы (REGIONAL) Когда функции AF и REGIONAL включены, устройство не будет переключаться на другую региональную станцию с более сильной частотой. При выезде за пределы области приема определенной региональной программы задайте для параметра [SET REGIONAL] значение [SET REG-OFF] в меню настройки [GENERAL] во время приема FM-радиостанции (стр. 22). Эта функция не работает в Великобритании и некоторых других регионах. Функция местной привязки (только для Великобритании) Эта функция позволяет настраиваться на волну других местных станций в данном районе, даже если они не занесены в память приемника под номерными кнопками. Во время приема в диапазоне FM нажмите номерную кнопку (1–6), для которой запрограммирована местная станция. Не более чем через 5 секунд еще раз нажмите номерную кнопку местной станции. Повторяйте процедуру, пока не будет найдена местная радиостанция. Выбор типов программ (PTY) 1 Нажмите PTY во время приема в диапазоне FM. 2 Поворачивайте дисковый регулятор, пока не отобразится требуемый тип программы, затем нажмите дисковый регулятор. Устройство начнет поиск станции, передающей программу выбранного типа. Тип программ NEWS (Новости), AFFAIRS (Текущие события), INFO (Информация), SPORT (Спорт), EDUCATE (Образование), DRAMA (Драматические передачи), CULTURE (Культура), SCIENCE (Наука), VARIED (Разные темы), POP M (Попмузыка), ROCK M (Рок-музыка), EASY M (Дорожная музыка), LIGHT M (Легкая классическая музыка), CLASSICS (Серьезная классическая музыка), OTHER M (Прочая музыка), WEATHER (Погода), FINANCE (Финансы), CHILDREN (Программы для детей), SOCIAL (Общественная жизнь), RELIGION (Религия), PHONE IN (Передачи с телефонными звонками радиослушателей), TRAVEL (Путешествия), LEISURE (Досуг), JAZZ (Джазовая музыка), COUNTRY (Музыка в стиле “Кантри”), NATION M (Этническая музыка), OLDIES (Старая музыка), FOLK M (Фолк-музыка), DOCUMENT (Документальные передачи). Воспроизведение Воспроизведение устройства USB В данной инструкции по эксплуатации термин “iPod” применяется для обобщения ссылок на функции iPod в iPod и iPhone, если иное не сказано в тексте или на рисунке. Сведения о совместимости вашего устройства iPod см. в разделе “Сведения об устройстве iPod” (стр. 26) или на вебсайте поддержки, указанном на последней странице обложки. Могут использоваться устройства USB* типа AOA (Android Open Accessory) 2.0, MSC (запоминающее устройство большой емкости) и MTP (протокол передачи мультимедиа), совместимые со стандартом USB. В зависимости от типа используемого устройства USB на аппарате можно выбрать режим Android или MSC/MTP. Для некоторых моделей цифровых плееров или смартфонов с ОС Android может потребоваться режим MTP. * Например, флеш-накопитель USB, цифровой плеер, смартфон с ОС Android. Примечания Установка часов (CT) Данные CT, передаваемые с сигналами RDS, используются для установки часов устройства. 1 Установите [SET CT-ON] в положение [GENERAL] (стр. 22). • Для получения подробных сведений о совместимости устройства USB посетите вебсайт поддержки, указанный на задней стороне обложки. • Смартфоны с установленной ОС Android 4.1 или более поздней версии поддерживают Android Open Accessory 2.0 (AOA 2.0). Однако некоторые смартфоны могут не полностью поддерживать AOA 2.0, даже если установлена ОС Android 4.1 или более поздняя версия. Для получения подробных сведений о совместимости вашего смартфона с ОС Android посетите веб-сайт поддержки, указанный на задней стороне обложки. • Воспроизведение перечисленных ниже файлов не поддерживается. MP3/WMA/FLAC: – файлы, защищенные авторскими правами; – файлы с DRM (управление цифровыми правами); – многоканальные звуковые файлы. 13RU MP3/WMA: – файлы, сжатые без потери данных. Перед установкой соединения выберите режим USB (режим Android или MSC/MTP) в зависимости от типа используемого устройства USB (стр. 22). 1 Подключите устройство USB к порту USB (стр. 10). Начнется воспроизведение. Чтобы начать воспроизведение, если устройство уже подключено, нажмите кнопку SRC и выберите [USB] (после того как устройство iPod будет распознано, на дисплее отобразится [IPD]). 2 Воспроизведение с устройства BLUETOOTH Вы можете воспроизвести содержимое на подключенном устройстве, поддерживающем профиль BLUETOOTH A2DP (Advanced Audio Distribution Profile). 1 Чтобы выбрать необходимое аудиоустройство, нажмите кнопку MENU, затем выберите [BLUETOOTH] [SET AUDIODEV] (стр. 25). Отрегулируйте громкость на данном устройстве. Для остановки воспроизведения Создайте подключение BLUETOOTH к аудиоустройству (стр. 7). 2 Нажимая кнопку SRC, выберите [BT AUDIO]. Для удаления устройства 3 Остановите воспроизведение, затем удалите устройство. На аудиоустройстве включите функцию воспроизведения. 4 Отрегулируйте громкость на данном устройстве. Нажмите и удерживайте кнопку OFF в течение 1 секунды. Предупреждение касательно iPhone При подключении iPhone через интерфейс USB громкость телефонного вызова управляется устройством iPhone, а не аппаратом. Не увеличивайте громкость устройства во время телефонного разговора, так как при завершении разговора может раздаться громкий звук. Примечания • В зависимости от используемого аудиоустройства на данном аппарате могут не отображаться некоторые сведения, например название композиции, номер и продолжительность дорожки, а также состояние воспроизведения. • Если выбрать другой источник на аппарате, аудиоустройство не прекратит воспроизведение. • При работе приложения “Sony | Music Center” через функцию BLUETOOTH на экране не отображается надпись [BT AUDIO]. Выравнивание уровня громкости устройства BLUETOOTH по отношению к другим источникам сигналов Включите воспроизведение на аудиоустройстве BLUETOOTH с умеренной громкостью, а затем установите на аппарате обычную для вас громкость. Нажмите кнопку MENU, затем выберите [SOUND] [SET BTA VOL] (стр. 24). 14RU Поиск и воспроизведение композиций Повторное воспроизведение и воспроизведение в случайной последовательности Недоступно, если подключено устройство USB в режиме Android. 1 Чтобы выбрать нужный режим воспроизведения, во время воспроизведения нажмите кнопку (повтор) или (случайная последовательность) несколько раз. Воспроизведение в выбранном режиме может начаться не сразу. Доступные режимы воспроизведения отличаются в зависимости от выбранного источника звука. Поиск композиции по названию (Quick-BrowZer™) Для выхода из режима QuickBrowZer Нажмите кнопку (обзор). Поиск с пропуском элементов (режим перехода) Функция недоступна, если подключено устройство USB в режиме Android или устройство iPod. 1 В режиме воспроизведения USB нажмите (обзор). 2 3 Нажмите кнопку (SEEK +). Поверните дисковый регулятор, чтобы выбрать элемент. Переход в списке выполняется шагами по 10 % от общего количества элементов в списке. 4 Нажмите кнопку ENTER для возврата в режим Quick-BrowZer. Появится выбранный элемент. 5 Поворачивая дисковый регулятор, выберите требуемый элемент, а затем нажмите дисковый регулятор. Начнется воспроизведение. Функция недоступна, если подключено устройство USB в режиме Android или устройство iPod. 1 В режиме воспроизведения USB нажмите (обзор)*, чтобы отобразить список категорий поиска. Когда появится список композиций, нажимайте кнопку (назад), пока не отобразится нужная категория поиска. * Во время воспроизведения с устройства USB нажмите и удерживайте кнопку (обзор) более 2 секунд, чтобы вернуться непосредственно к началу списка категорий. 2 Поворачивая дисковый регулятор, выберите требуемую категорию поиска, затем нажмите дисковый регулятор для подтверждения. 3 Повторите шаг 2 для поиска требуемой композиции. Начнется воспроизведение. 15RU Совершение телефонного звонка в режиме беспроводной гарнитуры (только через BLUETOOTH) Чтобы использовать мобильный телефон, подключите его к данному аппарату. К аппарату можно подключить два мобильных телефона. Подробные сведения см. в разделе “Подготовка устройства BLUETOOTH” (стр. 7). 1 Нажмите кнопку CALL. Если к аппарату подключены два мобильных телефона, то поворачивая дисковый регулятор, выберите любой из телефонов, а затем нажмите дисковый регулятор. 2 Поворачивая дисковый регулятор, выберите [PHONE BOOK], а затем нажмите дисковый регулятор. 3 Поворачивая дисковый регулятор, выберите инициал в списке, а затем нажмите дисковый регулятор. 4 Поворачивая дисковый регулятор, выберите имя в списке, а затем нажмите дисковый регулятор. 5 При входящем звонке с мелодией вызова нажмите кнопку CALL. Поворачивая дисковый регулятор, выберите номер в списке, а затем нажмите дисковый регулятор. Начнется телефонный разговор. Начнется телефонный разговор. Прием входящего вызова 1 Совершение вызова из телефонной книги Примечание Мелодия вызова и голос вашего собеседника будут воспроизводиться только через передние громкоговорители. Отклонение вызова Нажмите и удерживайте кнопку OFF в течение 1 секунды. Совершение вызова из журнала вызовов 1 Если к аппарату подключены два мобильных телефона, то поворачивая дисковый регулятор, выберите любой из телефонов, а затем нажмите дисковый регулятор. Завершение вызова Нажмите кнопку CALL еще раз. 2 Совершение вызова Если к аппарату подключен мобильный телефон с поддержкой профиля PBAP (Phone Book Access Profile, профиль доступа к телефонной книге), вы можете совершить вызов из телефонной книги или журнала вызовов. Если к аппарату подключены два телефона, вы можете выбрать любой из телефонов. 16RU Нажмите кнопку CALL. Поворачивая дисковый регулятор, выберите [RECENT CALL], а затем нажмите дисковый регулятор. Отобразится список журнала вызовов. 3 Поворачивая дисковый регулятор, выберите имя или номер телефона в журнале вызовов, а затем нажмите дисковый регулятор. Начнется телефонный разговор. Совершение вызова путем ввода номера телефона 1 Нажмите кнопку CALL. Если к аппарату подключены два мобильных телефона, то поворачивая дисковый регулятор, выберите любой из телефонов, а затем нажмите дисковый регулятор. 2 Поворачивая дисковый регулятор, выберите [DIAL NUMBER], а затем нажмите дисковый регулятор. 3 Поверните дисковый регулятор, введите номер телефона, потом выберите [ ] (пробел), а затем нажмите ENTER*. Совершение вызова с помощью голосовых меток Вы можете совершить вызов, произнеся голосовую метку, хранящуюся в подключенном мобильном телефоне, который оснащен функцией голосового набора номера. 1 Если к аппарату подключены два мобильных телефона, то поворачивая дисковый регулятор, выберите любой из телефонов, а затем нажмите дисковый регулятор. 2 Начнется телефонный разговор. Примечание Совершение вызова путем повторного набора номера 1 Нажмите кнопку CALL. Если к аппарату подключены два мобильных телефона, то поворачивая дисковый регулятор, выберите любой из телефонов, а затем нажмите дисковый регулятор. 2 Поворачивая дисковый регулятор, выберите [REDIAL], а затем нажмите дисковый регулятор. Начнется телефонный разговор. Поворачивая дисковый регулятор, выберите [VOICE DIAL], а затем нажмите дисковый регулятор. Кроме того, вы можете нажать кнопку VOICE и удерживать ее нажатой более 2 секунд. * Для выбора настраиваемого разряда используйте кнопки / (SEEK –/+). На дисплее вместо символа [#] отобразится символ [_]. Нажмите кнопку CALL. 3 Произнесите голосовую метку, хранящуюся в мобильном телефоне. Ваша речь будет распознана, после чего будет совершен вызов. Отмена голосового набора номера Нажмите VOICE. Операции, доступные во время вызова Настройка громкости мелодии вызова При поступлении входящего вызова поверните дисковый регулятор. Настройка громкости голоса собеседника Во время телефонного разговора поверните дисковый регулятор. Настройка громкости для собеседника (настройка усиления сигнала с микрофона) Нажмите MIC. Можно использовать следующие настраиваемые уровни громкости: [MIC-LOW], [MIC-MID] и [MIC-HI]. 17RU Уменьшение уровня эхо и шума (режим Echo Canceler/Noise Canceler) Нажмите кнопку MIC и удерживайте ее нажатой. Вы можете выбрать следующие режимы: [EC/NC-1] и [EC/NC-2]. Переключение между режимом беспроводной гарнитуры и обычным режимом телефона Во время телефонного разговора с помощью кнопки MODE вы можете переключать звук между аппаратом и мобильным телефоном. Примечание Доступность этой операции зависит от используемой модели мобильного телефона. Полезные функции Использование приложения Sony | Music Center с iPhone или смартфоном с ОС Android™ Вам потребуется скачать последнюю версию приложения “Sony | Music Center” из App Store (для iPhone) или из Google Play (для смартфона с ОС Android). Примечания • Ради собственной безопасности соблюдайте местные законы и правила дорожного движения и не используйте это приложение во время вождения автомобиля. • “Sony | Music Center” — это приложение для управления совместимыми с ним аудиоустройствами Sony с помощью iPhone или смартфонов с ОС Android. • Перечень функций, которыми вы сможете управлять с помощью приложения “Sony | Music Center”, зависит от подключенного устройства. • Сведения о том, как использовать функции “Sony | Music Center”, см. на своем iPhone или смартфоне с ОС Android. • Дополнительные сведения о приложении “Sony | Music Center” см. по следующему URLадресу: http://www.sony.net/smcqa/ • Посетите указанный ниже веб-сайт и изучите список совместимых моделей iPhone и смартфонов с ОС Android. Для iPhone: посетите App Store. Для смартфонов с ОС Android: посетите Google Play. Подключение к приложению Sony | Music Center 1 Создайте подключение BLUETOOTH к iPhone или смартфону с ОС Android (стр. 7). Чтобы выбрать необходимое аудиоустройство, нажмите кнопку MENU, затем выберите [BLUETOOTH] [SET AUDIODEV] (стр. 25). 2 18RU Запустите приложение “Sony | Music Center”. 3 Нажмите кнопку MENU, поверните дисковый регулятор для выбора [SONY APP], затем нажмите дисковый регулятор. 4 Повернув дисковый регулятор, выберите [CONNECT], а затем нажмите дисковый регулятор. Начнется процесс подключения к iPhone или смартфону с ОС Android. Сведения о работе с iPhone или смартфоном с ОС Android см. в разделе “Справка” приложения. Если отображается номер устройства Убедитесь, что отображается номер устройства (например, 123456), затем выберите [Да] на iPhone или смартфоне с ОС Android. Завершение подключения 1 Нажмите кнопку MENU, поверните дисковый регулятор для выбора [SONY APP], затем нажмите дисковый регулятор. 2 Повернув дисковый регулятор, выберите [CONNECT], а затем нажмите дисковый регулятор. Выбор источника сигнала или приложения Вы можете выбрать необходимый источник сигнала или приложение на iPhone или смартфоне с ОС Android. Выбор источника сигнала Нажмите кнопку SRC несколько раз. Кроме того, можно нажать кнопку SRC, повернуть дисковый регулятор, выбрать требуемый источник, а затем нажать кнопку ENTER. Объявление SMS с помощью функции воспроизведения речи (только для смартфонов с ОС Android) При получении SMS система автоматически зачитывает его через громкоговорители автомобиля. Сведения о соответствующих параметрах см. в разделе “Справка” приложения. Ответ на SMS (только для смартфонов с ОС Android) Вы можете ответить на сообщение, нажав значок ответа. 1 Активируйте приложение “Sony | Music Center”, а затем нажмите значок [Reply] (ответ). В приложении “Sony | Music Center” отобразится экран ввода сообщения. 2 Произнесите ответ на сообщение, используя функцию распознавания речи. В приложении “Sony | Music Center” отобразится список адресатов сообщений. 3 Поворачивая дисковый регулятор, выберите необходимое сообщение, а затем нажмите дисковый регулятор. Сообщение будет отправлено. Настройка параметров звука и дисплея С помощью iPhone или смартфона с ОС Android вы можете настроить параметры, связанные со звуком и дисплеем. Сведения о соответствующих параметрах см. в разделе “Справка” приложения. Отображение списка источников сигналов Нажмите кнопку SRC. 19RU Использование функции распознавания речи (только для смартфонов с ОС Android) 1 2 Чтобы активировать функцию распознавания речи, нажмите и удерживайте кнопку VOICE. Произнесите необходимую голосовую команду в микрофон. Выключение функции распознавания речи 1 Активируйте функцию Siri на устройстве iPhone. Дополнительные сведения см. в руководстве, поставляемом с iPhone. 2 Нажмите кнопку VOICE и удерживайте ее нажатой более 2 секунд. Отобразится экран голосовых команд. 3 После того как iPhone издаст сигнал, произнесите команду в микрофон. iPhone издаст еще один сигнал, и Siri начнет отвечать. Выключение функции Siri Eyes Free Нажмите VOICE. Нажмите VOICE. Примечания Примечания • В некоторых случаях функция распознавания речи может быть недоступна. • Функция распознавания речи может работать неправильно. Качество работы этой функции зависит от подключенного смартфона с ОС Android. • Используйте функцию при минимальном уровне шума (например, шума от двигателя). Использование функции Siri Eyes Free Благодаря функции Siri Eyes Free вы можете использовать iPhone в режиме беспроводной гарнитуры, просто произнося необходимые фразы в микрофон. Чтобы использовать эту функцию, вам потребуется подключить iPhone к данному аппарату через BLUETOOTH. Эта функция доступна на iPhone 4s и более новых моделях iPhone. Убедитесь, что на вашем iPhone используется последняя версия iOS. Прежде чем выполнять описанные ниже действия, необходимо выполнить регистрацию по каналу BLUETOOTH и настроить подключение iPhone к данному аппарату. Подробные сведения см. в разделе “Подготовка устройства BLUETOOTH” (стр. 7). Чтобы выбрать необходимое устройство iPhone, нажмите кнопку MENU, затем выберите [BLUETOOTH] [SET AUDIODEV] (стр. 25). 20RU • Устройство iPhone может не распознать вашу речь, так как качество распознавания речи зависит от условий, в которых оно используется. (Например, вы находитесь в движущемся автомобиле.) • В расположениях с плохим сигналом для iPhone функция Siri Eyes Free может работать неправильно или с большими задержками. • В зависимости от условий использования устройства iPhone функция Siri Eyes Free может работать неправильно или завершить свою работу. • Если вы воспроизводите музыкальную дорожку с iPhone, используя аудиоподключение BLUETOOTH, то когда начнется воспроизведение дорожки через BLUETOOTH, функция Siri Eyes Free автоматически завершит свою работу, и данный аппарат переключится на аудиоисточник BLUETOOTH. • Если включить функцию Siri Eyes Free во время воспроизведения аудио, то данный аппарат может переключиться на аудиоисточник BLUETOOTH, даже если вы не указали дорожу, которую необходимо воспроизвести. • При подключении iPhone к порту USB функция Siri Eyes Free может работать неправильно или завершить свою работу. • При подключении iPhone к данному аппарату через USB не включайте Siri на iPhone. Функция Siri Eyes Free может работать неправильно или завершить свою работу. • Если функция Siri Eyes Free активирована, аудио не будет воспроизводиться. Для возврата к предыдущему дисплею Параметры Отмена режима DEMO Можно выйти из демонстрационного режима, который запускается при отключении источника, и отображать часы. 1 Нажмите кнопку MENU, поверните дисковый регулятор для выбора [GENERAL], затем нажмите дисковый регулятор. 2 Поворачивая дисковый регулятор, выберите [SET DEMO], затем нажмите дисковый регулятор. 3 Поворачивая дисковый регулятор, выберите [SET DEMO-OFF], а затем нажмите дисковый регулятор. 4 (назад). Настройка общих параметров (GENERAL) AREA (регион) Установка страны/региона, где будет использоваться устройство: [EUROPE], [RUSSIA]. При изменении текущего региона или страны устройство перезагрузится, после чего на дисплее отобразятся часы. (Доступно только при выключенном источнике, когда отображаются часы.) Настройка завершена. DEMO (демонстрация) Включение режима демонстрации: [ON], [OFF]. Дважды нажмите кнопку (назад). CLOCK-ADJ (установка часов) (стр. 7) Дисплей вернется в режим обычного приема/воспроизведения. Основные операции настройки параметров Настройка элементов выполняется по таким категориям: настройка общих параметров (GENERAL), настройка звука (SOUND), настройка дисплея (DISPLAY), настройка BLUETOOTH (BLUETOOTH), настройка приложения Sony | Music Center (SONY APP). 1 2 Нажмите кнопку Нажмите кнопку MENU. Поворачивая дисковый регулятор, выберите категорию настройки, а затем нажмите дисковый регулятор. CAUT ALM (предупредительный звуковой сигнал) Включение предупредительного звукового сигнала: [ON], [OFF] (стр. 6). (Доступно только при выключенном источнике, когда отображаются часы.) BEEP (звуковой сигнал) Активизация звукового сигнала: [ON], [OFF]. AUTO OFF (автоматическое отключение) Автоматическое отключение через определенное время, если устройство выключено и отображаются часы (нажмите и удерживайте кнопку OFF в течение 1 секунды): [ON] (30 минут), [OFF]. Настраиваемые элементы отличаются в зависимости от источника и параметров. 3 Поворачивая дисковый регулятор, выберите параметры, а затем нажмите дисковый регулятор. 21RU STEERING (управление на руле) Регистрация/изменение настройки пульта дистанционного управления на руле. (Доступно только при выключенном источнике, когда отображаются часы.) STR CONTROL (пульт дистанционного управления на руле) Выбор режима ввода подключенного пульта дистанционного управления. Во избежание неисправностей перед использованием подберите соответствующий режим ввода для подключенного пульта дистанционного управления. CUSTOM (специальный) Режим ввода для пульта дистанционного управления на руле. PRESET (стандартный) Режим ввода для проводного пульта дистанционного управления за исключением пульта дистанционного управления на руле (выбирается автоматически при выполнении [RESET CUSTOM]). EDIT CUSTOM (настройка специального режима) Регистрация функций (SOURCE, ATT, VOL +/–, SEEK +/–, VOICE, ON HOOK и OFF HOOK) для пульта дистанционного управления на руле: Поворачивая дисковый регулятор, выберите функцию, которую нужно назначить для пульта дистанционного управления на руле, а затем нажмите дисковый регулятор. При мигающем сообщении [REGISTER] нажмите и удерживайте кнопку на пульте дистанционного управления на руле, которой требуется назначить функцию. По завершении регистрации отобразится [REGISTERED]. Для регистрации других функций повторите действия и . (Доступно, только если значение параметра [STR CONTROL] установлено на [CUSTOM].) 22RU RESET CUSTOM (сброс специальных настроек) Изменение настроек пульта дистанционного управления на руле: [YES], [NO]. (Доступно, только если значение параметра [STR CONTROL] установлено на [CUSTOM].) Примечания • Во время изменения настроек доступно только кнопочное управление на данном устройстве. В целях безопасности остановите автомобиль перед изменением этих настроек. • Если во время регистрации произойдет ошибка, вся ранее зарегистрированная информация сохранится. Выполните процедуру регистрации заново, начиная с той функции, где произошла ошибка. • Эта функция может быть недоступна в некоторых транспортных средствах. Для получения подробных сведений о совместимости вашего транспортного средства посетите веб-сайт поддержки, указанный на задней стороне обложки. USB MODE (режим USB) Изменение режима USB: [ANDROID], [MSC/MTP]. (Доступно, только когда выбран источник USB.) CT (время на часах) Включение функции CT: [ON], [OFF]. AF/TA (альтернативные частоты/ сообщения о текущей ситуации на дорогах) Включение/отключение альтернативных частот (AF) и сообщений о текущей ситуации на дорогах (TA): [AF-ON], [TA-ON], [AF/TA-ON], [AF/TA-OFF]. REGIONAL (региональные частоты) Прием ограничивается определенным регионом: [ON], [OFF]. (Доступно только при приеме FM.) BTM (память оптимальной настройки) (стр. 11) (Доступно, только когда выбран тюнер.) FIRMWARE (микропрограмма) (Доступно только при выключенном источнике, когда отображаются часы.) Проверка/обновление версии микропрограммы. Подробные сведения можно найти на веб-сайте, указанный на задней стороне обложки. FW VERSION (версия микропрограммы) Отображение текущей версии микропрограммы. FW UPDATE (обновление микропрограммы) Запуск обновления микропрограммы: [YES], [NO]. Обновление микропрограммы занимает несколько минут. Во время обновления не поворачивайте выключатель зажигания в положение OFF и не отсоединяйте используемое устройство USB. Настройка звука (SOUND) Это меню настроек недоступно при выключенном источнике, когда отображаются часы. EQ10 PRESET (выбор настроек эквалайзера EQ10) Выбор кривой эквалайзера из 10 кривых эквалайзера или выключение эквалайзера: [OFF], [R&B], [ROCK], [POP], [HIP-HOP], [EDM], [JAZZ], [SOUL], [COUNTRY], [KARAOKE]*, [CUSTOM]. Выбранную для каждого источника кривую эквалайзера можно занести в память. * При выборе [KARAOKE] звук вокала во время воспроизведения приглушается, но не устраняется полностью. Использование микрофона не поддерживается. EQ10 CUSTOM (специальные настройки эквалайзера EQ10) Выбор варианта [CUSTOM] для EQ10. Настройка кривой эквалайзера: [BAND1] – [BAND10] (32 Гц, 63 Гц, 125 Гц, 250 Гц, 500 Гц, 1 кГц, 2 кГц, 4 кГц, 8 кГц, 16 кГц). Уровень громкости настраивается в диапазоне от –6 дБ до +6 дБ с шагом 1 дБ. BALANCE (баланс) Регулировка звукового баланса: [RIGHT-15] – [CENTER] – [LEFT-15]. FADER (распределение сигнала) Регулировка относительного уровня: [FRONT-15] – [CENTER] – [REAR-15]. S.WOOFER (сабвуфер) SW LEVEL (уровень сабвуфера) Регулировка уровня громкости сабвуфера: [+6 dB] – [0 dB] – [-6 dB]. ([ATT] отображается, если установлено минимальное значение.) SW PHASE (фаза сабвуфера) Выбор фазы сабвуфера: [SUB NORM], [SUB REV]. LPF FREQ (частота фильтра низких частот) Выбор граничной частоты сабвуфера: [80Hz], [100Hz], [120Hz]. HPF FREQ (частота фильтра высоких частот) Выбор значения граничной частоты передних/задних громкоговорителей: [OFF], [80Hz], [100Hz], [120Hz]. AUX VOL (уровень громкости AUX) Настройка уровня громкости каждого подсоединенного дополнительного устройства: [+18 dB] – [0 dB] – [-8 dB]. Эта настройка исключает необходимость регулировки громкости для разных источников. (Доступно, только когда выбран источник AUX.) 23RU BTA VOL (уровень громкости звука устройства BLUETOOTH) Настройка уровня громкости для каждого подключенного устройства BLUETOOTH: [+6 dB] – [0 dB] – [-6 dB]. Эта настройка исключает необходимость регулировки громкости для разных источников. (Доступно, только когда выбрано аудиоустройство BT или приложение.) Настройка дисплея (DISPLAY) DIMMER (регулировка подсветки) Изменение яркости дисплея: [OFF], [ON], [AT] (автоматически), [CLK] (часы). (Режим [AT] доступен только тогда, когда подключен провод управления освещением, и работает, когда включены передние фары.) Чтобы эта функция была активна только в течение определенного времени, выберите [CLK], а затем задайте время начала и окончания. – Чтобы задать яркость при включенном диммере: Установите для [DIMMER] значение [ON] и отрегулируйте [BRIGHTNESS]. – Чтобы задать яркость при выключенном диммере: Установите для [DIMMER] значение [OFF] и отрегулируйте [BRIGHTNESS]. Настройка яркости сохраняется и применяется при включении или выключении диммера. BRIGHTNESS (яркость) Регулировка яркости дисплея. Настраиваемый диапазон уровня яркости: [1] – [10]. 24RU BUTTON-C (цвет кнопок) Выбор предварительно настроенного или пользовательского цвета для кнопок. COLOR (цвет) Выбор из 15 предварительно настроенных цветов и 1 пользовательского цвета. CUSTOM-C (пользовательский цвет) Настройка пользовательского цвета для кнопок. RGB RED, RGB GRN, RGB BLUE Настройка цветового диапазона: [0] – [32] (значение [0] не используется ни для каких диапазонов цветов). DSPL-C (цвет дисплея) Настройка предварительно настроенного или пользовательского цвета для дисплея. COLOR (цвет) Выбор из 15 предварительно настроенных цветов и 1 пользовательского цвета. CUSTOM-C (пользовательский цвет) Настройка пользовательского цвета для дисплея. RGB RED, RGB GRN, RGB BLUE Настройка цветового диапазона: [0] – [32] (значение [0] не используется ни для каких диапазонов цветов). SND SYNC (синхронизация по звуку) Включение синхронизации подсветки со звуком: [ON], [OFF]. AUTO SCR (автоматическая прокрутка) Автоматическая прокрутка длинных элементов: [ON], [OFF]. (Недоступно, если выбран источник AUX или тюнер.) Настройка BLUETOOTH (BLUETOOTH) PAIRING (сопряжение) (стр. 8) Подключение до двух устройств BLUETOOTH: [DEVICE 1], [DEVICE 2]. По завершении сопряжения вместо надписи [DEVICE 1] или [DEVICE 2] будет отображаться имя сопряженного устройства. AUDIODEV (аудиоустройство) Выбор аудиоустройства. На аппарате, сопряженном с устройством [DEVICE 1] или текущим аудиоустройством, совместимым с профилем A2DP, отображается символ [*]. RINGTONE (мелодия вызова) Выбор устройства, на котором должна звучать мелодия вызова (аппарат или подключенный мобильный телефон): [1] — аппарат, [2] — мобильный телефон. AUTO ANS (автоматический ответ) Настройка аппарата для автоматического ответа на входящие вызовы: [OFF], [1] — с задержкой приблизительно 3 секунды, [2] — с задержкой приблизительно 10 секунд. BT INIT (инициализация BLUETOOTH) Инициализация всех настроек, связанных с BLUETOOTH (сведения о сопряжении, сведения об устройстве и т. д.): [YES], [NO]. При утилизации данного аппарата выполните инициализацию всех настроек. (Доступно только при выключенном источнике, когда отображаются часы.) Настройка приложения Sony | Music Center (SONY APP) AUTO LAUNCH (автоматический запуск) Включение автоматического запуска приложения “Sony | Music Center”: [ON], [OFF]. Если выбрано значение [ON], приложение “Sony | Music Center” автоматически установит подключение по завершении подключения BLUETOOTH. CONNECT (подключение) Включение и выключение функции подключения “Sony | Music Center”. AUTOPAIR (автоматическое сопряжение) Автоматический запуск сопряжения по BLUETOOTH при подключении устройства с iOS 5.0 или более поздней версии через USB: [ON], [OFF]. BT SIGNL (сигнал BLUETOOTH) (стр. 9) Включение или выключение функции BLUETOOTH. 25RU Сведения об устройстве iPod Дополнительная информация Обновление микропрограммы Чтобы обновить микропрограмму, перейдите на веб-сайт технической поддержки, указанный на задней обложке, а затем следуйте указаниям в Интернете. • К данному аппарату можно подключать указанные ниже модели iPod. Перед использованием устройства iPod установите на нем программное обеспечение последней версии. Совместимые модели iPhone и iPod Совместимая модель Bluetooth® USB iPhone X Примечание iPhone 8 Во время обновления не отсоединяйте используемое устройство USB. iPhone 8 Plus iPhone 7 iPhone 7 Plus iPhone SE iPhone 6s iPhone 6s Plus iPhone 6 iPhone 6 Plus iPhone 5s iPhone 5c iPhone 5 iPhone 4s iPod touch (6-го поколения) iPod touch (5-го поколения) Меры предосторожности • Не оставляйте переднюю панель или аудиоустройства на приборной панели. • При включении устройства автоматически выдвигается антенна с электрическим приводом. • Не проливайте жидкости на устройство. Порядок воспроизведения аудиофайлов Папка (альбом) Аудиофайл (композиция) iPod nano (7-го поколения) • Использование значка “Изготовлено для Apple” означает, что аксессуар разработан специально для подключения к продуктам Apple, указанным в значке, и сертифицирован разработчиком на соответствие стандартам качества Apple. Apple не несет ответственности за работу этого устройства или его соответствие стандартам безопасности и нормативным требованиям. Обратите внимание, что использование этого аксессуара с продуктом Apple может повлиять на качество работы беспроводной сети. 26RU В случае возникновения вопросов или проблем, касающихся данного устройства, которые не описаны в этом руководстве, обратитесь к ближайшему дилеру Sony. Технические характеристики Тюнер Уход за устройством Чистка контактов Не прикасайтесь к контактам напрямую. Возможно, устройство не будет работать надлежащим образом из-за загрязнения контактов, служащих для соединения передней панели с устройством. Во избежание этого отсоедините переднюю панель (стр. 6) и протрите контакты ватным тампоном. Не прикладывайте излишних усилий. В противном случае можно повредить контакты. FM Диапазон настройки: Для параметра [AREA] задано значение [EUROPE]: 87,5 МГц – 108,0 МГц Для параметра [AREA] задано значение [RUSSIA]: FM1/FM2: 87,5 МГц – 108,0 МГц (с шагом 50 кГц) FM3: 65 МГц – 74 МГц (с шагом 30 кГц) Используемая чувствительность: 8 дБф Отношение “сигнал-шум”: 73 дБ Разделение: 50 дБ при 1 кГц MW/LW Диапазон настройки: MW: 531 кГц – 1602 кГц LW: 153 кГц – 279 кГц Чувствительность: MW: 26 мкВ, LW: 50 мкВ Примечание Проигрыватель USB В целях безопасности не снимайте переднюю панель во время вождения автомобиля. Интерфейс: USB (полноскоростной) Максимальная сила тока: 1 A Максимальное количество распознаваемых папок и файлов: папок (альбомов): 256 файлов (композиций): 256 Совместимая версия протокола Android Open Accessory (AOA): 2.0 Соответствующий кодек: MP3 (.mp3) Скорость передачи данных: 8 Кбит/с – 320 Кбит/с (поддержка VBR (переменная скорость передачи данных)) Частота дискретизации: 16 кГц – 48 кГц WMA (.wma) Скорость передачи данных: 32 Кбит/с – 192 Кбит/с (поддержка VBR (переменная скорость передачи данных)) Частота дискретизации: 32 кГц, 44,1 кГц, 48 кГц 27RU FLAC (.flac) Разрядность: 16 бит, 24 бит Частота дискретизации: 44,1 кГц, 48 кГц Поддерживаемая файловая система: FAT16, FAT32 Беспроводная связь Система связи: стандарт BLUETOOTH версии 3.0 Выход: стандарт BLUETOOTH, класс мощности 2 (макс. +1 дБм) Максимальная дальность связи: в пределах прямой видимости: прибл. 10 м*1 Диапазон частот: диапазон 2,4 ГГц (от 2,4000 ГГц до 2,4835 ГГц) Метод модуляции: FHSS Совместимые профили BLUETOOTH*2: A2DP (Advanced Audio Distribution Profile) 1.3 AVRCP (Audio Video Remote Control Profile) 1.3 HFP (Handsfree Profile) 1.6 PBAP (Phone Book Access Profile) SPP (Serial Port Profile) Соответствующий кодек: SBC (.sbc), AAC (.m4a) *1 Фактическая дальность связи зависит от различных факторов, например от препятствий между устройствами, магнитных полей вокруг микроволновых печей, статического электричества, чувствительности приемника, эффективности антенны, операционной системы, программного приложения и т. д. *2 Стандартные профили BLUETOOTH указывают на цель обмена данными по протоколу BLUETOOTH между устройствами. Подключение по NFC Общая информация Требования к источнику питания: автомобильный аккумулятор 12 В постоянного тока (с отрицательным заземлением) Номинальный ток: 10 A Размеры: прибл. 178 мм × 50 мм × 177 мм (ш/в/г) Монтажные размеры: прибл. 182 мм × 53 мм × 160 мм (ш/в/г) Масса: прибл. 0,8 кг Комплект поставки: Основное устройство (1) Микрофон (1) Детали для установки и подключений (1 комплект) Обратитесь к дилеру для получения подробной информации. Конструкция и характеристики могут изменяться без предварительного уведомления. Транспортировать в оригинальной упаковке, во время транспортировки не бросать, оберегать от падений, ударов, не подвергать излишней вибрации. Реализацию осуществлять в соответствии с действующими требованиями законодательства. Отслужившее изделие утилизировать в соответствии с действующими требованиями законодательства. Если неисправность не удается устранить следуя данной инструкции – обратитесь в ближайший авторизованный SONY центр по ремонту и обслуживанию. Диапазон частот: 13,56 МГц Усилитель мощности Выход: выходы громкоговорителей Полное сопротивление громкоговорителей: 4 Ω – 8 Ω Максимальная выходная мощность: 55 Вт × 4 (при сопротивлении 4 Ω) Авторские права Словесный товарный знак и логотипы Bluetooth® являются зарегистрированными товарными знаками корпорации Bluetooth SIG, Inc. и используются Sony Corporation по лицензии. Другие товарные знаки и торговые названия принадлежат соответствующим владельцам. Знак N является товарным знаком или зарегистрированным товарным знаком NFC Forum, Inc. в США и других странах. 28RU Windows Media является товарным знаком или зарегистрированным товарным знаком корпорации Microsoft Corporation в США и/или других странах. Данное изделие защищено определенными правами интеллектуальной собственности Microsoft Corporation. Использование или распространение подобной технологии, кроме как в данном продукте, без лицензии корпорации Microsoft или авторизованного представительства корпорации Microsoft запрещено. Apple, iPhone, iPod, iPod nano, iPod touch и Siri являются товарными знаками Apple Inc., зарегистрированными в США и других странах. App Store является знаком обслуживания компании Apple Inc. IOS является товарным знаком или зарегистрированным товарным знаком компании Cisco в США и других странах, который используется в соответствии с лицензией. Google, Google Play и Android являются товарными знаками корпорации Google LLC. libFLAC Авторское право (C) 2000–2009 гг. Джош Коалсон Авторское право (C) 2011-2013 гг. Xiph.Org Foundation Распространение и использование в исходных и двоичных формах с изменениями и без них разрешается при выполнении следующих условий: – В распространяемом исходном коде должно сохраниться указанное выше уведомление об авторских правах, данный список условий и следующее заявление об отказе от гарантий. – Распространяемые в двоичной форме файлы должны сохранить указанное выше уведомление об авторских правах, данный список условий и следующее заявление об отказе от гарантий в документации и/или других материалах, предоставляемых с распространяемым пакетом. – Имя фонда Xiph.org Foundation и имена участников фонда нельзя использовать для поощрения или продвижения продуктов, созданных на основе этого программного обеспечения без предварительного письменного разрешения. ДАННОЕ ПРОГРАММНОЕ ОБЕСПЕЧЕНИЕ ПРЕДОСТАВЛЯЕТСЯ ДЕРЖАТЕЛЯМИ АВТОРСКИХ ПРАВ И УЧАСТНИКАМ “КАК ЕСТЬ”. ПРИ ЭТОМ НЕ ПРЕДОСТАВЛЯЮТСЯ НИКАКИЕ ГАРАНТИИ, ЯВНЫЕ ИЛИ ПОДРАЗУМЕВАЕМЫЕ, В ТОМ ЧИСЛЕ ПОДРАЗУМЕВАЕМЫЕ ГАРАНТИИ КОММЕРЧЕСКОЙ ПРИГОДНОСТИ И ПРИГОДНОСТИ ДЛЯ ОПРЕДЕЛЕННОЙ ЦЕЛИ. НИ ПРИ КАКИХ ОБСТОЯТЕЛЬСТВАХ ФОНД ИЛИ УЧАСТНИКИ ФОНДА НЕ БУДУТ НЕСТИ ОТВЕТСТВЕННОСТЬ ЗА ЛЮБЫЕ ПРЯМЫЕ, КОСВЕННЫЕ, СЛУЧАЙНЫЕ, СПЕЦИАЛЬНЫЕ, ПРИСУЖДЕННЫЕ В ПОРЯДКЕ НАКАЗАНИЯ ИЛИ ПОСЛЕДУЮЩИЕ УБЫТКИ (В ТОМ ЧИСЛЕ ПРИОБРЕТЕНИЕ ТОВАРОВ ИЛИ УСЛУГ ДЛЯ ЗАМЕНЫ, ПОТЕРЯ ПРИГОДНОСТИ, ДАННЫХ ИЛИ ПРИБЫЛИ, ПРЕРЫВАНИЕ ДЕЯТЕЛЬНОСТИ), ВОЗНИКШИЕ ПО ЛЮБОЙ ПРИЧИНЕ, И ЗА ЛЮБЫЕ ОБЯЗАТЕЛЬСТВА, КАК КОНТРАКТНЫЕ, СТРОГИЕ ИЛИ ДЕЛИКАТНЫЕ (ВКЛЮЧАЯ ХАЛАТНОСТЬ И Т. Д.), КОТОРЫЕ ВОЗНИКЛИ ПРИ ЛЮБОМ ИСПОЛЬЗОВАНИИ ЭТОГО ПРОГРАММНОГО ОБЕСПЕЧЕНИЯ, ДАЖЕ ЕСЛИ БЫЛО СООБЩЕНО О ВОЗМОЖНОСТИ ПОДОБНОГО УЩЕРБА. Поиск и устранение неисправностей Приводимый ниже проверочный перечень поможет устранить большинство проблем, которые могут возникнуть при эксплуатации устройства. Перед ознакомлением с нижеприведенной таблицей обратитесь к разделам по подключению и эксплуатации устройства. Для получения дополнительных сведений о применении предохранителя, а также извлечении устройства из приборной панели см. “Установка/ подключение” (стр. 36). Если неполадку не удалось устранить, посетите веб-сайт поддержки, указанный на задней стороне обложки. Общая информация Звук отсутствует или очень тихий. Регулятор фейдера [FADER] не установлен для системы с 2 громкоговорителями. Очень низкий уровень громкости данного устройства и/или подключенного устройства. – Увеличьте громкость данного устройства и подключенного устройства. Не слышен звуковой сигнал. Подключен дополнительный усилитель мощности, а встроенный не используется. 29RU Из памяти удалены запрограммированные радиостанции и установка времени. Перегорел предохранитель. Слышен шум при переключении положения ключа зажигания. Провода неправильно подсоединены к разъему электропитания вспомогательного оборудования автомобиля. Во время воспроизведения или приема начинается демонстрация. Если при включенном демонстрационном режиме [DEMO-ON] в течение 5 минут не выполняются никакие операции, начинается демонстрация. – Установите значение [DEMO-OFF] (стр. 21). Пропала/не отображается индикация в окошке дисплея. Контакты загрязнены (стр. 27). Дисплей/подсветка мигает. Недостаточная подача питания. – Убедитесь, что на устройство подается достаточно питания от автомобильного аккумулятора. (Требование к источнику питания: 12 В постоянного тока.) Не работают кнопки управления. Нажмите и удерживайте кнопки DSPL и (назад)/MODE более 2 секунд, чтобы перезагрузить устройство. Содержимое памяти будет удалено. Прием радиостанций Слабый радиосигнал. Статический шум. Проверьте подсоединение антенны. В диапазоне FM3 не удастся настроить частоты 65 МГц – 74 МГц. Для [AREA] выбрано [EUROPE]. – Установите для [AREA] значение [RUSSIA] (стр. 21). 30RU RDS Не удается принять услуги RDS (когда для параметра [AREA] задано значение [RUSSIA]). Выбран диапазон FM3. – Выберите FM1 или FM2. Услуги RDS недоступны в данном регионе. После нескольких секунд прослушивания включается функция SEEK. Станция не передает данные TP или передает слишком слабый сигнал. – Отключите TA (стр. 12). Дорожные сообщения не передаются. Включите TA (стр. 12). Станция не транслирует дорожных сообщений, хотя и относится к типу TP. – Настройтесь на другую станцию. При включении функции PTY отображается индикация [- - - - - - - -]. Принимаемая станция не передает данные RDS, или слабый радиосигнал. Название программной услуги мигает. Для выбранной в данный момент станции не используется альтернативная частота. – Нажмите кнопку (SEEK –/+), пока мигает название программной услуги. Появится индикация [PI SEEK], и устройство начнет поиск другой частоты с такими же данными PI (программная идентификация). Воспроизведение с устройства USB Устройство USB требует больше времени для воспроизведения. Устройство USB содержит файлы со сложной разветвленной структурой папок. Не удается воспроизвести аудиофайл. Сведения о поддерживаемых форматах см. в разделе “Технические характеристики” (стр. 27). Если аудиофайл по-прежнему не воспроизводится, см. руководство к устройству USB или обратитесь к производителю устройства. Не удается выполнить операции пропуска альбома, пропуска элементов (режим перехода) и поиска композиции по названию (QuickBrowZer). Для параметра [USB MODE] установите значение [MSC/MTP] (стр. 22). В режиме Android звук с аппарата не воспроизводится. Проверьте состояние приложения для воспроизведения аудио на смартфоне с ОС Android. Функция NFC Не удается выполнить подключение одним касанием (с использованием функции NFC). Если смартфон не реагирует на касание, выполните указанные ниже действия. – Проверьте, включена ли функция NFC на смартфоне. – Еще больше приблизьте область со знаком N на смартфоне к области со знаком N на данном аппарате. – Если смартфон в чехле, снимите чехол. Чувствительность приемника NFC зависит от конкретного устройства. Если несколько раз не удается создать подключение к смартфону одним касанием, создайте подключение BLUETOOTH вручную. Функция BLUETOOTH Подключаемому устройству не удается обнаружить данный аппарат. Чтобы выполнить сопряжение, переведите аппарат в режим ожидания сопряжения. Когда аппарат подключен к двум устройствам BLUETOOTH, другому устройству не удастся обнаружить его. – Закройте все подключения и выполните поиск данного аппарата на другом устройстве. После выполнения сопряжения с устройством включите выходной сигнал BLUETOOTH (стр. 9). Не удается создать подключение. Подключением управляет одна из сторон (данный аппарат или устройство BLUETOOTH), но не обе одновременно. – Подключайтесь к аппарату с устройства BLUETOOTH или наоборот. Не отображается имя обнаруженного устройства. В зависимости от состояния другого устройства, возможно, не удастся получить его имя. Отсутствует мелодия вызова. При поступлении входящего вызова настройте громкость, поворачивая дисковый регулятор. В зависимости от подключенного устройства мелодия вызова может отправляться неправильно. – Задайте для параметра [RINGTONE] значение [1] (стр. 25). Передние громкоговорители не подключены к данному аппарату. – Подключите передние громкоговорители к аппарату. Мелодия вызова воспроизводится только через передние громкоговорители. Не слышно собеседника. Передние громкоговорители не подключены к данному аппарату. – Подключите передние громкоговорители к аппарату. Голос собеседника воспроизводится только через передние громкоговорители. 31RU Собеседник говорит, что вас слышно очень тихо или очень громко. Настройте необходимую громкость с помощью параметра усиления сигнала с микрофона (стр. 17). Во время телефонных разговоров слышно эхо или шум. Уменьшите громкость. Выберите для режима EC/NC значение [EC/NC-1] или [EC/NC-2] (стр. 18). Если уровень окружающего шума слишком высокий, попытайтесь уменьшить этот шум. Например, если открыто окно и слышен громкий шум дороги, закройте окно. Если громко работает кондиционер, уменьшите его мощность. Телефон не подключен. При воспроизведении аудио с устройства BLUETOOTH телефон не будет подключен, даже если вы нажмете кнопку CALL. – Выполните подключение с телефона. Плохое качество звука в телефоне. Качество звука в мобильном телефоне зависит от условий приема. – При плохих условиях приема переместите автомобиль в другое место, в котором уровень сигнала, принимаемого мобильным телефоном, будет больше. Громкость подключенного аудиоустройства слишком низкая или слишком высокая. Уровень громкости зависит от конкретного аудиоустройства. – Настройте громкость подключенного аудиоустройства на данном аппарате (стр. 24). Во время воспроизведения с аудиоустройства BLUETOOTH прерывается звук. Уменьшите расстояние между аппаратом и аудиоустройством BLUETOOTH. Если аудиоустройство BLUETOOTH хранится в чехле, снижающем уровень сигнала, то снимите этот чехол. 32RU Рядом используется несколько устройств BLUETOOTH или других устройств, излучающих радиоволны. – Выключите другие устройства. – Увеличьте расстояние между данным аппаратом и другими устройствами. При создании подключения между данным аппаратом и мобильным телефоном мгновенно прекращается воспроизведение аудио. Это не является неисправностью. Не удается управлять подключенным аудиоустройством BLUETOOTH. Убедитесь, что подключенное устройство BLUETOOTH поддерживает профиль AVRCP. Не работают некоторые функции. Убедитесь, что подключенное устройство поддерживает необходимые функции. Происходит автоматический ответ на входящий вызов. Подключенный телефон настроен так, чтобы автоматически отвечать на входящие вызовы. Не удалось выполнить сопряжение изза превышения времени ожидания. Время, отведенное на сопряжение, зависит от подключаемого устройства и может быть небольшим. – Постарайтесь выполнить сопряжение в отведенное время. Не удается управлять функцией BLUETOOTH. Выключите аппарат, нажав кнопку OFF и удерживая ее нажатой более 2 секунд, а затем снова включите его. Во время телефонного разговора в режиме беспроводной гарнитуры нет звука из динамиков автомобиля. Если звук поступает с мобильного телефона, настройте его так, чтобы звук от него шел через динамики автомобиля. Функция Siri Eyes Free не включена. Выполните регистрацию iPhone с функцией Siri Eyes Free в режиме беспроводной гарнитуры. Включите функцию Siri на устройстве iPhone. Отмените подключение BLUETOOTH между устройством iPhone и данным аппаратом, а затем снова создайте его. Использование приложения Sony | Music Center Название приложения не соответствует фактическому приложению в “Sony | Music Center”. Еще раз запустите приложение из приложения “Sony | Music Center”. При запуске приложения “Sony | Music Center” через BLUETOOTH дисплей автоматически переключается в режим [BT AUDIO]. Сбой приложения “Sony | Music Center” или функции BLUETOOTH. Запустите приложение еще раз. Когда дисплей переключается в режим [IPD], приложение “Sony | Music Center” автоматически отключается. Приложение “Sony | Music Center” на iPhone или iPod не поддерживает функцию воспроизведения iPod. – На данном аппарате выберите источник, отличный от [IPD], а затем создайте подключение к “Sony | Music Center” (стр. 18). Когда для режима USB на аппарате задано значение [ANDROID], приложение “Sony | Music Center” автоматически отключается. Смартфоны с ОС Android не поддерживают воспроизведение в режиме “Android”. – Задайте для режима USB на аппарате значение [MSC/MTP], а затем создайте подключение к “Sony | Music Center” (стр. 18). Сообщения Во время работы устройства могут отображаться или мигать следующие сообщения. INVALID Выбранная операция может не поддерживаться. Во время воспроизведения с устройства iPod не удается переключиться с режима [USB MODE] на другой режим. READ Дождитесь завершения считывания. Воспроизведение начнется автоматически. Это может занять некоторое время в зависимости от структуры файла. (знак подчеркивания): не удается отобразить символ. При воспроизведении с устройства USB: HUB NO SUPRT: не поддерживаются концентраторы USB. IPD STOP: воспроизведение с устройства iPod закончено. На iPod или iPhone включите функцию воспроизведения. NOT SUPPORT - ANDROID MODE К аппарату подключено устройство USB, не поддерживающее протокол AOA (Android Open Accessory) 2.0, когда для параметра [USB MODE] задано значение [ANDROID]. – Для параметра [USB MODE] установите значение [MSC/MTP] (стр. 22). USB ERROR Снова подключите устройство USB. USB NO DEV Убедитесь, что устройство USB или кабель USB надежно подключены. 33RU USB NO MUSIC Подсоедините устройство USB с воспроизводимыми файлами (стр. 27). USB NO SUPRT Для получения подробных сведений о совместимости устройства USB посетите веб-сайт поддержки, указанный на задней стороне обложки. OVERLOAD: устройство USB переполнено. Отключите устройство USB, а затем нажмите кнопку SRC для выбора другого источника. Устройство USB повреждено, или подсоединено неподдерживаемое устройство. При приеме станций RDS: NO AF: отсутствуют альтернативные частоты. Нажмите кнопку (SEEK –/+), пока мигает название программной услуги. Устройство начинает поиск другой частоты с теми же данными PI (программная идентификация) (появляется индикация [PI SEEK]). NO PI: нет программной идентификации. Для выбранной станции отсутствуют данные PI (программной идентификации). Выберите другую станцию. NO TP: нет сообщений о текущей ситуации на дорогах. Устройство продолжит поиск станций, передающих программу TP. Примечания по работе с функцией BLUETOOTH: BTA NO DEV: устройство BLUETOOTH не подключено или не распознано. Убедитесь, что устройство BLUETOOTH надежно подключено и что к нему создано подключение BLUETOOTH. ERROR: не удается выполнить выбранную операцию. Подождите некоторое время, а затем повторите попытку. UNKNOWN: не удается отобразить имя или номер телефона. WITHHELD: звонящий абонент скрыл свой номер телефона. При использовании приложения Sony | Music Center: APP ––––––––: не создано подключение к приложению. Создайте подключение к приложению “Sony | Music Center” еще раз (стр. 18). APP DISCNCT: приложение отключено. Создайте подключение к приложению “Sony | Music Center” (стр. 18). APP DISPLAY: открыто меню параметров экрана приложения. Чтобы можно было использовать кнопку, выйдите из меню параметров экрана в приложении. APP LIST: открыт список содержимого USB. Чтобы можно было использовать кнопку, выйдите из списка в приложении. APP MENU: открыто меню параметров в приложении. Чтобы можно было использовать кнопку, выйдите из меню параметров в приложении. 34RU APP NO DEV: устройство с установленным приложением не подключено или не распознано. Создайте подключение BLUETOOTH, а затем еще раз создайте подключение к приложению “Sony | Music Center” (стр. 18). APP SOUND: открыто меню параметров звука в приложении. Чтобы можно было использовать кнопку, выйдите из меню параметров звука в приложении. Если в результате предлагаемых действий не удастся устранить неполадку, обратитесь к ближайшему дилеру Sony. Если аппарат сдается в ремонт в случае неполадки, возникшей при воспроизведении устройства USB, необходимо иметь при себе данное устройство. OPEN APP: приложение “Sony | Music Center” не запущено. Запустите приложение. Примечания по работе пульта дистанционного управления на руле: ERROR Выполните регистрацию снова, начиная с той функции, где произошла ошибка (стр. 22). TIMEOUT Процедуру регистрации необходимо завершить, пока мигает [REGISTER] (около 6 секунд) (стр. 22). При обновлении микропрограммы: FILE ERROR: программа обновления отсутствует на устройстве USB. Сохраните программу обновления на устройстве USB и повторите попытку (стр. 26). UPDATE ERROR PRESS ENTER: ошибка обновления микропрограммы. Нажмите кнопку ENTER, чтобы закрыть сообщение, и повторите попытку. Во время обновления не поворачивайте выключатель зажигания в положение OFF и не отсоединяйте используемое устройство USB (стр. 26). 35RU Установка/подключение Внимание! • Подведите все заземляющие провода к общей точке заземления. • Не допускайте попадания проводов под винты или между подвижными деталями (например, между направляющими сидений). • Во избежание короткого замыкания перед установкой соединений выключите зажигание автомобиля. • Сначала подсоедините провод питания к устройству и громкоговорителям, а затем — к контактам внешнего источника питания. • В целях безопасности обязательно изолируйте все свободные неподсоединенные провода электроизоляционной лентой. Меры предосторожности • Тщательно выбирайте место для установки аппарата, чтобы он не мешал управлению автомобилем. • Не устанавливайте аппарат там, где он будет подвержен воздействию пыли, грязи, чрезмерной вибрации или высоких температур, например в местах, куда попадают прямые солнечные лучи, или вблизи вентиляционных решеток обогревателей. • В целях обеспечения надежной и безопасной установки используйте лишь входящие в комплект монтажные детали. Примечание относительно провода питания (желтый) При подключении данного устройства вместе с другими cтepeокомпонeнтaми номинальное значение силы тока в контуре питания автомобиля должно превышать суммарное значение силы тока, указанное на предохранителях всех компонентов. Регулировка угла установки Отрегулируйте угол установки так, чтобы он составлял менее 30°. 36RU Перечень деталей для установки ×2 • В этот список входит не все содержимое комплекта поставки. • Кронштейн и защитная манжета прикреплены к устройству до поставки. Перед установкой устройства воспользуйтесь ключами для демонтажа , чтобы отсоединить кронштейн от устройства. Подробные сведения см. в разделе “Отсоединение защитной манжеты и кронштейна” (стр. 40). • Сохраните ключи для демонтажа для использования в будущем, поскольку они также потребуются при демонтаже аппарата из автомобиля. Подключение Сабвуфер*1 *3 *3 *3 Усилитель мощности*1 *2 Подробные сведения см. в разделе “Установка соединений” (стр. 38). Подробные сведения см. в разделе “Схема подключения питания” (стр. 39). от проводного пульта дистанционного управления (не входит в комплект поставки)*4 *5*6 от автомобильной антенны*7 *1 Не входит в комплект поставки. *2 Полное сопротивление громкоговорителей: 4Ω–8Ω×4 *3 Кабель с разъемами RCA (не входит в комплект поставки). *4 В зависимости от типа автомобиля, возможно, потребуется использовать адаптер для проводного пульта дистанционного управления (не входит в комплект поставки). Подробные сведения об использовании проводного пульта дистанционного управления см. в разделе “Использование проводного пульта дистанционного управления” (стр. 40). *5 Независимо от того, будете ли вы использовать микрофон, проложите кабель микрофона так, чтобы он не мешал вождению. Закрепите кабель зажимом, если, например, он проходит рядом с вашими ногами. *6 Сведения об установке микрофона см. в разделе “Установка микрофона” (стр. 39). *7 В зависимости от типа автомобиля используйте адаптер (не входит в комплект поставки), если разъем антенны не подходит. 37RU Установка соединений 14 Если используется антенна с электроприводом без релейного блока, подсоединение этого устройства с помощью прилагаемого провода питания может привести к повреждению антенны. К разъему громкоговорителя автомобиля Импульсный источник электропитания подсветки Оранжевый/ с белыми полосками Импульсный 15 источник электропитания Красный 16 Заземление Черный Простое подключение сабвуфера Сабвуфер можно использовать без усилителя мощности, если подключить его к кабелю заднего громкоговорителя. Передний громкоговоритель 1 Задний громкоговори2 тель (правый) 3 Передний громкоговори4 тель (правый) 5 Передний громкоговори6 тель (левый) 7 Задний громкоговори8 тель (левый) Фиолетовый Фиолетовый/с черными полосками Серый Серый/с черными полосками Белый Белый/с черными полосками Зеленый Зеленый/с черными полосками К разъему электропитания автомобиля Источник 12 бесперебойного электропитания Желтый Антенна с электроприводом/ 13 управление усилителем мощности (REM OUT) Синий/с белыми полосками 38RU Сабвуфер Примечания • Требуется подготовка кабелей задних громкоговорителей. • Во избежание повреждений используйте сабвуфер с полным сопротивлением 4 Ω – 8 Ω и соответствующей предельно допустимой мощностью. Подсоединение для поддержки памяти Когда к устройству подсоединен желтый провод питания, блок памяти будет постоянно получать питание, даже при выключенном зажигании. Подключение громкоговорителей • Перед подключением громкоговорителей выключите устройство. • Во избежание повреждений используйте громкоговорители с полным сопротивлением 4 Ω – 8 Ω и соответствующей предельно допустимой мощностью. Схема подключения питания Проверьте разъем подключения вспомогательного питания автомобиля и правильно подключите провода (в зависимости от типа автомобиля). Если в автомобиле нет положения ACC Красный Красный Желтый Желтый Разъем подключения вспомогательного питания Общая схема подключения Красный Красный Желтый Желтый После проверки соответствия соединений и проводов импульсного источника электропитания подключите устройство к автомобильному контуру электропитания. В случае возникновения каких-либо вопросов или проблем, связанных с подключением устройства, которые не рассматриваются в настоящем руководстве, обратитесь за советом к дилеру автомобильной фирмы. Установка микрофона Источник 12 бесперебойного электропитания Желтый Импульсный источник электропитания 15 Красный Чтобы можно было использовать режим беспроводной гарнитуры, вам потребуется установить микрофон . Если красный и желтый провода переставлены местами Красный Красный Зажим (не входит в комплект поставки) Желтый 12 Желтый Импульсный источник электропитания Источник 15 бесперебойного электропитания Желтый Красный 39RU Внимание! 2 • Не допускайте наматывания кабеля на рулевую колонку или рычаг переключения передач. Это очень опасно. Убедитесь, что этот кабель и другие компоненты установлены так, что не мешают вождению автомобиля. • Если в вашем автомобиле есть подушки безопасности или другое оборудование для поглощения энергии при столкновении, то перед установкой данного аппарата обратитесь в магазин, в котором вы приобрели аппарат, или к продавцу автомобиля. Вставьте оба ключа для демонтажа до щелчка, потяните кронштейн вниз, а затем потяните устройство вверх, чтобы отсоединить его. Направьте крючок внутрь. Примечание Перед наклеиванием двусторонней липкой ленты очистите поверхность приборной панели с помощью сухой ткани. Использование проводного пульта дистанционного управления 1 Установка устройства в приборной панели Перед установкой убедитесь, что фиксаторы с обеих сторон кронштейна согнуты вовнутрь на 2 мм. 1 Чтобы активировать проводной пульт дистанционного управления, установите для [STR CONTROL] в [SET STEERING] значение [PRESET] (стр. 22). Установите кронштейн в приборную панель, затем выгните выступы наружу, чтобы обеспечить плотную фиксацию. 182 мм 53 мм Установка Отсоединение защитной манжеты и кронштейна Перед монтажом устройства отсоедините защитную манжету и кронштейн от устройства. 1 2 Прикрепите устройство к кронштейну , затем вставьте защитную манжету . Захватите оба края защитной манжеты , а затем вытащите ее. Фиксатор 40RU Примечания • Если фиксаторы не согнуты или выгнуты наружу, устройство не будет установлено надлежащим образом и может выпасть. • Убедитесь, что 4 фиксатора на защитной манжете надлежащим образом вставлены в отверстия, имеющиеся в устройстве. Снятие и установка передней панели Подробные сведения см. в разделе “Снятие передней панели” (стр. 6). Перезагрузка устройства Подробные сведения см. в разделе “Перезагрузка устройства” (стр. 7). Замена предохранителя При замене Предохранитель (10 A) предохранителей обязательно используйте только те, которые соответствуют силе тока, указанной на оригинальном предохранителе. Если перегорел предохранитель, проверьте подключение питания и замените предохранитель. Если после замены предохранитель снова перегорел, это может означать неисправность устройства. В этом случае обратитесь к ближайшему дилеру Sony. 41RU Eesti keel Български С настоящото, Sony Corporation декларира, че това оборудване е в съответствие с Директива 2014/53/EU. Цялостният текст на ЕС декларацията за съответствие може да се намери на следния интернет адрес: http://www.compliance.sony.de/ Hrvatski Sony Corporation ovime izjavljuje da je ova oprema u skladu s Direktivom 2014/53/EU. Cjeloviti tekst EU izjave o sukladnosti dostupan je na sljedećoj internetskoj adresi: http://www.compliance.sony.de/ Česky Sony Corporation tímto prohlašuje, že toto zařízení je v souladu se směrnicí 2014/53/EU. Úplné znění EU prohlášení o shodě je k dispozici na této internetové adrese: http://www.compliance.sony.de/ Dansk Herved erklærer Sony Corporation, at dette udstyr er i overensstemmelse med direktiv 2014/53/EU. Den fulde ordlyd af EUoverensstemmelseserklæringen er tilgængelig på følgende internetadresse: http://www.compliance.sony.de/ Nederlands Hierbij verklaart Sony Corporation dat deze radioapparatuur conform is met Richtlijn 2014/ 53/EU. De volledige tekst van de EUconformiteitsverklaring kan worden geraadpleegd op het volgende internetadres: http://www.compliance.sony.de/ English Hereby, Sony Corporation declares that this equipment is in compliance with Directive 2014/ 53/EU. The full text of the EU declaration of conformity is available at the following internet address: http://www.compliance.sony.de/ Käesolevaga deklareerib Sony Corporation, et käesolev seade vastab direktiivi 2014/53/EL nõuetele. ELi vastavusdeklaratsiooni täielik tekst on kättesaadav järgmisel internetiaadressil: http://www.compliance.sony.de/ Suomi Sony Corporation vakuuttaa, että tämä laite on direktiivin 2014/53/EU mukainen. EU-vaatimustenmukaisuusvakuutuksen täysimittainen teksti on saatavilla seuraavassa internetosoitteessa: http://www.compliance.sony.de/ Français Le soussigné, Sony Corporation, déclare que cet équipement est conforme à la Directive 2014/ 53/UE. Le texte complet de la déclaration UE de conformité est disponible à l’adresse internet suivante : http://www.compliance.sony.de/ Deutsch Hiermit erklärt Sony Corporation, dass diese Funkanlage der Richtlinie 2014/53/EU entspricht. Der vollständige Text der EU-Konformitätserklärung ist unter der folgenden Internetadresse verfügbar: http://www.compliance.sony.de/ Ελληνικά Με την παρούσα Sony Corporation δηλώνει ότι, αυτή η συσκευή πληροί τους όρους της οδηγίας 2014/53/EU. Το πλήρες κείμενο της δήλωσης συμμόρφωσης ΕΕ διατίθεται στην ακόλουθη ιστοσελίδα στο διαδίκτυο: http://www.compliance.sony.de/ Magyar A Sony Corporation igazolja, hogy ez a készülék megfelel a 2014/53/EU irányelvnek. Az EU-megfelelőségi nyilatkozat teljes szövege elérhető a következő internetes címen: http://www.compliance.sony.de/ Italiano Con la presente, Sony Corporation dichiara che questo apparecchio è conforme alla Direttiva 2014/53/UE. Il testo completo della dichiarazione di conformità UE è disponibile al seguente indirizzo Internet: http://www.compliance.sony.de/ Latviešu Ar šo Sony Corporation deklarē, ka šī iekārta atbilst direktīvai 2014/53/ES. Pilns ES atbilstības deklarācijas teksts ir pieejams šādā interneta vietnē: http://www.compliance.sony.de/ Lietuvių kalba Mes, Sony Corporation, patvirtiname, kad šis įrenginys atitinka direktyvą 2014/53/ES. Visas ES atitikties deklaracijos tekstas pasiekiamas šiuo internetiniu adresu: http://www.compliance.sony.de/ Norsk Herved erklærer Sony Corporation at utstyrstypen er i samsvar med direktiv 2014/53/ EU. EU-erklæring fulltekst finner du på Internett under: http://www.compliance.sony.de/ Polski Sony Corporation niniejszym oświadcza, że to urządzenie jest zgodne z dyrektywą 2014/53/ UE. Pełny tekst deklaracji zgodności UE jest dostępny pod następującym adresem internetowym: http://www.compliance.sony.de/ Português O(a) abaixo assinado(a) Sony Corporation declara que o presente equipamento está em conformidade com a Diretiva 2014/53/UE. O texto integral da declaração de conformidade está disponível no seguinte endereço de Internet: http://www.compliance.sony.de/ Română Prin prezenta, Sony Corporation declară că acest echipament este în conformitate cu Directiva 2014/53/UE. Textul integral al declarației UE de conformitate este disponibil la următoarea adresă internet: http://www.compliance.sony.de/ Slovensky Sony Corporation potrjuje, da je ta oprema skladna z Direktivo 2014/53/EU. Celotno besedilo izjave EU o skladnosti je na voljo na naslednjem spletnem naslovu: http://www.compliance.sony.de/ Slovenščina Sony Corporation týmto vyhlasuje, že zariadenie je v súlade so smernicou 2014/53/EÚ. Úplné vyhlásenie EÚ o zhode je k dispozícii na tejto internetovej adrese: http://www.compliance.sony.de/ Español Por la presente, Sony Corporation declara que este equipo es conforme con la Directiva 2014/ 53/UE. El texto completo de la declaración UE de conformidad está disponible en la dirección Internet siguiente: http://www.compliance.sony.de/ Svenska Härmed försäkrar Sony Corporation att denna utrustning överensstämmer med direktiv 2014/ 53/EU. Den fullständiga texten till EU-försäkran om överensstämmelse finns på följande webbadress: http://www.compliance.sony.de/ Türkçe Sony Corporation bu ekipmanın 2014/53/AB Direktifine uygun olduğunu işbu belge ile beyan eder. AB uygunluk beyanının tam metni aşağıdaki internet adresinden edinilebilir: http://www.compliance.sony.de/ Shqip Me anë të këtij dokumenti, Sony Corporation deklaron se kjo pajisje është në pajtueshmëri me Direktivën 2014/53/BE. Teksti i plotë i deklaratës së pajtueshmërisë së BE-së disponohet në adresën e mëposhtme të të internetit: http://www.compliance.sony.de/ Македонски Со овој документ, Sony Corporation изјавува дека оваа опрема е во согласност со Директивата 2014/53/ЕУ. Целосниот текст на Изјавата за сообразност на ЕУ е достапен на следнава адреса на интернет: http://www.compliance.sony.de/ Srpski Sony Corporation ovim izjavljuje da je ova oprema u skladu sa direktivom 2014/53/EU. Kompletan tekst EU izjave o usklađenosti je dostupan na sledećoj internet adresi: http://www.compliance.sony.de/ Support site Support-Website If you have any questions or for the latest support information on this product, please visit the web site below: Wenn Sie Fragen haben oder die neuesten Support-Informationen zu diesem Produkt abrufen möchten, rufen Sie bitte folgende Website auf: Site d’assistance Sito di assistenza clienti Si vous avez des questions ou si vous souhaitez consulter les toutes dernières informations techniques sur ce produit, rendez-vous sur le site Web suivant : In caso di domande o per le informazioni più aggiornate sul presente prodotto, visitare il seguente sito Web: Sitio Web de soporte técnico en línea Сайт для получения поддержки Para resolver cualquier duda u obtener la información В случае возникновения вопросов и для получения más reciente sobre el soporte técnico de este producto, самых последних сведений о данном продукте посетите следующий веб-сайт: visite el siguiente sitio Web: http://www.sony.eu/support Register your product online now at: Merci d’enregister votre produit en ligne sur : Registre su producto online en: Registrieren Sie Ihr Produkt jetzt bei: Registra online il tuo prodotto su: Зарегистрируйте ваш продукт на: http://www.sony.eu/mysony Smartphone app Smartphone App Support by Sony app - Find information and get notification about your product: Support by Sony App - Finden Sie Informationen und erhalten Sie Benachrichtigungen über Ihr Produkt: App. de smartphone App per smartphone Support by Sony app - Trouvez des infos et recevez des notifications au sujet de votre produit : App Support by Sony - Trovate informazioni e ricevete notifiche sul vostro prodotto: Aplicación para Smartphone Приложение для смартфонов Aplicación Support by Sony - Busque información y obtenga notificaciones acerca de su producto: Приложение Support by Sony — подробная информация и новости о продукте: √ News & Alerts / Nachrichten u. Alerts / Actus & Alertes / Novità e avvisi / Noticias y Alertas / Новости и сообщения √ Software updates / Software-Updates / Mises à jour / Aggiornamenti software / Actualizaciones de software / Обновления программного обеспечения √ Tutorials / Anleitungen / Didacticiels / Tutorial / Tutoriales / Руководства √ Tips & Tricks / Tipps u. Tricks / Conseils & Astuces / Consigli e suggerimenti / Consejos y Trucos / Советы и рекомендации https://sony.net/SBS ©2018 Sony Corporation Printed in Thailand http://www.sony.net/-
 1
1
-
 2
2
-
 3
3
-
 4
4
-
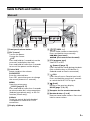 5
5
-
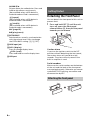 6
6
-
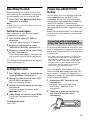 7
7
-
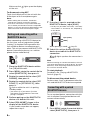 8
8
-
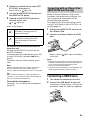 9
9
-
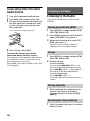 10
10
-
 11
11
-
 12
12
-
 13
13
-
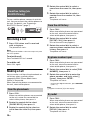 14
14
-
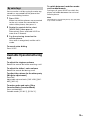 15
15
-
 16
16
-
 17
17
-
 18
18
-
 19
19
-
 20
20
-
 21
21
-
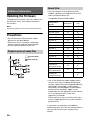 22
22
-
 23
23
-
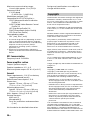 24
24
-
 25
25
-
 26
26
-
 27
27
-
 28
28
-
 29
29
-
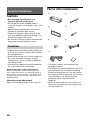 30
30
-
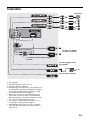 31
31
-
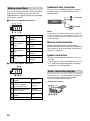 32
32
-
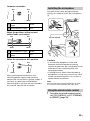 33
33
-
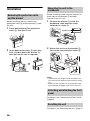 34
34
-
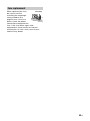 35
35
-
 36
36
-
 37
37
-
 38
38
-
 39
39
-
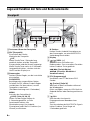 40
40
-
 41
41
-
 42
42
-
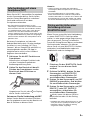 43
43
-
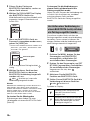 44
44
-
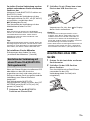 45
45
-
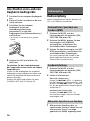 46
46
-
 47
47
-
 48
48
-
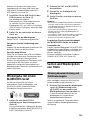 49
49
-
 50
50
-
 51
51
-
 52
52
-
 53
53
-
 54
54
-
 55
55
-
 56
56
-
 57
57
-
 58
58
-
 59
59
-
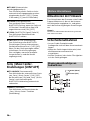 60
60
-
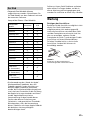 61
61
-
 62
62
-
 63
63
-
 64
64
-
 65
65
-
 66
66
-
 67
67
-
 68
68
-
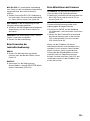 69
69
-
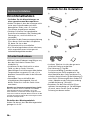 70
70
-
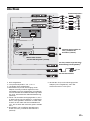 71
71
-
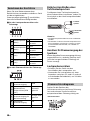 72
72
-
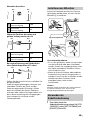 73
73
-
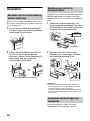 74
74
-
 75
75
-
 76
76
-
 77
77
-
 78
78
-
 79
79
-
 80
80
-
 81
81
-
 82
82
-
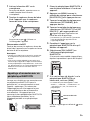 83
83
-
 84
84
-
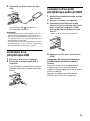 85
85
-
 86
86
-
 87
87
-
 88
88
-
 89
89
-
 90
90
-
 91
91
-
 92
92
-
 93
93
-
 94
94
-
 95
95
-
 96
96
-
 97
97
-
 98
98
-
 99
99
-
 100
100
-
 101
101
-
 102
102
-
 103
103
-
 104
104
-
 105
105
-
 106
106
-
 107
107
-
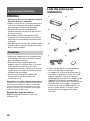 108
108
-
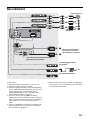 109
109
-
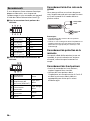 110
110
-
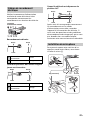 111
111
-
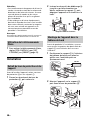 112
112
-
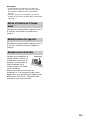 113
113
-
 114
114
-
 115
115
-
 116
116
-
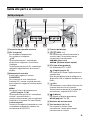 117
117
-
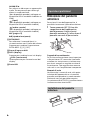 118
118
-
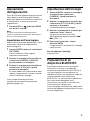 119
119
-
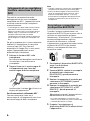 120
120
-
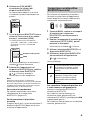 121
121
-
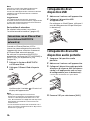 122
122
-
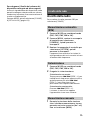 123
123
-
 124
124
-
 125
125
-
 126
126
-
 127
127
-
 128
128
-
 129
129
-
 130
130
-
 131
131
-
 132
132
-
 133
133
-
 134
134
-
 135
135
-
 136
136
-
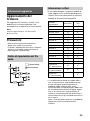 137
137
-
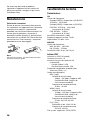 138
138
-
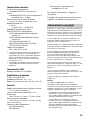 139
139
-
 140
140
-
 141
141
-
 142
142
-
 143
143
-
 144
144
-
 145
145
-
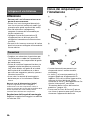 146
146
-
 147
147
-
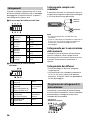 148
148
-
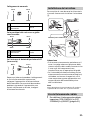 149
149
-
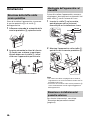 150
150
-
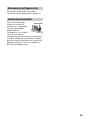 151
151
-
 152
152
-
 153
153
-
 154
154
-
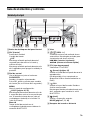 155
155
-
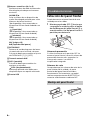 156
156
-
 157
157
-
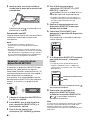 158
158
-
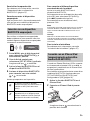 159
159
-
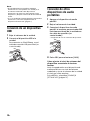 160
160
-
 161
161
-
 162
162
-
 163
163
-
 164
164
-
 165
165
-
 166
166
-
 167
167
-
 168
168
-
 169
169
-
 170
170
-
 171
171
-
 172
172
-
 173
173
-
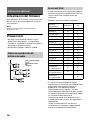 174
174
-
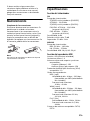 175
175
-
 176
176
-
 177
177
-
 178
178
-
 179
179
-
 180
180
-
 181
181
-
 182
182
-
 183
183
-
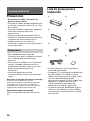 184
184
-
 185
185
-
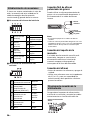 186
186
-
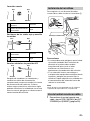 187
187
-
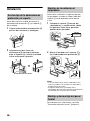 188
188
-
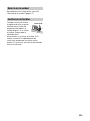 189
189
-
 190
190
-
 191
191
-
 192
192
-
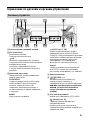 193
193
-
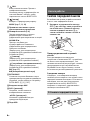 194
194
-
 195
195
-
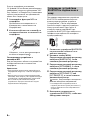 196
196
-
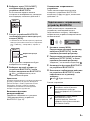 197
197
-
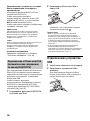 198
198
-
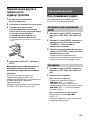 199
199
-
 200
200
-
 201
201
-
 202
202
-
 203
203
-
 204
204
-
 205
205
-
 206
206
-
 207
207
-
 208
208
-
 209
209
-
 210
210
-
 211
211
-
 212
212
-
 213
213
-
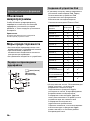 214
214
-
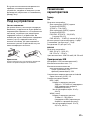 215
215
-
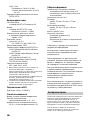 216
216
-
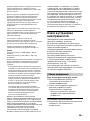 217
217
-
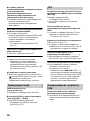 218
218
-
 219
219
-
 220
220
-
 221
221
-
 222
222
-
 223
223
-
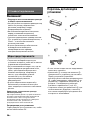 224
224
-
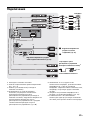 225
225
-
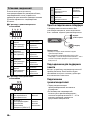 226
226
-
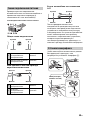 227
227
-
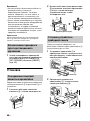 228
228
-
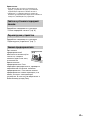 229
229
-
 230
230
-
 231
231
-
 232
232


Sony DSX-A416BT El manual del propietario
- Categoría
- Sistemas de video del coche
- Tipo
- El manual del propietario
en otros idiomas
- français: Sony DSX-A416BT Le manuel du propriétaire
- italiano: Sony DSX-A416BT Manuale del proprietario
- English: Sony DSX-A416BT Owner's manual
- Deutsch: Sony DSX-A416BT Bedienungsanleitung
- русский: Sony DSX-A416BT Инструкция по применению