LG G4 El manual del propietario
- Categoría
- Teléfonos móviles
- Tipo
- El manual del propietario


Manual de usuario
•
Algunoscontenidoseilustracionespuedenvariarrespectoasudispositivoen
funcióndelaregión,elproveedordeservicios,laversióndelsoftwareolaversión
delsistemaoperativoyestánsujetosacambiossinprevioaviso.
•
UtilicesiempreaccesoriosLGoriginales.Loselementosproporcionadosestán
diseñadosexclusivamenteparaestedispositivoyesposiblequenosean
compatiblesconotrosdispositivos.
•
Estedispositivonoesadecuadoparapersonasciegas,yaquecuentaconun
tecladodepantallatáctil.
•
Copyright©2015LGElectronics,Inc.Reservadostodoslosderechos.LGyel
logotipodeLGsonmarcascomercialesregistradasdeLGGroupylasentidades
relacionadas.Lasdemásmarcascomercialessonpropiedaddesusrespectivos
propietarios.
•
Google™,GoogleMaps™,Gmail™,YouTube™,Hangouts™yPlayStore™son
marcascomercialesdeGoogle,Inc.
ESPAÑOL

2
Contenido
Directrices para un uso seguro y eficaz ..4
Aviso importante ....................................15
Familiarizarse con el teléfono ...............18
Diseño del teléfono ................................18
Instalación de la tarjeta SIM o USIM y la
batería ................................................... 20
Carga de la batería ................................22
Inserción de una tarjeta de memoria ...... 23
Extracción de la tarjeta de memoria ....... 24
Bloqueo y desbloqueo del dispositivo ..... 24
Pantalla de inicio ....................................26
Sugerencias sobre la pantalla táctil........26
Pantalla principal ...................................27
Personalización de la pantalla de
página principal ..................................... 28
Cómo volver a aplicaciones utilizadas
recientemente .......................................29
Panel de notificaciones ..........................30
Teclado en pantalla ................................33
Características especiales .....................34
Disparo con gesto .................................. 34
Vista de gesto ........................................35
Vista Rápida ..........................................36
KnockON ...............................................36
Knock Code ...........................................37
Ventana doble ........................................38
QuickMemo+ ......................................... 38
QSlide ....................................................40
QuickRemote .........................................40
Configuración de la cuenta de Google ... 42
Creación de una cuenta de Google ......... 42
Inicio de sesión con su cuenta de
Google ...................................................42
Conexión a redes y dispositivos.............44
Wi-Fi .....................................................44
Bluetooth ...............................................45
Wi-Fi Direct ...........................................46
Transferencia de datos entre un PC y el
dispositivo .............................................47
Llamadas.................................................48
Realizar una llamada .............................48
Llamadas a contactos ............................ 48
Contestar y rechazar una llamada .......... 48
Realizar una segunda llamada ...............49
Ver los registros de llamadas .................49
Ajustes de llamadas ............................... 49
Contactos ................................................50
Buscar un contacto ................................ 50
Agregar un contacto nuevo ....................50
Contactos favoritos ................................50
Crear un grupo ......................................51
Mensajería ..............................................52
Enviar un mensaje .................................52
Contenido

3
Contenido
Vista de conversación ............................53
Modificación de los ajustes de mensajes ...
53
E-mail ......................................................54
Administración de cuentas de e-mail .....54
Trabajo con las carpetas de cuenta ........54
Redacción y envío de correo
electrónico.............................................55
Cámara y Vídeo ....................................... 56
Opciones de la cámara en el visor .........56
Utilizar la configuración avanzada .......... 57
Modo Manual en el visor ........................ 58
Hacer una foto .......................................59
Una vez haya hecho una foto .................59
Grabar un vídeo .....................................61
Después de grabar un vídeo ..................62
Galería ................................................... 63
Multimedia ..............................................67
Música ..................................................67
Utilidades ................................................70
Alarmas .................................................70
Calculadora ...........................................71
Calendario .............................................71
Grabadora .............................................72
Búsqueda por voz ..................................72
Descargas .............................................72
Radio FM ...............................................73
LG Health ..............................................73
Navegador ............................................... 74
Internet .................................................. 74
Chrome .................................................76
Ajustes ....................................................77
Redes ....................................................77
Sonido y Notificación .............................80
Pantalla .................................................82
General .................................................. 84
Actualización de software del
teléfono ...................................................92
Actualización de software del teléfono ...92
Acerca de la guía de usuario .................94
Acerca de la guía de usuario .................. 94
Marcas comerciales...............................95
DivX HD .................................................95
Dolby Digital Plus ................................... 95
Accesorios ..............................................96
Resolución de problemas .......................97
Preguntas frecuentes ...........................101

4
Directrices para un uso seguro y eficaz
Leaestassencillasinstrucciones.Sudesconocimientopuedeserpeligrosooilegal.
Enelcasodequeseprodujeraalgúnfallo,sudispositivointegraunaherramienta
desoftwarequerecopilaelregistrodefallos.Laherramientasolorecopilalosdatos
específicosdelfallo,comolapotenciadelaseñal,cellIDpositioncuandoseinterrumpe
lallamadaylasaplicacionescargadas.Elregistrosoloseutilizaparadeterminarla
causadelfallo.Estosregistrosestánencriptadosysolouncentrodereparacionesde
LGautorizadopuedeaccederaellas.Deberáenviarsudispositivoareparar.
Exposición a energía de radiofrecuencia
InformaciónsobreexposiciónaondasderadioySAR(SpecificAbsorptionRate,Tasa
específicadeabsorción).
EldiseñodelteléfonomóvilLG-H815cumplelanormativadeseguridadvigenteen
materiadeexposiciónalasondasderadio.Estanormativasebasaendirectrices
científicasqueincluyenmárgenesdeseguridaddiseñadosparagarantizarlaseguridad
detodotipodepersonas,independientementedesuedadyestadodesalud.
•
Lasdirectricesdeexposiciónaondasderadioutilizanunaunidaddemedición
conocidacomoTasaespecíficadeabsorción(SAR).LaspruebasdeSARsellevan
acaboutilizandométodosestandarizadosconelteléfonomediantelatransmisión
alnivelmásaltodepotenciacertificadoentodaslasbandasdefrecuencia
utilizadas.
•
AunquepuedehaberdiferenciasentrelosnivelesdeSARdelosdiferentes
modelosdeteléfonosLG,todoshansidodiseñadosparaajustarsealasdirectrices
relevantesdeexposiciónaondasderadio.
•
EllímitedeSARrecomendadoporlaICNIRP(InternationalCommissionon
Non-IonizingRadiationProtection,Comisióninternacionaldeproteccióncontra
radiacionesnoionizantes)esde2W/kgmedidosobrediez10gramosdetejido.
Directrices para un uso seguro y eficaz

5
Directrices para un uso seguro y eficaz
•
ElvalormásaltodeSARregistradoparaelusoauditivodeestemodelode
teléfonoes0,618W/kg(10g),mientrasqueelvalormásaltocorrespondientea
sutransportejuntoalcuerpoes0,460W/Kg(10g).
•
Estedispositivocumplelasdirectricesdeexposiciónaradiofrecuenciacuando
seutilizaenposiciónnormaljuntoaloídoocuandosesitúaaunadistanciade
almenos1,5cmdelcuerpo.Siseutilizaunacarcasadetransporte,unclip
paraelcinturónocualquierotrotipodesoporteparaelcuerpo,éstosnopueden
contenerpartesmetálicasydebencolocarseaunadistanciadealmenos1,5cm
delcuerpo.Parapodertransmitirarchivosdedatosomensajes,estedispositivo
requiereunaconexiónadecuadaalared.Enalgunoscasos,latransmisiónde
archivosdedatosomensajespuedequesufraretrasoshastaquedichaconexión
estédisponible.Compruebequesiguelasinstruccionesdedistanciadeseparación
mencionadasanteriormentehastaquesehayacompletadolatransmisión.
Cuidado y mantenimiento del producto
ADVERTENCIA
Utilice siempre baterías, cargadores y accesorios genuinos de LG aprobados
para su utilización con este modelo de teléfono concreto. De lo contrario,
puede quedar invalidada cualquier aprobación o garantía para el teléfono, y
puede resultar peligroso.
•
Nodesmonteestaunidad.Siesnecesariorepararla,llévelaauntécnicode
serviciocualificado.
•
Lasreparacionesqueserealicenbajogarantía,alaenteradiscrecióndeLG,
puedenincluirpiezasoplacasderepuestonuevasoreparadas,siempreque
mantenganlafuncionalidaddelaspiezassustituidas.
•
Manténgalaalejadadeaparatoseléctricoscomotelevisores,radiosyordenadores
personales.
•
Launidaddebealejarsedefuentesdecalorcomoradiadoresuhornos.

6
Directrices para un uso seguro y eficaz
•
Noladejecaer.
•
Noexpongaestaunidadavibracionesmecánicasogolpes.
•
Apagueelteléfonoencualquierzonaenlaqueasíloexijannormativasespeciales.
Porejemplo,noloutiliceenhospitales,yaquepodríanverseafectadosequipos
médicossensibles.
•
Nocojaelteléfonoconlasmanosmojadasmientrasseestácargando.Podría
sufrirunadescargaeléctricaydañargravementeelteléfono.
•
Nocargueelteléfonocercadematerialinflamableyaquepodríacalentarsey
provocarunincendio.
•
Utiliceunpañosecoparalimpiarelexteriordelaunidad(noutilicedisolventes
comobenceno,diluyentesoalcohol).
•
Nocargueelteléfonosobresuperficiesacolchadas.
•
Elteléfonosedebecargarenunazonaconlaventilaciónadecuada.
•
Noexpongaestaunidadahumoopolvoexcesivo.
•
Nocoloqueelteléfonocercadetarjetasdecréditoobilletesdetransporte,podría
afectaralainformacióndelasbandasmagnéticas.
•
Nogolpeelapantallaconunobjetopunzante,yaquepuedeestropearelteléfono.
•
Noexpongaelteléfonoalíquidosnihumedad.
•
Utiliceconcuidadolosaccesorios(porejemplo,losauriculares).Notoquelaantena
sinoesnecesario.
•
Noutilice,toqueniintenteretirarnirepararelcristalagrietadosiestáastilladoo
presentaesquirlas.Lagarantíanocubrelosdañosenlapantallacausadosporel
usoincorrectodeldispositivo.
•
Elteléfonoesundispositivoelectrónicoquegeneracalorenmodonormalde
funcionamiento.Sisehautilizadodeformaprolongada,elcontactodirectoconla
pielsinlaventilaciónadecuadapuedesermolestooprovocarquemaduras.Tenga
cuidadocuandomanipuleelteléfonodurantesufuncionamientoodespuésde
éste.

7
Directrices para un uso seguro y eficaz
•
Sielteléfonosemoja,desenchúfeloinmediatamenteydéjelosecarporcompleto.
Nointenteacelerarelprocesodesecadoconunafuentedecalorexterna,como
unhorno,unmicroondasounsecadordepelo.
•
Sielteléfonoresultamojado,unaetiquetaenelinteriorcambiarádecolor.La
garantíanocubrelosdañosproducidosensudispositivocomoconsecuenciadela
exposiciónalíquidos.
Funcionamiento eficaz del teléfono
Dispositivos electrónicos
Todoslosteléfonosmóvilespuedenrecibirinterferenciasquepuedenafectaral
rendimiento.
•
Noutilicesuteléfonomóvilcercadeaparatosmédicossinsolicitarpermiso.Evite
colocarelteléfonosobremarcapasos(esdecir,noselocoloqueenelbolsillode
lacamisa).
•
Algunosaudífonospuedenverseafectadosporteléfonosmóviles.
•
Tambiénpuedengenerarpequeñasinterferenciasentelevisores,radios,
ordenadores,etc.
•
Utiliceelteléfonoatemperaturasentre0ºCy40ºC,siesposible.Exponerel
teléfonoatemperaturasextremadamentebajasoaltaspodríaproducirdaños,un
funcionamientoincorrectooinclusounaexplosión.
Seguridad vial
Compruebelasleyesynormativaslocalessobreelusodeteléfonosmóvilesdurantela
conducción.
•
Noutiliceelteléfonomóvilmientrasconduzca.
•
Dediquetodasuatenciónalaconducción.
•
Salgadelacarreterayaparqueantesdehacerllamadasoresponderlassilas
condicionesdelaconducciónasílorequieren.

8
Directrices para un uso seguro y eficaz
•
Laenergíaderadiofrecuenciapuedeafectaraalgunossistemaselectrónicosdesu
vehículo,comolaradiodelcocheoelequipodeseguridad.
•
Sisuvehículodisponedeunairbag,noloobstruyaconequiposinalámbricos
portátilesofijos.Podríanprovocarunfallodelairbagyocasionarlegravesheridas
debidoaunfuncionamientoindebido.
•
Siescuchamúsicamientrasestáenlacalle,asegúresedequeelvolumentiene
unaintensidadrazonabledeformaquepuedaserconscientedeloquesucedeen
suentorno.Estoesimportantesobretodocercadelasvíasdetráfico.
Lesiones auditivas
Para evitar las posibles lesiones auditivas, no se exponga a altos
niveles de volumen durante largos períodos de tiempo.
Esposiblequeeloídosufradañoscuandoseveexpuestoasonidosdealtovolumen
durantelargosperíodos.Porlotanto,lerecomendamosquenoenciendaniapagueel
teléfonocercadelosoídos.Lerecomendamosigualmentequeelvolumendelamúsica
ydelasllamadasseestablezcaenunnivelrazonable.
•
Siutilizaauriculares,bajeelvolumensinopuedeescucharalaspersonasquele
hablandecercaosilapersonasentadaasuladopuedeescucharloqueusted
estáescuchando.
NOTA
•
Un nivel excesivo de sonido en los auriculares puede provocar pérdida de
audición.

9
Directrices para un uso seguro y eficaz
Piezas de cristal
Algunaspiezasdesuteléfonomóvilestánfabricadasconcristal.Estecristalpuede
rompersesielteléfonocaesobreunasuperficieduraorecibeunimpactofuerte.Si
elcristalserompe,nolotoqueniintenteretirarlo.Noutilicesuteléfonohastaqueun
proveedorautorizadosustituyaelcristal.
Derribos
Noutiliceelteléfonomientrasserealizanderribos.Respetelasrestriccionesysigalas
normativas.
Entornos potencialmente explosivos
•
Noutilicesuteléfonoengasolineras.
•
Noloutilicecercadeproductosquímicosocombustibles.
•
Notransporteoalmaceneexplosivos,líquidosogasesinflamablesenel
compartimentodesuvehículodondetengaelteléfonomóvilolosaccesorios.
En aviones
Losdispositivosinalámbricospuedenprovocarinterferenciasenlosaviones.
•
Apagueelteléfonomóvilantesdeembarcar.
•
Noloutiliceentierrasinelpermisodelatripulación.
Niños
Dejeelteléfonoenunlugarsegurofueradelalcancedeniñospequeños.Incluyepiezas
pequeñasque,sisetragan,puedencausarasfixia.

10
Directrices para un uso seguro y eficaz
Llamadas de emergencia
Puedequelasllamadasdeemergencianoesténdisponiblesentodaslasredes
móviles.Porello,nuncadebedependerúnicamentedesuteléfonopararealizar
llamadasdeemergencia.Consulteasuproveedordeservicioslocal.
Información y mantenimiento de la batería
•
Noesnecesariodescargarporcompletolabateríaantesdevolveracargarla.
Adiferenciadeotrossistemasdebaterías,noexisteningúnefectodememoria
quepuedaafectaralrendimientodelabatería.
•
UtilicesólolasbateríasycargadoresdeLG.LoscargadoresdeLGhansido
diseñadosparamaximizarlavidadelabatería.
•
Nodesmonteniprovoquecortocircuitosenlabatería.
•
Mantengalimpiosloscontactosmetálicosdelabatería.
•
Sustituyalabateríacuandodejedefuncionarcorrectamente.Labateríapuede
recargarsecentenaresdevecesantesdequedebasustituirse.
•
Recarguelabateríasinosehautilizadodurantemuchotiempoparamaximizarsu
funcionalidad.
•
Noexpongaelcargadordelabateríaalaluzdirectadelsolynoloutiliceen
entornosmuyhúmedos,comoenelcuartodebaño.
•
Nodejelabateríaenlugaresfríosocalientes,yaquesepodríadeteriorarsu
rendimiento.
•
Existeriesgodeexplosiónsilabateríasesustituyeporotradeuntipoincorrecto.
•
Deshágasedelasbateríassegúnlasinstruccionesdelfabricante.Porfavor,
recíclelassiemprequeseaposible.Nolastirealabasuradoméstica.
•
Sinecesitasustituirlabatería,llévelaalproveedoropuntodeservicioautorizado
máscercanodeLGElectronicsparaobtenerasistencia.
•
Desenchufesiempreelcargadordelatomadecorrienteunavezqueelteléfono
hayaterminadodecargarse,paraevitarasíunconsumodeenergíainnecesario
delcargador.

11
Directrices para un uso seguro y eficaz
•
Laduraciónrealdelabateríadependerádelaconfiguracióndered,losajustesdel
producto,lospatronesdeuso,eltipodebateríaylascondicionesambientales.
•
Asegúresedequeningúnelementoconbordesafilados,comodientesouñasde
animales,tocalabatería.Podríaprovocarunincendio.
Precauciones de uso de la cubierta trasera de cuero
•
Esteproductoestáfabricadoapartirdepieldevacunoypuedepresentardistintos
plieguesopatronescomoresultadodelaspropiedadesnaturalesdelcuero.Siel
productosemojaconcualquierlíquido(agua,refresco,aguamarina,lluvia,sudor,
protectorsolar,cosméticos,humedad,etc.),podríaperderocambiardecoloro
deformarse.
•
Sielproductosemojaosecontamina,elimineelaguapresionándoloconcuidado
conunatoallasecaoaplíqueleceraparacueroydéjelosecaralasombra.
Cuandounproductoseexponeaunentornomojadodurantelargosperiodos
detiempopodríanaparecerarrugasymoho.Puedequeelcueronorecupere
suformaoriginaltrashaberlolimpiadodebidoasuspropiedadesnaturales,yes
posiblequelacontaminaciónodeformaciónseagravensiseutilizandetergente
corrienteodisolventesorgánicos.
•
Sielcuerosemojaconaguadelluviaosudor,tengacuidadoyevitequeentreen
contactoconlaropa,yaqueeltintepodríaconvertirseenmanchas.
•
Debidoalanaturalezadelcuero,lafricciónprolongadaolafuerzaexcesiva
puedendañarsusuperficie.

12
Directrices para un uso seguro y eficaz
Declaración de seguridad de láser
Precaución
Esteproductoutilizaunsistemaláser.Paragarantizarunusoadecuadodeeste
producto,leaestemanualdelpropietariodetenidamenteyconsérveloparaconsultarlo
cuandolonecesite.Encasodequelaunidadrequieramantenimiento,póngaseen
contactoconuncentrodeservicioautorizado.
Elusodecontrolesoajustes,asícomoelrendimientodeprocedimientosdistintosde
losespecificadosenestemanualpuedesuponerunpeligrodeexposiciónaradiación.
Paraevitarlaexposicióndirectaalhazdeluzdelláser,nointenteabrirlacarcasani
hacercontactodirectoconelláser.
Información del aviso de software de código abierto
Para obtener el código fuente correspondiente GPL, LGPL, MPL y
otras licencias de código abierto que contiene este producto, visite
http://opensource.lge.com.
Además del código fuente, podrá descargar las condiciones de las licencias,
exención de responsabilidad de la garantía y avisos de copyright.
LG Electronics también le proporcionará código abierto en CD-ROM por un
importe que cubre los gastos de su distribución (como el soporte, el envío
y la manipulación) previa solicitud por correo electrónico a opensource@
lge.com. Esta oferta es válida durante tres (3) años a partir de la fecha de
adquisición del producto.

13
Directrices para un uso seguro y eficaz
CÓMO ACTUALIZAR EL DISPOSITIVO
Acceda a los lanzamientos de firmware más recientes, a nuevas funciones de
software, así como a mejoras.
•
Seleccione la actualización del software en el menú de ajustes de su
dispositivo.
•
Actualice el dispositivo conectándolo a un PC. Paraobtener más
información acerca del uso de esta función, visite http://www.lg.com/
common/index.jsp y seleccione el país y el idioma.
DECLARACIÓN DE CONFORMIDAD
Por la presente, LG Electronics declara que el producto LG-H815 cumple
con los requisitos imprescindibles y cualquier otra disposición relevante de
la directiva 1999/5/EC. Puede consultar una copia de la Declaración de
conformidad en http://www.lg.com/global/declaration
Póngase en contacto con la oficina para comprobar la conformidad de
este producto:
LG Electronics Inc.
EU Representative, Krijgsman 1,
1186 DM Amstelveen, The Netherlands
NOTA: De acuerdo con la EN 60950-1 (§ 1.7.2)
Para prevenir un consumo innecesario de energia, desconecte el dispositivo
una vez esté totalmente cargado. Utilize siempre una base de toma de
corriente cerca del equipo y fácilmente accesible.

14
Directrices para un uso seguro y eficaz
Cómo desechar aparatos eléctricos y electrónicos obsoletos
1 Todoslosaparatoseléctricosoelectrónicossedebendesecharaparte
delserviciomunicipalderecogidadebasuras,atravésdelospuntos
derecogidadesignadosporelgobiernoolasautoridadeslocales.
2 Eldesechoadecuadodelasunidadesinserviblescontribuyeaevitar
riesgospotencialesparaelmedioambienteylasaludpública.
3 Paraobtenermásinformaciónsobrecómodesecharlosaparatos
obsoletos,póngaseencontactoconsuayuntamiento,elserviciode
recogidadebasuraoelestablecimientodondeadquirióelproducto.
Cómo desechar las baterías y los acumuladores gastados
1 Silabateríacontienemásdel0,0005%demercurio(Hg);0,002%de
cadmio(Cd)o0,004%deplomo(Pb),estesímbolopuedeaparecer
juntoalossímbolosquímicosdelmercurio,cadmiooplomo.
2 Todaslasbaterías/acumuladoressedebendesecharapartedelservicio
municipalderecogidadebasuras,atravésdelospuntosderecogida
designadosporelgobiernoolasautoridadeslocales.
3 Laeliminacióncorrectadebateríasyacumuladorescontribuyea
evitarposiblesriesgosparaelmedioambiente,losanimalesylasalud
pública.
4 Paraobtenermásinformaciónsobrecómodesecharlasbateríasy
acumuladoresinservibles,póngaseencontactoconelayuntamiento,
elservicioderecogidadebasuraoelestablecimientodondehaya
adquiridoelproducto.

15
Aviso importante
Lea esta información antes de comenzar a usar su teléfono.
Antesdellamaralserviciodeatenciónalclienteollevarelteléfonoalserviciotécnico,
compruebesilosproblemasdesuteléfonosedescribenenestasección.
1. Memoria del teléfono
Cuandoquedenmenosde10MBdeespaciodisponibleenlamemoriadelteléfono,
estenopodrárecibirmensajes.Seránecesariocomprobarlamemoriadelteléfonoy
eliminaralgunosdatos,comoaplicacionesomensajes,paradisponerdemásespacio
enlamemoria.
Para desinstalar aplicaciones:
1 Presione > > >fichaGeneral>Aplicaciones.
2 Cuandosemuestrentodaslasaplicaciones,despláceseyseleccionelaaplicación
quedeseadesinstalar.
3 PresioneDesinstalar.
2. Optimización de la duración de la batería
Aumentelapotenciadelabateríamedianteladesconexióndeaquellasfuncionesque
nonecesitaejecutardeformaconstanteensegundoplano.Puedesupervisarcómolas
aplicacionesyrecursosdelsistemaconsumenlaenergíadelabatería.
Para aumentar la duración de la batería:
•
Desactivelascomunicacionesporradiocuandonolasestéutilizando.Sinoestá
utilizandolasfuncionesdeWi-Fi,BluetoothoGPS,apáguelas.
•
Reduzcaelbrillodelapantallayestablezcauntiempodeesperadepantallamás
breve.
Aviso importante

16
Aviso importante
•
DesactivelasincronizaciónautomáticadeGMail,Calendario,Contactosyotras
aplicaciones.
•
Algunasdelasaplicacionesquehadescargadopuedenreducirladuracióndela
batería.
•
Compruebeelniveldecargadelabateríamientrasutilizaaplicaciones
descargadas.
3. Antes de instalar una aplicación o un sistema operativo de
fuente abierta
ADVERTENCIA
•
Si instala y utiliza un sistema operativo diferente al proporcionado por
el fabricante, puede hacer que el teléfono no funcione correctamente.
Además, la garantía de su teléfono se anulará.
•
Para proteger el teléfono y sus datos personales, descargue únicamente
aplicaciones que procedan de fuentes seguras, como Play Store™. Si se
han instalado aplicaciones de forma incorrecta en su teléfono, es posible
que este no funcione normalmente o que se produzca un error grave. Debe
desinstalar del teléfono dichas aplicaciones y todos sus datos y ajustes.
4. Apertura y cambio de aplicaciones
RealizarvariastareasresultasencilloconAndroidporqueesposibleejecutarmásde
unaaplicaciónalavez.Nohaynecesidaddesalirdeunaaplicaciónparaabrirotra.
Puedeutilizarvariasaplicacionesabiertasycambiardeunaaotra.Androidgestiona
cadaaplicación,deteniéndolaeiniciándolasegúnseanecesario,paragarantizarque
lasaplicacionesinactivasnoconsumenrecursosinnecesariamente.

17
Aviso importante
1 Toque .Apareceráunalistadelasaplicacionesutilizadasrecientemente.
2 Presionelaaplicaciónalaquedeseeacceder.Estonodetienelaejecuciónen
segundoplanodelaaplicaciónanterior.Asegúresedepresionar
parasalirde
unaaplicacióncuandoterminedeutilizarla.
•
Paracerrarunaaplicacióndelalistadeaplicacionesrecientes,deslicelavista
previadelaaplicaciónhacialaizquierdaohacialaderecha.Paraborrartodaslas
aplicaciones,presioneLimpiar todo.
5. Cuando la pantalla se bloquea
Silapantallasebloqueaoelteléfononorespondealintentarutilizarlo,extraigala
bateríayvuelvaainsertarla.Acontinuación,enciendaelteléfono.

18
Familiarizarse con el teléfono
Diseño del teléfono
Auricular
Sensor de proximidadObjetivo de la cámara
delantera
Notificación LED
Conector de auriculares
Micrófono
Cargador/puerto USB
Micrófono
LED de infrarrojos
NOTA: Sensor de proximidad
•
Al recibir y realizar llamadas, el sensor de proximidad apaga
automáticamente la luz de fondo y bloquea la pantalla táctil cuando detecta
que el teléfono está cerca de la oreja. Esto amplía la duración de la batería y
evita que el teclado táctil se active por accidente durante las llamadas.
ADVERTENCIA
Si coloca un objeto pesado sobre el teléfono o se sienta sobre él, puede
dañar la pantalla y las funciones de la pantalla táctil. No cubra el sensor de
proximidad con una película de protección ni ningún otro tipo de protección.
Esto podría hacer que el sensor no funcionara correctamente.
Familiarizarse con el teléfono

19
Familiarizarse con el teléfono
Teclas de volumen
Tecla de encendido/
bloqueo
Punto táctil NFC
Enfoque automático con
detección por láser
Altavoz
Objetivo de la cámara
trasera
Flash
Tecla de
encendido/bloqueo
•
Enciendayapagueelteléfonomanteniendopulsadaesta
tecla.
•
Púlselabrevementeparabloquear/desbloquearla
pantalla.
Teclas de volumen (Con la pantalla apagada)
•
PulselateclaSubirvolumendosvecesparainiciar
QuickMemo+
•
PulselateclaBajarvolumendosvecesparainiciarla
Cámara
ADVERTENCIA
•
La antena NFC para este modelo se encuentra en la cubierta posterior.
•
Tenga cuidado de no dañar el punto táctil NFC del teléfono que forma parte
de la antena NFC.

20
Familiarizarse con el teléfono
Instalación de la tarjeta SIM o USIM y la batería
InsertelatarjetaSIMoUSIMproporcionadaporelproveedordeserviciosdetelefonía
móvilylabateríaincluida.
1 Paraquitarlacubiertaposterior,sujeteelteléfonofirmementeconunamano.Con
laotramano,levantelacubiertaposteriorconelpulgarcomosemuestraenel
siguientedibujo.
2 InsertelatarjetaSIMdeslizándolaenlaranuraparatarjetaSIM,talycomose
muestraeneldibujo.Asegúresedequeeláreadecontactosdoradosdelatarjeta
estéorientadahaciaabajo.

21
Familiarizarse con el teléfono
ADVERTENCIA
No intente insertar una tarjeta de memoria en la ranura para tarjeta SIM. En
el caso de que la tarjeta de memoria esté atascada en la ranura para tarjeta
SIM, deberá llevar el dispositivo a un centro de servicios de LG para extraer la
tarjeta de memoria.
NOTA
•
Únicamente las tarjetas microSIM funcionan con el dispositivo.
3 Insertelabatería.
4 Parasustituirlacubiertaeneldispositivo,alineelacubiertaposteriorconel
compartimentodelabatería
ypresiónelahastaqueencajaensusitioconun
clic
.

22
Familiarizarse con el teléfono
Carga de la batería
Carguelabateríaantesdeutilizarelteléfonoporprimeravez.Utiliceelcargador
debateríasuministrado.Tambiénpuedeutilizarelordenadorparacargarlabatería
conectándolaatravésdelcableUSB.
ADVERTENCIA
Utilice solamente cargadores, baterías y cables aprobados por LG. Si utiliza
cargadores, baterías y cables no aprobados puede causar retrasos en la
carga de la batería. Estos incluso pueden hacer que la batería explote o que
el dispositivo resulte dañado. Dichas situaciones no están cubiertas por la
garantía.
Elconectordelcargadorseencuentraubicadoenlaparteinferiordelteléfono.
Introduzcaelcargadoryenchúfeloaunatomadecorriente.
NOTA
•
No abra la cubierta posterior mientras se carga el teléfono.

23
Familiarizarse con el teléfono
Inserción de una tarjeta de memoria
EldispositivoadmitetarjetasmicroSDdehasta2TB.Enfuncióndelfabricanteyeltipo
detarjetadememoria,puedequealgunasnoseancompatiblesconsudispositivo.
ADVERTENCIA
Es posible que algunas tarjetas de memoria no sean del todo compatibles
con el dispositivo. El uso de una tarjeta no compatible podría dañar el
dispositivo o la tarjeta de memoria o bien almacenar los datos almacenados
en la misma.
NOTA
•
La escritura frecuente y el borrado de datos acortan la vida útil de las
tarjetas de memoria.
1 Quitelacubiertaposterior.
2 Inserteunatarjetadememoriaconloscontactosdoradoshaciaabajo.
3 Vuelvaacolocarlacubiertaposterior.

24
Familiarizarse con el teléfono
Extracción de la tarjeta de memoria
Antesdeextraerlatarjetadememoria,deberádesactivarlaparaunaextracciónsegura.
1 Presione
> > >fichaGeneral>Almacenamiento>Desactivar
tarjeta SD.
2 Quitelacubiertaposterioryextraigalatarjetadememoria.
ADVERTENCIA
No extraiga la tarjeta de memoria mientras el dispositivo está transfiriendo
datos o accediendo a la información. En caso contrario, podría provocar
la pérdida de datos o bien dañar la tarjeta de memoria o el dispositivo. El
fabricante no se hace responsable de los daños provocados por el uso
incorrecto de tarjetas de memoria dañadas, incluida la pérdida de datos.
Bloqueo y desbloqueo del dispositivo
Alpulsarlatecla de encendido/bloqueosedesactivalapantallaysebloquea
eldispositivo.Eldispositivosebloqueaautomáticamentesinoseutilizadurante
unperíododetiempoespecificado.Estocontribuyeaevitarquesepresione
accidentalmenteyahorraenergíadelabatería.
Paradesbloqueareldispositivo,pulselatecla de encendido/bloqueoydeslicela
pantallaencualquierdirección.
NOTA
•
La pantalla también se puede activar presionándola dos veces en lugar de
presionar la tecla de encendido/bloqueo.

25
Familiarizarse con el teléfono
Cambio del método de bloqueo de la pantalla
Puedecambiarlaformaenlaquesebloquealapantallaparaevitarqueotraspersonas
accedanasuinformaciónpersonal.
1 Presione
> > >fichaPantalla>Bloqueo de pantalla>Tipo de
bloqueo.
2 Seleccioneeltipodebloqueodepantalladeseadoentredistintasopciones:Ninguno,
Deslizamiento,KnockCode,Patrón,PINyContraseña.
NOTA
•
Antes de establecer un patrón de desbloqueo, debe crear una cuenta de
Google. No olvide el PIN de seguridad que estableció al crear el patrón de
bloqueo.
Precaución Si no ha creado una cuenta de Google en el teléfono y ha
olvidado su PIN, contraseña o la copia de seguridad PIN, deberá llevar a
cabo un restablecimiento completo. Si hace un restablecimiento completo,
se eliminarán todas las aplicaciones y los datos de usuario. Recuerde realizar
una copia de seguridad de todos los datos importantes antes de realizar un
reinicio completo.
SUGERENCIA: Smart Lock
Puede utilizar Smart Lock para que le resulte más sencillo desbloquear el
teléfono. Puede establecer esta opción para que su teléfono se mantenga
desbloqueado cuando tenga un dispositivo Bluetooth seguro conectado al
mismo, cuando no se encuentra en una ubicación que le sea familiar como su
casa o el trabajo o cuando reconoce su cara.
Ajuste del Smart Lock
1 Presione
> > .
2 Presione la ficha Pantalla > Bloqueo de pantalla > Smart Lock.
3 Antes de agregar ningún dispositivo, lugar o cara seguros, deberá
establecer un bloqueo de pantalla (Patrón, PIN o Contraseña).

26
Pantalla de inicio
Sugerencias sobre la pantalla táctil
Acontinuación,lepresentamosalgunassugerenciassobrecómonavegarporel
teléfono.
•
Tocar: toquesóloconundedoparaseleccionarelementos,enlaces,accesos
directosyletraseneltecladoenpantalla.
•
Toque de manera continua: mantengaunelementopulsadoenlapantallasin
levantareldedohastaqueseproduzcaunaacción.
•
Arrastrar:paraarrastrarunelemento,manténgalopulsadounelementoun
momentoy,acontinuación,muevaeldedoporlapantallasinlevantarlohastaque
lleguealaposicióndedestino.Puedearrastrarelementosenlapantalladeinicio
pararecolocarlos.
•
Deslizar o desplazarse:paradeslizarodesplazarse,muevarápidamenteeldedo
sobrelasuperficiedelapantallasindetenersedesdeelmomentoenqueha
presionadolapantalla(paranoarrastrarelelemento).
•
Presionar dos veces:presionedosvecesparaampliarunapáginaWeboun
mapa.
•
Juntar y separar los dedos para ajustar el tamaño de la imagen:utilicelos
dedosíndiceypulgarjuntándolosyseparándolosparaacercaroalejarlaimagen
cuandoutiliceelnavegador,mapasoexaminefotografías.
•
Girar la pantalla:enmuchasaplicacionesymenús,laorientacióndelapantalla
seajustaalaorientaciónfísicadeldispositivo.
NOTA
•
No ejerza una presión excesiva. La pantalla táctil es lo suficientemente
sensible como para detectar una presión ligera pero firme.
•
Utilice la punta del dedo para tocar la opción que desee. Intente no
presionar otros botones.
Pantalla de inicio

27
Pantalla de inicio
Pantalla principal
Lapantalladeinicioeselpuntodeinicioparalamayoríadeaplicacionesyfunciones.
Permiteagregardistintostiposdeelementoscomoaccesosdirectosdeaplicaciones
ywidgetsdeGoogleparaofrecerunaccesoinstantáneoalasaplicacionesyala
información.Esteesellienzopredeterminadoypuedeaccederseaéldesdecualquier
menúpresionando
.
Barra est.
Widget
Iconos de aplicaciones
Indicador de ubicación
Área de botones rápidos
Botones táctiles de Inicio
Muestrainformacióndeestadodelteléfonocomolahora,laintensidaddelaseñal,
elestadodelabateríaeiconosdenotificación.
Loswidgetssonaplicacionesindependientesalasquesepuedeaccederatravés
delapantallaAplicacionesodelapantalladeinicio.Aldiferenciadeunacceso
rápido,unwidgetpuedefuncionarcomounaaplicaciónenpantalla.
Presioneenunicono(deaplicación,carpeta,etc.)paraabrirloyutilizarlo.
Indicaellienzodepantalladeinicioqueseestámostrandoactualmente.
Permiteaccederconunsolotoquealafunciónencualquierlienzodelapantalla
deinicio.

28
Pantalla de inicio
Botón Retroceder
Vuelvealapantallaanterior.Tambiéncierraelementos
emergentes,comomenús,cuadrosdediálogoyel
tecladoenpantalla.
Botón Inicio
Vuelvealapantalladeiniciodesdecualquierotra
pantalla.
Botón Recientes
Aplicaciones
Muestralasaplicacionesutilizadasrecientemente.Si
tocademaneracontinuaestebotón,abriráelmenúde
opcionesdisponibles.
Pantalla de inicio ampliada
Elsistemaoperativoofrecevarioslienzosdepantallasdeinicioparaproporcionarmás
espacioenelqueañadiriconos,widgetsuotroselementos.
•
Desliceeldedoaladerechaoalaizquierdaporlapantalladeinicioparaacceder
alienzosadicionales.
Personalización de la pantalla de página principal
Puedepersonalizarlapantalladeiniciomediantelaincorporacióndeaplicacionesy
widgets,ycambiandolosfondosdepantalla.
Adición de elementos a la pantalla de inicio
1 Tambiénpuedemantenerpulsadalapartevacíadelapantalladeinicio.
2 EnelmenúdelmodoAñadir,seleccioneloselementosquedeseeañadir.
Acontinuación,podráverenlapantalladeinicioesteelementoañadido.
3 Arrástrelosalaubicaciónquedeseeylevanteeldedo.
SUGERENCIA: Para añadir el icono de una aplicación a la pantalla de inicio
desde el menú Aplicaciones, toque de manera continua la aplicación que
desee añadir.

29
Pantalla de inicio
Eliminación de un elemento de la pantalla de inicio
•
Enlapantalladeinicio,toquedemaneracontinuaeliconoquedeseeeliminar>
arrástrelohasta
.
Adición de una aplicación al área de botones rápidos
•
EnlapantallaAplicacionesoenlapantalladeinicio,toquedemaneracontinuaun
iconodeaplicaciónyarrástreloaláreadebotonesrápidos.Acontinuación,suéltela
enlaubicacióndeseada.
Eliminación de una aplicación del área de botones rápidos
•
Presionedemaneracontinuaelbotónrápidoquedeseeyarrástreloa .
NOTA
•
No se puede eliminar el botón Aplicaciones .
Personalización de los iconos de aplicaciones en la pantalla de inicio
1 Toquedemaneracontinuauniconodeaplicaciónhastadesbloquearlodelaposición
enlaqueseencuentray,acontinuación,suéltelo.Semostraráeliconodeedición
enlaesquinasuperiorderechadelaaplicación.
2 Vuelvaapresionareliconodelaaplicaciónyseleccionesutamañoydiseño.
3 PresioneACEPTARparaguardarelcambio.
Cómo volver a aplicaciones utilizadas recientemente
1 Toque .Apareceráunavistapreviadelasaplicacionesutilizadasrecientemente.
2 Presionelavistapreviadeunaaplicaciónparaabrirlaaplicación.
-O-
Presione
paravolveralapantallaanterior.

30
Pantalla de inicio
Panel de notificaciones
Lasnotificacionesleavisandelallegadadenuevosmensajes,eventosdecalendario
oalarmas,asícomodeeventosqueseesténrealizandoenesemomentocomo,por
ejemplo,cuandoestáenunallamada.
Cuandoserecibeunanotificación,semuestraeliconocorrespondienteenlaparte
superiordelapantalla.Losiconosdenotificacionespendientessemuestranala
izquierda,mientrasquelosiconosdelsistema,comolaintensidaddelabateríaodela
redWi-Fi,semuestranaladerecha.
NOTA
•
Las opciones disponibles pueden variar en función de la región o el
proveedor de servicios.
Notificaciones
pendientes
Notificaciones
del sistema
Apertura del panel de notificaciones
Desdelabarradeestado,desliceeldedohaciaabajoparaabrirelpanelde
notificaciones.Paracerrarelpaneldenotificaciones,deslicelapantallahaciaarribao
presione
.

31
Pantalla de inicio
Área Ajustes rápidos
Notificaciones
Borrar
Presionecadabotóndeajusterápidoparaactivarlo/desactivarlo.Toquedemanera
continuaelbotóndeseadoparaaccederdirectamentealmenúdeajustesdela
función.Paravermásbotonesdecambio,desliceeldedoaizquierdaoderecha.
Presione
paraeliminar,añadiroreordenarbotonesdeajustesrápidos.
Semuestranlasnotificacionesactuales,juntoconunabrevedescripcióndecada
una.Presionesobreunanotificaciónparaverla.
Presioneparaborrartodaslasnotificaciones.
Iconos de indicador en la barra de estado
Losiconosdeindicadorsemuestranenlabarradeestadoenlapartesuperiorde
lapantalla,einformanacercadellamadasperdidas,nuevosmensajes,eventosde
calendarioyestadosdeldispositivoentreotros.

32
Pantalla de inicio
Losiconosquesemuestranenlapartesuperiordelapantallaproporcionan
informaciónacercadelestadodeldispositivo.Enlatablasiguientesemuestranalgunos
delosiconosmáshabituales.
Icono Descripción Icono Descripción
Nosehainsertadoninguna
tarjetaSIM.
Seestáreproduciendouna
canciónactualmente
Nohayseñaldered
disponible
Eltimbreestásilenciado
Modoaviónactivado Mododevibraciónactivado
ConectadoaunaredWi-Fi Bateríacargadaporcompleto
Auricularesdecable
conectados
Bateríaencarga
Llamadaencurso
Elteléfonoestáconectadoa
unPCatravésdeuncable
USB
Llamadaperdida Descargandodatos
Bluetoothestáactivado Cargandodatos
Advertenciadelsistema GPSactivado
Alarmaestablecida
Losdatosseestán
sincronizando
Nuevobuzóndevoz
disponible
Seleccioneelmétodode
entrada
Nuevomensajedetextoo
multimedia
ElpuntodeaccesoWi-Fiestá
activo
NFCactivado
Compartircontenidodel
servidordemediosactivado

33
Pantalla de inicio
NOTA
•
La localización del icono en la barra de estado puede diferir según la función
o el servicio.
Teclado en pantalla
Puedeescribirtextoutilizandoeltecladoenpantalla.Eltecladoenpantallaapareceen
lapantallacuandopresionauncampodeentradadetextodisponible.
Uso del teclado e introducción de texto
Toqueesteiconounavezparaponerenmayúsculaslapróximaletraquevaa
escribir.Toquedosvecesparaescribirsiempreenmayúscula.
Presioneparairalosajustesdeteclado.Toquedemaneracontinuaparacambiarel
métododeintroduccióndetexto.
Toqueesteiconoparaintroducirunespacio.
Toqueparacrearunanuevalínea.
Toqueesteiconoparaeliminarelcarácteranterior.
Introducción de letras acentuadas
Alseleccionarfrancésoespañolcomoidiomadeescrituradetexto,puedeescribir
caracteresespecialesfrancesesoespañoles(p.ej.,"á").
Porejemplo,paraintroducir"á",toquedemaneracontinualatecla"a"hastaque
aumentelatecladeampliaciónysemuestrencaracteresdediferentesidiomas.
Acontinuación,seleccioneelcarácterespecialquedesee.

34
Características especiales
Disparo con gesto
LafunciónDisparoenmovimientopermitehacerunafotografíaconlacámara
delanteraconunmovimientodelamano.
Cómo hacer una foto
HaydosmétodosparautilizarlafunciónGestodelamano.
•
Levantelamanoconlapalmaabiertahastaquelacámarafrontalladetectey
aparezcauncuadroenlapantalla.Acontinuación,cierrelamanoenunpuñopara
iniciareltemporizadoryparaquetengatiempoparaprepararse.
-O-
•
Levantelamanoconelpuñocerradohastaquelacámarafrontalladetectey
aparezcauncuadroenlapantalla.Acontinuación,suelteelpuñoparainiciarel
temporizadoryparaquetengatiempoparaprepararse.
-O-
SUGERENCIA: Disparo a intervalo
Si cierra el puño dos veces o toca de manera continua
, la cámara hace 4
fotos consecutivas.
Características especiales

35
Características especiales
Vista de gesto
Trashacerunafotoconelobjetivodelacámarafrontal,puedecomprobar
automáticamentelafotocapturadaconestegesto.
1 Presione
> > .
2 Hagaunafotografíaconlacámarafrontal.
3 Trashacerlafotografía,acerqueelteléfonoasucara.Semostrarálafotocapturada.
Hacer una fotografía Vista previa rápida Volver al modo de
cámara frontal
NOTA
•
En función de la velocidad y el ángulo del gesto, es posible que esta opción
no funcione correctamente.
•
Cuando el ángulo cambia tras la vista previa rápida, volverá al modo de
cámara. Debe ir a la Galería para ver la fotografía de nuevo.

36
Características especiales
Vista Rápida
Cuandolapantalladelteléfonoestáapagada,puedeverlabarradeestado,lahorayla
fechaarrastrandoeldedohaciaabajoporlapantalla.
KnockON
LafunciónKnockONpermiterealizarunadoblepresiónsobrelapantallapara
encenderlaoapagarlafácilmente.
Para encender la pantalla
1 Pulsedosvecesenelcentrodelapantalladebloqueoparaencenderla.
2 Desbloqueelapantallaoaccedaacualquieradelosaccesosdirectosowidgets
disponibles.
Para apagar la pantalla
1 Realiceunadoblepresiónenunáreavacíadelapantalladeinicioolabarrade
estado.
2 Lapantallaseapagará.
NOTA
•
Presione en el área central de la pantalla. Si presiona en la zona inferior o
superior, el índice de reconocimiento podría descender.

37
Características especiales
Knock Code
LafunciónKnockCodelepermitecrearsupropiocódigodedesbloqueoutilizando
unacombinacióndepulsacionesenlapantalla.Puedeaccederalapantalladeinicio
directamentecuandolapantallaestáapagadapresionandolamismasecuenciaenla
pantalla.
NOTA
•
Si introduce un Knock Code incorrecto 6 veces, deberá iniciar sesión
obligatoriamente con su cuenta de Google o introducir su PIN de seguridad.
•
Utilice la punta del dedo o la uña para tocar la pantalla y encenderla o
apagarla.
1 Presione > > >fichaPantalla>Bloqueo de pantalla>Tipo de
bloqueo>Knock Code.
2 PresioneloscuadradossiguiendounpatrónparaestablecerelKnockCode.Elpatrón
deKnockCodepuedetenerentre3y8pulsaciones.
Desbloqueo de la pantalla utilizando el Knock Code
Cuandoseapaguelapantalla,puededesbloquearlaintroduciendoelpatróndeKnock
Codequeyahaestablecido.

38
Características especiales
Ventana doble
Estafunciónlepermitirállevaracabovariastareasaldividirlapantallaendos,porlo
quepodráutilizardosaplicacionescompatiblesalmismotiempo.
1 Presione
>Ventana doble.
2 Presioneoarrastreeliconodelaaplicaciónquedeseeutilizar.
:PresioneparaverlasopcionesdelmenúVentanadobleoarrastreparacambiar
eltamañodelaspantallasdivididas.
:Despláceseentrepantallasdivididas.
:Vealalistadeaplicaciones.
:Cambielaventanaseleccionadaapantallacompleta.
:Cierrelaventanadelaaplicaciónseleccionadaactualmente.
NOTA
•
Puede activar o desactivar la Ventana doble a través del menú Ajustes.
1 Presione
> > > ficha General > Ventana doble.
2 Deslice la tecla de cambio a Encendido o Apagado.
QuickMemo+
LafunciónQuickMemo+lepermitetomarnotasyhacercapturasdepantalla.
PuedeutilizarQuickMemo+paratomarnotasduranteunallamadadeformasencillay
eficaz,conunaimagenguardadaobienlapantallaactualdelteléfono.
1 Presioneydeslicelabarradeestadohaciaabajoypresione
.

39
Características especiales
2 Creeunanotaconlassiguientesopciones:
Toqueparadeshacerlaúltimaacciónrealizada.
Toquepararehacerlaúltimaaccióndeshecha.
Presioneparainsertartextoenlanota.
Presioneparaseleccionareltipoyelcolordellápiz.
Presioneconelfindeutilizarelborradorparaborrarlasmarcasdelápiz
enlanota.
Presioneparaguardarlanotaquehacreado.
Presioneparaocultaromostrarlabarradeherramientas.
NOTA
•
Use la punta del dedo para utilizar la función QuickMemo+. No utilice la uña.
3 Presione paraguardarlanotaactualenQuickMemo+ oenlaGalería.
Cómo descartar QuickMemos
•
Presione .
Visualización de la nota guardada
•
Presione > > yseleccioneelálbumdeQuickMemo+.
-O-
Presione
> > yseleccionelanotaquedesee.

40
Características especiales
QSlide
Encualquieradelaspantallas,utiliceelPaneldenotificaciónparaaccederyutilizarcon
todafacilidadelBlocdenotas,elCalendario,laCalculadoraymuchomásconQSlide.
Presioneparaampliarlaventana
atamañocompleto.
Presioneparaajustarla
transparenciadelaventana.
Presioneparacerrarlaventana
QSlide.
Arrastreparaajustareltamaño.
1 Toqueydeslicelabarradeestadohaciaabajo>presioneQSlideparaverlas
aplicacionesQSlidedisponibles.
SUGERENCIA: Mientras se utilizan aplicaciones compatibles con QSlide,
presione > QSlide. La función se mostrará como una pequeña ventana en
la pantalla.
2 PuedeutilizarypresionarlapantallabajolasventanasdeQSlidecuandolabarrade
transparencianoestécompleta
.
NOTA
•
QSlide admite hasta dos ventanas a la vez.
QuickRemote
QuickRemoteconviertesuteléfonoenunmandoadistanciauniversalparacontrolarsu
televisor,decodificador,sistemadeaudioymuchomás.

41
Características especiales
Configuración
1 Toqueydeslicelabarradeestadohaciaabajoy
presione
>AÑADIR MANDO A DISTANCIA.Sino
puedever
,presione >activeQuickRemote
paraactivarlo.
-O-
Presione
> >fichaAplicaciones (sies
necesario)>
>presione .
2 Seleccioneeltipoylamarcadeldispositivo,a
continuaciónsigalasinstruccionesenpantallapara
configurareldispositivo.
Acceso a QuickRemote
3 Unavezhayacompletadolaconfiguracióninicial,podrá
accederfácilmenteaQuickRemotedesdeelPanelde
notificación.AbraelPaneldenotificaciónyutilicelas
funcionesdeQuickRemote.
NOTA
•
QuickRemote funciona como un mando a distancia normal con señales
infrarrojas (IR). Tenga cuidado de no cubrir el sensor de infrarrojos en la
parte superior del teléfono cuando use la función QuickRemote (man. ráp).
Es posible que no se admita esta función dependiendo del modelo, el
fabricante y la empresa que ofrece el servicio.

42
Configuración de la cuenta de Google
LaprimeravezqueabraunaaplicacióndeGoogleenelteléfono,selesolicitaráque
iniciesesiónconsucuentadeGoogle.SinoposeeunacuentadeGoogle,seleinvitará
acrearuna.
Creación de una cuenta de Google
1 Presione > > >fichaGeneral>Cuentas y sincronización.
2 PresioneAÑADIR CUENTA>Google>O crear una cuenta nueva.
3 Introduzcasunombreyapellidosy,acontinuación,presioneSIGUIENTE.
4 IntroduzcaunnombredeusuarioypresioneSIGUIENTE.Elteléfonosecomunicará
conlosservidoresdeGoogleyverificaráladisponibilidaddelnombredeusuario.
5 IntroduzcasucontraseñaypresioneSIGUIENTE.
6 Sigalasinstruccioneseintroduzcalainformaciónsolicitadayopcionalsobrela
cuenta.Esperemientraselservidorcreasucuenta.
Inicio de sesión con su cuenta de Google
1 Presione > > >fichaGeneral>Cuentas y sincronización.
2 PresioneAÑADIR CUENTA>Google.
3 Introduzcasudireccióndee-mailypresioneSIGUIENTE.
4 Traseliniciodesesión,yapodráutilizarGmailylosserviciosdeGoogleincluidosen
elteléfono.
5 UnavezconfiguradalacuentadeGoogle,elteléfonosesincronizará
automáticamenteconlacuentadeGoogledelaWeb(sihaydisponibleunaconexión
dedatos).
Configuración de la cuenta de Google

43
Configuración de la cuenta de Google
Trashaberiniciadosesión,suteléfonosesincronizaráconsusserviciosdeGoogle,
comoGmail,GoogleContactsyGoogleCalendar.TambiénpodráutilizarMaps,
descargaraplicacionesdePlayStore,realizarcopiasdeseguridaddesusajustesenlos
servidoresdeGoogleyaprovecharotrosmuchosserviciosqueGoogleleofrecepara
suteléfono.
IMPORTANTE
•
Algunas aplicaciones, como el calendario, sólo funcionan con la primera
cuenta de Google que agregue. Si tiene previsto utilizar más de una cuenta
de Google con el teléfono, primero asegúrese de iniciar sesión en la cuenta
que desea utilizar con dichas aplicaciones. Al iniciar sesión, sus contactos,
mensajes de Gmail, eventos de calendario y otros datos de estas aplicaciones
y servicios de la Web se sincronizan con su teléfono. Si no inicia sesión en la
cuenta de Google durante la configuración, se le solicitará que inicie sesión o
que cree una cuenta de Google la primera vez que inicie una aplicación que
requiera una, como Gmail o Play Store.
•
Si tiene una cuenta de empresa, su departamento de TI puede tener
instrucciones especiales sobre cómo iniciar sesión en dicha cuenta.

44
Conexión a redes y dispositivos
Wi-Fi
PuedeutilizarelaccesoaInternetdealtavelocidadconlacoberturadelpuntode
accesoinalámbrico.
Conexión a redes Wi-Fi
1 Presione > > >fichaRedes>Wi-Fi.
2 Pulse
paraactivarestafunciónycomenzarabuscarredesWi-Fidisponibles.
3 Presioneunaredparaconectarseaella.
•
Silaredestáprotegidaconuniconodecandado,deberáintroducirunaclaveo
contraseñadeseguridad.
4 LabarradeestadomuestraiconosqueindicanelestadodelaconexiónWi-Fi.
NOTA
•
Si no se encuentra dentro de un área Wi-Fi o desactiva la opción de Wi-Fi,
puede que el dispositivo se conecte automáticamente a la Web utilizando
datos móviles, lo cual puede tener cargos adicionales por datos.
SUGERENCIA: Cómo obtener la dirección MAC
Presione
> > > ficha Redes > Wi-Fi > > Wi-Fi avanzado >
Dirección MAC.
Conexión a redes y dispositivos

45
Conexión a redes y dispositivos
Bluetooth
Bluetoothesunatecnologíadecomunicacionesdecortoalcancequelepermite
conectarsedeformainalámbricaaunaseriededispositivosBluetooth,porejemplo,
auricularesokitsmanoslibresparaautomóvil,teléfonos,ordenadores,impresorasy
dispositivosinalámbricosconBluetooth.
NOTA
•
LG no se hace responsable de la pérdida, interceptación o uso indebido de
los datos enviados o recibidos a través de la funcionalidad Bluetooth.
•
Asegúrese siempre de que los dispositivos con los que comparte
información, o de los que recibe datos, son fiables y seguros.
•
Si hay obstáculos entre los dispositivos, la distancia de funcionamiento
puede reducirse.
•
Algunos dispositivos, especialmente los que no cuentan con la certificación
de Bluetooth SIG, pueden ser incompatibles con su teléfono.
Emparejamiento de su teléfono con otro dispositivo Bluetooth
1 Presione > > >fichaRedes>Bluetooth.
2 Presione
paraactivarlaconexiónBluetoothycomenzarabuscardispositivos
Buetoothdisponibles.
•
Sitambiéndeseadetectarlosdispositivosvisiblesdentrodelradiodealcance,
presioneBUSCAR.
3 Seleccionedelalistaeldispositivoconelquedeseaasociarse.Unavezqueel
emparejamientosehayarealizadocorrectamente,elteléfonoseconectaráalotro
dispositivo.
NOTA
•
El emparejamiento entre dos dispositivos Bluetooth es un proceso de
una sola operación. Una vez creado el emparejamiento, los dispositivos
continuarán reconociéndolo e intercambiarán información.

46
Conexión a redes y dispositivos
SUGERENCIA: Para obtener información sobre el modo y la contraseña de
vinculación (normalmente 0 0 0 0, cuatro ceros), consulte la documentación
incluida con el dispositivo Bluetooth.
Envío de datos a través de Bluetooth
1 Seleccioneunarchivooelemento,porejemplo,uncontactooarchivomultimedia.
2 SeleccionelaopcióndeenvíodedatosatravésdeBluetooth.
3 BuscaryvincularseaundispositivoBluetooth.
NOTA
•
Debido a las distintas especificaciones y características del resto de
dispositivos compatibles con Bluetooth, la visualización y operaciones
podrían ser diferentes, y funciones como, por ejemplo, la transferencia o el
intercambio, podrían no ser posibles con todos los dispositivos compatibles
con Bluetooth.
Recepción de datos a través de Bluetooth
1 Presione > > >fichaRedes>Bluetooth.
2 Pulse
paraactivarlaconexiónBluetooth.
3 Recibiráunasolicitudparaaceptarunintentodeemparejamientodeldispositivode
envío.AsegúresedeseleccionarACEPTAR.
Wi-Fi Direct
Wi-FiDirectproporcionaunaconexióndirectaentredispositivosconWi-Fihabilitadosin
necesidaddeunpuntodeacceso.
Activación de Wi-Fi Direct
1 Presione > > >ficha Redes> Wi-Fi.
2 Presione
> Wi-Fi avanzado > Wi-Fi Direct.

47
Conexión a redes y dispositivos
NOTA
•
Cuando se encuentre en este menú, su dispositivo será visible para otros
dispositivos de Wi-Fi Direct cercanos.
Transferencia de datos entre un PC y el dispositivo
PuedecopiarotransferirdatosentreunPCyeldispositivo.
Transferencia de datos
1 ConectesudispositivoaunPCutilizandoelcableUSBincluidoconsuteléfono.
2 Abraelpaneldenotificaciones,presioneeltipodeconexiónactualyseleccione
Dispositivo de medios (MTP).
3 ApareceráunaventanaemergenteensuPCquelepermitirátransferirlosdatos
deseados.
NOTA
•
Deberá instalar el controlador de la plataforma Android de LG en su PC
para poder detectar el teléfono.
•
Compruebe los requisitos para utilizar el Dispositivo de medios (MTP).
Elementos Requisito
SO MicrosoftWindowsXPSP3,Vistaosuperior
VersióndelReproductorde
WindowsMedia
ReproductordeWindowsMedia10osuperior

48
Llamadas
Llamadas
Realizar una llamada
1 Presione > paraabrirelmarcador.
2 Introduzcaelnúmeroutilizandoelmarcador.Paraeliminarundígito,toque
.
3 Despuésdeintroducirelnúmerodeseado,presione
pararealizarlallamada.
4 Parafinalizarlallamada,presione
.
SUGERENCIA: para introducir el signo "+" cuando realice llamadas
internacionales, mantenga pulsado .
Llamadas a contactos
1 Presione > paraabrirlalistadecontactos.
2 Despláceseporlalistadecontactos.Tambiénpuedeintroducirelnombredel
contactoenelcampodebúsquedaodesplazarseporlasletrasdelalfabetoquese
muestranenelbordederechodelapantalla.
3 Enlalistaqueaparece,toqueelcontactoalquedeseallamar.
Contestar y rechazar una llamada
•
Deslice encualquierdirecciónparacontestarlallamada.
•
Deslice encualquierdirecciónpararechazarlallamada.
NOTA
•
Presione o deslice el icono Rechazar con mensaje si desea enviar un
mensaje a la persona que llama.

49
Llamadas
Realizar una segunda llamada
1 Enlaprimerallamada,presione >Añadir llamadaymarqueelnúmero.
2 Presione
pararealizarlallamada.
3 Ambasllamadasapareceránenlapantalladellamada.Laprimerallamadase
bloquearáysepondráenespera.
4 Presioneelnúmeroquesemuestraparaalternarentrellamadas.Tambiénpuede
presionar
paracomenzarunaconferenciatelefónica.
5 Parafinalizartodaslasllamadas,toque
.
NOTA
•
Se le cobrará por cada una de las llamadas realizadas.
Ver los registros de llamadas
1 Presione > >fichaRegistro.
2 Permiteverlalistadetodaslasllamadasrealizadas,recibidasyperdidas.
SUGERENCIA:
•
Presione cualquier entrada del registro de llamadas para ver su fecha, hora
y duración.
•
Presione > Eliminar todo para borrar todos los elementos registrados.
Ajustes de llamadas
Puedeconfigurarlosajustesdellamada,comoeldesvíodellamadasylallamadaen
espera,asícomoelrestodefuncionesespecialesqueofrezcasuoperador.
1 Presione
> paraabrirelmarcador.
2 Presione
>Ajustes de llamadasyconfigurelasopcionesdeseadas.

50
Contactos
Contactos
Puedeañadircontactosalteléfonoysincronizarlosconloscontactosenlacuentade
Googleyotrascuentasqueadmitanlasincronizacióndecontactos.
Buscar un contacto
1 Presione > paraabrirlalistadecontactos.
2 PresioneBuscar contactoseintroduzcaelnombredelcontactomedianteel
teclado.
Agregar un contacto nuevo
1 Presione > eintroduzcaelnúmerodelcontactonuevo.
2 Presione
>Añadir a contactos>Nuevo Contacto.
3 Sideseaañadirunaimagenalnuevocontacto,presioneeliconodelaimagen.
SeleccioneentreHacer una fotooSeleccionar de galería.
4 Introduzcalainformacióndeseadaparaelcontacto.
5 PresioneGUARDAR.
Contactos favoritos
Puedeclasificarloscontactosalosquellameconfrecuenciacomofavoritos.
Adición de un contacto a sus favoritos
1 Presione > paraabrirlalistadecontactos.
2 Presioneuncontactoparaverlosdetalles.
3 Presionelaestrellaenlapartesuperiorderechadelapantalla.Laestrellasepondrá
amarilla.

51
Contactos
Eliminación de un contacto de su lista de favoritos
1 Presione > >fichaFavoritos.
2 Seleccioneuncontactoparaverlosdetalles.
3 Presionelaestrellaamarillaenlapartesuperiorderechadelapantalla.Laestrella
sevuelvedecoloroscuroyelcontactoseeliminadelosfavoritos.
Crear un grupo
1 Presione > >fichaGrupos.
2 Presione
>Nuevo grupo.
3 Introduzcaunnombreparaelnuevogrupo.Tambiénpuedeestableceruntono
distintoparaelgruporeciéncreado.
4 PresioneAñadir miembrosparaañadircontactosalgrupoy,acontinuación,
presioneAÑADIR.
5 PresioneGUARDARparaguardarelgrupo.
NOTA
•
Si borra un grupo, no se perderán los contactos asignados a ese grupo.
Permanecerán en su lista de contactos.

52
Mensajería
Suteléfonocombinamensajesdetextoymultimediaenunmenúintuitivoyfácilde
usar.
Enviar un mensaje
1 Presione > > .
2 IntroduzcaunnombredecontactoounnúmerodeteléfonoenelcampoPara.
Amedidaqueintroduzcaelnombredelcontacto,apareceráncontactosque
coincidan.Puedepresionarundestinatariosugeridoyañadirmásdeuncontacto.
NOTA
•
Puede que se le cobre por cada mensaje de texto que envíe. Póngase en
contacto con su proveedor de servicios.
3 Presioneelcampodetextoparacomenzaraintroducirelmensaje.
4 Presione
paraabrirelmenúdeopciones.Elijaentrelasdistintasopciones
disponibles.
SUGERENCIA: Puede presionar para adjuntar al mensaje el archivo que
desee compartir.
5 PresioneEnviarparaenviarelmensaje.
SUGERENCIA:
•
El límite de 160 caracteres puede variar de un país a otro en función de la
forma en la que el mensaje de texto esté codificado y del idioma en el que
esté escrito el mensaje.
•
Si añade un archivo de imagen, vídeo o audio a un mensaje de texto, este
se convertirá automáticamente en un mensaje multimedia por lo que se
generarán cargos adicionales.
Mensajería

53
Mensajería
NOTA
•
Si recibe un mensaje de texto durante una llamada, escuchará una
notificación de audio.
Vista de conversación
Losmensajesintercambiadosconotrapersonasevisualizanporordencronológico
paraasímantenerlalógicadelasconversacionesybuscarlascontotalfacilidad.
Modificación de los ajustes de mensajes
Losajustesdemensajesdelteléfonoestánpredefinidosparaquepuedaenviar
mensajesdesdeelprincipio.Puedecambiarlosajustesconformeasuspreferencias.
•
Presione > > >Ajustes.

54
E-mail
PuedeutilizarlaaplicaciónCorreoelectrónicoparaleerelcorreoelectrónicode
proveedoresdistintosaGmail.LaaplicaciónE-mailescompatibleconlossiguientes
tiposdecuenta:POP3,IMAPyMicrosoftExchange(parausuariosdeEnterprise).
Administración de cuentas de e-mail
Para abrir la aplicación Correo electrónico
LaprimeravezqueabralaaplicaciónCorreoelectrónico,seabriráunasistentede
configuraciónparaayudarleaañadirunacuentadecorreoelectrónico.
•
Presione > > .
Adición de otra cuenta de e-mail:
•
Presione > > > >Ajustes > .
Modificación de los ajustes generales de e-mail:
•
Presione > > > >Ajustes>Ajustes general.
Eliminación de una cuenta de e-mail:
•
Presione > > > >Ajustes> >Borrar cuenta>Seleccionela
cuentaquedeseaborrar>ELIMINAR>SÍ.
Trabajo con las carpetas de cuenta
•
Presione > > > >Mostrar todas las carpetas.
Cadacuentatienelassiguientescarpetas:Recibidos,Enviando,EnviadosyBorradores.
Segúnlasfuncionesqueadmitaelproveedordeserviciosdelacuenta,puedecontar
concarpetasadicionales.
E-mail

55
E-mail
Redacción y envío de correo electrónico
1 Presione > > > paracrearunnuevomensajedecorreoelectrónico.
2 Introduzcaladireccióndeldestinatariodelmensaje.Amedidaqueintroduzca
eltexto,apareceránlasdireccionesdesuscontactosquecoincidan.Separelas
distintasdireccionesconpuntoycoma.
3 PresioneelcampoCC/CCOparaenviarunacopiaounacopiaocultaaotros
contactos/direccionesdee-mail.
4 Presioneelcampodetextoeintroduzcaelmensaje.
5 Presione
paraadjuntarelarchivoquedeseeenviarconsumensaje.
6 Presione
paraenviarelmensaje.

56
Cámara y Vídeo
Opciones de la cámara en el visor
Puedeutilizarlacámaraovideocámaraparacapturarycompartirfotosyvídeos.
•
Presione > > > > .
1
6
9
2
7
8
3
4
5
Ocultar/visualizar opciones: presioneparaocultar/visualizarlasopcionesdela
cámaraenelvisor.ElijaentreSimple, BásicooManual.
Flash: lepermitegestionarelflashdelacámara.
Cambiar cámara:lepermitealternarentreelobjetivofrontaldelacámarayla
trasera.
Modo disparo:lepermiteseleccionarelmododedisparoparalafotografía.
Ajustes:presioneesteiconoparaabrirelmenúdeajustesdelacámara.
Galería:presioneparaverlaúltimafotoovídeoquehagrabado.
Grabar:presioneparacomenzaragrabar.
Capturar: presioneesteiconoparahacerunafoto.
Botón Retroceder: presioneesteiconoparasalirdelacámara.
Cámara y Vídeo

57
Cámara y Vídeo
NOTA
•
Asegúrese de limpiar la cubierta protectora del objetivo con un paño de
microfibra antes de hacer fotografías. Un objetivo con manchas de huellas
dactilares puede producir imágenes borrosas con un efecto de "aureola".
Utilizar la configuración avanzada
Enelvisordelacámara,presione paramostrarlasopcionesavanzadas.Presione
cadaiconoparaajustarlossiguientesajustesdelacámara.
Combinafotostomadasconvariasexposicionesenunafotoóptimapara
obtenerlamejorversiónensituacionesdeiluminacióndifíciles.
Establezcaeltamañodelafotoyvídeo.
Lepermitehacerfotosporcomandosdevoz.Unavezactivado,solotiene
quedecir"Cheese","Smile","LG",etc.parahacerunafotografía.
Ajusteeltemporizadordelacámara.Idóneosideseasalirenlafotografía
ovídeo.
Lepermitehacermejoresfotografíasygrabarmejoresvídeosgracias
alavisualizacióndeunalíneadecuadrículaqueleayudaráconla
alineación.
/
Definalaubicacióndealmacenamientoparalasimágenesylosvídeos.
ElijaentreIN(memoriainterna)ySD(tarjetadememoria).Estemenú
soloaparececuandosehainsertadounatarjetaSD.
Lepermitedescubrircómofuncionaunaopción.Esteiconole
proporcionaunaguíadeayuda.

58
Cámara y Vídeo
Modo Manual en el visor
Puedecontrolartodaslasopcionesdedetallemanualmente.
•
Presione > > > > .
1
62 7
8
3 4 5
–PresioneesteiconoparaseleccionarunformatodearchivoentreJPEGy
DNG.
–Presioneesteiconoparamejorarlacalidaddecolorendistintas
condicioneslumínicas.
–Presioneesteiconoparautilizarelmododeenfoquemanual.
–Presioneesteiconoparaajustarelbrillo.
–PresioneesteiconoparaajustarelvalorISO.
–Presioneesteiconoparaajustarlavelocidaddeobturación.
–Presioneesteiconoparautilizarelbloqueodeexposiciónautomático.
Muestralainformacióndeestadomanual.

59
Cámara y Vídeo
Uso de la configuración avanzada para el modo manual
Enelvisordelacámara,presione paramostrarlasopcionesavanzadas.Presione
cadaiconoparaajustarlossiguientesajustesdelacámara.
Presioneparamostrarunalíneainclinadaounalíneadecuadrículaquele
ayudaráconlaalineación.
Presioneparamostrarunhistograma.
Hacer una foto
1 Presione > > .
2 Enfoquehaciaelsujetoparaqueaparezcaenlapantalla.
3 Apareceráunrecuadroalrededorparaindicarquelacámaraestáenfocada.
4 Presione
parahacerunafotografía.Laimagenseguardaráautomáticamenteen
laGalería.
Una vez haya hecho una foto
Presionelaminiaturadelaimagenenlapantallaparaverlaúltimafotoquehatomado.
Presioneesteiconoparaeditarlafotografía.
Toqueesteiconoparahacerotrafotografíainmediatamente.
Presioneesteiconoparaabrirlasopcionesdeusocompartidodisponibles.
Presioneesteiconoparaborrarlafotografía.
Presioneesteiconoparaaccederaopcionesadicionales.
Presioneparaañadirlafotoasusfavoritos.

60
Cámara y Vídeo
Auto Focus de múltiples puntos
Cuandohaceunafoto,lafunciónAutoFocus(AF)demúltiplespuntosseactiva
automáticamenteylepermitiráverunaimagenclara.
Disparo en ráfaga
Permitehacervariasfotografíasrápidamente.Mantengapulsada .
Modo Panorama
Permitehacerunafotografíapanorámica.
1 Presione
> > .
2 Toque
Modo
> .
3 Presione
paracomenzarahacerlafotografíapanorámica.
4 Desplaceelteléfonolentamenteenunadirección.
5 Asegúresedequeeláreadeenfoquesealineaconlaguíaazulmientrashacela
fotografía.
6 Presione
paraterminardehacerlafotografíapanorámica.
Dual
LafunciónDoblelepermitehacerunafotografíaograbarunvídeoconlascámaras
frontalytraseraalmismotiempo.
1 Presione
> > .
2 Toque
Modo
> .
NOTA
•
Arrastre la pantalla pequeña para moverla a la ubicación que desee.
Mantenga pulsada la pantalla pequeña para cambiar su tamaño. Presione
en la pantalla pequeña para alternar entre las dos cámaras.

61
Cámara y Vídeo
3 Presione parahacerunafotografía.
-O-
Presione
paragrabarvídeo.
4 Presione
paradetenerlagrabacióndual.
Zoom 8X
Alutilizarelobjetivodelacámaraposterior,podráusarelzoomparaacercaroalejarun
máximode8x.
NOTA
•
Mantenga el pulso firme. Esta función no es compatible con algunas
funciones. Es posible que los objetos se superpongan al hacer fotografías
de objetos en movimiento.
Grabar un vídeo
1 Presione > > .
2 Enfoquehaciaelsujetoparaqueaparezcaenlapantalla.
3 Presione
paracomenzaragrabarvídeo.
4 Laduracióndelagrabaciónapareceindicadaenlapartesuperiordelapantalla.
NOTA
•
Presione para hacer fotos mientras graba vídeo.
5 Pulse parapausarlagrabacióndevídeo.Presione parareanudarlagrabación.
-O-
Toque
paradetenerlagrabación.Elvídeoseguardaráautomáticamenteenla
Galería.

62
Cámara y Vídeo
Después de grabar un vídeo
Presionelaminiaturadelvídeoenlapantallaparaverelúltimovídeoquehagrabado.
Presioneesteiconoparagrabarotrovídeoinmediatamente.
Presioneesteiconoparaabrirlasopcionesdeusocompartidodisponibles
(comoMensajesoBluetooth)ycompartir.
Presioneesteiconoparaborrarelvídeo.
Presioneesteiconoparaaccederaopcionesadicionales.
Presioneesteiconoparaañadirelvídeoasusfavoritos.
Zoom en directo
Elzoomendirectolepermiteacercaroalejarunapartedeunvídeoqueseestá
reproduciendoparaaumentaroreducirlapartedeseada.
Durantelavisualizacióndeunvídeo,utilicelosdedosíndiceypulgarjuntándolosy
separándolosparaacercaroalejarlaimagen.
NOTA
•
No ejerza una presión excesiva. La pantalla táctil es lo suficientemente
sensible como para detectar un toque ligero pero firme.

63
Cámara y Vídeo
Reproducción doble
Reprod.Doble(conexiónconcableoinalámbricaadospantallas)puedeejecutarseen
unapantalladiferente.
NOTA
•
Conecte dos dispositivos con un cable (Slimport-HDMI) o de forma
inalámbrica (Miracast). El dispositivo a conectar puede ser un televisor o un
monitor conectado mediante un cable HDMI o Miracast. Tanto la Galería
como las aplicaciones de Vídeo son compatibles con Reprod. Doble.
Presione cuando dos pantallas muestren un estado diferente (p, ej.,
cuando el monitor muestre un vídeo y la aplicación de vídeo del teléfono
una pantalla vacía) para comenzar la Reprod. Doble. La función Reprod.
Doble no es compatible con todos los vídeos. Reprod. Doble funciona a una
resolución de 1280 x 720 o superior.
Galería
LaaplicaciónGaleríamuestralasfotografíasylosvídeosalmacenados,incluyendo
tantolosquehayatomadoconlaaplicaciónCámaracomolosquehayadescargadode
Internetodeotrasubicaciones.
1 Presione
> > paraverlasimágenesalmacenadas.
2 Presioneunálbumparaabrirloyversuscontenidos.(Lasimágenesylosvídeosdel
álbumaparecenenordencronológico).
3 Presioneunafotografíaenunálbumparaverla.
NOTA
•
En función del software instalado, algunos formatos de archivo podrían no
ser compatibles.
•
Puede que algunos archivos no se reproduzcan correctamente debido a su
codificación.

64
Cámara y Vídeo
Visualización de imágenes
LaGaleríamuestralasimágenesencarpetas.Cuandounaaplicación,comoE-mail,
guardaunaimagen,secreaautomáticamentelacarpetadedescargas,enlaquese
guardarálafotografía.Delmismomodo,alrealizarseunacapturadepantalla,secrea
lacarpetaCapturasdepantalla.
Lasimágenessemuestransegúnlafechaenlaquesehancreado.Seleccioneuna
fotografíaparaverlaenpantallacompleta.Desplácesealaderechaoalaizquierda
paraverlaimagenanteriorosiguiente.
Vista cronológica
LaGaleríaordenaautomáticamenteymuestranumerosasfotosenordencronológico
paraverlasdeunVistaRápida.
1 Presione
> > .
2 Presione
>Duración.
3 SeleccioneentreAño,Mes yDía(s).
Vista Memorias
LaGaleríaorganizaautomáticamenteymuestralosálbumesdememoriasenfunción
delainformaciónderegiónyhoradelasfotosguardadas.
1 Presione
> > .
2 Presione
>Memorias.
3 Seleccioneálbumesdememorias.
NOTA
•
Esta función es un servicio basado en la ubicación. Haga fotos y vídeos con
sus ubicaciones.

65
Cámara y Vídeo
Acercar y alejar mediante el zoom
Paraampliarunaimagen,utiliceunodelosmétodossiguientes:
•
Toquedosveceslazonaquedeseaampliar.
•
Coloquedosdedossobrelazonadelaimagenquedeseaampliarysepárelos.
Júntelosopresionedosvecesenlaimagenparareducirla.
Opciones de vídeo
1 Presione > > .
2 Seleccioneelvídeoquedeseaver.
Presioneesteiconoparapausar/reanudarlareproduccióndevídeo.
Mantengapulsadoesteiconoparaavanzarrápidamenteen
incrementosde3segundos.
Presioneparaavanzarrápidamente10segundos.
Mantengapulsadoesteiconopararebobinarenincrementosde3
segundos.
Presionepararetroceder10segundos.
Presioneparaajustarelvolumendelvídeo.
Presioneparabloquear/desbloquearlapantalla.
PresioneparautilizarQSlideparalaaplicaciónVídeo.

66
Cámara y Vídeo
Presioneesteiconoparacompartirsuvídeopormediodela
funciónSmartShare.
Presioneesteiconoparaaccederaopcionesadicionales.
NOTA
•
Durante la reproducción de un vídeo, deslice la parte derecha de la pantalla
hacia arriba o hacia abajo para ajustar el volumen.
•
Durante la reproducción de un vídeo, deslice la parte izquierda de la pantalla
hacia arriba o hacia abajo para ajustar el brillo.
•
Durante la reproducción de un vídeo, deslice el dedo de izquierda a derecha
(o viceversa) para avanzar rápidamente o retroceder.
Edición de fotos
Cuandoestéviendounafoto,presione .
Borrar fotos y vídeos
Utiliceunodelosmétodossiguientes:
•
Cuandoestéenunacarpeta,presione ,seleccionelasfotosolosvídeosy,a
continuación,presioneBORRAR.
•
Cuandoestéviendounafoto,presione .
Ajuste del fondo de pantalla
Cuandoestéviendounafoto,presione >Usar imagen comoparaestablecerla
imagencomofondodepantallaoasignárselaauncontacto.
NOTA
•
En función del software instalado, algunos formatos de archivo podrían no
ser compatibles.
•
Si el tamaño de archivo es superior a la capacidad de memoria disponible,
puede producirse un error al abrir los archivos.

67
Multimedia
Música
Elteléfonocuentaconunreproductordemúsicaparaquepuedaescuchartodassus
cancionesfavoritas.
Reproducir una canción
1 Presione > > .
2 PresionelafichaCanciones.
3 Seleccionelacanciónquedeseareproducir.
4 Disponedelassiguientesopciones.
Multimedia

68
Multimedia
Toqueparaponerenpausalareproducción.
Presioneparacontinuarconlareproducción.
Presioneparasaltaralapistasiguientedelálbum,listadereproducción
olistadereproducciónaleatoria.Toquedemaneracontinuaparaavanzar
rápidamente.
Presioneparareiniciarlapistaactualosaltaralapistaanteriordel
álbum,listadereproducciónolistadereproducciónaleatoria.Mantenga
pulsadopararetroceder.
Presioneparaajustarelvolumen.
Presioneparaestablecerefectosdeaudio.
Presioneparareproducirlalistadereproducciónactualenmodoaleatorio
(laspistassereproducenenordenaleatorio).
Presioneparacambiarentrerepetirtodaslascanciones,repetirla
canciónactualydesactivarlarepetición.
PresioneparacompartirsumúsicapormediodelafunciónSmartShare.
Presioneparaañadirlacanciónasusfavoritos.
Presioneparaabrirlalistadereproducciónactual.
Presioneesteiconoparaaccederaopcionesadicionales.

69
Multimedia
NOTA
•
En función del software instalado, algunos formatos de archivo podrían no
ser compatibles.
•
Si el tamaño de archivo es superior a la capacidad de memoria disponible,
puede producirse un error al abrir los archivos.
•
El copyright de los archivos de música puede estar protegido por tratados
internacionales y leyes nacionales de derechos de autor. Por tanto, puede
que sea necesario obtener permiso o una licencia para reproducir o copiar
música. En algunos países, las leyes nacionales prohíben la realización de
copias de material protegido con copyright. Antes de descargar o copiar el
archivo, infórmese sobre la legislación relativa a este tipo de material en el
país correspondiente.

70
Utilidades
Alarmas
LaaplicaciónRelojofreceaccesoaAlarmas,Temporizados,Relojmundialy
Cronómetro.Accedaaestasfuncionespresionadolasfichasqueaparecenenlaparte
superiordelapantallaodeslizandoeldedohorizontalmenteporlapantalla.
•
Presione > > .
Alarmas
LafichaAlarmaslepermiteestableceralarmas.
1 Presione
> > >fichaAlarmas.
2 Presione
paraañadirunanuevaalarma.
3 EstablezcalosajustesnecesariosypresioneGUARDAR.
NOTA
•
También puede presionar una alarma existente para editarla.
Temporizador
LafichaTemporizadorpuedealertarleconunaseñalaudiblecuandohayapasadouna
cantidaddetiempodeterminada.
1 Presione
> > >fichaTemporizador.
2 Establezcalahoradeseadaeneltemporizador.
3 PresioneInicioparainiciareltemporizador.
4 PresioneDetenerparadetenereltemporizador.
Reloj mundial
LafichaRelojmundiallepermitecomprobarfácilmentelahoraactualenotras
ciudadesenelmundo.
Utilidades

71
Utilidades
1 Presione > > >fichaReloj mundial.
2 Presione
yseleccionelaciudaddeseada.
Cronómetro
LafichaCronómetrolepermiteutilizarsuteléfonocomouncronómetro.
1 Presione
> > >fichaCronómetro.
2 PresioneInicioparainiciarelcronómetro.
•
PresioneVueltapararegistrartiemposdevuelta.
3 PresioneDetenerparadetenerelcronómetro.
Calculadora
LaaplicaciónCalculadoralepermiterealizarcálculosmatemáticosmedianteuna
calculadoraestándarocientífica.
1 Presione
> > .
2 Presionelosbotonesnuméricosparaintroducirnúmeros.
3 Paracálculossencillos,presionelafunciónquedeseerealizar(+,–,xo÷),seguida
de=.
NOTA
•
Para realizar cálculos más complejos, presione .
Calendario
LaaplicaciónCalendariolepermiterealizarunseguimientodesuprogramaciónde
eventos.
1 Presione
> > .
2 Presionelafechaalaquedeseaañadirunevento.Acontinuación,presione
.

72
Utilidades
Grabadora
LaaplicaciónGrabadoradevozgrabaarchivossonorosparaquelospuedautilizarde
diversasformas.
Grabar sonido o voz
1 Presione > > .
2 Presione
paracomenzarlagrabación.
3 Presione
parafinalizarlagrabación.
4 Presione
paraescucharlagrabación.
NOTA
•
Presione para acceder a sus grabaciones. Podrá escuchar las
grabaciones guardadas.
Búsqueda por voz
Utiliceestaaplicaciónparabuscarpáginaswebporvoz.
1 Presione
> >carpetaGoogle> .
2 DigaunapalabraounafrasecuandosemuestreEscuchando...enlapantalla.
Seleccioneunadelaspalabrasclavesugeridasquesemuestran.
NOTA
•
En función de su región y de su proveedor de servicios, es posible que esta
aplicación no esté disponible.
Descargas
Utiliceestaaplicaciónparaverquéarchivoshansidodescargadospormediodelas
aplicaciones.
•
Presione > > .

73
Utilidades
NOTA
•
En función de su región y de su proveedor de servicios, es posible que esta
aplicación no esté disponible.
Radio FM
ElteléfonodisponederadioFMintegradaquelepermitirásintonizarsusemisoras
favoritasyescucharlasencualquierparte.
•
Presione > > .
SUGERENCIA: Deberá conectar sus auriculares para utilizarlos como antena.
NOTA
•
En función de su región y de su proveedor de servicios, es posible que esta
aplicación no esté disponible.
LG Health
LGHealthleayudaaadministrarsusaludymantenerbuenoshábitosdeejercicio
medianteelseguimientoderegistrosylacompeticiónconotraspersonas.
1 Presione
> > .
2 Leayaceptelostérminosycondiciones.
3 Enlapáginadeperfilyobjetivo,introduzcasuinformacióndeperfilypresione
Guardar.
4 Utilicelassiguientesopcionesparainiciarelseguimientodelaactividad.
NOTA
•
Esta función se proporciona para comodidad del usuario. Utilícela solo
como referencia.

74
Navegador
Internet
GraciasaInternet,podráaccederrápidamentedesdesuteléfonomóvilaunmundo
coloridodejuegos,música,noticias,deporte,entretenimientoymuchomás.
NOTA
•
Se aplicarán cargos adicionales cuando se conecte a estos servicios y
descargue contenido. Compruebe los gastos de transmisión de datos con
su proveedor de red.
•
Presione > > .
Uso de la barra de herramientas Web
DesplácesehastalapartesuperiordelapáginaWebparaaccederalabarrade
herramientasdelnavegador.
Presioneesteiconopararetrocederunapágina.
Presioneesteiconoparaavanzarunapágina.
Presioneesteiconoparaaccederalapáginadeinicio.
Presioneesteiconoparaabrirunanuevaventana.
Pulseesteiconoparaaccederalosfavoritos.
Navegador

75
Navegador
Visualización de páginas Web
PresioneelcampoDirección,introduzcaladirecciónWebypresioneIrenelteclado.
Apertura de una página
Parairaunanuevapágina,presione > .
ParairaotrapáginaWeb,toque
,desplácesehaciaarribaohaciaabajoytoquela
páginaquedeseeseleccionar.
Búsqueda por voz en la Web
Presioneelcampodedireccióny,acontinuación,presione .Cuandoselesolicite,
digaunapalabraclaveyseleccioneunadelaspalabrasclavesugeridasqueaparecen.
NOTA
•
Esta función puede no estar disponible según la zona geográfica o el
proveedor de servicios.
Favoritos
Paraañadirlapáginaactualasusfavoritos,presione >Añadir a favoritos>
ACEPTAR.
ParaabrirunapáginaWebfavorita,presione
yseleccioneelfavoritodeseado.
Historial
Presione >fichaHistorialparaabrirlalistadepáginasWebvisitadasmás
recientemente.Paraborrartodoelhistorial,presione
>SÍ.

76
Navegador
Chrome
UtiliceChromeparabuscarinformaciónynavegarporpáginasweb.
•
Presione > > .
NOTA
•
En función de su región y su proveedor de servicios, es posible que esta
aplicación no esté disponible.
Visualización de páginas Web
PresioneelcampoDireccióneintroduzcaunadirecciónWebouncriteriodebúsqueda.
Apertura de una página
Paraabrirunanuevapágina,presione >Nueva pestaña.
ParairaotrapáginaWeb,presione
yseleccionelapáginaquedeseeparaabrirla.

77
Ajustes
LaaplicaciónAjustescontienelamayoríadelasherramientasnecesariaspara
personalizaryconfigurarelteléfono.Enestasecciónsedescribentodoslosajustesde
laaplicaciónAjustes.
Para abrir la aplicación Ajustes
•
Presione >toquedemaneracontinua >Ajustes del sistema.
-O-
•
Presione > > .
Redes
< REDES INALÁMBRICAS >
Wi-Fi
PermiteactivarWi-FiparaconectarconlasredesWi-Fidisponibles.
Bluetooth
ActivaydesactivalafuncionalidadinalámbricaBluetoothparautilizarBluetooth.
Datos móviles
Muestraelusodelosdatosyellímitedeusodedatosmóviles.
Ajustes de llamadas
Estemenúpermiteconfigurarvariosajustesdellamadas.
•
Buzón de voz:permiteseleccionarelserviciodebuzóndevozdeloperador.
•
Marcación fija:permiteadministraryreunirunalistaconlosnúmerosalosque
sepuedellamardesdeelteléfono.NecesitaráelcódigoPIN2queeloperadorle
hayasuministrado.Siestaopciónestáactivada,desdesuteléfonosolosepodrá
llamaralosnúmerosincluidosenlalistademarcaciónfija.
Ajustes

78
Ajustes
•
Pantalla emergente de llamada entrante:muestraunapantallaemergentecon
lallamadaentrantecuandounaaplicaciónestáenuso.
•
Rechazar llamada: permiteestablecerlafunciónderechazodellamadas.
•
Rechazar con mensaje: permiteenviarunmensajerápidocuandoserechaza
unallamada.Estoesútilsitienequerechazarunallamadaduranteunareunión.
•
Desvío de llamadas:lepermiteescogercuándodesviarlasllamadas.
•
Respuesta automática: estableceeltiempoantesdequeeldispositivomanos
libresconectadorespondaautomáticamentealallamadaentrante.
•
Vibración de conexión:elteléfonovibracuandolaotraparterespondeala
llamada.
•
Supresión de ruido:suprimeelruidodefondoeneldispositivodurantela
llamada.
•
Claridad de voz:mejoralacalidaddelavozenentornosruidososparaque
escuchemuchomejor.
•
Guardar números desconocidos:permiteañadirnúmerosdesconocidosalos
contactosdespuésdeunallamada.
•
La tecla de encendido termina la llamada:permiteutilizarlatecladeencendido
parafinalizarlasllamadas.
•
Responder una llamada entrante:activeestaopciónparaquealacercarel
dispositivoalaorejaserespondaautomáticamentealallamadaentrante.
•
Silenciar llamadas entrantes:activeestaopciónparaquealgirareldispositivo
sesilencienlasllamadasentrantes.
•
Restringidas:permitebloquearllamadasentrantes,salientesointernacionales.
•
Registro tiempos de llamadas:permiteverladuracióndelallamadaparavarios
tiposdellamadas.
•
Configuración adicional:permitemodificarlosajustessiguientes.

79
Ajustes
< CONEXIÓN >
Compartir y conectar
•
NFC:elteléfonoesunteléfonomóvilconNFC.NFC(delinglésNearField
Communication,comunicacióndecampocercano)esunatecnologíade
conectividadinalámbricaqueactivalacomunicacióndedosvíasentrelos
dispositivoselectrónicos.Funcionaaunadistanciadeunospocoscentímetros.
PuedecompartirsucontenidoconunaetiquetaNFCuotrodispositivocompatible
conNFCsimplementepresionándolosconsudispositivo.Sipresionaunaetiqueta
NFCconsudispositivo,semostraráelcontenidodelaetiqueta.
•
Android Beam: cuandoestafunciónestáactivada,puedetransferirelcontenido
deunaaplicaciónaotrodispositivocompatibleconNFCmanteniendoambos
dispositivoscerca.Bastaconjuntarlosdispositivos(normalmenteporlaparte
posterior)ypresionarlapantalla.Laaplicacióndeterminaquédatossetransmiten.
•
SmartShare Beam:permiterecibircontenidomultimediaatravésdeteléfonosy
tabletasLG.
•
Servidor multimedia:permitecompartircontenidosmultimediacondispositivos
compatiblesconDLNAcercanos.
•
Miracast:permitereproducirdeformainalámbricalapantallayelsonidodesu
teléfonoenuntelevisorounidadMiracast.
•
LG Bridge:permiteconectarconunordenadorparagestionarelteléfono.
•
Impresión:permiteimprimirelcontenidodedeterminadaspantallas(como
páginasWebmostradasenChrome)enunaimpresoraconectadaalamismared
Wi-FiqueeldispositivoAndroid.
Anclaje a red
•
Módem USB:permitecompartirlaconexióndeInternetconelordenadoratravés
deuncableUSB.
•
Punto de acceso Wi-Fi:permitecrearunpuntodeaccesoycompartirsu
conexión.Consulte"Cómo compartir la conexión de datos del teléfono"para
obtenermásinformación.

80
Ajustes
•
Conexión a Internet mediante Bluetooth:permiteconectarseaotrosdispositivos
atravésdeBluetooth.
•
Ayuda: muestrainformacióndeayudasobreMódemUSB,PuntodeaccesoWi-Fiy
ConexiónaInternetmedianteBluetooth.
Más
•
Modo avión:elModoaviónpermiteutilizarmuchasdelascaracterísticasdel
teléfono,porejemplo,juegosymúsica,mientrasseencuentraenunáreaen
laqueestáprohibidorealizarorecibirllamadas,asícomoelusodedatos.Al
configurarelteléfonoenelModoavión,nopodrárealizarnirecibirllamadasni
accederalosdatosenlínea.
•
Redes móviles:estemenúpermiteconfigurarvariosajustesderedesmóviles.
•
VPN: desdeelteléfonopuedeañadir,establecerygestionarredesprivadas
virtuales(VPN)quelepermitenconectarseyaccederarecursosdeunaredlocal
segura,comosuredcorporativa.
Sonido y Notificación
< BÁSICO >
Perfil de sonido
Permiteestablecerelperfildesonidodelteléfono.ElijaentreSonidoyVibración.
< SONIDO >
Volumen
Modifiquelosajustesdevolumendelteléfonoparaadaptarlosasusnecesidadesysu
entorno.
Tono
Permiteestablecereltonodelasllamadas.Tambiénpuedeañadiruntonodellamada
presionando
enlaesquinasuperiorderechadelapantalla.
Tono de llamada de contacto
Permitecomponertonosdellamadabasadosenelnúmerodeteléfonodelallamada
entrante.

81
Ajustes
< VIBRACIÓN >
Fuerza de vibración
Permiteajustarlafuerzadevibracióndelasllamadas,notificacionesyrespuestatáctil.
Sonido con vibración
Activeestaopciónparaqueelteléfonovibreademásdeescucharseeltonoalrecibir
llamadas.
Tipo de vibración
Permiteescogereltipodevibración.
< NOTIFICACIONES >
Interrupciones
Permiteestablecerunaprogramaciónenfuncióndelacualevitarlasinterrupciones
delasnotificaciones.Puedeestablecerquedeterminadascaracterísticasinterrumpan
cuandosehaconfiguradolaopciónSoloprioridad.
Bloqueo de pantalla
Permiteescogersideseamostraruocultarlasnotificacionesenlapantalladebloqueo.
Aplicaciones
Permiteevitarquelasaplicacionesmuestrennotificacionesoconfigurarlas
aplicacionesparamostrarnotificacionesconprioridadcuandolaopciónNomolestarse
haestablecidoenSoloprioridad.
LED de notificación
Presioneelconmutadorparaactivarloydesactivarlo.AlactivarloseactivaráelLED
Flashparalasnotificacionesqueseleccione,enelcolorqueestablezcaparacadauna.
< AJUSTES AVANZADOS >
Más
•
Notificaciones:lepermiteajustareltonodenotificación.Tambiénpuedeañadir
unanotificaciónpresionando
enlaesquinasuperiorderechadelapantalla.
•
Vibrar al tocar:seleccionesideseaqueelteléfonovibrecuandosetocanlos
botonestáctilesdeInicioyduranteotrasinteraccionesUI.
•
Efectos de sonido:presioneparaestablecerlostonosmultifrecuencia,lossonidos
altocaryelsonidodebloqueodepantalla.

82
Ajustes
•
Notificaciones de mensajes/llamadas de voz:presionelaopción
Notificaciones de mensajes/llamadas de vozparaactivarlaodesactivarla.
Alactivarlosepermitequeeldispositivolealasllamadasentrantesyeventosde
mensajesautomáticamente.
Pantalla
< INICIO Y BLOQUEO >
Pantalla de inicio
•
Seleccionar inicio:establezca Inicio o EasyHome comopantalladeinicio
predeterminada.
•
Smart Bulletin:presionelaopciónSmart Bulletinparaactivarlaodesactivarla.
Laactivacióndeestafunciónañadeunapantalladeinicioadicionalquemuestra
informaciónpersonalizada.
•
Tema:estableceeltemadelapantalladesudispositivo.Puededescargartemas
nuevosdeLG SmartWorld.
•
Fondo de pantalla:estableceelfondodepantallaqueseusaráensupantallade
inicio.
•
Efecto de pantalla: seleccioneeltipodeefectodeseadoquesemostrarácuando
sedeslicedeunlienzodelapantalladeinicioalsiguiente.
•
Desplazar pantalla de inicio circularmente:muestralaprimerapantalla
despuésdelaúltimacuandosedesplazalapantalladeinicio.
•
Ayuda:muestralainformacióndeayudaenlapantalladeinicio.
Bloqueo de pantalla
•
Tipo de bloqueo:estableceuntipodebloqueodepantallaparaprotegerel
teléfono.Abreunaseriedepantallasqueleguíaenlacreacióndeunpatrónde
desbloqueodepantalla.
Sitienehabilitadoeltipodebloqueopatrón,cuandoenciendaelteléfonooactive
lapantalla,selesolicitaráquecreeelpatróndedesbloqueoparadesbloquearla
pantalla.

83
Ajustes
•
Smart Lock:permitemantenerelteléfonodesbloqueadoconundispositivooen
unlugardeconfianza.
•
Efecto de pantalla:establecelasopcionesdeefectodepantalla.
NOTA
•
Este nombre de ajuste puede ser Efecto patrón si Bloqueo de pantalla se
establece en Patrón.
•
Fondo de pantalla:permiteestablecerelfondodebloqueo.
•
Accesos directos:permiteescogerlosaccesosdirectosdisponiblesenlapantalla
debloqueo.
•
Animación meteorológica:activeestaopciónparamostrarunaanimación
meteorológicaenlapantalladebloqueoparalaubicaciónactual.
•
Mostrar información de contacto:permitemostrarlainformacióndelpropietario
enlapantalladebloqueoenelcasodequesepierdaelteléfono.
•
Temporizador de bloqueo:estableceeltiempoquetranscurriráhastaquela
pantallasebloqueeautomáticamenteunavezseexcedaeltiempodeespera.
•
Botón de encendido para bloquear: activeestaopciónparabloquearlapantalla
alinstantecuandosepulseelbotóndeencendido/bloqueo.Esteajusteanulael
ajusteTemp.bloqueosegur.
Botones táctiles de Inicio
EstablezcalosbotonestáctilesdeIniciomostradosenlaparteinferiordetodaslas
pantallas.Establezcalasteclasquesemostrarán,suposiciónenlabarraysuaspecto.
< FUENTE >
Tipo de fuente
Seleccioneeltipodefuentedeseado.
Tamaño de fuente
Seleccioneeltamañodefuentequedesee.

84
Ajustes
< CONFIGURACIONES BÁSICAS >
Brillo
Ajusteelbrillodelapantallautilizandoelcontroldeslizante.
Pantalla giratoria
Permitecambiarlaorientaciónautomáticamentealgirarelteléfono.
Tiempo espera pantalla
Permiteajustareltiempoquepasaráhastaquelapantallaseapagueautomáticamente.
< AJUSTES AVANZADOS >
Más
•
Protector de pantalla:seleccioneestaopciónparamostrarelprotectorde
pantallacuandoelteléfonoestéenreposomientrasestáacopladooencarga.
•
Calibración del sensor de movimiento:lepermitemejorarlaprecisióndela
inclinaciónylavelocidaddelsensor.
General
< PERSONAL >
Idioma y teclado
Seleccioneelidiomadeltextodesuteléfonoyconfigureeltecladoenpantalla,
incluidaslaspalabrasquehaañadidoaestediccionario.
•
Idioma:seleccioneelidiomaquedeseausarenelteléfono.
•
Predeterminado:lepermiteseleccionareltipodetecladopredeterminado.
•
Teclado LG:presioneeliconoAjustesparacambiarlosajustesdelTecladoLG.
•
Dictado por voz de Google:activeestaopciónparaseleccionarlaescriturapor
vozdeGoogleparaintroducirdatos.PresioneeliconoAjustesparacambiarlos
ajustesdevozdeGoogle.
•
Búsqueda por voz: presioneparainiciarlaconfiguracióndelosajustesde
búsquedaporvoz.

85
Ajustes
•
Salida de Texto a voz: presioneestaopciónparaestablecerelmotorpreferidoo
losajustesgeneralesdelasalidadetextoavoz.
•
Velocidad del puntero:ajustelavelocidaddelpuntero.
Ubicación
Alactivarelserviciodeubicación,elteléfonodeterminasuubicaciónaproximada
mediantelaconexiónWi-Fiylasredesmóviles.Alseleccionarestaopción,sele
solicitaráqueconfirmesipermiteaGoogleutilizarsuubicaciónparaproporcionarestos
servicios.
•
Modo:establececómosedeterminasuinformacióndeubicaciónactual.
•
Cámara:activeestaopciónparaetiquetarfotosovídeosconsuslocalizaciones.
•
Informes de Ubicación de Google:lepermiteescogerlosajustesdeinformación
deubicaciónalosqueaccedetantoGooglecomosusproductos.
Cuentas y sincronización
UseelmenúCuentasysincronizaciónparaañadir,quitaryadministrarlascuentasde
Googleyotrascuentascompatibles.Tambiénpuedeutilizarestosajustesparacontrolar
cómoysilasaplicacionesenvían,recibenysincronizandatosensuprogramaciónysi
todaslasaplicacionespuedensincronizarlosdatosdeusuariodeformaautomática.
EsposiblequeGmail™,Calendarioyotrasaplicacionestengansuspropiosajustes
paracontrolarelmodoenquesincronizanlosdatos;paraobtenermásinformación,
consultelasseccionessobreesasaplicaciones.PresioneAÑADIR CUENTAparaañadir
unanuevacuenta.
Nube
Permiteañadirunacuentaenlanubeparautilizarrápidayfácilmenteunservicioenla
nube.
Usuario
Activeestaopciónparaañadirusuarioscuandoelteléfonoestébloqueado.
Añadausuariosparacompartirelteléfonoconotraspersonas.Cadausuariopuede
tenersuspropiasaplicacionesycontenidosensupropioespacio.Cualquierpersona
queutiliceelteléfonopuedecambiarajustescomoeldeWi-Fiyaceptaractualizaciones
deaplicacionesqueafectaránatodoslosusuarios.Esnecesarioestablecerunos
ajustesinicialesparaquelosnuevosusuariosutilicenelteléfono.

86
Ajustes
Accesibilidad
UtilicelosajustesdeAccesibilidadparaconfigurarcualquiercomplementode
accesibilidadquehayainstaladoenelteléfono.
•
Visión
- TalkBack:permiteconfigurarlafunciónTalkBack,queayudaalaspersonascon
deficienciavisualmediantelaproporcióndeinstruccionesdevoz.
- Notificaciones de mensajes/llamadas de voz:presione
paraactivarlas
odesactivarlas.Silaactivapodráescucharalertasdevozautomáticasparalas
llamadasentrantesylosmensajes.
- Protectores de pantalla:activeestaopciónparaestablecerlapantallaenun
contrastemásoscuro.
- Tamaño de fuente:estableceeltamañodelafuente.
- Zoom táctil:lepermitenampliaryreducirlaimagenpulsandolapantallacon
tresdedos.
- Inversión color de pantalla:activeestaopciónparainvertirloscoloresdela
pantallaydelcontenido.
- Ajuste de color de pantalla:permiteajustarloscoloresdelapantallayel
contenido.
- Filtro de color de la pantalla:permitecambiarloscoloresdelapantallayel
contenido.
- La tecla de encendido termina la llamada:activeestaopciónparapoder
finalizarlasllamadasdevozpulsandolatecladeencendido/bloqueo.
•
Audición
- Subtítulo:permitepersonalizarajustesdesubtituladoparalaspersonascon
problemasauditivos.
- LED de notificación:permiteactivarelLEDparalasllamadasentrantesy
notificaciones.
- Alertas Flash:activeestaopciónparaestablecerqueelflashparpadeecon
llamadasentrantesynotificaciones.

87
Ajustes
- Apagar todos los sonidos:activeestaopciónparadesactivartodoslossonidos
deldispositivo.
- Tipo Audio:estableceeltipodeaudio.
- Balance de sonido:establecelarutadeaudio.Muevaelreguladorporlabarra
dedeslizamientoparaajustarelvalor.
•
Motor y cognición
- Tiempo de realimentación táctil: permiteajustareltiempoderealimentación
táctil.
- Touch assistant:proporcionaunpaneltáctilfácildeusarparabotones
generalesogestosparaaccederrápidamente.
- Tiempo espera pantalla:estableceeltiempoantesdequeseapague
automáticamentelaluzdefondo.
- Áreas de control táctil:permiteseleccionarunáreadelapantallaenlaque
limitarlaactivacióntáctilatansoloesaáreadelapantalla.
•
Acceso directo a funciones de accesibilidad
Permiteaccederafuncionesseleccionadasconrapidezalrealizaruntoquetriple
sobreelbotónInicio.
•
Pantalla giratoria
Activeestaopciónparapermitirqueeldispositivogirelapantallasegúnla
orientaciónfísicadelteléfono(retratoopaisaje).
•
Accesiblidad mejorada
Permiteinteractuarconeldispositivoutilizandounoomásconmutadoresque
funcionancomoteclasdelteclado.Estemenúesmuyútilparaaquellosusuarios
conproblemasdemovilidadquelepuedanimpedirinteractuardirectamentecon
eldispositivo.
Tecla de acceso directo
Presionedosveceslasteclas de volumenparaaccederrápidamenteaaplicaciones
cuandolapantallaestéapagadaobloqueada.

88
Ajustes
< PRIVACIDAD >
Seguridad
UseelmenúdeSeguridadparaconfigurarcómodeseaprotegerelteléfonoysus
datos.
•
Bloqueo de contenido:seleccionelostiposdebloqueoparabloqueararchivosde
laGaleríaElija entreContraseña oPatrón.
•
Encriptar teléfono:lepermiteencriptardatosenelteléfonoaefectosde
seguridad.SelesolicitaráqueintroduzcaunPINocontraseñaparadescifrarsu
teléfonocadavezqueloencienda.
•
Encriptar almacenamiento de tarjeta SD:encriptaelalmacenamientodela
tarjetaSDyhacerlosdatosinaccesiblesaotrosdispositivos.
•
Bloqueo de tarjeta SIM:estableceelPINquebloqueasutarjetaSIMylepermite
cambiarelPIN.
•
Escritura de contraseña visible:activeestaopciónparamostrarbrevemente
loscaracteresdelascontraseñassegúnlasintroduceparaquepuedaverloque
escribe.
•
Administradores de dispositivos: permitevisualizarodesactivarlos
administradoresdelteléfono.
•
Orígenes desconocidos:permiteinstalaraplicacionesdistintasdePlayStore.
•
Verificar aplicaciones: nopermitiroadvertirantesdelainstalaciónde
aplicacionesquepuedancausardaños.
•
Tipo de almacenamiento:copiaseguridadporhardware
•
Administración de certificados
- Credenciales de confianza:activeestaopciónparapermitirquelas
aplicacionesaccedanalalmacénencriptadodelteléfonodecertificadosseguros,
contraseñasrelacionadasyotrascredenciales.Utiliceelalmacéndecredenciales
paraestableceralgunostiposdeconexionesVPNyWi-Fi.Sinohaconfigurado
unacontraseñaparaelalmacenamientosegurodecredenciales,esteajuste
apareceatenuado.

89
Ajustes
- Instalar desde memoria:presioneparainstalaruncertificadoseguro.
- Borrar certificados: borratodosloscertificadosseguros,lascredenciales
relacionadasylapropiacontraseñadelalmacenamientoseguro.
•
Trust agents:permiteseleccionaraplicacionesparautilizarlassindesbloquearla
pantalla.
•
Anclaje de pantalla:podráactivarsudispositivoparamostrarsolouna
determinadapantalladeaplicaciónutilizandoelanclajedepantalla.
•
Aplicaciones con acceso de uso:permiteverinformacióndeusodelas
aplicacionesdelteléfono.
< FUNCIONES INTELIGENTES >
Smart settings
Permiteactivar/desactivar,abrirocambiarajustescomoWi-Fi,MúsicaoPerfilde
sonidoenfuncióndellugarenelqueseencuentreoloqueestéhaciendo.
Funda QuickCircle
Estemenúlepermiteseleccionarlasaplicacionesqueseutilizarándirectamenteen
lacubiertaenlavistareducidamedianteQuickCircle.Recuerdequealactivarestas
configuracionesdelasfundasQuickCircle,eldispositivopuedefuncionardeforma
irregular.
Ventana doble
PermiteconfigurarlafunciónVentanadoble.
•
Abrir automáticamente:activeestaopciónparaquealpresionarunvínculoenla
pantallacompletaounarchivoadjuntodeune-mailseabranenlaVentanadoble.
•
Ayuda:muestraconsejossobreelusodelasventanasdobles.
< ADMINISTRACIÓN DE DISPOSITIVOS >
Fecha y hora
Establezcasuspreferenciasparamostrarlafechaylahora.
Almacenamiento
Podrácontrolarlamemoriainternautilizadaydisponibleeneldispositivo.

90
Ajustes
Ahorro de batería y energía
•
Uso de la Batería:podráverelusodelabatería.
•
Barra de estado del porcentaje de la batería: activeestaopciónparamostrarel
porcentajedeniveldelabateríaenlabarradeestadojuntoaliconodelabatería.
•
Ahorro de Energía: presioneelconmutadorAhorrodeEnergíaparaactivarloo
desactivarlo.Estableceelniveldeporcentajedecargadelabateríaqueactivará
automáticamenteelAhorrodeEnergía.Elijaentre Inmediatamente,5% batería
y 15% batería.
•
Optimizador de juegos:ajustalacalidaddevídeodelosjuegosparaahorrar
batería.
Smart cleaning
Permiteadministraslasaplicacionesydatosnoutilizados.
Aplicaciones
Lepermiteverlosdetallesacercadelasaplicacionesinstaladasenelteléfono,
administrarsusdatosyforzarlasalida.
Aplicación de mensaje predeterminada
Estemenúlepermiteescogerquéaplicacióndemensajeríautilizarcomoaplicaciónde
mensajeríapredeterminada.
Copia de seguridad y reinicio
Cambielosajustesparaadministrarlaconfiguraciónylosdatos.
•
LG Backup:realizaunacopiadeseguridaddetodalainformacióndeldispositivoy
larestauraencasodequesepierdanosesustituyanlosdatos.
•
Copia de seguridad de datos:activeestaopciónpararealizarunacopiade
seguridaddelosdatos,contraseñasWi-Fiyotrosajustesdelosservidoresde
Google.
•
Cuenta copia seguridad:muestralacuentaqueseestáutilizandopararealizar
copiasdeseguridaddelainformación.
•
Restauración automática:alreinstalarunaaplicación,serestauranlosajustesy
losdatosdelosquesehanhechocopiadeseguridad.

91
Ajustes
•
Restaurar datos de fábrica:restablecelosajustesconlosvaloresdefábricay
eliminatodossusdatos.Sirestableceelteléfonodeestaforma,selesolicitará
quevuelvaaintroducirlamismainformaciónquelaprimeravezqueinicióAndroid.
Acerca del teléfono
Consultelainformaciónlegal,compruebeelestadodelteléfonoylasversionesde
software,yactualiceelsoftware.

92
Actualización de software del teléfono
Actualización de software del teléfono
Actualización de software de teléfonos móviles LG desde Internet
Paraobtenermásinformaciónacercadelusodeestafunción,visite
http://www.lg.com/common/index.jsp
yseleccioneelpaísyelidioma.
Estaopciónlepermiteactualizarcómodamenteelfirmwaredelteléfonoconlaúltima
versióndesdeInternet,sinnecesidaddevisitarningúncentrodeservicios.Esta
característicasoloestarádisponiblesiempreycuandoLGpubliqueunanuevaversión
defirmwareparaeseteléfono.
Elprogramadeactualizacióndelfirmwaredelteléfonomóvilrequierelaatencióndel
usuariodurantetodoelprocesodeactualización.Antesderealizarcualquieracción,
asegúresedeentendertodaslasinstruccionesynotas.SiextraeelcablededatosUSB
durantelaactualizaciónpuedecausardañosimportantesenelteléfonomóvil.
NOTA
•
LG se reserva el derecho de ofrecer actualizaciones de firmware únicamente
para modelos seleccionados según lo estime oportuno, y no garantiza
la disponibilidad de una versión actualizada del firmware para todos los
modelos de teléfono.
Actualización inalámbrica del software de teléfonos móviles LG
Estafunciónleayudaaactualizarcómodamenteelsoftwaredeldispositivoconuna
nuevaversiónatravésdeOTA,sintenerqueconectarsemedianteuncablededatos
USB.EstacaracterísticasoloestarádisponiblesiempreycuandoLGpubliqueuna
nuevaversióndefirmwareparaeseteléfono.
Enprimerlugar,debecomprobarlaversióndelsoftwaredelteléfonomóvil:Ajustes>
fichaGeneral>Acerca del teléfono>Actualizar SW>Actualización de SW>
Compruebe si existe nuevo SW.
Actualización de software del teléfono

93
Actualización de software del teléfono
NOTA
•
Los datos personales del almacén interno del teléfono, incluida la
información sobre la cuenta de Google y cualquier otra cuenta, los datos y
ajustes del sistema y de las aplicaciones, cualquier aplicación descargada
y la licencia DRM, podrían eliminarse en el proceso de actualización del
software del teléfono. Por tanto, LG le recomienda que realice una copia
de seguridad de sus datos personales antes de actualizar el software
del teléfono. LG no se responsabiliza de las posibles pérdidas de datos
personales.
•
Esta función depende del proveedor de servicios de red, la región y el país.

94
Acerca de la guía de usuario
Acerca de la guía de usuario
•
Antesdeutilizarsudispositivo,leadetenidamenteestaguía.Deestaforma,se
asegurarádeutilizarelteléfonocorrectamenteydeformasegura.
•
Algunasdelasimágenesycapturasdepantallaindicadasenestaguíapueden
diferirconrespectoasuteléfono.
•
Sucontenidopuedeserdistintoaldelproductofinaloaldelsoftware
proporcionadoporlosproveedoresdeservicio.Estecontenidoestásujetoa
cambiossinprevioaviso.Paraaccederalaúltimaversióndeestaguía,visiteel
sitioWebdeLGenwww.lg.com.
•
Lasaplicacionesyfuncionesdesuteléfonopuedenvariarenfuncióndesupaís,
suregiónosusespecificacionesdehardware.LGnosehaceresponsablede
ningúnproblemaderendimientoresultantedelusodeaplicacionesdesarrolladas
porproveedoresdistintosdeLG.
•
LGnosehaceresponsabledeningúnproblemaderendimientooincompatibilidad
resultantedelaedicióndelosajustesdelregistroodelamodificacióndelsoftware
delsistemaoperativo.Cualquierintentodemodificacióndelsistemaoperativo
puedeproducirunfuncionamientoincorrectodeldispositivoodesusaplicaciones.
•
Lalicenciadelsoftware,audio,fondodepantalla,imágenesydemásmedios
suministradosconsudispositivoesdeusolimitado.Siextraeyutilizaestos
materialesparausocomercialodecualquierotrotipo,esposiblequeesté
incurriendoenunainfraccióndelosderechosdelcopyright.Comousuario,esel
únicoresponsabledelusoilícitodelmaterialmultimedia.
•
Esposiblequeseapliquencargosadicionalesporlosserviciosdedatos,como
mensajería,carga,descarga,sincronizaciónautomáticaolosserviciosde
ubicación.Paraevitarelcobrodedichoscargos,seleccioneunplandedatos
adecuadoasusnecesidades.Póngaseencontactoconsuproveedordeservicios
paraobtenermásinformación.
Acerca de la guía de usuario

95
Acerca de la guía de usuario
Marcas comerciales
•
LGyellogotipodeLGsonmarcascomercialesregistradasdeLGElectronics.
•
Bluetooth esunamarcacomercialregistradaentodoelmundodeBluetoothSIG,
Inc.
•
Wi-Fi yellogotipodeWi-FisonmarcascomercialesregistradasdeWi-FiAlliance.
•
Lasdemásmarcascomercialesycopyrightsonpropiedaddesusrespectivos
propietarios.
DivX HD
EstedispositivocuentaconlacertificaciónDivXCertified ,dadoquehasuperadolas
rigurosaspruebasdereproduccióndevídeoDivX
.
ParareproducirvídeosDivX,primerodeberegistrareldispositivoenvod.divx.com.
PuedeencontrarelcódigoderegistroenlasecciónDivXVODdelmenúde
configuracióndeldispositivo.
DivX Certified
para reproducir vídeo DivX hasta HD 720p, incluido el contenido
premium.
DivX
, DivX Certified y los logotipos asociados son marcas comerciales de DivX,
Inc. y se utilizan bajo licencia.
Dolby Digital Plus
Fabricado bajo licencia de Dolby Laboratories. Dolby, Dolby Digital Plus y el
símbolo de la doble D son marcas comerciales de Dolby Laboratories.

96
Accesorios
Estosaccesoriosestándisponiblesparausarseconesteteléfono.(Los elementos que
se describen a continuación pueden ser opcionales).
•
Adaptadordeviaje
•
Guíadeiniciorápido
•
Auricularesestéreo
•
CableUSB
•
Batería
NOTA
•
Utilice siempre accesorios LG originales. Los elementos proporcionados
están diseñados exclusivamente para este dispositivo y es posible que no
sean compatibles con otros dispositivos.
•
Los elementos proporcionados con el dispositivo y cualquier accesorio
disponible podrían variar en función de la región o proveedor de servicio.
Accesorios

97
Resolución de problemas
Enestecapítulosedescribenalgunosproblemasquesepuedenproducircuandouse
elteléfono.Parasolucionaralgunosdeellos,deberállamarasuproveedordeservicios,
aunquelamayoríadeproblemaspodrásolucionarlosustedmismo.
Mensaje Causas posibles Soluciones posibles
Error de la
tarjeta SIM o
USIM
No existe tarjeta
SIM o USIM en el
teléfono o se ha
insertado de forma
incorrecta.
Asegúrese de que la tarjeta
SIM o USIM se ha insertado
correctamente.
Sin conexión
de red/Se ha
perdido la
conexión de
red.
Señal débil o el
dispositivo está
fuera de la red
del proveedor de
servicios.
Muévase hacia una ventana o a un
área abierta. Compruebe el mapa de
cobertura del operador de red.
El operador ha
aplicado nuevos
servicios.
Compruebe si la tarjeta SIM o
USIM tiene más de 6-12 meses
de antigüedad. Si es así, cambie la
tarjeta SIM o USIM en la oficina de
su proveedor de red más cercana.
Póngase en contacto con su
proveedor de servicios.
Resolución de problemas

98
Resolución de problemas
Mensaje Causas posibles Soluciones posibles
Los códigos
no coinciden
Para cambiar
un código de
seguridad, debe
volver a introducir
el código nuevo
para confirmarlo.
Si pierde el código, póngase en
contacto con el proveedor de
servicios.
Los dos códigos
que ha introducido
no coinciden.
No se
pueden
establecer
aplicaciones.
El proveedor
de servicios
no admite la
función o requiere
registrarse.
Póngase en contacto con su
proveedor de servicios.
Llamadas no
disponibles
Error de marcación Red nueva no autorizada.
Nueva tarjeta SIM
o USIM insertada.
Compruebe las nuevas restricciones.
Límite de cargos
por prepago
alcanzado.
Póngase en contacto con el
proveedor de servicios o restablezca
el límite con PIN2.
No se puede
encender el
teléfono
La tecla Activar/
Desactivar se
ha pulsado muy
rápidamente.
Pulse la tecla Activar/Desactivar al
menos durante dos segundos.
La batería no está
cargada.
Cargue la batería. Compruebe el
indicador de carga en la pantalla.

99
Resolución de problemas
Mensaje Causas posibles Soluciones posibles
Error al cargar
La batería no está
cargada.
Cargue la batería.
La temperatura
exterior es
demasiado alta o
baja.
Asegúrese de que el teléfono se
carga a temperatura normal.
Problema de
contacto
Compruebe la conexión del
cargador al teléfono.
No hay tensión
Enchufe el cargador en otra toma de
corriente.
Cargador
defectuoso
Cambie el cargador.
Cargador erróneo
Utilice sólo accesorios de LG
originales.
Número no
permitido.
La función
Marcación fija está
activada.
Compruebe el menú Ajustes y
desactive la función.
No se
pueden
recibir/enviar
SMS ni fotos
Memoria llena Borre algunos mensajes del teléfono.
Los archivos
no se abren
Formato de archivo
no compatible
Compruebe los formatos de archivo
admitidos.

100
Resolución de problemas
Mensaje Causas posibles Soluciones posibles
La pantalla no
se enciende
cuando
recibo una
llamada.
Problema del
sensor de
proximidad
Si utiliza una película o carcasa
de protección, asegúrese de no
tapar el área que rodea al sensor
de proximidad. Asegúrese de que
el área de alrededor del sensor de
proximidad está limpia.
Sin sonido Modo de vibración
Compruebe el estado de
configuración del menú de sonido
para asegurarse de que no está
en modo sin interrupciones o de
vibración.
El dispositivo
se bloquea
Problema
de software
intermitente
Intente actualizar el software a través
del sitio Web.

101
Preguntas frecuentes
Categoría Pregunta Respuesta
Dispositivos
Bluetooth
¿Qué funciones hay
disponibles a través
de Bluetooth?
Puede conectar un dispositivo
de audio Bluetooth, como unos
auriculares estéreo/mono o un kit de
manos libres para coche.
Copia de
seguridad de
los contactos
¿Cómo puedo
realizar una copia
de seguridad de los
contactos?
Los contactos se pueden sincronizar
entre el teléfono y su cuenta de
Google.
Sincronización
¿Es posible
configurar una
sincronización
unidireccional con
Gmail?
Solo está disponible la sincronización
bidireccional.
Sincronización
¿Es posible
sincronizar todas las
carpetas de correo
electrónico?
La carpeta Recibidos se sincroniza
automáticamente. Para ver otras
carpetas, presione
y seleccione
Mostrar todas las carpetas para
elegir una carpeta.
Inicio de sesión
de Gmail
¿Tengo que iniciar
sesión en Gmail
siempre que quiera
tener acceso a
Gmail?
Una vez que haya iniciado sesión en
Gmail, no necesitará volver a hacerlo
de nuevo.
Cuenta de
Google
¿Es posible
filtrar los correos
electrónicos?
No, el teléfono no es compatible con
el filtrado de e-mail.
Preguntas frecuentes

102
Preguntas frecuentes
Categoría Pregunta Respuesta
Correo
electrónico
¿Qué ocurre
cuando ejecuto otra
aplicación mientras
escribo un correo
electrónico?
Sus mensajes de e-mail se guardarán
automáticamente como borrador.
Tono
¿Hay un límite de
tamaño de archivo
para utilizar archivos
MP3 como tonos?
No hay ningún límite de tamaño de
archivo.
Hora del
mensaje
Mi teléfono no
muestra la hora
de recepción de
mensajes anteriores
a 24 horas. ¿Cómo
puedo ver la hora?
Abra la conversación y toque de
manera continua el mensaje deseado.
A continuación, presione Detalles.
Navegación
¿Es posible instalar
otra aplicación de
navegación en el
teléfono?
Se puede instalar y utilizar cualquier
aplicación que esté disponible en Play
Store™ y que sea compatible con el
hardware.
Sincronización
¿Es posible
sincronizar los
contactos de todas
mis cuentas de
correo electrónico?
Sólo se pueden sincronizar los
contactos de Gmail y MS Exchange
Server (servidor de email empresarial).

103
Preguntas frecuentes
Categoría Pregunta Respuesta
Espera y pausa
¿Es posible usar la
opción de espera y
pausa al guardar un
número de teléfono?
Si ha transferido un contacto
utilizando las funciones Espera y
pausa guardadas en el número, no
podrá utilizar dichas funciones. Deberá
guardar de nuevo cada número.
Cómo guardar un número con la
opción de espera y pausa:
1. Presione
> .
2. Marque el número y, a
continuación, presione
.
3. Toque Añadir pausa de dos
segundos o Añadir espera.
Seguridad
¿Cuáles son las
funciones de
seguridad del
teléfono?
Puede configurar el teléfono para que
le pida que introduzca un patrón de
desbloqueo para poder acceder al
mismo o utilizarlo.

104
Preguntas frecuentes
Categoría Pregunta Respuesta
Patrón de
desbloqueo
¿Cómo se crea
el patrón de
desbloqueo?
1. En la pantalla de inicio, toque de
manera continua
.
2. Presione Ajustes del sistema
> ficha Pantalla > Bloqueo de
pantalla.
3. Toque Tipo de bloqueo > Patrón.
La primera vez que lo configura,
aparece un breve tutorial sobre
la creación de un patrón de
desbloqueo.
4. Configure el patrón dibujándolo una
vez y dibujándolo una segunda vez
para confirmarlo.
Precauciones que debe tomar si usa
el patrón de bloqueo
Es muy importante que recuerde
el patrón de desbloqueo que ha
establecido. No podrá volver a
acceder al teléfono si utiliza cinco
veces seguidas un patrón incorrecto.
Tiene cinco oportunidades para
introducir el patrón de desbloqueo, el
PIN o la contraseña. Si ha agotado
las cinco oportunidades, puede volver
a intentarlo tras 30 segundos. (Otra
opción es preestablecer el PIN de
copia de seguridad y usar el código
PIN de copia de seguridad para
desbloquear el patrón.)

105
Preguntas frecuentes
Categoría Pregunta Respuesta
Patrón de
desbloqueo
¿Qué debo hacer si
olvido el patrón de
desbloqueo?
Si ha olvidado su patrón:
Si ha iniciado sesión en su cuenta
de Google desde el teléfono pero ha
cometido cinco errores al introducir el
patrón, toque el botón habilitado en
caso de que haya olvidado su patrón.
A continuación, se le solicitará que
inicie sesión en su cuenta de Google
para desbloquear el teléfono.
Memoria
¿Sabré que la
memoria está llena?
Sí, recibirá una notificación.
Compatibilidad
de idiomas
¿Es posible cambiar
el idioma del
teléfono?
El teléfono tiene capacidades en
varios idiomas.
Para cambiar el idioma:
1. En la pantalla de inicio, toque de
manera continua
y presione
Ajustes del sistema.
2. Presione la ficha General > Idioma
y teclado > Idioma.
3. Presione en el idioma que desee.
VPN
¿Cómo configuro
una red VPN?
La configuración del acceso VPN es
diferente para cada empresa. Para
configurar el acceso VPN desde el
teléfono, el administrador de la red de
la empresa deberá proporcionarle los
detalles.

106
Preguntas frecuentes
Categoría Pregunta Respuesta
Tiempo de
espera de la
pantalla
La pantalla se
apaga tras solo 15
segundos. ¿Cómo
puedo cambiar la
cantidad de tiempo
que transcurre hasta
que se apaga la luz
de fondo?
1. En la pantalla de inicio, toque de
manera continua
.
2. Toque Ajustes del sistema > ficha
Pantalla.
3. Toque Tiempo espera pantalla.
4. Presione sobre el tiempo de espera
que prefiera para la luz de fondo de
la pantalla.
Wi-Fi y red
móvil
Cuando estén
disponibles tanto
la conexión Wi-Fi
como la red móvil,
¿qué servicio utilizará
el teléfono?
Al utilizar datos, el teléfono usará
la conexión Wi-Fi de forma
predeterminada (si está activada en el
teléfono). No obstante, no se notificará
cuando el teléfono cambie de una
conexión a otra.
Para saber qué conexión se está
usando, compruebe el icono de red
móvil o Wi-Fi de la parte superior de
la pantalla.
Pantalla
principal
¿Es posible eliminar
una aplicación de la
pantalla principal?
Sí. Sólo tiene que tocar de manera
continua el icono hasta que aparezca
el icono de papelera en la parte
superior central de la pantalla.
Acontinuación, sin levantar el dedo,
arrastre el icono hasta la papelera.
Aplicación
He descargado una
aplicación y causa
muchos errores.
¿Cómo la elimino?
1. En la pantalla de inicio, toque de
manera continua
.
2. Presione Ajustes del sistema >
ficha General > Aplicaciones >
DESCARGADAS.
3. Toque la aplicación y, a
continuación, Desinstalar.

107
Preguntas frecuentes
Categoría Pregunta Respuesta
Cargador
¿Es posible cargar
mi teléfono mediante
el cable de datos
USB sin instalar el
controlador USB
correspondiente?
Sí, el teléfono se cargará a través del
cable USB, independientemente de
si los controladores necesarios están
instalados.
Alarma
¿Puedo utilizar
archivos de música
para la alarma?
Sí. Después de guardar un archivo de
música como tono, puede utilizarlo
como alarma.
1. Mantenga pulsada una de las
canciones de una lista de la
biblioteca. En el menú que se abre,
presione Establecer como tono >
Llamadas o Tono del llamante.
2. En la pantalla de ajuste del reloj de
la alarma, seleccione la canción
como tono.
Alarma
Si el teléfono está
apagado, ¿la
alarma sonará o se
activará?
No, no se admite esa función.
Alarma
Si el volumen
del timbre está
establecido en
vibración, ¿se oirá la
alarma?
La alarma está programada para que
suene incluso en esos casos.

108
Preguntas frecuentes
Categoría Pregunta Respuesta
Restablecimiento
completo
(restablecimiento
a los ajustes de
fábrica)
¿Cómo puedo
realizar un
restablecimiento
completo si no
puedo tener acceso
al menú de ajustes
del teléfono?
Si el teléfono no vuelve a sus ajustes
originales, realice un restablecimiento
completo (restablecimiento a los
ajustes de fábrica) para inicializarlo.

User Guide
•
Somecontentsandillustrationsmaydifferfromyourdevicedependingonthe
region,serviceprovider,softwareversion,orOSversion,andaresubjectto
changewithoutpriornotice.
•
AlwaysusegenuineLGaccessories.Thesupplieditemsaredesignedonlyforthis
deviceandmaynotbecompatiblewithotherdevices.
•
Thisdeviceisnotsuitableforpeoplewhohaveavisualimpairmentduetothe
touchscreenkeyboard.
•
Copyright©2015LGElectronics,Inc.Allrightsreserved.LGandtheLGlogoare
registeredtrademarksofLGGroupanditsrelatedentities.Allothertrademarks
arethepropertyoftheirrespectiveowners.
•
Google™,GoogleMaps™,Gmail™,YouTube™,Hangouts™andPlayStore™
aretrademarksofGoogle,Inc.
ENGLISH

2
Table of contents
Guidelines for safe and efficient use .......4
Important notice .....................................14
Getting to know your phone ................... 17
Phone layout .......................................... 17
Installing the SIM or USIM card and
battery ...................................................19
Charging the battery .............................. 21
Inserting a memory card ........................ 22
Removing the memory card ................... 23
Locking and unlocking the device ..........23
Your Home screen ................................... 25
Touch screen tips ..................................25
Home screen .........................................26
Customizing the Home screen ...............27
Returning to recently-used
applications ........................................... 28
Notifications panel .................................29
On-screen keyboard ..............................32
Special Features .....................................33
Gesture shot ..........................................33
Gesture View .........................................34
Glance View ........................................... 35
KnockON ...............................................35
Knock Code ...........................................36
Dual window..........................................37
QuickMemo+ ......................................... 38
QSlide ....................................................39
QuickRemote .........................................40
Google account setup ............................. 41
Creating your Google account ................41
Signing into your Google account ........... 41
Connecting to Networks and Devices .... 43
Wi-Fi .....................................................43
Bluetooth ...............................................44
Wi-Fi Direct ...........................................45
Transferring data between a PC and
the device .............................................. 46
Calls ........................................................47
Making a call .........................................47
Calling your contacts .............................47
Answering and rejecting a call ...............47
Making a second call .............................48
Viewing your call logs ............................48
Call settings ........................................... 48
Contacts ..................................................49
Searching for a contact .......................... 49
Adding a new contact ............................49
Favourites contacts ................................49
Creating a group .................................... 50
Messaging ............................................... 51
Sending a message ...............................51
Conversation view .................................52
Changing your messaging settings ........52
Table of contents

3
Table of contents
E-mail ......................................................53
Managing email accounts ......................53
Working with account folders .................53
Composing and sending email ...............54
Camera and Video ...................................55
Camera options on the viewfinder .......... 55
Using the advanced settings ..................56
Manual mode on the viewfinder .............57
Taking a photo ....................................... 58
Once you have taken a photo ................. 58
Recording a video ..................................60
After recording a video...........................60
Gallery ................................................... 62
Multimedia ..............................................66
Music ....................................................66
Utilities ....................................................68
Clock .....................................................68
Calculator ..............................................69
Calendar ................................................ 69
Voice Recorder ......................................70
Voice Search..........................................70
Downloads ............................................70
FM radio ................................................71
LG Health ..............................................71
Web Browser ...........................................72
Internet .................................................. 72
Chrome .................................................73
Settings ...................................................74
Networks ...............................................74
Sound & notification ..............................77
Display ..................................................78
General .................................................. 80
Phone software update ..........................87
Phone software update ..........................87
About this user guide .............................89
About this user guide ............................. 89
Trademarks ...........................................90
DivX HD .................................................90
Dolby Digital Plus ................................... 90
Accessories ............................................. 91
Troubleshooting ......................................92
FAQ ..........................................................95

4
Guidelines for safe and efficient use
Pleasereadthesesimpleguidelines.Notfollowingtheseguidelinesmaybedangerous
orillegal.
Shouldafaultoccur,asoftwaretoolisbuiltintoyourdevicethatwillgatherafaultlog.
Thistoolgathersonlydataspecifictothefault,suchassignalstrength,cellIDposition
insuddencalldropandapplicationsloaded.Thelogisusedonlytohelpdeterminethe
causeofthefault.Theselogsareencryptedandcanonlybeaccessedbyanauthorised
LGRepaircentreshouldyouneedtoreturnyourdeviceforrepair.
Exposure to radio frequency energy
RadiowaveexposureandSpecificAbsorptionRate(SAR)information.
ThismobilephonemodelLG-H815hasbeendesignedtocomplywithapplicablesafety
requirementsforexposuretoradiowaves.Theserequirementsarebasedonscientific
guidelinesthatincludesafetymarginsdesignedtoassurethesafetyofallpersons,
regardlessofageandhealth.
•
Theradiowaveexposureguidelinesemployaunitofmeasurementknownasthe
SpecificAbsorptionRate,orSAR.TestsforSARareconductedusingstandardised
methodswiththephonetransmittingatitshighestcertifiedpowerlevelinallused
frequencybands.
•
WhiletheremaybedifferencesbetweentheSARlevelsofvariousLGphone
models,theyarealldesignedtomeettherelevantguidelinesforexposuretoradio
waves.
•
TheSARlimitrecommendedbytheInternationalCommissiononNon-Ionizing
RadiationProtection(ICNIRP)is2W/kgaveragedover10goftissue.
•
ThehighestSARvalueforthismodelphonetestedforuseattheearis
0.618W/kg(10g)andwhenwornonthebodyis0.460W/Kg(10g).
Guidelines for safe and efficient use

5
Guidelines for safe and efficient use
•
ThisdevicemeetsRFexposureguidelineswhenusedeitherinthenormaluse
positionagainsttheearorwhenpositionedatleast1.5cmawayfromthebody.
Whenacarrycase,beltcliporholderisusedforbody-wornoperation,itshould
notcontainmetalandshouldpositiontheproductatleast1.5cmawayfromyour
body.Inordertotransmitdatafilesormessages,thisdevicerequiresaquality
connectiontothenetwork.Insomecases,transmissionofdatafilesormessages
maybedelayeduntilsuchaconnectionisavailable.Ensuretheaboveseparation
distanceinstructionsarefolloweduntilthetransmissioniscompleted.
Product care and maintenance
WARNING
Always use genuine LG batteries, chargers and accessories approved for use
with this particular phone model. The use of any other types may void any
approval or warranty applying to the phone and may be dangerous.
•
Donotdisassemblethisunit.Takeittoaqualifiedservicetechnicianwhenrepair
workisrequired.
•
Repairsunderwarranty,atLG'sdiscretion,mayincludereplacementpartsor
boardsthatareeitherneworreconditioned,providedthattheyhavefunctionality
equaltothatofthepartsbeingreplaced.
•
KeepawayfromelectricalappliancessuchasTVs,radiosandpersonalcomputers.
•
Theunitshouldbekeptawayfromheatsourcessuchasradiatorsorcookers.
•
Donotdrop.
•
Donotsubjectthisunittomechanicalvibrationorshock.
•
Switchoffthephoneinanyareawhereyouarerequiredtobyspecialregulations.
Forexample,donotuseyourphoneinhospitalsasitmayaffectsensitivemedical
equipment.
•
Donothandlethephonewithwethandswhileitisbeingcharged.Itmaycausean
electricshockandcanseriouslydamageyourphone.

6
Guidelines for safe and efficient use
•
Donotchargeahandsetnearflammablematerialasthehandsetcanbecomehot
andcreateafirehazard.
•
Useadryclothtocleantheexterioroftheunit(donotusesolventssuchas
benzene,thinneroralcohol).
•
Donotchargethephonewhenitisonsoftfurnishings.
•
Thephoneshouldbechargedinawellventilatedarea.
•
Donotsubjectthisunittoexcessivesmokeordust.
•
Donotkeepthephonenexttocreditcardsortransporttickets;itcanaffectthe
informationonthemagneticstrips.
•
Donottapthescreenwithasharpobjectasitmaydamagethephone.
•
Donotexposethephonetoliquidormoisture.
•
Useaccessorieslikeearphonescautiously.Donottouchtheantennaunnecessarily.
•
Donotuse,touchorattempttoremoveorfixbroken,chippedorcrackedglass.
Damagetotheglassdisplayduetoabuseormisuseisnotcoveredunderthe
warranty.
•
Yourphoneisanelectronicdevicethatgeneratesheatduringnormaloperation.
Extremelyprolonged,directskincontactintheabsenceofadequateventilation
mayresultindiscomfortorminorburns.Therefore,usecarewhenhandlingyour
phoneduringorimmediatelyafteroperation.
•
Ifyourphonegetswet,immediatelyunplugittodryoffcompletely.Donotattempt
toacceleratethedryingprocesswithanexternalheatingsource,suchasanoven,
microwaveorhairdryer.
•
Theliquidinyourwetphone,changesthecolouroftheproductlabelinsideyour
phone.Damagetoyourdeviceasaresultofexposuretoliquidisnotcovered
underyourwarranty.

7
Guidelines for safe and efficient use
Efficient phone operation
Electronics devices
Allmobilephonesmayreceiveinterference,whichcouldaffectperformance.
•
Donotuseyourmobilephonenearmedicalequipmentwithoutrequesting
permission.Avoidplacingthephoneoverpacemakers,forexample,inyourbreast
pocket.
•
Somehearingaidsmightbedisturbedbymobilephones.
•
MinorinterferencemayaffectTVs,radios,PCsetc.
•
Useyourphoneintemperaturesbetween0ºCand40ºC,ifpossible.Exposing
yourphonetoextremelyloworhightemperaturesmayresultindamage,
malfunction,orevenexplosion.
Road safety
Checkthelawsandregulationsontheuseofmobilephonesintheareawhenyou
drive.
•
Donotuseahand-heldphonewhiledriving.
•
Givefullattentiontodriving.
•
Pullofftheroadandparkbeforemakingoransweringacallifdrivingconditions
sorequire.
•
RFenergymayaffectsomeelectronicsystemsinyourvehiclesuchascarstereos
andsafetyequipment.
•
Whenyourvehicleisequippedwithanairbag,donotobstructwithinstalledor
portablewirelessequipment.Itcancausetheairbagtofailorcauseseriousinjury
duetoimproperperformance.
•
Ifyouarelisteningtomusicwhilstoutandabout,pleaseensurethatthevolume
isatareasonablelevelsothatyouareawareofyoursurroundings.Thisisof
particularimportancewhennearroads.

8
Guidelines for safe and efficient use
Avoid damage to your hearing
To prevent possible hearing damage, do not listen at high volume
levels for long periods.
Damagetoyourhearingcanoccurifyouareexposedtoloudsoundforlongperiodsof
time.Wethereforerecommendthatyoudonotturnonoroffthehandsetclosetoyour
ear.Wealsorecommendthatmusicandcallvolumesaresettoareasonablelevel.
•
Whenusingheadphones,turnthevolumedownifyoucannothearthepeople
speakingnearyou,orifthepersonsittingnexttoyoucanhearwhatyouare
listeningto.
NOTE
•
Excessive sound pressure from earphones and headphones can cause
hearing loss.
Glass Parts
Somepartsofyourmobiledevicearemadeofglass.Thisglasscouldbreakifyour
mobiledeviceisdroppedonahardsurfaceorreceivesasubstantialimpact.Iftheglass
breaks,donottouchorattempttoremoveit.Stopusingyourmobiledeviceuntilthe
glassisreplacedbyanauthorisedserviceprovider.
Blasting area
Donotusethephonewhereblastingisinprogress.Observerestrictionsandfollowany
regulationsorrules.
Potentially explosive atmospheres
•
Donotuseyourphoneatarefuelingpoint.
•
Donotusenearfuelorchemicals.

9
Guidelines for safe and efficient use
•
Donottransportorstoreflammablegas,liquidorexplosivesinthesame
compartmentofyourvehicleasyourmobilephoneoraccessories.
In aircraft
Wirelessdevicescancauseinterferenceinaircraft.
•
Turnyourmobilephoneoffbeforeboardinganyaircraft.
•
Donotuseitonthegroundwithoutpermissionfromthecrew.
Children
Keepthephoneinasafeplaceoutofthereachofsmallchildren.Itincludessmallparts
whichmaycauseachokinghazardifdetached.
Emergency calls
Emergencycallsmaynotbeavailableonallmobilenetworks.Thereforeyoushould
neverdependsolelyonyourphoneforemergencycalls.Checkwithyourlocalservice
provider.
Battery information and care
•
Youdonotneedtocompletelydischargethebatterybeforerecharging.Unlike
otherbatterysystems,thereisnomemoryeffectthatcouldcompromisethe
battery’sperformance.
•
UseonlyLGbatteriesandchargers.LGchargersaredesignedtomaximisethe
batterylife.
•
Donotdisassembleorshort-circuitthebattery.
•
Keepthemetalcontactsofthebatteryclean.
•
Replacethebatterywhenitnolongerprovidesacceptableperformance.The
batterypackmayberechargedhundredsoftimesbeforeitneedsreplacing.
•
Rechargethebatteryifithasnotbeenusedforalongtimetomaximiseusability.

10
Guidelines for safe and efficient use
•
Donotexposethebatterychargertodirectsunlightoruseitinhighhumidity,such
asinthebathroom.
•
Donotleavethebatteryinhotorcoldplaces,asthismaydeterioratebattery
performance.
•
Thereisriskofexplosionifthebatteryisreplacedwithanincorrecttype.
•
Disposeofusedbatteriesaccordingtothemanufacturer’sinstructions.Please
recyclewhenpossible.Donotdisposeashouseholdwaste.
•
Ifyouneedtoreplacethebattery,takeittothenearestauthorisedLGElectronics
servicepointordealerforassistance.
•
Alwaysunplugthechargerfromthewallsocketafterthephoneisfullychargedto
saveunnecessarypowerconsumptionofthecharger.
•
Actualbatterylifewilldependonnetworkconfiguration,productsettings,usage
patterns,batteryandenvironmentalconditions.
•
Makesurethatnosharp-edgeditemssuchasanimal’steethornails,comeinto
contactwiththebattery.Thiscouldcauseafire.
Precautions for use of leather back cover
•
Thisproductismadeofcattlehideandmayhavedifferentcreasesandpatterns
duetothepropertiesofnaturalleather.Iftheproductgetswetwithanyliquid
(water,soda,seawater,rain,sweat,sunscreen,cosmetics,moisture,etc.),itmay
losecolour,changecolour,ordeforminshape.
•
Whenthisproductgetswetorcontaminated,getridofthewaterbypressingit
gentlywithadrytowel,orwipeitwithleathercreamandleaveittodryinshade.
Whentheproductisexposedtoawetenvironmentforalongtime,itmaycause
creasesormould.Theshapeoftheleathermaynotberestoredtoitsoriginal
stateaftercleaningbecauseofthepropertiesofleather,andanycontaminationor
deformitymaygetworsewhenusingregulardetergentoranorganicsolvent.
•
Whentheleatheriswetwithrainorsweat,usecautionandavoidcontactwith
clothes.Itcancauseanydyetobecomeastain.
•
Duetothenatureofleather,frictionforlongperiodsoftimeorexcessiveforcemay
damagethesurfaceoftheleather.

11
Guidelines for safe and efficient use
Laser safety statement
Caution!
Thisproductemploysalasersystem.Toensureproperuseofthisproduct,pleaseread
thisowner'smanualcarefullyandretainforfuturereference.Shouldtheunitrequire
maintenance,contactanauthorisedservicecentre.
Useofcontrols,adjustments,ortheperformanceofproceduresotherthanthose
specifiedhereinmayresultinhazardousradiationexposure.
Topreventdirectexposuretolaserbeam,donottrytoopentheenclosureormake
directcontactwiththelaser.
Open Source Software Notice Information
To obtain the source code under GPL, LGPL, MPL, and other
open source licenses, that is contained in this product, please
visit http://opensource.lge.com.
In addition to the source code, all referred license terms, warranty
disclaimers and copyright notices are available for download.
LG Electronics will also provide open source code to you on CD-ROM for a
charge covering the cost of performing such distribution (such as the cost of
media, shipping, and handling) upon email request to opensour[email protected].
This offer is valid for three (3) years from the date on which you purchased the
product.

12
Guidelines for safe and efficient use
HOW TO UPDATE YOUR DEVICE
Access to latest firmware releases, new software functions and
improvements.
•
Select the software update in settings menu on your device.
•
Update your device by connecting it to your PC. For more information
about using this function, please visit http://www.lg.com/common/index.jsp
select country and language.
DECLARATION OF CONFORMITY
Hereby, LG Electronics declares that this LG-H815 product is in compliance
with the essential requirements and other relevant provisions of Directive
1999/5/EC. A copy of theDeclaration of Conformity can be found at
http://www.lg.com/global/declaration
Contact office for compliance of this product:
LG Electronics Inc.
EU Representative, Krijgsman 1,
1186 DM Amstelveen, The Netherlands
NOTE: Pursuant EN 60950-1 (§ 1.7.2)
In order to prevent unnecessary energy consumption, disconnect the device
when fully charged. Always use an easily accessible power-outlet for charging
your device.

13
Guidelines for safe and efficient use
Disposal of your old appliance
1 Allelectricalandelectronicproductsshouldbedisposedofseparately
fromthemunicipalwastestreamviadesignatedcollectionfacilities
appointedbythegovernmentorthelocalauthorities.
2 Thecorrectdisposalofyouroldappliancewillhelppreventpotential
negativeconsequencesfortheenvironmentandhumanhealth.
3 Formoredetailedinformationaboutdisposalofyouroldappliance,
pleasecontactyourcityoffice,wastedisposalserviceortheshop
whereyoupurchasedtheproduct.
Disposal of waste batteries/accumulators
1 Thissymbolmaybecombinedwithchemicalsymbolsformercury(Hg),
cadmium(Cd)orlead(Pb)ifthebatterycontainsmorethan0.0005%
ofmercury,0.002%ofcadmiumor0.004%oflead.
2 Allbatteries/accumulatorsshouldbedisposedseparatelyfromthe
municipalwastestreamviadesignatedcollectionfacilitiesappointedby
thegovernmentorthelocalauthorities.
3 Thecorrectdisposalofyouroldbatteries/accumulatorswillhelpto
preventpotentialnegativeconsequencesfortheenvironment,animal
andhumanhealth.
4 Formoredetailedinformationaboutdisposalofyouroldbatteries/
accumulators,pleasecontactyourcityoffice,wastedisposalserviceor
theshopwhereyoupurchasedtheproduct.

14
Important notice
Please read this before you start using your phone!
Pleasechecktoseewhetheranyproblemsyouencounteredwithyourphoneare
describedinthissectionbeforetakingthephoneinforserviceorcallingaservice
representative.
1. Phone memory
Whenthereislessthan10MBofspaceavailableinyourphonememory,yourphone
cannotreceivenewmessages.Youmayneedtocheckyourphonememoryanddelete
somedata,suchasapplicationsormessages,tomakemorememoryavailable.
To uninstall applications:
1 Tap > > >Generaltab>Apps.
2 Onceallapplicationsappear,scrolltoandselecttheapplicationyouwantto
uninstall.
3 TapUninstall.
2. Optimizing battery life
Extendyourbattery'spowerbyturningofffeaturesthatyoudonotneedtorun
constantlyinthebackground.Youcanmonitorhowapplicationsandsystemresources
consumebatterypower.
Extending your phone's battery life:
•
Turnoffradiocommunicationswhenyouarenotusing.IfyouarenotusingWi-Fi,
BluetoothorGPS,turnthemoff.
•
Reducescreenbrightnessandsetashorterscreentimeout.
•
TurnoffautomaticsyncingforGmail,Calendar,Contactsandotherapplications.
Important notice

15
Important notice
•
Someapplicationsyoudownloadmayconsumebatterypower.
•
Whileusingdownloadedapplications,checkthebatterychargelevel.
3. Before installing an open source application and OS
WARNING
•
If you install and use an OS other than the one provided by the manufacturer
it may cause your phone to malfunction. In addition, your phone will no
longer be covered by the warranty.
•
To protect your phone and personal data, only download applications from
trusted sources, such as Play Store™. If there are improperly installed
applications on your phone, the phone may not work normally or a serious
error may occur. You must uninstall those applications and all associated
data and settings from the phone.
4. Opening and switching applications
MultitaskingiseasywithAndroid;youcankeepmorethanoneapplicationrunningat
thesametime.Thereisnoneedtoquitanapplicationbeforeopeninganother.Useand
switchbetweenseveralopenapplications.Androidmanageseachapplication,stopping
andstartingthemasneededtomakesurethatidleapplicationsdon'tconsume
resourcesunnecessarily.
1 Tap
.Alistofrecentlyusedapplicationswillbedisplayed.
2 Taptheapplicationyouwanttoaccess.Thisdoesnotstopthepreviousappfrom
runninginthebackground.Makesuretotap
tobackoutofanappafterusingit.
•
Tocloseanappfromtherecentappslist,swipetheapppreviewtotheleftorright.
Toclearallapps,tapClear all.

16
Important notice
5. When the screen freezes
Ifthescreenfreezesorthephonedoesnotrespondwhenyoutrytooperateit,remove
thebatteryandreinsertit.Thenpowerthephonebackon.

17
Getting to know your phone
Phone layout
Earpiece
Proximity SensorFront Camera Lens
Notification LED
Headset Jack
Microphone
Charger/USB port
Microphone
Infrared LED
NOTE: Proximity sensor
•
When receiving and making calls, the proximity sensor automatically turns
the backlight off and locks the touch screen by sensing when the phone is
near your ear. This extends battery life and prevents you from unintentionally
activating the touch screen during calls.
WARNING
Placing a heavy object on the phone or sitting on it can damage the display
and touch screen functions. Do not cover the proximity sensor with screen
protectors or any other type of protective film. This could cause the sensor to
malfunction.
Getting to know your phone

18
Getting to know your phone
Volume Keys
Power/Lock Key
NFC Touch Point
Laser Detection
AutoFocus
Speaker
Rear Camera Lens
Flash
Power/Lock Key
•
Turnyourphoneon/offbypressingandholdingthiskey.
•
Shortpresstolock/unlockthescreen
Volume Keys (While screen is off)
•
PressVolumeUpKeytwicetolaunchQuickMemo+
•
PressVolumeDownKeytwicetolaunchCamera
WARNING
•
The NFC antenna for this model is on the back cover.
•
Be careful not to damage the NFC touch point on the phone, which is part
of the NFC antenna.

19
Getting to know your phone
Installing the SIM or USIM card and battery
InserttheSIMorUSIMcardprovidedbythemobiletelephoneserviceprovider,andthe
includedbattery.
1 Toremovethebackcover,holdthephonefirmlyinonehand.Withyourotherhand,
liftoffthebackcoverwithyourthumbnailasshowninthefigurebelow.
2 SlidetheSIMcardintotheSIMcardslotasshowninthefigure.Makesurethegold
contactareaonthecardisfacingdownward.

20
Getting to know your phone
WARNING
Do not insert a memory card into the SIM card slot. If a memory card
happens to be lodged in the SIM card slot, take the device to a LG Service
Centre to remove the memory card.
NOTE
•
Only the microSIM cards work with the device.
3 Insertthebattery.
4 Toreplacethecoverontothedevice,alignthebackcoveroverthebattery
compartment
andpressitdownuntilitclicksintoplace .

21
Getting to know your phone
Charging the battery
Chargethebatterybeforeusingitforfirsttime.Usethechargertochargethebattery.
Acomputercanalsobeusedtochargethebatterybyconnectingthephonetoitusing
theUSBcable.
WARNING
Use only LG-approved chargers, batteries and cables. If you use unapproved
chargers, batteries or cables, it may cause battery charging delay. Or this can
cause the battery to explode or damage the device, which are not covered by
the warranty.
Thechargerconnectorislocatedatthebottomofthephone.Insertthechargerand
plugitintoapoweroutlet.
NOTE
•
Do not open the back cover while your phone is charging.

22
Getting to know your phone
Inserting a memory card
Yourdevicesupportsuptoa2TBmicroSDcard.Dependingonthememorycard
manufacturerandtype,somememorycardsmaynotbecompatiblewithyourdevice.
WARNING
Some memory cards may not be fully compatible with the device. Using an
incompatible card may damage the device or the memory card, or corrupt the
data stored in it.
NOTE
•
Frequent writing and erasing of data shortens the lifespan of memory cards.
1 Removethebackcover.
2 Insertamemorycardwiththegold-colouredcontactsfacingdownwards.
3 Replacethebackcover.

23
Getting to know your phone
Removing the memory card
Beforeremovingthememorycard,firstunmountitforsaferemoval.
1 Tap
> > >Generaltab>Storage>Unmount SD card.
2 Removethebackcoverandpulloutthememorycard.
WARNING
Do not remove the memory card while the device is transferring or accessing
information. Doing so can cause data to be lost or corrupted or damage to
the memory card or device. It is not responsible for losses that result from the
misuse of damaged memory cards, including the loss of data.
Locking and unlocking the device
PressingthePower/Lock Keyturnsoffthescreenandputsthedeviceintolockmode.
Thedeviceautomaticallygetslockedifitisnotusedforaspecifiedperiod.Thishelpsto
preventaccidentaltapsandsavesbatterypower.
Tounlockthedevice,pressthePower/Lock Keyandswipethescreeninanydirection.
NOTE
•
Double-tapping on the screen also can wake up the screen instead of the
Power/Lock Key.
Changing the screen lock method
Youcanchangethewaythatyoulockthescreentopreventothersaccessingyour
personalinformation.
1 Tap
> > >Displaytab>Lock screen>Select screen lock.
2 SelectadesiredscreenlockfromNone,Swipe,KnockCode,Pattern,PINand
Password.

24
Getting to know your phone
NOTE
•
Create a Google account before setting an unlock pattern and remember
the Backup PIN you created when creating your pattern lock.
Caution! If you haven't created a Google account on the phone and you
forgot your PIN, Password, and the backup PIN, you need to perform a
hard reset. But if you perform a hard reset, all user applications and user
data will be deleted. Please remember to back up any important data before
performing a hard reset.
TIP! Smart Lock
You can use Smart Lock to make unlocking your phone easier. You can set
it to keep your phone unlocked when you have a trusted Bluetooth device
connected to it, when it's in a familiar location like your home or work, or
when it recognises your face.
Setting up Smart Lock
1 Tap
> > .
2 Tap Display tab > Lock screen > Smart Lock.
3 Before you add any trusted devices, trusted places, or trusted face, you
need to set up a screen lock (Pattern, PIN or Password).

25
Your Home screen
Touch screen tips
Herearesometipsonhowtonavigateonyourphone.
•
Tap or touch–Asinglefingertapselectsitems,links,shortcutsandlettersonthe
on-screenkeyboard.
•
Touch and hold–Touchandholdanitemonthescreenbytappingitandnot
liftingyourfingeruntilanactionoccurs.
•
Drag–Touchandholdanitemforamomentandthen,withoutliftingyourfinger,
moveyourfingeronthescreenuntilyoureachthetargetposition.Youcandrag
itemsontheHomescreentorepositionthem.
•
Swipe or slide–Toswipeorslide,quicklymoveyourfingeracrossthesurface
ofthescreen,withoutpausingwhenyoufirsttapit(soyoudon'tdraganitem
instead).
•
Double-tap–Double-taptozoomonawebpageoramap.
•
Pinch-to-Zoom–Useyourindexfingerandthumbinapinchingorspreading
motiontozoominoroutwhenusingthebrowser,Maps,orwhenviewingpictures.
•
Rotate the screen–Frommanyapplicationsandmenus,thescreenorientation
adjuststothedevice'sphysicalorientation.
NOTE
•
Do not press too hard; the tap screen is sensitive enough to pick up a light,
yet firm tap.
•
Use the tip of your finger to tap the option you want. Be careful not to tap
any other buttons.
Your Home screen

26
Your Home screen
Home screen
TheHomescreenisthestartingpointformanyapplicationsandfunctions.Itallows
youtoadditemslikeappshortcutsandGooglewidgetstogiveyouinstantaccessto
informationandapplications.Thisisthedefaultcanvasandaccessiblefromanymenu
bytapping
.
Status Bar
Widget
Application Icons
Location Indicator
Quick Button Area
Home touch Buttons
Showsphone’sstatusinformation,includingthetime,signalstrength,batterystatus
andnotificationicons.
Widgetsareself-containedapplicationsthatcanbeaccessedthroughtheApps
drawerorontheHomescreen.Unlikeashortcut,aWidgetcanfunctionasan
on-screenapplication.
Tapanicon(application,folder,etc.)toopenanduseit.
IndicateswhichHomescreencanvasyouarecurrentlyviewing.
Providesone-touchaccesstothefunctioninanyHomescreencanvas.

27
Your Home screen
Back Button
Returnstothepreviousscreen.Alsoclosespop-up
items,suchasmenus,dialogueboxesandtheon-screen
keyboard.
Home Button
ReturntotheHomescreenfromanyscreen.
Recent Apps
Button
Displaysrecentlyusedapplications.Ifyoutouchandhold
thisButton,itopensamenuofavailableoptions.
Extended Home screen
TheoperatingsystemprovidesmultipleHomescreencanvasestoprovidemorespace
foraddingicons,widgetsandmore.
•
SlideyourfingerleftorrightacrosstheHomescreentoaccessadditional
canvases.
Customizing the Home screen
YoucancustomiseyourHomescreenbyaddingappsandwidgetsandchanging
wallpapers.
Adding items on your Home screen
1 TouchandholdtheemptypartoftheHomescreen.
2 IntheAddModemenu,selecttheitemyouwanttoadd.Youthenseethisadded
itemontheHomescreen.
3 Dragittothedesiredlocationandliftyourfinger.
TIP! To add an application icon to the Home screen from the Apps screen,
touch and hold the application you want to add.
Removing an item from the Home screen
•
WhileontheHomescreen,touchandholdtheiconyouwanttoremove>dragit
to
.

28
Your Home screen
Adding an app to the Quick Button Area
•
FromtheAppsscreenorontheHomescreen,touchandholdanapplicationicon
anddragittotheQuickButtonArea.Thenreleaseitinthedesiredlocation.
Removing an app from the Quick Button Area
•
TouchandholdthedesiredQuickButton,dragitto .
NOTE
•
The Apps Button cannot be removed.
Customizing app icons on the Home screen
1 Touchandholdanapplicationiconuntilitunlocksfromitscurrentposition,then
releaseit.Theeditingicon
appearsintheupper-rightcorneroftheapplication.
2 Taptheapplicationiconagainandselectthedesiredicondesignandsize.
3 TapOKtosavethechange.
Returning to recently-used applications
1 Tap .Apppreviewsofrecentlyusedapplicationswillbedisplayed.
2 Tapanapppreviewtoopentheapplication.
-OR-
Tap
toreturntoyourpreviousscreen.

29
Your Home screen
Notifications panel
Notificationsalertyoutothearrivalofnewmessages,calendareventsandalarms,as
wellasongoingevents,suchaswhenyouareonacall.
Whenanotificationarrives,itsiconappearsatthetopofthescreen.Iconsforpending
notificationsappearontheleft,andsystemicons,suchasWi-Fiandbatterystrength
areshownontheright.
NOTE
•
The available options may vary depending on the region or service provider.
Pending
notifications
System
notifications
Opening the notifications panel
Swipedownfromthestatusbartoopenthenotificationspanel.Toclosethe
notificationspanel,swipethescreenupwardsortap
.

30
Your Home screen
Quick Settings Area
Notifications
Clear
Tapeachquicksettingbuttontotoggleiton/off.Touchandholdthedesiredbutton
todirectlyaccessthesettingsmenuforthefunction.Toseemoretogglebuttons,
swipeleftorright.Tap
toremove,addorrearrangequicksettingbuttons.
Currentnotificationsarelisted,eachwithabriefdescription.Tapanotificationto
viewit.
Taptoclearallthenotifications.
Indicator icons on the Status Bar
Indicatoriconsappearonthestatusbaratthetopofthescreentoreportmissedcalls,
newmessages,calendarevents,devicestatusandmore.

31
Your Home screen
Theiconsdisplayedatthetopofthescreenprovideinformationaboutthestatusofthe
device.Theiconslistedinthetablebelowaresomeofthemostcommonones.
Icon Description Icon Description
NoSIMcardinserted Asongiscurrentlyplaying
Nonetworksignalavailable Ringerissilenced
Airplanemodeison Vibratemodeison
ConnectedtoaWi-Finetwork Batteryfullycharged
Wiredheadsetconnected Batteryischarging
Callinprogress
Thephoneisconnectedtoa
PCviaaUSBcable
Missedcall Downloadingdata
Bluetoothison Uploadingdata
Systemwarning GPSison
Analarmisset Dataissynchronizing
Newvoicemailavailable Chooseinputmethod
Newtextormultimedia
message
Wi-Fihotspotisactive
NFCison
Mediaservercontentsharing
ison

32
Your Home screen
NOTE
•
The icon's location in the status bar may differ according to the function or
service.
On-screen keyboard
Youcanentertextusingtheon-screenkeyboard.Theon-screenkeyboardappearson
thescreenwhenyoutapanavailabletextentryfield.
Using the keypad and entering text
Taponcetocapitalisethenextletteryoutype.Double-tapforallcaps.
Taptogotothekeyboardsettings.Touchandholdtochangeenteringtextmethod.
Taptoenteraspace.
Taptocreateanewline.
Taptodeletethepreviouscharacter.
Entering accented letters
WhenyouselectFrenchorSpanishasthetextentrylanguage,youcanenterspecial
FrenchorSpanishcharacters(e.g."á").
Forexample,toinput"á",touchandholdthe"a"keyuntilthezoom-inkeyexpands
anddisplayscharactersfromdifferentlanguages.Thenselectthespecialcharacteryou
want.

33
Special Features
Gesture shot
TheGestureshotfeatureallowsyoutotakeapicturewithahandgestureusingthe
frontcamera.
To take a photo
TherearetwomethodsforusingtheGestureshotfeature.
•
Raiseyourhand,withanopenpalm,untilthefrontcameradetectsitandabox
appearsonthescreen.Thencloseyourhandintoafisttostartthetimer,allowing
youtimetogetready.
-OR-
•
Raiseyourhand,inaclenchedfist,untilthefrontcameradetectsitandabox
appearsonthescreen.Thenunclenchyourfisttostartthetimer,allowingyoutime
togetready.
-OR-
TIP! Interval shot
If you make a fist twice or touch and hold
, the camera consecutively takes
4 photos at a time.
Special Features

34
Special Features
Gesture View
Aftertakingaphotowiththefrontcameralens,youcanautomaticallycheckthe
capturedphotowiththisgesture.
1 Tap
> > .
2 Takeapicturewiththefrontcamera.
3 Aftertakingthepicture,bringthephoneclosetoyourface.Thecapturedphotowill
bedisplayed.
Taking a picture Quick preview Returning front camera mode
NOTE
•
Depends on the speed and angle of the gesture, this feature may not work
properly.
•
When the angle is changed after Quick preview, it will go back to the camera
mode. You should go to Gallery to view the picture again.

35
Special Features
Glance View
Whenthephonescreenisoff,youcanseethestatusbar,timeanddatebydragging
yourfingerdownonthescreen.
KnockON
TheKnockONfeatureallowsyoutodouble-tapthescreentoeasilyturnitonoroff.
To turn the screen on
1 Double-tapthecentreoftheLockscreentoturnthescreenon.
2 Unlockthescreenoraccessanyoftheavailableshortcutsorwidgets.
To turn the screen off
1 Double-tapanemptyareaoftheHomescreenortheStatusBar.
2 Thescreenwillturnoff.
NOTE
•
Tap on the centre area of the screen. If you tap on the bottom or the top
area, the recognition rate may decrease.

36
Special Features
Knock Code
TheKnockCodefeatureallowsyoutocreateyourownunlockcodeusinga
combinationofknocksonthescreen.YoucanaccesstheHomescreendirectlywhen
thescreenisoffbytappingthesamesequenceonthescreen.
NOTE
•
If you enter the wrong Knock Code 6 times, it will compulsorily take you to
your Google account log in/backup PIN.
•
Use the fingertip instead of finger nail to tap the screen for turning it on or
off.
1 Tap > > >Display tab>Lock screen>Select screen lock>
Knock Code.
2 TapthesquaresinapatterntosetyourKnockCode.YourKnockCodepatterncan
be3to8taps.
Unlocking the screen using the Knock Code
YoucanunlockthescreenbytappingtheKnockCodepatternyoualreadyset,when
thescreenturnsoff.

37
Special Features
Dual window
Thisfeatureallowsyoutomulti-taskbysplittingupthescreenintotwo,allowingyouto
usetwocompatibleapplicationsatthesametime.
1 Tap
>Dual window.
2 Tapordragtheappiconforthecorrespondingapplicationyouwishtouse.
:TaptoviewtheDualwindowmenuoptions,ordragtoresizethesplitscreens.
:Switchtwoscreens.
:Viewtheapplist.
:Changetheselectedwindowtofullscreen.
:Closethecurrentlyselectedappwindow.
NOTE
•
You can enable or disable Dual window through the Settings menu.
1 Tap
> > > General tab > Dual window.
2 Slide the toggle key to On or Off.

38
Special Features
QuickMemo+
TheQuickMemo+featureallowsyoutocreatememosandcapturescreenshots.
YoucanuseQuickMemo+toeasilyandefficientlycreatememosduringacall,witha
savedpictureoronthecurrentphonescreen.
1 TapanddragtheStatusBardownandtap
.
2 Createamemousingthefollowingoptions:
Taptoundothemostrecentaction.
Taptoredothemostrecentlydeletedaction.
Taptoinserttextintoyourmemo.
Taptoselectthepentypeandcolour.
Taptousetheerasertoerasethepenmarksonthememo.
Taptosavethememoyou'vecreated.
Taptohideordisplaythetoolbar.
NOTE
•
Please use a fingertip while using the QuickMemo+ feature. Do not use your
fingernail.
3 Tap tosavethecurrentmemototheQuickMemo+ orGallery.

39
Special Features
Discard QuickMemos
•
Tap .
View the Saved Memo
•
Tap > > andselecttheQuickMemo+album.
-OR-
Tap
> > andselectthedesiredmemo.
QSlide
Fromanyscreen,usetheNotificationpaneltoeasilyaccessandusetheNotepad,
Calendar,Calculator,andmorewithQSlide.
Taptoexpandthewindowtofull
windowsize.
Taptoadjustthewindow's
transparency.
TaptoclosetheQSlidewindow.
Dragtoadjustthesize.
1 Touchandslidethestatusbardownward>tapQSlidetoviewtheavailableQSlide
apps.
TIP! While using applications that support QSlide, tap > QSlide.
The function is displayed as a small window on your screen.
2 YoucanuseandtapthescreenundertheQSlidewindowswhenthetransparency
barisnotfull
.
NOTE
•
QSlide can support up to two windows at the same time.

40
Special Features
QuickRemote
QuickRemoteturnsyourphoneintoaUniversalRemoteforyourhomeTV,set-topbox
andaudiosystem,andmore.
Set up
1 TouchandslidetheStatusbardownwardandtap
>ADD REMOTE.Ifyoucannotsee
,tap >
checkmarkQuickRemotetoenable.
-OR-
Tap
> >Apps tab(ifnecessary)> >tap
.
2 Selectthetypeandbrandofthedevice,thenfollowthe
on-screeninstructionstoconfigurethedevice.
Access your QuickRemote
3 Onceyouhavecompletedtheinitialsetup,youcan
easilyaccesstheQuickRemotefromtheNotification
panel.OpentheNotificationpanelandusethe
QuickRemotefunctions.
NOTE
•
The QuickRemote operates the same way as an ordinary remote control
infrared (IR) signals. Be careful not to cover the infrared sensor at the top
of the phone when you use the QuickRemote function. This function may
not be supported depending on the model, the manufacturer or service
company.

41
Google account setup
ThefirsttimeyouopenaGoogleapplicationonyourphone,youwillberequiredtosign
inwithyourexistingGoogleaccount.IfyoudonothaveaGoogleaccount,youwillbe
promptedtocreateone.
Creating your Google account
1 Tap > > >Generaltab>Accounts & sync.
2 TapADD ACCOUNT>Google>Create a New Account.
3 Enteryourfirstandlastname,thentapNEXT.
4 EnterausernameandtapNEXT.YourphonewillcommunicatewithGoogleservers
andcheckforusernameavailability.
5 EnteryourpasswordandtapNEXT.
6 Followtheinstructionsandentertherequiredandoptionalinformationaboutthe
account.Waitwhiletheservercreatesyouraccount.
Signing into your Google account
1 Tap > > >Generaltab>Accounts & sync.
2 TapADD ACCOUNT>Google.
3 EnteryouremailaddressandtapNEXT.
4 Aftersigningin,youcanuseGmailandtakeadvantageofGoogleservicesonyour
phone.
5 OnceyouhavesetupyourGoogleaccount,yourphonewillautomatically
synchronisewithyourGoogleaccountontheweb(ifadataconnectionisavailable).
Google account setup

42
Google account setup
Aftersigningin,yourphonewillsyncwithyourGoogleservices,suchasGmail,
Contacts,andGoogleCalendar.YoucanalsouseMaps,downloadapplicationsfrom
PlayStore,backupyoursettingstoGoogleservers,andtakeadvantageofotherGoogle
servicesonyourphone.
IMPORTANT
•
Some applications, such as Calendar, work only with the first Google Account
you add. If you plan to use more than one Google Account with your phone,
be sure to sign into the one you want to use with such applications first. When
you sign in, your contacts, Gmail messages, Calendar events, and other
information from these applications and services on the web are synchronised
with your phone. If you don't sign into a Google Account during setup, you will
be prompted to sign in or to create a Google Account the first time you start
an application that requires one, such as Gmail or Play Store.
•
If you have an enterprise account through your company or other organization,
your IT department may have special instructions on how to sign into that
account.

43
Connecting to Networks and Devices
Wi-Fi
Youcanusehigh-speedInternetaccesswhilewithinthecoverageofthewireless
accesspoint(AP).
Connecting to Wi-Fi networks
1 Tap > > >Networks tab>Wi-Fi.
2 Tap
toturnWi-FionandstartscanningforavailableWi-Finetworks.
3 Tapanetworktoconnecttoit.
•
Ifthenetworkissecuredwithalockicon,youwillneedtoenterasecuritykeyor
password.
4 ThestatusbardisplaysiconsthatindicateWi-Fistatus.
NOTE
•
If you are out of the Wi-Fi zone or have set Wi-Fi to Off, the device may
automatically connect to the Web using mobile data, which may incur data
charges.
TIP! How to obtain the MAC address
Tap
> > > Networks tab > Wi-Fi > > Advanced Wi-Fi > MAC
address.
Connecting to Networks and Devices

44
Connecting to Networks and Devices
Bluetooth
Bluetoothisashort-rangecommunicationstechnologythatallowsyoutoconnect
wirelesslytoanumberofBluetoothdevices,suchasheadsetsandhands-freecarkits,
andBluetooth-enabledhandhelds,computers,printers,andwirelessdevices.
NOTE
•
LG is not responsible for the loss, interception or misuse of data sent or
received via the Bluetooth feature.
•
Always make sure that you share and receive data with devices that are
trusted and properly secured.
•
If there are obstacles between the devices, the operating distance may be
reduced.
•
Some devices, especially those that are not tested or approved by Bluetooth
SIG, may be incompatible with your device.
Pairing your phone with another Bluetooth device
1 Tap > > >Networks tab>Bluetooth.
2 Tap
toturnBluetoothonandstartscanningforavailableBluetoothdevices.
•
Ifyouwanttodetectthevisibledevicesinrangeadditionally,tapSEARCH.
3 Choosethedeviceyouwanttopairwithfromthelist.Oncetheparingissuccessful,
yourphoneconnectstotheotherdevice.
NOTE
•
Pairing between two Bluetooth devices is a one-time process. Once a
pairing has been created, the devices will continue to recognise their
partnership and exchange information.
TIP! Please consult documentation included with Bluetooth device for
information on pairing mode and passcode (typically 0 0 0 0 – four zeroes).

45
Connecting to Networks and Devices
Sending data via Bluetooth
1 Selectafileoritemsuchasacontactormediafile.
2 SelecttheoptionforsendingdataviaBluetooth.
3 SearchforandpairwithaBluetooth-enableddevice.
NOTE
•
Due to different specifications and features of other Bluetooth-compatible
devices, display and operations may be different, and functions such as
transfer or exchange may not be possible with all Bluetooth compatible
devices.
Receiving data via Bluetooth
1 Tap > > >Networks tab>Bluetooth.
2 Tap
toturnBluetoothon.
3 Youwillreceivearequesttoacceptapairingattemptfromthesendingdevice.Be
suretoselectAccept.
Wi-Fi Direct
Wi-FiDirectprovidesadirectconnectionbetweenWi-Fienableddeviceswithout
requiringanaccesspoint.
Turning on Wi-Fi Direct
1 Tap > > > Networks tab > Wi-Fi.
2 Tap
> Advanced Wi-Fi > Wi-Fi Direct.
NOTE
•
When in this menu, your device is visible to other visible Wi-Fi Direct devices
nearby.

46
Connecting to Networks and Devices
Transferring data between a PC and the device
YoucancopyormovedatabetweenaPCandthedevice.
Transferring data
1 ConnectyourdevicetoaPCusingtheUSBcablethatcamewithyourphone.
2 OpentheNotificationspanel,tapthecurrentconnectiontype,andselectMedia
device (MTP).
3 Awindowwillpop-uponyourPC,allowingyoutotransferthedesireddata.
NOTE
•
The LG Android Platform Driver is required to be installed on your PC to be
able to detect the phone.
•
Check the requirements for using Media device (MTP).
Items Requirement
OS MicrosoftWindowsXPSP3,Vistaorhigher
WindowMediaPlayerversion WindowsMediaPlayer10orhigher

47
Calls
Making a call
1 Tap > toopenthedialer.
2 Enterthenumberusingthedialer.Todeleteadigit,tap
.
3 Afterenteringthedesirednumber,tap
toplacethecall.
4 Toendthecall,tap
.
TIP! To enter "+" to make international calls, touch and hold .
Calling your contacts
1 Tap > toopenyourcontacts.
2 Scrollthroughthecontactlist.Youcanalsoenterthecontact'snameintheSearch
fieldorscrollalongthealphabetlettersontherightedgeofthescreen.
3 Inthelistthatisdisplayed,tapthecontactyouwanttocall.
Answering and rejecting a call
•
Swipe inanydirectiontoanswertheincomingcall.
•
Swipe inanydirectiontodeclineanincomingcall.
NOTE
•
Tap or swipe the Decline with message if you want to send a message to
the caller.
Calls

48
Calls
Making a second call
1 Duringyourfirstcall,tap >Add callandenterthenumber.
2 Tap
toplacethecall.
3 Bothcallsaredisplayedonthecallscreen.Yourinitialcallislockedandputonhold.
4 Tapthedisplayednumbertotogglebetweencalls.Ortap
tostartaconference
call.
5 Toendallcalls,tap
.
NOTE
•
You are charged for each call you make.
Viewing your call logs
1 Tap > >Call logstab.
2 Viewalistofalldialed,receivedandmissedcalls.
TIP!
•
Tap any call log entry to view the date, time and duration of the call.
•
Tap > Delete all to delete all of the recorded items.
Call settings
Youcanconfigurephonecallsettings,suchascallforwarding,aswellasotherspecial
featuresofferedbyyourcarrier.
1 Tap
> toopenthedialer.
2 Tap
>Call settingsandconfigurethedesiredoptions.

49
Contacts
Youcanaddcontactsonyourphoneandsynchronisethemwiththecontactsinyour
GoogleAccountorotheraccountsthatsupportsyncingcontacts.
Searching for a contact
1 Tap > toopenyourcontacts.
2 TapSearch contactsandenterthecontactnameusingthekeyboard.
Adding a new contact
1 Tap > andenterthenewcontact'snumber.
2 Tap
>Add to Contacts>New contact.
3 Ifyouwanttoaddapicturetothenewcontact,taptheimageicon.
ChooseTake photoorSelect from Gallery.
4 Enterthedesiredinformationforthecontact.
5 TapSAVE.
Favourites contacts
Youcanclassifyfrequentlycalledcontactsasfavourites.
Adding a contact to your favourites
1 Tap > toopenyourcontacts.
2 Tapacontacttoviewitsdetails.
3 Tapthestaratthetoprightofthescreen.Thestarturnsyellow.
Contacts

50
Contacts
Removing a contact from your favourites list
1 Tap > >Favouritestab.
2 Chooseacontacttoviewitsdetails.
3 Taptheyellowstaratthetoprightofthescreen.Thestarturnsadarkcolourand
thecontactisremovedfromyourfavourites.
Creating a group
1 Tap > >Groups tab.
2 Tap
>New group.
3 Enteranameforthenewgroup.Youcanalsosetadistinctringtoneforthenewly
createdgroup.
4 TapAdd memberstoaddcontactstothegroupandtapADD.
5 TapSAVEtosavethegroup.
NOTE
•
If you delete a group, the contacts assigned to that group will not be lost.
They will remain in your contact list.

51
Messaging
Yourphonecombinestextandmultimediamessagingintooneintuitive,easytouse
menu.
Sending a message
1 Tap > > .
2 EnteracontactnameorcontactnumberintotheTofield.Asyouenterthecontact
name,matchingcontactsappear.Youcantapasuggestedrecipientandaddmore
thanonecontact.
NOTE
•
You may be charged for each text message you send. Please consult with
your service provider.
3 Tapthetextfieldandstartenteringyourmessage.
4 Tap
toopentheoptionsmenu.Choosefromanyoftheavailableoptions.
TIP! You can tap to attach the file that you want to share with message.
5 TapSendtosendyourmessage.
TIP!
•
The 160-character limit may vary from country to country depending on how
the text message is coded and the language used in the message.
•
If an image, video, or audio file is added to a text message, it will be
automatically converted into a multimedia message and you will be charged
accordingly.
Messaging

52
Messaging
NOTE
•
When you get a text message during a call, there will be an audible
notification.
Conversation view
Messagesexchangedwithanotherpartyaredisplayedinchronologicalordersothat
youcanconvenientlyseeandfindyourconversations.
Changing your messaging settings
Yourphone'smessagingsettingsarepredefinedtoallowyoutosendmessages
immediately.Youcanchangethesettingsbasedonyourpreferences.
•
Tap > > >Settings.

53
E-mail
YoucanusetheEmailapplicationtoreademailfromprovidersotherthanGmail.
TheEmailapplicationsupportsthefollowingaccounttypes:POP3,IMAPandMicrosoft
Exchange(forEnterpriseusers).
Managing email accounts
To open the Email application
ThefirsttimeyouopentheEmailapplication,asetupwizardopenstohelpyouaddan
emailaccount.
•
Tap > > .
Adding another email account:
•
Tap > > > >Settings > .
Changing an email general settings:
•
Tap > > > >Settings>General settings.
Deleting an email account:
•
Tap > > > >Settings> >Remove account>Selectthe
accounttodelete>REMOVE>YES.
Working with account folders
•
Tap > > > >Show all folders.
EachaccounthasInbox,Outbox,SentandDraftsfolders.Dependingonthefeatures
supportedbyyouraccount'sserviceprovider,youmayhaveadditionalfolders.
E-mail

54
E-mail
Composing and sending email
1 Tap > > > tocreateanewemail.
2 Enteranaddressforthemessage'sintendedrecipient.Asyouentertext,matching
addresseswillbeofferedfromyourcontacts.Separatemultipleaddresseswith
semicolons.
3 TaptheCc/Bccfieldtocopyorblindcopytoothercontacts/emailaddresses.
4 Tapthetextfieldandenteryourmessage.
5 Tap
toattachthefileyouwanttosendwithyourmessage.
6 Tap
tosendthemessage.

55
Camera and Video
Camera options on the viewfinder
Youcanusethecameraorcamcordertotakeandsharepicturesandvideos.
•
Tap > > > > .
1
6
9
2
7
8
3
4
5
Hide/Display Options–Taptohide/displaythecameraoptionsontheviewfinder.
ChoosefromSimple, BasicorManual.
Flash–Allowsyoutomanagethecamera'sflash.
Swap camera–Taptoswapbetweentherearcameralensandthefrontcamera
lens.
Shot mode–Allowsyoutoselecttheshotmodeforthepicture.
Settings–Tapthisicontoopenthecamerasettingsmenu.
Gallery–Taptoviewthelastphotoorvideoyourecorded.
Record–Taptostartrecording.
Capture –Taptotakeaphoto.
Back Button –Taptoexitthecamera.
Camera and Video

56
Camera and Video
NOTE
•
Be sure to clean the protective lens cover with a microfiber cloth before
taking pictures. A lens cover with smudges from fingers can cause blurry
pictures with a "halo" effect.
Using the advanced settings
Inthecameraviewfinder,tap toshowtheadvancedoptions.Tapeachiconto
adjustthefollowingcamerasettings.
Combinesphotostakenatmultipleexposuresintooneoptimalphototo
getabetterphotoindifficultlightingsituations.
Setthesizeofyourpictureandvideo.
Allowsyoutotakepictureswithvoicecommands.Whenon,youjustsay
"Cheese","Smile","LG",etc.totakeapicture.
Setyourcamera'stimer.Thisisidealifyouwanttobeapartofthe
pictureorvideo.
Allowsyoutotakebetterpicturesandrecordbettervideosbydisplaying
agridlineforhelpwithalignment.
/
Setthestoragelocationforyourpicturesandvideos.ChoosefromIN
(internalmemory)andSD(memorycard).Thismenuappearsonlywhen
theSDcardisinserted.
Allowsyoutolearnhowafunctionworks.Thisiconwillprovideyouwith
ahelpguide.

57
Camera and Video
Manual mode on the viewfinder
Youcancontroleverydetailoptionmanually.
•
Tap > > > > .
1
62 7
8
3 4 5
–TaptoselectafileformatbetweentheJPEGandtheDNG.
–Taptoimprovecolourqualityinvariouslightingconditions.
–Taptousethemanualfocusmode.
–Taptoadjustthebrightness.
–TaptoadjusttheISO.
–Taptoadjusttheshutterspeed.
–Taptousetheautoexposelock.
Displaythemanualstatusinformation.

58
Camera and Video
Using the advanced settings for the manual mode
Inthecameraviewfinder,tap toshowtheadvancedoptions.Tapeachiconto
adjustthefollowingcamerasettings.
Taptodisplayainclineoragridlineforhelpwithalignment.
Taptodisplayahistogram.
Taking a photo
1 Tap > > .
2 Frameyoursubjectonthescreen.
3 Asquarearoundthesubjectindicatesthatthecamerahasfocused.
4 Tap
totakeaphoto.YourpicturewillbeautomaticallysavedtotheGallery.
Once you have taken a photo
Taptheimagethumbnailonthescreentoviewthelastphotoyoutook.
Taptoeditthephoto.
Taptotakeanotherphotoimmediately.
Taptoopentheavailablesharingoptions.
Taptodeletethephoto.
Taptoaccessadditionaloptions.
Taptoaddthephototoyourfavourites.

59
Camera and Video
Multi-point Auto Focus
Whenyoutakeapicture,theMulti-pointAutoFocus(AF)functionoperates
automaticallyandwillallowyoutoseeaclearimage.
Burst shot
Allowsyoutotakemultipleshotsquickly.Touchandhold .
Panorama mode
Allowsyoutotakeapanoramicpicture.
1 Tap
> > .
2 Tap
Mode
> .
3 Tap
tostarttakingthepanoramicpicture.
4 Panyourphoneslowlyinonedirection.
5 Makesurethatthefocusareaalignswiththeblueguidelinewhiletakingthephoto.
6 Tap
tostoptakingthepanoramicpicture.
Dual
TheDualfeatureallowsyoutotakeapictureorrecordavideowiththefrontandrear
camerasatthesametime.
1 Tap
> > .
2 Tap
Mode
> .
NOTE
•
Drag the small screen to move it to your desired location. Touch and hold
the small screen to resize it. Tap on the small screen to alternate between
the two cameras.
3 Tap totakeapicture.
-OR-
Tap
torecordvideo.
4 Tap
tostopdualrecording.

60
Camera and Video
8X Zooming
Whenusingtherearcameralens,youcanzoominoroutto8x.
NOTE
•
Use a steady hand. This feature does not work with some functions Objects
may be overlapped when taking a picture of fast-moving subjects.
Recording a video
1 Tap > > .
2 Frameyoursubjectonthescreen.
3 Tap
tostartrecordingthevideo.
4 Thelengthoftherecordingisdisplayedonthetopofthescreen.
NOTE
•
Tap to take pictures while recording video.
5 Tap topauserecordingvideo.Youcanresumerecordingagainbytapping .
-OR-
Tap
tostoprecording.YourvideowillbeautomaticallysavedtotheGallery.
After recording a video
Tapthevideothumbnailonthescreentoviewthelastvideoyourecorded.
Taptorecordanothervideoimmediately.
Taptoopentheavailablesharingoptions(suchasMessagingorBluetooth)
toshare.
Taptodeletethevideo.
Taptoaccessadditionaloptions.

61
Camera and Video
Taptoaddthevideotoyourfavorites.
Live Zoom
LiveZoomallowsyoutozoominoroutonaportionofavideothatisbeingplayedto
makethedesiredsectionappearlargerorsmaller.
Whenviewingavideo,useyourindexfingerandthumbinapinchingorspreading
motiontozoominorout.
NOTE
•
Do not press too hard; the touch screen is sensitive enough to pick up a
light, but firm touch.
Dual Play
DualPlay(wiredorwirelessconnectiontotwodisplays)canberunonadifferent
screen.
NOTE
•
Connect two devices using a wired (Slimport-HDMI) cable or wirelessly
(Miracast). The connectable device can be a TV or a monitor supported
by an HDMI cable or Miracast. The Gallery and Video apps are supported
on Dual Play. Tap once when two displays are a different status (i.e.
the monitor is playing a video and your phone’s video app is displaying an
empty screen), then Dual Play will start. Not all videos are supported by Dual
Play. Dual Play operates at 1280X720 or higher display resolution.

62
Camera and Video
Gallery
TheGalleryapplicationpresentsthepicturesandvideosinyourstorage,includingthose
you'vetakenwiththeCameraapplicationandthoseyoudownloadedfromthewebor
otherlocations.
1 Tap
> > toviewtheimagesstoredinthestorage.
2 Tapanalbumtoopenitandviewitscontents.(Thepicturesandvideosinthealbum
aredisplayedinchronologicalorder.)
3 Tapapictureinanalbumtoviewit.
NOTE
•
Depending on the software installed, some file formats may not be
supported.
•
Some files may not play properly due to their encoding.
Viewing pictures
TheGallerydisplaysyourpicturesinfolders.Whenanapplication,suchasE-mail,saves
apicture,thedownloadfolderisautomaticallycreatedtocontainthepicture.Likewise,
capturingascreenshotautomaticallycreatestheScreenshotsfolder.
Picturesaredisplayedbythedatetheywerecreated.Selectapicturetoviewitfull
screen.Scrollleftorrighttoviewthenextorpreviousimage.
Timeline view
TheGalleryautomaticallysortsanddisplaysalotofphotosinchronologicalordertosee
ataglance.
1 Tap
> > .
2 Tap
>Timeline.
3 SelectfromYear,Month andDay.

63
Camera and Video
Memories view
TheGalleryautomaticallyorganisesanddisplaysthememoriesalbumsdependingon
theregionandtimeinformationofsavedphotos.
1 Tap
> > .
2 Tap
>Memories.
3 Selectmemoriesalbums.
NOTE
•
This feature is a location based service. Take photos and videos with their
locations.
Zooming in and out
Useoneofthefollowingmethodstozoominonanimage:
•
Double-tapanywheretozoomin.
•
Spreadtwofingersapartonanyplaceinthepicturezoomin.Pinchinordouble-
taptheimagetozoomout.

64
Camera and Video
Video options
1 Tap > > .
2 Selectthevideoyouwanttowatch.
Taptopause/resumevideoplayback.
Touchandholdtofast-forwardin3secondincrements.
Taptofast-forward10seconds.
Touchandholdtorewindin3secondincrements.
Taptorewind10seconds.
Taptoadjustthevideovolume.
Taptolock/unlockthescreen.
TaptouseQSlidefortheVideoapp.
TaptoshareyourvideousingtheSmartSharefunction.
Taptoaccessadditionaloptions.

65
Camera and Video
NOTE
•
While playing a video, slide the right side of the screen up or down to adjust
the sound.
•
While playing a video, slide the left side of the screen up or down to adjust
the brightness.
•
While playing a video, slide your finger from left to right (or vice versa) to
fast-forward and rewind.
Editing photos
Whileviewingaphoto,tap .
Deleting photos/videos
Useoneofthefollowingmethods:
•
Whileinafolder,tap ,selectthephotos/videosandthentapDELETE.
•
Whileviewingaphoto,tap .
Setting wallpaper
Whileviewingaphoto,tap >Set image astosettheimageaswallpaperorassign
ittoacontact.
NOTE
•
Depending on the software installed, some file formats may not be
supported.
•
If the file size exceeds the available memory, an error can occur when you
open files.

66
Multimedia
Music
Yourphonehasamusicplayerthatletsyouplayallyourfavouritetracks.
Playing a song
1 Tap > > .
2 TaptheSongstab.
3 Selectthesongyouwanttoplay.
4 Thefollowingoptionsareavailable.
Taptopauseplayback.
Taptoresumeplayback.
Taptoskiptothenexttrackinthealbum,playlistorshufflelist.Touchand
holdtofast-forward.
Multimedia

67
Multimedia
Taptorestartthecurrenttrackorskiptotheprevioustrackinthealbum,
playlistorshufflelist.Touchandholdtorewind.
Taptoadjustthevolume.
Taptosetaudioeffects.
Taptoplaythecurrentplaylistinshufflemode(tracksareplayedin
randomorder).
Taptotogglethroughrepeatallsongs,repeatcurrentsongandrepeatoff.
TaptoshareyourmusicusingtheSmartSharefunction.
Taptoaddthesongtoyourfavorites.
Taptoopenthecurrentplaylist.
Taptoaccessadditionaloptions.
NOTE
•
Depending on the software installed, some file formats may not be
supported.
•
If the file size exceeds the available memory, an error can occur when you
open files.
•
Music file copyrights may be protected by international treaties and national
copyright laws. Therefore, it may be necessary to obtain permission or
a licence to reproduce or copy music. In some countries, national laws
prohibit private copying of copyrighted material. Before downloading or
copying the file, please check the national laws of the relevant country
concerning the use of such material.

68
Utilities
Clock
TheClockappgivesyouaccesstotheAlarms,Timer,WorldclockandStopwatch
functions.Accessthesefunctionsbytappingthetabsacrossthetopofthescreenor
swipinghorizontallyacrossthescreen.
•
Tap > > .
Alarms
TheAlarmstaballowsyoutosetalarms.
1 Tap
> > >Alarmstab.
2 Tap
toaddanewalarm.
3 AdjustthesettingsasnecessaryandtapSave.
NOTE
•
You can also tap an existing alarm to edit it.
Timer
TheTimertabcanalertyouwithanaudiblesignalwhenasetamountoftimehas
passed.
1 Tap
> > >Timertab.
2 Setthedesiredtimeonthetimer.
3 TapStarttostartthetimer.
4 TapStoptostopthetimer.
World clock
TheWorldclocktaballowsyoutoeasilycheckthecurrenttimeinothercitiesaround
theworld.
1 Tap
> > >World clocktab.
Utilities

69
Utilities
2 Tap andselectthedesiredcity.
Stopwatch
TheStopwatchtaballowsyoutouseyourphoneasastopwatch.
1 Tap
> > >Stopwatchtab.
2 TapStarttoinitiatethestopwatch.
•
Tap Laptorecordlaptimes.
3 TapStoptostopstopwatch.
Calculator
TheCalculatorappallowsyoutoperformmathematicalcalculationsusingastandardor
scientificcalculator.
1 Tap
> > .
2 Tapthenumberbuttonstoenternumbers.
3 Forsimplecalculations,tapthefunctionyouwanttoperform(+,–,xor÷)followed
by=.
NOTE
•
For more complex calculations, tap .
Calendar
TheCalendarappallowsyoutotrackyourscheduleofevents.
1 Tap
> > .
2 Tapthedateyouwanttoaddaneventto.Thentap
.

70
Utilities
Voice Recorder
TheVoiceRecorderapprecordsaudiblefilesforyoutouseinavarietyofways.
Recording a sound or voice
1 Tap > > .
2 Tap
tobeginrecording.
3 Tap
toendtherecording.
4 Tap
tolistentotherecording.
NOTE
•
Tap to access your recordings. You can listen to your saved recordings.
Voice Search
Usethisapplicationtosearchwebpagesusingvoice.
1 Tap
> >Google folder> .
2 SayakeywordorphrasewhenListening...appearsonthescreen.Selectoneofthe
suggestedkeywordsthatappear.
NOTE
•
This application may not be available depending on the region or service
provider.
Downloads
Usethisapplicationtoseewhatfileshavebeendownloadedthroughtheapplications.
•
Tap > > .

71
Utilities
NOTE
•
This application may not be available depending on the region or service
provider.
FM radio
Yourphonehasabuilt-inFMradiosoyoucantuneintoyourfavouritestationsand
listenonthego.
•
Tap > > .
TIP! You must plug in your earphones in order to use them as an antenna.
NOTE
•
This application may not be available depending on the region or service
provider.
LG Health
TheLGHealthhelpsyoumanageyourhealthandmaintaingoodexercisehabitsby
trackinglogsandcompetingwithpeople.
1 Tap
> > .
2 Readandagreetothetermsandconditions.
3 OntheProfileandgoalpage,enteryourprofileinformationandtapSave.
4 Usetheoptionsbelowtobegintrackingactivity.
NOTE
•
This feature is provided for user convenience. Please use for reference only.

72
Web Browser
Internet
Theinternetgivesyouafast,fullcolourworldofgames,music,news,sports,
entertainment,andmuchmore,rightonyourmobilephone.
NOTE
•
Additional charges apply when connecting to these services and
downloading content. Check data charges with your network provider.
•
Tap > > .
Using the Web toolbar
Scrolltowardsthetopofthewebpagetoaccessthebrowsertoolbar.
Taptogobackonepage.
Taptogoforwardonepage.
TaptogototheHomepage.
Taptoopenanewwindow.
Taptoaccessyourbookmarks.
Viewing webpages
Taptheaddressfield,enterthewebaddressandtapGoonthekeyboard.
Opening a page
Togotoanewpage,tap > .
Togotoanotherwebpage,tap
,scrollupordown,andtapthepagetoselectit.
Web Browser

73
Web Browser
Searching the web by voice
Taptheaddressfieldandthentap .Whenprompted,sayakeywordandselectone
ofthesuggestedkeywordsthatappear.
NOTE
•
This feature may not be available depending on the region or service
provider.
Bookmarks
Tobookmarkthecurrentwebpage,tap >Add to bookmarks>OK.
Toopenabookmarkedwebpage,tap
andselectthedesiredbookmark.
History
Tap >Historytabtoopenalistofrecentlyvisitedwebpages.Toclearallofyour
history,tap
>Yes.
Chrome
UseChrometosearchforinformationandbrowsewebpages.
•
Tap > > .
NOTE
•
This application may not be available depending on your region and service
provider.
Viewing webpages
Taptheaddressfield,andthenenterawebaddressorsearchcriteria.
Opening a page
Toopenanewpage,tab >New tab.
Togotoanotherwebpage,tap
andtapthepagetoselectit.

74
Settings
TheSettingsapplicationcontainsmostofthetoolsforcustomizingandconfiguringyour
phone.AllofthesettingsintheSettingsapplicationaredescribedinthissection.
To open the Settings application
•
Tap >touchandhold >System settings.
-OR-
•
Tap > > .
Networks
< WIRELESS NETWORKS >
Wi-Fi
TurnsonWi-FitoconnecttoavailableWi-Finetworks.
Bluetooth
TurnstheBluetoothwirelessfeatureonorofftouseBluetooth.
Mobile data
Displaysthedatausageandmobiledatausagelimit.
Call
Thismenuallowsyoutoconfigurevariouscallsettings.
•
Voicemail –Allowsyoutoselectyourcarrier’svoicemailservice.
•
Fixed dialing numbers–Allowsyoutomanageandcompilealistofnumbers
thatcanbecalledfromyourphone.YouneedyourPIN2,whichisavailablefrom
youroperator.Ifactivated,onlynumbersinthefixeddiallistcanbecalledfrom
yourphone.
•
Incoming voice call pop-up–Displaysapop-upforanincomingcallwhenan
appisinuse.
•
Call reject–Allowsyoutosetthecalldeclinefunction.
Settings

75
Settings
•
Decline with message–Whenyouwanttodeclineacall,youcansendaquick
messageusingthisfunction.Thisisusefulifyouneedtodeclineacallduringa
meeting.
•
Call forwarding–Allowsyoutochoosewhentoforwardcalls.
•
Auto answer–Setsthetimebeforeaconnectedhands-freedeviceautomatically
answersanincomingcall.
•
Connection vibration–Vibratesyourphonewhentheotherpartyanswersthe
call.
•
Noise suppression –Suppressesbackgroundnoiseonyourdeviceduringacall.
•
Voice clarity –Enhancesvoicequalityinnoisyenvironmentssoyoucanhear
moreclearly.
•
Save unknown numbers–Allowsyoutoaddunknownnumberstocontactsafter
acall.
•
Power key ends call–AllowsyoutousethePowerkeytoendcalls.
•
Answer an incoming call –Checkmarktoenableyoutobringthedevicetoyour
eartoautomaticallyanswertheincomingcall.
•
Silence incoming calls –Checkmarktoallowyoutoflipthedevicetosilence
incomingcalls.
•
Call barring–Locksincoming,outgoingorinternationalcalls.
•
Call duration–Allowsyoutoviewthecalldurationforvarioustypesofcalls.
•
Additional settings–Allowsyoutochangethefollowingsettings.
< CONNECTIVITY >
Share & connect
•
NFC–YourphoneisanNFC-enabledcellmobilephone.NFC(NearField
Communication)isawirelessconnectivitytechnologythatenablestwo-way
communicationbetweenelectronicdevices.Itoperatesoveradistanceofafew
centimetres.YoucanshareyourcontentwithanNFCtagoranotherNFCsupport
devicebysimplytappingitwithyourdevice.IfyoutapanNFCtagwithyour
device,itdisplaysthetagcontentonyourdevice.
•
Android Beam–Whenthisfeatureisturnedon,youcantransferappcontentto
anotherNFC-capabledevicebyholdingthedevicesclosetogether.

76
Settings
Justbringthedevicetogether(typicallybacktoback)andthentapyourscreen.
Theappdetermineswhatgetsbeamed.
•
SmartShare Beam–AllowsyoutoreceivemultimediacontentviaLGphonesand
tablets.
•
Media server–SharemediacontentwithnearbyDLNA-compatibledevices.
•
Miracast–Allowsyoutowirelesslymirrorthephonescreenandsoundontoa
MiracastdongleorTV.
•
LG Bridge –Allowsyoutoconnecttoacomputertomanageyourphone.
•
Printing–Allowsyoutoprintthecontentofcertainscreens(suchaswebpages
displayedinChrome)toaprinterconnectedtothesameWi-Finetworkasyour
Androiddevice.
Tethering
•
USB tethering–Allowsyoutosharetheinternetconnectionwithyourcomputer
viaaUSBcable.
•
Wi-Fi hotspot–Allowsyoutocreateahotspotandshareyourconnection.Please
consult"Sharing your phone’s data connection"formoreinformation.
•
Bluetooth tethering–AllowsyoutoconnecttootherdevicesviaBluetooth.
•
Help–DisplaysHelpinformationaboutUSBtethering,Wi-Fihotspot,andBluetooth
tethering.
More
•
Airplane mode–AirplaneMode(flightmode)allowsyoutousemanyofyour
phone'sfeatures,suchasgames,andmusic,whenyouareinanareawhere
makingorreceivingcallsordatauseisprohibited.Whenyousetyourphoneto
AirplaneMode,itcannotsendorreceiveanycallsoraccessonlinedata.
•
Mobile networks–Thismenuallowsyoutoconfigurevariousmobilenetwork
settings.
•
VPN–Fromyourphone,youcanadd,setup,andmanagevirtualprivatenetworks
(VPNs)thatallowyoutoconnectandaccessresourcesinsideasecuredlocal
network,suchasyourcorporatenetwork.

77
Settings
Sound & notification
< BASIC >
Sound profile
Allowsyoutosetyourphone'ssoundprofile.ChoosefromSound,Vibrate only.
< SOUND >
Volume
Adjustthephone’svolumesettingstosuityourneedsandenvironment.
Ringtone
Allowsyoutosettheringtonesforcalls.Youcanalsoaddaringtonebytapping
in
theupper-rightcornerofthescreen.
Ringtone ID
Allowsyoutocomposeringtonesbasedonphonenumberofincomingcall.
< VIBRATION >
Vibration strength
Allowsyoutosetthevibrationstrengthforcalls,notificationsandtouchfeedback.
Sound with vibration
Checkmarktosetthephonetovibrateinadditiontotheringtonewhenyoureceive
calls.
Vibration type
Allowsyoutochoosethetypeofvibration.
< NOTIFICATIONS >
Interruptions
Allowsyoutosetaschedulewhentopreventinterruptionsfromnotifications.Youcan
settoallowcertainfeaturestointerruptwhenPriorityonlyisset.
Lock screen
Allowsyoutochooseifyouwanttoshoworhidenotificationsonthelockscreen.

78
Settings
Apps
Allowsyoutopreventappsfromdisplayingnotificationsorsetappstoshow
notificationswithprioritywhenDonotdisturbissettoPriorityonly.
Notification LED
TaptheswitchtotoggleitOnorOff.OnactivatestheLEDlightforthenotificationsyou
select,inthecolouryousetforeach.
< ADVANCED SETTINGS >
More
•
Notification sound –Allowsyoutosetthenotificationsound.Youcanalsoadda
notificationsoundbytapping
intheupper-rightcornerofthescreen.
•
Vibrate on tap –CheckmarktovibratewhentappingtheHometouchbuttonsand
duringotherUIinteractions.
•
Sound effects –Taptosetthedialpadtouchtones,touchsoundsandscreen
locksound.
•
Message/call voice notifications –TaptheMessage/call voice notifications
switchtotoggleitOnorOff.Onallowsyourdevicetoreadoutincomingcallsand
messageeventsautomatically.
Display
< HOME & LOCK >
Home screen
•
Select Home –SetHomeorEasyHomeasthedefaulthome.
•
Smart Bulletin –TaptheSmart BulletinswitchtotoggleitOnorOff.Activating
thisfeatureaddsanadditionalHomescreenshowingcustomisedinformation.
•
Theme –Setsthescreenthemeforyourdevice.Youcandownloadnewthemes
fromLG SmartWorld.
•
Wallpaper –SetsthewallpapertouseonyourHomescreen.
•
Screen swipe effect –Choosethedesiredtypeofeffecttodisplaywhenyou
swipefromoneHomescreencanvastothenext.

79
Settings
•
Allow Home screen looping –Displaysthefirstscreenafterthelastscreenwhen
scrollingtheHomescreen.
•
Help –DisplayshelpinformationfortheHomescreen.
Lock screen
•
Select screen lock–Setascreenlocktypetosecureyourphone.Opensasetof
screensthatguideyouthroughdrawingascreenunlockpattern.
IfyouenabledaPatternlocktypewhenyouturnonyourphoneorwakeupthe
screen,youareaskedtodrawyourunlockpatterntounlockthescreen.
•
Smart Lock–Setstokeepyourphoneunlockedwithtrusteddeviceoraplace.
•
Screen swipe effect–Setsthescreenswipeeffectoptions.
NOTE
•
This setting name may be Pattern effect if the Screen lock is set to Pattern.
•
Wallpaper–AllowsyoutosetyourLockscreenwallpaper.
•
Shortcuts–Allowsyoutochoosetheshortcutsavailableonthelockscreen.
•
Weather animation–Checkmarktoshowweatheranimationonthelockscreen
forthecurrentlocation.
•
Contact info for lost phone–Allowsyoutodisplaytheownerinformationonthe
lockscreenincasethephoneislost.
•
Lock timer–Setstheamountoftimebeforethescreenautomaticallylocksafter
thescreenhastimedout.
•
Power button instantly locks–Checkmarktoinstantlylockthescreenwhenthe
Power/LockButtonispressed.ThissettingoverridestheSecuritylocktimersetting.
Home touch buttons
SettheHometouchbuttonsdisplayedatthebottomofallscreens.Setwhichkeysare
displayed,theirpositiononthebarandwhattheylooklike.

80
Settings
< FONT >
Font type
Selectthedesiredfonttype.
Font size
Selectthedesiredfontsize.
< BASIC SETTINGS >
Brightness
Adjustthescreenbrightnessbyusingtheslider.
Auto-rotate screen
Settoswitchorientationautomaticallywhenyourotatethephone.
Screen timeout
Setthetimedelaybeforethescreenautomaticallyturnsoff.
< ADVANCED SETTINGS >
More
•
Daydream-Selectthescreensavertodisplaywhenthephoneissleepingwhile
dockedand/orcharging.
•
Motion sensor calibration–Allowsyoutoimprovetheaccuracyofthetiltand
speedofthesensor.
General
< PERSONAL >
Language & input
Selectthelanguageforthetextonyourphoneandforconfiguringtheon-screen
keyboard,includingwordsthatyou'veaddedtoitsdictionary.
•
Language –Choosealanguagetouseonyourphone.
•
Default –Allowsyoutoselectthedefaultkeyboardtype.
•
LG Keyboard –TaptheSettingsicontochangetheLGKeyboardsettings.
•
Google voice typing –CheckmarktoselectGooglevoicetypingtoenterdata.Tap
theSettingsicontochangetheGooglevoicesettings.

81
Settings
•
Voice Search–TaptoconfiguretheVoiceSearchsettings.
•
Text-to-speech output –Taptosetthepreferredengineorgeneralsettingsfor
text-to-speechoutput.
•
Pointer speed –Adjustthepointerspeed.
Location
Turnonlocationservice,yourphonedeterminesyourapproximatelocationusingWi-Fi
andmobilenetworks.Whenyouselectthisoption,you'reaskedwhetheryouconsentto
allowingGoogletouseyourlocationwhenprovidingtheseservices.
•
Mode –Setsthehowyourcurrentlocationinformationisdetermined.
•
Camera –Checkmarktotagphotosorvideoswiththeirlocations.
•
Google Location Reporting –Allowsyoutochooseyourlocationinformation
settingsasaccessedbyGoogleanditsproducts.
Accounts & sync
UsetheAccounts&syncsettingsmenutoadd,remove,andmanageyourGoogleand
othersupportedaccounts.Youalsousethesesettingstocontrolhowandwhether
allapplicationssend,receive,andsyncdataontheirownschedulesandwhetherall
applicationscansynchroniseuserdataautomatically.
Gmail™,Calendar,andotherapplicationsmayalsohavetheirownsettingstocontrol
howtheysynchronisedata;seethesectionsonthoseapplicationsfordetails.TapADD
ACCOUNTtoaddnewaccount.
Cloud
Allowsyoutoaddacloudaccounttoquicklyandeasilyuseacloudservice.
Users
Checkmarktoadduserswhenphonelocked.
Addusertosharethephonewithotherpeople.Eachusercanhavetheirownappsand
contentintheirownspace.AnyoneusingthephonecanchangesettingslikeWi-Fiand
acceptappupdatesthatwillaffecteveryone.Initialsetupisrequiredfornewusersto
usephone.

82
Settings
Accessibility
UsetheAccessibilitysettingstoconfigureaccessibilityplug-insyouhaveinstalledon
yourphone.
•
Vision
- TalkBack –AllowsyoutosetuptheTalkBackfunctionwhichassistspeoplewith
impairedvisionbyprovidingverbalfeedback.
- Message/call voice notifications –Tap
totoggleitOnorOff.Onallows
youtohearautomaticspokenalertsforincomingcallsandmessages.
- Screen shade –Checkmarktosetthescreentoadarkercontrast.
- Font size –Setsthefontsize.
- Touch zoom–Allowsyoutozoominandoutbytriple-tappingthescreen.
- Screen colour inversion –Checkmarktoinvertthecoloursofthescreenand
content.
- Screen colour adjustment –Allowsyoutoadjustthecoloursofscreenand
content.
- Screen colour filter –Allowsyoutochangethecoloursofscreenandcontent.
- Power key ends call –Checkmarksothatyoucanendvoicecallsbypressing
thePower/LockKey.
•
Hearing
- Captions–Allowsyoutocustomisecaptionsettingsforthosewithhearing
impairments.
- Notification LED–AllowsyoutoactivatetheLEDlightforincomingcallsand
notifications.
- Flash alerts –Checkmarktosettheflashtoblinkforincomingcallsand
notifications.
- Turn off all sounds–Checkmarktoturnoffalldevicesounds.
- Audio type–Setstheaudiotype.
- Sound balance–Setstheaudioroute.Movethesliderontheslidebartosetit.

83
Settings
•
Motor & cognition
- Touch feedback time–Setsthetouchfeedbacktime.
- Touch assistant –Showatouchboardwitheasyaccesstocommonactions.
- Screen timeout –Setstheamountoftimebeforethebacklightturnsoff
automatically.
- Touch control areas –Allowsyoutoselectanareaofthescreentolimittouch
activationtojustthatareaofthescreen.
•
Accessibility features shortcut
Allowyoutoaccessselectedfeaturesquicklywhentriple-tappingtheHomebutton.
•
Auto-rotate screen
Checkmarktoallowthephonetorotatethescreendependingonthephysical
phoneorientation(portraitorlandscape).
•
Switch Access
Allowsyoutointeractwithyourdeviceusingoneormoreswitchesthatworklike
keyboardkeys.Thismenucanbehelpfulforuserswithmobilitylimitationsthat
preventthemfrominteractingdirectlywiththeyourdevice.
Shortcut key
GetquickaccesstoappsbypressingtheVolume Keystwicewhenthescreenisoff
orlocked.
< PRIVACY >
Security
UsetheSecuritymenutoconfigurehowtohelpsecureyourphoneanditsdata.
•
Content lock –SelectlocktypestolockfilesinGallery.Choose fromPassword
orPattern.
•
Encrypt phone–Allowsyoutoencryptdataonthephoneforsecurity.Youwillbe
requiredtoenteraPINorpasswordtodecryptyourphoneeachtimeyoupower
iton.
•
Encrypt SD card storage–EncryptSDcardstorageandkeepdataunavailable
forotherdevices.

84
Settings
•
Set up SIM card lock –SetsthePINtolockyourSIMcardandallowsyouto
changethePIN.
•
Password typing visible–Checkmarktobrieflyshoweachcharacterof
passwordsasyouenterthemsothatyoucanseewhatyouenter.
•
Phone administrators–Viewordeactivatephoneadministrators.
•
Unknown sources–Allowinstallationofnon-PlayStoreapplications.
•
Verify apps –Disalloworwarnbeforeinstallationofappsthatmaycauseharm.
•
Storage type –Hardware-backed.
•
Certificate management
- Trusted credentials –Checkmarktoallowapplicationstoaccessyour
phone'sencryptedstoreofsecurecertificatesandrelatedpasswordsandother
credentials.YouusecredentialstoragetoestablishsometypesofVPNandWi-Fi
connections.Ifyouhavenotsetapasswordforthesecurecredentialstorage,
thissettingisdimmed.
- Install from storage –Taptoinstallasecurecertificate.
- Clear credentials –Deletesallsecurecertificatesandrelatedcredentialsand
erasesthesecurestorage'sownpassword.
•
Trust agents –Selectappstousewithoutunlockingscreen.
•
Screen pin –Youcanenableyourdevicetoonlyshowacertainapp'sscreen
usingscreenpin.
•
App usage access –Allowsyoutoviewusageinformationofappsonyourphone.
< SMART FUNCTIONS >
Smart settings
Allowsyoutoturnon/off,openorchangesomethingsuchasWi-Fi,Music,Sound
profileaccordingtowhereyouareorwhatyoudo.
QuickCircle case
Thismenuallowsyoutoselectappstobeuseddirectlyonthecoverinsmallview
usingQuickCircle.KeepinmindthatturningontheseQuickCirclecasesettingsmay
resultinirregulardevicebehaviour.

85
Settings
Dual window
AllowsyoutoconfiguretheDualWindowfeature.
•
Auto-open–Checkmarktoallowyoutotapalinkonthefullscreenor
attachmentsfromemailstoopenDualwindow.
•
Help–DisplaytipsforusingDualwindow.
< PHONE MANAGEMENT >
Date & time
Setyourpreferencesforhowthedateandtimeisdisplayed.
Storage
Youcanmonitortheusedandavailableinternalmemoryinthedevice.
Battery & power saving
•
Battery usage –Viewbatteryusage.
•
Battery percentage on status bar –Checkmarktodisplaythebatterylevel
percentageontheStatusBarnexttotheBatteryicon.
•
Battery saver –TaptheBatterySaverswitchtotoggleitonoroff.Setsthebattery
chargepercentlevelthatautomaticallyturnsonBatterySaver.Chooserfrom
Immediately,5% battery,and15% battery.
•
Game optimizer –Adjustvideoqualityingamestosavebattery.
Smart cleaning
Allowsyoutomanageunusedappsanddata.
Apps
Allowsyoutoviewdetailsabouttheappsinstalledonyourphone,managetheirdata,
andforcethemtostop.
Default message app
Thismenuallowsyoutochoosewhatmessagingapptouseasyourdefaultmessaging
app.

86
Settings
Backup & reset
Changethesettingsformanagingyoursettingsanddata.
•
LG Backup –Backsupallinformationonthedeviceandrestoresitintheeventof
datalossorreplacement.
•
Back up my data –Backupappdata,Wi-Fipasswords,andothersettingsto
Googleservers.
•
Backup account –Displaystheaccountthatiscurrentlybeingusedtobackup
information.
•
Automatic restore –Whenreinstallinganapp,restorebackedupsettingsand
data.
•
Factory data reset –Resetyoursettingstothefactorydefaultvaluesanddelete
allyourdata.Ifyouresetthephonethisway,youarepromptedtore-enterthe
sameinformationaswhenyoufirststartedAndroid.
About phone
Viewlegalinformation,checkphonestatusandsoftwareversions,andperforma
softwareupdate.

87
Phone software update
Phone software update
LG Mobile phone software update from the Internet
Formoreinformationaboutusingthisfunction,pleasevisithttp://www.lg.com/common/
index.jsp
selectyourcountryandlanguage.
Thisfeatureallowsyoutoconvenientlyupdatethefirmwareonyourphonetoanewer
versionfromtheInternetwithoutneedingtovisitaservicecentre.Thisfeaturewillonly
beavailableifandwhenLGmakesanewerfirmwareversionavailableforyourdevice.
Becausethemobilephonefirmwareupdaterequirestheuser'sfullattentionforthe
durationoftheupdateprocess,pleasemakesureyoucheckallinstructionsandnotes
thatappearateachstepbeforeproceeding.PleasenotethatremovingtheUSBdata
cableduringtheupgrademayseriouslydamageyourmobilephone.
NOTE
•
LG reserves the right to make firmware updates available only for selected
models at its own discretion and does not guarantee the availability of the
newer version of the firmware for all handset models.
LG Mobile Phone software update via Over-the-Air (OTA)
Thisfeatureallowsyoutoconvenientlyupdateyourphone'ssoftwaretoanewer
versionviaOTA,withoutconnectingusingaUSBdatacable.Thisfeaturewillonlybe
availableifandwhenLGmakesanewerfirmwareversionavailableforyourdevice.
Youshouldfirstcheckthesoftwareversiononyourmobilephone:Settings>General
tab>About phone>Update Center > Software Update > Check now for update.
Phone software update

88
Phone software update
NOTE
•
Your personal data from internal phone storage—including information about
your Google account and any other accounts, your system/application data
and settings, any downloaded applications and your DRM licence—might
be lost in the process of updating your phone's software. Therefore, LG
recommends that you backup your personal data before updating your
phone's software. LG does not take responsibility for any loss of personal
data.
•
This feature depends on your network service provider, region and country.

89
About this user guide
About this user guide
•
Beforeusingyourdevice,pleasecarefullyreadthisguide.Thisensuresthatyou
useyourphonesafelyandcorrectly.
•
Someoftheimagesandscreenshotsprovidedinthisguidemayappeardifferently
onyourphone.
•
Yourcontentmaydifferfromthefinalproductorfromsoftwaresuppliedbyservice
providersorcarriers.Thiscontentissubjecttochangewithoutpriornotice.Forthe
latestversionofthisguide,pleasevisittheLGwebsiteatwww.lg.com.
•
Yourphone'sapplicationsandtheirfunctionsmayvarybycountry,regionor
hardwarespecifications.LGcannotbeheldliableforanyperformanceissues
resultingfromtheuseofapplicationsdevelopedbyprovidersotherthanLG.
•
LGcannotbeheldliableforperformanceorincompatibilityissuesresultingfrom
editedregistrysettingsormodifiedoperatingsystemsoftware.Anyattemptto
customiseyouroperatingsystemmaycausethedeviceoritsapplicationstowork
incorrectly.
•
Software,audio,wallpaper,images,andothermediasuppliedwithyourdeviceare
licensedforlimiteduse.Ifyouextractandusethesematerialsforcommercialor
otherpurposes,youmaybeinfringingcopyrightlaws.Asauser,youarefullyare
entirelyresponsiblefortheillegaluseofmedia.
•
Additionalchargesmayapplyfordataservices,suchasmessaging,
uploading,downloading,auto-syncingandlocationservices.Toavoidadditional
charges,selectadataplansuitabletoyourneeds.Contactyourserviceproviderto
obtainadditionaldetails.
About this user guide

90
About this user guide
Trademarks
•
LGandtheLGlogoareregisteredtrademarksofLGElectronics.
•
Bluetooth isaregisteredtrademarkofBluetoothSIG,Inc.worldwide.
•
Wi-Fi andtheWi-FilogoareregisteredtrademarksoftheWi-FiAlliance.
•
Allothertrademarksandcopyrightsarethepropertyoftheirrespectiveowners.
DivX HD
ThisDivXCertified devicehaspassedrigoroustestingtoensureitplaysDivX video.
ToplaypurchasedDivXmovies,firstregisteryourdeviceatvod.divx.com.Findyour
registrationcodeintheDivXVODsectionofyourdevicesetupmenu.
DivX Certified
to play DivX video up to HD 720p, including premium content.
DivX
, DivX Certified and associated logos are trademarks of DivX, LLC and are
used under license.
Dolby Digital Plus
Manufactured under license from Dolby Laboratories. Dolby, Dolby Digital Plus,
and the double-D symbol are trademarks of Dolby Laboratories.

91
Accessories
Theseaccessoriesareavailableforusewiththeyourphone.(Items described below
may be optional.)
•
Traveladaptor
•
QuickStartGuide
•
Stereoheadset
•
USBcable
•
Battery
NOTE
•
Always use genuine LG accessories. The supplied items are designed only
for this device and may not be compatible with other devices.
•
The items supplied with the device and any available accessories may vary
depending on the region or service provider.
Accessories

92
Troubleshooting
Thischapterlistssomeproblemsyoumightencounterwhenusingyourphone.Some
problemsrequireyoutocallyourserviceprovider,butmostareeasytofixyourself.
Message Possible causes Possible corrective measures
SIM or
USIM card
error
There is no SIM
or USIM card in
the phone or it is
inserted incorrectly.
Make sure that the SIM or USIM card
is correctly inserted.
No network
connection/
Dropped
network
Signal is weak or
you are outside the
carrier network.
Move toward a window or into
an open area. Check the network
operator coverage map.
Operator applied
new services.
Check whether the SIM or USIM card
is more than 6~12 months old. If so,
change your SIM or USIM card at your
network provider's nearest branch.
Contact your service provider.
Codes do
not match
To change a
security code,
must need to
confirm the
new code by
re-entering it.
If you forget the code, contact your
service provider.
The two codes
you entered do not
match.
Troubleshooting

93
Troubleshooting
Message Possible causes Possible corrective measures
No
applications
can be set
Not supported by
service provider
or registration
required.
Contact your service provider.
Calls not
available
Dialing error New network not authorised.
New SIM or USIM
card inserted.
Check for new restrictions.
Pre-paid charge
limit reached.
Contact service provider or reset limit
with PIN2.
Phone
cannot be
turned on
On/Off key pressed
too briefly.
Press the On/Off key for at least two
seconds.
Battery is not
charged.
Charge battery. Check the charging
indicator on the display.
Charging
error
Battery is not
charged.
Charge battery.
Outside
temperature is too
hot or cold.
Make sure phone is charging at a
normal temperature.
Contact problem
Check the charger and its connection
to the phone.
No voltage Plug the charger into a different outlet.
Charger defective Replace the charger.
Wrong charger Use only original LG accessories.

94
Troubleshooting
Message Possible causes Possible corrective measures
Number not
allowed.
The Fixed dialling
number function
is on.
Check the Settings menu and turn the
function off.
Impossible
to receive/
send SMS
& photos
Memory full
Delete some messages from your
phone.
Files do not
open
Unsupported file
format
Check the supported file formats.
The screen
does not
turn on
when I
receive a
call.
Proximity sensor
problem
If you use a protection tape or case,
make sure it has not covered the area
around the proximity sensor. Make
sure that the area around the proximity
sensor is clean.
No sound Vibration mode
Check the settings status in the sound
menu to make sure you are not in
vibration or no interruptions mode.
Hangs up
or freezes
Intermittent
software problem
Try to perform a software update
through the website.

95
FAQ
Category Question Answer
Bluetooth
Devices
What functions
are available via
Bluetooth?
You can connect a Bluetooth audio
device, such as a Stereo/Mono
headset or car kit.
Contacts
Backup
How can I back up
Contacts?
Contacts data can be synchronised
between your phone and your Google
account.
Synchronization
Is it possible to set up
one-way sync with
Gmail?
Only two-way synchronization is
available.
Synchronization
Is it possible to
synchronise all email
folders?
The Inbox is automatically
synchronised. You can view other
folders by tapping
and selecting
Show all folders to choose a folder.
Gmail Log-In
Do I have to log into
Gmail whenever I want
to access Gmail?
Once you have logged into Gmail, there
is no need to log into Gmail again.
Google
Account
Is it possible to filter
emails?
No, the phone does not support email
filtering.
Email
What happens when
I execute another
application while
writing an email?
Your email is automatically saved as
a draft.
Ringtone
Is there a file size limit
for using MP3 files as
ringtones?
There is no file size limit.
FAQ

96
FAQ
Category Question Answer
Message
Time
My phone does not
display the time of
receipt for messages
older than 24 hrs.
How can I view the
time?
Open the conversation and touch and
hold the desired message. Then tap
Details.
Navigation
Is it possible to install
another navigation
application on my
phone?
Any application that is available at Play
Store™ and is compatible with the
hardware can be installed and used.
Synchronisation
Is it possible to
synchronise my
contacts from all my
email accounts?
Only Gmail and MS Exchange server
(company email server) contacts can
be synchronised.
Wait and
Pause
Is it possible to save
a contact with Wait
and Pause in the
numbers?
If you transferred a contact using the
Wait & Pause functions saved into the
number, you cannot use those features.
You must save each number again.
How to save with Wait and Pause:
1. Tap
> .
2. Dial the number, then tap
.
3. Tap Add 2-sec pause or Add wait.
Security
What are the phone's
security functions?
You can set the phone to require an
Unlock Pattern to be entered before
the phone can be accessed or used.

97
FAQ
Category Question Answer
Unlock
Pattern
How do I create the
Unlock Pattern?
1. From the Home screen, touch and
hold
.
2. Tap System settings > Display tab
> Lock screen.
3. Tap Select screen lock > Pattern.
The first time you do this, a short
tutorial about creating an Unlock
Pattern appears.
4. Set up your pattern by drawing it
then drawing it a second time for
confirmation.
Precautions to take when using the
pattern lock.
It is very important to remember the
unlock pattern you set. You can no
longer access your phone if you use
an incorrect pattern five times. You
have five chances to enter your unlock
pattern, PIN or password. If you have
used all 5 opportunities, you can try
again after 30 seconds. (Or, if you
preset the backup PIN, you can use
the backup PIN code to unlock the
pattern.)
Unlock
Pattern
What should I do if
I forget the unlock
pattern?
If you forgot your pattern:
If you logged into your Google account
on the phone but failed to enter the
correct pattern 5 times, tap the Forgot
pattern button. You are then required
to log in with your Google account to
unlock your phone.

98
FAQ
Category Question Answer
Memory
Will I know when my
memory is full?
Yes, you will receive a notification.
Language
Support
Is it possible to
change my phone's
language?
The phone has multilingual capabilities.
To change the language:
1. From the Home screen, touch and
hold
and tap System settings.
2. Tap General tab > Language &
input > Language.
3. Tap the desired language.
VPN
How do I set up a
VPN?
VPN access configuration is different
for each company. To configure VPN
access on your phone, you must
obtain the details from your company's
network administrator.
Screen time
out
My screen turns off
after only 15 seconds.
How can I change the
amount of time for the
backlight to turn off?
1. From the Home screen, touch and
hold
.
2. Tap System settings > Display tab.
3. Tap Screen timeout.
4. Tap the preferred screen backlight
timeout time.
Wi-Fi &
mobile
network
When the Wi-Fi and
mobile networks are
both available, which
service does my
phone use?
When using data, your phone may
default to the Wi-Fi connection (if Wi-Fi
connectivity on your phone is set to
On). However, there is no notification
when your phone switches from one to
the other.
To know which data connection is
being used, view the mobile network or
Wi-Fi icon at the top of your screen.

99
FAQ
Category Question Answer
Home
screen
Is it possible to
remove an application
from the Home
screen?
Yes. Just touch and hold the icon until
the trash can icon appears at the top
and centre of the screen. Then, without
lifting your finger, drag the icon to the
trash can.
Application
I downloaded an
application and it
causes a lot of errors.
How do I remove it?
1. From the Home screen, touch and
hold
.
2. Tap System settings > General tab
> Apps > DOWNLOADED.
3. Tap the application, then tap
Uninstall.
Charger
Is it possible to charge
my phone using
a USB data cable
without installing the
necessary USB driver?
Yes, the phone is charged through the
USB cable regardless of whether the
necessary drivers are installed.
Alarm
Can I use music files
for my alarm?
Yes. After saving a music file as a
ringtone, you can use it as an alarm.
1. Touch and hold a song in a library
list. In the menu that opens, tap
Setas ringtone > Phone ringtone
or Caller ringtones.
2. On the Alarm Clock Setting screen,
select the song as a ringtone.
Alarm
Will my alarm be
audible or will it go off
if the phone is turned
off?
No, this is not supported.

100
FAQ
Category Question Answer
Alarm
If my ringer volume
is set to vibrate, will I
hear my alarm?
Your alarm is programmed to be
audible even in these scenarios.
Hard Reset
(Factory
Reset)
How can I perform a
factory reset if I cannot
access the phone's
Settings menu?
If your phone does not restore to its
original condition, use a hard reset
(factory reset) to initialise it.

TARJETA DE GARANTÍA
1.- Antes de poner en marcha el producto, lea detenidamente el
contenido de esta tarjeta de garantía. Asimismo, no ponga en
funcionamiento el producto antes de leer de manera detallada el
Manual de usuario.
2.- Guarde durante todo el período de garantía esta tarjeta
debidamente cumplimentada y sellada por el establecimiento
comercializador junto con la factura de compra.
3.- Cuando requiera cualquier servicio de reparación deberá mostrar
esta tarjeta de garantía.
4.- Para cualquier información que requiera sobre nuestros productos
o ante cualquier duda o consulta en relación a los mismos, puede
hacerlo a través de nuestra web o por medio de nuestra línea de
atención al cliente.
ESTAMOS A SU DISPOSICIÓN
Ante cualquier necesidad de asistencia,
puede ponerse en contacto con nosotros
mediante nuestra página Web, chat online,
correo electrónico o nuestro centro de
Atención al Cliente.
www.lg.com
www.lg.com/es/posventa
Atención al cliente
963 05 05 00

CERTIFICADO DE GARANTÍA
LG ELECTRONICS ESPAÑA S.A.U. (LGEES)
SE COMPROMETE A RESPETAR Y/O HACER CUMPLIR
LAS CONDICIONES DE COBERTURA DE LA PRESENTE GARANTÍA.
REQUISITOS PARA LA VALIDEZ DE LA GARANTÍA
(1) La presente garantía sólo ampara productos oficiales importados o comercializados por LG
dentro de la Unión Europea y para beneficiarse de la misma deberá:
(1.1) En el periodo pre-venta el establecimiento comercializador deberá reflejar el modelo del
dispositivo y número de IMEI o número de Serie (SN) del mismo.
(1.2) En el periodo de garantía será REQUISITO IMPRESCINDIBLE adjuntar, junto a la presente
garantía debidamente sellada por el establecimiento, el original del ticket o factura de
compra que identifique el dispositivo incluyendo modelo del terminal e IMEI o número de
Serie (SN) del mismo.
(2) Para que la garantía sea válida es IMPRESCINDIBLE que el cliente final o establecimiento
comercializador cumplimente, en el momento de efectuar la adquisición, los datos de todos los
apartados que en la misma se indican.
(3) Los beneficios de la presente garantía sólo serán validos si se utilizan los Servicios Técnicos
autorizados que LG Electronics España, S.A.U. tiene establecidos en su Red de Asistencia Técnica.
(4) El dispositivo debe ser utilizado de conformidad con las instrucciones que se detallan en el
manual de usuario.
PERIODO DE LA GARANTÍA
(1) La garantía se aplica a todos los dispositivos comercializados por LG dentro de la Unión Europea.
El periodo de garantía es el siguiente:
-Dispositivo: 2 años.
-Accesorios: 2 años.
- Medios o soporte de software (CD–ROM, tarjetas de memoria, USB, etc): 90 días.
(2) La aplicación de la garantía comienza a partir de la fecha de adquisición (fecha de factura)
y será de conformidad con lo establecido en la legislación que se encuentre vigente en el
momento de la fecha de la adquisición (fecha de factura compra).
(3) LG Electronics España, S.A.U. (LGEES) garantiza cualquier pieza o producto reparado por un
periodo de noventa (90) días a partir de su fecha de entrega, o hasta el final de la garantía,
aplicándose aquella cuya duración sea más larga. Eventualmente, en beneficio del propio cliente,
LGEES, solucionará la incidencia en el dispositivo sustituyendo el dispositivo por otro equipo
en perfectas condiciones de uso siendo equivalente en prestaciones y fiabilidad al original,
conservando el cliente todos los derechos y coberturas incluidos en la garantía. Todos aquellos
componentes de hardware sustituidos en garantía pasarán a ser propiedad de LGEES.

COBERTURAS DE LA GARANTÍA
NOTA IMPORTANTE
(1) La presente garantía comercial no afecta a los derechos que dispone el cliente final conforme
a las previsiones contenidas en el RDL 1/2007 de 16 de Noviembre de 2007 (BOE 287 de 30
de Noviembre de 2007), frente a la garantía por falta de conformidad del vendedor, que son
independientes y compatibles con la presente garantía.
(2) De acuerdo con lo previsto en el Título V, del RDL 1/2007, el cliente final tendrá derecho a exigir
al vendedor, y/o al productor en los casos determinados en la Ley, la reparación y sustitución del
producto, e incluso, en su caso, la rebaja en el precio o la resolución del contrato si ello no fuere
desproporcionado.
(3) El titular de la garantía disfrutará de los derechos y coberturas que se contienen en el presente
documento.
(4) Para reclamar los derechos y coberturas que se contienen en el presente documento el cliente
final dispondrá de la vía de comunicación con nuestro número de Atención al Cliente y/o por escrito
dirigiéndose a las Oficinas Centrales (Calle Chile, nº 1 28290 Las Rozas de Madrid) o a la Central de
Asistencia Técnica (Parque tecnológico de Paterna, C/Louis Pasteur, 1 Nave 2 C.P. 46980 Paterna –
Valencia), o bien por la vía de la jurisdicción ordinaria.
(5) Durante el tiempo que dure la reparación, no se abonarán los daños y perjuicios por el tiempo
que el aparato esté fuera de servicio.
(6)
Es responsabilidad del cliente guardar una copia de seguridad de los datos contenidos en el terminal
previo a su envío para reparación, realizar un borrado completo de la información contenida en el
dispositivo e inhabilitar todos los usuarios y contraseñas de acceso a sus cuentas en redes sociales y
demás Sites que contengan información confidencial (entidades financieras, correo electrónico, etc..).
En el transcurso del servicio, el contenido de los soportes de almacenamiento del producto podrá ser
borrado, reemplazado o reformateado. En consecuencia, LG Electronics España S.A.U. no garantiza ni
cubre las pérdidas financieras o de otra índole causadas por la pérdida de datos.
(7) LG Electronics España, S.A.U. no se hace responsable de los daños que un dispositivo pueda
causar a elementos externos.
PROTECCIÓN DE DATOS DE CARÁCTER PERSONAL
(1) De conformidad con la Ley Orgánica 15/1999 de 13 de Diciembre, de Protección de Datos de
Carácter Personal, le informamos que los datos personales solicitados, todos ellos obligatorios
para la prestación del servicio de Garantía, serán incorporados a un fichero/s debidamente
inscrito/s en el RGPD cuyo responsable es LG Electronics España S.A.U. con la finalidad de
prestarle el servicio, así como para mantenerle informado de productos o servicios similares.
Usted podrá ejercer sus derechos de acceso, rectificación, cancelación y oposición dirigiéndose
por escrito a la dirección: Calle Chile nº 1, 28029 Las Rozas de Madrid o bien remitiendo un
correo electrónico a la dirección: [email protected], acompañando su solicitud de una copia
de un documento oficial que acredite su identidad e indicando en la misma el derecho que desea
ejercitar.

EXCLUSIONES DE LA GARANTÍA
La garantía de su producto está sujeta a las siguientes exclusiones y
limitaciones:
(1) Incumplimiento de cualquiera de los requisitos citados anteriormente.
(2) Todo componente o accesorio interior o exterior del dispositivo, que no esté especificado e incluido en este
certificado de garantía o no forme parte del producto original.
(3) Puestas en marcha, configuraciones y demostraciones de funcionamiento al usuario.
(4) Si la avería es producida por incendio, inundación, agentes meteorológicos, humedad excesiva o corrosión, golpeo,
aplastamiento o aplicación de voltaje o energía inadecuada o mal conexionado.
(5) Los daños por el mal trato, incluso los de transportes, que deberán reclamarse en presencia del personal de la
compañía de transporte, por lo que conviene inspeccionar los paquetes antes de conformar los albaranes de
entrega correspondientes.
(6) Las averías producidas por rotura física, tales como carcasas, plásticos, pinturas, esmaltes, cristales,
embellecedores y similares.
(7) Los productos cuya avería se deba al mal uso y/o a no atender las instrucciones de funcionamiento y manejo que se
adjuntan con cada aparato.
(8) Por la utilización de accesorios o componentes electrónicos no adecuados.
(9) El uso inadecuado de elementos punzantes sobre las las pantallas táctiles.
(10) Los dispositivos que no llevan identificado número de IMEI y Nº de Serie o que éstos hayan sido alterados o
borrados o no coincidan con el número expresado en el certificado de garantía o factura de compra.
(11) Los problemas inherentes a la unión de IMEI-Número de Abonado para la activación en la Red.
(12) Si el dispositivo es reparado o manipulado por personal no autorizado por LG Electronics España S.A.U.
(13) Las averías producidas por el desgaste normal debido a su uso (incluido el de baterías, lentes de cámaras,
pantallas, auriculares o manos libres externos).
(14) Cuando la avería la produzca un componente o accesorio interno o externo al dispositivo no incluido o
especificado en este certificado de garantía o no forme parte del producto original.
(15) Los fallos de píxel que no excedan de la normativa vigente o la establecida por el fabricante (LG Electronics
España, S.A.U.).
(16) Cualquier tipo de pérdida de información en discos duros, discos en estado sólido o memorias. El cliente final es
responsable de realizar una copia de seguridad de sus datos previa a la cesión del dispositivo al servicio técnico
de conformidad con lo establecido en el punto (6) del apartado “Coberturas de la Garantía”.
(17) Cualquier tipo de soporte físico de información que estuviera en el equipo a la hora de cederlo al servicio oficial
para su reparación.
(18) Los sistemas operativos y/o programas no originales diferentes a los pre-cargados y/o su funcionamiento.
(19) Las actualizaciones o versiones posteriores de software, no homologadas ni soportadas oficialmente por el
fabricante (LG Electronics España, S.A.U.), cualquiera que sea su procedencia.
(20) Los daños y fallos del dispositivo ocasionados por virus u otro tipo de programas maliciosos.
(21) En los consumibles, como las baterías, pilas, etc, el periodo de garantía dependerá de la vida útil de aquéllos,
determinada por los ciclos de carga / descarga y modo de uso, si bien a modo de referencia será de 1 año
aproximadamente.
(22) LG Electronics España S.A.U puede instalar actualizaciones del software de sistema dentro del servicio de
garantía, lo que impedirá que el terminal vuelva a una versión anterior del software del sistema.

RELLENAR TODOS LOS DATOS DEL
CLIENTE Y DEL PRODUCTO EN EL
MOMENTO DE LA COMPRA
NOMBRE Y APELLIDOS:
MODELO: Nº DE IMEI:
Nº DE SERIE (SN):
FECHA DE COMPRA: SELLO DEL VENDEDOR:
ESTA TARJETA DE GARANTÍA ES
INTRANSFERIBLE Y APLICABLE SOLO AL
COMPRADOR ORIGINAL.
CUMPLIMENTE LOS DATOS REQUERIDOS
Y GUÁRDELA JUNTO CON LA FACTURA DE
COMPRA EN LUGAR SEGURO.
LG Electronics España- Central Asistencia
Técnica
Parque Tecnólogico de Paterna
C/ Louis Pasteur 1, Nave 2
(46980) Paterna (Valencia)


Wi-Fi (WLAN)
Este equipo puede utilizarse en todos los países europeos.
La banda de 5150 - 5350 MHz se restringe únicamente al uso en interiores.
Wi-Fi (WLAN)
This equipment may be operated in all European countries.
The 5150 - 5350 MHz band is restricted to indoor use only.
AT BE BG CH HR CY CZ DK EE FI FR DE GR HU IE IT LI LV
LT LU MT
NO
NL PL PT RO SK SI ES SE GB IS ME RS TR
MK

Información general
<Centro de información al cliente de LG>
963 05 05 00
* Asegúrese de que el número es correcto antes de realizar una
llamada.
General Inquiries
<LG Customer Information Centre>
963 05 05 00
* Make sure the number is correct before making a call.
-
 1
1
-
 2
2
-
 3
3
-
 4
4
-
 5
5
-
 6
6
-
 7
7
-
 8
8
-
 9
9
-
 10
10
-
 11
11
-
 12
12
-
 13
13
-
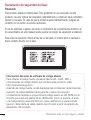 14
14
-
 15
15
-
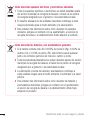 16
16
-
 17
17
-
 18
18
-
 19
19
-
 20
20
-
 21
21
-
 22
22
-
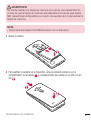 23
23
-
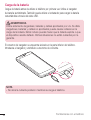 24
24
-
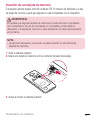 25
25
-
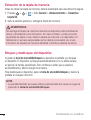 26
26
-
 27
27
-
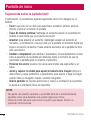 28
28
-
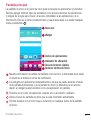 29
29
-
 30
30
-
 31
31
-
 32
32
-
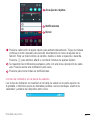 33
33
-
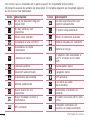 34
34
-
 35
35
-
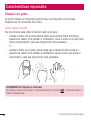 36
36
-
 37
37
-
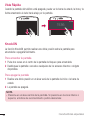 38
38
-
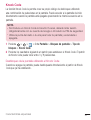 39
39
-
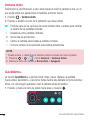 40
40
-
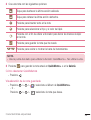 41
41
-
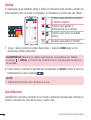 42
42
-
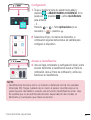 43
43
-
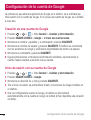 44
44
-
 45
45
-
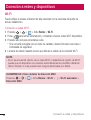 46
46
-
 47
47
-
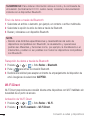 48
48
-
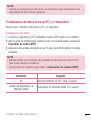 49
49
-
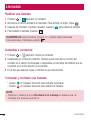 50
50
-
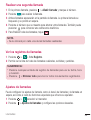 51
51
-
 52
52
-
 53
53
-
 54
54
-
 55
55
-
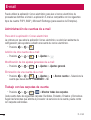 56
56
-
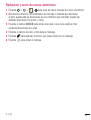 57
57
-
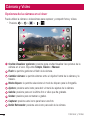 58
58
-
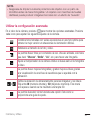 59
59
-
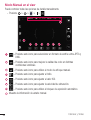 60
60
-
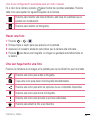 61
61
-
 62
62
-
 63
63
-
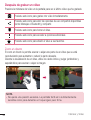 64
64
-
 65
65
-
 66
66
-
 67
67
-
 68
68
-
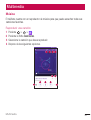 69
69
-
 70
70
-
 71
71
-
 72
72
-
 73
73
-
 74
74
-
 75
75
-
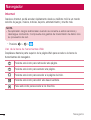 76
76
-
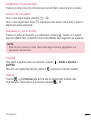 77
77
-
 78
78
-
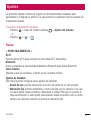 79
79
-
 80
80
-
 81
81
-
 82
82
-
 83
83
-
 84
84
-
 85
85
-
 86
86
-
 87
87
-
 88
88
-
 89
89
-
 90
90
-
 91
91
-
 92
92
-
 93
93
-
 94
94
-
 95
95
-
 96
96
-
 97
97
-
 98
98
-
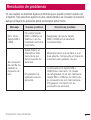 99
99
-
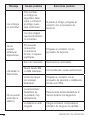 100
100
-
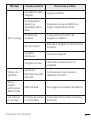 101
101
-
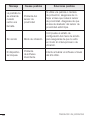 102
102
-
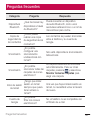 103
103
-
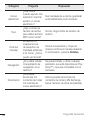 104
104
-
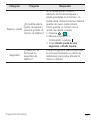 105
105
-
 106
106
-
 107
107
-
 108
108
-
 109
109
-
 110
110
-
 111
111
-
 112
112
-
 113
113
-
 114
114
-
 115
115
-
 116
116
-
 117
117
-
 118
118
-
 119
119
-
 120
120
-
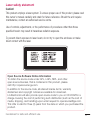 121
121
-
 122
122
-
 123
123
-
 124
124
-
 125
125
-
 126
126
-
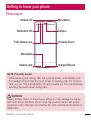 127
127
-
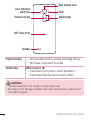 128
128
-
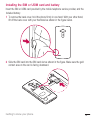 129
129
-
 130
130
-
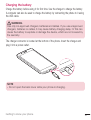 131
131
-
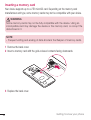 132
132
-
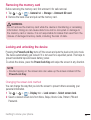 133
133
-
 134
134
-
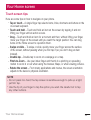 135
135
-
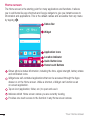 136
136
-
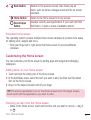 137
137
-
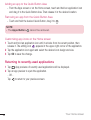 138
138
-
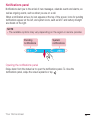 139
139
-
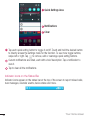 140
140
-
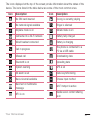 141
141
-
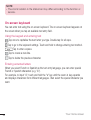 142
142
-
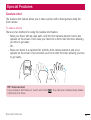 143
143
-
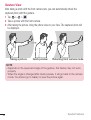 144
144
-
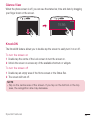 145
145
-
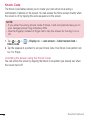 146
146
-
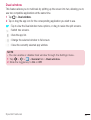 147
147
-
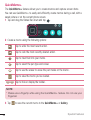 148
148
-
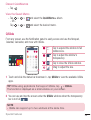 149
149
-
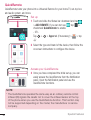 150
150
-
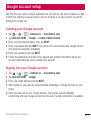 151
151
-
 152
152
-
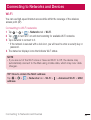 153
153
-
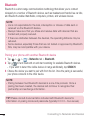 154
154
-
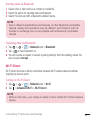 155
155
-
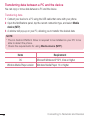 156
156
-
 157
157
-
 158
158
-
 159
159
-
 160
160
-
 161
161
-
 162
162
-
 163
163
-
 164
164
-
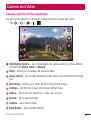 165
165
-
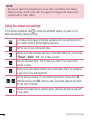 166
166
-
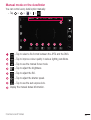 167
167
-
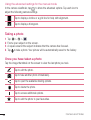 168
168
-
 169
169
-
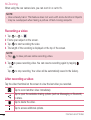 170
170
-
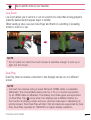 171
171
-
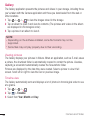 172
172
-
 173
173
-
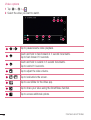 174
174
-
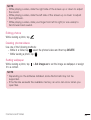 175
175
-
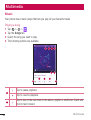 176
176
-
 177
177
-
 178
178
-
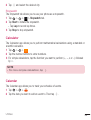 179
179
-
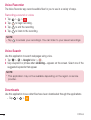 180
180
-
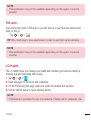 181
181
-
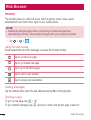 182
182
-
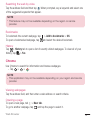 183
183
-
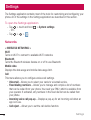 184
184
-
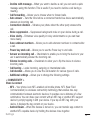 185
185
-
 186
186
-
 187
187
-
 188
188
-
 189
189
-
 190
190
-
 191
191
-
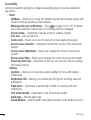 192
192
-
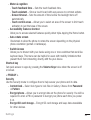 193
193
-
 194
194
-
 195
195
-
 196
196
-
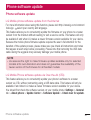 197
197
-
 198
198
-
 199
199
-
 200
200
-
 201
201
-
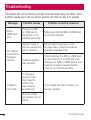 202
202
-
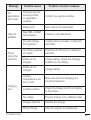 203
203
-
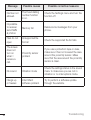 204
204
-
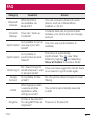 205
205
-
 206
206
-
 207
207
-
 208
208
-
 209
209
-
 210
210
-
 211
211
-
 212
212
-
 213
213
-
 214
214
-
 215
215
-
 216
216
-
 217
217
-
 218
218


LG G4 El manual del propietario
- Categoría
- Teléfonos móviles
- Tipo
- El manual del propietario
en otros idiomas
- English: LG G4 Owner's manual
Artículos relacionados
-
LG G4 Manual de usuario
-
-
LG G4 Vodafone El manual del propietario
-
LG LGH840.ACLRTN Manual de usuario
-
LG LGH735.APHLTS Manual de usuario
-
LG H735 El manual del propietario
-
LG G G4 Stylus Manual de usuario
-
LG H635 El manual del propietario
-
-
LG LGP710.AROMWH Manual de usuario