Yamaha EAD10 Manual de usuario
- Categoría
- Tambores musicales
- Tipo
- Manual de usuario
Este manual también es adecuado para


S-1
EAD10 Owner’s Manual
For EAD10
This product utilizes batteries or an external power supply (adapter).
DO NOT connect this product to any power supply or adapter other
than one described in the manual, on the name plate, or specifically
recommended by Yamaha.
WARNING: Do not place this product in a position where anyone
could walk on, trip over, or roll anything over power or connecting
cords of any kind. The use of an extension cord is not recommended!
If you must use an extension cord, the minimum wire size for a 25’
cord (or less ) is 18 AWG. NOTE: The smaller the AWG number, the
larger the current handling capacity. For longer extension cords, con-
sult a local electrician.
This product should be used only with the components supplied or; a
cart, rack, or stand that is recommended by Yamaha. If a cart, etc., is
used, please observe all safety markings and instructions that accom-
pany the accessory product.
SPECIFICATIONS SUBJECT TO CHANGE:
The information contained in this manual is believed to be correct at
the time of printing. However, Yamaha reserves the right to change or
modify any of the specifications without notice or obligation to update
existing units.
This product, either alone or in combination with an amplifier and
headphones or speaker/s, may be capable of producing sound levels
that could cause permanent hearing loss. DO NOT operate for long
periods of time at a high volume level or at a level that is uncomfort-
able. If you experience any hearing loss or ringing in the ears, you
should consult an audiologist.
IMPORTANT: The louder the sound, the shorter the time period before
damage occurs.
Some Yamaha products may have benches and / or accessory mount-
ing fixtures that are either supplied with the product or as optional
accessories. Some of these items are designed to be dealer assem-
bled or installed. Please make sure that benches are stable and any
optional fixtures (where applicable) are well secured BEFORE using.
Benches supplied by Yamaha are designed for seating only. No other
uses are recommended.
NOTICE:
Service charges incurred due to a lack of knowledge relating to how a
function or effect works (when the unit is operating as designed) are
not covered by the manufacturer’s warranty, and are therefore the
owners responsibility. Please study this manual carefully and consult
your dealer before requesting service.
ENVIRONMENTAL ISSUES:
Yamaha strives to produce products that are both user safe and envi-
ronmentally friendly. We sincerely believe that our products and the
production methods used to produce them, meet these goals. In keep-
ing with both the letter and the spirit of the law, we want you to be
aware of the following:
Battery Notice:
This product MAY contain a small non-rechargeable battery which (if
applicable) is soldered in place. The average life span of this type of
battery is approximately five years. When replacement becomes nec-
essary, contact a qualified service representative to perform the
replacement.
This product may also use “household” type batteries. Some of these
may be rechargeable. Make sure that the battery being charged is a
rechargeable type and that the charger is intended for the battery
being charged.
When installing batteries, never mix old batteries with new ones, and
never mix different types of batteries. Batteries MUST be installed cor-
rectly. Mismatches or incorrect installation may result in overheating
and battery case rupture.
Warning:
Do not attempt to disassemble, or incinerate any battery. Keep all bat-
teries away from children. Dispose of used batteries promptly and as
regulated by the laws in your area. Note: Check with any retailer of
household type batteries in your area for battery disposal information.
Disposal Notice:
Should this product become damaged beyond repair, or for some rea-
son its useful life is considered to be at an end, please observe all
local, state, and federal regulations that relate to the disposal of prod-
ucts that contain lead, batteries, plastics, etc. If your dealer is unable
to assist you, please contact Yamaha directly.
NAME PLATE LOCATION:
The name plate is located on the bottom of the product. The model
number, serial number, power requirements, etc., are located on this
plate. You should record the model number, serial number, and the
date of purchase in the spaces provided below and retain this manual
as a permanent record of your purchase.
Model
Serial No.
Purchase Date
PLEASE KEEP THIS MANUAL
SPECIAL MESSAGE SECTION
92-BP (bottom)
COMPLIANCE INFORMATION STATEMENT (DECLARATION OF CONFORMITY PROCEDURE)
Responsible Party : Yamaha Corporation of America
Address : 6600 Orangethorpe Ave., Buena Park, Calif. 90620
Telephone : 714-522-9011
Type of Equipment : Electronic Acoustic Drum Module
Model Name : EAD10
This device complies with Part 15 of the FCC Rules.
Operation is subject to the following two conditions:
1) this device may not cause harmful interference, and
2) this device must accept any interference received including interference that may cause undesired operation.
See user manual instructions if interference to radio reception is suspected.
* This applies only to products distributed by YAMAHA CORPORATION OF AMERICA. (FCC DoC)

S-2
EAD10 Owner’s Manual
For AC adaptor and EAD10
1. IMPORTANT NOTICE: DO NOT MODIFY THIS UNIT!
This product, when installed as indicated in the instructions con-
tained in this manual, meets FCC requirements. Modifications not
expressly approved by Yamaha may void your authority, granted by
the FCC, to use the product.
2. IMPORTANT: When connecting this product to accessories and/
or another product use only high quality shielded cables. Cable/s
supplied with this product MUST be used. Follow all installation
instructions. Failure to follow instructions could void your FCC
authorization to use this product in the USA.
3. NOTE: This product has been tested and found to comply with the
requirements listed in FCC Regulations, Part 15 for Class “B” digital
devices. Compliance with these requirements provides a reason-
able level of assurance that your use of this product in a residential
environment will not result in harmful interference with other elec-
tronic devices. This equipment generates/uses radio frequencies
and, if not installed and used according to the instructions found in
the users manual, may cause interference harmful to the operation
of other electronic devices. Compliance with FCC regulations does
not guarantee that interference will not occur in all installations. If
this product is found to be the source of interference, which can be
determined by turning the unit “OFF” and “ON”, please try to elimi-
nate the problem by using one of the following measures:
Relocate either this product or the device that is being affected by
the interference.
Utilize power outlets that are on different branch (circuit breaker or
fuse) circuits or install AC line filter/s.
In the case of radio or TV interference, relocate/reorient the
antenna. If the antenna lead-in is 300 ohm ribbon lead, change the
lead-in to co-axial type cable.
If these corrective measures do not produce satisfactory results,
please contact the local retailer authorized to distribute this type of
product. If you can not locate the appropriate retailer, please contact
Yamaha Corporation of America, Electronic Service Division, 6600
Orangethorpe Ave, Buena Park, CA90620
The above statements apply ONLY to those products distributed by
Yamaha Corporation of America or its subsidiaries.
* This applies only to products distributed by YAMAHA CORPORATION OF AMERICA. (class B)
FCC INFORMATION (U.S.A.)

S-3
EAD10 Owner’s Manual
For AC adaptor
This device complies with Part 15 of the FCC Rules. Operation is subject to the following two conditions:
(1) this device may not cause harmful interference, and (2) this device must accept any interference
received, including interference that may cause undesired operation.
(can_b_02)
CAN ICES-3 (B)/NMB-3(B)
Explanation of Graphical Symbols
The lightning flash with arrowhead symbol within
an equilateral triangle is intended to alert the user
to the presence of uninsulated “dangerous voltage”
within the product’s enclosure that may be of suffi-
cient magnitude to constitute a risk of electric
shock to persons.
The exclamation point within an equilateral trian-
gle is intended to alert the user to the presence of
important operating and maintenance (servicing)
instructions in the literature accompanying the
product.
IMPORTANT SAFETY INSTRUCTIONS
1 Read these instructions.
2 Keep these instructions.
3 Heed all warnings.
4 Follow all instructions.
5 Do not use this apparatus near water.
6 Clean only with dry cloth.
7 Do not block any ventilation openings. Install in accor-
dance with the manufacturer’s instructions.
8 Do not install near any heat sources such as radiators, heat
registers, stoves, or other apparatus (including amplifiers)
that produce heat.
9 Do not defeat the safety purpose of the polarized or
grounding-type plug. A polarized plug has two blades with
one wider than the other. A grounding type plug has two
blades and a third grounding prong. The wide blade or the
third prong are provided for your safety. If the provided
plug does not fit into your outlet, consult an electrician for
replacement of the obsolete outlet.
10 Protect the power cord from being walked on or pinched
particularly at plugs, convenience receptacles, and the
point where they exit from the apparatus.
11 Only use attachments/accessories specified by the manu-
facturer.
12 Use only with the cart, stand, tri-
pod, bracket, or table specified by
the manufacturer, or sold with the
apparatus. When a cart is used,
use caution when moving the cart/
apparatus combination to avoid
injury from tip-over.
13 Unplug this apparatus during light-
ning storms or when unused for long periods of time.
14 Refer all servicing to qualified service personnel. Servicing
is required when the apparatus has been damaged in any
way, such as power-supply cord or plug is damaged, liquid
has been spilled or objects have fallen into the apparatus,
the apparatus has been exposed to rain or moisture, does
not operate normally, or has been dropped.
(UL60065_03)
CAUTION: TO REDUCE THE RISK OF
ELECTRIC SHOCK, DO NOT REMOVE
COVER (OR BACK). NO USER-SERVICEABLE
PARTS INSIDE. REFER SERVICING TO
QUALIFIED SERVICE PERSONNEL.
CAUTION
RISK OF ELECTRIC SHOCK
DO NOT OPEN
WARNING
TO REDUCE THE RISK OF FIRE OR ELECTRIC SHOCK, DO NOT EXPOSE THIS APPARATUS TO RAIN OR MOISTURE.

S-4
EAD10 Owner’s Manual
(standby)
(weee_eu_en_02)
OBSERVERA!
Apparaten kopplas inte ur växelströmskällan (nätet) så länge som den ar ansluten till vägguttaget, även om själva apparaten har stängts av.
ADVARSEL: Netspændingen til dette apparat er IKKE afbrudt, sålænge netledningen sidder i en stikkontakt, som er tændt — også selvom der
er slukket på apparatets afbryder.
VAROITUS: Laitteen toisiopiiriin kytketty käyttökytkin ei irroita koko laitetta verkosta.
Information for users on collection and disposal of old equipment:
This symbol on the products, packaging, and/or accompanying documents means that used electrical and
electronic products should not be mixed with general household waste.
For proper treatment, recovery and recycling of old products, please take them to applicable collection
points, in accordance with your national legislation.
By disposing of these products correctly, you will help to save valuable resources and prevent any potential
negative effects on human health and the environment which could otherwise arise from inappropriate
waste handling.
For more information about collection and recycling of old products, please contact your local municipality,
your waste disposal service or the point of sale where you purchased the items.
For business users in the European Union:
If you wish to discard electrical and electronic equipment, please contact your dealer or supplier for further
information.
Information on Disposal in other Countries outside the European Union:
This symbol is only valid in the European Union. If you wish to discard these items, please contact your
local authorities or dealer and ask for the correct method of disposal.

2
EAD10 Owner’s Manual
PRECAUTIONS
PLEASE READ CAREFULLY BEFORE PROCEEDING
Please keep this manual in a safe and handy place for future reference.
WARNING
• This AC adaptor is designed for use with only Yamaha electronic instruments. Do
not use for any other purpose.
• Indoor use only. Do not use in any wet environments.
CAUTION
• When setting up, make sure that the AC outlet is easily accessible. If some trouble
or malfunction occurs, immediately turn off the power switch of the instrument and
disconnect the AC adaptor from the outlet. When the AC adaptor is connected to
the AC outlet, keep in mind that electricity is flowing at the minimum level, even if
the power switch is turned off. When you are not using the instrument for a long
time, make sure to unplug the power cord from the wall AC outlet.
WARNING
Always follow the basic precautions listed below to avoid the possibility of serious injury or even death from electrical shock, short-circuiting,
damages, fire or other hazards. These precautions include, but are not limited to, the following:
• Do not place the power cord near heat sources such as heaters or radiators. Also,
do not excessively bend or otherwise damage the cord, or place heavy objects on
it.
• Only use the voltage specified as correct for the instrument. The required voltage is
printed on the name plate of the instrument.
• Use the specified adaptor (page 63) only. Using the wrong adaptor can result in
damage to the instrument or overheating.
• Check the electric plug periodically and remove any dirt or dust which may have
accumulated on it.
• This instrument contains no user-serviceable parts. Do not open the instrument or
attempt to disassemble or modify the internal components in any way. If it should
appear to be malfunctioning, discontinue use immediately and have it inspected by
qualified Yamaha service personnel.
• Do not expose the instrument to rain, use it near water or in damp or wet
conditions, or place on it any containers (such as vases, bottles or glasses)
containing liquids which might spill into any openings. If any liquid such as water
seeps into the instrument, turn off the power immediately and unplug the power
cord from the AC outlet. Then have the instrument inspected by qualified Yamaha
service personnel.
• Never insert or remove an electric plug with wet hands.
• Do not put burning items, such as candles, on the unit. A burning item may fall
over and cause a fire.
• When one of the following problems occur, immediately turn off the power switch
and disconnect the electric plug from the outlet. Then have the device inspected by
Yamaha service personnel.
- The power cord or plug becomes frayed or damaged.
- It emits unusual smells or smoke.
- Some object has been dropped into the instrument.
- There is a sudden loss of sound during use of the instrument.
For AC adaptor
For EAD10
Power supply/AC adaptor
Do not open
Water warning
Fire warning
If you notice any abnormality
DMI-5 1/2

3
EAD10 Owner’s Manual
CAUTION
Always follow the basic precautions listed below to avoid the possibility of physical injury to you or others, or damage to the instrument or other
property. These precautions include, but are not limited to, the following:
• Do not connect the instrument to an electrical outlet using a multiple-connector.
Doing so can result in lower sound quality, or possibly cause overheating in the
outlet.
• When removing the electric plug from the instrument or an outlet, always hold the
plug itself and not the cord. Pulling by the cord can damage it.
• Remove the electric plug from the outlet when the instrument is not to be used for
extended periods of time, or during electrical storms.
• Read carefully the attached documentation explaining the assembly process.
Failure to assemble the instrument in the proper sequence might result in damage
to the instrument or even injury.
• Do not place the instrument in an unstable position where it might accidentally fall
over.
• Before moving the instrument, remove all connected cables, to prevent damage to
the cables or injury to anyone who might trip over them.
• When setting up the product, make sure that the AC outlet you are using is easily
accessible. If some trouble or malfunction occurs, immediately turn off the power
switch and disconnect the plug from the outlet. Even when the power switch is
turned off, electricity is still flowing to the product at the minimum level. When you
are not using the product for a long time, make sure to unplug the power cord from
the wall AC outlet.
• Use the included module holder if you are installing the EAD10 on the hi-hat stand.
Also, make sure you use the wing bolts included with the module holder. Failure to
do so could cause damage to the internal components or result in the instrument
falling over.
• Be sure to securely tighten the clamp screw and module holder wing bolts when
setting up the EAD10. Also, do not loosen the clamp screw or module holder wing
bolts rapidly. Not doing so can cause parts to fall off the main unit, sensor unit, or
module holder resulting in injury.
• Before connecting the instrument to other electronic components, turn off the
power for all components. Before turning the power on or off for all components,
set all volume levels to minimum.
• Be sure to set the volumes of all components at their minimum levels and gradually
raise the volume controls while playing the instrument to set the desired listening
level.
• Do not rest your weight on, or place heavy objects on the instrument, and do not
use excessive force on the buttons, switches or connectors.
• Do not use the instrument/device or headphones for a long period of time at a high
or uncomfortable volume level, since this can cause permanent hearing loss. If you
experience any hearing loss or ringing in the ears, consult a physician.
Always turn the power off when the instrument is not in use.
Even when the [ ] (Standby/On) switch is in standby status (display is off), electricity is still flowing to the instrument at the minimum level.
When you are not using the instrument for a long time, make sure you unplug the power cord from the wall AC outlet.
Power supply/AC adaptor
Assembly
Location
Connections
Handling caution
Yamaha cannot be held responsible for damage caused by improper use or modifications to the instrument, or data that is lost or destroyed.
DMI-5 2/2

4
EAD10 Owner’s Manual
NOTICE
To avoid the possibility of malfunction/ damage to the product, damage
to data, or damage to other property, follow the notices below.
Handling
• Do not use the instrument in the vicinity of a TV, radio, stereo equip-
ment, mobile phone, or other electric devices. Otherwise, the
instrument, TV, or radio may generate noise. When you use the
instrument along with an application on your iPad, iPhone or iPod
touch, we recommend that you set “Airplane Mode” to “ON” on that
device in order to avoid noise caused by communication.
• Do not expose the instrument to excessive dust or vibrations, or
extreme cold or heat (such as in direct sunlight, near a heater, or in
a car during the day) to prevent the possibility of panel disfiguration,
damage to the internal components or unstable operation.
• Do not place vinyl, plastic or rubber objects on the instrument,
since this might discolor the panel or keyboard.
Maintenance
• When cleaning the instrument, use a soft and dry/slightly damp
cloth. Do not use paint thinners, solvents, alcohol, cleaning fluids,
or chemical-impregnated wiping cloths.
Saving data
• System settings (Reference Manual (Advanced)(PDF)) are stored
automatically and will not be lost when the power is turned off.
However, settings may be lost due to malfunction or improper oper-
ation. Save important data to an external device such as a USB
flash drive or a computer (pages 25 and 30). Please read page 30
before using a USB flash drive.
• Edits to Scenes, etc., are lost if not saved before the power is
turned off. Likewise, edits are lost when the auto power off function
turns the power off (page 29). Save data you want to keep to the
main unit, or to an external device such as a computer or USB flash
drive (pages 25 and 30). However, data stored in the main unit may
be lost due to malfunction or improper operation. Save important
data to an external device such as a USB flash drive or a computer
(pages 25 and 30). Please read page 30 before using a USB flash
drive.
• To protect against data loss through USB flash drive damage, we
recommend that you save your important data onto spare USB
flash drive or an external device such as a computer as backup
data.
Information
About copyrights
• Copying of the commercially available musical data including but
not limited to MIDI data and/or audio data is strictly prohibited
except for your personal use.
• This product incorporates and bundles contents in which Yamaha
owns copyrights or with respect to which Yamaha has license to use
others’ copyrights. Due to copyright laws and other relevant laws,
you are NOT allowed to distribute media in which these contents
are saved or recorded and remain virtually the same or very similar
to those in the product.
* The contents described above include a computer program, Accompani-
ment Style data, MIDI data, WAV data, voice recording data, a score, score
data, etc.
* You are allowed to distribute medium in which your performance or music
production using these contents is recorded, and the permission of Yamaha
Corporation is not required in such cases.
About this manual
• The illustrations and LCD screens as shown in this manual are for
instructional purposes only, and may appear somewhat different
from those on your instrument.
• Windows is a registered trademark of Microsoft® Corporation in the
United States and other countries.
• MacOS, iPhone and iPad are trademarks of Apple Inc., registered
in the U.S. and other countries.
• The company names and product names in this manual are the
trademarks or registered trademarks of their respective companies.
• The names of buttons, terminals, and the like from the EAD10’s
front, rear and top panels are enclosed in [ ] (square brackets).
Latest Firmware Version
From time to time, Yamaha may update product firmware without
prior notice.
We recommend, therefore, that you check our web site (below) for
the latest version and keep your EAD10 firmware up to date.
http://download.yamaha.com/
The content of this Owner’s Manual applies to the newest version of
the firmware as of printing. Details regarding any functions added to
later versions will also be made available via the above web site.
About the Pads
Within this Owner’s Manual, the optional external pads that may be
connected to the EAD10 are referred to by model name. Please note
that these model names were up-to-date as of printing of this man-
ual.
Details regarding any subsequently released models will be made
available via the following web site.
http://download.yamaha.com/
* Yamaha Corporation reserves the right to modify this URL at any
time without prior notice.

5
EAD10 Owner’s Manual
(bottom_en_01)
The model number, serial number, power requirements, etc., may be found on or near the
name plate, which is at the bottom of the unit.
You should note this serial number in the space provided below and retain this manual as a
permanent record of your purchase to aid identification in the event of theft.
Model No.
Serial No.

6
EAD10 Owner’s Manual
Quick Guide
Adjusting Volume and Sound Balance (page 13)
1.
Turn the [MASTER VOLUME] knob or [AUDIO/
CLICK VOLUME] knob.
Hit all drums and cymbals in the drum set to make sure
that the EAD10 is picking up the sound.
Changing Sounds (page 33)
1.
Turn the [SCENE] knob to select different
sounds (Scenes).
2.
Adjust the levels with the [REVERB],
[EFFECT], and [TRIGGER] knobs.
Practicing with the Metronome (Click) (page 39)
1.
Press the [ ] (Click) button.
2.
Press the button below “ ” to the start the
Metronome.
3.
Use the [+] or [–] buttons to adjust the tempo.
4.
Press the “ ” button again to stop the Metro-
nome.
1
Overall volume Volume control for the AUX
IN (auxiliary input) and Met-
ronome (click)—sounds
other than what you play
2
1
Adjusts the
Reverb depth
Adjusts the Trigger Sound
volume (with the default
setting, the Trigger sound is
added to the bass drum)
Adjusts the
Effect depth
132, 4

7
EAD10 Owner’s Manual
Quick Guide
Playing Along with a Favorite Song (page 24)
1.
Connect a portable music player to the [AUX
IN] jack.
2.
Start music playback on your portable
player.
3.
Play the drums while listening with head-
phones.
Recording Your Performance (page 41)
1.
Press the [RECORDER] button.
2.
Press the button below “” to start record-
ing.
3.
Play the drums.
4.
Press the button below “ ” to stop record-
ing.
2
1
3
12, 4
3

8
EAD10 Owner’s Manual
PRECAUTIONS 2
Quick Guide 6
Included Accessories 9
Features of the EAD10 10
How the EAD10 makes sound........................................... 11
About the Manuals 12
Printed Manual .................................................................. 12
Digital Manual (PDF) ......................................................... 12
Panel Controls and Functions 13
Main Unit ........................................................................... 13
Sensor Unit........................................................................ 15
About the Trigger Input Jacks............................................ 16
Setup Guide 17
Setting Up.......................................................................... 17
Connect with Other Devices and Expand the Fun............. 24
Turning On or Off............................................................... 25
Setting Up the Sensor Unit ................................................ 27
Changing the Overall Settings........................................... 29
Using a USB Flash Drive................................................... 30
Basic Guide 32
Performing with Various of Scenes ................................... 32
Creating Your Own Scene................................................. 35
Using the Click (Metronome) ............................................. 39
Recording Your Performance............................................ 41
Application Guide 48
Enhance Your Drum Set with Separately Sold Add-Ons... 48
Reference 55
Menu List........................................................................... 55
Troubleshooting................................................................. 58
Message List ..................................................................... 61
Specifications .................................................................... 63
Index.................................................................................. 64
Contents

9
EAD10 Owner’s Manual
Welcome
Thank you for purchasing this Yamaha product.
To get the most out of your EAD10, be sure to read this Owner’s Manual carefully.
And after reading through this manual, be sure to store it in a safe place
so that you can refer back to it again as needed.
Included Accessories
Owner’s Manual (this book)
AC adaptor
Module holder
Module holder wing bolts (× 2)
Connector cables (1 pair)
Cable bands (× 3)
Adhesive cushions (× 2)

10
EAD10 Owner’s Manual
Features of the EAD10
The EAD10 lets you easily change the sound of your acoustic drums into the sound of your liking.
Connect a smart phone to the EAD10 and enjoy playing the drums along with your favorite music.
Also, it can be used in a wide range of applications from practice, recording to live situations.
• Sensor Unit that mounts on the bass drum makes setup simple
• Built-in XY configured stereo mic provides high quality monitoring of the entire drum set with natu-
ral balance and stereo orientation
• Loud drums can be monitored with proper volume using headphones or earphones
• Change effect settings with a single knob and easily save and recall settings
• PCM tone generator makes it easy to change the sound of your bass drum by using a Triggered
sound — even in the middle of a performance
• Play a wide range of musical genres from contemporary to the by using the effects, your own sam-
ples or the internal Triggered sounds
• Recording and playback possible via USB flash drive or USB audio
• Left and right outputs allow you to easily connect to a PA
Main Unit Sensor Unit
Easy setup allows comfortable monitoring of your drum sound while playing
Transforms the sound of your drums into a sound of your liking
Use for recording or in-live situations

11
EAD10 Owner’s Manual
How the EAD10 makes sound
The Sensor Unit sends two types of signals to the Main Unit; an audio signal captured with the mic
sensor, and a trigger signal captured with the trigger sensor.
The audio signal can be processed with Effects, while the trigger sensor can be used to play Trigger
Sounds depending on how you play your drums.
For more information on Trigger Sounds, Effects, and Reverb, please see “What is a Scene?” (page
32).
Mic sensor
Trigger sensor
Audio signal from
the drum set
Trigger signal from
the bass drum
(Mic sound &)
Effects
Trigger Sound
(internal Voices)
Reverb
Sensor Unit
Main Unit

12
EAD10 Owner’s Manual
About the Manuals
The following manuals are provided for using the EAD10. These manuals are intended for users
of the EAD10.
Owner’s Manual (this book)
Setup Guide
Explains how to attach and setup the EAD10 for producing sound.
Basic Guide
Describes the fundamentals needed to operate the EAD10.
Application Guide
Describes parameter settings and other more advanced uses.
Reference
Describes troubleshooting techniques and contains other reference materials.
Reference Manual (Advanced)
The Reference Manual provides a description of all of the functions that can be accessed by pressing the [MENU] but-
ton.
Data List
This provides lists of Scene and Effect names in the EAD10, and MIDI related information.
iPhone/iPad Connection Manual
Describes how to connect smart devices such as an iPhone and iPad.
Printed Manual
Digital Manual (PDF)
The digital format manuals listed above can be obtained from the Yamaha Downloads web page.
To do so, go to the web page using the following URL, enter “EAD10” in the “Model Name”
field, and then click “Search.”
Yamaha Downloads: http://download.yamaha.com/

13
EAD10 Owner’s Manual
Panel Controls and Functions
Main Unit
Top Panel
[AUDIO/CLICK VOLUME] knob
Adjusts the volume for AUX IN (aux-
iliary input) and Click functions—any
sound or audio you play along to.
Function Buttons 1–3
(page 33) ([F1], [F2], [F3])
Selects the functions that
appear at the bottom of each
screen.
Display (page 33)
Displays a variety of informa-
tion.
[SCENE] knob (page 33)
Switches between the dif-
ferent sound sets.
Or, returns to the Scene
screen from other screens.
NOTE
The knob can be used in the same manner as the
[–] and [+] buttons. For more information, refer to the
Reference Manual (Advanced) (PDF) (MENU/Utility/
General).
[ ] (Standby/On) switch (page 25)
Switches the power between standby (off) and
on.
[MENU] button
Accesses the advanced settings
screen. For more detailed informa-
tion, refer to the Reference Manual
(Advanced) (PDF).
[REVERB] knob (page 33)
Adjusts the reverb level.
[EFFECT] knob (page 33)
Adjusts the amount of Effect applied to the
audio signal from the mic sensor.
[TRIGGER] knob (page 33)
Adjusts the Trigger Sound volume.
[STORE] button (page 37)
Opens the Store screen. Stores Scenes
that you have created.
[–] button,
[+] button
Increases or
decreases the
value by one (1).
[ ] (Click) button (page 39)
Accesses the Click (Metronome)
screen. The button flashes in
sync with the Click tempo.
[RECORDER] button (page 41)
Accesses the Recorder (record/play-
back) screen. The button lights while
recording or during playback.
[EXIT] button
Cancels the action, or returns to the screen one level higher.
Press several times to return to the Scene screen.
NOTE
When in the Scene Screen, this button can also be used as a
Panic Button to stop any sounds.
[ ] (Sensor Unit) button
(page 27)
Accesses the Sensor Unit
screen. Set the mic sensor level
so that the button occasionally
flashes when hitting the drums
strongly.
[MASTER VOLUME] knob
Adjusts the overall volume.

14
EAD10 Owner’s Manual
Panel Controls and Functions
Rear Panel
[FOOT SW] Jack (page 48)
Connects a foot pedal or foot switch (sold sep-
arately).
FC5 HH65
etc.
FC7
TO SENSOR UNIT [A] jack
(page 17)
Connect to the [A] jack on the
Sensor Unit using the connec-
tor cable (included).
TO SENSOR UNIT [B] jack
Connect to the [B] jack on the
Sensor Unit.
For more information on the [qKICK/w]
to [y] jacks, see “About the Trigger Input
Jacks” (page 16).
Sensor Unit
Standard phone plug
(6.3 mm)
Stereo mini plug
(3.5 mm)
DC IN jack (page 17)
Use the AC adaptor that
came with the EAD10.
USB cable
[USB TO DEVICE] termi-
nal (page 30)
Connects a USB flash
drive.
Cannot be used with other
USB devices.
[USB TO HOST] terminal (page 25)
Connect a computer or smart device
such as an iPhone or iPad to send and
receive digital signals (audio and MIDI).
Additional parts are required for connect-
ing an iPhone or iPad. For more informa-
tion, refer to “iPhone/iPad Connection
Manual” (PDF).
Cord hook (page 17)
Wrap the AC adaptor cord
around this hook to prevent
accidental unplugging dur-
ing use.
Cord hook
AC adaptor cord
[AUX IN] (auxiliary
input) jack
(page 17)
Connect to the
headphone jack on
a smart phone or
portable music
player.
OUTPUT [R]/[L/MONO]
jacks (page 17)
Connect to powered speak-
ers or other such PA system.
These jacks are standard
phone type output jacks.
If mono output is required,
use only the [L/MONO] jack.

15
EAD10 Owner’s Manual
Panel Controls and Functions
Front Panel
Sensor Unit
NOTICE
Do not hit the Sensor Unit with the drumsticks. Doing so can damage the mic sensor resulting in inferior performance.
Standard stereo phone plug
(6.3 mm)
[PHONES] jack
Connects headphones. This output jack is a standard
stereo phone plug (6.3 mm). Use a 3.5 mm stereo
mini to (6.3 mm) stereo adaptor to connect head-
phones or earphones with a stereo mini plug (3.5 mm)
to the [PHONES] jack.
CAUTION
Do not use headphones for a long period of time at
high volume. Doing so can cause loss of hearing.
Mic Sensor
Captures the whole drum set’s
acoustic sound converting it into
an audio signal.
[A] jack
Connect to the TO SENSOR UNIT
[A] jack on the rear panel using
the connector cable (included).
Sends the trigger sensor signal.
[B] jack
Connect to the TO SENSOR UNIT
[B] jack on the rear panel using
the connector cable (included).
Sends the mic sensor signal.
Clamp screw (page 17)
Secures the Sensor Unit to
the bass drum hoop.
Trigger sensor
Converts vibrations produced
when the bass drum is hit
into a trigger signal.

16
EAD10 Owner’s Manual
Panel Controls and Functions
Trigger signals are received via the trigger input jacks. These are used for connecting separately sold accessories to the
EAD10. You can connect up to six pads or drum triggers.
[qKICK/w] through [y] jacks are located on the rear panel of the Main Unit.
Visit the web page below for more information on separately sold accessories that can be connected to each trigger input
jack.
For more information on connections of separately sold accessories, see “Enhance Your Drum Set with Separately Sold
Add-Ons” (page 48).
Yamaha Downloads: http://download.yamaha.com/
* Yamaha Corporation reserves the right to modify this URL at any time without prior notice.
About the Trigger Input Jacks
Standard stereo phone plug
(6.3 mm)
Trigger Input jacks
[qKICK/w]
The TO SENSOR UNIT [A] jack can
be as the [qKICK/w] jack (page 48).
This jack consists of a pair of mono
trigger inputs.
[eSNARE/r]
This jack consists of a pair of mono
trigger inputs. Connects drum triggers
such as the DT50S (sold separately)
(page 48).
DT50S
[t] and [y]
Connects DTX Series pads, etc.
(page 48).
Supports three-zone pads.
TP70S
XP80
PCY135
Using a commercially available Y-cable you
can connect two mono pads.
For example, you can connect a Sensor Unit
and a kick pad to the [qKICK/w] jack.
Stereo audio plug
Mono phone jack
Mono phone jack
Y-cable
KU100

17
EAD10 Owner’s Manual
Setup Guide
This provides information on setup and initial settings in preparation for playing.
This completes set up.
Positioning the drum set
The bass drum should be the central point in the drum set, with the snare, toms, cymbals, positioned in a well balanced man-
ner around it. Instruments positioned away from the Sensor Unit mounted on the bass drum may sound lower in volume.
When instruments such as the ride cymbal are positioned too close to the Sensor Unit, the sound will be too loud and out of
balance.
Using the sensor with double bass drum set ups gives an uneven and unbalanced sound, so we do not recommend using it in
this situation.
Workflow
Attaching the Sensor Unit
Installing the Main Unit
Connecting the Cables
Taking Measures Against Noise
Connecting the AC adaptor
Setting Up the Sensor Unit
Setting Up

18
EAD10 Owner’s Manual
Setting Up
Setup Guide
Attaching the Sensor Unit
Attach the Sensor Unit to the top of the batter side bass drum hoop.
Standard Straight Hoop
1.
Slide the Sensor Unit onto the top of the batter side bass drum hoop as far as possible.
2.
Lift the Sensor Unit and after making sure both surfaces shown in the figure below are in
contact with the hoop, turn the clamp screw.
Tighten the clamp screw firmly, making sure that the Sensor Unit is secure and not loose.
Other Hoop Types
1.
Attach the included adhesive cushions,
one each to the top of the inner and
outer hoop surfaces.
2.
Attach the sensor using the same procedure as for a standard hoop drum.
NOTICE
Make sure the uneven surface is filled with adhe-
sive cushions to provide a secure attachment for
the sensor. The Sensor Unit may fall off if the
adhesive cushions is not used.
Wood hoops
12
Side view
Top of the
batter side
Hoop
Make sure these two
surfaces are in con-
tact with the hoop
Make sure this sur-
face is in contact
with the hoop
Clamp
screw
Adhesive
cushion
(cross section)
Uneven profile type
Metal hoops
(cross section)

19
EAD10 Owner’s Manual
Setting Up
Setup Guide
Installing the Main Unit
Either place the Main Unit on a table, or attach the Main Unit to a hi-hat stand.
Placing on a Flat Surface
Place the Main Unit on a table or flat surface.
Mounting on a Hi-Hat Stand
1.
Combine the included module holder with a separately sold cymbal stand attachment
(CSAT924A) and mount on the hi-hat stand.
Tighten the module holder wing nuts to securely fasten the Main Unit and module holder.
We recommend attaching the Main Unit to a position where it cannot be hit by your knees.
Cymbal Stand
Attachment
Exploded view
Main Unit
Module holder
Module holder wing
bolts
Cymbal Stand
Attachment

20
EAD10 Owner’s Manual
Setting Up
Setup Guide
2.
We recommend positioning the Main Unit so
that it is inside the outer edge of the cymbal
when viewed from above to avoid hitting the
Main Unit.
Use a drum key (sold separately) on the Main Unit angle
adjustment.
Connecting the Cables
Connect the straight plug to the Main Unit, and the L-shaped
plug to the Sensor Unit.
Included Connector Cables
[A] jack on the rear panel of the Main Unit
[A] jack on the Sensor Unit
[B] jack on the Main Unit
[B] jack on the Sensor Unit
CAUTION
Do not connect or disconnect cables while the power is
ON.
About the Module Holder
The module holder has three sets of holes. Use the center set of holes to mount in a standard position. Use the
rear set of holes if you want the unit positioned forward, and use the front set of holes to position the unit to the
rear.
Main Unit
Front panel side
Rear panel side
Module holder
Main Unit
Angle adjustment key bolt
Module holder
Rear position
Standard position
Forward position
NOTE
The module holder is 22.2 mm (7/8") diameter.
Cymbal
Snare drum
(EAD10)
Main Unit
Sensor Unit

21
EAD10 Owner’s Manual
Setting Up
Setup Guide
Taking Measures Against Noise
To eliminate the cause of the noise, adjust positions beforehand so that your toms do not touch the Sensor Unit or that the
Connector Cables do not move around the Sensor Unit during your performance.
Check the Sensor Unit Location
Make sure the Sensor Unit does not touch the toms or other
instruments.
Securing the Cables
Position the L-shaped plugs connected the Sensor Unit on their
sides. This provides a more stable cable position.
Use the Cable band to secure the Connector Cables close to the
Sensor Unit.
When mounting the Main Unit on a hi-hat stand, use the Cable
band to keep the cables from interfering with the foot pedal.
Example of poor placement
Viewed from above
Viewed from the
Sensor Unit jack side
Hoop
Viewed from above
Cable band
Cable band

22
EAD10 Owner’s Manual
Setting Up
Setup Guide
Connecting the AC adaptor
1.
Make sure that the power is turned off (all
panel lights and the screen backlight are
off).
2.
For removable plug type AC adaptors only:
Make sure that the plug is not disconnected.
3.
Connect the AC adaptor.
WARNING
Only use the specified AC adaptor (page 63). Using a different AC adaptor can cause malfunction, overheating, fire, and
other problems. This may void the warranty so please take careful note.
CAUTION
Locate the Main Unit close to an AC outlet. If you notice any abnormalities during operation, turn the power off immedi-
ately and unplug the AC adaptor.
WARNING
• For AC adaptors with a removable plug, only use the
AC adaptor with the plug attached, and keep the
plug. Plugging only the plug into the power outlet
can cause electric shock or fire.
• If the removable plug comes off from the AC adaptor,
avoid touching the metal parts on the plug and slide
the AC adaptor onto the plug until you hear it lock on
to the adaptor with a click. Also, make sure you keep
any foreign objects out of the plug. This can cause
electrical shock, short circuit, or failure.
WARNING
Make sure to use the specified AC Adaptor.
No screen backlight
All off
Slide in the direction
indicated with the arrow.
Plug
DC IN jack
(page 63)

23
EAD10 Owner’s Manual
Setting Up
Setup Guide
4.
Hook the AC adaptor’s cord around the cord
hook to secure it in place.
5.
Plug the AC adaptor’s AC plug into a domes-
tic power outlet.
Connecting Headphones
Connect the headphones to the [PHONES] jack.
CAUTION
Excessive bending can damage the AC adaptor cord
and create a fire hazard. Ensure, therefore, that the
power cord is not bent at an extreme angle when
wrapped around the hook.
CAUTION
Even when the [ ] (Standby/On) switch is in standby
status (power lamp is off/display is off), electricity is
still flowing to the instrument at the minimum level.
When you are not using the EAD10 for a long period of
time, make sure that you unplug the AC adaptor from
the wall AC outlet.
NOTE
When disconnecting the AC adaptor, turn the instrument and then carry out this procedure in reverse order.
CAUTION
Do not use headphones at high volume for an extended
period of time. Doing so can cause loss of hearing.
NOTE
Please take note of the following if you are using open or semi-
open headphones.
- Volume tends to sound louder because of the sound of the
drums leaking into the headphones when playing.
- When recording or connected to a PA, the Click sound from
the headphones may get mixed into your recording or PA
system.
Cord hook
AC adaptor cord
Power outlet
AC adaptor
Front panel side

24
EAD10 Owner’s Manual
Connect with Other Devices and Expand the Fun
Setup Guide
This section describes how to connect to a portable music player and PA system.
Connecting a Portable Music Player
You can play along with audio playback from a smartphone or
portable music player.
Connect the smartphone or portable music player to the [AUX
IN] jack.
Connecting to a PA System
Connect the OUTPUT [R]/[L/MONO] jacks to the PA system.
Connect with Other Devices and Expand the Fun
NOTICE
Before making any connections, make sure volume levels on
all devices are set at their minimum.
CAUTION
• Acoustic feedback (a loud squeal or screech) may occur
depending upon the position of the microphone and the
proximity and direction of the speakers.
• Please note that Scenes using high-gain effects such as
distortion or compression are more likely to cause feed-
back if the speakers are too close or pointed towards the
drum set.
NOTICE
• Whenever connecting other devices, make sure that plugs
on the cables you are using match the jacks on each
device.
• Make sure the volume levels on all external devices are set
at their minimum.
• When using the Main Unit with an external device for
sound output, turn the Main Unit power on first, and then
the power on the external device. When turning power off,
do so in the reverse order. Not following the proper order
can damage the equipment.
Stereo mini plug
(3.5 mm)
Standard phone plug
(6.3 mm)

25
EAD10 Owner’s Manual
Turning On or Off
Setup Guide
Connecting a Computer
If you have a computer and DAW software, connect the Main Unit to the computer and you can record your performance
and listen to the playback from the computer. For more information, refer to the Reference Manual (Advanced) (PDF).
Turning On
1.
Turn the [MASTER VOLUME] knob fully
counterclockwise to lower the Main Unit vol-
ume to its minimum.
2.
Press the [ ] (Standby/On) switch.
The startup screen appears in the LCD.
Turning On or Off
CAUTION
Do not reconnect cables between the Main Unit and Sensor Unit after turning the power on. Doing so will cause noise.
Precautions when using the [USB TO HOST] terminal
When connecting the computer to the [USB TO HOST] terminal, make sure to observe the following points. Failing
to do so risks freezing the computer and corrupting or losing the data.
If the computer or the instrument freezes, restart the application software or the computer OS, or turn the power to
the EAD10 off then on again.
NOTICE
• Use an AB type USB cable of less than 3 meters. USB 3.0 cables cannot be used.
• Before connecting a computer to the [USB TO HOST] terminal, disable any power-saving mode of the computer
(such as suspend, sleep, or standby).
• Execute the following before turning the power to the instrument on/off or plugging/unplugging the USB cable to/
from the [USB TO HOST] terminal.
- Quit any open application software on the computer.
• While the computer is connected to the EAD10, you should wait for six seconds or more between these opera-
tions: (1) when turning the power of the EAD10 off then on again, or (2) when alternately connecting/disconnect-
ing the USB cable.
May differ from the actual specifica-
tions.

26
EAD10 Owner’s Manual
Turning On or Off
Setup Guide
3.
If you are connected to a PA system:
Turn the external speakers on.
Turning Off
1.
If you are connected to a PA system:
Turn the external speakers off.
2.
Turn the [MASTER VOLUME] knob fully
counterclockwise to lower the volume to its
minimum.
3.
Hold down the [ ] (Standby/On) switch.
The EAD10 is in Standby and the display and lights are
off.
NOTICE
• The Main Unit automatically stores settings when the power is turned off, so do not unplug the AC adaptor until the LCD
screen is turned off completely.
• Unsaved Scene data will lost, so always save (Store) data before turning the power off.
Power on
Power off
Hold down
All off

27
EAD10 Owner’s Manual
Setting Up the Sensor Unit
Setup Guide
About the Sensor Unit Settings
Adjust the gain and sensitivity settings for the Mic sensor and Trigger sensor built into the Sensor Unit. When you need to
adjust the gain, you can also use the Auto Setting feature.
Setting the Sensor Gain Automatically
1.
Press the [ ] (Sensor Unit) button.
The SENSOR UNIT screen appears.
Setting Up the Sensor Unit
Setting Screen display Optimal condition
MIC
(Mic gain)
The level should occasionally reach to the right and the [ ]
(Sensor Unit) button lights by striking all the instruments in
the drum set.
TRG
(Trigger gain)
The level should reach to the right when the bass drum is
struck loudly
Mic gain
Trigger gain
Press the [EXIT] but-
ton to return to the
Scene screen.
Setting Up Automatically
2.
Press the button below “AUTO” ([F3]).
3.
Strike each of the instruments in the drum set with
an 8-beat rhythm.
The setting is complete after about 10 seconds of playing the drums.
If you want to stop the Auto Setting before completion, press “STOP.”
NOTE
Detection may fail in some cases, particularly if there is background noise. When detection fails, try the Auto Setting several
times. Fine adjustments should be done manually. If the Auto setting is not successful after several attempts, adjust manually.
The setting is complete when
“AUTO” reappears.

28
EAD10 Owner’s Manual
Setting Up the Sensor Unit
Setup Guide
Manually Adjusting the Sensor Unit Settings
1.
Press the [ ] (Sensor Unit) button.
The SENSOR UNIT screen appears.
2.
Use the buttons below “ ” or “ ” ([F1] or
[F2]) to move the cursor.
3.
Use the [–] or [+] buttons to adjust the value.
Setting Finer Adjustments
1.
With the SENSOR UNIT screen displayed, press the button
below “ ” ([F2]).
The SENSOR UNIT (fine adjustment) screen opens.
Press the [EXIT] button to
return to the Scene screen.
TRG SENS
(Trigger Sensitivity)
Sensitivity for
light strokes
The larger the value, the louder
the sound produced when struck
lightly.
[L] Mic gain left Adjust the L and R settings when
the volume balance between the
left and right Mics is poor.
[R] Mic gain right
Mic gain
Trigger gain
Lower Higher
SENSOR UNIT screen
SENSOR UNIT (fine adjustment) screen
NOTE
• If this is set too low, the Trigger
sound might not be played.
• If this is set too high, the snare
drum or toms might trigger the
bass drum Trigger Sound when
hit.
NOTE
The same value is displayed in the
[L] setting in the SENSOR UNIT
(fine adjustment) screen and in the
“MIC” setting in the SENSOR UNIT
screen.

29
EAD10 Owner’s Manual
Changing the Overall Settings
Setup Guide
2.
Use the buttons below “ ” or “ ” ([F1] or
[F2]) to move the cursor.
3.
Use the [–] or [+] buttons to adjust the value.
Auto Power-Off
The Auto Power-Off function automatically turns off the Main Unit after a certain period of inactivity. The factory default is
set at 30 minutes.
Auto Power-Off Quick Cancel
While holding down the [STORE] button, press the [ ]
(Standby/On) button to cancel the Auto Power-off. The func-
tion will remain off until you set a new Auto Power-Off time.
Changing the Overall Settings
NOTICE
• Unsaved data is lost when the Main Unit is turned off with the Auto Power-Off function. Always store data before turning
the power off.
• In certain modes of operation, the Auto Power-Off function will not turn off the Main Unit when the set time has elapsed.
So we recommend that you always turn off the Main Unit manually when you are finished using it.
• If you expect the Main Unit to be inactive for a certain length of time while connected to external audio equipment or a
PA, we recommend fully lowering the volume on the external equipment. Alternatively, you can disable the Auto Power-
Off function to ensure that the Main Unit stays on.
NOTE
To set the Auto Power-Off to a time other than 30 minutes, access the setting from the [MENU] button. (MENU/Utility/General)
Lower Higher

30
EAD10 Owner’s Manual
Using a USB Flash Drive
Setup Guide
Restoring Main Unit Settings to the Factory Defaults (Factory
Reset)
Use the Factory Reset function to restore the Main Unit’s settings to their factory defaults, even if you have accidentally
overwritten them.
Performing a Factory Reset
While holding down the [–] and [+] buttons, press the [ ]
(Standby/On) button to perform the factory reset.
Connect a USB flash drive to the [USB TO DEVICE] terminal on the rear panel of the Main Unit and record your perfor-
mance directly to the USB flash drive. Also, you can save Main Unit settings to and load settings from a USB flash drive.
Connecting a USB Flash Drive to the Main Unit
Precautions When Using the [USB TO DEVICE] Terminal
When connecting a USB device to the terminal, be sure to follow the important precautions below.
NOTICE
A factory reset overwrites any settings you have made with the corresponding factory defaults. Save any important user-
defined data to a USB flash drive before carrying out a factory reset. For more information, refer to the Reference Manual
(Advanced) (PDF). (MENU/File)
NOTE
You can also access the factory reset with the [MENU] button.
Using a USB Flash Drive
NOTE
For more information about the handling of USB flash drives, refer to the owner’s manual of your USB flash drive.

31
EAD10 Owner’s Manual
Using a USB Flash Drive
Setup Guide
Compatible USB Devices
USB flash drives only
Please check the URL shown below for a list of compatible USB flash drives.
http://download.yamaha.com/
Connecting a USB Flash Drive
When connecting a USB device to the [USB TO DEVICE] terminal, make sure that the connector on the EAD10 is appro-
priate and that it is connected in the proper direction. The EAD10 conforms to the USB 1.1 specification. USB 2.0 and USB
3.0 flash drives can also be used. However, the transfer speed is equivalent to the USB1.1 specification.
Formatting the USB Flash Drive
Some USB flash drives should be formatted with this instrument before they can be used. For information on how to format
the USB flash drive, refer to the Reference Manual (Advanced) (PDF). (MENU/File/Format)
To Protect Your Data (Write Protection)
To prevent important data from being inadvertently erased, write-protect the USB flash drive. When you are saving data to
the USB flash drive, make sure you disable the write-protect first.
NOTE
• Other USB devices such as USB hub, mouse, computer keyboard, cannot be used.
• A USB cable cannot be used to connect a USB device to the [USB TO DEVICE] terminal.
NOTICE
The rating of the [USB TO DEVICE] terminal is a maximum of 5 V / 500 mA. Do not connect USB devices having a rating
above this, since this can cause damage to the instrument itself.
NOTICE
• Avoid connecting or disconnecting the USB device during playback/recording and file management operations (such as
Save, Copy, Delete, and Format), or when accessing the USB device. Failure to observe this may result in “freezing” of
the operation of the instrument or corruption of the USB device and the data.
• When connecting then disconnecting the USB device (and vice versa), make sure to wait a few seconds between the
two operations.
NOTICE
The format operation erases any previously existing data. Make sure that the USB flash drive you are formatting does not
contain any important data.

32
EAD10 Owner’s Manual
Basic Guide
What is a Scene?
A Scene consists of a group of assigned settings for Reverb, Effects, and Trigger Sounds. The Main Unit includes preset
Scenes you can select to change the overall sound.
Also, you can save Scene settings as User Scenes, and recall User Scenes by turning the [SCENE] knob. (page 35)
For live use, you can sort and save Scenes in any order then recall Scenes by turning the [SCENE] knob or hitting a pad. For
more information, refer to the Reference Manual (Advanced) (PDF). (MENU/Job/Scene, MENU/Utility/PadFunction)
Performing with Various of Scenes
DISTORTION
DELAY
WAH
COMPRESSOR
FLANGER
PHASER
Scene
Reverb Trigger SoundEffects
Studio
Concert Hall
Stage
Distortion
Phaser
Wah
Delay
Flanger
Compressor
Bass drum
Cymbal
Cowbell
Snare drum
Other
instruments
Tambourine
Simulates the acoustical
characteristics of a
venue or studio. For
example, you can re-
create the ambiance of
a live venue in the com-
fort of your own home.
Sound captured with the Mic Sensor is
processed with delay, distortion, or
other sound varying Effects.
Use the Trigger Sound to emphasize or
enhance the sound of your drums.
Add some DTX Series pads and play
other sounds such as electronic drums.

33
EAD10 Owner’s Manual
Performing with Various of Scenes
Basic Guide
Basic Scene Operation
How to Read the Scene Screen
NOTICE
About the “ ” mark:
The mark appears in the upper left of the screen when a Scene’s settings
have been changed. This is to remind you that Scene settings have changed
but have not yet been saved (Store). The mark disappears when you store
the settings (page 37). When you select another Scene without first storing
the settings, the changes will be lost.
Switches the Scene type.
Returns you to the Scene Screen
from other screens.
Adjusts the volume of
Reverb, Effect, or Trigger Sound
Changes the type of
Reverb, Effect, or Trigger Sound
NOTE
When in the screens listed below, the knob can be used like the [–] and [+] but-
tons without returning to the Scene Screen.
• Screens such as Store where it is used for selecting a Scene Number
• Screen for entering a name
Scene number
Scene name
Opens to the
REVERB TYPE
settings screen
Opens to the
EFFECT TYPE
settings screen
Opens to the
TRIGGER INST
screen
If the Scene is synced to the tempo, the
tempo setting appears.
Displays the Sensor Unit status.
M: Mic volume
T: Trigger signal strength
Press the [EXIT] but-
ton to return to the
Scene screen from
each settings screen.

34
EAD10 Owner’s Manual
Performing with Various of Scenes
Basic Guide
Selecting a Scene
1.
Rotate the [SCENE] knob.
Adjusting Scenes
Adjusting Reverb and Effect Levels and Trigger Sound Volume
After editing a Scene, your edits will be lost if you select another Scene before saving (Storing) the edits.
Scene number
Scene name
Scene number and Scene name are
displayed on the screen.
P***: Preset Scene (Presets that are already
stored in the EAD10)
U***: User Scene (Scene you have created)
NOTE
When you select another Scene before storing
the Scene being edited, you can use the recall
function to recall the edited contents. For more
information, refer to the Reference Manual
(Advanced) (PDF) (MENU/Job/Scene/Recall).
[REVERB] knob
Adjusts the amount of
Reverb
[EFFECT] knob
Adjusts the amount of
Effect applied to the
sound of the acoustic
drum set
[TRIGGER] knob
Volume control for the
Trigger Sound assigned
to each trigger input
(Trigger signal level)
Maximum: all lit
Minimum: all off

35
EAD10 Owner’s Manual
Creating Your Own Scene
Basic Guide
You can customize preset Scenes to create your own Scene.
Creating Your Own Scene
Changing
the Reverb Type
1.
Press the button
below “REV” ([F1]).
The REVERB TYPE screen
opens.
2.
Use the [–] or [+] but-
tons to select the
Reverb type you want
to use.
Changing
the Effect Type
1.
Press the button
below “EFF” ([F2]).
The EFFECT TYPE screen
opens.
2.
Use the [–] or [+] but-
tons to select the
Effect type you want
to use.
Use the “ ” ([F1]) and
“ ” ([F2]) buttons to change
the tempo for tempo synced
Effects.
Changing
the Trigger Sound
Changing the Trigger
Sound on the Bass Drum
(Set as a Factory Default)
1.
Press the button below
“TRG” ([F3]).
The TRIGGER INST screen opens.
2.
Use the [–] or [+] buttons
to select the number for
the Trigger Sound you
want to use.
Trigger Sound name
Trigger Sound number
About the “BYPASS”
In each screen, selecting “BYPASS” ([F3]) causes the corresponding knob lamps to
dimly flash and the Effect not applied. Each press of the [F3] button turns the bypass set-
ting on or off. When you select “BYPASS” while the knob is turned fully to the mini-
mum position, the two lamps below the knob dimly flash.
NOTE
To check the Trigger Sound, turn the
[TRIGGER] knob clockwise to
increase the volume.

36
EAD10 Owner’s Manual
Creating Your Own Scene
Basic Guide
Advanced Trigger Sound Settings
When you attach a Drum Trigger on the snare drum, or add a DTX series pad, you need to assign a Trigger Sound to each
device to play Trigger Sounds. This section describes how to change instrument categories to assign different Trigger
Sounds, how to audition Trigger Sounds, and how to turn off the Trigger Sound by switching the “BYPASS” setting.
If you want to make more precise changes to the settings, press the [MENU] button to make detailed settings. For more
information, refer to the Reference Manual (Advanced) (PDF). (MENU/Scene Edit/Inst or MENU/Scene Edit/Voice)
1.
Press the button
below “TRG” ([F3]).
Instrument category name
Trigger Sound number
Pad name
Trigger Sound name
The TRIGGER INST screen opens.
Switching the Instrument Category
2.
Press the button below “ ” ([F1]) to
move the cursor to “Category” (instru-
ment category name).
3.
Use the [–] or [+] buttons to select the
instrument category you want to use.
Next, move the cursor to Trigger Sound number using
the same procedure described in step 2, then select a
Trigger Sound using the same procedure as in step 3.
Auditioning Sounds
2.
Press the button below “ ” ([F2]).
You can listen to the Trigger Sound.
Switching the Pad
Strike the separately sold add-
on pad to select the pad whose
sound you want to change.
Make sure that the pad name in the
upper right corner of the screen has
changed.

37
EAD10 Owner’s Manual
Creating Your Own Scene
Basic Guide
Using Imported Sounds (.wav)
You can import audio files (.wav) into the EAD10 to use as Trigger Sounds.
For more information on importing audio files and settings, refer to the Reference Manual (Advanced) (PDF). (MENU/Job/
Wave)
For more information on using a USB flash drive, see “Using a USB Flash Drive” (page 30).
Saving a Scene Under a New Name
1.
Press the [STORE] button.
The STORE screen opens.
2.
Press the button below “NAME” ([F2)] to
open the NAME screen.
3.
Use the buttons below “<” or “>” ([F1] or
[F3]) to select the character position, then
use the [–] or [+] buttons to select a letter.
A name of up to 10 characters can be set to the Scene.
NOTE
You can also use the [SCENE] knob to select characters.
User Scene number and
User Scene name of the
Scene you are editing.
User Scene number and
User Scene name of the
Store Destination
Character position (cursor)
Character you
want to enter

38
EAD10 Owner’s Manual
Creating Your Own Scene
Basic Guide
4.
After entering all characters, press the but-
ton below “OK” ([F2]) and return to the
STORE screen.
5.
Use the [–] or [+] buttons to select a User
Scene Number to store your Scene to.
6.
After confirming the new Scene Number and
Scene Name, press the button below
“STORE” ([F3]).
When the Store operation is complete, the display returns to the Scene screen.
NOTE
You can also use the [SCENE] knob to make changes.
NOTE
You cannot save an edited Scene to a Preset Scene.
NOTICE
When overwriting a Scene, the current Scene settings
are replaced with the new settings. Before overwriting a
Scene, ensure that the Scene contains no irreplaceable
settings.
“Overwrite?” appears when the selected Scene Number already con-
tains a Scene.
If you want to overwrite to save the Scene, press the button below
“YES” ([F1]).
If you do not want to overwrite, press the button below “NO” ([F3])
and return to the previous screen where you can select another Scene
number.

39
EAD10 Owner’s Manual
Using the Click (Metronome)
Basic Guide
Set the Click (Metronome) tempo, volume, type of sound, etc.
1.
Press the [ ] (Click) button.
Using the Click (Metronome)
Press the [EXIT] but-
ton to return to the
previous screen or
the Scene screen.
The CLICK screen
opens.
Starting and
Stopping the Click
2.
Press the button
below “ ” ([F1])
to start the Click.
The [CLICK] button flashes
in sync with the tempo while
the Click sounds.
3.
Press the button
below “ ” ([F1])
to stop the Click.
NOTE
You can also press the [ ]
(Click) button to start the Click
and to stop the Click.
Setting Click Beat
Volumes and Types of
Sounds
2.
Press the button
below “VOL/BEAT”
([F2]).
The VOLUME/BEAT screen
opens.
Tap the button at the desired tempo to set
the tempo.
2.
Press the button below
“TAP” ([F3]).
The TAP screen opens.
3.
Tap the button below “
TAP” ([F3]) at least 3 times.
The tapped tempo is detected and appears
on the screen.
NOTE
You can also set the tempo by striking the
bass drum or a pad connected to the Trig-
ger Input jacks.
Setting the Tempo by
Tapping the Button
(Tap Tempo)
Changing the
Tempo
Slower Faster
(continued to the next page)

40
EAD10 Owner’s Manual
Using the Click (Metronome)
Basic Guide
(continued from the previous page)
VOLUME/BEAT screen
3/8, 6/8, 9/8, 12/8, 15/8 beats only have settings for Acc, dotted quarter, eighth, and sixteenth
notes.
Set the volume
Set the time signature
Accents Quarter
notes
Eighth
notes
Sixteenth
notes
Eighth note
triplets
Beats
(1/4−16/4, 1/8−16/8,
1/16−16/16)
Setting Individual Click Beat
Volumes
3.
Use the buttons below “<” or ”>” ([F1]
or [F2]) to move the cursor.
4.
Use the [–] or [+] buttons to adjust the
volume.
Changing the Click Sounds
3.
Press the button below “VOICE” ([F3]).
The CLICK VOICE screen opens.
4.
Use the [–] or [+] buttons to change
the Click Sound.

41
EAD10 Owner’s Manual
Recording Your Performance
Basic Guide
Use the EAD10 to record your performance. When a USB flash drive is connected to the unit, audio is recorded to the USB
flash drive.
Recording to the Main Unit (when no USB flash drive is connected
to the terminal)
1.
Press the [RECORDER] button.
Recording Your Performance
The RECORDER screen opens.
Destination and elapsed playback time
(min: sec)
The [RECORDER] button lights while
recording or during playback.
Switching to AUX IN
Recording
Change the setting when recording
audio from the [AUX IN] jack.
For more information, see “Switching
to AUX IN Recording” on page 43.
2.
Press the button
below “
” ([F1]) to
start recording.
While recording “Now recording
.. (elapsed recording time
(min:sec))” appears.
3.
Play the drums.
4.
After you finish play-
ing, press the button
below “ ” ([F1]) to
stop recording.
Recording
Playing Back
2.
Press the “>” button
([F2]) to start play-
back.
3.
To stop playback,
press the “
” button
([F2]).
NOTE
This is not displayed when there is
no recorded song.
NOTICE
• When your performance is already
recorded on the Main Unit, recording
again on the Main Unit erases the
previous recording.
• Any performance recorded to the
EAD10 Main Unit will be lost when the
power is turned off. Please export any
recorded performance data that you
wish to save.
NOTE
• Recording time to the Main Unit is about
1 minute 30 seconds.
• Press the [MENU] button to open the
Job screen from which you can export
your recording as a audio file. For more
information, refer to the Reference Man-
ual (Advanced) (PDF). (MENU/Job/
Recorder/Export Audio)
Press the [EXIT] button
to return to the Scene
screen.

42
EAD10 Owner’s Manual
Recording Your Performance
Basic Guide
Recording to a USB Flash Drive
1.
Connect a USB flash drive to the [USB TO DEVICE] terminal on the rear panel.
When a USB flash drive is connected
• You can record up to 30 minutes at a time.
• A new file is created every time you record.
• Simultaneously press Playback and Record to overdub your performance onto the
currently playing song.
Press the [EXIT] button to return
to the Scene screen.
The RECORDER
(USB) screen opens.
Song number and
elapsed playback time
(min:sec)
3.
Press the button below
“
” ([F1]) to start
recording.
While recording “Now recording ..
(elapsed recording time
(min:sec))” appears.
4.
Play the drums.
5.
After you finish play-
ing, press the button
below “ ” ([F1]) to
stop recording.
The RECORDER SAVE screen
opens.
6.
Press the button below
“SAVE” ([F3]) and
save the file.
Press the button below “CAN-
CEL” ([F2]) if you do not want to
save the file.
NOTE
If you want to change the file name,
press the button below “NAME”
([F1]) and enter a new name. (page
37)
Recording
File name
Switching to AUX IN Recording
Change the setting when recording audio from
the [AUX IN] jack.
For more information, see “Switching to AUX
IN Recording” on page 43.
Playing Back
3.
Use the [–] or [+] buttons to
select a song for playback.
4.
Press the button below “>”
([F2]) to start playback.
5.
Press the button below
“
” ([F2]) to stop playback.
NOTE
This is not displayed when there is no
recorded song.
NOTE
Up to 100 songs are recognized.
2.
Press the [RECORDER] button.

43
EAD10 Owner’s Manual
Recording Your Performance
Basic Guide
Switching to AUX IN Recording
The Input Source must be changed to record from the [AUX IN] jack.
1.
Press the [RECORDER] button.
2.
Press the button below “SOURCE” ([F3]).
3.
Press the button below “YES” ([F1]).
The setting is changed to the AUX IN recording.
After you finish recording, the EAD10 returns to the normal record settings.
NOTE
Your performance does not sound and is not recorded while
in AUX IN recording.
When recording to the Main Unit When recording to a USB flash drive
A confirmation message appears.

44
EAD10 Owner’s Manual
Recording Your Performance
Basic Guide
Overdub Recording Your Performance onto an Accompaniment
Song
You can overdub your performance onto a accompaniment song that you’ve imported onto a USB flash drive and save your
performance combined with the accompaniment song as a single audio file.
Preparing an Accompaniment Song (Audio File)
• Importing from a Computer
Save the audio file (.wav file) from the computer to the root directory on a USB flash drive.
• Importing from the [AUX IN] Jack
Connect a portable music player or other such device to the [AUX IN] jack on the rear panel, and have the song ready
for playback.
Recording the Accompaniment Song
1.
Connect the USB flash drive to the [USB TO
DEVICE] terminal on the rear panel, then
connect a portable music player to the
[AUX IN] jack.
2.
Press the [RECORDER] button.
The RECORDER (USB) screen opens.
NOTE
If you play along to a track coming into the Aux Input, only your performance will be recorded.
Audio file requirements: 16-bit, 44.1 kHz, stereo, wav format
NOTE
• Some of the audio files may not play back even when the above requirements are met.
• The EAD10 does not recognize the audio file if it is in a folder.

45
EAD10 Owner’s Manual
Recording Your Performance
Basic Guide
3.
Press the button below “SOURCE” ([F3]).
The “Switch to AUX IN recording?” confirmation
screen appears.
4.
Press the button below “YES” ([F1]), to
switch to AUX IN Recording.
5.
Press the button below “” ([F1]) on the
EAD10 to start recording, and simultane-
ously press Playback on the portable music
player to start playback of the accompani-
ment song.
6.
After the song playback finishes, press the
button below “ ” ([F1]) to stop recording.
The RECORDER SAVE screen opens.
7.
Press the button below “SAVE” ([F3]), and
save the file.
Press the button below “CANCEL” ([F2]) if you do not
want to save the file.
By doing this, the external song you have just recorded is on the USB flash drive, ready for you to
use.
NOTE
If you want to change the file name, press the button below
“NAME” ([F1]) and enter a new name. (page 37)

46
EAD10 Owner’s Manual
Recording Your Performance
Basic Guide
Recording Yourself Playing Along with the Accompaniment Song
1.
Use the [–] or [+] buttons to select the
accompaniment you have prepared.
2.
Press the button below “” ([F1]) and the
button below “>” ([F2]) to start recording
and playback.
3.
Play the drums.
4.
After you finish playing, press the button
below “ ” ([F1]) to stop recording.
You have now just recorded yourself over the song on the USB flash drive.
NOTE
Pressing the button below “” ([F2]) stops accompaniment
playback, but recording continues.

47
EAD10 Owner’s Manual
Recording Your Performance
Basic Guide
Recording with Smart Device Apps
Using apps compatible with the EAD10 provides greater convenience and a more enjoyable user experience.
For more information on how to connect, refer to the “iPhone/iPad Connection Manual” (PDF) available at the Yamaha
website.
For details on compatible smart devices and applications, refer to the web page below.
http://download.yamaha.com/
Recording to a Computer
You can connect to a computer and use DAW software to record your performance.
For more information on how to connect a computer, refer to the Reference Manual (Advanced) (PDF). For more informa-
tion on how to use the DAW software, refer to the Owner’s Manual for your DAW software.
NOTE
To eliminate the risk of interference due to noise by your iPhone or iPad when used in combination with the EAD10, turn on the Air-
plane Mode and then turn on Wi-Fi.
NOTICE
Be sure to place your iPhone or iPad on a stable surface to prevent it from falling over and being damaged.
What is DAW Software?
DAW is an abbreviation of Digital Audio Workstation and refers to applications such as Cubase that let you record, edit,
and mix audio on a computer.

48
EAD10 Owner’s Manual
Application Guide
You can connect add-ons (sold separately) to the Main Unit’s Trigger Input jacks or Footswitch jack and play Trigger
Sounds or switch functions.
Here are some of the things you can do with separately sold add-ons.
Connecting to the [qKICK/w]−[y] Jacks
(*1) About the Pads
Within this Owner’s Manual, the separately sold external pads that may be connected to the EAD10 are referred to by model
name. Please note that these model names were up-to-date as of printing of this manual. Details regarding any subsequently
released models will be made available via the following web site.
http://download.yamaha.com/
* Yamaha Corporation reserves the right to modify this URL at any time without prior notice.
Enhance Your Drum Set with Separately Sold Add-Ons
Separately sold add-ons Main applications
Drum Trigger
page 50
Attach a drum trigger to an acoustic drum and trigger a
sound from the EAD10 (including your own samples)
whenever the drum is played. The EAD10 will change the
volume of the sound depending on how hard you play.
Pad
(*1)
page 52
Play the EAD10 like an electronic drum module.
The pads can also be used to perform in other ways such
as kit switching, turning functions on and off and many
others.

49
EAD10 Owner’s Manual
Enhance Your Drum Set with Separately Sold Add-Ons
Application Guide
Connecting to the [FOOT SW] Jack
* May not be available depending on your area. Check with your Yamaha dealer.
Separately sold add-ons Main applications
Pedal
page 54
Switch functions
Play Trigger Sounds
Choose the pedal that best fits your needs.
NOTE
• In this manual, the term “FC3” refers to the FC3 and all other equivalent products, such as the FC3A.
• In this manual, the term “FC4” refers to the FC4 and all other equivalent products, such as the FC4A.
• Switch on or off
• Adjust volume (keeps its position when released)
• Switch on or off
• Play Trigger Sounds
• Switch on or off
• Adjust volume (pedal returns when released)
• Play Trigger Sounds
FC5
FC4
FC7
HH65
FC3

50
EAD10 Owner’s Manual
Enhance Your Drum Set with Separately Sold Add-Ons
Application Guide
Using Drum Triggers to Play Trigger Sounds with Your Acoustic
Drums (with Drum Triggers)
Attach a Drum Trigger (sold separately) to the snare drum or tom, and connect the Drum Trigger to the Main Unit, you can
play Trigger Sounds according to the timing and intensity of each stroke. For example, layer internal drum sounds to
enhance the sound, or layer other instrument sounds like percussion or sound effects.
Drum Trigger Connection Examples
Procedure:
Example) Connecting a DT50S Drum Trigger
1.
Turn off the Main Unit.
Make sure the Main Unit is turned off before connecting.
2.
Attach the DT50S between two of the tension
rods on the snare drum.
For more information, refer to the DT50S Owner’s Man-
ual.
NOTE
Position the Drum Trigger far from the drummer to prevent it
from being struck accidentally.
DT50S
Main Unit
All off
Head
Clamp screw
Hoop
DT50S

51
EAD10 Owner’s Manual
Enhance Your Drum Set with Separately Sold Add-Ons
Application Guide
3.
Connect the DT50S to the [eSNARE/r] jack
on the Main Unit rear panel.
4.
Press the [MENU] button to make necessary
settings for using DT50S.
When the DT50S is connected to the [eSNARE/r] jack,
settings can be used as they are, without having to make
any changes. When any other drum trigger is connected,
perform the following settings.
• Specify the type of trigger that is connected
Select the appropriate pad from the pad type list. For
more information, refer to the Reference Manual
(Advanced) (PDF). (MENU/Trigger/Pad Type)
• Specify the function of the connected trigger
Play trigger sounds (page 35)
This completes set up.
Main Unit
DT50S

52
EAD10 Owner’s Manual
Enhance Your Drum Set with Separately Sold Add-Ons
Application Guide
Using Electronic Drum Pads to Play Sounds or Control Functions
(with Add-on Pads)
You can play drum, percussion or other sounds, or control functions using pads (sold separately) connected to the Main
Unit.
Pad Connection Example
Procedure:
Example) Connecting a TP70S
1.
Turn off the Main Unit.
Make sure the Main Unit is turned off before connecting.
2.
Attach the pad.
Pad
Main Unit
All off
Clamp rod
Example
Cymbal
stand
Electronic Drum Pad
(TP70S)
Cymbal stand attachment
CSAT924A

53
EAD10 Owner’s Manual
Enhance Your Drum Set with Separately Sold Add-Ons
Application Guide
3.
Connect the TP70S to the [t] or [y] jack on
the Main Unit rear panel.
4.
Turn on the Main Unit.
5.
Press the [MENU] button to make necessary
settings for using TP70S.
When the TP70S is connected to the [t] jack or [y]
jack, settings can be used as they are, without having to
make any changes. When any other pad is connected, per-
form the following settings.
• Specify the type of pad that is connected
Select the appropriate pad from the pad type list. For
more information, refer to the Reference Manual
(Advanced) (PDF). (MENU/Trigger/Pad Type)
• Specify the function of the connected pad
• Play trigger sounds (page 35)
• Switch functions (refer to the Reference Manual
(Advanced) (PDF)) (MENU/Utility/PadFunction)
This completes set up.
Main Unit

54
EAD10 Owner’s Manual
Enhance Your Drum Set with Separately Sold Add-Ons
Application Guide
Using a Pedal to Play Sounds or Control Functions (with a Foot
Pedal or a Foot Controller)
You can connect a foot pedal to the [FOOT SW] jack for a variety of uses.
Procedure:
Example) Connecting an HH65
1.
Turn off the Main Unit.
Make sure the Main Unit is turned off before connecting.
2.
Connect the pedal’s plug to the [FOOT SW]
jack on the Main Unit rear panel.
Plug the other end of the cable that came with the HH65
into the [OUTPUT] jack on the HH65.
3.
Turn the Main Unit on.
4.
Press the [MENU] button to carry out the initial
setting.
When the HH65 is connected, settings can be used as they
are without having to make any changes. Perform the fol-
lowing settings when connecting any other pedal.
• Specify the type of pedal that is connected
Select the pedal you connected from MENU/Trigger/
FootSwSelect
• Specify the function of the connected pedal
• Specify the function of the connected pedal (MENU/
Utility/PadFunction)
• Select the Trigger Sound (to play sounds) (page 35)
This completes set up.
All off
HH65
Main Unit

55
EAD10 Owner’s Manual
Reference
Menu List
MENU
Scene Edit
Inst
Category . . . . . . . . . . . . . . . . . . . . . Instrument Category
InstNumber . . . . . . . . . . . . . . . . . . . Instrument Number
InstTune . . . . . . . . . . . . . . . . . . . . . . Instrument Tuning
InstDecay . . . . . . . . . . . . . . . . . . . . . Instrument Decay
InstPan . . . . . . . . . . . . . . . . . . . . . . . Instrument Pan
Voice
Category . . . . . . . . . . . . . . . . . . . . . Voice Category
VoiceNumber . . . . . . . . . . . . . . . . . . Voice Number
VoiceTune . . . . . . . . . . . . . . . . . . . . Voice Tuning
VoiceDecay . . . . . . . . . . . . . . . . . . . Voice Decay
VoicePan . . . . . . . . . . . . . . . . . . . . . Voice Pan
VoiceFilter . . . . . . . . . . . . . . . . . . . . Voice Filter Cutoff Frequency
VoiceQ . . . . . . . . . . . . . . . . . . . . . . . Voice Filter Resonance (Q)
VoiceAltGrp . . . . . . . . . . . . . . . . . . . Voice Alternate Group
VoiceHoldMode . . . . . . . . . . . . . . . . Voice Hold Mode
MessageType . . . . . . . . . . . . . . . . . Select MIDI Message Type
Effect
ReverbType . . . . . . . . . . . . . . . . . . . Reverb Type
ReverbSend . . . . . . . . . . . . . . . . . . .
Reverb Send
RevReturn . . . . . . . . . . . . . . . . . . . . Reverb Return
Mic RevSend . . . . . . . . . . . . . . . . . . Mic Reverb Send
TriggerRevSend . . . . . . . . . . . . . . . . Trigger Sound Reverb Send
Voice RevSend . . . . . . . . . . . . . Trigger Sound Voice Reverb Send
MicEffType . . . . . . . . . . . . . . . . . . . . Mic Effect Type
MicEffDepth . . . . . . . . . . . . . . . . . . . Mic Effect Depth
TrgEffType . . . . . . . . . . . . . . . . . . . . Trigger Sound Effect Type
TrgEffSend . . . . . . . . . . . . . . . . . . . . Trigger Sound Effect Send and Dry Balance
TrgEffReturn . . . . . . . . . . . . . . . . . . Trigger Sound Effect Return
TrgEffToRev . . . . . . . . . . . . . . . . . . Trigger Voice Effect Reverb Send
Volume
Scene Volume . . . . . . . . . . . . . . . . . Overall Scene Volume
Mic Volume . . . . . . . . . . . . . . . . Mic Volume
TriggerVolume . . . . . . . . . . . . . . Trigger Sound Overall Volume
Inst Volume . . . . . . . . . . . . . Trigger Sound Instrument Volume
Voice Volume . . . . . . . . Trigger Sound Voice Volume
Tempo . . . . . . . . . . . . . . . . . . . . . . . . . . Tempo for Selected Scene

56
EAD10 Owner’s Manual
Menu List
Reference
MENU
Trigger
Input Mode
Trg1/Trg2 . . . . . . . . . . . . . . . Trigger 1/Trigger 2 Input Mode
Trg3/Trg4 . . . . . . . . . . . . . . . Trigger 3/Trigger 4 Input Mode
Curve
Velocity Curve . . . . . . . . . . . Velocity Curve
Pad Type
PadType . . . . . . . . . . . . . . . Select Pad Type
Gain . . . . . . . . . . . . . . . . Gain
Sensitivity . . . . . . . . . . . Sensitivity
RejectTime . . . . . . . . . . Reject Time
MinLevel . . . . . . . . . . . . Minimum Level
MaxLevel . . . . . . . . . . . . Maximum Level
MinVelocity . . . . . . . . . . Minimum Velocity
MaxVelocity . . . . . . . . . . Maximum Velocity
WaitTime . . . . . . . . . . . . Wait Time
RimGain . . . . . . . . . . . . Rim Gain
H/R Balance . . . . . . . . . H/R Balance
Crosstalk
All Reject Lvl . . . . . . . . . . . . All Rejection Level
Reject Lvl . . . . . . . . . . . . . . . Rejection Level (Source Pad)
FootSwSelect . . . . . . . . . . . . . . . Select Foot Switch
Utility
General
SceneKnob . . . . . . . . . . . . . Scene Knob
AutoPowerOff . . . . . . . . . . . Auto Power Off
LCD Contrast . . . . . . . . . . . . LCD Contrast
ClickOutput . . . . . . . . . . . . . Click Output Destination
ClickCountOff . . . . . . . . . . . . Click Countoff
L&R Volume . . . . . . . . . . . . . External Device Output Volume
MicNoiseGate . . . . . . . . . . . Mic Noise Gate
AudioOutGain . . . . . . . . . . . Audio Out Gain
AudioMix . . . . . . . . . . . . . . . Audio Mix
USB To Host . . . . . . . . . . . . [USB TO HOST] Terminal Setting
MIDI LocalCtrl . . . . . . . . . . . MIDI Local Control
AuxInVolume . . . . . . . . . . . . [AUX IN] Volume
USB Volume . . . . . . . . . . . . USB Audio or Recorder Playback Volume
ClickVolume . . . . . . . . . . . . . Click Volume
PadFunction
PadFunction . . . . . . . . . . . . . Pad Function
BypassSw . . . . . . . . . . . . . . Bypass Switch
Phones EQ
EQ Lo
wGain . . . . . . . . . . . . EQ Low Gain
EQ HighGain . . . . . . . . . . . . EQ High Gain

57
EAD10 Owner’s Manual
Menu List
Reference
MENU
Job
Scene
Recall . . . . . . . . . . . . . . . Recall
Sort . . . . . . . . . . . . . . . .Sort
Exchange . . . . . . . . . . . . Exchange
Clear . . . . . . . . . . . . . . .Clear
Wave
Import . . . . . . . . . . . . . . . Import Selected Audio File
Import All . . . . . . . . . . . . Import All Audio Files
Delete . . . . . . . . . . . . . . Delete Selected Audio File
Delete All . . . . . . . . . . . .Delete All Audio Files
Optimize . . . . . . . . . . . . . Optimize Memory
Memory Info . . . . . . . . . . Memory Information
Recorder
Export Audio . . . . . . . . . Export Audio
File
Save . . . . . . . . . . . . . . . . . . .Save File
Load . . . . . . . . . . . . . . . . . . . Load File
Rename . . . . . . . . . . . . . . . . Rename File
Delete . . . . . . . . . . . . . . . . . .Delete File
Format . . . . . . . . . . . . . . . . . Format USB Flash Drive
Memory Info . . . . . . . . . . . . . USB Flash Drive Memory Information
Factory Reset . . . . . . . . . . . . . . . Factory Reset

58
EAD10 Owner’s Manual
Troubleshooting
Reference
Troubleshooting
Symptom Possible cause Solution Reference page
No sound EAD10 is not turned on Make sure that the power is turned
on.
page 25
The volume is not turned up Check the [MASTER VOLUME]
knob setting.
page 13
The cable is not properly connected
or
The cable is damaged
Make sure that the Sensor Unit and
Main Unit are properly connected
with a stereo phone cable.
page 17
Make sure the cable you are using
is in good condition.
Make sure that the Main Unit is
properly connected to headphones
or other audio equipment, such as
an amplifier and/or speakers.
Make sure that the ”A” cable is con-
nected to the [A] jacks, and the “B”
cable is connected to the [B] jacks.
The volume setting is improper. Check the [MASTER VOLUME]
knob setting.
Check the power and volume set-
tings on the external devices.
page 13
Poor volume balance
Poor volume balance between
the Mic Sound and Trigger
Sound
Adjust the Trigger Sound volume. If
it does not solve the problem, adjust
the mic gain.
page 34
page 28
Poor volume balance between
the AUX IN and your perfor-
mance
Adjust the volume on the device
connected to the [AUX IN] jack.
Adjust the [AUDIO/CLICK VOL-
UME] knob.
page 13
Poor volume balance between
the USB flash memory playback
and your performance
Adjust the [AUDIO/CLICK VOL-
UME] knob.
page 13
Cymbals sound distant or vol-
ume of some drums is low
Instruments placed far from the
Sensor Unit may sound low in vol-
ume. Check the positions of drums
and cymbals in the drum set.
page 17
The bass drum Trigger Sound
does not play
Trigger settings are improper. Try using the automatic setting to
set up the Sensor Unit.
page 27
Sensor Unit not properly attached Make sure the Sensor Unit is prop-
erly attached to the hoop.
page 17

59
EAD10 Owner’s Manual
Troubleshooting
Reference
Hard to notice changes to settings Reverb/Effect level or Trigger Sound
volume is too low
Turn the [REVERB] knob,
[EFFECT] knob, or [TRIGGER]
knob to the right to adjust depth or
volume.
page 33
The Mic Gain is set too low Try using the automatic setting to
set up the Sensor Unit.
page 27
Trigger settings are improper
The volume for the headphones you
are using is low
Use highly-efficient headphones,
closed-ear headphones, or ear-
phones.
page 23
Noise occurs Noise from the mic Secure the cables close to the Sen-
sor Unit using the supplied cable
band tape so that the cables do not
move about near the Sensor Unit.
page 17
Make sure the Sensor Unit is prop-
erly attached to the hoop.
Secure the cable connected to the
[B] jack (Mic Sensor cable) on the
Main Unit using the supplied cable
bands to prevent the cables from
moving about.
Multiple sounds produced with a
single strike (double trigger)
Double triggers are occurring Make sure the Sensor Unit is prop-
erly attached to the hoop.
page 17
The longer the bass drum head
vibrates, the easier it is to cause
double triggers.
Adjust the bass drum so it produces
a shorter sound. Try muting or tun-
ing the head or changing the head.
Separately sold add-on pads do not
sound
or
Hard to produce sound
Make sure the pad type setting is
correct.
Reference Manual
(Advanced) (PDF)
Sound is produced without striking
the pad
Sound is produced by a pad that
was not struck
Crosstalk is occurring Increase the Trigger Sound mini-
mum level setting. Setting this too
high, however, can prevent light
strokes from producing a sound.
Adjust as necessary.
page 33
Reference Manual
(Advanced) (PDF)
Crosstalk is occurring with the bass
drum Trigger Sound
Try using the automatic setting to
set up the Sensor Unit. Check the
Trigger Sensitivity setting.
page 27
If the bass drum sound plays when
striking the snare drum, move the
snare drum farther away from the
Sensor Unit. More distance
between the two might improve the
problem.
page 17
Symptom Possible cause Solution Reference page

60
EAD10 Owner’s Manual
Troubleshooting
Reference
*1 Refer to the website at http://download.yamaha.com/
*URL may change without notice.
Sound is distorted Mic gain level is set too high Press the [ ] button and adjust the
mic sensor settings.
page 27
The Master Volume is set too high Turn the [MASTER VOLUME] knob
to the left.
page 13
An Effect is applied Adjust the distortion or other Effect
setting.
page 13
Cannot record the Main Unit
Cannot record to a USB flash drive
Cannot record audio from the AUX IN The sound of your performance and
the audio from the AUX IN cannot
be recorded simultaneously.
Audio from the AUX IN must first be
recorded to the Main Unit, then you
can overdub your performance onto
the song.
page 41
Cannot record the Click EAD10 is not designed to record
the Click.
Not enough memory in the USB flash
drive
Check the available memory in the
USB flash drive.
The USB flash drive is write protected Disable the write protection from the
USB flash drive.
Audio files recorded on a USB flash
drive have low volume when playing
back on the Main Unit
Adjust the volume to an appropriate
level when recording.
Adjust the [AUDIO/CLICK VOL-
UME] knob during playback.
Record:
Reference Manual
(Advanced) (PDF)
Playback:
page 13
The audio file in the USB flash drive
cannot be played back with the Main
Unit
or
Playback stops in the middle of a
song when playing back the audio
file from the USB flash drive
Unsupported file format Check the file format or the sam-
pling frequency.
page 63
The USB flash drive performance is
insufficient.
We recommend using a USB flash
drive of 4GB or more. For more
information, refer to the “Compati-
ble USB Device List” on the
Yamaha web site.
*1
Power turns off unexpectedly The Auto Power-Off function is
enabled
Disable the Auto Power-Off func-
tion.
page 29
Does not turn on The AC adaptor is not connected Make sure the AC adaptor is con-
nected.
page 22
Edits made to the Scene are lost Before storing the edits, another
Scene was selected
Use the Recall function to recall the
edited contents.
page 34
Symptom Possible cause Solution Reference page

61
EAD10 Owner’s Manual
Message List
Reference
Message List
Message Description
Are you sure? Confirms whether or not you want to execute the specified operation.
Auto power off disabled. Appears when the [STORE] button is held down while turning on the
power informing the user that the Auto Power Off function is dis-
abled.
Backup error. Appears when writing data to the Flash ROM has failed.
If data was not be properly saved when turning off the unit, this mes-
sage appears the next time the power is turned on. After the error
message appears, the Factory Reset automatically executes.
Cancel AUX IN recording? Appears when the SOURCE button is pressed while the Recorder is
in AUX IN Recording. Press the button below “YES” to return to the
normal Recorder setting.
Canceled. Appears when the cancel operation is complete.
Can’t use RECORDER now. Cannot use the recorder because “USB To Host” is set to “audio.”
Check the “USB to Host” setting.
Completed. Appears when execution of a Scene Store, File Load/Save, Job, or
other function is complete.
Connecting USB device... Appears when connecting to a USB device.
Excessive demand for USB power. Power consumption of the USB device exceeds the specified value.
Factory Reset initializing... Appears on startup if you did a factory reset.
File already exists. A file with the same name already exists.
File not found. The selected file type was not found.
Illegal file. Appears when loading a file and the Main Unit cannot handle the tar-
get file or does not support the audio file.
Incompatible USB device. Appears when an unsupported USB device is connected to the [USB
TO DEVICE] terminal.
Invalid USB device. The USB device is faulty. Format the USB device again.
No data. Appears when the target data does not exist when using the
Recorder or using Wav-related parameters under “Job.”
No response from USB device. There is no response from the USB device.
Now importing... Appears when importing a .wav file.
Now loading... Appears when loading a file.
Now processing... Appears when executing a Scene Store or Job operation. Appears
during post-processing after canceling the File Load or File Save
operation.
Now saving... Appears when saving a file.
Now switching audio driver. Appears when the [USB TO HOST] terminal is connected to a com-
puter or other device and the following operation is performed.
When changing the “USB To Host” setting to “MIDI” or “MIDI+audio.”
When entering or exiting the Recorder screen when the "USB To
Host" setting is “auto.”
Overwrite? Appears when saving a file to the USB device and a file with the
same name already exists in the USB device.
Appears when attempting to rerun the Store User Scene operation
for the Scene previously saved.

62
EAD10 Owner’s Manual
Message List
Reference
*1 Refer to the website at http://download.yamaha.com/
*URL may change without notice.
Please stop recorder. Appears when performing an operation that exits the Recorder dur-
ing recorder playback or recording. Stop the Recorder and try again.
Recording time limit exceeded. Recording time is about 1 minute 30 seconds with internal memory,
and about 30 minutes with a USB flash drive.
Read only file. Appears when a read-only file is selected during a file operation.
Sample is too long. Sample is too long and cannot be loaded.
Sample is too short. Sample is too short and cannot be loaded.
Switch to AUX IN recording? Appears when the button below “source” is pressed while using the
recorder. Press the button below “YES” and switch to recording from
the [AUX IN] jack.
USB connection terminated. Appears if connection with the USB device was interrupted by an
abnormal electric current. Disconnect the USB device and press the
button below “OK”.
USB device’s transfer speed too slow. Appears when the transfer speed to the USB device is insufficient.
For information on devices that have been tested and confirmed to
work properly with the EAD10, refer to the “Compatible USB Device
List”
(*1)
on the Yamaha web site.
USB device full. Appears when the USB device is full and files cannot be saved on it.
Use a new USB device or make space by erasing unnecessary files
from the full device.
USB device not ready. Appears if the USB device is not properly connected to the Main
Unit.
USB device read/write error. Appears if an error occurred while reading or writing data to the USB
device.
USB device write protected. Appears if the USB device is write-protected.
USB transmission error. Appears if an error occurred while communicating with the USB
device.
Wave memory full. Appears if the WAVE memory is full and operations such as Import,
Job, or Load cannot be carried out.
Message Description

63
EAD10 Owner’s Manual
Specifications
Reference
Main Unit
Sensor Unit
Other
* The contents of this manual apply to the latest specifications as of the publishing date.
To obtain the latest manual, access the Yamaha website then download the manual file.
Since specifications, equipment or separately sold accessories may not be the same in every locale, please check with your Yamaha dealer.
Specifications
Tone
Generator
Block
Scenes Preset: 50
User: 200
Reverb 11
Effects Mic: 21, Trigger: 10
Trigger Sounds Tone generator AWM2
Maximum polyphony 64
Voices 757
Recorder Recording time Internal memory Approx. 1 min 30 sec
USB flash drive Approx. 30 min/file
Format Record/playback WAV (44.1 kHz, 16 bit, stereo)
Audio Files Import limit Up to 100
Playback sample rate 44.1 kHz
Wave memory 32 MB
Maximum loadable sample size 1 mono sample: 1.75 MB
1 stereo sample: 3.5 MB
Sample format WAV (16 bit)
Click-track Tempo 30−300 BPM, tap tempo function
Time signatures 1/4 to 16/4, 1/8 to 16/8, 1/16 to 16/16
Subdivisions Accents, quarter notes, eighth notes, sixteenth notes, and
eighth-note triplets
Functions Trigger sensitivity adjustment, USB audio/MIDI, headphone EQ
Control
Interface
Display Full Dot LCD (128 × 64 dot)
Other Controllers Knobs MASTER VOLUME, AUDIO/CLICK VOLUME, SCENE, REVERB,
EFFECT, TRIGGER
Buttons MENU, Sensor Unit, Click, RECORDER, EXIT, STORE, Functions 1–3,
–, +, Standby/On
Connectivity DC IN DC IN (12 V)
Headphones PHONES (standard stereo phone jack)
AUX IN AUX IN (stereo mini jack)
OUTPUT OUTPUT L/MONO, R (standard phone jack)
USB USB TO DEVICE
USB TO HOST
Sensor input For Trigger sensor A (standard stereo phone jack)
For Mic sensor B (standard stereo phone jack)
Trigger input Stereo (L: trigger, R: trigger) qKICK/w (also serves as A), eSNARE/r (standard stereo phone jack)
Three-zone (L: trigger, R: rim switch) t, y (standard stereo phone jack)
Foot Pedal FOOT SW (standard stereo phone jack)
Power Supply Power Supply PA-150 (or an equivalent recommended by Yamaha)
Power Consumption 10 W (when using PA-150 AC adaptor)
Auto Power Off Yes
Size/Weight Dimensions (W × D × H) Width × depth × height 260 (W) × 138 (D) × 63 (H) mm (10 1/4" × 5 7/16" × 2 1/2")
Weight Main Unit only 654 g (1 lb 7 oz)
Sensor Types Microphone High SPL mic × 2
Trigger Exclusive for bass drum × 1
Connectivity Sensor outputs For Trigger sensor A (standard phone jack)
For Mic sensor B (standard stereo phone jack)
Size/Weight Dimensions (W × D × H) Width × depth × height 76 (W) × 78 (D) × 88 (H) mm (3" × 3 1/16" × 3 7/16")
Weight Sensor Unit only 464 g (1 lb)
Included Accessories Owner’s Manual (this book), PA-150 (or an equivalent recommended by Yamaha)*, Module holder,
Module holder wing bolts (× 2), Connector cables (1 pair), Cable bands (× 3), Adhesive cushions (× 2)
*May not be included depending on your area. Check with your Yamaha dealer.
Separately Sold Accessories
(May not be available depending on
your area.)
• Cymbal stand attachment (CSAT924A)
• Please check the website for more information on other available accessories (http://download.yamaha.com/)

64
EAD10 Owner’s Manual
Index
Reference
Symbols
[ ] (Click) button .......................... 13
[ ] (Sensor Unit) button ......... 13, 27
[ ] (Standby/On) switch ......... 13, 25
[–] button, [+] button....................... 13
Numerics
[qKICK/w] ................................... 16
[eSNARE/r] ............................... 16
[t] ................................................ 16
[y] ................................................ 16
A
[A] jack .......................................... 15
AC adaptor ................................9, 22
Accompaniment Song...................44
Adhesive cushions ..........................9
[AUDIO/CLICK VOLUME] knob .... 13
audio file...................................37, 44
audio signal................................... 11
Auto Power-Off ..............................29
Auto setting ................................... 27
[AUX IN] (auxiliary input) jack ....... 14
AUX IN Recording ......................... 43
B
[B] jack .......................................... 15
BYPASS ........................................35
C
Cable bands ....................................9
Clamp screw ................................. 15
Click ..............................................39
Computer ................................ 25, 47
Connector cables ............................9
Cord hook...................................... 14
D
DAW Software...............................47
DC IN jack..................................... 14
Display .......................................... 13
double bass drum set ups............. 17
drum set ........................................ 17
Drum Trigger ...........................48, 50
E
E mark........................................... 33
[EFFECT] knob ............................. 13
Effects ..................................... 11, 32
[EXIT] button ................................. 13
F
[F1], [F2], [F3] ............................... 13
Factory Reset................................ 30
Foot Controller .............................. 54
Foot Pedal..................................... 54
[FOOT SW] Jack........................... 14
Front Panel.................................... 15
Function Buttons 1–3 .................... 13
G
Gain .............................................. 27
H
Headphones ................................. 23
Hoop ............................................. 18
I
Imported Sounds .......................... 37
Input Source.................................. 43
internal Voices................................11
iPhone/iPad................................... 47
L
[L] (Mic gain left)............................ 28
M
Main Unit................................. 10, 13
[MASTER VOLUME] knob ............ 13
[MENU] button............................... 13
Metal hoops .................................. 18
Metronome.................................... 39
MIC ............................................... 27
Mic gain......................................... 27
Mic Sensor.................................... 15
Mic sound ......................................11
Module holder ........................... 9, 20
Module holder wing bolts ................ 9
O
OUTPUT [R]/[L/MONO] jacks ....... 14
P
PA System..................................... 24
Pad.......................................... 48, 52
Pedal............................................. 49
[PHONES] jack ............................. 15
Portable Music Player ................... 24
Preset Scene................................. 34
R
[R] (Mic gain right) ........................ 28
Rear Panel.................................... 14
[RECORDER] button .................... 13
Reverb .....................................11, 32
[REVERB] knob ............................ 13
S
Scene ........................................... 32
[SCENE] knob .............................. 13
Scene Screen ............................... 33
Sensor Unit........................10, 15, 27
Separately Sold Add-Ons ............. 48
Store ............................................. 33
[STORE] button....................... 13, 37
T
Tap Tempo .................................... 39
Tempo ........................................... 39
TO SENSOR UNIT [A] jack........... 14
TO SENSOR UNIT [B] jack........... 14
Top Panel...................................... 13
TRG .............................................. 27
TRG SENS (Trigger Sensitivity).... 28
Trigger gain ................................... 27
Trigger Input Jacks...................14, 16
[TRIGGER] knob .......................... 13
Trigger sensor ............................... 15
trigger signal ..................................11
Trigger Sound ............................... 32
U
USB Flash Drive ..................... 30, 42
[USB TO DEVICE] terminal .... 14, 30
[USB TO HOST] terminal........ 14, 25
User Scene................................... 34
W
.wav .............................................. 37
Wood hoops.................................. 18
Y
Y-cable .......................................... 16
Index

65
EAD10 Owner’s Manual
LIMITED WARRANTY ON YAMAHA DRUMS, HARDWARE AND ACCESSORY PRODUCTS
Thank you for selecting a YAMAHA product. YAMAHA products are designed and manufactured to provide a high level of defect-free performance. Yamaha
Corporation of America (“YAMAHA”) is proud of the experience and craftsmanship that goes into each and every YAMAHA product. YAMAHA sells its products
through a network of reputable, specially authorized dealers and is pleased to offer you, the Original Owner, the following Limited Warranty, which applies only to
products that have been (1) directly purchased from YAMAHA’s authorized dealers in the fifty states of the USA and District of Columbia (the “Warranted Area”) and
(2) used exclusively in the Warranted Area. YAMAHA suggests that you read the Limited Warranty thoroughly, and invites you to contact your authorized YAMAHA
dealer or YAMAHA Customer Service if you have any questions.
THIS WARRANTY COVERS THE LISTED PRODUCTS AGAINST DEFECTS IN MATERIALS OR WORKMANSHIP.
Warranty Term
Duration of Warranty from Date of
Type of Product Purchase by or for the Original Owner
Acoustic Drum Shells, Finish, Drum Hardware, Freestanding Hardware, Pedals, Hardware Accessories 5 Years
Electronic Drums Modules, Pads, Accessories, Hardware, Pedals 1 Year
Coverage: YAMAHA will, at its option, repair or replace the product covered by this warranty if it becomes defective, malfunctions or otherwise fails to conform
with this warranty under normal use and service during the term of this warranty, without charge for labor or materials. Repairs may be performed using new or
refurbished parts that meet or exceed YAMAHA specifications for new parts. If YAMAHA elects to replace the product, the replacement may be a reconditioned unit.
You will be responsible for any installation or removal charges and for any initial shipping charges if the product(s) must be shipped for warranty service. However,
YAMAHA will pay the return shipping charges to any destination within the USA if the repairs are covered by the warranty. This warranty does not cover (a) damage,
deterioration or malfunction resulting from accident, negligence, misuse, abuse, improper installation or operation or failure to follow instructions according to the
Owner’s Manual for this product; any shipment of the product (claims must be presented to the carrier); repair or attempted repair by anyone other than YAMAHA
or an authorized YAMAHA Service Center; (b) any unit which has been altered or on which the serial number has been defaced, modified or removed; (c) normal
wear and any periodic maintenance; (d) deterioration due to perspiration, corrosive atmosphere or other external causes such as extremes in temperature or
humidity; (e) damages attributable to power line surge or related electrical abnormalities, lightning damage or acts of God; or (f) RFI/EMI (Interference/noise)
caused by improper grounding or the improper use of either certified or uncertified equipment, if applicable. Any evidence of alteration, erasing or forgery of proof-
of-purchase documents will cause this warranty to be void. This warranty covers only the Original Owner and is not transferable.
In Order to Obtain Warranty Service: Warranty service will only be provided for defective products within the Warranted Area. Contact your local authorized
YAMAHA dealer who will advise you of the procedures to be followed. If this is not successful, contact YAMAHA at the address, telephone number or website
shown below. YAMAHA may request that you send the defective product to a local authorized YAMAHA Servicer or authorize return of the defective product to
Y
A
MAHA for repair. If you are uncertain as to whether a dealer has been authorized by YAMAHA, please contact YAMAHA’s Service Department at the number
shown below, or check Yamaha’s website at http://usa.yamaha.com. Product(s) shipped for service should be packed securely and must be accompanied by a
detailed explanation of the problem(s) requiring service, together with the original or a machine reproduction of the bill of sale or other dated, proof-of-purchase
document describing the product, as evidence of warranty coverage. Should any product submitted for warranty service be found ineligible therefore, an estimate
of repair cost will be furnished and the repair will be accomplished only if requested by you and upon receipt of payment or acceptable arrangement for payment.
Limitation of Implied Warranties and Exclusion of Damages: ANY IMPLIED WARRANTIES, INCLUDING WARRANTIES OF MERCHANTABILITY AND FITNESS FOR
A PARTICULAR PURPOSE SHALL BE LIMITED IN DURATION TO THE APPLICABLE PERIOD OF TIME SET FORTH ABOVE. YAMAHA SHALL NOT BE RESPONSIBLE
FOR INCIDENTAL OR CONSEQUENTIAL DAMAGES OR FOR DAMAGES BASED UPON INCONVENIENCE, LOSS OF USE, DAMAGE TO ANY OTHER EQUIPMENT OR
OTHER ITEMS AT THE SITE OF USE OR INTERRUPTION OF PERFORMANCES OR ANY CONSEQUENCES. YAMAHA’S LIABILITY FOR ANY DEFECTIVE PRODUCT IS
LIMITED TO REPAIR OR REPLACEMENT OF THE PRODUCT, AT YAMAHA’S OPTION. SOME STATES DO NOT ALLOW LIMITATIONS ON HOW LONG AN IMPLIED
WARRANTY LASTS OR THE EXCLUSION OR LIMITATION OF INCIDENTAL OR CONSEQUENTIAL DAMAGES, SO THE ABOVE LIMITATION OR EXCLUSION MAY
NOT APPLY TO YOU. This Warranty gives you specific legal rights, and you may also have other rights which vary from state to state. This is the only express
warranty applicable to the product specified herein; Yamaha neither assumes nor authorizes anyone to assume for it any other express warranty.
If you have any questions about service received or if you need assistance in locating an authorized YAMAHA Servicer, please contact:
CUSTOMER SERVICE
Yamaha Corporation of America
6600 Orangethorpe Avenue, Buena Park, California 90620-1373
Telephone: 800-854-1569
• http://usa.yamaha.com
Do not return any product to the above address without a written Return Authorization issued by YAMAHA.
Drums
Limited
Warranty

66
EAD10 Owner’s Manual

67
EAD10 Owner’s Manual
For details of products, please contact your nearest Yamaha
representative or the authorized distributor listed below.
Pour plus de détails sur les produits, veuillez-vous adresser à Yamaha ou au
distributeur le plus proche de vous figurant dans la liste suivante.
Die Einzelheiten zu Produkten sind bei Ihrer unten aufgeführten
Niederlassung und bei Yamaha Vertragshändlern in den jeweiligen
Bestimmungsländern erhältlich.
Para detalles sobre productos, contacte su tienda Yamaha más cercana o
el distribuidor autorizado que se lista debajo.
CANADA
Yamaha Canada Music Ltd.
135 Milner Avenue, Toronto, Ontario M1S 3R1, Canada
Tel: +1-416-298-1311
U.S.A.
Yamaha Corporation of America
6600 Orangethorpe Avenue, Buena Park, CA 90620,
U.S.A.
Tel: +1-714-522-9011
MEXICO
Yamaha de México, S.A. de C.V.
Av. Insurgentes Sur 1647 Piso 9, Col. San José
Insurgentes, Delegación Benito Juárez, México, D.F.,
C.P. 03900, México
Tel: +52-55-5804-0600
BRAZIL
Yamaha Musical do Brasil Ltda.
Rua Fidêncio Ramos, 302 – Cj 52 e 54 – Torre B – Vila
Olímpia – CEP 04551-010 – São Paulo/SP, Brazil
Tel: +55-11-3704-1377
ARGENTINA
Yamaha Music Latin America, S.A.,
Sucursal Argentina
Olga Cossettini 1553, Piso 4 Norte,
Madero Este-C1107CEK,
Buenos Aires, Argentina
Tel: +54-11-4119-7000
PANAMA AND OTHER LATIN
AMERICAN COUNTRIES/
CARIBBEAN COUNTRIES
Yamaha Music Latin America, S.A.
Edif. Torre Banco General, F7, Urb. Marbella,
Calle 47 y Aquilino de la Guardia, Panama,
P.O.Box 0823-05863, Panama, Rep.de Panama
Tel: +507-269-5311
THE UNITED KINGDOM/IRELAND
Yamaha Music Europe GmbH (UK)
Sherbourne Drive, Tilbrook, Milton Keynes,
MK7 8BL, U.K.
Tel: +44-1908-366700
GERMANY
Yamaha Music Europe GmbH
Siemensstrasse 22-34, 25462 Rellingen, Germany
Tel: +49-4101-303-0
SWITZERLAND/LIECHTENSTEIN
Yamaha Music Europe GmbH, Branch
Switzerland in Thalwil
Seestrasse 18a, 8800 Thalwil, Switzerland
Tel: +41-44-3878080
AUSTRIA/CZECH REPUBLIC/HUNGARY/
ROMANIA/SLOVAKIA/SLOVENIA
Yamaha Music Europe GmbH, Branch Austria
Schleiergasse 20, 1100 Wien, Austria
Tel: +43-1-60203900
POLAND
Yamaha Music Europe GmbH
Sp.z o.o. Oddział w Polsce
ul. Wielicka 52, 02-657 Warszawa, Poland
Tel: +48-22-880-08-88
BULGARIA
Dinacord Bulgaria LTD.
Bul.Iskarsko Schose 7 Targowski Zentar Ewropa
1528 Sofia, Bulgaria
Tel: +359-2-978-20-25
MALTA
Olimpus Music Ltd.
Valletta Road, Mosta MST9010, Malta
Tel: +356-2133-2093
NETHERLANDS/BELGIUM/
LUXEMBOURG
Yamaha Music Europe, Branch Benelux
Clarissenhof 5b, 4133 AB Vianen, The Netherlands
Tel: +31-347-358040
FRANCE
Yamaha Music Europe
7 rue Ambroise Croizat, Zone d'activités de Pariest,
77183 Croissy-Beaubourg, France
Tel: +33-1-6461-4000
ITALY
Yamaha Music Europe GmbH, Branch Italy
Via Tinelli N.67/69 20855 Gerno di Lesmo (MB), Italy
Tel: +39-039-9065-1
SPAIN/PORTUGAL
Yamaha Music Europe GmbH Ibérica, Sucursal en
España
Ctra. de la Coruna km. 17,200, 28231
Las Rozas de Madrid, Spain
Tel: +34-91-639-88-88
GREECE
Philippos Nakas S.A. The Music House
19th klm. Leof. Lavriou 190 02 Peania – Attiki, Greece
Tel: +30-210-6686260
SWEDEN
Yamaha Music Europe GmbH Germany filial
Scandinavia
JA Wettergrensgata 1, 400 43 Göteborg, Sweden
Tel: +46-31-89-34-00
DENMARK
Yamaha Music Denmark,
Fillial of Yamaha Music Europe GmbH, Tyskland
Generatorvej 8C, ST. TH., 2860 Søborg, Denmark
Tel: +45-44-92-49-00
FINLAND
F-Musiikki Oy
Antaksentie 4
FI-01510 Vantaa, Finland
Tel: +358 (0)96185111
NORWAY
Yamaha Music Europe GmbH Germany -
Norwegian Branch
Grini Næringspark 1, 1332 Østerås, Norway
Tel: +47-6716-7800
ICELAND
Hljodfaerahusid Ehf.
Sidumula 20
IS-108 Reykjavik, Iceland
Tel: +354-525-5050
CROATIA
Euro Unit D.O.O.
Slakovec 73
40305 Nedelisce
Tel: +38540829400
RUSSIA
Yamaha Music (Russia) LLC.
Room 37, entrance 7, bld. 7, Kievskaya street, Moscow,
121059, Russia
Tel: +7-495-626-5005
OTHER EUROPEAN COUNTRIES
Yamaha Music Europe GmbH
Siemensstrasse 22-34, 25462 Rellingen, Germany
Tel: +49-4101-303-0
Yamaha Music Gulf FZE
JAFZA-16, Office 512, P.O.Box 17328,
Jebel Ali FZE, Dubai, UAE
Tel: +971-4-801-1500
TURKEY
Yamaha Music Europe GmbH
Merkezi Almanya Türkiye İstanbul Şubesi
Maslak Meydan Sodak, Spring Giz Plaza Bagimsiz Böl.
No:3, Sariyer Istanbul, Turkey
Tel: +90-212-999-8010
CYPRUS
Nakas Music Cyprus Ltd.
Nikis Ave 2k
1086 Nicosia
Tel: + 357-22-511080
Major Music Center
21 Ali Riza Ave. Ortakoy
P.O.Box 475 Nicosia, Cyprus
Tel: (392) 227 9213
OTHER COUNTRIES
Yamaha Music Gulf FZE
JAFZA-16, Office 512, P.O.Box 17328,
Jebel Ali FZE, Dubai, UAE
Tel: +971-4-801-1500
THE PEOPLE’S REPUBLIC OF CHINA
Yamaha Music & Electronics (China) Co., Ltd.
2F, Yunhedasha, 1818 Xinzha-lu, Jingan-qu,
Shanghai, China
Tel: +86-400-051-7700
HONG KONG
Tom Lee Music Co., Ltd.
11/F., Silvercord Tower 1, 30 Canton Road,
Tsimshatsui, Kowloon, Hong Kong
Tel: +852-2737-7688
INDIA
Yamaha Music India Private Limited
P-401, JMD Megapolis, Sector-48, Sohna Road,
Gurgaon-122018, Haryana, India
Tel: +91-124-485-3300
INDONESIA
PT. Yamaha Musik Indonesia (Distributor)
Yamaha Music Center Bldg. Jalan Jend. Gatot Subroto
Kav. 4, Jakarta 12930, Indonesia
Tel: +62-21-520-2577
KOREA
Yamaha Music Korea Ltd.
8F, Dongsung Bldg. 21, Teheran-ro 87-gil, Gangnam-
gu, Seoul, 06169, Korea
Tel: +82-2-3467-3300
MALAYSIA
Yamaha Music (Malaysia) Sdn. Bhd.
No.8, Jalan Perbandaran, Kelana Jaya, 47301
Petaling Jaya, Selangor, Malaysia
Tel: +60-3-78030900
SINGAPORE
Yamaha Music (Asia) Private Limited
Block 202 Hougang Street 21, #02-00,
Singapore 530202, Singapore
Tel: +65-6740-9200
TAIWAN
Yamaha Music & Electronics Taiwan Co., Ltd.
2F., No.1, Yuandong Rd., Banqiao Dist.,
New Taipei City 22063, Taiwan (R.O.C.)
Tel: +886-2-7741-8888
THAILAND
Siam Music Yamaha Co., Ltd.
3, 4, 15, 16th Fl., Siam Motors Building,
891/1 Rama 1 Road, Wangmai,
Pathumwan, Bangkok 10330, Thailand
Tel: +66-2215-2622
VIETNAM
Yamaha Music Vietnam Company Limited
15th Floor, Nam A Bank Tower, 201-203 Cach Mang
Thang Tam St., Ward 4, Dist.3,
Ho Chi Minh City, Vietnam
Tel: +84-8-3818-1122
OTHER ASIAN COUNTRIES
http://asia.yamaha.com
AUSTRALIA
Yamaha Music Australia Pty. Ltd.
Level 1, 99 Queensbridge Street, Southbank,
VIC 3006, Australia
Tel: +61-3-9693-5111
NEW ZEALAND
Music Works LTD
P.O.BOX 6246 Wellesley, Auckland 4680,
New Zealand
Tel: +64-9-634-0099
COUNTRIES AND TRUST
TERRITORIES IN PACIFIC OCEAN
http://asia.yamaha.com
NORTH AMERICA
CENTRAL & SOUTH AMERICA
EUROPE
AFRICA
MIDDLE EAST
ASIA
OCEANIA
DMI20
Head Office/Manufacturer: Yamaha Corporation 10-1, Nakazawa-cho, Naka-ku, Hamamatsu, 430-8650, Japan
(For European Countries) Importer: Yamaha Music Europe GmbH Siemensstrasse 22-34, 25462 Rellingen, Germany

Manual Development Group
© 2017 Yamaha Corporation
Published 06/2017 POHD*.*- **A0
Printed in China
ZW72890
-
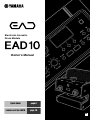 1
1
-
 2
2
-
 3
3
-
 4
4
-
 5
5
-
 6
6
-
 7
7
-
 8
8
-
 9
9
-
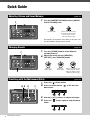 10
10
-
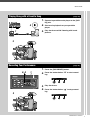 11
11
-
 12
12
-
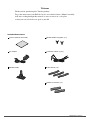 13
13
-
 14
14
-
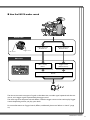 15
15
-
 16
16
-
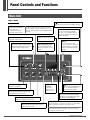 17
17
-
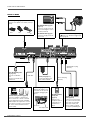 18
18
-
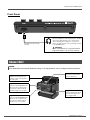 19
19
-
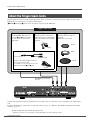 20
20
-
 21
21
-
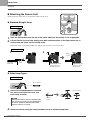 22
22
-
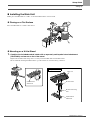 23
23
-
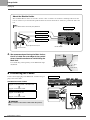 24
24
-
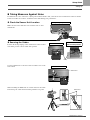 25
25
-
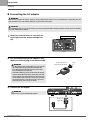 26
26
-
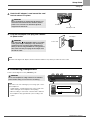 27
27
-
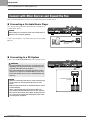 28
28
-
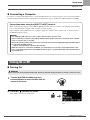 29
29
-
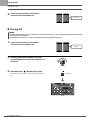 30
30
-
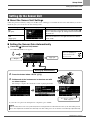 31
31
-
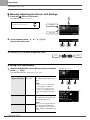 32
32
-
 33
33
-
 34
34
-
 35
35
-
 36
36
-
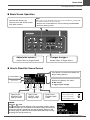 37
37
-
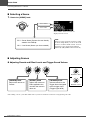 38
38
-
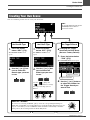 39
39
-
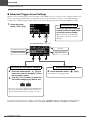 40
40
-
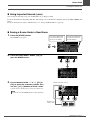 41
41
-
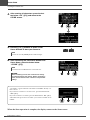 42
42
-
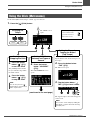 43
43
-
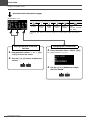 44
44
-
 45
45
-
 46
46
-
 47
47
-
 48
48
-
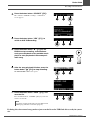 49
49
-
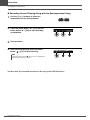 50
50
-
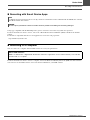 51
51
-
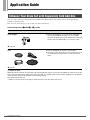 52
52
-
 53
53
-
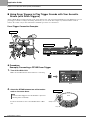 54
54
-
 55
55
-
 56
56
-
 57
57
-
 58
58
-
 59
59
-
 60
60
-
 61
61
-
 62
62
-
 63
63
-
 64
64
-
 65
65
-
 66
66
-
 67
67
-
 68
68
-
 69
69
-
 70
70
-
 71
71
-
 72
72


Yamaha EAD10 Manual de usuario
- Categoría
- Tambores musicales
- Tipo
- Manual de usuario
- Este manual también es adecuado para
en otros idiomas
- français: Yamaha EAD10 Manuel utilisateur
- italiano: Yamaha EAD10 Manuale utente
- English: Yamaha EAD10 User manual
- Deutsch: Yamaha EAD10 Benutzerhandbuch
- русский: Yamaha EAD10 Руководство пользователя
- Nederlands: Yamaha EAD10 Handleiding
- português: Yamaha EAD10 Manual do usuário
- dansk: Yamaha EAD10 Brugermanual
- polski: Yamaha EAD10 Instrukcja obsługi
- čeština: Yamaha EAD10 Uživatelský manuál
- svenska: Yamaha EAD10 Användarmanual
- Türkçe: Yamaha EAD10 Kullanım kılavuzu
- suomi: Yamaha EAD10 Ohjekirja
- română: Yamaha EAD10 Manual de utilizare
Artículos relacionados
-
Yamaha DD-75 El manual del propietario
-
Yamaha PSR-SX700 Guía de instalación
-
-
Yamaha FGDP-50 Guía del usuario
-
Yamaha EAD10 Drum Module El manual del propietario
-
-
Yamaha RS6 El manual del propietario
-
-
-