
Specifications:
120VAC 60 Hz
15A General/Resistive
1200W Tungsten
1200VA Ballast
1/2 HP
Installation Instructions
If you are unsure about the installation of this timer please contact a licensed electrician.
1. Turn power off at circuit breaker or fuse box before installation.
2. Remove current wallplate and switch from wall box.
3. Wires should be stripped to 5/8". (16mm).
4. Remove timer from package. Look at the back of the timer and
you will see LINE, LOAD, NEUTRAL and GROUND.
5. Loosen the LINE and LOAD screws with either a flat-blade or
Phillips screwdriver. When loosening terminal screws, stop when
you feel resistance. NOTE: Do not remove terminal screws.
6. Insert the line side wire from the wire box into hole marked LINE
and tighten the LINE screw.
7. Insert the load side wire from the wire box into hole marked
LOAD and tighten the LOAD screw.
8. Attach ground wire from box to the ground lug on the timer.
9. Remove white jumper wire from the package. Insert and tighten
jumper wire into the hole marked NEUTRAL.
10. Connect the neutral wire from the timer to the neutral wire in the
box. Often the neutral wire (white) can be found in the back of the
wire box connected with a wire nut. There may be several neutral
wires bound together. Add the neutral wire to all neutral wires
bound together and retighten the wire nut, making sure that the
wire nut is tight.
11. Tug each wire to verify connection, retighten if needed.
NOTE: Be sure that all wires and wire nuts are secure.
12. Insert timer into the 2 1/2" wall box, being careful not to pinch
any wires. Be sure the TOP (indicated on yoke of timer) is facing
up. Fasten the timer to the wall box using the screws provided.
13. Place rocker/decorator wallplate on timer, being careful to not
overtighten wallplate screws.
14. Turn the power on at the circuit breaker or fuse box.
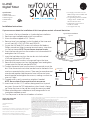
Typical SPST Installation
Figure 1
Black
Load
Black
Line
Green
Ground
LINE
NEUTRAL
GROUND
White
Neutral
JUMPER WIRE
TOP
LOAD
MADE IN CHINA
GE is trademark of General Electric Company and is under license by Jasco
Products Company LLC, 10 E. Memorial Rd., Oklahoma City, OK 73114.
This Jasco product comes with a 1-year limited warranty. Visit
www.byjasco.com for warranty details product registration.
Questions? Contact us at 1-800-654-8483 between 7:00AM–8:00PM CST.
This device complies with part 15 of the FCC and Industry Canada license-exempt RSS standard(s). Operation
is subject to the following two conditions:
(1) this device may not cause harmful interference, and (2) this device must accept any
interference received, including interference that may cause undesired operation.
FCC NOTE: The manufacturer is not responsible for any radio or TV interference caused by unauthorized
modifications to this equipment. Such modifications could void the user’s authority to operate the equipment.
NOTE: This equipment has been tested and found to comply with the limits for a Class B digital device, pursuant to
Part 15 of the FCC Rules. These limits are designed to provide reasonable protection against harmful interference in
a residential installation. This equipment generates, uses and can radiate radio frequency energy and, if not installed
and used in accordance with the instructions may cause harmful interference to radio communications. However,
there is no guarantee that interference will not occur in a particular installation. If this equipment does cause harmful
interference to radio or television reception, which can be determined by turning the equipment off and on, the user is
encouraged to try to correct the
interference by one or more of the following measures:
—Reorient or relocate the receiving antenna.
— Increase the separation between the equipment and receiver.
— Connect the equipment into an outlet on a circuit different from that to which the receiver is connected.
— Consult the dealer or an experienced radio/TV technician for help
Important note: To comply with the FCC RF exposure compliance requirements, no change to the antenna or the
device is permitted. Any change to the antenna or the device could result in the device exceeding the RF exposure
requirements and void user’s authority to operate the device.
CAN ICES-3(B)/NMB-3(B)
= Wiring Nut
Black
Black
Black
Light
WhiteWhite
120 VAC
Power
Source
Line
NO
Load
C
RISK OF ELECTRIC SHOCK
• SHUT OFF POWER AT FUSE BOX OR CIRCUIT
BREAKER BEFORE INSTALLATION
• DO NOT USE IN WET LOCATIONS
• USE INDOORS ONLY
RISK OF FIRE
•DO NOT USE TO CONTROL APPLIANCES THAT
CONTAIN HEATING ELEMENTS (COOKING
APPLIANCES, HEATERS, IRONS, ETC.)
• DO NOT EXCEED ELECTRICAL RATINGS
• USE COPPER WIRE ONLY WITH THIS DEVICE
• DO NOT USE TO CONTROL RECEPTACLES
WARNING
• For supply connections use 14
AWG or larger wires suitable and
rated for at least 75ºC
• For grounding lead use 12 AWG
or larger wires suitable and
rated for at least 75ºC
• Tighten wire connections to
12.4lbf-in. (1.4Nm)
• Use copper wire only
26893 WIRING VERSION 02
06/15/17
In-Wall
Digital Timer
Works with dimmable
LED and CFL bulbs.

Especificaciones:
120 VCA 60 Hz
15 A General / Resistiva
1200 W Tungsteno
1200 VA Balasto
1/2 HP
Instrucciones de instalación
Si no sabe cómo instalar este temporizador correctamente, contacte a un técnico electricista.
1. Antes de comenzar la instalación desconecte la electricidad en el disyuntor
o panel de fusiles.
2. Quite la placa de pared y el interruptor de la caja de embutir.
3. Debe pelar los cables 16 mm (5/8
").
4. Retire el temporizador del paquete. Observe la parte posterior del
temporizador y verá las palabras LINE (línea), LOAD (carga), NEUTRAL
(neutro) y GROUND (tierra).
5. Afloje los tornillos de LINE y LOAD con un destornillador de punta plana o
de cruz. Al aflojar tornillos de terminales, deténgase al sentir resistencia.
NOTA: No quite los tornillos de los terminales.
6. Introduzca el cable de línea proveniente de la caja de cables en el orificio
marcado LINE y apriete el tornillo de LINE.
7. Introduzca el cable de carga proveniente de la caja de cables en el orificio
marcado LOAD y apriete el tornillo de LOAD.
8. Conecte el cable a tierra, proveniente de la caja, a la oreja para conexión a
tierra situada en el temporizador.
9. Retire el cable puente blanco del paquete. Introduzca el cable puente en el
orificio marcado NEUTRAL y apriételo.
10. Conecte el cable neutro del temporizador al cable neutro de la caja. Muchas
veces, el cable neutro (blanco) se puede encontrar en la parte trasera de la
caja de embutir conectado con un empalme de cable. Puede haber varios
cables neutros amarrados. Incluya el neutro a todos los cables neutros
amarrados y vuelva a apretar el empalme, asegurándose de que quede
apretado.
11. Tire de cada cable para verificar la conexión, vuelva a ajustar de ser
necesario. NOTA: Asegúrese de que todos los cables y los empalmes de
cable estén ajustados.
12. Introduzca el temporizador en la caja de embutir de 6,35 cm (2,5 pulgadas)
teniendo cuidado de no comprimir los cables. Asegúrese de que la palabra
“TOP” (escrita en la horquilla del temporizador) esté mirando hacia arriba.
Fije el temporizador a la caja de embutir con los tornillos provistos.
13. Introduzca el temporizador en la caja de embutir de 6,35 cm (2,5 pulgadas)
teniendo cuidado de no comprimir los cables. Asegúrese de que la palabra
“TOP” (escrita en la horquilla del temporizador) esté mirando hacia arriba.
Fije el temporizador a la caja de embutir con los tornillos provistos.
14. Restablezca la electricidad en el disyuntor o panel de fusiles.
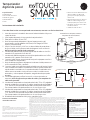
Instalación normal para contactos
unipolares de una vía (SPST)
Figura 1
Negro
Carga
Negro
Línea
Verde
Tierra
LINE
NEUTRAL
GROUND
Blanco
Neutro
CABLE PUENTE
TOP
LOAD
HECHO EN CHINA
GE es una marca registrada de la companía General Electric
Company y es utilizada bajo licencia a la companía Jasco
Prodcucts Company LLC, 10 E. Memorial Rd., Oklahoma City, OK
73114.
Este producto de Jasco Products tiene una garantía limitada de 1
Año. Visite www.jascoproducts.com para detalles.
¿Tiene preguntas? Comuníquese al 1-800-654-8483 entre las 7:30 a.m. y
las 5:00 p.m. CST ( hora central estándar).
Este dispositivo cumple con el apartado 15 de las normas de la FCC y con las especificaciones de las normas radioeléctricas
RSS del Ministerio de Industria de Canadá aplicables a aparatos exentos de licencia. El funcionamiento está sujeto a las
siguientes dos condiciones: (1) este dispositivo no debe provocar interferencia perjudicial, y (2) este dispositivo debe aceptar
toda interferencia que reciba, incluso la que pudiera causar un funcionamiento no deseado.
NOTA DE LA FCC: el fabricante no se hace responsable de ninguna interferencia de radio o TV ocasionada por modificaciones
no autorizadas efectuadas a este aparato. Dichas modificaciones podrían anular la autoridad del usuario para utilizar este
aparato.
NOTA: este aparato ha sido probado y cumple con los límites para aparatos digitales de Clase B, de conformidad con el
apartado 15 de la normativa de la FCC. Estos límites están diseñados para proveer protección razonable contra interferencias
perjudiciales en instalaciones residenciales. Este aparato genera, usa y puede irradiar energía de radiofrecuencias y, si no se
instala y usa según las instrucciones, puede provocar interferencia perjudicial a las radiocomunicaciones. No obstante, no hay
garantías de que no ocurrirá interferencia en una instalación en particular. Si este aparato provoca interferencia perjudicial a
la recepción de radio o televisión, lo que puede determinarse encendiendo y apagándolo, se recomienda que el usuario intente
corregir la interferencia por medio de la implementación de una o más de las siguientes medidas:
Reorientar o reubicar la antena receptora.
Incrementar la separación entre el equipo y el receptor.
Conectar el equipo a un tomacorriente de un circuito diferente del circuito al que el receptor está conectado.
Consultar al distribuidor o a un técnico con experiencia en radio/televisión para solicitar asistencia.
Este dispositivo y sus antenas no deben colocarse ni deben operar en conjunto con cualquier otra antena o transmisor.
CAN ICES-3(B)/NMB-3(B)
= Empalme de cable
Negro
Negro
Negro
Luz
BlancoBlanco
Fuente de
energía
120 VCA
Linea
NA
Carga
C
• Para la conexión de alimentación: use
cables 14 AWG o de calibre más
grueso que sean aptos para por lo
menos 75 °C.
• Para la puesta a tierra: use cables 12
AWG o de calibre más grueso que
sean aptos para por lo menos 75 °C.
• Apretar las conexiones de los cables
a 1.4Nm (12.4 lbf-in.)
• Utilizar sólo cable de cobre
RIESGO DE CHOQUE ELÉCTRICO
• CORTE LA CORRIENTE ANTES DE EFECTUAR
UNA INSTALACIÓN
• NO LO USE EN LUGARES HÚMEDOS
• USE SOLAMENTE EN INTERIORES
RIESGO DE INCENDIO
•NO USE PARA CONTROLAR ELECTRODOMÉSTICOS
QUE CONTENGAN ELEMENTOS CALORÍFICOS
(APARATOS PARA COCINAR, CALENTADORES,
PLANCHAS, ETC.).
• NO EXCEDA LOS LÍMITES ELÉCTRICOS PERMITIDOS
• UTILÍCELO CON ALAMBRE DE COBRE ÚNICAMENTE
• NO LO UTILICE PARA CONTROLAR RECEPTÁCULOS
ADVERTENCIA
Temporizador
digital de pared
Funciona con bombillas
atenuables LED e CFL.
-
 1
1
-
 2
2


myTouchSmart 26893-P1 Manual de usuario
- Tipo
- Manual de usuario
en otros idiomas
- English: myTouchSmart 26893-P1 User manual
Artículos relacionados
Otros documentos
-
 GE Enbrighten 26933 Manual de usuario
-
GE 13870 Manual de usuario
-
clare Z-Wave Plus In-Wall Smart Dimmer Switch Guía de inicio rápido
-
GE 12723 Manual de usuario
-
-
-
-
 GE Enbrighten 14294 Manual de usuario
-
Jasco 15312 Manual de usuario
-

