
Operating Instructions
Manuel d’utilisation
Bedienungsanleitung
Instrucciones de funcionamiento
Istruzioni d’uso
使用說明書
使用说明书
Инструкция по эксплуатации
Marine Case
Boîtier marin
防水盒
DMW-MCFT3
VQT3M30-1
Before connecting, operating or adjusting this product, please read the
instructions completely.
Avant de raccorder, régler ou utiliser l’appareil, il est recommandé de lire
attentivement le manuel d’utilisation.
Bitte lesen Sie diese Bedienungsanleitung vor der Inbetriebnahme des
Gerätes vollständig durch.
Antes del uso, lea completamente estas instrucciones.
Leggere completamente queste istruzioni prima dell’uso.
使用前,請完整閱讀本說明書。
使用前,请完整阅读本说明书。
Перед пользованием прочтите, пожалуйста, эту инструкцию полностью.
E
PP
Model No.
N
o
de modèle
型号
COVER.fm 1 ページ 2011年11月11日 金曜日 午前10時3分

2
VQT3M30
Contents
Before Use . . . . . . . . . . . . . . . . . . . . . . . . . . . . . . . . . . 3
Accessories. . . . . . . . . . . . . . . . . . . . . . . . . . . . . . . . . . 5
Handling and Care . . . . . . . . . . . . . . . . . . . . . . . . . . . . 6
Components . . . . . . . . . . . . . . . . . . . . . . . . . . . . . . . . . 8
What is the O-ring? . . . . . . . . . . . . . . . . . . . . . . . . . . . . 9
Preparation -Setting the O-ring- . . . . . . . . . . . . . . . . . 10
Preparation -Checking the Case is Waterproof- . . . . . 14
Preparation -Attaching the Digital Camera- . . . . . . . . 15
Taking Pictures . . . . . . . . . . . . . . . . . . . . . . . . . . . . . . 18
Tips for Taking Pictures in the Water . . . . . . . . . . . . . 19
After Use. . . . . . . . . . . . . . . . . . . . . . . . . . . . . . . . . . . 20
Cleaning and Storing . . . . . . . . . . . . . . . . . . . . . . . . . 21
Caution for Use. . . . . . . . . . . . . . . . . . . . . . . . . . . . . . 21
Specifications . . . . . . . . . . . . . . . . . . . . . . . . . . . . . . . 23
DMW-MCFT3-VQT3M30.book 2 ページ 2011年1月13日 木曜日 午前10時22分

3
VQT3M30
Before Use
≥ This Marine Case is designed for a Panasonic Digital Camera.
You can enjoy taking pictures underwater at depths up to 40 m/130 feet.
≥ In the case of water leakage due to insufficient care, Panasonic is in no
way liable for damage to any products (digital camera, batteries, card etc.)
inside this Case, photography costs or any other expenses.
≥ Panasonic also offers no compensation for accidents resulting in injury or
damage to property.
≥ Read the operating instructions for your digital camera.
≥ Before attaching the digital camera, submerge the case in water for
about 3 minutes or more to check that there is no water leakage.
∫ About handling this Case
≥ Use under the following conditions.
• Water depth: Up to 40 m/130 feet
• Ambient temperature: 0 °C
to
40 °C/32 °F
to
104 °F
≥ Do not use the Case in water over 40 °C/104 °F. The heat may damage the Case or
cause water leakage.
≥ The Case is made of impact resistant polycarbonate however be careful when you
are using it. It can be easily scratched when taking pictures in rocky places etc. and
can be damaged by the impact if dropped etc. When travelling, pack the Case
carefully to prevent any direct impact if it is dropped etc. and do not leave the digital
camera in the Case. Only attach the digital camera to the case if you are
transporting it a short distance such as from the airport to the diving spot. (You
cannot reuse the material the Case was packed in at the time of purchase to
transport it.)
≥ When boarding a plane, the change in atmospheric pressure may cause the inside
of the Case to expand causing damage to the Case. Remove the O-ring before
boarding a plane.
Insert the removed O-ring into the supplied exclusive polyester bag.
≥ Do not leave the digital camera in the Case for a long period of time in a car, a
ship, exposed to direct sunlight etc. The Case is an airtight device so the
temperature inside the Case will become very high and the digital camera may
stop operating properly. Do not let the temperature inside the Case become
too high.
ENGLISH
DMW-MCFT3-VQT3M30.book 3 ページ 2011年1月13日 木曜日 午前10時22分

4
VQT3M30
Before Use (continued)
∫ Using the Case in high or low temperatures
≥ If you open or close the Case where it is humid or hot and then move to a place that
is cold or dive underwater, condensation may appear inside the Case, the glass
surface may become cloudy and the digital camera may be damaged.
≥ If you suddenly move the Case from a cold place or cold water to a warm place, the
glass surface may become cloudy. Wait until the Case becomes close to the air
temperature before taking pictures.
∫ About preparation
≥ Do not open or close the Case where it may be splashed by water or sand may
get in it. We recommend opening or closing the Case indoors.
≥ Replace the battery, card etc. and attach the digital camera indoors where there is
little moisture.
≥ If you must open or close the Case at the diving spot to replace the battery or
the card, be sure to follow the steps below.
• Select a place where the Case will not be splashed by water and sand will not get
in it.
• Blow off any drops of water in the gap between the rear case and the front case
and on the buckle. Thoroughly wipe off any remaining drops of water with a dry
cloth.
• Thoroughly wipe off any drops of water on your body or hair.
• Be particularly careful about any water coming from the sleeves of your thermal
suit.
• Do not touch the digital camera if your hands are wet from sea water. Wet a towel
with fresh water and place it in a polyester bag beforehand. Use this towel to wipe
off any drops of water or sand on your hands or body.
≥ This Case does not absorb shock. If you place a heavy object on the Case or cause
shock to it, the digital camera may be damaged. Be careful when you are using the
case.
DMW-MCFT3-VQT3M30.book 4 ページ 2011年1月13日 木曜日 午前10時22分

5
VQT3M30
Accessories
When you first open the package, check that the Case and all the
accessories are included and that there has been no damage to the
Case or any of the accessories during distribution or
transportation. If you find something unusual, consult your dealer
before using the Case.
Do not use any accessories except those specified below.
Replacement O-ring
VMG1798
* In exclusive
polyester bag
* One has been
attached to the unit
in advance.
Silica Gel (Desiccant)
(1 g/5 pieces)
VZG0371
Grease (for O-ring)
VZG0372
Hand Strap
VFC4190
Diffuser/String
VYK3E56
≥ You can remove this diffuser when not using it
.
Removing Attaching
Align with the mark on the back of the
case and attach.
DMW-MCFT3-VQT3M30.book 5 ページ 2011年1月13日 木曜日 午前10時22分

6
VQT3M30
Handling and Care
≥ Do not place the Case where it may fall.
• If the Case falls on your head or foot, it will injure you and cause the Case to
malfunction.
≥ Never alter the Case.
• If water leaks into the digital camera because the Case was altered, the digital
camera may be damaged beyond repair.
• If you continue to use the digital camera after water has leaked into it, this may
cause a fire.
≥ Do not use the Case while scuba diving without proper training.
• You should only operate the Case while scuba diving if you have been properly
trained and certified for this sport.
≥ Never place the Case, grease, silica gel or O-ring within the reach of
infants.
• If any part of an infant’s body is caught in the Case, it may cause an injury.
• Infants may accidentally swallow the grease, silica gel or O-ring.
• Consult a doctor immediately if you think an infant may have swallowed the
grease, silica gel or O-ring.
≥ Do not hang the strap around your neck underwater.
• It may become wound around your neck causing suffocation or other serious
injuries.
≥ Thoroughly wash any grease on your hands.
• Do not allow the grease on your hands to come into contact with your mouth or
eyes.
≥ If water leaks into the case, stop using it immediately.
• This may cause an electric shock, burning or a fire.
• Consult your dealer.
≥ If anything abnormal occurs while using the Case underwater, please
follow all necessary procedures and guidelines for decompressing
when you ascend.
• If you ascend too quickly, you may get caisson disease.
≥ If smoke or abnormal heat, smells or sounds come from the Case,
stop using it immediately.
• These may cause an electric shock, burning or fire.
• Remove the digital camera from the Case and then immediately remove the
battery from the digital camera.
• Consult your dealer.
≥ Be careful when opening the Case after water leakage.
• The leaked water may blow out or the rear case may flip.
DMW-MCFT3-VQT3M30.book 6 ページ 2011年1月13日 木曜日 午前10時22分

7
VQT3M30
≥ Do not leave the Case where the temperature is high.
• The temperature inside the Case becomes very high particularly when it is
exposed to direct sunlight on a beach, a ship etc. or when it is left in an airtight car
in the summer. The heat may damage the Case or its inner parts.
• If a digital camera is attached to the Case, it may also be damaged.
• If you use the attached digital camera when the temperature inside the Case is
very high, it may cause leakage, short-circuiting or insulation failure resulting in
fire or malfunction.
≥ Do not handle the digital camera or the battery with wet hands.
• This may cause an electric shock or malfunction.
∫ When taking pictures with the flash
≥ When taking pictures with the flash, the corners of the picture may be vignetted or
the picture may not be lit evenly.
≥ When taking pictures with the flash, the available flash range is less underwater
than on land.
DMW-MCFT3-VQT3M30.book 7 ページ 2011年1月13日 木曜日 午前10時22分

8
VQT3M30
Components
1. Shutter Button
2. Motion Picture Button
3. Camera OFF/ON button
4. Mounting shoe for INON
Inc., external strobe
¢1
5. Front Case
6. Diffuser (supplied)
7. Front Glass
8. Zoom Button
9. Button operation section
(Read the operating
instructions of the digital
camera for details about
each button operation.)
10. Rear Case
11. Buckle
12. Lock Release Lever
13. Strap Eyelet
(for attaching the supplied hand
strap and diffuser)
324
7
1
5
6
8
9
10
12
13
11
¢1 This is a mounting shoe dedicated for an external strobe manufactured by
INON Inc.
Please refer to INON Inc. regarding compatible strobe.
http://www.inon.co.jp/INON_WORLD_body.html
DMW-MCFT3-VQT3M30.book 8 ページ 2011年1月13日 木曜日 午前10時22分

9
VQT3M30
What is the O-ring?
≥ The O-ring is a waterproofing packing used for underwater cameras, watches and
diving equipment.
≥ The O-ring keeps the Case waterproof by sealing the gap between the rear case
and the front case.
∫ How the O-ring keeps the Case waterproof
The gum comes into contact with the sides of the Case making the
Case waterproof and stopping water from entering from the gap.
When water pressure acts on the O-ring, the surface of the O-ring
expands and the Case is sealed more tightly.
The O-ring prevents water leakage by coming into uniform
contact with the sides of the Case. Therefore, good care of the
O-ring is very important. Incorrect care of the O-ring may
cause water leakage.
O-ring
Digital Camera
Front Case
Rear Case
O-ring
O-ring
DMW-MCFT3-VQT3M30.book 9 ページ 2011年1月13日 木曜日 午前10時22分

10
VQT3M30
Preparation -Setting the O-ring-
Be sure to set the O-ring before attaching a digital camera.
Thoroughly wash and dry your hands before handling the O-ring. Place
the O-ring where there is no sand or dust.
1 Loosen the O-ring with your fingers to remove it.
≥
Loosen part of the O-ring with the tips of two fingers and then lift the loosened
part. Be careful not to scratch the O-ring with your fingernails.
∫ Note
≥
Do not use a pointed object to remove the O-ring. This may scratch or damage the
O-ring.
O-ring
O-ring
DMW-MCFT3-VQT3M30.book 10 ページ 2011年1月13日 木曜日 午前10時22分

11
VQT3M30
2 Check the O-ring.
≥
Check that there is no dirt, sand, hair, dust, salt crystals, lint or grease on the
O-ring. If you find any of these, remove them with a soft, dry cloth.
≥ There may be dirt on the O-ring that you cannot see. Check if there is any dirt by
rubbing your finger over the O-ring.
≥ Be careful not to leave any fibers from the dry cloth on the O-ring when wiping it.
≥ Check that the O-ring is not ripped, twisted, squashed, frayed or scratched and
that there is no sand sticking to it. Replace the O-ring in these cases.
3 Inspect the O-ring groove.
≥ Grains of sand or hardened salt crystals may get into the O-ring groove.
Remove them carefully with an air spray or a cotton swab. If you use a cotton
swab, be careful not to leave any fibers from it in the O-ring groove.
≥ Inspect the front case groove as well as the rear case (side where O-ring is set)
groove.
3Dirt
3Sand
3Hair
3Dust 3Salt
crystals
3Lint
3Ripped
3Twisted
3
Squashed
3Frayed 3
Scratched
3Sand
DMW-MCFT3-VQT3M30.book 11 ページ 2011年1月13日 木曜日 午前10時22分

12
VQT3M30
Preparation -Setting the O-ring- (continued)
4
Apply the grease (supplied).
Apply O-ring grease to clean the surface of the O-ring and replenish the oil.
≥ Apply a rice-grain size of grease (supplied) evenly to the O-ring with the tip of
your finger. (Do not apply the grease with paper or a cloth. The fibers from the
paper or cloth may stick to the O-ring.)
≥ If there is too much grease on the O-ring, dirt and dust will stick to it causing
water to leak in. Therefore, hold the O-ring between the balls of your finger and
thumb and gently remove excess grease.
≥ By applying the O-ring grease thinly and evenly, the O-ring fits flexibly to the
groove of the marine case and keeps it airtight.
≥ Use only the specified grease. If you use other types of grease, the
surface of the O-ring may be damaged causing water leakage.
5 Fit the O-ring evenly into the O-ring groove.
Check the following:
≥ There is no dirt sticking to the O-ring.
≥ The O-ring has not come out.
≥ The O-ring is not twisted.
≥ The O-ring is not stretched too much.
CORRECT
INCORRECT
DMW-MCFT3-VQT3M30.book 12 ページ 2011年1月13日 木曜日 午前10時22分

13
VQT3M30
6 Inspect the O-ring one last time.
Check the following one more time:
≥ There is no dirt sticking to the O-ring.
≥ The O-ring has not come out.
≥ The O-ring is not twisted.
≥ There are no scratches or squashed parts on the O-ring.
Thoroughly wipe any grease off your hands with a dry cloth. Afterwards
wash thoroughly with fresh water.
7 Close the buckle.
≥
Check that no foreign materials are sticking to the outer surface of the O-ring or
the buckle on the front case and then close the Case.
∫ Notes
≥
To keep the Case completely airtight, do not scratch the surface of the O-ring that
comes into contact with the sides of the Case.
≥ Never use an O-ring that has been scratched or damaged by dirt etc. This will cause
water leakage.
≥ Each time you use the Case, remove the O-ring and check that there is no dirt,
sand, hair or other foreign materials in the O-ring groove and then apply a thin coat
of grease (supplied). If you apply too much grease, dirt and the dust may stick to the
O-ring causing water leakage.
≥ Be sure to bring a spare O-ring in case the O-ring that you are using becomes
damaged or scratched.
DMW-MCFT3-VQT3M30.book 13 ページ 2011年1月13日 木曜日 午前10時22分

14
VQT3M30
Preparation -Checking the Case is Waterproof-
After setting the O-ring, check that no water leaks into the Case by
submerging it in a water tank, bath tub etc. for more than about
3 minutes before attaching a digital camera.
≥
Do not use the Case in water over 40 °C/104 °F. The heat may damage the Case or
cause water leakage.
‘ Carry out the same test after attaching the digital camera to the Case. (P15)
∫ Notes
≥
If bubbles rise from the Case when it is submerged in water or there is water inside
the Case when you take it out of the water, there is water leakage. In these cases,
consult your dealer.
≥ If water leaks into the Case while you are using it and the digital camera is
submerged in water, remove the battery immediately. Hydrogen gas can cause
burning or explosion if there is a fire nearby.
≥ If you dive quickly while holding the Case or throw the Case from a ship into the sea,
some water leakage may occur because of high pressure. This is not a malfunction
of the Case. Always dive slowly into the water.
≥ The Case is designed to be used at a depth of up to 40 m/130 feet. If you dive
deeper than 40 m/130 feet, part of the Case may be damaged beyond repair.
≥ When closing the Case, be careful that no foreign materials get caught between the
O-ring and the O-ring groove. Even one strand of hair or one grain of sand can
cause water leakage.
DMW-MCFT3-VQT3M30.book 14 ページ 2011年1月13日 木曜日 午前10時22分

15
VQT3M30
Preparation -Attaching the Digital Camera-
Read the notes on page 17 before attaching the digital camera.
Check that the digital camera is set to [OFF].
≥
Remove the strap and silicon jacket from the digital camera.
1 Push 2 up with your finger while sliding 1 to open the buckle.
2 Attach the digital camera to the Case.
Be careful of the direction and insert the digital camera into the Case
as shown in the illustration.
≥
Check that there is no remaining water inside the digital camera and the Case.
≥ Be careful not to catch the shading hood 1.
3 Insert the silica gel (supplied).
≥
Always use new silica gel.
Front Case
Silica gel
Digital Camera
DMW-MCFT3-VQT3M30.book 15 ページ 2011年1月13日 木曜日 午前10時22分

16
VQT3M30
Preparation -Attaching the Digital Camera- (continued)
≥ When inserting the silica gel, bend it as shown in the illustration below
and then insert it as far as possible. If you close the Case with the silica
gel not fully inserted, the silica gel will get caught in the O-ring causing
water leakage.
≥ If the air temperature is high and the water temperature is low, condensation
may appear inside the Case. To prevent condensation, insert silica gel
(supplied) inside the Case in advance. To prevent the Case from becoming
fogged up, insert the silica gel about 1 to 2 hours before using the Case.
4 Close the buckle.
‘
Check that the buckle is closed firmly.
Do not insert the strap etc. in the buckle.
5 After you have attached the digital camera, check one more time that
no water leaks into the Case. (P14)
Silica gel
DMW-MCFT3-VQT3M30.book 16 ページ 2011年1月13日 木曜日 午前10時22分

17
VQT3M30
∫ Notes
≥
Be careful not to get the shading hood dirty with fingerprints etc.
≥ Check one more time that the O-ring is fitted evenly into the O-ring groove.
≥ Avoid opening or closing the Case where there is a lot of sand or dust and in humid
or wet places.
≥ If there is a sudden change of humidity caused by moist air entering the Case,
condensation may appear inside the Case.
≥ To prevent condensation, set the digital camera in as dry a place as possible. Also,
check that the silica gel (supplied) is sufficiently dry before inserting.
≥ If sunscreen or suntan oil sticks to the Case, wash it off immediately with lukewarm
water to prevent reduced waterproofness or discoloration.
≥
Submerge in fresh water for approximately 10 minutes after using the digital camera at
the beach or in water. Read the operating instructions for details.
≥
If there are any drops of water or dirt on the camera unit, wipe off using a dry cloth
before standing the unit upright on a dry cloth for a while and checking that the water has
been removed. After this, please attach the camera.
When a digital camera with GPS function, compass, altimeter (depth meter), and
barometer is attached to the marine case, positioning or measurements may not be
possible, or may contain major errors.
DMW-MCFT3-VQT3M30.book 17 ページ 2011年1月13日 木曜日 午前10時22分

18
VQT3M30
Taking Pictures
∫ Be sure to check the following before entering the water
Check the following before diving.
≥
Is there sufficient remaining battery power?
≥ Is there sufficient memory in the card?
≥ Is the O-ring fitted evenly into the O-ring groove?
≥ Have you checked that no water leaks into the Case?
≥ Is the buckle closed firmly?
∫ Taking pictures
1 Press the OFF/ON button and turn on the digital camera.
2 Set [Underwater].
≥
Read the operating instructions of the digital camera for details.
3 Aim the AF area on the LCD monitor at the subject you want to focus
on.
4 Press [AF-L ] to focus.
• Press [AF-L ] again to cancel.
5 Press the shutter button fully to take the picture.
∫ Notes
≥ Before attaching the camera to the Case, we recommend setting the clock again.
(Read the operating instructions of the digital camera for details.)
≥ If there are any particles floating in front of the camera, it may focus on them instead
of the subject.
≥ If there are drops of water or dirt sticking to the front glass, you may not be able to
focus properly. Be sure to wipe the front glass before taking pictures.
DMW-MCFT3-VQT3M30.book 18 ページ 2011年1月13日 木曜日 午前10時22分

19
VQT3M30
Tips for Taking Pictures in the Water
When the image is too bluish in the water
1
Select [White Balance] from the [Rec] Mode menu.
2 Press [DISP.] to display [WB Adjust.].
3 Press [AF-L ]/[ ] to adjust the white balance.
4 Press [MENU/SET] to finish.
≥ You can also press the shutter button halfway to finish.
Select the best picture
Set the flash to [ ].
Using the Auto Bracket Function (For models with an Auto Bracket Function)
≥ Each time the shutter button is pressed, 3 pictures with different exposures are
automatically recorded. You can select the desired picture from the 3 pictures.
Use Burst Mode
≥ When taking pictures of a fast-moving subject (a fish etc.), you can select your
favourite picture after taking the pictures using Burst Mode.
∫ Note
≥
WB fine adjustment (Underwater Mode) is also supported when recording motion
pictures.
The white balance can be adjusted according to water depth or preference.
≥ For more information, read the operating instructions of the digital camera.
MARINE BODY.fm 19 ページ 2011年11月11日 金曜日 午前10時7分

20
VQT3M30
After Use
After you have finished taking pictures, follow the steps below.
1 Submerge the Case in fresh water for about 30 minutes or more
without removing the digital camera to remove any salt crystals etc.
≥
Press all the operation buttons etc. on the Case to wash away any
seawater. If the salt crystals are not removed from the buttons etc., they
will harden and the buttons will become inoperable.
≥ Do not wash the Case with fast-running or pressurized water etc. as it may
cause water leakage.
2 Wipe the water with a dry cloth that has no salt crystals sticking to it
and then dry the Case completely.
≥
Do not dry the Case by exposing it to direct sunlight. This may
discolor
or
damage the Case or may hasten deterioration of the O-ring.
3 Open the rear of the case to remove the digital camera.
After thoroughly wiping your hands, apply your finger as shown in
the illustration and take out the digital camera.
DMW-MCFT3-VQT3M30.book 20 ページ 2011年1月13日 木曜日 午前10時22分

21
VQT3M30
4 Remove the O-ring from the Case and check that there is no dirt etc.
in the O-ring groove.
5 Check that there are no scratches etc. on the O-ring while you are
applying the grease.
∫ Notes
Be careful of the following points when taking out the digital camera.
≥ Remove the camera with clean hands. (Wash your hands with fresh water and then
thoroughly dry them.)
≥ Thoroughly dry any moisture on your body or hair. (Be particularly careful about any
water coming from the sleeves of your thermal suit.)
Cleaning and Storing
1
Wash the outside of the Case with water.
≥
Wash the outside of the Case until it is clean. (P20)
≥ Confirm that the O-ring is set securely, be sure to close the Case, and then
wash only the outside with water.
≥ Wipe off any dirt inside the Case with a wet, soft cloth.
∫ Notes
≥
Do not wash the Case with high-pressure water as it may cause water leakage.
Remove the digital camera before washing the Case with water.
≥ Do not leave the digital camera inside the Case when storing it.
≥ Detach the O-ring from the marine case and store so it will not dry. For details,
please read page 22.
When storing for a long period of time, insert in the supplied exclusive polyester bag
after first removing the O-ring.
Caution for Use
∫ Handling of the O-ring
≥
Do not use alcohol, thinner or a chemical cleaning agent for cleaning the O-ring.
This will cause damage to, or deterioration of, the O-ring.
≥ If you will not be using the Case for a long period of time, remove the O-ring
from the O-ring groove, apply a thin coat of grease (supplied), place it in
exclusive polyester bag and then store it in a cool, dark place to prevent the
surface from being damaged. When you use the O-ring again, thoroughly
check that it is not scratched, damaged or split.
DMW-MCFT3-VQT3M30.book 21 ページ 2011年1月13日 木曜日 午前10時22分

22
VQT3M30
Caution for Use (continued)
≥ Use only the specified grease. If you use other types of grease, the surface of
the O-ring may be damaged causing water leakage.
≥ The O-ring comes into contact with the sides of the Case making the Case
waterproof. Do not knock, insert foreign materials (dirt, sand, hair etc.) or scratch
the O-ring or sides of the Case.
≥ Use the tips of your fingers to remove the O-ring. Do not use a pointed object as it
may scratch or damage the O-ring.
≥ After removing the O-ring from the rear case, wipe off any dirt, sand, hair or other
foreign materials on it. Also wipe the O-ring groove and the inner sides of the front
case which come into contact with the O-ring.
≥ Never use an O-ring that has been scratched or damaged by dirt etc. This will cause
water leakage. Replace it with a new O-ring.
≥ After replacing the O-ring, when not in use for a long period of time, after attaching
the digital camera or when replacing the battery, if the marine case is opened
please thoroughly check the O-ring for damage or any cracks.
After checking, shut the marine case, immerse in water (a water tank or a bath tub)
for approximately 3 minutes or more, then check that there are no water leaks. (P14)
≥ O-rings are consumable products. Although the lifespan of O-rings will depend on
how well they are maintained, how often they are used and their storage conditions,
we recommend replacing them every year even if you cannot see any scratches.
∫ About maintenance
≥ Do not use the chemicals shown below for cleaning, rustproofing, defogging
or repair. Using them directly or indirectly (with a chemical spray etc.) on the
Case may cause it to crack.
≥ If grease sticks to the digital camera, wipe it off with a soft, dry cloth.
≥ When wiping the inside of the Case, only use a soft, dry cloth. Wipe the inside of the
front glass with a soft, dry cloth before and after use to keep the glass clear.
Prohibited chemicals Cautions
Volatile organic solvents/
Chemical cleansers
Do not clean the Case with volatile organic solvents
such as alcohol, gasoline or thinner or with chemical
cleansers. Clean it with fresh water or lukewarm water.
Anti-corrosives
Do not use anti-corrosives as the metal parts of the
Case are made from stainless steel or brass. Clean it
with fresh water.
Anticlouding agents
Do not use commercially available anticlouding
agents. Be sure to use the silica gel indicated in these
operating instructions.
Adhesives
Do not use adhesives for repair. If the Case needs to
be repaired, consult your dealer.
DMW-MCFT3-VQT3M30.book 22 ページ 2011年1月13日 木曜日 午前10時22分

23
VQT3M30
∫ About storage and inspection after use
≥ Always take the digital camera out of the Case.
≥ Make sure that no dirt or dust is stuck to the O-ring.
≥ Thoroughly dry the Case at room temperature and then store it in a cool, dark place.
≥ We recommend that the Case be inspected about 3 years after purchase. This
inspection involves dismantling and cleaning the Case, inspecting all the parts and
repairing them if necessary and checking the waterproofness of the Case using the
same hydrostatic test equipment that was used to check the waterproofness before
purchase. The customer is responsible for all transportation costs.
≥ Do not dismantle any parts or use any accessories not specified in these operating
instructions and do not alter the Case. If the Case does not work properly, consult
your dealer.
Specifications
Compatible model: DMC-FT3/DMC-TS3 (As of January 2011
¢
)
Dimensions: Approx. 145 mm (W)k94 mm (H)k52 mm (D)
[5.71q (W)k3.70q (H)k2.05q (D)]
(excluding the projecting parts)
Mass (Weight): Approx. 356 g/0.785 lb (including the diffuser)
Material: Polycarbonate
Waterproof construction: O-ring sealing
Water resistant depth: 40 m/130 feet
¢ Refer to the operating instructions, catalogue, website etc. of the digital
camera for the latest information on models that can be used.
One Panasonic Way, Secaucus, NJ 07094
Panasonic Consumer Electronics Company,
Division of Panasonic Corporation of North America
Panasonic Canada Inc.
5770 Ambler Drive, Mississauga, Ontario, L4W 2T3
Panasonic Corporation 2011
Printed in Japan
DMW-MCFT3-VQT3M30.book 23 ページ 2011年1月13日 木曜日 午前10時22分

24
VQT3M30
Table des matières
Avant utilisation. . . . . . . . . . . . . . . . . . . . . . . . . . . . . . 25
Accessoires. . . . . . . . . . . . . . . . . . . . . . . . . . . . . . . . . 27
Manipulation et entretien. . . . . . . . . . . . . . . . . . . . . . . 28
Composants . . . . . . . . . . . . . . . . . . . . . . . . . . . . . . . . 30
Qu’est-ce qu’un joint torique? . . . . . . . . . . . . . . . . . . . 31
Préparatifs -Mise en place du joint torique- . . . . . . . . 32
Préparatifs
-Vérification de l’étanchéité du boîtier-
. . . 36
Préparatifs -Mise en place de l’appareil photo
numérique- . . . . . . . . . . . . . . . . . . . . . . . . . . . . . . . . . 37
Prises de vues . . . . . . . . . . . . . . . . . . . . . . . . . . . . . . 40
Conseils pour la prise de vue dans l’eau . . . . . . . . . . 41
Après utilisation. . . . . . . . . . . . . . . . . . . . . . . . . . . . . . 42
Nettoyage et rangement . . . . . . . . . . . . . . . . . . . . . . . 44
Mises en garde . . . . . . . . . . . . . . . . . . . . . . . . . . . . . . 45
Spécifications . . . . . . . . . . . . . . . . . . . . . . . . . . . . . . . 47
DMW-MCFT3-VQT3M30.book 24 ページ 2011年1月13日 木曜日 午前10時22分

25
VQT3M30
Avant utilisation
≥ Ce boîtier marin est conçu pour un appareil photo numérique Panasonic.
Vous pouvez prendre des photos sous l’eau à une profondeur allant jusqu’à
40 m/130 pieds.
≥ Dans le cas d’une infiltration d’eau provoquée par un manque de précautions,
Panasonic n’est responsable en aucune manière des dommages subis par les
produits (appareil photo numérique, batteries, carte, etc.) présents à l’intérieur du
boîtier, du coût des photographies ou de toutes autres dépenses.
≥ Panasonic n’offre aucune compensation pour les accidents provoquant des
blessures ou des dommages.
≥ Veuillez lire le manuel d’utilisation de l’appareil photo numérique.
≥ Avant d’installer l’appareil photo numérique, immergez le boîtier dans l’eau
pendant environ 3 minutes ou plus pour vérifier son étanchéité.
∫ Manipulation du boîtier
≥
Utilisation dans les conditions suivantes:
• Profondeur de l’eau: jusqu’à 40 m/130 pieds
• Température ambiante: 0 °C à 40 °C/32 °F à 104 °F
≥ N’utilisez pas le boîtier dans une eau de plus de 40 °C/104 °F. La chaleur peut
l’endommager et causer des infiltrations d’eau.
≥ Le boîtier est fait de polycarbonate résistant au choc; toutefois faites attention en
l’utilisant. Il peut être facilement éraflé si vous prenez des photos dans des endroits
rocheux, etc. et peut être endommagé par le choc s’il venait à tomber, etc. Pour
voyager, emballez soigneusement le boîtier afin d’éviter les chocs en cas de chute,
etc. et ne laissez pas l’appareil photo dans le boîtier. Installez l’appareil photo
numérique dans le boîtier uniquement si vous le transportez sur une courte
distance comme de l’aéroport vers le point de plongée. (Vous ne pouvez pas
réutiliser le matériau avec lequel le boîtier a été emballé au moment de l’achat en
vue du transport.)
≥ Lorsque vous embarquez dans un avion, le changement de pression
atmosphérique peut causer une poussée à l’intérieur du boîtier qui risque de
l’endommager. Retirez le joint torique avant d’embarquer dans un avion.
Une fois retiré, rangez le joint torique dans le sac de rangement en polyester exclusif fourni.
≥ Ne laissez pas l’appareil photo numérique dans le boîtier pendant un long
moment dans une voiture, un bateau, exposé directement aux rayons du
soleil, etc. Le boîtier est un appareil hermétique, donc sa température
intérieure peut devenir très élevée et l’appareil photo numérique peut arrêter
de fonctionner correctement. Ne laissez pas la température intérieure du
boîtier devenir trop élevée.
FRANÇAIS
DMW-MCFT3-VQT3M30.book 25 ページ 2011年1月13日 木曜日 午前10時22分

26
VQT3M30
Avant utilisation (suite)
∫ Utilisation du boîtier à haute ou à basse
température
≥
Si vous ouvrez ou fermez le boîtier dans un endroit chaud et humide
,
puis que vous vous
déplacez vers un endroit froid ou que vous plongez sous l’eau, de la condensation peut
apparaître à l’intérieur du boîtier, la surface du verre peut s’embuer et l’appareil photo
peut être endommagé.
≥ Si vous déplacez soudainement le boîtier d’un endroit où la température de l’air ou
de l’eau est froide vers un endroit où la température est chaude, la surface du verre
peut s’embuer. Attendez jusqu’à ce que la température du boîtier soit proche de la
température ambiante avant de prendre des photos.
∫ Préparatifs
≥ N’ouvrez pas et ne fermez pas le boîtier dans un endroit où il pourrait être
éclaboussé par de l’eau ou dans un endroit où le sable pourrait y entrer. Nous
vous conseillons d’ouvrir et de fermer le boîtier à l’intérieur.
≥
Remplacez la batterie, la carte, etc. et installez l’appareil photo numérique à l’intérieur
dans un endroit peu humide.
≥ Si vous devez ouvrir ou fermer le boîtier au point de plongée pour remplacer
la batterie ou la carte, veillez à suivre les étapes suivantes.
• Choisissez un endroit où le boîtier ne sera pas éclaboussé par de l’eau et où le
sable ne pourra pas y pénétrer.
• Enlevez toutes les gouttes d’eau présentes entre le côté avant et arrière du boîtier
et sur le loquet de verrouillage en soufflant. Enlevez complètement les gouttes
d’eau restantes avec un chiffon sec.
• Essuyez complètement toutes les gouttes d’eau de votre corps ou vos cheveux.
• Soyez particulièrement attentif à l’eau qui a pénétré dans votre combinaison de
plongée par les manches.
• Ne touchez pas l’appareil photo numérique en présence d’eau de mer sur vos
mains. Mouillez une serviette avec de l’eau douce et mettez-la à l’avance dans un
sac en polyester. Utilisez cette serviette pour essuyer les gouttes d’eau et le sable
présents sur vos mains ou votre corps.
≥ Ce boîtier n’absorbe pas les chocs. Si vous placez un objet lourd sur le boîtier ou si
vous le cognez, l’appareil photo peut être endommagé. Faites attention lorsque
vous utilisez le boîtier.
DMW-MCFT3-VQT3M30.book 26 ページ 2011年1月13日 木曜日 午前10時22分

27
VQT3M30
Accessoires
Lorsque vous ouvrez l’emballage pour la première fois, vérifiez
bien qu’il contient le boîtier et tous les accessoires et que ceux-ci
n’ont pas été endommagés lors du transport. Si vous constatez
quelque chose d’anormal, consultez votre revendeur avant
d’utiliser le boîtier.
N’utilisez aucun autre accessoire que ceux indiqués ci-dessous.
Joint torique de
remplacement
VMG1798
*
Dans le sac de
rangement en
polyester exclusif
*
Un joint a été fixé au
préalable sur le boîtier.
Gel de silice
(dessiccatif)
(1 g/5 pièces)
VZG0371
Tube de graisse (pour
joint torique)
VZG0372
Dragonne
VFC4190
Diffuseur/Cordelette
VYK3E56
≥ Vous pouvez retirer le diffuseur lorsque vous ne l’utilisez pas.
Retirez Fixez
Alignez-le avec les repères à l’arrière
du boîtier et fixez-le.
DMW-MCFT3-VQT3M30.book 27 ページ 2011年1月13日 木曜日 午前10時22分

28
VQT3M30
Manipulation et entretien
≥ Ne placez pas le boîtier dans un endroit où il pourrait tomber.
• Si le boîtier tombe sur votre tête ou votre pied, il vous blessera et pourra mal
fonctionner.
≥ Ne modifiez jamais le boîtier.
• Si de l’eau s’introduit dans l’appareil photo numérique parce que le boîtier est
abîmé, celui-ci peut être endommagé de façon irrémédiable.
• Si vous continuez d’utiliser l’appareil photo après que l’eau s’y soit infiltrée, il peut
prendre feu.
≥ N’utilisez pas le boîtier en plongée sous-marine sans un
entraînement adéquat.
• Vous ne devez utiliser ce boîtier lors d’une plongée sous-marine que si vous avez
été correctement entraîné et êtes qualifié pour ce sport.
≥ Ne placez jamais le boîtier, la graisse, le gel de silice ou le joint
torique à la portée des enfants.
• Si un enfant se coince une partie du corps dans ce boîtier, cela peut provoquer
une blessure.
• Les enfants peuvent accidentellement avaler la graisse, le gel de silice ou le joint
torique.
• Consultez immédiatement votre médecin si vous pensez que votre enfant a avalé
de la graisse, du gel de silice ou le joint torique.
≥ N’enroulez pas la bandoulière autour de votre cou lorsque vous êtes
sous l’eau.
• Cela peut vous blesser le cou et causer une suffocation ou d’autres blessures
sérieuses.
≥ Nettoyez toutes traces de graisse de vos mains.
• Ne laissez pas la graisse de vos mains entrer en contact avec vos yeux ou votre
bouche.
≥ S’il y a des infiltrations d’eau dans le boîtier, arrêtez immédiatement
de l’utiliser.
• Ceci peut provoquer un choc électrique, une brûlure ou un incendie.
• Consultez votre revendeur.
≥ Si quelque chose d’anormal survient en utilisant le boîtier sous l’eau,
veuillez suivre toutes les procédures nécessaires et les consignes de
décompression lors de votre remontée.
• Si vous remontez trop rapidement, vous pouvez subir la maladie des caissons.
≥ Si de la fumée ou une chaleur, une odeur ou un bruit anormal
provient du boîtier, arrêtez de l’utiliser immédiatement.
• Cela peut causer un choc électrique, une brûlure ou un incendie.
• Retirez l’appareil photo numérique du boîtier, puis retirez les batteries de
l’appareil photo.
• Consultez votre revendeur.
DMW-MCFT3-VQT3M30.book 28 ページ 2011年1月13日 木曜日 午前10時22分

29
VQT3M30
≥ Faites attention en ouvrant le boîtier après une infiltration d’eau.
• L’eau qui s’est infiltrée peut sortir ou bien l’arrière du boîtier peut se renverser.
≥ Ne laissez pas le boîtier dans un endroit où la température est élevée.
• La température à l’intérieur du boîtier peut devenir très élevée surtout lorsqu’il est
exposé directement aux rayons du soleil sur une plage, en bateau, etc. ou
lorsqu’il est laissé dans une voiture fermée en plein été. La chaleur peut
endommager le boîtier ou ses éléments internes.
• Si un appareil photo numérique se trouve à l’intérieur du boîtier, celui-ci peut
également être endommagé.
• Si vous utilisez l’appareil photo numérique lorsque la température à l’intérieur du
boîtier est très élevée, cela peut causer des infiltrations, des courts-circuits ou
une panne d’isolation ayant pour résultat un feu ou un mauvais fonctionnement.
≥ Ne manipulez pas l’appareil photo numérique ou la batterie avec les
mains mouillées.
• Cela peut provoquer un choc électrique ou un mauvais fonctionnement.
∫ Prises de vues avec le flash
≥ Lorsque vous utilisez le flash, les angles de l’image peuvent être coupés ou l’image
peut ne pas apparaître illuminée de manière uniforme.
≥ En prenant des photos avec le flash, la portée disponible de celui-ci est plus faible
sous l’eau qu’en plein air.
DMW-MCFT3-VQT3M30.book 29 ページ 2011年1月13日 木曜日 午前10時22分

30
VQT3M30
Composants
1. Déclencheur
2. Touche d’images animées
3. Touche de mise en/hors
marche (OFF/ON)
4. Griffe porte-flash
stroboscopique externe de
INON Inc.
¢1
5. Couvercle avant
6. Diffuseur (fourni)
7. Verre avant
8. Touche du zoom
9. Touches de fonctionnement
(Reportez-vous au manuel
d’utilisation de l’appareil
photo numérique pour plus
de détails sur chaque touche
de fonctionnement.)
10. Couvercle arrière
11. Loquet de verrouillage
12. Levier de verrouillage/
déverrouillage
13. Œillet de la dragonne
(pour fixer la dragonne et le
diffuseur fournis)
324
7
1
5
6
8
9
10
12
13
11
¢1 Il s’agit d’une griffe porte-flash stroboscopique externe fabriqué par INON Inc.
Veuillez vous enquérir auprès de INON Inc. concernant le flash
stroboscopique externe compatible.
http://www.inon.co.jp/INON_WORLD_body.html
DMW-MCFT3-VQT3M30.book 30 ページ 2011年1月13日 木曜日 午前10時22分

31
VQT3M30
Qu’est-ce qu’un joint torique?
≥ Un joint torique est une garniture étanche utilisée pour les appareils photo, montres
ou équipements de plongée.
≥ Le joint torique rend le boîtier étanche en scellant l’espace entre sa partie avant et
arrière.
∫ Comment le joint torique rend-il le boîtier étanche?
Le caoutchouc entre en contact avec les côtés du boîtier, le rendant
ainsi étanche et empêchant l’eau d’entrer par l’ouverture.
Quand le joint torique est écrasé par la pression de l’eau, sa surface
s’élargit et le boîtier est scellé plus hermétiquement.
Le joint torique évite les infiltrations d’eau en uniformisant le
contact des deux côtés du boîtier. Donc, le bon entretien du
joint torique est très important. Un mauvais entretien peut
causer des infiltrations d’eau.
Joint
torique
Couvercle avant
Appareil photo numérique
Couvercle arrière
Joint
torique
Joint
torique
DMW-MCFT3-VQT3M30.book 31 ページ 2011年1月13日 木曜日 午前10時22分

32
VQT3M30
Préparatifs -Mise en place du joint torique-
Assurez-vous de mettre le joint torique en place avant d’installer
l’appareil photo numérique.
Lavez et séchez vos mains avec soin avant de manipuler le joint torique.
Placez le joint torique dans un endroit sans sable ni poussière.
1 Desserrez le joint torique avec vos doigts pour l’enlever.
≥
Desserrez une partie du joint torique du bout de vos deux doigts et soulevez la
partie détachée. Faites attention de ne pas érafler le joint torique avec vos
ongles.
∫ Nota
≥
N’utilisez pas d’objet pointu pour retirer le joint torique. Ceci pourrait l’érafler.
Joint torique
Joint torique
DMW-MCFT3-VQT3M30.book 32 ページ 2011年1月13日 木曜日 午前10時22分

33
VQT3M30
2 Vérifiez le joint torique.
≥
Vérifiez l’absence de saleté, sable, cheveux, poussière, cristaux de sel, fibre ou
graisse sur le joint torique. Si vous trouvez un de ces éléments, retirez-le avec
un chiffon sec et doux.
≥ Sur le joint torique, il peut y avoir de la saleté que vous ne pouvez pas voir.
Vérifiez la présence de saletés en frottant votre doigt sur le joint torique.
≥ Lors du nettoyage du joint torique, faites attention de ne pas laisser sur celui-ci
les fibres du linge sec et doux.
≥ Vérifiez que le joint torique ne soit ni déchiré, tordu, écrasé, effiloché ou éraflé
et qu’il n’y ait pas de sable collé dessus. Si c’est le cas, remplacez le joint
torique.
3 Vérifiez la rainure du joint torique.
≥ Des grains de sable ou des cristaux de sel durcis peuvent entrer dans la rainure
du joint torique. Retirez-les avec précaution avec un jet d’air ou un coton-tige. Si
vous utilisez un coton-tige, veillez à ne pas laisser de fibres dans la rainure du
joint torique.
≥ Vérifiez la rainure du couvercle avant du boîtier ainsi que celle du couvercle
arrière (côté où le joint torique est inséré).
3Saleté
3
S
a
b
l
e
3Cheveux 3Poussière 3
Cristaux
de sel
3Fils de tissu
3Fissures 3Distorsions 3Écrasements 3Écaillements 3Rayures 3
Dépôts de
sable
DMW-MCFT3-VQT3M30.book 33 ページ 2011年1月13日 木曜日 午前10時22分

34
VQT3M30
Préparatifs -Mise en place du joint torique- (suite)
4
Appliquez la graisse (fournie).
Appliquez la graisse pour joint torique pour nettoyer sa surface et le lubrifier.
≥
Appliquez uniformément et du bout du doigt une quantité de graisse (fournie) de la
dimension d’un grain de riz sur le joint torique. (N’appliquez pas la graisse à l’aide
d’un papier ou d’un chiffon. Des fibres pourraient rester collées au joint torique.)
≥ S’il y a trop de graisse sur le joint torique, de la saleté ou de la poussière s’y
collera causant des infiltrations d’eau. Par conséquent, vous devez tenir le joint
torique entre votre doigt et pouce pour retirer la graisse excessive.
≥ En appliquant de façon uniforme une couche mince de graisse pour joint
torique, celui-ci s’insère facilement dans la rainure du boîtier marin pour en
maintenir son étanchéité.
≥
Utilisez uniquement la graisse indiquée. Si vous utilisez un autre type de graisse,
la surface du joint torique peut être endommagée et causer des infiltrations d’eau.
5 Placez le joint torique dans la rainure.
Vérifiez les point suivants:
≥ Qu’il n’y ait pas de saleté collée sur le joint torique.
≥ Que le joint torique ne sorte pas de son logement.
≥ Que le joint torique n’est pas tordu.
≥ Que le joint torique ne soit pas trop étiré.
Correct
Incorrect
DMW-MCFT3-VQT3M30.book 34 ページ 2011年1月13日 木曜日 午前10時22分

35
VQT3M30
6 Vérifiez le joint torique une dernière fois.
Vérifiez les point suivants encore une fois:
≥ Qu’il n’y ait pas de saleté collée sur le joint torique.
≥ Que le joint torique ne sorte pas de son logement.
≥ Que le joint torique n’est pas tordu.
≥ Il n’y a aucune éraflure ou bossellement sur le joint torique.
Essuyez avec soin toute la graisse de vos mains avec un chiffon sec,
puis lavez-les soigneusement avec de l’eau douce.
7 Fermez le loquet.
≥
Vérifiez qu’aucun corps étranger ne soit collé à la surface extérieure ou au loquet
de verrouillage sur la partie avant du boîtier, puis fermez le boîtier.
∫ Nota
≥
Pour garder le boîtier complètement hermétique, n’éraflez pas la surface du joint
torique qui entre en contact avec les côtés du boîtier.
≥ N’utilisez jamais un joint torique qui a été éraflé ou endommagé par de la saleté,
etc. Ceci causerait des infiltrations d’eau.
≥ Chaque fois que vous utilisez le boîtier, retirez le joint torique et vérifiez qu’il n’y ait
ni saleté, sable, cheveux ou autre corps étranger dans la rainure, puis appliquez
une mince couche de graisse (fournie). Si vous appliquez trop de graisse, la saleté
et la poussière peuvent coller au joint torique et causer une infiltration d’eau.
≥ Assurez-vous d’avoir un joint torique de rechange dans le cas où celui que vous
utilisez soit endommagé ou éraflé.
DMW-MCFT3-VQT3M30.book 35 ページ 2011年1月13日 木曜日 午前10時22分

36
VQT3M30
Préparatifs -Vérification de l’étanchéité du boîtier-
Après la préparation du joint torique, vérifiez l’absence d’infiltrations
d’eau dans le boîtier en l’immergeant dans un bassin d’eau, une
baignoire, etc. pendant environ 3 minutes ou plus avant d’installer
l’appareil photo numérique.
≥
N’utilisez pas le boîtier dans une eau de plus de 40 °C/104 °F. La chaleur peut
l’endommager et causer des infiltrations d’eau.
‘ Effectuez le même test après avoir mis en place l’appareil photo numérique
dans le boîtier. (P37)
∫ Nota
≥
Si des bulles sont produites lorsque le boîtier est immergé dans l’eau ou qu’il y a de
l’eau à l’intérieur de celui-ci lorsque vous le retirez de l’eau, cela signifie qu’il y a une
fuite. Dans de tels cas, consultez le détaillant.
≥ Si de l’eau s’infiltre dans le boîtier pendant que vous l’utilisez et que l’appareil photo
numérique se retrouve submergé, retirez immédiatement la batterie. L’hydrogène
peut s’enflammer ou exploser si un feu se trouve à proximité.
≥ Si vous plongez rapidement tout en tenant le boîtier ou si vous lancez le boîtier d’un
bateau dans la mer, une infiltration d’eau peut survenir en raison de la pression
élevée. Il ne s’agit pas d’un mauvais fonctionnement du boîtier. Plongez toujours
lentement dans l’eau.
≥ Le boîtier est conçu pour être utilisé à une profondeur allant jusqu’à 40 m/130 pieds.
Si vous plongez à une profondeur de plus de 40 m/130 pieds, une partie du boîtier
peut être endommagée de façon irrémédiable.
≥ En fermant le boîtier, assurez-vous qu’aucun corps étranger ne se trouve entre le
joint torique et la rainure. Un simple cheveu ou grain de sable peut causer une
infiltration d’eau.
DMW-MCFT3-VQT3M30.book 36 ページ 2011年1月13日 木曜日 午前10時22分

37
VQT3M30
Préparatifs -Mise en place de l’appareil photo numérique -
Lisez la section nota à la page 39 avant de mettre l’appareil photo
numérique en place.
Vérifiez que l’appareil photo numérique est réglé sur [OFF].
≥ Retirez la dragonne et l’étui en silicone de l’appareil photo numérique.
1
Appuyez sur
2
avec votre doigt tout en faisant glisser
1
pour ouvrir le loquet.
2 Installez l’appareil photo numérique dans le boîtier.
Insérez l’appareil photo dans le boîtier marin tel qu’illustré,
en prenant soin de l’insérer dans le bon sens.
≥
Vérifiez qu’il ne reste plus d’eau sur la surface de l’appareil photo numérique ou
à l’intérieur du boîtier.
≥ Faites attention de ne pas coincer le protecteur d’objectif 1.
3 Insérez le gel de silice (fourni).
≥
Utilisez toujours du gel de silice neuf.
Couvercle avant
Gel de silice
Appareil photo numérique
DMW-MCFT3-VQT3M30.book 37 ページ 2011年1月13日 木曜日 午前10時22分

38
VQT3M30
Préparatifs
-Mise en place de l’appareil photo numérique - (suite)
≥ En introduisant le gel de silice, pliez-le comme montré sur l’illustration ci-
dessous et introduisez-le aussi loin que possible. Si vous fermez le boîtier
alors que le gel de silice n’est pas totalement mis en place, celui-ci sera
pris dans le joint torique et causera une infiltration d’eau.
≥ Si la température de l’air est élevée et si la température de l’eau est basse, de la
condensation peut apparaître à l’intérieur du boîtier. Pour éviter une telle
situation, placez au préalable le gel de silice (fourni) dans le boîtier. Pour éviter
que le boîtier ne s’embue, placez le gel de silice environ 1 à 2 heures avant
d’utiliser le boîtier.
4 Fermez le loquet.
‘ Vérifiez que le loquet est correctement fermé.
Ne coincez pas la courroie etc. dans le loquet.
5 Après avoir installé l’appareil photo, vérifiez une fois de plus
l’absence d’infiltration d’eau dans le boîtier. (P36)
Gel de silice
DMW-MCFT3-VQT3M30.book 38 ページ 2011年1月13日 木曜日 午前10時22分

39
VQT3M30
∫ Nota
≥
Faites attention de ne pas salir le protecteur d’objectif avec des traces de doigts,
etc.
≥ Vérifiez encore une fois la bonne mise en place du joint torique dans sa rainure.
≥ Évitez d’ouvrir ou de fermer le boîtier lorsqu’il y a beaucoup de sable ou de
poussière et dans des endroits humides ou mouillés.
≥ Un changement soudain de l’humidité en raison d’une infiltration d’air humide dans
le boîtier pourrait causer de la condensation à l’intérieur de celui-ci.
≥ Pour prévenir la condensation, rangez l’appareil photo numérique dans un endroit
aussi sec que possible. De plus, assurez-vous que le gel de silice (fourni) soit
suffisamment sec avant de l’insérer dans le boîtier.
≥ Si de l’écran solaire ou de l’huile solaire colle au boîtier, nettoyez-le immédiatement
avec de l’eau tiède afin d’éviter la décoloration et de réduire l’étanchéité.
≥
Après l’utilisation de l’appareil photo numérique en mer ou sous l’eau, immergez-le dans
l’eau douce pendant environ 10 minutes. Lisez le manuel d’instructions pour les détails.
≥ Si des gouttes d’eau ou de la saleté sont présentes sur l’appareil, essuyez-le avec
un linge sec et déposez-le debout sur un linge sec pendant une période prolongée
et vérifiez l’absence d’eau. Mettez ensuite l’appareil en place à l’intérieur du boîtier.
Si un appareil photo numérique possédant une fonction de GPS, une boussole, un
altimètre (profondimètre) et un baromètre est installé sur le boîtier marin, le
positionnement ou les mesures peuvent ne pas être possibles ou peuvent comporter
des erreurs majeures.
DMW-MCFT3-VQT3M30.book 39 ページ 2011年1月13日 木曜日 午前10時22分

40
VQT3M30
Prises de vues
∫ Avant d’entrer dans l’eau, faites les vérifications suivantes
Vérifiez les point suivants avant de plonger.
≥
Reste-t-il suffisamment d’énergie dans la batterie?
≥ Y a-t-il suffisamment d’espace mémoire sur la carte?
≥ Est-ce que le joint torique est correctement mis en place dans sa rainure?
≥ Avez-vous vérifié l’absence d’infiltration d’eau dans le boîtier?
≥ Le loquet est-il fermement verrouillé?
∫ Prises de vues
1 Appuyez sur la touche OFF/ON et mettez l’appareil photo numérique
en marche.
2 Réglez [Sous-marin].
≥
Pour plus de détails, lisez le manuel d’utilisation de l’appareil photo numérique.
3 Dirigez la zone MPA de l’écran ACL sur le sujet que vous désirez
mettre au point.
4 Appuyez sur [AF-L ] pour faire la mise au point.
• Appuyez à nouveau sur [AF-L ] pour annuler.
5 Appuyez à fond sur le déclencheur pour prendre une photo.
∫ Nota
≥
Avant de placer l’appareil photo numérique dans le boîtier, nous vous conseillons de
régler à nouveau l’horloge.
(Pour plus de détails, lisez le manuel d’utilisation de l’appareil photo numérique.)
≥ S’il y a des particules qui flottent devant l’appareil photo, elles peuvent être mises
au point à la place du sujet.
≥ S’il y a des gouttes d’eau ou de la saleté sur le verre avant, vous pouvez ne pas être
capable de faire correctement la mise au point. Essuyez le verre avant, avant de
prendre des photos.
DMW-MCFT3-VQT3M30.book 40 ページ 2011年1月13日 木曜日 午前10時22分

41
VQT3M30
Conseils pour la prise de vue dans l’eau
Lorsque l’image est trop bleuâtre dans l’eau
1
Sélectionnez [Éq.blancs] à partir du menu du mode [Enr.].
2 Appuyez sur la touche [DISP.] pour afficher [Réglage].
3 Appuyez sur [AF-L ]/[ ] pour régler l’équilibre des blancs.
4 Appuyez sur [MENU/SET] pour finir.
≥ Vous pouvez également appuyer à mi-course sur le déclencheur pour finir.
Sélectionnez la meilleure image
Réglez le flash sur [ ].
Utilisation de la fonction de prises de vues en rafale avec réglage automatique de
l’exposition (pour modèles munis de cette fonction)
≥ Chaque fois que le déclencheur est appuyé, 3 photos avec des expositions
différentes sont automatiquement enregistrées. Vous pouvez choisir la photo
désirée parmi les 3 qui ont été prises.
Utilisation du mode rafale
≥ Lors de prises de vues
d’un
sujet à mouvement rapide (un poisson, par
exemple) en mode rafale, vous pouvez sélectionner votre photo préférée parmi
celles qui ont été prises.
∫ Nota
≥
Le réglage fin de l’équilibre des blancs (mode sous-marin) est également pris en
charge lors de l’enregistrement d’images animées.
L’équilibre des blancs peut être réglé en fonction de la profondeur de l’eau ou de vos
préférences.
≥ Pour plus d’informations, lire le manuel d’utilisation de l’appareil photo numérique.
FRA-MARINE BODY.fm 41 ページ 2011年11月11日 金曜日 午前10時8分

42
VQT3M30
Après utilisation
Après avoir fini de prendre des photos, suivez les étapes suivantes.
1 Immergez le boîtier dans de l’eau douce pendant environ 30 minutes
ou plus sans retirer l’appareil photo afin d’enlever tous les cristaux
de sel, etc.
≥
Appuyez sur toutes les touches de fonctionnement, etc. du boîtier afin
d’enlever toute l’eau de mer. Si les cristaux de sel ne sont pas retirés des
touches, etc., ceux-ci durciront et les touches deviendront inutilisables.
≥ Ne lavez pas le boîtier avec de l’eau à trop grand débit ou sous pression,
etc. car cela peut causer des infiltrations d’eau.
2 Essuyez l’eau avec un chiffon sec qui n’est pas imprégné de cristaux
de sel et séchez complètement le boîtier.
≥ Ne séchez pas le boîtier en l’exposant directement aux rayons du soleil. Ceci
peut
décolorer
ou endommager le boîtier ou bien accélérer la détérioration du
joint torique.
DMW-MCFT3-VQT3M30.book 42 ページ 2011年1月13日 木曜日 午前10時22分

43
VQT3M30
3 Ouvrez le couvercle arrière pour retirer l’appareil photo numérique.
Séchez vos mains avec soin
et utilisez votre doigt,
tel qu’illustré, pour retirer l’appareil photo numérique.
4 Retirez le joint torique du boîtier et vérifiez qu’il n’y ait aucune
saleté, etc. dans la rainure.
5 Vérifiez qu’il n’y ait aucune éraflure, etc. sur le joint torique pendant
que vous appliquez la graisse.
∫ Nota
Faites attention aux points suivants lorsque vous retirez l’appareil
photo du boîtier.
≥
Retirez l’appareil photo avec les mains propres. (Lavez vos mains avec de l’eau
douce et séchez-les avec soin.)
≥ Séchez complètement toute trace d’humidité de votre corps et de vos cheveux.
(Soyez particulièrement attentif à l’eau qui a pénétré dans votre combinaison de
plongée par les manches.)
DMW-MCFT3-VQT3M30.book 43 ページ 2011年1月13日 木曜日 午前10時22分

44
VQT3M30
Nettoyage et rangement
1
Lavez l’extérieur du boîtier avec de l’eau.
≥
Lavez l’extérieur du boîtier jusqu’à ce qu’il soit propre. (P42)
≥ Vérifiez que le joint torique est bien installé, assurez-vous de fermer le boîtier,
puis lavez seulement l’extérieur avec de l’eau.
≥ Essuyez toutes traces de saleté à l’intérieur du boîtier avec un chiffon doux et
humide.
∫ Nota
≥
Ne lavez pas le boîtier avec de l’eau sous pression car cela peut provoquer des
infiltrations d’eau. Retirez l’appareil photo avant de laver le boîtier avec de l’eau.
≥ Ne laissez pas l’appareil photo numérique dans le boîtier lorsque vous le rangez.
≥ Détachez le joint torique du boîtier marin et rangez-le afin qu’il ne s’assèche pas.
Pour plus de détails, lisez la page 45.
Lorsque le joint torique ne sera pas utilisé pendant une période prolongée, rangez-le
dans le sac de rangement en polyester exclusif après l’avoir retiré du boîtier.
DMW-MCFT3-VQT3M30.book 44 ページ 2011年1月13日 木曜日 午前10時22分

45
VQT3M30
Mises en garde
∫ Manipulation du joint torique
≥ N’utilisez pas d’alcool, de solvant ou de nettoyant chimique pour nettoyer le
joint torique. Ceci causera des dommages ou la détérioration du joint torique.
≥ Si vous ne prévoyez pas utiliser le boîtier pendant une période prolongée,
retirez le joint torique de la rainure, appliquez une mince couche de graisse
(fournie), placez-le dans le sac de rangement en polyester exclusif, puis
placez-le dans un endroit frais et sombre afin d’éviter que la surface ne soit
endommagée. Lorsque vous utilisez le joint torique à nouveau, vérifiez avec
soin que celui-ci n’est ni égratigné, ni endommagé, ni fendillé.
≥ Utilisez uniquement la graisse indiquée. Si vous utilisez d’autres types de
graisse, la surface du joint torique peut en être abîmée et causer des
infiltrations d’eau.
≥ Le joint torique entre en contact avec les côtés du boîtier et le rend hermétique. Ne
cognez pas, n’introduisez aucun corps étranger (saleté, sable, cheveux, etc.) et
n’éraflez pas le joint torique ou les côtés du boîtier.
≥ Utilisez le bout de vos doigts pour retirer le joint torique. N’utilisez pas d’objet
pointu, car cela peut érafler le joint torique.
≥ Après avoir retiré le joint torique de la partie arrière du boîtier, retirez-en toute
saleté, sable, cheveux ou autre corps étranger. Essuyez également la rainure du
joint torique et les parties intérieures du couvercle avant qui sont en contact avec le
joint torique.
≥ N’utilisez jamais un joint torique qui a été éraflé ou taché par de la saleté, etc. Ceci
causerait des infiltrations d’eau. Remplacez-le par un joint torique neuf.
≥ Après avoir remplacé le joint torique, après une longue période d’inutilisation, après
avoir fixé l’appareil photo, ou lorsque la batterie est remplacée, si le boîtier marin est
ouvert, vérifiez bien qu’il n’y ait pas de dommages ou de craquelures sur le joint
torique.
Après cela, fermez le boîtier marin, immergez-le dans l’eau (un bassin d’eau ou une
baignoire) pendant environ 3 minutes ou plus, puis vérifiez qu’il n’y ait aucune
infiltration d’eau. (P36)
≥ Les joints toriques sont des produits consommables. Bien que la durée de vie des
joints toriques dépende de la manière dont ils sont entretenus, de la fréquence à
laquelle ils sont utilisés et de leurs conditions de rangement, nous vous conseillons
de les remplacer chaque année même si vous ne voyez aucune éraflure.
DMW-MCFT3-VQT3M30.book 45 ページ 2011年1月13日 木曜日 午前10時22分

46
VQT3M30
Mises en garde (suite)
∫ Entretien
≥ N’utilisez pas les produits chimiques indiqués ci-dessous pour le nettoyage,
la protection antirouille, la protection antibuée ou la réparation. Leur usage
direct ou indirect (avec un vaporisateur chimique, etc.) sur le boîtier peut
fissurer celui-ci.
≥ Si la graisse reste collée à l’appareil photo numérique, essuyez-la avec un linge
doux et sec.
≥ Pour essuyer l’intérieur du boîtier, utilisez uniquement un chiffon sec et doux.
Essuyez l’intérieur du verre avant avec ce chiffon, avant et après l’utilisation afin
qu’il reste propre.
Substances chimiques
interdites
Mises en garde
Solvants organiques
volatiles/Détergents
chimiques
Ne pas nettoyer le boîtier au moyen de solvants
organiques volatiles comme l’alcool, l’essence ou des
diluants ou avec des détergents chimiques. Nettoyez
le boîtier avec de l’eau courante ou tiède.
Produits anticorrosifs
Ne pas utiliser de produits anticorrosifs car les parties
en métal du boîtier sont en acier inoxydable ou en
laiton. Lavez-les à l’eau douce.
Produits antibuée
Ne pas utiliser de produits antibuée disponibles dans
le commerce. Veillez à utiliser le gel de silice indiqué
dans ce manuel d’utilisation.
Adhésifs
Ne pas utiliser d’adhésifs pour la réparation. Si le
boîtier a besoin d’être réparé, consultez votre
revendeur.
DMW-MCFT3-VQT3M30.book 46 ページ 2011年1月13日 木曜日 午前10時22分

47
VQT3M30
∫ À propos du rangement et de la vérification après
l’utilisation
≥ Retirez toujours l’appareil photo numérique du boîtier.
≥
Veillez à ce qu’aucune saleté ou poussière n’adhère au joint torique.
≥ Séchez bien le boîtier à température ambiante et rangez-le dans un endroit frais à
l’abri de la lumière.
≥ Nous vous conseillons de faire vérifier le boîtier environ 3 ans après l’achat. Cette
vérification comprend le désassemblage et le nettoyage du boîtier, l’inspection de
tous ses éléments et leur réparation si nécessaire ainsi que la vérification de son
étanchéité en utilisant le même test hydrostatique que celui effectué avant l’achat.
Tous les frais de port sont à la charge du client.
≥ Ne désassemblez aucun élément, n’utilisez aucun accessoire qui ne serait pas
indiqué dans ce manuel d’utilisation et ne modifiez pas le boîtier. Si le boîtier ne
fonctionne pas correctement, consultez votre revendeur.
Spécifications
Modèles compatibles:
DMC-FT3/DMC-TS3 (En date de janvier 2011
¢
)
Dimensions: Environ 145 mm (L)k94 mm
(H)k52 mm (P)
[5,71
po (L)k3,70 po (H)k2,05 po (P)]
(parties en saillie non comprises)
Poids: Environ 356 g/0,785 lb
(incluant le diffuseur)
Matière: Polycarbonate
Structure étanche: Fermeture avec joint torique
Profondeur de
résistance à l’eau: 40 m/130 pieds
¢ Reportez-vous au manuel d’utilisation, au catalogue, au site Internet, etc.,
de l’appareil photo numérique pour les informations les plus récentes au
sujet des modèles qui peuvent être utilisés.
Imprimé au Japon
Panasonic Canada Inc.
5770 Ambler Drive,
Mississauga, Ontario
L4W 2T3
(905) 624-5010
www.panasonic.ca
Panasonic Corporation 2011
DMW-MCFT3-VQT3M30.book 47 ページ 2011年1月13日 木曜日 午前10時22分

48
VQT3M30
Inhalt
Vor der Verwendung . . . . . . . . . . . . . . . . . . . . . . . . . . 49
Zubehör . . . . . . . . . . . . . . . . . . . . . . . . . . . . . . . . . . . . 51
Handhabung und Pflege . . . . . . . . . . . . . . . . . . . . . . . 52
Bauteile . . . . . . . . . . . . . . . . . . . . . . . . . . . . . . . . . . . . 54
Was ist der O-Ring? . . . . . . . . . . . . . . . . . . . . . . . . . . . 55
Vorbereitung -Einsetzen des O-Rings- . . . . . . . . . . . . 56
Vorbereitung -Kontrollieren, dass das
Gehäuse wasserdicht ist- . . . . . . . . . . 60
Vorbereitung -Anbringen der Digitalkamera- . . . . . . . 61
Aufnahme von Bildern . . . . . . . . . . . . . . . . . . . . . . . . . 64
Tipps zur Aufnahme von Bildern im Wasser . . . . . . . . 65
Nach Gebrauch . . . . . . . . . . . . . . . . . . . . . . . . . . . . . . 66
Reinigung und Aufbewahrung . . . . . . . . . . . . . . . . . . . 68
Vorsichtshinweise . . . . . . . . . . . . . . . . . . . . . . . . . . . . 69
Spezifikationen . . . . . . . . . . . . . . . . . . . . . . . . . . . . . . . 71
DMW-MCFT3-VQT3M30.book 48 ページ 2011年1月13日 木曜日 午前10時22分

49
VQT3M30
Vor der Verwendung
≥ Dieses Unterwassergehäuse wurde für die Digitalkameras von Panasonic.
Sie können bis zu einer Wassertiefe von 40 m Spaß an Unterwasseraufnahmen
haben.
≥ Beim Eindringen von Wasser aufgrund Nachlässigkeit haftet Panasonic in keiner
Weise für Schäden an jeglichen im Gehäuse enthaltenen Produkten (Digitalkamera,
Batterien, Karte, etc.), Kosten für Fotografien oder sonstige Aufwendungen.
≥ Panasonic leistet außerdem keinen Schadenersatz für Unfälle, die zu Verletzungen
oder Sachschaden führen.
≥ Lesen Sie dazu die Bedienungsanleitung zu Ihrer Digitalkamera.
≥ Bevor Sie die Digitalkamera anbringen, das Gehäuse ca. 3 Minuten oder
länger in Wasser tauchen, um zu überprüfen, ob kein Wasser eindringt.
∫ Zum Umgang mit diesem Gehäuse
≥ Verwendung unter den folgenden Bedingungen:
• Wassertiefe: Bis zu 40 m
• Umgebungstemperatur: 0 oC bis 40 oC
≥ Das Gehäuse nicht in Wasser mit einer Temperatur über 40 °C verwenden. Die
Wärme kann das Gehäuse beschädigen oder zum Eindringen von Wasser führen.
≥ Das Gehäuse besteht aus stoßfestem Polykarbonat. Seien Sie jedoch bei der
Benutzung vorsichtig, das es leicht zerkratzt, wenn Bilder an felsigen Stellen, etc.
aufgenommen werden und kann durch Stöße wie durch Herunterfallen o.ä.
beschädigt werden. Bei Reisen im Auto, Schiff, Zug oder Flugzeug, das Gehäuse
gut verpacken, um jegliche direkte Stöße zu vermeiden, falls es herunterfallen sollte
und lassen Sie die Digitalkamera nicht im Gehäuse. Die Digitalkamera nur im
Gehäuse anbringen, wenn Sie diese eine kurze Strecke lang, wie z.B. vom
Flughafen zum Tauchort transportieren. (Das Verpackungsmaterial aus dem Kauf
des Gehäuses kann nicht zum Transportieren verwendet werden.)
≥ Beim Besteigen eines Flugzeugs kann der Wechsel des atmosphärischen Druck zur
Ausdehnung des Gehäuses führen und dadurch zu Beschädigungen. Entfernen Sie
den O-Ring, bevor Sie ein Flugzeug besteigen.
Legen Sie den abgenommenen O-Ring in den mitgelieferten, speziell dafür
vorgesehenen Polyesterbeutel.
≥ Lassen Sie die Digitalkamera nicht längere Zeit in einem Auto, auf einem
Schiff oder direkter Sonneneinstrahlung ausgesetzt. Das Gehäuse ist eine
luftdichte Vorrichtung, daher wird die Temperatur darin sehr hoch und es
kann zu Funktionsstörungen der Digitalkamera kommen. Lassen Sie die
Temperatur im Gehäuse nicht zu hoch werden.
DEUTSCH
DMW-MCFT3-VQT3M30.book 49 ページ 2011年1月13日 木曜日 午前10時22分

50
VQT3M30
Vor der Verwendung (Fortsetzung)
∫ Verwendung des Gehäuses bei hohen oder
niedrigen Temperaturen
≥ Wenn Sie das Gehäuse an feuchten oder heißen Orten öffnen und dann an einen
kühlen Ort oder unter Wasser bringen, kann es im Inneren des Gehäuses zu
Kondensation kommen, die Glasfläche sich trüben und die Digitalkamera
beschädigt werden.
≥ Wenn Sie das Gehäuse plötzlich von einem kalten Ort oder kaltem Wasser an einen
warmen Ort bringen, kann die Oberfläche sich trüben. Warten Sie mit dem
Aufnehmen von Bildern, bis sich das Gehäuse der Lufttemperatur angepasst hat.
∫ Zur Vorbereitung
≥ Öffnen oder schließen Sie das Gehäuse nicht, wo es Wasserspritzern
ausgesetzt ist oder Sand hineingeraten kann. Wir empfehlen das Öffnen oder
Schließen des Gehäuses in geschlossenen Räumen.
≥ Nehmen Sie das Ersetzender Batterie, der Karte, etc. und das Anbringen der
Digitalkamera in geschlossenen Räumen vor, wo wenig Feuchtigkeit vorhanden ist.
≥ Wenn Sie das Gehäuse am Tauchort öffnen oder schließen müssen, um die
Batterie oder die Karte zu ersetzen, halten Sie unbedingt die unten
aufgeführten Schritte ein.
• Wählen Sie einen Ort, an dem kein Wasser auf das Gehäuse spritzen und kein
Sand in dieses gelangen kann.
• Entfernen Sie jegliche Wassertropfen im Zwischenraum zwischen vorderem und
hinterem Geräteteil und auf der Schnalle. Verbleibende Wassertropfen mit einem
trockenen Tuch sorgfältig abreiben.
• Sorgfältig jegliche Wassertropfen auf dem Körper und den Haaren trockenreiben.
• Achten Sie besonders auf Wasser aus den Ärmeln Ihres Taucheranzugs.
• Berühren Sie die Digitalkamera nicht, wenn Ihre Hände mit Salzwasser befeuchtet
sind. Feuchten Sie zuvor ein Handtuch mit Süßwasser an und bringen Sie es in
einer Plastiktüte unter. Verwenden Sie dieses Handtuch, um jegliche
Wassertropfen oder Sand von Händen und Körper zu entfernen.
≥ Das Gehäuse ist nicht stoßfest. Wenn Sie einen schweren Gegenstand darauf
abstellen oder es Stöße erleidet, kann die Digitalkamera beschädigt werden. Seien
Sie bei der Verwendung des Gehäuses vorsichtig.
DMW-MCFT3-VQT3M30.book 50 ページ 2011年1月13日 木曜日 午前10時22分

51
VQT3M30
Zubehör
Beim ersten Öffnen der Verpackung überprüfen, ob das Gehäuse und
alle Zubehörteile enthalten sind und dass keine Versand- oder
Transportschäden am Gehäuse oder an jeglichen Zubehörteilen
vorliegen. Bei Unregelmäßigkeiten wenden Sie sich vor der
Verwendung des Gehäuses an Ihren Händler.
Verwenden Sie keine anderen Zubehörteile als die unten
aufgeführten.
Ersatz-O-Ring
VMG1798
*
Im speziell dafür
vorgesehenen
Polyesterbeutel
* Ein O-Ring ist bei der
Auslieferung bereits
am Gehäuse befestigt.
Kieselgel
(Trockenmittel)
(1 g/5 Stück)
VZG0371
Fett (für O-Ring)
VZG0372
Handriemen
VFC4190
Diffusor/Band
VYK3E56
≥
Sie können den Diffusor entfernen, wenn Sie ihn nicht verwenden.
Mit der Kennzeichnung auf der Rückseite
des Gehäuses ausrichten und anbringen.
Entfernen Anbringen
DMW-MCFT3-VQT3M30.book 51 ページ 2011年1月13日 木曜日 午前10時22分

52
VQT3M30
Handhabung und Pflege
≥ Stellen Sie dieses Gehäuse nicht an einem instabilen Ort ab.
• Fällt das Gehäuse auf Kopf oder Füße, führt dies zu Verletzungen und zu
Funktionsstörungen des Gehäuses.
≥ Nehmen Sie keinerlei Veränderungen am Gehäuse vor.
• Wenn Wasser in die Digitalkamera eindringt, weil Änderungen am Gehäuse
vorgenommen wurden, kann die Digitalkamera irreparabel beschädigt werden.
• Wenn Sie die Digitalkamera weiter benutzen, nachdem in diese Wasser
eingedrungen ist, kann dies einen Brand zur Folge haben.
≥ Verwenden Sie das Gehäuse ohne angemessene Einweisung nicht
beim Scuba-Tauchen.
• Sie sollten das Gehäuse nur beim Scuba-Tauchen einsetzen, wenn Sie über eine
angemessene Ausbildung und einen Schein für diesen Sport verfügen.
≥ Das Gehäuse, das Fett, das Kieselgel und den O-Ring stets
außerhalb der Reichweite von Kindern aufbewahren.
• Geraten Körperteile von Kindern in das Gehäuse, kann dies zu Verletzungen
führen.
• Kinder können das Fett, das Kieselgel oder den O-Ring versehentlich
verschlucken.
• Suchen Sie umgehend den Arzt auf, wenn Sie annehmen, dass ein Kind Fett,
Kieselgel oder den O-Ring verschluckt hat.
≥ Den Riemen unter Wasser nicht um den Hals hängen.
• Dieser könnte sich um den Hals winden und zu Ersticken oder schweren
Verletzungen führen.
≥ Die Hände sorgfältig von jeglichem Fett reinigen.
• Vermeiden Sie, dass Fett an Ihren Händen in Kontakt mit Mund oder Augen
gerät.
≥ Gerät Wasser in das Gehäuse, unterbrechen Sie die Verwendung
umgehend.
• Dies kann sonst zu einem Stromschlag, Verbrennungen oder Brand führen.
• Verständigen Sie Ihren Händler.
≥ Bei unvorhergesehenen Ereignissen während des Gebrauchs des
Gehäuses unter Wasser halten Sie sich beim Auftauchen bitte an alle
vorgeschriebenen Vorgehensweisen und Richtlinien zum
Druckausgleich.
• Wenn Sie zu schnell auftauchen, kann dies die Caissonkrankheit zur Folge
haben.
DMW-MCFT3-VQT3M30.book 52 ページ 2011年1月13日 木曜日 午前10時22分

53
VQT3M30
≥ Wenn das Gehäuse Rauch oder anormale Wärme, Gerüche oder
Geräusche erzeugt, unterbrechen Sie die Verwendung unverzüglich.
• Diese können zu einem Stromschlag, Verbrennungen oder Brand führen.
• Entnehmen Sie die Digitalkamera aus dem Gehäuse und entfernen Sie dann
umgehend die Batterien.
• Verständigen Sie Ihren Händler.
≥ Beim Öffnen des Gehäuses nach dem Eintreten von Wasser
vorsichtig vorgehen.
• Das eingedrungene Wasser kann herausgedrückt werden oder die
Gehäuserückseite abspringen.
≥ Lassen Sie das Gehäuse nicht an Orten mit hohen Temperaturen
zurück.
• Die Innentemperatur des Gehäuses erreicht besonders hohe Werte, wenn dieses
direkter Sonneneinstrahlung am Strand, auf einem Schiff, etc. ausgesetzt wird
oder wenn dieses im Sommer im geschlossenen Auto gelassen wird. Die Wärme
kann zu Beschädigung des Gehäuses oder seiner internen Teile führen.
• Wird eine Digitalkamera im Gehäuse angebracht, kann diese ebenso beschädigt
werden.
• Wenn Sie die daran angebrachte Digitalkamera verwenden, wenn die
Innentemperatur des Gehäuses sehr hoch ist, kann dies zum Eindringen von
Wasser, Kurzschluss oder Ausfall der Isolierung und so zu Brand oder
Funktionsstörungen führen.
≥ Berühren Sie die Digitalkamera oder die Batterie nicht mit feuchten
Händen.
• Dies kann zu Stromschlag oder Funktionsstörungen führen.
∫ Bei der Aufnahme von Bildern mit Blitzlicht
≥ Bei der Aufnahme von Bildern mit Blitzlicht können die Ecken des Bildes
verschwommen sein oder das Bild kann nicht gleichmäßig ausgeleuchtet sein.
≥ Bei der Aufnahme von Bildern mit Blitzlicht ist der verfügbare Blitzlichtbereich unter
Wasser geringer als auf dem Land.
DMW-MCFT3-VQT3M30.book 53 ページ 2011年1月13日 木曜日 午前10時22分

54
VQT3M30
Bauteile
1. Auslösetaste
2. Taste fur Videos
3. OFF/ON-Schalter zum Aus-/
Einschalten der Kamera
4. Zubehörschuh für externes
Blitzgerät von INON Inc.
¢1
5. Vorderes Gehäuse
6. Diffusor (beiliegend)
7. Vordere Glasscheibe
8. Zoom-Taste
9. Funktionstastenbereich
(Lesen Sie die
Bedienungsanleitung zur
Digitalkamera für Details zu
jeder Tastenfunktion.)
10. Hinteres Gehäuse
11. Schnalle
12. Sperrfreigabe-Schalter
13. Riemenöse
(zum Anbringen des in der
Lieferung enthaltenen
Handriemens und des Diffusors)
324
7
1
5
6
8
9
10
12
13
11
¢1 Dieser Zubehörschuh ist für ein externes Blitzgerät von INON Inc.
vorgesehen.
Für Informationen zu kompatiblen Blitzgeräten wenden Sie sich an INON Inc.
http://www.inon.co.jp/INON_WORLD_body.html
DMW-MCFT3-VQT3M30.book 54 ページ 2011年1月13日 木曜日 午前10時22分

55
VQT3M30
Was ist der O-Ring?
≥ Der O-Ring ist eine wasserdichte Dichtung, die für Unterwasserkameras, Uhren und
Tauchausrüstungen verwendet wird.
≥ Der O-Ring erhält das Gehäuse wasserdicht, indem er den Zwischenraum
zwischen dem hinteren und vorderen Gehäuseteil abdichtet.
∫ Wie der O-Ring das Gehäuse wasserdicht erhält
Das Gummi befindet sich in Kontakt mit den Gehäuseseiten, macht das
Gehäuse so wasserdicht und verhindert, dass über den Zwischenraum
Wasser eintritt.
Wird der O-Ring durch den Wasserdruck zusammengedrückt, dehnt
sich dessen Oberfläche aus und das Gehäuse wird so noch besser
abgedichtet.
Der O-Ring verhindert das Eindringen von Wasser durch den
gleichmäßigen Kontakt mit den Gehäuseseiten. Daher ist die
korrekte Pflege des O-Rings sehr wichtig. Fehlerhafte Pflege
kann zum Eindringen von Wasser führen.
O-Ring
Digital-Kamera
Vorderes Gehäuse
Hinteres Gehäuse
O-Ring O-Ring
DMW-MCFT3-VQT3M30.book 55 ページ 2011年1月13日 木曜日 午前10時22分

56
VQT3M30
Vorbereitung -Einsetzen des O-Rings-
Setzen Sie vor dem Anbringen einer Digitalkamera unbedingt zuerst
den O-Ring ein.
Waschen und trocknen Sie Ihre Hände vor der Handhabung des O-Rings
gründlich. Den O-Ring an einem sand- und staubfreien Ort einsetzen.
1 Den O-Ring zum Entfernen mit den Fingern lösen.
≥
Einen Teil des O-Rings mit zwei Fingerspitzen lösen und dann den gelösten Teil
anheben. Darauf achten, dass keine Kratzer durch Fingernägel am O-Ring
entstehen.
∫ Hinweis
≥
Verwenden Sie keine spitzen Gegenstände zum Entfernen des O-Rings, da er
dadurch beschädigt werden könnte.
O-Ring
O-Ring
DMW-MCFT3-VQT3M30.book 56 ページ 2011年1月13日 木曜日 午前10時22分

57
VQT3M30
2 Prüfen des O-Rings.
≥
Kontrollieren Sie, dass kein Schmutz, Sand, keine Haare, Salzkristalle, Fusseln
oder altes Fett auf dem O-Ring vorhanden sind. Stellen Sie dies fest, diese mit
einem weichen, trockenen Tuch entfernen.
≥ Es kann sich nicht erkennbarer Schmutz auf dem O-Ring befinden.
Kontrollieren Sie den O-Ring auf Schmutz, indem Sie mit dem Finger darüber
fahren.
≥ Achten Sie darauf, dass nach dem Abreiben keine Fasern des trockenen Tuchs
auf dem O-Ring zurückbleiben.
≥ Kontrollieren, dass der O-Ring nicht gerissen, verdreht, gequetscht, rissig oder
zerkratzt ist und kein Sand daran haftet. In diesen Fällen den O-Ring ersetzen.
3 Die Nut des O-Rings überprüfen.
≥
Sandkörner oder hart gewordene Salzkristalle können in die Nut des O-Rings
gelangen. Diese vorsichtig durch Aufsprühen von Luft oder mit einem
Baumwolltuch entfernen. Wenn Sie ein Baumwolltuch verwenden, achten Sie
darauf, dass dessen Fasern nicht in der Nut des O-Rings zurückbleiben.
≥ Prüfen Sie die Nut des vorderen und des hinteren Gehäuseteils (Seite auf der
sich der O-Ring befindet).
3
Salzkristalle
3Fusseln3Schmutz 3Sand 3Haare 3Staub
3Risse 3Verdrehung 3Quetschung 3Abblättern 3Kratzer 3
Staub,
anhaftender
Sand
DMW-MCFT3-VQT3M30.book 57 ページ 2011年1月13日 木曜日 午前10時22分

58
VQT3M30
Vorbereitung -Einsetzen des O-Rings- (Fortsetzung)
4 Tragen Sie das Fett auf (beiliegend).
Reinigen Sie die Oberfläche des O-Rings mit Fett für Dichtungsringe und
schmieren Sie ihn.
≥ Tragen Sie eine reiskorngroße Fettmenge (beiliegend) gleichmäßig mit der
Fingerkuppe auf den O-Ring auf. (Tragen Sie das Fett nicht mit Papier oder
Stoff auf. Die Papier- oder Stofffasern können am O-Ring haften bleiben.)
≥
Zu viel Fett am O-Ring führt zum Anhaften von Schmutz und Staub, was das
Eindringen von Wasser zur Folge hat. Nehmen Sie deshalb den O-Ring zwischen
Zeigefinger und Daumen und reiben Sie behutsam das überschüssige Fett ab.
≥ Wird das Fett für Dichtungsringe dünn und gleichmäßig aufgetragen, liegt der
O-Ring flexibel in der Nut des Unterwassergehäuses an und hält es luftdicht.
≥ Verwenden Sie nur das angegebene Fett. Bei Verwendung anderer
Fettarten kann die Oberfläche des O-Rings beschädigt werden und zum
Eindringen von Wasser führen.
5 Den O-Ring gleichmäßig in seine Nut einsetzen.
Kontrollieren Sie Folgendes:
≥ Dass kein Schmutz am O-Ring haftet.
≥ Dass der O-Ring nicht heraustritt.
≥ Dass der O-Ring nicht verdreht ist.
≥ Dass der O-Ring nicht zu stark gedehnt ist.
Falsch
Richtig
DMW-MCFT3-VQT3M30.book 58 ページ 2011年1月13日 木曜日 午前10時22分

59
VQT3M30
6 Letzte Überprüfung des O-Rings.
Überprüfen Sie Folgendes erneut:
≥ Dass kein Schmutz am O-Ring haftet.
≥ Dass der O-Ring nicht heraustritt.
≥ Dass der O-Ring nicht verdreht ist.
≥ Es sind keine Kratzer oder Quetschungen am O-Ring vorhanden.
Wischen Sie sämtliches Fett mit einem trockenen Tuch von den Händen.
Waschen Sie Ihre Hände danach sorgfältig mit reichlich Frischwasser.
7 Schließen Sie die Schnalle.
≥
Kontrollieren, ob kein Fremdmaterial an der Außenoberfläche des O-Rings oder
der Schnalle an der vorderen Geräteseite haftet und dann das Gehäuse
schließen.
∫ Hinweise
≥
Um das Gehäuse vollkommen luftdicht zu halten, Kratzer auf der Oberfläche des
O-Rings vermeiden, die mit den Gehäuseseiten in Kontakt kommt.
≥ Nie einen O-Ring verwenden, der durch Schmutz, etc. zerkratzt oder beschädigt
wurde. Dies führt zum Eindringen von Wasser.
≥ Bei jeder Verwendung des Gehäuses den O-Ring entfernen und kontrollieren, dass
sich kein Schmutz, Sand, Haare oder anderes Fremdmaterial in der Nutz des
O-Rings befindet und dann einen dünne Schicht Fett (beiliegend) auftragen. Wird
zu viel Fett aufgetragen, können Schmutz und Staub am O-Ring haften bleiben und
zum Eindringen von Wasser führen.
≥ Nehmen Sie zur Sicherheit einen O-Ring als Ersatz mit, sollte der benutzte
beschädigt oder verkratzt sein.
DMW-MCFT3-VQT3M30.book 59 ページ 2011年1月13日 木曜日 午前10時22分

60
VQT3M30
Vorbereitung
-Kontrollieren, dass das Gehäuse wasserdicht ist-
Nach dem Einsetzen des O-Rings überprüfen, dass kein Wasser in das
Gehäuse eindringt, indem Sie es 3 Minuten lang in einen Wassertank,
eine Badewanne, etc. Eintauchen, bevor Sie die Digitalkamera
anbringen.
≥
Das Gehäuse nicht in Wasser mit einer Temperatur über 40 °C verwenden. Die
Wärme kann das Gehäuse beschädigen oder zum Eindringen von Wasser führen.
‘ Denselben Test nach dem Anbringen der Digitalkamera im Gehäuse
durchführen. (P61)
∫ Hinweise
≥
Steigen Blasen vom Gehäuse auf, wenn es unter Wasser getaucht ist oder befindet
sich Wasser im Gehäuse, wenn Sie es aus dem Wasser nehmen, ist es nicht
wasserdicht. Wenden Sie sich in diesem Fall an Ihren Händler.
≥ Gerät während der Verwendung Wasser in das Gehäuse und die Digitalkamera wird
ins Wasser getaucht, unverzüglich die Batterie entfernen. Wasserstoff kann zu
Brand oder Explosion führen, wenn sich offenes Feuer in der Nähe befindet.
≥ Wenn Sie schnell ins Wasser tauchen, während Sie das Gehäuse halten oder das
Gehäuse von einem Schiff ins Meer werfen, kann es durch den hohen Druck zum
Eindringen von Wasser kommen. Hierbei handelt es sich nicht um eine
Funktionsstörung des Gehäuses. Tauchen Sie stets langsam ins Wasser ein.
≥ Das Gehäuse ist darauf ausgelegt, auf einer Tiefe von bis zu 40 m verwendet zu
werden. Wenn Sie tiefer als 40 m tauchen, können Teile des Gehäuses irreparabel
beschädigt werden.
≥ Beim Schließen des Gehäuses darauf achten, dass keinerlei Fremdmaterial
zwischen den O-Ring und die Nut des O-Rings gelangt. Auf eine Haarsträhne oder
ein Sandkorn kann zum Eindringen von Wasser führen.
DMW-MCFT3-VQT3M30.book 60 ページ 2011年1月13日 木曜日 午前10時22分

61
VQT3M30
Vorbereitung -Anbringen der Digitalkamera-
Lesen Sie die Hinweise auf Seite 63, bevor Sie die Digitalkamera anbringen.
Achten Sie darauf, dass die Digitalkamera auf [OFF] gestellt ist.
≥ Entfernen Sie den Gurt und die Silikonhülle von der Digitalkamera.
1 Drücken Sie 2
mit dem Finger nach oben, während 1 zum Öffnen
der Schnalle verschoben wird.
2 Die Digitalkamera am Gehäuse anbringen.
Achten Sie auf die Ausrichtung der Digitalkamera und legen Sie sie so
wie in der Abbildung zu sehen ins Gehäuse ein.
≥ Achten Sie darauf, dass sich weder auf der Kamera noch im Gehäuse
Wasserreste befinden.
≥ Achten Sie darauf, nicht an die Schattenblende 1 zu stoßen.
3 Legen Sie das Kieselgel ein (beiliegend).
≥
Stets neues Kieselgel verwenden.
Vorderes Gehäuse
Kieselgel
Digital-Kamera
DMW-MCFT3-VQT3M30.book 61 ページ 2011年1月13日 木曜日 午前10時22分

62
VQT3M30
Vorbereitung -Anbringen der Digitalkamera- (Fortsetzung)
≥ Beim Einlegen des Kieselgels, dieses wie in der Abbildung unten biegen
und dann so weit wie möglich einschieben. Schließen Sie das Gehäuse
bei nicht vollständig eingeschobenem Kieselgel, gerät dieses in den
O-Ring und führt zum Eindringen von Wasser.
≥ Bei hoher Luft- und niedriger Wassertemperatur kann im Inneren des Gehäuses
Kondensation auftreten. Um Kondensation zu verhindern, legen Sie vorher das
mitgelieferte Kieselgel ins Gehäuse. Um ein Beschlagen des Gehäuses zu
vermeiden, das Kieselgel ca. 1 bis 2 Stunden vor dem Verwenden des
Gehäuses einlegen.
4 Schließen Sie die Schnalle.
‘
Kontrollieren Sie, ob die Schnalle fest verschlossen ist.
Nicht den Gurt usw. in die Schnalle einführen.
5 Nach dem Anbringen der Digitalkamera ein weiteres Mal überprüfen,
ob kein Wasser in das Gehäuse eindringt. (P60)
Kieselgel
DMW-MCFT3-VQT3M30.book 62 ページ 2011年1月13日 木曜日 午前10時22分

63
VQT3M30
∫ Hinweise
≥
Achten Sie darauf, dass die Schattenblende nicht durch Fingerabdrücke usw.
schmutzig wird.
≥ Ein weiteres Mal überprüfen, ob der O-Ring gleichmäßig in die Nut des O-Rings
eingesetzt ist.
≥ Vermeiden Sie das Öffnen und Schließen des Gehäuses an Orten mit viel Sand
oder Staub oder feuchten oder nassen Stellen.
≥
Falls sich die Luftfeuchtigkeit plötzlich ändert, weil feuchte Luft in das Gehäuse eintritt,
kann innerhalb des Gehäuses Kondensation entstehen.
≥ Um Kondensation zu verhindern, verwahren Sie die Digitalkamera an einem so
trockenen Ort wie möglich. Prüfen Sie außerdem, ob das mitgelieferte Kieselgel
ausreichend trocken ist, bevor Sie es einlegen.
≥ Gerät Sonnenschutzmittel oder –öl auf das Gehäuse, dies unverzüglich mit
lauwarmem Wasser abwaschen, um einer verringerten Wasserdichtigkeit oder
Entfärbung vorzubeugen.
≥
Tauchen Sie das Gehäuse ca. 10 Minuten lang vollständig in Süßwasser ein, nachdem
Sie die Digitalkamera am Meer oder im Wasser verwendet haben. Für genauere
Hinweise informieren Sie sich in der Bedienungsanleitung.
≥
Falls sich Wasserspritzer oder Schmutz auf der Kamera befinden, wischen Sie sie mit
einem trockenen Tuch ab, stellen Sie die Kamera dann eine Zeit lang aufrecht auf eine
trockene, saugfähige Unterlage und überprüfen Sie dann, ob das Wasser vollständig
entfernt ist. Bringen Sie danach die Kamera an.
Wenn eine Digital-Kamera mit GPS-Funktion, Kompass, Höhenmesser
(Tiefenmesser) und Barometer an das Meerwassergehäuse befestigt wird, könnte
die Positionierung oder Messungen nicht möglich sein bzw. könnten größere Fehler
enthalten.
DMW-MCFT3-VQT3M30.book 63 ページ 2011年1月13日 木曜日 午前10時22分

64
VQT3M30
Aufnahme von Bildern
∫ Prüfungen vor der Verwendung im Wasser
Vor dem Tauchen Folgendes überprüfen.
≥
Verbleibt ausreichend Batterieleistung?
≥ Ist ausreichend Speicher auf der Karte?
≥ Ist der O-Ring gleichmäßig in die Nut des O-Rings eingesetzt?
≥ Haben Sie kontrolliert, dass kein Wasser in das Gehäuse eindringt?
≥ Ist die Schnalle fest verschlossen?
∫ Aufnahme von Bildern
1 Drücken Sie die OFF/ON-Taste, um die Digitalkamera einzuschalten.
2 Satz [Unter Wasser].
≥
Lesen Sie wegen Details in der Bedienungsanleitung der Digitalkamera nach.
3 Den AF-Bereich auf dem LCD-Monitor auf das scharfzustellende
Objekt richten.
4 Drücken Sie [AF-L ] zum Scharfstellen.
• Drücken Sie erneut [AF-L ] zum Löschen.
5 Die Auslösetaste ganz drücken, um das Bild aufzunehmen.
∫ Hinweise
≥
Vor dem Anbringen der Kamera am Gehäuse empfehlen wir das erneute Einstellen der
Uhr. (Lesen Sie wegen Details in der Bedienungsanleitung der Digitalkamera nach.)
≥ Befinden sich schwebende Teilchen vor der Kamera, kann die Scharfeinstellung auf
diese anstatt auf das Objekt erfolgen.
≥ Befinden sich Wassertropfen oder Schmutz auf der vorderen Glasscheibe, kann die
Scharfeinstellung vielleicht nicht korrekt erfolgen. Achten Sie darauf, die vordere
Scheibe vor der Aufnahme abzureiben.
DMW-MCFT3-VQT3M30.book 64 ページ 2011年1月13日 木曜日 午前10時22分

65
VQT3M30
Tipps zur Aufnahme von Bildern im Wasser
Das Bild ist im Wasser zu bläulich
1
Wählen Sie [Weißabgleich] im [Rec] Menü Modus aus.
2 Drücken Sie [DISP.], um [Feineinst] anzuzeigen.
3 Drücken Sie [AF-L ]/[ ], um den Weißabgleich einzustellen.
4 Drücken Sie [MENU/SET], um zu beenden.
≥ Sie könne zum Beenden auch die Auslösetaste halb drücken.
Wählen Sie das beste Bild
Stellen Sie den Flash auf [ ].
Gebrauch der Auto Bracket-Funktion (bei Modellen mit Auto Bracket-Funktion)
≥ Bei jedem Drücken der Auslösetaste werden automatisch 3 Bilder mit
verschiedener Belichtung aufgenommen. Sie können das gewünschte Bild
unter den 3 Bildern aussuchen.
Verwendung des Burst-Modus
≥ Beim Aufnehmen von Bildern eines sich schnell bewegenden Objektes (ein
Clownfisch, usw.), können Sie das von Ihnen bevorzugte Bild nach der
Aufnahme im Burst-Modus auswählen.
∫ Hinweis
≥
Die Feineinstellung des Weißabgleichs (Unterwassermodus) ist auch bei
Videoaufnahmen möglich.
Der Weißabgleich kann auf die Wassertiefe bzw. die gewünschte Wirkung eingestellt
werden.
≥ Für weitere Informationen siehe Bedienungsanleitung der Digitalkamera.
GER-BODY.fm 65 ページ 2011年11月11日 金曜日 午前10時9分

66
VQT3M30
Nach Gebrauch
Nach der Bildaufnahme die folgenden Schritte ausführen.
1 Das Gehäuse ca. 30 Minuten oder mehr in Süßwasser tauchen, ohne
die Digitalkamera zu entfernen, um jegliche Salzkristalle, etc. zu
entfernen.
≥
Alle Bedienknöpfe etc. auf dem Gehäuse drücken, um jegliches
Salzwasser zu entfernen. Werden die Salzkristalle nicht von den Knöpfen,
etc. Entfernt, werden diese hart und mit der Zeit unbenutzbar.
≥ Das Gehäuse nicht unter fließendem oder unter Druck stehendem Wasser,
o.ä. waschen, da dies zum Eindringen von Wasser führen kann.
2 Das Wasser mit einem trockenen Tuch abreiben, an dem keine
Salzkristalle haften und dann vollkommen trockenreiben.
≥ Das Gehäuse nicht durch direkte Sonneneinstrahlung trocknen. Dies kann das
Gehäuse entfärben oder beschädigen oder den Verschleiß des O-Rings
beschleunigen.
DMW-MCFT3-VQT3M30.book 66 ページ 2011年1月13日 木曜日 午前10時22分

67
VQT3M30
3 Die Geräterückseite öffnen, um die Digitalkamera zu entfernen.
Trocknen Sie sich zunächst sorgfältig die Hände, setzen Sie dann
den Zeigefinger wie in der Abbildung zu sehen ein und nehmen Sie
die Digitalkamera heraus.
4 Den O-Ring aus dem Gehäuse entfernen und sicherstellen, dass
keine Rückstände, o.ä. in der Nut des O-Rings vorhanden sind.
5 Beim Auftragen des Fetts überprüfen, ob sich keine Kratzer, etc. auf
dem O-Ring befinden.
∫ Hinweise
Achten Sie auf folgende Punkte, wenn Sie die Digitalkamera herausnehmen.
≥ Die Kamera mit sauberen Händen entfernen. (Hände mit Süßwasser waschen und
sorgfältig abtrocknen.)
≥ Trocknen Sie jegliche Feuchtigkeit auf Körper und Haar sorgfältig ab. (Achten Sie
insbesondere auf aus den Ärmeln des Taucheranzugs austretendes Wasser.)
DMW-MCFT3-VQT3M30.book 67 ページ 2011年1月13日 木曜日 午前10時22分

68
VQT3M30
Reinigung und Aufbewahrung
1
Die Außenseite des Gehäuses mit Wasser abwaschen.
≥
Die Außenseite des Gehäuses mit Wasser sauberwaschen. (P66)
≥ Überprüfen Sie, dass der O-Ring sicher eingesetzt ist, vergewissern Sie sich,
dass das Gehäuse geschlossen ist, und reinigen Sie dann nur die Außenseite
mit Wasser.
≥ Jeglichen Schmutz im Inneren des Gehäuses mit einem nassen, weichen Tuch
abreiben.
∫ Hinweise
≥
Das Gehäuse nicht mit unter hohem Druck stehenden Wasser abwaschen, da dies
zum Eindringen von Wasser führen kann. Die Digitalkamera entfernen, bevor Sie
das Gehäuse mit Wasser reinigen.
≥ Lassen Sie die Digitalkamera zur Aufbewahrung nicht im Gehäuse.
≥ Nehmen Sie den O-Ring vom Unterwassergehäuse ab und lagern sie ihn so,
dass er nicht austrocknen kann. Genauere Hinweise dazu finden Sie auf Seite 69.
Wenn Sie den O-Ring für längere Zeit lagern, legen Sie ihn nach dem Abnehmen in
den mitgelieferten, speziell dafür vorgesehenen Polyesterbeutel.
DMW-MCFT3-VQT3M30.book 68 ページ 2011年1月13日 木曜日 午前10時22分

69
VQT3M30
Vorsichtshinweise
∫ Handhabung des O-Rings
≥ Verwenden Sie weder Alkohol, Verdünner, noch chemische Reinigungsmittel
zum Reinigen des O-Rings. Dies führt zu Beschädigungen oder einem
schnelleren Verschleiß des O-Rings.
≥ Falls Sie das Unterwassergehäuse für längere Zeit nicht verwenden, nehmen
Sie den O-Ring aus der O-Ring-Nut, tragen Sie eine dünne Schicht des
mitgelieferten Fetts auf, legen Sie den Ring in den speziell dafür
vorgesehenen Polyesterbeutel und lagern Sie ihn an einem kühlen, dunklen
Ort, um zu verhindern, dass die Oberfläche beschädigt wird. Wenn Sie den
O-Ring erneut benutzen, untersuchen Sie vorher, ob dieser keine Kratzer oder
Risse aufweist.
≥ Verwenden Sie nur das angegebene Fett. Bei Verwendung anderer Fettarten
kann die Oberfläche des O-Rings beschädigt werden und es kann zum
Eindringen von Wasser kommen.
≥ Der O-Ring kommt mit den Geräteseiten in Kontakt und macht das Gehäuse
wasserdicht. Nicht gegen den O-Ring oder die Geräteseiten stoßen,
Fremdmaterialien hineingeraten lassen (Schmutz, Sand, Haar, etc.) oder den
O-Ring oder die Seiten des Gehäuses verkratzen.
≥ Verwenden Sie die Fingerspitzen, um den O-Ring zu entfernen. Verwenden Sie
keine spitzen Gegenstände, da diese den O-Ring verkratzen könnten.
≥ Nach dem Entfernen des O-Rings aus der Geräterückseite jeglichen Schmutz,
Sand, Haare oder andere Fremdmaterialien darauf abreiben. Ebenso die Nut des
O-Rings und die Innenseiten der Vorderseite des Gehäuses abreiben, die mit dem
O-Ring in Kontakt kommen.
≥ Nie einen O-Ring verwenden, der durch Schmutz, o.ä. beschädigt wurde. Dies kann
zum Eindringen von Wasser führen. Durch einen neuen O-Ring ersetzen.
≥ Wenn Sie den O-Ring ausgetauscht haben, wenn Sie das Gehäuse längere Zeit
nicht verwendet haben, wenn Sie Einstellungen an der Digitalkamera vorgenommen
haben, den Akku ausgetauscht haben usw., untersuchen Sie den O-Ring beim
Öffnen des Unterwassergehäuses sorgfältig auf Schäden und Risse.
Schließen Sie das Unterwassergehäuse nach der Überprüfung, tauchen Sie es
mindestens 3 Minuten lang in Wasser (große Schüssel oder Badewanne) und
überprüfen Sie sorgfältig, ob kein Wassereintritt erfolgt. (P60)
≥ O-Ring sind Verbrauchsmaterialien. Obwohl die Lebensdauer von O-Ringen davon
abhängt, wie gut sie gewartet und wie oft sie benutzt werden und von ihren
Lagerbedingungen, empfehlen wir, diese einmal im Jahr zu ersetzen, auch wenn
Sie keine Kratzer erkennen können.
DMW-MCFT3-VQT3M30.book 69 ページ 2011年1月13日 木曜日 午前10時22分

70
VQT3M30
Vorsichtshinweise (Fortsetzung)
∫ Zur Wartung
≥ Verwenden Sie keine der unten gezeigten Chemikalien zum Reinigen, als
Rostschutz, zum Entfernen des Beschlags oder für Reparaturen. Falls Sie
diese Mittel direkt oder indirekt (z. B. in einem Spray, das entsprechende
Chemikalien enthält) auf dem Gehäuse anwenden, kann es Risse bekommen.
≥ Haftet Fett an der Digitalkamera, reiben Sie es mit einem weichen, trockenen Tuch
ab.
≥ Zum Abreiben der Innenseite des Gehäuses nur ein weiches, trockenes Tuch
verwenden. Die Innenseite der vorderen Glasscheibe vor und nach dem Gebrauch
mit einem weichen, trockenen Tuch abreiben, um das Glas sauber zu halten.
Verbotene Chemikalien Vorsichtsmaßnahmen
Flüchtige organische
Lösungsmittel/
Chemische
Reinigungsmittel
Reinigen Sie das Gehäuse nicht mit flüchtigen
organischen Lösungsmitteln wie Alkohol, Benzin oder
Verdünner bzw. chemischen Reinigungsmitteln. Reinigen
Sie es mit Süßwasser oder lauwarmem Wasser.
Korrosionsschutzmittel
Verwenden Sie keine Korrosionsschutzmittel, da die
Metallteile an diesem Gehäuse aus rostfreiem Stahl oder
Messing bestehen. Reinigen Sie diese mit Süßwasser.
Mittel zum Schutz gegen
Trübung
Verwenden Sie keine handelsüblichen Wirkstoffe gegen
Trübung von Glas. Verwenden Sie unbedingt das in dieser
Bedienungsanleitung angegebene Kieselgel.
Klebstoffe
Verwenden Sie keine Klebstoffe zum Reparieren. Ist
eine Reparatur des Gehäuses erforderlich,
verständigen Sie Ihren Händler.
DMW-MCFT3-VQT3M30.book 70 ページ 2011年1月13日 木曜日 午前10時22分

71
VQT3M30
∫ Zur Aufbewahrung und Inspektion nach der Benutzung
≥ Die Digitalkamera stets aus dem Gehäuse nehmen.
≥ Vergewissern Sie sich, dass kein Schmutz oder Staub am O-Ring haftet.
≥ Trocknen Sie das Gehäuse bei Raumtemperatur und verwahren Sie es dann an
einem kühlen, dunklen Ort.
≥ Wir empfehlen eine Inspektion des Gehäuses ca. 3 Jahre nach Erwerb. Diese
Inspektion umfasst das Zerlegen und Reinigen des Gehäuses, Inspizieren aller
Teile und deren Reparatur, wenn erforderlich und die Überprüfung der
Wasserdichtigkeit des Gehäuses unter Verwendung derselben hydrostatischen
Testausrüstung, die vor dem Kauf eingesetzt wurde. Alle Transportkosten sind vom
Kunden zu tragen.
≥ Keinerlei Teile zerlegen und kein Zubehör verwenden, das nicht in der
Bedienungsanleitung aufgeführt ist und keine Veränderungen am Gehäuse
anbringen. Bei Funktionsstörungen des Gehäuses verständigen Sie Ihren Händler.
Spezifikationen
Kompatibles Modell: DMC-FT3/DMC-TS3 (Stand Januar 2011
¢
)
Abmessungen: Ca. 145 mm (W)k94 mm (H)k52 mm (D)
(ohne hervorstehenden Teil)
Gewicht: Ca. 356 g (einschl. Streulinse)
Material: Polykarbonat
Wasserdicht gebaut: O-Ring-Dichtung
Wasserdicht bis: 40 m
¢ Für die neuesten Informationen zu den verwendbaren Modellen, siehe in
der Bedienungsanleitung, im Katalog, auf der Internetseite, usw. zur
Digitalkamera.
DMW-MCFT3-VQT3M30.book 71 ページ 2011年1月13日 木曜日 午前10時22分

72
VQT3M30
Indice
Antes del uso . . . . . . . . . . . . . . . . . . . . . . . . . . . . . . . . 73
Accesorios . . . . . . . . . . . . . . . . . . . . . . . . . . . . . . . . . . 75
Manejo y Cuidado. . . . . . . . . . . . . . . . . . . . . . . . . . . . . 76
Componentes . . . . . . . . . . . . . . . . . . . . . . . . . . . . . . . . 78
¿Qué es el anillo tórico? . . . . . . . . . . . . . . . . . . . . . . . . 79
Preparación -Ajuste del anillo tórico-. . . . . . . . . . . . . . 80
Preparación -Control de lo impermeable
del estuche-. . . . . . . . . . . . . . . . . . . . . . 84
Preparación -Unión de la cámara digital- . . . . . . . . . . 85
Sacar imágenes . . . . . . . . . . . . . . . . . . . . . . . . . . . . . . 88
Consejos para sacar imágenes en el agua. . . . . . . . . . 89
Después del uso . . . . . . . . . . . . . . . . . . . . . . . . . . . . . . 89
Limpieza y almacenamiento . . . . . . . . . . . . . . . . . . . . . 91
Precauciones para el uso . . . . . . . . . . . . . . . . . . . . . . . 91
Especificaciones . . . . . . . . . . . . . . . . . . . . . . . . . . . . . . 93
DMW-MCFT3-VQT3M30.book 72 ページ 2011年1月13日 木曜日 午前10時22分

73
VQT3M30
Antes del uso
≥ Este estuche marino ha sido diseñado para las cámaras digitales de Panasonic.
Puede gozar de la toma de imágenes submarinas a una profundidad hasta 40 m.
≥ En el caso de infiltración debida a escaso cuidado, Panasonic no se responsabiliza
por los daños padecidos por cualquier producto (cámara digital, baterías, tarjeta,
etc.) que quepa en este estuche, los costes fotográficos o cualquier otros gastos.
≥ Panasonic no proporciona ninguna compensación por accidentes que condujesen a
heridas o daños a la propiedad.
≥ Lea las instrucciones de funcionamiento de su cámara digital.
≥ Antes de unir la cámara digital, sumerja el estuche en el agua durante
3 minutos o más para comprobar que no haya infiltración de agua.
∫ Acerca del manejo del estuche
≥ Utilice teniendo en cuenta las siguientes condiciones.
• Profundidad del agua: Hasta 40 m
• Temperatura ambiente: 0 oC a 40 oC
≥ No use el estuche en agua por encima de los 40 °C. El calor puede dañar el
estuche o causar infiltración de agua.
≥ El estuche está hecho de policarbonato resistente al impacto, sin embargo ponga
cuidado cuando lo va a usar. Él puede arañarse fácilmente cuando toma imágenes
en lugares con escollos etc. y puede dañarse por el impacto debido a caída etc.
Cuando viaja en coche, buque, avión embale con esmero el estuche para evitar un
impacto directo en el caso de que se caiga y no deje la cámara digital dentro del
estuche. Sólo una la cámara digital al estuche cuando la lleva por cortas distancias
como la del aeropuerto al lugar del buceo (para transportarlo, no puede volver a
usar el material con el que fue embalado al momento de la compra).
≥ Cuando se embarca en un avión, el cambio de presión atmosférica podría hacer
expandir el interior del estuche causándole daño. Quite el anillo tórico antes de
embarcarse en un avión.
Inserte el anillo tórico quitado en la especial bolsa de poliéster suministrada.
≥ No deje la cámara digital en el estuche por largos períodos de tiempo dentro
de un coche, un buque, o bien expuesto a la luz directa del sol etc. El estuche
es un dispositivo estanco al aire así que la temperatura dentro del estuche va
a subir mucho y la cámara podría dejar de funcionar correctamente. No deje
que la temperatura dentro del estuche aumente demasiado.
ESPAÑOL
DMW-MCFT3-VQT3M30.book 73 ページ 2011年1月13日 木曜日 午前10時22分

74
VQT3M30
Antes del uso (continuación)
∫ Uso del estuche a altas o bajas temperaturas
≥ Si abre o cierra el estuche donde haya humedad o calor y luego va a un lugar frío o
bien va a bucear, podría tener lugar condensación dentro del estuche, ponerse
empañada la superficie del cristal y dañarse la cámara digital.
≥ Si de repente desplaza el estuche de un lugar, o agua, frío a uno caliente, podría
empañarse la superficie del cristal. Espere hasta que el estuche se acerque a la
temperatura del aire antes de tomar las imágenes.
∫ Acerca de la preparación
≥ No abra el estuche ni lo cierre donde puede rociarse por el agua o done pueda
entra arena en él. Le recomendamos que lo abra o lo cierra en casa.
≥ Reemplace la batería, la tarjeta etc. y una la cámara digital en casa donde haya
poca humedad.
≥ Si tiene que abrir o cerrar el estuche en lugares de buceo para reemplazar la
batería o la tarjeta, tenga cuidado de seguir los pasos siguientes.
• Elija un lugar donde el estuche no pueda ser rociado con agua o entrar arena en
su interior.
• Quite soplando cualquier gota de agua en el espacio entre la parte delantera y la
trasera del estuche y en la hebilla. Saque enteramente las gotas que quedan de
agua con un trapo seco.
• Seque enteramente cualquier gota de agua de su cuerpo o pelo.
• Ponga cuidado en el agua que pueda caer de las mangas de su traje térmico.
• No toque la cámara digital si sus manos están mojadas de agua del mar. Moje
una toalla con agua fresca y la coloque en una bolsa de poliéster de antemano.
Emplee esta toalla para sacar las gotas de agua o arena de su mano o cuerpo.
≥ Este estuche no absorbe los golpes. Si coloca un objeto pesado encima del
estuche o lo golpee, la cámara digital podría dañarse. Ponga cuidado cuando usa el
estuche.
DMW-MCFT3-VQT3M30.book 74 ページ 2011年1月13日 木曜日 午前10時22分

75
VQT3M30
Accesorios
Cuando antes abre el paquete, asegúrese de que estén incluidos
tanto el estuche como todos los accesorios y de que ambos no
hayan padecido daño alguno durante la distribución o el transporte.
En el caso de que encontrase algo insólito, llame a su comerciante
antes de utilizar el estuche.
No utilice ningún accesorio salvo los detallados a continuación.
Anillo tórico de repuesto
VMG1798
* En la especial bolsa
de poliéster
* Una ya se montó de
antemano en la
unidad.
Silicagel (Desecante)
(1 g/5 piezas)
VZG0371
Grasa (para el anillo
tórico)
VZG0372
Correa de mano
VFC4190
Difusor/Cadena
VYK3E56
≥ Puede quitar este difusor cuando no lo utiliza.
Remoción Unión
Alinee la marca de la parte trasera
del estuche y únalo.
DMW-MCFT3-VQT3M30.book 75 ページ 2011年1月13日 木曜日 午前10時22分

76
VQT3M30
Manejo y Cuidado
≥ No coloque el estuche donde pueda caerse.
• Por si se cae el estuche en su cabeza o pie, él herirá a usted y causará al
estuche un funcionamiento defectuoso.
≥ Nunca modifique el estuche.
• Si se filtra agua dentro de la cámara debido a que el estuche fue modificado, la
cámara digital podría dañarse sin posibilidad de ser reparada.
• Si sigue utilizando la cámara digital después de filtrarse agua en ella, eso podría
hacerla incendiar.
≥ No utilice el estuche para el buceo sin adecuado adiestramiento.
• El estuche tendría que ser hecho funcionar en el buceo sólo si usted tiene
adecuado entrenamiento y certificación para este deporte.
≥ Nunca deje el estuche, la grasa, el silicagel o el anillo tórico al
alcance de los niños.
• Si el estuche agarra una cualquier parte del cuerpo del niño puede causarle heridas.
• Los niños podrían por casualidad tragarse la grasa, el silicagel e el anillo tórico.
• Llame de inmediato a un médico por si duda que el niño pueda haberse tragado
la grasa, el silicagel o el anillo tórico.
≥ No cuelgue la correa alrededor de su cuello cuando está sumergido
en el agua.
• Ésta podría envolverse alrededor de su cuello causándole sofocación u otra seria
herida.
≥ Limpie toda grasa de sus manos.
• Con sus manos untadas de grasa no frote su boca ni sus ojos.
≥ Por si se filtra agua en el estuche, deje de usarlo de inmediato.
• Eso puede causar una descarga eléctrica, una quemadura o un incendio.
• Llame a su comerciante.
≥ Si ocurre algo anómalo mientras que está utilizando el estuche
sumergido en el agua, cuando sube siga todos los necesarios
procedimientos y líneas de guía para la descompresión.
• Si sube demasiado rápido, puede contraer la enfermedad del buzo.
≥ Si del estuche sale humo o calor anómalo, olor o sonido, déjelo de
usarlo de inmediato.
• Eso puede causar una descarga eléctrica, una quemadura o un incendio.
• Saque la cámara digital fuera del estuche y, de inmediato, quite la batería de la
cámara digital.
• Llame a su comerciante.
≥ Ponga cuidado cuando abre el estuche después de una infiltración
de agua.
• El agua penetrada podría hacerlo reventar o podría volcar el estuche trasero.
DMW-MCFT3-VQT3M30.book 76 ページ 2011年1月13日 木曜日 午前10時22分

77
VQT3M30
≥ No deje el estuche donde hay una lata temperatura.
• La temperatura dentro del estuche aumenta mucho sobre todo cuando éste está
expuesto a la luz directa del sol en una playa, un buque etc. o bien cuando se
deja en un coche sin aire durante el verano. El calor puede dañar el estuche o
sus piezas internas.
• Si al estuche está unida una cámara digital, también ésta podría salir dañada.
• Si utiliza la cámara digital unida cuando la temperatura dentro del estuche es
demasiado alta, éste podría causar una infiltración, un cortocircuito o una falta de
aislamiento y de eso hacer originar un incendio o un funcionamiento defectuoso.
≥ No maneje la cámara digital o la batería con las manos mojadas.
• Eso podría causar una descarga eléctrica o un funcionamiento defectuoso.
∫ Cuando se sacan imágenes con el flash
≥ Cuando toma imágenes usando el flash, lo que sale de las imágenes podría
resultar viñeteado o bien la imagen podría no alumbrarse uniformemente.
≥ Cuando toma imágenes con el flash, el rango disponible de éste último es menos
debajo de la superficie del agua que estando en tierra.
DMW-MCFT3-VQT3M30.book 77 ページ 2011年1月13日 木曜日 午前10時22分

78
VQT3M30
Componentes
1. Botón del obturador
2. Botón de imagen en
movimiento
3. Botón OFF/ON de la cámara
4. Zapata de montaje para
INON Inc., strobe externo
¢1
5. Estuche delantero
6. Difusor (suministrada)
7. Cristal delantero
8. Botón del zoom
9. Sección de funcionamiento
de botones
(Lea las instrucciones de
funcionamiento de la cámara
digital para los detalles
acerca de cada botón de
funcionamiento.)
10. Estuche trasero
11. Hebilla
12. Palanca para soltar el bloqueo
13. Ojal de la correa
(para unir la correa de mano
suministrada y el difusor)
324
7
1
5
6
8
9
10
12
13
11
¢1 Ésta es una zapata de montaje dedicada al strobe externo fabricado por INON
Inc.
Pregunte a INON Inc. sobre el strobe compatible.
http://www.inon.co.jp/INON_WORLD_body.html
DMW-MCFT3-VQT3M30.book 78 ページ 2011年1月13日 木曜日 午前10時22分

79
VQT3M30
¿Qué es el anillo tórico?
≥ El anillo tórico es una junta hermética utilizada para cámaras, reloj submarinos y
otros dispositivos de buceo.
≥ El anillo tórico mantiene lo impermeable del estuche cerrando la holgura entre su
parte trasera y la delantera.
∫ Cómo el anillo tórico mantiene lo impermeable del estuche
La goma toca ambos lados del estuche volviéndolo impermeable e
impidiendo al agua infiltrarse a través de la holgura.
Cuando el anillo tórico está prensado por la presión del agua, la
superficie del mismo anillo se expande yendo a proporcionar al
estuche un cierre más fuerte.
El anillo tórico impide la infiltración del agua por su contacto
uniforme con los lados del estuche. Por lo tanto, es muy
importante poner mucho cuidado en dicho anillo. Un cuidado
inadecuado del anillo tórico podría causar infiltraciones de agua.
Anillo tórico
Cámara digital
Estuche
delantero
Estuche trasero
Anillo
tórico
Anillo
tórico
DMW-MCFT3-VQT3M30.book 79 ページ 2011年1月13日 木曜日 午前10時22分

80
VQT3M30
Preparación -Ajuste del anillo tórico-
Tenga cuidado de poner el anillo tórico antes de unir una cámara digital.
Limpie a fondo y seque sus manos antes de manejar el anillo tórico.
Coloque dicho anillo en un lugar donde no haya arena ni polvo.
1 Afloje el anillo tórico con sus dedos para quitarlo.
≥
Afloje parte del anillo tórico con la punta de dos dedos, luego levante la parte
aflojada. Tenga cuidado de no arañar dicho anillo con las uñas.
∫ Nota
≥
No utilice un objeto puntiagudo para quitar el anillo tórico ya que eso podría
arañarlo.
Anillo tórico
Anillo tórico
DMW-MCFT3-VQT3M30.book 80 ページ 2011年1月13日 木曜日 午前10時22分

81
VQT3M30
2 Controle el anillo tórico.
≥
Compruebe que en el anillo tórico no haya suciedad, arena, pelo, polvo,
cristales de sal, hilas o grasa vieja. En el caso de que los encontrase, sáquelos
con un trapo blanco y seco.
≥ Podría haber suciedad en el anillo tórico que no puede verse. Compruebe si
hay suciedad frotando con su dedo encima del anillo tórico.
≥ Tenga cuidado de no dejar fibras del trapo seco en el anillo tórico cuando lo va
a limpiar.
≥ Compruebe que el anillo no esté desgarrado, torcido, apretado, deshilachado o
arañado y que no tenga arena pegada encima. En estos casos reemplace el
anillo tórico.
3 Controle la ranura del anillo tórico.
≥
Granos de arena o cristales de sal endurecidos pueden entrar en la ranura del
anillo tórico. Sáquelos con un chorro de aire o un estropajo de algodón. Si usa
un estropajo de algodón, tenga cuidado de no dejar ninguna de sus fibras en la
ranura de dicho anillo.
≥ Inspeccione la ranura frontal del estuche y también la ranura trasera del mismo
(el lado donde está montado el anillo tórico).
3Suciedad 3Arena 3Pelo 3Polvo 3Sal 3Hilas
3Hendedura
3Distorsión 3
Aplastamiento
3Peladura 3Arañazo 3Arena
pegada
DMW-MCFT3-VQT3M30.book 81 ページ 2011年1月13日 木曜日 午前10時22分

82
VQT3M30
Preparación -Ajuste del anillo tórico- (continuación)
4 Aplique la grasa (suministrada).
Aplique grasa al anillo tórico para limpiar la superficie del mismo y rellene el aceite.
≥
Con la punta de su dedo aplique uniformemente en el anillo tórico grasa
(suministrada) que tenga un tamaño de un grano de arroz. (No aplique la grasa
usando papel o un trapo ya que las fibras de éstos podrían pegarse al anillo tórico.)
≥
En el caso de que haya demasiada grasa en el anillo tórico, se pegará encima
suciedad o polvo causando infiltraciones de agua. Por lo tanto, agarre el anillo
tórico entre las puntas del dedo y el pulgar y quite suavemente la grasa sobrante.
≥ Aplicando la grasa del anillo tórico ligera y uniformemente, él se adapta de
manera flexible a la ranura del estuche marino y se mantiene hermético al aire.
≥ Sólo utilice la grasa especificada. Si usa grasa de otro género, puede
dañarse la superficie del anillo tórico causando infiltración de agua.
5 Ponga el anillo tórico de manera uniforme dentro de la respectiva
ranura.
Compruebe lo siguiente:
≥ No haya suciedad pegada al anillo tórico.
≥ El anillo tórico no salga.
≥ El anillo tórico no esté torcido.
≥ El anillo tórico no esté extendido demasiado.
OK
INCORRECTO
DMW-MCFT3-VQT3M30.book 82 ページ 2011年1月13日 木曜日 午前10時22分

83
VQT3M30
6 Controle el anillo tórico una última vez.
Compruebe lo siguiente una vez más:
≥ No haya suciedad pegada al anillo tórico.
≥ El anillo tórico no salga.
≥ El anillo tórico no esté torcido.
≥ No haya ningún arañazo ni partes apretadas en el anillo tórico.
Saque todo indicio de grasa de sus manos con un paño seco, Luego
lávela bien con agua dulce.
7 Cierre la hebilla.
≥
Compruebe que ningún material extraño esté pegado a la superficie externa del
anillo tórico y de la hebilla en el estuche delantero luego ciérrelo.
∫ Notas
≥
Para mantener el estuche enteramente estanco al aire, no arañe la superficie del
anillo tórico que va a tocar los lados del estuche.
≥ Nunca utilice un anillo tórico que haya sido arañado o dañado por la suciedad etc.
Eso causará infiltración de agua.
≥ Cada vez que utiliza el estuche, quite el anillo tórico y compruebe que no haya
suciedad, arena, pelo u otro material extraño en la ranura del anillo tórico y, luego,
aplique una ligera capa de grasa (suministrada). Si aplica demasiada grasa,
podrían pegarse a dicho anillo suciedad y polvo causando infiltración de agua.
≥ Tenga cuidado de llevar consigo un anillo tórico de repuesto en el caso de que se
dañase o arañase el que está usando.
DMW-MCFT3-VQT3M30.book 83 ページ 2011年1月13日 木曜日 午前10時22分

84
VQT3M30
Preparación -Control de lo impermeable del estuche-
Después de colocar el anillo tórico, compruebe que no haya infiltración
de agua dentro del estuche sumergiendo éste último en un tanque de
agua, una bañera etc. durante alrededor de 3 minutos antes de unirlo a
la cámara digital.
≥
No use el estuche en agua por encima de los 40 °C. El calor puede dañar el
estuche o causar infiltración de agua.
‘ Realice la misma prueba después de unir la cámara digital al estuche. (P85)
∫ Notas
≥
Si salen burbujas del estuche cuando se sumerge en agua o hay agua dentro del
estuche cuando lo saca del agua, hay una pérdida de agua. En esos casos,
consulte a su distribuidor.
≥ Si el agua se filtra en el estuche mientras que está usándolo y la cámara digital está
sumergida en el agua, quite de inmediato la batería. El gas de hidrógeno podría
incendiarse o causar una explosión por si hay un fuego cerca.
≥ Si bucea rápidamente mientras que mantiene el estuche o tira éste desde un buque
a la mar, podría ocurrir infiltración de agua debido a la alta presión. Eso no es un
funcionamiento defectuoso, sin embargo siempre bucee lentamente.
≥ El estuche está diseñado para que pueda ser usado a una profundidad hasta 40 m.
Por si bucea a una profundidad mayor de 40 m, parte del estuche podría dañarse
irreparablemente.
≥ Cuando cierra el estuche, ponga cuidado en que no sea agarrado ningún material
extraño entre el anillo tórico y su ranura incluso un pequeño pelo o grano de arena
podría causar infiltración de agua.
DMW-MCFT3-VQT3M30.book 84 ページ 2011年1月13日 木曜日 午前10時22分

85
VQT3M30
Preparación -Unión de la cámara digital-
Lea las notas de la página 87 antes de unir la cámara digital.
Compruebe que la cámara digital esté ajustada en [OFF].
≥
Saque la correa y el estuche de silicona desde la cámara digital.
1 Empuje hacia arriba 2 con su dedo, mientras hace deslizar 1 para
abrir la hebilla.
2 Una la cámara digital al estuche.
Ponga atención en la dirección e inserte la cámara digital en el
estuche tal como se muestra en la figura.
≥ Compruebe que no haya residuos de agua en la superficie de la cámara digital
y dentro del estuche.
≥ Tenga cuidado de no atrapar la visera de sombra 1.
3 Inserte el silicagel (suministrado).
≥ Siempre utilice silicagel nuevo.
Estuche frontal
Silicagel
Cámara digital
DMW-MCFT3-VQT3M30.book 85 ページ 2011年1月13日 木曜日 午前10時22分

86
VQT3M30
Preparación -Unión de la cámara digital- (continuación)
≥ Cuando inserta el silicagel, dóblelo como se muestra en la figura abajo,
luego insértelo lo más allá que sea posible. Si cierra el estuche con el
silicagel no insertado enteramente, éste será agarrado en el anillo tórico
causando infiltración de agua.
≥ Si la temperatura del aire es alta y la del agua es baja, puede tener lugar
condensación dentro del estuche. Para evitar condensación, antes meta el
silicagel (suministrado) dentro del estuche. Para evitar que se forme neblina en
el estuche, inserte el silicagel cerca de 1 a 2 horas antes de utilizar el estuche.
4 Cierre la hebilla.
‘
Compruebe que la hebilla esté cerrada firmemente.
No inserte la correa etc. en la hebilla.
5 Después de unir la cámara digital, compruebe una vez más que no
haya infiltración de agua en el estuche. (P84)
Silicagel
DMW-MCFT3-VQT3M30.book 86 ページ 2011年1月13日 木曜日 午前10時22分

87
VQT3M30
∫ Notas
≥
Tenga cuidado de que la visera de sombra no se ensucie con huellas dactilares,
etc.
≥ Compruebe una o más veces que el anillo tórico esté aplicado de manera uniforme
dentro de su ranura.
≥ Evite abrir o cerrar el estuche donde haya mucha arena o polvo o en lugares
húmedos o mojados.
≥
Si ocurre un cambio repentino de humedad debido al aire húmedo que entra en el
estuche, podría producirse condensación dentro del mismo estuche.
≥
Para evitar condensación, ajuste la cámara digital en un lugar lo más seco que sea
posible. Además, compruebe que el silicagel (suministrado) sea lo bastante seco antes
de insertarlo.
≥ Si un protector o aceite solar se pega al estuche, sáquelo de inmediato con agua
tibia para evitar que se reduzca lo impermeable suyo o se descolore.
≥
Sumerja en agua dulce durante alrededor de 10 minutos luego de utilizar la cámara
digital al mar o en el agua. Para los detalles lea las instrucciones de funcionamiento.
≥
Si hay algunas gotas de agua o suciedad en la cámara, frote ésta con un paño seco
antes de ponerla vertical por un rato encima de un paño seco y comprobando que el
agua haya sido eliminada. Después de eso, una la cámara.
Cuando se coloca una cámara digital con función GPS, brújula, altímetro (medidor
de profundidad) en el estuche marítimo, pueden no ser posibles los
posicionamientos o mediciones, o pueden contener errores graves.
DMW-MCFT3-VQT3M30.book 87 ページ 2011年1月13日 木曜日 午前10時22分

88
VQT3M30
Sacar imágenes
∫ Tenga cuidado de comprobar lo siguiente antes de entrar en el agua
Compruebe lo siguiente antes de bucear.
≥
¿Queda bastante carga en la batería?
≥ ¿Queda bastante memoria en la tarjeta?
≥ ¿El anillo tórico está aplicado de manera uniforme dentro de su ranura?
≥ ¿Ha comprobado que no haya infiltración de agua en el estuche?
≥ ¿La hebilla está cerrada firmemente?
∫ Sacar imágenes
1 Pulse el botón OFF/ON y encienda la cámara digital.
2 Fije [Submarino].
≥ Lea las instrucciones de funcionamiento de la cámara digital para más detalles.
3 Dirija el área AF en el monitor LCD hacia el sujeto que quiere
enfocar.
4 Pulse [AF-L ] para enfocar.
• Vuelva a pulsar [AF-L ] para cancelar.
5 Pulse a tope el botón del obturador para tomar la imagen.
∫ Notas
≥
Antes de unir la cámara al estuche, le recomendamos que ajuste de nuevo el reloj.
(Lea las instrucciones de funcionamiento de la cámara digital para más detalles.)
≥ Si hay algunas partículas flotantes delante de la cámara, puede enfocar éstas en
lugar del sujeto.
≥ Si hay gotas de agua o suciedad pegadas en el cristal delantero, podría no ser
posible enfocar correctamente. Tenga cuidado de limpiar el cristal antes de tomar
las imágenes.
DMW-MCFT3-VQT3M30.book 88 ページ 2011年1月13日 木曜日 午前10時22分

89
VQT3M30
Consejos para sacar imágenes en el agua
Cuando la imagen es demasiado azulada en el agua
1
Seleccione [Balance b.] desde el menú de modo [Rec].
2 Pulse [DISP.] para visualizar [Ajuste b.b.].
3 Pulse [AF-L ]/[ ] para ajustar el balance del blanco.
4 Pulse [MENU/SET] para terminar.
≥ Para terminar puede también pulsar a mitad el botón del obturador.
Elija la mejor imagen
Ajuste el flash a [ ].
Uso de la función del bracketing automático (Para modelos que tienen dicha función)
≥
Cada vez que pulsa el botón del obturador, se graban automáticamente
3 imágenes con diferente exposición. Entre las 3 puede elegir la imagen deseada.
Use el modo de ráfaga
≥
Cuando toma imágenes de un sujeto que se mueve rápido (un pez payaso etc.), puede
seleccionar su imagen favorita después de tomas las imágenes con el modo de ráfaga.
∫ Nota
≥
Se admite también el ajuste fino del balance del blanco (modo debajo del agua) cuando graba
imágenes en movimiento.
Puede ajustar el balance del blanco según sea la profundidad del agua o según prefiera Usted.
≥
Para más información, lea las instrucciones de funcionamiento sobre la cámara digital.
Después del uso
Después de terminar la toma de las imagines, siga los pasos a continuación.
1 Sumerja el estuche en agua fresca durante 30 minutos o más sin
quitar la cámara digital para sacar los cristales de sal etc.
SPA-BODY.fm 89 ページ 2011年11月11日 金曜日 午前10時10分

90
VQT3M30
Después del uso (continuación)
≥ Pulse todos los botones operacionales etc. en el estuche para sacar toda
agua del mar. En el caso de que de los botones no se saquen los cristales
de sal etc., éstos se endurecerán y los botones dejarán de ser operables.
≥ No limpie el estuche con agua de chorro rápido o presurizada etc. ya que
eso podría causar infiltración de agua.
2 Saque el agua con un trapo seco que no tenga cristales de sal
pegados en él y, luego, seque enteramente el estuche.
≥
No seque el estuche exponiéndolo a la luz directa del sol. Eso podría hacer
decolorar o dañar el estuche o acelerar el deterioro del anillo tórico.
3 Abra la parte trasera del estuche para quitar la cámara digital.
Después de limpiarse con esmero las manos, aplique su dedo de la
manera mostrada en la figura y saque fuera la cámara digital.
4 Quite el anillo tórico del estuche y compruebe que no haya suciedad
etc. en su ranura.
5 Compruebe que no haya arañazos etc. en el anillo tórico mientras va
aplicando la grasa.
∫ Notas
Ponga cuidado en los puntos a continuación cuando lleva fuera la
cámara digital.
≥ Quite la cámara con las manos limpias. (Lave sus manos con agua fresca y las
seque enteramente.)
≥ Seque cualquier humedad de su cuerpo o pelo. (Ponga especial cuidado en el agua
que sale de las mangas de su traje térmico.)
DMW-MCFT3-VQT3M30.book 90 ページ 2011年1月13日 木曜日 午前10時22分

91
VQT3M30
Limpieza y almacenamiento
1
Lave la parte externa del estuche con agua.
≥
Lave la parte externa del estuche hasta que esté limpia. (P89)
≥ Confirme que el anillo tórico se fije de forma segura, asegúrese de cerrar el
estuche, y luego lave el exterior con agua.
≥ Saque toda suciedad dentro del estuche con un trapo mojado y blando.
∫ Notas
≥
No lave el estuche con agua a alta presión ya que eso podría causar infiltración de
agua. Quite la cámara digital antes de lavar el estuche con agua.
≥ No deje la cámara digital en el interior del estuche cuando vaya a almacenarla.
≥ Quite el anillo tórico del estuche marino y guárdelo de manera que no se seque.
Para detalles, lea la página 92.
Cuando almacena durante un largo período, inserte el anillo tórico antes quitado en
la especial bolsa de poliéster suministrada.
Precauciones para el uso
∫ Manejo del anillo tórico
≥ No utilice alcohol, diluyente o un agente químico para limpiar el anillo tórico.
Eso causará daño o deterioro al anillo tórico.
≥ Si no utiliza el estuche durante un largo período de tiempo, quite el anillo
tórico de la respectiva ranura, aplique una capa fina de grasa (suministrada),
colóquelo en la especial bolsa de poliéster y almacénelo en un lugar frío y
oscuro para evitar que se dañe la superficie. Cuando vuelve a usarlo,
compruebe con esmero que no esté arañado ni roto.
≥ Sólo utilice la grasa especificada. Si usa grasa de otro género, puede dañarse
la superficie del anillo tórico causando infiltración de agua.
≥ El anillo tórico toca los lados del estuche volviendo éste último impermeable. No
golpee, haga entrar material extraño (suciedad, arena o pelo etc.) ni arañe el anillo
tórico ni los lados del estuche.
≥ Use las puntas de sus dedos para quitar el anillo tórico. No utilice objetos
puntiagudos ya que eso podría arañar el anillo tórico.
≥ Después de quitar el anillo tórico de la parte trasera del estuche, le saque toda
suciedad, arena, pelo u otro material extraño. Limpie también la ranura del anillo
tórico y los lados internos de la parte delantera del estuche que toca el anillo tórico.
≥ Nunca utilice un anillo tórico que haya sido arañado o dañado por la suciedad etc.
Eso causará infiltración de agua. Reemplácelo con uno nuevo.
DMW-MCFT3-VQT3M30.book 91 ページ 2011年1月13日 木曜日 午前10時22分

92
VQT3M30
Precauciones para el uso (continuación)
≥ Una vez reemplazado el anillo tórico, si no se utiliza durante un largo período,
después de ajustar la cámara digital, o bien cuando sustituya la batería o algo por el
estilo, en el caso de que vaya a abrir el estuche marino, verifique que dicho anillo no
esté dañado ni agrietado.
Después de verificar, cierre el estuche marino, lo sumerja en agua (un cubo de
agua o una bañera) durante alrededor de 3 minutos o más, luego compruebe qua
no haya filtración de agua. (P84)
≥ Los anillo tóricos son productos consumibles. Sin embargo su duración dependerá
del cómo se mantendrán, del cuánto se utilizan y de sus condiciones de
almacenamiento, le recomendamos reemplazarlos cada año aunque no vea ningún
arañazo.
∫ Acerca del mantenimiento
≥
No utilice los productos químicos a continuación para la limpieza, antioxidante,
antiempañante o reparación. El hecho de usarlos directa o indirectamente (con
un spray químico etc.) en el estuche podría ocasionar grietas.
≥ Si la grasa se pega a la cámara digital, sáquela con un trapo blando y seco.
≥ Cuando limpia el interior del estuche, sólo hágalo utilizando un trapo blando y seco.
Limpie el interior del cristal delantero con un trapo blando y seco antes y después
del uso para que el cristal se mantenga claro.
Productos
químicos
prohibidos
Cuidado
Disolventes
orgánicos volátiles/
Agentes químicos
para limpieza
No limpie el estuche con disolventes orgánicos volátiles como el
alcohol, la gasolina o un diluyente y agentes químicos para
limpieza. Límpielo con agua fría o tibia.
Anticorrosivos
No utilice anticorrosivos ya que las partes metálica están
hechas de acero inoxidable o bronce. Límpielo con agua fresca.
Agentes
antiempañantes
No utilice agentes antiempañantes a la venta. Tenga cuidado de
usar el silicagel indicado en estas instrucciones de
funcionamiento.
Adhesivos
No utilice adhesivos para reparar. En el caso de que su estuche
necesitase ser reparado, llame a su comerciante.
DMW-MCFT3-VQT3M30.book 92 ページ 2011年1月13日 木曜日 午前10時22分

93
VQT3M30
∫ Acerca del almacenamiento y de la inspección
después del uso
≥ Siempre tenga la cámara digital fuera del estuche.
≥ Ponga cuidado en que no haya suciedad ni polvo pegados en el anillo tórico.
≥ Seque a fondo el estuche a temperatura ambiente, luego almacénelo en un sitio frío
y oscuro.
≥ Le recomendamos que inspeccione el estuche después de 3 años desde la
compra. Esta inspección conlleva el desmontaje y la limpieza del estuche,
comprobando todas las piezas y reparándolas si fuese necesario y controlando lo
impermeable del estuche usando el mismo equipo de ensayo hidrostático que fue
usado para controlar lo impermeable antes de la compra. Todos los costes de
transporte están a cargo del cliente.
≥ No desmonte ninguna pieza ni utilice accesorio alguno que no esté especificado en
estas instrucciones de mantenimiento ni modifique el estuche. Si el estuche no
funciona correctamente, llame a su comerciante.
Especificaciones
Modelo compatible: DMC-FT3/DMC-TS3
(A partir de enero de 2011
¢
)
Dimensiones: Aproximadamente
145 mm (W)k94 mm (H)k52 mm (D)
(excluyendo las partes salientes)
Peso: Aproximadamente 356 g (incluyendo el difusor)
Material: Policarbonato
Sistema impermeable: Cierre de anillo tórico
Profundidad de
resistencia al agua: 40 m
¢ Se refiera a las instrucciones de funcionamiento, catálogo, sitio web etc. de
la cámara digital para la última información sobre los modelos que puede
usar.
DMW-MCFT3-VQT3M30.book 93 ページ 2011年1月13日 木曜日 午前10時22分

94
VQT3M30
Indice
Prima dell’uso . . . . . . . . . . . . . . . . . . . . . . . . . . . . . . . . 95
Accessori . . . . . . . . . . . . . . . . . . . . . . . . . . . . . . . . . . . 97
Manipolazione e cura . . . . . . . . . . . . . . . . . . . . . . . . . . 98
Componenti. . . . . . . . . . . . . . . . . . . . . . . . . . . . . . . . . 100
Cosa é un O-ring?. . . . . . . . . . . . . . . . . . . . . . . . . . . . 101
Preparazione -Preparazione dell’O-ring- . . . . . . . . . . 102
Preparazione -Controllo dell’impermeabilità
della custodia- . . . . . . . . . . . . . . . . . . . 106
Preparazione -Inserimento della
fotocamera digitale-. . . . . . . . . . . . . . . 107
Ripresa di immagini . . . . . . . . . . . . . . . . . . . . . . . . . . 110
Consigli per la ripresa di immagini in acqua . . . . . . . . 111
Dopo l’uso. . . . . . . . . . . . . . . . . . . . . . . . . . . . . . . . . . 112
Pulizia e custodia . . . . . . . . . . . . . . . . . . . . . . . . . . . . 114
Precauzioni per l’uso. . . . . . . . . . . . . . . . . . . . . . . . . . 115
Specifiche . . . . . . . . . . . . . . . . . . . . . . . . . . . . . . . . . . 117
DMW-MCFT3-VQT3M30.book 94 ページ 2011年1月13日 木曜日 午前10時22分

95
VQT3M30
Prima dell’uso
≥ Questa Custodia Marina può essere utilizzata con le fotocamere digitali Panasonic.
Consente di riprendere immagini sott’acqua a profondità fino a 40 m.
≥ In caso di infiltrazioni d’acqua dovute a negligenza da parte dell’utente, Panasonic
non può essere ritenuta responsabile dei danni ai prodotti (fotocamera digitale,
batterie, scheda ecc.) inseriti nella custodia, dei costi fotografici o di ogni altra
spesa.
≥ Panasonic non offre inoltre alcun risarcimento in caso di incidenti che causino
lesioni alle persone o danni alla proprietà.
≥ Leggere il manuale di istruzioni della fotocamera digitale.
≥ Prima di inserire la fotocamera digitale, immergere la custodia in acqua per
3 o più minuti , allo scopo di controllare che non vi siano infiltrazioni d’acqua.
∫ Trattamento della custodia
≥ Utilizzo nelle seguenti condizioni.
• Profondità dell’acqua: fino a 40 m
• Temperatura ambiente: 0 oC a 40 oC
≥ Non utilizzare la custodia in acqua a temperatura superiore a 40 °C. Il calore può
danneggiare la custodia o causare infiltrazioni.
≥ La custodia è in policarbonato resistente agli urti, ma fare comunque attenzione
quando la si utilizza. Si graffia facilmente, specialmente in ambienti rocciosi, e può
danneggiarsi in caso di urti violenti o cadute. Quando si viaggia in auto, nave, treno
o aereo, imballare attentamente la custodia per evitare urti diretti in caso di caduta,
e non lasciare la fotocamera digitale nella custodia. Inserire la fotocamera digitale
nella custodia solo se la distanza da coprire è breve, ad esempio quando si va
dall’aeroporto al luogo di immersione. (Non è possibile riutilizzare per il trasporto
l’imballaggio originale della custodia.)
≥ Quando ci si trova a bordo di un aereo, il cambiamento della pressione atmosferica
può causare l’espansione della parte interna della custodia, danneggiandola.
Rimuovere l’O-ring prima di imbarcarsi su un aereo.
Inserire l’O-ring rimosso nella busta di poliestere esclusiva in dotazione.
≥ Non lasciare per lungo tempo la fotocamera digitale nella custodia all’interno
di un’auto o di una nave, esposta alla luce solare diretta, ecc. La custodia è a
tenuta ermetica, per cui la temperatura al suo interno può raggiungere livelli
molto elevati, e la fotocamera digitale può cessare di funzionare
correttamente. Non lasciare che la temperatura all’interno della custodia
diventi troppo elevata.
ITALIANO
DMW-MCFT3-VQT3M30.book 95 ページ 2011年1月13日 木曜日 午前10時22分

96
VQT3M30
Prima dell’uso (continua)
∫ Utilizzo della custodia in condizioni di bassa o alta
temperatura
≥ Se si apre o si chiude la custodia in un ambiente umido o caldo e poi si passa in un
posto freddo o ci si immerge sott’acqua, all’interno della custodia può formarsi della
condensa, la superficie del vetro può appannarsi e la fotocamera digitale può
essere danneggiata.
≥ Se si porta repentinamente la custodia da un luogo in cui la temperatura dell’aria o
dell’acqua è bassa a un ambiente riscaldato, la superficie del vetro può appannarsi.
Attendere che la temperatura della custodia si avvicini a quella dell’ambiente prima
di riprendere le immagini.
∫ Preparazione
≥ Non aprire o chiudere la custodia dove spruzzi d’acqua potrebbero colpirla o
la sabbia rischia di penetrare al suo interno. Si consiglia di aprire o chiudere
la custodia all’interno.
≥ Quando si sostituisce la batteria, la scheda, ecc. e si inserisce la fotocamera nella
custodia, eseguire l’operazione al coperto, e in condizioni di scarsa umidità.
≥ Se si deve aprire o chiudere la custodia nella zona dell’immersione per
sostituire la batteria o la scheda, attenersi alla seguente procedura.
• Scegliere un punto in cui la custodia non possa essere raggiunta da spruzzi
d’acqua, e in cui la sabbia non possa penetrare al suo interno.
• Eliminare le eventuali gocce d’acqua dall’intercapedine tra la copertura anteriore
e quella posteriore, e dalla fibbia. Quindi rimuovere attentamente eventuali gocce
d’acqua residue con un panno asciutto.
• Eliminare attentamente eventuali gocce d’acqua dal corpo e dai capelli.
• Fare particolare attenzione all’acqua presente nelle maniche della muta termica.
• Non toccare la fotocamera digitale con le mani bagnate di acqua di mare.
Inumidire prima un asciugamano in acqua dolce e metterlo in una busta di
poliestere. Utilizzare tale asciugamano per rimuovere l’acqua o la sabbia dalle
mani o dal corpo.
≥ La custodia non è in grado di ammortizzare gli urti. Se si colloca un oggetto pesante
sulla custodia o la si urta, la fotocamera digitale può danneggiarsi. Fare attenzione
quando si utilizza la custodia.
DMW-MCFT3-VQT3M30.book 96 ページ 2011年1月13日 木曜日 午前10時22分

97
VQT3M30
Accessori
Quando si apre la confezione per la prima volta, controllare che siano
presenti la custodia e tutti gli accessori, e che non abbiano subito
danni durante la distribuzione o il trasporto.
Se si riscontra qualche anomalia, contattare il rivenditore prima di
utilizzare la custodia.
Non utilizzare accessori diversi da quelli sotto indicati.
Guarnizione di ricambio
VMG1798
* Nella busta di
poliestere esclusiva
* Una è già montata
sull’unità.
Silica Gel (Essiccante)
(1 g/5 pezzi)
VZG0371
Grasso (per O-ring)
VZG0372
Cinturino
VFC4190
Diffusore/Cordino
VYK3E56
≥ È possibile rimuovere il diffusore quando non lo si utilizza.
Allineare con il segno sul retro
della custodia e installare.
Rimozione Installazione
DMW-MCFT3-VQT3M30.book 97 ページ 2011年1月13日 木曜日 午前10時22分

98
VQT3M30
Manipolazione e cura
≥ Non collocare la custodia in punti instabili.
• Se la custodia dovesse cadere su un piede o sulla testa, potrebbe ferire l’utente.
Inoltre potrebbe non funzionare più in modo corretto.
≥ Non modificare mai la custodia.
• Se dell’acqua dovesse penetrare nella fotocamera digitale a causa di una modifica
alla custodia, la fotocamera può essere danneggiata in modo irreparabile.
• Se si continua ad utilizzare la fotocamera digitale dopo che l’acqua è penetrata al
suo interno, può svilupparsi un incendio.
≥ Non utilizzare la custodia per immersioni con respiratore se non si ha
una preparazione adeguata.
• Utilizzare la custodia durante immersioni con respiratore solo se si dispone di una
preparazione adeguata e di una certificazione per questo sport.
≥ Tenere la custodia, il grasso, il silica gel o l’O-ring al di fuori della
portata dei bambini.
• Se un bambino dovesse restare con una parte del corpo intrappolata nella
custodia, rischia di ferirsi.
• I bambini possono inghiottire accidentalmente il grasso, il silica gel o l’O-ring.
• Consultare immediatamente un medico se si ritiene che un bambino possa aver
inghiottito il grasso, il silica gel o l’O-ring.
≥ Non appendere la cinghia al collo sott’acqua.
• Infatti potrebbe avvolgersi intorno al collo, causando soffocamento o serie lesioni.
≥ Lavare via accuratamente ogni traccia di grasso dalle mani.
• Non strofinare gli occhi o la bocca con le mani sporche di grasso.
≥ Se l’acqua dovesse penetrare nella custodia, smettere immediatamente
di utilizzarla.
• In caso contrario si rischia di prendere la scossa o di ustionarsi, oppure può verificarsi
un incendio.
• Consultare il rivenditore.
≥ Se si verifica qualche anomalia mentre si utilizza la custodia sott’acqua,
seguire tutte le procedure necessarie e le istruzioni per la decompressione
durante la risalita.
• Se si risale troppo rapidamente, si rischia un’embolia gassosa.
≥ Se si verificano eventi quali fuoriuscita di fumo, surriscaldamento,
emissione di odori o suoni strani, cessare immediatamente di utilizzare
la custodia.
• In caso contrario si rischia di prendere la scossa o di ustionarsi, oppure può
verificarsi un incendio.
• Rimuovere la fotocamera digitale dalla custodia, quindi rimuovere immediatamente la
batteria dalla fotocamera digitale.
• Consultare il rivenditore.
DMW-MCFT3-VQT3M30.book 98 ページ 2011年1月13日 木曜日 午前10時22分

99
VQT3M30
≥ Fare attenzione quando si apre la custodia dopo una infiltrazione di acqua.
• L’acqua che si era infiltrata può fuoriuscire, o la copertura posteriore può
capovolgersi.
≥ Non lasciare la custodia esposta a temperature elevate.
• La temperatura interna raggiunge valori molto elevati in particolare quando la
custodia è esposta alla luce solare diretta su una spiaggia, su una nave, ecc., o
quando viene lasciata in una macchina chiusa in estate. Il calore può
danneggiare la custodia o le parti interne.
• Se nella custodia era inserita una fotocamera digitale, anche questa può essere
danneggiata.
• Se si utilizza la fotocamera digitale inserita nella custodia quando la temperatura
interna è molto elevata, possono verificarsi perdite, cortocircuiti o perdite di
isolamento, e la fotocamera può incendiarsi o guastarsi.
≥ Non maneggiare la fotocamera digitale o la batteria con le mani
bagnate.
• In caso contrario di rischia di prendere la scossa, o di danneggiare l’apparecchio.
∫ Quando si riprendono immagini con il flash
≥ Quando si riprendono immagini con il flash, gli angoli dell’immagine possono essere
soggetti all’effetto vignetta, o la luminosità dell’immagine può non essere uniforme.
≥ Quando si riprendono immagini con il flash, la distanza utile del flash è inferiore in
acqua che sulla terraferma.
DMW-MCFT3-VQT3M30.book 99 ページ 2011年1月13日 木曜日 午前10時22分

100
VQT3M30
Componenti
1. Pulsante di scatto otturatore
2. Pulsante immagine in
movimento
3. Pulsante di spegnimento/
accensione (OFF/ON) della
fotocamera
4. Connettore per flash
stroboscopico esterno di
INON Inc.
¢1
5. Copertura anteriore
6. Diffusore (in dotazione)
7. Vetro anteriore
8. Pulsante zoom
9. Funzionamento dei pulsanti
(Per ulteriori informazioni sul
funzionamento di ciascun
pulsante leggere le istruzioni
per l’uso della fotocamera
digitale.)
10. Copertura posteriore
11. Fibbia
12. Leva di sblocco chiusura
13. Occhiello cinghia
(Per l’installazione del cinghino
e del diffusore in dotazione)
324
7
1
5
6
8
9
10
12
13
11
¢1 Si tratta di un connettore dedicato ad un flash stroboscopico esterno prodotto
da INON Inc.
Contattare INON Inc. riguardo ai flash stroboscopici compatibili.
http://www.inon.co.jp/INON_WORLD_body.html
DMW-MCFT3-VQT3M30.book 100 ページ 2011年1月13日 木曜日 午前10時22分

101
VQT3M30
Cosa é un O-ring?
≥ L’O-ring è una guarnizione impermeabile utilizzata per fotocamere, orologi e
attrezzature subacquee.
≥ L’O-ring mantiene l’impermeabilità della custodia sigillando lo spazio tra la copertura
posteriore e quella anteriore.
∫ Come l’O-ring mantiene l’impermeabilità della custodia
La gomma aderisce a i lati della custodia, rendendola impermeabile e
impedendo all’acqua di entrare.
Quando l’O-ring viene schiacciato dalla pressione dell’acqua, la
superficie dell’O-ring si espande, sigillando più saldamente la
custodia.
L’O-ring impedisce l’infiltrazione di acqua aderendo
uniformemente ai lati della custodia. Perciò una buona
manutenzione dell’O-ring è molto importante. In caso
contrario si rischia che l’acqua filtri all’interno.
O-ring
Fotocamera digitale
Copertura anteriore
Copertura posteriore
O-ring O-ring
DMW-MCFT3-VQT3M30.book 101 ページ 2011年1月13日 木曜日 午前10時22分

102
VQT3M30
Preparazione -Preparazione dell’O-ring-
Ricordarsi di preparare l’O-ring prima di inserire la fotocamera digitale
nella custodia.
Lavare e asciugare accuratamente le mani prima di toccare l’O-ring.
Tenere l’O-ring lontano dalla sabbia e dalla polvere.
1 Allentare l’O-ring con le dita per rimuoverlo.
≥
Allentare l’O-ring con la punta di due dita, quindi sollevare la parte allentata.
Fare attenzione a non graffiare l’O-ring con le unghie.
∫ Nota
≥
Non utilizzare oggetti acuminati per rimuovere l’O-ring, per evitare di graffiarlo.
O-ring
O-ring
DMW-MCFT3-VQT3M30.book 102 ページ 2011年1月13日 木曜日 午前10時22分

103
VQT3M30
2 Controllare l’O-ring.
≥
Controllare che non vi siano sporcizia, sabbia, capelli, polvere, cristalli di sale,
fili di tessuto o residui di grasso sull’O-ring. Se si riscontra la presenza di quanto
sopra, rimuoverlo con un panno asciutto e morbido.
≥ Sull’O-ring può essere presente della sporcizia che non si riesce a vedere.
Controllare passando un dito sull’O-ring.
≥ Quando si pulisce l’O-ring, fare attenzione a non lasciare sullo stesso i pelucchi
del panno.
≥ Controllare che l’O-ring non sia strappato, piegato, schiacciato, consumato o
graffiato, e che non vi sia sabbia attaccata. In caso contrario sostituire l’O-ring.
3 Controllare l’alloggiamento dell’O-ring.
≥
Granelli di sabbia o cristalli di sale possono introdursi nell’alloggiamento
dell’O-ring. Rimuoverli attentamente con un getto d’aria o un tampone di
cotone. Se si utilizza un tampone di cotone, fare attenzione a non lasciare
pelucchi sull’O-ring.
≥ Controllare la scanalatura della custodia anteriore e quella della custodia
posteriore (sul lato dove si trova l’O-ring).
3Sporcizia 3Sabbia 3Capelli 3Polvere 3Cristalli
di sale
3Fili di
tessuto
3Fessure 3Distorsioni 3
Schiacciamenti
3Spellature 3Graffi 3Depositi di
sabbia
DMW-MCFT3-VQT3M30.book 103 ページ 2011年1月13日 木曜日 午前10時22分

104
VQT3M30
Preparazione -Preparazione dell’O-ring- (continua)
4 Applicare il grasso (in dotazione).
Applicare del grasso per O-ring per pulire la superficie dell’O-ring e reintegrare l’olio.
≥ Applicare uniformemente una quantità di grasso (in dotazione) delle dimensioni
di un chicco di riso sull’O-ring con la punta di un dito. (Non utilizzare della carta
o un panno per applicare il grasso. Le fibre della carta o del panno potrebbero
restare attaccate all’O-ring.)
≥
Se vi è troppo grasso sulla superficie dell’O-ring, sporcizia e polvere vi
aderiranno, causando infiltrazioni d’acqua. Tenere quindi l’O-ring tra i polpastrelli
del pollice e dell’indice e rimuovere delicatamente il grasso in eccesso.
≥
Applicando uno strato sottile e uniforme di grasso per O-ring, l’O-ring si inserisce in
modo flessibile nella scanalatura della custodia marina e ne garantisce l’impermeabilità.
≥
Utilizzare solo il grasso specificato. Se si utilizzano altri tipi di grasso, la
superficie dell’O-ring può essere danneggiata, causando infiltrazioni d’acqua.
5 Inserire l’O-ring in maniera uniforme nell’apposito alloggiamento.
Controllare che:
≥ All’O-ring non sia rimasta attaccata della sporcizia.
≥ L’O-ring non sia fuoriuscito dall’alloggiamento.
≥ L’O-ring non sia torto.
≥ L’O-ring non sia troppo teso.
OK
Non va bene
DMW-MCFT3-VQT3M30.book 104 ページ 2011年1月13日 木曜日 午前10時22分

105
VQT3M30
6 Controllare un’ultima volta l’O-ring.
Ricontrollare che:
≥ All’O-ring non sia rimasta attaccata della sporcizia.
≥ L’O-ring non sia fuoriuscito dall’alloggiamento.
≥ L’O-ring non sia torto.
≥ Non vi siano graffi o ammaccature sull’O-ring.
Rimuovere completamente ogni traccia di grasso dalle mani con un
panno asciutto, quindi lavare accuratamente in acqua corrente.
7 Chiudere la fibbia.
≥ Controllare che non vi siano corpi estranei sulla superficie esterna dell’O-ring e
sulla fibbia sulla copertura anteriore, quindi chiudere la custodia.
∫ Note
≥
Per mantenere la custodia completamente ermetica, non graffiare la superficie
dell’O-ring che aderisce ai lati della custodia.
≥ Non utilizzare mai un O-ring graffiato o danneggiato dalla sporcizia, ecc. In caso
contrario si verificheranno infiltrazioni d’acqua.
≥ Ogni volta che si utilizza la custodia, rimuovere l’O-ring e controllare che non vi
siano sporcizia, sabbia, capelli o altri corpi estranei nell’alloggiamento dell’O-ring,
quindi applicare un sottile strato di grasso (in dotazione). Se si applica una quantità
di grasso eccessiva, la sporcizia e la polvere possono aderire all’O-ring, causando
l’infiltrazione di acqua.
≥ Ricordarsi di portare un O-ring di ricambio, nel caso che quello in uso si danneggi o
si graffi.
DMW-MCFT3-VQT3M30.book 105 ページ 2011年1月13日 木曜日 午前10時22分

106
VQT3M30
Preparazione -Controllo dell’impermeabilità della custodia-
Dopo aver installato l’O-ring, controllare che non vi siano infiltrazioni
d’acqua immergendo la custodia in una vasca per circa 3 minuti prima
di inserirvi una fotocamera digitale.
≥
Non utilizzare la custodia in acqua a temperatura superiore a 40 °C. Il calore può
danneggiare la custodia o causare infiltrazioni.
‘ Eseguire una prova analoga dopo aver inserito la fotocamera nella custodia.
(P107)
∫ Note
≥
Se dalla custodia fuoriescono delle bolle quando è immersa in acqua, o se quando
la si estrae si trova dell’acqua al suo interno, significa che vi sono delle infiltrazioni.
In questi casi, contattare il rivenditore.
≥ Se l’acqua si infiltra nella custodia mentre la si sta utilizzando e la fotocamera
digitale viene sommersa dall’acqua, rimuovere immediatamente la batteria. Infatti
potrebbe verificarsi la formazione di idrogeno, un gas altamente infiammabile.
≥ Se ci si immerge rapidamente tenendo in mano la custodia o si getta in mare la
custodia da una nave, la pressione elevata può causare infiltrazioni d’acqua. Non si
tratta di un malfunzionamento della custodia. Quando ci si immerge in acqua, farlo
sempre lentamente.
≥ La custodia è progettata per essere utilizzata fino a una profondità di 40 m. Se ci si
immerge a una profondità superiore, alcuni componenti della custodia possono
essere danneggiati in modo irreparabile.
≥ Quando si chiude la custodia, fare attenzione a non intrappolare corpi estranei tra
l’O-ring e l’alloggiamento. Anche un singolo capello o un granello di sabbia possono
causare l’infiltrazione di acqua.
DMW-MCFT3-VQT3M30.book 106 ページ 2011年1月13日 木曜日 午前10時22分

107
VQT3M30
Preparazione -Inserimento della fotocamera digitale-
Leggere le note a pagina 109 prima di installare la fotocamera digitale.
Controllare che la fotocamera digitale sia spenta.
≥
Rimuovere la cinghietta e il rivestimento in silicone dalla fotocamera digitale.
1 Spingere 2 verso l’alto con un dito, e contemporaneamente far
scorrere 1 per aprire la fibbia.
2 Inserire la fotocamera digitale nella custodia.
Fare attenzione all’orientamento e inserire la fotocamera digitale
nella custodia come indicato nell’illustrazione.
≥
Controllare che non sia rimasta dell’acqua sulla superficie della fotocamera
digitale e all’interno della custodia.
≥ Fare attenzione che la pellicola antiriflesso 1 non rimanga incastrata.
3 Inserire il silica gel (in dotazione).
≥
Utilizzare sempre silica gel nuovo.
Custodia anteriore
Silica gel
Fotocamera digitale
DMW-MCFT3-VQT3M30.book 107 ページ 2011年1月13日 木曜日 午前10時22分

108
VQT3M30
Preparazione
-Inserimento della fotocamera digitale- (continua)
≥ Quando si inserisce il silica gel, piegarlo come indicato nella figura sotto,
quindi inserirlo il più a fondo possibile. Se si chiude la custodia senza
aver inserito il silica gel fino in fondo, questo rimarrà intrappolato
nell’O-ring, causando l’infiltrazione di acqua.
≥
Se la temperatura dell’aria è elevata e quella dell’acqua è bassa, all’interno della
custodia può formarsi della condensa. Per evitare la formazione di condensa,
inserire in anticipo il silica gel (in dotazione) all’interno della Custodia. Per evitare
che la custodia si appanni, inserire il silica gel circa 1 o 2 ore prima dell’uso.
4 Chiudere la fibbia.
‘
Controllare che la fibbia sia ben chiusa.
Non inserire la cinghia ecc. nella fibbia.
5 Dopo aver inserito la fotocamera digitale, ricontrollare che non vi
siano infiltrazioni d’acqua nella custodia. (P106)
Silica gel
DMW-MCFT3-VQT3M30.book 108 ページ 2011年1月13日 木曜日 午前10時22分

109
VQT3M30
∫ Note
≥
Fare attenzione a non sporcare la pellicola antiriflesso con ditate o altro.
≥ Ricontrollare che l’O-ring sia inserito in modo uniforme nell’apposito alloggiamento.
≥ Evitare di aprire o chiudere la custodia in luoghi caratterizzati dalla presenza di
sabbia, polvere, umidità elevata o acqua.
≥
Se il livello di umidità cambia repentinamente a causa di infiltrazioni di acqua all’interno
della custodia, è possibile che si formi della condensa.
≥
Per evitare la formazione di condensa, accertarsi che la fotocamera sia il più possibile
asciutta prima di inserirla. Controllare inoltre che il silica gel (in dotazione) sia
sufficientemente asciutto.
≥
Se la custodia viene a contatto con lozioni o olio solare, lavarla immediatamente con
acqua tiepida, per evitare che si scolorisca, o che la sua impermeabilità si riduca.
≥
Dopo aver utilizzato la fotocamera digitale al mare o sott’acqua immergerla per una
decina di minuti in acqua dolce. Per ulteriori informazioni leggere le istruzioni per l’uso.
≥
Se sulla fotocamera sono presenti gocce d’acqua o sporcizia, rimuoverle con un panno
asciutto, quindi mettere la fotocamera in verticale su un panno asciutto per qualche
tempo e controllare che l’acqua sia stata eliminata. Installare quindi la fotocamera.
Quando nella custodia subacquea si installa una fotocamera digitale dotata di
funzione GPS, bussola, altimetro (profondimetro) e barometro, è possibile che non si
riesca a rilevare la posizione o ad effettuare le misurazioni, o che si ottengano
risultati non corretti.
DMW-MCFT3-VQT3M30.book 109 ページ 2011年1月13日 木曜日 午前10時22分

110
VQT3M30
Ripresa di immagini
∫ Ricordarsi di controllare quanto segue prima di entrare in acqua
Prima di immergersi controllare quanto segue.
≥
La carica residua della batteria è sufficiente?
≥ La memoria residua della scheda è sufficiente?
≥ L’O-ring è inserito in maniera uniforme nell’apposito alloggiamento?
≥ Si è controllato che non vi siano infiltrazioni di acqua nella custodia?
≥ La fibbia è ben chiusa?
∫ Ripresa di immagini
1 Premere il pulsante OFF/ON e accendere la fotocamera digitale.
2 Impostare [Subacquea].
≥
Per ulteriori informazioni leggere le istruzioni operative della fotocamera digitale.
3 Inquadrare il soggetto che si desidera mettere a fuoco nell’area AF
sul monitor LCD.
4 Premere [AF-L ] per mettere a fuoco.
• Premere nuovamente [AF-L ] per annullare.
5 Premere fino in fondo il pulsante di scatto dell’otturatore per
riprendere l’immagine.
∫ Note
≥
Prima di inserire la fotocamera nella custodia, si consiglia di reimpostare l’orologio.
(Per ulteriori informazioni leggere le istruzioni operative della fotocamera digitale.)
≥ Se vi sono particelle che fluttuano davanti alla fotocamera, è possibile che vengano
messe a fuoco al posto del soggetto.
≥
Se sul vetro anteriore sono presenti gocce d’acqua o sporcizia, la messa a fuoco può
risultare impossibile. Ricordarsi di pulire il vetro anteriore prima di riprendere le immagini.
DMW-MCFT3-VQT3M30.book 110 ページ 2011年1月13日 木曜日 午前10時22分

111
VQT3M30
Consigli per la ripresa di immagini in acqua
Quando l’immagine risulta troppo bluastra
1
Selezionare [Bil. bianco] dal menu della modalità [Reg].
2 Premere [DISP.] per visualizzare [Regolaz.].
3 Premere [AF-L ]/[ ] per regolare il bilanciamento del bianco.
4 Premere [MENU/SET] per terminare.
≥ Per terminare è anche possibile premere parzialmente il pulsante di scatto
dell’otturatore.
Selezionare l’immagine migliore
Impostare il flash su [ ].
Utilizzo della funzione di bracketing automatico (Per i modelli dotati della funzione di
bracketing automatico)
≥ Ogni volta che si preme il pulsante di scatto dell’otturatore, vengono riprese
automaticamente 3 immagini con esposizioni differenti. Sarà poi possibile
scegliere l’immagine desiderata.
Utilizzo della modalità Scatto a raffica
≥ Quando si riprendono immagini di un soggetto in rapido movimento (come un
pesce pagliaccio), è possibile selezionare l’immagine che si preferisce dopo
averne riprese diverse in sequenza utilizzando la modalità Scatto a raffica.
∫ Nota
≥
La regolazione fine del bilanciamento del bianco (in modalità Subacquea) è supportata
anche quando si registrano immagini in movimento.
Il bilanciamento del bianco può essere regolato in base alla profondità dell’acqua o alle
proprie preferenze.
≥ Per ulteriori informazioni, leggere il manuale di istruzioni della fotocamera digitale.
ITA-BODY.fm 111 ページ 2011年11月11日 金曜日 午前10時10分

112
VQT3M30
Dopo l’uso
Al termine delle riprese, attenersi alla seguente procedura.
1 Immergere la custodia in acqua dolce per circa 30 minuti o più senza
rimuovere la fotocamera digitale, per eliminare eventuali cristalli di
sale, ecc.
≥
Premere tutti i pulsanti operativi sulla custodia per eliminare l’eventuale
acqua di mare. Se non si rimuovono i cristalli di sale dai pulsanti, questi
ultimi si induriranno e non potranno più essere azionati.
≥ Non lavare la custodia con acqua corrente o a forte pressione, per evitare
infiltrazioni.
DMW-MCFT3-VQT3M30.book 112 ページ 2011年1月13日 木曜日 午前10時22分

113
VQT3M30
2 Rimuovere l’acqua con un panno asciutto, facendo attenzione che
non vi siano cristalli di sale attaccati, quindi asciugare
completamente la custodia.
≥
Non asciugare la custodia esponendola alla luce solare diretta. Questo può
causare lo scolorimento della custodia o danneggiarla, oppure accelerare il
deterioramento dell’O-ring.
3 Aprire la copertura posteriore per rimuovere la fotocamera digitale.
Dopo aver accuratamente asciugato le mani, mettere il dito come
indicato nell’illustrazione ed estrarre la fotocamera digitale.
DMW-MCFT3-VQT3M30.book 113 ページ 2011年1月13日 木曜日 午前10時22分

114
VQT3M30
Dopo l’uso (continua)
4 Rimuovere l’O-ring dalla custodia e controllare che non vi sia
sporcizia nell’alloggiamento dell’O-ring.
5 Controllare che non vi siano graffi ecc. sull’O-ring mentre si applica
il grasso.
∫ Note
Fare attenzione a quanto segue quando si estrae la fotocamera digitale.
≥ Fare attenzione di avere le mani pulite prima di rimuovere la fotocamera. (Lavarsi le
mani in acqua dolce e asciugarle accuratamente.)
≥ Asciugare accuratamente eventuali tracce di umidità dal corpo e dai capelli. (Fare
particolare attenzione all’acqua presente nelle maniche della muta termica.)
Pulizia e custodia
1
Lavare l’esterno della custodia con acqua.
≥
Lavare l’esterno della custodia finché non risulta pulito. (P112)
≥ Controllare che la guarnizione sia installata saldamente, chiudere la Custodia,
quindi lavare solo l'esterno con acqua.
≥ Rimuovere l’eventuale sporcizia all’interno della custodia con un panno morbido
inumidito.
∫ Note
≥
Non lavare la custodia con acqua ad alta pressione, per evitare infiltrazioni.
Rimuovere la fotocamera digitale prima di lavare la custodia con acqua.
≥ Quando si ripone la custodia, non lasciare la fotocamera digitale all’interno.
≥ Rimuovere la guarnizione dalla custodia subacquea e conservarla in modo che non
si secchi. Per maggiori informazioni, leggere pagina 115.
Quando si prevede di non utilizzare la custodia per un periodo prolungato, inserirla
nella busta di poliestere esclusiva dopo aver rimosso l’O-ring.
DMW-MCFT3-VQT3M30.book 114 ページ 2011年1月13日 木曜日 午前10時22分

115
VQT3M30
Precauzioni per l’uso
∫ Trattamento dell’O-ring
≥ Non utilizzare alcol, diluenti o detergenti chimici per pulire l’O-ring. Questo
accelererebbe il danneggiamento o il deterioramento dell’O-ring.
≥ Se si prevede di non utilizzare la Custodia per un periodo prolungato,
rimuovere l’O-ring dalla sua scanalatura, applicarvi un sottile strato di grasso
(in dotazione), collocarla nella busta di poliestere esclusiva, quindi riporla in
un luogo fresco e al riparo dalla luce, per evitare che la superficie si danneggi.
Quando si utilizza nuovamente l’O-ring, controllare attentamente che non sia
graffiato o tagliato.
≥ Utilizzare solo il grasso specificato. Se si utilizzano altri tipi di grasso, la
superficie dell’O-ring può essere danneggiata, causando infiltrazioni d’acqua.
≥ L’O-ring aderisce ai lati della custodia, rendendola impermeabile. Non urtare,
contaminare con corpi estranei (sporcizia, sabbia, capelli, ecc.) o graffiare l’O-ring o
i lati della custodia.
≥ Utilizzare la punta delle dita per rimuovere l’O-ring. Non utilizzare un oggetto
appuntito, perché potrebbe graffiare l’O-ring.
≥ Dopo aver rimosso l’O-ring dalla copertura posteriore, rimuovere l’eventuale
sporcizia, sabbia, capelli o latri corpi estranei presenti. Pulire anche l’alloggiamento
dell’O-ring e i lati interni della copertura anteriore a contatto con l’O-ring.
≥ Non utilizzare mai un O-ring graffiato o danneggiato dalla sporcizia, ecc. In caso
contrario si verificheranno infiltrazioni d’acqua. Sostituirlo con un nuovo O-ring.
≥ Dopo aver sostituito la guarnizione, quando non è stata usata da lungo tempo, dopo
aver inserito la fotocamera digitale, o quando si sostituisce la batteria, se viene
aperta la custodia subacquea, verificare attentamente eventuali danni o
screpolature della guarnizione.
Dopo la verifica, chiudere la custodia subacquea, immergerla in acqua (in un
serbatoio o in una vasca) per circa 3 minuti o per un tempo maggiore, quindi
verificare che non si siano verificate infiltrazioni d’acqua. (P106)
≥ Gli O-ring sono materiali di consumo. Anche se la durata degli O-ring dipende dalla
regolarità della manutenzione e dalle condizioni di utilizzo e di conservazione, si
consiglia di sostituirli ogni anno anche se non vi sono graffi visibili.
DMW-MCFT3-VQT3M30.book 115 ページ 2011年1月13日 木曜日 午前10時22分

116
VQT3M30
Precauzioni per l’uso (continua)
∫ Manutenzione
≥ Non utilizzare le sostanze chimiche sotto indicate per la pulizia, la protezione
dalla ruggine, lo sbrinamento o la riparazione. Il loro utilizzo diretto e indiretto
(ad es. sotto forma di spray chimico) sulla Custodia può causarne la rottura.
≥ Se del grasso rimane attaccato alla fotocamera digitale, pulirlo con un panno
asciutto e morbido.
≥ Quando si pulisce l’interno della custodia, utilizzare solo un panno asciutti e
morbido. Pulire l’interno del vetro anteriore con un panno asciutto e morbido prima e
dopo l’uso per mantenere trasparente il vetro.
Sostanze chimiche
proibite
Precauzioni
Solventi organici volatili/
Detergenti chimici
Non pulire la custodia con solventi organici volatili
come alcol, benzina o diluenti o con detergenti
chimici. Pulire la custodia con acqua corrente o
tiepida.
Anticorrosivi
Non utilizzare anticorrosivi perché le parti in metallo di
questa custodia sono in acciaio inossidabile o in
ottone. Pulirla con acqua dolce.
Agenti
antiappannamento
Non utilizzare gli antiappannanti disponibili in
commercio. Ricordarsi di utilizzare il silica gel indicato
in queste istruzioni operative.
Adesivi
Non utilizzare adesivi per le riparazioni. Se occorre
riparare la custodia, consultare il rivenditore.
DMW-MCFT3-VQT3M30.book 116 ページ 2011年1月13日 木曜日 午前10時22分

117
VQT3M30
∫ Custodia e ispezione dopo l’uso
≥ Rimuovere sempre la fotocamera digitale dalla custodia.
≥ Accertarsi che non vi sia sporcizia o polvere attaccata all’O-ring.
≥ Asciugare bene la custodia a temperatura ambiente, quindi riporla in un luogo
fresco e riparato dalla luce.
≥ Si consiglia di far ispezionare la custodia circa 3 anni dopo l’uso. Tale ispezione
consiste nello smontare e pulire la custodia, ispezionare tutti i componenti e se
necessario ripararli, quindi controllare l’impermeabilità della custodia utilizzando la
stessa apparecchiatura per prove idrostatiche utilizzata per tale prova prima
dell’acquisto. Tutti i costi di trasporto sono a carico del cliente.
≥ Non smontare alcuna parte o utilizzare accessori non specificati in queste istruzioni,
e non alterare in alcun modo la custodia. In caso di funzionamento non corretto,
consultare il rivenditore.
Specifiche
Modello compatibile: DMC-FT3/DMC-TS3
(Dato aggiornato a gennaio 2011
¢
)
Dimensioni: Circa 145 mm (W)k94 mm (H)k52 mm (D)
(escluse le parti sporgenti)
Massa: Circa 356 g (compreso il diffusore)
Materiale: Policarbonato
Costruzione
impermeabile: Guarnizione O-ring
Impermeabile fino a: 40 m
¢ Per accedere alle informazioni più aggiornate sui modelli utilizzabili,
consultare le istruzioni per l’uso, il catalogo, o il sito Web della fotocamera
digitale.
DMW-MCFT3-VQT3M30.book 117 ページ 2011年1月13日 木曜日 午前10時22分

118
VQT3M30
目錄
用前須知 . . . . . . . . . . . . . . . . . . . . . . . . . . . . . . . . . . . 119
附件. . . . . . . . . . . . . . . . . . . . . . . . . . . . . . . . . . . . . . . 121
處理和維護 . . . . . . . . . . . . . . . . . . . . . . . . . . . . . . . . . 122
部件. . . . . . . . . . . . . . . . . . . . . . . . . . . . . . . . . . . . . . . 123
什麼是 O 形環? . . . . . . . . . . . . . . . . . . . . . . . . . . . . . 124
準備 - 安裝 O 形環 - . . . . . . . . . . . . . . . . . . . . . . . . . . 125
準備 - 盒子的防水檢查 - . . . . . . . . . . . . . . . . . . . . . . . 129
準備 - 安裝數位相機 - . . . . . . . . . . . . . . . . . . . . . . . . . 130
拍攝圖片 . . . . . . . . . . . . . . . . . . . . . . . . . . . . . . . . . . . 133
水中拍攝圖片的技巧 . . . . . . . . . . . . . . . . . . . . . . . . . . 134
使用後 . . . . . . . . . . . . . . . . . . . . . . . . . . . . . . . . . . . . . 135
清潔與存放 . . . . . . . . . . . . . . . . . . . . . . . . . . . . . . . . . 136
使用注意事項 . . . . . . . . . . . . . . . . . . . . . . . . . . . . . . . 136
規格. . . . . . . . . . . . . . . . . . . . . . . . . . . . . . . . . . . . . . . 138
DMW-MCFT3-VQT3M30.book 118 ページ 2011年1月13日 木曜日 午前10時22分

119
VQT3M30
用前須知
≥ 此防水盒被設計用於 Panasonic 的數位相機。
可以享受在水下 40 m 的深度內拍攝圖片的樂趣。
≥ 由於不適當的管理而造成漏水的情況下,
Panasonic
公司不對該盒中任何產品 (數位
相機、電池、卡等)的損壞、攝影成本或者任何其它費用負責。
≥
Panasonic
公司同樣不對意外事故造成的傷害和財產損失進行補償。
≥ 請閱讀數位相機的使用說明書。
≥ 在安裝數位相機之前,將盒子浸到水中約 3 分鐘或更長的時間,以便檢查是否漏水。
∫ 關於盒子的處理
≥ 在下列條件下使用。
• 水深: 在 40 m 範圍內
• 環境溫度: 0 oC 到 40 oC
≥ 請勿在溫度高於 40 °C 的水中使用此盒子。 該溫度可能會損壞盒子或者導致漏水。
≥ 本盒子是由抗擠壓的聚碳酸酯製成的,但使用時也要多加小心。 當在多岩石的地方
等拍攝圖片時它特別容易擦傷,並且可能被跌落時的撞擊損壞。當乘坐汽車、輪船、
火車或飛機旅行時,請包裝好盒子以防止任何如跌落等的直接撞擊,並且不要將數
位相機留在盒子內。 請僅在短距離運輸時將數位相機安裝在盒子里,例如 : 從機場到
潛水地。 (請勿重新使用銷售時的包裝進行運輸。)
≥ 乘坐飛機時,氣壓的改變會引起盒子內部膨脹,從而導致盒子損壞。 乘坐飛機前,
請取出 O 形環。
請將取下的 O 形環放入到提供的專用聚酯袋中。
≥ 請勿在汽車、輪船內、陽光直射的地方等,將數位相機長時間留在盒子內。盒子是
一種密封設備,因此盒子內的溫度將很快升高,數位相機可能無法正常工作。 請勿
使盒子內部溫度太高。
中 文
DMW-MCFT3-VQT3M30.book 119 ページ 2011年1月13日 木曜日 午前10時22分

120
VQT3M30
用前須知
(續)
∫ 在高溫或低溫環境下使用盒子
≥ 如果在潮濕或炎熱的地方打開或關閉盒子後,將盒子移到寒冷處或者潛入水下,在
盒子內部可能會生成水汽凝結,玻璃表面可能會變得模糊不清並且數位相機可能會
損壞。
≥ 如果突然將盒子從水下或寒冷的地方移向暖和的地方,玻璃表面會變得模糊不清。
拍攝圖片前請等待直到盒子溫度接近空氣溫度。
∫ 關於準備
≥ 請勿在水滴飛濺或沙子可能進入盒子的地方打開或關閉盒子。 建議在室內打開或關
閉盒子。
≥ 請在濕氣少的室內更換電池、卡等,安裝數位相機。
≥ 如果必須在潛水地打開或關閉盒子以更換電池或卡,請務必按照下列步驟進行操作。
• 選擇一個沒有水滴飛濺或沙子不能進入盒子的地方。
• 請吹去所有位於後封蓋和前封蓋之間的封隙中,以及盒扣中的水滴。 用乾布完全擦
去所有剩餘的水滴。
• 徹底擦乾身體和頭髮上的水滴。
• 特別要注意衣袖里的水。
• 請勿用沾有海水的濕手觸摸數位相機。 請預先用清水弄濕毛巾,然後將其放在聚酯
袋中。 使用這塊毛巾擦去手或身體上的水滴或沙子。
≥ 此盒子不能承受震動。 如果在盒子上放置重物或者使其震動,數位相機可能會損壞。
使用盒子時請多加小心。
DMW-MCFT3-VQT3M30.book 120 ページ 2011年1月13日 木曜日 午前10時22分

121
VQT3M30
附件
當第一次打開包裝時,請檢查盒子和所有的附件,確定它們沒有在銷售
或運輸時受到任何損壞。 若發現某些不尋常處,請在使用盒子前與經銷
商聯繫。
請勿使用除以下那些指定附件以外的任何附件。
更換用 O 形環
VMG1798
* 在專用聚酯袋中
* 已預先安裝在本機上
一個。
硅膠 (乾燥劑)
(1 g/5 片 )
VZG0371
潤滑油 (用於 O 形環)
VZG0372
手腕帶
VFC4190
擴散器 / 連接繩
VYK3E56
≥ 當不使用漫散屏時,可以將其取下。
取下 安裝
對準盒子背面的標記,然後安上。
DMW-MCFT3-VQT3M30.book 121 ページ 2011年1月13日 木曜日 午前10時22分

122
VQT3M30
處理和維護
≥ 請勿將此盒子放在不穩定的地方。
• 如果盒子掉在頭或腳上,可能會造成人身傷害以及導致盒子故障。
≥ 切勿改造盒子。
• 如果由於改造盒子而導致數位相機進水,數位相機可能遭到不可修復的損壞。
• 如果在數位相機進水後繼續使用,它可能導致火災。
≥ 未經專門訓練,請勿在水肺潛水中使用此盒子。
• 如果已經經過專門的訓練並得到水肺潛水的證書,才能在該項運動時使用此盒子。
≥ 切勿將此盒子、潤滑油、硅膠和 O 形環放在兒童所能觸及的範圍內。
• 如果兒童身體的任何部位被夾在盒子中,可能會引起傷害。
• 兒童會在無意中吞下潤滑油、硅膠或 O 形環。
• 如果認為兒童可能吞下了潤滑油、硅膠或 O 形環,請立即就醫。
≥ 切勿在水下將背帶掛在脖子上。
• 背帶可能會纏繞在脖子上,從而導致窒息或者其它嚴重傷害。
≥ 徹底沖洗手上的潤滑油。
• 請勿使手上的潤滑油接觸到眼睛和嘴巴。
≥ 如果盒子中進水,請立即停止使用。
• 這可能導致電擊、燒傷或起火。
• 請與經銷商聯繫。
≥ 在水下使用此盒子時如果出現任何異常情況,則在上浮時請注意遵循所有
減壓時的必要步驟和指導方針。
• 如果上浮速度太快,可能會引起潛水病。
≥ 如果盒子中冒煙或異常發熱、出現氣味或響聲,請立即停止使用。
• 這可能導致電擊、燒傷或起火。
• 從盒子中取出數位相機,然後迅速從數位相機中取出電池。
• 請與經銷商聯繫。
≥ 漏水後打開盒子時請多加小心。
• 漏入的水可能噴出或者後封蓋可能會翻轉。
≥ 請勿將此盒子放在溫度高的地方。
• 當盒子暴露在海灘、船上等直射的陽光下,或者當盒子被放置在夏天密閉的汽車
內時,其內部的溫度會特別得高。 該溫度可能會損壞盒子或其內部部件。
• 如果數位相機被安裝到盒子中,則它也可能被損壞。
• 如果在盒子內的溫度很高時使用安裝的數位相機,則可能導致漏水、短路或者絕
緣失效,從而導致火災或故障。
≥ 請勿用濕手觸摸數位相機或電池。
• 這可能導致電擊或故障。
∫ 使用閃光燈拍攝圖片
≥ 使用閃光燈拍攝圖片時,圖片的四角可能會出現虛光或者圖片感光不均的現象。
≥ 使用閃光燈拍攝圖片時,水下的可用閃光範圍要小於陸地上的。
DMW-MCFT3-VQT3M30.book 122 ページ 2011年1月13日 木曜日 午前10時22分

123
VQT3M30
部件
1. 快門鍵
2. 動態影像按鈕
3. 相機 OFF/ON 按鈕
4. 用於 INON Inc. 的外部閃光
燈的配件冷靴
¢1
5. 前封蓋
6. 擴散器 (提供)
7. 前玻璃
8. 變焦按鈕
9. 按鈕操作部分
(有關每各按鈕的操作詳情,
請閱讀數位相機的使用說明
書。)
10. 後封蓋
11. 盒扣
12. 鎖定解除桿
13. 背帶孔
(用於安裝附帶的掛帶和擴散器)
324
7
1
5
6
8
9
10
12
13
11
¢1 這是專門用於由 INON Inc. 製造的外部閃光燈的配件冷靴。
關於相容的閃光燈,請諮詢 INON Inc.。
http://www.inon.co.jp/INON_WORLD_body.html
DMW-MCFT3-VQT3M30.book 123 ページ 2011年1月13日 木曜日 午前10時22分

124
VQT3M30
什麼是
O
形環?
≥ O 形環是一種防水密封墊,可用於水下照相機、手錶或潛水設備。
≥ O 形環通過密封在後封蓋和前封蓋之間的縫隙,從而保持盒子的防水性能。
∫ O 形環如何使盒子防水
膠脂物接觸到盒子邊緣使盒子防水,並且阻止水從縫隙進入盒子。
當周圍的水壓擠壓 O 形環時,O 形環的表面擴張,使得盒子密封得更嚴
密。
O 形環通過與盒子邊緣均勻地接觸,可以防止漏水。 因此,對 O 形
環的良好維護是非常重要的。 O 形環的錯誤的維護可能導致漏水。
O 形環
數位相機
前封蓋
後封蓋
O 形環O 形環
DMW-MCFT3-VQT3M30.book 124 ページ 2011年1月13日 木曜日 午前10時22分

125
VQT3M30
準備
-
安裝
O
形環
-
在安裝數位相機前,請務必安裝 O 形環。
在觸摸 O 形環前,請將手洗淨並擦干。 請在沒有砂粒或灰塵的地方放置 O 形
環。
1 用手指將 O 形環鬆開,然後取下。
≥
用兩手指的指尖鬆開部分的 O 形環,然後將鬆開的部分抬起。 請小心不要讓指甲
擦傷 O 形環。
∫ 注意
≥
請勿使用有尖角的物體取下 O 形環。 這可能會擦傷 O 形環。
O 形環
O 形環
DMW-MCFT3-VQT3M30.book 125 ページ 2011年1月13日 木曜日 午前10時22分

126
VQT3M30
準備
-
安裝
O
形環
-
(續)
2 檢查 O 形環。
≥
請檢查 O 形環上是否有髒物、砂粒、毛髮、灰塵、鹽粒、棉絨或以前的潤滑油。
如果有的話,可以用乾軟布將其擦掉。
≥ O 形環上可能有無法看到的髒物。 用手指在 O 形環上擦拭以檢查是否有髒物。
≥ 擦拭 O 形環時,請小心不要在 O 形環上留下任何乾布的纖維。
≥ 請檢查 O 形環上是否有裂紋、扭曲、擠壓、磨損或擦傷,是否沾有砂粒。 在這些
情況下,請更換 O 形環。
3 檢查 O 形環槽。
≥
砂粒或堅硬的鹽粒可能會進入 O 形環槽中。 請用空氣噴嘴或棉籤仔細清除。 如果
使用棉籤,請小心不要在 O 形環槽中留下棉籤纖維。
≥ 檢查前封蓋槽和後封蓋 (安裝 O 形環的一面)槽。
3 髒物 3 砂粒 3 毛髮 3 灰塵 3 鹽粒 3 棉絨
3 裂紋 3 扭曲 3 擠壓 3 剝落 3 擦傷 3 沾附砂粒
DMW-MCFT3-VQT3M30.book 126 ページ 2011年1月13日 木曜日 午前10時22分

127
VQT3M30
4 塗抹潤滑油 (提供)。
為了清潔 O 形環的表面和補油,請塗抹 O 形環潤滑油。
≥ 請用指尖將一塊米粒大小的潤滑油 (提供)均勻地塗抹在 O 形環上。
( 請勿用紙或布塗抹潤滑油。 紙或布的纖維可能會沾附在 O 形環上。)
≥ 如果 O 形環上的潤滑油過多,髒物和灰塵會附著在上面,從而導致漏水。
因此,請用手指和拇指的指肚捏著 O 形環,輕輕擦去多餘的潤滑油。
≥ 通過均勻地塗抹上薄薄一層 O 形環潤滑油,可以將 O 形環沿著潛水盒的槽柔軟變
形,並使其保持密封。
≥ 請僅使用指定的潤滑油。 如果使用其它類型的潤滑油,可能會破壞 O 形環的表
面,從而導致漏水。
5 將 O 形環均勻地安裝到 O 形環槽中。
檢查下列各項:
≥ O 形環上是否沾有髒物。
≥ O 形環是否露出。
≥ O 形環是否扭曲。
≥ O 形環是否延伸過長。
合格
不合格
DMW-MCFT3-VQT3M30.book 127 ページ 2011年1月13日 木曜日 午前10時22分

128
VQT3M30
準備
-
安裝
O
形環
-
(續)
6 最後檢查 O 形環。
請再次檢查下列各項:
≥ O 形環上是否沾有髒物。
≥ O 形環是否露出。
≥ O 形環是否扭曲。
≥ O 形環上沒有劃痕或壓壞的部分。
用乾布徹底擦掉手上的潤滑油,然後用清水徹底洗淨。
7 關上盒扣。
• 檢查 O 形環的外部表面和前盒上的盒扣是否附有外來物,然後關閉盒子。
∫ 注意
≥
為了使盒子保持完全密封,請勿擦傷 O 形環與盒子邊緣相接觸的表面。
≥ 請勿使用由於髒物等被擦傷或者變形的 O 形環。這可能導致漏水。
≥ 每當使用該盒子時,請取出 O 形環,並檢查 O 形環槽內是否有髒物、砂粒、毛髮或其
它外來物,然後塗抹薄薄一層潤滑油 (提供)。 如果塗抹過多的潤滑油,髒物或灰
塵會附著在 O 形環上,從而導致漏水。
≥ 請務必攜帶備用 O 形環,以防正在使用的 O 形環損壞或擦傷。
DMW-MCFT3-VQT3M30.book 128 ページ 2011年1月13日 木曜日 午前10時22分

129
VQT3M30
準備
-
盒子的防水檢查
-
裝好 O 形環後,請在將數位相機裝入盒子前檢查盒子是否有可能漏水,方法
是將盒子沉入水槽或浴盆等容器中大約 3 分鐘。
≥ 請勿在溫度高於 40 oC 的水中使用此盒子。 該溫度可能會損壞盒子或者導致漏水。
‘ 在將數位相機裝入盒子後,請進行同樣的測試。 (P130)
∫ 注意
≥
如果在它被浸在水中時會從盒中產生氣泡或當您將它從水中拿出時盒子內部有水,
則說明漏水。在這種情況下,請向經銷商諮詢。
≥ 在使用盒子並且數位相機被浸入水中時,如果發生漏水,請立刻取下電池。 如果附
近有火,氫氣可能會燃燒或者爆炸。
≥ 如果拿著盒子快速潛入水中,或者從船上將盒子丟入海中時,可能會因為高壓而有
少許漏水。 這不是盒子的故障。 請小心慢慢潛入水中。
≥ 本盒子專用於 40 m 內的深度。 如果潛入深度超過 40 m,則盒子的某些部位可能受到
無法修復的損壞。
≥ 當蓋上盒子時,請小心不要將外來物帶到 O 形環及 O 形環槽之間。 即使一根毛髮或一
顆砂粒也會導致漏水。
DMW-MCFT3-VQT3M30.book 129 ページ 2011年1月13日 木曜日 午前10時22分

130
VQT3M30
準備
-
安裝數位相機
-
在安裝數位相機之前,請閱讀第 132 頁的注意事項。
確認數位相機被設定為 [OFF]。
≥ 請從數位相機上取下掛帶和矽膠套。
1 在滑動 1 的同時,用手指上推 2 打開盒扣。
2 將數位相機裝入盒子。
請注意方向,將數位相機如圖所示裝入盒子。
≥
請確認數位相機的表面上和盒子內部沒有殘留的水。
≥ 請注意不要夾住遮光罩 1。
3 插入硅膠 (提供)。
≥
要一直使用新硅膠。
前封蓋
硅膠
數位相機
DMW-MCFT3-VQT3M30.book 130 ページ 2011年1月13日 木曜日 午前10時22分

131
VQT3M30
≥ 當插入硅膠時,請將硅膠如下圖所示弄彎,然後將其插入盡可能得深。 如果在硅
膠沒有完全插入的情況下就關上盒子,則由於硅膠被夾在 O 形環內而導致漏水。
≥ 如果氣溫高水溫低,盒子內部可能會出現水汽凝結。 為了防止水汽凝結,請預先
將硅膠 (提供)插入到盒子內部。為了防止盒子霧化,請在使用盒子前插入硅
膠約 1 到 2 小時。
4 關上盒扣。
‘ 檢查盒扣是否牢固地關上。
請勿將掛帶等夾在盒扣中。
5 裝入數位相機後,請再次檢查盒子是否漏水。 (P129)
硅膠
DMW-MCFT3-VQT3M30.book 131 ページ 2011年1月13日 木曜日 午前10時22分

132
VQT3M30
準備
-
安裝數位相機
-
(續)
∫ 注意
≥
請注意不要用指印等弄髒遮光罩。
≥ 再次檢查 O 形環是否均勻地安裝在 O 形環槽中。
≥ 請盡可能避免在沙子多、灰塵大、以及潮濕或多雨的地方打開或關閉盒子。
≥
如果由於濕氣進入防水盒而導致濕度突然改變,則防水盒內部可能會出現水汽凝結。
≥
為防止水汽凝結,請將數位相機放置在盡可能乾燥的地方。
此外,請在插入之前確認矽
膠 (提供)是完全乾燥的。
≥ 如果遮光劑或防晒油沾到盒子上,請立刻用溫水清洗乾淨,以防止防水性能下降或
盒子退色。
≥
在海邊或水中使用數位相機後,請將其浸在淡水中約
10
分鐘。
有關詳情,請閱讀使用說
明書。
≥
如果相機機身上有水滴或污垢,請在將相機豎立放置在乾布上一會兒之前用乾布將其擦
去,並確認水已經被擦去。
在此之後,請安裝相機。
將具有 GPS 功能、指南針、高度計 (深度計)和氣壓計的數位相機安裝到防水盒中
時,定位或測量可能不能進行,或者可能含有主要誤差。
DMW-MCFT3-VQT3M30.book 132 ページ 2011年1月13日 木曜日 午前10時22分

133
VQT3M30
拍攝圖片
∫ 入水前請務必檢查下列各項
請在潛水前檢查下列各項。
≥
剩餘電池電量足夠用嗎?
≥ 記憶卡的容量足夠嗎?
≥ O 形環均勻地安裝到 O 形環槽中了嗎?
≥ 已經檢查過沒有水漏入盒子嗎?
≥ 盒扣牢固地關上了嗎?
∫ 拍攝圖片
1 按 OFF/ON 按鈕,開啟數位相機。
2 設定 [ 水中 ]。
≥
詳情請閱讀數位相機的使用說明書。
3 瞄準想對焦的目標,將其置於 LCD 顯示屏上的 AF 區域中。
4 按下 [AF-L ] 聚焦。
• 再次按下 [AF-L ] 取消。
5 完全按下快門鍵拍攝圖片。
∫ 注意
≥ 在將相機安裝到盒子上之前,我們建議重新設定時鐘。
(詳情請閱讀數位相機的使用說明書。)
≥ 如果相機前漂浮有任何的小微粒,則相機可能聚焦在這些東西上而不是在目標上。
≥ 如果有水滴或髒物沾附在前玻璃上,可能無法正常聚焦。 請務必在拍攝圖片前擦乾
淨前玻璃。
DMW-MCFT3-VQT3M30.book 133 ページ 2011年1月13日 木曜日 午前10時22分

134
VQT3M30
水中拍攝圖片的技巧
當影像在水中偏藍時
1 從 [拍攝] 模式功能表中選擇 [白平衡]。
2 按 [DISP.] 顯示 [調整]。
3 按下 [AF-L ]/[ ] 調整白平衡。
4 按下 [MENU/SET] 完成設定。
≥ 也可以半按快門鍵完成設定。
選擇最佳圖片
將閃光燈設定為 []。
使用自動曝光包圍功能 (對於具有自動曝光包圍功能的機型)
≥ 每按下快門鍵,就自動拍攝 3 張不同曝光的圖片。可以從 3 張圖片中選擇想要的
圖片。
使用連拍模式
≥ 拍攝快速移動物體 (小丑魚等)的圖片時,可以在使用連拍模式拍攝後選擇您
特別喜歡的圖片。
∫ 注意
≥
錄製動態影像時,也支持白平衡精細調整 (水中模式)。
可以根據水深或喜好調整白平衡。
≥ 詳細信息,請參閱數位相機的使用說明書。
TAI_BODY.fm 134 ページ 2011年11月11日 金曜日 午前10時11分

135
VQT3M30
使用後
完成拍攝後,請按照下列步驟進行操作。
1 不要取出數位相機,將盒子浸沒在清水中約 30 分鐘或更長時間以清除所有
的鹽粒等。
≥ 按下所有盒子上的操作鍵等以將海水清洗乾淨。 如果鍵子等上的鹽粒沒有清除乾
淨,鹽粒會硬化,鍵子將會無法操作。
≥ 不要用傾洩的水或有壓力的水等,這可能導致漏水。
2 請用沒有沾有鹽粒的乾布將水擦去,然後將盒子完全擦乾。
≥
請勿將此盒子暴露在直射的陽光下使其晒乾。 這可能導致盒子
退色
或損壞,或者
加速 O 形環的老化。
3 打開後封蓋取出數位相機。
在將手徹底擦乾後,請將手指如圖所示放置然後取出數位相機。
DMW-MCFT3-VQT3M30.book 135 ページ 2011年1月13日 木曜日 午前10時22分

136
VQT3M30
使用後
(續)
4 從盒子中取出 O 形環,並檢查 O 形環槽中沒有廢物等。
5 當塗抹潤滑油時,檢查 O 形環上沒有擦傷。
∫ 注意
取出數位相機時,請注意以下幾點。
≥
用清潔的雙手取下相機。 (請用清水洗手,然後完全擦乾。)
≥ 徹底擦乾身體和頭髮上的水。 (特別要注意衣袖里的水。)
清潔與存放
1 用水沖洗盒子的外部。
≥
用水沖洗盒子的外部直到乾淨。 (P135)
≥ 請確認 O 形環是否被牢牢地安裝,務必關上盒子,然後用水只沖洗外面。
≥ 用濕軟布擦去盒子內部的任何髒物。
∫ 注意
≥
不要用傾洩的水沖洗盒子,因為這可能導致漏水。 用水沖洗盒子前,應先取出數位
相機。
≥ 存放時,請勿將數位相機留在盒子里。
≥ 請從防水盒上取下 O 形環存放起來,使其不會變乾。有關詳情,請參閱第 137 頁。
要長時間存放時,請先取下 O 形環,然後將其放入到提供的專用聚酯袋中。
使用注意事項
∫ 處理 O 形環
≥ 請勿用酒精、稀釋劑或化學清洗劑清洗 O 形環。 這樣將加速 O 形環的損壞或老化。
≥ 如果長時間不使用盒子,請將 O 形環從 O 形環槽中取出,塗上薄薄一層潤滑油 (提
供),放在專用聚酯袋中,然後將其存放在陰涼避光的地方以防止表面損壞。 當再次
使用 O 形環時,請徹底檢查是否有擦傷或者裂紋。
≥ 請僅使用指定的潤滑油。 如果使用其它類型的潤滑油,可能會破壞 O 形環的表面,從
而導致漏水。
DMW-MCFT3-VQT3M30.book 136 ページ 2011年1月13日 木曜日 午前10時22分

137
VQT3M30
≥ O 形環接觸到盒子的邊緣使盒子防水。 請勿敲打、插入外來物 (髒物、沙子、毛髮
等)或者擦傷 O 形環或盒子邊緣。
≥
請用指尖取下
O
形環。
請勿使用有尖角的物體因為它可能會
擦傷
O
形環。
≥ 從後封蓋取出 O 形環後,請擦去 O 形環上所有髒物、沙子、毛髮或其它外來物。 也請
擦拭 O 形環槽以及與 O 形環相接觸的前封蓋的內邊。
≥ 請勿使用由於髒物等被擦傷或者變形的 O 形環。這可能導致漏水。 請用新的 O 形環更
換。
≥ 更換 O 形環後、長時間不使用時、設定數位相機後或者在更換電池等時,如果防水盒
被開啟,請徹底檢查 O 形環確認是否受損或有任何裂縫。
檢查後,請關上防水盒,將其浸在水中 (水箱或浴盆)約 3 分鐘以上,然後確認沒
有漏水。(P129)
≥ O 形環是消耗品。儘管它的壽命依賴於維護、使用頻率和存放條件,但我們建議即使
沒有發現任何擦傷也請每年更換一次。
∫ 關於維護
≥ 請勿使用下列所示的化學製品清洗、除鏽、除霧或修理。 直接或間接地在盒子上使
用它們 (化學噴霧等)可能會導致盒子產生裂紋。
≥ 如果潤滑劑沾到數位相機上,請用乾軟布將其擦去。
≥ 當擦拭盒子內部時,請僅使用乾軟布。 請在使用前後用乾軟布擦拭前玻璃的內側,
以保持玻璃清潔。
禁用的化學製品 注意事項
揮發性有機溶劑
/ 化學清
潔劑
請勿使用諸如酒精、汽油或稀釋劑這樣的揮發性有機
溶劑或化學清潔劑清洗盒子。 請用清水或溫水清洗盒
子。
抗腐蝕劑
請勿使用抗腐蝕劑,因為盒子的金屬部分是用不鏽鋼
或黃銅製成的。 請用清水清洗它們。
抗濕潤劑
請勿使用商業流通的抗濕潤試劑。 請務必使用使用說
明書中指定的硅膠。
黏合劑
請勿使用黏合劑進行修理。 如果盒子需要修理,請與
經銷商聯繫。
DMW-MCFT3-VQT3M30.book 137 ページ 2011年1月13日 木曜日 午前10時22分

138
VQT3M30
使用注意事項
(續)
∫ 關於使用後的存放和檢查
≥ 請從盒子中取出數位相機。
≥ 確保 O 形環上沒有沾上髒物或灰塵。
≥ 請在室溫下徹底弄乾盒子,然後將其存放在陰涼避光的地方。
≥ 我們建議在購買後每 3 年檢查一次盒子。 檢查包括拆卸和清洗盒子、檢查所有的部
件、如果需要請進行修理、以及使用與購買前進行盒子防水檢查相同的流體靜力學
測試設備檢查盒子的防水性能。 客戶必須支付所有運費。
≥ 請勿拆除任何部件,或者使用使用說明書中沒有指定的附件,並且不要修改盒子。
如果盒子不能正常工作,請與經銷商聯繫。
規格
相容型號:
DMC-FT3/DMC-TS3
(截止到
2011
年
1
月
¢
)
尺寸: 約 145 mm ( 寬 ) k94 mm ( 高 ) k52 mm ( 深 )
(不包括突出部分)
重量: 約 356 g (包括擴散器)
材料: 聚碳酸酯
防水構造: O 形環封口
防水深度: 40 m
¢ 有關可使用機型的最新資訊,請參閱數位相機的使用說明書、目錄、網站
等。
DMW-MCFT3-VQT3M30.book 138 ページ 2011年1月13日 木曜日 午前10時22分

139
VQT3M30
目录
用前须知 . . . . . . . . . . . . . . . . . . . . . . . . . . . . . . . . . . . 140
附件. . . . . . . . . . . . . . . . . . . . . . . . . . . . . . . . . . . . . . . 142
处理和维护 . . . . . . . . . . . . . . . . . . . . . . . . . . . . . . . . . 143
部件. . . . . . . . . . . . . . . . . . . . . . . . . . . . . . . . . . . . . . . 144
什么是 O 形环? . . . . . . . . . . . . . . . . . . . . . . . . . . . . . 145
准备 - 安装 O 形环 -. . . . . . . . . . . . . . . . . . . . . . . . . . . 146
准备 - 盒子的防水检查 - . . . . . . . . . . . . . . . . . . . . . . . 150
准备 - 安装数码相机 - . . . . . . . . . . . . . . . . . . . . . . . . . 151
拍摄图片 . . . . . . . . . . . . . . . . . . . . . . . . . . . . . . . . . . . 154
水中拍摄图片的技巧 . . . . . . . . . . . . . . . . . . . . . . . . . . 155
使用后 . . . . . . . . . . . . . . . . . . . . . . . . . . . . . . . . . . . . . 156
清洁与存放 . . . . . . . . . . . . . . . . . . . . . . . . . . . . . . . . . 157
使用注意事项 . . . . . . . . . . . . . . . . . . . . . . . . . . . . . . . 158
规格. . . . . . . . . . . . . . . . . . . . . . . . . . . . . . . . . . . . . . . 159
简体中文
DMW-MCFT3-VQT3M30.book 139 ページ 2011年1月13日 木曜日 午前10時22分

140
VQT3M30
用前须知
≥ 此防水盒被设计用于 Panasonic 的数码相机。
可以享受在水下 40 m 的深度内拍摄图片的乐趣。
≥ 由于不适当的管理而造成漏水的情况下,
Panasonic
公司不对该盒中任何产品 (数码
相机、电池、卡等)的损坏、摄影成本或者任何其它费用负责。
≥
Panasonic
公司同样不对意外事故造成的伤害和财产损失进行补偿。
≥ 请阅读数码相机的使用说明书。
≥ 在安装数码相机之前,将盒子浸到水中约 3 分钟或更长的时间,以便检查是否漏水。
∫ 关于盒子的处理
≥ 在下列条件下使用。
• 水深 : 在 40 m 的范围内
• 环境温度 : 0 oC 到 40 oC
≥ 请勿在温度高于 40 oC 的水中使用此盒子。 该温度可能会损坏盒子或者导致漏水。
≥ 本盒子是由抗挤压的聚碳酸酯制成的,但使用时也要多加小心。 当在多岩石的地方
等拍摄图片时它特别容易擦伤,并且可能被跌落时的撞击损坏。当乘坐汽车、轮船、
火车或飞机旅行时,请包装好盒子以防止任何如跌落等的直接撞击,并且不要将数
码相机留在盒子内。 请仅在短距离运输时将数码相机安装在盒子里,例如 : 从机场到
潜水地。 (请勿重新使用销售时的包装进行运输。)
≥ 乘坐飞机时,气压的改变会引起盒子内部膨胀,从而导致盒子损坏。 乘坐飞机前,
请取出 O 形环。
请将取下的 O 形环放入到提供的专用聚酯袋中。
≥ 请勿在汽车、轮船内、阳光直射的地方等,将数码相机长时间留在盒子内。盒子是
一种密封设备,因此盒子内的温度将很快升高,数码相机可能无法正常工作。 请勿
使盒子内部温度太高。
DMW-MCFT3-VQT3M30.book 140 ページ 2011年1月13日 木曜日 午前10時22分

141
VQT3M30
∫ 在高温或低温环境下使用盒子
≥ 如果在潮湿或炎热的地方打开或关闭盒子后,将盒子移到寒冷处或者潜入水下,在
盒子内部可能会生成水汽凝结,玻璃表面可能会变得模糊不清并且数码相机可能会
损坏。
≥ 如果突然将盒子从水下或寒冷的地方移向暖和的地方,玻璃表面会变得模糊不清。
拍摄图片前请等待直到盒子温度接近空气温度。
∫ 关于准备
≥ 请勿在水滴飞溅或沙子可能进入盒子的地方打开或关闭盒子。 建议在室内打开或关
闭盒子。
≥ 请在湿气少的室内更换电池、卡等,安装数码相机。
≥ 如果必须在潜水地打开或关闭盒子以更换电池或卡,请务必按照下列步骤进行操作。
• 选择一个没有水滴飞溅或沙子不能进入盒子的地方。
• 请吹去所有位于后封盖和前封盖之间的封隙中,以及盒扣中的水滴。 用干布完全擦
去所有剩余的水滴。
• 彻底擦干身体和头发上的水滴。
• 特别要注意衣袖里的水。
• 请勿用粘有海水的湿手触摸数码相机。 请预先用清水弄湿毛巾,然后将其放在聚酯
袋中。 使用这块毛巾擦去手或身体上的水滴或沙子。
≥ 此盒子不能承受震动。 如果在盒子上放置重物或者使其震动,数码相机可能会损坏。
使用盒子时请多加小心。
DMW-MCFT3-VQT3M30.book 141 ページ 2011年1月13日 木曜日 午前10時22分

142
VQT3M30
附件
当第一次打开包装时,请检查盒子和所有的附件,确定它们没有在销
售或运输时受到任何损坏。若发现某些不寻常处,请在使用盒子前与
经销商联系。
请勿使用除以下那些指定附件以外的任何附件。
更换用 O 形环
VMG1798
* 在专用聚酯袋中
* 已预先安装在本机上
一个。
硅胶(干燥剂)
(1 g/5 片 )
VZG0371
润滑油(用于 O 形环)
VZG0372
挂带
VFC4190
扩散器 / 连接绳
VYK3E56
≥ 当不使用漫散屏时,可以将其取下。
取下 安装
对准盒子背面的标记,然后安上。
DMW-MCFT3-VQT3M30.book 142 ページ 2011年1月13日 木曜日 午前10時22分

143
VQT3M30
处理和维护
≥ 请勿将此盒子放在不稳定的地方。
• 如果盒子掉在头或脚上,可能会造成人身伤害以及导致盒子故障。
≥ 切勿改造盒子。
• 如果由于改造盒子而导致数码相机进水,数码相机可能遭到不可修复的损坏。
• 如果在数码相机进水后继续使用,它可能导致火灾。
≥ 未经专门训练,请勿在水肺潜水中使用此盒子。
• 如果已经经过专门的训练并得到水肺潜水的证书,才能在该项运动时使用此盒子。
≥ 切勿将此盒子、润滑油、硅胶和 O 形环放在儿童所能触及的范围内。
• 如果儿童身体的任何部位被夹在盒子中,可能会引起伤害。
• 儿童会在无意中吞下润滑油、硅胶或 O 形环。
• 如果认为儿童可能吞下了润滑油、硅胶或 O 形环,请立即就医。
≥ 切勿在水下将背带挂在脖子上。
• 背带可能会缠绕在脖子上,从而导致窒息或者其它严重伤害。
≥ 彻底冲洗手上的润滑油。
• 请勿使手上的润滑油接触到眼睛和嘴巴。
≥ 如果盒子中进水,请立即停止使用。
• 这可能导致电击、烧伤或起火。
• 请与经销商联系。
≥ 在水下使用此盒子时如果出现任何异常情况,则在上浮时请注意遵循所有
减压时的必要步骤和指导方针。
• 如果上浮速度太快,可能会引起潜水病。
≥ 如果盒子中冒烟或异常发热、出现气味或响声,请立即停止使用。
• 这可能导致电击、烧伤或起火。
• 从盒子中取出数码相机,然后迅速从数码相机中取出电池。
• 请与经销商联系。
≥ 漏水后打开盒子时请多加小心。
• 漏入的水可能喷出或者后封盖可能会翻转。
≥ 请勿将此盒子放在温度高的地方。
• 当盒子暴露在海滩、船上等直射的阳光下,或者当盒子被放置在夏天密闭的汽车
内时,其内部的温度会特别得高。 该温度可能会损坏盒子或其内部部件。
• 如果数码相机被安装到盒子中,则它也可能被损坏。
• 如果在盒子内的温度很高时使用安装的数码相机,则可能导致漏水、短路或者绝
缘失效,从而导致火灾或故障。
≥ 请勿用湿手触摸数码相机或电池。
• 这可能导致电击或故障。
∫ 使用闪光灯拍摄图片
≥ 使用闪光灯拍摄图片时,图片的四角可能会出现虚光或者图片感光不均的现象。
≥ 使用闪光灯拍摄图片时,水下的可用闪光范围要小于陆地上的。
DMW-MCFT3-VQT3M30.book 143 ページ 2011年1月13日 木曜日 午前10時22分

144
VQT3M30
部件
1. 快门按钮
2. 动态影像按钮
3. 相机 OFF/ON 按钮
4. 用于 INON Inc. 的外部闪光
灯的配件冷靴
¢1
5. 前封盖
6. 扩散器 (附件)
7. 前玻璃
8. 变焦按钮
9. 按钮操作部分
(有关每个按钮的操作详情,
请阅读数码相机的使用说明
书。)
10. 后封盖
11. 盒扣
12. 锁定解除杆
13. 背带孔
(用于安装附带的挂带和扩散器)
324
7
1
5
6
8
9
10
12
13
11
¢1 这是专门用于由 INON Inc. 制造的外部闪光灯的配件冷靴。
关于兼容的闪光灯,请咨询 INON Inc.。
http://www.inon.co.jp/INON_WORLD_body.html
DMW-MCFT3-VQT3M30.book 144 ページ 2011年1月13日 木曜日 午前10時22分

145
VQT3M30
什么是
O
形环?
≥ O 形环是一种防水密封垫,可用于水下照相机、手表或潜水设备。
≥ O 形环通过密封在后封盖和前封盖之间的缝隙、从而保持盒子的防水性能。
∫ O 形环如何使盒子防水
胶脂物接触到盒子边缘使盒子防水,并且阻止水从缝隙进入盒子。
当周围的水压挤压 O 形环时, O 形环的表面扩张,使得盒子密封得更
严密。
O 形环通过与盒子边缘均匀地接触,可以防止漏水。 因此,对 O 形
环的良好维护是非常重要的。 O 形环的错误的维护可能导致漏水。
O 形环
数码相机
前封盖
后封盖
O 形环O 形环
DMW-MCFT3-VQT3M30.book 145 ページ 2011年1月13日 木曜日 午前10時22分

146
VQT3M30
准备
-
安装
O
形环
-
在安装数码相机前,请务必安装 O 形环。
在触摸 O 形环前,请将手洗净并擦干。 请在没有沙粒或灰尘的地方放置 O 形
环。
1 用手指将 O 形环松开,然后取下。
≥
用两手指的指尖松开部分的 O 形环,然后将松开的部分抬起。 请小心不要让指甲
擦伤 O 形环。
∫ 注意
≥
请勿使用有尖角的物体取下 O 形环。 这可能会擦伤 O 形环。
O 形环
O 形环
DMW-MCFT3-VQT3M30.book 146 ページ 2011年1月13日 木曜日 午前10時22分

147
VQT3M30
2 检查 O 形环。
≥
请检查 O 形环上是否有脏物、沙粒、毛发、灰尘、盐粒、棉绒或以前的润滑油。
如果有的话,可以用干软布将其擦掉。
≥ O 形环上可能有无法看到的脏物。 用手指在 O 形环上擦拭以检查是否有脏物。
≥ 擦拭 O 形环时,请小心不要在 O 形环上留下任何干布的纤维。
≥ 请检查 O 形环上是否有裂纹、扭曲、挤压、磨损或擦伤,是否粘有沙粒。 在这些
情况下,请更换 O 形环。
3 检查 O 形环槽。
≥
沙粒或坚硬的盐粒可能会进入 O 形环槽中。 请用空气喷嘴或棉签仔细清除。 如果
使用棉签,请小心不要在 O 形环槽中留下棉签纤维。
≥ 检查前封盖槽和后封盖 (安装 O 形环的一面)槽。
3 脏物 3 沙粒 3 毛发 3 灰尘 3 盐粒 3 棉绒
3 裂纹 3 扭曲 3 挤压 3 剥落 3 擦伤 3 粘附沙粒
DMW-MCFT3-VQT3M30.book 147 ページ 2011年1月13日 木曜日 午前10時22分

148
VQT3M30
准备
-
安装
O
形环
-
(续)
4 涂抹润滑油 (附件)。
为了清洁 O 形环的表面和补油,请涂抹 O 形环润滑油。
≥ 请用指尖将一块米粒大小的润滑油 (附件)均匀地涂抹在 O 形环上。
( 请勿用纸或布涂抹润滑油。 纸或布的纤维可能会粘附在 O 形环上。 )
≥ 如果 O 形环上的润滑油过多,脏物和灰尘会附着在上面,从而导致漏水。因此,
请用手指和拇指的指肚捏着 O 形环,轻轻擦去多余的润滑油。
≥ 通过均匀地涂抹上薄薄一层 O 形环润滑油,可以将 O 形环沿着潜水盒的槽柔软变
形,并使其保持密封。
≥ 请仅使用指定的润滑油。 如果使用其它类型的润滑油,可能会破坏 O 形环的表
面,从而导致漏水。
5 将 O 形环均匀地安装到 O 形环槽中。
检查下列各项 :
≥ O 形环上是否粘有脏物。
≥ O 形环是否露出。
≥ O 形环是否扭曲。
≥ O 形环是否延伸过长。
合格
不合格
DMW-MCFT3-VQT3M30.book 148 ページ 2011年1月13日 木曜日 午前10時22分

149
VQT3M30
6 最后检查 O 形环。
请再次检查下列各项 :
≥ O 形环上是否粘有脏物。
≥ O 形环是否露出。
≥ O 形环是否扭曲。
≥ O 形环上没有划痕或压坏的部分。
用干布彻底擦掉手上的润滑油,然后用清水彻底洗净。
7 关上盒扣。
≥
检查 O 形环的外部表面和前盒上的盒扣是否附有外来物,然后关闭盒子。
∫ 注意
≥
为了使盒子保持完全密封,请勿擦伤 O 形环与盒子边缘相接触的表面。
≥ 请勿使用由于脏物等被擦伤或者变形的 O 形环。这可能导致漏水。
≥ 每当使用该盒子时,请取出 O 形环,并检查 O 形环槽内是否有脏物、沙粒、毛发或其
它外来物,然后涂抹薄薄一层润滑油 (附件)。 如果涂抹过多的润滑油,脏物或灰
尘会附着在 O 形环上,从而导致漏水。
≥ 请务必携带备用 O 形环,以防正在使用的 O 形环损坏或擦伤。
DMW-MCFT3-VQT3M30.book 149 ページ 2011年1月13日 木曜日 午前10時22分

150
VQT3M30
准备
-
盒子的防水检查
-
装好 O 形环后,请在将数码相机装入盒子前检查盒子是否有可能漏水,方法
是将盒子沉入水槽或浴盆等容器中大约 3 分钟。
≥ 请勿在温度高于 40 oC 的水中使用此盒子。 该温度可能会损坏盒子或者导致漏水。
‘ 在将数码相机装入盒子后,请进行同样的测试。 (P151)
∫ 注意
≥
如果在它被浸在水中时会从盒中产生气泡或当您将它从水中拿出时盒子内部有水,
则说明漏水。在这种情况下,请向经销商咨询。
≥ 在使用盒子并且数码相机被浸入水中时,如果发生漏水,请立刻取下电池。 如果附
近有火,氢气可能会燃烧或者爆炸。
≥ 如果拿着盒子快速潜入水中,或者从船上将盒子丢入海中时,可能会因为高压而有
少许漏水。 这不是盒子的故障。 请小心慢慢潜入水中。
≥ 本盒子专用于 40 m 内的深度。 如果潜入深度超过 40 m,则盒子的某些部位可能受到
无法修复的损坏。
≥ 当盖上盒子时,请小心不要将外来物带到 O 形环及 O 形环槽之间。 即使一根毛发或一
颗沙粒也会导致漏水。
DMW-MCFT3-VQT3M30.book 150 ページ 2011年1月13日 木曜日 午前10時22分

151
VQT3M30
准备
-
安装数码相机
-
在安装数码相机之前,请阅读第 153 页的注意事项。
确认数码相机被设置为 [OFF]。
≥ 请从数码相机上取下挂带和硅胶套。
1 在滑动 1 的同时,用手指上推 2 打开盒扣。
2 将数码相机装入盒子。
请注意方向,将数码相机如图所示装入盒子。
≥ 请确认数码相机的表面上和盒子内部没有残留的水。
≥ 请注意不要夹住遮光罩 1。
3 插入硅胶 (附件)。
≥
要一直使用新硅胶。
前封盖
硅胶
数码相机
DMW-MCFT3-VQT3M30.book 151 ページ 2011年1月13日 木曜日 午前10時22分

152
VQT3M30
准备
-
安装数码相机
-
(续)
≥ 当插入硅胶时,请将硅胶如下图所示弄弯,然后将其插入尽可能得深。 如果在硅
胶没有完全插入的情况下就关上盒子,则由于硅胶被夹在 O 形环内而导致漏水。
≥ 如果气温高水温低,盒子内部可能会出现水汽凝结。 为了防止水汽凝结,请预先
将硅胶 (附件)插入到盒子内部。
为了防止盒子雾化,请在使用盒子前插入硅
胶约 1 到 2 小时。
4 关上盒扣。
‘ 检查盒扣是否牢固地关上。
请勿将挂带等夹在盒扣中。
5 装入数码相机后,请再次检查盒子是否漏水。 (P150)
硅胶
DMW-MCFT3-VQT3M30.book 152 ページ 2011年1月13日 木曜日 午前10時22分

153
VQT3M30
∫ 注意
≥
请注意不要用指印等弄脏遮光罩。
≥ 再次检查 O 形环是否均匀地安装在 O 形环槽中。
≥ 请尽可能避免在沙子多、灰尘大、以及潮湿或多雨的地方打开或关闭盒子。
≥ 如果由于湿气进入防水盒而导致湿度突然改变,则防水盒内部可能会出现水汽凝结。
≥ 为防止水汽凝结,请将数码相机放置在尽可能干燥的地方。 此外,请在插入之前确
认硅胶 (提供)是完全干燥的。
≥ 如果遮光剂或防晒油粘到盒子上,请立刻用温水清洗干净,以防止防水性能下降或
盒子退色。
≥ 在海边或水中使用数码相机后,请将其浸在淡水中约 10 分钟。 有关详情,请阅读使
用说明书。
≥ 如果相机机身上有水滴或污垢,请在将相机竖立放置在干布上一会儿之前用干布将
其擦去,并确认水已经被擦去。 在此之后,请安装相机。
将具有 GPS 功能、指南针、高度计 (深度计)和气压计的数码相机安装到防水盒中
时,定位或测量可能不能进行,或者可能含有主要误差。
DMW-MCFT3-VQT3M30.book 153 ページ 2011年1月13日 木曜日 午前10時22分

154
VQT3M30
拍摄图片
∫ 入水前请务必检查下列各项
请在潜水前检查下列各项。
≥
剩余电池电量足够用吗?
≥ 记忆卡的容量足够吗?
≥ O 形环均匀地安装到 O 形环槽中了吗?
≥ 已经检查过没有水漏入盒子吗?
≥ 盒扣牢固地关上了吗?
∫ 拍摄图片
1 按 OFF/ON 按钮,开启数码相机。
2 设置 [ 水中 ]。
≥
详情请阅读数码相机的使用说明书。
3 瞄准想对焦的目标,将其置于 LCD 显示屏上的 AF 区域中。
4 按下 [AF-L ] 聚焦。
• 再次按下 [AF-L ] 取消。
5 完全按下快门按钮拍摄图片。
∫ 注意
≥ 在将相机安装到盒子上之前,我们建议重新设置时钟。
(详情请阅读数码相机的使用说明书。)
≥ 如果相机前漂浮有任何的小微粒,则相机可能聚焦在这些东西上而不是在目标上。
≥ 如果有水滴或脏物粘附在前玻璃上,可能无法正常聚焦。请务必在拍摄图片前擦干
净前玻璃。
DMW-MCFT3-VQT3M30.book 154 ページ 2011年1月13日 木曜日 午前10時22分

155
VQT3M30
水中拍摄图片的技巧
当影像在水中偏蓝时
1 从 [拍摄] 模式菜单中选择 [白平衡]。
2 按 [DISP.] 显示 [白平衡调整]。
3 按下 [AF-L ]/[ ] 调整白平衡。
4 按下 [MENU/SET] 完成设置。
≥ 也可以半按快门按钮完成设置。
选择最佳图片
将闪光灯设置为 []。
使用自动括弧式曝光功能 (对于具有自动括弧式曝光功能的机型)
≥ 每按下快门按钮,就自动拍摄 3 张不同曝光的图片。可以从 3 张图片中选择想要
的图片。
使用连拍模式
≥ 拍摄快速移动物体 (小丑鱼等)的图片时,可以在使用连拍模式拍摄后选择您
特别喜欢的图片。
∫ 注意
≥
录制动态影像时,也支持白平衡精细调整 (水中模式)。
可以根据水深或喜好调整白平衡。
≥ 详细信息,请参阅数码相机的使用说明书。
PEK_BODY.fm 155 ページ 2011年11月11日 金曜日 午前10時12分

156
VQT3M30
使用后
完成拍摄后,请按照下列步骤进行操作。
1 不要取出数码相机,将盒子浸没在清水中约 30 分钟或更长时间以清除所有
的盐粒等。
≥
按下所有盒子上的操作按钮等以将海水清洗干净。 如果按钮子等上的盐粒没有清
除干净,盐粒会硬化,按钮子将会无法操作。
≥ 不要用倾泄的水或有压力的水等,这可能导致漏水。
2 请用没有粘有盐粒的干布将水擦去,然后将盒子完全擦干。
≥
请勿将此盒子暴露在直射的阳光下使其晒干。 这可能导致盒子
退色
或损坏,或者
加速 O 形环的老化。
3 打开后封盖取出数码相机。
在将手彻底擦干后,请将手指如图所示放置然后取出数码相机。
DMW-MCFT3-VQT3M30.book 156 ページ 2011年1月13日 木曜日 午前10時22分

157
VQT3M30
4 从盒子中取出 O 形环,并检查 O 形环槽中没有废物等。
5 当涂抹润滑油时,检查 O 形环上没有擦伤。
∫ 注意
取出数码相机时,请注意以下几点。
≥ 用清洁的双手取下相机。 (请用清水洗手,然后完全擦干。)
≥ 彻底擦干身体和头发上的水。 (特别要注意衣袖里的水。)
清洁与存放
1 用水冲洗盒子的外部。
≥
用水冲洗盒子的外部直到干净。 (P156)
≥ 请确认 O 形环是否被牢牢地安装,务必关上盒子,然后用水只冲洗外面。
≥ 用湿软布擦去盒子内部的任何脏物。
∫ 注意
≥
不要用倾泄的水冲洗盒子,因为这可能导致漏水。 用水冲洗盒子前,应先取出数码
相机。
≥ 存放时,请勿将数码相机留在盒子里。
≥ 请从防水盒上取下 O 形环存放起来,使其不会变干。有关详情,请参阅第 158 页。
要长时间存放时,请先取下 O 形环,然后将其放入到提供的专用聚酯袋中。
DMW-MCFT3-VQT3M30.book 157 ページ 2011年1月13日 木曜日 午前10時22分

158
VQT3M30
使用注意事项
∫ 处理 O 形环
≥ 请勿用酒精、稀释剂或化学清洗剂清洗 O 形环。 这样将加速 O 形环的损坏或老化。
≥ 如果长时间不使用盒子,请将 O 形环从 O 形环槽中取出,涂上薄薄一层润滑油 (附
件),放在专用聚酯袋中,然后将其存放在阴凉避光的地方以防止表面损坏。当再次
使用 O 形环时,请彻底检查是否有擦伤或者裂纹。
≥ 请仅使用指定的润滑油。 如果使用其它类型的润滑油,可能会破坏 O 形环的表面,从
而导致漏水。
≥ O 形环接触到盒子的边缘使盒子防水。 请勿敲打、插入外来物 (脏物、沙子、毛发
等)或者擦伤 O 形环或盒子边缘。
≥
请用指尖取下
O
形环。
请勿使用有尖角的物体因为它可能会
擦伤
O
形环。
≥ 从后封盖取出 O 形环后,请擦去 O 形环上所有脏物、沙子、毛发或其它外来物。 也请
擦拭 O 形环槽以及与 O 形环相接触的前封盖的内边。
≥ 请勿使用由于脏物等被擦伤或者变形的O 形环。这可能导致漏水。 请用新的 O 形环更
换。
≥ 更换 O 形环后、长时间不使用时、设置数码相机后或者在更换电池等时,如果防水盒
被打开,请彻底检查 O 形环确认是否受损或有任何裂缝。检查后,请关上防水盒,
将其浸在水中 (水箱或浴盆)约 3 分钟以上,然后确认没有漏水。 (P150)
≥ O 形环是消耗品。尽管它的寿命依赖于维护、使用频率和存放条件,但我们建议即使
没有发现任何擦伤也请每年更换一次。
∫ 关于维护
≥ 请勿使用下列所示的化学制品清洗、除锈、除雾或修理。直接或间接地在盒子上使
用它们 (化学喷雾等)可能会导致盒子产生裂纹。
≥ 如果润滑剂粘到数码相机上,请用干软布将其擦去。
≥ 当擦拭盒子内部时,请仅使用干软布。 请在使用前后用干软布擦拭前玻璃的内侧,
以保持玻璃清洁。
禁用的化学制品 注意事项
挥发性有机溶剂 / 化学清
洁剂
请勿使用诸如酒精、汽油或稀释剂这样的挥发性有机
溶剂或化学清洁剂清洗盒子。 请用清水或温水清洗盒
子。
抗腐蚀剂
请勿使用抗腐蚀剂,因为盒子的金属部分是用不锈钢
或黄铜制成的。 请用清水清洗它们。
抗湿润剂
请勿使用商业流通的抗湿润试剂。 请务必使用使用说
明书中指定的硅胶。
粘合剂
请勿使用粘合剂进行修理。 如果盒子需要修理,请与
经销商联系。
DMW-MCFT3-VQT3M30.book 158 ページ 2011年1月13日 木曜日 午前10時22分

159
VQT3M30
∫ 关于使用后的存放和检查
≥ 请从盒子中取出数码相机。
≥ 确保 O 形环上没有粘上脏物或灰尘。
≥ 请在室温下彻底弄干盒子,然后将其存放在阴凉避光的地方。
≥ 我们建议在购买后每 3 年检查一次盒子。 检查包括拆卸和清洗盒子、检查所有的部
件、如果需要请进行修理、以及使用与购买前进行盒子防水检查相同的流体静力学
测试设备检查盒子的防水性能。 客户必须支付所有运费。
≥ 请勿拆除任何部件,或者使用使用说明书中没有指定的附件,并且不要修改盒子。
如果盒子不能正常工作,请与经销商联系。
规格
相容型号 :
DMC-FT3/DMC-TS3
(截止到
2011
年
1
月
¢
)
尺寸 : 约 145 mm ( 宽 ) k94 mm ( 高 ) k52 mm ( 深 )
(不包括突出部分)
重量 : 约 356 g (包括扩散器)
材料 : 聚碳酸酯
防水构造 : O 形环封口
防水深度 : 40 m
¢ 有关可使用机型的最新信息,请参阅数码相机的使用说明书、目录、网站
等。
DMW-MCFT3-VQT3M30.book 159 ページ 2011年1月13日 木曜日 午前10時22分

160
VQT3M30
Содержание
Перед использованием . . . . . . . . . . . . . . . . . . . . . . 161
Принадлежности. . . . . . . . . . . . . . . . . . . . . . . . . . . . 163
Обращение и уход. . . . . . . . . . . . . . . . . . . . . . . . . . . 164
Составные части. . . . . . . . . . . . . . . . . . . . . . . . . . . . 166
Что такое уплотнительное кольцо? . . . . . . . . . . . . 167
Подготовка -Установка уплотнительного
кольца- . . . . . . . . . . . . . . . . . . . . . . . . 168
Подготовка -Проверка водонепроницаемости
футляра- . . . . . . . . . . . . . . . . . . . . . . . 172
Подготовка -Установка цифровой камеры-. . . . . . 173
Съемка. . . . . . . . . . . . . . . . . . . . . . . . . . . . . . . . . . . . 176
Советы по съемке под водой . . . . . . . . . . . . . . . . . 177
После использования . . . . . . . . . . . . . . . . . . . . . . . . 178
Очистка и хранение . . . . . . . . . . . . . . . . . . . . . . . . . 179
Предосторожности при использовании . . . . . . . . . 180
Технические характеристики . . . . . . . . . . . . . . . . . 183
DMW-MCFT3-VQT3M30.book 160 ページ 2011年1月13日 木曜日 午前10時22分

161
VQT3M30
Перед использованием
≥ Этот футляр для подводной съемки предназначен для цифровых камер
Panasonic.
Допускается делать снимки под водой на глубине до 40 м.
≥ При протекании футляра вследствие недостаточного ухода компания
Panasonic не несет ответственности за ущерб, причиненный устройствам
(цифровой камере, батарейкам, картам памяти и т.д.), находящимся внутри
футляра, за стоимость фотографий и за любые другие расходы.
≥ Кроме того, компания Panasonic не выплачивает компенсации за несчастные
случаи, повлекшие за собой причинение травм или материальные убытки.
≥ Изучите руководство по эксплуатации цифровой камеры.
≥ Перед установкой цифровой камеры погрузите футляр в воду примерно
на 3 минуты или более и убедитесь, что футляр не протекает.
∫ Обращение с футляром
≥ Используйте в следующих условиях.
• глубина: до 40 м
• температура окружающей среды: 0 oC до 40 oC
≥ Не используйте футляр в воде с температурой выше 40 °C. Высокая
температура может привести к повреждению футляра или к попаданию воды
в футляр.
≥ Футляр изготовлен из ударопрочного поликарбоната, тем не менее, будьте
осторожны при его использовании. Футляр можно легко поцарапать при
съемке в скалистых и других подобных местах или повредить от удара, если
его уронить. Перед путешествием на автомобиле, корабле или самолете
тщательно упакуйте футляр во избежание прямых ударов при падении
футляра. Не оставляйте камеру в футляре. Устанавливайте камеру в футляр
только при поездках на небольшие расстояния, например, от аэропорта до
места погружения. (Для транспортировки футляра не допускается
использовать упаковку, в которую футляр был запакован при покупке.)
≥ При посадке в самолет изменение атмосферного давления может привести к
расширению воздуха внутри футляра и повреждению футляра. Перед
посадкой в самолет снимите уплотнительное кольцо.
Поместите извлеченное уплотнительное кольцо в специальный пакет из
полиэстера, который входит в комплект поставки.
≥ Не оставляйте цифровую камеру в футляре на продолжительное время
под прямыми солнечными лучами в автомобиле или на катере. Футляр –
это герметичное приспособление, поэтому температура внутри футляра
поднимется до очень высокой, и камера может перестать нормально
функционировать. Не допускайте значительного повышения
температуры внутри футляра.
РУССКИЙ ЯЗЫК
DMW-MCFT3-VQT3M30.book 161 ページ 2011年1月13日 木曜日 午前10時22分

162
VQT3M30
Перед использованием (продолжение)
∫ Использование футляра при высоких или
низких температурах
≥
Если открыть или закрыть футляр в условиях высокой влажности или
температуры, а затем поместить его в прохладные условия или погрузить под
воду, внутри футляра может начаться конденсация, поверхность стекла может
запотеть, а цифровая камера может получить повреждения.
≥
При быстром перемещении футляра из холодного места либо холодной воды в
теплое место поверхность стекла может запотеть. Прежде чем делать снимки,
подождите, пока температура футляра не повысится до температуры воздуха.
∫ Подготовка
≥ Не открывайте и не закрывайте футляр в местах, где в футляр могут
попасть брызги воды или песок. Рекомендуется открывать и закрывать
футляр в помещении.
≥
Замена батарейки, карты памяти и установка цифровой камеры в футляр должны
производиться в помещении с низким содержанием влаги.
≥ Если футляр необходимо открыть или закрыть на месте погружения
для замены батарейки или карты памяти, следуйте описанным ниже
указаниям.
• Выберите место, где в футляр не попадут брызги воды и песок.
• Сдуйте капли воды со стыка между задней и передней частями футляра и с
защелки. Тщательно вытрите оставшиеся капли воды сухой тканью.
• Тщательно вытрите капли воды на теле и волосах.
• Будьте особенно осторожны, чтобы вода не вылилась из рукавов костюма
для подводного плавания.
• Не прикасайтесь к камере руками, мокрыми от морской воды.
Предварительно смочите полотенце пресной водой и положите его в пакет
из полиэстера. С помощью этого полотенца вытрите капли воды или песок
на руках и теле.
≥
Футляр не поглощает удары. Если поместить на футляр тяжелый предмет или
нанести удар, можно повредить цифровую камеру. Будьте осторожны при
использовании футляра.
DMW-MCFT3-VQT3M30.book 162 ページ 2011年1月13日 木曜日 午前10時22分

163
VQT3M30
Принадлежности
При первом открытии упаковки убедитесь, что в ней
присутствует футляр и все принадлежности. Проверьте,
чтобы футляр и принадлежности не были повреждены при
пересылке или транспортировке. При обнаружении чего-либо
необычного, перед тем как начать пользоваться футляром,
обратитесь к дилеру.
Используйте только аксессуары, описанные ниже.
Замена уплотнительного
кольца
VMG1798
* В специальный
пакет из
полиэстера
* Прикреплено к
камере заранее.
Силикагель
(влагопоглотитель)
(1 г/5 шт.)
VZG0371
Смазка (для
уплотнительного
кольца)
VZG0372
Ремешок
VFC4190
Диффузор/Шнурок
VYK3E56
≥ Этот диффузор можно снять, если вы им не
пользуетесь.
Снятие Прикрепление
Совместите с меткой на задней
части футляра и прикрепите.
DMW-MCFT3-VQT3M30.book 163 ページ 2011年1月13日 木曜日 午前10時22分

164
VQT3M30
Обращение и уход
≥ Не оставляйте футляр в местах, где он может упасть.
• Падение футляра на голову или ногу может нанести травму и стать
причиной неисправности футляра.
≥ Не вносите изменений в футляр.
• При попадании воды в цифровую камеру вследствие внесения изменений
в футляр камера может получить неисправимые повреждения.
• Если камера используется после попадания в нее воды, это может
вызвать пожар.
≥ Не используйте футляр при погружениях с аквалангом, если вы
не прошли надлежащую подготовку.
• Если вы предполагаете использовать футляр только при погружениях с
аквалангом, вы должны пройти соответствующее обучение и получить
сертификат, разрешающий заниматься подводным плаванием с
аквалангом.
≥ Не оставляйте футляр, смазку, силикагель или уплотнительное
кольцо в пределах досягаемости детей.
• Если какая-либо часть тела ребенка попадет в футляр, ребенок может
получить травму.
• Дети могут случайно проглотить смазку, силикагель или уплотнительное
кольцо.
• Если вы полагаете, что ребенок проглотил смазку, силикагель или
уплотнительное кольцо, немедленно обратитесь к врачу.
≥ Не надевайте ремешок на шею под водой.
• Ремешок может намотаться на шею и вызвать удушение или другие
серьезные травмы.
≥ Тщательно смывайте смазку с рук.
• Не допускайте попадания смазки в рот или в глаза.
≥ При попадании в футляр воды немедленно прекратите его
использование.
• Попадание воды может вызвать электрический удар, привести к
возгоранию или стать причиной пожара.
• Обратитесь к дилеру.
≥ Если возникли неисправности при использовании футляра под
водой, при всплытии следуйте всем процедурам и правилам
декомпрессии.
• Слишком быстрое всплытие может стать причиной кессонной болезни.
DMW-MCFT3-VQT3M30.book 164 ページ 2011年1月13日 木曜日 午前10時22分

165
VQT3M30
≥ При появлении из футляра дыма, выделении большого
количества тепла, выделении необычного запаха или
появлении необычного звука немедленно прекратите
использовать футляр.
• Перечисленные признаки могут привести к электрическому удару,
возгоранию или пожару.
• Немедленно выньте цифровую камеру из футляра, а затем извлеките
батарейку из камеры.
• Обратитесь к дилеру.
≥ Будьте осторожны при открытии футляра после попадания в
него воды.
• Попавшая в футляр вода может вырваться, а задняя часть футляра может
отскочить.
≥ Не оставляйте футляр в местах с высокой температурой.
• Температура в футляре становится очень высокой, особенно если
оставить футляр под прямыми солнечными лучами летом на пляже, на
катере и т.д. или в герметично закрытом автомобиле. Высокая
температура может привести к повреждению футляра или его внутренних
элементов.
• Если при этом в футляре находится цифровая камера, она также может
получить повреждения.
• Использование камеры при высокой температуре внутри футляра может
привести к протеканию футляра, короткому замыканию или пробою
изоляции, что, в свою очередь, может стать причиной пожара или
неисправности.
≥ Не прикасайтесь к цифровой камере или к батарейке мокрыми
руками.
• Это может привести к электрическому удару или вызвать неисправность.
∫ Съемка со вспышкой
≥ При съемке со вспышкой углы снимка могут быть затемненными, или яркость
снимка может оказаться неоднородной.
≥ При съемке со вспышкой под водой допустимое расстояние будет меньше,
чем на суше.
DMW-MCFT3-VQT3M30.book 165 ページ 2011年1月13日 木曜日 午前10時22分

166
VQT3M30
Составные части
1. Кнопка затвора
2. Кнопка видеосъемки
3. Кнопка ВЫКЛ./ВКЛ. камеры
4. Установочный башмак для
INON Inc., выносной
импульсной вспышки
¢1
5. Передняя часть футляра
6. Диффузор (входит в
комплект поставки)
7. Переднее стекло
8. Кнопка масштабирования
9. Раздел об использовании
кнопок
(Информацию об
использовании каждой
кнопки см. в инструкциях
по эксплуатации цифровой
камеры.)
10. Задняя часть футляра
11. Защелка
12. Рычажок открытия замка
13. Отверстие для крепления
ремешка
(для крепления
поставляемого ремешка и
диффузора)
324
7
1
5
6
8
9
10
12
13
11
¢1 Данный установочный башмак предназначен для выносной импульсной
вспышки производства INON Inc.
Для получения информации о совместимой импульсной вспышке
обращайтесь в INON Inc.
http://www.inon.co.jp/INON_WORLD_body.html
DMW-MCFT3-VQT3M30.book 166 ページ 2011年1月13日 木曜日 午前10時22分

167
VQT3M30
Что такое уплотнительное кольцо?
≥ Уплотнительное кольцо – это влагоизоляционное уплотнение, которое
применяется в подводных камерах, часах и снаряжении для подводного плавания.
≥ Уплотнительное кольцо обеспечивает водонепроницаемость футляра за
счет герметизации стыка между задней и передней частью футляра.
∫ Каким образом уплотнительное кольцо
обеспечивает водонепроницаемость?
Резина кольца входит в контакт с торцами частей футляра, тем
самым обеспечивая водонепроницаемость и не допуская
пропускания воды через стык.
При сдавливании уплотнительного кольца давлением воды
поверхность кольца расширяется, за счет чего обеспечивается
более плотная герметизация футляра.
Уплотнительное кольцо предотвращает попадание воды
в футляр за счет равномерного контакта с торцами частей
футляра. Поэтому очень важное значение имеет
правильный уход за уплотнительным кольцом.
Неправильный уход может привести к попаданию воды в
футляр.
Уплотнительное
кольцо
Цифровая фотокамера
Переднее стекло
Задняя часть футляра
Уплотнитель
ное кольцо
Уплотнитель
ное кольцо
DMW-MCFT3-VQT3M30.book 167 ページ 2011年1月13日 木曜日 午前10時22分

168
VQT3M30
Подготовка -Установка уплотнительного кольца-
Перед установкой цифровой камеры не забудьте установить
уплотнительное кольцо.
Перед работой с уплотнительным кольцом тщательно вымойте и
высушите руки. Устанавливайте кольцо в условиях отсутствия
песка и пыли.
1 Для снятия уплотнительного кольца ослабьте его пальцами
рук.
≥
Ослабьте кольцо кончиками пальцев рук, а затем поднимите
ослабленную часть. Будьте осторожны, чтобы не поцарапать
уплотнительное кольцо ногтями.
∫ Примечание
≥
При снятии уплотнительного кольца не пользуйтесь заостренными
предметами. Это может привести к появлению царапин.
Уплотнительное кольцо
Уплотнительное кольцо
DMW-MCFT3-VQT3M30.book 168 ページ 2011年1月13日 木曜日 午前10時22分

169
VQT3M30
2 Проверка уплотнительного кольца.
≥
Убедитесь, что на уплотнительном кольце нет грязи, песка, волос, пыли,
кристаллов соли, ворса или старой смазки. При обнаружении любого
загрязнения удалите его мягкой сухой тканью.
≥ На уплотнительном кольце может находиться грязь, которую нельзя
увидеть. Убедитесь в отсутствии грязи, проведя пальцем по кольцу.
≥ Будьте осторожны, чтобы не оставить волокна сухой ткани на кольце при
его вытирании.
≥ Убедитесь, что уплотнительное кольцо не разорвано, не перекручено, не
раздавлено, не потерто и не поцарапано. Также убедитесь в отсутствии
на кольце частиц песка. В случае обнаружения любого из перечисленных
условий замените кольцо.
3 Проверьте паз уплотнительного кольца.
≥ В паз кольца могут попасть частицы песка или кристаллы соли.
Осторожно удалите их с помощью струи воздуха или ватного тампона.
При использовании тампона будьте осторожны, не оставляйте волокна в
пазе уплотнительного кольца.
≥ Осмотрите передний паз футляра, а также задний паз футляра (сторона,
с которой устанавливается уплотнительное кольцо).
3Грязь 3Песок 3Волосы 3Пыль 3Кристалл
соли
3Ворс
3Разрыв 3
Искривление
3
Сдавливание
3
Шелушение
3Царапина 3
Прилипшие
песчинки
DMW-MCFT3-VQT3M30.book 169 ページ 2011年1月13日 木曜日 午前10時22分

170
VQT3M30
Подготовка
-Установка уплотнительного кольца- (продолжение)
4 Нанесите смазку (входит в комплект поставки).
Нанесите смазку для уплотнительного кольца, чтобы очистить поверхность
уплотнительного кольца, и добавьте масло.
≥
Кончиком пальца равномерно нанесите на уплотнительное кольцо смазку,
которая (входит в комплект поставки), примерно в объеме рисового зерна.
(Не наносите смазку с помощью бумаги или ткани. Волокна бумаги или
ткани могут прилипнуть к кольцу.)
≥ Если на уплотнительном кольце слишком много смазки, к нему могут
прилипнуть грязь и пыль, что приведет к проникновению воды внутрь
футляра. Поэтому, удерживая уплотнительное кольцо подушечками
пальцев, осторожно удалите избыточную смазку.
≥ Уплотнительное кольцо с тонким равномерным слоем смазки изгибается
и устанавливается в паз футляра для подводной съемки, обеспечивая
герметичность.
≥ Применяйте смазку только указанного типа. При использовании
смазок других типов уплотнительное кольцо может быть
повреждено, что приведет к попаданию воды в футляр.
5 Равномерно установите уплотнительное кольцо в паз.
Убедитесь, что:
≥ к кольцу не прилипла грязь.
≥ кольцо не вышло из паза.
≥ кольцо не перекручено.
≥ кольцо не растянуто больше, чем нужно.
Нормально
Ненормально
DMW-MCFT3-VQT3M30.book 170 ページ 2011年1月13日 木曜日 午前10時22分

171
VQT3M30
6 Проверьте уплотнительное кольцо еще раз.
Еще раз проверьте, чтобы:
≥ к кольцу не прилипла грязь.
≥ кольцо не вышло из паза.
≥ кольцо не было перекручено.
≥ на уплотнительном кольце нет царапин либо вмятин.
Тщательно удалите смазку с рук с помощью сухой ткани, после
чего тщательно вымойте руки водой.
7 Закройте защелку.
• Убедитесь, что на внешней поверхности уплотнительного кольца и на
защелке передней части футляра отсутствуют частицы загрязнения, и
закройте футляр.
∫ Примечания
≥ Для обеспечения полной герметичности футляра не царапайте поверхность
уплотнительного кольца, которая находится в контакте с торцами частей
футляра.
≥ Не пользуйтесь кольцом с царапинами или повреждениями. Это может
привести к попаданию воды в футляр.
≥ При каждом использовании футляра снимите уплотнительное кольцо и
убедитесь, что в пазе кольца нет грязи, песка, волос и других инородных
материалов, а затем нанесите тонкий слой смазки (входит в комплект
поставки). Если нанести большое количество смазки, к уплотнительному
кольцу могут прилипнуть грязь и пыль, что приведет к попаданию воды в
футляр.
≥ Убедитесь, что у вас есть запасное уплотнительное кольцо на случай, если
используемое кольцо будет повреждено или поцарапано.
DMW-MCFT3-VQT3M30.book 171 ページ 2011年1月13日 木曜日 午前10時22分

172
VQT3M30
Подготовка -Проверка водонепроницаемости футляра-
После установки уплотнительного кольца перед установкой
цифровой камеры проверьте, что вода не попадает в футляр,
погрузив футляр в бак с водой, ванну или другую емкость с водой
примерно на 3 минуты.
≥
Не используйте футляр в воде с температурой выше 40 °C. Высокая
температура может привести к повреждению футляра или к попаданию
воды в футляр.
‘ Проведите эту же проверку после установки камеры в футляр. (P173)
∫ Примечания
≥
Если при погружении в воду из футляра выходят пузырьки воздуха, либо
внутри футляра оказывается влага, когда он вынимается из воды, то футляр
протекает. В таких случаях обратитесь к дилеру.
≥ При попадании воды в футляр, когда в футляре установлена камера,
немедленно удалите батарейку. При наличии огня водород может загореться
или взорваться.
≥ При быстром погружении с футляром в руках или при бросании футляра с
катера в воду из-за высокого давления в футляр может попасть некоторое
количество воды. Это не неисправность футляра. Всегда медленно
погружайтесь под воду.
≥ Футляр предназначен для использования на глубинах до 40 м. При
погружении более чем на 40 м футляр может получить невосстановимые
повреждения.
≥ При закрытии футляра убедитесь, что инородные материалы не попали в
зазор между уплотнительным кольцом и пазом кольца. Даже один волосок
или частица песка может привести к попаданию воды в футляр.
DMW-MCFT3-VQT3M30.book 172 ページ 2011年1月13日 木曜日 午前10時22分

173
VQT3M30
Подготовка -Установка цифровой камеры-
До установки цифровой камеры прочитайте примечания на стр. 175.
Убедитесь, что питание цифровой камеры установлено на [OFF].
≥
Снимите ремешок и силиконовый чехол с цифровой камеры.
1 Для открытия защелки поднимите деталь 2 пальцем,
перемещая деталь 1.
2 Установите цифровую камеру в футляр.
Осторожно вставьте цифровую камеру в футляр в указанном
направлении в соответствии с рисунком.
≥ Убедитесь, что на поверхности цифровой камеры и внутри футляра не
осталось воды.
≥ Будьте осторожны, чтобы не задеть бленду 1.
3 Вставьте силикагель (входит в комплект поставки).
≥
Всегда используйте новый силикагель.
Передняя часть
футляра
Силикагель
Цифровая фотокамера
DMW-MCFT3-VQT3M30.book 173 ページ 2011年1月13日 木曜日 午前10時22分

174
VQT3M30
Подготовка
-Установка цифровой камеры- (продолжение)
≥ При вставке силикагеля согните его, как показано на рисунке ниже,
а затем вставьте как можно глубже. Если закрыть футляр при
неполностью вставленном силикагеле, силикагель заденет
уплотнительное кольцо, что приведет к попаданию воды в футляр.
≥ При высокой температуре воздуха и низкой температуре воды внутри
футляра может начаться конденсация. Во избежание образования
конденсата предварительно поместите силикагель (входит в комплект
поставки) внутрь футляра. Для предотвращения образования тумана в
футляре вставьте силикагель за 1 до 2 часа до использования футляра.
4 Закройте защелку.
‘ Убедитесь, что защелка плотно закрыта.
Не вставляйте в защелку ремень и т.д.
5 После установки цифровой камеры еще раз проверьте, что в
футляр не попадает вода. (P172)
Силикагель
DMW-MCFT3-VQT3M30.book 174 ページ 2011年1月13日 木曜日 午前10時22分

175
VQT3M30
∫ Примечания
≥
Постарайтесь не загрязнить бленду отпечатками пальцев и т. д.
≥
Еще раз проверьте, что уплотнительное кольцо равномерно распределено по пазу.
≥ Избегайте открытия и закрытия футляра в местах с большим количеством
песка или пыли, а также в условиях большого содержания влаги.
≥
В случае внезапного изменения влажности, вызванного попаданием в футляр
влажного воздуха, внутри футляра может появиться конденсат.
≥
Для предотвращения конденсации поместите цифровую камеру в как можно
более сухое место. Кроме того, до помещения внутрь силикагеля (поставляется в
комплекте) убедитесь в том, что он достаточно сухой.
≥ Если на футляр попал солнцезащитный крем или масло для загара,
немедленно смойте его теплой водой для предотвращения снижения уровня
водонепроницаемости или обесцвечивания футляра.
≥
После использования цифровой камеры в море или под водой погрузите ее в
пресную воду примерно на 10 минут. Подробную информацию можно найти в
руководстве по эксплуатации.
≥
Если на корпусе камеры остались капли воды или грязь, сначала удалите их сухой
мягкой тканью, а затем на некоторое время поставьте камеру вертикально на сухую
ткань и убедитесь в отсутствии воды. После этого установите камеру в футляр.
Если цифровая камера с функцией GPS, компаса, высотомера (глубиномера) и
барометра прикреплена к футляру для подводной съемки, определение
местоположения или выполнение измерений могут стать невозможными или
содержать серьезные ошибки.
DMW-MCFT3-VQT3M30.book 175 ページ 2011年1月13日 木曜日 午前10時22分

176
VQT3M30
Съемка
∫ Перед погружением в воду обязательно проверьте следующее
Перед погружением проведите следующие проверки.
≥
Достаточна ли оставшаяся емкость батарейки?
≥ Если ли на карте памяти свободное место достаточного объема?
≥ Равномерно ли установлено уплотнительное кольцо в пазе?
≥ Проверен ли футляр на водонепроницаемость?
≥ Плотно ли закрыта защелка?
∫ Съемка
1 Нажмите кнопку ВЫКЛ./ВКЛ. и включите цифровую камеру.
2 Выберите [Подвод. съемка].
≥
Подробную информацию можно найти в руководстве по эксплуатации
цифровой камеры.
3 Наведите область автофокусировки на мониторе ЖКД на
объект фокусировки.
4 Для фокусировки нажмите [AF-L ].
• Для отмены нажмите [AF-L ] еще раз.
5 Для съемки полностью нажмите кнопку затвора.
∫ Примечания
≥ Перед установкой камеры в футляр рекомендуется еще раз установить часы.
(Подробную информацию можно найти в руководстве по эксплуатации
цифровой камеры.)
≥ Если перед камерой плавают какие-либо объекты, камера может
сфокусироваться на них, а не на объекте съемки.
≥ Если на переднем стекле находятся капли воды или грязь, правильная
фокусировка может оказаться невозможной. Перед съемкой обязательно
протрите переднее стекло.
DMW-MCFT3-VQT3M30.book 176 ページ 2011年1月13日 木曜日 午前10時22分

177
VQT3M30
Советы по съемке под водой
Если при подводной съемке снимки имеют синеватый оттенок
1
Выберите [Бал. бел.] в меню режима [Зап.].
2 Нажмите [DISP.] для отображения [Настр.].
3 Нажмите [AF-L ]/[ ] для регулировки баланса белого.
4 Для завершения нажмите [MENU/SET].
≥ Кроме того, для завершения можно наполовину нажать кнопку затвора.
Выберите наилучший снимок
Установите вспышку на [ ].
Использование функции автоматической настройки значений экспозиции (для
моделей, оснащенных функцией автоматической настройкой значений
экспозиции)
≥ При каждом нажатии кнопки затвора автоматически записываются 3
снимка с разными значениями экспозиции. Из полученных 3 снимков
можно выбрать наилучший.
Пользуйтесь режимом серийной съемки
≥ При съемке быстродвижущегося объекта (дельфина и т. д.), можно
выбрать любимый снимок, сделав снимки с использованием режима
серийной съемки.
∫ Примечание
≥
Точная настройка баланса белого (режим подводной съемки) также
поддерживается при записи видеокадров.
Баланс белого настраивается в соответствии с глубиной воды или предпочтением
пользователя.
≥ Более подробная информация приведена в руководстве по эксплуатации
цифровой камеры.
RUS_BODY.fm 177 ページ 2011年11月11日 金曜日 午前10時12分

178
VQT3M30
После использования
После съемки выполните следующие операции.
1 Погрузите футляр в пресную воду не менее чем на 30 минут, не
вынимая цифровую камеру. Это необходимо для удаления
кристаллов соли и т.д.
≥
Чтобы смыть морскую воду, нажмите все кнопки на футляре. Если
кристаллы соли не будут удалены с кнопок и других элементов,
кристаллы затвердеют, и кнопки перестанут работать нормально.
≥ Не промывайте футляр в быстрой проточной воде или в проточной воде
с большим напором. Это может привести к попаданию воды в футляр.
2 Вытрите воду сухой тканью, на которой нет кристаллов соли, а
затем сразу же высушите футляр.
≥ Не сушите футляр под прямыми солнечными лучами. Это может привести
к
обесцвечиванию
или повреждению футляра и ускорить старение
уплотнительного кольца.
3 Чтобы вынуть цифровую камеру, откройте заднюю часть футляра.
Тщательно вытрите руки, после чего при помощи пальца
извлеките цифровую камеру, как показано на рисунке.
DMW-MCFT3-VQT3M30.book 178 ページ 2011年1月13日 木曜日 午前10時22分

179
VQT3M30
4 Снимите уплотнительное кольцо с футляра и убедитесь, что в
пазе кольца нет грязи и других инородных частиц.
5 Нанесите смазку на уплотнительное кольцо и проверьте, нет ли
на кольце царапин и других повреждений.
∫ Примечания
Соблюдайте следующие меры предосторожности во время
извлечения цифровой камеры.
≥
Выньте камеру чистыми руками. (Вымойте руки пресной водой и тщательно
высушите.)
≥ Тщательно высушите влагу на теле и волосах. (Будьте особенно осторожны,
чтобы вода не вылилась из рукавов костюма для подводного плавания.)
Очистка и хранение
1
Промойте наружную поверхность футляра водой.
≥
Дочиста вымойте наружную поверхность футляра. (P178)
≥ Убедитесь, что уплотнительное кольцо установлено надежно, закройте
футляр, а затем промойте его только снаружи водой.
≥ Вытрите грязь внутри футляра с помощью влажной мягкой ткани.
∫ Примечания
≥
Не промывайте футляр в быстрой проточной воде или в проточной воде с
большим напором. Перед промыванием футляра в воде выньте камеру.
≥ При хранении футляра не оставляйте в нем камеру.
≥ Отсоедините уплотнительное кольцо от футляра для подводной съемки и
храните его таким образом, чтобы оно не высохло. См. подробную
информацию на странице 180.
При длительном хранении поместите камеру в специальный пакет из
полиэстера, который входит в комплект поставки, предварительно сняв
уплотнительное кольцо.
DMW-MCFT3-VQT3M30.book 179 ページ 2011年1月13日 木曜日 午前10時22分

180
VQT3M30
Предосторожности при использовании
∫ Обращение с уплотнительным кольцом
≥ Не используйте спирт, растворители или химические моющие средства
для очистки уплотнительного кольца. Эти вещества могут нанести
повреждения уплотнительному кольцу или ухудшить его свойства.
≥ Если футляр не будет использоваться в течение длительного времени,
извлеките уплотнительное кольцо из паза, нанесите тонкий слой смазки
(входит в комплект поставки), поместите кольцо в специальный пакет
из полиэстера и храните в темном прохладном месте. Это предотвратит
повреждение поверхности кольца. Перед повторным использованием
уплотнительного кольца после хранения тщательно проверьте, чтобы
поверхность кольца не имела царапин или разрывов.
≥ Применяйте смазку только указанного типа. При использовании смазок
других типов уплотнительное кольцо может быть повреждено, что
приведет к попаданию воды в футляр.
≥ Уплотнительное кольцо входит в контакт с торцами частей футляра, чем
обеспечивается водонепроницаемость футляра. Не ударяйте, не допускайте
попадания инородных материалов (грязи, песка, волос и т.д.) и не царапайте
уплотнительное кольцо или торцы частей футляра.
≥
Снимайте уплотнительное кольцо кончиками пальцев. При снятии
уплотнительного кольца не пользуйтесь заостренными предметами, поскольку
они могут
поцарапать
уплотнительное кольцо.
≥ После снятия уплотнительного кольца с задней части футляра удалите с
кольца грязь, песок, волосы и другие инородные материалы. Кроме того,
протрите паз кольца и внутренние поверхности передней части футляра,
контактирующие с уплотнительным кольцом.
≥ Не пользуйтесь кольцом с царапинами или повреждениями. Это может
привести к попаданию воды в футляр. Замените уплотнительное кольцо
новым.
≥ После замены уплотнительного кольца, если оно не используется в течение
длительного времени, после настройки цифровой камеры или при замене
аккумулятора и т. п., если футляр для подводной съемки открыт, тщательное
проверьте уплотнительное кольцо на предмет отсутствия повреждений или
каких-либо трещин.
После проверки закройте футляр для подводной съемки, погрузите его в
воду (бак с водой или ванну) приблизительно на 3 минуты или больше, затем
убедитесь, что в футляр не попадает вода. (P172)
≥ Уплотнительные кольца – это расходуемый элемент. Несмотря на то, что
срок службы уплотнительных колец зависит от ухода за ними, частоты их
использования и условий хранения, уплотнительные кольца рекомендуется
менять каждый год, даже если на кольцах отсутствуют царапины.
DMW-MCFT3-VQT3M30.book 180 ページ 2011年1月13日 木曜日 午前10時22分

181
VQT3M30
∫ Уход
≥ Не используйте перечисленные ниже химические вещества для
очистки, предотвращения ржавления, предотвращения запотевания или
ремонта. Непосредственное их нанесение на футляр (с помощью
пульверизатора или другими методами) может привести к появлению
трещин на футляре.
≥ Если на цифровую камеру попала грязь, вытрите ее мягкой сухой тканью.
≥ Для протирания внутренней поверхности футляра пользуйтесь только мягкой
сухой тканью. Для обеспечения прозрачности стекла протирайте
внутреннюю поверхность переднего стекла мягкой сухой тканью до и после
использования футляра.
Химические
вещества,
запрещенные к
использованию
Предостережения
Летучие органические
растворители/
химические моющие
средства
Не очищайте футляр таким летучими
органическими растворителями, как спирт,
бензин или растворитель, или химическими
моющими средствами. Для очистки используйте
пресную или теплую воду.
Противокоррозионные
составы
Не пользуйтесь противокоррозионными
составами, поскольку металлические детали
футляра изготовлены из нержавеющей стали или
латуни. Для очистки используйте пресную воду.
Вещества,
предотвращающие
запотевание
Не пользуйтесь имеющимися в продаже
веществами, предотвращающими запотевание.
Используйте силикагель, указанный в настоящем
руководстве.
Клеящие вещества
Не пользуйтесь клеящими веществами для
ремонта футляра. Если футляр нуждается в
ремонте, обратитесь к дилеру.
DMW-MCFT3-VQT3M30.book 181 ページ 2011年1月13日 木曜日 午前10時22分

182
VQT3M30
Предосторожности при использовании
(продолжение)
∫ Хранение и проверка после использования
≥ Всегда вынимайте камеру из футляра.
≥ Убедитесь, что на уплотнительном кольце нет грязи или пыли.
≥ Тщательно высушите футляр при комнатной температуре, а затем поместите
его на хранение в темное прохладное место.
≥ Рекомендуется провести проверку футляра спустя примерно 3 года после
покупки. Эта проверка включает разборку и очистку футляра, проверку всех
его деталей и, при необходимости, их ремонт, а также проверку
водонепроницаемости футляра с помощью того же оборудования для
гидростатических испытаний, что использовалось для проверки
водонепроницаемости перед покупкой. Все транспортные расходы
оплачиваются покупателем.
≥ Не снимайте детали футляра и не используйте принадлежности, не
описанные в настоящем руководстве. Не вносите изменения в футляр. Если
футляр не работает нормально, обратитесь к дилеру.
DMW-MCFT3-VQT3M30.book 182 ページ 2011年1月13日 木曜日 午前10時22分

183
VQT3M30
Технические характеристики
Совместимые модели: DMC-FT3/DMC-TS3
(По состоянию на январь 2011
¢
)
Размеры: около 145 мм (Ш) k94 мм (В) k52 мм (Г)
(исключая выступающую часть)
Масса: около 356 г (включая диффузор)
Материал: поликарбонат
Метод обеспечения
водонепроницаемости: уплотнительное кольцо
Глубина обеспечения
водонепроницаемости: 40 м
¢ Последнюю информацию о моделях, которые могут использоваться,
смотрите в руководствах по эксплуатации, каталогах, на веб-сайтах
и т. д.
DMW-MCFT3-VQT3M30.book 183 ページ 2011年1月13日 木曜日 午前10時22分

VQT3M30-1
S0111SM1111
Panasonic Corporation
Web Site: http://panasonic.net
Panasonic Corporation 2011
Back.fm 184 ページ 2011年11月11日 金曜日 午前10時2分
-
 1
1
-
 2
2
-
 3
3
-
 4
4
-
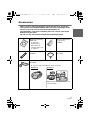 5
5
-
 6
6
-
 7
7
-
 8
8
-
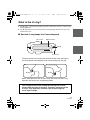 9
9
-
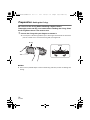 10
10
-
 11
11
-
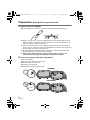 12
12
-
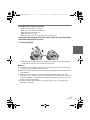 13
13
-
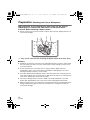 14
14
-
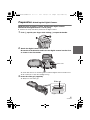 15
15
-
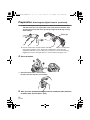 16
16
-
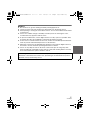 17
17
-
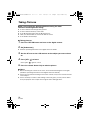 18
18
-
 19
19
-
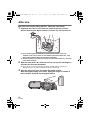 20
20
-
 21
21
-
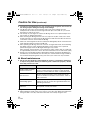 22
22
-
 23
23
-
 24
24
-
 25
25
-
 26
26
-
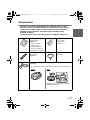 27
27
-
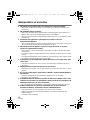 28
28
-
 29
29
-
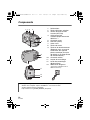 30
30
-
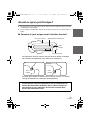 31
31
-
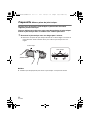 32
32
-
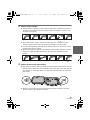 33
33
-
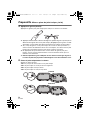 34
34
-
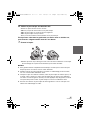 35
35
-
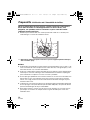 36
36
-
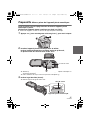 37
37
-
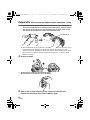 38
38
-
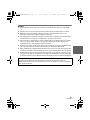 39
39
-
 40
40
-
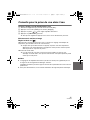 41
41
-
 42
42
-
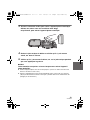 43
43
-
 44
44
-
 45
45
-
 46
46
-
 47
47
-
 48
48
-
 49
49
-
 50
50
-
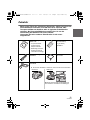 51
51
-
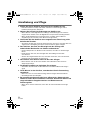 52
52
-
 53
53
-
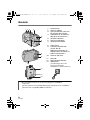 54
54
-
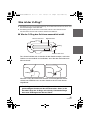 55
55
-
 56
56
-
 57
57
-
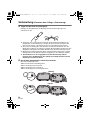 58
58
-
 59
59
-
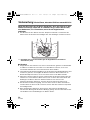 60
60
-
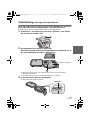 61
61
-
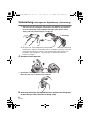 62
62
-
 63
63
-
 64
64
-
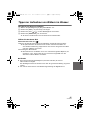 65
65
-
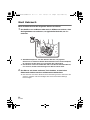 66
66
-
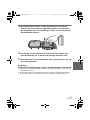 67
67
-
 68
68
-
 69
69
-
 70
70
-
 71
71
-
 72
72
-
 73
73
-
 74
74
-
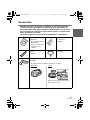 75
75
-
 76
76
-
 77
77
-
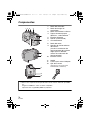 78
78
-
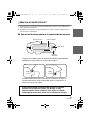 79
79
-
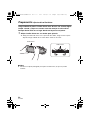 80
80
-
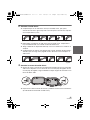 81
81
-
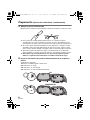 82
82
-
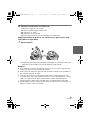 83
83
-
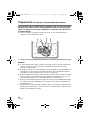 84
84
-
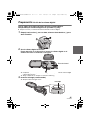 85
85
-
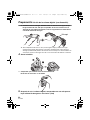 86
86
-
 87
87
-
 88
88
-
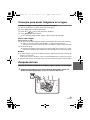 89
89
-
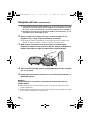 90
90
-
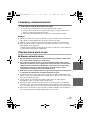 91
91
-
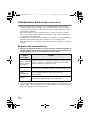 92
92
-
 93
93
-
 94
94
-
 95
95
-
 96
96
-
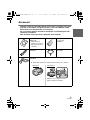 97
97
-
 98
98
-
 99
99
-
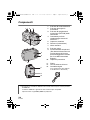 100
100
-
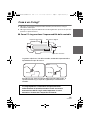 101
101
-
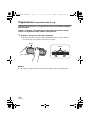 102
102
-
 103
103
-
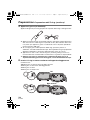 104
104
-
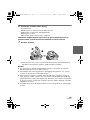 105
105
-
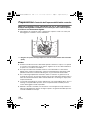 106
106
-
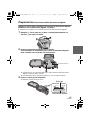 107
107
-
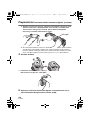 108
108
-
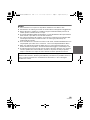 109
109
-
 110
110
-
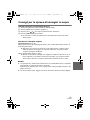 111
111
-
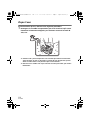 112
112
-
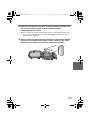 113
113
-
 114
114
-
 115
115
-
 116
116
-
 117
117
-
 118
118
-
 119
119
-
 120
120
-
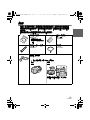 121
121
-
 122
122
-
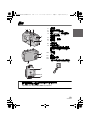 123
123
-
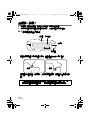 124
124
-
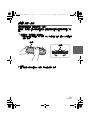 125
125
-
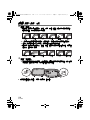 126
126
-
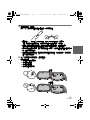 127
127
-
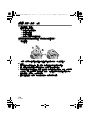 128
128
-
 129
129
-
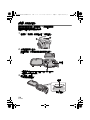 130
130
-
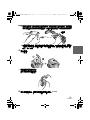 131
131
-
 132
132
-
 133
133
-
 134
134
-
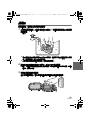 135
135
-
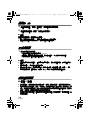 136
136
-
 137
137
-
 138
138
-
 139
139
-
 140
140
-
 141
141
-
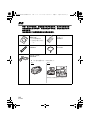 142
142
-
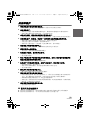 143
143
-
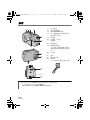 144
144
-
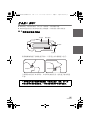 145
145
-
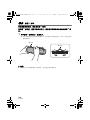 146
146
-
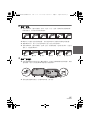 147
147
-
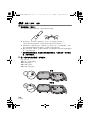 148
148
-
 149
149
-
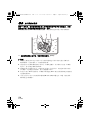 150
150
-
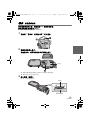 151
151
-
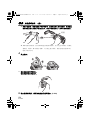 152
152
-
 153
153
-
 154
154
-
 155
155
-
 156
156
-
 157
157
-
 158
158
-
 159
159
-
 160
160
-
 161
161
-
 162
162
-
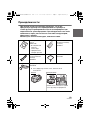 163
163
-
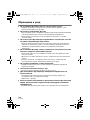 164
164
-
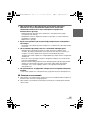 165
165
-
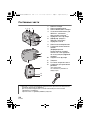 166
166
-
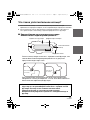 167
167
-
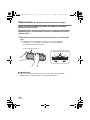 168
168
-
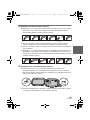 169
169
-
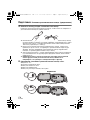 170
170
-
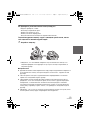 171
171
-
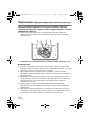 172
172
-
 173
173
-
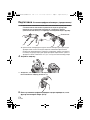 174
174
-
 175
175
-
 176
176
-
 177
177
-
 178
178
-
 179
179
-
 180
180
-
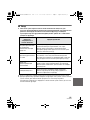 181
181
-
 182
182
-
 183
183
-
 184
184


Panasonic LUMIX DMW-MCFT3PP El manual del propietario
- Tipo
- El manual del propietario
- Este manual también es adecuado para
en otros idiomas
Artículos relacionados
-
Panasonic DMWMCTZ20PP El manual del propietario
-
-
-
-
-
Panasonic HPS45175E Manual de usuario
-
-
Panasonic H-X025E El manual del propietario
-
-