
1
To assemble the tree top,
properly align and insert the
"TOP" section into the top of
section "B". (See Fig. D)
Adjust branch tips, as needed,
for a fuller look.
7
Carefully unpack the carton.
Remove bubble wrap and
inspect the sections of your tree.
The carton should include sections
labeled "A", "B" and "Top", as well as
a Tree Stand.
2
3
The tree stand should be open and
set at 90° angle.
90°
Insert Section labeled A into tree stand,
tighten the thumbscrew. Then
insert the plug into an electrical
wall outlet.
8Gently press on foot pedal
to select the desired lighting
function. (See below)
a.This tree is provided with an extension cord for a tree
topper, which can be attached to the top section
along the pole.
b. As an option, the tree adapter can be plugged into the
back of the tree top extension cord as an add-on.
This feature allows you to utilize only one outlet.
Nicolas Holiday Ltd. thanks you for purchasing this pre-lit Christmas
tree. Should you have any problems with your tree, visit us at
www.geholidaylighting.com for more information. You can call our
toll free number at 1-877-398-7337.
Check our website for latest service hours and assembly instruction videos.
NOTE: No tools required
7.5 FT TREE
Tree Storage
1.Remove the tree’s main extension cord
plug from the wall outlet.
2. Starting at the top, disconnect the "TOP"
from section "B" and then disconnect
section "B" from section "A". {Fig. 1}
Note: Gently fold the tips in branches
and fold the branches
up toward the center. {Fig. 2}
Care should be taken to avoid
damage to the lights.
3.Remove section "A" from the tree stand
and close tree stand to place into the carton.
4.Refer to the drawing on how to repack
your tree. {Fig. 3}
DISCLAIMER : DO NOT USE OR INSTALL ANY ADDITIONAL CHRISTMAS LIGHTING
OR ORNAMENTATION THAT IS POWERED BY A LIGHT BULB SOCKET. DOING THIS
MAY RESULT IN DAMAGE TO YOUR CHRISTMAS TREE OR CAUSE PERSONAL
INJURY. DOING THIS, WILL RESULT IN A VOID OF THE LIMITED WARRANTY OF
THIS PRODUCT.
Disconnect the decorative item from the power source before
performing any maintenance or cleaning.
4Untie RED twist-tie to release branch
panels. All branches should fall into
place with a gentle pull on the outer
layer of branches.
Fig. A. Start at the inner and stagger
the tips. Move each tip up to 40°.
Fig. B. Make tips 2 & 3 to horizontial,
tip 4 to vertical and tips 5 and 6
up to 45°.
B
ATOP
2
3
1
Thumbscrew
To assemble the section labeled
"B", properly align and insert
section "B" into the top of
section "A". (See Fig. C)
Adjust branch tips, as needed,
for a fuller look.
5
Repeat “Step 4” for shaping.
6
For indoor use only 120V
THIS IS NOT A TOY, FOR DECORATIVE USE ONLY.
GE is a trademark of General Electric Company
and is under license by Nicolas Holiday Ltd.
©2022 Nicolas Holiday Ltd.
9 F., No. 37, Guangfu North Rd., Taipei, Taiwan 10560 All rights reserved.
Printed in China 22036LO
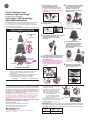
Tree Sections Tree Stand Approx. Asm Time*
7.5 ft tree 3 Metal 5 – 10 minutes
TREE ASSEMBLY DIAGRAM
7.5 FT
TOP
B
A
AC CONNECTOR
FOR
TREE TOP
Color change
foot pedal
SCHEMATIC DIAGRAM
Tree Extension
Cord
Tree Stand OPEN
TOP
A
B
Tree Stand
It is important that
you align the mark
when you connect
two tree sections.
Fig. C
It is important that
you align the mark
when you connect
two tree sections.
Fig. D
Pre-Lit Christmas Trees
with
Easy Light Technology
®
eliminates cord connections
Color Choice
®
LED Technology
Assembly Instructions
Easy Light
Technology
®
A
40°
1
B
90° 90°
45°
23
4
56
Troubleshooting Tips
If the tree does not illuminate, try stepping on the Color change foot pedal
and make certain the wall switch is turned on. If one section of your tree does
not illuminate, check that section for cut or damage wires or that all electrical
connections on tree are made. Due to unique construction of the light sets, the
individual LEDs are not replaceable. The light sets are designed for continued
operation even if an individual LED fails to light.
IMPORTANT: Store your carton neatly in a cool, dry location protected from sunlight
to prolong the tree life and to better keep the light sets in working order. Do not place
a heavy load on the carton to avoid damage to or crushing the carton and tree inside.
3-amp
2 pcsQty
Spare parts
included

a.Este árbol está provisto de un cable de extensión para un
adorno de tope, que se puede unir a la sección superior
a lo largo de la varilla.
b.Como opción, el adaptador de árbol se puede conectar a
la parte posterior del cable de extensión de la copa del
árbol como complemento. Esta característica le permite
utilizar solo un tomacorriente.
Nicolas Holiday Ltd. le agradece la compra de este árbol de Navidad.
Si tiene algún problema con su árbol, visítenos en
www.geholidaylighting.com para obtener más información. Puede
llamar a nuestro número gratuito al 1-877-398-7337.
Visite nuestro sitio web para conocer los horarios de atención y videos
de instrucciones de ensamblaje más recientes.
NOTA: no se necesitan herramientas
Almacenaje del árbol
1. Retire el enchufe del cable de extensión
principal del árbol del tomacorriente de pared.
2. Comenzando por la parte superior, desconecte
la sección "SUPERIOR" de la sección "B" y
luego desconecte la sección "B" de la
sección "A". {Fig. 1}
Nota: pliegue suavemente las puntas
en las ramas y pliegue las ramas
hacia el centro. {Fig. 2}
Se debe tener cuidado para
evitar dañar las luces.
3. Retire la sección "A" de la base para árbol y
cierre la base para árbol para colocarla en la caja.
4. Consulte el dibujo sobre cómo volver a embalar el árbol. {Fig. 3}
EXENCIÓN: NO USE NI INSTALE NINGUNA ILUMINACIÓN O ADORNOS NAVIDEÑOS
ADICIONALES QUE SEAN ALIMENTADOS MEDIANTE UN PORTALÁMPARAS.
HACERLO PODRÍA PRODUCIR DAÑOS AL ÁRBOL DE NAVIDAD O CAUSAR
LESIONES PERSONALES. SI REALIZA LO DESCRITO ANTERIORMENTE, SE
ANULARÁ LA GARANTÍA LIMITADA DE ESTE PRODUCTO.
Antes de limpiar o realizar cualquier mantenimiento, desconecte
el artículo de decoración de la fuente de alimentación.
Solo para uso en interiores 120 V
NO ES UN JUGUETE; SOLO PARA DECORACIÓN.
GE es una marca comercial de General Electric Company
y se usa bajo licencia de Nicolas Holiday Ltd.
©2022 Nicolas Holiday Ltd.
9 F., No. 37, Guangfu North Rd., Taipei, Taiwan 10560 Todos los derechos reservados.
Impreso en China 22036LO
DIAGRAMA DE ENSAMBLAJE DEL ÁRBOL
2,29 M
PARTE
SUPERIOR
B
A
CONECTOR DE CA
PARA LA COPA
DEL ÁRBOL
Pedal de cambio
de color
DIAGRAMA ESQUEMÁTICO
Cable de
extensión eléctrica
Easy Light
Technology
®
Base para árbol ABRIR
1
Abra la caja con cuidado. Retire el
plástico de burbujas e inspeccione
las secciones del árbol.
La caja debe incluir secciones
etiquetadas como "A", "B" y "Superior",
así como una base para árbol.
2
La base para árbol debe estar abierta
y colocarse en un ángulo de 90°.
90°
3
Inserte la sección etiquetada A en la
base para árbol, apriete el tornillo de
mariposa. Luego, inserte el enchufe
en un tomacorriente de pared.
4
Desate el cordón de amarre ROJO
para liberar los paneles de ramas.
Todas las ramas se deben acomodar
en su lugar jalando ligeramente la
capa exterior de estas.
Fig. A. Comience en el interior y
avance hacia las puntas. Levante cada
punta hasta en 40°. Fig. B. Coloque las
puntas 2 y 3 en posición horizontal,
la punta 4 en posición vertical y las
puntas 5 y 6 en un ángulo de 45°.
Tornillo de mariposa
PARTE
SUPERIOR
A
B
Base para árbol
ÁRBOL DE
2,29 M
B
A
PARTE
SUPERIOR
2
3
1
Árboles de Navidad preiluminados
con Easy Light Technology
®
Instrucciones de ensamblaje
elimina las conexiones con cables
Tecnología LED Color Choice
®
Secciones Base para Tiempo estimado
del árbol árbol de ensamblaje*
3 Metal 5 a 10 minutos
Árbol de 2,29 m
7
Para ensamblar la copa del árbol,
alinee e inserte correctamente la
sección "SUPERIOR" en la parte
superior de la sección "B".
(Consulte la Fig. D) Ajuste las puntas
de las ramas, según sea necesario,
para una apariencia más completa.
Es importante
que alinee la
marca cuando
conecte dos
secciones de árbol.
Fig. C
Es importante que
alinee la marca
cuando conecte dos
secciones de árbol.
Fig. D
Repita el "Paso 4" para dar forma.
6
5
Para ensamblar la sección
etiquetada "B", alinee e inserte
correctamente la sección "B" en
la parte superior de la sección "A".
(Consulte la Fig. C)
Ajuste las puntas de las ramas,
según seanecesario, para una
apariencia más completa.
A
40°
1
B
90° 90°
45°
23
4
56
Sugerencias para la solución de problemas
Si el árbol no se enciende, presione el Pedal para cambiar los colores. Si el
árbol está conectado a un tomacorriente controlado por interruptor, asegúrese
de que el interruptor esté Encendido. Si una sección del árbol no enciende,
revise que esa sección no tenga alambres cortados o dañados y que todas
las conexiones eléctricas del árbol estén bien hechas. Debido al diseño único
de los juegos de luces de LED, las bombillas individuales de LED no son
reemplazables. Los juegos de luces son diseñados para operar de manera
continua incluso si una de as bombillas de LED individuales no enciende.
8
Presione suavemente el pedal para
seleccionar la función de iluminación
deseada. (Consulte abajo)
SOLO PARA USO
EN INTERIORES
LISTA DE
FUNCIONES:
1. Blanco fijo
2. Multicolor fijo
3. Brillo suave
4. Brillo suave blanco
5. Brillo suave multicolor
6. Blanco intermitente
7. Multicolor intermitente
8. Intermitente cambiante
/destellante
9. Apagado
IMPORTANTE: guarde la caja en un lugar fresco y seco protegido de la luz solar para
prolongar la vida del árbol y mantener en mejor funcionamiento los juegos de luces.
No coloque una carga pesada sobre la caja para evitar dañar o aplastar la caja y el árbol
en el interior.
3 amperios
2 piezasCantidad
Piezas de
repuesto incluidas
-
 1
1
-
 2
2


