
English EN
Español ES
Français FR
Deutsch DE
Nederlands NL
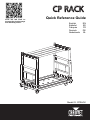
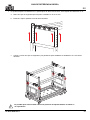
Quick Reference Guide
Model ID: CPRACK
Scan the QR code to
access the product page
and warranty terms.
CP RACKCP RACK

1
EN
QUICK REFERENCE GUIDE
CP Rack QRG Rev. 1
Safety Notes
These Safety Notes include important information about installation, use, and maintenance of the CP Rack.
What is Included
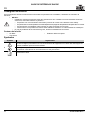
Symbols
•DO NOT:
• Leave outdoors in locations with extreme environmental conditions. This includes, but is not limited to:
• Exposure to a marine/saline environment (within 3 miles of a saltwater body of water).
• Locations where normal temperatures exceed the temperature ranges in this manual.
• Locations that are prone to flooding or being buried in snow.
• Other areas where the product will be subject to extreme radiation or caustic substances.
• In the event of a serious operating problem, stop using immediately.
•CPRack
• Cover
• Quick Reference Guide
Symbol Meaning
Critical installation, configuration, or operation information. Not following these instructions may
make the product not work, cause damage to the product, or cause harm to the operator.
Important installation or configuration information. The product may not function correctly if this
information is not used.
Useful information.

EN
2
CP Rack QRG Rev. 1
QUICK REFERENCE GUIDE
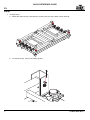
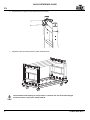
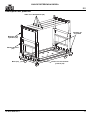
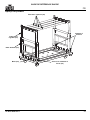
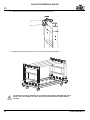
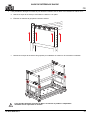
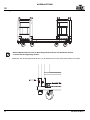
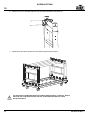
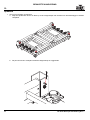
Product Overview
Adjustable H
frame (x2)
Tube with 2 clamps (x4)
Base (x8)
Safety pin
Screw with 2 washers
and nut (x4)
Side rails (x2)

3
EN
QUICK REFERENCE GUIDE
CP Rack QRG Rev. 1
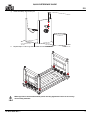
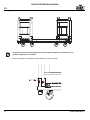
Setup
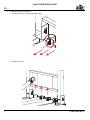
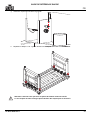
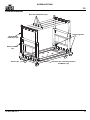
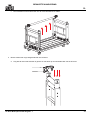
1. To begin setup:
a. Raise each side rail of the CP Rack by removing the pins at the base of each side rail.
b. To remove the pin, remove the safety clip first.

EN
4
CP Rack QRG Rev. 1
QUICK REFERENCE GUIDE
c.
d.

5
EN
QUICK REFERENCE GUIDE
CP Rack QRG Rev. 1
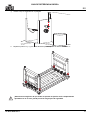
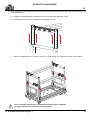
e.
f. Insert the pin to lock the side rail into upright position.
It is possible to remove both of the H frames from the CP Rack. The H frames may
then be hung from a truss.

EN
6
CP Rack QRG Rev. 1
QUICK REFERENCE GUIDE
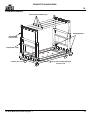
g. Insert the safety clip into the pin.
h. Repeat steps 1-f and 1-g with all bases to lock the side rails.
Warning! Ensure that all attachment points are fully tightened. Failure to do so may
cause safety hazards!

7
EN
QUICK REFERENCE GUIDE
CP Rack QRG Rev. 1
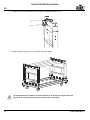
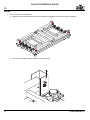
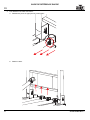
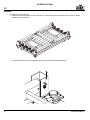
2. To detach the tubes from bases:
a. Release the clamp by depressing the switch.
b. Remove the tube.

EN
8
CP Rack QRG Rev. 1
QUICK REFERENCE GUIDE
c. Repeat the process with the other clamp to release the tube completely.
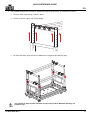
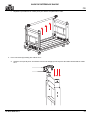
3. To connect the tube(s) to the H frames:
a. Ensure that the clamp is facing down and press the clamp onto the horizontal bar of the H frame.

9
EN
QUICK REFERENCE GUIDE
CP Rack QRG Rev. 1
b. Ensure that the clamp is firmly attached to the H frame.
c. Repeat the previous steps with any other desired tubes:
The maximum load capacity for this product is 1,000 lbs. Do not exceed this weight,
as failure to do so may cause safety hazards.

EN
10
CP Rack QRG Rev. 1
QUICK REFERENCE GUIDE
4. It is possible to extend the H frames to double the height of the CP Rack. To extend the H frames:
a. Remove safety clips locking H frame in place.
b. Extend or lower the pin to the desired height.
c. Re-insert the safety clips and pins to stabilize the H frames at the desired height.
It is possible to stack another CP Rack on top of this product. Maximum stacking is 2
products high.

11
ES
GUÍA DE REFERENCIA RÁPIDA
CP Rack GRR Rev. 1
Notas de seguridad
Estas notas de seguridad incluyen información importante sobre la instalación, el uso y el mantenimiento del CP Rack.
Qué se incluye
Simbolos
• NO HACER:
• Instalar permanentemente en el exterior en lugares con condiciones ambientales extremas. Esto incluye,
pero no se limita a:
• Exposición a un entorno marino/salino (a menos de 3 millas de una masa de agua salada).
• Lugares donde las temperaturas normales superan los rangos de temperatura de este manual.
• Lugares propensos a las inundaciones o a quedar enterrados en la nieve.
• Otras zonas en las que el producto esté sometido a radiaciones extremas o a sustancias cáusticas.
• En caso de un problema grave de funcionamiento, deje de usarlo inmediatamente.
•CPRack
•Cobre
• Guía de referencia rápida
Símbolo Significado
Instalación, configuración o información sobre funcionamiento crítica. Hacer caso omiso de esta
información puede hacer que el producto no funcione, que se averíe, o causar daños al usuario.
Instalación o información de configuración importante. El producto puede no funcionar
correctamente si esta información no se usa.
Información útil.

ES
12
CP Rack GRR Rev. 1
GUÍA DE REFERENCIA RÁPIDA
Descripción del producto
Bastidor en H
ajustable (x2)
Tubo con 2 abrazaderas (x4)
Base (x8)
Pasador de
seguridad
Tornillo con 2 arandelas
y tuerca (x4)
Barras laterales
(x2)

13
ES
GUÍA DE REFERENCIA RÁPIDA
CP Rack GRR Rev. 1
Montaje
1. Para comenzar el montaje:
a. Levante cada barra lateral del CP Rack retirando los pasadores de la base de cada barra lateral.
b. Para extraer el pasador, retire primero el clip de seguridad.

ES
14
CP Rack GRR Rev. 1
GUÍA DE REFERENCIA RÁPIDA
c.
d.

15
ES
GUÍA DE REFERENCIA RÁPIDA
CP Rack GRR Rev. 1
e.
f. Inserte el pasador para bloquear la barra lateral en posición vertical.
Es posible retirar los dos bastidores en H del CP Rack. Después los bastidores en H
pueden colgarse de un armazón.

ES
16
CP Rack GRR Rev. 1
GUÍA DE REFERENCIA RÁPIDA
g. Inserte el clip de seguridad en el pasador.
h. Repita los pasos 1-f y 1-g con todas las bases para bloquear las barras laterales.
¡Advertencia! Asegúrese de que todos los puntos de fijación estén completamente
apretados. Si no lo hace, puede provocar riesgos para la seguridad.

17
ES
GUÍA DE REFERENCIA RÁPIDA
CP Rack GRR Rev. 1
2. Para separar los tubos de las bases:
a. Suelte la abrazadera presionando el interruptor.
b. Retire el tubo.

ES
18
CP Rack GRR Rev. 1
GUÍA DE REFERENCIA RÁPIDA
c. Repita el proceso con la otra abrazadera para liberar completamente el tubo.
3. Para conectar los tubos a los bastidores en H:
a. Asegúrese de que la abrazadera esté orientada hacia abajo y presiónela sobre la barra horizontal del
bastidor en H.

19
ES
GUÍA DE REFERENCIA RÁPIDA
CP Rack GRR Rev. 1
b. Asegúrese de que la abrazadera esté firmemente sujeta al bastidor en H.
c. Repita los pasos anteriores con los demás tubos que desee:
La capacidad de carga máxima de este producto es de 450 kg. No supere este peso,
ya que de lo contrario puede provocar riesgos para la seguridad.

ES
20
CP Rack GRR Rev. 1
GUÍA DE REFERENCIA RÁPIDA
4. Es posible ampliar los bastidores en H para duplicar la altura del CP Rack. Para ampliar los bastidores en H:
a. Retire los clips de seguridad que bloquean el bastidor en H en su sitio.
b. Extienda o baje el pasador hasta la altura deseada.
c. Vuelva a colocar los clips de seguridad y los pasadores para estabilizar los bastidores en H a la altura
deseada.
Es posible apilar otro CP Rack sobre este producto. El apilado máximo en altura es
de 2 productos.

21
FR
GUIDE DE RÉFÉRENCE RAPIDE
CP Rack GRR Rev. 1
Consignes de sécurité
Ces consignes de sécurité contiennent des informations importantes sur l’installation, l’utilisation et l’entretien de
CP Rack.
Contenu de la boîte
Symboles
•NE PAS:
• Installer de manière permanente dans des endroits avec des conditions environnementales extrêmes.
Cela inclut, mais sans toutefois s’y limiter à :
• Exposition à un environnement marin/salin (à moins de 3 miles d’une étendue d’eau salée).
• Emplacements où les températures normales dépassent les plages de températures indiquées dans ce manuel.
• Emplacements susceptibles d’être inondés ou d’être ensevelis sous la neige.
• Autres zones où le produit sera soumis à des radiations extrêmes ou à des substances caustiques.
• En cas de problème de fonctionnement grave, arrêter immédiatement de l’utiliser.
•CPRack
• Couverture
• Guide de référence rapide
Symbole Signification
Consignes importantes en matière d'installation, de configuration et de fonctionnement. Le non-respect
de ces consignes peut entraîner le non-fonctionnement de l'appareil ou lui causer des dommages. De
même, l'utilisateur peut s'en trouver affecté.
Consignes importantes en matière d'installation ou de configuration. Le produit peut ne pas
fonctionner correctement si ces instructions ne sont pas suivies.
Informations utiles.

FR
22
CP Rack GRR Rev. 1
GUIDE DE RÉFÉRENCE RAPIDE
Aperçu du produit
Cadre en H
réglable (x2)
Tube avec 2 pinces (x4)
Base (x8)
Goupille à
nourrice
Vis avec 2 rondelles et
écrou (x4)
Rails latéraux (x2)

23
FR
GUIDE DE RÉFÉRENCE RAPIDE
CP Rack GRR Rev. 1
Setup
1. Pour commencer la configuration :
a. Soulevez chaque rail latéral du CP Rack en retirant les goupilles à la base de chaque rail latéral.
b. Pour retirer la goupille, retirez d’abord le clip de sécurité.

FR
24
CP Rack GRR Rev. 1
GUIDE DE RÉFÉRENCE RAPIDE
c.
d.

25
FR
GUIDE DE RÉFÉRENCE RAPIDE
CP Rack GRR Rev. 1
e.
f. Insérez la goupille pour verrouiller le rail latéral en position verticale.
Il est possible de supprimer les deux cadres en H du CP Rack. Les cadres en H
peuvent ensuite être suspendus à une ferme.

FR
26
CP Rack GRR Rev. 1
GUIDE DE RÉFÉRENCE RAPIDE
g. Insérez le clip de sécurité dans la goupille.
h. Répétez les étapes 1-f et 1-g avec toutes les bases pour verrouiller les rails latéraux.
Attention ! Assurez-vous que tous les points de fixation sont bien serrés.
Le non-respect de cette consigne peut entraîner des risques pour la sécurité !

27
FR
GUIDE DE RÉFÉRENCE RAPIDE
CP Rack GRR Rev. 1
2. Pour détacher les tubes des bases :
a. Relâchez la pince en appuyant sur l’interrupteur.
b. Retirez le tube.

FR
28
CP Rack GRR Rev. 1
GUIDE DE RÉFÉRENCE RAPIDE
c. Répétez la procédure avec l’autre pince pour libérer complètement le tube.
3. Pour connecter le(s) tube(s) aux cadres en H :
a. Assurez-vous que la pince est orientée vers le bas et appuyer sur la pince de la barre horizontale du cadre
en H.

29
FR
GUIDE DE RÉFÉRENCE RAPIDE
CP Rack GRR Rev. 1
b. Assurez-vous que la pince est fermement fixée au cadre en H.
c. Répétez les étapes précédentes avec tous les autres tubes souhaités :
La capacité de charge maximale de ce produit est de 450 kg. Ne dépassez pas ce
poids, car le non-respect de cette consigne peut entraîner des risques pour la
sécurité.

FR
30
CP Rack GRR Rev. 1
GUIDE DE RÉFÉRENCE RAPIDE
4. Il est possible de rallonger les cadres H pour doubler la hauteur des CP Rack. Pour étendre les cadres en H :
a. Retirez les clips de sécurité qui verrouillent le cadre en H en place.
b. Étendez ou abaissez la goupille à la hauteur désirée.
c. Réinsérez les clips de sécurité et les goupilles pour stabiliser les cadres en H à la hauteur souhaitée.
Il est possible d’empiler un autre CP Rack en haut de ce produit. L’empilement
maximum est de 2 produits en hauteur.

31
DE
KURZANLEITUNG
CP Rack KA Rev. 1
Sicherheitshinweise
Diese Sicherheitshinweise enthalten wichtige Informationen zu Installation, Nutzung und Wartung des CP Rack.
Lieferumfang
Symbole
• FOLGENDES SOLLTEN SIE NIEMALS TUN:
• Nicht für Installation im Freien an Orten mit extremen Umweltbedingungen geeignet. Dies beinhaltet, ist
aber nicht beschränkt auf:
• Exposition in einer Meeres-/Salzwasserumgebung (innerhalb von 3 Meilen um einen Salzwasserkörper).
• Das Produkt an Orten betreiben, an denen die normalen Temperaturen die in diesem Handbuch
angegebenen Temperaturbereiche überschreiten.
• Orte, die überschwemmungsgefährdet sind oder unter Schnee begraben werden.
• Andere Bereiche, in denen das Produkt extremer Strahlung oder ätzenden Substanzen ausgesetzt ist.
• Im Falle einer schwerwiegenden Störung ist der Betrieb sofort einzustellen.
•CPRack
•Umschalg
• Kurzanleitung
Symbole Bedeutung
Wichtige Informationen zur Installation, Konfiguration und zum Betrieb. Bei Nichtbeachtung dieser
Informationen kann es zu Fehlfunktionen oder Beschädigungen des Geräts oder zu Verletzungen
des Bedieners kommen.
Wichtige Informationen zur Installation oder Konfiguration. Wenn diese Informationen nicht beachtet
werden, kann es zu Fehlfunktionen kommen.
Nützliche Informationen.

DE
32
CP Rack KA Rev. 1
KURZANLEITUNG
Produktübersicht
Verstellbarer
H-Rahmen (x2)
Rohr mit 2 Klammern (x4)
Sockel (x8)
Sicherungsstift
Schraube mit 2 Unterlegscheiben
und Mutter (x4)
Seitenschienen
(x2)

33
DE
KURZANLEITUNG
CP Rack KA Rev. 1
Aufbau
1. So beginnen Sie den Aufbau:
a. Stellen Sie die Seitenschienen des CP Rack auf, indem Sie die Sicherungsstifte am Sockel an beiden
Seitenschienen entfernen.
b. Zum Entfernen eines Sicherungsstiftes muss zunächst der Splint entfernt werden.

DE
34
CP Rack KA Rev. 1
KURZANLEITUNG
c.
d.

35
DE
KURZANLEITUNG
CP Rack KA Rev. 1
e.
f. Setzen Sie den Sicherungsstift wieder ein, um die Seitenschiene in der aufrechten Position zu sichern.
Beide H-Rahmen können vom CP Rack abgenommen werden. Die H-Rahmen können
an einem Gerüst aufgehängt werden.

DE
36
CP Rack KA Rev. 1
KURZANLEITUNG
g. Sichern Sie den Sicherungsstift mit dem Splint.
h. Wiederholen Sie die Schritte 1-f und 1-g an allen Sockeln, um die Seitenschienen zu sichern.
Warnung! Stellen Sie sicher, dass alle Sicherungsstifte eingesetzt und mit Splinten
gesichert sind. Anderenfalls besteht ein hohes Sicherheitsrisiko!

37
DE
KURZANLEITUNG
CP Rack KA Rev. 1
2. So lösen Sie die Rohre von den Sockeln:
a. Lösen Sie die Klammer, indem Sie den Hebel entriegeln.
b. Nehmen Sie das Rohr ab.

DE
38
CP Rack KA Rev. 1
KURZANLEITUNG
c. Wiederholen Sie diese Schritte an der anderen Klammer, um das Rohr vollständig zu lösen.
3. So verbinden Sie das Rohr bzw. die Rohre mit dem H-Rahmen:
a. Stellen Sie sicher, dass die Klammer nach unten zeigt, und drücken Sie die Klammer auf die horizontale
Stange des H-Rahmens.

39
DE
KURZANLEITUNG
CP Rack KA Rev. 1
b. Stellen Sie sicher, dass die Klammer fest mit dem H-Rahmen verbunden ist.
c. Wiederholen Sie diese Schritte für alle weiteren gewünschten Rohre:
Die maximale Tragfähigkeit dieses Produktes beträgt 450 kg (1.000 lbs). Dieses
Gewicht darf nicht überschritten werden, anderenfalls besteht ein hohes
Sicherheitsrisiko!

DE
40
CP Rack KA Rev. 1
KURZANLEITUNG
4. Die H-Rahmen können bis zur doppelten Höhe des CP Rack verstellt werden. So verstellen Sie die H-Rahmen:
a. Entfernen Sie die Sicherungsstifte, die den H-Rahmen in Position halten.
b. Verstellen Sie den H-Rahmen auf die gewünschte Höhe.
c. Setzen Sie die Sicherungsstifte wieder ein und sichern Sie sie mit den Splinten, um den H-Rahmen in der
gewünschten Höhe zu fixieren.
Ein weiterer CP Rack kann auf dieses Produkt aufgesetzt werden. Die maximale
Stapelhöhe beträgt 2 Produkte.

41
NL
BEKNOPTE HANDLEIDING
CP Rack Beknopte handleiding Rev. 1
Veiligheidsvoorschriften
Deze veiligheidsvoorschriften bevatten belangrijke informatie over de installatie, het gebruik en het onderhoud van de
CP Rack.
In de verpakking
Symbolsen
• NOOIT:
• Het product permanent buiten installeren op een plek met extreme omgevingsfactoren. Dit omvat, maar
is niet beperkt tot:
• Blootstelling aan mariene/zilte omgevingen (binnen 5 km van zoutwatergebied).
• Locaties waar de normale temperaturen hoger zijn dan de temperatuurbereiken aangegeven in deze
handleiding.
• Plaatsen die kwetsbaar zijn voor overstromingen of een zwaar sneeuwdek.
• Andere gebieden waar het product onderhevig is aan extreme straling of bijtende stoffen.
• Stop het gebruik onmiddellijk bij een ernstig probleem in de werking.
•CPRack
•Hoes
• Beknopte handleiding
Symbool Betekenis
Kritieke installatie-, configuratie- of bedieningsinformatie. Het negeren van deze informatie kan
ervoor zorgen dat het product niet werkt, beschadigd raakt of leidt tot letsel van de gebruiker.
Belangrijke installatie- of configuratie-informatie. Als deze informatie niet wordt gebruikt kan het
product net correct functioneren.
Nuttige informatie.

NL
42
CP Rack Beknopte handleiding Rev. 1
BEKNOPTE HANDLEIDING
Productoverzicht
Verstelbaar
H-frame (x2)
Buis met 2 klemmen (x4)
Bases (x8)
Veiligheidspen
Schroef met 2 onderlegringen
en moer (x4)
Zijstaanders (x2)

43
NL
BEKNOPTE HANDLEIDING
CP Rack Beknopte handleiding Rev. 1
Opzetten
1. Om met het opzetten te beginnen:
a. Klap elke zijstaander van de CP Rack op na de veiligheidspen aan de basis van elke dwarsligger te hebben
verwijderd.
b. De pen kan worden verwijderd nadat de veiligheidsclip is weggehaald.

NL
44
CP Rack Beknopte handleiding Rev. 1
BEKNOPTE HANDLEIDING
c.
d.

45
NL
BEKNOPTE HANDLEIDING
CP Rack Beknopte handleiding Rev. 1
e.
f. Steek de pin in de staander om deze rechtop vast te zetten.
Het is mogelijk om beide H-frames van de CP Rack te verwijderen.
Daarna kunnen de H-frames worden opgehangen aan een truss.

NL
46
CP Rack Beknopte handleiding Rev. 1
BEKNOPTE HANDLEIDING
g. Steek de veiligheidsclip in de pen.
h. Herhaal de stappen 1-f en 1-g op alle bases om de staanders vast te zetten.
Waarschuwing! Zorg ervoor dat alle bevestigingspunten stevig vastzitten.
Als dit achterwege wordt gelaten, kan dat gevaarlijk zijn voor de veiligheid!

47
NL
BEKNOPTE HANDLEIDING
CP Rack Beknopte handleiding Rev. 1
2. De buizen worden als volgt losgemaakt van de bases:
a. Maak de klem los door de schakelaar in te drukken.
b. Haal de buis weg.

NL
48
CP Rack Beknopte handleiding Rev. 1
BEKNOPTE HANDLEIDING
c. Doe hetzelfde met de andere klem om de buis helemaal los te maken.
3. Buizen worden als volgt vastgemaakt aan de H-frames:
a. Zorg dat de klem naar beneden is gericht en duw deze op de horizontale balk van het H-frame.

49
NL
BEKNOPTE HANDLEIDING
CP Rack Beknopte handleiding Rev. 1
b. Ga na of de klem stevig aan het H-frame vastzit.
c. Herhaal de vorige stappen desgewenst met eventuele andere buizen:
De maximale laadcapaciteit van dit product is 450 kg. Overschrijd dit gewicht niet,
want anders kan de veiligheid in gevaar komen.

NL
50
CP Rack Beknopte handleiding Rev. 1
BEKNOPTE HANDLEIDING
4. Het is mogelijk om de H-frames uit te schuiven tot de dubbele hoogte van de CP Rack. De H-frames worden als
volgt uitgeschoven:
a. Verwijder de veiligheidsclips waarmee het H-frame op zijn plaats gehouden wordt.
b. Verplaats de poten omhoog of omlaag tot de gewenste hoogte.
c. Steek de veiligheidsclips en -pennen er weer in om de H-frames op de gewenste hoogte vast te zetten.
Het is mogelijk om een andere CP Rack bovenop dit product te plaatsen.
Er mogen maximaal 2 producten worden gestapeld.

Multi-Language
QUICK REFERENCE GUIDE
51 CP Rack QRG Rev. 1
Contact Us
Visit the applicable website above to verify our contact information and instructions to request support. Outside the U.S.,
U. K., Ireland, Mexico, France, Germany, or Benelux, contact the dealer of record.
General Information Technical Support
Chauvet World Headquarters
Address: 3360 Davie Rd. Voice: (844) 393-7575
Davie, FL 33314 Fax: (954) 756-8015
Voice: (954) 577-4455 Email: chauvetcs@chauvetlighting.com
Fax: (954) 929-5560
Toll Free: (800) 762-1084 Website: www.chauvetprofessional.com
Chauvet U.K.
Address: Unit 1C Email: UKtech@chauvetlighting.eu
Brookhill Road Industrial Estate
Pinxton, Nottingham, UK Website: www.chauvetprofessional.eu
NG16 6NT
Voice: +44 (0) 1773 511115
Fax: +44 (0) 1773 511110
Chauvet Benelux
Address: Stokstraat 18 Email: [email protected]u
9770 Kruishoutem
Belgium Website: www.chauvetprofessional.eu
Voice: +32 9 388 93 97
Chauvet France
Address: 3, Rue Ampère
91380 Chilly-Mazarin Email: [email protected]
France Website: www.chauvetprofessional.eu
Voice: +33 1 78 85 33 59
Chauvet Germany
Address: Bruno-Bürgel-Str. 11
28759 Bremen Email: DEtech@chauvetlighting.de
Germany Website: www.chauvetprofessional.eu
Voice: +49 421 62 60 20
Chauvet Mexico
Address: Av. de las Partidas 34 - 3B
(Entrance by Calle 2) Email: [email protected]
Zona Industrial Lerma Website: www.chauvetprofessional.mx
Lerma, Edo. de México, CP 52000
Voice: +52 (728) 690-2010
-
 1
1
-
 2
2
-
 3
3
-
 4
4
-
 5
5
-
 6
6
-
 7
7
-
 8
8
-
 9
9
-
 10
10
-
 11
11
-
 12
12
-
 13
13
-
 14
14
-
 15
15
-
 16
16
-
 17
17
-
 18
18
-
 19
19
-
 20
20
-
 21
21
-
 22
22
-
 23
23
-
 24
24
-
 25
25
-
 26
26
-
 27
27
-
 28
28
-
 29
29
-
 30
30
-
 31
31
-
 32
32
-
 33
33
-
 34
34
-
 35
35
-
 36
36
-
 37
37
-
 38
38
-
 39
39
-
 40
40
-
 41
41
-
 42
42
-
 43
43
-
 44
44
-
 45
45
-
 46
46
-
 47
47
-
 48
48
-
 49
49
-
 50
50
-
 51
51
-
 52
52


Chauvet CP Guia de referencia
- Tipo
- Guia de referencia
- Este manual también es adecuado para
en otros idiomas
- français: Chauvet CP Guide de référence
- English: Chauvet CP Reference guide
- Deutsch: Chauvet CP Referenzhandbuch
- Nederlands: Chauvet CP Referentie gids