ROOMS TO GO 30341008 Assembly Instructions
- Tipo
- Assembly Instructions

LIMITED WARRANTY
SKYLINE FURNITURE INC. guarantees
its upholstered furniture against defects in
construction for a period of one (1) year.
When a structural defect is brought to our
attention, we will repair or replace it at our
option at no charge to the customer (includes
parts and labor, not transportation costs).
Fabric wearability for upholstered furniture
is not covered by the warranty. Vacuum for
regular cleaning.
PLEASE DISPOSE OF PLASTIC BAG (S) AND
CARTON (S) RESPONSIBLY.
LIMITE DE GARANTIA
SKYLINE FURNITURE INC. garantiza
sus muebles tapizados contra defectos en
construccion por un periodo de un (1) ano.
Cuando un problema de estructura es traido
a nuestra atencion, nosotros repararemos o
remplazaremos sin ningun cargo a nuestro
cliente (incluye partes y trabajo, no costo en
transportacion). Descoloramiento del materi-
al de muebles tapizados no es cubierto por la
garantia. Regularmente puede aspirar.
POR FAVOR TIRAR BOLSA (S) Y CAJA (S)
RESPONSABLEMENTE.
GARANTIE LIMITÉE
SKYLINE FURNITURE INC. garantit ses
meubles rembourrés contre les défauts de
construction pendant une période d’un (1)
an. Lorsqu’un vice de construction nous est
signalé, nous réparons ou remplaçons le
meuble, selon notre choix, sans frais pour le
client (incluant les pièces et la main-d’oeu-
vre, mais excluant les frais de transport). La
durabilité du tissu des meubles rembourrés
n’est pas couverte par la garantie. Nettoyer
régulièrement avec un aspirateur.
VEUILLEZ JETER LE OU LES SAC(S)
EN PLASTIQUE ET BOÎTE(S) DE FAÇON
RESPONSABLE.
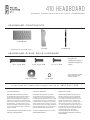
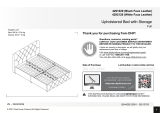
(1) Headboard*
(2) wings* (2) metal legs
(4) 1” x ¼” bolts
(8) 2” x 5/16” bolts
(20) 1¼” washers
(4) ⅝” x 5/16” bolts
(4) ¼” nuts
You will need:
• phillips screwdriver
• at head screwdriver
• pliers
*Open all hardware packets
in both packages before
starting assembly.
410 headboard
Assembly Instructions for 410, 100, & 100NB Series
headboard components
If you have any questions, please call us at 1.800.542.7553
headboard & side rails hardware
*images might vary from actual product

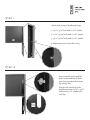
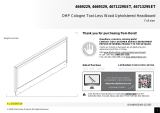
Attach each wing to headboard using:
1. (1) 2” x 5/16” bolt and (1) 1¼” washer
2. (1) 2” x 5/16” bolts and (1) 1¼” washer
3. (1) 2” x 5/16” bolts and (1) 1¼” washer
4. Repeat process for the other wing.
1
2
3
Step 1
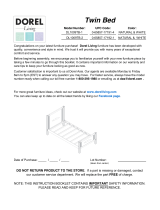
Insert metal legs through the
holes in the headboard. Make
sure that you place the correct
leg facing “Out.”
Attach each metal leg to the
headboard using (2) ⅝” x 5/16”
bolts and (2) 1¼” washers for
each leg.
Step 2
-
 1
1
-
 2
2


ROOMS TO GO 30341008 Assembly Instructions
- Tipo
- Assembly Instructions
en otros idiomas
- français: ROOMS TO GO 30341008
- English: ROOMS TO GO 30341008
Otros documentos
-
 Dorel Home Products 4410619 Manual de usuario
-
Hillsdale Furniture 1116BKRG Instrucciones de operación
-
 Dorel Home 4292149 Assembly Manual
-
 Dorel Home 4291029 Assembly Manual
-
Dorel Home 4346139 Assembly Manual
-
 Dorel Home 4671329SET Assembly Manual
-
 Dorel Home Furnishings DL1009TB El manual del propietario


