Sony XS-GF1031X Instrucciones de operación
- Categoría
- Altavoces de coche
- Tipo
- Instrucciones de operación

XS-GF1031X
2004 Sony Corporation Printed in China
Instructions
Instrucciones
10cm Coaxial
3-way Speaker
3-262-046-11 (1)
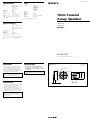
ø 103
22.5
ø 117
ø 138.4
2
ø 90
ø 65
5 × 7
ø 102
44.4
Specifications
Speaker Coaxial 3-way:
Woofer 10 cm, HOP, cone type
Midrange 2.8 cm,
Al, cone type
Tweeter 0.8 cm,
PET, dome type
Peak power 130 W
Rated power 30 W
Impedance 4 ohms
Sensitivity 88 dB/W/m
Frequency response 45 – 25,000 Hz
Mass Approx. 400 g per speaker
Supplied accessory Parts for installation
Design and specifications are subject to change
without notice.
Especificaciones
Altavoz Coaxial de 3 vías:
Graves de HOP de 10 cm, tipo
cono
Medios de AL de 2,8 cm, tipo
cono
Agudos de PET de 0,8 cm, tipo
bóveda
Potencia máxima 130 W
Potencia nominal 30 W
Impedancia 4 Ω
Sensibilidad 88 dB/W/m
Respuesta en frecuencia 45 – 25 000 Hz
Peso Aprox. 400 g por altavoz
Accesorios suministrados
Componentes para instalación
Diseño y especificaciones sujetos a cambio sin previo
aviso.
Ω
Precautions
•Do not continuously use the speaker system
beyond the peak power handling capacity.
•Keep recorded tapes, watches, and personal
credit cards using magnetic coding away from
the speaker system to protect them from damage
caused by the magnets in the speakers.
If you cannot find an appropriate mounting
location, consult your car dealer or your
nearest Sony dealer before mounting.
Precauciones
•Evite utilizar de forma continuada el sistema de
altavoces con una potencia que sobrepase su
capacidad de potencia máxima.
•Mantenga alejados del sistema de altavoces las
cintas grabadas, relojes o tarjetas de crédito con
codificación magnética para evitar daños que
posiblemente causaría el imán de los altavoces.
Si no puede encontrar un emplazamiento
apropiado para instalarlos, consulte al
distribuidor de su automóvil o al proveedor de
Sony más próximo.
•
•
Dimensions
Dimensiones
Unit: mm
Unidad: mm

Before mounting
A depth of at least 44.4 mm is required for flush mounting. Measure the depth of the area where you are
to mount the speaker, and ensure that the speaker is not obstructing any other components of the car.
Keep the following in mind when choosing a mounting location:
•Make sure that nothing is obstructing around the mounting location of the door (front or rear) where
you are to mount the speaker.
•A hole for mounting may already be cut out of the inner panel of the door (front or rear). In this case,
you need to modify the board only.
•If you are to mount this speaker system in the door (front or rear), make sure that the speaker terminals,
frame or magnet do not interfere with any inner parts, such as the window mechanism in the door
(when you open or close the window), etc.
Also make sure that the speaker grille does not touch any inner fittings, such as the window cranks, door
handles, arm rests, door pockets, lamps or seats etc.
Antes del montaje
Para montar el altavoz de modo que quede empotrado en la ubicación de montaje se requiere una
profundidad mínima de 44,4 mm. Mida la profundidad del área donde desee montar el altavoz y
asegúrese de que no obstruya ningún otro componente del automóvil. Cuando elija la ubicación de
montaje, recuerde lo siguiente:
•Asegúrese de que no haya ningún objeto cerca de la puerta (delantera o trasera) donde desea montar el
altavoz que pueda impedir su instalación.
•Es posible que en el panel interno de la puerta (delantera o trasera) ya exista un orificio para montar el
altavoz. En este caso, sólo deberá modificar el tablero.
•Si desea montar este sistema de altavoces en la puerta (delantera o trasera), asegúrese de que los
terminales, el marco o el imán del altavoz no interfieran con los componentes internos como, por
ejemplo, el mecanismo de la ventanilla de la puerta (al subir o bajar la ventanilla), etc.
Asegúrese también de que la rejilla del altavoz no esté en contacto con accesorios internos como, por
ejemplo, los picaportes de las ventanillas y las puertas, los reposabrazos, los compartimentos para
guardar objetos situados en las puertas, las luces o los asientos etc.
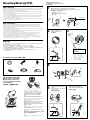
Mounting/Montaje/
•
•
•
Parts list/Lista de las piezas/
× 8
× 8
ø 4 × 30
1
4
23
56
× 2
2 m
× 2 × 2
Flat mounting (installed flush
with the surface of the dash)
Montaje plano (instalación a
ras con la superficie del tablero
de instrumentos)
This speaker can be made to fit in almost any type
of car by removing the mounting tabs.
Use clippers or pliers, etc. to cut or snap the
mounting tabs off so that it is even with the
edge of the speaker frame as illustrated.
Note
After removing the mounting tabs, handle the speaker
frame with care, as the edges may be sharp.
Este altavoz puede adaptarse a prácticamente
cualquier tipo de automóvil extrayendo las
lengüetas de montaje.
Utilice cortadores o alicates, etc., para cortar las
lengüetas de montaje de forma que haya
uniformidad con el borde del marco del altavoz
tal como se ilustra.
Nota
Después de extraer las lengüetas de montaje, maneje
el marco del altavoz con cuidado, ya que los bordes
pueden estar afilados.
Mounting from the car interior
Montaje desde el interior del automóvil
1
Mark the 4 bolt holes and make them 3.3 mm* in diameter.
Marque los orificios de los 4 pernos y hágalos de 3,3 mm* de diámetro.
*
* When using 4: ø 5 mm
* Cuando utilice 4 : 5 mm de diámetro
* 4 ø
c
ø 3.3 mm*
ø 103 mm
1
2
Remove the grille net.
Extraiga la red de la rejilla.
6
5
3
2
*
Striped cord
Cable rayado
To speaker cord of a car.
Al cable del altavoz de un
automóvil.
4
4
3
5
5
6
5
6
5
Press and insert the edges of the
grille net.
Presione e inserte los extremos de
la red de la rejilla.
How to remove the grille net
Cómo extraer la red de la rejilla
ø 91 mm
* White cord — Left speaker
Grey cord — Right speaker
* Cable blanco — Altavoz izquierdo
Cable gris — Altavoz derecho
*
—
—
2
2 mm
13 mm
Door panel
Panel de la
puerta
Transcripción de documentos
3-262-046-11 (1) Specifications 規格 Speaker 揚聲器 Peak power Rated power Impedance Sensitivity Frequency response Mass Supplied accessory Coaxial 3-way: Woofer 10 cm, HOP, cone type Midrange 2.8 cm, Al, cone type Tweeter 0.8 cm, PET, dome type 130 W 30 W 4 ohms 88 dB/W/m 45 – 25,000 Hz Approx. 400 g per speaker Parts for installation Design and specifications are subject to change without notice. 峰值功率 額定功率 阻抗 靈敏度 頻率響應 重量 提供的附件 同軸型 3聲道: 低音揚聲器 10 cm,高度定向 聚烯烴,錐型 中音揚聲器 2.8 cm, 純鋁,錐型 高音揚聲器 0.8 cm, PET 圓頂型 130 W 30 W 4 Ω 88dB/W/m 45-25000 Hz 大約 400 g 每個揚聲器 安裝用部件 10cm Coaxial 3-way Speaker 設計和規格有所變更時,恕不另行奉告。 Especificaciones Altavoz Potencia máxima Potencia nominal Impedancia Sensibilidad Respuesta en frecuencia Peso Accesorios suministrados Instructions Coaxial de 3 vías: Graves de HOP de 10 cm, tipo cono Medios de AL de 2,8 cm, tipo cono Agudos de PET de 0,8 cm, tipo bóveda 130 W 30 W 4Ω 88 dB/W/m 45 – 25 000 Hz Aprox. 400 g por altavoz Instrucciones 使用說明書 Componentes para instalación Diseño y especificaciones sujetos a cambio sin previo aviso. XS-GF1031X 2004 Sony Corporation Printed in China Precauciones •Evite utilizar de forma continuada el sistema de altavoces con una potencia que sobrepase su capacidad de potencia máxima. •Mantenga alejados del sistema de altavoces las cintas grabadas, relojes o tarjetas de crédito con codificación magnética para evitar daños que posiblemente causaría el imán de los altavoces. Si no puede encontrar un emplazamiento apropiado para instalarlos, consulte al distribuidor de su automóvil o al proveedor de Sony más próximo. ø 117 22.5 2 44.4 ø 102 If you cannot find an appropriate mounting location, consult your car dealer or your nearest Sony dealer before mounting. 如果您找不到適當的安裝位置,即請洽詢您購 入車輛的商店或附近的 Sony 銷售店,然後才進 行安裝。 5×7 ø 90 • 請勿超過峰值功率處理能力連續使用揚聲器系統。 • 錄影 音磁帶,手錶,和利用磁碼的個人信用卡, 都必須遠離揚聲器系統放置以免記錄內容被揚聲器 中的磁鐵所損壞。 Unit: mm Unidad: mm 單位:mm ø 65 •Do not continuously use the speaker system beyond the peak power handling capacity. •Keep recorded tapes, watches, and personal credit cards using magnetic coding away from the speaker system to protect them from damage caused by the magnets in the speakers. Dimensions Dimensiones 尺寸 ø 103 使用前須注意 ø 138.4 Precautions Mounting/Montaje/安裝 Mounting from the car interior Montaje desde el interior del automóvil 從汽車內安裝 Before mounting A depth of at least 44.4 mm is required for flush mounting. Measure the depth of the area where you are to mount the speaker, and ensure that the speaker is not obstructing any other components of the car. Keep the following in mind when choosing a mounting location: •Make sure that nothing is obstructing around the mounting location of the door (front or rear) where you are to mount the speaker. •A hole for mounting may already be cut out of the inner panel of the door (front or rear). In this case, you need to modify the board only. •If you are to mount this speaker system in the door (front or rear), make sure that the speaker terminals, frame or magnet do not interfere with any inner parts, such as the window mechanism in the door (when you open or close the window), etc. Also make sure that the speaker grille does not touch any inner fittings, such as the window cranks, door handles, arm rests, door pockets, lamps or seats etc. 1 Mark the 4 bolt holes and make them 3.3 mm* in diameter. Marque los orificios de los 4 pernos y hágalos de 3,3 mm* de diámetro. 劃出4個螺栓孔,使其直徑呈為 3.3 mm*。 * When using 4: ø 5 mm * Cuando utilice 4 : 5 mm de diámetro * 使用 4 時:ø 5 mm 1 ø 103 mm Door panel Panel de la puerta 門板 c Antes del montaje Para montar el altavoz de modo que quede empotrado en la ubicación de montaje se requiere una profundidad mínima de 44,4 mm. Mida la profundidad del área donde desee montar el altavoz y asegúrese de que no obstruya ningún otro componente del automóvil. Cuando elija la ubicación de montaje, recuerde lo siguiente: •Asegúrese de que no haya ningún objeto cerca de la puerta (delantera o trasera) donde desea montar el altavoz que pueda impedir su instalación. •Es posible que en el panel interno de la puerta (delantera o trasera) ya exista un orificio para montar el altavoz. En este caso, sólo deberá modificar el tablero. •Si desea montar este sistema de altavoces en la puerta (delantera o trasera), asegúrese de que los terminales, el marco o el imán del altavoz no interfieran con los componentes internos como, por ejemplo, el mecanismo de la ventanilla de la puerta (al subir o bajar la ventanilla), etc. Asegúrese también de que la rejilla del altavoz no esté en contacto con accesorios internos como, por ejemplo, los picaportes de las ventanillas y las puertas, los reposabrazos, los compartimentos para guardar objetos situados en las puertas, las luces o los asientos etc. ø 3.3 mm* 2 3 Remove the grille net. Extraiga la red de la rejilla. 取下格柵網。 Striped cord Cable rayado 條紋電線 安裝以前 2* 嵌入安裝至少需要 44.4 mm 的深度。測量安裝揚聲器區域的深度,並確信揚聲器不會妨礙汽車上的任何其 它部件。選擇安裝位置時,請注意下列事項: •確保您要安裝揚聲器的車門上的安裝位置周圍(前面或後面)沒有任何障礙物。 •車門的內面板上(前面或後面)可能已經開有安裝孔。這種情況下,只需更改底板。 •若您打算將該揚聲器系統安裝在車門上(前面或後面),確保在打開或關閉車窗時,揚聲器的接頭、框架 或磁體不會干擾車門內的車窗機構等內部部件的動作。 此外,確保揚聲器的格柵不會碰到任何內部裝置,例如車窗搖柄、車門把手、座位扶手、 門套、燈或座位等。 6 To speaker cord of a car. Al cable del altavoz de un automóvil. 至汽車揚聲器電線。 * White cord — Left speaker Grey cord — Right speaker Parts list/Lista de las piezas/零件一覽表 1 2 * 白色電線 —左揚聲器 灰色電線 —右揚聲器 3 2m ø 4 × 30 ×2 5 ×8 4 6 mm 13 4 * Cable blanco — Altavoz izquierdo Cable gris — Altavoz derecho 5 2 m m 3 ×8 ×2 ×2 4 Flat mounting (installed flush with the surface of the dash) Montaje plano (instalación a ras con la superficie del tablero de instrumentos) 平面安裝(與隔板齊平安裝) 5 5 This speaker can be made to fit in almost any type of car by removing the mounting tabs. Use clippers or pliers, etc. to cut or snap the mounting tabs off so that it is even with the edge of the speaker frame as illustrated. 2 Press and insert the edges of the grille net. How to remove the grille net Presione e inserte los extremos de la red de la rejilla. 如何取下格柵網 將格柵網邊緣按下並插入。 Note After removing the mounting tabs, handle the speaker frame with care, as the edges may be sharp. Este altavoz puede adaptarse a prácticamente cualquier tipo de automóvil extrayendo las lengüetas de montaje. Utilice cortadores o alicates, etc., para cortar las lengüetas de montaje de forma que haya uniformidad con el borde del marco del altavoz tal como se ilustra. ø 91 mm 5 6 6 Nota Después de extraer las lengüetas de montaje, maneje el marco del altavoz con cuidado, ya que los bordes pueden estar afilados. 去除安裝翼片後,此揚聲器幾乎可適合安裝在任何類 型的汽車上。 用剪刀或鉗子等工具剪去或鉗斷此安裝翼片,且如圖 所示正好與揚聲器框的邊緣平齊。 附註 在去除安裝翼片後,由於揚聲器的外框邊緣可能較鋒利,請 小心操作。 5 Cómo extraer la red de la rejilla-
 1
1
-
 2
2


Sony XS-GF1031X Instrucciones de operación
- Categoría
- Altavoces de coche
- Tipo
- Instrucciones de operación
En otros idiomas
Documentos relacionados
-
Sony XS-GF1631X Instrucciones de operación
-
Sony XS-GF1032X Instrucciones de operación
-
-
-
-
-
-
-
Sony XS-F1031 El manual del propietario
-