Indesit MTM 1711 T Guía del usuario
- Categoría
- Frigoríficos-congeladores
- Tipo
- Guía del usuario

GB
2-DOOR FRIDGE
Contents
Installation, 2
Positioning and connection
Reversible doors
Description of the appliance, 3
Overall view
Accessories, 4
Start-up and use, 5-6
Starting the appliance
Chiller system
Using the refrigerator to its full potential
Using the freezer to its full potential
Maintenance and care, 7
Switching the appliance off
Cleaning the appliance
Avoiding mould and unpleasant odours
Defrosting the appliance
Replacing the light bulb
Precautions and tips, 8
General safety
Disposal
Respecting and conserving the environment
Troubleshooting, 9
Assistance, 10
Operating Instructions
Français, 11English,1
GB F
ES
Espanol, 21
MTM 1711 T
40 .....
AR

2
GB
Installation
Reversible doors
1
2
3
4
5
! Before placing your new appliance into operation
please read these operating instructions carefully. They
contain important information for safe use, for
installation and for care of the appliance.
! Please keep these operating instructions for future
reference. Pass them on to possible new owners of the
appliance.
Positioning and connection
Positioning
1. Place the appliance in a well-ventilated humidity-free
room.
2. Do not obstruct the rear fan grills. The compressor
and condenser give off heat and require good
ventilation to operate correctly and save energy.
3. Leave a space of at least 10 cm between the top part
of the appliance and any furniture above it, and at least
5 cm between the sides and any furniture/side walls.
4. Ensure the appliance is away from any sources of
heat (direct sunlight, electric stove, etc.).
5. In order to maintain the correct distance between the
appliance and the wall behind it, fit the spacers
supplied in the installation kit, following the
instructions provided.
Levelling
1. Install the appliance on a level and rigid floor.
2. If the floor is not perfectly horizontal, adjust the
refrigerator by tightening or loosening the front feet.
Electrical connections
After the appliance has been transported, carefully
place it vertically and wait at least 3 hours before
connecting it to the electricity mains. Before inserting
the plug into the electrical socket ensure the following:
• The appliance is earthed and the plug is compliant
with the law.
• The socket can withstand the maximum power of the
appliance, which is indicated on the data plate
located on the bottom left side of the fridge (e.g. 150
W).
• The voltage must be in the range between the values
indicated on the data plate located on the bottom left
side (e.g. 220-240V).
• The socket is compatible with the plug of the
appliance.
If the socket is incompatible with the plug, ask an
authorised technician to replace it (
see Assistance
).
Do not use extension cords or multiple sockets.
! Once the appliance has been installed, the power
supply cable and the electrical socket must be easily
accessible.
! The cable must not be bent or compressed.
! The cable must be checked regularly and replaced by
authorised technicians only (see Assistance).
! The manufacturer declines any liability should
these safety measures not be observed.
∅ 3
mm

GB
3
Description of the
appliance
Overall view
The instructions contained in this manual are applicable to different model refrigerators. The diagrams may not
directly represent the appliance purchased. For more complex features, consult the following pages.
Varies by number and/or position.
*
Available only on certain models.
Removable lidded
shelf with EGG TRAY
Removable
multipurpose
SHELVES•
BOTTLE shelf•
FRESH BOX
Compartment
*
TEMPERATURE
CONTROL
SHELVES•
FRUIT and
VEGETABLE VEGETABLE
VEGETABLE VEGETABLE
VEGETABLE bin
Levelling FEET
FREEZER and
STORAGE
compartment
ICE tray
*
CAN RACK
*

4
GB
Accessories
Refrigerator compartment
SHELVES: with or without grill.
Due to the special guides the
shelves are removable and the
height is adjustable (
see
diagram
), allowing easy storage
of large containers and food.
Height can be adjusted without
complete removal of the shelf.
FRESH BOX
*
: for fresh meat and fish. Due to the
compartment’s low temperature (the coldest in the
refrigerator) and to the clear door that provides
protection against oxidation and blackening, food can
be stored for even up to one week. It can also be used
for “cold meals.”
BREAKFAST BOX
*
: This is the ideal container for the
storage of foods consumed at breakfast. It can be
removed and used at the breakfast table to serve the
food that, thanks to the special design of the container,
will maintain the correct temperature for longer. The lid
can be used as a practical tray, simply by using the
handles provided. The Breakfast Box can also be used
as a meat container, for food products that must be
well-protected in order to be stored correctly.
1
2
*
Available only on certain models.
WINE AREA
*
: to store up to
three bottles of wine (
see
diagram
). The air circulates
freely between the bottles
guaranteeing rapid cooling.
When not in use, close it to
increase the space on the shelf.

GB
5
Start-up and use
Starting the appliance
! Before starting the appliance, follow the
installation instructions (
see Installation
).
! Before connecting the appliance, clean the
compartments and accessories well with lukewarm
water and bicarbonate.
1. Insert the plug into the socket and ensure that the
internal light illuminates.
2. Turn the TEMPERATURE ADJUSTMENT knob to an
average value. After a few hours you will be able to
put food in the refrigerator.
Setting the temperature
The temperature inside the refrigerator compartment
automatically adjusts itself according to the position of
the thermostat knob.
1 = warmest
5 = coldest
We recommend, however, a medium position.
The cooling section of the refrigerator is located inside
the back wall of the refrigerator compartment for
increased space and improved aesthetics. During
operation, the back wall will be covered in frost or water
droplets depending on whether the compressor is
operating or paused. Do not worry, the refrigerator is
functioning normally.
Chiller system
The appliance comes with one of the chiller systems
described below: take note of your system in order to
determine the most efficient food storage method.
A.I.R. SYSTEM (Ariston Integrated Refrigeration)
It is recognizable due to the presence of the
mechanism on the top part of the refrigerator
compartment (
see diagram
).
The A.I.R. System maintains a constant fridge
temperature to keep food fresher for longer and will
quickly restore the temperature to the correct level,
even if the door is opened frequently: the blown air (A)
is cooled when it comes into contact with the cold wall,
whereas the hotter air (B) is sucked up (
see diagram
).
The back wall may be covered in frost or droplets of
water, depending on whether the compressor is in
operation or whether it is paused.
Static
Models without the A.I.R. have the cooling section in
the internal back wall of the compartments. The wall will
be covered in frost or water droplets depending on
whether the compressor is operating or paused: both
cases are normal. If the TEMPERATURE ADJUSTMENT
knob has been set on high values with large quantities
of food and with a high ambient temperature, the
appliance can operate continuously, resulting in
excessive frost formation and excessive energy
consumption: compensate for this by shifting the knob
towards lower values (defrosting will occur
automatically).
In static appliances, the air circulates in a natural way:
the colder air tends to move downwards as it is heavier.
The food should be stored as follows:
A
B
)RRG
$UUDQJHPHQWLQVLGHWKH
UHIULJHUDWRU
Fresh fish and meat
Above the fruit and vegetable
bins
Fresh cheese
Above the fruit and vegetable
bins
Cooked food On any shelf
Salami, bread loaf,
chocolate
On any shelf
Fruit and vegetables In the fruit and vegetable bins
Eggs On the shelf provided
Butter and margarine On the shelf provided
Bottles, drinks, milk On the shelf provided

6
GB
Using the refrigerator to its full potential
• Use the TEMPERATURE ADJUSTMENT knob to
adjust the temperature (
see Description
).
• Place only cold or lukewarm foods in the
compartment, not hot foods (
see Precautions and
tips
).
• Remember that cooked foods do not last longer than
raw foods.
• Do not store liquids in open containers. They will
increase humidity in the refrigerator and cause
condensation to form.
Using the freezer to its full potential
• Do not re-freeze food that is defrosting or that has
already been defrosted. These foods must be
cooked and eaten (within 24 hours).
• Fresh food that needs to be frozen must not come
into contact with food that has already been
defrosted. Fresh food must be stored above the grill
in the freezer compartment and if possible be in
direct contact with the walls (side and rear), where
the temperature drops below -18°C and guarantees
rapid freezing.
• Do not place glass bottles which contain liquids, and
which are corked or hermetically sealed in the
freezer because they could break.
• The maximum quantity of food that may be frozen
daily is indicated on the plate containing the technical
properties located on the bottom left side of the
refrigerator compartment (for example: Kg/24h: 4)
! Do not open the door during freezing.
! If there is a power cut or malfunction, do not open the
freezer door. This will help maintain the temperature
inside the freezer, ensuring that foods are conserved for
at least 9 -14 hours.
! If the room temperature drops below 14°C for an
extended period of time, the ideal temperature will not
be reached in the freezer compartment and food
preservation will be reduced.

GB
7
Maintenance and care
Switching the appliance off
During cleaning and maintenance it is necessary to
disconnect the appliance from the electricity supply:
It is not sufficient to set the temperature adjustment
knobs on
(appliance off) to eliminate all electrical
contact.
Cleaning the appliance
• The external and internal parts, as well as the rubber
seals may be cleaned using a sponge that has been
soaked in lukewarm water and bicarbonate of soda
or neutral soap. Do not use solvents, abrasive
products, bleach or ammonia.
• The removable accessories may be soaked in warm
water and soap or dishwashing liquid. Rinse and dry
them carefully.
• The back of the appliance may collect dust which
can be removed by delicately using the hose of a
vacuum cleaner set on medium power. The
appliance must be switched off and the plug must be
pulled out before cleaning the appliance.
Avoiding mould and unpleasant odours
• The appliance is manufactured with hygienic
materials which are odour free. In order to maintain
an odour free refrigerator and to prevent the
formation of stains, food must always be covered or
sealed properly.
• If you want to switch the appliance off for an
extended period of time, clean the inside and leave
the doors open.
Defrosting the appliance
! Follow the instructions below.
Do not speed up the defrosting process by using any
devices or tools other than the scraper provided, you
may damage the refrigeration circuit.
Defrosting the refrigerator compartment
The refrigerator has an
automatic defrosting
function: water is ducted
to the back of the
appliance by a special
discharge outlet (
see
diagram
) where the heat
produced by the
compressor causes it to
evaporate. It is
necessary to clean the
discharge hole regularly so that the water can flow out
easily.
Defrosting the freezer compartment
Remove frost regularly using the special scraper
provided. If the frost layer is greater than 5 mm, it is
necessary to defrost manually:
1. Set the TEMPERATURE ADJUSTMENT knob to the
position
.
2. Wrap frozen foods in newspaper and place them in
another freezer or in a cool place.
3. Leave the door open until the frost has melted
completely. This can be made easier by placing
containers with lukewarm water in the freezer
compartment.
4. Clean and dry the freezer compartment carefully
before switching the appliance on again.
5. Wait for approximately 2 hours, i.e. until the ideal
storage conditions have been restored, before
placing food in the freezer compartment.
Replacing the light bulb
To replace the light bulb in the refrigerator
compartment, pull out the plug from the electrical
socket. Follow the instructions below.
Access the light bulb by
removing the cover as
indicated in the diagram.
Replace it with a similar
light bulb within the
power range indicated on
the cover (15W or 25W).
1
2

8
GB
Precautions and tips
! The appliance was designed and manufactured in
compliance with international safety standards. The
following warnings are provided for safety reasons
and must be read carefully.
This appliance complies with the following
Community Directives:
- 73/23/EEC of 19/02/73 (Low Voltage) and
subsequent amendments;
-89/336/EEC of 03.05.89 (Electromagnetic
Compatibility) and subsequent amendments;
- 2002/96/CE.
General safety
• The appliance was designed for domestic use inside
the home and is not intended for commercial or
industrial use.
• The appliance must be used to store and freeze food
products by adults only and according to the
instructions in this manual.
• The appliance must not be installed outdoors, even in
covered areas. It is extremely dangerous to leave the
appliance exposed to rain and storms.
• Do not touch the appliance with bare feet or with wet
or moist hands and feet.
• Do not touch the internal cooling elements: this
could cause skin abrasions or frost/freezer burns.
• When unplugging the appliance always pull the plug
from the mains socket, do not pull on the cable.
• Before cleaning and maintenance, always switch off
the appliance and disconnect it from the electrical
supply. It is not sufficient to set the temperature
adjustment knobs on
(appliance off) to eliminate all
electrical contact.
• In the case of a malfunction, under no circumstances
should you attempt to repair the appliance yourself.
Repairs carried out by inexperienced persons may
cause injury or further malfunctioning of the appliance.
• Do not use devices or tools other than the special
scraper provided inside the compartments.
• Do not put ice cubes taken directly from the freezer
into your mouth.
• Do not allow children to tamper with the controls or
play with the appliance. Under no circumstance
should they be allowed to sit on the bins or to hang
from the door.
• Keep packaging material out of the reach of children! It
can become a choking or suffocation hazard.
Disposal
• Observe local environmental standards when
disposing packaging material for recycling
purposes.
• The European Directive 2002/96/EC on Waste
Electrical and Electronic Equipment (WEEE), requires
that old household electrical appliances must not be
disposed of in the normal unsorted municipal waste
stream. Old appliances must be collected separately
in order to optimise the recovery and recycling of the
materials they contain and reduce the impact on
human health and the environment. The crossed out
“wheeled bin” symbol on the product reminds you of
your obligation, that when you dispose of the
appliance it must be separately collected.
Consumers should contact their local authority or
retailer for information concerning the correct
disposal of their old appliance.
Respecting and conserving the
environment
• Install the appliance in a fresh and well-ventilated
room. Ensure that it is protected from direct sunlight
and do not place it near heat sources.
• Try to avoid keeping the door open for long periods
or opening the door too frequently in order to
conserve energy.
• Do not fill the appliance with too much food:
cold air must circulate freely for food to be preserved
properly. If circulation is impeded, the compressor
will work continuously.
• Do not place hot food directly into the refrigerator.
The internal temperature will increase and force the
compressor to work harder and will consume more
energy.
• Defrost the appliance if ice forms (
see Maintenance
).
A thick layer of ice makes cold transference to food
products more difficult and results in increased
energy consumption.
• Regularly check the door seals and wipe clean to
ensure they are free of debris and to prevent cold air
from escaping (
see Maintenance
).

GB
9
Troubleshooting
If the appliance does not work, before calling for Assistance (
see Assistance
), check for a solution from the following list.
Malfunctions:
The internal light does not
illuminate.
The refrigerator and the freezer do
not cool well.
The food inside the refrigerator is
beginning to freeze.
The AIR fan does not rotate.
The motor runs continuously.
The appliance makes a lot of noise.
Some of the external parts of the
refrigerator become hot.
The back wall of the refrigerator unit
is covered in frost or droplets of
water.
There is water at the bottom of the
refrigerator.
Possible causes / Solutions:
• The plug has not been inserted into the electrical socket, or not far
enough to make contact, or there is no power in the house.
• The doors do not close properly or the seals are damaged.
• The doors are opened too frequently.
• The TEMPERATURE ADJUSTMENT knob is not in the correct position
• The refrigerator or the freezer have been over-filled.
• The atmospheric temperature of the area surrounding the appliance is
lower than 14°C.
• The TEMPERATURE ADJUSTMENT knob is not in the correct position.
• The food is in contact with the back inside wall of the refrigerator.
• The refrigerator door is open.
• The AIR system is only activated automatically when it becomes
necessary to restore perfect operational conditions inside the
refrigerator compartment.
• The door is not closed properly or is continuously opened.
• The outside ambient temperature is very high.
• The thickness of the frost exceeds 2-3 mm (
see Maintenance
).
• The appliance has not been installed on a level surface (
see
Installation
)
.
• The appliance has been installed between cabinets that vibrate and
make noise.
• The internal refrigerant makes a slight noise even when the compressor
is off. This is not a defect, it is normal.
• These raised temperatures are necessary in order to avoid the
formation of condensation on certain parts of the product.
• This shows the appliance is operating normally.
• The water discharge hole is blocked (
see Maintenance
).

10
GB
Assistance
Before calling for Assistance:
•
Check if the malfunction can be solved on your own (
see Troubleshooting
).
• If after all the checks, the appliance still does not operate or the problem persists, call the nearest Service
Centre
Communicating:
• type of malfunction
• appliance model (Mod.)
• serial number (S/N)
This information can be found on the data
plate located on the bottom left side of the
refrigerator compartment.
Never call on unauthorized technicians and always refuse spare parts which are not originals.
Mod.
RG 2330
TI
Cod.
93139180000 S/N 704211801
220 - 240 V- 50 Hz 150 W
W
Fuse
A
Max 15 w
Total
Gross
Bruto
Brut
Compr.
Kompr.
Syst.
R 134 a
kg 0,090
Gross
Bruto
Brut
340
Net
Util
Utile
Gross
Bruto
Brut
Freez. Capac
Poder de Cong
75
Made in Italy 13918
Test
P.S-I.
Pressure
HIGH-235
LOW 140
kg/24 h
4,0
Class
Clase
N
Classe
model serial number
195058112.00
04/2006 - Xerox Business Services

REFRIGERATEUR/
Mode demploi
F
Sommaire
Installation, 12
Mise en place et raccordement
Réversibilité des portes
Description de lappareil, 13
Vue d’ensemble
Accessoires, 14
Mise en marche et utilisation, 15-16
Mise en service de l’appareil
Réglage de la température
Système de refroidissement
Pour profiter à plein de votre réfrigérateur
Pour profiter à plein de votre congélateur
Entretien et soins, 17
Mise hors tension
Nettoyage de l’appareil
Contre la formation de moisissures et de mauvaises odeurs
Dégivrage de l’appareil
Remplacement de l’ampoule d’éclairage
Précautions et conseils, 18
Sécurité générale
Mise au rebut
Economies et respect de l’environnement
Anomalies et remèdes, 19
Assistance, 20
Français, 11
40 .....
English,1
GB F
AR
ES
Espanol, 21
MTM 1711 T

12
F
Installation
! Conservez ce mode d’emploi pour pouvoir le consulter
à tout moment. En cas de vente, de cession ou de
déménagement, veillez à ce qu’il suive l’appareil pour
informer le nouveau propriétaire sur son fonctionnement
et lui fournir les conseils correspondants.
! Lisez attentivement les instructions : elles contiennent
des conseils importants sur l’installation, l’utilisation et la
sécurité de votre appareil.
Mise en place et raccordement
Mise en place
1. Placez l’appareil dans une pièce bien aérée et non
humide.
2. Ne bouchez pas les grilles d’aération arrière : le
compresseur et le condensateur produisent de la
chaleur et exigent une bonne aération pour bien
fonctionner et réduire la consommation d’électricité.
3. Prévoir au moins 10 cm entre le haut de l’appareil et
les meubles installés au-dessus et au moins 5 cm
entre les côtés et les meubles/parois latérales.
4. Installez l’appareil loin de sources de chaleur (rayons
directs du soleil, cuisinière électrique).
5. Pour maintenir une distance optimale entre le produit
et la paroi arrière, montez les cales d’espacement
comprises dans le kit d’installation et suivez les
instructions de la notice spécialement prévue.
Mise à niveau
1. Installez l’appareil sur un sol plat et rigide.
2. Si le sol n’est pas parfaitement horizontal, vissez ou
dévissez les petits pieds avant pour bien niveler l’appareil.
Raccordement électrique
Après le transport, placez l’appareil à la verticale et
attendez au moins 3 heures avant de le raccorder à
l’installation électrique. Avant de brancher la fiche dans
la prise de courant, assurez-vous que :
• la prise est bien munie d’une terre conforme à la loi;
• la prise est bien apte à supporter la puissance
maximale de l’appareil, indiquée sur la plaquette
signalétique placée à l’intérieur du compartiment
réfrigérateur en bas à gauche (ex. 150 W);
• la tension d’alimentation est bien comprise entre les
valeurs indiquées sur la plaquette signalétique,
placée en bas à gauche (ex.220-240 V);
• la prise est bien compatible avec la fiche de l’appareil.
En cas d’incompatibilité, faites remplacer la fiche par
un technicien agréé (
voir Assistance
); n’utilisez ni
rallonges ni prises multiples.
! Après installation de l’appareil, le câble électrique et la
prise de courant doivent être facilement accessibles.
! Le câble ne doit être ni plié ni excessivement écrasé.
! Il doit être contrôlé prériodiquement et ne peut être
remplacé que par un technicien agréé (voir Assistance).
! Nous déclinons toute responsabilité en cas de non
respect des normes énumérées ci-dessus.
Réversibilité des portes
1
2
3
4
5
∅ 3
mm

F
13
Description de
lappareil
Vue densemble
Ces instructions d’utilisation s’appliquent à plusieurs modèles, il se peut donc que les composants illustrés
présentent des différences par rapport à ceux de l’appareil que vous avez acheté. Vous trouverez dans les pages
suivantes la description des objets plus complexes.
Leur nombre et/ou leur emplacement peut varier.
*
N’existe que sur certains modèles.
PIED
de réglage
Balconnet amovible à
abattant, contenant
un SUPPORT A
OEUFS
Balconnet amovible
PORTE-OBJETS
Balconnet
BOUTEILLES
CLAYETTE
Commande pour
RÉGLER LA
TEMPÉRATURE
Compartiment
CONGELATION et
CONSERVATION
Bac à GLAÇONS
*
Bac FRUITS et
LEGUMES
Compartiment
FRESH BOX
*
Balconnet
PORTE-CANETTES
*

14
F
Accessoires
CLAYETTES: pleines ou grillagées.
Elles sont amovibles et
réglables en hauteur grâce à
des glissières spéciales (
voir
figure
), pour le rangement de
récipients ou d’aliments de
grande dimension. Pour régler
la hauteur, pas besoin de sortir
la clayette complètement.
1
2
*
N’existe que sur certains modèles.
FRESH BOX
*
: pour viandes et poissons frais. Ce
compartiment sert à prolonger la durée de conservation
jusqu’à une semaine, grâce à sa température très basse
– la plus froide du réfrigérateur – et à son volet
transparent qui protège contre les phénomènes
d’oxydation et de noircissement. Il peut aussi être utilisé
pour conserver des “plats froids”.
BREAKFAST BOX
*
: C’est la boîte de rangement
idéale pour les aliments du petit-déjeuner. Vous
pouvez aussi l’utiliser pour servir à table et, grâce à sa
forme spéciale, les aliments maintiendront leur
température plus longtemps. Muni de poignées, le
couvercle peut se transformer en un plateau très
pratique. La “Breakfast Box” peut aussi servir de bac
à viande pour stocker des aliments qui doivent être
protégés pour mieux se conserver.
WINE AREA
*
: pour ranger
jusqu’à trois bouteilles de vin (
voir
figure
). L’air circule facilement
entre les bouteilles pour garantir
un refroidissement rapide. Quand
il ne sert pas, il peut être refermé
pour augmenter la place
disponible sur la clayette.

F
15
Mise en marche et
utilisation
Mise en service de lappareil
! Avant de mettre lappareil en service, suivez bien
les instructions sur l’installation (
voir Installation
).
! Avant de brancher votre appareil, nettoyez bien les
compartiments et les accessoires à l’eau tiède
additionnée de bicarbonate.
1. Branchez la fiche dans la prise de courant et
assurez-vous que l’éclairage intérieur s’allume.
2. Amenez le bouton de REGLAGE DE LA
TEMPERATURE sur une valeur intermédiaire. Au
bout de quelques heures, vous pourrez commencer
à stocker des aliments dans le réfrigérateur.
Réglage de la température
Le réglage de la température à l’intérieur du
compartiment réfrigérateur est automatique en
fonction de la position du bouton du thermostat.
1 = moins froid
5 = plus froid
Nous conseillons toutefois une position intermédiaire
Pour augmenter la place disponible, simplifier le
rangement et améliorer l’aspect esthétique, cet
appareil loge sa “partie refroidissante” à l’intérieur de
la paroi arrière du compartiment réfrigérateur. Pendant
le fonctionnement de l’appareil, cette paroi est tour à
tour couverte de givre ou de gouttelettes d’eau selon
que le compresseur est en marche ou à l’arrêt. Ne
vous inquiétez pas ! Votre réfrigérateur fonctionne
normalement.
Système de refroidissement
Cet appareil monte un des systèmes de
refroidissement décrits ci après : il est donc important
de savoir lequel et en tenir compte pour respecter le
mode de conservation des aliments.
A.I.R. SYSTEM (Ariston Integrated Refrigeration)
A
B
On le reconnaît à la présence d’un dispositif appliqué
à la paroi dans le haut du compartiment réfrigérateur
(
voir figure
). L’A.I.R. System permet une conservation
optimale des aliments en rétablissant très rapidement
la température après chaque ouverture de porte et en
la distribuant parfaitement à l’intérieur du
compartiment : l’air soufflé (A) refroidit au contact de
la paroi froide, tandis que l’air plus chaud (B) est
aspiré (
voir figure
).
La paroi arrière est tour à tour couverte de givre ou de
gouttelettes d’eau selon que le compresseur est en
marche ou à l’arrêt.
Statique
Sur les modèles dépourvus
d’A.I.R. System
, la partie
refroidissante est logée dans la paroi intérieure arrière
des compartiments; elle est tour à tour couverte de
givre ou de gouttelettes d’eau selon que le
compresseur est en marche ou à l’arrêt : tout cela est
tout à fait normal. Si vous amenez le bouton de
REGLAGE DE LA TEMPERATURE sur des valeurs plus
élevées, que vous stockez de grandes quantités
d’aliments et que la température ambiante est élevée,
votre appareil peut fonctionner de façon continue, ce
qui entraîne une formation abondante de givre et une
consommation d’électricité excessive : amenez alors le
bouton sur des valeurs plus basses (un dégivrage
automatique sera lancé).
A l’intérieur des appareils statiques l’air circule de
façon naturelle : l’air plus froid a tendance à
descendre car il est plus lourd. Quelques exemples
de rangement des aliments :
Aliments
Rangement à l’intérieur du
réfrigérateur
Viande et poisson
évidé
Au-dessus des bacs à fruits et
légumes
Fromages frais
Au-dessus des bacs à fruits et
légumes
Aliments cuits Sur n’importe quelle clayette
Saucissons, pain de
mie, chocolat
Sur n’importe quelle clayette
Fruits et légumes
Dans les bacs à fruits et à
légumes
Œufs Dans le balconnet prévu
Beurre et margarine Dans le balconnet prévu
Bouteilles, boissons,
lait
Dans le balconnet prévu

16
F
Pour profiter à plein de votre
réfrigérateur
• Pour régler la température, utilisez le bouton de
REGLAGE DE LA TEMPERATURE (
voir Description
).
• N’introduisez que des aliments froids ou à peine tièdes,
jamais chauds (
voir Précautions et conseils
).
• Les aliments cuits contrairement à ce que l’on croit ne se
conservent pas plus longuement que les aliments crus.
• N’introduisez pas de récipients non fermés contenant
des liquides : ces derniers entraîneraient une
augmentation de l’humidité et la formation d’eau
condensée.
Pour profiter à plein de votre
congélateur
• Ne recongelez pas des aliments décongelés ou en
cours de décongélation; il faut les faire cuire et les
consommer (dans les 24 heures).
• Les aliments frais à congeler ne doivent pas être
placés au contact d’aliments déjà congelés; il faut les
stocker dans le compartiment supérieur
CONGELATION et CONSERVATION où la température
qui descend au-dessous de -18°C garantit une vitesse
de congélation adéquate.
• Ne stockez pas dans votre congélateur des bouteilles
en verre contenant des liquides, bouchées ou
fermées hermétiquement, elles pourraient se briser.
• La quantité journalière maximale d’aliments pouvant
être congelée est indiquée sur l’étiquette des
caractéristiques, placée dans le compartiment
réfrigérateur en bas à gauche (exemple : 4 Kg/24h).
Evitez d’ouvrir la porte pendant la phase de congélation.
! En cas de coupure de courant ou de panne, n’ouvrez
pas la porte du congélateur : les produits surgelés et
congelés se conserveront ainsi sans problème pendant 9
- 14 heures environ.
! Si la température ambiante se maintient longuement au-
dessous de 14°C, le compartiment freezer n’arrive pas à
atteindre les températures indispensables à une longue
conservation et la période de conservation sera par
conséquent réduite.

F
17
Entretien et soin
Mise hors tension
Pendant les opérations de nettoyage et d’entretien,
mettez l’appareil hors tension en débranchant la fiche
de l’appareil de la prise de courant. Il ne suffit pas de
placer le bouton de réglage de la température sur
(appareil éteint) pour éliminer tout contact électrique.
Nettoyage de lappareil
• Nettoyez l’extérieur, l’intérieur et les joints en
caoutchouc à l’aide d’une éponge imbibée d’eau
tiède additionnée de bicarbonate de soude ou de
savon neutre. N’utilisez pas de solvants, de
produits abrasifs, d’eau de Javel ou d’ammoniaque.
• mettez tremper les accessoires amovibles dans de
l’eau chaude additionnée de savon ou de liquide
vaisselle. Rincez-les et essuyez-les soigneusement.
• Le dos de l’appareil a tendance à s’empoussiérer,
pour éliminer la poussière avec délicatesse, après
avoir éteint l’appareil et débranché la fiche, servez-
vous d’un aspirateur montant un accessoire
adéquat et réglé sur une puissance intermédiaire.
Contre la formation de moisissures et
de mauvaises odeurs
• Cet appareil est fabriqué dans des matériaux
hygiéniques qui ne transmettent pas d’odeur. Pour
sauvegarder cette caractéristique, veillez à bien
emballer et couvrir vos aliments. Vous éviterez par
la même occasion la formation de taches.
• Si vous devez laisser votre appareil éteint pendant
une période de temps prolongée, nettoyez-le bien
l’intérieur et laissez les portes ouvertes.
Dégivrage de lappareil
! Conformez-vous aux instructions suivantes.
N’accélérez pas le processus avec des dispositifs
ou des ustensiles autres que la raclette à givre
fournie avec l’appareil, vous risqueriez
d’endommager le circuit réfrigérant.
Dégivrage du compartiment réfrigérateur
Le réfrigérateur est muni
d’un système de
dégivrage automatique :
l’eau est acheminée vers
la paroi arrière par un trou
d’évacuation (
voir figure
)
où la chaleur produite par
le compresseur la fait
évaporer. Il vous suffit de
nettoyer périodiquement
le trou d’évacuation pour
permettre à l’eau de s’écouler normalement.
Dégivrage du compartiment congélateur
Eliminez périodiquement le givre à l’aide de la raclette
plastique fournie avec l’appareil. Si la couche de givre
dépasse 5 mm, procédez à un dégivrage manuel :
1. Amenez le bouton de REGLAGE DE LA
TEMPERATURE sur
.
2. Enveloppez vos produits surgelés ou congelés
dans du papier et placez-les dans un endroit frais.
3. Laissez la porte ouverte jusqu’à ce que le givre
fonde complètement; pour accélérer cette opération
placez dans le compartiment congélateur des
récipients d’eau tiède.
4. Nettoyez et séchez soigneusement le compartiment
congélateur avant de rallumer l’appareil.
5. Avant da ranger vos aliments dans le compartiment
congélateur, attendez environ 2 heures pour le
rétablissement des conditions idéales de
conservation des aliments.
Remplacement de lampoule déclairage
Pour remplacer l’ampoule d’éclairage du compartiment
réfrigérateur, débranchez la fiche de la prise de
courant. Suivez les indications fournies ci-dessous.
Pour pouvoir remplacer
l’ampoule, démontez le
couvercle de protection
comme illustré (voir
figure). Remplacez-la
par une ampoule
semblable dont la
puissance doit
correspondre à celle
indiquée sur le
couvercle de protection
(15 W ou 25 W).
1
2

18
F
Précautions et conseils
! L’appareil a été conçu et fabriqué conformément aux
normes internationales de sécurité. Ces conseils sont
fournis pour des raisons de sécurité et doivent être lus
attentivement.
Cet appareil est conforme aux Directives
Communautaires suivantes :
- 73/23/CEE du 19/02/73 (Basse Tensione) et
modifications suivantes;
-89/336/CEE du 03/05/89 (Compatibilité
Electromagnétique) et modifications suivantes;
- 2002/96/CE.
Sécurité générale
• Cet appareil a été conçu pour un usage familial, de
type non professionnel.
• Cet appareil qui sert à conserver et à congeler des
aliments ne doit être utilisé que par des adultes
conformément aux instructions du mode d’emploi.
• Cet appareil ne doit pas être installé en extérieur,
même dans un endroit à l’abri, il est en effet très
dangereux de le laisser exposé à la pluie et aux
orages.
• Ne touchez pas à l’appareil pieds nus ou si vos
mains ou pieds sont mouillés ou humides.
• Ne touchez pas aux parties refroidissantes :
vous pourriez vous brûler ou vous blesser.
• Pour débrancher la fiche de la prise de courant,
sortez la fiche, ne tirez surtout pas sur le câble.
• Avant d’effectuer toute opération de nettoyage ou
d’entretien, débranchez la fiche de la prise de
courant. Il ne suffit pas de placer le bouton de
REGLAGE DE LA TEMPERATURE sur OFF (appareil
éteint) pour éliminer tout contact électrique.
• En cas de panne, n’essayez en aucun cas
d’accéder aux mécanismes internes pour tenter de
réparer l’appareil.
• A l’intérieur des compartiments, n’utilisez aucun
dispositif ou ustensile autre que la raclette fournie
avec l’appareil.
• Ne pas porter à la bouche des glaçons à peine
sortis du congélateur.
• Ne permettez pas aux enfants de jouer avec
l’appareil. Il ne faut en aucun cas qu’ils s’asseyent
sur les tiroirs ou qu’ils s’accrochent à la porte.
• Les emballages ne sont pas des jouets pour
enfants.
Mise au rebut
• Mise au rebut du matériel d’emballage : conformez-
vous aux réglementations locales, les emballages
pourront ainsi être recyclés.
• La Directive Européenne 2002/96/EC sur les
Déchets des Equipements Electriques et
Electroniques (DEEE), exige que les appareils
ménagers usagés ne soient pas jetés dans le flux
normal des déchets municipaux. Les appareils
usagés doivent être collectés séparément afin
d’optimiser le taux de récupération et le recyclage
des matériaux qui les composent et réduire l’impact
sur la santé humaine et l’environnement. Le
symbole de la ‘‘poubelle barrée’’ est apposée sur
tous les produits pour rappeler les obligations de
collecte séparée.
Les consommateurs devront contacter les autorités
locales ou leur revendeur concernant la démarche
à suivre pour l’enlèvement de leur vieil appareil.
Economies et respect de
lenvironnement
• Installez votre appareil dans un endroit frais et bien
aéré, protégez-le contre l’exposition directe aux
rayons du soleil et ne le placez pas près de
sources de chaleur.
• Pour introduire ou sortir les aliments, n’ouvrez les
portes de l’appareil que le temps strictement
nécessaire.
Chaque ouverture de porte cause une considérable
dépense d’énergie.
• Ne chargez pas trop votre appareil :
pour une bonne conservation des aliments, le froid
doit pouvoir circuler librement. Si la circulation est
entravée, le compresseur travaillera en
permanence.
• N’introduisez pas d’aliments chauds : ces derniers
font monter la température intérieure ce qui oblige
le compresseur à travailler beaucoup plus en
gaspillant un tas d’électricité.
• Dégivrez l’appareil dès que de la glace se dépose
(
voir Entretien
); une couche de glace trop épaisse
gêne considérablement la cession de froid aux
aliments et augmente la consommation
d’électricité.
• Gardez toujours les joints propres et en bon état
pour qu’ils adhèrent bien aux portes et ne laissent
pas le froid s’échapper (
voir Entretien
).

F
19
Anomalies et remèdes
Il peut arriver que l’appareil ne fonctionne pas. Avant de téléphoner au service de dépannage (
voir Assistance
),
contrôlez s’il ne s’agit pas d’un problème facile à résoudre à l’aide de la liste suivante.
Anomalies:
Léclairage intérieur ne sallume
pas.
Le réfrigérateur et le congélateur
refroidissent peu.
Les aliments gèlent à lintérieur du
réfrigérateur.
Le ventilateur AIR ne tourne pas.
Le moteur est branché en
permanence.
Lappareil est très bruyant.
La température est élevée à certains
endroits de lextérieur du
réfrigérateur.
Formation de givre ou de gouttelettes
deau sur la paroi arrière du
compartiment réfrigérateur .
Il y a de leau dans le fond du
réfrigérateur.
Causes / Solution possibles:
• La fiche n’est pas branchée dans la prise de courant ou pas assez
enfoncée pour qu’il y ait contact ou bien il y a une coupure de courant.
• Les portes ne ferment pas bien ou les joints sont abîmés.
• Ouverture trop fréquente des portes.
• La position du bouton de REGLAGE DE LA TEMPERATURE n’est pas
correcte
• Le réfrigérateur et le congélateur sont excessivement remplis.
• La température ambiante de travail du produit est inférieure à 14°C.
• La position du bouton de REGLAGE DE LA TEMPERATURE n’est pas
correcte
• Les aliments touchent à la paroi arrière.
• La porte du réfrigérateur est ouverte.
• Le système AIR ne se met en marche automatiquement que quand il est
nécessaire afin de rétablir les conditions optimales dans le compartiment
réfrigérateur.
• La porte n’est pas bien fermée ou trop souvent ouverte.
• La température à l’extérieur est très élevée.
• L’épaisseur du givre dépasse 2-3 mm (
voir Entretien
).
• L’appareil n’a pas été installé bien à plat (
voir Installation
)
.
• L’appareil est installé entre des meubles ou des objets qui vibrent et font
du bruit.
• Le gaz réfrigérant interne produit un léger bruit même quand le
compresseur est à l’arrêt : il ne s’agit pas d’un défaut, c’est tout à fait
normal.
• Les températures élevées sont nécessaires pour éviter la formation d’eau
condensée dans des zones particulières du produit
• Il s’agit du fonctionnement normal du produit.
.
• Le trou d’évacuation de l’eau est bouché (
voir Entretien
).

20
F
Assistance
Avant de contacter le centre dAssistance :
•
Vérifiez si vous pouvez résoudre l’anomalie vous-même (
voir Anomalies et Remèdes
).
• Si, malgré tous ces contrôles, l’appareil ne fonctionne toujours pas et l’inconvénient persiste, faites appel
au service après-vente le plus proche de chez vous.
Signalez :
• le type d’anomalie
• le modèle de l’appareil (Mod.)
• le numéro de série (S/N)
Vous trouverez tous ces renseignements sur
l’étiquette signalétique placée dans le
compartiment réfrigérateur en bas à gauche.
Ne faites jamais appel à des techniciens non agréés et refusez toujours des pièces détachées non
originales.
Mod.
RG 2330
TI
Cod.
93139180000 S/N 704211801
220 - 240 V- 50 Hz 150 W
W
Fuse
A
Max 15 w
Total
Gross
Bruto
Brut
Compr.
Kompr.
Syst.
R 134 a
kg 0,090
Gross
Bruto
Brut
340
Net
Util
Utile
Gross
Bruto
Brut
Freez. Capac
Poder de Cong
75
Made in Italy 13918
Test
P.S-I.
Pressure
HIGH-235
LOW 140
kg/24 h
4,0
Class
Clase
N
Classe
modèle
numéro de série
195058112.00
04/2006 - Xerox Business Services

ES
FRIGORÍFICO DE 2 PUERTAS
Sumario
Instalación, 22
Colocación y conexión
Reversibilidad de la apertura de las puertas
Descripción del aparato, 23
Vista en conjunto
Accesorios, 24
Puesta en funcionamiento y uso, 25-26
Poner en marcha el aparato
Sistema de enfriamiento
Uso óptimo del frigorífico
Uso óptimo del congelador
Mantenimiento y cuidados, 27
Cortar la corriente eléctrica
Limpiar el aparato
Evitar la formación de moho y malos olores
Descongelar el aparato
Sustituir la bombilla
Precauciones y consejos, 28
Seguridad general
Eliminación
Ahorrar y respetar el medio ambiente
Anomalías y soluciones, 29
Asistencia, 30
Manual de instrucciones
Français, 11
40 .....
English,1
GB F
AR
ES
Espanol, 21
MTM 1711 T

22
ES
Instalación
Reversibilidad de la apertura de las
puertas
1
2
3
4
5
! Es importante conservar este manual para poder
consultarlo cuando sea necesario. En caso de venta,
cesión o traslado, verifique que permanezca junto al
aparato para informar al nuevo propietario sobre su
funcionamiento y sobre las precauciones durante su uso
! Lea atentamente las instrucciones: contienen
información importante sobre la instalación, sobre el uso
y sobre la seguridad.
Colocación y conexión
Colocación
1. Coloque el aparato en un ambiente bien aireado y seco.
2. No obstruya las rejillas posteriores de ventilación: el
compresor y el condensador emiten calor y requieren
una buena aireación para funcionar bien y limitar el
consumo eléctrico.
3. Deje una distancia mínima de 10 cm. entre la parte
superior del aparato y los muebles situados encima y
de 5 cm., como mínimo, entre los costados y los
muebles o paredes laterales.
4. Mantenga el aparato lejos de fuentes de calor (por ej.
la luz solar directa o una cocina eléctrica).
5. Para mantener una distancia óptima entre el producto
y la pared posterior, coloque los distanciadores que
se encuentran en la caja de instalación siguiendo las
instrucciones presentes en la hoja correspondiente
Nivelación
1. Instale el aparato sobre un piso plano y rígido.
2. Si el piso no fuera perfectamente horizontal, compense los
desniveles atornillando o desatornillando las patas
delanteras.
Conexión eléctrica
Después de su transporte, coloque el aparato
verticalmente y espere 3 horas como mínimo antes de
conectarlo a la red eléctrica. Antes de enchufarlo a la
toma de corriente, controle que:
• la toma posea la conexión a tierra y que sea
conforme a la ley;
• el enchufe sea capaz de soportar la carga máxima
de potencia de la máquina indicada en la placa de
características ubicada en la parte inferior izquierda
del frigorífico (ej. 150 W);
• la tensión de alimentación esté comprendida entre los
valores indicados en la placa de características
ubicada abajo a la izquierda (ej. 220-240V);
• la toma sea compatible con el enchufe del aparato.
Si no fuera así, solicite la sustitución del enchufe a un
técnico autorizado (
ver Asistencia
); no utilice
prolongaciones ni conexiones múltiples.
! Una vez instalado el aparato, el cable eléctrico y la
toma de corriente deben ser fácilmente accesibles.
! El cable no debe sufrir pliegues ni compresiones.
! El cable debe ser revisado periódicamente y sustituido
sólo por técnicos autorizados (ver Asistencia).
! La empresa declina toda responsabilidad en los
casos en que no hayan sido respetadas estas normas.
∅ 3
mm

ES
23
Descripción del
aparato
Vista de conjunto
Las instrucciones sobre el uso son válidas para distintos modelos y por lo tanto es posible que la figura presente
detalles diferentes a los del aparato que Ud. ha adquirido. La descripción de las piezas más complejas se
encuentra en las páginas sucesivas.
La cantidad y/o su ubicación pueden variar.
*
Se encuentra solo en algunos modelos.
Balconcito extraíble
con tapa, con
HUEVERA
Balconcito extraíble
PORTAOBJETOS•
Balconcito
BOTELLAS•
Cubeta de HIELO
*
Mando REGULACIÓN
DE LA
TEMPERATURA
BANDEJAS•
Recipiente FRUTA y
VERDURA
PATAS de
regulación
Compartimento
congelador
CONGELACIÓN y
CONSERVACIÓN
Compartimiento
FRESH BOX
*
Balconcito
PORTALATAS
*

24
ES
Accesorios
Compartimento frigorífico
BANDEJAS: enteras o tipo rejilla.
Son extraíbles y su altura es
regulable gracias a las guías
especiales (
ver la figura
), se
utilizan para introducir
recipientes o alimentos de gran
tamaño. Para regular la altura no
es necesario extraer las
bandejas completamentes.
FRESH BOX
*
: para carne y pescado fresco. El
compartimiento permite largos tiempos de conservación,
hasta de una semana, gracias a la baja temperatura – la
más fría del refrigerador – y a la puerta transparente que
protege de fenómenos de oxidación y ennegrecimiento.
Se puede utilizar también para “platos fríos”.
BREAKFAST BOX
*
: es el recipiente ideal para los
alimentos del desayuno. Se puede extraer y utilizar
para llevar a la mesa los alimentos que, gracias a la
particular forma de este recipiente, mantendrán
durante más tiempo su temperatura. Utilizando las
manijas correspondientes, la tapa se puede convertir
en una práctica bandeja. El Breakfast Box también se
puede utilizar como recipiente para la carne, o sea,
para contener los alimentos que deben ser protegidos
para ser conservados.
1
2
*
Se encuentra solo en algunos modelos.
WINE AREA
*
: se utiliza para
colocar hasta tres botellas de
vino (
ver la figura
). El aire circula
libremente entre las botellas
asegurando un rápido
enfriamiento. Si no se utiliza,
ciérrela para aumentar el
espacio en el estante.

ES
25
Puesta en
funcionamiento y uso
Poner en marcha el aparato
! Antes de poner en funcionamiento el aparato, siga
las instrucciones sobre la instalación (
ver Instalación
).
! Antes de conectar el aparato limpie bien los
compartimentos y los accesorios con agua tibia y
bicarbonato.
1. Enchufe el aparato en la toma de corriente y verifique
que se encienda la lámpara de iluminación interna.
2. Gire el mando de REGULACIÓN DE LA TEMPERATURA
hasta un valor medio. Después de algunas horas será
posible introducir alimentos en el frigorífico.
Regulación de la temperatura
La temperatura interna del compartimento frigorífico se
regula automáticamente en base a la posición del
mando del termostato.
1 = menos frío
5 = más frío
Se aconseja, en todo caso, poner una posición media.
Para aumentar el espacio disponible y mejorar el
aspecto estético, este aparato posee la “parte
refrigerante” ubicada en el interior de la pared posterior
del compartimento frigorífico. Durante el funcionamiento,
dicha pared se presentará cubierta de escarcha o de
gotitas de agua según si el compresor está en
funcionamiento o en pausa. ¡No se preocupe por ello! El
frigorífico está trabajando de forma normal.
Sistema de enfriamiento
El aparato posee uno de los sistemas de enfriamiento
descritos a continuación: es importante conocerlo y
tenerlo en cuenta para las modalidades
de conservación de los alimentos.
A.I.R. SYSTEM (Ariston Integrated Refrigeration)
Es identificable por la presencia del dispositivo en la
pared superior del compartimento frigorífico (
ver la
figura
). El A.I.R. System permite una óptima
conservación de los alimentos debido a que restablece
rápidamente la temperatura después de la apertura de
la puerta y la distribuye de forma homogénea: el aire
ventilado (A) se enfría en contacto con la pared fría,
mientras que el aire más caliente (B) se aspira (
ver la
figura
).
La pared posterior se encuentra cubierta de escarcha
o de gotitas de agua según si el compresor está en
funcionamiento o en pausa.
Estático
Los modelos sin A.I.R. System poseen la parte
frigorífica en la pared posterior interna de los
compartimentos; dicha pared se presentará cubierta
de escarcha o de gotitas de agua según si el
compresor está en funcionamiento o no: ambos casos
son normales. Si se coloca el mando de REGULACIÓN
DE LA TEMPERATURA en valores altos, con grandes
cantidades de alimentos y con una temperatura
ambiente elevada, el aparato puede funcionar
continuamente, produciendo una excesiva formación
de escarcha y aumentando el consumo de electricidad.
evítelo desplazando el mando hacia valores más bajos
(se efectuará una descongelación automática).
En los aparatos estáticos el aire circula de modo
natural: el más frío tiende a descender porque es más
pesado. He aquí como colocar los alimentos:
A
B
Alimento Ubicación en el refrigerador
Carne y pescado
limpio
Sobre los recipientes para fruta
y verdura
Quesos frescos
Sobre los recipientes para fruta
y verdura
Alimentos cocidos En cualquier bandeja
Salchichón, pan,
chocolate
En cualquier bandeja
Fruta y verdura
En los recipientes para fruta y
verdura
Huevos En el balconcito correspondiente
Mantequilla y
margarina
En el balconcito correspondiente
Botellas, bebidas,
leche
En el balconcito correspondiente

26
ES
Uso óptimo del frigorífico
• Para regular la temperatura utilice el mando de
REGULACIÓN DE LA TEMPERATURA (
ver
Descripción
).
• Introduzca sólo alimentos fríos o apenas tibios,
nunca calientes (
ver Precauciones y consejos
).
• Recuerde que los alimentos cocidos no se
mantienen durante más tiempo que los crudos.
• No introduzca recipientes destapados con líquidos:
produciría un aumento de humedad con la
consiguiente formación de condensación.
Uso óptimo del congelador
• No vuelva a congelar alimentos que están por
descongelar o descongelados; dichos alimentos
deben ser previamente cocinados para ser
consumidos (dentro de las 24 horas).
• Los alimentos frescos por congelar no deben
colocarse en contacto con los ya congelados; se
deben colocar sobre la rejilla del compartimento
congelador, si es posible, en contacto con las
paredes (laterales y posterior) donde la temperatura
desciende por debajo de los –18ºC y garantiza una
mayor velocidad de congelación.
• No coloque en el congelador botellas de vidrio que
contengan líquidos, tapadas o cerradas
herméticamente porque podrían romperse.
• La cantidad máxima diaria de alimentos a congelar
está indicada en la placa de características ubicada
en el compartimento frigorífico abajo a la izquierda
(por ejemplo: 4 Kg/24h).
! Evite abrir la puerta durante la congelación.
! Cuando se produzca una interrupción de corriente o
una avería, no abra la puerta del congelador: de este
modo, los alimentos congelados se conservarán sin
alteración durante aproximadamente 9-14 horas.
! Si durante un largo período de tiempo la temperatura
ambiente permanece por debajo de los 14ºC, no se
alcanzan las temperaturas necesarias para una larga
conservación en el compartimento congelador y, por lo
tanto, el período de conservación resultará menor.

ES
27
Mantenimiento y cuidados
Cortar la corriente eléctrica
Durante los trabajos de limpieza y mantenimiento, es
necesario aislar el aparato de la red de alimentación
eléctrica, desenchufándolo:
No es suficiente llevar el mando para la regulación de
la temperatura hasta la posición
(aparato apagado)
para eliminar todo contacto eléctrico.
Limpiar el aparato
• Las partes externas, las partes internas y las juntas
de goma se pueden limpiar con una esponja
empapada en agua tibia y bicarbonato sódico o
jabón neutro. No utilice disolventes, productos
abrasivos, lejía o amoníaco.
• Los accesorios extraíbles se pueden colocar en
remojo en agua caliente y jabón o detergente para
platos. Enjuáguelos y séquelos con cuidado.
• La parte posterior del aparato tiende a cubrirse de
polvo que se puede eliminar, después de haber
apagado y desenchufado el aparato, utilizando con
delicadeza la boca de la aspiradora y trabajando
con una potencia media.
Evitar la formación de moho y malos
olores
• El aparato está fabricado con materiales higiénicos
que no transmiten olores. Para mantener esta
característica es necesario que los alimentos estén
siempre protegidos y bien cerrados. Esto evitará
también
la formación de manchas.
• Si se debe apagar el aparato por un largo período,
limpie su interior y deje las puertas abiertas.
Descongelar el aparato
! Respete las instrucciones que se dan a continuación.
No acelere el proceso con dispositivos o utensilios
diferentes de la rasqueta que se suministra con el
aparato porque se podría dañar el circuito refrigerante.
Descongelar el compartimento frigorífico
El frigorífico posee
descongelación
automático: el agua se
envía hacia la parte
posterior por un orificio
de descarga (
ver la
figura
) donde el calor
producido por el
compresor la hace
evaporar. La única
intervención que se debe
realizar periódicamente consiste en limpiar el orificio de
descarga para que el agua pueda fluir libremente.
Descongelar el compartimento congelador
Elimine periódicamente la escarcha utilizando la
raedera que se suministra con el aparato. Si la capa de
escarcha es superior a los 5 mm es necesario realizar
una descongelación manual:
1. Coloque el mando de REGULACIÓN DE LA
TEMPERATURA en la posición
.
2. Envuelva los alimentos congelados en papel de
periódico y colóquelos en otro congelador o en un
lugar fresco.
3. Deje la puerta abierta hasta que la escarcha se haya
derretido completamente; facilite la operación
colocando en el compartimento congelador
recipientes con agua tibia.
4. Limpie y seque con cuidado el compartimento
congelador antes de volver a encender el aparato.
5. Antes de introducir los alimentos en el
compartimento congelador, espere
aproximadamente 2 horas para restablecer las
condiciones ideales de conservación.
Sustituir la bombilla
Para sustituir la bombilla de iluminación del compartimento
frigorífico, desenchufe el aparato. Siga las instrucciones
que se dan a continuación.
Acceda a la lámpara
quitando la protección
como se indica en la
figura. Sustitúyala con otra
bombilla con una potencia
igual a la indicada en la
protección (15 W o 25 W).
1
2

28
ES
Precauciones y consejos
! El aparato ha sido proyectado y fabricado en
conformidad con las normas internacionales sobre
seguridad. Estas advertencias se suministran por
razones de seguridad y deben ser leídas atentamente.
Este equipamiento es conforme con las
siguientes Directivas Comunitarias:
- 73/23/CEE del 19/02/73 (Baja Tensión) y
sucesivas modificaciones;
-89/336/CEE del 03/05/89 (Compatibilidad
Electromagnética) y sucesivas
modificaciones;
- 2002/96/CE.
Seguridad general
• El aparato ha sido pensado para un uso de tipo no
profesional en el interior de una vivienda.
• El aparato debe ser utilizado para conservar y
congelar alimentos sólo por personas adultas y
según las indicaciones contenidas en este manual.
• El aparato no se debe instalar al aire libre ni siquiera
si el lugar está protegido debido a que es muy
peligroso dejarlo expuesto a la lluvia y tormentas.
• No toque el aparato estando descalzo o con las
manos o pies mojados o húmedos.
• No toque las piezas refrigerantes internas: podría
quemarse o herirse.
• No desenchufe el aparato tirando del cable sino
sujetando el enchufe.
• Es necesario desenchufar el aparato antes de
realizar operaciones de limpieza y de
mantenimiento. No es suficiente llevar el mando
para LA REGULACIÓN DE LA TEMPERATURA hasta
la posición
(aparato apagado) para eliminar todo
contacto eléctrico.
• En caso de avería, nunca acceda a los mecanismos
internos para intentar una reparación.
• En el interior de los compartimentos no utilice
dispositivos o utensilios diferentes de la rasqueta
suministrada con el equipo.
• No introduzca en su boca cubitos apenas extraídos
del congelador.
• No permita a los niños que jueguen con el aparato.
No se deben sentar en los cajones o colgarse de la
puerta.
• Los embalajes no son juguetes para los niños.
Eliminación
• Eliminación del material de embalaje: respete las
normas locales, de esta manera los embalajes
podrán ser reutilizados.
• En base a la Norma europea 2002/96/CE de
Residuos de aparatos Eléctricos y Electrónicos
(RAEE), los electrodomésticos viejos no pueden ser
arrojados en los contenedores municipales
habituales; tienen que ser recogidos selectivamente
para optimizar la recuperación y reciclado de los
componentes y materiales que los constituyen, y
reducir el impacto en la salud humana y el
medioambiente. El símbolo del cubo de basura
tachado se marca sobre todos los productos para
recordar al consumidor la obligación de separarlos
para la recogida selectiva.
El consumidor debe contactar con la autoridad local
o con el vendedor para informarse en relación a la
correcta eleminación de su electrodoméstico viejo.
Ahorrar y respetar el medio ambiente
• Instale el aparato en una ambiente fresco y bien
aireado, protéjalo de la exposición directa a los
rayos
solares y no lo coloque cerca de fuentes de
calor.
• Para introducir o extraer los alimentos, abra las
puertas del aparato el menor tiempo posible.
Cada apertura de las puertas produce un notable
gasto de energía.
• No llene con demasiados alimentos el aparato:
para una buena conservación, el frío debe poder
circular libremente. Si se impide la circulación, el
compresor trabajará continuamente.
• No introduzca alimentos calientes: elevarían la
temperatura interior obligando al compresor a un
mayor trabajo con un gran gasto de energía
eléctrica.
• Descongele el aparato si se formara hielo (
ver
Mantenimiento
); una espesa capa de hielo vuelve
más difícil la cesión de frío a los alimentos y hace
que aumente el consumo de energía.
• Mantenga eficientes y limpias las juntas para que se
adhieran bien a las puertas y no dejen salir el frío
(
ver Mantenimiento
).

ES
29
Anomalías y soluciones
Puede suceder que el aparato no funcione. Antes de llamar al Servicio de Asistencia Técnica (
ver Asistencia
), controle
que no se trate de un problema fácilmente solucionable con la ayuda de la siguiente lista.
Anomalías:
La lámpara de iluminación interna
no se enciende.
El frigorífico y el congelador enfrían
poco.
En el frigorífico los alimentos se
congelan.
El ventilador AIR no gira.
El motor funciona continuamente.
El aparato hace mucho ruido.
La temperatura de algunas partes
externas del frigorífico es elevada.
En la pared del fondo de la cámara
de refrigeración se ha formado
escarcha o gotitas de agua:
En el fondo del frigorífico hay agua.
Posibles causas / Solución:
• El enchufe no está introducido en la toma de corriente o no está lo
suficiente como para hacer contacto o bien en la casa no hay corriente.
• Las puertas no cierran bien o las juntas están dañadas.
• Las puertas se abren demasiado frecuentemente.
• El mando de REGULACIÓN DE LA TEMPERATURA no está en la posición
correcta.
• El frigorífico o el congelador se han llenado excesivamente.
• La temperatura ambiente de trabajo del producto es menor que 14ºC.
• El mando de REGULACIÓN DE LA TEMPERATURA no está en la posición
correcta.
• Los alimentos están en contacto con la pared posterior.
• La puerta del frigorífico está abierta
• El sistema AIR se activa automáticamente sólo cuando es necesario
restablecer las condiciones óptimas en el interior del compartimento
frigorífico.
• La puerta no está bien cerrada o se abre continuamente.
• La temperatura del ambiente externo es muy alta.
• El espesor de la escarcha supera los 2-3 mm (
ver Mantenimiento
).
• El aparato no fue instalado en un lugar plano (
ver Instalación
)
.
• El aparato ha sido instalado entre muebles u objetos que vibran y
producen ruidos.
• El gas refrigerante interior produce un ligero ruido aún cuando el
compresor está detenido: no es un defecto, es normal.
• Las temperaturas elevadas son necesarias para evitar la formación de
condensación en zonas particulares del producto.
• Se trata del funcionamiento normal del producto.
• El orificio de descarga del agua está obstruído (
ver Mantenimiento
).

30
ES
Asistencia
Antes de llamar al Servicio de Asistencia Técnica:
•
Verifique si la anomalía puede ser resuelta por ud. mismo (
ver Anomalías y Soluciones
).
• Se, apesar de todos os controlos, o aparelho não funcionar e a anomalia que notou continuar a verificar-
se, chamar o Centro de Assistência Técnica mais próximo.
Comunique:
• el tipo de anomalía
• el modelo de la máquina (Mod.)
• el número de serie (S/N)
Esta información se encuentra en la placa
de características ubicada en el
compartimento frigorífico abajo a la
izquierda.
No recurrir nunca a técnicos no autorizados y rechazar siempre la instalación de repuestos no
originales.
195058112.00
04/2005 - Xerox Business Services
Mod.
RG 2330
TI
Cod.
93139180000 S/N 704211801
220 - 240 V- 50 Hz 150 W
W
Fuse
A
Max 15 w
Total
Gross
Bruto
Brut
Compr.
Kompr.
Syst.
R 134 a
kg 0,090
Gross
Bruto
Brut
340
Net
Util
Utile
Gross
Bruto
Brut
Freez. Capac
Poder de Cong
75
Made in Italy 13918
Test
P.S-I.
Pressure
HIGH-235
LOW 140
kg/24 h
4,0
Class
Clase
N
Classe
modelo
número de serie

31
AR
ﺓﺪﻋﺎﺴﻤﻟﺍ
:ﺓﺪﻋﺎﺴﻤﻟﺍ ءﺎﻋﺪﺘﺳﺍ ﻞﺒﻗ
.(ﺎﻬﻠﺣﻭ ﻞﻛﺎﺸﻤﻟﺍ ﻑﺎﺸﻜﺘﺳﺍ ﺮﻈﻧﺍ) ﻚﺴﻔﻨﺑ ﺔﻠﻜﺸﻤﻟﺍ ّﻞﺣ ﻚﻧﺎﻜﻣﺈﺑ ﻥﺎﻛ ﺍﺫﺇ ﺎﻤﻴﻓ ﺺﺤﻓﺍ •
.ﺔﻣﺪﺧ ﺰﻛﺮﻣ ﺏﺮﻗﺃ ﻉﺪﺘﺳﺍ ،ﺓﺮﻤﺘﺴﻣ ﺔﻠﻜﺸﻤﻟﺍ ﻥﺃ ﻭﺃ ،ﻞﻤﻌﻳ ﻻ ﻝﺍﺯ ﺎﻣ ﺯﺎﻬﺠﻟﺍ ﻦﻜﻟﻭ ،ﺹﻮﺤﻔﻟﺍ ﻞﻛ ﺖﻳﺮﺟﺃ ﺍﺫﺇ •
:ﻝﺎﺼﺗﻻﺍ
ﻞﻠﺨﻟﺍ ﻉﻮﻧ •
.(Mod.) ﺯﺎﻬﺠﻟﺍ ﺯﺍﺮﻃ •
.(S/N) ﻲﻠﺴﻠﺴﺘﻟﺍ ﻢﻗﺮﻟﺍ •
ﺓﺩﻮﺟﻮﻤﻟﺍ ﺕﺎﻧﺎﻴﺒﻟﺍ ﺔﻘﺻﻻ ﻲﻓ ﺕﺎﻣﻮﻠﻌﻤﻟﺍ ﻩﺬﻫ ﻰﻠﻋ ﺭﻮﺜﻌﻟﺍ ﻦﻜﻤﻳ
.ﺔﺟﻼﺜﻟﺍ ﺓﺮﺠﺣ ﻦﻣ ﻯﺮﺴﻴﻟﺍ ﺔﻴﻠﻔﺴﻟﺍ ﺔﻬﺠﻟﺍ ﻲﻓ
.ﺔﻴﻠﺻﻷﺍ ﺮﻴﻏ ﺭﺎﻴﻐﻟﺍ ﻊﻄﻗ ﺎﻤﺋﺍﺩ ﺾﻓﺭﺍﻭ ،ﺍﺪﺑﺃ ﻦﻴﻠﻫﺆﻤﻟﺍ ﺮﻴﻏ ﻦﻴﻴﻨﻔﻟﺍ ﻲﻋﺪﺘﺴﺗ ﻻ
Mod.
RG 2330
TI
Cod.
93139180000 S/N 704211801
220 - 240 V- 50 Hz 150 W
W
Fuse
A
Max 15 w
Total
Gross
Bruto
Brut
Compr.
Kompr.
Syst.
R 134 a
kg 0,090
Gross
Bruto
Brut
340
Net
Util
Utile
Gross
Bruto
Brut
Freez. Capac
Poder de Cong
75
Made in Italy 13918
Test
P.S-I.
Pressure
HIGH-235
LOW 140
kg/24 h
4,0
Class
Clase
N
Classe
ﺯﺍﺮﻄﻟﺍﻲﻠﺴﻠﺴﺘﻟﺍ ﻢﻗﺮﻟﺍ

AR
32
ﺎﻬﻠﺣﻭ ﻞﻛﺎﺸﻤﻟﺍ ﻑﺎﺸﻜﺘﺳﺍ
.ﻲﻟﺎﺘﻟﺍ ﻝﻭﺪﺠﻟﺍ ﻲﻓ ﻞﺣ ﻦﻋ ﺚﺤﺑﺍ ،(ﺓﺪﻋﺎﺴﻤﻟﺍ ﺮﻈﻧﺍ) ﺓﺪﻋﺎﺴﻤﻟﻝ ﻚﺋﺎﻋﺪﺘﺳﺍ ﻞﺒﻗﻭ ،ﺯﺎﻬﺠﻟﺍ ﻞﻤﻌﻳ ﻢﻟ ﺍﺫﺇ
:ﻞﻄﻌﻟﺍ
.ﺔﺌﻴﻀﻣ ﺮﻴﻏ ﺔﻴﻠﺧﺍﺪﻟﺍ ﺓﺭﺎﻧﻹﺍ
.ﺪﻴﺟ ﻞﻜﺸﺑ ﻥﺍﺩّﺮﺒﺗ ﻻ ﺪﻳﺮﺒﺘﻟﺍ ﺓﺮﺠﺣﻭ ﺔﺟﻼﺜﻟ
.ﺪّﻤﺠﺘﻟﺎﺑ ﺔﺟﻼﺜﻟﺍ ﻞﺧﺍﺩ ﻡﺎﻌﻄﻟﺍ ﺃﺪﺒﻳ
.ﺭﻭﺪﺗ ﻻ ءﺍﻮﻬﻟﺍ ﺔﺣﻭﺮﻣ
.ﺮﻤﺘﺴﻣ ﻞﻜﺸﺑ ﻞﻤﻌﻳ ﻙﺮﺤﻤﻟﺍ
.ﺞﻴﺠﻀﻟﺍ ﻦﻣ ﺮﻴﺜﻜﻟﺍ ﺭﺪﺼﻳ ﺯﺎﻬﺠﻟﺍ
.ﺔﻨﺧﺎﺳ ﺖﺤﺒﺻﺃ ﺔﻴﺟﺭﺎﺨﻟﺍ ﺔﺟﻼﺜﻟﺍ ءﺍﺰﺟﺃ ﺾﻌﺑ
ﻭﺃ ﺪﻴﻠﺠﻟﺎﺑ ﻰﻄﻐﻣ ﺔﺟﻼﺜﻟﺍ ﺓﺪﺣﻭ ﻲﻓ ﻲﻔﻠﺨﻟﺍ ﺭﺍﺪﺠﻟﺍ
.ءﺎﻤﻟﺍ ﺕﺍﺮﻄﻘﺑ
.ﺔﺟﻼﺜﻟﺍ ﻞﻔﺳﺃ ءﺎﻣ ﺪﺟﻮﻳ
:ﻝﻮﻠﺤﻟﺍ /ﺔﻠﻤﺘﺤﻤﻟﺍ ﺏﺎﺒﺳﻷﺍ
ﻭﺃ ،ﺎﻴﺋﺎﺑﺮﻬﻛ ﺎﺳﺎﻤﺗ ﺙﺪﺤﻴﻟ ﺔﻳﺎﻔﻜﻟﺍ ﻪﻴﻓ ﺎﻤﺑ ﻪﻟﺎﺧﺩﺇ ﻢﺘﻳ ﻢﻟ ﻭﺃ ،ﻲﺋﺎﺑﺮﻬﻜﻟﺍ ﺲﺒﻘﻤﻟﺍ ﻲﻓ ﺲﺑﺎﻘﻟﺍ ﻝﺎﺧﺩﺇ ﻢﺘﻳ ﻢﻟ •
.ﺖﻴﺒﻟﺍ ﻲﻓ ﺔﻋﻮﻄﻘﻣ ﺔﻴﺋﺎﺑﺮﻬﻜﻟﺍ ﺔﻗﺎﻄﻟﺍ ﻥﺃ
.ﻒﻟﺎﺗ ﺎﻬﻃﺎﻄﻣ ﻥﺃ ﻭﺃ ﺪﻴﺟ ﻞﻜﺸﺑ ﺔﻘﻠﻐﻣ ﺮﻴﻏ ﺏﺍﻮﺑﻷﺍ •
.ﺭﺮﻜﺘﻣ ﻞﻜﺸﺑ ﺢﺘﻔُﺗ ﺏﺍﻮﺑﻷﺍ •
ﺢﻴﺤﺼﻟﺍ ﻊﺿﻮﻟﺍ ﻲﻓ ﺲﻴﻟ ﺓﺭﺍﺮﺤﻟﺍ ﺔﺟﺭﺩ ﻂﺒﺿ ﺭﺯ •
.ﺐﺠﻳ ﺎﻤﻣ ﺮﺜﻛﺃ ﺪﻴﻤﺠﺘﻟﺍ ﺓﺮﺠﺣ ﻭﺃ ﺔﺟﻼﺜﻟﺍ ﺔﺌﺒﻌﺗ ﺖﻤﺗ •
.ﺔﻳﻮﺌﻣ ﺔﺟﺭﺩ 14 ﻦﻣ ﻞﻗﺃ ﺔﺟﻼﺜﻟﺎﺑ ﺔﻄﻴﺤﻤﻟﺍ ﺔﻘﻄﻨﻤﻟﺍ ﺓﺭﺍﺮﺣ ﺔﺟﺭﺩ •
ﺢﻴﺤﺼﻟﺍ ﻊﺿﻮﻟﺍ ﻲﻓ ﺲﻴﻟ ﺓﺭﺍﺮﺤﻟﺍ ﺔﺟﺭﺩ ﻂﺒﺿ ﺭﺯ •
.ﺔﺟﻼﺜﻟﺍ ﻲﻓ ﻲﻠﺧﺍﺪﻟﺍ ﻲﻔﻠﺨﻟﺍ ﺭﺍﺪﺠﻟﺍ ﺲﻣﻼﺗ ﺔﻤﻌﻃﻷﺍ •
.ﺡﻮﺘﻔﻣ ﺔﺟﻼﺜﻟﺍ ﺏﺎﺑ •
ﺓﺮﺠﺣ ﻞﺧﺍﺩ ﻰﻠﺜﻤﻟﺍ ﻞﻴﻐﺸﺘﻟﺍ ﻑﻭﺮﻇ ﺩﺍﺩﺮﺘﺳﻹ ﺓﺭﻭﺮﻀﻟﺍ ﺖﻀﺘﻗﺍ ﻝﺎﺣ ﻲﻓ ﻂﻘﻓ AIR ﻡﺎﻈﻧ ﻞﻴﻐﺸﺗ ﻢﺘﻳ •
.ﺔﺟﻼﺜﻟﺍ
.ﺭﺮﻜﺘﻣ ﻞﻜﺸﺑ ﺢﺘﻔُﻳ ﻪﻧﺃ ﻭﺃ ﺢﻴﺤﺻ ﻞﻜﺸﺑ ﻖﻠﻐﻣ ﺮﻴﻏ ﺏﺎﺒﻟﺍ •
.ﺍﺪﺟ ﺔﻌﻔﺗﺮﻣ ﺝﺭﺎﺨﻟﺍ ﻲﻓ ﻮﺠﻟﺍ ﺓﺭﺍﺮﺣ ﺔﺟﺭﺩ •
.(ﺔﻧﺎﻴﺼﻟﺍ ﺮﻈﻧﺍ) ﻢﻠﻣ 3-2 ﻯﺪﻌﺘﻳ ﺪﻴﻠﺠﻟﺍ ﻚﻤﺳ •
.(ﺐﻴﻛﺮﺘﻟﺍ ﺮﻈﻧﺍ) ﻮﺘﺴﻣ ﺢﻄﺳ ﻰﻠﻋ ﺯﺎﻬﺠﻟﺍ ﺐﻴﻛﺮﺗ ﻢﺘﻳ ﻢﻟ •
.ﺎﺠﻴﺠﺿﻭ ﺎﺟﺎﺠﺗﺭﺍ ﺙﺪﺤﺗ ﻦﺋﺍﺰﺧ ﻦﻴﺑ ﺯﺎﻬﺠﻟﺍ ﺐﻴﻛﺮﺗ ﻢﺗ •
ﺲﻴﻟ ﺍﺬﻫ .ﻞﻤﻌﻟﺍ ﻦﻋ ﻂﻐﻀﻟﺍ ﻡﺎﻈﻧ ﻒﻗﻮﺘﻳ ﺎﻣﺪﻨﻋ ﻰﺘﺣ ﺎﻔﻴﻔﺧ ﺎﺠﻴﺠﺿ ﺙﺪﺤﻳ ﻲﻠﺧﺍﺪﻟﺍ ﺪﻳﺮﺒﺘﻟﺍ ﻡﺎﻈﻧ •
.ﻲﻌﻴﺒﻃ ﻪﻧﺇ ،ﻼﻠﺧ
.ﺞﺘﻨﻤﻟﺍ ﻲﻓ ﺔﻴﻨﻌﻣ ءﺍﺰﺟﺃ ﻰﻠﻋ ﻒﺛﺎﻜﺘﻟﺍ ﻥّﻮﻜﺗ ﻲﺷﺎﺤﺘﻟ ﻱﺭﻭﺮﺿ ﺓﺭﺍﺮﺤﻟﺍ ﺕﺎﺟﺭﺩ ﻲﻓ ﻉﺎﻔﺗﺭﻻﺍ ﺍﺬﻫ •
.ﻲﻌﻴﺒﻃ ﻞﻜﺸﺑ ﻞﻤﻌﻳ ﺯﺎﻬﺠﻟﺍ ﻥﺃ ﻦّﻴﺒﻳ ﺍﺬﻫ •
.(ﺔﻧﺎﻴﺼﻟﺍ ﺮﻈﻧﺍ) ﺩﻭﺪﺴﻣ ءﺎﻤﻟﺍ ءﻼﺧﺇ ﺬﻔﻨﻣ •

33
AR
ﺢﺋﺎﺼﻧﻭ ﺭﺬﺣ ﻞﺋﺎﺳﻭ
ﺪﻳﻭﺰﺗ ﻢﺘﻳ .ﺔﻴﻤﻟﺎﻌﻟﺍ ﻥﺎﻣﻷﺍ ﺕﺎﻔﺻﺍﻮﻤﻟ ﺎﻘﺒﻃ ﻪﻌﻴﻨﺼﺗﻭ ﺯﺎﻬﺠﻟﺍ ﻢﻴﻤﺼﺗ ﻢﺗ !
.ﺔﻳﺎﻨﻌﺑ ﺎﻬﺗءﺍﺮﻗ ﺐﺠﻳﻭ ﺔﻴﺋﺎﻗﻭ ﺏﺎﺒﺳﻷ ﺔﻴﻟﺎﺘﻟﺍ ﺕﺍﺮﻳﺬﺤﺘﻟﺍ
:ﺔﻴﻟﺎﺘﻟﺍ ﺔﻳﺮﻴﻫﺎﻤﺠﻟﺍ ﺕﺍﺩﺎﺷﺭﻺﻟ ﺯﺎﻬﺠﻟﺍ ﺍﺬﻫ ﻦﻋﺬﻳ
(ﺾﻔﺨﻨﻣ ﺪﻬﺟ) 73/02/19 ﺦﻳﺭﺎﺗ ﻦﻣ
3EEC/23/73 -
ﺔﻘﺣﻼﻟﺍ ﺕﻼﻳﺪﻌﺘﻟﺍﻭ
ﺔﻴﺴﻨﻴﻃﺎﻨﻐﻤﻟﺍ ﻖﺑﺎﻄﺗ) 89/05/03 ﺦﻳﺭﺎﺗ ﻦﻣ
3EEC/336/89 -
ﺔﻘﺣﻼﻟﺍ ﺕﻼﻳﺪﻌﺘﻟﺍﻭ (ﺔﻴﺋﺎﺑﺮﻬﻜﻟﺍ
.
3CE/96/2002 -
ﺔﻣﺎﻌﻟﺍ ﺔﻳﺎﻗﻮﻟﺍ
ﻝﺎﻤﻌﺘﺳﻼﻟ ّﺪﻌﻣ ﺮﻴﻏ ﻮﻫﻭ ﻝﺰﻨﻤﻟﺍ ﻞﺧﺍﺩ ﻲﺘﻴﺒﻟﺍ ﻝﺎﻤﻌﺘﺳﻼﻟ ﺯﺎﻬﺠﻟﺍ ﻢﻴﻤﺼﺗ ﻢﺗ •
.ﻲﻋﺎﻨﺼﻟﺍ ﻭﺃ ﻱﺭﺎﺠﺘﻟﺍ
ﺎﻘﻓﻭﻭ ﻂﻘﻓ ﻦﻴﻐﻟﺎﺒﻟﺍ ﻞﺒﻗ ﻦﻣ ﺔﻳﺬﻏﻷﺍ ﺕﺎﺠﺘﻨﻣ ﺪﻴﻤﺠﺗﻭ ﻥﺰﺨﻟ ﺯﺎﻬﺠﻟﺍ ﻡﺍﺪﺨﺘﺳﺍ ﺐﺠﻳ •
.ﻞﻴﻟﺪﻟﺍ ﺍﺬﻫ ﻲﻓ ﺔﺟﺭﺪﻤﻟﺍ ﺕﺎﻤﻴﻠﻌﺘﻠﻟ
.ﺓﺎﻄﻐﻣ ﻖﻃﺎﻨﻣ ﻲﻓ ﻚﻟﺫ ﻥﺎﻛ ﻥﺇﻭ ﻰﺘﺣ ،ﻝﺰﻨﻤﻟﺍ ﺝﺭﺎﺧ ﺯﺎﻬﺠﻟﺍ ﺐﻴﻛﺮﺗ ﻡﺪﻋ ﺐﺠﻳ •
.ﻒﺻﺍﻮﻌﻟﺍﻭ ءﺎﺘﺸﻠﻟ ﺔﺿﺮﻋ ﺯﺎﻬﺠﻟﺍ ءﺎﻘﺑﺇ ﺍﺪﺟ ﺮﻄﺨﻟﺍ ﻦﻣ
.ﻦﻴﺘﺒﻃﺭ ﻭﺃ ﻦﻴﺘﻠﻠﺒﻣ ﻦﻴﻠﺟﺭﻭ ﻦﻳﺪﻴﺑ ﻭﺃ ﻦﻴﻣﺪﻘﻟﺍ ﻲﻓﺎﺣ ﺖﻧﺃﻭ ﺯﺎﻬﺠﻟﺍ ﺲﻤﻠﺗ ﻻ •
ﻕﻭﺮﺣ ﻭﺃ ﺪﻠﺠﻟﺍ ﺵﺪﺧ ﺐﺒﺴﻳ ﻥﺃ ﻚﻟﺬﻟ ﻦﻜﻤﻳ :ﺔﻴﻠﺧﺍﺪﻟﺍ ﺪﻳﺮﺒﺘﻟﺍ ﺮﺻﺎﻨﻋ ﺲﻤﻠﺗ ﻻ •
.ﺪﻴﻠﺠﻟﺍ/ﺩﺮﺒﻟﺍ ﻦﻋ ﺔﺠﺗﺎﻧ
،ﺔﻴﺴﻴﺋﺮﻟﺍ ﺔﻜﺒﺸﻟﺍ ﺲﺒﻘﻣ ﻦﻣ ﺲﺑﺎﻘﻟﺍ ﺎﻤﺋﺍﺩ ﺐﺤﺳﺍ ،ءﺎﺑﺮﻬﻜﻟﺍ ﻦﻋ ﺯﺎﻬﺠﻟﺍ ﻞﺼﻓ ﺪﻨﻋ •
.ﻞﺒﻜﻟﺍ ﺐﺤﺴﺗ ﻻ
ﺔﻜﺒﺷ ﻦﻋ ﻪﻠﺼﻓﻭ ﺯﺎﻬﺠﻟﺍ ﻞﻴﻐﺸﺗ ﻑﺎﻘﻳﺈﺑ ﻢﻗ ،ﺔﻧﺎﻴﺼﻟﺍﻭ ﻒﻴﻈﻨﺘﻟﺍ ﺯﺎﺠﻧﺇ ﻞﺒﻗ •
ﻒﻴﻗﻮﺗ)
ﻰﻟﺇ ﺓﺭﺍﺮﺤﻟﺍ ﺔﺟﺭﺩ ﻂﺒﺿ ﺭﺍﺭﺯﺃ ﺩﺍﺪﻋﺇ ﻲﻔﻜﻳ ﻻ .ﻲﺋﺎﺑﺮﻬﻜﻟﺍ ﺪﻳﻭﺰﺘﻟﺍ
.ﺔﻴﺋﺎﺑﺮﻬﻜﻟﺍ ﺕﻼﻴﺻﻮﺘﻟﺍ ﺔﻓﺎﻛ ﻝﺎﻄﺑﻹ (ﺯﺎﻬﺠﻟﺍ
ﺢﻴﻠﺼﺗ ،ﻝﺎﻜﺷﻷﺍ ﻦﻣ ﻞﻜﺷ ﻱﺄﺑ ،ﻝﻭﺎﺤﺗ ﻻ ﺯﺎﻬﺠﻟﺍ ﻞﻤﻋ ﻲﻓ ﻞﻠﺧ ﺙﻭﺪﺣ ﻝﺎﺣ ﻲﻓ •
ﻥﺃ ﺓﺮﺒﺨﻟﺍ ﻲﻠﻴﻠﻗ ﺹﺎﺨﺷﺃ ﻞﺒﻗ ﻦﻣ ﺕﺎﺤﻴﻠﺼﺘﻟﺍ ءﺍﺮﺟﻹ ﻦﻜﻤﻳ .ﻚﺴﻔﻨﺑ ﺯﺎﻬﺠﻟﺍ
.ﺯﺎﻬﺠﻟﺍ ﻞﻴﻄﻌﺗ ﻰﻟﺇ ﻰﺘﺣ ﻭﺃ ﻯﺫﻷﺍ ﻖﺤﻠﻳ
ﻞﺧﺍﺩ ﺓﺩﻭﺰﻤﻟﺍ ﺔﺻﺎﺨﻟﺍ ﺔﻄﺷﺎﻜﻟﺍ ﺍﺪﻋ ﺎﻤﻴﻓ ،ﺕﺍﻭﺩﻷﺍ ﻭﺃ ﺓﺰﻬﺟﻷﺍ ﻡﺪﺨﺘﺴﺗ ﻻ •
.ﺕﺍﺮﺠﺤﻟﺍ
.ﺓﺮﺷﺎﺒﻣ ﻚﻤﻓ ﻲﻓ ﺪﻴﻤﺠﺘﻟﺍ ﺓﺮﺠﺣ ﻦﻣ ﺓﺫﻮﺧﺄﻤﻟﺍ ﺞﻠﺜﻟﺍ ﻊﻄﻗ ﻊﻀﺗ ﻻ •
ﻱﺄﺑ ،ﻢﻬﻟ ﺢﺴﻤﻳ ﻻ .ﺯﺎﻬﺠﻟﺎﺑ ﺐﻌﻠﻟﺍ ﻭﺃ ﻢﻜﺤﺘﻟﺍ ﺭﺍﺭﺯﺄﺑ ﺚﺒﻌﻟﺎﺑ ﺩﻻﻭﻸﻟ ﺢﻤﺴﺗ ﻻ •
.ﺏﺎﺒﻟﺍ ﻰﻠﻋ ﻖّﻠﻌﺘﻟﺍ ﻭﺃ ﺯﺎﻬﺠﻟﺍ ﺕﺍﺮﺠﺣ ﻲﻓ ﺱﻮﻠﺠﻟﺍ ،ﻝﺎﻜﺷﻷﺍ ﻦﻣ ﻞﻜﺷ
ﺮﻄﺧ ﻞﻜﺸﺗ ﻥﺃ ﺩﺍﻮﻤﻟﺍ ﻩﺬﻬﻟ ﻦﻜﻤﻳ !ﺩﻻﻭﻷﺍ ﺪﻳ ﻝﻭﺎﻨﺘﻣ ﻦﻋ ﺔﺌﺒﻌﺘﻟﺍ ﺩﺍﻮﻣ ﺪﻌﺑﺃ •
.ﻕﺎﻨﺘﺧﻻﺍ
ﺺﻠﺨﺘﻟﺍ
ﺓﺩﺎﻋﺇ ﻑﺪﻬﺑ ﺔﺌﺒﻌﺘﻟﺍ ﺩﺍﻮﻣ ﻦﻣ ﺺﻠﺨﺘﻟﺍ ﺪﻨﻋ ﺔﻴﻠﺤﻤﻟﺍ ﺔﻴﺌﻴﺒﻟﺍ ﺮﻴﻳﺎﻌﻤﻟﺎﺑ ﺪّﻴﻘﺗ •
.ﺎﻫﺮﻳﻭﺪﺗ
ﺔﻴﻧﻭﺮﺘﻜﻟﻹﺍ ﺓﺰﻬﺟﻷﺎﺑ ﺔﻘﻠﻌﺘﻤﻟﺍ
3CE/96/2002 ﺔﻴﺑﻭﺭﻭﻷﺍ ﺕﺎﻬﻴﺟﻮﺘﻟﺍ ﻲﻀﻘﺗ •
ﺔﻤﻳﺪﻘﻟﺍ ﺔﻴﺘﻴﺒﻟﺍ ﺔﻴﻧﻭﺮﺘﻜﻟﻹﺍ ﺓﺰﻬﺟﻷﺍ ﻦﻣ ﺺﻠﺨﺘﻟﺍ ﻡﺪﻌﺑ (WEEE) ﺔﻔﻟﺎﺘﻟﺍ
ﺔﻤﻳﺪﻘﻟﺍ ﺓﺰﻬﺟﻷﺍ ﻊﻤﺟ ﺐﺠﻳ .ﺔﻔﻨﺼﻤﻟﺍ ﺮﻴﻏ ﺔﻳﺪﻠﺒﻟﺍ ﺕﺎﻳﺎﻔﻨﻟﺍ ﻊﻤﺟ ﺓﺭﻭﺩ ﺔﻄﺳﺍﻮﺑ
ﻱﻮﺘﺤﺗ ﻲﺘﻟﺍ ﺩﺍﻮﻤﻟﺍ ﺮﻳﻭﺪﺗ ﺓﺩﺎﻋﺇﻭ ﺩﺍﺩﺮﺘﺳﺍ ﺔﻴﻠﻤﻋ ﻉﺎﺠﻧﺇ ﻑﺪﻬﺑ ﺩﺍﺮﻔﻧﺍ ﻰﻠﻋ
“ﺔﻳﺮﺋﺍﺪﻟﺍ ﺔﻠﺴﻟﺍ” ﺓﺭﺎﺷﺇ .ﺔﺌﻴﺒﻟﺍﻭ ﻥﺎﺴﻧﻹﺍ ﺔﺤﺻ ﻰﻠﻋ ﺎﻫﺮﻴﺛﺄﺗ ﻞﻴﻠﻘﺗﻭ ﺎﻬﻴﻠﻋ
ﺐﺠﻳ ،ﺯﺎﻬﺠﻟﺍ ﻦﻣ ﻚﺼﻠﺨﺗ ﺪﻨﻋ ﻪﻧﺄﺑ ﻚﻣﺍﺰﺘﻟﺎﺑ ﻙﺮﻛﺬﺗ ﺞﺘﻨﻤﻟﺍ ﻰﻠﻋ ﺔﺑﻮﻄﺸﻤﻟﺍ
.ﺓﺪﺣ ﻰﻠﻋ ﻪﻌﻴﻤﺠﺗ
ﺎﻤﻴﻓ ﺓءﺰﺠﺘﻟﺍ ﺮﺟﺎﺘﺑ ﻭﺃ ﺔﻴﻠﺤﻤﻟﺍ ﻢﻬﺘﻄﻠﺴﺑ ﻝﺎﺼﺗﻻﺍ ﻦﻴﻜﻠﻬﺘﺴﻤﻟﺍ ﻰﻠﻋ ﺐﺟﻮﺘﻳ
.ﻢﻳﺪﻘﻟﺍ ﻢﻫﺯﺎﻬﺟ ﻦﻣ ﺺﻠﺨﺘﻠﻟ ﺔﺤﻴﺤﺼﻟﺍ ﺔﻘﻳﺮﻄﻟﺎﺑ ﺔﻘﻠﻌﺘﻤﻟﺍ ﺕﺎﻣﻮﻠﻌﻤﻟﺎﺑ ﻖﻠﻌﺘﻳ
ﺎﻬﻴﻠﻋ ﻅﺎﻔﺤﻟﺍﻭ ﺔﺌﻴﺒﻟﺍ ﻡﺍﺮﺘﺣﺍ
ﺲﻤﺸﻟﺍ ﺔﻌﺷﺃ ﻰﻟﺇ ﻪﻀﻳﺮﻌﺗ ﻡﺪﻋ ﻦﻣ ﺪﻛﺄﺗ .ﺓءﻮﻬﺘﻟﺍ ﺓﺪﻴﺟ ﺔﻓﺮﻏ ﻲﻓ ﺯﺎﻬﺠﻟﺍ ﺐﻛﺭ •
.ﺔﻳﺭﺍﺮﺤﻟﺍ ﺭﺩﺎﺼﻤﻟﺍ ﺐﻧﺎﺠﺑ ﻪﻌﻀﺗ ﻻﻭ ﺓﺮﺷﺎﺒﻤﻟﺍ
ﻚﻟﺫﻭ ﺍﺮﻴﺜﻛ ﺏﺎﺒﻟﺍ ﺢﺘﻓ ﻭﺃ ،ﺔﻠﻳﻮﻃ ﺕﺍﺮﺘﻔﻟ ﺎﺣﻮﺘﻔﻣ ﺏﺎﺒﻟﺍ ءﺎﻘﺑﺇ ﻲﺷﺎﺤﺗ ﻝﻭﺎﺣ •
.ﺔﻗﺎﻄﻟﺍ ﺮﻴﻓﻮﺗ ﻑﺪﻬﺑ
:ﺎﻬﺑ ﻎﻟﺎﺒﻣ ﻡﺎﻌﻃ ﺔﻴﻤﻜﺑ ﺯﺎﻬﺠﻟﺍ ﻸﻤﺗ ﻻ •
ﺖﻤﺗ ﺍﺫﺇ .ﻦﻜﻤﻣ ﻞﻜﺷ ﻞﻀﻓﺄﺑ ﻡﺎﻌﻄﻟﺍ ﺔﻳﺎﻤﺤﻟ ﺔﻳﺮﺤﺑ ﺮﺸﺘﻨﻳ ﻥﺃ ﺩﺭﺎﺒﻟﺍ ءﺍﻮﻬﻟﺍ ﻰﻠﻋ
.ﺭﺍﺮﻤﺘﺳﺎﺑ ﻞﻤﻌﻴﺳ ﻂﻐﻀﻟﺍ ﻡﺎﻈﻧ ﻥﺈﻓ ،ءﺍﻮﻬﻟﺍ ﺭﺎﺸﺘﻧﺍ ﺔﻗﺎﻋﺇ
ﺔﻴﻠﺧﺍﺪﻟﺍ ﺓﺭﺍﺮﺤﻟﺍ ﺔﺟﺭﺩ ﻊﻔﺗﺮﺘﺳ .ﺓﺮﺷﺎﺒﻣ ﺔﺟﻼﺜﻟﺍ ﻲﻓ ﺔﻨﺧﺎﺴﻟﺍ ﺔﻤﻌﻃﻷﺍ ﻊﻀﺗ ﻻ •
.ﺮﺒﻛﺃ ﺔﻗﺎﻃ ﻚﻠﻬﺘﺴﻴﺳﻭ ﺪﻬﺠﺑ ﻞﻤﻌﻳ ﻂﻐﻀﻟﺍ ﻡﺎﻈﻨﺑ ﻞﻌﺠﻳ ﺎﻤﻣ
ﺪﻴﻠﺠﻟﺍ ﻦﻣ ﺔﻜﻴﻤﺳ ﺔﻘﺒﻃ ﻥﺇ .(ﺔﻧﺎﻴﺼﻟﺍ ﺮﻈﻧﺍ) ﺪﻴﻠﺠﻟﺍ ﻥّﻮﻜﺗ ﺍﺫﺇ ﺯﺎﻬﺠﻟﺍ ﺔﺑﺍﺫﺈﺑ ﻢﻗ •
ﻙﻼﻬﺘﺳﺍ ﺓﺩﺎﻳﺯ ﻰﻟﺇ ﻱﺩﺆﺗﻭ ﺔﻤﻌﻃﻷﺍ ﻰﻟﺇ ﺩﺭﺎﺒﻟﺍ ءﺍﻮﻬﻟﺍ ﺮﻳﺮﻤﺗ ﺔﺑﻮﻌﺻ ﻦﻣ ﺪﻳﺰﺗ
.ﺔﻗﺎﻄﻟﺍ
ﺥﺎﺳﻭﻷﺍ ﻦﻣ ﻩﻮﻠﺧ ﻦﻣ ﺪﻛﺄﺘﻠﻟ ﻪﻔ ّﻈﻧﻭ ﻡﺎﻈﺘﻧﺎﺑ ﺏﺎﺒﻟﺍ ﻡﺎﻜﺣﺇ ﻁﺎﻄﻣ ﺺﺤﻓﺍ •
.(ﺔﻧﺎﻴﺼﻟﺍ ﺮﻈﻧﺍ) ﺝﺭﺎﺨﻟﺍ ﻰﻟﺇ ﺩﺭﺎﺒﻟﺍ ءﺍﻮﻬﻟﺍ ﺏّﺮﺴﺗ ﻲﺷﺎﺤﺘﻟﻭ

AR
34
ﺔﻳﺎﻨﻌﻟﺍﻭ ﺔﻧﺎﻴﺼﻟﺍ
ﺯﺎﻬﺠﻟﺍ ﻞﻴﻐﺸﺗ ﻑﺎﻘﻳﺇ
ﺪﻳﻭﺰﺘﻟﺍ ﻦﻋ ﺯﺎﻬﺠﻟﺍ ﻞﺼﻓ ،ﺔﻧﺎﻴﺼﻟﺍﻭ ﻒﻴﻈﻨﺘﻟﺍ ﺔﻴﻠﻤﻋ ﻝﻼﺧ ،ﻱﺭﻭﺮﻀﻟﺍ ﻦﻣ
:ﻲﺋﺎﺑﺮﻬﻜﻟﺍ
ﺔﻓﺎﻛ ﻝﺎﻄﺑﻹ (ﺯﺎﻬﺠﻟﺍ ﻒﻴﻗﻮﺗ)
ﻰﻟﺇ ﺓﺭﺍﺮﺤﻟﺍ ﺔﺟﺭﺩ ﻂﺒﺿ ﺢﻴﺗﺎﻔﻣ ﺩﺍﺪﻋﺇ ﻲﻔﻜﻳ ﻻ
.ﺔﻴﺋﺎﺑﺮﻬﻜﻟﺍ ﺕﻼﻴﺻﻮﺘﻟﺍ
ﺯﺎﻬﺠﻟﺍ ﻒﻴﻈﻨﺗ
ﺎﻤﻬﻔﻴﻈﻨﺗ ﻦﻜﻤﻳ ﺔﻴﻃﺎﻄﻤﻟﺍ ءﺍﺰﺟﻷﺍﻭ ﺔﻴﻠﺧﺍﺪﻟﺍ ءﺍﺰﺟﻷﺍﻭ ﺔﻴﺟﺭﺎﺨﻟﺍ ءﺍﺰﺟﻷﺍ •
ﺮﻴﻏ ﻥﻮﺑﺎﺼﻟﺍ ﻭﺃ ﻡﻮﻳﺩﻮﺼﻟﺍ ﺕﺎﻧﻮﺑﺮﻜﻴﺑﻭ ﺮﺗﺎﻔﻟﺍ ءﺎﻤﻟﺎﺑ ﺔﻠﻠﺒﻣ ﺔﺠﻨﻔﺳﺇ ﻡﺍﺪﺨﺘﺳﺎﺑ
.ﺎﻴﻧﻮﻣﻷﺍ ﻭﺃ ﺕﺎﻀّﻴﺒﻤﻟﺍ ،ﺔﻄﺷﺎﻜﻟﺍ ﺕﺎﺠﺘﻨﻤﻟﺍ ،ﺔﺒﻳﺬﻤﻟﺍ ﺩﺍﻮﻤﻟﺍ ﻡﺪﺨﺘﺴﺗ ﻻ .ﻞﻋﺎﻔﺘﻤﻟﺍ
ﻞﺴﻏ ﻞﺋﺎﺳ ﻲﻓ ﻭﺃ ﻥﻮﺑﺎﺼﻟﺍﻭ ﺮﺗﺎﻔﻟﺍ ءﺎﻤﻟﺍ ﻲﻓ ﻚﻴﻜﻔﺘﻠﻟ ﺔﻠﺑﺎﻘﻟﺍ ﺕﺍﻭﺩﻷﺍ ﻊﻘﻧ ﻦﻜﻤﻳ •
.ﺭﺬﺤﺑ ﺎﻬﻔﻔﺟﻭ ﺎﻬﻔﻄﺷﺍ .ﻕﺎﺒﻃﻷﺍ
ﺔﻣﻮﻌﻨﺑ ﻪﺘﻟﺍﺯﺇ ﻦﻜﻤﻳ ﻱﺬﻟﺍ ﺭﺎﺒﻐﻟﺍ ﻂﻘﺘﻠﺗ ﻥﺃ ﺯﺎﻬﺠﻟﺍ ﻦﻣ ﺔﻴﻔﻠﺨﻟﺍ ﺔﻬﺠﻠﻟ ﻦﻜﻤﻳ •
ﻑﺎﻘﻳﺇ ﺐﺠﻳ .ﺔﻄﺳﻮﺘﻣ ﺓﻮﻘﺑ ﺎﻬﻄﺒﺿ ﻢﺗ ﺔﻴﺋﺎﺑﺮﻬﻛ ﺔﺴﻨﻜﻣ ﻡﻮﻃﺮﺧ ﻡﺍﺪﺨﺘﺳﺎﺑ
.ﺯﺎﻬﺠﻟﺍ ﻒﻴﻈﻨﺗ ﻞﺒﻗ ﺲﺑﺎﻘﻟﺍ ﻞﺼﻓﻭ ﺯﺎﻬﺠﻟﺍ ﻞﻴﻐﺸﺗ
ﺔﻬﻳﺮﻜﻟﺍ ﺢﺋﺍﻭﺮﻟﺍﻭ ﻦّﻔﻌﺘﻟﺍ ﻲﺷﺎﺤﺗ
ﻰﻠﻋ ﻅﺎﻔﺤﻠﻟ .ﺔﻬﻳﺮﻜﻟﺍ ﺢﺋﺍﻭﺮﻟﺍ ﻦﻣ ﺔﻴﻟﺎﺧ ﺔﻴﺤﺻ ﺩﺍﻮﻣ ﻦﻣ ﺯﺎﻬﺠﻟﺍ ﻊﻴﻨﺼﺗ ﻢﺗ •
ﺔﻴﻄﻐﺗ ﺎﻤﺋﺍﺩ ﺐﺠﻳ ﺥﺎﺳﻭﻷﺍ ﻥﻮﻜﺗ ﻲﺷﺎﺤﺘﻟﻭ ﺔﻬﻳﺮﻜﻟﺍ ﺢﺋﺍﻭﺮﻟﺍ ﻦﻣ ﺔﻴﻟﺎﺧ ﺔﺟﻼﺜﻟﺍ
.ﺐﺠﻳ ﺎﻤﻛ ﺎﻬﻣﺎﻜﺣﺇ ﻭﺃ ﺔﻤﻌﻃﻷﺍ
ءﺰﺠﻟﺍ ﻒﻈﻧ ،ﺖﻗﻮﻟﺍ ﻦﻣ ﻝﻮﻃﺃ ﺓﺪﻤﻟ ﺯﺎﻬﺠﻟﺍ ﻞﻴﻐﺸﺗ ﻑﺎﻘﻳﺇ ﻲﻓ ﺖﺒﻏﺭ ﺍﺫﺇ •
.ﺔﺣﻮﺘﻔﻣ ﺏﺍﻮﺑﻷﺍ ﻙﺮﺗﺍﻭ ﻪﻨﻣ ﻲﻠﺧﺍﺪﻟﺍ
ﺯﺎﻬﺠﻟﺍ ﺪّﻤﺠﺗ ﺐﻳﻭﺬﺗ
.ﻩﺎﻧﺩﺃ ﺕﺎﻤﻴﻠﻌﺘﻟﺍ ﻊﺒﺗﺍ !
ﺔﻄﺷﺎﻜﻟﺍ ﺍﺪﻋ ﺎﻤﻴﻓ ﺕﺍﺪﻌﻣ ﻭﺃ ﺓﺰﻬﺟﺃ ﺔﻳﺃ ﻡﺍﺪﺨﺘﺳﺎﺑ ﺔﺑﺍﺫﻹﺍ ﺔﻴﻠﻤﻋ ﻊﻳﺮﺴﺘﺑ ﻢﻘﺗ ﻻ
.ﺪﻴﻤﺠﺘﻟﺍ ﺓﺮﺋﺍﺩ ﻑﻼﺗﺇ ﻚﻟﺬﺑ ﻚﻨﻜﻤﻴﻓ ،ﺓﺩّﻭﺰﻤﻟﺍ
ﺔﺟﻼﺜﻟﺍ ﺓﺮﺠﺣ ﺪّﻤﺠﺗ ﺐﻳﻭﺬﺗ
:ﺔﻴﻜﻴﺗﺎﻣﻮﺗﻭﺃ ﺔﺑﺍﺫﺇ ﺔﻔﻴﻇﻮﺑ ﺓﺩّﻭﺰﻣ ﺔﺟﻼﺜﻟﺍ
ﻦﻣ ﺔﻴﻔﻠﺨﻟﺍ ﺔﻬﺠﻟﺍ ﻰﻟﺇ ءﺎﻤﻟﺍ ﺐﻳﺮﺴﺗ ﻢﺘﻳ
ﺮﻈﻧﺍ) ﺹﺎﺧ ءﻼﺧﺇ ﺬﻔﻨﻣ ﺔﻄﺳﺍﻮﺑ ﺯﺎﻬﺠﻟﺍ
ﺪﻴﻟﻮﺘﺑ ﻂﻐﻀﻟﺍ ﻡﺎﻈﻧ ﻡﻮﻘﻳ ﺚﻴﺣ (ﻢﺳﺮﻟﺍ
ﻦﻣ .ءﺎﻤﻟﺍ ﺮﺨﺒﺗ ﻰﻟﺇ ﻱﺩﺆﻳ ﺎﻤﻣ ﺓﺭﺍﺮﺤﻟﺍ
ﻡﺎﻈﺘﻧﺎﺑ ءﻼﺧﻹﺍ ﺬﻔﻨﻣ ﻒﻴﻈﻨﺗ ﻱﺭﻭﺮﻀﻟﺍ
ﺝﺭﺎﺨﻟﺍ ﻰﻟﺇ ﻖﻓﺪﺘﻟﺍ ءﺎﻤﻠﻟ ﺢﻴﺘﻳ ﺚﻴﺤﺑ
.ﺔﻟﻮﻬﺴﺑ
ﺔﺟﻼﺜﻟﺍ ﺓﺮﺠﺣ ﺪّﻤﺠﺗ ﺐﻳﻭﺬﺗ
ﺪﻳﺰﺗ ﺪﻴﻠﺠﻟﺍ ﺔﻘﺒﻃ ﺖﻧﺎﻛ ﺍﺫﺇ .ﺓﺩّﻭﺰﻤﻟﺍ ﺔﻄﺷﺎﻜﻟﺍ ﻡﺍﺪﺨﺘﺳﺎﺑ ﻡﺎﻈﺘﻧﺎﺑ ﺪﻴﻠﺠﻟﺍ ﻝﺯﺃ
:ﺎﻳﻭﺪﻳ ﺔﺑﺍﺫﻹﺍ ءﺍﺮﺟﺇ ﻱﺭﻭﺮﻀﻟﺍ ﻦﻣ ،ﻢﻠﻣ 5 ﻦﻋ
.
ﻊﺿﻮﻟﺍ ﻰﻟﺇ ﺓﺭﺍﺮﺤﻟﺍ ﺔﺟﺭﺩ ﻂﺒﺿ ﺡﺎﺘﻔﻣ ﻂﺒﻀﺑ ﻢﻗ .1
ﻥﺎﻜﻣ ﻲﻓ ﻭﺃ ﻯﺮﺧﺃ ﺪﻴﻤﺠﺗ ﺓﺮﺠﺣ ﻲﻓ ﺎﻬﻌﺿﻭ ﺓﺪﻳﺮﺠﺑ ﺓﺪﻤﺠﻤﻟﺍ ﺔﻤﻌﻃﻷﺍ ﻒّﻠﻏ .2
.ﺩﺭﺎﺑ
ﻞﻬﺳﺃ ﺔﻘﻳﺮﻄﺑ ﻚﻟﺫ ءﺍﺮﺟﺃ ﻦﻜﻤﻳ .ﺎﻴﻠﻛ ﺪﻴﻠﺠﻟﺍ ﻲﻔﺘﺨﻳ ﻥﺃ ﻰﻟﺇ ﺎﺣﻮﺘﻔﻣ ﺏﺎﺒﻟﺍ ﻙﺮﺗﺃ .3
ﺪﻴﻤﺠﺘﻟﺍ ﺓﺮﺠﺣ ﻞﺧﺍﺩ ﺮﺗﺎﻔﻟﺍ ءﺎﻤﻟﺎﺑ ﺓءﻮﻠﻤﻣ ﺕﺍﻮﺒﻋ ﻊﺿﻮﺑ ﻚﻟﺫﻭ
.ﺔﻴﻧﺎﺛ ﺯﺎﻬﺠﻟﺍ ﻞﻴﻐﺸﺗ ﻞﺒﻗ ﺔﻳﺎﻨﻌﺑ ﺎﻬﻔﻔﺟﻭ ﺪﻳﺮﺒﺘﻟﺍ ﺓﺮﺠﺣ ﻒ ّﻈﻧ .4
ﻞﺒﻗ ،ﺔﻴﻟﺎﺜﻤﻟﺍ ﻦﻳﺰﺨﺘﻟﺍ ﻑﻭﺮﻇ ﺩﺍﺩﺮﺘﺳﺍ ﻢﺘﻳ ﻰﺘﺣ ﻱﺃ ،ﻦﻴﺘﻋﺎﺳ ﻲﻟﺍﻮﺣ ﺮﻈﺘﻧﺍ .5
.ﺪﻴﻤﺠﺘﻟﺍ ﺓﺮﺠﺣ ﻲﻓ ﻡﺎﻌﻄﻟﺍ ﻊﺿﻭ
ﺓﺭﺎﻧﻹﺍ ﺡﺎﺒﺼﻣ ﻞﻳﺪﺒﺗ
ﻊﺒﺗﺍ .ءﺎﺑﺮﻬﻜﻟﺍ ﺲﺒﻘﻣ ﻦﻣ ﺲﺑﺎﻘﻟﺍ ﺐﺤﺳﺍ ،ﺔﺟﻼﺜﻟﺍ ﺓﺮﺠﺣ ﺓﺭﺎﻧﺇ ﺡﺎﺒﺼﻣ ﻞﻳﺪﺒﺘﻟ
.ﻩﺎﻧﺩﺃ ﺕﺎﻤﻴﻠﻌﺘﻟﺍ
ءﺎﻄﻐﻟﺍ ﺔﻟﺍﺯﺈﺑ ﺓﺭﺎﻧﻹﺍ ﺡﺎﺒﺼﻣ ﻦﻋ ﻒﺸﻛﺍ
.ﻢﺳﺮﻟﺍ ﻲﻓ ﻦﻴﺒﻣ ﻮﻫ ﺎﻤﻛ
ﺔﻴﺣﺎﻧ ﻦﻣ ﻪﺑﺎﺸﻣ ﺓﺭﺎﻧﺇ ﺡﺎﺒﺼﻤﺑ ﻪﻟّﺪﺑ
ءﺎﻄﻐﻟﺍ ﻰﻠﻋ ﻪﻴﻟﺇ ﺭﺎﺸﻤﻟﺍ ﺔﻗﺎﻄﻟﺍ ﻝﺎﺠﻣ
.(25W ﻭﺃ 15W)
1
2

35
AR
ﺔﻠﻣﺎﻜﻟﺍ ﺎﻬﺗﺭﺪﻘﺑ ﺔﺟﻼﺜﻟﺍ ﻡﺍﺪﺨﺘﺳﺍ
.(ﻒﺻﻮﻟﺍ ﺮﻈﻧﺍ) ﺓﺭﺍﺮﺤﻟﺍ ﺔﺟﺭﺩ ﻂﺒﻀﻟ ﺓﺭﺍﺮﺤﻟﺍ ﺔﺟﺭﺩ ﻂﺒﺿ ﺡﺎﺘﻔﻣ ﻡﺪﺨﺘﺳﺍ •
ﺔﻨﺧﺎﺴﻟﺍ ﺔﻤﻌﻃﻷﺍ ﺲﻴﻟﻭ ،ﺓﺮﺠﺤﻟﺍ ﻲﻓ ﻂﻘﻓ ﺓﺮﺗﺎﻔﻟﺍ ﻭﺃ ﺓﺩﺭﺎﺒﻟﺍ ﺔﻤﻌﻃﻷﺍ ﻊﺿ •
.(ﺢﺋﺎﺼﻨﻟﺍﻭ ﺮﻳﺬﺤﺘﻟﺍ ﻞﺋﺎﺳﻭ ﺮﻈﻧﺍ)
.ﺔﺌﻴﻨﻟﺍ ﺔﻤﻌﻃﻷﺍ ﻦﻣ ﻝﻮﻃﺃ ﺓﺪﻤﻟ ﻡﻭﺪﺗ ﻻ ﺔﺧﻮﺒﻄﻤﻟﺍ ﺔﻤﻌﻃﻷﺍ ﻥﺃ ﺮﻛﺬﺗ •
ﺔﺟﻼﺜﻟﺍ ﻲﻓ ﺔﺑﻮﻃﺮﻟﺍ ﺔﺒﺴﻧ ﺪﻳﺰﺘﺳ ﺎﻬﻧﺇ .ﺔﺣﻮﺘﻔﻣ ﺕﺍﻮﺒﻋ ﻲﻓ ﻞﺋﺍﻮﺴﻟﺍ ﻆﻔﺤﺗ ﻻ •
.ﻒﺛﺎﻜﺘﻟﺍ ﻥّﻮﻜﺗ ﺐﺒﺴﺘﺳﻭ
ﺔﻠﻣﺎﻜﻟﺍ ﺎﻬﺗﺭﺪﻘﺑ ﺪﻳﺮﺒﺘﻟﺍ ﺓﺮﺠﺣ ﻡﺍﺪﺨﺘﺳﺍ
ﻩﺬﻬﻟ ﺐﺠﻳ .ﺎﻫﺪﻴﻤﺠﺗ ﺐﻳﺫﺃ ﺪﻗ ﻥﺎﻛ ﻲﺘﻟﺍ ﻭﺃ ﺔﺒﺋﺍﺬﻟﺍ ﺔﻤﻌﻃﻷﺍ ﺪﻴﻤﺠﺗ ﺪﻴﻌﺗ ﻻ •
.(ﺔﻋﺎﺳ 24 ﻝﻼﺧ) ﻞﻛﺆﺗﻭ ﺦﺒﻄُﺗ ﻥﺃ ﺔﻤﻌﻃﻷﺍ
ﺖﻤﺗ ﻲﺘﻟﺍ ﺔﻤﻌﻃﻷﺍ ﺲﻣﻼﺗ ﻻﺃ ﺪﻴﻤﺠﺗ ﻰﻟﺇ ﺝﺎﺘﺤﺗ ﻲﺘﻟﺍ ﺔﺟﺯﺎﻄﻟﺍ ﺔﻤﻌﻃﻷﺍ ﻰﻠﻋ •
،ﺪﻴﻤﺠﺘﻟﺍ ﺓﺮﺠﺣ ﻲﻓ ﺔﻜﺒﺸﻟﺍ ﻕﻮﻓ ﺔﺟﺯﺎﻄﻟﺍ ﺔﻤﻌﻃﻷﺍ ﻆﻔﺣ ﺐﺠﻳ .ﺎﻫﺪﻴﻤﺠﺗ ﺔﺑﺍﺫﺇ
ﺚﻴﺣ ،(ﻲﻔﻠﺨﻟﺍﻭ ﻲﺒﻧﺎﺠﻟﺍ) ﺓﺮﺷﺎﺒﻣ ﻥﺍﺭﺪﺠﻟﺍ ،ﺮﻣﻷﺍ ﻦﻜﻣﺃ ﻥﺇ ،ﺲﻣﻼﺗ ﻥﺃﻭ
.ﺎﻌﻳﺮﺳ ﺍﺪﻴﻤﺠﺗ ﻦﻤﻀﺗﻭ ﺔﻳﻮﺌﻣ ﺔﺟﺭﺩ 18- ﻦﻣ ﻞﻗﺃ ﻰﻟﺇ ﺓﺭﺍﺮﺤﻟﺍ ﺔﺟﺭﺩ ﺾﻔﺨﻨﺗ
ﺔﻤﻜﺤﻣ ﻭﺃ ﺔﺳﺍﺪﺴﺑ ﺓﺩﻭﺪﺴﻤﻟﺍﻭ ،ﻞﺋﺍﻮﺴﻟﺍ ﻰﻠﻋ ﻱﻮﺘﺤﺗ ﻲﺘﻟﺍ ﺕﺎﺟﺎﺟﺰﻟﺍ ﻊﻀﺗ ﻻ •
.ﺮﺴﻜﻨﺗ ﻥﺃ ﻦﻜﻤﻳ ﺎﻬﻧﻷ ﺪﻴﻤﺠﺘﻟﺍ ﺓﺮﺠﺣ ﻲﻓ ﻕﻼﻏﻹﺍ
ﻱﻮﺘﺤﺗ ﻲﺘﻟﺍ ﺔﺣﻮﻠﻟﺍ ﻲﻓ ﺓﺩﺪﺤﻣ ﺎﻴﻣﻮﻳ ﺎﻫﺪﻴﻤﺠﺗ ﻦﻜﻤﻳ ﻲﺘﻟﺍ ﻯﻮﺼﻘﻟﺍ ﺔﻤﻌﻃﻷﺍ ﺔﻴﻤﻛ •
ﺔﺟﻼﺜﻟﺍ ﺓﺮﺠﺣ ﻦﻣ ﻯﺮﺴﻴﻟﺍ ﺔﻴﻠﻔﺴﻟﺍ ﺔﻬﺠﻟﺍ ﻲﻓ ﺓﺩﻮﺟﻮﻤﻟﺍ ،ﺔﻴﻨﻘﺘﻟﺍ ﺺﺋﺎﺼﺨﻟﺍ ﻰﻠﻋ
(Kg/24h: 4 :ﻝﺎﺜﻤﻟﺍ ﻞﻴﺒﺳ ﻰﻠﻋ)
.ﺪﻴﻤﺠﺘﻟﺍ ﻝﻼﺧ ﺏﺎﺒﻟﺍ ﺢﺘﻔﺗ ﻻ !
ﺍﺬﻫ .ﺪﻴﻤﺠﺘﻟﺍ ﺓﺮﺠﺣ ﺏﺎﺑ ﺢﺘﻔﺗ ﻻ ،ﻲﺋﺎﺑﺮﻬﻜﻟﺍ ﺭﺎﻴﺘﻟﺍ ﻲﻓ ﻞﻠﺧ ﻭﺃ ﻉﺎﻄﻘﻧﺍ ﺙﺪﺣ ﺍﺫﺇ !
ﻆﻔﺣ ﻦﻤﻀﻳﻭ ،ﺪﻴﻤﺠﺘﻟﺍ ﺓﺮﺠﺣ ﻞﺧﺍﺩ ﺓﺭﺍﺮﺤﻟﺍ ﺔﺟﺭﺩ ﻰﻠﻋ ﻅﺎﻔﺤﻟﺍ ﻰﻠﻋ ﺪﻋﺎﺴﻴﺳ
.ﻞﻗﻷﺍ ﻰﻠﻋ ﺔﻋﺎﺳ 14-9 ﺓﺪﻤﻟ ﺔﻤﻌﻃﻷﺍ
،ﺔﻠﻳﻮﻃ ﺓﺮﺘﻔﻟ ﺔﻳﻮﺌﻣ ﺔﺟﺭﺩ 14 ﻦﻣ ﻞﻗﺃ ﻰﻟﺇ ﺔﻓﺮﻐﻟﺍ ﺓﺭﺍﺮﺣ ﺔﺟﺭﺩ ﺖﻀﻔﺨﻧﺍ ﺍﺫﺇ !
ﻆﻔﺣ ﻰﻠﻋ ﺓﺭﺪﻘﻟﺍ ﻞﻘﺘﺳﻭ ﻰﻠﺜﻤﻟﺍ ﺓﺭﺍﺮﺤﻟﺍ ﺔﺟﺭﺩ ﻰﻟﺇ ﺪﻳﺮﺒﺘﻟﺍ ﺓﺮﺠﺣ ﻞﺼﺗ ﻦﻠﻓ
.ﻡﺎﻌﻄﻟﺍ

AR
36
ﻡﺍﺪﺨﺘﺳﻻﺍﻭ ﻞﻴﻐﺸﺘﻟﺍ
ﺯﺎﻬﺠﻟﺍ ﻞﻴﻐﺸﺗ
.(ﺐﻴﻛﺮﺘﻟﺍ ﺮﻈﻧﺍ) ﺐﻴﻛﺮﺘﻟﺍ ﺕﺎﻤﻴﻠﻌﺗ ﻊﺒﺗﺍ ،ﺯﺎﻬﺠﻟﺍ ﻞﻴﻐﺸﺗ ءﺪﺑ ﻞﺒﻗ !
ﺮﺗﺎﻔﻟﺍ ءﺎﻤﻟﺍ ﻡﺍﺪﺨﺘﺳﺎﺑ ﺍﺪﻴﺟ ﺔﻘﺤﻠﻤﻟﺍ ﺕﺍﻭﺩﻷﺍﻭ ﺕﺍﺮﺠﺤﻟﺍ ﻒﻈﻧ ،ﺯﺎﻬﺠﻟﺍ ﻞﺻﻭ ﻞﺒﻗ !
.ﺕﺎﻧﻮﺑﺮﻜﻴﺒﻟﺍﻭ
.ﺔﻴﻠﺧﺍﺪﻟﺍ ﺓﺭﺎﻧﻹﺍ ﺓءﺎﺿﺇ ﻦﻣ ﺪﻛﺄﺗﻭ ﺲﺒﻘﻤﻟﺍ ﻲﻓ ﺲﺑﺎﻘﻟﺍ ﻞﺧﺩﺃ .1
ﻥﻮﻜﻴﺳ ﺕﺎﻋﺎﺳ ﻊﻀﺑ ﺪﻌﺑ .ﺔﻟﺪﺘﻌﻣ ﺔﻤﻴﻗ ﻰﻟﺇ ﺓﺭﺍﺮﺤﻟﺍ ﺔﺟﺭﺩ ﻂﺒﺿ ﺡﺎﺘﻔﻣ ﺭﺩﺃ .2
.ﺔﺟﻼﺜﻟﺍ ﻲﻓ ﻡﺎﻌﻄﻟﺍ ﻊﺿﻭ ﻚﻧﺎﻜﻣﺈﺑ
ﺓﺭﺍﺮﺤﻟﺍ ﺔﺟﺭﺩ ﻂﺒﺿ
ﺡﺎﺘﻔﻣ ﻊﺿﻭ ﺐﺴﺣ ﺎﻴﻜﻴﺗﺎﻣﻮﺗﻭﺃ ﺔﺟﻼﺜﻟﺍ ﺓﺮﺠﺣ ﻞﺧﺍﺩ ﺓﺭﺍﺮﺤﻟﺍ ﺔﺟﺭﺩ ﻂﺒﺿ ﻢﺘﻳ
.ﺕﺎﺘﺳﻮﻣﺮﺜﻟﺍ
ﺓﺩﻭﺮﺑ ﻞﻗﻷﺍ = 1
ﺓﺩﻭﺮﺑ ﺮﺜﻛﻷﺍ = 5
.ﻂﺳﻮﺘﻤﻟﺍ ﻊﺿﻮﻟﺎﺑ ﻲﺻﻮﻧ ﻦﺤﻧ ،ﻝﺎﺣ ﺔﻳﺃ ﻰﻠﻋ
ﺓﺩﺎﻳﺰﻟ ﻚﻟﺫﻭ ﻲﻔﻠﺨﻟﺍ ﺔﺟﻼﺜﻟﺍ ﺓﺮﺠﺣ ﺭﺍﺪﺟ ﻞﺧﺍﺩ ﺩﻮﺟﻮﻣ ﺔﺟﻼﺜﻟﺍ ﻲﻓ ﺪﻳﺮﺒﺘﻟﺍ ءﺰﺟ
ﻭﺃ ﺪﻴﻠﺠﻟﺎﺑ ﻲﻔﻠﺨﻟﺍ ﺭﺍﺪﺠﻟﺍ ﻰﻄﻐُﻴﺳ ،ﻞﻴﻐﺸﺘﻟﺍ ﻝﻼﺧ .ﻲﻟﺎﻤﺠﻟﺍ ﺮﻬﻈﻤﻟﺍ ﻦﻴﺴﺤﺘﻟﻭ ﺔﻌﺴﻟﺍ
،ﻖﻠﻘﺗ ﻻ .ﻒﻗﻮﺘﻣ ﻪﻧﺃ ﻡﺃ ﻞﻤﻌﻳ ﻂﻐﻀﻟﺍ ﻡﺎﻈﻧ ﻥﺎﻛ ﺍﺫﺇ ﺎﻣ ﺐﺴﺣ ﻚﻟﺫﻭ ءﺎﻤﻟﺍ ﺕﺍﺮﻄﻗ
.ﻲﻌﻴﺒﻃ ﻞﻜﺸﺑ ﻞﻤﻌﺗ ﺔﺟﻼﺜﻟﺍ ﻥﺈﻓ
ﺪﻳﺮﺒﺘﻟﺍ ﻡﺎﻈﻧ
ﺪﻳﺪﺤﺗ ﻑﺪﻬﺑ ﻚﻳﺪﻟ ﻡﺎﻈﻨﻟﺍ ﻰﻟﺇ ﻪﺒﺘﻧﺃ :ﻩﺎﻧﺩﺃ ﺔﻨﻴﺒﻤﻟﺍ ﺪﻳﺮﺒﺘﻟﺍ ﺔﻤﻈﻧﺃ ﺪﺣﺄﺑ ﺩّﻭﺰﻣ ﺯﺎﻬﺠﻟﺍ
.ﻡﺎﻌﻄﻟﺍ ﻦﻳﺰﺨﺘﻟ ﺔﻟﺎﻌﻓ ﺔﻘﻳﺮﻃ ﻞﻀﻓﺃ
A.I.R. SYSTEM (Ariston Integrated Refrigeration)
ﻦﻣ ﻱﻮﻠﻌﻟﺍ ءﺰﺠﻟﺍ ﻰﻠﻋ ﺓﺩﻮﺟﻮﻤﻟﺍ ﻞﻤﻌﻟﺍ ﺔﻴﻟﺁ ﻞﻀﻔﺑ ﻪﻴﻠﻋ ﻑﺮﻌﺘﻟﺍ ﻦﻜﻤﻳ ﻡﺎﻈﻧ
.(ﻢﺳﺮﻟﺍ ﺮﻈﻧﺃ) ﺔﺟﻼﺜﻟﺍ ﺓﺮﺠﺣ
ﻝﻮﻃﺃ ﺓﺪﻤﻟ ﺔﺟﺯﺎﻃ ﺔﻤﻌﻃﻷﺍ ءﺎﻘﺑﻹ ﺔﺘﺑﺎﺛ ﺓﺭﺍﺮﺣ ﺔﺟﺭﺩ ﻰﻠﻋ .A.I.R ﻡﺎﻈﻧ ﻆﻓﺎﺤﻳ
ﻰﻠﻋ ﺏﺎﺒﻟﺍ ﺢﺘﻓ ﻢﺗ ﻥﺇﻭ ﻰﺘﺣ ،ﻲﻟﺎﺤﻟﺍ ﻯﻮﺘﺴﻤﻟﺍ ﻰﻟﺇ ﺓﺭﺍﺮﺤﻟﺍ ﺔﺟﺭﺩ ﺩﺍﺩﺮﺘﺳﺍ ﺓﺩﺎﻋﺇﻭ
ﺚﻴﺣ ،ﺩﺭﺎﺒﻟﺍ ﺭﺍﺪﺠﻟﺍ ﺲﻣﻼﻳ ﺎﻣﺪﻨﻋ (A) ﺥﻮﻔﻨﻤﻟﺍ ءﺍﻮﻬﻟﺍ ﺪﻳﺮﺒﺗ ﻢﺘﻳ :ﺔﺑﺭﺎﻘﺘﻣ ﺕﺍﺮﺘﻓ
.(ﻢﺳﺮﻟﺍ ﺮﻈﻧﺍ) (B) ﻦﺧﺎﺴﻟﺍ ءﺍﻮﻬﻟﺍ ﺹﺎﺼﺘﻣﺍ ﻢﺘﻳ
ﻥﺎﻛ ﺍﺫﺇ ﺎﻣ ﺐﺴﺣ ﻚﻟﺫﻭ ،ءﺎﻤﻟﺍ ﺕﺍﺮﻄﻘﺑ ﻭﺃ ﺪﻴﻠﺠﻟﺎﺑ ﻰﻄﻐُﻳ ﻥﺃ ﻲﻔﻠﺨﻟﺍ ﺭﺍﺪﺠﻠﻟ ﻦﻜﻤﻳ
.ﻒﻗﻮﺘﻣ ﻪﻧﺃ ﻡﺃ ﻞﻤﻌﻳ ﻂﻐﻀﻟﺍ ﻡﺎﻈﻧ
ﻦﻛﺎﺳ
ﻲﻠﺧﺍﺪﻟﺍ ﺭﺍﺪﺠﻟﺍ ﻲﻓ ﺎﻬﻴﻓ ﺪﻳﺮﺒﺘﻟﺍ ءﺰﺟ ﻥﻮﻜﻳ .A.I.R ﻡﺎﻈﻨﺑ ﺓﺩﻭﺰﻤﻟﺍ ﺮﻴﻏ ﺕﺍﺯﺍﺮﻄﻟﺍ
ﺍﺫﺇ ﺎﻣ ﺐﺴﺣ ﻚﻟﺫﻭ ءﺎﻤﻟﺍ ﺕﺍﺮﻄﻘﺑ ﻭﺃ ﺪﻴﻠﺠﻟﺎﺑ ﺭﺍﺪﺠﻟﺍ ﻰﻄﻐُﻴﺳ .ﺕﺍﺮﺠﺤﻟﺍ ﻦﻣ ﻲﻔﻠﺨﻟﺍ
ﻥﺎﻛ ﺍﺫﺇ .ﻥﺎﺘﻴﻌﻴﺒﻃ ﻥﺎﺘﻟﺎﺣ ﺎﻤﻫ ﻥﺎﺗﻻﺎﺤﻟﺍ .ﻒﻗﻮﺘﻣ ﻪﻧﺃ ﻡﺃ ﻞﻤﻌﻳ ﻂﻐﻀﻟﺍ ﻡﺎﻈﻧ ﻥﺎﻛ
ﺕﺎﻴﻤﻛ ﺔﺟﻼﺜﻟﺍ ﻲﻓ ﺪﺟﻮﺗﻭ ﺔﻴﻟﺎﻋ ﻢﻴﻗ ﻰﻟﺇ ﻪﻄﺒﺿ ﻢﺗ ﺪﻗ ﺓﺭﺍﺮﺤﻟﺍ ﺔﺟﺭﺩ ﻂﺒﺿ ﺡﺎﺘﻔﻣ
ﻞﻜﺸﺑ ﻞﻤﻌﻳ ﻥﺃ ﺯﺎﻬﺠﻠﻟ ﻦﻜﻤﻳ ،ﺔﻌﻔﺗﺮﻣ ﺔﺌﻴﺒﻟﺍ ﺓﺭﺍﺮﺣ ﺔﺟﺭﺩﻭ ﺔﻤﻌﻃﻷﺍ ﻦﻣ ﺓﺮﻴﺒﻛ
ﻦﻋ ﺾﻳﻮﻌﺘﻟﺍ ﻦﻜﻤﻳ .ﺔﻗﺎﻄﻠﻟ ﺍﺮﻴﺒﻛ ﺎﻛﻼﻬﺘﺳﺍﻭ ﺪﻴﻠﺠﻟﺍ ﻦﻣ ﺎﻀﺋﺎﻓ ﺞﺘﻨﻳ ﺎﻤﻣ ،ﻞﺻﺍﻮﺘﻣ
.(ﺎﻴﻜﻴﺗﺎﻣﻮﺗﻭﺃ ﻢﺘﻴﺳ ﺪﻴﻠﺠﻟﺍ ﻥﺎﺑﻭﺫ) ﺔﻀﻔﺨﻨﻣ ﺕﺎﻳﻮﺘﺴﻣ ﻩﺎﺠﺗﺎﺑ ﺡﺎﺘﻔﻤﻟﺍ ﺓﺭﺍﺩﺈﺑ ﻚﻟﺫ
ﻰﻟﺇ ﺓﺩﻭﺮﺑ ﺮﺜﻛﻷﺍ ءﺍﻮﻬﻟﺍ ﻞﻴﻤﻳ :ﺔﻴﻌﻴﺒﻃ ﺔﻘﻳﺮﻄﺑ ءﺍﻮﻬﻟﺍ ﺮﺸﺘﻨﻳ ﺔﻨﻛﺎﺴﻟﺍ ﺓﺰﻬﺟﻷﺍ ﻲﻓ
:ﻲﻟﺎﺘﻟﺍ ﻮﺤﻨﻟﺍ ﻰﻠﻋ ﻡﺎﻌﻄﻟﺍ ﻦﻳﺰﺨﺗ ﺐﺠﻳ .ﻞﻘﺛﺃ ﻪﻧﻮﻜﻟ ﻞﻔﺳﻷﺍ ﻰﻟﺇ ﻁﻮﺒﻬﻟﺍ
ﻡﺎﻌﻄﻟﺍ ﻉﻮﻧﺔﺟﻼﺜﻟﺍ ﻞﺧﺍﺩ ﻪﺒﻴﺗﺮﺗ
ﺔﺟﺯﺎﻄﻟﺍ ﻡﻮﺤﻠﻟﺍﻭ ﻙﺎﻤﺳﻷﺍﺭﺎﻀﺨﻟﺍﻭ ﻪﻛﺍﻮﻔﻟﺍ ﺝﺍﺭﺩﺃ ﻕﻮﻓ
ﺔﺟﺯﺎﻄﻟﺍ ﻥﺎﺒﺟﻷﺍﺭﺎﻀﺨﻟﺍﻭ ﻪﻛﺍﻮﻔﻟﺍ ﺝﺍﺭﺩﺃ ﻕﻮﻓ
ﺔﺧﻮﺒﻄﻤﻟﺍ ﺔﻤﻌﻃﻷﺍﻑﺭ ﻱﺃ ﻕﻮﻓ
،ﺰﺒﺨﻟﺍ ﺔﻔﻏﺭﺃ ،ﻲﻣﻼﺴﻟﺍ
ﺔﻃﻻﻮﻛﻮﺸﻟﺍ
ﻑﺭ ﻱﺃ ﻕﻮﻓ
ﺭﺎﻀﺨﻟﺍﻭ ﻪﻛﺍﻮﻔﻟﺍﺭﺎﻀﺨﻟﺍﻭ ﻪﻛﺍﻮﻔﻟﺍ ﺝﺍﺭﺩﺃ ﻲﻓ
ﺾﻴﺒﻟﺍﺺﺼﺨﻤﻟﺍ ﻑﺮﻟﺍ ﻰﻠﻋ
ﻦﻳﺮﺟﺮﻤﻟﺍﻭ ﺓﺪﺑﺰﻟﺍﺺﺼﺨﻤﻟﺍ ﻑﺮﻟﺍ ﻰﻠﻋ
ﺐﻴﻠﺤﻟﺍ ،ﺕﺎﺑﻭﺮﺸﻤﻟﺍ ،ﺕﺎﺟﺎﺟﺰﻟﺍﺺﺼﺨﻤﻟﺍ ﻑﺮﻟﺍ ﻰﻠﻋ
A
B

37
AR
ﺔﻘﺤﻠﻤﻟﺍ ﺕﺍﻭﺩﻷﺍ
ﺔﺟﻼﺜﻟﺍ ﺓﺮﺠﺣ
.ﺎﻬﻧﻭﺪﺑ ﻭﺃ ﺔﻜﺒﺷ ﻊﻣ :ﻑﻮﻓﺮﻟﺍ
ﻑﻮﻓﺮﻟﺍ ﻥﺈﻓ ،ﺓﺰﻴﻤﻤﻟﺍ ﻪﻴﺟﻮﺘﻟﺍ ﺕﺍﺭﺎﺴﻣ ﻞﻀﻔﺑ
،(ﻢﺳﺮﻟﺍ ﺮﻈﻧﺍ) ﺎﻬﻋﺎﻔﺗﺭﺍ ﻂﺒﺿﻭ ﺔﻟﺍﺯﻺﻟ ﺔﻠﺑﺎﻗ
ﺓﺮﻴﺒﻜﻟﺍ ﺕﺍﻮﺒﻌﻟﺍ ﻦﻳﺰﺨﺗ ﺔﻟﻮﻬﺳ ﺮﻓﻮﻳ ﻱﺬﻟﺍ ﺮﻣﻷﺍ
ﺔﻟﺍﺯﺇ ﻥﻭﺩ ﻉﺎﻔﺗﺭﻻﺍ ﻂﺒﺿ ﻦﻜﻤﻳ .ﺔﻤﻌﻃﻷﺍﻭ
.ﻪﻠﻤﻛﺄﺑ ﻑﺮﻟﺍ
ﺓﺭﺍﺮﺣ ﺔﺟﺭﺩ ﻞﻀﻔﺑ .ﺔﺟﺯﺎﻄﻟﺍ ﻙﺎﻤﺳﻷﺍﻭ ﻡﻮﺤﻠﻟ :
*
ﺔﺟﺯﺎﻄﻟﺍ ﺔﻤﻌﻃﻷﺍ ﻕﻭﺪﻨﺻ
ﻱﺬﻟﺍ ﻑﺎﻔﺸﻟﺍ ﺏﺎﺒﻟﺍ ﻞﻀﻔﺑﻭ (ﺓﺩﻭﺮﺑ ﺔﺟﻼﺜﻟﺍ ﺕﺍﺮﺠﺣ ﺮﺜﻛﺃ) ﺔﻀﻔﺨﻨﻤﻟﺍ ﺓﺮﺠﺤﻟﺍ
.ﺪﺣﺍﻭ ﻉﻮﺒﺳﺃ ﻰﺘﺣ ﺔﻤﻌﻃﻷﺍ ﻦﻳﺰﺨﺗ ﻦﻜﻤﻳ ،ﺩﺍﺩﻮﺳﻻﺍﻭ ﺪﺴﻛﺄﺘﻟﺍ ﻦﻣ ﺔﻳﺎﻤﺣ ﺮﻓﻮﻳ
.“ﺓﺩﺭﺎﺒﻟﺍ ﺕﺎﺒﺟﻮﻠﻟ” ﺎﻀﻳﺃ ﻪﻣﺍﺪﺨﺘﺳﺍ ﻦﻜﻤﻳ
ﻲﻓ ﺎﻬﻟﻭﺎﻨﺗ ﻢﺘﻳ ﻲﺘﻟﺍ ﺔﻤﻌﻃﻷﺍ ﻥﺰﺨﻟ ﻰﻠﺜﻤﻟﺍ ﺔﻳﻭﺎﺤﻟﺍ ﻲﻫ ﻩﺬﻫ :
*
ﺭﻮﻄﻔﻟﺍ ﻕﻭﺪﻨﺻ
ﻲﺘﻟﺍ ﺔﻤﻌﻃﻷﺍ ﻢﻳﺪﻘﺘﻟ ﺭﻮﻄﻔﻟﺍ ﺔﻟﻭﺎﻃ ﻰﻠﻋ ﺎﻬﻣﺍﺪﺨﺘﺳﺍﻭ ﺎﻬﺘﻟﺍﺯﺇ ﻦﻜﻤﻳ .ﺭﻮﻄﻔﻟﺍ ﺔﺒﺟﻭ
ﻦﻜﻤﻳ .ﺰﻴﻤﻤﻟﺍ ﺔﻳﻭﺎﺤﻟﺍ ﻢﻴﻤﺼﺗ ﻞﻀﻔﺑ ﻝﻮﻃﺃ ﺖﻗﻮﻟ ﺎﻬﺗﺭﺍﺮﺣ ﺔﺟﺭﺩ ﻰﻠﻋ ﻅﺎﻔﺤﻟﺍ ﻢﺘﻴﺳ
ﻦﻜﻤﻳ .ﺔﻟﻮﻬﺴﺑ ﺓﺩﻭﺰﻤﻟﺍ ﺕﺎﻜﺴﻤﻟﺍ ﻡﺍﺪﺨﺘﺳﺎﺑ ﻚﻟﺫﻭ ،ﺔﻴﻠﻤﻋ ﺔﻴﻨﻴﺼﻛ ءﺎﻄﻐﻟﺍ ﻡﺍﺪﺨﺘﺳﺍ
ﻅﺎﻔﺤﻟﺍ ﺐﺠﻳ ﻲﺘﻟﺍ ﺔﻤﻌﻃﻷﺍ ﺕﺎﺠﺘﻨﻤﻟ ،ﻡﻮﺤﻠﻟ ﺔﻳﻭﺎﺤﻛ ﺎﻀﻳﺃ ﺭﻮﻄﻔﻟﺍ ﻕﻭﺪﻨﺻ ﻡﺍﺪﺨﺘﺳﺍ
.ﺢﻴﺤﺻ ﻞﻜﺸﺑ ﺎﻬﻨﻳﺰﺨﺗ ﻑﺪﻬﺑ ﺍﺪﻴﺟ ﺎﻬﻴﻠﻋ
1
2
ﻂﻘﻓ ﺔﻨﻴﻌﻣ ﺕﺍﺯﺍﺮﻃ ﻲﻓ ﺮﻓﻮﺘﻣ
*
ﺕﺎﺟﺎﺟﺯ ﺙﻼﺛ ﻰﺘﺣ ﻦﻳﺰﺨﺘﻟ :
*
ﺬﻴﺒﻨﻟﺍ ﺔﻘﻄﻨﻣ
ﻦﻴﺑ ءﺍﻮﻬﻟﺍ ﻉﺯﻮﺘﻳ .(ﻢﺳﺮﻟﺍ ﺮﻈﻧﺍ) ﺬﻴﺒﻨﻟﺍ ﻦﻣ
.ﻊﻳﺮﺴﻟﺍ ﺪﻳﺮﺒﺘﻟﺍ ﻦﻤﻀﻳ ﺎﻤﻣ ﺮﺣ ﻞﻜﺸﺑ ﺕﺎﺟﺎﺟﺰﻟﺍ
ﺔﻌﺳ ﺓﺩﺎﻳﺰﻟ ﺎﻬﻘﻠﻏﺃ ،ﻡﺍﺪﺨﺘﺳﻻﺍ ﺪﻴﻗ ﻥﻮﻜﺗ ﻻ ﺎﻣﺪﻨﻋ
.ﻑﺮﻟﺍ

AR
38
ﺯﺎﻬﺠﻟﺍ ﻒﺻﻭ
ﺔﻣﺎﻋ ﺓﺮﻈﻧ
ﺮﺜﻛﻷﺍ ﺎﻳﺍﺰﻤﻟﺍ ﻝﻮﺣ .ﻩﺅﺍﺮﺷ ﻢﺗ ﻱﺬﻟﺍ ﺞﺘﻨﻤﻟﺍ ﻦﻋ ﺓﺮﺷﺎﺒﻣ ﺮﺒﻌﺗ ﻻﺃ ﻡﻮﺳﺮﻠﻟ ﻦﻜﻤﻳ .ﺕﺎﺟﻼﺜﻟﺍ ﻦﻣ ﺔﻔﻠﺘﺨﻣ ﺕﺍﺯﺍﺮﻄﻟ ﺔﻤﺋﻼﻣ ﻥﻮﻜﺗ ﻥﺃ ﻦﻜﻤﻳ ﻞﻴﻟﺪﻟﺍ ﺍﺬﻫ ﺎﻬﻳﻮﺘﺤﻳ ﻲﺘﻟﺍ ﺕﺎﻤﻴﻠﻌﺘﻟﺍ
.ﺔﻴﻟﺎﺘﻟﺍ ﺕﺎﺤﻔﺼﻟﺍ ﺮﻈﻧﺍ ،ﺍﺪﻴﻘﻌﺗ
.ﻊﺿﻮﻤﻟﺍ ﻭﺃ/ﻭ ﻢﻗﺮﻟﺍ ﺐﺴﺣ ﺮﻴﻐﺘﺗ
•
ﻂﻘﻓ ﺔﻨﻴﻌﻣ ﺕﺍﺯﺍﺮﻃ ﻲﻓ ﺮﻓﻮﺘﻣ
*
ﺔﻟﺍﺯﻺﻟ ﻞﺑﺎﻗ ﻰﻄﻐﻣ ﻑﺭ
ﺾﻴﺒﻠﻟ ﺔﻴﻨﻴﺼﺑ ﺩﻭﺰﻣ
ﺓﺩﺪﻌﺘﻣ ﻑﻮﻓﺭ
•ﺔﻟﺍﺯﻺﻟ ﺔﻠﺑﺎﻗ ﻑﺍﺪﻫﻷﺍ
•ﺕﺎﺟﺎﺟﺰﻟﺍ ّﻑﺭ
ﺔﻤﻌﻃﻷﺍ ﻕﻭﺪﻨﺻ ﺓﺮﺠﺣ
*
ﺔﺟﺯﺎﻄﻟﺍ
ﺓﺭﺍﺮﺤﻟﺍ ﺔﺟﺭﺪﺑ ﻢﻜﺤﺘﻟﺍ
•ﻑﻮﻓﺭ
ﺭﺎﻀﺨﻟﺍﻭ ﻪﻛﺍﻮﻔﻟﺍ ﺝﺭٌﺩ
ﻉﺎﻔﺗﺭﻻﺍ ﺪﻳﺪﺤﺗ ﻞﺟﺭﺃ
ﻦﻳﺰﺨﺘﻟﺍﻭ ﺪﻴﻤﺠﺘﻟﺍ ﺓﺮﺠﺣ
*
ﺞﻠﺜﻟﺍ ﺔﻴﻨﻴﺻ
*
ﺔﻴﻧﺪﻌﻤﻟﺍ ﺐﻠﻌﻟﺍ ﻞﻣﺎﺣ

39
AR
ﺐﻴﻛﺮﺘﻟﺍ
ﺱﺎﻜﻌﻧﻼﻟ ﺔﻠﺑﺎﻗ ﺏﺍﻮﺑﺍ
1
2
3
4
5
ﺕﺎﻤﻴﻠﻌﺗ ﺃﺮﻗﺍ ءﺎﺟﺮﻟﺍ ،ﻪﻴﻓ ﻞﻤﻌﻴﺳ ﻱﺬﻟﺍ ﻥﺎﻜﻤﻟﺍ ﻲﻓ ﺪﻳﺪﺠﻟﺍ ﻙﺯﺎﻬﺟ ﻊﺿﻭ ﻞﺒﻗ !
ﺐﻴﻛﺮﺘﻟ ،ﻦﻣﻵﺍ ﻡﺍﺪﺨﺘﺳﻼﻟ ﺔﻣﺎﻫ ﺕﺎﻣﻮﻠﻌﻣ ﻰﻠﻋ ﻱﻮﺘﺤﺗ ﺎﻬﻧﺇ .ﺔﻳﺎﻨﻌﺑ ﻩﺬﻫ ﻞﻴﻐﺸﺘﻟﺍ
.ﻪﺑ ﺔﻳﺎﻨﻌﻟﺍﻭ ﺯﺎﻬﺠﻟﺍ
ﻰﻟﺇ ﺎﻬﻠﻳﻮﺤﺘﺑ ﻢﻗ .ﻞﺒﻘﺘﺴﻤﻟﺍ ﻲﻓ ﺎﻬﺘﻌﺟﺍﺮﻤﻟ ﻩﺬﻫ ﻞﻴﻐﺸﺘﻟﺍ ﺕﺎﻣﻮﻠﻌﻤﺑ ﻅﺎﻔﺘﺣﻻﺍ ءﺎﺟﺮﻟﺍ !
.ﻦﻴﻨﻜﻤﻤﻟﺍ ﺩﺪﺠﻟﺍ ﺯﺎﻬﺠﻟﺍ ﻲﻜﻟﺎﻣ
ﻞﻴﺻﻮﺘﻟﺍﻭ ﻊﺿﻮﻤﻟﺍ ﺪﻳﺪﺤﺗ
ﻊﺿﻮﻤﻟﺍ ﺪﻳﺪﺤﺗ
.ﺔﺑﻮﻃﺮﻟﺍ ﻦﻣ ﺔﻴﻟﺎﺧﻭ ﺓءﻮﻬﺘﻟﺍ ﺓﺪﻴﺟ ﺔﻓﺮﻏ ﻲﻓ ﺯﺎﻬﺠﻟﺍ ﻊﺿ .1
ﺎﻤﻫﻭ ﺓﺭﺍﺮﺤﻟﺍ ﻒّﺜﻜﻤﻟﺍﻭ ﻂﻐﻀﻟﺍ ﻡﺎﻈﻧ ﻖﻠﻄﻳ .ﺔﻴﻔﻠﺨﻟﺍ ﺔﺣﻭﺮﻤﻟﺍ ﺕﺎﻜﺒﺷ ﺪﺴﺗ ﻻ .2
.ﺔﻗﺎﻄﻟﺍ ﺮﻴﻓﻮﺘﻟﻭ ﺢﻴﺤﺻ ﻞﻜﺸﺑ ﻼﻤﻌﻴﻟ ﺓﺪﻴﺟ ﺓءﻮﻬﺗ ﻰﻟﺇ ﻥﺎﺟﺎﺘﺤﻳ
ﺙﺎﺛﺃ ﻱﺃ ﻦﻴﺑﻭ ﺯﺎﻬﺠﻟﺍ ﻦﻣ ﻱﻮﻠﻌﻟﺍ ءﺰﺠﻟﺍ ﻦﻴﺑ ﻢﺳ 10 ﻦﻋ ﻞﻘﺗ ﻻ ﺔﻓﺎﺴﻣ ﻙﺮﺗﺍ .3
.ﺔﻴﺒﻧﺎﺟ ﻥﺍﺭﺪﺟ/ﺙﺎﺛﺃ ﻱﺃﻭ ﺯﺎﻬﺠﻟﺍ ﺐﻧﺍﻮﺟ ﻦﻴﺑ ﻞﻗﻷﺍ ﻰﻠﻋ ﻢﺳ 5 ﻭ ،ﻪﻗﻮﻓ ﺩﻮﺟﻮﻣ
ﺓﺄﻓﺪﻣ ،ﺓﺮﺷﺎﺒﻤﻟﺍ ﺲﻤﺸﻟﺍ ﺔﻌﺷﺃ) ﺔﻳﺭﺍﺮﺣ ﺭﺩﺎﺼﻣ ﻱﺃ ﻦﻋ ﺪﻴﻌﺑ ﺯﺎﻬﺠﻟﺍ ﻥﺃ ﻦﻣ ﺪﻛﺄﺗ .4
.(ﻚﻟﺫ ﻪﺑﺎﺷ ﺎﻣﻭ ﺔﻴﺋﺎﺑﺮﻬﻛ
ﻢﻗ ،ﻪﻔﻠﺧ ﺩﻮﺟﻮﻤﻟﺍ ﻂﺋﺎﺤﻟﺍﻭ ﺯﺎﻬﺠﻟﺍ ﻦﻴﺑ ﺔﺤﻴﺤﺼﻟﺍ ﺔﻓﺎﺴﻤﻟﺍ ﻰﻠﻋ ﻅﺎﻔﺤﻟﺍ ﻑﺪﻬﺑ .5
ﺕﺎﻤﻴﻠﻌﺘﻟﺍ ﻉﺎﺒﺗﺎﺑ ،ﺐﻴﻛﺮﺘﻟﺍ ﺔﻣﺰﺤﺑ ﺓﺩﻭﺰﻤﻟﺍ ﺔﻓﺎﺴﻤﻟﺍ ﻰﻠﻋ ﻅﺎﻔﺤﻟﺍ ﻊﻄﻗ ﻊﺿﻮﺑ
.ﺓﺩّﻭﺰﻤﻟﺍ
ﻉﺎﻔﺗﺭﻻﺍ ﺪﻳﺪﺤﺗ
.ﺔﺒﻠﺻ ﺔﻴﺿﺭﺃﻭ ﻮﺘﺴﻣ ﺢﻄﺴﻣ ﻰﻠﻋ ﺯﺎﻬﺠﻟﺍ ﺐّﻛﺭ .1
ﺮﻳﺮﺤﺗ ﻭﺃ ّﺪﺷ ﺔﻄﺳﺍﻮﺑ ﺔﺟﻼﺜﻟﺍ ﻂﺒﻀﺑ ﻢﻗ ،ﺎﻣﺎﻤﺗ ﺔﻴﻘﻓﺃ ﺔﻴﺿﺭﻷﺍ ﻦﻜﺗ ﻢﻟ ﺍﺫﺇ .2
.ﺔﻴﻣﺎﻣﻷﺍ ﻞﺟﺭﻷﺍ
ﺔﻴﺋﺎﺑﺮﻬﻜﻟﺍ ﺕﻼﻴﺻﻮﺘﻟﺍ
ﻪﻠﻴﺻﻮﺗ ﻞﺒﻗ ﻞﻗﻷﺍ ﻰﻠﻋ ﺕﺎﻋﺎﺳ 3 ﺓﺪﻤﻟ ﺮﻈﺘﻧﺍﻭ ﺎﻳﺩﻮﻤﻋ ﻪﻌﺿ ،ﺯﺎﻬﺠﻟﺍ ﻞﻘﻧ ﺪﻌﺑ
:ﻲﻟﺎﺘﻟﺍ ﻦﻣ ﺪﻛﺄﺗ ﻲﺋﺎﺑﺮﻬﻜﻟﺍ ﺲﺒﻘﻤﻟﺍ ﻲﻓ ﺲﺑﺎﻘﻟﺍ ﻝﺎﺧﺩﺇ ﻞﺒﻗ .ﺔﻴﺋﺎﺑﺮﻬﻜﻟﺍ ﺔﻜﺒﺸﻟﺎﺑ
.ﻥﻮﻧﺎﻘﻠﻟ ﻦﻋﺬﻳ ﺲﺑﺎﻘﻟﺍ ﻥﺃﻭ ﺽﺭﺆﻣ ﺯﺎﻬﺠﻟﺍ ﻥﺃ •
ﺕﺎﻧﺎﻴﺒﻟﺍ ﺔﺣﻮﻟ ﻲﻓ ﻪﻴﻟﺇ ﺭﺎﺸﻤﻟﺍ ،ﺯﺎﻬﺠﻟﺍ ﺔﻗﺎﻃ ﻦﻣ ﻰﺼﻗﻷﺍ ﺪﺤﻠﻟ ﻡﻭﺎﻘﻣ ﺲﺒﻘﻤﻟﺍ ﻥﺃ •
.(ﻁﺍﻭ 150 ﻼﺜﻣ) ﺔﺟﻼﺜﻟﺍ ﻦﻣ ﻯﺮﺴﻴﻟﺍ ﺔﻴﻠﻔﺴﻟﺍ ﺔﻬﺠﻟﺍ ﻲﻓ ﺓﺩﻮﺟﻮﻤﻟﺍ
ﺕﺎﻧﺎﻴﺒﻟﺍ ﺔﺣﻮﻟ ﻲﻓ ﺎﻬﻴﻟﺇ ﺭﺎﺸﻤﻟﺍ ﻢﻴﻘﻟﺍ ﻦﻴﺑ ﺎﻣ ﺡﻭﺍﺮﺘﻳ ﻥﺃ ﺐﺠﻳ ﻲﺋﺎﺑﺮﻬﻜﻟﺍ ﺪﻬﺠﻟﺍ ﻥﺃ •
.(ﻁﺍﻭ 220-240 ﻼﺜﻣ) ﻯﺮﺴﻴﻟﺍ ﺔﻴﻠﻔﺴﻟﺍ ﺔﻬﺠﻟﺍ ﻲﻓ ﺓﺩﻮﺟﻮﻤﻟﺍ
.ﺯﺎﻬﺠﻟﺍ ﺲﺑﺎﻗ ﻊﻣ ﻖﻓﺍﻮﺘﻣ ﺲﺒﻘﻤﻟﺍ ﻥﺃ •
.ﻩﺮﻴﻴﻐﺘﺑ ﻡﻮﻘﻳ ﻥﺃ ﻞﻫﺆﻣ ّﻲﻨﻓ ﻦﻣ ﺐﻠﻃﺍ ،ﺲﺑﺎﻘﻟﺍ ﻊﻣ ﺎﻘﻓﺍﻮﺘﻣ ﺲﺒﻘﻤﻟﺍ ﻦﻜﻳ ﻢﻟ ﺍﺫﺇ
.ﺓﺩﺪﻌﺘﻤﻟﺍ ﺲﺑﺎﻘﻤﻟﺍ ﻭﺃ ﺪﻳﺪﻤﺘﻟﺍ ﺕﻼﺒﻛ ﻡﺪﺨﺘﺴﺗ ﻻ .(ﺓﺪﻋﺎﺴﳌﺍ ﺮﻈﻧﺍ)
ﻲﺋﺎﺑﺮﻬﻜﻟﺍ ﺲﺒﻘﻤﻟﺍﻭ ﺔﻗﺎﻄﻟﺍ ﺪﻳﻭﺰﺗ ﻞﺒﻛ ﻥﻮﻜﻳ ﻥﺃ ﺐﺠﻳ ،ﺯﺎﻬﺠﻟﺍ ﺐﻴﻛﺮﺗ ﻢﺗ ﻥﺃ ﺪﻌﺑ !
.ﻞﻬﺴﻟﺍ ﻝﻮﺻﻮﻠﻟ ﻦﻴﻠﺑﺎﻗ
.ﺎﻃﻮﻐﻀﻣ ﻭﺃ ﺎﺟﻮﻌﻣ ﻥﻮﻜﻳ ﻻﺃ ﻞﺒﻜﻟﺍ ﻰﻠﻋ !
.(ﺓﺪﻋﺎﺴﳌﺍ ﺮﻈﻧﺍ) ﻂﻘﻓ ﻞﻫﺆﻣ ﻲّﻨﻓ ﻞﺒﻗ ﻦﻣ ﻪﻠﻳﺪﺒﺗﻭ ﻡﺎﻈﺘﻧﺎﺑ ﻞﺒﻜﻟﺍ ﺺﺤﻓ ﺐﺠﻳ !
.ﻩﺬﻫ ﺔﻳﺎﻗﻮﻟﺍ ﺮﻴﺑﺍﺪﺘﺑ ﺪﻴﻘﺘﻟﺍ ﻡﺪﻋ ﻝﺎﺣ ﻲﻓ ﺔﻴﻟﻭﺆﺴﻣ ﺔﻳﺃ ﻊﻨﺼﻤﻟﺍ ﻞﻤﺤﺘﻳ ﻻ !
∅ 3
mm

ﻦﻴﺑﺎﺑ ﺔﺟﻼﺛ
ﺕﺎﻳﻮﺘﺤﻤﻟﺍ
39 ،ﺐﻴﻛﺮﺘﻟﺍ
ﻞﻴﺻﻮﺘﻟﺍﻭ ﻊﺿﻮﻤﻟﺍ ﺪﻳﺪﺤﺗ
ﺱﺎﻜﻌﻧﻼﻟ ﺔﻠﺑﺎﻗ ﺏﺍﻮﺑﺃ
38 ،ﺯﺎﻬﺠﻟﺍﻒﺻﻭ
ﺔﻣﺎﻋ ﺓﺮﻈﻧ
37 ،ﺔﻘﺤﻠﻤﻟﺍﺕﺍﻭﺩﻷﺍ
35-36 ،ﻡﺍﺪﺨﺘﺳﻻﺍﻭ ﻞﻴﻐﺸﺘﻟﺍءﺪﺑ
ﺯﺎﻬﺠﻟﺍ ﻞﻴﻐﺸﺗ
ﺪﻳﺮﺒﺘﻟﺍ ﻡﺎﻈﻧ
ﺔﻠﻣﺎﻜﻟﺍ ﺎﻬﺗﺭﺪﻘﺑ ﺔﺟﻼﺜﻟﺍ ﻡﺍﺪﺨﺘﺳﺍ
ﺔﻠﻣﺎﻜﻟﺍ ﺎﻬﺗﺭﺪﻘﺑ ﺪﻳﺮﺒﺘﻟﺍ ﺓﺮﺠﺣ ﻡﺍﺪﺨﺘﺳﺍ
34 ،ﺔﻳﺎﻨﻌﻟﺍﻭﺔﻧﺎﻴﺼﻟﺍ
ﺯﺎﻬﺠﻟﺍ ﻞﻴﻐﺸﺗ ﻑﺎﻘﻳﺇ
ﺯﺎﻬﺠﻟﺍ ﻒﻴﻈﻨﺗ
ﺔﻬﻳﺮﻜﻟﺍ ﺢﺋﺍﻭﺮﻟﺍﻭ ﻦّﻔﻌﺘﻟﺍ ﻲﺷﺎﺤﺗ
ﺯﺎﻬﺠﻟﺍ ﺪّﻤﺠﺗ ﺐﻳﻭﺬﺗ
ﺓﺭﺎﻧﻹﺍ ﺡﺎﺒﺼﻣ ﻞﻳﺪﺒﺗ
33 ،ﺢﺋﺎﺼﻧﻭﺭﺬﺣﻞﺋﺎﺳﻭ
ﺔﻣﺎﻌﻟﺍ ﺔﻳﺎﻗﻮﻟﺍ
ﺺﻠﺨﺘﻟﺍ
ﺎﻬﻴﻠﻋ ﻅﺎﻔﺤﻟﺍﻭ ﺔﺌﻴﺒﻟﺍ ﻡﺍﺮﺘﺣﺍ
32،ﺎﻬﻠﺣﻭ ﻞﻛﺎﺸﻤﻟﺍ ﻑﺎﺸﻜﺘﺳﺍ
31 ،ﺓﺪﻋﺎﺴﻤﻟﺍ
Français, 11
40
،ﻲﺑﺮﻋ
English,1
GBF
AR
ES
Espanol, 21
MTM 1711 T
ﻞﻴﻐﺸﺘﻟﺍ ﺕﺎﻤﻴﻠﻌﺗ
195058112.00
04/2006 - ﺕﺎﻣﺪﺧ Xerox ﻱﺭﺎﺠﺘﻟﺍ ﻉﺎﻄﻘﻠﻟ
AR
40
-
 1
1
-
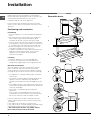 2
2
-
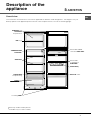 3
3
-
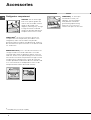 4
4
-
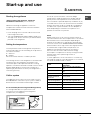 5
5
-
 6
6
-
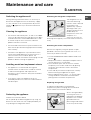 7
7
-
 8
8
-
 9
9
-
 10
10
-
 11
11
-
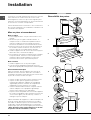 12
12
-
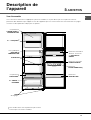 13
13
-
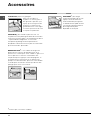 14
14
-
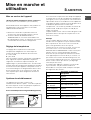 15
15
-
 16
16
-
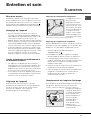 17
17
-
 18
18
-
 19
19
-
 20
20
-
 21
21
-
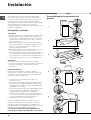 22
22
-
 23
23
-
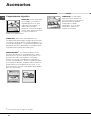 24
24
-
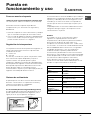 25
25
-
 26
26
-
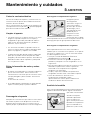 27
27
-
 28
28
-
 29
29
-
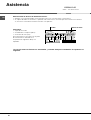 30
30
-
 31
31
-
 32
32
-
 33
33
-
 34
34
-
 35
35
-
 36
36
-
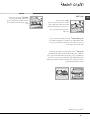 37
37
-
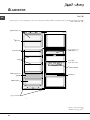 38
38
-
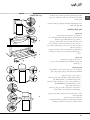 39
39
-
 40
40


Indesit MTM 1711 T Guía del usuario
- Categoría
- Frigoríficos-congeladores
- Tipo
- Guía del usuario
en otros idiomas
- français: Indesit MTM 1711 T Mode d'emploi
- English: Indesit MTM 1711 T User guide
Artículos relacionados
Otros documentos
-
Whirlpool BOZ 3031 V Guía del usuario
-
-
-
-
Whirlpool MTM 1722 V Guía del usuario
-
Whirlpool MBM 1832 Guía del usuario
-
-
-
Hotpoint-Ariston BDZ M 330 IX El manual del propietario
-