Glacier Bay VT3322G2 Guía de instalación
- Categoría
- Artículos sanitarios
- Tipo
- Guía de instalación
Este manual también es adecuado para

2019 V1

12
póngase en contacto con el 1-855-HD-GLACIER para asistencia adicional.
12

BB
BB
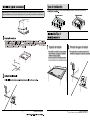
Undermount clip
(Not included)
HOMEDEPOT.COM/GLACIERBAY
If you need to use as under
www.homedepot.com/glacierbay.com.
-mount sink,
please buy a similar screw (BB)
11
(K)
K
póngase en contacto con el 1-855-HD-GLACIER para asistencia adicional.

10
póngase en contacto con el 1-855-HD-GLACIER para asistencia adicional.
2
2
2
2
2
2
2
2
2

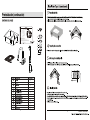
Advertencia: la hora de elegir la instalación lavabo contrario, Por favor no ponga las costillas se retiraron, causará
daños irreparables en el producto, por favor llame a un instalador profesional o distribuidor del gabinete de mármol /
cocina de instalar.
póngase en contacto con el 1-855-HD-GLACIER para asistencia adicional.
HOMEDEPOT.COM/GLACIERBAY

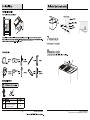
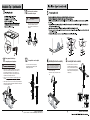
Securing the faucet assembly
Installing the faucet assembly
5
póngase en contacto con el 1-855-HD-GLACIER para asistencia adicional.
Cómo hacer las conexiones
del suministro de agua
□ Enrosca la tuerca (1) de la línea de suministro
en la salida de la válvula de suministro de
agua (2) y aprieta con una llave. No aprietes
demasiado.
NOTA:
con una etiqueta. Evita enroscar los cables juntos o
colocarlos cerca y evita dañarlos.
1
2
Cómo purgar las tuberías y
comprobar que no haya fugas
□ Retira del caño el ensamblaje de la manguera y retira el cabezal del
rociador desenroscándolo de la manguera en el sentido contrario a
las manecillas del reloj. Asegúrate de sostener el extremo de la
manguera hacia abajo en el fregadero y gira el grifo a la posición de
agua tibia donde mezcla el agua caliente y la fría.
□ Deja que corra el agua por un minuto. Esto enjuagará cualquier suciedad
aírdop euq
□ Vuelve a ajustar las conexiones que lo necesiten, pero sin apretar demasiado.
Vuelve a instalar el cabezal rociador ajustándolo manualmente en la manguera
del rociador de izquierda a derecha.
IMPORTANTE: Luego de terminar la instalación, abre los
□ Si es necesario, retira el conector rápido (1),
aprieta las pestañas (2) de la manguera y hala
hacia abajo para desconectar.
Aprieta
Hala
hacia
abajo
1
1
2
Cómo quitar el conector rápido
CAUTION: Always shut off the water supply before
removing an existing faucet or replacing any part of a
faucet. Open the faucet handle to relieve water pressure
and ensure that the water is completely shut off.
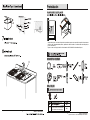
□ Shut off the water supply.
□ Insert the faucet body (L) through the hole in the
sink.
L
□ From underneath the sink, secure the faucet
assembly to the sink with the FastMount™
system (O). Push the FastMount™ system (O)
up over the threads until it stops against the
bottom of the sink, then hand turn (clockwise)
to tighten (Fig 1).
O
Push
up
O
O
2
Sink
Screw
Sink
3
Sink
Push
up
O
11
Fig 1
9
10
11
12
HOMEDEPOT.COM/GLACIERBAY

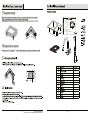
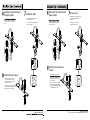
Attaching the quick connector to
the receiving block
Installing the weight
Installing the soap dispenser
Cómo montar el conector rápido al
bloque receptor
Instalar la peso
póngase en contacto con el 1-855-HD-GLACIER para asistencia adicional.
□
attach it to the receiving block (1). Pull down
moderately to ensure the connection has been
made.
P
1
P
□ Insert the weight (Q) onto the clip (R) by sliding
it down onto the clip (R).
□ Install the weight clip (R) at the point of the
hose marking “weight here”.
Weight
here
Weight
here
R
R
Q
Q
□ Insert the soap assembly (1) through the
selected hole in the sink. Secure the soap
assembly to the sink with the soap dispenser
mounting nut (2) provided.
□ soap dispenser eht wercs ,knis eht rednu morF
body (M) onto the soap assembly (1) shank. Insert the soap
pump (3) down into the soap assembly (1).
3
1
2
M
□
hacia arriba y fíjalo en el bloque receptor (1).
Hala hacia abajo ligeramente para asegurar
que la conexión es segura.
P
1
P
□ Inserta la peso (Q) en el sujetador (R)
deslizándola en el sujetador (R).
□ Instala el sujetador de la peso (R) en la punta
de la manguera marcada “weight here”
(peso aquí).
Weight
here
Weight
here
R
R
Q
Q
Cómo instalar el dispensador
de jabón
□ Inserta el ensamblaje para jabón (T) en el
el ensamblaje para jabón en el fregadero con
la tuerca de montaje incluida (U) para el
dispensador de jabón.
□ Desde abajo del fregadero, enrosca la botella
de jabón arap ejalbmasne led ogatsáv le ne )V(
jabón (T). Inserta la bomba para jabón (S) abajo
en el ensamblaje para el jabón (T).
S
T
U
V
HOMEDEPOT.COM/GLACIERBAY

Cómo instalar el ensamblaje del grifo
Making the water supply connections
Installing the sink
□
□
□
□
□
□
Thread the nut (1) on the supply line onto the
Apply silicone sealant (not included) around the underside and lip of the sink (A).
Carefully lower the sink (A) into the counter.
Attach the mounting clips (AA).
with the counter. Do not overtighten.
Wipe excess sealant with a rag.
outlet of the water supply valve (2) and tighten
with a wrench. Do not overtighten.
NOTE: The hot side inlet tube is indicated by a label. Avoid
twisting tubes together or placing the tubes close to each
other and damaging.
1
2
póngase en contacto con el 1-855-HD-GLACIER para asistencia adicional.
□ Cierra el suministro de agua.
□
del fregadero.
PRECAUCIÓN: Cierra siempre el suministro de agua
antes de retirar un grifo existente o reemplazar alguna
parte del mismo. Abre la llave del grifo para liberar la
presión de agua y asegúrate de que el suministro de agua
esté completamente cerrado.
N
Desde abajo del lavamanos, asegura el
conjunto del grifo a aquel con la sistema
FastMount™ (O). Empuja la sistema
FastMount™ (O) hacia arriba sobre las
roscas hasta que toque la parte inferior del
lavamanos. Enseguida gírala con la mano
(hacia la derecha) para ajustar (Fig. 1).
□
O
Lavamanos
Lavamanos
Tornillo
Empuja
hacia
arriba
Empuja
hacia
arriba
Lavamanos
Fig 1
O
11
O
O
2
3
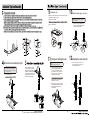
Flushing and checking for leaks
□ Pull the hose assembly out of the spout and
remove the spray head by unscrewing it from
the hose in a counterclockwise direction. Be
sure to hold the end of the hose down into the
sink and turn the faucet to the warm position
where it mixes hot and cold water.
□
away any debris that could cause damage to
internal parts. Check for leaks.
□ Re-tighten any connections if necessary, but do
not overtighten. Reinstall the spray head by hand
tightening it back onto the spray hose in a
clockwise direction.
IMPORTANT: After installation is completed, turn on the
hot and cold water supplies. Check for leaks.
12
Removing the quick connector
□ If it is necessary to remove the quick connector
(1), squeeze the tabs (2) on the quick connector
and then pull down to disconnect.
Squeeze
Pull
down
1
1
2
9 10
11
HOMEDEPOT.COM/GLACIERBAY

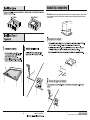
WARNING:
When you choose undermount style installation, please do not pull out the installation rail shown
here as pulling this rail out
póngase en contacto con el 1-855-HD-GLACIER para asistencia adicional.
will permanently damage the sink. It is strongly recommended that you have a professional installer install this sink for the undermount style.
A1 or A2,
(A1 or A2)
(A1 or A2)
(A1 or A2)
HOMEDEPOT.COM/GLACIERBAY

10
4
2
2
2
2
2
2
2
2
2
2
HOMEDEPOT.COM/GLACIERBAY

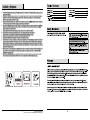
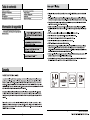
Compare todas las piezas con las listas de Herraje incluido y Contenido del paquete en este manual. Revise la superficie del
lavabo en busca
de defectos o daños, incluyendo abolladuras, dobleces, protuberancias o marcas de arañazos. Si se advierten daños o hacen falta piezas, no
.nóicalatsni al no
steps
c adecorp
Póngase en contacto con el Equipo de Servicio al Cliente llamando al 1-855-HD-GLACIER o visite www.HomeDepot.com
BB
B B
Contrarrestar la cuenca del tornillo
(no contiene)
Si lo que necesita hacer la cuenca del público,
tiene que adquirir un tornillo similares (BB)
11
(K)
póngase en contacto con el 1-855-HD-GLACIER para asistencia adicional.
K
HOMEDEPOT.COM/GLACIERBAY

12
12
HOMEDEPOT.COM/GLACIERBAY

-
 1
1
-
 2
2
-
 3
3
-
 4
4
-
 5
5
-
 6
6
-
 7
7
-
 8
8
-
 9
9
-
 10
10
-
 11
11
-
 12
12
-
 13
13


Glacier Bay VT3322G2 Guía de instalación
- Categoría
- Artículos sanitarios
- Tipo
- Guía de instalación
- Este manual también es adecuado para
En otros idiomas
Documentos relacionados
-
Glacier Bay HD67780-1008D2 Guía de instalación
-
-
Glacier Bay 67780-0008D2 Guía de instalación
-
-
-
-
-
-
-