
ROYAL
®
EpochESmanual0813
50 Hilton Street
Easton, PA 18042
Made in China
Hecho en China
ROYAL
®
Consumer Information Products, Inc.
© Copyright
Royal Consumer Information Products, Inc.
2013, All Rights Reserved.
Portable Manual Typewriter
Máquina de escribir portátil
Operation Manual
Manual de operaciones
Epoch
Epoch
Portable Manual Typewriter
Máquina de escribir portátil

10
Epoch máquina de escribir portátil
Epoch Portable Manual Typewriter
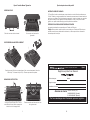
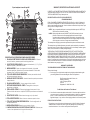
CARRYING CASE
UNPACKING INSTRUCTION
Slide the two case locks outward. Lift case top and remove the
typewriter.
Swing up Paper Support Bar. Pull out
and discard the two plastic carrage lock
blocks from the carrage frame.
Remove and discard the wire lock from
the type bar nest.
Gently grasp and lift the two upper edges of the cover and separate it from the
main body. Tilt forward as you lift up. Reverse procedure to replace.
1
COVER REMOVAL AND REPLACEMENT
INSTRUCCIONES DE CUIDADO
Tu Royal Epoch está construida para proporcionarte un servicio libre de problemas por
5 años. Cuidado y manejo apropiado son necesarios para mantener los mecanismos de
escritura y su cubierta. Evite manipulaciones agresivas. Limpie la cubierta con una toalla
de papel húmeda. No use agentes de limpieza ásperos. Utilice un cepillo de cerdas
rígidas o un cepillo de dientes antiguo para limpiar teclas metálicas.
ESTADO DE CALIFORNIA PROPOSICIÓN 65 PELIGRO
La siguiente declaración es requerida por el Estado de California.
Peligro: Este producto contiene químicos conocidos por el Estado de California que
pueden causar cáncer, problemas al nacimiento, o daños reproductivos. Lávese las
manos después de ocupar
Información de registro del producto
Epoch
Registre su producto en línea en:
Fecha de compra: Modelo:
Lugar de compra:
Lote/Numero de serie:
Por favor mantenga esta información para sus registros.
Atencion al cliente
1-800-272-6229 {US}
1-888-266-9380 {Canada}
01-800-849-4826 {Mexico}

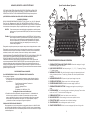
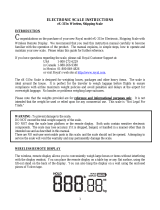
TYPEWRITER IDENTIFICATION AND OPERATION
1. CARRIAGE RETURN & LINE SPACE LEVER: Moves the carriage to the right
and advances page to the next line.
2. LINE SPACE SELECTOR: Sets line spacing to ( 1 ), ( 1.5 ), ( 2 ) spacing. Setting
( R ) platen release.
3. MARGIN STOP TABS: Sets the left and right margins by depressing tabs and
sliding to desired positions. The bell ring indicates five more keystrokes before
stopping.
4. MARGIN RELEASE KEY: Depress to type beyond margin stop tabs.
5. PAPER SUPPORT BAR: Raise support bar to hold paper upright.
6. PAPER RELEASE LEVER: Releases or secures page to platen roll.
7. CARRIAGE RELEASE BUTTON: Disengages carriage for repositioning on
page.
8. PLATEN KNOBS: Turn for inserting paper or advancing the page. Press center
button on the LEFT knob to obtain fine alignment.
9. RIBBON SELECTOR: Select from black, red or stencil type.
10. BACK SPACE KEY: Moves carriage in reverse one space at a time.
11. PRE-SET TAB KEY: Freestyle tabs for mulitipal tab settings.
12. SPACE BAR KEY: Moves carriage one space at a time.
13. SPACE REPEATER KEY: Hold to move carriage quickly down the type line.
2
Epoch Portable Manual Typewriter
GARANTÍA, REGISTRO & SOPORTE TÉCNICO
POR FAVOR COMPLETAR Y ENVIAR LA TARJETA DE REGISTRO de PRODUCTO
INCLUIDA CON SU NUEVO PRODUCTO ROYAL, O LLENA EL FORMULARIO DE
REGISTRO de PRODUCTO EN LA PAGINA WEB ROYAL EN: http: //www.royal.com.
¡ASEGÚRESE de GUARDAR UNA COPIA DE SU RECIBO de VENTAS!
GARANTÍA ESTÁNDAR
ROYAL CONSUMER INFORMATION PRODUCTS, INC. ("Royal"), en 1160 U.S. Highway 22
East, Suite 301, Bridgewater, NJ 08807 USA. GARANTIZA que su NUEVO Producto se
encuentra libre de defectos de funcionamiento y materiales. Si hay un defecto o una falla en el
funcionamiento de este producto, Royal lo reparará libre de cargo de acuerdo a lo siguiente:
PARTES: Partes nuevas o partes reacondicionadas comparables a cambio de partes
defectuosas por el periodo de NOVENTA (90) DIAS de la fecha de la compra
de cliente.
TRABAJO: Royal proporciona garantía de trabajo por NOVENTA (90) DIAS de la fecha
de la compra del usuario. El producto debe ser enviado y asegurado a Royal
de acuerdo con los procedimientos de garantía detallados más abajo. Al
terminar la reparación, el consumidor será responsable de los cargas de
envío de regreso desde Royal, y de cualquier parte o servicios ya no
cubiertos bajo la garantía.
Esta garantía no aplica a personas que compraron este producto de segunda mano o usado.
Esta garantía no incluye ajustes, partes y/o las reparaciones necesarias por circunstancias
más allá del control de Royal, inclusive pero no limitado a incendios ni otro acontecimiento,
accidente, descuido, abus
o, maltrato, uso anormal ni daños por daños de batería.
NO HAY NINGUNA OTRA GARANTÍA EXPRESA APARTE DE LA INDICADA AQUÍ. DESPUÉS
DEL PERÍODO DE GARANTÍA EXPRESADO AQUÍ, NO HAY NINGUNA GARANTÍA
EXPLÍCITA O IMPLÍCITA Y AQUELLOS EXCLUÍDOS INCLUYEN ESOS DE
COMERCIALIZACIÓN Y SALUD PARA UN PROPÓSITO PARTICULAR. Royal no será
asumida responsable de DAÑOS CONSECUENTES que resultan de algún fallo, defecto o
malfuncionamiento de este producto. Algunos Estados no permiten limitaciones sobre el
tiempo que una garantía implícita puede durar y algunos Estados no permiten la exclusión ni
la limitación de daños casuales ni consecuentes, por tanto las limitaciones antes mencionadas
pueden no aplicar en su caso.
PROCEDIMIENTOS de la GARANTÍA
Para OBTENER SERVICIO BAJO LOS TÉRMINOS DE ESTA GARANTÍA:
Por favor haga lo Siguiente:
1. Envíe una copia de su recibo original de ventas que muestra la fecha original de
la compra junto con su dirección de envío y una nota que describa la naturaleza
del problema a:
Royal Consumer Information Products, Inc.
Warranty Processing
1160 U.S. Highway 22 East
Suite 301
Bridgewater, NJ 08807-2931 USA
¡No Regrese el Producto a Esta Dirección!
2. Recibirá un número de autorización de regreso dentro de 7-12 días hábiles de
la fecha en que su petición fue recibida si es determinado que hay una base
para un recambio de producto. La forma de la autorización de regreso que usted
recibirá listará los procedimientos del regreso, los cargos aplicables, si aplica,
y la dirección correcta de envío para el regreso del producto.
LÍNEA de SOPORTE PARA EL PRODUCTO:
Para preguntas en el uso de este producto o esta garantía, llamar al +1-800-272-6229
(en Canadá 1-888-266-9380 o en México +(52-55-53-33-1333), lunes a viernes durante
las horas normales de oficina. Usted también puede enviar un correo electrónico a Royal
a: hotline@royal.com
9
1
2
3
20
3
4
5
6
7
8
9
10
11
12
13
14
15
16
8
18
19
17
14

14. TECLA DE MAYÚSCULAS: Presionar para tipear letras mayúsculas o
caracteres especiales.
15. BLOQUEO TECLA DE MAYÚSCULAS: Presionar para tipeo continuo en
letras mayúsculas o caracteres especiales. Desenganchar el bloqueo de
mayúsculas presionando cualquier tecla de mayúsculas.
16. PALANCA DE CONTROL DE IMPRESIÓN: Ajusta la presión del golpe de
tecla en el papel.
17. DIBUJO DE LÍNEAS: Inserte la punta de un lápiz en el agujero y presione la
barra espaciadora con repetición automática para dibujar líneas.
18. AJUSTADOR DE PAPEL: Mantiene el papel contra la placa y posee una regla
de medida de 21 cm.
19. AJUSTE Y ELIMINACIÓN DE TABULACIÓN: Para ajustar un límite de
tabulación mueva el control (+); para la eliminar un límite de tabulación presione la
tecla (11), y seleccione el control (-).
16. GUIADOR DEL PAPEL: Ajusta la presión del golpe de tecla en el papel.
CÓMO CAMBIAR LA CINTA
1. Remover la cubierta superior (Véase sección REMOCIÓN DE COBERTURA
para instrucciones)
.
2. Enrolle la cinta vieja en el carrete anterior y remuévala de los pinchos de soporte
(B) y guías de cinta (A).
3. Levante los carretes de los carros (C).
4.
Coloque los nuevos carretes de cinta en los carros (C) con el lado negro hacia
arriba.
5.
Rotar cada carrete hasta que el poste de carro este inserto en un agujero
debajo de cada carrete.
6. Enlazar cada cinta a través de los pinchos de soporte (B) y la guía de cinta central
(A) asegurándose que la ranura esté situada ante los pinchos de soporte (B).
7. Vuelva a colocar la cobertura.
8. Nota: La cinta se revertirá a sí misma cuando el carrete termine.
8
14. SHIFT KEY: Press for typing capital letters or special characters.
15. SHIFT LOCK KEY: Press for continuous typing in capital letters or special
characters. Disengage lock by pressing either Shift Key.
16. IMPRESSION CONTROL LEVER: Adjusts the pressure of the keystroke on the
paper.
17. LINE DRAWING: Insert pencil tip into hole and depress Space Repeater Key to
draw lines.
18. PAPER BAIL: Holds paper against platen and features 10 1/2” measuring ruler.
19. TAB SET AND CLEAR: For the setting of a tab stop move the (+) setting: for
the clearing of a tab stop by operation the tab key (11), and select (-) setting.
20. PAPER GUIDE: Will keep the edge of the paper flush to the left hand edge when
it is inserted.
Epoch Portable Manual Typewriter
Epoch máquina de escribir portátil
3
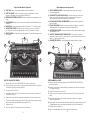
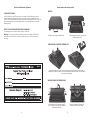
HOW TO CHANGE THE RIBBON
1. Remove top cover (see COVER REMOVAL section for instructions).
2. Wind old ribbon onto one spool. Swing back ribbon brake (D) and remove it from
the support forks (B) and ribbon guides (A)
3. Lift the spools off carriers (C).
4. Swing Back ribbon brake (D). Place the new ribbon spools onto the carriers (C)
black ribbon side up.
5. Rotate each spool until the carrier post is inserted into a hole under each spool.
6. Thread new ribbon through support forks (B) and center ribbon guide (A) making
sure ribbon eyelet is situated before the support fork (B).
7. Reattach cover.
8. Note: The ribbon will reverse itself when the spool ends.
E 3
A
B
D
B
D
C
C
A
B
B
C
C
La página se está cargando ...

5
Epoch Portable Manual Typewriter
Deslice los dos seguros hacia afuera. Levante la parte superior y remueva la
máquina de escribir.
Suavemente agarre y levante los dos extremos superiores de la cubierta. Ésta se
separará del cuerpo principal. Incline hacia adelante mientras levanta. Procedimiento
inverso para reemplazar.
Gire hacia arriba la Barra sujeta papel.
Tire y deseche los dos seguros plásticos
del bastidor del carro.
Remueva y deseche el seguro de
alambre de la cuna de teclas.
6
Epoch máquina de escribir portátil
INSTRUCCIONES DE DESEMPAQUE
CARE INSTRUCTIONS
Your Royal Epoch is built to provide you with years of trouble-free typing service.
Proper care and handling are necessary to maintain its typing mechanisms and
housing. Avoid rough handling. Clean housing with a damp paper towel. Do not use
harsh cleaning agents. Use a stiff bristle brush, or an old toothbrush, to clean the
metal type keys.
STATE OF CALIFORNIA PROPOSITION 65 WARNING
The following state is required by the State of California.
Warning: This product contains chemicals known to the State of California to
cause cancer, birth defects, or other reproductive harm. Wash hands after
handling.
REMOCIÓN DE CUBIERTA Y REEMPLAZO
MALETA
Epoch
Transcripción de documentos
Portable Manual Typewriter Máquina de escribir portátil Epoch ROYAL ® Portable Manual Typewriter Máquina de escribir portátil Operation Manual Manual de operaciones ROYAL ® Consumer Information Products, Inc. © Copyright Royal Consumer Information Products, Inc. 2013, All Rights Reserved. 50 Hilton Street Easton, PA 18042 EpochESmanual0813 Made in China Hecho en China Epoch Epoch máquina de escribir portátil Epoch Portable Manual Typewriter CARRYING CASE INSTRUCCIONES DE CUIDADO Tu Royal Epoch está construida para proporcionarte un servicio libre de problemas por 5 años. Cuidado y manejo apropiado son necesarios para mantener los mecanismos de escritura y su cubierta. Evite manipulaciones agresivas. Limpie la cubierta con una toalla de papel húmeda. No use agentes de limpieza ásperos. Utilice un cepillo de cerdas rígidas o un cepillo de dientes antiguo para limpiar teclas metálicas. ESTADO DE CALIFORNIA PROPOSICIÓN 65 PELIGRO La siguiente declaración es requerida por el Estado de California. Slide the two case locks outward. Lift case top and remove the typewriter. Peligro: Este producto contiene químicos conocidos por el Estado de California que pueden causar cáncer, problemas al nacimiento, o daños reproductivos. Lávese las manos después de ocupar COVER REMOVAL AND REPLACEMENT Información de registro del producto Gently grasp and lift the two upper edges of the cover and separate it from the main body. Tilt forward as you lift up. Reverse procedure to replace. � Registre su producto en línea en: Fecha de compra: UNPACKING INSTRUCTION Epoch Modelo: Lugar de compra: Lote/Numero de serie: Atencion al cliente 1-800-272-6229 {US} 1-888-266-9380 {Canada} 01-800-849-4826 {Mexico} Por favor mantenga esta información para sus registros. Swing up Paper Support Bar. Pull out and discard the two plastic carrage lock blocks from the carrage frame. Remove and discard the wire lock from the type bar nest. 1 10 Epoch Portable Manual Typewriter GARANTÍA, REGISTRO & SOPORTE TÉCNICO POR FAVOR COMPLETAR Y ENVIAR LA TARJETA DE REGISTRO de PRODUCTO INCLUIDA CON SU NUEVO PRODUCTO ROYAL, O LLENA EL FORMULARIO DE REGISTRO de PRODUCTO EN LA PAGINA WEB ROYAL EN: http: //www.royal.com. ¡ASEGÚRESE de GUARDAR UNA COPIA DE SU RECIBO de VENTAS! GARANTÍA ESTÁNDAR ROYAL CONSUMER INFORMATION PRODUCTS, INC. ("Royal"), en 1160 U.S. Highway 22 East, Suite 301, Bridgewater, NJ 08807 USA. GARANTIZA que su NUEVO Producto se encuentra libre de defectos de funcionamiento y materiales. Si hay un defecto o una falla en el funcionamiento de este producto, Royal lo reparará libre de cargo de acuerdo a lo siguiente: PARTES: Partes nuevas o partes reacondicionadas comparables a cambio de partes defectuosas por el periodo de NOVENTA (90) DIAS de la fecha de la compra de cliente. TRABAJO: Royal proporciona garantía de trabajo por NOVENTA (90) DIAS de la fecha de la compra del usuario. El producto debe ser enviado y asegurado a Royal de acuerdo con los procedimientos de garantía detallados más abajo. Al terminar la reparación, el consumidor será responsable de los cargas de envío de regreso desde Royal, y de cualquier parte o servicios ya no cubiertos bajo la garantía. Esta garantía no aplica a personas que compraron este producto de segunda mano o usado. Esta garantía no incluye ajustes, partes y/o las reparaciones necesarias por circunstancias más allá del control de Royal, inclusive pero no limitado a incendios ni otro acontecimiento, accidente, descuido, abuso, maltrato, uso anormal ni daños por daños de batería. NO HAY NINGUNA OTRA GARANTÍA EXPRESA APARTE DE LA INDICADA AQUÍ. DESPUÉS DEL PERÍODO DE GARANTÍA EXPRESADO AQUÍ, NO HAY NINGUNA GARANTÍA EXPLÍCITA O IMPLÍCITA Y AQUELLOS EXCLUÍDOS INCLUYEN ESOS DE COMERCIALIZACIÓN Y SALUD PARA UN PROPÓSITO PARTICULAR. Royal no será asumida responsable de DAÑOS CONSECUENTES que resultan de algún fallo, defecto o malfuncionamiento de este producto. Algunos Estados no permiten limitaciones sobre el tiempo que una garantía implícita puede durar y algunos Estados no permiten la exclusión ni la limitación de daños casuales ni consecuentes, por tanto las limitaciones antes mencionadas pueden no aplicar en su caso. PROCEDIMIENTOS de la GARANTÍA Para OBTENER SERVICIO BAJO LOS TÉRMINOS DE ESTA GARANTÍA: Por favor haga lo Siguiente: 1. Envíe una copia de su recibo original de ventas que muestra la fecha original de la compra junto con su dirección de envío y una nota que describa la naturaleza del problema a: Royal Consumer Information Products, Inc. Warranty Processing 1160 U.S. Highway 22 East Suite 301 Bridgewater, NJ 08807-2931 USA ¡No Regrese el Producto a Esta Dirección! 2. Recibirá un número de autorización de regreso dentro de 7-12 días hábiles de la fecha en que su petición fue recibida si es determinado que hay una base para un recambio de producto. La forma de la autorización de regreso que usted recibirá listará los procedimientos del regreso, los cargos aplicables, si aplica, y la dirección correcta de envío para el regreso del producto. LÍNEA de SOPORTE PARA EL PRODUCTO: Para preguntas en el uso de este producto o esta garantía, llamar al +1-800-272-6229 (en Canadá 1-888-266-9380 o en México +(52-55-53-33-1333), lunes a viernes durante las horas normales de oficina. Usted también puede enviar un correo electrónico a Royal a: [email protected] 9 2 20 1 8 16 15 5 3 17 18 4 3 7 6 8 10 19 11 14 9 14 13 12 TYPEWRITER IDENTIFICATION AND OPERATION 1. CARRIAGE RETURN & LINE SPACE LEVER: Moves the carriage to the right and advances page to the next line. 2. LINE SPACE SELECTOR: Sets line spacing to ( 1 ), ( 1.5 ), ( 2 ) spacing. Setting ( R ) platen release. 3. MARGIN STOP TABS: Sets the left and right margins by depressing tabs and sliding to desired positions. The bell ring indicates five more keystrokes before stopping. 4. MARGIN RELEASE KEY: Depress to type beyond margin stop tabs. 5. PAPER SUPPORT BAR: Raise support bar to hold paper upright. 6. PAPER RELEASE LEVER: Releases or secures page to platen roll. 7. CARRIAGE RELEASE BUTTON: Disengages carriage for repositioning on page. 8. PLATEN KNOBS: Turn for inserting paper or advancing the page. Press center button on the LEFT knob to obtain fine alignment. 9. RIBBON SELECTOR: Select from black, red or stencil type. 10. BACK SPACE KEY: Moves carriage in reverse one space at a time. 11. PRE-SET TAB KEY: Freestyle tabs for mulitipal tab settings. 12. SPACE BAR KEY: Moves carriage one space at a time. 13. SPACE REPEATER KEY: Hold to move carriage quickly down the type line. 2 Epoch Portable Manual Typewriter Epoch máquina de escribir portátil 14. SHIFT KEY: Press for typing capital letters or special characters. 15. SHIFT LOCK KEY: Press for continuous typing in capital letters or special characters. Disengage lock by pressing either Shift Key. 16. IMPRESSION CONTROL LEVER: Adjusts the pressure of the keystroke on the paper. 17. LINE DRAWING: Insert pencil tip into hole and depress Space Repeater Key to draw lines. 18. PAPER BAIL: Holds paper against platen and features 10 1/2” measuring ruler. 19. TAB SET AND CLEAR: For the setting of a tab stop move the (+) setting: for the clearing of a tab stop by operation the tab key (11), and select (-) setting. 20. PAPER GUIDE: Will keep the edge of the paper flush to the left hand edge when it is inserted. A B D B D 17. DIBUJO DE LÍNEAS: Inserte la punta de un lápiz en el agujero y presione la barra espaciadora con repetición automática para dibujar líneas. 18. AJUSTADOR DE PAPEL: Mantiene el papel contra la placa y posee una regla de medida de 21 cm. 19. AJUSTE Y ELIMINACIÓN DE TABULACIÓN: Para ajustar un límite de tabulación mueva el control (+); para la eliminar un límite de tabulación presione la tecla (11), y seleccione el control (-). 16. GUIADOR DEL PAPEL: Ajusta la presión del golpe de tecla en el papel. B C C HOW TO CHANGE THE RIBBON 1. Remove top cover (see COVER REMOVAL section for instructions). 2. Wind old ribbon onto one spool. Swing back ribbon brake (D) and remove it from the support forks (B) and ribbon guides (A) 3. Lift the spools off carriers (C). 4. Swing Back ribbon brake (D). Place the new ribbon spools onto the carriers (C) black ribbon side up. 5. Rotate each spool until the carrier post is inserted into a hole under each spool. 6. Thread new ribbon through support forks (B) and center ribbon guide (A) making sure ribbon eyelet is situated before the support fork (B). 7. Reattach cover. 8. 14. TECLA DE MAYÚSCULAS: Presionar para tipear letras mayúsculas o caracteres especiales. 15. BLOQUEO TECLA DE MAYÚSCULAS: Presionar para tipeo continuo en letras mayúsculas o caracteres especiales. Desenganchar el bloqueo de mayúsculas presionando cualquier tecla de mayúsculas. 16. PALANCA DE CONTROL DE IMPRESIÓN: Ajusta la presión del golpe de tecla en el papel. Note: The ribbon will reverse itself when the spool ends. 3 C A B C CÓMO CAMBIAR LA CINTA 1. Remover la cubierta superior (Véase sección REMOCIÓN DE COBERTURA para instrucciones). 2. Enrolle la cinta vieja en el carrete anterior y remuévala de los pinchos de soporte (B) y guías de cinta (A). 3. Levante los carretes de los carros (C). 4. Coloque los nuevos carretes de cinta en los carros (C) con el lado negro hacia arriba. 5. Rotar cada carrete hasta que el poste de carro este inserto en un agujero debajo de cada carrete. 6. Enlazar cada cinta a través de los pinchos de soporte (B) y la guía de cinta central (A) asegurándose que la ranura esté situada ante los pinchos de soporte (B). 7. Vuelva a colocar la cobertura. 8. Nota: La cinta se revertirá a sí misma cuando el carrete termine. 8 Epoch Portable Manual Typewriter Epoch máquina de escribir portátil MALETA CARE INSTRUCTIONS Your Royal Epoch is built to provide you with years of trouble-free typing service. Proper care and handling are necessary to maintain its typing mechanisms and housing. Avoid rough handling. Clean housing with a damp paper towel. Do not use harsh cleaning agents. Use a stiff bristle brush, or an old toothbrush, to clean the metal type keys. STATE OF CALIFORNIA PROPOSITION 65 WARNING The following state is required by the State of California. Warning: This product contains chemicals known to the State of California to cause cancer, birth defects, or other reproductive harm. Wash hands after handling. Deslice los dos seguros hacia afuera. Levante la parte superior y remueva la máquina de escribir. REMOCIÓN DE CUBIERTA Y REEMPLAZO Epoch � Suavemente agarre y levante los dos extremos superiores de la cubierta. Ésta se separará del cuerpo principal. Incline hacia adelante mientras levanta. Procedimiento inverso para reemplazar. INSTRUCCIONES DE DESEMPAQUE � Gire hacia arriba la Barra sujeta papel. Tire y deseche los dos seguros plásticos del bastidor del carro. 5 Remueva y deseche el seguro de alambre de la cuna de teclas. 6-
 1
1
-
 2
2
-
 3
3
-
 4
4
-
 5
5
-
 6
6


EPOCH Royal El manual del propietario
- Tipo
- El manual del propietario
- Este manual también es adecuado para
En otros idiomas
- English: EPOCH Royal Owner's manual
Otros documentos
-
Royal ROY79103Y Manual de usuario
-
-
-
 Royal Consumer Information Products eX-315w Manual de usuario
-
Brother PT-1950 Manual de usuario
-
-
Brother PT-2710 Thermal Label Printer Guía del usuario
-
-
Brother PT-1910 Manual de usuario
-
Tally Dascom T2280+ Guía del usuario
