
Muchas gracias por la adquisición
del Soporte para teclado L-2L.
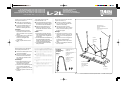
● Consulte la ilustración para evitar
errores de ensamblaje.
● Para evitar rayaduras, coloque el
PortaTone sobre una manta (de
lana) debajo del teclado cuando
fije el estante.
Ensamblaje
1) Dé la vuelta al PortaTone con el
teclado hacia la parte frontal y
colóquelo sobre una manta.
2) Alinee los tres tornillos del soporte
con los orificios roscados del
PortaTone y apriételos provisional-
mente.
3) Finalmente, apríete a fondo los tres
tornillos.
Thank you very much for purchasing
the Keyboard Stand L-2L.
● Please refer to the illustration to
avoid mistakes when assembling.
● To prevent scratches place your
PortaTone on a soft (woolen)
blanket for attaching the stand.
Assembly
1) Invert the PortaTone with the
Keyboard towards the front and
place it upside-down on a prepared
blanket.
2) Align the three screws of the stand
with the screw holes in the
PortaTone and tighten them
provisionally.
3) Finally, tighten the three screws
fully.
Merci beaucoup pour avoir acheté le
support de clavier L-2L.
● Veuillez-vous référer à l’illustra-
tion pour éviter de commettre des
erreurs lors du montage.
● Pour éviter de le rayer, placez
votre PortaTone sur une couverture
douce (couverture de laine) pour la
fixation du support.
Montage
1) Retournez le PortaTone, le clavier
orienté vers l’avant, et placez-le tel
quel sur une couverture préparée à
cet effet.
2) Alignez les trois vis du support sur
les orifices pratiqués dans le
PortaTone et serrez-les provisoire-
ment.
3) Terminez le montage en serrant les
trois vis à fond.
M.D.G., EMI Division © Yamaha Corporation 1995 VT25160 Printed in Japan
Screws
Schrauben
Vis
Tornillos
Stand Main Unit
Ständer-Haupteinheit
Clavier
Unidad principal del soporte
PortaTone
Vielen Dank für den Kauf des
Keyboard-Ständers L-2L.
● Um Schwierigkeiten beim Aufbau
des Ständers zu vermeiden, richten
Sie sich bitte nach der Abbildung.
● Schützen Sie das PortaTone vor
Kratzern, indem Sie es auf eine
Decke oder einen dicken weichen
Teppich legen.
Aufbau
1) Das PortaTone mit der Oberseite
nach unten und dem Manual nach
vorne auf die vorher ausgebreitete
Decke legen.
2) Die drei Schrauben am Ständer mit
den entsprechenden Schrauben-
löchern auf dem PortaTone ausrich-
ten und vorläufig einschrauben.
3) Anschließend die drei Schrauben
richtig festziehen.
L-2L
KEYBOARD STAND FOR PSR-210/PSR-310
KEYBOARD-STÄNDER FÜR PSR-210/PSR-310
SUPPORT DE CLAVIER DU PSR-210/PSR-310
SOPORTE DE TECLADO PARA EL PSR-210/PSR-310
Assembly Instructions
Aufbauanleitung
Instructions de montage
Instrucciones de ensamblaje
Keyboard side
Seite mit Manual
Côté clavier
Lado del teclado
Stand Main Unit x 1
Screws x 2
Ständer-Haupteinheit x 1
Schrauben x 2
Clavier x 1
Vis x 2
Unidad principal del
soporte x 1
Tornillos x 2
x 1
x 2
Contents
Lieferumfang
Contenu
Indice
Transcripción de documentos
L-2L KEYBOARD STAND FOR PSR-210/PSR-310 KEYBOARD-STÄNDER FÜR PSR-210/PSR-310 SUPPORT DE CLAVIER DU PSR-210/PSR-310 SOPORTE DE TECLADO PARA EL PSR-210/PSR-310 PSR-210/PSR-310用キーボードスタンド ○ ○ ○ ○ ○ ○ ○ ○ ○ ○ ○ ○ ○ ○ ○ ○ ○ ○ ○ ○ ○ ○ ○ ○ ○ ○ ○ ○ ○ ○ ○ ○ ○ ○ ○ ○ ○ ○ ○ ○ ○ ○ ○ ○ ○ ○ ○ 2)ポータトーンのスタンド用ネジ穴に合わせ て、 ネジ (3ケ所) を仮締めします。 ○ ○ ○ ○ ○ ○ ○ ○ 3)最後にネジ(3ケ所) を本締めして固定しま す。 ○ ○ ○ ○ ○ ○ ○ ○ 1)鍵盤側を手前にして、 ポータトーンを裏返し ます。 ○ ○ ○ ○ 組み立て手順 ○ Ensamblaje 1) Dé la vuelta al PortaTone con el teclado hacia la parte frontal y colóquelo sobre una manta. 2) Alinee los tres tornillos del soporte con los orificios roscados del PortaTone y apriételos provisionalmente. 3) Finalmente, apríete a fondo los tres tornillos. ● 傷がつかないように、毛布など柔らかい布 の上で組み立てられることをお勧めします。 ○ ● Para evitar rayaduras, coloque el PortaTone sobre una manta (de lana) debajo del teclado cuando fije el estante. ○ ○ ○ ○ ○ ○ ○ ○ ○ ○ ○ ○ ○ ○ ○ ○ ○ ○ Contents Lieferumfang Contenu Indice Stand Main Unit x 1 Screws x 2 同梱品 Clavier x 1 Vis x 2 Ständer-Haupteinheit x 1 Schrauben x 2 ○ ○ ○ ● 取付けの向きを間違えないように注意して 組み立ててください。 ○ ● Consulte la ilustración para evitar errores de ensamblaje. ○ ○ このたびはキーボードスタンドL-2Lをお買い 求めいただき、 まことにありがとうございます。 ○ ○ ○ ○ ○ ○ ○ ○ ○ ○ ○ ○ Muchas gracias por la adquisición del Soporte para teclado L-2L. ○ ○ ○ ○ ○ ○ ○ ○ ○ ○ ○ ○ ○ ○ ○ ○ ○ Unidad principal del soporte x 1 Tornillos x 2 スタンド本体 x 1 ネジ x 2 Keyboard side Seite mit Manual Côté clavier Lado del teclado 鍵盤側 ○ ○ PortaTone ポータトーン ○ ○ ネジ ○ ○ Screws Schrauben Vis Tornillos ○ ○ Montage 1) Retournez le PortaTone, le clavier orienté vers l’avant, et placez-le tel quel sur une couverture préparée à cet effet. 2) Alignez les trois vis du support sur les orifices pratiqués dans le PortaTone et serrez-les provisoirement. 3) Terminez le montage en serrant les trois vis à fond. ○ ○ スタンド本体 ○ ○ ○ ○ ○ ○ ○ ○ ○ ○ ○ ○ ○ ○ ○ ○ ○ Aufbau 1) Das PortaTone mit der Oberseite nach unten und dem Manual nach vorne auf die vorher ausgebreitete Decke legen. 2) Die drei Schrauben am Ständer mit den entsprechenden Schraubenlöchern auf dem PortaTone ausrichten und vorläufig einschrauben. 3) Anschließend die drei Schrauben richtig festziehen. ○ ○ ○ ○ ○ ○ ○ ○ Stand Main Unit Ständer-Haupteinheit Clavier Unidad principal del soporte ● Pour éviter de le rayer, placez votre PortaTone sur une couverture douce (couverture de laine) pour la fixation du support. ○ ○ ○ ○ ● Schützen Sie das PortaTone vor Kratzern, indem Sie es auf eine Decke oder einen dicken weichen Teppich legen. ○ Assembly 1) Invert the PortaTone with the Keyboard towards the front and place it upside-down on a prepared blanket. 2) Align the three screws of the stand with the screw holes in the PortaTone and tighten them provisionally. 3) Finally, tighten the three screws fully. ○ ○ ○ ○ ● To prevent scratches place your PortaTone on a soft (woolen) blanket for attaching the stand. ● Veuillez-vous référer à l’illustration pour éviter de commettre des erreurs lors du montage. ○ ● Um Schwierigkeiten beim Aufbau des Ständers zu vermeiden, richten Sie sich bitte nach der Abbildung. ○ ● Please refer to the illustration to avoid mistakes when assembling. 組み立てかた Merci beaucoup pour avoir acheté le support de clavier L-2L. ○ Vielen Dank für den Kauf des Keyboard-Ständers L-2L. ○ Thank you very much for purchasing the Keyboard Stand L-2L. Assembly Instructions Aufbauanleitung Instructions de montage Instrucciones de ensamblaje M.D.G., EMI Division © Yamaha Corporation 1995 VT25160 Printed in Japan-
 1
1

En otros idiomas
- français: Yamaha L-2L Manuel utilisateur
- English: Yamaha L-2L User manual
- Deutsch: Yamaha L-2L Benutzerhandbuch
- 日本語: Yamaha L-2L ユーザーマニュアル
Documentos relacionados
-
Yamaha L-2C Assembly Instructions
-
-
-
-
-
-
-
-