Sharper Image Pivoting High Pressure Showerhead El manual del propietario
- Tipo
- El manual del propietario

Orbit
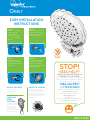
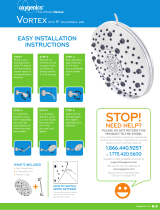
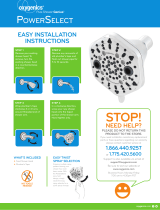
EASY INSTALLATION
INSTRUCTIONS
CHANGING
SPRAY
PATTERNS
Spray patterns may be
changed easily using
the switch located
on the orbital. Simply
move the easy spray
selector from side to side to
alternate spray patterns.
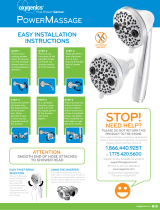
USING THE ORBITAL
The orbital can be rotated 360º
around the rain shower giving you
total coverage. Simply slide the orbital
clockwise until the desired position is
reached. The orbital’s angle can also
be changed by gently tilting the unit
forward or back.
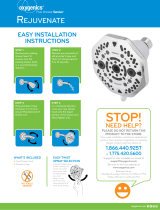
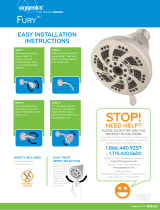
WHAT’S INCLUDED
+
Rain Shower Head
+
Plumber’s Tape
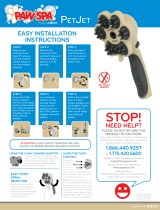
STEP 3
Wrap plumber’s tape
clockwise 3 or 4 turns
around threaded end of
shower arm.
STEP 1
Remove your existing
shower head. To
remove, turn the
existing shower head
in a counterclockwise
direction.
STEP 4
In a clockwise direction,
screw your new shower
head onto the taped
portion of the shower arm.
Hand tighten only.
STEP 2
Remove any remnants of
old plumber’s tape and
flush out shower pipe for
5 to 10 seconds.
STOP!
NEED HELP?
PLEASE DO NOT RETURN THIS
PRODUCT TO THE STORE.
If you need installation assistance, replacement
parts or have questions regarding our warranty
please contact customer service at
1.866.440.9257
or 1.775.420.5600
Support is also available via email at
support@oxygenics.com
Be sure to visit our website at
www.oxygenics.com
Business Hours:
Monday-Thursday 7:00 am to 5:00 pm PST
Friday 7:00 am to 4:30 pm PST

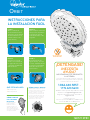
Orbit
INSTRUCCIONES PARA
LA INSTALACIÓN FÁCIL
CÓMO CAMBIAR
LOS PATRONES
DE LLUVIA
Los patrones de lluvia
pueden cambiarse
fácilmente usando el
interruptor ubicado en el
orbital. Sólo debe mover el
seleccionador fácil de lluvia
de un lado a otro para alternar
entre patrones de lluvia.
CÓMO USAR EL ORBITAL
El orbital puede rotarse 360º por la
lluvia de la ducha, proporcionándole
una cobertura total. Sólo debe
deslizar el orbital en el sentido de
las agujas del reloj hasta alcanzar
la posición deseada. El ángulo del
orbital también puede cambiarse
inclinando la unidad suavemente
hacia delante o hacia atrás.
QUÉ ESTÁ INCLUIDO:
+
Ducha tipo lluvia
+
Cinta de plomería
PASO 3
Envuelva con cinta de
plomero en el sentido de
las agujas del reloj con 3
o 4 vuelvas alrededor del
brazo de ducha.
PASO 1
Quite su cabezal de
ducha existente. Para la
extracción, gire el cabezal
de ducha existente en el
sentido contrario a las
agujas del reloj.
PASO 4
En la dirección de las
agujas del reloj, enrosque
su nuevo cabezal de ducha
a la porción encintada del
brazo de la ducha. Solo
ajuste a mano.
PASO 2
Quite cualquier remanente
de vieja cinta de plomería
y enjuague el caño de
la ducha durante 5 a 10
segundos.
NO SE NECESITA
HERRAMIENTAS
¡
DETÉNGASE!
¿
NECESITA
AYUDA?
NO DEVUELVA ESTE PRODUCTO
A LA TIENDA.
Si necesita asistencia de instalación, partes de
repuesto o si tiene preguntas sobre su garantía,
contacte a atención al cliente al
1.866.440.9257
o al
1.775.420.5600
También existe soporte disponible vía correo
electrónico al support@oxygenics.com
Asegúrese de visitar nuestro sitio web en
oxygenics.com
Horario de atención:
De lunes a jueves de 7:00 am a 5:00 pm PST
Viernes de 7:00 am a 5:00 pm PST
-
 1
1
-
 2
2


Sharper Image Pivoting High Pressure Showerhead El manual del propietario
- Tipo
- El manual del propietario
En otros idiomas
Otros documentos
-
 Oxygenics 55266 Guía de instalación
-
 Oxygenics 57568 Guía de instalación
-
 Oxygenics 48267 Guía de instalación
-
 Oxygenics PAW SPA PETJET Guía de instalación
-
 Oxygenics 82268 Guía de instalación
-
 Oxygenics 92568 Guía de instalación
-
 Oxygenics 51376 Guía de instalación
-
 Oxygenics 89246 Guía de instalación
-
 Oxygenics 88368 Guía de instalación
-
Oxygenics 25488 Guía de instalación


