WiMo EAntennas 2850MOX Dual Band Moxon Antenna El manual del propietario
- Tipo
- El manual del propietario

2850MOX
2850MOX
Thank you for choosing EAntenna.
All our products are manufactured and developed with the best materials on the market, to offer the best qualities and
guarantees to our customers.
The Yagi type MOXON antennas were developed by Leslie A. Moxon, to be used in communications in HF during the 2nd half
of the 20th century, quite successfully. Its cost, profit and ease of construction make it an option very convenient. As it is a
specific antenna according to the bands in which we want to operate. The address of the maximum Gain is obtained in the
opposite direction to the reflector and perpendicular to the radiating element. According to the position with respect to
ground, horizontal or vertical, will be its polarization. It is very important that this coincides with the polarization used in the
antenna of the equipment to which you connect with this antenna.
Like any antenna manufactured by EAntenna, we do not include a connector, to have the minimum losses. We include
terminals to solder directly, although we offer as an option balun or ferrites EMI / RFI.
We detail the materials used, for their best use and assembly. All the fittings are made of stainless steel and the
Aluminum is made of T6061 or T6063 alloy, known as Aeronautical Aluminium, which offers the best conditions to withstand
the most extreme climates, the force of the wind and the best conductivity. The plastics used, is Polyamide or Polypropylene,
which offer the best hardness and durability for the passage of time. We offer guarantee in the operation, and guarantee in the
ironworks, delivering the kit of hardware some extra pieces, for possible losses or forced breakages.
In the following pages we detail the exploded view with its graphics.
3,740m
Peso: 6,2Kg.
Max. Potencia: 3,0 kW*
yagi antenna
yagi antenna
1,80m
17824.2850
Rev. V1.1 - 12/03/21

SPECIFICATIONS
EAntenna
2850MOX
Elements:
2
3
Frequency Range:
28~29,7 MHz.
50~52 MHz.
Gain:
8,32 dBi
10,52 dBi
Gain @10m High:
13,85 dBi
16,48 dBi
F/B:
21,0 dB
12,0 dB
SWR:
1,0:1~1,5:1 @1000KHz
1,0:1~1,3:1 @1500KHz
Impedance
50 Ohms
50 Ohms
Max. Power:
10 kW.
10 kW.
Boom Length:
1,8m
5,90'
Wind Survival
≥ 200kmh / ≥
≥ 120mph
Weight:
6,2 Kg.
8,4 Pounds
14,0.......21,0 MHz.
1
1.3
1.5
2.0
3.0
5.03500 KHz. 3800 KHz.
Ω
300 W.
Boom Size:
40x40x2mm
Element Diameter: 10m 20x1,5mm - 16x1mm - LOOP 13x1mm
6m 13x1mm - LOOP 10x1mm
10m High

ESPAÑOLENGLISH
Reflector 10m
Driven 10m
Driven 6m Director 6m
Reflector 6m
Mast Plate
860mm

10m Band
ESPAÑOL ENGLISH
El BOOM cuadrado tiene 4 caras, para identificar por que parte del
boom ensamblaremos la antena.
Cara A; en esta cara del boom se introducen los tornillos DIN 7991
M4x40 para la sujección de los elementos.
Cara B; la cara opuesta a la A es donde se introduce la tuerca DIN
934 M4 y aprieta con una llave del número 7.
Cara C y D; en estos agujeros van introducidos los elementos.
El montaje de la Eantenna 2850MOX es tan fácil como introducir
cada elemento en su correspondiente agujero en el boom (Cara C y
D), y con el el tornillo DIN 7991 M4x40roscar sobre el mismo
elemento (CARA A). Para reforzar el elemento al boom, se añade
una tuerca M4 DIN 934 que con una llave de vaso o tubo del número
7 se aprieta fácilmente (CARA B)
The square BOOM has 4 sides, to identify by which part of the
boom we will assemble the antenna.
Side A; On this side of the boom the screws DIN 7991 M4x40 are
inserted for fastening the elements.
Side B; the side opposite to the A is where the nut DIN 934 M4 is
installed.
Side C and D; in these holes the elements are inserted.
The assembly of the Eantenna 2850MOX is as easy as inserting
each element in its corresponding hole in the boom (SIDE C and
D), and with a screw DIN 7991 M4x40 thread on the same
element (SIDE A). In addition, an M4 nut is added, which
ensures that the element does not get loose. (SIDE B)
CARA A
CARA B
CARA C-D
Ø 5mm
Ø 12mm
Ø 20mm
SIDE A
SIDE B
SIDE C-D
1
2
3
4
5
6
1
2
3
4
5
6

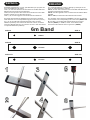
6m Band
ESPAÑOL ENGLISH
El BOOM cuadrado tiene 4 caras, para identificar por que parte del
boom ensamblaremos la antena.
Cara A; en esta cara del boom se introducen los tornillos DIN 7991
M4x40 para la sujección de los elementos.
Cara B; la cara opuesta a la A es donde se introduce la tuerca DIN
934 M4 y aprieta con una llave del número 7.
Cara C y D; en estos agujeros van introducidos los elementos.
El montaje de la Eantenna 2850MOX es tan fácil como introducir
cada elemento en su correspondiente agujero en el boom (Cara C y
D), y con el el tornillo DIN 7991 M4x40roscar sobre el mismo
elemento (CARA A). Para reforzar el elemento al boom, se añade
una tuerca M4 DIN 934 que con una llave de vaso o tubo del número
7 se aprieta fácilmente (CARA B)
The square BOOM has 4 sides, to identify by which part of the
boom we will assemble the antenna.
Side A; On this side of the boom the screws DIN 7991 M4x40 are
inserted for fastening the elements.
Side B; the side opposite to the A is where the nut DIN 934 M4 is
installed.
Side C and D; in these holes the elements are inserted.
The assembly of the Eantenna 2850MOX is as easy as inserting
each element in its corresponding hole in the boom (SIDE C and
D), and with a screw DIN 7991 M4x40 thread on the same
element (SIDE A). In addition, an M4 nut is added, which
ensures that the element does not get loose. (SIDE B)
CARA A
CARA B
CARA C-D
Ø 5mm
Ø 12mm
Ø 13mm
SIDE A
SIDE B
SIDE C-D
1
2
3
4
5
6
1
2
3
4
5
6

La fijación de los elementos del Rectangulo DE, es mediante abrazadera Sin/Fin 8-12mm (P0100022) de los elementos de 13 a 10mm.
ESPAÑOL
13mm Ø 10mm Ø
ABRAZADERA 8-16mm Ø
(P01000022)
50 MHz.
110mm
El ensamblaje de los elementos, una vez seleccionados todos las longitudes, colocar en cada mitad de 13mm Ø frontalmente, introduciendo
uno a uno, los tubos de 10mm Ø x 200mm (EA0120010) en una de las mitades. Una vez ya fijada la primera parte de un elemento, introducir
la siguiente mitad y fijarla de nuevo con los tornillos DIN 7984 M4X10 y el remache M4 que aparece detallado debajo. Tener en cuenta que la
cabeza del tornillo tiene que quedar alojada dentro del hueco de mas diámetro del elemento.
SI NO
13mm Ø 10mm Ø
DIN 7984 M4X10
REMACHE M4
110mm
The fixing of the LOOP element, each element is using a Hose Clamp 8-12mm (P0100022) the 13 to 10mm diameter.
13mm Ø 10mm Ø
HOSE CLAMP 8-16mm Ø
(P01000022)
YES NO
13mm Ø 10mm Ø
DIN 7984 M4X10
INSERT RIVET M4
The assembly of elements, once selected all lengths, place in each half of Ø 13mm front, insert one by one, the tubes of 10mm diameter
x 200mm (EA0120010) in one of the 13mm tube. Once fixed and the first part of an item, enter the next half and secure again screws
DIN 7984 M4X10 and the M4 Insert rivet which is detailed below. Note that the screw head has to be accommodated within the
bigger hole in element.
ENGLISH

ESPAÑOL
28 MHz.
150mm
150mm
Fijar el tubo de 16mm dentro del de 20mm con la abrazadera 20-12mm (P0100024) y el elemento de 16mm al loop de 13mm para ajustar la
ROE con las abrazaderas 8-12mm (P0100022).
Fix the 16mm element into the 20mm tube with hose clamp 20-12mm (P0100024) and at each corner of the 16 to 13mm diameter tubes.
8-12mm (P0100022) hose clamps hold the loop end in place and allow for adjustment (SWR).
20mm Ø
20mm Ø
16mm Ø
16mm Ø
ENGLISH
16mm Ø
16mm Ø
13mm Ø
13mm Ø
ABRAZADERA 8-12mm Ø
(P01000022)
HOSE CLAMP 10-16mm Ø
(P01000022)
ABRAZADERA 20-12mm Ø
(P01000024)
HOSE CLAMP 20-12mm Ø
(P01000024)
40mm
40mm

PLACAS SUJECIÓN MÁSTIL ESPAÑOL
La placa de sujeción BOOM/MÁSTIL (EA013016) de 250X100X6mm consta de 12 agujeros; 4 gruesos para los abarcones redondos y 8
para las pletinas (EA010083) que sujetan el BOOM.
Los 4 agujeros de mayor grosor tienen la función de que hagan la mayor fuerza sobre el mástil, mediante abarcones redondos de M8.
Los abarcones redondos de M8 (A-0163), van fijados mediante arandela DIN 9021 M8 y tuerca DIN 934 M8 proporcionadas en el mismo
abarcón, y fijada al mástil con la Mordaza (23035.50).
Detallamos dibujos para una mayor ilustración:
(EA013016) (EA013016)
Vista frontal desde el mástil
Vista lateral desde el mástil Vista lateral desde el BOOM
Vista frontal desde el BOOM
DIN 985 M6
(23035.50) (A-0163)
(S912-9660) (S985-906)
(S127-96)

The clamping plate BOOM / MAST (EA013016) 250X100X6mm consists of 12 holes; 4 thick for round U-bolts and 8 small holes to joint the
(EA010083) securing the BOOM.
The 4 holes are thicker function that make the greatest force on the mast by means of M8 round U-bolts. Round U-bolts M8 (A-0163), are
secured by washer DIN 9021 M8 and nut DIN 934 M8 provided in the same U-bolt, and fixed to the mast with clamp (23035.50).
Detailed drawings for further illustration:
MAST TO BOOM PLATE ASSEMBLY
Front view from Mast
Side view from Mast
Front view from BOOM
Side view from BOOM
ENGLISH
(EA013016) (EA013016)
(23035.50) (A-0163)
(S912-9660) (S985-906)
(S127-96)
DIN 985 M6

Montaje correcto:
Correct positions:
Dirección directividad
Beam Direction
Reflector
Driven
Alimentación mediante coaxial:
Solo alimentamos el elemento de 10m. mediante el Balun descrito en la pagina siguiente :
In this antenna, you only may connect the coax thru the balun to the 10m band element.
Boom DRV D1REF
10m 10m6m 6m 6m
ESPAÑOL
DRVREF
ENGLISH
EA012850M
S7981-93

BOOM
Vivo
Inner Conductor
Malla
Outter Conductor
COAXIAL
COAXIAL
The DRIVEN ELEMENT comes pre-assembled, but for its
assembly into the boom, one side has to be removed. Then,
put the insulator into the large hole of the boom, fix with
screws as explained above and re-install the side tube
which was removed before.
El elemento de más grosor o DRIVEN viene pre-
ensamblado, pero para su montaje en el BOOM debe de
quitar una parte de la alimentación, para introducir la parte
aislante del DRIVEN y esta mediante el agujero que trae,
es donde debe de fijarse al boom como se explica
anteriormente.
ESPAÑOL ENGLISH

Balun
Balun
Alimentación
Feeding
El primer paso de colocar el balun es roscar el tornillo sobre las roscas de boom para darle estabilidad. No apretrar
hasta que no este posicionado el balun correctamente. Cuando el balun este colocado en su posicion definitiva, girar
el tornillo con los dedos hasta que el tornillo presione el balun y lo fije a la anilla plastica blanca. Apretar la tuerca con
algo de fuerza con la llave fija y acto seguido, apretar las tuercas de la parte que da al boom para fijar completamente este sistema.
The first step of placing the balun is screwing the screws on the boom. Don’t tightening until the balun not positioned correctly.
When the balun is placed in its final position, rotate the screw with your fingers until the screw press the balun and fix it to the white
plastic ring. Tighten the nut some strength with a wrench and then, tightening nuts on boom to complete fix this system.
ESPAÑOL
ENGLISH


ESPAÑOLENGLISH
BOLSA 1 - BAG #1
PART #
PIEZA Nº
IMAGEN
PART IMAGE
DESCRIPCION
DESCRIPTION
MEDIDAS
SIZES
CANTIDAD
QUANTITY
EA013016
Placa Mástil/Boom n1
Mast and Boom plate n1
250 x 100 x 6mm
Abarcon
U-Bolt.
Placa Mástil/Boom n2
Mast and Boom plate n2
Mordaza
Tube Clamp
DIN 9021
Tuerca Autoblocante DIN 985
DIN 985 NUT
50 x 60 x 6mm
50mm, M8
M6
M6
2
8
8
8
1
2
2
23035.50
S912-9660
A-0163
EA010083
S9021-96
S985-906
Tornillo Allen DIN 912
Allen DIN 912 Screw M6x60mm
DIN 127 WASHER
DIN 934 NUT
M8
M8
50mm
4
4
S127-98
S934-98
Llave Allen 2,5
Tornillo DIN 7991
DIN 7991 Screw
2,5mm
40x4mm
1
5
P1300002
S7991-9440
DIN 934 M4 5
S934-94
PART #
PIEZA Nº
IMAGEN
PART IMAGE
DESCRIPCION
DESCRIPTION
MEDIDAS
SIZES
CANTIDAD
QUANTITY
BOLSA 2 - BAG #2
Abrazadera Sin-Fin
Hose clamp
Abrazadera Sin-Fin
Hose clamp
Abrazadera Sin-Fin
Hose clamp 4
4
4
P0100024
P0100033
P0100022
12-20mm
10-16mm
8-12mm

ENGLISHESPAÑOL
PART #
PIEZA Nº
IMAGEN
PART IMAGE
DESCRIPCION
DESCRIPTION
MEDIDAS
SIZES
CANTIDAD
QUANTITY
BOLSA 3 - BAG #3
EA0120010 200m x 10mm Ø 6
Pieza unión elementos
Join elements part
DIN 7984 M4x10mm 12
S7984-9410
Remache M4
M4 Rivnut M4 12
RIVSS_M4
EA01BALKI
EA012850M
S914-96.8
3kW BALUN
71,5x25mm
M6x8mm
1
2
4
BALUN + KIT
ELEMENTS SPREADERS
Allen bolt

PART #
PIEZA Nº
IMAGEN
PART IMAGE
DESCRIPCION
DESCRIPTION
MEDIDAS
SIZES
CANTIDAD
QUANTITY
Boom 1800mm x 40mm 1
2
2
2850MOX
BOOM
PACKING LIST
LISTA DE PIEZAS
6m. Sección Tubo 10mm
6m. 10mm Tube section
10m. Sección Tubo 13mm
10m. 13mm Tube section
1800mm x 20mm Ø
900mm x 13mm Ø
700mm x 13mm Ø
940mm x 13mm Ø
1800mm x 20mm Ø
1080mm x 16mm Ø
1
3
4
2
1
4
Parte Central Reflector 10m
Reflector Middle tube 10m
Parte Central 6m
Middle tube 6m
Tubos de extremos 6m Exitado y Reflector
End tips 6m band for Reflector and Driven
Tubos de extremos 6m D1
End tips 6m band for D1
Parte Central Exitado
DRIVEN Middle tube
Reflector y exitado Banda 10m 16mm
Driven and Reflector 10m band 16mm
740mm x 10mm Ø
1489mm x 13mm Ø
-
 1
1
-
 2
2
-
 3
3
-
 4
4
-
 5
5
-
 6
6
-
 7
7
-
 8
8
-
 9
9
-
 10
10
-
 11
11
-
 12
12
-
 13
13
-
 14
14
-
 15
15
-
 16
16
-
 17
17
-
 18
18
-
 19
19


