
INSTRUCTION MANUAL
MANUAL DE INSTRUCCIONES
Cordless Grass Trimmer
Cortador Inalámbrico de Pasto
GRU01
IMPORTANT: Read Before Using.
IMPORTANTE: Lea antes de usar.

2ENGLISH
ENGLISH (Original instructions)
SPECIFICATIONS
Model: GRU01
Handle type Loop handle
No load speed
(at each rotation speed level)
Nylon cutting head 3: 0 - 6,500 /min
2: 0 - 5,300 /min
1: 0 - 3,500 /min
Overall length
(without cutting tool)
1,760 mm (69-1/4″)
Nylon cord diameter 2.0 - 2.3 mm (0.08 - 0.09″)
Applicable cutting tool and
cutting diameter
Nylon cutting head
(P/N 191D89-4)
380 mm (15″)
Rated voltage D.C. 36 V - 40 V max
Net weight 4.1 - 4.4 kg (9.0 - 9.7 lbs)
•
Due to our continuing program of research and development, the specications herein are subject to change without notice.
• Specications may dier from country to country.
• The weight may dier depending on the attachment(s), including the battery cartridge. The lightest and heavi-
est combination, according to EPTA-Procedure 01/2014, are shown in the table.
Applicable battery cartridge and charger
Battery cartridge BL4025 / BL4040
Charger DC40RA
•
Some of the battery cartridges and chargers listed above may not be available depending on your region of residence.
WARNING: Only use the battery cartridges and chargers listed above. Use of any other battery cartridges
and chargers may cause injury and/or re.
SAFETY WARNINGS
Important safety instructions
WARNING: When using electric gardening
appliances, basic safety precautions should
always be followed to reduce the risk of re,
electric shock, and personal injury, including the
following.
Read All Instructions
Failure to follow the warnings and instructions may
result in electric shock, re and/or serious injury.
SAVE THESE INSTRUCTIONS.
General instructions
1. Never allow people unfamiliar with these
instructions or children to use the machine.
Local regulations can restrict the age of the
operator. It is dangerous in the hands of untrained
users or children.
2. Be sure that anyone who is to operate the
string trimmer has rst read the instruction
manual.
3. Use the string trimmer with the utmost care
and attention.
4.
Operate the string trimmer only if you are in good
physical condition. Perform all work calmly and
carefully. Use common sense and keep in mind that
the operator or user is responsible for accidents or
hazards occurring to other people or their property.
5.
Never operate the string trimmer when tired, feel-
ing ill or under the inuence of alcohol or drugs.
6. Avoid accidentally starting:
— Ensure the switch is in the o posi-
tion before installing the battery pack.
Inserting the battery pack into the string
trimmer with the switch on invites accidents.
— Carrying the string trimmer with your
nger on the switch invites accidents.
7.
The string trimmer should be switched o immedi-
ately if it shows any signs of abnormal operation.
8. Don't force the tool. It will do the job better and
with less likelihood of a risk of injury at the rate for
which it was designed.
9. Don't overreach. Keep proper footing and
balance at all times.
10. Stay Alert - Watch what you are doing. Use
common sense. Do not operate appliance
when you are tired.
11. Store idle appliances indoors.
12. Keep ngers away from switch trigger when
not operating the tool and when moving from
one operating position to another.

3ENGLISH
Intended use of the tool
1. Use right tool. The cordless string trimmer
is only intended for cutting grass and light
weeds. It should not be used for any other
purpose such as edging or hedge cutting as
this may cause injury.
2.
Use only the manufacturer’s recommended acces-
sories and attachments. Use of any other accesso-
ries and attachments may increase the risk of injury.
Personal protective equipment
1. Dress Properly. The clothing worn should be
functional and appropriate, i.e. it should be
tight-tting but not cause hindrance. Do not
wear loose clothing or jewelry. They can be
caught in moving parts. Use of thick leather
gloves and substantial footwear is recom-
mended when working outdoors. Wear protec-
tive hair covering to contain long hair.
2. In order to avoid either head, eye, hand or foot
injuries as well as to protect your hearing the
following protective equipment and protective
clothing must be used during operation of the
equipment.
3. Always wear a helmet where there is a risk of
falling objects. The protective helmet is to be
checked at regular intervals for damage and
is to be replaced at least every ve years. Use
only approved protective helmets.
4. Use safety glasses. The visor of the helmet (or
alternatively goggles) protects the face from
ying debris and stones. During operation
of the tool always wear goggles, or a visor to
prevent eye injuries.
5. Wear adequate noise protection equipment
to avoid hearing impairment (ear mus , ear
plugs etc.).
6. Work overalls protect against injury from
ying stones and debris. It is strongly recom-
mended that the user wears work overalls.
7. Special gloves made of thick leather are part of
the prescribed equipment and must always be
worn during operation of the tool.
8. When using the tool, always wear sturdy shoes
with a nonslip sole. This protects against injuries
from ying debris and ensures a good footing.
9. Use a dust mask if operation is dusty.
Electrical and battery safety
1. Avoid dangerous environment. Don't use the
tool in damp or wet locations or expose it to
rain. Water entering the tool will increase the risk
of electric shock.
2. Prevent unintentional starting. Ensure the
switch is in the o-position before connecting
to battery pack, picking up or carrying the
machine. Carrying the machine with your nger
on the switch or energizing machine that have the
switch on invites accidents.
3. Disconnect the battery pack from the machine
before making any adjustments, changing
accessories, or storing machine. Such preven-
tive safety measures reduce the risk of starting the
machine accidentally.
4. Recharge only with the charger specied by
the manufacturer. A charger that is suitable for
one type of battery pack may create a risk of re
when used with another battery pack.
5. Use machines only with specically desig-
nated battery packs. Use of any other battery
packs may create a risk of injury and re.
6. When battery pack is not in use, keep it away
from other metal objects, like paper clips,
coins, keys, nails, screws or other small metal
objects, that can make a connection from one
terminal to another. Shorting the battery termi-
nals together may cause burns or a re.
7.
Under abusive conditions, liquid may be ejected
from the battery; avoid contact. If contact acci-
dentally occurs, ush with water. If liquid con-
tacts eyes, seek medical help. Liquid ejected from
the battery may cause irritation or burns.
8. Do not use a battery pack or machine that is
damaged or modied. Damaged or modied
batteries may exhibit unpredictable behaviour
resulting in re, explosion or risk of injury.
9.
Do not expose a battery pack or machine to re or
excessive temperature. Exposure to re or tempera-
ture above 130°C (265°F) may cause explosion.
10. Follow all charging instructions and do not
charge the battery pack or machine outside of
the temperature range specied in the instruc-
tions. Charging improperly or at temperatures
outside of the specied range may damage the
battery and increase the risk of re.
11. Have servicing performed by a qualied repair
person using only identical replacement parts.
This will ensure that the safety of the product is
maintained.
12. Do not modify or attempt to repair the machine
or the battery pack except as indicated in the
instructions for use and care.

4ENGLISH
13. Do not dispose of the battery(ies) in a re.
The cell may explode. Check with local codes for
possible special disposal instructions.
14.
Do not open or mutilate the battery(ies). Released
electrolyte is corrosive and may cause damage to the
eyes or skin. It may be toxic if swallowed.
15. Do not charge battery in rain, or in wet
locations.
16. Do not replace the battery with wet hands.
17. Do not replace the battery in the rain.
18. Do not wet the terminal of battery with liquid
such as water, or submerge the battery. Do not
leave the battery in the rain, nor charge, use,
or store the battery in a damp or wet place. If
the terminal gets wet or liquid enters inside of bat-
tery, the battery may be short circuited and there is
a risk of overheat, re, or explosion.
19. After removing the battery from the tool or
charger, be sure to attach the battery cover to
the battery and store it in a dry place.
20. If the battery cartridge gets wet, drain the
water inside and then wipe it with a dry cloth.
Dry the battery cartridge completely in a dry
place before use.
21. Do not charge the battery outdoors.
22. Do not handle charger, including charger plug,
and charger terminals with wet hands.
Starting up the tool
1. Make sure that there are no children or other
people within a working range of 15 meters
(50 ft), also pay attention to any animals in the
working vicinity. Otherwise stop using the tool.
2. Before use always check that the tool is safe
for operation. Check the security of the nylon
cutting head and the guard and the switch
trigger/lever for easy and proper action. Check
for clean and dry handles and test the on/o
function of the switch.
3. Check damaged parts before further use of
the tool. A guard or other part that is damaged
should be carefully checked to determine
that it will operate properly and perform its
intended function. Check for alignment of
moving parts, binding of moving parts, break-
age of parts, mounting, and any other condi-
tion that may aect its operation. A guard or
other part that is damaged should be properly
repaired or replaced by our authorized ser-
vice center unless indicated elsewhere in this
manual.
4. Switch on the motor only when hands and feet
are away from the nylon cutting head.
5. Before starting make sure that the nylon cut-
ting head has no contact with hard objects
such as branches, stones etc. as the nylon
cutting head will revolve when starting.
6. Remove any adjusting key, wrench or blade
cover before turning the power tool on. An
accessory left attached to a rotating part of the
power tool may result in personal injury.
7. Make sure there are no electrical cables, water
pipes, gas pipes etc. that could cause a hazard
if damaged by use of the tool.
8. Do not use a cutting tool which is not recom-
mended by Makita.
9. Do not operate the tool in bad weather or if
there is a risk of lightning.
Method of operation
1. Only use the tool in good light and visibility.
During the winter season beware of slippery
or wet areas, ice and snow (risk of slipping).
Always ensure a safe footing.
2. Take care against injury to feet and hands from
the nylon cutting head.
3. Never cut above waist height.
4. Never stand on a ladder and run the tool.
5. Never climb up into trees to perform cutting
operation with the tool.
6. Never work on unstable surfaces.
7. Remove sand, stones, nails etc. found within
the working range. Foreign particles may dam-
age the nylon cutting head.
8. Should the nylon cutting head hit stones or
other hard objects, immediately switch o the
motor and inspect the nylon cutting head.
9. Before commencing cutting, the nylon cutting
head must have reached full working speed.
10. During operation always hold the tool with
both hands. Never hold the tool with one hand
during use. Always ensure a safe footing.
11. The nylon cutting head has to be equipped
with the guard. Never run the tool with dam-
aged guards or without guards in place!
12. All protective equipment such as guards sup-
plied with the string trimmer must be used
during operation.
13. Except in case of emergency, never drop
or cast the tool to the ground or this may
severely damage the tool.
14. Never drag the tool on the ground when mov-
ing from place to place, the tool may become
damaged if moved in this manner.
15. Always remove the battery cartridge from the
tool:
— whenever leaving the tool unattended;
— before clearing a blockage;
— before checking, cleaning or working on
the tool;
— whenever the tool starts vibrating
abnormally;
— whenever transporting the tool.

5ENGLISH
16. Always ensure that the ventilation openings
are kept clear of debris.
17. Cutting elements continue to rotate after the
motor is switched o.
18. Do not operate power tools in explosive atmo-
spheres, such as in the presence of ammable
liquids, gases or dust. Power tools create sparks
which may ignite the dust or fumes.
19. Take a rest to prevent loss of control caused
by fatigue. We recommend to take a 10 to
20-minute rest every hour.
20. Hold the power tool by insulated gripping
surfaces only, because the cutting tool may
contact hidden wiring. Cutting tool contacting a
“live” wire may make exposed metal parts of the
power tool “live” and could give the operator an
electric shock.
21. Do not use the tool on steep slopes.
22. The shoulder harness must be used during
operation, if supplied with the tool.
23. Do not start the tool when the cutting tool is
tangled with cut grass.
24. Before starting the tool, be sure that the cut-
ting tool is not touching the ground and other
obstacles such as a tree.
25. Always keep your hands, face, and clothes
away from the cutting tool when it is rotating.
Failure to do so may cause personal injury.
26. Only use the cutting tool that are marked with
a speed equal or higher than the speed marked
on the tool.
27.
Do not touch the gear case during and immedi-
ately after the operation. The gear case becomes
hot during operation and can cause burn injury.
28. Do not use the tool when there is a risk of
lightning.
29. When you use the tool on muddy ground, wet
slope, or slippery place, pay attention to your
footing.
30. Avoid working in poor environment where
increased user fatigue is expected.
31. Do not use the tool in bad weather where visi-
bility is limited. Failure to do so may cause fall or
incorrect operation due to low visibility.
32. Do not submerge the tool into a puddle.
33. Do not leave the tool unattended outdoors in
the rain.
34. When wet leaves or dirt adhere to the suc-
tion mouth (ventilation window) due to rain,
remove them.
35. Do not use the tool in the snow.
Maintenance instructions
1. The condition of the nylon cutting head, pro-
tective devices must be checked before com-
mencing work.
2. Turn o the motor and remove the battery
cartridge before carrying out maintenance,
replacing the nylon cutting head or nylon cord
and cleaning the tool.
3. Check for loose fasteners and damaged parts
such as cracks in the nylon cutting head.
4. Follow instructions for lubricating and chang-
ing accessories if applicable.
5. When not in use store the equipment in an
indoor dry location that is locked up or out of
children's reach.
6. Use only the manufacturer's recommended
replacement parts and accessories.
7. Inspect and maintain the tool regularly, espe-
cially before/after use. Have the tool repaired
only by our authorized service center.
8. Keep handles dry, clean and free from oil and
grease. Keep all cooling air inlets clear of
debris.
9. Always keep the tool in good working condi-
tion. Poor maintenance can result in inferior per-
formance and shorten the life of the tool.
10. Do not wash the tool with high pressure water.
11. When washing the tool, do not let water enter
the electrical mechanism such as battery,
motor, and terminals.
12. When storing the tool, avoid direct sunlight
and rain, and store it in a place where it does
not get hot or humid.
13. Perform inspection or maintenance in a place
where rain can be avoided.
14. After using the tool, remove the adhered dirt
and dry the tool completely before storing.
Depending on the season or the area, there is a
risk of malfunction due to freezing.
SAVE THESE INSTRUCTIONS.
WARNING: DO NOT let comfort or familiarity
with product (gained from repeated use) replace
strict adherence to safety rules for the subject
product. MISUSE or failure to follow the safety
rules stated in this instruction manual may cause
serious personal injury.
WARNING: Use of this product can create
dust containing chemicals which may cause
respiratory or other illnesses. Some examples of
these chemicals are compounds found in pesti-
cides, insecticides, fertilizers and herbicides.
Your risk from these exposures varies, depend-
ing on how often you do this type of work. To
reduce your exposure to these chemicals: work
in a well ventilated area, and work with approved
safety equipment, such as those dust masks that
are specially designed to lter out microscopic
particles.
Symbols
The followings show the symbols used for tool.
volts
direct current
no load speed
revolutions or reciprocation per minute

6ENGLISH
Important safety instructions for
battery cartridge
1. Before using battery cartridge, read all instruc-
tions and cautionary markings on (1) battery
charger, (2) battery, and (3) product using
battery.
2. Do not disassemble or tamper the battery
cartridge. It may result in a re, excessive heat,
or explosion.
3. If operating time has become excessively
shorter, stop operating immediately. It may
result in a risk of overheating, possible burns
and even an explosion.
4. If electrolyte gets into your eyes, rinse them
out with clear water and seek medical atten-
tion right away. It may result in loss of your
eyesight.
5. Do not short the battery cartridge:
(1) Do not touch the terminals with any con-
ductive material.
(2) Avoid storing battery cartridge in a con-
tainer with other metal objects such as
nails, coins, etc.
(3) Do not expose battery cartridge to water
or rain.
A battery short can cause a large current
ow, overheating, possible burns and even a
breakdown.
6. Do not store and use the tool and battery car-
tridge in locations where the temperature may
reach or exceed 50 °C (122 °F).
7. Do not incinerate the battery cartridge even if
it is severely damaged or is completely worn
out. The battery cartridge can explode in a re.
8. Do not nail, cut, crush, throw, drop the battery
cartridge, or hit against a hard object to the
battery cartridge. Such conduct may result in a
re, excessive heat, or explosion.
9. Do not use a damaged battery.
10. The contained lithium-ion batteries are subject
to the Dangerous Goods Legislation require-
ments.
For commercial transports e.g. by third parties,
forwarding agents, special requirement on pack-
aging and labeling must be observed.
For preparation of the item being shipped, consult-
ing an expert for hazardous material is required.
Please also observe possibly more detailed
national regulations.
Tape or mask o open contacts and pack up the
battery in such a manner that it cannot move
around in the packaging.
11. When disposing the battery cartridge, remove
it from the tool and dispose of it in a safe
place. Follow your local regulations relating to
disposal of battery.
12. Use the batteries only with the products
specied by Makita. Installing the batteries to
non-compliant products may result in a re, exces-
sive heat, explosion, or leak of electrolyte.
13. If the tool is not used for a long period of time,
the battery must be removed from the tool.
14. During and after use, the battery cartridge may
take on heat which can cause burns or low
temperature burns. Pay attention to the han-
dling of hot battery cartridges.
15. Do not touch the terminal of the tool imme-
diately after use as it may get hot enough to
cause burns.
16. Do not allow chips, dust, or soil stuck into the
terminals, holes, and grooves of the battery
cartridge. It may result in poor performance or
breakdown of the tool or battery cartridge.
17. Unless the tool supports the use near
high-voltage electrical power lines, do not use
the battery cartridge near a high-voltage elec-
trical power lines. It may result in a malfunction
or breakdown of the tool or battery cartridge.
18. Keep the battery away from children.
SAVE THESE INSTRUCTIONS.
CAUTION: Only use genuine Makita batteries.
Use of non-genuine Makita batteries, or batteries that
have been altered, may result in the battery bursting
causing res, personal injury and damage. It will
also void the Makita warranty for the Makita tool and
charger.
Tips for maintaining maximum
battery life
1. Charge the battery cartridge before completely
discharged. Always stop tool operation and
charge the battery cartridge when you notice
less tool power.
2. Never recharge a fully charged battery car-
tridge. Overcharging shortens the battery
service life.
3. Charge the battery cartridge with room tem-
perature at 10 °C - 40 °C (50 °F - 104 °F). Let
a hot battery cartridge cool down before
charging it.
4. When not using the battery cartridge, remove
it from the tool or the charger.
5. Charge the battery cartridge if you do not use
it for a long period (more than six months).

7ENGLISH
PARTS DESCRIPTION
1 2
6
45
7
8
9
12
10
11
13
3
1Speed indicator 2ADT indicator
(ADT = Automatic Torque
Drive Technology)
3Caution lamp 4Main power button
5Reverse button 6Battery cartridge 7Lock-o lever 8Switch trigger
9Hanger 10 Handle 11 Barrier (country specic) 12 Protector
13 Shoulder harness ------
NOTE: The protector supplied as the standard accessory varies depending on the countries.

8ENGLISH
FUNCTIONAL
DESCRIPTION
WARNING: Always be sure that the tool is
switched o and the battery cartridge is removed
before adjusting or checking function on the tool.
Failure to switch o and remove the battery cartridge
may result in serious personal injury from accidental
start-up.
Installing or removing battery
cartridge
CAUTION: Always switch o the tool before
installing or removing of the battery cartridge.
CAUTION: Hold the tool and the battery car-
tridge rmly when installing or removing battery
cartridge. Failure to hold the tool and the battery
cartridge rmly may cause them to slip o your hands
and result in damage to the tool and battery cartridge
and a personal injury.
1
23
► 1. Red indicator 2. Button 3. Battery cartridge
To remove the battery cartridge, slide it from the tool
while sliding the button on the front of the cartridge.
To install the battery cartridge, align the tongue on the
battery cartridge with the groove in the housing and slip
it into place. Insert it all the way until it locks in place
with a little click. If you can see the red indicator on the
upper side of the button, it is not locked completely.
CAUTION: Always install the battery cartridge
fully until the red indicator cannot be seen. If not,
it may accidentally fall out of the tool, causing injury to
you or someone around you.
CAUTION: Do not install the battery cartridge
forcibly. If the cartridge does not slide in easily, it is
not being inserted correctly.
Tool / battery protection system
The tool is equipped with a tool/battery protection
system. This system automatically cuts o power to
the motor to extend tool and battery life. The tool will
automatically stop during operation if the tool is placed
under one of the following conditions:
Caution lamp Status
Color On Blinking
Green Overload
Red (tool) / (battery) Overheat
Red Over
discharge
Overload protection
If the tool gets into one of the following situation, the
tool automatically stops and the caution lamp starts
blinking in green:
— The tool is overloaded by entangled weeds or
other debris.
— The cutting tool is locked or kicked back.
— The main power button is turned on while the
switch trigger is being pulled.
In this situation, release the switch trigger and remove
entangled weeds or debris if necessary. After that, pull
the switch trigger again to resume.
CAUTION: If you need to remove the entan-
gled weeds on the tool or release the locked
cutting tool, be sure to turn the tool o before you
start.
Overheat protection for tool or battery
If the tool or battery cartridge is overheated, the tool stops
automatically. When the tool is overheated, the caution
lamp lights up in red. When the battery cartridge is over-
heated, the caution lamp blinks in red. Let the tool and/or
battery cool down before turning the tool on again.
Overdischarge protection
When the battery capacity becomes low, the tool stops
automatically and the caution lamp starts blinking in red.
If the tool does not operate even when the switches are
operated, remove the battery cartridge from the tool and
charge it.
Indicating the remaining battery
capacity
Press the check button on the battery cartridge to indi-
cate the remaining battery capacity. The indicator lamps
light up for a few seconds.
1
2
► 1. Indicator lamps 2. Check button

9ENGLISH
Indicator lamps Remaining
capacity
Lighted O Blinking
75% to 100%
50% to 75%
25% to 50%
0% to 25%
Charge the
battery.
The battery
may have
malfunctioned.
NOTE: Depending on the conditions of use and the
ambient temperature, the indication may dier slightly
from the actual capacity.
NOTE: The rst (far left) indicator lamp will blink when
the battery protection system works.
Main power switch
Tap the main power button to turn on the tool.
To turn o the tool, press and hold the main power
button until the speed indicator goes o.
2
1
► 1. Speed indicator 2. Main power button
NOTE: The tool will automatically turned o if it is left
without any operations for a certain period of time.
Switch action
WARNING: For your safety, this tool is
equipped with lock-o lever which prevents the
tool from unintended starting. NEVER use the tool
if it runs when you simply pull the switch trigger
without pressing the lock-o lever. Return the
tool to our authorized service center for proper
repairs BEFORE further usage.
WARNING: NEVER tape down or defeat pur-
pose and function of lock-o lever.
CAUTION: Before installing the battery car-
tridge into the tool, always check to see that the
switch trigger actuates properly and returns to
the "OFF" position when released. Operating a tool
with a switch that does not actuate properly can lead
to loss of control and serious personal injury.
CAUTION: Never put your nger on the main
power button and switch trigger when carrying
the tool. The tool may start unintentionally and cause
injury.
NOTICE: Do not pull the switch trigger hard with-
out pressing the lock-o lever. This can cause
switch breakage.
To prevent the switch trigger from being accidentally
pulled, a lock-o lever is provided. To start the tool,
depress the lock-o lever and pull the switch trigger.
The tool speed increases by increasing pressure on the
switch trigger. Release the switch trigger to stop.
2
1
► 1. Lock-o lever 2. Switch trigger
Speed adjusting
You can select the tool speed by tapping the main
power button. Each time you tap the main power button,
the level of speed will change.
2
1
► 1. Speed indicator 2. Main power button

10 ENGLISH
Speed indicator Mode Rotation speed
High 0 - 6,500 /min
Medium 0 - 5,300 /min
Low 0 - 3,500 /min
Automatic Torque Drive Technology
When you turn on the Automatic Torque Drive
Technology (ADT), the tool runs at optimum rotation
speed and torque for the condition of grass being cut.
To start ADT, press and hold the reverse button until the
ADT indicator turns on.
To stop ADT, press and hold the reverse button until the
ADT indicator turns o.
2
1
► 1. ADT indicator 2. Reverse button
Indicator Mode Rotation speed
ADT 3,500 - 6,500 /min
Reverse button for debris removal
WARNING: Switch o the tool and remove
the battery cartridge before you remove entan-
gled weeds or debris which the reverse rotation
function can not remove. Failure to switch o and
remove the battery cartridge may result in serious
personal injury from accidental start-up.
This tool has a reverse button to change the direction of
rotation. It is only for removing weeds and debris entan-
gled in the tool.
To reverse the rotation, tap the reverse button and pull
the switch trigger while depressing the lock-o lever
when the cutting tool is stopped. The speed indicators
and ADT indicator start blinking, and the cutting tool
rotates in reverse direction when you pull the switch
trigger.
To return to regular rotation, release the trigger and wait
until the cutting tool stops.
3
1
2
► 1. Speed indicator 2. ADT indicator 3. Reverse
button
NOTE: During the reverse rotation, the tool operates
only for a short period of time and then automatically
stops.
NOTE: Once the tool is stopped, the rotation returns
to regular direction when you start the tool again.
NOTE: If you tap the reverse button while the cutting
tool is still rotating, the tool comes to stop and to be
ready for reverse rotation.
Electric brake
This tool is equipped with an electric brake. If the tool
consistently fails to quickly stop after the switch trigger
is released, have the tool serviced at our service center.
CAUTION: This brake system is not a substi-
tute for the protector. Never use the tool without
the protector. An unguarded cutting tool may result
in serious personal injury.
Electronic function
Constant speed control
The speed control function provides the constant rota-
tion speed regardless of load conditions.
Soft start feature
Soft start because of suppressed starting shock.

11 ENGLISH
ASSEMBLY
WARNING:
Always be sure that the tool is switched o
and battery cartridge is removed before carrying out any work
on the tool. Failure to switch o and remove the battery cartridge
may result in serious personal injury from accidental start-up.
WARNING:
Never start the tool unless it is completely
assembled. Operation of the tool in a partially assembled state
may result in serious personal injury from accidental start-up.
Installing the handle
1. Attach the upper and lower clamps on the damper.
2. Put the handle on the upper clamp and x it with
hex socket head bolts as illustrated.
2
1
3
5
4
6
► 1. Hex socket head bolt 2. Handle 3. Upper clamp
4. Damper 5. Lower clamp 6. Spacer
CAUTION:
Do not remove or shrink the spacer. Doing
so lose the balance of the tool and may cause personal injury.
Attaching the barrier
For the loop handle model only (country specic)
If the barrier is included in your model, attach it to the
handle using the screw on the barrier.
1
2
► 1. Barrier 2. Screw
CAUTION:
After assembling the barrier, do not
remove it. The barrier works as a safety part to prevent
you from contacting the cutting blade accidentally.
Hex wrench storage
CAUTION: Be careful not to leave the hex
wrench inserted in the tool head. It may cause
injury and/or damage to the tool.
When not in use, store the hex wrench as illustrated to
keep it from being lost.
1
► 1. Hex wrench
For the loop handle model, the hex wrench can also be
stored on the handle as illustrated.
1
► 1. Hex wrench
Correct combination of the cutting
tool and the protector
CAUTION: Always use the correct combi-
nation of cutting tool and the protector. A wrong
combination may not protect you from the cutting tool,
ying debris, and stones. It can also aect the bal-
ance of the tool and result in an injury.
Cutting tool Protector
Nylon cutting head

12 ENGLISH
Installing the protector
WARNING: Never use the tool without the
guard or with the guard improperly installed.
Failure to do so can cause serious personal injury.
CAUTION: Take care not to injure yourself on
the cutter for cutting the nylon cord.
Attach the protector to the clamp using bolts.
1
2
3
► 1. Clamp 2. Protector 3. Cutter
Installing the cutting tool
CAUTION: Always use the supplied
wrench(es) to remove or to install the cutting tool.
CAUTION:
Be sure to remove the hex wrench
inserted into the tool head after installing the cutting tool.
NOTE:
The type of the cutting tool(s) supplied as the stan-
dard accessory varies depending on the countries. The cut-
ting tool is not included in some specications of the model.
NOTE: Turn the tool upside down so that you can
replace the cutting tool easily.
NOTICE: Be sure to use genuine Makita nylon
cutting head.
4
5
3
1
2
► 1. Nylon cutting head 2. Spindle 3. Hex wrench
4. Loosen 5. Tighten
1. Insert the hex wrench through the hole in the tool
head to lock the spindle. Rotate the spindle until the hex
wrench is fully inserted.
2. Place the nylon cutting head onto the spindle and
tighten it securely by hand.
3. Remove the hex wrench from the tool head.
To remove the nylon cutting head, follow the installation
procedures in reverse.
OPERATION
Attaching the shoulder harness
CAUTION: When you use the tool in combi-
nation of the backpack-type power supply such
as portable power pack, do not use the shoulder
harness included in the tool package, but use the
hanging band recommended by Makita.
If you put on the shoulder harness included in the
tool package and the shoulder harness of the back-
pack-type power supply at the same time, removing
the tool or backpack-type power supply is dicult in
case of an emergency, and it may cause an accident
or injury. For the recommended hanging band, ask
Makita Authorized Service Centers.
CAUTION:
Always use the shoulder harness
attached to the tool. Before operation, adjust the shoul-
der harness according to the user size to prevent fatigue.
CAUTION: Before operation, make sure that
the shoulder harness is properly attached to the
hanger on the tool.
1. Wear the shoulder harness on your left shoulder.
2.
Clasp the hook on the shoulder harness to tool's hanger.
1
2
► 1. Hook 2. Hanger

13 ENGLISH
3. Adjust the shoulder harness to a comfortable
working position.
The shoulder harness features a means of quick
release.
Simply squeeze the sides of the buckle to release the
tool from the shoulder harness.
1
► 1. Buckle
Correct handling of the tool
WARNING: Always position the tool on your
right-hand side. Correct positioning of the tool allows
for maximum control and will reduce the risk of seri-
ous personal injury.
WARNING: Be extremely careful to maintain
control of the tool at all times. Do not allow the
tool to be deected toward you or anyone in the
work vicinity. Failure to keep control of the tool
could result in serious injury to the bystander and the
operator.
WARNING: To avoid accident, leave more
than 15m (50 ft) distance between operators when
two or more operators work in one area. Also,
arrange a person to observe the distance between
operators. If someone or an animal enters the
working area, immediately stop the operation.
CAUTION: If the cutting tool accidentally
impacts a rock or hard object during operation,
stop the tool and inspect for any damage. If the
cutting tool is damaged, replace it immediately.
Use of a damaged cutting tool may result in serious
personal injury.
Correct positioning and handling allow optimum control
and reduce the risk of injury.
When using a nylon cutting head (bump & feed type)
The nylon cutting head is a dual string trimmer head
provided with a bump & feed mechanism.
To feed out the nylon cord, tap the cutting head against
the ground while rotating.
1
► 1. Most eective cutting area
NOTICE: The bump feed will not operate prop-
erly if the nylon cutting head is not rotating.
NOTE: If the nylon cord does not feed out while
tapping the head, rewind/replace the nylon cord
by following the procedures in the section for the
maintenance.
MAINTENANCE
WARNING: Always be sure that the tool is
switched o and battery cartridge is removed
before attempting to perform inspection or main-
tenance on the tool. Failure to switch o and remove
the battery cartridge may result in serious personal
injury from accidental start-up.
NOTICE: Never use gasoline, benzine, thinner,
alcohol or the like. Discoloration, deformation or
cracks may result.
To maintain product SAFETY and RELIABILITY,
repairs, any other maintenance or adjustment should
be performed by Makita Authorized or Factory Service
Centers, always using Makita replacement parts.

14 ENGLISH
Replacing the nylon cord
WARNING: Use only the nylon cord with
diameter specied in this instruction manual.
Never use heavier line, metal wire, rope or the
like. Failure to do so may cause damage to the tool
and result in serious personal injury.
WARNING: Always remove the nylon cutting
head from the tool when replacing the nylon cord.
WARNING: Make sure that the cover of the
nylon cutting head is secured to the housing
properly as described below. Failure to properly
secure the cover may cause the nylon cutting head to
y apart resulting in serious personal injury.
Replace the nylon cord if it is not fed any more. The
method of replacing the nylon cord varies depending on
the type of the nylon cutting head.

15 ENGLISH
95-M10L
1
2
3
5
4
6
7
8
4 m (13 ft)
80 mm
(3-1/8″)
100 mm
(3-15/16″)

16 ENGLISH
96-M10L
1
2
4
3
5
6
4 m (13 ft)
100 mm
(3-15/16″)

17 ENGLISH
B&F ECO 4L
1
2
3
4
5
6
7
8
4 m (13 ft)
80 mm
(3-1/8″)
100 mm
(3-15/16″)

18 ENGLISH
TROUBLESHOOTING
Before asking for repairs, conduct your own inspection rst. If you nd a problem that is not explained in the manual,
do not attempt to dismantle the tool. Instead, ask Makita Authorized Service Centers, always using Makita replace-
ment parts for repairs.
State of abnormality Probable cause (malfunction) Remedy
Motor does not run. Battery cartridge is not installed. Install the battery cartridge.
Battery problem (under voltage) Recharge the battery. If recharging is not eective,
replace battery.
The drive system does not work
correctly.
Ask your local authorized service center for repair.
Motor stops running after a little use. Battery's charge level is low. Recharge the battery. If recharging is not eective,
replace battery.
Overheating. Stop using of tool to allow it to cool down.
It does not reach maximum RPM. Battery is installed improperly. Install the battery cartridge as described in this
manual.
Battery power is dropping. Recharge the battery. If recharging is not eective,
replace battery.
The drive system does not work
correctly.
Ask your local authorized service center for repair.
Cutting tool does not rotate:
stop the machine immediately!
Foreign object such as a branch is
jammed between the guard and the
cutting tool.
Remove the foreign object.
The drive system does not work
correctly.
Ask your local authorized service center for repair.
Abnormal vibration:
stop the machine immediately!
One end of the nylon cord has been
broken.
Tap the nylon cutting head against the ground while
it is rotating to cause the cord to feed.
The drive system does not work
correctly.
Ask your local authorized service center for repair.
Cutting tool and motor cannot stop:
Remove the battery immediately!
Electric or electronic malfunction. Remove the battery and ask your local authorized
service center for repair.
OPTIONAL ACCESSORIES
WARNING: Do not mount a metal blade on
this tool and only use the recommended accesso-
ries or attachments indicated in this manual. The
use of a metal blade or any other accessory or attach-
ment may result in serious personal injury.
CAUTION: These accessories or attachments
are recommended for use with your Makita tool
specied in this manual. The use of any other
accessories or attachments might present a risk of
injury to persons. Only use accessory or attachment
for its stated purpose.
If you need any assistance for more details regard-
ing these accessories, ask your local Makita Service
Center.
• Nylon cutting head
• Nylon cord (cutting line)
• Protector
• Makita genuine battery and charger
NOTE: Some items in the list may be included in the
tool package as standard accessories. They may
dier from country to country.
MAKITA LIMITED WARRANTY
Please refer to the annexed warranty sheet for the
most current warranty terms applicable to this product.
If annexed warranty sheet is not available, refer to the
warranty details set forth at below website for your
respective country.
United States of America: www.makitatools.com
Canada: www.makita.ca
Other countries: www.makita.com

19 ESPAÑOL
ESPAÑOL (Instrucciones originales)
ESPECIFICACIONES
Modelo: GRU01
Tipo de mango Mango redondo
Velocidad sin carga
(en cada nivel de la velocidad
de rotación)
Cabezal de corte de nailon 3: 0 r/min - 6 500 r/min
2: 0 r/min - 5 300 r/min
1: 0 r/min - 3 500 r/min
Longitud total
(sin la herramienta de corte)
1 760 mm (69-1/4″)
Diámetro del cordón de nailon 2,0 mm - 2,3 mm (0,08″ - 0,09″)
Herramienta de corte aplicable
y diámetro de corte
Cabezal de corte de nailon
(No. de pza. 191D89-4)
380 mm (15″)
Tensión nominal c.c. 36 V - 40 V máx.
Peso neto 4,1 kg - 4,4 kg (9,0 lbs - 9,7 lbs)
• Debido a nuestro continuo programa de investigación y desarrollo, las especicaciones aquí incluidas están
sujetas a cambio sin previo aviso.
• Las especicaciones pueden variar de país a país.
• El peso puede variar en función de los accesorios, incluido el cartucho de batería. En la tabla se muestra la
combinación de peso más ligero y más pesado conforme al procedimiento 01/2014 de EPTA.
Cartucho de batería y cargador aplicables
Cartucho de batería BL4025 / BL4040
Cargador DC40RA
• Algunos de los cartuchos de batería y cargadores enumerados arriba podrían no estar disponibles depen-
diendo de su área de residencia.
ADVERTENCIA: Use únicamente los cartuchos de batería y los cargadores indicados arriba. El uso de
cualquier otro cartucho de batería y cargador podría ocasionar una lesión y/o un incendio.
ADVERTENCIAS DE
SEGURIDAD
Instrucciones importantes de seguridad
ADVERTENCIA: Al utilizar aparatos eléc-
tricos de jardinería, siempre deben tomarse en
cuenta las precauciones básicas de seguridad
a n de reducir el riesgo de incendio, descarga
eléctrica y lesiones personales, incluyendo lo
siguiente.
Lea todas las instrucciones
El no seguir las advertencias e instrucciones podrá ocasio-
nar descargas eléctricas, incendios y/o lesiones graves.
GUARDE ESTAS INSTRUCCIONES.
Instrucciones generales
1. Nunca permita que los niños o gente que no
esté familiarizada con estas instrucciones
utilice la máquina. Las regulaciones locales
pueden restringir la edad del operador. Es
peligroso en manos de usuarios no entrenados o
de niños.
2. Asegúrese de que cualquier persona que vaya
a utilizar la desbrozadora haya leído primero el
manual de instrucciones.
3. Use la desbrozadora con extremo cuidado y
atención.
4. Opere la desbrozadora sólo si se encuentra en
buena condición física. Realice todo el trabajo
tranquila y cuidadosamente. Use el sentido
común y tenga en cuenta que el operador o
usuario es responsable de los accidentes o
peligros que le ocurran a otras personas o a
su propiedad.
5. Nunca opere la desbrozadora si está cansado,
se siente enfermo o está bajo la inuencia de
alcohol o drogas.
6. Evite la puesta en marcha accidental:
— Asegúrese de que el interruptor se
encuentre en la posición de apagado
antes de instalar el paquete de batería.
Insertar el paquete de batería en la desbro-
zadora con el interruptor encendido puede
provocar accidentes.
— Cargar la desbrozadora con su dedo en el
interruptor puede provocar accidentes.

20 ESPAÑOL
7. La desbrozadora deberá apagarse inmediata-
mente si muestra alguna señal de operación
anormal.
8. No fuerce la herramienta. Esto permitirá hacer
mejor el trabajo con un menor riesgo de lesiones a
la velocidad para la que fue diseñada.
9. No utilice la herramienta donde no alcance.
Mantenga los pies sobre suelo rme y el equi-
librio en todo momento.
10. Manténgase alerta - Preste atención a lo que
está haciendo. Utilice el sentido común. No
utilice el aparato cuando esté cansado.
11. Almacene los aparatos que no use en
interiores.
12. Mantenga los dedos alejados del gatillo inte-
rruptor cuando no opere la herramienta y
cuando pase de una posición de operación a
otra.
Uso previsto de la herramienta
1. Utilice la herramienta adecuada. La desbroza-
dora inalámbrica está diseñada sólo para cor-
tar césped y maleza ligera. No debe utilizarse
para ningún otro propósito tal como la poda de
bordes o cercos de setos, ya que esto podría
causar lesiones.
2. Use sólo los accesorios y aditamentos reco-
mendados por el fabricante. El uso de cualquier
otro accesorio y aditamento puede incrementar el
riesgo de lesiones.
Equipo de protección personal
1. Use una vestimenta adecuada. La vestimenta
que lleve deberá ser funcional y adecuada,
es decir, deberá quedar ajustada pero sin que
estorbe. No use ropa oja ni alhajas. Éstas
podrían engancharse en las piezas móviles.
Cuando se trabaje en exteriores es recomen-
dable usar guantes de piel gruesa y un calzado
resistente. Lleve protección en el cabello para
cubrirlo en caso de tenerlo largo.
2. Para evitar lesiones ya sea en la cabeza, ojos,
manos o pies, así como para proteger su audi-
ción, se requiere el uso del siguiente equipo
de protección y prendas protectoras durante la
operación del equipo.
3. Use siempre casco donde haya riesgo de caída
de objetos. El casco protector debe ser revi-
sado durante intervalos periódicos para ver
si tiene daños y debe reemplazarse al menos
cada cinco años. Use sólo cascos protectores
aprobados.
4. Use gafas de seguridad. El visor del casco (o
gafas protectoras como alternativa) protege
la cara de los residuos y piedras que salgan
proyectados. Use siempre gafas protectoras o
visor para evitar lesiones en los ojos durante
el uso de la herramienta.
5. Use un equipo adecuado de protección contra
ruido para evitar el daño auditivo (orejeras,
tapones para los oídos, etc.).
6. Los overoles de trabajo protegen contra lesio-
nes a causa de residuos y piedras que salgan
proyectados. Es altamente recomendable que
el usuario use un overol de trabajo.
7. Los guantes especiales hechos de piel gruesa
forman parte del equipo recomendado y deben
usarse siempre durante la operación de la
herramienta.
8. Cuando utilice la herramienta, use siempre un
calzado resistente con suela antiderrapante.
Esto lo protegerá contra lesiones a causa de
residuos que salgan proyectados y asegurará que
pise rmemente.
9. Utilice una máscara contra polvo si la opera-
ción es polvorienta.
Seguridad eléctrica y de la batería
1. Evite los entornos peligrosos. No utilice la
herramienta en lugares húmedos o mojados ni
la exponga a la lluvia. El agua que ingrese a la
herramienta incrementará el riesgo de descarga
eléctrica.
2. Evite una puesta en marcha accidental.
Asegúrese de que el interruptor esté en
la posición apagada antes de conectar el
paquete de baterías, levantar la herramienta o
cargarla. Cargar la herramienta con su dedo en el
interruptor o pasar energía a la herramienta con el
interruptor encendido puede propiciar accidentes.
3. Desconecte el paquete de baterías de la herra-
mienta antes de hacer cualquier ajuste, cam-
biar accesorios o almacenar la herramienta.
Estas medidas de seguridad preventivas reducen
el riesgo de poner en marcha la herramienta
accidentalmente.
4. Recargue sólo con el cargador especicado
por el fabricante. Un cargador que sea adecuado
para un tipo especíco de paquete de batería
puede generar un riesgo de incendio al usarse
con un paquete de batería distinto.

21 ESPAÑOL
5.
Use las herramientas únicamente con los paque-
tes de baterías designados especícamente para
ellas. El uso de otros paquetes de baterías puede
generar riesgo de lesiones e incendio.
6. Cuando no se esté usando el paquete de
batería, manténgalo alejado de otros objetos
metálicos, como sujetapapeles (clips), mone-
das, llaves, clavos, tornillos u otros objetos
pequeños de metal que puedan crear una
conexión entre una terminal y otra. Causar un
cortocircuito en las terminales de la batería puede
provocar quemaduras o incendio.
7. En condiciones de mal uso, podría escapar
líquido de la batería; evite el contacto. Si toca
el líquido accidentalmente, enjuague con agua.
Si hay contacto del líquido con los ojos, soli-
cite atención médica. El líquido expulsado de la
batería puede causar irritación o quemaduras.
8. No utilice un paquete de baterías o una herra-
mienta que esté dañado/dañada o haya sido
modicado/modicada. Las baterías dañadas
o modicadas podrían comportarse de manera
impredecible causando un incendio, explosión
o riesgo de lesión.
9. No exponga un paquete de baterías o una
herramienta al fuego o a una temperatura
excesiva. La exposición al fuego a una tempe-
ratura superior a 130 °C (265 °F) podría causar
una explosión.
10. Siga todas las instrucciones relativas a la
carga y no cargue el paquete de baterías o la
herramienta fuera del rango de temperatura
especicado en las instrucciones. Cargar de
manera inapropiada o a temperaturas fuera del
rango especicado podría dañar la batería e incre-
mentar el riesgo de incendio.
11. Pida que el servicio lo realice un técnico en
reparaciones calicado y que utilice única-
mente piezas de repuesto idénticas a las
originales. Esto garantizará que se mantenga la
seguridad del producto.
12. No modique ni intente reparar la herramienta
ni el paquete de baterías salvo como se indi-
que en las instrucciones para el uso y cuidado.
13. No deseche la(s) batería(s) donde haya fuego.
La celda podría explotar. Consulte los códigos
locales para ver si hay instrucciones especiales
relativas al desecho.
14. No abra ni dañe la(s) batería(s). Los electrolitos
liberados son corrosivos y pueden ocasionar
daños en los ojos o la piel. Éstos pueden ser
tóxicos si se llegan a tragar.
15. No cargue la batería bajo la lluvia ni en lugares
mojados.
16. No reemplace la batería con las manos
mojadas.
17. No reemplace la batería bajo la lluvia.
18. No moje el terminal de la batería con líquidos,
como el agua, ni sumerja la batería en ellos.
No deje la batería bajo la lluvia, ni cargue,
utilice, o guarde la batería en un lugar húmedo
o mojado. Si el terminal se moja o entra líquido
dentro de la batería, la batería puede sufrir un
cortocircuito, con el consiguiente riesgo de sobre-
calentamiento, incendio o explosión.
19. Después de retirar la batería de la herramienta
o el cargador, asegúrese de acoplar la cubierta
de la batería a la batería y de guardarla en un
lugar seco.
20. Si el cartucho de batería se moja, drene el
agua que se haya acumulado en el interior
y luego límpielo con un paño seco. Seque el
cartucho de batería por completo en un lugar
seco antes de usarlo.
21. No cargue la batería en exteriores.
22. No manipule el cargador, incluida la la clavija
del cargador, ni los terminales con las manos
mojadas.
Puesta en marcha de la herramienta
1. Asegúrese de que no haya niños ni otras per-
sonas en un rango de 15 metros (50 pies), y
cuide también que no haya animales alrededor
del área de trabajo. En caso contrario, inte-
rrumpa la operación de la herramienta.
2. Antes de usar la herramienta, revísela siem-
pre para una operación segura. Compruebe
la seguridad del cabezal de corte de nailon
y el protector, así como el gatillo interrup-
tor/palanca para un accionamiento fácil y
correcto. Revise que los mangos estén limpios
y secos, y compruebe el funcionamiento del
interruptor de encendido/apagado.
3. Inspeccione las piezas dañadas antes de con-
tinuar usando la herramienta. Si un protector
u otra pieza están dañados, deberá revisarlos
cuidadosamente para cerciorarse de que van
a funcionar correctamente y realizar el trabajo
para el que fueron diseñados. Verique la ali-
neación de las piezas móviles, la unión de las
mismas, roturas de las piezas, la instalación y
cualquier otra condición que pueda afectar su
funcionamiento. Cualquier protector o pieza
dañada deberá ser debidamente reparada o
reemplazada por un centro de servicio autori-
zado, a menos que se indique de alguna otra
forma en este manual.
4. Encienda el motor sólo cuando tenga las
manos y pies alejados del cabezal de corte de
nailon.
5. Antes de poner en marcha la herramienta,
asegúrese de que el cabezal de corte de nailon
no esté haciendo contacto con objetos duros
tales como ramas, piedras, etc., ya que éste
empezará a girar una vez que la ponga en
marcha.

22 ESPAÑOL
6.
Retire cualquier llave de ajuste, llave de apriete
o cubierta de la cuchilla antes de encender la
herramienta. Cualquier accesorio que se deje
puesto en una pieza giratoria de la herramienta
eléctrica puede provocar lesiones personales.
7. Asegúrese de que no haya cables eléctricos,
tubos de agua, tubos de gas, etc. que pudieran
representar un peligro en caso de ser dañados
por el uso de la herramienta.
8. No utilice una herramienta de corte que no sea
recomendada por Makita.
9. No utilice la herramienta cuando haya mal
tiempo o si existe el riesgo de ser alcanzado
por un rayo.
Método de operación
1. Use la herramienta sólo en condiciones de
buena iluminación y visibilidad. Durante la
época de invierno, tenga cuidado con las áreas
resbalosas o mojadas, así como con el hielo y
la nieve (riesgo de resbalones). Siempre ase-
gúrese de pisar suelo rme.
2. Tenga cuidado con el cabezal de corte de
nailon para evitar lesiones en pies y manos.
3. Nunca haga cortes por encima de la altura de
su cintura.
4. Nunca se coloque sobre una escalera para
poner en marcha la herramienta.
5. Nunca se suba a árboles para realizar una
operación de corte con la herramienta.
6. Nunca trabaje sobre supercies inestables.
7.
Retire la arena, piedras, clavos, etc. que encuen-
tre en el área de trabajo. Las partículas extrañas
podrían dañar el cabezal de corte de nailon.
8. Si el cabezal de corte de nailon llega a golpear
piedras u otros objetos duros, apague inme-
diatamente el motor e inspeccione el cabezal
de corte de nailon.
9. Antes de comenzar a cortar, el cabezal de
corte de nailon deberá alcanzar su velocidad
de trabajo completa.
10. Durante la operación, siempre sostenga la
herramienta con ambas manos. Nunca sos-
tenga la herramienta con una mano durante el
uso. Siempre asegúrese de pisar suelo rme.
11. El cabezal de corte de nailon debe estar equi-
pado con su protector. ¡Nunca ponga en mar-
cha la herramienta con un protector dañado o
que no esté colocado en su lugar!
12. Todo el equipo de protección deberá utilizarse
durante la operación, tal como los protectores
suministrados con la desbrozadora.
13. Salvo en caso de emergencia, nunca deje caer
ni arroje la herramienta al suelo ya que podría
dañarse severamente.
14. Nunca arrastre la herramienta por el suelo al
moverla de un lugar a otro, ya que esto podría
dañarla.
15. Siempre retire el cartucho de batería de la
herramienta:
— cada vez que la vaya a dejar desatendida;
— antes de despejar una obstrucción;
— antes de revisar, limpiar o trabajar en la
herramienta;
— cada vez que la herramienta comience a
vibrar de manera anormal;
— cada vez que vaya a transportar la
herramienta.
16. Asegúrese siempre de que las aberturas de
ventilación estén libres de residuos.
17. Los elementos de corte continúan girando una
vez que el motor se haya apagado.
18. No utilice las herramientas eléctricas en
atmósferas explosivas, tal como en la presen-
cia de líquidos, gases o polvo inamables. Las
herramientas eléctricas crean chispas que pueden
prender fuego al polvo o los humos.
19. Tome un descanso para evitar la pérdida de
control a causa de la fatiga. Recomendamos
tomar de 10 minutos a 20 minutos de descanso
cada hora.
20. Sujete la herramienta eléctrica solamente por
las supercies de asimiento aisladas, ya que la
herramienta de corte podría entrar en contacto
con cableado oculto. La herramienta de corte
que entre en contacto con un cable con corriente
podrá transmitirla a las partes metálicas expues-
tas de la herramienta eléctrica y ocasionar una
descarga eléctrica al operador.
21. No utilice la herramienta en pendientes
inclinadas.
22. El arnés para hombro deberá ser usado
durante la operación si es que éste es suminis-
trado junto con la herramienta.
23. No arranque la herramienta cuando la herra-
mienta de corte quede enredada con el césped
cortado.
24. Antes de arrancar la herramienta, asegúrese
de que la herramienta de corte no esté tocando
el suelo, así como otros obstáculos como un
árbol.
25. Mantenga siempre las manos, la cara y las
prendas lejos de la herramienta de corte mien-
tras la herramienta está girando. El no hacerlo
podría ocasionar una lesión personal.
26. Utilice únicamente la herramienta de corte
marcada con una velocidad igual o mayor a la
velocidad marcada en la herramienta.
27. No toque la caja de engranajes durante e inme-
diatamente después de la operación. La caja
de engranajes se calienta durante la operación y
puede causar una lesión por quemadura.
28. No utilice la herramienta cuando exista riesgo
de ser alcanzado por un rayo.
29. Cuando utilice la herramienta sobre suelo
embarrado, inclinaciones mojadas o super-
cies resbalosas, tenga cuidado al pisar.
30. Evite trabajar en un entorno deciente donde
sea probable que aumente la fatiga del
usuario.
31. No utilice la herramienta cuando las condicio-
nes climáticas no sean buenas y la visibilidad
sea limitada. En caso contrario se podrían oca-
sionar caídas u operaciones incorrectas debido a
la baja visibilidad.
32. No sumerja la herramienta en los charcos.
33. No deje la herramienta desatendida a la intem-
perie bajo la lluvia.

23 ESPAÑOL
34. Cuando debido a la lluvia se adhieran hojas
mojadas o tierra a la abertura de succión (ven-
tana de ventilación), retírelas.
35. No utilice la herramienta en la nieve.
Instrucciones de mantenimiento
1. La condición del cabezal de corte de nailon,
así como de los dispositivos de protección
deberán ser revisados antes de iniciar la
operación.
2. Apague el motor y quite el cartucho de batería
antes de llevar a cabo operaciones de mante-
nimiento, reemplazo del cabezal de corte de
nailon o del cordón de nailon y la limpieza de
la herramienta.
3. Revise si hay sujetadores que estén sueltos o
piezas dañadas, tal como grietas en el cabezal
de corte de nailon.
4. Siga las instrucciones para la lubricación y
el cambio de los accesorios si aplica para el
caso.
5. Cuando no se utilice, almacene el equipo en
un lugar seco en interiores que esté bajo llave
o fuera del alcance de los niños.
6. Utilice solamente las piezas de repuesto y los
accesorios recomendados por el fabricante.
7. Inspeccione y dé mantenimiento a la herra-
mienta de manera regular, especialmente
antes y después del uso. Lleve la herramienta
a reparación sólo a nuestro centro de servicio
autorizado.
8. Mantenga los mangos secos, limpios, y libres
de aceite y grasa. Mantenga todas las entradas
de aire despejadas de residuos.
9. Mantenga siempre la herramienta en buenas
condiciones de trabajo. Un mantenimiento de-
ciente puede resultar en un desempeño inferior y
la vida útil de la herramienta podría reducirse.
10. No lave la herramienta con agua a alta presión.
11. Al lavar la herramienta, no permita que el agua
entre en el mecanismo eléctrico, como la bate-
ría, el motor y los terminales.
12. Almacene la herramienta lejos de la lluvia y la
luz directa del sol y en un sitio donde no haga
calor ni haya humedad.
13. Realice las inspecciones y labores de manteni-
miento en un sitio protegido de la lluvia.
14. Después de utilizar la herramienta, quite la
suciedad adherida y séquela completamente
antes de guardarla. Dependiendo de la estación
o de la zona, existe el riesgo de un mal funciona-
miento por congelación.
GUARDE ESTAS
INSTRUCCIONES.
ADVERTENCIA: NO DEJE que la comodidad
o familiaridad con el producto (a base de utilizarlo
repetidamente) sustituya la estricta observancia
de las normas de seguridad para dicho producto.
El MAL USO o el no seguir las normas de seguri-
dad establecidas en este manual de instrucciones
puede ocasionar lesiones personales graves.
ADVERTENCIA: El uso de este producto
puede producir polvo que contenga sustancias
químicas que podrían causar enfermedades
respiratorias o de otro tipo. Algunos ejemplos de
estas sustancias químicas son los compuestos
encontrados en pesticidas, insecticidas, fertili-
zantes y herbicidas.
El riesgo al que se expone varía, dependiendo
de la frecuencia con la que realice este tipo de
trabajo. Para reducir la exposición a estas sus-
tancias químicas: trabaje en un área bien ven-
tilada y use un equipo de seguridad aprobado,
tal como las máscaras contra polvo que están
especialmente diseñadas para ltrar partículas
microscópicas.
Símbolos
A continuación se muestran los símbolos utilizados
para la herramienta.
volts o voltios
corriente directa o continua
velocidad sin carga
revoluciones o alternaciones por minuto,
frecuencia de rotación
Instrucciones importantes de
seguridad para el cartucho de batería
1. Antes de utilizar el cartucho de batería, lea
todas las instrucciones e indicaciones de
precaución en el (1) el cargador de batería, (2)
la batería, y (3) el producto con el que se utiliza
la batería.
2. No desarme ni modique el cartucho de bate-
ría. Podría ocurrir un incendio, calor excesivo o
una explosión.
3. Si el tiempo de operación se ha acortado en
exceso, deje de operar de inmediato. Podría
correrse el riesgo de sobrecalentamiento,
posibles quemaduras e incluso explosión.
4. En caso de que ingresen electrolitos en sus
ojos, enjuáguelos bien con agua limpia y con-
sulte de inmediato a un médico. Esto podría
ocasionar pérdida de visión.
5. Evite cortocircuitar el cartucho de batería:
(1) No toque las terminales con ningún mate-
rial conductor.
(2) Evite guardar el cartucho de batería en un
cajón junto con otros objetos metálicos,
tales como clavos, monedas, etc.
(3) No exponga el cartucho de batería al
agua o la lluvia.
Un cortocircuito en la batería puede causar
un ujo grande de corriente, sobrecalenta-
miento, posibles quemaduras e incluso una
descompostura.

24 ESPAÑOL
6.
No guarde ni utilice la herramienta y el cartucho
de batería en lugares donde la temperatura
pueda alcanzar o exceder los 50 °C (122 °F).
7. Nunca incinere el cartucho de batería incluso
en el caso de que esté dañado seriamente o
ya no sirva en absoluto. El cartucho de batería
puede explotar si se tira al fuego.
8. No clave, corte, aplaste, lance o deje caer el
cartucho de batería, ni golpee un objeto sólido
contra el cartucho de batería. Dicha acción
podría resultar en un incendio, calor excesivo o en
una explosión.
9. No use una batería dañada.
10. Las baterías de ión de litio están sujetas a los
requisitos reglamentarios en materia de bie-
nes peligrosos.
Para el trasporte comercial, por ej., mediante
terceros o agentes de transporte, se deben tomar
en cuenta los requisitos especiales relativos al
empaque y el etiquetado.
Para efectuar los preparativos del artículo que se
va a enviar, se requiere consultar a un experto
en materiales peligrosos. Si es posible, consulte
además otras regulaciones nacionales más deta-
lladas.
Pegue o cubra con cinta adhesiva los contactos
abiertos y empaque la batería de manera que ésta
no pueda moverse dentro del paquete.
11. Para deshacerse del cartucho de batería,
sáquelo de la herramienta y deséchelo en un
lugar seguro. Siga las regulaciones locales
relacionadas al desecho de las baterías.
12. Utilice las baterías únicamente con los pro-
ductos especicados por Makita. Instalar las
baterías en productos que no cumplan con los
requisitos podría ocasionar un incendio, un calen-
tamiento excesivo, una explosión o una fuga de
electrolito.
13. Si no se utiliza la herramienta por un
período largo, debe extraerse la batería de la
herramienta.
14. El cartucho de batería podría absorber calor
durante y después de su uso, lo que ocasiona-
ría quemaduras o quemaduras a baja tempe-
ratura. Tenga cuidado con la manipulación de
los cartuchos de batería que estén calientes.
15. No toque el terminal de la herramienta inme-
diatamente después de su uso, ya que el
mismo podría estar lo sucientemente caliente
como para provocarle quemaduras.
16. No permita que las rebabas, el polvo o la tierra
queden atrapados en los terminales, oricios
y ranuras del cartucho de batería. Esto podría
ocasionar un desempeño deciente o descompos-
tura de la herramienta o del cartucho de batería.
17. No utilice el cartucho de batería cerca de
cables eléctricos de alto voltaje, a menos que
la herramienta sea compatible con el uso cer-
cano a estos cables eléctricos de alto voltaje.
Esto podría ocasionar una avería o descompos-
tura de la herramienta o del cartucho de batería.
18. Mantenga la batería alejada de los niños.
GUARDE ESTAS
INSTRUCCIONES.
PRECAUCIÓN: Utilice únicamente baterías
originales de Makita. El uso de baterías no origina-
les de Makita, o de baterías alteradas, puede ocasio-
nar que las baterías exploten causando un incendio,
lesiones personales y daños. Asimismo, esto inva-
lidará la garantía de Makita para la herramienta y el
cargador Makita.
Consejos para alargar al máximo
la vida útil de la batería
1. Cargue el cartucho de batería antes de que
se descargue completamente. Pare siem-
pre la operación y cargue el cartucho de
batería cuando note menos potencia en la
herramienta.
2. No cargue nunca un cartucho de batería que
esté completamente cargado. La sobrecarga
acortará la vida de servicio de la batería.
3. Cargue el cartucho de batería a una tempera-
tura ambiente de 10 °C - 40 °C (50 °F - 104 °F).
Si un cartucho de batería está caliente, déjelo
enfriar antes de cargarlo.
4. Cuando no utilice el cartucho de batería,
sáquelo de la herramienta o del cargador.
5. Cargue el cartucho de batería si no va a utili-
zarlo durante un período prolongado (más de
seis meses).

25 ESPAÑOL
DESCRIPCIÓN DE LAS PIEZAS
1 2
6
45
7
8
9
12
10
11
13
3
1Indicador de velocidad 2Indicador de ADT
(ADT = Automatic
Torque Drive Technology
(Tecnología de acciona-
miento automático de
torsión))
3Luz indicadora de
precaución
4Botón de encendido
principal
5Botón de inversión 6Cartucho de batería 7Palanca de desbloqueo 8Gatillo interruptor
9Colgador 10 Mango 11 Traba (especíca del
país)
12 Protector
13 Arnés para hombro ------
NOTA: El protector suministrado como el aditamento estándar varía dependiendo de cada país.

26 ESPAÑOL
DESCRIPCIÓN DEL
FUNCIONAMIENTO
ADVERTENCIA: Asegúrese siempre de que
la herramienta esté apagada y que el cartucho
de batería haya sido extraído antes de realizar
cualquier ajuste o revisión del funcionamiento
de la herramienta. El no seguir esta indicación de
apagar y quitar el cartucho de batería puede ocasio-
nar lesiones personales graves debido al encendido
accidental.
Instalación o extracción del
cartucho de batería
PRECAUCIÓN: Apague siempre la herra-
mienta antes de colocar o quitar el cartucho de
batería.
PRECAUCIÓN: Sujete la herramienta y el car-
tucho de la batería con rmeza al colocar o quitar
el cartucho de batería. Si no se sujeta con rmeza la
herramienta y el cartucho de batería, puede ocasio-
nar que se resbalen de sus manos causando daños
a la herramienta y al cartucho de batería, así como
lesiones a la persona.
1
23
► 1. Indicador rojo 2. Botón 3. Cartucho de batería
Para quitar el cartucho de batería, deslícelo de la herramienta
mientras desliza el botón sobre la parte delantera del cartucho.
Para colocar el cartucho de batería, alinee la lengüeta
sobre el cartucho de batería con la ranura en la carcasa
y deslice en su lugar. Inserte por completo hasta que
se je en su lugar con un pequeño clic. Si puede ver el
indicador rojo del lado superior del botón, esto indica
que no ha quedado jo por completo.
PRECAUCIÓN: Introduzca siempre com-
pletamente el cartucho de batería hasta que
el indicador rojo no pueda verse. Si no, podría
accidentalmente salirse de la herramienta y caer al
suelo causando una lesión a usted o alguien a su
alrededor.
PRECAUCIÓN: No instale el cartucho de
batería a la fuerza. Si el cartucho no se desliza al
interior fácilmente, se debe a que no está siendo
insertado correctamente.
Sistema de protección para la
herramienta/batería
La herramienta está equipada con un sistema de
protección para la herramienta/batería. Este sistema
corta automáticamente la alimentación al motor para
prolongar la vida de la herramienta y la batería. La
herramienta se detendrá automáticamente durante la
operación si ésta se somete a alguna de las siguientes
condiciones:
Luz indicadora de precaución Estado
Color
Encendido
Parpadeando
Verde Sobrecarga
Rojo (herramienta) /
(batería)
Sobrecalenta-
miento
Rojo
Sobredescarga
Protección contra sobrecarga
Si la herramienta presenta una de las siguientes situa-
ciones, la herramienta se detendrá automáticamente
y la luz indicadora de precaución parpadeará en color
verde:
— La herramienta se sobrecarga cuando se enreda
maleza u otros residuos.
— La herramienta de corte se bloquea o tiene un
retroceso brusco.
— El botón de encendido principal se enciende mien-
tras se está jalando el gatillo interruptor.
En esta situación, suelte el gatillo interruptor y quite
la maleza u otros residuos enredados si es necesario.
Después de esto, vuelva a jalar el gatillo interruptor
para reanudar el funcionamiento.
PRECAUCIÓN: Si necesita extraer la maleza
enredada en la herramienta o liberar la herra-
mienta de corte bloqueada, asegúrese de haber
apagado la herramienta antes de iniciar.
Protección contra el
sobrecalentamiento de la
herramienta o la batería
Si la herramienta o el cartucho de batería se sobreca-
lientan, la herramienta se detendrá automáticamente.
Cuando la herramienta se sobrecalienta, la luz indi-
cadora de precaución se ilumina en rojo. Cuando el
cartucho de batería se sobrecalienta, la luz indica-
dora de precaución parpadea en rojo. Permita que la
herramienta y/o la batería se enfríen antes de volver a
encender la herramienta.
Protección en caso de
sobredescarga
Cuando la capacidad de la batería se reduzca, la herra-
mienta se detendrá automáticamente y la luz indicadora
de precaución empezará a parpadear en color rojo.
Si la herramienta no funciona incluso cuando los inte-
rruptores están siendo operados, retire el cartucho de
batería de la herramienta y cárguelo.

27 ESPAÑOL
Indicación de la capacidad restante
de la batería
Oprima el botón de vericación en el cartucho de la
batería para que indique la capacidad restante de la
batería. Las luces indicadoras se iluminarán por algu-
nos segundos.
1
2
► 1. Luces indicadoras 2. Botón de vericación
Luces indicadoras Capacidad
restante
Iluminadas Apagadas Parpadeando
75% a 100%
50% a 75%
25% a 50%
0% a 25%
Cargar la
batería.
La batería
pudo haber
funcionado
mal.
NOTA: Dependiendo de las condiciones de uso y
la temperatura ambiente, la indicación podrá diferir
ligeramente de la capacidad real.
NOTA: La primera luz indicadora (extrema izquierda)
parpadeará cuando el sistema de protección de
batería esté en funcionamiento.
Interruptor de alimentación principal
Pulse el botón de encendido principal para encender la
herramienta.
Para apagar la herramienta, mantenga oprimido el
botón de encendido principal hasta que el indicador de
velocidad se apague.
2
1
► 1. Indicador de velocidad 2. Botón de encendido
principal
NOTA: La herramienta se apagará automáticamente
si no es operada durante cierto periodo de tiempo.
Accionamiento del interruptor
ADVERTENCIA: Por su seguridad, esta
herramienta está equipada con una palanca de
desbloqueo para prevenir un arranque no inten-
cional de la herramienta. NUNCA use la herra-
mienta si se activa simplemente al jalar el gatillo
interruptor sin presionar la palanca de desblo-
queo. Devuelva la herramienta a nuestro centro
de servicio autorizado para que realicen las repa-
raciones apropiadas ANTES de continuar su uso.
ADVERTENCIA: NUNCA je con cinta adhe-
siva ni impida el funcionamiento ni la nalidad de
la palanca de desbloqueo.
PRECAUCIÓN: Antes de instalar el cartucho
de batería en la herramienta, compruebe siempre
que el gatillo interruptor se accione debidamente
y que regrese a la posición de apagado una vez
que se suelte. Usar una herramienta con un interrup-
tor que no funciona adecuadamente puede resultar
en pérdida del control ocasionando graves lesiones
a la persona.
PRECAUCIÓN: Nunca coloque su dedo en
el botón de encendido principal y en el gatillo
interruptor cuando transporte la herramienta. La
herramienta podría ponerse en marcha accidental-
mente y ocasionar una lesión.
AVISO: No jale fuerte el gatillo interruptor sin
presionar la palanca de desbloqueo. Esto podría
dañar el interruptor.

28 ESPAÑOL
Se proporciona una palanca de desbloqueo para evitar
que el gatillo interruptor sea jalado accidentalmente.
Para arrancar la herramienta, presione la palanca de
desbloqueo y jale el gatillo interruptor. La velocidad de
la herramienta aumenta al incrementar la presión en
el gatillo interruptor. Para detenerla, suelte el gatillo
interruptor.
2
1
► 1. Palanca de desbloqueo 2. Gatillo interruptor
Ajuste de velocidad
Puede seleccionar la velocidad de la herramienta pul-
sando el botón de encendido principal. Cada vez que
toque el botón de encendido principal, el nivel de velo-
cidad cambiará.
2
1
► 1. Indicador de velocidad 2. Botón de encendido
principal
Indicador de
velocidad
Modo Velocidad de
rotación
Alto 0 r/min - 6 500
r/min
Medio 0 r/min - 5 300
r/min
Bajo 0 r/min - 3 500
r/min
Tecnología de accionamiento
automático de torsión
Cuando enciende la tecnología de accionamiento auto-
mático de torsión (ADT), la herramienta funciona a una
velocidad de rotación y a una torsión óptimas para el
tipo de césped que se está cortando.
Para encender la ADT, mantenga oprimido el botón de
inversión hasta que el indicador de ADT se encienda.
Para detener la ADT, mantenga oprimido el botón de
inversión hasta que el indicador de ADT se apague.
2
1
► 1. Indicador de ADT 2. Botón de inversión
Indicador Modo Velocidad de
rotación
ADT (tecnología
de accionamiento
automático de
torsión)
3 500 r/min - 6 500
r/min
Botón de inversión para la
eliminación de residuos
ADVERTENCIA: Apague la herramienta y
retire el cartucho de batería antes de quitar la
maleza o residuos que se hayan enredado y que
no se puedan quitar con la función de rotación
inversa. El no seguir esta indicación de apagar y qui-
tar el cartucho de batería puede ocasionar lesiones
personales graves debido al encendido accidental.
Esta herramienta cuenta con un botón de inversión
para cambiar la dirección de rotación. Su única función
es la de eliminar la maleza y residuos enredados en la
herramienta.
Para invertir la rotación, pulse el botón de inversión y
jale el gatillo interruptor mientras oprime la palanca de
desbloqueo cuando la herramienta de corte se haya
detenido. Los indicadores de velocidad y el indicador de
ADT comenzarán a parpadear y la herramienta de corte
girará en dirección inversa al jalar el gatillo interruptor.
Para regresar a la rotación normal, suelte el gatillo y
espere hasta que la herramienta de corte se detenga.

29 ESPAÑOL
3
1
2
► 1. Indicador de velocidad 2. Indicador de ADT
3. Botón de inversión
NOTA: Durante la rotación inversa, la herramienta
sólo funcionará durante un breve lapso de tiempo y
luego se detendrá automáticamente.
NOTA: Una vez que se haya detenido la herramienta,
la rotación regresará a la dirección normal cuando
ponga nuevamente en marcha la herramienta.
NOTA: Si pulsa el botón de inversión mientras la
herramienta de corte está girando, la herramienta se
detendrá y se preparará para la rotación inversa.
Freno eléctrico
Esta herramienta está equipada con un freno eléctrico.
Si de manera consistente la herramienta no logra dete-
nerse rápidamente después de soltar el gatillo interrup-
tor, lleve la herramienta a nuestro centro de servicio
para que le den mantenimiento.
PRECAUCIÓN: Este sistema de frenado no
es un sustituto para el protector. Nunca utilice la
herramienta sin el protector. El uso de una herra-
mienta de corte sin el protector puede ocasionar
graves lesiones personales.
Función eléctrica
Control de velocidad constante
La función de control de velocidad permite una rotación
constante independientemente de las condiciones de
carga.
Característica de inicio suave
Inicio suave debido a la supresión del choque de inicio.
MONTAJE
ADVERTENCIA: Asegúrese siempre de que
la herramienta esté apagada y que el cartucho de
batería haya sido extraído antes de realizar cual-
quier trabajo en la herramienta. El no seguir esta
indicación de apagar y quitar el cartucho de batería
puede ocasionar lesiones personales graves debido
al encendido accidental.
ADVERTENCIA: Nunca arranque la herra-
mienta a menos que se encuentre completamente
ensamblada. La operación de la herramienta en
un estado de ensamble parcial puede ocasionar
lesiones personales graves en caso de un arranque
accidental.
Instalación del mango
1. Coloque las abrazaderas superior e inferior en el
amortiguador.
2. Ponga el mango en la abrazadera superior y ase-
gúrelo con el perno de cabeza hueca hexagonal, como
se muestra en la ilustración.
2
1
3
5
4
6
► 1. Perno de cabeza hueca hexagonal 2. Mango
3. Abrazadera superior 4. Amortiguador
5. Abrazadera inferior 6. Espaciador
PRECAUCIÓN: No quite ni reduzca el separa-
dor. Hacerlo podría ocasionar perder el balance de la
herramienta y ocasionar una lesión personal.

30 ESPAÑOL
Colocación de la traba
Solamente para el modelo de mango redondo
(especíco del país)
Si la traba está incluida en su modelo, colóquela con el
mango usando el tornillo en la traba.
1
2
► 1. Traba 2. Tornillo
PRECAUCIÓN: Después de ensamblada la
traba, no la retire. La traba funciona como una pieza
de seguridad, para evitar que usted toque la cuchilla
de corte por accidente.
Almacenamiento de la llave Allen
(hexagonal)
PRECAUCIÓN: Tenga cuidado de no dejar
la llave hexagonal insertada en el cabezal de la
herramienta. Esto podría ocasionar lesiones y/o
daños a la herramienta.
Cuando no se utilice, guarde la llave hexagonal en su
lugar tal como se muestra en la ilustración para evitar
que se pierda.
1
► 1. Llave hexagonal
Para el modelo de mango redondo, la llave hexagonal tam-
bién se puede guardar en el mango, tal como se ilustra.
1
► 1. Llave hexagonal
Combinación correcta de la
herramienta de corte y el protector
PRECAUCIÓN:
Utilice siempre la combina-
ción correcta de herramienta de corte y el protec-
tor. Una combinación incorrecta podría no protegerlo
de la herramienta de corte, los residuos que salgan
proyectados y las piedras. Asimismo, podría afectar el
equilibrio de la herramienta y ocasionar alguna lesión.
Herramienta de corte Protector
Cabezal de corte de nailon
Instalación del protector
ADVERTENCIA: Nunca utilice la herramienta
sin el protector o con el protector instalado de
manera inadecuada. No seguir esta indicación
puede causar lesiones graves a la persona.
PRECAUCIÓN:
Tenga cuidado de no lasti-
marse con la cortadora al cortar el cordón de nailon.
Fije el protector a la abrazadera usando los pernos.
1
2
3
► 1. Abrazadera 2. Protector 3. Pieza de corte

31 ESPAÑOL
Instalación de la herramienta de
corte
PRECAUCIÓN: Utilice siempre la(s) llave(s)
suministrada(s) para extraer o instalar la herra-
mienta de corte.
PRECAUCIÓN: Tenga cuidado de extraer
la llave hexagonal insertada en el cabezal de la
herramienta, después de instalar la herramienta
de corte.
NOTA: El tipo de herramienta(s) de corte suminis-
trado como el aditamento estándar varía depen-
diendo de cada país. La herramienta de corte no se
incluye en algunas especicaciones del modelo.
NOTA: Voltee la herramienta al revés para que pueda
reemplazar fácilmente la herramienta de corte.
AVISO: Asegúrese de utilizar un cabezal de corte
de nailon original de Makita.
4
5
3
1
2
► 1. Cabezal de corte de nailon 2. Eje 3. Llave hexa-
gonal 4. Aojar 5. Apretar
1. Inserte la llave hexagonal a través del oricio del
cabezal de la herramienta para bloquear el eje. Gire el
eje hasta que la llave hexagonal se haya insertado por
completo.
2. Coloque el cabezal de corte de nailon en el eje y
apriételo rmemente con la mano.
3. Retire la llave hexagonal del cabezal de la
herramienta.
Para extraer el cabezal de corte de nailon, siga los
procedimientos de instalación en orden inverso.
OPERACIÓN
Instalación del arnés para hombro
PRECAUCIÓN: Cuando use la herramienta
en combinación con la fuente de alimentación
tipo mochila, como una unidad portátil de ali-
mentación eléctrica, no use el arnés para hombro
incluido en el paquete de la herramienta, pero use
la banda para colgado recomendada por Makita.
Si se pone el arnés para hombro incluido en el
paquete de la herramienta y el arnés para hombro
de la fuente de alimentación tipo mochila al mismo
tiempo, se dicultará retirar la herramienta o la fuente
de alimentación tipo mochila en caso de emergencia,
y podría causar un accidente o una lesión. Para la
banda para colgado recomendada, pregunte a los
centros de servicio autorizado de Makita.
PRECAUCIÓN: Siempre lleve puesto el arnés
para hombro colocado en la herramienta. Antes
de la operación, ajuste el arnés para hombro
de acuerdo al tamaño del usuario para evitar la
fatiga.
PRECAUCIÓN: Antes de la operación, asegú-
rese de que el arnés para hombro esté colocado
correctamente al colgador en la herramienta.
1. Colóquese el arnés para hombro en su hombro
izquierdo.
2. Abroche el gancho en el arnés para hombro en el
colgador de la herramienta.
1
2
► 1. Gancho 2. Colgador

32 ESPAÑOL
3. Ajuste el arnés para hombro en una posición
cómoda para trabajar.
El arnés para hombro cuenta con un medio de libera-
ción rápida.
Simplemente apriete los lados de la hebilla para liberar
la herramienta del arnés para hombro.
1
► 1. Hebilla
Manipulación correcta de la
herramienta
ADVERTENCIA: Siempre coloque la herra-
mienta de su lado derecho. El correcto posiciona-
miento de la herramienta permite un máximo control y
reducirá el riesgo de lesiones personales graves.
ADVERTENCIA: Sea extremadamente cui-
dadoso en mantener el control de la herramienta
en todo momento. No permita que la herramienta
se desvíe hacia usted ni hacia otra persona alre-
dedor. El no mantener el control de la herramienta
podría ocasionar lesiones graves a las personas
alrededor y al operador.
ADVERTENCIA: Cuando dos o más operado-
res se encuentren trabajando en una misma área,
la distancia entre ellos deberá ser de más de 15
m (50 pies) para evitar un accidente. Asimismo,
designe a una persona para vericar que se man-
tenga la distancia entre los operadores. Si alguna
persona o animal llega a ingresar al área de tra-
bajo, detenga la operación inmediatamente.
PRECAUCIÓN: Si durante la operación la
herramienta de corte se impacta accidentalmente
contra alguna piedra u objeto duro, detenga la
herramienta y revise que no haya daños. Si la
herramienta de corte se daña, reemplácela de
inmediato. El uso de una herramienta de corte
dañada puede ocasionar lesiones personales graves.
La correcta posición y manipulación permiten un control
óptimo y reducen el riesgo de lesiones.
Cuando utilice un cabezal de corte de nailon (de
tipo golpe y alimentación)
El cabezal de corte de nailon es una cabeza de
desbrozadora dual con un mecanismo de golpe y
alimentación.
Para alimentar el cordón de nailon, golpee ligeramente
el cabezal contra el suelo mientras esté girando.
1
► 1. Área de corte más ecaz
AVISO: La alimentación por golpe no funcionará
correctamente si el cabezal de corte de nailon no
se encuentra girando.
NOTA: Si la alimentación del cordón de nailon no
ocurre al golpear ligeramente el cabezal, rebobine/
reemplace el cordón de nailon siguiendo los procedi-
mientos en la sección para mantenimiento.

33 ESPAÑOL
MANTENIMIENTO
ADVERTENCIA: Asegúrese siempre de que
la herramienta esté apagada y que el cartucho
de batería haya sido extraído antes de intentar
realizar una inspección o mantenimiento en la
herramienta. El no seguir esta indicación de apa-
gar y quitar el cartucho de batería puede ocasionar
lesiones personales graves debido al encendido
accidental.
AVISO: Nunca use gasolina, bencina, diluyente
(tíner), alcohol o sustancias similares. Puede que
esto ocasione grietas o descoloramiento.
Para mantener la SEGURIDAD y FIABILIDAD del pro-
ducto, las reparaciones, y cualquier otra tarea de man-
tenimiento o ajuste deberán ser realizadas en centros
de servicio autorizados o de fábrica Makita, empleando
siempre repuestos Makita.
Reemplazo del cordón de nailon
ADVERTENCIA: Utilice el cordón de nailon
únicamente con el diámetro especicado en este
manual de instrucciones. Nunca use una línea
más pesada, alambre de metal, cuerda o simila-
res. El no hacerlo podría causar daños a la herra-
mienta y resultar en lesiones personales graves.
ADVERTENCIA: Extraiga siempre el cabezal
de corte de nailon de la herramienta cuando vaya
a reemplazar el cordón de nailon.
ADVERTENCIA: Asegúrese de que la
cubierta del cabezal de corte de nailon quede
debidamente asegurada en la carcasa tal como
se describe a continuación. El no asegurar debi-
damente la cubierta podría causar que el cabezal de
corte de nailon saliera volando ocasionando lesiones
personales graves.
Reemplace el cordón de nailon si su alimentación ya
no es posible. El método para reemplazar el cordón de
nailon varía en función del tipo de cabezal de corte de
nailon.

34 ESPAÑOL
95-M10L
1
2
3
5
4
6
7
8
4 m (13 ft)
80 mm
(3-1/8″)
100 mm
(3-15/16″)

35 ESPAÑOL
96-M10L
1
2
4
3
5
6
4 m (13 ft)
100 mm
(3-15/16″)

36 ESPAÑOL
B&F ECO 4L
1
2
3
4
5
6
7
8
4 m (13 ft)
80 mm
(3-1/8″)
100 mm
(3-15/16″)

37 ESPAÑOL
RESOLUCIÓN DE PROBLEMAS
Antes de solicitar alguna reparación, primero realice una inspección por su cuenta. Si detecta algún problema que
no esté explicado en el manual, no intente desensamblar la herramienta. En vez de esto, solicite la reparación a un
centro de servicio autorizado de Makita, usando siempre piezas de repuesto Makita.
Estado de la anomalía Causa probable (avería) Remedio
El motor no funciona.
El cartucho de batería no está instalado.
Instale el cartucho de batería.
Problema con la batería (bajo voltaje) Recargue la batería. Si la recarga no es efectiva,
reemplace la batería.
El sistema de accionamiento no fun-
ciona correctamente.
Solicite la reparación en el centro de servicio autori-
zado de su localidad.
El motor deja de funcionar después
de un rato de uso.
El nivel de carga de la batería es bajo. Recargue la batería. Si la recarga no es efectiva,
reemplace la batería.
Sobrecalentamiento.
Deje de usar la herramienta para permitir que se enfríe.
No se alcanza el nivel máximo de
RPM.
La batería está mal instalada. Instale el cartucho de batería como se describe en
este manual.
La potencia de la batería se está
reduciendo.
Recargue la batería. Si la recarga no es efectiva,
reemplace la batería.
El sistema de accionamiento no fun-
ciona correctamente.
Solicite la reparación en el centro de servicio autori-
zado de su localidad.
La herramienta de corte no gira:
¡Detenga la máquina
inmediatamente!
Un objeto extraño, como una rama,
está atascado entre el protector y la
herramienta de corte.
Retire el objeto extraño.
El sistema de accionamiento no fun-
ciona correctamente.
Solicite la reparación en el centro de servicio autori-
zado de su localidad.
Vibración anormal:
¡Detenga la máquina
inmediatamente!
Un extremo del cordón de nailon se
ha roto.
Golpee el cabezal de corte de nailon contra el suelo mien-
tras esté girando para permitir la alimentación del cordón.
El sistema de accionamiento no fun-
ciona correctamente.
Solicite la reparación en el centro de servicio autori-
zado de su localidad.
La herramienta de corte y el motor no se
pueden detener:
¡Extraiga la batería inmediatamente!
Avería eléctrica o electrónica. Extraiga la batería y solicite la reparación en el
centro de servicio autorizado de su localidad.
ACCESORIOS OPCIONALES
ADVERTENCIA: No instale una cuchilla
metálica en esta herramienta y sólo use los acce-
sorios o aditamentos recomendados que se indi-
can en este manual. El uso de una cuchilla metálica
o cualquier otro accesorio o aditamento puede oca-
sionar lesiones personales graves.
PRECAUCIÓN:
Estos accesorios o aditamen-
tos están recomendados para utilizarse con su herra-
mienta Makita especicada en este manual. El empleo
de cualquier otro accesorio o aditamento puede conllevar
el riesgo de lesiones personales. Utilice los accesorios o
aditamentos solamente para su n establecido.
Si necesita cualquier ayuda para más detalles en relación con
estos accesorios, pregunte a su centro de servicio local Makita.
• Cabezal de corte de nailon
• Cordón de nailon (línea de corte)
• Protector
• Batería y cargador originales de Makita
NOTA: Algunos de los artículos en la lista pueden
incluirse en el paquete de la herramienta como acce-
sorios estándar. Éstos pueden variar de país a país.
GARANTÍA LIMITADA DE MAKITA
Ésta Garantía no aplica para México
Consulte la hoja de la garantía anexa para ver los
términos más vigentes de la garantía aplicable a este
producto. En caso de no disponer de esta hoja de
garantía anexa, consulte los detalles sobre la garantía
descritos en el sitio web de su país respectivo indicado
a continuación.
Estados Unidos de América: www.makitatools.com
Canadá: www.makita.ca
Otros países: www.makita.com

38

39

Makita Corporation
3-11-8, Sumiyoshi-cho,
Anjo, Aichi 446-8502 Japan
www.makita.com
885860-946
GRU01-1
EN, ESMX
20201202
-
 1
1
-
 2
2
-
 3
3
-
 4
4
-
 5
5
-
 6
6
-
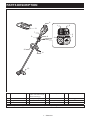 7
7
-
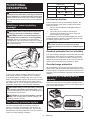 8
8
-
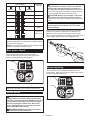 9
9
-
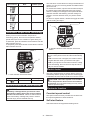 10
10
-
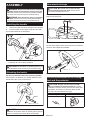 11
11
-
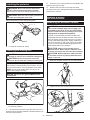 12
12
-
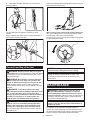 13
13
-
 14
14
-
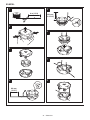 15
15
-
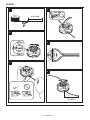 16
16
-
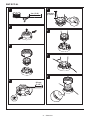 17
17
-
 18
18
-
 19
19
-
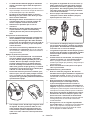 20
20
-
 21
21
-
 22
22
-
 23
23
-
 24
24
-
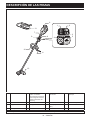 25
25
-
 26
26
-
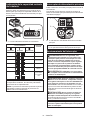 27
27
-
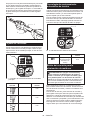 28
28
-
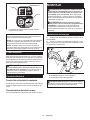 29
29
-
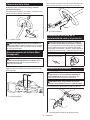 30
30
-
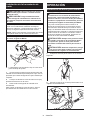 31
31
-
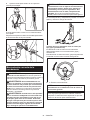 32
32
-
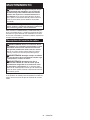 33
33
-
 34
34
-
 35
35
-
 36
36
-
 37
37
-
 38
38
-
 39
39
-
 40
40


Makita GRU01 Manual de usuario
- Categoría
- Herramientas eléctricas
- Tipo
- Manual de usuario
en otros idiomas
- English: Makita GRU01 User manual