
es-FR-eN-De
GANCHO PesADOR
CROCHeT PeseUR
CRANe sCALe
KRANWAAGe
sTA
20052015
V1.3
marca propiedad de | est une marque de | trade mark propiety of:
Pol. Empordà Internacional Calle F. Parcela 15-16
17469 VILAMALLA - (Girona) SPAIN
T. (34) 972 527 212 - F. (34) 972 527 211
El fabricante se reserva el derecho de modificar sin previo aviso las características de sus productos para introducir mejoras técnicas o cumplir con nuevas regulaciones oficiales./Le
constructeur se réserve le droit de modifier les caractéristiques de ses produits en vue d’y apporter des améliorations techniques ou de respecter de nouvelles réglamentations./The
manufacturer reserves the right to modify the specifications of its products in order to make technical improvements or comply with new regulations.

GANCHO PESADOR | CROCHET PESEUR | WEIGHING HOOK | KRANWAAGE STA
2
INDEX
MANUAL D’USAGER
1Guide de sécurité 17
2Caractéristiques du produit 18
3Spécifications 18
4Paramètres basiques 18
5Dimensions et poids net 19
6Guide d’opérations 19
7Diagramme électrique principal 20
8Illustration de l’écran 21
9Guide de possibles problèmes 22
10 Précautions 22
11 Guide de télecommande 23
MANUEL TECHNICIEN
1Illustrations de l’écran 25
2Fonctions du clavier pour l’installation des paramètres/calibration 26
3Installation des paramètres 26
4Calibration 27
5Guide de possibles problèmes 28
GARANTIE 28
ÍNDICE
MANUAL DE USUARIO
1 Guía de seguridad 5
2 Características del producto 6
3 Especificaciones 6
4 Parámetros básicos 6
5 Dimensiones y peso neto 7
6 Guía de operaciones 7
7 Diagrama eléctrico principal 8
8 Mensajes en pantalla 9
9 Guía de posibles problemas 10
10 Precauciones 10
11 Guía de control remoto 11
MANUAL TÉCNICO
1 Mensajes en pantalla 13
2 Funciones de teclado dentro de parámetros/calibración 14
3 Configuración parámetros 14
4 Calibración 15
5 Guía de posibles problemas 16
GARANTÍA 16
ES
FR

GANCHO PESADOR | CROCHET PESEUR | WEIGHING HOOK | KRANWAAGE STA
3
INDEX
USER’S GUIDE
1Safety guide 29
2Product characteristics 30
3Main technical data 30
4Basic parameters 30
5Dimension and net weight 31
6Operation guide 31
7Electrical circuit diagram 32
8Display illustraction 33
9Troubleshooting guide 34
10 Precaution 34
11 Remote controller guide 35
TECHNICAL MANUAL
1Display illustration 37
2Key function in parameter setting/calibration 38
3Parameters setting 38
4Calibration 39
5Troubleshooting guide 40
WARRANTY 40
INDEX
INHALTSVERZEICHNIS
1Sicherheitsinformationen 41
2Haupteigenschaften 42
3Technische Daten 42
4Grundlegende Parameter 42
5Abmessungen und Nettogewicht 43
6Funktionen 43
7Elektrisches Diagramm 44
8Symbole auf dem LCD-Display 45
9Meldungen des Gerätes während der Benutzung 46
10 Sicherheitsanweisungen. 46
11 Bedienungsanleitung Fernbedienung 47
TECHNICAL MANUAL
1Display illustration 50
2Key function in parameter setting/calibration 51
3Parameter setting 51
4Calibration 52
5Troubleshooting guide 53
GARANTIE 53
Declaración de conformidad
Déclaration de conformité
Declaration of conformity
Konformitätserklärung 55
ENDE

MANUAL DE USUARIO | GANCHO PESADOR | STA EN
4

MANUAL DE USUARIO | GANCHO PESADOR | STA EN
5
1. GUÍA DE SEGURIDAD
Lea atentamente las siguientes instrucciones y consejos antes de utilizar este gancho.
El instrumento tiene garantía y NO DEBE SER ABIERTO POR EL USUARIO por ningún motivo. Cada intento de reparación
o modificación de la unidad puede exponer al usuario al peligro de descarga eléctrica y anulará cualquier condición de
la garantía. Cualquier problema con la unidad sistema debe ser notificado al fabricante o al distribuidor donde ha sido
comprado.
El gancho debe ser usado exclusivamente para medir a tracción. Cargas móviles que pueden provocar tensiones y torsio-
nes deben estar suspendidas con elementos flexibles o giratorios.
Colocar la carga sin provocar impacto.
No pasar ni parar por debajo de la carga suspendida.
No exponer o utilizar en caso de lluvia o humedad.
No derramar líquidos sobre el gancho.
No usar disolventes para limpiar el gancho.
No exponer el instrumento a la luz directa del sol o cerca de fuentes de calor.
No instalar en ambientes con riesgo de explosión.
No exponer en caso de campos magnéticos o eléctricos fuertes.
No arrojar las baterías al fuego ya que podrían explotar. No esparcir las baterías en el ambiente.
Está estrictamente prohibido sobrecargar este equipo.
Evite larga duración en el pesado, ello puede conllevar a un desgaste excesivo de la célula de carga del interior del gancho.
El desgaste excesivo de la célula de carga puede causar una disminución en la precisión y acortar el tiempo de vida y
funcionamiento del gancho.
Revise las trabas y el gancho periódicamente.
Revise el nivel de potencia de la batería antes y después de su uso y recargue la batería si es necesario.
Para obtener un rendimiento máximo de la batería es necesario realizar recargas periódicas, incluso si éstas no están en
funcionamiento durante largo tiempo.
No intente reparar el equipo usted mismo.
Utilice solamente el cargador que se adjunta con el equipo.

MANUAL DE USUARIO | GANCHO PESADOR | STA EN
6
2. CARACTERÍSTICAS DEL PRODUCTO
MODELO PANTALLA CARACTERÍSTICAS
STA LED 30mm (1.2”) Alta precisión, volumen reducido, portátil.
Alta calidad: El proceso de gestión se realiza siguiendo la regulación OIML R76 , GB/T11883-2002 y con la obtención del certificado
europeo (CE)
Instalación de seguridad: Carcasa de aluminio fundido, gancho y grilletes de alta intensidad, célula de carga especial para la instalación
de seguridad.
Alta fiabilidad: Uso de componentes altamente cualificados en PCB para asegurar una perdurable estabilidad.
Extensas aplicaciones: pantalla de carácteres de 30mm de alto, tiro de vista distancia de 25m, uso apto para industria de almacenaje,
industria textil, industria metalúrgica, etc.
Operaciones simples: revisa la potencia de batería automáticamente, control remoto sin cable, espacio separado para batería, volumen
reducido, y portátil.
Funciones completas: Conversión Kg/lb, Hold, Tara, opción de división, regulación de estabilidad, acumulación/ búsqueda, conversión
peso bruto/neto, parámetro de regulación etc.
3. ESPECIFICACIONES
Estándar GB/T11883-2002 “Balanza de gancho electrónica”
Clase de precisión OIML clase III
Pantalla 5 dígitos LED de 30mm (1.2”)
Rango de cero 4% capacidad completa
Rango de tara 100% capacidad completa
Tiempo estable ≤ 10 segundos
Indicación de sobrecarga 100% capacidad máxima +9e
Carga máxima de seguridad 125% capacidad máxima
Carga final 400% capacidad másima
Duración batería ≤ 50 horas
Tipo de batería Batería de ácido de plomo completamente sellada, 6V/5Ah
Adaptador DC9V/1500mA
Temperatura de funcionamiento -10ºC ~ +40ºC
Humedad de funcionamiento ≤ 85% RH bajo 20ºC
Distancia de control remoto Min. 10m
Batería de control remoto 1.5V x 2 AA baterías
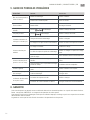
4. PARÁMETROS BÁSICOS
MODELO CAPACIDAD MÁXI-
MA (kg/lb)
CAPACIDAD MÍNI-
MA (kg/lb)
DIVISIÓN
(kg/lb)
CUENTAS TOTALES PANTA-
LLA (n)
STA 100 100/220 1/2 0.05/0.1 2000
STA 300 300/700 2/4 0.1/0.2 3000
STA 500 500/1100 4/10 0.2/0.5 2500
STA 1000 1000/2200 10/20 0.5/1 2000

MANUAL DE USUARIO | GANCHO PESADOR | STA EN
7
5. DIMENSIONES Y PESO NETO
CAPACIDAD
MÁXIMA
L
(mm)
A
(mm)
B
(mm)
C
(mm)
PESO
NETO (kg)
100 kg 335 20 65 20 4.0
200 kg 335 20 65 20 4.0
300 kg 335 20 65 20 4.0
500 kg 360 25 75 20 4.2
1000 kg 360 25 75 20 4.2
6. GUÍA DE OPERACIONES
ENCENDIDO
OPERACIÓN PANTALLA EXPLICACIÓN
Muestra 2 veces.
Muestra la capacidad 2 veces.
Muestra el voltage de la batería.
Señal estable de espera.
Luz “STB”, puede colgar el peso.
NOTA: Para garantizar la precisión, deje el gancho libre de peso de 3 a 5 minutos después del encendido.
CERO
OPERACIÓN PANTALLA EXPLICACIÓN
Presione en el gancho Después de encender, generalmente muestra , sino para
mostrar opere de este modo.
Presione en el mando
TARA
OPERACIÓN PANTALLA EXPLICACIÓN
Presione en el gancho. Presione este botón para deducir el peso del recipiente, mientras la luz
“TARE” esté encendida, la balanza mostrará el peso neto de la carga.
Presione en el mando.
NOTA: Debido a que el gancho deduce el peso del recipiente automáticamente, mostrará el peso neto de la carga, usted no necesita pre-
sionar esta tecla para obtener el peso hasta que usted cambie el recipiente o apague la balanza.

MANUAL DE USUARIO | GANCHO PESADOR | STA EN
8
REVISIÓN DE LA BATERÍA
IPresione en la balanza, cuando encienda o apague, le mostrará .
II Presione en control remoto, cuando apague, mostrará .
III Presione seguidamente , le mostrará , presione para regresar.
MANTENER LA LECTURA DE PESO
Presione la tecla HOLD en el control remoto para mantener la lectura de peso en pantalla. En este momento, la luz “HOLD” está encendida.
Presione esta tecla otra vez para desactivar esta función.
AVISO DE BATERÍA BAJA
Cuando la potencia de la batería es inferior a , la pantalla parpadeará, pero la balanza aún puede continuar funcionando hasta
que en la pantalla aparezca el símbolo , un minuto después, ella se apagará automáticamente. Usted debe recargar la batería otra
vez para hacer funcionar la balanza otra vez.
AVISO DE SOBRECARGA
La pantalla mostrará cuando la carga (Neto+Tara) sobrepase la capacidad máxima. Asegúrese de que la carga se encuentra
dentro de los límites de capacidad.
AHORRO DE ENERGÍA
La pantalla mostrará cuando la carga esté en un estado estable con más de 15 minutos y volverá a la lectura normal de peso
cuando se cambie la carga. Cuando la carga se encuentra en estado estable y con exceso de 60 minutos, la balanza se apagará automáti-
camente.
RECARGA DE BATERÍA
1. Apague el gancho, conecte el adaptador a la toma de corriente 230V AC, inserte también el conector situado en la parte posterior del
gancho. La luz se vuelve ambar, ello significa que se está recargando automáticamente, hasta que la luz verde se vuelve verde. Ello
significa que la recarga ha terminado.
2. Cuando necesite utilizar el gancho hora tras hora, quite la cobertura trasera, cambie la batería con batería recargable.
ATENCIÓN: Generalmente, el tiempo de recarga no debe ser inferior a 8 horas, este gancho posee función protectora de recarga, un
período largo de recarga no dañará la batería.
APAGADO
I
II
III -
7. DIAGRAMA ELÉCTRICO PRINCIPAL
mando a

MANUAL DE USUARIO | GANCHO PESADOR | STA EN
9
8. MENSAJES EN PANTALLA
PANTALLA EXPLICACIÓN
Esperar la estabilización durante la calibración.
Peso acumulado no superior al peso mín.
Ha sobrepasado el número de acumulaciones (no puede acumular más de 30 veces).
Ha sobrepasado el peso máximo acumulable (no puede acumular más de 9999).
Pregunta si usted desea realmente anular el peso acumulado, en caso de error de anulación.
Abandonar anulación.
Confirmar anulación.
Ningún valor acumulado (cuando usted comprueba).
Segunda función, cuando usted presiona en control remoto.
Estado actual del voltage de la batería.
CALIBRACIÓN.
Acceder al ajuste de parámetros.
Introducir ajuste de potencia.
Aviso de sobrecarga.
Aviso de batería baja.
Fin, cuando los ajustes de parámetros són correctos.
Apagar.

MANUAL DE USUARIO | GANCHO PESADOR | STA EN
10
9. GUIA DE POSIBLES PROBLEMAS
PROBLEMA RAZÓN SOLUCIÓN
No se enciende la pantalla cuando en-
ciende el gancho.
Batería dañada Revise batería
Se ha perdido contacto con la batería Estreche el contacto
La pantalla parpadea Batería baja Recargue la batería
No se puede encender ni apagar botón dañado Revise y limpie el botón
No puede tarar botón dañado Revise y limpie el botón
El indicador de recarga de luz no se
enciende
El recargador está dañado Revise el recargador
El recargador no se ha conectado correctamen-
te Inserte el enchufe otra vez
La pantalla no está estable
La carga es inestable Estabilice la carga
Cable de la celula de carga dañado Revise y reemplace la celula de carga
Se ha dejado el gancho en un ambiente húmedo
durante un largo período de tiempo Sitúe el gancho en un ambiente seco
La pantalla no muestra “0” cuando se
vacía la carga
No ha habido tiempo suficiente para calentar el
gancho después de encenderla
Después de encender el gancho, ca-
liente 3-5 minutos
El gancho se ha situado a nivel del suelo durante
un tiempo demasiado largo El gancho debe colgarse
El error es grande El gancho no se ha colgado adecuadamente Revise el gancho y el colgador
La batería no se puede recargar Batería dañada Cambie la batería
Toma de corriente dañada Cambie la toma de corriente
Distancia del control remoto acortada La ventana receptora está demasiado sucia Revise y limpie
Batería baja del controlador Cambie la batería del control remoto
10. PRECAUCIÓN
El gancho es un tipo de instrumento de pesaje preciso, realice con atención su uso y mantenimiento.
Gire la carga y no el gancho cuando sea necesario para la operación.
Deje de utilizar el gancho cuando haya tormenta y lluvia
Compruebe periódicamente que los clips/pins y los tornillos del gancho no estén sueltos o rotos antes de utilizarlo.
Si aparece la señal de batería baja y el indicador LED aparece en verde mientras se está cargando, por favor compruebe la batería.
Resguarde bien el gancho cuando éste no sea utilizado.

MANUAL DE USUARIO | GANCHO PESADOR | STA EN
11
11. GUÍA DE CONTROL REMOTO
OPERACIÓN PANTALLA EXPLICACIÓN
BRILLO
DE PANTALLA
(valor defecto de fábrica: 4) Valor de 0~5. Parámetros: bl=0, luz mínima
hasta bl=5, luz máxima
CERO
Muestra sin carga, se enciende la luz “ZERO”.
HOLD Mantiene el peso, luz “HOLD” encendida.
Cambiar a situación de pesado, luz “HOLD” apagada.
TARA La pantalla muestra el peso neto, indicación “TARE” encendidas.
La pantalla muestra el peso bruto, indicación “TARE” apagadas.
PRETARA
Peso tara actual.
Introduzca el valor mediante las teclas y .
Confirmación, indicación “TARE” encendida. Se deducirá el peso tara auto-
máticamente durante el pesaje.
ACUMULACIÓN
H0001
L5321
NOTA: después de mostrar dos veces, volverá a la situación de pesaje automáticamente, usted también puede
presionar para volver directamente.
TOTALIZACIÓN Número de acumulaciones
Muestra el peso actual del gancho, si no hay producto mostrará 0 si tenemos
un producto dará el valor de éste. (esté no se utilizará para la totalización ni la
acumulación)
Seguidament 4 dígitos más significativos del valor acumulado actual. (eje: valor
totalización 99999= H0009 L9999)
4 dígitos menos significativos del valor acumulado actual. (eje: valor totaliza-
ción 99999= H0009 L9999)
Regreso al modo de pesaje.

MANUAL DE USUARIO | GANCHO PESADOR | STA EN
12
BORRADO
CONVERSIÓN DE
UNIDADES
KG/LB
BUSCAR VECES DE
SOBRECARGA
PANTALLA DE
POTENCIA
APAGADO

MANUAL DE USUARIO | GANCHO PESADOR | STA EN
13
MANUAL TÉCNICO
Puede utilizar el control remoto para operar con la instalación de parámetro y la calibración.
1. MENSAJES DE PANTALLA
PANTALLA EXPLICACIÓN NOTAS
Accede a calibración del punto cero.
Introduzca calibración peso.
Introduzca calibración parámetro.
Introduzca potencia calibración.
Primer punto calibración. LoAd1<LoAd2<LoAd3
Segundo punto calibración.
Tercer punto calibración.
Se ha excedido el límite más alto. Peso tara no puede sobrepasar capacidad máxima.
Se ha excedido el límite mínimo. Peso tara no puede ser negativo.
Posición de espera.
Peso inferior a Capacidad mínima. No puede acumular el valor.
Ha sobrepasado el número de acumulaciones No puede acumular más después de 30 veces.
Ha sobrepasado el peso acumulable. No puede acumular más después de 99999
Error en acumulación repetida. No puede acumular un peso repetidamente
Número de acumulaciones actuales.
4 dígitos más significativos del peso acumulado. Seguidament 4 dígitos más significativos del valor actual.
(eje: valor acumulación 99999= H0009 L9999)
4 dígitos menos significativos del peso acumula-
do.
4 dígitos menos significativos del valor actual. ( eje: valor
acumulación 99999= H0009 L9999)
Pregunta si usted realmente quiere eliminar peso
acumulado. En caso de error en borrar
Abandonar la eliminación.
Confirmar la eliminación.
Cambio. Segunda función de las teclas.
El valor introducido es demasiado grande. Cuando usted introduzca valor tara o valor de peso
El valor introducido es demasiado pequeño. Cuando usted introduzca valor tara o valor de peso
No hay contenidos acumulados. Cuando usted comprueba acumulación
Aviso de sobrecarga. Tara + Peso Neto sobrepasan capacidad máxima +9e
Aviso de batería baja. Se apaga automáticamente 1 minuto después
La potencia de la batería en funcionamiento.
Final. Cuando la instalación de parámetro o calibración están
a punto
Apagar.

MANUAL DE USUARIO | GANCHO PESADOR | STA EN
14
2. FUNCIÓN DE TECLADO DENTRO DE PARÁMETROS/CALIBRACIÓN
TECLA FUNCIÓN
→ Cambio de dígito en edición (parpadeante). Nota: en STA cambio de menú.
↑ modificar dígito
Confirmar
3. CONFIGURACIÓN PARÁMETROS
ITEM OPERACIÓN PANTALLA INSTALACIÓN RANGO Y EXPLICACIÓN
Acceder a
configuración
F1 & F2 Presionar juntos, 2 segundos
Presionar botón para introducir la contraseña de
instalación de parámetro.
Acceder a configuración de parámetros
Capacidad Pantalla 0.05/ 0.1/ 0.2/ 0.3/ 0.5/ 1/ 2/3/5/10/15/20/30/50/ circularmente
e.g. escoger capacidad 5000 kg
Division Pantalla 01/02/05 circularmente
e.g. escoger 2 kg como división
Posición decimal 0=no | 1=X.X | 2=X.X X | 3=X.XXX
e.g. sin posición decimal
Introducir cero
manualmente y
automáticamente
A (**): rango cero manual, d (**) rango cero automático.
0=0%FS | 1=2%FS | 2=4%FS | 3=20%FS 4=100%FS
Parámetro instalado en fábrica, 4%F.S.
Búsqueda rango
y velocidad
pantalla
C (**) : búsqueda-cero;
0-5, 0=0d, 1=0.5d, 2=1d, 3=1.5d, 4=2d, 5=2.5d
d (**): velocidad pantalla 0-2;
0=lento, 1=normal, 2=rápido
Parámetro instalado en fábrica.
Efecto estable
0=mínimo, 1=normal, 2=máximo
Parámetro instalado en fábrica.
Unidad 0=kg | 1=lb
Parámetro instalado en fábrica.
Método de
apagado
0=apagar manualmente
1=estable; después de 15 minutos, pantalla balanza
2= estable; después de 15 minutos, pantalla balanza ,
después de 60 minutos, se apaga automáticamente.
Parámetro instalado en fábrica.
Instalación de parámetro finalizada.

MANUAL DE USUARIO | GANCHO PESADOR | STA EN
15
4. CALIBRACIÓN
ITEM OPERACIÓN PANTALLA RANGO INSTALACIÓN Y EXPLICACIÓN
INTRODUCIR INSTALACIÓN Presionar juntos, 2 segundos.
Presionar para introducir con-
traseña de calibración
Acceder calibración
CALIBRACIÓN SIN CARGA Asegúrese de que no hay carga y deje la balanza
estable
Calibración ok
PRIMERA CARGA Empezar el primer punto de carga de calibración
Último valor calibración o valor fallido
Introducir peso, ejemplo: 1000kg usando
Peso pesando, espera estable
Calibración primera carga ok
SEGUNDA CARGA Empieza el segundo punto de carga de calibración
Último valor de calibración o valor fallido
Introducir peso, ejemplo: 3000kg usando
Peso pesando, espera estable
Calibración segunda carga ok
TERCERA CARGA Empezar calibración tercer punto de carga
Último valor de calibración o valor fallido
Introducir peso, ejemplo: 5000kg usando
Peso pesando, espera estable
Calibración tercera carga ok
Calibración acabada, volver
ATENCIÓN
1. El peso de la tara de la balanza no puede sobrepasar el 50%F.S. El rango entre carga1, carga2, carga3 no puede ser inferior
a 20%FS, en caso contrario la calibración finalizará automáticamente.
2. LOAd1 < LOAd2 < LOAd3

MANUAL DE USUARIO | GANCHO PESADOR | STA EN
16
5. GUÍA DE POSIBLES PROBLEMAS
PROBLEMA RAZÓN SOLUCIÓN
No se enciende la pantalla cuando en-
ciende la balanza.
Batería dañada Revise batería
Se ha perdido contacto con la batería Estreche el contracto
La pantalla parpadea Batería baja Recargue la batería
No se puede encender ni apagar botón dañado Revise y limpie el botón
No puede tarar botón dañado Revise y limpie el botón
El indicador de recarga de luz no se
enciende
El recargador está dañado Revise el recargador
El recargador no se ha conectado co-
rrectamente Inserte el enchufe otra vez
La pantalla no está estable
La carga es inestable Estabilice la carga
Cable de la celula de carga dañado Revise y reemplace la celula de carga
Se ha dejado la balanza en un ambien-
te húmedo durante un largo período de
tiempo
Sitúe la balanza en un ambiente seco
La pantalla no muestra “0” cuando se
vacía la carga
No ha habido tiempo suficiente para
calentar la balanza después de encen-
derla
Después de encender la balanza, ca-
liente 3-5 minutos
La balanza se ha situado a nivel del
suelo durante un tiempo demasiado
largo
La balanza debe colgarse
El error es grande La balanza no se ha colgado adecua-
damente Revise la balanza y el colgador
La batería no se puede recargar
Batería dañada Cambie la batería
Toma de corriente dañada Cambie la toma de corriente
Distancia del control remoto acortada
La ventana recibidor está demasiado
sucia Revise y limpie
Batería baja del controlador Cambie la batería del controlador
6. GARANTÍA
Este gancho está garantizado contra todo defecto de fabricación y de materiales, por un período de un año, a partir de la fecha
de entrega. Durante este período, GIROPÈS SL, se hará cargo de la reparación del gancho.
Esta garantía no incluye los daños causados por uso indebido, sobrecarga, o no haber seguido las recomendaciones descritas
en este manual.
La garantía no cubre los gastos de envío necesarios para la reparación del gancho.

MANUEL D’USAGER | CROCHET PESEUR | STA FR
17
1. GUIDE DE SÉCURITÉ
Lire attentivement les suivantes instructions et conseils avant d’utiliser cette crochet peseur.
L’instrument a garantie et NE DOIT PAS ÊTRE OUVERT PAR L’UTILISATEUR pour aucun motif. Chaque tentative réparation ou modifi-
cation de l’unité peut exposer à l’utilisateur au danger de décharge électrique et annulera toute condition de la garantie. Tout problème
avec l’unité ou avec le système doit être notifié au fabricant ou au distributeur où il a été acheté.
Le crochet peseur doit exclusivement être utilisé pour mesurer à traction. Des charges mobiles qui peuvent provoquer des tensions
et des torsions doivent être suspendues avec des éléments flexibles ou giratoires.
Placer la charge sans provoquer impact.
Ne pas passer ni être arrêté sous la charge suspendue.
Ne pas exposer ou utiliser en cas de pluie ou d’humidité.
Ne pas renverser de liquides sur le crochet peseur.
Ne pas exposer l’instrument à la lumière directe du soleil ou près de sources de chaleur.
Ne pas installer dans des atmosphères au risque d’explosion.
Ne pas exposer en cas de champs magnétiques ou de forts éléctriques.
Ne pas faire apparaître les batteries au feu puisqu’ils pourraient exploser.
Ne pas disperser les batteries dans l’atmosphère.
Il est strictement interdit de surcharger cet appareil.
Éviter les longues durées du pesage, pour éviter une usure excessive du capteur. L’usure excessive du capteur peut réduire la durée
de vie et le bon fonctionnement du crochet et il peut causer aussi une diminution de la précision du crochet.
Réviser périodiquement les liens et le crochet.
Réviser le niveau de puissance de la batterie avant et après l’utilisation et recharger si nécessaire.
Pour obtenir une utilisation maximale de la batterie réaliser des recharges périodiques, même si celles-ci ne sont pas en fonction-
nement pendant longtemps.
N’essayer pas de réparer cet appareil vous-même.
Utiliser seulement le chargeur joint avec l’appareil.

MANUAL D’USAGER | CROCHET PESEUR | STA FR
18
2. CARACTÉRISTIQUES DU PRODUIT
MODÈLE ÉCRAN CARACTÉRISTIQUES
STA LED 30mm (1.2”) Haute précision, volume réduit, portatif.
Haute qualité: Le procès de gestion sont validé OIML R76, GB/T11883-2002 et avec l’obtention du certificat européen (CE)
Sécurité: Carcasse aluminium fondu, crochet et manilles de grande intensité, capteur spécial sécurité.
Haute fiabilité: Utilisation des composants hautement qualifiés en PCB pour assurer une stabilité durable.
Spécificité: écran de caractères de 30mm de hauteur, distance de vue approximativement 25m, utilisation pour industrie de magasinage,
industrie textile, industrie métallurgique, etc.
Opérations simples: il interroge automatiquement la puissance de la batterie, télécommande sans câble, espace séparé pour batterie,
volume réduit, et portatif.
Fonctions complètes: Conversion Kg/lb, Hold, tare, option de division, régulation de stabilité, accumulation / recherche, conversion pèse
brut/net, paramètre de régulation etc.
3. SPÉCIFICATIONS
Standard GB/T11883-2002 “balance crochet éléctronique”
Classe de précision OIML clase III
Écran 5 digits LED de 30mm (1.2”)
Rang de zéro 4% capacité complète
Rang de tare 100% capacité complète
Temps stable ≤ 10 secondes
Indication de surcharge 100% capacité maximale +9e
Charge maximale de sécurité 125% capacité maximale
Charge finale 400% capacité maximale
Durée de la batterie ≤ 50 heures
Type de batterie Batterie d’acide de plomb complètement scellée, 6V/5Ah
Adaptateur DC9V/1500mA
Température de fonctionnement -10ºC ~ +40ºC
Humidité de fonctionnement ≤ 85% RH bajo 20ºC
Distance de télécommande Min. 10m
Batterie de télécommande AA batteries, 1.5V x 2
4. PARAMÈTRES BASIQUES
MODÈLE CAPACITÉ MAXIMALE
(kg/lb)
CAPACITÉ MINIMALE
(kg/lb)
DIVISION
(kg/lb)
COMPTES TOTAUX ÉCRAN
(n)
STA 100 100/220 1/2 0.05/0.1 2000
STA 300 300/700 2/4 0.1/0.2 3000
STA 500 500/1100 4/10 0.2/0.5 2500
STA1000 1000/2200 10/20 0.5/1 2000

MANUEL D’USAGER | CROCHET PESEUR | STA FR
19
5. DIMENSIONS ET POIDS NET
CAPACITÉ
MAXIMALE
L (mm) A
(mm)
B (mm) C
(mm)
POIDS NET
(kg)
100 kg 335 20 65 20 4.0
200 kg 335 20 65 20 4.0
300 kg 335 20 65 20 4.0
500 kg 360 25 75 20 4.2
1000 kg 360 25 75 20 4.2
6. GUIDE D’OPÉRATIONS
ALLUMAGE
OPÉRATION ÉCRAN ILLUSTRATION
Il montre 2 fois.
Il montre 2 fois la capacité.
Il montre le voltage de la batterie.
Signal stable d’attente.
Lumière “STB”, il peut suspendre le poids.
NOTE: Pour garantir la précision, laisser le crochet libre de poids pendant 3-5 minutes après l’allumage.
ZÉRO
OPÉRATION ÉCRAN ILLUSTRATION
Appuyer sur sur le crochet. Après avoir allumé, génñeralement s’affiche , mais s’il
n’est pas montré opérer de cette manière.
Appuyer sur sur le télécom-
mande.
TARE
OPÉRATION ÉCRAN ILLUSTRATION
Appuyer sur sur le crochet. Appuyer sur cette touche pour déduire le poids du récipient, pendant
que la lumière “TARE” est allumé, le crochet montrera le poids net de
la charge.
Appuyer sur sur le télécom-
mande.
NOTE: étant donné que le crochet déduit automatiquement le poids du récipient, il montrera le poids net de la charge, on n’a pas besoin de
Appuyer sur cette touche pour obtenir le poids net jusqu’à ce qu’on change le récipient ou on éteigne le crochet peseur.

MANUAL D’USAGER | CROCHET PESEUR | STA FR
20
RÉVISION DE LA BATTERIE
I
II
III
SOUTENIR LA LECTURE DE PESAGE
Appuyer sur la touche HOLD sur la télécommande pour maintenir la lecture de pesage à l’écran. La lumière “HOLD” s’allumera. Appuyer
sur une autre fois cette touche pour désactiver cette fonction.
AVIS DE BATTERIE FAIBLE
Quand la charge de la batterie est inférieure à , l’écran clignote, mais le crochet peseur peut cependant fonctionner jusqu’à ce
que l’écran montre le symbole , après une minute, le crochet peseur s’éteindra automatiquement. On doit recharger la batterie
pour faire fonctionner une autre fois balance.
AVIS DE SURCHARGE
L’écran montrera quand la charge (Neto+Tara) depassé la capacité maximale. Assurer que la charge se trouve aux limites de
capacité.
ÉCONOMIE D’ENERGIE
L’écran montrera quand la charge soit en état stable avec un excès de 15 minutes et il retournera à la lecture normale de
poids pendant que la charge est changée. Quand la charge se trouve en état stable et trop de 60 minutes, le crochet peseur s’éteindra
automatiquement.
RECHARGE LA BATTERIE
1. Éteindre le crochet peseur, connecter l’adaptateur dans la prise de courant 220V AC, insérer aussi la prise de courant située à la partie
postérieure du crochet peseur. La lumière devient ambre, cela signifie que la batterie se recharge automatiquement, jusqu’à ce que la
lumière devienne vert. Cela signifie que la recharge a terminé.
2. Quand on a besoin d’utiliser le crochet peseur crochet une heure après l’autre, enlever la couverture postérieure, changer la batterie
avec batterie rechargeable.
Attention: Généralement, le temps de recharge ne doit pas être inférieur à 8 heures, ce crochet possè fonction protectrice de recharge, une
période longue de recharge n’endommagera pas la batterie.
ÉTEINT
IAppuyer sur sur le crochet pendant 2 secondes.
II Appuyer sur sur le télécommande pendant 2 secondes.
III Stable, après de 15 minutes, écran balance , après de 60 minutes, elles est éteinte automatiquement.
7. DIAGRAMME ÉLECTRIQUE PRINCIPAL
Télé-
commande

MANUEL D’USAGER | CROCHET PESEUR | STA FR
21
8. ILLUSTRATION D’ÉCRAN
ÉCRAN ILLUSTRATION
Attendre la stabilisation pendant l’étalonnage
Poids accumulé non supérieur au poids min.
a dépassé le nombre d’accumulations (il ne peut pas accumuler plus de 30 fois)
Excès de poids accumulés (il ne peut pas accumuler plus de 99999)
Ce symbole demande si on désire vraiment annulé le poids accumulé, en cas d’annulation.
Abandonner annulation.
Confirmer annulation.
Aucune valeur accumulée (quand on vérifie)
Deuxième fonction; quand on pousse en télécommande.
État actuel de la batterie.
CALIBRATION.
Accès l’ajustage de paramètres.
Introduire le réglage puissance.
Avis de surcharge.
Avis de batterie fiable.
Final, quand le paramètre d’ajustage est correct.
Éteindre.

MANUAL D’USAGER | CROCHET PESEUR | STA FR
22
9. GUIDE DES SOLUTIONS DE PANNES
PROBLÈME RAISON SOLUTION
Rien sur l’écran quand on allume le
crochet peseur.
Batterie endommagée. Vérifier la batterie.
Contact avec la batterie perdu. Serrer le contact.
Écran vacillant. Batterie faible. Recharger la batterie.
On ne peu pas allumer/éteindre Touche endommagée. Vérifier et nettoyer la touche.
Il ne peut pas tarer. Touche endommagée. Vérifier et nettoyer la touche.
La lumière indicatrice de recharge ne
s’allume pas.
Chargeur de batterie endommagé. Vérifier le chargeur.
Le chargeur n’est pas connecté correcte-
ment.
Insérer une autre fois la prise de courant.
L’écran ne devient pas stabilisé. La charge est instable. Stabiliser la charge.
Le câble du capteur de poids est endomma-
gé.
Vérifier et changer le capteur de charge-
ment.
Le crochet peseur s’est laissé pendant une
longue période de temps.
Situer le crochet peseur dans un environ-
nant sec.
L’écran ne montre pas 0 quand on
retire la charge.
Temps insuffisant de chauffage après l’avoir
allumée.
Après l’avoir allumée, la chauffer 3-5 mi-
nutes.
Situer le crochet peseur sur le sol pendant une
longue période de temps.
Le crochet peseur doit être suspendue.
L’erreur et grande. Le crochet peseur n’a pas été suspendue con-
venablement.
Vérifier le crochet peseur et le sujeteur.
La batterie ne peut pas être rechar-
gée.
Batterie endommagée.
Outlet endommagée.
Changer la batterie.
Changer outlet.
La distance du télécomande est plus
courte.
La fenêtre du récepteur est sale. Vérifier et nettoyer.
La batterie de la télécommande est baisse. Changer la batterie de la télécommande.
10. PRÉCAUTION
Le crochet peseur est un type d’instrument de pesage précis, réaliser avec une attention d’utilisation et d’entretient.
Tourner la charge et non le crochet lors des opérations de pesé.
Ne pas utiliser le crochet en cas de vent et de pluie.
Vérifier périodiquement que les clips/pins et les visses du crochet ne soient pas libres ou cassées, avant de l’utiliser.
Si le signal de batterie baisse et l’annonciateur LED apparaît en vert pendant qu’elle se charge, vérifier la batterie.
Protégez bien le crochet peseur-crochet quand celle-ci ne sera pas utilisée.

MANUEL D’USAGER | CROCHET PESEUR | STA FR
23
11. GUIDE DE TÉLECOMMANDE
OPÉRATION PANTALLA ILLUSTRATION
BRILLE D’ÉCRAN (Par défaut: 4) Valeur 0~5. Parametres: bl:0=lumière minime, bl:0= 5
lumière maximale
ZÉRO Muestra sin carga, se enciende la luz “ZERO”.
HOLD Il maintient le poids, lumière “HOLD” allumée.
Changer à la situation de pesage, lumière “HOLD” éteinte.
TARE L’écran montre le poids net, indication “TARE” allumées.
L’écran montre le poids brut, indication “TARE” éteintes.
PRETARE
Poids tare actuel.
Introduir la valeur, appuyer sur les touches et .
Confirmation, indication “TARE” allumées, il déduira le poids tare automa-
tiquement pendant le message.
ACCUMULATION Fois d’accumulation actuelles.
4 digits davant de la valeur accumulée actuelle. (exe: valeur accumulation:
23053= H0002 L3053)
4 digits derrière de la valeur accumulée actuelle. (exe: valeur accumula-
tion: 23053= H0002 L3053)
NOTE: Après avoir affiché deux fois, il retournera automatiquement en mode pesage, en peut appuyer sur la
touche
TOTALISATION Fois d’accumulation actuelles.
Poids actuelle.
4 digits davant de la valeur accumulée actuelle. (exe: valeur accumulation:
23053= H0002 L3053)
4 digits dèrriere de la valeur accumulée actuelle.(exe: valeur accumulation:
23053= H0002 L3053)
Reviens au mode pesage.

MANUAL D’USAGER | CROCHET PESEUR | STA FR
24
EFFACER Confirmer vous voulez effacer la value accumulé.
Annuler effacé.
Confirmer effacé.
CONVERSION kg/lb Un=0:kg “lb” lumière éteinte.
Un=1:lb “lb” lumière allumée.
MONTRER FOIS DE
SURCHARGE
Montrer fois de surcharge.
ÉCRAN DE
PUISSANCE
Il montre la puissance actuelle de la batterie.
Il retourne à la situation de pesage.
ÉTEINT Appuyer sur la touche OFF pendant 2 seconds
Il montre la puissance actuelle de la batterie et après il s’éteint.

MANUEL D’USAGER | CROCHET PESEUR | STA FR
25
MANUEL TECHNICIEN
On peut utiliser le contrôle éloigné pour opérer avec l’installation des paramètres et la calibration.
I. ILLUSTRATIONS DE L’ÉCRAN
ÉCRAN ILLUSTRATION REMARQUE
Accès le point zéro de la calibration
Accès le poids de calibration
Accès l’installation du paramètre
Accès la puissance de la calibration
Premier point de la calibration LoAd1<LoAd2<LoAd3
Secont point de la calibration
Troisième point de la calibration
On a dépassé la limite plus haute Le poids tare ne peut pas dépasser la portée maxi-
male
On a dépassé la limite minimale Le poids tare ne peut pas être négatif
Position d’attente
Poids inférieur à la portée minimale On ne peut pas accumuler la valeur
Dépassé le nombres accumulés On ne peut pas accumuler plus après 30 fois
Dépassé le poids accumules On ne peut pas accumuler plus après 99999
Erreur en accumulation répétée On ne peut pas accumuler un poids maintes fois
Nombres de accumulations actuel
Avant de quatre digits de poids accumulé (exe: valeur 23053 kg= H0002 L3053)
Quatre digits peu communs de poids accu-
mulé (exe: valeur 23053 kg= H0002 L3053)
Elle demande si vous voulez réellement effa-
cer supprimer le poids accumulé En cas d’érreur en effacer
Abandonner supprimer
Confirmer supprimer
Change: deuxième fonction
La valeur introduite est trop grande Quand vous introduisez la valeur tare ou la valeur
de poids
La valeur introduite est trope petite Quand vous introduisez la valeur tare ou la valeur
de poids
Ils n’ont pas contenu accumulés Quand vous vérifierez une accumulation
Avis de surcharge Tare + Poids Net dépassent la portée maximale +
9e
Avis de batterie basse Elle est automatiquement éteinte 1 minute ensuite
La puissance de la batterie en fonctionne-
ment
Fin Quand l’installation du paramètre ou la calibration
seront à point
Éteindre

MANUAL D’USAGER | CROCHET PESEUR | STA FR
26
2. FONCTION DU CLAVIER POUR L’INSTALLATION DES PARAMÈTRES/CALIBRATION
3. CONFIGURATION DES PARAMÈTRES
Entrer
configuration
F1 & F2 Pousser ensemble, 2 seconds
Pousser pour introduire le mot de passe d’installation
eds paramètres
Entrer configuration du paramètre.
Portée Écran 0.05/ 0.1/ 0.2/ 0.3/ 0.5/ 1/ 2/3/5/10/15/20/30/50/
consécutivement
e.g. choisir portée 5000 kg
Division Écran 01/02/05 consécutivement
e.g. choisir 2 kg comme division
Position
décimale 0=no | 1=X.X | 2=X.XX | 3=X.XXX
e.g. sans position décimale
Introduire zéro
manuellement et
automatiquement
A **: rang zéro manuel, b **: rang zéro automatic. 0-4, 0=0%F.S.,
1=2%F.S., 2=4%F.S., 3=20%F.S., 4=100%F.S.,
Paramètre installé en usine, 4%F.S.
Recherche rang
zéro et vitesses
écran
C **: recherche-zéro, 0-5, 0=0d, 1=0.5d, 2=1d, 3=1.5d, 4=2d,
5=2.5d;
d **: vitesse écran, 0-2, 0=lent, 1=normal, 2=rapide.
Paramètre installé en usine.
Effet stable 0=minimum, 1=normal, 2=maximum
Paramètre installé en usine.
Unité 0=kg, 1=lb
Paramètre installé en usine.
Éteindre métode
0=éteindre manuellement
1=stable; après de 15 minutes, écran balance , 2= sta-
ble; arpès de 15 minutes, écran balance , arpès de 60 mi-
nutes, elle est éteinte automatiquement.
Paramètre installé en usine.
Installation du paramètre finie.

MANUEL D’USAGER | CROCHET PESEUR | STA FR
27
4. CALIBRATION
Introducir
instalación Pousser ensemble, 2 seconds.
Pousser ensemble, après introduire
le mot de pas de la calibration
Introduire calibration
Calibración sin
carga
On doit être sure qu’il n’y a pas charge et laisse la ba-
lance stable
Calibration ok
Primera carga Commencer le premier point de charge de la calibra-
tion
Dernière valeur de calibration ou valeur manqué
Introduisez poids, e.g. 1000kg
En pesant poids, attendre stable
Première calibration de charge ok
Segunda carga Commencer le seconde point de charge de la calibra-
tion
Dernière valeur de calibration ou valeur manqué
Introduisez poids, e.g. 3000kg
En pesant poids, attendre stable
Calibration seconde charge ok
Tercera carga Commencer le troisième point de charge de la calibra-
tion
Dernière valeur de calibration ou valeur manqué
Introduisez poids, e.g. 5000kg
En pesant poids, attendre stable
Calibration troisième charge ok
Calibración acabada, volver
ATTENTION:
1. Le poids tare du crochet ne peut pas dépasser 50%F.S., le rang entre charge1, charge2, charge3 ne peut pas être inférieur
a 20%F.S. Autrement, l’etalonnage finalisé automatiquement.
2. LOAd1 < LOAd2 < LOAd3

MANUAL D’USAGER | CROCHET PESEUR | STA FR
28
5. GUIDE DE POSSIBLES PROBLÈMES
Rien sur l’écran quand on
allume la balance.
Batterie endommagée. Vérifier la batterie.
Contact avec la batterie perdu. Serrer le contact.
Écran vacillant. Batterie faible. Recharger la batterie.
On ne peu pas allumer/
éteindre Touche endommagée. Vérifier et nettoyer la touche.
Il ne peut pas tarer. Touche endommagée. Vérifier et nettoyer la touche.
La lumière indicatrice de
recharge ne s’allume pas.
Chargeur de batterie endommagé. Vérifier le chargeur.
Le chargeur n’est pas connecté correctement. Insérer une autre fois la prise de courant.
L’écran ne devient pas
stabilisé.
La charge est instable. Stabiliser la charge.
Le câble du capteur de poids est endommagé. Vérifier et changer le capteur de charge-
ment.
La balance s’est laissé pendant une longue pé-
riode de temps. Situer la balance dans un environnant sec.
L’écran ne montre pas 0
quand on retire la charge.
Temps insuffisant de chauffage après l’avoir
allumée.
Après l’avoir allumée, la chauffer 3-5 mi-
nutes.
Situer la balance sur le sol pendant une longue
période de temps. La balance doit être suspendue.
L’erreur et grande. La balance n’a pas été suspendue convenable-
ment. Vérifier la balance et le sujeteur.
La batterie ne peut pas
être rechargée.
Batterie endommagée.
Outlet endommagée.
Changer la batterie.
Changer outlet.
La distance du télécoman-
de est plus courte.
La fenêtre du récepteur est sale. Vérifier et nettoyer.
La batterie de la télécommande est baisse. Changer la batterie de la télécommande.
6. GARANTIE
Cette chrochet peseur est garantie contre tout défaut de fabrication et de matériel pendant 1 an à partir de la date de livraison.
Durant cette période, GIROPÈS SL. se chargera de la réparation du crochet peseur.
Cette garantie n’inclut pas les dommages causés par une utilisation impropre, surcharge ou par le non respect des recomman-
dations décrites dans ce manuel.
La garantie ne couvre pas les frais d’envois nécessaires à la réparation du crochet peseur.

USER’S GUIDE | WEIGHING HOOK | STA ES
29
I. SAFETY GUIDE
Read carefully the following instruction and advice before using this weighing hook.
The instrument under guarantee cannot BE OPEN BY THE USER, under none motive. Each tentative of repair or modification
of the unit can expose the user to an electric discharge danger and can annul all application of the guarantee. All problem
with the unit or with the system must be notified to the manufacturer or the distributor where it has been bought.
The hook must be used exclusively to measure traction. The mobile loads that can cause tensions and torsions must be
suspended with flexible or gyrating elements.
To place the load without causing impact.
Not to pass and not to be stopped under the suspended load.
Not to expose or to use in case of rain or humidity.
Not to reverse any liquids on the weighing hook.
Not to use any solvents to clean the weighing hook.
Not to expose the instrument to the direct light of the sun or near to sources of heat.
Not to install in atmospheres with explosion risk.
Not to expose to strong magnetic fields or electric fields.
Not to throw the batteries to fire because they could explode.
Not to disperse the batteries in the atmosphere.
It is forbiden strictly overloading this device.
To avoid the long lengths of the weighing, to avoid an excessive use of the load cell. The excessive use of the load cell can
reduce the life span and the good working of the hook and it can also decrease the precision of the hook.
To verify the straps and the hook periodically.
To get a maximal use of the battery reload it periodically, even though they have not been used during a long time.
Not to try to repair this device yourself.
To use the joined battery charger exclusively with the device.

USER’S GUIDE | WEIGHING HOOK | STA EN
30
2. PRODUCT CHARACTERISTICS
MODEL DISPLAY CHARACTERISTICS
STA LED 30mm (1.2”) High précision, reduced volume, portable.
High quality: The process management is operated according to OIML R76, GB/T11883-2002, and get the European CE certificate.
Safty installation: Aluminium casting case, high intensity hook and shackle, special loadcell for safty installation.
High reliability: PCB use high quality components to insure long time stability.
Broad applicability: 30 mm high character display, 25M distance eyeshot, can be used in storage industry, textile industry, metallurgy
industry etc.
Simple operation: Check battery voltage automatically, wireless remote controller, separate battery space, small volume, easy to bring.
Complete function: Special remote controller, kg/lb conversion, hold, tare, division choice, stability regulation, accumulation/search, gross/
net conversion, parameter regulation etc.
3. MAIN TECHNICAL DATA
Standard GB/T11883-2002 “Electronic crane scale”
Accuracy class OIML class III
Display 30mm (1.2”) 5 digits LED
Zero range 4% full capacity
Tare range 100% full capacity
Stable time ≤ 10 seconds
Overload indication 100% Max. capacity +9e
Max. Safety load 125% Max. capacity
Ultimate load 400% Max. capacity
Battery life ≤ 50 hours
Battery type Fully sealed lead-acid battery, 6V/5Ah
Charger DC9V/1500mA
Operating temperature -10ºC ~ +40ºC
Operating humidity ≤ 85% RH under 20ºC
Remote controller operating distance Min. 10m
Battery off remote controller AA batteries, 1.5V x 2
4. BASIC PARAMETERS
MODEL MAX. CAPACITY
(kg/lb)
MIN. CAPACITY
(kg/lb)
DIVISION
(kg/lb)
TOTAL DISPLAY COUNTS
(n)
STA 100 100/220 1/2 0.05/0.1 2000
STA 300 300/700 2/4 0.1/0.2 3000
STA 500 500/1100 4/10 0.2/0.5 2500
STA 1000 1000/2200 10/20 0.5/1 2000

USER’S GUIDE | WEIGHING HOOK | STA ES
31
5. DIMENSIONS AND NET WEIGHT
MAX.
CAP.
L
(mm)
A
(mm)
B
(mm)
C
(mm)
NET
WEIGHT (kg)
100 kg 335 20 65 20 4.0
200 kg 335 20 65 20 4.0
300 kg 335 20 65 20 4.0
500 kg 360 25 75 20 4.2
1000 kg 360 25 75 20 4.2
6. OPERATION GUIDE
TURN ON
OPERATION DISPLAY ILLUSTRATION
Shows 2 times.
Shows capacity 2 times.
Shows the voltage of the batery.
Waiting stable signal.
Light “STB”, can hang the weight.
NOTE: In order to ensure high accuracy, after turn on, keep the weighing hook stable for 3-5 minutes after the hook turn on.
ZÉRO
OPERATION DISPLAY ILLUSTRATION
Press on the weighing hook. After turn on, generally display , if not for
can operate like this.
Press on controller.
TARE
OPERATION DISPLAY ILLUSTRATION
Press on the weighing hook. Press this key to deduct the weight of the container, while “TARE” light
on, the weighing hook will show the net wieght of load.
Press on controller.
NOTE: As crane scale deduct the weight of container automatically, so it will show the net weight of load every time, you needn’t press
this key to get net weight until you change the container or turn off.

USER’S GUIDE | WEIGHING HOOK | STA EN
32
CHECK BATTERY
I
II
III
KEEP THE WEIGHT READING
Press HOLD key on controller to maintain the weight reading on the display. Now, “HOLD” light is on. Press this key again to turn
off this function.
LOW BATTERY WARNING
When the battery voltage is lower than , the display flash, but the weighing hook can still work until to permit lowest
voltage, it will show , after 1 minut, the weighing hook will turn off automatically. You need to recharge the battery to
use again.
OVERLOADING WARNING
The display will show , once the load (Net+Tare) exceeds Max. Capacity. Make sure that the load are within the capa-
city range, otherwise it’s very dangerous.
POWER SAVING
The display will show when the load are at stable in excess of 15 minutes and revert to normal weighing readings when
load changes. When the load are at stable status in excess of 60 minutes, the weighing hook will turn off automatically.
BATTERY RECHARGING
1. Turn off, connect the adapter with 220V AC power supply, also insert the plug in the socket which located in the rear of scale. The
light become orange, it means it’s recharging automatically, until the orange light become red, that means recharging is finished.
2. When you need to use weighing hook hour after hour, take off the rear cover, change the battery with rcharged battery.
ATTENTION: Generally, the time of recharging should not lower than 8 hours, this hook have recharging protection function, long
time recharging will not damage the battery.
TURN OFF
I
II
III
7. ELECTRICAL PRINCIPLE DIAGRAM

USER’S GUIDE | WEIGHING HOOK | STA ES
33
8. DISPLAY ILLUSTRATION
DISPLAY ILLUSTRATION
Wait the stability while the calibration doing.
Accumulated weight doesn’t exceed Min. Capacity.
Accumulation exceeds 30 times.
Accumulated weight exceeds 99999.
Confirm accumulation clearance.
Cancel accumulation deletion.
Confirm accumulation deletion.
No accumulation.
Second function: Switch to other mode, when pressing remote control.
battery voltage status
Calibration
Ener parameter setting.
Enter intensity adjustement.
Overload warning.
Low power warning.
End.
Turn off.

USER’S GUIDE | WEIGHING HOOK | STA EN
34
9. TROUBLESHOOTING GUIDE
PROBLEM REASON SOLUTION
No display when turn on the weighing
hook
Batterie damaged Check battery
Battery contacted loosed Tighten the contact
Display flash Low battery Recharge the battery
Can’t turn on&off button damaged Check & clean the button
Can’t tare buttond damaged Check & clean the button
Recharge indicator light can’t turn on The recharger damaged Check the recharger
The recharger isn’t plugged ready Insert plug again
Display isn’t stable
The load is unstable Stabilize the load
Load cell cable damaged Check and replace loadcell
The weighing hook is damp environ-
ment for a long time
Put the weighing hook in dry environ-
ment
The display don’t show “0” when emp-
ty load
No enough time for heating the weighing
hook after turn on. After turning on, heating 3-5 minutes.
Put the weighing hook on ground for
too long time. The hook should be hung.
The error is large The weighing hook isn’t hung properly. Check the weighing hook and sling.
Battery can’t recharge Battery damaged. Replace battery
Outlet damaged. Replace the outlet
Remote distance shortened Receiver window is too dirty Check and clean.
Low battery of controller Replace remote control battery.
10. ATTENTION
For good performance and precise measurement, be careful with daily operation and maintenance.
Rotate the load rather than the weighing hook if needed.
Do not use the weighing hook under thunder or rain.
Check the clips, pins and screws regularly.
When battery is out of power and battery indicator turns red, chech the battery or replace it with a full one.
Hang the weighing hook on special shelf in dry and well-ventilated room. Do not place the weighing hook on the ground
drectly.

USER’S GUIDE | WEIGHING HOOK | STA ES
35
11. REMOTE CONTROLLER OPERATION
OPERACIÓN PANTALLA EXPLICACIÓN
BRIGHTNESS
OPTION
Values to 0 until 5. (Value 0: Min brightness - Value 5: Max brightness) - (Value
of default: 4)
ZÉRO Set when empty load, light “ZERO” turns on.
HOLD Hold the weight. “HOLD” light on.
Change at weighing mode, “HOLD” light off.
TARE
PRETARE
-
ACUMULACIÓN Current accumulation times.
H: High 4 digitals of accumulation value.
L: Low 4 digital of accumulation value.
For example: the value is 99999kg, the max capacity for accumulation weight.
You read the indicator: First, display shows H0009 and immediately L9999.
NOTE: after display twice, it will return automatically to the situation of weighing, you also you can press
to return directly.
TOTALIZATION
-
-
display shows
-
CLEAR
KG/LB UNIT
CONVERSION

USER’S GUIDE | WEIGHING HOOK | STA EN
36
KG/LB UNIT
CONVERSION Un= 0:kg “lb” light off.
Un= 1:lb “lb” light on.
OVERLOAD
QUERY
Display overloading times.
VOLTAGE
DISPLAY
Display current battery voltage.
Returns to weighing mode.
TURN
OFF Press mantein two seconds on the Key “OFF”
Display current battery voltage and power off.

USER’S GUIDE | WEIGHING HOOK | STA ES
37
TECHNICAL MANUAL
You can use remote controller to operate parameter setting and calibration
I. DISPLAY ILLUSTRATION
Enter zero point calibration.
Enter weight calibration.
Enter parameter setting.
Enter voltage calibration.
First calibration point. LoAd1<LoAd2<LoAd3
Second calibration point.
Third calibration point.
Exceed high limit. Tare weight can’t exceed full capacity.
Exceed low limit. Tare weight can’t be negative.
Waiting.
Weight less than min. capacity. Can’t accumulate the value.
Accumulated times exceed, Can’t accumulate after 30 times.
Accumulated weight exceed. Can’t accumulate after 99999)
Error in repeat accumulation. Can’t accumulate one weight repeatedly.
Current accumulation times.
Front four digit of accumulated weight. For example: the value is 99999kg, the max capacity for
accumulation weight.
You read the indicator: First, display shows H0009 and
immediately L9999.
Rare four digit of accumulated weight.
Ask if you really want to delete accumulated
weight. In case error deletion
Give up deletion.
Confirm deletion.
Switch. Second function Keys
Input value is too large. When you input tare or weight value.
Input value is too small. When you input tare or weight value.
No any accumulated content. When you check accumulation.
Overload warning. Tare + Net weight exceed full capacity + 9e
Low battery warning. Turn off automatically one minute later.
The voltage of current battery.
End. When parameter setting or calibration ready
Turn off.

USER’S GUIDE | WEIGHING HOOK | STA EN
38
2. KEY FUNCTION IN PARAMETER SETTING/CALIBRATION
KEY FUNCTION
Shift (choosen digit glitter)
Parameter setting
Confirm
3. PARAMETERS SETTING
Enter setting
Press together, 2 seconds.
Press key to input parameter setting password.
Enter parameters setting.
Capacity
Display : 0.05 / 0.1/ 0.2 / 0.3 / 0.5 / 1 / 2 / 3 / 5 / 10 / 15 / 20 / 30 / 50
/ 75 circularly.
e.g. choose capacity 5000 kg
Division
Display 01/02/05 circularly
e.g. choose 2 kg as division
Decimal position
0=no/ 1=X.X / 2=X.XX / 3=X.XXX
e.g. sin posición decimal
Zero-setting
manually &
automatically
A**: manual zero range, B **: automatical zero range. 0-4,
0=0% FS | 1=2%FS | 2=4%FS | 3=20%FS | 4=100%FS
Parameter set in factory, 4%F.S.
Zero-tracking
range and dis-
play speed
C**: zero-tracking, 0=0d, 1=0.5d, 2=1d, 3=1.5d, 4=2d, 5=2.5d
D**: display speed, 0=slow, 1=average, 2=fast.
Parameter set in factory.
Stable effect
0=minimum, 1=average, 2=maximum
Parameter set in factory.
Unit
0=kg, 1=lb
Parameter set in factory.
Turn off method
0=turn off manually / 1=stable, after 15 minutes, scale display
, / 2= stable, after 15 minuts, scale display ,
after 60 minuts, turn off automatically.
Parameter set in factory.
Parameter setting finished.

USER’S GUIDE | WEIGHING HOOK | STA ES
39
4. CALIBRATION
ITEM OPERATION DISPLAY SETTING RANGE & EXPLAIN
ENTER SETTING Press together, 2 seconds.
Press together, then input cali-
bration password.
Enter calibration.
CALIBRATION
WITH NO LOAD Make sure no load and let scale stable.
Calibration ok.
FIRST LOAD Start fisrst load point calibration.
Last calibration value or default value.
Input weight, e.g. 1000kg
Hanging weight, waiting stable.
First load calibration ok.
SECOND LOAD Start second load point calibration.
Last calibration value or default value.
Input weight, e.g. 3000kg
Hanging weight, waiting stable.
Second load calibration ok.
THIRD LOAD Start third load point calibration.
Last calibration value or default value.
Input weight, e.g. 5000kg
Hanging weight, waiting stable.
Third load calibration ok.
Calibration finished, return.
ATTENTION:
1. The tare weight can’t exceed the 50%F.S.The range between load1, load2, load3 can’t less than 20%FS, otherwise, calibra-
tion finished automaically.
2. LOAd1 < LOAd2 < LOAd3

USER’S GUIDE | WEIGHING HOOK | STA EN
40
5. TROUBLESHOOTING GUIDE
-
6. WARRANTY
This weighing hook is warranted against defects of manufacturing and materials for a period of 1 year, from the delivery date.
During this period, GIROPÈS SL will take charge of repairing the weighing hook.
This warranty does not cover defects or damaged caused by misuse, overloading or improper installation contrary to the recom-
mendations described in this manual.
This warranty does not cover shipping costs for the reparation of the weighing hook.

41
BENUTZERHANDBUCH | KRANWAAGE | STA DE
1. SICHERHEITSINFORMATIONEN
Lesen Sie das Benutzerhandbuch vor der ersten Verwendung aufmerksam durch und bewahren Sie sie für eine spätere Verwendung auf.
Die Kranwaagen wird durch eine Garantie abgedeckt und darf unter keinen Umständen VON BENUTZER GEÖFFNET werden. Jeder
Versuch der Reparatur oder der Abänderung des Gerätes kann für den Benutzer die Gefahr elektrischer Schläge darstellen und führt
zum Verfall sämtlicher Garantieleistungsansprüche..
Benutzen Sie die Kranwaage ausschließlich zum Heben und Wägen frei beweglicher Lasten und Zugkräfte. Bewegliche Lasten, die
eine Torsionsbelastung verursachen können, müssen mit flexiblen oder drehbaren Fesseln aufgehängt werden.
Die Last nicht reißen, lockern oder schleppen.
Nicht unter hängenden Lasten stehen oder gehen.
Keine Flüssigkeiten auf das Anzeigegerät gießen.
Für die Reinigung des Anzeigerätes keine Lösungsmittel benutzen.
Das Gerät vor direkter Sonnenbestrahlung schützen und von Wärmequellen fernhalten.
Nicht in Bereichen mit Explosionsgefahr installieren.
Überlasten Sie niemals die Kranwaage
Lassen Sie kein Lasten auf die Waage fallen. Sie sollten eine Belastung der Waagen über den angegebenen Wägebereich hinaus auf
jeden Fall vermeiden. Ein Überbelastung kann zur Zerstörung der Wägezelle führen. Dies kann zur Reduzierung der Zuverlässigkeit
und Verkürzung der Lebensdauer des Gerätes.
Prüfen Sie Schäkel und Haken regelmäßig auf Festigkeit oder optisch auf Auffälligkeiten.
Um die Lebensdauer des Akkus möglichst hoch zu halten, sollte in regelmässigen Abständen eine Wiederaufladung erfolgen, auch
wenn die Waage nicht in Betrieb ist.
Versuchen Sie niemals die Kranwaage selbst zu reparieren. Wartungs-, Reparatur- oder Kalibrierarbeiten dürfen nur durch Fachmi-
tarbeiter erfolgen.
Benutzen Sie nur das beigefügte Netzadapter mit dem Gerät.

42
BENUTZERHANDBUCH | KRANWAAGE | STA DE
2. HAUPTEIGENSCHAFTEN
MODELL LCD-DISPLAY MERKMALE
STA LED 30mm (1.2”) Höhe Präzision, geringe Abmessungen, tragbar.
Hohe Qualität: Gemäß Europäischer Richtlinie OIML R76, GB/T11883-2002. Die Waage ist CE-zertifiziert.
Sicherheitsinstallation: Robustes Aluminiumguss Gehäuse, robuste Ausführung mit Schäkel und Haken und spezielle Wägezelle um eine
sichere Installation zu gewährleisten.
Hohe Zuverlässigkeit: Diese Kranwaage ist mit allen Merkmalen modernster Technik ausgestattet. Dank der Verwendung von hochwertigen
Komponenten wie die elektronische Leiterplatte (PCB) bietet diese Waage eine sehr hohe Zuverlässigkeit.
Zahlreiche Anwendungen: Diese Kranwaage wird in verschiedenen Branchen benutzt wie Lagerindustrie, Textilindustrie und Metallurgiein-
dustrie.
Einfache Funktionen: Test über die Batteriespannung, Fernbedienung, geringe Abmessungen, tragbar.
Wichtige Funktionen: Umstellung der Anzeigeeinheit kg/lb, Wägewert-Haltefunktion Hold, Tara, Werte akkumulieren, Aufrufen und Löschen
der akkumulierten Daten, Brutto/Netto, usw..
3. TECHNISCHE DATEN
Standard GB/T11883-2002 ”Elektronische kranwaage”
Genauigkeitsklasse OIML, Klasse III
LCD-Display Display mit 5 Ziffern, Höhe 30 mm (1.2”)
Nullbereich 4% max. Kapazität
Tarabereich 100% max. Kapazität
Stabilitätszeit ≤ 10 Sekunden
Überlastung 100% max. Kapazität + 9e
Max. Nachladezeit 125% max. Kapazität
Max, Überlast 400% max. Kapazität
Batteriestatus ≤ 50 Stunden
Batterie Versiegelte Blei-Säure-Batterie, 6V/5Ah
Netzadapter DC9V/1500mA
Betriebstemperatur -10ºC ~ +40ºC
Betriebsfeuchtigkeit ≤ 85% RH unter 20ºC
Reichweite der Fernbedienung Min. 10m
Batterie der Fernbedienung 1.5V x 2 AA Batterien
4. PARÁMETROS BÁSICOS
MODELL
MAX.
WÄGEFÄHIGKEI
(kg/lb)
MIN.
WÄGEFÄHIGKEI
(kg/lb)
ZIFFERNSCHRITT
(kg/lb)
MAX.
TEILUNGENIM DISPLAY (n)
STA 100 100/220 1/2 0.05/0.1 2000
STA 300 300/700 2/4 0.1/0.2 3000
STA 500 500/1100 4/10 0.2/0.5 2500
STA 1000 1000/2200 10/20 0.5/1 2000

43
BENUTZERHANDBUCH | KRANWAAGE | STA DE
5. ABMESSUNGEN UND NETTOGEWICHT
MAX.
KAPÄZITAT
L
(mm)
A
(mm)
B
(mm)
C
(mm)
NETTOGEWICHT
(kg)
100 kg 335 20 65 20 4.0
200 kg 335 20 65 20 4.0
300 kg 335 20 65 20 4.0
500 kg 360 25 75 20 4.2
1000 kg 360 25 75 20 4.2
6. FUNKTIONEN
EINSCHALTEN
FUNKTION LCD-DISPLAY ANZEIGEN
Erscheint alle Segmente zweimal.
Erscheint die doppelte Kapazität.
Erscheint die Batteriespannung.
Stabilitätsanzeige.
“STB” (Stabilitätsindikator), dann wird [0] sichtbar und die Waage ist
HINWEIS: Eine kurze Anwärmzeit von 3-5 Minuten nach dem Einschalten stabilisiert die Messwerte und garantiert die hohe Präzision der
Waage.
NULLSTELLUNG
FUNKTION LCD-DISPLAY ANZEIGEN
Drücken Sie die -Taste an der
Kranwaage
Nach dem Abschalten des Gerätes erscheint auf dem
Display.
Drücken Sie die -Taste auf der
Fernbedienung
TARA
FUNKTION LCD-DISPLAY ANZEIGEN
Drücken Sie die -Taste an der
Kranwaage
Nach dem Abschalten des Gerätes drücken Sie diese Taste und wird
das Gewicht tariert (Die TARA - LED unterhalb der Anzeige leuchtet
wenn die Waage tariert wurde).
Drücken Sie die -Taste auf
der Fernbedienung
HINWEIS: Das Gewicht des Wägebehälters wird automatisch tariert. Der Wägebehälter wird durch das tarieren (TARE) bei der Wiegung
nicht berücksichtigt, so dass nur das Nettogewicht des Wägegutes angezeigt wird.

44
BENUTZERHANDBUCH | KRANWAAGE | STA DE
BATTERIETEST
IDrücken Sie die -Taste an der Kranwaage beim Einschalten/Ausschalten und dann erscheint auf dem
Display.
II Drücken Sie die -Taste auf der Fernbedienung beim Ausschalten und dann erscheint auf dem Display
III Drücken Sie die -Taste und die -Taste und dann erscheint auf dem Display. Dann drücken Sie erneut die
-Taste, um die Anzeige wieder zu verlassen.
WÄGEWERT-HALTEFUNKTION HOLD
Wenn Sie die [HOLD]-Taste auf der Fernbedienung drücken, wird der Gewichtswert Display eingefroren. Ein “HOLD-Zeichen” erscheint an
der Kranwaage. Um den Hold-Modus wieder zu verlassen, drücken Sie nochmals die Hold-Taste für einige Zeit, um zum normalen Display-
Modus zurückzukehren.
WARNUNG BEI ZU NIEDRIGER BATTERIEKAPAZITÄT
Wenn die Batteriekapazität zu gering ist, erscheint im Display. Die Kranwaage kann weiterhin benutzt warden, bis im Display
der Kranwaage , für “Low Battery” erscheint. Danach schaltet sich die Waage nach ca. 1 min ab. Die Batterie soll entladen
werden.
WARNUNG VOR ÜBERLASTUNG
Wenn das Display der Kranwaage anzeigt, wird der maximale Wägebereich überschritten. Entlasten Sie die Kranwaage sofort
und achten Sie darauf, dass bei einer Neubelastung nur Massen angehängt werden, die den Wägebereich nicht
überschreiten.
BATTERIE-SPAR-MODUS
Wenn die Kranwaage mit einer angehängten Masse belastet wird, erscheint im Display (der Wägewert wird kontinuerlich
angezeigt). Nach 15 min ohne Bewegung geht die Waagen in einem Sparmodus über. Nach 60 min ohne Bewegung schaltet sie sich aus.
BATTERIE WIEDER AUFLADEN
1. Schalten Sie die Kranwaage mittels der [ON/OFF]-Taste aus. Stecken Sie den Netzadapter in die dafür vorgesehene Buchse an der Waage.
Stecken Sie dann das Netzstecker-Teil in die 220V-Steckdose. Die Wiederladung beginnt jetzt. Die grüne Ladelampe beginnt zu leuchten.
Wenn die Lampe rot leuchtet, ist der Ladevorgang abgeschlossen. Die Kranwaage ist jetzt wieder
betriebsbereit.
2. Wenn die Kranwaage für eine längere Zeit benutzt wird, entfernen Sie die Platte an der Rückseite der Waage, nehmen Sie die Batterie
heraus und legen Sie eine wiederaufladbare Batterie ein.
Achtung: Bitte beachten Sie, dass die normale Ladezeit etwa 8 Stunden beträgt. Eine lange Ladezeit führt nicht zur Zerstörung des
Akkus.
APAGADO
I
II
III
7. ELEKTRISCHES DIAGRAMM

45
BENUTZERHANDBUCH | KRANWAAGE | STA DE
8. SYMBOLE AUF DEM LCD-DISPLAY
LCD-DISPLAY ANZEIGEN
Stabilisierungsphase.
Das akkumulierte Gewicht erreicht nicht die Mindeskapazität.
Akkumulierungszeit überschritten (>30 min).
Maximal zu akkumulierendes Gewicht überschritten (99999).
Kann zur Löschung vom akkumulierten Gewicht aus dem Waagenspeicher verwendet werden.
Wenn Sie die akkumulierte Werte nicht löschen möchten, können Sie die Prozedur abbrechnen.
Bestätigt die Löschung akkumulierter Werte.
Zeigt an, dass kein akkumulierter Wert vorhanden ist.
Shift-“Umstellungs” -Taste (oder Zeichen).
Batteriespannung.
Zur Justierung des Gewichtes.
Parametriemodus anwählen.
Einstellung der Leistung.
Warnung vor Überlastung der Wägezelle.
Batteriekapazität zu gering.
Ende der Parametrierung.
Ausschalten.

46
BENUTZERHANDBUCH | KRANWAAGE | STA DE
9. MELDUNGEN DES GERÄTES WÄHREND DER BENUTZUNG
MELDUNG MÖGLICHER GRUND FEHLERBEHEBUNG
-
Revise el gancho y el colgador
10. SICHERHEITSANWEISUNGEN
Diese Kranwaage ist ein Präzisionsinstrument. Das vorliegende Benutzerhandbuch enthält nützliche Hinweise für einen vorschrift-
mäßigen Gebrauch und die Wartung der Kranwaage.
Das Drehen der Kranwaage muß verhindert werden.
Das Gerät nie Witterungseinflüssen wie Regen und Gewitter aussetzen.
Prüfen Sie Schäkel und Haken regelmäßig auf Festigkeit.
Stellen Sie sicher, dass die Batterie nicht defekt ist.
Wenn Sie die Kranwaage längere Zeit nicht verwenden, lagern Sie die Kranwaage in trockener Umgebung.

47
BENUTZERHANDBUCH | KRANWAAGE | STA DE
11. BEDIENUNGSANLEITUNG FERNBEDIENUNG
OPERACIÓN PANTALLA EXPLICACIÓN
EINSTELLEN DER
WAAGENBELEUCH-
TUNG
0~5, 0: keine Beleuchtung, 1: min. Beleuchtung, 5 : max. Beleuchtung.
(voreingestellt ist 4)
NULLSTELLUNG
Erscheint ohne Last und die “ZERO”-LED leuchtet.
WÄGEWERT-HALTE-
FUNKTION HOLD Der Gewichtswert wird im Display eingefroren und die “HOLD”-LED leu-
chtet.
Den “HOLD”-Modus wieder zu verlassen. Im normalen Wägemodus
zurücksetzen. (die “HOLD”-LED leuchtet nicht).
TARA
Nettogewicht wird im Display erscheint und die “TARE”-LED leuchtet.
Nettogewicht wird im Display erscheint und die LED- “TARE”-LED leuchtet
nicht.
PRETARA
Aktuelles Taragewicht.
Information Nettogewicht.
Ausgang, die “TARE”-LED leuchtet, das Taragewicht wird gespeichert.
ACUMULACIÓN Anzahl der vorgenommenen Wägungen.
Gesamtgewicht mit 4 Zeichen nach.
Gesamtgewicht mit 4 Zeichen vor.
HINWEIS: Drücken Sie die -Taste um in den normalen Wägemodus zurückzukehren.
AUFRUFEN DER
AKKUMULIERTEN
DATEN Anzahl der vorgenommenen
Aktuelles Gewicht.
Gesamtgewicht mit 4 Zeichen nach.
Gesamtgewicht mit 4 Zeichen vor.
zum Gesamtgewicht zurückkehren.

48
BENUTZERHANDBUCH | KRANWAAGE | STA DE
LÖSCHEN DER AKKUMU-
LIERTEN WERT Bestätigen Sie die Löschung.
Löschung annulieren.
Löschung bestätigen.
UMSTELLUNG DER ANZEI-
GEEINHEIT KG/LB
SUCHEN NACH DER
DAUER DER
ÜBERSCHREITUNG DER
MAXIMALLAST
ANZEIGEN DER
BATTERIESPANNUNG
Aktuelle Spannung der Batterie.
Zur normalen Wägung Zurückkehren.
AUSSCHALTEN

49
BENUTZERHANDBUCH | KRANWAAGE | STA DE
TECHNISCHES HANDBUCH
I. SYMBOLE AUF DEM LCD-DISPLAY
LCD-DISPLAY ANZEIGEN NOTIZEN
-

50
BENUTZERHANDBUCH | KRANWAAGE | STA DE
2. TASTATUR-FUNKTION (PARAMETEREINSTELLUNG/KALIBRIERUNGEINSTELLUNG)
→
↑
3. PARAMETEREINSTELLUNG
ITEM
F1 & F2 Drücken Sie etwa 2 Sekunden lang die und - Tasten glei-
chtzeitig.
Drücken Sie die und die -
Tasten um das Passwort von.
Parametern einzugeben.
LCD-Display 0.05/ 0.1/ 0.2/ 0.3/ 0.5/ 1/ 2/3/5/10/15/20/30/50/
z.B. 5000 kg Kapazität auswählen
0=nein | 1=X.X | 2=X.X X | 3=X.XXX
A (**): , d (**) .
0=0%FS | 1=2%FS | 2=4%FS | 3=20%FS 4=100%FS
, 4%F.S.
C (**) : ;
0-5, 0=0d, 1=0.5d, 2=1d, 3=1.5d, 4=2d, 5=2.5d
d (**): 0-2;
0=, 1=normal, 2=
0=, 1=normal, 2=
0=kg | 1=lb
0=
1= ;
2= ,
.

51
BENUTZERHANDBUCH | KRANWAAGE | STA DE
4. KALIBRIERUNG
INSTALLATION Drücken Sie etwa 2 Sekunden lang die und
- Tasten gleichtzeitig.
Drücken Sie die und die - Tas-
ten um das Passwort von Parametern einzugeben.
Kalibrierung einstellen.
KALIBRIERUNG OHNE
LAST
Lassen Sie kein Lasten auf die Waage fallen (Sta-
bilität).
Kalibrierung OK.
Erste Last Erster Kalibrierungspunkt.
Letzter Kalibrierungswert
Gewicht einstellen, z.B. 1000 kg
Erster Kalibrierungspunkt OK
Zweite Last Zweiter Kalibrierungspunkt
Letzter Kalibrierungswert
Gewicht einstellen, z.B. 3000 kg
Zweiter Kalibrierwert OK
DRITTE LAST Dritter Kalibrierungspunkt
Letzter Kalibrierungswert
Gewicht einstellen, z.B. 5000 kg
Dritter Kalibrierungspunkt OK
Kalibrierung beendet, zurück
Achtung:
1. Taragewicht darf 50% FS nicht überschreiten, das Bereich zwischen Lasten 1, 2 und 3 darf niedriger als 20% FS sein. Ist das
Bereich niedriger als 20% FS, dann wird die Kalibrierung automatisch beendet.
2. LOAd1 < LOAd2 < LOAd3

52
BENUTZERHANDBUCH | KRANWAAGE | STA DE
5. MELDUNGEN DES GERÄTES WÄHREND DER BENUTZUNG
-
-
-
6. GARANTIE
Gültige Garantie gegen alle Herstellungsfehler und Materialfehler für einen Zeitraum von 1 Jahr ab dem Datum der Lieferung. Giropès ist
in diesem Zeitraum für die Reparatur des Betrachters verantwortlich. Diese Garantie deckt keine Schäden, die durch Missbrauch oder
Überlastung entstanden sind. Die Garantie gilt nicht für erforderliche Versandkosten (Fracht) für die Reparatur der kranwaage.

GANCHO PESADOR | CROCHET PESEUR | WEIGHING HOOK | KRANWAAGE STA
53

GANCHO PESADOR | CROCHET PESEUR | WEIGHING HOOK | KRANWAAGE STA
54

GANCHO PESADOR | CROCHET PESEUR | WEIGHING HOOK | KRANWAAGE STA
55
DECLARACIÓN DE CONFORMIDAD
DECLARATION OF CONFORMITY
DÉCLARATION DE CONFORMITÉ
KONFORMITÄTSERKLÄRUNG
Nosotros:
We/ Nous/ Wir:
BAXTRAN S.L.
Pol. Empordà International
C/F. Parcela 15-16
E-17469 VILAMALLA (Girona)
- SPAIN -
Declaramos bajo nuestra responsabilidad que el producto denominado:
Declare under our responsibility that the denominated product:
Nous déclarons sous notre résponsabilité que le produit ci-dessous nommé:
Erklären unter unserer Verantwortung, dass das Produkt mit dem Namen:
STA
A la cual se refiere la presente declaración, es conforme a las siguientes normas o documentos:
To wich déclaration referes to, conform wich the followings standards or other normative documents:
A la quelle se refaire la présente déclaration, et conforme aux normes suivantes ou documents:
auf das sich diese Erklärung bezieht, mit den nachstehenden Normen und folgende Standards übereinstimmt:
Conformidad CE:
CE conformity / conformité CE / CE Kennzeichnung:
2004/108/CE Directiva sobre la compatibilidad electromagnética.
2004/108/CE directive on the electromagnetic compatibility.
2004/108/CE directive surla compatibilité electromagnétique.
2004/108/CE EMV-Richtlinie.
2006/95/CE Directiva sobre baja tensión.
2006/95/CE low tension directive
2006/95/CE directive sur les baisses tensions.
2006/95/CE Niederspannungsrichtlinie.
2006/42/CE Directiva sobre máquinas.
2006/42/CE Machinery directive.
2006/42/CE Directive sur les machines.
2006/42/CE Maschinenrichtlinie
Jordi Ribalta
Director General
General Manager

marca propiedad de | est une marque de | trade mark propiety of:
Pol. Empordà Internacional Calle F. Parcela 15-16
17469 VILAMALLA - (Girona) SPAIN
T. (34) 972 527 212 - F. (34) 972 527 211
-
 1
1
-
 2
2
-
 3
3
-
 4
4
-
 5
5
-
 6
6
-
 7
7
-
 8
8
-
 9
9
-
 10
10
-
 11
11
-
 12
12
-
 13
13
-
 14
14
-
 15
15
-
 16
16
-
 17
17
-
 18
18
-
 19
19
-
 20
20
-
 21
21
-
 22
22
-
 23
23
-
 24
24
-
 25
25
-
 26
26
-
 27
27
-
 28
28
-
 29
29
-
 30
30
-
 31
31
-
 32
32
-
 33
33
-
 34
34
-
 35
35
-
 36
36
-
 37
37
-
 38
38
-
 39
39
-
 40
40
-
 41
41
-
 42
42
-
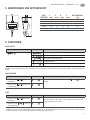 43
43
-
 44
44
-
 45
45
-
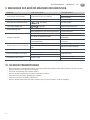 46
46
-
 47
47
-
 48
48
-
 49
49
-
 50
50
-
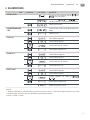 51
51
-
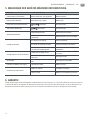 52
52
-
 53
53
-
 54
54
-
 55
55
-
 56
56


En otros idiomas
- français: Baxtran STA Manuel utilisateur
- English: Baxtran STA User manual
- Deutsch: Baxtran STA Benutzerhandbuch