
INSTALLATION INSTRUCTIONS FOR 80993 (Moen
®
OEM# 1200) & 88431E (Moen
®
OEM# 1225)
INSTRUCCIONES DE INSTALACIÓN PARA 80993 (Moen
®
OEM# 1200) & 88431E (Moen
®
OEM# 1225)
©2017 Danco, Inc., Irving, TX 75062
80993TS_88431i-E/S 10/17
Important: Read all notes and instructions below in entirety before beginning. Before turning off the water supply,
make sure you have a few gallons of water in a bucket and a clean cotton rag or sponge readily on hand to clean the
valve body and your hands.
Importante: Lee completamente todas las notas e instrucciones siguientes antes de comenzar. Antes de cortar el suministro de agua, asegura
disponer de algunos galones de agua en una cubeta y una esponja o paño de algodón limpio para limpiar a mano el cuerpo de la válvula y tus
manos.
NOTA: ES DE VITAL IMPORTANCIA QUE SIGAS LAS INSTRUCCIONES MÁS ABAJO DE LA SECCIÓN “CÓMO LIMPIAR EL CUERPO DE LA VÁLVULA”. NO
LIMPIAR EL CUERPO DE LA VÁLVULA ANTES DE INSTALAR EL CARTUCHO NUEVO PUEDE PROVOCAR DAÑOS AL CARTUCHO Y/O LOS SELLOS, QUE
SON CAUSA DE FILTRACIONES Y POSIBLES DAÑOS A LA PROPIEDAD.
NOTE: IT IS VITALLY IMPORTANT THAT YOU FOLLOW THE INSTRUCTIONS UNDER THE SECTION “CLEANING VALVE
BODY” BELOW. FAILURE TO CLEAN THE VALVE BODY PRIOR TO INSTALLING THE NEW CARTRIDGE MAY RESULT IN
DAMAGE TO THE CARTRIDGE AND/OR SEALS, CAUSING LEAKS AND POTENTIAL PROPERTY DAMAGE.
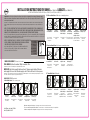
NOTE: IT IS IMPORTANT FOR YOU TO TAKE NOTE OF THE NOTCH ORIENTATION
ON THE CARTRIDGE STEM BEFORE REMOVING THE ORIGINAL CARTRIDGE.
CHECK THE BOX THAT APPLIES TO YOUR CARTRIDGE.
NOTCH TOWARDS
YOU OR DOWN
MUESCA MIRANDO HACIA
TI O HACIA ABAJO
MUESCA ALEJADA DE TI O
HACIA ARRIBA
NOTCH AWAY FROM
YOU OR UP
NOTA: ES IMPORTANTE QUE TE FIJES EN CÓMO ESTÁ ORIENTADA LA MUESCA EN EL
VÁSTAGO DEL CARTUCHO ANTES DE QUITAR EL CARTUCHO ORIGINAL. MARCA LA
CASILLA QUE CORRESPONDA A TU CARTUCHO.
1. HANDLE DISASSEMBLY / DESMONTAJE DE LA MANIJA:
IMPORTANT: Shut of water supply to tub/shower faucet. This may require shutting off the main
water supply to the house. Once the water supply is shut off, turn on the faucet to relieve pressure.
Importante: Corta el suministro de agua al grifo de la bañera/ducha. Esto pudiera implicar el cierre del suministro principal de agua a la casa. Una
vez cortado el suministro de agua, abre el grifo para aliviar la presión.
TOOLS NEEDED: Flathead Screwdriver, Phillips Screwdriver, Pliers
Herramientas necesarias: Destornillador plano, destornillador Phillips, alicates
Pry handle
cover off.
Unscrew
handle screw.
Pull off handle
and tube.
Remove
cartridge washer.
Remove cartridge
retaining clip.*
Quita la cubierta
de la manija.
Saca el tornillo de la
manija.
Saca la manija y la
arandela.
Quita el tope de límite
de temperatura.
Remove cartridge
retaining clip.*
A. Knob Handle Faucet / Grifo con manija tipo perilla
CHOOSE YOUR STYLE / Elige tu estilo:
Unscrew set
screw with Hex.**
Remove
lever handle.
Unscrew adapter
screw. Remove
handle adapter.
Remove
both cartridge
retaining rings.
Remove
cartridge washer
and additional
cartridge retainer.
Saca el tornillo de
fijación con la llave
hexagonal.**
Saca el tornillo de la
manija.
Saca la manija y la
arandela.
Retira los dos anillos de
retención del cartucho.
Retira la arandela del
cartucho y el retenedor
de cartucho adicional.
Retira la presilla de
retención del
cartucho.*
B. Old Lever Handle Faucet / Grifo viejo con manija tipo palanca
Unscrew set
screw with Hex.**
Remove
lever handle.
Unscrew
adapter screw.
Saca el tornillo de
fijación con la
llave hexagonal.**
Retira la manija tipo
palanca.
Saca el tornillo
del adaptador.
Retira la presilla de
retención del cartucho.***
C. New Lever Handle Faucet / Grifo nuevo con manija tipo palanca
Remove cartridge
retaining clip.***
Remove cartridge
retaining clip.***
Unscrew set
screw with Hex.**
Remove
lever handle.
Unscrew adapter
screw. Remove
handle adapter.
Unscrew
trim from
shower/bath wall.
Remove
cartridge washer.
Remove tube.
Saca el tornillo de
fijación con la
llave hexagonal.**
Retira la manija
tipo palanca.
Saca el tornillo
del adaptador. Retira el
adaptador de la manija.
Desenrosca la
moldura de la pared
de la ducha/baño.
Retira la arandela del
cartucho. Retira
el tubo.
Retira la presilla
de retención
del cartucho.*
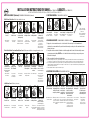
D. Tub and Bath Valve / Estilo perilla
Remove cartridge
retaining clip.*
*Make sure cartridge notch is facing up. / Asegura que la muesca del cartucho quede hacia arriba.
**The set screw is directly underneath the handle. / El tornillo de ajuste se encuentra directamente debajo de la empuñadura..
***Make sure cartridge notch is facing down. / Asegura que la muesca del cartucho quede hacia abajo.

INSTALLATION INSTRUCTIONS FOR 80993 (Moen
®
OEM# 1200) & 88431E (Moen
®
OEM# 1225)
INSTRUCCIONES DE INSTALACIÓN PARA 80993 (Moen
®
OEM# 1200) & 88431E (Moen
®
OEM# 1225)
Pry handle
cover off.
Unscrew
handle screw.
Unscrew both
round cartridge
retaining rings.
Unscrew square
cartridge retainer
Remove
cartridge washer.
Quita la cubierta
de la manija
Saca el tornillo
de la manija.
Desenrosca los dos
anillos de retención
redondos del cartucho.
Desenrosca el
retenedor cuadrado
del cartucho.
Retira la arandela
del cartucho.
Saca la presilla de
retención del cartucho
con los alicates.
(Asegura que la
muesca del cartucho
quede hacia arriba.)
E. Old Kitchen Pullout Faucet / Grifo viejo extraíble de cocina
Unscrew set
screw with Hex.
(The set screw is
directly underneath
the handle.)
Unscrew
handle screw.
Pull off handle.
Unscrew faucet
trim ring.
Unscrew cartridge
screw and remove
both adapters
Unscrew cartridge
retaining ring.
Remove cartridge
washer.
Quita la cubierta
de la manija
Saca el tornillo
de la manija.
Saca la manija .
Saca la manija y
la arandela.
Quita el tope de límite
de temperatura.
Saca el tubo del tope.
F. New Kitchen Pullout Faucet and New Kitchen Faucet / Grifo nuevo extraíble de cocina y grifo nuevo de cocina
Remove
Handle Cover.
Pry off second
handle cover.
Unscrew
handle screw.
Remove
faucet handle.
Unscrew square
cartridge retainer.
Aplica lubricante en los
sellos del cartucho.
Saca la segunda
cubierta de grifo.
Saca el tornillo de
la manija.
Retira la manija
del grifo.
Desenrosca el
retenedor cuadrado
del cartucho.
Saca la presilla de retención
del cartucho con los alicates.
(Asegura que la muesca del
cartucho quede hacia arriba.)
G. Old Kitchen Faucet / Grifo viejo de cocina
HANDLE DISASSEMBLY (Continued) / DESMONTAJE DE LA MANIJA: (Continued)
3. CLEANING VALVE BODY / CÓMO LIMPIAR EL CUERPO DE LA VÁLVULA
1. Apply a lime, calcium and rust remover to clean the inside of the valve body. Check the manufacturer’s
instructions for recommendations. Vinegar for household use may be used in place of the name brand cleaner
but may take longer.
2. Using either a brass wire brush, toothbrush or similar thoroughly scrub the inside of the valve body to remove
any remaining mineral buildup. DO NOT use a steel brush in the brass valve body or you may create grooves
that result in a leak path.
3. Flush any residuals from the valve body with water.
1. Aplica un eliminador de óxido, calcio y cal para limpiar el interior del cuerpo de la válvula. Verifica las instrucciones del fabricante para
recomendaciones. El vinagre de uso doméstico puede emplearse en lugar de los limpiadores comerciales, pero pudiera demorar más.
2. Usa un cepillo de alambre de latón, un cepillo de dientes o algo similar para restregar el interior del cuerpo de la válvula y eliminar así
cualquier acumulación mineral residual. NO uses un cepillo con cerdas de acero en el cuerpo de la válvula de latón, pues pudieran provocar
ranuras que den lugar a filtraciones.
3. Elimina cualquier residuo del cuerpo de la válvula con agua.
2. CARTRIDGE REMOVAL / CÓMO QUITAR EL CARTUCHO
Attach Cartridge
removal adapter.
Turn the cartridge
90 degrees.
Remove cartridge
removal adapter.
Pull out the old
cartridge with pliers.
Coloca el adaptador
para quitar el cartucho.
Gira el cartucho
90 grados.
Quita el adaptador para
sacar el cartucho.
Saca el cartucho viejo
con los alicates.
Danco recommends
using 60885 Cartridge
removal tool.
Danco recomienda usar
su propio Extractor de
Cartuchos 60885
Apply lubrication
to new cartridge
Hold cartridge in one
hand and pull stem
with the other until
completely extended.
Press new
cartridge into
valve body by
pushing on
cartridge tabs.
Make sure cartridge
tabs align with valve
body slots and the
stem notch orientation
matches the box you
checked above.
Insert cartridge
retaining clip.
Reassembly of all
faucets should
follow the reverse
order in which you
removed the parts.
4. CARTRIDGE INSTALLATION / INSTALACIÓN DEL CARTUCHO
Aplica lubricante en los
sellos del cartucho.
Mantenga el cartucho en
una mano y tire de la
aguja con la otra hasta
que esté completamente
extendido.
Presione el cartucho
nuevo en el cuerpo de
la válvula de cartucho
empujando en fichas.
Asegúrese de que las
pestañas del cartucho se
alinean con las ranuras del
cuerpo de la válvula y el
tallo muesca orientación
coincide con la casilla
activada anteriormente.
Inserte el cartucho
clip de sujeción.
El montaje de todos
los grifos deben
seguir el orden
inverso en el que se
extrajo de las piezas.
Remove cartridge
retaining clip.
(Make sure cartridge
notch is facing you.)
Saca la presilla de
retención del cartucho
con los alicates.
(Asegura que la
muesca del cartucho
quede hacia arriba.)
Remove cartridge
retaining clip.
(Make sure cartridge
notch is facing you.)
Remove cartridge
retaining clip.
(Make sure cartridge
notch is facing you.)
-
 1
1
-
 2
2


DANCO 88431E Guía de instalación
- Categoría
- Artículos sanitarios
- Tipo
- Guía de instalación
en otros idiomas
- English: DANCO 88431E Installation guide
Artículos relacionados
Otros documentos
-
Moen 7210W El manual del propietario
-
-
-
-
Glacier Bay 873X-6101 Guía de instalación
-
-
-
-
Signature Hardware 447891 Guía de instalación