GE JK3800DHBB Guía del usuario

Categoría
Microondas
Tipo
Guía del usuario

Este manual también es adecuado para

49-80737 Rev. 2 08-19 GEA
Write the model and serial
numbers here:
Model # _________________
Serial # _________________
You can find them on a label
on the side trim or on the front of
the (lower) oven behind the oven
door.
ESPAÑOL
Para consultar una version en
español de este manual de
instrucciones, visite nuestro sitio de
internet GEAppliances.com.
OWNER’S MANUAL
JT3800 - 30" Double Wall Oven
JK3800 - 27" Double Wall Oven
GE is a trademark of the General Electric Company. Manufactured under trademark license.
WALL OVEN
Built-In Combination Microwave/Thermal
SAFETY INFORMATION .......... 3
USING THE RANGE
Oven Controls ..........................10
Oven Settings ..........................11
Oven Options ..........................12
Microwaving ...........................13
Cooking Modes .........................17
Sabbath Mode ..........................18
Cooking Guide .........................19
Rack .................................20
Aluminum Foil/Oven Liners .............20
CARE AND CLEANING
Cleaning the Range .....................21
Oven Maintenance ..................... 23
Oven Door ............................ 23
TROUBLESHOOTING TIPS .......24
LIMITED WARRANTY ............30
ACCESSORIES .....................31
CONSUMER SUPPORT ........... 32
2 49-80737 Rev. 2
THANK YOU FOR MAKING GE APPLIANCES A PART OF YOUR HOME.
Whether you grew up with GE Appliances, or this is your first, we’re happy to have you in the family.
We take pride in the craftsmanship, innovation and design that goes into every GE Appliances
product, and we think you will too. Among other things, registration of your appliance ensures that we
can deliver important product information and warranty details when you need them.
Register your GE appliance now online. Helpful websites and phone numbers are available in the
Consumer Support section of this Owner’s Manual. You may also mail in the pre-printed registration
card included in the packing material.
49-80737 Rev. 2 3
READ AND SAVE THESE INSTRUCTIONS
IMPORTANT SAFETY INFORMATION
READ ALL INSTRUCTIONS BEFORE USING THE APPLIANCE
SAFETY INFORMATION (Upper Oven)
PRECAUTIONS TO AVOID POSSIBLE EXPOSURE TO EXCESSIVE
MICROWAVE ENERGY
(a) Do Not Attempt to operate this oven with the
door open since open-door operation can result
in harmful exposure to microwave energy. It is
important not to defeat or tamper with the safety
interlocks.
(b) Do Not Place any object between the oven front
face and the door or allow soil or cleaner residue
to accumulate on sealing surfaces.
(c) Do Not Operate the oven if it is damaged. It is
particularly important that the oven door close
properly and that there is no damage to the:
(1) door (bent),
(2) hinges and latches (broken or loosened),
(3) door seals and sealing surfaces.
(d) The Oven Should Not be adjusted or repaired by
anyone except properly qualified service personnel.
WARNING
GENERAL SAFETY INSTRUCTIONS
Ŷ 5HDGDOOLQVWUXFWLRQVEHIRUHXVLQJWKLVDSSOLDQFH
When using electrical appliances, basic safety
precautions should be followed, including the
following:
Ŷ 5HDGDQGIROORZWKHVSHFLILFSUHFDXWLRQVLQ
the PRECAUTIONS TO AVOID POSSIBLE
EXPOSURE TO EXCESSIVE MICROWAVE
ENERGY section.
Ŷ %HVXUH\RXUDSSOLDQFHLVSURSHUO\LQVWDOOHGDQG
grounded by a qualified technician in accordance
with the provided installation instructions.
Ŷ ,QVWDOORUORFDWHWKLVDSSOLDQFHRQO\LQDFFRUGDQFH
with the provided installation instructions.
Ŷ 6RPHSURGXFWVVXFKDVZKROHHJJVDQGVHDOHG
containers—for example, closed jars—are able to
explode and should not be heated in this oven.
Such use of the oven could result in injury.
Ŷ 'RQRWPRXQWWKLVDSSOLDQFHRYHUDVLQN
Ŷ 7KLVRYHQLVQRWDSSURYHGRUWHVWHGIRUPDULQHXVH
Ŷ 7KLVRYHQLV8/OLVWHGIRUVWDQGDUGZDOOLQVWDOODWLRQ
Ŷ 'RQRWRSHUDWHWKLVDSSOLDQFHLILWKDVEHHQ
damaged or dropped.
Ŷ $VZLWKDQ\DSSOLDQFHFORVHVXSHUYLVLRQLV
necessary when used by children.
Ŷ 8VHWKLVDSSOLDQFHRQO\IRULWVLQWHQGHGXVHDV
described in this manual.
Ŷ 'RQRWXVHFRUURVLYHFKHPLFDOVRUYDSRUVLQWKLV
appliance.
Ŷ 7KLVRYHQLVVSHFLILFDOO\GHVLJQHGWRKHDWGU\RU
cook food and is not intended for laboratory or
industrial use.
Ŷ 7KLVDSSOLDQFHPXVWRQO\EHVHUYLFHGE\TXDOLILHG
service personnel. Contact nearest authorized
service facility for examination, repair or adjustment.
Ŷ 'RQRWFRYHURUEORFNDQ\RSHQLQJVRQWKH
appliance.
Ŷ 'RQRWVWRUHWKLVDSSOLDQFHRXWGRRUV'RQRWXVH
this product near water—for example, in a wet
basement, near a swimming pool, near a sink or in
similar locations.
Ŷ 6HHGRRUVXUIDFHFOHDQLQJLQVWUXFWLRQVLQWKH&DUH
and Cleaning of the Oven section of this manual.
To reduce the risk of burns, electric shock, fire, injury to persons or exposure to excessive microwave energy:
4 49-80737 Rev. 2
SAFETY INFORMATION (Upper Oven)
READ AND SAVE THESE INSTRUCTIONS
IMPORTANT SAFETY INFORMATION
READ ALL INSTRUCTIONS BEFORE USING THE APPLIANCE
WARNING
ARCING
Arcing can occur during microwave cooking. If you see arcing, press the Clear/Off pad and correct the problem..
Arcing is the microwave term for sparks in the oven. Arcing is caused by:
Ŷ 0HWDORUIRLOWRXFKLQJWKHVLGHRIWKHRYHQ
Ŷ )RLOQRWPROGHGWRIRRGXSWXUQHGHGJHVDFWOLNH
antennas).
Ŷ 8VHIRLORQO\DVUHFRPPHQGHGLQWKLVPDQXDO
Ŷ 0HWDOFRRNZDUHXVHGGXULQJPLFURZDYHFRRNLQJ
Ŷ 0HWDOVXFKDVWZLVWWLHVSRXOWU\SLQVRUJROG
rimmed dishes, in the oven.
Ŷ 5HF\FOHGSDSHUWRZHOVFRQWDLQLQJVPDOOPHWDO
pieces being used in the oven.
WARNING
NOTICE—PACEMAKERS
Most pacemakers are shielded from interference from electronic products, including microwaves. However,
patients with pacemakers may wish to consult their physicians if they have concerns.
WARNING
GENERAL SAFETY INSTRUCTIONS (Cont.)
Ŷ 7RUHGXFHWKHULVNRIILUHLQWKHRYHQFDYLW\
Do not overcook food. Carefully attend appliance
when paper, plastic or other combustible
materials are placed inside the oven while
microwave cooking.
Remove wire twist-ties and metal handles from
paper or plastic containers before placing them
in the oven.
Do not use the oven for storage purposes. Do
not leave paper products, cooking utensils or
food in the oven when not in use.
If materials inside the oven ignite, keep the oven
door closed, turn the oven off and shut off power
at the fuse or circuit breaker panel. If the door is
opened, the fire may spread.
²'RQRWXVHWKH6HQVRU)HDWXUHVWZLFHLQ
succession on the same food portion. If food
is undercooked after the first countdown, use
COOK BY TIME for additional cooking time.
Ŷ 'RQRWRSHUDWHWKHRYHQZLWKRXWWKHWXUQWDEOHLQSODFH
The turntable must be unrestricted so it can turn.
Ŷ 3RWHQWLDOO\KRWVXUIDFHVLQFOXGHWKHRYHQGRRUIORRU
walls, oven rack and turntable.
Ŷ 'RQ¶WGHIURVWIUR]HQEHYHUDJHVLQQDUURZQHFNHG
bottles (especially carbonated beverages). Even if
the container is open, pressure can build up. This
can cause the container to burst, possibly resulting
in injury.
Ŷ )RRGVFRRNHGLQOLTXLGVVXFKDVSDVWDPD\WHQG
to boil more rapidly than foods containing less
moisture. Should this occur, refer to the Care and
Cleaning of the oven section for instructions on how
to clean the inside of the oven.
Ŷ +RWIRRGVDQGVWHDPFDQFDXVHEXUQV%HFDUHIXO
when opening any containers of hot food, including
popcorn bags, cooking pouches and boxes. To
prevent possible injury, direct steam away from
hands and face.
Ŷ 'RQRWRYHUFRRNSRWDWRHV7KH\FRXOGGHK\GUDWH
and catch fire, causing damage to your oven.
Ŷ $YRLGKHDWLQJEDE\IRRGLQJODVVMDUVHYHQZLWK
the lid off. Make sure all infant food is thoroughly
cooked. Stir food to distribute the heat evenly. Be
careful to prevent scalding when warming formula.
The container may feel cooler than the formula really
is. Always test the formula before feeding the baby.
Ŷ 'RQRWDWWHPSWWRGHHSIU\LQWKHRYHQ
49-80737 Rev. 2 5
READ AND SAVE THESE INSTRUCTIONS
IMPORTANT SAFETY INFORMATION
READ ALL INSTRUCTIONS BEFORE USING THE APPLIANCE
WARNING
FOODS
Ŷ :KHQPLFURZDYLQJSODFHDOOIRRGVDQGFRQWDLQHUV
on the clear glass tray.
Ŷ 'RQRWSRSSRSFRUQLQ\RXURYHQXQOHVVLQDVSHFLDO
microwave popcorn accessory or unless you use
popcorn labeled for use in microwave ovens.
Ŷ 'RQRWERLOHJJVLQWKLVRYHQ3UHVVXUHZLOOEXLOGXS
inside egg yolk and will cause it to burst, possibly
resulting in injury.
Ŷ 'RQRWRSHUDWHWKHRYHQZLWKRXWIRRGLQVLGH7KLV
may cause damage to the oven. It increases the
heat around the magnetron and can shorten the life
of the oven.
Ŷ )RRGVZLWKXQEURNHQRXWHU³VNLQ´VXFKDVSRWDWRHV
hot dogs, sausages, tomatoes, apples, chicken
livers and other giblets, and egg yolks should be
pierced to allow steam to escape during cooking.
Ŷ SUPERHEATED WATER
Liquids, such as water, coffee or tea, are able to
be overheated beyond the boiling point without
appearing to be boiling. Visible bubbling or boiling
when the container is removed from the microwave
oven is not always present. THIS COULD RESULT
IN VERY HOT LIQUIDS SUDDENLY BOILING
OVER WHEN THE CONTAINER IS DISTURBED
OR A SPOON OR OTHER UTENSIL IS INSERTED
INTO THE LIQUID.
To reduce the risk of injury to persons:
Do not overheat the liquid.
Stir the liquid both before and halfway through
heating it.
Do not use straight-sided containers with narrow
necks.
After heating, allow the container to stand in
the microwave oven for a short time before
removing the container.
Use extreme care when inserting a spoon or
other utensil into the container.
SAFETY INFORMATION (Upper Oven)
6 49-80737 Rev. 2
READ AND SAVE THESE INSTRUCTIONS
IMPORTANT SAFETY INFORMATION
READ ALL INSTRUCTIONS BEFORE USING THE APPLIANCE
The turntable must
always be in place when
using the oven.
The clear glass tray
should always be in place
when microwaving.
SAFETY INFORMATION (Upper Oven)
WARNING
MICROWAVE-SAFE COOKWARE
Make sure to use suitable cookware during microwave cooking. Most glass casseroles, cooking dishes,
measuring cups, custard cups, pottery or china dinnerware which does not have metallic trim or glaze with a
PHWDOOLFVKHHQFDQEHXVHG6RPHFRRNZDUHLVODEHOHG³VXLWDEOHIRUPLFURZDYLQJ´
Ŷ 3ODFHIRRGRUPLFURZDYDEOHFRQWDLQHUGLUHFWO\RQ
the clear glass tray to cook your food.
Ŷ 8VHRIWKHQRQVWLFNPHWDOWUD\GXULQJPLFURZDYH
cooking will result in inferior cooking performance.
Ŷ ,I\RXDUHQRWVXUHLIDGLVKLVPLFURZDYHVDIH
use this test: Place in the oven both the dish you
are testing and a glass
measuring cup filled with
1 cup of water—set the
measuring cup either in or
next to the dish. Microwave
30-45 seconds at high. If the
dish heats, it should not be
used for microwaving.
If the dish remains cool and only the water in the
cup heats, then the dish is microwave-safe.
Ŷ &RRNZDUHPD\EHFRPHKRWEHFDXVHRIKHDW
transferred from the heated food. Oven mitts may
be needed to handle the cookware.
Ŷ 'RQRWXVHUHF\FOHGSDSHUSURGXFWV5HF\FOHG
paper towels, napkins and waxed paper can contain
metal flecks which may cause arcing or ignite.
Paper products containing nylon or nylon filaments
should be avoided, as they may also ignite.
Ŷ 8VHIRLORQO\DVGLUHFWHGLQWKLVPDQXDO:KHQXVLQJ
IRLOLQWKHRYHQNHHSWKHIRLODWOHDVW´DZD\IURP
the sides of the oven.
Ŷ 'RQRWXVHWKHRYHQWRGU\QHZVSDSHUV
Ŷ ,I\RXXVHDPHDWWKHUPRPHWHUZKLOHFRRNLQJPDNH
sure it is safe for use in microwave ovens.
Ŷ 6RPHIRDPWUD\VOLNHWKRVHWKDWPHDWLVSDFNDJHG
on) have a thin strip of metal embedded in the
bottom. When microwaved, the metal can burn the
floor of the oven or ignite a paper towel.
Ŷ 3DSHUWRZHOVZD[HGSDSHUDQGSODVWLFZUDSFDQEH
used to cover dishes in order to retain moisture and
prevent spattering. Be sure to vent plastic wrap so
steam can escape.
Ŷ 1RWDOOSODVWLFZUDSLVVXLWDEOHIRUXVHLQPLFURZDYH
ovens. Check the package for proper use.
Ŷ ³%RLODEOH´FRRNLQJSRXFKHVDQGWLJKWO\FORVHGSODVWLF
bags should be slit, pierced or vented as directed by
package. If they are not, plastic could burst during
or immediately after cooking, possibly resulting in
injury. Also, plastic storage containers should be at
least partially uncovered because they form a tight
seal. When cooking with containers tightly covered
with plastic wrap, remove covering carefully and
direct steam away from hands and face.
Ŷ 3ODVWLFFRRNZDUH²3ODVWLFFRRNZDUHGHVLJQHGIRU
microwave cooking is very useful, but should be used
carefully. Even microwave-safe plastic may not be
as tolerant of overcooking conditions as are glass or
ceramic materials and may soften or char if subjected
to short periods of overcooking. In longer exposures
to overcooking, the food and cookware could ignite.
Follow these guidelines:
1. Use microwave-safe plastics only and use them in
strict compliance with the cookware manufacturer’s
recommendations.
2. Do not microwave empty containers.
3. Do not permit children to use plastic cookware
without complete supervision.
How to test for a
microwave-safe dish.
49-80737 Rev. 2 7
READ AND SAVE THESE INSTRUCTIONS
IMPORTANT SAFETY INFORMATION
READ ALL INSTRUCTIONS BEFORE USING THE APPLIANCE
SAFETY INFORMATION (Lower Oven)
WARNING
5HDGDOOVDIHW\LQVWUXFWLRQVEHIRUHXVLQJWKHSURGXFW)DLOXUHWRIROORZWKHVHLQVWUXFWLRQVPD\UHVXOW
in fire, electrical shock, serious injury or death.
WARNING
GENERAL SAFETY INSTRUCTIONS
Ŷ 8VHWKLVDSSOLDQFHRQO\IRULWVLQWHQGHGSXUSRVHDV
described in this Owner’s Manual.
Ŷ%HVXUH\RXUDSSOLDQFHLVSURSHUO\LQVWDOOHGDQG
grounded by a qualified installer in accordance with
the provided installation instructions.
Ŷ'RQRWDWWHPSWWRUHSDLURUUHSODFHDQ\SDUWRI\RXU
oven unless it is specifically recommended in this
manual. All other servicing should be transferred to
a qualified technician.
Ŷ%HIRUHSHUIRUPLQJDQ\VHUYLFHGLVFRQQHFWWKH
power supply at the household distribution panel by
removing the fuse or switching off the circuit breaker.
Ŷ'RQRWOHDYHFKLOGUHQDORQH²FKLOGUHQVKRXOGQRW
be left alone or unattended in an area where an
appliance is in use. They should never be allowed
to climb, sit or stand on any part of the appliance.
Ŷ
CAUTION
Do not store items of interest
to children in cabinets above an oven - children
climbing on the oven to reach items could be
seriously injured.
Ŷ8VHRQO\GU\SRWKROGHUV²PRLVWRUGDPSSRW
holders on hot surfaces may result in burns from
steam. Do not let pot holders touch hot heating
elements. Do not use a towel or other bulky cloth
in place of pot holders.
Ŷ 1HYHUXVH\RXUDSSOLDQFHIRUZDUPLQJRUKHDWLQJ
the room.
Ŷ 'RQRWWRXFKWKHKHDWLQJHOHPHQWVRUWKHLQWHULRU
surface of the oven. These surfaces may be hot
enough to burn even though they are dark in color.
During and after use, do not touch, or let clothing
or other flammable materials contact any interior
area of the oven; allow sufficient time for cooling
first. Other surfaces of the appliance may become
hot enough to cause burns. Potentially hot surfaces
include the oven vent opening, surfaces near the
opening and crevices around the oven door.
Ŷ 'RQRWKHDWXQRSHQHGIRRGFRQWDLQHUV3UHVVXUH
could build up and the container could burst,
causing an injury.
Ŷ 'RQRWXVHDQ\W\SHRIIRLORUOLQHUWRFRYHUWKH
oven bottom or anywhere in the oven, except as
described in this manual. Oven liners can trap heat
or melt, resulting in damage to the product and risk
of shock, smoke or fire.
Ŷ $YRLGVFUDWFKLQJRULPSDFWLQJJODVVGRRUVRUFRQWURO
panels. Doing so may lead to glass breakage.
Do not cook on or in a product with broken glass.
Shock, fire or cuts may occur.
Ŷ &RRNPHDWDQGSRXOWU\WKRURXJKO\²PHDWWRDWOHDVW
DQLQWHUQDOWHPSHUDWXUHRI)DQGSRXOWU\WRDW
OHDVWDQLQWHUQDOWHPSHUDWXUHRI)&RRNLQJ
to these temperatures usually protects against
foodborne illness.
WARNING
KEEP FLAMMABLE MATERIALS AWAY FROM THE RANGE
Failure to do so may result in fire or personal injury.
Ŷ 'RQRWVWRUHRUXVHIODPPDEOHPDWHULDOVLQDQRYHQ
or near the cooktop, including paper, plastic, pot
holders, linens, wall coverings, curtains, drapes and
gasoline or other flammable vapors and liquids.
Ŷ 1HYHUZHDUORRVHILWWLQJRUKDQJLQJJDUPHQWVZKLOH
using the appliance. These garments may ignite if
they contact hot surfaces causing severe burns.
Ŷ 'RQRWOHWFRRNLQJJUHDVHRURWKHUIODPPDEOH
materials accumulate in or near the range. Grease
in the oven or on the cooktop may ignite.
8 49-80737 Rev. 2
READ AND SAVE THESE INSTRUCTIONS
IMPORTANT SAFETY INFORMATION
READ ALL INSTRUCTIONS BEFORE USING THE APPLIANCE
SAFETY INFORMATION (Lower Oven)
WARNING
IN THE EVENT OF A FIRE, TAKE THE FOLLOWING
STEPS TO PREVENT INJURY AND FIRE SPREADING
Ŷ 'RQRWXVHZDWHURQJUHDVHILUHV1HYHUSLFNXSD
flaming pan.
Ŷ ,IWKHUHLVDILUHLQWKHRYHQGXULQJEDNLQJVPRWKHU
the fire by closing the oven door and turning the
oven off or by using a multi-purpose dry chemical or
foam-type fire extinguisher.
Ŷ ,IWKHUHLVDILUHLQWKHRYHQGXULQJVHOIFOHDQWXUQ
the oven off and wait for the fire to go out. Do not
force the door open. Introduction of fresh air at self-
clean temperatures may lead to a burst of flame
IURPWKHRYHQ)DLOXUHWRIROORZWKLVLQVWUXFWLRQPD\
result in severe burns.
WARNING
OVEN SAFETY INSTRUCTIONS
Ŷ 6WDQGDZD\IURPWKHRYHQZKHQRSHQLQJWKHRYHQ
door. Hot air or steam which escapes can cause
burns to hands, face and/or eyes.
Ŷ .HHSWKHRYHQYHQWXQREVWUXFWHG
Ŷ .HHSWKHRYHQIUHHIURPJUHDVHEXLOGXS*UHDVHLQ
the oven may ignite.
Ŷ 3ODFHRYHQUDFNVLQGHVLUHGORFDWLRQZKLOHRYHQLV
cool. If rack must be moved while oven is hot, do not
let pot holder contact hot heating element in oven.
Ŷ :KHQXVLQJFRRNLQJRUURDVWLQJEDJVLQWKHRYHQ
follow the manufacturer’s directions.
Ŷ 3XOOLQJRXWWKHVWDQGDUGUDFNVWRWKHLUVWRSORFNV
or the extension rack to its fully open position is
a convenience in lifting heavy foods. It is also a
precaution against burns from touching hot surfaces
of the door or oven walls.
Ŷ 'RQRWOHDYHLWHPVVXFKDVSDSHUFRRNLQJXWHQVLOV
or food in the oven when not in use. Items stored in
an oven can ignite.
Ŷ 1HYHUSODFHFRRNLQJXWHQVLOVSL]]DRUEDNLQJVWRQHV
or any type of foil or liner on the oven floor. These
items can trap heat or melt, resulting in damage to
the product and risk of shock, smoke or fire.
WARNING
SELF-CLEANING OVEN SAFETY INSTRUCTIONS
The self-cleaning feature operates the oven at temperatures high enough to burn away food soils in the oven.
)ROORZWKHVHLQVWUXFWLRQVIRUVDIHRSHUDWLRQ
Ŷ 'RQRWWRXFKRYHQVXUIDFHVGXULQJVHOIFOHDQ
operation. Keep children away from the oven during
VHOIFOHDQLQJ)DLOXUHWRIROORZWKHVHLQVWUXFWLRQV
may cause burns.
Ŷ %HIRUHVHOIFOHDQLQJWKHRYHQUHPRYHVKLQ\VLOYHU
colored oven racks (on some models), the probe,
any aluminum foil, and any broiler pan, grid, and
other cookware. Only porcelain coated oven racks
may be left in the oven.
Ŷ %HIRUHRSHUDWLQJWKHVHOIFOHDQF\FOHZLSHJUHDVH
and food soils from the oven. Excessive amount
of grease may ignite, leading to smoke damage to
your home.
Ŷ ,IWKHVHOIFOHDQLQJPRGHPDOIXQFWLRQVWXUQWKH
oven off and disconnect the power supply. Have it
serviced by a qualified technician.
Ŷ 'RQRWFOHDQWKHGRRUJDVNHW7KHGRRUJDVNHWLV
essential for a good seal. Care should be taken not
to rub, damage or move the gasket.
Ŷ 'RQRWXVHRYHQFOHDQHUV1RFRPPHUFLDORYHQ
cleaner or oven liner protective coating of any kind
should be used in or around any part of the oven.
49-80737 Rev. 2 9
READ AND SAVE THESE INSTRUCTIONS
How to Remove Protective Shipping Film and Packaging Tape
Carefully grasp a corner of the protective shipping film
with your fingers and slowly peel it from the appliance
surface. Do not use any sharp items to remove the film.
Remove all of the film before using the appliance for the
first time.
To assure no damage is done to the finish of the
product, the safest way to remove the adhesive from
packaging tape on new appliances is an application of
a household liquid dishwashing detergent. Apply with a
soft cloth and allow to soak.
NOTE: The adhesive must be removed from all parts. It
cannot be removed if it is baked on.
FCC RADIO FREQUENCY INTERFERENCE
This equipment generates and uses ISM frequency
energy and if not installed and used properly, that is in
strict accordance with the manufacturer's instructions,
may cause interference to radio and television reception.
It has been type tested and found to comply with limits
IRUDQ,60(TXLSPHQWSXUVXDQWWRSDUWRI)&&5XOHV
which are designed to provide reasonable protection
against such interference in a residential installation.
However, there is no guarantee that interference will not
occur in a particular installation. If this equipment does
cause interference to radio or television reception, which
can be determined by turning the equipment off and on,
the user is encouraged to try to correct the interference
by one or more of the following:
Ŷ 5HRULHQWWKHUHFHLYLQJDQWHQQDRIUDGLRRUWHOHYLVLRQ
Ŷ 5HORFDWHWKH0LFURZDYHRYHQZLWKUHVSHFWWRWKH
receiver.
Ŷ 0RYHWKHPLFURZDYHRYHQDZD\IURPWKHUHFHLYHU
Ŷ 3OXJWKHPLFURZDYHRYHQLQWRDGLIIHUHQWRXWOHWVRWKDW
microwave oven and receiver are on different branch
circuits.
The manufacturer is not responsible for any radio or TV
interference caused by unauthorized modification to
this microwave oven. It is the responsibility of the user to
correct such interference.
IMPORTANT SAFETY INFORMATION
READ ALL INSTRUCTIONS BEFORE USING THE APPLIANCE
SAFETY INFORMATION
10 49-80737 Rev. 2
Common Controls
1. Timer On/Off:
Works as a countdown timer. Press
the Timer On/Off pad, select the timer type (hours and
minutes or minutes and seconds), use the selector dial
to set the time, and press the selector dial to start the
timer countdown. The oven will continue to operate
when the timer countdown is complete. To turn the timer
off, press the Timer On/Off pad.
2. Settings / Lock Controls: )LQGRYHQ
options for: Help, Clock Settings, Display Mode, Auto
Conversion, Auto Shut Off, Beeper Volume, Reminder,
Temperature Units, Thermostat Adjust and Oven
Information under this selection. See the Oven Settings
section for more details. Press and hold Settings pad
for 3 seconds to lock or unlock the controls. This locks
out the control so that pressing any of the control pads
does not activate the feature. Clear/Off is always active,
even when the control is locked.
3. Selector Dial: The selector dial is used for both
the upper and lower ovens. Rotate dial to select oven
settings, upper/lower oven options and cooking options
then press to confirm the selection. Rotate dial to
increase or decrease temperatures or time and then
press to confirm the set temperature or time.
4. Back: Press this pad to go back a menu level in the
display.
5. Start/Pause: Press the Start/Pause pad to start
any cooking, clean or timed function. Press the Start/
Pause pad to pause any upper oven features.
6. Display: Information about both the upper and lower
ovens is shown in this display window.
Upper Oven Controls
7. Microwave:
Press the Microwave pad for
microwaving options. Use the selector dial to find the
microwaving option desired and press the selector dial to
select it. Options available include Cook by Time, Cook,
Defrost, Beverage, Popcorn, Melt, Reheat, Simmer and
Soften. Use the clear glass tray and microwave-safe
cookware when using the microwave features. See
Upper Oven Microwaving section for more detail.
8. Add 30 Sec: Press the Add 30 Sec pad for 30
seconds of microwave cooking time. Each time this pad
is pressed an additional 30 seconds is added to the
remaining cooking time. The oven starts immediately.
9. Defrost: Press the Defrost pad to defrost, rotate
selector dial to select the type of defrost and press to
select. Type of defrost available include; Defrost by
)RRG7\SH'HIURVWE\7LPH'HIURVWE\:HLJKWOE
Quick Defrost, Melt, and Soften. See the Microwaving
section for more information.
10. Reheat: Press the Reheat pad to reheat, rotate
selector dial to select food type to reheat and press
to select. Types of food available under the Reheat
feature include; Beverage, Casserole, Chicken, Pasta,
3L]]D3ODWHRI)RRG5LFH6RXS6WHDNV&KRSVDQG
Vegetables.
11. Popcorn: Press the Popcorn pad to microwave
popcorn, press the selector dial to select. Popcorn
feature is a microwave sensor feature and automatically
senses when popcorn is done and shuts itself off. Do
QRWXVHWKH6HQVRU)HDWXUHVWZLFHLQVXFFHVVLRQRQWKH
same food portion.
12. Clear/Off: The Clear/Off pad cancels ALL upper
oven programs except the clock and timer.
Lower Oven Controls
13. Light:
Press the Light pad to turn the oven light on
or off in the lower oven. Note that light in the lower oven
will not turn on if the oven is in a clean mode.
14. Bake: Press the Bake pad to bake, rotate selector dial
to select baking temperature and press to select.
15. Broil: Press the Broil pad to broil, rotate selector dial
to select Hi/Lo and press to select.
16. Options: )LQGWKH'HOD\6WDUW3URRI6DEEDWK
Self Clean, Steam Clean and Warm features under
this selection. See the Oven Options section for more
details.
17. Warm: Press the Warm pad to warm, press the
selector dial to select. Do not use Warm to cook or
heat cold food. See the Cooking Mode section for more
information.
18. Clear/Off: The Clear/Off pad cancels ALL lower oven
programs except the clock and timer.
USING THE OVEN: Oven Controls
Common Controls
Upper Oven
Controls
Lower Oven
Controls
Oven Controls
10 12 18 1617
11 13 14 15
179 6 4
582 3
49-80737 Rev. 2 11
Help
Use this feature to find out more about your oven and
its features by pressing the Settings pad and selecting
help. Turn the selector dial and press to select the
feature you want to find out more about.
NOTE: Not all features of help may be on your oven
model. Below are features found in the Help function:
Clock Settings
Use this feature to set the time of day and to specify
how the time of day will be displayed. You can select a
standard 12-hour clock (12 hr) or 24-hour military time
display (24 hr). Prior to the first use of your oven, the
clock must be set.
Display Mode
Use this feature to set Power Saver or Display Always
On display mode.
Auto Shut-Off
Use this feature to activate/deactivate Auto Shut-Off.
Activating the Auto Shut-Off feature will turn off the
lower oven after 12 hours of continuous operations.
The factory setting for Auto Shut-Off feature is
activated. When in Sabbath mode Auto Shut-Off will be
deactivated.
Beeper Volume
Use this feature to set Beeper Volume to Mute or Normal.
NOTE: Some tones are not mutable.
Reminder
Use this feature to Set, Review, or Clear Reminder.
Temperature Units
8VHWKLVIHDWXUHWRVHWWKHGLVSOD\WHPSHUDWXUHXQLWWR)
)DKUHQKHLWRU&&HOVLXV
Thermostat Adjust
This feature allows the oven baking and convection
EDNLQJWHPSHUDWXUHWREHDGMXVWHGXSWR)KRWWHU
RUGRZQWR)FRROHURQWKHORZHURYHQ7KHXSSHU
oven cannot be adjusted. Use this feature if you believe
your oven temperature is too hot or too cold and wish to
change it. This adjustment affects Bake, and Convection
Bake modes. No other cooking modes are affected.
Oven Information
This feature shows the Oven Model and Serial number.
Oven Settings
USING THE OVEN: Oven Settings
Features found in the Help function.
Adding Time Defrost by Weight Start/Pause
Auto Conversion Delay Start (Lower) Steam Clean
Auto Shut-Off Display Mode Temperature Units
Back Edit Thermostat Adjust
Bake Help Timer On/Off
Beeper Volume Melt Toast
Beverage Micro 30 Secs Warm
Broil Microwave
Clear/Off My Recipes
Clock Probe
Control Lockout Proof
Cook Reheat
&RRNE\)RRG Reminder
Cook by Time Repeat Last
Cook by Time 1 & 2 Resume
Cooking Options
(Lower)
Sabbath
Cooking Options
(Upper)
Self Clean
Defrost Sensor Cooking
'HIURVWE\)RRG Simmer
Defrost by Time Soften
Speed Cook
12 49-80737 Rev. 2
Oven Options
USING THE OVEN: Oven Options
Lower Oven Options
Delay Start
Use this feature to delay starting a Bake or Self Clean
feature. To use this feature select Delay Start and set the
time to start, then select cook mode. You can also use the
Delay Start feature while programming a Bake cooking
feature.
Proof
Use this feature to proof dough. See Lower Oven
Cooking Modes for more detail.
Sabbath
Use this feature to enter Sabbath mode. Sabbath mode
sets the oven for observance of the Jewish Sabbath and
Holidays. This feature conforms to the Star-K Jewish
Sabbath requirements. Sabbath mode disables the oven
lights (the oven light will not turn on when the door is
opened), all sounds (the control will not beep when a
button is pressed, but will still beep if certain oven faults
occur), and all upper oven functions and lower oven
functions, except lower oven Bake. During Sabbath mode
only lower oven Bake is available. While in Sabbath
mode, after setting/changing a bake temperature, a
random delay of approximately 30 seconds to 1 minute
will occur before the oven will begin baking. To stop
cooking, press the Back pad and then the Start/Pause
pad. Your oven will shut off after a random delay of
approximately 30 seconds to 1 minute. To immediately
exit lower oven Bake, press the Clear/Off pad at any time
cooking elements will immediately turn off and Sabbath
Bake will change to Sabbath on the display, indicating
that the oven has turned off. To exit Sabbath mode press
and hold the Back pad for 3 seconds. Do not press any
other buttons until Sabbath mode has exited, or Sabbath
mode will be re-initialized and will not exit. See Lower
Oven Sabbath Mode for more detail.
NOTE: If power outage occurs during Sabbath mode the
unit will remain in Sabbath mode but will no longer be
cooking when power is restored.
Self Clean
Use this feature to enter Self Clean mode. See Cleaning
The Oven section for more detail.
Steam Clean
Use this feature to enter Steam-Clean mode. See
Cleaning The Oven section for more detail.
Warm
Use this feature to warm. See Lower Oven Cooking
Modes for more detail.
49-80737 Rev. 2 13
UPPER OVEN: Microwaving
Microwaving
Using The Microwave Features
Make sure the turntable and clear glass tray are in place.
Place food or microwavable container directly on the
clear glass tray to cook your food.
The turntable must always be
in place when using the oven.
The clear glass tray should
always be in place when
microwaving.
MICROWAVE PRESET SELECTIONS:
Ŷ %HYHUDJH
– Water (8-12 oz.)
Coffee
(8-12 oz.)
– Tea (8-12 oz.)
– Milk (8-12 oz.)
Hot Cocoa
(8-12 oz.)
Ŷ 3RSFRUQ
– Popcorn Sensor
Ŷ 0HOW
– Butter
– Caramel
– Cheese
– Chocolate Chips
– Marshmallow
Ŷ 6LPPHU
Ŷ &RRN
 ±%\)RRG7\SH
– By Time
– By Time 1 & 2
Ŷ 6RIWHQ
– Butter
– Cream Cheese
 ±)URVWLQJR]
– Ice Cream
Ŷ 'HIURVW
– 1.0 lb Quick
– By Time
– By Weight
 ±%\)RRG7\SH
– Melt
– Soften
Ŷ 5HKHDW
– Beverage
– Casserole
– Chicken
– Pasta
– Pizza
 ±3ODWHRI)RRG
– Rice
– Soup
– Steaks/Chops
– Vegetables
How To Use Pre-Set Microwave Selections
1. Press the Microwave pad.
If no selection is made within 15 seconds, the display
will revert back to the time of day.
2. Turn the selector dial to find the food or beverage you
want to cook, defrost, soften, melt, simmer or reheat.
Press the selector dial to enter.
3. Turn the selector dial to select the type, amount,
weight and/or size. (As required, the oven will prompt
you.) Press the selector dial after each selection.
4. Press the selector dial or the Start/Pause pad to start
cooking.
To review or edit settings during cooking, press the
selector dial.
If the door is opened during cooking, the oven will stop
and PAUSE will appear in the display. Close the door
and press Start/Pause pad to resume cooking.
If you enter an undesired selection at any time, simply
press the Back pad and reenter the desired selections.
Ŷ :KHQWKHRYHQLVRQOLJKWPD\EHYLVLEOHDURXQGWKH
door or outer case.
Ŷ 7KHRYHQFDYLW\OLJKWZLOOFRPHRQGXULQJDPLFURZDYH
cooking cycle.
Ŷ 6WHDPRUYDSRUPD\HVFDSHIURPDURXQGWKHGRRU
Cook By Time And Cook By Time 1 & 2
Use Cook By Time and Cook By Time 1 & 2 to
microwave food that is not in the recipe section and at
the time(s) you set.
Ŷ 7KHSRZHUOHYHOLVDXWRPDWLFDOO\VHWDWKLJKEXW\RX
can change it for more flexibility.
1. Press the Microwave pad.
2. Turn the selector dial to select Cook By Time or Cook
By Time 1 & 2 and press the selector dial to enter.
3. Turn the selector dial to set the cook time and press
the selector dial to enter.
4. Select power level setting.
If you selected Cook By Time 1 & 2, turn the selector
dial to set the second cook time, second power level
setting and press the selector dial to enter.
5. Press the selector dial or the Start/Pause pad to
start cooking.
You may open the door during Cook By Time and Cook
By Time 1 & 2 to check the food. Close the door and
press Start/Pause to resume cooking.
14 49-80737 Rev. 2
UPPER OVEN: Microwaving
Microwaving (Cont.)
Defrost By Food Type
Auto Defrost automatically sets the defrosting times and
power levels to give even defrosting results for meats,
poultry and fish weighing up to 6 pounds.
1. Remove food from the package and place it on a
microwave-safe dish.
2. Press the Microwave pad and select defrost.
 7XUQWKHVHOHFWRUGLDOWR'HIURVW%\)RRG7\SH3UHVV
the selector dial to enter.
4. Turn the selector dial to select food type. Press the
selector dial to enter.
5. Turn the selector dial to the food weight, using the
&RQYHUVLRQ*XLGHDWWKHULJKW)RUH[DPSOHGLDO
for 1.2 pounds (1 pound, 3 oz.) Press the selector dial
to enter.
6. Press the selector dial or Start/Pause pad to start
defrosting.
 7XUQWKHIRRGRYHUZKHQWKHRYHQVLJQDOV7XUQ)RRG
Over.
Ŷ 5HPRYHGHIURVWHGPHDWRUVKLHOGZDUPDUHDVZLWK
small pieces of foil for even defrosting.
Ŷ $IWHUGHIURVWLQJPRVWPHDWVQHHGWRVWDQGPLQXWHV
to complete defrosting. Large roasts should stand for
about 30 minutes.
Conversion Guide
If the weight of food is stated in pounds and ounces, the
ounces must be converted to tenths (.1) of a pound.
Defrost By Time
Use Defrost By Time to defrost for a selected length of time.
1. Press the Microwave pad and select defrost.
2. Turn the selector dial to Defrost By Time. Press the
selector dial to enter.
3. Turn the selector dial to select the time you want.
Press the selector dial to enter.
4. Press the selector dial or Start/Pause pad to start
defrosting.
 7XUQWKHIRRGRYHUZKHQWKHRYHQVLJQDOV7XUQ)RRG
Over.
Power level is automatically set at 3, but can be
changed. To change the power levels, see the
Microwave Power Level(s) section. You can defrost
small items quickly by raising the power level after
entering the time. Power level 7 cuts the total defrosting
time in about half; power level 10 cuts the total time to
about 1/3. When defrosting at high power levels, food
will need more frequent attention than usual.
Microwave Power Level(s)
Ŷ <RXFDQFKDQJHWKHSRZHUOHYHOGXULQJPRVWFRRNLQJ
program.
1. Press the selector dial to edit
2. Rotate selector dial to change time and/or press
selector dial to enter.
3. Turn the selector dial clockwise to increase and
counterclockwise to decrease the power level. Press
the selector dial to enter.
Here are some examples of uses for various power
levels:
High 10)LVKEDFRQYHJHWDEOHVERLOLQJOLTXLGV
Med-High 7: Gentle cooking of meat and poultry; baking
casseroles and reheating.
Medium 5: Slow cooking and tenderizing for stews and
less tender cuts of meat.
Low 2 or 3: Defrosting, simmering, delicate sauces.
Warm 1: Keeping food warm, softening butter.
Weight of Food in
Ounces
Enter Food Weight
(tenths of a pound)
1–2 .1
3.2
4–5 .3
6–7 .4
8.5
9–10 .6
11 .7
12–13 .8
14–15 .9
49-80737 Rev. 2 15
Defrost By Weight
Use Defrost By Weight to defrost for a selected length
of time.
1. Press the Microwave pad and select defrost.
2. Turn the selector dial to Defrost By Weight. Press the
selector dial to enter.
3. Turn the selector dial to select the weight you want.
Press the selector dial to enter.
4. Press the selector dial or Start/Pause pad to start
defrosting.
 7XUQWKHIRRGRYHUZKHQWKHRYHQVLJQDOV7XUQ)RRG
Over.
Power level cannot be changed during this setting.
1.0 lb. Quick Defrost
Use 1.0 lb. Quick Defrost for quick defrost of 1.0 lb. of
frozen food.
1. Press the Microwave pad and select 1.0 Lb. quick
defrost.
2. Press selector dial or Start/Pause pad to start
defrosting. Press the selector dial to enter.
 7XUQWKHIRRGRYHUZKHQWKHRYHQVLJQDOV7XUQ)RRG
Over.
Power level cannot be changed during this setting.
Defrosting Tips
Ŷ )RRGVIUR]HQLQSDSHURUSODVWLFFDQEHWLPH
defrosted in the package, but foods should be taken
RXWRIWKHSDFNDJHZKHQXVLQJ'HIURVW%\)RRG7\SH
Closed packages should be slit, pierced or vented
after food has partially defrosted. Plastic storage
containers should be partially uncovered.
Ŷ )DPLO\VL]HSUHSDFNDJHGIUR]HQGLQQHUVFDQEH
defrosted and microwaved. If the food is in a foil
container, transfer it to a microwave-safe dish.
Ŷ )RRGVWKDWVSRLOHDVLO\VKRXOGQRWEHDOORZHGWRVLW
out for more than one hour after defrosting. Room
temperature promotes the growth of harmful bacteria.
Ŷ )RUPRUHHYHQGHIURVWLQJRIODUJHUIRRGVVXFKDV
roasts, use Defrost By Time. Be sure large meats are
completely defrosted before cooking.
Ŷ :KHQGHIURVWHGIRRGVKRXOGEHFRROEXWVRIWHQHGLQ
all areas. If still slightly icy, return to the microwave
very briefly, or let it stand a few minutes.
UPPER OVEN: Microwaving
Microwaving (Cont.)
16 49-80737 Rev. 2
Microwave Sensor Cooking
The sensor feature detects the increasing humidity
released during cooking. The oven automatically adjusts
the cooking time to various types and amounts of food.
'RQRWXVHWKH6HQVRU)HDWXUHVWZLFHLQVXFFHVVLRQ
on the same food portion— it may result in severely
overcooked or burnt food. If food is undercooked after
the first countdown, use Cook By Time for additional
cooking time.
The proper containers and covers are essential for
best sensor cooking.
Ŷ $OZD\VXVHPLFURZDYHVDIHFRQWDLQHUVDQGFRYHU
them with lids or vented plastic wrap. Never use tight
sealing plastic containers—they can prevent steam
from escaping and cause food to overcook.
Ŷ %HVXUHWKHRXWVLGHRIWKHFRRNLQJFRQWDLQHUVDQG
the inside of the oven are dry before placing food in
the oven. Beads of moisture turning into steam can
mislead the sensor.
Ŷ %HYHUDJHVDUHEHVWKHDWHGXQFRYHUHG
Covered
Vented
Dry off dishes so they don’t
mislead the sensor.
To Use All Sensor Programs
Upper Oven microwave mode features sensor cooking. It
automatically senses when food is done and shuts itself
off—eliminating the need to program cook times and
power levels.
1. Press the Microwave pad and turn the selector dial
WR&RRN%\)RRG7\SHRU5HKHDW3UHVVWKHVHOHFWRU
dial to enter.
2. Turn the selector dial to select the food you want.
Press the selector dial to enter.
3. Press the selector dial or press the Start/Pause pad
to start cooking.
Do not open the oven door until time is counting down
in the display or the microwave stop cooking. If the door
is opened, close it and press Start/Pause immediately.
If the food is not done enough, use Cook By Time in the
microwave selector to cook for more time.
NOTE:'RQRWXVHWKH6HQVRU)HDWXUHVWZLFHLQ
succession on the same food portion—it may result in
severely overcooked or burnt food.
Ŷ ,I\RXKDYHEHHQVSHHGFRRNLQJDQGWKHRYHQLV
already hot, it may indicate that it is too hot for sensor
cooking. Of course, you can always continue with
Cook By Time.
NOTE: If the oven is too hot then it will automatically
change to time cooking.
Ŷ 7RVKRUWHQRUOHQJWKHQWKHFRRNWLPHZDLWXQWLOWKH
time countdown shows in the display. Then turn the
selector dial to add or subtract time.
Ŷ ,I\RXRSHQWKHGRRUZKLOH6HQVRU&RRNLQJ6HQVRU
Error will appear. Close the door, press Start/Pause
to begin again.
Notes about the Reheat program:
Reheated foods may have wide variations in
temperature. Some areas may be extremely hot.
It is best to use Cook By Time and not Reheat for these
foods:
Ŷ %UHDGSURGXFWV
Ŷ )RRGWKDWPXVWEHUHKHDWHGXQFRYHUHG
Ŷ )RRGVWKDWQHHGWREHVWLUUHGRUWXUQHG
Ŷ )RRGVFDOOLQJIRUDGU\ORRNRUFULVSVXUIDFHDIWHU
reheating.
UPPER OVEN: Microwaving
Microwaving (Cont.)
MICROWAVE SENSOR PROGRAMS:
Ŷ*URXQG0HDW
Ŷ3RSFRUQ
Ŷ6RXS
Ŷ5LFH
Ŷ9HJHWDEOHV
(Canned, Fresh, Frozen)
Ŷ&KLFNHQ5HKHDW
Ŷ3DVWD5HKHDW
Ŷ3ODWHRI)RRG5HKHDW
Ŷ6RXS5HKHDW
Ŷ9HJHWDEOH5HKHDW
49-80737 Rev. 2 17
Your new oven has a variety of cooking modes to help you get the best results. These modes are described below. Refer
to the Cooking Guide section for recommendations for specific foods. Remember, your new oven may perform differently
than the oven it is replacing.
Baking and Roasting Modes
Select a mode for baking and roasting based on the type
and quantity of food you are preparing. When preparing
baked goods such as cakes, cookies, and pastries always
SUHKHDWWKHRYHQILUVW)ROORZUHFLSHUHFRPPHQGDWLRQVIRU
food placement. If no guidelines are provided, center food
in the oven.
Traditional Bake
The traditional bake mode is intended for single rack cooking.
This mode uses heat primarily from the lower element but
also from the upper element to cook food. To use this mode
press the Bake pad, turn the selector dial to set the oven
temperature and press to enter, then press Start. Preheating
is generally recommended when using this mode.
Broiling Modes
Always broil with the door closed. The broil element in this
oven is very powerful. Monitor food closely while broiling.
Use caution when broiling on upper rack positions as
placing food closer to the broil element increases smoking,
spattering, and the possibility of fats igniting. Broiling on
rack position 6 is not recommended.
Try broiling foods that you would normally grill. Adjust rack
positions to adjust the intensity of the heat to the food. Place
foods closer to the broil element when a seared surface
and rare interior is desired. Thicker foods and foods that
need to be cooked through should be broiled on a rack
position farther from the broiler or by using Broil Lo. )RUEHVW
performance center food below the broil heating element.
Broil Hi
The Traditional Broil Hi mode uses intense heat from the
upper element to sear foods. Use Broil Hi for thinner cuts
of meat and/ or foods you prefer less done on the interior.
To use this mode press the Broil pad, turn the selector
dial to Hi and press to enter, and then press Start. It is not
necessary to preheat when using this mode.
Broil Lo
The Traditional Broil Lo mode uses less intense heat from
the upper element to cook food thoroughly while also
producing surface browning. Use Broil Lo for thicker cuts of
meat and/or foods that you would like cooked all the way
through. To use this mode press the Broil pad, turn the
selector dial to Lo and press to enter, and then press Start.
It is not necessary to preheat when using this mode.
Proof
Proof mode is designed for rising (fermenting and proofing)
bread dough. Press the Options pad, turn the selector
dial to select Proof and press to select, then press Start.
Cover dough well to prevent drying out. Bread will rise more
rapidly than at room temperature. Note that for double wall
ovens, proof cannot be run when running a clean mode in
the lower oven.
Warm
Warm mode is designed to keep hot foods hot for up to 3
hours. To use this mode, press the Options pad, turn the
selector dial to select Warm and press to select, then press
Start. Cover foods that need to remain moist and do not
cover foods that should be crisp. Preheating is not required.
Do not use warm to heat cold food other than crisping
crackers, chips or dry cereal. It is also recommended that
food not be kept warm for more than 2 hours.
LOWER OVEN: Cooking Modes
Cooking Modes
18 49-80737 Rev. 2
Your new oven conforms to the Star-K Jewish Sabbath requirements with the Sabbath mode cooking feature. Below
describes the detail of Sabbath mode feature.
To Enter Sabbath Mode
Press the lower oven Options pad and turn the selector
dial to Sabbath and press to select. The display
ZLOOVKRZ³'XULQJ6DEEDWK0RGHWKHXSSHURYHQLV
XQDYDLODEOH´3UHVVWKHVHOHFWRUGLDOWRFRQWLQXH$Q\
upper oven features running will exit, and the lower oven
will immediately transition into Sabbath mode.
To Change Temperature
Once in Sabbath mode, in order to change oven
temperature or start a bake feature, the user can
change temperature to one of 10 pre-set temperatures
as indicated below:
Changing to one of the above temperatures requires the
user to press the keypad associated with the desired
temperature and then press the Start/PauseSDG)RU
H[DPSOHWRVHWD%DNH)WKHXVHUZLOOSUHVVWKHBake
pad on the lower oven and then press Start/Pause pad.
The Bake feature will start (or if already running, the
oven temperature will change) at a random time between
30 60 seconds after the Start/Pause pad is pressed,
with the exception of pressing the Clear/Off pad, which
will immediately cancel the cooking settings. (The unit
will remain in Sabbath mode). Change of temperature
may be executed at any time in the cooking cycle.
To Turn Oven Off
Press Clear/Off pad or Back and then Start pads at
any time. The oven will immediately turn off but will stay
in Sabbath mode and return to the standby Sabbath
display screen.
To Exit Sabbath Mode
Press and hold the Back pad for 3 seconds. The oven
will shut down at a random time between 30 60
seconds after the Back pad is pressed and held.
NOTE: Do not press any other pads during this time, or
the Sabbath mode will be re-initialized and will not exit.
The oven will exit Sabbath mode and return to its
default screen.
Timed Cook Feature In Sabbath Mode
The Sabbath mode is not capable of running a timed
cook feature on its own. If there is a desire to run a
Timed Cook, the following steps must be followed:
1. Use the Settings pad to set your Beeper Volume to
Mute.
2. Use the Light pad to set your lower oven Light to On.
3. Use Bake to program a temperature. After
programming a temperature select a cook time and
enter your cook time. Press Start to start the oven.
NOTE: Convection Bake should NOT be used.
4. Once the oven is started, do NOT open the door
until the oven has finished preheating and reached a
steady state temperature. Doing so prior to preheating
completing will result in the air distribution fan
de-energizing immediately upon door opening.
5. Once the food has been placed in the oven, do not
open the door until cooking has completed. Doing so
will result in the display on the screen changing to
prompt you to close your door.
6. Do NOT open the upper oven door. Doing so will turn
the light on immediately.
7. Do not press any additional buttons on the lower
oven controls once started or the display will change
immediately upon the button press.
NOTES
Ŷ 'XULQJ6DEEDWKPRGHRQO\ORZHURYHQ%DNHLV
available. Broil, Convection Bake, Warm, or other
functions are not available.
Ŷ :KHQLQ6DEEDWKPRGHWKHKRXUDXWRVKXWRII
is disabled regardless of the setting selected in the
Settings.
Ŷ 6DEEDWKPRGHFDQEHHQWHUHGRQO\LIQRFRRNLQJ
mode is running in the lower oven. Entering the
Sabbath Mode will cancel all functions in the lower
and upper oven (including timer and reminder).
Ŷ :KHQDQ\EXWWRQVDUHSUHVVHGLQ6DEEDWK0RGH
there are no beeps or tones, no changes to lights or
change in the display. Also, when the door is opened
or closed in Sabbath Mode, there are no beeps or
tones, no changes to lights or change in the display.
Ŷ ,IDSRZHURXWDJHRFFXUVGXULQJ6DEEDWKPRGHEDNLQJ
the unit will return to Sabbath Mode when power
comes back, but will not return in the baking mode.
UI Key Temp. (°F)
Left Side Keys (Upper Oven)
Microwave 170
Speed Cook/ Defrost 200
Cooking Options/ Popcorn 225
Add 30 Sec 250
Convection Bake/Reheat 300
Right Side Keys (Lower Oven)
Back 0
Clear/Off Cancels immediately
Light 325
Bake 350
Broil 375
Convection Bake/Warm 400
Options 450
LOWER OVEN: Sabbath Mode
Sabbath Mode
49-80737 Rev. 2 19
LOWER OVEN: Cooking Guide
FOOD TYPE
RECOMMENDED
MODE(S)
RECOMMENDED
RACK POSITION(S) ADDITIONAL SUGGESTIONS
Baked Goods
Layer cakes, sheet cakes,
bundt cakes, muffins, quick
breads on a Single Rack
Bake 3 Use shiny cookware.
Layer cakes* on Multiple
Racks
Bake 2 and 4 Ensure adequate airflow (see illustration below).
Chiffon cakes (angel food) Bake 1 Use shiny cookware.
Cookies, biscuits, scones on
a Single Rack
Bake 3 Use shiny cookware.
Cookies, biscuits, scones on
Multiple Racks
Bake 2 and 4
)RUIRRGVOLNHVXJDUFRRNLHVVZLWFKIRRGORFDWLRQ
partially through cooking for more even cooking
results between racks. Ensure adequate airflow.
Beef & Pork
Hamburgers Broil Hi 5
Use a broil pan; move food down for more
doneness/less searing. Watch food
FORVHO\ZKHQEURLOLQJ)RUEHVWSHUIRUPDQFHFHQWHU
food below the broil heating element.
Steaks & Chops Broil Hi 5
Use a broil pan; Move food down for more
doneness/less searing. Watch food closely when
EURLOLQJ)RUEHVWSHUIRUPDQFHFHQWHUIRRGEHORZWKH
broil heating element.
Roasts Bake 2 or 3
Leave uncovered, use a low sided pan such
as a broil pan. Preheating is not necessary.
Poultry
Whole chicken Bake 2 or 3 Use a low sided pan such as a broil pan.
Bone-in chicken breasts,
legs, thighs
Broil Hi 1 If breaded or coated in sauce avoid Broil Hi modes.
Broil skin side down first. Watch food closely when
EURLOLQJ)RUEHVWSHUIRUPDQFHZKHQEURLOLQJFHQWHU
food below the broil heating element.
Broil Lo
Bake
3
Boneless chicken breasts
Broil Lo
Bake
1 (broil) or 3
Move food down for more doneness/less searing
and up for greater searing/browning when broiling.
)RUEHVWSHUIRUPDQFHZKHQEURLOLQJFHQWHUIRRG
below the broil heating element.
Whole turkey Bake 1 or 2 Use a low sided pan such as a broil pan.
Turkey breast Bake 2 or 3 Use a low sided pan such as a broil pan.
Fish Broil Lo
5 (1/2 thick or less)
4 (>1/2 inch)
:DWFKIRRGFORVHO\ZKHQEURLOLQJ)RUEHVWSHUIRUPDQFH
center food below the broil heating element.
Casseroles Bake 3
Frozen Convenience Foods
Pizza, french fries, tator tots,
chicken nuggets, appetizers
on a Single Rack
Bake 3 Use shiny cookware.
Pizza, french fries, tator tots,
chicken nuggets, appetizers
on Multiple Racks
Bake 2 and 4
Use shiny cookware. Switch food location partially
through cooking for more even cooking results.
*When baking four cake layers at a time, use racks 2
and 4. Place the pans as shown so that one pan is not
directly above another.
Cook food thoroughly to help protect against food
borne illness. Minimum safe food temperature
recommendations for food safety can be found at
IsItDoneYet.gov. Make sure to use a food thermometer
to take food temperatures.
Cooking Guide
20 49-80737 Rev. 2
LOWER OVEN:5DFNV$OXPLQXP)RLODQG2YHQ/LQHUV&RRNZDUH
Racks
Your oven has six rack positions. Recommended rack
positions for various types of foods are provided in the
Cooking Guide. Adjusting rack position is one way to
LPSDFWFRRNLQJUHVXOWV)RUH[DPSOHLI\RXZRXOGSUHIHU
darker tops on cakes, muffins, or cookies, try moving
food one rack position higher. If you find foods are too
brown on top try moving them down next time.
When baking with multiple pans and on multiple racks,
ensure there is sufficient space between pans to allow
air to flow.
Flat Racks
When placing and removing cookware, pull the rack out
to the bump (stop position) on the rack support.
To remove a rack, pull it toward you, tilt the front end up
and pull it out.
To replace, place the curved end of the rack (stop-locks)
onto the oven supports, tilt up the front of the rack and
push the rack in.
Racks may become difficult to slide, especially after a
self-clean. Put some vegetable oil on a soft cloth or
paper towel and rub onto the left and right edges.
Note: Using other cooking oils will cause a discoloring
or a rust like color residue on the racks and cavity sides.
To clean this residue, use a soap and water or a vinegar
and water solution. Rinse with clean water and dry with
a soft cloth.
Cookware
Cookware Guidelines
The material, finish, and size of cookware affect baking
performance.
Dark, coated and dull pans absorb heat more readily
than light, shiny pans. Pans that absorb heat more
readily can result in a browner, crisper, and thicker crust.
If using dark and coated cookware check food earlier
than minimum cook time. If undesirable results are
obtained with this type of cookware consider reducing
RYHQWHPSHUDWXUHE\)QH[WWLPH
Shiny pans can produce more evenly cooked baked
goods such as cakes and cookies.
Glass and ceramic pans heat slowly but retain heat well.
These types of pans work well for dishes such as pies
and custards.
Air insulated pans heat slowly and can reduce bottom
browning.
Keep cookware clean to promote even heating.
CAUTION
Do not use any type of foil or oven liner to cover the oven bottom. These items can trap heat
or melt, resulting in damage to the product and risk of shock, smoke or fire. Damage from improper use of
these items is not covered by the product warranty.
)RLOPD\EHXVHGWRFDWFKVSLOOVE\SODFLQJDVKHHWRQDORZHUUDFNVHYHUDOLQFKHVEHORZWKHIRRG'RQRWXVHPRUH
IRLOWKDQQHFHVVDU\DQGQHYHUHQWLUHO\FRYHUDQRYHQUDFNZLWKDOXPLQXPIRLO.HHSIRLODWOHDVW´IURPRYHQZDOOV
to prevent poor heat circulation.
Aluminum Foil and Oven Liners
49-80737 Rev. 2 21
CARE AND CLEANING: Cleaning The Oven
Cleaning The Oven
Helpful Hints
An occasional thorough wiping with a solution of
baking soda and water keeps the inside fresh. Also
we recommend against using cleaners with ammonia
or alcohol, as they can damage the appearance of
the oven. If you choose to use a common household
cleaner, first apply the cleaner directly to a clean cloth,
then wipe the soiled area.
Control Panel
It’s a good idea to wipe the control panel after each use.
Clean with mild soap and water or vinegar and water,
rinse with clean water and polish dry with a soft cloth.
Do not use abrasive cleansers, strong liquid cleansers,
plastic scouring pads or oven cleaners on the control
panel—they will damage the finish.
Oven Exterior
Do not use oven cleaners, abrasive cleansers, strong
liquid cleansers, steel wool, plastic scouring pads, or
cleaning powders on the interior or exterior of the oven.
Clean with a mild soap and water or vinegar and water
solution. Rinse with clean water and dry with a soft cloth.
When cleaning surfaces, make sure that they are at
room temperature and not in direct sunlight.
If stain on the door vent trim is persistent, use a mild
abrasive cleaner and a sponge-scrubber for best results.
Spillage of marinades, fruit juices, tomato sauces and
basting liquids containing acids may cause discoloration
and should be wiped up immediately. Let hot surfaces
cool, then clean and rinse.
Stainless Steel Surfaces (on some models)
Do not use a steel wool pad; it will scratch the surface.
To clean the stainless steel surface, use warm sudsy
water or a stainless steel cleaner or polish. Always
ZLSHWKHVXUIDFHLQWKHGLUHFWLRQRIWKHJUDLQ)ROORZ
the cleaner instructions for cleaning the stainless steel
surface.
To inquire about purchasing cleaning products including
stainless steel appliance cleaner or polish, see the
Accessories and Consumer Support sections at the end
of this manual.
How To Clean The Upper Oven Interior
Clean the inside of the oven often for proper heating
performance.
Some spatters can be removed with a paper towel,
others may require a warm soapy cloth. Remove greasy
spatters with a sudsy cloth; then rinse with a damp cloth.
Do not use abrasive cleaners or sharp utensils on oven
walls.
Never use a commercial oven cleaner on any part of
your oven.
Do not clean the inside of the oven with metal scouring
pads. Pieces can break off the pad, causing electrical
shock.
Door Seal
It’s important to keep the area clean where the door seals
against the oven. Use only mild, nonabrasive detergents
applied with a clean sponge or soft cloth. Rinse well.
Removable Turntable
The area underneath the turntable should be cleaned
frequently to avoid odors and smoking during a cooking
cycle.
The turntable can be broken if dropped. Wash carefully
in warm, sudsy water. Dry completely and replace.
To replace the turntable, place its center over the spindle
in the center of the oven and turn it until it seats into place.
(Make sure the smooth side of the turntable is facing up
and that its center seats securely on the spindle.)
Be sure electrical power is off and all surfaces are cool before cleaning any part of the oven.
:DOOV)ORRU,QVLGH:LQGRZ0HWDODQG
Plastic Parts on the Door
Turntable
Do not use the oven without the
turntable in place.
22 49-80737 Rev. 2
How To Clean The Upper Oven Interior (Cont.)
Cooking Trays And Baking Sheet
To prevent breakage, allow the trays to cool completely
before cleaning. Wash carefully in warm, sudsy water or
in the dishwasher.
Do not use metal scouring pads or abrasives, as they
may damage the finish. A soap-filled scouring pad may
be used to clean the trays.
Clear glass tray for microwaving
How To Clean The Lower Oven Interior
The interior of your new oven can be cleaned manually
or by using the Steam Clean or Self Clean modes.
Spillage of marinades, fruit juices, tomato sauces and
basting liquids containing acids may cause discoloration
and should be wiped up immediately. Let hot surfaces
cool, then clean and rinse.
Manual Cleaning
Do not use oven cleaners, abrasive cleaners, strong
liquid cleansers, steel wool, scouring pads, or cleaning
powders on the interior of the oven. Clean with a mild
soap and water or vinegar and water solution. Rinse with
clean water and dry with a soft cloth. When cleaning
surfaces, make sure that they are at room temperature.
Steam Clean Mode
Steam clean is intended to clean small spills using water
and a lower cleaning temperature than Self Clean.
To use the Steam Clean feature, wipe grease and soils
from the oven. Pour one cup of water into the bottom
of the oven. Close the door. Press the Options pad,
select Steam Clean, and then press Start. The oven
door will lock. You can not open the door during the
30 minute steam clean as this will decrease the steam
clean performance. At the end of the steam clean cycle
the door will unlock. Wipe out any excess water and any
remaining soil.
Self Clean Mode
Read Self-Cleaning Oven Safety Instructions at the
beginning of this manual before using Self Clean Mode.
Self-clean uses very high temperatures to clean the oven
interior. The oven door will lock when using this feature.
Before operating the self-clean cycle, wipe up grease
and soils from the oven. Remove all items from the
oven other than enameled (dark color) racks. Shiny or
silver racks and any cookware or other items should all
be removed from the oven before initiating a self-clean
cycle. Close the door. Press the Options pad, select
Self Clean, and a default self-clean time is displayed.
The clean time can be changed to 3:00, 4:00, or 5:00
KRXUVE\XVLQJWKHVHOHFWRUGLDO)RUKHDYLO\VRLOHG
ovens, the maximum 5 hour clean time is recommended.
If you wish to use the default time, press the Start pad
immediately after selecting the Self Clean. The oven
will turn off automatically when the self-clean cycle is
complete. The door will stay locked until the oven has
cooled down. After the oven has cooled down wipe any
ash out of the oven.
IMPORTANT: The health of some birds is extremely
sensitive to the fumes given off during the self-cleaning
cycle of any range. Move birds to another well-
ventilated room.
CARE AND CLEANING: Cleaning The Oven
Cleaning The Oven (Cont.)
Flat Racks
)ODWUDFNVFDQEHOHIWLQWKHFDYLW\GXULQJVHOIFOHDQ
(if enameled racks, not shiny) or can be washed with
warm, soapy water.
Racks may be more difficult to slide, especially after
a self-clean. Put some vegetable oil on a soft cloth or
paper towel and rub onto the left and right edges.
NOTE: Using other cooking oils will cause a discoloring
or a rust like color residue on the racks and cavity sides.
To clean this residue, use a soap and water or a vinegar
and water solution. Rinse with clean water and dry with a
soft cloth.
49-80737 Rev. 2 23
WARNING
SHOCK OR BURN HAZARD: Before replacing oven light bulb, disconnect the electrical power to the
UDQJHDWWKHPDLQIXVHRUFLUFXLWEUHDNHUSDQHO)DLOXUHWRGRVRPD\UHVXOWLQHOHFWULFVKRFNRUEXUQ
Lift-Off Lower Oven Door
The door is very heavy. Be careful when removing and lifting the door.
Do not lift the door by the handle.
To remove the door:
 )XOO\RSHQWKHGRRU
2. Pull the hinge locks down toward the door frame, to
the unlocked position. A tool, such as a small flat-
blade screwdriver, may be required.
 )LUPO\JUDVSERWKVLGHVRI WKHGRRUDWWKHWRS
4. Close door to the door removal position. The door
should be open approximately 3" with no obstruction
above the door.
5. Lift door up and out until both hinge arms are clear of
the slots.
To replace the door:
 )LUPO\JUDVSERWKVLGHVRI WKHGRRUDWWKHWRS
2. Starting on the left side, with the door at the same
angle as the removal position, seat the indentation of
the hinge arm into the bottom edge of the hinge slot.
The notch in the hinge arm must be fully seated into
the bottom of the slot. Repeat for right side.
 )XOO\RSHQWKHGRRU,IWKHGRRUZLOOQRWIXOO\ RSHQWKH
indentation is not seated correctly in the bottom edge
of the slot.
4. Push the hinge locks up against the front frame of the
oven cavity, to the locked position.
5. Close the oven door.
CAUTION
BURN HAZARD: The glass cover and bulb should be removed when cool. Touching hot glass with
bare hands or a damp cloth can cause burns.
Lower Oven Light Replacement
1. Disconnect power at the main fuse or circuit breaker
panel.
2. Remove oven racks.
3. Slide a flat blade screwdriver between the housing
and the glass light cover.
4. Support the glass light cover with two fingers to
prevent the cover from falling to the bottom of the
oven. Be careful not to chip the oven coating.
5. Gently twist the screwdriver blade to loosen the glass
light cover.
6. Remove the glass light cover.
7. Remove the bulb by firmly grasping and sliding the
bulb straight out until the two prongs have cleared the
ceramic holder.
8. Do not touch the glass of the new replacement bulb
with your fingers. It will cause the bulb to fail when it
lights. Grasp the replacement bulb with a clean towel
or facial tissue with the prongs facing down. Align
the two prongs in the ceramic holder, pressing gently
until the bulb is securely in the ceramic socket.
9. Slide the protective lens into the holder and push until
the clips snap into the housing.
10. Reconnect power.
CARE AND CLEANING: Lower Oven Maintenance / Oven Door
Lower Oven Maintenance
Oven Door
Removal position
Hinge lock
Slot
Pull hinge locks down to unlock
Push hinge locks up to lock
Hinge
lock
Hinge
arm
Indentation
Bottom
edge of
slot
Hinge arm
24 49-80737 Rev. 2
Problem Possible Cause What To Do
FAN
Fan continues to run after
cooking stops
The oven is cooling. The fan will automatically shut off when the internal parts of
the oven have cooled.
Oven vent emits warm air
while oven is on
This is normal.
Fan comes on automatically
when using the microwave
This is normal.
COOKING
The oven makes unusual
sounds while cooking
Clicks and fans blowing are normal. The
relay board is turning the components on
and off.
These sounds are normal.
Smoke comes out of the
oven when I open the door
)RRGLVKLJKLQIDWFRQWHQW$HURVROVSUD\
used on the pans.
Smoke is normal when cooking high-fat foods.
Food is not fully cooked
or browned at the end of a
cooking program
Programmed times may not match the size
or amount of food you are cooking.
Adjust time for doneness or adjust the upper or
lower lamps for browning and doneness.
SENSOR ERROR displayed
along with an oven signal
)RRGDPRXQWRUW\SHSODFHGLQWKHRYHQ
does not match the program that was set.
Press the Clear/Off pad. Set the oven program to match
the food or liquid to be cooked or heated.
Steam was not sensed by the oven because
plastic wrap was not vented, a lid too tight
was on the dish or a liquid was covered.
Vent plastic wrap, use a looser lid or uncover liquids when
cooking or heating.
DISPLAY
The display is blank Power saver mode may be activated. Check the Settings menu for clock display settings. Turn
the display on.
A fuse in your home may be blown or the
circuit breaker tripped.
Replace the fuse or reset the circuit breaker.
Power outage or surge Reset the clock. If the oven was in use, you must reset it by
pressing the Clear/Off pad, setting the clock and resetting
any cooking function.
“Control is LOCKED”
appears in display
The control has been locked. Press and hold Settings pad for 3 seconds to unlock the
control.
TROUBLESHOOTING TIPS (Upper Oven)
Save time and money! Review the charts on the following pages first and you may not need to schedule service.
Troubleshooting tips ... Before you schedule service
Control display is lit yet oven
will not start
Clock is not set. Set the clock.
Door not securely closed. Open the door and close securely.
Start/Pause pad or selector dial not
pressed after entering cooking selection.
Press Start/Pause pad or selector dial.
Another selection already entered in oven
and Clear/Off pad not pressed to cancel it.
Press Clear/Off pad.
Size, quantity or cooking time not entered
after final selection.
Make sure you have entered cooking time after selecting.
Clear/Off pad was pressed accidentally. Reset cooking program and press Start/Pause pad.
49-80737 Rev. 2 25
Problem Possible Cause What To Do
OTHER PROBLEMS
The door and inside of the
oven feels hot
The heat lamps produce intense heat in a
small space.
This is normal. Use oven mitts to remove food when ready.
Oven will not start A fuse in your home may be blown or the
circuit breaker tripped.
Replace fuse or reset circuit breaker.
Cannot edit cooking features Some pre-programmed cooking features
may not be able to be edited to prevent
degradation of cooking performance.
This is normal.
The pads on one side of the
control do not function
The control has locked out the use of these
pads and need to be reset.
Press and hold the Clear/Off pad on the other side of the
display for 30 seconds. If this does not reset the control, it
may be necessary to cycle the circuit breaker.
TROUBLESHOOTING TIPS (Upper Oven)
Troubleshooting tips ... Before you schedule service
26 49-80737 Rev. 2
TROUBLESHOOTING TIPS (Lower Oven)
Problem Possible Cause What To Do
My new oven doesn't cook
like my old one. Is something
wrong with the temperature
settings?
Your new oven has a different cooking
system from your old oven and therefore
may cook differently than your old oven.
)RUWKHILUVWIHZXVHVIROORZ\RXUUHFLSHWLPHVDQG
temperatures carefully. If you still think your new oven is
too hot or too cold, you can adjust the temperature yourself
to meet your specific cooking preference. NOTE: This
adjustment affects Bake temperatures; it will not affect Broil
or Clean.
Food does not bake properly Oven controls improperly set. See the Cooking Modes section.
Rack position is incorrect or rack is not level. See the Cooking Modes section and Cooking Guide.
Incorrect cookware or cookware of improper
size being used.
See the Cookware section.
Oven temperature needs adjustment. See the Settings section.
Ingredient substitution Substituting ingredients can change the recipe outcome.
Food does not broil properly Oven controls improperly set. Make sure you select the appropriate broil mode.
Improper rack position being used. See Cooking Guide for rack location suggestions.
)RRGEHLQJFRRNHGLQDKRWSDQ Make sure cookware is cool.
Cookware not suited for broiling. Use a pan specifically designed for broiling.
Aluminum foil used on the broiling pan and
grid has not been fitted properly and slit as
recommended.
If using aluminum foil conform to pan slits.
In some areas the power (voltage) may be
low.
Preheat the broil element for 10 minutes.
Oven temperature too hot or
too cold
Oven temperature needs adjustment. See the Settings section.
Oven does not work or appears
not to work
A fuse in your home may be blown or the
circuit breaker tripped.
Replace the fuse or reset the circuit breaker.
Oven controls improperly set. See the Using the Oven section.
Oven is in Sabbath Mode. Verify, that the oven is not in Sabbath Mode.
See the Sabbath Mode section.
“Crackling” or “popping”
sound
This is the sound of the metal heating
and cooling during both the cooking and
cleaning functions.
This is normal.
Why is my range making a
"clicking" noise when using my
oven?
Your range has been designed to
maintain a tighter control over your oven's
temperature. You may hear your oven's
heating elements "click" on and off more
frequently than in older ovens to achieve
better results during baking, broiling,
convection, and self-clean cycles.
This is normal.
Clock and timer do not work A fuse in your home may be blown or the
circuit breaker tripped.
Replace the fuse or reset the circuit breaker.
Oven light does not work Light bulb is loose or defective. Tighten or replace bulb.
Pad operating light is broken.
Call for service.
Oven will not self-clean The temperature is too high to set a self-
clean operation.
Allow the oven to cool and reset the controls.
Oven controls improperly set. See the Cleaning the Oven section.
Excessive smoking during
clean cycle
Excessive soil or grease. Press the Clear/Off pad. Open the windows to rid the room
of smoke. Wait until the OVEN IS COOLING DOOR IS
LOCKED display goes off. Wipe up the excess soil and
reset the clean cycle.
Excessive smoking during
broiling
)RRGWRRFORVHWREXUQHUHOHPHQW Lower the rack position of the food.
Oven door will not open after a
clean cycle
Oven too hot. Allow the oven to cool below locking temperature.
Troubleshooting tips ... Before you schedule service
49-80737 Rev. 2 27
TROUBLESHOOTING TIPS (Lower Oven)
Problem Possible Cause What To Do
Oven not clean after a clean
cycle
Oven controls improperly set. See the Cleaning the Oven section.
Oven was heavily soiled. Clean up heavy spillovers before starting the clean cycle.
Heavily soiled ovens may need to self-clean again or for a
longer period of time.
"CLOSE DOOR TO CONTINUE
COOKING" show on display
section
The door is open during a cooking or
cleaning feature.
Close the oven door.
"OVEN IS COOLING DOOR IS
LOCKED" show on display
section
The oven door is locked because the
temperature inside the oven has not
dropped below the unlocking temperature.
Press the Clear/Off pad. Allow the oven to cool.
An oven error and "SERVICE
MAY BE NEEDED" show in the
display
You have a function error code. Press the Clear/Off pad. Allow the oven to cool for one
hour. Put the oven back into operation.
If the function code repeats. Disconnect all power to the oven for at least 30 seconds
and then reconnect power. If the function error code
repeats
, call for service.
“Burning” or “oily” odor
emitting from the vent
This is normal in a new oven and will
disappear in time.
To speed the process, set a self-clean cycle for a minimum
of 3 hours. See the Cleaning the Oven section.
Strong odor An odor from the insulation around the
inside of the oven is normal for the first few
times the oven is used.
This is temporary and will go away after several uses or a
self-clean cycle.
Fan noise A cooling fan may automatically turn on. This is normal. The cooling fan will turn on to cool internal
parts. It may run for up to 1-1/2 hours after the oven is
turned off.
My oven door glass appears to
be "tinted" or have a "rainbow"
color. Is this defective?
No. The inner oven glass is coated with
a heat barrier to reflect the heat back into
the oven to prevent heat loss and keep the
outer door cool while baking.
This is normal. Under certain light or angles, you may see
this tint or rainbow color.
Sometimes the oven takes
longer to preheat to the same
temperature
Cookware or food in oven The cookware or food in the oven will cause the oven to take
longer to preheat. Remove items to reduce preheat time.
Number of racks in oven Adding more racks to the oven will cause the oven to take
longer to preheat. Remove some racks.
Troubleshooting tips ... Before you schedule service
28 49-80737 Rev. 2
Notes
49-80737 Rev. 2 29
Notes
30 49-80737 Rev. 2
Staple your receipt here. Proof of the original purchase
date is needed to obtain service under the warranty.
GEAppliances.com
$OOZDUUDQW\VHUYLFHLVSURYLGHGE\RXU)DFWRU\6HUYLFH&HQWHUVRUDQDXWKRUL]HG&XVWRPHU&DUH
®
technician. To schedule
service online, visit us at GEAppliances.com/service, or call GE Appliances at 800.GE.CARES (800.432.2737). Please
have your serial number and your model number available when calling for service.
Servicing your appliance may require the use of the onboard data port for diagnostics. This gives a GE Appliances factory
service technician the ability to quickly diagnose any issues with your appliance and helps GE Appliances improve its
products by providing GE Appliances with information on your appliance. If you do not want your appliance data to be
sent to GE Appliances, please advise your technician not to submit the data to GE Appliances at the time of service.
What GE Appliances will not cover:
Ŷ 6HUYLFHWULSVWR\RXUKRPHWRWHDFK\RXKRZWR
use the product.
Ŷ ,PSURSHULQVWDOODWLRQGHOLYHU\RUPDLQWHQDQFH
Ŷ )DLOXUHRIWKHSURGXFWLILWLVDEXVHGPLVXVHG
modified or used for other than the intended
purpose or used commercially.
Ŷ 5HSODFHPHQWRIKRXVHIXVHVRUUHVHWWLQJRI
circuit breakers.
Ŷ 'DPDJHWRWKHSURGXFWFDXVHGE\DFFLGHQWILUH
floods or acts of God.
Ŷ ,QFLGHQWDORUFRQVHTXHQWLDOGDPDJHFDXVHGE\
possible defects with this appliance.
Ŷ 'DPDJHFDXVHGDIWHUGHOLYHU\
Ŷ 3URGXFWQRWDFFHVVLEOHWRSURYLGHUHTXLUHG
service.
Ŷ 6HUYLFHWRUHSDLURUUHSODFHOLJKWEXOEVH[FHSW
for LED lamps.
LIMITED WARRANTY
GE Appliances Limited Warranty
EXCLUSION OF IMPLIED WARRANTIES
Your sole and exclusive remedy is product repair as provided in this Limited Warranty. Any implied warranties,
including the implied warranties of merchantability or fitness for a particular purpose, are limited to one year or
the shortest period allowed by law.
This limited warranty is extended to the original purchaser and any succeeding owner for products purchased for
home use within the USA. If the product is located in an area where service by a GE Appliances Authorized Servicer
is not available, you may be responsible for a trip charge or you may be required to bring the product to an Authorized
GE Appliances Service location for service. In Alaska, the limited warranty excludes the cost of shipping or service
calls to your home.
Some states do not allow the exclusion or limitation of incidental or consequential damages. This limited warranty
gives you specific legal rights, and you may also have other rights which vary from state to state. To know what your
legal rights are, consult your local or state consumer affairs office or your state’s Attorney General.
Warrantor: GE Appliances, a Haier company
Louisville, KY 40225
Extended Warranties: Purchase a GE Appliances extended warranty and learn about special discounts that are
available while your warranty is still in effect. You can purchase it online anytime at
GEAppliances.com/extended-warranty
or call 800.626.2224 during normal business hours. GE Appliances Service will still be there after your warranty expires.
For the period of GE Appliances will replace
One year
)URPWKHGDWH
of the original
purchase
Any part of the range which fails due to a defect in materials or workmanship. During this
limited one-year warranty, GE Appliances will provide, free of charge, all labor and in-home
service to replace the defective part.
49-80737 Rev. 2 31
Accessories
6PDOO%URLOHU3DQô´[ó´[ò³
/DUJH%URLOHU3DQô´[ó´[ò³
;/%URLOHU3DQ´[ó´[³
Parts
Glass Tray
Turntable
Oven Racks
Oven Elements
Light Bulbs
Cleaning Supplies
16 oz. Micro Bryte
®
Appliance Cleaner
CitruShine™ Stainless Steel Wipes
CERAMA BRYTE
®
Stainless Steel Appliance Cleaner
Graphite Lubricant
7KHODUJHEURLOHUSDQGRHVQRWILWLQ´´UDQJHV
7KH;/EURLOHUSDQGRHVQRWILWLQ´ZDOORYHQV´GURSLQVRU´´UDQJHV
ACCESSORIES
Looking For Something More?
GE Appliances offers a variety of accessories to improve your cooking and maintenance experiences!
To place an order visit us online at:
www.GEApplianceParts.com (U.S.) or www.GEAppliances.ca (Canada)
or call 800.626.2002 (U.S.) 800.661.1616 (Canada)
The following products and more are available:
Accessories
32 49-80737 Rev. 2
Printed in the United States
CONSUMER SUPPORT
Consumer Support
GE Appliances Website
Have a question or need assistance with your appliance? Try the GE Appliances Website 24 hours a day, any day
of the year! You can also shop for more great GE Appliances products and take advantage of all our on-line support
services designed for your convenience. In the US: GEAppliances.com
Register Your Appliance
Register your new appliance on-line at your convenience! Timely product registration will allow for enhanced
communication and prompt service under the terms of your warranty, should the need arise. You may also mail in
the pre-printed registration card included in the packing material. In the US: GEAppliances.com/register
Schedule Service
Expert GE Appliances repair service is only one step away from your door. Get on-line and schedule your service at
your convenience any day of the year. In the US: GEAppliances.com/service
or call 800.432.2737 during normal business hours.
Extended Warranties
Purchase a GE Appliances extended warranty and learn about special discounts that are available while your
warranty is still in effect. You can purchase it on-line anytime. GE Appliances Services will still be there after your
warranty expires. In the US: GEAppliances.com/extended-warranty
or call 800.626.2224 during normal business hours.
Remote Connectivity
)RUDVVLVWDQFHZLWKZLUHOHVVQHWZRUNFRQQHFWLYLW\IRUPRGHOVZLWKUHPRWHHQDEOH
visit our website at GEAppliances.com/connect or call 800.220.6899 in the US.
Parts and Accessories
Individuals qualified to service their own appliances can have parts or accessories sent directly to their homes
(VISA, MasterCard and Discover cards are accepted). Order on-line today 24 hours every day.
In the US: GEApplianceparts.com or by phone at 877.959.8688 during normal business hours.
Instructions contained in this manual cover procedures to be performed by any user. Other servicing
generally should be referred to qualified service personnel. Caution must be exercised, since improper
servicing may cause unsafe operation.
Contact Us
If you are not satisfied with the service you receive from GE Appliances, contact us on our Website with all the
details including your phone number, or write to:
In the US: General Manager, Customer Relations | GE Appliances, Appliance Park | Louisville, KY 40225
GEAppliances.com/contact
49-80737 Rev. 2 08-19 GEA
MANUAL DEL
PROPIETARIO
Escriba los números de modelo y
de serie aquí:
Nº de Modelo ____________
Nº de Serie ______________
Los podrá encontrar en una
etiqueta en el borde lateral o en
el frente del horno detrás de la
puerta del horno
Horno de Pared Doble JT3800 de 30”
Horno de Pared Doble JK3800 de 27”
GE es una marca registrada de General Electric Company. Fabricado bajo licencia de marca.
INFORMACIÓN DE SEGURIDAD .....3
USO DE LA COCINA
Unidades de superficie .......................8
Controles del Horno ..........................9
Funciones Especiales ........................10
Estantes del Horno .......................... 11
Papel de Aluminio y Cobertores del Horno ..... 11
Utensilios ..................................12
Modos de Cocción ..........................12
Guía de Cocción ............................13
CUIDADO Y LIMPIEZA
Limpieza de la Cocina - Exterior ..............14
Limpieza de la Cocina - Interior ..............16
Luz del Horno ..............................17
Puerta del Horno ...........................17
CONSEJOS PARA LA
SOLUCIÓN DE PROBLEMAS ........18
GARANTÍA LIMITADA ................22
ACCESORIOS ..........................23
SOPORTE PARA
EL CONSUMIDOR .....................24
HORNO DE PARED
Incorporado con Combinación Microondas/ Térmico
2 49-80737 Rev. 2
GRACIAS POR HACER QUE GE APPLIANCES SEA PARTE DE SU HOGAR.
Ya sea que haya crecido usando GE Appliances, o que ésta es su primera vez, nos complace
tenerlo en la familia.
Sentimos orgullo por el nivel de arte, innovación y diseño de cada uno de los electrodomésticos de
GE Appliances, y creemos que usted también. Entre otras cosas, el registro de su electrodoméstico
asegura que podamos entregarle información importante del producto y detalles de la garantía
cuando los necesite.
Registre su electrodoméstico GE ahora a través de Internet. Sitios Web y números telefónicos útiles
están disponibles en la sección de Soporte para el Consumidor de este Manual del Propietario.
También puede enviar una carta en la tarjeta de inscripción preimpresa que se incluye con
el material embalado.
49-80737 Rev. 2 3
GUARDE ESTAS INSTRUCCIONES
INFORMACIÓN IMPORTANTE DE SEGURIDAD
LEA TODAS LAS INSTRUCCIONES ANTES DE USAR
INFORMACIÓN DE SEGURIDAD (Horno Superior)
PRECAUCIONES PARA EVITAR LA POSIBLE EXPOSICIÓN A ENERGÍA
DE MICROONDAS EXCESIVA
(a) No intente hacer funcionar el horno con la compuerta
abierta ya que ésto puede provocar exposición
peligrosa a la energía de microondas. Es importante no
forzar ni dañar los seguros.
(b) No coloque ningún objeto entre la parte frontal del
horno y la compuerta, ni permita que se acumulen
residuos de producto limpiador o detergente, suciedad o
polvo en las superficies de sellado.
(c) No haga funcionar el horno si se encuentra dañado.
Es particularmente importante cerrar bien la compuerta
del horno y que no haya daños en:
(1) la compuerta (doblada o curvada),
(2) las bisagras y pestillos (rotos o flojos),
(3) sellos de la compuerta y superficies de sellado.
(d) El horno no debe ser ajustado o reparado por ninguna
persona, excepto por personal de mantenimiento
calificado.
ADVERTENCIA
INSTRUCCIONES GENERALES DE SEGURIDAD
Ŷ /HDWRGDVODVLQVWUXFFLRQHVDQWHVGHXWLOL]DUHVWHDSDUDWR
Cuando utilice aparatos eléctricos, se deben seguir las
precauciones de seguridad básicas, entre las que se
incluyen las siguientes:
Ŷ /HD\VLJDODVSUHFDXFLRQHVHVSHFtILFDVGHVFULWDVHQOD
VHFFLyQ35(&$8&,21(63$5$(9,7$5/$326,%/(
EXPOSICIÓN A ENERGÍA DE MICROONDAS EXCESIVA.
Ŷ $VHJ~UHVHTXHVXDSDUDWRHVWpLQVWDODGR\SXHVWRDWLHUUD
apropiadamente por un técnico cualificado de acuerdo a
las instrucciones de instalación suministradas.
Ŷ ,QVWDOHRXELTXHHVWHDSDUDWR~QLFDPHQWHGHDFXHUGRD
las instrucciones de instalación suministradas.
Ŷ $OJXQRVSURGXFWRVWDOHVFRPRKXHYRVHQWHURV\
contenedores sellados (por ejemplo, frascos sellados)
son propensos a explotar y no deben calentarse en este
horno. Tal uso del horno puede resultar en lesiones
personales.
Ŷ 1RPRQWHHVWHDSDUDWRVREUHHOIUHJDGHUR
Ŷ (VWHKRUQRQRKDVLGRDSUREDGRQLSUREDGRSDUD
utilización marina.
Ŷ (VWHKRUQRHVWiOLVWDGRSRU8/SDUDODLQVWDODFLyQGH
pared estándar.
Ŷ 1RKDJDIXQFLRQDUHVWHDSDUDWRVLKDVLGRGDxDGRR
dejado caer.
Ŷ &RPRFRQFXDOTXLHUDSDUDWRFXDQGRVHDXWLOL]DGRSRU
niños es necesaria una estrecha vigilancia.
Ŷ 8WLOLFHHVWHDSDUDWRVRODPHQWHSDUDHOILQSUHYLVWRFRPR
se describe en este manual.
Ŷ 1RXWLOLFHTXtPLFRVQLYDSRUHVFRUURVLYRVHQHVWHDSDUDWR
Ŷ (VWHKRUQRHVWiHVSHFtILFDPHQWHGLVHxDGRSDUDFDOHQWDU
secar o cocinar alimentos y bebidas y no está diseñado
para usarse en un laboratorio ni para uso industrial.
Ŷ 6yORSHUVRQDOFXDOLILFDGRGHEHUHSDUDUHVWHDSDUDWR
Póngase en contacto con el centro de mantenimiento
autorizado más cercano en caso de necesitar revisión,
reparación o ajuste.
Ŷ 1RFXEUDQLEORTXHHQLQJXQDDSHUWXUDGHHVWHDSDUDWR
Ŷ 1RDOPDFHQHHVWHDSDUDWRDODLUHOLEUH1RXWLOLFHHVWH
producto cerca del agua; por ejemplo, en un sótano
húmedo, cerca de una piscina, cerca de un lavabo o
lugares similares.
Ŷ &RQVXOWHODVLQVWUXFFLRQHVGHOLPSLH]DGHODVXSHUILFLHGH
la puerta en la sección de Mantenimiento y limpieza del
horno de este manual.
Para reducir el riesgo de quemaduras, descargas eléctricas, incendio, lesiones o exposición a energía de microondas
excesiva:
4 49-80737 Rev. 2
GUARDE ESTAS INSTRUCCIONES
INFORMACIÓN IMPORTANTE DE SEGURIDAD
LEA TODAS LAS INSTRUCCIONES ANTES DE USAR ESTE
INFORMACIÓN DE SEGURIDAD (Horno Superior)
ADVERTENCIA
ARQUEO VOLTAICO
Se pueden producir arqueos voltaicos al cocinar con microondas. Si nota que ocurre arqueo voltaico, apriete el botón táctil
Clear/Off (Borrar/ Apagar) y corrija el problema.
El arqueo voltaico es el término técnico que define las chispas en el horno. El arqueo voltaico es causado por:
Ŷ 0HWDOROiPLQDGHPHWDOHQFRQWDFWRFRQHOFRVWDGRGHO
horno.
Ŷ /iPLQDGHPHWDOPROGHDGDDODOLPHQWRORVERUGHV
doblados hacia arriba actúan como antenas).
Ŷ 8WLOLFHODOiPLQDGHPHWDOVHJ~QODVUHFRPHQGDFLRQHVGH
este manual.
Ŷ 8WHQVLOLRVGHPHWDOXVDGRVGXUDQWHODFRFFLyQFRQ
microondas.
Ŷ 0HWDOWDOFRPRWLULWDVPHWiOLFDVGHVHJXULGDGVXMHWDGRUHV
para carne de ave o platos con borde de oro en el horno.
Ŷ 7RDOODVGHSDSHOUHFLFODGRTXHFRQWHQJDQSHGD]RVGH
metal pequeños que se utilizan en el horno.
ADVERTENCIA
AVISO: MARCAPASOS
/DPD\RUtDGHORVPDUFDSDVRVVHHQFXHQWUDQSURWHJLGRVFRQWUDODLQWHUIHUHQFLDGHSURGXFWRVHOHFWUyQLFRVLQFOX\HQGRORV
microondas. Sin embargo, los pacientes que tengan marcapasos deberían consultar a sus médicos si tienen alguna duda.
ADVERTENCIA
INSTRUCCIONES GENERALES DE SEGURIDAD (Cont.)
Ŷ 3DUDUHGXFLUHOULHVJRGHLQFHQGLRGHQWURGHOKRUQR
No cocine excesivamente los alimentos. Vigile
cuidadosamente el aparato cuandose coloque papel,
plástico u otros materiales combustibles dentro del
microondas mientras se cocina.
Quite las tiritas de seguridad (twist-ties) y asas
metálicas de los recipientes de papel o plástico antes
de colocarlos dentro del microondas.
No utilice el horno para propósitos de
almacenamiento. No deje productos de papel,
utensilios de cocina ni comestibles dentro del horno
cuando no se utilicen.
Si los materiales que se encuentran dentro del
horno prenden fuego, mantenga la compuerta del
microondas cerrada, apague el horno y corte el
suministro eléctrico a nivel del fusible o del panel de
interruptores de su hogar. Puede propagar el fuego si
abre la compuerta del microondas.
No utilice las funciones del sensor dos veces
sucesivamente en la misma porción de alimento. Si
el alimento no se cocina completamente después del
SULPHUFRQWHRUHJUHVLYRXWLOLFHODIXQFLyQ&22.%<
TIME (COCINAR POR TIEMPO) para permitir tiempo
de cocción adicional.
Ŷ 1RKDJDIXQFLRQDUHOKRUQRVLQWHQHUFRORFDGDHQVX
OXJDUODEDVHJLUDWRULD/DEDVHJLUDWRULDGHEHHVWDUOLEUH
de bloqueos para poder girar.
Ŷ (QWUHODVVXSHUILFLHVSRWHQFLDOPHQWHFDOLHQWHVVHLQFOX\HOD
compuerta, base, paredes, parrilla y base giratoria del horno.
Ŷ 1RGHVFRQJHOHEHELGDVHQERWHOODVFRQFXHOORVDQJRVWRV
(especialmente bebidas gaseosas/carbonatadas). Incluso
si el recipiente se encuentra abierto, se puede acumular
presión. Esto puede ocasionar que el recipiente explote,
dando posiblemente como resultando una lesión.
Ŷ /RVDOLPHQWRVFRFLQDGRVHQOtTXLGRVWDOHVFRPRODSDVWD
pueden tener la tendencia de hervir más rápidamente que
los alimentos que contienen menos humedad. En caso de
que ocurra esto, consulte la sección de Mantenimiento y
limpieza del horno para las instrucciones de cómo limpiar
el interior del horno.
Ŷ /RVDOLPHQWRVFDOLHQWHV\HOYDSRUSXHGHQSURYRFDU
quemaduras. Tenga cuidado al abrir cualquier tipo de
recipiente que contenga alimentos calientes, incluyendo
bolsas de palomitas de maíz, bolsas y cajas de cocina.
Para prevenir la posibilidad de lesiones, dirija el vapor en
dirección contraria a las manos y el rostro.
Ŷ 1RFRFLQHODVSDSDVH[FHVLYDPHQWH3XHGHQ
deshidratarse y provocar fuego, causando daños al horno.
Ŷ (YLWHFDOHQWDUORVDOLPHQWRVSDUDEHEpHQIUDVFRVGH
vidrio, incluso sin la tapa. Asegúrese de cocinar bien toda
la comida del bebé. Remueva los alimentos para distribuir
el calor uniformemente. Tenga cuidado de evitar las
escaldaduras al calentar la fórmula. El recipiente puede
sentirse más frío de lo que la fórmula realmente está.
Revise siempre la fórmula antes de alimentar al bebé.
Ŷ 1XQFDLQWHQWHIUHtUHQDEXQGDQWHDFHLWHHQHOPLFURRQGDV
49-80737 Rev. 2 5
GUARDE ESTAS INSTRUCCIONES
INFORMACIÓN IMPORTANTE DE SEGURIDAD
LEA TODAS LAS INSTRUCCIONES ANTES DE USAR
INFORMACIÓN DE SEGURIDAD (Horno Superior)
ADVERTENCIA
ALIMENTOS
Ŷ &XDQGRXWLOLFHHOPLFURRQGDVFRORTXHWRGRVORVDOLPHQWRV
y contenedores en la bandeja de vidrio transparente.
Ŷ 1RFRFLQHSDORPLWDVGHPDt]HQHOKRUQRDPHQRVTXH
se coloquen en un accesorio de palomitas de maíz para
microondas especial o a menos que utilice palomitas de
maíz aptas para hornos de microondas.
Ŷ 1RKLHUYDKXHYRVHQHVWHKRUQR6HDFXPXODUiSUHVLyQ
dentro de la yema del huevo y causará que explote,
posiblemente causando lesiones.
Ŷ 1RSRQJDDIXQFLRQDUHOKRUQRVLQDOLPHQWRVHQHOLQWHULRU
Esto podría dañar el horno. Aumenta el calor alrededor
del magnetrón y puede acortar la vida útil del microondas.
Ŷ $OLPHQWRVFRQODFiVFDUDQRFRUWDGDFRPRSDSDV
salchichas, embutidos, tomates, manzanas, hígado de pollo
y otras menudencias y yemas de huevo deben perforarse
para permitir que el vapor escape durante la cocción.
Ŷ AGUA SOBRECALENTADA
/tTXLGRVWDOHVFRPRDJXDFDIpRWpVRQFDSDFHV
de sobrecalentarse más allá del punto de ebullición
sin parecer que estén hirviendo. No siempre hay
burbujeo o hervor visible cuando se saca el recipiente
GHOKRUQRPLFURRQGDV(67238('(5(68/7$5(1
/$(%8//,&,Ï15(3(17,1$'(/Ë48,'2608<
&$/,(17(6&8$1'26(08(9((/5(&,3,(17(
26(,16(57$81$&8&+$5$8275287(16,/,2
'(1752'(//Ë48,'2
Para reducir el riesgo de lesión física:
No sobrecaliente el líquido.
Revuelva el líquido antes y a la mitad del tiempo de
calentamiento.
No utilice recipientes con costados rectos y cuellos
angostos.
Después de calentar el recipiente, déjelo en el horno
microondas por un período corto de tiempo antes de
sacarlo.
Tenga extrema precaución cuando introduzca una
cuchara u otro utensilio en el recipiente.
6 49-80737 Rev. 2
ADVERTENCIA
Recipientes de cocina seguros diseñados para microondas
Asegúrese de utilizar recipientes de cocina adecuados durante la cocción a microondas. Se pueden utilizar la mayoría de las
cacerolas, platos para cocinar, tazas de medir, tazas normales, cerámica o loza que no tengan bordes metálicos o vidriados
con un recubrimiento metálico. Algunos recipientes de cocina se encuentran marcados como adecuados para microondas.
Ŷ /DXWLOL]DFLyQGHODEDQGHMDPHWiOLFDDQWLDGKHUHQWH
durante la cocción en microondas puede producir
resultados insatisfactorios.
Ŷ 6LQRHVWiVHJXURGHTXHVXUHFLSLHQWHGHFRFLQDVHD
adecuado para microondas, realice la siguiente prueba:
coloque en el horno el plato
que desee probar y una taza
de medida de vidrio llena con
1 taza de agua coloque la taza
junto o sobre el plato. Prenda
el microondas durante 30–45
segundos a alta potencia. Si
el plato se calienta, no debe
utilizarse en el microondas.
Si el plato permanece frío y sólo se calienta el agua de la
taza, entonces el plato es adecuado para microondas.
Ŷ /RVXWHQVLOLRVGHFRFLQDSXHGHQWRUQDUVHPX\FDOLHQWHV
debido a la transferencia de calor proveniente de los
alimentos calentados. Podrían requerirse guantes de
cocina para manipular los recipientes de cocina.
Ŷ 1RXWLOLFHSURGXFWRVGHSDSHOUHFLFODGR/DVWRDOODV
servilletas y papel encerado fabricados de material
reciclado pueden contener partículas metálicas que
pueden causar arqueo voltaico o prender fuego. Se deben
evitar los productos de papel que contienen nylon o
filamentos de nylon, ya que también pueden incendiarse.
Ŷ 8WLOLFHODVOiPLQDVPHWiOLFDV~QLFDPHQWHFRPRVHLQGLFD
en este manual. Cuando utilice la lámina de metal en el
KRUQRPDQWHQJDODOiPLQDSRUORPHQRVƎDOHMDGDGHORV
costados del horno.
Ŷ 1RXWLOLFHHOKRUQRSDUDVHFDUSHULyGLFRV
Ŷ 6LXWLOL]DXQWHUPyPHWURGHFDUQHPLHQWUDVFRFLQD
asegúrese que sea seguro para utilizarse en hornos
microondas.
Ŷ $OJXQDVEDQGHMDVGHHVSXPDFRPRDTXHOODVHQODVTXH
se empaca la carne) tienen una tirita de metal delgada
empotrada en la parte inferior. Cuando se cocinan con
microondas, el metal puede quemar el fondo del horno o
hacer que arda una toalla de papel.
Ŷ 6HSXHGHXWLOL]DUWRDOODVGHSDSHOSDSHOHQFHUDGR\ODV
envolturas plásticas para cubrir los platos con el propósito
de mantener la humedad y prevenir los salpicones.
Asegúrese de ventilar cortando la envoltura plástica para
que pueda escapar el vapor.
Ŷ 1RWRGDVODVFXELHUWDVSOiVWLFDVVRQDGHFXDGDVSDUD
KRUQRVPLFURRQGDV/HDHQODFDMDODVLQVWUXFFLRQHV
correspondientes.
Ŷ 6HGHEHQFRUWDUSHUIRUDURYHQWLODUFRPRVHLQGLFDHQOD
caja las bolsas de cocina “hervibles” y bolsas plásticas
cerradas herméticamente. De lo contrario, el plástico
puede reventarse durante o inmediatamente después de
la cocción, resultando en una posible lesión. También,
los recipientes de almacenamiento plásticos deben al
menos estar parcialmente descubiertos debido a que
forman un sello muy ajustado. Al cocinar con recipientes
cubiertos con envoltura plástica de manera muy ajustada,
quite cuidadosamente la cubierta y dirija el vapor fuera y
alejado de manos y rostro.
Ŷ 5HFLSLHQWHVGHFRFLQDSOiVWLFRV²/RVUHFLSLHQWHVGH
cocina diseñados para microondas son muy útiles, pero
deben utilizarse con cuidado. Incluso el plástico diseñado
para microondas podría no tolerar condiciones de sobre
cocción, así como los materiales de vidrio o cerámica
y podrían suavizarse o carbonizarse si se exponen a
períodos cortos de sobre cocción. En exposiciones
más prolongadas a la sobrecocción, los alimentos y los
recipientes de cocina podrían coger fuego.
Siga las siguientes pautas:
1. Utilice plásticos seguros para microondas únicamente y
utilícelos estrictamente según las especificaciones del
fabricante.
2. No cocine en el microondas recipientes vacíos.
3. No permita que los niños utilicen recipientes de plástico
sin vigilarlos bien.
Cómo probar si un envase
es seguro para usarse en
un horno de microondas
GUARDE ESTAS INSTRUCCIONES
INFORMACIÓN IMPORTANTE DE SEGURIDAD
LEA TODAS LAS INSTRUCCIONES ANTES DE USAR
INFORMACIÓN DE SEGURIDAD (Horno Superior)
/Dbase giratoria
siempre debe estar
colocada en su lugar
cuando se utiliza el horno.
/Dbandeja de cristal
transparente siempre
deberá estar en su lugar
cuando se cocina con
microondas.
49-80737 Rev. 2 7
GUARDE ESTAS INSTRUCCIONES
INFORMACIÓN IMPORTANTE DE SEGURIDAD
LEA TODAS LAS INSTRUCCIONES ANTES DE USAR
INFORMACIÓN DE SEGURIDAD (Horno Inferior)
ADVERTENCIA
/HDWRGDVODVLQVWUXFFLRQHVGHVHJXULGDGDQWHVGHXWLOL]DUHVWHSURGXFWR1RVHJXLUHVWDVLQVWUXFFLRQHV
puede generar un incendio, una descarga eléctrica, lesiones corporales o la muerte.
ADVERTENCIA
INSTRUCCIONES GENERALES DE SEGURIDAD
Ŷ 8VHHVWHHOHFWURGRPpVWLFRVyORSDUDVXSURSyVLWRRULJLQDO
como se describe en el Manual del Propietario.
Ŷ 6ROLFLWHTXHXQLQVWDODGRUFDOLILFDGRLQVWDOHVX
electrodoméstico y que esté adecuadamente conectado
a tierra, de acuerdo con las instrucciones de instalación
provistas.
Ŷ 1RLQWHQWHUHSDUDURUHHPSOD]DUQLQJXQDSDUWHGHOKRUQR
a menos que se recomiende específicamente en este
manual. Cualquier otra reparación deberá ser realizada
por un técnico calificado.
Ŷ $QWHVGHUHDOL]DUFXDOTXLHUVHUYLFLRWpFQLFRGHVFRQHFWHHO
suministro de corriente desde el panel de distribución del
hogar, retirando el fusible o desconectando el disyuntor.
Ŷ 1RGHMHDORVQLxRVVRORV±QRVHGHEHUiGHMDUDORV
niños solos o fuera de su radio de atención en el área
donde el electrodoméstico se encuentre en uso. Nunca
se les deberá permitir trepar, sentarse o pararse sobre
ninguna parte del electrodoméstico.
Ŷ
PRECAUCIÓN
No coloque artículos de interés
para los niños sobre los gabinetes que están sobre un
horno si los niños se trepan sobre el horno para llegar
a estos artículos podrían sufrir lesiones graves.
Ŷ 8VHVyORPDQJRVGHROODVVHFDV±ORVPDQJRVK~PHGRV
sobre superficies calientes pueden producir quemaduras
debido al vapor. No deje que los mangos de las ollas
toquen los elementos que están calientes. No use una
toalla u otra tela voluminosa para reemplazar el mango
de las cacerolas.
Ŷ 1XQFDXVHHOHOHFWURGRPpVWLFRSDUDFDOHQWDUR
calefaccionar la habitación.
Ŷ 1RWRTXHHOHOHPHQWRFDOHQWDGRUQLODVXSHUILFLHLQWHULRU
del horno. Es posible que estas superficies estén
demasiado calientes como para quemar, aunque su
color sea oscuro. Durante y después del uso, no toque ni
permita que telas u otros materiales inflamables toquen
cualquier área interior del horno; espere a que haya
pasado un tiempo suficiente para que se enfríen. Otras
superficies del electrodoméstico se podrán calentar lo
VXILFLHQWHFRPRSDUDRFDVLRQDUOHVLRQHV/DVVXSHUILFLHV
potencialmente calientes incluyen la abertura de la
ventilación del horno, superficies cercanas a la abertura y
grietas alrededor de la puerta del horno.
Ŷ 1RFDOLHQWHHQYDVHVGHFRPLGDTXHQRKD\DQVLGR
abiertos. Se podría acumular presión y el envase podría
explotar, ocasionando una lesión.
Ŷ 1RXVHQLQJ~QWLSRGHDOXPLQLRRFREHUWRUSDUDFXEULU
el fondo del horno o cualquier parte del horno, excepto
FRPRVHGHVFULEHHQHVWHPDQXDO/RVFREHUWRUHVGH
horno pueden atrapar el calor o derretirse, ocasionando
daños sobre el producto y el riesgo de descargas, humo
o incendios.
Ŷ (YLWHODVUDOODGXUDVRLPSDFWRVVREUHODVSXHUWDVGHYLGULR
o los paneles de control. Hacer esto podrá producir la
rotura de vidrios. No cocine sobre ni en un producto con
un vidrio roto. Es posible que se produzcan descargas,
incendios o cortes.
Ŷ &RFLQHFDUQHV\FDUQHVGHDYHHQIRUPDFRPSOHWD±OD
carne por lo menos a una temperatura interna de 160º F
y la carne de ave por lo menos a una temperatura interna
de 180º F. Normalmente la cocción a estas temperaturas
es una protección contra las enfermedades transmitidas
por la comida.
ADVERTENCIA
MANTENGA LOS MATERIALES INFLAMABLES ALEJADOS DE LA COCINA
Si esto no se cumple, se podrán sufrir lesiones personales graves o incendios.
Ŷ 1RDOPDFHQHRXWLOLFHPDWHULDOHVLQIODPDEOHVGHQWURGH
un horno o cerca de la estufa, tales como papel, plástico,
agarraderas, telas, recubrimientos de pared, cortinas y
gasolina u otros vapores y líquidos inflamables.
Ŷ 1XQFDXVHYHVWLPHQWDVKROJDGDVRDPSOLDVPLHQWUDV
utilice el aparato. Estas vestimentas pueden prenderse
fuego si entran en contacto con superficies calientes,
provocando quemaduras graves.
Ŷ 1RSHUPLWDTXHODJUDVDGHODFRFFLyQXRWURVPDWHULDOHV
inflamables se acumulen dentro de la cocina o en su
FHUFDQtD/DJUDVDGHQWURGHOKRUQRRVREUHODHVWXID
puede encenderse.
8 49-80737 Rev. 2
GUARDE ESTAS INSTRUCCIONES
INFORMACIÓN IMPORTANTE DE SEGURIDAD
LEA TODAS LAS INSTRUCCIONES ANTES DE USAR
INFORMACIÓN DE SEGURIDAD (Horno Inferior)
ADVERTENCIA
INSTRUCCIONES DE SEGURIDAD DEL HORNO
Ŷ 0DQWpQJDVHDOHMDGRGHOKRUQRDODEULUODSXHUWDGHO
mismo. El aire caliente o el vapor que sale puede causar
quemaduras en las manos, rostro y/u ojos.
Ŷ 0DQWHQJDGHVREVWUXLGDODYHQWLODFLyQGHOKRUQR
Ŷ 0DQWHQJDHOKRUQROLEUHGHDFXPXODFLyQGHJUDVD/D
grasa del horno se puede incendiar.
Ŷ &RORTXHORVHVWDQWHVGHOKRUQRHQODXELFDFLyQGHVHDGD
mientras éste se encuentra frío. Si es necesario mover
el estante mientras el horno está caliente, evite que
el mango de la olla tenga contacto con el elemento
calentador en el horno.
Ŷ $OXVDUODVEROVDVSDUDFRFLQDURGRUDUHQHOKRUQRVLJD
las instrucciones del fabricante.
Ŷ (VFRQYHQLHQWHHPSXMDUKDFLDDIXHUDORVHVWDQWHV
estándares hasta el tope o empujar el estante extensible
hasta la posición completamente abierta para levantar
comidas pesadas. Esto también es una precaución contra
quemaduras por tocar superficies calientes de la puerta o
las paredes del horno.
Ŷ 1RGHMHSURGXFWRVWDOHVFRPRSDSHOXWHQVLOLRVGHFRFLQDQL
comida en el horno cuando éste no se encuentre en uso.
/RVDUWtFXORVJXDUGDGRVHQHOKRUQRVHSXHGHQLQFHQGLDU
Ŷ 1XQFDFRORTXHORVXWHQVLOLRVGHFRFLQDSLHGUDVSDUD
pizza u horneado o cualquier otro tipo de aluminio o
cobertor en la base del horno. Estos ítems pueden
atrapar el calor o derretirse, ocasionando daños sobre el
producto y el riesgo de descargas, humo o incendios.
ADVERTENCIA
INSTRUCCIONES DE SEGURIDAD DEL HORNO CON LIMPIEZA AUTOMÁTICA
/DIXQFLyQGHOLPSLH]DDXWRPiWLFDXVDHOKRUQRHQWHPSHUDWXUDVORVXILFLHQWHPHQWHDOWDVFRPRSDUDFRQVXPLUODVXFLHGDGGH
comida que haya dentro del horno. Para un funcionamiento seguro, siga estas instrucciones.
Ŷ 1RWRTXHODVVXSHUILFLHVGHOKRUQRGXUDQWHHOFLFORGH
limpieza automática. Mantenga a los niños alejados del
horno durante la limpieza automática. Si no se siguen
estas instrucciones, se podrán producir quemaduras.
Ŷ $QWHVGHXVDUHOFLFORGHOLPSLH]DDXWRPiWLFDGHOKRUQR
retire los estantes de color gris brillante (en algunos
modelos), la sonda, cualquier papel de aluminio, y
cualquier bandeja para asar, rejilla, u otros utensilios.
Sólo se pueden dejar dentro del horno los estantes para
horno cubiertos de porcelana.
Ŷ $QWHVGHXWLOL]DUHOFLFORGHOLPSLH]DDXWRPiWLFDOLPSLH
la grasa y restos de comida que haya en el horno. Una
cantidad excesiva de grasa se puede incendiar, lo cual
puede producir daños con humo en su hogar.
Ŷ 6LHOPRGRGHOLPSLH]DDXWRPiWLFDIXQFLRQDGHIRUPD
incorrecta, apague el horno y desconecte el suministro de
corriente. Solicite el servicio de un técnico calificado.
Ŷ 1ROLPSLHODMXQWDGHODSXHUWD/DMXQWDGHODSXHUWDHV
esencial para un buen sellado. Se debe tener cuidado de
no frotar, dañar ni mover la junta.
Ŷ 1RXVHOLPSLDGRUHVSDUDKRUQR1RVHGHEHUiXVDU
limpiadores comerciales para horno ni revestimientos de
protección para hornos de ningún tipo en o alrededor de
cualquier parte del horno.
ADVERTENCIA
EN CASO DE INCENDIO, SIGA LOS SIGUIENTES PASOS
PARA EVITAR LA PROPAGACIÓN DEL FUEGO
Ŷ 1RXVHDJXDVREUHHOIXHJRGHODJUDVD1XQFDWRPHXQD
olla que se esté incendiando.
Ŷ 6LKD\XQLQFHQGLRHQHOKRUQRGXUDQWHHOKRUQHDGR
ahogue el fuego cerrando la puerta del horno y apagando
el mismo o usando un químico seco multipropósito o un
extintor de incendio con espuma.
Ŷ (QFDVRGHTXHKD\DIXHJRHQHOKRUQRGXUDQWHHOFLFOR
de limpieza automática, apague el horno y espere a que
el fuego se extinga. No fuerce la puerta para abrirla.
/DHQWUDGDGHDLUHIUHVFRVREUHODVWHPSHUDWXUDVGHOD
limpieza automática podrá conducir a la producción de
llamas en el horno. Si no se siguen estas instrucciones,
se podrán producir quemaduras graves.
49-80737 Rev. 2 9
GUARDE ESTAS INSTRUCCIONES
Cómo Retirar la Película Protectora de Envío y la Cinta de Embalaje
Con cuidado tome un extremo de la película protectora
de envío con los dedos y lentamente retire la misma de la
superficie del electrodoméstico. No utilice ningún producto
filoso para retirar la película. Retire toda la película antes de
usar el electrodoméstico por primera vez.
Para asegurar que no haya daños sobre el acabado del
producto, la forma más segura de retirar el adhesivo de la cinta
de embalaje en electrodomésticos nuevos es aplicando un
detergente líquido hogareño para lavar platos. Aplique con una
tela suave y deje que se seque.
NOTA: El adhesivo deberá ser eliminado de todas las partes.
No se puede retirar si se hornea con éste dentro.
DECLARACIÓN DE LA FCC SOBRE INTERFERENCIA DE FRECUENCIAS RADIALES
Este equipo genera y usa potencia de frecuencia ISM y si no
es instalado y usado de forma adecuada, en cumplimiento
estricto con las instrucciones del fabricante, se podrán
ocasionar interferencias en la recepción de radio y televisión.
Se realizó una evaluación por tipo y se encontró en
cumplimiento con los límites de un equipo ISM, de acuerdo
con la parte 18 de las Reglas FCC, que fueron diseñadas para
brindar una protección razonable contra dichas interferencias
en una instalación residencial. Sin embargo, no se garantiza
que no se presenten interferencias en una instalación en
particular. Si el equipo provoca interferencias en la recepción
de radio o televisión, lo que se puede determinar encendiendo
y apagando el equipo, se aconseja al usuario que intente
corregir la interferencia a través de una o más de las
siguientes medidas:
Ŷ 5HRULHQWHODDQWHQDUHFHSWRUDGHUDGLRRWHOHYLVLyQ
Ŷ 5HXELTXHHOKRUQRPLFURRQGDVFRQUHVSHFWRDOUHFHSWRU
Ŷ 8ELTXHHOKRUQRPLFURRQGDVHQXQDSRVLFLyQDOHMDGDGHO
receptor.
Ŷ (QFKXIHHOKRUQRPLFURRQGDVHQXQWRPDFRUULHQWHGLIHUHQWH
de modo que el horno microondas y el receptor estén en
diferentes circuitos de empalmes.
El fabricante no es responsable por cualquier interferencia de
radio o TV ocasionada por una modificación no autorizada
sobre este horno microondas. Es responsabilidad del usuario
corregir dicha interferencia.
INFORMACIÓN IMPORTANTE DE SEGURIDAD
LEA TODAS LAS INSTRUCCIONES ANTES DE USAR ESTE ELECTRODOMÉSTICO
INFORMACIÓN DE SEGURIDAD
10 49-80737 Rev. 2
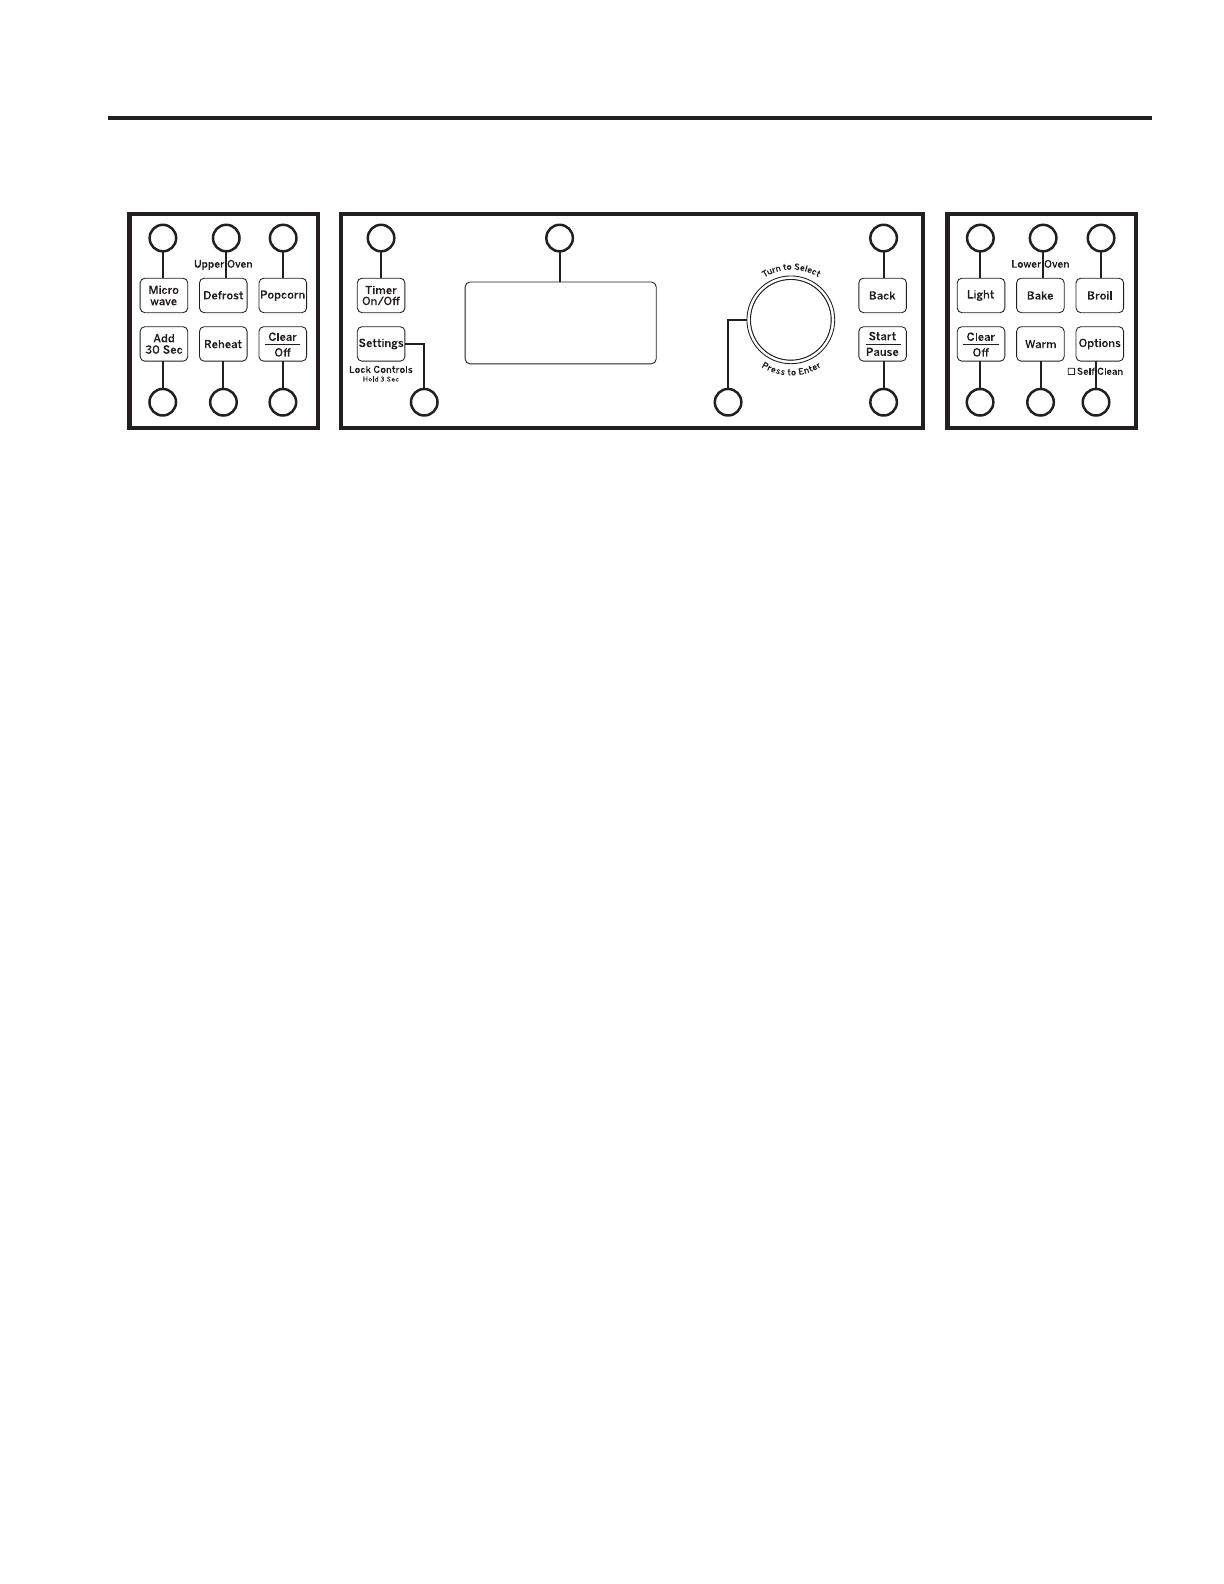
USO DEL HORNO: Controles del Horno
Controles Comunes
Controles del
Horno Superior
Controles del
Horno Inferior
Controles del Horno
Controles Comunes
1. Timer On/Off (Temporizador Encendido/
Apagado):
Funciona como un temporizador con cuenta regresiva:
Presione la tecla Timer On/Off (Temporizador Encendido/ Apagado),
seleccione el tipo de temporizador (horas y minutos o minutos y
segundos), use el dial de selección para configurar la hora, y presione
el dial del selector para iniciar la cuenta regresiva del temporizador.
El horno continuará funcionando cuando la cuenta regresiva del
temporizador se haya completado. Para apagar el temporizador,
presione la tecla Timer On/Off (Temporizador Encendido/ Apagado).
2. Settings/Lock Controls (Controles de
Configuraciones/ Bloqueo):
%XVTXHODVRSFLRQHVGHOKRUQR
para: Help (Ayuda), Clock Settings (Configuraciones del Reloj), Display
Mode (Modo de Pantalla), Auto Conversion (Conversión Automática), Auto
6KXW2II$SDJDGR$XWRPiWLFR%HHSHU9ROXPH9ROXPHQGHO3LWLGR
Reminder (Recordatorio), Temperature Units (Unidades de Temperatura),
Thermostat Adjust (Ajustar el Termostato) y Oven Information (Información
del Horno) bajo esta selección. Para más detalles, consulte la sección
Oven Settings (Configuraciones del Horno). Mantenga presionada la
tecla Settings (Configuraciones) durante 3 segundos para bloquear o
desbloquear los controles. Esto bloquea el control, de modo que al presionar
ODVWHFODVGHFRQWUROQRVHDFWLYHHVWDIXQFLyQ/DIXQFLyQ&OHDU2II%RUUDU
Apagar) siempre está activa, incluso cuando el control está bloqueado.
3. Selector Dial (Dial de Selección): El dial de selección se
usa tanto para el horno superior como para el inferior. Gire el dial para
seleccionar las configuraciones del horno, opciones del horno superior/
inferior y opciones de cocción, y luego presione el mismo para confirmar
la selección. Gire el dial para incrementar o reducir las temperaturas o
el tiempo y luego presione el mismo para configurar la temperatura o el
tiempo configurados.
4. Back (Retroceder): Presione esta tecla para ir hacia atrás en un
nivel del menú en la pantalla.
5. Start/Pause (Iniciar/ Pausar): Presione la tecla Start/
Pause (Iniciar/ Pausar) para iniciar cualquier función de cocción,
limpieza o con temporizador. Presione la tecla Start/Pause (Iniciar/
Pausar) para pausar cualquier función del horno superior.
6. Display (Pantalla): /DLQIRUPDFLyQVREUHHOKRUQRVXSHULRU\HO
horno inferior se muestra en la ventana de esta pantalla.
Controles del Horno Superior
7. Microwave (Cocinar con Microondas):
Presione
la tecla Microwave (Cocinar con Microondas) para acceder a las
opciones de cocción con microondas. Use el dial de selección para
buscar la opción de cocción con microondas deseada y presione el dial
SDUDVHOHFFLRQDUODPLVPD/DVRSFLRQHVGLVSRQLEOHVLQFOX\HQ&RRN
by Time (Cocinar por Tiempo), Cook (Cocinar), Defrost (Descongelar),
%HYHUDJH%HELGD3RSFRUQ3DORPLWDVGH0Dt]0HOW'HUUHWLU5HKHDW
(Recalentar), Simmer (Hervir) y Soften (Ablandar). Use la bandeja de
vidrio trasparente y el utensilio para uso seguro en el microondas al usar
las funciones de cocción con microondas. Para más detalles, consulte la
sección de Cocción con microondas en el horno superior.
8. Add 30 Sec (Agregar 30 Segundos): Presione la
tecla Add 30 Sec (Agregar 30 Segundos) de tiempo de cocción en
el microondas. Cada vez que se presiona esta tecla, se suman 30
segundos al tiempo de cocción restante. El horno se inicia de inmediato.
9. Defrost (Descongelar): Presione la tecla Defrost
(Descongelar) para descongelar, gire el dial para seleccionar el
tipo de descongelación y presione el dial para hacer la selección.
El tipo de descongelación disponible incluye: Defrost by Food Type
(Descongelación por Tipo de Comida), Defrost by Time (Descongelación
por Tiempo), Defrost by Weight (Descongelación por Peso), 1.0 lb. Quick
Defrost (Descongelación Rápida), Melt (Derretir), y Soften (Ablandar).
Para más información, consulte la sección Cocinar con el Microondas.
10. Reheat (Recalentar): Presione la tecla Reheat (Recalentar)
para recalentar, gire el dial para seleccionar el tipo de comida que
GHVHDUHFDOHQWDU\SUHVLRQHHOGLDOSDUDKDFHUODVHOHFFLyQ/RVWLSRV
de comidas disponibles en la función Reheat (Recalentar) incluyen:
%HYHUDJH%HELGD&DVVHUROH&D]XHOD&KLFNHQ3ROOR3DVWD3DVWD
Pizza (Pizza), Plate of Food (Plato de Comida), Rice (Arroz), Soup
6RSD6WHDNV&KRSV%LIHV&RVWLOODV\9HJHWDEOHV9HUGXUDV
11. Popcorn (Palomitas de Maíz): Presione la tecla Popcorn
(Palomitas de Maíz) para cocinar palomitas de maíz con el microondas;
SUHVLRQHHOGLDOSDUDKDFHUODVHOHFFLyQ/DIXQFLyQ3RSFRUQ3DORPLWDV
de Maíz) es una función con sensor de microondas y detecta de forma
automática cuándo las palomitas de maíz están hechas y se apaga
automáticamente. No use las funciones del sensor dos veces seguidas
con la misma porción de comida.
12. Clear/Off (Borrar/ Apagar): /DWHFOD&OHDU2II%RUUDU
Apagar) cancela TODOS los programas del horno superior, excepto el
reloj y el temporizador.
Controles del Horno Inferior
13. Light (Luz):
Presione la tecla Light (Luz) para encender o apagar
la luz del horno en el horno inferior. Observe que la luz del horno inferior
no se encenderá si éste se encuentra en el modo de limpieza.
14. Bake (Hornear): Presione la tecla Bake (Hornear) para hornear,
gire el dial para seleccionar la temperatura de horneado y presione el
dial para hacer la selección.
15. Broil (Asar): Presione la tecla Broil (Asar) para asar, gire el dial para
VHOHFFLRQDU+L/R$OWR%DMR\SUHVLRQHHOGLDOSDUDKDFHUODVHOHFFLyQ
16. Options (Opciones): %XVTXHODVIXQFLRQHV'HOD\6WDUW
5HWUDVDU,QLFLR3URRI/HXGDU6DEEDWK6DEiWLFR6HOI&OHDQ
/LPSLH]D$XWRPiWLFD6WHDP&OHDQ/LPSLH]DFRQ9DSRU\:DUP
(Calentar) en esta selección. Para más detalles, consulte la sección
Oven Options (Opciones del Horno).
17. Warm (Calentar): Presione la tecla Warm (Calentar) para
calentar; presione el dial para hacer la selección. No use la función
Warm (Calentar) para cocinar o calentar comida fría. Para más
información, consulte la sección de Modos de Cocción.
18. Clear/Off (Borrar/ Apagar): /DWHFOD&OHDU2II%RUUDU
Apagar) cancela TODOS los programas del horno inferior, excepto el
reloj y el temporizador.
10 12 18 1617
11 13 14 15
179 6 4
582 3
49-80737 Rev. 2 11
Ayuda
Use esta función para saber más sobre su horno y sus
funciones, presionando la tecla Settings (Configuraciones)
y seleccionando Help (Ayuda). Gire el dial de selección y
presione el mismo para seleccionar la función sobre la cuál
desee saber más.
NOTA: Es posible que su horno no cuente con todas las
funciones de ayuda. A continuación figuran funciones de la
función Help (Ayuda):
Clock Settings (Configuraciones del Reloj)
Use esta función para configurar la hora del día y para especificar
cómo ésta será exhibida. Puede seleccionar el reloj estándar de
12 horas (12 hrs.) o el reloj militar de 24 horas (24 hrs.). El reloj
deberá ser configurado antes del primer uso del horno.
Display Mode (Modo de Pantalla)
Use esta función para configurar el modo de pantalla Power
Saver (Ahorro de Energía) o Display Always (Mostrar Siempre).
Auto Shut-Off (Apagado Automático)
Use esta función para activar/ desactivar la función Auto
Shut-Off (Apagado Automático). Activar la función Auto Shut-
Off (Apagado Automático) apagará el horno inferior luego de
12 horas de funcionamiento continuo. Esta configuración de
fábrica para la función Auto Shut-Off (Apagado Automático)
está activada. Cuando esté en el modo Sabbath (Sabático), la
función Auto Shut-Off (Apagado Automático) será desactivada.
Beeper Volume (Volumen del Pitido)
Use esta función para configurar el volumen del pitido en Mute
(Mudo) o Normal (Normal).
NOTA: Algunos tonos no se pueden enmudecer.
Reminder (Recordatorio)
Use esta función con Set (Configurar), Review (Revisar), o
&OHDU5HPLQGHU%RUUDU5HFRUGDWRULR
Temperature Units (Unidades de
Temperatura)
Use esta función para configurar la unidad de temperatura en
pantalla a ºF (Fahrenheit) o ºC (Celsius).
Thermostat Adjust (Ajustar el Termostato)
Esta función permite que la temperatura de horneado del
horno y de horneado por convección sean ajustadas hasta
35ºF más caliente o 35ºF más fría en el horno inferior. El
horno superior no puede ser ajustado. Use esta función si
piensa que la temperatura de su horno es demasiado caliente
o demasiado fría y desea modificarla. Este ajuste afecta los
PRGRV%DNH+RUQHDU\&RQYHFWLRQ%DNH+RUQHDUSRU
Convección). Ningún otro modo de cocción se ve afectado.
Oven Information (Información del Horno)
Esta función muestra el modelo y número de serie del horno.
Configuraciones del Horno
USO DEL HORNO: Configuraciones del Horno
Funciones que se encuentran en la función HELP (AYUDA).
Adding Time
(Añadir Tiempo)
Defrost by Weight
(Descongelación
por Peso)
Start/Pause (Iniciar/
Pausar)
Auto Convection
(Convección
Automática)
'HOD\6WDUW/RZHU
(Retrasar Inicio)
(Inferior)
Steam Clean
/LPSLH]DDO9DSRU
Auto Shut-Off (Apagado
Automático)
Display Mode
(Modo de Pantalla)
Temperature Units
(Unidades de
Temperatura)
%DFN5HJUHVDU Edit (Editar) Thermostat Adjust
(Ajustar el Termostato)
%DNH+RUQHDU Help (Ayuda) Timer On/Off
(Temporizador
Encendido/ Apagado)
%HHSHU9ROXPH
(Volumen del Pitido)
Melt (Derretir) Toast (Tostar)
%HYHUDJH%HELGD Micro 30 Secs (30 seg.
de Microondas)
Warm (Calentar)
%URLO$VDU Microwave (Cocinar con
Microondas)
Clear/Off
%RUUDU$SDJDU
My Recipes
(Mis recetas)
Clock (Reloj) Probe (Sonda)
&RQWURO/RFNRXW
%ORTXHRGHO&RQWURO
3URRI/HXGDU
Cook (Cocinar) Reheat (Recalentar)
Cook by Food
(Cocción por Comida)
Reminder
(Recordatorio)
Cook by Time
(Cocinar por Tiempo)
5HSHDW/DVW5HSHWLUHO
Último Paso)
Cook by Time 1 & 2
(Cocinar por Tiempo
1 y 2)
Resume (Reiniciar)
Cooking Options
/RZHU
(Opciones de Cocción)
(Inferior)
Sabbath (Sabático)
Cooking Options
(Upper)
(Opciones de Cocción)
(Superior)
6HOI&OHDQ/LPSLH]D
Automática)
Defrost (Descongelar) Sensor Cooking
(Cocción por Sensor)
Defrost by Food
(Descongelar por
Comida)
Simmer (Hervir)
Defrost by Time
(Descongelación por
Tiempo)
Soften (Ablandar)
Speed Cook
(Cocción Rápida)
12 49-80737 Rev. 2
Opciones del Horno
USO DEL HORNO: Opciones del Horno
Opciones del Horno Inferior
Delay Start (Iniciar con Retraso)
8VHHVWDIXQFLyQSDUDUHWUDVDUHOLQLFLRGHODVIXQFLRQHV%DNH
+RUQHDUR6HOI&OHDQ/LPSLH]D$XWRPiWLFD3DUDXVDUHVWD
función, seleccione Delay Start (Iniciar con Retraso) y configure
la hora de inicio, y luego seleccione el modo de cocción.
También puede usar la función Delay Start (Iniciar con Retraso),
PLHQWUDVSURJUDPDXQDIXQFLyQGHFRFFLyQFRQ%DNH+RUQHDU
Proof (Leudar)
Use esta función para leudar masa. Para más detalles,
consulte los Modos de Cocción en el Horno Inferior.
Sabbath (Modo Sabático)
Use esta función para ingresar el modo Sabbath (Sabático).
Este modo configura el horno para el Festejo Sabático Judío y
Feriados. Esta función cumple con los requisitos de la Estrella
K del Festejo Sabático Judío. El modo sabático desactiva las
luces del horno (la luz del horno no se encenderá cuando la
puerta sea abierta), todos los sonidos (el control no emitirá
ningún pitido cuando un botón sea presionado, pero emitirá
un pitido si ciertas fallas del horno se producen), y todas las
IXQFLRQHVGHOKRUQRVXSHULRUHLQIHULRUH[FHSWR%DNH+RQHDU
en el horno inferior. Durante el modo Sabbath (Sabático) sólo
%DNH+RUQHDUHQHOKRUQRLQIHULRUHVWiGLVSRQLEOH'XUDQWH
este modo, luego de configurar/ modificar una temperatura
de horneado, un retraso al azar de aproximadamente entre
30 segundos y 1 minuto se producirá, antes de que el horno
comience a hornear. Para detener la cocción, presione la
tecla Back (Retroceder) y luego la tecla Start/Pause (Iniciar/
Pausar). El horno se apagará luego de un retraso al azar de
aproximadamente entre 30 segundos y 1 minuto. Para salir
LQPHGLDWDPHQWHGH%DNH+RUQHDUHQHOKRUQRLQIHULRUSUHVLRQH
la tecla Clear/Off (Borrar/ Apagar) en cualquier momento;
los elementos de cocción se apagarán de forma inmediata
\6DEEDWK%DNH+RUQHDUHQHO0RGR6DEiWLFRFDPELDUiD
Sabbath (Sabático) en la pantalla, indicando que el horno fue
apagado. Para salir del modo Sabbath (Sabático), mantenga
presionada la tecla Back (Retroceder) durante 3 segundos. No
presione ningún otro botón hasta que se haya salido del modo
Sabbath (Sabático), o el modo Sabbath (Sabático) se volverá a
iniciar y no se saldrá del mismo. Para más detalles, consulte la
sección de Modo Sabático en el Horno Inferior.
NOTA: Si se produce un corte de corriente durante el modo
Sabático, la unidad permanecerá en el modo Sabático pero
apagada cuando vuelva la corriente.
Self Clean (Limpieza Automática)
8VHHVWDIXQFLyQSDUDLQJUHVDUHOPRGR6HOI&OHDQ/LPSLH]D
Automática). Para más detalles, consulte la sección de
/LPSLH]DGHO+RUQR
Steam Clean (Limpieza al Vapor)
8VHHVWDIXQFLyQSDUDLQJUHVDUHOPRGR6HOI&OHDQ/LPSLH]D
Automática). Para más detalles, consulte la sección de
/LPSLH]DGHO+RUQR
Warm (Calentar)
Use esta función para calentar. Para más detalles, consulte los
Modos de Cocción en el Horno Inferior.
49-80737 Rev. 2 13
HORNO SUPERIOR: Cocción con Microondas
Cocción con Microondas
Cómo Utilizar las Funciones de Microondas
Asegúrese de que la base giratoria y la bandeja de vidrio
transparente se encuentran colocadas.
Coloque los alimentos o recipiente para microondas directamente
en la bandeja de vidrio transparente para cocinar sus alimentos.
/Dbase giratoria siempre
debe estar colocada en su lugar
cuando se utiliza el horno.
/Dbandeja de cristal
transparente siempre deberá
estar en su lugar cuando se
cocina con microondas.
Cómo Utilizar las Selecciones de Microondas Preprogramadas
1. Presione la tecla Microwave (Cocinar con Microondas).
Si no se realiza una selección dentro del plazo de 15
segundos, la pantalla regresará a la hora del día.
2. Gire el dial de selección para buscar la comida o bebida
que desee cocinar, descongelar, ablandar, derretir, hervir o
recalentar. Presione el dial de selección para ingresar.
3. Gire el dial para seleccionar el tipo, cantidad, peso y/o
tamaño. (El horno le consultará, en la medida que sea
necesario.) Presione el dial luego de cada selección.
4. Presione el dial de selección o la tecla Start/Pause
(Iniciar/ Pausar) para iniciar la cocción.
Para revisar o editar las configuraciones durante la cocción,
presione el dial de selección.
Si se abre la compuerta durante la cocción, el horno se
detendrá y se mostrará Pause (Pausa) en la pantalla. Cierre
la compuerta y apriete el botón Start/Pause (Iniciar/Pausar)
para continuar cocinando.
Si ingresa una selección no deseada en cualquier momento,
simplemente apriete el botón Back (Regresar) y reingrese las
selecciones deseadas.
Ŷ &XDQGRHOKRUQRHVWiHQFHQGLGRVHSRGUiYHUODOX]
alrededor de la compuerta o de la cubierta externa.
Ŷ /DOX]GHOLQWHULRUGHOKRUQRVHHQFHQGHUiGXUDQWHXQFLFOR
de cocción por microondas.
Ŷ 3RGUtDHVFDSDUYDSRUGHOUHGHGRUGHODFRPSXHUWD
Cook By Time (Cocinar Por Tiempo) y Cook By Time 1 & 2 (Cocinar Por Tiempo 1 y 2)
8WLOLFHODVIXQFLRQHVGH&RRN%\7LPH&RFLQDU3RU7LHPSR\
&RRN%\7LPHSDUDFRFLQDUSRUPLFURRQGDVORVDOLPHQWRV
que no se encuentran en la sección de recetas y en el tiempo
que programó.
Ŷ (OQLYHOGHSRWHQFLDVHHQFXHQWUDDMXVWDGR
automáticamente en High (Alto), pero puede cambiarlo
para dar mayor flexibilidad.
1. Presione la tecla Microwave (Cocinar con Microondas).
 *LUHHOGLDOSDUDVHOHFFLRQDU&RRN%\7LPH&RFLQDUSRU
7LHPSRR&RRN%\7LPH&RFLQDUSRU7LHPSR\
y presione el dial de selección para ingresar.
3. Gire el dial de selección para configurar el tiempo de
cocción y presione el mismo para ingresar.
4. Seleccione la configuración del nivel de potencia.
6LVHOHFFLRQy&RRN%\7LPH&RFLQDUSRU7LHPSR
y 2), gire el dial de selección para configurar el segundo
tiempo de cocción, la segunda configuración de nivel de
potencia y presione el dial para ingresar.
5. Presione el dial de selección o la tecla Start/Pause
(Iniciar/ Pausar) para iniciar la cocción.
'XUDQWHODVIXQFLRQHVGH&RRN%\7LPH&RFLQDU3RU7LHPSR
R&RRN%\7LPH&RFLQDU3RU7LHPSRSXHGHDEULU
la compuerta para revisar la comida. Cierre la compuerta y
apriete el botón Start/Pause (Iniciar/Pausar) para continuar
cocinando.
SELECCIONES MICROWAVE PRE-SET (PREPROGRAMACIONES DE MICROONDAS)
Ŷ %HELGDV
Agua (8-12 onzas)
Café (8-12 onzas)
Té (8-12 onzas)
 ±/HFKHRQ]DV
Cacao Caliente
(8-12 onzas)
Ŷ 3DORPLWDVGH0Dt]
Sensor de palomitas
de maíz
Ŷ 'HUUHWLU
– Manteca
Caramelo
Queso
Trozos de Chocolate
Malvavisco
Ŷ +HUYLU
Ŷ &RFLQDU
– Por tipo de alimento
Por tiempo
Por tiempo 1 y 2
Ŷ 6XDYL]DU
– Manteca
Queso Crema
Glaseado (16 onzas)
Helado
Ŷ 'HVFRQJHODU
– 1,0 lb. Rápido
Por tiempo
Por peso
Por tipo de alimento
Derretir
Suavizar
Ŷ 5HFDOHQWDU
 ±%HELGDV
Cazuela
Pollo
Pasta
Pizza
Plato de comida
Arroz
Sopa
 ±%LVWHFV&KXOHWDV
Verduras
14 49-80737 Rev. 2
HORNO SUPERIOR: Cocción con Microondas
Cocción con Microondas (Cont.)
Nivel(es) De Potencia Del Horno Microondas
Ŷ 3XHGHPRGLILFDUHOQLYHOGHSRWHQFLDGXUDQWHODPD\RUSDUWH
del programa de cocción.
1. Presione el dial de selección para editar.
2. Gire el dial de selección para cambiar la hora y/o presione
el dial de selección para ingresar.
3. Gire el dial de selección en dirección de las agujas del reloj
para incrementar el nivel de potencia y en contra de las
agujas del reloj para reducir el mismo. Presione el dial de
selección para ingresar.
Aquí se presentan algunos ejemplos de utilizaciones para
varios niveles de potencia:
High (Alto) 10: Pescado, tocino, verduras, líquidos hirvientes.
Med (Medio) - High (Alto) 7: Cocción moderada de carne de
res y pollo; hornear guisados y recalentamiento.
Med (Medio) 5: Cocción lenta y ablandamiento para guisados
y cortes de carne de res menos suaves.
Low (Bajo) 2 o 3: Descongelación; hervir a fuego lento; salsas
delicadas.
Warm (Caliente) 1: Mantener comidas calientes; suavizar
mantequilla.
Descongelación Por Tipo De Alimento
/DIXQFLyQ$XWR'HIURVW'HVFRQJHODFLyQDXWRPiWLFDDMXVWD
los tiempos de descongelación y los niveles de potencia para
ofrecer resultados de descongelación uniformes para carnes
de res, pollo y pescado de hasta 6 libras de peso.
1. Saque los alimentos de la caja y colóquelos en un plato
adecuado para microondas.
2. Presione la tecla Microwave (Cocinar con Microondas) y
seleccione Defrost (Descongelar).
3. Gire el selector del dial a Defrost (Descongelar) y a Food
Type (Tipo de Comida). Presione el dial de selección para
ingresar.
4. Gire el dial para seleccionar el tipo de comida. Presione el
dial de selección para ingresar.
5. Gire el dial de selección al peso de la comida, usando la
Guía de Conversión que figura a la derecha. Por ejemplo,
seleccione 1.2 para 1.2 libras (1 libra, 3 onzas). Presione el
dial de selección para ingresar.
6. Presione el dial de selección o la tecla Start/Pause
(Iniciar/ Pausar) para iniciar la descongelación.
7. Gire los alimentos cuando el horno le indique Turn Food
2YHU'DU9XHOWD$/RV$OLPHQWRV
Ŷ 6DTXHODFDUQHGHVFRQJHODGDRFXEUDODViUHDVFDOLHQWHV
con pedazos pequeños de lámina de aluminio para lograr
una descongelación uniforme.
Ŷ 'HVSXpVGHGHVFRQJHODUODPD\RUtDGHODVFDUQHV
necesitan dejarse en reposo durante 5 minutos para
completar la descongelación. Asados de mayor tamaño
deben permanecer en reposo por cerca de 30 minutos.
Guía de conversión
Si se indica el peso de los alimentos en libras y onzas, se
deben convertir las onzas a décimos (.1) de libra.
Descongelación Por Tiempo
8VH'HIURVW%\7LPH'HVFRQJHODUSRU7LHPSRSDUD
descongelar durante un período de tiempo seleccionado.
1. Presione la tecla Microwave (Cocinar con Microondas) y
seleccione Defrost (Descongelar).
 *LUHHOGLDOGHVHOHFFLyQD'HIURVW%\7LPH'HVFRQJHODU
por Tiempo). Presione el dial de selección para ingresar.
3. Gire el dial para seleccionar el tiempo que desee. Presione
el dial de selección para ingresar.
4. Presione el dial de selección o la tecla Start/Pause
(Iniciar/ Pausar) para iniciar la descongelación.
5. Gire los alimentos cuando el horno le indique Turn Food
2YHU'DU9XHOWD$/RV$OLPHQWRV
El nivel de potencia se ajusta automáticamente a 3, pero puede
cambiarse. Para cambiar los niveles de potencia, consulte la
sección Nivel de potencia del microondas. Puede descongelar
alimentos pequeños aumentando el nivel de potencia después
de ingresar el tiempo. El nivel de potencia 7 corta el tiempo de
descongelación total a cerca de la mitad; el nivel de potencia
10 corta el tiempo total de descongelación a cerca de un
tercio. Cuando descongela a niveles de potencia más altos, los
alimentos necesitarán atención más frecuente de la normal.
Peso del alimento
del alimento en onzas
Ingresar el peso
(décimos de libra)
1–2 .1
3.2
4–5 .3
6–7 .4
8.5
9–10 .6
11 .7
12–13 .8
14–15 .9
49-80737 Rev. 2 15
Defrost By Weight (Descongelar por Peso)
8VH'HIURVW%\:HLJKW'HVFRQJHODUSRU3HVRSDUD
descongelar durante un período de tiempo seleccionado.
1. Presione la tecla Microwave (Cocinar con Microondas) y
seleccione Defrost (Descongelar).
 *LUHHOGLDOGHVHOHFFLyQD'HIURVW%\:HLJKW'HVFRQJHODU
por Peso). Presione el dial de selección para ingresar.
3. Gire el dial para seleccionar el peso que desee. Presione el
dial de selección para ingresar.
4. Presione el dial de selección o la tecla Start/Pause (Iniciar/
Pausar) para iniciar la descongelación.
5. Gire los alimentos cuando el horno le indique Turn Food
2YHU'DU9XHOWD$/RV$OLPHQWRV
El nivel de potencia no puede ser modificado durante esta
configuración.
Quick Defrost (Descongelación Rápida) con 1.0 lbs.
Use Quick Defrost (Descongelación Rápida) con 1.0 lbs. para
una descongelación rápida de 1.0 lbs. de comida congelada.
1. Presione la tecla Microwave (Cocinar con Microondas)
y seleccione la descongelación rápida con 1.0 lbs.
2. Presione el dial de selección o la tecla Start/Pause
(Iniciar/ Pausar) para iniciar la descongelación. Presione
el dial de selección para ingresar.
3. Gire los alimentos cuando el horno le indique Turn Food
2YHU'DU9XHOWD$/RV$OLPHQWRV
El nivel de potencia no puede ser modificado durante esta
configuración.
Consejos Para Descongelar
Ŷ 6HSXHGHQGHVFRQJHODUDOLPHQWRVFRQJHODGRVHQSDSHOR
plástico en el paquete cuando se utiliza la función Defrost
%\)RRG7\SH'HVFRQJHODU3RU7LSR'H&RPLGD6H
deben cortar, perforar o ventilar los paquetes cerrados
después de que se hayan descongelado los alimentos
parcialmente. Se deben descubrir parcialmente los
recipientes de almacenamiento plásticos.
Ŷ 6HSXHGHQGHVFRQJHODU\FRFLQDUFRQPLFURRQGDVODV
meriendas preempacadas, de tamaño familiar, congeladas.
Si el alimento se encuentra en un recipiente de lámina de
aluminio, transfiéralo a un plato adecuado para microondas.
Ŷ /RVDOLPHQWRVTXHVHHFKDQDSHUGHUIiFLOPHQWHQRVH
deben dejar fuera del refrigerador durante más de una
KRUDGHVSXpVGHVFRQJHODUVH/DWHPSHUDWXUDDPELHQWH
promueve el crecimiento de bacterias nocivas.
Ŷ 3DUDXQDGHVFRQJHODFLyQPiVXQLIRUPHGHDOLPHQWRVPiV
JUDQGHVWDOHVFRPRDVDGRVXWLOLFHODIXQFLyQ'HIURVW%\
Time (Descongelación Por Tiempo). Asegúrese que las
carnes se encuentran completamente descongeladas antes
de cocinarlas.
Ŷ &XDQGRORVDOLPHQWRVVHHQFXHQWUDQGHVFRQJHODGRVGHEHQ
encontrarse fríos pero suaves en todas las áreas. Si aún
se encuentran restos de hielo, vuélvalos a colocar en el
microondas pero por un período muy corto de tiempo o
déjelos reposar durante un par de minutos.
HORNO SUPERIOR: Cocción con Microondas
Cocción con Microondas (Cont.)
16 49-80737 Rev. 2
Cocción De Microondas Por Sensor
/DIXQFLyQGHVHQVRUGHWHFWDHODXPHQWRGHKXPHGDGOLEHUDGD
durante la cocción. El horno ajusta el tiempo de cocción
automáticamente a los diferentes tipos y cantidades de comida.
No utilice las funciones de sensor dos veces en sucesión en la
misma porción de comida ya que puede tener como resultado
comida severamente sobrecocinada o quemada. Si el alimento
no se cocina completamente después del primer conteo
UHJUHVLYRXWLOLFHODIXQFLyQGH&RRN%\7LPH&RFLQDU3RU
Tiempo) para permitir tiempo de cocción adicional.
Los recipientes y tapas o cubiertas apropiadas son
esenciales para obtener los mejores resultados con la
cocción por sensor.
Ŷ 8WLOLFHVLHPSUHUHFLSLHQWHVDGHFXDGRVSDUDPLFURRQGDV\
cúbralos con tapas o envoltura plástica ventilada. Nunca
utilice recipientes de plástico con sellado ajustado ya que
pueden prevenir que el vapor escape ocasionando que se
sobrecocinen los alimentos.
Ŷ $VHJ~UHVHGHTXHHO
exterior de los recipientes
de cocina y el interior
del horno se encuentren
secos antes de colocar
los alimentos en el horno.
/DVJRWDVGHKXPHGDG
que se convierten en
vapor pueden dar lecturas
incorrectas al sensor.
Ŷ /DVEHELGDVVHFDOLHQWDQ
mejor descubiertas.
Para Utilizar Todos Los Programas De Sensor
El modo de microondas del horno superior cuenta con cocción
con sensor. De forma automática, detecta cuándo la comida
está lista y se apaga, eliminando la necesidad de programar
tiempos de cocción y niveles de potencia.
1. Presione la tecla Microwave (Cocinar con Microondas) y
JLUHHOGLDOGHVHOHFFLyQD&RRN%\)RRG7\SH&RFLQDUSRU
Tipo de Comida) o Reheat (Recalentar). Presione el dial de
selección para ingresar.
2. Gire el dial para seleccionar la comida que desee. Presione
el dial de selección para ingresar.
3. Presione el dial de selección o la tecla Start/Pause
(Iniciar/ Pausar) para iniciar la cocción.
No abra la puerta del horno hasta que se esté realizando la
cuenta regresiva en la pantalla o hasta que el microondas
finalice la cocción. Si la compuerta se encuentra abierta, ciérrela
y apriete Start/Pause (Iniciar/Pausar) inmediatamente. Si los
alimentos aún no se encuentran lo suficientemente cocinados,
XWLOLFHODIXQFLyQ&RRN%\7LPH&RFFLyQ3RU7LHPSRHQHO
selector de microondas para cocinar por más tiempo.
NOTA: No utilice las funciones de sensor dos veces en
sucesión en la misma porción de comida ya que puede dar
como resultado comida severamente sobrecocinada o quemada.
Ŷ 6LKDHVWDGRXWLOL]DQGRODIXQFLyQGHFRFFLyQUiSLGD\HO
horno se encuentra caliente, esto puede ser una indicación
de que está demasiado caliente como para cocinar por
sensor. Por supuesto, siempre puede proceder a cocinar
FRQODIXQFLyQ&RRN%\7LPH&RFFLyQ3RU7LHPSR
NOTA: Si el horno se encuentra demasiado caliente, cambiará
automáticamente a cocción por tiempo.
Ŷ 3DUDGLVPLQXLURDXPHQWDUHOWLHPSRGHFRFFLyQHVSHUH
hasta que se muestre el conteo de tiempo regresivo en
ODSDQWDOOD/XHJRJLUHHOGLDOGHVHOHFFLyQSDUDDJUHJDUR
restar tiempo.
Ŷ 6LDEUHODFRPSXHUWDPLHQWUDVVHHQFXHQWUDXWLOL]DQGROD
función Sensor Cooking (Cocción Por Sensor), aparecerá
el mensaje Sensor Error (Error De Sensor). Cierre la
compuerta y apriete el botón Start/Pause (Iniciar/Pausar)
para comenzar nuevamente.
Notas sobre el programa de Recalentamiento:
/RVDOLPHQWRVUHFDOHQWDGRVSRGUtDQWHQHUDPSOLDVYDULDFLRQHV
de temperatura. Algunas áreas se pueden encontrar
extremadamente calientes.
(VPHMRUXWLOL]DUODIXQFLyQ&RRN%\7LPH&RFFLyQ3RU
Tiempo) y no Recalentar estos alimentos:
Ŷ 3URGXFWRVGHSDQ
Ŷ /RVDOLPHQWRVTXHGHEHQUHFDOHQWDUVHFXELHUWRV
Ŷ /RVDOLPHQWRVTXHQHFHVLWDQUHYROYHUVHRYROWHDUVH
Ŷ /RVDOLPHQWRVTXHQHFHVLWDQWHQHUXQDVSHFWRVHFRR
superficie crujiente después del recalentamiento.
Cubiertas
Ventiladas
Seque los platos de modo que no
den lecturas incorrectas al sensor.
HORNO SUPERIOR: Cocción con Microondas
Cocción con Microondas (Cont.)
PROGRAMAS DE SENSOR PARA COCCIÓN POR MICROONDAS:
Ŷ*URXQG0HDW&DUQHPROLGD
Ŷ3RSFRUQ3DORPLWDV
Ŷ6RXS6RSD
Ŷ5LFH$UUR]
Ŷ9HJHWDEOHV9HUGXUDV
(enlatadas, frescas, congeladas)
Ŷ&KLFNHQ5HKHDW5HFDOHQWDPLHQWR
de pollo)
Ŷ3DVWD5HKHDW5HFDOHQWDPLHQWR
de pasta)
Ŷ3ODWHRI)RRG5HKHDW3ODWRGH
recalentamiento de comida
Ŷ6RXS5HKHDW5HFDOHQWDPLHQWR
de sopa)
Ŷ9HJHWDEOH5HKHDW
(Recalentamiento de verduras)
49-80737 Rev. 2 17
Su nuevo horno posee una variedad de modos de cocción para que pueda obtener los mejores resultados. Estos modos se describen a
continuación. Para acceder a recomendaciones para comidas específicas, consulte la sección de la Guía de Cocción. Recuerde que es
posible que su nuevo horno funcione de manera diferente que aquel que está reemplazando.
Modos de Horneado y Dorado
Seleccione un modo para hornear y dorar basado en el tipo y
cantidad de comida que está preparando. Al preparar comidas
horneadas tales como tartas, galletas y masas, siempre
precaliente el horno primero. Siga las recomendaciones de la
receta sobre la colocación de la comida. Si no se brindan pautas,
centre la comida en el horno.
Horneado Tradicional
El modo de horneado tradicional está pensado para la cocción en
un solo estante. Este modo usa el calor principalmente desde el
elemento inferior, pero también desde el elemento superior para
cocinar la comida. Para usar este modo presione la tecla Bake
(Hornear), gire el dial de selección para configurar la temperatura del
horno y presione el dial para ingresar, y luego presione Start (Iniciar).
El precalentamiento generalmente se recomienda al usar este modo.
Modo para Asar
Siempre ase con la puerta cerrada. El elemento para asar en el
horno es muy potente. Monitoree la comida de cerca al asar. Tenga
cuidado al asar en posiciones de estantes superiores, ya que
colocar la comida más cerca del elemento para asar incrementa el
humo, salpicaduras y la posibilidad de que se incendien las grasas.
No se recomienda asar en el estante de la posición 6.
Intente asar las comidas que normalmente haría a la parrilla.
Ajuste las posiciones de los estantes para ajustar la intensidad del
calor a la comida. Coloque las comidas más cerca del elemento
para asar, cuando se desee una superficie más cocinada y un
LQWHULRUSRFRFRFLGR/DVFRPLGDVPiVJUXHVDV\ODVFRPLGDVFX\R
interior debe ser cocinado deberían ser asadas en un estante en
una posición alejada del usado para asar, o usando las funciones
%URLO/R$VDU%DMR3DUDXQPHMRUUHQGLPLHQWRFHQWUHODFRPLGD
debajo del elemento calentador para asar.
Asar Alto
(OPRGR%URLO+L$VDU$OWRXVDFDORULQWHQVRGHOHOHPHQWR
VXSHULRUSDUDVRDVDUODVFRPLGDV8VHODIXQFLyQ%URLO+L$VDGR
Alto) para cortes más delgados de carne y/o comidas que prefiera
que quedan menos cocinadas en su interior. Para usar este modo
presione la tecla Broil (Asar), gire el dial de selección a Hi (Alto) y
presione el dial para ingresar, y luego presione Start (Iniciar). No
es necesario realizar el precalentamiento al usar este modo.
Asar Bajo
(OPRGR%URLO/R$VDU%DMRXVDPHQRVFDORULQWHQVRGHOHOHPHQWR
superior para cocinar la comida completamente mientras también
VHUHDOL]DHOGRUDGRVXSHUILFLDO8VHODIXQFLyQ%URLO/R$VDGR
%DMRSDUDFRUWHVGHFDUQHPiVJUXHVRV\RFRPLGDVTXHGHVHH
que queden completamente cocinadas. Para usar este modo
presione la tecla Broil (Asar)JLUHHOGLDOGHVHOHFFLyQD/R%DMR
y presione el dial para ingresar, y luego presione Start (Iniciar). No
es necesario realizar el precalentamiento al usar este modo.
Leudar
(OPRGR3URRI/HXGDUHVWiGLVHxDGRSDUDHOHYDUIHUPHQWDU\
leudar) masas de pan. Presione la tecla Options (Opciones), gire
HOGLDOSDUDVHOHFFLRQDU3URRI/HXGDU\SUHVLRQHHOGLDOSDUDKDFHU
la selección, y luego presione Start (Iniciar). Cubra bien la masa
para evitar que se seque. El pan se elevará más rápidamente que
a temperatura ambiente. Se deberá observar que con los hornos
de pared doble, la función para leudar no se podrá activar cuando
se esté usando un modo de limpieza en el horno inferior.
Calentar
El modo Warm (Calentar) está diseñado para mantener comidas
calientes hasta durante 3 horas. Para usar este modo presione
la tecla Options (Opciones), gire el dial para seleccionar Warm
(Caliente) y presione el dial para hacer la selección, y luego
presione Start (Iniciar). Cubra las comidas que necesitan mantener
la humedad y no cubra aquellas comidas que deberían quedar
crocantes. No se requiere precalentar las mismas. No use la
función Warm (Calentar) para calentar comida fría, excepto galletas
crujientes, papas fritas o cereales secos. También se recomienda
que la comida no se mantenga caliente por más de dos horas.
HORNO INFERIOR: Modos de Cocción
Modos de Cocción
18 49-80737 Rev. 2
Su nuevo horno cumple con los requisitos del Feriado Sabático Judío de la Estrella K, contando con la función de cocción del
modo Sabbath (Sabático). A continuación se describe en detalle la función del modo Sabbath (Sabático).
Para Ingresar a Sabbath Mode (Modo
Sabático)
Presione la tecla Options (Opciones) del horno inferior y gire
el dial a Sabbath (Sabático) y presione el mismo para hacer la
selección. En la pantalla aparecerá “During Sabbath Mode the
upper oven is unavailable” (Durante el Modo Sabático el horno
superior no está disponible). Presione el dial de selección
para continuar. Cualquier función del horno superior que esté
funcionando se detendrá, y el horno inferior hará una transición
inmediata al modo Sabbath (Sabático).
Para Cambiar la Temperatura
Una vez en el modo Sabbath (Sabático), a fin de modificar la
temperatura del horno o de iniciar una función de horneado, el
usuario podrá cambiar la temperatura a una de las 10 temperaturas
configuradas previamente, como se indica a continuación:
El cambio a una de las temperaturas anteriores requiere que el
usuario presione la tecla asociada con la temperatura deseada
y que luego presione la tecla Start/Pause (Iniciar/ Pausar).
Por ejemplo, para configurar Hornear 350ºF, el usuario deberá
presionar la tecla Bake (Hornear) en el horno inferior y luego
presionar la tecla Start/Pause (Iniciar/ Pausar).
/DIXQFLyQ%DNH+RUQHDUVHLQLFLDUiRVL\DHVWiIXQFLRQDQGR
la temperatura del horno cambiará) en un momento al azar entre
los 30 y 60 segundos luego de que la tecla Start/Pause (Iniciar/
Pausar) haya sido presionada, con la excepción de presionar la
tecla Clear/Off (Borrar/ Apagar), lo cual cancelará de inmediato
ODVFRQILJXUDFLRQHVGHFRFFLyQ/DXQLGDGSHUPDQHFHUiHQHO
modo Sabático). El cambio de temperatura puede ser ejecutado
en cualquier momento durante el ciclo de cocción.
Para Apagar el Horno
Presione la tecla Clear/Off (Borrar/ Apagar) o Back
(Retroceder) y luego la tecla Start (Iniciar) en cualquier
momento. El horno se apagará de inmediato, pero
permanecerá en el modo Sabbath (Sabático) y regresará a la
pantalla de suspensión de Sabbath (Sabático).
Para Salir del Modo Sabático
Mantenga presionada la tecla Back (Retroceder) durante
3 segundos. El horno se apagará en un momento al azar
entre los 30 y 60 segundos, luego de que la tecla Back
(Retroceder) se mantenga presionada.
NOTA: No presione ninguna otra tecla durante este momento,
ya que de lo contrario el modo Sabbath (Sabático) será
reiniciado y no se podrá salir del mismo.
El horno saldrá del modo Sabbath (Sabático) y regresará a la
pantalla por omisión.
Función de Cocción por Tiempo en el Modo
Sabático
El modo Sabbath (Sabático) no puede activar una función de
cocción por tiempo por solo. Si se desea activar Timed Cook
(Cocinar por Tiempo), se deberán realizar los siguientes pasos:
1. Use la tecla Settings (Configuraciones) para configurar
%HHSHU9ROXPHQ9ROXPHQGHO3LWLGRHQ0XWH0XGR
2. Use la tecla Light (Luz) para configurar la luz de su horno
inferior en On (Encender).
3. Use Bake (Hornear) para programar una temperatura.
/XHJRGHSURJUDPDUXQDWHPSHUDWXUDVHOHFFLRQHXQ
tiempo de cocción e ingrese su tiempo de cocción.
Presione la tecla Start (Iniciar) para iniciar el horno.
NOTA:12VHGHEHUiXVDU&RQYHFWLRQ%DNH+RUQHDUSRU
Convección).
4. Una vez iniciado el horno, NO abra la puerta hasta que el
mismo se haya terminado de precalentar y haya alcanzado
una temperatura pareja. Hacer esto antes de que se complete
el precalentamiento hará que el ventilador de distribución del
aire pierda potencia de forma inmediata al abrir la puerta.
5. Una vez que la comida fue colocada en el horno, no abra
la puerta hasta que la cocción se haya completado. Hacer
esto hará que la imagen de la pantalla cambie y le indique
que cierre la puerta.
6. NO abra la puerta del horno superior. Hacer esto
encenderá la luz de forma inmediata.
7.
No presione ningún botón adicional en los controles del horno
inferior una vez iniciada la cocción, ya que de lo contrario la
pantalla cambiará inmediatamente al presionar el botón.
NOTAS
Ŷ 'XUDQWHODIXQFLyQ6DEEDWK0RGH0RGR6DEiWLFRVyOR
%DNH+RUQHDUHQHOKRUQRLQIHULRUHVWiGLVSRQLEOH%URLO
$VDU&RQYHFWLRQ%DNH+RUQHDUSRU&RQYHFFLyQ:DUP
(Calentar), u otras funciones no están disponibles.
Ŷ (QHOPRGR6DEEDWK6DEiWLFRHODSDJDGRDXWRPiWLFR
luego de 12 horas está desactivado, sin importar
qué configuración fue seleccionada en Settings
(Configuraciones).
Ŷ (OPRGR6DEEDWK6DEiWLFRSXHGHVHULQJUHVDGRVyORVL
ningún modo de cocción está funcionando en el horno
inferior. Ingresar a Sabbath Modo (Modo Sabático)
cancelará todas las funciones del horno inferior y superior
(incluyendo el temporizador y el recordatorio).
Ŷ &XDQGRXQERWyQHVSUHVLRQDGRHQ6DEEDWK0RGH0RGR
Sabático), no hay pitidos ni tonos, ni cambios en las luces
o en la pantalla. Además, cuando la puerta es abierta o
cerrada en Sabbath Mode (Modo Sabático), no hay pitidos
ni tonos, ni cambios en las luces o en la pantalla.
Ŷ 6LVHSURGXFHXQFRUWHGHFRUULHQWHGXUDQWHHOKRUQHDGRHQ
el modo Sabbath (Sabático), la unidad regresará a dicho
modo cuando el suministro de corriente sea restablecido,
pero no regresará al modo de horneado.
Tecla UI Temperatura (ºF)
Teclas del Lado Izquierdo (Horno Superior)
Microwave (Cocinar en el Microondas) 170
Speed Cook/ Defrost
(Cocción Rápida/ Descongelar)
200
Cooking Options/ Popcorn
(Opciones de Cocción/ Palomitas de Maíz)
225
Add 30 Sec (Agregar 30 Segundos) 250
&RQYHFWLRQ%DNH5HKHDW
(Hornear por Convección/ Recalentar)
300
Teclas del Lado Derecho (Horno Inferior)
%DFN5HWURFHGHU 0
&OHDU2II%RUUDU$SDJDU Se cancela inmediatamente
/LJKW/X] 325
%DNH+RUQHDU 350
%URLO$VDU 375
&RQYHFWLRQ%DNH:DUP
(Hornear por Convección/ Calentar)
400
Options (Opciones) 450
HORNO INFERIOR: Modo Sabático
Modo Sabático
49-80737 Rev. 2 19
TIPO DE COMIDA
MODO(S)
RECOMENDADO(S)
POSICIÓN(ES)
DE ESTANTES
RECOMENDADA SUGERENCIAS ADICIONALES
Productos Horneados
Tortas con capas, tortas
rectangulares, roscas, panecillos,
pan rápido en un Solo Estante
Hornear 3 Use utensilios brillantes.
Tortas con capas* en Múltiples
Estantes
Hornear 2 y 4 Asegúrese de que haya un flujo de aire adecuado (Vea la ilustración).
Tortas de grasa (pastel de ángel) Hornear 1 Use utensilios brillantes.
Galletas, galletitas, bizcochitos
en un Solo Estante
Hornear 3 Use utensilios brillantes.
Galletas, galletitas, bizcochitos
en Múltiples Estantes
Hornear 2 y 4
Con comidas tales como galletas con azúcar, cambie la ubicación de la
comida parcialmente durante la cocción, a fin de lograr resultados de
cocción más parejos entre los estantes..
Bife y Cerdo
Hamburguesas Asar Alto 5
Use una olla para asa; precaliente 5 minutos si usará el Modo para Asar
por Convección. Mueva la comida hacia abajo para que quede más
preparada y menos soasada. Preste atención a la comida al asarla. Para
un mejor rendimiento, centre la comida debajo del elemento que emite
calor para asar.
%LIHV\&KXOHWDV Asar Alto 5
Use una olla para asar; Mueva la comida hacia abajo para que quede
más preparada y menos soasada. Preste atención a la comida al asarla.
Para un mejor rendimiento, centre la comida debajo del elemento
calentador para asar.
Dorados Hornear 2 o 3
Deje sin cubrir, use una olla chata tal como una olla para asar. No se
requiere precalentarla.
Ave
Pollo entero Hornear 2 o 3 Use una olla chata tal como una olla para asar.
Pechugas, patas, muslos con
huesos
Asar Alto 1 6LVHHPSDQyRFXEULyFRQVDOVDHYLWHORVPRGRV%URLO+L$VDU$OWR$VH
del lado de la piel hacia abajo primero. Preste atención a la comida al
asarla. Para un mejor rendimiento, centre la comida debajo del elemento
calentador para asar.
$VDGR%DMR
Hornear
3
Pechugas de pollo deshuesadas
$VDGR%DMR
Hornear
3
Mueva la comida más abajo para que quede más preparada y menos
soasada y más arriba para soasar/ dorar al asar. Para un mejor
rendimiento, centre la comida debajo del elemento calentador para asar.
Pavo entero Honear 1 o 2 Usa una olla chata tal como una olla para asar.
Pechuga de pavo Hornear 2 o 3 Use una olla chata tal como una olla para asar.
Pescado $VDGR%DMR
5 (mitad del grosor o menos)
4 (>1/2 pulgada)
Precaliente 5 minutos al Asar por Convección. Preste atención a la
comida al asarla. Para un mejor rendimiento, centre la comida debajo
del elemento calentador para asar.
Cazuelas Hornear 3
Comidas Congeladas a Conveniencia
Pizza, papas fritas, tator tots,
patitas de pollo fritas, aperitivos
en un Solo Estante
Hornear 3 Use utensilios brillantes.
Pizza, papas fritas, tator tots,
patitas de pollo fritas, aperitivos
en Múltiples Estantes
Hornear 2 y 4
Use utensilios brillantes. Cambie la ubicación de la comida parcialmente
durante la cocción, a fin de obtener resultados de cocción más parejos.
*Al hornear cuatro tortas con capas a la vez, use los estantes
2 y 4. Coloque las ollas como se muestra, de modo que no
quede una olla encima de la otra.
Cocine la comida completamente para evitar que se
produzcan enfermedades a partir de la comida. Puede
encontrar recomendaciones sobre temperatura mínima para
cocinar de forma segura en IsItDoneYet.gov. Asegúrese de
usar un termómetro de comidas para medir la temperatura
de las mismas.
HORNO INFERIOR: Guía de Cocción
Guía de Cocción
20 49-80737 Rev. 2
Utensilios
Pautas de Uso de Utensilios
El material, el acabado y el tamaño de los utensilios afectan el
horneado.
/DVROODVRVFXUDVUHYHVWLGDV\RSDFDVDEVRUEHQHOFDORUPiV
rápidamente que las ollas claras y brillantes. Al usar ollas
que absorben el calor más rápidamente, las comidas podrán
resultar más doradas, crocantes y con una capa más gruesa.
Si utiliza utensilios oscuros y revestidos, controle la comida
antes del tiempo mínimo de cocción. Si se obtienen resultados
no deseados con este tipo de utensilios, considere la
posibilidad de reducir la temperatura del horno en 25º F la
próxima vez.
/DVROODVEULOODQWHVSXHGHQSURGXFLUUHVXOWDGRVGHKRUQHDGR
más parejos en tortas y galletas.
/DVROODVGHYLGULR\FHUiPLFDFDOLHQWDQFRQOHQWLWXGSHUR
retienen bien el calor.
Estos tipos de ollas funcionan bien con platos tales como
tartas y postres con natilla.
/DVROODVFRQDLVODQWHGHDLUHFDOLHQWDQOHQWDPHQWH\SXHGHQ
producir fondos dorados.
Mantenga los utensilios limpios para una cocción más pareja.
PRECAUCIÓN
No use ningún tipo de aluminio o cobertor de horno para cubrir el fondo del horno. Estos ítems
pueden atrapar el calor o derretirse, ocasionando daños sobre el producto y el riesgo de descargas, humo o incendios.
Los daños por uso inadecuado de estos ítems no están cubiertos por la garantía del producto.
Se podrá usar aluminio para evitar derrames, colocando una hoja sobre un estante inferior varias pulgadas debajo de la comida.
No use más aluminio que el necesario y nunca cubra totalmente el estante de un horno con papel de aluminio. Mantenga el
aluminio a por lo menos 1 1/2” de las paredes del horno, para evitar una circulación deficiente del calor.
Papel de Aluminio y Cobertores del Horno
HORNO INFERIOR: Estantes / Papel de Aluminio y Cobertores del Horno / Utensilios
Estantes
El horno cuenta con seis posiciones de estantes. En la Guía
de Cocción, se brindan recomendaciones de posiciones de
los estantes para diferentes tipos de comidas. Se ajusta
un estante en una dirección para afectar los resultados de
cocción. Por ejemplo, si se prefieren partes superiores más
oscuras en tartas, panecillos o galletas, pruebe moviendo
la comida a un estante que se encuentre una posición más
arriba. Si encuentra que las comidas están demasiado doradas
en la parte superior, pruebe moviendo las mismas más abajo
la próxima vez.
Al hornear con múltiples ollas y en múltiples estantes,
asegúrese de que haya suficiente espacio entre las ollas para
que fluya el aire.
Flat Racks
Al colocar y retirar utensilios de cocina, empuje el estante
hacia afuera del tope (posición de detención) sobre el soporte
del estante.
Para retirar el estante, empuje el mismo hacia usted,
incline el extremo frontal hacia arriba y empuje hacia
afuera.
Para hacer un reemplazo, coloque el extremo curvo del
estante (bloqueadores) en los soportes del horno, incline
hacia arriba el frente y empuje el estante hacia adentro.
Es posible que resulte difícil deslizar los estantes,
especialmente luego de la limpieza automática. Coloque
aceite vegetal en una tela húmeda o toalla de papel y
frote sobre los extremos izquierdo y derecho.
NOTA: El uso de otros aceites de cocina provocará una
descoloración o un residuo de color similar al óxido en los
estantes y laterales de las cavidades. Para limpiar este
residuo, use agua y jabón o una solución de vinagre y agua.
Enjuague con agua limpia y seque con una tela seca.
49-80737 Rev. 2 21
CUIDADO Y LIMPIEZA:/LPSLH]DGHO+RUQR
Limpieza del Horno
Consejos Útiles
Una limpieza minuciosa ocasional con un trapo empapado
de bicarbonato sódico y agua mantendrá el interior fresco.
También recomendamos no usar limpiadores con amoníaco
o alcohol, ya que pueden dañar el aspecto del horno. Si
elige usar un limpiador hogareño común, primero aplique el
limpiador directamente sobre una tela seca, y luego limpie el
área que se encuentre sucia.
Panel de Control
Una buena idea es limpiar el panel de control luego de cada
XVR/LPSLHFRQXQMDEyQVXDYH\DJXDRYLQDJUH\DJXD
enjuague con agua limpia y pula en seco con una tela suave.
No use limpiadores abrasivos, limpiadores líquidos fuertes,
almohadillas para fregar de plástico ni limpiadores de horno en
el panel de control; dañarán el acabado.
Exterior del Horno
No use limpiadores de horno, limpiadores abrasivos,
limpiadores líquidos fuertes, estropajos de acero, almohadillas
para fregar de plástico, ni polvos limpiadores en el interior
RHOH[WHULRUGHOKRUQR/LPSLHHOPLVPRFRQDJXD\MDEyQR
una solución de vinagre y agua. Enjuague con agua limpia y
seque con una tela seca. Al limpiar supeficies, asegúrese de
que estén a temperatura ambiente y fuera del contacto con
la luz solar. Si las manchas en el borde de la ventana de la
puerta son persistentes, use un limpiador abrasivo suave o
una esponja con estropajo para obtener un mejor resultado. El
derrame de adobo, jugos de fruta, salsas de tomate y líquidos
para humedecer que contengan ácidos pueden ocasionar
descoloración y se deberán limpiar de inmediato. Deje que las
superficies calientes se enfríen, y luego limpie y enjuague.
Superficies de Acero Inoxidable (en algunos modelos)
No use virutas de acero; éstas dañarán la superficie. Para
limpiar la superficie de acero inoxidable, use agua tibia
con jabón o un limpiador o pulidor para acero inoxidable.
Siempre limpie la superficie en la dirección del veteado. Siga
las instrucciones del limpiador para limpiar la superficie de
acero inoxidable. Para realizar consultas sobre la adquisición
de productos, incluyendo limpiadores o pulidores para
electrodomésticos de acero inoxidable, consulte las secciones
de Accesorios y Soporte al Consumidor al final de este manual.
Cómo Limpiar el Interior del Horno Superior
/LPSLHHOLQWHULRUGHOKRUQRFRQIUHFXHQFLDSDUDTXHFDOLHQWH
bien.
Se pueden remover algunas partículas con una toalla de
papel; otras pueden requerir un trapo caliente con una
solución jabonosa. Elimine las partículas de grasa con un trapo
humedecido con agua jabonosa, luego enjuague con un trapo
húmedo.
No utilice limpiadores abrasivos o utensilios puntiagudos en las
paredes del horno.
Nunca utilice un limpiador de horno comercial en ninguna
pieza del horno.
No limpie el interior del horno con esponjillas metálicas para
fregar. Pueden desprenderse piezas de la esponjilla metálica,
ocasionando una descarga eléctrica.
Sello de la compuerta
Es importante mantener el área limpia en el lugar donde
la compuerta se sella contra el horno. Utilice únicamente
detergentes de acción mediana, no abrasivos aplicados con
una esponja o trapo húmedo. Enjuáguela bien.
Base Giratoria Desmontable
Se debe limpiar con frecuencia el área localizada debajo de
la base giratoria para evitar olores y humo durante un ciclo de
cocción.
Si se deja caer, la base giratoria se puede romper.
/iYHODFXLGDGRVDPHQWHHQDJXDWLELDMDERQRVD6pTXHOD
completamente y vuelva a colocarla.
Para colocar la base giratoria, coloque su centro sobre el rotor
ubicado en el centro del horno y gírela hasta que se asiente
en su lugar. (Asegúrese de que la superficie lisa de la base
giratoria se encuentre colocada hacia arriba y que el centro se
encuentre asentado de manera segura en el rotor.)
Asegúrese de que la corriente eléctrica esté apagada y que todas las superficies estén frías antes de limpiar cualquier parte del horno.
Paredes, piso, ventanilla interna, piezas
de metal y plástico en la compuerta
No haga funcionar el horno sin tener
colocada en su lugar la base giratoria.
%DVHJLUDWRULD
22 49-80737 Rev. 2
How To Clean The Upper Oven Interior (Cont.)
Bandejas Para Cocinar Y Lámina De Hornear
Para evitar que se rompan las bandejas, deje que se enfríen
FRPSOHWDPHQWHDQWHVGHOLPSLDUODV/DYHODVEDQGHMDVHQDJXD
jabonosa tibia o en la máquina lavaplatos.
No utilice esponjillas metálicas para fregar o limpiadores
abrasivos, ya que pueden dañar el acabado. Se puede utilizar
una esponjilla cubierta de jabón para limpiar las bandejas.
%DQGHMDGHYLGULRWUDQVSDUHQWH
para la función de microondas
Cómo Limpiar el Interior del Horno Inferior
El interior de su nuevo horno puede ser limpiado de forma
PDQXDORXWLOL]DQGRORVPRGRV6WHDP&OHDQ/LPSLH]DFRQ
9DSRUR6HOI&OHDQ/LPSLH]D$XWRPiWLFD
El derrame de adobo, jugos de fruta, salsas de tomate y
líquidos para humedecer que contengan ácidos pueden
ocasionar descoloración y se deberán limpiar de inmediato.
Espere a que las superficies calientes se enfríen, y luego
limpie y enjuague.
Limpieza Manual
No use limpiadores de horno, limpiadores abrasivos,
limpiadores líquidos fuertes, estropajos de acero, almohadillas
para fregar, ni polvos limpiadores en el interior del horno.
/LPSLHHOPLVPRFRQDJXD\MDEyQRXQDVROXFLyQGHYLQDJUH
y agua. Enjuague con agua limpia y seque con una tela seca.
Al limpiar supeficies, asegúrese de que estén a temperatura
ambiente y fuera del contacto con la luz solar.
Modo de Limpieza con Vapor
/DOLPSLH]DFRQYDSRUHVWiSHQVDGDSDUDOLPSLDUSHTXHxRV
derrames usando agua y a una temperatura de limpieza más
EDMDTXHODIXQFLyQ6HOI&OHDQ/LPSLH]D$XWRPiWLFD
3DUDXVDUODIXQFLyQ6WHDP&OHDQ/LPSLH]DFRQ9DSRU
limpie las grasas y suciedades del horno. Vierta una taza de
agua en la parte inferior del horno. Cierre la puerta. Presione
la tecla Options (Opciones), seleccione Steam Clean
/LPSLH]DFRQ9DSRU\OXHJRSUHVLRQHStart (Iniciar)/D
puerta del horno se trabará. No podrá abrir la puerta durante
los 30 minutos de la limpieza con vapor, ya que esto reducirá
su rendimiento. Al finalizar el ciclo de limpieza al vapor, la
SXHUWDVHGHVWUDEDUi/LPSLHFXDOTXLHUH[FHVRGHDJXD\
cualquier suciedad que haya quedado.
Modo de Limpieza Automática
/HDODV,QVWUXFFLRQHVGH6HJXULGDGGHO+RUQRFRQ/LPSLH]D
Automática, en el comienzo de este manual antes de usar
HOPRGR6HOI&OHDQ/LPSLH]D$XWRPiWLFD(VWHPRGRXVD
temperaturas muy altas para limpiar el interior del horno. Cuando
use esta función, la puerta del horno se trabará. Antes de
utilizar el ciclo de limpieza automática, limpie la grasa y restos
de comida que haya en el horno. Retire todos los artículos
del horno, excepto los estantes esmaltados (color oscuro).
/RVHVWDQWHVEULOODQWHVRGHSODWD\FXDOTXLHUXWHQVLOLRXRWURV
artículos deberían ser retirados del horno antes de iniciar un ciclo
de limpieza automática. Presione la tecla Options (Opciones),
VHOHFFLRQH6HOI&OHDQ/LPSLH]D$XWRPiWLFD\VHH[KLELUi
un tiempo de limpieza automática por omisión. El tiempo de
limpieza puede ser modificado a 3, 4 o 5 horas, usando el dial de
selección. Cuando el nivel de suciedad en el horno sea muy alto,
se recomienda usar el tiempo de limpieza máximo de 5 horas.
Si desea usar el tiempo por omisión, presione la tecla Start
(Iniciar) inmediatamente luego de seleccionar la tecla Self Clean
/LPSLH]D$XWRPiWLFD(OKRUQRVHDSDJDUiGHIRUPDDXWRPiWLFD
FXDQGRHOFLFORGHOLPSLH]DDXWRPiWLFDVHDFRPSOHWDGR/D
puerta permanecerá bloqueada hasta que el horno se haya
enfriado. Una vez que el horno se haya enfriado, limpie cualquier
ceniza que haya quedado en el horno.
IMPORTANTE:/DVHPDQDFLRQHVSURGXFLGDVSRUHOFLFORGH
autolimpieza de cualquier horno afectan la salud de algunas
aves de manera notoria. Procure llevar sus aves a otra
habitación bien ventilada.
CUIDADO Y LIMPIEZA:/LPSLH]DGHO+RUQR
Limpieza del Horno (Cont.)
Estantes Planos
/RVHVWDQWHVSODQRVVHSRGUiQGHMDUHQODFDYLGDG
durante la limpieza automática (si se trata de estantes
esmaltados, no brillantes) o se podrán lavar con agua
caliente y jabón.
Es posible que resulte difícil deslizar los estantes,
especialmente luego de la limpieza automática. Coloque
aceite vegetal en una tela húmeda o toalla de papel y
frote el mismo sobre los extremos izquierdo y derecho.
NOTA: El uso de otros aceites de cocina provocará una
descoloración o un residuo de color similar al óxido en
los estantes y laterales de las cavidades. Para limpiar
este residuo, use agua y jabón o una solución de
vinagre y agua. Enjuague con agua limpia y seque con
una tela seca.
49-80737 Rev. 2 23
CUIDADO Y LIMPIEZA: Mantenimiento del Horno Inferior
Mantenimiento del Horno Inferior
Puerta del Horno
ADVERTENCIA
PELIGRO DE DESCARGA ELÉCTRICA O QUEMADURAS: Antes de reemplazar la bombilla del
horno, desconecte la alimentación de energía al horno desde el panel principal de fusibles o del
interruptor de circuitos. No hacerlo puede provocar una descarga eléctrica o una quemadura.
PRECAUCIÓN
RIESGO DE INCENDIO:/DWDSDGHYLGULR\ODOiPSDUDGHOX]VHGHEHUiQUHWLUDUFXDQGRHVWpQIUtDV7RFDU
el vidrio caliente sin protección en las manos o con un trapo húmedo puede ocasionar quemaduras.
Reemplazo de la bombilla del horno
1. Desconecte la corriente desde el fusible principal o el panel
del disyuntor.
2. Retire los estantes del horno.
3. Deslice un destornillador de punta plana entre la caja y la
tapa de luz de vidrio.
4. Apoye la tapa de luz de vidrio con dos dedos para evitar
que se caiga al fondo del horno. Tenga cuidado de no
astillar la cubierta del horno.
5. De forma suave, gire la punta del destornillador para aflojar
la tapa de luz de vidrio.
6. Retire la tapa de luz de vidrio.
7. Retire la lámpara sosteniendo firmemente y deslizando
la misma hacia afuera, hasta que las dos clavijas hayan
dejado el soporte de cerámica.
8. No toque el vidrio de la nueva lámpara con los dedos. Esto
hará que la lámpara falle al dar luz. Tome la lámpara de
reemplzado con una toalla limpia o un pañuelo de papel
con las clavijas hacia abajo. Aliñe las dos clavijas en el
soporte de cerámica, presionando suavemente hasta que
la lámpara quede asegurada en la ficha de cerámica.
9. Deslice las lentes protectoras del soporte y presione hasta
que las pinzas queden enganchadas en la caja.
10. Vuelva a conectar la corriente.
Levante la Puerta del Horno Inferior
/DSXHUWDHVPX\SHVDGD7HQJDFXLGDGRDOUHWLUDU\OHYDQWDUODSXHUWD
No levante la puerta usando la manija.
Para retirar la puerta:
1. Abra la puerta totalmente.
2. Empuje los bloqueos de la bisagra hacia abajo en
dirección a la estructura de la puerta, hasta la posición
desbloqueada. Es posible que necesite una herramienta tal
como un destornillador pequeño de punta plana.
3. Firmemente tome ambos lados de la puerta por la parte
superior.
4. Cierre la puerta hasta la posición de retiro de la misma.
/DSXHUWDGHEHUtDVHUDELHUWDDSUR[LPDGDPHQWHD´VLQ
obstrucción sobre la misma.
 /HYDQWHODSXHUWDKDFLDDUULED\DIXHUDKDVWDTXHORV
brazos de las bisagras queden fuera de las ranuras.
Para reemplazar la puerta:
1. Firmemente tome ambos lados de la puerta por la parte
superior.
2. Comenzando desde el lado izquierdo, con la puerta en el
mismo ángulo de la posición de retiro, apoye la hendidura
del brazo de la bisagra en el extremo inferior de la ranura
GHODELVDJUD/DDEHUWXUDHQHOEUD]RGHODELVDJUDGHEHUi
estar totalmente apoyada en la parte inferior de la ranura.
Repita el procedimiento del lado derecho.
3. Abra la puerta totalmente. Si la puerta no se abre
totalmente, la hendidura no está correctamente apoyada en
el extremo inferior de la ranura.
4. Empuje los bloqueos de la bisagra contra la estructura
frontal de la cavidad del horno, hasta la posición de
bloqueo.
5. Cierre la puerta del horno.
Posición de retiro
%ORTXHRGHODELVDJUD
Ranura
Empuje los bloqueos de la
bisagra hacia abajo para
desbloquear
Extremo inferior de la ranura
%ORTXHRGH
la bisagra
%UD]RGH
la bisagra
Hendidura
Empuje el
bloqueo de la
bisagra hacia
arriba hasta
que quede
bloqueado
%UD]RGH
la bisagra
24 49-80737 Rev. 2
CONSEJOS PARA LA SOLUCIÓN DE PROBLEMAS (Horno Superior)
Problema Causa Posible Qué Hacer
LUCES
La luz durante un ciclo de
cocción rápida se atenúa y se
cicla incluso a máximos niveles
de potencia
Esto es normal. El nivel de potencia ha sido se
reduce automáticamente debido a que el horno se
encuentra caliente.
Esto es normal. El horno detecta el nivel de calor y se ajusta
automáticamente.
Luz visible alrededor la
compuerta y cubierta externa
mientras cocción rápida
Esto es normal. Cuando el horno se encuentra encendido la luz sea visible alrededor
de la compuerta y cubierta externa.
VENTILADOR
El ventilador continúa
funcionando después de terminar
de cocinar
El horno se está enfriando. El ventilador se apagará automáticamente cuando las piezas
internas del horno se hayan enfriado.
El ventilador del horno irradia
aire caliente mientras el horno se
encuentra encendido
Esto es normal.
El ventilador se enciende
automáticamente cuando
utilizando el microondas
Esto es normal.
COCCIÓN
El horno hace sonidos inusuales
mientras se cocina
Chasquidos y ventiladores soplando son
normales. El tablero de relés está encendiendo y
apagando los componentes.
Estos sonidos son normales.
Se expulsa humo del horno
cuando abro la compuerta
/RVDOLPHQWRVWLHQHQDOWRFRQWHQLGRGHJUDVD
Pulverizador en aerosol utilizado en las bandejas.
El humo es normal cuando se cocina alimentos con alto contenido
de grasa.
La comida no está
completamente cocinada o
dorada al finalizar un programa
de cocción
/RVWLHPSRVSURJUDPDGRVSRGUtDQQR
corresponder al tamaño o cantidad de comida que
está cocinando.
Ajustar el tiempo para nivel de cocción o ajuste las luces superiores
o inferiores para asar y para el nivel de cocción.
SENSOR ERROR (ERROR DE
SENSOR) mostrado junto con
una señal del horno
Cantidad o tipo de comida colocado en el horno no
corresponde con la programación que fue elegido.
Apriete el botón Clear/Off (Borrar/ Apagar) Ajuste el programa del
horno corresponda con la comida o líquido a ser cocinado o calentado.
Vapor no detectado por el horno porque la envoltura
plástico no se ventiló, una tapa muy ajustada estaba
sobre el plato o se cubrió un líquido.
Ventile la envoltura de plástico, utilice una tapa más floja o destape
los líquidos cuando los cocine o caliente.
PANTALLA
La pantalla se encuentra en
blanco
Es posible que el modo de ahorro de corriente
esté activado.
Revise el menú Settings (Configuraciones) para el reloj ajustes de
la pantalla. Encienda la pantalla.
Es posible que un fusible de su hogar se haya
quemado o que el disyuntor se haya desconectado.
Reemplace el fusible o reinicie el disyuntor.
Corte o exceso de corriente Reinicie el reloj. Si el horno estuvo en uso, deberá reiniciar el mismo
presionando la tecla Clear/Off (Borrar/ Apagar) configurando el
reloj y reiniciando cualquier función de cocción.
Control is LOCKED (Control
BLOQUEADO) aparece en
la pantalla
El control ha sido bloqueado. Mantenga presionada la tecla Settings (Configuraciones) durante 3
segundos para desbloquear el control.
¡Ahorre tiempo y dinero! Primero revise los cuadros que aparecen en las siguientes páginas y es posible que no
necesite solicitar reparaciones.
Consejos para la Solución de Problemas... Antes de solicitar el servicio técnico
49-80737 Rev. 2 25
Problema Causa Posible Qué Hacer
PANTALLA
La pantalla de control está
iluminada pero el horno no se
inicia
No se ha programado el reloj. Programe el reloj.
Compuerta no cerrada bien. Abra la compuerta y ciérrela bien.
/DWHFOD6WDUW3DXVH,QLFLDU3DXVDUQRVHSUHVLRQy
luego de ingresar la configuración de la cocción.
Presione la tecla Start/Pause (Iniciar/ Pausar) o el dial de selección.
Ya se ha ingresado otra selección en el horno
\QRVHKDDSUHWDGRHOERWyQ&OHDU2II%RUUDU
Apagar) para cancelarla.
3UHVLRQHODWHFOD&OHDU2II%RUUDU$SDJDU
Tamaño, cantidad o tiempo de cocción no
ingresado después de la selección final.
Asegúrese que ha ingresado el tiempo después de seleccionar.
6HDSUHWy&OHDU2II%RUUDU$SDJDU
accidentalmente.
Reinicie el programa de cocción y presione la tecla Start/ Pause
(Iniciar/ Pausar).
OTROS PROBLEMAS
La compuerta y el interior del
horno se sienten calientes
/DVOiPSDUDVWpUPLFDVSURGXFHQFDORULQWHQVRHQ
un espacio reducido.
Esto es normal. Use guantes térmicos de cocina para sacar la
comida cuando esté lista.
El horno no enciende Un fusible en su hogar puede haberse fundido o
el interruptor de circuitos fue activado.
Reemplace el fusible o reinicie sus interruptores de circuitos.
No puede editar las funciones de
cocción
Es posible que algunas funciones de cocción
programadas previamente no se puedan editar a
fin de evitar la degradación del rendimiento de la
cocción.
Esto es normal.
La teclas de este lado del control
no funcionan
El control bloqueó el uso de estas teclas y se
debe reiniciar.
Mantenga presionada la tecla Clear/Off (Borrar/ Apagar) del otro
lado de la pantalla durante 30 segundos. Si esto no reinicia el
control, podrá ser necesario hacer que el disyuntor realice ciclos.
CONSEJOS PARA LA SOLUCIÓN DE PROBLEMAS (Horno Superior)
Consejos para la Solución de Problemas... Antes de solicitar el servicio técnico
26 49-80737 Rev. 2
CONSEJOS PARA LA SOLUCIÓN DE PROBLEMAS (Horno Inferior)
Problema Causa Posible Qué Hacer
Mi horno nuevo no cocina como el
anterior. ¿Hay algún problema con
las configuraciones de temperatura?
Su horno nuevo cuenta con un sistema de
cocción diferente con relación al anterior y, por lo
tanto, es posible que cocine de forma diferente.
En los primeros usos, use los tiempos y temperaturas de su receta
con cuidado. Si aún piensa que su horno nuevo cocina con demasiado
calor o demasiado frío, podrá ajustar el termostato usted mismo
para aplicar su preferencia de cocción específica. NOTA: Este ajuste
DIHFWDODVWHPSHUDWXUDVGHODIXQFLyQ%DNH+RUQHDUQRDIHFWDUiODV
IXQFLRQHV%URLO$VDUR&OHDQ/LPSLDU
La comida no se hornea de forma
apropiada
Controles del horno configurados de forma incorrecta.
Consulte la sección Modos de Cocción.
/DSRVLFLyQGHOHVWDQWHHVLQFRUUHFWDRHOHVWDQWH
no está nivelado.
SeConsulte la sección Modos de Cocción y la Guía de Cocción.
Uso de una cacerola incorrecta o de una cacerola
de tamaño incorrecto.
Consulte la sección Utensilios.
/DWHPSHUDWXUDGHOKRUQRGHEHVHUDMXVWDGD Consulte la sección Settings (Configuraciones).
Sustitución de ingredientes Sustituir ingredientes puede modificar el resultado de la receta.
La comida no asa de forma
apropiada
Controles del horno configurados de forma incorrecta.
Asegúrese de seleccionar el modo correcto para asar.
Se usó una posición incorrecta del estante. Para acceder a sugerencias de ubicación de estantes, consulte la
Guía de Cocción.
Se cocinó comida en una olla caliente. Asegúrese de que el utensilio esté frío
Utensilio de cocina inadecuado para asar. Use una olla específicamente diseñada para asar
El papel de aluminio usado para la olla y la
rejilla para asar no se ajustó ni cortó de forma
apropiada, según lo recomendado.
Si usará papel de aluminio, deberá usarse conforme con las
aberturas de la olla.
En algunas áreas, es posible que el nivel de
corriente (voltaje) sea bajo.
Precaliente el elemento para asar durante 10 minutos.
La temperatura del horno es
demasiado caliente o demasiado fría
/DWHPSHUDWXUDGHOKRUQRGHEHVHUDMXVWDGD Consulte la sección Settings (Configuraciones).
El horno no funciona o parece no
funcionar
Es posible que un fusible de su hogar se haya
quemado o que el disyuntor se haya desconectado.
Reemplace el fusible o reinicie el disyuntor.
Controles del horno configurados de forma incorrecta.
Consulte la sección Uso del Horno.
El horno se encuentra en Sabbath Mode (Modo
Sabático)
Verifique que el horno no esté en Sabbath Mode (Modo Sabático).
Consulte la sección del Modo Sabático.
Sonido de “chisporroteo” o
“traqueo”
Éste es el sonido de metal calentándose o
enfriándose durante las funciones de cocción y
limpieza.
Esto es normal.
¿Por qué la estufa hace un sonido
de “clic” cuando uso el horno?
Su estufa fue diseñada para mantener un control
más ajustado sobre la temperatura del horno.
Es posible que escuche que los elementos
de calentamiento del horno hagan sonidos de
“clic” con mayor frecuencia que con hornos más
antiguos para lograr mejores resultados durante
los ciclos de horneado, asado, convección y
limpieza automática.
Esto es normal.
El reloj y el temporizador no
funcionan
Es posible que un fusible de su hogar se haya
quemado o que el disyuntor se haya desconectado.
Reemplace el fusible o reinicie el disyuntor.
La luz del horno no funciona La lámpara está floja o presenta defectos. Ajuste o reemplace la lámpara.
La luz de funcionamiento del interruptor está
rota.
/ODPHDOVHUYLFLRWpFQLFR
El modo de limpieza automática del
horno no funciona
La temperatura del horno es demasiado caliente
como para configurar la limpieza automática.
Espere a que el horno se enfríe y reinicie los controles.
Los controles del horno están configurados de
forma incorrecta.
&RQVXOWHODVHFFLyQGH/LPSLH]DGHO+RUQR
Exceso de humo durante un ciclo
de limpieza
Suciedad o grasa excesiva. Presione la tecla Clear/Off (Borrar/ Apagar)
Abra las ventanas para
liberar el humo en la habitación. Espere hasta que la pantalla OVEN
,6&22/,1*'225,6/2&.('(OKRUQRVHHVWiHQIULDQGROD
SXHUWDHVWiEORTXHDGDGHVDSDUH]FD/LPSLHHOH[FHVRGHVXFLHGDG
y reinicie el ciclo de limpieza.
Humo excesivo al asar
La comida está demasiado cerca del quemador.
%DMHODSRVLFLyQGHOHVWDQWHFRQFRPLGD
La puerta del horno no se abrirá
luego de un ciclo de limpieza
El horno está demasiado caliente. Espere a que el horno se enfríe por debajo de la temperatura de
bloqueo.
Consejos para la Solución de Problemas... Antes de solicitar el servicio técnico
49-80737 Rev. 2 27
CONSEJOS PARA LA SOLUCIÓN DE PROBLEMAS (Horno Inferior)
Problema Causa Posible Qué Hacer
El horno no limpia luego de un ciclo
de limpieza
Los controles del horno están configurados de
forma incorrecta.
&RQVXOWHODVHFFLyQGH/LPSLH]DGHO+RUQR
El horno estaba demasiado sucio. /LPSLHGHUUDPHVH[FHVLYRVDQWHVGHLQLFLDUHOFLFORGHOLPSLH]D(V
posible que, en hornos con mucha suciedad, sea necesario usar
la limpieza automática nuevamente o usarla durante un período de
tiempo más prolongado.
Aparece “CLOSE DOOR TO
CONTINUE COOKING” (Cierre la
puerta para continuar cocinando) en
la sección de pantalla
La puerta está abierta durante una función de
cocción o limpieza.
Cierre la puerta del horno.
Aparece “OVEN IS COOLING DOOR
IS LOCKED” (El horno se está
enfriando; la puerta está bloqueada)
en la sección de pantalla.
La puerta del horno está bloqueada debido a que
la temperatura interior del horno no descendió
por debajo de la temperatura de bloqueo.
Presione la tecla Clear/Off (Borrar/ Apagar) Deje que el horno se
enfríe.
En la pantalla se muestra un error
del horno y “SERVICE MAY BE
NEEDED” (Es posible que necesite
el servicio técnico).
Tiene un código de error de función. Presione la tecla Clear/Off (Borrar/ Apagar) Permita que el horno se
enfríe durante una hora. Vuelva a poner el horno en funcionamiento.
Si el código de función se repite. Desconecte totalmente la corriente de la cocina durante por lo
menos 30 minutos y vuelva a conectar la misma. Si el código de
error de función se repite, llame al servicio técnico.
Olor a “quemado” o “aceite” desde
la ventilación
Esto es normal en un horno nuevo y
desaparecerá con el tiempo.
Para acelerar el proceso, configure un ciclo de limpieza automática
SRUXQPtQLPRGHKRUDV&RQVXOWHODVHFFLyQGH/LPSLH]DGHO+RUQR
Olor fuerte Un olor en la aislación alrededor del interior
del horno es normal desde las primeras veces
en que el horno es usado.
Esto es temporario y desaparecerá luego de varios usos o de un
ciclo de limpieza automática.
Ruido del ventilador Es posible que un ventilador de enfriamiento
se active automáticamente.
Esto es normal. El ventilador de enfriamiento se encenderá para
enfriar las partes internas. Es posible que funcione hasta durante
una hora y media, una vez que el horno se haya apagado.
La puerta de vidrio del horno parece
estar “teñida” o tener un color
“arcoíris”. ¿Es esto un defecto?
No. El vidrio del horno interno está cubierto
con una barrera de calor que refleja este
último nuevamente hacia el horno, a fin de
evitar la pérdida de calor y de mantener fría la
puerta externa mientras se hornea.
(VWRHVQRUPDO%DMRFLHUWDVOXFHV\iQJXORVHVSRVLEOHTXH
visualice esta tinta o arcoíris.
A veces el horno tarda más
en precalentarse a la misma
temperatura
Utensilio o comida en el horno El utensilio o la comida en el horno hará que éste tarde más en
precalentarse. Retire estos artículos para reducir el tiempo de
precalentamiento.
Número de estantes en el horno Agregar más estantes al horno hará que éste tarde más en
precalentarse. Retire algunos estantes.
Consejos para la Solución de Problemas... Antes de solicitar el servicio técnico
28 49-80737 Rev. 2
Notas
49-80737 Rev. 2 29
Notas
30 49-80737 Rev. 2
Abroche su recibo aquí. Para acceder al servicio técnico de acuerdo con
la garantía deberá contar con la prueba de la fecha original de compra.
GARANTÍA LIMITADA
Garantía Limitada de GE Appliances
GEAppliances.com
Todo el servicio de garantía es provisto por nuestros Centros de Servicio de Fabricación, o un técnico autorizado de Customer
Care
®
. Para programar una visita del servicio técnico a través de Internet, visítenos en GEAppliances.com/service, o llame al 800.
GE.CARES (800.432.2737). Cuando llame para solicitar el servicio, tenga los números de serie y modelo disponibles.
Para realizar el servicio técnico de su electrodoméstico, se podrá requerir el uso de datos del puerto de abordaje para su diagnóstico.
Esto da al técnico del servicio de fábrica de GE Appliances la habilidad de diagnosticar de forma rápida cualquier problema con
su electrodoméstico, y de ayudar a GE Appliances a mejorar sus productos al brindarle a GE Appliances la información sobre su
electrodoméstico. Si no desea que los datos de su electrodoméstico sean enviados a GE Appliances, solicitamos que le indique a su
técnico no entregar los datos a GE Appliances en el momento del servicio.
Qué no cubrirá GE Appliances:
Ŷ Viajes del técnico del servicio a su hogar para enseñarle
sobre cómo usar el producto.
Ŷ ,QVWDODFLyQHQWUHJDRPDQWHQLPLHQWRLQDGHFXDGRV
Ŷ )DOODVGHOSURGXFWRHQFDVRGHDEXVRPDOXVRPRGLILFDFLyQ
o uso para propósitos diferentes al original o uso comercial.
Ŷ 'DxRVDODHVWXIDGHYLGULRSURYRFDGRVSRUHOXVRGH
limpiadores distintos de las cremas y paños recomendados.
Ŷ 'DxRVDODHVWXIDGHYLGULRSURYRFDGRVSRUGHUUDPHV
endurecidos de materiales azucarados o plástico derretido
que no se limpiaron de acuerdo con las instrucciones del
Manual del Propietario.
Ŷ 5HHPSOD]RGHIXVLEOHVGHODFDVDRUHLQLFLRGHGLV\XQWRUHV
Ŷ 'DxRVRFDVLRQDGRVVREUHHOSURGXFWRSRUDFFLGHQWH
incendio, inundaciones o catástrofes naturales.
Ŷ 'DxRVLQFLGHQWDOHVRFRQVHFXHQWHVFDXVDGRVSRUSRVLEOHV
defectos sobre este producto.
Ŷ 'DxRFDXVDGRGHVSXpVGHODHQWUHJD
Ŷ 3URGXFWRQRDFFHVLEOHSDUDEULQGDUHOVHUYLFLRUHTXHULGR
Ŷ 6ROLFLWHHOVHUYLFLRWpFQLFRSDUDUHSDUDURUHHPSOD]DUODV
OiPSDUDVH[FHSWRODVOiPSDUDV/('
EXCLUSIÓN DE GARANTÍAS IMPLÍCITAS
6X~QLFD\H[FOXVLYDDOWHUQDWLYDHVODUHSDUDFLyQGHOSURGXFWRFRPRVHLQGLFDHQOD*DUDQWtD/LPLWDGD/DV
garantías implícitas, incluyendo garantías implícitas de comerciabilidad o conveniencia sobre un propósito
particular, se limitan a un año o al período más corto permitido por la ley.
Esta garantía limitada se extiende al comprador original y a cualquier propietario posterior de los productos
comprados para uso doméstico dentro de EE. UU. Si el producto está en un área donde no se encuentra disponible
un Proveedor Autorizado del Servicio Técnico de GE Appliances, usted será responsable por el costo de un viaje o se
podrá requerir que traiga el producto a una ubicación del Servicio Técnico de GE Appliances autorizado para recibir el
servicio. En Alaska, la garantía limitada excluye el costo de envío o visitas de servicio a su domicilio. Algunos estados
no permiten la exclusión o limitación de daños fortuitos o consecuentes. Esta garantía limitada le otorga derechos
legales específicos, y usted también podría tener otros derechos que varían de estado a estado. Para conocer cuáles
son sus derechos legales, consulte a la oficina de asuntos del consumidor local o estatal o al Fiscal de su estado.
Garante: GE Appliances, a Haier company
/RXLVYLOOH.<
Garantías Extendidas: Adquiera una garantía extendida de GE Appliances y conozca los descuentos especiales que
están disponibles mientras su garantía aún está vigente. Puede acceder a la misma a través de Internet en cualquier
momento en
GEAppliances.com/extended-warranty
ROODPDQGRDOGXUDQWHHOKRUDULRFRPHUFLDO/RV6HUYLFLRVSDUDORV*($SSOLDQFHVD~QHVWDUiQ
disponibles cuando su garantía caduque.
Por el Período de GE Appliances reemplazará
Un Año
Desde la fecha de la
compra original
Cualquier parte de la cocina que falle debido a un defecto en los materiales o la fabricación. Durante
esta garantía limitada de un año, GE Appliances también proveerá, sin costo, todo el trabajo y el
servicio en el hogar para reemplazar la parte que presente defectos.
49-80737 Rev. 2 31
Accesorios
Olla para Asar Pequeña (8 ¾ ” x 1 ¼” x 13 ½ “)
Olla para Asar Grande* (12 ¾ ” x 1 ¼” x 16 ½ “)
Olla para Asar Extra Grande* (17 ¾ ” x 1 ¼” x 19 ½ “)
Piezas
%DQGHMDGH9LGULR
Plato Giratorio
Estantes del horno
Elementos del horno
/iPSDUDVGHOX]
Suministros de Limpieza
/LPSLDGRUSDUD(OHFWURGRPpVWLFRV0LFUR%U\WH
®
de 16 onzas
/LPSLDGRUHVGH$FHUR,QR[LGDEOH&LWUL6KLQH
/LPSLDGRUGH(OHFWURGRPpVWLFRVGH$FHUR,QR[LGDEOH&(5$0$%5<7(
®
/XEULFDQWHGH*UDILWR
/DROODSDUDDVDUJUDQGHQRHQWUDHQFRFLQDVGH´´
/DROOD;/QRHQWUDHQKRUQRVGHSDUHGGH´HPSRWUDEOHVGH´RFRFLQDVGH´´
ACCESORIOS
¿Busca Algo Más?
¡GE ofrece una variedad de accesorios para mejorar sus experiencias de cocción y mantenimiento!
Para realizar una orden, visítenos a través de Internet en:
www.GEApplianceParts.com (EE.UU.) o en www.GEAppliances.ca (Canadá)
o llame al 800.626.2002 (EE.UU.) 800.661.1616 (Canadá)
Accesorios
32 49-80737 Rev. 2
SOPORTE PARA EL CONSUMIDOR
Soporte para el Consumidor
Impreso en Estados Unidos
Sitio Web de GE Appliances
¿Desea realizar una consulta o necesita ayuda con su electrodoméstico? ¡Intente a través del Sitio Web de GE Appliances las
24 horas del día, cualquier día del año! Usted también puede comprar más electrodomésticos maravillosos de GE Appliances y
aprovechar todos nuestros servicios de soporte a través de Internet, diseñados para su conveniencia.
En EE.UU.: GEAppliances.com
Registre su Electrodoméstico
¡Registre su electrodoméstico nuevo a través de Internet, según su conveniencia! Un registro puntual de su producto permitirá
una mejor comunicación y un servicio más puntual de acuerdo con los términos de su garantía, en caso de surgir la necesidad.
También puede enviar una carta en la tarjeta de inscripción preimpresa que se incluye con el material embalado.
En EE.UU.: GEAppliances.com/register
Servicio Programado
El servicio de reparación de expertos de GE Appliances está a sólo un paso de su puerta. Conéctese a través de Internet y programe
su servicio a su conveniencia cualquier día del año. En EE.UU.: GEAppliances.com/service
o comuníquese al 800.432.2737 durante el horario de atención comercial.
Garantías Extendidas
Adquiera una garantía extendida de GE Appliances y conozca los descuentos especiales que están disponibles mientras su
JDUDQWtDD~QHVWiYLJHQWH/DSXHGHDGTXLULUHQFXDOTXLHUPRPHQWRDWUDYpVGH,QWHUQHW/RVVHUYLFLRVGH*($SSOLDQFHVD~Q
estarán allí cuando su garantía caduque.
En EE.UU.: GEAppliances.com/extended-warranty
o comuníquese al 800.626.2224 durante el horario de atención comercial.
Conectividad Remota
Para solicitar asistencia para la conectividad de red inalámbrica (para modelos con acceso remoto),
visite nuestro sitio web en GEAppliances.com/connect o comuníquese al 800.220.6899 en EE.UU.
Piezas y Accesorios
Aquellos individuos calificados para realizar el servicio técnico de sus propios electrodomésticos podrán solicitar el envío de
piezas o accesorios directamente a sus hogares (se aceptan las tarjetas VISA, MasterCard y Discover). Ordene hoy a través de
Internet durante las 24 horas, todos los días. En EE.UU.: GEApplianceparts.com o de forma telefónica al 877.959.8688 durante
el horario de atención comercial.
Las instrucciones que figuran en este manual cubren los procedimientos que serán realizados por cualquier usuario.
Otros servicios técnicos generalmente deben ser derivados a personal calificado del servicio. Se deberá tener cuidado,
ya que una reparación indebida podrá hacer que el funcionamiento no sea seguro.
Contáctenos
Si no se encuentra satisfecho con el servicio que recibió de GE Appliances, comuníquese con nosotros a través de nuestro sitio
Web con todos los detalles, incluyendo su número telefónico, o escriba a:
(Q((88*HQHUDO0DQDJHU&XVWRPHU5HODWLRQV_*($SSOLDQFHV$SSOLDQFH3DUN_/RXLVYLOOH.<
GEAppliances.com/contact
1 / 1

GE JK3800DHBB Guía del usuario

Categoría
Microondas
Tipo
Guía del usuario
Este manual también es adecuado para

En otros idiomas