ATEN HDMI Wireless Extender (1080p@30m) Guía de inicio rápido
- Categoría
- Secadoras
- Tipo
- Guía de inicio rápido
Este manual también es adecuado para

Hardware Review
A
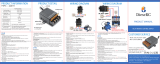
VE809T Front View
1. Port LED
2. Port Selection Pushbutton
3. Power Pushbutton / LED
4. IR Receiver
VE809R Front View
1. Power Pushbutton / LED
2. Port Selection Pushbutton
3. Port LED
4. IR Receiver
VE809T Rear View
1. Tripod Bracket
2. Power Jack
3. HDMI In Port
4. HDMI Out Port
5. IR Blaster Port
6. Service Port
Description de l’appareil
A
Vue avant du VE809T
1. Voyants des ports
2. Bouton de sélection de port
3. Bouton / voyant d’alimentation
4. Récepteur infrarouge
Vue avant du VE809R
1. Bouton / voyant d’alimentation
2. Bouton de sélection de port
3. Voyants des ports
4. Récepteur infrarouge
Vue arrière du VE809T
1. Support trépied
2. Prise d’alimentation
3. Port d’entrée HDMI
4. Port de sortie HDMI
5. Port de module émetteur infrarouge
6. Port de service
Hardwareübersicht
A
VE809T - Vorderseite
1. Port-LED
2. Portauswahl-Drucktaste
3. Drucktaste Ein/Aus / LED-Betriebsanzeige
4. Infrarot-Empfänger
VE809R - Vorderseite
1. Drucktaste Ein/Aus / LED-Betriebsanzeige
2. Portauswahl-Drucktaste
3. Port-LED
4. Infrarot-Empfänger
VE809T - Rückseite
1. Stativhalterung
2. Stromeingangsbuchse
3. HDMI-Eingang
4. HDMI-Ausgang
5. Infrarot-Ausgang
6. Port des Kerberos-Dienstes
Presentación del hardware
A
VE809T – Vista frontal
1. Indicadores LED del puerto
2. Botón de selección de puertos
3. Botón / indicador de alimentación
4. Receptor de infrarrojos
VE809R – Vista frontal
1. Botón / indicador de alimentación
2. Botón de selección de puertos
3. Indicadores LED del puerto
4. Receptor de infrarrojos
VE809T – Vista posterior
1. Sujeción para trípode
2. Entrada de alimentación
3. Puerto de entrada HDMI
4. Puerto de salida HDMI
5. Salida de infrarrojos
6. Puerto del servicio
Hardware
A
Lato anteriore del VE809T
1. LED delle porte
2. Pulsante di selezione della porta
3. LED/Pulsante d’alimentazione
4. Ricevitore a infrarossi
Lato anteriore del VE809R
1. LED/Pulsante d’alimentazione
2. Pulsante di selezione della porta
3. LED delle porte
4. Ricevitore a infrarossi
Lato posteriore del VE809T
1. Staffa del treppiede
2. Presa d’alimentazione
3. Porta d’ingresso HDMI
4. Porta d’uscita HDMI
5. Porta dell'IR blaster
6. Porta di servizio
VE809R Rear View
1. Tripod Bracket
2. HDMI Out Port
3. USB mini power adpater port
Remote Control
1. Power
2. Info
3. IR
4. Source
Hardware Installation
B
Transmitter Installation
1. Use an HDMI cable to connect the HDMI source device(s) to the
HDMI input port(s) on the rear of the VE809T.
2. Use an HDMI cable to connect the local HDMI video display (HDTV)
to the HDMI output port on the rear of the VE809T.
3. Plug the power adapter cable into the Power Jack on the VE809T.
4. Connect the IR Blaster cable into the IR Out port.
Vue arrière du VE809R
1. Support trépied
2. Port de sortie HDMI
3. Port pour adaptateur secteur mini USB
Télécommande
1. Marche
2. Info
3. Infrarouge
4. Source
Installation du matériel
B
Installation de l’émetteur
1. Utilisez un câble HDMI pour relier le ou les périphériques sources
au(x) port(s) d’entrée HDMI à l’arrière du VE809T.
2. Utilisez un câble HDMI pour relier le périphérique d’af chage vidéo
HDMI local (téléviseur HD) au port de sortie HDMI à l’arrière du
VE809T.
3. Branchez le câble de l’adaptateur secteur dans la prise d’alimentation
du VE809T.
VE809R - Rückseite
1. Stativhalterung
2. HDMI-Ausgang
3. Port für Netzteil mit Mini-USB-Stecker
Fernbedienung
1. Stromversorgung
2. Info
3. Infrarot
4. Quelle
Hardware installieren
B
Sender installieren
1. Verbinden Sie die HDMI-Signalquelle(n) mit dem/den HDMI-
Eingang/-Eingängen auf der Rückseite des VE809T. Verwenden Sie
dazu ein HDMI-Kabel.
2. Verbinden Sie den lokalen HDMI-Bildschirm (HDTV) mit dem HDMI-
Ausgang auf der Rückseite des VE809T. Verwenden Sie dazu ein
HDMI-Kabel.
VE809R – Vista posterior
1. Sujeción para trípode
2. Puerto de salida HDMI
3. Entrada de alimentación Mini USB
Mando a distancia
1. Alimentación
2. Información
3. Infrarrojos
4. Fuente
Instalar el hardware
B
Instalar el transmisor
1. Conecte la(s) fuente(s) de señales HDMI a la(s) entrada(s) HDMI en
la parte posterior del VE809T. Para ello, emplee un cable HDMI.
2. Conecte la pantalla HDMI local a la salida HDMI en la parte posterior
del VE809T. Para ello, emplee un cable HDMI.
3. Conecte el cable del adaptador de alimentación a la entrada de
alimentación del VE809T.
4. Conecte el cable para infrarrojos a la salida de infrarrojos.
Lato posteriore del VE809R
1. Staffa del treppiede
2. Porta d’uscita HDMI
3. Porta mini USB per l’alimentatore
Telecomando
1. Alimentazione
2. Info
3. Infrarossi
4. Sorgente
Installazione dell’hardware
B
Installazione del trasmettitore
1. Usare un cavo HDMI per collegare i dispositivi sorgente HDMI alle
porte d’ingresso HDMI sul retro del VE809T.
2. Usare un cavo HDMI per collegare il dispositivo video HDMI locale
(HDTV) alle porte d’uscita HDMI sul retro del VE809T.
3. Inserire il cavo dell’alimentatore nella presa d’alimentazione del
VE809T.
4. Collegare il cavo dell’IR blaster alla porta di uscita infrarossi.
Receiver Installation
1. Place the VE809R Receiver up to 30m* from the VE809T
Transmitter.
2. Use the HDMI cable to connect the HDMI video display (HDTV) to
the HDMI output port on the rear of the VE809R Receiver.
3. Plug the power adapter cable into the USB mini power adapter port
on the VE809R.
* Distance may vary depending on environment; solid objects such as
steel, concrete and brick may view shorter distances.
Operation
Basic Operation
1. Power On the Transmitter and Receiver.
2. The blue Power LED blinks on the Transmitter and Receiver until
both units are wirelessly connected. It may take up to 20 seconds to
establish the wireless connection.
3. From the Receiver side, turn the TV on and select the TV’s HDMI
input source for the VE809R Receiver’s connection.
4. Branchez le câble du module émetteur infrarouge dans le port de
sortie infrarouge.
Installation du récepteur
1. Placez le récepteur VE809R jusqu’à 30 m* de l'émetteur VE809T.
2. Utilisez le câble HDMI pour relier le périphérique d’af chage vidéo
HDMI (téléviseur HD) au port de sortie HDMI à l’arrière du récepteur
VE809R.
3. Branchez le câble de l’adaptateur secteur dans le port mini USB
situé sur le VE809R.
* La distance peut varier en fonction de l’environnement ; la présence
d’objets solides tels que des éléments en acier, béton et brique peut
raccourcir les distances.
Fonctionnement
Fonctionnement de base
1. Allumez l’émetteur et le récepteur.
2. Le voyant d’alimentation bleu clignote sur l’émetteur et sur le
récepteur jusqu'à ce que les deux modules soient connectés sans l.
Cela peut prendre jusqu’à 20 secondes pour que la connexion sans
l soit établie.
3. Verbinden Sie das Kabel des Netzteils mit der Stromeingangsbuchse
am VE809T.
4. Verbinden Sie das Infrarot-Kabel mit dem Infrarot-Ausgang.
Empfänger installieren
1. Stellen Sie den Empfänger VE809R bis zu 30 m* vom Sender
VE809T auf.
2. Verbinden Sie den HDMI-Bildschirm (HDTV) mit dem HDMI-Ausgang
auf der Rückseite des Empfängers VE809R. Verwenden Sie dazu
das HDMI-Kabel.
3. Verbinden Sie das Kabel des Netzteils mit der Mini-USB-
Stromeingangsbuchse am VE809R.
* Die Reichweite ist umgebungsabhängig. Undurchlässige Materialien
wie Stahl, Beton und Mauerwerk verkürzen den Übertragungsweg.
Bedienung
Bedienung - Grundlagen
1. Schalten Sie Sender und Empfänger ein.
2. Die blaue Betriebsanzeige blinkt am Sender und am Empfänger, bis
die Funkverbindung zwischen beiden Geräten hergestellt wurde. Es
Instalar el receptor
1. Instale el VE809R a hasta 30 m* del transmisor VE809T.
2. Conecte la pantalla HDMI (HDTV) a la salida HDMI en la parte
posterior del VE809R. Para ello, emplee un cable HDMI.
3. Conecte el cable del adaptador de alimentación a la entrada de
alimentación Mini USB del VE809R.
* La distancia depende del entorno: los objetos sólidos tales como el
acero, hormigón o muros pueden reducir el alcance.
Funcionamiento
Funcionamiento básico
1. Encienda el transmisor y el receptor.
2. El indicador de alimentación parpadea de color azul hasta que se
haya establecido la conexión inalámbrica entre los dos dispositivos.
Es posible que se tarde hasta 20 segundos en establecer la
conexión inalámbrica.
3. En el lado del receptor, encienda el televisor y, en el televisor,
seleccione la fuente de señal HDMI para la conexión del receptor
VE809R.
Installazione del ricevitore
1. Collocare il ricevitore VE809R entro 30m* dal trasmettitore VE809T.
2. Usare un cavo HDMI per collegare il dispositivo video HDMI (HDTV)
alle porte d’uscita HDMI sul retro del ricevitore VE809R.
3. Inserire il cavo dell’alimentatore nella porta d’alimentazione mini USB
del VE809R.
* La distanza può variare a seconda delle condizioni ambientali. Oggetti
solidi come metallo, cemento o mattoni possono ostacolare il segnale
e ridurre la distanza.
Funzionamento
Funzionamento di base
1. Accendere il trasmettitore e il ricevitore.
2. Il LED blu di alimentazione lampeggia sul trasmettitore e sul
ricevitore no a quando entrambe le unità non sono connesse in
modalità wireless. Possono essere necessari no a 20 secondi per
stabilire la connessione wireless.
3. Dal lato del ricevitore, accendere il televisore e selezionare la relativa
sorgente HDMI per la connessione del ricevitore VE809R.
4. From the Transmitter, turn on the source device(s) and press the
Source button (on top of the unit or from the Remote Control) to
select the source device you would like to use: HDMI 1 or HDMI 2.
5. With the Power LED on both units solid blue, video from the selected
source device will be broadcast on the remote HDTV connected to
the Receiver.
3. Du côté du récepteur, allumez le téléviseur et sélectionnez la
source d'entrée HDMI du téléviseur pour la connexion du récepteur
VE809R.
4. Du côté de l’émetteur, allumez le ou les périphériques sources
et appuyez sur le bouton Source (en haut du module ou sur la
télécommande) a n de sélectionner le périphérique source que vous
voulez utiliser : HDMI 1 ou HDMI 2.
5. Une fois que le voyant d’alimentation bleu des deux modules reste
xe, la vidéo du périphérique source sélectionné est diffusée sur le
téléviseur HD distant raccordé au récepteur.
kann bis zu 20 Sekunden dauern, bis eine Verbindung hergestellt
wird.
3. Schalten Sie den am Empfänger angeschlossenen Fernseher ein,
und wählen Sie am Fernseher die Eingangsquelle HDMI, damit das
Bild des Empfängers VE809R angezeigt wird.
4. Schalten Sie beim Empfänger die Signalquelle(n) ein, und drücken
Sie die Taste Source (oben am Gerät oder auf der Fernbedienung),
um die gewünschte Signalquelle auszuwählen: HDMI 1 oder HDMI
2.
5. Leuchten die Betriebsanzeigen beider Geräte blau, wird das Bild der
Signalquelle auf den am Empfänger angeschlossenen Fernseher
übertragen.
4. En el lado del transmisor, encienda el/los dispositivo(s) fuente y
pulse el botón Source (arriba en la unidad o en el mando a distancia)
para seleccionar la fuente de señal que desee ver: HDMI 1 o HDMI
2.
5. Cuando el indicador LED de ambas unidades se ilumine de color
azul, la imagen del dispositivo seleccionado se transmitirá al
televisor HDTV remoto conectado al receptor.
4. Dal trasmettitore, accendere i dispositivi sorgente e premere il
pulsante Source (sul lato superiore dell'unità o sul telecomando) per
selezionare il dispositivo sorgente che si desidera utilizzare: HDMI 1
o HDMI 2.
5. Quando il LED di alimentazione rimane illuminato sso in blu, viene
trasmesso il segnale video del dispositivo sorgente selezionato
sull’HDTV remota collegata al ricevitore.
B
Package Contents
1 VE809T HDMI Wireless Extender
1 VE809R HDMI Wireless Extender
1 IR Remote Control
1 IR Blaster Cable
VE809T Front View
Transmitter Installation
Receiver Installation
VE809T Rear View
VE809R Rear View Remote ControlVE809R Front View
Hardware Installation
© Copyright 2012 ATEN
®
International Co., Ltd.
ATEN and the ATEN logo are trademarks of ATEN International Co., Ltd. All rights reserved.
All other trademarks are the property of their respective owners.
This product is RoHS compliant.
Printing Date: 11/2012
HDMI Wireless Extender
Quick Start Guide
VE809
VE809 HDMI Wireless Extender Quick Start Guide
www.aten.com
Système d'extension sans l HDMI VE809 – Guide de démarrage rapide
www.aten.com
VE809 Drahtlose HDMI-Verlängerung Kurzanleitung
www.aten.com
VE809 Alargador HDMI inalámbrico Guía rápida
www.aten.com
Estensore wireless HDMI VE809 - Guida rapida
www.aten.com
Important Notice
Considering environmental protection,
ATEN does not provide a fully printed user
manual for this product. If the information
contained in the Quick Start Guide is not
enough for you to con gure and operate
your product, please visit our website
www.aten.com, and download the full
user manual.
Online Registration
http://eservice.aten.com
Technical Phone Support
International:
886-2-86926959
North America:
1-888-999-ATEN Ext: 4988
United Kingdom:
44-8-4481-58923
All information, documentation, rmware,
software utilities, and specifications
contained in this package are subject to
change without prior notification by the
manufacturer. Please visit our website
http://www.aten.com/download/?cid=dds
for the most up-to-date versions.
1 HDMI Cable
1 Mini USB Power Adapter(VE809R)
1 Power Adapter (VE809T)
1 AAA Batteries
1 User Instructions
1
2
3
4
1
2
3
4
1
2
3
4
4
1
6
5
32
123
4
1
3
2
2
3
A
Hardware Review
La página se está cargando...
Transcripción de documentos
Package Contents 1 HDMI Cable 1 Mini USB Power Adapter(VE809R) 1 Power Adapter (VE809T) 1 AAA Batteries 1 User Instructions 1 VE809T HDMI Wireless Extender 1 VE809R HDMI Wireless Extender 1 IR Remote Control 1 IR Blaster Cable A B Hardware Installation Important Notice Transmitter Installation 2 Hardware Review 4 VE809T Front View VE809T Rear View 3 Online Registration 5 1 VE809 Technical Phone Support 2 3 HDMI Wireless Extender Quick Start Guide http://eservice.aten.com 1 2 3 4 International: 886-2-86926959 1 6 4 North America: 1-888-999-ATEN Ext: 4988 Receiver Installation VE809R Front View VE809R Rear View Considering environmental protection, ATEN does not provide a fully printed user manual for this product. If the information contained in the Quick Start Guide is not enough for you to configure and operate your product, please visit our website www.aten.com, and download the full user manual. United Kingdom: 44-8-4481-58923 Remote Control 2 3 1 2 3 © Copyright 2012 ATEN® International Co., Ltd. 1 3 ATEN and the ATEN logo are trademarks of ATEN International Co., Ltd. All rights reserved. 2 1 4 3 2 All other trademarks are the property of their respective owners. 4 This product is RoHS compliant. Printing Date: 11/2012 VE809 HDMI Wireless Extender Quick Start Guide Hardware Review www.aten.com VE809R Rear View A Receiver Installation 1. Tripod Bracket 2. HDMI Out Port 3. USB mini power adpater port VE809T Front View 1. Port LED 2. Port Selection Pushbutton 3. Power Pushbutton / LED 4. IR Receiver 1. Place the VE809R Receiver up to 30m* from the VE809T Transmitter. 2. Use the HDMI cable to connect the HDMI video display (HDTV) to the HDMI output port on the rear of the VE809R Receiver. 3. Plug the power adapter cable into the USB mini power adapter port on the VE809R. * Distance may vary depending on environment; solid objects such as steel, concrete and brick may view shorter distances. Remote Control 1. Power 2. Info 3. IR 4. Source VE809R Front View 1. Power Pushbutton / LED 2. Port Selection Pushbutton 3. Port LED 4. IR Receiver Hardware Installation VE809T Rear View Basic Operation 1. Use an HDMI cable to connect the HDMI source device(s) to the HDMI input port(s) on the rear of the VE809T. 2. Use an HDMI cable to connect the local HDMI video display (HDTV) to the HDMI output port on the rear of the VE809T. 3. Plug the power adapter cable into the Power Jack on the VE809T. 4. Connect the IR Blaster cable into the IR Out port. 1. Tripod Bracket 2. Power Jack 3. HDMI In Port 4. HDMI Out Port 5. IR Blaster Port 6. Service Port 1. Power On the Transmitter and Receiver. 2. The blue Power LED blinks on the Transmitter and Receiver until both units are wirelessly connected. It may take up to 20 seconds to establish the wireless connection. 3. From the Receiver side, turn the TV on and select the TV’s HDMI input source for the VE809R Receiver’s connection. Système d'extension sans fil HDMI VE809 – Guide de démarrage rapide www.aten.com Vue arrière du VE809R A 4. Branchez le câble du module émetteur infrarouge dans le port de sortie infrarouge. 1. Support trépied 2. Port de sortie HDMI 3. Port pour adaptateur secteur mini USB Vue avant du VE809T 1. Voyants des ports 2. Bouton de sélection de port 3. Bouton / voyant d’alimentation 4. Récepteur infrarouge Installation du récepteur 1. Placez le récepteur VE809R jusqu’à 30 m* de l'émetteur VE809T. 2. Utilisez le câble HDMI pour relier le périphérique d’affichage vidéo HDMI (téléviseur HD) au port de sortie HDMI à l’arrière du récepteur VE809R. 3. Branchez le câble de l’adaptateur secteur dans le port mini USB situé sur le VE809R. * La distance peut varier en fonction de l’environnement ; la présence d’objets solides tels que des éléments en acier, béton et brique peut raccourcir les distances. Télécommande 1. Marche 2. Info 3. Infrarouge 4. Source Vue avant du VE809R 1. Bouton / voyant d’alimentation 2. Bouton de sélection de port 3. Voyants des ports 4. Récepteur infrarouge Installation du matériel B Installation de l’émetteur Vue arrière du VE809T 1. Utilisez un câble HDMI pour relier le ou les périphériques sources au(x) port(s) d’entrée HDMI à l’arrière du VE809T. 2. Utilisez un câble HDMI pour relier le périphérique d’affichage vidéo HDMI local (téléviseur HD) au port de sortie HDMI à l’arrière du VE809T. 3. Branchez le câble de l’adaptateur secteur dans la prise d’alimentation du VE809T. 1. Support trépied 2. Prise d’alimentation 3. Port d’entrée HDMI 4. Port de sortie HDMI 5. Port de module émetteur infrarouge 6. Port de service Fonctionnement de base 1. Allumez l’émetteur et le récepteur. 2. Le voyant d’alimentation bleu clignote sur l’émetteur et sur le récepteur jusqu'à ce que les deux modules soient connectés sans fil. Cela peut prendre jusqu’à 20 secondes pour que la connexion sans fil soit établie. www.aten.com VE809R - Rückseite A 3. Verbinden Sie das Kabel des Netzteils mit der Stromeingangsbuchse am VE809T. 4. Verbinden Sie das Infrarot-Kabel mit dem Infrarot-Ausgang. 1. Stativhalterung 2. HDMI-Ausgang 3. Port für Netzteil mit Mini-USB-Stecker VE809T - Vorderseite 1. Port-LED 2. Portauswahl-Drucktaste 3. Drucktaste Ein/Aus / LED-Betriebsanzeige 4. Infrarot-Empfänger Empfänger installieren Fernbedienung 1. Stromversorgung 2. Info 3. Infrarot 4. Quelle VE809R - Vorderseite 1. Drucktaste Ein/Aus / LED-Betriebsanzeige 2. Portauswahl-Drucktaste 3. Port-LED 4. Infrarot-Empfänger Hardware installieren B Sender installieren VE809T - Rückseite 1. Verbinden Sie die HDMI-Signalquelle(n) mit dem/den HDMIEingang/-Eingängen auf der Rückseite des VE809T. Verwenden Sie dazu ein HDMI-Kabel. 2. Verbinden Sie den lokalen HDMI-Bildschirm (HDTV) mit dem HDMIAusgang auf der Rückseite des VE809T. Verwenden Sie dazu ein HDMI-Kabel. 1. Stativhalterung 2. Stromeingangsbuchse 3. HDMI-Eingang 4. HDMI-Ausgang 5. Infrarot-Ausgang 6. Port des Kerberos-Dienstes 1. Stellen Sie den Empfänger VE809R bis zu 30 m* vom Sender VE809T auf. 2. Verbinden Sie den HDMI-Bildschirm (HDTV) mit dem HDMI-Ausgang auf der Rückseite des Empfängers VE809R. Verwenden Sie dazu das HDMI-Kabel. 3. Verbinden Sie das Kabel des Netzteils mit der Mini-USBStromeingangsbuchse am VE809R. * Die Reichweite ist umgebungsabhängig. Undurchlässige Materialien wie Stahl, Beton und Mauerwerk verkürzen den Übertragungsweg. VE809T – Vista frontal 1. Indicadores LED del puerto 2. Botón de selección de puertos 3. Botón / indicador de alimentación 4. Receptor de infrarrojos VE809R – Vista frontal 1. Botón / indicador de alimentación 2. Botón de selección de puertos 3. Indicadores LED del puerto 4. Receptor de infrarrojos VE809T – Vista posterior 1. Sujeción para trípode 2. Entrada de alimentación 3. Puerto de entrada HDMI 4. Puerto de salida HDMI 5. Salida de infrarrojos 6. Puerto del servicio Bedienung - Grundlagen 1. Schalten Sie Sender und Empfänger ein. 2. Die blaue Betriebsanzeige blinkt am Sender und am Empfänger, bis die Funkverbindung zwischen beiden Geräten hergestellt wurde. Es www.aten.com A VE809R – Vista posterior Instalar el receptor 1. Sujeción para trípode 2. Puerto de salida HDMI 3. Entrada de alimentación Mini USB 1. Instale el VE809R a hasta 30 m* del transmisor VE809T. 2. Conecte la pantalla HDMI (HDTV) a la salida HDMI en la parte posterior del VE809R. Para ello, emplee un cable HDMI. 3. Conecte el cable del adaptador de alimentación a la entrada de alimentación Mini USB del VE809R. * La distancia depende del entorno: los objetos sólidos tales como el acero, hormigón o muros pueden reducir el alcance. Mando a distancia 1. Alimentación 2. Información 3. Infrarrojos 4. Fuente Instalar el hardware A Lato anteriore del VE809T 1. LED delle porte 2. Pulsante di selezione della porta 3. LED/Pulsante d’alimentazione 4. Ricevitore a infrarossi Lato anteriore del VE809R 1. LED/Pulsante d’alimentazione 2. Pulsante di selezione della porta 3. LED delle porte 4. Ricevitore a infrarossi Lato posteriore del VE809T 1. Staffa del treppiede 2. Presa d’alimentazione 3. Porta d’ingresso HDMI 4. Porta d’uscita HDMI 5. Porta dell'IR blaster 6. Porta di servizio 4. En el lado del transmisor, encienda el/los dispositivo(s) fuente y pulse el botón Source (arriba en la unidad o en el mando a distancia) para seleccionar la fuente de señal que desee ver: HDMI 1 o HDMI 2. 5. Cuando el indicador LED de ambas unidades se ilumine de color azul, la imagen del dispositivo seleccionado se transmitirá al televisor HDTV remoto conectado al receptor. Funcionamiento Funcionamiento básico B Instalar el transmisor 1. Conecte la(s) fuente(s) de señales HDMI a la(s) entrada(s) HDMI en la parte posterior del VE809T. Para ello, emplee un cable HDMI. 2. Conecte la pantalla HDMI local a la salida HDMI en la parte posterior del VE809T. Para ello, emplee un cable HDMI. 3. Conecte el cable del adaptador de alimentación a la entrada de alimentación del VE809T. 4. Conecte el cable para infrarrojos a la salida de infrarrojos. 1. Encienda el transmisor y el receptor. 2. El indicador de alimentación parpadea de color azul hasta que se haya establecido la conexión inalámbrica entre los dos dispositivos. Es posible que se tarde hasta 20 segundos en establecer la conexión inalámbrica. 3. En el lado del receptor, encienda el televisor y, en el televisor, seleccione la fuente de señal HDMI para la conexión del receptor VE809R. Estensore wireless HDMI VE809 - Guida rapida Hardware kann bis zu 20 Sekunden dauern, bis eine Verbindung hergestellt wird. 3. Schalten Sie den am Empfänger angeschlossenen Fernseher ein, und wählen Sie am Fernseher die Eingangsquelle HDMI, damit das Bild des Empfängers VE809R angezeigt wird. 4. Schalten Sie beim Empfänger die Signalquelle(n) ein, und drücken Sie die Taste Source (oben am Gerät oder auf der Fernbedienung), um die gewünschte Signalquelle auszuwählen: HDMI 1 oder HDMI 2. 5. Leuchten die Betriebsanzeigen beider Geräte blau, wird das Bild der Signalquelle auf den am Empfänger angeschlossenen Fernseher übertragen. Bedienung VE809 Alargador HDMI inalámbrico Guía rápida Presentación del hardware 3. Du côté du récepteur, allumez le téléviseur et sélectionnez la source d'entrée HDMI du téléviseur pour la connexion du récepteur VE809R. 4. Du côté de l’émetteur, allumez le ou les périphériques sources et appuyez sur le bouton Source (en haut du module ou sur la télécommande) afin de sélectionner le périphérique source que vous voulez utiliser : HDMI 1 ou HDMI 2. 5. Une fois que le voyant d’alimentation bleu des deux modules reste fixe, la vidéo du périphérique source sélectionné est diffusée sur le téléviseur HD distant raccordé au récepteur. Fonctionnement VE809 Drahtlose HDMI-Verlängerung Kurzanleitung Hardwareübersicht 4. From the Transmitter, turn on the source device(s) and press the Source button (on top of the unit or from the Remote Control) to select the source device you would like to use: HDMI 1 or HDMI 2. 5. With the Power LED on both units solid blue, video from the selected source device will be broadcast on the remote HDTV connected to the Receiver. Operation B Transmitter Installation Description de l’appareil All information, documentation, firmware, software utilities, and specifications contained in this package are subject to change without prior notification by the manufacturer. Please visit our website http://www.aten.com/download/?cid=dds for the most up-to-date versions. www.aten.com Lato posteriore del VE809R Installazione del ricevitore 1. Staffa del treppiede 2. Porta d’uscita HDMI 3. Porta mini USB per l’alimentatore 1. Collocare il ricevitore VE809R entro 30m* dal trasmettitore VE809T. 2. Usare un cavo HDMI per collegare il dispositivo video HDMI (HDTV) alle porte d’uscita HDMI sul retro del ricevitore VE809R. 3. Inserire il cavo dell’alimentatore nella porta d’alimentazione mini USB del VE809R. * La distanza può variare a seconda delle condizioni ambientali. Oggetti solidi come metallo, cemento o mattoni possono ostacolare il segnale e ridurre la distanza. Telecomando 1. Alimentazione 2. Info 3. Infrarossi 4. Sorgente Installazione dell’hardware Installazione del trasmettitore Funzionamento B 1. Usare un cavo HDMI per collegare i dispositivi sorgente HDMI alle porte d’ingresso HDMI sul retro del VE809T. 2. Usare un cavo HDMI per collegare il dispositivo video HDMI locale (HDTV) alle porte d’uscita HDMI sul retro del VE809T. 3. Inserire il cavo dell’alimentatore nella presa d’alimentazione del VE809T. 4. Collegare il cavo dell’IR blaster alla porta di uscita infrarossi. Funzionamento di base 1. Accendere il trasmettitore e il ricevitore. 2. Il LED blu di alimentazione lampeggia sul trasmettitore e sul ricevitore fino a quando entrambe le unità non sono connesse in modalità wireless. Possono essere necessari fino a 20 secondi per stabilire la connessione wireless. 3. Dal lato del ricevitore, accendere il televisore e selezionare la relativa sorgente HDMI per la connessione del ricevitore VE809R. 4. Dal trasmettitore, accendere i dispositivi sorgente e premere il pulsante Source (sul lato superiore dell'unità o sul telecomando) per selezionare il dispositivo sorgente che si desidera utilizzare: HDMI 1 o HDMI 2. 5. Quando il LED di alimentazione rimane illuminato fisso in blu, viene trasmesso il segnale video del dispositivo sorgente selezionato sull’HDTV remota collegata al ricevitore.-
 1
1
-
 2
2


ATEN HDMI Wireless Extender (1080p@30m) Guía de inicio rápido
- Categoría
- Secadoras
- Tipo
- Guía de inicio rápido
- Este manual también es adecuado para
en otros idiomas
- français: ATEN HDMI Wireless Extender (1080p@30m) Guide de démarrage rapide
- italiano: ATEN HDMI Wireless Extender (1080p@30m) Guida Rapida
- English: ATEN HDMI Wireless Extender (1080p@30m) Quick start guide
- Deutsch: ATEN HDMI Wireless Extender (1080p@30m) Schnellstartanleitung
- русский: ATEN HDMI Wireless Extender (1080p@30m) Инструкция по началу работы
- português: ATEN HDMI Wireless Extender (1080p@30m) Guia rápido
- 日本語: ATEN HDMI Wireless Extender (1080p@30m) クイックスタートガイド
Artículos relacionados
-
ATEN VE849 Guía de inicio rápido
-
ATEN VE2812AEUT Guía de inicio rápido
-
ATEN VE2812AUST Guía de inicio rápido
-
ATEN KE8950 Guía de inicio rápido
-
ATEN VE2812UST-AT-U Guía de inicio rápido
-
ATEN VE1812 Guía de inicio rápido
-
-
ATEN VE3912T Guía de inicio rápido
-
ATEN VE829 Guía de inicio rápido
-