Lenco LS-101 Manual de usuario
- Categoría
- Tocadiscos de audio
- Tipo
- Manual de usuario

Model No: LS-101
User Manual – Turntable with bluetooth reception/transmission and wooden speakers
Gebruikershandleiding - platenspeler met bluetooth-ontvangst/
-transmissie en houten luidsprekers
Bedienungsanleitung – Plattenspieler mit Bluetooth-Empfänger/
-Sender und Holzlautsprechern
Mode d’emploi – Tourne-disque avec réception/transmission
Bluetooth et haut-parleurs en bois
Manual del usuario – Tocadiscos con recepción/transmisión por
Bluetooth y altavoces de madera
Manuale d'uso – Giradischi con ricezione e trasmissione
Bluetooth e altoparlanti in legno
Руководство по эксплуатации – Проигрыватель виниловых пластинок с функцией
приёма/передачи через Bluetooth-соединение и акустической системой в
деревянном корпусе

Index
English .......................................................................................................................................................... 2
Nederlands................................................................................................................................................. 12
Deutsch ...................................................................................................................................................... 24
Français ...................................................................................................................................................... 36
Español ...................................................................................................................................................... 48
Italiano ....................................................................................................................................................... 60
Русский ...................................................................................................................................................... 72
Version: 3.0

2
English
CAUTION:
Usage of controls or adjustments or performance of procedures other than those specified herein may result in
hazardous radiation exposure.
PRECAUTIONS BEFORE USE
KEEP THESE INSTRUCTIONS IN MIND:
1. Do not cover or block any ventilation openings. When placing the device on a shelf, leave 5 cm (2”) free
space around the whole device.
2. Install in accordance with the supplied user manual.
3. Keep the device away from heat sources such as radiators, heaters, stoves, candles and other
heat-generating products or naked flame. The device can only be used in moderate climates. Extremely
cold or warm environments should be avoided. Working temperature between 0° and 35°C.
4. Avoid using the device near strong magnetic fields.
5. Electrostatic discharge can disturb normal usage of this device. If so, simply reset and restart the device
following the instruction manual. During file transmission, please handle with care and operate in a
static-free environment.
6. Warning! Never insert an object into the product through the vents or openings. High voltage flows
through the product and inserting an object can cause electric shock and/or short circuit internal parts.
For the same reason, do not spill water or liquid on the product.
7. Do not use in wet or moist areas such as bathrooms, steamy kitchens or near swimming pools.
8. The device shall not be exposed to dripping or splashing and make sure that no objects filled with
liquids, such as vases, are placed on or near the apparatus.
9. Do not use this device when condensation may occur. When the unit is used in a warm wet room with
damp, water droplets or condensation may occur inside the unit and the unit may not function properly;
let the unit stand in power OFF for 1 or 2 hours before turning on the power: the unit should be dry
before getting any power.
10. Although this device is manufactured with the utmost care and checked several times before leaving
the factory, it is still possible that problems may occur, as with all electrical appliances. If you notice
smoke, an excessive build-up of heat or any other unexpected phenomena, you should disconnect the
plug from the main power socket immediately.
11. This device must operate on a power source as specified on the specification label. If you are not sure of
the type of power supply used in your home, consult your dealer or local power company.
12. Keep away from animals. Some animals enjoy biting on power cords.
13. To clean the device, use a soft dry cloth. Do not use solvents or petrol based fluids. To remove severe
stains, you may use a damp cloth with dilute detergent.
14. The supplier is not responsible for damage or lost data caused by malfunction, misuse, modification of
the device or battery replacement.
15. Do not interrupt the connection when the device is formatting or transferring files. Otherwise, data may
be corrupted or lost.
16. If the unit has USB playback function, the USB memory stick should be plugged into the unit directly.
Don’t use an USB extension cable because it can cause interference resulting in failing of data.
17. The rating label has been marked on the bottom or back panel of the device.
18. This device is not intended for use by people (including children) with physical, sensory or mental
disabilities, or a lack of experience and knowledge, unless they’re under supervision or have received
instructions about the correct use of the device by the person who is responsible for their safety.
19. This product is intended for non professional use only and not for commercial or industrial use.
20. Make sure the unit is adjusted to a stable position. Damage caused by using this product in an unstable
position vibrations or shocks or by failure to follow any other warning or precaution contained within
this user manual will not be covered by warranty.
21. Never remove the casing of this device.
22. Never place this device on other electrical equipment.
23. Do not allow children access to plastic bags.

3
24. Only use attachments/accessories specified by the manufacturer.
25. Refer all servicing to qualified service personnel. Servicing is required when the device has been
damaged in any way, such as the power supply cord or the plug, when liquid has been spilled or objects
have fallen into the device, when the device has been exposed to rain or moisture, does not operate
normally, or has been dropped.
26. Long exposure to loud sounds from personal music players may lead to temporary or permanent
hearing loss.
27. If the product is delivered with power cable or AC power adaptor:
• If any trouble occur, disconnect the AC power cord and refer servicing to qualified personnel.
• Don’t step on or pinch the power adaptor. Be very careful, particularly near the plugs and the
cable’s exit point. Do not place heavy items on the power adaptor, which may damage it. Keep the
entire device out of children’s reach! When playing with the power cable, they can seriously injure
themselves.
• Unplug this device during lightning storms or when unused for a long period.
• The socket outlet must be installed near the equipment and must be easily accessible.
• Do not overload ac outlets or extension cords. Overloading can cause fire or electric shock.
• Devices with class 1 construction should be connected to a main socket outlet with a protective
earthed connection.
• Devices with class 2 construction do not require a earthed connection.
• Always hold the plug when pulling it out of the main supply socket. Do not pull the power cord.
This can cause a short circuit.
• Do not use a damaged power cord or plug or a loose outlet. Doing so may result in fire or electric
shock.
28. If the product contains or is delivered with a remote control containing coin/cell batteries:
Warning:
• “Do not ingest battery, Chemical Burn Hazard” or equivalent working.
• [The remote control supplied with] This product contains a coin/button cell battery. If the battery
is swallowed, it can cause severe internal burns in just 2 hours and can lead to death.
• Keep new and used batteries away from children.
• If the battery compartment does not close securely, stop using the product and keep it away from
children.
• If you think batteries might have been swallowed or placed inside any part of the body, seek
immediate medical attention.
29. Caution about the use of Batteries:
• Danger of explosion if battery is incorrectly replaced. Replace only with the same or equivalent
type.
• Battery cannot be subjected to high or low extreme temperatures, low air pressure at high
altitude during use, storage or transportation.
• Replacement of a battery with an incorrect type that can result in an explosion or the leakage of
flammable liquid or gas.
• Disposal of a battery into fire or a hot oven, or mechanically crushing or cutting of a battery, that
can result in an explosion.
• Leaving a battery in an extremely high temperature surrounding environment that can result in an
explosion or that leakage of flammable liquid or gas.
• A battery subjected to extremely low air pressure that may result in an explosion or the leakage of
flammable liquid or gas.
• Attention should be drawn to the environmental aspects of battery disposal.
INSTALLATION
• Unpack all parts and remove protective material.
• Do not connect the unit to the mains before checking the mains voltage and before all other connections
have been made.
* Those instruction are related only to products using power cable or AC power adaptor.

4
Accessories included:
User manual
Power Adaptor

5
1. TURNTABLE PARTS:
1. Turntable Platter
2. Turntable Shaft
3. 45 RPM Adaptor
4. Lift Lever
5. Auto Stop Control Switch
6. Speed Selection Switch
7. Tone Arm
8. Tone Arm Lock
9. Phono Stylus Cartridge
10. Power/Function Led Light Indicator
11. Headphone jack
12. POWER/VOLUME Knob
13. Function Selector ( OUT/PHONO/AUX/ IN)
14. Removable Dust Cover
15. Hinge
16. Power Adaptor Jack
17. Pitch(speed)control knob
18. External Speaker Jacks
19. Aux in Jack
20. External Speakers
21. Speaker cable at External Speaker

6
SET UP
An AC/DC adaptor with an output of 12V DC 2.0A is included with this Turntable with Bluetooth reception and
Wooden Speakers. The adaptor is required for operating the unit.
Connect the speaker cables from each speaker to the back of the unit
Note: The external speaker cables are color coded, the cable with the red connector should be put in the red
hole and the white one in the white hole.
Firmly and securely insert the DC plug of the adaptor to the DC IN Jack on the back of the unit.
Plug the adaptor’s AC plugs into a power outlet rated at 220-240V AV ~ 50 Hz.
Turn on the unit by the POWER/VOLUME Knob. The Power/Function Led Light Indicator will turn on.
Remark: To avoid Larsen effect or Feedback noise, you can do the following:
1. Put your speakers at minimum distance of 60 cm or more from your turntable
2. Keep the dustcover open when you play a record at higher sound volume
Power On and Mode selection
Turn on the unit by the POWER/VOLUME Knob. You will hear a click sound and the Power/Function Led Light
Indicator will turn on confirming the power is ON. When the power is ON, you can rotate the control normally
to adjust the volume of the music playing.
Rotate the FUNCTION SELECTOR to difference modes ( OUT/PHONO/AUX/ IN).
2. Listen to a Record
1. Raise the dust cover
2. Turn on the unit by the POWER/VOLUME Knob. The Power/Function Led
Light Indicator will light in RED at PHONO mode.
3. Or you can rotate FUNCTION SELECTOR to PHONO mode.
4. Place a record on the turntable platter and set the player speed to match
the record speed.
Note: When playing a single (a 45 rpm record) and/or records with large
centre holes, use the 45 rpm adaptor.
5. Remove the needle cartridge protective cover
Unlock the tone arm lock from the tone arm rest. Push the lift lever backward, the tone arm will gently rise up.
Gently move the tone arm to the desired position over the record and the turntable platter will begin to rotate
when the arm is moved towards it If Auto Stop Control Switch in ON. Release the tone arm onto the turntable
by pushing the lift lever forward and the vinyl record will begin to play.
If the Auto Control Switch is turned ON, the record will stop automatically when finished. If Auto Stop Control
Switch is turned OFF, the record will NOT stop automatically when finished; you must push the lift lever
backward to raise the tone arm and place it back in the rest and then turn off the power to stop the turntable
from spinning.
Remark: AUTO STOP function applies to most 33RPM vinyl records. However, for very few vinyl records, it will
stop when it does not come to the end, or it will not stop when it comes to the end when AUTO STOP is ON.
NOTE: If your record stops before the last track finishes, set the AUTO STOP switch to OFF. Your record will now
play to the end, but you will have to stop the turntable rotation manually.
NOTE: Depending on the record length, AUTO STOP may be enabled before the end of the recording.
Do not rely on AUTO STOP alone to turn off playback.

7
The PITCH CONTROL allows you to fine tune the playing speed of the record once the correct speed
(33/45/78 RPM) is chosen. Rotate the PITCH CONTROL to slightly increase or decrease the speed of the
turntable if necessary.
To stream your record music to external Bluetooth speakers (not included), see the BLUETOOTH OUT
OPERATION section.
3. Bluetooth out operation
This turntable supports Bluetooth wireless connection ( OUT). It can be connected with external Bluetooth
compatible headphones (not included) or Bluetooth speakers (not included).
1. Turn on the unit by the POWER/VOLUME Knob.
2. Rotate the FUNCTION SELECTOR to select the OUT mode.
3. The POWER/FUNCTION INDICATOR will light "blue" and begin to flash
slowly.
4. Turn ON your external Bluetooth receiving device (such as Bluetooth
headphones or Bluetooth speakers) and set to pairing mode.
5. When pairing is successful, the POWER/FUNCTION INDICATOR will stop
flashing and remain lit "blue".
6. You are now connected to your external Bluetooth device.
7. Begin playing a record, the sound will be heard from the external Bluetooth device.
Note: You can ONLY adjust the volume using the volume control on your external Bluetooth device.
Notes:
• Place the Bluetooth device within 3 feet (1m) from the turntable to enable them to pair correctly.
• The turntable stays in the pairing mode for only 30 seconds. If pairing is not properly completed within
30 seconds, repeat Step 2 till 4 again after turning all devices OFF.
• “ OUT” only works in PHONO mode. OUT will NOT work in the AUX IN or regular Bluetooth ( IN)
function modes.
4. Listen to Bluetooth
An external device with Bluetooth Connectivity like a smartphone or tablet be wirelessly connected to this
Turntable using the Bluetooth function.
1. Turn on the unit by the POWER/VOLUME Knob.
2. Rotate the FUNCTION SELECTOR to select the IN mode.
3. The POWER/FUNCTION INDICATOR will light "blue" and begin to flash.
4. The first time you use your Bluetooth device with the turntable, you will
need to pair them together.
5. Turn your external device’s Bluetooth Setting ON. Wait a moment, then
look for the Bluetooth pairing name “Lenco LS-101”. If your device asks
for a password (depending on the device manufacturers, model, and
software version), then enter digits “0000” and press OK.
6. Select the Bluetooth pairing name, to connect the unit. Once connected, the Led light will stop flashing.
7. You are now connected to your external device via Bluetooth
8. Rotate the Volume Control Knob to adjust the sound level and adjust the volume control at your external
audio device.

8
5. Listen to auxiliary input
1. Turn on the unit by the POWER/VOLUME Knob.
2. Rotate the FUNCTION SELECTOR to select the AUX mode.
3. The POWER/FUNCTION INDICATOR will light "purple" (red + blue).
4. Using a 3.5mm Stereo cable (not included), connect an external audio
device to the AUX socket at the back of the unit.
5. Use the POWER/VOLUME KNOB to adjust the volume and use the
controls on the external audio device to control the Playback/Volume
functions
Automatic stand-by for power saving (CE regulation): The LS-101 will go automatically in standby if there is no
audio signal (record or Bluetooth) during +/- 15 minutes. To re-activate the device, you have the choice
below:
• Turn the POWER/VOLUME Knob to OFF and ON again.
• Rotate the FUNCTION SELECTOR.
HOW TO REPLACE THE NEEDLE
To replace the needle (spare needle not included), please refer to the instructions below.
Removing the needle from the cartridge
1. Place a screwdriver at the tip of the stylus and push downward as shown in direction “A”.
2. Remove the stylus by pulling the stylus forward and pushing downward.
Installing the Stylus
1. Hold the tip of the stylus and insert the stylus by pressing as shown in direction “B”.
2. Push the stylus upward as in direction “C” until the stylus locks into the tip position.
NOTES
We advise you to clean your records with an anti-static cloth (for example LENCO TTA-3IN1 cleaning kit
(buy separately) to gain maximum enjoyment from them.
We would also point out that for the same reason your stylus should be replaced periodically (approximately
every 250 playback hours)
Guide Pins (inside)

9
Technical information:
Lenco
Turntable
LS-101
Type
Belt drive full manual
Drive Motor
DC motor
Speed
33, 45, 78 RPM
Turntable platter
200mm
Bluetooth
Version
5.0
Frequency Range
2402MHz to 2480MHz
Maximum Transmission Power
<8dbm
General
ADAPTOR
input AC100-240V~50/60Hz 0.8A
output DC12V-2A
Device input power
DC12V-2A
Power Consumption
24W
Dimension
340x320x100mm for main unit; 130x120x200mm for speaker
Weight
Approx. 4,12 kgs
Power supply adaptor
Manufacturer: SHENZHEN SHI GUANGKAIYUAN TECHNOLOGY LTD
Model number: GKYZT0200120KH
Use only the power supply listed in the user instructions

10
Information
Value and and precision
Manufacturers name or trade mark,
commercial registration and address
SHENZHEN SHI GUANGKAIYUAN TECHNOLOGY LTD
2 floor, 41 TianSheng Road, TianLiao village, GongMing
Street, Guangming, Shenzhen, Guangdong, P.R.China
Model Identifier
GKYZT0200120KH
Input voltage
100-240V
Input AC frequency
50-60Hz
Output voltage
DC 12V
Output current
2A
Output Power
24W
Average active efficiency
86.66%
Efficiency at low load (10%)
84.42%
No load Power consumption
0.08
Guarantee
Lenco offers service and warranty in accordance to European law, which means that in case of repairs
(both during and after the warranty period) you should contact your local dealer.
Important note: It is not possible to send products that need repairs to Lenco directly.
Important note: If this unit is opened or accessed by a non-official service center in any way, the warranty
expires.
This device is not suitable for professional use. In case of professional use, all warranty obligations of the
manufacturer will be voided.
Disclaimer
Updates to Firmware and/or hardware components are made regularly. Therefore some of the instruction,
specifications and pictures in this documentation may differ slightly from your particular situation. All items
described in this guide for illustration purposes only and may not apply to particular situation. No legal right or
entitlements may be obtained from the description made in this manual.

11
Disposal of the Old Device
This symbol indicates that the relevant electrical
product or battery should not be disposed of as
general household waste in Europe. To ensure the
correct waste treatment of the product and battery,
please dispose them in accordance to any applicable
local laws of requirement for disposal of electrical
equipment or batteries. In so doing, you will help to
conserve natural resources and improve standards of
environmental protection in treatment and disposal of
electrical waste (Waste Electrical and Electronic
Equipment Directive).
CE Marking
Products with the CE marking comply with the
EMC Directive (2014/30/EU) and the Low Voltage
Directive (2014/35/EU) issued by the Commission of the
European Community.
Hereby, Commaxx B.V. Wiebachstraat 37, 6466 NG
Kerkrade, The Netherlands, declares that this product is
in compliance with the essential requirements.
The declaration of conformity may be consulted at
techdoc@lenco.com
Service
For more information and helpdesk support, please visit www.lenco.com
Commaxx B.V. Wiebachstraat 37, 6466 NG Kerkrade,The Netherlands.

12
Nederlands
OPGELET:
Het gebruik van bedieningen of afstellingen of het uitvoeren van procedures anders dan hierin gespecificeerd,
kan leiden tot blootstelling aan gevaarlijke straling.
VOORZORGSMAATREGELEN VÓÓR GEBRUIK
NEEM MET DE VOLGENDE INSTRUCTIES IN ACHT:
1. Bedek of blokkeer geen van de ventilatieopeningen. Als u het apparaat op een schap plaatst, dient u
voor 5 cm vrije ruimte rondom het gehele apparaat te zorgen.
2. Installeer in overeenstemming met de meegeleverde gebruikshandleiding.
3. Houd het apparaat uit de buurt van warmtebronnen zoals radiatoren, kachels, fornuizen, kaarsen en
andere warmtegenererende producten of open vuur. Het apparaat kan alleen worden gebruikt in
gematigde klimaten. Extreem koude of warme omgevingen dienen te worden vermeden.
Bedrijfstemperatuur tussen 0° en 35°C.
4. Gebruik het apparaat niet in de buurt van krachtige magnetische velden.
5. Elektrostatische ontlading kan het normale gebruik van dit apparaat verstoren. In dit geval kunt u het
apparaat gewoon resetten en opnieuw starten volgens de gebruiksaanwijzingen. Wees voorzichtig
tijdens bestandsoverdracht en voer dit uit in een omgeving zonder statische interferentie.
6. Waarschuwing! Steek geen voorwerpen in het product via de ventilatie- of andere openingen. Er is hoge
spanning aanwezig in het product en als u er een voorwerp insteekt, kan dat tot elektrische schokken
en/of kortsluiting van de interne onderdelen leiden. Laat om dezelfde reden geen water of vloeistof op
het product terechtkomen.
7. Gebruik het apparaat niet in natte of vochtige ruimtes zoals badkamers, keukens met veel stoom of in
de buurt van zwembaden.
8. Stel het apparaat niet bloot druppels of spetters en zorg ervoor dat er geen met vloeistof gevulde
voorwerpen, zoals vazen, op of in de buurt van het apparaat worden geplaatst.
9. Gebruik dit apparaat niet als er condensatie kan optreden. Wanneer het apparaat in een warme en
vochtige kamer wordt gebruikt, dan kunnen er waterdruppeltjes of condensatie binnenin het apparaat
worden gevormd waardoor het apparaat mogelijk niet meer goed werkt; houd en apparaat 1 of 2 uur op
UIT staan voordat u de voeding weer inschakelt: het apparaat dient droog te zijn voordat deze stroom
ontvangt.
10. Al is dit apparaat met de grootste zorg vervaardigd en meerdere keren gecontroleerd voordat deze de
fabriek verlaat, is het toch mogelijk dat er problemen optreden, zoals bij alle elektrische apparaten.
Als u rook, overmatige warmteontwikkeling of andere onverwachte verschijnselen constateert, dient u
onmiddellijk de stekker uit het stopcontact te trekken.
11. Dit apparaat moet van stroom worden voorzien door een bron zoals gespecificeerd op het nominale
specificatielabel. Als u niet zeker weet welk type stroomvoorziening in uw huis wordt gebruikt, neem
dan contact op met uw dealer of het plaatselijke energiebedrijf.
12. Houd uit de buurt van dieren. Sommige dieren knauwen graag aan voedingskabels.
13. Gebruik een zachte, droge doek om het apparaat schoon te maken. Gebruik geen oplosmiddelen of
vloeistoffen op benzinebasis. U kunt een vochtige doek met verdund schoonmaakmiddel gebruiken om
hardnekkige vlekken te verwijderen.
14. De leverancier is niet verantwoordelijk voor schade of verlies van gegevens veroorzaakt door storing,
misbruik, modificatie van het apparaat of vervanging van de batterij.
15. Zorg ervoor de verbinding niet te verbreken terwijl het apparaat bezig is met formatteren of
bestandsoverdracht. Gegevens kunnen anders corrupt of verloren raken.
16. Als het apparaat een USB-afspeelfunctie heeft, moet de USB-geheugenstick rechtstreeks in het apparaat
worden gestoken. Gebruik geen USB-verlengsnoer, omdat deze interferentie kan veroorzaken waardoor
uw gegevens verloren kunnen gaan.
17. Het nominale specificatielabel is te vinden op het onder- of achterpaneel van het apparaat.
18. Dit product is niet bestemd voor gebruik door personen (waaronder kinderen) met verminderde fysieke,
zintuiglijke of mentale capaciteiten, of met een tekort aan kennis en ervaring, tenzij een persoon
verantwoordelijk voor hun veiligheid toezicht houdt of instructies heeft gegeven voor het correcte
gebruik van het apparaat.

13
19. Dit product is uitsluitend bedoeld voor niet-professioneel gebruik en niet voor commercieel of
industrieel gebruik.
20. Zorg ervoor dit apparaat op een stabiele plek te plaatsen. Beschadigingen veroorzaakt door het gebruik
van dit apparaat in een onstabiele positie, trillingen of schokken of door het niet opvolgen van andere
waarschuwingen of voorzorgsmaatregelen beschreven in deze gebruikshandleiding, worden niet gedekt
door de garantie.
21. Verwijder nooit de behuizing van dit apparaat.
22. Plaats dit apparaat nooit op andere elektrische apparatuur.
23. Houd plastic zakken uit de buurt van kinderen.
24. Gebruik alleen uitbreidingen/accessoires gespecificeerd door de fabrikant.
25. Laat alle reparaties over aan bevoegd onderhoudspersoneel. Reparatie is vereist wanneer het apparaat
op enigerlei wijze is beschadigd, zoals een beschadigde voedingskabel of stekker, wanneer vloeistof is
gemorst of voorwerpen in het apparaat zijn gevallen, wanneer het apparaat is blootgesteld aan regen of
vocht, niet normaal functioneert of is gevallen.
26. Langdurige blootstelling aan harde geluiden van persoonlijke muziekspelers kan leiden tot tijdelijk of
permanent gehoorverlies.
27. Als het product wordt geleverd met een voedingskabel of AC-stroomadapter:
• Als er problemen optreden, koppel de AC-voedingskabel dan los en laat reparaties over aan
bevoegd personeel.
• Niet op de stroomadapter gaan staan of deze indrukken. Wees zeer voorzichtig, vooral in de buurt
van de stekkers en waar de kabel uit het apparaat komt. Plaats geen zware voorwerpen op de
stroomadapter, om beschadiging ervan te voorkomen. Houd het gehele apparaat buiten bereik van
kinderen! Wanneer kinderen met de voedingskabel spelen, kunnen zij ernstig letsel oplopen.
• Koppel dit apparaat los tijdens onweer of wanneer deze voor een lange periode niet wordt
gebruikt.
• Het stopcontact moet in de buurt van de apparatuur zijn geïnstalleerd en eenvoudig te bereiken
zijn.
• Zorg ervoor stopcontacten of verlengsnoeren niet te overbelasten. Overbelasting kan tot brand of
elektrische schokken leiden.
• Apparaten met een klasse 1 constructie moeten worden aangesloten op een stopcontact met een
beschermende aardeverbinding.
• Apparaten met een klasse 2 constructie vereisen geen aardeverbinding.
• Houd altijd de stekker vast wanneer u deze uit het stopcontact trekt. Trek niet aan de
voedingskabel. Dit kan anders een kortsluiting veroorzaken.
• Gebruik geen beschadigde voedingskabel of stekker of een los stopcontact. Dit kan anders leiden
tot brand of elektrische schokken.
28. Als het product een afstandsbediening met knoop-/celbatterijen bevat of daarmee wordt geleverd:
Waarschuwing:
• "Batterij niet inslikken, gevaar op chemische brandwonden" of soortgelijke werking.
• [De afstandsbediening meegeleverd met] Dit product bevat een knoop-/celbatterij. Als de batterij
wordt ingeslikt, kan deze in slechts 2 uur ernstige en zelfs fatale interne brandwonden
veroorzaken.
• Houd zowel nieuwe als verbruikte batterijen uit de buurt van kinderen.
• Als het batterijvak niet goed sluit, gebruik het product dan niet langer en houd het uit de buurt van
kinderen.
• Als u denkt dat batterijen zijn ingeslikt of in een lichaamsdeel zijn geplaatst, dient u onmiddellijk
medische hulp in te roepen.
29. Waarschuwing m.b.t. het gebruik van batterijen:
• Explosiegevaar als de batterij niet correct wordt vervangen. Vervang alleen door hetzelfde of een
gelijkwaardig type.
• Stel de batterij niet bloot aan extreem hoge of lage temperaturen of een lage luchtdruk op grote
hoogte tijdens gebruik, opslag of transport.
• Vervanging van een batterij door een incorrect type kan leiden tot een ontploffing of de lekkage
van ontvlambare vloeistoffen of gas.

14
• Verwijdering van een batterij in vuur of een hete oven of het mechanisch verpletteren of snijden
van een batterij kan leiden tot een ontploffing.
• Laat een batterij nooit achter in omgevingen met extreem hoge temperaturen, anders kan dit
leiden tot een ontploffing of de lekkage van ontvlambare vloeistoffen of gas.
• Stel een batterij nooit bloot aan een extreem lage luchtdruk, anders kan dit leiden tot een
ontploffing of de lekkage van ontvlambare vloeistoffen of gas.
• Houd rekening met de impact op het milieu bij het afdanken van batterijen.
INSTALLATIE
• Pak alle onderdelen uit en verwijder het beschermende materiaal.
• Sluit het apparaat niet aan op het lichtnet voordat de correcte netspanning is geverifieerd en alle andere
aansluitingen tot stand zijn gebracht.
* Deze instructies hebben alleen betrekking op producten die een voedingskabel of AC-stroomadapter
gebruiken.

15
Inbegrepen accessoires:
Gebruikershandleiding
Stroomadapter

16
1. ONDERDELEN PLATENSPELER:
1. Draaiplateau
2. As
3. 45-toerenadapter
4. Hefhendel
5. Bedieningsschakelaar automatische stop
6. Snelheidsselectieschakelaar
7. Toonarm
8. Toonarmvergrendeling
9. Naaldcartridge
10. Aan/uit/functie-indicator
11. Hoofdtelefoonaansluiting
12. AAN/UIT/VOLUME-knop
13. Functieknop ( OUT/PHONO/AUX/ IN)
14. Afneembare stofkap
15. Scharnier
16. Stroomadapteraansluiting
17. Snelheidsregelknop
18. Externe luidsprekeraansluitingen
19. Aux in-aansluiting
20. Externe luidsprekers
21. Luidsprekerkabel aan externe luidspreker

17
CONFIGURATIE
Bij deze platenspeler met bluetooth-ontvangst en houten luidsprekers wordt een AC/DC-adapter met een
uitgang van 12 V DC 2,0 A meegeleverd. De adapter is nodig voor de werking van het apparaat.
Sluit de luidsprekerkabels van elke luidspreker aan op de achterkant van het apparaat.
Opmerking: de kabels van de externe luidsprekers zijn kleurgecodeerd. De rode stekker moet in het rode gat
worden gestoken en de witte stekker in het witte gat.
Steek de DC-stekker van de adapter stevig in de DC IN-aansluiting op de achterkant van het apparaat.
Steek de AC-stekkers van de adapter in een stopcontact met een spanning van 220-240V AV ~ 50 Hz.
Schakel het apparaat in met de AAN/UIT/VOLUME-knop. De aan/uit/functie-indicator zal oplichten.
Opmerking: om het larsen-effect of audiofeedback te vermijden, kunt u het volgende doen:
1. Plaats uw luidsprekers op een minimale afstand van 60 cm of meer van uw
platenspeler.
2. Houd de stofkap open wanneer u een plaat afspeelt met een hoger geluidsvolume.
Inschakelen en modusselectie
Schakel het apparaat in met de AAN/UIT/VOLUME-knop. U hoort een klikgeluid en de aan/uit/functie-indicator
zal oplichten om aan te geven dat de stroom is ingeschakeld. Wanneer de stroom is ingeschakeld, kunt u de
knop normaal draaien om het volume van de muziek te regelen.
Draai de FUNCTIEKNOP naar de verschillende modi ( OUT/PHONO/AUX/ IN).
2. Naar een plaat luisteren
1. Open de stofkap.
2. Schakel het apparaat in met de AAN/UIT/VOLUME-knop.
De aan/uit/functie-indicator zal in de PHONO-modus ROOD oplichten.
3. U kunt ook de FUNCTIEKNOP naar PHONO-modus draaien.
4. Plaats een plaat op het draaiplateau en stel de snelheid van de platenspeler in op de snelheid van de
plaat.
Opmerking: Gebruik bij het afspelen van een single (een 45-toerenplaat) en/of platen met grote gaten in
het midden de 45-toerenadapter.
5. Verwijder de beschermkap van de naaldcartridge
Ontgrendel de toonarmvergrendeling van de toonarmsteun. Duw de hefhendel naar achteren zodat de

18
toonarm zachtjes omhoog komt. Beweeg de toonarm voorzichtig naar de gewenste positie over de plaat.
Het draaiplateau begint te draaien wanneer de arm ernaartoe wordt bewogen als de bedieningsschakelaar
automatische stop op ON staat. Laat de toonarm zakken op het draaiplateau door de hefhendel naar voren te
duwen, de plaat zal beginnen te spelen.
Indien de bedieningsschakelaar automatische stop op ON staat, zal de plaat automatisch stoppen wanneer deze
afgelopen is. Als de bedieningsschakelaar automatische stop op OFF staat, zal de plaat NIET automatisch
stoppen als deze afgelopen is. U moet de hefhendel naar achteren duwen om de toonarm omhoog te brengen
en terug in de ruststand te plaatsen en vervolgens de stroom uitschakelen om het draaiplateau te laten stoppen
met draaien.
Opmerking: De AUTOMATISCHE STOP-functie is van toepassing op de meeste 33 toeren platen. Bij een beperkt
aantal platen stopt de plaat echter niet wanneer deze is afgelopen, of stopt de plaat niet wanneer de
bedieningsschakelaar automatische stop op ON staat.
OPMERKING: sls uw plaat stopt voordat deze afgelopen is, zet dan de bedieningsschakelaar automatische stop
op OFF. Uw plaat wordt nu tot het einde afgespeeld, maar u moet draaien van het draaiplateau handmatig
stoppen.
OPMERKING: Afhankelijk van de lengte van de plaat kan AUTOMATISCHE STOP worden ingeschakeld voor het
einde van de plaat. Vertrouw niet op AUTOMATISCHE STOP alleen om het afspelen uit te schakelen.
Met de TOONHOOGTEREGELING kunt u de afspeelsnelheid van de plaat afstellen zodra de juiste snelheid
(33/45/78 toeren) is gekozen. Draai aan de TOONHOOGTEREGELKNOP om de snelheid van het draaiplateau zo
nodig iets te verhogen of te verlagen.
Zie de paragraaf WERKING BLUETOOTH OUT om uw plaat naar externe bluetooth-luidsprekers
(niet meegeleverd) te streamen.
3. Werking bluetooth out
Deze platenspeler ondersteunt een draadloze bluetooth-verbinding ( OUT). Het kan worden aangesloten op
externe bluetooth-compatibele hoofdtelefoons (niet meegeleverd) of Bluetooth-luidsprekers (niet meegeleverd).
1. Schakel het apparaat in met de AAN/UIT/VOLUME-knop.
2. Draai de FUNCTIEKNOP om de OUT-modus te selecteren.
3. De AAN/UIT/FUNCTIE-INDICATOR zal blauw oplichten en langzaam
beginnen te knipperen.
4. Schakel uw externe bluetooth-ontvangstapparaat (zoals een
bluetooth-hoofdtelefoon of bluetooth-luidsprekers) in en zet het in de
koppelingsmodus.
5. Wanneer het koppelen gelukt is, stopt de AAN/UIT/FUNCTIE-INDICATOR
met knipperen en blijft deze blauw branden.
6. U bent nu verbonden met uw externe bluetooth-apparaat.
7. Start een plaat zodat het geluid te horen is op het externe bluetooth-apparaat.
Opmerking: U kunt het volume ALLEEN regelen met de volumeregeling op uw externe bluetooth-apparaat.
Opmerkingen:
• Plaats het bluetooth-apparaat binnen 1 meter van de platenspeler om een goede koppeling mogelijk te
maken.
• De platenspeler blijft slechts 30 seconden in de koppelingsmodus. Als het koppelen niet binnen
30 seconden is gelukt, herhaalt u stap 2 tot en met 4 nogmaals nadat u alle apparaten heeft uitgeschakeld.
• OUT werkt alleen in de PHONO-modus. OUT werkt NIET in de AUX IN-modus of gewone
bluetooth-modus ( IN-modus).
4. Naar bluetooth luisteren
Een extern apparaat met bluetooth-connectiviteit zoals een smartphone of tablet wordt draadloos verbonden
met deze platenspeler via de bluetooth-functie.

19
1. Schakel het apparaat in met de AAN/UIT/VOLUME-knop.
2. Draai de FUNCTIEKNOP om de IN-modus te selecteren.
3. De AAN/UIT/FUNCTIE-INDICATOR zal blauw oplichten en beginnen te
knipperen.
4. De eerste keer dat u uw bluetooth-apparaat met de platenspeler gebruikt,
moet u ze met elkaar koppelen.
5. Schakel bluetoothop uw externe apparaat in. Wacht even en zoek
vervolgens naar de bluetooth-koppelingsnaam “Lenco LS-101”.
Als uw apparaat om een wachtwoord vraagt (afhankelijk van de fabrikant,
het model en de softwareversie van het apparaat), voer dan de cijfers
“0000” in en druk op OK.
6. Selecteer de bluetooth-koppelingsnaam om het apparaat te koppelen. Eenmaal gekoppeld zal indicator
stoppen met knipperen.
7. U bent nu via bluetooth verbonden met uw externe apparaat
8. Draai aan de aan/uit/volume-knop om het geluidsniveau aan te passen en regel het volume op uw
externe audioapparaat.
5. Naar AUX IN luisteren
1. Schakel het apparaat in met de AAN/UIT/VOLUME-knop.
2. Draai de FUNCTIEKNOP om de AUX-modus te selecteren.
3. De AAN/UIT/FUNCTIE-INDICATOR zal paars oplichten (rood en blauw).
4. Sluit met behulp van een 3,5 mm stereokabel (niet meegeleverd) een
extern audioapparaat aan op de AUX-aansluiting aan de achterkant van
het apparaat.
5. Gebruik de AAN/UIT/VOLUME-KNOP om het volume te regelen en
gebruik de bedieningsknoppen op het externe audioapparaat om de
afspeel-/volumefuncties te bedienen.
Automatische stand-by voor energiebesparing (CE-regelgeving): De LS-101 gaat automatisch in stand-by als er
gedurende +/- 15 minuten geen audiosignaal (opname of Bluetooth) is. Om het apparaat opnieuw te activeren,
heeft u de volgende keuzes:
• Draai de AAN/UIT/VOLUME knop naar OFF en vervolgens naar ON.
• Draai de FUNCTIEKNOP.
DE NAALD VERVANGEN
Om de naald te vervangen (reservenaald niet meegeleverd) moet u de onderstaande instructies volgen.
De naald uit de cartridge verwijderen
1. Plaats een schroevendraaier op het uiteinde van de naald en druk naar beneden in richting “A”,
zoals aangegeven.
2. Verwijder de naald door de naald naar voren te trekken en naar beneden te duwen.
De naald installeren
1. Houd de punt van de naald vast en plaats de naald door in richting “B” te drukken, zoals aangegeven.
2. Duw de naald omhoog in richting “C”, zoals aangegeven, totdat de naald vastklikt in de puntpositie.

20
OPMERKINGEN
We raden u aan uw platen te reinigen met een antistatische doek (bijvoorbeeld LENCO TTA-3IN1 reinigingsset,
apart verkrijgbaar) om er maximaal plezier van te hebben.
We willen u er ook op wijzen dat om dezelfde reden uw naald periodiek moet worden vervangen
(ongeveer iedere 250 speeluren)
Geleidepennen (binnenkant)

21
Technische informatie:
Lenco
Platenspeler
LS-101
Type
Riemaandrijving, volledig handmatig
Aandrijfmotor
DC motor
Snelheid
33, 45, 78 toeren
Draaiplateau
200 mm
Bluetooth
Versie
5.0
Frequentiebereik
2402 MHz tot 2480 MHz
Maximaal zendvermogen
<8 dbm
Algemeen
ADAPTER
ingang AC100-240 V~50/60 Hz, 0,8 A
uitgang DC12 V-2 A
Ingangsvermogen apparaat
DC12 V-2 A
Stroomverbruik
24 W
Afmetingen
340X320x100 mm voor de platenspeler, 130x120x200 mm voor de luidspreker
Gewicht
Ca. 4,12 kg
Stroomadapter
Fabrikant: SHENZHEN SHI GUANGKAIYUAN TECHNOLOGY LTD
Modelnummer: GKYZT0200120KH
Gebruik uitsluitend de voeding vermeld in de gebruikshandleiding.

22
Informatie
Waarde en precisie
Naam of handelsmerk van de fabrikant,
handelsregistratie en adres
SHENZHEN SHI GUANGKAIYUAN TECHNOLOGY LTD
2 verdieping, 41 TianSheng Road, TianLiao village,
GongMing Street, Guangming, Shenzhen, Guangdong, China
Model-ID
GKYZT0200120KH
Ingangsspanning
100-240 V
AC-ingangsfrequentie
50-60Hz
Uitgangsspanning
DC 12 V
Uitgangsstroom
2 A
Uitgangsvermogen
24 W
Gemiddelde actieve efficiëntie
86,66%
Efficiëntie bij lage belasting (10%)
84,42%
Stroomverbruik bij geen belasting
0,08
Garantie
Lenco verleent service en garantie in overeenstemming met de Europese wetgeving, wat betekent dat u bij
reparaties (zowel tijdens als na de garantieperiode) contact dient op te nemen met uw lokale dealer.
Belangrijke opmerking: Het is niet mogelijk om te repareren producten direct naar Lenco te sturen.
Belangrijke opmerking: Als dit apparaat op enigerlei wijze wordt geopend door de gebruiker of een
niet-officieel servicecentrum, komt de garantie te vervallen.
Dit apparaat is niet geschikt voor professioneel gebruik. In het geval professioneel gebruik, komen alle
garantieverplichtingen van de fabrikant te vervallen.
Disclaimer
Er worden regelmatig updates voor de firmware en/of hardwarecomponenten uitgegeven. Daarom kunnen
sommige instructies, specificaties en afbeeldingen in deze documentatie enigszins afwijken van uw specifieke
situatie. Alle items beschreven in deze handleiding, zijn alleen bestemd ter illustratie en zijn mogelijk niet van
toepassing op een bepaalde situatie. Aan de beschrijving in deze handleiding kunnen geen wettelijke rechten of
aanspraken worden ontleend.

23
Het oude apparaat afdanken
Dit symbool geeft aan dat het betreffende elektrische
product of de batterij in Europa niet als algemeen
huishoudelijk afval mag worden afgevoerd. Om ervoor
te zorgen dat het product en de batterij op de juiste
manier worden verwerkt, dient u deze af te danken in
overeenstemming met de toepasselijke lokale
wetgeving met betrekking tot de verwijdering van
elektrische apparatuur of batterijen. U helpt hierdoor
natuurlijke hulpbronnen te behouden en de normen
voor milieubescherming bij de behandeling en
verwijdering van elektrisch afval te verbeteren
(richtlijn afgedankte elektrische en elektronische
apparatuur).
CE-markering
Producten met de CE-markering voldoen aan de
EMC-richtlijn (2014/30/EU) en de
laagspanningsrichtlijn (2014/35/EU) die door de
Europese Commissie zijn uitgevaardigd.
Hierbij verklaart Commaxx B.V. Wiebachstraat 37,
6466 NG Kerkrade, Nederland, dat dit product in
overeenstemming is met de essentiële vereisten.
De verklaring van overeenstemming kan worden
geraadpleegd op techdoc@lenco.com
Service
Bezoek voor meer informatie en helpdeskondersteuning www.lenco.com
Commaxx B.V. Wiebachstraat 37, 6466 NG Kerkrade, Nederland.

24
Deutsch
ACHTUNG:
Eine andere als die hier beschriebene Benutzung der Bedienelemente oder Einstellung oder Durchführung von
Abläufen kann zu einem gefährlicher Strahlung ausgesetzt werden führen.
VORSICHTSMASSNAHMEN VOR DER BENUTZUNG
BEFOLGEN SIE IMMER FOLGENDE ANWEISUNGEN:
1. Blockieren oder bedecken Sie keine Lüftungsöffnungen. Wenn Sie das Gerät auf ein Regal stellen,
lassen Sie um das gesamte Gerät 5 cm (2”) freien Platz.
2. Stellen Sie das Gerät entsprechend den Anweisungen der mitgelieferten Bedienungsanleitung auf.
3. Halten Sie das Gerät von Hitzequellen wie Radiatoren, Heizern, Öfen, Kerzen oder anderen
hitzeerzeugenden Produkten oder offenen Flammen fern. Das Gerät darf nur bei gemäßigtem Klima
verwendet werden. Sehr kalte oder heiße Umgebungen sind zu vermeiden. Die Betriebstemperatur liegt
zwischen 0 °C und 35 °C.
4. Meiden Sie bei der Benutzung des Produkts die Nähe starker Magnetfelder.
5. Elektrostatische Entladungen können die ordnungsgemäße Funktion dieses Geräts stören. Sollte dies
geschehen, führen Sie einfach einen Reset aus und starten Sie dann das Gerät entsprechend den
Anweisungen dieser Bedienungsanleitung neu. Gehen Sie besonders bei Datenübertragungen mit dem
Gerät vorsichtig um und führen Sie diese nur in einer antielektrostatischen Umgebung aus.
6. Warnung! Niemals Gegenstände durch die Lüftungsschlitze oder Öffnungen in das Gerät stecken. In
diesem Gerät fließt Hochspannung und das Hineinstecken von Gegenständen kann zu elektrischem
Schock und/oder Kurzschluss interner elektrischer Bauteile führen. Spritzen/Gießen Sie aus dem
gleichen Grund kein Wasser oder Flüssigkeiten auf das Gerät.
7. Benutzen Sie das Gerät nicht in nasser oder feuchter Umgebung wie Bad, Dampfküche oder in der Nähe
von Schwimmbecken.
8. Das Gerät darf weder Tropf- noch Spritzwasser ausgesetzt werden und es dürfen keine mit Flüssigkeit
gefüllten Behälter wie z. B. Vasen auf das Gerät oder in der Nähe des Gerätes gestellt werden.
9. Benutzen Sie das Gerät nicht, wenn Kondensation entstehen kann. Wenn Sie das Gerät in einem
warmen feuchten Raum mit Dampf benutzen, dann können Wassertropfen oder Kondensation in das
Gerät eindringen und u. U. zu Fehlfunktionen des Geräts führen. Schalten Sie in diesem Fall das Gerät
für 1 – 2 Stunden aus, bevor Sie es erneut einschalten, wobei Sie darauf achten sollten, dass das Gerät
vollständig getrocknet ist, bevor Sie es wieder einschalten.
10. Obwohl dieses Gerät unter größter Sorgfalt hergestellt und vor Auslieferung mehrmals überprüft wurde,
können trotzdem wie bei jedem anderen elektrischen Gerät auch Probleme auftauchen. Trennen Sie das
Gerät bei Rauchentwicklung, starker Hitzeentwicklung oder jeder anderen unnatürlichen Erscheinung
sofort vom Stromnetz.
11. Dieses Gerät ist durch eine Stromquelle wie auf dem Typenschild angegeben zu betreiben. Halten Sie
bei Unsicherheiten über die Art Ihrer Stromversorgung in Ihrer Wohnung Rücksprache mit Ihrem
Händler oder Ihrer Stromzuliefererfirma.
12. Halten Sie das Gerät von Haustieren fern. Einige Nagetiere lieben es, an Netzkabeln zu nagen.
13. Benutzen Sie für die Reinigung ein weiches und trockenes Tuch. Benutzen Sie niemals Lösungsmittel
oder Flüssigkeiten auf Ölbasis. Benutzen Sie zum Entfernen hartnäckiger Flecken ein feuchtes Tuch mit
mildem Reinigungsmittel.
14. Der Hersteller haftet nicht für Beschädigungen oder Datenverluste durch Fehlfunktion,
Zweckentfremdung oder Modifikation des Geräts oder durch das Wechseln der Batterie.
15. Unterbrechen Sie die Verbindung nicht während einer Formatierung oder einer Datenübertragung.
Bei Unterbrechung drohen Datenverlust und Datenbeschädigung.
16. Wenn das Gerät eine USB-Wiedergabefunktion besitzt, dann stecken Sie den USB-Stick direkt in das
Gerät. Verwenden Sie kein USB-Verlängerungskabel, weil die erhöhte Störungsanfälligkeit zu
Datenverlust führen kann.
17. Das Typenschild befindet sich an der Unter- oder Rückseite des Gerätes.

25
18. Dieses Gerät ist nicht zur Benutzung durch Personen (einschließlich Kinder) mit physischen,
sensorischen oder mentalen Beeinträchtigungen oder ohne ausreichender Erfahrung vorgesehen, es sei
denn, sie werden durch eine verantwortliche Person beaufsichtigt oder wurden in die ordnungsgemäße
Bedienung des Gerätes durch eine für ihre Sicherheit verantwortlichen Person eingewiesen.
19. Dieses Produkt ist nur für den nicht-professionellen Gebrauch und nicht für gewerbliche oder
industrielle Zwecke bestimmt.
20. Stellen Sie sicher, dass das Gerät in einer stabilen Position aufgestellt ist. Schäden, die durch
Verwendung dieses Produkts in einer instabilen Position, durch Vibrationen, Stöße oder Nichtbeachtung
der anderen in diesem Handbuch enthaltenen Warnungen und Sicherheitsmaßnahmen entstehen,
werden nicht durch die Garantie abgedeckt.
21. Entfernen Sie niemals das Gehäuse dieses Geräts.
22. Stellen Sie dieses Gerät niemals auf andere elektrische Geräte.
23. Halten Sie Kinder von den Plastiktüten fern.
24. Benutzen Sie nur vom Hersteller spezifizierte Erweiterungen/Zubehörteile.
25. Lassen Sie alle Wartungs-/Reparaturarbeiten von qualifiziertem Servicepersonal ausführen.
Reparatur/Wartung wird notwendig, wenn das Gerät in irgendeiner Weise wie beispielsweise am
Netzkabel oder am Netzstecker beschädigt wurde oder wenn Flüssigkeit in das Gerät gelangt ist bzw.
Gegenstände in das Gerät gefallen sind, das Gerät Regen oder Feuchtigkeit ausgesetzt war, es
heruntergefallen ist oder nicht ordnungsgemäß funktioniert.
26. Langes Hören lauter Töne aus einem Musikgerät kann zum zeitweiligen oder permanenten Hörverlust
führen.
27. Wenn zum Lieferumfang des Produkts ein Netzkabel oder ein Netzadapter gehört:
• Wenn irgendwelche Probleme auftreten, dann trennen Sie das Gerät vom Stromnetz und setzen
Sie sich anschließend mit einer qualifizierten Fachkraft in Verbindung.
• Treten Sie nicht auf den Netzadapter und klemmen Sie ihn auch nicht ein. Seien Sie besonders im
näheren Bereich des Netzsteckers und an der Stelle vorsichtig, an der das Netzkabel aus dem Gerät
herausgeführt wird. Stellen Sie keine schweren Gegenstände auf den Netzadapter, weil er dadurch
beschädigt werden kann. Halten Sie das gesamte Gerät außerhalb der Reichweite von Kindern!
Durch Spielen mit dem Netzkabel können sie sich ernsthafte Verletzungen zuziehen.
• Trennen Sie das Gerät während eines Gewitters oder bei längerer Nichtbenutzung vom Stromnetz.
• Die Netzsteckdose muss sich in der Nähe des Geräts befinden und einfach zu erreichen sein.
• Überlasten Sie Steckdosen und Verlängerungsleitungen nicht. Eine Überlastung kann zu
Brandgefahr bzw. Stromschlag führen.
• Geräte der Schutzklasse 1 müssen Sie an eine Netzsteckdose mit Schutzleiter anschließen.
• Geräte der Schutzklasse 2 benötigen keinen Schutzleiteranschluss.
• Halten Sie den Netzstecker in der Hand, wenn Sie ihn aus der Netzsteckdose ziehen. Ziehen Sie ihn
nicht durch Zerren am Kabel heraus. Das kann zu einem Kurzschluss führen.
• Verwenden Sie weder ein beschädigtes Netzkabel noch einen beschädigten Netzstecker oder eine
lockere Steckdose. Missachtung kann zu Brand oder Stromschlag führen.
28. Wenn das Produkt mit einer Fernbedienung mit Batterien/Knopfzellen geliefert wird oder das Produkt
eine derartige Fernbedienung umfasst:
Warnung:
• Die Batterie nicht einnehmen – Verätzungsgefahr!
• Die mit diesem Produkt mitgelieferte Fernbedienung enthält eine Knopfzelle. Das Verschlucken der
Batterie kann innerhalb von nur 2 Stunden zu schwersten inneren Verbrennungen mit Todesfolge
führen.
• Halten Sie neue und gebrauchte Batterien von Kindern fern.
• Falls sich das Batteriefach nicht richtig schließen lässt, dann benutzen Sie das Gerät nicht mehr und
halten Sie es von Kindern fern.
• Wenn Sie vermuten, dass Batterien verschluckt oder in eine Körperöffnung eingeführt worden sind,
dann suchen Sie umgehend eine/-n Ärztin/Arzt auf.

26
29. Warnhinweise bzgl. der Verwendung von Batterien:
• Es besteht Explosionsgefahr, wenn die Batterie nicht korrekt ersetzt wird. Tauschen Sie die Batterie
nur gegen eine Batterie des gleichen Typs aus.
• Die Batterie darf während der Benutzung, Aufbewahrung oder des Transports weder sehr hohen
oder sehr niedrigen Temperaturen noch niedrigem Luftdruck in großen Höhenlagen ausgesetzt
werden.
• Die Ersetzung der Batterie mit einem falschen Batterietyp kann zum Explodieren der Batterie oder
zum Entweichen von entflammbarem Gas oder Auslaufen von entflammbarer Flüssigkeit aus der
Batterie führen.
• Die Entsorgung der Batterie in Feuer oder einem heißen Ofen oder das mechanische Zerkleinern
oder Zerteilen der Batterie kann zu Explosionen führen.
• Das Verbleiben der Batterie in einer Umgebung mit sehr hohen Temperaturen kann zum
Explodieren der Batterie oder zum Entweichen von entflammbarem Gas oder Auslaufen von
entflammbarer Flüssigkeit aus der Batterie führen.
• Eine einem sehr niedrigen Luftdruck ausgesetzte Batterie kann explodieren oder es kann aus einer
einem sehr niedrigen Luftdruck ausgesetzten Batterie entflammbares Gas entweichen oder
entflammbare Flüssigkeit auslaufen.
• Legen Sie besonderes Augenmerk auf den ökologischen Aspekt der Batterieentsorgung.
AUFSTELLEN
• Packen Sie alle Teile aus und entfernen Sie danach die Schutzmaterialien.
• Schließen Sie das Gerät nicht eher an das Stromnetz an, bevor Sie die Netzspannung überprüft haben
und alle anderen notwendigen Verbindungen hergestellt sind.
* Diese Anweisungen gelten nur für Produkte mit Netzkabel oder Netzadapter.

27
Im Lieferumfang enthaltene Zubehörteile:
Bedienungsanleitung
Netzadapter

28
1. KOMPONENTEN DES PLATTENSPIELERS:
1. Plattenteller
2. Plattenspielerdorn
3. Plattenpuck
4. Tonarmheber
5. Auto-Stopp-Schalter
6. Geschwindigkeitswahlschalter
7. Tonarm
8. Tonarm-Arretierung
9. Tonabnehmer
10. Betriebs-/Funktions-LED-Anzeige
11. Kopfhöreranschluss
12. Ein/Aus-Knopf / Lautstärkeregler
13. Funktionswahlschalter ( -AUSGANG/PHONO/AUX/ -EINGANG)
14. Abnehmbare Staubabdeckung
15. Scharnier
16. Netzadapteranschluss
17. Geschwindigkeitsregler
18. Anschlüsse für externe Lautsprecher
19. AUX-Eingang
20. Externe Lautsprecher
21. Lautsprecherkabel am externen Lautsprecher

29
EINRICHTUNG
Ein Netzadapter mit einer Leistung von 12 V Gleichspannung, 2,0 A, ist im Lieferumfang dieses Plattenspielers
mit Bluetooth-Empfang und Holzlautsprechern enthalten. Der Netzadapter wird für den Betrieb des Gerätes
benötigt.
Schließen Sie das Lautsprecherkabel jedes Lautsprechers an der Rückseite des Gerätes an.
Hinweis: Die Kabel der externen Lautsprecher sind farbcodiert. Das Kabel mit dem roten Anschluss muss in den
roten Anschluss, das weiße Kabel in den weißen Anschluss eingesteckt werden.
Schließen Sie den DC-Stecker des Netzadapters sicher und fest am DC-Eingang an der Rückseite des Gerätes an.
Stecken Sie den Netzstecker des Netzadapters in eine Steckdose mit 220 bis 240 V Wechselspannung bei 50 Hz.
Schalten Sie das Gerät über den EIN/AUS-/LAUTSTÄRKE-Knopf ein. Die BETRIEBS-/FUNKTIONS-LED-Anzeige
rleuchtet auf.
Hinweis: Zur Vermeidung des Larsen-Effekts und zur Unterdrückung von Rückkopplungsgeräuschen können
Sie Folgendes tun:
1. Stellen Sie die Lautsprecher mindestens 60 cm vom Plattenspieler entfernt auf.
2. Lassen Sie die Staubabdeckung beim Abspielen einer Schallplatte bei hoher
Lautstärke geöffnet.
Einschalten und Auswahl der Betriebsart
Schalten Sie das Gerät über den EIN/AUS-/LAUTSTÄRKE-Knopf ein. Sie hören ein Klickgeräusch und die
BETRIEBS-/FUNKTIONS-LED-Anzeige zeigt durch Aufleuchten an, dass das Gerät eingeschaltet ist. Wenn das
Gerät eingeschaltet ist, können Sie die Wiedergabelautstärke durch Drehen des Lautstärkereglers einstellen.
Drehen Sie den FUNKTIONSWAHLSCHALTER auf einen der Modi ( -AUSGANG/PHONO/AUX/ -EINGANG).
2. Eine Schallplatte anhören
1. Öffnen Sie die Staubabdeckung.
2. Schalten Sie das Gerät über den EIN/AUS-/LAUTSTÄRKE-Knopf ein.
Die BETRIEBS-/FUNKTIONS-LED-Anzeige leuchtet in der Betriebsart
PHONO in ROT.
3. Sonst stellen Sie den FUNKTIONSWAHLSCHALTER auf PHONO.
4. Legen Sie eine Schallplatte auf den Plattenteller und stellen Sie die
Wiedergabegeschwindigkeit entsprechend der Geschwindigkeit der
Schallplatte ein.
Hinweis: Verwenden Sie zum Abspielen einer Single (eine Schallplatte für
45 U/min) und/oder Schallplatten mit größerem Loch in der Mitte einen
Single-Puck.
5. Entfernen Sie die Schutzabdeckung der Tonnadel.
EN
DE
OUT
-AUSGANG
PHONO
PHONO
IN
-EINGANG
AUX
AUX

30
Entriegeln Sie den Tonarm auf der Tonarmauflage. Drücken Sie den Tonarmheber nach hinten, der Tonarm hebt
sich langsam. Bewegen Sie den Tonarm vorsichtig in die gewünschte Position über der Schallplatte. Der
Plattenteller beginnt sich zu drehen, sobald der Arm über ihn bewegt wird, sofern der Auto-Stopp-Schalter auf
ON steht. Senken Sie den Tonarm auf die Schallplatte, indem Sie den Tonarmheber nach vorne drücken. Die
Wiedergabe der Schallplatte beginnt.
Wenn der Auto-Stopp-Schalter auf ON steht, schaltet der Plattenspieler am Ende automatisch ab. Wenn der
Auto-Stopp-Schalter auf OFF steht, schaltet der Plattenspieler am Ende NICHT automatisch ab; Sie müssen den
Tonarmheber nach hinten drücken, damit sich der Tonarm hebt, und ihn auf der Tonarmauflage ablegen.
Schalten Sie dann das Gerät aus, damit der Plattenteller aufhört sich zu drehen.
Hinweis: Die Auto-Stopp-Funktion funktioniert für die meisten Schallplatten für 33 U/min. Bei einigen wenigen
Schallplatten kann es jedoch vorkommen, dass trotz Aktivierung der Auto-Stopp-Funktion der Plattenspieler vor
dem Ende abschaltet oder am Ende nicht abschaltet.
HINWEIS: Falls die Wiedergabe der Schallplatte vor Ende des letzten Titels abbricht, stellen Sie den
Auto-Stopp-Schalter auf OFF. Die Schallplatte wird nun bis zum Ende abgespielt. In diesem Fall müssen Sie die
Drehung des Plattentellers jedoch manuell beenden.
HINWEIS: Je nach Schallplattenlänge könnte die Auto-Stopp-Funktion vor Ende der Aufnahme aktiviert werden.
Vertrauen Sie zum Beenden der Wiedergabe nicht allein auf die Auto-Stopp-Funktion.
Mit dem Tonhöhenregler können Sie die Abspielgeschwindigkeit der Schallplatte feineinstellen, sobald die
richtige Geschwindigkeit (33/45/78 U/min) gewählt wurde. Drehen Sie den Tonhöhenregler, um die
Geschwindigkeit des Plattenspielers bei Bedarf leicht zu erhöhen oder zu verringern.
Sie können die Musik der Schallplatte an externe Bluetooth-Lautsprecher (nicht im Lieferumfang enthalten)
streamen, indem Sie die Schritte im Abschnitt BLUETOOTH-AUSGABE befolgen.
3. Bluetooth-Ausgabe
Dieser Plattenspieler unterstützt eine kabellose Bluetooth-Verbindung („ -AUSGANG“). Sie können ihn mit
Bluetooth-fähigen Kopfhörern (nicht im Lieferumfang enthalten) oder Bluetooth-Lautsprechern (nicht im
Lieferumfang enthalten) verbinden.
1. Schalten Sie das Gerät über den EIN/AUS-/LAUTSTÄRKE-Knopf ein.
2. Drehen Sie den FUNKTIONSWAHLSCHALTER zur Auswahl der Betriebsart
„-AUSGANG“.
3. Die BETRIEBS-/FUNKTIONS-ANZEIGE leuchtet blau und beginnt langsam zu
blinken.
4. Schalten Sie Ihr externes Bluetooth-Empfangsgerät
(z. B. Bluetooth-Kopfhörer oder Bluetooth-Lautsprecher) ein und versetzen
Sie es in den Kopplungsmodus.
5. Bei erfolgreicher Kopplung hört die BETRIEBS-/FUNKTIONS-ANZEIGE auf zu
blinken und leuchtet dauerhaft blau.
6. Der Plattenspieler ist nun mit Ihrem externen Bluetooth-Gerät verbunden.
7. Beginnen Sie mit dem Abspielen einer Schallplatte. Der Ton wird über das externe Bluetooth-Gerät
ausgegeben.
Hinweis: Sie können die Lautstärke NUR über den Lautstärkeregler an Ihrem externen Bluetooth-Gerät
anpassen.
EN
DE
OUT
-AUSGANG
PHONO
PHONO
IN
-EINGANG
AUX
AUX

31
Hinweis:
• Platzieren Sie das Bluetooth-Gerät in maximal 1 m Entfernung zum Plattenspieler, damit die Kopplung
gelingt.
• Der Plattenspieler bleibt nur 30 Sekunden lang im Kopplungsmodus. Falls die Kopplung nicht innerhalb von
30 Sekunden zustande kommt, wiederholen Sie Schritt 2 bis 4 nach Abschalten aller Geräte.
• „-AUSGANG“ funktioniert nur im PHONO-Modus. „ -AUSGANG“ funktioniert nicht im AUX -EINGANGS-
oder im regulären Bluetooth- („ -EINGANG“) Modus.
4. Eine Bluetooth-Quelle anhören
Über die Bluetooth-Funktion können Sie ein externes Bluetooth-fähiges Gerät, wie z. B. ein Smartphone oder
Tablet, kabellos mit diesem Plattenspieler verbinden.
1. Schalten Sie das Gerät über den EIN/AUS-/LAUTSTÄRKE-Knopf ein.
2. Drehen Sie den FUNKTIONSWAHLSCHALTER zur Auswahl der Betriebsart
„-EINGANG“.
3. Die BETRIEBS-/FUNKTIONS-ANZEIGE leuchtet blau und beginnt zu blinken.
4. Wenn Sie das Bluetooth-Gerät zum ersten Mal mit dem Plattenspieler
verwenden, müssen Sie beide koppeln.
5. Aktivieren Sie das Bluetooth Ihres externen Geräts. Warten Sie einen
Augenblick, suchen Sie dann zur Bluetooth-Kopplung nach dem Eintrag
„Lenco LS-101“. Geben Sie „0000“ ein und drücken Sie OK, falls Ihr Gerät
nach einem Passwort fragt (je nach Hersteller, Modell und
Software-Version des Geräts).
6. Wählen Sie zum Herstellen der Verbindung den Bluetooth-Kopplungsnamen aus. Sobald die Verbindung
steht, hört die LED auf zu blinken.
7. Ihr Gerät ist nun über Bluetooth mit Ihrem externen Gerät verbunden.
8. Drehen Sie den Lautstärkeregler zur Anpassung der Lautstärke und stellen Sie die Lautstärke auf Ihrem
externen Audiogerät ein.
EN
DE
OUT
-AUSGANG
PHONO
PHONO
IN
-EINGANG
AUX
AUX
5. Eine AUX-Quelle anhören
1. Schalten Sie das Gerät über den EIN/AUS-/LAUTSTÄRKE-Knopf ein.
2. Drehen Sie den FUNKTIONSWAHLSCHALTER zur Auswahl der Betriebsart
AUX.
3. Die BETRIEBS-/FUNKTIONS-ANZEIGE leuchtet lila (rot + blau).
4. Verbinden Sie ein externes Audiogerät über ein 3,5-mm-Stereokabel
(nicht im Lieferumfang enthalten) mit dem AUX-Anschluss an der
Rückseite des Gerätes.
5. Passen Sie über den EIN/AUS-/LAUTSTÄRKE-Knopf die Lautstärke an und
nutzen Sie die Bedienelemente am externen Audiogerät zur Steuerung
der Wiedergabe und zum Einstellen der Lautstärke.

32
EN
DE
OUT
-AUSGANG
PHONO
PHONO
IN
-EINGANG
AUX
AUX
Automatischer Wechsel in den Bereitschaftsmodus, um Energie zu sparen (CE-Richtlinie): Der LS-101 wechselt
automatisch in den Bereitschaftsmodus, wenn 15 Minuten lang kein Audiosignal eingeht (Schallplatte oder
Bluetooth). Zur Reaktivierung des Gerätes haben Sie folgende Möglichkeiten:
• Schalten Sie das Gerät über den POWER/VOLUME-Regler aus und wieder ein.
• Drehen Sie den FUNKTIONSWAHLSCHALTER.
ERSETZEN DER TONNADEL
Befolgen Sie zum Ersetzen der Tonnadel (Ersatznadel nicht im Lieferumfang enthalten) die nachstehende
Anleitung.
Entfernen der Tonnadel aus dem Tonkopf
1. Setzen Sie einen Schraubendreher an der Spitze der Tonnadel an. Drücken Sie dann wie in der Abbildung
gezeigt nach unten in Richtung „A“.
2. Nehmen Sie danach die Tonnadel ab, indem Sie sie nach vorn ziehen und dabei nach unten drücken.
Einsetzen der Tonnadel
1. Halten Sie die Tonnadel an der Spitze fest und setzen Sie sie dann ein, indem Sie sie wie abgebildet in
Richtung „B“ drücken.
2. Drücken Sie nun die Tonnadel solange nach oben in Richtung „C“, bis sie in der für sie vorgesehenen
Position einrastet.
HINWEISE
Wir empfehlen Ihnen, Schallplatten für maximalen Hörgenuss mit einem Antistatik-Tuch zu reinigen
(zum Beispiel mit dem Reinigungsset LENCO TTA-3IN1 (separat erhältlich)).
Wir möchten Sie aus selben Grund darauf hinweisen, Ihre Tonnadel regelmäßig (ungefähr alle
250 Wiedergabestunden) zu wechseln.
Führungsstifte (innen)

33
Technische Daten:
Lenco
Plattenspieler
LS-101
Typ
Riemenantrieb vollständig manuell
Antriebsmotor
Gleichstrommotor
Geschwindigkeit
33, 45, 78 U/min
Plattenteller
200 mm
Bluetooth
Version
5.0
Frequenzbereich
2402 MHz bis 2480 MHz
Maximale Übertragungsleistung
< 8 dbm
Allgemein
NETZTEIL
Eingang: 100 bis 240 V Wechselspannung, 50/60 Hz, 0,8 A
Ausgang: 12 V Gleichspannung, 2 A
Eingangsleistung des Geräts
12 V Gleichspannung, 2 A
Leistungsaufnahme
24 W
Abmessungen
340 x 320 x 100 mm (Hauptgerät); 130 x 120 x 200 mm (Lautsprecher)
Gewicht
Ca. 4,12 kg
Netzadapter
Hersteller: SHENZHEN SHI GUANGKAIYUAN TECHNOLOGY LTD
Modellnummer: GKYZT0200120KH
Benutzen Sie nur die in der Bedienungsanleitung angegebene Stromversorgung

34
Information
Wert und Genauigkeit
Name des Herstellers oder der Handelsmarke,
kommerzielle Zulassung und Anschrift
SHENZHEN SHI GUANGKAIYUAN TECHNOLOGY LTD
2 floor, 41 TianSheng Road, TianLiao village, GongMing
Street, Guangming, Shenzhen, Guangdong, P.R.China
Modellidentifikator
GKYZT0200120KH
Eingangsspannung
100 – 240 V
Wechselstromfrequenz des AC-Eingangs
50/60 Hz
Ausgangsspannung
12 V Gleichspannung
Ausgangsstrom
2 A
Ausgangsleistung
24 W
Durchschnittliche Effizienz bei Normallast
86,66 %
Effizienz bei Niederlast (10 %)
84,42 %
Leistungsaufnahme bei Nulllast
0,08
Garantie
Lenco bietet Leistungen und Garantien im Einklang mit Europäischem Recht. Setzen Sie sich deshalb im Falle
von Reparaturen (sowohl während als auch nach Ablauf der Garantiezeit) mit Ihrem Fachhändler in
Verbindung.
Wichtiger Hinweis: Es ist nicht möglich, Produkte für Reparaturen direkt an Lenco zu schicken.
Wichtiger Hinweis: Wenn dieses Gerät für welchen Grund auch immer durch ein nicht offizielles
Servicezentrum geöffnet wurde oder durch dieses Servicezentrum darauf zugegriffen wurde, erlischt die
Garantie.
Dieses Gerät ist nicht für professionelle Zwecke geeignet. Falls das Gerät für professionelle Zwecke eingesetzt
wird, erlöschen alle Garantieverpflichtungen seitens des Herstellers.
Haftungsausschluss
Aktualisierungen der Firmware und/oder Hardware-Komponenten werden regelmäßig durchgeführt. Aus
diesem Grund können einige der Anleitungen, Spezifikationen und Abbildungen in dieser Dokumentation zu
dem Ihnen vorliegenden Gerät leicht abweichen. Alle in diesem Handbuch beschriebenen Elemente dienen nur
zur Illustration und treffen auf Ihre individuelle Situation möglicherweise nicht zu. Aus der in diesem Handbuch
getätigten Beschreibung können keine Rechtsansprüche oder Leistungsanforderungen geltend gemacht
werden.

35
Entsorgung des Altgeräts
Dieses Symbol zeigt an, dass das entsprechende
Produkt oder dessen Akku/Batterie in Europa nicht mit
dem normalen Hausmüll entsorgt werden darf. Um die
ordnungsgemäße Abfallbehandlung des Produkts und
dessen Akku/Batterie zu gewährleisten, müssen diese
im Einklang mit allen anwendbaren örtlichen
Vorschriften zur Entsorgung von Elektrogeräten und
Akkus/Batterien entsorgt werden. Dabei helfen Sie,
natürliche Ressourcen zu schonen und
Umweltschutzstandards zur Verwertung und
Entsorgung von Altgeräten aufrecht zu halten
(Richtlinie über Entsorgung Elektrischer und
Elektronischer Altgeräte).
CE-Kennzeichen
Produkte mit der CE-Kennzeichnung entsprechen der
von der EU-Kommission herausgegebenen
EMV-Richtlinie (2014/30/EU) und
Niederspannungsrichtlinie (2014/35/EU).
Hiermit erklärt Commaxx B.V. Wiebachstraat 37, 6466
NG Kerkrade, The Netherlands, dass dieses Produkt
den grundsätzlichen Anforderungen entspricht.
Die Konformitätserklärung kann unter folgendem Link
abgerufen werden : techdoc@lenco.com
Service
Besuchen Sie bitte für weitere Informationen und unseren Kundendienst unsere Homepage www.lenco.com
Commaxx B.V. Wiebachstraat 37, 6466 NG Kerkrade, The Netherlands.

36
Français
ATTENTION :
L’utilisation de commandes ou réglages, ou l’exécution de procédures autres que ceux spécifiés dans ce manuel
peut entraîner une exposition à des rayonnements dangereux.
PRÉCAUTIONS AVANT UTILISATION
GARDEZ CES INSTRUCTIONS À L’ESPRIT :
1. Ne couvrez ni n’obturez aucune ouverture de ventilation. Lorsque l’appareil est placé sur une étagère,
laissez un espace libre de 5 cm autour de l’appareil.
2. L’installation doit être effectuée conformément au guide d’utilisation fourni.
3. Gardez l’appareil à l’écart des sources de chaleur telles que radiateurs, chauffages, cuisinières,
bougies et autres équipements générant de la chaleur ou une flamme nue. L’appareil ne doit être utilisé
que dans un climat modéré. Les environnements extrêmement froids ou chauds doivent être évités.
La température de fonctionnement est entre 0 et 35 °C.
4. Évitez d’utiliser l’appareil à proximité de champs magnétiques puissants.
5. Des décharges électrostatiques peuvent perturber le fonctionnement normal de cet appareil.
Dans ce cas, réinitialisez et redémarrez l’appareil en suivant le guide d’utilisation. Pendant le transfert de
fichiers, manipulez l’appareil avec précaution dans un environnement privé d’électricité statique.
6. Avertissement ! N’introduisez jamais un objet dans l’appareil par les ouvertures et fentes de ventilation.
Des tensions élevées sont présentes dans l’appareil, l’insertion d’un objet peut entraîner une
électrocution ou court-circuiter certains composants. Pour les mêmes raisons, ne renversez pas d’eau ou
de liquide sur l’appareil.
7. N’utilisez pas l’appareil dans des endroits humides tels que salle de bain, cuisine pleine de vapeur ou à
proximité d’une piscine.
8. L’appareil ne doit pas être exposé à des écoulements ou des éclaboussures et aucun objet contenant un
liquide, tel qu’un vase, ne doit être posé sur ou près de l’appareil.
9. N’utilisez pas cet appareil lorsque de la condensation est possible. Lorsque l’appareil est utilisé dans une
pièce chaude humide, des gouttelettes d’eau ou de la condensation peuvent se produire et entrainer un
mauvais fonctionnement. Laissez l’appareil éteint pendant 1 ou 2 heures avant de l’allumer : il doit être
sec avant d’être allumé.
10. Cet appareil est fabriqué avec le plus grand soin et vérifié plusieurs fois avant de quitter l’usine,
cependant il est toujours possible, comme pour tout appareil électrique, que des problèmes
surviennent. Si l’appareil émet de la fumée ou s’il y a une accumulation de chaleur excessive ou un
phénomène inattendu, débranchez immédiatement la fiche d’alimentation du secteur.
11. Cet appareil doit fonctionner avec la source d’alimentation indiquée sur la plaque signalétique.
Si vous n’êtes pas sûr de votre type d’alimentation électrique, contactez le revendeur ou la compagnie
d’électricité locale.
12. Gardez l’appareil à l’écart des animaux. Certains animaux aiment ronger les cordons d’alimentation.
13. Pour nettoyer l’appareil, utilisez un chiffon doux et sec N’utilisez ni solvant ni liquide à base de pétrole.
Pour enlever les taches tenaces, utilisez un chiffon humide imbibé d’une solution de détergent diluée.
14. Le fournisseur n’est pas responsable des dommages ou pertes de données causés par un
dysfonctionnement, une utilisation abusive, une modification de l’appareil ou un remplacement de la
batterie.
15. Ne coupez aucune connexion lorsque l’appareil effectue un formatage ou transfert de fichiers.
Autrement, les données risquent d’être corrompues ou perdues.
16. Si l’appareil offre la lecture USB, il faut brancher la clé USB directement dans l’appareil. N’utilisez pas de
câble de rallonge USB, car cela peut provoquer des interférences provoquant la perte de données.
17. La plaque signalétique se situe en dessous ou à l’arrière de l’appareil.
18. Cet appareil n’est pas destiné à être utilisé par des personnes (enfants compris) souffrant de handicaps
physiques, sensoriels ou mentaux, ou manquant d’expérience et de connaissances, sauf si elles sont
sous surveillance ou ont reçu des instructions sur l’utilisation correcte de l’appareil par la personne qui
est responsable de leur sécurité.
19. Cet appareil est réservé à un usage non professionnel, et non pas à un usage commercial ou industriel.

37
20. Vérifiez que l’appareil est en position stable. La garantie ne couvre pas les dégâts occasionnés par
l’utilisation de cet appareil en position instable, soumis à des vibrations ou chocs, ou par le non-respect
de tout autre avertissement ou précaution contenus dans ce guide d’utilisation.
21. N’ouvrez jamais cet appareil.
22. Ne placez jamais cet appareil sur un autre appareil électrique.
23. Ne laissez pas les sacs en plastique à la portée des enfants.
24. N’utilisez que des pièces/accessoires recommandés par le fabricant.
25. Confiez tout entretien à un personnel qualifié. Une réparation est nécessaire lorsque l’appareil a été
endommagé de quelque façon que ce soit, par exemple lorsque le cordon d’alimentation ou sa fiche est
endommagée, lorsqu’un liquide a été renversé ou des objets ont été introduits dans l’appareil, lorsqu’il
a été exposé à la pluie ou à l’humidité, ne fonctionne pas correctement ou s’il est tombé.
26. Une exposition prolongée à des sons puissants produits par des lecteurs personnels de musique peut
entraîner une perte auditive temporaire ou permanente.
27. Si l’appareil est livré avec un cordon ou adaptateur d’alimentation secteur :
• En cas de problème, débranchez le cordon d’alimentation secteur et confiez l’entretien à un
personnel qualifié.
• Ne marchez pas ni ne pincez l’adaptateur secteur. Faites très attention, en particulier près des
fiches et du point de sortie du câble. Ne placez aucun objet lourd sur l’adaptateur secteur,
il pourrait l’endommager. Gardez l’appareil hors de portée des enfants. Les enfants pourraient se
blesser gravement s’ils jouent avec le cordon d’alimentation.
• Débranchez cet appareil pendant les orages ou lorsqu’il n’est pas utilisé pendant une longue
durée.
• La prise secteur doit être installée près de l’appareil et doit être facilement accessible.
• Ne surchargez pas les prises de courant ou les rallonges. Une surcharge peut entraîner un incendie
ou une électrocution.
• Un appareil étant de classe 1 doit être branché dans une prise secteur disposant d’une mise à la
terre.
• Les appareils de classe 2 ne nécessitent pas de mise à la terre.
• Tirez toujours sur la fiche lorsque vous la retirez de la prise d’alimentation secteur. Ne tirez pas sur
le cordon d’alimentation. Cela pourrait provoquer un court-circuit.
• N’utilisez ni cordon, ni fiche endommagé, ni une prise desserrée. Cela pourrait entraîner une
électrocution ou un incendie.
28. Si l’appareil contient ou est livré avec une télécommande contenant des piles boutons/piles :
Avertissement :
• « Ne pas avaler les piles ! Risque de brûlure chimique » ou équivalent.
• La télécommande fournie avec cet appareil contient une pile bouton/pile. Si la pile bouton est
avalée, elle peut causer des brûlures internes graves en seulement 2 heures et peut conduire à la
mort.
• Gardez les piles neuves et usées hors de la portée des enfants.
• Si le compartiment à pile ne se ferme pas correctement, cessez d’utiliser l’appareil et le garder hors
de la portée des enfants.
• Si vous pensez que les piles ont été avalées ou placées à l’intérieur d’une partie du corps, consultez
un médecin immédiatement.
29. Avertissements sur l’utilisation des piles :
• Risque d’explosion si la pile n’est pas correctement remplacée. Ne les remplacez que par des piles
du même type ou d’un type équivalent.
• Les piles ne doivent pas être soumises à des températures extrêmement élevées ou basses, à une
faible pression d’air à haute altitude pendant l’utilisation, le stockage ou le transport.
• Tout remplacement de pile par un type incorrect peut entraîner une explosion ou une fuite de
liquide ou de gaz inflammable.
• L’élimination de pile dans un feu, four chaud, équipement d’écrasement ou de coupure mécanique,
peut entraîner une explosion.
• Laisser une pile dans un environnement à température extrêmement élevée peut entraîner une
explosion ou une fuite de liquide ou de gaz inflammable.

38
• Une pile soumise à une pression d’air extrêmement basse peut entraîner une explosion ou une
fuite de liquide ou de gaz inflammable.
• Une attention particulière doit être portée sur les aspects environnementaux d’élimination des
piles.
INSTALLATION
• Déballez tous les composants et enlevez les matériaux de protection.
• Ne branchez pas l’appareil sans avoir vérifié la tension secteur et sans avoir effectué tous les autres
branchements.
* Ces instructions s’appliquent uniquement aux produits utilisant un cordon d’alimentation ou un
adaptateur secteur.

39
Accessoires inclus :
Mode d’emploi
Adaptateur secteur

40
1. PIÈCES DU TOURNE-DISQUE :
1. Plateau de la platine
2. Axe du tourne-disque
3. Adaptateur de 45 tours
4. Levier de levage
5. Interrupteur de commande d'arrêt automatique
6. Sélecteur de vitesse
7. Bras de lecture
8. Blocage du bras de lecture
9. Cellule de lecture
10. Voyant LED d’alimentation/de fonction
11. Prise casque
12. Bouton de Marche/ arrêt et VOLUME
13. Sélecteur de fonction ( SORTIE/PHONO/AUX/ ENTRÉE)
14. Couvercle poussière amovible
15. Charnière
16. Prise de l’adaptateur d'alimentation
17. Bouton de contrôle de la vitesse
18. Prises des enceintes externes
19. Prise d’entrée auxiliaire
20. Haut-parleurs externes
21. Câble de haut-parleur sur le haut-parleur externe

41
INSTALLATION
Un adaptateur CA/CC avec une puissance de 12 V CC 2,0 A est fourni avec ce tourne-disque avec réception
Bluetooth et haut-parleurs en bois. L’adaptateur est nécessaire pour faire fonctionner l’appareil.
Connectez les câbles de haut-parleurs de chaque haut-parleur à l’arrière de l’appareil
Remarque : Les câbles du haut-parleur externe sont codés en couleur, le câble avec le connecteur rouge doit
être placé dans le trou rouge et le blanc dans le trou blanc.
Insérez fermement la fiche CC de l’adaptateur dans la prise d’entrée CC à l’arrière de l’appareil.
Branchez les fiches CA de l’adaptateur dans une prise de courant de 220-240 V CA ~ 50 Hz.
Allumez l’appareil à l’aide du bouton ALIMENTATION/VOLUME (12).Le voyant LED d’alimentation/de fonction
s’allume.
Remarque : Pour éviter l’effet Larsen ou un bruit de retour, vous pouvez effectuer les opérations suivantes :
1. Placez vos haut-parleurs à une distance minimale de 60 cm ou plus de votre
tourne-disque
2. Laissez le couvercle anti-poussière ouvert lorsque vous écoutez un disque à haut
volume
Mise en marche et sélection de mode
Allumez l’appareil à l’aide du bouton ALIMENTATION/VOLUME. Vous entendrez un clic et le voyant LED
d’alimentation/de fonction s’allumera pour confirmer que l’appareil est allumé. Lorsque l’appareil est allumé,
vous pouvez faire tourner la commande normalement pour régler le volume de lecture de la musique.
Accédez aux différents modes ( OUT/PHONO/AUX/ IN) en tournant le SÉLECTEUR DE FONCTION.
2. Écouter un disque
1. Soulevez le couvercle poussière.
2. Allumez l’appareil à l’aide du bouton ALIMENTATION/VOLUME. Le voyant
LED d’alimentation/de fonction devient rouge en mode PHONO.
3. Vous pouvez sinon faire tourner le SÉLECTEUR DE FONCTION en
mode PHONO.
4. Placez un disque sur le plateau du tourne-disque et réglez la vitesse du
lecteur afin qu’elle corresponde à celle du disque.
Remarque : En lisant un single (45 tours) ou des disques avec un grand
trou central, utilisez l'adaptateur de 45 tours.
5. Retirez le cache de protection de la cellule de lecture
EN
FR
OUT
OUT
PHONO
PHONO
IN
IN
AUX
AUX

42
Déverrouillez le verrou du bras de lecture du repose-bras. Poussez le levier de levage vers l’arrière et le bras de
lecture se lèvera délicatement. Déplacez soigneusement le bras de lecture pour le mettre dans la position
voulue sur le disque et le plateau du tourne-disque commencera à tourner quand le bras est rapproché si
l'interrupteur de commande d'arrêt automatique est réglé sur ON. Relâchez le bras de lecture sur le
tourne-disque en poussant le levier de levage vers l’avant et le disque vinyle commencera à se lire.
Si l'interrupteur de commande d'arrêt automatique est mis sur ON, le disque s’arrêtera automatiquement
quand il sera fini. Si l'interrupteur de commande d'arrêt automatique est mis sur OFF, le disque ne s’arrêtera
PAS automatiquement quand il sera fini, vous devrez pousser le levier de levage vers l’arrière pour soulever le
bras de lecture et le remettre en place dans son support puis couper l’alimentation pour que le tourne-disque
arrête de tourner.
Remarque : La fonction ARRÊT AUTO s’applique à la plupart des disques vinyle 33 tours. Cependant, pour
quelques rares disques vinyle, il s’arrêtera avant d’arriver à la fin ou ne s’arrêtera pas en arrivant à la fin quand
la fonction ARRÊT AUTOMATIQUE est activée.
REMARQUE : Si votre enregistrement s’arrête avant la fin du dernier morceau, placez le bouton d’ARRÊT
AUTOMATIQUE sur OFF. Votre disque va maintenant être lu jusqu’à la fin, mais vous devrez arrêter la rotation
du tourne-disque manuellement.
REMARQUE : Selon la longueur du disque, l’ARRÊT AUTOMATIQUE peut être activé avant la fin de
l’enregistrement. Ne vous fiez pas seulement à l’ARRÊT AUTOMATIQUE pour arrêter la lecture.
La COMMANDE DE LA HAUTEUR vous permet de régler finement la vitesse de lecture de l’enregistrement une
fois que la bonne vitesse (33/45/78 TR/MIN) est choisie. Tournez la COMMANDE DE LA HAUTEUR pour
augmenter ou diminuer légèrement la vitesse du tourne-disque le cas échéant.
Pour diffuser la musique de votre disque sur des haut-parleurs Bluetooth externes (non fournis), consultez la
section FONCTIONNEMENT DE LA SORTIE BLUETOOTH.
3. Fonctionnement de la sortie Bluetooth
Ce tourne-disque prend en charge la connexion sans fil Bluetooth ( OUT). Il peut être connecté à un casque
externe compatible Bluetooth (non fourni) ou à des haut-parleurs Bluetooth (non fournis).
1. Allumez l’appareil à l’aide du bouton ALIMENTATION/VOLUME.
2. Tournez le SÉLECTEUR DE FONCTION pour sélectionner le mode OUT.
3. Le voyant D’ALIMENTATION/DE FONCTION devient « bleu » et commence à
clignoter lentement.
4. Allumez votre appareil récepteur Bluetooth externe (comme un
casque Bluetooth ou des haut-parleurs Bluetooth) et réglez-le sur le mode
de jumelage.
5. Lorsque le jumelage est réussi, le voyant D’ALIMENTATION/DE FONCTION
cesse de clignoter et reste allumé en « bleu ».
6. Vous êtes maintenant connecté à votre appareil Bluetooth externe.
7. Commencez la lecture d’un disque, le son sera diffusé à partir de l’appareil Bluetooth externe.
Remarque : Vous NE pouvez régler le volume qu’à l’aide de la commande de volume de votre appareil
Bluetooth externe.
EN
FR
OUT
OUT
PHONO
PHONO
IN
IN
AUX
AUX

43
Remarques :
• Placez l’appareil Bluetooth à moins de 1 m du tourne-disque pour leur permettre de se jumeler
correctement.
• Le tourne-disque reste en mode jumelage pendant seulement 30 secondes. Si le jumelage n’est pas
correctement effectué dans les 30 secondes, répétez les étapes 2 à 4 après avoir éteint tous les appareils.
• « OUT » ne fonctionne qu’en mode PHONO. OUT NE FONCTIONNERA PAS dans les modes de
fonction AUX IN ou ( IN) Bluetooth.
4. Écouter via Bluetooth
Un appareil externe doté de la connectivité Bluetooth comme un smartphone ou une tablette peut être
connecté sans fil à ce tourne-disque à l’aide de la fonction Bluetooth.
1. Allumez l’appareil à l’aide du bouton ALIMENTATION/VOLUME.
2. Tournez le SÉLECTEUR DE FONCTION pour sélectionner le mode IN.
3. Le voyant D’ALIMENTATION/DE FONCTION devient « bleu » et commence
à clignoter.
4. La première fois que vous utiliserez votre appareil Bluetooth avec le
tourne-disque, vous devrez les jumeler.
5. Activez le réglage Bluetooth de votre appareil externe. Patientez quelques
instants, puis recherchez le nom de jumelage Bluetooth « Lenco LS-101 »
Si votre appareil demande un mot de passe (selon le fabricant de
l’appareil, le modèle et la version du logiciel), entrez les chiffres « 0000 »
et appuyez sur OK.
6. Sélectionnez le nom de jumelage Bluetooth pour connecter l’appareil. Une fois la connexion établie, le
voyant rouge cesse de clignoter.
7. Vous êtes maintenant connecté à votre appareil externe par Bluetooth.
8. Tournez le bouton de commande du volume pour régler le niveau sonore et réglez le volume sur votre
appareil audio externe.
EN
FR
OUT
OUT
PHONO
PHONO
IN
IN
AUX
AUX
5. Écouter l’entrée auxiliaire
1. Allumez l’appareil à l’aide du bouton ALIMENTATION/VOLUME.
2. Tournez le SÉLECTEUR DE FONCTION pour sélectionner le mode AUX.
3. Le voyant D’ALIMENTATION/DE FONCTION devient « violet »
(rouge + bleu).
4. À l’aide d’un câble stéréo de 3,5 mm (non fourni), connectez un appareil
audio externe à la prise AUX située à l’arrière de l’appareil.
5. Utilisez le bouton D’ALIMENTATION/DE VOLUME pour régler le volume
et utilisez les commandes de l’appareil audio externe pour contrôler les
fonctions de lecture/Volume

44
EN
FR
OUT
OUT
PHONO
PHONO
IN
IN
AUX
AUX
Veille automatique pour l’économie d’énergie (règlement CE) : Le Lenco LS-101 se met automatiquement en
veille lorsqu’il n’y a pas de signal audio (disque ou Bluetooth) pendant +/- 15 minutes. Pour réactiver
l’appareil, vous avez le choix entre les options ci-dessous :
• Tournez le bouton D’ALIMENTATION/DE VOLUME pour éteindre et rallumer.
• Tournez le SÉLECTEUR DE FONCTION.
COMMENT CHANGER LA TÊTE DE LECTURE
Pour changer la tête de lecture (tête de lecture de rechange non fournie), consultez les instructions ci-dessous.
Démontage de la tête de lecture hors de la cartouche
1. Placez un tournevis au niveau de la pointe de la tête de lecture et poussez vers le bas dans la
direction « A » comme indiqué.
2. Retirez l’aiguille en la tirant vers l’avant et en la poussant vers le bas.
Installation de la tête de lecture
1. Maintenez le bout de la tête de lecture et insérez-la en pressant dans la direction « B » comme indiqué.
2. Poussez la tête de lecture vers le haut dans la direction « C » jusqu’à ce qu’elle se bloque dans la position
de la pointe.
REMARQUES
Nous vous conseillons de nettoyer vos disques avec un chiffon antistatique (par exemple, le kit de nettoyage
LENCO TTA-3IN1 (à acheter séparément) pour en profiter au maximum.
Nous tenons à également souligne que pour les mêmes raisons votre tête de lecture doit être changée
périodiquement (environ toutes les 250 heures).
Tiges de guidage (internes)

45
Informations techniques :
Lenco
Platine
LS-101
Type
Entraînement par courroie, entièrement manuel
Moteur d'entraînement
Moteur CC
Vitesse
33, 45, 78 tr/min
Plateau de la platine
200 mm
Bluetooth
Version
5,0
Plage de fréquence
De 2402 MHz à 2480 MHz
Puissance de transmission maximale
< 8 dbm
Général
ADAPTATEUR
Entrée 100-240 VCA ~ 50/60 Hz 0,8 A
Sortie 12 VCC-2 A
Puissance en entrée de l’appareil
12 VCC-2 A
Puissance consommée
24 W
Dimensions
340 x 320 x 100 mm pour le module principal ; 130 x 120 x 200 mm
pour le haut-parleur
Poids
Environ 4,12 kg
Adaptateur d’alimentation
Fabricant : SHENZHEN SHI GUANGKAIYUAN TECHNOLOGY., LTD.
Numéro du modèle : GKYZT0200120KH
Utilisez uniquement l’alimentation électrique indiquée dans le guide d’utilisation.

46
Informations
Valeurs et précision
Nom ou marque de fabrique,
enregistrement commercial et adresse
SHENZHEN SHI GUANGKAIYUAN TECHNOLOGY., LTD.
2 floor, 41 TianSheng Road, TianLiao village, GongMing
Street, Guangming, Shenzhen, Guangdong, R.P. de Chine
Identifiant du modèle
GKYZT0200120KH
Tension d'entrée
100 - 240 V
Fréquence secteur d’entrée
50 à 60 Hz
Tension de sortie
12 VCC
Courant en sortie
2 A
Puissance de sortie
24 W
Efficacité active moyenne
86,66 %
Efficacité à faible charge (10 %)
84,42 %
Pas de consommation d’énergie à vide
0,08
Garantie
Lenco propose un service et une garantie conformément à la législation européenne, ce qui signifie qu’en cas
de besoin de réparation (aussi bien pendant et après la période de garantie), vous pouvez contacter le
revendeur le plus proche.
Remarque importante : Il n’est pas possible de renvoyer l’appareil pour réparation directement à Lenco.
Remarque importante : Si l’appareil est ouvert ou modifié de quelque manière que ce soit par un réparateur
non agréé, la garantie est annulée.
Cet appareil ne convient pas à une utilisation professionnelle. En cas d’utilisation professionnelle, les
obligations de garantie du fabricant sont annulées.
Clause de non-responsabilité
Des mises à jour du microprogramme et/ou des composants matériels sont effectuées régulièrement. Ainsi,
certaines instructions, spécifications et images de la présente documentation peuvent être légèrement
différentes. Tous les éléments décrits dans ce manuel sont donnés uniquement à des fins d’illustration et
peuvent ne pas s’appliquer à une situation particulière. Aucun droit juridique ou légal ne peut être obtenu à
partir de la description faite dans ce manuel.

47
Mise au rebut de l’appareil usagé
Ce symbole indique que le produit électrique concerné
ainsi que les piles ne doivent pas être jetés avec les
autres déchets ménagers en Europe. Pour assurer le
traitement correct des déchets de l'appareil et des
piles, il faut les éliminer conformément aux lois locales
applicables sur l’élimination des équipements
électriques et des piles. En faisant cela, vous
contribuez à la conservation des ressources naturelles
et à l’amélioration des normes de protection de
l’environnement dans le traitement et l’élimination
des déchets électriques (Directive sur les déchets
d’équipements électriques et électroniques).
Marquage CE
Les produits avec le marquage CE sont conformes à la
directive CEM (2014/30/EU) et à la directive basse
tension (2014/35/EU) émises par la Commission de la
Communauté européenne.
Par la présente, Commaxx B.V. Wiebachstraat 37, 6466
NG Kerkrade, Pays-Bas, déclare que ce produit est
conforme aux exigences principales.
La déclaration de conformité peut être consultée au
lien : techdoc@lenco.com
Réparation
Pour plus d’informations et le service d’assistance, rendez-vous sur www.lenco.com
Commaxx B.V. Wiebachstraat 37, 6466 NG Kerkrade, Pays-Bas

48
Español
PRECAUCIÓN:
Un uso de los controles, unos ajustes o un rendimiento de los procedimientos distintos a los especificados aquí
puede resultar en una exposición peligrosa a la radiación.
PRECAUCIONES PREVIAS AL USO
TENGA ESTAS INSTRUCCIONES EN CUENTA:
1. No cubra ni obstruya las aberturas de ventilación. Si coloca el dispositivo sobre una estantería, deje una
separación de 5 cm (2”) alrededor de todo el dispositivo.
2. Instálelo en conformidad con el manual del usuario incluido.
3. Mantenga el dispositivo apartado de fuentes de calor como radiadores, calentadores, estufas, velas y
otros productos que generen calor o llamas abiertas. El dispositivo solo puede utilizarse en climas
moderados. Deben evitarse los entornos muy fríos o cálidos. La temperatura de funcionamiento es de
entre 0 °C y 35 °C.
4. Evite utilizar el dispositivo cerca de campos magnéticos intensos.
5. Las descargas electrostáticas pueden perturbar el uso normal de este dispositivo. En tal caso, solo tiene
que seguir el manual de instrucciones para restablecer y reiniciar el dispositivo. Durante la transmisión
de archivos, por favor manéjelo con cuidado y opérelo en un entorno libre de electricidad estática.
6. ¡Advertencia! Nunca introduzca objetos en las aberturas o conductos de ventilación del producto.
Alto voltaje fluye a través del producto e insertar un objeto puede provocar una descarga eléctrica o un
cortocircuito en sus componentes internos. Por el mismo motivo, no derrame agua ni líquidos sobre el
producto.
7. No lo utilice en áreas mojadas o húmedas, como cuartos de baño, cocinas con mucho vapor o cerca de
piscinas.
8. No se debe exponer el dispositivo a goteos ni salpicaduras y debe asegurarse de que no haya objetos
llenos de líquidos, como jarrones, encima ni cerca del aparato.
9. No utilice este dispositivo si puede haber condensación. Cuando se utilice la unidad en una sala cálida y
húmeda, pueden aparecer gotas de agua o condensación dentro de la unidad y esta puede no funcionar
correctamente; deje la unidad apagada durante 1 o 2 horas antes de encender la alimentación: la
unidad debe estar seca antes de encenderla.
10. Aunque este dispositivo está fabricado con el máximo cuidado y se ha comprobado varias veces antes
de salir de fábrica, todavía es posible que se puedan producir problemas, igual que con todos los
aparatos eléctricos. Si detecta humo, una acumulación excesiva de calor o cualquier otro fenómeno
inesperado, deberá desconectar inmediatamente el enchufe de la toma de corriente.
11. Este dispositivo debe estar conectado a una fuente de alimentación conforme a lo indicado en la
etiqueta de especificaciones. Si no está seguro del tipo de fuente de alimentación de su hogar, consulte
con su distribuidor o su empresa eléctrica local.
12. Manténgalo alejado de los animales. Algunos animales muerden los cables eléctricos.
13. Utilice un trapo suave y húmedo para limpiar el dispositivo. No utilice disolventes ni líquidos con base
de gasolina. Puede usar un paño húmedo con detergente diluido para eliminar las manchas
persistentes.
14. El proveedor no asume ninguna responsabilidad por daños o datos perdidos como consecuencia de un
funcionamiento incorrecto, uso incorrecto, modificación del dispositivo o sustitución de la batería.
15. No interrumpa la conexión mientras se formatea el dispositivo o esté transfiriendo archivos. De lo
contrario, los datos podrían quedar dañados o perderse.
16. Si la unidad tiene una función de reproducción USB, se debe conectar directamente el dispositivo de
memoria USB a la unidad. No utilice cables de extensión USB ya que pueden crear interferencias que
causen una pérdida de datos.
17. La etiqueta de clasificación está marcada en el panel inferior o trasero del dispositivo.
18. Este aparato no está diseñado para su uso por personas (incluyendo niños) con discapacidades físicas,
sensoriales o mentales o con falta de experiencia o conocimientos, salvo que estén bajo supervisión o
hayan recibido formación sobre el uso correcto del dispositivo por parte de una persona responsable de
su seguridad.
19. Este producto está destinado únicamente al uso no profesional y no al uso comercial ni industrial.

49
20. Compruebe que la unidad está ajustada en una posición estable. Los daños causados por las vibraciones
o sacudidas derivadas del uso del producto en una posición inestable o el incumplimiento de otras
advertencias o precauciones incluidas en este manual del usuario no estarán cubiertos por la garantía.
21. Nunca retire la carcasa del dispositivo.
22. Nunca coloque el dispositivo sobre otros equipos eléctricos.
23. No permita que los niños accedan a las bolsas de plástico.
24. Utilice solo los accesorios especificados por el fabricante.
25. Solicite todo el trabajo de mantenimiento a personal de servicio cualificado. El dispositivo deberá ser
reparado cuando quede dañado de cualquier forma, por ejemplo, si el cable de alimentación o el
enchufe están dañados, se ha derramado líquido o han caído objetos sobre él, ha quedado expuesto a la
lluvia o a la humedad, no funciona con normalidad, o se ha caído al suelo.
26. La exposición prolongada a sonidos fuertes de reproductores personales de música puede provocar una
pérdida temporal o permanente de audición.
27. Si el producto incluye un cable de alimentación o un adaptador de CA:
• Si hubiera algún problema, desconecte el cable de CA y solicite su mantenimiento al personal
cualificado.
• No pise ni pellizque el adaptador de corriente. Tenga mucho cuidado, en especial cerca de los
enchufes y el punto de salida del cable. No coloque objetos pesados sobre el adaptador de
corriente, ya que podría dañarlo. ¡Mantenga todo el dispositivo fuera del alcance de los niños!
Si juegan con el cable de alimentación, pueden sufrir lesiones graves.
• Desenchufe el dispositivo durante tormentas eléctricas o si no se utiliza durante largos periodos.
• La toma debe estar instalada cerca del equipo y ser fácilmente accesible.
• No sobrecargue las tomas de CA ni los cables de extensión. Una sobrecarga podría provocar un
incendio o una descarga eléctrica.
• Los dispositivos con una construcción de clase 1 deben estar conectados a una toma eléctrica con
conexión a tierra protectora.
• Los dispositivos con una construcción de clase 2 no requieren una conexión a tierra.
• Sujete siempre el enchufe cuando lo extraiga de la toma de corriente. No estire del cable eléctrico.
Podría provocar un cortocircuito.
• No utilice cables de alimentación o enchufes deteriorados o tomas sueltas. Podría provocar un
incendio o descarga eléctrica.
28. Si el producto contiene o se entrega con un mando a distancia que contiene pilas de botón:
Advertencia:
• «No ingiera la pila, existe riesgo de quemaduras químicas» o equivalente.
• [Mando a distancia incluido] Este producto contiene una pila de botón. En caso de ingesta de la pila,
puede provocar quemaduras internas graves en menos de 2 horas que pueden provocar la muerte.
• Mantenga las pilas nuevas y usadas fuera del alcance de los niños.
• Si el compartimento de las pilas no cierra bien, deje de usar el producto y manténgalo fuera del
alcance de los niños.
• Si cree que puede haber ingerido una pila, solicite inmediatamente atención médica.
29. Precauciones sobre el uso de las pilas:
• Existe peligro de explosión si se sustituye la pila por una de tipo incorrecto. Sustitúyalas
únicamente por pilas del mismo tipo o equivalentes.
• No se puede someter las pilas a temperaturas muy altas o bajas, ni a presiones de aire bajas a
altitudes altas durante el uso, almacenamiento o transporte.
• La sustitución de una pila por una de tipo incorrecto puede resultar en una explosión o fuga del
líquido o gas inflamable.
• Arrojar una pila al fuego o a un horno caliente, o aplastarla o cortarla con medios mecánicos,
puede resultar en una explosión.
• Dejar una pila en un entorno con temperaturas muy altas puede resultar en una explosión o fuga
del líquido o gas inflamable.
• Someter una pila a presiones de aire muy bajas puede resultar en una explosión o la fuga del
líquido o gas inflamable.
• Se debe prestar atención a los aspectos medioambientales sobre la eliminación de baterías.

50
INSTALACIÓN
• Desempaquete todas las piezas y retire el material protector.
• No conecte la unidad a la corriente sin comprobar la tensión eléctrica y que se han hecho todas las
demás conexiones.
* Estas instrucciones solo se refieren a los productos que utilizan cable de alimentación o adaptadores
de corriente CA.

51
Accesorios incluidos:
Manual del usuario
Adaptador eléctrico

52
1. PIEZAS DEL TOCADISCOS:
1. Plato del tocadiscos
2. Eje del tocadiscos
3. Adaptador de 45 rpm
4. Palanca de izado
5. Interruptor de control de parada automática
6. Interruptor de selección de velocidad
7. Brazo de lectura
8. Bloqueo del brazo de lectura
9. Cartucho de aguja fonocaptora
10. Indicador led de encendido/función
11. Conector para auriculares
12. Rueda de encendido/volumen
13. Selector de función ( SALIDA/FONO/AUX/ ENTRADA)
14. Sobrecubierta extraíble
15. Bisagra
16. Conector del adaptador de corriente
17. Rueda de control de velocidad
18. Conectores para altavoces externos
19. Conector de entrada auxiliar
20. Altavoces externos
21. Cable del altavoz externo

53
CONFIGURACIÓN
Este tocadiscos con recepción por Bluetooth y altavoces de madera incluye un adaptador CA/CC con una
potencia de 12 V CC y 2,0 A. Dicho adaptador es necesario para utilizar la unidad.
Conecte los cables de cada altavoz en la parte trasera de la unidad
Nota: Los cables de los altavoces externos están codificados por colores. El cable rojo debe ir conectado al
conector rojo, y el blanco, al conector blanco.
Inserte de manera firme y segura el conector CC del adaptador en la entrada de CC de la parte trasera de la
unidad.
Inserte los conectores del adaptador de CA en una toma de corriente de 220-240 V CA, 50 Hz.
Encienda la unidad con la rueda de encendido/volumen. El indicador led de encendido/función se iluminará.
Observaciones: Para evitar el efecto Larsen o ruidos de retrolimentación, puede:
1. Poner los altavoces a una distancia mínima de 60 cm o más respecto al tocadiscos
2. Mantener la sobrecubierta abierta cuando reproduzca un disco al volumen máximo
Encender y elegir el modo
Encienda la unidad con la rueda de encendido/volumen. Escuchará un chasquido y el indicador led de
encendido/función se iluminará para confirmar que hay alimentación. Cuando esté encendido, puede girar con
normalidad el control para ajustar el volumen de la música en reproducción.
Gire el SELECTOR DE FUNCIÓN a los diferentes modos ( SALIDA/FONO/AUX/ ENTRADA).
2. Escuchar un disco
1. Levante la sobrecubierta
2. Encienda la unidad con la rueda de encendido/volumen. El indicador led
de encendido/función se iluminará en ROJO en modo FONO.
3. También puede girar el SELECTOR DE FUNCIÓN al modo FONO.
4. Coloque un disco sobre el plato del tocadiscos y ajuste la velocidad para
que coincida con la velocidad del disco.
Nota: Para reproducir un single (disco de 45 rpm) y/o discos con agujeros
centrales grandes utilice el adaptador de 45 rpm.
5. Retire la cubierta protectora de la aguja
EN
ES
OUT
SALIDA
PHONO
FONO
IN
ENTRADA
AUX
AUX
Libere el brazo de lectura del soporte. Empuje la palanca de izado hacia atrás y el brazo de lectura se levantará
suavemente. Mueva suavemente el brazo de lectura a la posición deseada sobre el disco y el plato del
tocadiscos empezará a girar cuando mueva el brazo hacia él si el interruptor de control de parada automática
está encendido. Libere el brazo de lectura sobre el tocadiscos empujando la palanca de izado hacia delante y el
disco de vinilo empezará a reproducirse.

54
Si el interruptor de control automático está encendido, el disco dejará de reproducirse automáticamente
cuando se termine. Si el interruptor de control de parada automática está apagado, el disco NO dejará de
reproducirse automáticamente cuando se termine. Deberá empujar la palanca de izado hacia atrás para
levantar el brazo de lectura y colocarlo en el soporte, y entonces apagar el tocadiscos para que deje de girar.
Observaciones: La función de PARADA AUTOMÁTICA funciona con la mayoría de discos de vinilo de 33 rpm. Sin
embargo, algunos discos de vinilo se detendrán cuando no se hayan terminado, o no se detendrán cuando se
hayan terminado con la función de PARADA AUTOMÁTICA encendida.
NOTA: Si el disco se detiene antes de finalizar la última pista, ponga el interruptor de PARADA AUTOMÁTICA en
apagado. El disco se reproducirá hasta el final pero deberá detener manualmente el giro del tocadiscos.
NOTA: Según la duración del disco, la PARADA AUTOMÁTICA podría activarse antes de terminar la reproducción.
No dependa solo de la PARADA AUTOMÁTICA para detener la reproducción.
El CONTROL DE TONO le permite afinar la velocidad de reproducción del disco después de elegir la velocidad
correcta (33/45/78 rpm). Gire el CONTROL DE TONO para incrementar o reducir ligeramente la velocidad del
tocadiscos, si fuera necesario.
Consulte la sección USO DEL BLUETOOTH para transmitir la música del disco a altavoces Bluetooth externos
(no incluidos).
3. Uso del Bluetooth
Este tocadiscos permite una conexión inalámbrica por Bluetooth ( SALIDA). Es posible conectarlo a
auriculares externos compatibles con Bluetooth (no incluidos) o altavoces Bluetooth (no incluidos).
1. Encienda la unidad con la rueda de encendido/volumen.
2. Gire el SELECTOR DE FUNCIÓN para elegir el modo SALIDA.
3. El INDICADOR DE ENCENDIDO/FUNCIÓN se iluminará en azul y empezará a
parpadear lentamente.
4. Encienda su dispositivo de recepción Bluetooth externo (por ejemplo,
auriculares o altavoces Bluetooth) y ajústelo en modo de vinculación.
5. Una vez vinculados correctamente, el INDICADOR DE
ENCENDIDO/FUNCIÓN dejará de parpadear y se mantendrá encendido en
azul.
6. Ahora estará conectado a su dispositivo Bluetooth externo.
7. Empiece a reproducir un disco y el sonido se escuchará a través del dispositivo Bluetooth externo.
Nota: SOLO puede ajustar el volumen mediante el control de volumen del dispositivo Bluetooth externo.
EN
ES
OUT
SALIDA
PHONO
FONO
IN
ENTRADA
AUX
AUX
Notas:
• Coloque el dispositivo Bluetooth a menos de 1 m (3 pies) respecto al tocadiscos para poder vincularlos
correctamente.
• El tocadiscos se mantiene en modo de vinculación solo durante 30 segundos. Si no se realiza la vinculación
correctamente en esos 30 segundos, repita los pasos 2 a 4 después de apagar todos los dispositivos.
• SALIDA solo funciona en modo FONO. SALIDA NO funciona en los modos ENTRADA AUXILIAR o
Bluetooth ( ENTRADA).

55
4. Escuchar por Bluetooth
Un dispositivo externo con conectividad Bluetooth, como un smartphone o una tableta, se conecta de manera
inalámbrica a este tocadiscos mediante la función Bluetooth.
1. Encienda la unidad con la rueda de encendido/volumen.
2. Gire el SELECTOR DE FUNCIÓN para elegir el modo ENTRADA.
3. El INDICADOR DE ENCENDIDO/FUNCIÓN se iluminará en azul y empezará
a parpadear.
4. La primera vez que utilice el dispositivo Bluetooth con el tocadiscos,
deberá vincularlo.
5. Active el Bluetooth de su dispositivo externo. Espere un momento y
busque el nombre de vinculación de Bluetooth Lenco LS-101. Si el
dispositivo le pide una contraseña (según el fabricante, modelo y versión
de software del dispositivo), introduzca los dígitos 0000 y pulse OK.
6. Seleccione el nombre de vinculación Bluetooth para conectar la unidad. Una vez conectada, la luz led
dejará de parpadear.
7. Ahora estará conectado a su dispositivo externo por Bluetooth.
8. Gire la rueda de control de volumen para ajustar el nivel de sonido y ajuste el control de volumen de su
dispositivo de audio externo.
EN
ES
OUT
SALIDA
PHONO
FONO
IN
ENTRADA
AUX
AUX
5. Escuchar por entrada auxiliar
1. Encienda la unidad con la rueda de encendido/volumen.
2. Gire el SELECTOR DE FUNCIÓN para elegir el modo AUXILIAR.
3. El INDICADOR DE ENCENDIDO/FUNCIÓN estará iluminado en púrpura
(rojo + azul).
4. Utilice un cable estéreo de 3,5 mm (no incluido) para conectar un
dispositivo de audio externo a la toma AUX de la parte trasera de la
unidad.
5. Utilice la RUEDA DE ENCENDIDO/VOLUMEN para ajustar el volumen y
utilice los controles del dispositivo de audio externo para controlar las
funciones de reproducción/volumen.
EN
ES
OUT
SALIDA
PHONO
FONO
IN
ENTRADA
AUX
AUX

56
Espera automática para ahorro de energía (normas CE): El LS-101 entrará automáticamente en modo de
espera si no hay señal de audio (de disco o por Bluetooth) en aproximadamente 15 minutos. Para reactivar el
dispositivo:
• Gire la rueda de ENCENDIDO/APAGADO a apagado y de nuevo a encendido.
• Gire el SELECTOR DE FUNCIÓN.
CÓMO SUSTITUIR LA AGUJA
Consulte las instrucciones siguientes para sustituir la aguja (aguja de repuesto no incluida).
Retirar la aguja del cartucho
1. Coloque un destornillad en la punta de la aguja y empuje hacia abajo, en la dirección mostrada en A.
2. Estire de la aguja hacia delante y empuje hacia abajo para retirarla.
Instalar la aguja
1. Sostenga la punta de la aguja y presione en la dirección mostrada en B para insertar la aguja.
2. Empuje la aguja hacia arriba en la dirección mostrada en C hasta que quede fijada en la posición de la
punta.
NOTAS:
Se recomienda limpiar los discos con un paño antiestática (por ejemplo, el kit de limpieza 3 en 1 LENCO TTA
[se vende por separado]) para disfrutar al máximo de ellos.
También por ese motivo debe sustituir periódicamente la aguja (aproximadamente cada 250 horas de
reproducción).
Pasadores guía (interior)

57
Información técnica:
Lenco
Tocadiscos
LS-101
Tipo
Transmisión manual completa
Motor de transmisión
Motor DC
Velocidad
33, 45, 78 rpm
Plato del tocadiscos
200 mm
Bluetooth
Versión
5.0
Rangos de frecuencias
2402 MHz a 2480 MHz
Potencia de transmisión máxima
<8 dbm
General
ADAPTADOR
Entrada 100-240 V CA, 50/60 Hz, 0,8 A
Salida 12 V CC, 2 A
Potencia de entrada del
dispositivo
12 V CC, 2 A
Consumo energético
24 W
Dimensiones
340 x 320 x 100 mm de la unidad principal; 130 x 120 x 200 mm del altavoz
Peso
Aproximadamente 4,12 kg.
Adaptador eléctrico
Fabricante: SHENZHEN SHI GUANGKAIYUAN TECHNOLOGY LTD
Número de modelo: GKYZT0200120KH
Use únicamente la alimentación descrita en las instrucciones de usuario.

58
Información
Valor y precisión
Nombre del fabricante o registro comercial de la
marca y dirección
SHENZHEN SHI GUANGKAIYUAN TECHNOLOGY LTD
2 floor, 41 TianSheng Road, TianLiao village, GongMing
Street, Guangming, Shenzhen, Guangdong, República
Popular de China
Identificador de modelo
GKYZT0200120KH
Tensión de entrada
100-240 V
Frecuencia CA de entrada
50-60 Hz
Tensión de salida
12 V CC
Corriente de salida
2 A
Potencia de salida
24 W
Eficiencia activa media
86,66 %
Eficiencia con carga baja (10 %)
84,42 %
Consumo energético sin carga
0,08
Garantía
Lenco ofrece servicio y garantía en conformidad con las leyes europeas, por lo que en caso de requerir una
reparación (tanto durante como después del periodo de garantía) debe ponerse en contacto con su distribuidor
local.
Nota importante: No es posible enviar directamente a Lenco los productos que necesiten reparación.
Nota importante: Si se abre la unidad o se accede a su interior en modo alguno en un centro de mantenimiento
no oficial, la garantía quedará anulada.
El dispositivo no es adecuado para un uso profesional. En caso de realizar un uso profesional, todas las
obligaciones de garantía del fabricante quedarán anuladas.
Aviso legal
Se realizan actualizaciones del firmware y/o componentes de hardware de manera periódica. Por tanto, algunas
instrucciones, especificaciones e imágenes de estos documentos podrían diferir ligeramente de su modelo
concreto. Todos los elementos descritos en esta guía son únicamente para fines ilustrativos y pueden no
corresponderse a su modelo concreto. Las descripciones de este manual no otorgarán ningún derecho legal.

59
Eliminación de un dispositivo usado
Este símbolo indica que el producto eléctrico o batería
pertinente no debe eliminarse con los residuos
domésticos generales en Europa. Para garantizar un
tratamiento correcto de los residuos del producto y las
pilas, elimínelos en conformidad con las leyes locales
vigentes para la eliminación de equipos eléctricos y
pilas. Al hacerlo, ayudará a preservar los recursos
naturales y mejorar los niveles de protección del
medio ambiente en el tratamiento y eliminación de
residuos eléctricos (Directiva sobre residuos de
aparatos eléctricos y electrónicos).
Marca CE
Los productos con la marca CE cumplen la directiva
de CEM (2014/30/UE) y la directiva de baja tensión
(2014/35/UE) emitidas por la Comisión de la
Unión Europea.
Por la presente, Commaxx B.V. Wiebachstraat 37, 6466
NG Kerkrade, Países Bajos, declara que este producto
cumple los requisitos fundamentales.
Puede consultar la declaración de conformidad a
través de techdo[email protected]om
Servicio
Para más información y atención al cliente, visite www.lenco.com
Commaxx B.V. Wiebachstraat 37, 6466 NG Kerkrade, Países Bajos.

60
Italiano
ATTENZIONE:
L'utilizzo di controlli o regolazioni o l'esecuzione di procedure diverse da quelle specificate può causare
l'esposizione a radiazioni pericolose.
PRECAUZIONI PRIMA DELL'USO
CONSERVARE QUESTE ISTRUZIONI:
1. Non coprire o bloccare le aperture di ventilazione. Quando si posiziona il dispositivo su uno scaffale,
lasciare uno spazio libero di 5 cm (2") attorno all'intero perimetro.
2. Installare secondo quanto riportato nel manuale fornito.
3. Tenere il dispositivo lontano da sorgenti termiche come radiatori, termosifoni, stufe, candele e altri
prodotti che generano calore o fiamme libere. Il dispositivo può essere utilizzato solo in climi miti.
Evitare ambienti estremamente freddi o caldi. Temperatura operativa compresa tra 0° e 35°C.
4. Evitare l'uso del dispositivo in presenza di forti campi magnetici.
5. Le scariche elettrostatiche possono interferire con il normale funzionamento di questo dispositivo.
In tal caso, è sufficiente ripristinare e riavviare il dispositivo seguendo il manuale di istruzioni. Durante la
trasmissione di file, maneggiarlo con cura e operare in un ambiente privo di elettricità statica.
6. Avviso! Non inserire mai oggetti nel prodotto attraverso le prese d'aria o le aperture. All'interno del
prodotto sono presenti tensioni elevate e l'inserimento di un oggetto può provocare scariche elettriche
e/o cortocircuiti. Per lo stesso motivo, non versare acqua o liquidi sul prodotto.
7. Non utilizzare in aree umide o bagnate come bagni, cucine con vapore o piscine.
8. Non esporre il dispositivo a schizzi o gocciolamenti di liquidi; non poggiare sopra o accanto al dispositivo
oggetti contenenti liquidi, ad esempio vasi.
9. Non utilizzare questo dispositivo in caso di condensa. Quando l'unità viene utilizzata in una stanza calda
e umida, all'interno dell'unità possono formarsi goccioline d'acqua o condensa e l'unità potrebbe non
funzionare correttamente; lasciare l'unità spenta per 1 o 2 ore prima di accenderla: l'unità deve essere
asciutta prima di essere alimentata.
10. Sebbene questo dispositivo sia fabbricato con la massima cura e controllato più volte prima di lasciare la
fabbrica, è comunque possibile che si verifichino problemi come per qualsiasi altra apparecchiatura
elettrica. Se si nota fumo, eccessivo accumulo di calore o altri fenomeni imprevisti, scollegare
immediatamente la spina dalla presa di alimentazione principale.
11. Questo dispositivo deve funzionare con una fonte di alimentazione con i valori indicati sull'etichetta
delle specifiche. Se non si è sicuri del tipo di alimentazione utilizzata in casa, consultare il rivenditore o la
compagnia elettrica locale.
12. Tenere fuori dalla portata degli animali domestici, Ad alcuni animali piace mordere i cavi di
alimentazione.
13. Per pulire il dispositivo, utilizzare un panno morbido e asciutto. Non usare solventi o liquidi a base di
benzina. Per rimuovere le macchie ostinate, utilizzare un panno umido con del detergente diluito.
14. Il fornitore non è responsabile per danni o perdita di dati causati da malfunzionamento, uso improprio,
modifica del dispositivo o sostituzione della batteria.
15. Non interrompere la connessione quando il dispositivo sta formattando o trasferendo file. In caso
contrario, i dati potrebbero essere danneggiati o andare persi.
16. Se l'unità dispone della funzione di riproduzione USB, la chiavetta USB deve essere collegata
direttamente all'unità. Non utilizzare una prolunga USB perché può causare interferenze con
conseguenti anomalie dati.
17. L'etichetta di classificazione è stata contrassegnata sul pannello inferiore o posteriore del dispositivo.
18. Questo dispositivo non è destinato all'uso da parte di persone (compresi i bambini) con disabilità fisiche,
sensoriali o mentali, o privi di esperienza e conoscenza, a meno che non siano controllati o abbiano
ricevuto istruzioni circa l'uso corretto del dispositivo da parte di chi è responsabile per la loro sicurezza.
19. Questo prodotto è destinato esclusivamente a un uso non professionale e non può essere utilizzato per
scopi commerciali o industriali.
20. Assicurarsi che l'unità sia collocata in una posizione stabile. I danni causati dall'uso di questo prodotto in
una posizione instabile, vibrazioni o urti o la mancata osservanza di qualsiasi altro avvertimento o
precauzione indicati in questo manuale utente non saranno coperti da garanzia.

61
21. Non rimuovere mai la carcassa di questo dispositivo.
22. Non posizionare mai questo dispositivo su altre apparecchiature elettriche.
23. Non permettere ai bambini di accedere ai sacchetti di plastica.
24. Utilizzare solo collegamenti/accessori specificati dal produttore.
25. Rivolgersi a personale qualificato per l'assistenza. La manutenzione è necessaria quando l'apparecchio è
stato danneggiato in qualsivoglia modo, ad esempio se il cavo di alimentazione o la spina sono
danneggiati, se è stato versato del liquido o sono caduti oggetti all'interno dell'apparecchio, se
l'apparecchio è stato esposto a pioggia o umidità, se non funziona normalmente o è caduto.
26. L'esposizione prolungata ai suoni ad alto volume dei lettori musicali può causare una perdita
temporanea o permanente dell'udito.
27. Se il prodotto viene consegnato con cavo di alimentazione o alimentatore CA:
• In caso di problemi, scollegare la scheda di alimentazione CA e rivolgersi a personale qualificato.
• Non calpestare o schiacciare l'alimentatore. Fare molta attenzione, in particolare vicino alle prese e
al punto di uscita del cavo. Non posizionare oggetti pesanti sull'alimentatore in quanto potrebbero
danneggiarlo. Tenere il dispositivo fuori dalla portata dei bambini. Giocando con il cavo di
alimentazione possono infortunarsi seriamente.
• Scollegare il dispositivo durante i temporali o quando non viene utilizzato per un lungo periodo.
• La presa di corrente deve essere installata vicino all'apparecchio e deve essere facilmente
accessibile.
• Non sovraccaricare le prese CA né le prolunghe. Il sovraccarico può causare incendi o scariche
elettriche.
• I dispositivi con struttura di classe 1 devono essere collegati a una presa di rete con connessione di
messa a terra di protezione.
• I dispositivi con struttura di classe 2 non richiedono una connessione a terra.
• Tenere sempre la spina quando la si estrae dalla presa di rete. Non tirare il cavo di alimentazione.
Ciò può causare un cortocircuito.
• Non utilizzare un cavo o una presa di alimentazione danneggiati o una presa non fissata.
Tale azione potrebbe provocare incendi o scariche elettriche.
28. Se il prodotto contiene o viene consegnato con un telecomando contenente batterie a pulsante/a bottone:
Avvertenza:
• "Non ingerire la batteria, pericolo di ustioni chimiche" o funzionamento equivalente.
• (Il telecomando in dotazione con) Il presente prodotto contiene una pila a bottone. Se ingerita,
la batteria può causare gravi ustioni interne in sole 2 ore e portare alla morte.
• Tenere le batterie, nuove o usate, fuori dalla portata dei bambini.
• Se il vano batteria non si chiude completamente, interrompere l’uso del dispositivo e tenerlo fuori
della portata dei bambini.
• Se si teme che delle batterie possano essere state inghiottite o essere venute a contatto con
qualsiasi parte interna del corpo, contattare immediatamente un medico.
29. Precauzioni sull'uso delle batterie:
• Pericolo di esplosione se la batteria viene sostituita in modo errato. Sostituire solo con lo stesso
tipo o equivalente.
• Non sottoporre le batterie a temperature estreme alte o basse, bassa pressione dell'aria ad alta
quota durante l'uso, lo stoccaggio o il trasporto.
• La sostituzione di una batteria con una di tipo non corretto può provocare un'esplosione o la
fuoriuscita di liquido o gas infiammabile.
• Lo smaltimento di una batteria nel fuoco o in un forno caldo o lo schiacciamento o il taglio
meccanico di una batteria possono provocare un'esplosione.
• Lasciare una batteria in un ambiente a temperatura estremamente elevata può provocare
un'esplosione o la fuoriuscita di liquido o gas infiammabile.
• Una batteria soggetta a una pressione dell'aria estremamente bassa può provocare un'esplosione
o una perdita di liquidi o gas infiammabili.
• È necessario prestare attenzione agli aspetti ambientali legati allo smaltimento delle batterie.

62
INSTALLAZIONE
• Disimballare tutte le parti e rimuovere il materiale protettivo.
• Non collegare l’unità alla rete elettrica prima di avere controllato la tensione di rete e prima che siano
stati effettuati tutti gli altri collegamenti.
* Queste istruzioni si riferiscono solo ai prodotti che utilizzano un cavo di alimentazione o un
alimentatore CA.

63
Accessori inclusi
Manuale d'uso
Adattatore di alimentazione

64
1. PARTI GIREVOLI:
1. Piatto girevole
2. Albero girevole
3. Adattatore 45 giri
4. Leva di sollevamento
5. Selettore controllo stop automatico
6. Selettore velocità
7. Braccio
8. Blocco braccio
9. Testina Bustina Foto
10. Spia LED Accensione/Funzione
11. Jack per cuffie
12. Manopola ALIMENTAZIONE/VOLUME
13. Selettore di funzioni (USCITA /PHONO/AUX/INGRESSO )
14. Coperchio antipolvere rimovibile
15. Cerniera
16. Jack adattatore alimentazione
17. Manopola di controllo del velocità
18. Jack altoparlante esterno
19. Jack Aux in
20. Altoparlanti esterni
21. Cavo altoparlante su altoparlante esterno

65
CONFIGURAZIONE
Un adattatore CA/CC con un'uscita di 12V CC 2.0A è incluso con questo giradischi con ricezione Bluetooth e
altoparlanti in legno. L'adattatore è necessario per il funzionamento dell'unità.
Collegare i cavi degli altoparlanti da ciascun altoparlante al retro dell'unità
Nota: i cavi degli altoparlanti esterni sono contraddistinti da colori, il cavo con il connettore rosso deve essere
inserito nel foro rosso e quello bianco nel foro bianco.
Inserire saldamente la spina CC dell'adattatore nella presa DC IN sul retro dell'unità.
Collegare le spine CA dell'adattatore a una presa di corrente da 220-240 V AV ~ 50 Hz.
Accendere l'unità tramite la manopola ALIMENTAZIONE/VOLUME. La spia LED Accensione/Funzione si
illuminerà.
Osservazioni: Per evitare l'effetto Larsen o il rumore di feedback, fare quanto segue:
1. Posizionare gli altoparlanti a una distanza minima di 60 cm o più dal giradischi
2. Lasciare il coperchio antipolvere aperto quando si riproduce un disco ad alto volume.
Accensione e selezione della modalità
Accendere l'unità tramite la manopola ALIMENTAZIONE/VOLUME. Si sentirà un clic e la spia LED di
accensione/funzione si illuminerà per confermare che l'apparecchio è acceso. Quando l'apparecchio è acceso,
ruotare la manopola per regolare il volume della musica in riproduzione.
Ruotare il SELETTORE DI FUNZIONE per accedere alle varie modalità (USCITA /PHONO/AUX/INGRESSO ).
2. Ascoltare un disco
1. Sollevare il coperchio antipolvere
2. Accendere l'unità tramite la manopola ALIMENTAZIONE/VOLUME. La spia
LED di accensione/funzione si illumina in rosso nella modalità PHONO.
3. In alternativa, ruotare il SELETORE DI FUNZIONE sulla modalità PHONO.
4. Porre una registrazione sul piatto girevole e importare il lettore e
impostare la velocità del rettore che corrisponde.
Nota: Quando si riproduce un singolo (un disco da 45 giri) e/o dischi con
grandi fori centrali, utilizzare l'adattatore da 45 giri.
5. Rimuovere la copertura protettiva della testina dell'ago
EN
IT
OUT
USCITA
PHONO
PHONO
IN
INGRESSO
AUX
AUX
Sbloccare il blocco del braccio dal supporto. Spingere indietro la leva di sollevamento, il braccio si solleverà
delicatamente. Spostare delicatamente il braccio nella posizione desiderata sul disco e il piatto del giradischi
inizierà a ruotare quando il braccio viene spostato verso di esso se l'interruttore di controllo arresto automatico
è su ON. Rilasciare il braccio sul giradischi spingendo la leva di sollevamento in avanti e il disco in vinile inizierà a
suonare.

66
Se l'interruttore di controllo automatico è attivato, la registrazione si interromperà automaticamente al termine.
Se l'interruttore di controllo arresto automatico è disattivato, la registrazione NON si interromperà
automaticamente al termine; è necessario spingere la leva di sollevamento all'indietro per sollevare il braccio e
riposizionarlo nel resto, quindi spegnere l'alimentazione per fermare la rotazione del giradischi.
Osservazioni: La funzione ARRESTO AUTOMATICO si applica alla maggior parte dei dischi in vinile a 33 giri/min.
Tuttavia, per pochissimi dischi in vinile, si fermerà quando non arriva alla fine, o non si fermerà quando arriva
alla fine quando ARRESTO AUTOMATICO è su ON.
NOTA: Se il disco si interrompe prima della fine dell'ultima traccia, impostare il selettore ARRESTO AUTOMATICO
su OFF. Il disco ora verrà riprodotto fino alla fine, ma occorrerà interrompere manualmente la rotazione del
giradischi.
NOTA: A seconda della durata della registrazione, ARRESTO AUTOMATICO potrebbe essere abilitato prima della
fine della registrazione. Non fare affidamento solo su ARRESTO AUTOMATICO per disattivare la riproduzione.
Dopo aver selezionato la velocità corretta (33/45/78 giri/min), il CONTROLLO DEL PITCH consente di regolare
con precisione la velocità di riproduzione del disco. Girare il CONTROLLO DEL PITCH per aumentare o diminuire
leggermente la velocità del giradischi, se necessario.
Per trasmettere la musica riprodotta a un altoparlante Bluetooth esterno (non in dotazione), fare riferimento
alla sezione USCITA BLUETOOTH.
3. Uscita Bluetooth
Questo giradischi supporta la connessione wireless Bluetooth ( OUT). È possibile collegarlo con delle cuffie
Bluetooth (non in dotazione) o degli altoparlanti Bluetooth (non in dotazione) compatibili.
1. Accendere l'unità tramite la manopola ALIMENTAZIONE/VOLUME.
2. Girare il SELETTORE DI FUNZIONE e selezionare la modalità OUT.
3. La SPIA LED ACCENSIONE/FUNZIONE comincerà a lampeggiare lentamente
in blu.
4. Accendere il dispositivo di ricezione Bluetooth esterno (ad es. delle cuffie o
altoparlanti Bluetooth) e impostarlo in modalità di associazione.
5. Una volta completata correttamente l'associazione, la SPIA
ACCENSIONE/FUNZIONE smette di lampeggiare ed emette una luce blu
fissa.
6. Il giradischi è ora connesso al dispositivo Bluetooth esterno.
7. Quando si riproduce un disco, il suono viene trasmesso dal dispositivo Bluetooth esterno.
Nota: è possibile regolare il volume SOLO utilizzando il controllo del volume del dispositivo Bluetooth esterno.
EN
IT
OUT
USCITA
PHONO
PHONO
IN
INGRESSO
AUX
AUX
Note:
• posizionare il dispositivo Bluetooth a non più di un metro dal giradischi affinché l'associazione vada a buon
fine.
• Il giradischi resta in modalità di associazione solo 30 secondi. Se l'associazione non è completata entro
30 secondi, spegnere tutti i dispositivi, quindi ripetere i passaggi da 2 a 4.
• " OUT" funziona solo in modalità PHONO. OUT NON funziona nelle modalità AUX IN o Bluetooth ( IN).

67
4. Ascoltare da Bluetooth
Un dispositivo esterno con connettività Bluetooth, ad es. uno smartphone o un tablet, è connesso al giradischi
in modalità wireless utilizzando la funzione Bluetooth.
1. Accendere l'unità tramite la manopola ALIMENTAZIONE/VOLUME.
2. Girare il SELETTORE DI FUNZIONE e selezionare la modalità IN.
3. La SPIA LED ACCENSIONE/FUNZIONE comincerà a lampeggiare in blu.
4. La prima volta che si utilizza il dispositivo Bluetooth con il giradischi,
occorre associarli.
5. Attivare l'impostazione Bluetooth del dispositivo esterno. Attendere
qualche secondo, quindi cercare il nome dell'associazione Bluetooth
"Lenco LS-101". Se il dispositivo richiede una password (a seconda del
produttore del dispositivo, del modello e della versione del software),
digitare "0000", quindi premere OK.
6. Selezionare il nome dell'accoppiamento Bluetooth per connettere l'unità. Una volta stabilita la
connessione, la spia LED smetterà di lampeggiare.
7. Il giradischi è ora connesso al dispositivo esterno tramite Bluetooth
8. Ruotare la manopola di controllo del volume per regolare il livello del suono e regolare il controllo del
volume sul dispositivo audio esterno.
EN
IT
OUT
USCITA
PHONO
PHONO
IN
INGRESSO
AUX
AUX
5. Ascolto dall'ingresso ausiliario
1. Accendere l'unità tramite la manopola ALIMENTAZIONE/VOLUME.
2. Girare il SELETTORE DI FUNZIONE e selezionare la modalità AUX.
3. La SPIA ACCENSIONE/FUNZIONE si illumina di luce viola (rosso + blu).
4. Collegare un dispositivo audio esterno alla presa AUX dell'unità con un
cavo stereo da 3,5 mm.
5. Utilizzare la MANOPOLA ALIMENTAZIONE/VOLUME per regolare il
volume e utilizzare i controlli sul dispositivo audio esterno per
controllare le funzioni di riproduzione/volume
EN
IT
OUT
USCITA
PHONO
PHONO
IN
INGRESSO
AUX
AUX
Standby automatico per il risparmio energetico (normativa CE): Il giradischi LS-101 entrerà automaticamente in
modalità standby in assenza di segnale audio (disco o Bluetooth) per circa 15 minuti. Per riattivare il
dispositivo, procedere come segue:
• Spegnere il dispositivo e riaccenderlo
• Girare il SELETTORE DI FUNZIONE.

68
SOSTITUZIONE DELLA PUNTINA
Per sostituire la puntina, fare riferimento alle istruzioni riportare di seguito.
Rimozione della puntina dalla testina.
1. Posizionare un cacciavite sulla punta della puntina e spingere verso il basso come mostrato in direzione "A".
2. Rimuovere la puntina tirandola in avanti e spingendo verso il basso.
Installazione della puntina
1. Tenere la punta della puntina e inserire la puntina premendo come mostrato in direzione "B".
2. Spingere la puntina verso l'alto come nella direzione "C" finché la puntina non si blocca nella posizione
della punta.
NOTE
Consigliamo di pulire i dischi con un panno antistatico (ad esempio il kit per la pulizia LENCO TTA-3IN1, venduto
separatamente) per il massimo piacere di ascolto.
Segnaliamo inoltre che, per lo stesso motivo, la puntina dovrebbe essere sostituita periodicamente (circa ogni
250 ore di riproduzione)
Perni guida (interni)

69
Informazioni tecniche:
Lenco
Giradischi
LS-101
Tipo
Trasmissione a cinghia completamente manuale
Motore guida
Motore CC
Velocità
33, 45, 78 giri
Piatto girevole
200 mm
Bluetooth
Versione
5.0
Intervallo di frequenze
da 2402 MHz a 2480 MHz
Potenza di trasmissione massima
<8dbm
Generale
ADATTATORE
ingresso CA 100-240 V~50/60 Hz 0,8 A
uscita CC 12 V-2 A
Correnti d'ingresso del dispositivo
CC 12 V-2 A
Consumo di energia
24 W
Dimensioni
340x320x100 mm per l'unità principale; 130x120x200 mm per
l'altoparlante
Peso
Ca. 4,12 kg
Alimentatore
Produttore: SHENZHEN SHI GUANGKAIYUAN TECHNOLOGY LTD
Numero di modello: GKYZT0200120KH
Utilizzare solo l'alimentazione indicata nel presente manuale.

70
Informazioni
Valore e precisione
Nome del produttore o marchio commerciale,
registrazione commerciale e indirizzo
SHENZHEN SHI GUANGKAIYUAN TECHNOLOGY LTD
2 floor, 41 TianSheng Road, TianLiao village, GongMing
Street, Guangming, Shenzhen, GuangDong, R.P.C.
Identificatore del modello
GKYZT0200120KH
Tensione in ingresso
100-240 V
Frequenza in ingresso CA
50-60 Hz
Tensione in uscita
CC 12 V
Corrente in uscita
2 A
Potenza in uscita
24 W
Efficienza media attiva
86,66%
Efficienza a basso carico (10%)
84,42%
Nessun carico Consumo energetico
0,08
Garanzia
Lenco offre assistenza e garanzia in conformità con la legge europea, il che significa che in caso di riparazioni
(sia durante che dopo il periodo di garanzia) è necessario contattare il rivenditore locale.
Nota importante: Non è possibile inviare direttamente a Lenco i prodotti da riparare.
Nota importante: Qualora l’unità venga aperta o manomessa in qualsiasi modo da un centro di assistenza non
riconosciuto, la garanzia decade.
Questo dispositivo non è adatto per l’uso professionale. Qualora l’unità venga utilizzata per scopi professionali,
tutti gli obblighi del produttore derivanti dalla garanzia sono nulli.
Clausola di esclusione della responsabilità
Il firmware e/o i componenti hardware vengono aggiornati regolarmente. Pertanto, è possibile che alcune parti
relative a istruzioni, specifiche e immagini contenute nella presente documentazione siano diverse da quanto
riscontrato nel singolo caso. Tutti gli elementi descritti in questa guida sono solo a scopo illustrativo e
potrebbero non essere applicabili a situazioni particolari. Nessun diritto legale o contrattuale può derivare dalle
descrizioni contenute nel presente manuale di istruzioni.

71
Smaltimento a fine vita del dispositivo
Questo simbolo indica che in Europa è vietato gettare
il relativo prodotto elettrico o batteria tra i rifiuti
domestici. Per il corretto smaltimento a fine vita del
prodotto e della batteria, attenersi alle vigenti
normative locali per il trattamento dei rifiuti da
apparecchiature elettriche ed elettroniche e delle
batterie. In tal modo si contribuisce a salvaguardare le
risorse naturali e a migliorare gli standard per la
protezione dell’ambiente nel trattamento dei rifiuti da
apparecchiature elettriche ed elettroniche
(Direttiva RAEE).
Marchio CE
I prodotti con il marchio CE sono conformi alla
Direttiva EMC (2014/30/UE) e alla Direttiva Bassa
Tensione (2014/35/UE) emanate dalla Commissione
della Comunità Europea.
Con la presente, Commaxx B.V. Wiebachstraat 37,
6466 NG Kerkrade, Paesi Bassi, dichiara che questo
prodotto è conforme ai requisiti essenziali.
La dichiarazione di conformità può essere consultata a
techdoc@lenco.com
Assistenza
Per ulteriori informazioni e accesso all’helpdesk, visitare il sito www.lenco.com
Commaxx B.V. Wiebachstraat 37, 6466 NG Kerkrade, Paesi Bassi.

72
Русский
ОСТОРОЖНО:
Использование устройств управления или регулирования или выполнение процедур, отличных от
указанных в настоящем руководстве, может привести к опасному воздействию излучения.
МЕРЫ ПРЕДОСТОРОЖНОСТИ ПЕРЕД ИСПОЛЬЗОВАНИЕМ
НЕОБХОДИМО СОБЛЮДАТЬ СЛЕДУЮЩИЕ ИНСТРУКЦИИ:
1. Не закрывайте и не загораживайте вентиляционные отверстия. При размещении устройства на полке
требуется 5 см (2 дюйма) свободного пространства вокруг устройства со всех сторон.
2. Установите в соответствии с прилагаемым руководством по эксплуатации.
3. Держите устройство вдали от источников тепла, таких как радиаторы отопления, обогреватели, печи,
свечи и другие устройства, выделяющие тепло, или источники открытого огня. Устройство можно
использовать только в условиях умеренного климата. Следует избегать слишком низких или слишком
высоких температур. Рабочая температура: от 0° до 35°C.
4. Избегайте использования устройства вблизи сильных магнитных полей.
5. Электростатический разряд может создать помехи в работе данного устройства. В таком случае
необходимо выполнить сброс данных и перезагрузку устройства, следуя инструкциям в руководстве по
эксплуатации. При передаче данных требуется осторожность и обеспечение работы устройства в среде,
свободной от помех.
6. Внимание! Никогда не вставляйте посторонние предметы в устройство через вентиляционные и
другие отверстия. Через устройство проходит высокое напряжение, и вставка постороннего предмета
может привести к поражению электрическим током и/или короткому замыканию на внутренних
элементах устройства. По той же причине нельзя допускать проливания на устройство воды или другой
жидкости.
7. Не используйте устройство в помещениях с высокой влажностью, таких как ванные комнаты, кухни,
наполненные паром, или около бассейнов.
8. Не допускайте попадания на устройство капель или брызг, следите за тем, чтобы ни на устройстве, ни
рядом с ним не было емкостей, наполненных жидкостью, например, ваз.
9. Не используйте устройство в условиях, в которых возможно образование конденсата. Если
устройство используется в теплом помещении с повышенной влажностью, внутри устройства могут
образоваться капли воды или конденсат, что может привести к некорректной работе устройства; следует
оставить устройство с выключенным питанием на 1-2 часа, и только после этого можно включать питание:
перед подачей питания устройство должно быть сухим.
10. Хотя данное устройство и изготовлено с особой тщательностью, а также прошло неоднократную
проверку перед отгрузкой с завода-изготовителя, могут возникнуть проблемы, как и у любого
электрического прибора. Если вы заметили дым, перегрев или иные неожиданные явления, немедленно
вытащите вилку из розетки.
11. Устройство должно работать от источника питания, характеристики которого соответствуют
характеристикам, указанным на заводской табличке. Если вы не уверены в соответствии типа источника
питания, используемого в вашем доме, обратитесь за консультацией к дилеру или местной
энергоснабжающей организации.
12. Не допускайте к устройству животных. Некоторые животные любят грызть шнуры питания.
13. Для очистки устройства используйте мягкую сухую ткань. Не используйте растворители или жидкости
на основе нефтепродуктов. Для удаления стойких загрязнений можно использовать ткань, смоченную
разбавленным моющим средством.
14. Поставщик не несет ответственности за повреждения или потерю данных в результате
неисправности, неправильного использования, модификации устройства или замены аккумулятора.
15. Не прерывайте соединение, когда устройство форматирует или передает файлы. Иначе данные могут
быть повреждены или потеряны.
16. Если устройство оснащено функцией воспроизведения через USB, то USB-накопитель следует
подключать непосредственно к устройству. Не используйте удлинительный USB-кабель, так как он может
вызвать помехи, что приведет к сбою данных.
17. На нижней или задней панели устройства имеется табличка с техническими данными.
18. Данное устройство не предназначено для использования людьми (включая детей) с инвалидностью
вследствие соматических нарушений, с нарушениями чувственного восприятия или психическими
нарушениями, а также не имеющими достаточного опыта и знаний, если они не находятся под
присмотром или не получили инструкции по правильному использованию устройства от лица,
ответственного за их безопасность.
19. Устройство не предназначено для профессионального, коммерческого или промышленного
применения.
20. Убедитесь в том, что устройство находится в устойчивом положении. Гарантия не распространяется
на повреждения, возникшие в результате использования устройства в неустойчивом положении,

73
вибрационного воздействия или ударов, а также несоблюдения других предупреждений или мер
предосторожности, содержащихся в данном руководстве по эксплуатации.
21. Никогда не снимайте корпус устройства.
22. Никогда не помещайте устройство на другое электрическое оборудование.
23. Не разрешайте детям играть с пластиковой упаковкой от устройства.
24. Используйте только приспособления/вспомогательное оборудование, указанные производителем.
25. Обслуживание устройства должно осуществляться только квалифицированными специалистами.
Обслуживание требуется при наличии каких-либо повреждений на устройстве, например, в случае
повреждения шнура питания или вилки, если на устройство пролилась жидкость, или что-то упало, если
устройство подверглось воздействию дождя или влаги, если оно не функционирует нормально, или его
уронили.
26. Длительное воздействие громких звуков от музыкальных проигрывателей может привести к
временной или постоянной потере слуха.
27. Если устройство поставляется с кабелем питания или адаптером питания переменного тока:
▪ При возникновении неполадок отсоедините кабель питания от сети переменного тока и обратитесь к
квалифицированным специалистам для выполнения технического обслуживания.
▪ Не наступайте на адаптер питания и не допускайте его защемления. Соблюдайте осторожность,
особенно возле штекеров и кабельного вывода. Не ставьте на адаптер питания тяжелые предметы,
которые могут его повредить. Храните устройство в недоступном для детей месте! При игре с
кабелем питания они могут получить серьезные травмы.
▪ Отключайте устройство от сети во время грозы, или если оно не используется в течение длительного
времени.
▪ Розетка должна находиться рядом с оборудованием и должна быть легкодоступной.
▪ Не перегружайте розетки сети переменного тока или удлинители. Перегрузка может привести к
возгоранию или поражению электрическим током.
▪ Устройства с конструкцией класса 1 следует подключать к основной розетке с заземлением.
▪ Устройства с конструкцией класса 2 не требуют заземления.
▪ При извлечении вилки из основной розетки всегда следует держаться за вилку, а не тянуть за шнур
питания. Это может привести к короткому замыканию.
▪ Не используйте поврежденный шнур питания или вилку, а также незакрепленную розетку. Это
может привести к возгоранию или поражению электрическим током.
28. При наличии батареек/элементов питания таблеточного типа в самом устройстве или в пульте
дистанционного управления:
Внимание:
▪ "Не проглатывать батарею, опасность химического ожога" или аналогичная надпись.
▪ [Пульт дистанционного управления, входящий в комплект поставки] Данное изделие содержит
батарейку/элемент питания таблеточного типа. В случае проглатывания батарейка может вызвать
тяжелые внутренние ожоги в течение всего 2 часов и привести к смерти.
▪ Храните новые и использованные батарейки в недоступном для детей месте.
▪ Если батарейный отсек невозможно надежно закрыть, прекратите использование устройства и
поместите его в место, недоступное для детей.
▪ Если вы предполагаете, что батарейки могли быть проглочены или помещены внутрь какой-либо
части тела, немедленно обратитесь за медицинской помощью.
29. Осторожность при использовании батареек:
▪ Опасность взрыва при неправильной замене элемента питания. Допускается замена только на
элементы питания того же или эквивалентного типа.
▪ Элемент питания нельзя подвергать воздействию слишком высоких или слишком низких температур,
низкого атмосферного давления на больших высотах при эксплуатации, хранении или
транспортировке.
▪ Замена элемента питания на элемент питания несоответствующего типа может привести к взрыву
или утечке легковоспламеняющейся жидкости или газа.
▪ Сжигание элемента питания, механическое разрушение или разрезание элемента питания может
привести к взрыву.
▪ Оставление элемента питания в окружающей среде с очень высокими температурами может
привести к взрыву или утечке легковоспламеняющейся жидкости или газа.
▪ Нахождение элемента питания в условиях слишком низкого атмосферного давления может привести
к взрыву или утечке легковоспламеняющейся жидкости или газа.
▪ Необходимо обратить внимание на экологические аспекты утилизации элементов питания.
УСТАНОВКА
• Распакуйте все детали и снимите защитный материал.
• Не следует подключать устройство к сети без предварительной проверки сетевого напряжения и до
выполнения всех других подключений.
* Данные инструкции относятся только к устройствам с кабелем питания или адаптером
переменного тока.

74
Комплект поставки
Руководство по эксплуатации
Адаптер питания

75
6. КОМПОНЕНТЫ УСТРОЙСТВА:
22. Диск проигрывателя
23. Шпиндель проигрывателя
24. Адаптер на 45 об/мин
25. Рычаг
26. Кнопка включения функции «Автостоп»
27. Переключатель скорости
28. Тонарм
29. Фиксатор тонарма
30. Звукосниматель
31. Светодиодный индикатор питания/функции
32. Гнездо для подключения наушников
33. Регулятор ПИТАНИЕ/ГРОМКОСТЬ
34. Функциональный переключатель ( OUT/PHONO/AUX/ IN)
35. Съемная пылезащитная крышка
36. Петли
37. Гнездо для подключения адаптера питания
38. Регулятор высоты тона (скорости)
39. Гнезда для подключения внешней акустической системы
40. Разъем Aux in
41. Внешняя акустическая система
42. Акустический кабель для подключения внешних динамиков

76
ПОДГОТОВКА К РАБОТЕ
Адаптер переменного/постоянного тока с выходом 12 В постоянного тока 2,0 А входит в комплект
поставки
проигрывателя с функцией приёма через Bluetooth-соединение и акустической системой в деревянном
корпусе. Адаптер необходим для эксплуатации устройства.
Подключите акустические кабели от каждого динамика к задней панели устройства.
Примечание: кабели внешней акустической системы обозначены цветом: кабель с красным разъемом
вставляется в отверстие красного цвета, а белый – в отверстие белого цвета.
Вставьте до упора штекер адаптера постоянного тока в гнездо постоянного тока (DC IN) на задней панели
устройства.
Подключите штекеры адаптера переменного тока к сетевой розетке с напряжением 220-240 В
переменного тока, 50 Гц.
Включите устройство с помощью регулятора ПИТАНИЯ/ГРОМКОСТИ. Загорится светодиодный индикатор
питания/функции.
Примечание: Чтобы избежать эффекта Ларсена или акустической обратной связи, можно сделать
следующее:
1. Установите динамики на расстоянии не менее 60 см от проигрывателя.
2. При воспроизведении записи с более высокой громкостью держите открытой пылезащитную
крышку.
Включение и выбор режима
Включите устройство с помощью регулятора ПИТАНИЕ/ГРОМКОСТЬ. Вы услышите щелчок, и загорится
светодиодный индикатор питания/функции, означающий включение питания. Когда питание включено,
можно использовать регулятор для регулировки громкости воспроизводимой музыки.
Поворачивая функциональный переключатель, вы можете переключаться в разные режимы (
OUT/PHONO/AUX/ IN)
7. Прослушивание записи
6. Поднимите пылезащитную крышку.
7. Включите устройство с помощью регулятора ПИТАНИЕ/ГРОМКОСТЬ.
Светодиодный индикатор питания/функции загорится КРАСНЫМ цветом в
режиме PHONO
8. Или можно повернуть функциональный переключатель в режим PHONO.
9. Положите пластинку на диск проигрывателя и установите скорость
проигрывателя в соответствии со скоростью записи.
Примечание: при воспроизведении сингла (запись на 45 об./мин) и/или
пластинок с большими центральными отверстиями используйте адаптер
на 45 об./ мин.
10. Снимите защитное устройство со звукоснимателя.
Разблокируйте фиксатор тонарма на опоре. Сдвиньте рычаг назад, и тонарм плавно поднимется.
Аккуратно переместите тонарм в нужное положение над пластинкой, и диск проигрывателя начнет
вращаться, когда тонарм будет перемещен к нему, если кнопка включения функции «Автостоп»
находится в положении ВКЛ. Опустите тонарм на проигрыватель, пододвинув рычаг, и начнется
воспроизведение виниловой пластинки.
Если кнопка включения функции «Автостоп» ВКЛЮЧЕНА, воспроизведение пластинки автоматически
остановится по ее окончании. Если кнопка включения функции «Автостоп» ВЫКЛЮЧЕНА,
воспроизведение пластинки НЕ остановится автоматически по окончании; Нужно сдвинуть рычаг назад,
чтобы тонарм поднялся, и поместить его обратно на опору, а затем выключить питание, чтобы
проигрыватель не вращался.

77
Примечание: функция «Автостоп» может применяться к большинству виниловых пластинок со скоростью
33 об/мин. Однако у некоторых виниловых пластинок проигрывание останавливается, когда она еще не
доходит до конца, или проигрывание не останавливается, когда пластинка закончилась, если ВКЛЮЧЕНА
функция «Автостоп».
ПРИМЕЧАНИЕ: если проигрывание пластинки останавливается до окончания последней дорожки,
установите кнопку включения функции «Автостоп» в положение ВЫКЛ. Теперь пластинка будет
проигрываться до конца, но нужно будет останавливать вращение проигрывателя вручную.
ПРИМЕЧАНИЕ: в зависимости от длины записи функция «Автостоп» может быть включена до окончания
записи.
Не стоит рассматривать функцию «Автостоп» как единственный вариант остановки воспроизведения.
Регулятор ВЫСОТЫ ТОНА позволяет точно настроить скорость воспроизведения записи за счет выбора
правильной скорости вращения (33/45/78 об/мин). Поверните регулятор ВЫСОТЫ ТОНА, чтобы при
необходимости немного увеличить или уменьшить скорость вращения проигрывателя.
Для потоковой передачи записанной музыки на внешние Bluetooth-колонки (не входят в комплект) см.
раздел РЕЖИМ BLUETOOTH
8. Режим Bluetooth
Этот проигрыватель поддерживает беспроводное соединение Bluetooth ( OUT). Его можно подключить
к внешним наушникам с Bluetooth (не входят в комплект) или к внешним Bluetooth-колонкам (не входят в
комплект).
8. Включите устройство с помощью регулятора ПИТАНИЕ/ГРОМКОСТЬ.
9. Поверните функциональный переключатель в режим OUT.
10. Светодиодный индикатор питания/функции загорится синим и начнет
медленно мигать.
11. Включите внешнее приемное устройство с Bluetooth (например,
Bluetooth-наушники или Bluetooth-колонки) и установите режим
сопряжения.
12. После успешного сопряжения индикатор питания/функции перестанет
мигать и будет продолжать гореть "синим".
13. Теперь вы подключены к внешнему устройству с Bluetooth.
14. При начале воспроизведения записи звук будет слышен с внешнего устройства с Bluetooth.
Примечание: Регулировать громкость можно будет ТОЛЬКО с помощью регулятора громкости на
внешнем устройстве с Bluetooth.
Примечания:
• Поместите устройство с Bluetooth на расстоянии 3 футов (1 м) от проигрывателя для обеспечения
правильного сопряжения.
• Проигрыватель остается в режиме сопряжения всего 30 секунд. При отсутствии правильного
сопряжения в течение 30 секунд, снова повторите шаги со 2 по 4 после выключения всех устройств.
• “ OUT” работает только в режиме PHONO. OUT НЕ будет работать в режимах AUX IN или
обычном режиме Bluetooth ( IN)
9. Прослушивание в режиме Bluetooth
Внешнее устройство с функцией подключения по Bluetooth, например, смартфон или планшет, можно
подключить к этому проигрывателю по беспроводной сети с помощью функции Bluetooth.

78
9. Включите устройство с помощью регулятора ПИТАНИЕ/ГРОМКОСТЬ.
10. Поверните функциональный переключатель в режим IN.
11. Светодиодный индикатор питания/функции загорится синим и
начнет медленно мигать.
12. Если устройство с Bluetooth впервые подключается к проигрывателю,
сначала требуется их сопряжение.
13. Включите настройку Bluetooth на внешнем устройстве. Немного
подождите, затем найдите имя сопряжения Bluetooth “Lenco LS-101”.
Если ваше устройство запрашивает пароль (в зависимости от
производителя устройства, модели и версии программного
обеспечения), введите цифры “0000” и нажмите OK.
14. Выберите имя сопряжения Bluetooth для подключения устройства. После подключения светодиод
перестанет мигать.
15. Подключение к внешнему устройству через Bluetooth установлено.
16. Поверните ручку регулировки громкости, чтобы отрегулировать уровень звука, и отрегулируйте
громкость на внешнем аудиоустройстве.
10. Прослушивание через дополнительный вход
1. Включите устройство с помощью регулятора ПИТАНИЕ/ГРОМКОСТЬ.
2. Поверните функциональный переключатель в режим AUX.
3. Светодиодный индикатор питания/функции загорится
"фиолетовым" (красный + синий)
4. С помощью акустического кабеля (stereo) 3,5 мм (не входит в
комплект) подключите внешнее аудиоустройство к разъему AUX на
задней панели устройства.
5. С помощью регулятора ПИТАНИЕ/ГРОМКОСТЬ отрегулируйте
громкость и используйте элементы управления на внешнем
аудиоустройстве для управления функциями воспроизведения /
регулировки громкости.
Автоматический режим ожидания для экономии энергии (регламент CE): LS-101 автоматически
переходит в режим ожидания при отсутствии аудиосигнала (запись или Bluetooth) в течение +/- 15
минут. Чтобы снова включить устройство, можно воспользоваться одним из приведенных ниже
способов:
• Поверните регулятор ПИТАНИЕ/ГРОМКОСТЬ в положение ВЫКЛ. и снова в положение ВКЛ
• Поверните функциональный переключатель
ЗАМЕНА ИГЛЫ
Для замены иглы (запасная игла не входит в комплект), необходимо следовать приведенным ниже
инструкциям.
Извлечение иглы из звукоснимателя
3. Надавите отверткой на кончик иглы книзу, как показано на рисунке, в направлении “А”.
4. Извлеките иглу, потянув вперед и и книзу.
Установка иглы
1. Удерживая кончик иглы, вставьте ее, нажав, как показано на рисунке, в направлении “B”.
2. Протолкните иглу вверх, как показано на рисунке, в направлении “C”, пока игла не зафиксируется в
нужном положении.

79
ПРИМЕЧАНИЯ
Рекомендуется очищать пластинки антистатической тканью (например, набор для очистки LENCO
TTA-3IN1
(приобретается отдельно), чтобы получать от их прослушивания максимум удовольствия.
Также нам хотелось бы отметить, что по той же причине следует периодически производить замену иглы
(примерно каждые 250 часов воспроизведения).
направляющие штифты (внутри)

80
Технические характеристики:
Lenco
Проигрыватель
LS-101
Тип
Ременный привод, полностью ручное управление
Привод
Двигатель постоянного тока
Скорость
33, 45, 78 об/мин
Диск проигрывателя
200 мм
Bluetooth
Версия
5.0
Диапазон частоты
2402 – 2480 МГц
Максимальная мощность передачи
<8 дБм
Общие
АДАПТЕР
Вход: переменный ток 100-240 В~50/60 Гц 0,8 A
Выход: постоянный ток 12 В - 2 A
Входная мощность
постоянный ток 12 В - 2 A
Потребляемая мощность
24 Вт
Размеры
340x320x100 мм для основного устройства;
130x120x200 мм для динамика
Вес
ок. 4,12 кг
Адаптер питания
Производитель: SHENZHEN SHI GUANGKAIYUAN TECHNOLOGY LTD
Модель: GKYZT0200120KH
Используйте только источник питания, указанный в руководстве по
эксплуатации

81
Информация
Значение и точность
Наименование или торговая марка
производителя, торговая регистрация и
адрес
SHENZHEN SHI GUANGKAIYUAN TECHNOLOGY LTD
Тяньшен Роуд, 41, 2 этаж, деревня Тяньляо, ул. Гунмин,
Гуанмин, Шэньчжэнь, Гуандун, Китайская Народная
Республика
(2 floor, 41 TianSheng Road, TianLiao village, GongMing
Street, Guangming, Shenzhen, Guangdong, P.R.China)
Идентификатор модели
GKYZT0200120KH
Входное напряжение
100-240 В
Входная частота переменного тока
50-60 Гц
Выходное напряжение
12 В постоянного тока
Выходной ток
2 A
Выходная мощность
24 Вт
Средняя фактическая производительность
86,66%
Производительность при низкой нагрузке
(10%)
84,42%
Потребляемая мощность без нагрузки
0,08
Гарантия
Срок гарантии составляет 1 (один) год с даты продажи. Срок службы – до 5 (пяти) лет.
Важное примечание: Компания Lenco не обеспечивает обслуживание оборудования в случае
непосредственного обращения в головной офис компании.
Важное примечание: Гарантия не действует, если устройство вскрывалось или подвергалось
изменениям вне официального сервисного центра.
Это устройство не предназначено для профессионального использования. В случае профессионального
использования гарантийные обязательства производителя не будут выполняться.
Заявление об ограничении ответственности
Обновления микропрограммного обеспечения и/или компонентов аппаратного обеспечения
производятся регулярно. Поэтому некоторые инструкции, технические характеристики и изображения в
данной документации могут несколько отличаться от Вашей конкретной ситуации. Все элементы,
описанные в настоящем руководстве, предназначены только для иллюстрации и могут не относится к
конкретной ситуации. На основе описания, приведенного в настоящем руководстве, не возникает
никаких юридических прав

82
Утилизация устройства
Данный символ означает, что соответствующее
электрооборудование или элементы питания не
подлежит утилизации как обычные бытовые
отходы на территории Европы. Для обеспечения
надлежащей утилизации данного оборудования
следует руководствоваться местными законами
или требованиями в отношении утилизации
электронного оборудования и элементов питания.
Таким образом, Вы поможете сохранить
природные ресурсы и улучшить стандарты защиты
окружающей среды при обращении и утилизации
отходов электрического оборудования (Директива
ЕС об отходах электрического и электронного
оборудования).
Маркировка CE
Продукция с маркировкой CE соответствует
требованиям Директивы по электромагнитной
совместимости (2014/30/ЕС) и Директивы по
низковольтному оборудованию (2014/35/ЕС),
изданные Комиссией Европейского сообщества.
Настоящим компания Commaxx B.V. («Коммакс Б.В.»),
Нидерланды, 6466 NG Керкраде, Вебахстраат, 37,
заявляет, что данный продукт соответствует основным
требованиям.
С декларацией соответствия можно ознакомиться по
адресу
techdoc@lenco.com
Маркировка «EAC»
Товар сертифицирован для использования на территории Таможенного Союза без
каких-либо ограничений. Соответствует требованиям ТР ТС 004/2011 «О безопасности
низковольтового оборудования» и ТР ТС 020/2011 «Электромагнитная совместимость
технических средств». Импортер и организация, уполномоченная на принятие
претензий: ООО "Бизнес-фабрика", 123458 г. Москва, ул. Маршала Прошлякова, д. 30, офис 503, +7 495
787 5900. Изготовитель: «Коммакс Б.В», Нидерланды, 6466 NG Керкраде, Вебахстраат, 37, заявляет/
Филиал: Эс.Ти.Ай. Электроникс Лтд., Юнит 903-907, 9/ЭФ, Лоз Коммершиал Плаза, 788 Чонг Ша Ван Роуд,
Коулун, Гонконг. Сделано в Китае

83
Обслуживание
Для получения дополнительной информации и обращения в службу поддержки клиентов посетите наш
веб-сайт: www.lenco.ru. Дизайн и спецификация могут быть изменены производителем без
предварительного информирования.
Дата изготовления продукции
Год и месяц изготовления продукции указаны в номере партии и серийном номере продукта. Ниже
описаны способы уточнения этой даты.
• По номеру партии (номер партии указан либо на упаковке устройства, либо на
транспортировочной упаковке).
o Формат номера партии: AAAABDDMY
• По серийному номеру продукта (серийный номер указан на устройстве).
o Формат серийного номера: AAAABDDMYSSSSSS
Где M (восьмой символ слева) равен месяцу производства, а Y (девятый символ слева) равен году
производства. Месяц производства указывается одной из букв латинского алфавита.
Соответствие буквенных обозначений месяца производства:
A
B
C
D
E
F
Январь
Февраль
Март
Апрель
Май
Июнь
G
H
I
J
K
L
Июль
Август
Сентябрь
Октябрь
Ноябрь
Декабрь
Год производства указывается одной цифрой, которая соответствует последней цифре года производства
(цифра 1 равна 2021 году производства).
Пример расшифровки по номеру партии:
• Номер партии: 2461A05C0
• Где буква C это месяц (Март), а цифра 0 – последняя цифра года производства (2020 год).
Пример расшифровки по серийному номеру:
• 2461A05A1123456
• Где буква A это месяц (Январь), а цифра 1 – последняя цифра года производства (2021 год).

84
Гарантийный талон
Информация об устройстве
Модель:
Серийный
номер:
Дата
продажи:
срок гарантии – 1 (один) год с даты продажи
Информация о продавце
Название торговой
организации:
Телефон торговой
организации:
Адрес, e-mail:
Подпись продавца______________________ М.П.
Подпись покупателя_____________________
Изделие получил в исправном состоянии и в полной комплектации. С условиями
гарантии ознакомлен и согласен.
ВНИМАНИЕ! Гарантийный талон недействителен без печати продавца.
Поддержка: www.lenco.ru
-
 1
1
-
 2
2
-
 3
3
-
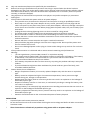 4
4
-
 5
5
-
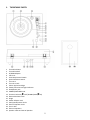 6
6
-
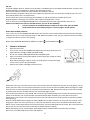 7
7
-
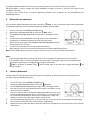 8
8
-
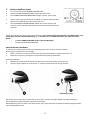 9
9
-
 10
10
-
 11
11
-
 12
12
-
 13
13
-
 14
14
-
 15
15
-
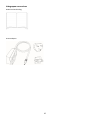 16
16
-
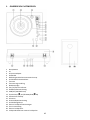 17
17
-
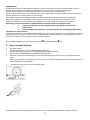 18
18
-
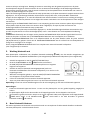 19
19
-
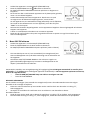 20
20
-
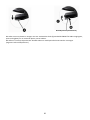 21
21
-
 22
22
-
 23
23
-
 24
24
-
 25
25
-
 26
26
-
 27
27
-
 28
28
-
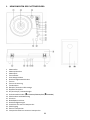 29
29
-
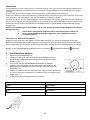 30
30
-
 31
31
-
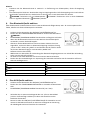 32
32
-
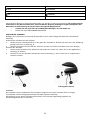 33
33
-
 34
34
-
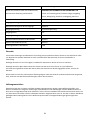 35
35
-
 36
36
-
 37
37
-
 38
38
-
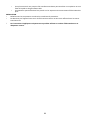 39
39
-
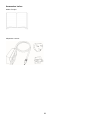 40
40
-
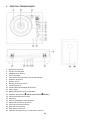 41
41
-
 42
42
-
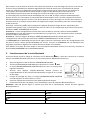 43
43
-
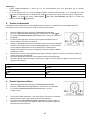 44
44
-
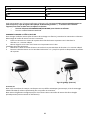 45
45
-
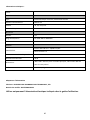 46
46
-
 47
47
-
 48
48
-
 49
49
-
 50
50
-
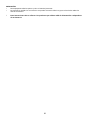 51
51
-
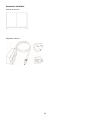 52
52
-
 53
53
-
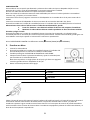 54
54
-
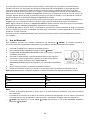 55
55
-
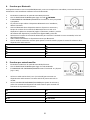 56
56
-
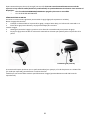 57
57
-
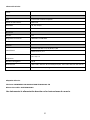 58
58
-
 59
59
-
 60
60
-
 61
61
-
 62
62
-
 63
63
-
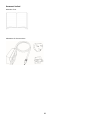 64
64
-
 65
65
-
 66
66
-
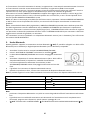 67
67
-
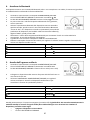 68
68
-
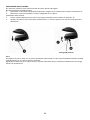 69
69
-
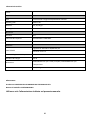 70
70
-
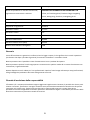 71
71
-
 72
72
-
 73
73
-
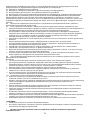 74
74
-
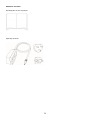 75
75
-
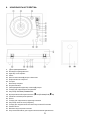 76
76
-
 77
77
-
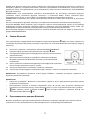 78
78
-
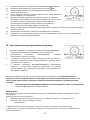 79
79
-
 80
80
-
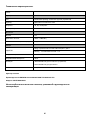 81
81
-
 82
82
-
 83
83
-
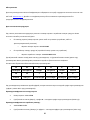 84
84
-
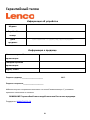 85
85


Lenco LS-101 Manual de usuario
- Categoría
- Tocadiscos de audio
- Tipo
- Manual de usuario
En otros idiomas
- français: Lenco LS-101 Manuel utilisateur
- italiano: Lenco LS-101 Manuale utente
- Deutsch: Lenco LS-101 Benutzerhandbuch
- Nederlands: Lenco LS-101 Handleiding
Documentos relacionados
-
Lenco TT-120 Manual de usuario
-
Lenco Classic Phono TT-120BNWH El manual del propietario
-
Lenco TT-110 Manual de usuario
-
Lenco LS-300 El manual del propietario
-
-
-
-
Lenco LS-440BUBG Turntable El manual del propietario
-