ROOMS TO GO 90251061 Assembly Instructions
- Tipo
- Assembly Instructions

8027-15 1.0
Assembly Instructions (English)
Tel: (212) 736 4440 Fax: (212) 736 4806
www.adessohome.com
ASSEMBLY INSTRUCTION FOR
Sahara Tall Floorchiere
Model# 8027-15
21 Penn Plaza Suite 909 New York,NY 10001
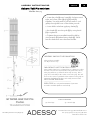
1. Screw the pole (B) onto base (A) clockwise until
tight, and screw poles (B), (C), (D) and (E)
together. You may need to pull any excess cord
gently through the base so that these parts fit.
2. Screw bulbs in before applying shade (F).
3. Put shade (F) onto the pole (E) by using finial
(G) to tighten it.
4. Tighten the pre-assembled metal buckle by
using wrench (H) when fixing shade (F). Hook
bottom shade wire onto the metal buckle.
GENERAL PRODUCT INFORMATION:
This product is suitable
for dry locations only.
---------------------------------------------------------------
IMPORTANT SAFETY INSTRUCTIONS:
This portable lamp has a polarized plug as a feature to reduce
the risk of electric shock (one blade is larger than the other).
This plug will fit in a polarized outlet only one way. If the
plug does not fit fully in the outlet, reverse the plug. If it still
does not fit, contact a qualified electrician.Do not use with an
extension cord unless the plug can be fully inserted. DO
NOT ALTER THE PLUG .
-------------------------------------------------------
BULB TYPE: Use only with maximum of 3*60 watt
incandescent bulbs (bulbs not included).
PARTS DIAGRAM
(1) * finial (G) (1) * wrench (H)

8027-15 1.0
INSTRUCCIONES DE ENSAMBLAJE PARA
Sahara Lámpara de Piso Alta
Modelo# 8027-15
21 Penn Plaza Suite 909 New York,NY 10001
Tel: (212) 736 4440 Fax: (212) 736 4806
www.adessohome.com
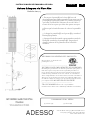
1. Enrosque el poste (B) en la base (A) hacia la
derecha hasta que quede apretado, luego enrosque los
postes(B), (C), (D) y (E) juntos. Es posible que tenga
que halar suavemente cualquier exceso de cable a
través de la base para que estas dos partes encajen.
2. Enrosque la bombilla antes de colocar la pantallla
(F).
3. Coloque la pantalla (F) en el poste (E) y usando el
florón (G) apriételo.
4. Apriete la hebilla metálica premontada usando la
llave (H) cuando fije la pantalla (F). Enganche el
alambre inferior de la pantalla sobre la hebilla
metálica.
DIAGRAMA DE LAS PIEZAS
(1) * florón (G) (1) * llave (H)
INFORMACION GENERAL DEL PRODUCTO:
Este producto es adecuado sólo
para lugares secos.
---------------------------------------------------------------
INSTRUCCIONES IMPORTANTES DE SEGURIDAD:
Esta lámpara portátil tiene un enchufe polarizado (una paleta es
más ancha que la otra), función de seguridad que reduce el
riesgo de una descarga eléctrica. Este enchufe encajará en un
tomacorriente polarizado en un sólo sentido. Si el enchufe no
entra completamente en el tomacorriente, invierta el enchufe. Si
aún así no encaja, llame a un electricista calificado. Nunca use
un cable de extensión a menos que el enchufe pueda insertarse
por completo. NO MODIFICAR EL ENCHUFE.
-------------------------------------------------------------------------
TIPO DE BOMBILLA: Use sólo con 3 bombilas
incandescentes de 60 Vatios máximo (bombillas no incluidas).
-
 1
1
-
 2
2


ROOMS TO GO 90251061 Assembly Instructions
- Tipo
- Assembly Instructions
en otros idiomas
- English: ROOMS TO GO 90251061
Artículos relacionados
-
ROOMS TO GO 90221676 Assembly Instructions
-
-
-
-
-
-
-
-
-