RedMax EB7001 El manual del propietario
- Categoría
- Sopladores / secadores de aire
- Tipo
- El manual del propietario
Este manual también es adecuado para

OWNER/OPERATOR MANUAL
MANUAL DEL PROPIETARIO/OPERADOR
BACKPACK BLOWER
SOPLADOR DE MOCHILA
T4030-93110 (205)
EB7001/EB7001RH
APPLICABLE SERIAL NUMBERS: 200101 and up
NÚMEROS DE SERIE APLICABLES: 200101 y posteriores
The engine exhaust from this product
contains chemicals known to the State
of California to cause cancer, birth
defects or other reproductive harm.
WARNING
Los gases de escape del motor de
este producto contienen sustancias
químicas conocidas por el Estado de
California como causantes de cáncer,
malformaciones en recién nacidos y
otros problemas de reproducción.
ADVERTENCIA
Before using our products, please
read this manual carefully to
understand the proper use of your
unit.
WARNING
Antes de usar nuestros productos,
lea detenidamente este manual a fin
de familiarizarse con el uso correcto
de este aparato.
ADVERTENCIA

EspañolEnglish
LA SEGURIDAD PRIMERO
Las instrucciones que se dan en las
advertencias contenidas en este manual y
en las etiquetas de advertencia marcadas
con el símbolo en el soplador, hacen
referencia a puntos críticos que se deben
tomar en consideración para evitar
posibles lesiones físicas graves y, por
esta razón, le solicitamos que lea
detenidamente dichas instrucciones y que
las siga estrictamente.
Tenga presente que las etiquetas de
advertencia pueden desprenderse o
ensuciarse y tornarse ilegibles. Si esto
sucediera, tome contacto con el
distribuidor del cual adquirió el producto y
solicite nuevas etiquetas; luego, pegue las
etiquetas en los puntos necesarios.
■ Notas sobre los tipos de advertencia
Las instrucciones señaladas con el
símbolo que se muestra a la izquierda
hacen referencia a pasos o
procedimientos de importancia crítica
que se deben seguir con el fin de evitar
accidentes que puedan causar graves
lesiones físicas o la muerte. Este
símbolo se usa para indicar
instrucciones que se deben seguir sin
excepción.
Las instrucciones señalada con el símbolo
que se muestra a la izquierda hacen
referencia a pasos o procedimientos que,
de no realizarse correctamente, pueden
causar fallos mecánicos, mal
funcionamiento o daños.
Se utiliza para indicar instrucciones
adicionales que proporcionan
recomendaciones o directivas útiles para
el uso del producto.
NOTA
IMPORTANTE
ADVERTENCIA
SAFETY FIRST
Instructions contained in warnings within
this manual and warning seals marked
with a symbol on the blower concern
critical points which must be taken into
consideration to prevent possible serious
bodily injury, and for this reason you are
requested to read all such instructions
carefully and follow them without fail.
Note that there may be times when
warning seals peel off or become soiled
and impossible to read. If this happens,
you should contact the dealer from which
you purchased the product to order new
seals and affix the new seal(s) in the
required location(s).
■ Notes on types of warnings
Instructions labeled as shown at left,
concern critical steps or procedures
which must be followed in order to
prevent accidents which could lead to
serious bodily injury or death.This
mark is used to indicate instructions
which must be followed without
exception.
Instructions labeled as shown at left
concern steps or procedures which, if not
followed correctly, could lead to
mechanical failure, breakdown, or
damage.
Used to label supplementary instructions
designed to provide hints or directions
useful in the use of the product.
NOTE
IMPORTANT
WARNING
2
Read this manual carefully
to understand all safety
precautions, controls,
proper operation and
maintenance of your
RedMax blower. Failure to
do so could result in
serious injury.
Lea detenidamente este
manual a fin de
familiarizarse con las
precauciones de seguridad,
controles, uso y
mantenimiento correcto del
soplador RedMax. Si no lee
el manual, podrá sufrir
graves lesiones.
La página se está cargando ...

EspañolEnglish
4
• Read this Blower Owner/Operator
Manual carefully. Be sure you
understand how to operate this
unit properly before you use it.
Failure to do so could result in
serious injury.
• Be sure to keep this manual handy
so that you may refer to it later
whenever any questions arise.
Also note that you are requested to
contact the dealer from whom you
purchased the product for
assistance the event that you have
any questions which cannot be
answered herein.
• Always be sure to include this
manual when selling, lending, or
otherwise transferring the
ownership of this product.
■ OPERATOR
• Refrain from operating the blower if you
are tired, ill, or upset, or if you are under
the influence of alcohol, drugs or
medication.
• To reduce the risk of hearing loss
associated with sound level(s), hearing
protection is required.
• Always wear eye protection and foot
protection. Eye protection should meet
the requirements of ANSI Z87.1.
• To reduce the risk of injury associated
with the inhalation of dust, use a face
filter mask in dusty conditions.
• Wear rubber-soled shoes or shoes with
some other form of anti-slip protection
to help protect you against falling.
• To reduce the risk of injury associated
with objects being drawn into rotating
parts, do not wear loose clothing,
scarves, neck chains, unconfined long
hair, and the like.
■ USE OF BLOWER
• Each time before starting the engine,
inspect the entire unit to see if every
part is in good order and is securely
tightened in place. If any damage is
found in the fuel line, the exhaust line,
or the ignition wiring, do not use the
blower until it has been repaired.
• Before starting operation, always make
IMPORTANT
WARNING
Safety Precautions
• Lea detenidamente el “Manual del
propietario/operador” de este
soplador. Asegúrese de
comprender la forma de uso
correcta de este aparato antes de
usarlo. De lo contrario, podrá sufrir
graves lesiones.
• Asegúrese de guardar este manual
en un lugar cercano y accesible,
de modo que pueda consultarlo
cada vez que tenga una duda.
Asimismo, tenga presente que
deberá ponerse en contacto con el
distribuidor del cual adquirió el
aparato en caso de que tenga
dudas que no puedan responderse
en este manual.
• Asegúrese de incluir siempre este
manual al vender, prestar o
transferir de alguna otra forma la
propiedad de este producto.
■ OPERADOR
• Absténgase de usar el soplador si está
cansado, enfermo o alterado, o si está
bajo la influencia del alcohol, drogas o
medicamentos.
• Para reducir el riesgo de pérdida de la
audición asociado a altos niveles de
ruido, use protectores para los oídos.
• Utilice siempre gafas protectoras y
protecciones para los pies. Las gafas
protectoras deben cumplir con los
requisitos de ANSI Z87.1.
• Para reducir el riesgo de lesiones
asociadas a la inhalación de polvo, use
una máscara con filtro antipolvo en
ambientes polvorientos.
• Use zapatos con suela de goma o
zapatos que tengan algún tipo de
protección antideslizante, para evitar
caerse.
• Para reducir el riesgo de lesiones
causadas por objetos atraídos a ciertas
piezas giratorias, no use ropa sueltas,
bufandas, cadenas alrededor del cuello,
pelo largo suelto, etc.
■ USO DEL SOPLADOR
• Siempre que vaya a arrancar el motor,
inspeccione primero la máquina
completa para comprobar que todas las
piezas están en buenas condiciones y
debidamente instaladas en posición. Si
detecta cualquier daño en la tubería de
combustible, en la tubería de escape de
gases o en el cableado de encendido,
no use el soplador hasta haber
reparado el desperfecto.
• Antes de comenzar a utilizar la
IMPORTANTE
ADVERTENCIA
Precauciones de seguridad

5
EspañolEnglish
sure to check if any obstacles are left
inside the volute case. The obstacles
may cause damage on fan and volute
case and serious injury.
(1) Volute Case
Check to see if the shock-absorbing
rubber mount has become cracked or
otherwise damaged. Note that failing to
replace this rubber mount when it has
become cracked or damaged may
cause the engine to come loose from
its frame during use, thus resulting in
possible serious bodily injury.
• If cracked, be sure to replace without
delay.
(2) Shock-absorbing Rubber Mount
To reduce the risk of injury associated
with contacting rotating parts, stop the
engine before installing or removing
attachments. Do not operate without net
in place. Always disconnect the spark
plug before performing maintenance or
accessing movable parts.
(3) Net
• Do not allow children to use blower.
Make sure that each person you
authorize to operate the blower
understands all of the safety rules in
this manual.
• Avoid using any accessory or
attachment other than those bearing the
RedMax mark for use with the blower.
• Drain the fuel from the fuel tank before
transporting or storing the blower.
• When storing the blower, choose a
space indoors free from moisture and
out of the reach of children.
• Examine the blower at intervals for
loose fasteners and rusted or damaged
parts. Use special care around the fuel
line, the muffler, and the ignition
wiring.
• All engine service except for those
described in this manual should be
performed by competent service
personnel. Improper service to the
blower fan and muffler could cause a
hazardous failure.
WARNING
WARNING
Safety Precautions
máquina, asegúrese de comprobar
siempre si han quedado obstáculos en
el interior de la caja de espirales. La
presencia de obstáculos puede causar
daños al ventilador y a la caja de
espirales, así como lesiones graves.
(1) Caja de espirales
Inspeccione la montura de goma
amortiguadora para determinar si está
agrietada o dañada de alguna otra forma.
Tenga presente que si no se reemplaza
la montura de goma si ésta se ha
agrietado o dañado, el motor podrá
soltarse de su bastidor durante el uso
de la máquina, lo que a su vez puede
causar graves lesiones físicas.
• Si está agrietada, reemplace la montura
de goma inmediatamente.
(2) Montura de goma amortiguadora
Para reducir el riesgo de lesiones
asociadas al contacto con piezas
giratorias, apague el motor antes de
instalar o retirar accesorios. No use la
máquina sin la malla instalada.
Desconecte siempre la bujía antes de
realizar labores de mantenimiento o
acceder a piezas móviles.
(3) Malla
• No permita que el soplador sea
utilizado por niños. Asegúrese de que
todas las personas que usted autorice a
usar el soplador comprendan la
totalidad de las instrucciones de
seguridad contenidas en este manual.
• Evite usar cualquier accesorio o
dispositivo adicional que no lleve la
marca RedMax, que indica que el
accesorio o dispositivo es apropiado
para el soplador.
• Antes de transportar o almacenar el
soplador, vacíe el combustible del
depósito de combustible.
• Para almacenar el soplador, elija un
lugar bajo techo que esté libre de
humedad y fuera del alcance de los
niños.
• Inspeccione el soplador a intervalos
regulares para determinar si hay
sujetadores sueltos o piezas oxidadas o
dañadas. Tenga especial cuidado
alrededor de la tubería de
combustible, silenciador y cableado
de encendido.
• Todo el mantenimiento del motor,
excepto el que se describe en este
ADVERTENCIA
ADVERTENCIA
Precauciones de seguridad

EspañolEnglish
6
■ FUEL
To reduce the risk of fire and burn
injury:
• Handle fuel with care. It is highly
flammable.
• Do not smoke while handing fuel.
• Do not refuel a hot engine.
• Do not refuel a running engine.
• Avoid spilling fuel or oil. Always wipe
unit dry before using.
• Move at least 10 ft. (3 meters) away
from the fueling point before starting
engine.
• Always store gasoline in a container
approved for flammable liquids.
• Make sure the unit is properly
assembled and in good operating
condition.
■ WORKING CONDITION
• Check the work area that the blower will
be used in and remove or cover all
valuables that may be damaged by the
air blast or thrown debris.
• To reduce the risk of injury associated
with exhaust fume inhalation, do not
operate in unventilated area. The
exhaust gases contain harmful carbon
monoxide.
• Do not allow bystanders in work area.
• Do not point the blower nozzle in the
direction of people or pets.
• Avoid using the blower where stable
footing and balance are not assured.
• Never to touch the spark plug or plug
cord while the engine is in operation.
Doing so may result in being subjected
to an electrical shock.
• Never to touch the muffler, spark plug,
or other metallic parts of the engine
while the engine is in operation or
immediately after shutting down the
engine. These metallic parts reach high
temperatures during operation and
doing so could result in serious burns.
WARNING
Safety Precautions
manual, deberá ser realizado por
personal de servicio cualificado. Un
trabajo de mantenimiento mal realizado
en el ventilador y silenciador del
soplador puede causar fallos
peligrosos.
■ COMBUSTIBLE
Para reducir el riesgo de incendio o
quemaduras:
• Manipule el combustible con cuidado.
El combustible es altamente inflamable.
• No fume mientras manipula el
combustible.
• No agregue combustible mientras el
motor está caliente.
• No agregue combustible mientras el
motor está en marcha.
• Evite derramar combustible o aceite.
Limpie siempre la máquina antes de
usarla.
• Aléjese al menos 10 pies (3 metros) del
punto de carga de combustible antes
de arrancar el motor.
• Asegúrese de almacenar la gasolina en
un recipiente aprobado para líquidos
inflamables.
• Asegúrese de que la máquina esté
debidamente montada y en buenas
condiciones de funcionamiento.
■ CONDICIONES DE TRABAJO
• Inspeccione el área donde va a usar el
soplador y retire o cubra todos los
objetos de valor que pudieran dañarse
con el chorro de aire o con las materias
expulsadas.
• Para reducir el riesgo de lesiones
asociadas a la inhalación de gases de
escape, no use el soplador en lugares
que no tengan ventilación. Los gases
de escape contienen monóxido de
carbono, que es dañino para la salud y
puede ser letal.
• No permita que haya personas
observando en el área de trabajo.
• No apunte la tobera del soplador hacia
personas o mascotas.
• Evite usar el soplador en lugares donde
no se pueda garantizar una base
estable que le permita mantenerse de
pie sin perder el equilibrio.
• Nunca toque la bujía o el cable de la
bujía mientras el motor está en
funcionamiento. De lo contrario, podrá
sufrir una descarga eléctrica.
• Nunca toque la bujía, el silenciador u
otras piezas metálicas mientras el
motor está en funcionamiento o
inmediatamente después de apagarlo.
Estas piezas metálicas alcanzan altas
temperaturas durante el uso de la
ADVERTENCIA
Precauciones de seguridad

7
EspañolEnglish
■ AVOID NOISE PROBLEM
Check and follow the local
regulations as to sound level and
hours of operations for blower.
• Operate power equipment only at
reasonable hours-not early in the
morning or late at night when people
might be disturbed. Comply with times
listed in local ordinances.
• To reduce sound levels, limit the
number of pieces of equipment used at
any one time.
• Operate power blowers at the lowest
possible throttle speed to do the job.
• Check your equipment before
operation, especially the muffler, air
intakes and air filters.
• Loosen compacted leaves, grass or
debris with a rake or broom beforehand,
so that the lowest possible throttle
setting would get the job done.
• In dusty conditions, slightly dampen
surfaces or use mister attachment when
water is available.
■ AVOID CHANCES OF DAMAGE
• Watch out for children, pets, open
windows or freshly washed cars, and
blow debris safely away.
• Use the full blower nozzle extension so
the air stream can work close to the
ground.
• After using blowers and other
equipment, CLEAN UP! Dispose of
debris in trash receptacles.
• Always check to be sure that no debris
has been blown onto someone else’s
property.
NOTE
Safety Precautions
máquina y pueden causar graves
quemaduras.
■ CÓMO EVITAR PROBLEMAS DE
RUIDO
Siga las disposiciones locales en
cuanto al nivel de ruido permitido y a
los horarios de uso del soplador.
• Use el equipo solamente en horarios
razonables – no lo use temprano en la
mañana ni tarde por la noche, cuando
pueda molestar a los vecinos.
Asegúrese de cumplir con los horarios
indicados en las disposiciones locales.
• Para reducir el nivel de ruido, limite el
número de unidades utilizadas a la vez.
• Use los sopladores a la velocidad de
regulador más baja posible mientras
realiza el trabajo.
• Revise el equipo antes de utilizarlo,
especialmente el silenciador, las
entradas de aire y los depuradores de
aire.
• Use un rastrillo o una escoba para
retirar hojas, pasto u escombros
adheridos, de modo que el trabajo
pueda realizarse con el ajuste más bajo
del regulador posible.
• En ambientes polvorientos, humedezca
ligeramente las superficies o utilice un
adaptador para nebulizador cuando
haya agua disponible.
■ CÓMO MINIMIZAR LAS
POSIBILIDADES DE DAÑO
• Tenga cuidado con los niños,
mascotas, ventanas abiertas o
automóviles recién lavados; al retirar
escombros con el soplador, hágalo de
forma segura.
• Use la extensión completa de la tobera
del soplador de modo que el chorro de
aire pueda aplicarse cerca del suelo.
• Después de usar sopladores y otros
equipos, ¡LÍMPIELOS! Deseche los
escombros en receptáculos para
basura.
• Compruebe siempre que no ha arrojado
escombros con el soplador a una
propiedad ajena.
NOTA
Precauciones de seguridad

EspañolEnglish
8
(1)Read owner's manual before
operating this machine.
(2)Wear head, eye and ear protection.
(3)Handling this machine improperly
could result in accidents causing
serious injury or death. Read this
manual carefully and practice using
the blower until you are fully
acquainted with all operations and
have learned to use it correctly.
If warning label peel off or become soiled
and impossible to read, you should
contact the dealer from which you
purchased the product to order new labels
and affix them in the required location(s).
Never modify your machine.
We won't warrant the machine, if you
use the remodeled machine or you
don't observe the proper usage written
in the manual.
WARNING
IMPORTANT
Warning labels on the machine
(1)Lea el manual de propietario antes
de usar esta máquina.
(2)Use elementos de protección para la
cabeza, ojos y oídos.
(3)El uso incorrecto de esta máquina
puede causar accidentes, lo cuales
a su vez pueden ocasionar graves
lesiones o la muerte. Lea este
manual detenidamente y practique
con el soplador hasta que se haya
familiarizado por completo con
todas las operaciones y haya
aprendido a usarlo correctamente.
Si una etiqueta de advertencia se
desprende o ensucia y se torna ilegible,
tome contacto con el distribuidor del cual
adquirió el producto y solicite nuevas
etiquetas; luego, pegue las etiquetas en
los puntos necesarios.
Nunca modifique la máquina.
La garantía quedará nula si usted
remodela la máquina o si no la utiliza
correctamente de acuerdo con las
instrucciones de este manual.
ADVERTENCIA
IMPORTANTE
Etiquetas de advertencia en la máquina

9
EspañolEnglish
For safe operation and maintenance,
symbols are carved in relief on the
machine. According to these indications,
please be careful not to make a mistake.
(a)The port to refuel the "MIX GASOLINE"
POSITION: FUEL TANK CAP
(b)The direction to close the choke
POSITION: AIR CLEANER COVER
(c) The direction to open the choke
POSITION: AIR CLEANER COVER
Symbols on the machine
Para un uso y mantenimiento seguro, se
han estampado símbolos en relieve en la
máquina. Observe siempre estas
indicaciones y tenga cuidado de no
cometer un error.
(a)El orificio de llenado de combustible
“MIX GASOLINE”
POSICIÓN: TAPÓN DEL DEPÓSITO DE
COMBUSTIBLE
(b)La dirección en que se cierra el
estrangulador
POSICIÓN: CUBIERTA DEL
DEPURADOR DE AIRE
(c)La dirección en que se abre el
estrangulador
POSICIÓN: CUBIERTA DEL
DEPURADOR DE AIRE
Símbolos en la máquina
IMPORTANT ENGINE INFORMATION
THIS ENGINE MEETS U.S. EPA PH1 AND 2001
CALIFORNIA EMISSION REGULATIONS FOR SI
SORE’s COMPLIANCE PERIOD : CATEGORY A
ENGINE FAMILY : 1KZXS.0625MN ; EM
ENGINE DISPLACEMENT : 62.0cc
REFER TO OWNER’S MANUAL FOR MAINTE-
NANCE SPECIFICATIONS AND ADJUSTMENTS.
KOMATSU ZENOAH CO.
MANUFACTURED:
RedMax
ESTE MOTOR CUMPLE CON LAS NORMAS SOBRE
EMISIONES U.S. EPA PH1 Y 2001 DE CALIFORNIA PARA EL
PERÍODO DE CONFORMIDAD “SI SORE”: CATEGORÍA A
TIPO DE MOTOR : 1KZXS.0625MN ; EM
CILINDRADA DEL MOTOR : 62,0 cc
CONSULTE EL MANUAL DEL PROPIETARIO PARA LAS
ESPECIFICACIONES Y AJUSTES DE MANTENIMIENTO.
INFORMACIÓN IMPORTANTE ACERCA DEL MOTOR
FABRICADO POR:
KOMATSU ZENOAH CO.
RedMax
Ce moteur est conformc aux normcs U.S. EPA PH1 et 2001
ainsi qu’aux autres dispositions ultérieures de la réglementation
concernant la pollution de l’air pour les petits moteurs tout-terrain
avec une période de accordable : CATEGORY A
Type de moteur : 1KZXS.0625MN ;EM
Cylindrée du moteur : 62,0cc
Se référer au Manuel de l’utilisateur pour les
spécifications d’entretien et les réglages.
INFORMATION IMPORTANTE CONCERNANT LE MOTEUR
KOMATSU ZENOAH CO.
RedMax
MANUFACTURÉ:

EspañolEnglish
10
1. Frame
2. Shoulder Strap
3. Spark Plug Cap
4. Throttle Lever
5. Stop Switch (behind)
6. Net
7. Choke Lever
8. Air Cleaner
9. Volute Case
10. “CAUTION” Label
11. Elbow
12. Fuel Tank
13. Recoil Starter
14. Ignition Switch
Parts Location
1. Bastidor
2. Correa para el hombro
3. Casquillo de la bujía
4. Palanca del regulador
5. Interruptor de parada (atrás)
6. Malla
7. Palanca del estrangulador
8. Depurador de aire
9. Caja de espirales
10. Etiqueta “PRECAUCIÓN”
11. Codo
12. Depósito de combustible
13. Arrancador de retroceso
14. Interruptor de encendido
Posición de las piezas y especificaciones
[ EB7001RH ]

11
EspañolEnglish
Specifications
Posición de las piezas y especificaciones
MODEL EB7001/EB7001RH
Dimensions (L x W x H) mm (in)
................................520 x 580 x 490 (20.5 x 22.8 x 19.3)
Dry Weight kg (lbs)
...........................................................................9.7 (21.5)
Fuel Tank Capacity liter (fl. oz)
...........................................................................2.1 (70.9)
Engine Type
...................................Air cooled 2-cycle gasoline engine
Piston Displacement cc (cu. in)
............................................................................62 (3.78)
Air Filter
.........................................2-stage fresh flow filter system
Carburetor (Diaphragm) valve type
...............................................................................Rotary
Ignition System
..................................................................................C.D.I
Spark Plug
.......................................Champion RCJ6Y (Noise-proof)
Muffler
...................................................Spark arrester equipped
Operating Engine Speed rpm
.....................................................................2000 to 7300
Fuel Consumption liter/h (fl. oz/h)
..............................................................................2.2 (65)
Max. Air Volume (w/std Pipe) cu. m/min (cfm)
.............................................................................18 (630)
Max. Air Volume (w/o Pipe) cu. m/min (cfm)
.............................................................................24 (855)
Max. Air Velocity m/sec (mph)
.............................................................................92 (205)
Durability Period hrs.
....................................................................................300
Noise Level (50 Feet ANSI B175-2) dB(A)
......................................................................................73
MODELO EB7001/EB7001RH
Dimensiones (largo x ancho x alto) mm (pulg.)
................................520 x 580 x 490 (20,5 x 22,8 x 19,3)
Peso en seco kg (lbs.)
...........................................................................9,7 (21,5)
Capacidad del depósito de combustible litros (fl. oz.)
...........................................................................2,1 (70,9)
Tipo de motor
..................
Motor de gasolina de 2 tiempos tipo enfriado por aire
Cilindrada del pistón cc (pulg.
3
)
............................................................................62 (3,78)
Depurador de aire
..........................Sistema de filtro de flujo puro de 2 fases
Carburador (diafragma) tipo válvula
............................................................................Giratorio
Sistema de encendido
.................................................................................C.D.I.
Bujía
............................Champion RCJ6Y (a prueba de ruidos)
Silenciador
.............................................Equipado con apagachispas
Velocidad de funcionamiento del motor rpm
......................................................................2000 a 7300
Consumo de combustible litros (fl. oz/h)
...............................................................................2,2(65)
Máx volumen de aire (w/std Pipes) m
3
/min. (cfm)
.............................................................................18 (630)
Máx volumen de aire (w/o Pipes) m
3
/min. (cfm)
.............................................................................24 (855)
Máx velocidad del aire m/seg. (mph)
.............................................................................92 (205)
Período de durabilidad hrs.
....................................................................................300
Nivel de ruido (50 Feet ANSI B175-2) dB(A)
......................................................................................73

EspañolEnglish
12
■ BLOWER TUBES
1. Connect the blower and swivel joint with
flexible hose. Clamp both ends of the
flexible hose securely with the hardware
supplied with the unit.
2. Align the protrusion and the groove
provided on the tube ends and twist the
tube until connection is locked up.
■ THROTTLE LEVER [EB7001RH]
• Set up the clamp to the swivel and
tighten the screw on the clamp.
(1)Clamp
(2)Swivel
(3)Screw
■ THROTTLE CABLE [EB7001RH]
• Use the band to fasten the colgate tube
containing the throttle cable and the
power cable to the hose.
(1)Fasten with bands
(2)Cable
(3)Hose
Assembly
■ TUBOS DEL SOPLADOR
1. Conecte el soplador a la unión giratoria
con la manguera flexible. Asegure
ambos extremos de la manguera
flexible con las abrazaderas y demás
elementos proporcionados con el
aparato.
2. Alinee la parte saliente con la ranura
que hay en los extremos del tubo, y gire
el tubo hasta que la conexión quede
trabada.
■
PALANCA DEL REGULADOR [EB7001RH]
• Instale la abrazadera a la unión
giratoria y apriete el tornillo en la
abrazadera.
(1)Abrazadera
(2)Unión giratoria
(3)Tornillo
■
CABLE DEL REGULADOR [EB7001RH]
• Utilice la banda para atar con la
manguera el tubo de protección que
contiene el cable del gas y el cable del
motor.
(1)Atar con la banda
(2)Cable
(3)Manguera
Montaje
F1
F2
F3
F4
[EB7001RH]
[EB7001RH]

EspañolEnglish
• Gasoline is very flammable. Avoid
smoking or bringing any flame or
sparks near fuel. Make sure to stop
the engine and allow it cool before
refueling the unit. Select outdoor
bare ground for fueling and move at
least 3m(10ft) away from the fueling
point before starting the engine.
• The RedMax engines are lubricated by
oil specially formulated for air-cooled 2-
cycle gasoline engine use. If RedMax
oil is not available, use an anti-oxidant
added quality oil expressly labeled for
air-cooled 2-cycle engine use. (JASO
FC GRADE OIL or ISO EGC GRADE)
RECOMMENDED MIXING RATIO
GASOLINE 50 : OIL 1
50:1 MIXING CHART
GASOLINE gal. 12345
2-CYCLE OIL fl.oz 2.6 5.2 7.8 10.4 13
GASOLINE liter 12345
2-CYCLE OIL ml 20 40 60 80 100
• Exhaust emission are controlled by
the fundamental engine parameters
and components(eq., carburation,
ignition timing and port timing)
without addition of any major
hardware or the introduction of an
inert material during combustion.
• These engines are certified to operate
on unleaded gasoline.
• Make sure to use gasoline with a
minimum octane number of 90
ROZ(USA/Canada : pump octane
min.87)
• Unleaded gasoline is recommended to
reduce the contamination of the air for
the sake of your health and the
environment.
• Poor quality gasolines or oils may
damage sealing rings, fuel lines or fuel
tank of the engine.
WARNING
Fuel
• La gasolina es altamente inflamable.
Evite fumar o utilizar elementos que
generen llamas o chispas cerca del
combustible. Asegúrese de apagar el
motor y permitir que se enfríe antes
de cargar combustible. Elija un lugar
despejado al aire libre para cargar
combustible, y luego aléjese al
menos 3 m (10 pies) del lugar de
carga de combustible antes de
arrancar el motor.
• Los motores RedMax utilizan un aceite
de lubricación especialmente formulado
para motores de gasolina de 2 tiempos
enfriados por aire. Si no dispone de
aceite RedMax, use un aceite que
contenga antioxidante y que esté
expresamente indicado para motores
de 2 tiempos enfriados por aire.
(ACEITE DE GRADO JASO FG o ISO
EGC).
RELACIÓN DE MEZCLA RECOMENDADA
GASOLINA 50 : ACEITE 1
DIAGRAMA DE MEZCLA 50:1
GASOLINA gal. 12345
ACEITE de
2,6 5,2 7,8 10,4 13
2 TIEMPOS fl. oz.
GASOLINA litros 12345
ACEITE de
20 40 60 80 100
2 TIEMPOS ml
• La emisión de gases de escape se
controla mediante los parámetros y
componentes fundamentales del
motor (p. ej., carburación,
sincronización de encendido y
sincronización de lumbreras) sin
necesidad de agregar elementos
adicionales ni introducir algún
material inerte durante la
combustión.
• Estos motores están certificados para
funcionar con gasolina sin plomo.
• Asegúrese de usar gasolina con un
octanaje mínimo de 90 ROZ
(EE.UU./Canadá: octanaje mínimo 87).
• Se recomienda usar gasolina sin plomo
para reducir la contaminación del aire y
proteger la salud y el medio ambiente.
• Las gasolinas o aceites de mala calidad
pueden dañar los anillos obturadores,
las tuberías de combustible o el
depósito de combustible del motor.
ADVERTENCIA
Combustible
13

14
EspañolEnglish
■ HOW TO MIX FUEL
1. Measure out the quantities of gasoline
and oil to be mixed.
2. Put some of the gasoline into a clean,
approved fuel container.
3. Pour in all of the oil and agitate well.
4. Pour in the rest of gasoline and agitate
again for at least one minute.
5. Put a clear indication on the outside of
the container to avoid mixing up with
gasoline or other containers.
6. Indicate the contents on outside of
container for easy identification.
■ FUELING THE UNIT
1. Untwist and remove the fuel cap. Rest
the cap on a dustless place.
2. Put fuel into the fuel tank to 80% of the
full capacity.
3. Fasten the fuel cap securely and wipe
up any fuel spillage around the unit.
1. Select bare ground for fueling.
2. Move at least 10 feet (3 meters) away
from the fueling point before starting
the engine.
3. Stop the engine before refueling the
unit.
FOR YOUR ENGINE LIFE, AVOID;
1. FUEL WITH NO OIL(RAW GASOLINE)
– It will cause severe damage to the
internal engine parts very quickly.
2. GASOHOL – It can cause deterioration
of rubber and/or plastic parts and
disruption of engine lubrication.
3. OIL FOR 4-CYCLE ENGINE USE or
WATER COOLED 2-CYCLE ENGINE
USE – It can cause spark plug fouling,
exhaust port blocking, or piston ring
sticking.
4. Mixed fuels which have been left
unused for a period of one month or
more may clog the carburetor and result
in the engine failing to operate properly.
WARNING
Fuel
■ CÓMO MEZCLAR EL COMBUSTIBLE
1. Mida las cantidades de gasolina y
aceite que va a mezclar.
2. Vierta un poco de gasolina en un
recipiente limpio, aprobado para
combustibles.
3. Vierta todo el aceite en el recipiente y
agítelo bien.
4. Vierta el resto de la gasolina en el
recipiente y vuelva a agitarlo durante al
menos un minuto.
5. Ponga una indicación clara en el
exterior del recipiente para evitar
confundirlo con otros recipientes (p. ej.,
de gasolina).
6. Indique el contenido en el exterior del
recipiente para facilitar su identificación.
■ CARGA DE COMBUSTIBLE EN EL
APARATO
1. Suelte y retire el tapón del depósito de
combustible. Deje el tapón en un lugar
que esté libre de polvo.
2. Vierta el combustible en el depósito de
combustible hasta alcanzar el 80% de
la capacidad máxima del depósito.
3. Coloque el tapón y apriételo de forma
segura, y seque las salpicaduras de
combustible en el aparato.
1. Elija un lugar despejado para cargar
combustible.
2. Aléjese al menos 3 m (10 pies) del
lugar de carga de combustible antes
de arrancar el motor.
3. Apague el motor antes de volver a
cargar combustible.
PARA PROLONGAR LA VIDA ÚTIL DEL
MOTOR, EVITE USAR;
1. COMBUSTIBLE SIN ACEITE
(GASOLINA PURA) – Esto causará
serios daños a las piezas internas de
motor rápidamente.
2. GASOHOL – Puede causar el deterioro
de las piezas de goma y/o plásticas y la
ruptura de la lubricación del motor.
3. ACEITE PARA MOTORES DE 4
TIEMPOS o PARA MOTORES DE 2
TIEMPOS ENFRIADOS POR AGUA –
Puede ensuciar la bujía o causar la
obstrucción de la lumbrera de escape o
el agarrotamiento del aro del émbolo.
4. Los combustibles mezclados que no se
han utilizado durante un mes o más
tiempo pueden obstruir el carburador e
impedir el funcionamiento correcto del
motor.
ADVERTENCIA
Combustible

(1)
(2)
(3)
(4)
F8
EspañolEnglish
■ CONTROL ARM [EB7001]
• Hold the upper end of the control arm in
hand and, while pulling it away from the
unit, rotate arm forward (anti-clockwise
as the arrow direction) until it clicks.
(The first position)
And if you want, you can rotate arm
more forward until it clicks. (The second
position)
Choose the arm position according to
your working condition.
• To fold the arm, reverse the order.
(1)The First Position
(2)The Second Position
■ STARTING ENGINE
• Avoid operating the blower with the
flexible tube and swivel joint
disconnected. That will reduce the
cooling air and the engine could be
damaged by overheating.
1. Push the primer bulb until fuel flows out
in the clear tube.
2. When the engine is cool, close the
choke.
(1)Choke Lever
(2)Primer Bulb
(3)OPEN
(4)CLOSE
3. [EB7001RH]
Set the ignition switch to the start
position.
4. Set the throttle lever in 1/3 open
position.
(1)Full Throttle
(2)About 1/3 Open
(3)Idling
(4)Ignition Switch
5. To start, hold the top of the blower
firmly with your left hand. Pull the
starter knob slowly until you feel it
engage and then give it a vigorous
strong pull.
• Avoid pulling the starter rope out to
its full extent and allowing the starter
rope to snap back. This will prevent
premature damage to the starter.
• Do not let a person stand near the
blower or the exhaust port.
IMPORTANT
IMPORTANT
Operation
■ BRAZO DE CONTROL [EB7001]
• Sostenga el extremo superior del brazo
de control en la mano y, mientras tira
de él, gire el brazo hacia adelante (en
el sentido contrario a las agujas del
reloj, en la dirección de la flecha) hasta
escuchar un “clic”. (Primera posición)
Si lo desea, puede girar el brazo aún
más, hasta escuchar un segundo “clic”.
(Segunda posición)
Elija la posición del brazo de acuerdo
con las condiciones de trabajo.
• Para plegar el brazo, repita este
procedimiento en orden inverso.
(1)Primera posición
(2)Segunda posición
■ ARRANQUE DEL MOTOR
• Evite usar el soplador con el tubo
flexible y la unión giratoria
desconectados. Esto reducirá el aire
de enfriamiento, con lo cual el motor
puede dañarse por recalentamiento.
1. Presione la pera de cebado hasta que
el combustible fluya por el tubo
transparente.
2. Cuando el motor esté frío, cierre el
estrangulador.
(1)Botón del estrangulador
(2)Pera de cebado
(3)ABRIR
(4)CERRAR
3. [EB7001RH]
Coloque el interruptor en la posición
“START”.
4. Ajuste la palanca del estrangulador en
la posición abierta de 1/3.
(1)Plena admisión
(2)Abierto 1/3
(3)Marcha mínima
(4)Interruptor de encendido
5. Para arrancar el motor, sostenga
firmemente la parte superior del
soplador con su mano izquierda. Tire
lentamente del botón del arrancador
hasta sentir que se engancha, y luego
dele un tirón fuerte.
• Evite tirar de la cuerda del
arrancador de modo que se salga
completamente y luego soltarla para
que se devuelva por sí sola. Esto
evitará daños prematuros en el
arrancador.
IMPORTANTE
IMPORTANTE
Uso
F5
F6
(1)
(2)
(3)
(4)
F7
(1)
(2)
(3)
F9
[EB7001]
[EB7001RH]
15
[EB7001]
[EB7001]

16
EspañolEnglish
6. Once the engine is running, gradually
open the choke if it was set closed, and
let the engine run at idle speed for a
minute to warm it up.
When the engine fails to start after several
attempts due to overchoking, open the
choke and repeat pulling the rope.
■ ADJUSTING IDLE SPEED
• The idling speed is set for 2000 rpm at
the factory. If it is necessary to adjust
the idle speed, use the adjustment
screw on the top side of carburetor.
(1)Idling Adjustment Screw
■ STOPPING ENGINE
[EB7001]
• Move the throttle lever to the idling
position and press the stop switch (red
button) until the engine comes to a
complete stop.
(1)Stop Switch
[EB7001RH]
• Move the throttle lever to the idling
position and set the ignition switch to
the stop position.
(1)Ignition Switch
NOTE
Operation
• No permita que haya personas cerca
del soplador o de la lumbrera de
escape.
6. Una vez que el motor esté funcionando,
abra gradualmente el estrangulador si
estaba cerrado, y permita que el motor
funcione en marcha mínima durante un
minuto para que se caliente.
Si el motor no arranca después de varios
intentos debido a estrangulación excesiva,
abra el estrangulador y vuelva a tirar de la
cuerda.
■ AJUSTE DE LA VELOCIDAD DE
MARCHA MÍNIMA
• La velocidad de marcha mínima viene
ajustada a 2000 rpm de fábrica. Si
fuera necesario ajustar la velocidad de
marcha mínima, use el tornillo de ajuste
situado en la parte superior del
carburador.
(1)Tornillo de Ajuste de Velocidad de
Marcha Mínima
■ CÓMO APAGAR EL MOTOR
[EB7001]
• Mueva la palanca de emisión de gases
hasta la posición mínima y pulse el
interruptor de parada (botón rojo) hasta
que el motor se detenga
completamente.
(1)Interruptor de parada
[EB7001RH]
• Mueva la palanca de emisión de gases
hasta la posición mínima y mueva el
interruptor en la posición “STOP”.
(1)Interruptor de encendido
NOTA
Uso
(1)
F10
(1)
F11
(1)
F12
[EB7001]
[EB7001RH]

EspañolEnglish
Make sure that the engine has stopped
and is cool before performing any
service to the blower. Contact with
rotating blower fan or hot muffler may
result in a personal injury.
■ AIR CLEANER
• Never operate the blower without an air
filter or with a deformed or broken filter
element.
• Check the air cleaner every once
week of use or more frequently if
used under dusty conditions. A
clogged air filter may increase fuel
consumption while cutting down the
engine power. Never operate the
blower without the air filter or with a
deformed filter element because
unfiltered dusty air will quickly ruin
the engine.
CLEANING AIR FILTER:
1. Unscrew 2 knob bolts and remove the
air cleaner cover. Then remove a
prefilter mounted inside the air cleaner
cover.
(1)Knob Bolt
(2)Prefilter
(3)Paper Filter
2. Wash the prefilter in fresh, non
flammable cleaning solution (ex. warm
soapy water) and then dry.
(Clean the air filter once in a week.)
3. Exchange the paper filter element with
new one in case it has been
contaminated.
• This element is dry type.
• Never wash the element in
oleaginous cleaning solution.
WARNING
WARNING
Maintenance
Antes iniciar los trabajos de
mantenimiento del soplador, asegúrese
de que el motor se haya detenido y
enfriado. El contacto con el ventilador
en movimiento o con el silenciador
caliente puede causar lesiones.
■ DEPURADOR DE AIRE
• Nunca utilice el soplador sin un
depurador de aire instalado o con un
elemento de filtro deformado o roto.
• Compruebe el depurador de aire
cada una vez semana de uso o con
mayor frecuencia en caso de utilizar
el soplador en ambientes
polvorientos. Un depurador de aire
obstruido puede aumentar el
consumo de combustible y reducir al
mismo tiempo la potencia del motor.
Nunca utilice el soplador sin el
depurador de aire instalado o con un
elemento de filtro deformado o roto,
ya que el aire sin filtrar (que contiene
polvo) arruinará rápidamente el
motor.
LIMPIEZA DEL DEPURADOR DE AIRE:
1. Desatornille los dos pernos de perilla y
quite la cubierta del depurador de aire.
Luego quite el filtro montado dentro de
la cubierta del depurador de aire.
(1)Perno de perilla
(2)Filtro
(3)Filtro de papel
2. Lave el filtro con agua limpia, y con una
solución no inflamable (eje. Agua de
jabón tibia) y luego séquelo.
(Limpie el depurador de aire una vez
por semana)
3. Cambie el accesorio del filtro de papel
por uno nuevo, en caso de que este
resulte contaminado.
• Este filtro es de tipo seco.
• Nunca lave el filtro en soluciones de
limpieza oleaginosas.
ADVERTENCIA
ADVERTENCIA
Mantenimiento
F13
17

18
EspañolEnglish
■ FUEL FILTER
• A clogged fuel filter may cause poor
acceleration of the engine. Check
periodically to see if the filter is clogged
with dirt. The filter can be taken out of
the fueling port using a small wire hook.
Disconnect the filter assembly from the
fuel pipe and unhook the retainer to
disassemble it. Clean the components
with gasoline.
(1)Screen
(2)Element (2)
(3)Holder
(4)Retainer
■ SPARK PLUG
• The spark plug may gather carbon
deposits on its firing end with
reasonable use. Remove and inspect
the spark plug every 25 hours and
clean the electrodes as necessary with
a wire brush. The spark gap should be
adjusted to .025 in (0.6~0.7mm).
• Plug manufacturers recommend
replacing the plug twice a year to avoid
unexpected plug failure in a job.
REPLACEMENT PLUG IS A
CHAMPION RCJ6Y.
• Note that using any spark plugs other
than those designated may result in the
engine failing to operate properly or in
the engine becoming overheated and
damaged.
• To install the spark plug, first turn the
plug until it is finger tight, then tighten it
a quarter turn more with a socket
wrench.
■ MUFFLER
• Inspect periodically, the muffler for
loose fasteners, any damage or
corrosion. If any sign of exhaust
leakage is found, do not use the blower
and have it repaired immediately.
• Note that failing to do so may result
in the engine catching on fire.
• Before starting operation, always make
sure to check if the muffler is properly
held by three bolts to the cylinder.
(Fastening Torque : 80~120kg·cm)
• Even if one bolt out of three bolts is
IMPORTANT
WARNING
IMPORTANT
Maintenance
■ FILTRO DE COMBUSTIBLE
• Un filtro de combustible puede causar
una aceleración débil del motor.
Inspeccione periódicamente el filtro
para ver si está obstruido con suciedad.
El filtro puede sacarse por la lumbrera
de carga de combustible utilizando un
gancho de alambre. Desconecte el
conjunto del filtro del tubo de
combustible y desenganche el
retenedor para desarmarlo. Limpie los
componentes con gasolina.
(1)Tamiz
(2)Elemento (2)
(3)Soporte
(4)Retenedor
■ BUJÍA
• En el extremo de encendido de la bujía
pueden acumularse depósitos de
carbón con el uso normal del aparato.
Retire e inspeccione la bujía cada 25
horas de uso y limpie los electrodos
según sea necesario con un cepillo de
alambre. La separación de los
electrodos de la bujía debe ajustarse a
0,25 pulg. (0,6 – 0,7 mm).
• Los fabricantes de bujías recomiendan
reemplazar la bujía dos veces por año
para evitar fallos inesperados durante
la realización de un trabajo.
BUJÍA DE RECAMBIO: CHAMPION
RCJ6Y.
• Tenga presente que el uso de bujías
distintas de las especificadas puede
impedir que el motor funcione
correctamente o hacer que el motor se
recaliente y dañe.
• Para instalar la bujía, primero gírela
hasta sentir que está apretada, y luego
apriétela un cuarto de vuelta adicional
con una llave de cubo.
■ SILENCIADOR
• Inspeccione periódicamente el
silenciador para comprobar si hay
sujetadores sueltos, daños o corrosión.
Si detecta cualquier signo de fuga de
gases de escape, deje de usar el
soplador y mándelo a reparar
inmediatamente.
• Tenga presente que si continúa
usando el soplador en estas
condiciones, el motor puede
incendiarse.
• Antes de comenzar a usar el soplador,
IMPORTANTE
ADVERTENCIA
IMPORTANTE
Mantenimiento
F14
F15

EspañolEnglish
19
loose, the muffler may get loose during
operation which may result in engine
catching on fire.
■ SPARK ARRESTER
• The muffler is equipped with a spark
arrester to prevent red hot carbon from
flying out of the exhaust outlet.
Periodically inspect and clean as
necessary with a wire brush. In the
State of California it is required by law
(Section 4442 of the California Pulic
Resources Code) to equip a spark
arrester when a gas powered tool is
used in any forest covered, bush
covered, or grass covered unimproved
land.
(1)Three Bolts
(2)Spark Arrester
■ AIR INLET NET
• Blowing air is taken in from the air inlet
net. When air flow has dropped down
during operation, stop the engine and
inspect the air inlet net for blocking by
obstacles.
• Note that failure to remove any such
obstacles may result in the engine
becoming overheated and damaged.
(1)Net
Never use the blower without the net of
the blower. Before each use, check that
the net is attached in place and is free
from any damage.
WARNING
IMPORTANT
Maintenance
asegúrese de comprobar que el
silenciador esté debidamente
asegurado al cilindro con tres pernos.
(Par de torsión: 80 – 120 kg·cm).
• Incluso si sólo uno de los tres pernos
está suelto, el silenciador puede
soltarse durante el uso del soplador, lo
que a su vez puede hacer que el motor
se incendie.
■ APAGACHISPAS
• El silenciador de escape está equipado
con un amortiguador de chispas para
evitar que salgan carbonillas calientes
por el tubo de escape. Revíselo
periódicamente y límpielo siempre que
sea necesario con una escobilla. En el
estado de California, las leyes (Sección
4442 del Código de Recursos Públicos
de California) obligan a instalar un
amortiguador de chispas cuando se
utiliza una herramienta que funciona
con gasolina en un terreno no
urbanizado cubierto de vegetación,
maleza o hierba.
(1)Tres pernos
(2)Apagachispas
■ MALLA DE LA ENTRADA DE AIRE
• El aire expulsado por el soplador es
captado a través de la malla de la
entrada de aire. Cuando el flujo de aire
disminuya durante el uso del soplador,
apague el motor e inspeccione la malla
de la entrada de aire para determinar si
está obstruida.
• Tenga presente que si no retira los
obstáculos que obstruyen la malla, el
motor podrá recalentarse y dañarse.
(1)Malla
Nunca utilice el soplador sin la malla
instalada. Antes de cada uso,
compruebe que la malla esté instalada
y que no esté dañada.
ADVERTENCIA
IMPORTANTE
Mantenimiento
F16
F17

20
EspañolEnglish
■ SHOULDER STRAP
• If the shoulder strap is damaged it may
break during use, thus causing the
product to fall and resulting in personal
injury. Follow the instructions below to
replace the shoulder strap with new
one.
• Pass the upper end of the strap through
the hanger, making the FLAPPED SIDE
OUTSIDE.
• Put the end of the strap through the ring
on the strap, and then push the ring
toward the hanger as close as possible.
(1)Ring
The flap on the end of the strap works
as a stopper. Never install the strap
with the flapped side inside, or the unit
may fall from the operator, which could
result in injury to the operator and/or
damage to the unit.
Do not apply liquid type screw lock glue
on screws or bolts used to fix plastics
components. Adherence of this type of
glue may cause cracks on plastics and
end up with the breakage.
IMPORTANT
WARNING
Maintenance
■ CORREA PARA EL HOMBRO
• Si la correa para el hombro está
dañada, ésta puede romperse durante
el uso del soplador, causando la caída
del producto y eventuales lesiones a su
persona. Para reemplazar la correa
para el hombro por una nueva, siga las
instrucciones que se dan a
continuación.
• Pase el extremo superior de la correa a
través del colgador, asegurándose de
que el LADO CON LA ALETA QUEDE
HACIA FUERA.
• Pase el extremo de la correa a través
del aro de la misma, y luego empuje el
aro hacia el colgador, lo más que
pueda.
(1)Aro
La aleta en el extremo de la correa
funciona como tope. Nunca instale la
correa de manera que el lado de la
aleta quede hacia el interior; de lo
contrario, el soplador podrá caerse,
causando lesiones al operador y/o
daños al mismo.
No aplique adhesivo de fijación de rosca
líquido a los tornillos o pernos usados
para asegurar los componentes plásticos.
La adherencia de este tipo de adhesivos
puede causar grietas en los plásticos, y su
posterior ruptura.
IMPORTANTE
ADVERTENCIA
Mantenimiento
F18
BEFORE STORING THE BLOWER:
1. Drain a fuel tank and push the primer
bulb until it becomes empty of fuel.
2 .Remove the spark plug and drop a
spoonful of 2-cycle oil into the cylider.
Crank the engine several time and
install the spark plug.
Storage
ANTES DE ALMACENAR EL SOPLADOR:
1. Vacíe el depósito de combustible y
presione la pera de cebado hasta que
quede sin combustible.
2. Retire la bujía y vierta una cucharada
de aceite para motores de 2 tiempos en
el cilindro. Dele manivela al motor
varias veces e instale la bujía.
Almacenamiento

21
PARTS LIST
LISTA DE PIEZAS
NOTE:
1. Use KOMATSU ZENOAH genuine parts as
specified in the parts list for repair and/or
replacement.
2. KOMATSU ZENOAH does not warrant the
machines, which have been damaged by the
use of any parts other than those specified by
the company.
3. When placing parts orders for repair and/or
replacement, check if the model name and the
serial number are applicable to those specified
in the parts list, then use parts number
described in the parts list.
4. The contents described in the parts list may
change due to improvement.
5. The parts for the machine shall be supplied
seven (7) years after the machine is
discontinued. [It is possible that some specific
parts may be subject to change of their delivery
term and list price within the limit of seven (7)
years after the machine is discontinued. It is
also possible that some parts may be available
even after the limit of seven (7) years.]
NOTA:
1. Para reparaciones o cambios, utilice piezas
KOMATSU ZENOAH genuinas según se
especifica en la lista de piezas.
2. KOMATSU ZENOAH no garantiza máquinas
que se han dañado por el uso de piezas
distintas a las especificadas por la compañía.
3. Al solicitar piezas para reparación y/o
reemplazo, compruebe que el nombre y el
número de serie del modelo corresponden con
los indicados en la lista de piezas, y utilice los
números de pieza indicados en la lista de
piezas.
4. Las piezas incluidas en la lista de piezas
pueden cambiar debido a mejoras.
5. Se suministrarán piezas para la máquina hasta
siete (7) años después de que la máquina haya
sido discontinuada. [Algunas piezas específicas
pueden estar sujetas a cambios en los términos
de entrega y precios de lista dentro de un límite
de siete (7) años después de que la máquina ha
sido discontinuada. También puede suceder
que ciertas piezas sigan estando disponibles
una vez transcurrido el límite de siete (7) años.]
APPLICABLE SERIAL NUMBERS: 200101 and up
May 2002
NÚMEROS DE SERIE APLICABLES: 200101 y posteriores
BACKPACK BLOWER
SOPLADOR DE MOCHILA
EB7001/EB7001RH
La página se está cargando ...
La página se está cargando ...
La página se está cargando ...
La página se está cargando ...
La página se está cargando ...
La página se está cargando ...
La página se está cargando ...

La Comisión de Recursos del Aire de California y KOMATSU ZENOAH tienen el agrado de
explicar la garantía del sistema de control de emisiones para motores “todo terreno” modelo
1995 y posteriores. En California, los nuevos motores “todo terreno” deben ser diseñados,
construidos y equipados para cumplir con las estrictas normas antiesmog del estado. KOMATSU
ZENOAH garantiza el sistema de control de emisiones del motor “todo terreno” por los períodos
que se indican más abajo, siempre que no haya habido mal uso, negligencia o mantenimiento
incorrecto del motor “todo terreno”.
El sistema de control de emisiones puede incluir piezas tales como el carburador y el sistema de
encendido.
Cuando exista una condición que esté cubierta por la garantía, KOMATSU ZENOAH reparará el
motor “todo terreno” gratuitamente, incluyendo los costos de diagnóstico, piezas y mano de
obra.
Cobertura de la garantía dada por el fabricante:
Los motores “todo terreno” de 1995 y posteriores están cubiertos por la garantía durante
dos años. Si cualquier pieza relacionada con el sistema de control de emisiones del
motor presenta un desperfecto, dicha pieza será reparada o reemplazada por KOMATSU
ZENOAH.
Responsabilidades del propietario:
– Como propietario del motor “todo terreno”, usted es responsable por la realización del
mantenimiento requerido que se indica en el manual del propietario. KOMATSU
ZENOAH le recomienda conservar todos los recibos de los trabajos de mantenimiento
realizados en el motor “todo terreno”. No obstante, KOMATSU ZENOAH no puede anular
la garantía solamente por la ausencia de recibos o por la no realización del
mantenimiento programado.
– Sin embargo, como propietario del motor “todo terreno”, debe tener presente que
KOMATSU ZENOAH puede negar la cobertura bajo la garantía si el motor “todo terreno”
o una parte del mismo falla debido a mal uso, negligencia, mantenimiento incorrecto o
modificaciones no autorizadas.
– Usted es responsable de llevar el motor “todo terreno” a un centro de distribución
KOMATSU ZENOAH tan pronto como surja un problema. Los trabajos de reparación
deberán completarse dentro de un plazo razonable, el que no excederá de 30 días.
Si tiene cualquier duda acerca de sus derechos y responsabilidades de acuerdo con esta
garantía, póngase en contacto con KOMATSU ZENOAH AMERICA INC. llamando al
(770)-381-5147, o escriba a
KOMATSU ZENOAH AMERICA INC.
4344 Shackleford Road Suite 500
Norcross, Georgia 30093
DECLARACIÓN DE GARANTÍA DE CONTROL DE EMISIONES DE CALIFORNIA
SUS DERECHOS Y OBLIGACIONES DE ACUERDO CON ESTA GARANTÍA
La página se está cargando ...
La página se está cargando ...
La página se está cargando ...
Transcripción de documentos
T4030-93110 (205) OWNER/OPERATOR MANUAL MANUAL DEL PROPIETARIO/OPERADOR BACKPACK BLOWER SOPLADOR DE MOCHILA EB7001/EB7001RH WARNING ADVERTENCIA The engine exhaust from this product contains chemicals known to the State of California to cause cancer, birth defects or other reproductive harm. Los gases de escape del motor de este producto contienen sustancias químicas conocidas por el Estado de California como causantes de cáncer, malformaciones en recién nacidos y otros problemas de reproducción. WARNING ADVERTENCIA Before using our products, please read this manual carefully to understand the proper use of your unit. Antes de usar nuestros productos, lea detenidamente este manual a fin de familiarizarse con el uso correcto de este aparato. APPLICABLE SERIAL NUMBERS: 200101 and up NÚMEROS DE SERIE APLICABLES: 200101 y posteriores English Español @@@@@@@@e? @@@@@@@@e?@@@@@@@@?e@@@@@@@@e?@@@@@@@@?e@@@@@@@@e?@@@@@@@@?e@@@@@@@@e?@@@@@@@@?e@@@@@@@@e?@@@@@@@@?e@@@@@@@@e?@@@@@@@@?e@@@@@@@@e?@@@@@@@@?e@@@@@@@@e?@@@@@@@@?e @@@@@@@@e? @@@@@@@@e?@@@@@@@@?e@@@@@@@@e?@@@@@@@@?e@@@@@@@@e?@@@@@@@@?e@@@@@@@@e?@@@@@@@@?e@@@@@@@@e?@@@@@@@@?e@@@@@@@@e?@@@@@@@@?e@@@@@@@@e?@@@@@@@@?e@@@@@@@@e?@@@@@@@@?e@@@@@@@@ @@@@@@@@ @@h? @@ @@h? @@ @@h? @@ @@h? @@ @@h? @@ @@h? @@ @@ @@ @@ @@ @@ @@ @@ @@ @@ @@ @@ @@ @@ @@ @@ @@ @@ @@ @@ @@ @@ @@ @@ @@ @@ @@ @@ @@ @@ @@ @@ @@ @@ @@ @@ @@ @@ @@ @@ @@ @@ @@ @@ @@ @@ @@ @@ @@ @@ @@ @@ @@ @@ @@ @@ @@ @@ @@ @@ @@ @@ @@ @@ @@ @@ @@ @@ @@ @@ @@ @@ @@ @@ @@ @@ @@ @@ @@ @@ @@ @@ @@ @@ @@ @@ @@ @@ @@ @@ @@ @@ @@ @@ @@ @@ @@ Read this manual carefully to understand all safety precautions, controls, proper operation and maintenance of your RedMax blower. Failure to do so could result in serious injury. @@g @@g @@g @@g @@g @@g @@@@@@@@ @@@@@@@@ ?@@@@@@@@?e@@@@@@@@e?@@@@@@@@?e@@@@@@@@e?@@@@@@@@?e@@@@@@@@e?@@@@@@@@?e@@@@@@@@e?@@@@@@@@?e@@@@@@@@e?@@@@@@@@?e@@@@@@@@e?@@@@@@@@?e@@@@@@@@e?@@@@@@@@?e@@@@@@@@ ?@@@@@@@@?e@@@@@@@@e?@@@@@@@@?e@@@@@@@@e?@@@@@@@@?e@@@@@@@@e?@@@@@@@@?e@@@@@@@@e?@@@@@@@@?e@@@@@@@@e?@@@@@@@@?e@@@@@@@@e?@@@@@@@@?e@@@@@@@@e?@@@@@@@@?e@@@@@@@@ @@@@@@@@e? @@@@@@@@e?@@@@@@@@?e@@@@@@@@e?@@@@@@@@?e@@@@@@@@e?@@@@@@@@?e@@@@@@@@e?@@@@@@@@?e@@@@@@@@e?@@@@@@@@?e@@@@@@@@e?@@@@@@@@?e@@@@@@@@e?@@@@@@@@?e@@@@@@@@e?@@@@@@@@?e @@@@@@@@e? @@@@@@@@e?@@@@@@@@?e@@@@@@@@e?@@@@@@@@?e@@@@@@@@e?@@@@@@@@?e@@@@@@@@e?@@@@@@@@?e@@@@@@@@e?@@@@@@@@?e@@@@@@@@e?@@@@@@@@?e@@@@@@@@e?@@@@@@@@?e@@@@@@@@e?@@@@@@@@?e@@@@@@@@ @@@@@@@@ @@h? @@ @@h? @@ @@h? @@ @@h? @@ @@h? @@ @@h? @@ @@ @@ @@ @@ @@ @@ @@ @@ @@ @@ @@ @@ @@ @@ @@ @@ @@ @@ @@ @@ @@ @@ @@ @@ @@ @@ @@ @@ @@ @@ @@ @@ @@ @@ @@ @@ @@ @@ @@ @@ @@ @@ @@ @@ @@ @@ @@ @@ @@ @@ @@ @@ @@ @@ @@ @@ @@ @@ @@ @@ @@ @@ @@ @@ @@ @@ @@ @@ @@ @@ @@ @@ @@ @@ @@ @@ @@ @@ @@ @@ @@ @@ @@ @@ @@ @@ @@ @@ @@ @@ @@ @@ @@ @@ @@ @@ @@ @@ @@ @@ @@ @@ @@ @@ @@ @@ @@ @@ @@ @@ @@ @@ ?@@ ?@@ ?@@ ?@@ ?@@ ?@@ ?@@@@@@@@ ?@@@@@@@@ @@ @@ @@ @@ @@ @@ @@ @@ @@ @@ @@ @@ @@ @@ @@ @@ @@ @@ @@ @@ @@ @@ @@ @@ @@ @@ @@ @@ @@ @@ @@ @@ @@ @@ @@ @@ @@ @@ @@ @@ @@ @@ @@ @@ @@ @@ @@ @@ @@ @@ @@ @@ @@ @@ @@ @@ @@ @@ @@ @@ @@ @@ @@ @@ @@ @@ @@ @@ @@ @@ @@ @@ @@ @@ @@ @@ @@ @@ @@ @@ @@ @@ @@ @@ @@ @@ @@ @@ @@ @@ @@ @@ @@ @@ @@ @@ Lea detenidamente este manual a fin de familiarizarse con las precauciones de seguridad, controles, uso y mantenimiento correcto del soplador RedMax. Si no lee el manual, podrá sufrir graves lesiones. @@g @@g @@g @@g @@g @@g @@@@@@@@ @@@@@@@@ ?@@@@@@@@?e@@@@@@@@e?@@@@@@@@?e@@@@@@@@e?@@@@@@@@?e@@@@@@@@e?@@@@@@@@?e@@@@@@@@e?@@@@@@@@?e@@@@@@@@e?@@@@@@@@?e@@@@@@@@e?@@@@@@@@?e@@@@@@@@e?@@@@@@@@?e@@@@@@@@ ?@@@@@@@@?e@@@@@@@@e?@@@@@@@@?e@@@@@@@@e?@@@@@@@@?e@@@@@@@@e?@@@@@@@@?e@@@@@@@@e?@@@@@@@@?e@@@@@@@@e?@@@@@@@@?e@@@@@@@@e?@@@@@@@@?e@@@@@@@@e?@@@@@@@@?e@@@@@@@@ SAFETY FIRST Instructions contained in warnings within this manual and warning seals marked with a symbol on the blower concern critical points which must be taken into consideration to prevent possible serious bodily injury, and for this reason you are requested to read all such instructions carefully and follow them without fail. Note that there may be times when warning seals peel off or become soiled and impossible to read. If this happens, you should contact the dealer from which you purchased the product to order new seals and affix the new seal(s) in the required location(s). ■ Notes on types of warnings WARNING Instructions labeled as shown at left, concern critical steps or procedures which must be followed in order to prevent accidents which could lead to serious bodily injury or death.This mark is used to indicate instructions which must be followed without exception. IMPORTANT Instructions labeled as shown at left concern steps or procedures which, if not followed correctly, could lead to mechanical failure, breakdown, or damage. NOTE Used to label supplementary instructions designed to provide hints or directions useful in the use of the product. @@ @@ @@ @@ @@ @@ @@ @@ @@ @@ @@ @@ @@ @@ @@ @@ @@ @@ @@ @@ @@ @@ @@ @@ @@ @@ @@ @@ @@ @@ @@ @@ @@ @@ @@ @@ @@ @@ @@ @@ @@ @@ @@ @@ @@ @@ @@ @@ @@ @@ @@ @@ @@ @@ @@ @@ @@ @@ @@ @@ @@ @@ @@ @@ @@ @@ @@ @@ @@ @@ @@ @@ @@ @@ @@ @@ @@ @@ @@ @@ @@ @@ @@ @@ @@ @@ @@ @@ @@ @@ @@ @@ @@ @@ @@ @@ @@ @@ @@ @@ @@ @@ @@ @@ @@ @@ @@ @@ @@ @@ @@ @@ ?@@ ?@@ ?@@ ?@@ ?@@ ?@@ ?@@@@@@@@ ?@@@@@@@@ LA SEGURIDAD PRIMERO Las instrucciones que se dan en las advertencias contenidas en este manual y en las etiquetas de advertencia marcadas con el símbolo en el soplador, hacen referencia a puntos críticos que se deben tomar en consideración para evitar posibles lesiones físicas graves y, por esta razón, le solicitamos que lea detenidamente dichas instrucciones y que las siga estrictamente. Tenga presente que las etiquetas de advertencia pueden desprenderse o ensuciarse y tornarse ilegibles. Si esto sucediera, tome contacto con el distribuidor del cual adquirió el producto y solicite nuevas etiquetas; luego, pegue las etiquetas en los puntos necesarios. ■ Notas sobre los tipos de advertencia ADVERTENCIA Las instrucciones señaladas con el símbolo que se muestra a la izquierda hacen referencia a pasos o procedimientos de importancia crítica que se deben seguir con el fin de evitar accidentes que puedan causar graves lesiones físicas o la muerte. Este símbolo se usa para indicar instrucciones que se deben seguir sin excepción. IMPORTANTE Las instrucciones señalada con el símbolo que se muestra a la izquierda hacen referencia a pasos o procedimientos que, de no realizarse correctamente, pueden causar fallos mecánicos, mal funcionamiento o daños. NOTA Se utiliza para indicar instrucciones adicionales que proporcionan recomendaciones o directivas útiles para el uso del producto. 2 English Español Safety Precautions Precauciones de seguridad @@@@@@@@e? @@@@@@@@e?@@@@@@@@?e@@@@@@@@e?@@@@@@@@?e@@@@@@@@e?@@@@@@@@?e@@@@@@@@e?@@@@@@@@?e@@@@@@@@e?@@@@@@@@?e@@@@@@@@e?@@@@@@@@?e@@@@@@@@e?@@@@@@@@?e@@@@@@@@e?@@@@@@@@?e @@@@@@@@e? @@@@@@@@e?@@@@@@@@?e@@@@@@@@e?@@@@@@@@?e@@@@@@@@e?@@@@@@@@?e@@@@@@@@e?@@@@@@@@?e@@@@@@@@e?@@@@@@@@?e@@@@@@@@e?@@@@@@@@?e@@@@@@@@e?@@@@@@@@?e@@@@@@@@e?@@@@@@@@?e@@@@@@@@ @@@@@@@@ @@h? @@ @@h? @@ @@h? @@ @@h? @@ @@h? @@ @@h? @@ @@@@@@@@e? @@@@@@@@e?@@@@@@@@?e@@@@@@@@e?@@@@@@@@?e@@@@@@@@e?@@@@@@@@?e@@@@@@@@e?@@@@@@@@?e@@@@@@@@e?@@@@@@@@?e@@@@@@@@e?@@@@@@@@?e@@@@@@@@e?@@@@@@@@?e@@@@@@@@e?@@@@@@@@?e @@@@@@@@e? @@@@@@@@e?@@@@@@@@?e@@@@@@@@e?@@@@@@@@?e@@@@@@@@e?@@@@@@@@?e@@@@@@@@e?@@@@@@@@?e@@@@@@@@e?@@@@@@@@?e@@@@@@@@e?@@@@@@@@?e@@@@@@@@e?@@@@@@@@?e@@@@@@@@e?@@@@@@@@?e@@@@@@@@ @@@@@@@@ @@h? @@ @@h? @@ @@h? @@ @@h? @@ @@h? @@ @@h? @@ @@ @@ @@ @@ @@ @@ @@ @@ @@ @@ @@ @@ @@ @@ @@ @@ @@ @@ @@ @@ @@ @@ @@ @@ @@ @@ @@ @@ @@ @@ @@ @@ @@ @@ @@ @@ @@ @@ @@ @@ @@ @@ @@ @@ @@ @@ @@ @@ @@ @@ @@ @@ @@ @@ @@ @@ @@ @@ @@ @@ @@ @@ @@ @@ @@ @@ @@ @@ @@ @@ @@ @@ @@ @@ @@ @@ @@ @@ @@ @@ @@ @@ @@ @@ @@ @@ @@ @@ @@ @@ @@ @@ @@ @@ @@ @@ @@ @@ @@ @@ @@ @@ @@ @@ @@ @@ @@ @@ @@ @@ @@ @@ @@ @@ @@ @@ @@ @@ @@ @@ @@ @@ @@ @@ @@ @@ @@ @@ @@ @@ @@ @@ @@ @@ @@ @@ @@ @@ @@ @@ @@ @@ @@ @@ @@ @@ @@ @@ @@ @@ @@ @@ @@ @@ @@ @@ @@ @@ @@ @@ @@ @@ @@ @@ @@ @@ @@ @@ @@ @@ @@ @@ @@ @@ @@ @@ @@ @@ @@ @@ @@ @@ @@ @@ @@ @@ @@ @@ @@ @@ @@ @@ @@ @@ @@ @@ @@ @@ @@ @@ @@ @@ @@ @@ @@ @@ @@ @@ @@ @@ @@ @@ @@ @@ @@ @@ @@ @@ @@ @@ @@ @@ @@ @@ @@ @@ @@ @@ @@ @@ @@ @@ @@ @@ @@ @@ @@ @@ @@ @@ @@ @@ @@ @@ @@ @@ @@ @@ @@ @@ @@ @@ @@ @@ @@ @@ @@ @@ @@ @@ @@ @@ @@ @@ @@ @@ @@ @@ @@ @@ @@ @@ @@ @@ @@ @@ @@ @@ @@ @@ @@ @@ @@ @@ @@ @@ @@ @@ WARNING • Read this Blower Owner/Operator Manual carefully. Be sure you understand how to operate this unit properly before you use it. Failure to do so could result in serious injury. • Be sure to keep this manual handy so that you may refer to it later whenever any questions arise. Also note that you are requested to contact the dealer from whom you purchased the product for assistance the event that you have any questions which cannot be answered herein. • Always be sure to include this manual when selling, lending, or otherwise transferring the ownership of this product. @@g @@g @@g @@g @@g @@g @@@@@@@@ @@@@@@@@ ?@@@@@@@@?e@@@@@@@@e?@@@@@@@@?e@@@@@@@@e?@@@@@@@@?e@@@@@@@@e?@@@@@@@@?e@@@@@@@@e?@@@@@@@@?e@@@@@@@@e?@@@@@@@@?e@@@@@@@@e?@@@@@@@@?e@@@@@@@@e?@@@@@@@@?e@@@@@@@@ ?@@@@@@@@?e@@@@@@@@e?@@@@@@@@?e@@@@@@@@e?@@@@@@@@?e@@@@@@@@e?@@@@@@@@?e@@@@@@@@e?@@@@@@@@?e@@@@@@@@e?@@@@@@@@?e@@@@@@@@e?@@@@@@@@?e@@@@@@@@e?@@@@@@@@?e@@@@@@@@ @@ @@ @@ @@ @@ @@ @@ @@ @@ @@ @@ @@ @@ @@ @@ @@ @@ @@ @@ @@ @@ @@ @@ @@ @@ @@ @@ @@ @@ @@ @@ @@ @@ @@ @@ @@ @@ @@ @@ @@ @@ @@ @@ @@ @@ @@ @@ @@ @@ @@ @@ @@ @@ @@ @@ @@ @@ @@ @@ @@ @@ @@ @@ @@ @@ @@ @@ @@ @@ @@ @@ @@ @@ @@ @@ @@ @@ @@ @@ @@ @@ @@ @@ @@ @@ @@ @@ @@ @@ @@ @@ @@ @@ @@ @@ @@ @@ @@ @@ @@ @@ @@ @@ @@ @@ @@ @@ @@ @@ @@ @@ @@ @@ @@ @@ @@ @@ @@ @@ @@ @@ @@ @@ @@ @@ @@ @@ @@ @@ @@ @@ @@ @@ @@ @@ @@ @@ @@ @@ @@ @@ @@ @@ @@ ?@@ ?@@ ?@@ ?@@ ?@@ ?@@ ?@@@@@@@@ ?@@@@@@@@ @@ @@ @@ @@ @@ @@ @@ @@ @@ @@ @@ @@ @@ @@ @@ @@ @@ @@ @@ @@ @@ @@ @@ @@ @@ @@ @@ @@ @@ @@ @@ @@ @@ @@ @@ @@ @@ @@ @@ @@ @@ @@ @@ @@ @@ @@ @@ @@ @@ @@ @@ @@ @@ @@ @@ @@ @@ @@ @@ @@ @@ @@ @@ @@ @@ @@ @@ @@ @@ @@ @@ @@ @@ @@ @@ @@ @@ @@ @@ @@ @@ @@ @@ @@ @@ @@ @@ @@ @@ @@ @@ @@ @@ @@ @@ @@ @@ @@ @@ @@ @@ @@ @@ @@ @@ @@ @@ @@ @@ @@ @@ @@ @@ @@ @@ @@ @@ @@ @@ @@ @@ @@ @@ @@ @@ @@ @@ @@ @@ @@ @@ @@ @@ @@ @@ @@ @@ @@ @@ @@ @@ @@ @@ @@ @@ @@ @@ @@ @@ @@ @@ @@ @@ @@ @@ @@ @@ @@ @@ @@ @@ @@ @@ @@ @@ @@ @@ @@ • Lea detenidamente el “Manual del propietario/operador” de este soplador. Asegúrese de comprender la forma de uso correcta de este aparato antes de usarlo. De lo contrario, podrá sufrir graves lesiones. • Asegúrese de guardar este manual en un lugar cercano y accesible, de modo que pueda consultarlo cada vez que tenga una duda. Asimismo, tenga presente que deberá ponerse en contacto con el distribuidor del cual adquirió el aparato en caso de que tenga dudas que no puedan responderse en este manual. • Asegúrese de incluir siempre este manual al vender, prestar o transferir de alguna otra forma la propiedad de este producto. @@g @@g @@g @@g @@g @@g @@@@@@@@ @@@@@@@@ ?@@@@@@@@?e@@@@@@@@e?@@@@@@@@?e@@@@@@@@e?@@@@@@@@?e@@@@@@@@e?@@@@@@@@?e@@@@@@@@e?@@@@@@@@?e@@@@@@@@e?@@@@@@@@?e@@@@@@@@e?@@@@@@@@?e@@@@@@@@e?@@@@@@@@?e@@@@@@@@ ?@@@@@@@@?e@@@@@@@@e?@@@@@@@@?e@@@@@@@@e?@@@@@@@@?e@@@@@@@@e?@@@@@@@@?e@@@@@@@@e?@@@@@@@@?e@@@@@@@@e?@@@@@@@@?e@@@@@@@@e?@@@@@@@@?e@@@@@@@@e?@@@@@@@@?e@@@@@@@@ @@ @@ @@ @@ @@ @@ @@ @@ @@ @@ @@ @@ @@ @@ @@ @@ @@ @@ @@ @@ @@ @@ @@ @@ @@ @@ @@ @@ @@ @@ @@ @@ @@ @@ @@ @@ @@ @@ @@ @@ @@ @@ @@ @@ @@ @@ @@ @@ @@ @@ @@ @@ @@ @@ @@ @@ @@ @@ @@ @@ @@ @@ @@ @@ @@ @@ @@ @@ @@ @@ @@ @@ @@ @@ @@ @@ @@ @@ @@ @@ @@ @@ @@ @@ @@ @@ @@ @@ @@ @@ @@ @@ @@ @@ @@ @@ @@ @@ @@ @@ @@ @@ @@ @@ @@ @@ @@ @@ @@ @@ @@ @@ @@ @@ @@ @@ @@ @@ @@ @@ @@ @@ @@ @@ @@ @@ @@ @@ @@ @@ @@ @@ @@ @@ @@ @@ @@ @@ @@ @@ @@ @@ @@ @@ @@ @@ @@ @@ @@ @@ @@ @@ @@ @@ @@ @@ @@ @@ @@ @@ @@ @@ @@ @@ @@ @@ @@ @@ @@ @@ @@ @@ @@ @@ @@ @@ @@ @@ @@ @@ @@ @@ @@ @@ @@ @@ @@ @@ @@ @@ @@ @@ ?@@ ?@@ ?@@ ?@@ ?@@ ?@@ ?@@@@@@@@ ?@@@@@@@@ ■ OPERATOR • Refrain from operating the blower if you are tired, ill, or upset, or if you are under the influence of alcohol, drugs or medication. • To reduce the risk of hearing loss associated with sound level(s), hearing protection is required. • Always wear eye protection and foot protection. Eye protection should meet the requirements of ANSI Z87.1. • To reduce the risk of injury associated with the inhalation of dust, use a face filter mask in dusty conditions. • Wear rubber-soled shoes or shoes with some other form of anti-slip protection to help protect you against falling. • To reduce the risk of injury associated with objects being drawn into rotating parts, do not wear loose clothing, scarves, neck chains, unconfined long hair, and the like. ■ OPERADOR • Absténgase de usar el soplador si está cansado, enfermo o alterado, o si está bajo la influencia del alcohol, drogas o medicamentos. • Para reducir el riesgo de pérdida de la audición asociado a altos niveles de ruido, use protectores para los oídos. • Utilice siempre gafas protectoras y protecciones para los pies. Las gafas protectoras deben cumplir con los requisitos de ANSI Z87.1. • Para reducir el riesgo de lesiones asociadas a la inhalación de polvo, use una máscara con filtro antipolvo en ambientes polvorientos. • Use zapatos con suela de goma o zapatos que tengan algún tipo de protección antideslizante, para evitar caerse. • Para reducir el riesgo de lesiones causadas por objetos atraídos a ciertas piezas giratorias, no use ropa sueltas, bufandas, cadenas alrededor del cuello, pelo largo suelto, etc. ■ USE OF BLOWER • Each time before starting the engine, inspect the entire unit to see if every part is in good order and is securely tightened in place. If any damage is found in the fuel line, the exhaust line, or the ignition wiring, do not use the blower until it has been repaired. ■ USO DEL SOPLADOR • Siempre que vaya a arrancar el motor, inspeccione primero la máquina completa para comprobar que todas las piezas están en buenas condiciones y debidamente instaladas en posición. Si detecta cualquier daño en la tubería de combustible, en la tubería de escape de gases o en el cableado de encendido, no use el soplador hasta haber reparado el desperfecto. IMPORTANT • Before starting operation, always make 4 @@ @@ @@ @@ @@ @@ @@ @@ ADVERTENCIA IMPORTANTE • Antes de comenzar a utilizar la English Safety Precautions sure to check if any obstacles are left inside the volute case. The obstacles may cause damage on fan and volute case and serious injury. (1) Volute Case Español Precauciones de seguridad máquina, asegúrese de comprobar siempre si han quedado obstáculos en el interior de la caja de espirales. La presencia de obstáculos puede causar daños al ventilador y a la caja de espirales, así como lesiones graves. (1) Caja de espirales WARNING Check to see if the shock-absorbing rubber mount has become cracked or otherwise damaged. Note that failing to replace this rubber mount when it has become cracked or damaged may cause the engine to come loose from its frame during use, thus resulting in possible serious bodily injury. • If cracked, be sure to replace without delay. ADVERTENCIA Inspeccione la montura de goma amortiguadora para determinar si está agrietada o dañada de alguna otra forma. Tenga presente que si no se reemplaza la montura de goma si ésta se ha agrietado o dañado, el motor podrá soltarse de su bastidor durante el uso de la máquina, lo que a su vez puede causar graves lesiones físicas. • Si está agrietada, reemplace la montura de goma inmediatamente. (2) Shock-absorbing Rubber Mount (2) Montura de goma amortiguadora WARNING To reduce the risk of injury associated with contacting rotating parts, stop the engine before installing or removing attachments. Do not operate without net in place. Always disconnect the spark plug before performing maintenance or accessing movable parts. ADVERTENCIA Para reducir el riesgo de lesiones asociadas al contacto con piezas giratorias, apague el motor antes de instalar o retirar accesorios. No use la máquina sin la malla instalada. Desconecte siempre la bujía antes de realizar labores de mantenimiento o acceder a piezas móviles. (3) Net (3) Malla • Do not allow children to use blower. Make sure that each person you authorize to operate the blower understands all of the safety rules in this manual. • Avoid using any accessory or attachment other than those bearing the RedMax mark for use with the blower. • Drain the fuel from the fuel tank before transporting or storing the blower. • When storing the blower, choose a space indoors free from moisture and out of the reach of children. • Examine the blower at intervals for loose fasteners and rusted or damaged parts. Use special care around the fuel line, the muffler, and the ignition wiring. • All engine service except for those described in this manual should be performed by competent service personnel. Improper service to the blower fan and muffler could cause a hazardous failure. • No permita que el soplador sea utilizado por niños. Asegúrese de que todas las personas que usted autorice a usar el soplador comprendan la totalidad de las instrucciones de seguridad contenidas en este manual. • Evite usar cualquier accesorio o dispositivo adicional que no lleve la marca RedMax, que indica que el accesorio o dispositivo es apropiado para el soplador. • Antes de transportar o almacenar el soplador, vacíe el combustible del depósito de combustible. • Para almacenar el soplador, elija un lugar bajo techo que esté libre de humedad y fuera del alcance de los niños. • Inspeccione el soplador a intervalos regulares para determinar si hay sujetadores sueltos o piezas oxidadas o dañadas. Tenga especial cuidado alrededor de la tubería de combustible, silenciador y cableado de encendido. • Todo el mantenimiento del motor, excepto el que se describe en este 5 English Safety Precautions Español Precauciones de seguridad manual, deberá ser realizado por personal de servicio cualificado. Un trabajo de mantenimiento mal realizado en el ventilador y silenciador del soplador puede causar fallos peligrosos. ■ FUEL WARNING 6 ■ COMBUSTIBLE ADVERTENCIA To reduce the risk of fire and burn injury: Para reducir el riesgo de incendio o quemaduras: • Handle fuel with care. It is highly flammable. • Do not smoke while handing fuel. • Do not refuel a hot engine. • Do not refuel a running engine. • Avoid spilling fuel or oil. Always wipe unit dry before using. • Move at least 10 ft. (3 meters) away from the fueling point before starting engine. • Always store gasoline in a container approved for flammable liquids. • Make sure the unit is properly assembled and in good operating condition. • Manipule el combustible con cuidado. El combustible es altamente inflamable. • No fume mientras manipula el combustible. • No agregue combustible mientras el motor está caliente. • No agregue combustible mientras el motor está en marcha. • Evite derramar combustible o aceite. Limpie siempre la máquina antes de usarla. • Aléjese al menos 10 pies (3 metros) del punto de carga de combustible antes de arrancar el motor. • Asegúrese de almacenar la gasolina en un recipiente aprobado para líquidos inflamables. • Asegúrese de que la máquina esté debidamente montada y en buenas condiciones de funcionamiento. ■ WORKING CONDITION • Check the work area that the blower will be used in and remove or cover all valuables that may be damaged by the air blast or thrown debris. • To reduce the risk of injury associated with exhaust fume inhalation, do not operate in unventilated area. The exhaust gases contain harmful carbon monoxide. • Do not allow bystanders in work area. • Do not point the blower nozzle in the direction of people or pets. • Avoid using the blower where stable footing and balance are not assured. • Never to touch the spark plug or plug cord while the engine is in operation. Doing so may result in being subjected to an electrical shock. • Never to touch the muffler, spark plug, or other metallic parts of the engine while the engine is in operation or immediately after shutting down the engine. These metallic parts reach high temperatures during operation and doing so could result in serious burns. ■ CONDICIONES DE TRABAJO • Inspeccione el área donde va a usar el soplador y retire o cubra todos los objetos de valor que pudieran dañarse con el chorro de aire o con las materias expulsadas. • Para reducir el riesgo de lesiones asociadas a la inhalación de gases de escape, no use el soplador en lugares que no tengan ventilación. Los gases de escape contienen monóxido de carbono, que es dañino para la salud y puede ser letal. • No permita que haya personas observando en el área de trabajo. • No apunte la tobera del soplador hacia personas o mascotas. • Evite usar el soplador en lugares donde no se pueda garantizar una base estable que le permita mantenerse de pie sin perder el equilibrio. • Nunca toque la bujía o el cable de la bujía mientras el motor está en funcionamiento. De lo contrario, podrá sufrir una descarga eléctrica. • Nunca toque la bujía, el silenciador u otras piezas metálicas mientras el motor está en funcionamiento o inmediatamente después de apagarlo. Estas piezas metálicas alcanzan altas temperaturas durante el uso de la English Español Safety Precautions Precauciones de seguridad máquina y pueden causar graves quemaduras. ■ AVOID NOISE PROBLEM ■ CÓMO EVITAR PROBLEMAS DE RUIDO @@@@@@@@e? @@@@@@@@e?@@@@@@@@?e@@@@@@@@e?@@@@@@@@?e@@@@@@@@e?@@@@@@@@?e@@@@@@@@e?@@@@@@@@?e@@@@@@@@e?@@@@@@@@?e@@@@@@@@e?@@@@@@@@?e@@@@@@@@e?@@@@@@@@?e@@@@@@@@e?@@@@@@@@?e @@@@@@@@e? @@@@@@@@e?@@@@@@@@?e@@@@@@@@e?@@@@@@@@?e@@@@@@@@e?@@@@@@@@?e@@@@@@@@e?@@@@@@@@?e@@@@@@@@e?@@@@@@@@?e@@@@@@@@e?@@@@@@@@?e@@@@@@@@e?@@@@@@@@?e@@@@@@@@e?@@@@@@@@?e@@@@@@@@ @@@@@@@@ @@h? @@ @@h? @@ @@h? @@ @@h? @@ @@h? @@ @@h? @@ @@ @@ @@ @@ @@ @@ @@ @@ @@ @@ @@ @@ @@ @@ @@ @@ @@ @@ @@ @@ @@ @@ @@ @@ @@ @@ @@ @@ @@ @@ @@ @@ @@ @@ @@ @@ @@ @@ @@ @@ NOTE Check and follow the local regulations as to sound level and hours of operations for blower. @@g @@g @@g @@g @@g @@g @@@@@@@@ @@@@@@@@ ?@@@@@@@@?e@@@@@@@@e?@@@@@@@@?e@@@@@@@@e?@@@@@@@@?e@@@@@@@@e?@@@@@@@@?e@@@@@@@@e?@@@@@@@@?e@@@@@@@@e?@@@@@@@@?e@@@@@@@@e?@@@@@@@@?e@@@@@@@@e?@@@@@@@@?e@@@@@@@@ ?@@@@@@@@?e@@@@@@@@e?@@@@@@@@?e@@@@@@@@e?@@@@@@@@?e@@@@@@@@e?@@@@@@@@?e@@@@@@@@e?@@@@@@@@?e@@@@@@@@e?@@@@@@@@?e@@@@@@@@e?@@@@@@@@?e@@@@@@@@e?@@@@@@@@?e@@@@@@@@ @@@@@@@@e? @@@@@@@@e?@@@@@@@@?e@@@@@@@@e?@@@@@@@@?e@@@@@@@@e?@@@@@@@@?e@@@@@@@@e?@@@@@@@@?e@@@@@@@@e?@@@@@@@@?e@@@@@@@@e?@@@@@@@@?e@@@@@@@@e?@@@@@@@@?e@@@@@@@@e?@@@@@@@@?e @@@@@@@@e? @@@@@@@@e?@@@@@@@@?e@@@@@@@@e?@@@@@@@@?e@@@@@@@@e?@@@@@@@@?e@@@@@@@@e?@@@@@@@@?e@@@@@@@@e?@@@@@@@@?e@@@@@@@@e?@@@@@@@@?e@@@@@@@@e?@@@@@@@@?e@@@@@@@@e?@@@@@@@@?e@@@@@@@@ @@@@@@@@ @@h? @@ @@h? @@ @@h? @@ @@h? @@ @@h? @@ @@h? @@ @@ @@ @@ @@ @@ @@ @@ @@ @@ @@ @@ @@ @@ @@ @@ @@ @@ @@ @@ @@ @@ @@ @@ @@ @@ @@ @@ @@ @@ @@ @@ @@ @@ @@ @@ @@ @@ @@ @@ @@ @@ @@ @@ @@ @@ @@ @@ @@ @@ @@ @@ @@ @@ @@ @@ @@ @@ @@ @@ @@ @@ @@ @@ @@ @@ @@ @@ @@ @@ @@ @@ @@ @@ @@ @@ @@ @@ @@ @@ @@ ?@@ ?@@ ?@@ ?@@ ?@@ ?@@ ?@@@@@@@@ ?@@@@@@@@ @@ @@ @@ @@ @@ @@ @@ @@ NOTA @@ @@ @@ @@ @@ @@ @@ @@ Siga las disposiciones locales en cuanto al nivel de ruido permitido y a los horarios de uso del soplador. @@g @@g @@g @@g @@g @@g @@@@@@@@ @@@@@@@@ ?@@@@@@@@?e@@@@@@@@e?@@@@@@@@?e@@@@@@@@e?@@@@@@@@?e@@@@@@@@e?@@@@@@@@?e@@@@@@@@e?@@@@@@@@?e@@@@@@@@e?@@@@@@@@?e@@@@@@@@e?@@@@@@@@?e@@@@@@@@e?@@@@@@@@?e@@@@@@@@ ?@@@@@@@@?e@@@@@@@@e?@@@@@@@@?e@@@@@@@@e?@@@@@@@@?e@@@@@@@@e?@@@@@@@@?e@@@@@@@@e?@@@@@@@@?e@@@@@@@@e?@@@@@@@@?e@@@@@@@@e?@@@@@@@@?e@@@@@@@@e?@@@@@@@@?e@@@@@@@@ @@ @@ @@ @@ @@ @@ @@ @@ @@ @@ @@ @@ @@ @@ @@ @@ @@ @@ @@ @@ @@ @@ @@ @@ ?@@ ?@@ ?@@ ?@@ ?@@ ?@@ ?@@@@@@@@ ?@@@@@@@@ • Operate power equipment only at reasonable hours-not early in the morning or late at night when people might be disturbed. Comply with times listed in local ordinances. • To reduce sound levels, limit the number of pieces of equipment used at any one time. • Operate power blowers at the lowest possible throttle speed to do the job. • Check your equipment before operation, especially the muffler, air intakes and air filters. • Loosen compacted leaves, grass or debris with a rake or broom beforehand, so that the lowest possible throttle setting would get the job done. • In dusty conditions, slightly dampen surfaces or use mister attachment when water is available. • Use el equipo solamente en horarios razonables – no lo use temprano en la mañana ni tarde por la noche, cuando pueda molestar a los vecinos. Asegúrese de cumplir con los horarios indicados en las disposiciones locales. • Para reducir el nivel de ruido, limite el número de unidades utilizadas a la vez. • Use los sopladores a la velocidad de regulador más baja posible mientras realiza el trabajo. • Revise el equipo antes de utilizarlo, especialmente el silenciador, las entradas de aire y los depuradores de aire. • Use un rastrillo o una escoba para retirar hojas, pasto u escombros adheridos, de modo que el trabajo pueda realizarse con el ajuste más bajo del regulador posible. • En ambientes polvorientos, humedezca ligeramente las superficies o utilice un adaptador para nebulizador cuando haya agua disponible. ■ AVOID CHANCES OF DAMAGE • Watch out for children, pets, open windows or freshly washed cars, and blow debris safely away. • Use the full blower nozzle extension so the air stream can work close to the ground. • After using blowers and other equipment, CLEAN UP! Dispose of debris in trash receptacles. • Always check to be sure that no debris has been blown onto someone else’s property. ■ CÓMO MINIMIZAR LAS POSIBILIDADES DE DAÑO • Tenga cuidado con los niños, mascotas, ventanas abiertas o automóviles recién lavados; al retirar escombros con el soplador, hágalo de forma segura. • Use la extensión completa de la tobera del soplador de modo que el chorro de aire pueda aplicarse cerca del suelo. • Después de usar sopladores y otros equipos, ¡LÍMPIELOS! Deseche los escombros en receptáculos para basura. • Compruebe siempre que no ha arrojado escombros con el soplador a una propiedad ajena. 7 English Español Warning labels on the machine Etiquetas de advertencia en la máquina (1) Read owner's manual operating this machine. (1) Lea el manual de propietario antes de usar esta máquina. before (2) Wear head, eye and ear protection. (3) Handling this machine improperly could result in accidents causing serious injury or death. Read this manual carefully and practice using the blower until you are fully acquainted with all operations and have learned to use it correctly. IMPORTANT If warning label peel off or become soiled and impossible to read, you should contact the dealer from which you purchased the product to order new labels and affix them in the required location(s). WARNING Never modify your machine. We won't warrant the machine, if you use the remodeled machine or you don't observe the proper usage written in the manual. 8 (2) Use elementos de protección para la cabeza, ojos y oídos. (3) El uso incorrecto de esta máquina puede causar accidentes, lo cuales a su vez pueden ocasionar graves lesiones o la muerte. Lea este manual detenidamente y practique con el soplador hasta que se haya familiarizado por completo con todas las operaciones y haya aprendido a usarlo correctamente. IMPORTANTE Si una etiqueta de advertencia se desprende o ensucia y se torna ilegible, tome contacto con el distribuidor del cual adquirió el producto y solicite nuevas etiquetas; luego, pegue las etiquetas en los puntos necesarios. ADVERTENCIA Nunca modifique la máquina. La garantía quedará nula si usted remodela la máquina o si no la utiliza correctamente de acuerdo con las instrucciones de este manual. English Español Symbols on the machine Símbolos en la máquina For safe operation and maintenance, symbols are carved in relief on the machine. According to these indications, please be careful not to make a mistake. Para un uso y mantenimiento seguro, se han estampado símbolos en relieve en la máquina. Observe siempre estas indicaciones y tenga cuidado de no cometer un error. (a) The port to refuel the "MIX GASOLINE" POSITION: FUEL TANK CAP (a) El orificio de llenado de combustible “MIX GASOLINE” POSICIÓN: TAPÓN DEL DEPÓSITO DE COMBUSTIBLE (b) The direction to close the choke POSITION: AIR CLEANER COVER (b) La dirección en que se cierra el estrangulador POSICIÓN: CUBIERTA DEL DEPURADOR DE AIRE (c) The direction to open the choke POSITION: AIR CLEANER COVER (c) La dirección en que se abre el estrangulador POSICIÓN: CUBIERTA DEL DEPURADOR DE AIRE IMPORTANT ENGINE INFORMATION THIS ENGINE MEETS U.S. EPA PH1 AND 2001 CALIFORNIA EMISSION REGULATIONS FOR SI SORE’s COMPLIANCE PERIOD : CATEGORY A ENGINE FAMILY : 1KZXS.0625MN ; EM ENGINE DISPLACEMENT : 62.0cc REFER TO OWNER’S MANUAL FOR MAINTENANCE SPECIFICATIONS AND ADJUSTMENTS. MANUFACTURED: KOMATSU ZENOAH CO. RedMax INFORMACIÓN IMPORTANTE ACERCA DEL MOTOR ESTE MOTOR CUMPLE CON LAS NORMAS SOBRE EMISIONES U.S. EPA PH1 Y 2001 DE CALIFORNIA PARA EL PERÍODO DE CONFORMIDAD “SI SORE”: CATEGORÍA A TIPO DE MOTOR : 1KZXS.0625MN ; EM CILINDRADA DEL MOTOR : 62,0 cc CONSULTE EL MANUAL DEL PROPIETARIO PARA LAS ESPECIFICACIONES Y AJUSTES DE MANTENIMIENTO. FABRICADO POR: KOMATSU ZENOAH CO. RedMax INFORMATION IMPORTANTE CONCERNANT LE MOTEUR Ce moteur est conformc aux normcs U.S. EPA PH1 et 2001 ainsi qu’aux autres dispositions ultérieures de la réglementation concernant la pollution de l’air pour les petits moteurs tout-terrain avec une période de accordable : CATEGORY A Type de moteur : 1KZXS.0625MN ;EM Cylindrée du moteur : 62,0cc Se référer au Manuel de l’utilisateur pour les spécifications d’entretien et les réglages. MANUFACTURÉ: KOMATSU ZENOAH CO. RedMax 9 English Español Parts Location Posición de las piezas y especificaciones 1. 2. 3. 4. 5. 6. 7. 8. 9. 10. 11. 12. 13. 14. 1. 2. 3. 4. 5. 6. 7. 8. 9. 10. 11. 12. 13. 14. Frame Shoulder Strap Spark Plug Cap Throttle Lever Stop Switch (behind) Net Choke Lever Air Cleaner Volute Case “CAUTION” Label Elbow Fuel Tank Recoil Starter Ignition Switch [ EB7001RH ] 10 Bastidor Correa para el hombro Casquillo de la bujía Palanca del regulador Interruptor de parada (atrás) Malla Palanca del estrangulador Depurador de aire Caja de espirales Etiqueta “PRECAUCIÓN” Codo Depósito de combustible Arrancador de retroceso Interruptor de encendido English Español Specifications Posición de las piezas y especificaciones MODEL EB7001/EB7001RH Dimensions (L x W x H) mm (in) ................................520 x 580 x 490 (20.5 x 22.8 x 19.3) Dry Weight kg (lbs) ...........................................................................9.7 (21.5) Fuel Tank Capacity liter (fl. oz) ...........................................................................2.1 (70.9) Engine Type ...................................Air cooled 2-cycle gasoline engine Piston Displacement cc (cu. in) ............................................................................62 (3.78) Air Filter .........................................2-stage fresh flow filter system Carburetor (Diaphragm) valve type ...............................................................................Rotary Ignition System ..................................................................................C.D.I Spark Plug .......................................Champion RCJ6Y (Noise-proof) Muffler ...................................................Spark arrester equipped Operating Engine Speed rpm .....................................................................2000 to 7300 Fuel Consumption liter/h (fl. oz/h) ..............................................................................2.2 (65) Max. Air Volume (w/std Pipe) cu. m/min (cfm) .............................................................................18 (630) Max. Air Volume (w/o Pipe) cu. m/min (cfm) .............................................................................24 (855) Max. Air Velocity m/sec (mph) .............................................................................92 (205) Durability Period hrs. ....................................................................................300 Noise Level (50 Feet ANSI B175-2) dB(A) ......................................................................................73 MODELO EB7001/EB7001RH Dimensiones (largo x ancho x alto) mm (pulg.) ................................520 x 580 x 490 (20,5 x 22,8 x 19,3) Peso en seco kg (lbs.) ...........................................................................9,7 (21,5) Capacidad del depósito de combustible litros (fl. oz.) ...........................................................................2,1 (70,9) Tipo de motor ..................Motor de gasolina de 2 tiempos tipo enfriado por aire Cilindrada del pistón cc (pulg.3) ............................................................................62 (3,78) Depurador de aire ..........................Sistema de filtro de flujo puro de 2 fases Carburador (diafragma) tipo válvula ............................................................................Giratorio Sistema de encendido .................................................................................C.D.I. Bujía ............................Champion RCJ6Y (a prueba de ruidos) Silenciador .............................................Equipado con apagachispas Velocidad de funcionamiento del motor rpm ......................................................................2000 a 7300 Consumo de combustible litros (fl. oz/h) ...............................................................................2,2(65) Máx volumen de aire (w/std Pipes) m3/min. (cfm) .............................................................................18 (630) Máx volumen de aire (w/o Pipes) m3/min. (cfm) .............................................................................24 (855) Máx velocidad del aire m/seg. (mph) .............................................................................92 (205) Período de durabilidad hrs. ....................................................................................300 Nivel de ruido (50 Feet ANSI B175-2) dB(A) ......................................................................................73 11 English F1 Español Assembly Montaje ■ BLOWER TUBES 1. Connect the blower and swivel joint with flexible hose. Clamp both ends of the flexible hose securely with the hardware supplied with the unit. 2. Align the protrusion and the groove provided on the tube ends and twist the tube until connection is locked up. ■ TUBOS DEL SOPLADOR 1. Conecte el soplador a la unión giratoria con la manguera flexible. Asegure ambos extremos de la manguera flexible con las abrazaderas y demás elementos proporcionados con el aparato. 2. Alinee la parte saliente con la ranura que hay en los extremos del tubo, y gire el tubo hasta que la conexión quede trabada. ■ THROTTLE LEVER [EB7001RH] • Set up the clamp to the swivel and tighten the screw on the clamp. ■ PALANCA DEL REGULADOR [EB7001RH] • Instale la abrazadera a la unión giratoria y apriete el tornillo en la abrazadera. F2 F3 (1) Clamp (2) Swivel (3) Screw (1) Abrazadera (2) Unión giratoria (3) Tornillo [EB7001RH] ■ THROTTLE CABLE [EB7001RH] • Use the band to fasten the colgate tube containing the throttle cable and the power cable to the hose. F4 (1) Fasten with bands (2) Cable (3) Hose [EB7001RH] 12 ■ CABLE DEL REGULADOR [EB7001RH] • Utilice la banda para atar con la manguera el tubo de protección que contiene el cable del gas y el cable del motor. (1) Atar con la banda (2) Cable (3) Manguera English Español Fuel Combustible WARNING ADVERTENCIA • Gasoline is very flammable. Avoid smoking or bringing any flame or sparks near fuel. Make sure to stop the engine and allow it cool before refueling the unit. Select outdoor bare ground for fueling and move at least 3m(10ft) away from the fueling point before starting the engine. • The RedMax engines are lubricated by oil specially formulated for air-cooled 2cycle gasoline engine use. If RedMax oil is not available, use an anti-oxidant added quality oil expressly labeled for air-cooled 2-cycle engine use. (JASO FC GRADE OIL or ISO EGC GRADE) • La gasolina es altamente inflamable. Evite fumar o utilizar elementos que generen llamas o chispas cerca del combustible. Asegúrese de apagar el motor y permitir que se enfríe antes de cargar combustible. Elija un lugar despejado al aire libre para cargar combustible, y luego aléjese al menos 3 m (10 pies) del lugar de carga de combustible antes de arrancar el motor. • Los motores RedMax utilizan un aceite de lubricación especialmente formulado para motores de gasolina de 2 tiempos enfriados por aire. Si no dispone de aceite RedMax, use un aceite que contenga antioxidante y que esté expresamente indicado para motores de 2 tiempos enfriados por aire. (ACEITE DE GRADO JASO FG o ISO EGC). RECOMMENDED MIXING RATIO GASOLINE 50 : OIL 1 RELACIÓN DE MEZCLA RECOMENDADA GASOLINA 50 : ACEITE 1 50:1 MIXING CHART GASOLINE gal. 1 2 3 4 5 2-CYCLE OIL fl.oz 2.6 5.2 7.8 10.4 13 DIAGRAMA DE MEZCLA 50:1 GASOLINA gal. 1 2 3 4 5 ACEITE de 2,6 5,2 7,8 10,4 13 2 TIEMPOS fl. oz. GASOLINE liter 2-CYCLE OIL ml 1 20 2 40 3 60 4 5 80 100 • Exhaust emission are controlled by the fundamental engine parameters and components(eq., carburation, ignition timing and port timing) without addition of any major hardware or the introduction of an inert material during combustion. • These engines are certified to operate on unleaded gasoline. • Make sure to use gasoline with a minimum octane number of 90 ROZ(USA/Canada : pump octane min.87) • Unleaded gasoline is recommended to reduce the contamination of the air for the sake of your health and the environment. • Poor quality gasolines or oils may damage sealing rings, fuel lines or fuel tank of the engine. GASOLINA litros ACEITE de 2 TIEMPOS ml 1 2 3 4 5 20 40 60 80 100 • La emisión de gases de escape se controla mediante los parámetros y componentes fundamentales del motor (p. ej., carburación, sincronización de encendido y sincronización de lumbreras) sin necesidad de agregar elementos adicionales ni introducir algún material inerte durante la combustión. • Estos motores están certificados para funcionar con gasolina sin plomo. • Asegúrese de usar gasolina con un octanaje mínimo de 90 ROZ (EE.UU./Canadá: octanaje mínimo 87). • Se recomienda usar gasolina sin plomo para reducir la contaminación del aire y proteger la salud y el medio ambiente. • Las gasolinas o aceites de mala calidad pueden dañar los anillos obturadores, las tuberías de combustible o el depósito de combustible del motor. 13 English Fuel Combustible ■ HOW TO MIX FUEL 1. Measure out the quantities of gasoline and oil to be mixed. 2. Put some of the gasoline into a clean, approved fuel container. 3. Pour in all of the oil and agitate well. 4. Pour in the rest of gasoline and agitate again for at least one minute. 5. Put a clear indication on the outside of the container to avoid mixing up with gasoline or other containers. 6. Indicate the contents on outside of container for easy identification. ■ CÓMO MEZCLAR EL COMBUSTIBLE 1. Mida las cantidades de gasolina y aceite que va a mezclar. 2. Vierta un poco de gasolina en un recipiente limpio, aprobado para combustibles. 3. Vierta todo el aceite en el recipiente y agítelo bien. 4. Vierta el resto de la gasolina en el recipiente y vuelva a agitarlo durante al menos un minuto. 5. Ponga una indicación clara en el exterior del recipiente para evitar confundirlo con otros recipientes (p. ej., de gasolina). 6. Indique el contenido en el exterior del recipiente para facilitar su identificación. ■ FUELING THE UNIT 1. Untwist and remove the fuel cap. Rest the cap on a dustless place. 2. Put fuel into the fuel tank to 80% of the full capacity. 3. Fasten the fuel cap securely and wipe up any fuel spillage around the unit. ■ CARGA DE COMBUSTIBLE EN EL APARATO 1. Suelte y retire el tapón del depósito de combustible. Deje el tapón en un lugar que esté libre de polvo. 2. Vierta el combustible en el depósito de combustible hasta alcanzar el 80% de la capacidad máxima del depósito. 3. Coloque el tapón y apriételo de forma segura, y seque las salpicaduras de combustible en el aparato. WARNING 1. Select bare ground for fueling. 2. Move at least 10 feet (3 meters) away from the fueling point before starting the engine. 3. Stop the engine before refueling the unit. FOR YOUR ENGINE LIFE, AVOID; 1. FUEL WITH NO OIL(RAW GASOLINE) – It will cause severe damage to the internal engine parts very quickly. 2. GASOHOL – It can cause deterioration of rubber and/or plastic parts and disruption of engine lubrication. 3. OIL FOR 4-CYCLE ENGINE USE or WATER COOLED 2-CYCLE ENGINE USE – It can cause spark plug fouling, exhaust port blocking, or piston ring sticking. 4. Mixed fuels which have been left unused for a period of one month or more may clog the carburetor and result in the engine failing to operate properly. 14 Español ADVERTENCIA 1. Elija un lugar despejado para cargar combustible. 2. Aléjese al menos 3 m (10 pies) del lugar de carga de combustible antes de arrancar el motor. 3. Apague el motor antes de volver a cargar combustible. PARA PROLONGAR LA VIDA ÚTIL DEL MOTOR, EVITE USAR; 1. COMBUSTIBLE SIN ACEITE (GASOLINA PURA) – Esto causará serios daños a las piezas internas de motor rápidamente. 2. GASOHOL – Puede causar el deterioro de las piezas de goma y/o plásticas y la ruptura de la lubricación del motor. 3. ACEITE PARA MOTORES DE 4 TIEMPOS o PARA MOTORES DE 2 TIEMPOS ENFRIADOS POR AGUA – Puede ensuciar la bujía o causar la obstrucción de la lumbrera de escape o el agarrotamiento del aro del émbolo. 4. Los combustibles mezclados que no se han utilizado durante un mes o más tiempo pueden obstruir el carburador e impedir el funcionamiento correcto del motor. English F5 [EB7001] Español Operation Uso ■ CONTROL ARM [EB7001] • Hold the upper end of the control arm in hand and, while pulling it away from the unit, rotate arm forward (anti-clockwise as the arrow direction) until it clicks. (The first position) And if you want, you can rotate arm more forward until it clicks. (The second position) Choose the arm position according to your working condition. ■ BRAZO DE CONTROL [EB7001] • Sostenga el extremo superior del brazo de control en la mano y, mientras tira de él, gire el brazo hacia adelante (en el sentido contrario a las agujas del reloj, en la dirección de la flecha) hasta escuchar un “clic”. (Primera posición) Si lo desea, puede girar el brazo aún más, hasta escuchar un segundo “clic”. (Segunda posición) Elija la posición del brazo de acuerdo con las condiciones de trabajo. • To fold the arm, reverse the order. F6 (1) The First Position (2) The Second Position • Para plegar el brazo, repita este procedimiento en orden inverso. (1) Primera posición (2) Segunda posición ■ STARTING ENGINE IMPORTANT [EB7001] F7 (1) (3) (4) (2) F8 (4) (1) (2) (3) [EB7001RH] F9 (1) (2) (3) [EB7001] ■ ARRANQUE DEL MOTOR IMPORTANTE • Avoid operating the blower with the flexible tube and swivel joint disconnected. That will reduce the cooling air and the engine could be damaged by overheating. • Evite usar el soplador con el tubo flexible y la unión giratoria desconectados. Esto reducirá el aire de enfriamiento, con lo cual el motor puede dañarse por recalentamiento. 1. Push the primer bulb until fuel flows out in the clear tube. 2. When the engine is cool, close the choke. 1. Presione la pera de cebado hasta que el combustible fluya por el tubo transparente. 2. Cuando el motor esté frío, cierre el estrangulador. (1) Choke Lever (2) Primer Bulb (3) OPEN (4) CLOSE (1) Botón del estrangulador (2) Pera de cebado (3) ABRIR (4) CERRAR 3. [EB7001RH] Set the ignition switch to the start position. 4. Set the throttle lever in 1/3 open position. 3. [EB7001RH] Coloque el interruptor en la posición “START”. 4. Ajuste la palanca del estrangulador en la posición abierta de 1/3. (1) Full Throttle (2) About 1/3 Open (3) Idling (4) Ignition Switch (1) Plena admisión (2) Abierto 1/3 (3) Marcha mínima (4) Interruptor de encendido 5. To start, hold the top of the blower firmly with your left hand. Pull the starter knob slowly until you feel it engage and then give it a vigorous strong pull. 5. Para arrancar el motor, sostenga firmemente la parte superior del soplador con su mano izquierda. Tire lentamente del botón del arrancador hasta sentir que se engancha, y luego dele un tirón fuerte. IMPORTANT • Avoid pulling the starter rope out to its full extent and allowing the starter rope to snap back. This will prevent premature damage to the starter. • Do not let a person stand near the blower or the exhaust port. IMPORTANTE • Evite tirar de la cuerda del arrancador de modo que se salga completamente y luego soltarla para que se devuelva por sí sola. Esto evitará daños prematuros en el arrancador. 15 English Español Operation Uso 6. Once the engine is running, gradually open the choke if it was set closed, and let the engine run at idle speed for a minute to warm it up. • No permita que haya personas cerca del soplador o de la lumbrera de escape. NOTE When the engine fails to start after several attempts due to overchoking, open the choke and repeat pulling the rope. 6. Una vez que el motor esté funcionando, abra gradualmente el estrangulador si estaba cerrado, y permita que el motor funcione en marcha mínima durante un minuto para que se caliente. NOTA Si el motor no arranca después de varios intentos debido a estrangulación excesiva, abra el estrangulador y vuelva a tirar de la cuerda. ■ ADJUSTING IDLE SPEED • The idling speed is set for 2000 rpm at the factory. If it is necessary to adjust the idle speed, use the adjustment screw on the top side of carburetor. F10 (1) (1) Idling Adjustment Screw ■ AJUSTE DE LA VELOCIDAD DE MARCHA MÍNIMA • La velocidad de marcha mínima viene ajustada a 2000 rpm de fábrica. Si fuera necesario ajustar la velocidad de marcha mínima, use el tornillo de ajuste situado en la parte superior del carburador. (1) Tornillo de Ajuste de Velocidad de Marcha Mínima ■ STOPPING ENGINE [EB7001] • Move the throttle lever to the idling position and press the stop switch (red button) until the engine comes to a complete stop. F11 (1) ■ CÓMO APAGAR EL MOTOR [EB7001] • Mueva la palanca de emisión de gases hasta la posición mínima y pulse el interruptor de parada (botón rojo) hasta que el motor se detenga completamente. (1) Stop Switch (1) Interruptor de parada [EB7001] F12 (1) [EB7001RH] 16 [EB7001RH] • Move the throttle lever to the idling position and set the ignition switch to the stop position. [EB7001RH] • Mueva la palanca de emisión de gases hasta la posición mínima y mueva el interruptor en la posición “STOP”. (1) Ignition Switch (1) Interruptor de encendido English Español Maintenance Mantenimiento WARNING F13 ADVERTENCIA Make sure that the engine has stopped and is cool before performing any service to the blower. Contact with rotating blower fan or hot muffler may result in a personal injury. Antes iniciar los trabajos de mantenimiento del soplador, asegúrese de que el motor se haya detenido y enfriado. El contacto con el ventilador en movimiento o con el silenciador caliente puede causar lesiones. ■ AIR CLEANER • Never operate the blower without an air filter or with a deformed or broken filter element. • Check the air cleaner every once week of use or more frequently if used under dusty conditions. A clogged air filter may increase fuel consumption while cutting down the engine power. Never operate the blower without the air filter or with a deformed filter element because unfiltered dusty air will quickly ruin the engine. ■ DEPURADOR DE AIRE • Nunca utilice el soplador sin un depurador de aire instalado o con un elemento de filtro deformado o roto. • Compruebe el depurador de aire cada una vez semana de uso o con mayor frecuencia en caso de utilizar el soplador en ambientes polvorientos. Un depurador de aire obstruido puede aumentar el consumo de combustible y reducir al mismo tiempo la potencia del motor. Nunca utilice el soplador sin el depurador de aire instalado o con un elemento de filtro deformado o roto, ya que el aire sin filtrar (que contiene polvo) arruinará rápidamente el motor. CLEANING AIR FILTER: 1. Unscrew 2 knob bolts and remove the air cleaner cover. Then remove a prefilter mounted inside the air cleaner cover. LIMPIEZA DEL DEPURADOR DE AIRE: 1. Desatornille los dos pernos de perilla y quite la cubierta del depurador de aire. Luego quite el filtro montado dentro de la cubierta del depurador de aire. (1) Knob Bolt (2) Prefilter (3) Paper Filter (1) Perno de perilla (2) Filtro (3) Filtro de papel 2. Wash the prefilter in fresh, non flammable cleaning solution (ex. warm soapy water) and then dry. (Clean the air filter once in a week.) 3. Exchange the paper filter element with new one in case it has been contaminated. 2. Lave el filtro con agua limpia, y con una solución no inflamable (eje. Agua de jabón tibia) y luego séquelo. (Limpie el depurador de aire una vez por semana) 3. Cambie el accesorio del filtro de papel por uno nuevo, en caso de que este resulte contaminado. WARNING • This element is dry type. • Never wash the element oleaginous cleaning solution. ADVERTENCIA in • Este filtro es de tipo seco. • Nunca lave el filtro en soluciones de limpieza oleaginosas. 17 English F14 Maintenance Mantenimiento ■ FUEL FILTER • A clogged fuel filter may cause poor acceleration of the engine. Check periodically to see if the filter is clogged with dirt. The filter can be taken out of the fueling port using a small wire hook. Disconnect the filter assembly from the fuel pipe and unhook the retainer to disassemble it. Clean the components with gasoline. ■ FILTRO DE COMBUSTIBLE • Un filtro de combustible puede causar una aceleración débil del motor. Inspeccione periódicamente el filtro para ver si está obstruido con suciedad. El filtro puede sacarse por la lumbrera de carga de combustible utilizando un gancho de alambre. Desconecte el conjunto del filtro del tubo de combustible y desenganche el retenedor para desarmarlo. Limpie los componentes con gasolina. (1) Screen (2) Element (2) (3) Holder (4) Retainer F15 ■ SPARK PLUG • The spark plug may gather carbon deposits on its firing end with reasonable use. Remove and inspect the spark plug every 25 hours and clean the electrodes as necessary with a wire brush. The spark gap should be adjusted to .025 in (0.6~0.7mm). • Plug manufacturers recommend replacing the plug twice a year to avoid unexpected plug failure in a job. REPLACEMENT PLUG IS A CHAMPION RCJ6Y. IMPORTANT • Note that using any spark plugs other than those designated may result in the engine failing to operate properly or in the engine becoming overheated and damaged. • To install the spark plug, first turn the plug until it is finger tight, then tighten it a quarter turn more with a socket wrench. ■ MUFFLER WARNING • Inspect periodically, the muffler for loose fasteners, any damage or corrosion. If any sign of exhaust leakage is found, do not use the blower and have it repaired immediately. • Note that failing to do so may result in the engine catching on fire. IMPORTANT • Before starting operation, always make sure to check if the muffler is properly held by three bolts to the cylinder. (Fastening Torque : 80~120kg·cm) • Even if one bolt out of three bolts is 18 Español (1) Tamiz (2) Elemento (2) (3) Soporte (4) Retenedor ■ BUJÍA • En el extremo de encendido de la bujía pueden acumularse depósitos de carbón con el uso normal del aparato. Retire e inspeccione la bujía cada 25 horas de uso y limpie los electrodos según sea necesario con un cepillo de alambre. La separación de los electrodos de la bujía debe ajustarse a 0,25 pulg. (0,6 – 0,7 mm). • Los fabricantes de bujías recomiendan reemplazar la bujía dos veces por año para evitar fallos inesperados durante la realización de un trabajo. BUJÍA DE RECAMBIO: CHAMPION RCJ6Y. IMPORTANTE • Tenga presente que el uso de bujías distintas de las especificadas puede impedir que el motor funcione correctamente o hacer que el motor se recaliente y dañe. • Para instalar la bujía, primero gírela hasta sentir que está apretada, y luego apriétela un cuarto de vuelta adicional con una llave de cubo. ■ SILENCIADOR ADVERTENCIA • Inspeccione periódicamente el silenciador para comprobar si hay sujetadores sueltos, daños o corrosión. Si detecta cualquier signo de fuga de gases de escape, deje de usar el soplador y mándelo a reparar inmediatamente. • Tenga presente que si continúa usando el soplador en estas condiciones, el motor puede incendiarse. IMPORTANTE • Antes de comenzar a usar el soplador, English Maintenance F16 Español Mantenimiento loose, the muffler may get loose during operation which may result in engine catching on fire. asegúrese de comprobar que el silenciador esté debidamente asegurado al cilindro con tres pernos. (Par de torsión: 80 – 120 kg·cm). • Incluso si sólo uno de los tres pernos está suelto, el silenciador puede soltarse durante el uso del soplador, lo que a su vez puede hacer que el motor se incendie. ■ SPARK ARRESTER • The muffler is equipped with a spark arrester to prevent red hot carbon from flying out of the exhaust outlet. Periodically inspect and clean as necessary with a wire brush. In the State of California it is required by law (Section 4442 of the California Pulic Resources Code) to equip a spark arrester when a gas powered tool is used in any forest covered, bush covered, or grass covered unimproved land. ■ APAGACHISPAS • El silenciador de escape está equipado con un amortiguador de chispas para evitar que salgan carbonillas calientes por el tubo de escape. Revíselo periódicamente y límpielo siempre que sea necesario con una escobilla. En el estado de California, las leyes (Sección 4442 del Código de Recursos Públicos de California) obligan a instalar un amortiguador de chispas cuando se utiliza una herramienta que funciona con gasolina en un terreno no urbanizado cubierto de vegetación, maleza o hierba. (1) Three Bolts (2) Spark Arrester (1) Tres pernos (2) Apagachispas ■ AIR INLET NET ■ MALLA DE LA ENTRADA DE AIRE IMPORTANT F17 • Blowing air is taken in from the air inlet net. When air flow has dropped down during operation, stop the engine and inspect the air inlet net for blocking by obstacles. • Note that failure to remove any such obstacles may result in the engine becoming overheated and damaged. (1) Net WARNING Never use the blower without the net of the blower. Before each use, check that the net is attached in place and is free from any damage. IMPORTANTE • El aire expulsado por el soplador es captado a través de la malla de la entrada de aire. Cuando el flujo de aire disminuya durante el uso del soplador, apague el motor e inspeccione la malla de la entrada de aire para determinar si está obstruida. • Tenga presente que si no retira los obstáculos que obstruyen la malla, el motor podrá recalentarse y dañarse. (1) Malla ADVERTENCIA Nunca utilice el soplador sin la malla instalada. Antes de cada uso, compruebe que la malla esté instalada y que no esté dañada. 19 English F18 Maintenance Mantenimiento ■ SHOULDER STRAP • If the shoulder strap is damaged it may break during use, thus causing the product to fall and resulting in personal injury. Follow the instructions below to replace the shoulder strap with new one. • Pass the upper end of the strap through the hanger, making the FLAPPED SIDE OUTSIDE. • Put the end of the strap through the ring on the strap, and then push the ring toward the hanger as close as possible. ■ CORREA PARA EL HOMBRO • Si la correa para el hombro está dañada, ésta puede romperse durante el uso del soplador, causando la caída del producto y eventuales lesiones a su persona. Para reemplazar la correa para el hombro por una nueva, siga las instrucciones que se dan a continuación. • Pase el extremo superior de la correa a través del colgador, asegurándose de que el LADO CON LA ALETA QUEDE HACIA FUERA. • Pase el extremo de la correa a través del aro de la misma, y luego empuje el aro hacia el colgador, lo más que pueda. (1) Ring WARNING The flap on the end of the strap works as a stopper. Never install the strap with the flapped side inside, or the unit may fall from the operator, which could result in injury to the operator and/or damage to the unit. IMPORTANT Do not apply liquid type screw lock glue on screws or bolts used to fix plastics components. Adherence of this type of glue may cause cracks on plastics and end up with the breakage. 20 Español (1) Aro ADVERTENCIA La aleta en el extremo de la correa funciona como tope. Nunca instale la correa de manera que el lado de la aleta quede hacia el interior; de lo contrario, el soplador podrá caerse, causando lesiones al operador y/o daños al mismo. IMPORTANTE No aplique adhesivo de fijación de rosca líquido a los tornillos o pernos usados para asegurar los componentes plásticos. La adherencia de este tipo de adhesivos puede causar grietas en los plásticos, y su posterior ruptura. Storage Almacenamiento BEFORE STORING THE BLOWER: 1. Drain a fuel tank and push the primer bulb until it becomes empty of fuel. 2 .Remove the spark plug and drop a spoonful of 2-cycle oil into the cylider. Crank the engine several time and install the spark plug. ANTES DE ALMACENAR EL SOPLADOR: 1. Vacíe el depósito de combustible y presione la pera de cebado hasta que quede sin combustible. 2. Retire la bujía y vierta una cucharada de aceite para motores de 2 tiempos en el cilindro. Dele manivela al motor varias veces e instale la bujía. PARTS LIST LISTA DE PIEZAS BACKPACK BLOWER SOPLADOR DE MOCHILA EB7001/EB7001RH NOTE: 1. Use KOMATSU ZENOAH genuine parts as specified in the parts list for repair and/or replacement. 2. KOMATSU ZENOAH does not warrant the machines, which have been damaged by the use of any parts other than those specified by the company. 3. When placing parts orders for repair and/or replacement, check if the model name and the serial number are applicable to those specified in the parts list, then use parts number described in the parts list. 4. The contents described in the parts list may change due to improvement. 5. The parts for the machine shall be supplied seven (7) years after the machine is discontinued. [It is possible that some specific parts may be subject to change of their delivery term and list price within the limit of seven (7) years after the machine is discontinued. It is also possible that some parts may be available even after the limit of seven (7) years.] APPLICABLE SERIAL NUMBERS: 200101 and up NOTA: 1. Para reparaciones o cambios, utilice piezas KOMATSU ZENOAH genuinas según se especifica en la lista de piezas. 2. KOMATSU ZENOAH no garantiza máquinas que se han dañado por el uso de piezas distintas a las especificadas por la compañía. 3. Al solicitar piezas para reparación y/o reemplazo, compruebe que el nombre y el número de serie del modelo corresponden con los indicados en la lista de piezas, y utilice los números de pieza indicados en la lista de piezas. 4. Las piezas incluidas en la lista de piezas pueden cambiar debido a mejoras. 5. Se suministrarán piezas para la máquina hasta siete (7) años después de que la máquina haya sido discontinuada. [Algunas piezas específicas pueden estar sujetas a cambios en los términos de entrega y precios de lista dentro de un límite de siete (7) años después de que la máquina ha sido discontinuada. También puede suceder que ciertas piezas sigan estando disponibles una vez transcurrido el límite de siete (7) años.] NÚMEROS DE SERIE APLICABLES: 200101 y posteriores May 2002 21 DECLARACIÓN DE GARANTÍA DE CONTROL DE EMISIONES DE CALIFORNIA SUS DERECHOS Y OBLIGACIONES DE ACUERDO CON ESTA GARANTÍA La Comisión de Recursos del Aire de California y KOMATSU ZENOAH tienen el agrado de explicar la garantía del sistema de control de emisiones para motores “todo terreno” modelo 1995 y posteriores. En California, los nuevos motores “todo terreno” deben ser diseñados, construidos y equipados para cumplir con las estrictas normas antiesmog del estado. KOMATSU ZENOAH garantiza el sistema de control de emisiones del motor “todo terreno” por los períodos que se indican más abajo, siempre que no haya habido mal uso, negligencia o mantenimiento incorrecto del motor “todo terreno”. El sistema de control de emisiones puede incluir piezas tales como el carburador y el sistema de encendido. Cuando exista una condición que esté cubierta por la garantía, KOMATSU ZENOAH reparará el motor “todo terreno” gratuitamente, incluyendo los costos de diagnóstico, piezas y mano de obra. Cobertura de la garantía dada por el fabricante: Los motores “todo terreno” de 1995 y posteriores están cubiertos por la garantía durante dos años. Si cualquier pieza relacionada con el sistema de control de emisiones del motor presenta un desperfecto, dicha pieza será reparada o reemplazada por KOMATSU ZENOAH. Responsabilidades del propietario: – Como propietario del motor “todo terreno”, usted es responsable por la realización del mantenimiento requerido que se indica en el manual del propietario. KOMATSU ZENOAH le recomienda conservar todos los recibos de los trabajos de mantenimiento realizados en el motor “todo terreno”. No obstante, KOMATSU ZENOAH no puede anular la garantía solamente por la ausencia de recibos o por la no realización del mantenimiento programado. – Sin embargo, como propietario del motor “todo terreno”, debe tener presente que KOMATSU ZENOAH puede negar la cobertura bajo la garantía si el motor “todo terreno” o una parte del mismo falla debido a mal uso, negligencia, mantenimiento incorrecto o modificaciones no autorizadas. – Usted es responsable de llevar el motor “todo terreno” a un centro de distribución KOMATSU ZENOAH tan pronto como surja un problema. Los trabajos de reparación deberán completarse dentro de un plazo razonable, el que no excederá de 30 días. Si tiene cualquier duda acerca de sus derechos y responsabilidades de acuerdo con esta garantía, póngase en contacto con KOMATSU ZENOAH AMERICA INC. llamando al (770)-381-5147, o escriba a KOMATSU ZENOAH AMERICA INC. 4344 Shackleford Road Suite 500 Norcross, Georgia 30093-
 1
1
-
 2
2
-
 3
3
-
 4
4
-
 5
5
-
 6
6
-
 7
7
-
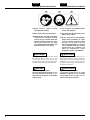 8
8
-
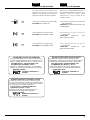 9
9
-
 10
10
-
 11
11
-
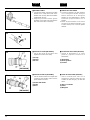 12
12
-
 13
13
-
 14
14
-
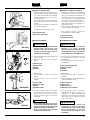 15
15
-
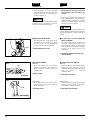 16
16
-
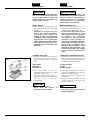 17
17
-
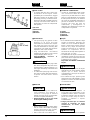 18
18
-
 19
19
-
 20
20
-
 21
21
-
 22
22
-
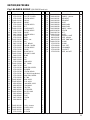 23
23
-
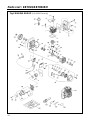 24
24
-
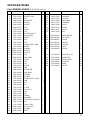 25
25
-
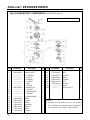 26
26
-
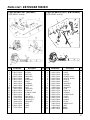 27
27
-
 28
28
-
 29
29
-
 30
30
-
 31
31
-
 32
32


RedMax EB7001 El manual del propietario
- Categoría
- Sopladores / secadores de aire
- Tipo
- El manual del propietario
- Este manual también es adecuado para
En otros idiomas
- English: RedMax EB7001 Owner's manual