Craftsman 247.203740 Manual de usuario
- Categoría
- Cortadoras de césped
- Tipo
- Manual de usuario

perator's
£RnFrSMAN°
T1600 LAWN TRACTOR
19 HP, Variation Speed
46" Deck
Model No. 247.203740
• Espanol, P. 31
This product has a low emission engine which operates differently
from previously built engines. Before you start the engine, read and
understand this Operator's Manual.
Before using this equipment,
read this manuaJ and foJJow
aJJsafety ruJes and operating
instructions.
For answers to your questions about
this product, call:
1-800=659=5917
CraftsmanTractorHelpLine
7 am =7 pm CT, Mort. =Sun.
Sears Brands Management Corporation, Hoffman Estates, IL 60179 U.S.A.
Visit our website: www.craftsman.com FormNo.769-09449
(November1,2013)

Warranty Statement .......................................................... 2
Safety Instructions ............................................................ 3
Slope Gauge ..................................................................... 8
Assembly ........................................................................... 9
Operation ........................................................................ 11
Service and Maintenance .............................................. 17
Off-Season Storage ........................................................ 25
Trou bleshooting .............................................................. 26
Espa_ol ............................................................................ 31
Service Numbers ............................................. Back Cover
CRAFTSMAN FULL WARRANTY
FORTWOYEARSfromthedateofpurchase,all non-expendablepartsofthis ridingequipmentarewarrantedagainstanydefectsinmaterialor
workmanship.A defectivenon-expendablepartwill receivefreein-homerepairorreplacementif repairisunavailable.
BATTERYLIMITEDWARRANTY
FOR90 DAYSfromthedateofpurchase,thebattery(an expendablepart)ofthis ridingequipmentiswarrantedagainstanydefectsinmaterialor
workmanship.A newbatterywillbesuppliedfreeof charge.Youareresponsibleforthelaborcostof batteryinstallation.
ADDITIONALLIMITEDWARRANTIES
Inthefollowingadditionalwarranties,youare responsibleforthe laborcostofpartinstallationafterthe secondyearfromthedateof purchase.
FORFIVEYEARSfromthedateof purchase,theframeofthis ridingequipmentiswarrantedagainstanydefectsinmaterialorworkmanship.A
newframewillbe suppliedfreeofcharge.
FORTENYEARSfromthedateofpurchase,thefrontaxleof thisridingequipmentiswarrantedagainstanydefectsin materialorworkmanship.
A newfrontaxlewillbe suppliedfreeofcharge.
FORASLONGASIT ISUSEDbytheoriginalownerafterthetenthyearfromthedateofpurchase,thecastironfrontaxle(ifequipped)ofthisriding
equipmentiswarrantedagainstanydefectsinmaterialorworkmanship.Withproofofpurchase,a newcastironfrontaxlewillbesuppliedfreeofcharge.
WARRANTYSERVICE
Forwarrantycoveragedetailsto obtainfreerepairor replacement,call1-800-659-5917orvisitthewebsite:www.craftsman.com
Inallcasesabove,if partrepairor replacementisimpossible,theridingequipmentwillbe replacedfreeofchargewiththesameor anequivalent
model.
Alloftheabovewarrantycoverageisvoidifthisridingequipmentiseverusedwhileprovidingcommercialservicesor if rentedtoanotherperson.
ThiswarrantycoversONLYdefectsin materialandworkmanship.WarrantycoveragedoesNOTinclude:
• Expendableparts(exceptbattery)thatcanwearoutfromnormalusewithinthewarrantyperiod,includingbutnotlimitedto blades,spark
plugs,air cleaners,belts,andoilfilters.
Standardmaintenanceservicing,oilchanges,or tune-ups.
Tirereplacementor repaircausedbypuncturesfromoutsideobjects,suchasnails,thorns,stumps,or glass.
• Tireor wheelreplacementor repairresultingfromnormalwear,accident,orimproperoperationor maintenance.
Repairsnecessarybecauseof operatorabuse,includingbutnotlimitedtodamagecausedbytowingobjectsbeyondthecapabilityofthe
ridingequipment,impactingobjectsthatbendtheframe,axleassemblyorcrankshaft,or over-speedingtheengine.
Repairsnecessarybecauseof operatornegligence,includingbutnotlimitedto,electricalandmechanicaldamagecausedbyimproper
storage,failureto usethepropergradeandamountofengineoil,failuretokeepthedeckclearofflammabledebris,orfailuretomaintainthe
ridingequipmentaccordingtotheinstructionscontainedin theoperator'smanual.
• Engine(fuelsystem)cleaningor repairscausedbyfueldeterminedto becontaminatedoroxidized(stale).Ingeneral,fuelshouldbeused
within30 daysof itspurchasedate.
• Normaldeteriorationandwearoftheexteriorfinishes,or productlabelreplacement.
Thiswarrantygivesyouspecificlegalrights,andyoumayalsohaveotherrightswhichvaryfromstatetostate.
Sears BrandsManagementCorporation, Hoffman Estates,IL 60179
ModelNumber:
EngineOil: SAE30 Serial Number:
Dateof Purchase:
Fuel: UnleadedGasoline Recordthemodelnumber,serialnumber,
anddateof purchaseabove,
© SearsBrands,LLC 2

Thissymbolpointsoutimportantsafetyinstructionswhich,if not
followed,couldendangerthe personalsafetyand/orproperty of
yourselfandothers.Readandfollow all instructionsinthis manual
beforeattempting tooperatethis machine.Failuretocomplywith these
instructionsmayresultinpersonalinjury.Whenyouseethis symbol,HEED
ITSWARNING!
CALiFORNiA PROPOSITION 65
EngineExhaust,someof itsconstituents,andcertainvehidecomponents
containoremit chemicalsknowntoStateofCaliforniato causecancerand
birth defectsor otherreproductiveharm.
Batteryposts,terminals,andrelatedaccessoriescontain leadand lead
compounds,chemicalsknowntothe StateofCaliforniatocausecancerand
reproductiveharm.Washhandsafter handling.
Thismachinewasbuilt tobeoperatedaccordingtothesafeoperation
practicesinthis manual.Aswith anytype of powerequipment,
carelessnessorerroronthe partoftheoperatorcanresultinseriousinjury.
Thismachineiscapableof amputatingfingers, hands,toesandfeet and
throwingdebris.Failuretoobservethefollowing safetyinstructionscould
resultinseriousinjuryor death.
Your Responsibility--Restrict theuseofthis powermachineto
personswho read,understandandfollow thewarningsand instructionsin
thismanualandonthemachine.
SAVETHESEINSTRUCTIONS!
GENERAL OPERATION
Read,understand,andfollowall instructionsonthemachineandinthe
manual(s)beforeattemptingtoassembleandoperate.Keepthismanualin
asafeplaceforfutureandregularreferenceandfororderingreplacement
parts.
Befamiliarwith allcontrolsandtheirproperoperation.Knowhowtostop
themachineanddisengagethemquickly.
Neverallowchildrenunder14yearsoldtooperatethismachine.Children14
yearsoldandovershouldreadandunderstandtheoperationinstructions
andsafetyrulesinthismanualandshouldbetrainedandsupervisedbya
parent.
Neverallowadultstooperatethismachinewithout properinstruction.
Tohelpavoidbladecontactorathrownobjectinjury,keepbystanders,
helpers,childrenandpetsatleast75feetfromthemachinewhileitisin
operation.Stopmachineifanyoneentersthearea.
Thoroughlyinspecttheareawheretheequipmentistobeused.Remove
allstones,sticks,wire,bones,toys,andotherforeignobjectswhichcould
bepickedupandthrownbytheblade(s).Thrownobjectscancauseserious
personalinjury.
Planyourmowingpatterntoavoiddischargeofmaterialtowardroads,
sidewalks,bystandersandthelike.Also,avoiddischargingmaterialagainst
awallorobstructionwhichmaycausedischargedmaterialto ricochetback
towardtheoperator.
Alwayswearsafetyglassesorsafetygogglesduringoperationandwhile
performinganadjustmentor repairtoprotectyoureyes.Thrownobjects
whichricochetcancauseseriousinjurytotheeyes.
Wearsturdy,rough-soledworkshoesandclose-fittingslacksandshirts.
Loosefitting clothesandjewelrycanbecaughtin movableparts.Never
operatethis machineinbarefeetorsandals.
Beawareofthemowerandattachmentdischargedirectionanddonotpoint
itatanyone.Donotoperatethemowerwithoutthedischargecoverorentire
grasscatcherinitsproperplace.
Donotput handsorfeetnearrotatingpartsor underthecuttingdeck.
Contactwiththe blade(s)canamputatehandsandfeet.
Amissingordamageddischargecovercancausebladecontactorthrown
objectinjuries.
Stoptheblade(s)whencrossinggraveldrives,walks,orroadsandwhilenot
cuttinggrass.
Watchfortrafficwhenoperatingnearorcrossingroadways.Thismachineis
not intendedforuseonanypublicroadway.
Donotoperatethemachinewhileunderthe influenceofalcoholordrugs.
Mowonlyindaylightorgoodartificiallight.
Nevercarrypassengers.
Disengageblade(s)beforeshiftingintoreverse.Backupslowly.Alwayslook
downandbehindbeforeandwhilebackingtoavoidaback-overaccident.
Slowdownbeforeturning.Operatethemachinesmoothly.Avoiderratic
operationandexcessivespeed.
Disengageblade(s),setparkingbrake,stopengineandwaituntilthe
blade(s)cometoacompletestopbeforeremovinggrasscatcher,emptying
grass,uncloggingchute,removinganygrassordebris,ormakingany
adjustments.
Neverleavearunningmachineunattended.Alwaysturnoffblade(s),set
parkingbrake,stopengineandremovekeybeforedismounting.
Useextracarewhenloadingor unloadingthemachineintoa trailerortruck.
Thismachineshouldnotbedrivenupordownramp(s),becausethemachine
couldtipover,causingseriouspersonalinjury.Themachinemustbepushed
manuallyonramp(s)toloadorunloadproperly.
Mufflerandenginebecomehotandcancauseaburn.Donottouch.

Checkoverheadclearancescarefullybeforedrivingunderlowhangingtree
branches,wires,dooropeningsetc.,wheretheoperatormaybestruckor
pulledfromthemachine,whichcouldresultinseriousinjury.
Disengageallattachmentclutchesanddepressthebrakepedalcompletely
beforeattemptingtostartengine.
Yourmachineisdesignedtocutnormalresidentialgrassofaheightnomore
than10".Donotattempttomowthroughunusuallytall,drygrass(e.g.,
pasture)orpilesofdryleaves.Drygrassorleavesmaycontacttheengine
exhaustand/orbuilduponthemowerdeckpresentingapotentialfire
hazard.
Useonlyaccessoriesandattachmentsapprovedforthismachinebythe
machinemanufacturer.Read,understandandfollowallinstructions
providedwiththeapprovedaccessoryorattachment.Foralistofapproved
accessoriesandattachments,call1-800-659-5917.
Dataindicatesthatoperators,age60yearsandabove,areinvolvedina
largepercentageofridingmower-relatedinjuries.Theseoperatorsshould
evaluatetheirabilitytooperatetheridingmowersafelyenoughtoprotect
themselvesandothersfromseriousinjury.
Ifsituationsoccurwhicharenotcoveredinthismanual,usecareandgood
judgment.
SLOPE OPERATION
Slopesareamajorfactorrelatedtolossofcontrolandtip-overaccidentswhichcan
resultinsevereinjuryordeath.Allslopesrequireextracaution.Ifyoucannotback
uptheslopeorif youfeeluneasyonit, donotmowit.
Foryoursafety,usetheSlopeGuideincludedaspartofthismanualtomeasure
slopesbeforeoperatingthismachineonaslopedorhillyarea.Iftheslopeisgreater
than15degreesasshownonthe SlopeGuide,donotoperatethismachineonthat
areaorseriousinjurycouldresult.
Do:
Mowupanddownslopes,notacross.Exerciseextremecautionwhen
changingdirectiononslopes.
Watchforholes,ruts,bumps,rocks,orotherhiddenobjects.Uneventerrain
couldoverturnthemachine.Tallgrasscanhideobstacles.
Useslowspeed.Choosea lowenoughspeedsettingsothat youwill nothave
tostoporshiftwhileontheslope.Tiresmaylosetractiononslopeseven
thoughthebrakesarefunctioningproperly.Alwayskeepmachineingear
whengoingdownslopestotakeadvantageofenginebrakingaction.
Followthemanufacturer'srecommendationsforwheelweightsor
counterweightstoimprovestability.
Useextracarewith grasscatchersorotherattachments.Thesecanchange
thestabilityofthemachine.
Keepallmovementontheslopesslowandgradual.Donotmakesudden
changesinspeedordirection.Rapidengagementorbrakingcouldcause
thefrontofthe machineto lift andrapidlyflipoverbackwardswhichcould
causeseriousinjury.
Avoidstartingorstoppingona slope.Iftireslosetraction,disengagethe
blade(s)andproceedslowlystraightdowntheslope.
Do Not:
Donotturnonslopesunlessnecessary;then,turnslowlyandgradually
downhill,if possible.
Donotmowneardrop-offs,ditchesorembankments.Themowercould
suddenlyturnoverira wheelisovertheedgeofacliff,ditch,orifanedge
cavesin.
Donottry tostabilizethemachinebyputtingyourfootontheground.
Donotusea grasscatcheronsteepslopes.
Donotmowonwetgrass.Reducedtractioncouldcausesliding.
Donotattempttocoastdownhill.Over-speedingmaycausetheoperatorto
losecontrolofthe machineresultinginseriousinjuryordeath.
Donottowheavypullbehindattachments(e.g.loadeddumpcart,lawn
roller,etc.)onslopesgreaterthan5degrees.Whengoingdownhill,the
extraweighttendstopushthetractorandmaycauseyoutoloosecontrol
(e.g.tractormayspeedup,brakingandsteeringabilityarereduced,
attachmentmayjack-knifeandcausetractortooverturn).
CHILDREN
Tragicaccidentscanoccuriftheoperatorisnotalerttothe presenceofchildren.
Childrenareoftenattractedtothemachineandthemowingactivity.Theydonot
understandthedangers.Neverassumethatchildrenwill remainwhereyoulastsaw
them.
Keepchildrenoutofthemowingareaandinwatchfulcareofaresponsible
adultotherthantheoperator.
Bealertandturnmachineoff ifachildentersthearea.
Beforeandwhilebacking,lookbehindanddownforsmallchildren.
Nevercarrychildren,evenwith theblade(s)shutoff.Theymayfall offandbe
seriouslyinjuredorinterferewith safemachineoperation.
Useextremecarewhenapproachingblindcorners,doorways,shrubs,trees
orotherobjectsthat mayblockyourvisionofachildwhomayrunintothe
machine.
Toavoidback-overaccidents,alwaysdisengagethecuttingblade(s)before
shiftingintoReverse.Ifequipped,the"ReverseCautionMode"(blades
operatewhilemachineridesinreverse)shouldnotbeusedwhenchildrenor
othersarearound.
Keepchildrenawayfromhotorrunningengines.Theycansufferburnsfrom
ahotmuffler.
Removekeywhenmachineisunattendedto preventunauthorized
operation.
Neverallowchildrenunder14yearsofagetooperatethismachine.Children14and
overshouldreadandunderstandtheinstructionsandsafeoperationpracticesin
thismanualandonthemachineandshouldbetrainedandsupervisedbyanadult.
TOWING
Towonlywith a machinethathasa hitchdesignedfortowing.Donotattach
towedequipmentexceptatthehitchpoint.
Followthe manufacturersrecommendationforweightlimitsfortowed
equipmentandtowingonslopes.
Neverallowchildrenorothersinorontowedequipment.
4

Onslopes,theweightofthetowedequipmentmaycauselossoftractionand
lossofcontrol.
Alwaysuseextracautionwhentowingwith amachinecapableofmaking
tight turns(e.g."zero-turn"ride-onmower).Makewideturnstoavoid
jack-knifing.
Travelslowlyandallowextradistancetostop.
Donotcoastdownhill.
SERVICE
Safe Handling of Gasoline:
Toavoidpersonalinjuryorproperty damageuseextremecarein handling
gasoline.Gasolineisextremelyflammableandthe vaporsareexplosive.
Seriouspersonalinjurycanoccurwhen gasolineisspilledonyourselforyour
clotheswhichcanignite.Washyourskinand changeclothesimmediately.
Useonlyanapprovedgasolinecontainer.
Neverfill containersinsideavehicleoronatruckortrailerbedwithaplastic
liner.Alwaysplacecontainersonthegroundawayfromyourvehiclebefore
filling.
Whenpractical,removegas-poweredequipmentfromthetruckor
trailerandrefuelit ontheground.If thisisnotpossible,thenrefuelsuch
equipmentonatrailerwithaportablecontainer,ratherthanfromagasoline
dispensernozzle.
Keepthenozzlein contactwith therimofthefueltankorcontaineropening
atalltimesuntilfuelingiscomplete.Donotuseanozzlelock-opendevice.
Extinguishallcigarettes,cigars,pipesandothersourcesofignition.
Neverfuelmachineindoors.
Neverremovegascaporaddfuelwhiletheengineishotor running.Allow
enginetocoolatleasttwominutesbeforerefueling.
Neveroverfill fueltank.Filltanktonomorethan1/2inchbelowbottomof
fillernecktoallowspaceforfuelexpansion.
Replacegasolinecapandtightensecurely.
Ifgasolineisspilled,wipeit offtheengineandequipment.Movemachineto
anotherarea.Wait5minutesbeforestartingtheengine.
Toreducefirehazards,keepmachinefreeofgrass,leaves,orotherdebris
build-up.Cleanupoilorfuelspillageandremoveanyfuelsoakeddebris.
Neverstorethemachineorfuelcontainerinsidewherethereisanopen
flame,sparkorpilotlightasonawaterheater,spaceheater,furnace,clothes
dryerorothergasappliances.
Allowamachinetocoolatleastfiveminutesbeforestoring.
General Service
Neverrunanengineindoorsorinapoorlyventilatedarea.Engineexhaust
containscarbonmonoxide,anodorless,anddeadlygas.
Beforecleaning,repairing,orinspecting,makecertaintheblade(s)andall
movingpartshavestopped.Disconnectthesparkplugwireandground
againsttheenginetopreventunintendedstarting.
Periodicallychecktomakesurethebladescometocompletestopwithin
approximately(5)fivesecondsafteroperatingthebladedisengagement
control.Ifthebladesdonotstopwithinthethistimeframe,yourmachine
shouldbeservicedprofessionallybyaSearsorotherqualifiedservicedealer.
Checkbrakeoperationfrequentlyasit issubjectedtowearduringnormal
operation.Adjustandserviceasrequired.
Checktheblade(s)andenginemountingboltsatfrequentintervalsfor
propertightness.Also,visuallyinspectblade(s)for damage(e.g.,excessive
wear,bent,cracked).Replacetheblade(s)with theoriginalequipment
manufacturer's(O.E.M.)blade(s)only,listedinthismanual.Useofparts
whichdonotmeettheoriginalequipmentspecificationsmayleadto
improperperformanceandcompromisesafety!
Mowerbladesaresharp.Wrapthebladeorweargloves,anduseextra
cautionwhenservicingthem.
Keepallnuts,bolts,andscrewstight tobesuretheequipmentisinsafe
workingcondition.
Nevertamperwith thesafetyinterlocksystemorothersafetydevices.Check
theirproperoperationregularly.
Afterstrikingaforeignobject,stoptheengine,disconnectthesparkplug
wire(s)andgroundagainsttheengine.Thoroughlyinspectthemachinefor
anydamage.Repairthedamagebeforestartingandoperating.
Neverattempttomakeadjustmentsorrepairstothe machinewhilethe
engineisrunning.
Grasscatchercomponentsandthedischargecoveraresubjecttowear
anddamagewhichcouldexposemovingpartsorallowobjectstobe
thrown.Forsafetyprotection,frequentlycheckcomponentsandreplace
immediatelywithoriginalequipmentmanufacturer's(O.E.M.)partsonly,
listedinthismanual.Useofpartswhichdonotmeettheoriginalequipment
specificationsmayleadtoimproperperformanceandcompromisesafety!
Donotchangetheenginegovernorsettingsorover-speedtheengine.The
governorcontrolsthemaximumsafeoperatingspeedoftheengine.
Maintainorreplacesafetyandinstructionlabels,asnecessary.
Observeproperdisposallawsandregulationsforgas,oil,etc.toprotectthe
environment.
AccordingtotheConsumerProductsSafetyCommission(CPSC)andtheU.S.
EnvironmentalProtectionAgency(EPA),thisproducthasanAverageUseful
Lifeofseven(7)years,or 270hoursofoperation.AttheendoftheAverage
UsefulLife,buyanewmachineorhavethemachineinspectedannuallyby
aSearsorotherqualifiedservicedealertoensurethat allmechanicaland
safetysystemsareworkingproperlyandnotwornexcessively.Failuretodo
socanresultin accidents,injuriesordeath.

DO NOT MODIFY ENGINE
Toavoidseriousinjuryor death,donot modifyengineinanyway.Tampering
with thegovernorsetting canleadto a runawayengineandcauseitto
operateat unsafespeeds.Nevertamperwith factorysetting ofengine
governor.
NOTICE REGARDING EMiSSiONS
Engineswhicharecertified to complywith CaliforniaandfederalEPA
emissionregulationsforSORE(SmallOffRoadEquipment)arecertified
tooperateonregularunleadedgasoline,andmayincludethefollowing
emissioncontrolsystems:EngineModification(EM),OxidizingCatalyst(0C),
SecondaryAirinjection(SAI)andThreeWayCatalyst(TWC)ifsoequipped.
SPARK ARRESTOR
Thismachineisequippedwith aninternalcombustionengineand should
not beusedonor nearanyunimprovedforest-covered,brushcoveredor
grass-coveredland unlesstheengine'sexhaustsystemisequippedwith a
sparkarrestormeetingapplicablelocalorstate laws(ifany).
Ifa sparkarrestorisused,it shouldbemaintainedineffectiveworking order
bythe operator.Inthe StateofCaliforniathe aboveisrequiredbylaw (Section
4442ofthe CaliforniaPublicResourcesCode).Otherstatesmayhavesimilar
laws.Federallawsapplyonfederallands.
Asparkarrestorfor the muffler isavailablethrough yournearestSearsParts
andRepairServiceCenter.
WARNING: Your Responsibility--Restrict the use of this power machine to persons who read, understand and follow
the warnings and instructions in this manual and on the machine.
SAVETHESEINSTRUCTIONS!
6

SAFETY SYMBOLS
This page depicts and describes safety symbols that may appear on this product. Read, understand, and follow all instructions on the machine before
attempting to assemble and operate.
P
I
I
I
0
...............j
• ®
|i
A
READ THE OPERATOR'S MANUAL(S)
Read, understand, and follow all instructions in the manual(s) before attempting to assemble and
operate
DANGER-- ROTATING BLADES
Never carry passengers. Never carry children, even with the blades off.
DANGER-- ROTATING BLADES
Always look down and behind before and while backing to avoid a back-over accident.
WARNING-- ROTATING BLADES
Do not put hands or feet near rotating parts or under the cutting deck. Contact with the blade(s)
can amputate hands and feet.
WARNING--THROWN OBJECTS
This machine may pick up and throw and objects which can cause serious personal injury.
WARNING--THROWN OBJECTS
This machine may pick up and throw and objects which can cause serious personal injury.
BYSTANDERS
Keep bystanders, helpers, children and pets at least 75 feet from the machine while it is in
operation.
WARNING-- SLOPE OPERATION
Do not operate this machine on a slope greater than 15 degrees.
WARNING-- HOT SURFACE
Engine parts, especially the muffler, become extremely hot during operation. Allow engine and
muffler to cool before touching.
DANGER- ROTATING BLADES
To reduce the risk of injury, keep hands and feet away. Do not operate unless discharge cover or grass
catcher is in its proper place. If damaged, replace immediately.

(OK)
15° Slope
X
(TOO STEEP)
15° Slope
'_. _ Figure1
USETHISSLOPEGAUGETODETERMINE
IFA SLOPEISTOOSTEEPFORSAFEOPERATION!
Tochecktheslope,proceedasfollows:
1. Removethis pageandfoldalongthedashedline.
2. Locatea verticalobject onor behindtheslope(e.g.a pole,building,fence, tree,etc.)
3. Align eithersideoftheslopegaugewith theobject(SeeFigure1 and Figure2 ).
4. Adjust gaugeupor downuntilthe left cornertouchestheslope(SeeFigure1and Figure2).
5.
15°
dashedline
If thereisagap belowthegauge,theslopeistoo steepfor safeoperation(SeeFigure2above).
Figure2
Slopes are a major factor related to tip-over and roll-over accidents which can result in severe injury or death. Do not operate machine
on slopes in excess of 15 degrees. All slopes require extra caution. If you cannot back up the slope or if you feel uneasy on it, do not
mow it. Always mow up and down the face of slopes, never mow across the face of slopes.

IMPORTANT:Yourtractorisshippedwithmotoroilintheengine.However,
youMUSTchecktheoillevelbeforeoperating.RefertotheService&Maintenance
sectionforinstructionsoncheckingtheoillevel.
NOTE:AnyreferenceinthismanualtotheRIGHTor LEFTsideofthe
tractorisobservedfromoperator'sseatpositionfacingforwardtowards
thefrontoftractor.
Attaching the Battery Cables
CALIFORNIA PROPOSITION 65
Batteryposts,terminals,andrelatedaccessoriescontainleadand
leadcompounds,chemicalsknowntotheStateof Californiato
causecancerandreproductiveharm.Washhandsafterhandling.
Whenattachingbatterycables,alwaysconnectthe POSITIVE(Red)wire to its
terminalfirst, followed bythe NEGATIVE(Black)wire.
Forshippingreasons,bothbatterycablesonyourequipmenthavebeenleft
disconnectedfromtheterminalsatthefactory.Toconnectthe batterycables,
proceedasfollows:
NOTE:ThepositivebatteryterminalismarkedPos.(+).Thenegativebattery
terminalismarkedNeg.(-).
1. Removetheplasticcover,ifpresent,fromthepositivebatteryterminaland
attachtheredcabletothepositivebatteryterminal(+) withtheboltand
hexnut.SeeFigure1.
2. Removetheplasticcover,ifpresent,fromthenegativebatteryterminaland
attachtheblackcabletothenegativebatteryterminal(-) with theboltand
hexnut.SeeFigure1.
f --,,
J
J
J
J
J
J
J
J
J
f
J
J
J
J
\ J
Figure1
3. Positiontheredrubberbootoverthe positivebatteryterminaltohelp
protectit fromcorrosion.
NOTE:Ifthebatteryisput intoserviceafterthedateshownontopofbattery,
chargethe batteryasinstructedin theService&Maintenancesectionofthis
manualpriortooperatingthetractor.
Shipping BraceRemoval
Makesurethe ridingmower'sengineisoff, removethe ignitionkey,and
setthe parkingbrakebeforeremovingthe shippingbrace.Refertothe
Operatonsectonfor nstructonsonhowtosetthe parkng brake.
Locatetheshippingbrace,if present,andaccompanyingwarningtagfound
ontherightsideofthemower,betweenthedischargechutedeflectorand
thecuttingdeck.SeeFigure2.
Figure2
Placethedecklift leverin thehighestcuttingposition.RefertoSettingthe
CuttingHeightintheOperationsectionofthismanual.
Whilepushingthedischargechutedeflectortowardsthemachinewithyourleft
hand,removetheshippingbracewithyourrighthandbygraspingitbetweenyour
thumbandindexfingerandrotatingitclockwise.
Theshippingbrace,usedforpackagingpurposesonly,must beremovedand
discardedbeforeoperatingyourridingmower.
Themowingdeckiscapableof throwing objects.Failuretooperatethe
Iridingmowerwithout the dischargechutedeflector inthe properoperating
[positioncouldresultinseriouspersonalinjuryand/orpropertydamage.
Attaching TheSteeringWheel
Ifthesteeringwheelforyourtractordidnotcomeattached,thehardwarefor
attachingit hasbeenpackedwithinthesteeringwheel,beneaththesteeringwheel
cap.Carefullypryoffthe steeringwheelcapandremovethehardware.
I. Withthewheelsofthetractorpointingstraightforward,placethesteering
wheeloverthesteeringshaft.
2. Placethewasher(withthecuppedsidedown)overthesteeringwheeland
securewith thehexbolt.SeeFigure3.
9

f
\
Figure3
3.
Placethesteeringwheelcapoverthecenterofthesteeringwheelandpush
downwarduntilit"clicks"intoplace.
Attaching TheSeat
NOTE: Forshippingreasons,theseatiseitherfastenedto thetractor
seat'spivotbracketwitha plastictie,or mountedbackwardtothepivot
bracket.Ineithercase,freetheseatfromits shippingpositionbeing
carefulnotto bendor kinkthewiringharnessandfollowtheinstruc-
tionsbelowtoattachit.
1. Removethetwohexscrewsandnutsfromtheseatpivotbracket.
2. Alignthefrontholesoftheseatmountingbracketwiththeholesintheseat
pivotbracketonyourtractorandsecurewithpreviouslyremovedhexscrews
andnuts.SeeAinFigure4.
3. Plugthewiringharnessintotheseatsafetyswitchinthebottomoftheseat,
asshowninBofFigure4.
flOTE:Thetractorwillnotoperatewiththewiringharnessdisconnected.
Adjusting the Seat
Toadjustthepositionoftheseat,pull upandholdtheseatadjustmentlever.Slide
theseatforwardorrearwardtothedesiredposition;thenreleasetheadjustment
lever.Makesureseatislockedintopositioninaseat-stopbeforeoperatingthe
tractor.SeeFigure5.
Beforeoperatingthe tractor, makesurethe seatisengagedinaseat-stop.
Engagethe parkingbrake.Standbehindthe machineand pull backonseat
until itclicksintoplace.
_,, ,J
Figure5
Tire Pressure
Maximumtire pressureunderanycircumstancesis30psi.Equaltire pressure
shouldbe maintainedatall times.Neverexceedthe maximuminflation
)ressureshownonthe sidewallofthe tire.
Therecommendedoperatingtirepressureis:
Approximately10psiforthereartires
Approximately14psiforthefronttires
IMPORTANT: Refertothetiresidewallforexacttiremanufacturer's
recommendedormaximumpsi.Donotoverinflate.Uneventire
pressurecouldcausethecuttingdeckto mowunevenly.
Figure4
10

H
G
A
©
B
C
D
E
F
Figure7
A ParkingBrakeLever
B Throttle/ChokeControlLever
C IgnitionSwitchModule
D Auto-drivePedal
E DeckLiftLever
F PTOLever(BladeEngage)
G CupHolder
H ShiftLever
I SeatAdjustmentLever
J BrakePedal
NOTE:Anyreferenceinthismanualto theRIGHTor LEFTsideofthetractoris observedfromoperator'sseat
positionfacingforwardtowardsthefrontoftractor.
MeetsANSiSafetyStandards
CraftsmanTractorsconformtothesafetystandardoftheAmericanNationalStandardsInstitute(ANSI).
11

ParkingBrakeLever
Tosettheparkingbrake:Fullydepressthebrakepedal.Movethe
parkingbrakeleverintotheparkingbrakeposition.Releasethe
brakepedaltoallowtheparkingbraketoengage.
Toreleasetheparkingbrake:Depressthebrakepedalandmove
theparkingbrakeleveroutofthe ONpositionandintotheOFF
position.Theparkingbrakewill thenbereleased.Releasethe
brakepedal.
NOTE:Theparkingbrakemustbesetiftheoperatorleavestheseat
with theenginerunningortheenginewill automaticallyshutoff.
Throttle/chokeControlLever
m
m
mmmmmmm
SLOW
Thethrottle/chokecontrolleverislocatedon
theleftsideofthetractor'sdashpanel.This
levercontrolsthespeedoftheengineandwhen
pushedallthewayforward,thechokecontrol
also.Whensetinagivenposition,thethrottle
will maintainauniformenginespeed.
IMPORTANT:Whenoperatingthetractorwith thecuttingdeck
engaged,thethrottle/chokecontrollevermustalwaysbeinthe
FAST(rabbit)position.
Ignition SwitchModule
Tostarttheengine,insertthekeyintotheignitionswitchandturn
clockwiseto theSTARTposition.Releasethekeyintothe NORMAL
MOWINGMODEpositiononcetheenginehasfired.
Tostoptheengine,turntheignitionkeycounterclockwisetothe
STOPposition.
IM PORTANT: Priortooperatingthe
tractor,refertoboththe"SafetyInterlock
System"and"StartingTheEngine"laterinthis
sectionofthis manualfor detailedinstructions
regardingtheIgnitionSwitchModuleand
operatingthetractorinREVERSECAUTION
MODE.
Neverleavearunningmachineunattended.AlwaysdisengagePTO(Blade
EngageLever),moveshiftleverintoneutralposition,setparking brake,
stopengineand removekeyto preventunintendedstarting.
SeatAdjustmentLever
Theseatadjustmentleverislocatedbelowthefront/left oftheseat.Thelever
allowsforadjustmentoftheforeandaft positionoftheseat.RefertotheAssembly
sectionofthemanualformoredetailedinstructionsforadjustingtheseatposition.
Auto-drivepedal
Thedrivepedalislocatedontherightsideofthetractor,alongtherunningboard.
Depressthedrivepedalforwardandthetractorwill moveinthedirectionthatthe
shiftleverisengagedin.Tocausethetractortotravelforward,whileatacomplete
stop,movetheshiftleverintotheForwardposition.Graduallysteponthedrive
pedalandthetractorwill begintomoveforward.TomoveinReverse,followthe
sameprocedureonlymovetheshiftleverintothereverseposition.
Thegroundspeediscontrolledwith thedrivepedal.Thefurtherforwardthat the
pedalispivoted,thefasterthetractorwill travel.Thepedalwill returntoitsoriginal
positionwhenit'snotdepressed.RefertotheOperationsectionofthismanualfor
detailedinstructionsregardingthe drivepedal.
IMPORTANT:Always set the parking brake when leaving thetractor
unattended.
DeckLiftLever
Foundonyourtractor'srightfender,thedecklift leverisusedto
changetheheightofthecuttingdeck.Touse,movethelevertothe
left, thenplaceinthenotchbestsuitedfor yourapplication.
PTO(BladeEngage)Lever
Foundonthetractor'srightfender,thePTO(bladeengage)lever
isusedtoengagepowertothecuttingdeckorother(separately
available)attachments.Tooperate,movetheleveralltheway
forward.Movingthe leverallthewayrearwardintothe PTOOFF
positiondisengagespowertothecuttingdeck/attachment.
flOTPThe PTO (blade engage) lever must be in the
disengaged (PTO OFF) position when starting the engine.
CupHolder
Thetractor'scupholderislocatedonthefendertothe leftoftheseat.
Shift Lever
Theshiftleverislocatedontheleftside
ofthefenderandhasthreepositions,
FORWARD,NEUTRALandREVERSE.The
brakepedalmustbedepressedandthe
tractormustnotbeinmotionwhenthe
movingshiftlever.
IMPORTANT:Neverforcetheshiftlever.
Doingsomayresultinseriousdamageto
thetractor'stransmission.
BrakePedal
REVERSE
Thebrakepedalislocatedontheleftsideofthelawntractor,alongtherunning
board.Depressthebrakepedaltoengagethediscbrakeandbringthetractortoa
completestop.
NOTE:Thepedalmustbedepressedtostarttheengine.RefertoSafetyInterlock
Switcheslaterin thissectionofthismanual.
12

Gasand Oil Fill-up
Oil
IMPORTAfl#Yourtractorisshippedwith motoroil intheengine.However,you
MUSTchecktheoillevelbeforeoperating.Becarefulnottooverfill.
Forinstructionsonhowtochecktheengineoil,refertoCheckingTheEngine0il in
theseparateEngineOperator'sManualincludedwiththistractor.
Gasoline
Thegasolinetankislocatedunderthehood.Donotoverfill.
Useextremecarewhenhandling gasoline.Gasolineisextremelyflammable
andthe vaporsareexplosive.Neverfuel machineindoorsorwhile the
engineishotor running. Extinguishcigarettes,cigars,pipes,andother
sourcesof gnt on.
NOTE:Purchasegasolineinsmallquantities.Donotusegasolineleftoverfromthe
previousseason,to minimizegumdepositsinthefuelsystem.
Thisengineiscertifiedtooperateonunleadedgasoline.Forbestresults,fill
thefueltankwith onlyclean,fresh,unleadedgasolinewith apumpsticker
octaneratingof87orhigher.
Gasohol(upto10%ethylalcohol,90%unleadedgasolinebyvolume)isan
approvedfuel.Othergasoline/alcoholblends,suchasE85,arenotapproved.
MethylTertiaryButylEther(MTBE)andunleadedgasolineblends(uptoa
maximumof15%MTBEbyvolume)areapprovedfuels.Othergasoline/ether
blendsarenotapproved.
Fillfueltankoutdoorsorinwell-ventilatedarea.
Donotoverfillfueltank.Filltankto nomorethan1/2inchbelowbottomof
fillerneckto allowspaceforfuelexpansion.
Neverremovegascaporaddfuelwhiletheengineishotor running.Allow
enginetocoolatleasttwominutesbeforerefueling.
Ifgasolineisspilled,wipeit offthe engineandequipment.Movemachineto
anotherarea.Wait5minutesbeforestartingtheengine.
ToAdd Gasoline
1. Turntheengineoffandletenginecoolat least2minutesbeforeremoving
thefuelcap.Thegasolinetankislocatedunderthehood.Removethefuel
capbyturningitcounterclockwise.
2. Fillthefueltankwith gasoline.Useonlyclean,fresh(nomorethan30days
old),unleadedgasoline.Filltanktonomorethan1/2inchbelowbottomof
fillernecktoallowspaceforfuelexpansion.
3. Reinstallthefuelcap.
/MPORTAN_Donotoverfillthetank.Filltanktonomorethan1/2inchbelow
bottomoffiller necktoallowspaceforfuelexpansion.SeeFigure8.
Figure8
Avoid Serious Injury or Death
Goupanddownslopes,notacross.
Avoidsuddenturns.
Donotoperatetheunitwhereitcouldsliportip.
Ifmachinestopsgoinguphill,stopbladesandbackdownhillslowly.
Donotmowwhenchildrenorothersarearound.
Nevercarrychildren,evenwithbladesoff.
Lookdownandbehindbeforeandwhilebacking.
Keepsafetydevices(guards,shields,andswitches)inplaceandworking.
Removeobjectsthat couldbethrownbytheblades.
Knowlocationandfunctionofallcontrols.
Besurebladesandenginearestoppedbeforeplacinghandsorfeetnear
blades.
Beforeleavingoperator'sposition,stoptractor,disengageblades,engage
parkingbrake,shutengineoff,andremovekey.
Read Operator's Manual
SafetyInterlock System
Thesafetyinterlocksystemisdesignedfor safeoperationofthetractor.Ifthis
systemshouldevermalfunction,donotoperatethetractor,Immediatelycontact
1-800-659-5917to havethesystemserviced.
Thesafetyinterlocksystempreventstheenginefromstartingunless
theparkingbrakeisengagedandthePTO(BladeEngage)leverisinthe
disengaged(OFF)position.
Thesafetyinterlocksystemwill automaticallyshutoffthe engineif the
operatorleavestheseatbeforeengagingtheparkingbrake.
Thesafetyinterlocksystemwill automaticallyshutoffthe engineif the
operatorleavesthetractor'sseatwiththe PTO(BladeEngage)leverengaged,
regardlessofwhethertheparkingbrakeisengaged.
13

Withthe ignitionkeyintheNORMALMOWINGposition,theelectricPTO
(BladeEngage)clutchwill automaticallyshutoff if thePTO(BladeEngage)
knobismovedintotheengaged(ON)positionwiththedrivepedalin
positionforreversetravel.
Donotoperatethetractoriftheinterlocksystemismalfunctioning.Thissystem
wasdesignedforyoursafetyandprotection.
Engagingthe ParkingBrake
Toengagethe parking brake:
I. Fullydepressthe brakepedalandholdit downwithyourfoot.
2. Movethespeedcontrolleverallthewaydownandintotheparkingbrake
position.
3. Releasethebrakepedaltoallowtheparkingbraketoengage.
Toreleasethe parking brake:
I. Depressthebrakepedalandmovethespeedcontrolleveroutoftheparking
brakepositionandintoadesiredspeed.
Setting the Cutting Height
1. Selecttheheightpositionofthecuttingdeckbyplacingthedecklift leverin
anyofthedifferentcuttingheightnotchesontherightsideofthefender.
2. Adjustthedeckwheelssothat theyarebetween1A-inchandY2-inchabove
thegroundwhenthetractorisonasmooth,flat surfacesuchasadriveway.
Toadjust DeckWheels:
I. Removetheflangelocknutontheshoulderboltsecuringthedeckwheel.
2. Positionthewheeltothedesiredheightaslistedabove.SeeFigure9.
f
Figure9
Securetheshoulderboltwith theflangelocknut.
Keephandsandfeet awayfrom the dischargeopening of the cutting
deck.
NOTE:Thedeckwheelsareananti-scalpfeatureofthedeckandarenotdesigned
tosupporttheweightofthecuttingdeck.RefertoLevelingintheMaintenanceand
Servicesectionofthismanualformoredetailedinstructionsregardingvariousdeck
adjustments.
Starting the Engine
Donotoperatethe tractor if the interlocksystemismalfunctioning. This
systemwasdesignedfor yoursafetyandprotection.
NOTE:RefertotheGasolineand011fill-up instructionsearlierinthissection.
I. Insertthetractorkeyintotheignitionswitch.
2. PlacethePTO(BladeEngage)leverinthedisengaged(OFF)position.
3. Engagethetractor'sparkingbrake.
4. Activatethechokecontrolbymovlngthethrottle/chokeleverallthewayupinto
thechokeposition.
5. TurntheignitionkeyclockwisetotheSTARTposition.Aftertheenginestarts,
releasethekey.It will returntotheON(orNormalMowing)position.
DoNOTholdthe keyin the STARTposition for longer than ten seconds
at atime. Doing somaycause damageto your engine's electric
starter.
6. Aftertheenginestarts,deactivatethechokecontrolandplacethethrottle
controlinthe FASTposition.
NOTE:DoNOTleavethechokecontrolonwhileoperatingthetractor.Doingsowill
resultina"rich"fuelmixtureandcausetheenginetorunpoorly.
Stopping the Engine
Ifyou strike aforeign object, stop the engine, disconnect the spark
plug wire(s) and ground against the engine. Thoroughly inspect the
machine for any damage. Repairthe damagebefore restarting and
operating
1. Ifthebladesareengaged,placethePTO(BladeEngage)leverin the
disengaged(OFF)position.
2. TurntheignitionkeycounterclockwisetotheSTOPposition.
3. Removethekeyfromtheignitionswitchtopreventunintendedstarting.
DrivingTheTractor
Avoidsuddenstarts,excessivespeedandsuddenstops.
Donotleavethe seatofthe tractor without first placingthe PTO(Blade
Engage)leverin the disengaged(OFF)position,depressingthe brakepedal
andengagingthe parkingbrake.Ifleavingthe tractor unattended,also
turn the ignitionkeyoff and removethe key.
14

Alwayslookdownand behindbeforeandwhilebackingup toavoidaback-
overaccident.
1. Depressthebrakepedaltoreleasetheparkingbrakeandthenletthepedal
up.
2. Movethethrottle leverintothe FAST(rabbit)position.
3. PlacetheshiftleverineithertheFORWARDorREVERSEposition.
IMPOR@N_DoNOTusetheshiftlevertochangethedirectionoftravelwhenthe
tractorisinmotion.Alwaysusethebrakepedaltobringthetractortoacomplete
stopbeforeshifting.
4. Graduallybegintoapplypressuretothedrivepedal.Thefurtherdownthe
pedalispushed,thefasterthetractorwill travelin thedesireddirection
basedonthepositionoftheshiftlever.
5. Thelawntractorisbroughttoastopbyreleasingthedrivepedalandthen
depressingthebrakepedal.
Beforeleavingthe operator'spositionforanyreason,disengagethe blades,
placethe shift leverinneutral,engagethe parkingbrake,shut engineoff
andremovethe key.
Whenstopping the tractor for any reasonwhile on agrasssurface,
always:
Placetheshiftleverinneutral,
I.
2.
3.
Engagetheparkingbrake,
Shutengineoffandremovethekey.Doingsowill minimizethe possibility
ofhavingyourlawn"browned"byhotexhaustfromyourtractor'srunning
engine.
ReverseCautionMode
TheREVERSECAUTIONMODEpositionofthe keyswitchmoduleallowsthetractorto
maneuverinreversewith theblades(PTO)engaged.
NOTE:Mowinginreverseisnotrecommended.
Useextremecautionwhileoperatingthetractor inthe REVERSECAUTION
MODE.Alwayslookdownand behindbeforeandwhile backing.Donot
operatethe tractorwhen childrenorothersarearound.Stopthe tractor
immediatelyifsomeoneentersthe area.
Tousethe REVERSECAUTIONMODE:
NOTE:TheoperatorMUSTbeseatedinthetractorseat.
1. Starttheengineaspreviouslyinstructedonthepreviouspage.
2. TurnthekeyfromtheNORMALMOWING(Green)positiontotheREVERSE
CAUTIONMODE(Yellow)positionofthekeyswitchmodule.SeeFigure10.
3. Pressthe REVERSEPUSHBUTTON(Orange,TriangularButton)atthetop,
rightcornerofthe keyswitchmodule.Theredindicatorlightatthetop,left
cornerofthekeyswitchmodulewill beONwhileactivated.SeeFigure10.
Reverse
Indicator Push
Light Z_ _ Button
Reverse R F
Caution
Mode
Position
Stop
position
Normal
Driving
Mode
position
Figure10
4. Onceactivated(indicatorlightON),thetractorcanbedrivenin reversewith
thecuttingblades(PTO)engaged.
5. Alwayslookdownandbehindbeforeandwhilebackingtomakesureno
childrenarearound.Afterresumingforwardmotion,returnthekeytothe
NORMALMOWINGposition.
TheREVERSECAUTIONMODEwill remainactivateduntil:
a. ThekeyisplacedineithertheNORMALMOWINGpositionor STOP
positionor
b. Theoperatorleavestheseat.
DrivingOnSlopes
RefertotheSLOPEGAUGEintheSafetyInstructionssectionofthemanualtohelp
determineslopeswhereyoumayoperatethistractorsafely.
Donotmowoninclineswith aslopein excessof15degrees(ariseof
approximately2-112feet every10feet). Thetractorcouldoverturn and
causeseriousinjury.
Mowupanddownslopes,NEVERacross.
Exerciseextremecautionwhenchangingdirectiononslopes.
Watchforholes,ruts,bumps,rocks,orotherhiddenobjects.Uneventerrain
couldoverturnthemachine.Tallgrasscanhideobstacles.
Avoidturnswhendrivingonaslope.Ifaturnmustbemade,turndownthe
slope.Turningupaslopegreatlyincreasesthechanceofa rollover.
Avoidstoppingwhendrivingupaslope.Ifit isnecessarytostopwhile
drivingupa slope,startupsmoothlyandcarefullyto reducethepossibility
offlippingthetractoroverbackward.
15

Engagingthe Blades
Engagingthe PTO(BladeEngage)transferspowertothecuttingdeckorother
(separatelyavailable)attachments.Toengagetheblades,proceedasfollows:
I. Movethethrottle/chokecontrollevertotheFAST(rabbit)position.
2. GraspthePTO(BladeEngage)leverandpivotit allthewayforwardintothe
engaged(ON)position.
3. Keepthethrottleleverinthe FAST(rabbit)positionforthemostefficientuse
ofthecuttingdeckorother(separatelyavailable)attachments.
NOTE:Theenginewill automaticallyshutoff if thePTOisengagedwith
theshiftleverinpositionforreversetravelwith theignitionkeyintheON
position.
Mulching
Amulchkitisavailableasanattachment.Mulchingisaprocessofrecirculating
grassclippingsrepeatedlybeneaththecuttingdeck.Theultra-fineclippingsare
thenforcedbackintothe lawnwheretheyactasanaturalfertilizer.
Amulchkitcanbepurchasedthroughtheretaillocationinwhichyoupurchased
thistractor.Formoreinformation,simplycontactSearsat 1-800-659-5917.
Usingthe DeckLift Lever
Toraisethecuttingdeck,movethedecklift levertotheleft,thenplaceit inthe
notchbestsuitedfor yourapplication.RefertoSettingTheCuttingHeightearlierin
thissection.
Mowing
Tohelpavoid bladecontactorathrown object injury,keepbystanders,
helpers,childrenandpetsat least75feetfrom the machinewhile it isin
operation.Stopmachineif anyoneentersthearea.
Thefollowinginformationwill behelpfulwhenusingthecuttingdeckwith your
tractor:
Planyourmowingpattern to avoiddischargeof materialstoward roads,
sidewalks,bystandersandthe like.Also,avoiddischargingmaterial against
awall or obstructionwhichmaycausedischargedmaterialto ricochetback
towardthe operator.
Donotmowat highgroundspeed,especiallyira mulchkitorgrasscollector
isinstalled.
Forbestresultsit isrecommendedthatthefirsttwo lapsbecutwith the
dischargethrowntowardsthecenter.Afterthefirst twolaps,reversethe
directiontothrowthedischargetotheoutsideforthebalanceofcutting.
Thiswill giveabetterappearancetothelawn.
Donotcutthegrasstooshort.Shortgrassinvitesweedgrowthandyellows
quicklyindryweather.
Mowingshouldalwaysbedonewith theengineatfull throttle.
Underheavierconditionsit maybenecessarytogobackoverthecutareaa
secondtimetogetacleancut.
DoNOTattemptto mowheavybrushandweedsandextremelytall grass.
Yourtractorisdesignedto mowlawns,NOTclearbrush.
Keepthebladessharpandreplacethebladeswhenworn.RefertoCutting
Bladesin theServicesectionofthismanualforproperbladesharpening
instructions.
Headlights
ThelampsareONwheneverthetractor'sengineisrunning.
Thelampsturn OFFwhentheignitionkeyismovedtotheSTOPposition.
16

MAINTENANCESCHEDULE
Beforeperforminganytype ofmaintenance/service,disengageallcontrols
andstopthe engine.Waituntil all movingpartshavecometoacomplete
stop.Disconnectsparkplugwireandgroundit againstthe enginetoprevent
unintendedstarting. Alwayswearsafetyglassesduring operationorwhile
performing anyadjustmentsor repairs.
BeforeEachUse
Inthe FirstFiveHours
Every10Hours
Every25hours
Every50hours
Annually
BeforeStorage
1.
2.
3.
I.
I.
2.
3.
I.
2.
3.
4.
5.
1.
2.
1.
2.
3.
4.
5.
6.
7.
1.
2.
3.
4.
5.
6.
7.
Engineoil level
Mufflerareaandcontrols
Fingerguard
EngineOil
Hood/Dashairvents
Batteryterminals
Deckspindlesandidlerbracket
Airfilter'sprecleaner*
Airfilter*
Midsteeringarms,pivotshafts,
andaxles
Frontwheelbearings
Frontdeckwheels
Engineoil/Oil filter
Muffler
Airfilter
Airfilter'spre-cleaner
Sparkplug
Aircoolingsystem*
Fuelfilter
SteeringGears
RearWheels
Hood/Dashairvents
Batteryterminals
Midsteeringarms,pivotshafts,
andaxles
Frontwheelbearings
Frontdeckwheels
Deckspindlesandidlerbracket
Pedalpivotpoints
*Servicemorefrequentlyunderdustyconditions.EngineMaintenance
Followthe maintenanceschedulegivenbelow.Thischartdescribesservice
guidelinesonly.UsetheServiceLogcolumnto keeptrackofcompleted
maintenancetasks.Tolocatethe nearest Parts&RepairServiceCenteror to
scheduleservice,simplycontact1-800-659-5917.
1. Check
2. Clean
3. Clean
1. Change
1. Clean
2. Clean
3. Lubricate
1. Clean
2. Clean
3. Lubricate
4. Lubricate
5. Lubricate
1. Change/Replace
2. Check
1. Replace
2. Replace
3. Replace
4. Clean
5. Replace
6. Clean
7. Removeandgreaseaxles
1. Clean
2. Clean
3. Lubricate
4. Lubricate
5. Lubricate
6. Lubricate
7. Lubricate
Beforeperforminganymaintenanceor repairs,disengagethe PTO(Blade
EngageLever),engagethe parkingbrake,stopthe engineandremovethe
keyto preventunintendedstarting.
Ifthe enginehasbeenrecentlyrun,the engine,muffler and surrounding
metalsurfaceswill behot andcancauseburnsto the skin.Exercisecaution
to avoidburns.
17

Maintenence
Beforeperforming anymaintenanceorrepairs,disengagePTO,moveshift [
[leverintoneutralposition,setparkingbrake,stopengineandremovekeytoI
Lpreventunintendedstarting, j
Usedoil isahazardouswasteproduct.Disposeofusedoil properly.Donot
discardwith householdwaste.Checkwith yourlocalauthorities oror contact
1-800-659-5917for alistofsafedisposal/recydingfacilities.
FuelFilter
Engine
RefertotheEngineOperator/OwnerManualforenginemaintenanceinstructions.
Checkengineoil levelbeforeeachuseasinstructedin theEngineOperator/Owner
Manualpackedwith yourunit.Followtheinstructionscarefully.
ChangingEngineOil
Theengineoilshouldbechangedinthefirst5hoursandthenevery50hoursor
onceaseason.Tochangetheengineoil,proceedasfollows:
1. WithengineOFFbutstillwarm,disconnectsparkplugwireandkeepitaway
fromsparkplug.
2. Removetheoilfillcap/dipstickfromtheoilfilltube.SeeFigure10.
Dipstick
OilDrain
Valve
Oil Drain
Sleeve
Figure10
3. Turnthesteeringwheelallthewaytotherightto betterexposethedrain
plug.
4. Cliptheoildrainsleeve(packedwiththismanual)ontotheoildrainport.
Routetheoppositeendofthesleeveintoanappropriateoilcollection
containerwitha capacitygreatenoughtocollecttheusedoil.
5. Removetheoildrainplug,Theoilwill begintodrainout oftheengine.
6. Aftertheoilhasfinisheddraining,replacetheoil drainplugandtighten.Be
carefulnottoovertighten.
Removetheoildrainsleeveandstoreforlateruse.7.
8.
Refilltheenginewith newmotoroilasinstructedin theEngineOperator's
Manualincludedwith thistractor.
Gasolineanditsvaporsareextremelyflammable andexplosive.Fireor
explosioncancausesevereburnsor death.
Keepgasolineawayfromsparks,openflames,pilotlights,heat,andother
ignitionsources.
Checkfuellines,tank,cap,andfittingsfrequentlyforcracksorleaks.Replace
ifnecessary.
Beforereplacingthefuelfilter,drainthefueltankaspertheinstructions
below.
Donotdrainfuelwhentheengineishot.Allowtheengineadequatetime to
cool.Drainfuelintoanapprovedcontaineroutdoors,awayfromopenflame.
Drainanylargevolumeoffuelfromthetankbydisconnectingthefuelline
fromthein-linefuelfilter neartheengine.
RemovethefuellinefromtheIn-lineside(sidetowardsthefueltank)ofthe
fuelfilter.
Replacementpartsmustbethesameandinstalledin thesamepositionas
theoriginalparts.
Iffuelspills,waituntilit evaporatesbeforestartingengine.
Beforereplacingthefuelfilter,drainthefueltank.Otherwise,fuelcanleak
outandcauseafireorexplosion.
To Drain the fuel:
1. Locatethefuelfilter,whichisroutedontheleftsideoftheenginebetween
thefueltankandthecarburetor,andmaybeattachedtotheenginewithatie
strap.Cutthetiestrap,ifpresent,thenpinchthein-lineclamponthefuelfilter
with apairofpliers,slidetheclampupthefuelline.Pullthefuellinefreefrom
thefilterandplacetheopenendofthelineintoanapprovedcontainertodrain
thefuel.
To change the fuel filter:
1. Useplierstosqueezethetabsontheotherclamp(theout-linesideofthe
fuelfilter),thenslidetheclampawayfromthefuelfilter.Twistandpullthe
fuellineoffofthe fuelfilter.SeeFigure11.
Clamp
Fuel
Line
Tab
18
Figure11
J

2. Checkthefuellinesforcracksorleaks.Replaceifnecessary.
3. Replacethefuelfilterwith anoriginalequipmentreplacementfilter. Call
1-800-659-5917topurchasetheoriginalequipmentreplacementfilter.
4. Securethefuellineswiththeclamps.
Air Cleaner
Servicethe pre-cleanerandcartridge/aircleanerelementasinstructedinthe
EngineOperator/OwnerManualpackedwith yourunit.
SparkPlug
Thesparkplugshouldbecleanedandthegapresetonceaseason.Sparkplug
replacementisrecommendedatthestartofeachmowingseason.Refertothe
EngineOperator/OwnerManualfor correctplugtypeandgapspecifications.
Muffler
Temperatureof muffler and nearbyengineareasmayexceed150° F(65°C).
Avoidcontactwith theseareas.
Inspectmufflerperiodically,andreplaceifnecessary.Replacementparts
forthemufflermustbethesameandinstalledinthesamepositionasthe
originalparts.
CleanEngine
Dailyorbeforeeveryuse,deangrass,chafforaccumulateddebrisfrom
engine.Keeplinkage,spring,andcontrolsclean.
Keepareaaroundandbehindmufflerfreeofanycombustibledebris.
Keepingenginecleanallowsairmovementaroundengine.
Enginepartsshouldbekeptcleantoreducetheriskofoverheatingand
ignitionofaccumulateddebris.
Donotusewaterto deanengineparts.Watercouldcontaminatefuel
system.Useabrushordry cloth.
iMPORTANT: TheuseofapressurewashertocleanyourtractorisNOT
recommended.It maycausedamagetoelectricalcomponents,spindles,pulleys,
bearingsortheengine.
CarburetorAdjustment
Thecarburetoronthisengineisnotadjustable.
Lubrication
Beforelubricating,repairing, orinspecting,alwaysdisengage (Blade
PTO
EngageLever),moveshift [everintoneutral position,setparking brake,stop
engineandremovekeytopreventunintendedstarting.
Engine
Lubricatetheenginewith motoroil asinstructedintheEngineOwnerManual
packedwith yourunit.
PivotPoints& Linkage
Lubricateallthepivotpointsonthedrivesystem,parkingbrakeandlift linkageat
leastonceaseasonwith lightoil.
RearWheels
Therearwheelsshouldberemovedfromtheaxlesonceaseason.Lubricatethe
axlesandthe rimswellwith anall-purposegreasebeforere-installingthem.
Front Wheels
Thefrontwheelsshouldberemovedfromtheaxlesonceaseason.Lubricatethe
axlesandthe rimswellwith anall-purposegreasebeforere-installingthem.
DeckWash
Yourtractor'sdeckisequippedwithawaterportonitssurfaceaspartofitsDeck
WashSystemTM, followtheseinstructionstoutilizethisfeature.
UsetheDeckWashtorinsegrassclippingsfromthedeck'sundersideandprevent
thebuildupofcorrosivechemicals.CompletethefollowingstepsAFTEREACH
MOWING:
1. Drivethetractortoalevel,clearspotonyourlawn,nearenoughforyour
gardenhoseto reach.
Makecertain thetractor's dischargechuteisdirectedAWAYfrom yourhouse,
garage,parkedcars,etc.
2. DisengagethePTO(Blade Engage),settheparkingbrakeandstopthe
engine.
3. Threadthehosecoupler(packagedwith yourtractor'sOperator'sManual)
ontotheendofyourgardenhose.
4. Attachthehosecouplertothewaterportonthedeck'ssurface.SeeFigure
12.
5.
6.
Turnthewateron.
Whilesittingin theoperator'spositiononthetractor,starttheengineand
placethethrottleleverinthe FAST(rabbit)position.
19

7.
8.
9.
r
Movethetractor'sPTO(Blade Engage) intotheONposition.
Remainintheoperator'spositionwith thecuttingdeckengagedfor a
minimumoftwo minutes,allowingtheundersideofthecuttingdeckto
thoroughlyrinse.
Movethetractor'sPTO(Blade Engage) intotheOFFposition.
10.
11.
Figure12
TurntheignitionkeytotheSTOPpositiontoturnthetractor'sengineoff.
Turnthewateroffanddetachthehosecouplerfromthewaterportonyour
deck'ssurface.
12. Repeatsteps4through11ontheoppositesideofthecuttingdeck.
IM PORTANT: Aftercleaningyourdeckwiththe DeckWashSystemTM, return
totheoperator'spositionandengagethePTO.Keepthecuttingdeckrunningfor a
minimumoftwo minutes,allowingtheundersideofthecuttingdecktothoroughly
dry.
Adjustments
Neverattempt to makeanyadjustmentswhile the engineisrunning,except
wherespecifiedinthe operator'smanual.
Levelingthe Deck
NOTE:Checkthetractor'stirepressurebeforeperforminganydeckleveling
adjustments.RefertoTiresintheServicesectionofthismanualformore
informationregardingtirepressure.
Front ToRear
Thefrontofthecuttingdeckissupportedbyastabilizerbarthatcanbeadjustedto
levelthedeckfromfront torear.Thefrontofthedeckshouldbebetween1g-inch
and3/8-inchlowerthantherearofthedeck.Adjustifnecessaryasfollows:
1. Withthetractorparkedonafirm,levelsurface,placetheleverforlifting the
platformonthesecondtothetopnotch(secondhighestposition)androtate
thebladeascloseaspossibletothedischargechannelthat isparallelto the
tractor.
2. Measurethedistancefromthefrontofthebladetiptothegroundandthe
rearofthebladetip totheground.Thefirst measurementtakenshould
bebetweenlg"and3/8"lessthanthesecondmeasurement.Determine
theapproximatedistancenecessaryforproperadjustmentandproceed,if
necessary,tothenextstep.
3. Locatetheflangelocknutonthefrontsideofthestabilizerbracket.See
Figure13.
Tightentheflangelocknutto raisethefrontofthedeck;
Loosentheflangelocknuttolowerthefrontofthedeck.
f
J
J
Figure13
Sideto Side
Ifthecuttingdeckappearstobemowingunevenly,asidetosideadjustmentcanbe
performed.Adjustif necessaryasfollows:
1. Withthetractorparkedonafirm,levelsurface,placethedecklift leverin
thesecondfromthetopnotch(secondhighestposition)androtateboth
bladessothattheyareperpendicularwith thetractor.
2. Measurethedistancefromtheoutsideofthe leftbladetiptotheground
andthedistancefromtheoutsideoftherightbladetip totheground.Both
measurementstakenshouldbeequal.Ifthey'renot,proceedtothenext
step.
3. Loosen,butdoNOTremove,thehexcapscrewontheleftdeckhanger
bracket.SeeFigure14.
4. Balancethedeckbyusingawrenchtoturntheadjustmentgear(found
immediatelybehindthehexcapscrewjust loosened)clockwise/upor
counterclockwise/down.Thedeckisproperlybalancedwhenbothbladetip
measurementstakenearlierareequal.
5. Retightenthe hexcapscrewonthe leftdeckhangerbracketwhenproper
adjustmentisachieved.
2O

\\
Hex Cap Screw
J
Figure14
SeatAdjustment
RefertotheAssemblysectionofthis manualforseatadjustmentinstructions.
Parking BrakeAdjustment
Neverattempt to adjustthe brakeswhile theengineisrunning.Always
disengagePTO(bladeengage)lever,moveshift leverintoneutralposition,
stopengineandremovekeytopreventunintendedstarting.
Ifthetractordoesnotcometoacompletestopwhenthe brakepedaliscompletely
depressed,orif thetractor'srearwheelscanrollwith theparkingbrakeapplied,
thebrakeisin needofadjustment.ContactthenearestSearsServiceCentertohave
yourbrakesproperlyadjusted.
Tolocate the nearestParts& RepairServiceCenteror toscheduleservice,
contact1-800-659-5917.
Cutting Deck Removal
Toremovethe cuttingdeck,proceedasfollows:
I. Placethe PTO(BladeEngage)leverinthedisengaged(OFF)positionand
engagetheparkingbrake.
2. Lowerthedeckbymovingthedecklift leverintothe bottomnotchonthe
rightfender.
3. Removetheself-tappingscrewCA)thatsecuresthebelt-keeperrodfrom
aroundthetractor'sPTOpulley,thenremovethebeltkeeperrod(B).See
Figure15.
Note:Makeamentalnotewhatholetheotherendofthebelt-keeperrodis
insertedin forreinstallationpurposes.
4. Removethebelt(C)fromaroundthetractor'sPTOpulley.SeeFigure15.
Avoidpinchinginjuries.Neverplaceyourfingersonthe idler springor
between the beltand apulleywhile removingthe belt.
J
Figure15
5. Lookingatthecuttingdeckfromtheleftsideofthetractor,locatethebow-
tiepinthatsecuresthedecksupportrodontherearleft sideofthedeck.See
Figure16.Removethebow-tiepinthatsecuresthedecksupportrod,and
carefullyremovethedecksupportfromthedecklift arm.
6. Repeattheabovestepsonthetractor'srightside.
NOTE:Thebow-tieclipsshouldbere-installedfromthetopdown.
7. Movethedecklift leverintothetopnotchontherightfendertoraisethe
decklift armsupandoutoftheway.
f
Figure16
21

Removethebow-tiecotterpinsecuringthedeckstabilizerrodtothedeck.
Slidethedecklift rodfromthe mountingbracketonthedeckasshownin
Figure17.
/
J
8.
Figure17
CarefullyremovethePTOcablefromtherearofthecuttingdeckby
removingthebow-tiecotterpinwhichsecuresit. Removethespringfrom
thedeckidlerbracket.SeeFigure18.
f
/j,'
9.
J
Figure18
10. Gentlyslidethecuttingdeck(fromthe leftside)outfromunderneaththe
tractor.
Tires
Neverexceedthe maximum inflation pressureshownonthe sidewall of
tire.
The recommended operating tire pressureis:
Approximately10psiforthereartires
Approximately14psiforthefronttires
IMPORTANT: Refertothetire sidewallforexacttire manufacturer's
recommendedormaximumpsi.Donotoverinflate.Uneventirepressurecould
causethecuttingdecktomowunevenly.
Battery
Thebatteryissealedandismaintenance-free.Acidlevelscannotbechecked.
Alwayskeepthebatterycablesandterminalscleanandfreeofcorrosive
build-up.
Aftercleaningthebatteryandterminals,applyalightcoatofpetroleumjelly
orgreasetobothterminals.
Alwayskeeptherubberbootpositionedoverthepositiveterminalto prevent
shorting.
Ifremovingthe battery,disconnectthe NEGATIVE(Black)wire from its
terminal first, followedbythe POSITIVE(Red)wire.Whenre-installing
the battery,alwaysconnectthe POSITIVE(Red)wireto itsterminalfirst,
followed bythe NEGATIVE(Black)wire.
California Proposition65
Batteryposts,terminals,and relatedaccessoriescontainleadand lead
compounds,chemicalsknownto the StateofCaliforniato causecancerand
reproductiveharm.Washhandsafter handling.
JumpStarting
Neverjump start adamagedor frozen battery. Becertain the vehicles
do not touch, and ignitionsareoff. Do not allow cable clamps to
touch.
1. Connectpositive(+) cabletopositivepost(+)ofyourtractor'sdischarged
battery.
2. Connecttheotherendofthecabletothe(positive+) postofthejumper
battery.
3. Connectthesecondcable(negative-) totheotherpostofthejumper
battery.
4. Connecttheotherendofthenegativecabletotheengineblockofthe
tractor,awayfromthebattery.Attachtoanunpaintedparttoassureagood
connection.
Ifthejumperbattery isinstalledonavehicle(i.e.car,truck),do NOTstart
the vehicle'senginewhenjump starting yourtractor.
5. Startthetractor(asinstructedearlierinthissectionofthismanual).
6. Setthetractor'sparkingbrakebeforeremovingthejumpercables,inreverse
orderofconnection.
22

Charging
Batteriesgiveoff anexplosivegaswhile charging.Chargethe battery ina
wellventilated areaandkeepawayfrom anopenflameor pilot lightasona
waterheater,spaceheater,furnace,clothesdryer orother gasappliances.
Whenchargingyourtractor'sbattery,useonlyachargerdesignedfor 12Vlead-
acidbatteries.Readyourbatterycharger'sOwner'sManualpriortocharging I
yourtractor'sbattery.Alwaysfollow itsinstructionsandheeditswarnings, j
Ifyourtractorhasnotbeenputintousefor anextendedperiodoftime,chargethe
batteryasfollows:
1. Setyourbatterychargertodeliveramaxof10amperes.
2. Ifyourbatterychargerisautomatic,chargethe batteryuntilthecharger
indicatesthatchargingiscomplete.Ifthechargerisnotautomatic,charge
fornofewerthaneighthours.
Fuse
One20AMPfuseisinstalledin yourtractor'swiringharnessto protectthetractor's
electricalsystemfromdamagecausedbyexcessiveamperage.
Iftheelectricalsystemdoesnotfunction,oryourtractor'senginewill notcrank,
firstchecktobecertainthatthefusehasnotblown.Itcanbefoundattherearof
theunit,underneaththefenderlocatedbythebattery.
RexFlangeNut
Figure19
Alwaysuseafusewith the sameamperagecapacityfor replacement.
Cutting Blades
Shutthe engineoffand removeignitionkeybeforeremovingthecutting
blade(s)for sharpeningor replacement.Protectyourhandsbyusingheavy
gloveswhengraspingtheblade.
Periodicallyinspectthebladeand/orspindleforcracksordamage,
especiallyafter you'vestruckaforeign object.Donot operatethe machine
until damagedcomponentsarereplaced.
Toremovetheblades,proceedasfollows:
I. Removethedeckfrombeneaththetractor,(refertoCuttingDeckRemoval
earlierin thissection)thengentlyflip thedeckovertoexposeitsunderside.
2. Placeablockofwoodbetweenthecenterdeckhousingbaffleandthe
cuttingbladetoactasastabilizer.SeeFigure19.
3. Removethehexflangenutthat securesthebladetothespindleassembly.
4. Toproperlysharpenthecuttingblades,removeequalamountsofmetal
frombothendsofthebladesalongthecuttingedges,paralleltothetrailing
edge,ata 25°- to30°angle.Alwaysgrindeachcuttingbladeedgeequallyto
maintainproperbladebalance.SeeFigure20.
Figure20
Ifthe cutting edgeofthe bladehaspreviouslybeensharpened,or if any
metal separationispresent,replacethe bladeswith newones.
Apoorlybalancedbladewillcauseexcessivevibration, maycausedamageto
thetractorand/orresultinpersonalinjury.
5. Testtheblade'sbalanceusinga bladebalancer.Grindmetalfromthe
heavysideuntil it balancesevenly.
/VOTE:Whenreplacingtheblade,besuretoinstallthe bladewiththesideofthe
blademarked"Bottom" (orwith apartnumberstampedin it)facingtheground
whenthe mowerisintheoperatingposition.
Useatorquewrenchtotighten the bladespindlehexflangenut to between
70Ibs-ftand90Ibs-ft.
23

Changingthe DeckBelt
Besuretoshut theengineoff, removeignitionkey,disconnectthe spark
plugwire(s)andgroundagainstthe engineto preventunintendedstarting
[before removngthe bet.
Allbeltsonyourtractoraresubjectto wearandshouldbereplacedifany
7. Remountthe beltguardsremovedearlier.
8. Re-installthedeck,makingsurethebeltremainsroutedaroundthepulleys
asinstructed.ThecompletebeltroutingisshowninFigure21.
9. Pulltherightsideofthebelt,andplacethenarrowVsideofthebeltintothe
PT0pulley.
10. Whileholdingthebeltandpulleytogether,rotatethe pulleytotheleft.
Continueholdingandrotatingthepulleyandbeltuntilthebeltisfully rolled
intothePT0pulley.
signsof weararepresent.
IM PORTANT: TheV-beltfoundonyourtractorisspeciallydesignedtoengage
anddisengagesafely.Asubstitute(non-0EM)V-beltcanbedangerousbynot
disengagingcompletely.Foraproperworkingmachine,useidenticalequipment
beltsaslistedinthepartspagesofthisOperator'sManual.
Tochangeor replacethedeckbeltonyourtractor,proceedasfollows:
Removethedeckasinstructedearlierinthissection.
1. Removethebeltcoversfromthespindlepulleysbyremovingthehexscrews
thatfastenthecoverstothedeck.SeeFigure21.
2. Itmayalsobenecessarytoloosenthehexnutontheleftdeckidlerpulleyto
getthebeltoffthe pulleyandaroundthebeltguard.
3. Carefullyremovethedeckbeltfromaroundthetwospindlepulleysandthe
twodeckidlerpulleys.SeeFigure21.
4. Toplacethenewbelt,beginbyroutingthebeltaroundthetwoouterspindle
pulleysasshowninFigure21.
5. ThenroutethebeltaroundthetwodeckidlerpulleysasshowninFigure21.
6. Retightenthebeltkeeperrodloosenedearlier.
ParkingBrakeAdjustment
Neverattempt to adjustthe brakeswhilethe engineisrunning.Always
[disengagePTO(BladeEngageLever),moveshift leverintoneutralposition,
[stopengineand removekeyto preventunintendedstarting.
Ifthetractordoesnotcometoacompletestopwhentheclutch-brakepedalis
completelydepressed,orifthetractor'srearwheelscanrollwith theparkingbrake
applied,thebrakeisinneedofadjustment.ContactthenearestParts&Repair
ServiceCentertohaveyourbrakesserviced.
Tolocate the nearestParts&RepairServiceCenterorto scheduleservice,
contact1-800-659-5917.
Changingthe TransmissionDrive Belt
NOTE:Several components must be removed and special tools (i.e. air/
impact wrench) in order to change the tractor's drive belt. Contact the
nearest Parts & Repair Service Center to have your transmission
drive belt serviced.
Tolocatethe nearestParts&RepairServiceCenterorto scheduleservice,
contact1-800-659-5917.
Hex Washer Screws
This portion of the
belt routes around
the PTOPulley
Figure21
24

Neverstorelawntractorwith fuel intank indoorsor inpoorlyventilated
areaswherefuelfumesmayreachanopenflame,spark,or pilot light ason
afurnace,waterheater,clothesdryer,or gasappliance.
PreparingTheEngine
IMPORTANT: Fuelleft inthefueltankduringwarmweatherdeterioratesand
will causeseriousstartingproblems.
Topreventgumdepositsfromforminginsidetheengine'scarburetorandcausing
possiblemalfunctionoftheengine,thefuelsystemmustbeeithercompletely
emptied,orthegasolinemustbetreatedwith astabilizertopreventdeterioration.
1. Ifusingafuelstabilizer:
a. Readtheproductmanufacturer'sinstructionsandrecommendations.
b. Addtoclean,freshgasolinethecorrectamountofstabilizerforthe
capacityofthefuelsystem.
c. Fillthefueltankwith treatedfuelandruntheenginefor 2-3minutesto
getstabilizedfuelintothecarburetor.
2. Ifemptyingthefuelsystem:
a. Donotdrainfuelwhentheengineishot.Allowtheengineadequate
timetocool.Drainfuelintoanapprovedcontaineroutdoors,awayfrom
openflame.
b. Drainanylargevolumeoffuelfromthetankbydisconnectingthe
fuellinefromthein-linefuelfilter neartheengine.Seethecomplete
instructionsforDrainingTheFuellaterin thissection.
Gasolineisextremelyflammableand canbeexplosiveundercertain
conditions. Draingasolinebeforestoring theequipment for extended
periods.Drainfuel onlyinto anapprovedcontaineroutdoors,awayfrom
anopenflame.Allowengineto cool.Extinguishcigarettes,cigars,pipes,
andother sourcesofignitionprior to drainingfuel.Storegasolineinan
approvedcontainerinsafelocation.
c. Reconnectthefuellineandruntheengineuntilitstartstofalter,then
usethechoketokeeptheenginerunninguntilallfuelin thecarburetor
hasbeenexhausted.
d. Disconnectthefuellineanddrainanyremaininggasolinefromthe
system.
DrainingTheFuel
1. Locatethefuelfilter,whichislocatedontheleft sideoftheengine,andmay
beattachedtotheenginewithatiestrap.
2. Cutthetiestrap,if present,thenpinchthein-lineclamponthefuelfilter
with apairofpliers,slidetheclampupthefuelline.
3. Pullthefuellinefreefromthefilterandplacetheopenendofthe lineinto
anapprovedcontainertodrainthefuel.
PreparingThelawn tractor
Cleanandlubricatetractorthoroughlyasdescribedinthelubrication
instructions.
2. Donotuseapressurewasherorgardenhosetocleanyourunit.
3. Storemowerin adry,cleanarea.Donotstorenexttocorrosivematerials,
suchasfertilizer.
Gasolineisatoxicsubstance.Disposeofgasolineproperly.Contactyour
localauthoritiesforapproveddisposalmethods.
3. Removethesparkplugandpourone(1)ounceofengineoilthroughthespark
plugholeintothecylinder.Cranktheengineseveraltimestodistributethe
oil. Replacethesparkplug.
25

Enginefailstostart
Enginerunserratically
1. PTO/BladeEngageleverengaged.
2. Parkingbrakenotengaged.
3. Sparkplugwire(s)disconnected.
4. Throttle/Chokecontrollevernotincorrect
startingposition.
5. Chokenotactivated
6. Fueltankempty,or stalefuel.
7. BIockedfuelline.
8. Faultysparkplug(s).
9. Engineflooded.
10. BlownFuse(s)
1. UnitrunningwithCHOKEactivated.
2. Sparkplugwire(s)loose.
3. Blockedfuellineor stalefuel.
4. Ventingascapplugged.
5. Waterordirtinfuel system.
6. Dirtyair cleaner.
Engineoverheats 1. Engineoillevellow. 1.
2. Airflowrestricted. 2.
Enginehesitatesat highRPM 1. Sparkpluggaptoo close. 1.
Engineidlesrough 1. Sparkplugfouled,faultyorgaptoowide. 1.
2. Dirtyair cleaner. 2.
Excessivevibration
Mowerwillnotmulchgrass
Unevencut
1. Cuttingbladelooseorunbalanced.
2. Damagedor bentcuttingblade.
1. Enginespeedtoolow.
2. Wetgrass.
3. Excessivelyhighgrass.
4. Dullblade.
1. Decknotleveledproperly.
2. Dullblade.
3. Uneventirepressure.
1. Placeleverindisengaged(OFF)position.
2. Engageparkingbrake.
3. Connectwire(s)to sparkplug(s).
4. PlaceThrottle/ChokeleverintotheFASTposition.
5. MovetheThrottle/ChokeleverintotheChoke
position.
6. Filltankwithclean,fresh(lessthan30 daysold) gas.
7. Replacethefuellineandreplacefuelfilter.
8. Clean,adjustgapor replaceplug(s).
9. Crankenginewiththrottlein FASTposition.
10. ReplaceFuse(s)See"Fuse"in Serviceand
Maintenancesection.
1. DeactivatetheCHOKE.
2. Connectsparkplugwire(s).
3. Replacethefuelline;filltankwithclean,fresh
gasolineandreplacefuelfilter.
4. Clearventor replacecapifdamaged.
5. Drainfueltank.Refillwithclean,freshgasoline.
6. Replaceair cleanerpaperelementor cleanfoam
pre-cleaner,ifequipped.
Fillcrankcasewith properamountandweightof oil.
Cleangrassclippingsanddebrisfromaroundthe
engine'scoolingfinsandhousing.
Removesparkplugandresetthegap.
Replacesparkplug.Setpluggap.
Replaceair cleanerelementand/orcleanpre-
cleaner.
1. Tightenbladeandspindle.
2. Replaceblade.
1. PlacethrottleinFAST(rabbit)position.
2. Donotmulchwhengrassiswet.
3. Mowonceata highcuttingheight,thenmowagain
at desiredheightormakea narrowercuttingswath.
4. Sharpenor replaceblade.
1. Performside-to-sidedeckadjustment.
2. Sharpenor replaceblade.
3. Checktirepressureinallfourtires.
NEED MORE HELP?
%£{_ls_lfim_} t}*_e_:_x/,',{'w(sran<Imoze on manag<'_ly[i£eo{o_, - fo[ f_e÷!
Find this and a[[ your other product manuals online.
Get answers from our team of home experts.
Get a personalized maintenance plan for your home.
Find information and tools to help with home projects.
26

(Thispageapplicableinthe U.S.A.and Canadaonly.)
Sears Brands Management Corporation (Sears), the California Air Resources Board (CARD)
and the United States Environmental Protection Agency (U.S. EPA)
Emission Control System Warranty Statement (Owner's Defect Warranty Rights and Obligations)
EMISSIONCONTROLWARRANTYCOVERAGEISAPPLICABLETOCERTI-
FIEDENGINESPURCHASEDINCALIFORNIAIN1995ANDTHEREAF-
TER,WHICHAREUSEDINCALIFORNIA,ANDTOCERTIFIEDMODEL
California and United States Emission
TheCaliforniaAirResourcesBoard(CARD),U.S.EPAand Searsarepleased
toexplainthe EmissionControlSystemWarrantyonyourmodelyear2000and
latersmalloff-roadengine(SORE).InCalifornia,newsmalloff-roadengines
mustbedesigned,builtandequippedto meettheState'sstringentanti-smog
standards.Elsewherein theUnitedStates,newnon-road,spark-ignition
enginescertifiedformodelyear1997and latermustmeetsimilarstandardsset
forthbythe U.S.EPA.Searsmustwarranttheemissioncontrolsystemonyour
YEAR1997ANDLATERENGINESWHICHAREPURCHASEDANDUSED
ELSEWHEREINTHEUNITEDSTATES(ANDAFTERJANUARY1,2001 IN
CANADA).
Control Defects Warranty Statement
enginefortheperiodsoftime listedbelow,providedtherehasbeennoabuse,
neglector impropermaintenanceofyoursmalloff-roadengine.Youremis-
sioncontrolsystemincludespartssuchas thecarburetor,aircleaner,ignition
system,mufflerandcatalyticconverter.Alsoincludedmaybeconnectorsand
otheremissionrelatedassemblies.Wherea warrantableconditionexists,Sears
will repairyoursmalloff-roadengineatnocostto youincludingdiagnosis,parts
andlabor.
Sears Emission Control Defects Warranty Coverage
Smalloff-roadenginesarewarrantedrelativeto emissioncontrolpartsdefects
foraperiodofone year,subjecttoprovisionssetforthbelow.Ifanycovered
Owner's Warranty
Asthe smalloff-roadengineowner,youareresponsiblefor theperformanceof
therequiredmaintenancelistedin yourOperatingandMaintenanceInstruc-
tions.Searsrecommendsthatyouretainallyourreceiptscoveringmaintenance
onyoursmalloff-roadengine,butSearscannotdenywarrantysolelyfor the
lackofreceiptsorfor yourfailuretoensuretheperformanceof allscheduled
maintenance.As the smalloff-roadengineowner,youshouldhoweverbe
awarethat Searsmaydenyyouwarrantycoverageifyoursmalloff-roadengine
ora parthasfaileddueto abuse,neglect,impropermaintenanceor unap-
parton yourengineis defective,the partwillbe repairedorreplacedbySears.
Responsibilities
provedmodifications.Youareresponsiblefor presentingyoursmalloff-road
engineto anAuthorizedSearsServiceDealerassoonasaproblemexists.The
undisputedwarrantyrepairsshouldbecompletedinareasonableamountof
time,notto exceed30days.Ifyouhaveanyquestionsregardingyourwarranty
rightsand responsibilities,youshouldcontactaSearsServiceRepresentative
at 1-800-469-4663.Theemissionwarrantyisa defectswarranty.Defectsare
judgedonnormalengineperformance.Thewarrantyis notrelatedtoan in-use
emissiontest.
Sears Emission Control Defects Warranty Provisions
ThefollowingarespecificprovisionsrelativetoyourEmissionControlDefectsWarrantyCoverage.ItisinadditiontotheSearsenginewarrantyfornon-regulated
enginesfoundin theOperatingand MaintenanceInstructions.
1. WarrantedParts
Coverageunderthis warrantyextendsonlytothe partslistedbelow(the
emissioncontrolsystemsparts)tothe extentthesepartswerepresenton
theenginepurchased.
a. FuelMeteringSystem
• Coldstartenrichmentsystem
• Carburetorand internalparts
• FuelPump
b. AirlnductionSystem
• Aircleaner
• Intakemanifold
c. IgnitionSystem
• Sparkplug(s)
• Magnetoignitionsystem
d. CatalystSystem
• Catalyticconverter
• Exhaustmanifold
• Air injectionsystemor pulsevalve
e. MiscellaneousItemsUsedin AboveSystems
• Vacuum,temperature,position,timesensitivevalves
andswitches
• Connectorsandassemblies
2. LengthofCoverage
Searswarrantstothe initialownerand eachsubsequentpurchaserthat
theWarrantedPartsshallbefreefromdefectsin materialsandworkman-
shipwhichcausedthefailureofthe WarrantedPartsfor aperiodofone
yearfromthe datethe engineis deliveredtoa retailpurchaser.
3. NoCharge
Repairor replacementof anyWarrantedPartwill beperformedat no
chargetothe owner,includingdiagnosticlaborwhichleadstothe
determinationthataWarrantedPartisdefective,ifthe diagnosticworkis
performedatanAuthorizedSearsServiceDealer.Foremissionswarranty
servicecontactyournearestAuthorizedSearsServiceDealeras listedin
the "YellowPages"under"Engines,Gasoline,""GasolineEngines,""Lawn
Mowers,"orsimilarcategory.
4. ClaimsandCoverageExclusions
Warrantyclaimsshall befiledin accordancewiththe provisionsofthe
SearsEngineWarrantyPolicy.Warrantycoverageshallbeexcludedfor
failuresof WarrantedPartswhicharenotoriginalSearspartsor because
ofabuse,neglector impropermaintenanceassetforth inthe Sears
EngineWarrantyPolicy.Searsisnotliableto coverfailuresof Warranted
Partscausedby theuseof add-on,non-original,or modifiedparts.
5. Maintenance
AnyWarrantedPartwhichis notscheduledforreplacementas required
maintenanceor whichis scheduledonlyforregularinspectiontothe effect
of"repairor replaceas necessary"shallbe warrantedastodefectsfor the
warrantyperiod.AnyWarrantedPartwhichisscheduledfor replacement
asrequiredmaintenanceshallbewarrantedastodefectsonlyforthe
periodoftime uptothe firstscheduledreplacementfor that part.Any
replacementpartthat isequivalentin performanceanddurabilitymay
beusedin the performanceofanymaintenanceor repairs.Theowneris
responsibleforthe performanceof all requiredmaintenance,as definedin
the SearsOperatingandMaintenanceInstructions.
6. ConsequentialCoverage
Coveragehereundershallextendtothefailureofanyenginecomponents
causedbythe failureofanyWarrantedPartstillunderwarranty.
Inthe USAandCanada,a 24hourhotline,1-800-469-4663,hasa menuofpre-recordedmessagesofferingyouenginemaintenanceinformation.
GDOC-100188Rev.B
27

FEDERALand/or CALIFORNIAEMISSIONCONTROLWARRANTYSTATEMENT
YOURWARRANTYRIGHTSANDOBLIGATIONS
MTD Consumer Group Inc, the United States Environmental Protection Agency (EPA), and for those products certified for sale in the state of
California, the California Air Resources Board (CARB) are pleased to explain the emission (evaporative and/or exhaust) control system (ECS)
warranty on your 2013 and later small off-road spark-ignited engine and equipment (outdoor equipment engine). In California, new outdoor
equipment engines must be designed, built and equipped to meet the State's stringent anti-smog standards (in other states, outdoor
equipment engines must be designed, built, and equipped to meet the U.S. EPA small off-road spark ignition engine regulations). MTD
Consumer Group Inc must warrant the ECSon your outdoor equipment engine for the period of time listed below, provided there has been no
abuse, neglect, or improper maintenance of the outdoor equipment engine.
Your ECS may include parts such as the carburetor, fuel-injection system, ignition system, catalytic converter, fuel tanks, fuel lines, fuel caps,
valves, canisters, filters, vapor hoses, clamps, connectors, and other associated emission-related components.
Where a warrantable condition exists, MTD Consumer Group Inc will repair your outdoor equipment engine at no cost to you including
diagnosis, parts, and labor.
MANUFACTURER'SWARRANTYCOVERAGE:
This emission control system is warranted for two years. If any emission-related part on your outdoor equipment engine is defective, the
part will be repaired or replaced by MTD Consumer Group Inc. In the event that a component is covered for longer than two years by the
Manufacturer's equipment warranty, the longer coverage period will apply.
/
OWNERSWARRANTYRESPONSIBILITIES:
As the outdoor equipment engine owner, you are responsible for performance of the required maintenance listed in your owner's manual. MTD
Consumer Group Inc recommends that you retain all receipts covering maintenance on your outdoor equipment engine, but MTD Consumer
Group Inc cannot deny warranty solely for the lack of receipts.
As the outdoor equipment engine owner, you should however be aware that MTD Consumer Group Inc may deny you warranty coverage if
your outdoor equipment engine or a part has failed due to abuse, neglect, improper maintenance, or unapproved modifications.
You are responsible for presenting your outdoor equipment engine to MTD Consumer Group Inc's distribution center or service center as soon
as the problem exists. The warranty repairs should be completed in a reasonable amount of time, not to exceed 30 days. If you have a question
regarding your warranty coverage, you should contact the MTD Consumer Group Inc Service Department at 1-800-800-7310 or at
http://su pport.mtd prod ucts.com.
GENERALEMISSIONSWARRANTYCOVERAGE:
MTD Consumer Group Inc warrants to the ultimate purchaser and each subsequent purchaser that the outdoor equipment engine is: (1)
designed, built, and equipped so as to conform with all applicable regulations; and (2) free from defects in materials and workmanship that
cause the failure of a warranted part for a period of two years.
The warranty period begins on the date the outdoor equipment engine is delivered to an ultimate purchaser or first placed into service.
Subject to certain conditions and exclusions as stated below, the warranty on emission-related parts is as follows:
1. Any warranted part that is not scheduled for replacement as required maintenance in the written instructions supplied is warranted for
the warranty period stated above. If the part fails during the period of warranty coverage, the part will be repaired or replaced by MTD
Consumer Group Inc according to subsection (4) below. Any such part repaired or replaced under warranty will be warranted for the
remainder of the period.
2. Any warranted part that is scheduled only for regular inspection in the written instructions supplied is warranted for the warranty period
stated above. Any such part repaired or replaced under warranty will be warranted for the remaining warranty period.
3. Any warranted part that is scheduled for replacement as required maintenance in the written instructions supplied is warranted for the
period of time before the first scheduled replacement date for that part. If the part fails before the first scheduled replacement, the part
will be repaired or replaced by MTD Consumer Group Inc according to subsection (4) below. Any such part repaired or replaced under
warranty will be warranted for the remainder of the period prior to the first scheduled replacement point for the part.
Repair or replacement of any warranted part under the warranty provisions herein must be performed at a warranty station at no charge
to the owner.
4.
5. Notwithstanding the provisions herein, warranty services or repairs will be provided at all of our distribution centers that are franchised to
service the subject engines or equipment.
6. The outdoor equipment engine owner will not be charged for diagnostic labor that is directly associated with diagnosis of a defective,
emission-related warranted part, provided that such diagnostic work is performed at a warranty station.
7. MTD Consumer Group Inc is liable for damages to other engine or equipment components proximately caused by a failure under
warranty of any warranted part.
8. Throughout the off-road engine and equipment warranty period stated above, MTD Consumer Group Inc will maintain a supply of
warranted parts sufficient to meet the expected demand for such parts.
9. Any replacement part may be used in the performance of any warranty maintenance or repairs and must be provided without charge to
the owner. Such use will not reduce the warranty obligations of MTD Consumer Group Inc.

10. Add-onormodifiedpartsthatarenotexemptedbytheAirResourcesBoardmaynotbeused.Theuseofanynon-exemptedadd-onor
modifiedpartsbytheultimatepurchaserwillbegroundsfordisallowingawarrantyclaims.MTDConsumerGroupIncwillnotbeliableto
warrantfailuresofwarrantedpartscausedbytheuseofanon-exemptedadd-onormodifiedpart.
WARRANTEDPARTS:
The repair or replacement of any warranted part otherwise eligible for warranty coverage may be excluded from such warranty coverage if
MTD Consumer Group Inc demonstrates that the outdoor equipment engine has been abused, neglected, or improperly maintained, and that
such abuse, neglect, or improper maintenance was the direct cause of the need for repair or replacement of the part. That notwithstanding,
any adjustment of a component that has a factory installed, and properly operating, adjustment limiting device is still eligible for warranty
coverage. Further, the coverage under this warranty extends only to parts that were present on the off-road engine and equipment purchased.
The following emission warranty parts are covered (if applicable):
1. Fuel Metering System
Cold start enrichment system (soft choke)
Carburetor and internal parts (or fuel injection system)
Fuel pump
Fuel tank
2. Air Induction System
Air cleaner
Intake manifold
3. Ignition System
Spark plug(s)
Magneto ignition system
4. Exhaust System
Catalytic converter
SAI (Reed valve)
5. Miscellaneous Items Used in Above System
Vacuum, temperature, position, time sensitive valves and switches
Connectors and assemblies
6. Evaporative Control
Fuel hose
Fuel hose clamps
Tethered fuel cap
Carbon canister
Vapor lines
050790 Rev.A

Congratulations on making a smart purchase. Your new Craftsman® product is designed and
manufactured for years of dependable operation. But like all products, it may require repair
from time to time. That's when having a Repair Protection Agreement can save you money and
aggravation.
Here's what the Repair Protection Agreement* includes:
[] Expert service by our 10,000 professional repair specialists
[] Unlimited service and no charge for parts and labor on all covered repairs
[] Product replacement up to $1500 if your covered product can't be fixed
[] Discount of 25% from regular price of service and related installed parts not covered by the
agreement; also, 25% off regular price of preventive maintenance check
[] Fast help by phone - we call it Rapid Resolution - phone support from a Sears representative.
Think of us as a "talking owner's manual."
Once you purchase the Repair Protection Agreement, a simple phone call is all that it takes for you
to schedule service. You can call anytime day or night, or schedule a service appointment online.
The Repair Protection Agreement is a risk-free purchase. If you cancel for any reason during the
product warranty period, we will provide a full refund. Or, a prorated refund anytime after the
product warranty period expires. Purchase your Repair Protection Agreement today!
Some limitations and exclusions apply. For prices and additional information in the U.S.A.
call 1=800=827=6655.
*Coverage in Canada varies on some items. For full details call Sears Canada at 1=800=361=
6665.
Sears Installation Service
For Sears professional installation of home appliances, garage door openers, water heaters, and
other major home items, in the U.S.A. or Canada call 1=800=4=MY=HOME®.
33

Operaci6n segura Pr,_cticas .......... Paginas 32
Asamblea ........................... Page 38
Operacion de ...................... Paginas 40
De Servicio y Mantenimiento de ....... Paginas 47
Fuera de temporada de almacenamiento .. Page 55
Soluci6n de problemas ................ Page 56
Reparaci6n de Acuerdo de Protecci6n .... Page 91
Servicio de nOmeros ............ atrasados Page
CRAFTSMAN GARANTiA COMPLETA
DURANTEdosa_osdesdelafechadecornpra,todaslaspartesde nofungiblesdeesteequipodeequitaci6nestangarantizadascontracualquier
defectode materialo rnanodeobra.Unapartenofungiblesdefectuosarecibir_a dornicilioreparaci6nola sustituci6nsilareparaci6nnoest_disponible.
GARANTiA LIMITADADE LA BATERiA
POR90 diasdesdelafechadecornpra,la bateria(unapiezaconsurnible)deesteequipodeconducci6nestagarantizadacontracualquier
defectode materialo rnanodeobra.UnabaterianuevasesurninistrarAgratuitarnente.Ustedesresponsableporelcostodernanodeobrade
instalaci6nde la bateria.
GARANTiALIMITADAADIClONAL
Enlassiguientesgaranfiasadicionales,ustedes responsableporel costodernanode obrade instalaci6nde la partedespu_sdelsegundoa_o
desdelafechadecornpra.
DURANTEcincoa_osdesdelafechadecornpra,el marcodeesteequipode conducci6nest_garantizadocontracualquierdefectode material
o rnanodeobra.Se surninistrar_unnuevomarcodeforrnagratuita.
DURANTEdieza_osdesdelafechadecornpra,el ejedelanterodeesteequipode conducci6nest_garantizadocontracualquierdefectode
materialo rnanodeobra.Sesurninistrar_unnuevoeje delanterogratuitarnente.
PARArnientrasesutilizadoporel propietariooriginaldespu_sdel d_cirnoa_ode lafechadecornpra,el eje hierrofundidofrontal(siest_
equipado)deesteequipodeconducci6nest_garantizadocontracualquierdefectode materialo rnanode obra.Concornprobantedecornpra,
sesurninistrar_un nuevoejedelanterodefundici6nde hierrodeforrnagratuita.
SERVIClODEGARANTiA
Paradetallesde lacoberturadegaranfiaobtenerla reparaci6no reernplazo,Ilarneal 1-800-659-5917ovisiteelsitioweb:www.craftsrnan.corn
Entodosloscasos,sisepartedelareparaci6no reernplazoesirnposible,elequipodeequitaci6nsereernplazar_gratuitarnenteconelrnisrnooequivalente.
Todoslosdelaanteriorgarantiaesnulasiseutilizaesteequipodeconducci6nrnientrasqueproporcionaservicioscornercialeso Sialquilaaotrapersona.
Estagarantiacubresolarnentedefectosenmaterialyrnanodeobra.Coberturade lagaranfianoincluye:
• Piezasfungibles(exceptola bateria)quepuedengastarseporel usonormaldentrodelperiodode garanfia,incluyendoperono lirnitadoa
cuchillas,bujias,filtrosde aire,correasyfiltrosdeaceite.
• Serviciode rnantenirnientoestandar,carnbiosde aceiteo puestasa punto.
• Neurn_ticode repuestoo reparaci6ncausadasporpinchazosde objetosexternos,talescornoclavos,espinas,toconeso vidrio.
• NeurnAticoo ruedade repuestoo reparaci6nresultantesdeldesgastenormal,accidente,o funcionarnientoincorrectoornantenirniento.
• Reparacionesnecesariasdebidoa abusodel operador,incluyendoperonolirnitadoa da_oscausadosporobjetosrn_sall_de la capacidad
de losequiposde conducci6nde rernolque,afectarobjetosquedoblanel marco,elejeo el cig(Je_alo over-speedingel motor.
• Reparacionesnecesariasdebidoa lanegligenciadeloperador,incluyendoperono lirnitadoa,da_osel_ctricosyrnecanicoscausados
potalrnacenarnientoinadecuado,no usarelgradoadecuadoyla cantidadde aceitede motor,nornantenerla cubiertalibrede residuos
inflarnables,o faltade rnantenirnientodelequipode equitaci6nsegQnlasinstruccionescontenidasenel manualdeloperador.
• Motor(sisternadecombustible)lirnpiezao reparacionesocasionadospotel combustibledeterrninadoestarcontarninadosuoxidan
(obsoletos).Engeneral,el combustibledebeutilizarsedentrode30 diasdela fechade cornpra.
• Eldeterioronormalyel desgastedelosacabadosexteriores,o reernplazodela etiquetadel producto.
Estagaranfialeotorgaderechoslegalesespecificos,y ustedtarnbi_npuedetenetotrosderechosquevariandeestadoa estado.
Sears BrandsManagementCm _oration,Hoffman Estates,IL 60179
N_rnerode rnodelo ..........................................................
Aceitedel motor: SAE30 N_mero de serie..............................................................
Fechade compra .............................................................
Combustible: Gasolinasinplorno Registrearribaeln_merodelmodelo,eln_merodeserieylafechadecompra
©SearsBrands,LLC 31

Lapresenciadeeste sirnboloindicaque setratade instrucciones
irnportantesde seguridadquesedebenrespetarparaevitar
ponerenpeligrosuseguridadpersonaly/o materialy lade otras
personas.Leaysigatodaslasinstruccionesdeestemanualantes
de poneren funcionarnientoestarn_.quina.Si no respetaestas
instruccionespodriaprovocarlesionespersonales.Cuandoveaeste
sirnbolo,ipresteatenci6na la advertencia!
PROPOSICION 65 DE CALIFORNIA
Elescapedel motordeesteproducto,algunosde suscornponentes
y algunoscornponentesdelvehiculocontieneno liberansustancias
quirnicasqueelestadodeCaliforniaconsideraque puedenproducir
c_.ncer,defectosde nacirnientouotrosproblernasreproductivos.
Losbornesdela bateriay losaccesoriosalinescontienenplornoy
cornpuestosde plorno,sustanciasquirnicasque segOnIoestableci-
do potel Estadode Californiacausanc_.ncery da_osenel sisterna
reproductivo.Ldveselasmanos despu_sde estaren contacto
con estoscomponentes.
Estarn_.quinarueconstruidaparaseroperadadeacuerdocon
lasreglasde seguridadcontenidasenestemanual.AIigualque
concualquiertipodeequipornotorizado,undescuidoo errorpor
partedeloperadorpuedeproducirlesionesgraves.Estarn_.quina
escapazde arnputarrnanosy piesy dearrojarobjetoscongran
fuerza.Denorespetarlasinstruccionesde seguridadsiguientesse
puedenproducirlesionesgraveso larnuerte.
Su responsabilidad--Restrinja el usode estarn_.quina
rnotorizadaalas personasque lean,cornprendany respetenlas
advertenciase instruccionesqueaparecenen estemanualyen la
rn_.quina.
iGUARDEESTASINSTRUCCIONES!
FUNCIONAMIENTO GENERAL
• Lea,entiendaycurnplatodaslasinstruccionesincluidasen
la rn_.quinayen losrnanualesantesdernontarlay utilizarla.
Guardeestemanualenun lugarseguroparaconsultasfuturasy
peri6dicas,asi cornoparasolicitarrepuestos.
• Farniliaricesecontodosloscontrolesyconel usoadecuado
delosrnisrnos.Sepac6rnodetenerlarn_.quinaydesactivarlos
controlesr_.pidarnente.
• Noperrnitanuncaque losni_osrnenoresde 14a_osutilicen
estarn_.quina.Losni_osde 14a_osen adelantedebenleery
entenderlasinstruccionesde operaci6ny norrnasdeseguridad
contenidaseneste manual,yen la rn_.quinay debenser
entrenadosy supervisadospor unadulto.
• Nuncaperrnitaquelosadultosoperenestarn_.quinasinrecibir
antesla instrucci6napropiada.
• Paraayudaraevitarel contactoconlascuchillaso unalesi6npor
algOnobjetoqueseaarrojado,rnantengaa losobservadores,a
losayudantes,ni_osy rnascotasalejadosal rnenos25 metrosde
la rn_.quinarnientrasest,.en funcionarniento.Detengala rn_.quina
sialguienentraenlazona.
• Inspeccionerninuciosarnenteel Areadondeutilizar_,el equipo.
Retiretodaslaspiedras,palos,cables,huesos,juguetesy otros
objetosextra_osquepodrianserrecogidosyarrojadospor la
acci6nde lascuchillas.Losobjetosarrojadospor larn_.quina
puedenproducirlesionesgraves.
• Planifiqueel patr6ndecortedelc_spedque hade seguirpara
evitarla descargade materialhacialoscarninos,lasveredas,los
observadores,etc.Eviteadern_.sdescargarmaterialcontralas
paredesyobstruccionesquepodrianprovocarqueel material
descargadorebotecontrael operador.
• Paraprotegerselosojosutilicesiernpreanteojoso antiparras
deseguridadrnientrasoperalarn_.quinao rnientraslaajusta
o repara.Losobjetosarrojadosque rebotanpuedenproducir
lesionesocularesgraves.
• Utilicezapatosde trabajoresistentes,desuelafuerte,asicorno
pantalonesycarnisasajustados.Lasprendassueltaso las
alhajaspuedenquedaratrapadasenlaspiezasrnovibles.Nunca
operela rn_.quinadescalzoo consandalias.
• Est_atentoa lacortadoraya la direcci6nde la descargade
losaditarnentosy noapuntea nadie.Nuncaoperelacortadora
de c_spedsinqueest_nen sulugarapropiadolacubiertade
descargao elcolectorde recortesdecesped.
• Nopongalasrnanoso lospiescercade laspiezasrotatoriaso
debajode la plataforrnadecorte.Elcontactoconlascuchillas
puedeproducirla arnputaci6ndernanosy pies.
• Unacubiertade descargafaltanteo da_adapuedeprovocarel
contactoconlacuchillao lesionespotobjetosarrojados.
• Detengala(s)cuchilla(s)cuandoatraviesesenderos,sendaso
carninosde gravaycuandonoest_cortandoel cesped.
• Vigileel tr_.nsitovehicularcuandoest_operandocercadeo en
crucesde carninos.Estarn_.quinanodebeutilizarseen lavia
pOblica.
• Noopereestarn_.quinabajolosefectosdelalcoholode drogas.
• Corteel cespedsolarnenteconluzdediao conunabuenaluz
artificial.
• Nuncatransportepasajeros.
• Desenganchela(s)cuchilla(s)antesdecolocarlarnarchaatr_.s.
Retrocedalentarnente.Siernpremirehaciaabajoy haciaatr_.santes
y rnientrasretrocede,paraevitaraccidentes.
• Reduzcala velocidadantesdedarlavuelta.Operelarn_.quina
suavernente.Evitelaoperaci6nerr_.ticayla velocidadexcesiva.
• Desenganchela(s)cuchilla(s),coloqueelfrenodeestaciona-
rniento,detengaelmotoryesperehastaquela(s)cuchilla(s)se
detenga(n)porcornpletoantesderetirarelcolectordec_sped,
vaciarlosrecortes,destaparelcanal,retirarrestosde cespedo
desechos,o hacercualquierajuste.
35

• Nuncadejelarn_.quinaen funcionarnientosinvigilancia.Apague
siernprelascuchillas,coloqueelfrenodernano,detengaelmotory
retirela Ilaveantesdebajarsedelvehiculo.
• Tengasurnocuidadoalcargaro descargarlarn_.quinaen un
rernolqueocarni6n.Estaunidadnodebeconducirseenascensoo
descensoderarnpas,porquepodrialadearseyprovocarlesiones
personalesgraves.Enlasrarnpaslarn_.quinasedebeernpujar
rnanualrnenteparacargarlao descargarlacorrectarnente.
• Elsilenciadoryel motorsecalientanypuedencausarquernaduras.
Nolostoque.
• Reviseel espaciolibrepotencirnade lacabezaantesdeconducir
bajolasrarnasbajasde_.rboles,cables,cerrarnientosde puertas,
etc.enloscualeseloperadorpodriaatorarseo serernpujadofuera
dela rn_.quina,Ioquepodriaresultaren lesionesgraves.
• Desenganchetodoslosernbraguesdelosaccesoriosy presione
totalrnenteel pedaldelfrenoantesdeintentararrancarel motor.
• Larn_.quinaest,.diseSadaparacortarc_spedresidencialnormal,
conunaalturanomayora 10".Nointentecortarcespeddernasiado
crecido,seco(porej.,pastura)nipilasdehojassecas.Elc_sped
ylashojassecaspuedenentraren contactoconel escapedel
motory/o acurnularseenla plataforrnade lacortadoradecesped,
convirti_ndoseen unpeligrodeincendio
• Utilicesolarnenteaccesoriosyaditarnentosaprobadosparaesta
rn_.quinapotelfabricantedelarnisrna.Lea,cornprendaysiga
todaslasinstruccionesproporcionadasconlosaccesorioso
aditarnentosaprobados.Paraobtenerunalistadelosaccesorios
aprobadosy losarchivosadjuntos,Ilarne1-800-659-5917.
• Losdatosestadsticosrnuestranquelosoperadoresde60 aSos
yrnayoresseven involucradosenunaltoporcentajedelesiones
relacionadascontractorescortacesped.Estosoperadoresdeben
evaluarsucapacidadparaoperarel tractorcortac_spedenforrna
suficienternenteseguraparaprotegersea ellosrnisrnosy alos
dern_.scontralesionesgraves.
Si sepresentansituacionesqueno est_.nprevistasen este
manualseacuidadosoyuseel sentidocornOn.
FUNCIONAiVIIENTO EN PENDIENTES
Laspendientessonunfactorirnportanterelacionadoconaccidentes
porderrapeyvuelcosquepuedenproducirlesionesgravese incluso
la rnuerte.Laoperaci6nen pendientesrequieremayorprecauci6n.
Si nopuederetrocederen la pendienteo sino sesienteseguro,no
realiceningunaoperaci6ndecorte.
Parasuseguridad,useel indicadordependientesqueseincluye
cornopartede estemanualpararnedirla pendienteantesdeoperarla
rn_.quinaenunazonainclinada.Sila pendientees mayorde 15grados
segOnel rnedidor,noopereestarn_.quinaenesesector,puespodria
causarlesionesgraves.
HagaIosiguiente:
• Podehaciaarribayabajodelaspendientes,nodeforrnatrans-
versal.Tengacuidadocuandocarnbiededirecci6nal operaren
pendiente.
• Est_atentoa loshoyos,surcos,baches,rocas,uotrosobjetos
ocultos.Elterrenodesniveladopuedevoltearla rn_.quina.Elcesped
altopuedeocultarobst_.culos.
• Vayaa bajavelocidad.ElijaunavelocidadIosuficienternentebaja,
de rnodoquenotengaquedetenerseohacercarnbiosrnientras
est,.sobrela pendiente.Losneurn_.ticospodrianperdertracci6n
sobrelaspendientesaQncuandolosfrenosfuncionaranapro-
piadarnente.Siernprernantengalarn_.quinaen carnbiornientras
desciendelaspendientes,parapoderfrenarconelmotor.
• Sigalasrecornendacionesdelfabricanteparalospesoso contra-
pesosdelasruedas,pararnejorarlaestabilidadde larn_.quina.
• Tengaespecialcuidadoconloscolectoresdecespeduotros
aditarnentos.Losrnisrnospuedenrnodificarlaestabilidaddela
rn_.quina.
• Hagaquetodoslosrnovirnientosen laspendientesseanlentosy
graduales.Nocarnbierepentinarnentelavelocidadniladirecci6n.
Unfrenadoo carnbiodevelocidadrepentinospuedencausarque
el frentede larn_.quinaselevantey d_unavolteretahaciaatr_.s,Io
quepodriaproducirlesionesgraves.
• Evitearrancaro detenerseenunapendiente.Silosneurn_.ticos
pierdenlatracci6n,desenganchelascuchillasydescienda
lentarnentela pendiente.
No hagaIo siguiente:
• Nogiresobrelaspendientesarnenosqueseanecesario.Sies
posible,girelentarnenteygradualrnenteduranteeldescenso.
• Nocorteelc_spedcercade pozos,hundirnientosoterraplenes.La
cortadoradec_spedpuedevolcarserepentinarnentesiunade las
ruedasestersobreelhordede unacantilado,zanjao siunhordese
desrnorona.
• Nointenteestabilizarlarn_.quinaponiendoelpieenel suelo.
• Noutiliceuncolectordec_speden pendientesernpinadas.
• NopodeelcespedhOrnedo.Unarnenortracci6npodriacausar
derrapes.
• Noparadescender.Elexcesodevelocidadpuedehacerqueel
operadorpierdaelcontroldela rn_.quina,ocasionandolesiones
graveseinclusolarnuerte.
• Norernolquecargaspesadasdetr_.sdelosaditarnentos(carritode
basuracargado,podadoraderodillos,etc)en pendientesrnayores
de5grados.Cuandosedesplazapendienteabajo,el pesoadicional
tiendeaernpujareltractorypuedehacerquesepierdaelcontrol
delrnisrno(porejernplo,eltractorsepuedeacelerar,sereducela
capacidadparafrenary rnaniobrar,losaccesoriospuedenplegarse
cornouncortaplurnasyhacerqueeltractorvuelque).
NINOS
Puedenocurriraccidentestr_.gicossiel operadornoest,.atentoa la
presenciade niSos.PotIogeneral,losniSossesientenatraidospor
estetipode rn_.quinasy sufuncionarniento.Noentiendenlosriesgos
ni lospeligros.NuncaasurnaquelosniSosperrnanecer_.nen el rnisrno
lugardondelosviopotQltirnavez.
• Mantengaa losniSosfueradel_.readetrabajoybajoestricta
vigilanciadeunadultoresponsableadern_.sdelpropiooperador.
Est_alertayapaguela rn_.quinasiunniSoingresaal_.rea.
• Antesy rnientrasest,.retrocediendo,mirehaciaatr_.sycuidequeno
hayaniSos.
NuncatransporteniSos,aQnconlacuchillaapagada.Podriancaerse
y resultarseverarnenteheridoso interferirconlaoperaci6nsegurade
la m_.quina.
• Tengaextrernaprecauci6ncuandoseaproxirneaesquinasciegas,
portales,arbustos,_.rbolesuotrosobjetosquepuedanirnpedirlever
a unniSoquesecruceenelrecorridode larn_.quina.
36

• Paraevitaraccidentesaloperarenrnarchaatr_.s,siernpredesengan-
chelascuchillasantesdecolocarrnarchaatr_.s.Siest,.instalado,
el"ModoPrecaucidnMarchaAtr_.s"(hojasdeoperarlarn_.quina,
rnientrasquelospaseosala inversa)nodebeutilizarsecuandohay
ni_osuotraspersonaspresentes.
• Mantengaa losni_osalejadosdelosrnotoresenrnarchao calientes.
Puedensufrirquernadurasconunsilenciadorcaliente.
• RetirelaIlavecuandodejelarn_.quinasinvigilancia,evitequeuna
personasinautorizaci6nlarnaneje.
Noperrnitanuncaque losni_osrnenoresde 14a_osutilicenesta
rn_.quina.Losni_osde 14a_osenadelantedebenleeryentenderlas
instruccionesdeoperaci6nynorrnasde seguridadcontenidaseneste
manual,y enla rn_.quinaydebenserentrenadosysupervisadospor
unadulto.
REIVIOLQUE
• Rernolque_nicarnenteconunarn_.quinaquecuenteconun
enganchediseSadopararernolcar.Noacopleequiporernolcado
exceptoenelpuntodeenganche.
• SigalasrecornendacionesdelfabricanteenIoquerespectaalos
lirnitesdepesodelosequiposa rernolcaryalrernolqueenpendien-
tes.
• Nuncaperrnitala presenciade niSosuotraspersonasdentroosobre
losequiposrernolcados.
• Enlaspendientes,elpesodelequiporernolcadopuedecausar
p_rdidadetraccidnyperdidadecontrolde larn_.quina.
• Siernpreuseextralaprecauci6nrernolcandoconunarn_.quina
capazdehacervueltasapretadas(p.ejpaseo"devueltacero"-enel
cortacesped).Hagaarnpliasvueltasparaevitaralgato-knifing.
• Despl_.ceselentarnenteydejedistanciaadicionalparafrenado.
• Noparadescender.
SERVIClO
Manejoseguro de lagasolina
Paraevitarlesionespersonaleso daSosrnaterialesseasurnarnente
cuidadosoal rnanipularla gasolina.Lagasolinaessurnarnente
infiarnableysusvaporespuedencausarexplosiones.Se puede
lesionargravernentesiderrarnagasolinasobreustedo sobrela ropa,
yaque_stasepuedeincendiar.L_.vesela piely c_.rnbiesede ropade
inrnediato.
• Utilices61olos recipientesparagasolinaautorizados.
• NuncaIlenelosrecipientesenel interiorde unvehiculoo carnidn
o cajade rernolqueconrecubrirnientopl_.stico.Coloquesiernpre
losrecipientesenel pisoylejosdel vehiculoantesde realizarla
carga.
• Cuandoseafactible,retireel equipoa gasolinadel carni6no
rernolqueyII_neloen elsuelo.Siestonoes posible,Ileneel
equipoen unrernolqueconuncontenedorport_.til,envezde
hacerloconunaboquilladispensadoradegasolina.
• Mantengala boquillade Ilenadoencontactoconel hordedel
dep6sitode combustibleoconla aberturadel recipienteen todo
rnornento,hastaterrninarlacarga.Noutiliceundispositivode
boquilladeapertura/cierre.
• Apaguetodosloscigarrillos,cigarros,pipasy otrasfuentesde
cornbustidn.
• Nuncacarguecombustibleenla rn_.quinaenun espaciocerrado.
• Nuncasaquela tapadel combustibleniagreguecombustible
rnientrasel motorest,.calienteo enrnarcha.Dejequeel motor
seenfrieporIornenosdosrninutosantesde volvera cargar
combustible.
• NuncaIleneen excesoel dep6sitode combustible.Lleneel
tanquenorn_.sde 1/2pulgadapordebajode labasedelcuello
del tap6ndecarga,paradejarespacioparalaexpansi6ndel
combustible.
• Vuelvaa colocarlatapadela gasolinayajQstelabien.
• Lirnpieel combustiblequese hayaderrarnadosobreel motory el
equipo.Trasladelarn_.quinaa otrazona.Espere5 rninutosantes
de encenderelmotor.
• Parareducirel riesgode incendio,rnantengala rn_.quinalirnpia
de pasto,hojasy deacurnulacidndeotros residuos.Lirnpielos
derrarnesdeaceiteo combustibleysaquetodoslosresiduos
ernbebidosde combustible.
• Nuncaguardelarn_.quinao el recipientedecombustibleen un
espaciocerradodondehayafuego,chispaso luzpiloto,corno
porejernplodecalentadoresdeagua,calefactoresde arnbientes,
hornos,secadoresde ropau otrosaparatosa gas.
• Dejequelarn_.quinaseenfriecincorninutospor Iornenosantes
de guardarla.
Servicio general
• Nuncaenciendael motoren espacioscerradosoen unazona
conpocaventilacidn.Elescapedel motorcontienernondxidode
carbono,ungasinodoroyletal.
• Antesdelirnpiar,repararo inspeccionarla rn_.quina,cornpruebe
que la(s)cuchilla(s)ytodaslaspartesenrnovirnientosehayan
detenido.Desconecteel cablede la bujfay p6ngalohaciendo
rnasacontrael motorparaevitarqueseenciendaaccidental-
rnente.
• Reviseperi6dicarnenteparaasegurarsequelascuchillasse
detenganporcornpletoenaproxirnadarnentecinco(5) segundos
despu_sdeaccionarel controldedesenganchede la(s)
cuchilla(s).Si lascuchillasnosedetienendentrodeeste lapso
de tiernpo,suunidaddeber_,ser reparadaporsudistribuidorde
servicioautorizadoMTD.
• Reviseconfrecuenciaelfuncionarnientodelsisternadefrenos
yaqueest,.sujetoa desgasteporla operaci6nnormal.Ajustey
efectQernantenirnientosegQnserequiera.
37

• Reviselospernosdemontajedela(s)cuchilla(s)ydel motora
intervalosfrecuentesparaverificarqueest6nbienapretados.
Adem_.s,inspeccionevisualmentela(s)cuchilla(s)en buscade
daSos(porejemplo,desgasteexcesivo,abolladuras,rajaduras,
etc.). Reemplacela(s)cuchilla(s)Qnicamenteconlascuchillas
defabricantesde equiposoriginales(O.E.M.)listadasen este
manual.Elusode piezasquenocumplenconlasespecifi-
cacionesdelequipooriginalpodriatenercomoresultadoun
rendimientoincorrectoyadem_.sponeren riesgola seguridad.
• Lascuchillasdelaspodadorassonmuyafiladas.Envuelvala
cuchillao utiliceguantesyextremelasprecaucionescuando
efectQemantenimiento.
Mantengatodoslospernos,tuercasy tornillosbienajustados
paraasegurarsede quela m_.quinaseencuentraen condiciones
segurasde operaci6n.
• Nuncaaltereel sistemade enclavamientode seguridadni
otrosmecanismosde seguridad.Controleperiddicamenteque
funcionencorrectamente.
Despu6sdegolpearconalgQnobjetoextraSo,detengael motor,
desconecteel cablede la bujfay conecteel motora masa.
Inspeccioneminuciosamentela m_.quinaparaversiest,.daSada.
Repareel daSoantesdearrancary ufilizarla m_.quina.
Nuncatratedehacerajusteso reparacionesa la m&quina
mientrasel motorest&enmarcha.
• Loscomponentesdel colectordec6spedy la cubiertade
descarga,estansujetosa desgasteydaSosque podriandejar
expuestaspartesen movimientoo permitirque searrojenobjetos.
Paraprotegersuseguridad,verifiquefrecuentementetodoslos
componentesy reempl_.celosinmediatamentes61oconpiezasde
losfabricantesdel equipooriginal,listadosen estemanual.Eluso
de piezasque nocumplenconlasespecificacionesdel equipo
originalpodriatenercomoresultadoun rendimientoincorrectoy
adem_.sponeren riesgola seguridad.
• Nocambielaconfiguraci6ndel reguladordel motorni Ioopere
a sobrevelocidad.El reguladordel motorcontrolala velocidad
m_.ximaseguradefuncionamientodel motor.
• Mantengao reemplacelasefiquetasde seguridade instrucciones
segQnseanecesario.
Respetelasnormasreferentesa ladisposicidncorrectay las
reglamentacionessobregasolina,aceite,etc.paraprotegerel
medicambiente.
• SegQnla Comisi6ndeSeguridadde Productosparael Consumi-
dorde losEstadosUnidos(CPSC)y laAgenciade Protecci6n
Ambientalde losEstadosUnidos(EPA),esteproductotieneuna
vidaQtilmediade siete(7)aSos,6 270horasdefuncionamiento.
AIfinalizarla vidaQtilmedia,adquieraunam_.quinanuevao haga
inspeccionaranualmente6staSearsporunou otrodistribuidorde
serviciosparacerciorarsedequetodoslossistemasmec_.nicos
yde seguridadfuncionancorrectamenteyno tienenexcesivo
desgaste.Si noIohace,puedenproducirseaccidentes,lesiones
o muerte.
NO MODIFIQUE EL MOTOR
Paraevitarlesionesgraveso lamuerte,nomodifiqueel motorbajo
ningunacircunstancia.Si cambialaconfiguraci6ndel reguladordel
motorel motorpuededescontrolarsey operara velocidadesinsegu-
ras.Nuncacambielaconfiguraci6ndef_.bricadelreguladordel motor.
AVlSO REFERIDO A EMISlONES
LosmotoresqueestAncertificadosycumplenconlasregulaciones
de emisionesfederalesEPAyde CaliforniaparaSORE(Equipos
pequeSostodoterreno)estAncertificadosparaoperarcongasolina
comQnsinplomoy puedenincluirlossiguientessistemasde control
de emisiones:Modificacidnde motor(EM)ycatalizadorde tresvias
(TWC)siest_.nequipadosde esamanera.
GUARDACHISPAS
EstamAquinaest,.equipadaconunmotorde combusti6ninternay
no debeserufilizadaeno cercade unterrenoagrestecubiertopor
bosque,malezaso hierbaexceptosiel sistemade escapedelmotor
est&equipadoconunamortiguadordechispasquecumplaconlas
leyeslocaleso estatalescorrespondientes,encasode haberlas.
Si seutilizaunamortiguadorde chispasel operadorIodebemantener
en condicionesde usoadecuadas.Enel Estadode Californialas
medidasanteriormentemencionadassonexigidasporIcy(Arficulo
4442del C6digode RecursosPOblicosde California).Esposible
queexistanleyessimilaresenotrosestados.Lasleyesfederalesse
aplicanenterritoriosfederales.
Puedeconseguirelamortiguadordechispasparael silenciadora
travesdesudistribuidorautorizadode motoreso poni6ndoseen
contactoconel centrode servicioSears.
38

SJlVlBOLOS DE SEGURIDAD
Estap&ginarepresentay describelaseguridadlossimbolosquepuedenpareceren esteproducto.Lea,comprenda,y sigatodasinstrucciones
enla m_quinaantesprocurarparareuniry operar.
0
AL
LEA EL MANUAL(S) DEL OPERADOR
leido, entienda, y siga todas las instrucciones en el manual(s) antes de procurar montar y funcionar
PELIGRO-- DE EL CORTE DE PIE
Nunca transporte pasajeros. Nunca transporte ni_os, aun con la cuchilla apagada.
PELIGRO-- DE EL CORTE DE PIE
Retroceda lentamente. Siempre mire hacia abajo y hacia atr_is antes y mientras retrocede, para evitar
accidentes.
PELIGRO-- DE EL CORTE DE PIE
Guarde manos y pies lejos de hacer girar partes.
PELIGRO-- ESCOMBROS LANZADOS
Quite objetos que pueden ser lanzados pot la I_imina en cualquier direcci6n. Lleve gafas de
seguridad..
PELIGRO-- ESCOMBROS LANZADOS
Quite objetos que pueden ser lanzados pot la I_imina en cualquier direcci6n. Lleve gafas de
seguridad.
ERSONAS PRESENTES
Guarde alas personas presentes, a los ayudantes y a ni_os pot Io menos 75 pies lejos.
PELIGRO-- CUESTAS
Use extra la precauci6n en cuestas. No siegue cuestas mayores que 15°.
ADVERTENCIA -- SUPERFICIE CALIENTE
Las partes del motor, especialmente el silenciador, Ilega a set muy caliente durante la operaci6n.
Permita motor y silenciador para ponerse frio antes de tocar.
PELIGRO-- GIRANDO HOJAS
Para reducir el riesgo de herida, guarde manos y pies lejos. No funcione a menos que la tapa
de descarga o el receptor de hierba est_n en su lugar apropiado. De ser dahado, sustituya
inmediatamente.
39

(ACEPTAR)
I5 ° Pendiente
X
(DEMASIADO ESCARPADO)
15° Pendiente
4_
• Figura1
"'"
USO DE ESTE PENDiENTE DE CALIBRE PARA DETERrvIINAR
SlUNA PENDIENTEES DEIVlASIADOESCARPADO PARA UNA OPEBACION SEGURA!
Paracomprobar la pendiente, hagaIo siguiente:
1. Borrar esta p_ginay doble aIo largo de la linea discontinua.
2.
3.
4.
5,
Localizar un objeto vertical sobre o detr_.sde la pendiente(un poste, un edificio, unavalla, un_.rbol,etc.)
Alinee cada lado de pendiente decalibre con el objeto vertical (consultar Figura 1 and Figura2 ).
Ajuste el pendiente decalibre arriba o hacia abajohasta los toques esquina izquierdael pendiente
(consultar Figura 1and Figura2).
Si hay un espacio por debajo de la pendientede calibre, el pendientees demasiado escarpa por operaci6n
segura(consultar Figura2 above).
Figura 2
Laspendientesson un factor importanterelacionadocon unvuelcoy renovaci6nde los accidentes quepuedenprovocar lesionesgraves o la muerte.
No utilice lama.quinaen pendientesde ma.sde 15grados.Todospendientes requieremayor precauci6n.Si no puede retrocederen la pendienteo si se
sienteinseguroen ella, nola recorte.Siemprecorte el cesped arribay abajo las pendientes,nuncaen toda la superficie de la cuesta.

IMPORTANTE: Su tractorseentregaconaceitedemotoren eJ
motor.Sinembargo,debecornprobarel niveldeaceiteantesde
operar.Consultela secci6nde Servicioy Mantenirnientoparaobtener
instruccionessobrelacornprobaci6ndelniveldeaceite.
CONEXION DE LOS CABLES DE LA BATERIA
PROPOSlClON 65 DE CALiFORNiA
Postesdela bateria,terrninalesyaccesoriosrelacionados,con-
tienenplornoycornpuestosde pJorno,sustanciasqueen el Estado
de Californiaporcausarc_.ncery daSosreproductivos.L_.veselas
rnanosdespu_sde rnanipular.
Cuandoconecteloscablesde la bateria,siernpreconecteel positivo
I(rojo)dealarnbrea suterminalenprimerlugar,seguidoporel
pgativo (Negro)dealarnbre.
Porrazonesde envb, tantodecablesde la bateriade suequipose
hanquedadodesconectadode losterrninalesen laf_.brica.Para
conectarloscablesde la bateria,hagaIosiguiente:
NOTA: Laterminalde Pospositivode labateriaest,.rnarcada.(+).El
terminalnegativode labateriaestArnarcadaNeg.(-).
1. Quitela cubiertadeplAstico,siestApresente,desdeelterminal
positivode labateriayconectarelcablerojoalterminalpositivode
labateria(+)conelpernoy tuercahexagonal.Veaselafigura1.
f --,,
ENVlO BRACE ELllVIINACION
AsegQresedequeel motordel tractorcortacespedes, retirelaIlave
de encendido,yponerel frenoantesde quitarlaIlavedeenvio.
IConsultela secci6nde Operaci6nparaobtenerinstruccionessobre
lc6rnoestaNecerel frenodeestacionarniento.
Busquela Ilavedeenvio,siexiste,ylaetiquetadeadvertenciaque
acornpaSaa encontrarseenel ladoderechode lacortadorade
cesped,entrelatolvadedescargay laplataforrnadecorte.Wase
la figura.2.
//
Figura1
2. Quitelacubiertadepl_.stico,siest,.presente,desdeelterminalnega-
tivode labateriayconectarel cablenegroal terminalnegativode
la bateria(-) conel pernoytuercahexagonal.Wase la figura1.
3. La posici6nde la botadegornarojasobreelterminalpositivode
la bateriaparaayudara protegerde lacorrosi6n.
NOTA: Si labateriaseponeen serviciodespu_sde lafechaindicada
en lapartesuperiorde la bateria,carguela bateriacornoseindicaen
el Servicioy Uantenirnientode la secci6ndeestemanualantesde
operarel tractor.
Figura2
CoJoquelapalancade elevaci6ndecubiertaen laposici6nrn_.s
altade corte.ConsulteAjustede laalturadecorteenlasecci6nde
Operaci6ndeestemanual.
MientraspresionalatoJvadedescargahaciala rn_.quinaconla
rnanoizquierda,retirela Ilavedetransporternaritirnoconla rnano
derechaagarrandoentreel pulgaryel dedoindiceygirandoen
sentidohorario.
ElenvioIlave,usadoparalosprop6sitosQnicarnenteel envasado,
debeserrernovidoydesechadoantesde operarsucortacesped.
Lacubiertade lasiegaescapazdelanzarobjetos.La faltade operar
el cortac_spedsinlacubiertade descargaen la posici6napropiada
de operaci6npodriaresultarenlesionespersonalesgravesy / o I
lda_osa a propedad. j
QUE UNE EL VOLANTE
Si el voJantede sutractornoIleg6adjunta,el hardwaredela
colocaci6nsehaernbaladoenel volante,pordebajode latapadel
volante.Concuidadola tapadelapalancadelvolanteyquitarel
hardware.
1. Conlasruedasdeltractor,apuntandodirectarnentehaciadelante,
colocarel volantesobreeleje dedirecci6n.
38

2. Coloquela arandela(conla parteahuecadahaciaabajo)sobreel
volantey seguraconel tornillohexagonal.Wase la figura.3.
f -,
Figura3
3. Coloquelatapadelvolantesobreelcentrodelvolanteyempujehacia
abajohastaque"clics"en sulugar.
COLOCAClON DE LA SEDE
NOTA:Porrazonesde envfo,elasientoest,.biensujetoalsoporte
depivotedel asientodeltractorconunaabrazaderadepl_.stico,o
montadoshaciaatr_.sen elsoportede pivote.Encualquiercaso,libre
el asientode suposici6ndeenvfoteniendocuidadodenodobleni
retuerzael cablede alimentaci6ny sigalasinstruccionesabajopara
fijarla.
1. Retirelosdostornillosdecabezahexagonalylastuercasdelasede
soportede pivote.
2. Alinearlosagujerosdelanterosdelasientoconelsoportedernontaje
losorificiosdel soportedepivotedelasientode sutractory
seguroconquequit6lostornilloshexagonalesytuercas.Vealas
A enFiguras4.
r
Figura4
3. Conecteelmazodecablesenelinterruptordeseguridaddelasiento
en la parteinferiordelasiento,comosemuestraen Bde la Figura
4.
NOTA:Eltractornofuncionaconel cabledealimentacidndesconectado.
Ajuste del asiento
Paraajustarla posici6ndel asiento,firelohaciaarribaysostengala
palancadeajustedel asiento.Desliceel asientohaciaadelanteo
haciaatr_.sa la posici6ndeseada;luegosueltela palancadeajuste.
AsegQresedequeel asientoest_trabadoen untopede asientoantes
de operarel tractor.
Veala Figura5.
Antesde operarel tractor,asegQresede queelasientoest_en-
ganchadoenel topedelasiento.Coloqueel frenode mano.P_.rese
detr_.sde la m_.quinay tiredelasientohaciaatr_.shastaqueencaje
en sulugarhaciendoclic.
Figura5
PFIESl0N DE LAS LLANTAS
M_.ximapresi6nde losneum_.ticos,en ning_ncasoesde30 psi.
Igualdadde presi6nde losneum_.ticosdebenmantenerseen todo
momento.Nosobrepasarnuncalapresi6nm_.ximade infiadofiguran
len e fancode neum_.tco.
Lapresi6nde losneum_.ticosrecomendadade funcionamientoesel
siguiente:
• Aproximadamenteel 10psiparalosneum_.ticostraseros
• Aproximadamenteel 14psiparalosneum_.ticosdelanteros
INIPORTANTE: Refi_rasea la pareddel neum_.ticoparala ISP
recomendadoso m_.ximosfabricantede neum_.ticosesexacto.No
inflardemasiado.Lapresi6ndel neum_.ticodesigualpodriacausarque
laplataformade corteparacortarde maneradesigual.
39

J
G
A
©
H
D
A Palancadelfrenodeestadonamiento
B AceleradorypalancadecontroldeChoke
C IgnitionSwitchModule
D Auto-discopedal
E Levantela palancadelacubierta
Figura6
F Tomadefuerzadepalanca(BladeEngage)
G Portavasos
H DeVe[oddad
I Pa[ancadeajustede[asiento
J Pedaldefreno
J
NOTA:Cualquierreferendahechaenestemanualal ladoDERECHOoIZQUIERDOdeltractordebeentendersetalcomoseobservadesde
laposid6ndeloperador.
Cumpieconlosest_ndaresde seguridaddeANSi
Lasm_quinasquitanievedeCraftsmancumplenconlosest_ndaresdeseguridadde[institutoestadounidensedeest_ndaresnacionales(ANSI).
40

Frenode estacionamiento
Paraajustarel frenodeestadonamiento:compietamenteelpedal
defreno.Moverlapalancadelfrenodeestadonamientoenla
posiddndelfrenodeestadonamiento.Suelteelpedaldelfreno
paraqueelfrenodeestadonamientoapartidpar.
Parasoltarelfrenodemano:Presioneelpedaldelfrenoymueva
lapalancadefrenodeestadonamientofueradelaposid6nONy
enlaposiddnOFF.Elfrenodeestadonamientoyluegopuestoen
libertad.Suelteel pedaldelfreno.
NO@:Elfrenodeestadonamientosedebeestablecersiel
operadordejaelasientoconel motorenmarchaoelmotorse
apagar_autom_ticamente.
Aceieradorypaianca decontrolde
estrangulador
/
m
M
m
SLOW
Elacelerador/ cebadorpalancadecontrol
seencuentraenelladoderechodelpanelde
instrumentosdeltractor.Estapalancacontrolala
veloddaddelmotory,cuandoseempujatodoel
caminoaseguir,elcontroldelestranguladortambl_n.Cuandose
poneenunaposid6ndetermlnada,el aceleradorser_mantener
unaveloddadunlforme.
IMPORTANTE:Cuandoopereeltractorconlaplataformadecorte
comprometido,estarsegurosdequelapalancadelaceleradorest_
siempreenel FAST(conejo)laposid6n.
M6dulodei interruptordeencendido
Precauci6n:Antesdeoperareltractor,
referirseaambosinterruptoresdebloqueo
deseguridadyArranquedelmotorenla
secci6nFuncionamientodeestemanualpara
verinstruccionesdetalladasdelM6dulodel
Interruptordeencendidoyfuncionamientodel
tractorenMODODEPRECAUCIONENMARCHA
ATRAS.
Paraarrancarelmotor,insertelaIlaveenelinterruptorde
encendidoygirarlasagujasdelrelojhastala posid6nSTART.
SueltelaIlaveenlaposid6nMODONORMALDECORTEunavezque
hayaarrancadoel motor.
Paradetenerel motor,girelaIlavedeencendidoensentido
contrarioalaposid6nSTOP.
@R F
©
Palancadeajuste del asiento
Lapalancadeajustedelasientoseencuentradebajodelapartefrontal/izquierda
delasiento.Lapalancapermiteelajustedelapartedelanterayla posid6n
longitudinaldelasiento.Consultelasecd6ndelaAsambleadelmanualpara
obtener[nstrucdonesm_sdetalladasparaajustarlaposid6ndelasiento.
Auto-unidadde pedal
Launidaddepedalseencuentraenelladoderechodeltractor,aIolargodelestribo.
Presioneel pedalhadadelantelaunldadyeltractorsemueveenladlrecd6nquela
palancadecamblosest_comprometidopulgadasacausarqueeltractorparaviajar
hadaadelante,mlentrasqueaunaparadacompleta,muevalapalancadecamblos
enlaposid6ndelantera.Pocoa poco,pasoenlaunidaddepedalyeltractor
comenzar_aavanzar.Paramoverseenreversa,sigaelmismoprocedimiento,s61o
moverlapalancadecambiosenlaposid6ninversa.
Laveloddaddetierrasecontrolaconlaunldaddepedal.Lom_sadelanteque
el pedalsegir6,elm_sr_pido,elvehiculodeviaje.Elpedalvolver_asuposld6n
originalcuandonoest_deprlmldo.Consultelasecd6ndeOperad6ndeestemanual
para[nstrucdonesdetalladassobrela unldaddepedal.
IMPORTANTE:Slemprepongaelfrenodeestadonamlentoalsallrdeltractorsin
vigilanda.
Levantela palancade lacubierta
Encontradoenel guardabarrosderechodesutractor,lapalancadelevantarla
cublertaseusaparacamblarlaalturadelaplataformadecorte.Para
utilizar,moverla palancaalaizquierda,secolocar_enlaprimera
categoriam_sadecuadaparasuapllcad6n.
PTO(BladeEngage)Palanca
Encontradoenel guardabarrosderechodeltractor,latomadefuerza
(hojadepartidpar)lapalancaseutillzaparapoderdedlcarseala
plataformadecorteodeotrotipo(disponlbleporseparado)losarcHvos
adjuntos.Paraoperar,muevalapalancadetodoelcaminoaseguir.
Moviendolapalancahaciaatr_s,todoelcamJnohacialaposici6nOFFPTO
desconectadeallmentad6na laplataformadecorte/ archlvoadjunto.
NO@:Latomadefuerza(hojadeparticipar)delapalancadebeestaren
ladesembragar(PTOOFF)cuandolaposid6ndearrancarel motor.
Portavasos
Titulardelatazadeltractorseencuentraenel guardabarrosala
[zqulerdadelasiento.
Nuncadejeaunequipo queejecutasinsupervisi6n.Siempredesconecte
tomadefuerza,palancadecambiosepongaen posici6nneutral,elfreno de
mano,apagueel motory quitela llaveparaevitarel arranquenodeseado.
41

Lapalancadecambio
Lapalancadecambiosest_situadaenel
ladoizquierdodeladefensaytienetres
posidones,FORWARD,neutraly REVERSE.
Elembrague-pedaldefrenodebeestar
depdmidoyel tractornodebeestar
enmovimientocuandolapalancade
cambiosenmovimiento.
/MPORTANTE:Nuncafuercelapalanca _P_s_I_I
decamblos.S[Iohace,puederesultaren
gravesdaffosalatransmlsi6ndeltractor.
pedaldefreno
Elpedaldelfrenoest_situadoenelladoizquierdodeltractordec_sped,aIolargodel
estdbo.Pisarelembrague-pedaldefrenoparalapartkipad6ndeldiscodefrenoy
Ilevareltractoraunaparadacompleta.
NO@:Elpedaldebeserpresionadaparaencenderelmotor.ConsulteInterruptores
deenclavamientodeseguddadm_sadelanteenestasecd6ndeestemanual.
Cargadeaceite y gasolina
Aceite
IMPORTANTE:Sutractorseenviaconaceiteenelmotor.Sinembargo,ustedDEBE
controlarel nlveldeacelteantesdeoperar.TengaculdadodenoIlenarenexceso.
Paraobtener[nstrucdonessobrec6mocomprobarelaceltedelmotor,consulte
Revisi6ndelaceitedelmotorenel Manualdeloperadordelmotoradicionalquese
incluyeconestetractor.
Gasolina
Eltanquedegasolinaest_ubicadodebajodelcap6.Nollenedemasiado.
Tengamuchocuidadoal trabajar congasolina.Lagasolinaessumamente
inflamableysusvaporespuedencausarexplosiones.Nuncacargue
combustibleen lam_cluinaenunespadocerradoocuandoelmotorest_
calienteoen marcha.Apaguedgardllos, cigarros,pipasy otrasfuentesde
combusti6n.
NOTA: Compregasolinaenpequeffascantidades.Nousegasolinaquehaya
quedadodelatemporadaanterior,paramlnlmlzarlaformad6ndedep6sitosde
gomaenel sistemadecombustible.
Estemotorest_habilitadoparafundonarcongasolinasinplomo.Para
obtenerelmejorresultado,lleneeldep6sitodecombustiblet_nlcamentecon
gasolinasinplomollmpiayfresca,enunsurtidorquelndlqueunoctanaje
lguala87om_s.
Elgasohol(hasta10%dealcoholetilico,90%degasollnasinplomopor
volumen)esuncombustibleaprobado.Noseapruebaelusodeotras
mezclasdegasollna/alcohol,comoE85.
El_termetillcoterdarlo-butillco(MTBE)ylasmezclasdegasolinasin
plomo(hastaunm_ximode15%deMTBEporvolumen)soncombustibles
aprobados.Noseapruebael usodeotrasmezclasdegasollna/_ter.
NuncaIleneenexcesoeldep6sitodecombustible.Lleneeltanquenom_s
de1/2pulgadapotdebajodelabasedelcuellodeltap6ndecarga,paradejar
espadoparalaexpansi6ndelcombustible.
Nuncasaquelatapadelcombustiblenlagreguecombustiblemientrasel
motorest_calienteoenmarcha.Dejequeel motorseenfr[epotIomenos
dosminutosantesdevolveracargarcombustible.
Limpieelcombustiblequesehayaderramadosobreelmotoryelequipo.
Trasladelam_quinaaotrazona.Espere5minutosantesdeencenderel
motor.
Paraagregargasolina
1. Apagueel motorydejequeel motorseenfrieporIomenos2minutosantes
deremoverlatapadelcombustible.Eltanquedegasolinaseencuentra
debajodelcap6.Retirelatapadelcombustiblegirandohadalaizquierda.
2. Lleneeltanquedecombustiblecongasolina.Utilkes61o[impiayfresca(no
m_sde30d[asdeedad),lagasolinasinplomo.Lleneeltanquenopulgada
m_sde1/ 2debajodelabasedelcuellodeIlenadoparadejarespadoparala
expansi6ndelcombustible.
3. Vuelvaacolocarlatapadelcombustible.
IMPORTANTE:NoIlenedemasiadoeltanque.Lleneeltanquenopulgadam_sde1
/ 2debajodelabasedelcuellodeIlenadoparadejarespadoparalaexpansi6ndel
combustible.WaselaFigura7.
Figura7
Llenarel dep6sitodecombustiblealairelibreoenlugarbienventilado.
42

Fvite lesionespersonalesgraveso lamuerte
Enlaspendientesconduzcahadaarribay hadaabajo,node
formatransversal.
Evitemaniobrasdegirobruscas.
Nooperelaunidaden_reasdondepuedederraparoladearse.
Silam_quinadejadesubirlapedientedetengalascuchillasy
retrocedalentamentebajandolapendiente.
Nocorteel c_spedcuandohayaniffosuotraspersonascerca.
Nuncatransporteniffos,nisiquierasilascuchillasest_n
desconectadas.
Mirehadaabajoyhadaatr_santesymientrasoperaenmarcha
atr_s.
Mantengatodoslosdispositivosdeseguridad(protecdones,
escudoseinterruptores)ensulugaryencorrecto
fundonamiento.
Retirelosobjetosquepuedanserarrojadosporlascuchillasen
cualquierdirecd6n.
Conozcalaubicad6nyfund6ndetodosloscontroles.
Aseguresedequelascuchillasyelmotorsedetenganantesde
colocarlasmanosolospiescercadelascuchillas.
Antesdeabandonarlaposici6ndeloperafor,dejardetractor,
desenganchelascuchillas,coloqueelfrenodemano,apagueel
motory retirelallave.
lea el manual del operador
Sistemadebloqueo de seguridad
Elsistemadebloqueodeseguridadest_diseffadoparalaoperad6nseguradel
tractor.Siestesistemanuncadejadefundonarcorrectamente,noopereeltractor,
contacteinmediatamenteconsuSearsParts& RepairServiceCenter.
Elsistemadebloqueodeseguridadimpideelarranquedelvehiculoamenos
queelfrenodeestadonamientoysededkaalatomadefuerza(Blade
Engage)palancaest,_enlaposki6nOFFdesconectadoposki6nO.
Elsistemadebloqueodeseguridadseapagar_autom_tkamenteelmotorsi
eloperadordejael asientoantesdeinkiarelfrenodeestadonamiento.
Elsistemadebloqueodeseguridadseapagar_autom_tkamenteelmotor
cuandoeloperadorabandonasuasientodeltractorconlatomadefuerza
(BladeEngage)palancacomprometido,independientementedesiest_
activadoelfrenodeestadonamiento.
Withtheignitionkeyin theNORMALMOWINGposition,theelectrkPTO
(BladeEngage)clutchwill automatkallyshutoff ifthe PTO(BladeEngage)
knobismovedintotheengaged(ON)positionwiththedrivepedalin
positionforreversetravel.
Acdonadoelfreno deestadonamiento
Paraactivar el ffeno deestadonamiento:
I. Completamenteelpedaldefrenoymantengahaciaabajoconelpie.
2. Moverlapalancadelfrenodeestadonamientohastaelrondoyen elfreno
deestadonamiento(ON)la posici6n.
3. Suelteelpedaldelfrenoparaqueelfrenodeestadonamientoapartidpar.
Paraliberar el ffeno de estadonamiento:
I. Presioneel pedaldefrenoymoverlapalancadelfrenodeestadonamiento
fueradelfrenodeestadonamiento(ON)laposid6nyenlaposid6nOFF.
Ajustede iaaitura decorte
1. Selecdonelaposici6ndeaituradelaplataformadecortemediantelacoiocaci6nde
la palancadelevantarlacubiertaencualquieradelosdiferentesmuescas
alturadecorteenel ladoderechodeladefensa.
2. AjustedelasruedasdecuNertaparaqueseentrelgpulgadasyl/2pulgadapor
endmadelsuelocuandoeltractorseencuentraenunasuperfidelisa,plana
comounaentrada.
Ajusteia ruedacubierta
Ajustarlasruedasdecubiertamediantelaeliminad6ndelatuercadelabriday
tornilloquesujetaelhombrodecadaruedayIlevarlosaunodelosagujeros
quepermitequelasruedasparaestarentrelg pulgadasy1/2pulgadapor
endmadelsuelocuandoeltractorseencuentraenunsuave,superfide
plana,comouncaminodeentrada.V_aselaFigura8.
J
Figura8
Mantengalasmanosy piesdedistanda delaaberturadedescargadela
plataformadetorte°
NOTA:Lasruedasdelacubiertasonunafund6nanti-cuerocabelludodelacubierta
y noest&ndiseffadosparasoportarelpesodelaplataformadecorte.Consulte
lanivelad6nenlasecd6ndeServkioyMantenimientodeestemanualpara
instrucdonesm&sdetalladassobrelosajustesdecubiertadiferentes.
43

Arranquedel motor
Nohagafuncionarel tractor,sielsistemadebioqueonofunciona
correctamente.Estesistemafue diseffadoparasuseguridady protecci6n.
NOTA:Refl_rasealagasolinayelaceitehastacompletarlasinstrucdones
anteriormenteenestasecci6n.
1. InsertelaIlavedeltractorenel interruptordeencendido.
2. Colocarlatomadefuerza(BladeEngage)palancaenlaposid6nOFFdesconectado
posid6n.
3. Elfrenodeestacionamientodeltractor.
4.
5.
Activeel controldelestrangulador.
GirealaizquierdalaIlavedeencendidoalaposici6ninitial.Despu_sdequeel
motorarranque,sueltelatecla.Sevolver_alaON(Normalocortarelc_sped)
posid6n.
2. Moverla palancadelaceleradorenelFAST(conejo)laposici6n.
3. Coloquelapalancadecambiostantoenlaposki6ninversao FORWARD.
IMPORTANTE:NOintentecambiarladirecd6ndelamarchacuandoeltractorest_
enmovimiento.SiempreIleveeltractoraunaparadacompletaantesdemoverla
palancadecontroldeveloddadhadaadelanteaatr_sovkeversa.Elnohacerlo
podr[aresultarenseriosdaffosalatransmisi6ndesutractor.
4. Pocoapococomienzanaejercerpresi6nenlaunidaddepedal.Cuantom_s
abajoelpedalseempuja,m_sr_pidoqueeltractorsedesplazar_enla
direcd6ndeseadasobrelabasedelaposid6ndelapalancadecambios.
5. Eltractordec_spedesIlevadoaunaparadaporlaIiberad6ndelaunidadde
pedaly luegooprimirelpedaldefreno.
Antesdeabandonarlaposici6nde[operadorpotcualquierraz6n,separar
lashojas,ponerla palancadecontroldevelocidadenneutral,pongael
freno deestadonamiento,paradamotor apagadoy quitarlallave.
NOtienenla llaveenla posici6ninitialdurantem_isdediezsegundosala
vez.SiIohatepuedecausardaffosal motor dearranqueel_ctrko del motor.
6. Despu_sdequeelmotorarranque,desactivarelcontroldelestranguladorycoloque
elcontroldelaceleradorenlaposki6ndeFAST.
NO@:NOdejeel controldelestranguladorenduranteelfuncionamientodel
tractor.SIIohate,dar_lugaraunamezcla"rica"decombustibley causarqueel
motorfundonemal.
Parodel motor
Sisegolpeaunobjeto extraffo,detengael motor,desconecteelcablede la
bujia(s)y tierra contrael motor.Inspecdonarcuidadosamenteelequipode
losdaffos.Reparad6ndelosdaffosantesdereinMary defundonamiento.
1. SIsededicanalashojas,colocarlatomadefuerza(BladeEngage)palancaenla
posid6nOFFdesconectadoposki6n.
2. GirealaizquierdalaIlavedeencendidoalaposici6nSTOP.
3. RetirelaIlavedelaIlavedeencendidoparaevitarelarranquenodeseado.
Laconducci6ndeltractor
Evitecomienzapronto,el excesodeveloddady paradasbruscas.
Nodejeelasientodeltractor,sin colocarlatoma defuerza (BladeEngage)
palancaen laposici6nOFFdesembragar0 posid6n,presionandoel pedalde
frenoy accionadoelfreno deestadonamiento.Sinopuedesalirdeltractor
sinvigilanda, tambi_nasuvezla llavedeencendidoapagadoyquitarla
llave.
AIparareltractor, porcualquier motivo, mientras queen unasuperficie
de hierba,siempre:
1. Coloquelapalancadecambiosenpuntomuerto,
2. Apliqueelfrenodeestadonamiento,
3. Apagueel motoryquitarlaIlave.SiIohate,redudr_alminimolaposibilidad
dequesuc_spedsedore'"'porelescapecalientedelmotordesutractor.
Conducci6neniasiaderas
Refierenalanchodelapendienteenlaseguridaddelaspr_cticasdeoperad6n
importantesecd6ndelmanualparaayudaradeterminarzonasdeladeradonde
puedeoperareltractorcontotalseguridad.
Notorte elc_spedenpendientesconunaindinad6ndem_isde15grados
(unaumentodeapro×imadamente2-112piescada10pies).Eltractor puede
volcarycausarlesionesgraves.
Corteelc_spedylaspendientes,nuncatransversal.
Tengaextremaprecaud6nalcambiardedirecd6nenlaspendientes.
Watchparalosagujeros,grietas,baches,piedrasuotrosobjetosocultos.
Terrenoirregularpuederevertirla m_quina.Elc_spedaltopuedeocultar
obst_culos.
Evitegirarcuandosedrculaporunapendiente.Siunavez,debehacerse,a
suvezpotlapendiente.Elregresodeunapendienteaumentalaposibilidad
deunrollover.
Evitedetenersecuandoseconduceporunapendiente.Siesnecesario
detenermientrasseconduceporunapendiente,puestaenmarchasin
problemasyconcuidadopararedudrlaposibilidaddevolteareltractor
hadaarras.
Siempremirehaciaabajoy detr_isantesy durantelacopiadeseguridad
paraevitar lacopiadem_isdeunaccidente.
Pisarelembrague-pedaldefrenoparaIiberarelfrenodeestadonamientoydejar
queelpedal. 44

Involucrara losBlades
Participaci6ndelatomadefuerza(BladeEngage)lastransferenciasdeenerg[aa[a
plataformadetorteodeotrotipo(disponibleporseparado)losarchivosadjuntos.Para
participardelashojas,hagaIosiguiente:
1. Moverlapalancadecontroldelaceleradoralar_pida(conejo)laposici6n.
2. Sujetelatomadefuerza(BladeEngage)ygirarlapalancadetodoel cam[no
aseguiralosnovios(ON)laposici6n.
3. Mantengalapalancadelaceleradorenel FAST(conejo)[aposk[6nparael
usom_sefidentedelaplataformadetorteodeotrotipo(disponiblepor
separado)losarchivosadjuntos.
NO@:Elmotorseapagar_autom_tkamentesilatomadefuerzaest_
comprometidocon[apalancadecambiosenlaposki6ndemarchaatr_sconlaIlave
deencendidoenlaposici6nON.
4. Unavezact[vadoOndkadorluminosoencendido),eltractorsepueden
condudrensentidocontrarioconlascuchillasdecorte(PTO)haejerddo.
5. Siempremirarhadaabajoy haciaatr_santesdedarmarchaatr_spara
asegurarsedequenohayn[ffoscerca.
6. Despu_sdereanudarel mov[m[entohaciaadelante,devolverlaIlaveala
posid6nnormaldesiega.
IMPOI?TANTE:ElmodoPRECAUCIONINVERSORpermanecer_act[vadahastaque:
• Laclaveseencuentraenlaposid6ndelasiegaoposki6nnormalSTOR
• Eloperadorsecomprometeelfrenodeestadonamientototalmente
depfimenteel pedaldefrenoymantenerlapresionadam[entrassemuevela
palancadecontroldeveloddadenla posid6ndefrenodeestadonamiento.
ReverseModePrecauci6n
ElATENCIONINVERSORmododeposid6ndelm6dulodeinterruptordeIlavepermite
queeltractorparaoperarensentidoinversoconlascuchillas(PTO)haejercido.
IMPORTANTE:Cortaralainversanoesrecomendable.
Tengamuchocuidadoaloperareltractor enel mododePRECAUCION
INVERSA.Siempremirar haciaabajoyhaciaatr_santesdedarmarchaarras.
Nohagafuncionarel tractor cuandolosniffosu otraspersonasairededor.
Pararel tractor inmediatamentesialguienentraenel _rea.
Parautilizarel modoPRECAUCIONREVERSO:
/MPORTANTE:Eloperadordebeestarsentadoenelasientodeltractor.
1. Arrancarelmotorcomoseindkaenelepigrafedearrancarelmotor.
2. GirelaIlavedelas[egaNORMAL(verde)la posid6nenelmodode
PRECAUCIONINVERSOR(Amarillo)laposici6ndelm6dulode[nterruptorde
Ilave.VerFigura9.
3. Presioneelbot6nPUSHINVERSOR(Orange,bot6ntriangular)enlaesqu[na
superiorderechadelatedadem6dulodeconmutad6n.Laluz[ndicadora
decolorrojoenlapartesuperior[zquierdadelm6dulodeconmutaci6nclave
ser_ONmientrasactivado.VerFigura9.
f
Luz
indicadora Bot6n
Z_ _ marohaatras
_osici6ndemode
deprecauci6ner
marcnaatras
Modode
Normal
Posici6n
dedetenci6n
Figura9

Mulching
Unkit paraabonoest_disponiblecomounarchivoadjunto.Mulchingesunproceso
derecirculad6nhierbacortadavafiasvecespordebajodelaplataformadecorte.
Losultra-finasrecortessevenobligadosdenuevoenelc#speddondeactuancomo
unfertilizantenatural.
Unkit paraabonosepuedecompraratravdsdelpuntodeventaenelqueadquiri6
estetractor.Paraobtenerm_sinformaci6n,561otienequeponerseencontactocon
Searsal1-800-659-5917.
Faros
LasI_mparasest_nONcuandoelmotordeltractorseest_ejecutando.
LaslucesseapagacuandolaIlavedecontactosemuevealaposid6nSTOR
Usode lapalancade elevaci6nde la plataforma
Paraelevarlaplataformadecorte,muevalapalancadeelevad6ndelaplataforma
alaizquierda,luegocol6quelaenlamuescaquemejorseadaptealaaplkad6n.
ConsulteAjustedelaalturadecorteantefiormenteenestasecd6n.
Cortar
Paraayudaraevitar elcontactoconlacuchillao unalesi6nenelobjeto
lanzado,Mantengaalosespectadores,losayudantes,losniffosy las
mascotaspotIomenos75piesdedistanda dela m_quinamientrasest_en
fundonamiento. Paradadelam_quina,sialguienentra enel_rea.
Lasiguienteinformad6nser_t_tilcuandoseutilizalaplataformadecorteconsu
tractor:
Plandesupatr6ndecorteparaevitar ladescargade materialeshadalas
carreteras,aceras,transeuntes,etc.Adem_s,evitematerial quesedescarga
contraunaparedo unaobstrucd6nquepuedecausaralta materiala
rebotarhadael operador.
Nocorteelc_spedalaveloddaddeterrenoelevado,espedalmentesiseha
instaladounkitdemantilloocolectordec_sped.
Paraobtenerlosmejoresresultadosserecomiendaquelasdospfimeras
vueltassecortar_conlaaprobad6ndelagesti6narrojadohadaelcentro.
Traslasdospfimerasvueltas,invertlrelsentldodelanzarladescargahadael
exteriordelabalanzadecorte.Estoledar_unamejorapafiendaalc_sped.
Nocorteelc_speddemasiadocorto.Pastocortoinvitacredmientodemalas
hierbasylosamafillosconrapidezeneltlemposeco.
Cortarel c_spedsiempresedebehacerconelmotoratodogas.
Bajolascondidonesm_spesadas,puedesernecesafiovolversobrelazonadel
corteporsegundavezparaobteneruncorteIimpio.
NOintentecortarespesamalezaymalashierbasyelpastomuyalto.Sutractorest_
dise_adoparacortarelc_sped,uncepillonoest_daro.
MantengalascuchillasafiladasysustituirlascucMlasencasodedesgaste.
ConsulteHojasdecorteenel servidoylasecd6nMantenimientodeeste
manualdeinstrucdonesdeafilarlahojaadecuada.
46

LISTADEMANTENIMIENTO
AntesdereaJizarcuaiquiertipo deJmantenimiento/servicio,sueJtetodoslos
mandosypareel motor.Esperehastaquetodaslaspartesdemovimiento
hayanvenidoa unaparadacompleta.DesconecteeJalambredebujiay
b_selocontrael motor paraprevenirel comienzoinvoluntario.SiempreIleve
puestoscristalesinastillablesdurantela operad6norealizandocualquier
ajusteoreparadones.
Sigalalistademantenimientodadaabajo.Estacartadescribepautasdeservicio
s61o.UselacolumnadeTroncodeServicioparaguardarla pistadetareasde
mantenimientocompletadas.
Localizarel mascercanoChamuscael Centrode Serviciooprogramarel
servicio,simpiementeponerseencontactoChamuscaen 1-800-4-MY-
HOME_.
Antesdecadauso
Losprimeroscincohoras
Cada10horas
Cada25horas
Cada50horas
Anualmente
AntesdeAlmacenaje
1. Niveldelaceitedemotor
2. Silenciadorzonay loscontroles
3. Dedodelamanodeguardia
1. Elaceitedelmotor
1. E[cap6/Iosrespiraderos
2. Losbornesdela bater[a
3. Loshusillosy lam_nsulaintermediadela plataforma
1. Eldepuradordelfiltrodeaire*
2. Filtrodeaire*
3. Losbrazosdemandointermedios,ejesdelpivoteyejes
4. Losrodamientosdelasruedasdelanteras
5. Lasruedasdelanterasdelaplataforma
1. Elaceitedelmotor/elfiltro deaceite
2. Silenciador
1. Filtrodeaire
2. Eldepuradordelfiltrodeaire
3. Bujia
4. Sistemaderefrlgerad6nporaire*
5. Filtrodecombustible
6. DirectivoEngranajes
7. Ruedastraseras
I. Elcap6/losresplraderos
2. Losbornesdela bateria
3. Losbrazosdemandointermedios,ejesdelpivoteyejes
4. Losrodamientosdelasruedasdelanteras
5. Lasruedasdelanterasdelaplataforma
6. Loshusillosy lam_nsulaintermediadela plataforma
7. Lospuntosdepivotedelpedal
Realiceelserviciom_sfrecuentementecuandohayamuchopolvo.
Antesderealizartareasdemantenimientoo reparaciones,desconectelapotencia
dearranque(PTO),coloqueel frenodemano,apagueelmotory retirelaIlave,
paraevitarel encendidoaccidentaldelmotor.
1.
2.
3.
1.
1.
2.
3.
1.
2.
3.
Comprobar
Limpie
Limpie
Cambie
Limpie
Limpie
Lubrique
Limpie
Limpie
Lubrique
4. Lubrique
5. Lubrique
1. Cambie/reemplace
2. Comprobar
1. Reemplace
2. Reemplace
3. Reemplace
4. Limpie
5. Reemplace
6. Limpie
7. Quitelagrasay losejes
1. Limpie
2. Limpie
3. Lubrique
4. Lubrique
5. Lubrique
6. Lubrique
7. Lubrique
Sielmotorsehapuestoenfuncionamientorecientemente,elmotor,silenciador
ylassuperficiesmet_licasdrcundantesestar_ncalientesypuedencausar
quemadurasa apie.Tengaprecauci6nparaevitarquemaduras.
47

Mantenimiento
Antesderealizarcualquieroperationdemantenimientooreparadones,
desconectelatoma defuerza,muevalapaiancadecambiosen posici6n
neutral,pongaelfreno deestadonamiento,apagueel motory retirela
llave,paraevitar queseendendaaccidentaimente.
Motor
Consulteeloperadordelmotor/Manualdelpropietadoparaobtenerinstrucdones
demantenimientodelmotor.
Reviseel niveldeaceitedelmotorantesdecadausosegLinlasinstrucdones
delManualdelpropietafio/ operadordelmotorembarc6consuproducto.Siga
cuidadosamentelasinstrucdones.
Cambiodeaceite de motor
Elaceitedelmotordebesercambiadoenlaspfimeras5horasyluegocada50horas
ounavezportemporada.Paracambiarelaceitedelmotor,sigaestospasos:
1. Conelmotorapagadoperoauncaliente,desconecteel cabledelabujiay
mant_ngaloalejadodelabujia.
2. Retirelatapadellenadodeaceite/ vadllamedidoradeltubodellenadode
aceite.VerFigura10.
/FTira reactwa _ _ -_
Wlvula dedrenajede
aceite
Drenajedeaceitede ...............
manga
Figura10
3. Gireelvolantecompletamentehacialaderechaparaexportermejoreltap6nde
drenaje.
4. Sujeteelmanguitodedrenajedeaceite(empaquetadaconestemanual)
enelpuertodedrenaje.Coloqueel extremoopuestodelmanguitoen
unrecipientederecolecci6ndeaceiteadecuadoconunacapacidadIo
suficientementegrandecomopararecogerelaceiteusado.
5. Retireeltap6ndedrenajedeaceite,elaceitecomenzar_adrenarfueradel
motor.
6.
Despu_sdequeelpetr61eohaterminadodedrenaje,vuelvaacolocarel
tap6ndevadadoyapd_telo.Tengacuidadodenoapretardemasiado.
7. Extraigaelmanguitodedrenajedeaceiteyalmacenarparasuusoposterior.
8. VuelvaaIlenarel motorconaceitenuevodemotorcomoseindkaenel
Manualdeloperadordelmotorincluidoconestetractor.
Elaceiteusadoesunproductoderesiduospeligrosos.Desecheelaceiteusado
correctamente.Nodesecharconlosresiduosdom_sticos.Consulteconlas
[autoridadeslocalesoSearsCentrodeServidoparalaeliminad6nsegura/
[instaladonesdereddaje.
FuelFilter
Lagasolinaysusvaporessonextremadamenteinflamablesyexplosivos.Elfuego
ounaexplosi6npuedencausargravesquemadurasola muerte.
Mantengalagasolinalejosdechispas,llamas,lutespiloto,elcalor,yotras
fuentesdeignki6n.
CompruebelasI[neasdecombustible,eltanque,latapay losaccesofioscon
frecuendaparadetectarrajadurasoescapes.Reemplazarsiesnecesafio.
Antesdereemplazarel filtrodecombustible,vadareltanquede
combustiblesegLinlasinstrucdonesdeabajo.
Nofugadecombustiblecuandoel motorest_caliente.Dejequeelmotor
detiempoadecuadoparaenffiar.Evacuarelcombustibleenunredpiente
aprobadoal airelibre,lejosdellamasabiertas.
Cualquierfugadegranvolumendecombustibledesdeeldep6sitode
desconectarlaI[neadecombustibledelfiltro enlaI[neadecombustible
cercadelmotor.
QuitelalineadecombustibledelaLN-ladodelaI[nea(ladohaciaeltanque
decombustible)delfiltro decombustible.
Laspiezasderecambiodebeserlamismaeinstaladosenlamismaposici6n
quelaspiezasoriginales.
Sisederramacombustible,esperehastaqueseevaporaantesdearrancarel
motor.
Antesdereemplazarel filtrodecombustible,vaciareltanquede
combustible.DeIocontrario,elcombustiblepuedefiltrarsey provocarun
incendioounaexplosi6n.
Paradrenar el combustible:
Localiceelfiltro decombustible,quesetransfierenenelladoizquierdo
delmotorentreeltanquedecombustibleyelcarburador,y puedeser
conectadoalmotorconunacorreadeempate.Cortarlacorreadela
corbata,siest_presente,entoncesemergenteenlaabrazaderaenlineaen
elfiltro decombustibleconunpardealicates,deslicelaabrazaderadela
I[neadecombustible.QuitelalineadecombustibleenlaI[neaylafugade
combustibleenunrecipienteaprobado.
Paracambiar el filtro de combustible:
Usepinzasparaapretarlaspestaffasdelaabrazadera(elladodelaI[neade
fueradelfiltro decombustible),acontinuad6n,deslicelaabrazaderalejos
delfiltro decombustible.TwistytirardelaI[neadecombustiblefueradel
filtro decombustible.V_aselaFigura11.
48

f
abrazadera
lineadecombustible
lengiJeta
2.
Figura11
Compruebelaslineasdecombustibleparalasgrietaso fugas.Reemplazarsies
necesario.
3. Reemplaceelfiltrodecombustibleconunoriginalfiltrodereemplazodeequipo.
ContactoSear'sai1-800-4-MY-I-IOME_ paracomprareloriginal de
filtro dereemplazodelequipo.
4. Asegurelaslineasdecombustibleconlaspinzas.
Limpiador deaire
Serviciodelprefiltroyelcartucho/elementodelfiltrodeairecomoseindicaenel
Manualdelpropietario/operadordelmotorembarc6consuproducto.
Bujia
Labujiadebeserlimpiadaylabrecharestableceunavezportemporada.Reemplazo
delasbujiasserecomiendaaliniciodecadatemporadadesiega.Consulteel
propietario/ operadordelmanualdelmotorparael tipodebujiacorrectaylas
especificacionesbrecha.
Silendador
Temperaturadelsilenciadory_reascercanasdelmotorpodr_sersuperiora150°
(65°C).Eviteelcontactoconestas_reas.
Inspeccioneperi6dicamenteelsilenciador,yreemplazarsiesnecesario.Piezasde
repuestoparaelsilenciadordebeserelmismoeinstaladoenlamismaposici6nque
laspiezasoriginales.
Limpieza del motor
Diariamenteoantesdecadauso,hierbalimpio,pajaoresiduosacumulados
enel motor.Mantengalimpiaslasconexiones,laprimavera,ylosmandos.
Mantengael_reaalrededorydetr_sdelsilenciadorfibredecualquierresto
decombustible.
Mantenerelmotorlimpiopermiteelmovimientodelairealrededordel
motor.
Laspiezasdelmotordebemantenerselimpiaparareducirelriesgode
sobrecalentamientoe ignici6ndelosresiduosacumulados.
Noutiliceaguaparalimpiarlaspiezasdelmotor.Elaguapuedecontaminarelsistemadc
combustible.Utiliceuncepilloounpaffoseco.
Carburadordeajuste
Elcarburadorenestemotornoesajustable.
Lubricaci6n
Antesdelubricantes,reparad6noinspecd6n,siempredesconectartomade
fuerza,palancadecambiosepongaenposid6nneutral,elfrenodemano,apague
el motoryquitelaIlaveparaevitarelarranquenodeseado.
Motor
Lubricarelmotorconaceitedemotorcomoseindicaenel manualdelpropietario
delmotorembarc6consuproducto.
Puntosde pivote yvarillaje
Lubriquetodoslospuntosdepivotedelsistemadeaccionamiento,frenode
estacionamientoyloselevadoresalmenosunavezportemporadaconaceiteligero.
Ruedastraseras
Lasruedastraserasdebenserretiradosdelosejesunavezportemporada.Lubricar
losejesy lasllantasbienconunagrasamultiusoantesdevolverainstalarlos.
Ruedasdelanteras
Lasruedasdelanterasdebenserremovidosdelosejesunavezportemporada.
Lubricarlosejesylasllantasbienconunagrasamultiusoantesdevolvera
instalarlos.
DeckWash
Sisederramacombustibleoaceitesobrelam_quina,debelimpiarsedeinmediato.
NOpermitaqueseacumulendesechosalrededordelasaletasderefrigeraci6ndel
motornienningunaotrapartedelam_quina.
IM PORTANTE: NOserecomiendaelusodeunalavadoradepresi6npara
limpiareltractor.Puededaffarloscomponentesel_ctricos,loshusillos,laspoleas,
losrodamientosoelmotor.
Enlasuperficiedelaplataformadesutractorhayunconectorhexagonal.VealaFigura
12.
Estetarugosepuedereemplazarporunpuertodeaguaaserusadocomopartede
unsistemadelavadodelaplataformadisponibleporseparado.
f
Figura12
49

ElsistemaDeckWashSystemTM seusaparalavarlapartedeabajodelaplataforma
yquitarlosrecortesdec_spedeimpedirlaacumulaci6ndesustanciasquimicas
corrosivas.
NOTA:Consultelasecd6nAdltamentosyAccesoriosdeestemanualparaobtener
informad6nsobre#steyotrosaditamentosyaccesoriosdisponiblesporseparado
parasutractor.
Nuncatratedehacerlosajustesmlentraselmotorest_enmarcha,exceptosise
espedficaenel manualdeloperador.
Nivelaci6nde la cubiertade
NOTA:Verifiquelapresi6ndelneum_iticodeltractorantesderealizarcualquier
paquetedenivelaci6ndelosajustes.Consultea losneum_iticosenlasecci6nde
servkiosdeestemanualparaobtenerm_isinformaci6nsobrelapresi6ndelos
neum_itkos.
Delantea atr_s
Elfrentedelaplataformadecorteesapoyadoporunabarraestabllizadoraque
sepuedeajustaralniveldelacubiertadedelanteaatr_is.Lapartefrontaldela
cubiertadebeserdelg pulgadasy3/8-pulgadainferioralapartetraseradela
cubierta.AjustesiesnecesarioIosiguiente:
1. Coneltractorestacionadoenunasuperficiefirmeynivelada,coloquela
palancadeelevaci6ndelaplataformaenlasegundaa laprimeracategor[a
(segundaposid6nm_isalta),ygirelahojaIom_iscercadelcanaldedescarga
queesparaleloaltractor.
2. Medirladistanciadesdelapartefrontaldelapuntadelapalaenelsueloyla
partetraseradelapuntadelapalaenelsuelo.Laprimeramedidatomadadebe
estarentrelg"y3/ 8"menosdelasegundamedid6n.Determinarladistanda
aproximadanecesariaparaunbuenajusteyproceder,sifueranecesario,el
siguientepaso.
3. Busquelatuercay latuercadebloqueoenla partefrontaldelsoportedel
estabilizador.V_aselaFigura13Despu_sdeaflojarlatuercadebloqueo:
Apretarlatuercadebloqueoparaelevarlapartedelantera
delacubierta;
Aflojarlatuercadebloqueoparabajarlapartedelanterade
lacubierta.
Figura13
Unladoa otto
SIla plataformadetortepareceserlasJegadeformadeslgual,unladoaladode
ajustepuedeserrealizado.AjustesiesnecesarioIosiguiente:
1. Conel tractorestadonadoenunasuperfidefirmey nivelada,coloque
lapalancadelevantarlacubiertaenlasegundadelaprimeracategor[a
(segundaposici6nm_isalta)ygirarambashojasdemodoquesean
perpendicularesconeltractor.
2. Medirladistanciadesdeel exteriordelapuntadela palaala izquierdaen
elsueloy ladistanciadesdeelexteriordela puntadelapaladerechoala
tierra.Ambasmedidasadoptadasdebenseriguales.Sinoesas[,continL_e
conelpasosiguiente.
3. Afloje,peronoIoquite,eltorn[llohexagonaldelaizquierdasoportedela
cubiertadecolgar.V#aselaFigura14.
4. BalancedelacubiertaconunaIlaveparaencenderelequipodeajuste(que
seencuentra[nmediatamentedetkisdeltornillohexagonals61oaflojar)
hadaladerecha/ arribaohadala[zquierdaohaciaabajo.Lacubiertaest_i
bienequilibradocuandolasmedicionesdeambashojapuntaadoptada
anteriormentesoniguales.
5. Vuelvaaapretareltorn[llohexagonaldelaizquierdasoportedelacubierta
suspensi6ncuandoseIograelajusteadecuado.
Tomillohexagonal
Figura14
Ajustedel asiento
Consultelasecci6ndelaAsambleadeestemanualparainstruccionesdeajustedel
asiento.
5O

Plataforma detorte deeliminad6n 7,
Paraquitarla plataformadetorte, hagaIosiguiente:
I. Colocarlatomadefuerza(BladeEngage)palancaen[aposici6nOFF
desembragarla posici6nypongaelfrenodeestacionamiento.
2. Bajolacubiertamoviendolapalancadeelevaci6ndecubiertaenlamuesca
enlaparteinferiordelguardabarrosderecho.
3. Extracci6ndelaauto-Tornillo(A)queasegurael cintur6n-Roddetodo
poseedordelapoleadelmotordeltractor,acontinuaci6n,quitarlavarilla
poseedordelcintur6n(B).V_aselaFigura15.
Nola:HagaunanotamentaldeIoagujeroalotroextremodelacinta-Rod
poseedorseinsertaenlosprop6sitosdereinstalaci6n.
4. Retirelacorrea(C)dealrededordelapoleadelmotordeltractor.V_asela
Figura15.
Evite[as[esionespellizcos.NuncacoIoquesusdedosen[aprimaveraociosooentre[
lacorreayunapolea,mientrassequitaelcintur6n, l
I
I
F
®
Figura15
5. Encuantoalaplataformadecortedesdeelladoizquierdodeltractor,busque
elarcoalfilerdecorbataqueaseguralavaradeapoyodecubiertaenla parte
traseraizquierdadelacubierta.V_aselaFigura16.Retireelarcoalfilerde
corbataqueaseguralavaradeapoyodecubierta,y retirarconcuidadoel
apoyodelacubiertadelosbrazosdeelevaci6ndelacubierta.
6. Repitalospasosanterioresenelladoderechodeltractor.
NOTIhElarcodepeloalfilerdecorbataclipsdebeserinstaladodesdearriba
haciaabajo.
Moverlapalancadeelevaci6nenlacubiertadeprimeraclaseenel
guardabarrosderechoaplantearlacubiertadelevantarlosbrazoshacia
arribayfueradelcamino.
Figura16
Retirelapajaritachavetagarantizarlabarraestabilizadoradecubiertaa
cubierta.Deslkelabarradelevantarlacubiertadelasoldadurademontaje
enlacubiertacomoseveenlafiguFigura17ra.20.
..........£,:_,,,,........
Figura17
51

9.
Retireconcuidadoel cabledetomadefuerzadelapartetraseradela
plataformadecorteal eliminarelclipdehorquillaqueIosujeta.Retireel
muelledelsoporteruedaIocadelacubierta.V_aselaFigura18.
//
/
/
PTOCaNe
J
Figura18
10. Deslkesuavementelaplataformadecorte(delaizquierda)lapartededebajodel
tractor.
Neum_ti¢os
Nosobrepasarnuncalapresi6nm_ximadeinfladoqueapareceenlaparedlateral
delaIlanta.
Lapresi6nde losneum_tkosrecomendadadefundonamiento es
el siguiente:
Aproximadamenteel 10psiparalosneum_tkostraseros
Aproximadamenteel 14psiparalosneum_ticosdelanteros
IMPOI?@NTE:Refi_rasealapareddelneum_tkoparala ISPrecomendados
om_ximosfabficantedeneum_tkosesexacto.Nosobre[nflar.Lapresi6ndel
neum_ticodesigualpodfiacausarquelaplataformadecorteparacortardemanera
desigual.
Batefia
Labatefiaest_selladaynonecesitamantenimiento.Losnivelesde_ddonose
puedencontrolar.
Siempremantengaloscablesdelabatefiay losterminalesIimpiosyIibresde
corrosi6nacumulacl6n.
Despu_sdelimpiarlabatefiaylosbornes,apliqueunacapadelgadade
vaselinaograsaaambosbornes.
Mantengasiempreel protectordegomacolocadosobreel polopositivopara
evitarelcortocircuito.
Sialquitarlabatefia,desconecteelcablenegativo(Negro)eselcabledela
terminalenprimerlugar,seguidopotel positivo(rojo)dealambre.Cuandovuelva
ainstalarlabatefia,conecteel positivo(rojo)dealambredesuterminalenprimer
lugar,seguidoporel negativo(cableNegro).
Proposi¢i6n65deCalifornia
Postesdela batefia,terminalesy accesoriosreiacionados,contienenplomo
y compuestosdeplomo,sustanciasqueen elEstadodeCaliforniaporcausar
c&ncery daffosreproductivos.L&veselasmanosdespu_sdemanipular.
Elarranque
Nuncasalteinidarunabateriadahadaocongelados.Est_segurodelosvehkulos
nosetocan,yest_nfueradeignici6n.Nopermitaquelasabrazaderasdecableal
tacto.
1. Conectarpositivo(+) paraenviarporcablepositivo(+) delabatefia
descargadadesutractor.
2. Conecteelotroextremodelcableala(positivo+) despu_sdelabatefiade
puente.
3. Conecteelsegundocable(negativo-)paraelotto puestodelabatefiadel
puente.
4. Hacerlaconexi6nfinalenelbloquedelmotordeltractor,[ejosde[abatefia.
Adjuntaraunapartesinpintar,paraasegurarunabuenaconexi6n.
Silabatefiapuenteest_instaladoenunvehkulo(coche,esdealt,camiones),no
arranqueel motordelvehkulocuandoelarranquedesutractor.
5. Inidodeltractor(comose[ndicaantefiormenteenestasecd6ndeeste
manual).
6. Elfrenodemanodeltractorantesderetirarloscablesdepuente,enelorden
inversodelaconexi6n.
Carga
Batefiasemitenungasexplosivodurante[acarga.Cargadelabatefiaenun
_reabienventiladaymantenerselejosdeunallamaabiertaopilotocomoenun
calentadordeagua,estufa,homo,secadoraderopaodeotrosaparatosdegas.
AIcargarla batefiadesutractor,utilices61ouncargadorde12Vdiseffadopara
batefiasdeplomo-_ddo.Leasucargadordebateriamanualdelpropietafioantes
decargarlabatefiadesutractor.Sigasiemprelas[nstrucdonesy presteatend6n
[asuADVERTENCAS.
52

Sieltractornosehapuestoenusoduranteunperiododetiempoprolongado,
carguelabateriadelasiguientemanera:
I. Fijesucargadordebateriaparaofrecerunm_ximode10amperios.
2. Sielcargadordelabateriaesautom_tica,carguelabateriahastael cargador
indicaquelacargaest_completa.Sielcargadornoest_autom_tica,cargo
pornomenosdeochohoras.
Fusible
Unfusiblede20AMPest_instaladoenlosjuegosdecablesdesutractorpara
protegerelsistemael#ctrkodeltractordedafioscausadosporelamperajeexcesivo.
Sielsistemael#ctriconofundona,oelmotordesutractornoarranca,compruebe
primeroquetenerlacertezadequeelfusiblenosehaquemado.Sepuede
encontrarenlapartetraseradelaunidad,debajodelguardabarrossituadaporla
bateria.
Siempreuseunfusibleconlacapaddaddepotendaequivalenteparala
sustituci6n.
Cuchiilasdetorte
Apagueel motory quitela llavedeencendidoantesderetirar lacuchilla
detorte (s)paraafilar odesustitud6n. Protejasusmanosusandoguantes
gruesosal sujetarla hoja.
Inspeccioneperi6dicamentela hojay/ ohusillodegrietaso daffos,sobre
tododespu_sdehaberllegadoa unobjetoextraffo.Nohagafundonar la
m_quinahastaquesesustituir_n loselementosdaffadoso
Paraquitarlashojas,hagaIosiguiente:
1. Quitelacubiertadedebajodeltractor,(verplataformadecortede
eliminad6nanteriormenteenestasecd6n)yluegosetirasuavementedela
cubiertaparaexponerlaparteinferior.
2. Coloqueunbloquedemaderaentreelcentroyeldeflectordelavivienda
cubiertadelacucMladecorteparaactuarcomounestabilizador.V_asela
Figura19.
3. QuitelatuercahexagonalbridaquesujetalahojaalaAsambleadelhusillo.
V_aselaFigura19.
Tuercahexagonalconpestaffa
/ /"
f //
\
\
Figura19
Paraafinarcorrectamentelashojasdecorte,retirelamismacantidaddemetal
deambosextremosdelashojasaIolargodelosbordesdecorte,paralelo
al bordedefuga,enun25°- 30°de_ngulo.Siempremolercadafilo dela
cuchilladecorteporigualamantenerelequilibriodelahojaadecuada.
V_aselaFigura20.
Figura20
SIelfilo delahojahasidopreviamenteafilado,osicualquierseparad6ndemetal
est_presente,sustituirlashojasporotrasnuevas.
Unahojamalequilibradacausar_excesivavibraci6n,puedecausardaffosenel
tractory/ oresultarenlesionespersonales.
5. Pruebadeequilibriodelahojaconunbalanceadordelahoja.Grindmetaldesdeel
ladom_spesadohastaqueseequilibredemanerauniforme.
NOTII:Cuandotengaquereemplazarlahoja,aseguresedeinstalarlahojaconla
caradelahojamarcada"fondo"(oconunnumeroestampadoen_I)frentealatierra
cuandoelcortac_spedseencuentraenlaposid6ndefundonamiento.
53

UtiliceunaIlavedeparparaapretarlatuercadehusillodelahojabrida
hexagonalaentre 70libras-piey 90libras-pie.
De ¢ambiar ia ¢orrea de ¢ubierta
Aseguresedequeapagueel motor,quitar[a[lavedeencendido,desconecte
Iel cabledelabujia(s)ytierra contrael motorparaevitar involuntariade
_artida antesdequitareldntur6n.
Todosloscinturonesensutractor est_nsujetosadesgastey debenset
[reemp azadosencasodecuaquersgnodedesgasteest_npresentes.
IMPORTAflTE:ElV-cintur6nseencuentraensutractorest_espedalmentediseffado
paraconectarydesconectardeformasegura.Unsustituto(noOEM)V-correa
puedeserpeligrosoalnodesvincularsecompletamente.Paraunam_quinadebuen
fundonamiento,laf_bdcadednturonesdeusoaprobado.
Paracambiarosustituirlacintadelacubiertaensutractor,hagaIosiguiente:
1. Quitelacubiertacomeseindicaanteriormenteenestasecci6n.
2. Retirelacintacubremediantelaeliminacibndelostornilloshexagonales
quesujetanalacubierta.V_aselaFigura21.
3. Tambidnpuedesernecesarioaflojarlatuercahexagonaldelapoleatensora
alaizquierdaparaobtenerelcintur6nalrededordelapoleayel protectorde
lacorrea.
4. Retireconcuidadolacintadecubiertadeairededordelasdospoleasdel
husilloylasdospoleaspoleatensoradelacubierta.VdaselaFigura21.
5. Pancolocarlacorreanueva,empiezahaciendoqueelcintur6nalrededorde
lasdospoleasexteriordelhuso,comesemuestraenlaFigura21.
6. Luego,lacintaderutaalrededordelasdospolinespoleasdelacubierta
comesemuestraenlaFigura21.
7. Volveraapretarlabarraposeedordelcintur6naflojadoantes.
8. Volveramontarlacintadelosguardiasderetirarseantes.
9. Vuelvaainstalarlacubierta,asegur_ndosedequelacintasiguesiendo
derrotadosenlaspoleasconlasinstrucciones.Elenrutamientodebanda
completasemuestraenlaFigura21.
10. Tiredelapartederechadelacinta,y coloqueel ladeVestrechadelacorrea
enlapoleaPTO.
11. Mientrassemantienelacorreaylapoleajuntos,girarlapoleaa laizquierda.
Seguirmanteniendoyrotaci6ndela poleaylacorreahastaquelacorreaes
totalmenteenrolladoenlapoleaPTO.
Frenode estadonamientodeajuste
Nuncaintenteajustarlosfrenoscuandoelmotorest_funcionando.Siempre
desconectetomadefuerza,palancadecambiosepongaenposici6nneutral,
apagueelmotoryquitelallaveparaevitarelarranquenodeseado.
SieltractornoIlegaadetenersepercompletecuandoelpedaldelfrenoest_
totalmentedeprimido,osilasruedastraserasdeltractorpuederodarconelfreno
deestacionamientoaplicado,elfrenoest_enlanecesidaddeajuste.Comuniquese
conelCentredeServidom_scercanoSearsquelosfrenoscorrectamenteajustado.
Paraubicarel CentredeServkio m_scercaneSearso para pregramar el
servkio, simplemente p6ngaseencontacto conSearsal 1-800-659-S917.
Cambiode lacorreade transmisi6n detransmisidn
flOTA:Vadoscomponentesdebenserretiradosy herramientasespeciales(es
dedraire/ Llavedeimpacto)afin decambiarlacorreadetransmid6ndeltractor.
Comuniqueseconel CentredeServkiom_scercanoSearsquesucorreade
transmisi6ndetransmisi6ndelosservicios.
Paraubkarel CentredeServido m_scercaneSearsopara programar el
servicie,simplemente pbngaseencentacto conSearsal 1-800-659-5917.
Z _ Estapartedelasrutasde
f'i" l{ d°t.r6°airededorde[apolea
Z _ o _ II II % Cubiertadelacorrea !l I
i oO[
j_o DeckIdlerPulley _ J_/ _ ///
/
Figura21
54

Nuncaalmacenetractordec_spedconcombustibleenel tanqueenun
espaciocerradooen_reasconpocaventilaci6n,dondelosgasesdel
combustiblepuedanakanzarelfuego, chispaso una luzpiloto comolaque
tienen algunoshornos,calentadoresdeagua,secadoresderopaoalgun
otro dispositivoagas.
Preparaci6ndeimotor
IM PORTANTE: Elcombustiblequequedaeneltanquecuandohacecalorse
detefiorayocasionagravesproblemasdeencendido.
Paraevitarqueseformendep6sitosdegomadentrodelcarburadordelmotor
yposiblesdesperfectosenel motor,elsistemadecombustibledebeservadado
completamente,o sedebetratarlagasolinaconunestabilizadorparaevitarel
deterioro.
I. SiutilizaunestabJlJzadordecombustible:
a. Lealasinstruccionesy recomendadonesdelfabricantedelproducto.
b. Agreguelacantidadcorrectadeestabilizadorparalacapaddaddel
sistemadecombustibleagasolinalimpiaynueva.
c. Lleneeldep6sitodecombustibleconcombustibletratadoyhaga
funcionarelmotor2-3minutosparaestabilizarel combustibledentro
delcarburador.
Cuandovacieelsistemadecombustible:
a. Nodreneelcombustiblecuandoelmotorest_caliente.Permitaque
elmotorseenfriebien.Dreneel combustibledentrodeunredpiente
aprobadoyalaireIJbre,lejosdecualquierllamaexpuesta.
b. Dreneungranvolumendecombustibledesdeeldep6sito,desco-
nectandolaI[neadecombustibledelfiltro decombustibleenI[neaque
seencuentracercadelmotor.
Lagasolinaessumamenteinflamabley puedesetexplosivaendertas
condidones.Vadela antesdealmacenarelequipoduranteperiodos
prolongados.Dreneel combustibleunicamentedentrodeun recipiente
aprobadoy alairefibre,lejosdecualguierllamaexpuesta.Dejeque
el motorseenffie.Antesdedrenarel combustible,apaguecigarrillos,
dgarros,pipasyotrasfuentesdecombusti6n.Vadelagasolinaenun_rea
bienventilada,lejosdecualquierfuentedellamaochispas,incluidocualquier
artefactoconluzpiloto.Almacenelagasolinaenunrecipienteaprobado,enun
lugarseguro.
Extraigalabujiayviertauna(1)onzadeaceiteparamotorporelorificio
delabujiaenelcilindro.Hagagirarel motorvariasvecesparadistribuirel
aceite.Vuelvaacolocarlabuj[a.
Eldrenaje de loscombustibles
I. Localiceelfiltro decombustible,queseencuentraenel ladoizquierdodel
motor,ypuedeserconectadoalmotorconunacorreadeempate.
2. Cortarlacorreadelacorbata,siest_presente,entoncesemergenteenla
abrazaderaenl[neaenelfiltro decombustibleconunpardealicates,deslice
laabrazaderadela l[neadecombustible.
QuitelalineadecombustibleenlaI[neaylafugadecombustibleenun
redpienteaprobado.
Preparad6nde iatractor dec sped
1. Limpieylubriquelatractorcomosedescribeenlasinstrucdonesde
lubricaci6n.
2. Noutilkeunalavadoraapresi6nniunamangueradejard[nparalimpiarsu
unidad.
3. Almacenelatractorenunazonalimpiayseca.Nolaalmacenecercade
matefialescorrosivoscomoporejemplofertilizantes.
c. VuelvaacontectarlaI[neadecombustibleyhagafuncJonarel motor
hastaquecomiencea fallar,useentoncesel cebadorparamantenerel
motorenmarchahastaagotartodoelcombustibledelcarburador.
d. VuelvaadesconectarlaI[neadecombustibleydrenelagasolina
restanteenelsistema.
Lagasolinaesunasustanciat6xica.Eliminelagasolinaadecuadamente.
Comuniqueseconlasautoridadeslocalesparaaveriguarcuriessonlos
_todosadecuadosparaeliminar la gasolina.
55

El motor no arranca
El motor funciona de manera
err_fitica
1. Perilla de potencia de arranque (PTO)
El motor recalienta
conectada.
2. No est_ficolocado el freno de mano.
3. Se ha desconectado el cable de las bujias.
4. La palanca de control del regulador no
est,1 en la posici6n de arranque correcta.
5. No se ha activado el cebador
6. El dep6sito de combustible est,1 vacio o el
combustible se ha echado a perder.
7. La linea del combustible est_fibloqueada.
8. Las bujias no funcionan correctamente.
9. Motor ahogado.
10. Fusible fundido (s)
1. La unidad est,1 funcionando con el
CEBADOR activado.
2. Se han aflojado los cables de la bujia.
3. La linea del combustible est,1 tapada o el
combustible se ha echado a perder.
La cortadora de c6sped no
regresa el recorte de c6sped
como abono
4.
5.
6.
La ventilaci6n en la tapa del combustible
est_fiobstruida.
Agua o suciedad en el sistema del
combustible.
El filtro de aire est_fisucio.
1. El nivel de aceite del motor est_fibajo.
2. Flujo de aire restringido.
1. Coloque la perilla en la posici6n de desconexi6n
(OFF).
2. Coloque el freno de mano.
3. Conecte el cable alas bujias.
4. Mueva la palanca del regulador a la posici6n FAST
(r_fipido).
5. Tire el control del CEBADOR hacia afuera.
6. Llene el dep6sito con gasolina limpia y nueva (de
menos de 30 dias).
7. Limpie la linea de combustible y reemplace el filtro de
combustible.
8. Limpie o cambie las bujias o ajuste la separaci6n.
9. Arranque el motor con el regulador en posici6n FAST
(r_ipido).
10. Reemplace el fusible (s)
1. Presione el control del CEBADOR.
2.
3.
Conecte los cables de la bujia.
Limpie la linea de combustible; Ilene el tanque
con gasolina limpia y nueva y reemplace el filtro
de combustible.
4. Destape la ventilaci6n o reemplace la tapa si est_fi
dahada.
5. Vacie el tanque de combustible. Llene el tanque
con gasolina limpia y nueva.
6. Reemplace el elemento de papel del filtro de aire
o limpie el depurador de espuma.
1. Llene el c_firter con la adecuada cantidad y peso de
aceite.
2.
El motor vacila a altas 1. La separaci6n de las bujias es muy 1.
revoluciones pequeha.
El motor funciona con 1. Bujia atorada, averiada o exceso de 1.
dificultad en ralenti separaci6n.
2. El filtro de aire est_fisucio. 2.
Demasiada vibraci6n 1. Cuchilla de corte floja o descentrada. 1.
2. Cuchilla dahada o curvada 2.
1. La velocidad del motor es demasiado 1.
lenta.
2.
3.
2. C6sped humedo.
3. C6sped demasiado alto.
4. La cuchilla de la cortadora no est_fiafilada.
1. Laplataforma no est,1correctamente nivelada.
2. La cuchilla de la cortadora no est_fiafilada.
3. Presi6n de neum_iticos desigual.
Corte desigual
Limpie los recortes de pasto y la suciedad
acumulados alrededor de las aletas de refrigeraci6n
del motor y del alojamiento del soplador.
Retire las bujias y reajuste la separaci6n
4.
1.
2.
3.
Reemplace las bujias. Configure la separaci6n de
la bujia.
Reemplace el elemento del filtro de aire y/o limpie
el depurador.
Apriete la cuchilla y el husillo.
Reemplace la cuchilla.
Coloque el control del regulador en la posici6n
FAST (velocidad r_fipida, representada pot una
liebre).
No realice abono cuando el c_sped est_fi humedo.
Corte una vez a una altura de corte elevada
y luego vuelva a cortar el c_sped a la altura
deseada, o haga una pasada de corte m_fis
angosta.
Afile o cambie la cuchilla.
Realice un ajuste de la plataforma lado a lado.
Afile o cambie la cuchilla.
Verifique la presi6n de los cuatro neum_fiticos.
56

Esta pagina se dej6 intencionalmente en blanco. Utilice esta pagina para tomar notas acerca de su tractor.
57

Esta pagina se dej6 intencionalmente en blanco. Utilice esta pagina para tomar notas acerca de su tractor.
58

Esta pagina se dej6 intencionalmente en blanco. Utilice esta pagina para tomar notas acerca de su tractor.
59

(Esta p_.ginase aplica s61oen EE.UU. y Canada.).
Sears Brands Management Corporation, el Consejo de Recursos Ambientales de California (CARB)
y la Agencia de Protecci6n Ambiental de los Estados Unidos (EPA)
Declaraci6n de garantia del sistema de control de emisiones (derechos y obligaciones de la garanfia de defectos del propi=
etario)
LACOBERTURADE LAGARANTJADECONTROLDEEMISIONESES Y PARALOSMODELOSCERTIFICADOSDELANO1997YPOSTERIORES,
APLIOABLEALOSMOTORESCERTIFICADOSCOMPRADOSENCALIFOR- QUESECOMPRENYUTILICENENCUALQUIERPARTEDE LOSESTADOS
NIAEN1995Y POSTERIORMENTE,QUESE UTILIZANENCALIFORNIA, UNIDOS(Y APARTIRDEL1 DE ENERODE2001ENCANADA).
Declaraci6n de garanfia sobre defectos en el control de emisiones para California y los Estados Unidos
ElConsejode RecursosAmbientalesdeCalifornia(CARB),la EPA(Agencia
de Protecci6nAmbientaldelos EE.UU.)y Searstienenel gustodeexplicarla
garantiadelsistemadecontroldeemisionesparamotoresdela_o2000y para
elfuturoconrelaci6na motorespeque_ostodoterreno(SORE).EnCalifornia,
los nuevosmotorespeque_ostodoterrenodebenestardise_ados,construidos
y equipadosparacumplirconlas rigurosasnormasanti-smogdelestado.En
el restodelos EstadosUnidos,losmotoresnuevostodoterrenodeencendido
porchispacertificadosparaela_o 1997debencumplirest_ndaressimilares
establecidospot laEPA.Searsdebegarantizarel sistemadecontroldeemis-
ionesdesu motorparalosperiodosdetiempoenumeradosacontinuaci6n,
siemprequenohayaabuso,negligenciao mantenimientoindebidode su
motortodoterrenopeque_o.Susistemade controldeemisionespuedeincluir
piezastalescomoel carburador,el filtrodeaire,elsistemadeencendido,el
silenciadoryel conversorcatalitico.Tambienpuedeincluirconectoresyotras
unidadesrelacionadasconlasemisiones.Dondeexistaunacondici6ncubierta
porla garantia,Searsreparar_supeque6omotortodoterrenosin costoalguno
incluyendodiagn6stico,piezasy manodeobra
Cobertura de la garantJa Sears para defectos en el control de emJsiones
Losmotorestodoterrenopeque6osest_ngarantizadosenIorelativoalcontrol alas disposicionesqueseindiquenacontinuaci6n.Si unapartedesumotor
deemisionesparadefectosenpiezasduranteunperiododedosa_os,sujeto cubiertapot lagaranfiaesdefectuosa,Searsreparar_osustituir_dichaparte.
Responsabilidades del propietario en relacibn con la garantia
Comopropietariodelmotortodoterrenopeque_o,Ud.esresponsabledela
realizaci6ndelmantenimientorequeridoqueseincluyeenlas instrucciones
deoperaci6ny mantenimiento.Searsrecomiendaqueseconserventodoslos
recibosrelativosal mantenimientodesu motortodoterrenopeque_o,pero
nopudedenegarla garantiasimplementeporla faltade losmismos,oporsu
incumplimientodelmantenimientoprogramatic.Comopropietariodelmotor
peque_otodoterrenodebesaberque,sinembargo,Searslepuedenegar
lacoberturade lagarantiasi su motortodoterrenopeque6oouna piezadel
mismohanfalladodebidoaabuso,negligencia,mantenimientoindebidoo
a modificacionesnoaprobadas.Ud.esresponsabledepresentarsu motor
todoterrenopeque6oaundistribuidorde serviciosSearsautorizadotan pronto
comoaparezcaunproblema.Lasreparacionesdela garantiasinconfiicto
debencompletarseen unplazodetiemporazonable,nosuperiora30dias.Si
tienealgunapreguntarespectoa susderechosy responsabilidadesreferen-
tesala garantia,debecontactarconunrepresentantedeserviciosSearsal
1--800--469--4663.Lagarantiadeemisionesesunagarantiapordefectos.Los
defectossejuzgandeacuerdoconelfuncionamientonormalde unmotor.La
garantiano est_relacionadaconunapruebade emisionesenuso.
Disposiciones de la garantJa Sears para defectos en el control de emJsiones
Lassiguientessondisposicionesespecificasrelacionadasconla coberturade lagarantiaparadefectosenel controldeemisiones.Esuna_adidoa lagarantiade
motorSearsparamotoresnoreguladosque seencuentraen lasinstruccionesdefuncionamientoy mantenimiento.
1. Piezascongarantia
Lacoberturadeesta garantiaseextiendeL]nicamentealas piezas
queaparecena continuaci6n(las partesde lossistemasdecontrolde
emisiones),siemprequedichaspiezasestuvieranyaenel motoren el
momentodesucompra.
a. Sistemademedici6ndecombustible
•Sistemadeenriquecimientoparaarranqueenfrio
•Carburadory partesinternas
• Bombade combustible
b. Sistemadeinducci6nde aire
• Filtrodeaire
•Colectordeadmisi6n
c. Sistemadeencendido
• Bujia(s)deencendido
•Sistemadeencendidomagneto
d. Sistemadelcatalizador
•Convertidorcatalitico
•Colectordeescape
•Sistemadeinyecci6nde aireov_lvulade impulsos
e. Elementosvariadosusadosenlossistemasanteriores
•Wlvulas devacio,sensiblesatemperatura,posici6ny tiempo
einterruptores
•Conectoresy montajes
2. AIcancedela cobertura
Searsgarantizaal poseedorinicialy a loscompradoressubsiguientes
quelaspiezascongarantianotendr_ndefectosen materialesni mano
deobraque provoquenla falladelas mismasduranteun periodode
dosaSosa partirdela fechaen queel motorseentregaa uncomprador
particular.
3. Sincargo
Lareparaci6noreemplazodecualquierpartecongarantiase realizar_
sin cargoalgunoparael poseedor,incluyendotareasdediagn6sticoque
permitandeterminarsi una partecongarantiaesdefectuosa,siempreque
dichodiagn6sticoserealiceenundistribuidordeserviciosSearsautoriza-
do. Parael serviciode lagarantiadeemisiones,contacteal distribuidorde
serviciosSearsautorizadom_scercanoincluidoen las"P_ginasamarillas"
en lascategorias"Motores,gasolina","Motoresdegasolina","Podadoras
de cesped",o similares.
4. Reclamacionesyexclusionesa la cobertura
Las reclamacionesde lagarantiadebenenviarsedeacuerdocon las
disposicionesdela politicadegarantiaparamotoresSears.Lacobertura
de lagarantiaexcluir_defectosen piezascongarantiaquenoscan partes
originalesSears,o abuso,negligenciao mantenimientoincorrecto,taly
comoseestableceen lapoliticadegarantiaparamotoresSears.Searsno
es responsablede lasfallasenpiezascongarantiaprovocadasporel uso
de partesa6adidas,que noscanoriginalesoquesehayanmodificado.
5. Mantenimiento
Cualquierpartecongarantiaque noesteprogramadaparaserreem-
plazadacomomantenimientorequerido,oques61odebainspeccionarse
regularmentealefectode"inspeccioneoreemplacesegL]nsea necesario",
estar_garantizadacontradefectosduranteelperiodode lagarantia.Todas
las piezasgarantizadasqueestenprogramadasparasureemplazopara
cumplirconlos requisitosdemantenimientoestar_ngarantizadass61o
porel periodoanterioral primerreemplazoprogramaticparadicha pieza.
Cualquierpiezade recambioqueseaequivalenteenfuncionamientoy
durabilidadpuedeusarsepararealizarmantenimientoo reparaciones.El
propietarioes responsablederealizartodoel mantenimientorequerido,tal
y comose defineenlas instruccionesdefuncionamientoy mantenimiento
Sears
6. Coberturaindirecta
Porla presente,la coberturaseextiendeala falladecualquiercomponente
de motorprovocadapotlafallade unapiezacongarantiaqueestetodavia
en periododegarantia.
Enlos EstadosUnidosy Canad_hayunalineadeatenci6nde24 horas,1-800-469--4GG3,quecuentacon unmenL]conmensajespre-grabadosquecontienen
informaci6nparael mantenimientodemotores.

DECLARACI6NFEDERALy/o DECALiFORNiASOBREGARANTiASENELCONTROLDEEMISIONES
SUSDERECHOSY OBLIGACIONESENCUANTOALAGARANTiA
MTD Consumer Group Inc, laAgencia de Proteccidn Medioambiental de los Estados Unidos (EPA), y para aquellos productos certificados para su
venta en el estado de California, el Departamento de los Recursos del Aire de California (CARB) se complacen en explicar la garantia que cubre
al sistema de control (ECS) de emisiones (evaporativas y/o de escape) de su equipo y motor (motor de equipos de exteriores) de encendido por
chispa para todo terreno, peque_o, de exteriores del a_o 2013 y ahos posteriores En California, los nuevos motores de equipos de exteriores
deben estar dise_ados, construidos y equipados para cumplir con las estrictas normas antipolucidn del Estado (en otros estados, los equipos
del aho 1997 y modelos posteriores deben ser estar dise_ados, construidos y equipados para cumplir con las regulaciones de motores de
encendido por chispa para todo terreno peque_os de la Agencia de Proteccidn Medioambiental de los Estados Unidos, (EPA). MTD Consumer
Group Inc. debe garantizar el sistema de control de emisiones (ECS) de su motor de equipos de exteriores por el periodo de tiempo indicado
m_is abajo, siempre y cuando no exista uso incorrecto, negligencia o mantenimiento inadecuado de dicho motor.
Su ECS puede incluir piezas tales como el carburador, el sistema de inyeccidn de combustible, el sistema de encendido, el convertidor catalitico,
los depdsitos de combustible, las lineas de combustible, los tapones de combustible, las wilvulas, contenedores, filtros, mangueras de vapor,
abrazaderas, conectores y otros componentes afines relacionados con las emisiones.
Donde exista una condicidn cubierta por la garantia, MTD Consumer Group Inc. reparar_i su motor de equipos de exteriores sin costo alguno
incluyendo el diagn6stico, las piezas y la mano de obra.
COBERTURADELAGARANTiADELFABRICANTE:
Este sistema de control de emisiones se garantiza por el t_rmino de dos a_os. Si alguna pieza relacionada con las emisiones de su motor de
equipos de exteriores es defectuosa, MTD CONSUMER GROUP INC. reparar_i o sustituir_i dicha pieza. En caso de que un componente est,1
cubierto pot m_is de dos ahos pot la garantia del equipo del fabricante, el periodo de cobertura ya no se aplicar_i.
RESPONSAI31LIDADESDELPROPIETARiOSEGUNLAGARANTiA:
En su car_icter de propietario del motor de equipos de exteriores, usted es responsable del mantenimiento requerido que se especifica en el
manual del propietario. MTD Consumer Group Inc le recomienda que conserve todos los recibos que cubren el mantenimiento de su motor, no
obstante Io cual MTD Consumer Group Inc no podr_i denegar el cumplimiento de la garantia 0nicamente pot la falta de los recibos.
Como propietario del motor de equipos de exteriores, usted debe saber que MTD Consumer Group Inc. puede denegar la cobertura de
la garantia si su motor o una pieza del mismo fallan debido a uso incorrecto, negligencia, mantenimiento indebido o a modificaciones no
aprobadas.
Usted es responsable de presentar su motor al centro de distribuci6n o servicio t_cnico de MTD Consumer Group Inc. tan pronto como
aparezca el problema. Las reparaciones cubiertas por la garantia se deben Ilevar a cabo en un lapso razonable que no exceda de 30 dias.
Si tiene alguna pregunta respecto de la cobertura de la garantia, p6ngase en contacto con el Departamento del Servicio T_cnico de MTD
Consumer Group Inc. al tel_fono 1-800-800-7310 o pot correo electr6nico en http://support.mtdproducts.com
COBERTURADELAGARANTiADEEMISIONESGENERALES:
MTD Consumer Group Inc garantiza al comprador final y a cada comprador subsiguiente que el motor de equipos de exteriores: est,1 dise_ado,
construido y equipado de modo de cumplir con todas las regulaciones aplicables y que se encuentra libre de defectos de materiales y de
fabricaci6n que pudieren causar la falla de una pieza garantizada id_ntica, en todos los aspectos materiales a la pieza descripta en la solicitud
de certificacidn de MTD Consumer Group Inc.
El periodo de garantia comienza en la fecha de entrega del motor al comprador final o en la fecha en que la m_iquina se pone en
funcionamiento pot primera vez. El periodo de garantia es de dos ahos.
Sujeto a ciertas condiciones y exclusiones que se indican a continuaci6n, la garantia de las piezas relacionadas con las emisiones es la siguiente:
1. Cualquier pieza garantizada que no est_ programada para set reemplazada como parte del mantenimiento requerido en las instrucciones
escritas suministradas se garantiza pot el periodo de garantia arriba mencionado. Si la pieza falla durante el periodo de cobertura de la
garantia, la misma ser_i reparada o reemplazada pot MTD Consumer Group Inc. de acuerdo con el p_irrafo (4) a continuaci6n. Cualquier
pieza reparada o reemplazada seg0n la garantia se garantizar_i por el resto del periodo de garantia.
2. Cualquier pieza garantizada que est_ programada solamente para inspecci6n regular en las instrucciones escritas suministradas se
garantiza pot el periodo de garantia arriba mencionado. Cualquier pieza reparada o reemplazada seg0n la garantia se garantizar_i pot el
resto del periodo.
3. Cualquier pieza garantizada que est_ programada para reemplazo seg0n el mantenimiento requerido de conformidad con las
instrucciones escritas suministradas, se garantiza pot el periodo de tiempo anterior a la primera fecha de reemplazo programada para esa
pieza. Si la pieza falla antes del primer reemplazo programado, la misma ser_i reparada o reemplazada pot MTD Consumer Group Inc. de
acuerdo con el p_irrafo (4) a continuaci6n. Cualquier pieza reparada o reemplazada bajo garantia se garantizar_i pot el resto del periodo
anterior al primer reemplazo programado puntual para esa pieza.
4. La reparaci6n o el reemplazo de cualquier pieza garantizada de conformidad con las disposiciones de la garantia que aqui se estipula se
deben realizar en un centro de garantia sin costo alguno para el propietario.
5. No obstante las disposiciones que aqui se estipulan, los servicios o reparaciones bajo garantia se suministrar_in en todos nuestros centros
de distribuci6n bajo franquicia de mantenimiento para los motores o equipos en cuesti6n.

6. Elpropietariodelmotordeequiposdeexterioresnodeber_pagareltrabajodediagndsticodirectamenteasociadoconunapieza
garantizadadefectuosaenrelaci6nconlasemisiones,siempreycuandodichotrabajodediagn6sticoserealiceenuncentrocubiertopot
lagarantia.
7. MTDConsumerGroupIncesresponsablepotdahoscausadosaotroscomponentesdemotoresoequiposderivadosdelafallabajo
garantiadecualquierpiezagarantizada.
8. Durantelatotalidaddelperiododegarantiadelmotoryequipoparatodoterrenoarribamencionado,MTDConsumerGroupInc
mantendr_unsuministro
depiezasbajogarantiasuficienteparasatisfacerlademandaesperadadetalespiezas.
9. Cualquierpiezadereemplazosepodr_usarparaelcumplimientodelmantenimientoolasreparacionesbajogarantiaysesuministraran
sincargopara
elpropietario.Dichousonoreducir_lasobligacionesdegarantiadeMTDConsumerGroupInc.
]0. Nosepodr_nusarpiezasadicionalesnimodificadasquenoest_nexentasdeacuerdoconelDepartamentodelosRecursosdelAire
(AirResourcesBoard).Elusodecualquierpiezaadicionalomodificadanoexentapotelcompradorfinalser_causaldeinvalidezdelos
reclamosbajogarantia.MTDConsumerGroupIncnotendr_responsabilidadpotlagarantiadefallasdepiezasgarantizadasquefueren
causadaspotelusodeunapiezaadicionalnoexenta
omodificada.
PIEZAS GARANTIZAi)AS:
La reparaci6n o el reemplazo de cualquier pieza garantizada que de otro modo pudiese estar cubierta por la garantia podr_ ser excluida de
tal cobertura de garantia si MTD Consumer Group Inc demuestra que el motor es objeto de uso incorrecto, negligencia o mantenimiento
inadecuado, y que tal uso incorrecto, negligencia o mantenimiento inadecuado rue causa directa de la necesidad de reparaci6n o reemplazo de
dicha pieza. No obstante Io antedicho, cualquier ajuste de un componente con un dispositivo de limitaci6n de ajuste instalado en f_brica y que
funcione adecuadamente, podr_ set cubierto pot la garantia. Adem_s,
la cobertura bajo esta garantia se extiende solo a piezas que estuvieron presentes en el motor y equipo todo terreno adquiridos.
Est_n cubiertas las siguientes piezas con garantia para emisiones (de corresponder):
1. Sistema de medici6n de combustible
Sistema de mejora para inicio en frfo (cebado suave)
Carburador y piezas internas (o sistema de inyecci6n pot combustible)
Bomba de combustible
Dep6sito de combustible
2. Sistema de inducci6n de aire
Purificador de aire
Colector de admisi6n
3. Sistema de encendido
Bujia(s) de encendido
Sistema de encendido pot magneto
4. Sistema de encendido
Convertidor catalitico
SAI (v_lvula Reed)
5. Componentes varios utilizados en el sistema anterior
Wlvulas e interruptores de vacio, temperatura, posici6n sensibles al tiempo
Conectores y montajes
6. Control evaporativo
Manguera de combustible
Abrazaderas de la manguera de combustible
Tap6n del combustible atado pot correa
Caja de carbono
Lineas de vapor
050790Rev.A

Felicitaciones por haber realizado una adquisici6n inteligente. El producto Craftsman® que ha
adquirido esta diseSado y fabricado para brindar muchos aSos de funcionamiento confiable. Pero
como todos los productos a veces puede requerir de reparaciones. Es en ese momento cuando el
disponer de un Acuerdo de protecci6n para reparaciones le puede ahorrar dinero y problemas.
A continuaci6nse detallanlos puntosincluidosen el Acuerdo:
[] Servicio experto prestadopor nuestros10,000especialistasen reparacionesprofesionales
[] Servicio ilirnitado sin cargo paralas piezasy la manode obra entodas las reparacionescubiertas
[] Reernplazo del producto hasta 1500d61aressi no es posible repararel producto cubierto
[] Descuento de 25% del precionormal delservicioy de las piezas relacionadascon el mismo que no estencubiertas
por elacuerdo;ademas,25% del precionormal de laverificaci6nde mantenimientopreventivo
[] Ayuda r_pida pot tel_fono - Io IlamamosResoluci6n RApida- elapoyotelef6nico de un Chamusca al representante.
Pienseennosotroscomo elmanual "de un dueSohablador."
Una vezadquiridoel Acuerdo, puede programarel servicio con tan s61orealizar una Ilamadatelef6nica. Puede Ilamaren
cualquier momentodeldia o de la nocheo programarunservicio en linea.
ElAcuerdode Protecci6nde Reparaci6nes unacompra sin riesgo. Si ustedanulapor alguna raz6nduranteel periodode
garantiade producto,proporcionaremosunreembolso Ileno.O, un reembolsoprorrateadoencualquier momentodespues
del periodode garantiade producto expira, iAdquiera hoysu acuerdode protecci6nparareparaciones!
Se aplican determinadas limitaciones y exclusiones.Paraobtener informaciTnadicional y precios en los Estados
Unidos Ilame al 1-800-827-6655.
El *Coverage en Canad_ivaria en algunos articulos. Para detalles Ilenos la Ilamada Chamusca Canad_ien 1-800-
361-8885.
Servicio de instalaci6nde Sears
Sidesea solicitar la instalaci6nprofesionalde Searsde aparatosdomesticos,dispositivos paraabrir portones,calentado-
resde aguay otrosarticulos domesticosimportantes,en los EstadosUnidoso Canadaflameal 1-800-4-MY-HOME®.
63

Riding Equipment
questions or problems?
Satisfaction with your purchase
is our number one concern!
To troubleshoot problems,
get answers to questions, order parts,
or schedule repair service for your
Riding Equipment, call the number below.
Para respuestas a preguntas o problemas,
y ordenar piezas o pedir servicio para la
reparacibn de su equipo, Ilame el nt_mero abajo.
1-800-659-5917
Craftsman Help Line
www.craftsman.com
TM
® Registered Trademark / Trademark of KCD IP, LLC in the United States, or Sears Brands, LLC in other countries
® Marca Registrada / TMMarca de Fabrica de KCD IP, LLC en Estados Unidos, o Sears Brands, LLC in otros paises
-
 1
1
-
 2
2
-
 3
3
-
 4
4
-
 5
5
-
 6
6
-
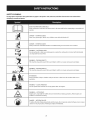 7
7
-
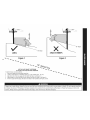 8
8
-
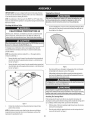 9
9
-
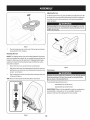 10
10
-
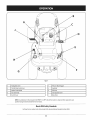 11
11
-
 12
12
-
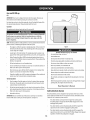 13
13
-
 14
14
-
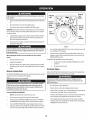 15
15
-
 16
16
-
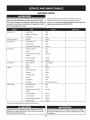 17
17
-
 18
18
-
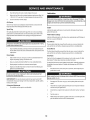 19
19
-
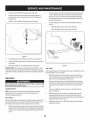 20
20
-
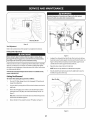 21
21
-
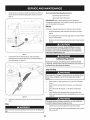 22
22
-
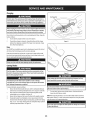 23
23
-
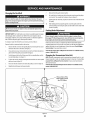 24
24
-
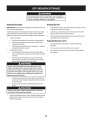 25
25
-
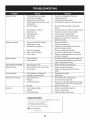 26
26
-
 27
27
-
 28
28
-
 29
29
-
 30
30
-
 31
31
-
 32
32
-
 33
33
-
 34
34
-
 35
35
-
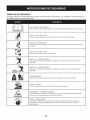 36
36
-
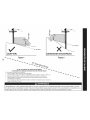 37
37
-
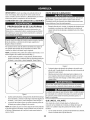 38
38
-
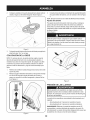 39
39
-
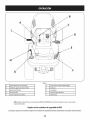 40
40
-
 41
41
-
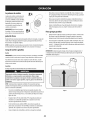 42
42
-
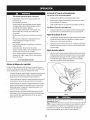 43
43
-
 44
44
-
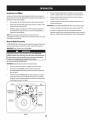 45
45
-
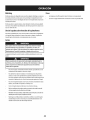 46
46
-
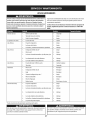 47
47
-
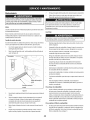 48
48
-
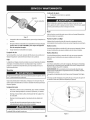 49
49
-
 50
50
-
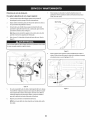 51
51
-
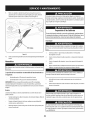 52
52
-
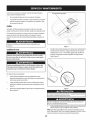 53
53
-
 54
54
-
 55
55
-
 56
56
-
 57
57
-
 58
58
-
 59
59
-
 60
60
-
 61
61
-
 62
62
-
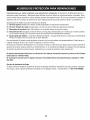 63
63
-
 64
64


Craftsman 247.203740 Manual de usuario
- Categoría
- Cortadoras de césped
- Tipo
- Manual de usuario
En otros idiomas
- English: Craftsman 247.203740 User manual