Auna 10008989 El manual del propietario
- Categoría
- Tocadiscos de audio
- Tipo
- El manual del propietario

www.auna-multimedia.com
TT-92W
Plattenspieler
Turntable
Tocadiscos
Platine vinyle
Giradischi
10008988 10008989


3
DE
English 19
Français 31
Español 43
Italiano 55
Sehr geehrter Kunde,
wir gratulieren Ihnen zum Erwerb Ihres Gerätes.
Lesen Sie die folgenden Hinweise sorgfältig durch
und befolgen Sie diese, um möglichen Schäden
vorzubeugen. Für Schäden, die durch Missachtung der
Hinweise und unsachgemäßen Gebrauch entstehen,
übernehmen wir keine Haftung. Scannen Sie den
folgenden QR-Code, um Zugri auf die aktuellste
Bedienungsanleitung und weitere Informationen rund
um das Produkt zu erhalten:
INHALTSVERZEICHNIS
Technische Daten 4
Sicherheitshinweise 4
Geräteübersicht 6
Fernbedienung 8
Inbetriebnahme und Bedienung 9
Radio wiedergeben 9
Schallplatte 10
AUX-IN-Anschluss 10
Wiedergabe von MP3-Dateien von USB/SD-Anschluss 11
Wiedergabe 12
Line-Ausgang 13
Aufnahme 13
Spezielle Entsorgungshinweise für Verbraucher in Deutschland 15
Hinweise zur Entsorgung 17
Konformitätserklärung 17

4
DE
TECHNISCHE DATEN
Artikelnummer 10008989
Stromversorgung 220-240 V ~ 50/60 Hz
Hinweis: Zu diesem PLattenspieler können Sie unter der Artikelnummer 10008988
zusätzlich eine Ersatz-Nadel erwerben. Besuchen Sie dafür unsere Webseite:
www.elektronik-star.de
SICHERHEITSHINWEISE
Allgemeine Hinweise
• Blitzschlag - Wenn Sie das Gerät länger nicht benutzen oder es
gewittert, ziehen Sie den Stecker aus der Steckdose oder trennen
Sie das Gerät vom Antennenanschluss. Dadurch werden Schäden am
Produkt durch Blitzschlag und Überspannung vermieden.
• Überlastung - Überlasten Sie keine Steckdosen, Verlängerungskabel
oder integrierten Steckdosen, da dies zu einem Brand oder Stromschlag
führen kann.
• Fremdkörper und Flüssigkeitseintritt - Schieben Sie niemals
Gegenstände jeglicher Art durch Önungen in das Gerät, da sie
gefährliche Spannungspunkte berühren oder Teile kurzschließen
können, die zu einem Brand oder einem elektrischen Schlag führen
könnten. Verschütten Sie niemals Flüssigkeiten jeglicher Art auf dem
Gerät.
• Reparatur und Wartung - Versuchen Sie nicht, dieses Produkt selbst zu
warten, da Sie sich durch das Önen oder Entfernen von Abdeckungen
gefährlichen Spannungen oder anderen Gefahren aussetzen.
Überlassen Sie alle Wartungsarbeiten qualiziertem Servicepersonal.
• Schäden, die einen Service erfordern - Ziehen Sie den Netzstecker aus
der Steckdose und wenden Sie sich an einen qualizierten Fachbetrieb,
wenn eine der folgenden Situationen eintritt:
a) Wenn das Netzkabel oder der Stecker beschädigt ist.
b) Wenn Flüssigkeit verschüttet wurde oder Gegenstände auf das
Produkt gefallen sind.
c) Wenn das Produkt Regen oder Wasser ausgesetzt war.
d) Wenn das Produkt heruntergefallen oder beschädigt ist.
e) Wenn das Produkt eine deutlich verringerte Leistung aufweist.

5
DE
• Ersatzteile - Wenn Ersatzteile benötigt werden, stellen Sie sicher, dass
der Fachbetrieb, der die Teile ersetzt, nur Ersatzteile verwendet, die
vom Hersteller zugelassen sind oder dieselben Eigenschaften wie das
Originalteil haben. Unbefugter Austausch kann zu Feuer, Stromschlag
oder anderen Gefahren führen.
• Wärme - Stellen Sie das Gerät nicht in der Nähe von Wärmequellen
wie Heizkörpern, Heizregistern, Öfen oder anderen Produkten
(einschließlich Verstärkern) auf.
Besondere Hinweise
• Kinder ab 8 Jahren, psychisch, sensorisch und körperlich eingeschränkte
Menschen dürfen das Gerät nur benutzen, wenn sie vorher von einer
für sie verantwortlichen Aufsichtsperson ausführlich mit den Funktionen
und den Sicherheitsvorkehrungen vertraut gemacht wurden und die
damit verbundenen Risiken verstehen.
• Kinder sollten beaufsichtigt werden, um sicherzustellen, dass sie nicht
mit dem Gerät spielen. Achten Sie darauf, dass Kinder und Babys nicht
mit Plastiktüten oder anderen Verpackungsmaterialien spielen.
• Achten Sie darauf, dass der Netzstecker / Netzadapter immer leicht
zugänglich bleibt, damit das Gerät im Notfall schnell von Stromnetz
getrennt werden kann.
• Wenn Sie das Gerät nicht mehr benutzen, schalten Sie es aus und
ziehen Sie den Stecker aus der Steckdose.

6
DE
GERÄTEÜBERSICHT

7
DE
1 Staubschutz 14 Wiederhol-/Zufallsfunktion
(LED Indikator)
2 Band/FM- Wahlschalter 15 SD/MMC-Anschluss
3 Lautsprecher 16 Ein/Standby/Lautstärke
4 USB-Anschluss 17 Ein/Aus (LED Indikator)
5 Funktionstaste 18 Frequenzregler
6 FM-Stereo (LED Indikator) 19 45 RPM Adapter
7 Wiederhol-/Zufallsfunktion 20 Geschwindigkeitsregler
8 Aufnahmetaste 21 Tonarm Sicherung
9 Titel vor/zurück 22 Auto Stop Schalter
10 Wiedergabe/Pause/Stop 23 Cinch-Audio-Ausgang
11 +10 Taste 24 3.5 mm AUX-IN-Anschluss
12 Aufnahme LED Indikator 25 FM-Antenne
13 Wiedergabe LED Indikator 26 Netzkabel

8
DE
FERNBEDIENUNG
Für den Betrieb benötigt die Fernbedienung 2 AAA-Batterien (nicht im
Lieferumfang enthalten)
Skip/Serch forward
Skip/Search backward Titel vor
Titel zurück
Play/Pause Wiedergabe/Pause
+10/-10 MP3: 10 Titel vor oder zurück
Stop Anhalten
REP/RAN Wiederholen/
Zufallswiedergabe
Track Separation Titeltrennung
REC Aufnahme
DELETE Löschen

9
DE
INBETRIEBNAHME UND BEDIENUNG
Aufbau
• Packen Sie alle Teile aus und entfernen Sie die Verpackung.
• Schließen Sie das Gerät nicht an, bevor die Spannungsversorgung
geprüft und sämtliche Kabel angeschlossen haben.
• Decken Sie keine Belüftungsönungen ab und vergewissern Sie sich,
dass rund um das Gerät mehrere Zentimeter Platz zur Belüftung sind.
Anschluss
• Stecken Sie den Stromstecker in eine geeignete Steckdose.
• Drehen Sie den Lautstärkeregler(26) auf bis die Betriebs-LED
aueuchtet.
RADIO WIEDERGEBEN
1 Schalten Sie das Gerät ein und wählen Sie mit Hilfe der
Funktionstaste(5) die Position „Tuner“ aus.
2 Stellen Sie mithilfe des Frequenzreglers (18) den gewünschten
Radiosender ein.
3 Mit Lautstärkeregler (16) können Sie die Lautstärke entsprechend Ihren
Hörgewohnheiten anpassen.
FM und FM-Stereo Empfang
• Stellen Sie den Band/FM-Wahlschalter (2) auf „FM“, um den Sender in
Mono zu empfangen. Bei schwachen Sendersignalen wird der Mono-
Modus empfohlen.
• Stellen Sie den Schalter(21) auf „FM ST“, um den Sender in Stereo
empfangen.
• Wird ein Sender als Stereosignal empfangen, leuchtet der Indikator (6)
auf.
Hinweise für einen besseren Empfang: Im Gerät ist eine FM-
Wurfantenne (19) integriert. Durch eine Positionsänderung der Antenne
sowie des Geräts selbst kann der Empfang verbessert werden.

10
DE
SCHALLPLATTE
Vor Gebrauch:
• Entfernen Sie alle Verpackungen und Klebebänder
• Klappen Sie die durchsichtige Kunststoabdeckung der Ton-Nadel nach
oben und klappen Sie sie nach Gebrauch wieder nach unten.
• Entfernen Sie den schwarzen Kabelbinder und drücken Sie vorsichtig
die Halteschelle, die den Tonarm sichert, nach oben und nach rechts.
1 Wählen Sie „Phono“ mit dem Schalter(5).
2 Stellen Sie die richtige Geschwindigkeit ein.
3 Legen Sie eine Schallplatte auf, verwenden Sie ggf. den 45 RPM Spindel
- Adapter.
4 Heben Sie den Tonarm von der Tonarmablage und führen Sie ihn zum
Schallplattenrand.
5 Die Schallplatte beginnt sich zu drehen.
6 Platzieren Sie den Tonarm auf der gewünschten Stelle auf der
Schallplatte.
7 Regulieren Sie die Lautstärke.
8 Die Wiedergabe stoppt automatisch am Ende der Schallplatte.
9 Heben Sie den Tonarm vorsichtig von der Schallplatte und sichern Sie
diesen auf der Tonarmablage.
10 Um die Wiedergabe manuell zu stoppen, heben Sie den Tonarm von der
Schallplatte und legen Sie ihn auf der Tonarmablage ab.
Auto-Stop Funktion
Es gibt Schallplatten, bei denen die Wiedergabe gestoppt wird, bevor das
letzte Lied abgespielt. Das liegt daran, dass die Auto-Stop-Zone außerhalb
der voreingestellten Auto-Stop-Zone liegt. Falls die der Fall ist, schieben Sie
den Auto-Stop-Regler auf der Rückseite des Gerätes auf „o“, der Tonarm
gibt nun auch den Rest der Schallplatte wieder. Die Wiedergabe stoppt nun
nicht mehr automatisch. Sie müssen nun zum Anhalten der Schallplatte den
Tonarm von der Schallplatte nehmen. Nadel austauschen: Falls die Nadel
ausgetauscht werden muss, können Sie eine Universal-Nadel für 45/33/78
RPM Schallplatten verwenden.
AUX-IN-ANSCHLUSS
Zum Anschluss von analogen Wiedergabegeräten. Über diese Buchse
können Sie auch den Ton anderer Wiedergabegeräte wie MP3-Player, CD-
Player usw. über die Lautsprecher hören. Wählen Sie mithilfe der (5) den “
PHONO/AUX ” Position aus und verbinden Sie die beiden Geräte mit einem
entsprechenden Kabel. Hinweis: Stellen Sie die Lautstärke des externen
Gerätes auf eine hörgerechte Lautstärke.

11
DE
WIEDERGABE VON MP3-DATEIEN VON USB/SD-
ANSCHLUSS
1 Stellen Sie den Wahlschalter(5) auf „USB“ oder „SD“.
2 Schließen einen USB/SD-Speichermedium an. Falls Sie versuchen das
Speicher- medium falsch herum einzulegen, kann es zu Schäden am
Gerät kommen. Prüfen Sie die richtige Ausrichtung vor dem Einsetzen.
3 Das Gerät beginnt automatisch mit dem Laden und zeigt die Anzahl den
MP3-Dateien an.
Hinweise
• Das Gerät kann über USB nur MP3-Dateien lesen.
• Sollten Sie einen MP3-Player mittels USB an das Gerät anschließen,
wird er unter Umständen nicht als USB-Speicher erkannt. Dies ist keine
Fehlfunktion.
• Der USB-Anschluss ist nicht für USB-Verlängerungen oder den direkten
Anschluss an einen PC ausgelegt.
Entfernen von USB / Speicherkarte
Vor dem Entfernen müssen Sie da Gerät abschalten bzw. den Modus zu
„PHONO“, oder „TUNER“ wechseln. Nun können Sie das Speichermedium
entnehmen.

12
DE
WIEDERGABE
Wiedergabe/Pause/Stop
• Damit die Wiedergabe unterbrochen wird drücken Sie die Taste
(10) einmal, um mit der Wiedergabe fortzufahren drücken Sie die Taste
erneut.
• Halten Sie die Taste länger gedrückt (2 Sek.) stoppen Sie die
Wiedergabe, um die Wiedergabe zu starten müssen Sie die Taste
einmal drücken.
Überspringen/Suchmodus (Überspringen/Suche vor/Suche zurück)
• Drücken Sie während der Wiedergabe wechselt das Gerät zum
nächsten Titel.
• Drücken Sie während der Wiedergabe wechselt das Gerät zum
Anfang des Titels.
• Drücken Sie während der Wiedergabe die oben erwähnten Tasten zwei
Mal wechselt das Gerät zum nächsten oder vorherigen Titel.
Anforderungen an MP3-Titel:
• MP3-Bitrate: 32kbps ~ 256kbps. Sampling-Rate: 32kHz, 44.1kHz und 48
Hz dekodierbar
• Die Wiedergabeleistung variiert je nach Aufnahmequalität. Das Einlesen
der MP3-CDs kann länger dauern als bei normalen CDs.
Wiederholung/Intro/Zufallswiedergabe
Drücken Sie „Repeat/Random“-Taste (7) vor oder während der Wiedergabe,
um einen Titel, einen Ordner oder alle Titel in verschiedenen Modi
wiederzugeben: (1) Wiederholung 1 > (2) Wiederholung 1 Ordner > (3)
Wiederholung alle > (4) Zufallswiedergabe > (5) Aus.
Wiedergabemodus LCD-Anzeige
Wiederholung Titel rot blinkend
Wiederholung alle rot leuchtend
Zufallswiedergabe grün leuchtend
Aus -------------------
Wiederholung: Sie können ununterbrochen einen Titel oder Ordner hören.
Zufallswiedergabe: Sie können sich alle Titel in zufälliger Reihenfolge
anhören.

13
DE
LINE-AUSGANG
Sie können das Gerät über den Line-Ausgang (23) mit einer Stereoanlage
verbinden. Verbinden Sie den Line- Ausgang mit dem AUX-Eingang der
Stereoanlage: Verwenden Sie hierzu ein Cinchkabel (nicht im Lieferumfang
enthalten.
Hinweise:
• Die Tonwiedergabe über die integrierten Lautsprecher wird nicht
unterbrochen, selbst dann nicht, wenn das Gerät mit einer HiFi-Anlage
verbunden ist. Drehen Sie die Lautstärke auf ein Minimum.
• Das Gerät wechselt automatisch in den Standby-Modus, wenn länger
als 15 min keine Musik wiedergegeben wird.
AUFNAHME
Das Gerät ist in der Lage Aufnahmen von der Schallplatte/AUX/Line-IN
machen und im MP3 Format auf USB/SD abzuspeichern.
Aufnahme von der Schallplatte
1 Stellen Sie den Schalter(5) auf „Phono/Aux“ und drücken Sie „REC“ (8).
2 Der Indikator (8) leuchtet auf. Das System ist bereit für die Aufnahme.
3 Starten Sie die Wiedergabe.
4 Um die Aufnahme zu stoppen, drücken Sie die Taste (8) erneut.
Hinweis: Die Aufnahmegeschwindigkeit ist 1:1 zur
Wiedergabegeschwindigkeit. Um die Aufnahme zu unterbrechen.
Drücken Sie “REC”-Taste (8) und die Aufnahme pausiert. Um die
Aufnahme fortzusetzen, drücken Sie erneut die Taste (8).
AUX-IN Aufnahme
1 Verbinden Sie ein externes Gerät über AUX-IN-Anschluss (24).
2 Stellen Sie den Schalter(5) auf „Phono/Aux“ und drücken Sie „REC“ (8).
3 Der Indikator (8) leuchtet auf. Das System ist bereit für die Aufnahme.
4 Starten Sie die Wiedergabe.
5 Um die Aufnahme zu stoppen, drücken Sie die Taste (8) erneut.
Titeltrennung (Fernbedienung)
Während der Aufnahme können Sie die Titel durch Drücken der Taste „TS“
trennen. Es wird ein neuer Titel angelegt, der Indikator (12) leuchtet bei
Erfolg einmal auf und die die Aufnahme wird fortgesetzt.

14
DE
Titel löschen
Sie können den aktuell aktuellen Titel durch langes Drücken der „Delete“-
Taste auf der Fernbedienung während der Wiedergabe löschen. Der LED
Indikator (13) leuchtet einmal auf.

15
DE
SPEZIELLE ENTSORGUNGSHINWEISE FÜR
VERBRAUCHER IN DEUTSCHLAND
Entsorgen Sie Ihre Altgeräte fachgerecht. Dadurch wird gewährleistet,
dass die Altgeräte umweltgerecht verwertet und negative Auswirkungen
auf die Umwelt und menschliche Gesundheit vermieden werden. Bei der
Entsorgung sind folgende Regeln zu beachten:
• Jeder Verbraucher ist gesetzlich verpichtet, Elektro- und
Elektronikaltgeräte (Altgeräte) sowie Batterien und Akkus
getrennt vom Hausmüll zu entsorgen. Sie erkennen die
entsprechenden Altgeräte durch folgendes Symbol der
durchgestrichene Mülltonne (WEEE Symbol).
• Sie haben Altbatterien und Altakkumulatoren, die nicht vom Altgerät
umschlossen sind, sowie Lampen, die zerstörungsfrei aus dem
Altgerät entnommen werden können, vor der Abgabe an einer
Entsorgungsstelle vom Altgerät zerstörungsfrei zu trennen.
• Bestimmte Lampen und Leuchtmittel fallen ebenso unter das Elektro-
und Elektronikgesetz und sind dementsprechend wie Altgeräte zu
behandeln. Ausgenommen sind Glühbirnen und Halogenlampen.
Entsorgen Sie Glühbirnen und Halogenlampen bitte über den Hausmüll,
sofern Sie nicht das WEEE Symbol tragen.
• Jeder Verbraucher ist für das Löschen von personenbezogenen Daten
auf dem Elektro- bzw. Elektronikgerät selbst verantwortlich.
Rücknahmepicht der Vertreiber
Vertreiber mit einer Verkaufsäche für Elektro- und Elektronikgeräte von
mindestens 400 Quadratmetern sowie Vertreiber von Lebensmitteln
mit einer Gesamtverkauläche von mindestens 800 Quadratmetern, die
mehrmals im Kalenderjahr oder dauerhaft Elektro- und Elektronikgeräte
anbieten und auf dem Markt bereitstellen, sind verpichtet,
1 bei der Abgabe eines neuen Elektro- oder Elektronikgerätes an einen
Endnutzer ein Altgerät des Endnutzers der gleichen Geräteart, das
im Wesentlichen die gleichen Funktionen wie das neue Gerät erfüllt,
am Ort der Abgabe oder in unmittelbarer Nähe hierzu unentgeltlich
zurückzunehmen und
2 auf Verlangen des Endnutzers Altgeräte, die in keiner äußeren
Abmessung größer als 25 Zentimeter sind, im Einzelhandelsgeschäft
oder in unmittelbarer Nähe hierzu unentgeltlich zurückzunehmen; die
Rücknahme darf nicht an den Kauf eines Elektro- oder Elektronikgerätes
geknüpft werden und ist auf drei Altgeräte pro Geräteart beschränkt.

16
DE
• Bei einem Vertrieb unter Verwendung von Fernkommunikationsmitteln
ist die unentgeltliche Abholung am Ort der Abgabe auf Elektro- und
Elektronikgeräte der Kategorien 1, 2 und 4 gemäß § 2 Abs. 1 ElektroG,
nämlich „Wärmeüberträger“, „Bildschirmgeräte“ (Oberäche von mehr
als 100 cm²) oder „Großgeräte“ (letztere mit mindestens einer äußeren
Abmessung über 50Zentimeter) beschränkt. Für andere Elektro- und
Elektronikgeräte (Kategorien 3, 5, 6) ist eine Rückgabemöglichkeit in
zumutbarer Entfernung zum jeweiligen Endnutzer zu gewährleisten.
• Altgeräte dürfen kostenlos auf dem lokalen Wertstohof oder in
folgenden Sammelstellen in Ihrer Nähe abgegeben werden: www.take-
e-back.de
• Für Elektro- und Elektronikgeräte der Kategorien 1, 2 und 4 an bieten
wir auch die Möglichkeit einer unentgeltlichen Abholung am Ort der
Abgabe. Beim Kauf eines Neugeräts haben sie die Möglichkeit eine
Altgerätabholung über die Webseite auszuwählen.
• Batterien können überall dort kostenfrei zurückgegeben werden, wo sie
verkauft werden (z. B. Super-, Bau-, Drogeriemarkt). Auch Wertsto- und
Recyclinghöfe nehmen Batterien zurück. Sie können Batterien auch per
Post an uns zurücksenden. Altbatterien in haushaltsüblichen Mengen
können Sie direkt bei uns von Montag bis Freitag zwischen 08:00 und
16:00 Uhr unter der folgenden Adresse unentgeltlich zurückgeben:
Chal-Tec Fulllment GmbH
Norddeutschlandstr. 3
47475 Kamp-Lintfort
• Wichtig zu beachten ist, dass Lithiumbatterien aus Sicherheitsgründen
vor der Rückgabe gegen Kurzschluss gesichert werden müssen (z. B.
durch Abkleben der Pole).
• Finden sich unter der durchgestrichenen Mülltonne auf der Batterie
zusätzlich die Zeichen Cd, Hg oder Pb ist das ein Hinweis darauf, dass
die Batterie gefährliche Schadstoe enthält. (»Cd« steht für Cadmium,
»Pb« für Blei und »Hg« für Quecksilber).
Hinweis zur Abfallvermeidung
Indem Sie die Lebensdauer Ihrer Altgeräte verlängern, tragen Sie dazu
bei, Ressourcen eizient zu nutzen und zusätzlichen Müll zu vermeiden.
Die Lebensdauer Ihrer Altgeräte können Sie verlängern indem Sie defekte
Altgeräte reparieren lassen. Wenn sich Ihr Altgerät in gutem Zustand
bendet, könnten Sie es spenden, verschenken oder verkaufen.

17
DE
HINWEISE ZUR ENTSORGUNG
Wenn es in Ihrem Land eine gesetzliche Regelung
zur Entsorgung von elektrischen und elektronischen
Geräten gibt, weist dieses Symbol auf dem Produkt
oder auf der Verpackung darauf hin, dass dieses
Produkt nicht im Hausmüll entsorgt werden darf.
Stattdessen muss es zu einer Sammelstelle für
das Recycling von elektrischen und elektronischen
Geräten gebracht werden. Durch regelkonforme
Entsorgung schützen Sie die Umwelt und die
Gesundheit Ihrer Mitmenschen vor negativen
Konsequenzen. Informationen zum Recycling
und zur Entsorgung dieses Produkts, erhalten
Sie von Ihrer örtlichen Verwaltung oder Ihrem
Hausmüllentsorgungsdienst.
Dieses Produkt enthält Batterien. Wenn es in Ihrem
Land eine gesetzliche Regelung zur Entsorgung
von Batterien gibt, dürfen die Batterien nicht im
Hausmüll entsorgt werden. Informieren Sie sich
über die örtlichen Bestimmungen zur Entsorgung
von Batterien. Durch regelkonforme Entsorgung
schützen Sie die Umwelt und die Gesundheit Ihrer
Mitmenschen vor negativen Konsequenzen.
KONFORMITÄTSERKLÄRUNG
Hersteller:
Chal-Tec GmbH, Wallstraße 16, 10179 Berlin,
Deutschland.
Importeur für Großbritannien:
Berlin Brands Group UK Limited
PO Box 42
272 Kensington High Street
London, W8 6ND
United Kingdom
Hiermit erklärt Chal-Tec GmbH, dass der
Funkanlagentyp TT-92W der Richtlinie 2014/53/
EU entspricht. Der vollständige Text der EU-
Konformitätserklärung ist unter der folgenden
Internetadresse verfügbar: use.berlin/10008989


19
EN
Dear Customer,
Congratulations on purchasing this device. Please read
the following instructions carefully and follow them to
prevent possible damages. We assume no liability for
damage caused by disregard of the instructions and
improper use. Scan the QR code to get access to the
latest user manual and more product information.
CONTENT
Technical Data 20
Safety Instructions 20
Product Overview 22
Remote Control 24
Getting Started 25
Listening to Radio 25
Listening to Phono 26
AUX-IN Connection 26
Play MP3 Files from USB/SD Port 27
Playback 28
Line Out 29
Recording 29
Disposal Considerations 31
Declaration of Conformity 31

20
EN
TECHNICAL DATA
Item number 10008989
Power supply 220-240 V ~ 50/60 Hz
Note: You can also purchase a replacement needle for this plate player under item
number 10008988. Please visit our website: https://www.hi-tower.co.uk/
SAFETY INSTRUCTIONS
General information
• Lightning - If you are not going to use the device for a long time or
if there is a storm, disconnect the plug from the electrical outlet and
disconnect the device from the antenna connector. This will avoid
damage to the product that may be caused by lightning or overvoltage.
• Overload - Do not overload power outlets, extension cords, or built-in
power outlets, as this may result in a re or electric shock.
• Foreign objects and liquid - Never push objects of any kind through
openings in the device as they may touch dangerous voltage points or
short out parts, which could result in a re or electric shock. Never spill
liquids of any kind on the device.
• Repairs and maintenance - Do not attempt to service this product
yourself, as opening or removing covers will expose you to dangerous
voltages or other hazards. Leave all maintenance to qualied service
personnel.
• Damage requiring service - Disconnect the power plug from the outlet
and consult a qualied specialist if any of the following conditions
occur:
a) If the power cord or plug is damaged.
b) If liquid has been spilled or objects have fallen onto the product.
c) If the product has been exposed to rain or water.
d) If the product has been dropped or damaged.
e) If the product has a markedly reduced performance.

21
EN
• Replacement parts - When replacement parts are required, make
sure that the service professional who replaces the parts only uses
replacement parts that have been approved by the manufacturer or
that have the same characteristics as the original part. Unauthorized
replacement may result in re, electric shock or other hazards.
• Heat - Do not place the unit near heat sources such as radiators,
heaters, stoves or other products (including ampliers).
Special Instructions
• This device may be only used by children 8 years old or older and
persons with limited physical, sensory and mental capabilities and /
or lack of experience and knowledge, provided that they have been
instructed in use of the device by a responsible person who understands
the associated risks.
• Children should be supervised to ensure that they do not play with the
appliance.
• Ensure children and babies do not play with plastic bags or any
packaging materials.
• Mains plug/Power adaptor is used as disconnect device and it should
remain readily operable during intended use.
• In order to disconnect the apparatus from the mains completely, the
main plug/power adaptor should be disconnected from the mains
socket outlet completely.

22
EN
PRODUCT OVERVIEW

23
EN
1 Dust Cover 14 Repeat/Random indicator
2 Radio Band Selector 15 SD/MMC Card Slot
3 Loud speaker 16 Power On/O/Volume knob
4 USB Socket 17 Power LED indicator
5 Function knob 18 Tuning Knob
6 FM Stereo LED Indicator 19 Spindle Adaptor
7 Repeat/Random Button 20 Turntable Speed Selector
8 Record Button 21 Pick-Up Holder
9 Skip Up/ Down Button 22 Auto Stop On/O Switch
10 Play/Pause/Stop Button 23 Line Out Socket
11 +10 Button 24 3.5 mm Aux-In Jack
12 Record LED indicator 25 FM Wire Antenna
13 Play LED indicator 26 AC Power Cord

24
EN
REMOTE CONTROL
The infra-red transmitter require 2 pcs “ AAA “ size battery for operation
(not provided).
Skip/Serch forward
Skip/Search backward Skip to next track
Skip to previous track
Play/Pause Play/Pause
+10/-10 MP3: skip 10 tracks forward/
backward
Stop Stop
REP/RAN Repeat/Random function
Track Separation Divide recording track
REC Record function
DELETE Press & hold to delete current MP3
le

25
EN
GETTING STARTED
Installation
• Unpack all parts and remove protective material.
• Do not connect the unit to the mains before checking the mains voltage
and before all other connections have been made.
• Do not cover any vents and make sure that there is a space of several
centimeters around the unit for ventilation.
Connection
• Connect the Power Cord (26) to AC outlet.
• Turn the Power On/O Knob (16) clockwise until Power LED Indicator
(17) light up. It’s mean the power supply is normal. Now your system is
ready to play music.
LISTENING TO RADIO
1 Turn on the Power (16) and select Function knob (5) to “Tuner” position.
2 Select the desired band by Radio Band Selector(2)
3 Tune to the required station by turning the Tuning Knob (18).
4 Adjust the Volume Knob (16) to desired volume level.
FM & FM-stereo reception
• Set the Radio Band Selector (2) at “FM” position, program are
received in Mono mode. In particular when stereo signal are weak. It is
preferable to receive the program in Mono.
• Set the Radio Band Selector (2) at FM-ST” position for receiving stereo
programs. The FM-Stereo LED Indicator (6) will light up to show FM
Stereo program is receiving.
Hints for best reception: The receiver has a built-in FM Wire Antenna
(25) hanging at the rear cabinet. This wire should be totally unraveled
and extended for best reception.

26
EN
LISTENING TO PHONO
• Remove the stylus protector.
• Be sure that the tone arm is being detached from the tone arm rest
before operating and re-secured again after wards.
1 Select to “Phono” function from Function Selector(5)
2 Set the speed selector to the proper position depending on the record
to be played.
3 Place the record on the platter(use the Spindle Adaptor if required).
4 Lift the tone arm from the rest and slowly move it to the record side.
5 The platter will start to rotate.
6 Place the tone arm to the desired position of the record.
7 Adjust the volume to the desired level.
8 At the end of the record, the platter will automatically stop rotating.
9 Lift the tone arm from the record and return to the rest.
10 To stop manually, lift the tone arm from the record and return it to the
rest.
Remark
As some kind of record the auto-stop area was out of the unit setting, so
it will stop before the last track nish. In this case, select the Auto-Stop
Switch (22) to “O” position. Then it will run to the end of the record but
will not stop automatically.(Turn o the unit by power button or switch
back the Auto-Stop Switch (22) to “On” position to stop the platter rotate).
Then put back the tone arm to the rest position. Due to Aux and Phono
were designed at the same po- sition of this system. When Aux in jack(24)
plugged by 3.5mm plug. The channel will change to Aux automatically and
turntable will stop to ro- tate. Please ensure the Aux in jack (24) without
plugged by anything before playing Phono.
AUX-IN CONNECTION
1 Slide the Function knob(5) to Phono/Aux position.
2 Adjust the Power ON-OFF/ Volume Control Knob(16) to desired volume
level.
3 Start to play your external device

27
EN
PLAY MP3 FILES FROM USB/SD PORT
1 Set the selector switch (5) to „USB“ or „SD“.
2 Connect a USB/SD memory device. If you try to insert the storage
media the wrong way round, the unit may be damaged. Check the
correct orientation before inserting.
3 The unit will automatically start loading and display the number of MP3
les.
Notes
• The device can only read MP3 les via USB.
• If you connect an MP3 player to the unit via USB, it may not be
recognized as USB memory. This is not a malfunction.
• The USB port is not designed for USB extension or direct connection to
a PC.
Removing USB / Memory Card
Before removing it, you must switch o the device or change the mode to
„PHONO“ or „TUNER“. Now you can remove the storage medium.

28
EN
PLAYBACK
Play/Pause/Stop
• To pause playback, press the button (10) once, to resume playback,
press the button again.
• Press and hold the button longer (2 sec.) stop the playback, to start the
playback you have to press the button once.
Skip/Search Mode (Skip/Search Forward/Search Back)
• Press during playback, the unit switches to the next track.
• Press during playback, the unit will move to the beginning of the
title.
• During playback, press the above buttons twice to skip to the next or
previous track.
MP3 track format requirement:
• MP3 bit rate : 32 KBPS~256 KBPS.
• The system can detect and read the le under MP3 format only though
the USB port or SD Card slot.
• If connect the system to MP3 player via the USB socket, due to
variances in MP3 encoding format, some MP3
player may not be able to play via the USB socket. This is not a malfunction
of the system.
Repeat/Random mode
Press the Repeat/Random Button (7) before or during playback, a single
track or all the tracks can be played in dierent mode ass follow: (1) Repeat
1 > (2) Repeat 1 le > (3) Repeat all > (4) Random > (5) O.
Play Mode LCD Indicator
Repeat single track ash in red color
Repeat all tracks light up in red color
Random mode light up in green color
O mode -------------------
Repeat play: You can listen the desired track, or all tracks repeatedly by
this function.
Random play: You can listen all the tracks in a random order by this
function.

29
EN
LINE OUT
You can connect the unit to a stereo system via the line output (23). Connect
the line output to the AUX input of the stereo system: Use an RCA cable (not
supplied.
Notes:
• The sound from the built-in speakers will not be interrupted, even if the
device is connected to a Hi-Fi system. Turn the volume to a minimum.
• The unit automatically switches to standby mode if no music is played
for more than 15 minutes.
RECORDING
The device is able to make recordings from the board/AUX/Line-IN and
save them in MP3 format on USB/SD.
Recording from the board
1 Set the switch (5) to „Phono/Aux“ and press „REC“ (8).
2 The indicator (8) lights up. The system is ready for recording.
3 Start playback.
4 To stop recording, press the button (8) again.
Note: The recording speed is 1:1 to the playback speed. To stop
recording, press the „REC“ button (8) and recording will pause. To
resume recording, press button (8) again.
AUX-IN Recording
1 Connect an external device using the AUX IN connector (24).
2 Set the switch (5) to „Phono/Aux“ and press „REC“ (8).
3 The indicator (8) lights up. The system is ready for recording.
4 Start playback.
5 To stop recording, press the button (8) again.
Title separation (remote control)
During recording, you can separate the tracks by pressing the „TS“ button.
A new title is created, the indicator (12) lights up once if successful and
recording continues.

30
EN
Track delete
You can delete the current playback MP3 le from your USB/SD media, just
press and hold the delete button on the remote control during playback the
current le, the Play LED indicator (13) will ash once, it means the current
already deleted and system will just to next le and continue playback.

31
EN
DISPOSAL CONSIDERATIONS
If there is a legal regulation for the disposal of
electrical and electronic devices in your country,
this symbol on the product or on the packaging
indicates that this product must not be disposed of
with household waste. Instead, it must be taken to
a collection point for the recycling of electrical and
electronic equipment. By disposing of it in accordance
with the rules, you are protecting the environment and
the health of your fellow human beings from negative
consequences. For information about the recycling
and disposal of this product, please contact your local
authority or your household waste disposal service.
This product contains batteries. If there is a legal
regulation for the disposal of batteries in your country, the
batteries must not be disposed of with household waste.
Find out about local regulations for disposing of batteries.
By disposing of them in accordance with the rules, you are
protecting the environment and the health of your fellow
human beings from negative consequences.
DECLARATION OF CONFORMITY
Manufacturer:
Chal-Tec GmbH, Wallstrasse 16, 10179 Berlin,
Germany.
Importer for Great Britain:
Berlin Brands Group UK Limited
PO Box 42
272 Kensington High Street
London, W8 6ND
United Kingdom
Hereby, Chal-Tec GmbH declares that the radio
equipment type TT-92W is in compliance with Directive
2014/53/EU. The full text of the EU declaration of
conformity is available at the following internet address:
use.berlin/10008989
For Great Britain: Hereby, Chal-Tec GmbH declares that
the radio equipment type TT-92W is in compliance with
the relevant statutory requirements. The full text of the
declaration of conformity is available at the following
internet address: use.berlin/10008989


33
FR
Cher client,
Toutes nos félicitations pour l’acquisition de ce nouvel
appareil. Veuillez lire attentivement les instructions
suivantes de branchement et d’utilisation an d’éviter
d’éventuels dommages. Le fabricant ne saurait être tenu
pour responsable des dommages dus au non-respect
des consignes de sécurité et à la mauvaise utilisation
de l’appareil. Scannez le QR-Code pour accéder à
la dernière version du mode d‘emploi et à d‘autres
informations concernant le produit:
SOMMAIRE
Fiche technique 34
Consignes de sécurité 34
Aperçu de l‘appareil 36
Télécommande 38
Mise en marche et utilisation 39
Disque vinyle 40
Prise AUX IN 40
Lecture de chiers MP3 depuis un support USB/SD 41
Lecture 42
Sortie Line 43
Enregistrement 43
Conseils pour le recyclage 45
Déclaration de conformité 45

34
FR
FICHE TECHNIQUE
Numéro d'article 10008989
Alimentation 220-240 V ~ 50/60 Hz
Note : Vous pouvez également acheter une aiguille de remplacement pour ce joueur
de plaque sous le numéro d‘article 10008988. Veuillez visiter notre site web :
www.elektronik-star.fr
CONSIGNES DE SÉCURITÉ
Consignes générales
• Foudre - Si vous n‘utilisez pas l‘appareil pendant une longue période
ou s‘il y a de l‘orage, débranchez la che de la prise et débranchez
l‘antenne de l‘appareil. Cela évite d‘endommager le produit à cause de
la foudre et des surtensions.
• Surcharge - Ne surchargez pas les prises de courant, les rallonges ou
les prises de courant, car cela pourrait provoquer un incendie ou une
électrocution.
• Corps étranger et insertion de liquides - Ne glissez jamais d‘objets
d‘aucune sorte à travers les ouvertures de l‘appareil, car ils pourraient
toucher des points de tension dangereux ou court-circuiter des
éléments, ce qui pourrait provoquer un incendie ou une électrocution.
Ne renversez jamais de liquides d‘aucune sorte sur l‘appareil.
• Réparation et maintenance - Ne tentez pas de réparer ce produit
vous-même en vous exposant à des tensions dangereuses ou à d‘autres
risques en ouvrant ou en retirant les couvercles. Conez toute la
maintenance à un personnel qualié.
• Dégâts nécessitant une intervention de professionnel - Débranchez
la che de la prise et consultez un spécialiste qualié si l‘une des
situations suivantes se produit :
a) Lorsque le câble secteur ou la che sont endommagés.
b) Lorsque des liquides ont été renversés ou que des objets sont
tombés sur l‘appareil.
c) Lorsque le produit a été exposé à la pluie ou à l‘eau.
d) Lorsque le produit a fait une chute ou a été endommagé.
e) Lorsque le produit a des performances sensiblement réduites.

35
FR
Consignes particulières
• Cet appareil peut être utilisé par des enfants de 8 ans ou plus et des
personnes ayant des capacités physiques, sensorielles et mentales
limitées et / ou dénuées d‘expérience et de connaissances, à condition
d‘avoir été instruits au fonctionnement de l‘appareil par une personne
responsable et d‘en comprendre les risques associés.
• Surveillez les enfants pour vous assurer qu‘ils ne jouent pas avec
l‘appareil. Assurez-vous que les enfants et les bébés ne jouent pas avec
des sacs en plastique ou d‘autres matériaux d‘emballage.
• Assurez-vous que la che / l‘adaptateur restent toujours facilement
accessibles, de sorte que l‘appareil puisse être rapidement déconnecté
du secteur en cas d‘urgence.
• Lorsque vous n‘utilisez plus l‘appareil, éteignez-le et débranchez-le de
la prise de secteur.

36
FR
APERÇU DE L‘APPAREIL

37
FR
1 Couvercle anti-poussière 14 Témoin LED répétition /
lecture aléatoire
2 Sélecteur de bande/FM 15 Fente SD/MMC
3 Haut-parleurs 16 Marche/veille/volume
4 Prise USB 17 Témoin LED marche/arrêt
5 Commutateur de fonction 18 Régleur de fréquence
6 FM stéréo (témoin LED) 19 Adaptateur 45 tours
7Fonction répétition / lecture
aléatoire 20 Bouton de réglage de vitesse
8 Touche d’enregistrement 21 Protection du bras de lecture
9 Titre précédent/suivant 22 Bouton auto-stop
10 Lecture/pause/stop 23 Sortie audio RCA
11 Touche +10 24 Prise AUX-IN 3,5 mm
12 Témoin LED
d’enregistrement 25 Antenne laire
13 Témoin LED de lecture 26 Cordon d‘alimentation

38
FR
TÉLÉCOMMANDE
La télécommande nécessite 2 piles AAA pour fonctionner (non fournies)
Skip/Serch forward
Skip/Search backward Titre suivant
Titre précédent
Play/Pause Lecture/pause
+10/-10 MP3 : saut arrière ou avant de 10
titres
Stop Arrêter
REP/RAN Répétition / lecture aléatoire
Track Separation Séparation des titres
REC Enregistrement
DELETE Supprimer

39
FR
MISE EN MARCHE ET UTILISATION
Montage
• Déballer toutes les pièces de l’appareil et jeter l’emballage.
• Ne pas brancher l’appareil avant de vérier la tension électrique et de
brancher tous les câbles.
• Ne pas obstruer les ouvertures d’aération et s’assurer que l’appareil
est entouré de plusieurs centimètres d’es- pace libre pour garantir une
bonne aération.
Branchement
• Brancher la che d’alimentation dans une prise de terre adaptée.
• Tourner le bouton de réglage du volume (26) jusqu’à ce que la LED de
marche s’allume.
Diusion de la radio
1 Allumer l’appareil et sélectionner la position « Tuner » à l’aide du
commutateur de fonction.
2 Sélectionner la station de radio souhaitée à l’aide du bouton de réglage
de la fréquence (18).
3 Ajuster le volume à sa convenance à l’aide du bouton de réglage du
volume (16).
Réception FM et FM stéréo
• Mettre le sélecteur de bande/FM (2) sur « FM » pour capter une station
en mono. En cas de signal radio faible, le mode Mono est recommandé.
• Mettre le sélecteur de bande (2) sur « FM-ST » pour recevoir la station
en stéréo.
• Si une station est captée en signal stéréo, le voyant lumineux (6)
s’allume.
Conseils pour une meilleure réception: L’appareil est équipé d’une
antenne laire FM (19) intégrée. La réception peut être améliorée en
changement de position à l’antenne ou à l’appareil.

40
FR
DISQUE VINYLE
Avant utilisation
• Retirer tous les éléments d’emballage ainsi que les rubans adhésifs.
• Relever le capuchon protecteur en plastique transparent du diamant
puis le rabattre de nouveau après utilisation.
• Enlever le collier de serrage noir et soulever prudemment le support du
bras de lecture puis le déplacer vers la droite.
1 Sélectionner « Phono » sur le commutateur de fonction.
2 Sélectionner la vitesse adéquate.
3 Placer un disque vinyle, utiliser si besoin le centreur de disque 45 tours.
4 Soulever le bras de lecture de son support et l’approcher du bord du
disque vinyle.
5 La platine se met à tourner.
6 Poser le bras de lecture à l’endroit souhaité sur le disque.
7 Ajuster le volume.
8 La lecture s’arrête automatiquement à la n du disque vinyle.
9 Soulever prudemment le bras de lecture du disque et le reposer sur son
support.
10 Pour arrêter la lecture manuellement, soulever le bras de lecture du
disque vinyle et le reposer sur son support.
Fonction auto-stop
Il existe des disques vinyles dont la lecture s’arrête avant la dernière
chanson. Cela tient du fait que la zone au- to-stop se trouve en-dehors de
la zone auto-stop prévue. Si tel est le cas, mettre le bouton auto-stop situé
à l’ar- rière de l’appareil sur la position « o », le bras de lecture lit alors le
reste du disque vinyle. La lecture ne s’arrête alors plus automatiquement.
Pour arrêter la platine, soulever le bras de lecture du disque. Remplacer
le diamant si nécessaire. Il est possible d’utiliser un diamant en saphir
universel pour vinyles 45/33/78 tours.
PRISE AUX IN
Sert à brancher des appareils de lecture analogiques. Cette prise permet
d’écouter le son issu d’appareils de lecture tels qu’un lecteur MP3, un
lecteur CD etc. directement par les enceintes. Sélectionner « PHONO/AUX
» à l’aide du commutateur de fonction et connecter les deux appareils avec
les câbles correspondants. Remarque : ajuster le volume du périphérique à
un niveau audible.

41
FR
LECTURE DE FICHIERS MP3 DEPUIS UN
SUPPORT USB/SD
1 Mettre le commutateur de fonction (5) sur « USB » ou « SD ».
2 Brancher un périphérique de stockage USB/SD. Mal le brancher ou le
brancher dans le mauvais sens peut provoquer des dégâts au niveau de
l’appareil. Toujours bien vérier préalablement le bon sens d’insertion.
3 L’appareil commence immédiatement à charger les données et aiche
le nombre de chiers MP3.
Remarque
• L’appareil peut lire uniquement des chiers MP3 depuis un support USB.
• Si un lecteur MP3 est branché à l’appareil par câble USB, il est possible
qu’il ne soit pas reconnu comme péri- phérique de stockage USB. Il ne
s’agit pas d’un dysfonctionnement.
• La prise USB n’est pas conçue pour être reliée à une rallonge USB ou
pour un branchement direct à un PC.
Retrait du support USB / de la carte mémoire
Avant de retirer le périphérique, basculer dans un autre mode, comme «
PHONO » ou « TUNER ». Une fois dans
cet autre mode, il est possible de retirer le périphérique de stockage.

42
FR
LECTURE
Lecture/pause/stop
• Pour suspendre la lecture, appuyer une fois sur la touche (10) ; appuyer
de nouveau sur cette touche pour reprendre la lecture.
• Rester plus longtemps appuyer sur cette touche (2 sec.) pour arrêter
la lecture. Pour redémarrer la lecture, ap- puyer de nouveau sur cette
touche.
Saut/mode recherche (saut/recherche avant/arrière)
• Appuyer sur pendant la lecture pour passer au titre suivant.
• Appuyer sur pendant la lecture pour revenir au début du titre.
• Appuyer deux fois sur la touche citée ci-dessus pour passer au titre
précédent.
Caractéristiques des titres MP3 :
• Taux d’échantillonnage MP3 : 32kbps ~ 256kbps ; fréquence
d’échantillonnage : 32kHz, 44.1kHz et 48 Hz déco- dables.
• Les performances de lecture varient en fonction de la qualité de
l’enregistrement. La lecture de CD MP3 peut durer plus longtemps que
des CD normaux.
Répétition/Intro/lecture aléatoire
Appuyer sur la touche « Repeat/Random » (7) avant ou pendant la lecture
pour lire un titre, un dossier ou tous les titres dans un mode spécique : (1)
Répétition 1 > (2) Répétition 1 dossier > (3) Répétition de tout > (4) Lecture
aléatoire > (5) désactivé.
Mode de lecture Aichage LCD
Répétition d’un titre Clignotement rouge
Répétition de tous les titres Éclairage rouge
Lecture aléatoire Éclairage vert
Désactivé ----------------
Répétition : il est possible d’écouter un titre ou un dossier en boucle.
Lecture aléatoire : il est possible d’écouter tous les titres selon un ordre
aléatoire.

43
FR
SORTIE LINE
Il est possible de connecter l’appareil à une chaîne Hi stéréo via la sortie
Line (23). Relier la sortie Line à l’entrée AUX de la chaîne stéréo : utiliser
pour cela un câble RCA (non fourni à la livraison).
Remarque :
• La diusion sonore par les enceintes intégrées ne sera pas interrompue
si l’appareil est branché à une chaîne Hi. Mettre le bouton de volume
au minimum.
• L’appareil passe automatiquement en mode veille si aucune musique
n’est diusée pendant 15 minutes.
ENREGISTREMENT
L’appareil est en mesure d’eectuer des enregistrements depuis un vinyle/
AUX/Line-IN et de les enregistrer au format MP3 sur un support USB/SD.
Enregistrement à partir d’un vinyle
1 Mettre le commutateur de fonction (5) sur « Phono/Aux » et appuyer sur
« REC » (8).
2 Le voyant lumineux (8) s’allume. L’appareil est prêt pour
l’enregistrement.
3 Démarrer la lecture.
4 Pour arrêter l’enregistrement, appuyer de nouveau sur cette touche (8).
Remarque : la vitesse d’enregistrement est de 1:1 par rapport à la vitesse
de lecture. Pour mettre l’enregistrement en pause, appuyer sur la touche
« REC » (8). Pour reprendre l’enregistrement, appuyer de nouveau sur
cette touche (8).
Enregistrement AUX-IN
1 Brancher un appareil périphérique à la prise AUX-IN (24).
2 Mettre le commutateur de fonction (5) sur « Phono/Aux » et appuyer sur
« REC » (8).
3 Le voyant lumineux (8) s’allume. Le système est prêt pour un
enregistrement.
4 Démarrer la lecture.
5 Pour arrêter l’enregistrement, appuyer de nouveau sur cette touche (8).
Séparation des titres (télécommande)
Appuyer sur touche TS pour séparer des titres pendant la lecture. Un
nouveau titre est alors généré, le voyant lumineux (12) s’allume une fois en
cas de succès et l’enregistrement se poursuit.

44
FR
Supprimer des titres
Il est possible de supprimer le titre en cours de lecture en restant
longuement appuyer sur la touche « Delete » de la télécommande. Le
témoin LED (13) s’allume une fois.

45
FR
CONSEILS POUR LE RECYCLAGE
S‘il existe une réglementation pour l‘élimination ou le
recyclage des appareils électriques et électroniques
dans votre pays, ce symbole sur le produit ou sur
l‘emballage indique que cet appareil ne doit pas
être jeté avec les ordures ménagères. Vous devez le
déposer dans un point de collecte pour le recyclage
des équipements électriques et électroniques.
La mise au rebut conforme aux règles protège
l‘environnement et la santé de vos semblables des
conséquences négatives. Pour plus d‘informations
sur le recyclage et l‘élimination de ce produit, veuillez
contacter votre autorité locale ou votre service de
recyclage des déchets ménagers.
Ce produit contient des piles. S‘il existe une
réglementation pour l‘élimination ou le recyclage
des piles dans votre pays, vous ne devez pas les
jeter avec les ordures ménagères. Renseignez-vous
sur les dispositions locales relatives à la collecte
des piles usagées. La mise au rebut conforme aux
règles protège l‘environnement et la santé de vos
semblables des conséquences négatives.
DÉCLARATION DE CONFORMITÉ
Fabricant :
Chal-Tec GmbH, Wallstraße 16, 10179 Berlin,
Allemagne.
Importateur pour la Grande Bretagne :
Berlin Brands Group UK Limited
PO Box 42
272 Kensington High Street
London, W8 6ND
United Kingdom
Le soussigné, Chal-Tec GmbH, déclare que
l’équipement radioélectrique du type TT-92W est
conforme à la directive 2014/53/UE. Le texte complet
de la déclaration UE de conformité est disponible à
l’adresse internet suivante : use.berlin/10008989


47
ES
Estimado cliente:
Le felicitamos por la adquisición de este producto.
Lea atentamente el siguiente manual y siga
cuidadosamente las instrucciones de uso con el n de
evitar posibles daños. La empresa no se responsabiliza
de los daños ocasionados por un uso indebido del
producto o por haber desatendido las indicaciones de
seguridad. Escanee el código QR para obtener acceso
al manual de usuario más reciente y otra información
sobre el producto:
ÍNDICE DE CONTENIDOS
Datos técnicos 48
Indicaciones de seguridad 48
Vista general del aparato 50
Mando a distancia 52
Puesta en funcionamiento 53
Escuchar la radio 53
Tocadiscos 54
Conexión AUX-IN 54
Reproducción de archivos mp3 desde toma USB/SD 55
Reproducción 56
Salida de línea 57
Grabación 57
Retirada del aparato 59
Declaración de conformidad 59

48
ES
DATOS TÉCNICOS
Número de artículo 10008989
Suministro eléctrico 220-240 V ~ 50/60 Hz
Nota: Puede adquirir para este tocadiscos una aguja de repuesto con el número de
artículo 10008988. Para ello, visite nuestra página web: www.elektronik-star.de
INDICACIONES DE SEGURIDAD
Indicaciones generales
• Relámpago - Si no va a utilizar el aparato durante un periodo largo
de tiempo o si hay una tormenta eléctrica, desenchufe el aparato de la
toma de corriente y desconecte el conector de antena. De este modo,
protegerá el aparato de los daños que pueden ocasionar relámpagos y
la sobretensión.
• Sobrecarga - No sobrecargue las tomas de corriente, cables
alargadores o tomas de corriente integradas para evitar el riesgo de un
incendio o de descarga eléctrica.
• Objetos extraños y entrada de líquido - No introduzca objetos de
ningún tipo en las ranuras del aparato, ya que podría tocar elementos
con voltajes peligrosos o piezas salientes que podrían causar un
incendio o una descarga eléctrica. No derrame líquido de ningún tipo
sobre el aparato.
• Reparación y mantenimiento - No intente reparar el aparato usted
mismo, ya que si abre o retira las cubiertas, podría provocar una tensión
peligrosa u otro riesgo. Contacte con un servicio técnico para su
reparación.
• Daños que requieren una reparación - Desconecte el enchufe de
la toma de corriente y póngase en contacto con un servicio técnico
cualicado si:
a) El cable de alimentación o el enchufe está dañado.
b) Se ha derramado líquido o se ha caído un objeto en el interior del
aparato.
c) El producto ha estado expuesto a la lluvia o agua.
d) Se ha dejado caer el producto o está dañado.
e) El rendimiento del producto ha disminuido considerablemente.

49
ES
• Piezas de repuesto - Si necesita piezas de repuesto, asegúrese de
que el técnico que cambiará las piezas utiliza solamente las piezas
de recambio originales del fabricante o piezas con las mismas
características que las piezas originales. Las piezas no autorizadas
pueden provocar incendios, descargas eléctricas y otros riesgos.
• Calor - No instale el aparato cerca de las fuentes de calor como
radiadores, calentadores, hornos u otros aparatos similares (incluidos
amplicadores).
Indicaciones especiales
• Este aparato puede ser utilizado por niños mayores de 8 años y
personas con discapacidades físicas, sensoriales y mentales y/o con
falta de experiencia y conocimientos, siempre y cuando hayan sido
instruidos sobre el uso del aparato y comprendan los peligros y riesgos
asociados.
• Los niños deberán estar vigilados para evitar que jueguen con el
aparato. Asegúrese de que los niños y bebés no jueguen con bolsas de
plástico u otro material de embalaje.
• La toma de corriente debe ser fácilmente accesible para desconectar el
aparato de la red eléctrica en caso de avería.
• Si no utiliza el aparato, apáguelo y desconecte el enchufe de la toma de
corriente.

50
ES
VISTA GENERAL DEL APARATO

51
ES
1 Protección antipolvo 14 Función repetición/modo
aleatorio (indicador LED)
2Interruptor de selección
BAND/FM 15 Puerto SD/MMC
3 Altavoz 16 Encendido/reposo/volumen
4 Conexión USB 17 On/o (indicador LED)
5 Botón de función 18 Sintonizador
6 Estéreo FM (indicador LED) 19 Adaptador 45 RPM
7Función repetición/modo
aleatorio 20 Regulador de velocidad
8 Botón de grabación 21 Seguro del brazo
9 Pista siguiente / anterior 22 Interruptor de detención
automática:
10 Reproducción/Pausa/
Detención 23 Salida de audio RCA
11 Botón +10 24 Conexión AUX-IN 3,5 mm
12 Indicador LED de grabación 25 Antena FM
13 Indicador LED de
reproducción 26 Cable de alimentación

52
ES
MANDO A DISTANCIA
Para el funcionamiento del mando a distancia se necesitan 2 pilas AAA
(no incluidas en el envío)
Skip/Serch forward
Skip/Search backward Pista siguiente
Pista anterior
Play/Pause Reproducción/pausa
+10/-10 MP3: Avanzar o retroceder 10 pistas
Stop Detener
REP/RAN Repetir /reproducción aleatoria
Track Separation Separación de pistas
REC Grabación
DELETE Borrar

53
ES
PUESTA EN FUNCIONAMIENTO
Montaje
• Desembale todas las piezas y retire el embalaje.
• No conecte el aparato antes de haber comprobado la alimentación de
tensión y de conectar todos los cables.
• No tape los oricios de ventilación y asegúrese de que exista suciente
espacio alrededor del aparato para garantizar la ventilación.
Conexión
• Conecte el enchufe a una toma de corriente adecuada.
• Gire el regulador de volumen (26) hasta que se ilumine el LED de
funcionamiento.
ESCUCHAR LA RADIO
1 Encienda el aparato y seleccione „Tuner“ con ayuda del botón de
función (5).
2 Con ayuda del regulador de frecuencia (18), sintonice la emisora de
radio deseada.
3 Con el regulador de volumen (16) puede ajustar el volumen según
desee.
Recepción FM y FM estéreo
• Ajuste el interruptor de selección band/FM (2) en „FM“ para recibir las
emisoras en mono. Para señales de emisora débiles, se recomienda el
modo mono.
• Ajuste el interruptor (21) en „FM ST“ para recibir las emisoras en estéreo.
• Si se recibe una emisora como señal estéreo, el indicador (6) se ilumina.
Indicaciones para mejorar la recepción: El aparato tiene integrada una
antena FM (19). Con un cambio de posición de la antena y del aparato
también se puede mejorar la recepción.

54
ES
TOCADISCOS
Antes del uso
• Retire todos los embalajes y cintas adhesivas
• Despliegue la tapa de plástico transparente de la aguja y pliéguela
después de su uso.
• Retire la brida negra y presione con cuidado la abrazadera de sujeción
que sujeta el brazo hacia arriba a la derecha.
1 Seleccione “PHONO” con el interruptor (5).
2 Congure la velocidad correcta.
3 Coloque el tocadiscos y utilice el adaptador de 45 RMP si fuera
necesario.
4 Levante el brazo de su soporte y llévelo al borde del disco.
5 El disco empieza a girar.
6 Coloque el brazo en el punto deseado del disco.
7 Regule el volumen.
8 La reproducción se detiene automáticamente al nalizar el disco.
9 Levante el brazo con cuidado del disco y asegúrelo en su soporte.
10 Para detener manualmente la reproducción, levante el brazo del disco y
colóquelo en su soporte.
Función de detención automática
Existen discos donde se detiene la reproducción antes de que termine
la última pista. Esto produce que la zona de detención automática se
sitúa fuera de la zona predeterminada de detención automática. Si este
fuera el caso, deslice el regulador de detención automática situado en
la parte trasera del aparato hasta la posición „o“, para que el brazo
pueda reproducir el resto del disco. La reproducción ya no se detendrá
automáticamente. Ahora, para detener el tocadiscos, debe levantar el brazo
del disco. Sustituir la aguja: Si es necesario sustituir la aguja, puede utilizar
una aguja universal para discos de 45/33/78 RMP.
CONEXIÓN AUX-IN
Para conectar dispositivos de reproducción analógicos. En esta toma
puede escuchar música desde otros dispositivos de reproducción, como
reproductores MP3, reproductores de CD, etc. a través de los altavoces.
Con ayuda del botón (5), seleccione la posición „PHONO/AUX“ y conecte
ambos dispositivos con un cable adecuado. Nota: Regule el volumen del
dispositivo externo a un nivel adecuado.

55
ES
REPRODUCCIÓN DE ARCHIVOS MP3 DESDE
TOMA USB/SD
1 Selección „USB“ o „SD“ en el interruptor de presión (5).
2 Conecte un dispositivo de almacenamiento USB/SD. Si intenta
introducir incorrectamente el dispositivo de almacenamiento, pueden
producirse daños en el aparato. Compruebe la orientación adecuada
antes de introducirlo.
3 El dispositivo comienza automáticamente con la canción y muestra el
número de archivos MP3.
Observaciones
• El aparato puede leer archivos MP3 solo a través de USB.
• Si conecta un reproductor MP3 al aparato mediante USB, es posible que
no se reconozca como dispositivo USB. No se trata de un error en el
funcionamiento.
• La toma USB no está diseñada para alargadores USB o para una
conexión directa a un PC.
Desconectar USB/tarjeta de memoria
Antes de desconectarlos, debe apagar el aparato o pasar a los modos
„PHONO“ o „TUNER“. Ahora puede desconectar el dispositivo de
almacenamiento

56
ES
REPRODUCCIÓN
Reproducción/Pausa/Detención
• Para interrumpir la reproducción, pulse el botón (10) una vez y
vuelva a pulsarlo de nuevo para continuar con la reproducción.
• Mantenga pulsado el botón (2 seg) para detener la reproducción y
vuelva a pulsarlo de nuevo para continuar con ella.
Saltar/modo de búsqueda (saltar/ buscar adelante/ buscar atrás)
• Pulse durante la reproducción y el aparato pasa a la siguiente pista.
• Pulse durante la reproducción y el aparato regresa al inicio de la
pista.
• Pulse los botones anteriores dos veces durante la reproducción y el
aparato pasa a la pista siguiente o anterior.
Requisitos de las pistas MP3:
• Tasa de bits MP3: 32kbps ~ 256kbps. Tasa de muestreo: 32 kHz, 44.1kHz
y 48 Hz decodicable
• La potencia de reproducción varía en función de la calidad de
grabación. La lectura de CD-MP3 puede durar más tiempo que en los
CD normales.
Repetición / intro/ reproducción aleatoria
Pulse el botón „Repeat/Random“ (7) antes o durante la reproducción para
reproducir una carpeta o todas las pistas en distintos modos: (1) Repetir 1 >
(2) Repetir 1 Carpeta > (3) Repetir todos > (4) Reproducción aleatoria > (5)
Desactivado.
Modo de reproducción Pantalla LCD
Repetir pista rojo intermitente
Repetir todo rojo permanente
Reproducción aleatoria verde permanente
Desactivado -------------------
Repetición: Puede escuchar una pista o carpeta de manera ininterrumpida.
Reproducción aleatoria: Puede escuchar todas las pistas en orden
aleatorio.

57
ES
SALIDA DE LÍNEA
Puede conectar el aparato a un equipo estéreo mediante una salida Line
(23). Conecte la salida Line a la entrada AUX del equipo estéreo: Para ello,
utilice un cable RCA (no incluido en el envío).
Observaciones:
• La reproducción de sonido a través de los altavoces integrados no se
interrumpirá ni siquiera cuando el aparato se conecte a un equipo HiFi.
Regule el volumen al mínimo.
• El aparato pasa automáticamente al modo standby si no se ha
reproducido música en un periodo superior a 15 minutos.
GRABACIÓN
El aparato puede realizar grabaciones desde el disco/AUX/Line-in y
almacenarlas en formato MP3 en un USB/SD.
Grabación desde el tocadiscos
1 Coloque el interruptor (5) en la posición „Phono/Aux“ y presione „REC“
(8).
2 El indicador (8) se ilumina. El sistema está listo para iniciar la grabación.
3 Inicie la reproducción.
4 Para detener la grabación, pulse el botón (8) de nuevo.
Nota: La velocidad de grabación es 1:1 en comparación con la velocidad
de reproducción. Para interrumpir la grabación, pulse el botón „REC“ (8)
y la grabación se pausa. Para continuar con la grabación, pulse de nuevo
el botón (8).
Grabación AUX-IN
1 Conecte un dispositivo externo mediante la toma AUX-IN (24).
2 Coloque el interruptor (5) en la posición „Phono/Aux“ y presione „REC“
(8).
3 El indicador (8) se ilumina. El sistema está listo para iniciar la grabación.
4 Inicie la reproducción.
5 Para detener la grabación, pulse el botón (8) de nuevo.
Separación de pistas (Mando a distancia)
Durante la grabación puede separar las pistas pulsando el botón „TS“.
Se crea una nueva pista, el indicador (12) se ilumina y se continúa con la
reproducción.

58
ES
Eliminar pista
Puede eliminar la pista actual si mantiene pulsado „Delete“ en el mando a
distancia durante la reproducción. El indicador LED (13) se ilumina una vez.

59
ES
RETIRADA DEL APARATO
Si en su país existe una disposición legal relativa a
la eliminación de aparatos eléctricos y electrónicos,
este símbolo estampado en el producto o en
el embalaje advierte que no debe eliminarse
como residuo doméstico. En lugar de ello, debe
depositarse en un punto de recogida de reciclaje
de aparatos eléctricos y electrónicos. Una gestión
adecuada de estos residuos previene consecuencias
potencialmente negativas para el medio ambiente
y la salud de las personas. Puede consultar más
información sobre el reciclaje y la eliminación de este
producto contactando con su administración local o
con su servicio de recogida de residuos.
Este producto contiene baterías. Si en su país existe
una disposición legal relativa a la eliminación de
baterías, estas no deben eliminarse como residuo
doméstico. Infórmese sobre la normativa vigente
relacionada con la eliminación de baterías. Una
gestión adecuada de estos residuos previene
consecuencias potencialmente negativas para el
medio ambiente y la salud de las personas.
DECLARACIÓN DE CONFORMIDAD
Fabricante:
Chal-Tec GmbH, Wallstraße 16, 10179 Berlín, Alemania.
Importador para Gran Bretaña:
Berlin Brands Group UK Limited
PO Box 42
272 Kensington High Street
London, W8 6ND
United Kingdom
Por la presente, Chal-Tec GmbH declara que el tipo
de equipo radioeléctrico TT-92W es conforme con
la Directiva 2014/53/UE. El texto completo de la
declaración UE de conformidad está disponible en la
dirección Internet siguiente: use.berlin/10008989


61
IT
Gentile cliente,
La ringraziamo per aver acquistato il dispositivo.
La preghiamo di leggere attentamente le seguenti
istruzioni per l’uso e di seguirle per evitare possibili
danni tecnici. Non ci assumiamo alcuna responsabilità
per danni scaturiti da una mancata osservazione delle
avvertenze di sicurezza e da un uso improprio del
dispositivo. Scansionare il codice QR seguente, per
accedere al manuale d’uso più attuale e per ricevere
informazioni sul prodotto.
INDICE
Dati tecnici 62
Avvertenze di sicurezza 62
Descrizione del dispositivo 64
Telecomando 66
Messa in funzione e utilizzo 67
Ascoltare la radio 67
Giradischi 68
Connessione AUX-IN 68
Riproduzione di le mp3 dalla connessione USB/SD 69
Riproduzione 70
Uscita line 71
Registrare 71
Smaltimento 73
Dichiarazione di conformità 73

62
IT
DATI TECNICI
Articolo numero 10008989
Alimentazione 220-240 V ~ 50/60 Hz
Nota: una puntina di ricambio per questo giradischi è disponibile al numero articolo
10008988. Visitate il nostro sito web: www.electronic-star.it
AVVERTENZE DI SICUREZZA
Avvertenze generali
• Colpo di fulmine – Se il dispositivo non viene utilizzato o c’è un
temporale, staccare la spina dalla presa di corrente e scollegare il
dispositivo dalla connessione dell’antenna. In questo modo si evitano
danni al dispositivo dovuti a colpi di fulmine o sovratensione.
• Sovraccarico – Non sovraccaricare prese elettriche, prolunga o
prese di corrente integrate, in quanto ciò potrebbe causare incendi o
folgorazioni.
• Corpi estranei e liquidi – Non inlare nessun tipo di oggetto nelle
aperture del dispositivo, in quanto si potrebbe entrare in contatto
con pericolosi punti di tensione o causare il cortocircuito di alcune
componenti. Questo potrebbe causare incendi o folgorazioni. Non
rovesciare liquidi sul dispositivo.
• Riparazione e manutenzione – Non cercare di eettuare opere di
manutenzione in modo autonomo, dato che rimuovendo o aprendo
le coperture potrebbero liberarsi tensioni pericolose o insorgere
altri rischi. Lasciare che le opere di manutenzione siano eettuate da
personale tecnico qualicato.
• Danni che necessitano manutenzione – Staccare la spina dalla
presa elettrica e rivolgersi a un’azienda specializzata se si vericano le
seguenti situazioni:
a) Se cavo di alimentazione o spina sono danneggiati.
b) Se sono stati rovesciati liquidi o sono caduti oggetti sopra al
dispositivo.
c) Se il prodotto è stato esposto a pioggia o acqua.
d) Se il prodotto è caduto o è danneggiato.
e) Se il prodotto presenta prestazioni sensibilmente al di sotto della
norma.

63
IT
• Parti di ricambio – Se sono necessarie parti di ricambio, assicurarsi
che l’azienda specializzata che si occupa della sostituzione utilizzi solo
parti autorizzate dal produttore o con caratteristiche equivalenti alle
parti originali. Una sostituzione non adeguata può causare incendi,
folgorazioni o altri rischi.
• Calore – Non posizionare il dispositivo nei pressi di fonti di calore,
come termosifoni, radiatori convettivi, forni o altri prodotti (inclusi
amplicatori).
Avvertenze particolari
• Questo dispositivo può essere utilizzato da bambini a partire da 8 anni
e da persone con limitate capacità siche e psichiche o con conoscenza
ed esperienza limitate, solo se sono stati istruiti sulle modalità d’uso e
comprendono i rischi e i pericoli connessi.
• Tenere sotto controllo i bambini per assicurarsi che non giochino con
il dispositivo. Assicurarsi che bambini e neonati non giochino con i
sacchetti di plastica o altro materiale d’imballaggio.
• Assicurarsi che spina elettrica/adattatore siano sempre facilmente
accessibili, in modo da poter scollegare il dispositivo dalla rete elettrica
in caso di emergenza.
• Se non si utilizza più il dispositivo, spegnerlo e staccare la spina.

64
IT
DESCRIZIONE DEL DISPOSITIVO

65
IT
1 Copertura antipolvere 14
Funzione di ripetizione/
riproduzione casuale
(indicatore LED)
2Interruttore di selezione
banda/FM 15 Connessione SD/MMC
3 Altoparlanti 16 On/Standby/Volume
4 Connessione USB 17 On/O (indicatore LED)
5 Tasto funzioni 18 Regolazione frequenza
6 FM-Stereo (indicatore LED) 19 Adattatore 45 RPM
7Funzione di ripetizione/
riproduzione casuale 20 Regolazione velocità
8 Tasto di registrazione 21 Blocco del braccio del pick-
up
9 Titolo successivo/precedente 22 Interruttore per arresto
automatico (Auto Stop)
10 Play/Pausa/Stop 23 Uscita audio RCA
11 Tasto +10 24 Connessione AUX-IN da 3,5
mm
12 Indicatore LED registrazione 25 Antenna FM
13 Indicatore LED riproduzione 26 Cavo di alimentazione

66
IT
TELECOMANDO
Per essere utilizzato, il telecomando necessita di 2 batterie AAA (non
incluse in consegna).
Skip/Serch forward
Skip/Search backward Titolo successivo
Titolo precedente
Play/Pause Play/Pausa
+10/-10 MP3: 10 titoli successivi o
precedenti
Stop Arrestare
REP/RAN Ripetizione/Riproduzione casuale
Track Separation Divisione traccia
REC Registrare
DELETE Cancellare

67
IT
MESSA IN FUNZIONE E UTILIZZO
Montaggio
• Togliere tutti i componenti dall’imballaggio.
• Non collegare il dispositivo prima di aver controllato la tensione
dell’approvvigionamento elettrico e aver collegato tutti i cavi.
• Non coprire nessuna apertura di ventilazione e assicurarsi di lasciare
diversi centimetri di spazio intorno al dispositivo per garantire la
circolazione d’aria.
Collegamento
• Collegare a spina in una presa elettrica adeguata.
• Girare la manopola del volume (26) no a quando si illumina la spia LED
di funzionamento.
ASCOLTARE LA RADIO
1. Accendere il dispositivo e selezionare la posizione “Tuner” con il tasto
delle funzioni (5).
2. Impostare l’emittente desiderata con il regolatore della frequenza (18).
3. Con la manopola del volume (16) è possibile la regolazione sul livello
desiderato.
Ricezione FM e FM-Stereo
• Posizionare l’interruttore di banda/FM (2) su “FM” per ascoltare
l’emittente in mono. In caso di segnali deboli si consiglia l’ascolto in
mono.
• Posizionare l’interruttore (2) su “FM ST” per ascoltare l’emittente in
stereo.
• Se un’emittente viene ricevuta come segnale stereo, si illumina
l’indicatore (6).
Note per una migliore ricezione: nel dispositivo è integrata un’antenna
FM (19). Cambiando la posizione di antenna e dispositivo è possibile
migliorare la ricezione.

68
IT
GIRADISCHI
Prima dell’utilizzo
• Rimuovere tutto il materiale di imballaggio e i nastri adesivi.
• Sollevare la copertura in plastica trasparente della puntina e
riabbassarla dopo l’uso.
• Rimuovere il serracavo nero e premere leggermente verso destra e
verso l’alto la fascetta di bloccaggio del braccio del pick-up.
1. Selezionare “Phono” con il tasto delle funzioni (5).
2. Impostare la velocità corretta.
3. Poggiare un disco sul piatto e posizionare l’apposito adattatore se si
usa un disco a 45 giri.
4. Sollevare il braccio del pick-up dal suo supporto e portarlo verso il
bordo del disco.
5. Il piatto inizia a girare.
6. Posizionare il braccio del pick-up sul punto desiderato del disco.
7. Regolare il volume.
8. La riproduzione si arresta automaticamente alla ne del disco.
9. Sollevare con cura il braccio del pick-up dal disco e poggiarlo sul suo
supporto.
10. Per arrestare manualmente la riproduzione, sollevare il braccio del pick-
up dal disco e poggiarlo sul suo supporto.
Funzione Auto Stop
Ci sono dischi in cui la riproduzione viene arrestata prima della ne
dell’ultimo brano. Questo dipende dal fatto che la funzione Auto Stop si
trova al di fuori della zona predenita per l’arresto automatico. Se è così,
posizionare l’interruttore Auto Stop sul retro del dispositivo su “o” e il
braccio del pick-up riproduce anche il resto del disco. La riproduzione non si
arresta più automaticamente, ma è necessario togliere il braccio del pick-up
dal disco per fermarlo. Cambiare la puntina: se p necessario sostituire la
puntina, è possibile utilizzare una puntina universale per dischi a 35/33/78
RPM.
CONNESSIONE AUX-IN
Per collegare dispositivi di riproduzione analogici. Tramite questa
connessione è possibile anche ascoltare audio da dispositivi esterni, come
ad es. lettori MP3, lettori CD, ecc. attraverso gli altoparlanti del giradischi.
Utilizzando il tasto delle funzioni (5), selezionare “PHONO/AUX” e collegare
i due dispositivi in questione con un cavo adeguato. Nota: regolare il
volume del dispositivo esterno a un livello moderato.

69
IT
RIPRODUZIONE DI FILE MP3 DALLA
CONNESSIONE USB/SD
1. Posizionare l’interruttore di selezione (5) su “USB” o “SD”.
2. Collegare un supporto USB/SD. Se si cerca di inserire il supporto dal
lato sbagliato, possono risultare danni al dispositivo. Controllare che il
supporto sia dal verso giusto prima di inserirlo.
3. Il dispositivo inizia a caricare automaticamente i le MP3 e mostra il
numero totale.
Note
• Tramite USB, il dispositivo può leggere solo le MP3.
• Quando si collega un lettore MP3 tramite connessione USB, in alcuni
casi potrebbe non essere riconosciuto come supporto di memoria USB.
Questo non indica un malfunzionamento.
• La connessione USB non è adatta a prolunghe USB o al collegamento
diretto con un PC.
Rimuovere supporti USB/schede di memoria
Prima della rimozione, è necessario spegnere il dispositivo o passare in
modalità “PHONO” o “TUNER”. Ora è possibile rimuovere il supporto di
memoria.

70
IT
RIPRODUZIONE
Play/Pausa/Stop
• Per interrompere la riproduzione, premere una volta (10). Premerlo
nuovamente per riprendere la riproduzione.
• Tenere premuto il tasto più a lungo (2 secondi) per arrestare la
riproduzione. Premerlo di nuovo per riattivare la riproduzione.
Saltare brani/Modalità di ricerca (Saltare brani/Ricerca emittenti
successive/Ricerca emittenti precedenti)
• Durante la riproduzione, premere per passare al titolo successivo.
• Durante la riproduzione, premere per tornare all’inizio del titolo in
riproduzione.
• Durante la riproduzione, premere due volte i tasti sopracitati per
passare al titolo successivo o precedente.
Requisiti per titoli MP3:
• Bitrate MP3: 32kbps ~ 256kbps. Frequenza di campionamento: 32kHz,
decodicabile 44,1 kHz e 48 Hz.
• Le prestazioni di riproduzione dipendono dalla qualità della
registrazione. La lettura di CD MP3 può durare più a lungo rispetto a
normali CD.
Ripetizione/Intro/Riproduzione casuale
Premere Repeat/Random (7) prima o durante la riproduzione, in modo da
riprodurre in diversi modi un titolo, una cartella o tutti i titoli: (1) Ripetere 1 >
(2) Ripetere 1 cartella > (3) Ripetere tutti > (4) Riproduzione casuale > (6) O.
Modalità di riproduzione Schermo LCD
Ripetere titolo Lampeggia in rosso
Ripetere tutti Illuminata di rosso
Riproduzione casuale Illuminata di verde
O -------------------------
Ripetizione: è possibile ascoltare ininterrottamente un titolo o una cartella.
Riproduzione casuale: è possibile ascoltare tutti i titoli in sequenza casuale.

71
IT
USCITA LINE
Il dispositivo può essere collegato a un impianto stereo esterno tramite
l’uscita Line (23). Collegare l’uscita Line con l’ingresso AUX dell’impianto
stereo utilizzando un cavo RCA (non incluso in consegna).
Note:
• La riproduzione dell’audio dagli altoparlanti integrati non viene
interrotta, anche se il dispositivo è collegato a un impianto Hi-Fi.
Regolare il volume al minimo.
• Il dispositivo passa automaticamente in standby se non viene riprodotta
musica per 15 minuti.
REGISTRARE
Il dispositivo è in grado di registrare da giradischi/AUX/Line-IN e di salvare i
le su USB/SD in formato MP3.
Registrare da dischi
1. Posizionare l’interruttore (5) su “Phono/Aux” e premere “REC” (8).
2. L’indicatore (8) si illumina. L’impianto è pronto alla registrazione.
3. Avviare la riproduzione.
4. Per arrestare la registrazione, premere di nuovo il tasto (8).
Nota: la velocità di registrazione è di 1:1 rispetto a quella di riproduzione.
Per interrompere la registrazione: premere “REC” (8) per mettere in
pausa la registrazione e premere di nuovo (8) per riprenderla.
Registrare da AUX-IN
1. Collegare un dispositivo esterno alla connessione AUX-IN (24).
2. Posizionare l’interruttore (5) su “Phono/Aux” e premere “REC” (8).
3. L’indicatore (8) si illumina. L’impianto è pronto alla registrazione.
4. Avviare la riproduzione.
5. Per arrestare la registrazione, premere di nuovo il tasto (8).
Divisione traccia (telecomando)
Durante la riproduzione, è possibile dividere la traccia premendo il tasto
“TS”. Viene generato un nuovo titolo, l’indicatore (2) si illumina una volta in
caso di successo e viene proseguita la registrazione.

72
IT
Cancellare un titolo
Il titolo attuale può essere cancellato premendo a lungo il tasto “Delete” sul
telecomando durante la riproduzione. L’indicatore LED (13) si illumina una
volta.

73
IT
SMALTIMENTO
Se nel proprio paese si applicano le
regolamentazioni inerenti lo smaltimento di
dispositivi elettrici ed elettronici, questo simbolo
sul prodotto o sulla confezione segnala che questi
prodotti non possono essere smaltiti con i ri uti
normali e devono essere portati a un punto di
raccolta di dispositivi elettrici ed elettronici. Grazie
al corretto smaltimento dei vecchi dispositivi si
tutela il pianeta e la salute delle persone da possibili
conseguenze negative. Informazioni riguardanti
il riciclo e lo smaltimento di questi prodotti si
ottengono presso l’amministrazione locale oppure il
servizio di gestione dei ri uti domestici.
Il prodotto contiene batterie. Se nel proprio
paese si applicano le regolamentazioni inerenti
lo smaltimento di batterie, non possono essere
smaltite con i normali ri uti domestici. Preghiamo
di informarvi sulle regolamentazioni vigenti sullo
smaltimento delle batterie. Grazie al corretto
smaltimento dei vecchi dispositivi si tutela l’ambiente
e la salute delle persone da conseguenze negative.
DICHIARAZIONE DI CONFORMITÀ
Produttore:
Chal-Tec GmbH, Wallstraße 16, 10179 Berlino,
Germania.
Importatore per la Gran Bretagna:
Berlin Brands Group UK Limited
PO Box 42
272 Kensington High Street
London, W8 6ND
United Kingdom
Il fabbricante, Chal-Tec GmbH, dichiara che il
tipo di apparecchiatura radio TT-92W è conforme
alla direttiva 2014/53/UE. Il testo completo della
dichiarazione di conformità UE è disponibile al
seguente indirizzo Internet: use.berlin/10008989


-
 1
1
-
 2
2
-
 3
3
-
 4
4
-
 5
5
-
 6
6
-
 7
7
-
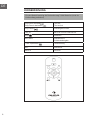 8
8
-
 9
9
-
 10
10
-
 11
11
-
 12
12
-
 13
13
-
 14
14
-
 15
15
-
 16
16
-
 17
17
-
 18
18
-
 19
19
-
 20
20
-
 21
21
-
 22
22
-
 23
23
-
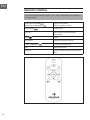 24
24
-
 25
25
-
 26
26
-
 27
27
-
 28
28
-
 29
29
-
 30
30
-
 31
31
-
 32
32
-
 33
33
-
 34
34
-
 35
35
-
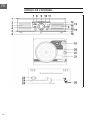 36
36
-
 37
37
-
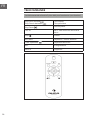 38
38
-
 39
39
-
 40
40
-
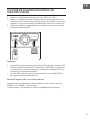 41
41
-
 42
42
-
 43
43
-
 44
44
-
 45
45
-
 46
46
-
 47
47
-
 48
48
-
 49
49
-
 50
50
-
 51
51
-
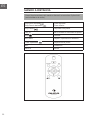 52
52
-
 53
53
-
 54
54
-
 55
55
-
 56
56
-
 57
57
-
 58
58
-
 59
59
-
 60
60
-
 61
61
-
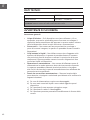 62
62
-
 63
63
-
 64
64
-
 65
65
-
 66
66
-
 67
67
-
 68
68
-
 69
69
-
 70
70
-
 71
71
-
 72
72
-
 73
73
-
 74
74
-
 75
75
-
 76
76


Auna 10008989 El manual del propietario
- Categoría
- Tocadiscos de audio
- Tipo
- El manual del propietario
en otros idiomas
- français: Auna 10008989 Le manuel du propriétaire
- italiano: Auna 10008989 Manuale del proprietario
- Deutsch: Auna 10008989 Bedienungsanleitung