
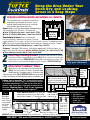
Determine waterflow direction and estimate your materials
1
1
Attach Slope Building Brackets
2
2
To build your slope, start with the third joist
by attaching a bracket using ordinary deck screws (FIG A). Attach a bracket to every other joist,
working your way across. IMPORTANT NOTE: Sloping drains water away from your house. Each
time you attach a new bracket drop it slightly to achieve your slope. SEE DETAILS BELOW.
Attach Tuftex
®
DeckDrain
™
Panels
Screw the first full sheet directly into the outside joist
(FIG B). After the first joist, the sheet is secured to slope
building brackets. Overlapping sheets 4˝ will prevent seep
& drip between sheets (FIG A).
IMPORTANT NOTE:
We recommend
using a vinyl adhesive on sheet sidelaps to maintain a watertight seal.
3
3
Panels: Multiply (A) X (B) for square footage, add approximately
10% for end laps. Each 10’ panel = 20 square feet.
■ Tuftex 10’ UltraVinyl Tan panel – Lowe’s Item # 72744
■ Tuftex 10’ UltraVinyl White panel – Lowe’s Item # 26145
Slope Building Brackets: Panels attach to these
easy-to-cut brackets.
To determine the
quantity of brackets
needed, multiplying 1/2 the number of deck joists by the linear feet of one joist, then
divide by four feet.
NOTE: You will attach slope building brackets to every other joist. Brackets are
sold in 4’ lengths.
■ Tuftex DeckDrain Slope Building Brackets – Lowe’s Item # 282735
Fasteners: 1 box equals 100 fasteners. It will require approximately 30 Tuftex fasteners to
properly fasten each 10´ Tuftex panel.
■
Tuftex DeckDrain Fasteners, Tan – Lowe’s Item # 17861
■
Tuftex DeckDrain Fasteners, White – Lowe’s Item # 28004
First Slope Building Bracket: Attach
your first bracket to the third joist.
Joists
Water Flow
IMPORTANT: Make sure water will flow over the lap and NOT under.
Attach additional bracket to every other joist
working your way across. As you attach a new
bracket, lower it approx. 1/4” to create your slope.
Tuftex DeckDrain panels are normally installed to run
perpendicular to the direction of the joists. This will
allow for Slope Building Brackets to be installed on
joists to create slope & direct water flow.
Building Slope Is Important: The 1st slope building bracket
is installed on the third joist from the end. Subsequent brackets
are attached approximately 1/4” lower on every other joist to
create a slope. If your deck is large, pitch it two ways from
the center. Minimum Slope = 1˝ per 10´ run. If you have
a run longer than 10’ increase your slope to 2”.
Wall
Each sheet, on the ends of the
deck, will fasten directly to the
first joist. Do not attach a slope
building bracket to the end joists.
16˝ on
center
Fig. B – Tuftex first sheet installation
X = Wait to
install next
section
before
fastening
Slope building brackets, attached
to joists, are indicated in grey.
Stagger
fasteners
between
ridges
Fig. A
Tools Needed For This Project:
• Tape measure
• Drill w/Hex head bit
• Heavy duty snips or
circular saw
• Vinyl adhesive caulk
First Joist:
Tuftex panel
starts here and
screws directly
into the joist
(no slope
building bracket
needed).
Attach Brackets
Attach Drain Panels
Enjoy great added value!
Water can
be directed
to fall to
either side
B
A
NEED HELP? Visit www.tuftexpanel.com or call 800-777-7663
Visit: www.lowes.com
Reverso para Espan´ ol.
© 2005 by Lowe’s.® All rights reserved. Lowe’s and
the gable design are registered trademarks of LF, LLC.
* Patent Pending – All Rights Reserved
Keep the Area Under Your
Deck Dry and Looking
Great in 3 Easy Steps
Optional Bracket
Attachment
or
If fasteners bite
into joist and
draw sheet
upward, try one
of these options.
Header Board,
cross section to
show joists
End Lap :
varies according to your
deck but should be no less than 4˝
*
*

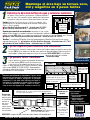
Determine la dirección del flujo de agua y calcule los materiales
1
1
Fije los soportes para construir con inclinación
2
2
Para construir con inclinación, comience por la tercera viga fijando un soporte con tornillos comunes para
terrazas (FIG A). Fije un soporte en cada otra viga y continúe en dirección diagonal. Cada vez que fije un
nuevo soporte, suéltelo poco a poco para alcanzar la inclinación.
NOTA IMPORTANTE: La inclinación
desvia el agua lejos de la vivienda
.
*
Vea detalles abajo.
Fije paneles Tuftex
®
DeckDrain
™
Haga un orificio en la primera hoja completa, directamente
en la viga externa (FIG B). Después de la primera viga,
la hoja está fija en los soportes para construir con incli-
nación. Las hojas superpuestas de 4” evitarán filtraciones y goteos
entre las hojas (FIG A).
NOTA IMPORTANTE: Recomendamos
utilizando un adhesivo de vinilo en el ultimo ondulo de la hoja
para mantener un sello hermético.
3
3
Primer soporte para construir con inclinación: Fije
su primer soporte en la tercera viga.
Vigas
Flujo de agua
IMPORTANTE: Asegúrese de que el agua corra sobre el borde y NO por debajo de él.
Pared
a 16˝ en
el
centro
Fig. B –
Instalación de la primera hoja Tuftex
Fig. A
Herramientas necesarias
para este proyecto:
• Cinta métrica
• Tijera para trabajos pesados
o sierra circular
• Taladro con broca de
cabeza hexagonal
• Masilla para calafatear
•
Adhesivo del vinilo calafatea
Los paneles Tuftex DeckDrain, por lo general, se colocan perpendicu-
lares a las vigas. Esto le permitirá instalar soportes para construir con
inclinación en vigas, para crear un flujo de agua directo e inclinado.
Paneles: Multiplique (A) x (B) para obtener el total de pies cuadrados, sume
aproximadamente
un 10% para los bordes de los extremos. Cada panel de
10 pies = 20 pies cuadrados.
■
Panel UltraVinyl Tuftex Quemado de 10´ – Artículo Lowe´s N.º 72744
■
Panel UltraVinyl Tuftex Blanco de 10´ – Artículo Lowe´s N.º 26145
Soportes para construir con inclinación: Los paneles se unen a estos
soportes fáciles de cortar. La cantidad se determina multiplicando la mitad del número de vigas de su terraza por el
largo de una viga. NOTA: Debe fijar un soporte para construir con inclinación en cada viga. Soportes son 4’ de largo.
■
Soportes Tuftex DeckDrain para construir con inclinación – Artículo de Lowe´s N.º 282735.
Tornillos: 1 caja contiene 100 tornillos. Necesitará aproximadamente 30 tornillos Tuftex para fijar de manera
adecuada cada panel de 10´.
■
Sujetadores de Tuftex DeckDrain Quemado – Artículo de Lowe´s N.º 17861
■
Sujetadores de Tuftex DeckDrain Blanco – Artículo de Lowe´s N.º 28004
Construir con inclinación es importante: El primer soporte
para construir con inclinación se instala sobre la tercera viga
desde el extremo. Los soportes subsiguientes se fijan aproxi-
madamente 1/4” más abajo, sobre cada viga, para lograr la
inclinación. Si su plataforma es grande, le echa en dos man-
eras del centro. Inclinación mínima: 1” cada 10´.
Si usted
tiene un corre más largo que 10” aumento su cuesta a 2”.
Cada hoja, sobre los extremos de la
terraza, se sujetará directamente en
la primera viga. No fije un soporte
para construir con inclinación en las
vigas de los extremos.
Los soportes para construir con inclinación,
fijos en las vigas, se muestran en gris.
Superponga
los sujeta-
dores entre
las canaletas
X = Espere para
instalar la próxima
sección antes de
fijarla
Primera viga:
El panel Tuftex
comienza aquí y
se clava directa-
mente en la
viga (no es
necesario
ningún soporte
para construir
con inclinación).
Borde del extremo: Varía según su terraza,
pero no debe medir menos que 4”
Tabla cabecera,
corte transversal para
mostrar las vigas
Fije soportes adicionales en cada viga y continúe en dirección
diagonal. Cuando fije el nuevo soporte, bájelo aproximadamente
1/4” para lograr la inclinación.
Fije los soportes
Fije paneles DeckDrain
Disfrute la excelente
relación precio-calidad.
Mantenga el área bajo su terraza seca,
útil y magnífica en 3 pasos fáciles
F
ijación que es
opcional.
Si los sujetadores
tocan el viga y alan
el panel arriba,
tratas uno de estos
optiones.
Para ayuda visite: www.tuftexpanel.com o´ 1-800-777-7663 Visita: www.lowes.com
II
*
El agua puede
desviarse para
que caiga hacia
cualquiera de
los lados
B
A
-
 1
1
-
 2
2


Tuftex 845 Guía de instalación
- Tipo
- Guía de instalación
en otros idiomas
- English: Tuftex 845 Installation guide
Otros documentos
-
Deckorators 351133 Guía de instalación
-
Heartland 183560 Guía de instalación
-
-
-
-
-
-
 Build and Grow 64576 Instrucciones de operación
-
 Build and Grow 65418 Manual de usuario
-
Sunbelt L75404077 Manual de usuario

